HOLIDAY DONATION DRIVE - SUPPORT MSW - DO YOUR PART TO KEEP THIS GREAT FORUM GOING! (Only 13 donations so far - C'mon guys!)
×


John Clements
-
Posts
73 -
Joined
-
Last visited
Content Type
Profiles
Forums
Gallery
Events
Everything posted by John Clements
-
There was a lot of discussion about the colours used a few pages back. In baroque painting in the court of Louis XIV, the allegorical paintings of the classical sun god scenes (which is where the idea of the Sun King came from) used specific colours which were meaningful to the observer, and could also relate to the house colours of the Bourbon family. Given Louis' propensity to control-freakery, I'm sure he took a great interest in the colour design of this ship and would have appreciated Marc's considered rendering. A complex subject and a lot more to it than just a choice between red or blue. One does wonder how much time they had to spend repainting the ships after each voyage.
- 2,696 replies
-
- 5
-

-

-
- heller
- soleil royal
- (and 9 more)
-
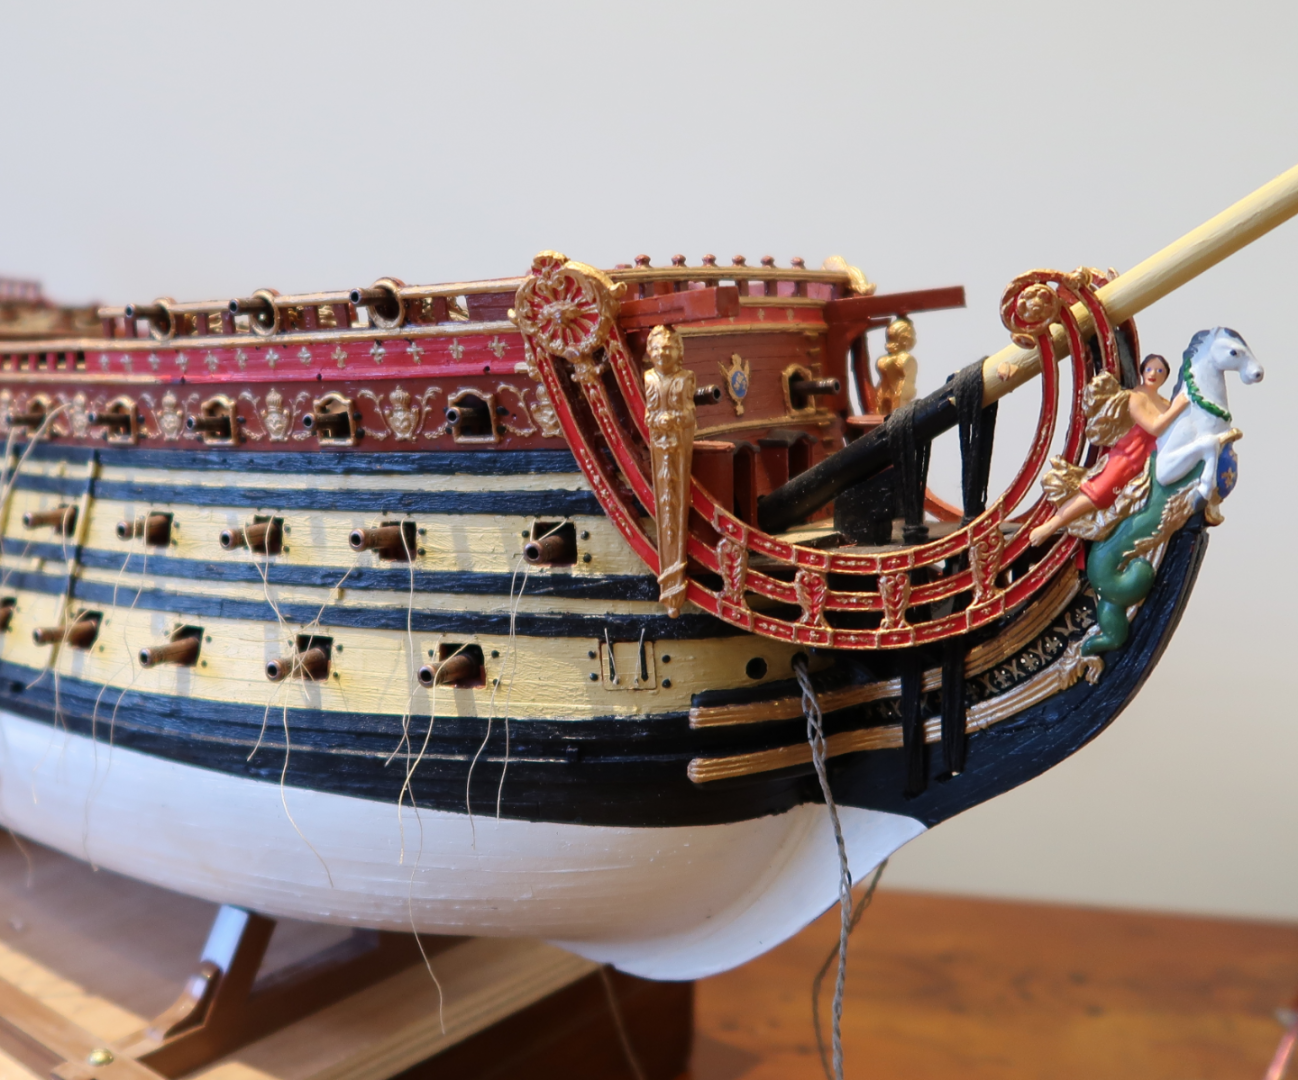
At last found time to catch up with your build now. Great progress and as others have said dedication and skill beyond many of us - and patience, too. My model has come perilously near to ending up in the bin with frustration more than once. I was thinking about the work you are doing at the moment, and the obvious error in the forward end of the headrails being above the sprit. I decided to leave it as I couldn't see my way to altering the kit, but on a second look and comparison with the St Philippe, I'm wondering if it is that the sprit is set at too shallow an angle. Certainly the sprit on the SP is noticeably steeper.
- 2,696 replies
-
- 6
-
-
- heller
- soleil royal
- (and 9 more)
-
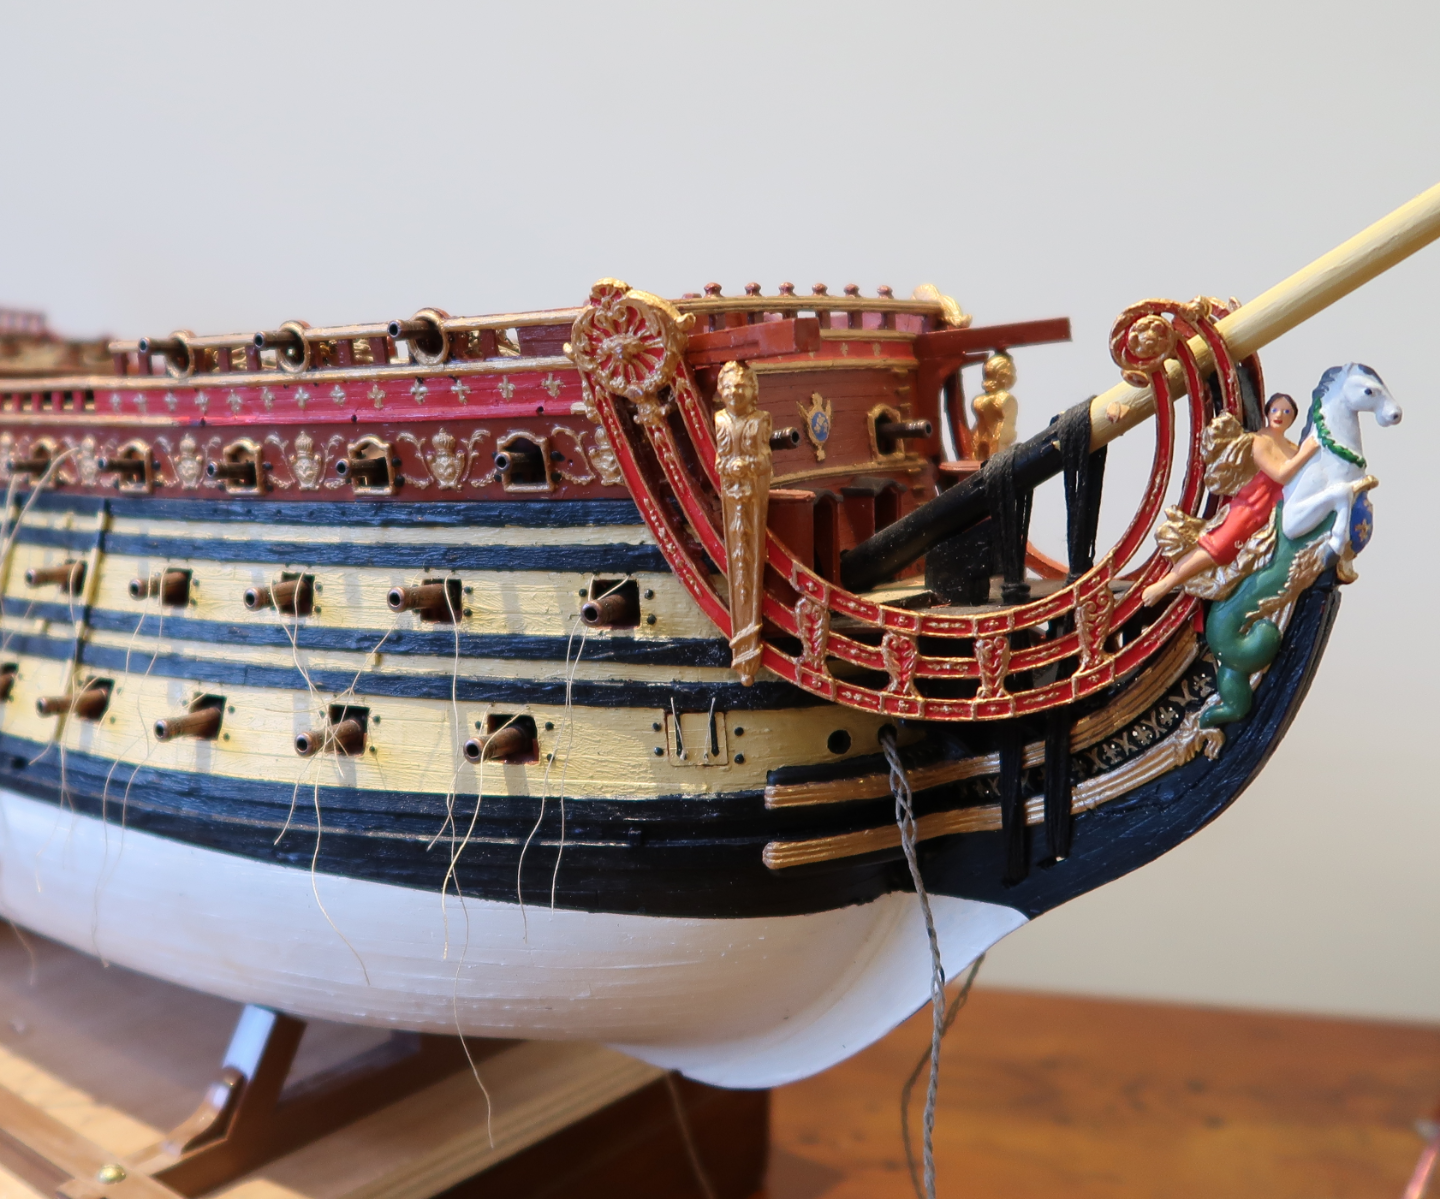
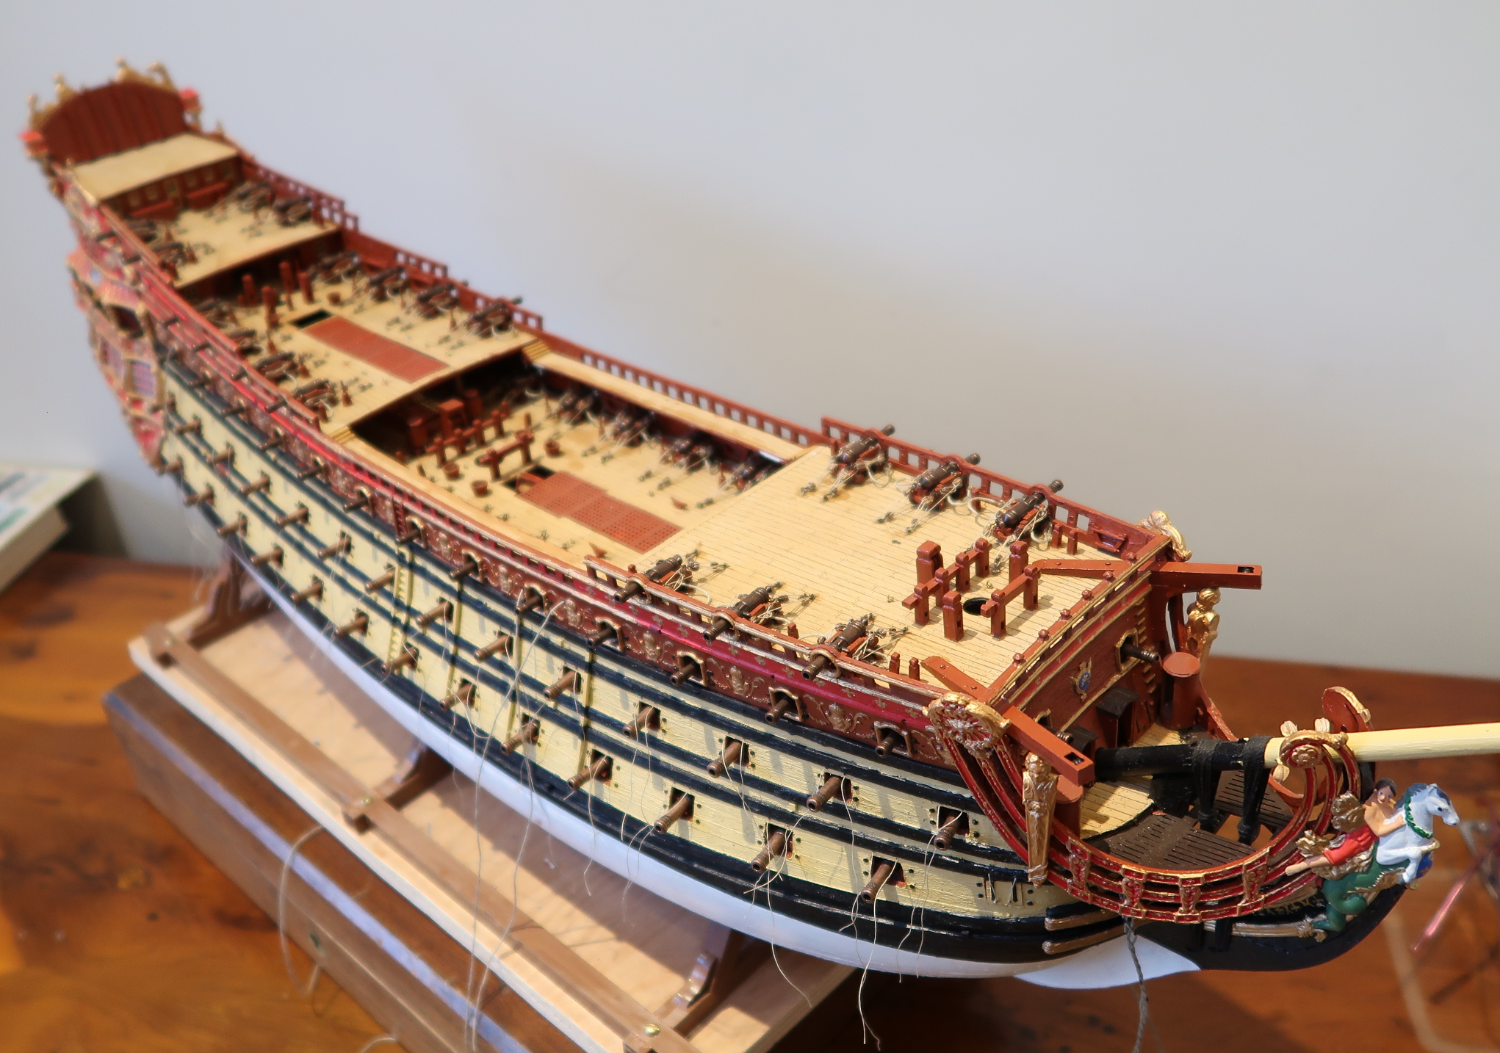
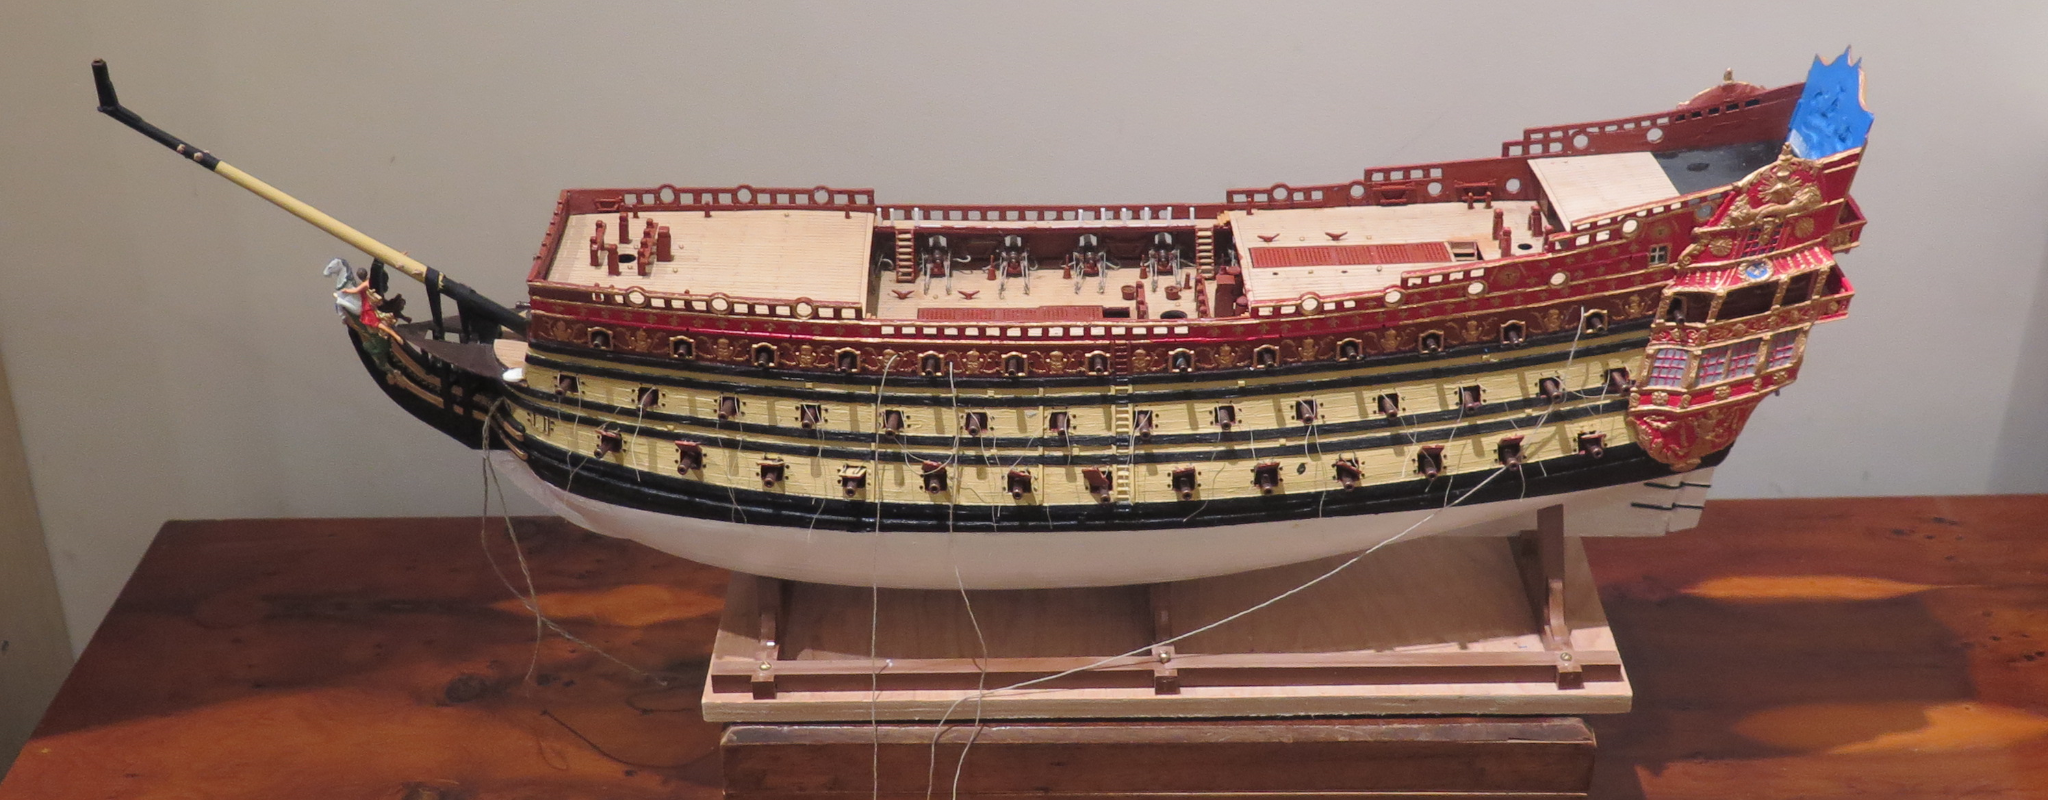
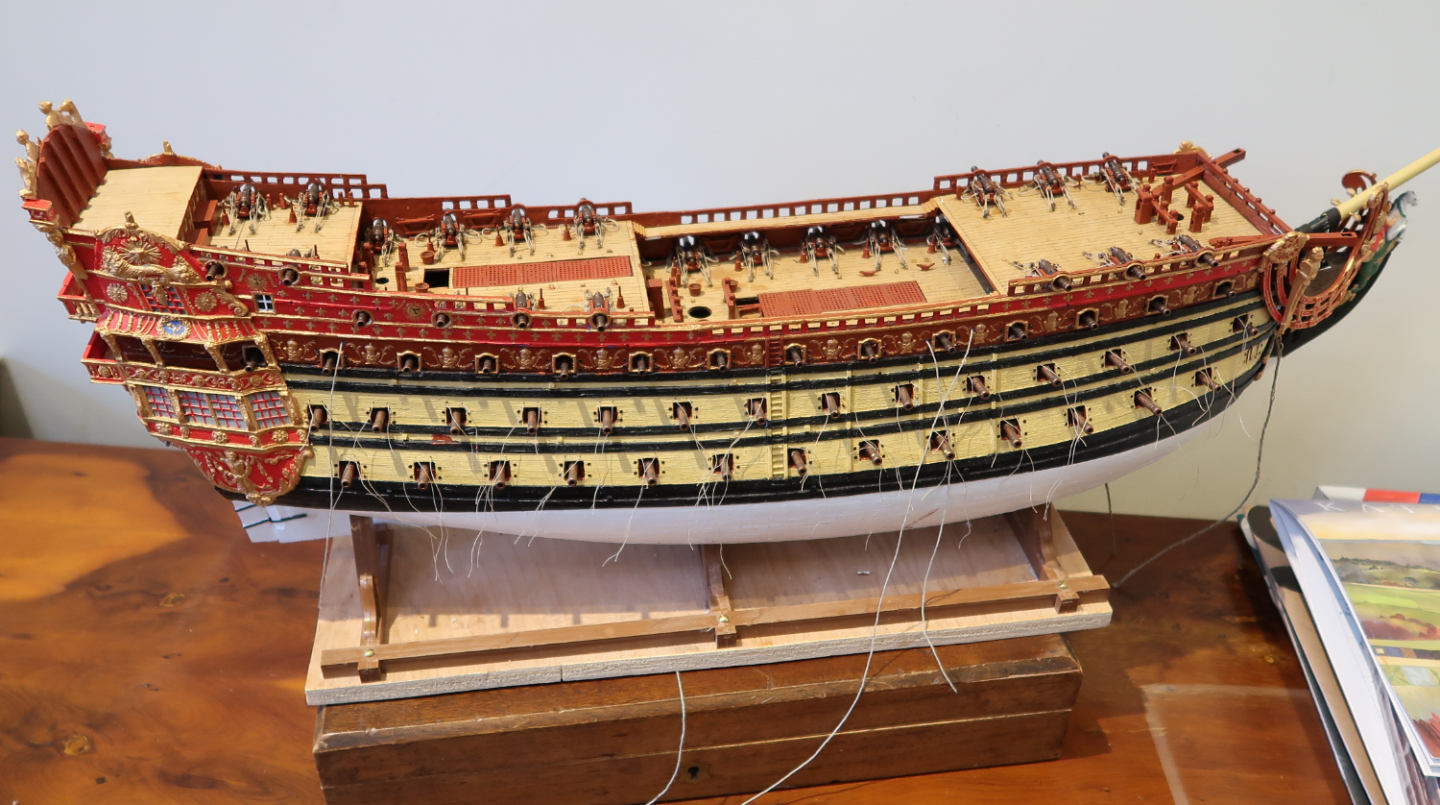
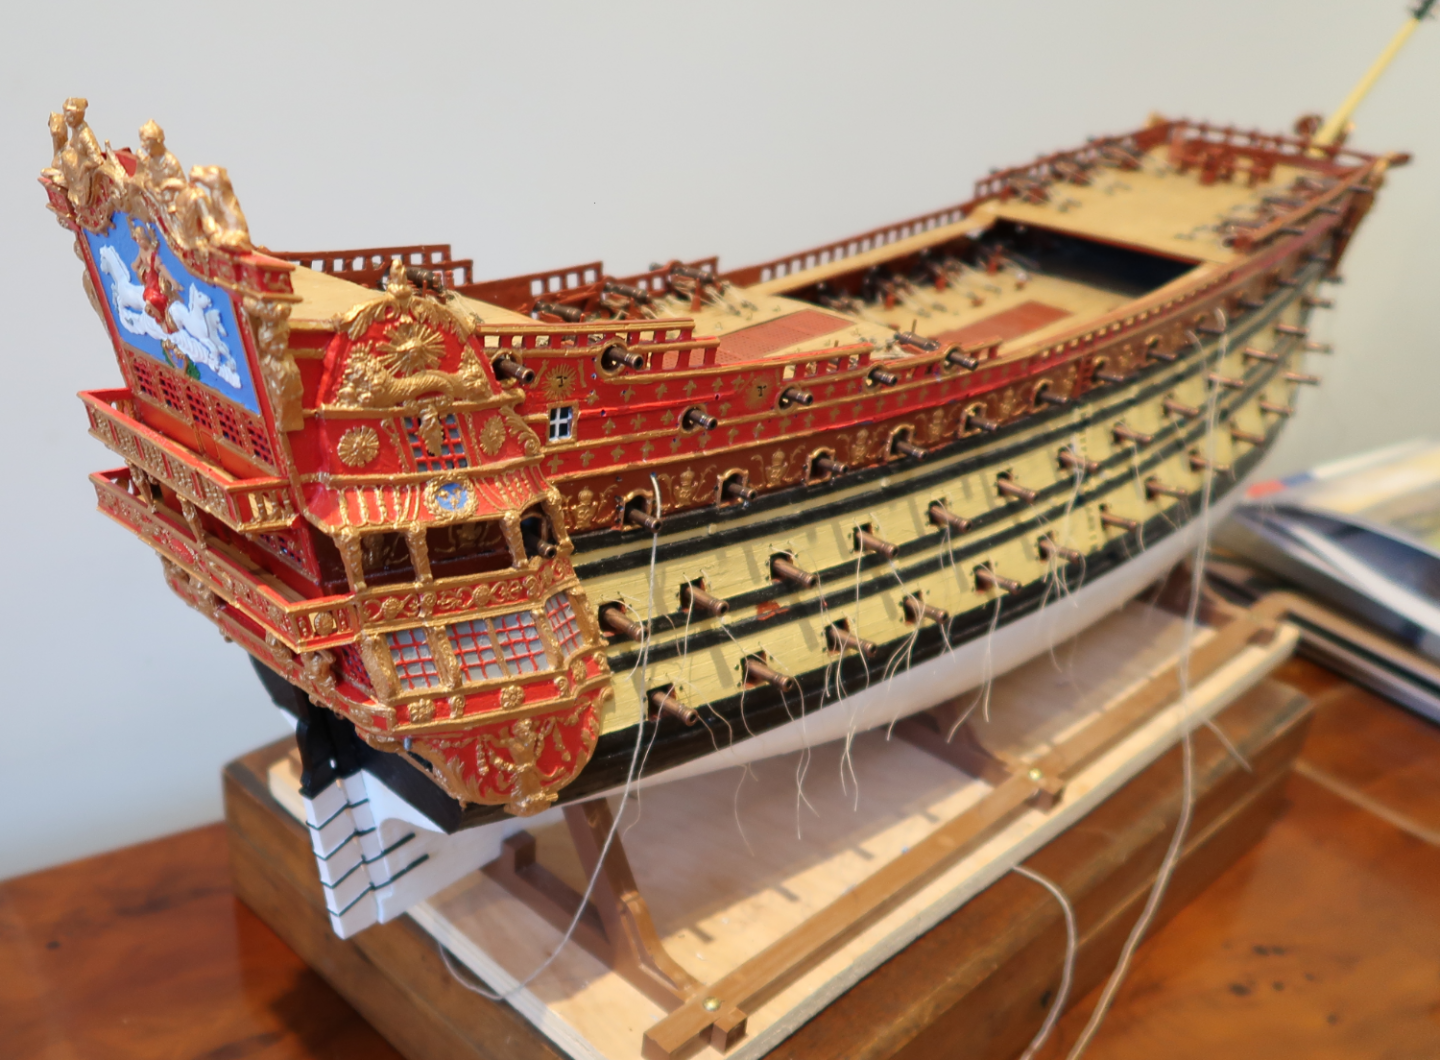
I can't believe it's been so long since I did a post. First, just to respond to Bill's advice about the waterline. I did exactly that and the waterline is very close to the first wale. Part of the reason for the long silence has been the tedious process of the gun tackles. With each gun needing eight blocks and hooks as well as putting in place all the eyelets to take the hooks (including those areas where there is little solid structure to place them), it took a long time. I also wanted to work out in my own mind the most appropriate set of railings and access stairs/ladders, having concluded that following Tanneron in everything seemed to be counter to reason and practicality, like how do you actually get from one part of the ship to another in reasonable safety. Another aspect is that some of these non-structural items would be different or differently placed between being in harbour, being in a light seaway, being in heavy swell and being in action. What the modeller is actually trying to convey seems relevent. I've also been looking for some figures to populate it and give an idea of scale. Anyway, after all that philosophising (so beloved of the French), I cracked on with some of the stem and stern decoration, the changes to the poop area, finished the tackles and can now start on those railings and ladders and also on the channels, masts and standing rigging. Here are some pictures of how it looks now with plenty of tidying up to the paintwork to be done at some stage. And progress will be slow over the summer too.

-
I think our different opinions are more a matter of degree than substance, and as this is a modelling site, not a social history blog, let's leave it at that I was beginning to wonder whether the walkways themselves were another imaginary addition, but Marc's contribution (thank you very much!) seems to show that they are genuine. In that case, maybe the flimsy bulwarks were supplemented at sea with netting or something similar which was used in that way years later. Surely in a seaway no-one would have walked across them anyway if they had so little protection.
-
Thanks for the comments above. I will be adding ladders as they appear in the Saint Philippe plans and put them where they don't interfere with the cannon. I don't see why they should be removable. That seems to me just an added complication in construction and storage. Whilst I agree that safety was not seen in the same way as we do today, I would hesitate to say that crew were disposable. They were trained, skilled people who could not just be picked up off the street if you were in the middle of a voyage to the colonies, for example, and you certainly wouldn't want your officers, warrant officers or craftsmen (of whom there were many on these ships) washed over board. Sailing warships of a later date did have full height bulwarks and inner railings, so my hunch would be that the model is incorrect but I will do some more research before deciding what to do about it. At present the bulwark is hardly stomache height and noticeably lower than the equivalent bulwarks on the other decks as you can see in the pictures above in a previous post.
-
Thanks, Ian. I do think painting the sculpture enhances what would otherwise be a rather large monochrome - or perhaps duo-chrome would be more accurate - expanse of red and gold. I'll have a think about those reins. Might work but the scale is still tiny and I'd hate to mess up what I've already done. I'm still plodding along doing all those gun tackles but at least I am on the last four, on the poop deck, having altered the deck and cabin front to fit the second pair of cannon. One thing that's nagging at me right now, which has been mentioned before, is the additional inner railing along the waist walkways. Measuring the height from the other deck railings in the kit gives me a railing twice as high as the outer railings which themselves, when set against the size of an average human at 1/100, are very low and really wouldn't stop anyone falling overboard. I'm wondering how authentic such a low railing would be, or whether this is another made up feature of the Paris model. If the railings were one unbroken line from quarterdeck to foc's'le, they would be at a much more reasonable height.
-
Just a progress report really. Nothing exciting to add. Progress has been very slow due to other pressures but I have put the quarterdeck in place and begun fitting it out. Discovered to my chagrin that I seem to have lost a few small pieces somewhere along the line, so some areas might not look quite as expected. The next job is to get all the guns in place and rigged so I can work out the placing of access steps and so on. For me that's a very slow process - 1 gun a day - so may well last until Christmas.


-
Thanks again for that very full response. Marslav's build is amazing but I can't look at too many like that; it just makes me want to give up and start again. I have begun to build a light railing along the waist walkways and am placing the guns on the upper decks before thinking about how the access can be contrived. Your solution is certainly a good one. I'll also think of placing the steps further inboard which is a pragmatic solution for which I don't have any evidence.
- 2,696 replies
-
- 5
-
-
- heller
- soleil royal
- (and 9 more)
-
Thanks, Marc. I was amused by the comment in the SP book about the Hubacs doing their own thing. It seemed rather appropriate to this thread! There's also a quote about decks sagging under the weight which is why they were later moved to the sides, and it does seem that the impact on the guns on either side was also known but accepted. I know the stove on the Victory (the only real one I've seen) is bigger but it must have been a significant weight with all the metal shielding and brick lining. Going back to an earlier comment you made about Tanneron making up his own version, I've just been puzzling over the lack of access to the upper aft decks, and that of an internal railing along the walkway between the foc's'le and quarterdeck. Surely there must have been one to stop crew falling off in a swell. So more hacking about of the kit.
- 2,696 replies
-
- 5
-
-
- heller
- soleil royal
- (and 9 more)
-
Fascinating. I see that in the St Philippe, it seems the stoves (2) were much further forward and on the second deck, although there is a comment that the Hubacs did not always follow the regulations.
- 2,696 replies
-
- 2
-
-
- heller
- soleil royal
- (and 9 more)
-
Hi and thanks for asking. I have just finished all the main deck gun tackles and added the deck furniture so that I could fix the quarterdeck in place. I have been using Radimir's wooden decking so had to sand the plastic deck down to keep the original thickness, which was a pain but it is now fixed in place. However, somehow the deck is not slightly bowed upwards in the middle as it should be (and to match the railing), in fact quite the reverse, and I think I am going to have to insert a couple of non-prototypical pillars under the forward edge of the deck to push the centre upwards and make it look right. They will be hidden behind the water barrels more or less, so not too obvious. When I've done that, I'll post some pictures.
-
Your exploration of the archives is fascinating. I'm sure you will turn up a lot of interesting stuff even if you don't find the answer to your question. I envy your patience and single-mindedness; I really could not see myself undertaking such a task, not least because I never learnt French at school, only German (not by choice). I am still wading through all those gun tackles on the main deck and can only bear to do one a day. I can't remember now why you decided to move the channels down a deck. They certainly look much better and more secure where you have fixed them.
- 2,696 replies
-
- 4
-
-
- heller
- soleil royal
- (and 9 more)
-
As you say, it is disappointing when there are so many good things one could say about the kit that there are such obvious errors like the lack of decoration - and the whole hull painted blue. Sadly they haven't been following this thread and have skimped on their research. An opportunity wasted.
- 2,696 replies
-
- 5
-
-
- heller
- soleil royal
- (and 9 more)
-
Rather a long break but today I put a thread through a block for the first time since my last post here over three months ago. Now a bit of a digression, but I hope you'll see why. I have spent some time over the summer reflecting on my frustrations at the painfully slow progress of this project, which led to a severe pruning of other modelling projects, and some re-assessment of priorities. I've given up my ambition of modelling the modern French navy in 1/400 scale; it just takes up too much room, and I've thinned out my collection. The last couple of months I've been working on a newly released 1/700 kit of an modern RN ship which was all resin, PE and 3d printed parts. The detail is truly amazing but so many of the parts were simply too small and delicate for me to handle, and have ended up broken or somewhere in the carpet, that I've realised I can't hope to work at that level, if I ever could. I did ponder abandoning the SR too; it is such a big thing and will definitely be my last large-scale kit, and I don't even like it as a ship, but on the other hand I've invested a lot in it, and it suits the way I work (a lot of short spells during the day rather than one long session), so yes, I am hoping to finish it and I've made a re-start tonight on all those gun tackles that I need to do next, and haven't been looking forward to but they need to be done.
-
A lot of wonderful progress since I last dropped by. I was especially interested to read about how you fitted the upper bulwark pieces as I found they did not fit that well and needed a lot of fettling to get a proper fit and to be really secure. Your patience and thoroughness are an example to so many modellers (I include myself) who are so keen to get on with projects that they don't always take enough time to think things through properly and and end up taking even longer as they have to correct their mistakes. I'm back on track with my own version after a break, so will be keeping tabs on your progress more often now, and pinching a few ideas, I expect. Looking forward to seeing the pictures pre-show.
- 2,696 replies
-
- 7
-
-
- heller
- soleil royal
- (and 9 more)
-
Another Wow! for this latest episode, and for several reasons. To spend five hours a day on one project is beyond me. I struggle to concentrate for an hour, which is partly why I have several projects in completely different areas on the go at one time to give variety, as well as 'normal' life of course. Painting the centre of those monograms blue is a great idea and completely changes their appearance - for the better. You've also reminded me that I need to do something myself to create that flow between levels in the bulwarks that you've made with the dolphins, and the picture of the other ship has me wondering about creating some more complex deck edge rails on the SR too, rather than the somewhat plain ones provided. There's just so much to think about with this kit, which makes it quite different from any other that I've attempted.
- 2,696 replies
-
- 3
-
-
- heller
- soleil royal
- (and 9 more)
-
The colours do really bring the plastic to life. I'm envious of your very steady hand as evidenced in those close-ups!
- 2,696 replies
-
- 4
-
-
- heller
- soleil royal
- (and 9 more)
-
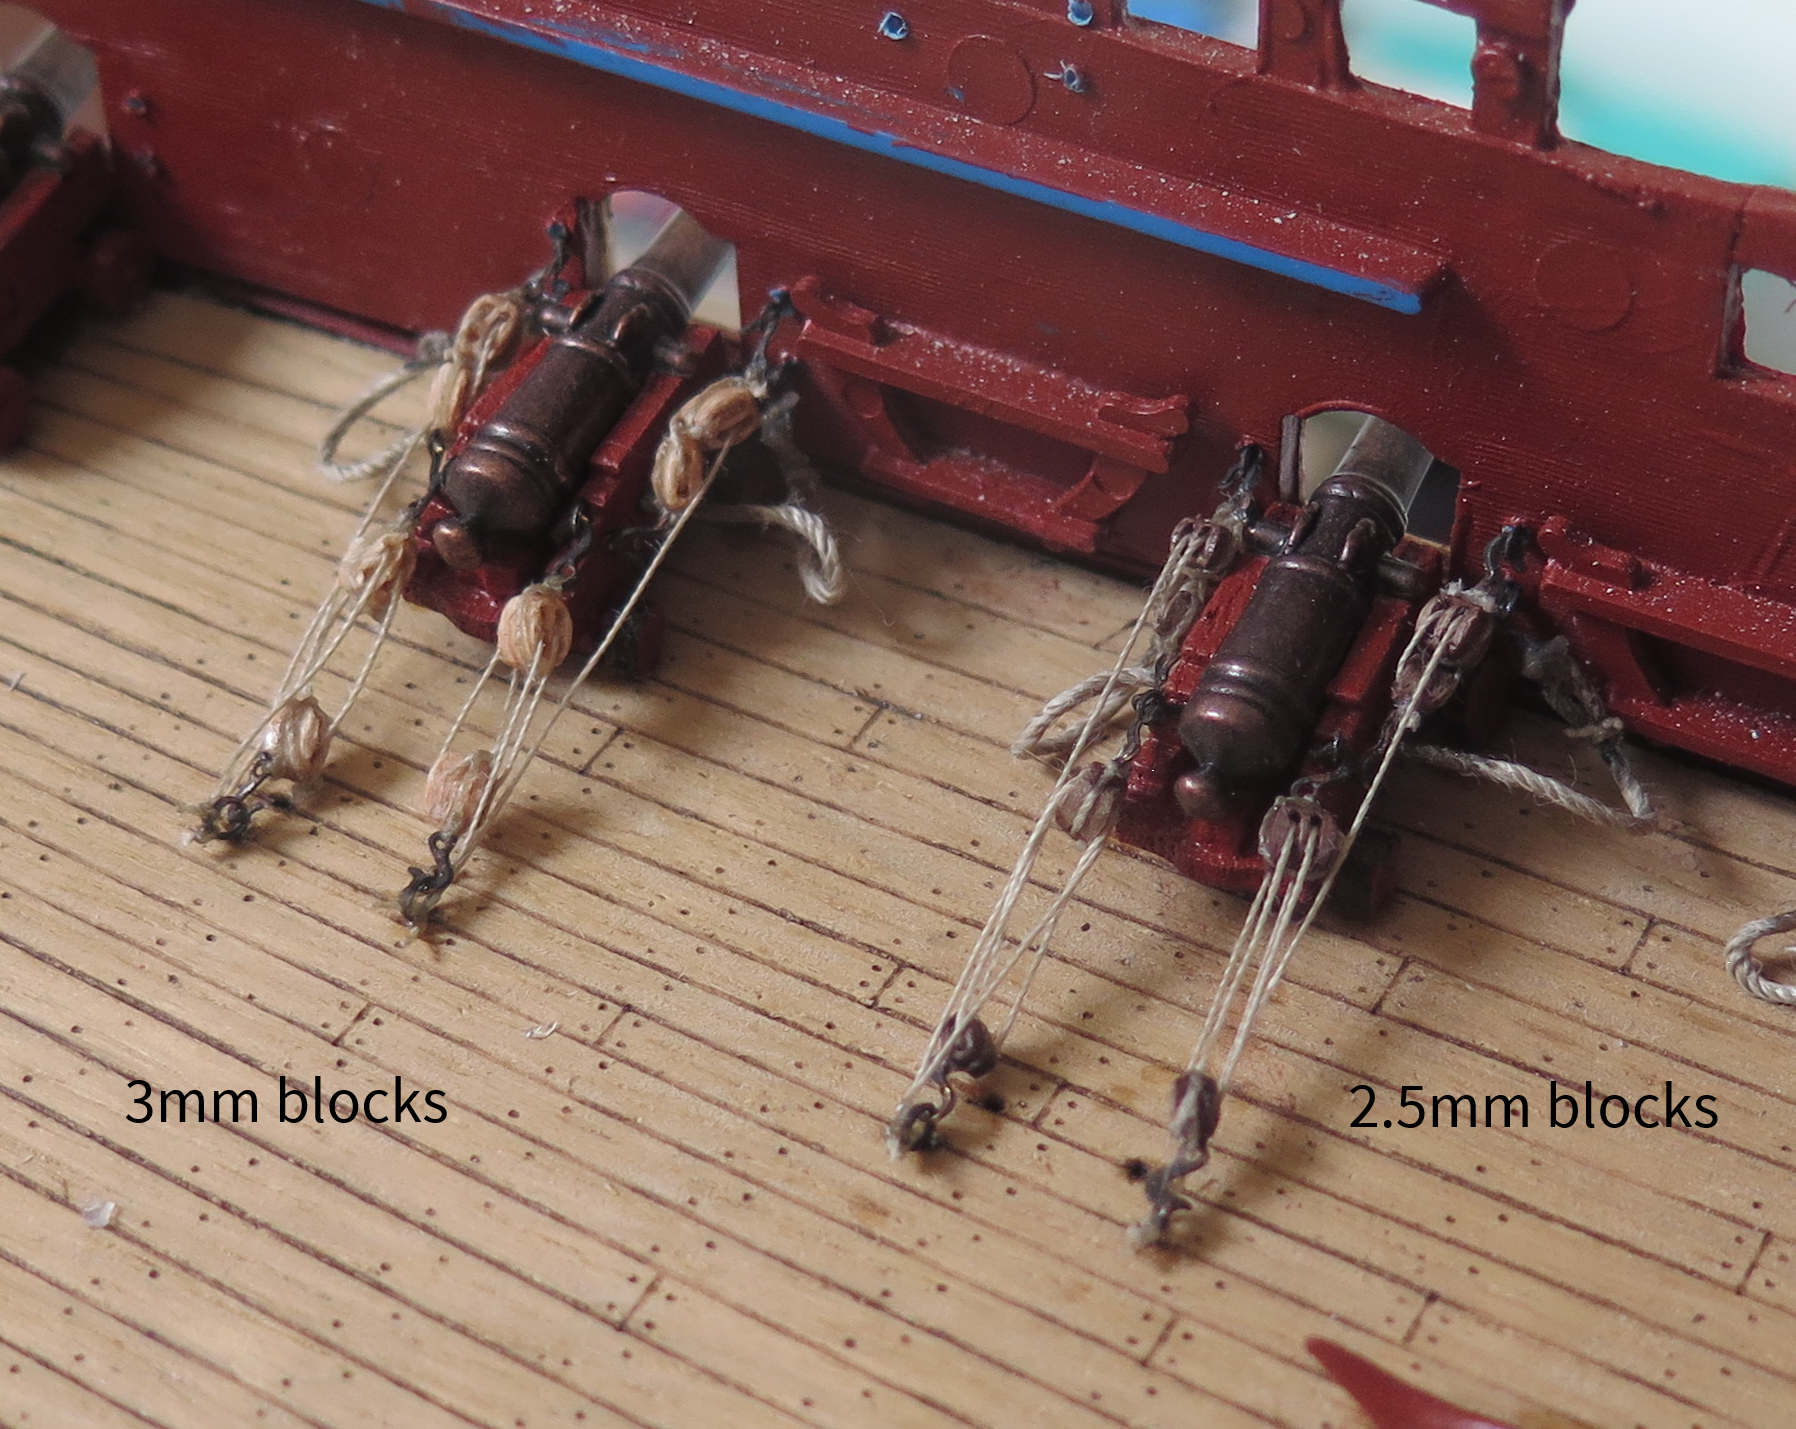
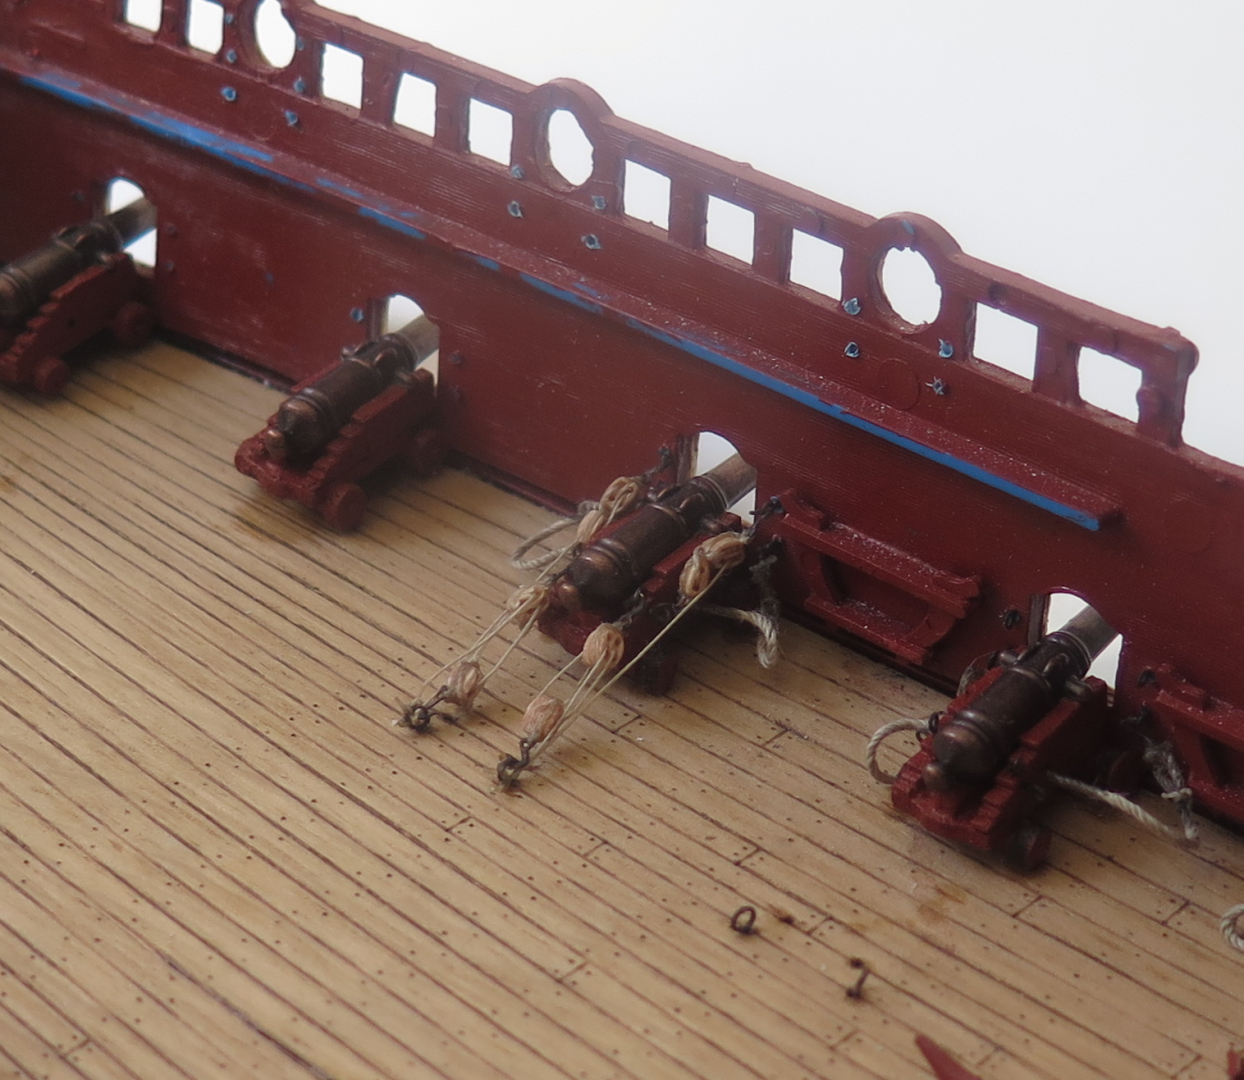
I bought a second-hand copy of the Mondfeld book. Yes, it is full of fascinating information and very easy to read. I quickly discovered some explanations of terms I had not understood in Boudriot and Lemineur. It turns out though that it is not so useful for the gun tackle questions, not because the answers are not there but because I already had them. The St Philippe book gives the rope sizes for each size of gun, and I have a table from Radimir which explains which block to use for each size of rope. I just hadn't put the two together. So far, so good. It seems that the 3mm blocks are correct but then, to my mind, the aesthetics take precedence. The 3mm blocks simply don't look right because there is insufficient space between the eyebolts for the line to be taut. That is what shows in the picture above. and I think part of the problem is that the hooks and eyes are over-scale, especially the hooks, and don't leave enough space for the blocks to separate. I do think that although the blocks on the front tackles can be very close, they do need to have a gap between them to look tidy and realistic, so I think now I will settle for the 2.5mm blocks and move the rear eyebolts as far back on the carriages as I can, as in the second photo above. This reflects the diagram in Mondfeld (of which I had already found a copy on the web) for the French style of tackle. Now I'm away for a week and will mull it all over before ordering the blocks.
-
Thanks, Bill. I will certainly have a look at that before going further.
-
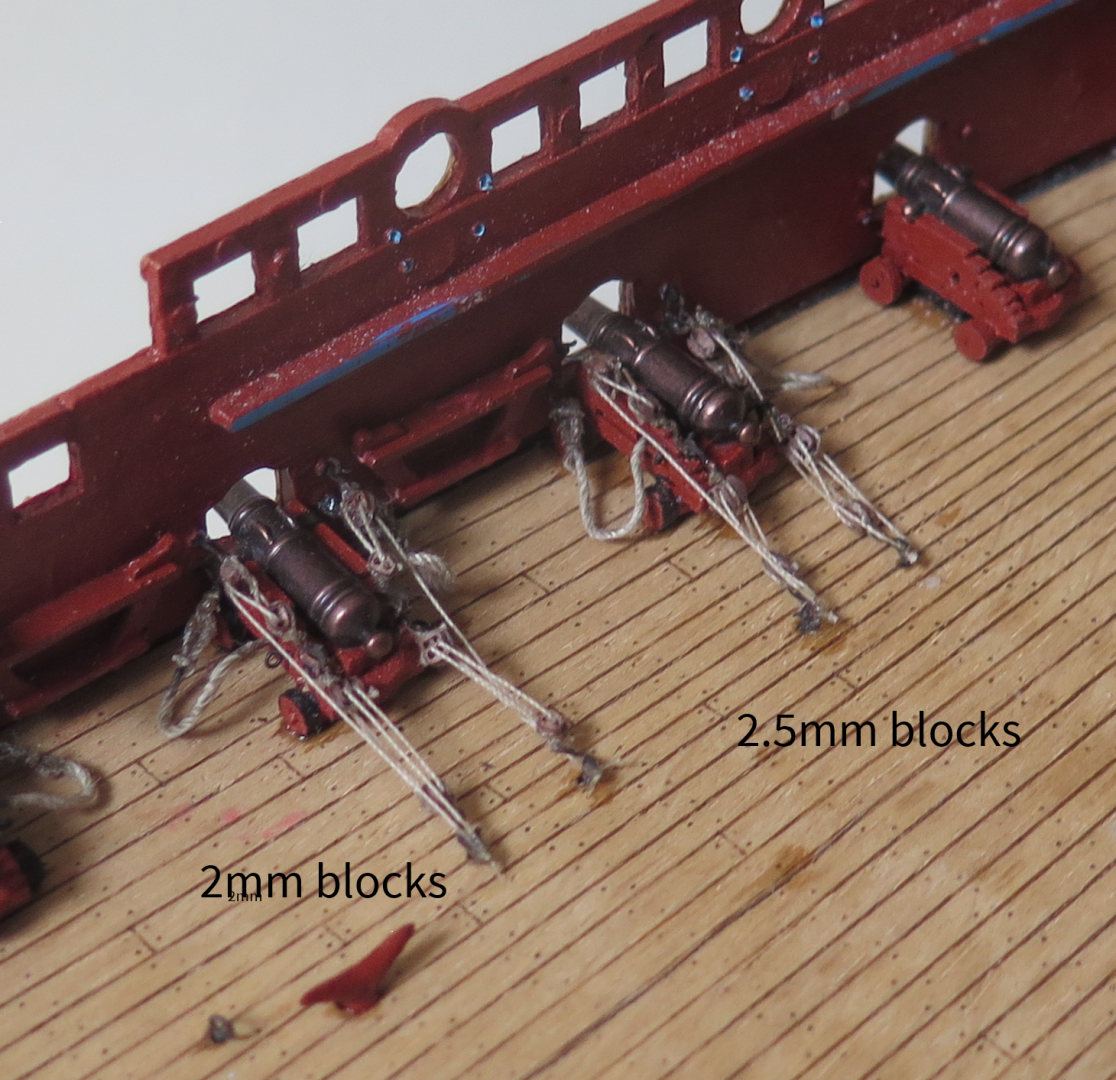
I have now experimented with the 2mm and 2.5mm blocks for the gun tackles and the outcome is in the pictures below. Not perfect but enough to show the intention, I hope. I do think the 3mm blocks are too big. The 2mm blocks are fine and are really the only ones that show a gap between the blocks of the front tackle but are difficult to manage (several just disappeared into the ether whilst I was rigging them), so I have settled on a mixed economy - 2mm blocks for the front tackle and 2.5mm for the rear. I have also moved the eyebolt at the rear of the carriage a little further back and am attaching both tackles to it, which does accord with the diagram Radimir sent me for continental tackles. I also have to be more careful to make sure that the hooks are in alignment so the tackle is not twisted, as some of these are, especially for the more visible guns (these are mainly under the fo'c'sle deck). It's good to have come to a conclusion on this - only another 30 guns to go!

-
Thanks for your comments, EJ & Ian. I am experimenting with different sizes of blocks and eyebolt positions on the gun tackles. There are an awful lot of them so it will be some time before there is any visible progress!
-
Thanks, Henry & Michael, for your helpful comments. Actually, the blocks are properly rigged - I've just checked with a bright light. It's an illusion created by the angle of the camera, the rope and block being the same colour, and the slight groove in the block between the two channels into which the rope has sunk. They say the camera never lies but in this case it has! But thanks for being helpful, anyway. I'm not sure about changing the arrangement of the rear tackle. It would certainly be simpler but I have already glued the guns to the deck and glued the eyebolts in (as indicated in documentation given to me by Radimir). As the carriages are quite fragile, I'm afraid of damaging them if I drill more holes in them. I may have to leave these as they are, and try the single tackle on the higher decks. I'll have a think.
-
Just to add to the above, Radimir at HisModel, helpful as always, is sending me some 2mm and 2.5mm blocks to try out.
-
I can't believe it's two months since I last posted progress but I don't have much to report. I have glued all the main deck guns in place and fitted the recoil tackles, and all the eyebolts in the deck, the bulwarks and the gun carriages. Now my problem is that the distance between the eyebolts is so short that the 3mm blocks I am using for the tackle are touching each other as the photo below shows. It may be that the rear end of the tackle should be fixed further back on the carriage; I used the pre-drilled holes in the carriage but my feeling is that the blocks should be smaller. That size is probably fine on a larger carriage such as on the lower decks but the upper deck guns are appreciably smaller and I believe the blocks should be too. At the end of the day, I think aesthetics has to come into it as well,; if it looks a mess, it's going to spoil the model. So I'm going to try the 2.5mm blocks, and if it still looks cramped, will use 2mm blocks which I can't say I would be looking forward to, given their size and my eyesight.
-
It's always so interesting to come back after a few weeks and see how you are progressing. I agree with all those comments about the bulwarks not fitting and had the same experience of it all appearing not square when glued up. Quite a lot of filing and filling needed. And the bulwarks did keep coming loose until the joint was saturated in plastic weld, though I still try and pick it up by the stand when I have to handle it. I did like your solution to the sheets being put through the bulwarks in the wrong place. I had been puzzling over that myself and the built-in sheaves just seems the right answer.
- 2,696 replies
-
- 4
-
-
- heller
- soleil royal
- (and 9 more)