WhiteWolf
-
Posts
44 -
Joined
-
Last visited
-
 flutlo6180 reacted to a post in a topic:
Bluenose II by WhiteWolf - Artesania Latina - 1:75 Scale
flutlo6180 reacted to a post in a topic:
Bluenose II by WhiteWolf - Artesania Latina - 1:75 Scale
-
hof00 reacted to a post in a topic:
Bluenose II by WhiteWolf - Artesania Latina - 1:75 Scale
-
 I was planning on just what you said. Letting the rigging hold the masts in place just for the purpose of wiggle room. I'll poke around on here too, before I get there, and see what others say. Thanks for the tips!
 -
 WhiteWolf reacted to a post in a topic:
Bluenose II by WhiteWolf - Artesania Latina - 1:75 Scale
WhiteWolf reacted to a post in a topic:
Bluenose II by WhiteWolf - Artesania Latina - 1:75 Scale
-
Prowler901 reacted to a post in a topic:
Bluenose II by WhiteWolf - Artesania Latina - 1:75 Scale
-
hof00 reacted to a post in a topic:
Bluenose II by WhiteWolf - Artesania Latina - 1:75 Scale
-
ccoyle reacted to a post in a topic:
Bluenose II by WhiteWolf - Artesania Latina - 1:75 Scale
-
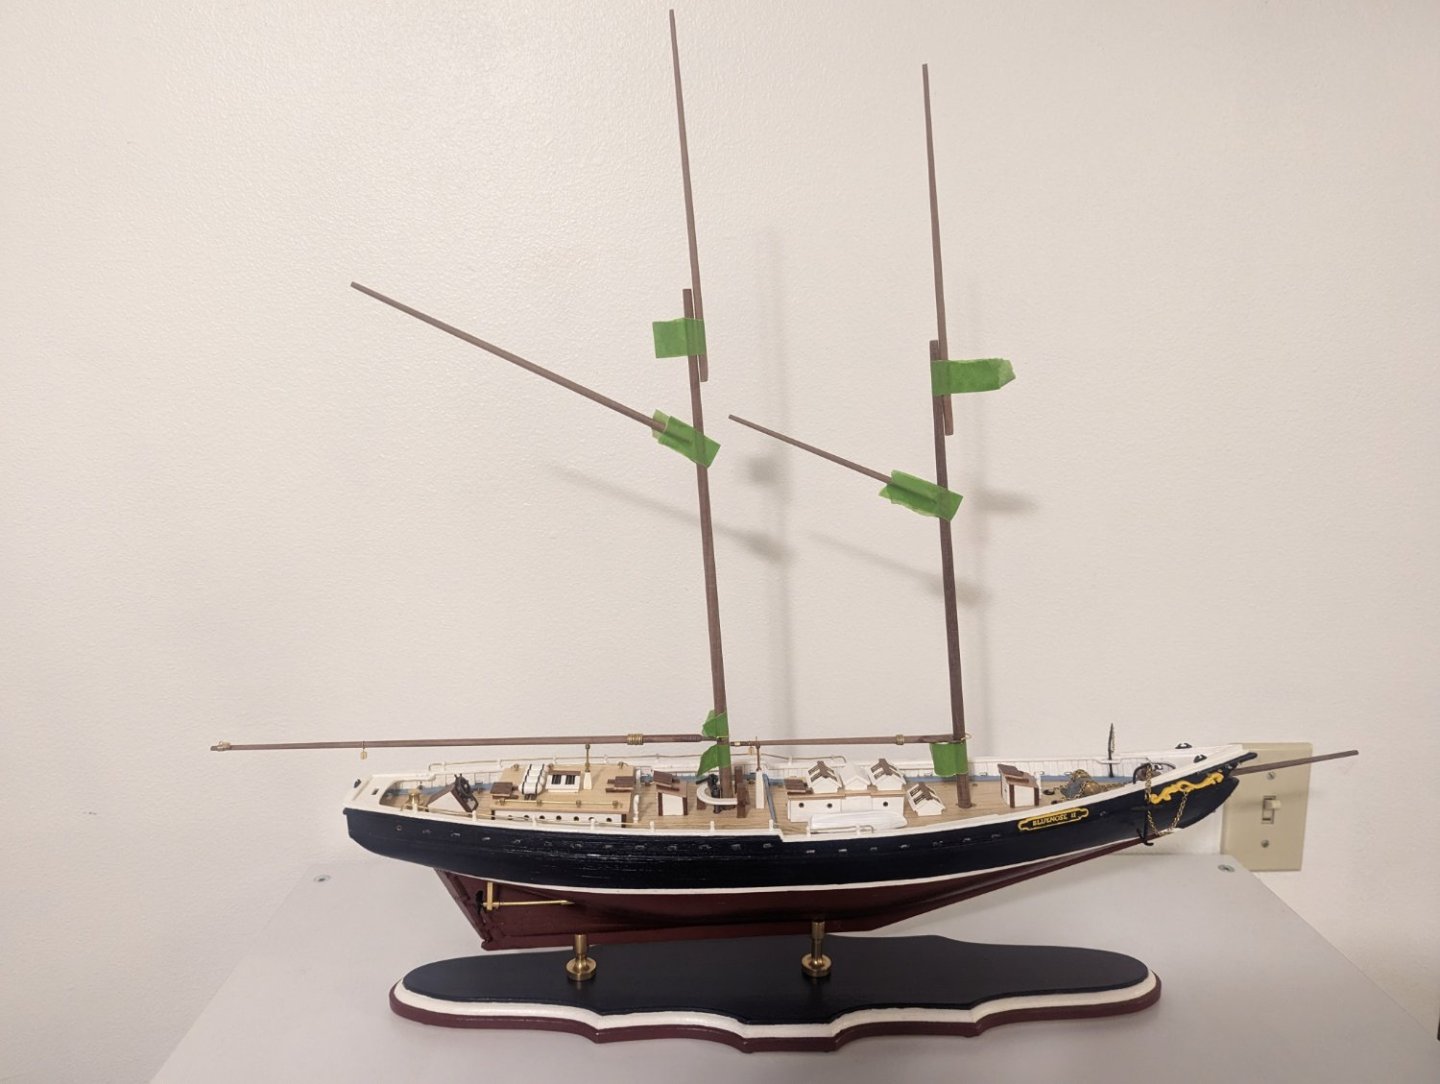
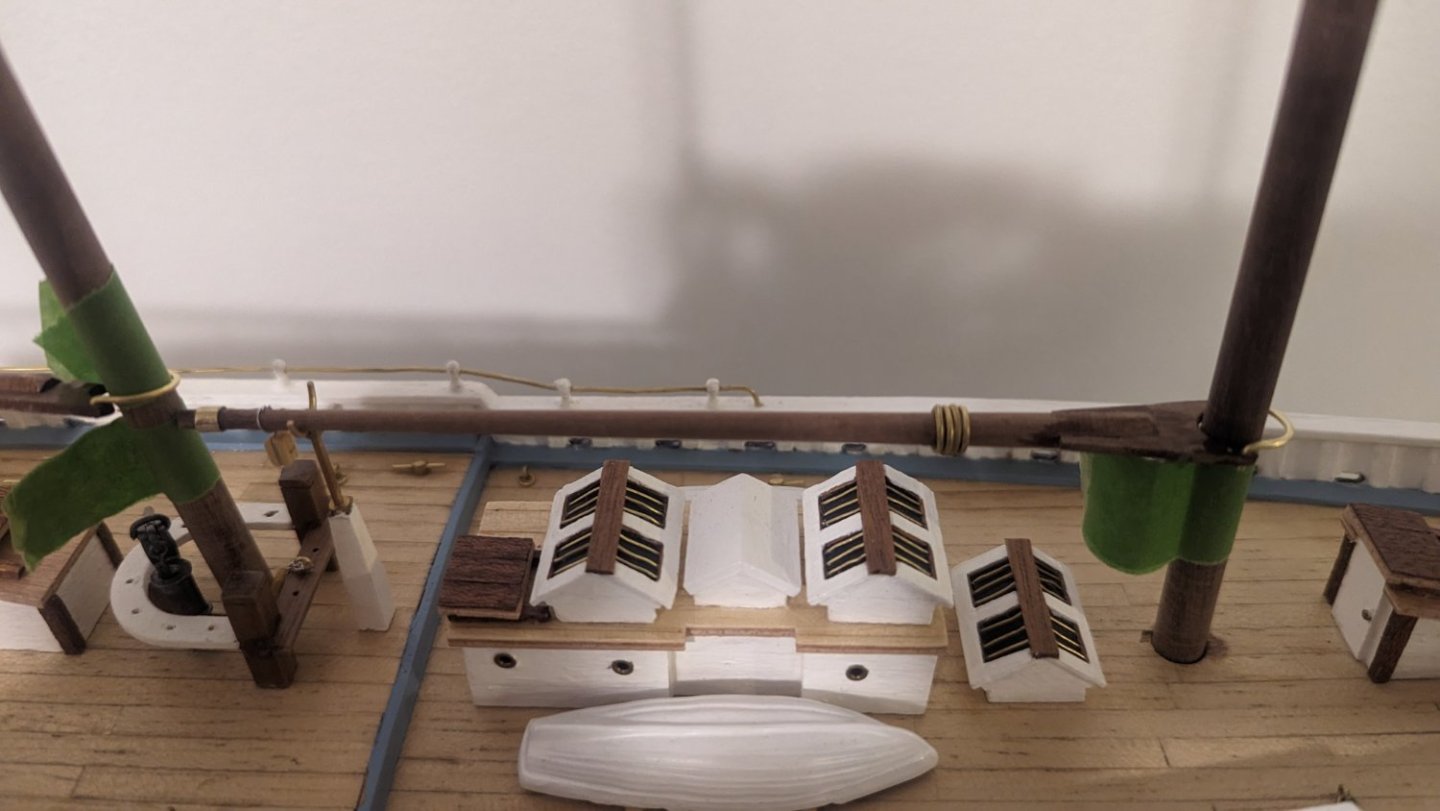
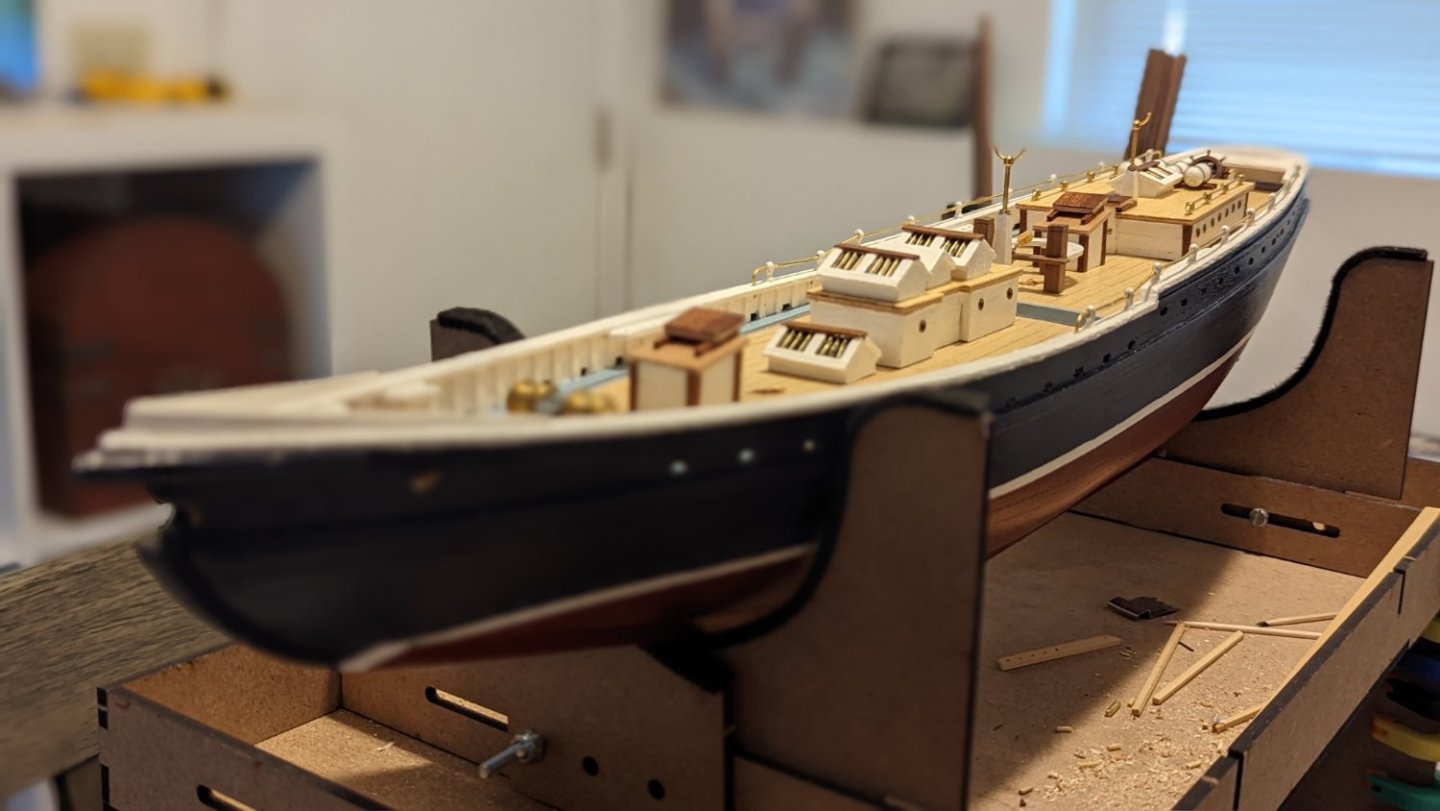
Been a while, but with the holidays upon us, I'm back to having some free time to sit and work. Got the masts tapered to where my skill level is comfortable, and I'm starting to put the parts together. My foremast boom feels a little long, so I may have to contend with that later, but we will see. Worst case I can shorten the end a couple mm and I will clear the main mast no issue. Right now it's a close thing. I'll mock up the final mast positions and angles once I have all the parts done and see what, if anything needs adjusted. (Tape is keeping everything in pace so I don't lose track of what's what.) Happy holidays!
-
flutlo6180 reacted to a post in a topic:
Bluenose II by WhiteWolf - Artesania Latina - 1:75 Scale
-
flutlo6180 reacted to a post in a topic:
Bluenose II by WhiteWolf - Artesania Latina - 1:75 Scale
-
WhiteWolf reacted to a post in a topic:
Bluenose II by WhiteWolf - Artesania Latina - 1:75 Scale
-
WhiteWolf reacted to a post in a topic:
Bluenose II by WhiteWolf - Artesania Latina - 1:75 Scale
-
mcb reacted to a post in a topic:
Bluenose II by WhiteWolf - Artesania Latina - 1:75 Scale
-
hof00 reacted to a post in a topic:
Bluenose II by WhiteWolf - Artesania Latina - 1:75 Scale
-
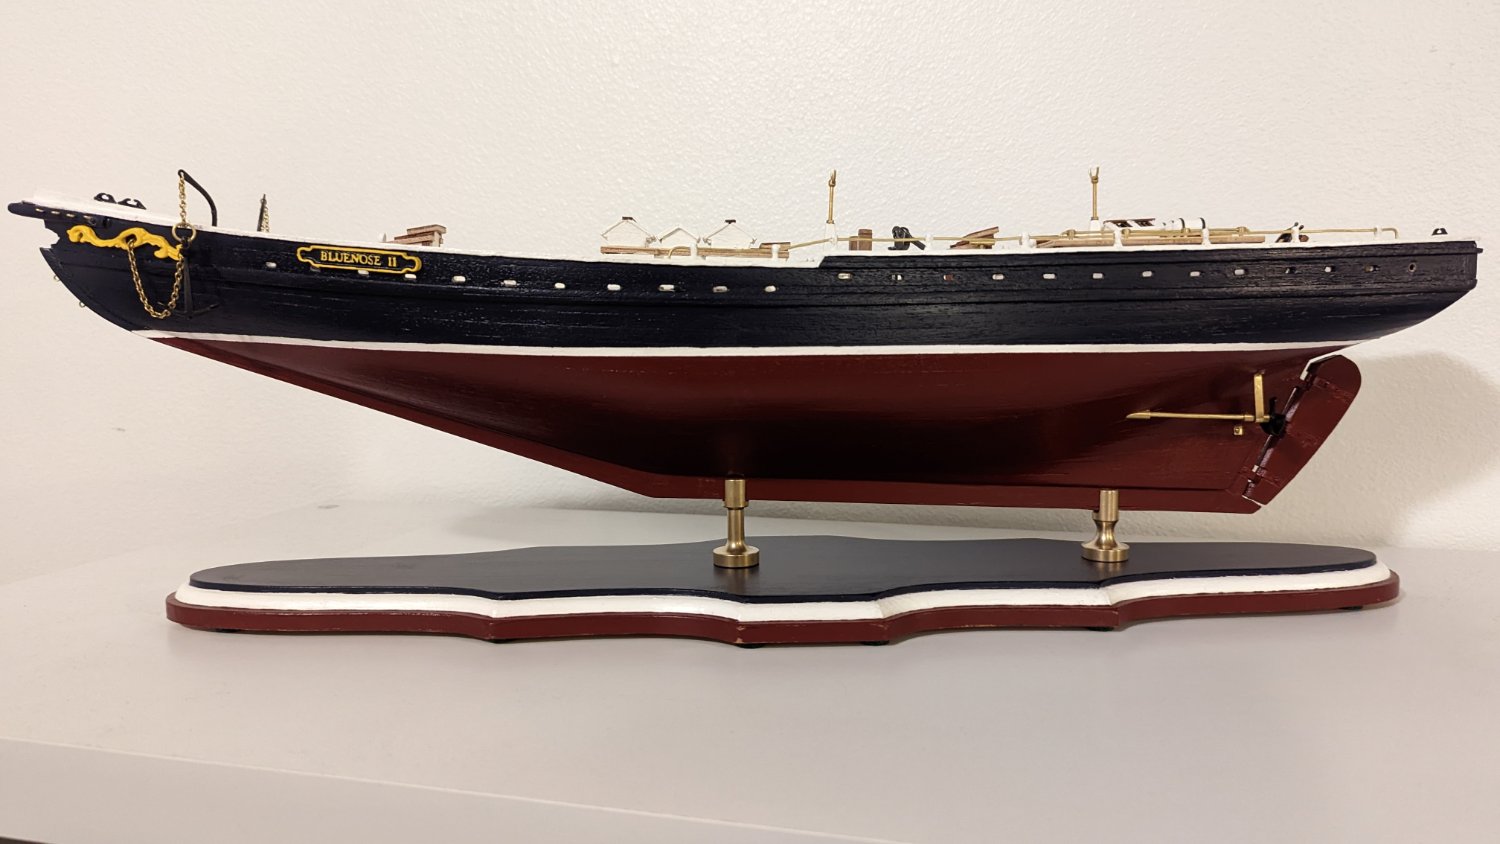
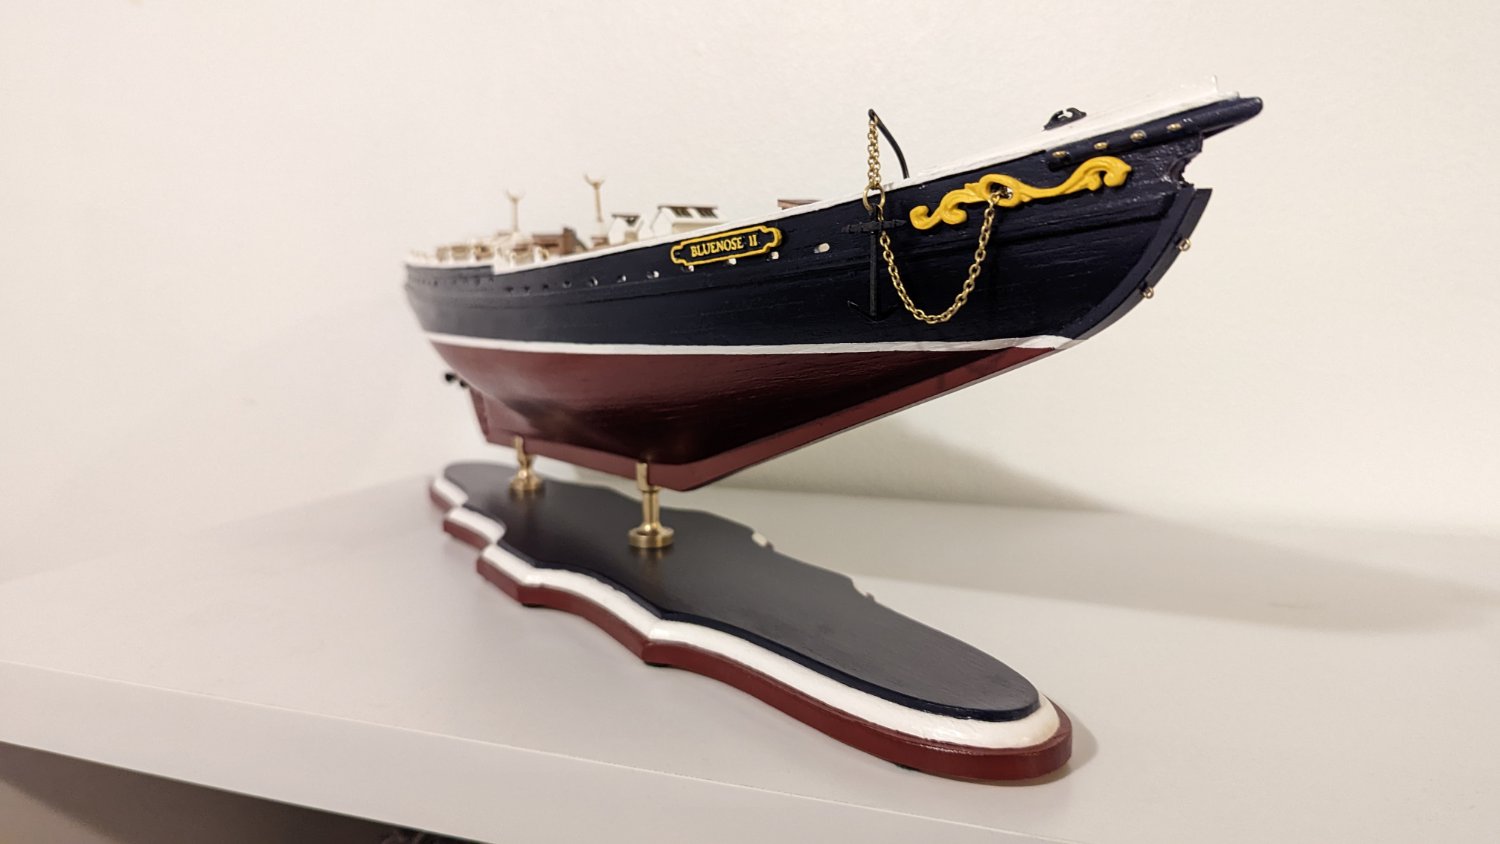
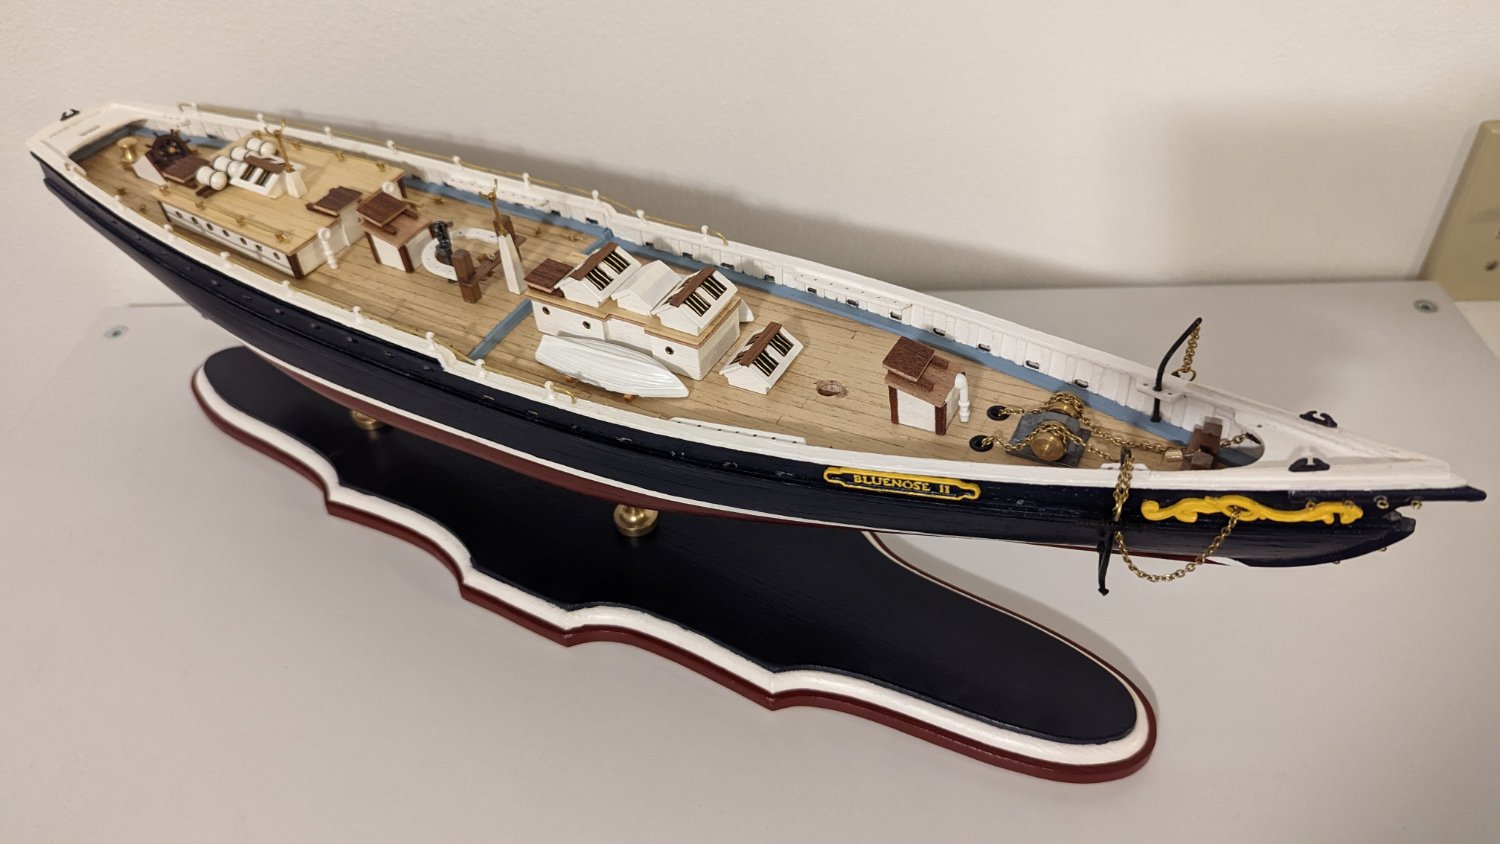
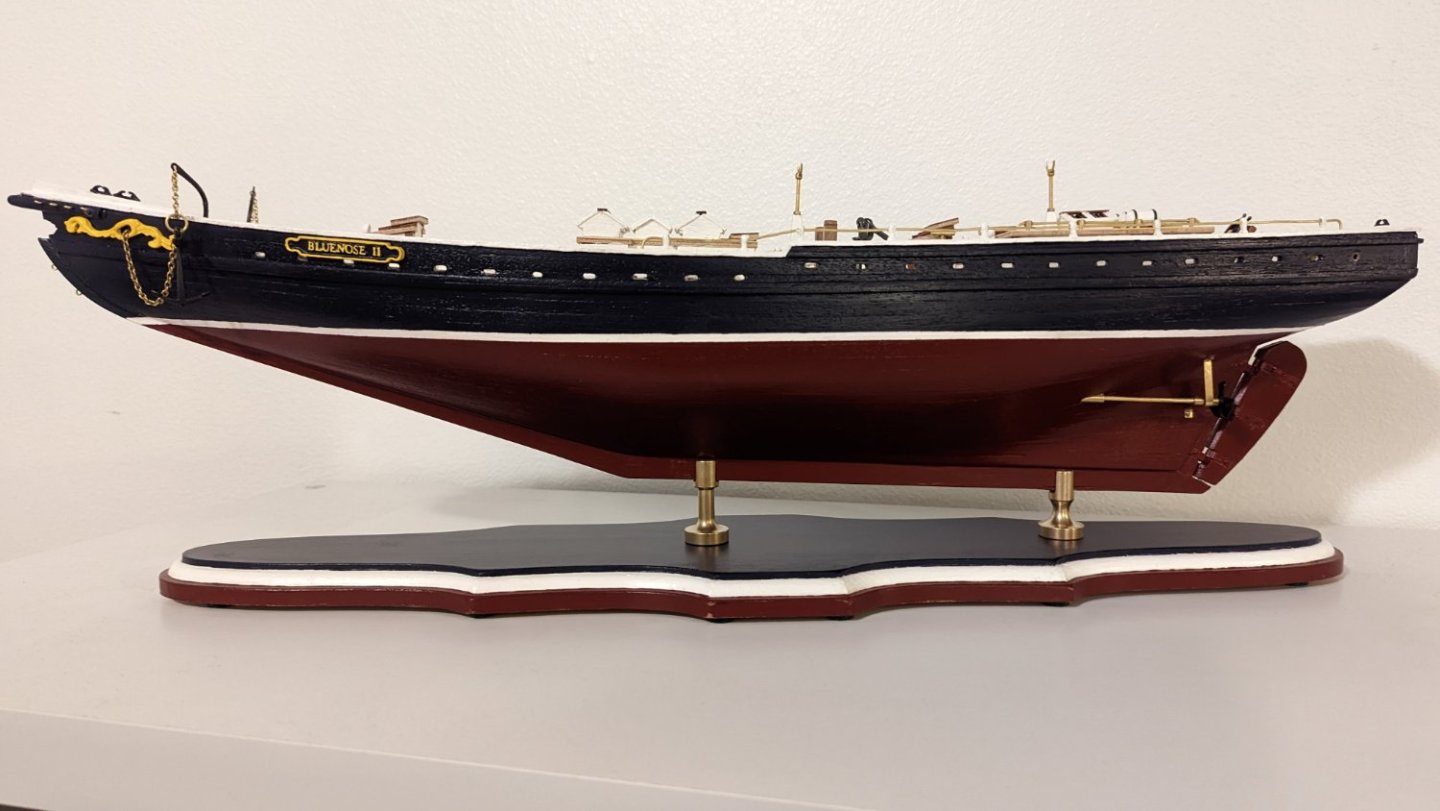
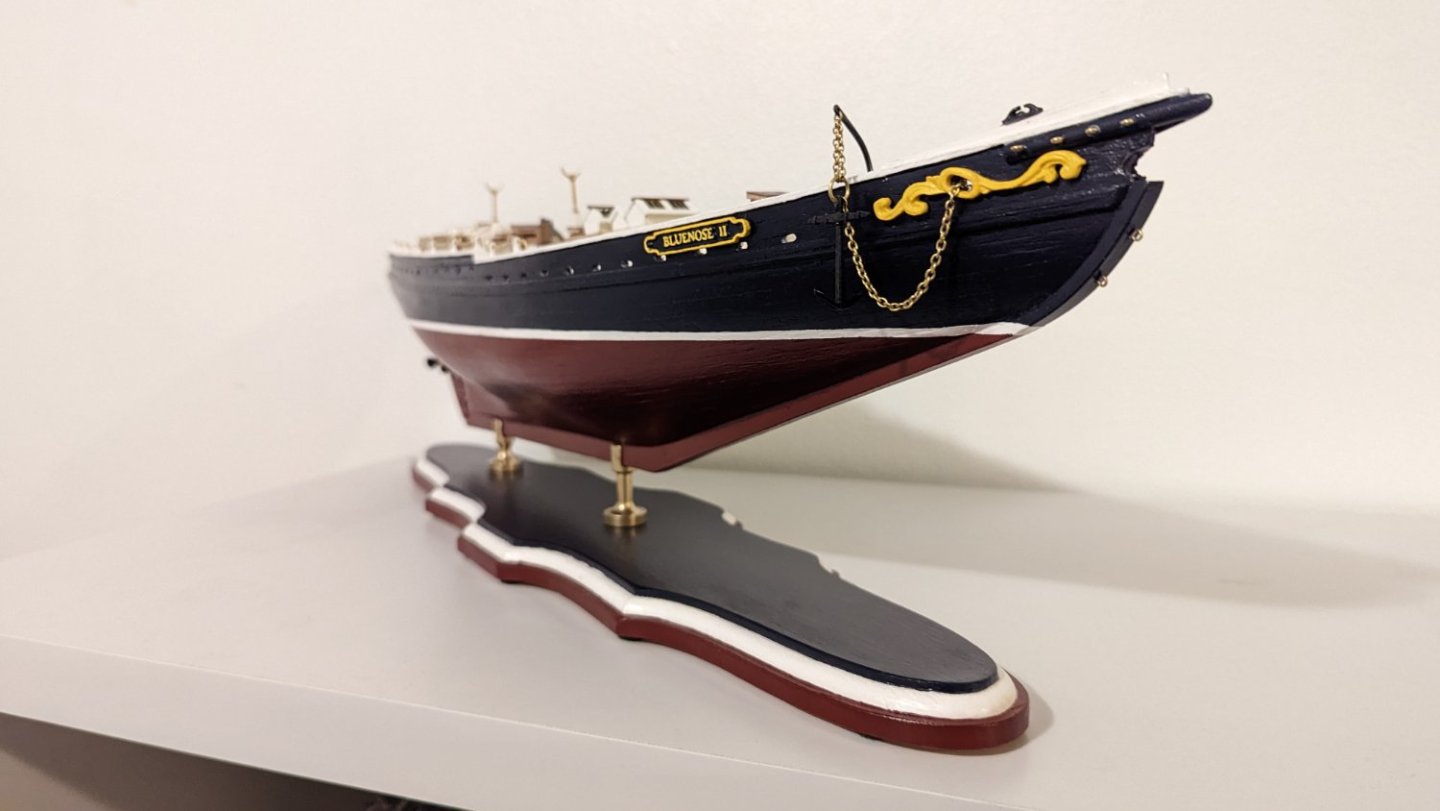
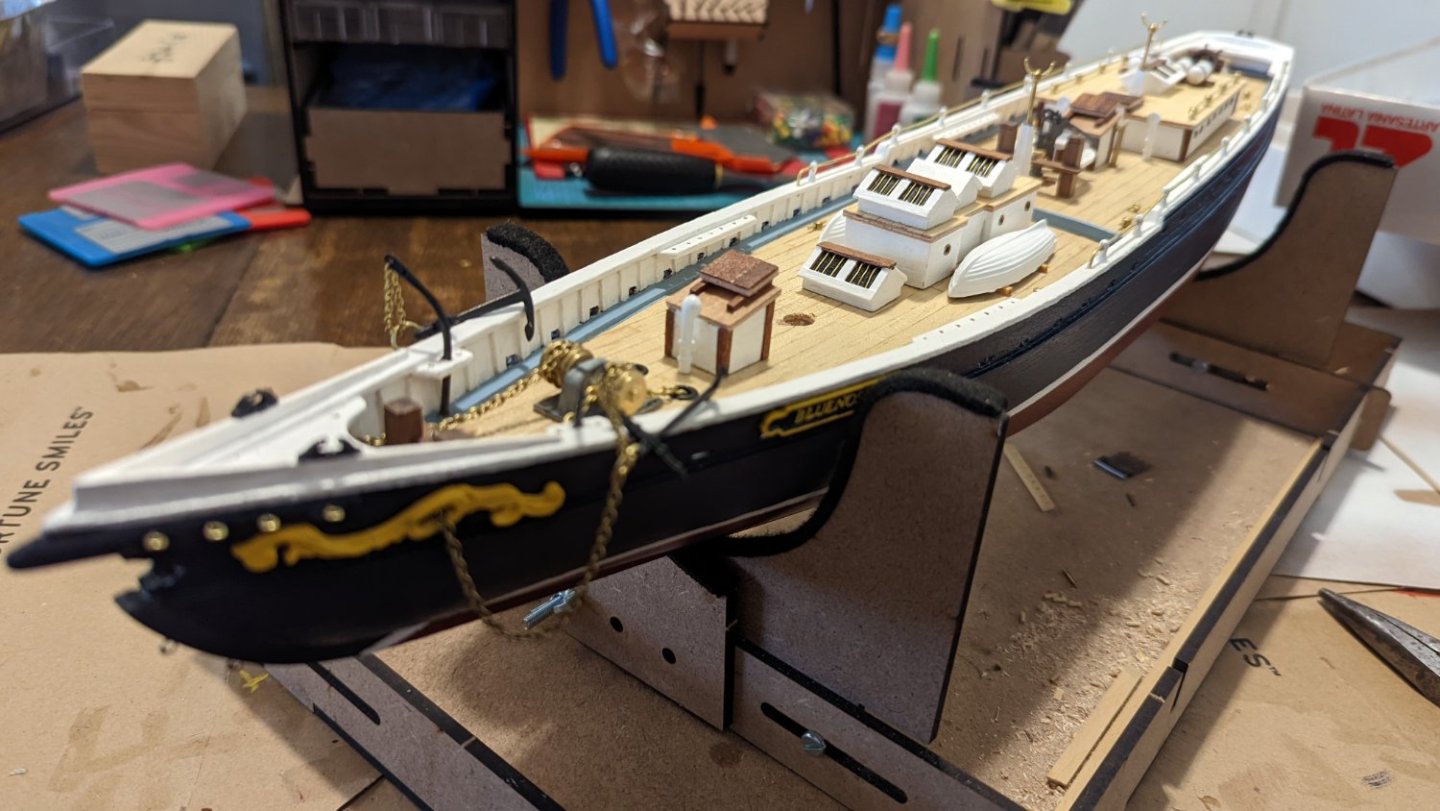
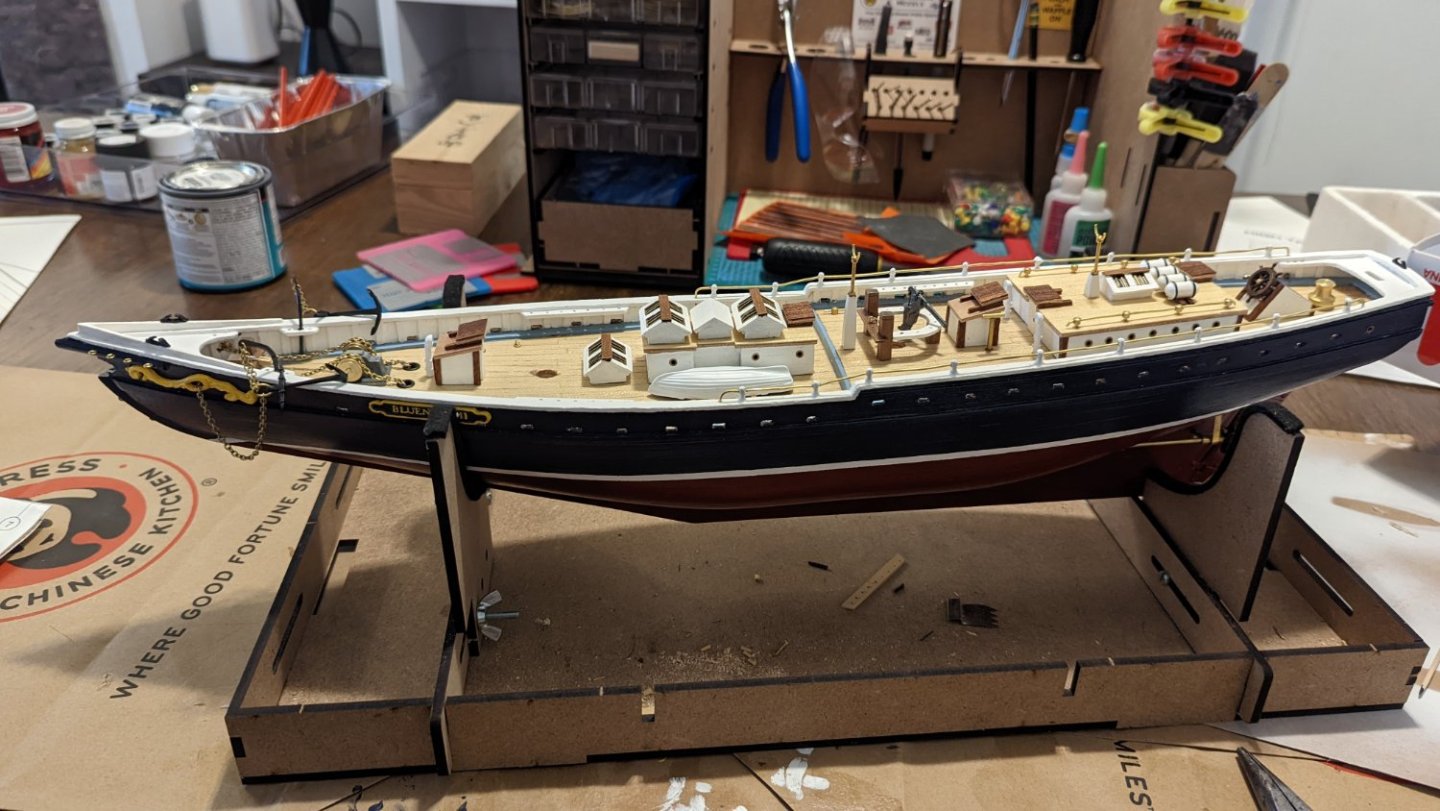
At long last, she is mounted to her base! Very pleased with how this came out, considering it was my first attempt at mounting like this. The base turned out great! I will be making a plaque when it's all finished with a fun tribute to my grandfather. But for now, I can move on!


-
hof00 reacted to a post in a topic:
Bluenose II by WhiteWolf - Artesania Latina - 1:75 Scale
-
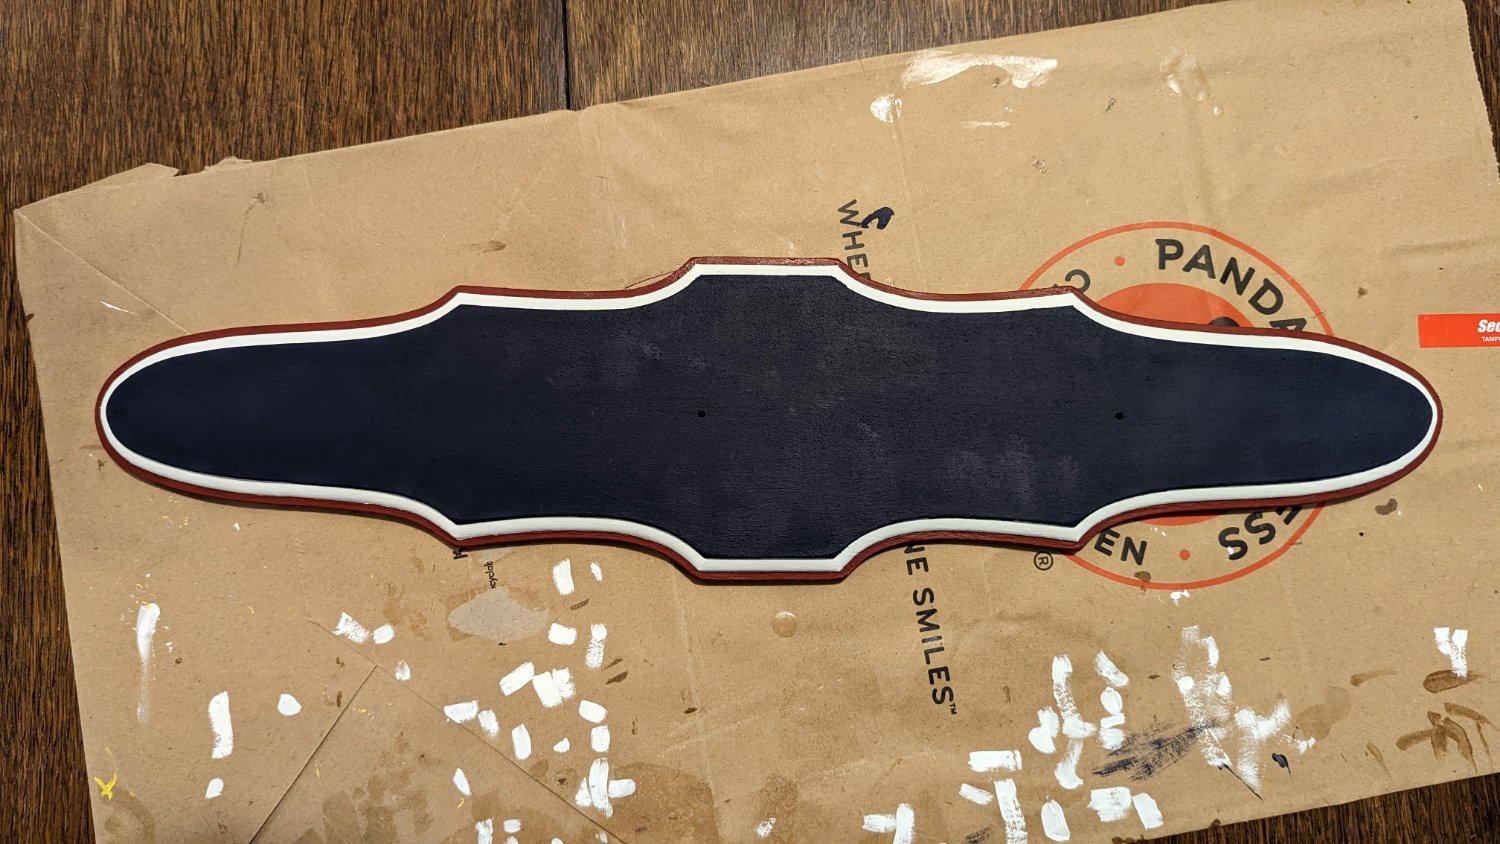
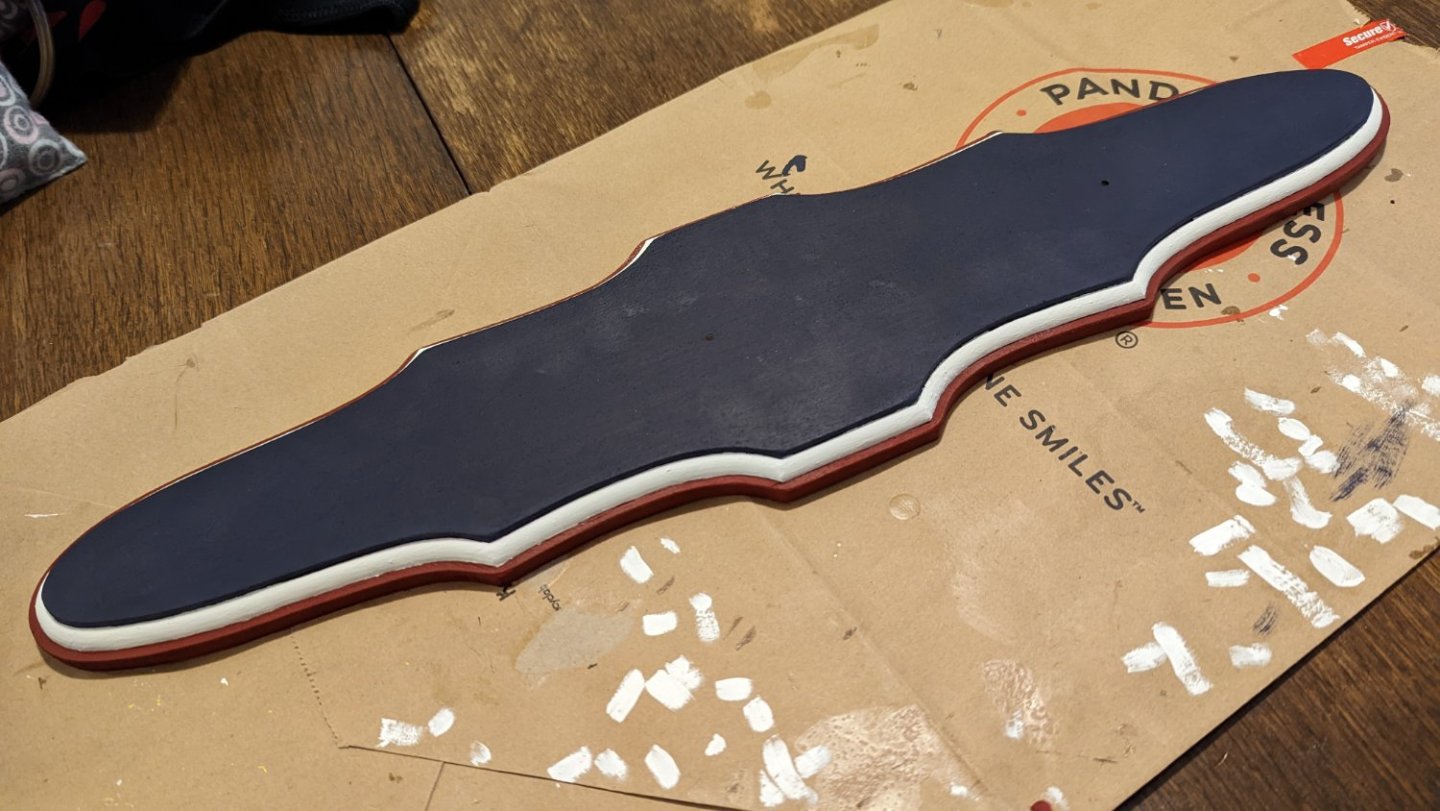
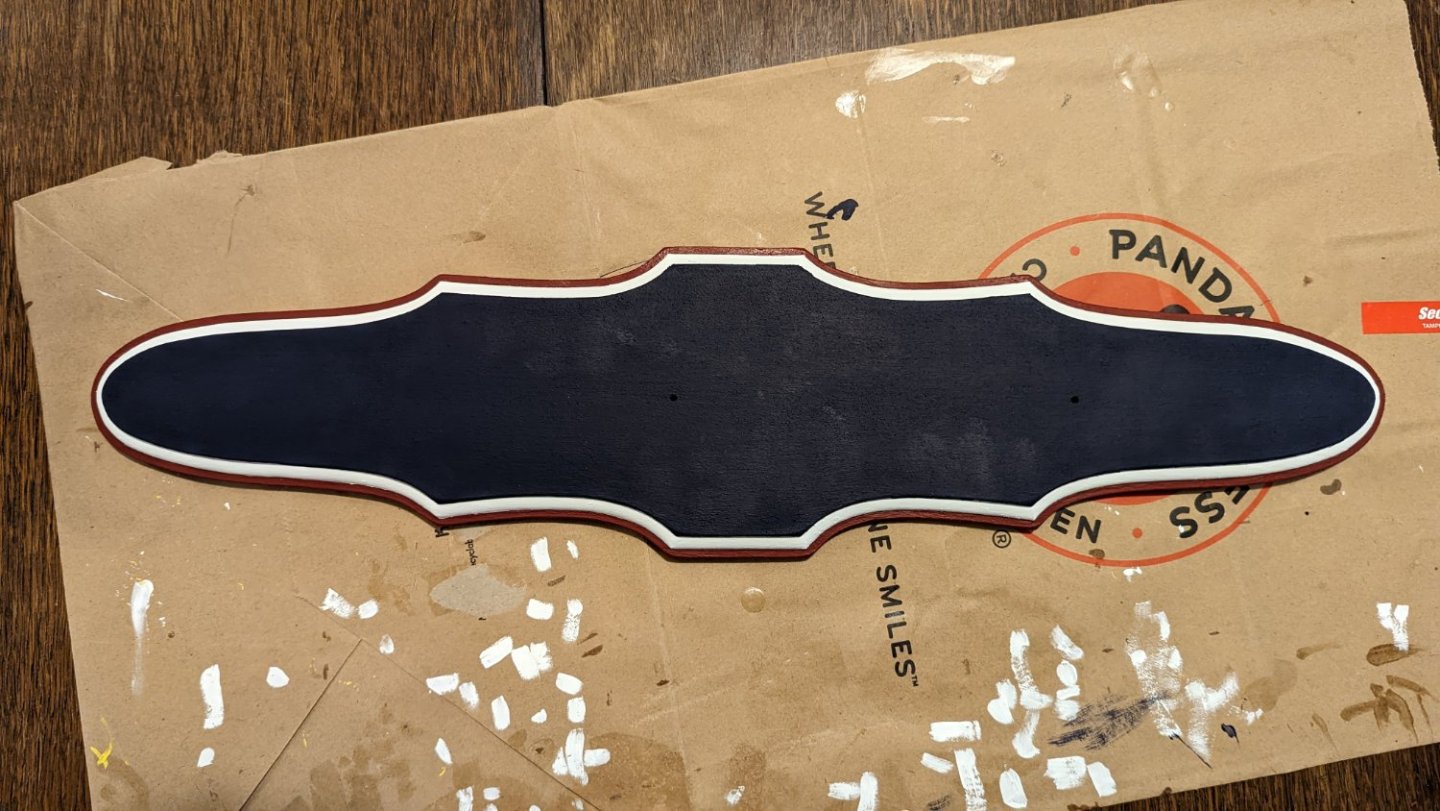
Finally have this painted and drilled. Been a couple weeks of crazy busy and sneaking stuff in when I can, but I just put the last touch of paint on it. This will dry, get the same varnish I put on the ship proper, and should be mounted up this weekend! Phew! I used the same paints as the ship, so it all matches. Very pleased!
-
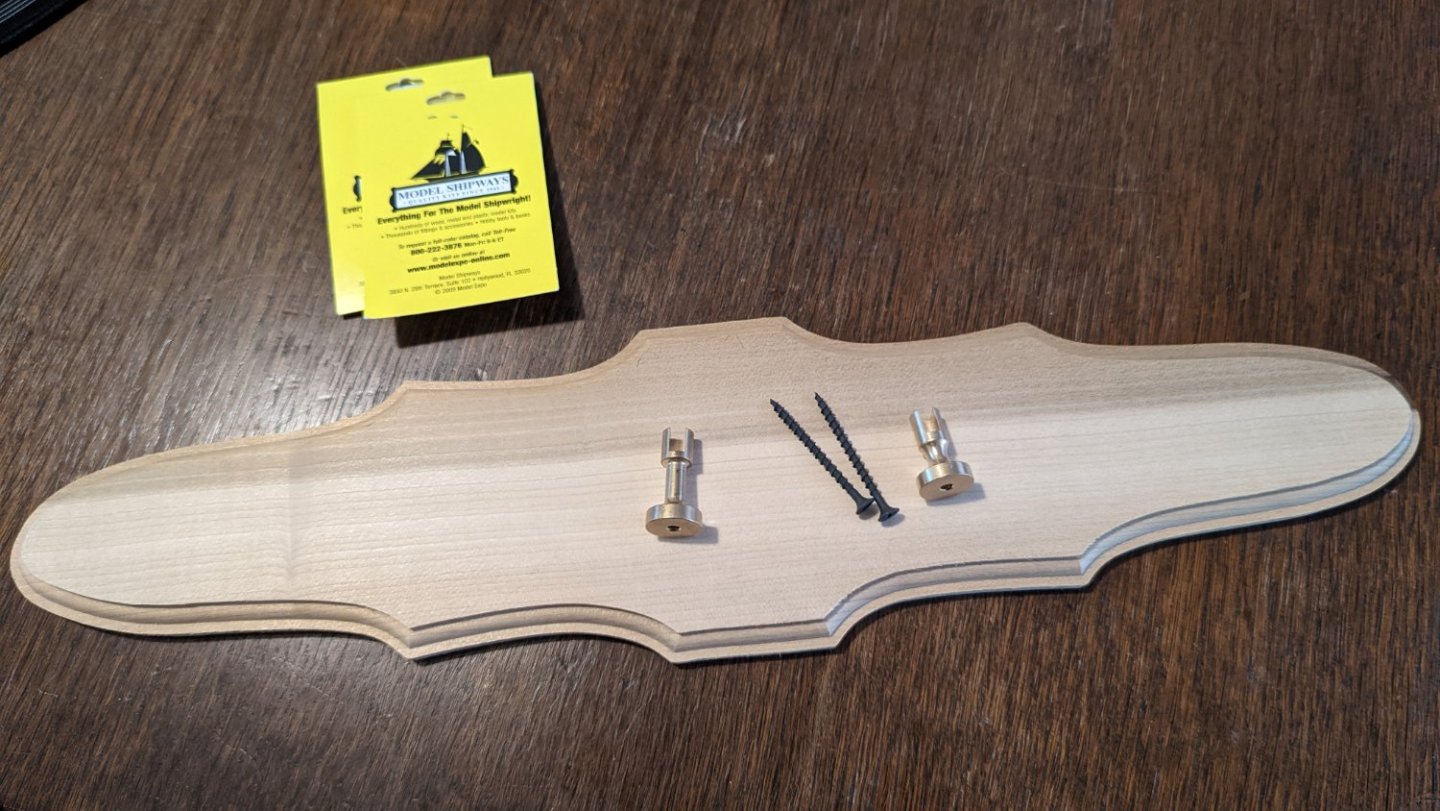
Got a base and some pedestals in today. The jaws are a bit too narrow, as I knew they may be, but I should be able to file a bit to get them to work. I'm going to paint the base the same blue as the ship, and varnish it in the same way. I also have a cool plan for the name plate that I'm working on in my head to honor my grandfather a bit for starting the build years ago. Once the ship is mounted, I will finally start on the masts!
-
WhiteWolf reacted to a post in a topic:
Bluenose II by WhiteWolf - Artesania Latina - 1:75 Scale
-
Alright, before I move forward with much more I want to think about mounting the ship and stand options. I don't want to mess with that once masts are on. I'm looking at two options, the standard pedestals or a cradle style stand. What should I expect as far as pros and cons to these two styles? I'm currently leaning toward the cradle style, and making my own, but if there are options for good stands to purchase, I'm interested in that too. Thanks!
-
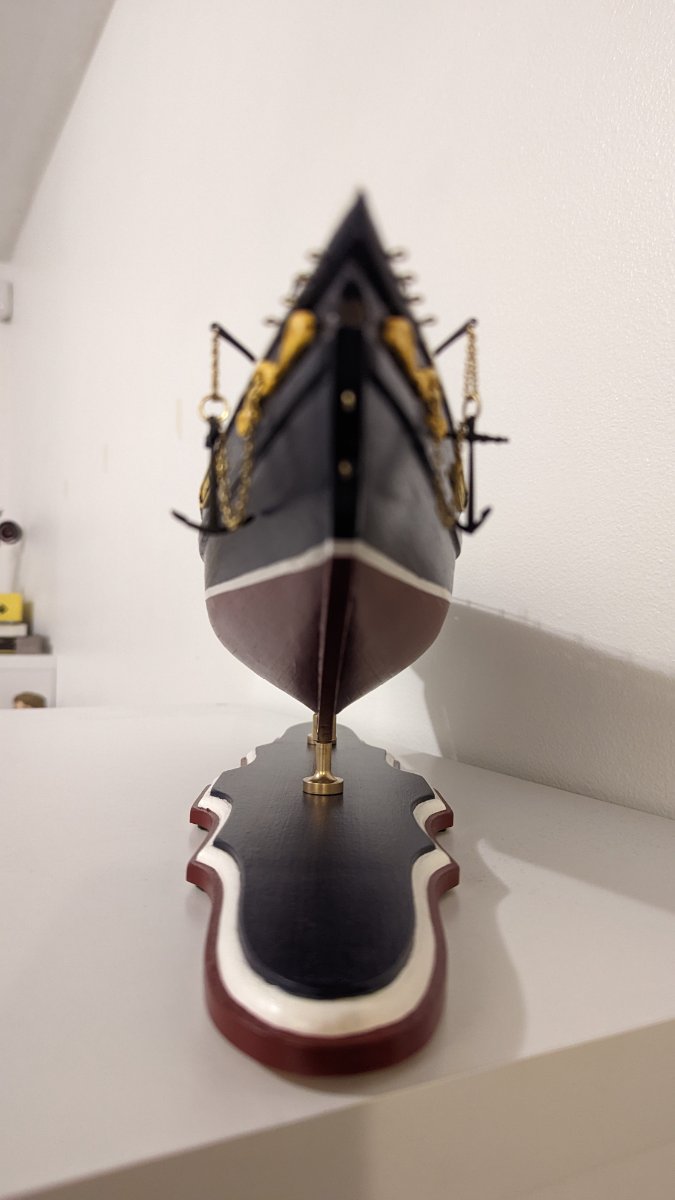
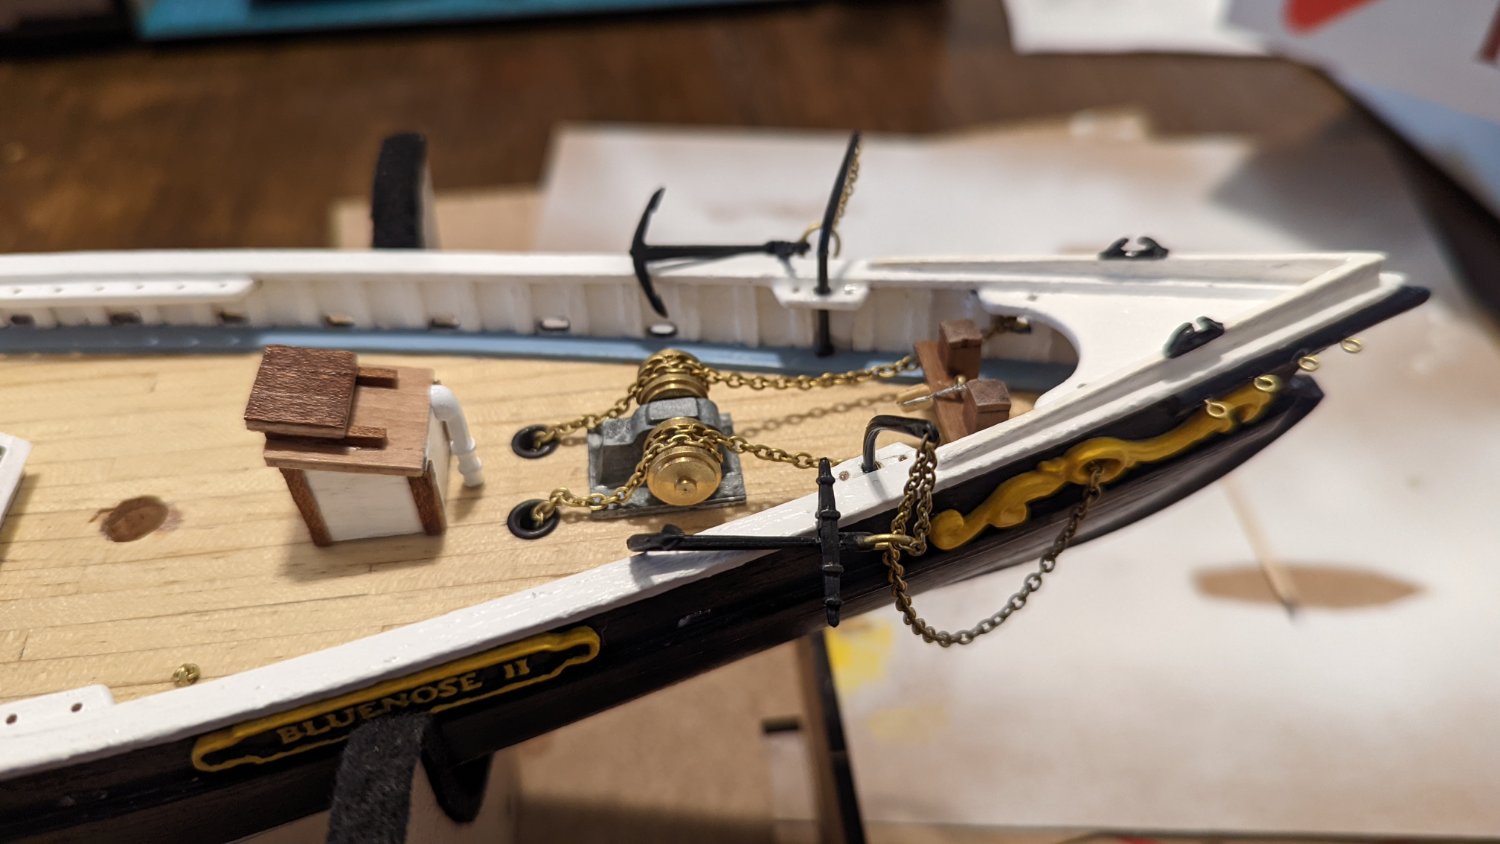
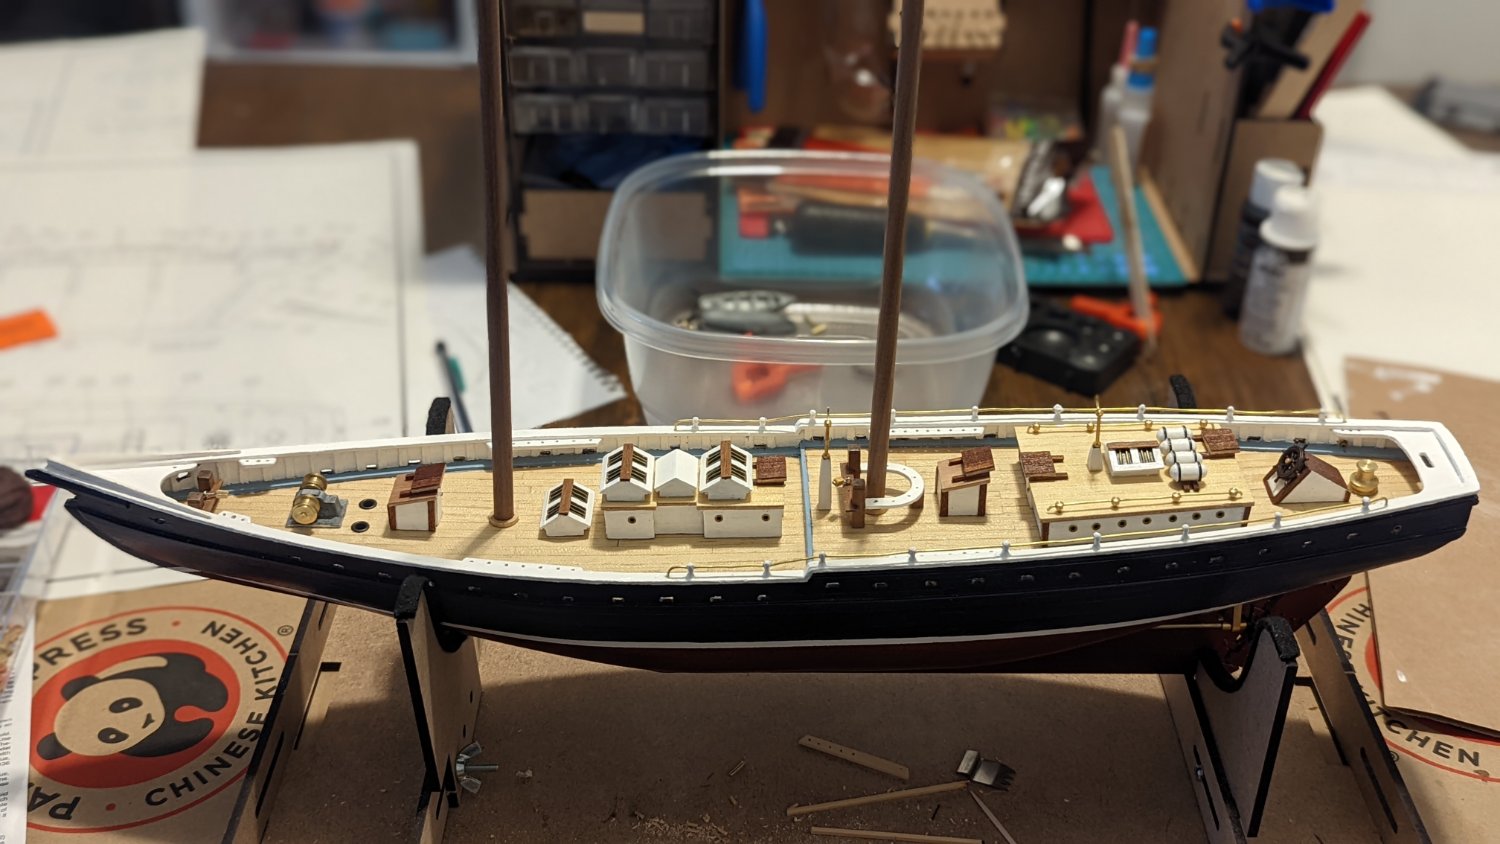
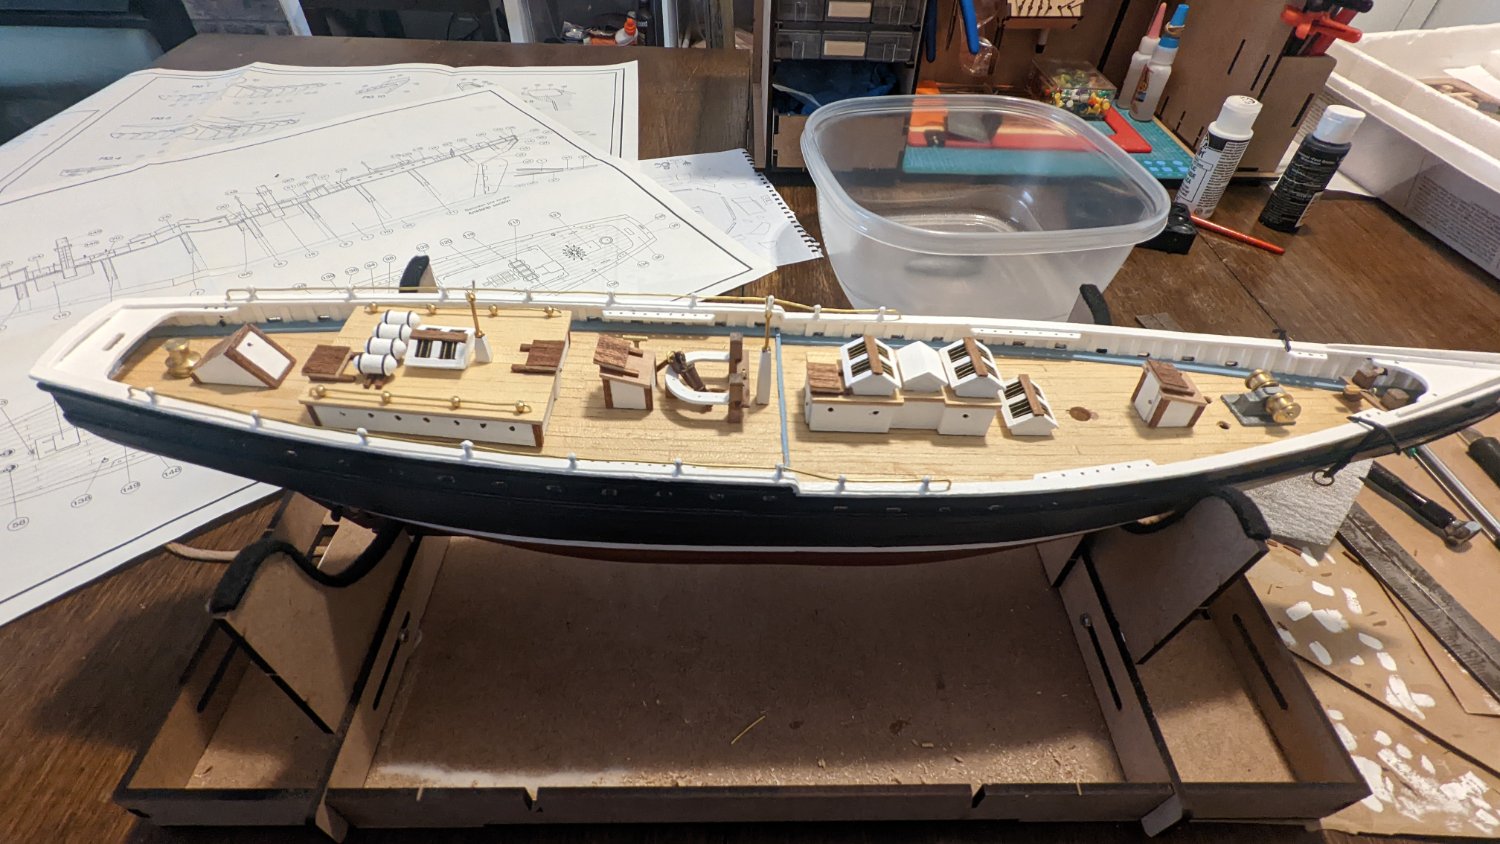
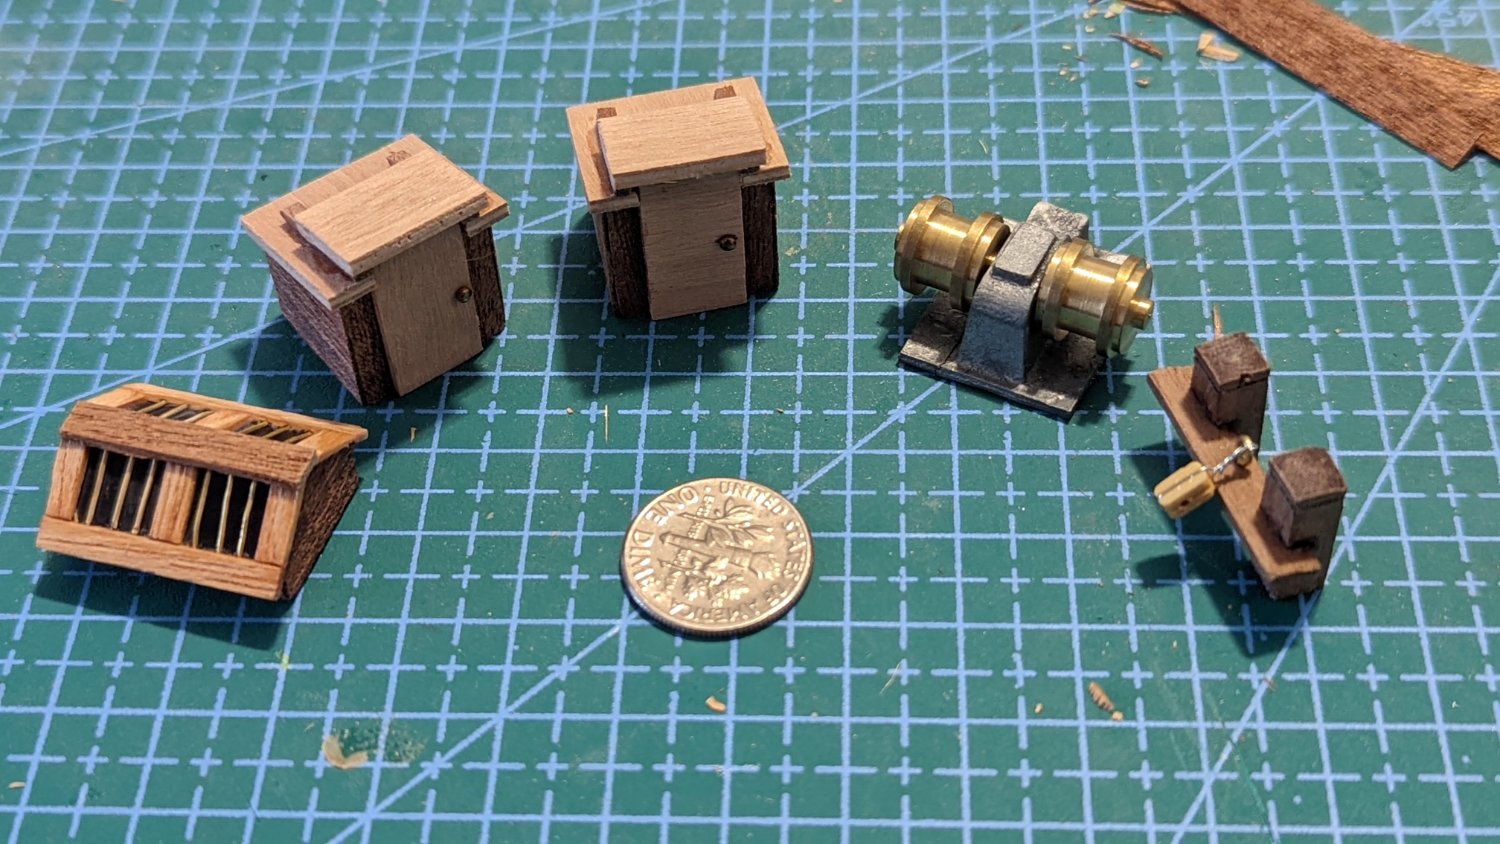
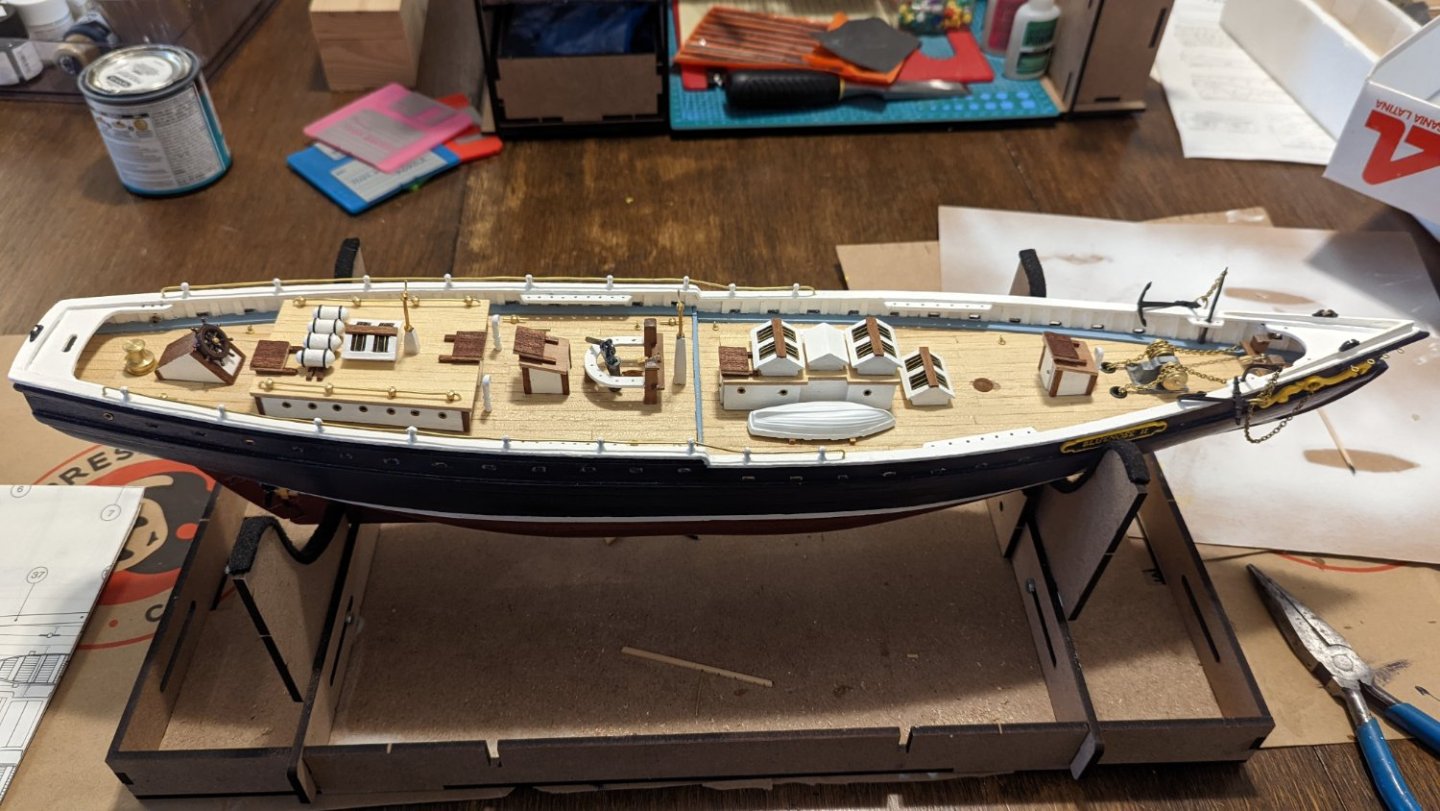
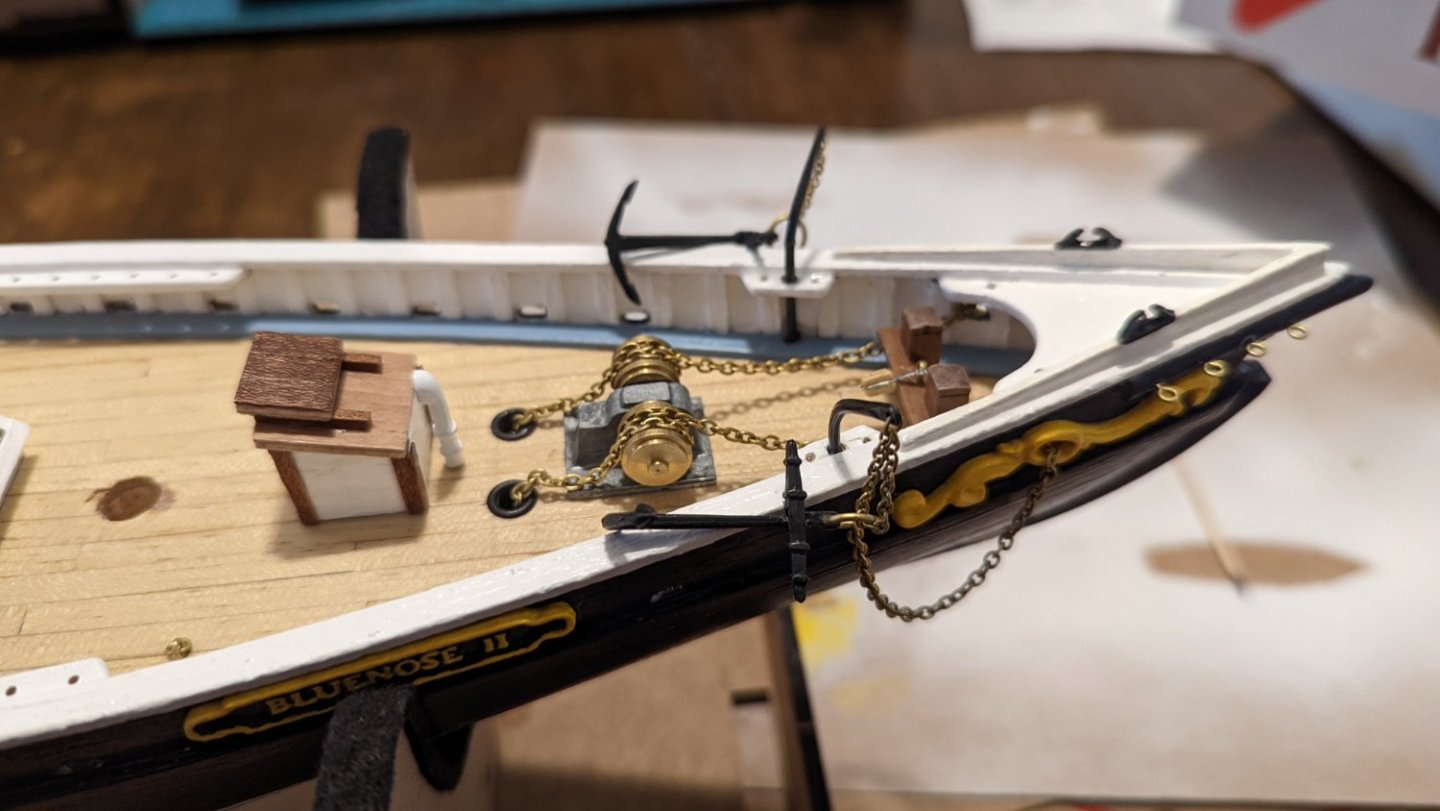
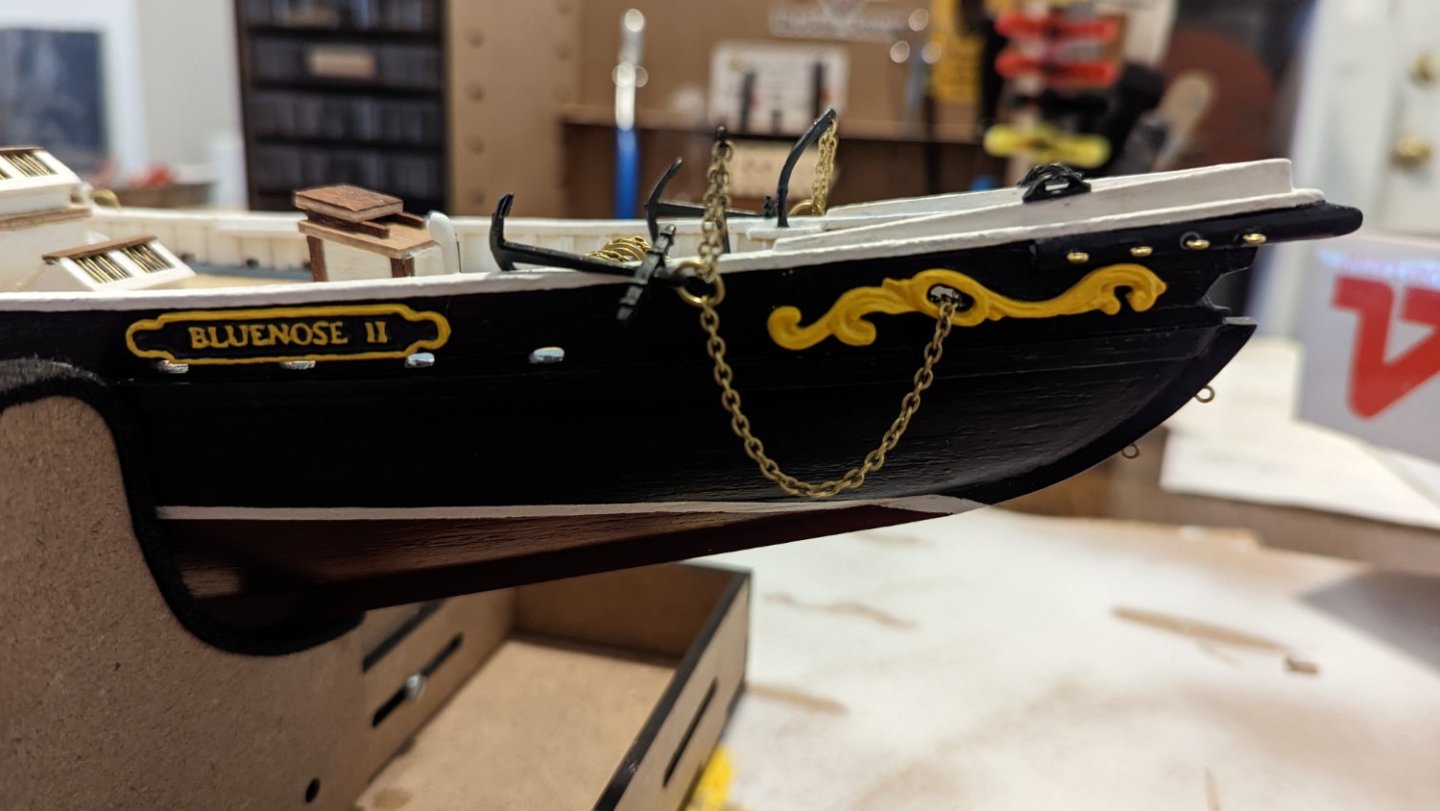
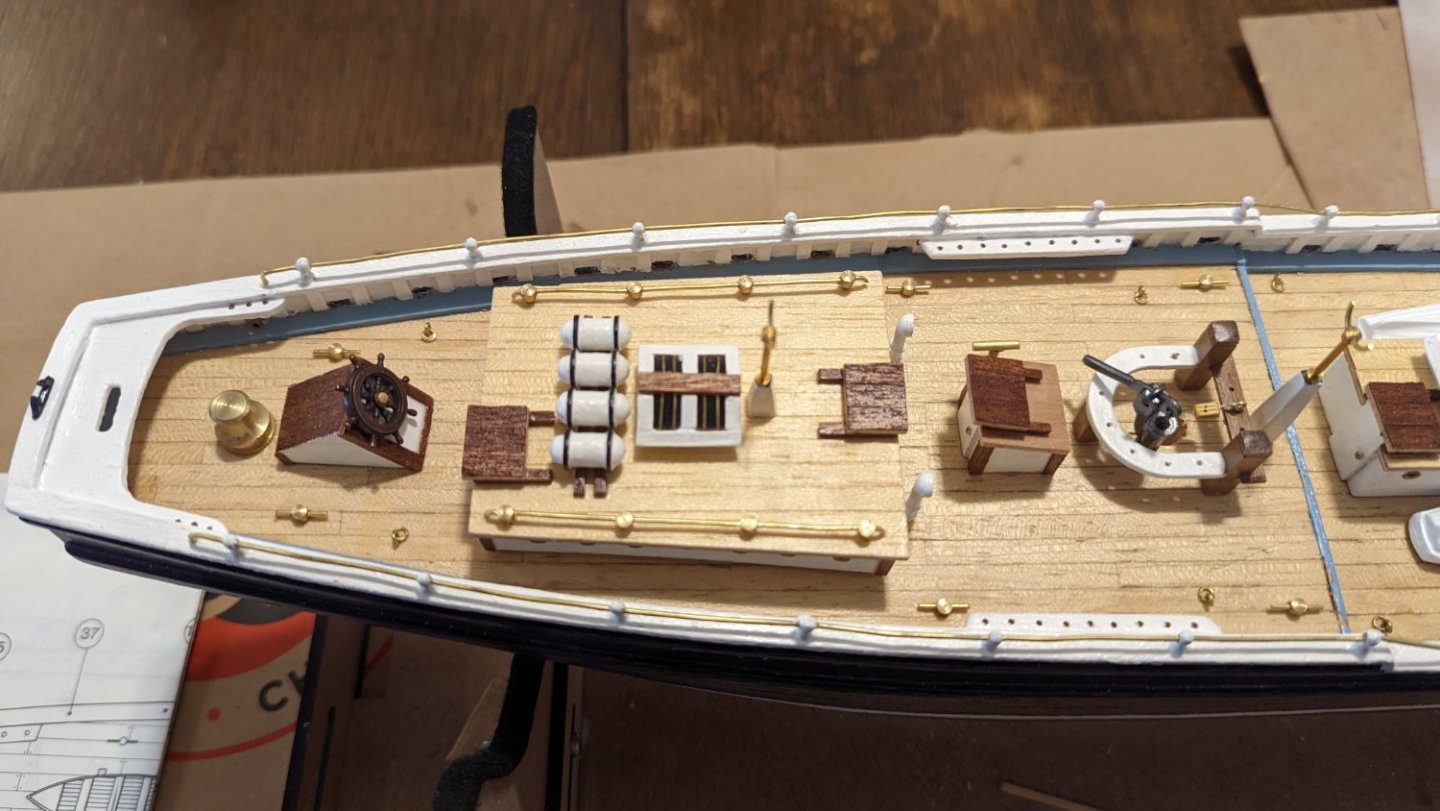
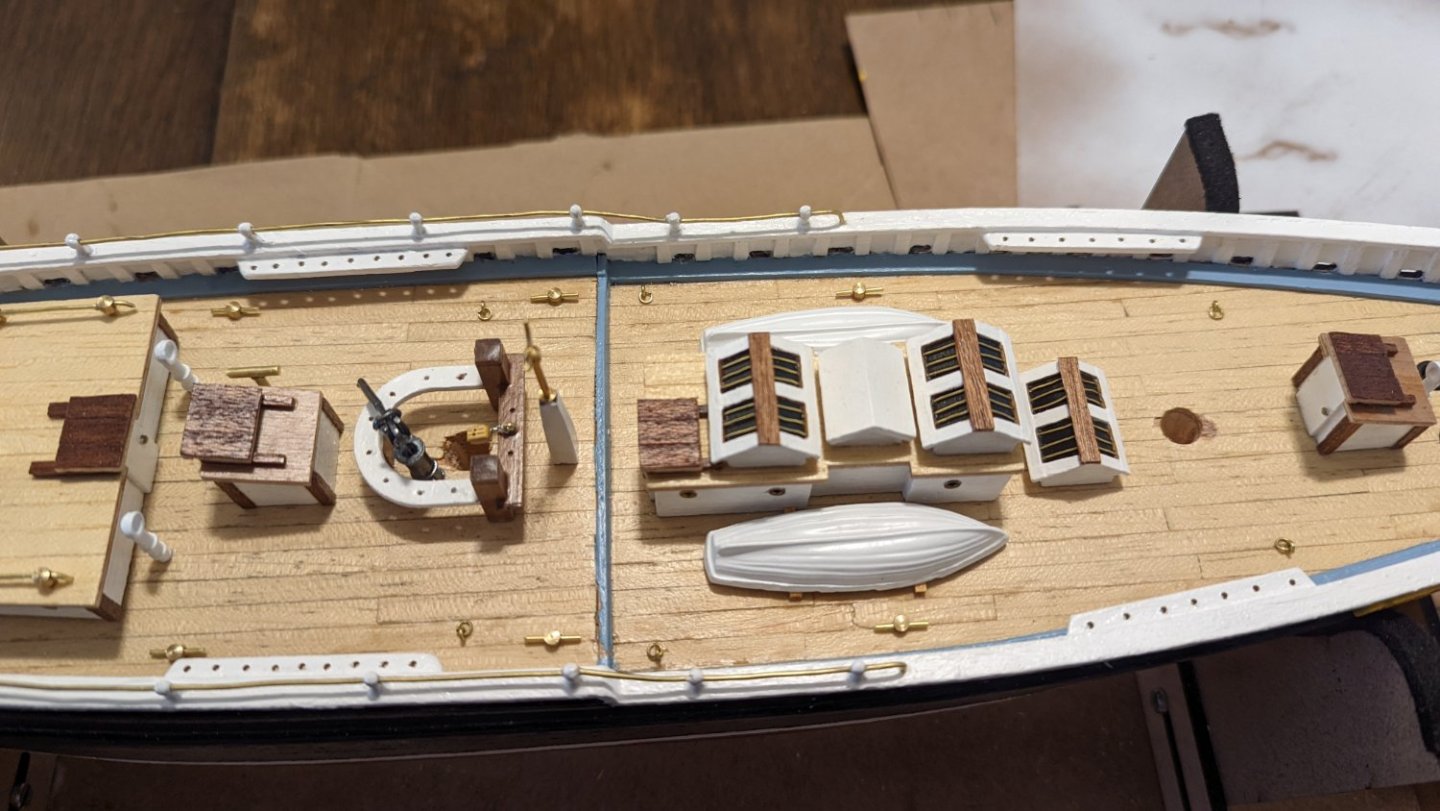
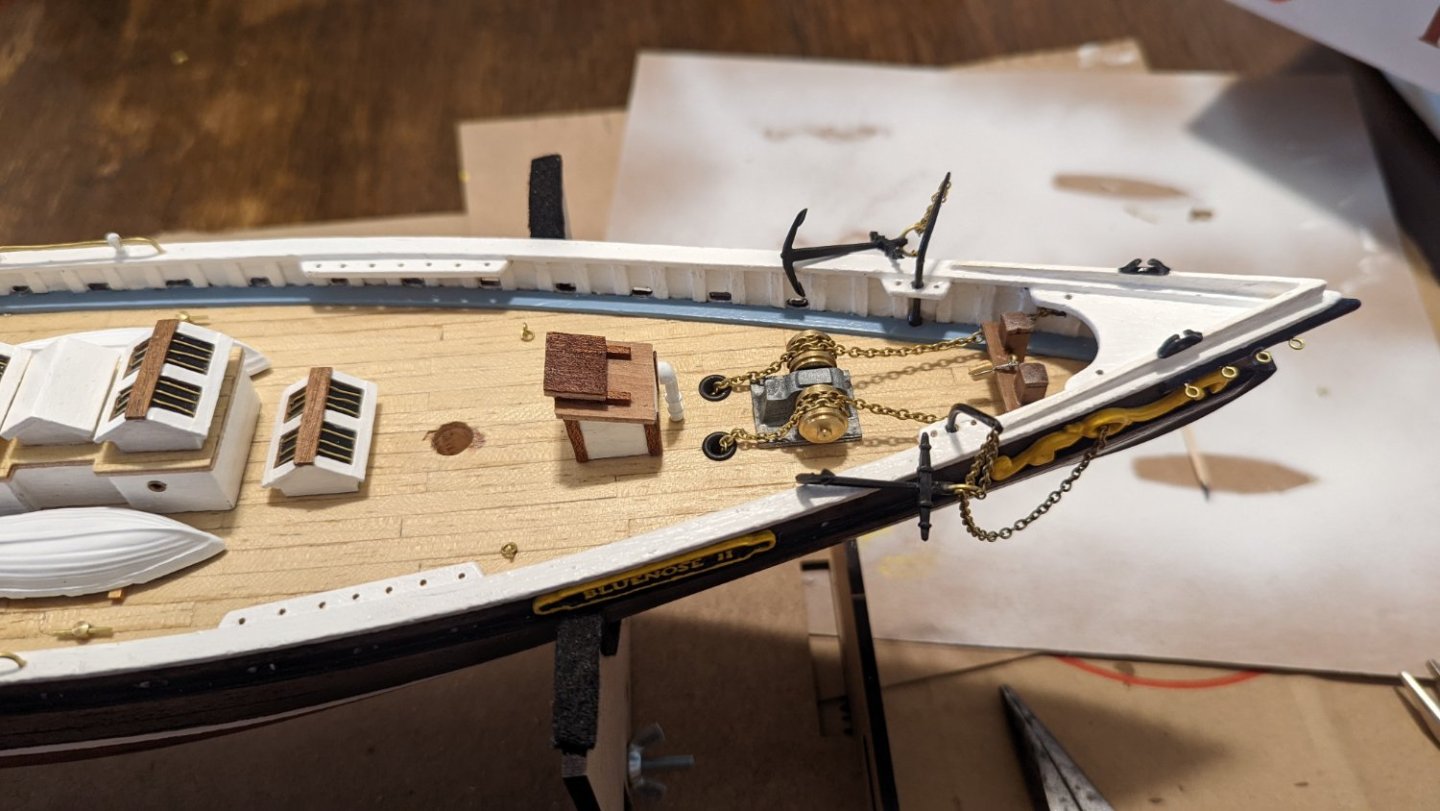
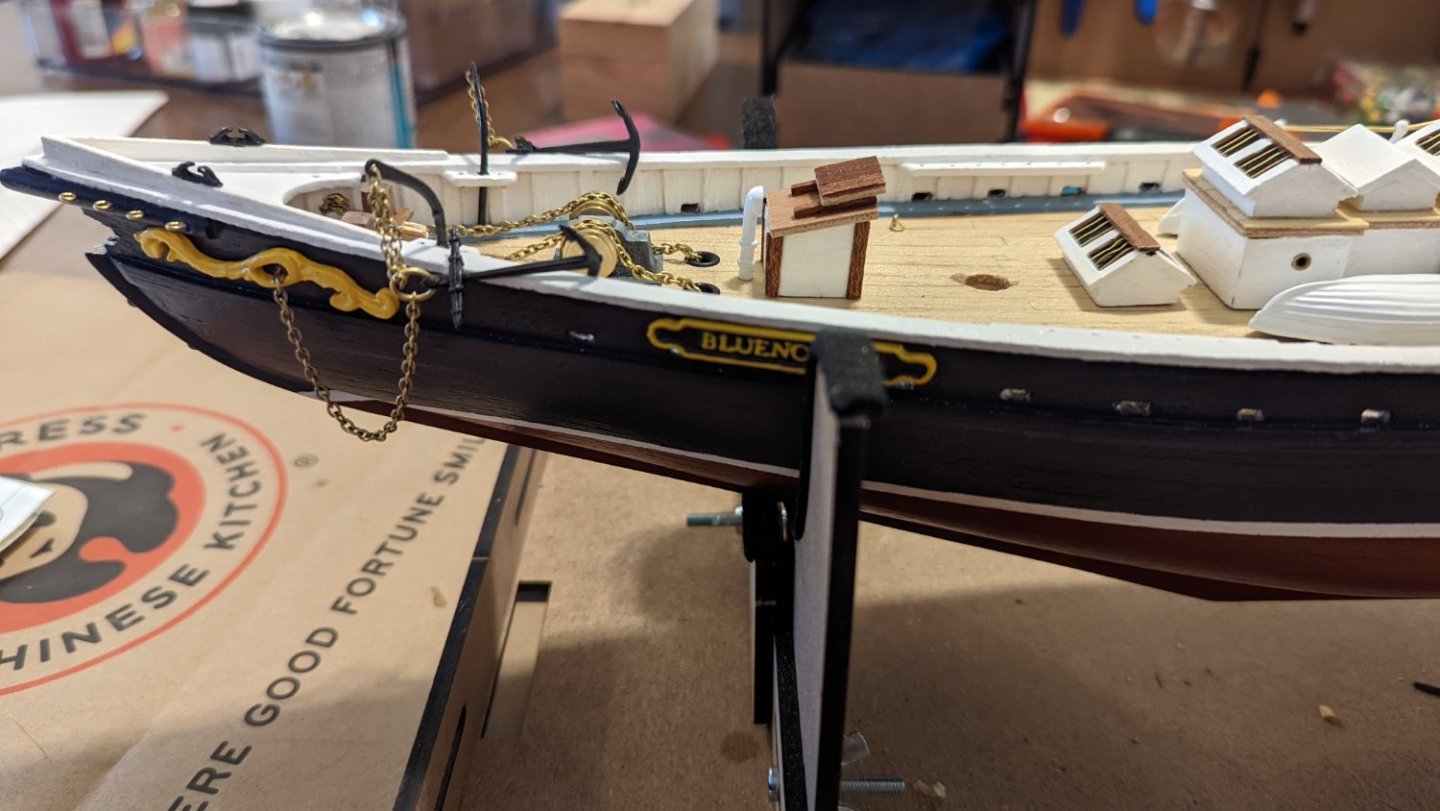
Okay, superstructure and hull are done. Masting is next! Pretty pleased with the progress. I did end up rigging the anchors up with some chain as in John Earl's documents, and based on the photos of the real ship. I have a casthead that broke twice in the process, weak metal, so I got it super glued back in place, and Coates the entire thing in a few layers of super thing CA to hopefully create a stronger "shell." So far it's holding up fine now. Otherwise, no issues.

-
Haha, I'll happily take that license!
-
WhiteWolf reacted to a post in a topic:
Bluenose II by WhiteWolf - Artesania Latina - 1:75 Scale
-
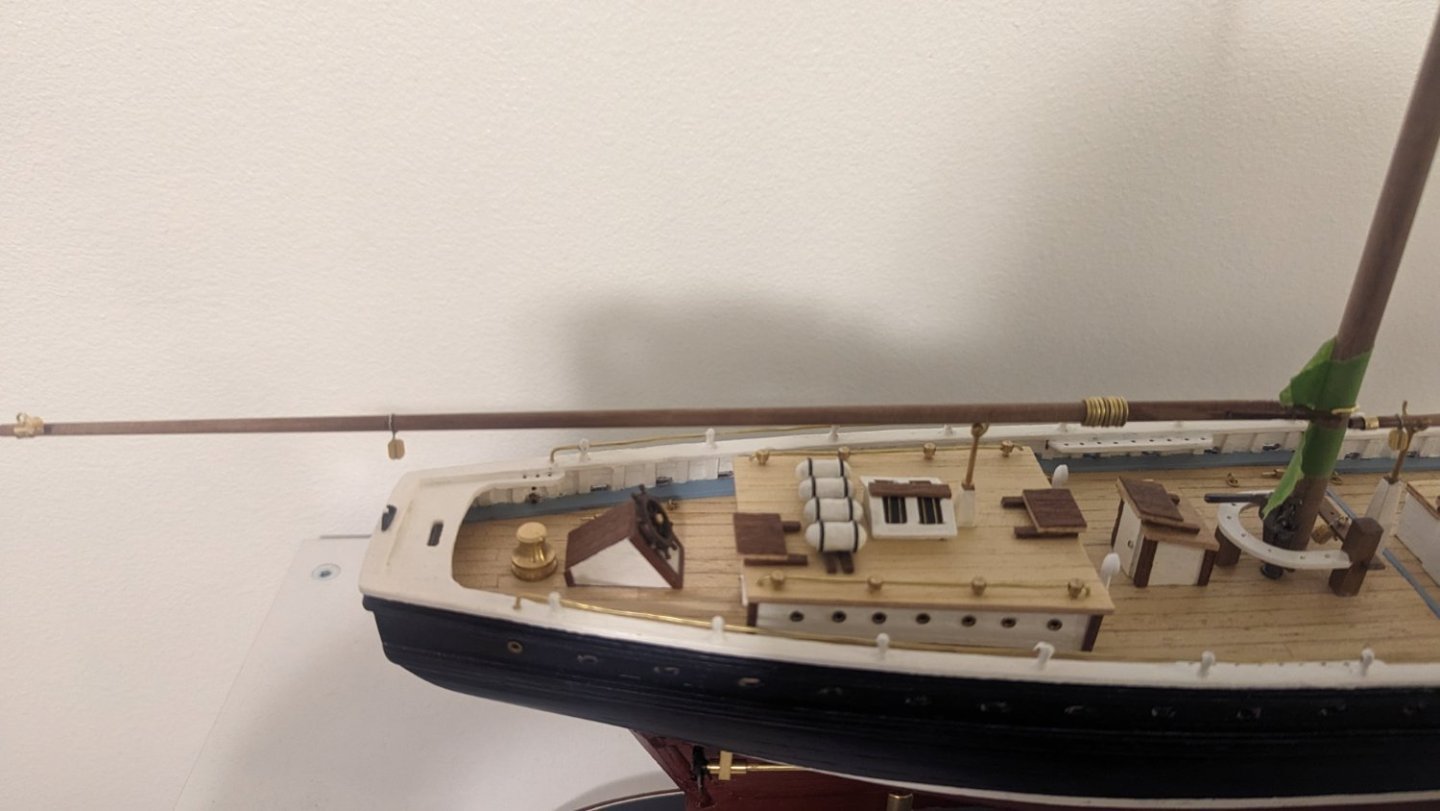
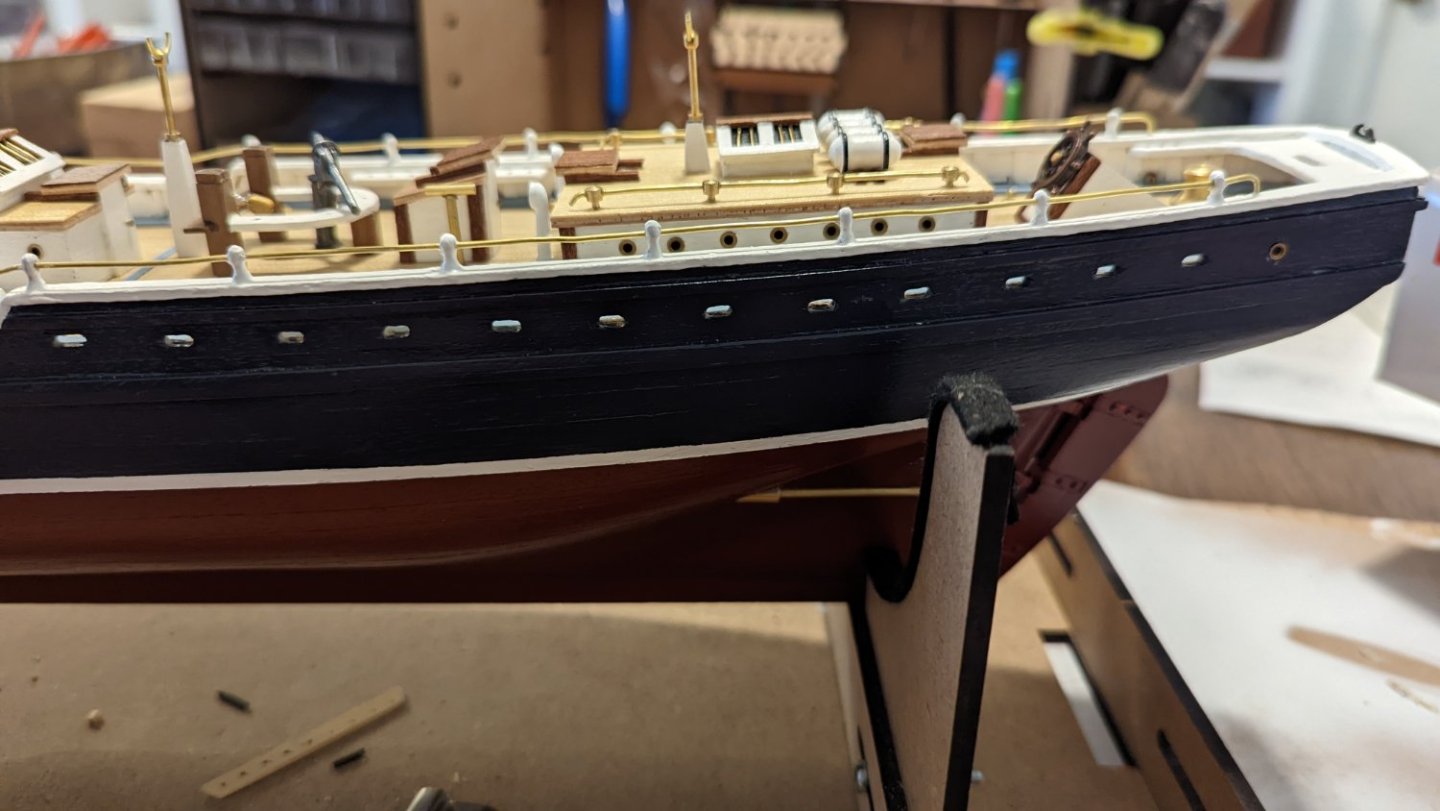
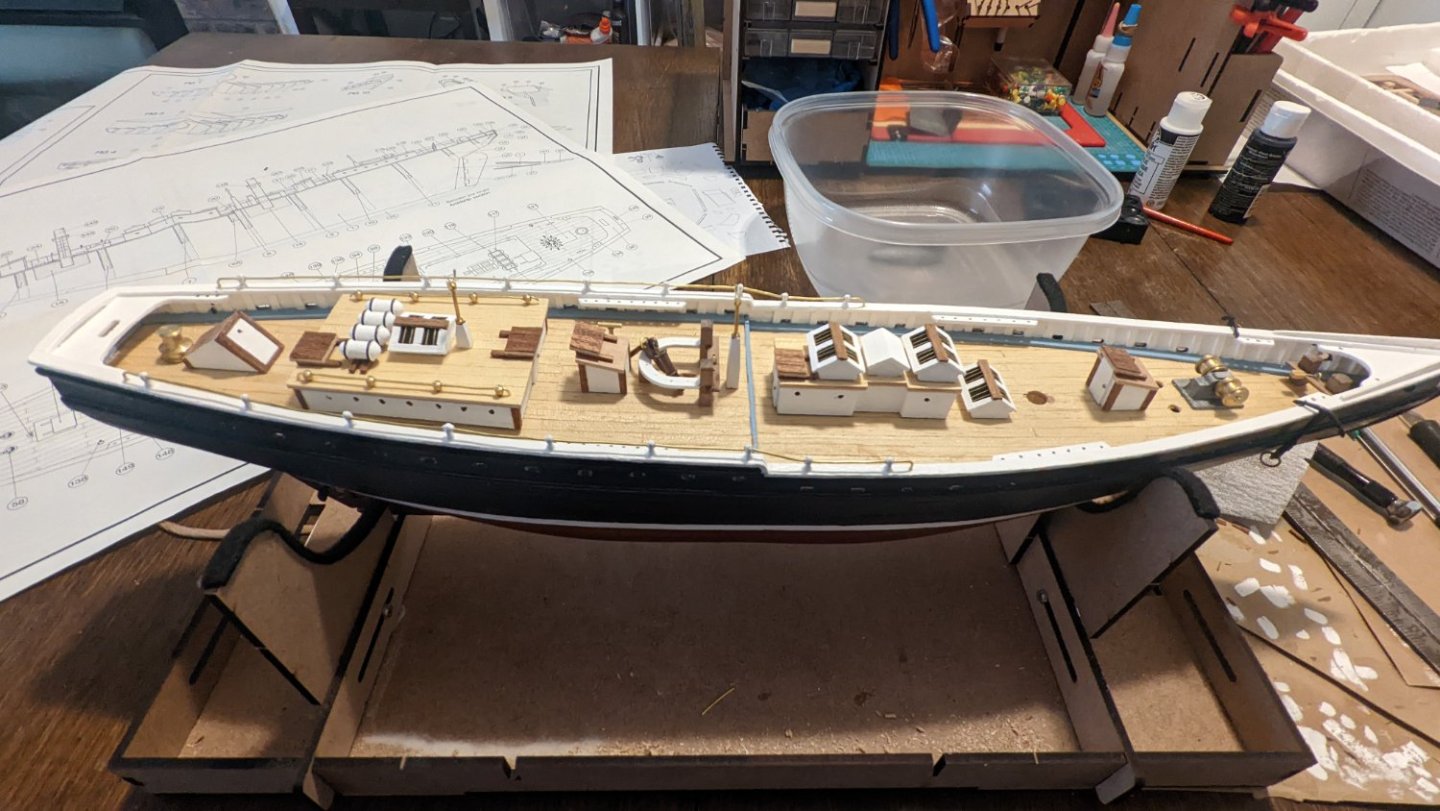
Glued down! (Yes, I do realize that I made a boo boo on the cabin. The door is supposed to be on the other side. And it was going so well... Noticed far too late to change it, so it gets the big "oh well!" And on we move. Ha!) Masts dowels are just on for reference to make sure I got things placed in correct proximity.

-
WhiteWolf reacted to a post in a topic:
Bluenose II by WhiteWolf - Artesania Latina - 1:75 Scale
-
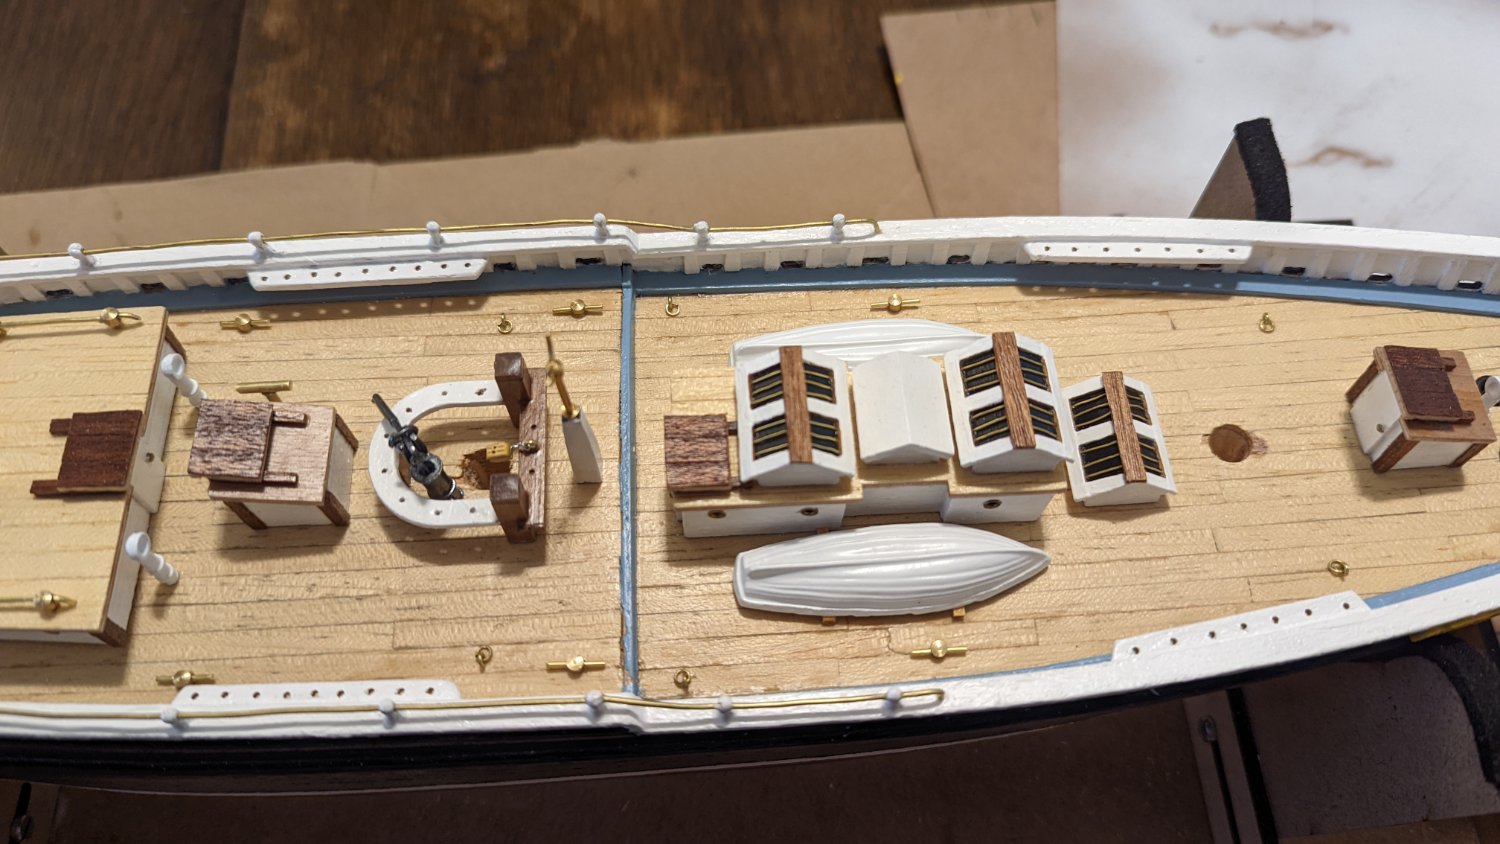
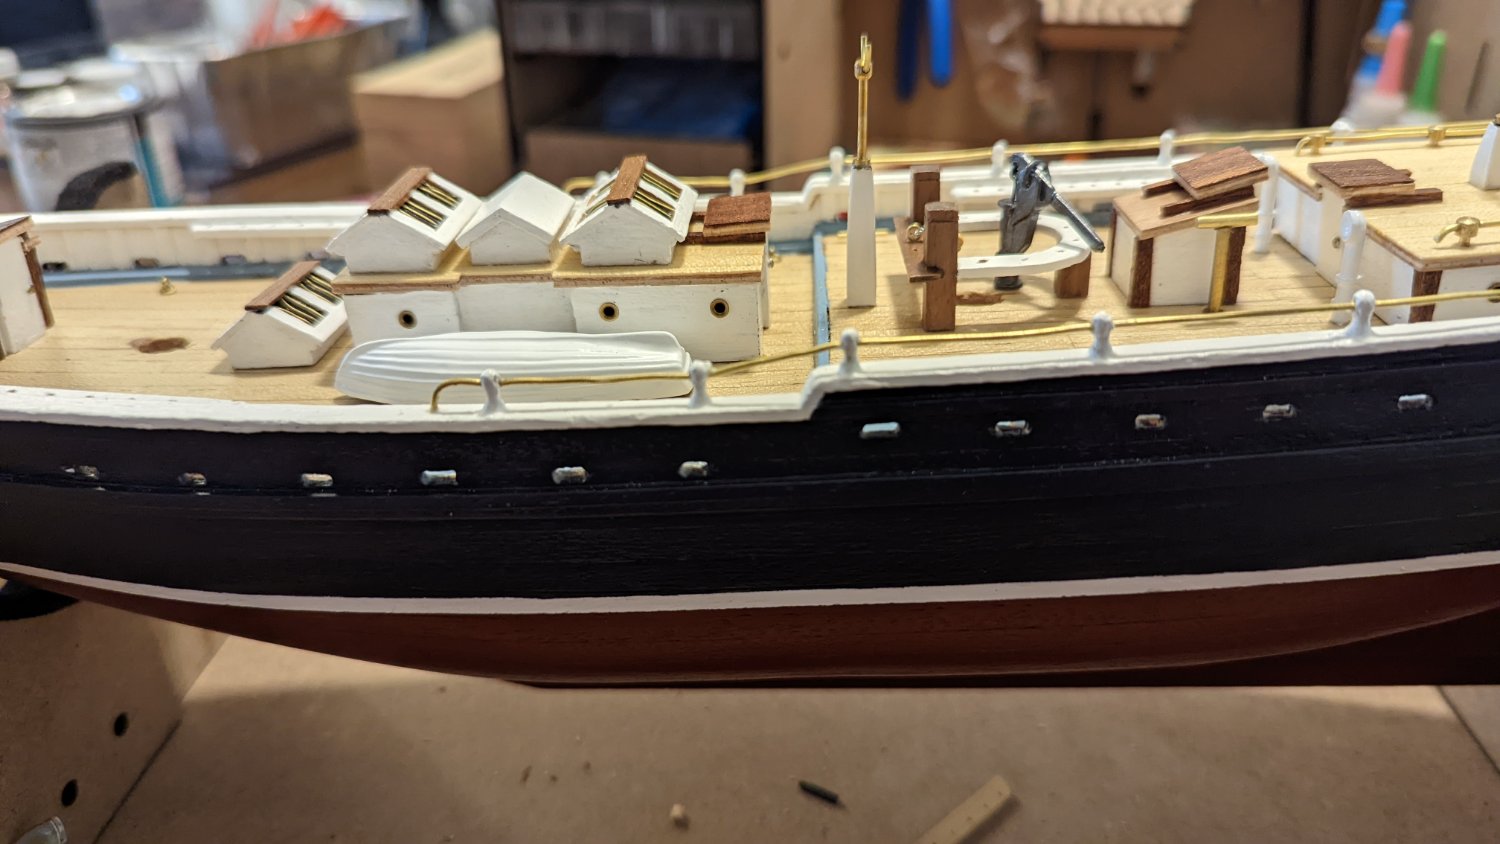
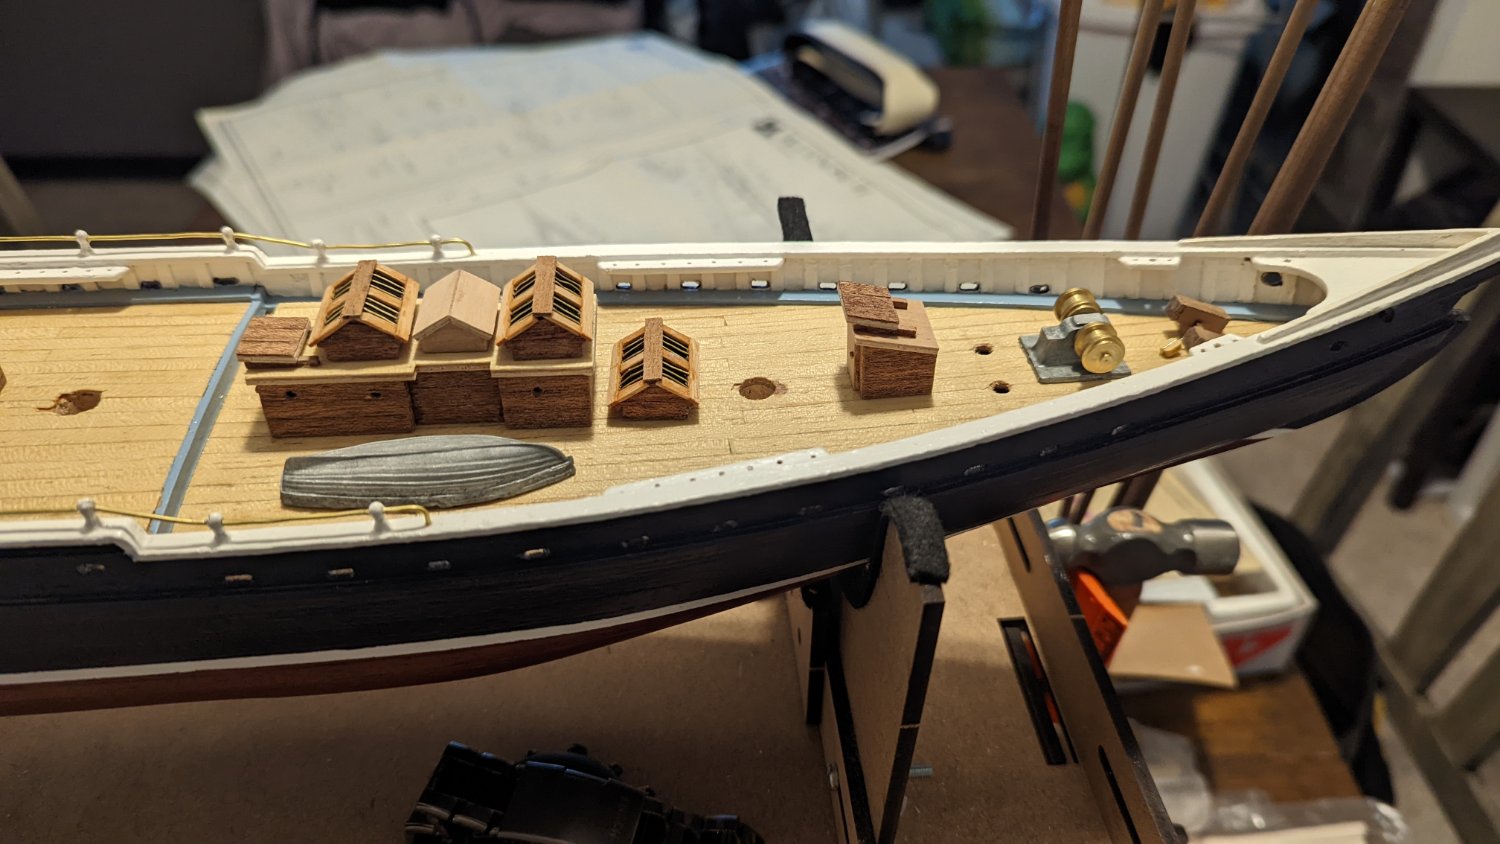
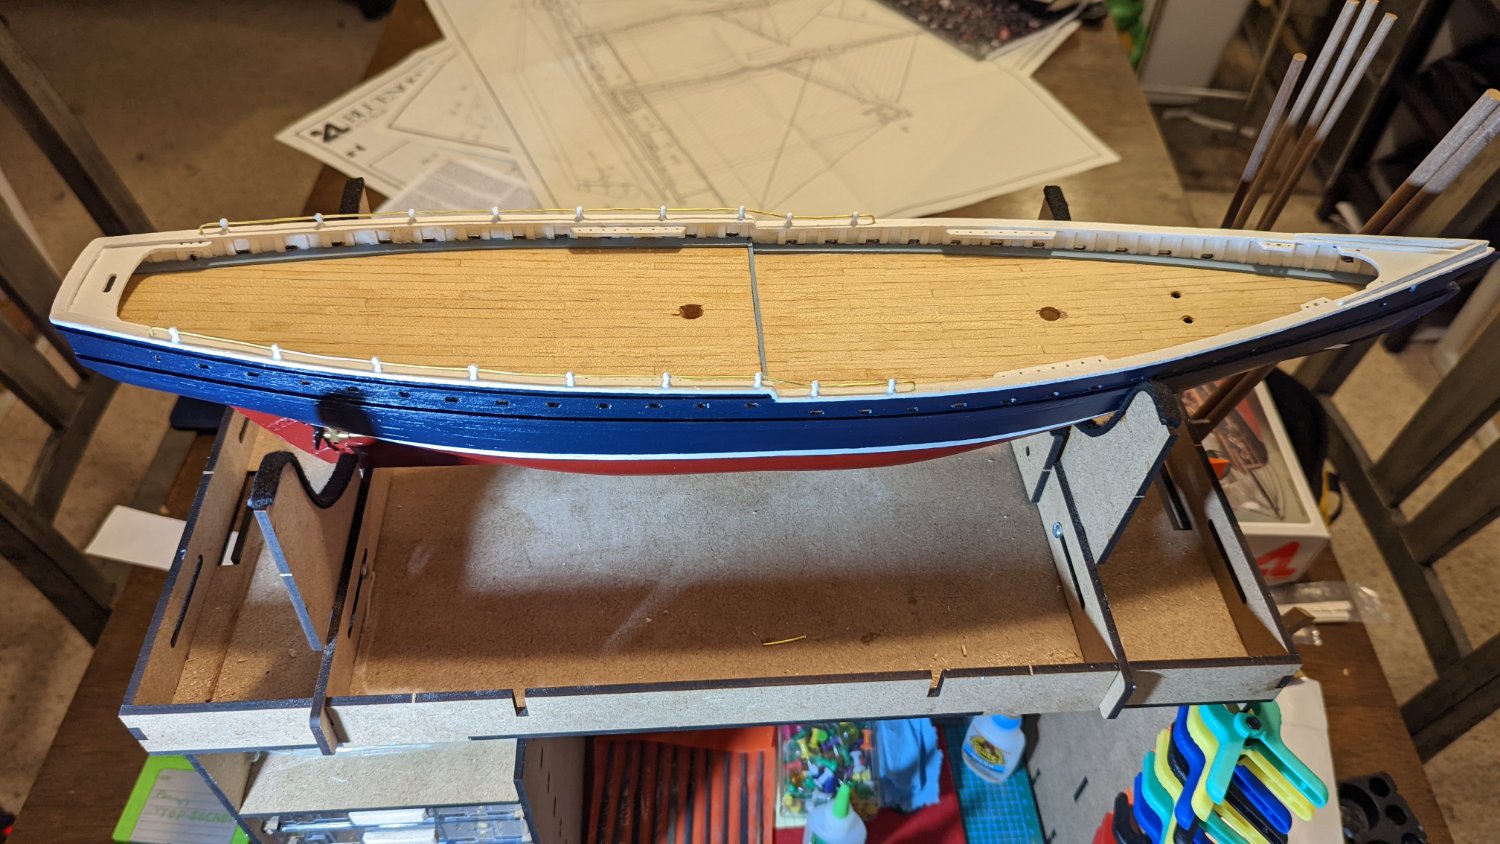
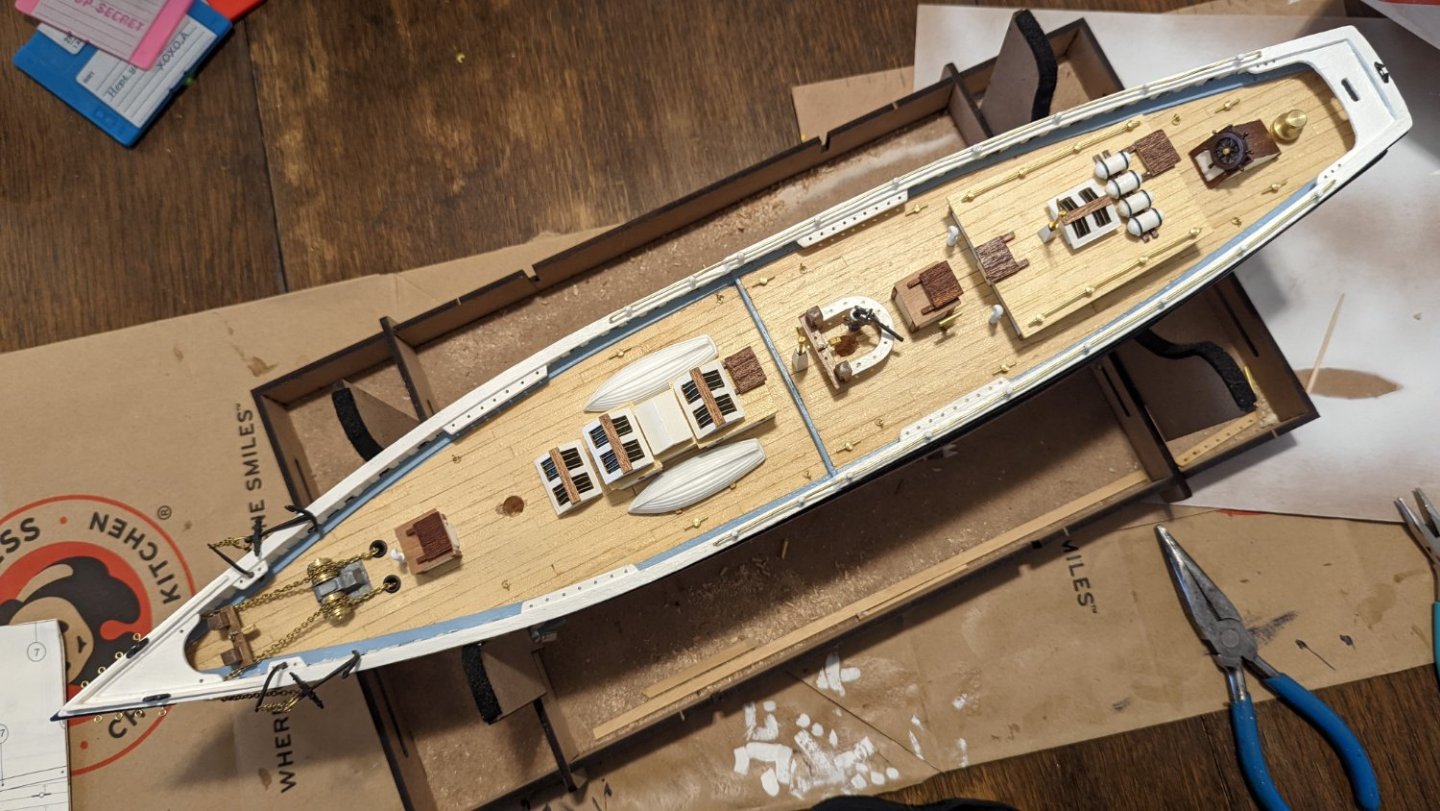
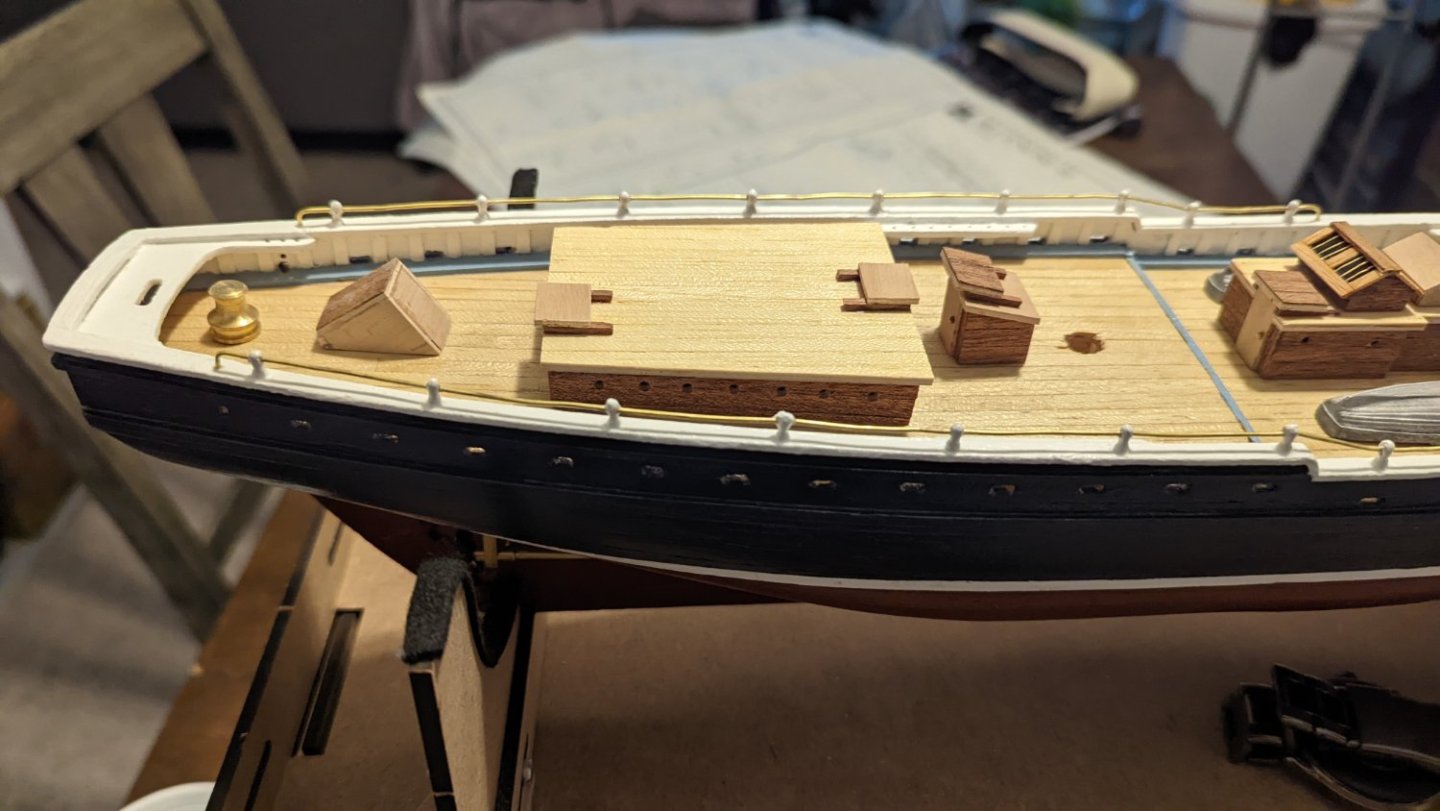
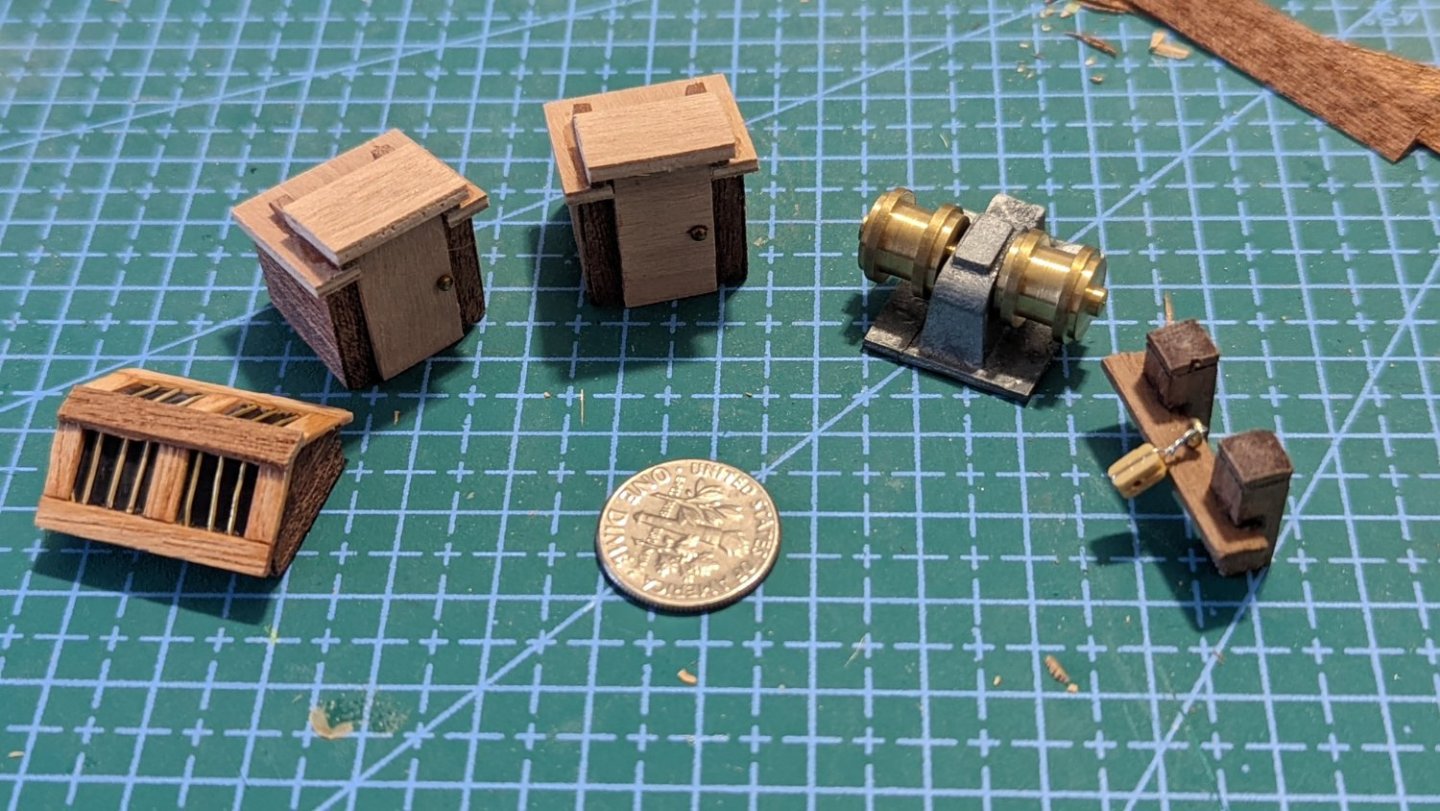
Okay, here is a photo dump. None of the superstructure is glued down yet, just mocked up in those photos. I based my paint off the series of photos from the Bluenose II restoration, so I have white washed the walls. I did my best to leave wood what was wood, and I even put little trim pieces on a few parts that I saw trim on in the references. I'm super happy with the outcome, and it's currently in the process of being varnished and finished. Then things will start being attached. I debated leaving it all natural wood, but in the end, went with the white wash. Glad I did. I wish I had done the deck a bit darker, but the finish is where I want it, so I'm not going to try to redo it. Next time!


-
Absolutely! And thank you for the kind comments! It's been a big challenge for me, but I'm just trying to take my time and work carefully. I will post a pic of what I used for the finish when I get a chance. Thanks again for the support!
-
WhiteWolf reacted to a post in a topic:
Bluenose II by WhiteWolf - Artesania Latina - 1:75 Scale
-
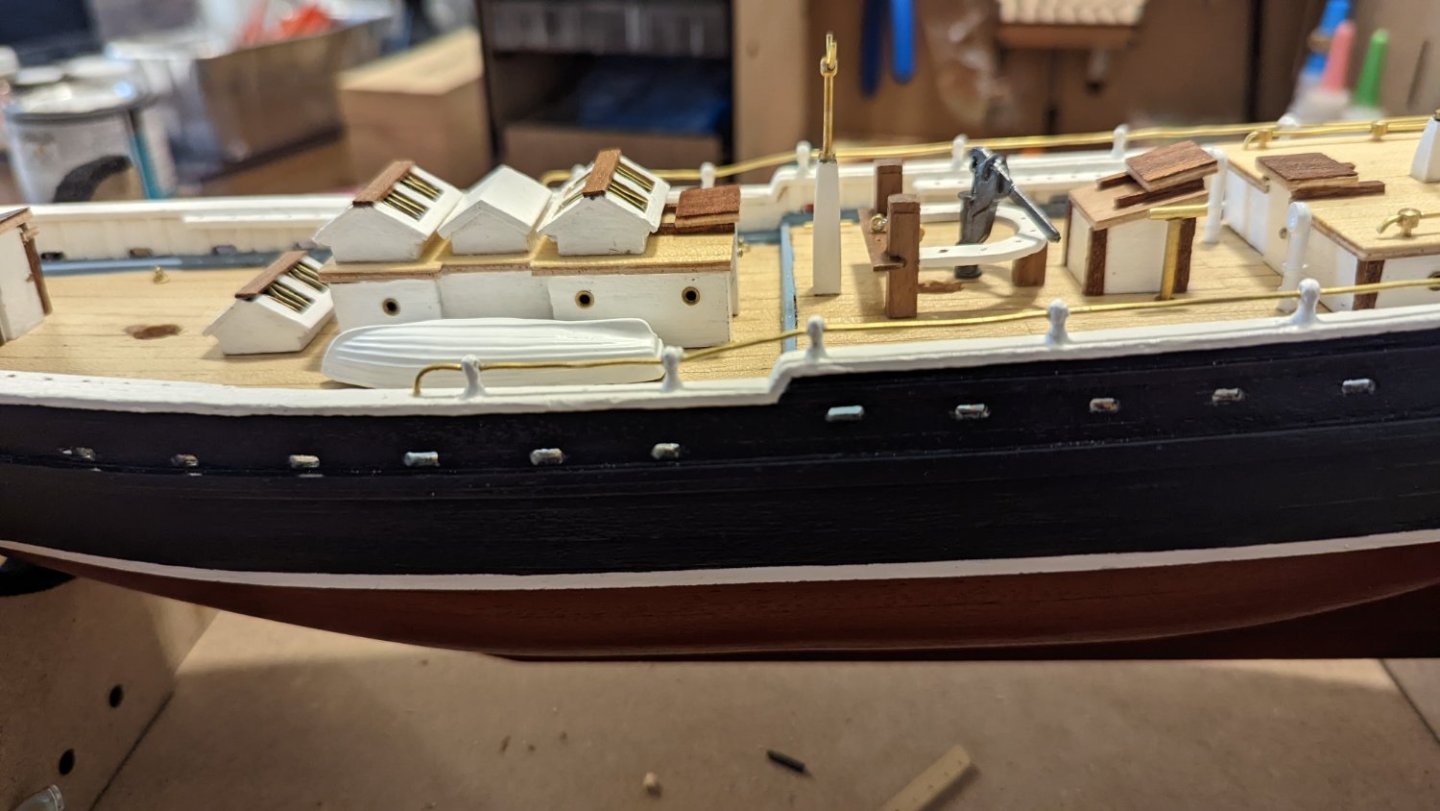
Next update! Varnish and paint is done, and so is the railing. I noticed that other builds and John Earl left those off, but I decided to include them as my grandfather wouldn't have had those resources when he started it, and wanted to stay true to that. Though I did do a bit of a change on the skylights, marching the bars to John's plans and adding the extra planking he did because I like the look. I have to decide if I will paint it white like the references I have of the real boat, or leave them natural wood. To be determined. Anyway, here is the progress I have made since last check in. I was racing cars this weekend, so I didn't do any work then.
-
WhiteWolf reacted to a post in a topic:
Bluenose II by WhiteWolf - Artesania Latina - 1:75 Scale
-
WhiteWolf reacted to a post in a topic:
Bluenose II by WhiteWolf - Artesania Latina - 1:75 Scale
-
Good to know about the pin stripe! I considered doing that, but decided to paint in case that didn't work. Now I know for next time! Appreciate the tip! :)
-
 WhiteWolf reacted to a post in a topic:
Bluenose II by WhiteWolf - Artesania Latina - 1:75 Scale
WhiteWolf reacted to a post in a topic:
Bluenose II by WhiteWolf - Artesania Latina - 1:75 Scale
-
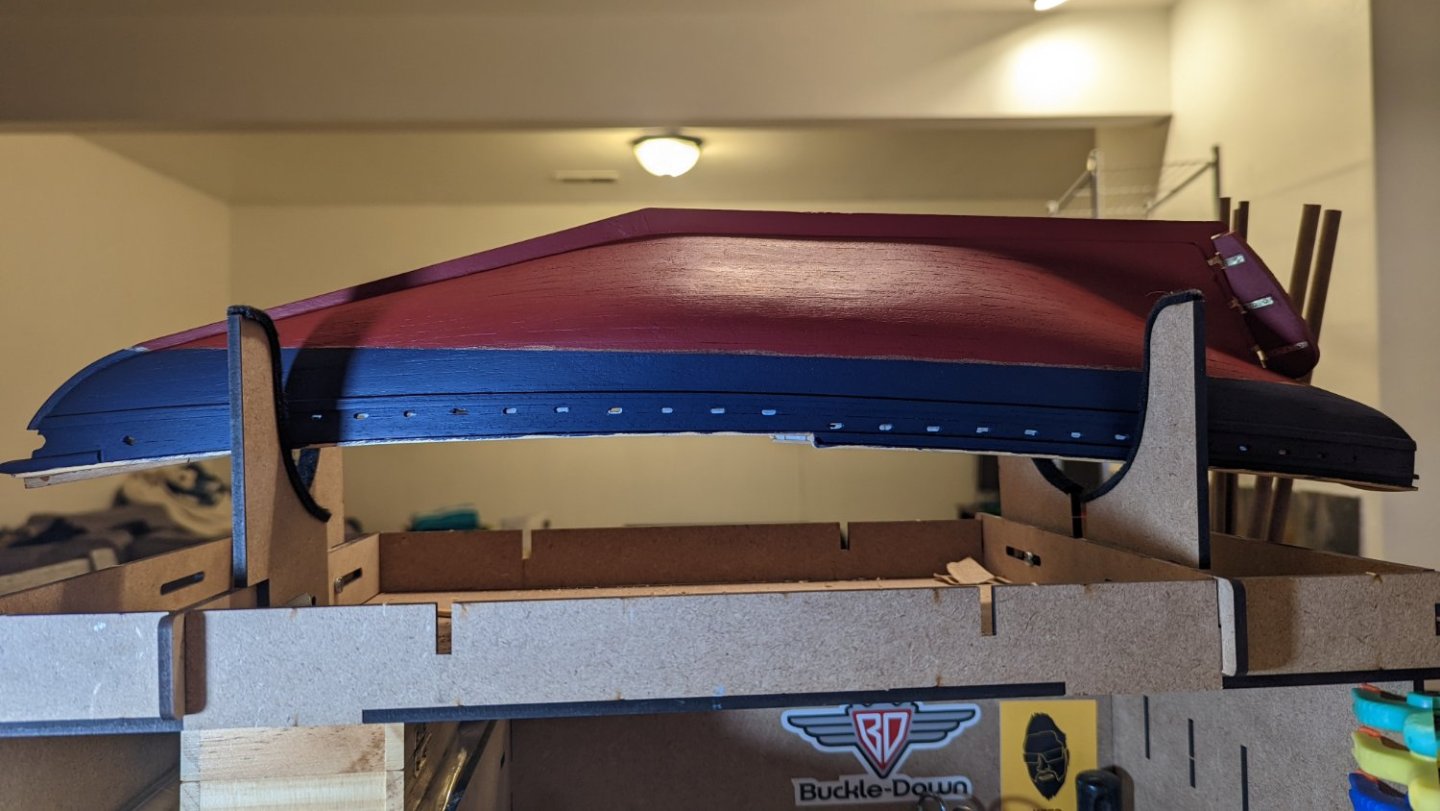
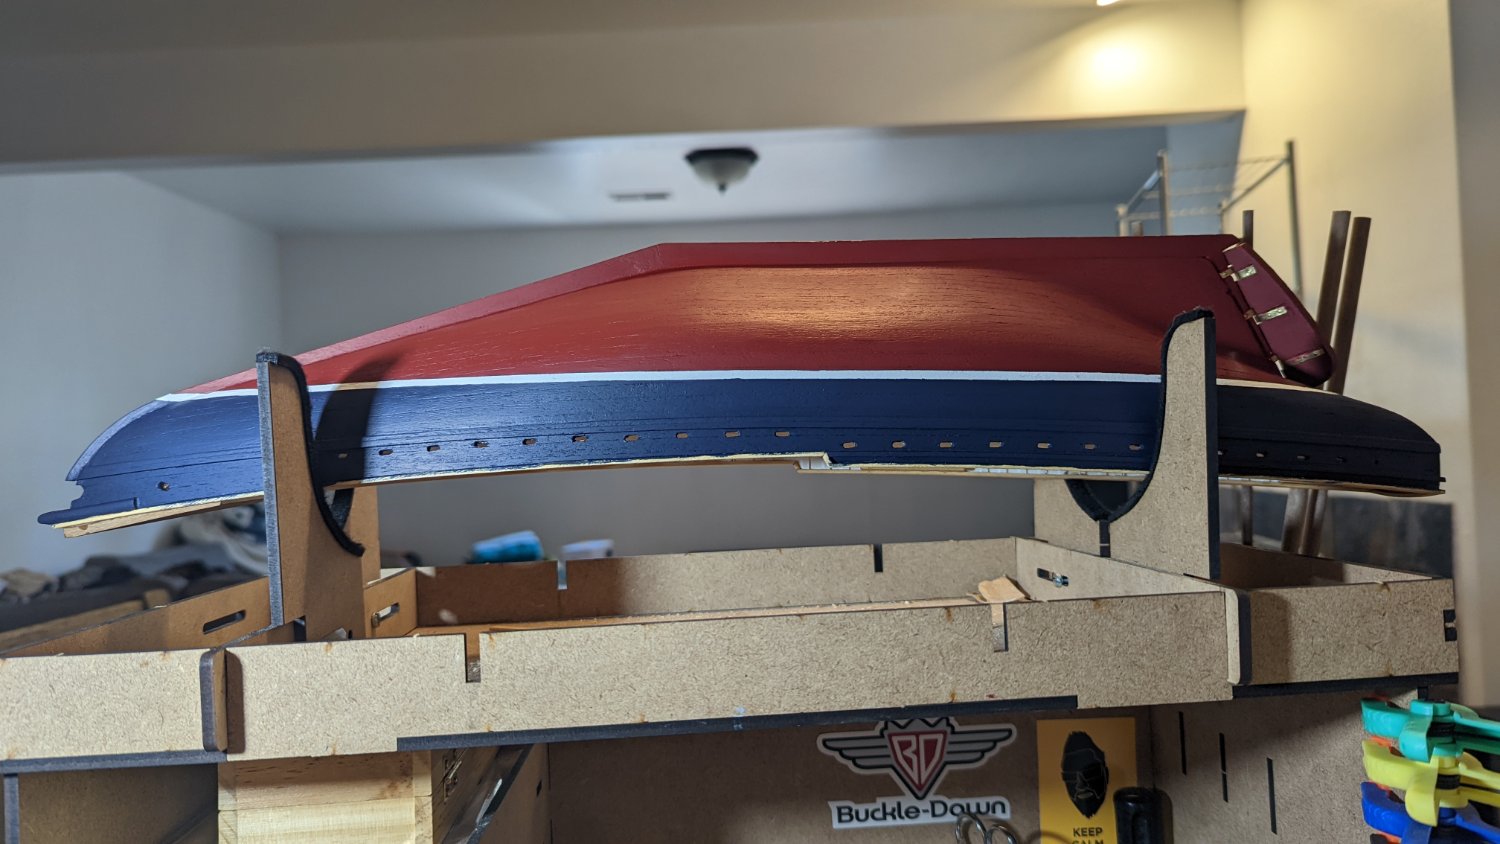
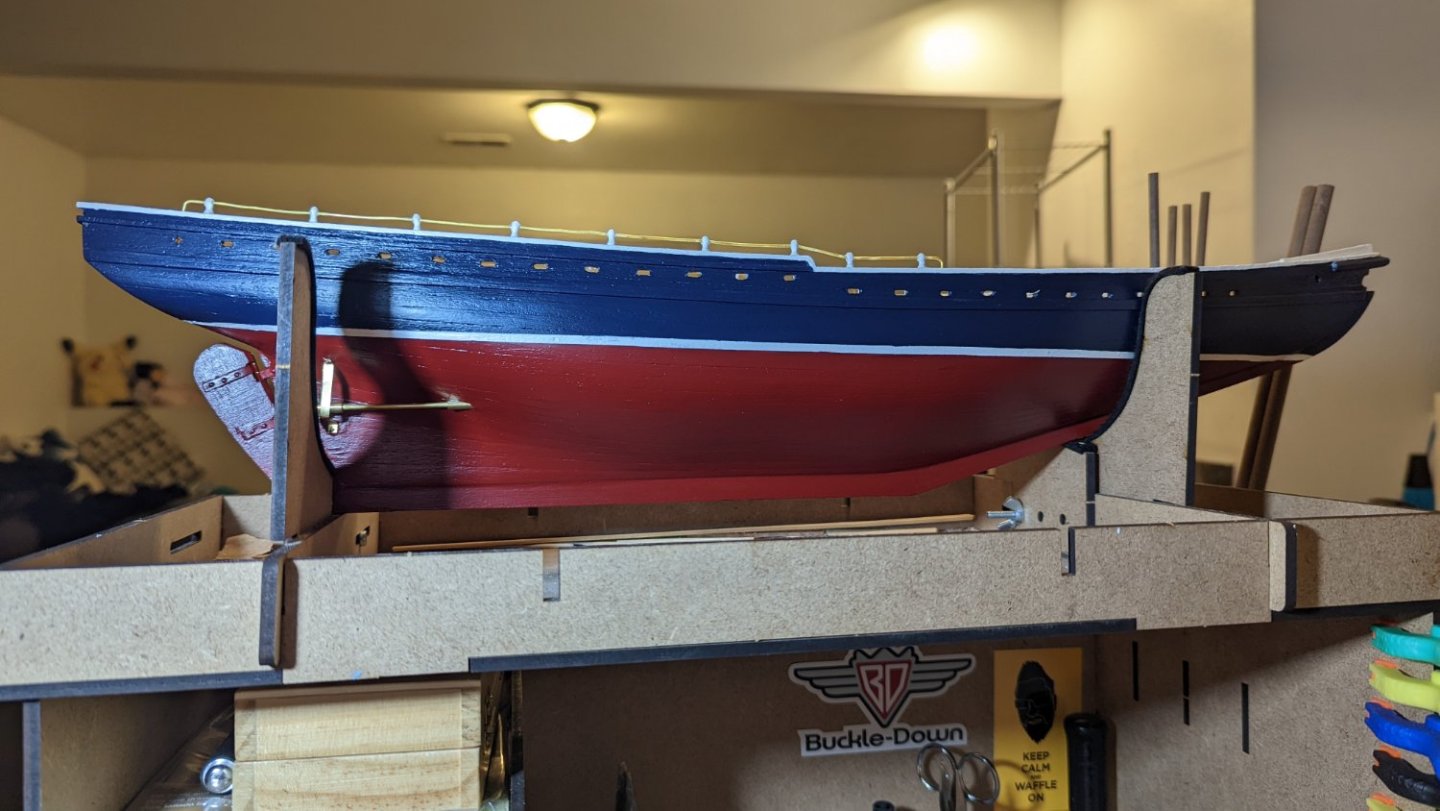
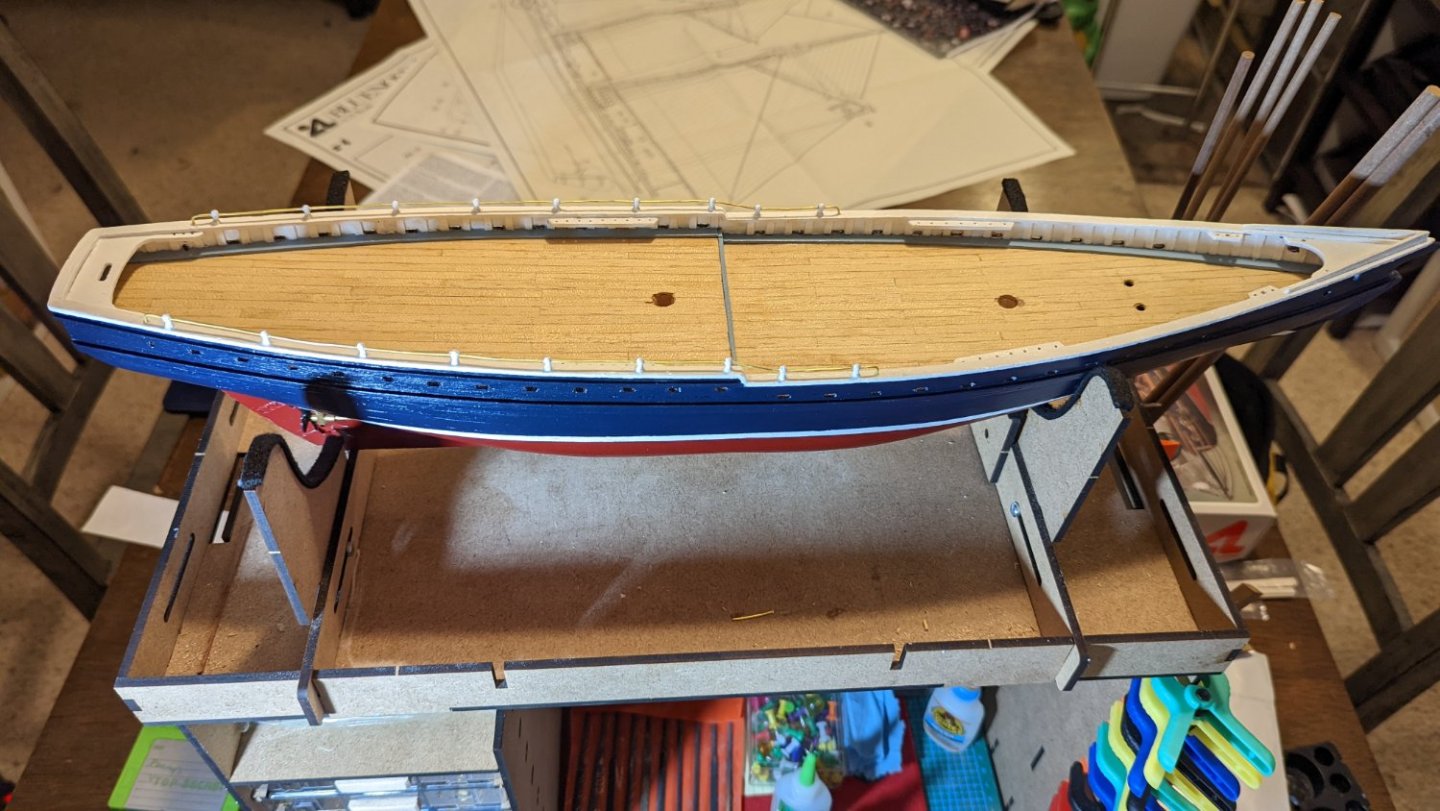
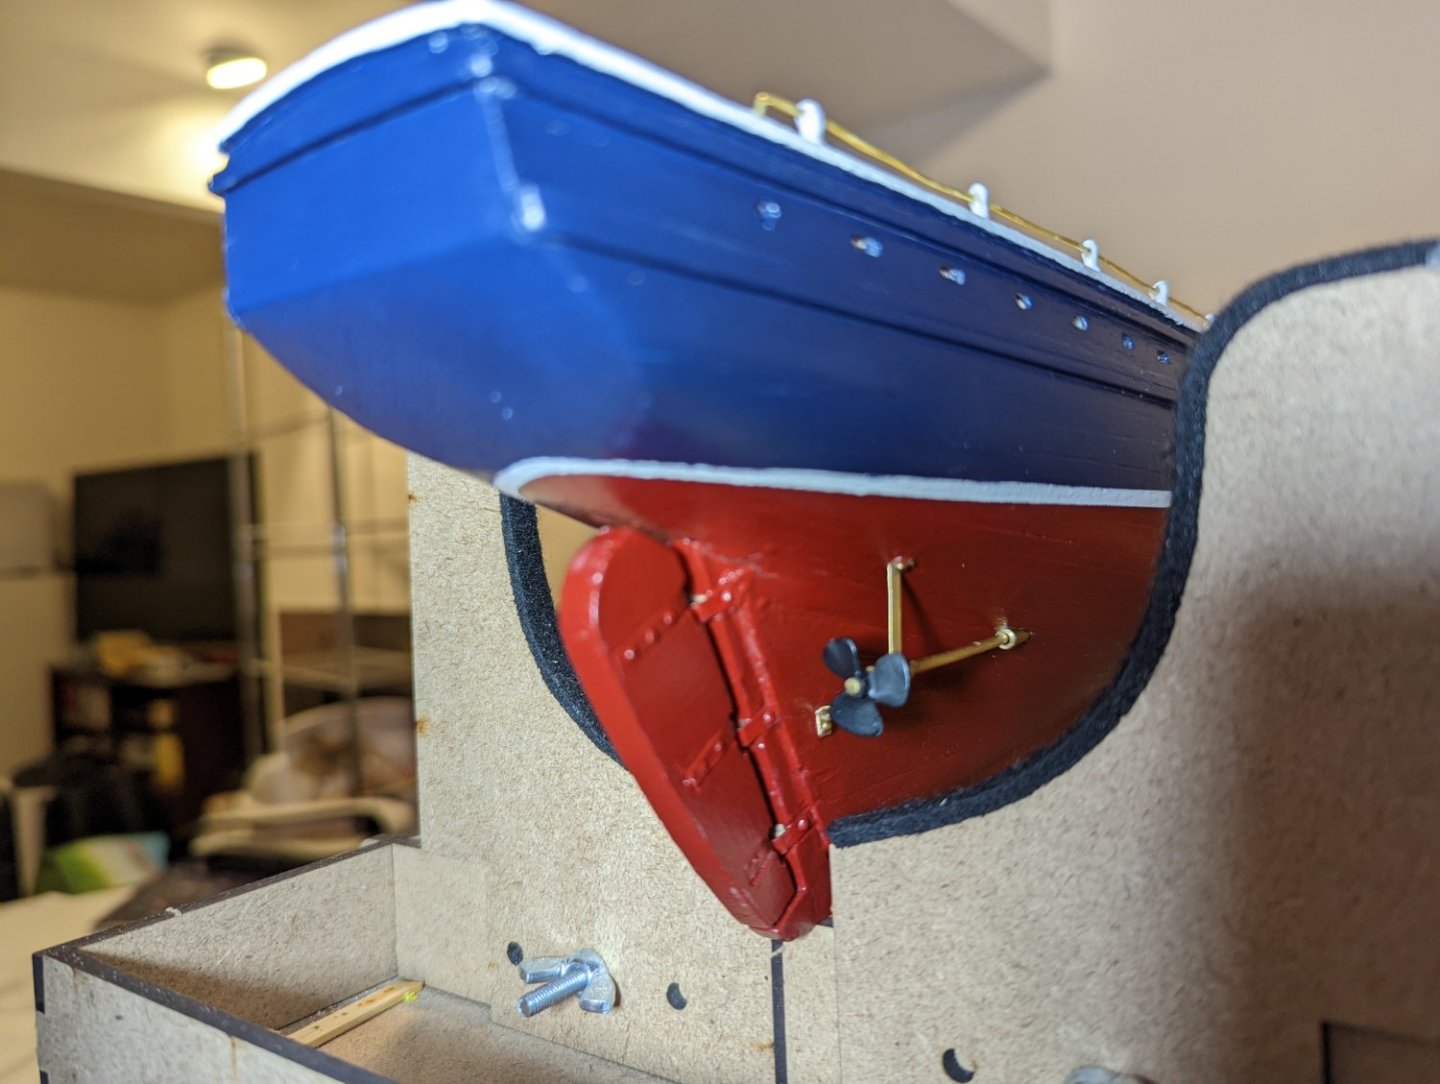
Waterline is on! After a bit of touch up on the red and blue, I'm a happy camper. It's obviously hand painted, but that's part of the charm. But I think it's crisp and looks great. Might be a bit wide, but I really don't mind it. Time to hurry up and wait while it dries.

-
Follow up. Painted red up to close to the crisp blue line I'll use to mask and guide for the white stripe. I went ahead and did blue on those parts like the real ship, and I like it. Once the waterline is painted, I'll put the propellers on, then the handrail posts, paint the rest of the white, and do the brass wire handrails. Then I'll be all set to move on to the buildings.