
ibozev
-
Posts
79 -
Joined
-
Last visited
Content Type
Profiles
Forums
Gallery
Events
Everything posted by ibozev
-
 This particular mistake may not be visible at the end. I think if you're lucky enough the hole for the rudder and the rudder itself could hide it at some point. 🙂
 -
Nice deck planking, James!
-
Hi James, I'm happy to hear that you've got your new keel. Indeed Occre have one of the best return and warranty polices! Unfortunately I think you made a mistake with the deck planking. You didn't have to cut the extra deck planks, which are above the holes for the ribs. The idea is to hide the ribs with the deck.
-
Hello, Travis, and welcome to MSW! For the second layer I suggest you to read the planking materials here in the forum or to check my Polaris build log, where I tried to explain this step in a detail. I also strongly recommend you to use only PVA white glue, instead of the contact cement. This glue is suggested in the instructions, but according to most people here (me as well), contact glue is awful and it's a big mess everytime you're using it.
-
Hi everyone and Happy New 2024 Year! It's a pleasure for me to have something new to share with you! A small, but important milestone for me - one of my Polaris photos was uploaded by OcCre on their website and is now part of the official model images! You can check them here.

-
Nice job with the deck weathering! I will be looking forward to see your progress on Polaris.
-
Well done Jack, you are making a good progress! Sanding the bulkheads and lining of the hull are some of the most important and crucial things in order to prepare the hull for the first layer of planks. As you said, take your time on these steps and don't rush. On my Polaris I spent a lot of time aligning the wooden battens and strips, just to find the perfect and most symmetrical position. One advice I could give is to not oversand the bow to much and check it's fit with the stem. Do this now, not when the hull is already planked. I made this mistake and after the first layer was planked, it was very difficult to sand the bow and mount the stem.
-
Thank you for all the likes and comments! An album with high quality images is already uploaded in my Profile section. This was also my first attempt to shoot with something different than a phone. 😅
-
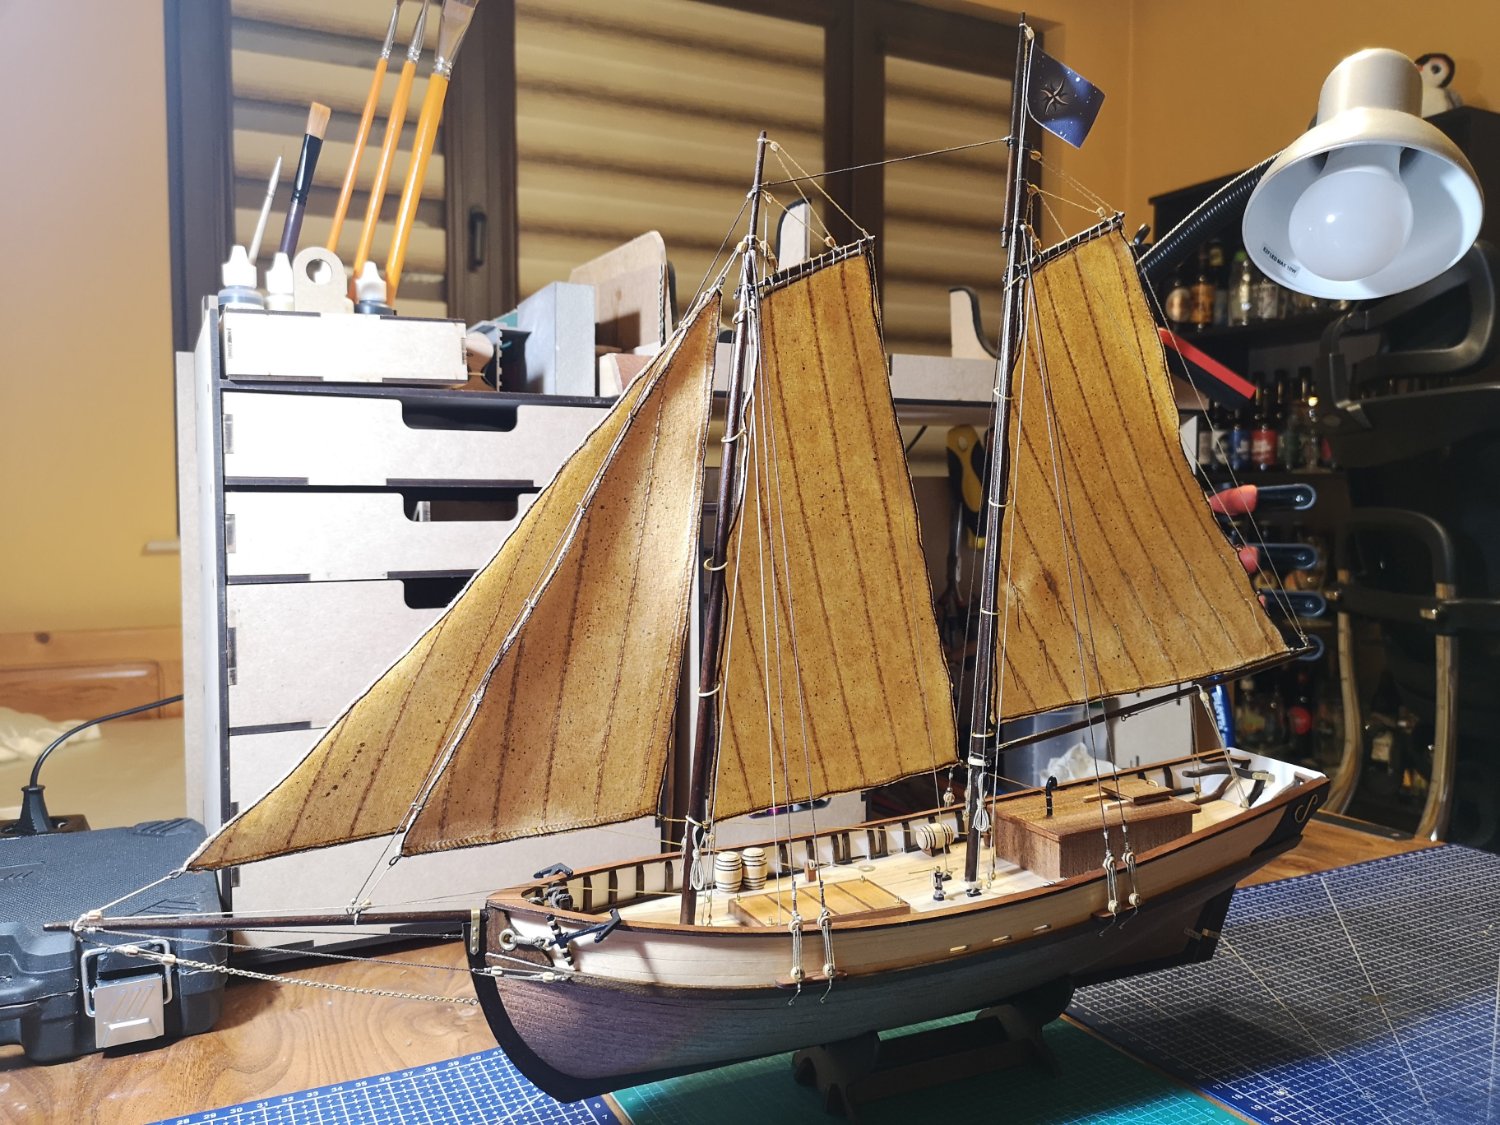
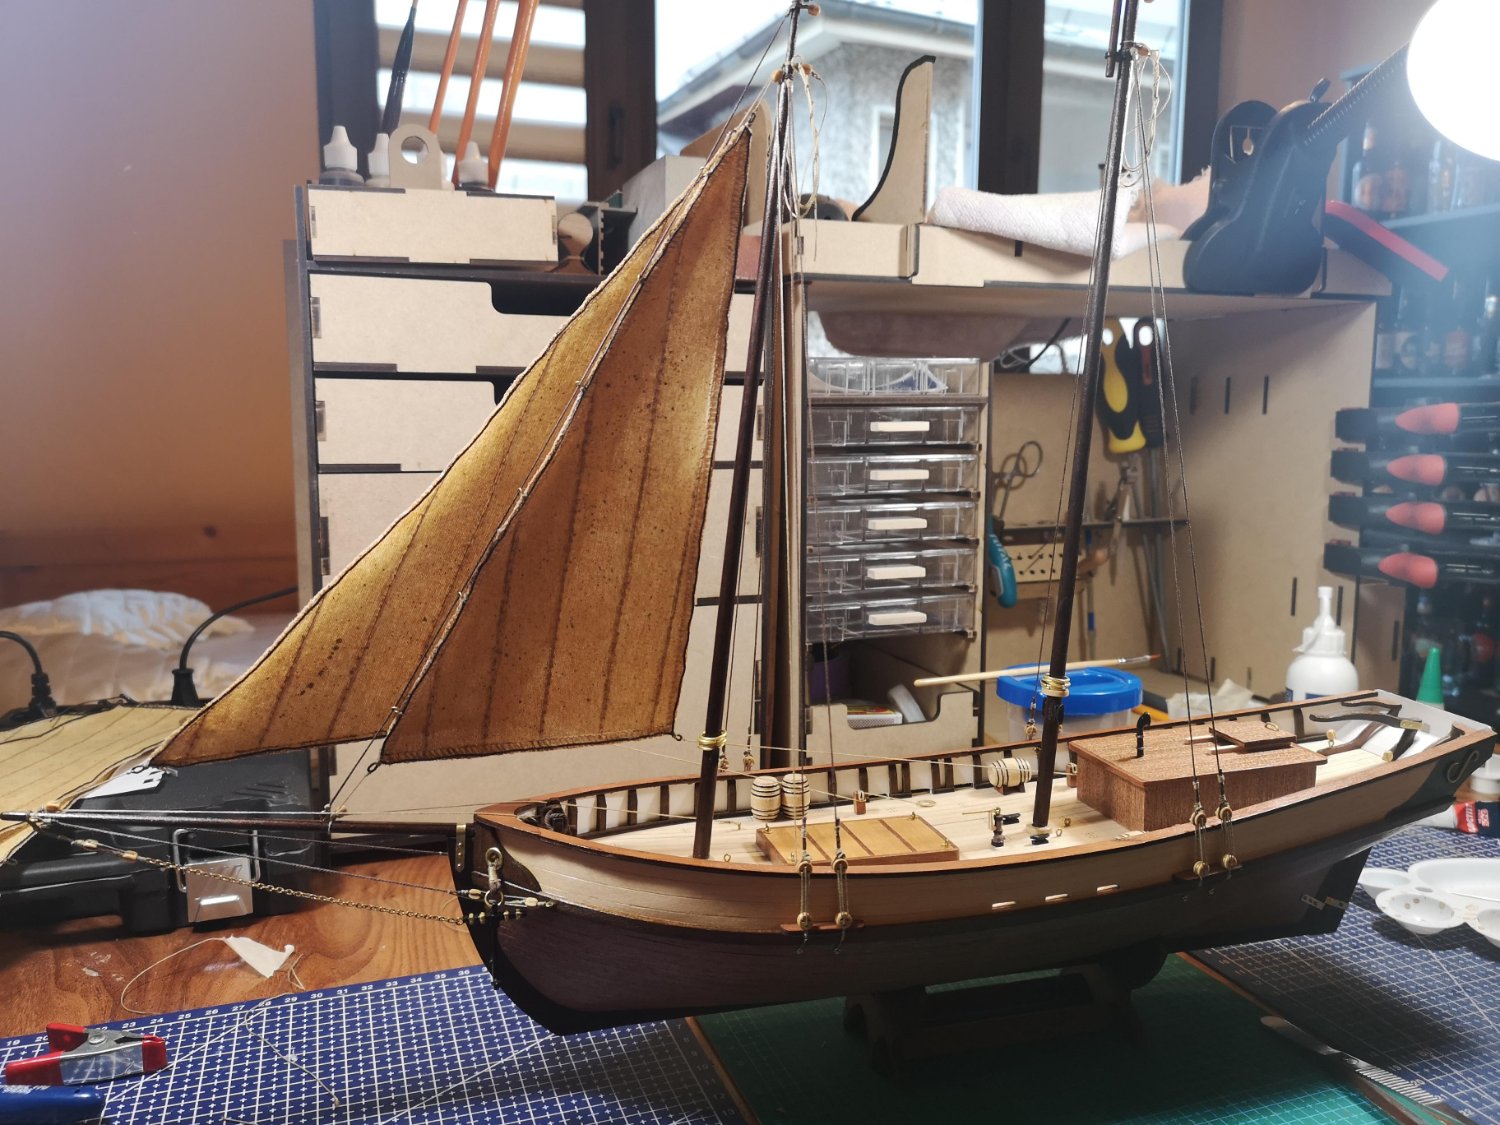
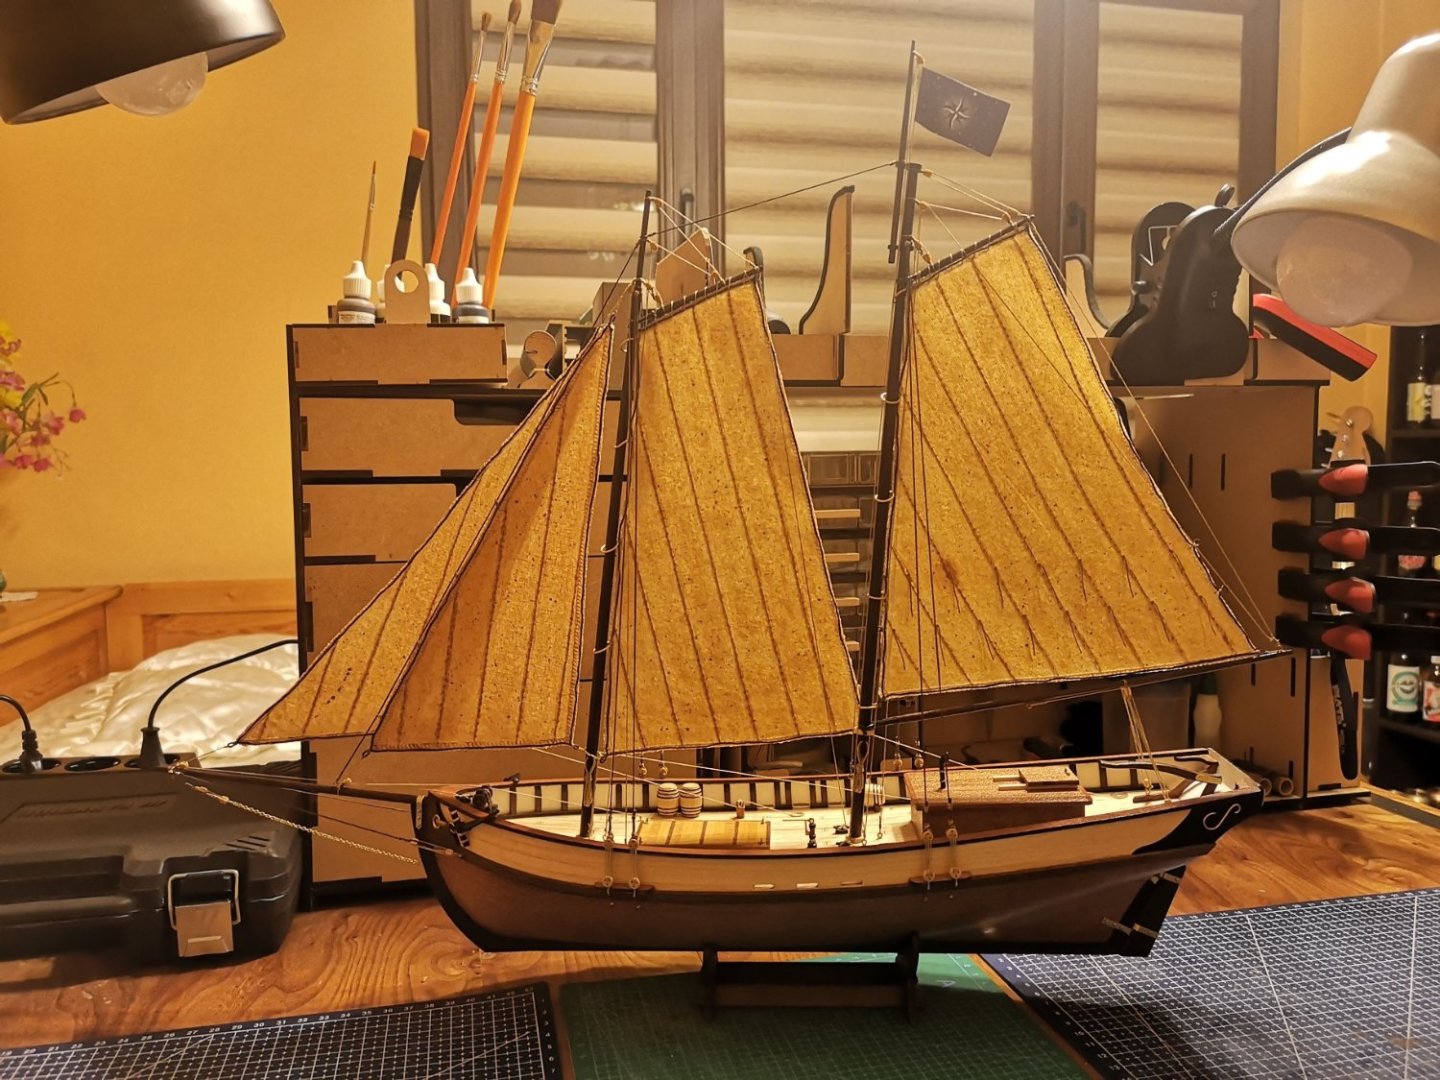
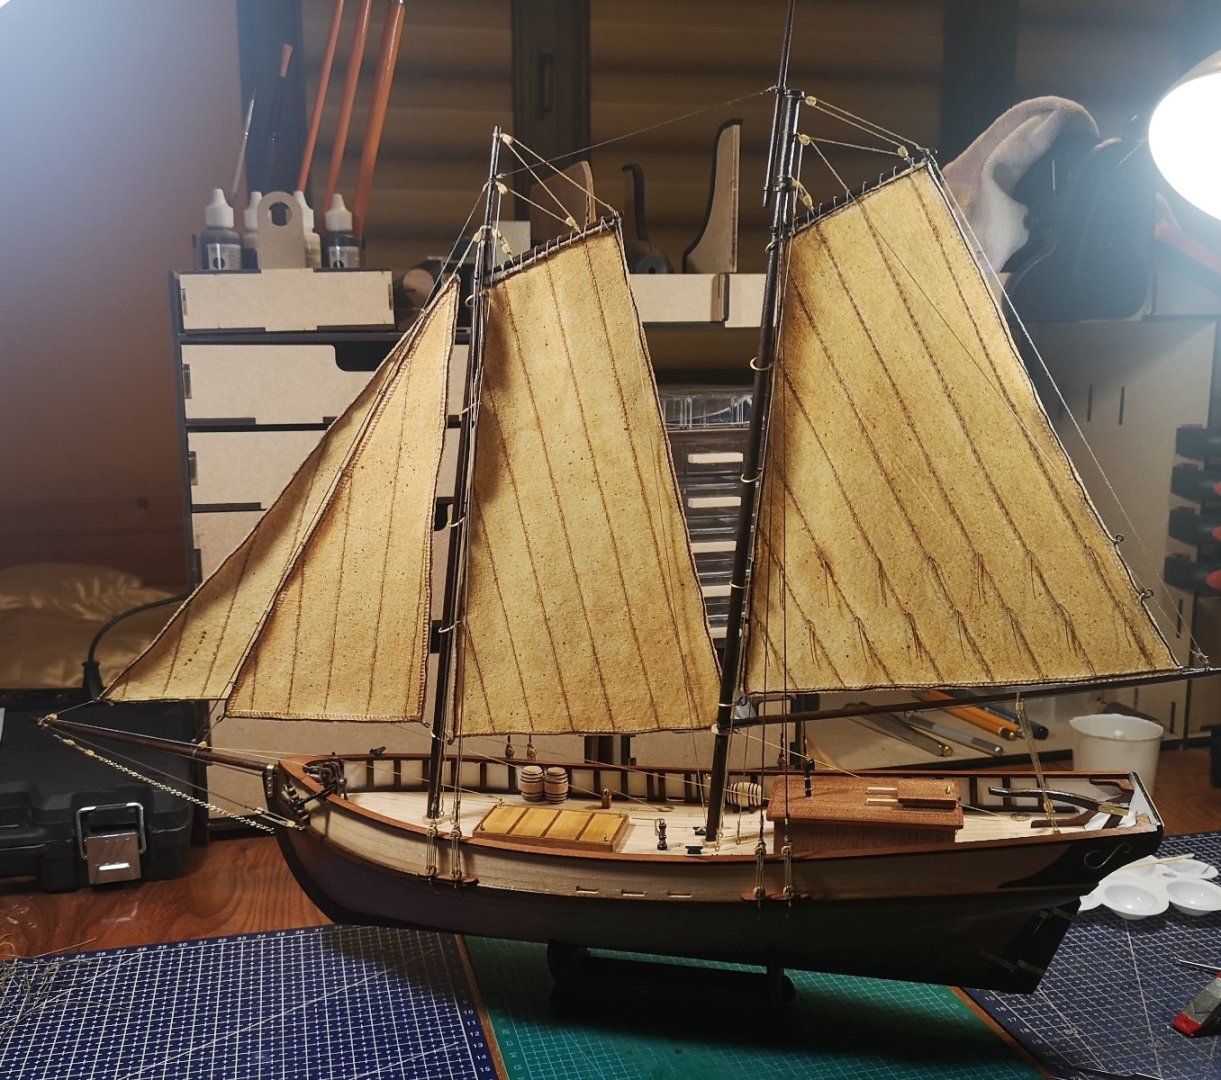
And here we are, after 14 months my Polaris is finally finished! I certainly kept my promise from the very first post of this log, that I will make it slowly 😅. Hopefully I fulfilled at least a little the other, more important, part of my promise: "to do it well"! I want to special thank for all of the comments, likes and support through this wonderful journey! I started as a total beginner without any nautical knowledge and ended with a finished model and a lot of information and lessons learn. For sure this won't be my last model and most probably my next build will start next year at the earliest. Till then I will try to read some books about rigging, make a display case and better photos of the finished model (the last one will happen soon). ----- P.S. Now I can finally back to one of my other hobbies and celebrate it properly! Cheers!


- 85 replies
-
- 16
-

-

-
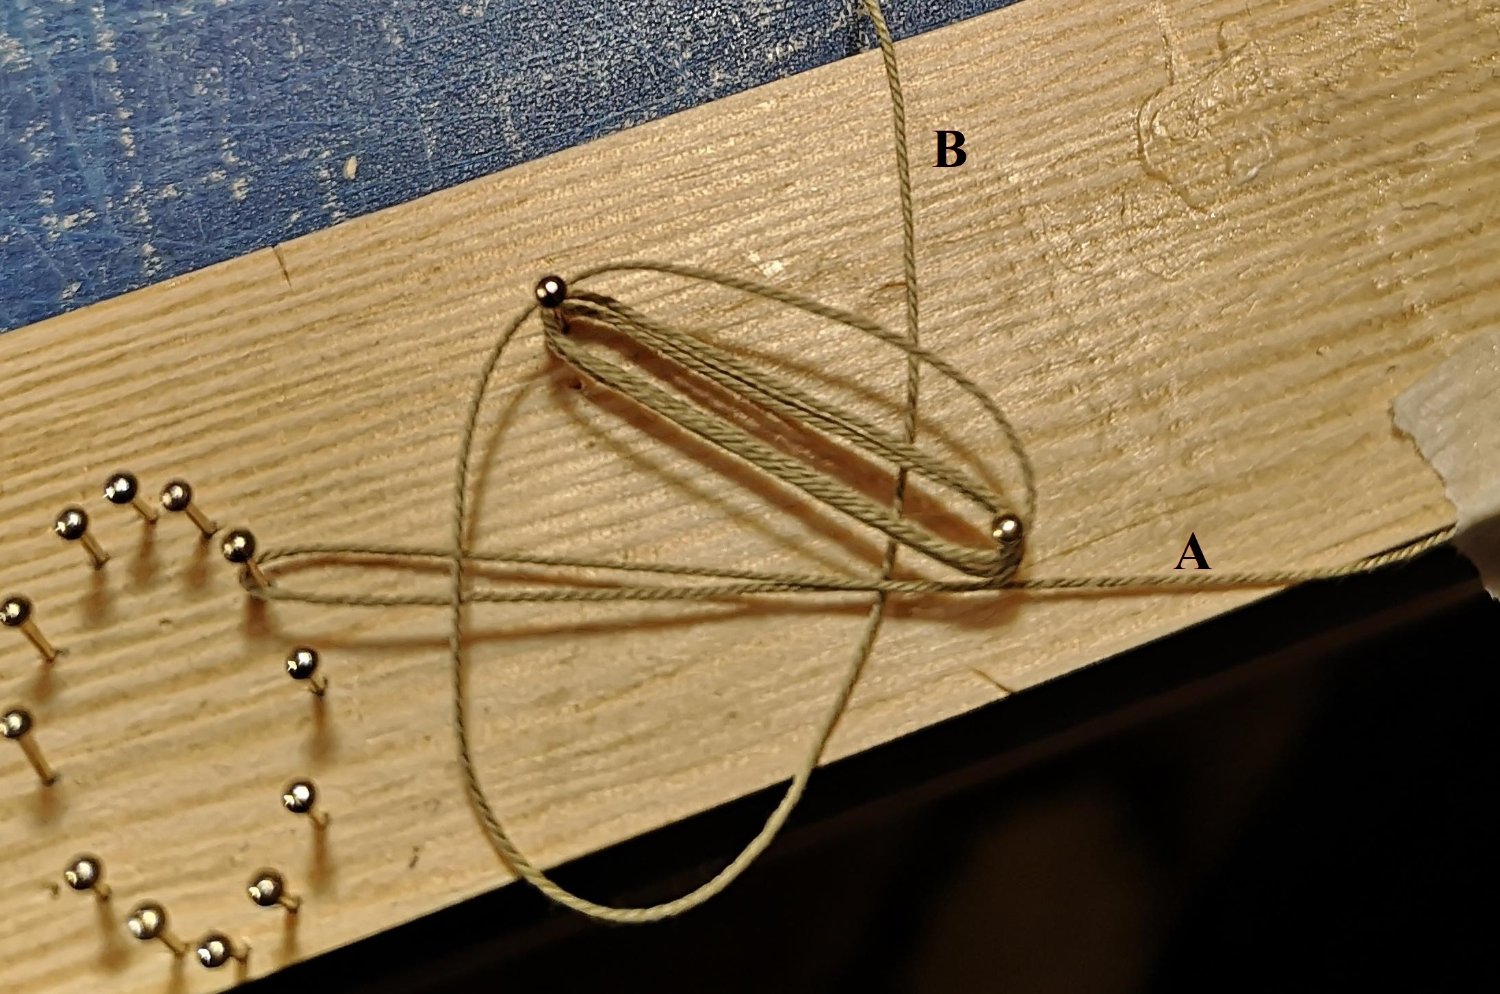
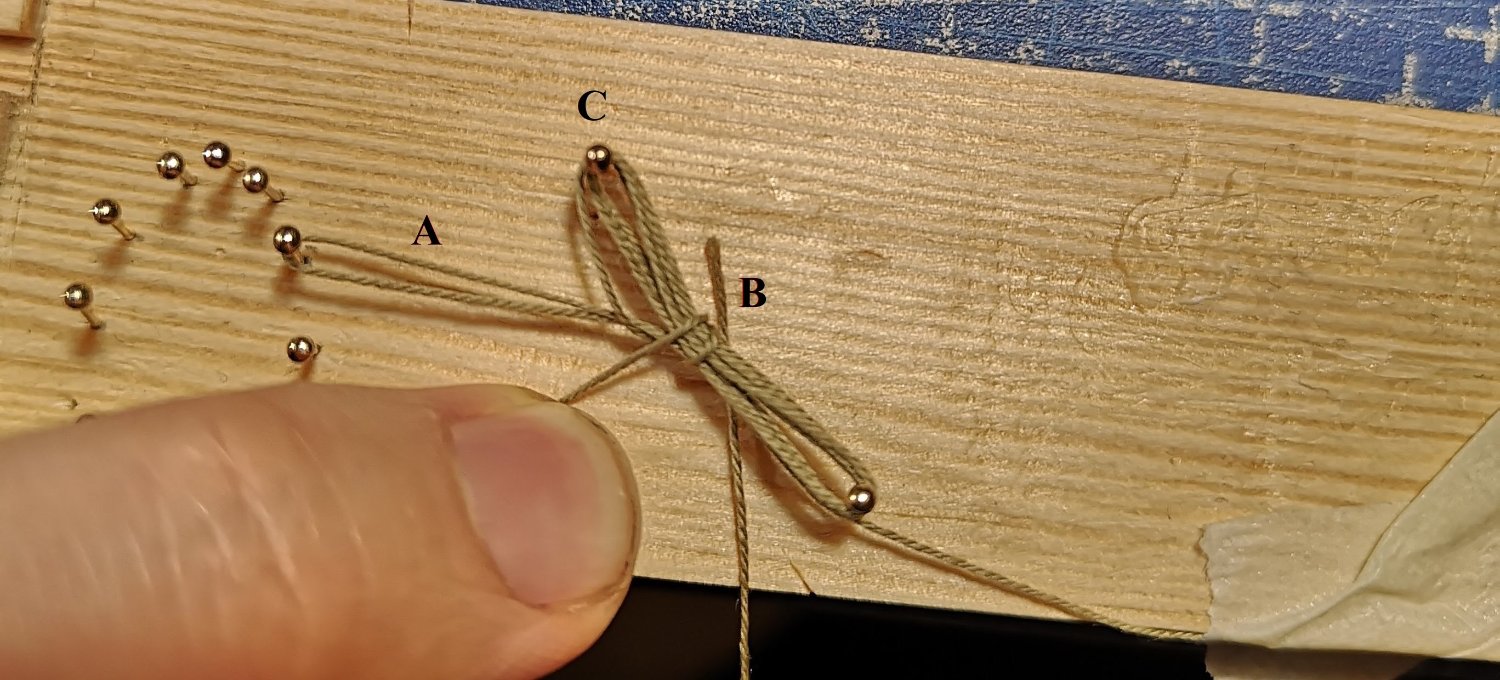
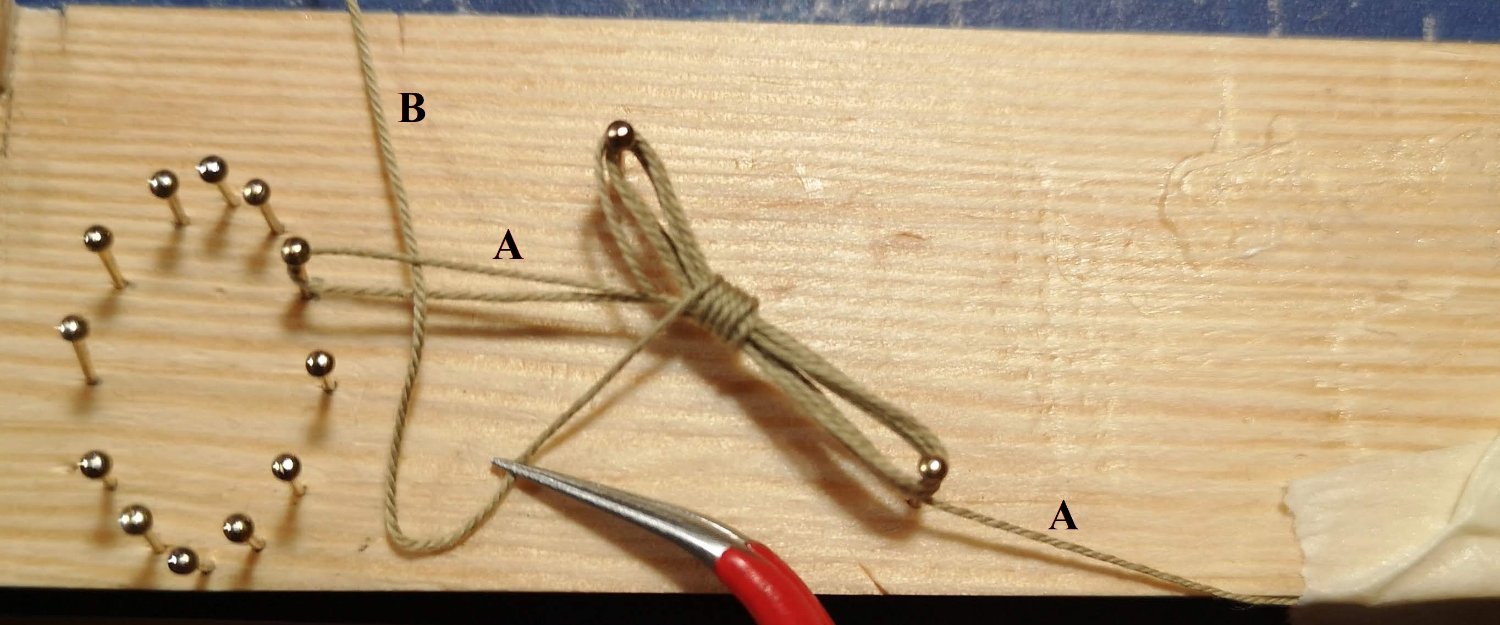
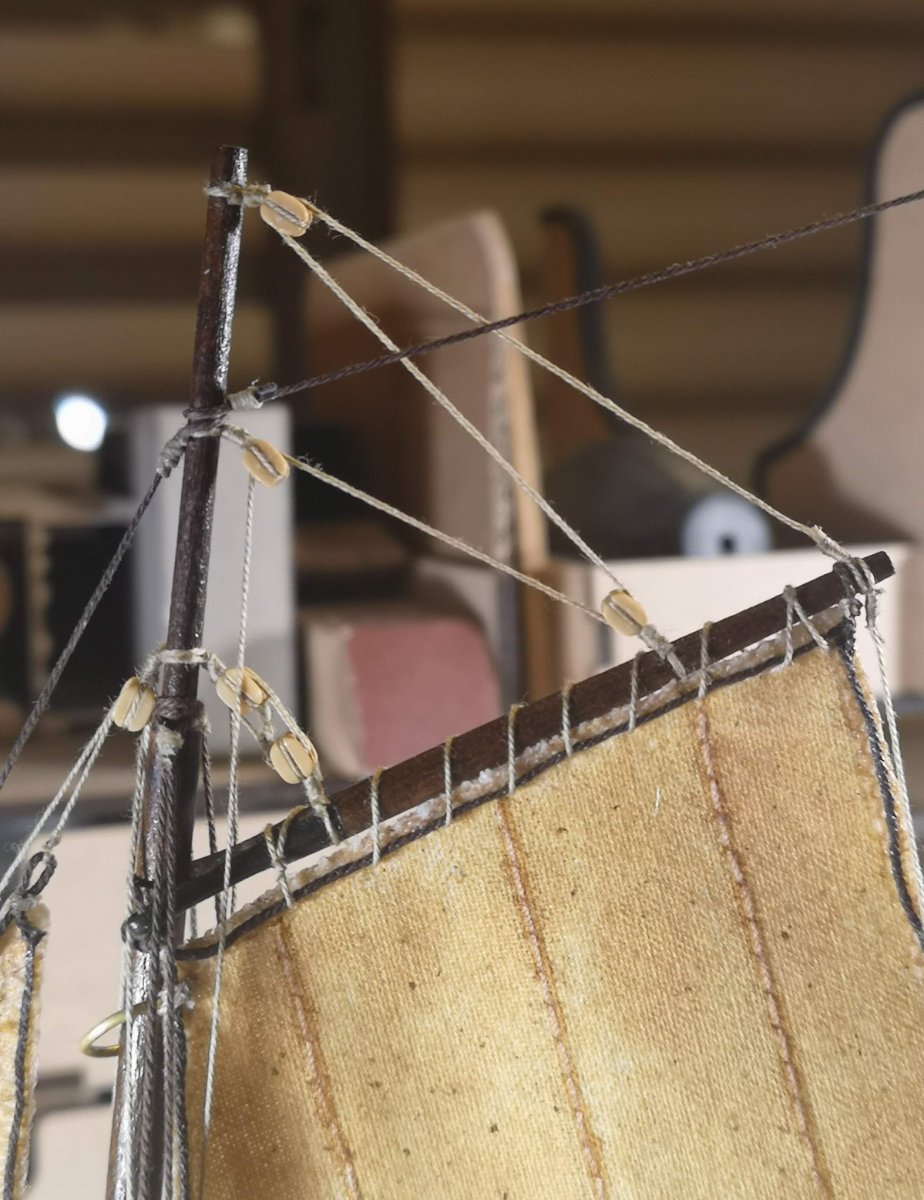
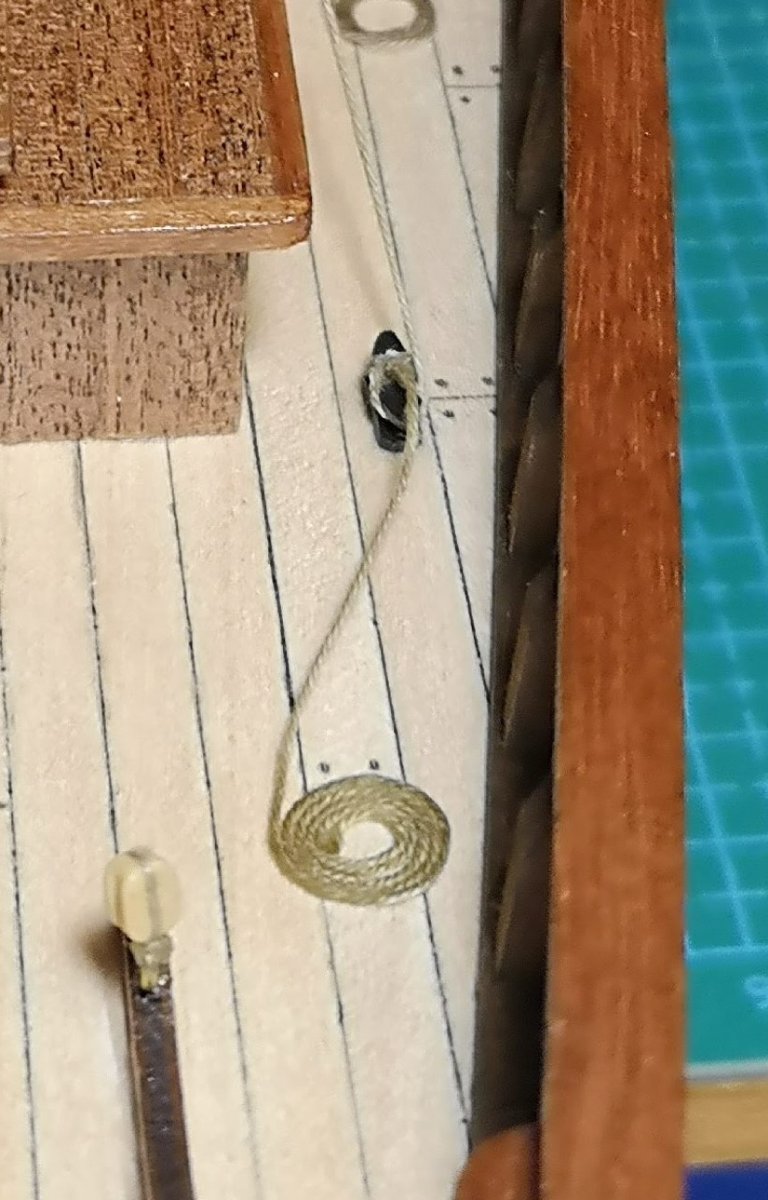
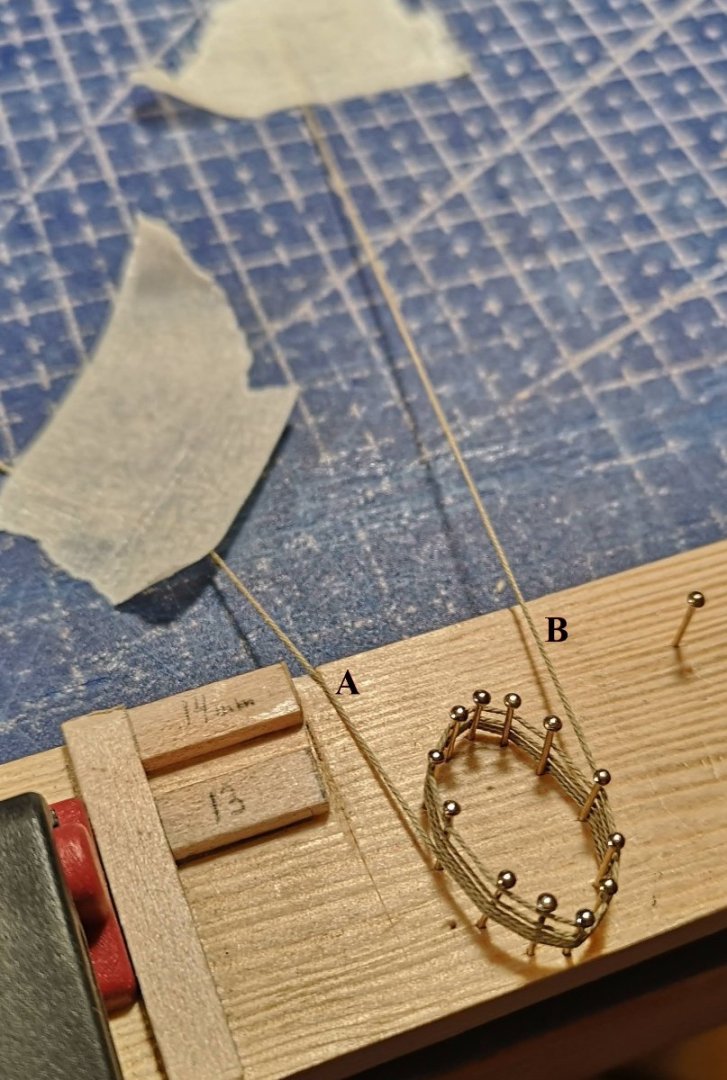
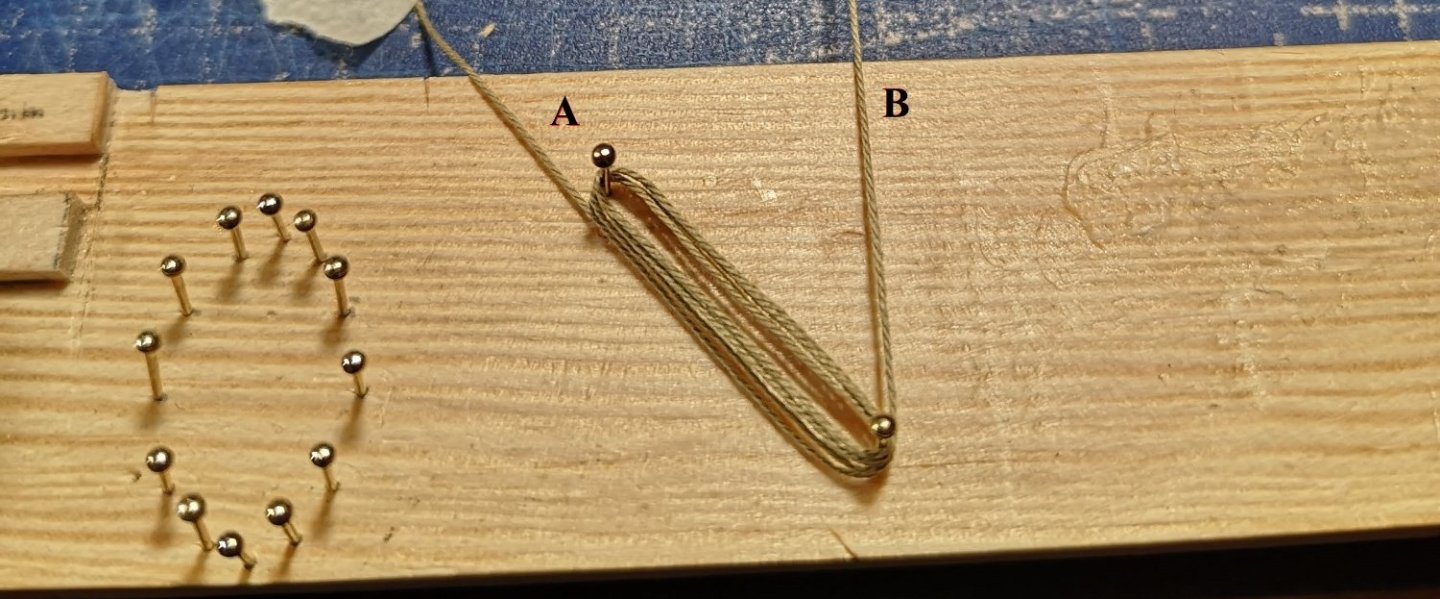
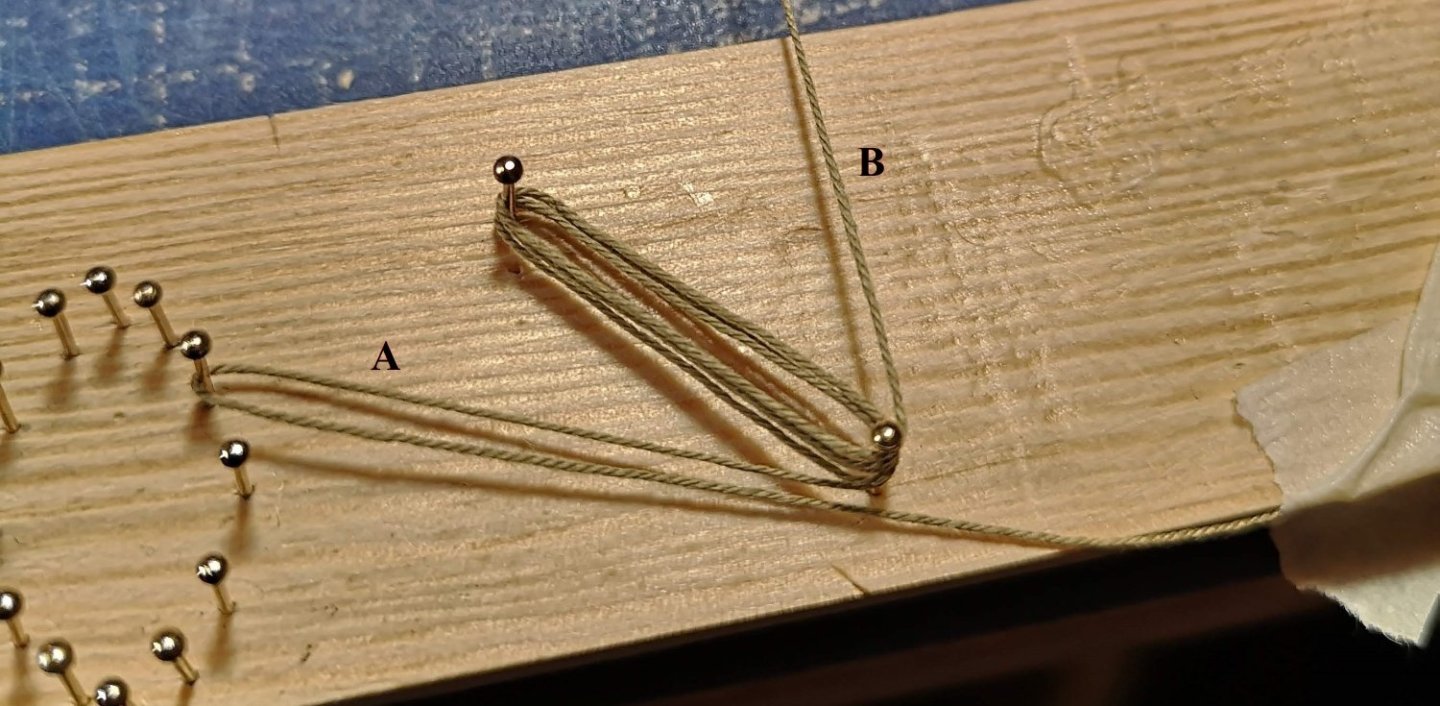
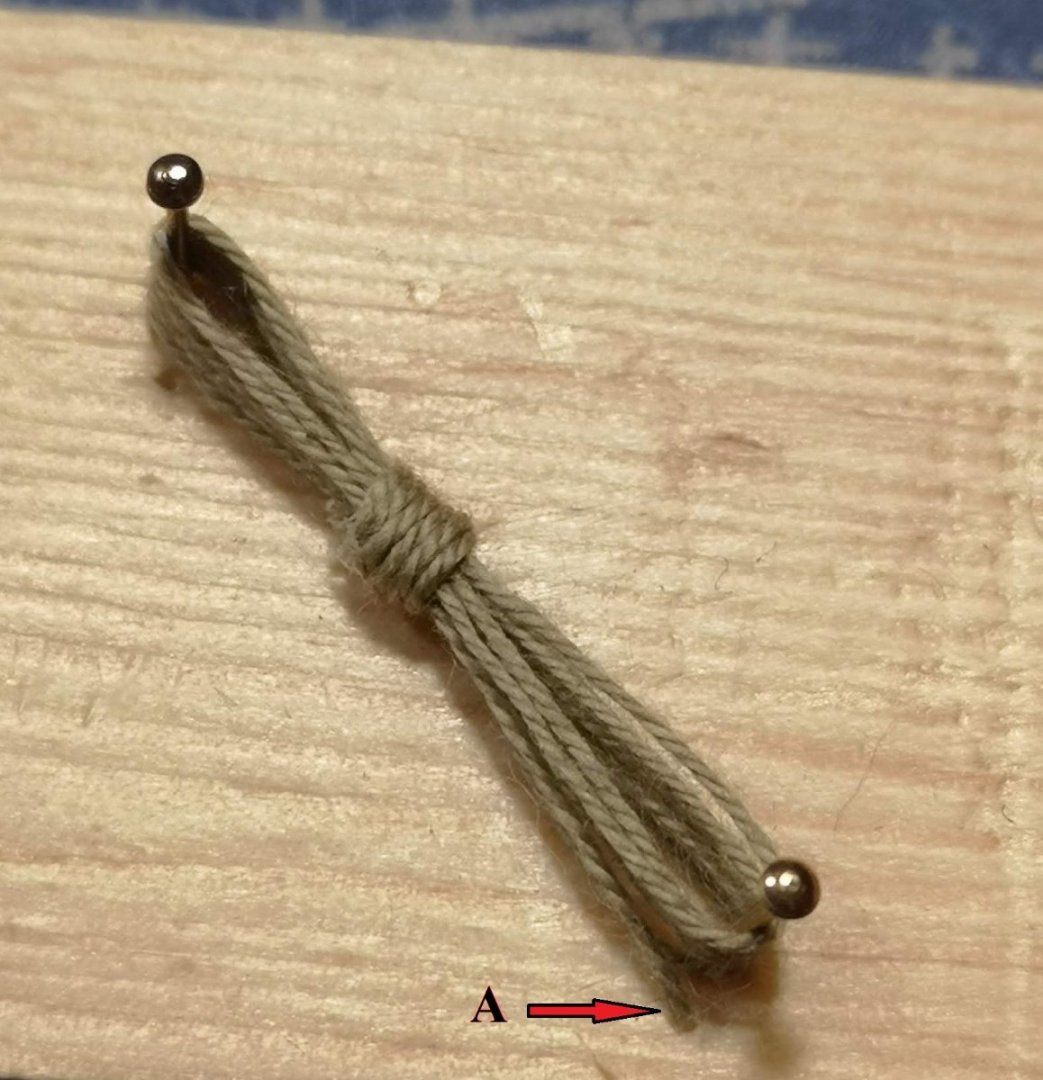
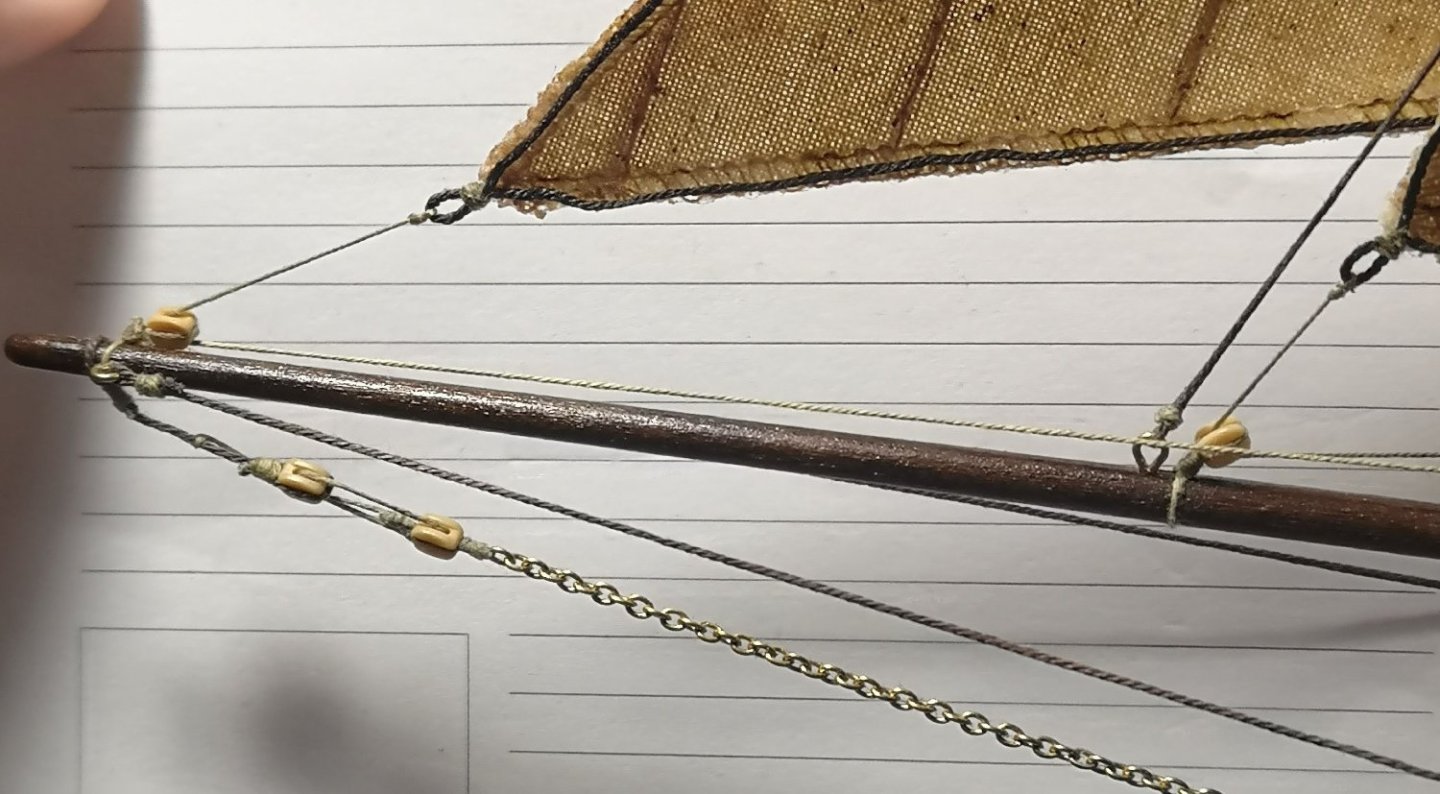
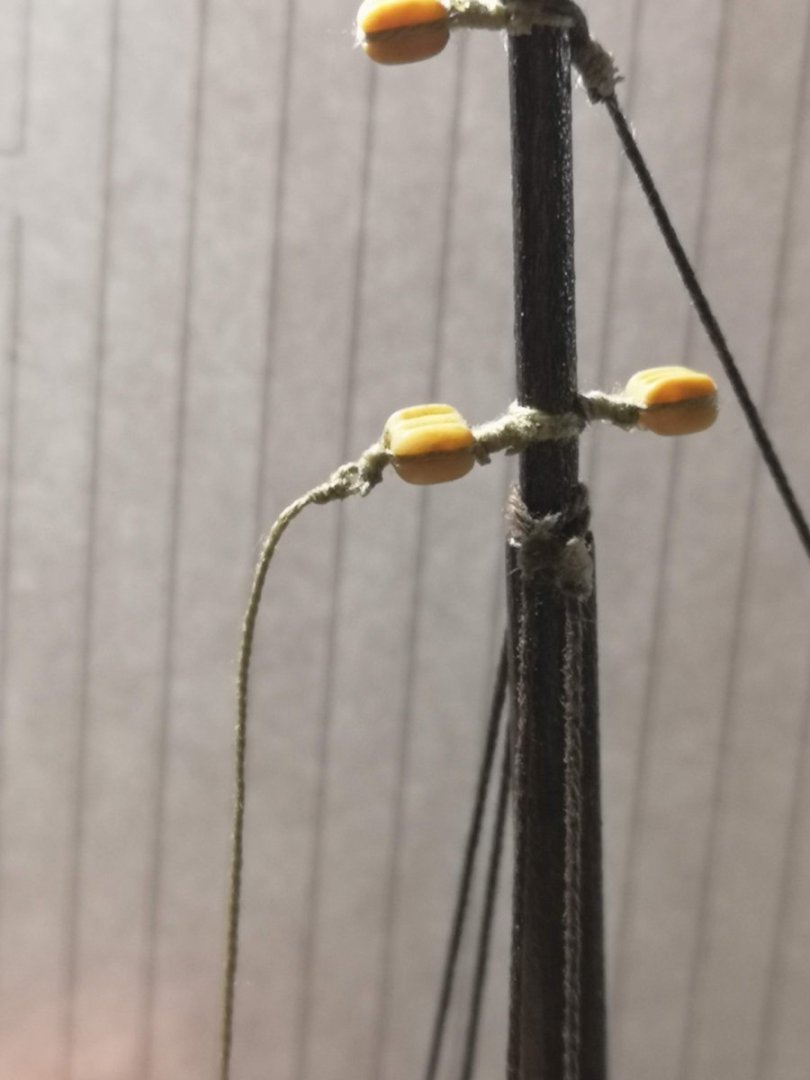
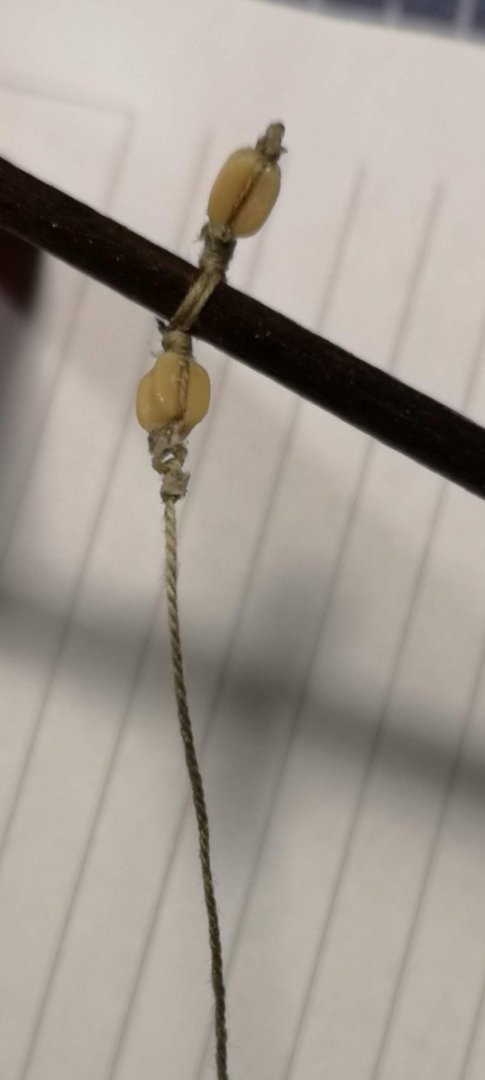
This post will be more like an improvised tutorial on making rope coils (hanks). I've read some info about coils making, watched couple of videos too, but all of the materials were about the lines belayed on the the belaying pins - something that doesn't exist in Polaris... My idea was to make something different, that I could hang on the masts cleats. So these are the steps I used: 1. First make an ellipsis jig with the desired length and shape. Then tape the starting end 'A' and make 4 or 5 rotations counter clockwise around the pins with the other end 'B'. 2. Then carefully transfer the shape to the other jig. I would say that the previous step can be skipped and use only the second jig. My initial idea for the first jig was to keep the shape somehow, in order to have rounded, not sharp ends of the coil. 3. Now make a bight with 'A', tape it again and fixed it on one of the side pins just for convenience. 4. Now begins the fun part. Take the 'B' end and reeve it counter clockwise over A's bight and below the whole coil. 5. Repeat step 4 couple of times, it is important to make every next loop towards 'C'. 6. When you are satisfied with the number of repetitions, reeve 'B' through A's loop and pull both ends. 7. A dot of CA on the backside and cut the excess. 8*. Brush the coil with diluted PVA (I decided not to do this step, but probably it will give a nice finish look). This is the final look of the coil, attached to the cleat:


-
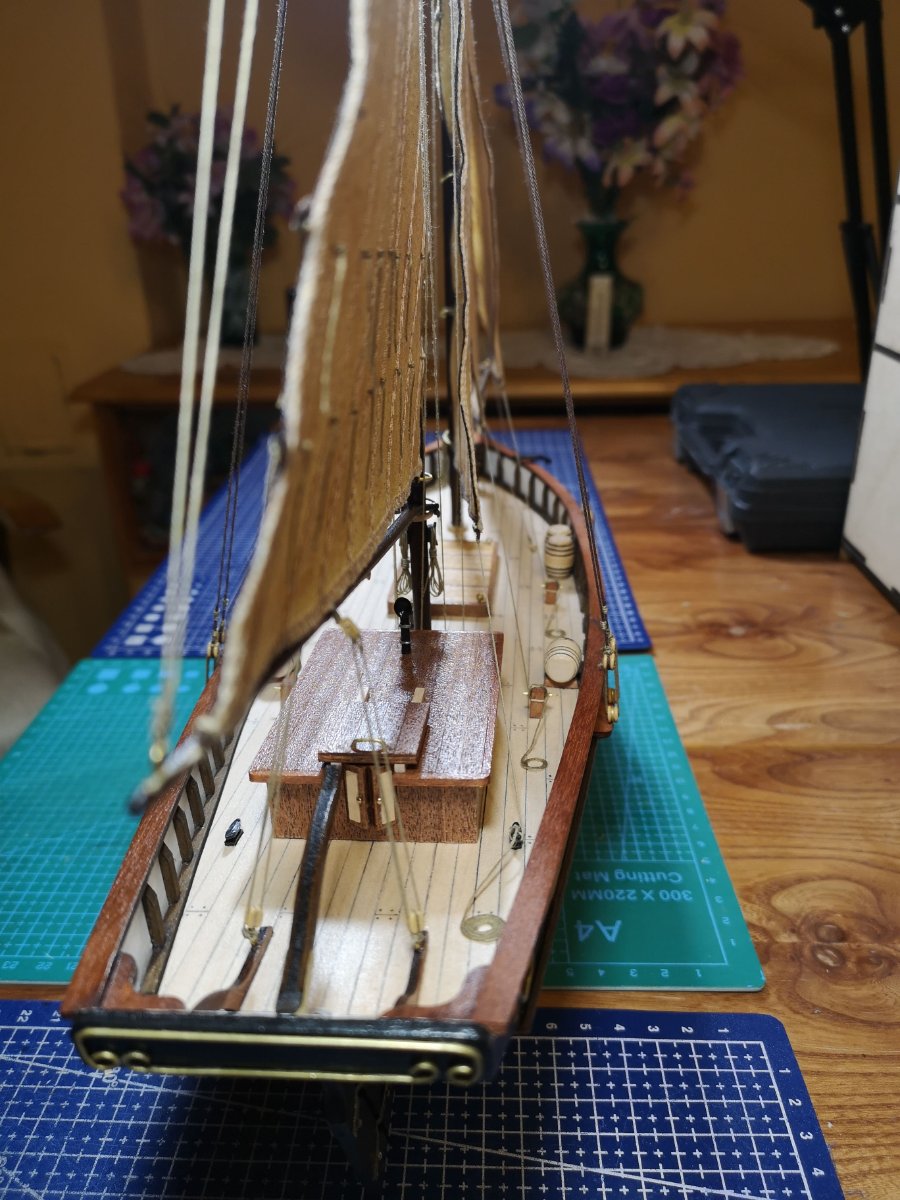
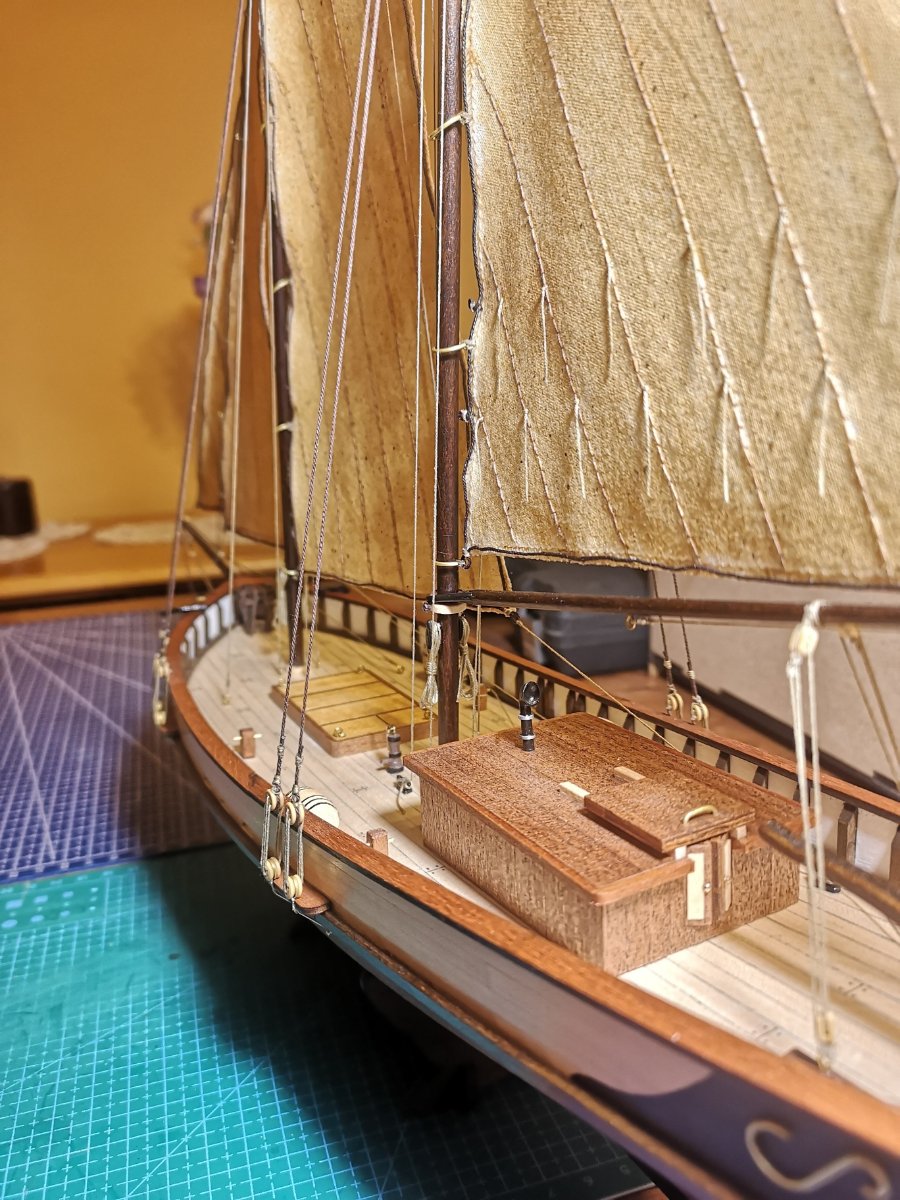
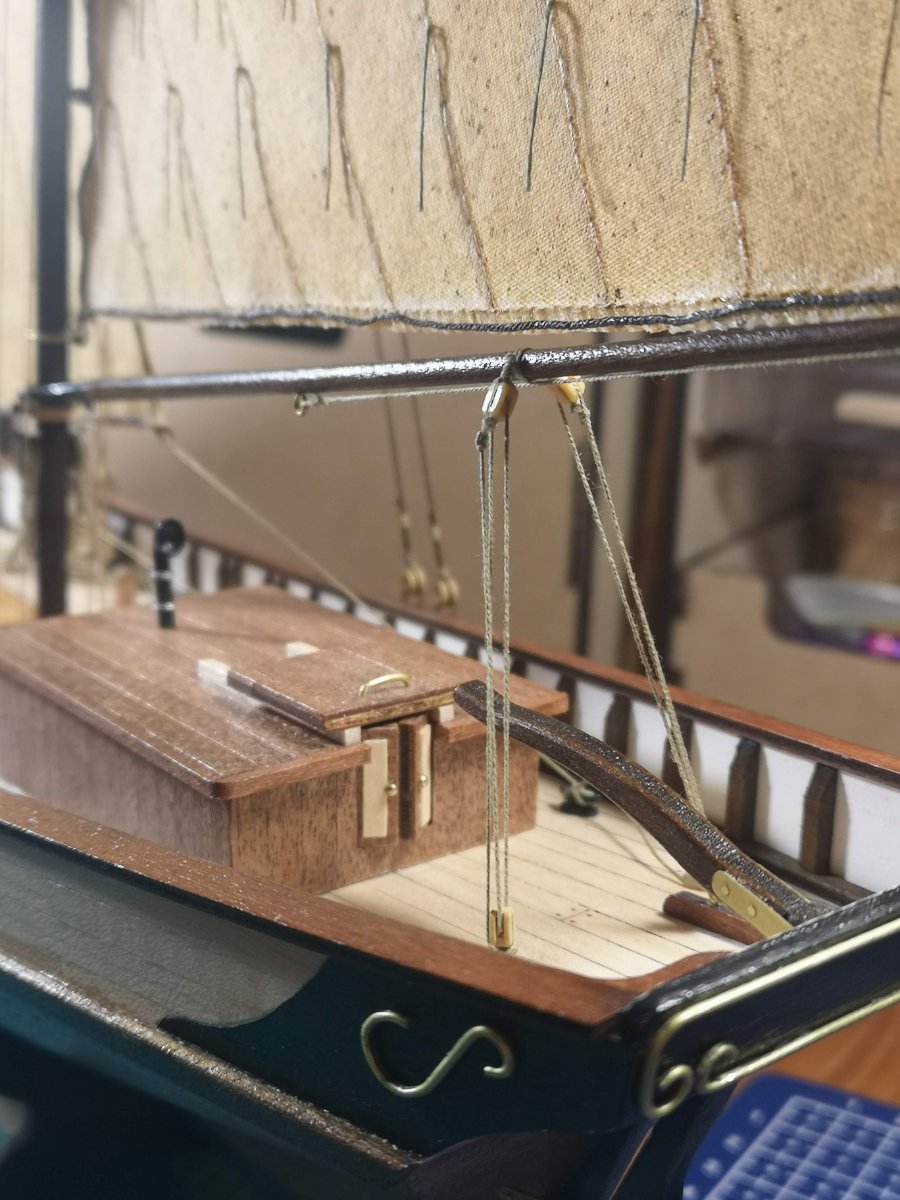
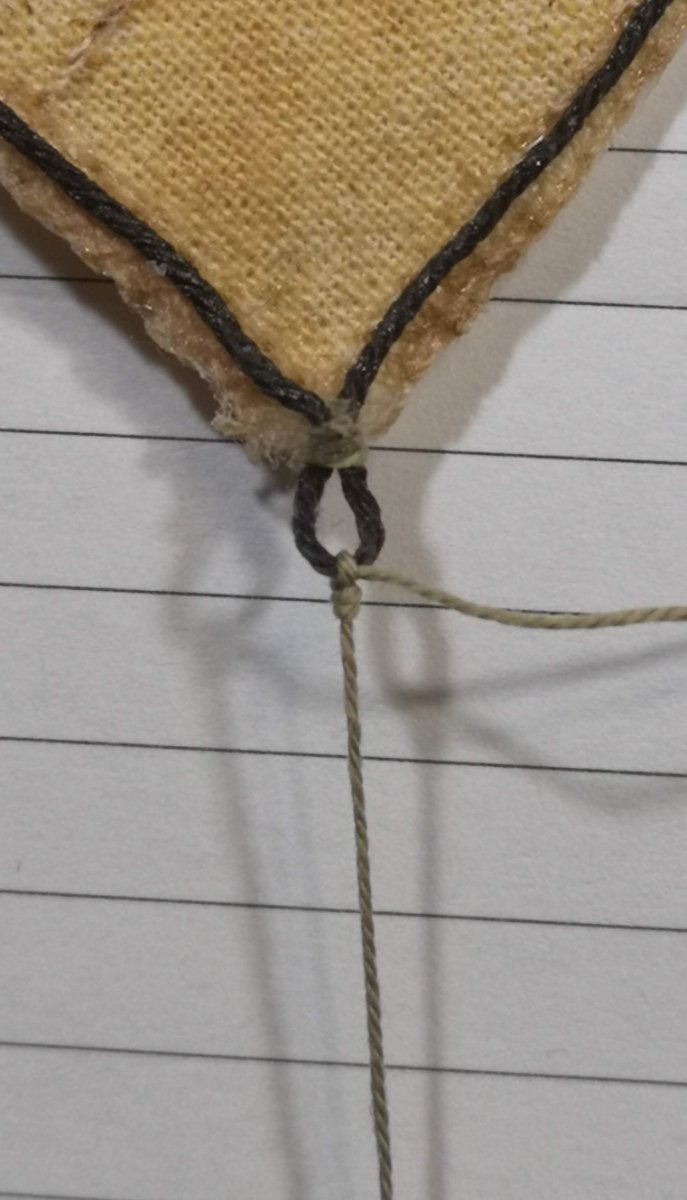
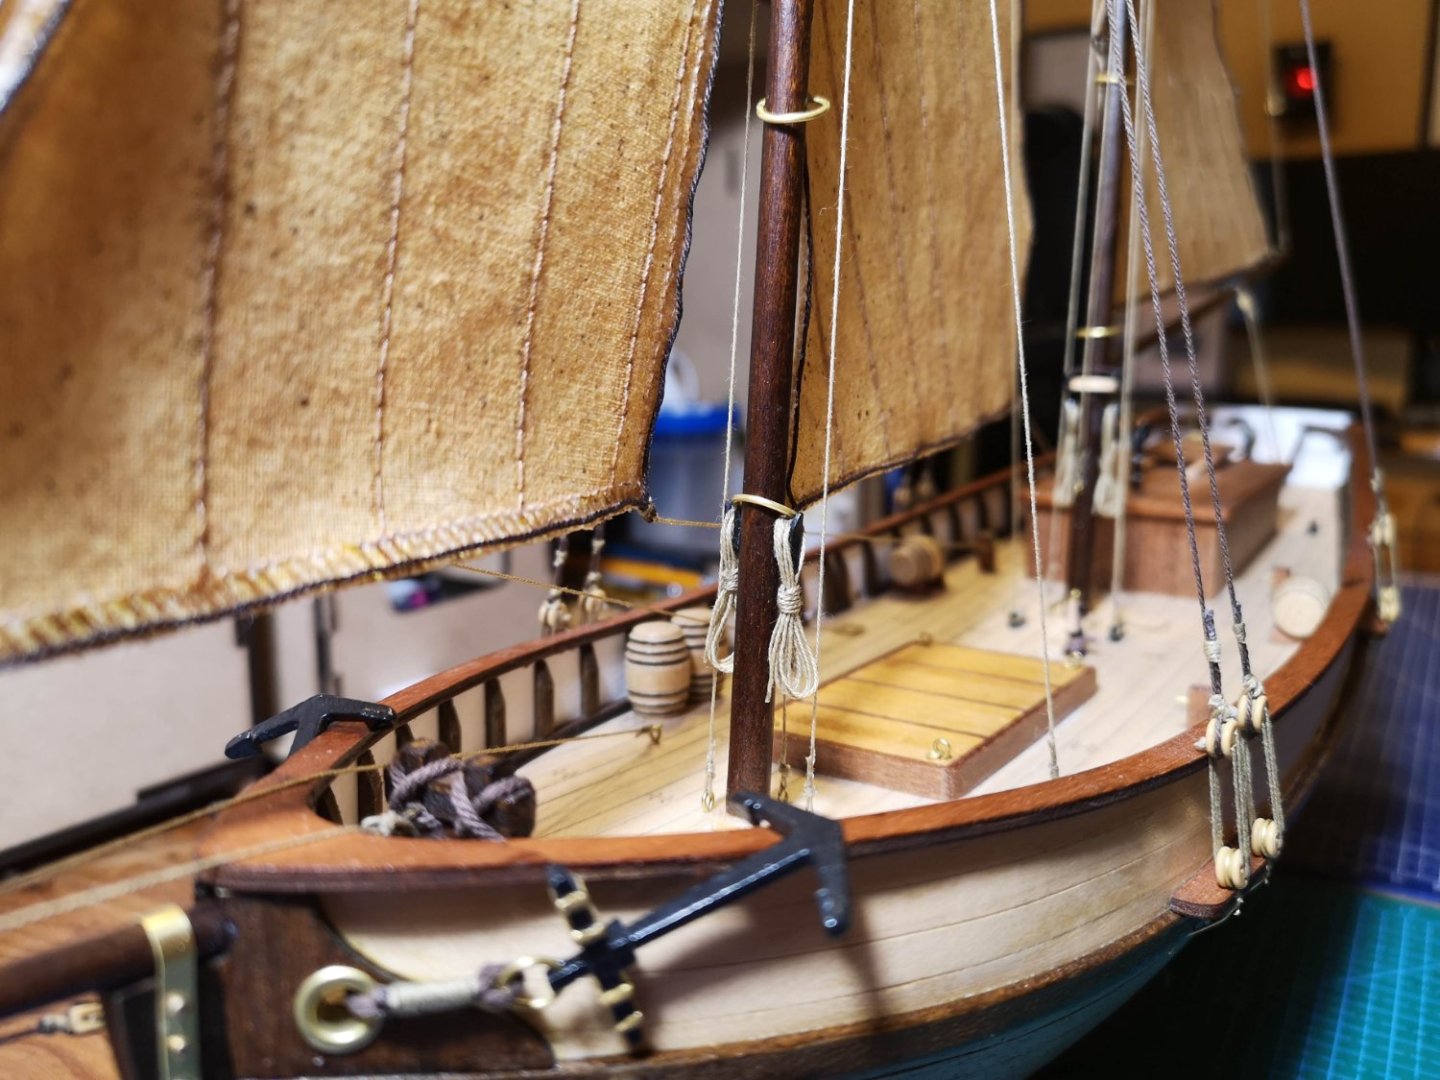
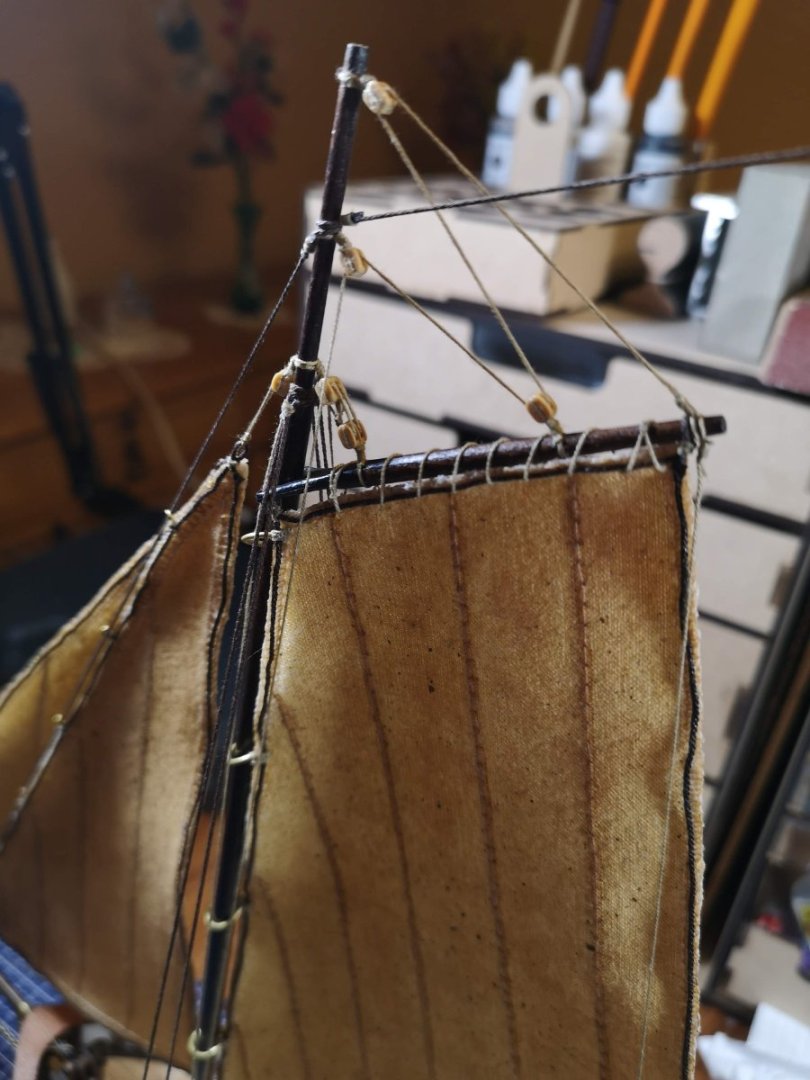
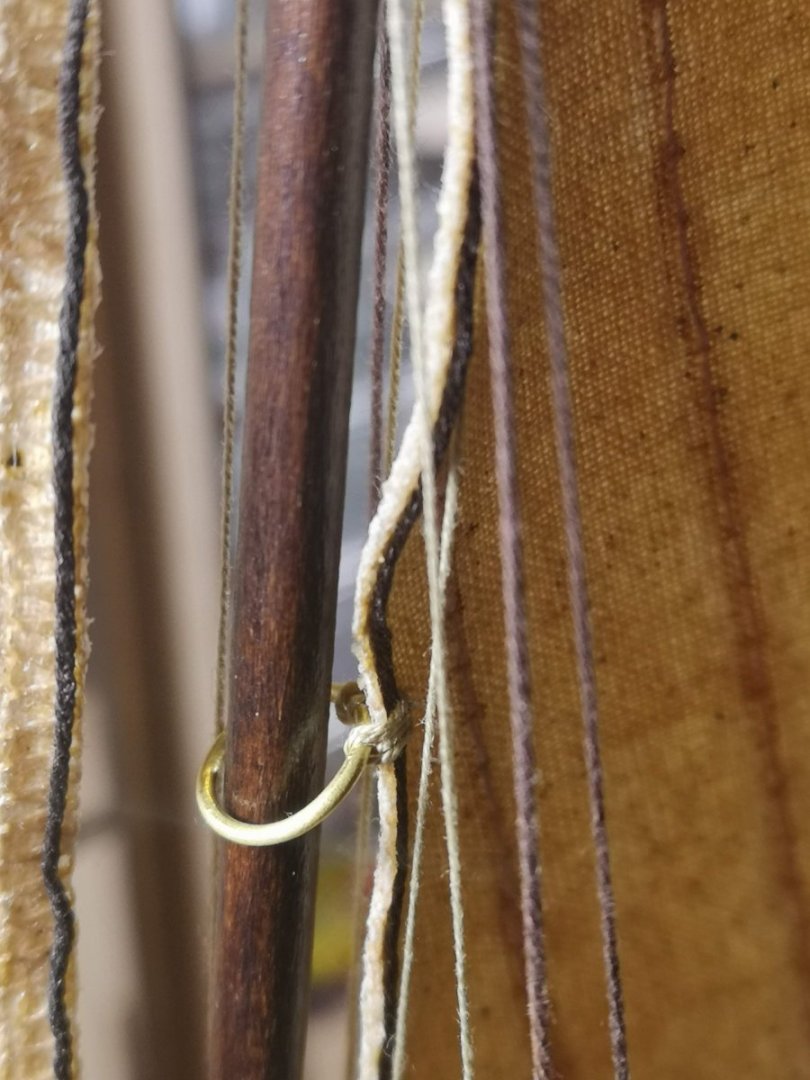
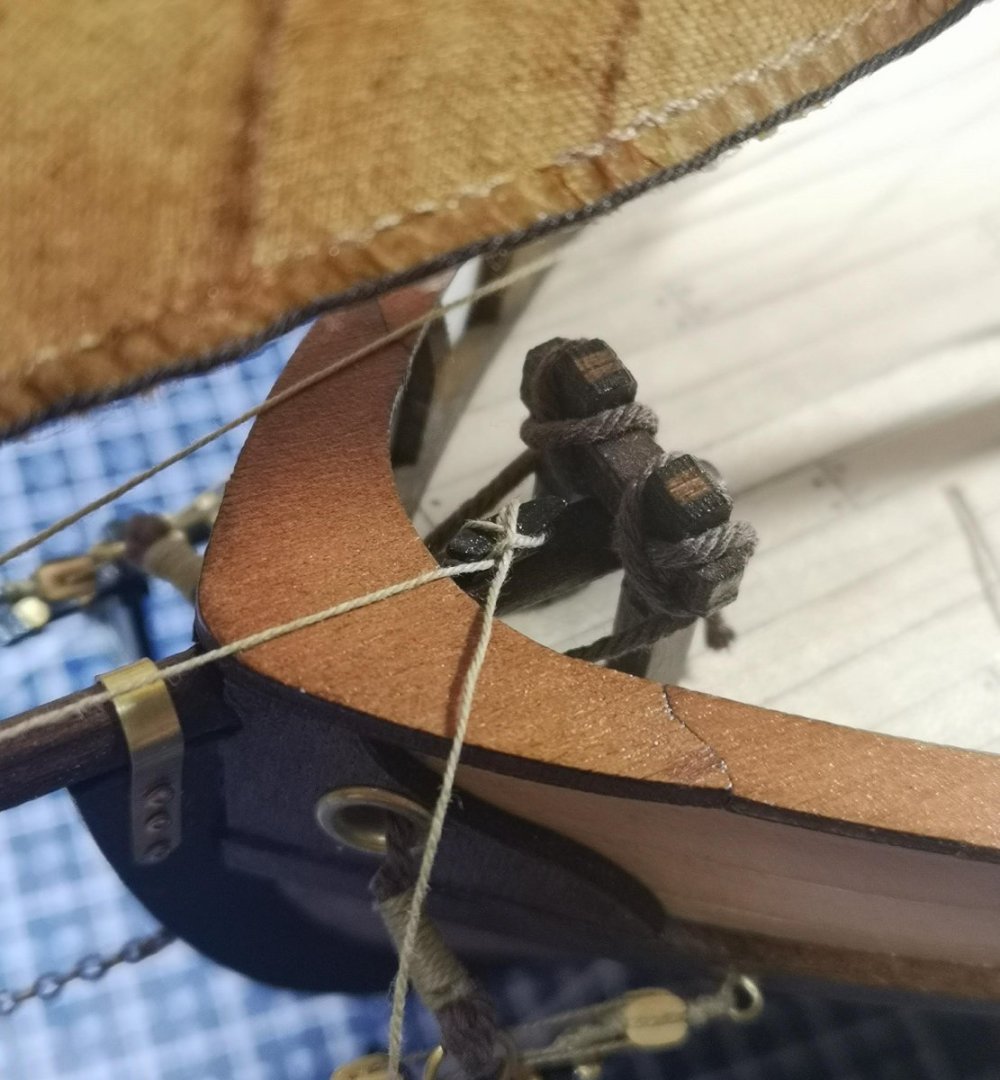
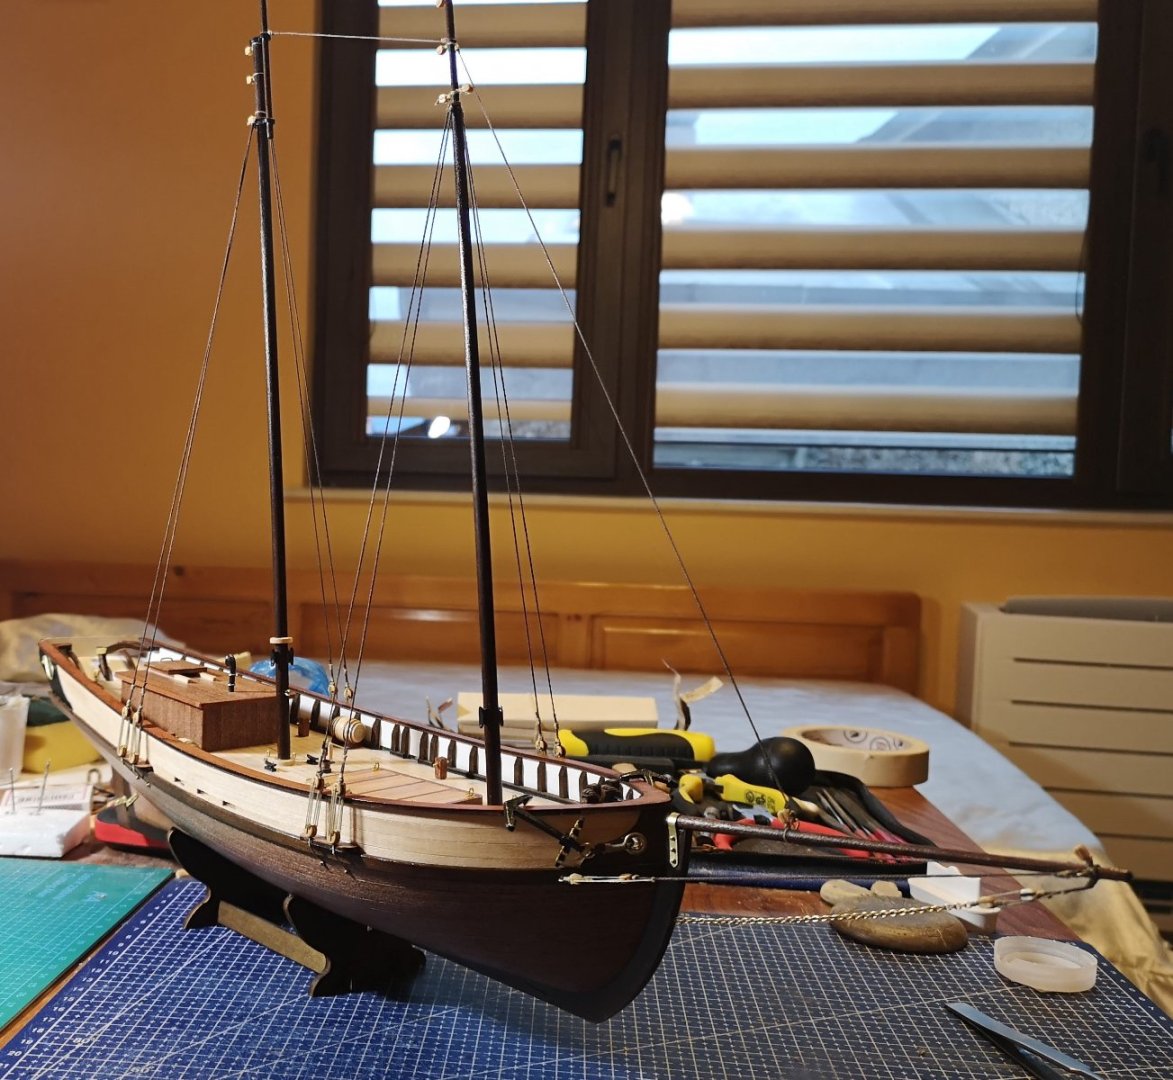
Next in the queue was the foresail. Here the rigging sequence I followed was as follow: throat halyard, gaff parrel, luff lacing, peak halyard, vang, clew line. My advice is not to glue the halyards until the luff is completely laced to the mast rings. All of the mast rings were again sewed, not pushed through the canvas. Well, that was a tricky and time consuming job, but the end result was pretty good: The clew line became better than the other two, maybe because the line was a little longer. For the mainsail the rigging sequence were: throat halyard, gaff parrel, luff lacing, peak halyard, topping lift, sheets, vang, clew line. Actually I rigged the vang before the sheets, but probably the vice versa variant would be better, I think. For me, the main sheets don't look very realistic and this is one of the many mistakes of the kit - there are no cleats or belaying pins for all of the rigging lines. As you can see on the above (and bottom) image, the boom is not perpendicular to the mainsail foot and this is a mistake I noticed later when the sail was fully mounted. With that being said, the only things left to do are the flag and the rope coils. So I can say that the end of this journey is near 🙂


-
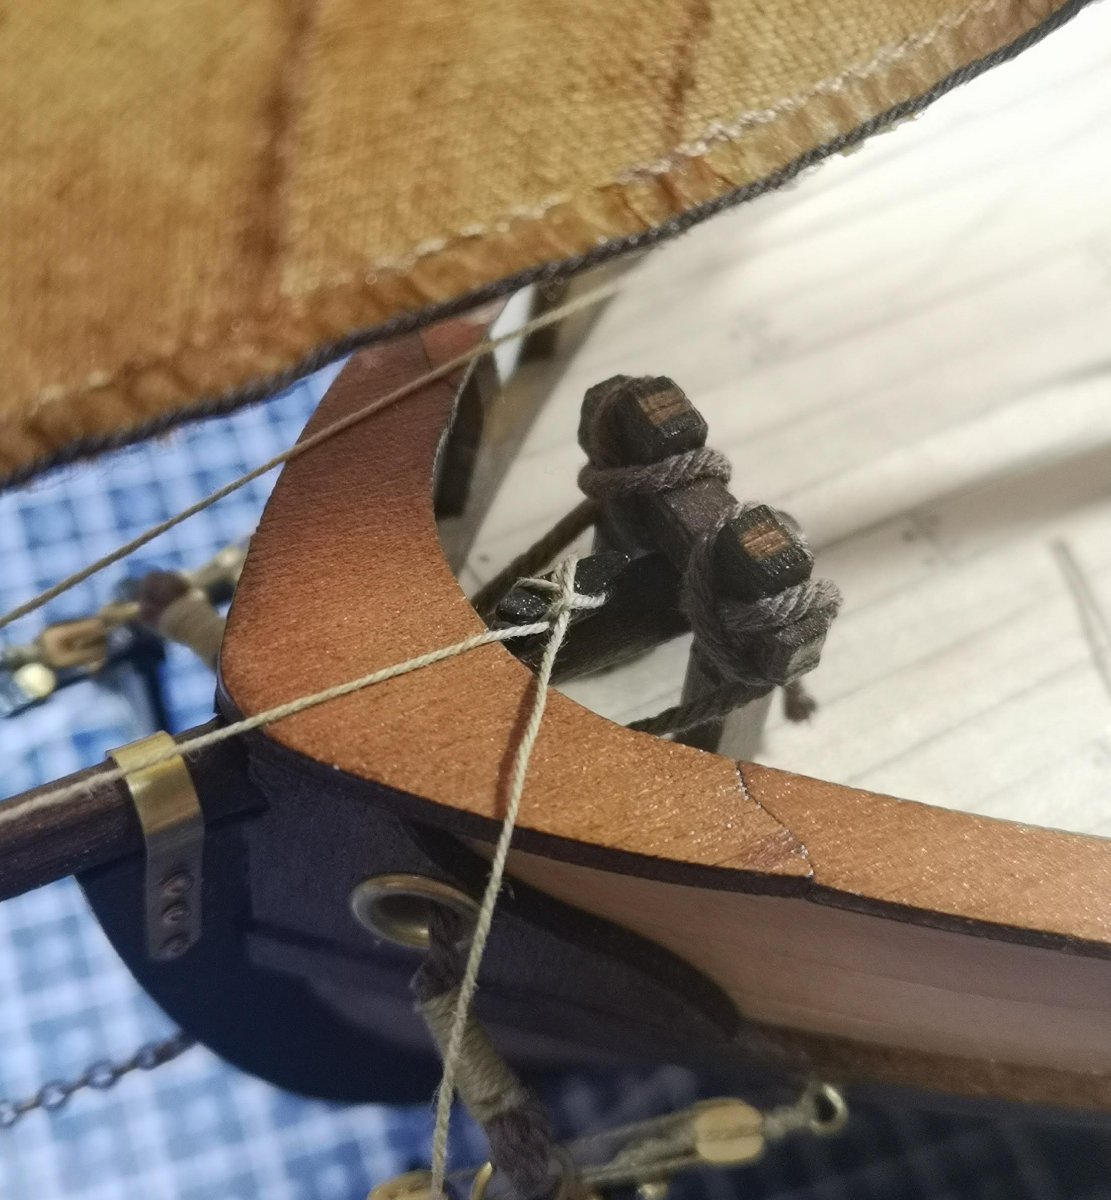
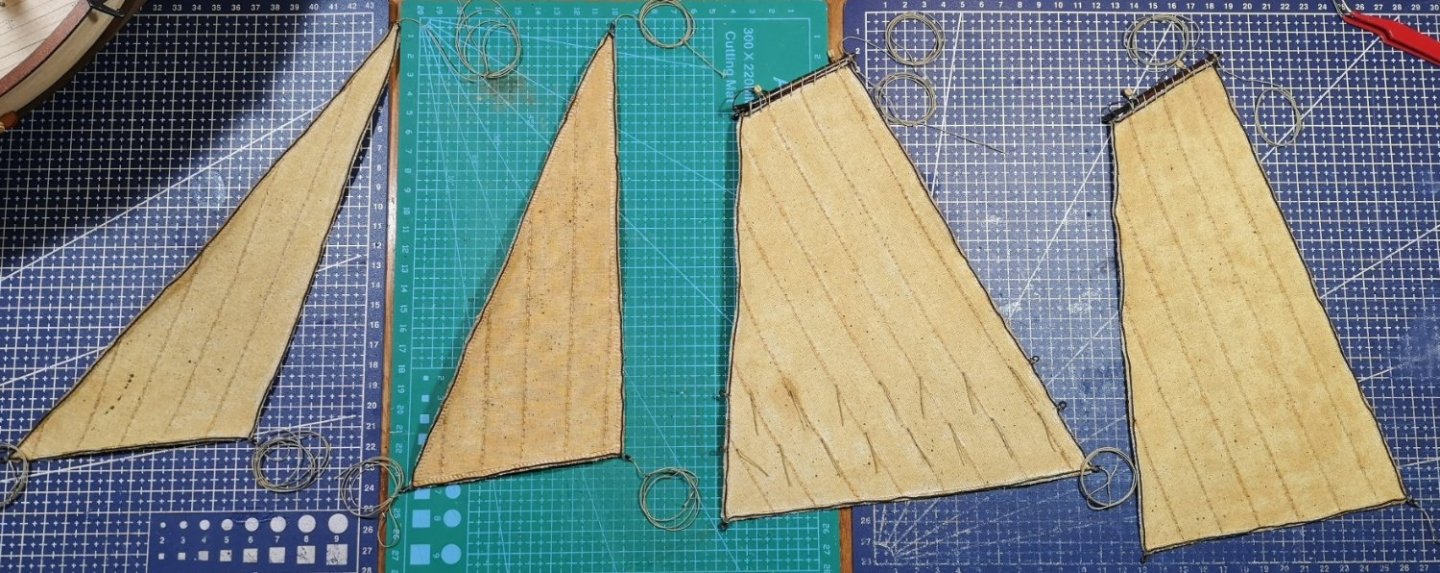
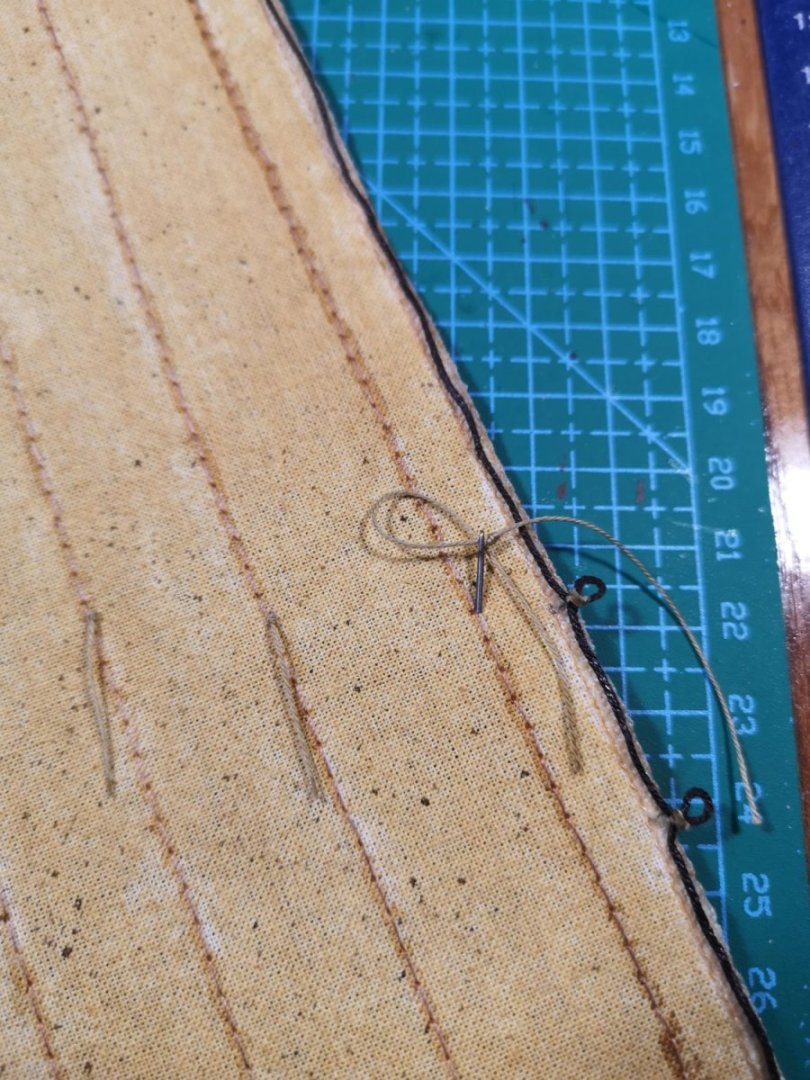
Well, it was a productive weekend and I have a lot to share. To keep the posts not too long, I will split them into several updates. After the sails were fully prepared it was time to install them and the first in the row was the jib. I clipped the halyard and tack line temporary, just to fix the sail. Then sewed all of the small rings, which I already attached to the forestay, using a simple overhand knots. I decided to sew all of the sail rings to the cloth, rather than pushing them through the sails as per the instructions. The distance between each ring was measured in advance and holes for the needle were also made. After securing the jib to the forestay, the halyard and tack line could be permanently reeved. I made a mistake here to reeve the jib sheet now, because it was very tricky to install the lines for the fore and main sails later. The better sequence probably could be to reeve all of the sheets at the end, when all sails are installed. This is how the other jib lines look installed: As you can see for the halyards I used a standard whipping, which in reality couldn't happen. But since there are a lot of factual mistakes in this kit, for me the visual appearance is more important . For the sheet lines I decided to make something interesting, which I haven't done before, but I've seen on other ships. Don't know the actual term and if it's appropriate for my Polaris, but it looks pretty good: The flying jib was installed after that in the same sequence as the jib.


-
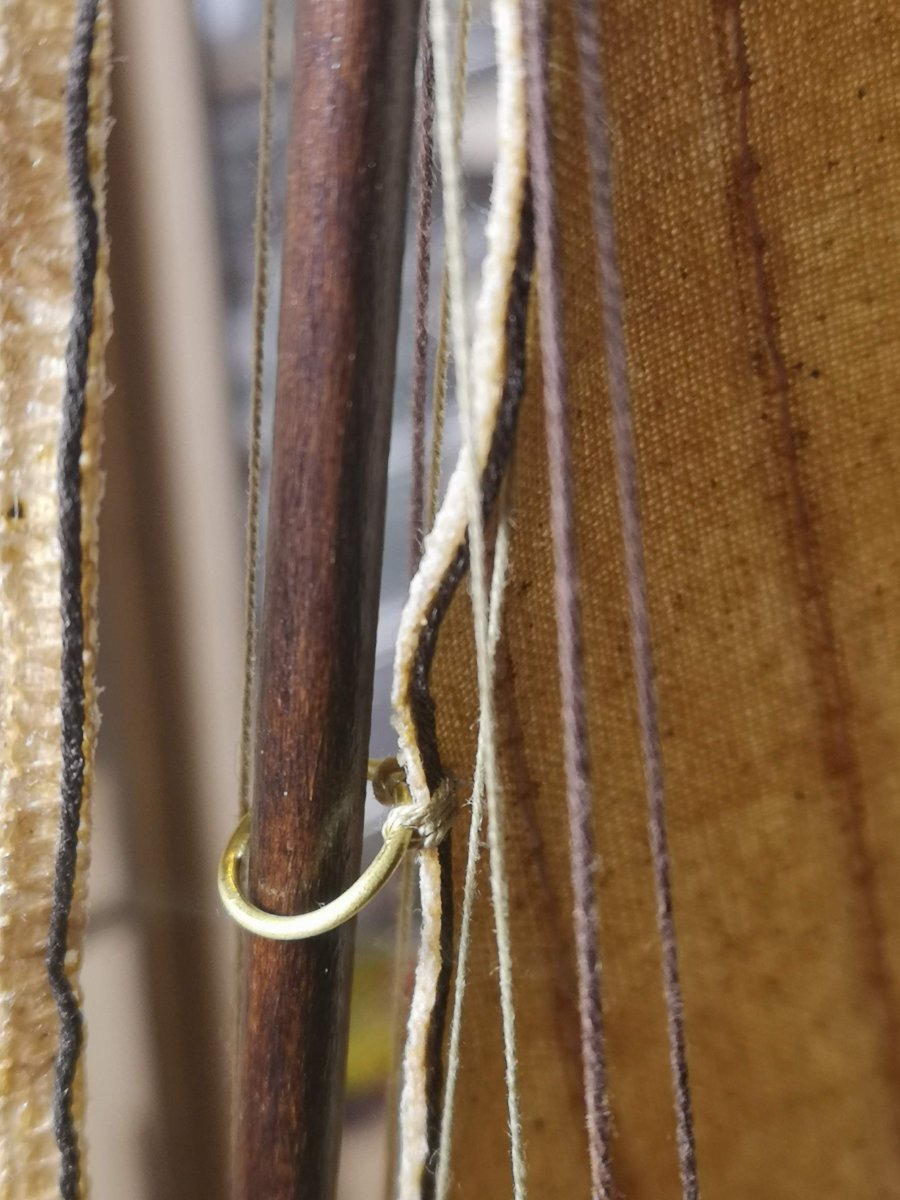
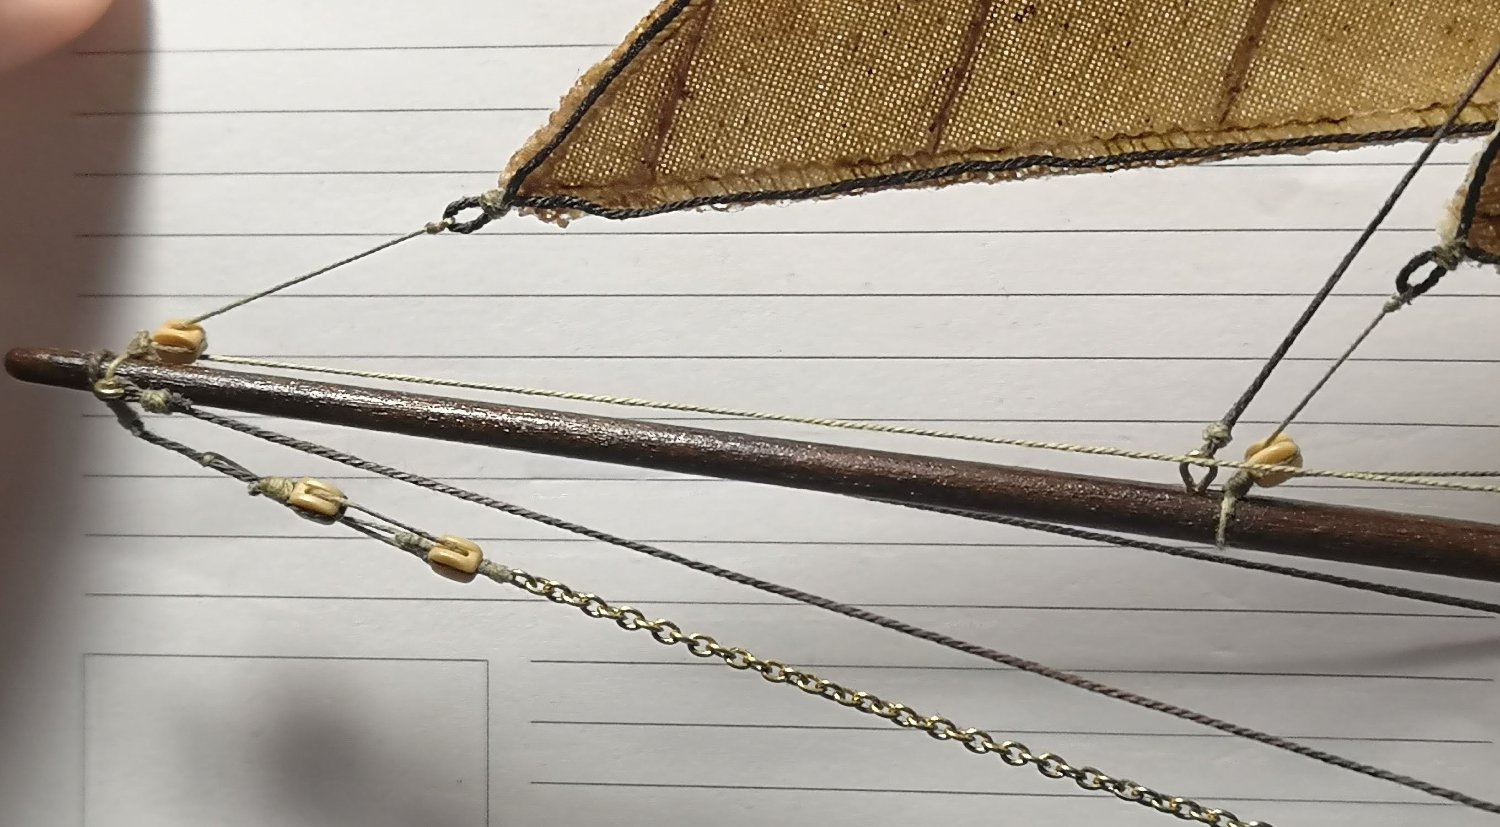
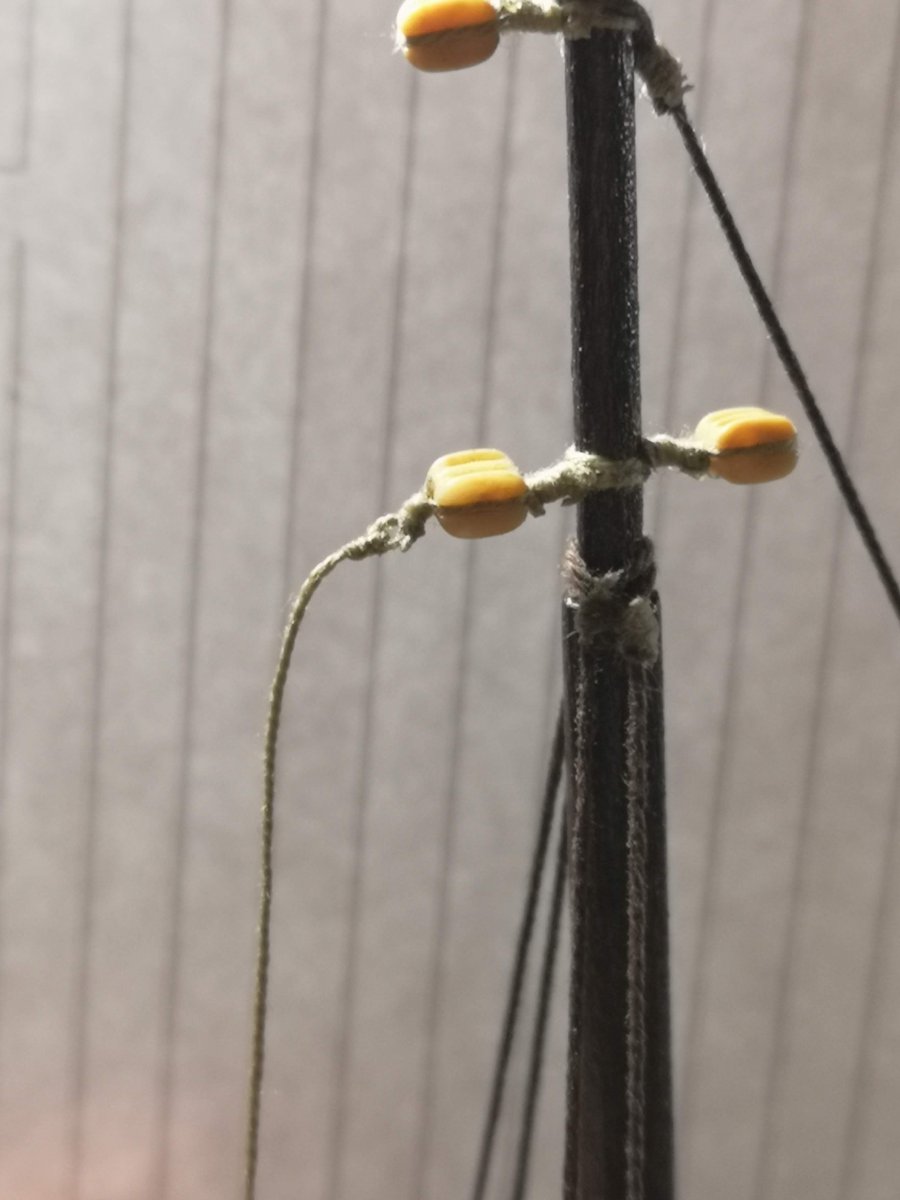
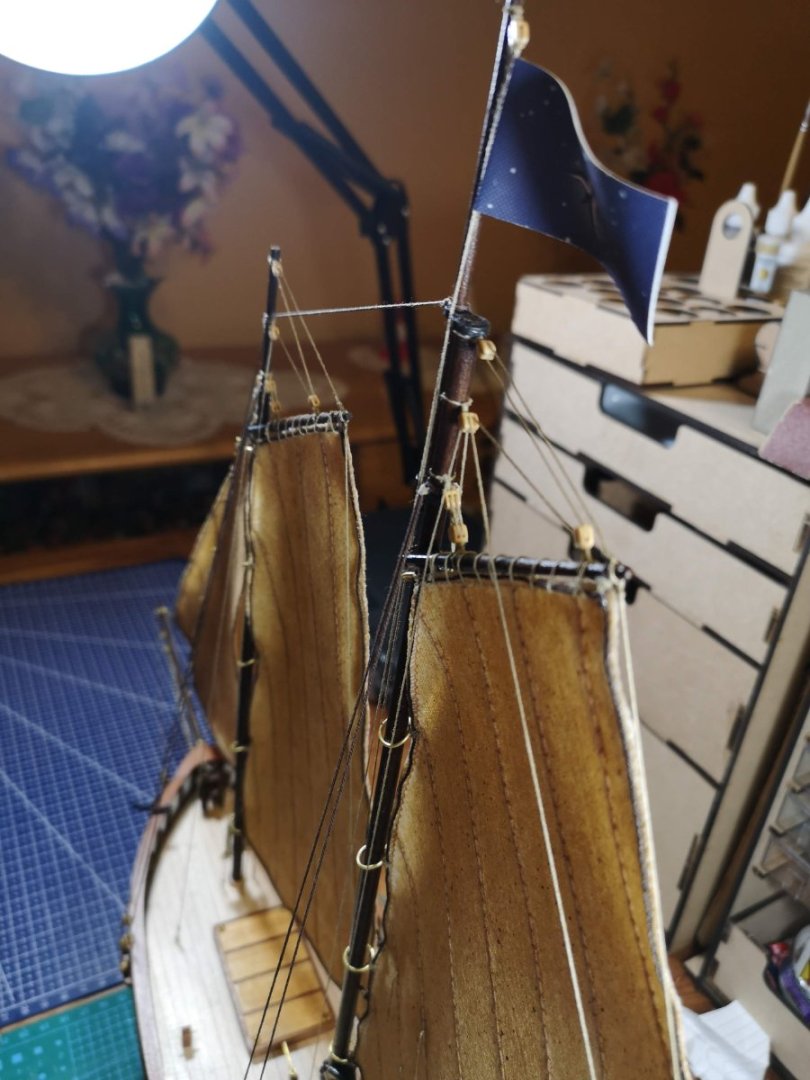
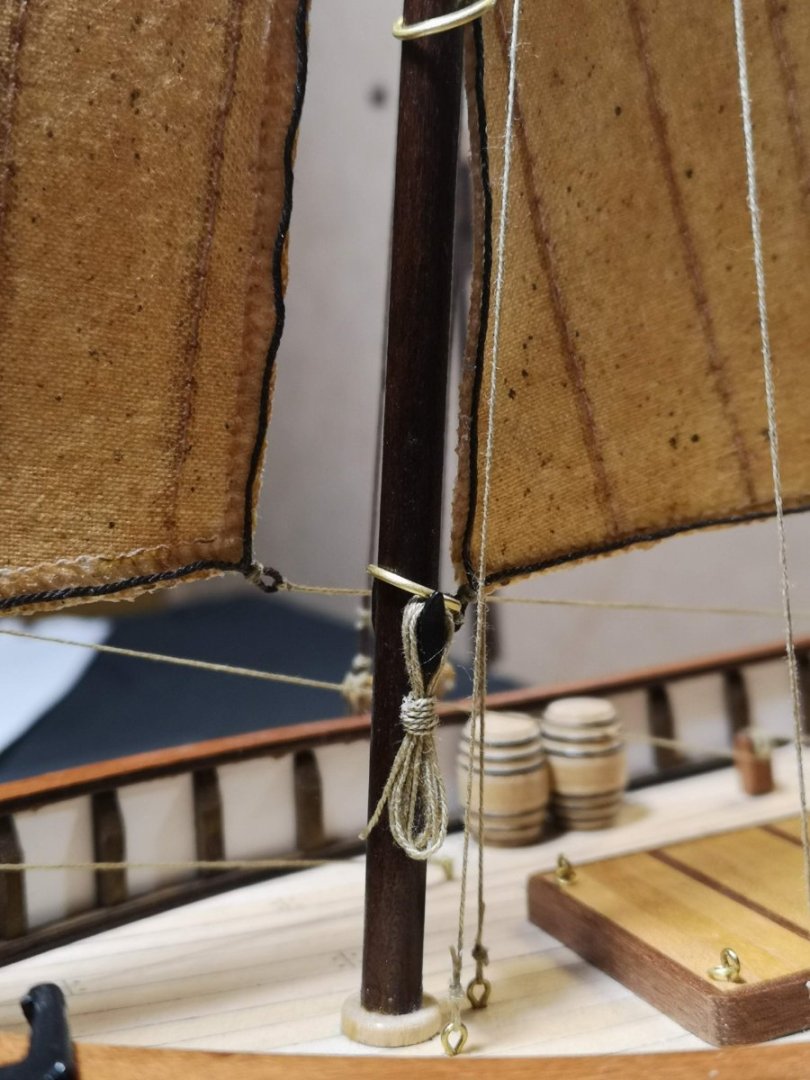
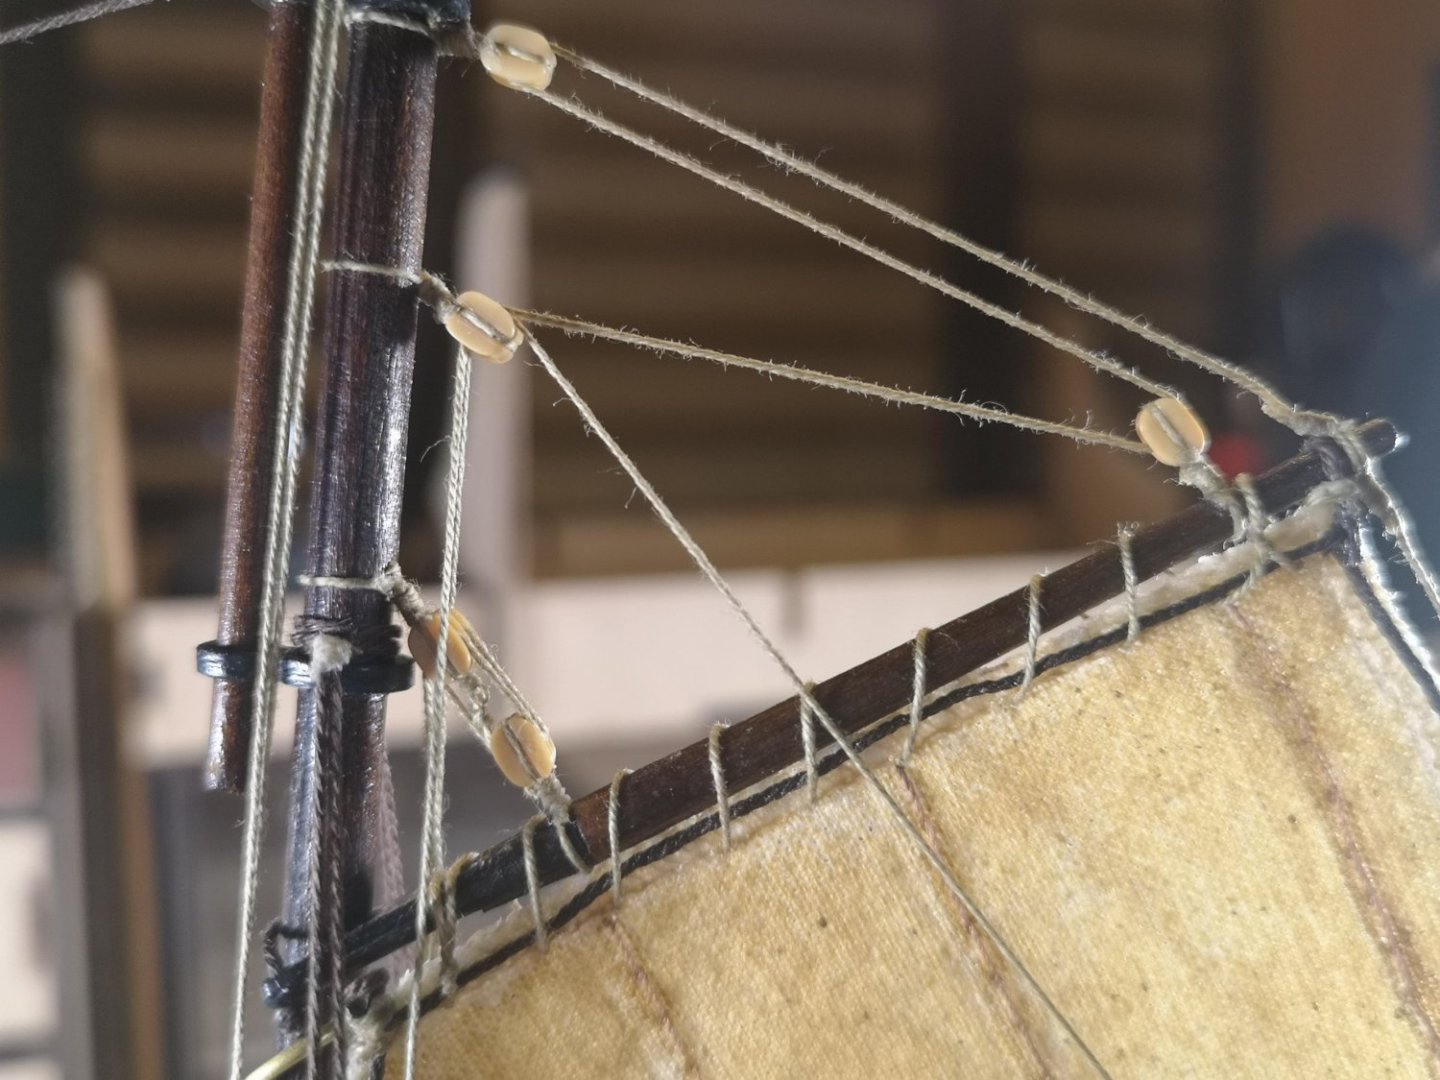
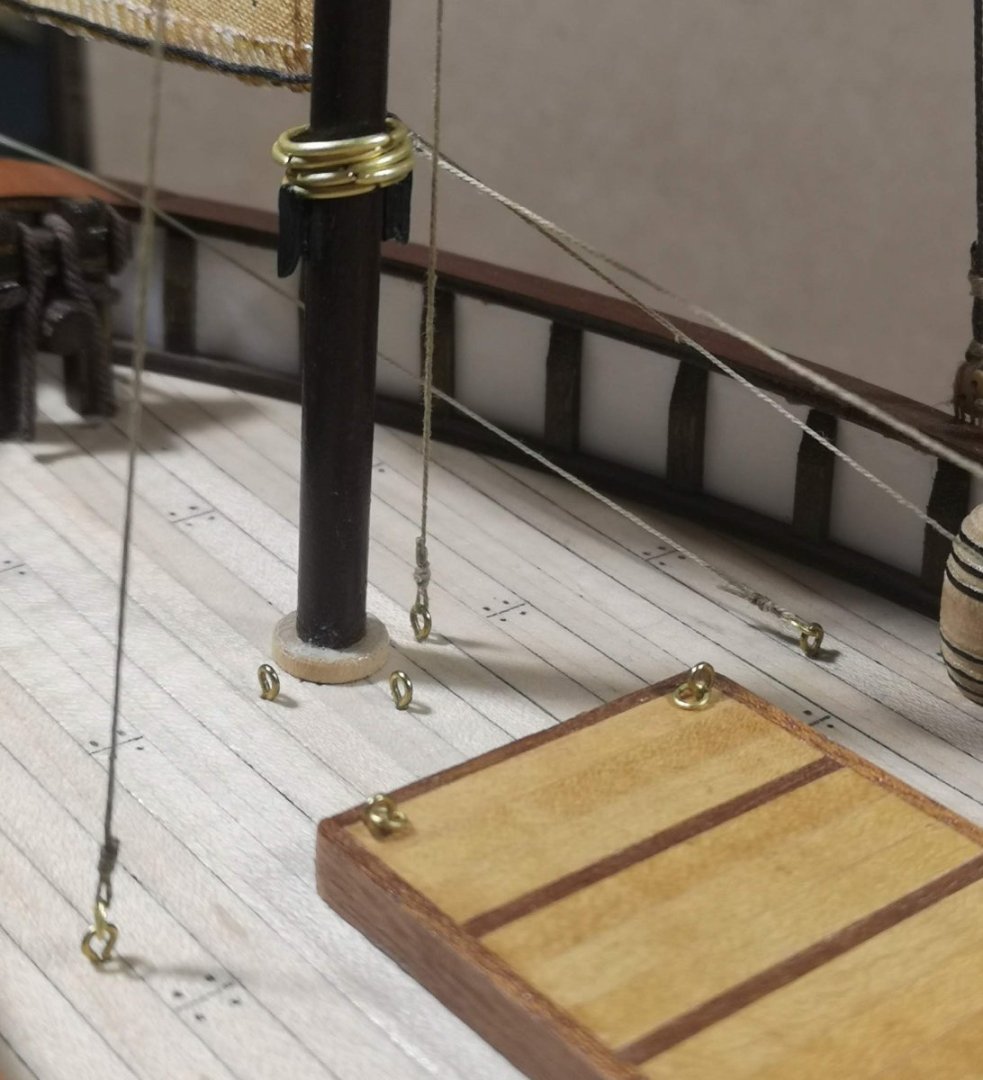
Quick update after two weeks away from the workbench. The last step before installing the sails is to prepare all of the needed running lines and to bend the sails to the gaffs. I used a halyard hitch knot to reeve all of the lines needed for jibs heads and tacks and all clew cringles. On the fore- and mainsail I didn't install other running rigging. The same knot I used also to install the lines for both throat halyards and main sheets: One advice here is to install those lines before attaching the blocks to the spars, it would be much easier. Well I didn't consider that when I built the masts and did it the hard way. I bend the sails to the gaffs using a single raw line with square knots in both ends. At this moment the vangs and peak halyards were also installed to the gaffs: And the last thing that I made before attaching the sails were to install the sails rings (don't know the actual nautical term) around the masts and on the forestay. Again, I should have done this before the standing rigging... And this is the final look of all sails (I decided to not fill them with air and leave them as they are at the moment:


-
I am still building my first model OcCre's Polaris - 1:50, the sails are almost done and are ready to be installed. I've used a Pine and Walnut dye for weathering and diluted PVA to glue the boltrope, but still thinking about the shape. I've read this wonderful topic and learnt some really nice techniques for sails making, but still cannot decide: "To fill the sails with wind or not? If yes, what would be the best method to use?". The sails I'm using are the ones provided with the kit and are made from cloth (probably cotton). I've read somewhere that the potato starch and the diluted PVA are 2 possible solutions, but I'm not familiar how to use them properly for this purpose.
-
Thanks for your comment, Chris! Yes, the one that you sent looks fantastic and a lot better than mine. For the next model I will try to do a better job with the bolt ropes, maybe will need to be more patient and concentrated on this step.
-
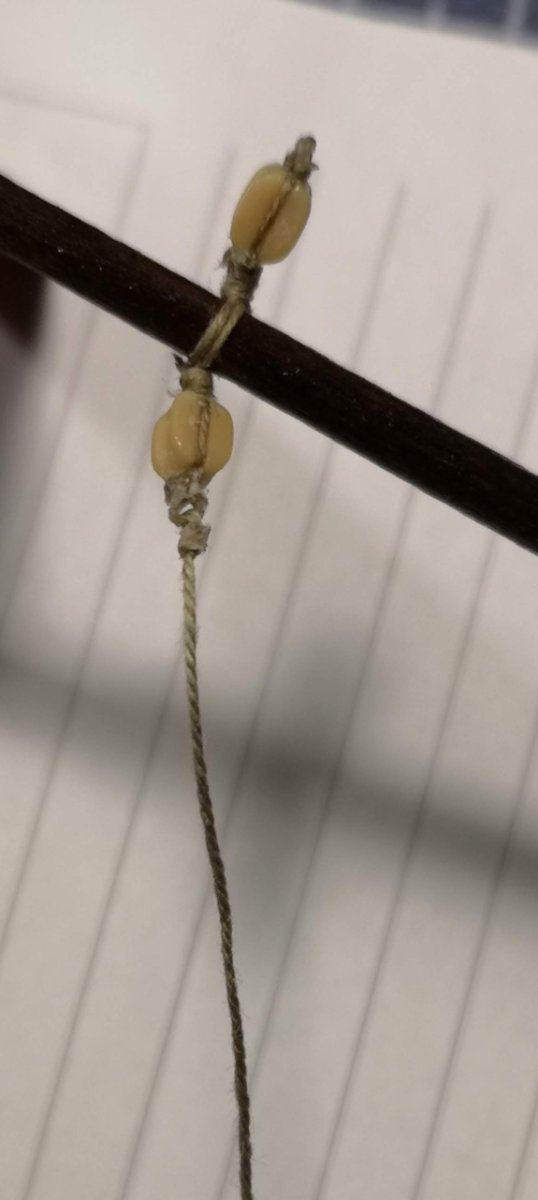
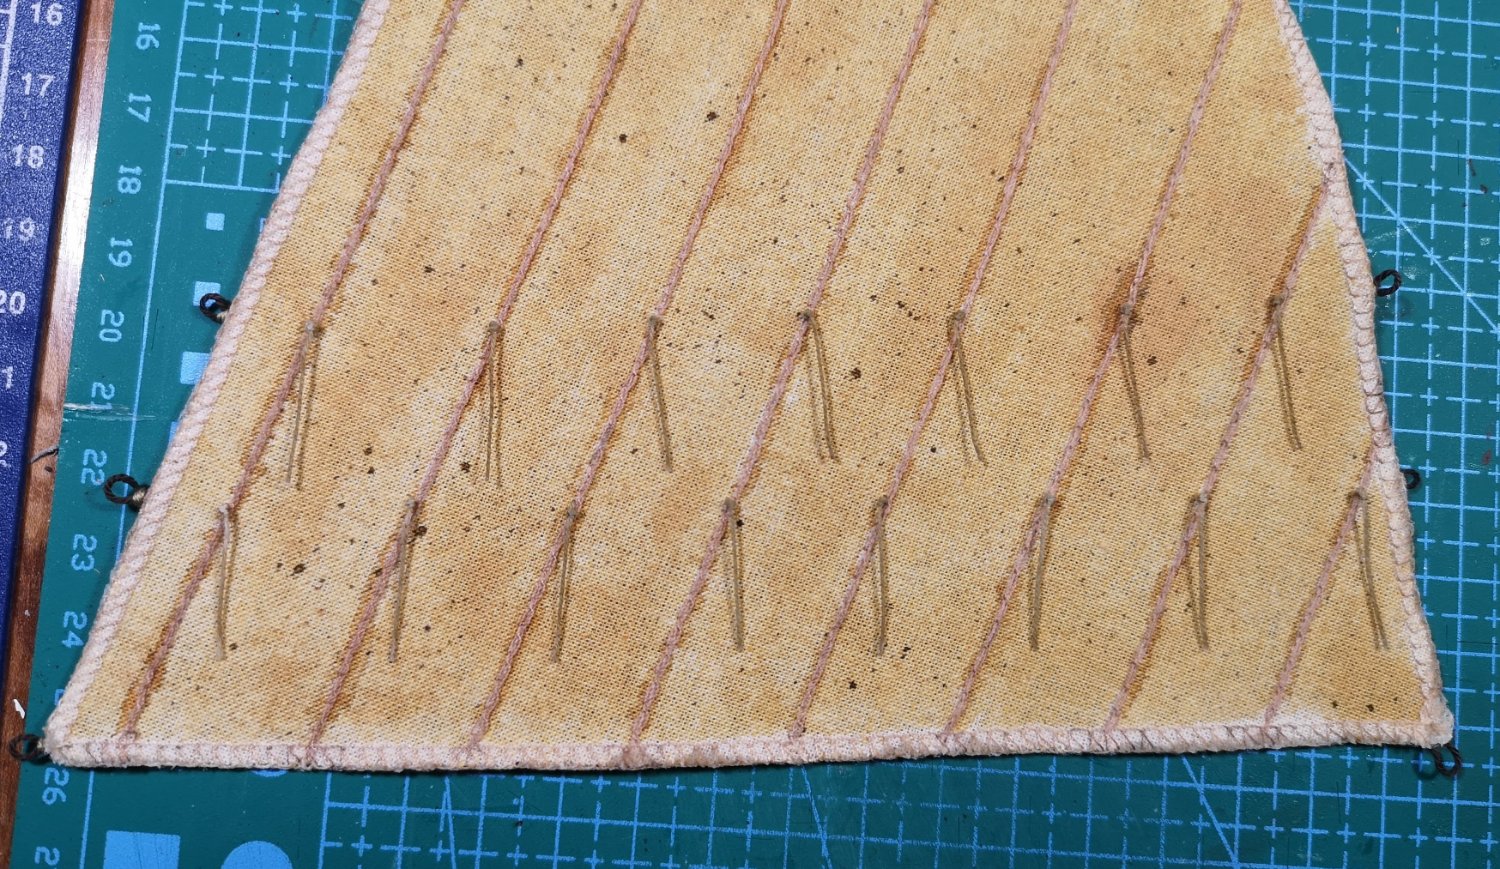
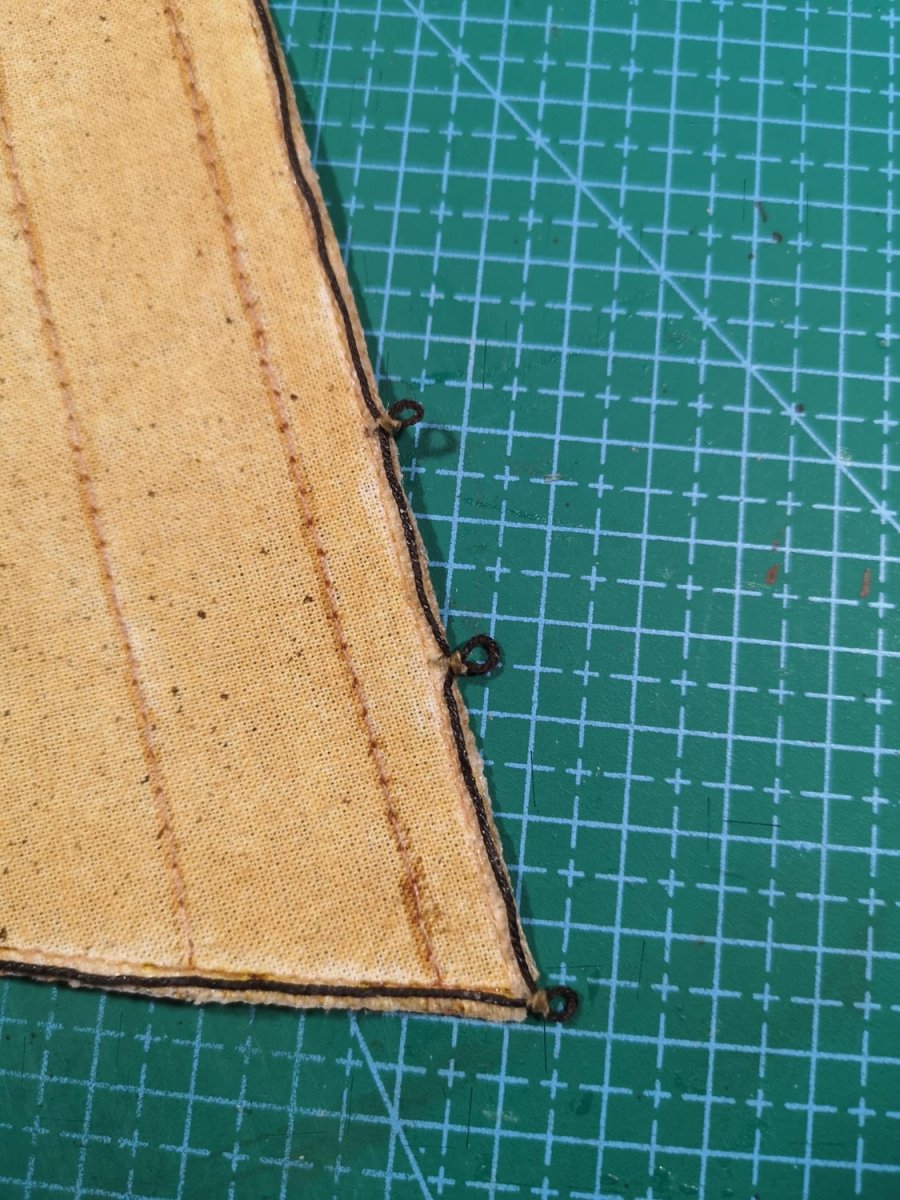
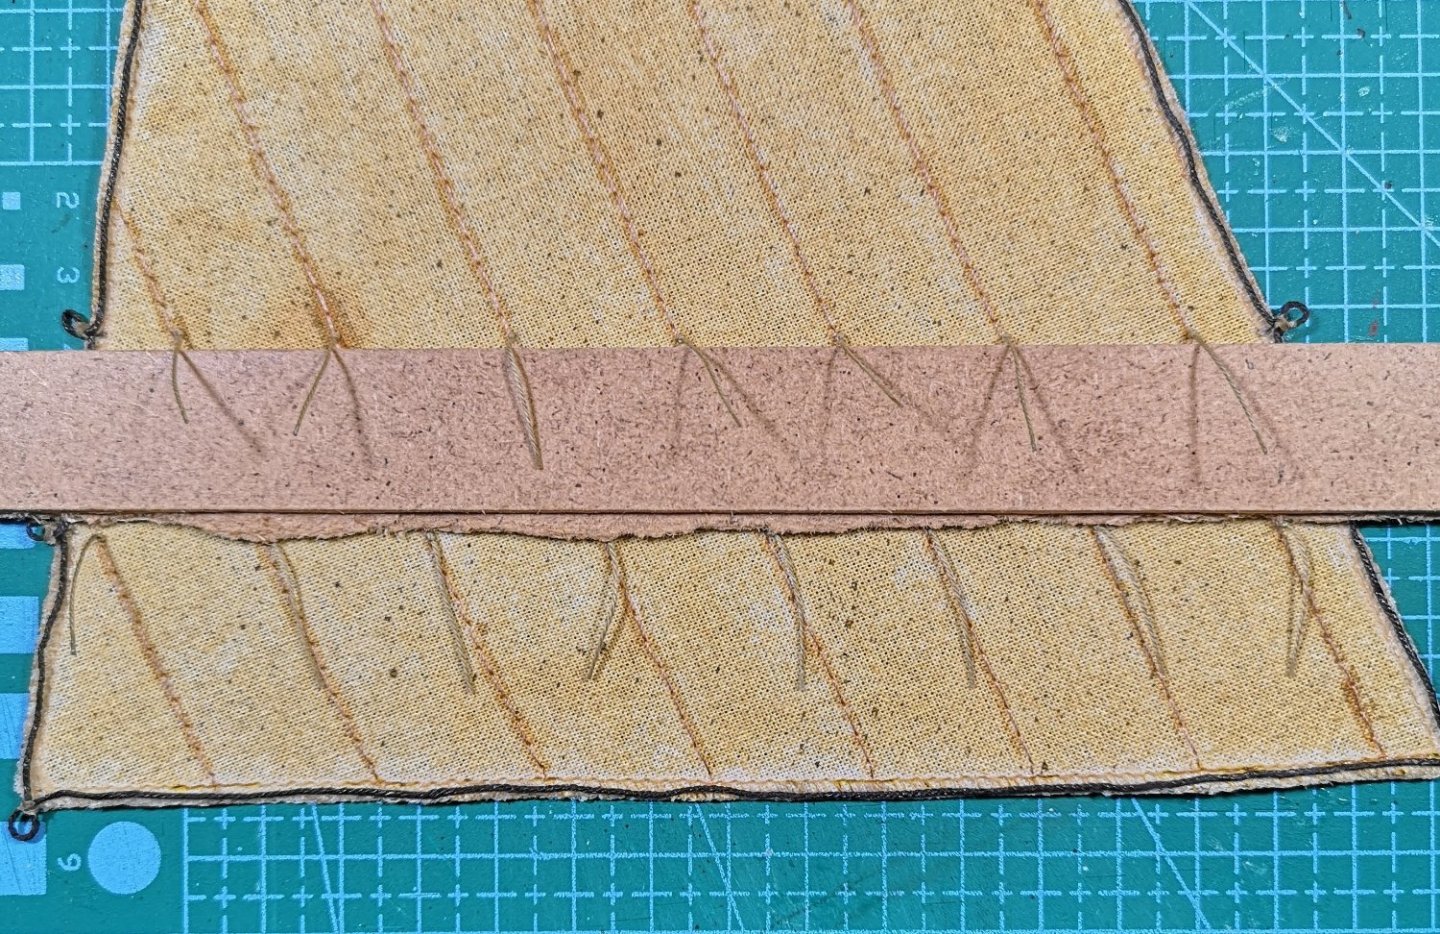
Sails preparation - reefing lines I decided to make two reef bands just on the mainsail, because in this kit the foresail doesn't have boom. And I think, that in reality, a sail with reefing lines without a boom couldn't exist. I made a research what should be the width of the intervals between each reef band and how many reefing points should be made on each band. I found somewhere that the reef bands should be made intervals of 12% of the sail's luff length - in my case around 2.4cm. I decided to not follow this rule strictly and made the lower band 3.5cm from the foot and the second band - 2.5cm from the lower band (6cm from the foot). In these two bands I punched a hole at each seam - 15 reefing points total. The length of the reefing lines I calculated "by eye" - 2cm each (for both bands). For the reefing lines I used OcCre's 0.15mm raw thread. I cut a line with length around 10cm and made a double overhand knot somewhere in the middle. Than with a needle pass the thread through the reefing point on the other side: On the other side first I removed the needle and then tied another double overhand knot as close to the cloth as possible. Then on each side I cut the excess thread by placing the line over a metal ruler and cut exactly on the 2cm. Before that I put a drop of CA on the place where I want to cut, just to make the line stiff and easier to cut with a knife. With this method all of the reefing lines should have the exact same length on both sides. When everything was ready I decided to straighten a bit the reefing lines with a diluted PVA. I've put a thin piece of scrap wood between the cloth and the reefing lines and then straighten them with a brush and glue: After repeating this step for each band on both sides of the sail, this was the final result (port and starboard sides):


-
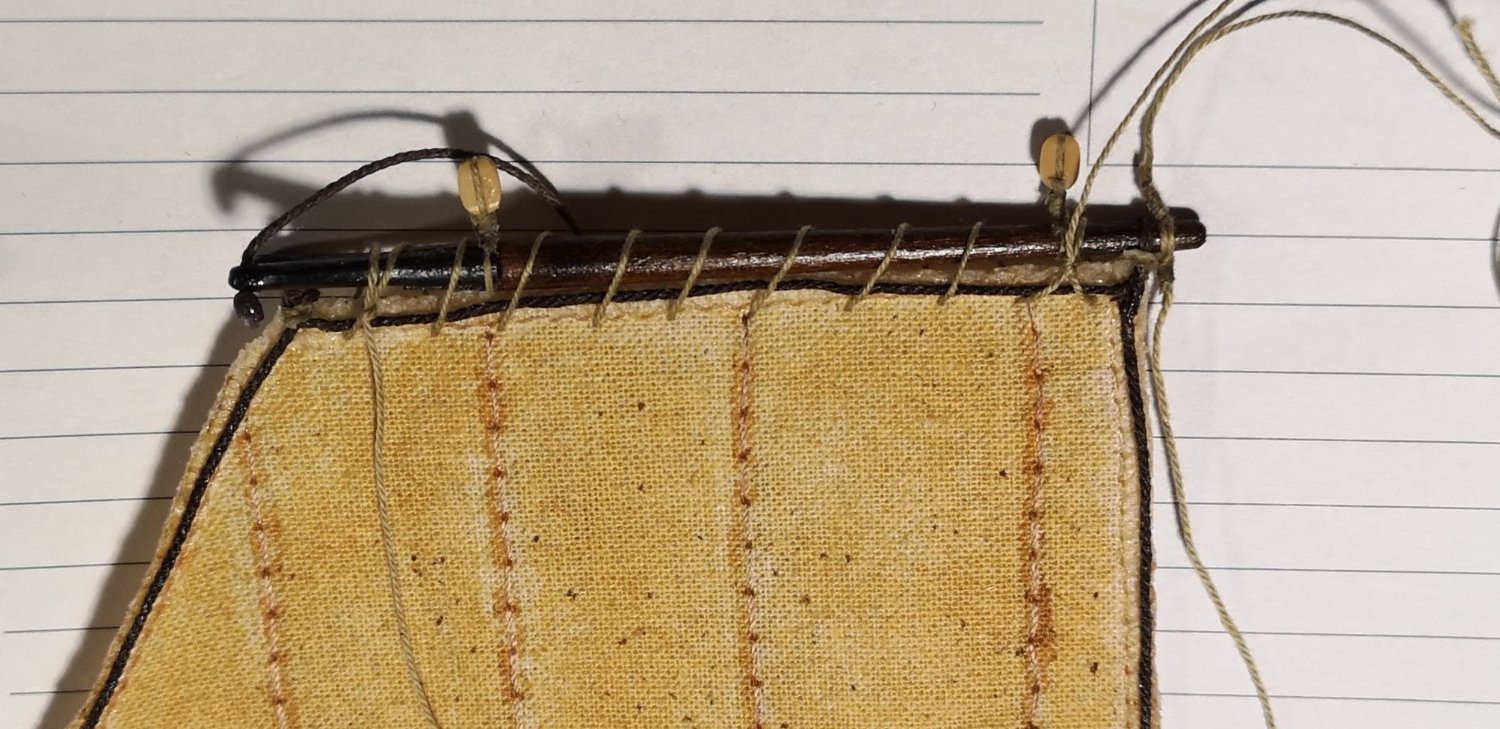
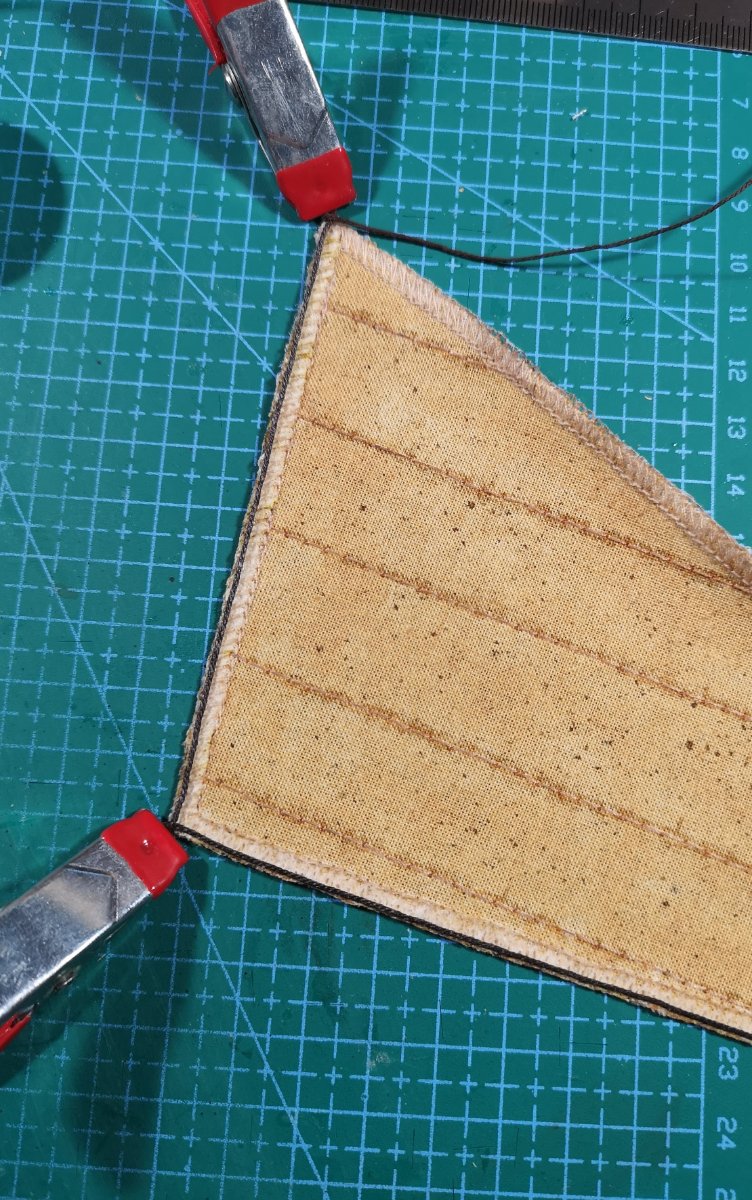
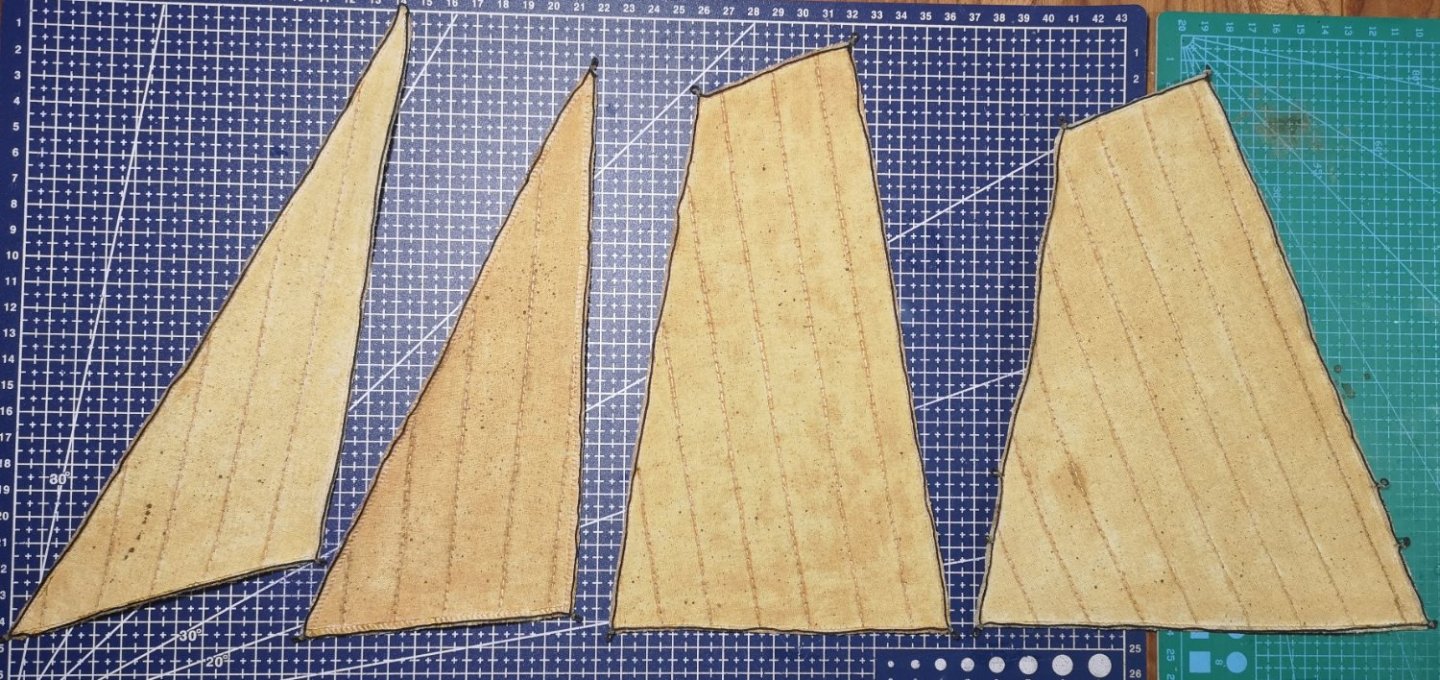
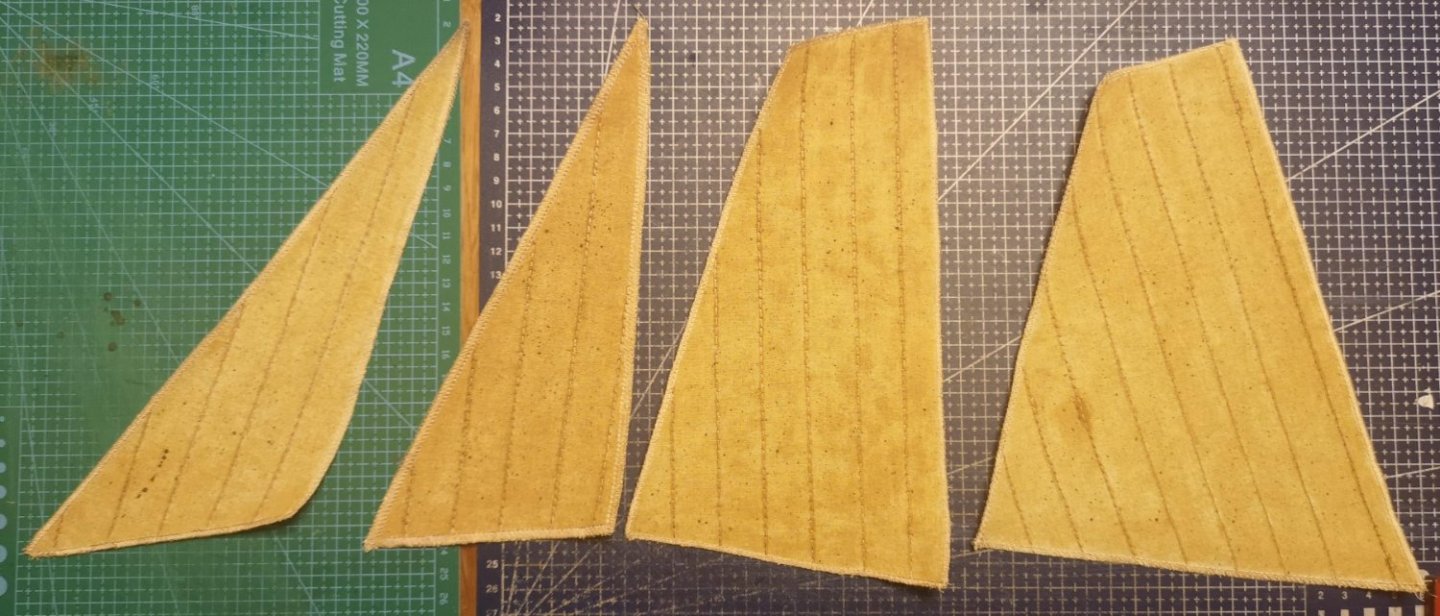
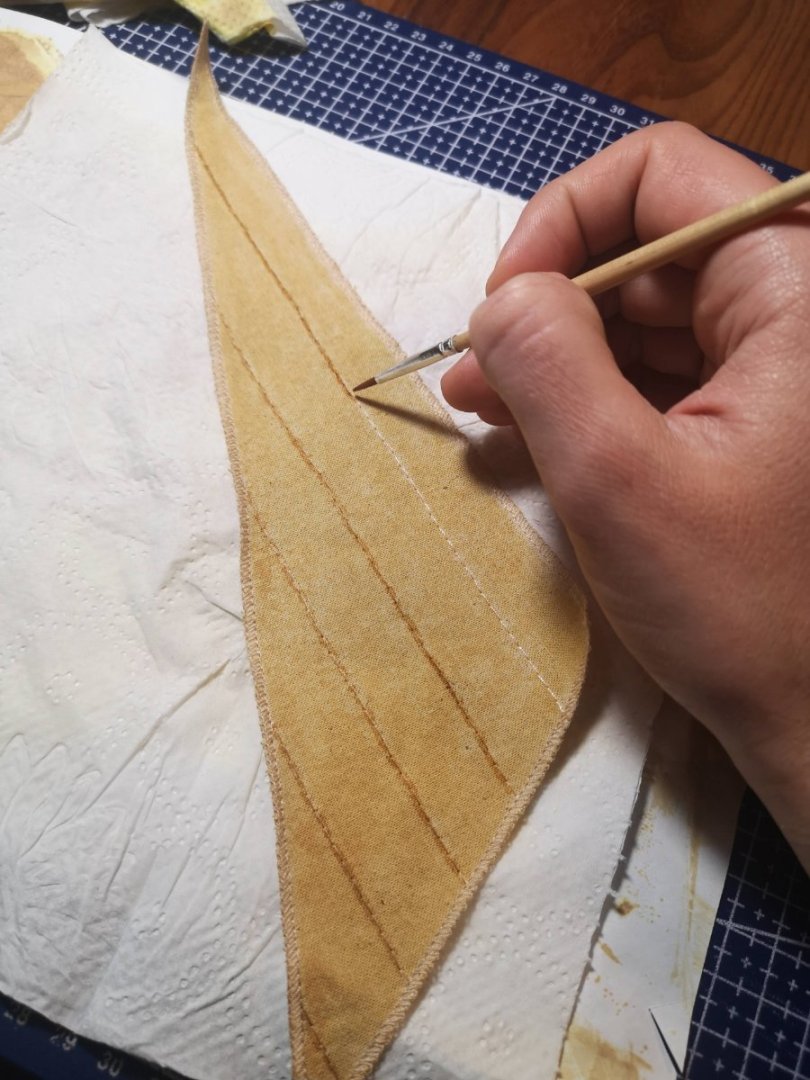
Sails preparation - bolt ropes. Hi all and Happy New Year! The sails work continues with the installation of the bolt ropes. First of all I wanted to remove the fuzz from the edges of the sails by using a tiny layer of CA - just a touch with the needle. You can see the difference on the image below - the left edge is already prepared and it looks cleaner than the right edge: For the bolt ropes I decided to glue them with a diluted PVA and not to sew them. For sure the right way is to sew the bolt rope on the cloth, just like in this post, but for my Polaris I think the 0.15mm raw thread will look out of scale with the 0.50mm brown bolt rope. Also I am pretty sure this will be almost an impossible task. Probably a bolt rope with bigger diameter will do the job, but in my case, the threads are just too small. I applied the glue on the port side of the sails, as closer to the edge as possible and put the bolt rope on it. On each corner I left some rope for the cringles: Here is the moment to say, that I tough this would be an easy job. Well it wasn't. The bolt rope wrinkled too much on some places and extra PVA was needed after some time. For sure this step could have been done better, but still I'm satisfied with the result. Finally when the glue dried completely I made seizing around the cringles: As you can see on the last image, I left extra cringles on the main sail for two reef bands, but will explain this step in detail in my next post. This is how the sails look after the bolt ropes were installed:


-
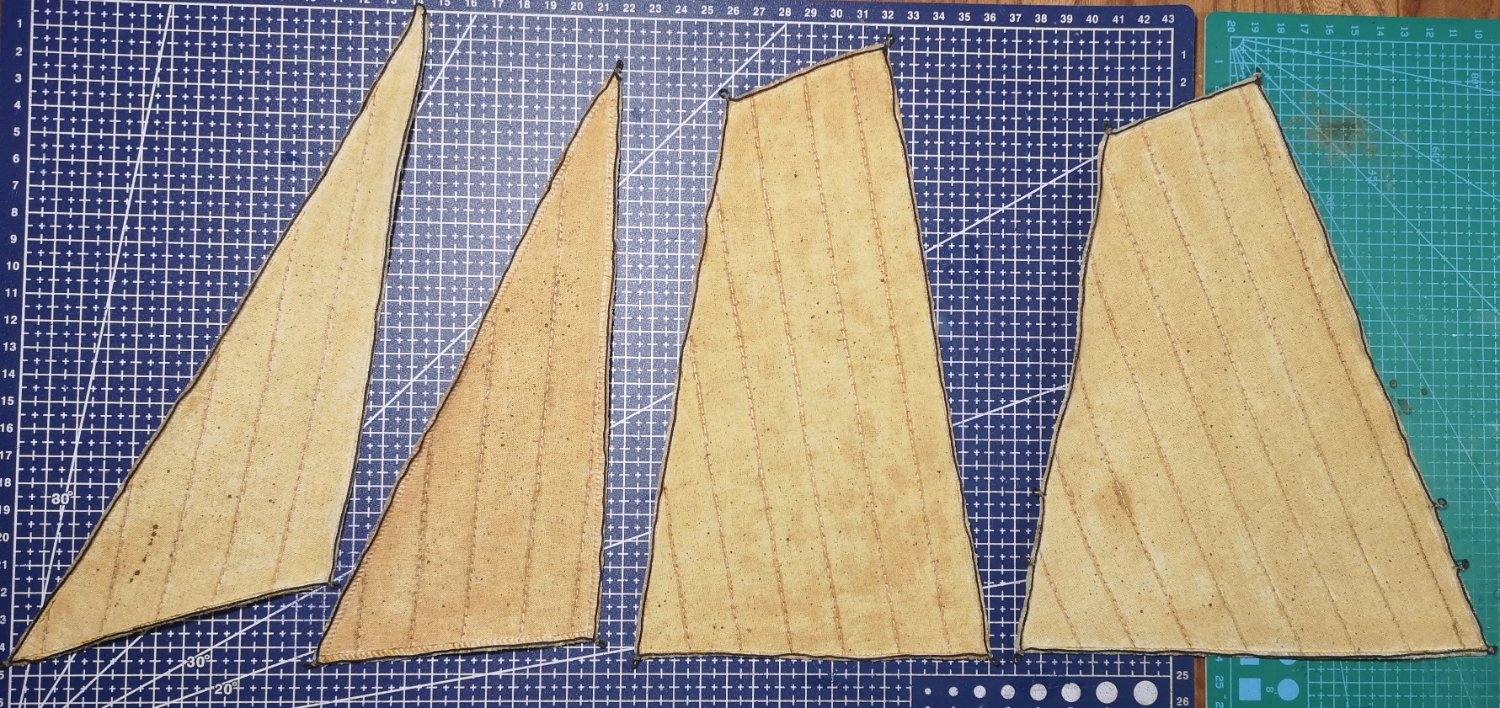
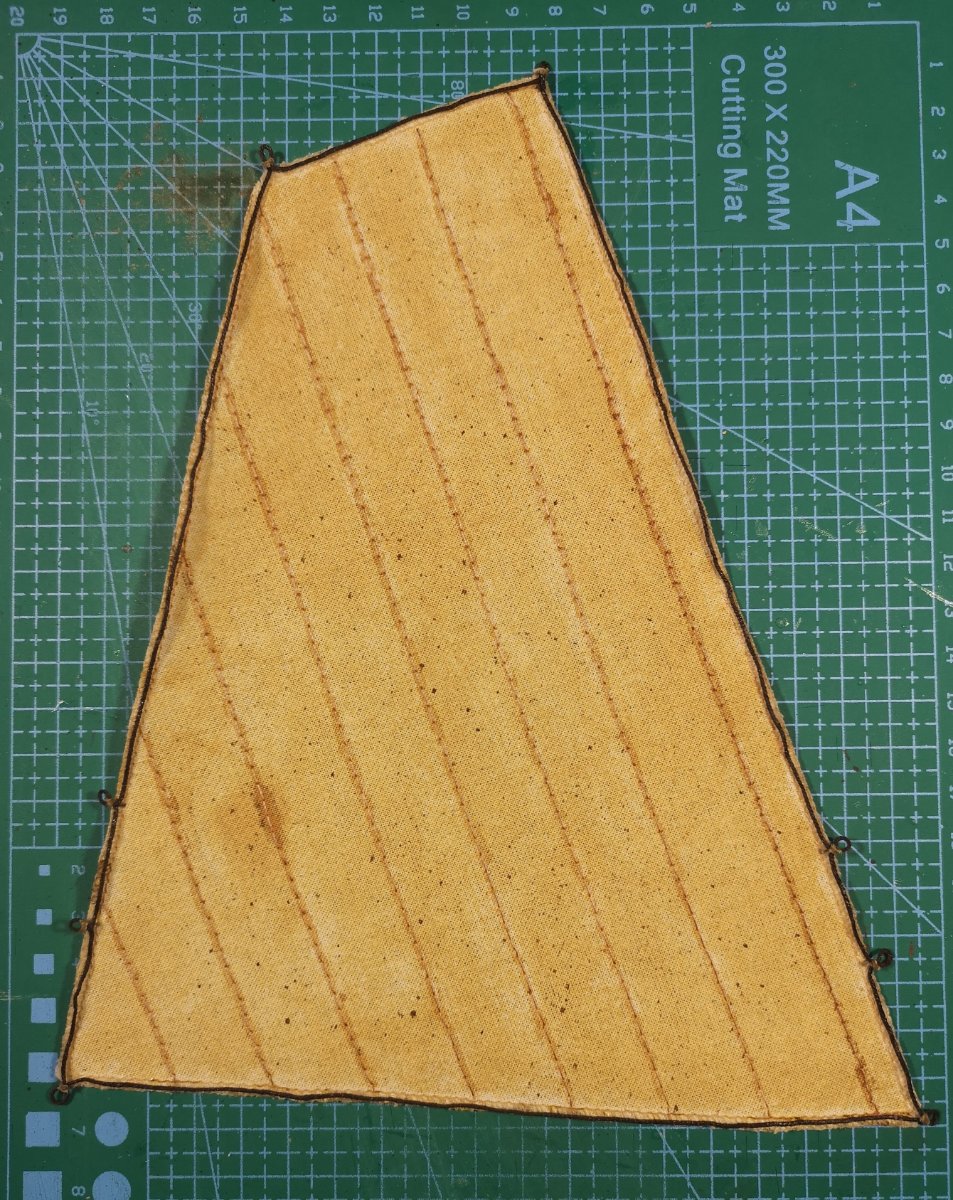
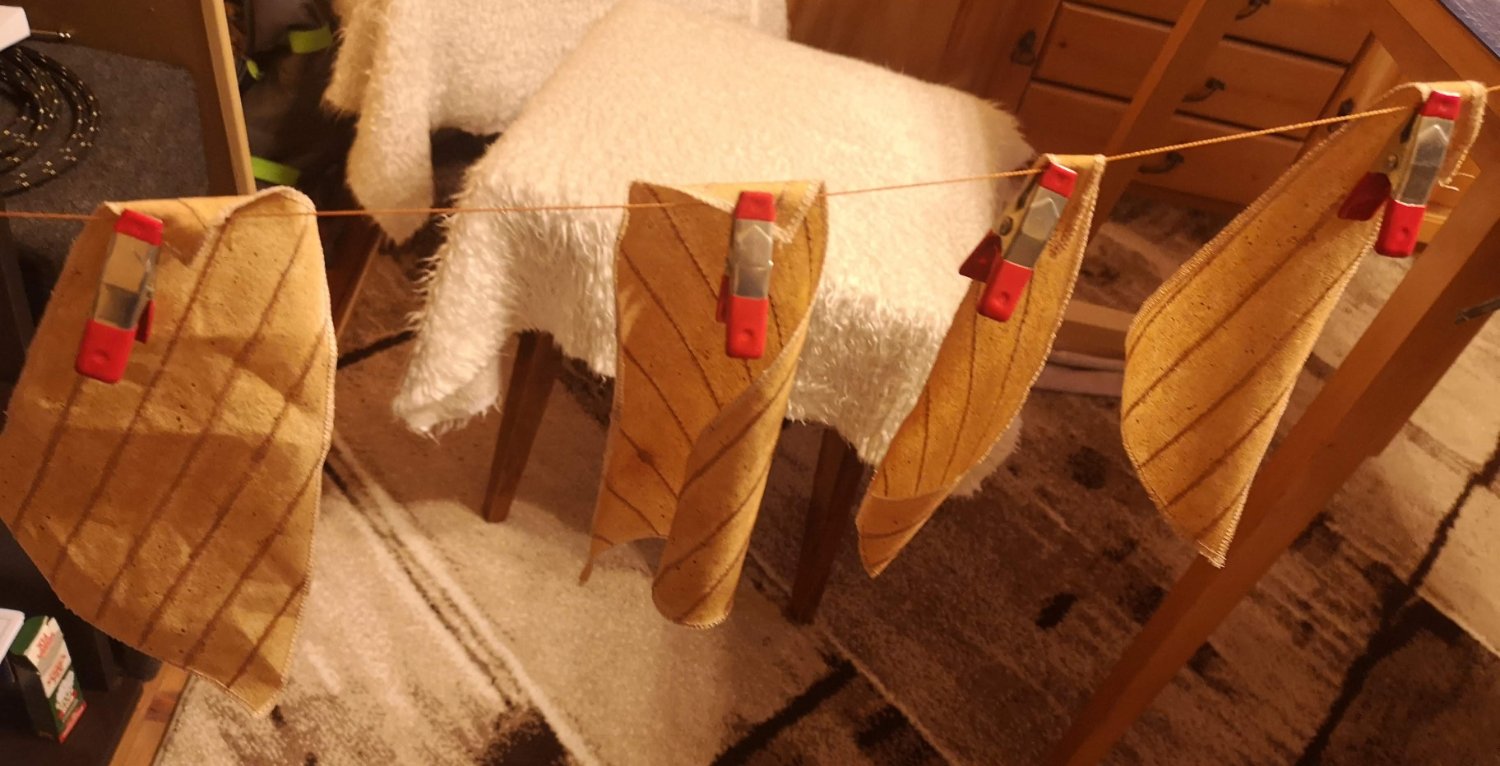
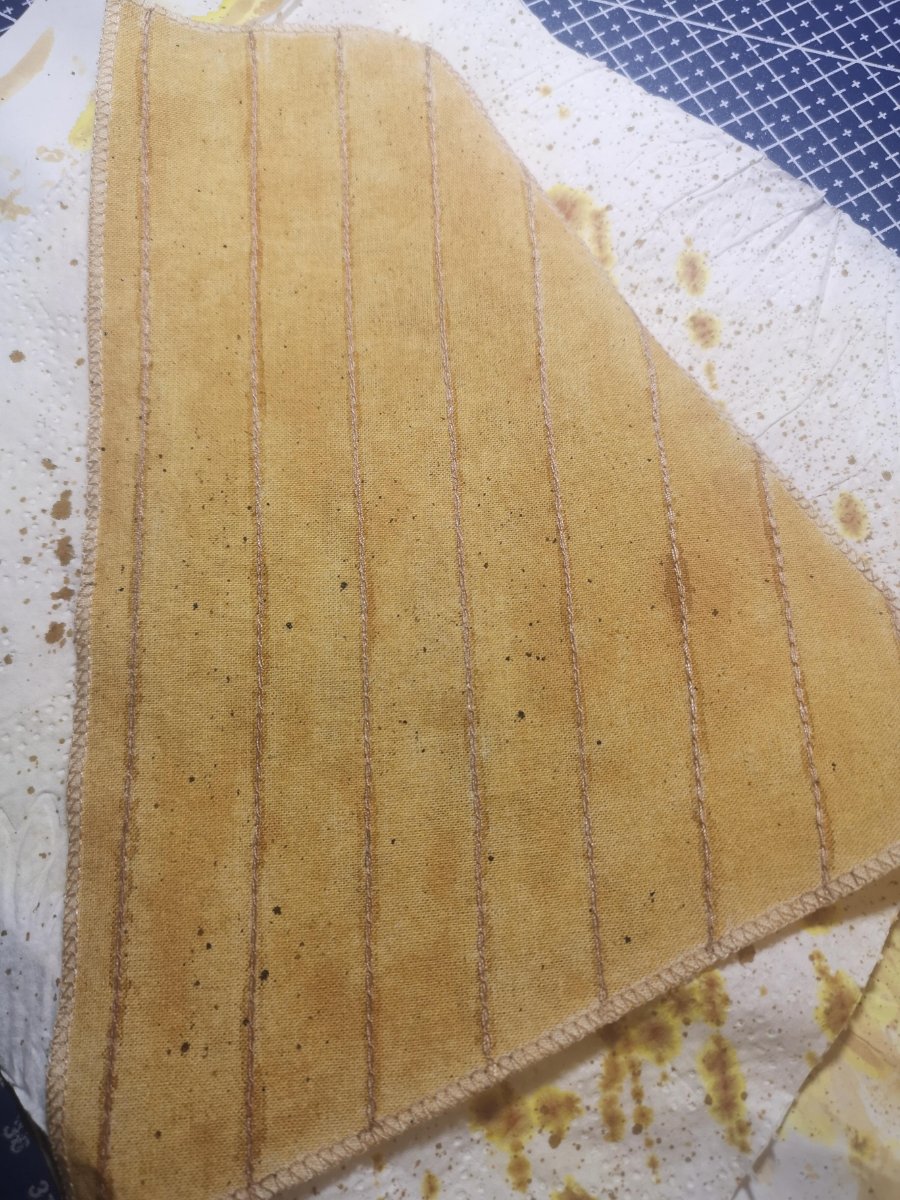
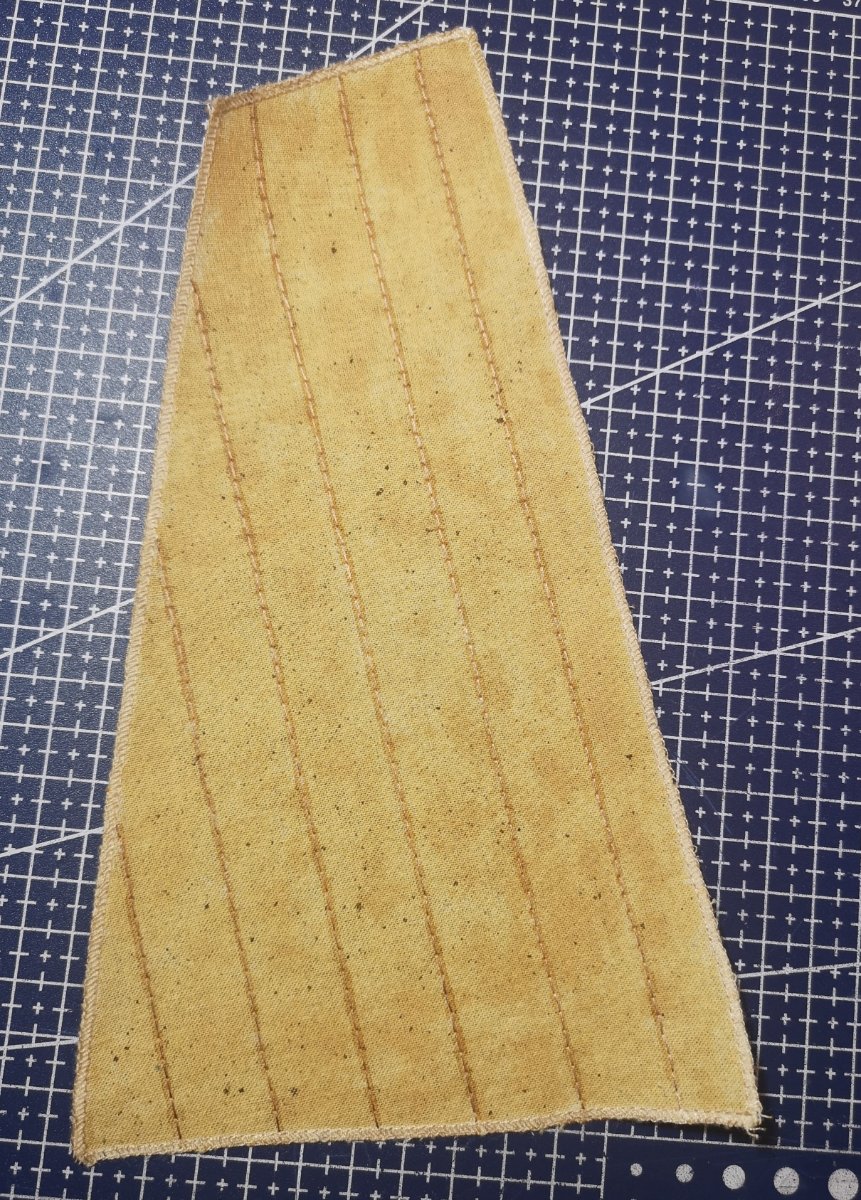
Sails preparation - aging. As a said in my previous post, the OcCre's Polaris sails are really awful, but because I already bought them I decided to use them anyway. For this purpose I've read as much as possible (almost every topic in MSW with a keyword "sails" 😄) and decided which techniques and methods could be helpful for my build to make the sails as good as possible. Here I will link some of the most helpful and informative topics, that I think would be useful to other guys also: How Realistic Can One Make Sails? - nice thread with many external links to other good resources and discussions. Gives the overall idea of what the sails should look like and how to handle different issues. A method for making panelled sails using paper by @Cathead - wonderful and very descriptive tutorial on how to make really accurate paper sails. If I hadn't already bought the cloth sails I would have used this method to make the sails from bond paper. Making Sails for Ship Models from Silkspan by Tom Lauria - video series in 3 parts on how to make furled silkspan sails. Sewing sails for ship models in scale 1/2''-1ft. by @shipphotographer.com - last but not least, the amazing video tutorial in 3 parts by Olha Batchvarov on how to make cloth sails from scratch. My personal opinion is that these were the most authentic sails with the best explained making techniques I could found. Enough talking, lets get back to the workbench. This is how the sails looked when I bought them: And this is how they look now: As I said, my idea was to use as much as possible the materials I already have, so for the coloring I decided to use only the OcCre's dyes. First - diluted Pine dye in a 1:1 ratio with water. With a normal painting brush I painted all the sails on both sides, but before that put them on a paper towel. Then hang them somewhere and wait till they are completely dry: I forgot the mention that I ironed the sails twice - first before coloring and second after the drying phase. Still not pretty sure if there should be any wrinkles when I install them on the model or not? Which is better and more authentic or it doesn't matter? After the sails were completely dry I painted all the seams with a Pine dye, but this time concentrated NOT diluted. The idea was to make them darker and more noticeable than the panels (on the upper image the seams are already painted): In fact, you can stop here if the result is good enough for you. But I decided to give my artistry a chance and experiment with something more. With the Walnut dye (not diluted) I tried to make random small splashes on the canvas, just to make it look dirtier. Dip the brush into the paint and shake it on my index finger. Repeat as many times as you like and the result should be something like this (as it is a messy job so be prepared for this step): And this is the final result for this step of the sails preparation after complete drying and ironing: In the next step I will try to make the bolt rope and all of the cringles. Most probably I will make reef points on the fore- and main sail (or only on the main, because there is no boom for the foresail). So because of that I will have to prepare in advance at least 4 more cringles. Enough for the current post, it has become too long anyway. The bolt rope step I will try to explain in my next post (hopefully in the upcoming days).


-
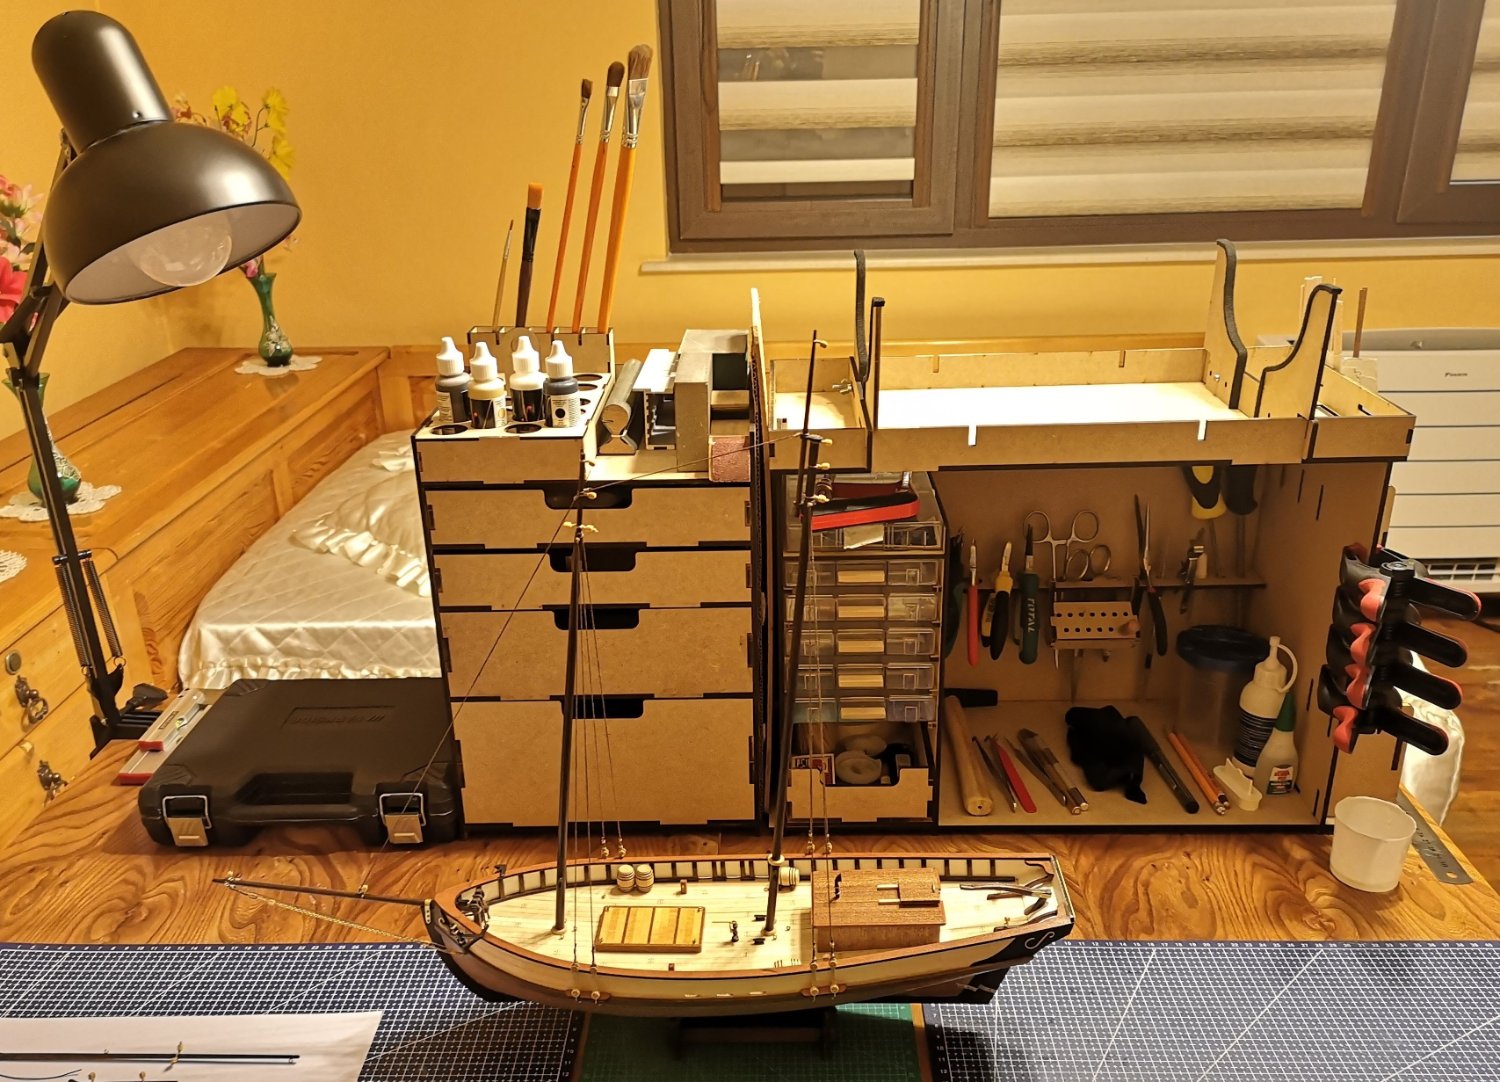
Hello and Merry Christmas to you all! Well, I didn't succeed to finish my Polaris in a year, but as I said in my very first post: "better good than fast". 🙂 In the past weeks I spent a lot of time for research about the sails making and I'm surprised how difficult is to make accurate and authentic sails and how much different opinions about that exists. If I had bought my Polaris kit without the sails, I wouldn't buy them at all - they are soooo much unrealistic and out of scale (like most of the manufactured sails). For sure my next ship will be without sails or with furled scratch made sails, but for this one I will try to give my best to make the sails as good as possible with the materials and tools I have. Tomorrow I will post the result after the first step of sails preparation - the aging. I think they turned out pretty well, for sure better than before. Meanwhile I've completed my new workspace and finally everything is clean and packed in one place. I highly recommend OcCre's workbench and the other wooden modules, for me they are very practical and convenient.

-
The Christmas side projects just arrived and it's time to finally organize my tools! 😁 Thanks to OcCre for the fast delivery and great customer service!

-
Thanks for your kind words Jack, I really appreciate it! For the moment I'm using two main resources for a rigging reference - Frank Mastini's book and the wonderful Olha Batchvarov YouTube channel. For sure this is not enough for all the details, that can bring the model to a whole new level, but for a first ship it's more than enough, I think. I am planning to buy some books, written specifically for rigging, but this will be after finishing my Polaris - probably before my next build. You can see in Olha's channel there is a separate section for book reviews, where I found out about both Lennarth Petersson's books (Rigging Period Ships Models) and The Art Of Rigging by George Biddlecombe. Probably I will buy any of these books somewhere in the future. I haven't choosen a specific model for my next build yet. I am hesitating between two options - any masterpiese from Chris' Vanguard models or OcCre again. Probably it will be another, but more challenging, ship from OcCre and for my third build I will jump to Vangard models. The bad news is that my next build won't start until 2024 for sure, because next year I'm planning a major renovation of my house and this project will take at least an year. But for sure this will be the perfect time for research and reading through this wonderful forum. 🙂
-
One mistake that I just noticed. The main shrouds on the starbord side were twisted... You can see this on the last image from my previous post: Luckily the CA on this lanyard wasn't too much and I was able to fix the shroud without any damage. So in addition, this is another (forth) thing to take care of when rigging the shrouds. 🙂

-
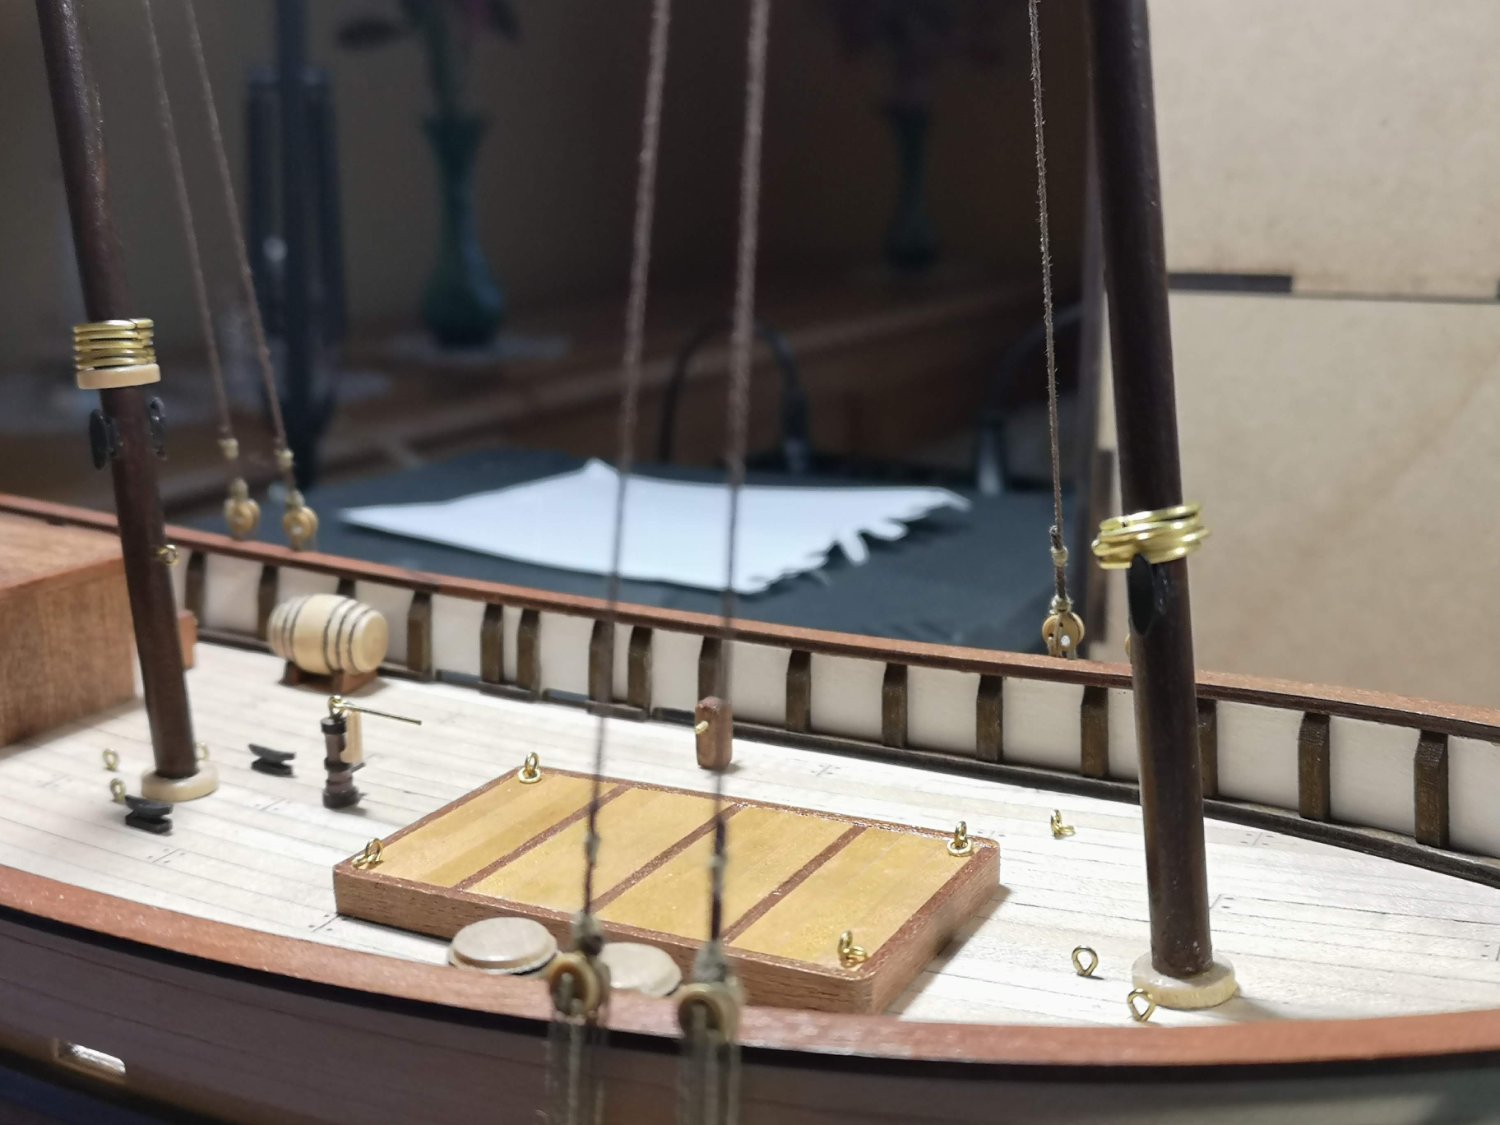
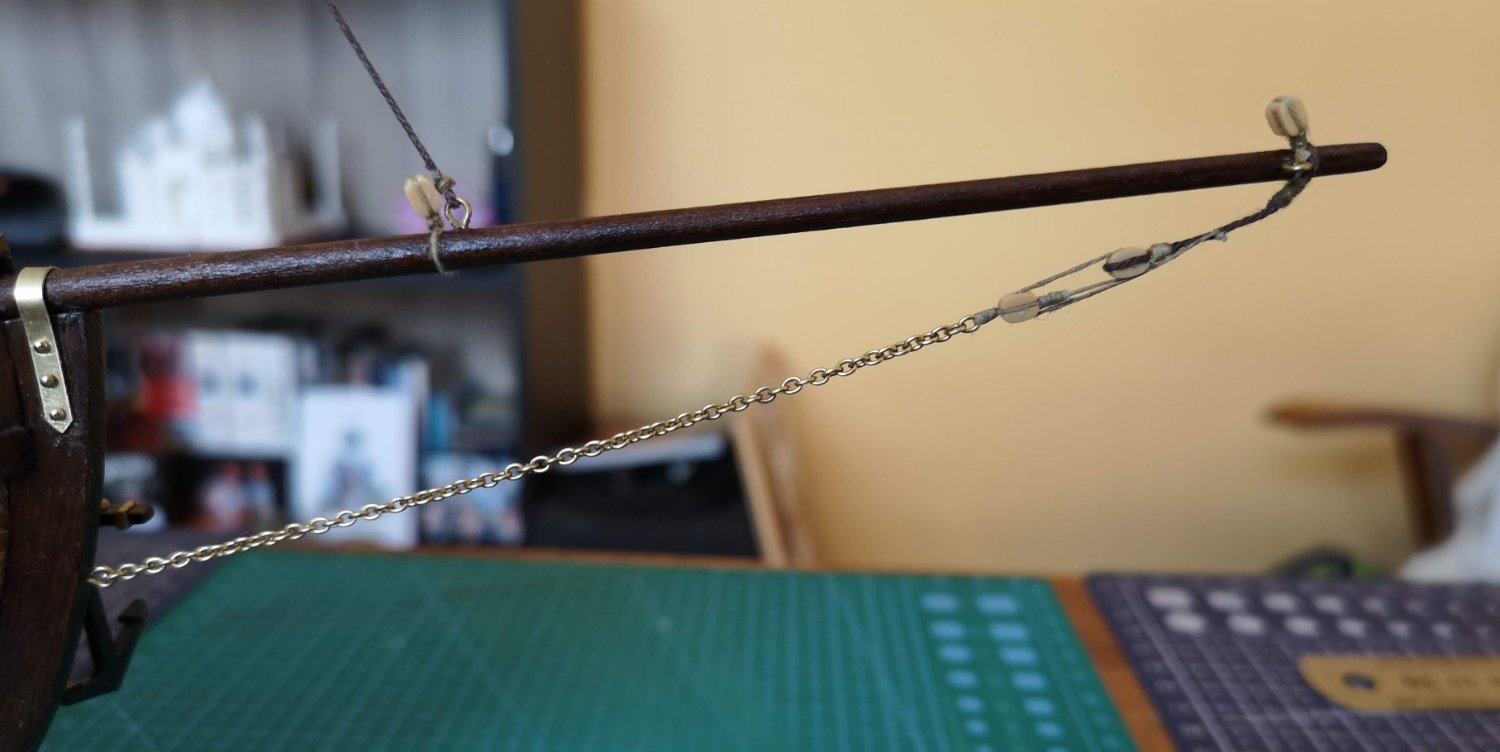
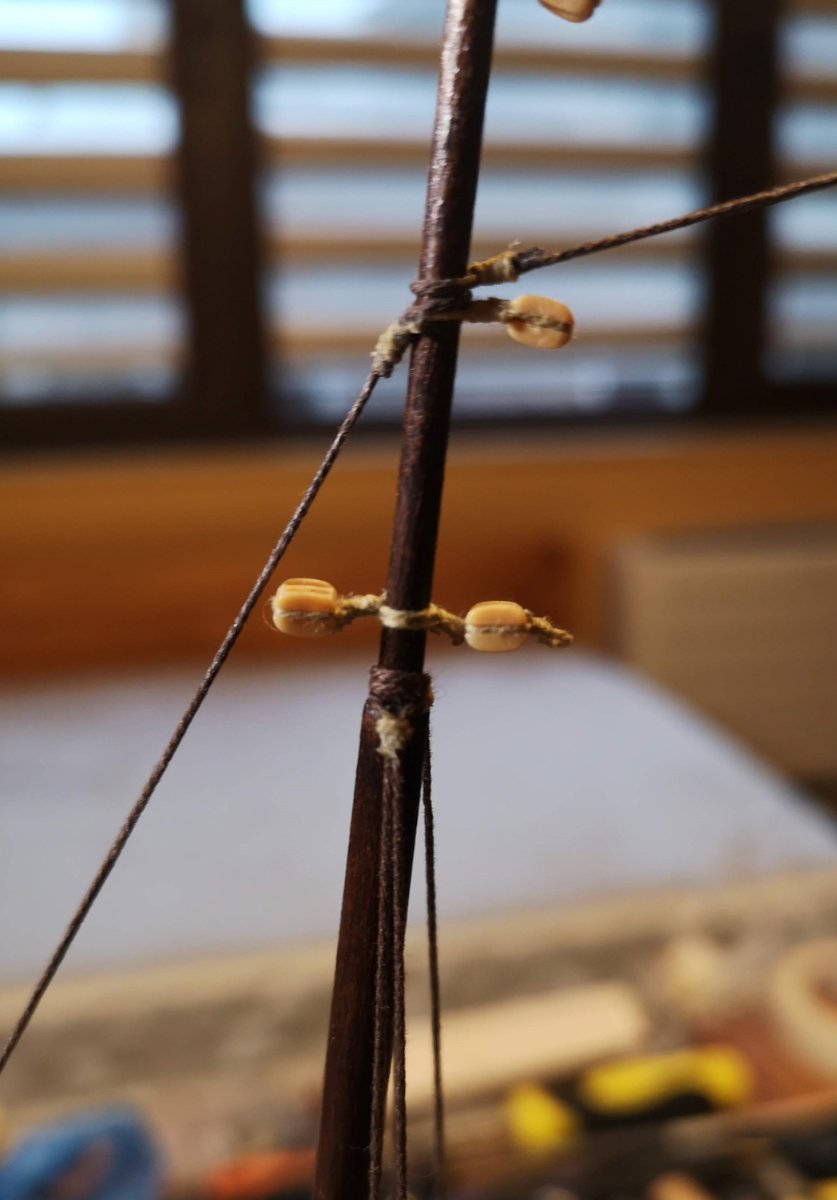
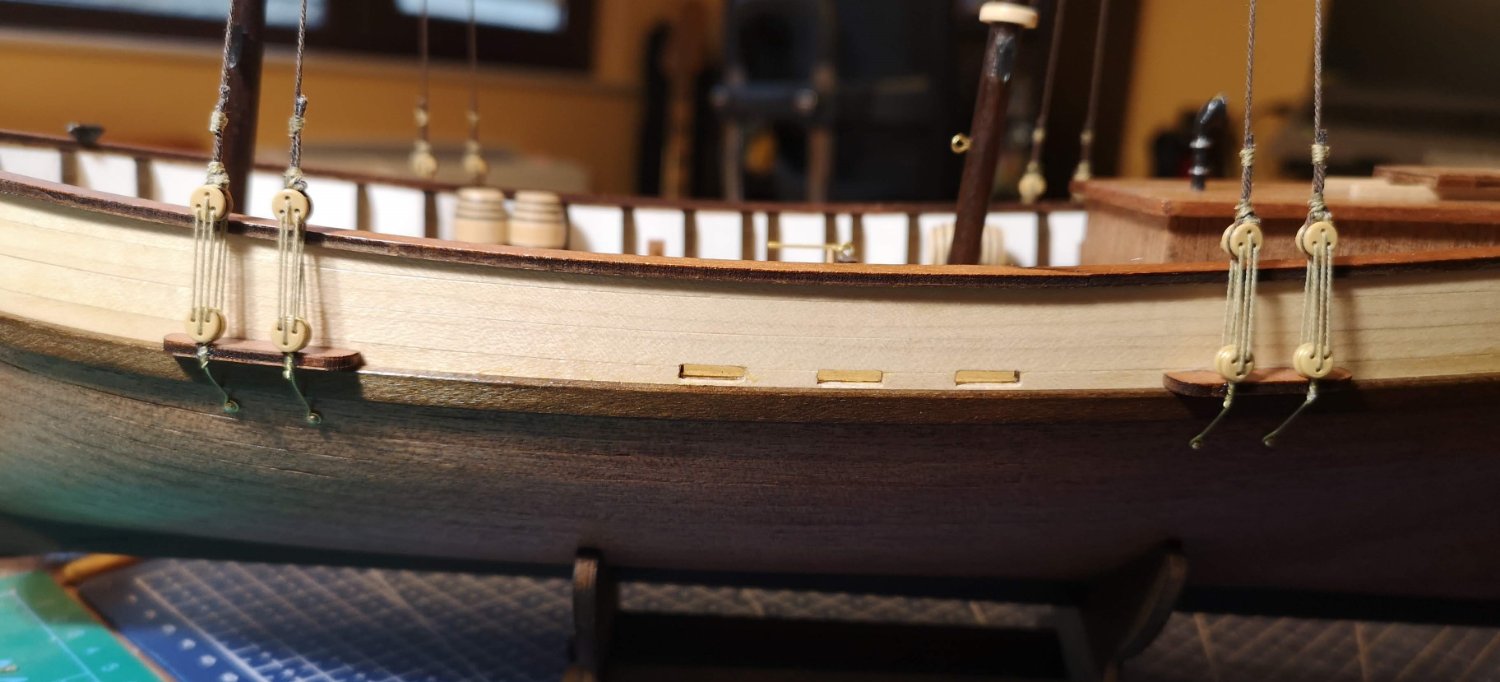
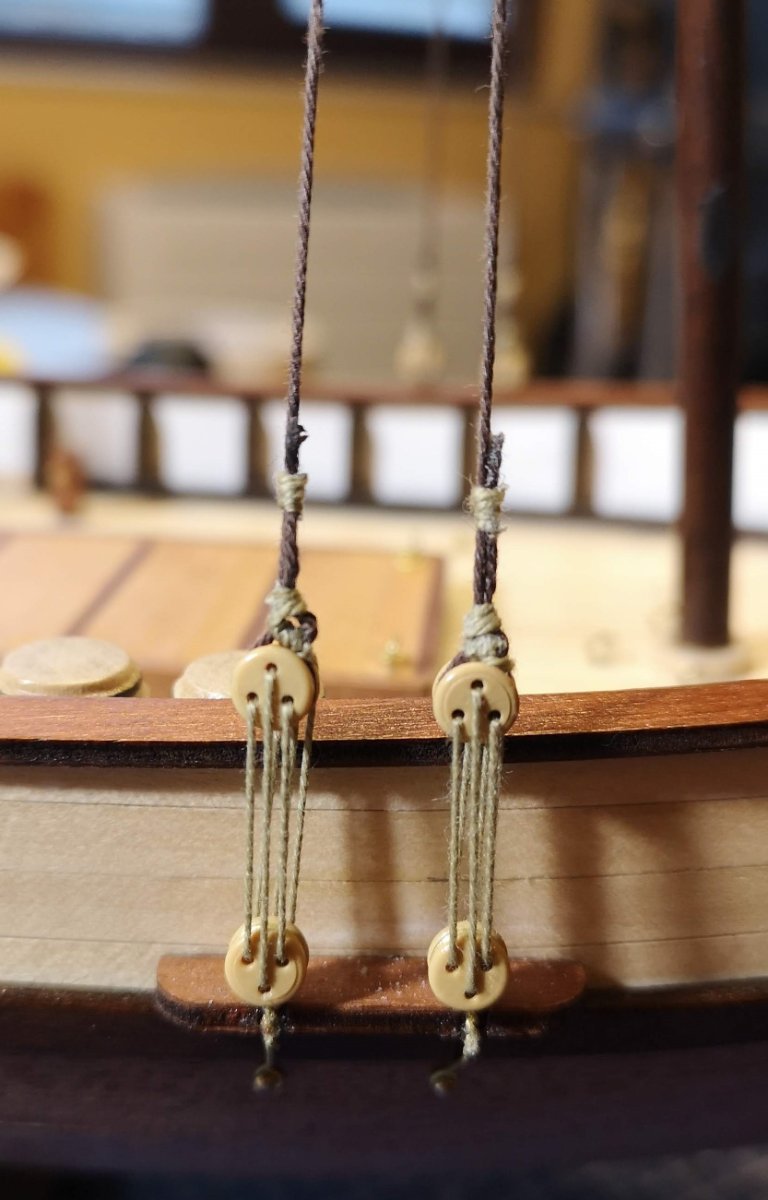
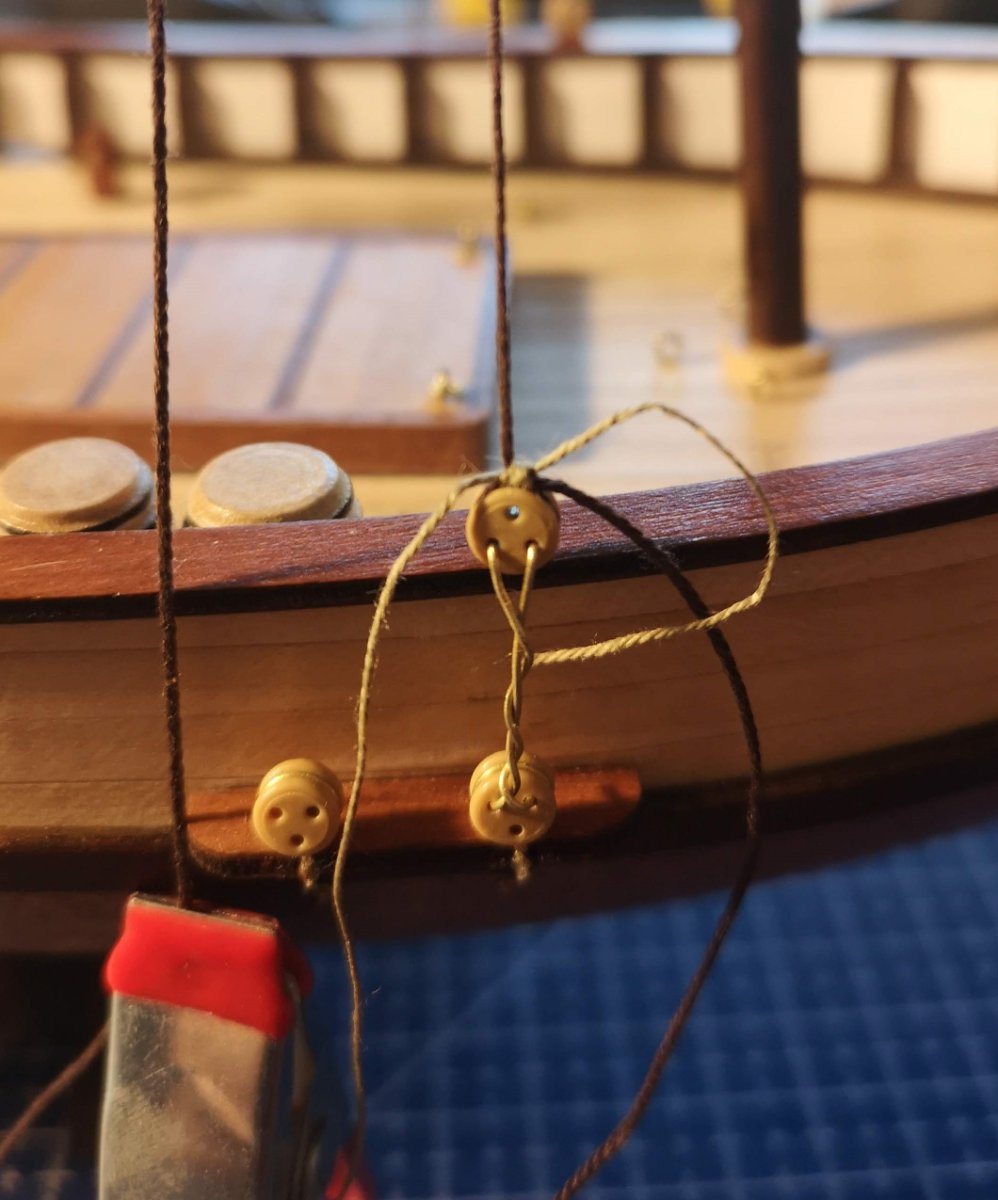
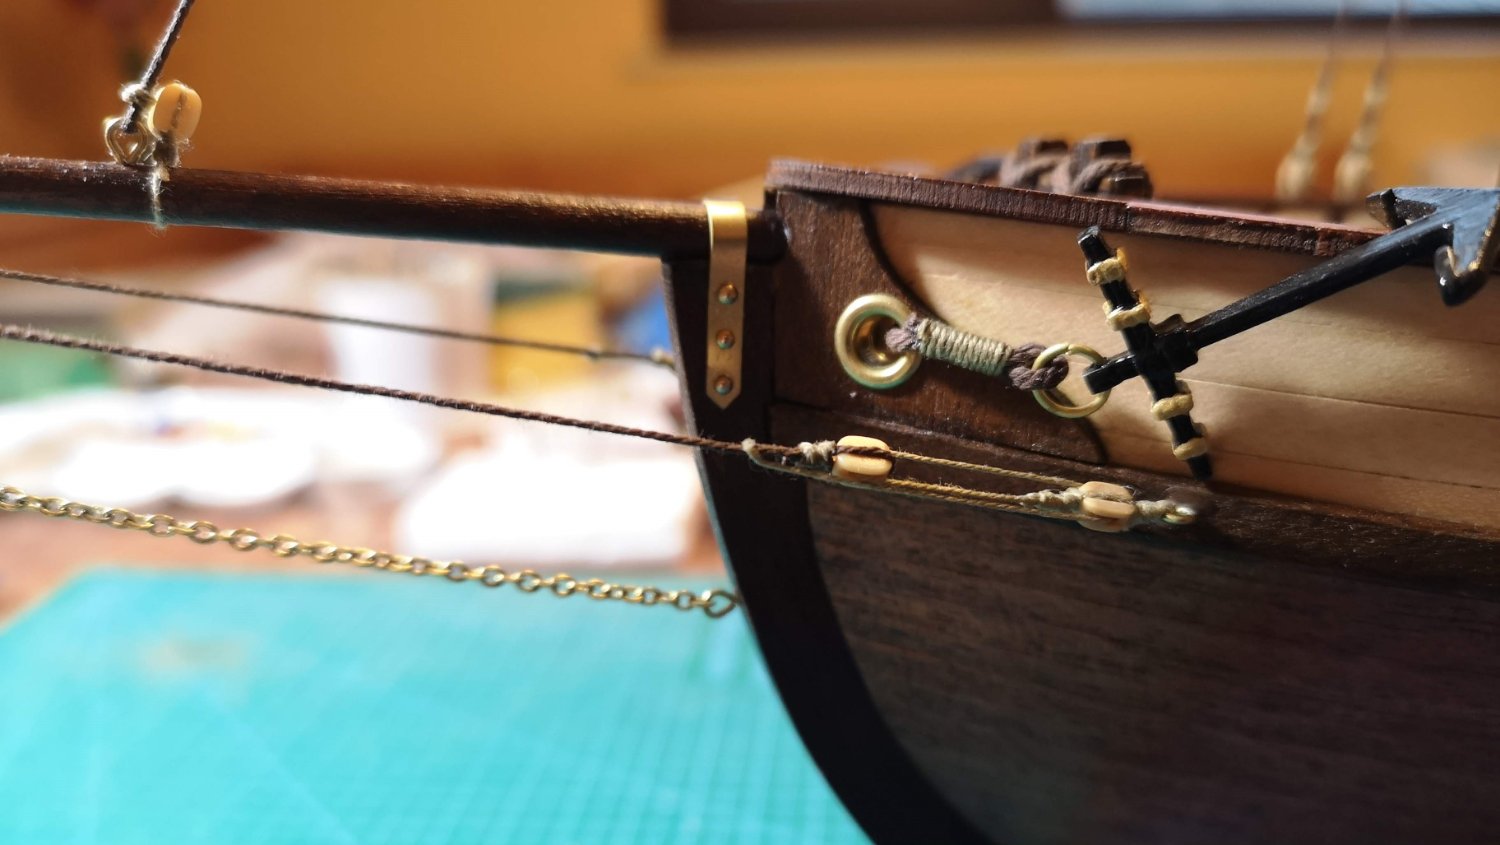
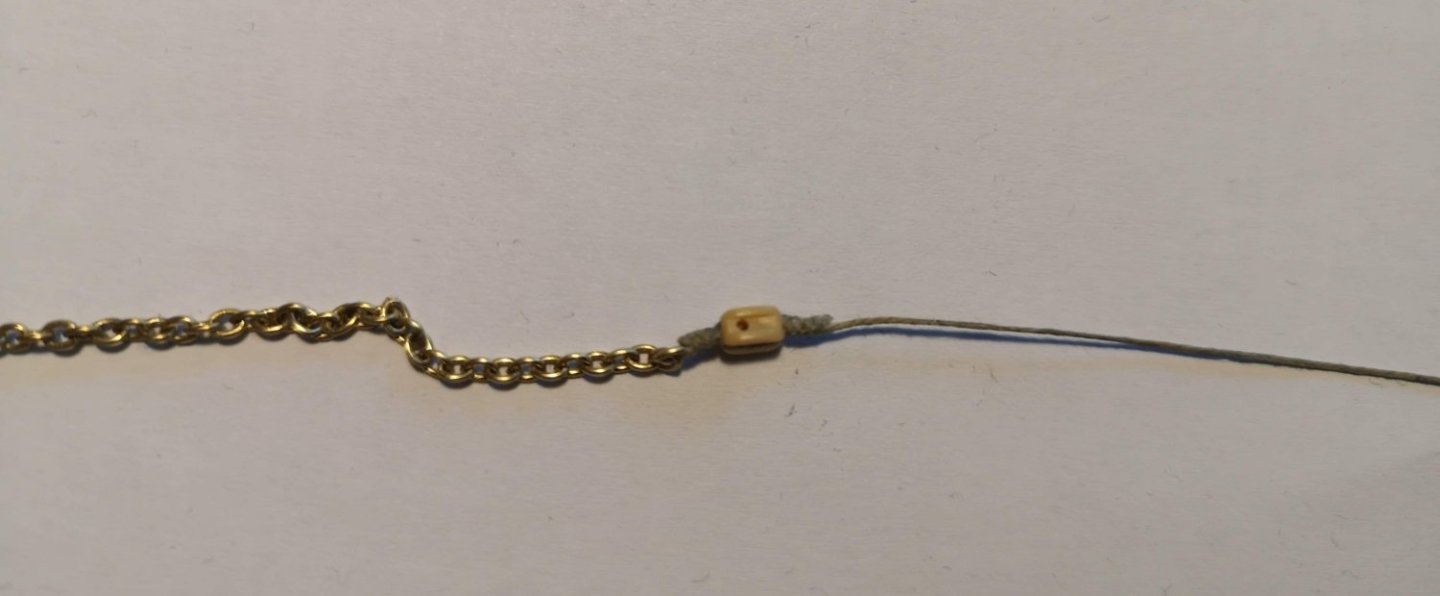
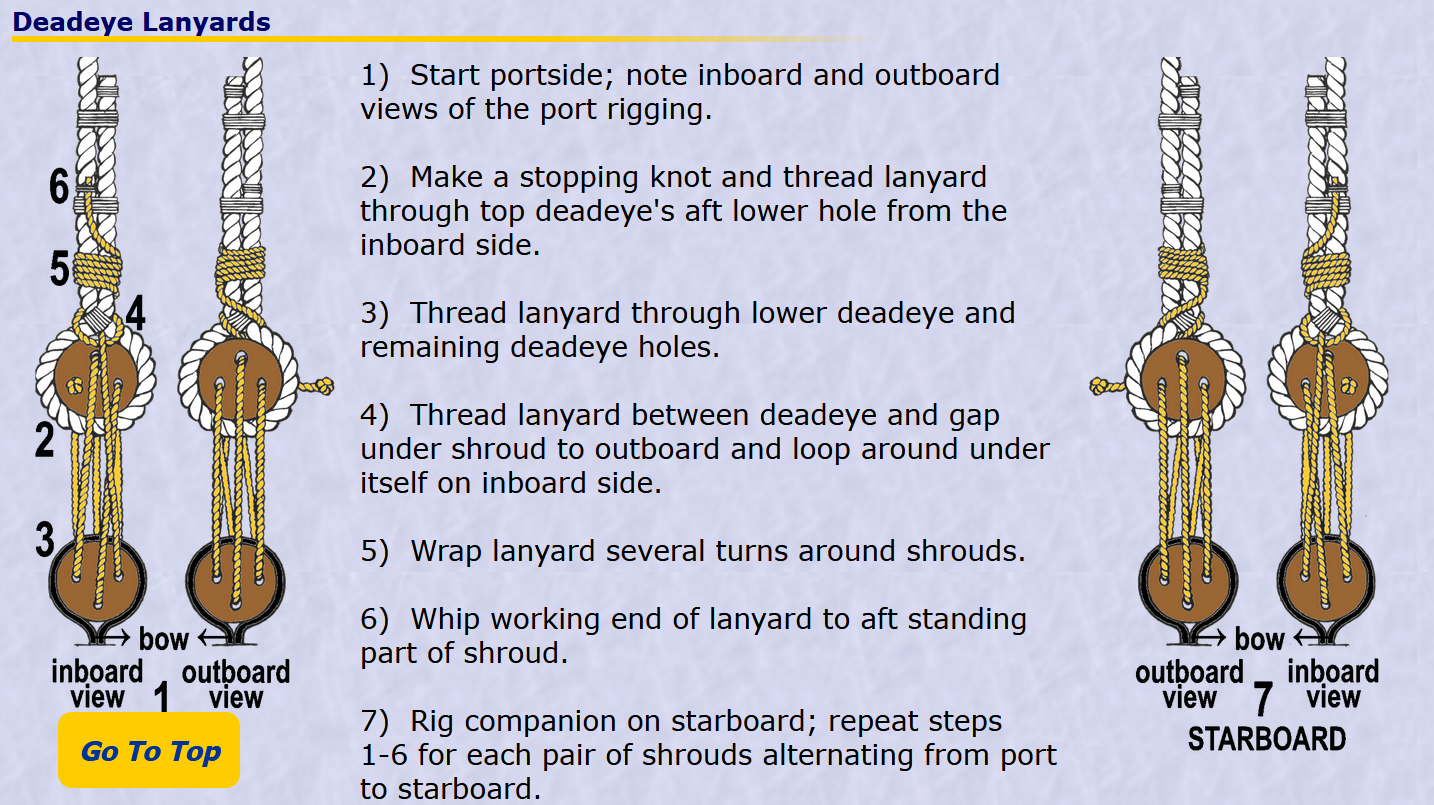
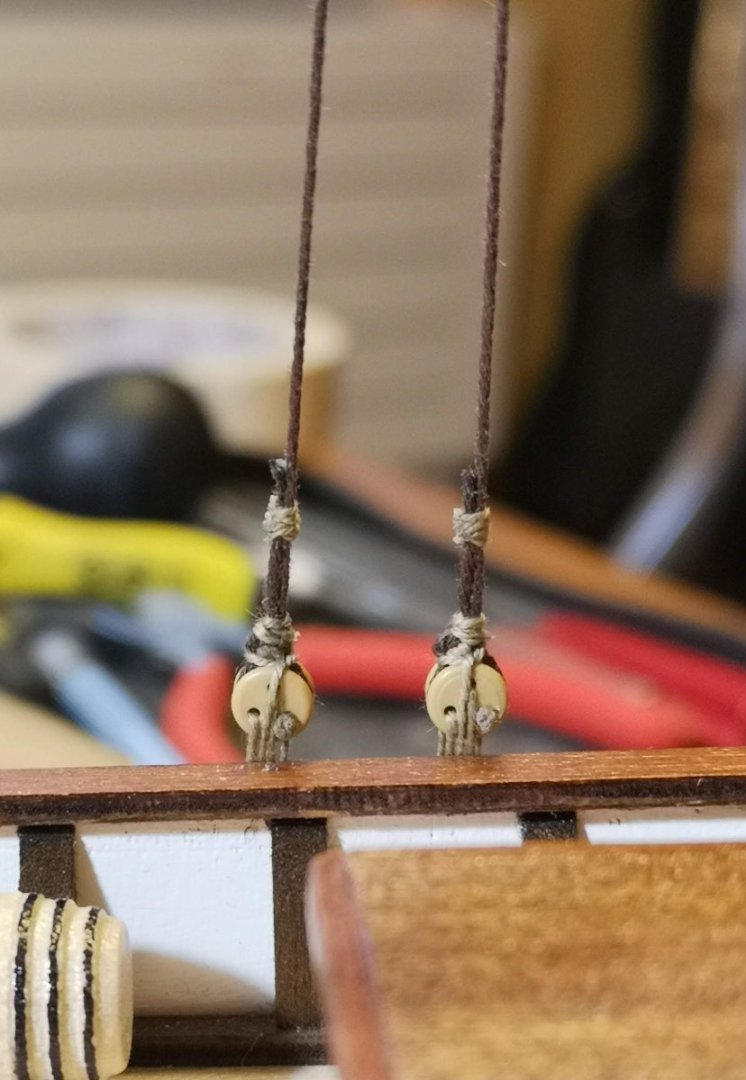
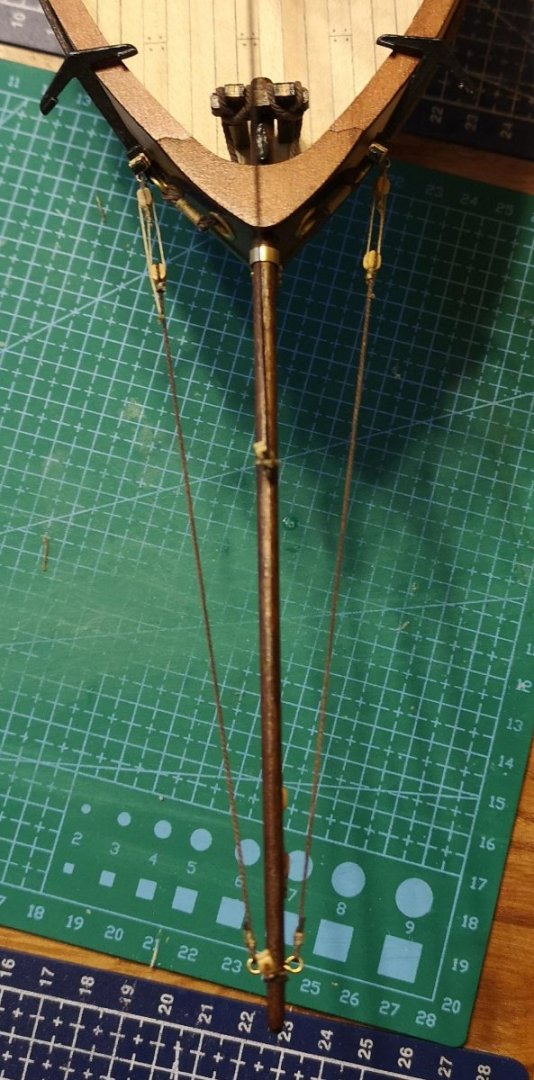
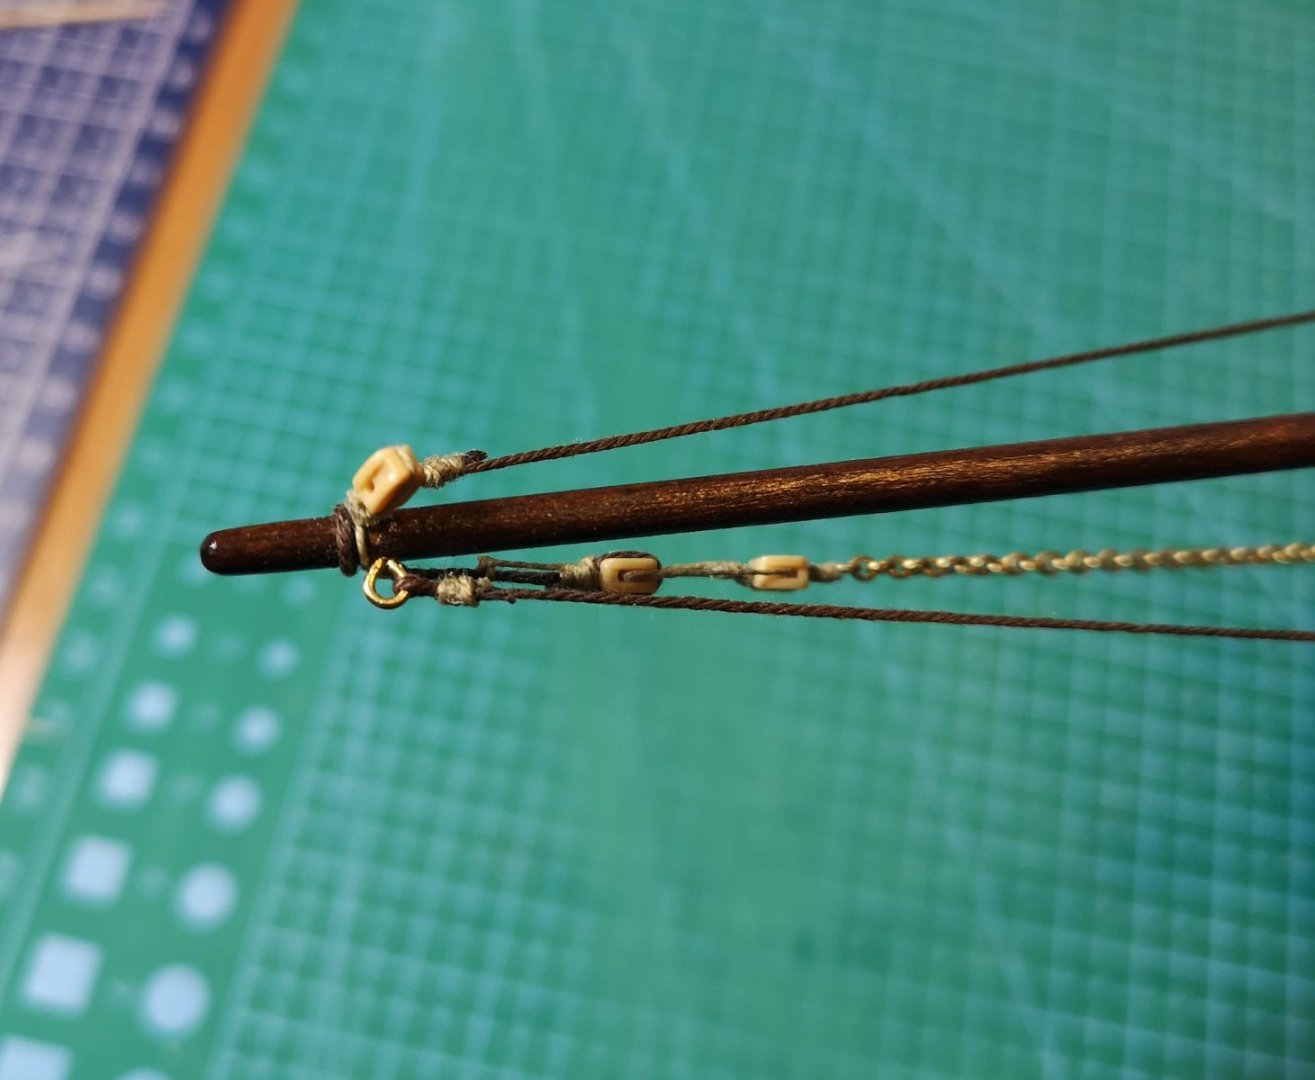
Standing rigging is done and yes it was a challenge! First - the bobstay. I installed a block to one of the ends of the chain, but after seizing I didn't cut the extra rope, just left it to use directly for the tackle. I don't like the method from the instructions where they tie the standing end just below the block and then reeve it through the other block: The other end of the chain I mounted directly to the eyebolt on the stem and assembled the tackle. The overhand knot at the working end is for sure not to best solution, but I didn't found any accurate information about how it should be done properly.: Then i continued with the fore and main stays and the shrouds. For all of them I used the same seizing technique to attach them to the masts. Yes this method is for sure not the fastest, but the end result is really authentic: And now the shrouds... Well this step was one of the trickiest so far, because several things should be considered. First of all the masts should be athwartship so the shrouds tension on each side must be equal. Second, all shrouds should have the same length, respectively all lanyards also. Third, the shrouds must be rigged alternately. If any of these are not met, there is a chance to tilt any of the masts and ruin the overall look. So be careful and take your time, don't rush here! I will not go so much in details, explaining the lanyards rigging, instead I'm attaching a screenshot from San Diego Ship Modelers Guild: Yes, I know it is frustrating, but believe me the end result looks so much better on the model, rather than the method showed in the instructions. One note here - for all shrouds I used only the starboard technique. And this is practically the result on my Polaris: One more tip how to make the lanyards the same length - make a "deadeye gauge" and use it as a measuring tool when securing the upper deadeye to the shrouds: After the masts shrouds I completed the standing rigging with the bowsprit shrouds. Here I used a similar "measuring tool" from a single brass wire just to make them equal: And the standing rigging is done. Next steps will be the running rigging and the sails. So far so good!


-
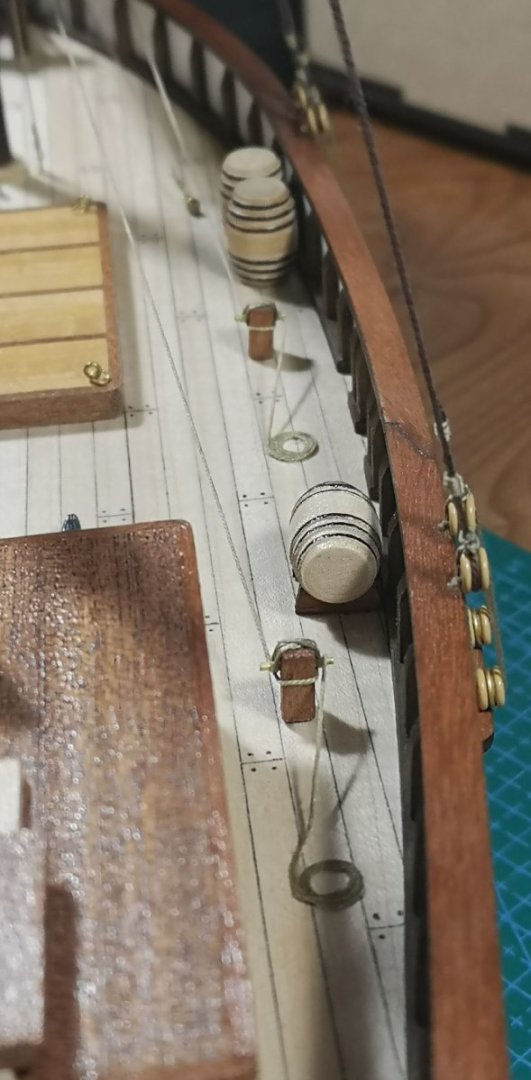
Yes, on the real ships or schooners (and also on the more accurate models) I am pretty sure there is a pin on the pinrail or a cleat where to belay these ropes. On my Polaris maybe I will just make a simple overhand knot at the end of the line just below the bottom block, which is for sure not the best solution.