Spaceman
-
Posts
44 -
Joined
-
Last visited
Content Type
Profiles
Forums
Gallery
Events
Everything posted by Spaceman
-
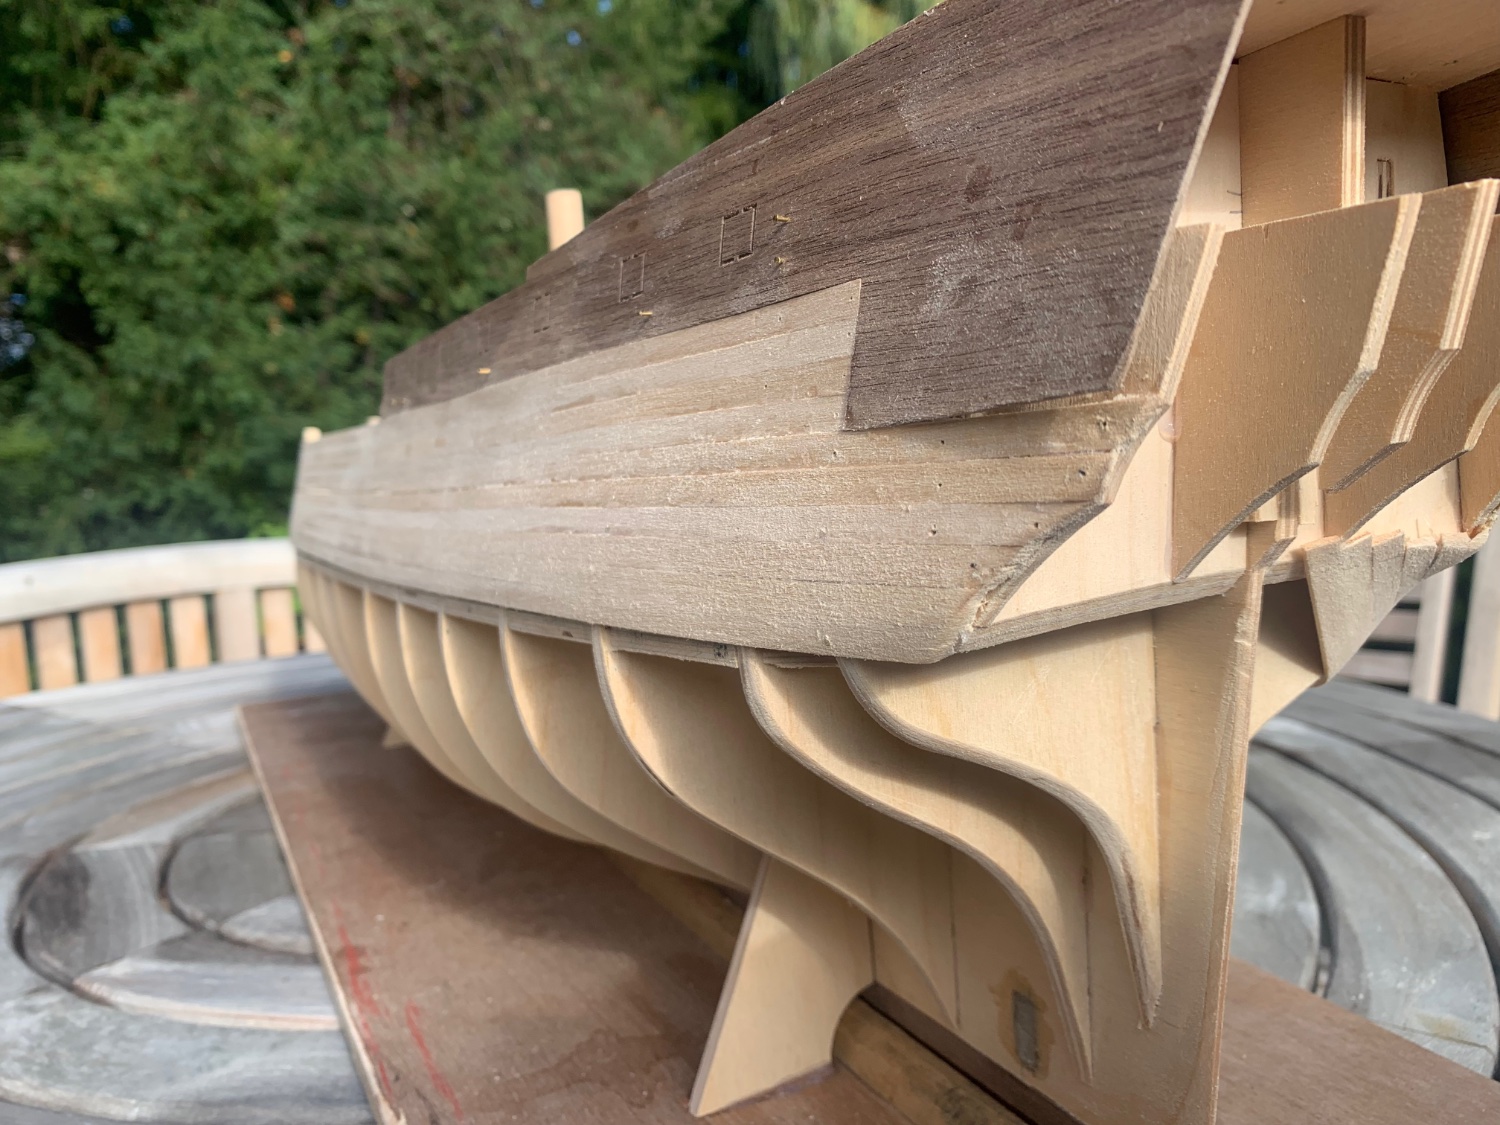
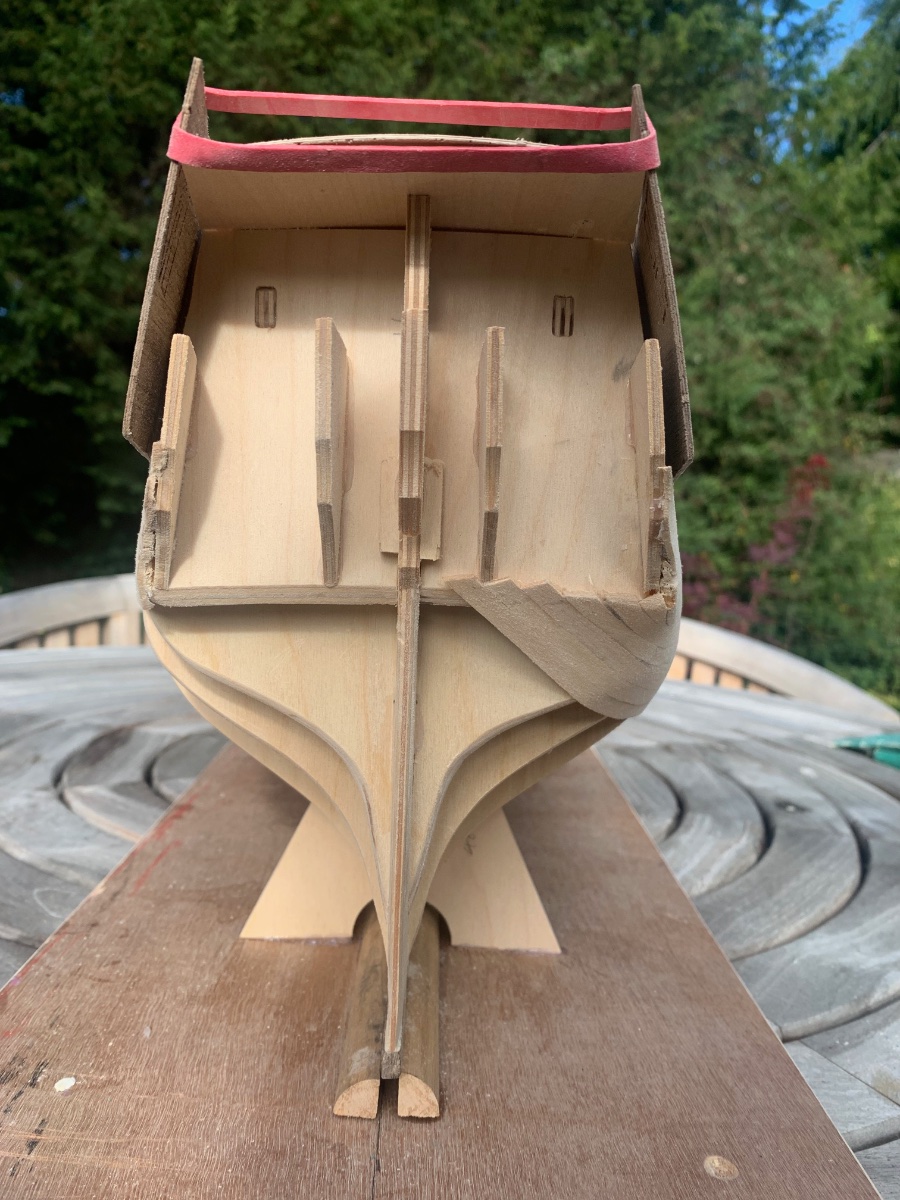
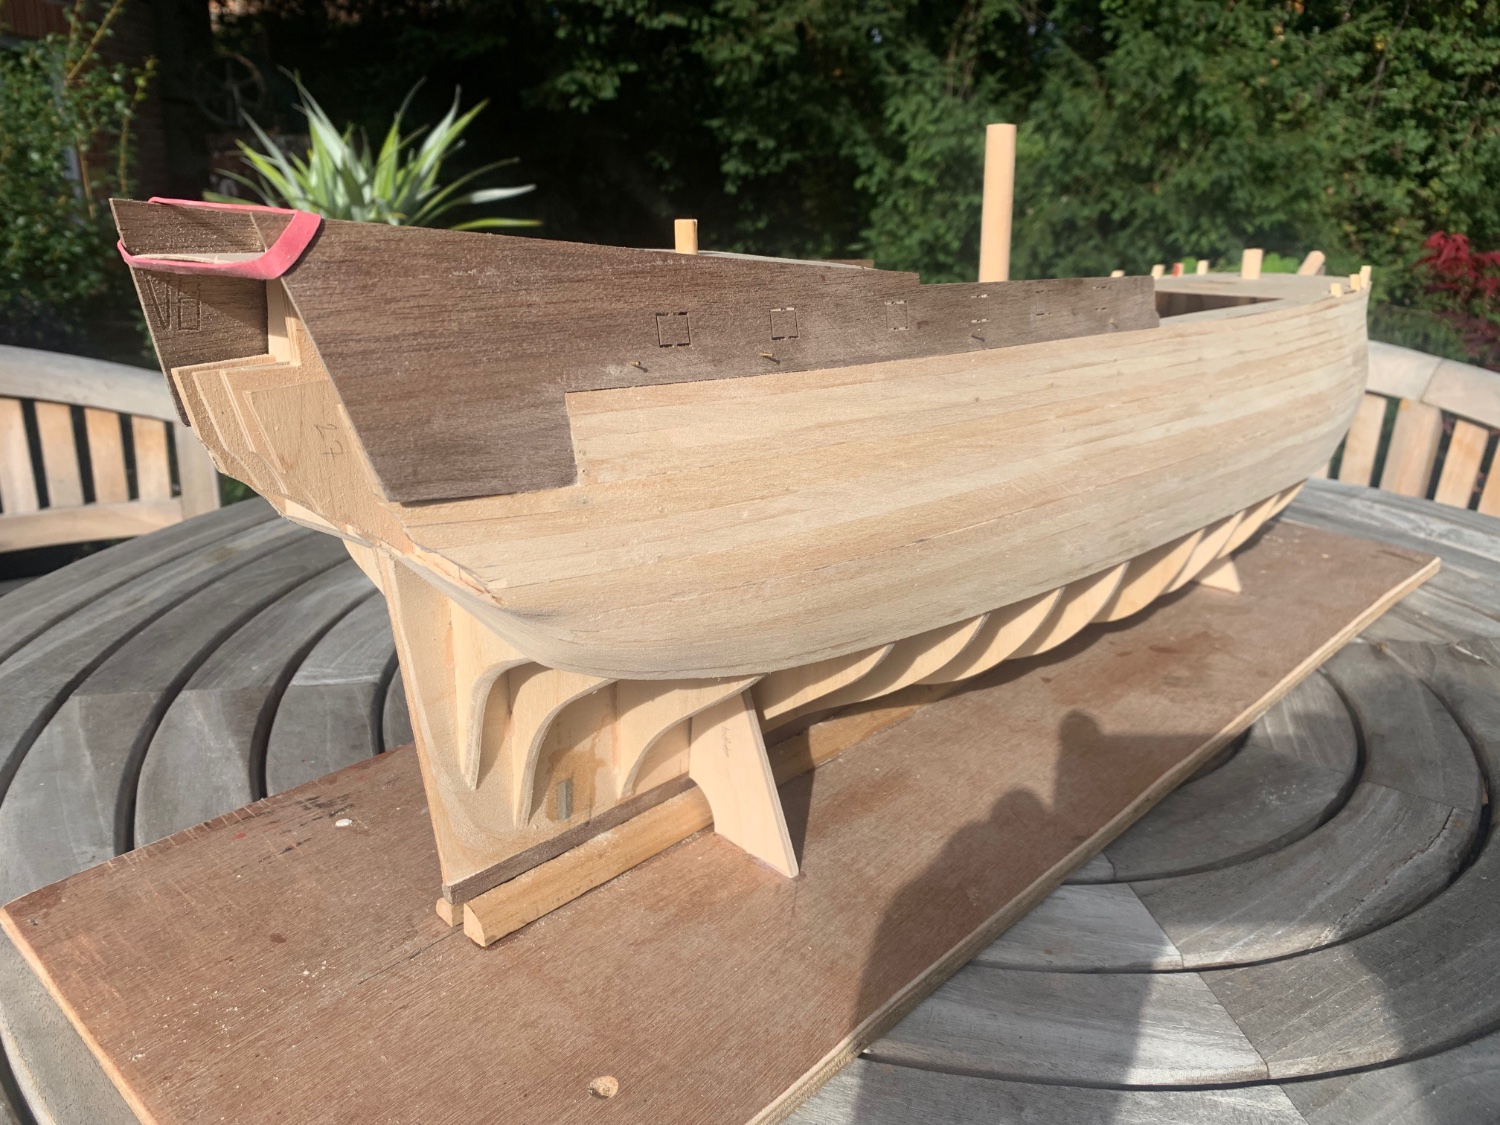
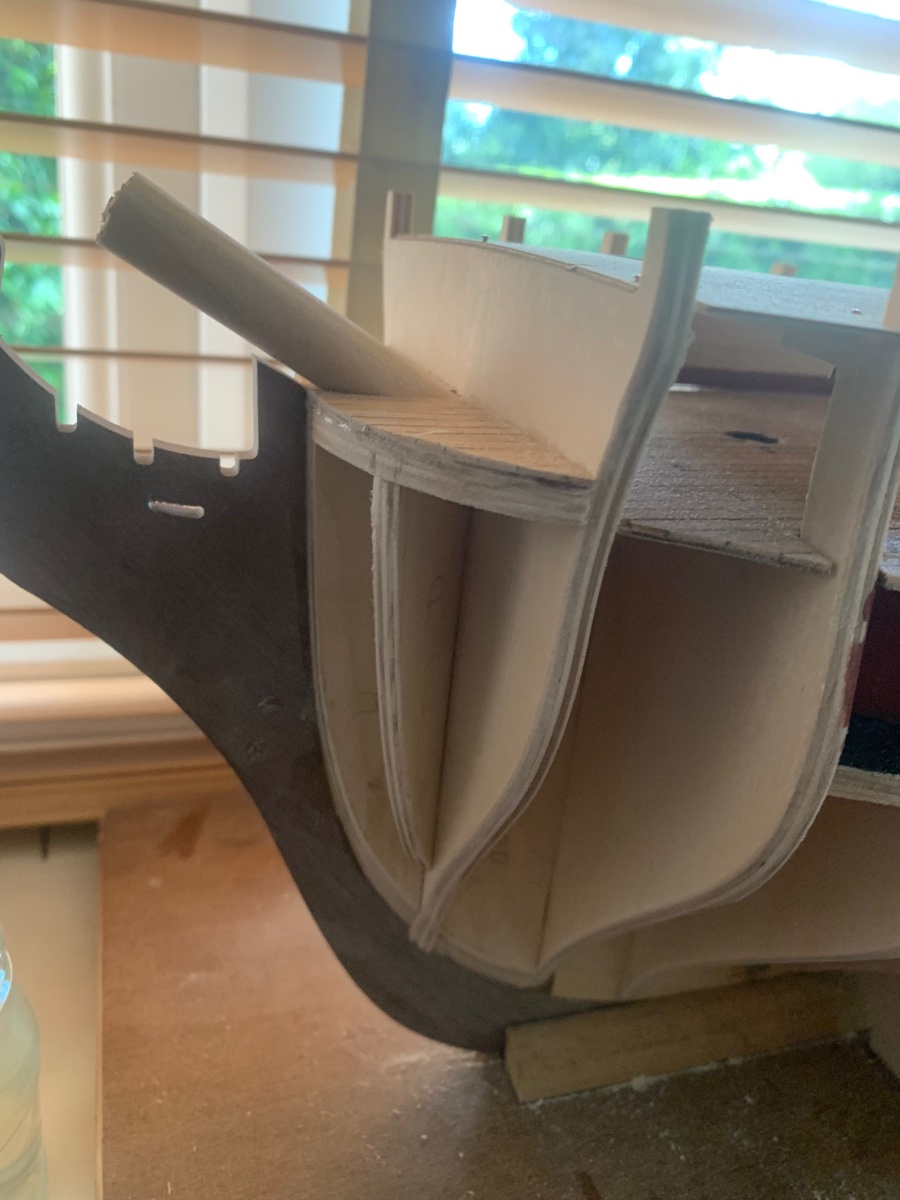
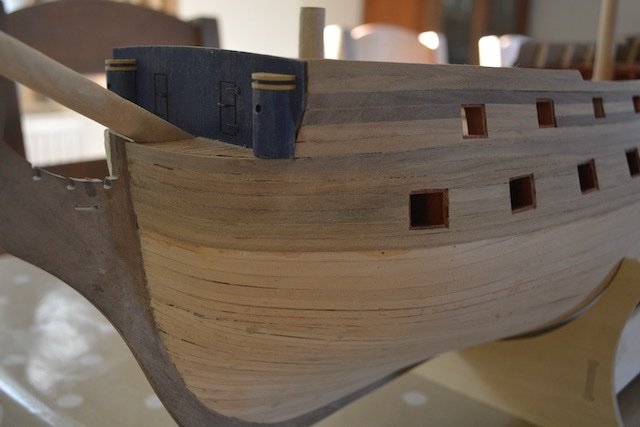
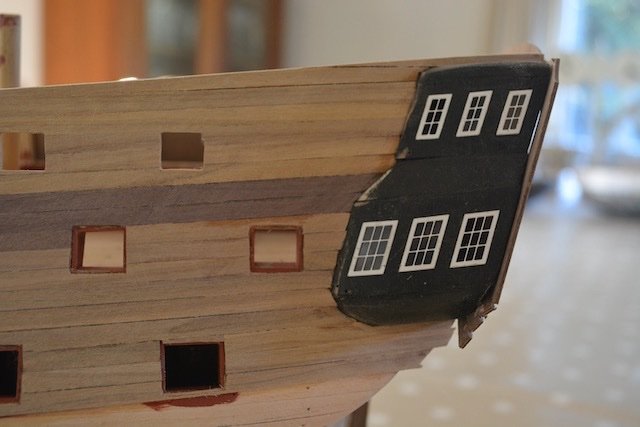
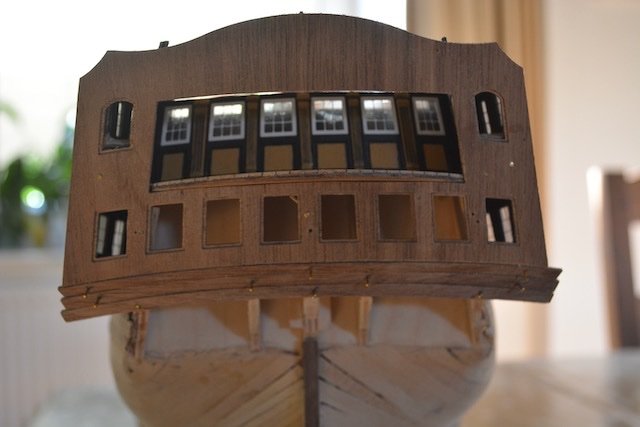
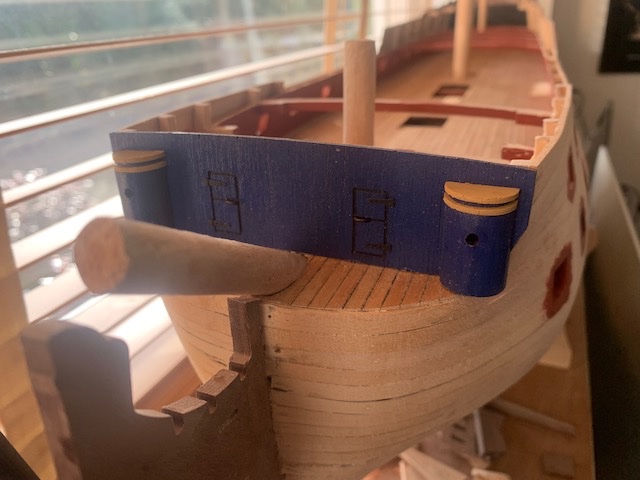
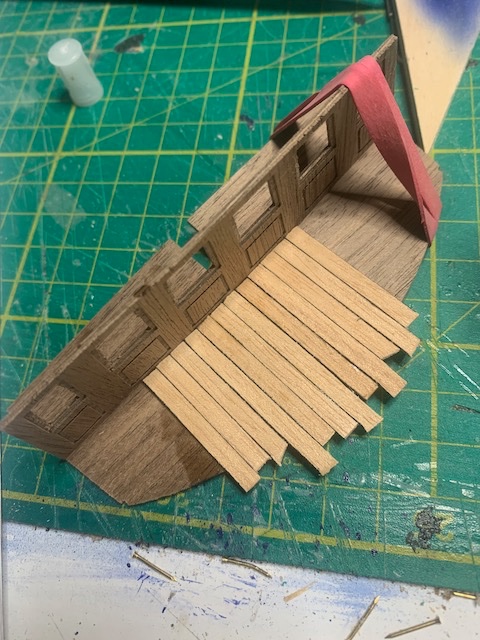
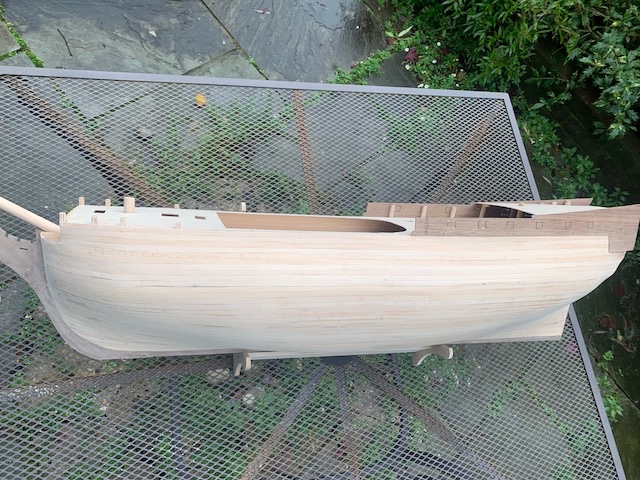
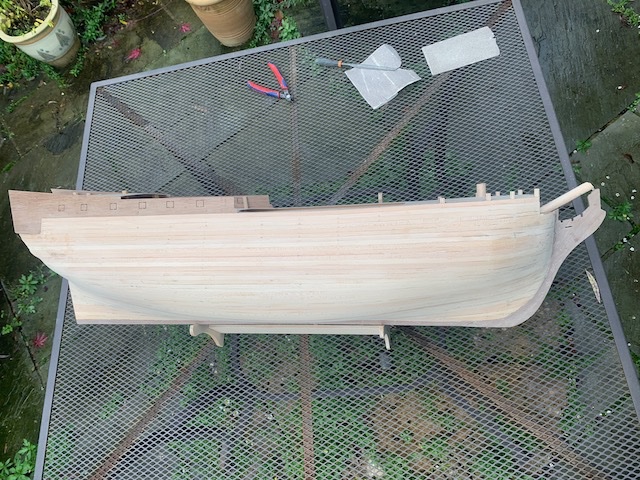
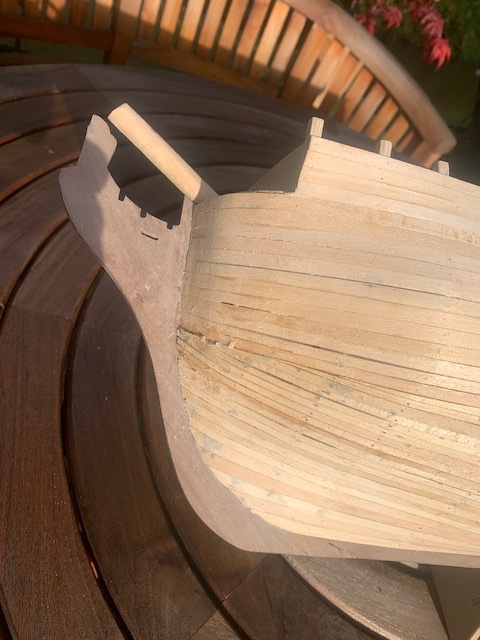
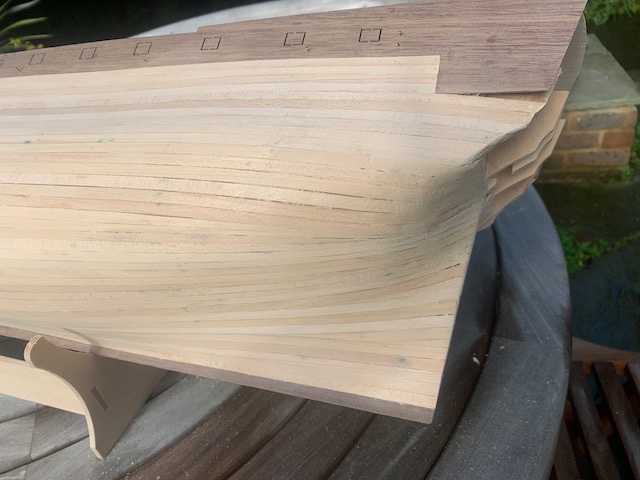
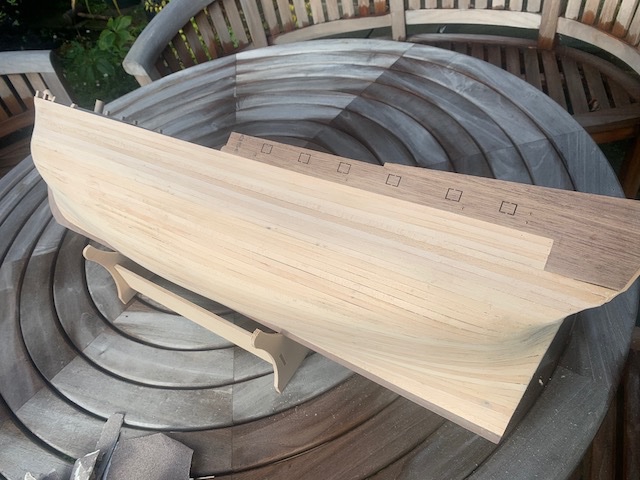
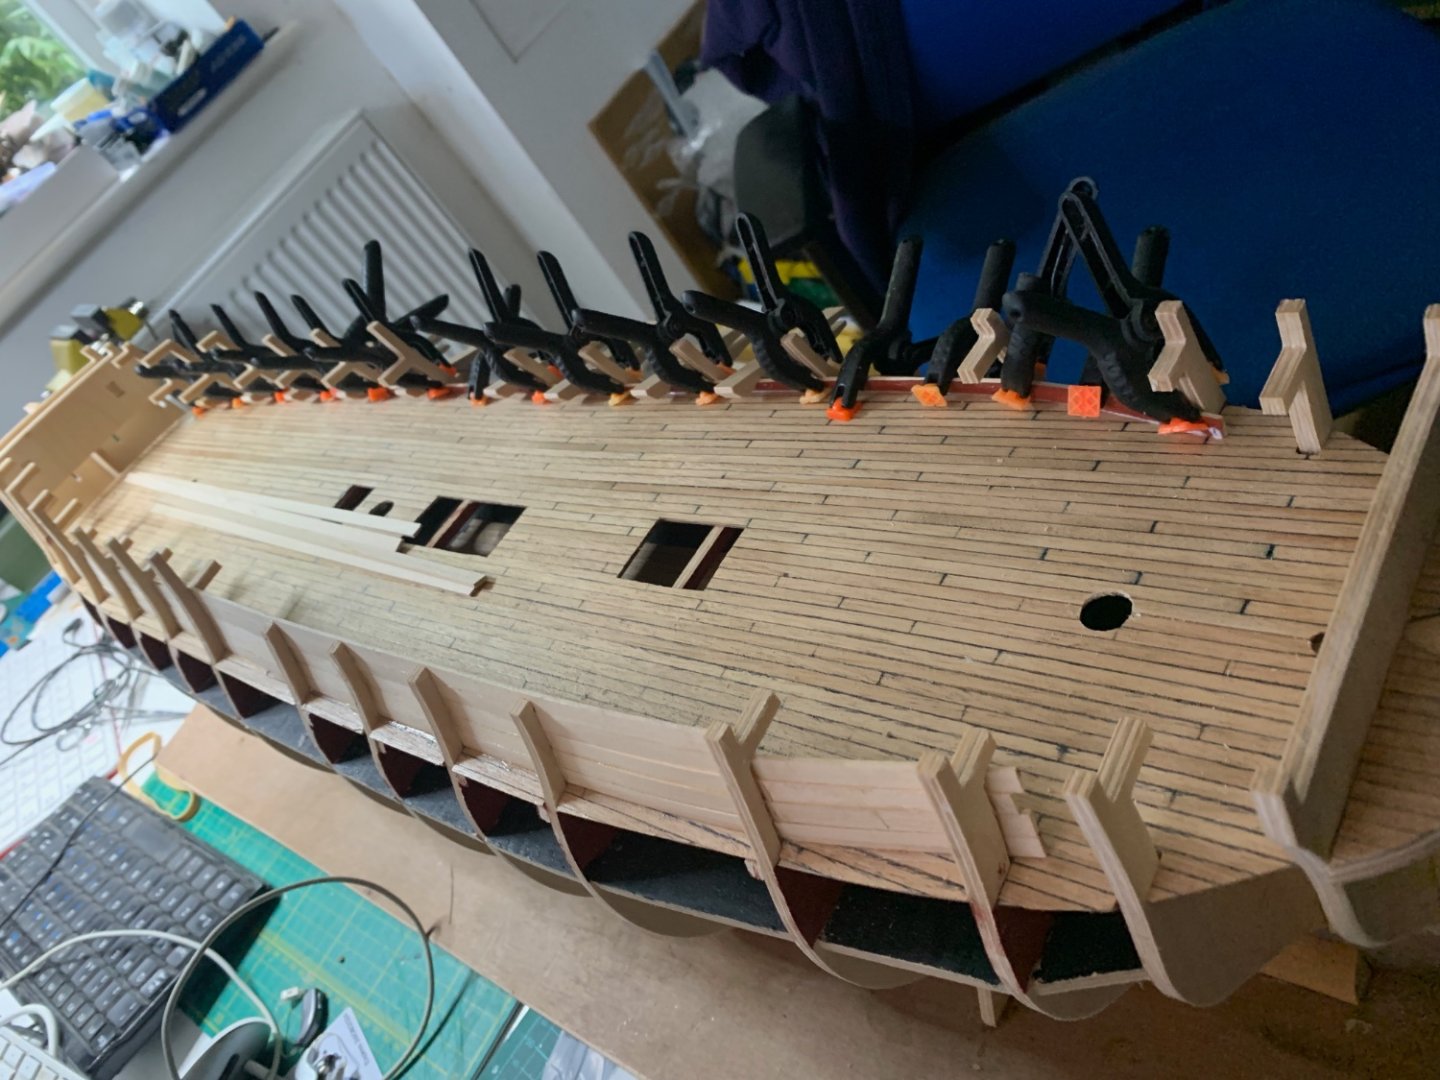
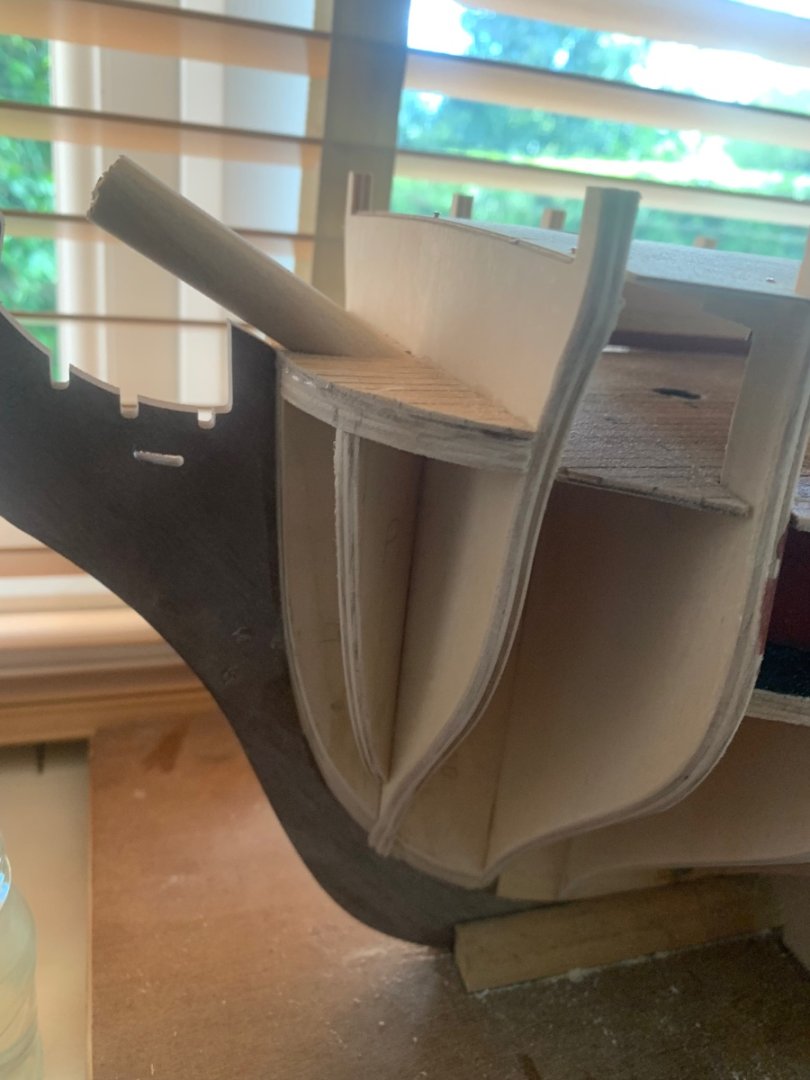
 I've been fighting with the Quarter galleries and stern transom placement. It's complex, fiddly and nothing is straight!! I decided to build the galleries as separate builds. I decided this would be easier than mounting all the various components on the bulwarks, trying to get the shapes, alignment and curves all correct and allowed me to ensure the pair matched up. Because of this I glazed before I mounted them. I encountered the same issue that most, if not all, builds seem to have at this point - the stern fascia does not line up well with the gallery decking and the bulwarks. This is addressed well in the build log by @Sjors (post #451) and I'm using the same solution. I did trim down slightly the fascia above the line of windows so it fits better to the gallery decking but was reluctant to take 2mm+ from this to line up with the top of the bulwarks. These can be trimmed later. I've noticed this leaves a little gap at the bottom of the fascia where it hangs below the quarter galleries which I'm not entirely happy with but I think it will be lost behind all the decoration that needs to be added. Second planking has commenced port side from the main wale upwards cutting gunport as I go. A bit of caulking (aka filler) required between the planks but not too much. I hide behind the fact that the originals were cut with 2 handed saws and adzes not CNC so joints should be seen to some degree.
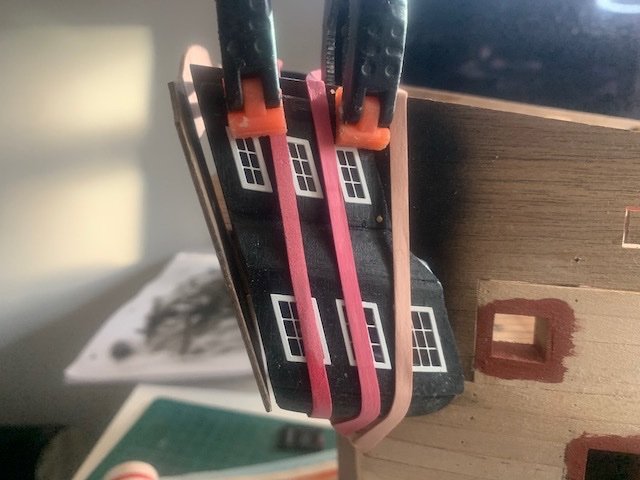
.jpeg.a5be178cbbcbaaa277a60c237d8b772f.jpeg)
-
@flyer Thanks. Loving your Bellerophon build, by the way. Build quality I aspire to. I can see your point with the fake 24pounders but, alas I'm too late as the top deck is in position so committed to dummies (hope the enemy don't notice!) It would be very fiddly to fit them through the gun ports !!
-
Some really good points here, I think the consensus is - if you are going to show Trenails make it subtle and realistic and not a feature. I've got a trip planned to France later this year and L'Hermione is on the agenda. 🙂 Thanks for all the responses on this.
-
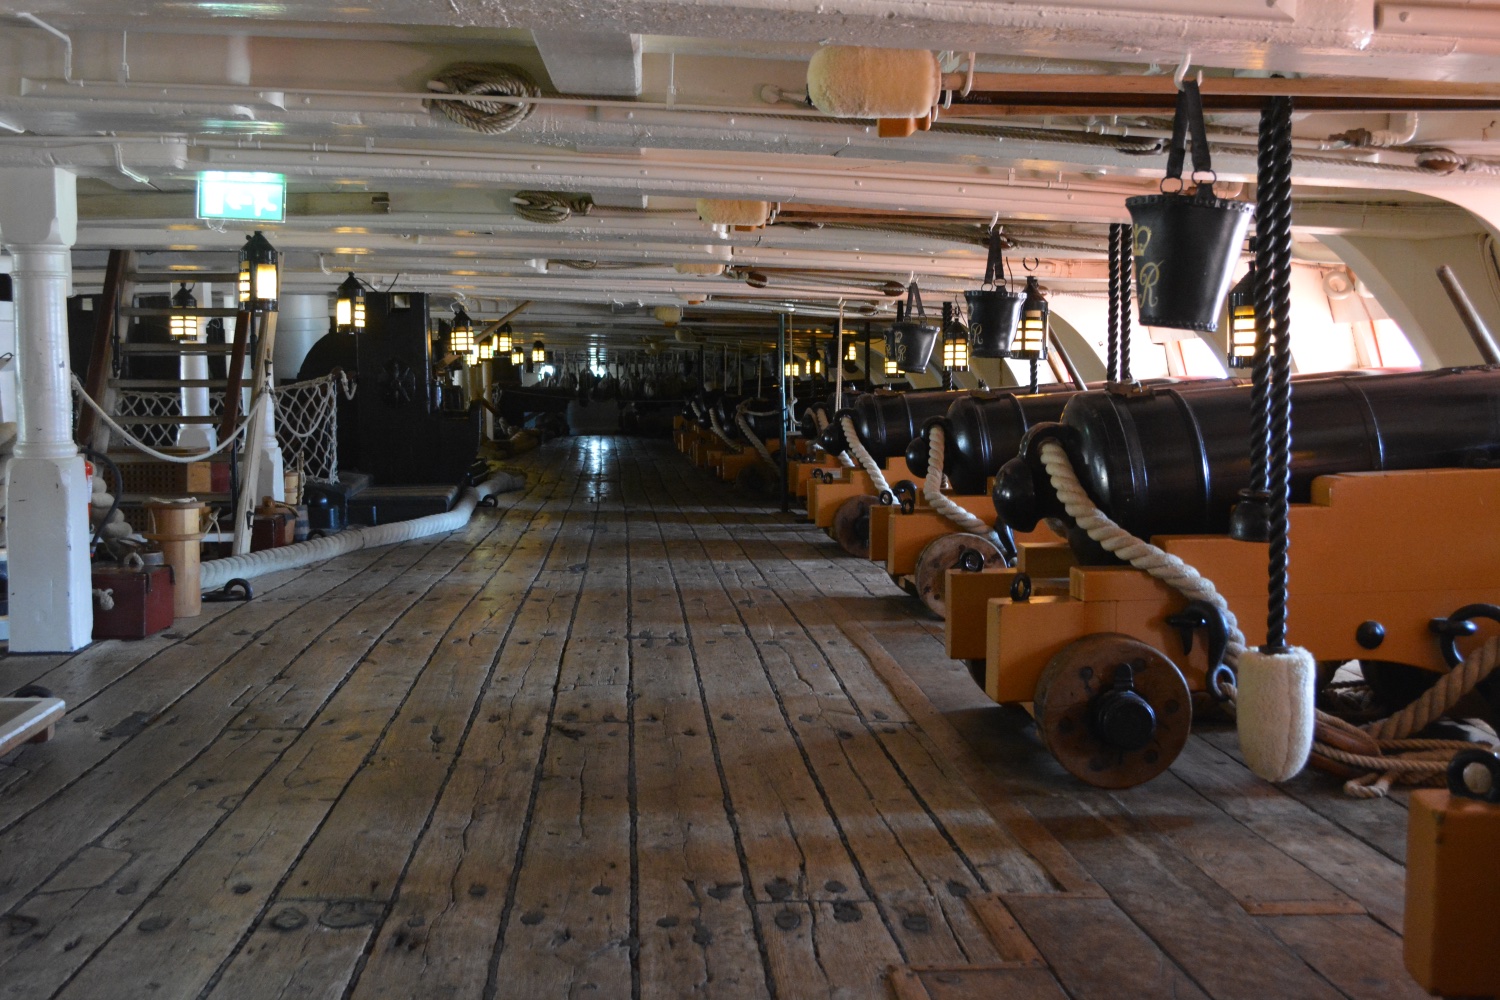
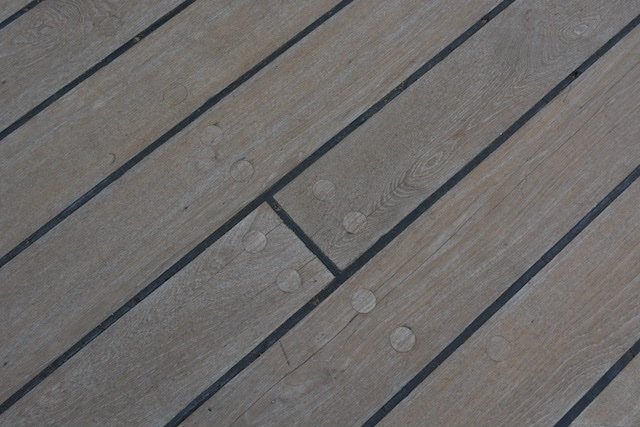
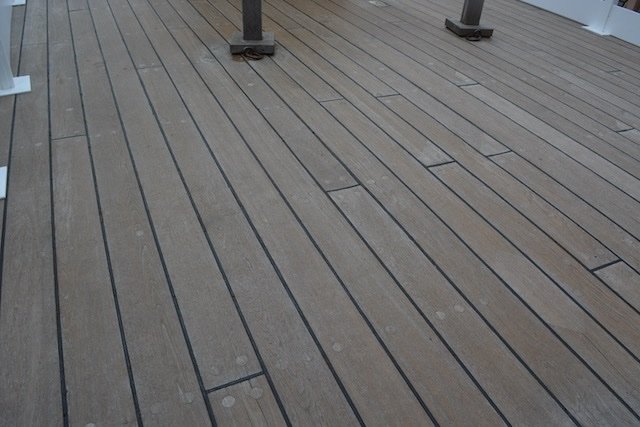
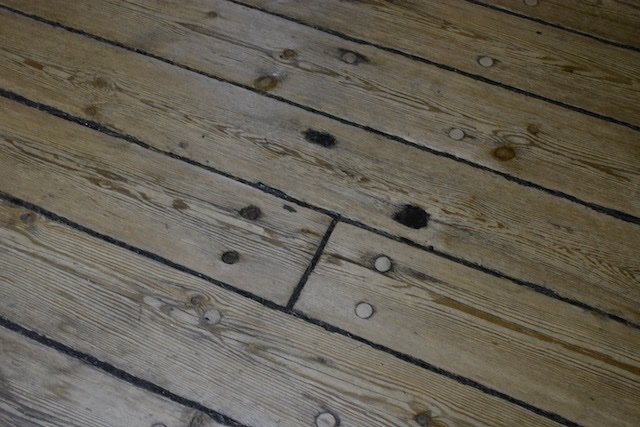
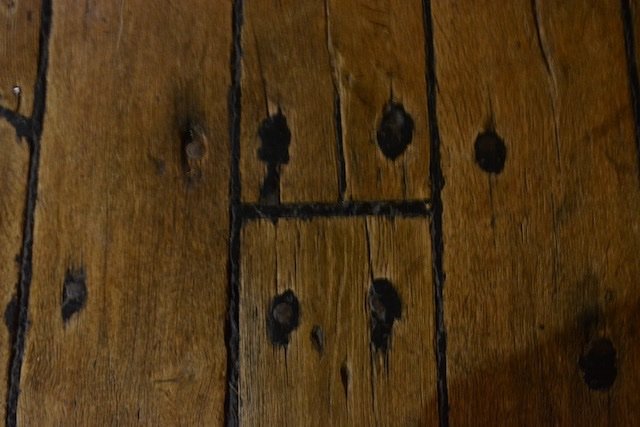
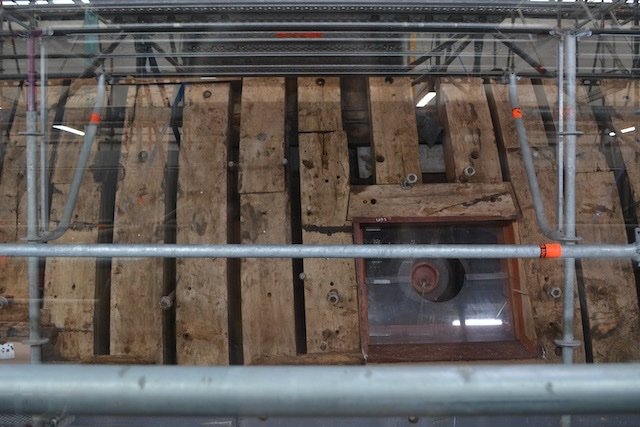
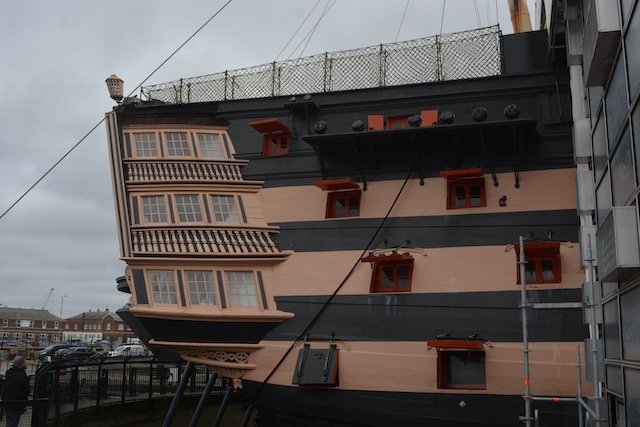
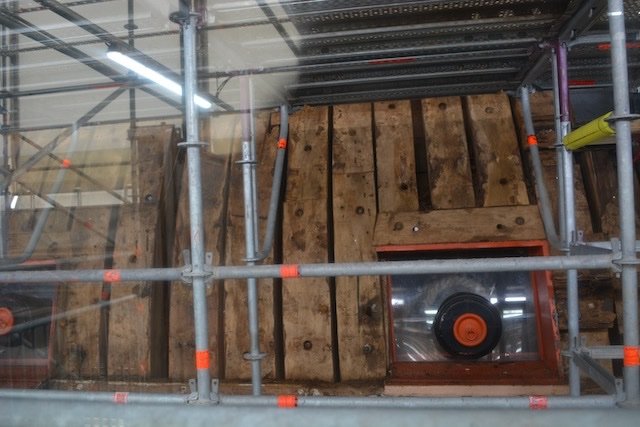
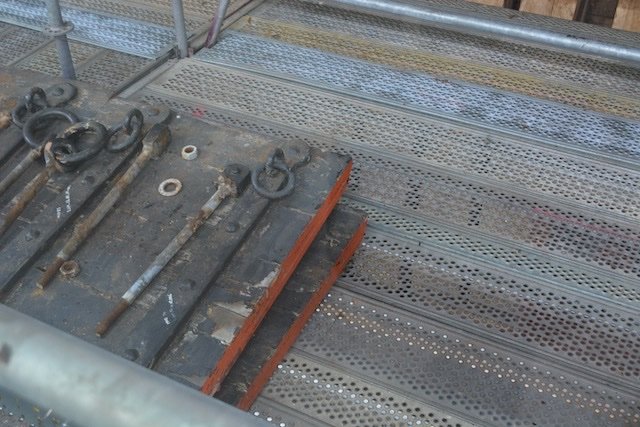
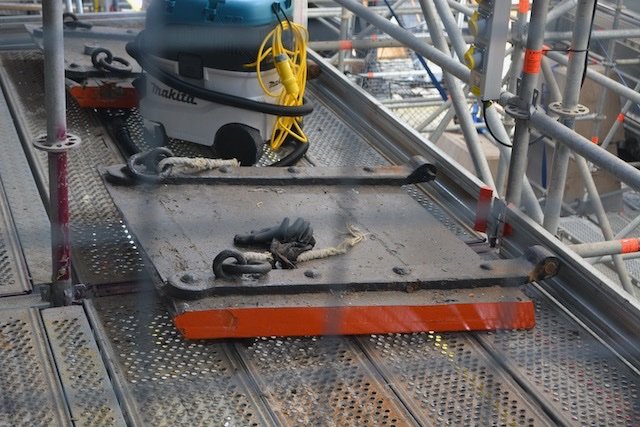
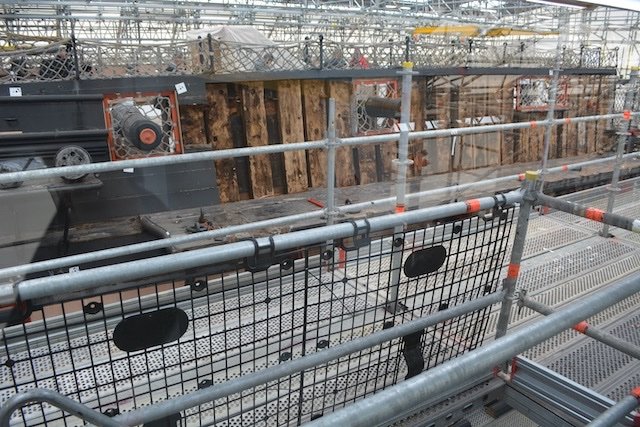
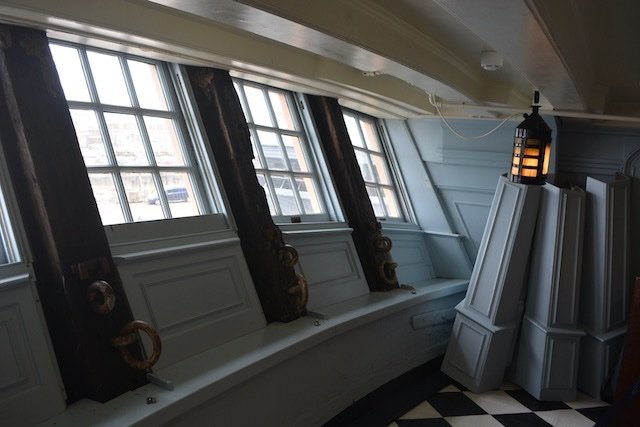
Finally managed to get down to HMS Victory this week. Huge renovation underway making it quite a sorry sight at the moment but obviously for the best in the long term. I had a good look for that Middle Deck planing but to no avail. I badgered a couple of the volunteers and guides. The visible parts of the middle deck are all clearly modern and very neatly trenailed. The Wardroom is not currently accessible and the planing is under covers. I suspect this is where the sample is thats shown in Bugler as it would be in the more visible and less accessed areas. Notable differenced in the decking throughout the ship. From the Lower deck (with the most original planking and very 'functional' filling of the trenail holes, through the middle & upper gunlocks to the poop which is neat enough to grace the Admiral's living room. The ship itself has mainmast removed and only the lower sections of the fore & mizzen (all Aluminium reproductions anyway) The midships is entirely covered in scaffolding and covered. They are removing and replacing the outer planking. Apparently this was replaced in the 1960's with a sandwich of Iroko and teak. Both hardwoods but the conditions and constant damp have caused the Iroko to disintegrate and the whole was in danger of falling off. I am told this is being replaced with Oak and they are tapering the planks in the way it was originally. Some photos below of 'bits we don't normally get to see' which may be of interest to members.

-
Allan That would be an interesting challenge. I don't have a micrometer in my toolbox but using a vernier I recon the mullions and bars are about 0.1 mm (at 1/64th scale). If full size were 1/2 inch at that scale they would be c0.2mm. Using a grained material, ie wood, would present a challenge. But we love a challenge!! Please let me know how you get on if you try this. One option, if that does not work may be to cut the frames from 1/32 ply as you suggest and add the mullions & bars with something like fusewire or piano wire. Malcolm
-
Thanks Allan Thats 0.5mm photo etched brass supplied with the Caldercraft kit. Malcolm
-
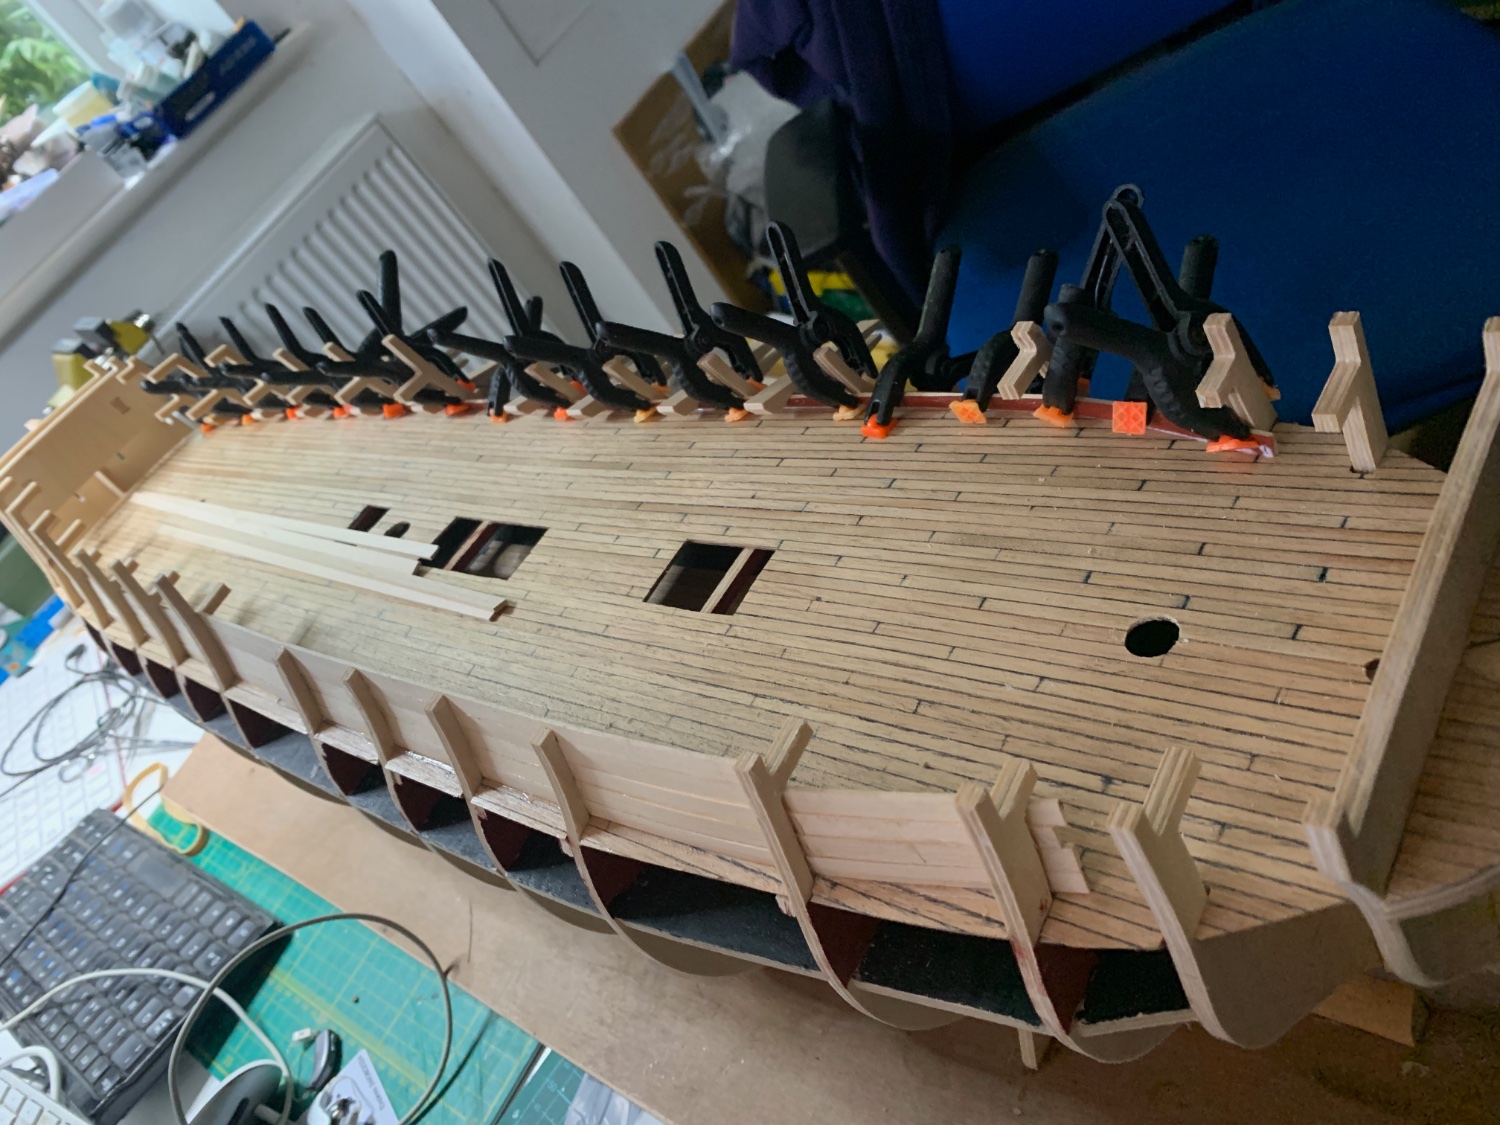
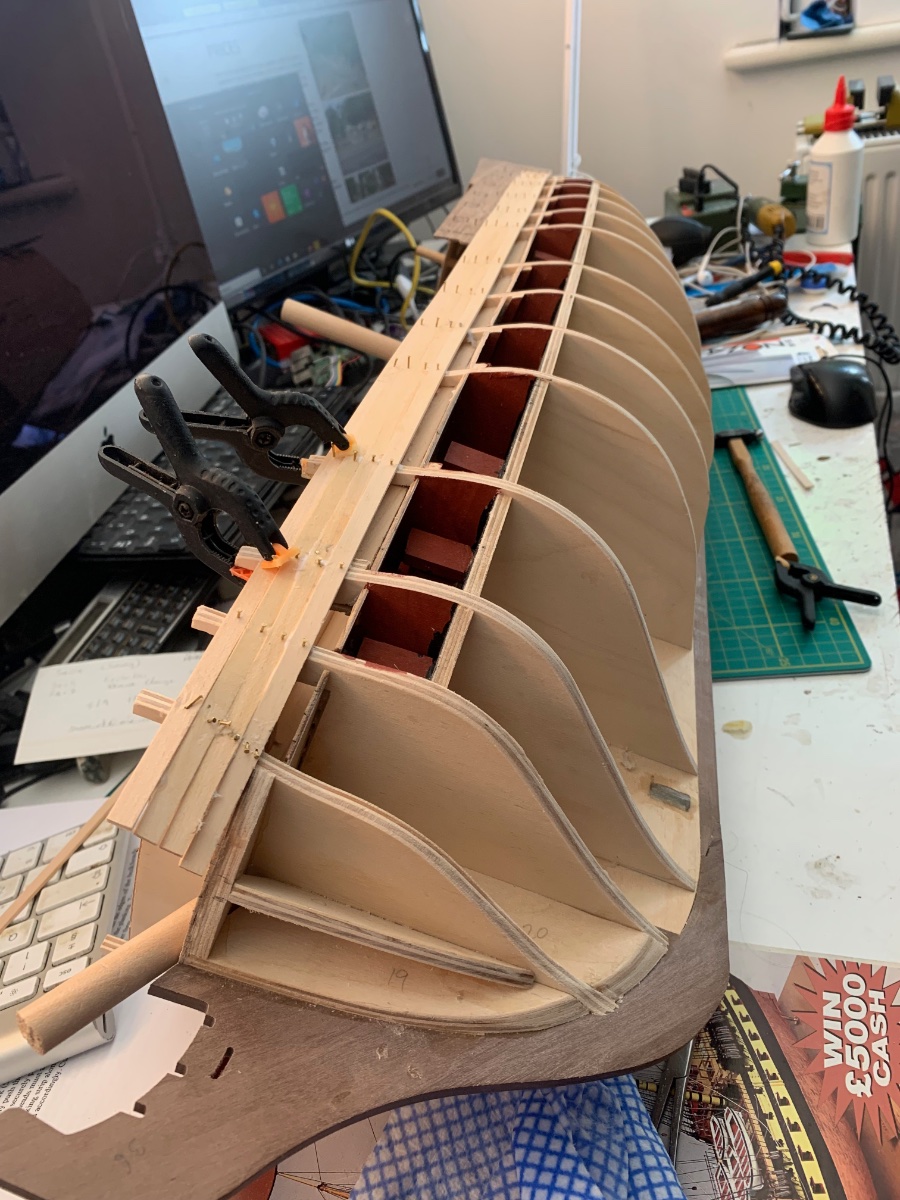
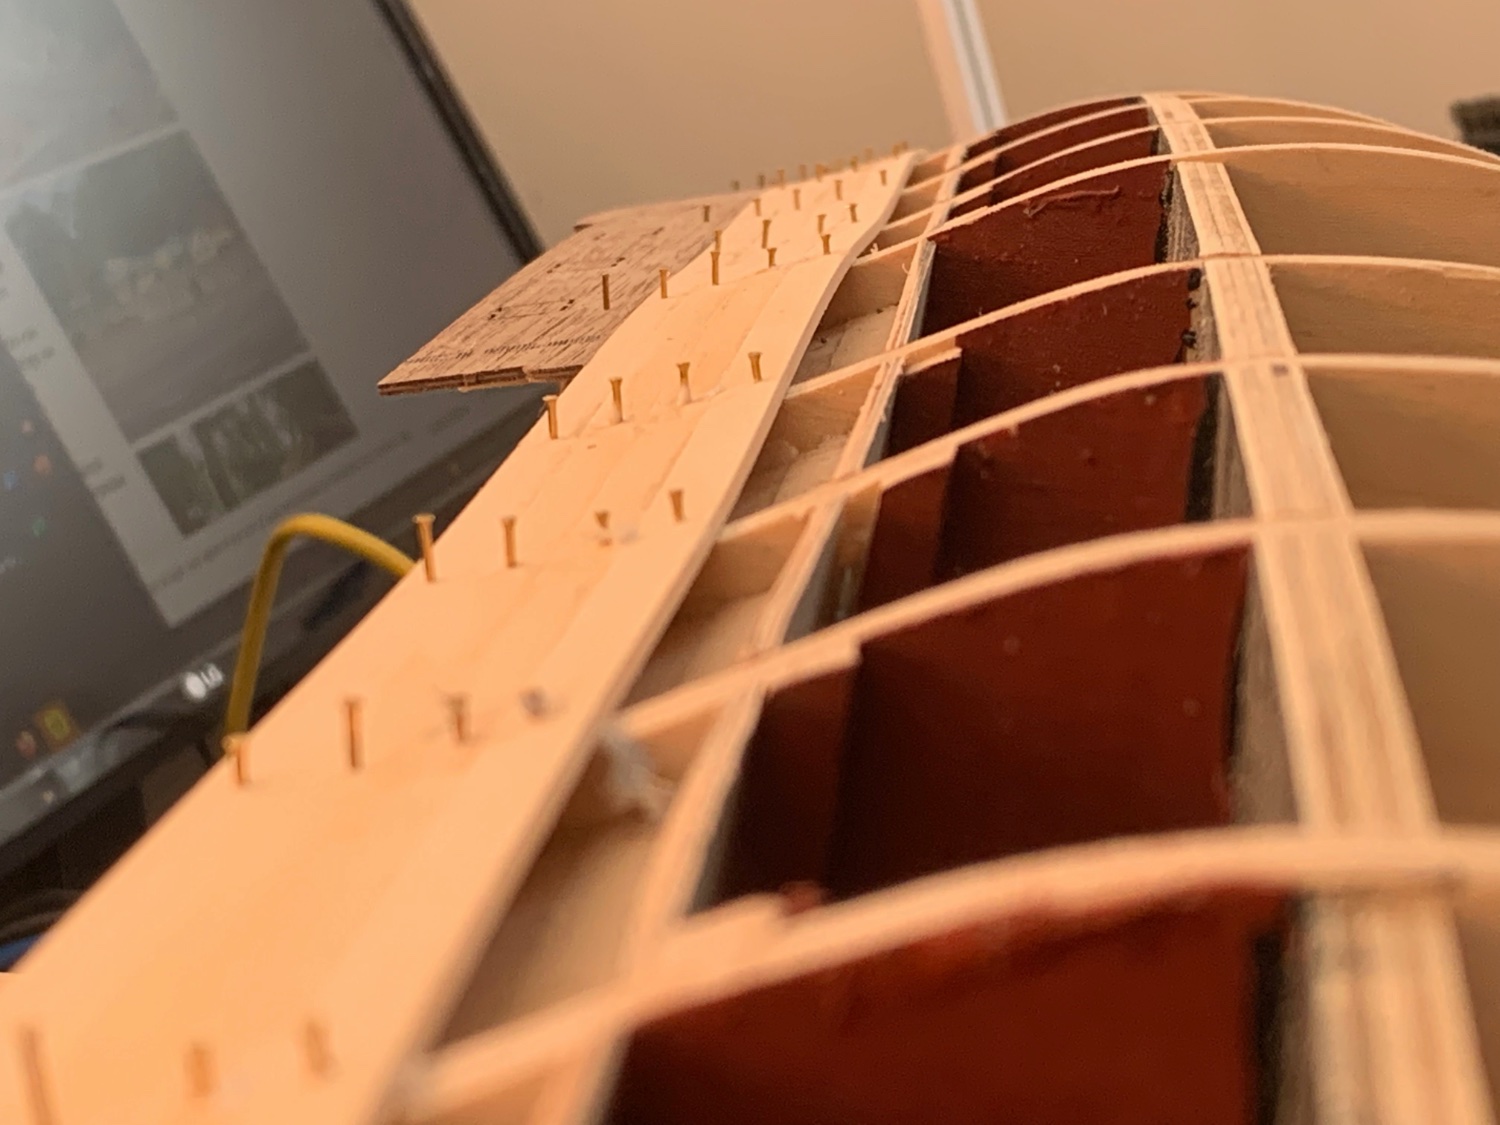
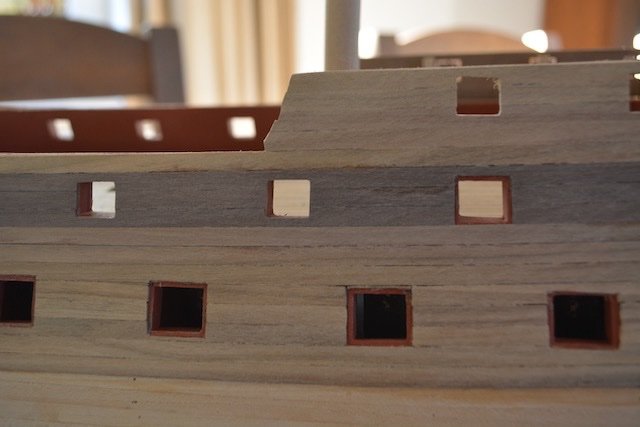
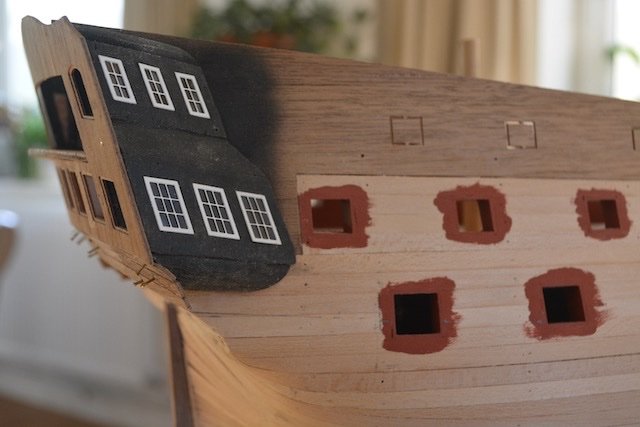
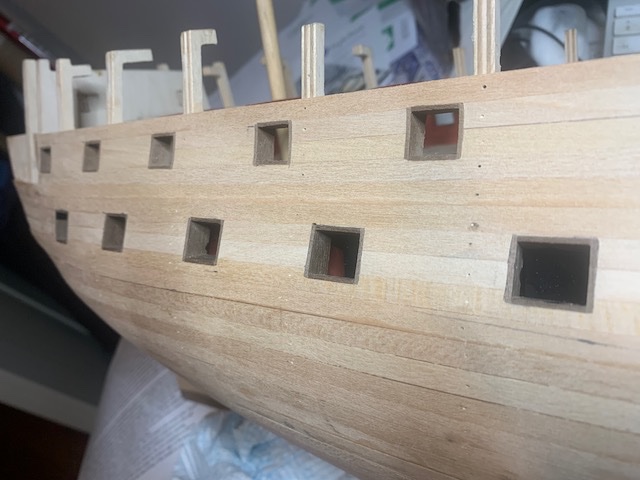
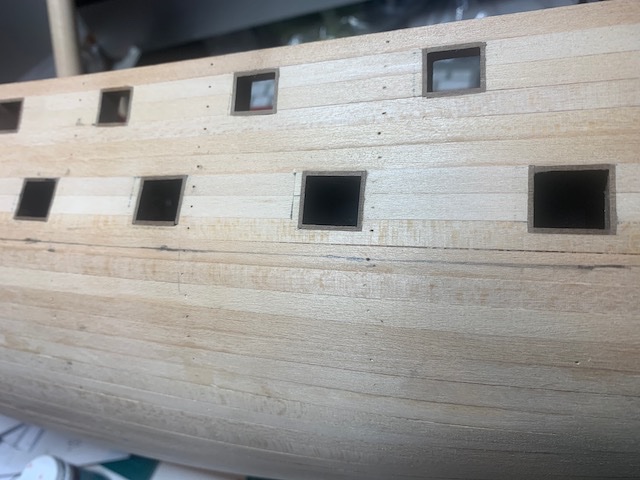
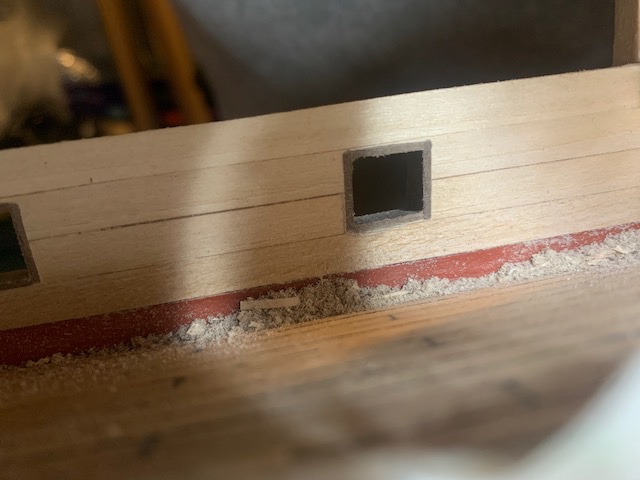
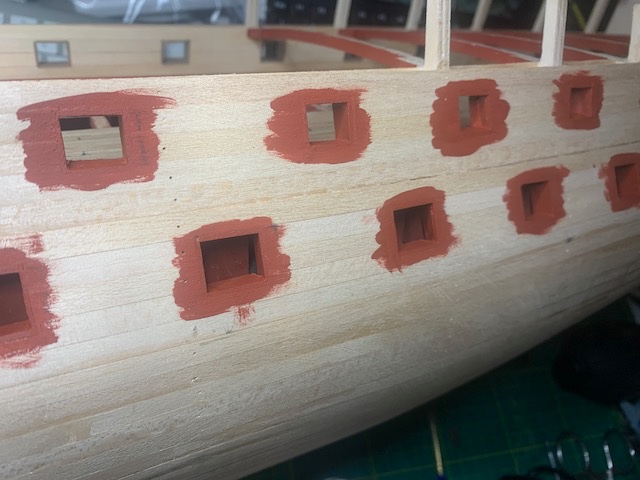
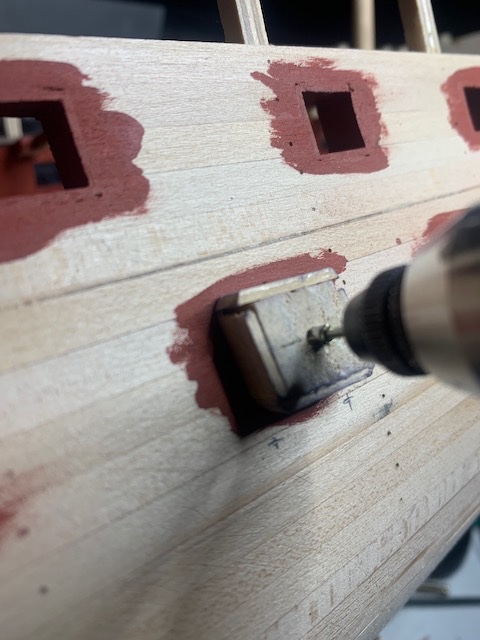
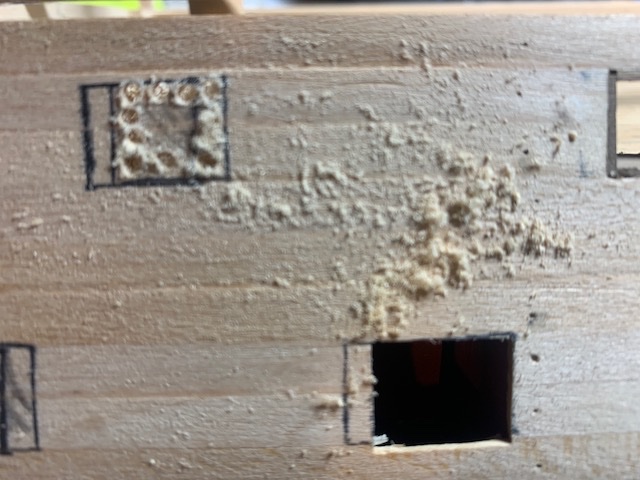
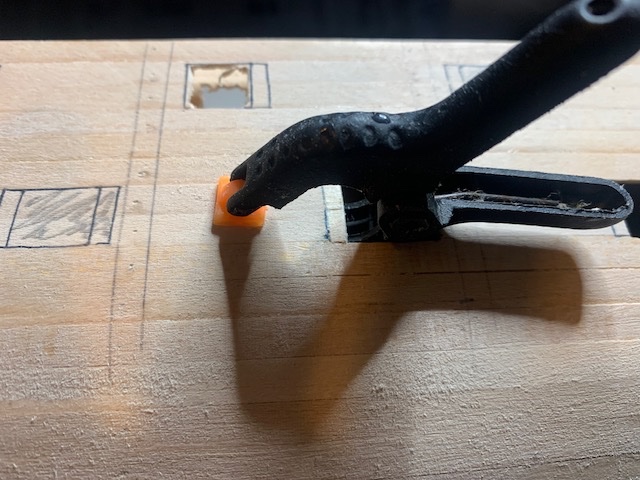
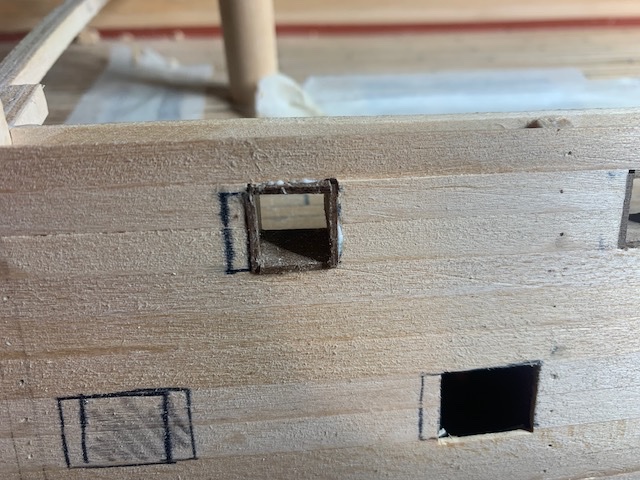
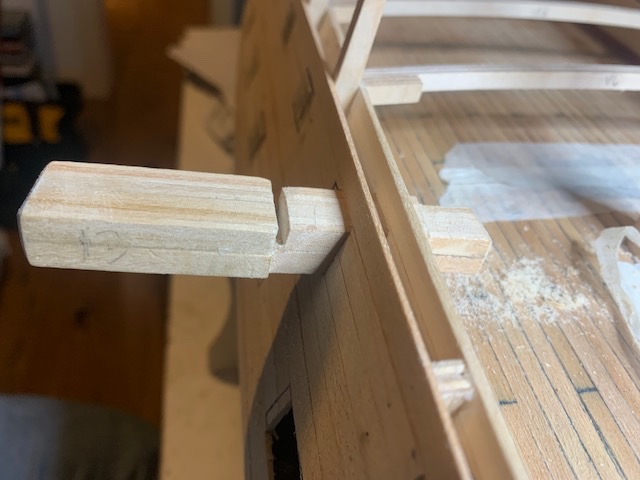
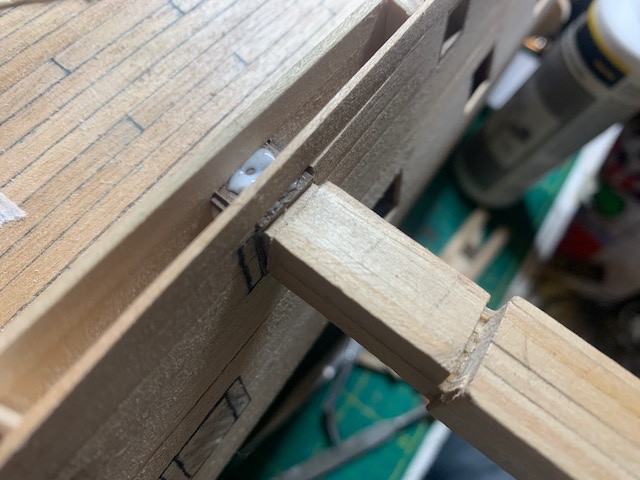
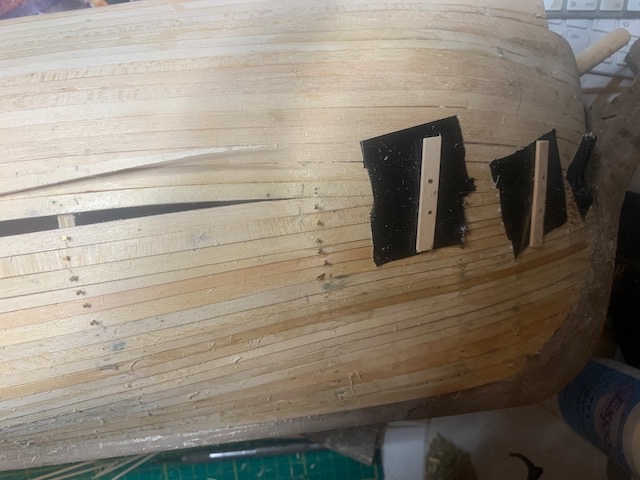
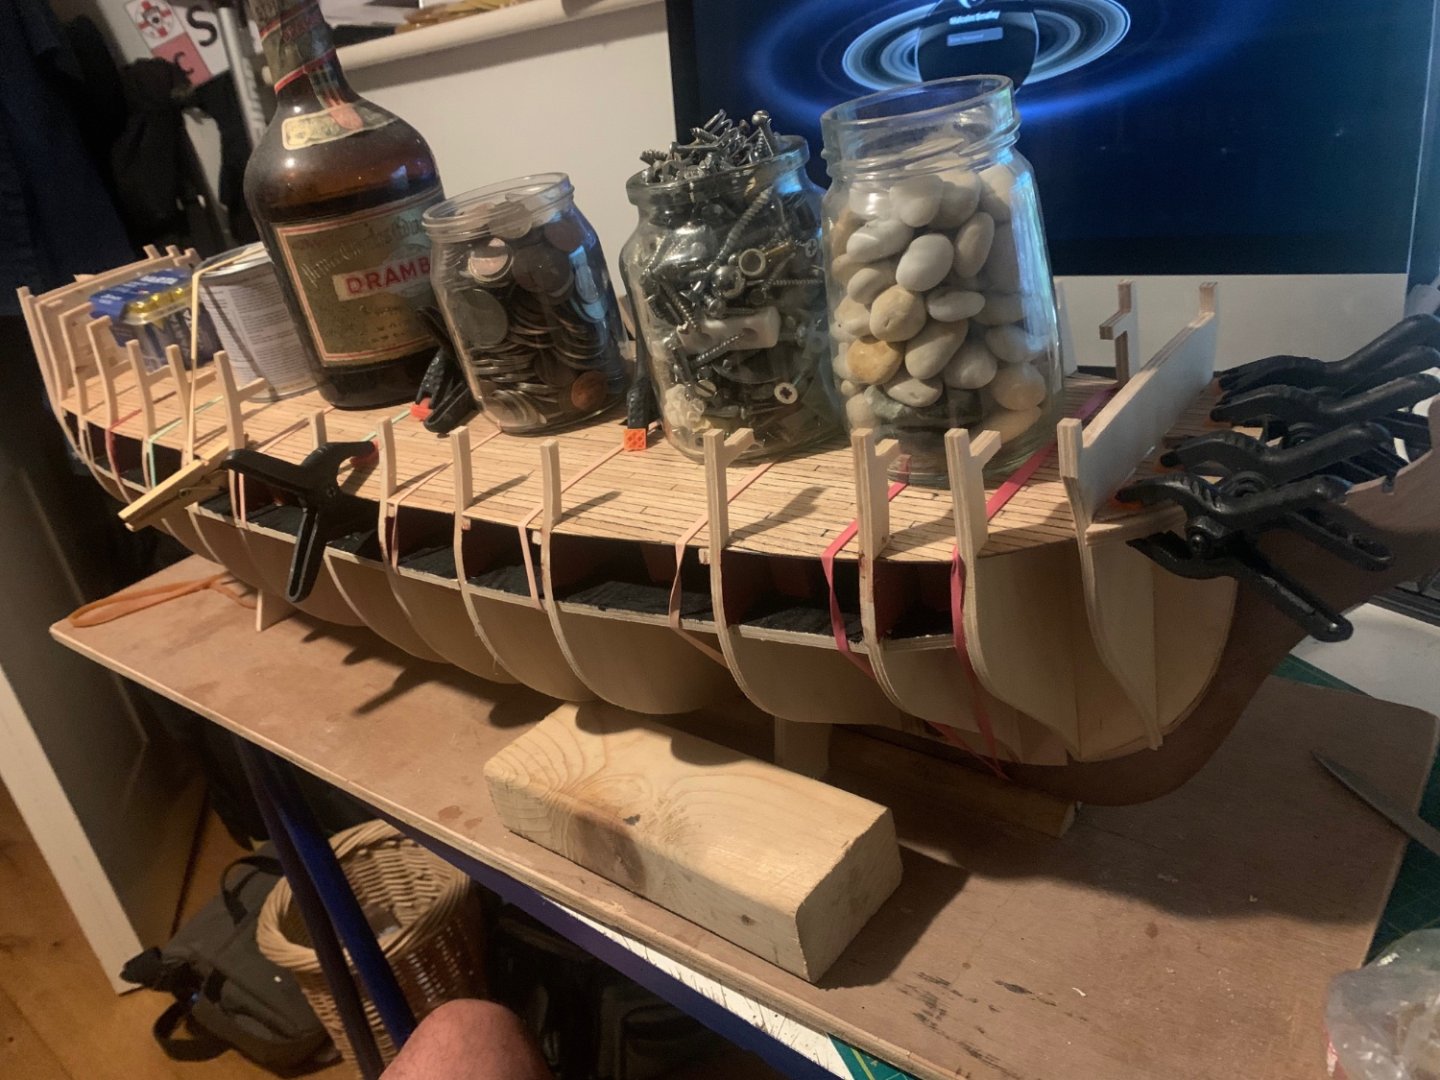
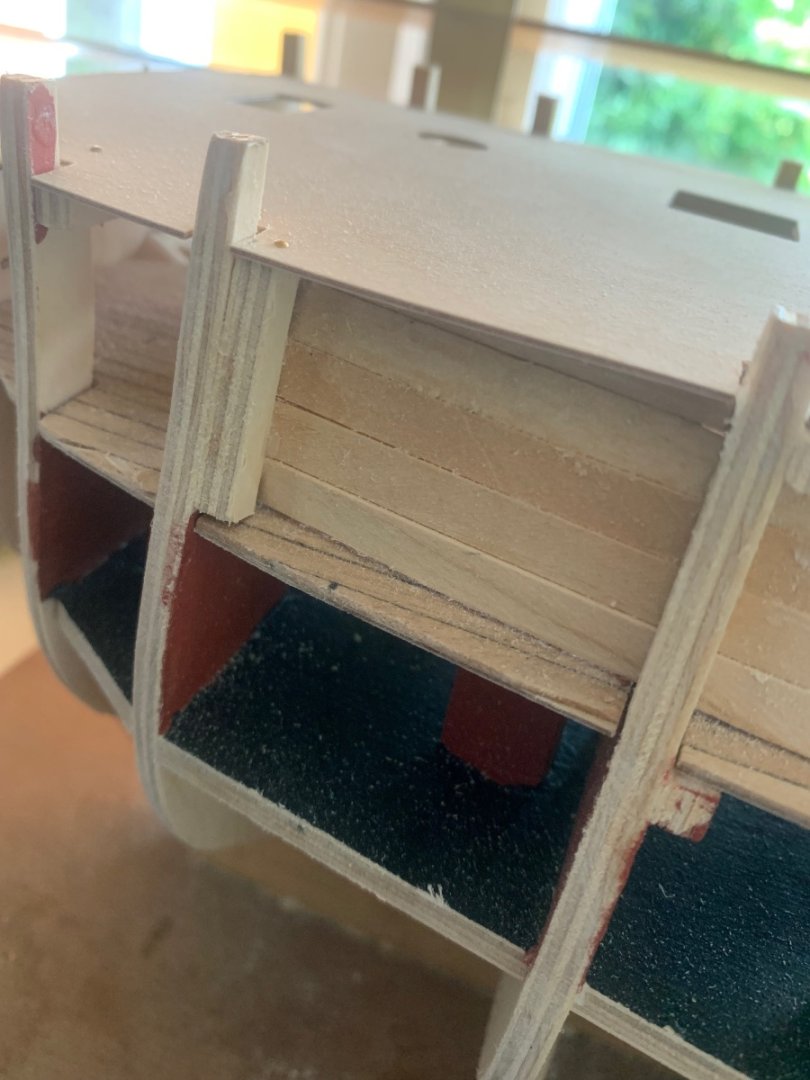
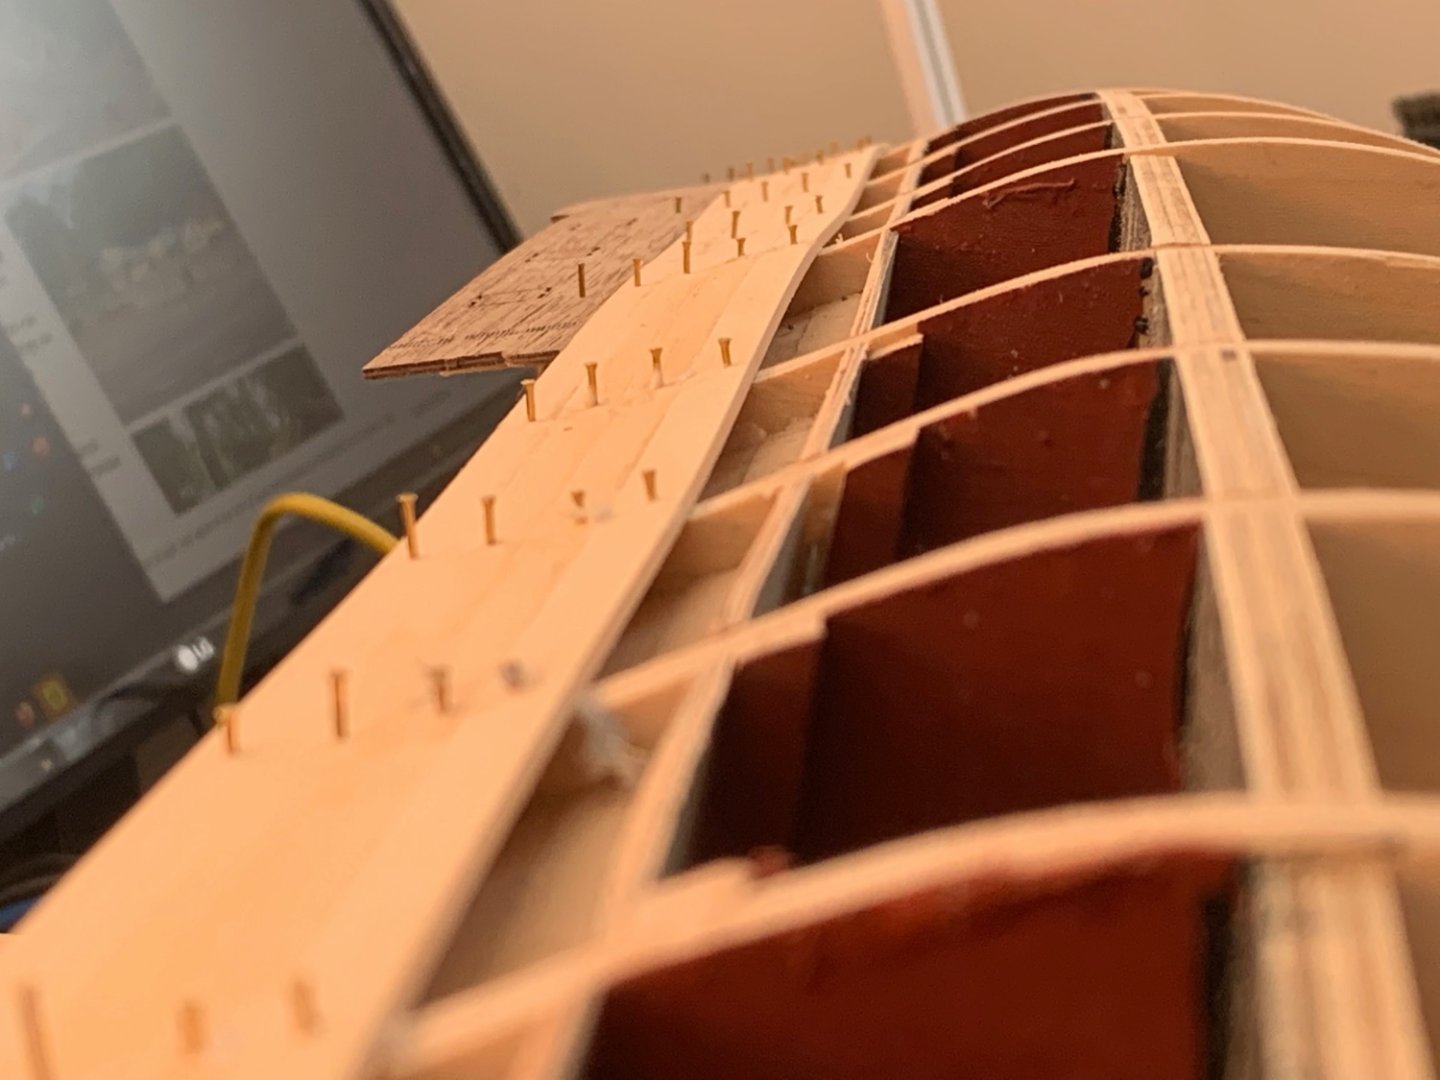
Thanks for comments & likes. @allanyed I will have a look into that, I know that the copper plates are not particularly historically accurate. Mine are still 'maturing' in the shed in genuine seawater from Spithead! Some progress in the lass few weeks. I've completed the gunport and decided to line them all at this stage - against what the build manual says - I figured it was going to be very fiddly to recess them all accurately by 1mm after the second planking, especially the lower ports where there is only the edge of the 1st planing to adhere to. For these I glued some 6mmx1.5mm lime wood (offcuts from the 1st planking) to the 10mm walnut to give a step which could be better glued. When dry the walnut sanded to the level of the 1st planking. I know this is going to mean I'm going to have to cut the 2nd planking cleanly to the outer edge of the lining later. But I think thats going to be easier than the alternative - I may live to regret, but let's see!! Following from previous post I did have to redo all the upper gunports along one side as the sizes cut were too small. I paid too much attention to the template. The reviewed sizes are those of the gunport lids. I should have looked at this first but likely realised before too much damage was done. Also taking the opportunity at this point to drill the holes for the lower deck 'false cannon'. Again its easier access at this point, without 2nd planking and gunport lids to get good access with the drill as they are required quite a way in so a long drill bit needed. I built a plug with a central hole to ensure consistency & accuracy. Round houses built and added - relatively straightforward. Working on the quarter galleries now. Starting with planking the rear decking. Malcolm

-
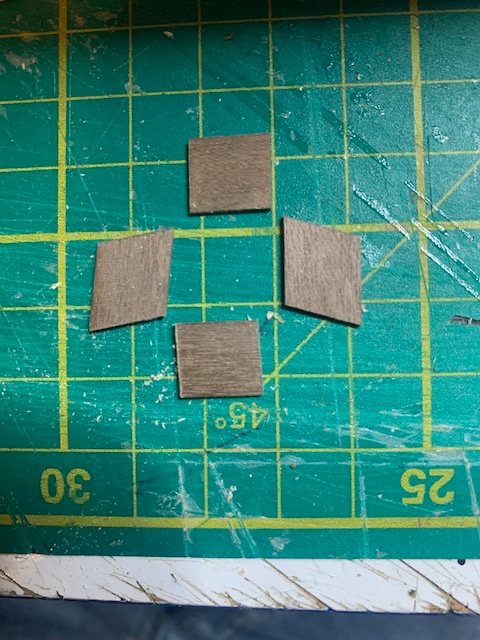
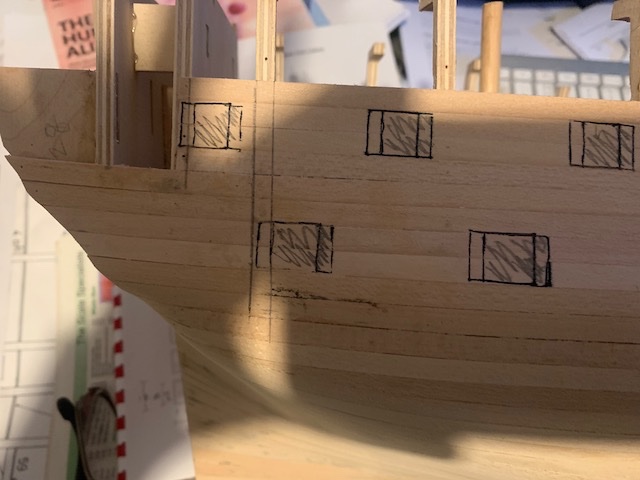
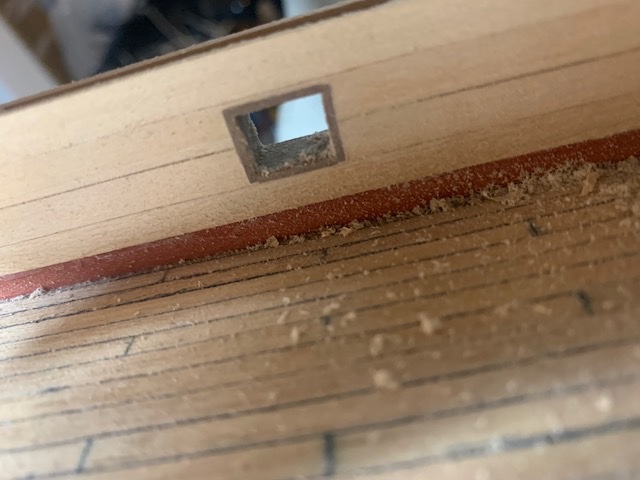
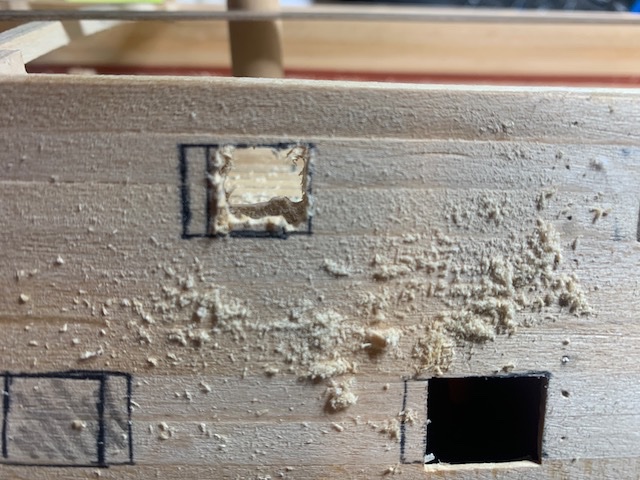
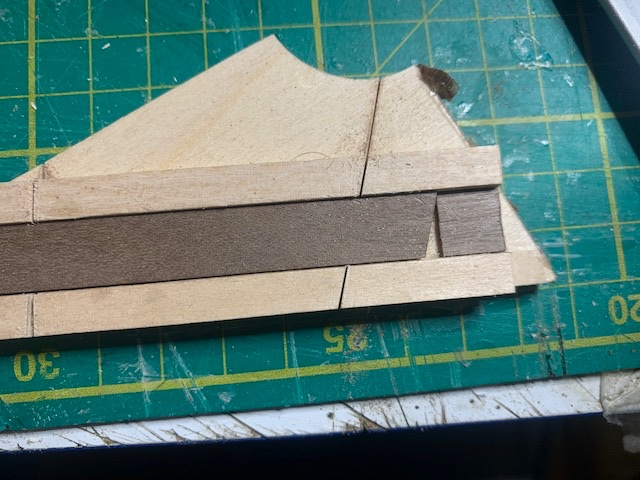
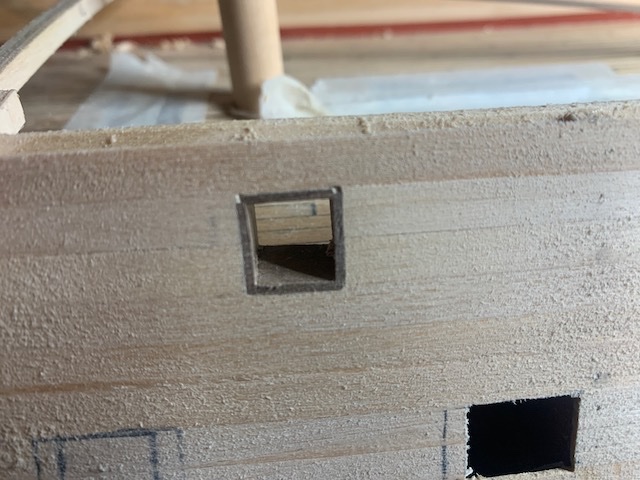
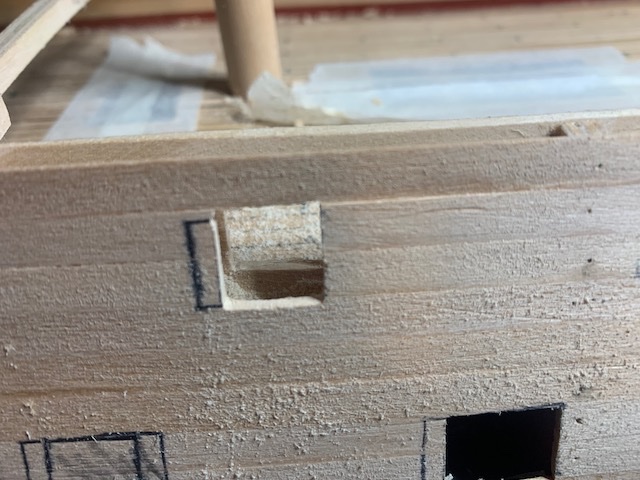
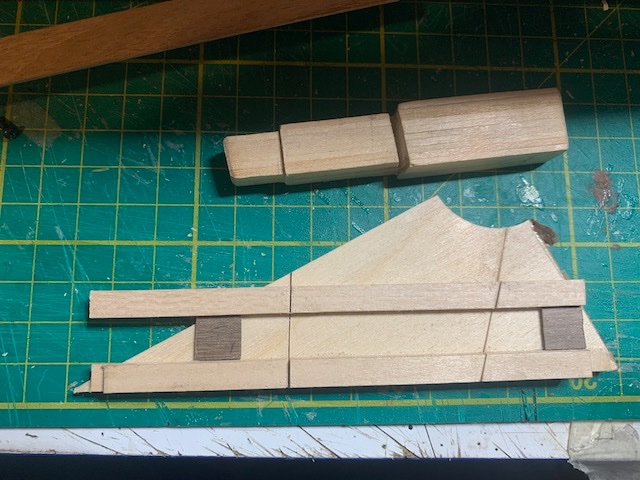
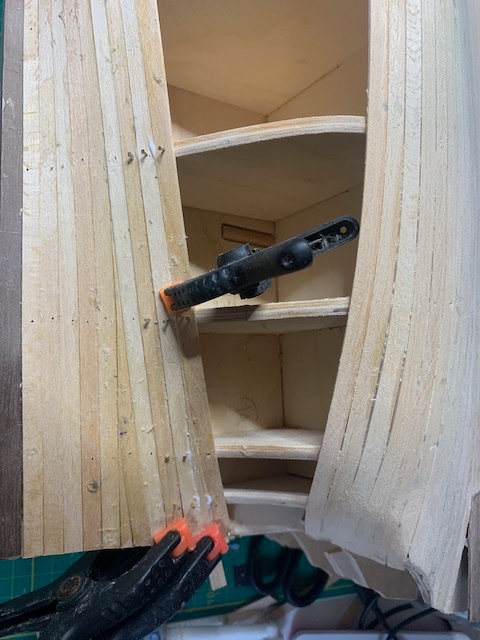
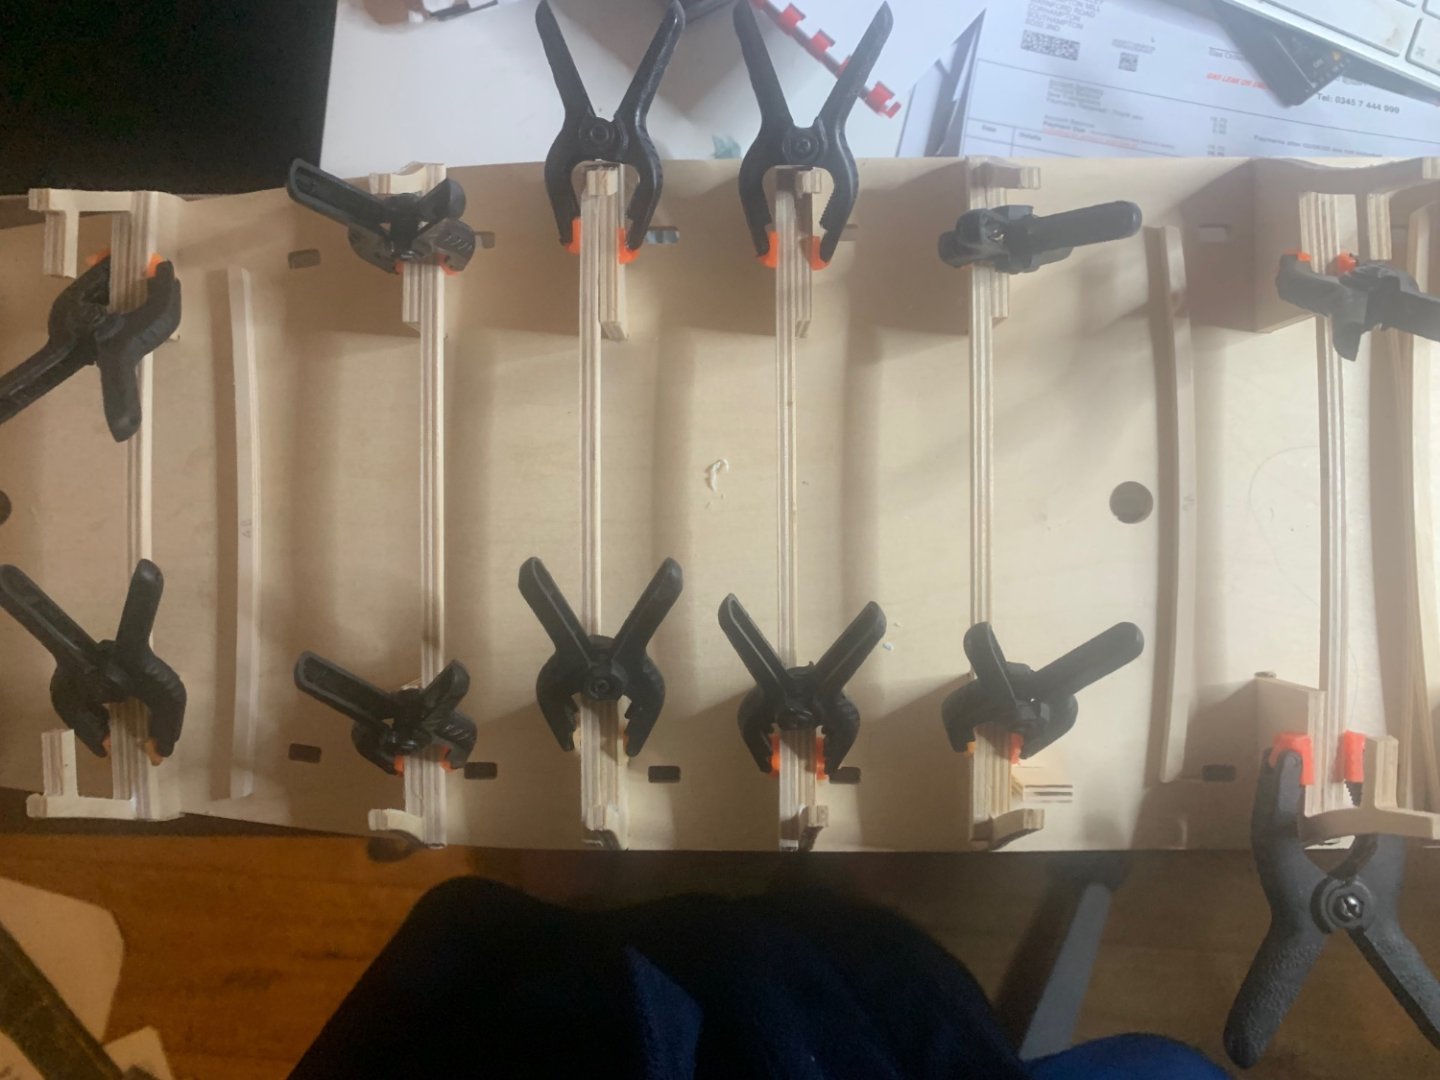
A bit slow progress - life has got in the way a bit!! - it happens. Been slowly progressing the gun port cutouts. Initially i laid the template onto the sides (as best I could with a flat template and a curvaceous model) marked them put and cut out the first 2 before I realised the rear two interfered with bulkheads 14 & 15. So I had to realign and remark. This resulted in a forward transaction of about 5mm. Hence the appearance of shutters on the pictures below!! I was able to correct the two cut with infill pieces so not too much damage done. Then slow progress cutting each out and lining them. Stitch drilling, opening out with a scalpel and then finishing with a file. I made a jig piece to ensure uniform size. This has three rectangular sections. One 12 x 11 mm for the upper gundeck cutouts, one 16x12 mm for the lower deck and a third 10x9mm for the lined upper ports. (I've not yet made the one for the lined lower ports) I'm cutting & lining each as I go so its slow progress. Each takes time, but what's the hurry! The upper linings are not required to be square. The vertical sections are rhombus shaped due to the tumblehome. Hence I constructed a jig for this out of scrap materials. Some details of the steps
-
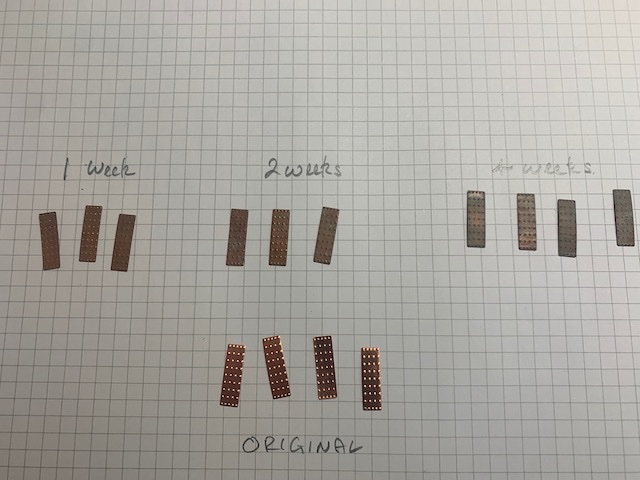
Looking ahead a few stages....during the weeks of planking I've also been experimenting with 'ageing' the copper plates by immersing them in seawater. Picture shows original, and 1,2 and 4 weeks of being submerged in a pot of seawater. I did stir it every few days to ensure that the water got to all surfaces as, where plates lay across each other the water did not necessarily reach all surfaces equally. Pretty happy with the outcome and I think the plates need 4 weeks of preparation so I've currently got all the plates that will be used in a 2 litre bottle of seawater. Agitating (shaking it up a bit & rotating) it on a daily basis to ensure a more even exposure.
-
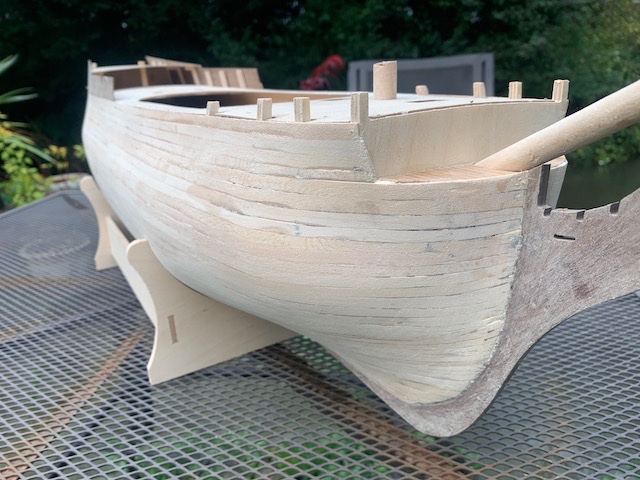
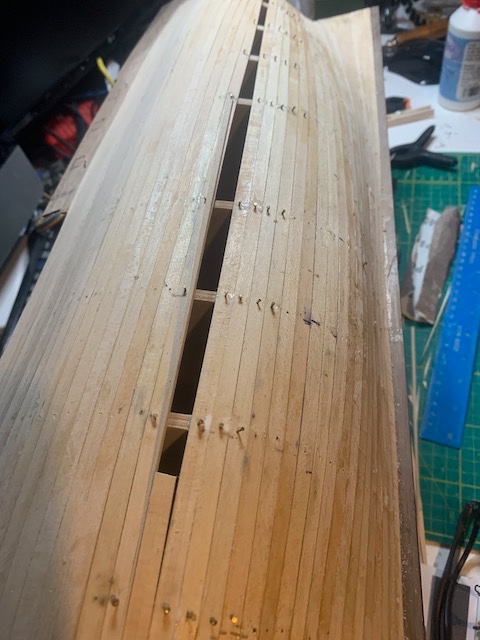
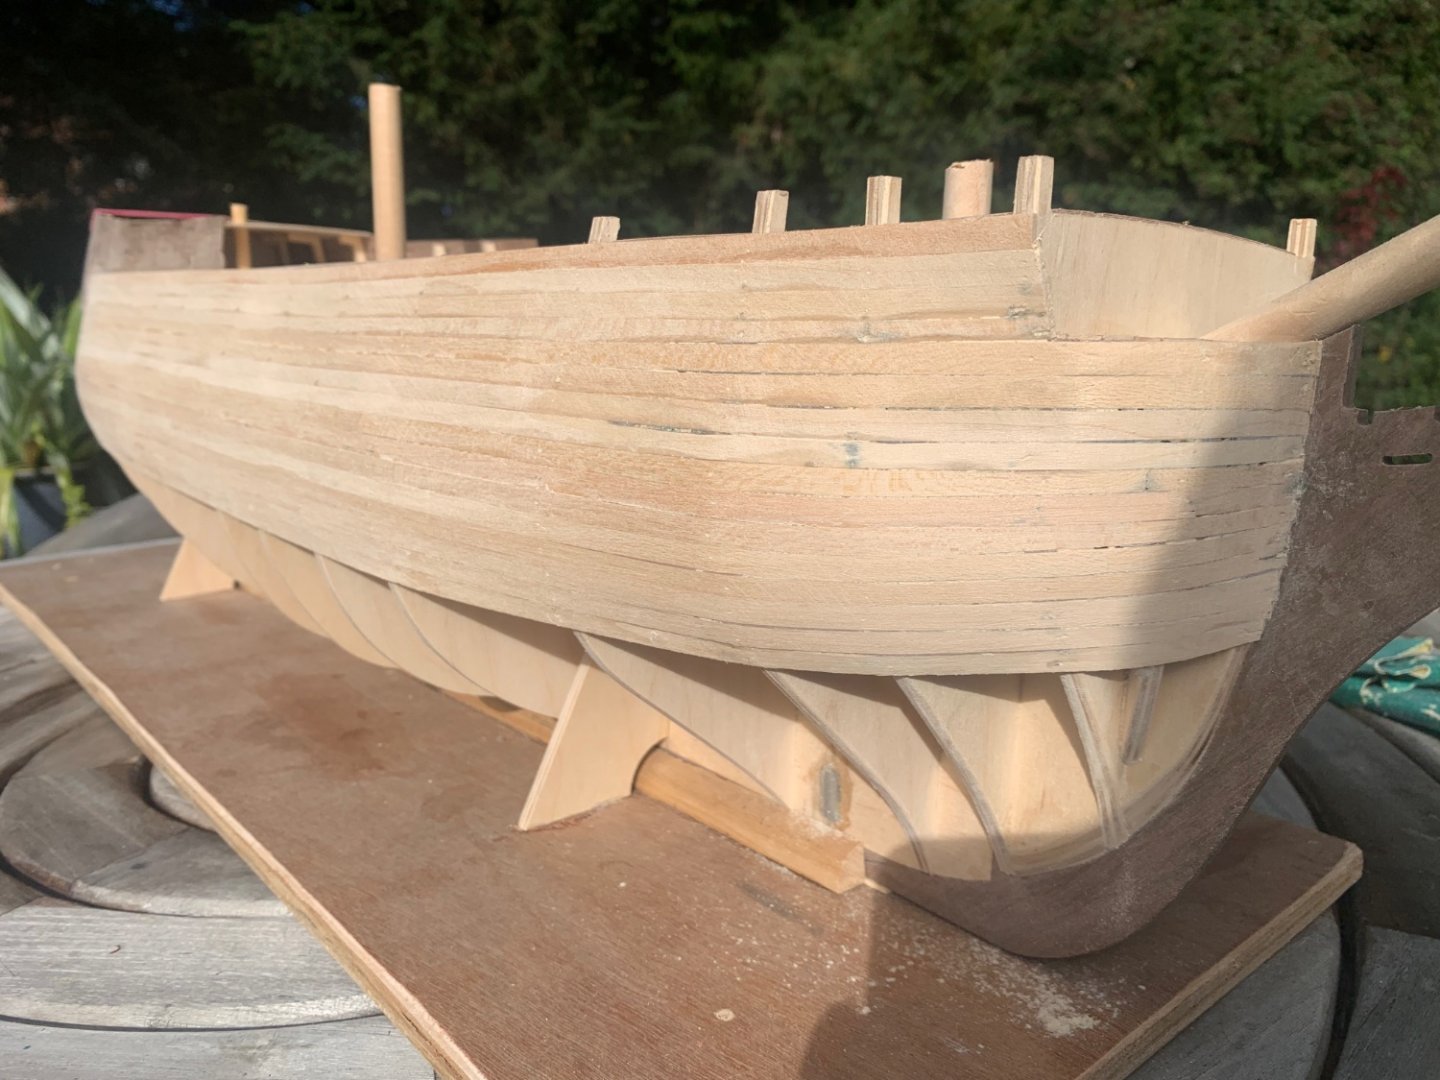
First planking completed. With the final piece of the jigsaw being the most complex. Gaffer tape and nailed cross pieces used to hold the tapered ends in shape while the glue dries and prevent them springing out as they could not be nailed in place. Gaffer tape mainly to stop the cross pieces from sticking to the planking through excess glue. A couple of hours of sanding giving the results in the pics. A little bit more needed in a few places. But not much, I think as its all about a smooth enough base for 2nd planking and not a finished surface.
-
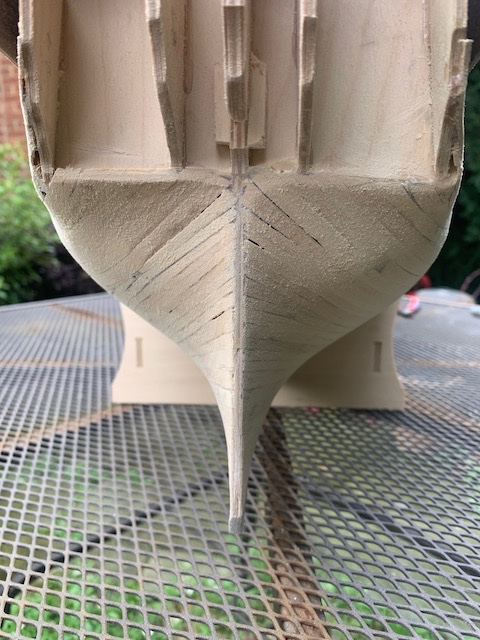
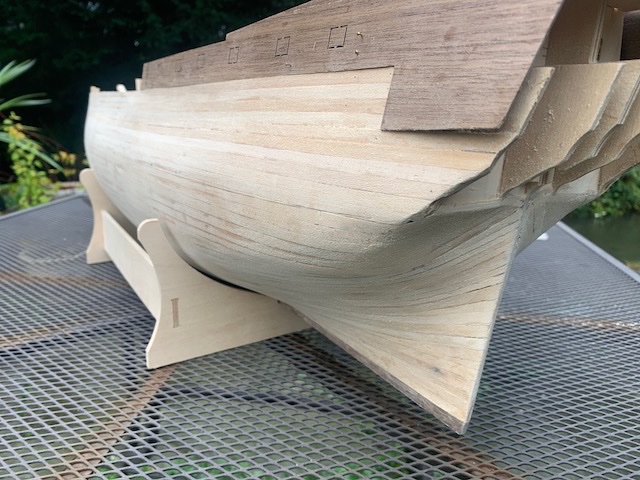
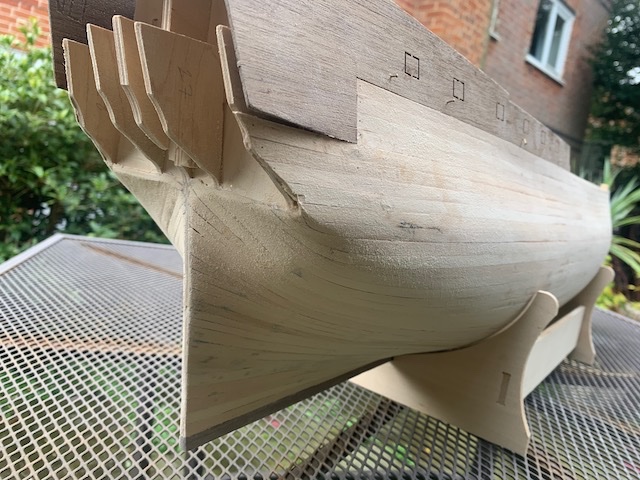
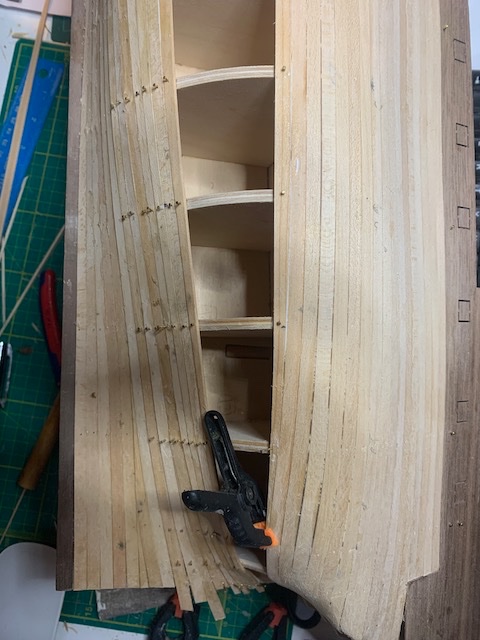
Thanks to everybody for the likes! The last two or three weeks have been about slow but steady progress on the first planking with the port side now completed apart from final filling & sanding. Longer planks on Agamemnon than I have used before so I took to soaking them in a rainwater butt which was just bout deep enough. I decided after planking from the bulwarks to the sternpost to plank up from the keel rather than continue down the hull. Whilst I know that this would give a discontinuity and a hole to fill I felt this gave a much better run of planks. As the gap was filled it required planks to be tapered at both ends. Thinner planking at the bow & stern made it easier to form these to the correct lines. I was also keen to avoid too many 'in fill planks' with tapered ends terminating mid bulwark as these then need to be clamped in position while the glue dries and have a tendency to spring out. About an hour of sanding predominately to remove excess glue & the stepping between planks and to taper down at the stern post. I'm pretty happy with the result so far. Now to press on with the starboard size. Some pics below at various stages of this. Malcolm
-
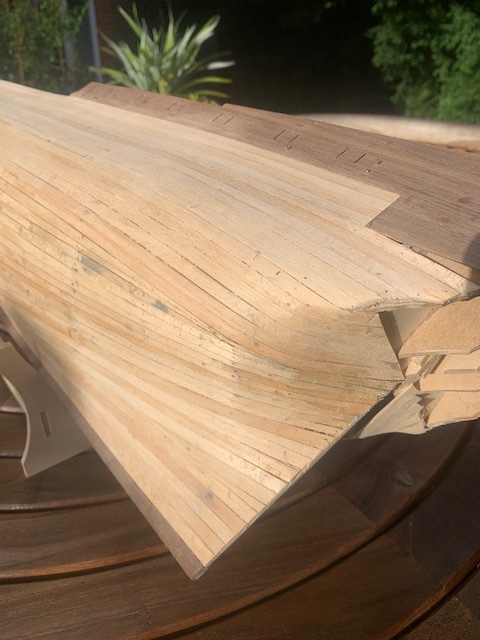
1st planking continues. About 1/3rd completed, I think. I took advantage of a bit of sunshine today to sit out and start the sanding - if only to remove the excess glue and the steps that you naturally get between the planks. Mostly ironed out the wrinkles in the upper planks through combination of sanding and filling the bulkheads. I was a bit worried getting to the 'interesting corner' at the stern but well soaked limewood planks prove to be flexible with patience and I'm 'round the bend' on the starboard side. There is a small stealer in the corner to tidy up. Some pics below. Malcolm


-
Thanks Chris thats amazing intel. Astounded that I get a response from the original source! I've checked both sides - BHs 9 & 12 are slightly proud on both sides. As you say, a bit more sanding required. Thanks Malcolm
-
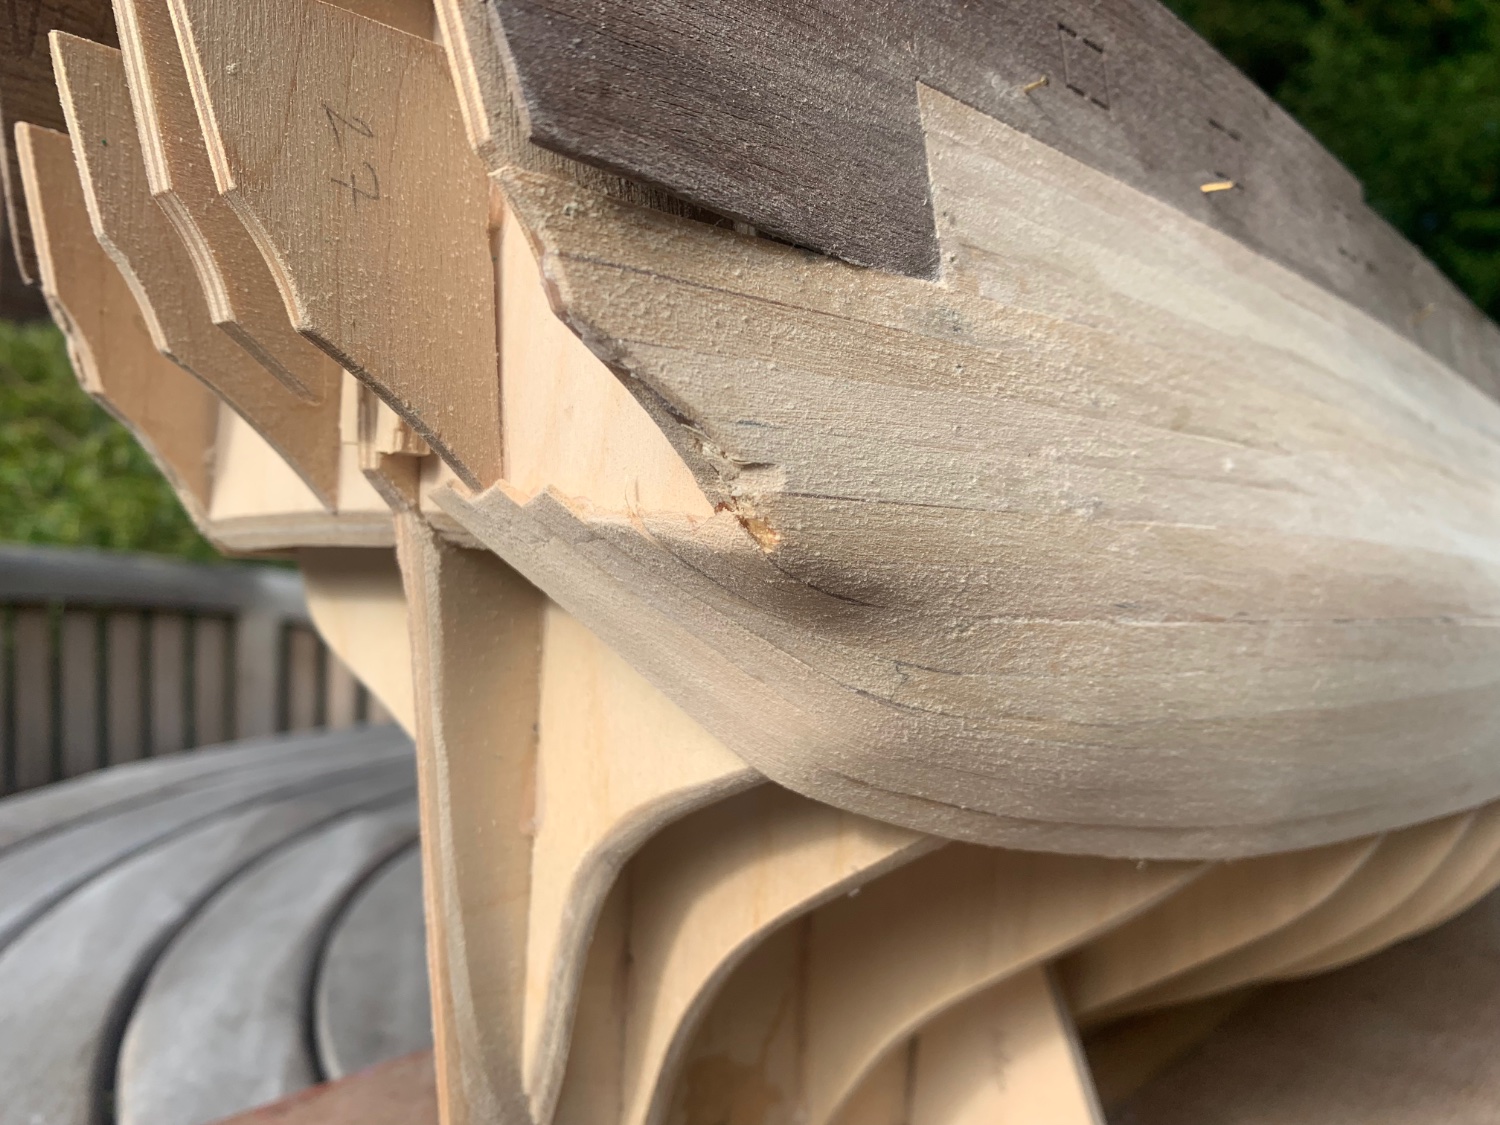
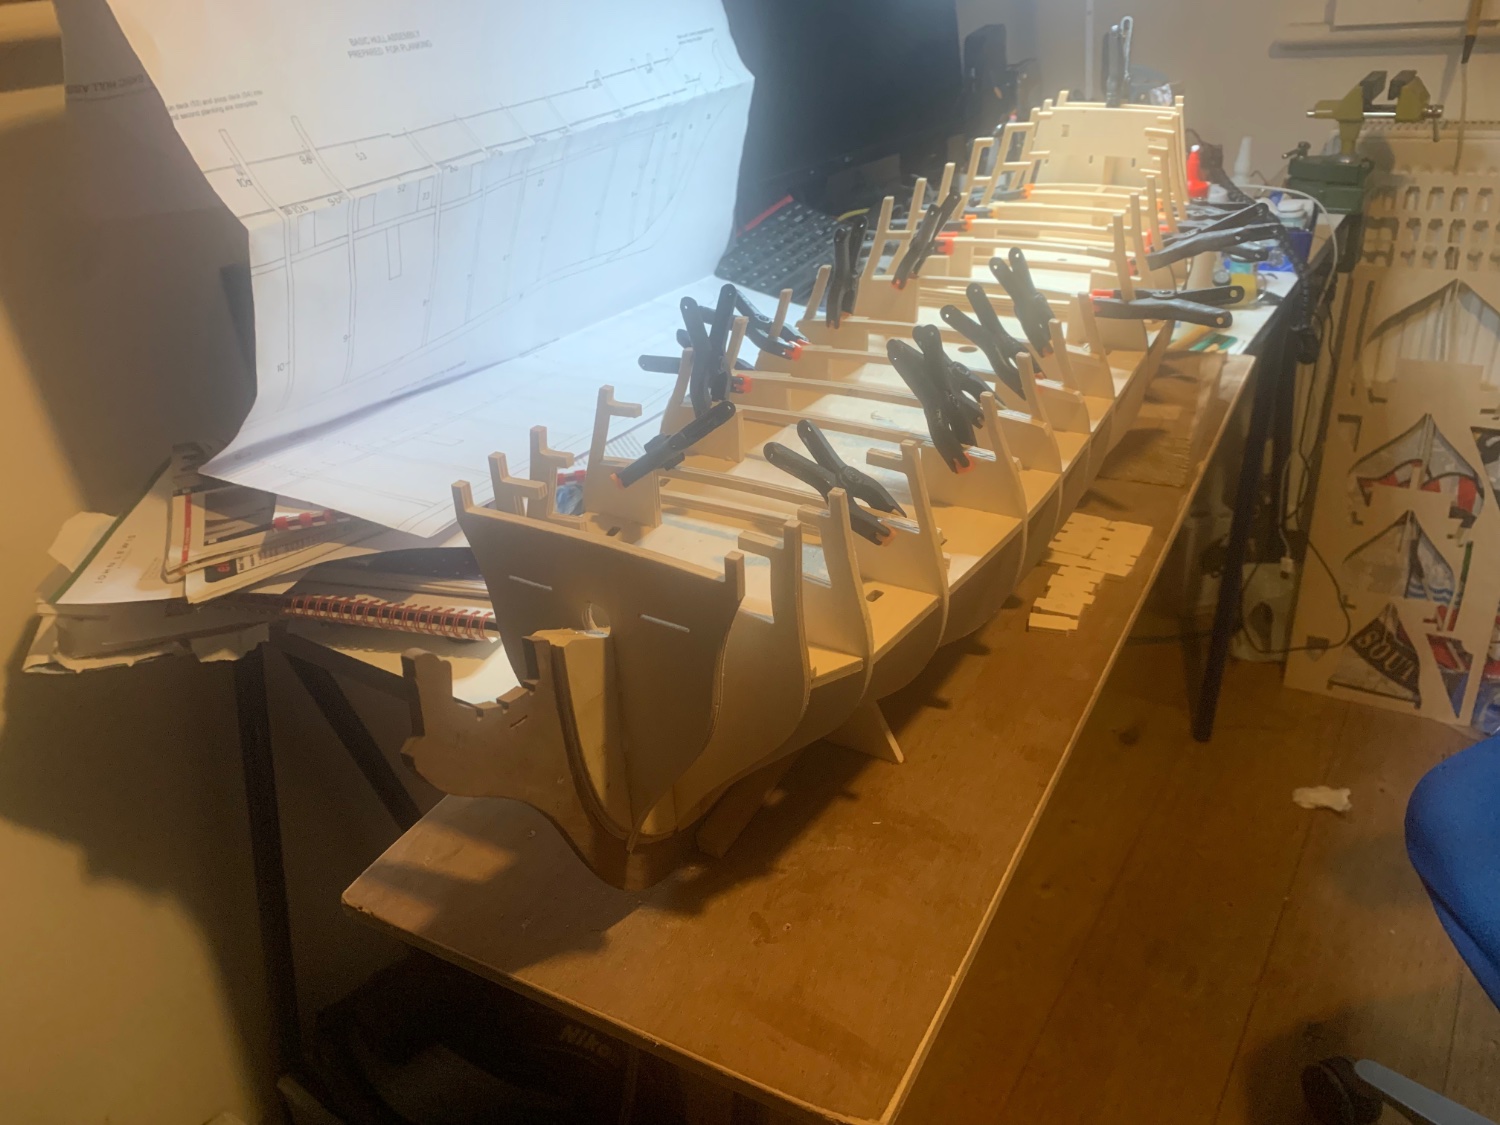
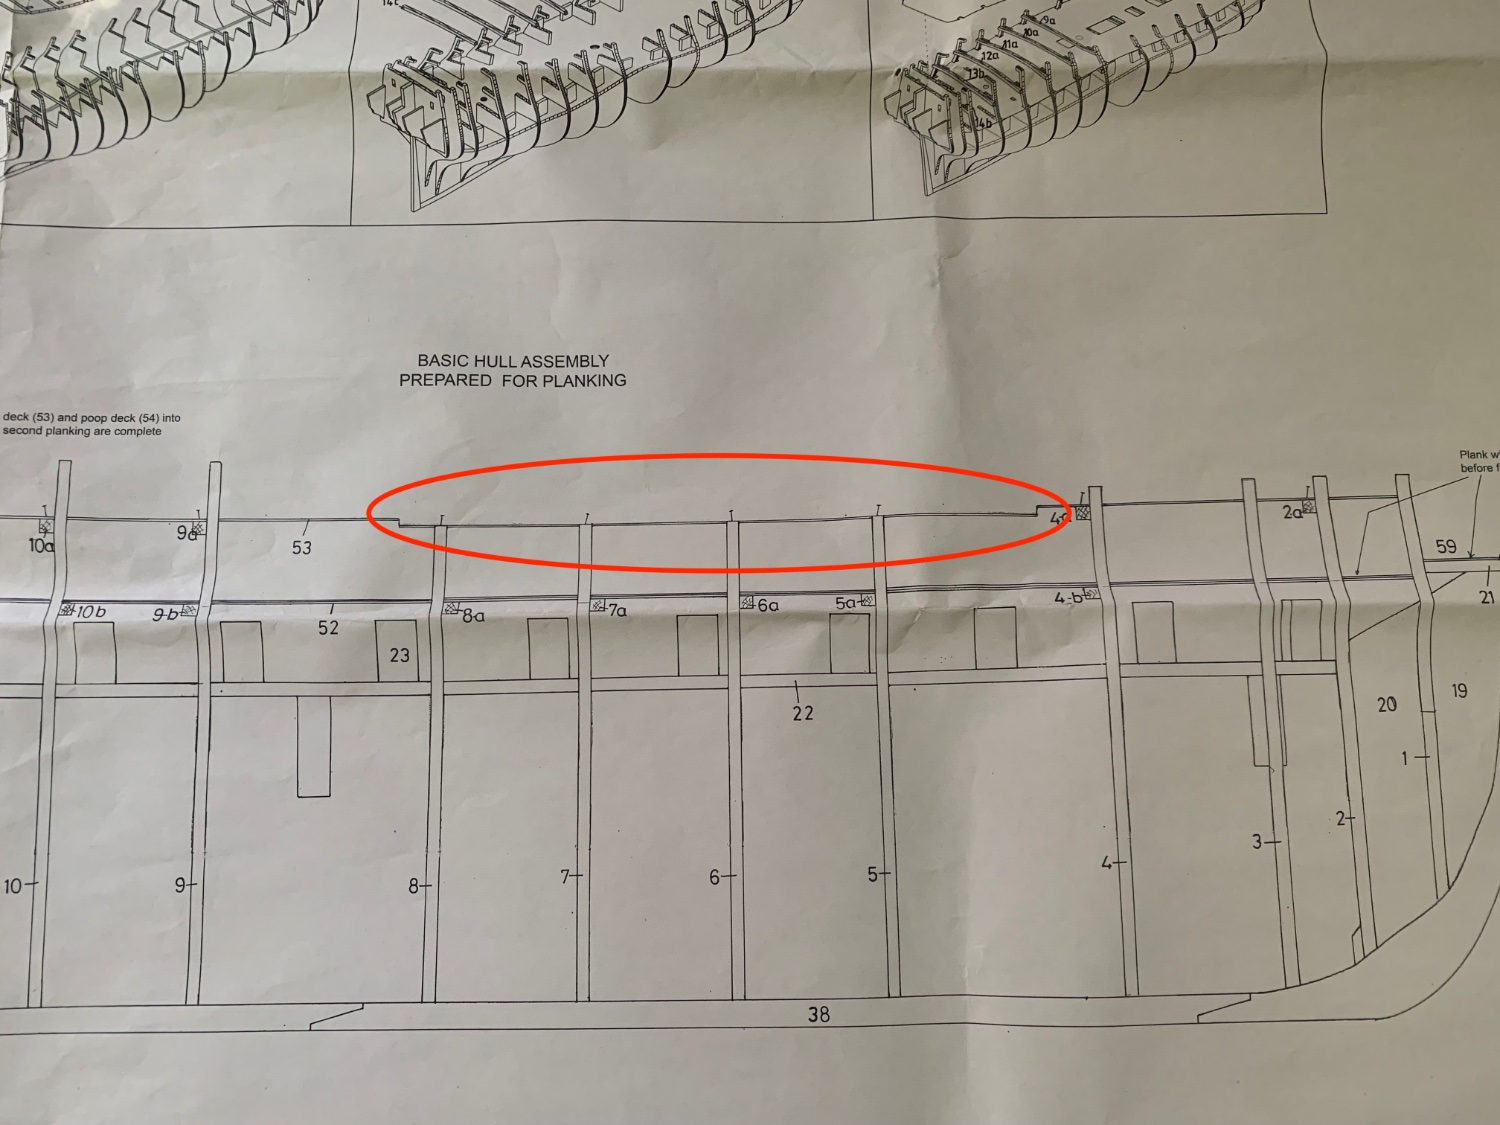
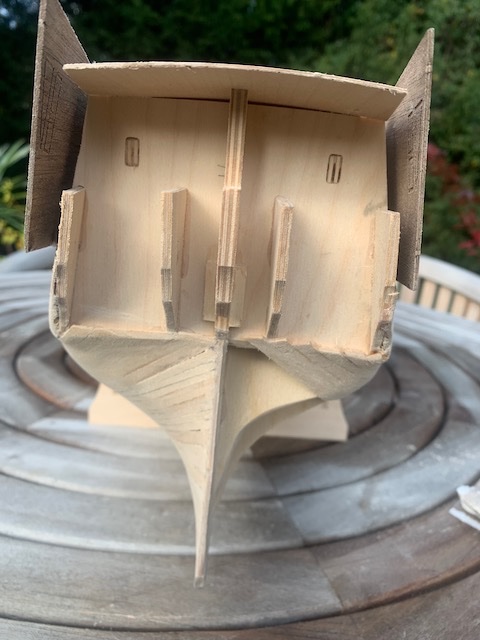
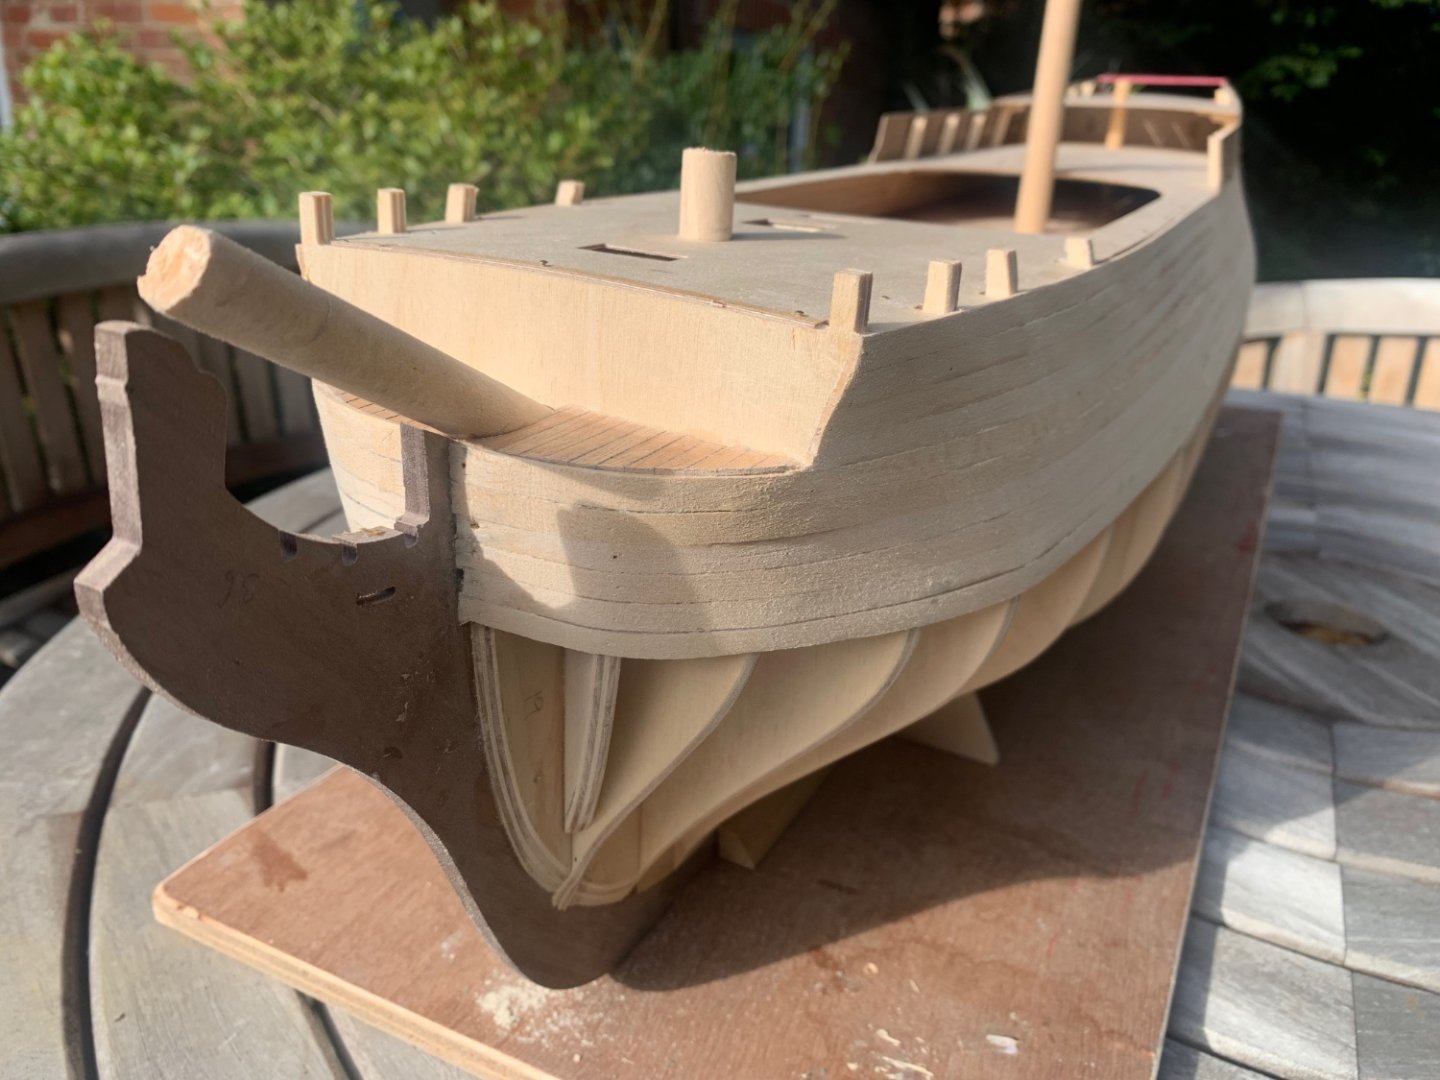
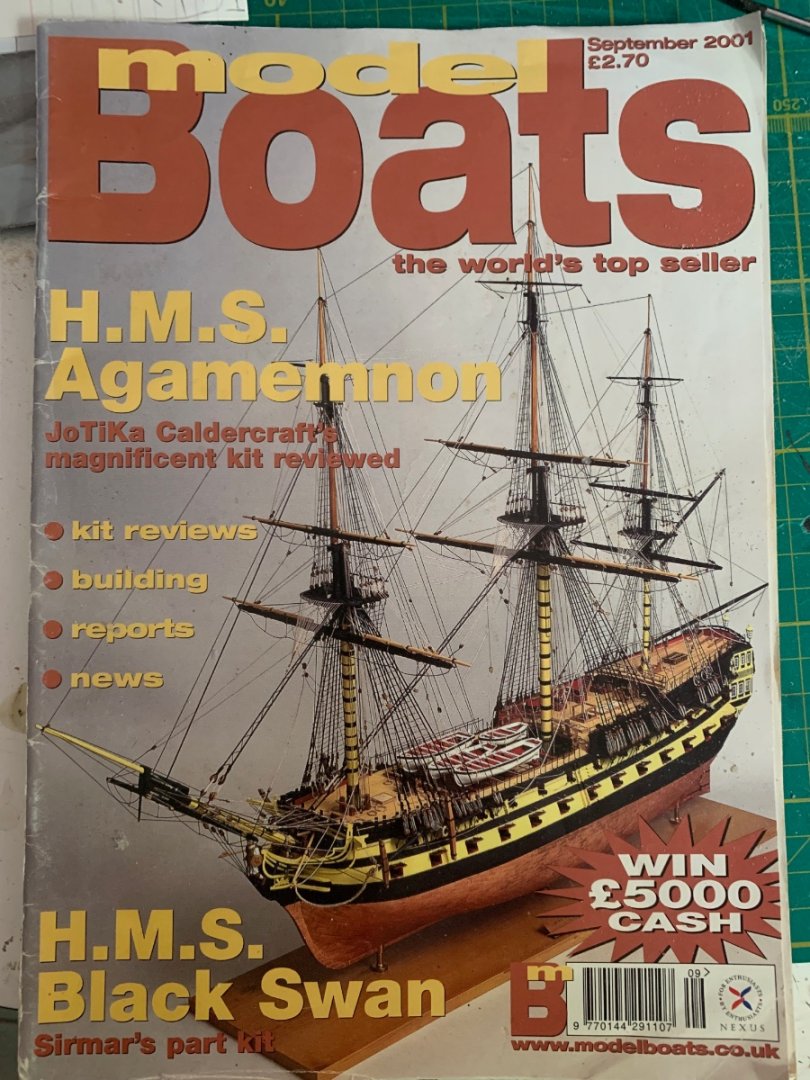
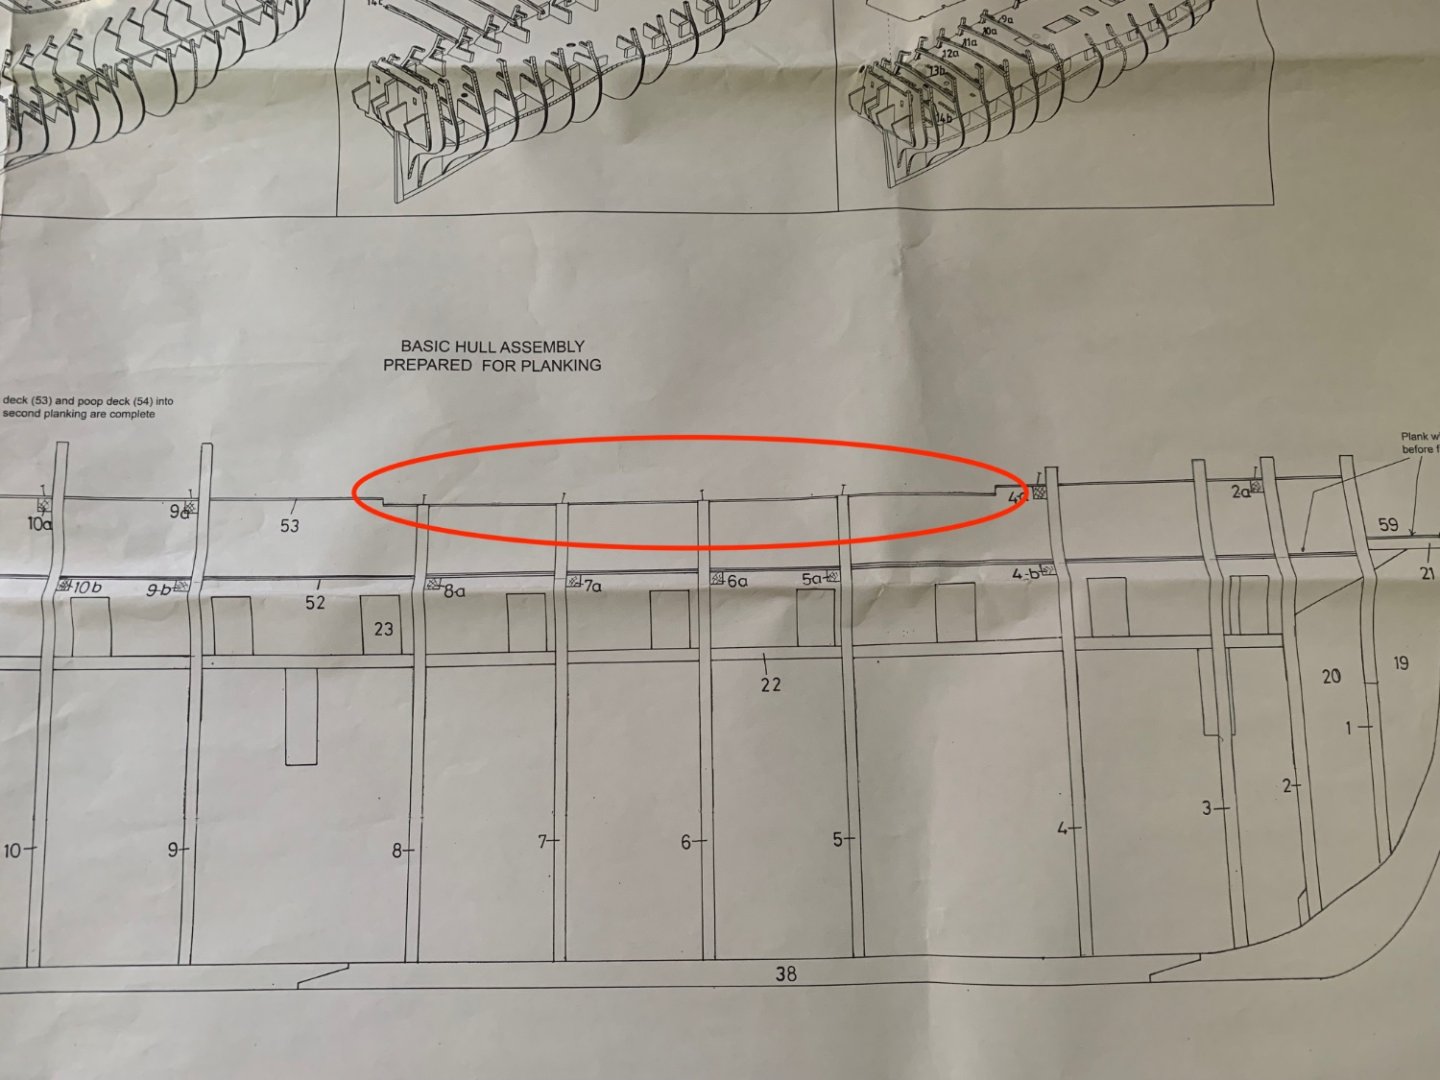
Agamemnon is my third build over a period in excess of 20 years. To be honest I'm been a bit shy in posting anything up to now as I'm in awe of the quality of many of the builds that I've seen in these pages. But I've also gleaned a lot of valuable and essential information from other contributors and feel its time to fully join the community. I think its also a great resource to help with those, all too regular conundrums and confusions we come across. So here goes !! So a bit of history - I have been interested in building 'Aggy' since I came across the September 2001 edition of Model Boats (UK) which had a great review. Prior to this I'd always had an interest in models and particularly this naval period and have a fine collection of 1:1200 Napoleonic Naval war-games models (Langton Miniatures) but I saw this article, read it a dozen times and wanted to build in wood. However, I was sensible enough (back then) to realise that Aggy was not an ideal 1st build. So I ordered HMS Jalouse as an introduction. Loved it. It took me about 20 year to complete mind - sat for many years half rigged until I finally found time after the kids had grown up to compete it (I nicknamed it HMS Lockdown!! - there were some benefits.) After completion I was keen to embark on another build. I still had the 2001 magazines. Still not sure I would have the stamina for HMS Agamemnon I embarked on HMS Pickle as an experiment. A huge shout out to MSW contributors here particularly @flyer 's build log. 15 months later and I'm looking for the next build....Luckily a big box was already under my bed. 21 years after seeing that mag it was time..... So I'm about a month in. Frames built. Gun deck installed. Inner planking in place. And today I started the 1st planking. All fairly straightforward so far. But a couple of points of note. I thought long and hard about Treenails and decided not to model them. There is a thread somewhere on this forum discussing this which I'll link to if anyone is interested. But basically decided that on visible decks a lot of effort was made to cover Treenails - less so on functional gun decks. So having visible Treenails was not necessarily accurate, even though they look nice!. I have not yet fitted the stern post and took the opportunity to taper the ply at the stern to allow the planks to run smoother to the transition with the stern post and rudder. This is something that is called out in the instructions for Pickle - 'Bearding' and worked very well. Inner wall planking where it terminates at bulkhead 3 seemed wrong. Its not clear whether this butts up to BH3 or lies inside BH3. I did it inside but realised that this would make for a peculiarly shaped gun port when this was cut later. Being a lot thicker at the bow end. So I added a filler piece to BH3 and reran the planking to this so it now runs parallel to the line of the deck and future outer planking. I also added an extra 45 degree bulkhead in the bows as I think this will aid the shaping of the 1st planking in that area. I was slightly confused by the plans for the upper deck - they seem to show a step down between BHs 4 and 8 but no mention anywhere else about cutting the deck. Looking at other build logs @Sjors @TrunkMonkey seem to lay flat so I think an error in the plans or an earlier version. Although the magazine article also lays this flat. Finally, today I started on the 1st planking for the 1st 5 planks and am noticing a slight wave in the planking. See pics. I think the phots exaggerate it and its actually a fraction of a millimetre so can be sorted in the filling & sanding phase. Also I've only done the port side so far so will need to see if the same is true on the Starboard. It may be the bulkheads themselves were not exactly aligned. So end of first post. Hopefully first of many with every expectation of months & years of build ahead. Some pics below with apologies for my cramped & messy workspace!! Malcolm


-
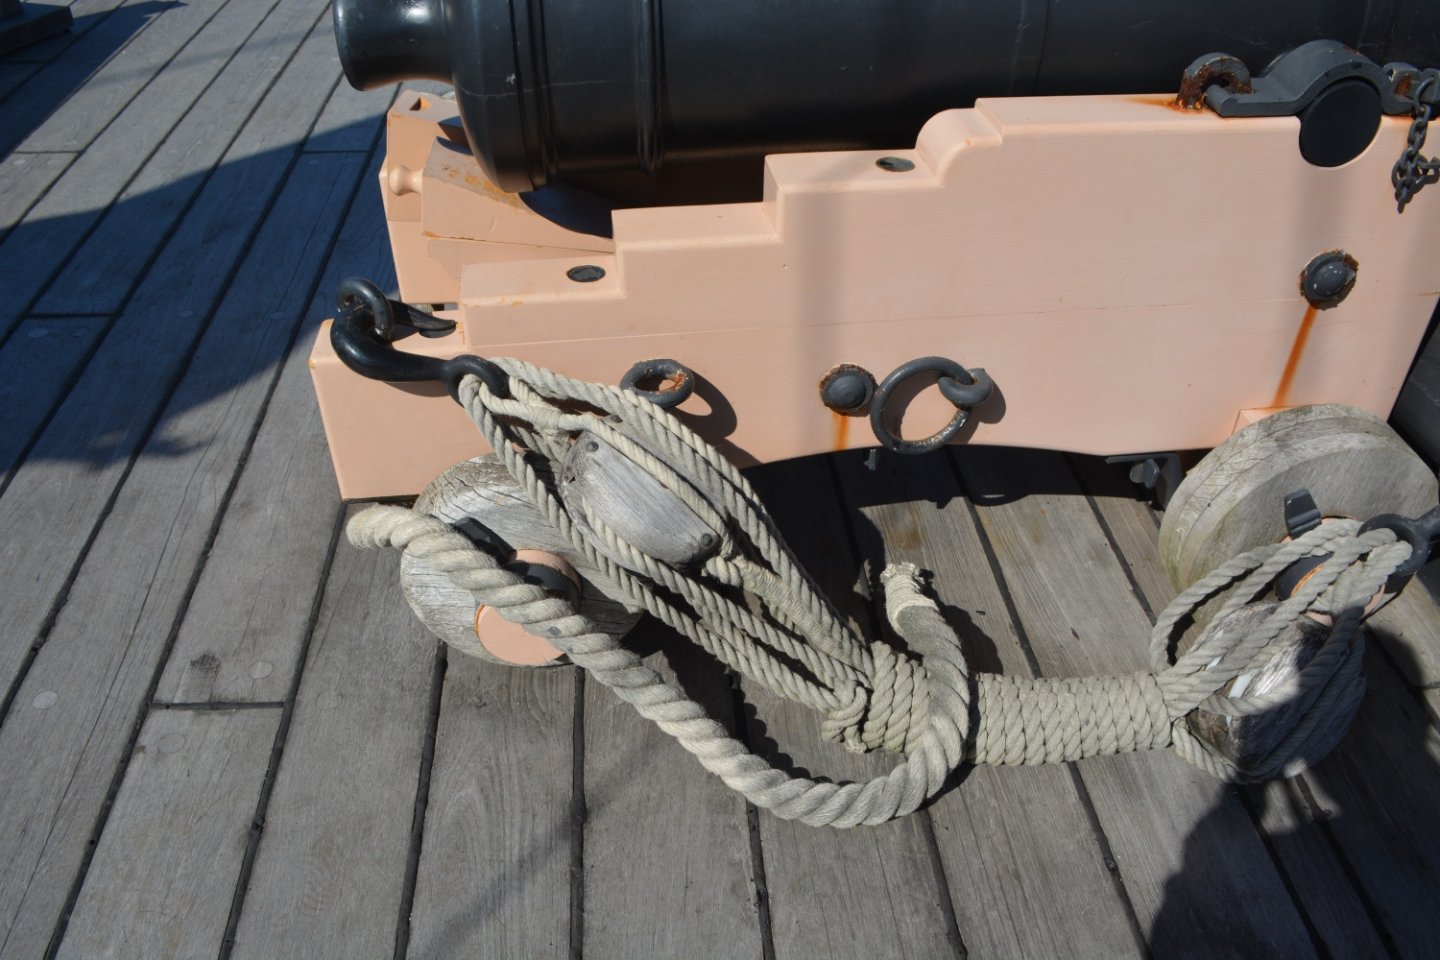
Looking fabulous. What do you use to get that finish on your gun barrels and mountings? It looks like a burnished gunmetal finish. Malcolm
-
Thanks all. I'm decided. No Trenails it is. Richard, I'll try and get that photo at the next opportunity. Thanks all for your comments and expertise. Malcolm
-
Druxey and Retired guy many thanks for your quick responses. There is a great picture in Bugler of the Diamond plugs (Plate 37) - I don't really want to copy & display here as there may be copyright infringements - but this shows both the plugs and a couple missing in both Oak & Fir planking as described by Druxey. I'll have to make a trip and try to find this area of planking on the middle gun deck and see how it looks in real life. In the plate it sits somewhat in the middle of my two examples. Nothing like as obvious as the caulked lower deck but also not as seamless as the 'modern' refit on the quarter deck which is probably in parts due to enhancements in tools as well as being different timber. Regards Malcolm
-
I'm in a dilemma as to whether to trenail my Agamemnon (Caldercraft/Jokita) or not. There are a lot of posts on this group about how to do it, techniques etc and some great build logs - most of whom do seem to trenail their decks. On top of this there are posts suggesting trenails should be practically invisible anyway on a freshly laid deck and not as obvious as in many builds. I live about 30mins away from a trip to HMS Victory which is obviously a very useful source. But even that does not helps seen in these pics! On the quarter deck (which is not original) the trenailing blends in almost perfectly with the decking and is almost invisible. Despite not being original this was replaced in 1922-9 with teak. So only about 100 years old !!! The planking secured with brass screws and the holed plugged with 1 1/4" Dowel (ref HMS Victory Building, Restoration & Repair-A Bugler) On the Lower Deck, which is believed to be the original oak decking, the trenailing is very obvious and showing caulking. In discussing the middle gun deck (predominately non-original fir but some original oak) Bugler comments "Where appearance was not very important, for example, on the lower gun deck, it was usual to drive the spikes so that the heads were just below the surface of the deck. Dowels were not fitted but the recesses ... were often filled with pitch when the decks were caulked and payed". This is clearly what is visible on the lower deck but on the original 'visible decks' would a less visible method have been employed as in the replacements? I'll be very interested in opinions and research from other members while I ponder my dilemma but I suspect it is going to be a matter of personal choice. Malcolm

-
Hi If you don't mind I'm going to be following your build with keen interest. I've just completed Pickle about 2 months ago after about an 18 month build. A great project that, I'm sure, went a lot better because of the great posts on this forum by some very skilled modellers. With a particular shout out to Flyer for his very detailed, honest and valuable postings & pictures of his variation. Good luck with the build and, most of all, enjoy it!! Malcolm
-
Current Build - HMS Agamemnon by Caldercraft/Jokita
Previous Builds - HMS Jalouse (2004-2021!!)
HMS Schooner Pickle (2021-22)
-
I'm just pulling my huge Agamemnon box out from its hiding place under the bed where it has been waiting for a year or so while I finished my last build (HMS Pickle) so having a look through all the excellent build logs in MSW before I start. I am just blown away by the quality of your build and, if I'm honest, has scared me a little!! But gives me something to aspire to. I will be following closely. Keep up the stunning modelling. Malcolm