WizardOfOs
-
Posts
73 -
Joined
-
Last visited
Recent Profile Visitors
779 profile views


-
 AlfredoCampos reacted to a post in a topic:
Albatros by WizardOfOs - OcCre - 1:100
AlfredoCampos reacted to a post in a topic:
Albatros by WizardOfOs - OcCre - 1:100
-
queen_of_raptors reacted to a post in a topic:
Albatros by WizardOfOs - OcCre - 1:100
-
JacquesCousteau reacted to a post in a topic:
Albatros by WizardOfOs - OcCre - 1:100
-
WizardOfOs reacted to a post in a topic:
Schooner Albatros by oudi2311 - OcCre - first build
-
WizardOfOs reacted to a post in a topic:
Schooner Albatros by oudi2311 - OcCre - first build
-
SiriusVoyager reacted to a post in a topic:
Albatros by WizardOfOs - OcCre - 1:100
-
Bryan Woods reacted to a post in a topic:
Albatros by WizardOfOs - OcCre - 1:100
-
WizardOfOs reacted to a post in a topic:
Naval figure set by Blue Ensign – Vanguard Models - 1:48 /1:64 scales
-
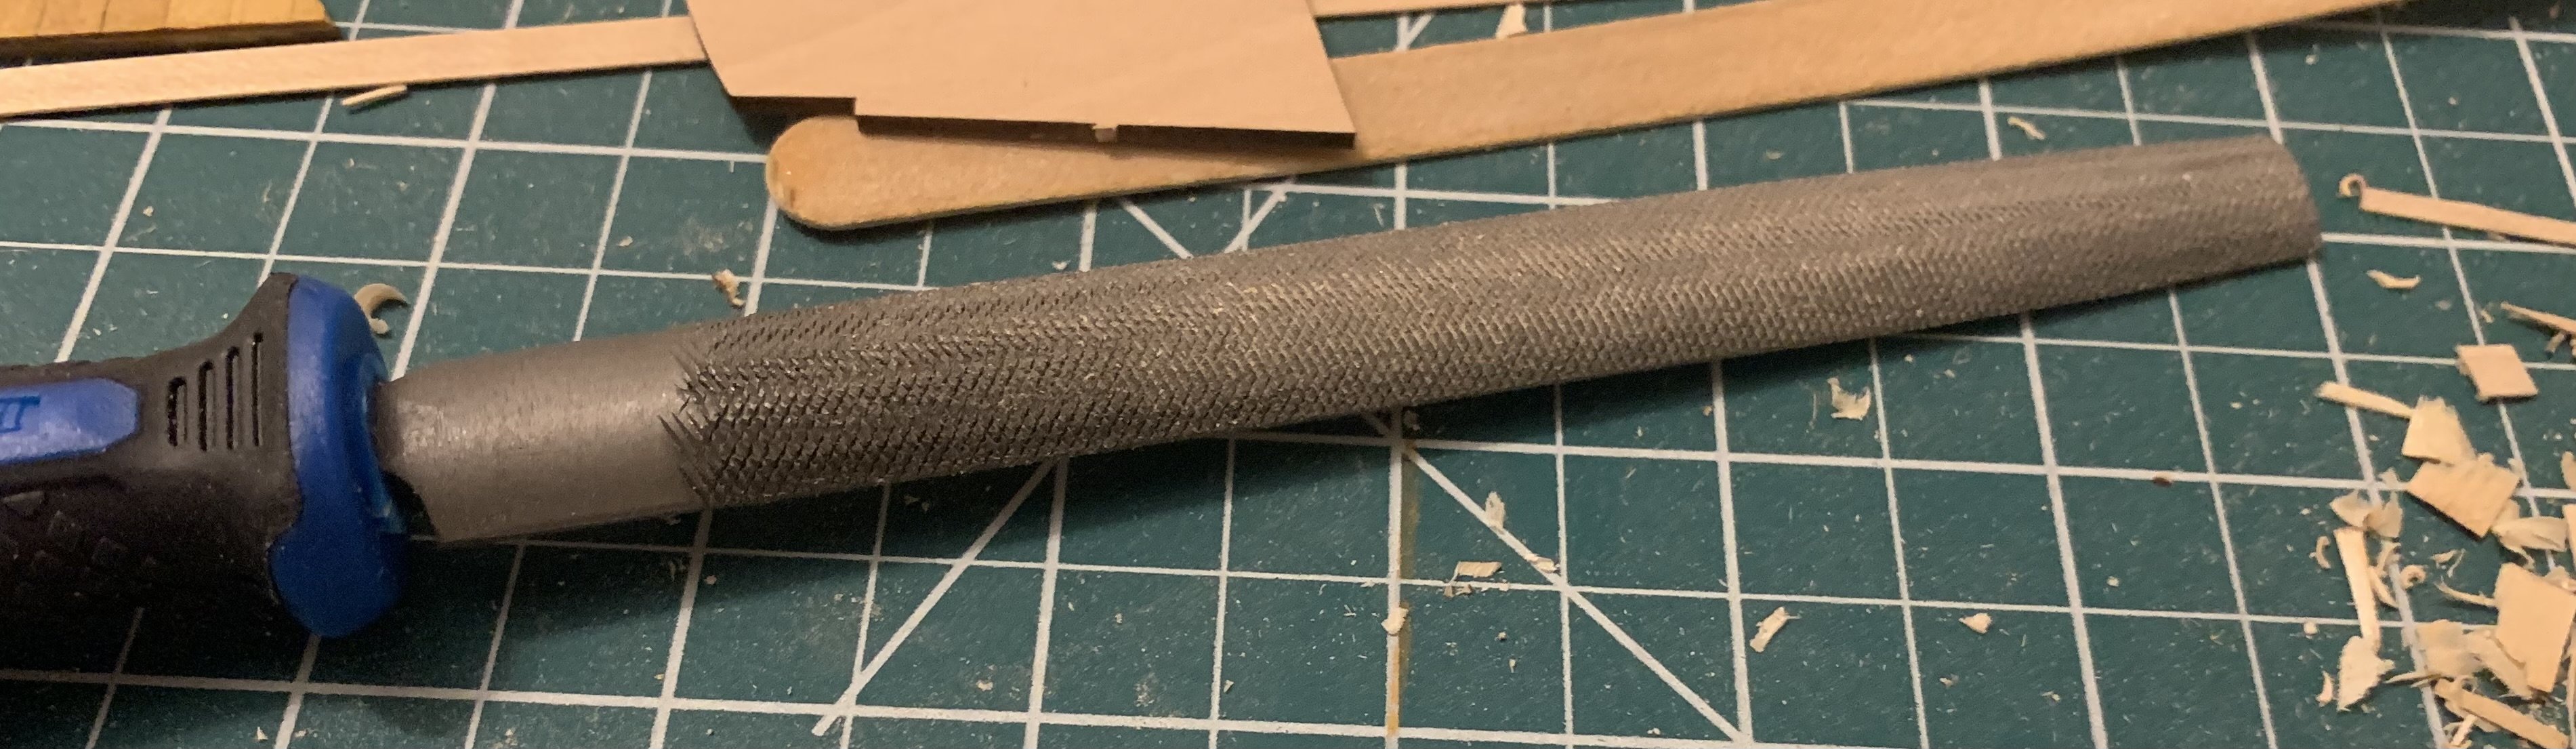
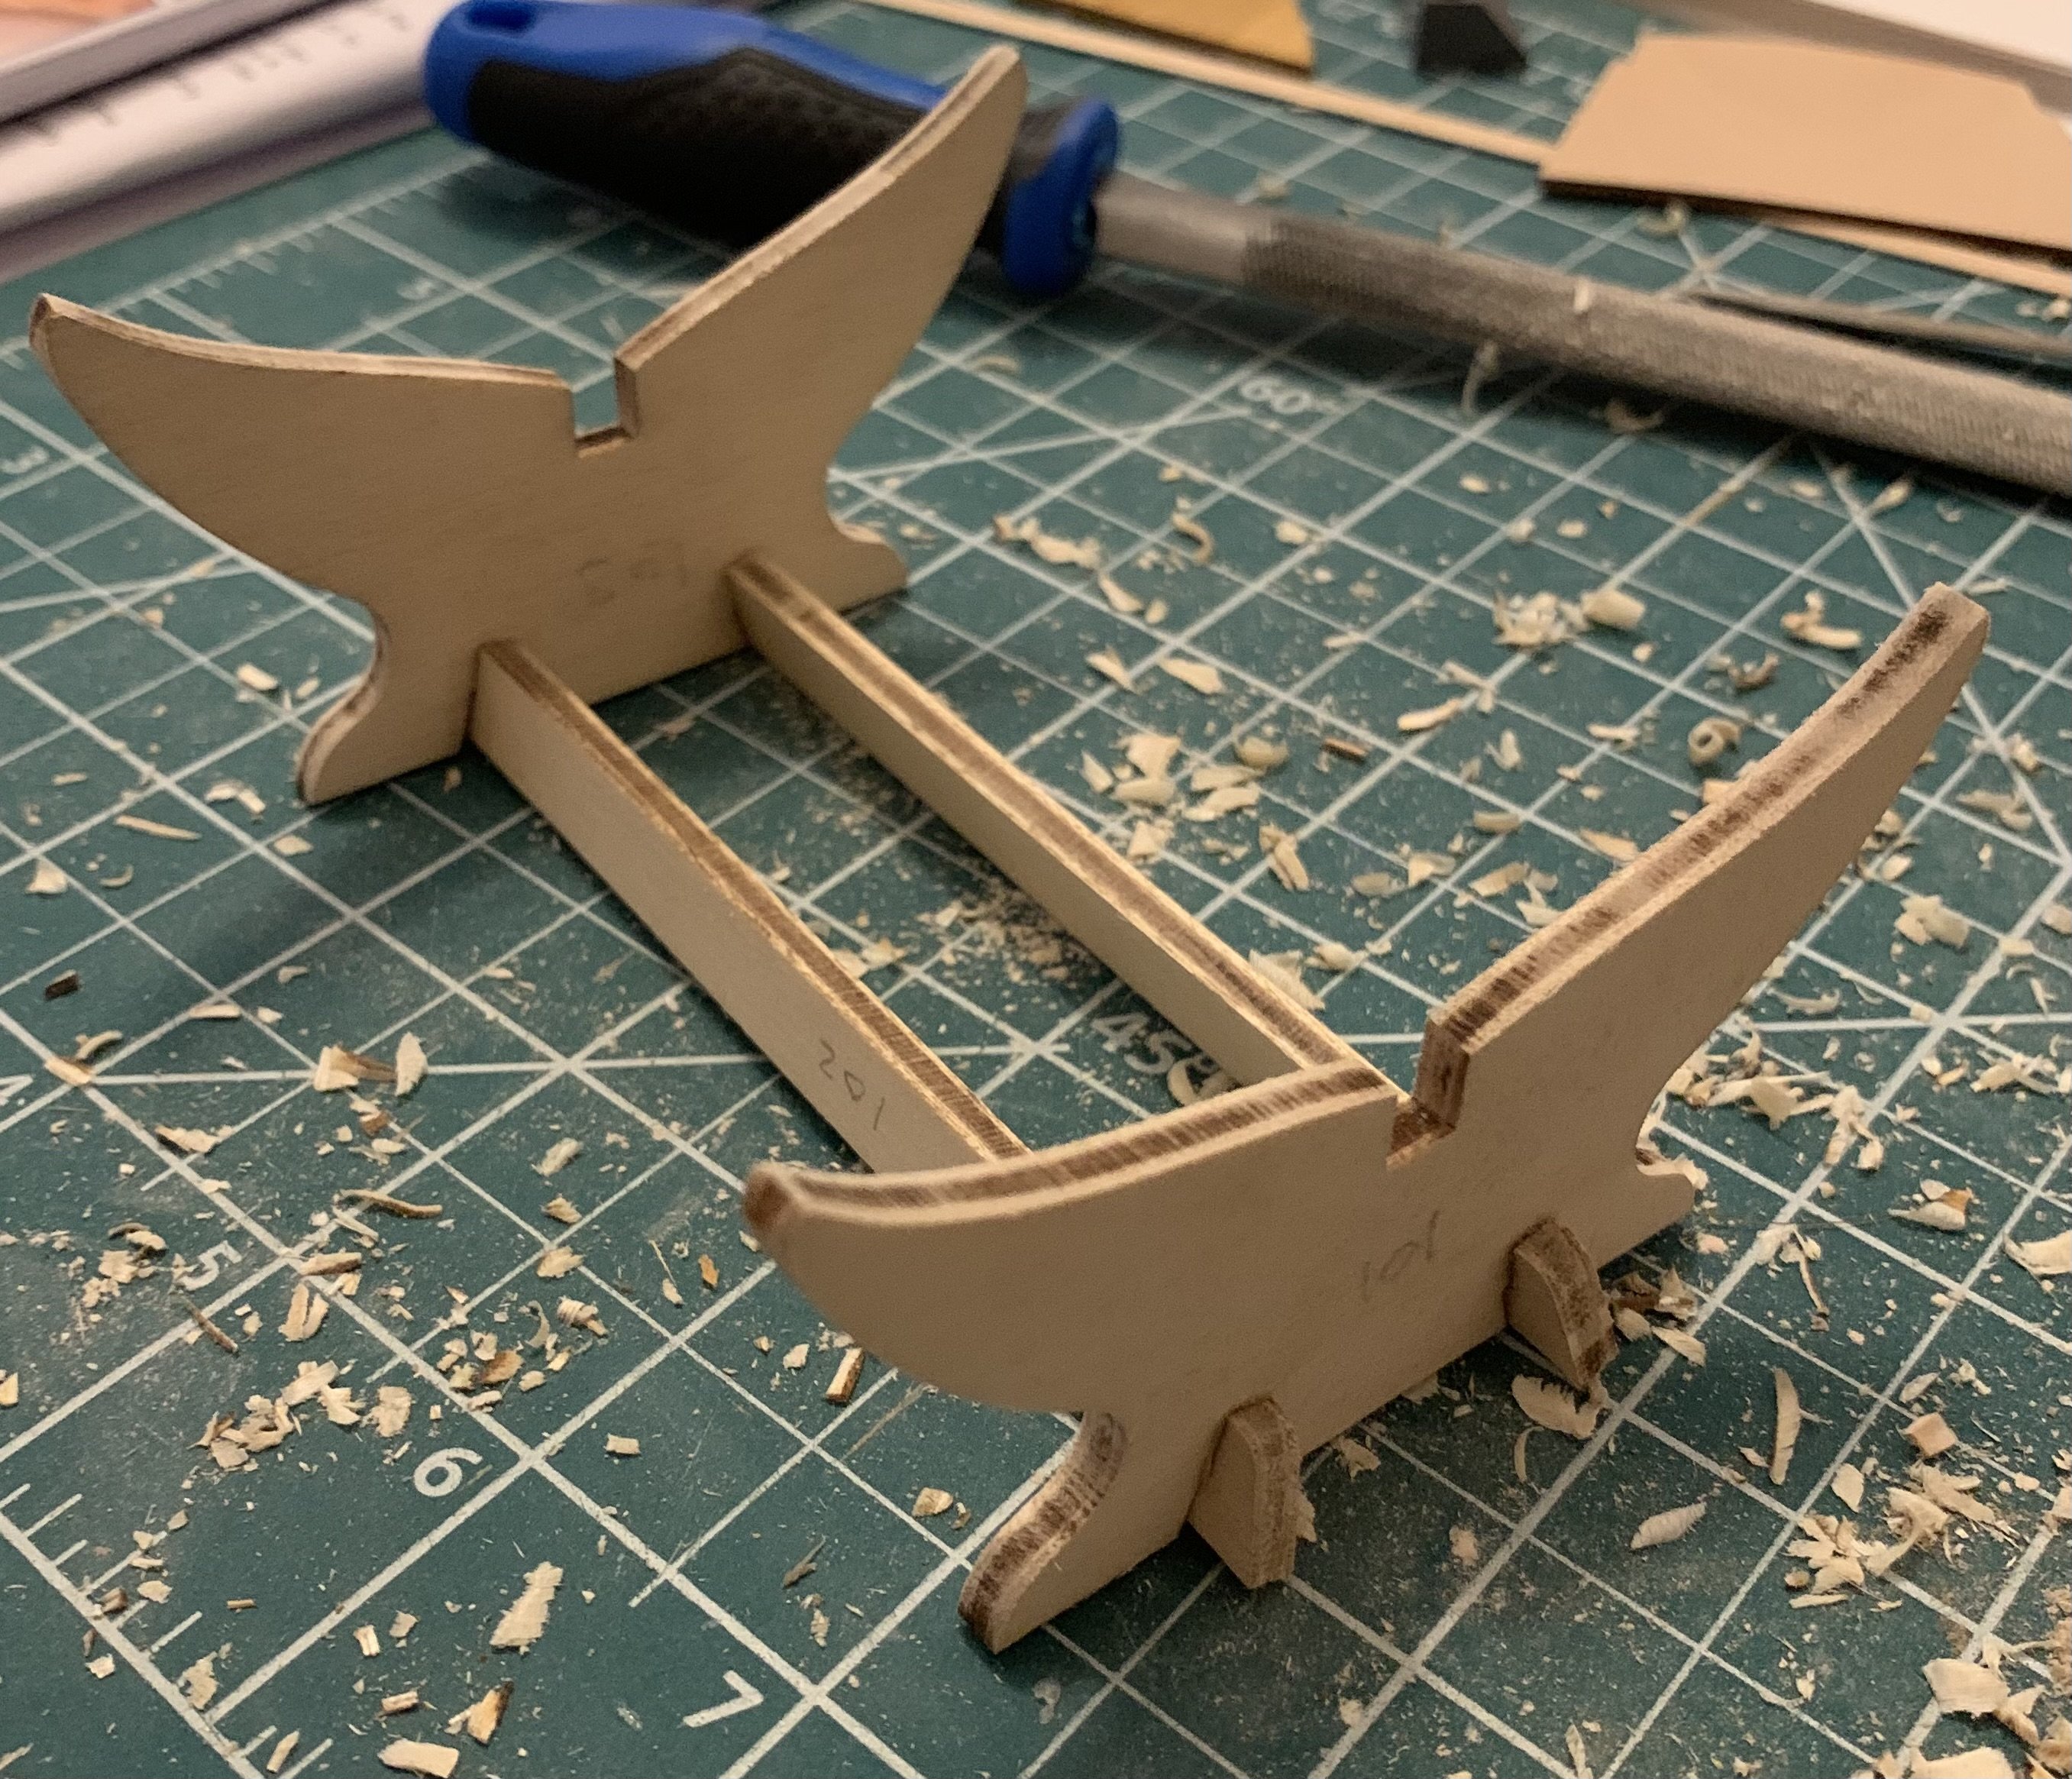
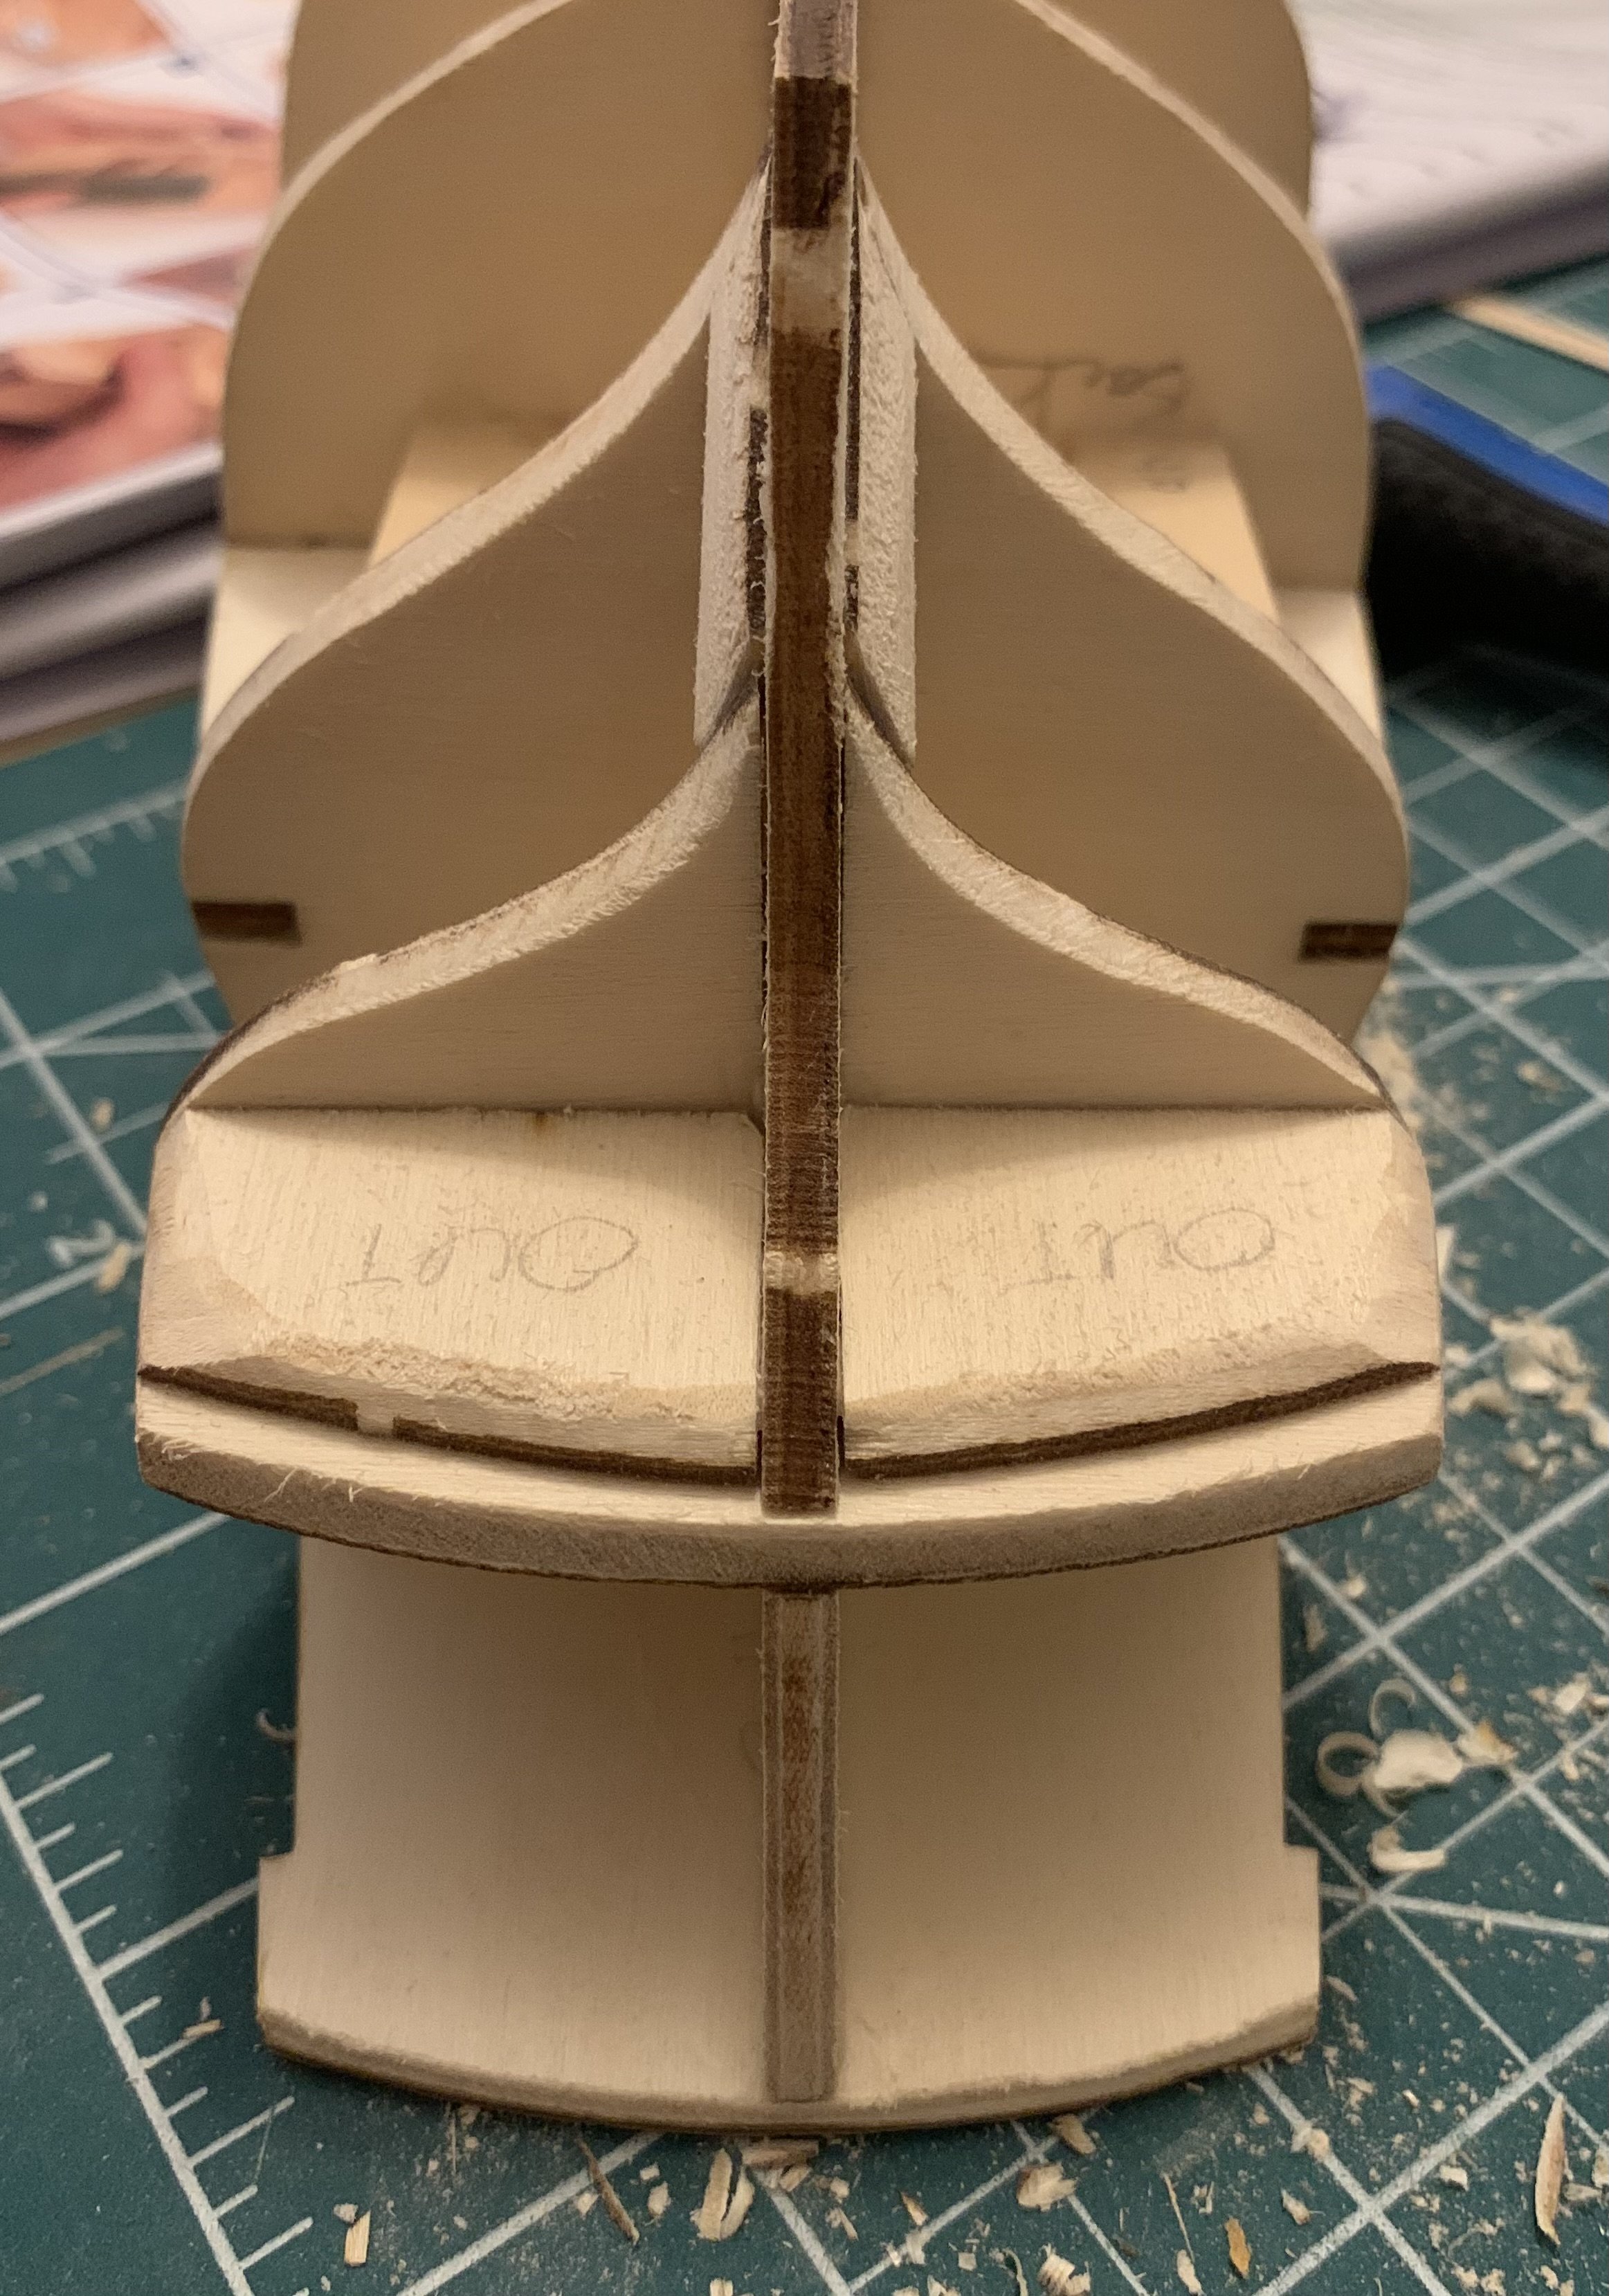
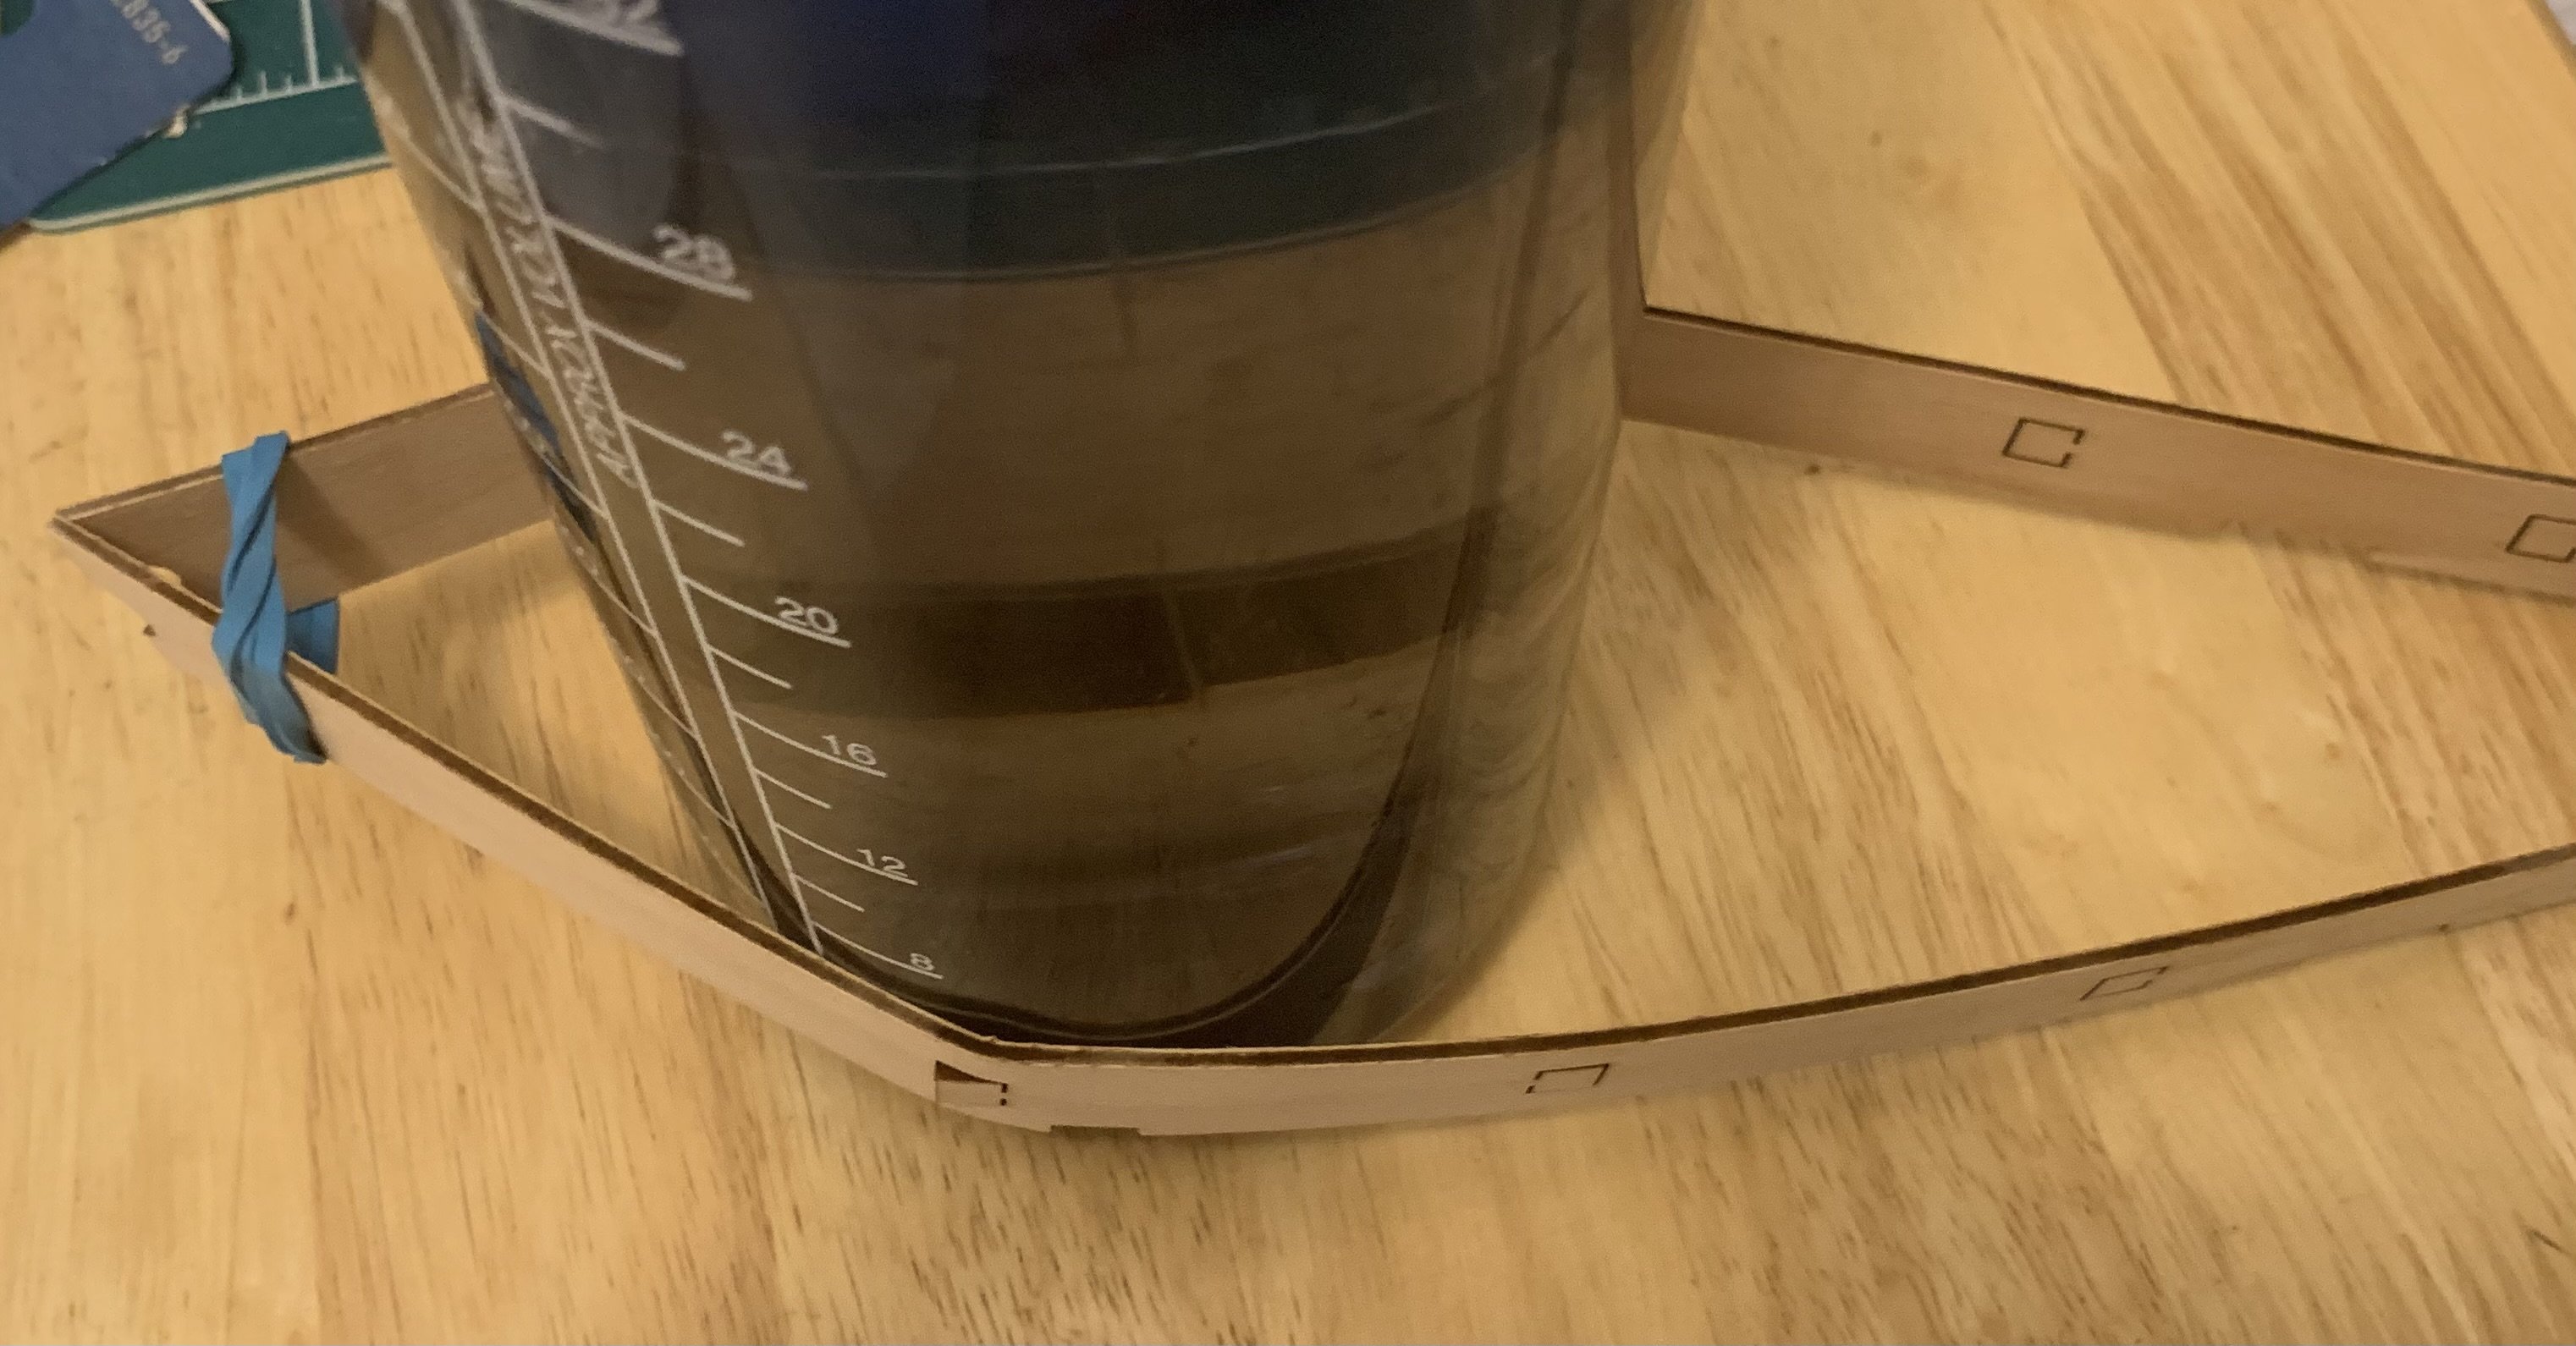
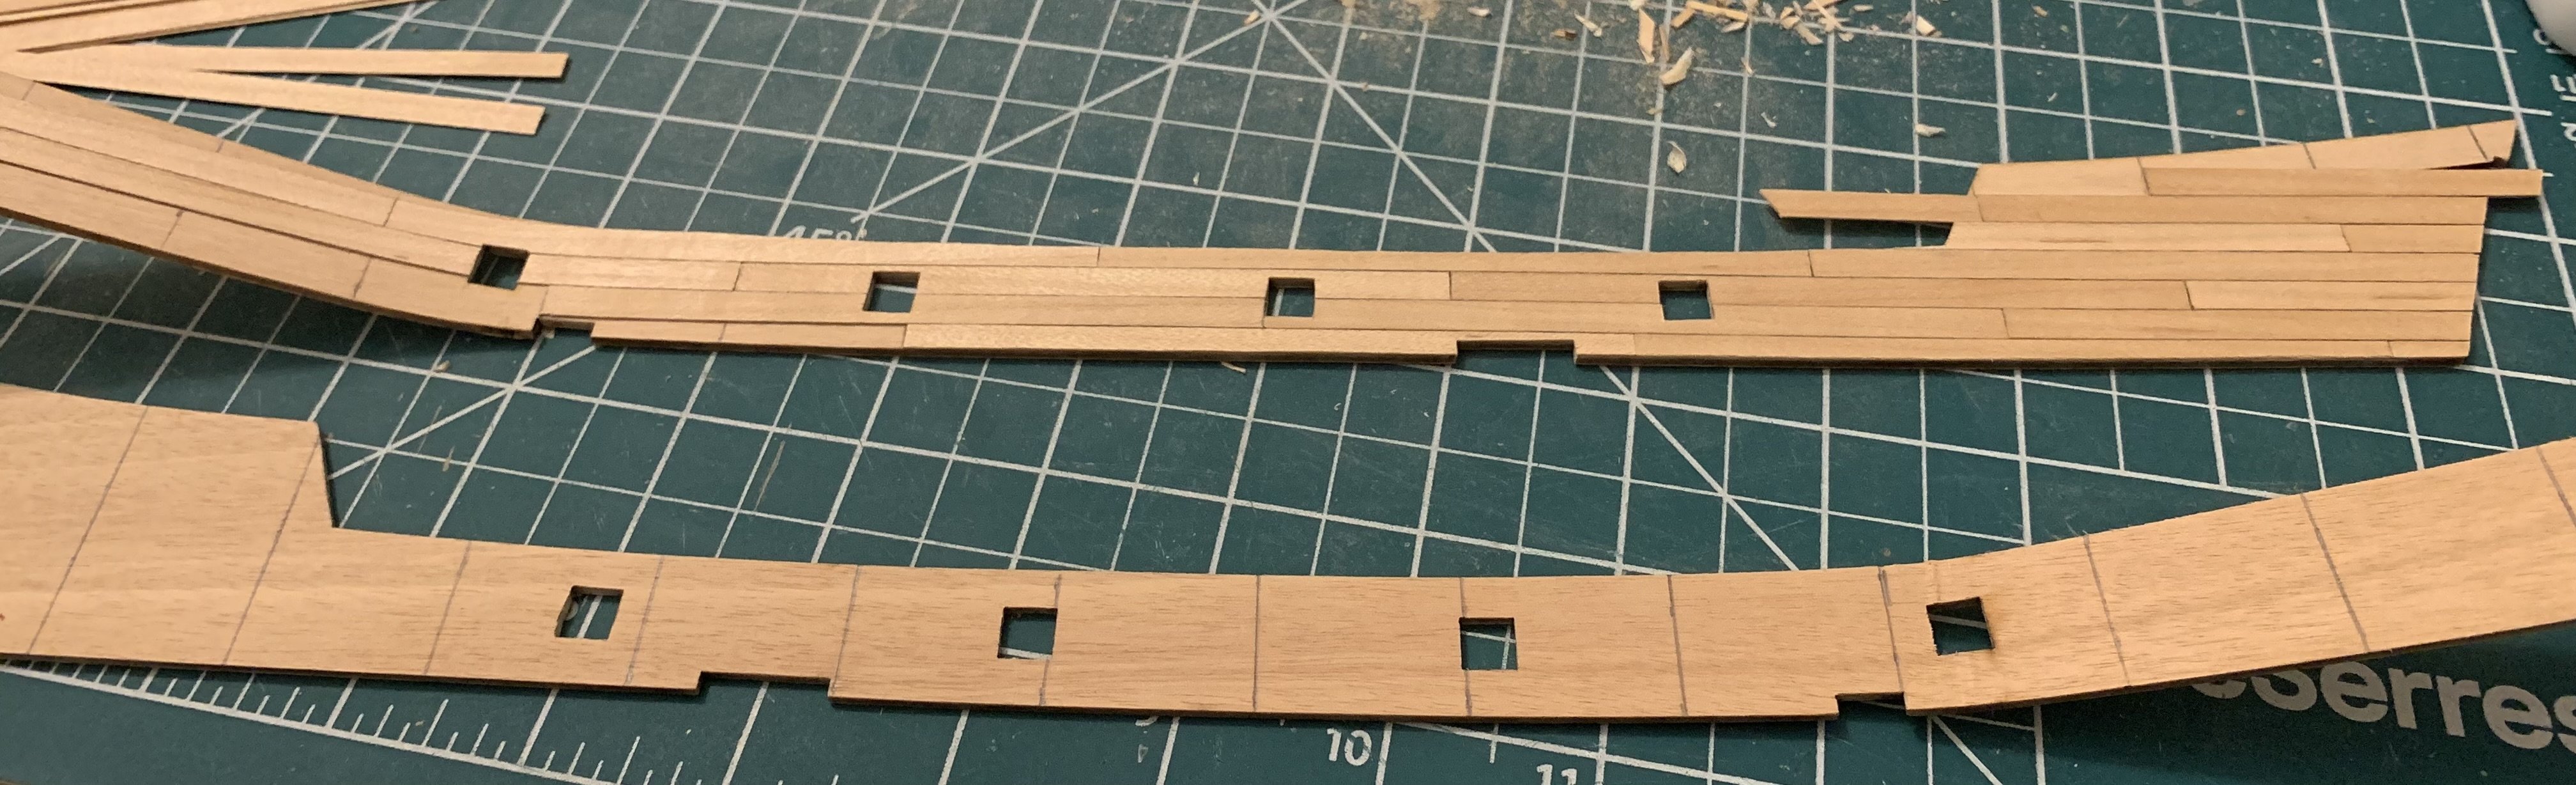
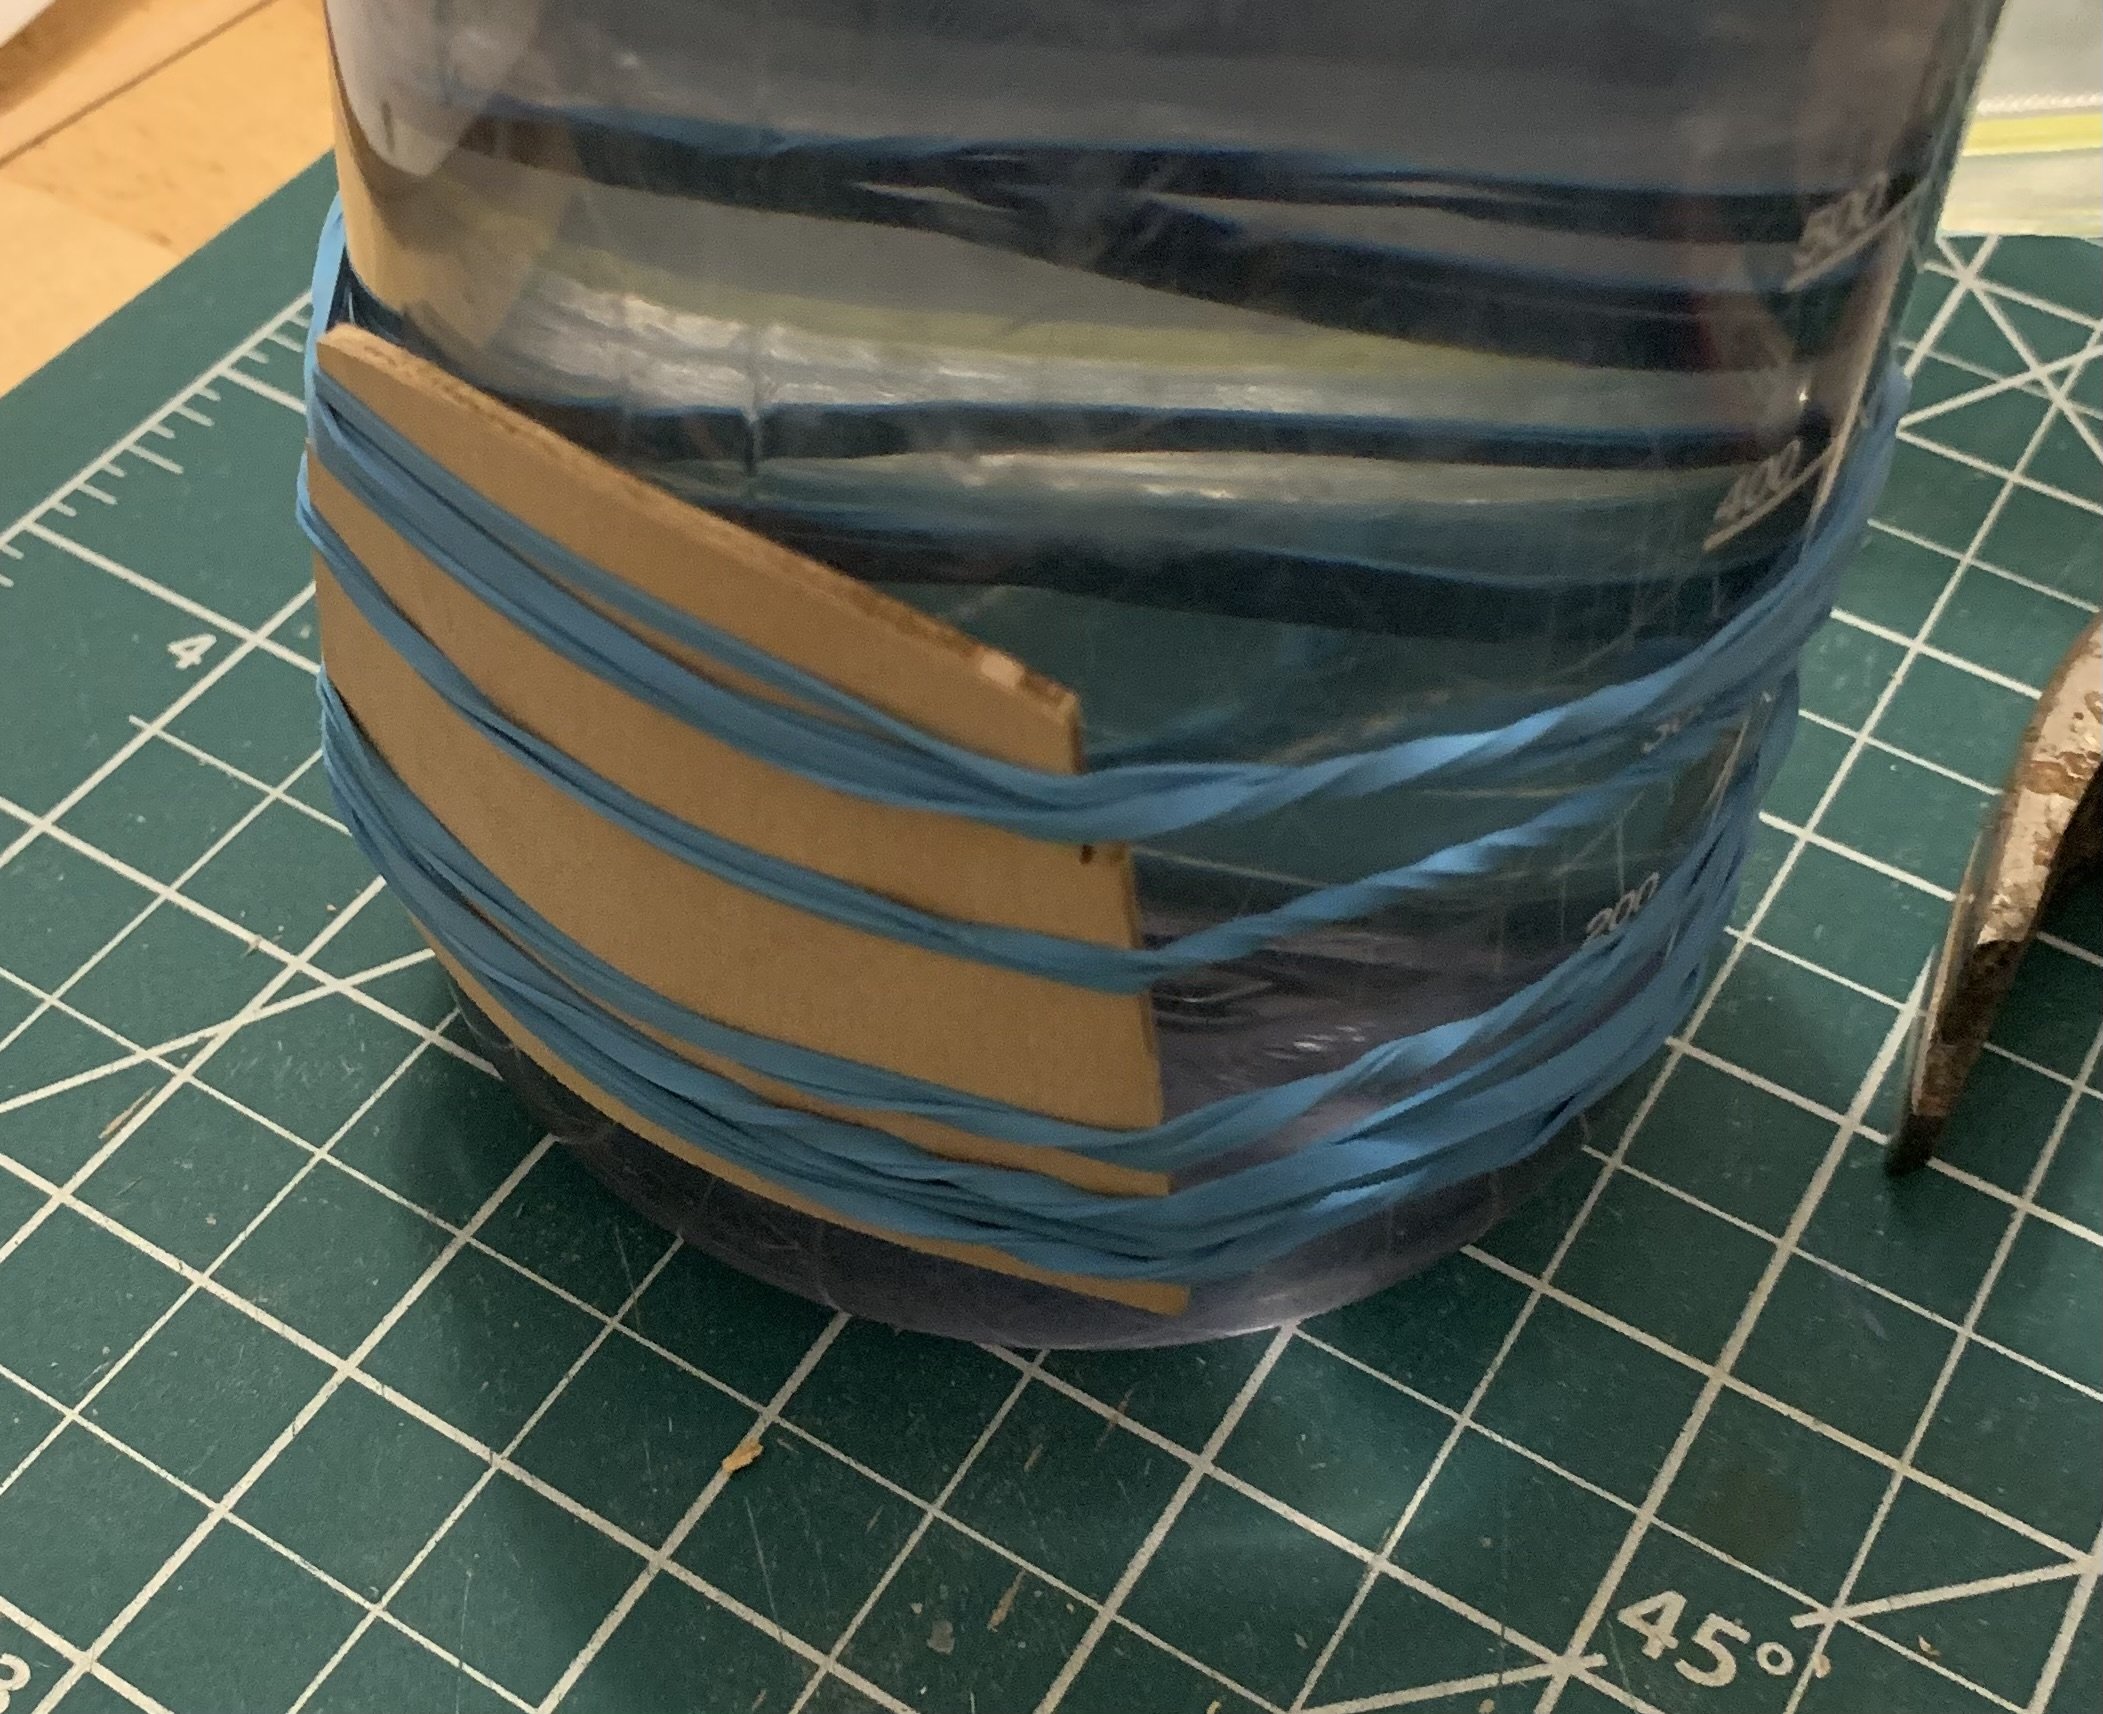
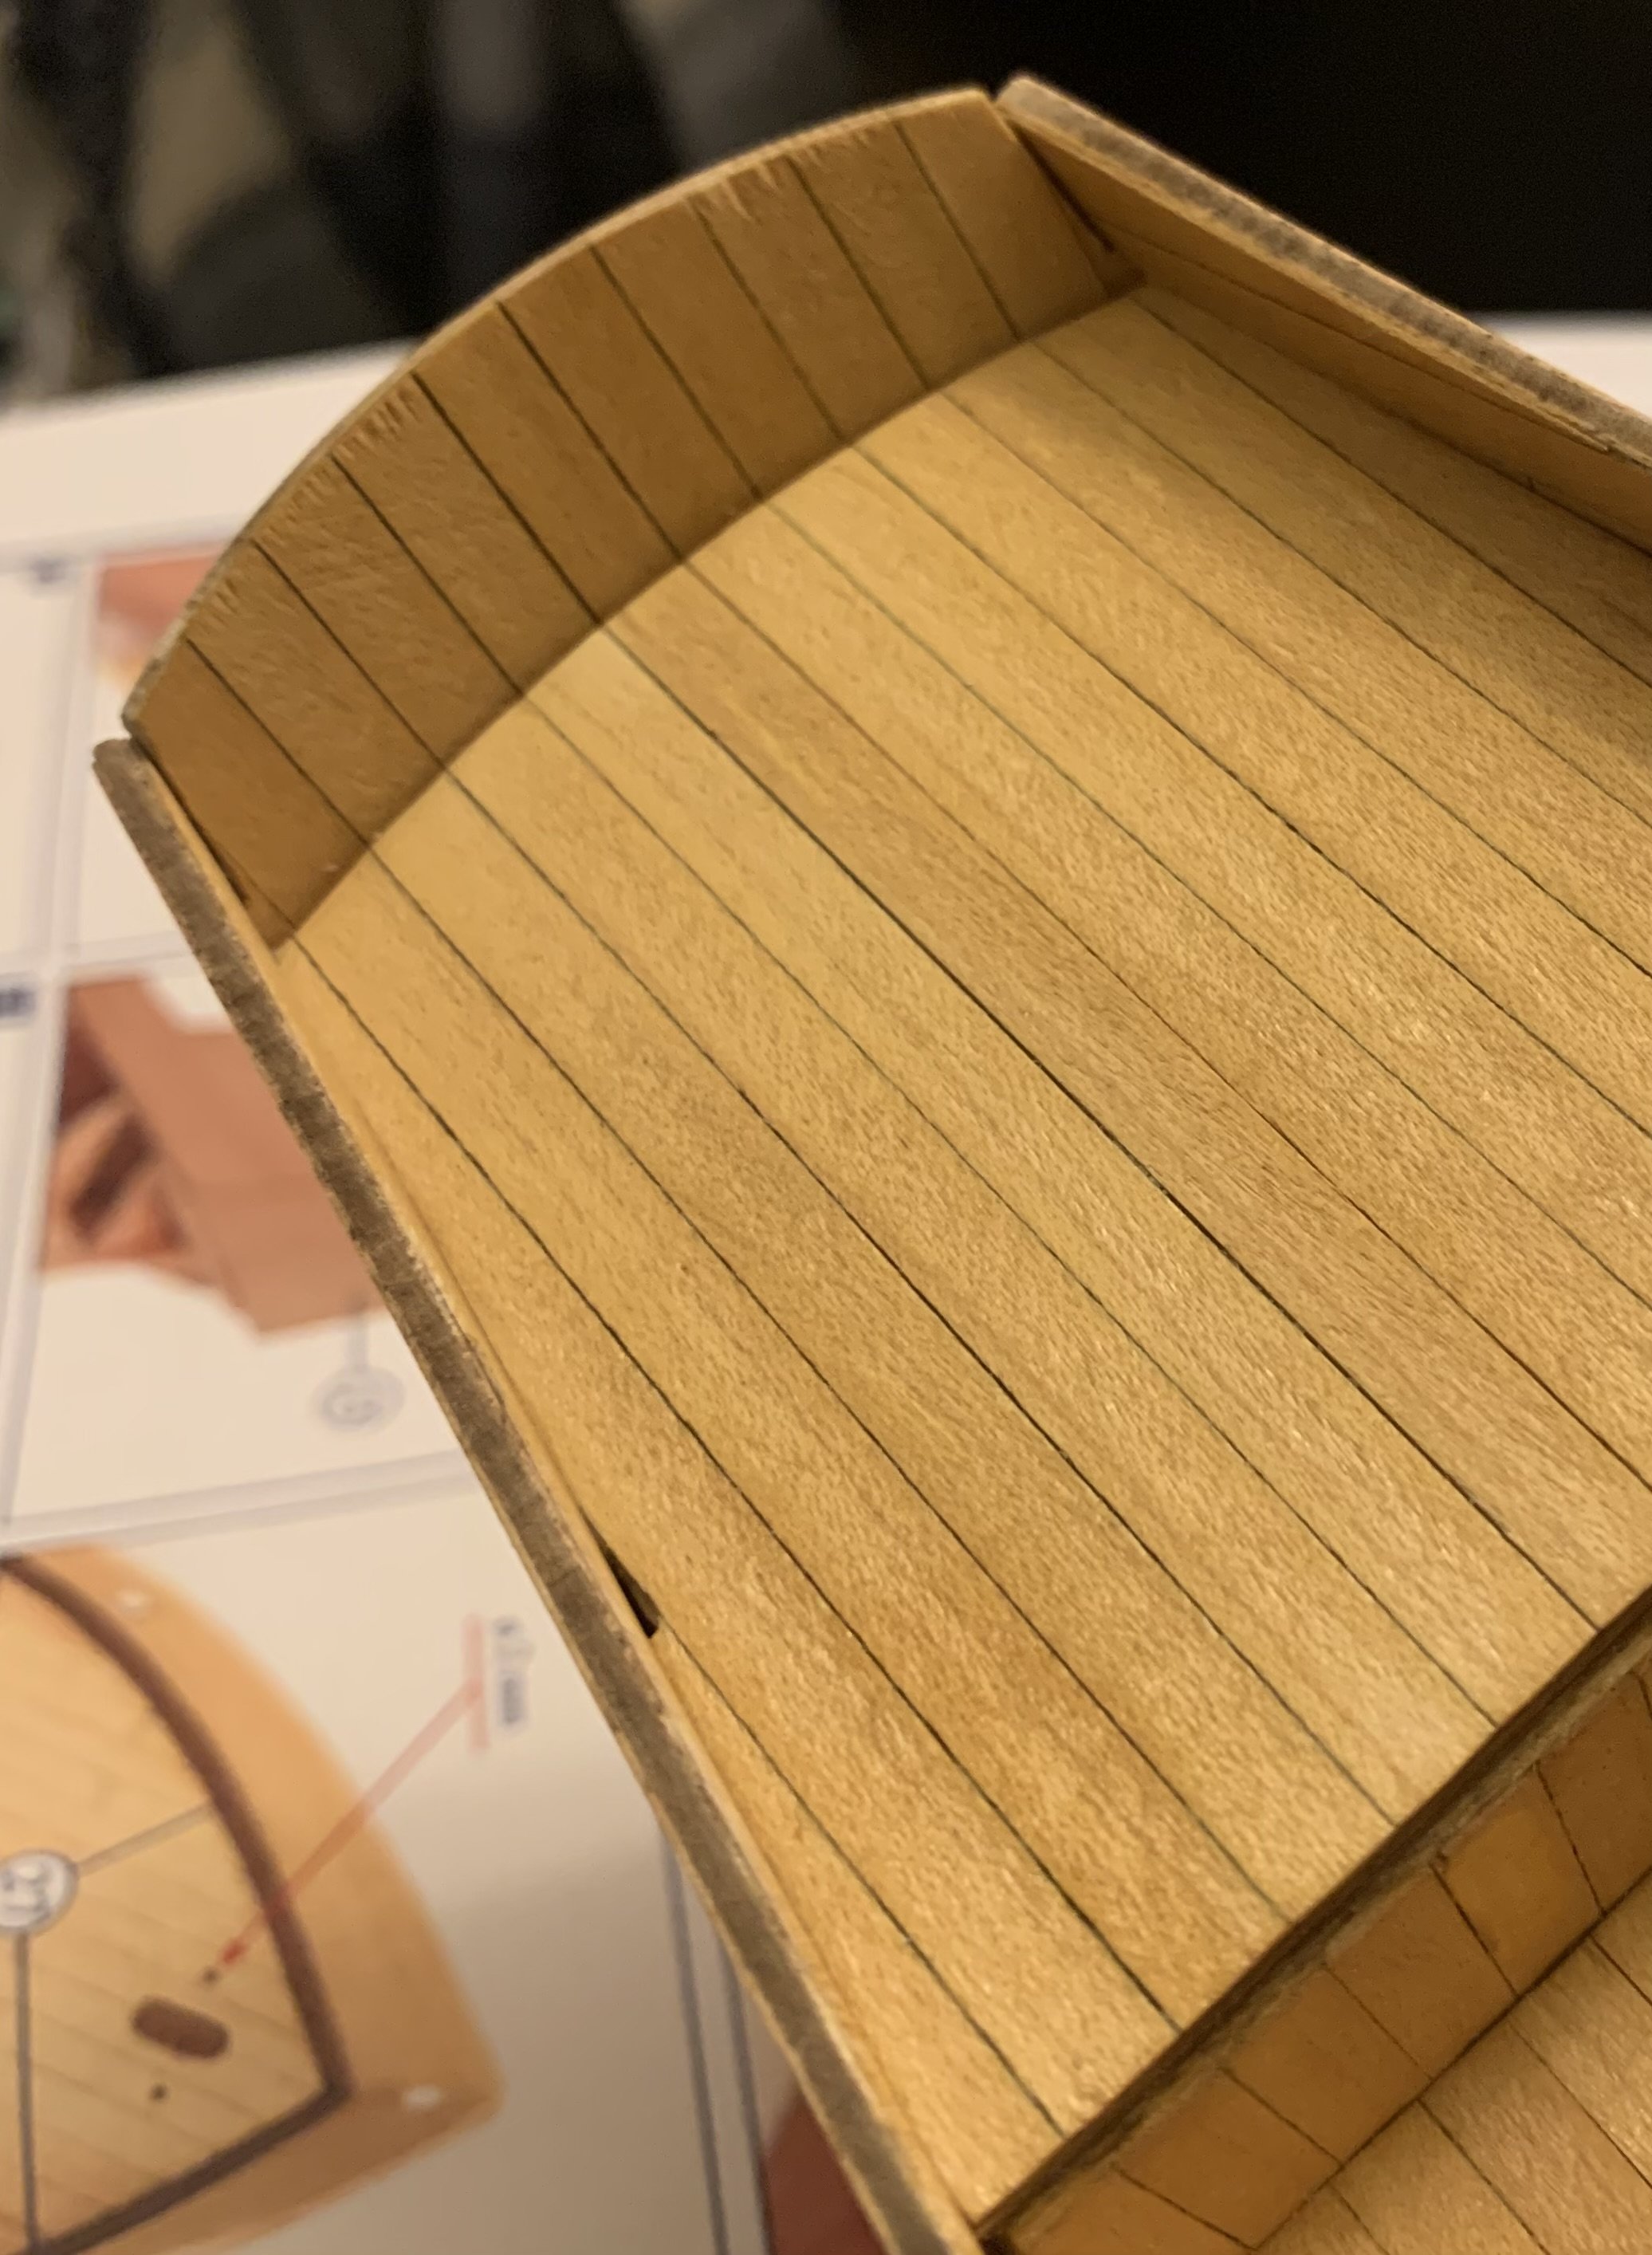
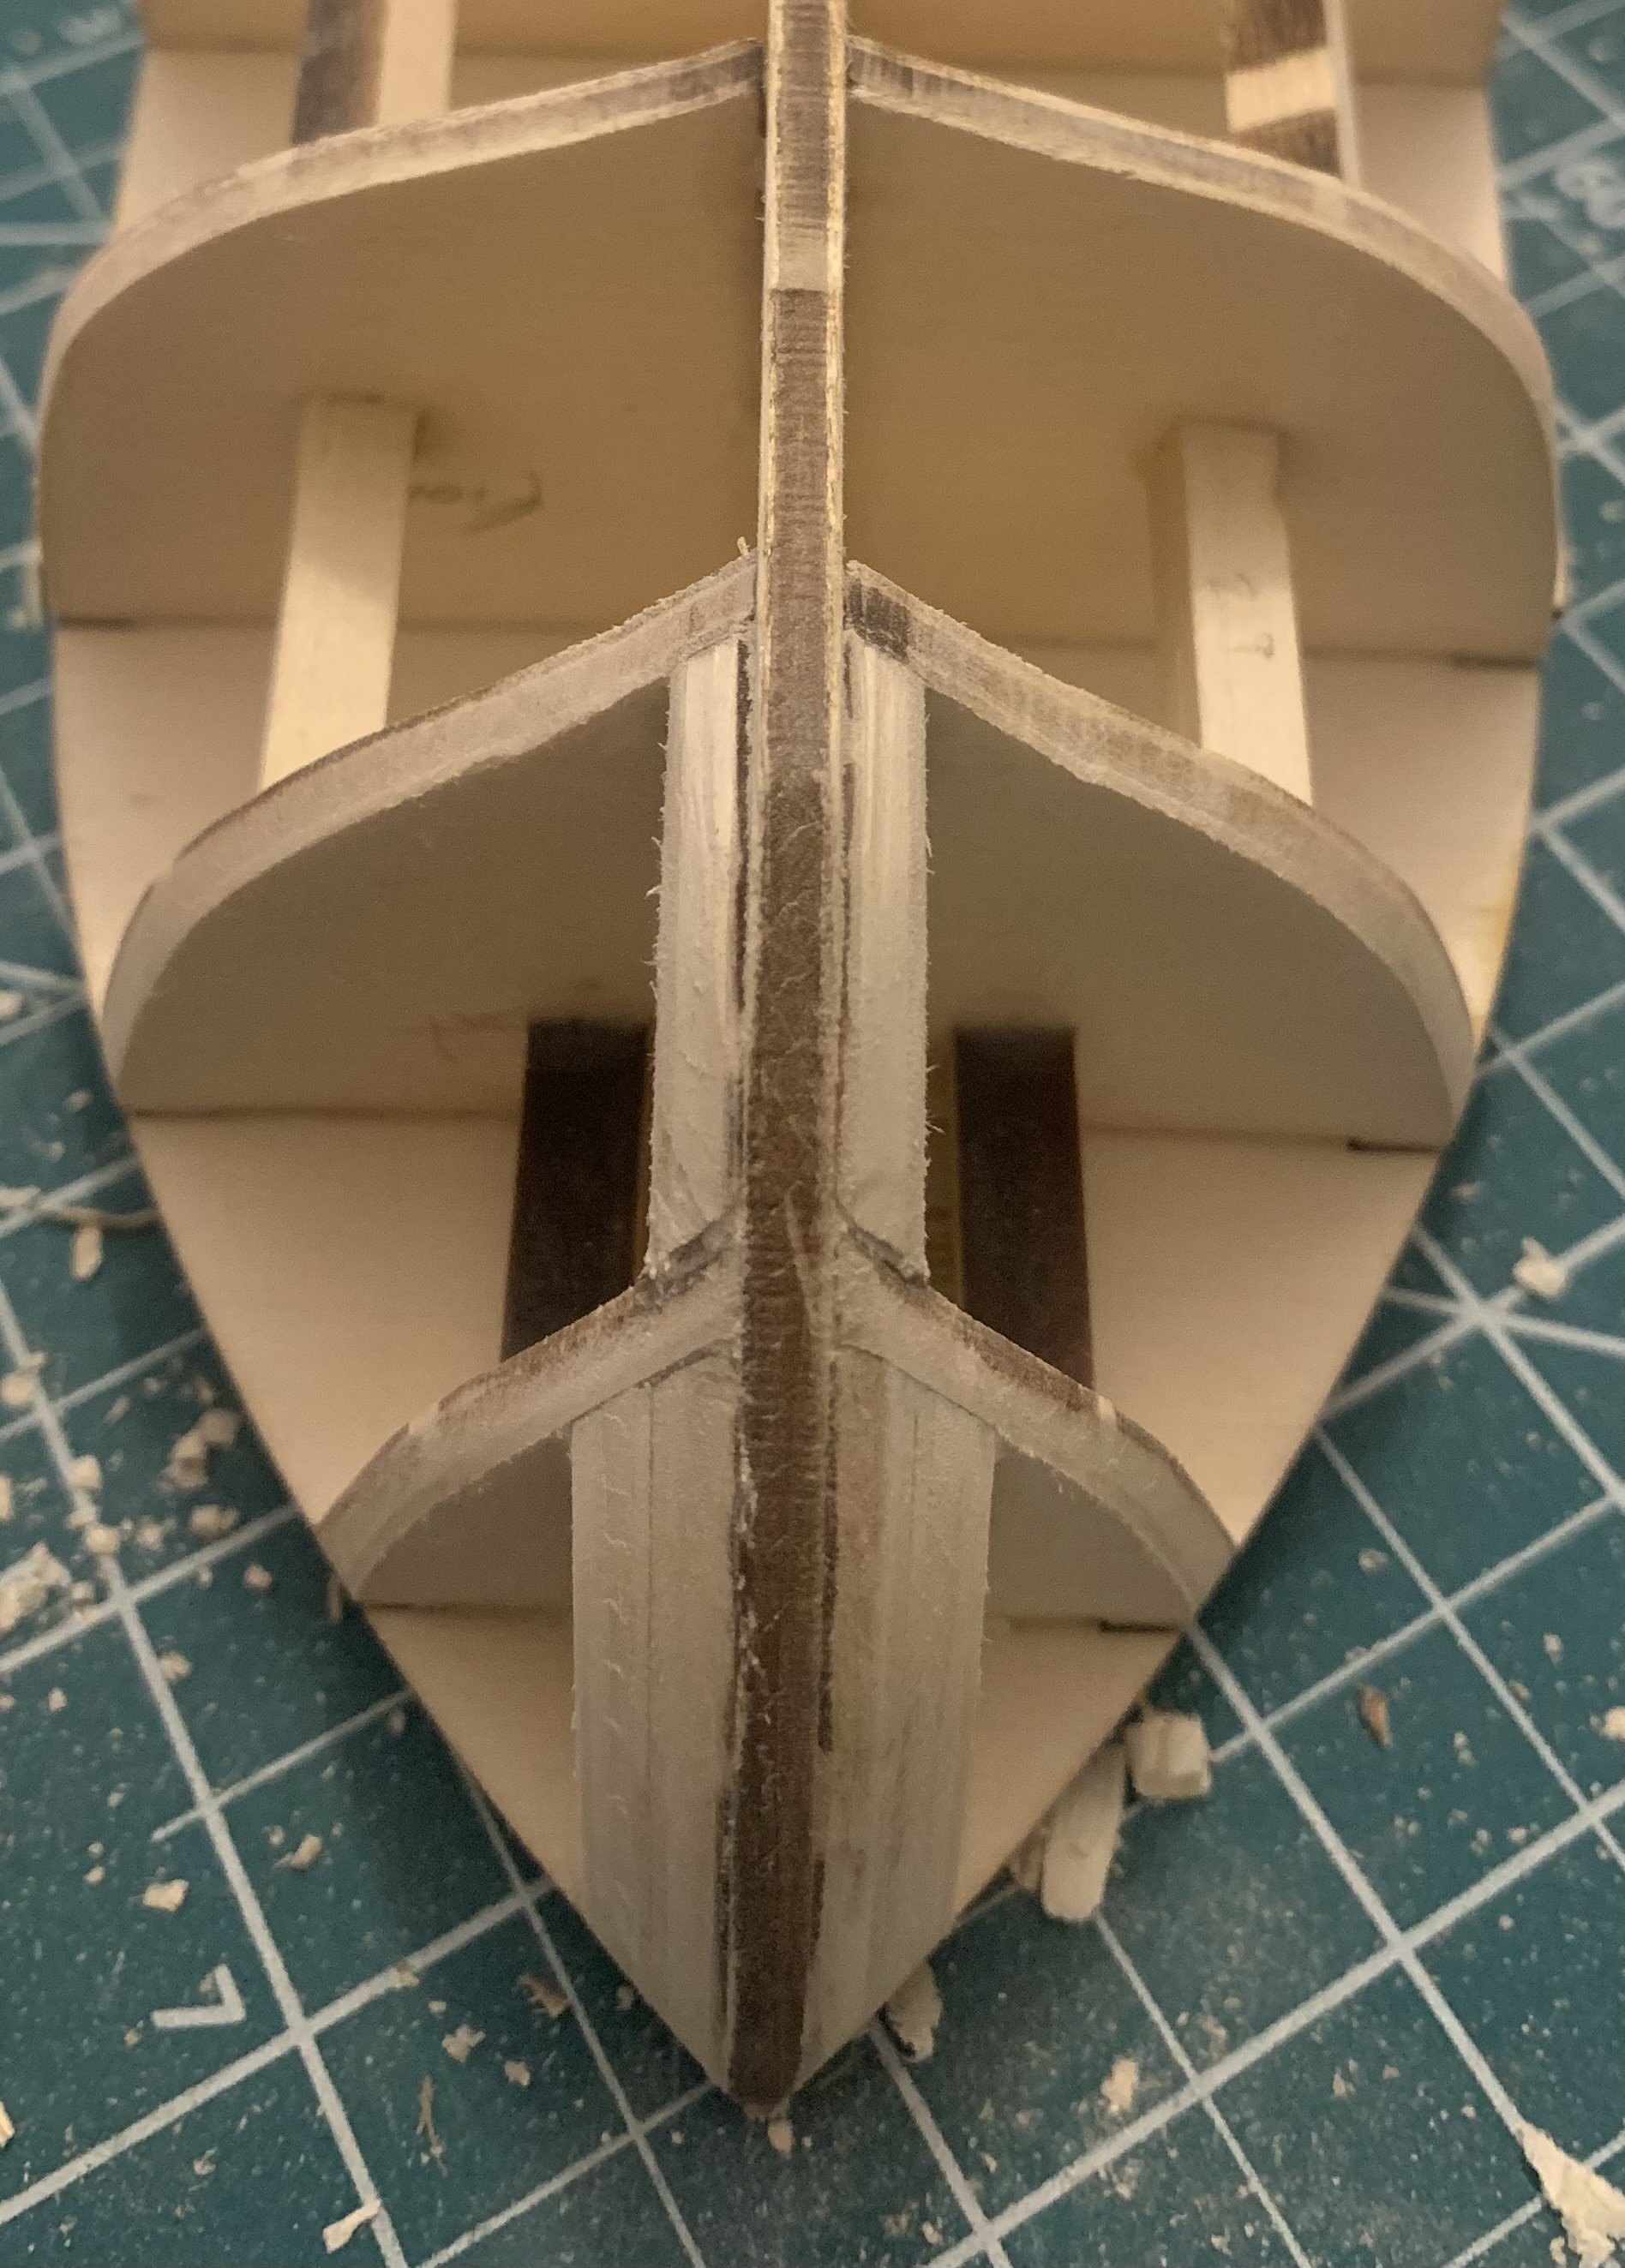
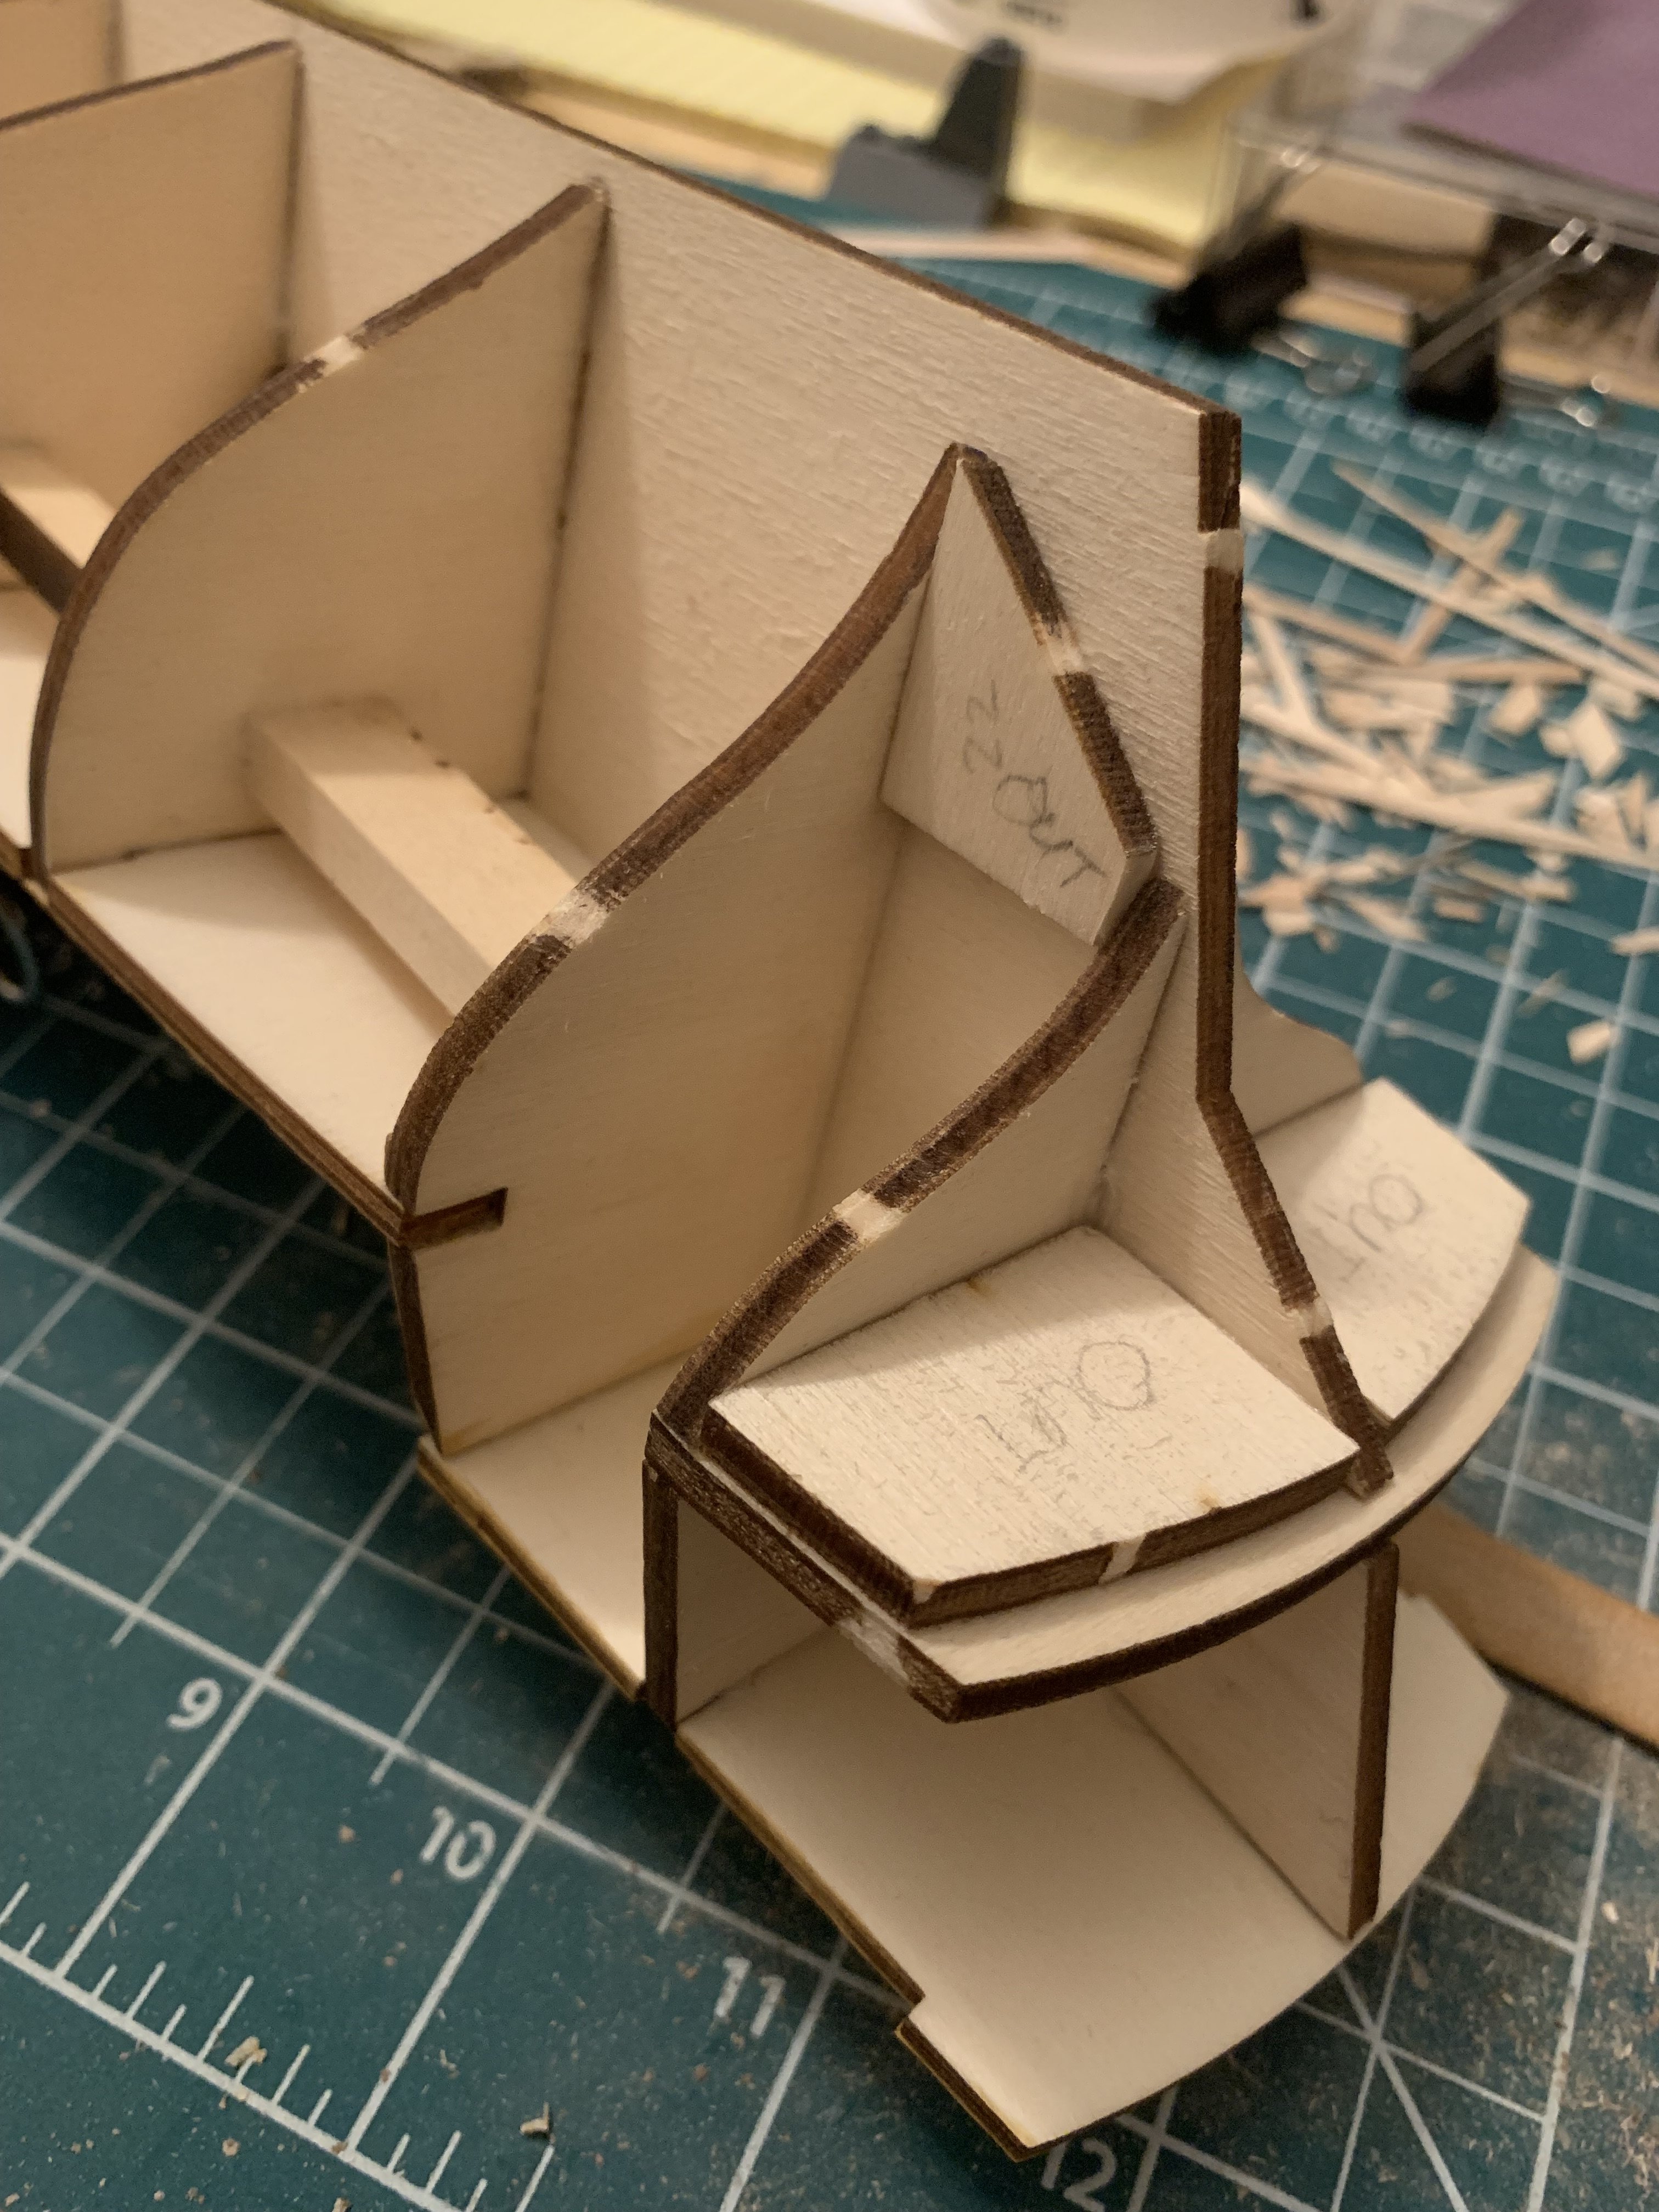
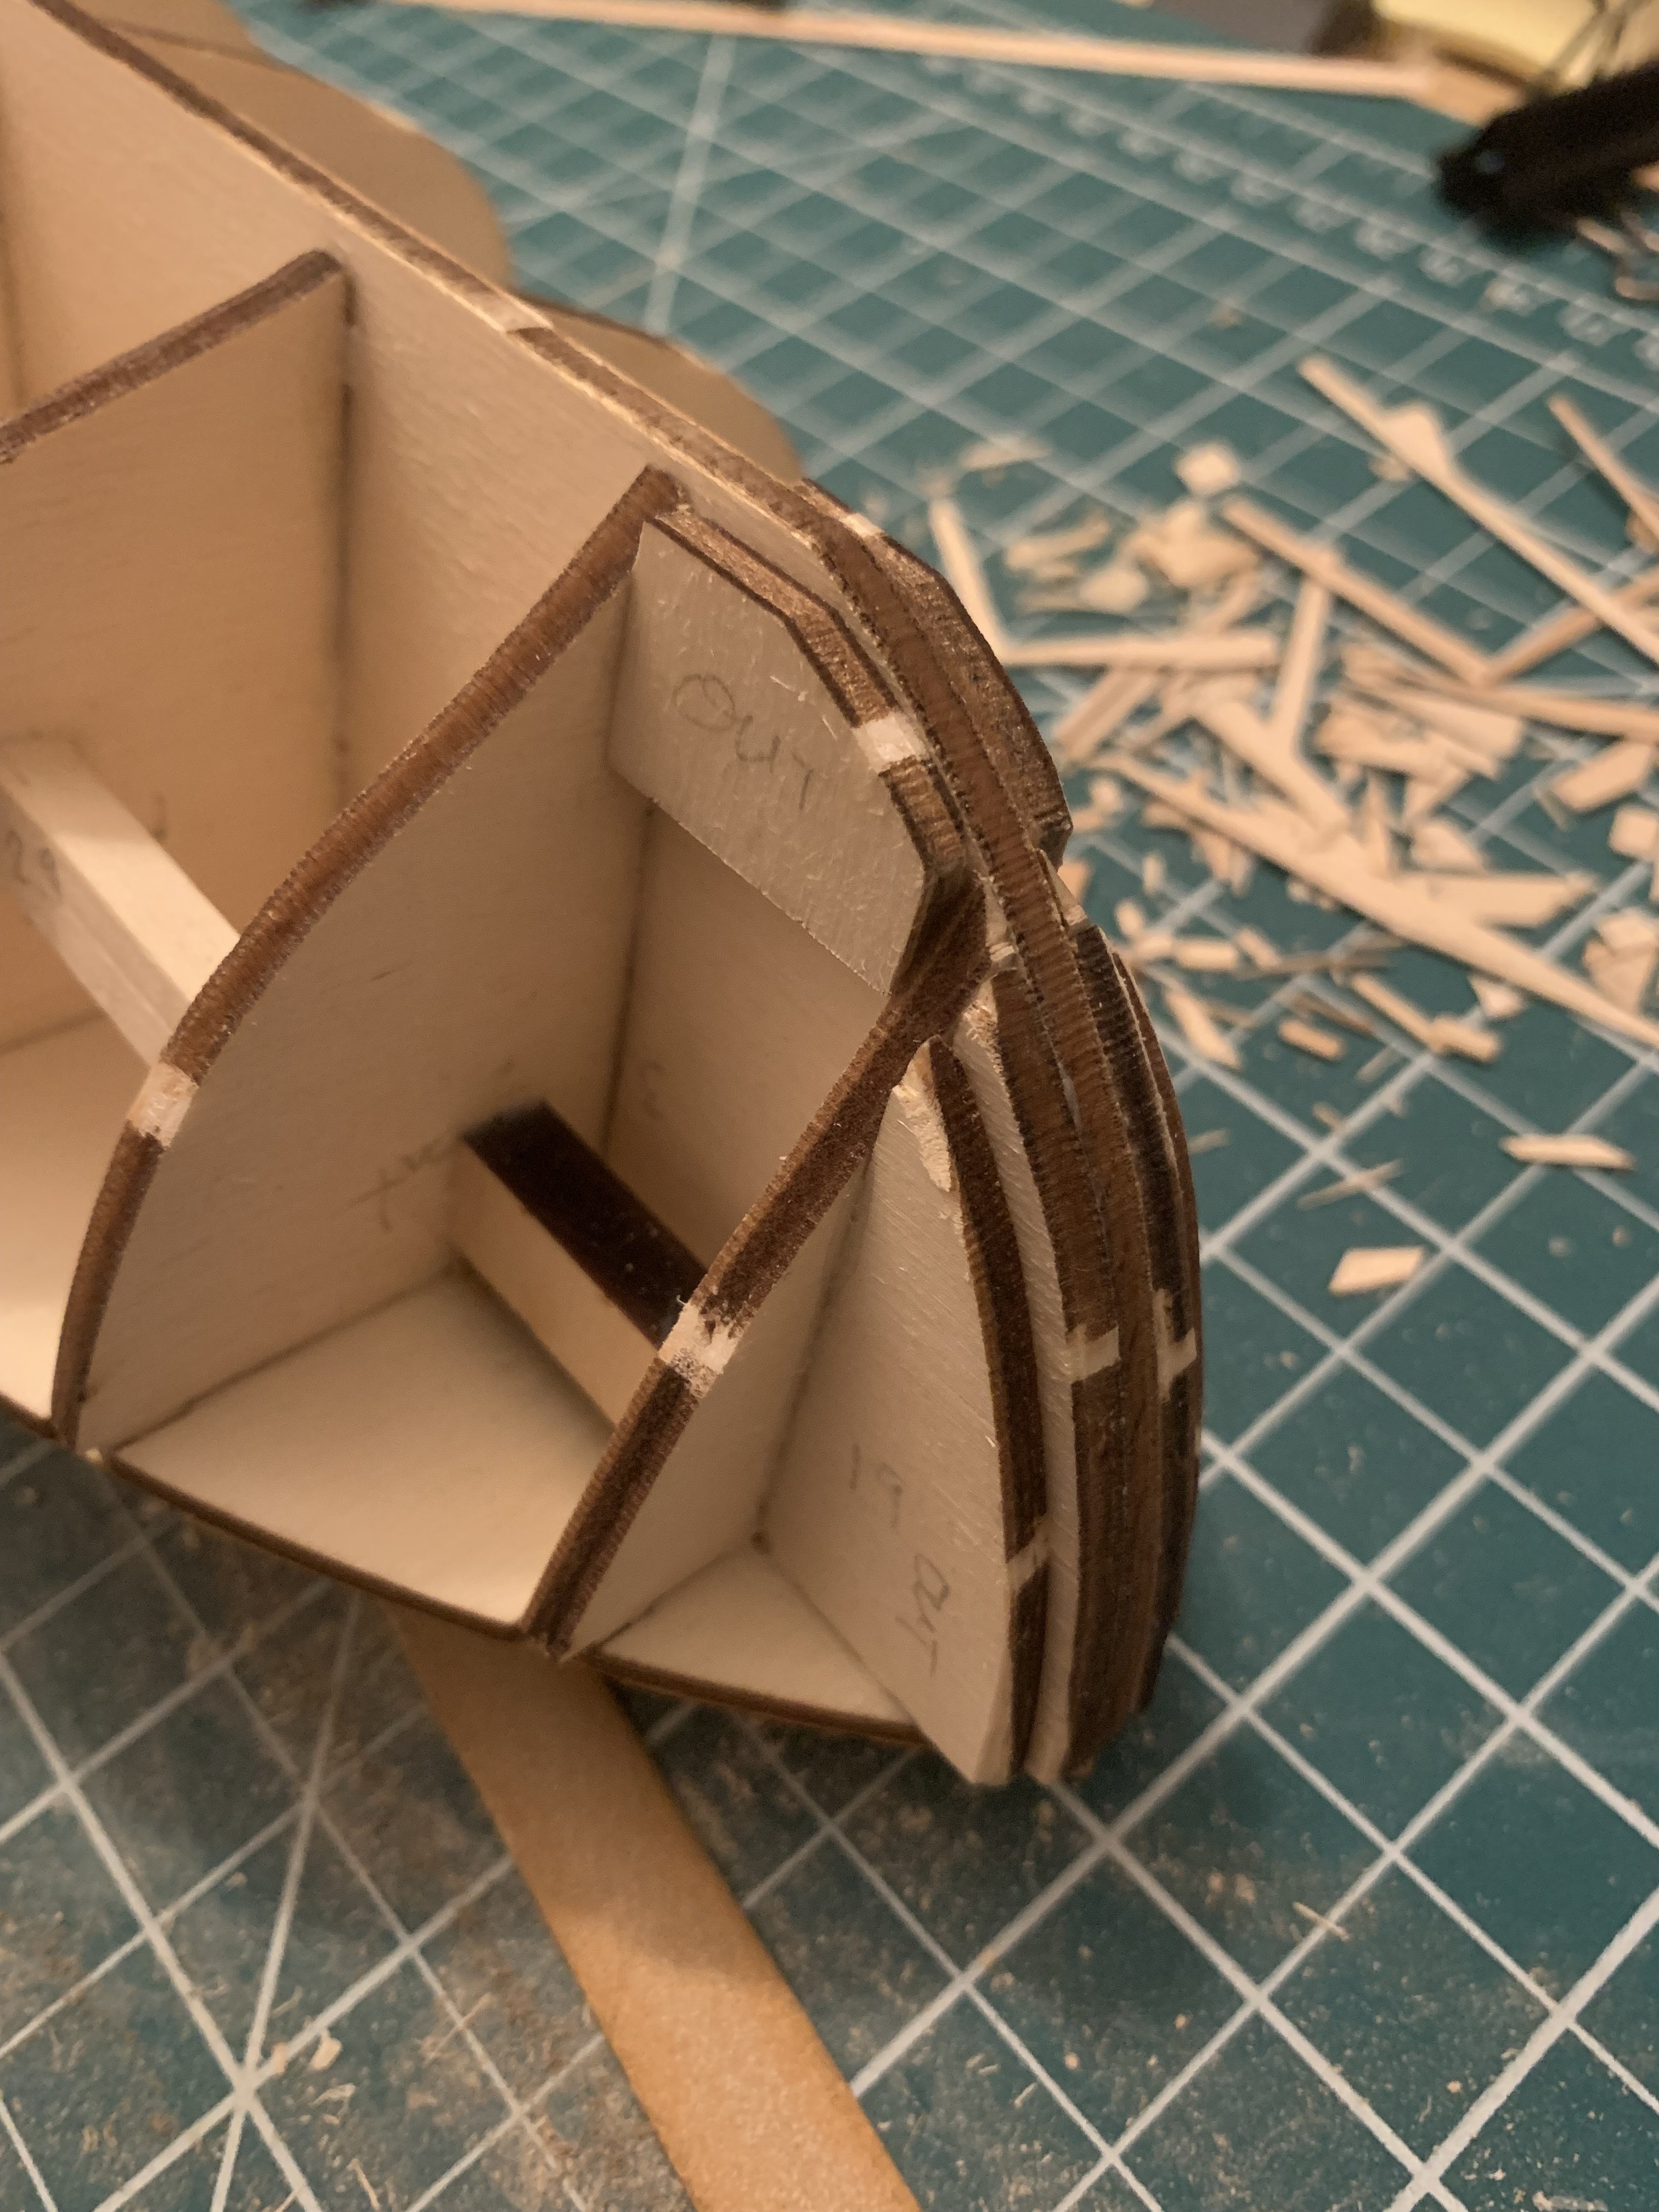
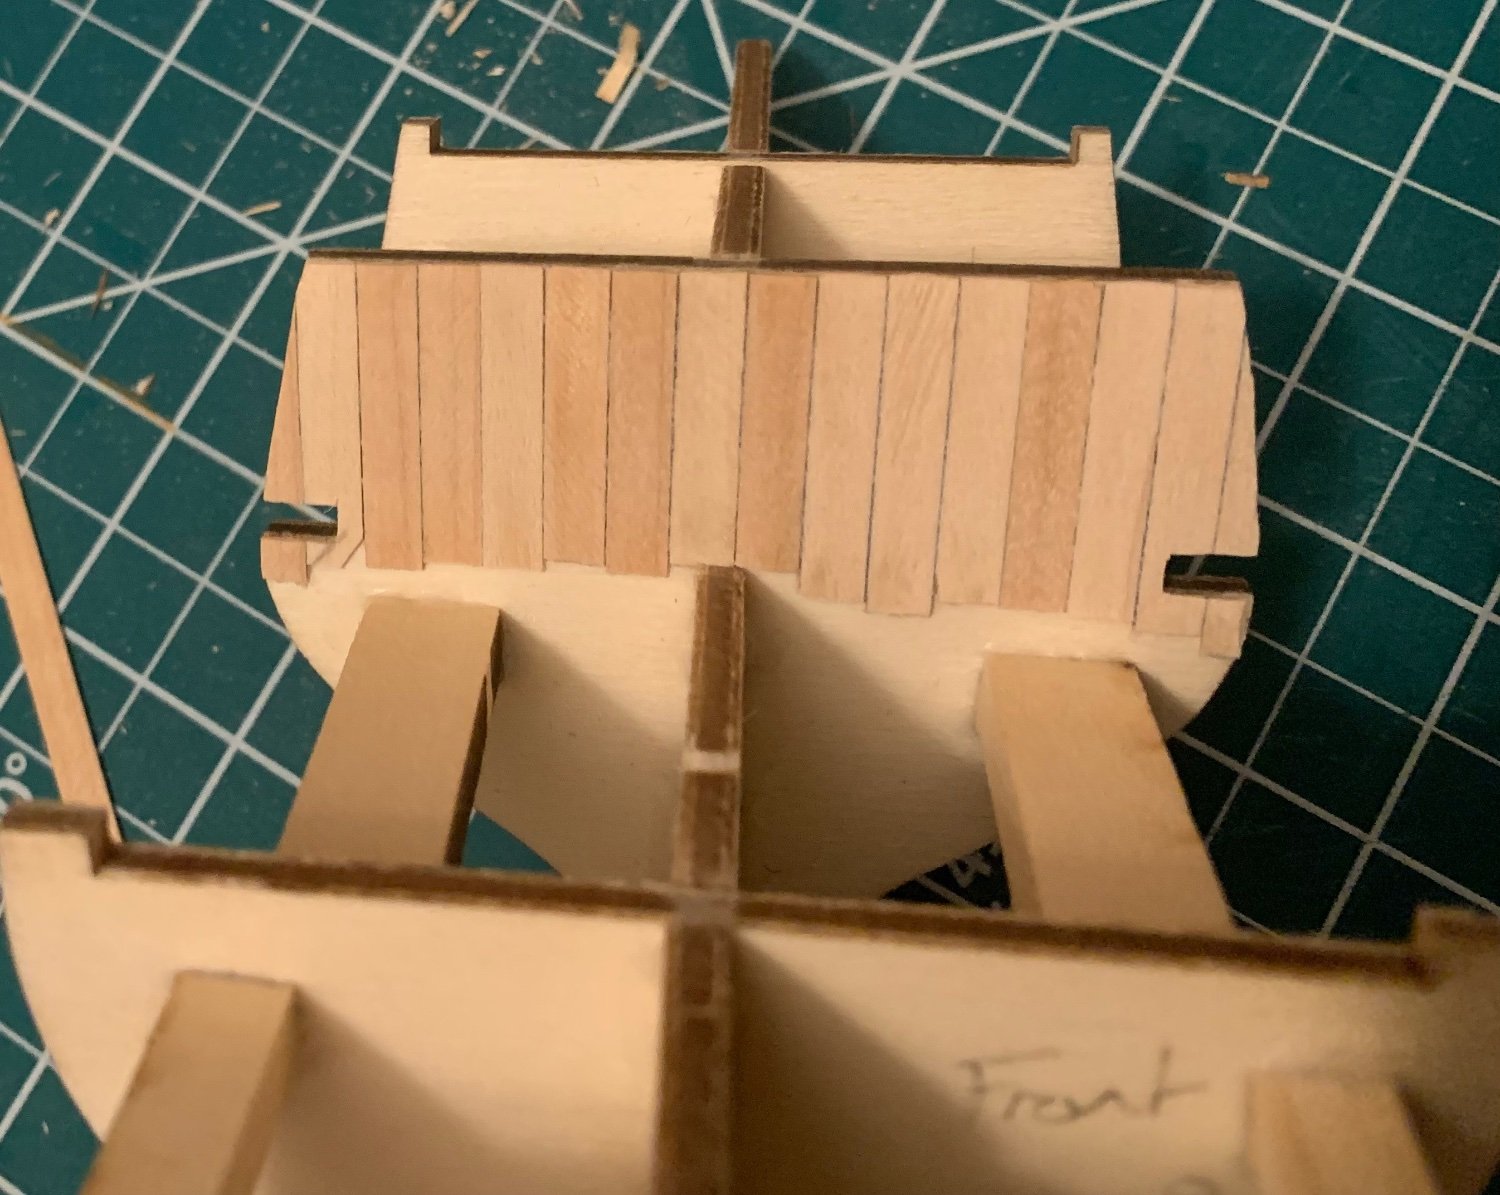
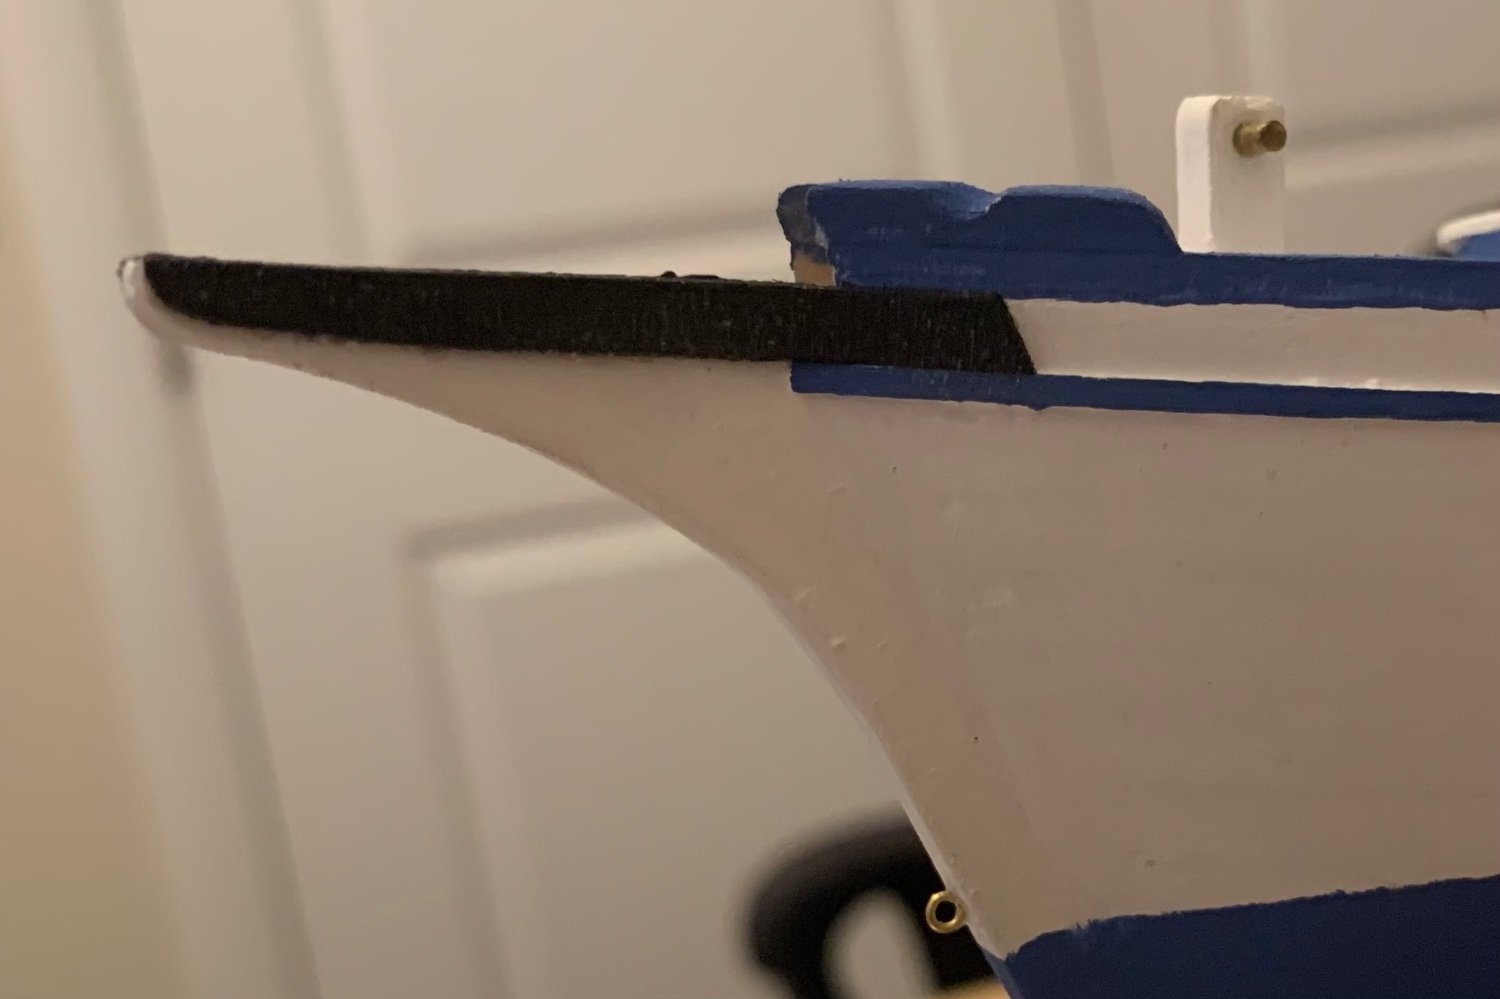
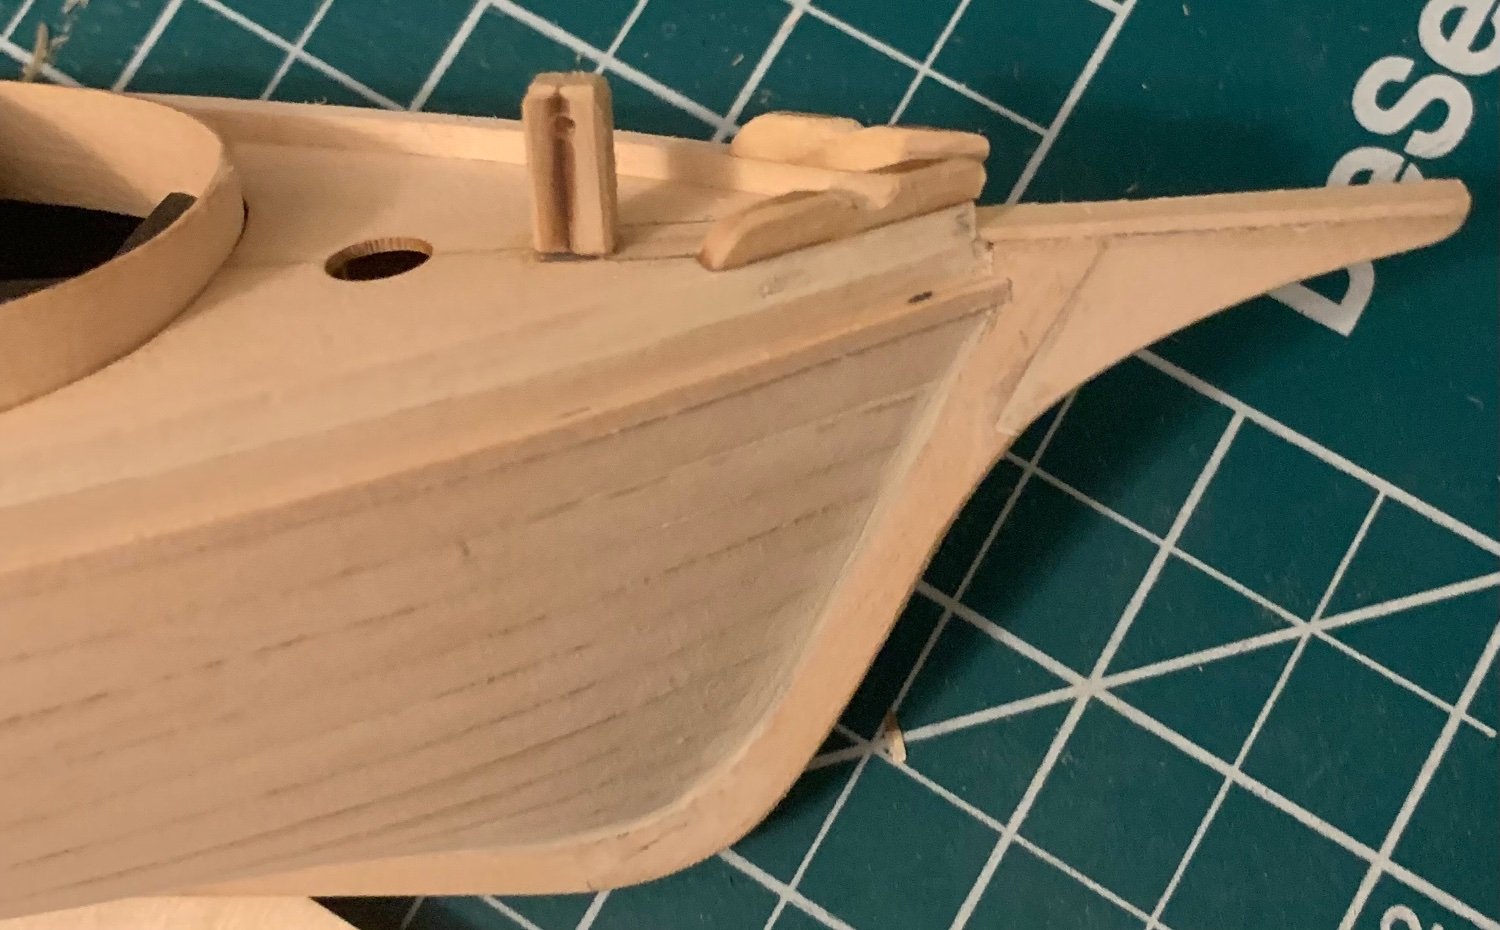
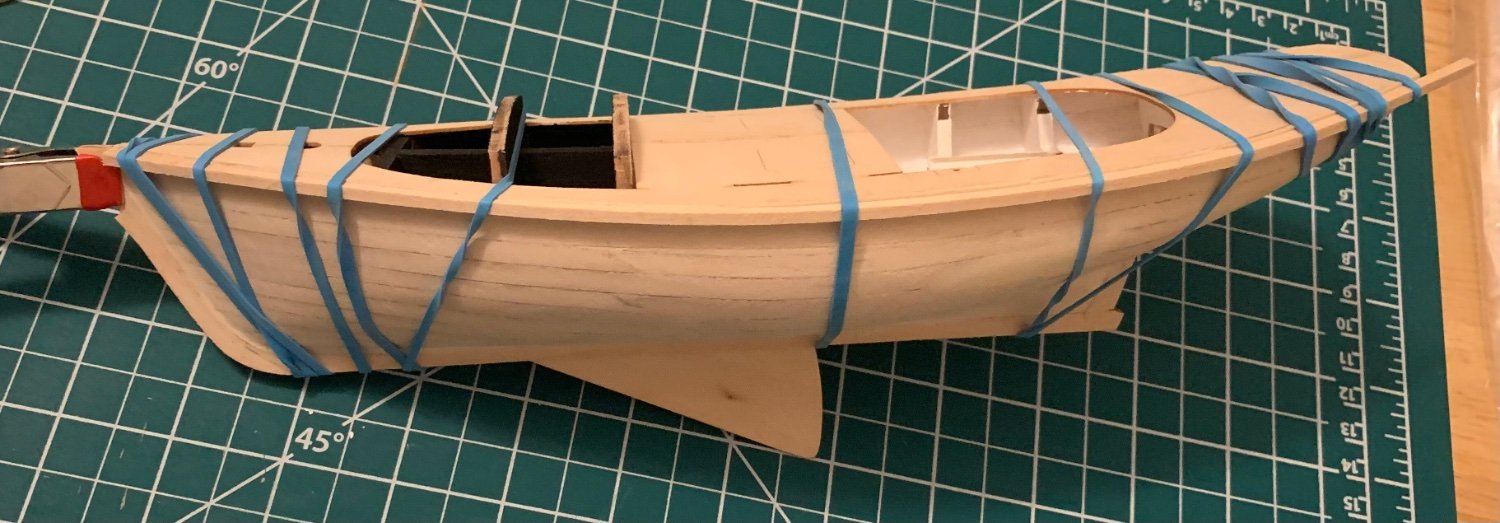
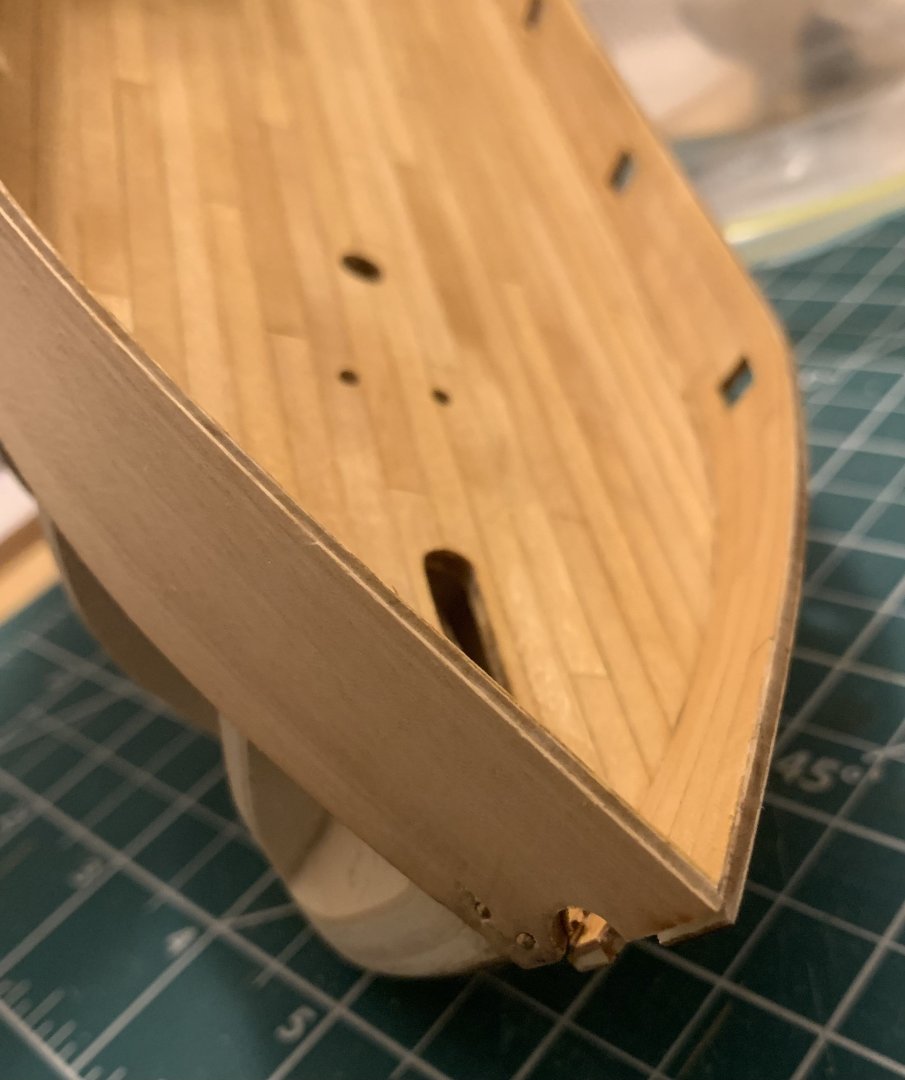
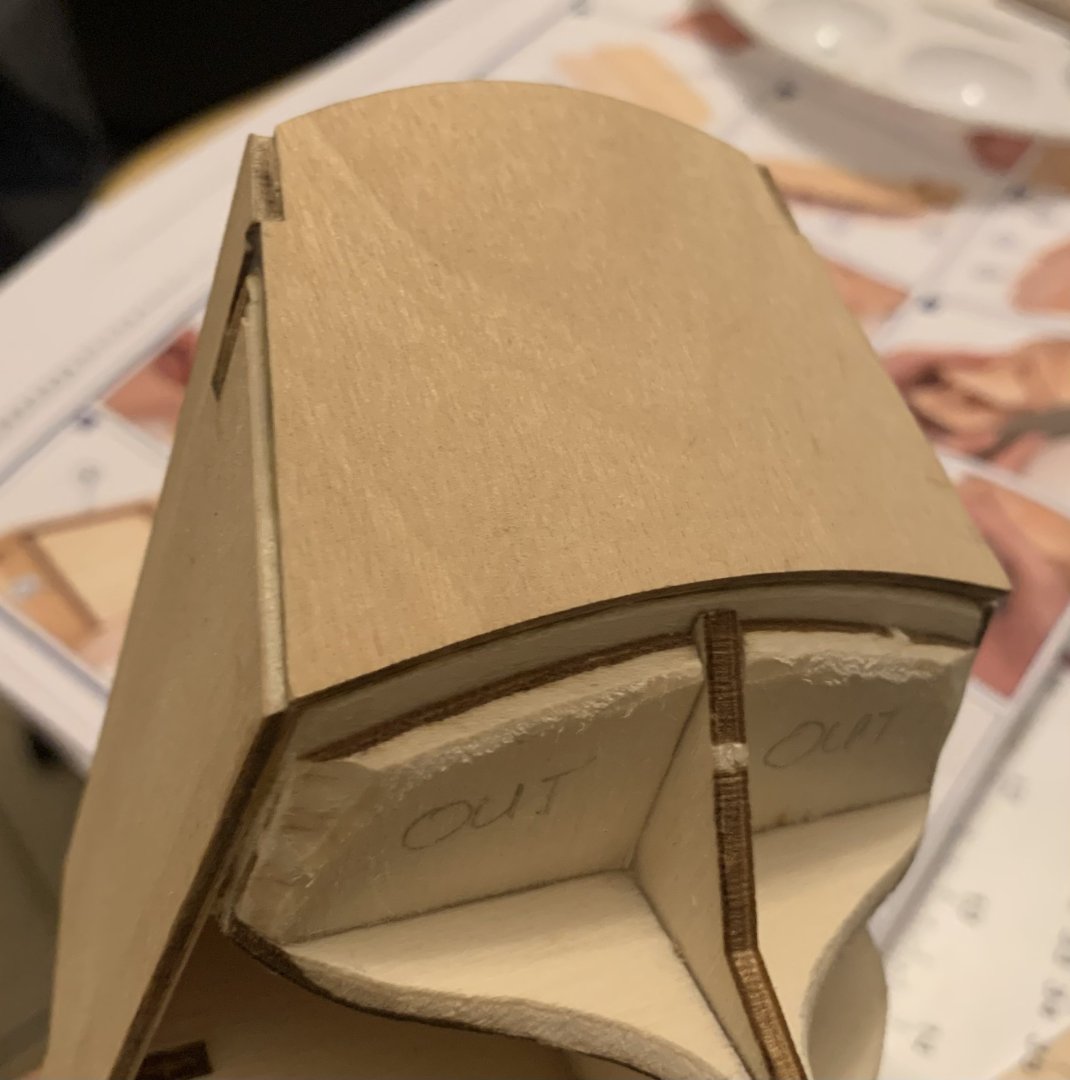
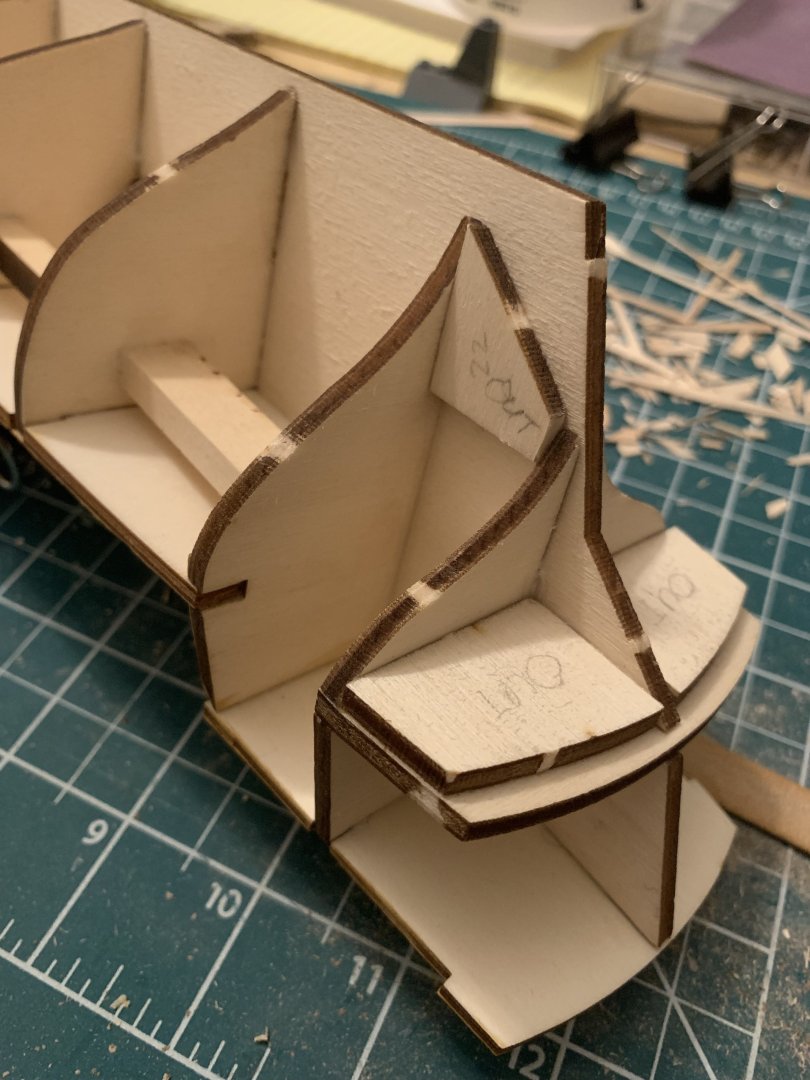
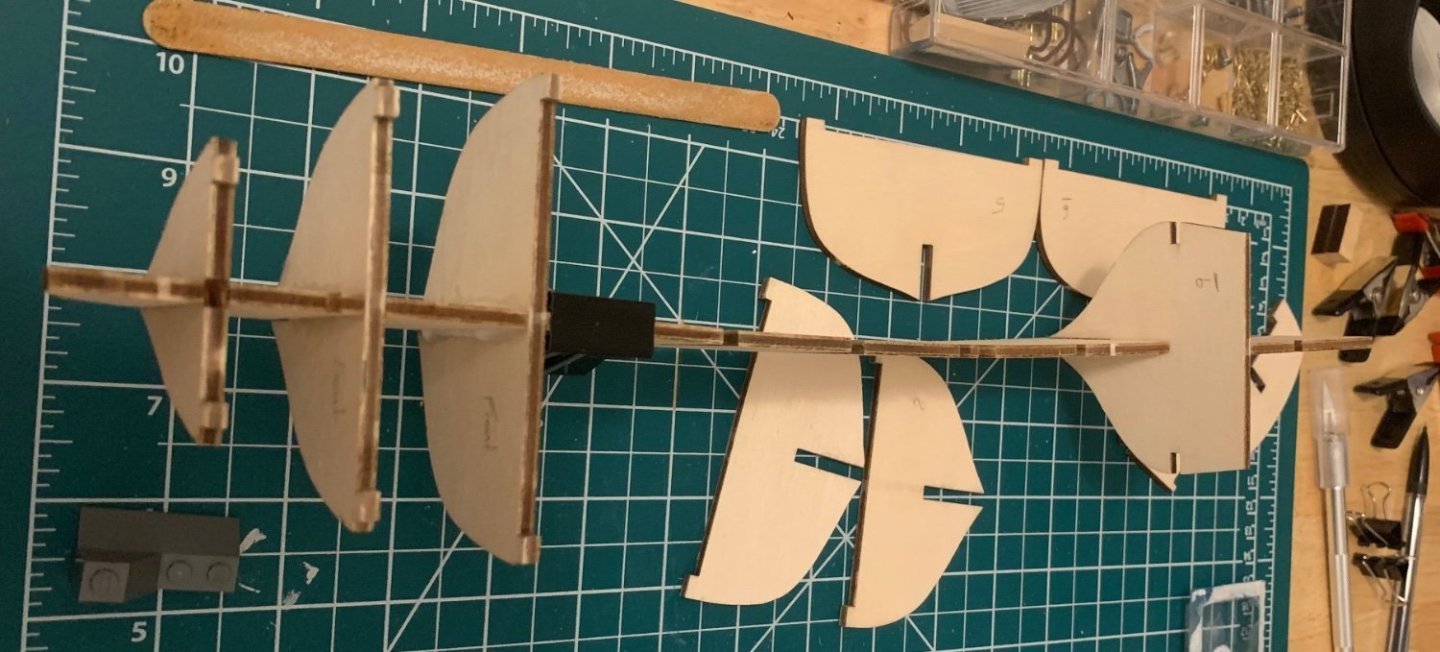
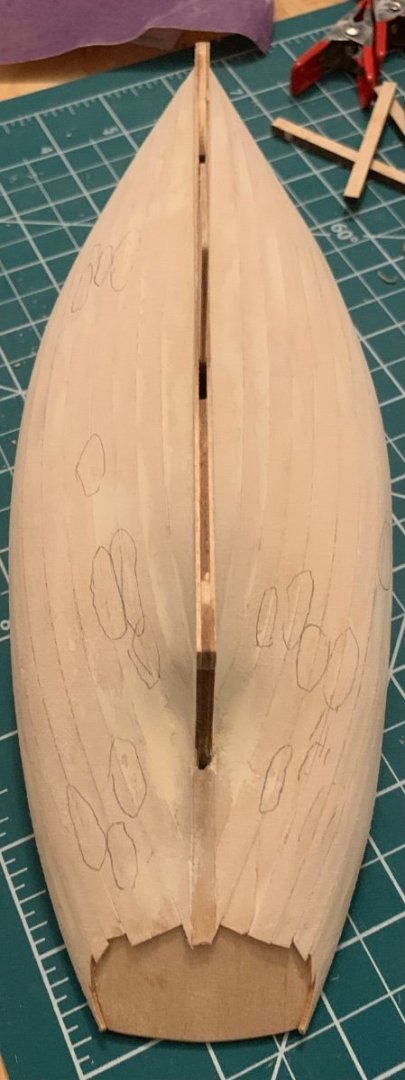
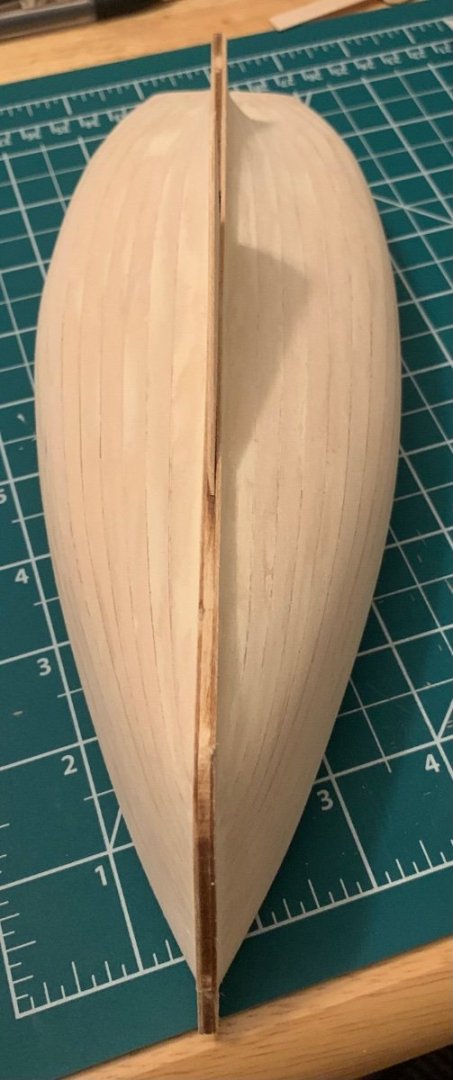
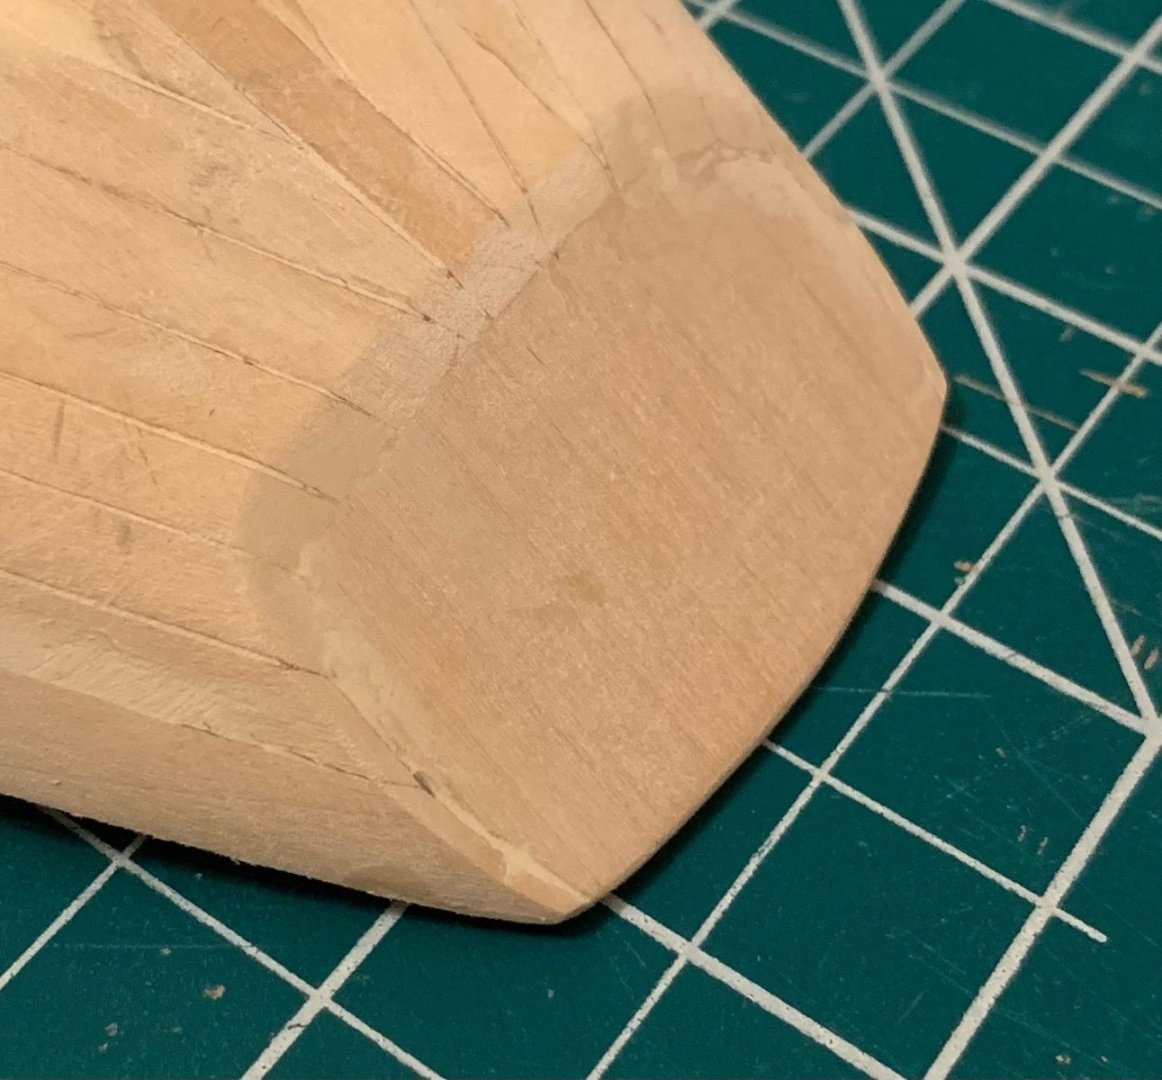
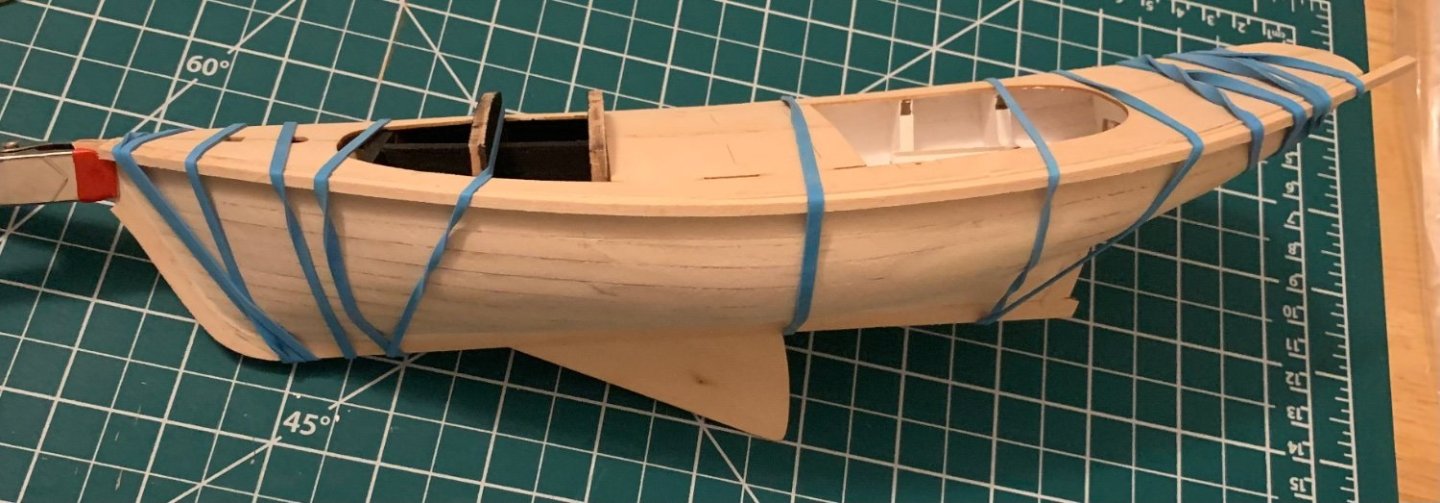
Picking up where I left off, I next moved from the bow to shaping the stern. Hollowing out these ribs was proving very difficult using sanding sticks. Yet another example of me discovering that a job can be made much easier once you choose the correct tool to do it. Lesson learned and now I have this file to help face similar jobs in the future. I also had a slight gap appear under the decking toward the rear and added a bit of scrap wood to fill that gap. My hope was that it would help to made a more solid point of contact later on. To this point I had just been laying the model on my cut mat, but that presented some challenges with keeping the sides free of debris. As a result, I quickly put the stand together. I have not decided if I’ll actually use this stand when finished, but it’s a good holder for building if nothing else. Next came bending the sides, something I was very nervous of. The water bottle (filled with near boiling water) served double duty in allowing me to soak the parts and in being approximately the correct diameter for the bend. You can see here that I got a slight kink at the foremost cutout, something that has persisted in causing me problems ever since. More on that to come. Once bent, I planked the sides in the same way I did the deck. In retrospect, this was probably a mistake. The actual ship wouldn’t likely have planking done this way here. We learn and we move on. After staining, I gradually glued the parts on, moving from back to front. That strategy worked very well. While I was waiting for the glue to dry I bent the stern board. Water bottle to the rescue again. Once I got all the way to the front, here is how things lined up: a bit of a gap toward the bottom, but meeting near perfectly at the top. The unfortunate problem I’ve encountered is that they’re not smoothly curved. Rather, they’re well curved in the area of the first cut out then flat again to the bow. I’ll need to find a way to round them before I glue the upper rail in place. Any suggestions on that? It would be hugely appreciated. Powering forward, I glued on the stern board and it looks excellent to my eye from both inside and out. Finally, I’ve just drilled the two extra holes for the anchor ropes. So questions and plans for next steps: 1) How am I going to round out the upper half of the sideboards around the bow? 2) The instructions seem to imply I should use 2x4 mm walnut strips to line the deck as waterways. If I glue them in as indicated, they’ll cover the bottommost portion of the wall higher than the bottom of the cutout gun ports. I suppose that means I will need to cut channels into them to match the ports. Should I do that before or after they’re glued in place? Things to think about. I’ll make a decision after I have the strips bent into shape.


-
Bryan Woods reacted to a post in a topic:
Albatros by WizardOfOs - OcCre - 1:100
-
JacquesCousteau reacted to a post in a topic:
Albatros by WizardOfOs - OcCre - 1:100
-
Paul Le Wol reacted to a post in a topic:
Albatros by WizardOfOs - OcCre - 1:100
-
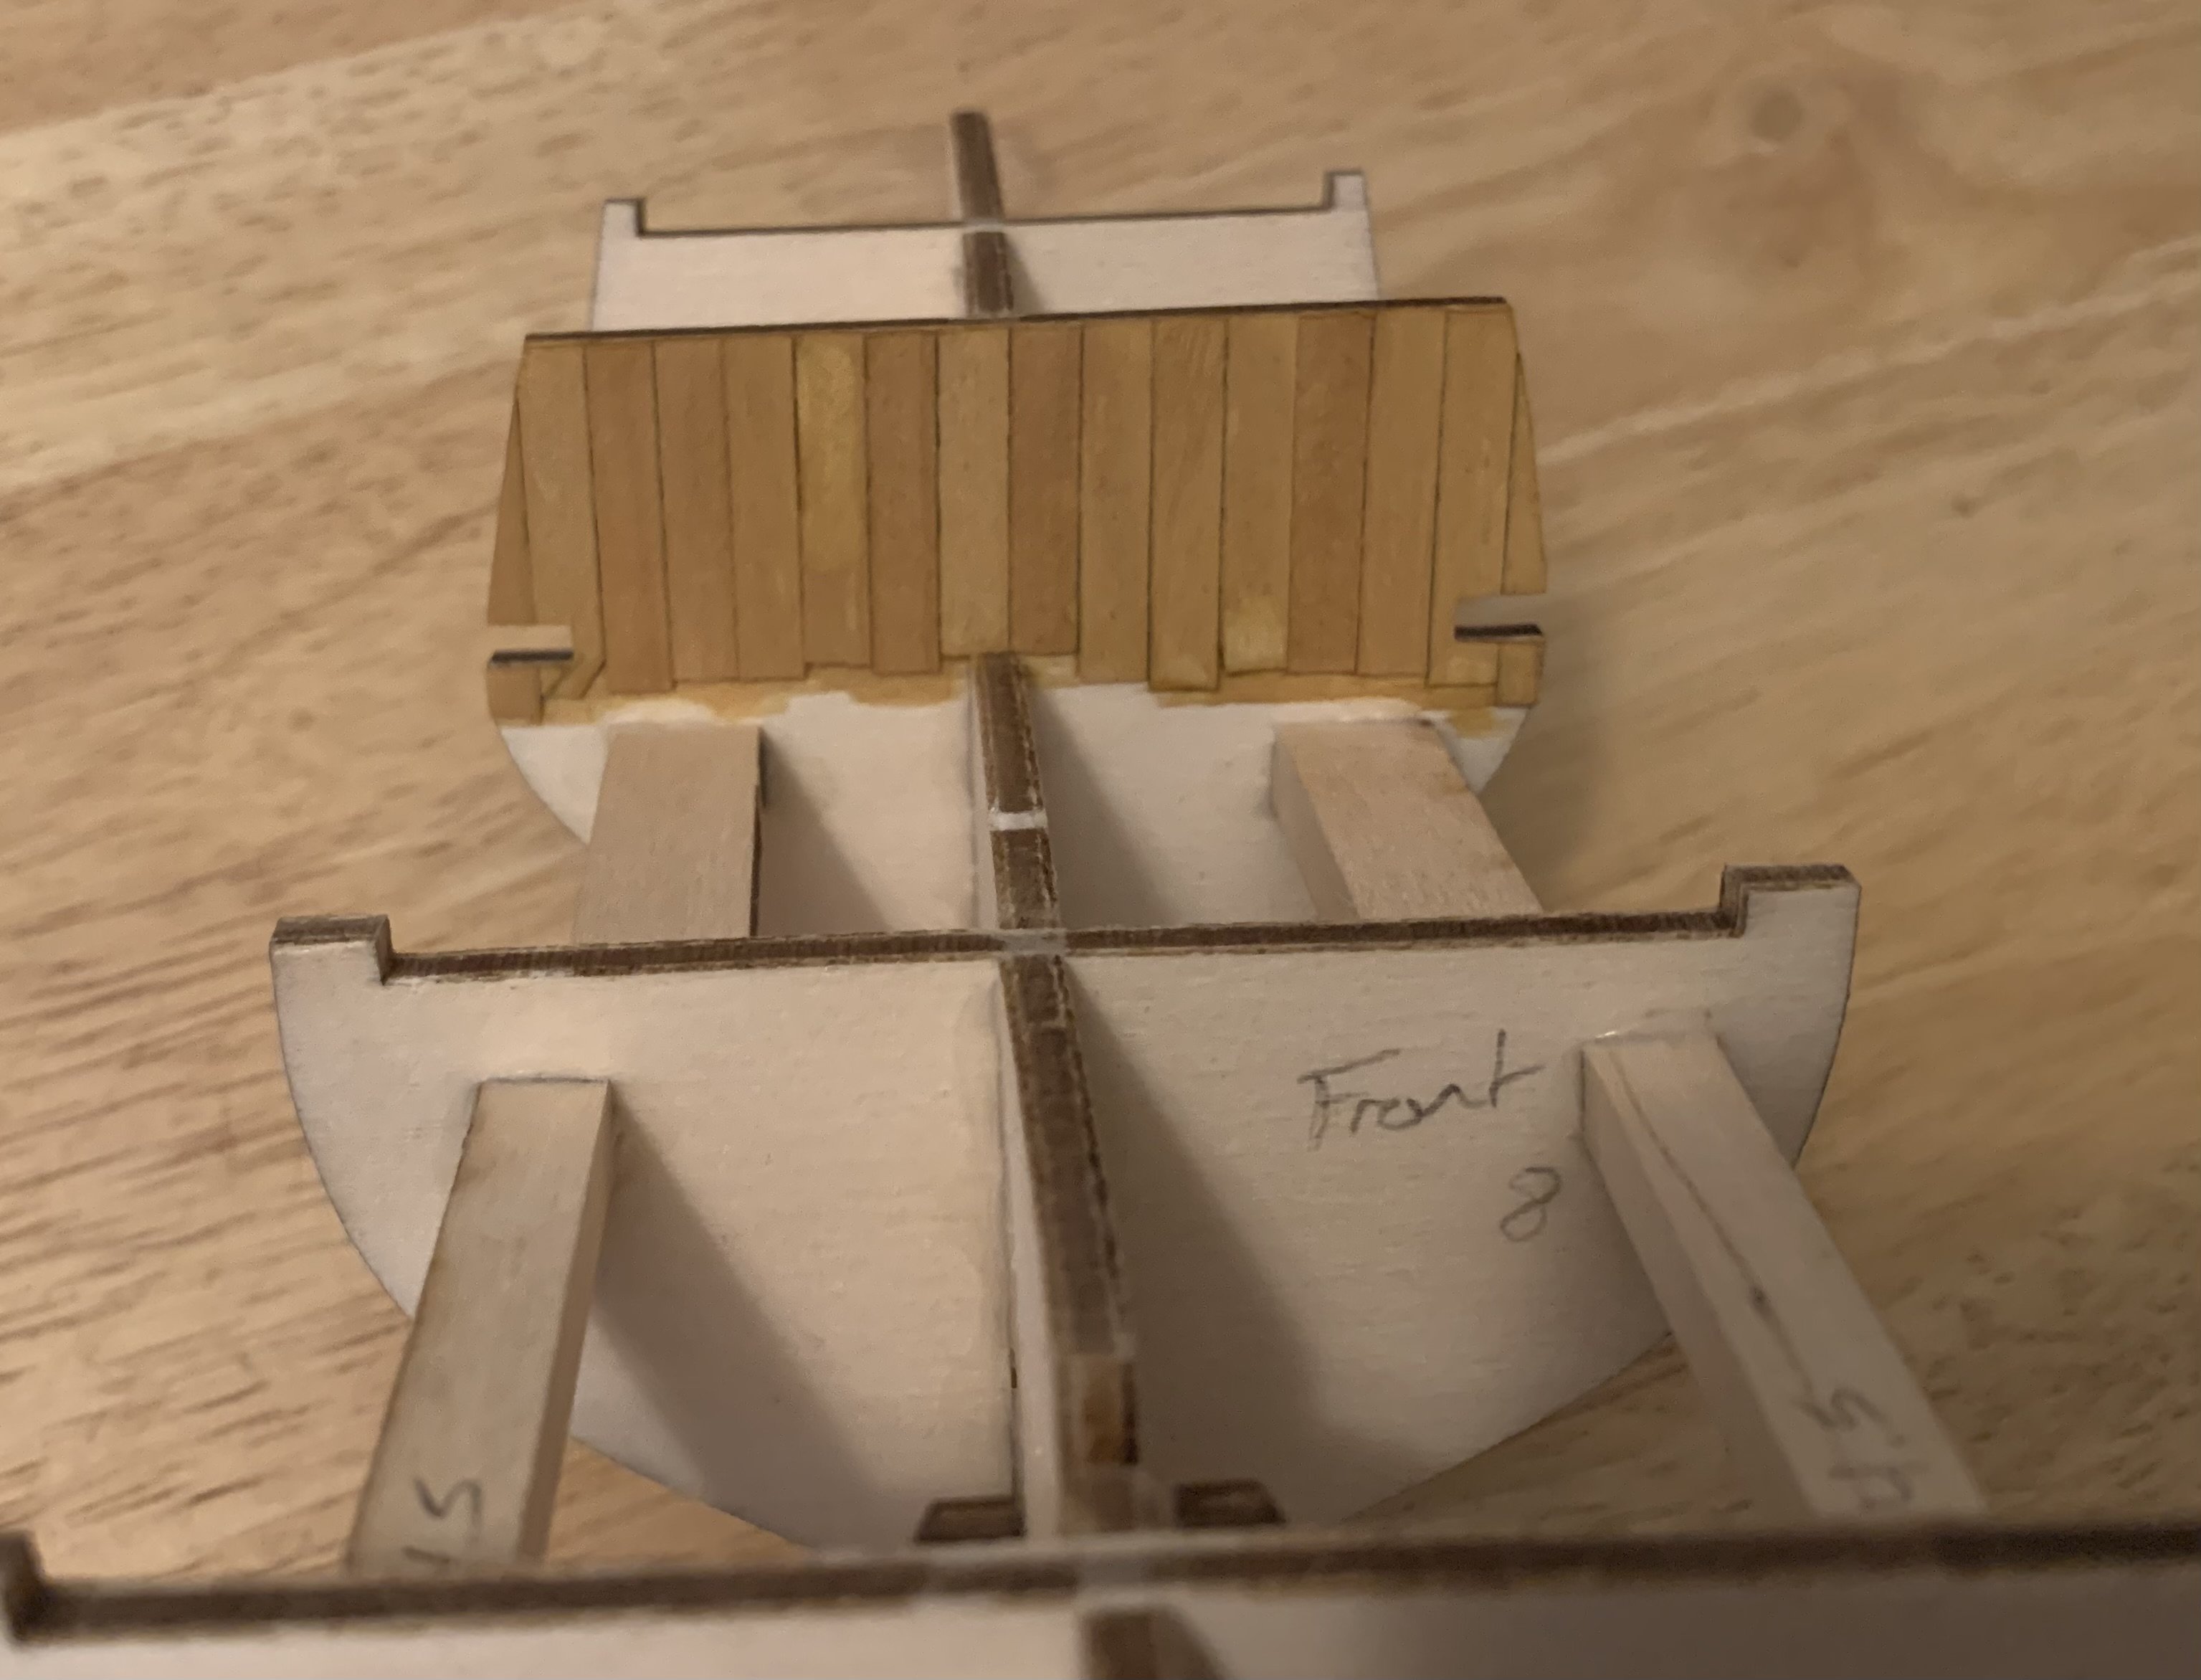
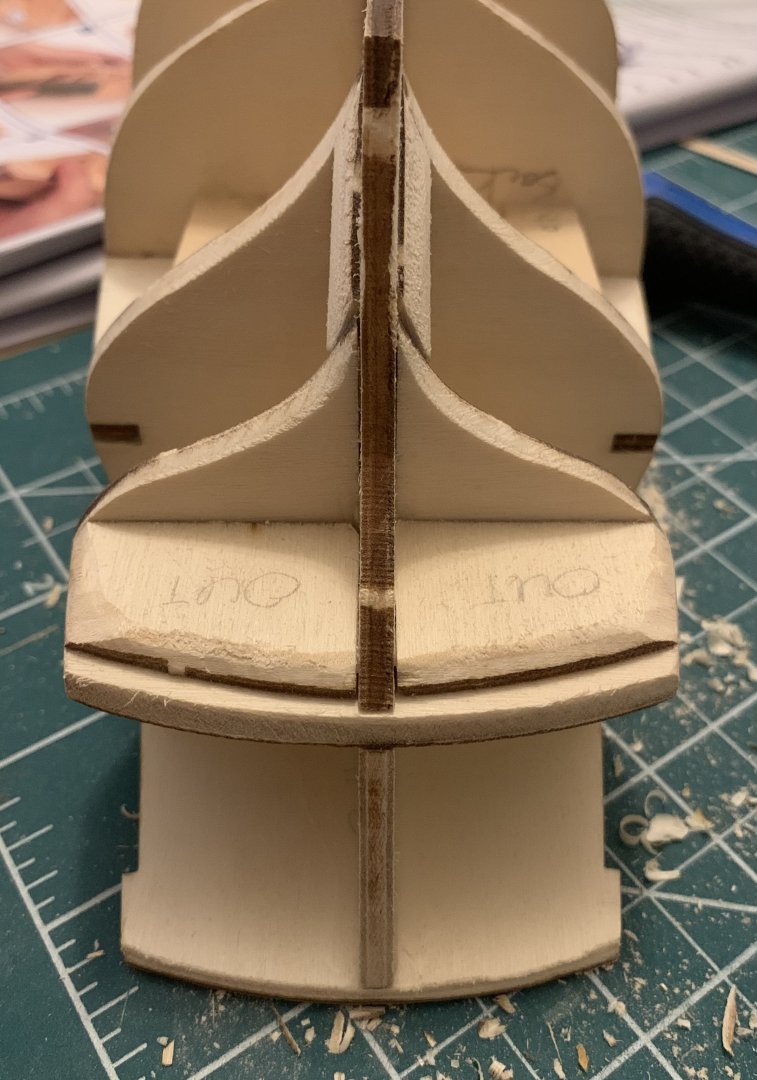
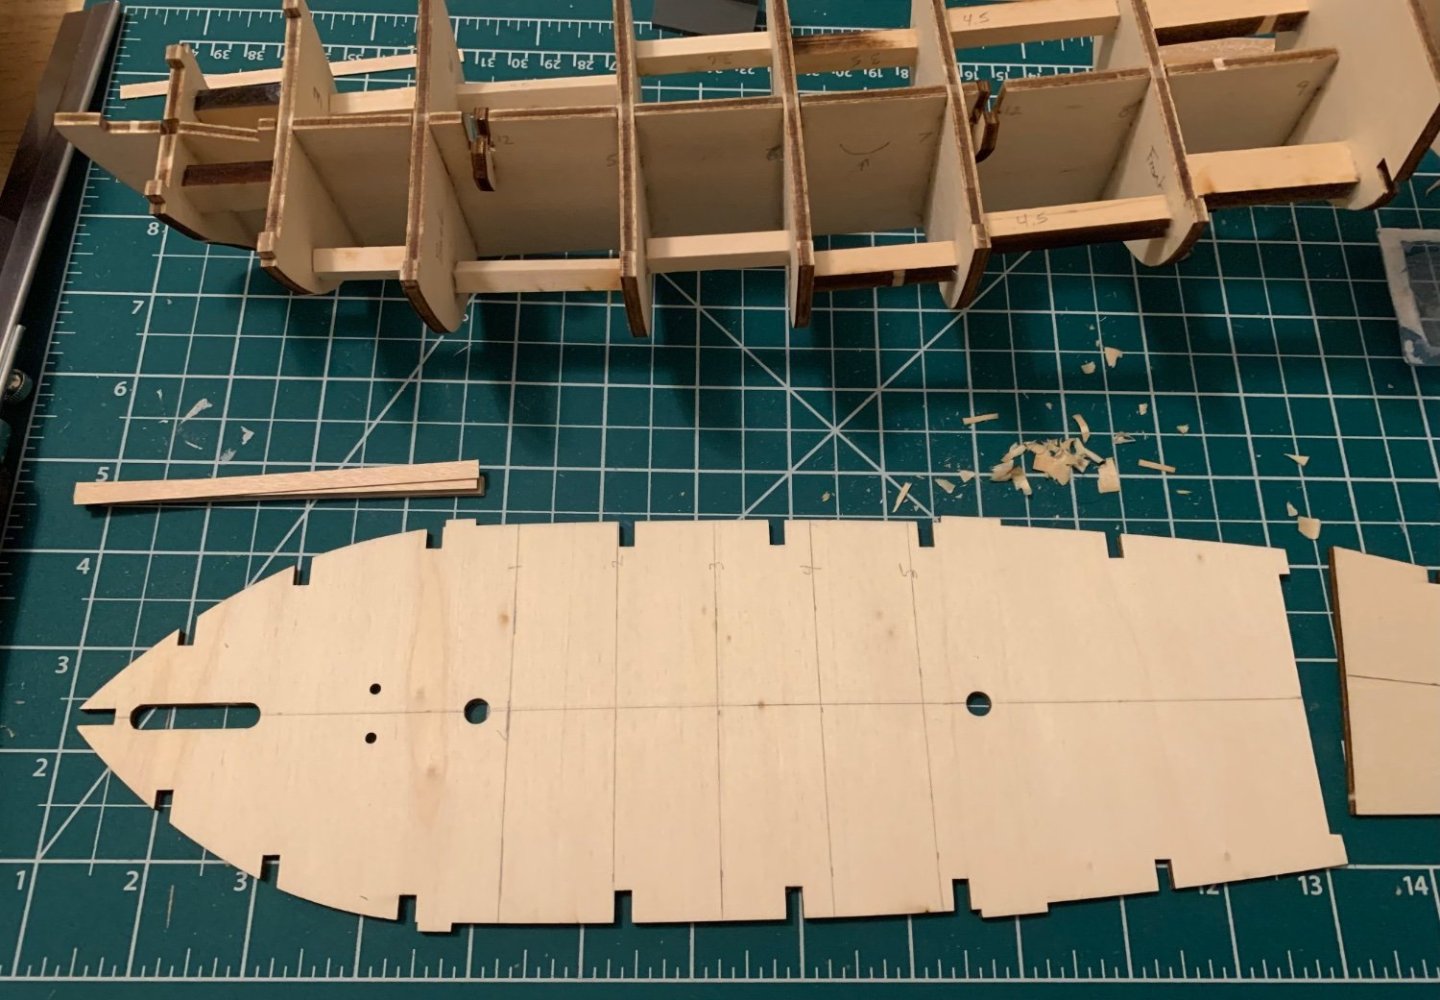
Have you ever been working on something that you truly enjoy, get distracted by some life event, put it down and not touch it again for four months? Yeah, me too. The good news is that I have finished school, having graduated and gotten a job I finally have time to pick up my toys again. Now where did I leave off? Before I had set things down I had finished planking the decks and cleaning up the holes for the masts. I was really proud of them at the time (as evidenced by the number of photos I’ve found on my phone) and still can’t believe how well they turned out. I had also been debating what colour stain to use and had settled on pine. This, too, I was happy with and feel like it gives the correct look. Worth noting is that the stain didn’t fully saturate in areas with glue residue (which should not have come as a surprise). I’m not really sure how to fix that for the future because a little glue squeezing out is typically not a bad thing. Sanding it down smooth was either not sufficient or wouldn’t have made a difference because the “planks” are so thin anyway. Next I had assembled and glued down the decks, making the model finally begin to look like a ship. My last addition before the hiatus was to add on the filling blocks to the bow and stern. And with that I promptly walked away and didn’t get around to picking it back up until yesterday. Sanding the frames has never been my favourite job and that probably contributed to my having left things alone for so long. A few hours of carefully carving away the excess followed by sanding things smooth has resulted in this: Granted, I have only tackled the bow, but I think it’s becoming presentable. If nothing else, it’s tolerably even between the two halves. Next step is going to involve doing something similar to the stern end, then I can get to planking the hull which is a much more enjoyable endeavor. Anyway, that is where things stand for now. Maybe I’ll post another update before 2025.


-
matepet reacted to a post in a topic:
Albatros by WizardOfOs - OcCre - 1:100
-
WizardOfOs reacted to a post in a topic:
Gretel by Bryan Woods - Mamoli - 1:54
-
WizardOfOs reacted to a post in a topic:
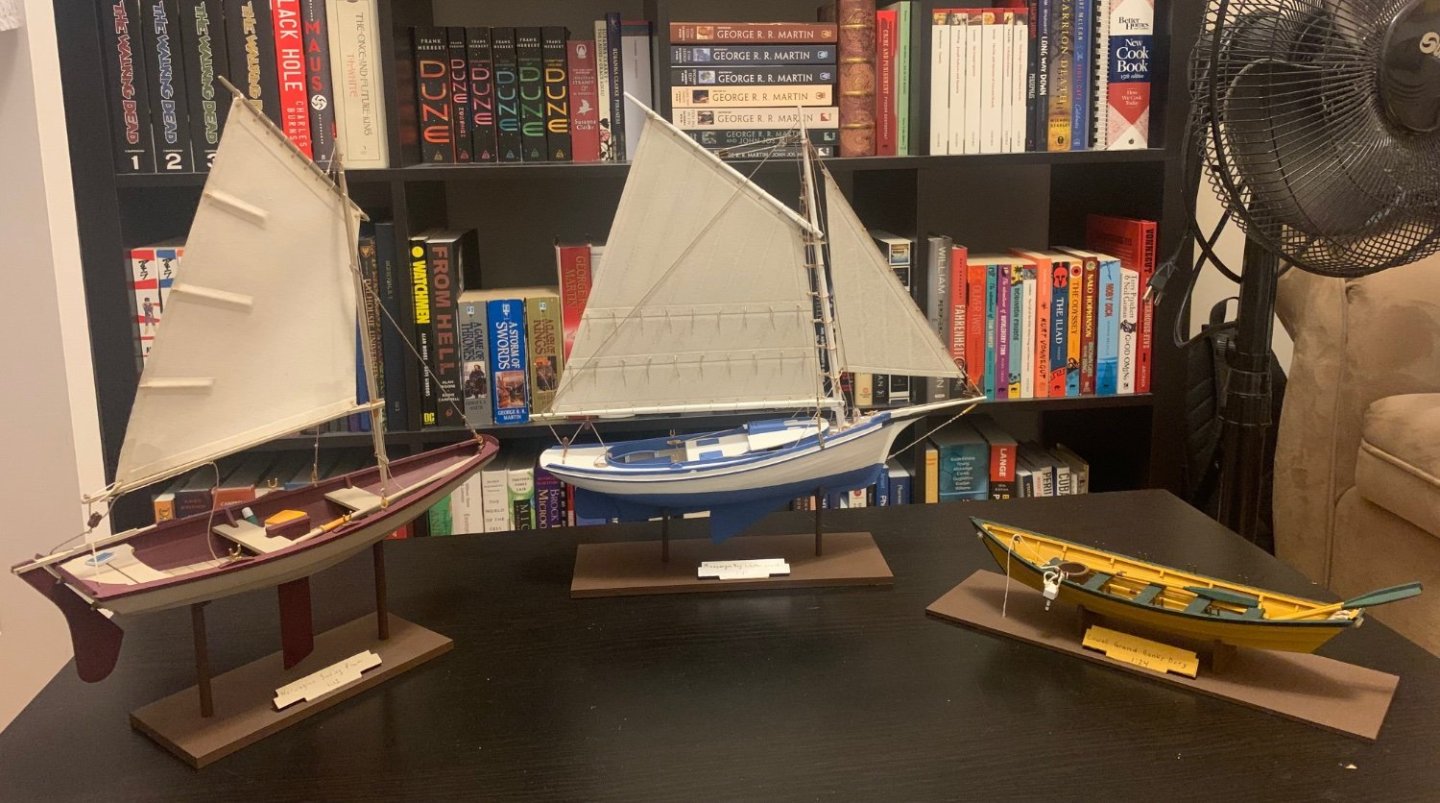
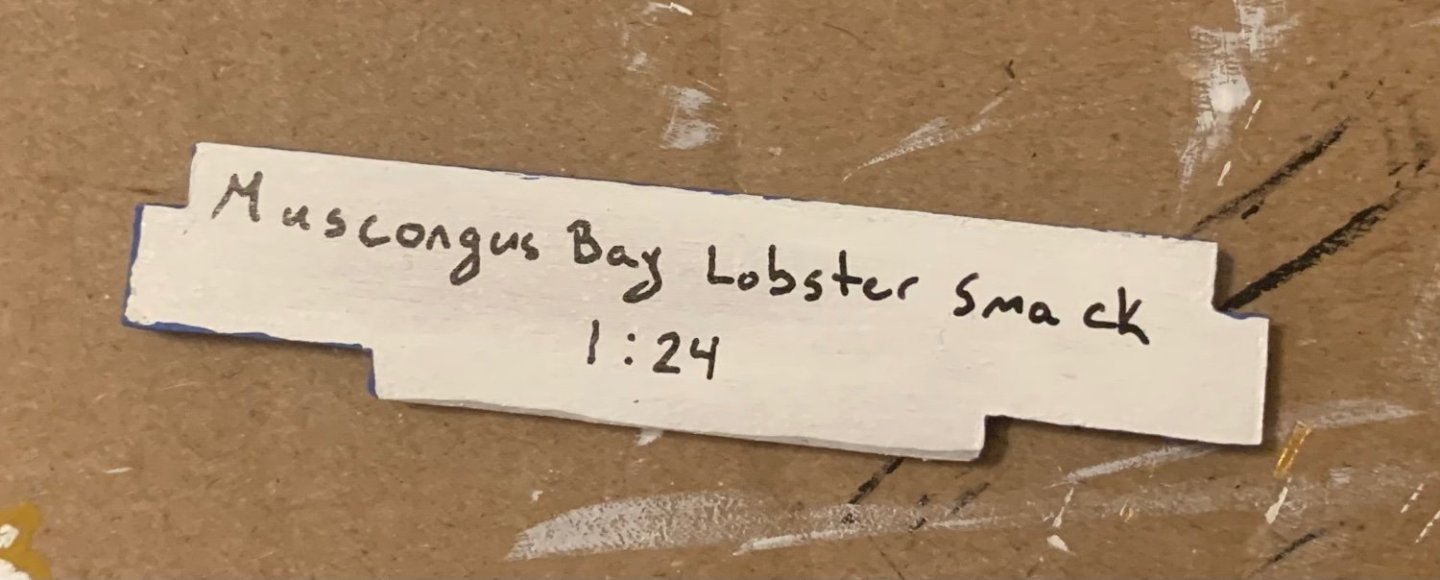
Muscongus Bay Lobster Smack by MajorChaos - FINISHED - Model Shipways - 1:24
-
WizardOfOs reacted to a post in a topic:
RMS Titanic by NavyShooter - 1/100 - 3D Print - Pond Float display - Halifax Public Gardens
-
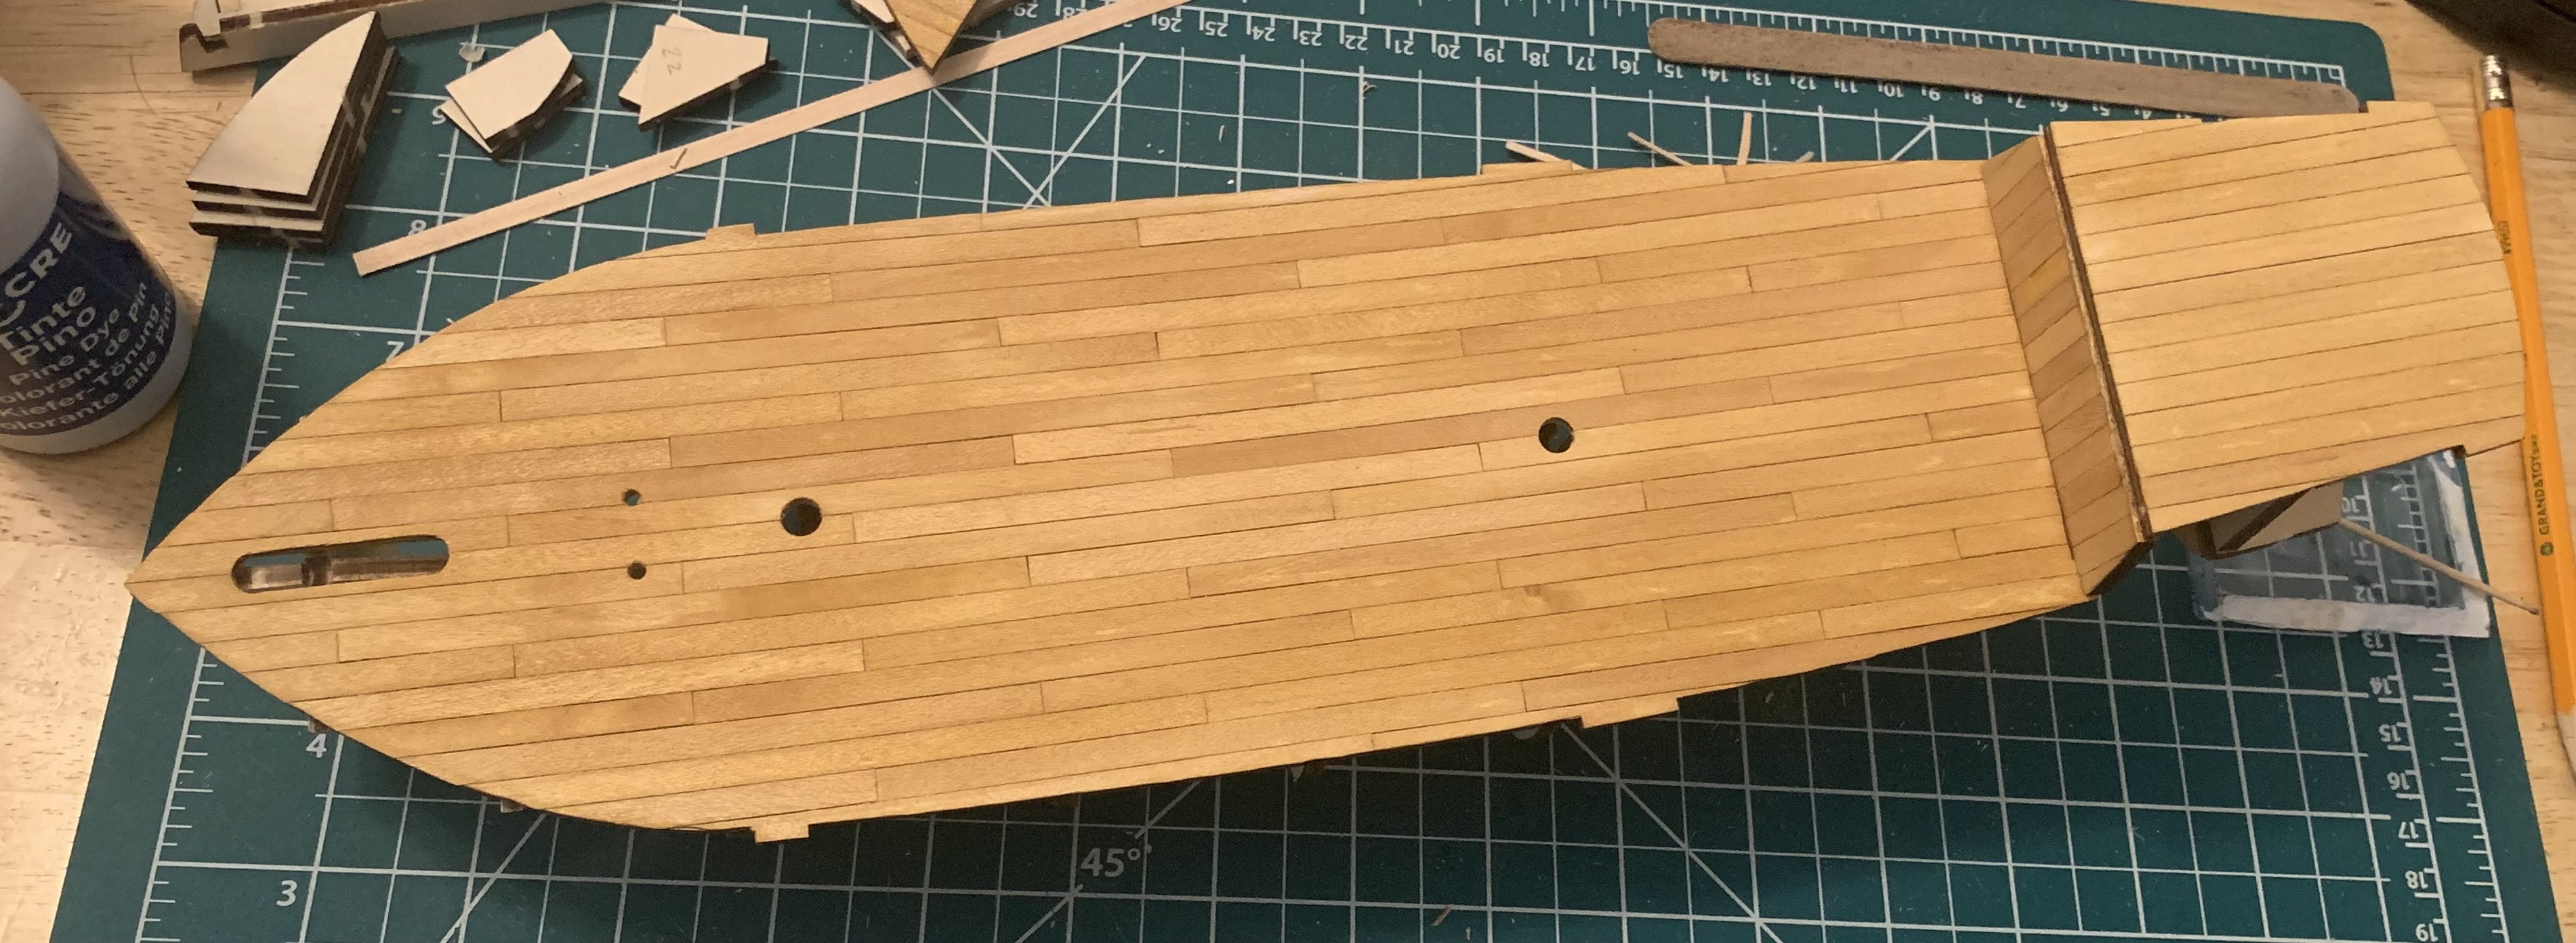
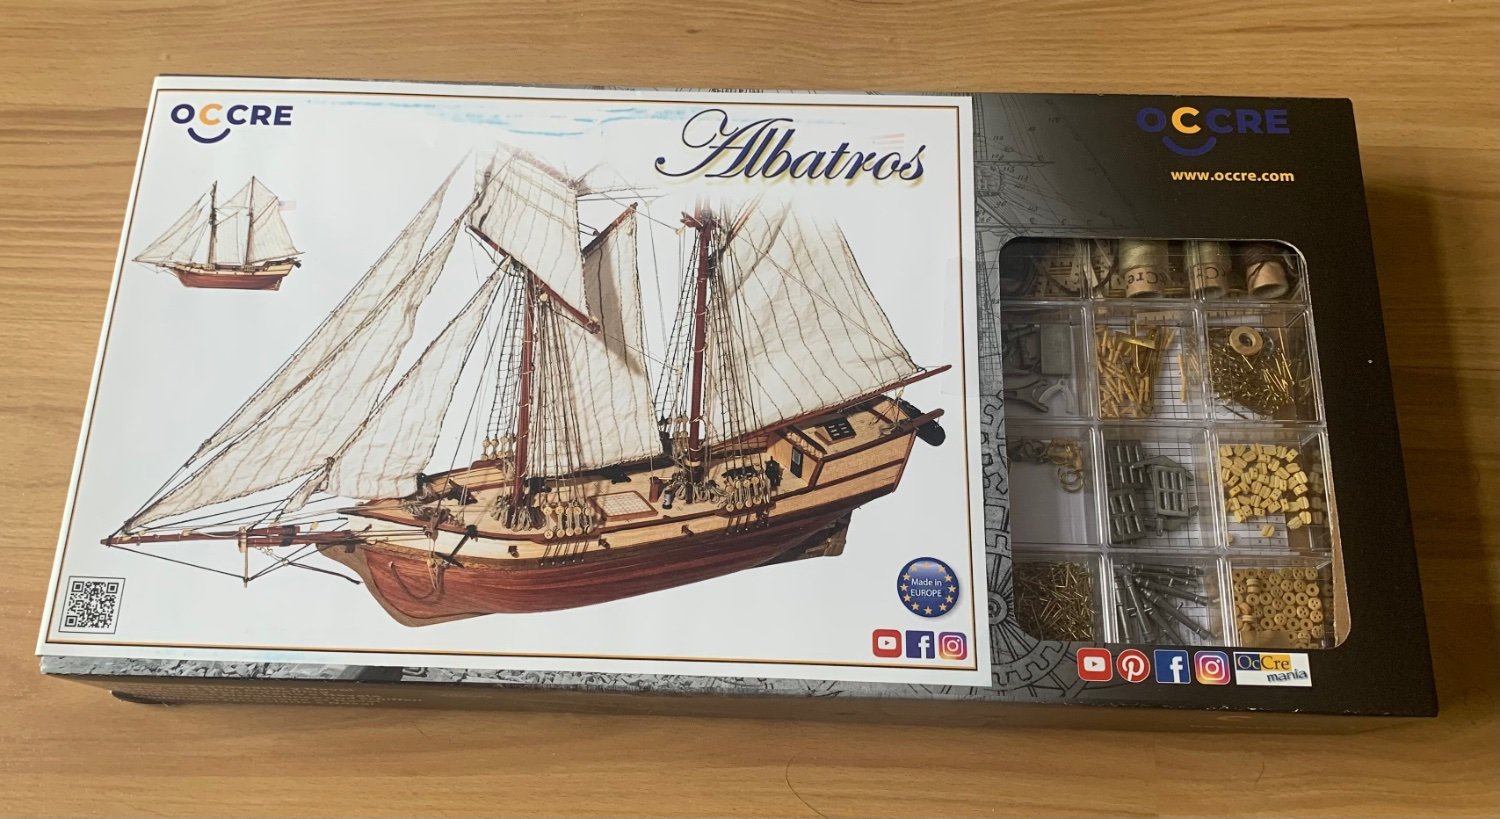
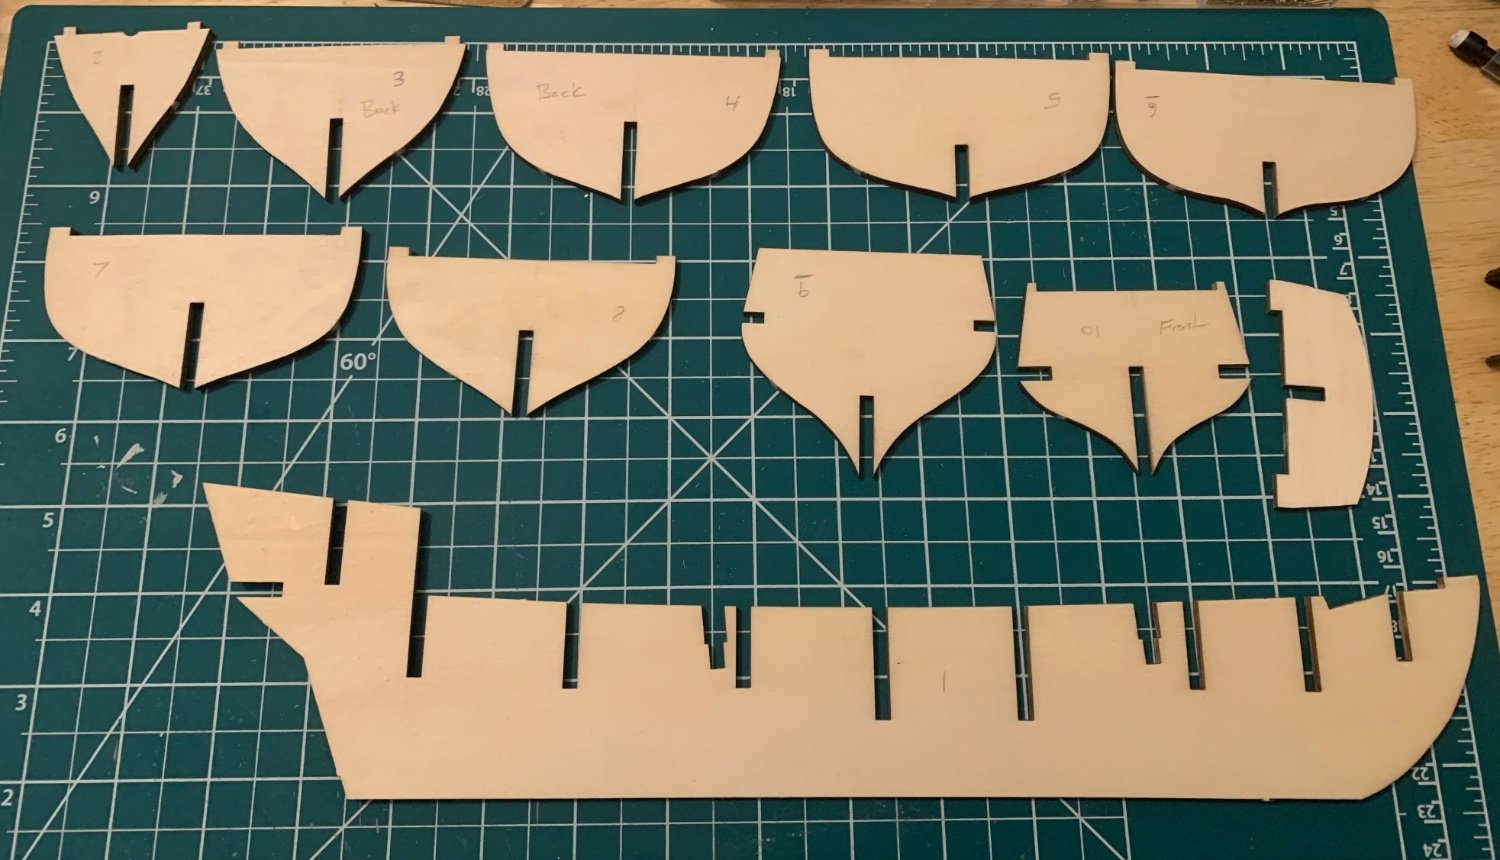
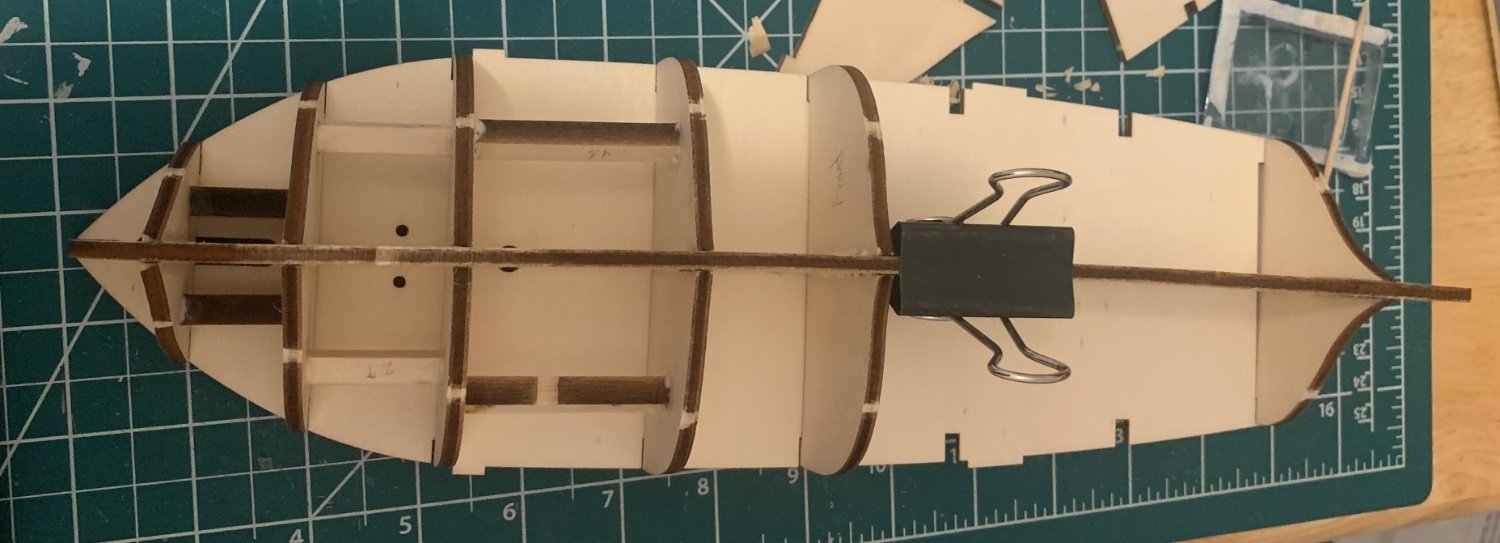
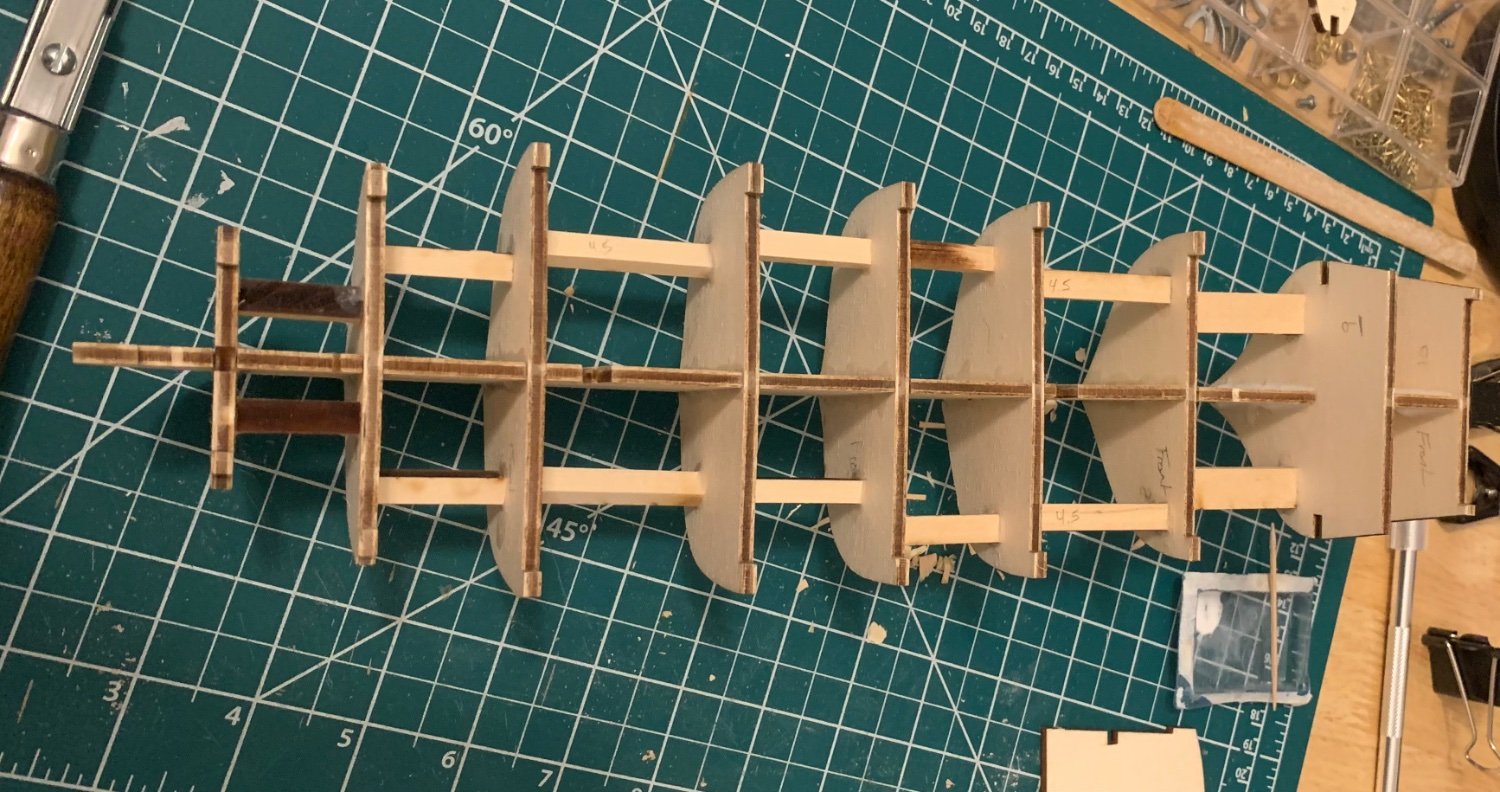
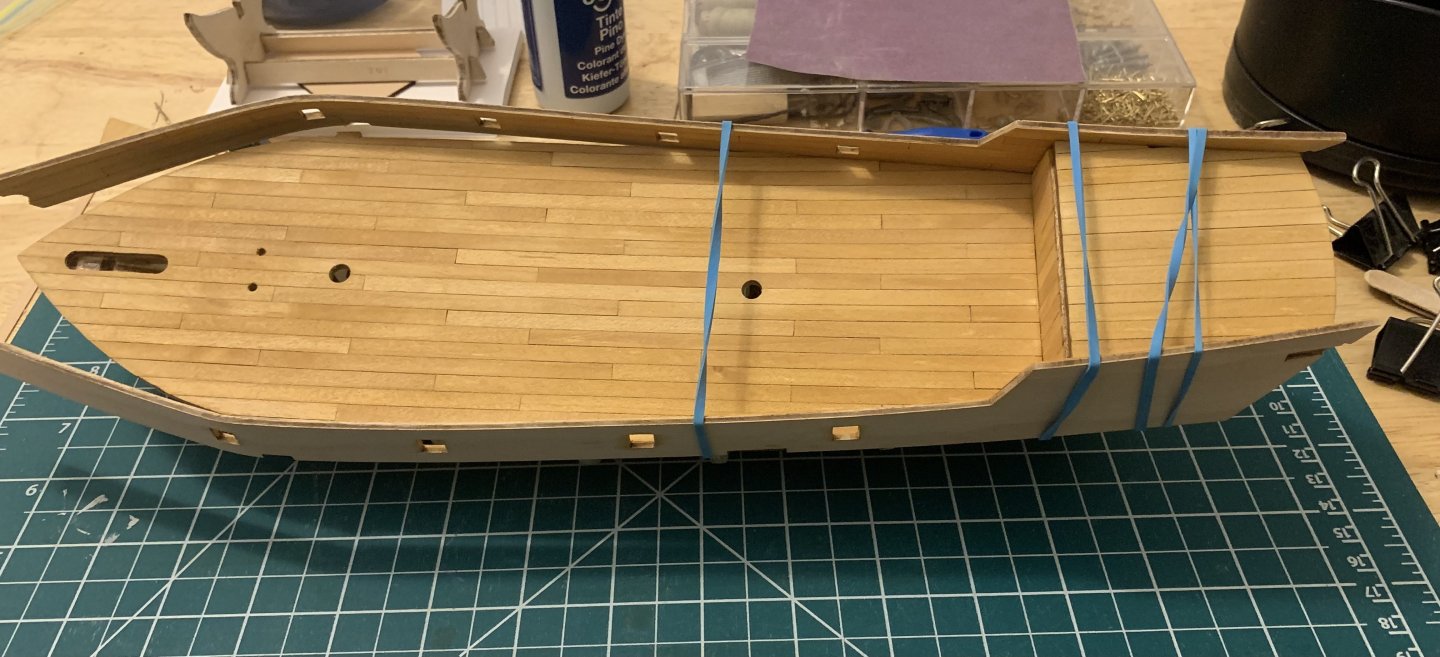
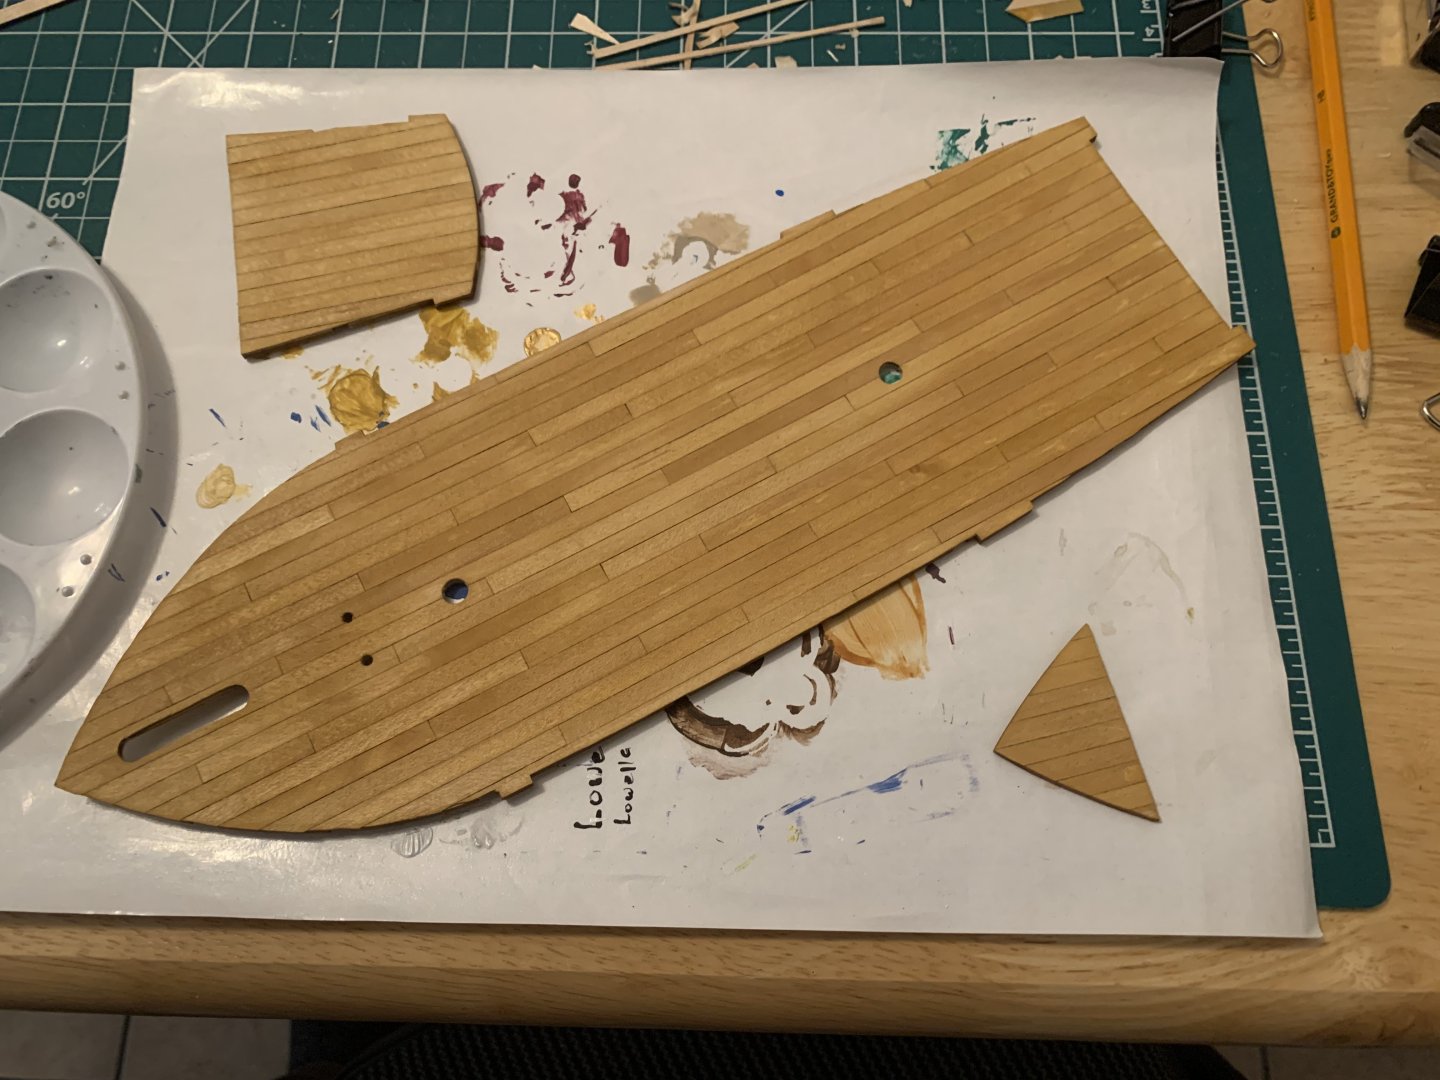
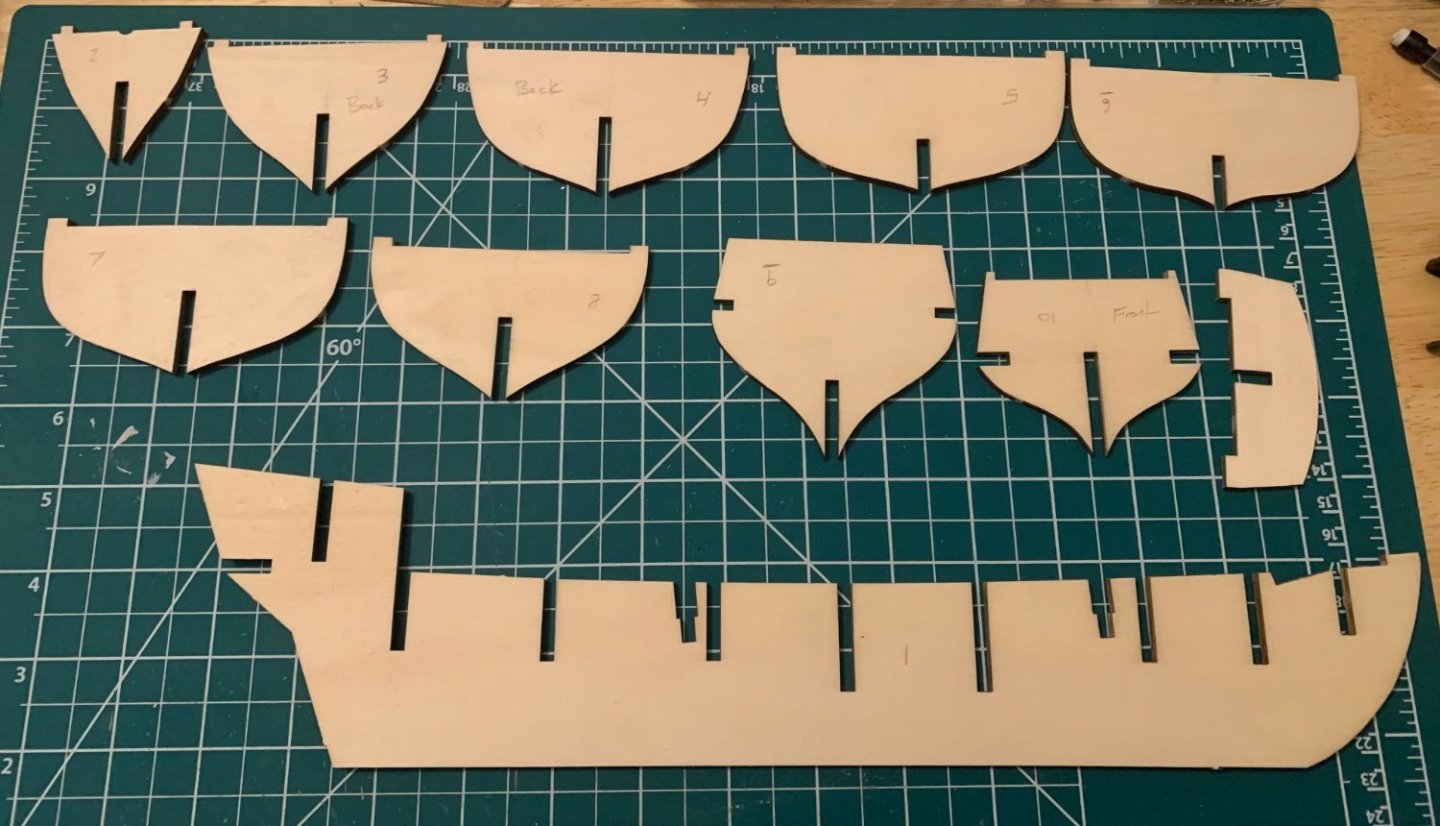
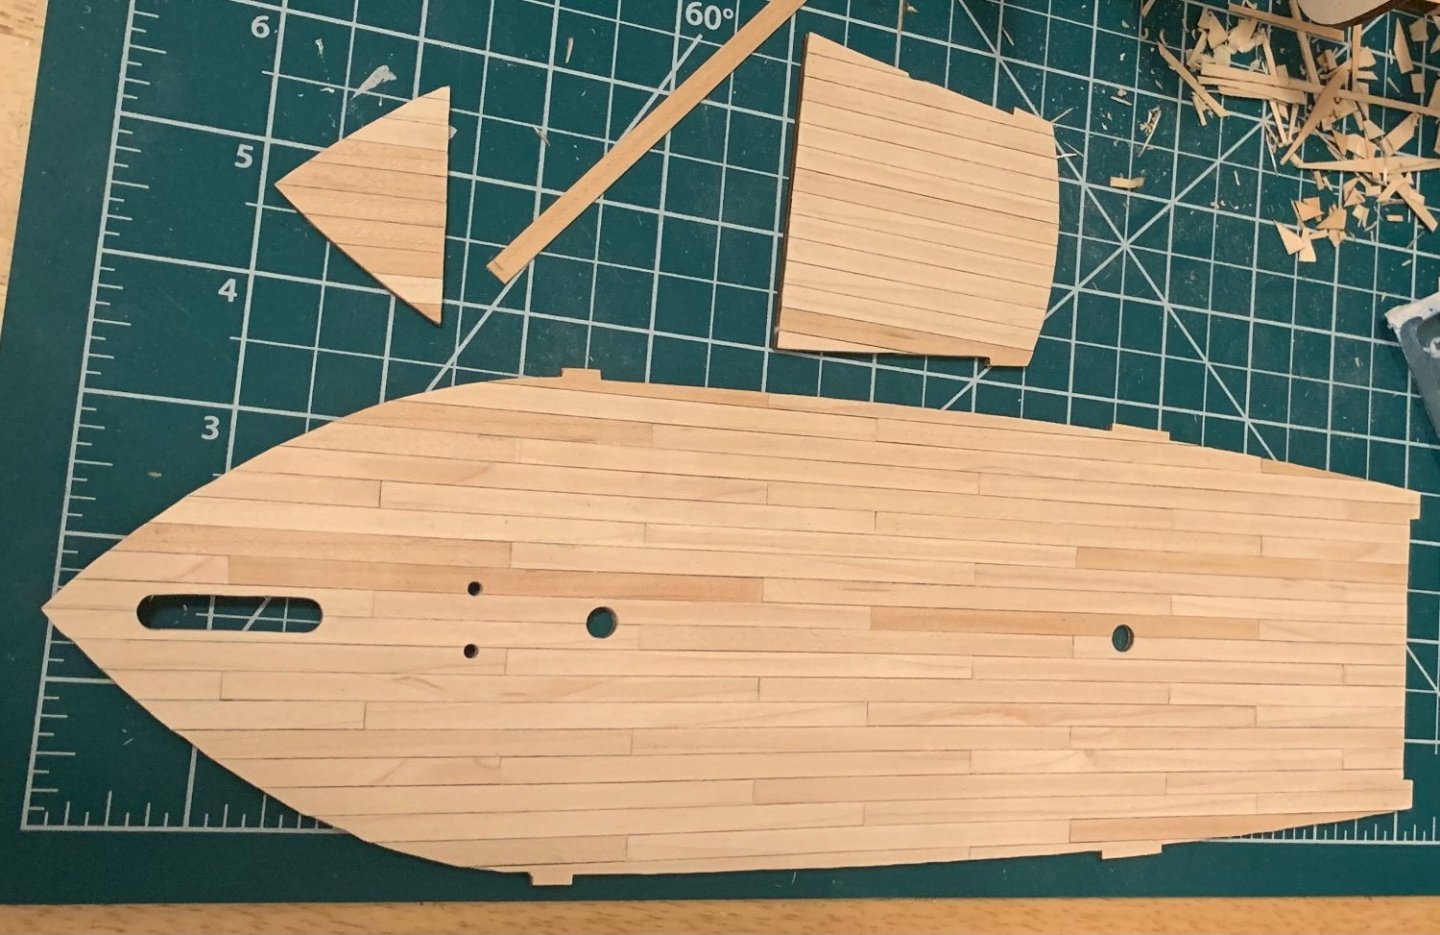
Here we go again, beginning the next model in a journey toward learning this wonderful craft. I’m also continuing the trend of modeling something a little bit bigger with every new entry. The Albatros by OcCre. An American schooner which I do not believe is meant to directly represent any specific, actual ship. Still, a good deal larger than the smack I just finished before Christmas. The first step was to open the packaging and cut some parts free. I have to admit that I was a bit disappointed by the plywood. Maybe I was just spoiled by the previous kits but I’d gotten used to the solid wood. That didn’t stop me from plowing ahead and directly into my first challenge of the build. The central spine of the ship was curved, rather severely by my inexpert estimation. So I looked across other build logs here and found out a couple of things. This isn’t an uncommon occurrence, and the most recommended correction is to use a jig of some type to hold the spine straight. I decided to take a different approach. I glued the first few frames in as squarely as I could and then proceeded to add additional bracing between them. Here, I have the deck temporarily in place to hold things square while the glue on those braces dry. Doing it this way was a slow, meticulous process but resulted in what I think was a very satisfactory result. They may not be perfectly even, but everything was square and the deck will be flat. The braces will ultimately be hidden anyway. Next came planking of my deck. The instructions recommended drawing lines on the planks every 100 mm. I opted for every 4 inches, which allowed me to divide that 4-inch span into 4 equal parts. Doing that would allow me to get a 3-butt shift pattern of 1-4-2-3. From there I could cut my “planks” into 4-inch lengths, colour the edges with graphite to simulate tar caulking, and start planking away. A little bit of sanding flat and I got my 3 deck pieces ready to go. I’d also skipped the wall where the cabin door will eventually go, so planked that the same way. Which brings me to where I stand now. The next step in the instructions is to glue the main deck in place, but I’m considering staining it first. The big decision there will be to use the “oak” or the “pine” stain. I’m not sure which would have been the more typical wood to use, so I’ll probably end up staining a few scraps to see which I like better before committing to the actual piece. Im excited to have a ship to work on again and I’m ready to jump into this next adventure.


-
Thank you all for the kind words and encouragement along the way. For posterity, the link to the album can be found here and forevermore in my signature. I've already begun production on the Albatros and plan to have that log officially begun in the next couple of days.
- 38 replies
-
- 3
-
-
- Model Shipways
- Shipwright Series
- (and 2 more)
-
WizardOfOs reacted to a post in a topic:
Muscongus Bay Lobster Smack by WizardOfOs - FINISHED - Model Shipways - 1:24
-
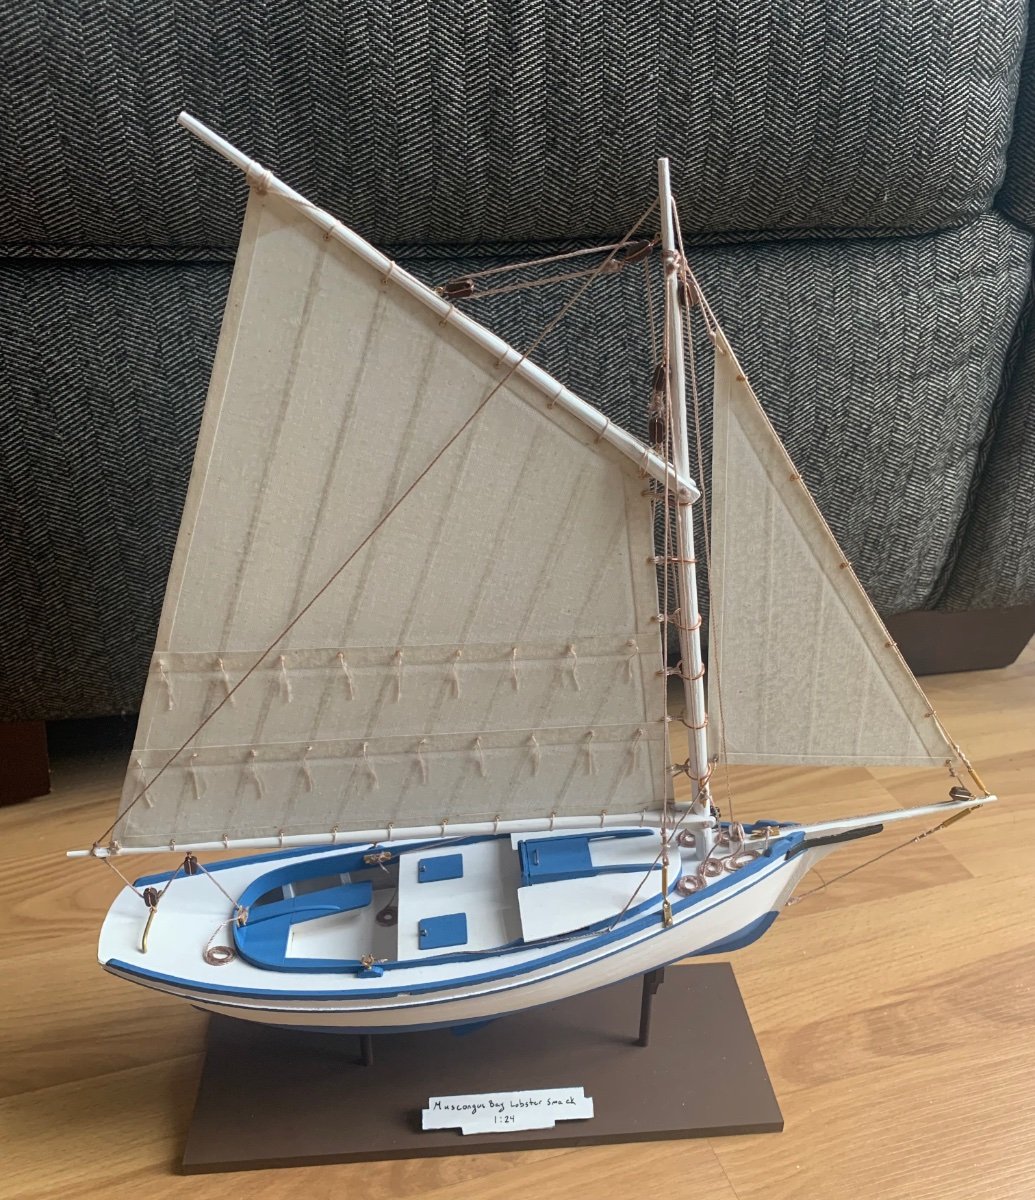
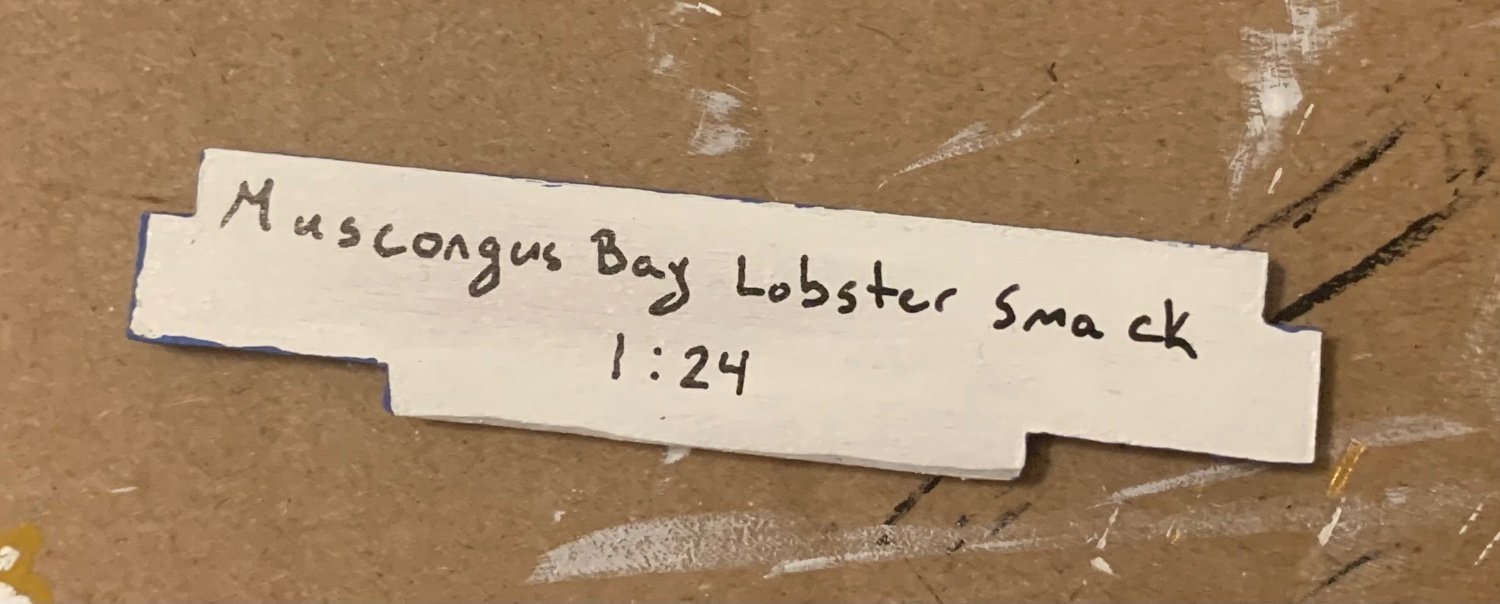
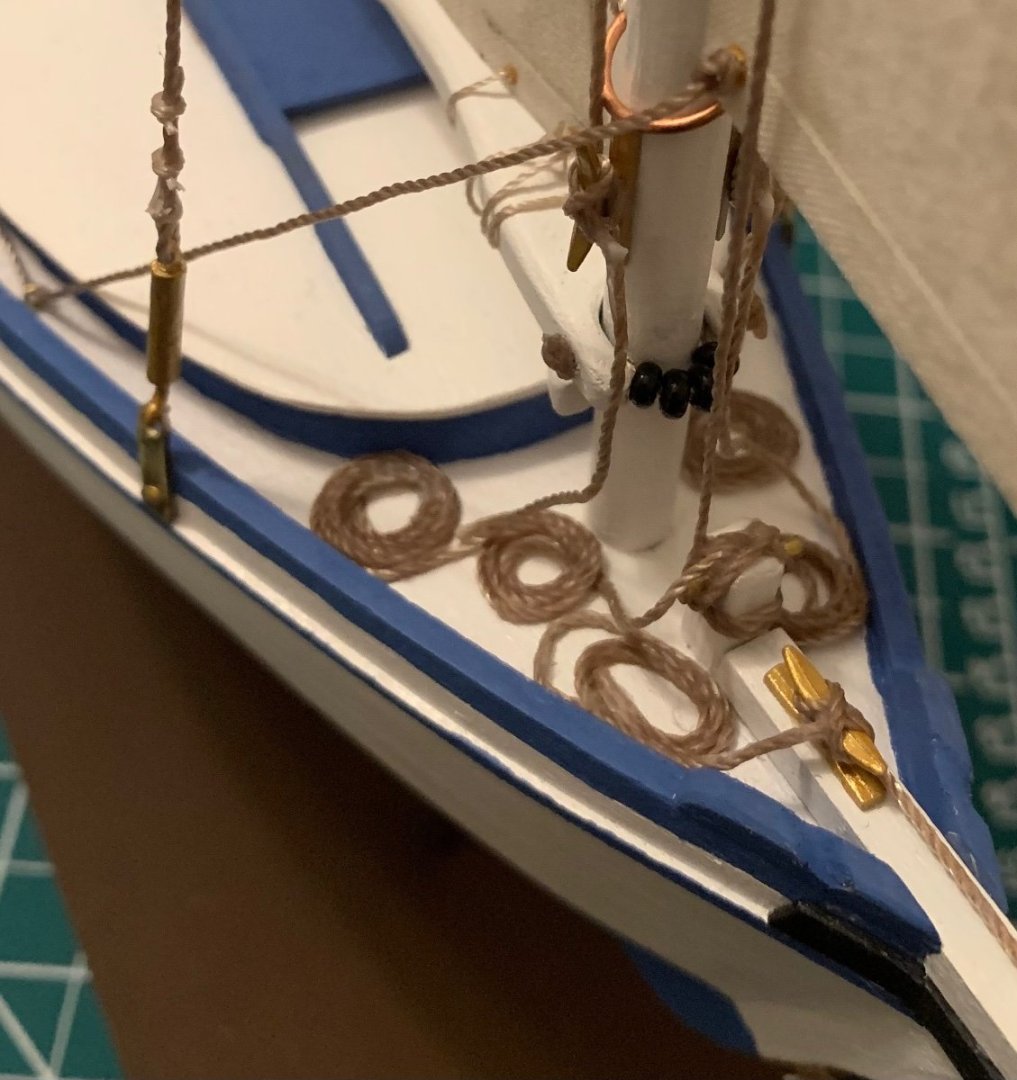
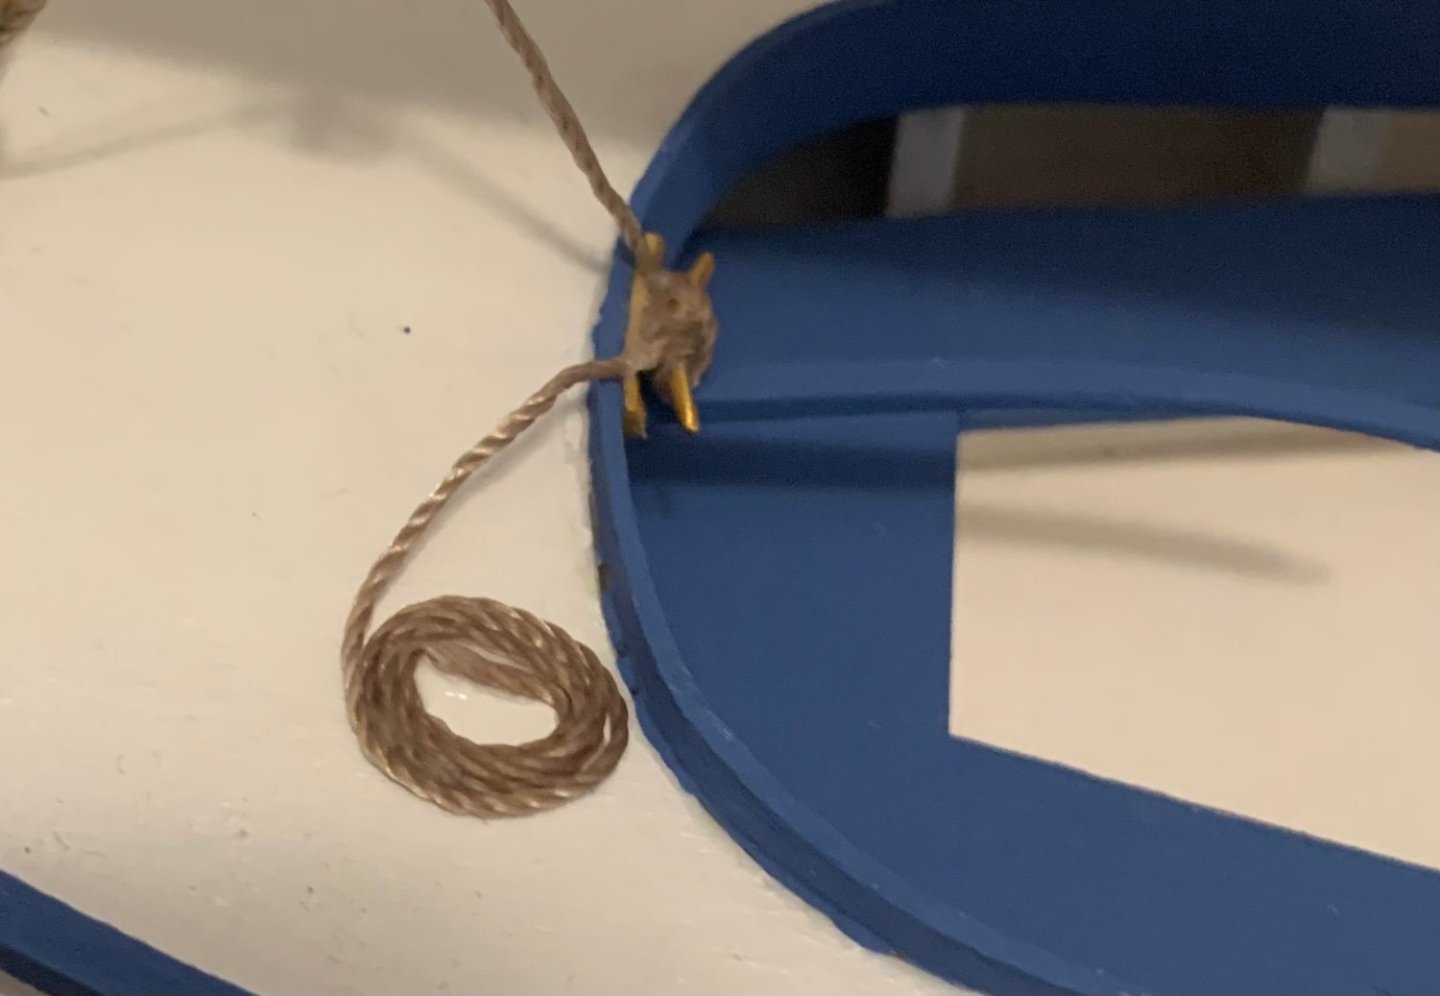
I’ve finished! Actually, I finished close to a month ago but have been a little busy elsewhere and never got around to posting about it. Here is a quick summary of the last few steps as I remember them. I got the mast into place and began securing lines and blocks to hold it there. What may be evident in these photos is that I immediately trimmed the excess line off at the cleats. Not something I was happy about when I noticed my error later on. By the time I realized, only a couple of lines remained for me to do “correctly.” So I ended up making several rope coils with a bit of free line still attached, then carefully glued them to the cleats. The effect is similar to that advised in the instructions. There turned out to be a lot of needed coils. I also got the name plate painted up and ready. Once that was glued in place I was finished. Which brings me to the end of the 3-kit learner set. It was a fantastic experience and I’m very pleased with myself for taking on the challenge, learning some new skills, and getting through to the end of the project. All that remains is to take some higher quality photos of the Smack and upload them as an album. I’ll likely get to that in the next week or so before the Holiday and add a link here once I’ve done so. What comes next? I already have a new project in hand. The Albatros by Occre. My plan is to leave it safely in its box until the new year. I need to finish up writing the first draft of that troublesome dissertation before I can allow myself to be distracted by something else.


- 38 replies
-
- 6
-

-
-
- Model Shipways
- Shipwright Series
- (and 2 more)
-
Wonderful project and glad to see Griffin's Pond is getting a new model again. I've always enjoyed seeing the previous one there when walking through the Gardens.
-
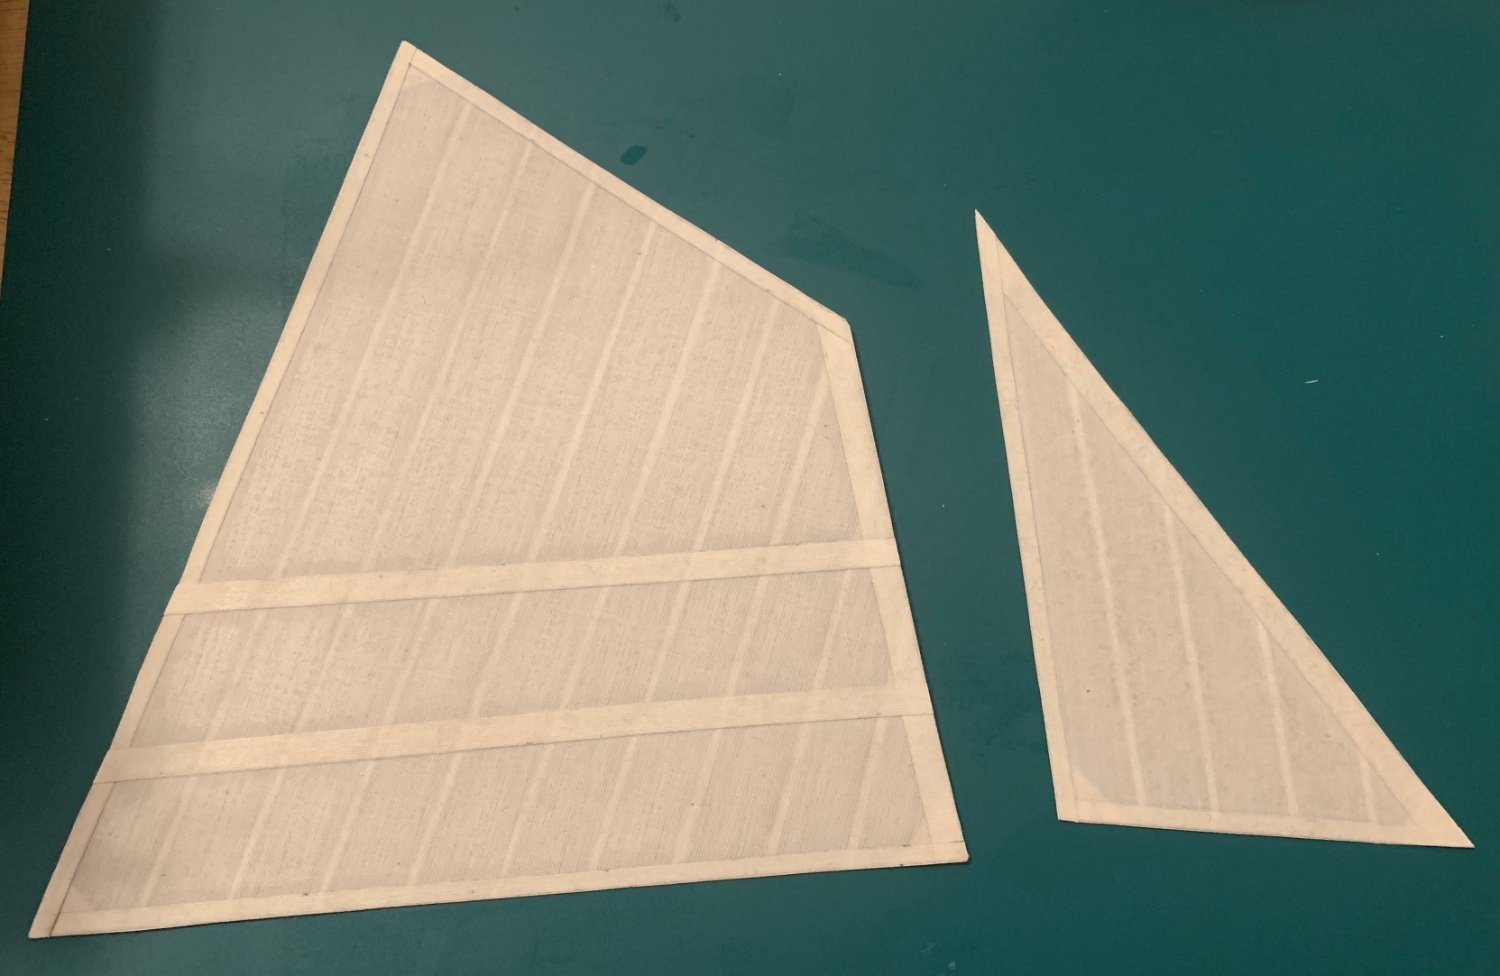
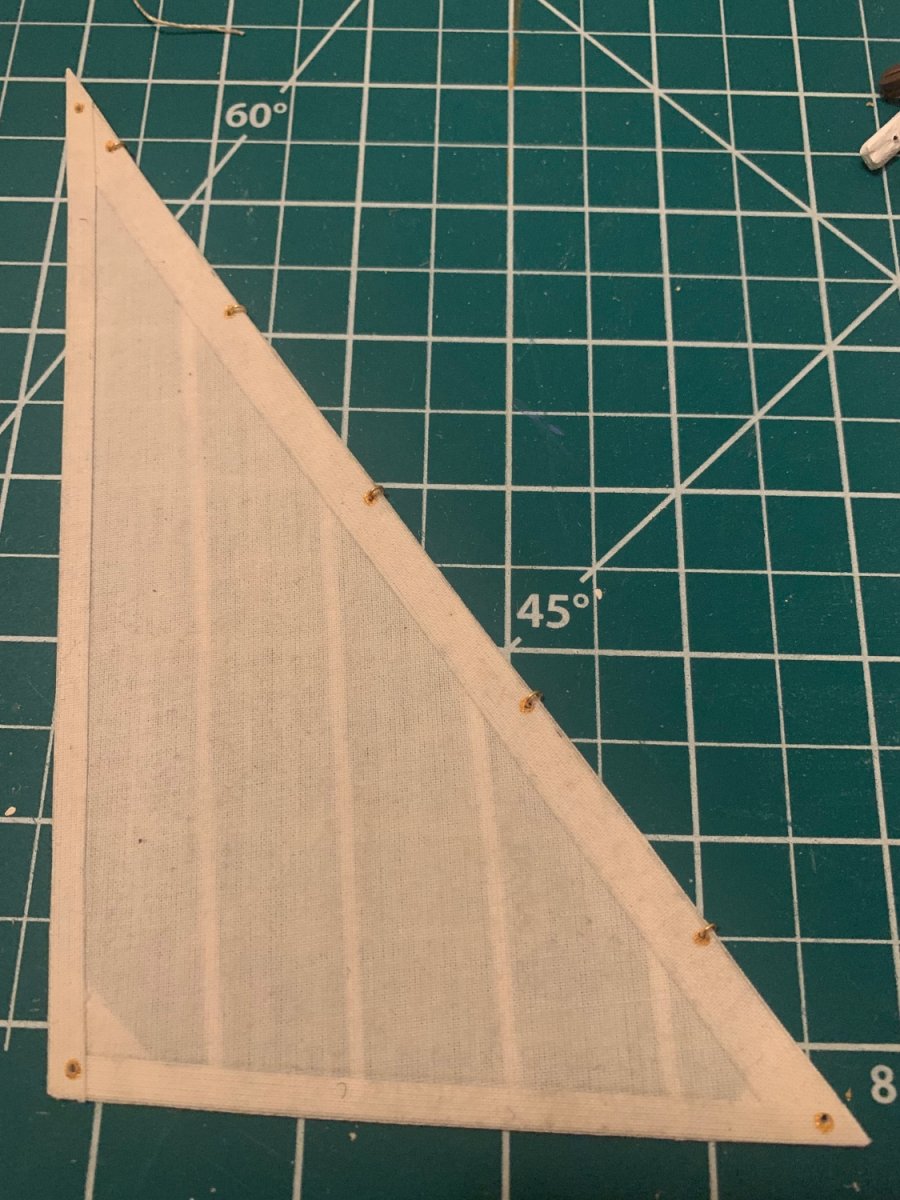
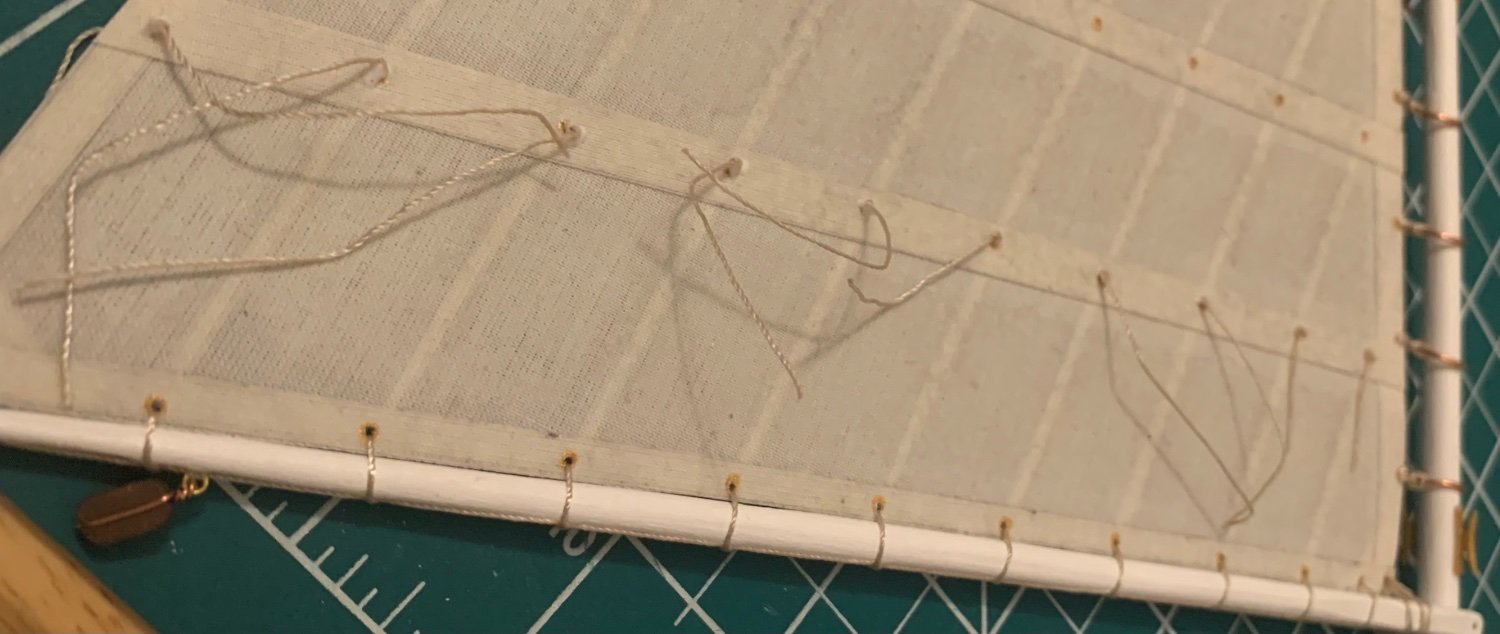
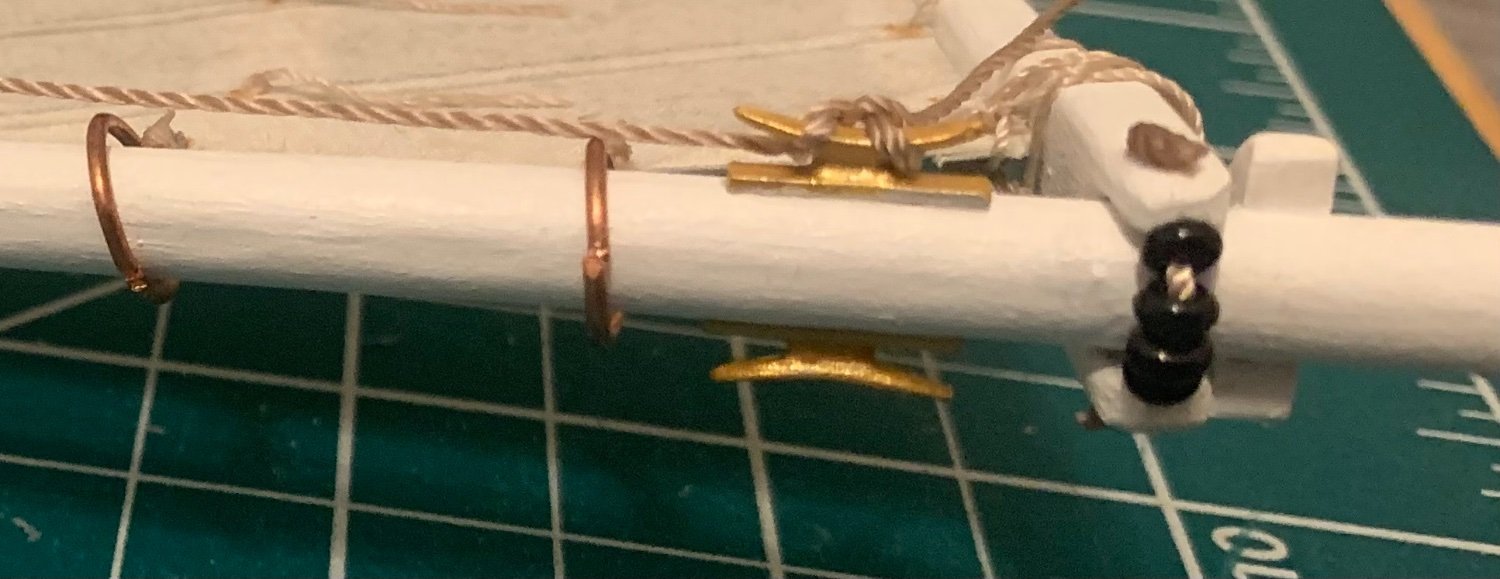
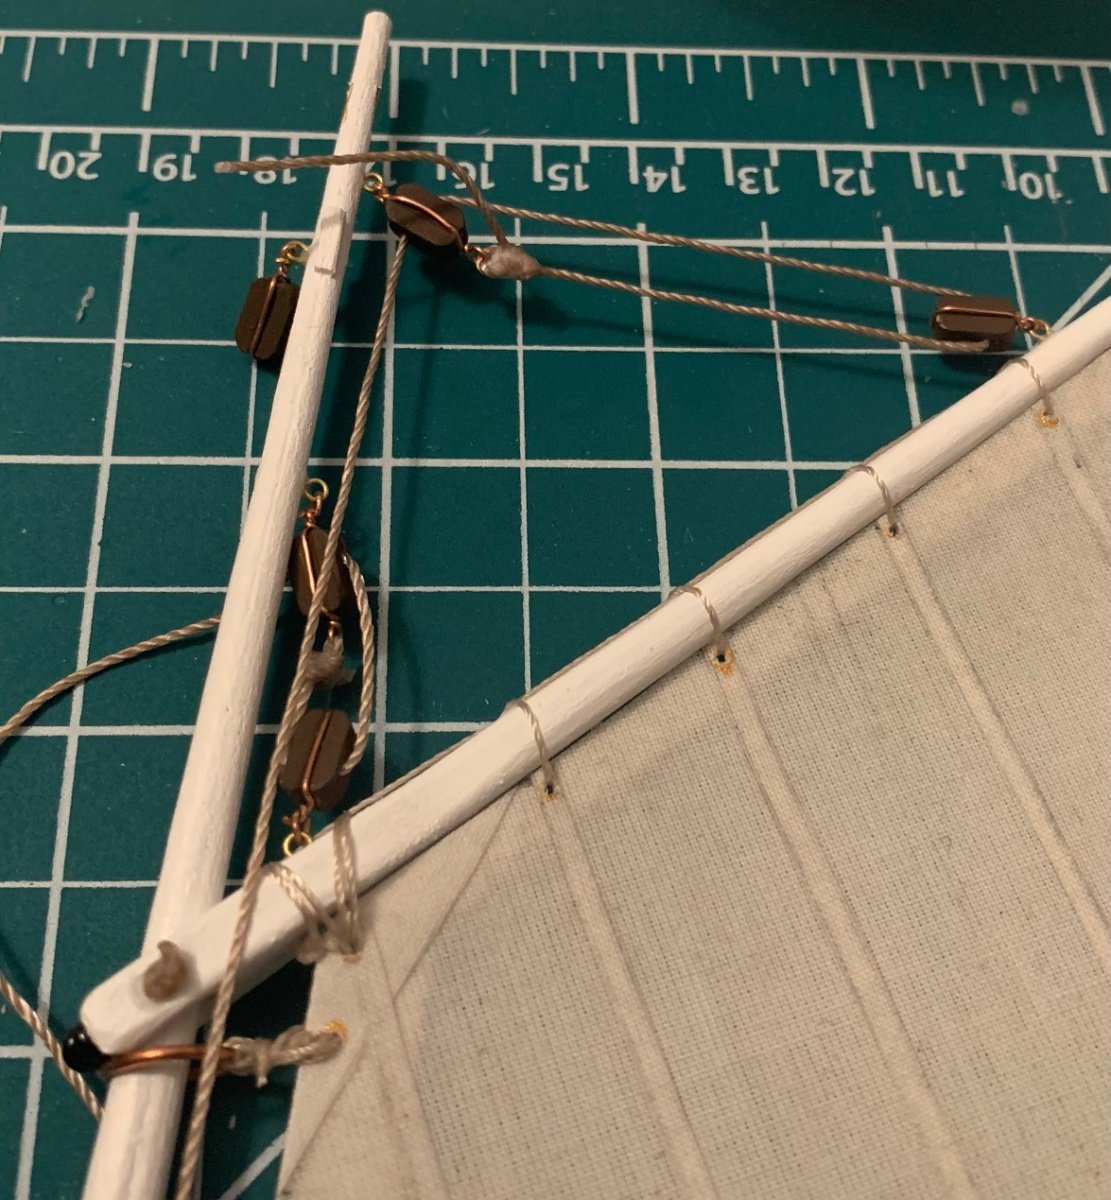
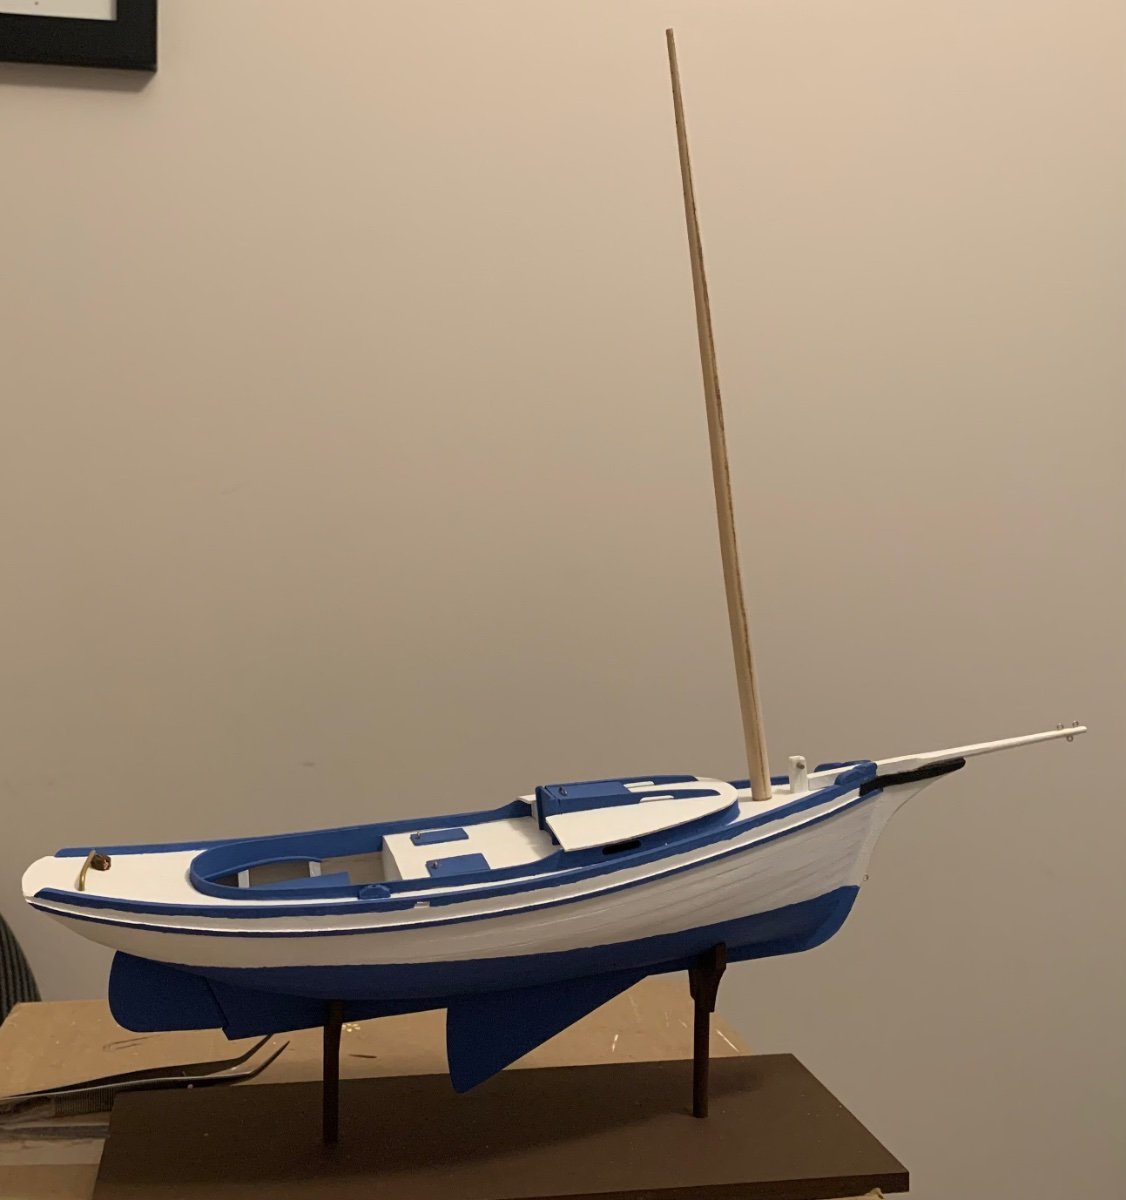
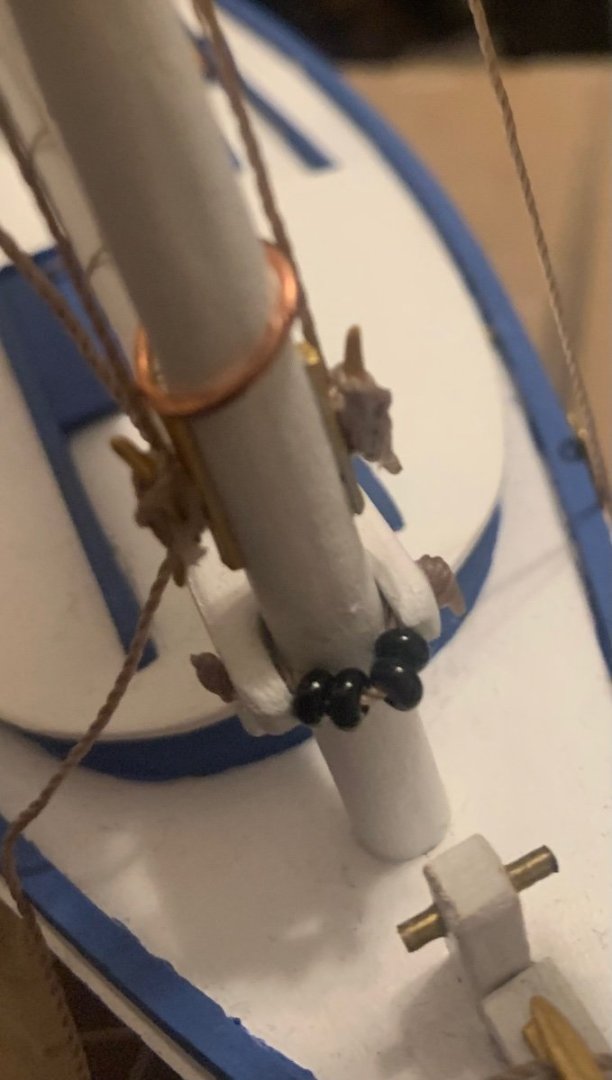
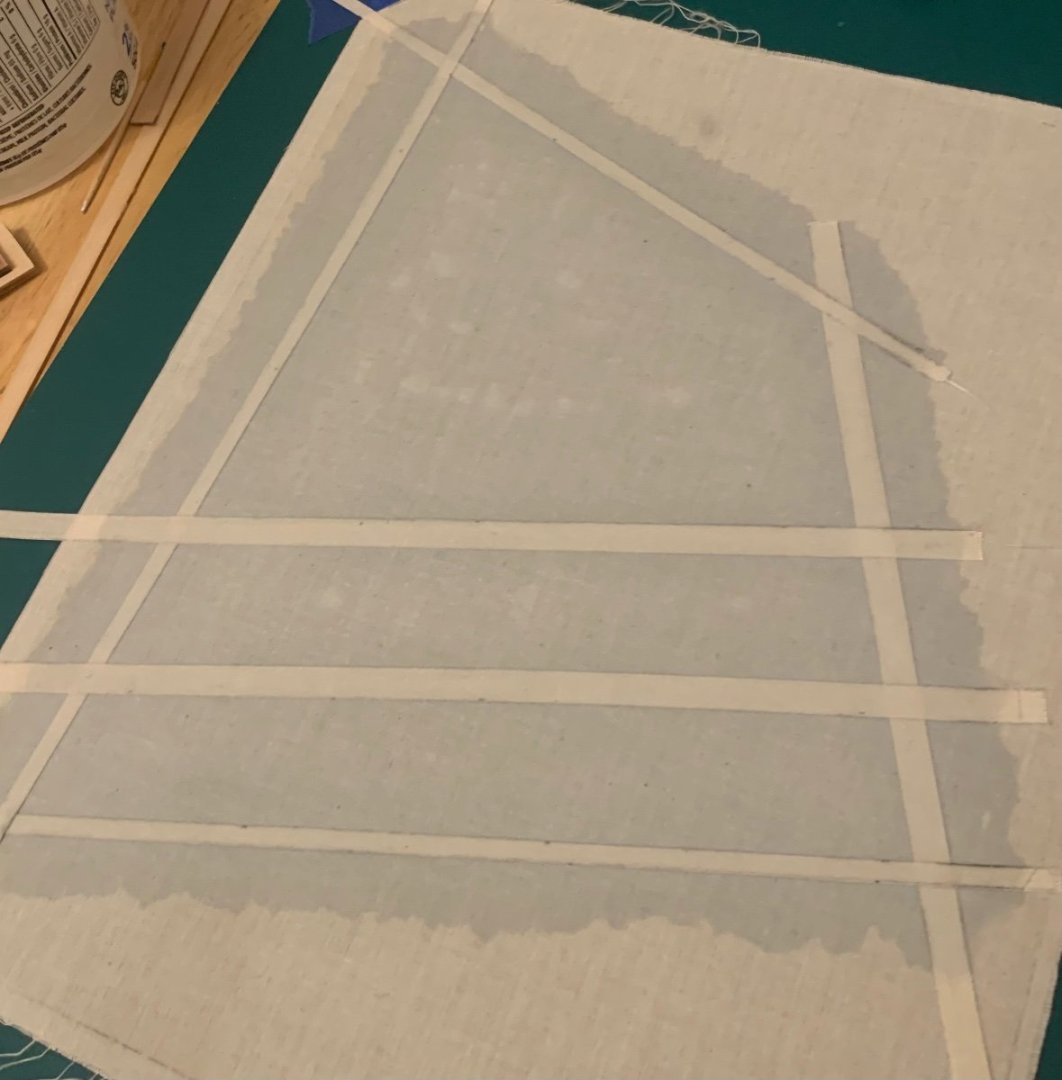
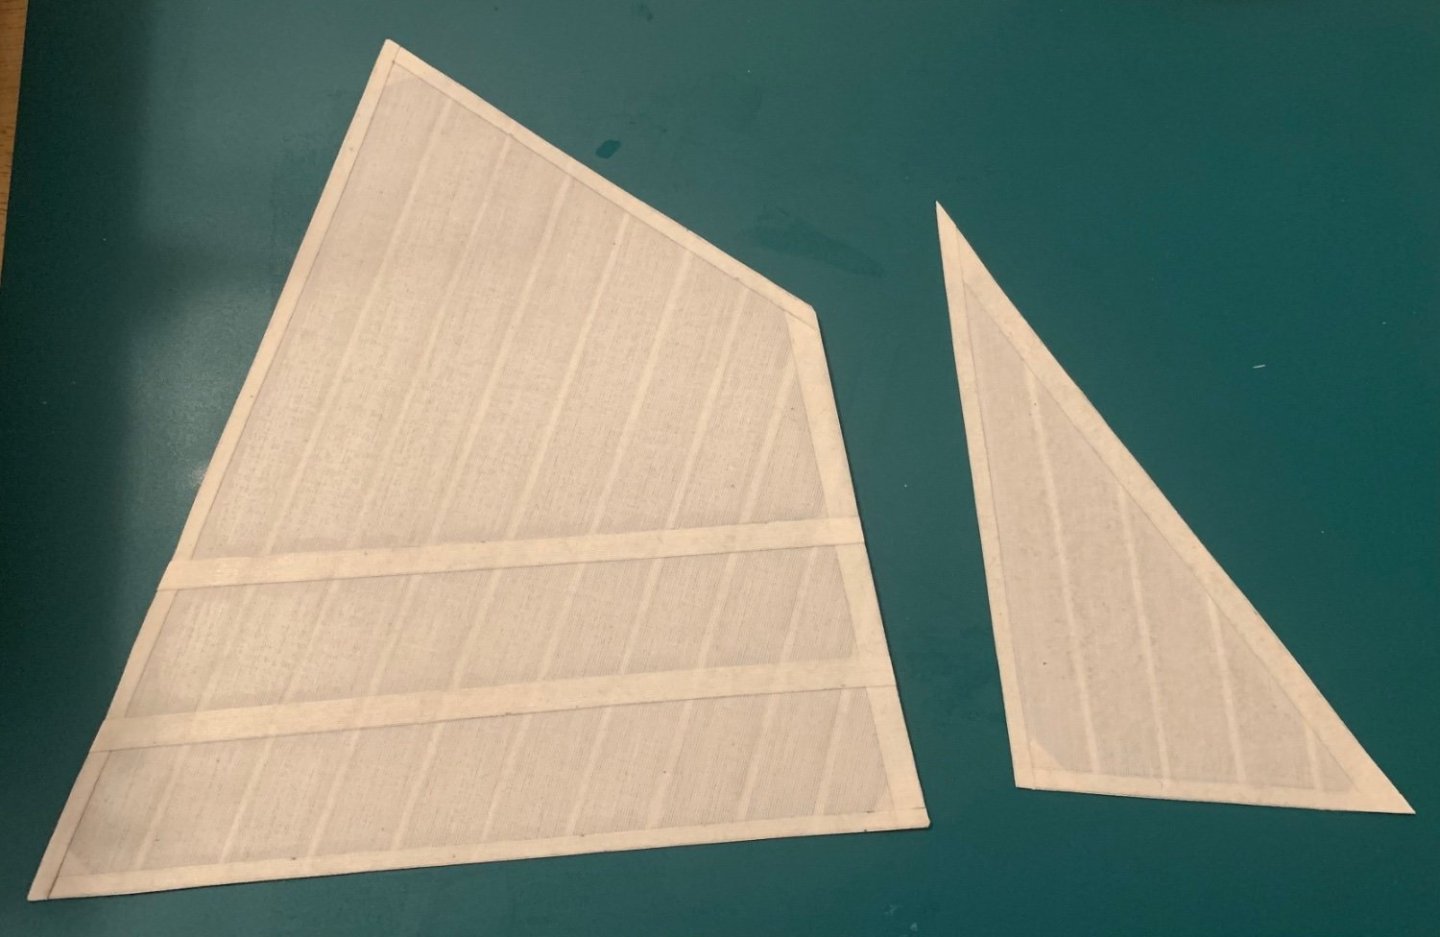
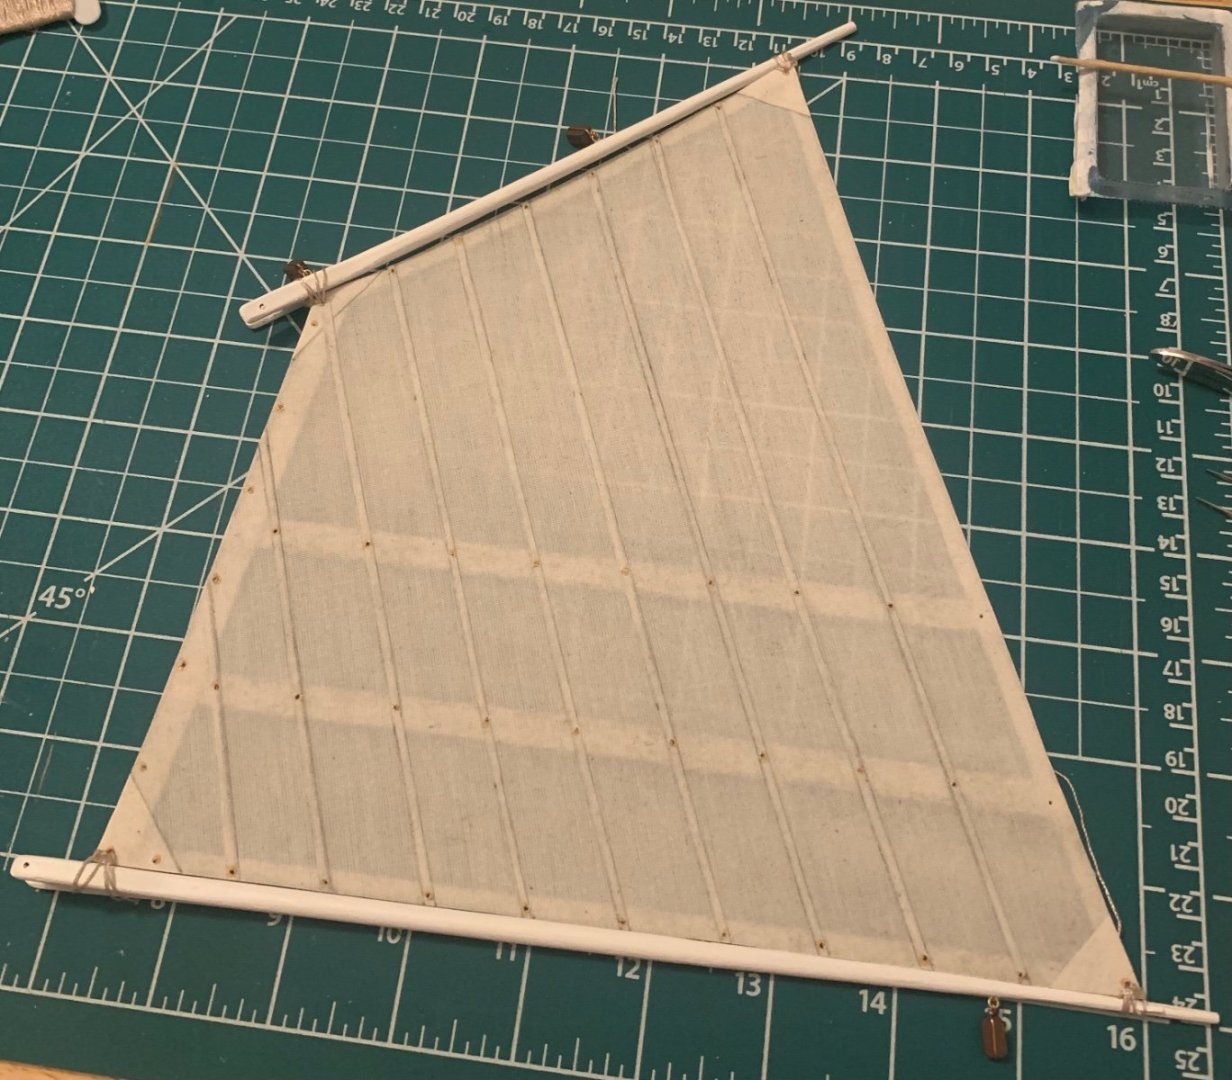
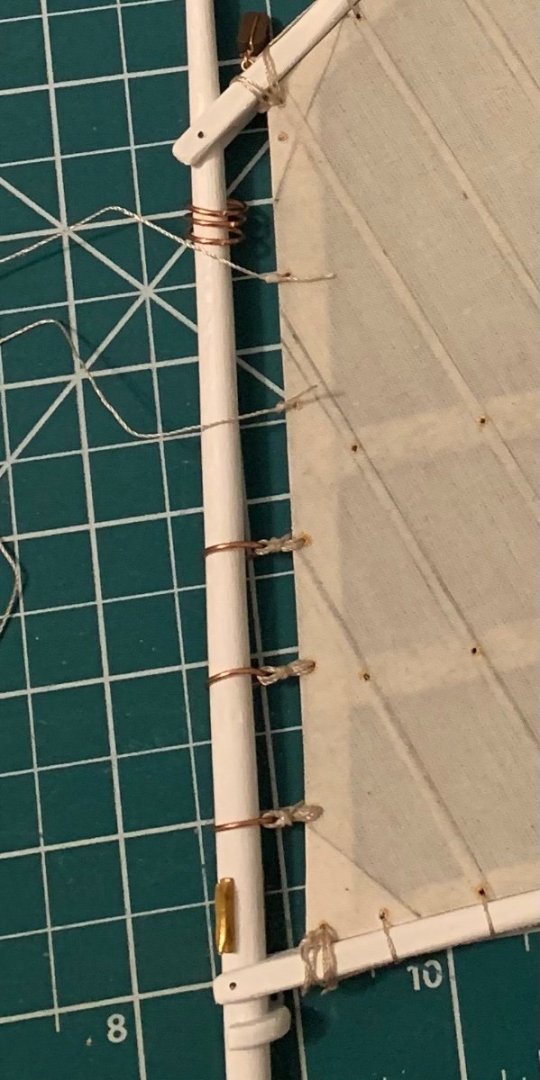
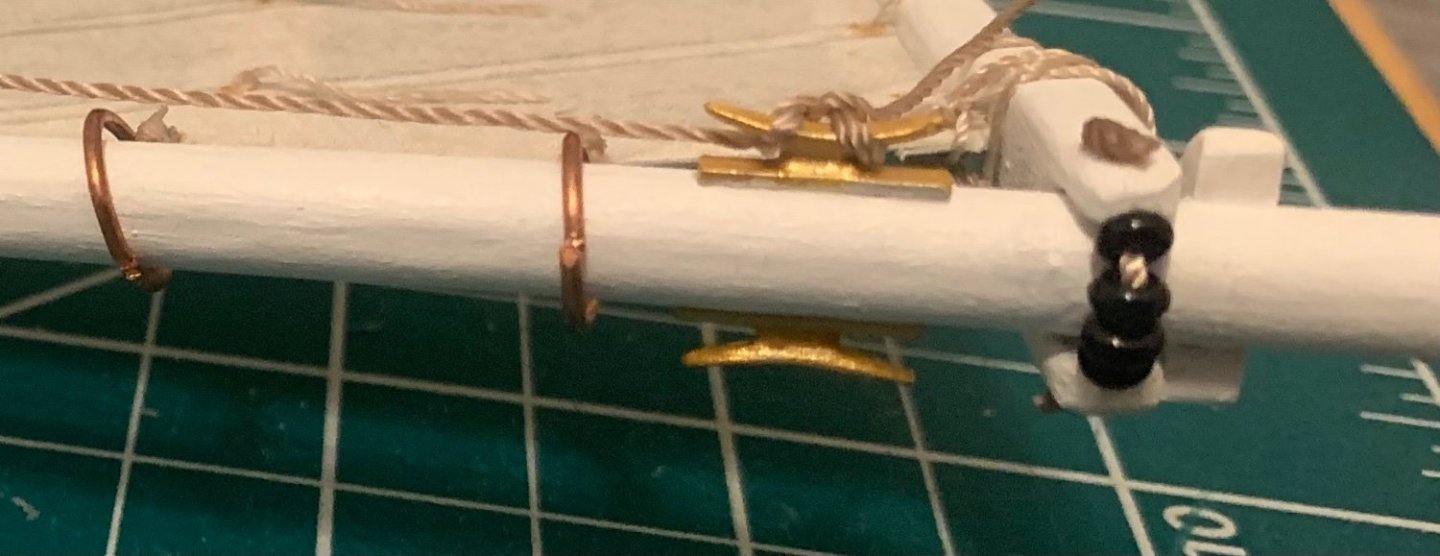
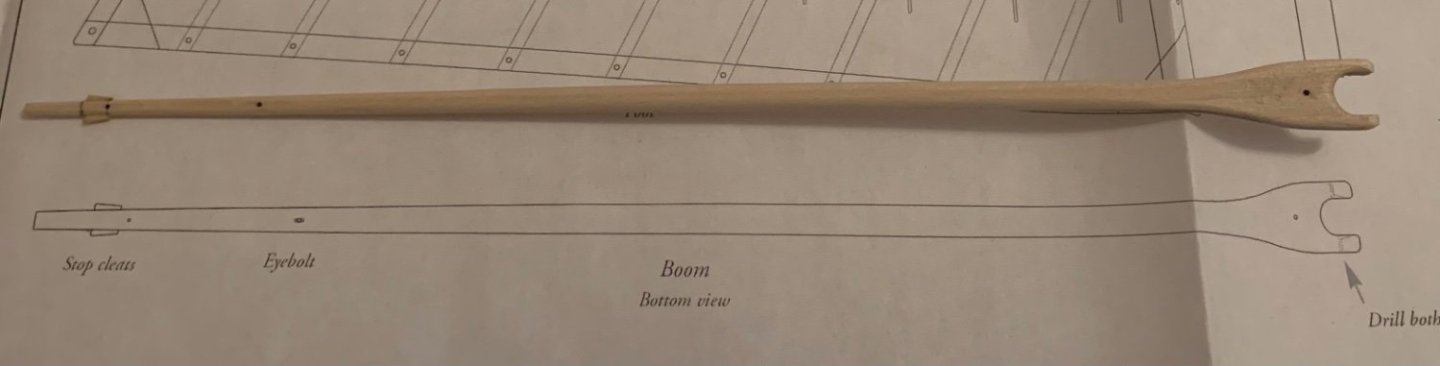
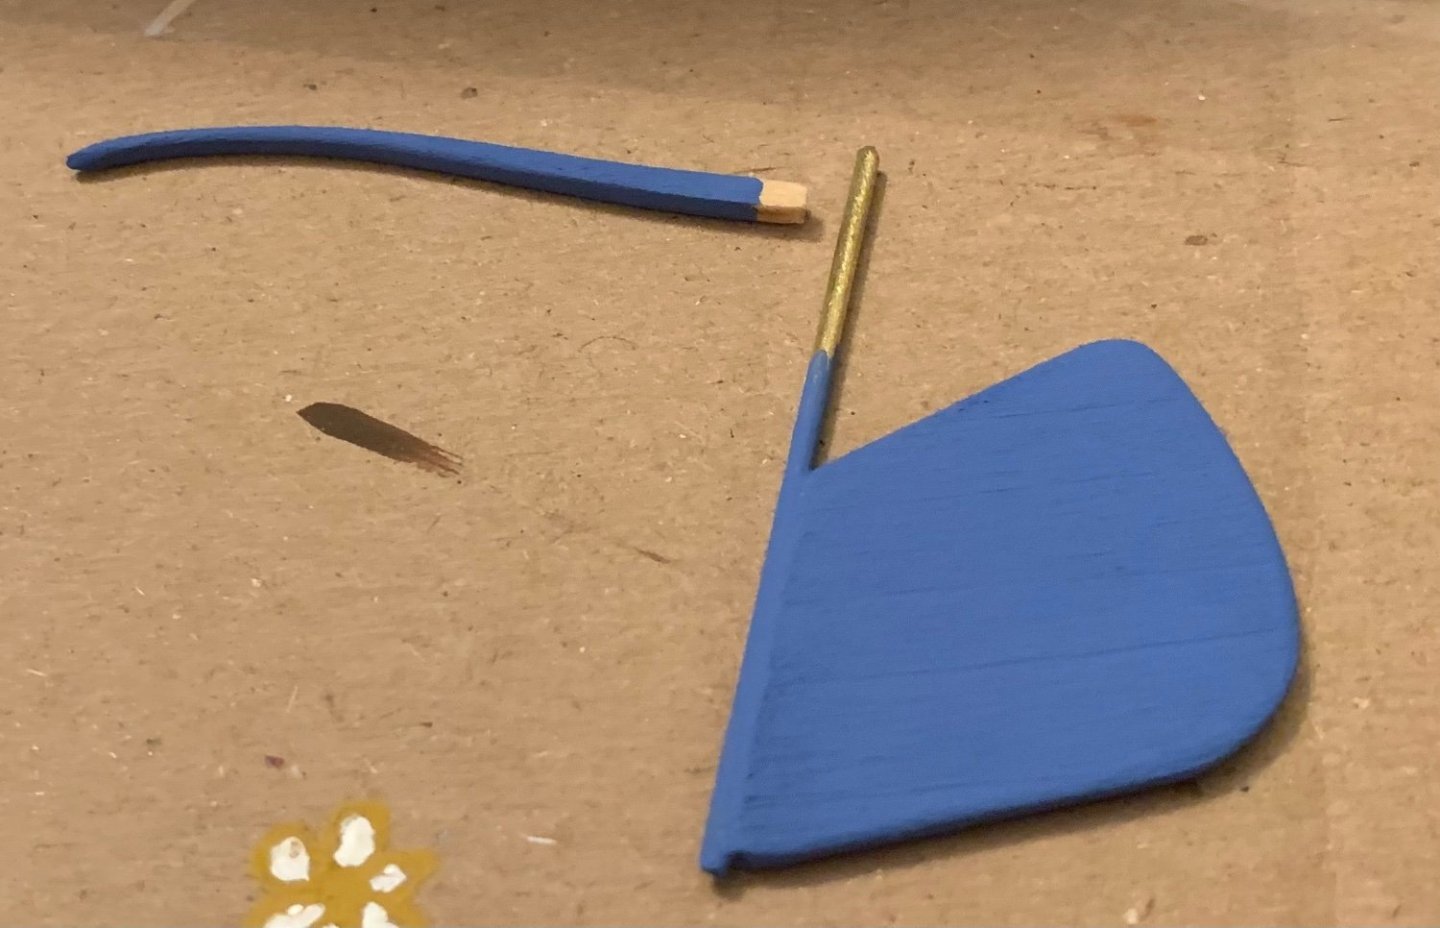
How could things be “sailing along smoothly” without any sails? Let’s fix that. I traced the outline of the sail from the schematic to the cloth and glued all the reenforcing strips in place. What came out were two very nice looking sails. I’m much happier with these than I was with the sail on the Pram. Turns out practice really does make you better at things. I used dots of gold paint to replicate grommets again and drilled holes as instructed. Then secured the main sail to the boom and gaff. While they’re difficult to see here, I also attached the small brass rings to the jib sail. It’s been patiently set aside until I get everything else ready for it. The main sail was attached to the copper rings on the mast. A job I really enjoyed. The knots look good to my eye and I’m proud of them. Next the sail was fully lashed to the gaff and boom. I made a small error in that one of my lashing lines was too short so I couldn’t tie it off at the end. I managed to hide it so no one will ever know but me, but if someone looks close enough they may be able to spot the oddity that the line just ends without any kind of knot securing it. I also added all the reef points by passing them through the sail and tying knots on either side. Once those were all in place I cut them to length and glued them down in a way I hope looks like they are hanging naturally. The perfectionist in me wasn’t happy with just tying the gaff and boom to the mast with rope so I got some seed beads. They’re 11/1 black acrylic, about 3mm wide. I found four fit nicely for the gaff but only three fit at the boom. As a lesson learned, this would have been much easier to assemble had I done it before I had tied the sail to the mast. It was a lot of painful fiddling in the order I chose. Most recently I’ve started to run some lines. I’m anxious to get the mast stood up and secured into place. Shouldn’t be too far from complete now. Oh! I also came to the realization that I hadn’t prepared a name plate for this model yet. Luckily I still had a good sized frame left over from the Dory. I’ll need to shape it up some and paint it. Meanwhile, I’ve now got about 145 pages written. Certainly not done, but progress on two fronts. The model is absolutely going to get finished first.


- 38 replies
-
- 6
-
-
- Model Shipways
- Shipwright Series
- (and 2 more)
-
Thanks for the support on writing, Jacques and Druxey. There are always so many more tempting things to do than write. I'm working in pharmacology. My project has been to determine the biochemical mechanism of action of a naturally derived cytotoxic agent. Basically, I have a "new" chemical which we could collect from bacteria, and we knew that chemical kills cancer cells, but we didn't know how it was doing it. I've been working to try to find that "how" and use the information to see if there is any potential to develop the chemical into a useful drug.
- 38 replies
-
- 1
-
-
- Model Shipways
- Shipwright Series
- (and 2 more)
-
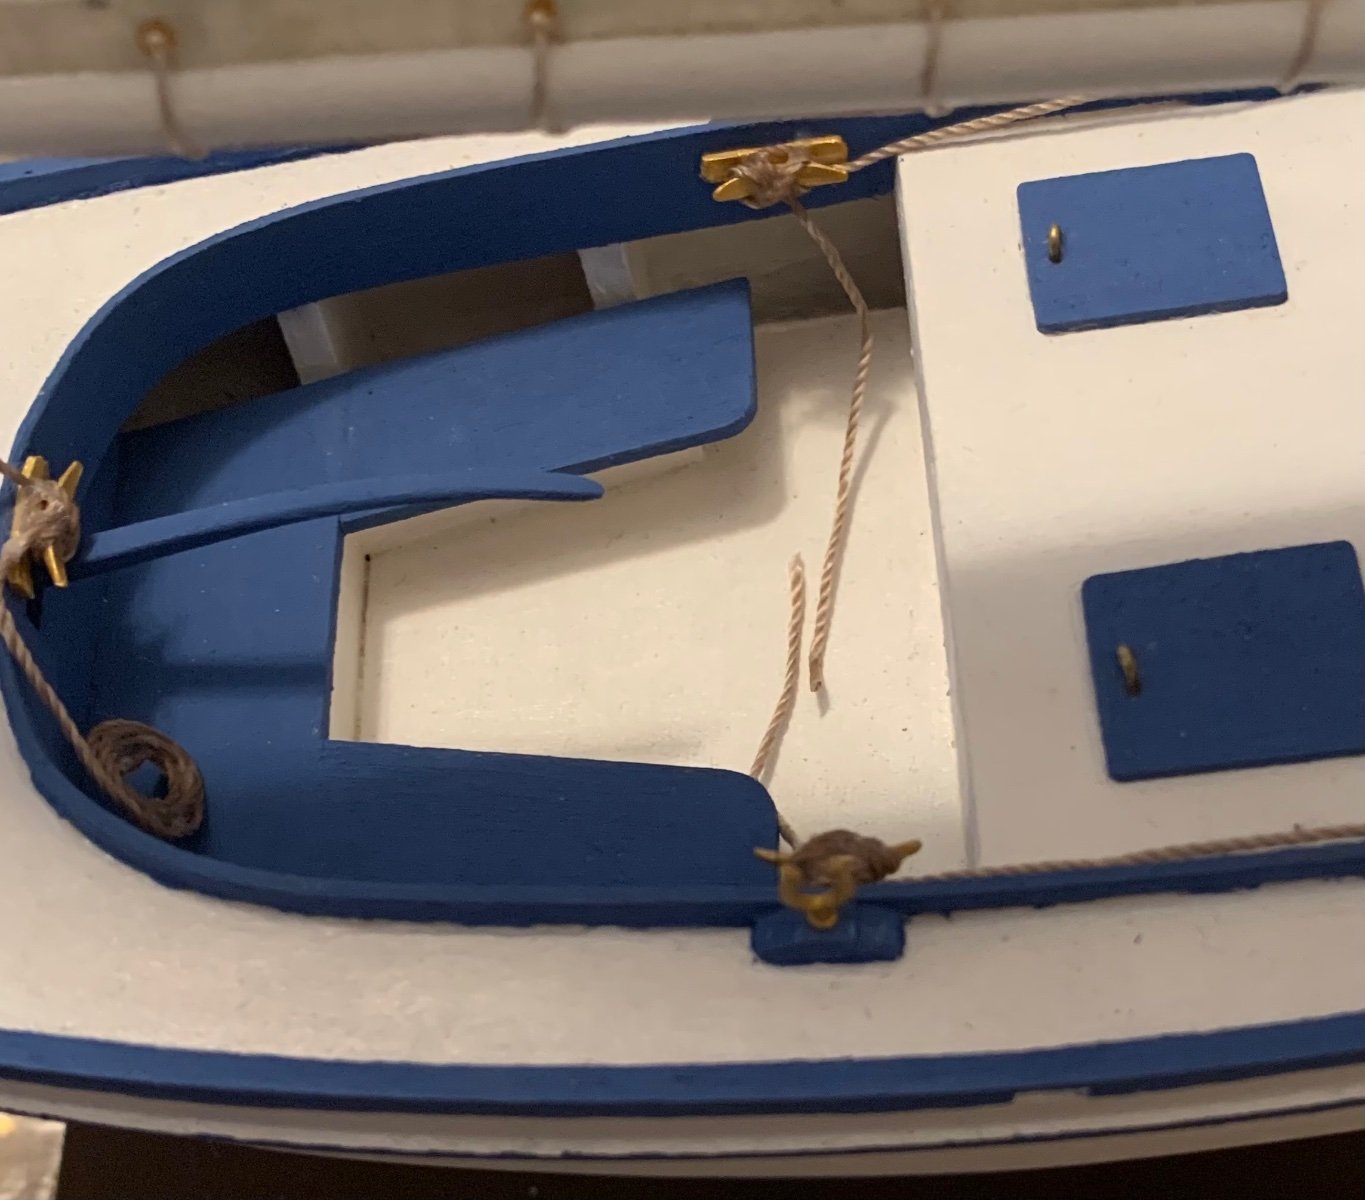
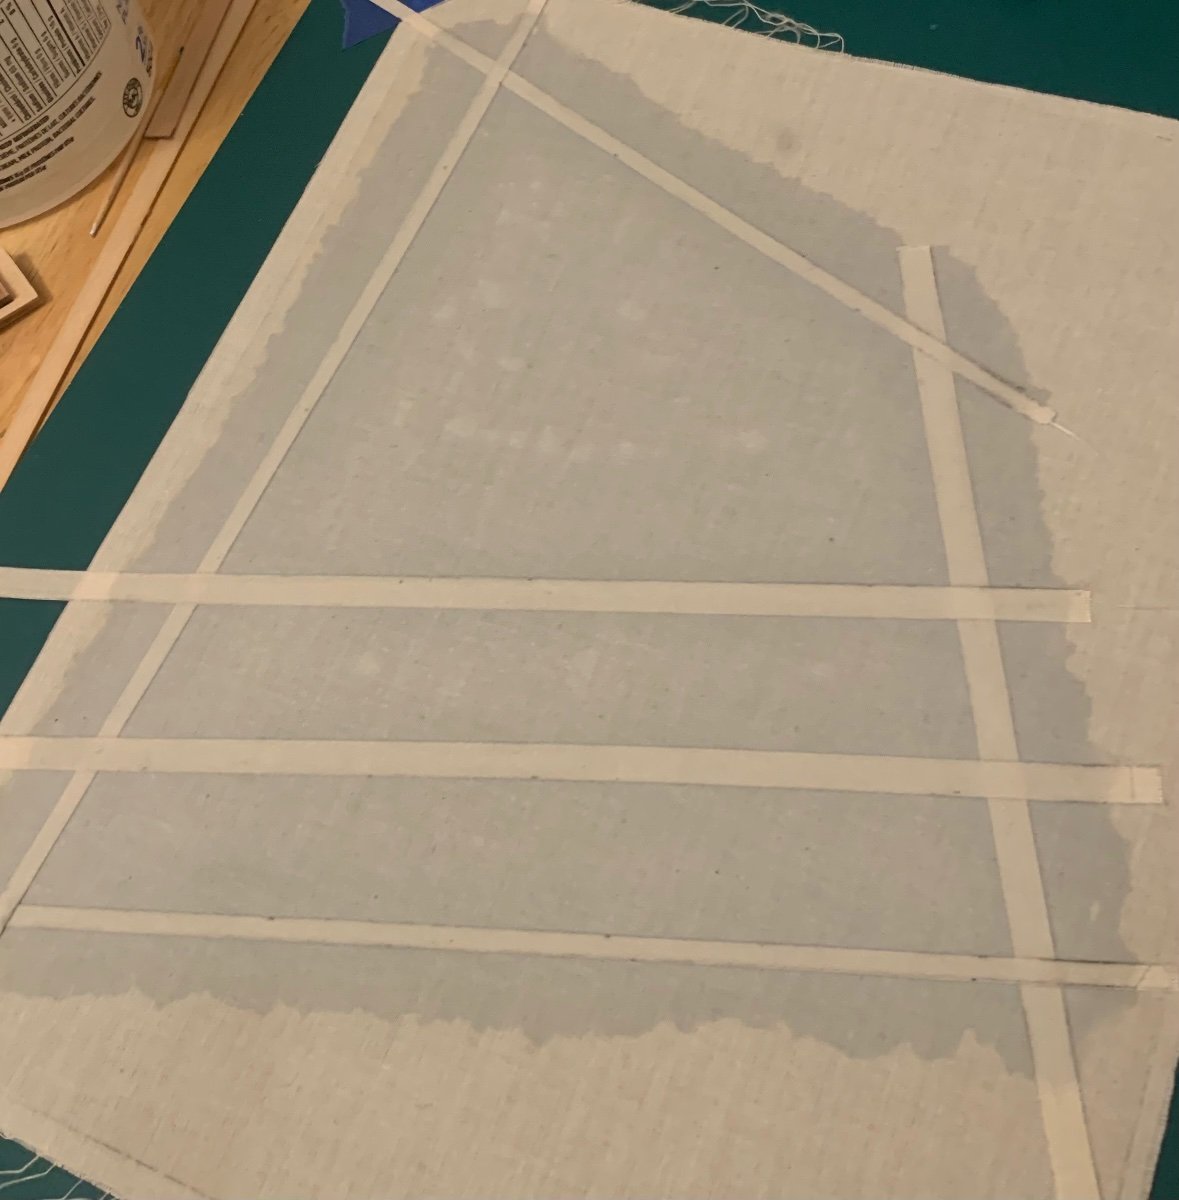
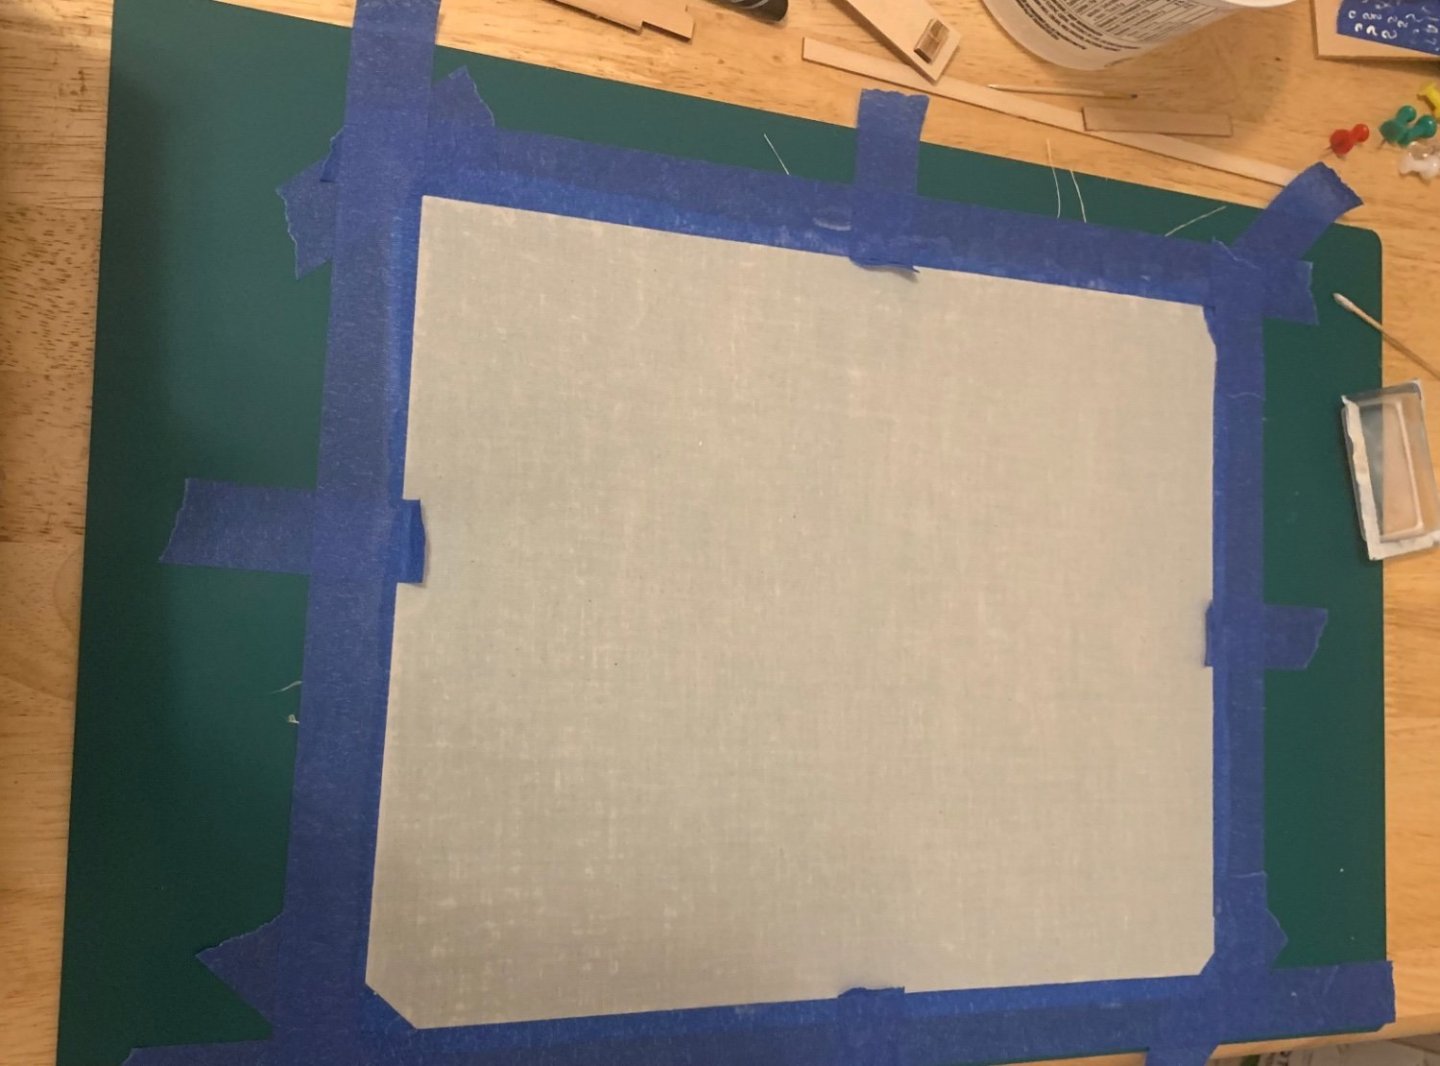
Thanks Druxey, I’m learning as much as I can as I go along. Some excellent instruction and tips are to be found from you and elsewhere on MSW. Outside of model building, in that dreaded world of real life, things have gotten very busy for me. I knew it was coming but that doesn’t make it any more fun. As a result, I’m spending 8-10 hours a day sitting in front of a computer and attempting to write a dissertation. That doesn’t leave much time of mental energy for this, thus, progress has been slow. Glueing and nailing the chainplates went well, and I couldn’t be more proud of them. Slight flaws and all. I also got onto strapping blocks and attaching them to eye bolts. Painting some of the white metal parts also provided a lesson or two. I stuck the cleats to some tape and painted them gold with acrylic, but when I pulled them back up the paint partially peeled back off the metal. A few touch ups later and it all worked out. Next up comes the sail. The sheet of material I received in the kit was 12” by 18.5” so I cut that into a 12”x10” and a 12”x8.5” piece. I’ve just soaked the larger one in dilute glue and it can dry over night. That brings me to the end of the update. No fun ship photos because I haven’t seen the Harbour (or natural light) for days. I do have a meme though, are memes allowed?


- 38 replies
-
- 4
-
-
- Model Shipways
- Shipwright Series
- (and 2 more)
-
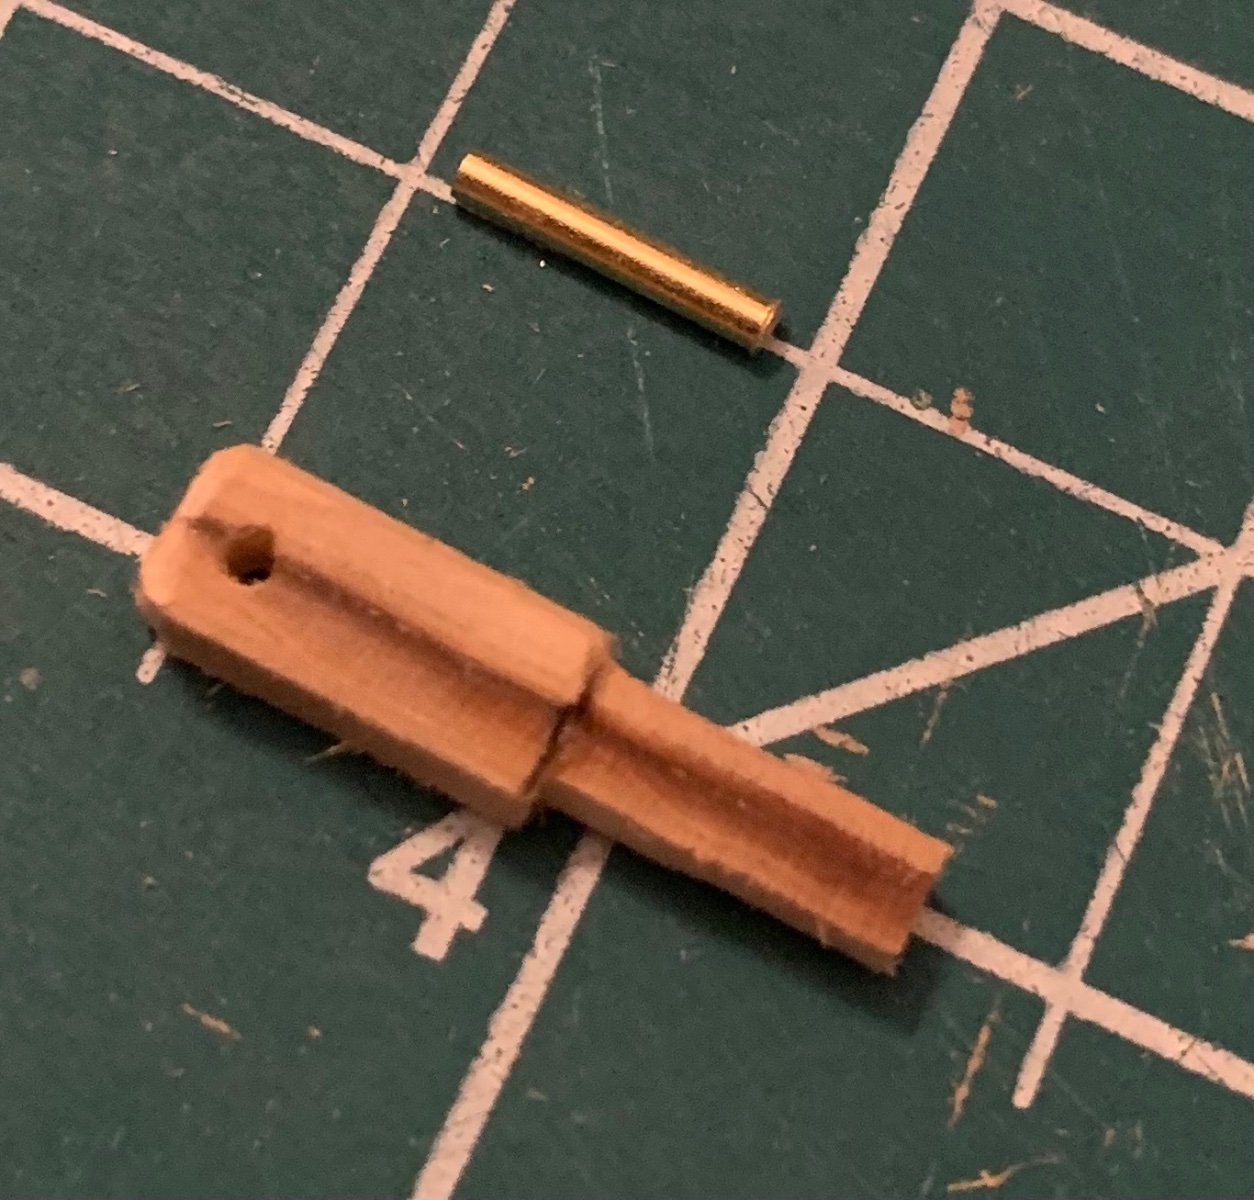
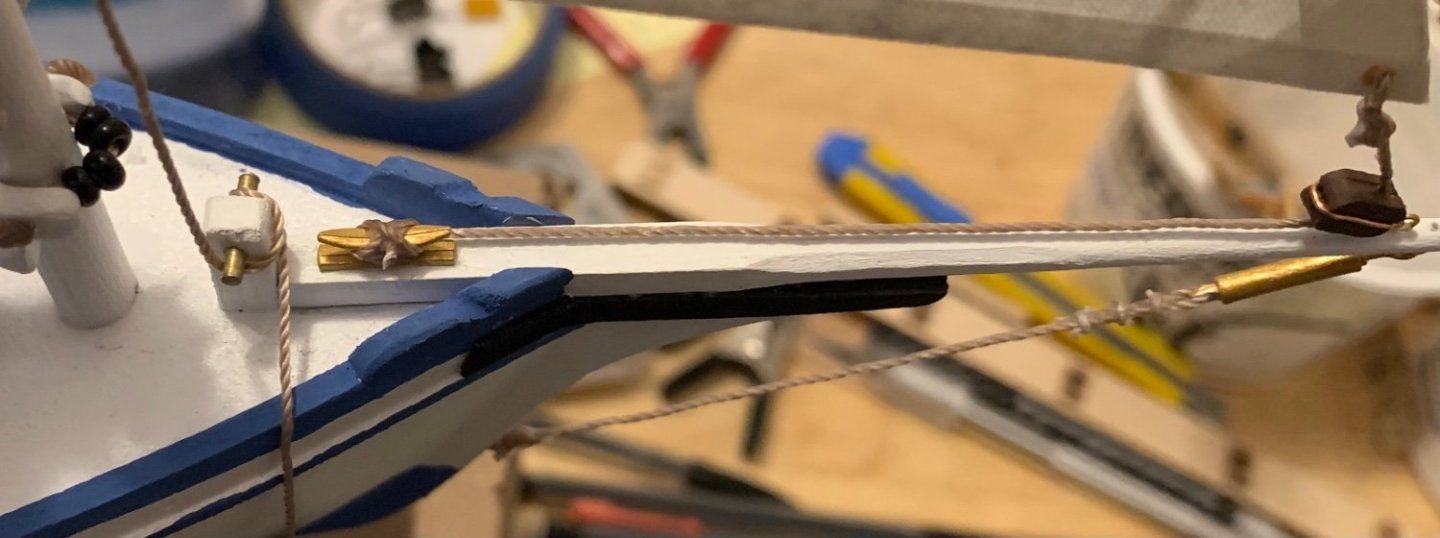
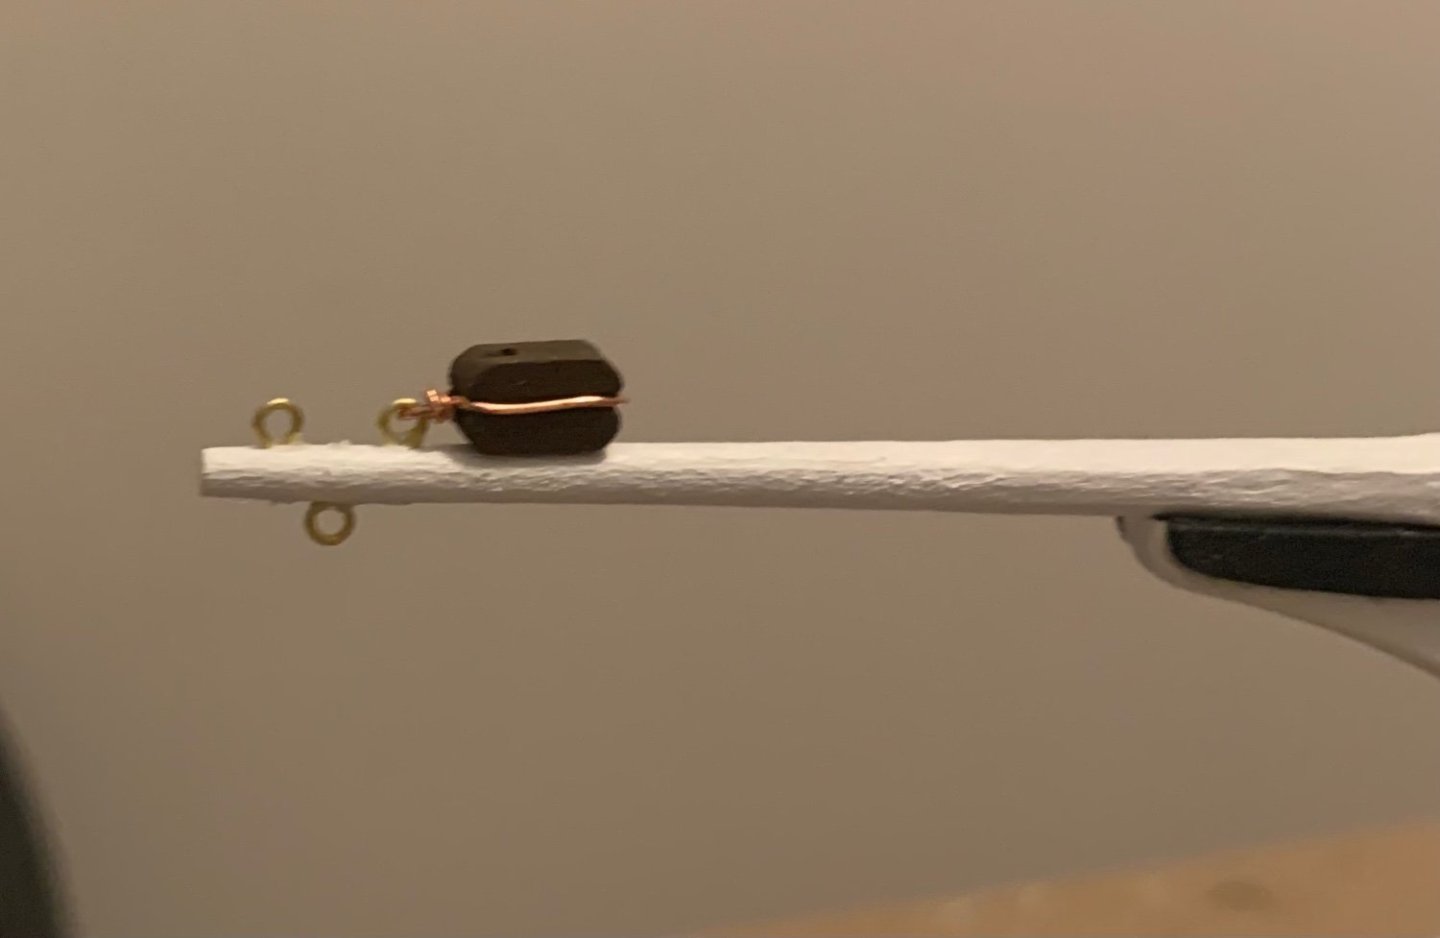
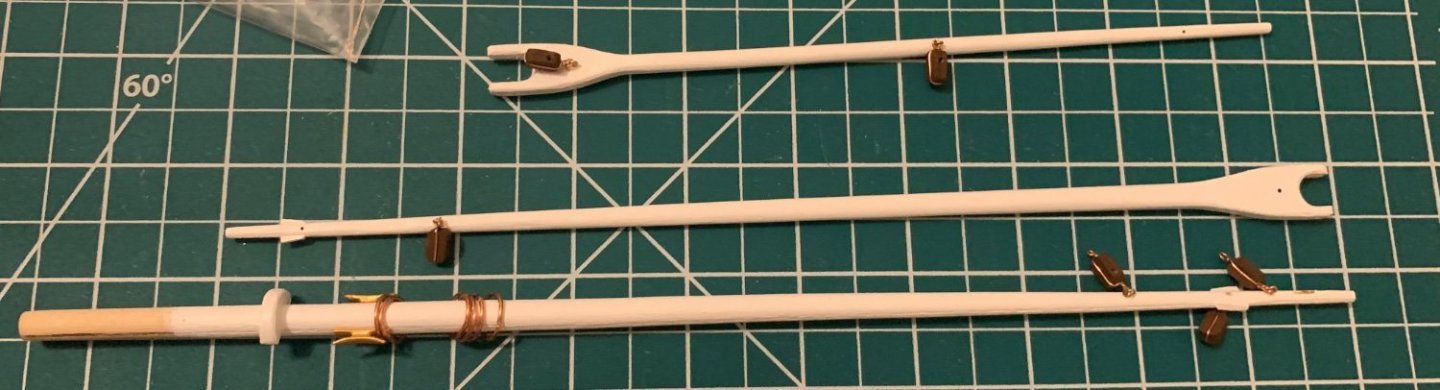
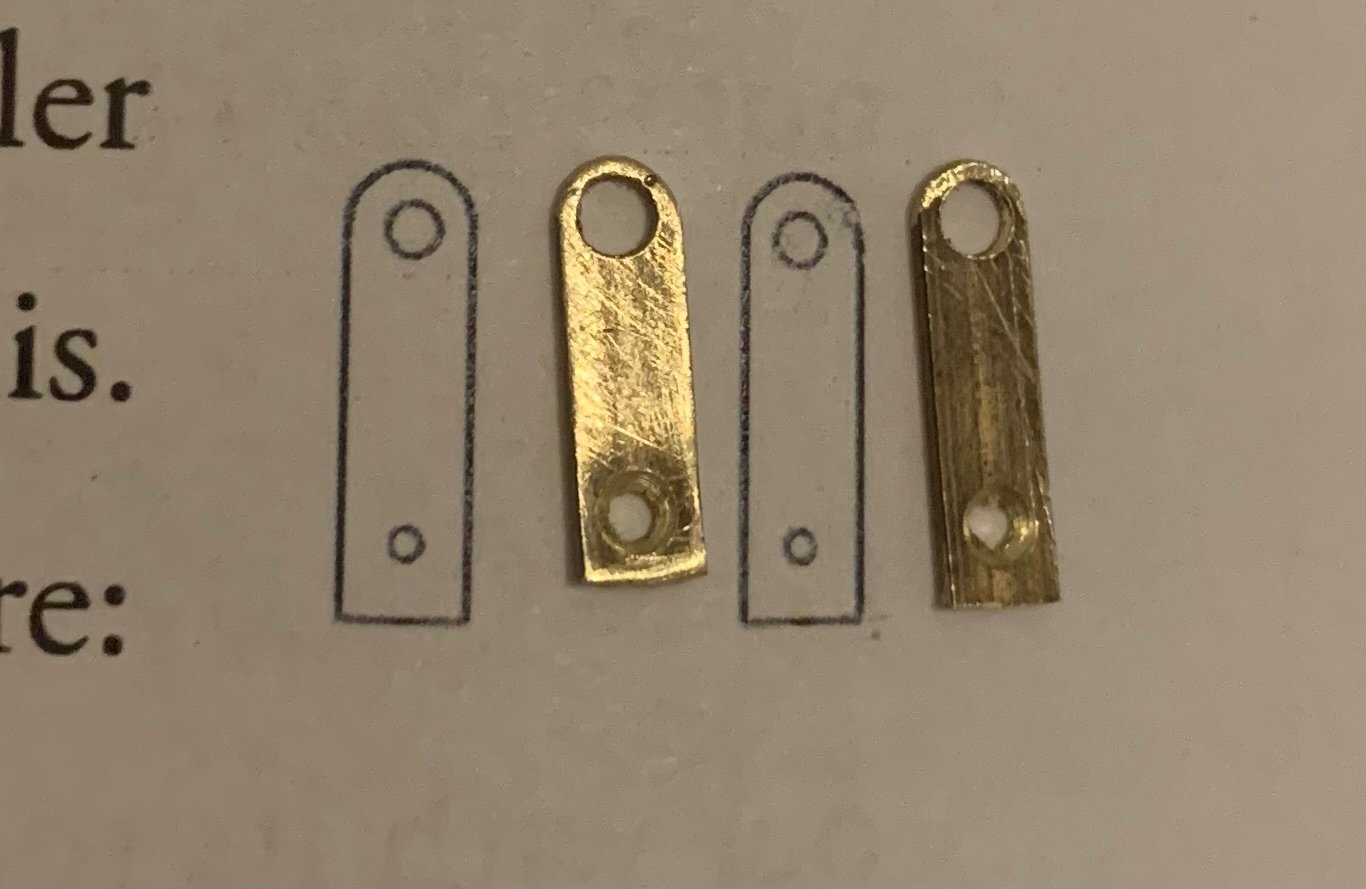
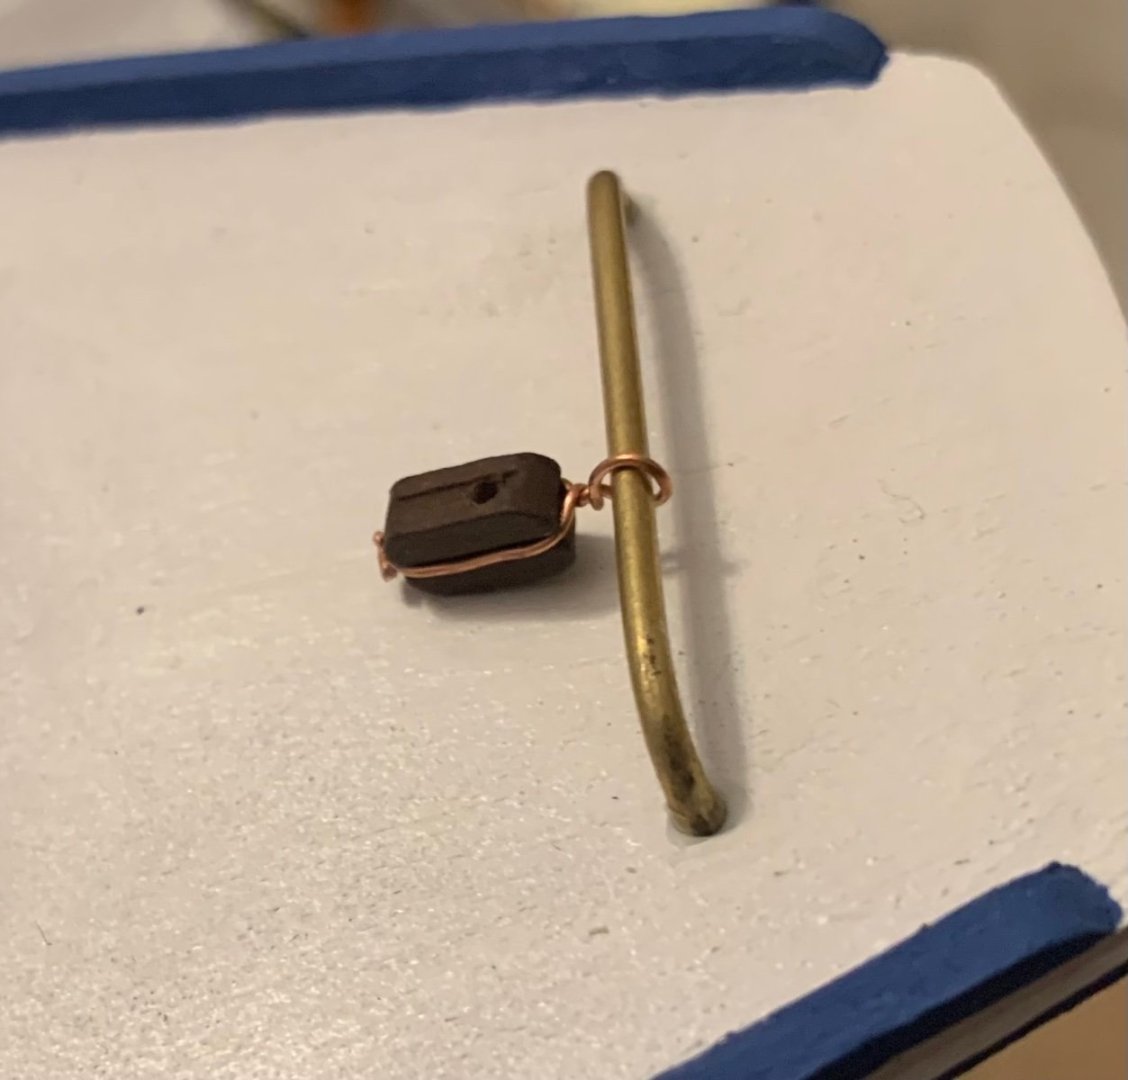
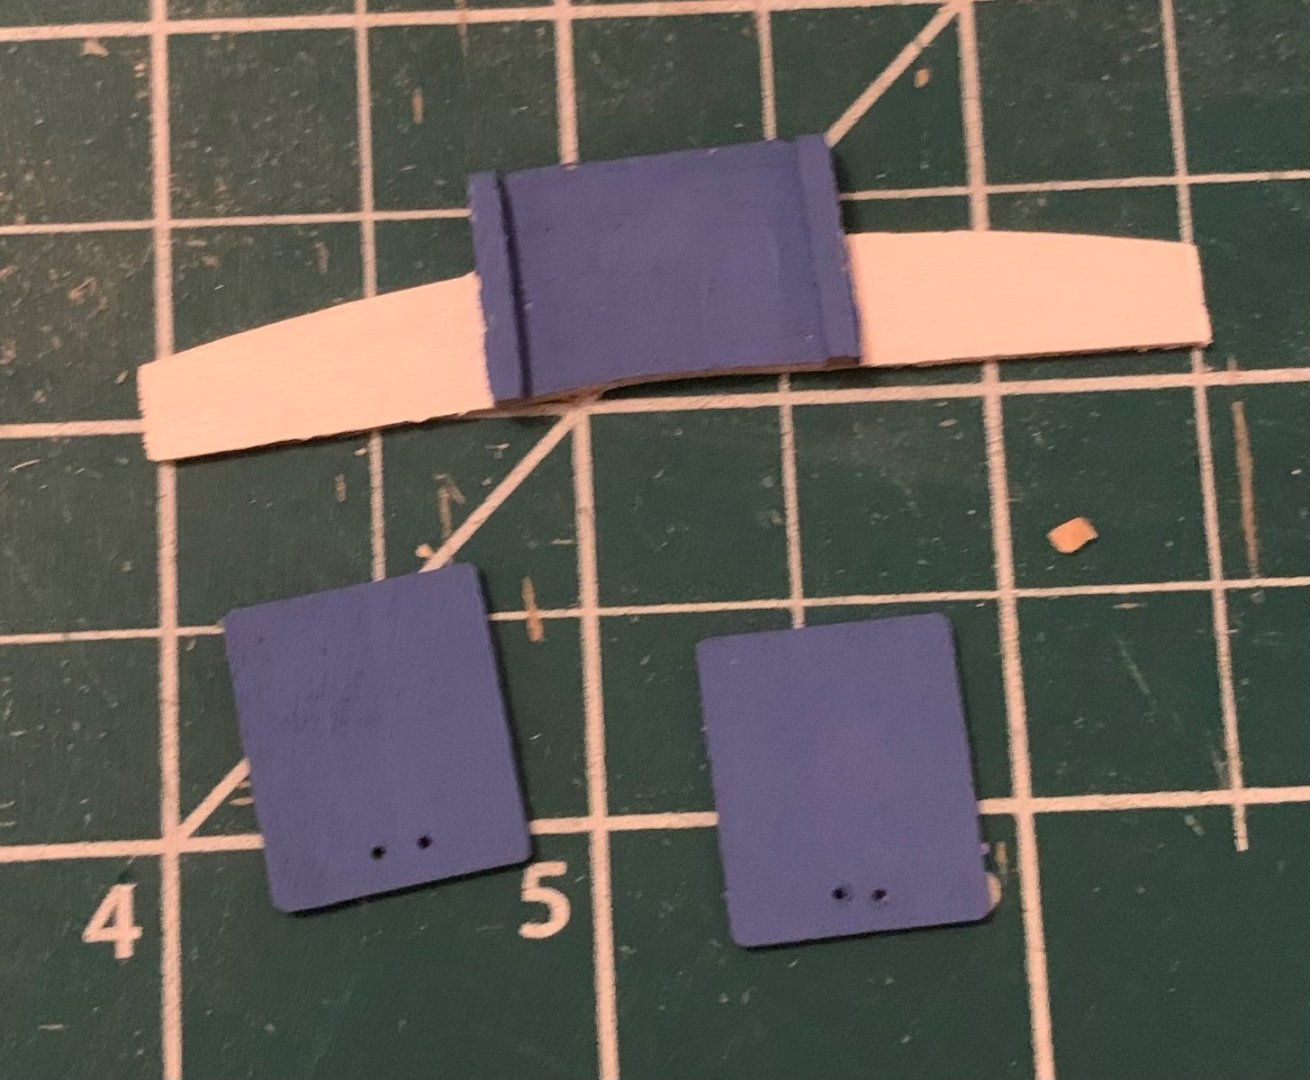
Thanks Bryan, I took another look through your log and see what you mean. Your blocks look good and you made them fit well but it gives me something to pay attention to moving forward. For now, I’ve been busy carving squares to octagons to rounds. I mounted the stop cleats to the top of the mast and shaped the copper rings for attaching the sail. Then I shaped the boom and the gaff the same way. My goal is to get these all painted before gluing in the eyelets. I need to decide if white or blue will look better. I’m leaning toward white right now. Then I dove back in to the world of brass work. Bending the rod was one thing but building an entire piece from stock was another. The wonderful thing about these three kits as an introduction to the hobby has been that they force me out of my comfort zone in a way that has a lot of room for learning and achievable goals. I can’t recommend them enough to other beginners. I don’t have a torch so I just used a candle to anneal the brass. I held the strip in a pair of pliers and passed it back and forth through the flame until I saw the colour begin to change, periodically wiping off the soot to keep it from insulating the metal from the heat. Then I drilled the holes and used a metal file to round off the top of the piece. Finally, a pair of sidecutters freed the piece from the stock and the file cleaned the flat end back off. They’re not identical, but I think quite close for my first try.


- 38 replies
-
- 3
-
-
- Model Shipways
- Shipwright Series
- (and 2 more)
-
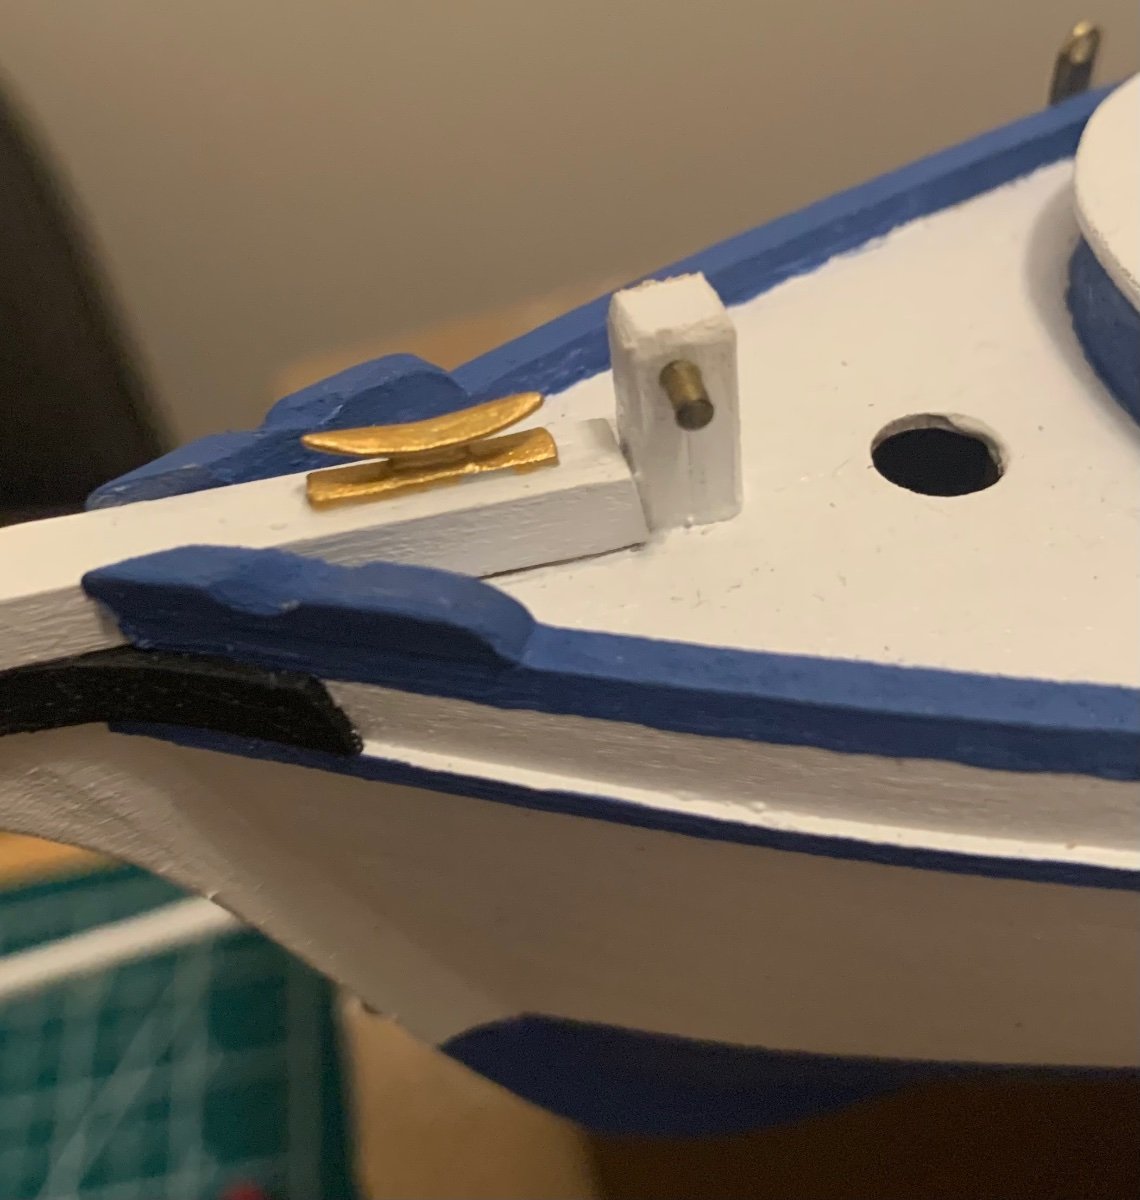
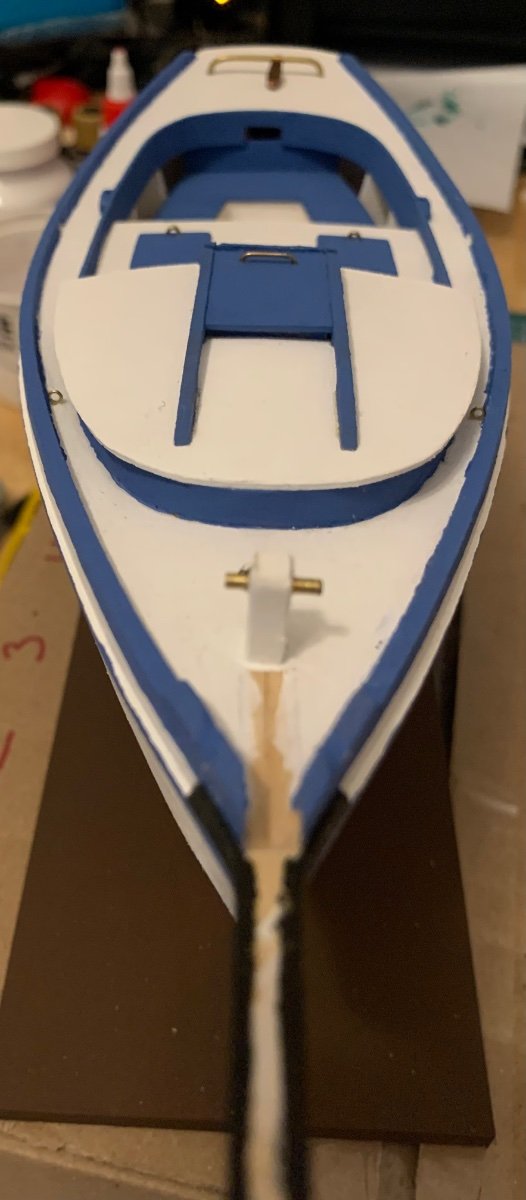
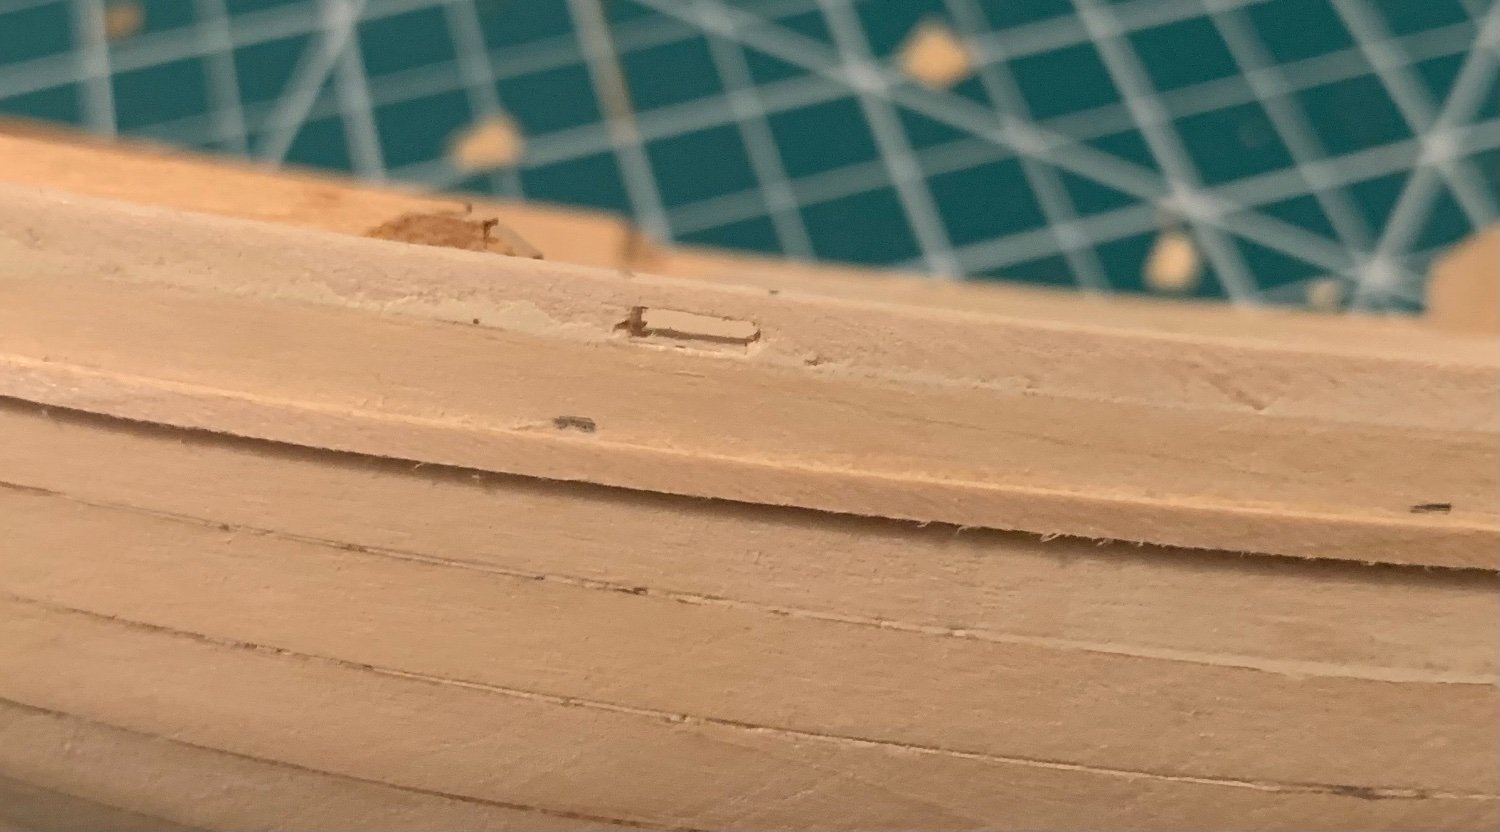
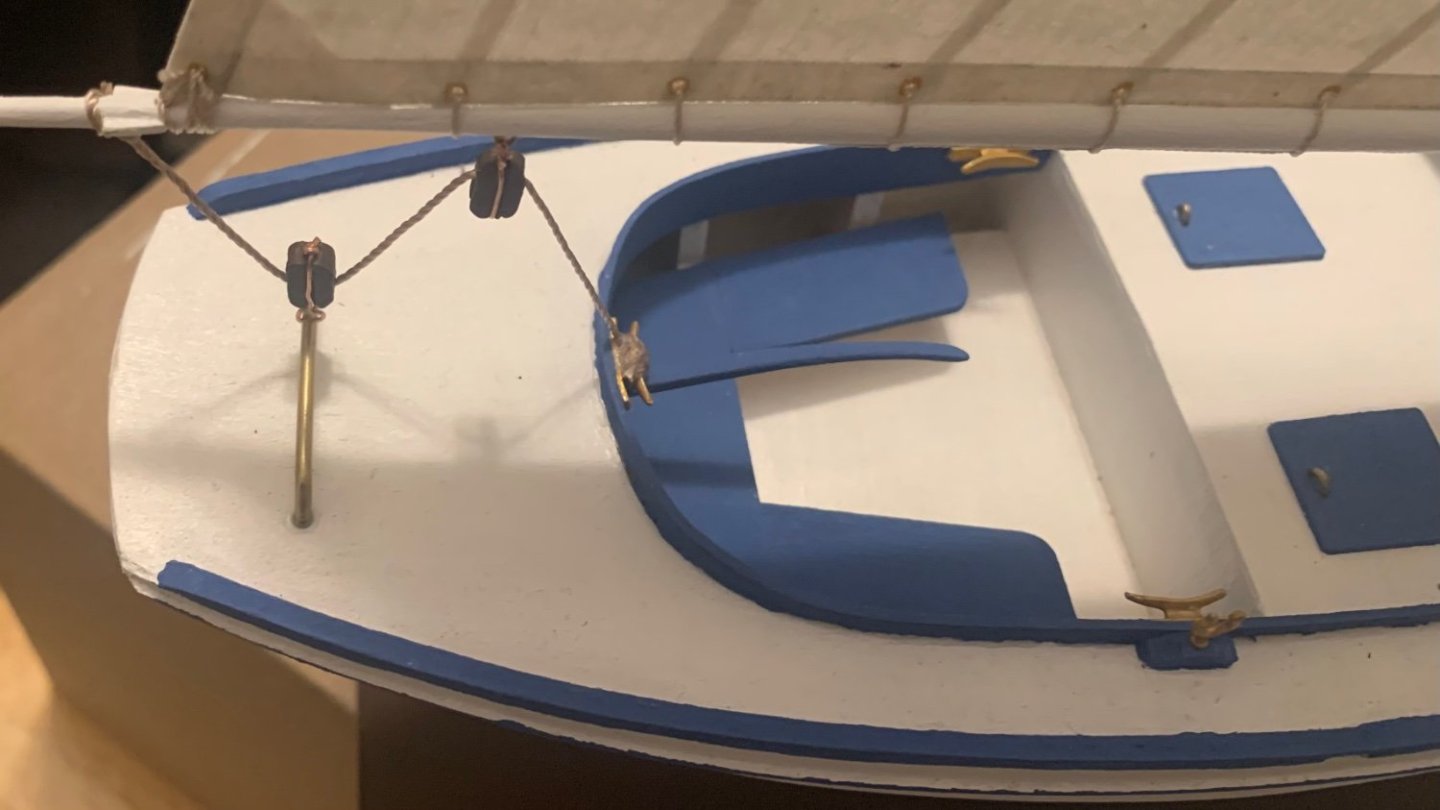
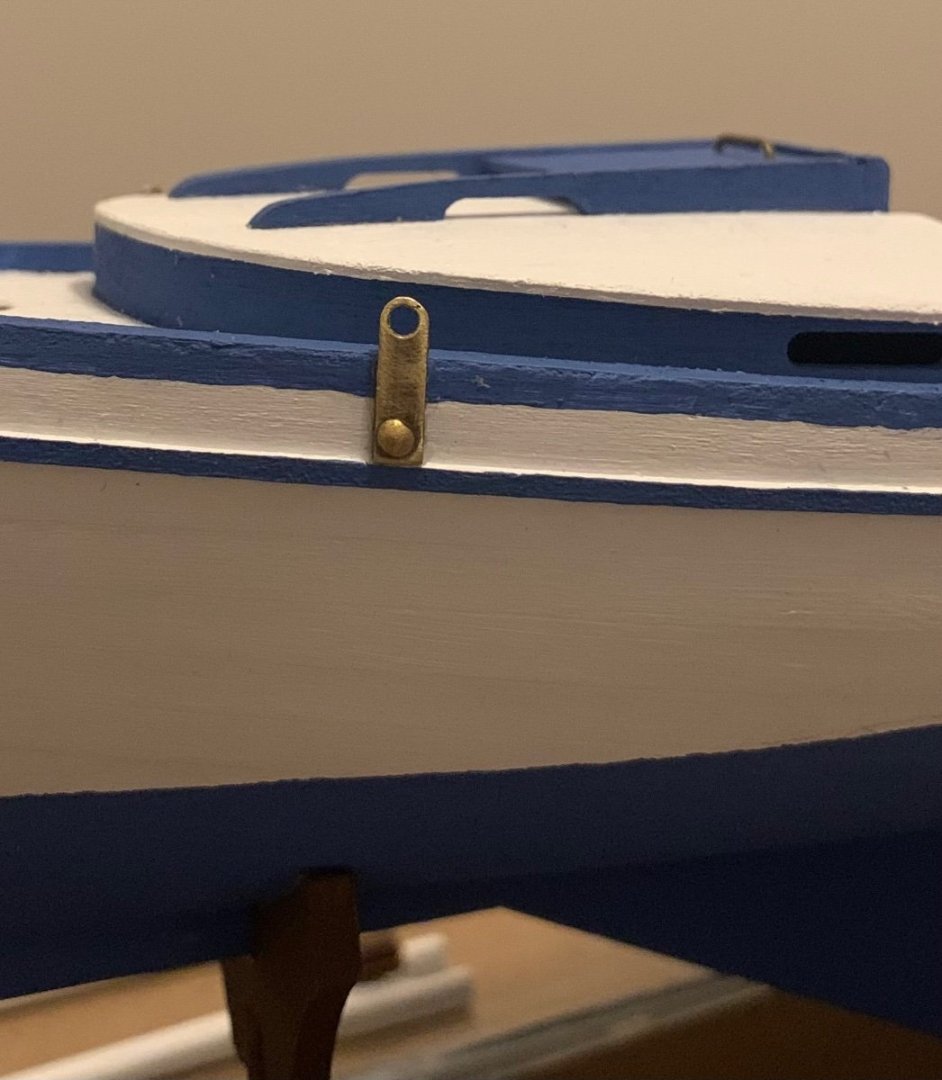
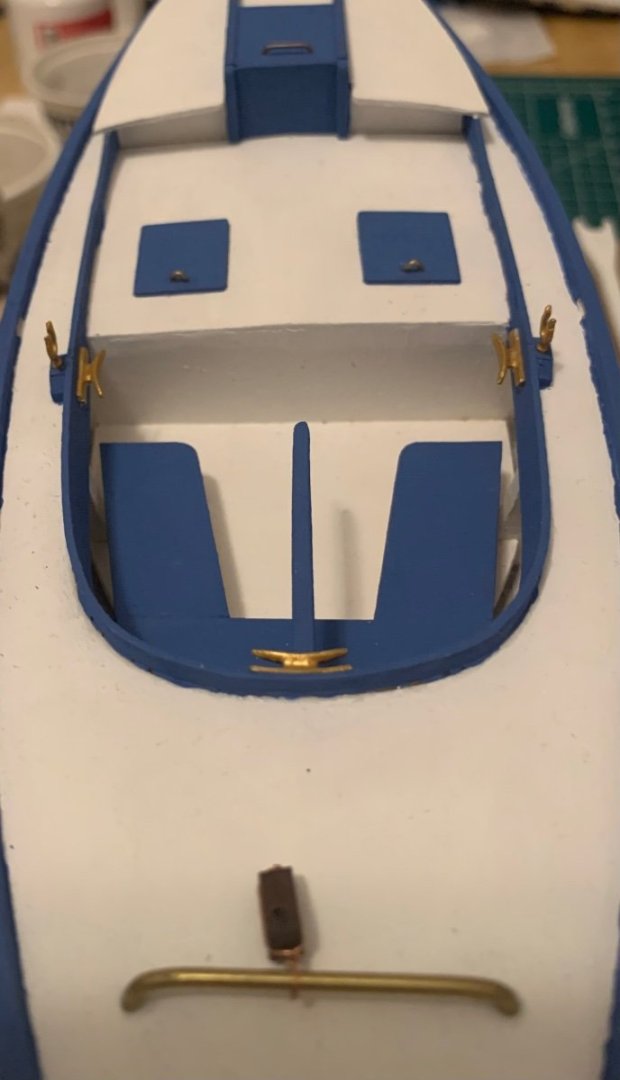
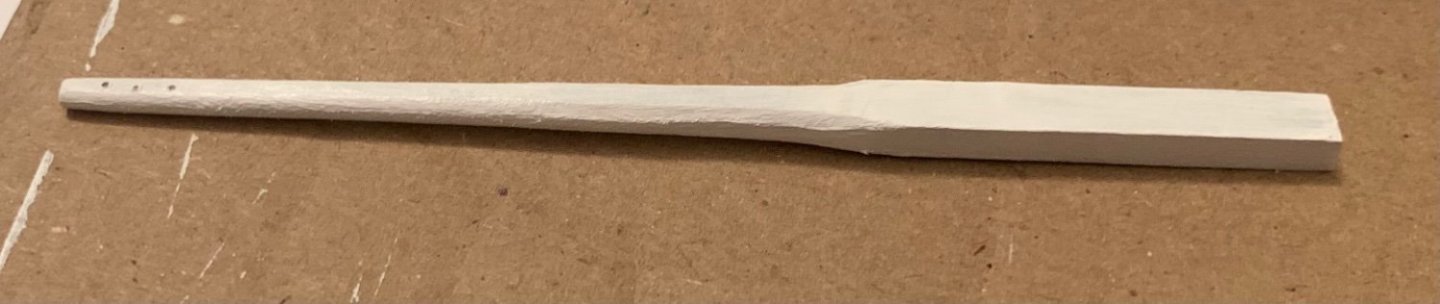
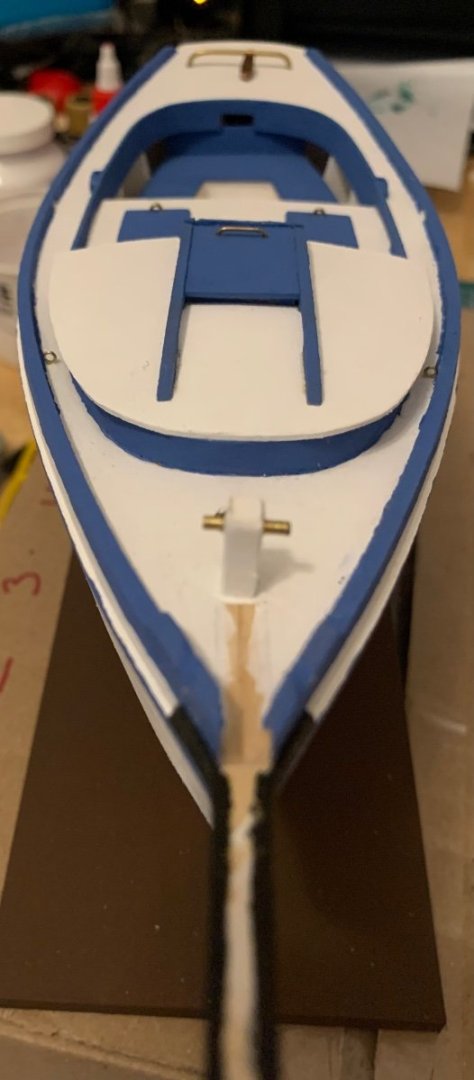
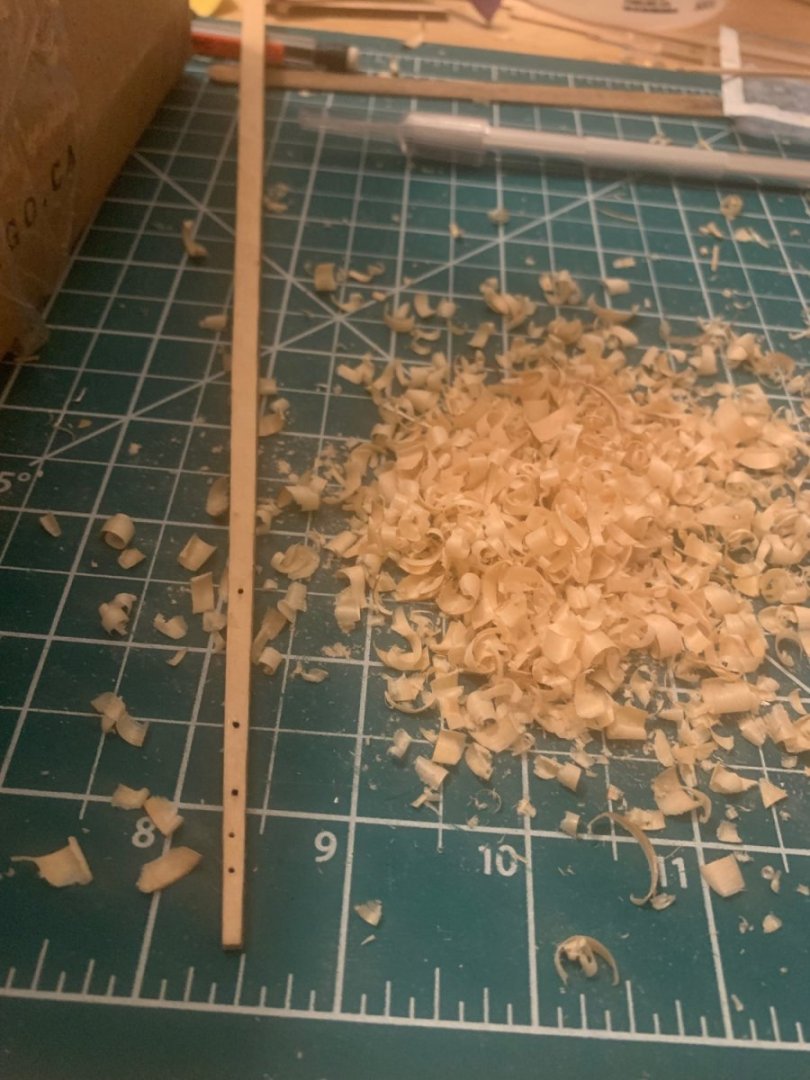
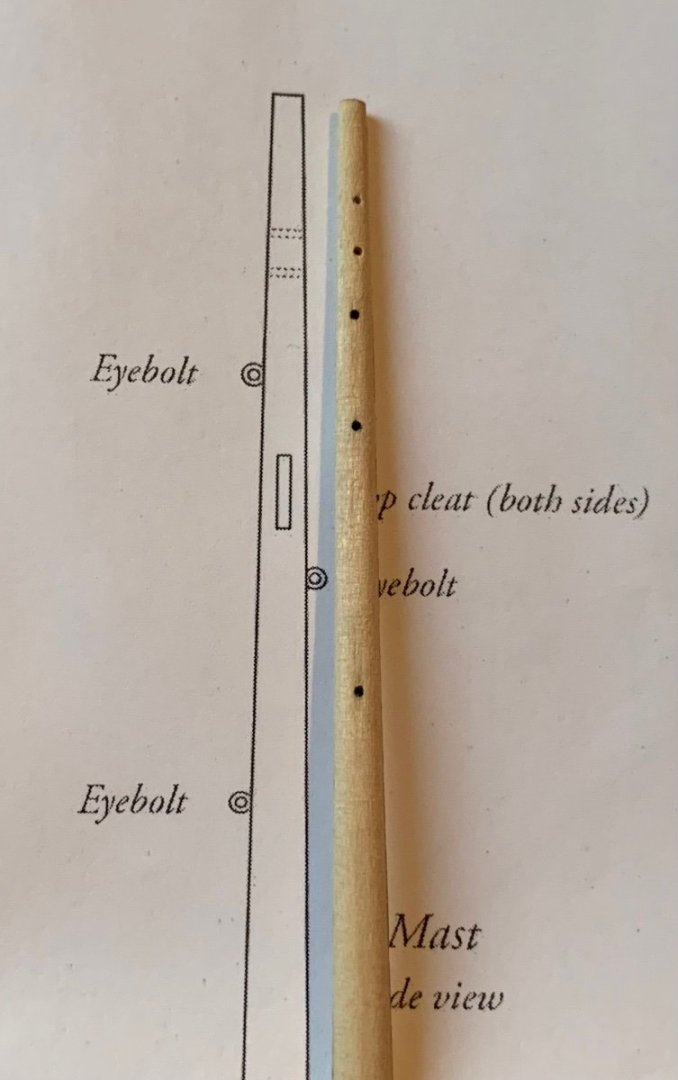
Picking back up exactly where I left off, I completed shaping the tiller and got both it and the rudder painted to match my hull. I also got the first of my blocks formed and painted, then threaded that onto the traveler and secured it into place. The bowsprit was a lot of fun to shape. I particularly enjoyed shaping the transition from square to octagonal to round, leaving sections in each of the intermediary shapes. I got it painted in preparation for adding the eyelets. Then I turned my attention to the trail boards. I was nervous about breaking them given the angle of the bend needed and how thin they are. Everything turned out great. Learning from past difficulties, they were painted first and then glued on. Underneath you can also see the glued in anchor point. Two more were added to each side of the cabin. They are very fragile brass eyelets. Now we’re getting back to what I’m currently working on. I got the mast whittled down to square. One of the things I was unhappy about with my finished Pram was the oval shaped mast. I hadn’t whittled that to square first and doing so here made a world of difference. I’m so much happier with the final shape once it was rounded. I got everything fit together without glue for a mock-up of final shape. We’re at the exciting stage where I can see what it’s going to look like. The last photo I’ll share is this one: The pre-cut mast had the three bottommost holes already cut into them. I drilled to two top most holes to act as my sheave. What I need to decide is: are these precut hole close enough for me to be happy with them as eyebolt point, so should I use wood filler to hide them and re-drill my own where the plans suggest they should be? Something to think about over the next couple of days before I come to a decision.


- 38 replies
-
- 7
-
-
- Model Shipways
- Shipwright Series
- (and 2 more)
-
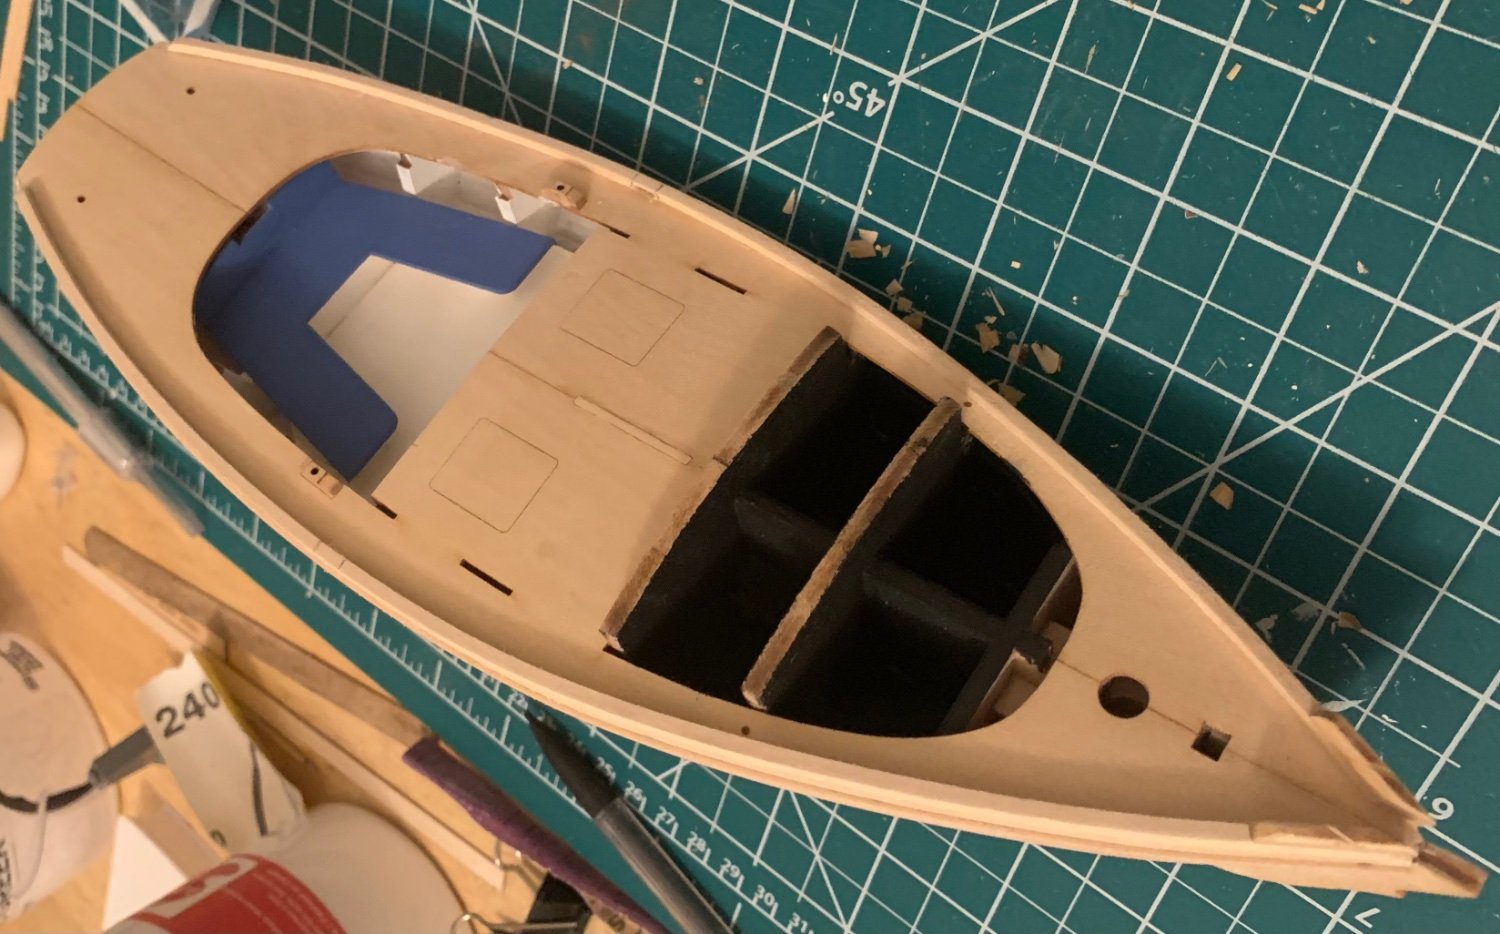
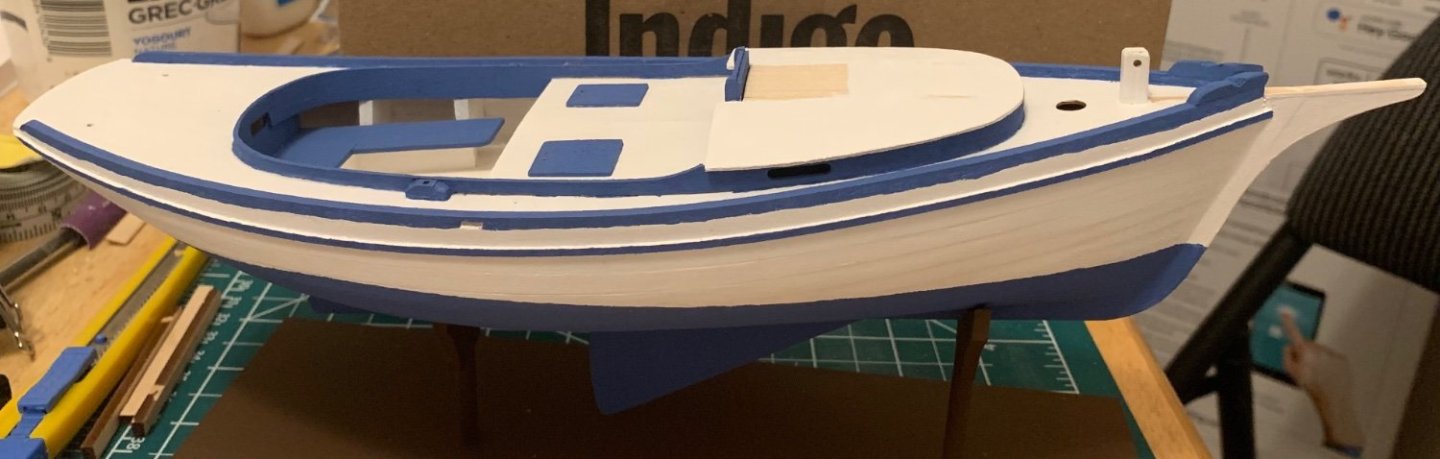
Thank you both, the painting was fun even if it could have been easier. I’ve even learned my lesson, and pre painted the well covers and hatch door. Those were glued in place, along with the roof. I also assembled the hatch cover and runners while I was waiting for the roof to dry so you can see my mock-up fit here. Applying the same lesson again, the roof got its coat of paint prior to gluing the runners on, as did the runners themselves. I also touched the rub rails with some blue paint because I liked the contrast it gave Bryan’s build. Then I glued everything together once I was happy with the fit. Visible here are some custom handles I made from scrap brass salvaged from the Pram kit. I thought it would be nice to have something to grab on to when opening the wells or going below deck. Encouraged in my ability to bend brass, I shaped the traveler and, while I was at it, cut a length of rod for the rudder. Ah, the rudder. Everything to this point went smoothly so there wasn’t a need for much elaboration beyond that tasks got accomplished. The rudder was more involved. In the process of filling, sanding, and painting the hole for the rudder became partially occluded. After some fruitless struggle I decided to risk something. I put the rod as far into the hole as I could and then tapped it with a hammer until it went all the way in, then pulled it back out with pliers and repeated the process until I could slide it in with just my fingers. Maybe that was a bad idea, but it worked out for me. I did the same thing with a short piece of scrap brass at the slot in the keel. This was where I had the most concern about breaking something, but again it worked fine. Finally, I shaped the rudder itself and glued it to the rod. I’ll leave off with another visitor to the Harbour. Although, visitor isn’t really fair considering we’re her home port. She just isn’t usually up by the boardwalk.


- 38 replies
-
- 4
-
-
- Model Shipways
- Shipwright Series
- (and 2 more)
-
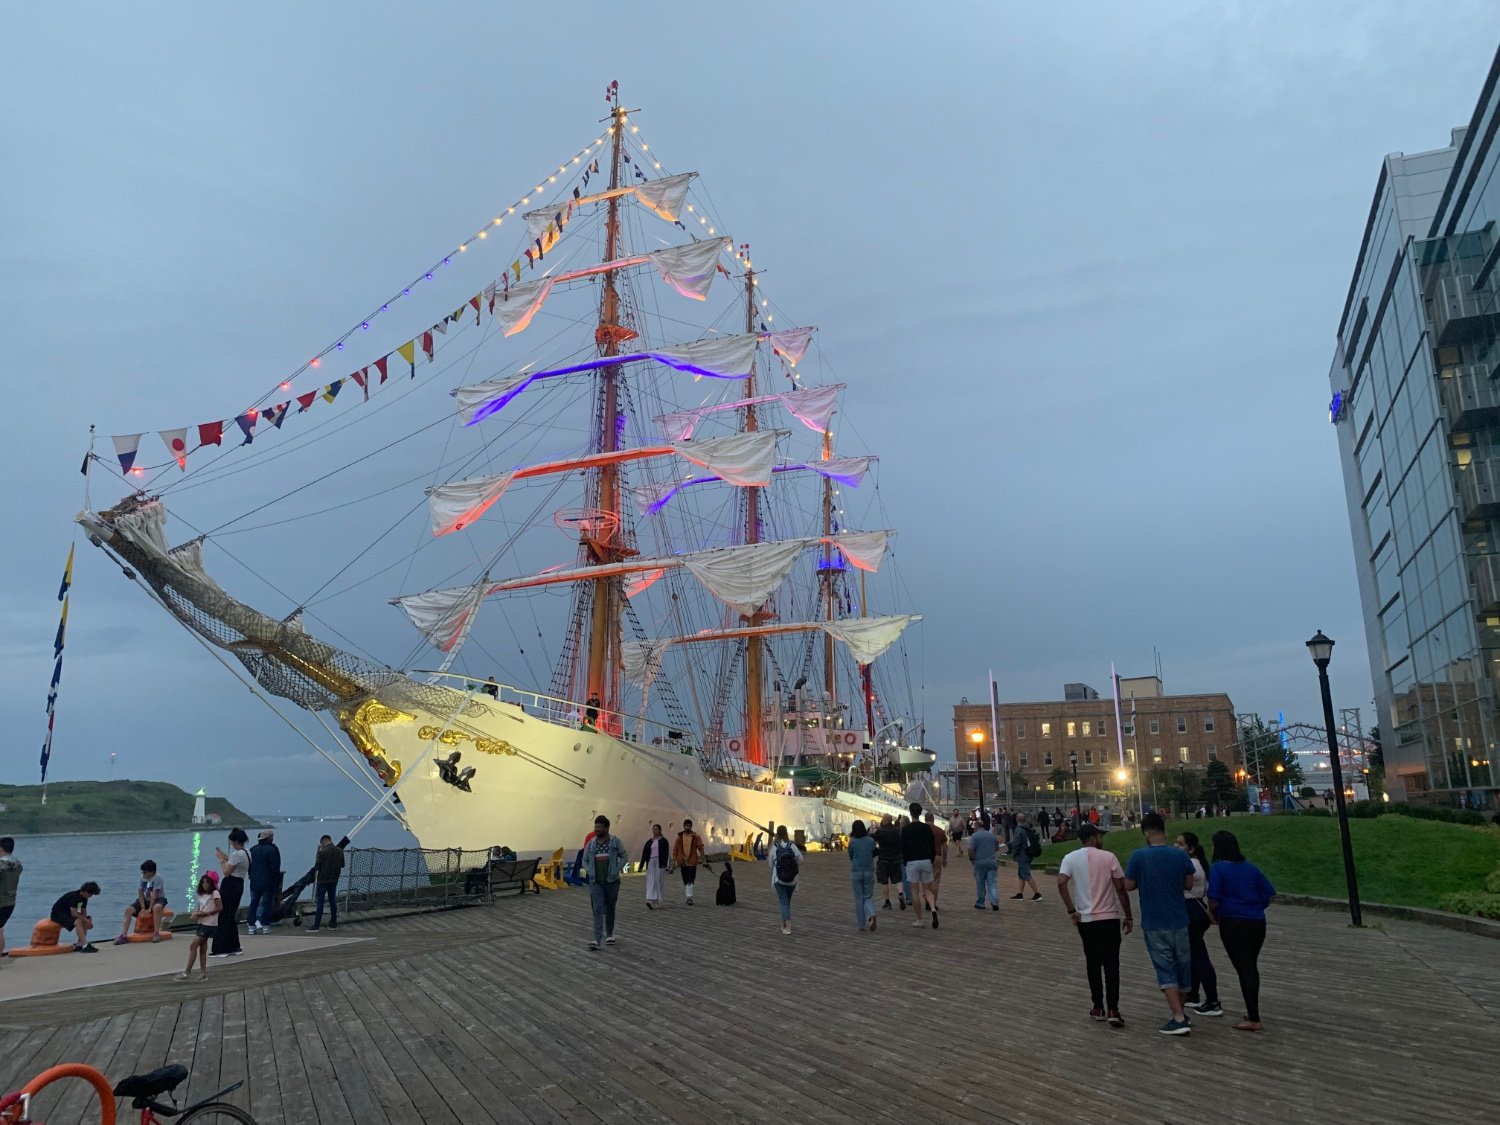
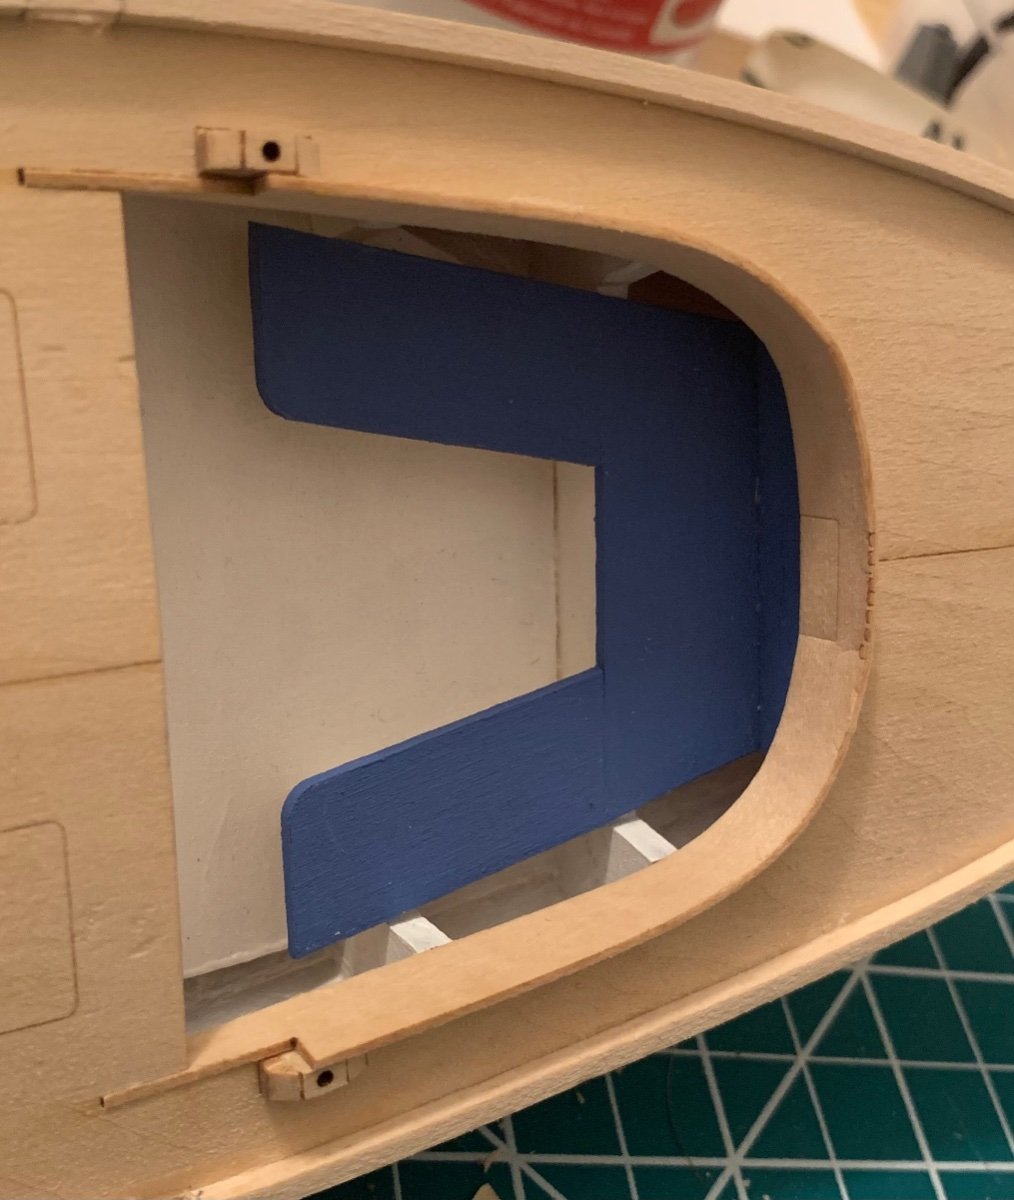
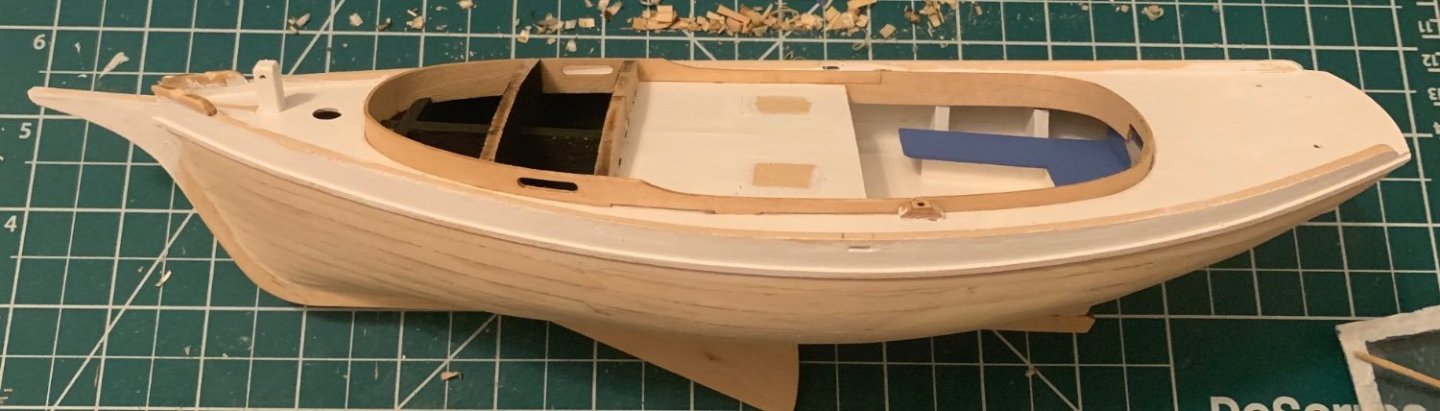
I have been slowly working away. It turned into an unusually busy summer and I’ve been a bit limited in free time. Ah well, the more sweet it makes the few hours I can spare. I cleaned up the fairleads considerably and am much happier with them now. They look intentional, as opposed to “roughed in” like they did. I also glued in the post and have that nicely situated. There was a lot of dry fitting with the bowsprit (even if it is as yet unshapped) to make certain everything fit square. I also got the combing and cabin sides glued into place. That happened after my initial layer of white paint and should make for a sleek looking deck when everything is finished. Now I’m still working on the difficult part: painting all the details blue. The common wisdom is to paint before assembling. I was aware of that and gleefully disregarded it with the attitude that “it’ll be easy to just add some paint where it need it.” Ha, that was wrong. A lesson for next time, and a lot more work for what I’ve already assembled to try to get clean lines. Unrelated to my build, we had a visitor to Halifax last week, the ARC Gloria out of Columbia. Maybe some day I’ll work my way up so something a little more this style.


- 38 replies
-
- 8
-
-
- Model Shipways
- Shipwright Series
- (and 2 more)
-
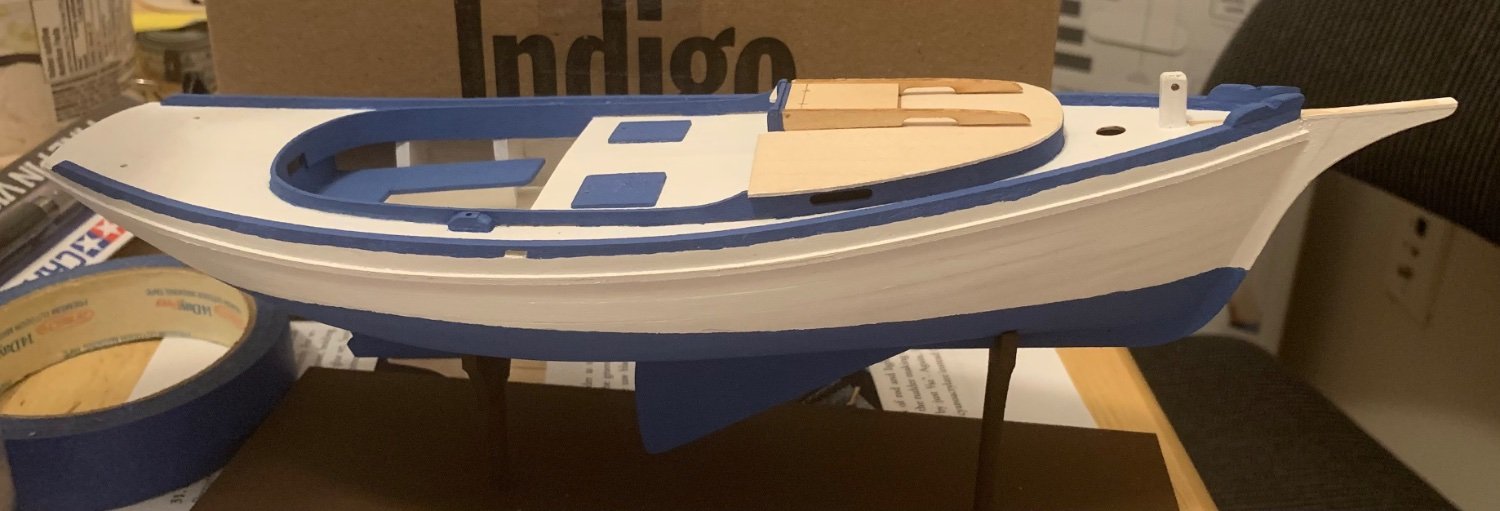
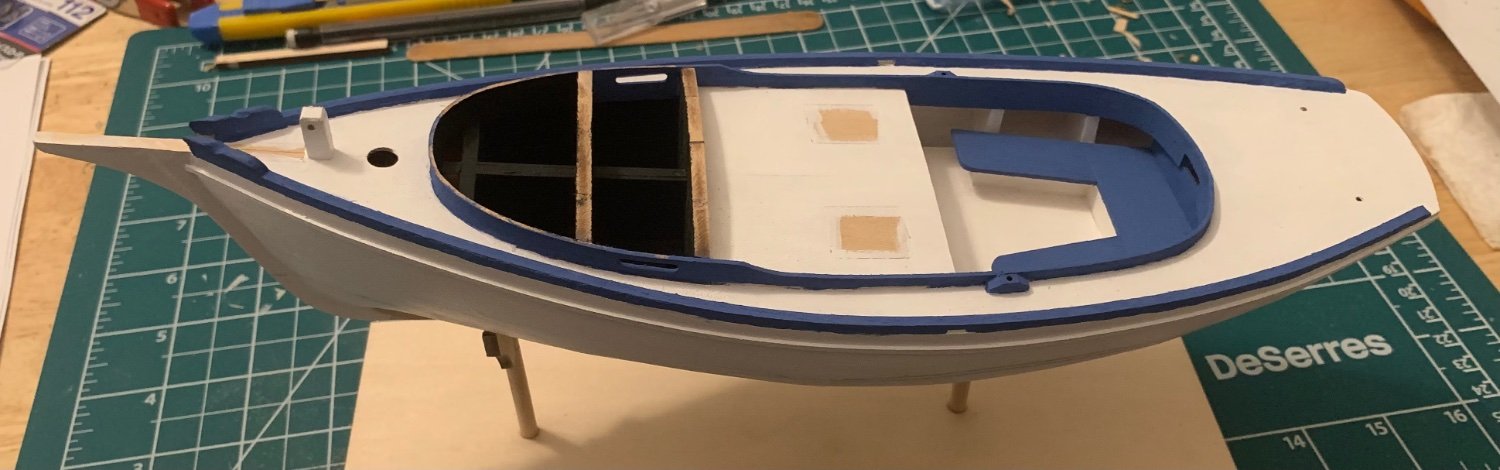
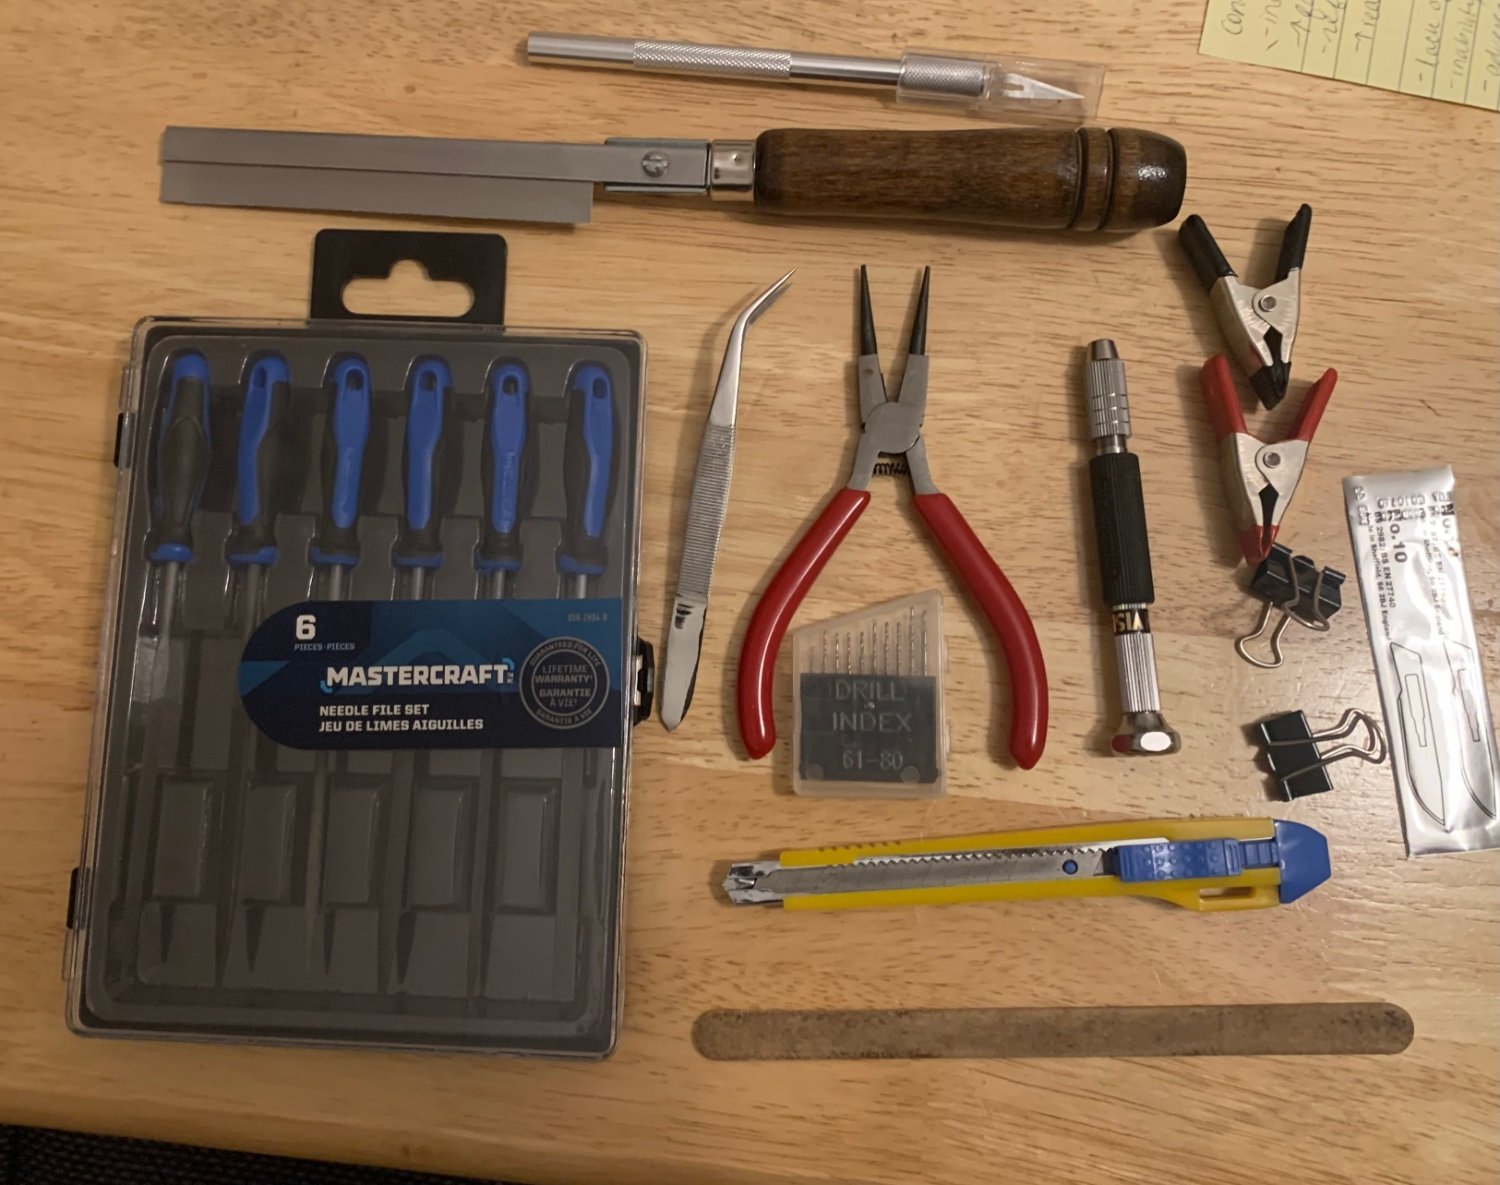
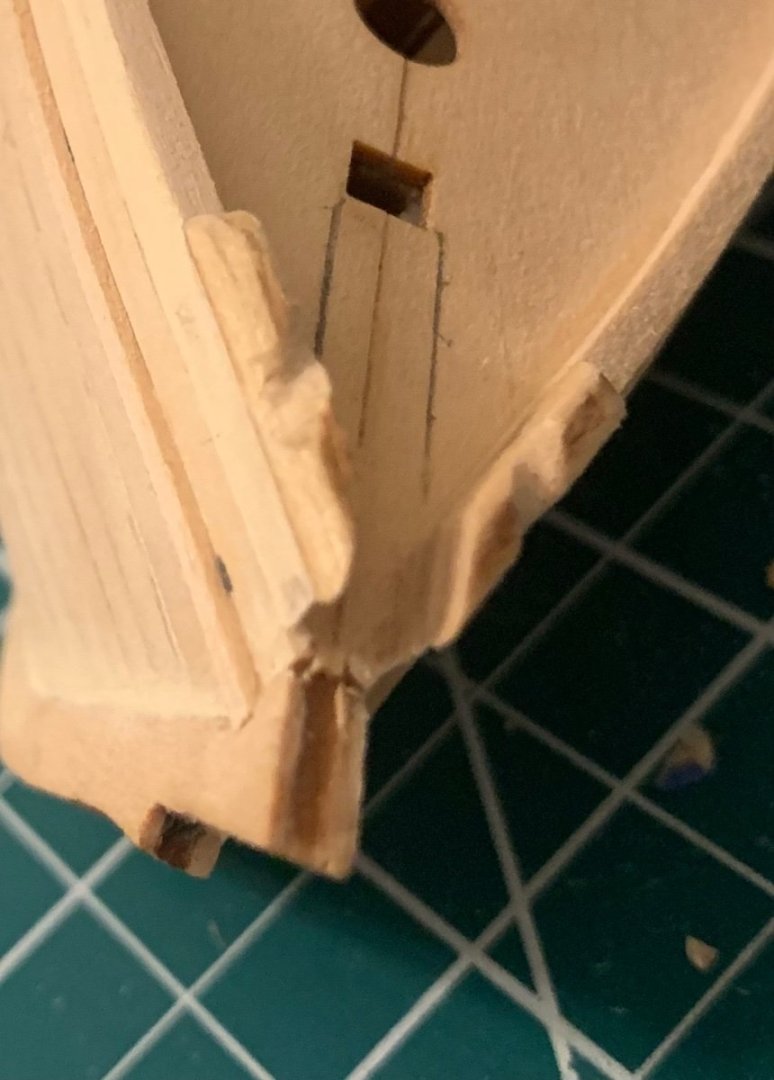
Time for a bit of a disorganized update because I got engrossed in working on things and forgot to take pictures as I progressed. That’s a good sign for interest in the actual building part. The method of bending the toe rail against the side of the hill worked well and I got that installed correctly. I also finally glued in the seat, which I think looks nice in place. You can also see the added oarlock pads, which I thought were a bit bulky at the time but have come around to really liking the look of now. While I was working on the toe rail I also added on the rub rail, which makes the side of the hill look a lot more complete. Carving the drainage holes into the rail was a fun challenge. It’s a whole new scale of small detail. Then came some bits and pieces. The Samson post broke as I was sanding it to fit, but came out looking nice. I applied some of the lessons learned from working with bras on the Pram and the small rod was easily made. Getting the fairleads to look right was more of a challenge and I’m not convinced I’m happy just yet. I’ll fiddle around with them a bit more. Most recently, bending the combing was quite stressful as it pinched sharply along one of the etched cut lines. I think it’s mostly salvaged. I thing the next step will be to bend the cabin sides, the. Pain the entirely of the upper deck white before gluing in the combing and cabin sides. Looking back, I’m somewhat amazed at the small pile of tools I’ve accumulated as I needed them. Everything has a very specific purpose and has become indispensable.


- 38 replies
-
- 4
-
-
- Model Shipways
- Shipwright Series
- (and 2 more)
-
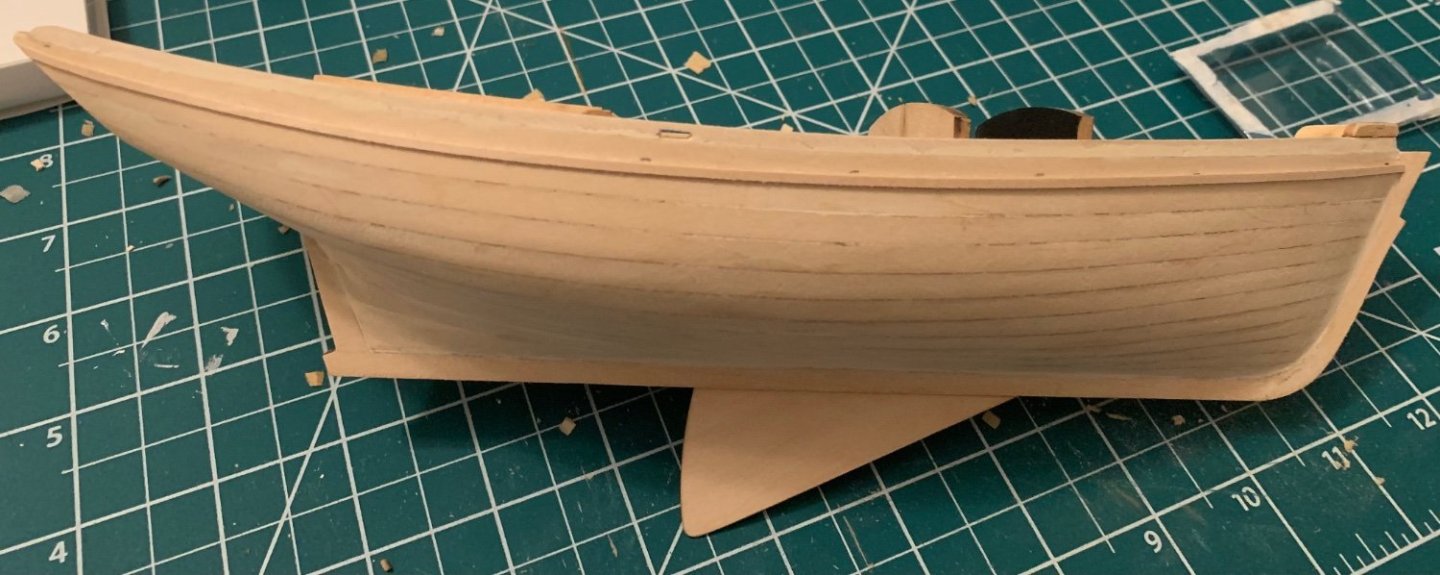
As Bryan predicted, sanding was a very satisfying job. I gave the boat a rough first sand to get approximately smooth lines, then used some wood filler to seal up the gaps between boards. Here’s what it looked like after the second sanding following the wood filler. I outlined remaining low spots with pencil so I would know where to focus on building things up with the filler. A second round of filler and third, final sanding yielded a result I wouldn’t have believed I was capable of. Then it was time to clean up the transom. Here it is trimmed, filled, and sanded. While I was working with the filler it occurred to me that now would be the best time to paint the inside of the boat, before I install the seat and before adding any additional parts. I painted the cockpit white and I painted the remainder of the inside black. That brings me back up to current, where I just soaked the toe rail in hot water and am waiting for it to dry to shape on the model itself. The best possible jig is the thing you’re trying to have it exactly fit to, right?

- 38 replies
-
- 6
-
-
- Model Shipways
- Shipwright Series
- (and 2 more)