


Lin Feng
-
Posts
62 -
Joined
-
Last visited
Reputation Activity
-

 Lin Feng reacted to marktiedens in Wasa by marktiedens - FINISHED - Corel - scale 1:75 (Vasa)
Another little update - all the guns & lids mounted. After re-sizing the upper gun ports the lion heads on the lids were a bit too large,but they will have to do.
/Mark
-
Lin Feng reacted to mar3kl in Vasa by mar3kl - Billing Boats - scale 1:75
The kit provides plastic gun port lids. Each consists of a square with a raised center section. The center is painted, but the edges are meant to simulate wood, which they do rather badly. Since I already scratched my gun ports and made them the correct size (bottom row slightly larger than top row), I needed to scratch the lids as well. I ended up trimming the edges off the plastic lids, leaving only the center section. I then made up a bunch of correctly-sized wood lids and glued the center sections to the lids. Finally I added ring bolts and seized lines for closing the lids. There were 52 lids, so this was a lot of very tedious, repetitive work. At least it's mentally preparing me for ratlines later in the build.
First step was to prime the lids, which I did with flat yellow spray paint, so as not to obscure the details. I then used a darker wash to bring out the details of the lion heads, and finally added the red background. I also made 52 square lids of the correct size and stained them:
Here are some photos of the finished lids, with ring bolts added but not yet painted:
Time to add the closing ropes. I had forgotten how to seize lines in the many years since building my last ship, so the first few were a bit of a learning experience. For those interested, I used tan scale rope from Syren and was very pleased with it. The most important thing for me was to wax the line first. It made the line much easier to work with. Start by tying a half hitch around the ring bolt. This will be the length of line used to close the port lid:
Cut that line, and tie another line at the base of ring bolt, around the two ends of the first line. This second line will be the seizing:
Bend the short ends of both lines down and lay them against the long end of the first line:
The remaining end of the second line gets wound round and round, about 4 turns, and pulled through to finish. Wash the whole thing with a dilute mixture of white glue and water when done:
Clip the short ends of each line close (the glue mixture will make the line stiff and easy to cut), plus the end of the seizing, and your're done.
Now repeat 51 more times...
-
Lin Feng reacted to marktiedens in Wasa by marktiedens - FINISHED - Corel - scale 1:75 (Vasa)
Update - finally got all the weather deck guns rigged. Also got most of the deck fittings in place including the slightly modified capstan.
Thanks for looking.
/Mark
-
Lin Feng reacted to marktiedens in Wasa by marktiedens - FINISHED - Corel - scale 1:75 (Vasa)
A small update - started rigging the guns.I am using Chuck`s nice little 2mm blocks. The blocks are really nice but also really small - I don`t know how he makes them so small and yet so nicely shaped. They are a bit difficult to handle but I am slowly getting them done.
/Mark
-
Lin Feng reacted to marsalv in Royal Caroline by marsalv - FINISHED - Panart
Few more pictures to the previous post.
-
Lin Feng reacted to marsalv in Royal Caroline by marsalv - FINISHED - Panart
Thanks guys .
The fore mast is completed.
-
Lin Feng reacted to fmodajr in Wasa by fmodajr - FINISHED - Corel - 1:75
When I finished sewing all the vertical lines, I turned my attention to the ends of the sails.
First I folded the ends 1/4 of an inch and ironed the fold flat.
Then (and this was the hard part for me), I lifted up the 1/4 inch fold and re-folded an 1/8 of an inch and tucked it under itself. Then I re-ironed it flat.
With the ends folded and iron flat, I now stitched the fold. I tried, as best I could, to keep the stitch near the inside edge, so I could insert some wire for shaping if needed.
Back side of sail
Front side of mizzenmast sail
Insertion of 22 gage wire for shaping of sail (if needed). If not needed when I hang the sail I can always pull it out.
Lower mainmast sail
I am pretty happy with the way things are turning out so far, but I wish I were more educated in the art of sewing!!
Now I am going to start hand stitching the bolt ropes around the edge of the sails and then start attaching the completed sails to the yards.
Thanks,
Frank
-
Lin Feng reacted to jollymillar in WASA by jollymillar - Billing Boats Model 490
Couple more pics of the WASA. Coming along but slow with lots to think of. Thanks to you all that have posted your help on the site and also answered some of my questions.
It is really helping....
More pics to come..... JM
-
Lin Feng reacted to marktiedens in Wasa by marktiedens - FINISHED - Corel - scale 1:75 (Vasa)
A little progress.........Most of the bow figures done. I may start on the guns & port lids next - tired of painting.Need to make some sawdust!
/Mark
-
Lin Feng reacted to fmodajr in Wasa by fmodajr - FINISHED - Corel - 1:75
Hello!
Continuing on with my sails:
My next step was to transfer my sail templates onto tracing paper and add a 1/4 inch band around all sides in order to create a double 1/8 inch fold along the edges while sewing.
I picked up a nice sheet of fabric from the fabric store. (Bleached white Muslin).
Since the cloth is too white, I picked up some fabric dyes and after some trials on scrap pieces, I settled on a formula in order to "dirty up" or soften the look of the sail cloth.
After mixing, per the instructions, with hot water, I dipped the whole sheet into the dye mix, in order to create an even look throughout the sheet.
Then I left the cloth dry overnight
After I pressed the wrinkles out of the cloth, I pinned the tracing paper to the cloth.
Now I cut the sail cloth to size.
I am now ready to start sewing.
I picked up some sewing thread that matches the running rigging line I will be using and the bolt rope I will be hand sewing later in the process.
Thanks,
Frank
-
Lin Feng reacted to dafi in HMS Victory by dafi - Heller - PLASTIC - To Victory and beyond ...
... good old times ...
... you can leave your head on ...
... and who discovers the parts from entry of 09.03.?
Cheers, Daniel -
Lin Feng reacted to fmodajr in Wasa by fmodajr - FINISHED - Corel - 1:75
Thanks George!
With the masts on, I feel I've turned a corner and that I am closer to the end than the beginning!
Anyway,
I finished constructing and tapering all the yards.
Bowsprit Yards
Foremast Yards
Mainmast Yards
Mizzenmast Yards
Yards painted a flat black and sprayed with clear dulcote for handling
My next step is to lay out all the sail sizes and shapes on paper, creating a template.
Thanks,
Frank
-
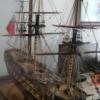
Lin Feng reacted to Karleop in Vasa by Karleop - FINISHED – Billing Boats – reviving a poorly built model
Hola:
To completely finish my Vasa I made the display case to protect it from dust. Now is in the place where I had the HMS Pandora, which I returned to the hobby room.
Saludos, Karl
-
Lin Feng reacted to Karleop in Vasa by Karleop - FINISHED – Billing Boats – reviving a poorly built model
Hi friends:
Finally the time has arrived. After 15 months of spending many hours of fun with the construction of Vasa, yesterday I finished placing flags and banners and also the hand railings. Today, a little sadly, I have started to save and organize tools and materials as well as the workbench.
I decided that before starting with the new project, the "Pride of Baltimore", I have to design and make a display cabinet for the exhibition of some of the models, since I have no place in the house to place another ship individually.
Here some pictures of my finished model.
Some having as backround the bay where I lived:
Some details:
And some simulating that it is a "real" ship on the Miramar Bay at Guaymas:
Saludos and see you in my next project.
PS: I want the opportunity to thank all the people that follow my log and specially to my Vasa mates for they encouragement and help. Also for all the likes I received throughout my work.
-
Lin Feng reacted to JanV in Wasa 1628 by JanV - Corel - scale 1:75 - Vasa
Temporary workshop during the modelbuilding show last weekend
in between several interesting talks with visitors I prepared some block for the platforms
and mounted them for the foremast and mainmast
and some blocks mounted on the masts
coming period I will not post a lot, due to other jobs in the house (painting etc ) -
Lin Feng reacted to NAZGÛL in Wasan 1628 by Nazgul - FINISHED - Billing Boats Vasa 1:75
Thanks JM, once you get what goes where she builds in to a nice model. Feel free to ask and perhaps me or the other Billing Vasa builders can help.
Karl, your model turned out beautyful!
Vasa was a regal class ship, a kings powerful ship named after his heraldic name. Regal ships where usually named after things that were symbols of the king, The Spectre, The Crown, The Sword, The Apple (like Vasa sister ship Äpplet) and so on. Vasa is the family name (heraldic name?) of the king Gustav II Adolf. We call the time period between 1521-1654 vasatiden (The Vasa time) in swedish history because of these kings (and one queen). The V or W is because they had no clear spelling rules back then and wrote anyway they wanted.
Here's their heraldic symbol, same as on the Vasa ship. The thing in the middle is a vasakärve, a bundle of seed. These symbols are still common is swedish authorities.
I just finished the display case and got the model inside. The case is customized with a set of legs from an old table I had and some planks to fasten them. The display case is shortened to fit the model amd get nicer proportions of it.
Cheers!
/Matti
-
Lin Feng reacted to fmodajr in Wasa by fmodajr - FINISHED - Corel - 1:75
Hello,
Thanks for all the likes and comments!
So, another snowstorm in Boston tonight! I am hunkering down and I thought it would be a good time to post some more picts before we lose power!
I continued work on the bowsprit by adding blocks and eyelets for future rigging. I am using the Corel plans, but modifying it with the plans from the Vasa Museum (along with visuals from Karl's great log on his Vasa). The museum plans and Karl's work show the rigging with the sails. Since I plan to use a combination of furled sails and a couple of sails fully open, I added more blocks onto the bowsprit than what the Corel plans show.
I now positioned and glued the bowsprit to the ship.
Then I added the rigging to tie down the bowsprit.
I previously added the cleats to the bowsprit and I mistakenly added them a little too close to where the lashings are suppose to be, but I think they will be fine and I will be able to work around them!
Then I added the supports for the lashings and the stairs.
My next step is to add the blocks and eyelets to the 3 masts and fit the masts to the ship.
Thanks
Frank
-
Lin Feng reacted to Karleop in Vasa by Karleop - FINISHED – Billing Boats – reviving a poorly built model
Hola:
As part of the last steps in finishing my Vasa I proceed to cutting and bending the flags. At first I used the method described by Matti and Denis Pink using an aluminium can and shaping it to look as a flag in the wind, wetting the flag in a mixture of white glue and covering the aluminium shape with it. Matti mention that the inner surface can have a glossy finish due to the contact of the glue with the shiny surface of the can, but that it can be fixed spraying it with a satin acrylic varnish. (Nazgul pp 62).
As expected I got the unpleasant glossy finished. To avoid it, I tried another and simpler method. After wetting the flag with the white glue mixture I shape it using clamps and strips of wood as you can see in the pictures. From my point of view it works great.
Saludos, Karl
-
Lin Feng reacted to fmodajr in Wasa by fmodajr - FINISHED - Corel - 1:75
Hello!
I finished up some work on the bowsprit.
I notched out the top of the bowsprit dowel and attached the posts.
After staining, I added the metal strip and cleats. I will add the steps on both sides of the bowsprit and the wood support for the lashings after the bowsprit is glued and the lashing rigging completed.
The platform and cap mounted onto the bowsprit.
Adding the upper mast sections.
Metal straps added to the mast and caps
My next step is to add all the blocks and eyelets to the masts and bowsprit and then glue the masts to the ship.
Thanks,
Frank
-
 Lin Feng got a reaction from Karleop in Wasa by fmodajr - FINISHED - Corel - 1:75
Power and the Glory: The Sculpture of the Warship Wasahttp://www.amazon.com/Power-Glory-Sculpture-Warship-Wasa/dp/9174022369
-
 Lin Feng got a reaction from GLakie in Wasa by fmodajr - FINISHED - Corel - 1:75
Power and the Glory: The Sculpture of the Warship Wasahttp://www.amazon.com/Power-Glory-Sculpture-Warship-Wasa/dp/9174022369
-
 Lin Feng got a reaction from janos in Wasa by fmodajr - FINISHED - Corel - 1:75
Power and the Glory: The Sculpture of the Warship Wasahttp://www.amazon.com/Power-Glory-Sculpture-Warship-Wasa/dp/9174022369
-
Lin Feng reacted to marsalv in Royal Caroline by marsalv - FINISHED - Panart
So I finished installation of blocks on the yards (cca 100 pieces). Most of them are fixed with served ropes, so it took a while.
-
Lin Feng reacted to maggsl_01 in HMY Royal Caroline by maggsl_01 - FINISHED - Panart - 1:47
Hi together...
This is probably my last update of my Royal Caroline log. I am ready, have ordered the hood, made the stand and took all the pics for the gallery. The gallery will be open soon, perhaps I will upload the pics today, perhaps tomorrow.
I thank you all again - it was a funny and really good time. One of the pics show my two models - the Half Moon and the Royal Caroline - a nice small fleet with nearly the same scale. And the last picture gives an Impression of the next project - the Endeavour.
I will see you all again as soon as I start the Endeavour. This will be not before March.
Enjoy the pics and come by to my gallery the next days. I will follow several logs and stay online - of course. When you start wooden modelling... well, you can't stop it so easy
Cheerio my friends
Max
-
Lin Feng reacted to Karleop in Vasa by Karleop - FINISHED – Billing Boats – reviving a poorly built model
Hi guys:
After just over two weeks I am back putting some of the advances in the forum. This is because I've been working on coiling ropes, a painstaking work and a bit boring. To do it it was necessary: first to adjust the tension of the standing and running rigging, fixing them with diluted white glue to its corresponding place, cutting the extra lengths and finally making and fixing a fake coiling rope to put over the belaying pins.
I hope to finish it soon to follow with banners, railings and other details.
Saludos, Karl