Pitan
-
Posts
172 -
Joined
-
Last visited
About Pitan

-
 hollowneck reacted to a post in a topic:
Chris Watton and Vanguard Models news and updates Volume 2
hollowneck reacted to a post in a topic:
Chris Watton and Vanguard Models news and updates Volume 2
-
thibaultron reacted to a post in a topic:
Chris Watton and Vanguard Models news and updates Volume 2
-
Canute reacted to a post in a topic:
Chris Watton and Vanguard Models news and updates Volume 2
-
chris watton reacted to a post in a topic:
Chris Watton and Vanguard Models news and updates Volume 2
-
AJohnson reacted to a post in a topic:
Chris Watton and Vanguard Models news and updates Volume 2
-
druxey reacted to a post in a topic:
Chris Watton and Vanguard Models news and updates Volume 2
-
I like the orange/blue racking and benches - noisy to assemble, but easy to rearrange if needed.
-
Pitan reacted to a post in a topic:
Chris Watton and Vanguard Models news and updates Volume 2
-
Pitan reacted to a post in a topic:
Hobbymill.EU / precision milled exotic woods
-
Pitan reacted to a post in a topic:
HMS Sphinx 1775 by Ronald-V - Vanguard Models - 1:64
-
Pitan reacted to a post in a topic:
HMS Sphinx 1775 by Ronald-V - Vanguard Models - 1:64
-
Pitan reacted to a post in a topic:
Chris Watton and Vanguard Models news and updates Volume 2
-
Pitan reacted to a post in a topic:
Chris Watton and Vanguard Models news and updates Volume 2
-
Pitan reacted to a post in a topic:
Syren Ship Model Company News, Updates and Info.....(part 2)
-
Pitan reacted to a post in a topic:
Oseberg by md1400cs - Ships of Pavel Nikitin - 1/32 scale - with hopefully many added details.
-
md1400cs reacted to a post in a topic:
Oseberg by md1400cs - Ships of Pavel Nikitin - 1/32 scale - with hopefully many added details.
-
Pitan reacted to a post in a topic:
Oseberg by md1400cs - Ships of Pavel Nikitin - 1/32 scale - with hopefully many added details.
-
Picked this up from your sig issues thread. I'm going to follow since I have the Nikitin 1/25 Osberg kit on order, and Bischoff's book on my shelves. Your approach to colouring shields looks interesting, and I may pinch the idea when my model arrives.
-
Pitan reacted to a post in a topic:
HMS Beagle by Maid of the Mist - FINISHED - OcCre - 1:60
-
Nightdive reacted to a post in a topic:
HM Armed Cutter Sherbourne by Pitan - Vanguard Models - 1:64
-
François de Saint Nazaire reacted to a post in a topic:
Chris Watton and Vanguard Models news and updates Volume 2
-
AJohnson reacted to a post in a topic:
Chris Watton and Vanguard Models news and updates Volume 2
-
Ooo, I see Chris has announced HMS Surprise as comming soon on the Vanguard home page!
-
Back in October, I asked a question about the choice of power supply for the table saw (I'm in the UK, so would need a European unit). It took a little while, but Donna did answer my question. (The intent is/was to offer 230v as well as US power supplies.) Note, the email reply was from an unexpected email address. Try searching your email client for Donna to see if you had a reply.
-
Good luck Chris, I hope the new space works well for you.
-
The flag Chris has produced looks great, very like contemporary paintings. If you want to show a flag on a model, check surviving examples. This is a pre-1801 white ensign at the National Maritime Museum: https://www.rmg.co.uk/collections/objects/rmgc-object-937 In 1784, Lord Howe had a Union Jack with similar 'errors' in the saltire, about 5:7 (h:w ratio), see p70, Flags at Sea, Timothy Wilson, Chatham Publishing. I doubt any business would offer that style, but it would make a good talking point at a show or exhibition.
-
There are lots of paintings with boats being towed, even in peacetime. Reasons include those given, but it also gave more space on deck, and helped keep the hull timbers wet, thus avoiding shrinkage and reduced the risk of leaks. Didn't Aubrey once put a mix of (potential) mutineers and good men in a towed boat? An uncomfortable experience.
-
Glad to learn this, I hear nothing but good about Byrnes machines and would like to get my hands on some (a table saw heads my list).
-
Question. When not in action, would the gun carriages in the captain's cabin be stored facing fore or aft, rather than out to the side? At the moment, they seem to be blocking access through the cabin doors while Aubrey and Maturin are relaxing with their music.
-
It's a nice kit, nicely priced - a good introduction to model ship building
-
As others have said, a Vanguard kit would make a nice next kit. I went for Sherbourne (still to be rigged), and am enjoying the Duchess of Kingston's yatch. Off topic, do you enjoy research? If you do, and since you are in Scotland, have a dig around, see what you can learn about HMS Wickham. There's no kit unfortunately, but I found her history interesting.
-
Deck details Some progress on the DoK's deck furniture. Bow sprit and main and mizzen mast bitts are glued in place. Also seen here are the windlass, wheel, ship's belfry, binacle and bowsprit. I also started making the bowsprit. The oval opening in the kit's bowsprit bitt looked odd to me. Taking a look around, I stumbled on a thread that suggests using a mortise and tenon joint. I haven't tried to make a mortise and tenon joint since school, decades ago, but I had a go here. Not perfect, but it works. The DoK windlass is (I think) 3d printed. It paints up well.


-
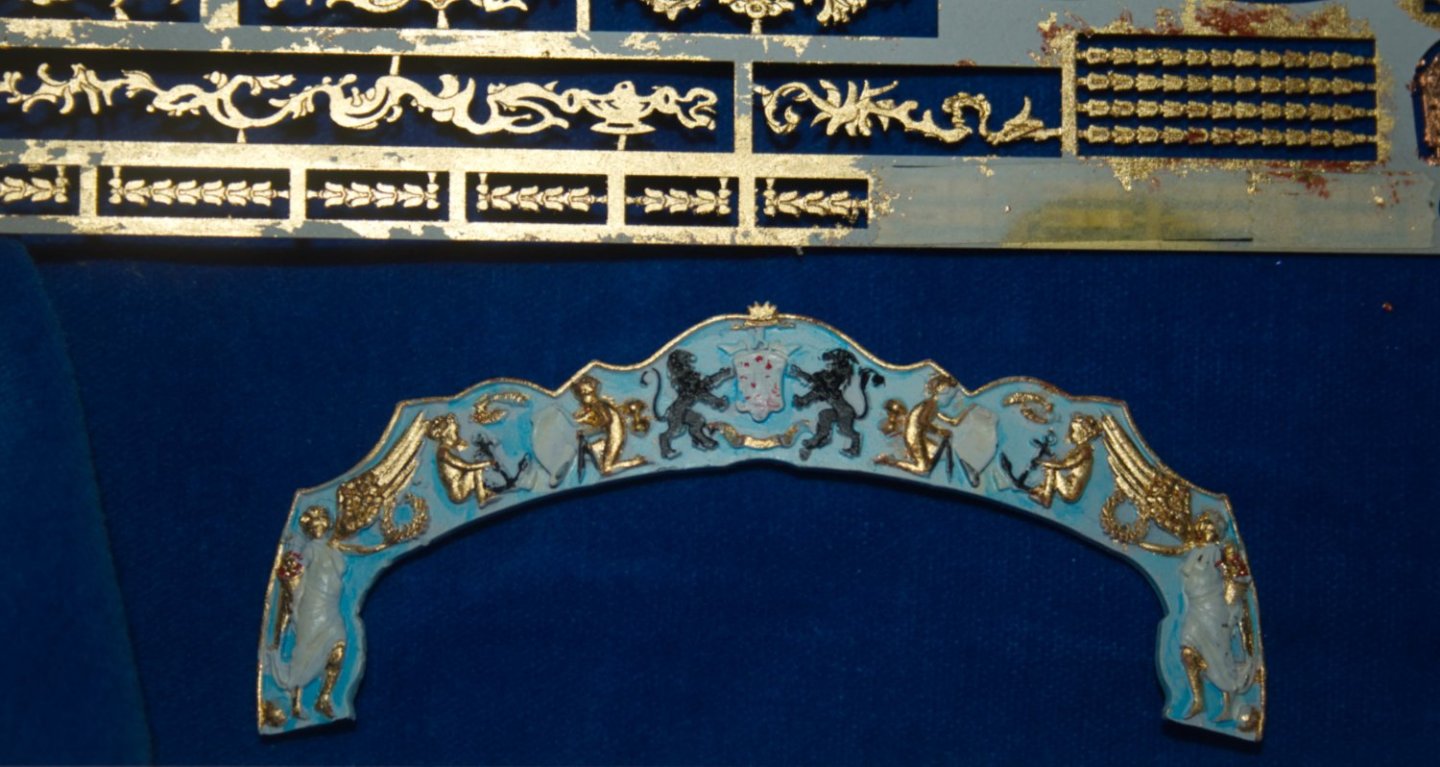
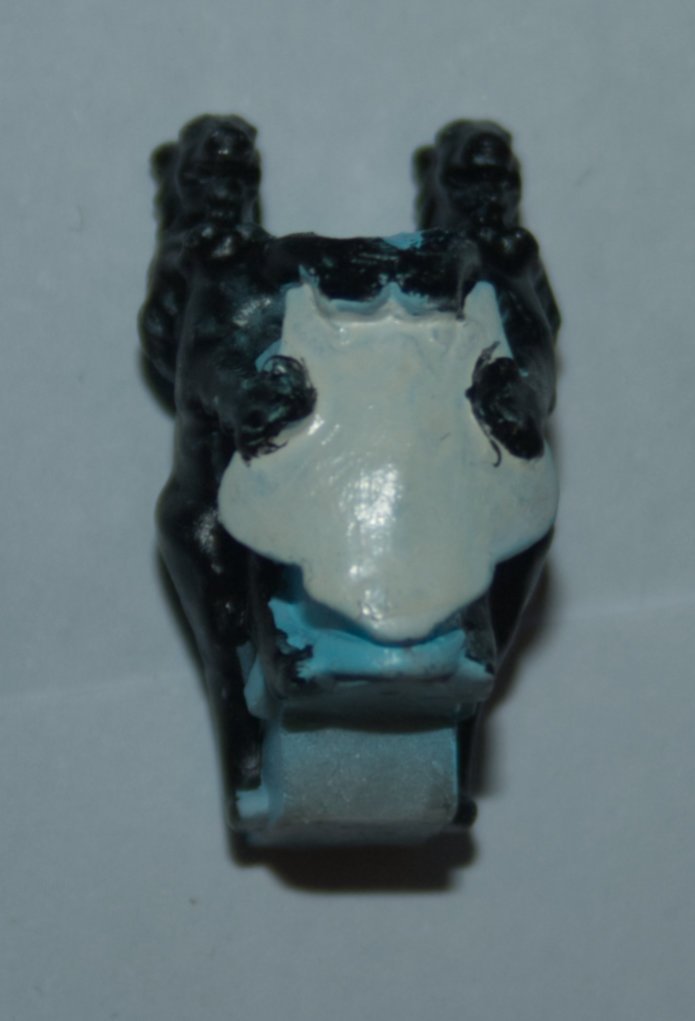
I made some home printed decals to add the Duke of Kingston's arms to significant parts of the yacht: To the stern decoration, the figurehead and above the cabin doors. Reflections haven't helped with the photo, rest assured, the lion on the stern decoration has not been decapitated. The duke's shield was a black lion on a white (silver) field scattered with red cinquefoils. Conveniently, the supporters were also black lions. Since the yacht was made for the duchess, I've presumed she would use the duchy arms, rather than anything inherited through her father. The lion is loosely based on Fig 284 in Fox-Davies A COMPLETE GUIDE TO HERALDRY (link: https://www.gutenberg.org/files/41617/41617-h/41617-h.htm#page179). The cinquefoils are distorted stars.


-
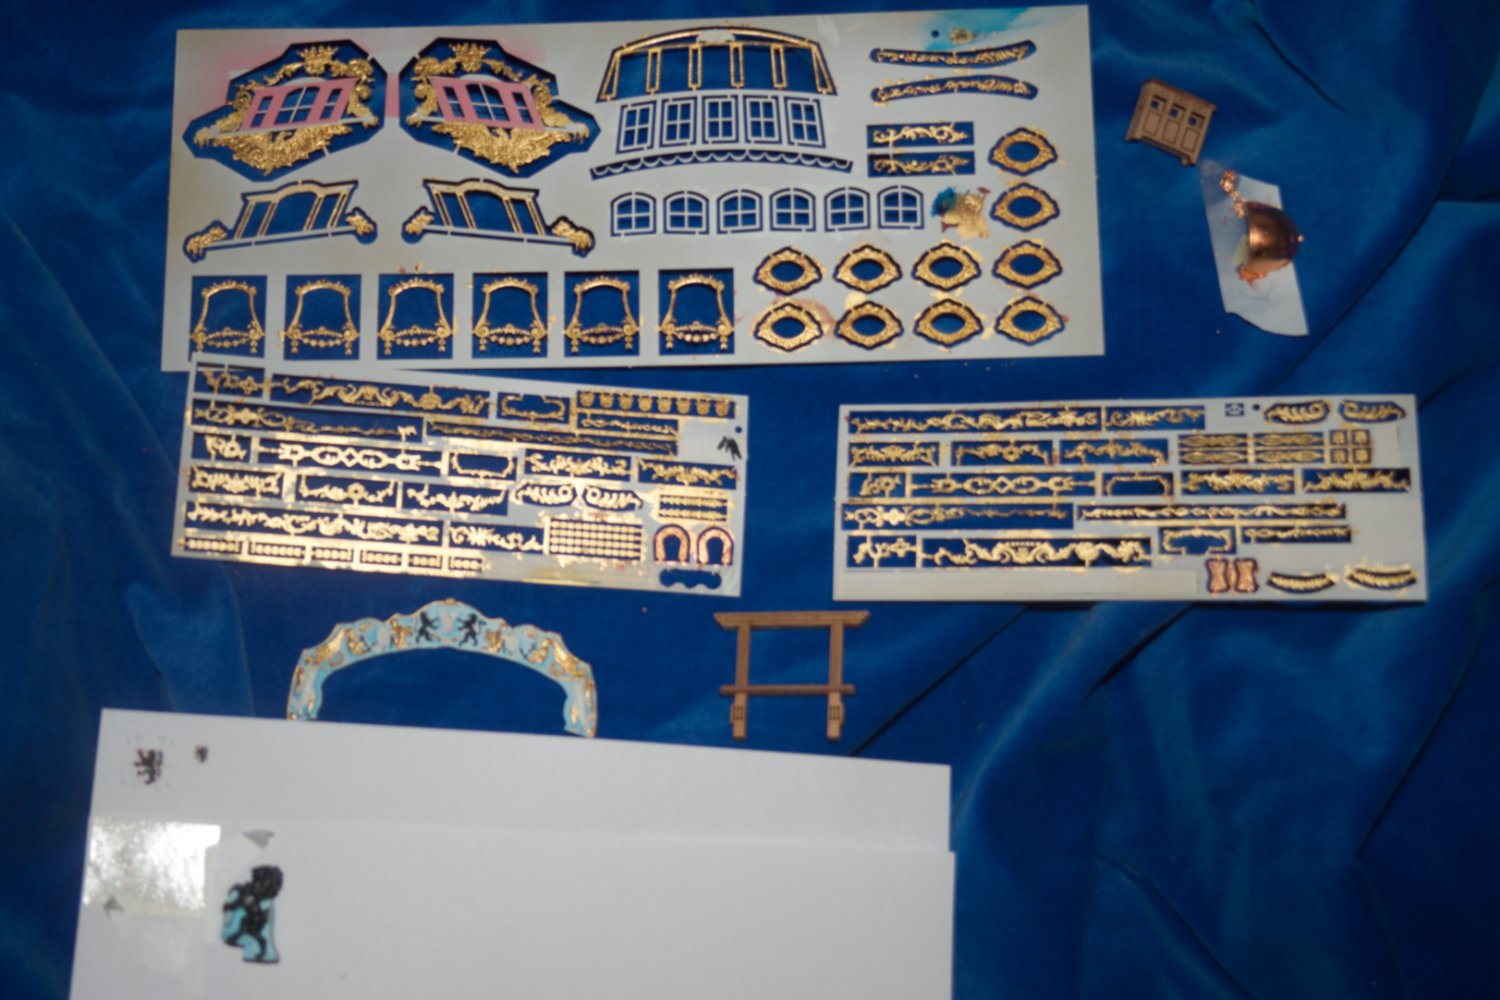
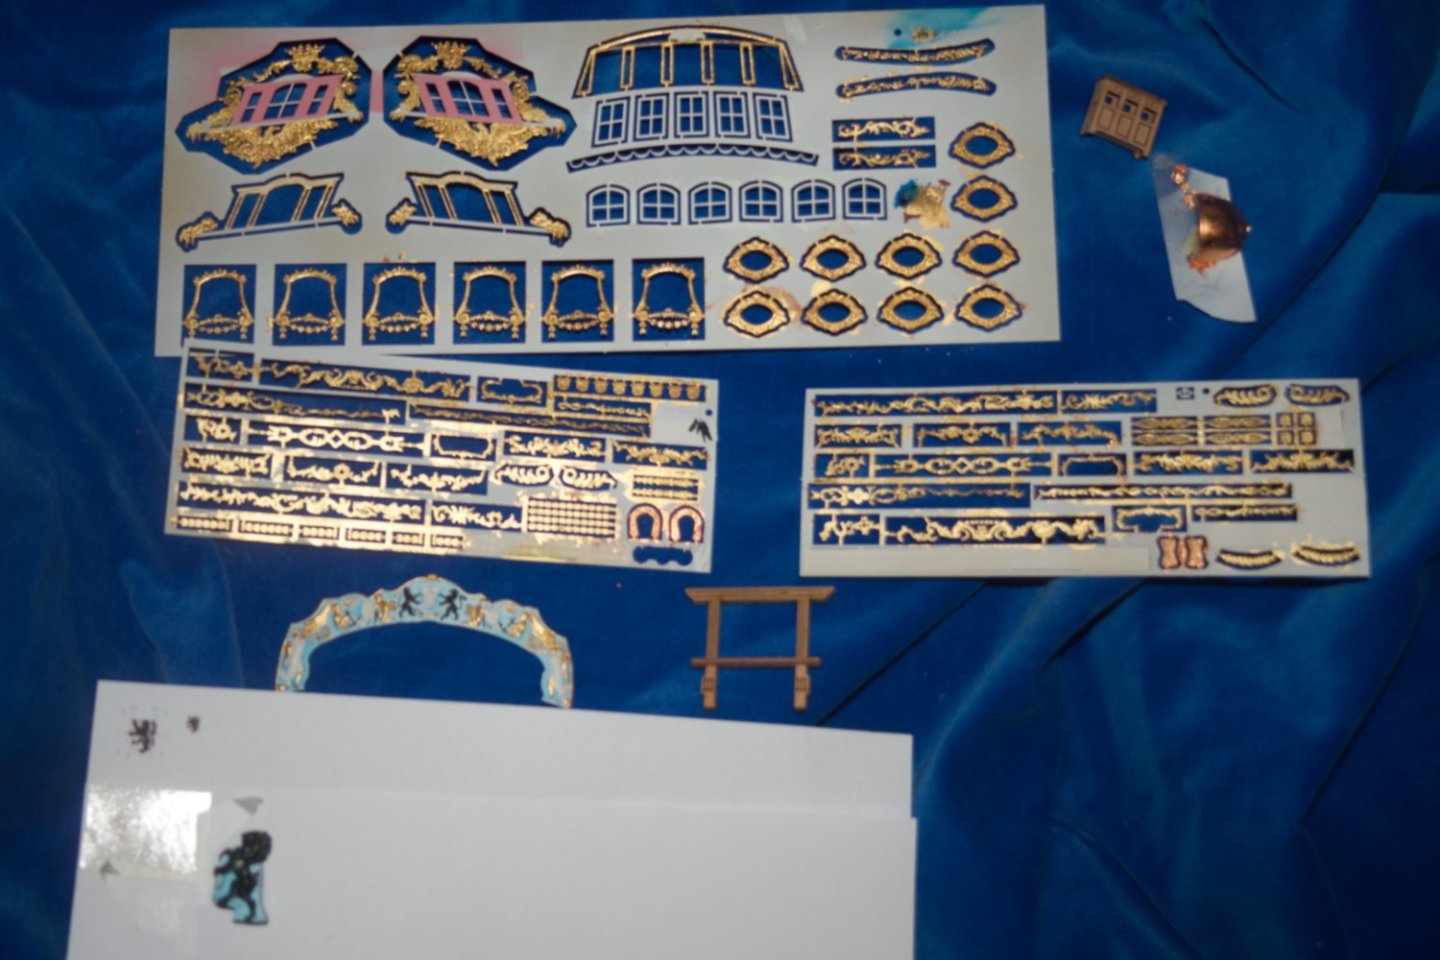
Gilding the Lily ... Or, no lilies. I removed the fleur-de-lis on the DoK's figurehead and on the stern decoration, and much gilding was applied (at least applied on the sprue/fret). Blurred, but detail shots will (may) follow. This is mostly gold leaf on an acrylic gold size. These I found surprisingly easy to use. My previous experience has been with silver leaf on oil size, and, while it worked well, that was noticeably more difficult in practice. Why gold leaf? I find most gold paints become disappointing over time; gold is very resistant to tarnish. Detail showing stern decoration. The central shield will be re-worked, but the rest may be passable. Above the stern decoration, you can see some of the ship's side decor. The red brown here is size (note, traditional water gilding often uses a red/brown bole). The figurehead This came with a knight's helm, which was removed; my intent is to replace it with a ducal coronet. (My interpretation of the DoK plans is that a coronet was to be used). The shield is, again, work in progress. Along with the gold leaf, I've applied some copper leaf to the quarter deck dome, (and to the horse shoe plates and fish plates). The deck dome, standing on some tape to aid painting/handling, is seen here with the ship's binnacle. Copper will tarnish in time, and I should give it some protection.

-
I was wondering when 18C child labour would come up. What age was Aubrey when he went to sea? I have him, in my head, at about 12 years old, but that may be a minimum age?