
TJM
-
Posts
362 -
Joined
-
Last visited
Content Type
Profiles
Forums
Gallery
Events
Everything posted by TJM
-
Thanks Ronald, much appreciated! It is a good point about not using too many different colours, to have some consistency. My though was that one will simulate a raw wood deck, the other a painted colour, so perhaps they should be different? But perhaps that does not really matter, and perhaps the two are too close in colour to register as different if both were on the model... Hmmm..
- 148 replies
-
- 2
-

-
- Christiania
- Vanguard Models
- (and 1 more)
-
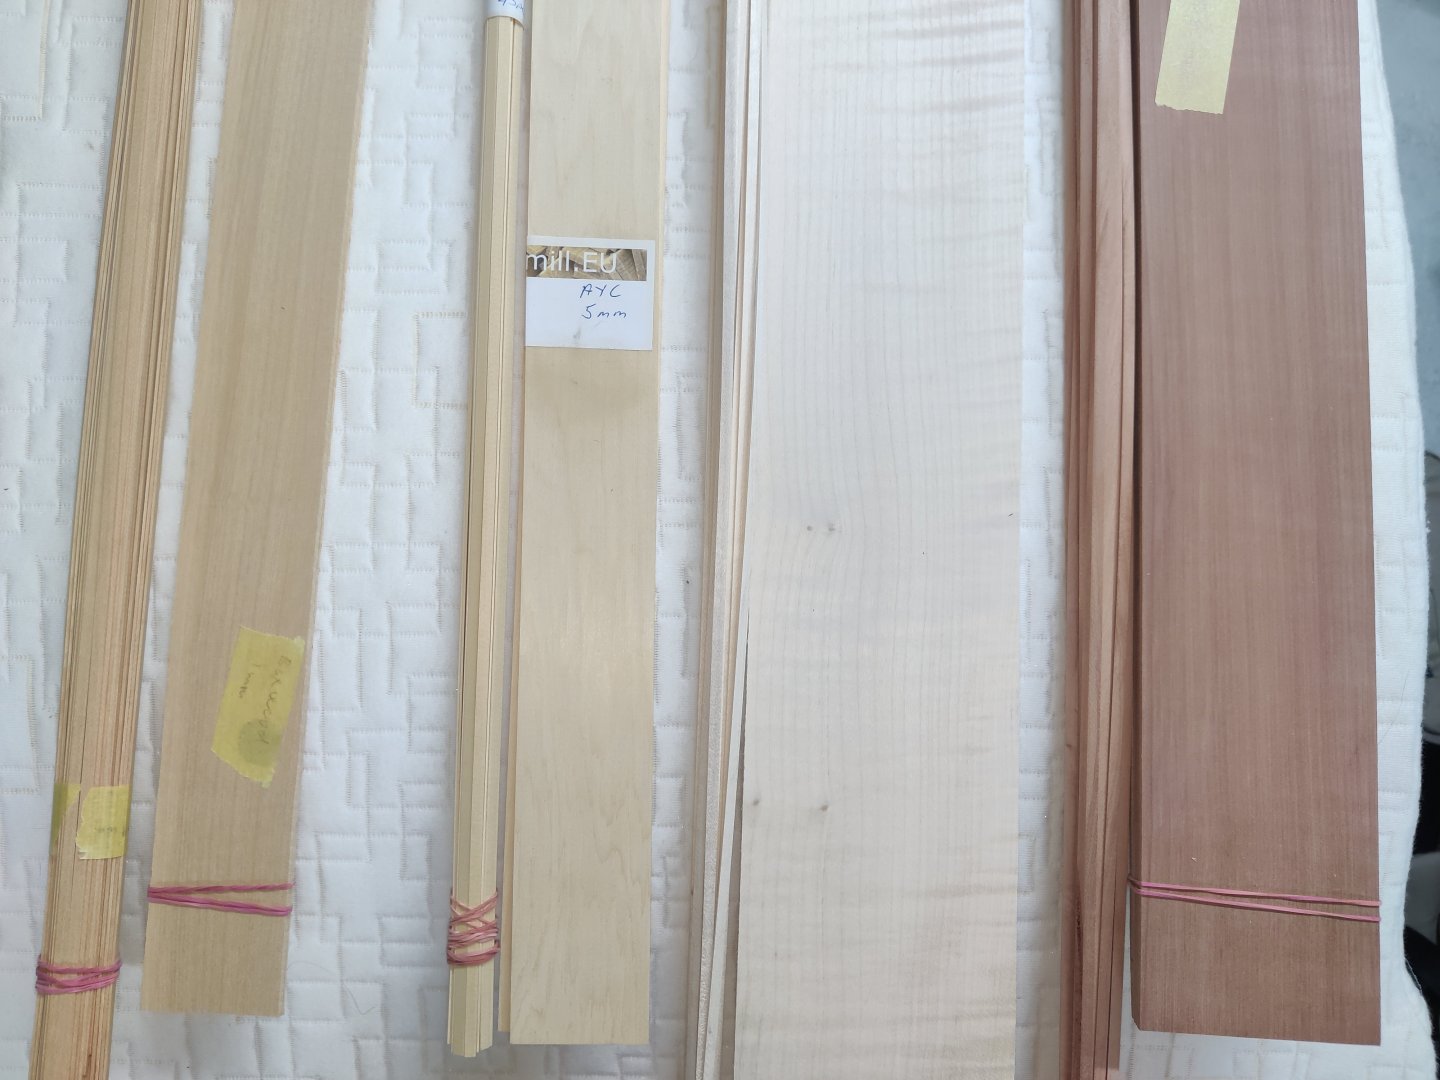
Log entry 12 - thinking about colours and the second planking While I am sanding the first planking layer, I am thinking about how to proceed with the second layer. I have to plan ahead as I have some ideas I want to try: I prefer to keep as much as possible unpainted to show the wood itself. But I also want as much of the colour sheme as possible to show on the final model! With flirt, I elected to not paint below the waterline, and I am very happy with that deisicion. But it does mean that the overall look is not as 'accurate'. My solution to this for this build is going to be use of different woods for different parts of the planking. Below the waterline, I intend to plank with maple - it is quite light in colour (I have only come across american holly that is whiter) and I can get thin sheets of it for laser cutting parts as well. And this is needed, as I need to make the keel and rudder parts below the waterline out of this as well! This will be a small mini project in itself. I am confident that i can do this, though it will take a bit of time, I am more worried about achieving a nice waterline between the pear and the maple. I will also use 12 cm strips to simulate planks as I did with Flirt and as @Ronald-V has done so successfully on his Sphinx. This will make it much easier to handle I hope. I intend to do the following: when a pear plank crosses the waterline, that I will mark on the inner planking, I will cut it off along the line, make a maple piece that is identical to the cutoff and the attatch both. Hopefully I can keep the waterline straight enough like this, but I do fret about this. If I manage, I think the end result could look great. Perhaps I should make a test on a small section of another model first... Apart from this, I also want to emulate the yellow band around the gunports with a yellow wood, either boxwood or alaskan yellow cedar. I will make the swivel gun supports out of the same material (eventually...). Here are a a comparison between the woods: The order is: Boxwood, Alaskan Yellow Cedar, Maple and Pear I am leaning towards AYC for the yellow band but perhaps it is too light and not actually yellow enough? I will probably end up using boxwood for the quarterdeck and forecastle planking - I would be happy enough with the laser cut deck, but my forecasle deck shape is probably too changed to use that, and then I would like everything to be consistent. But I could use boxwood for both the deck and the bulwark stripe. Any opinions of what would be best to use here? I am also considering how far down to plank with Boxwood/AYC, and have tried to make a colour mockup of two options: I am leaning towards the last one, so that there will only be yellow between upper wale and the decorated part, but I am not sure. Again, any opinions? BR TJM

- 148 replies
-
- 4
-
-
- Christiania
- Vanguard Models
- (and 1 more)
-
That joint looks so nice!
-
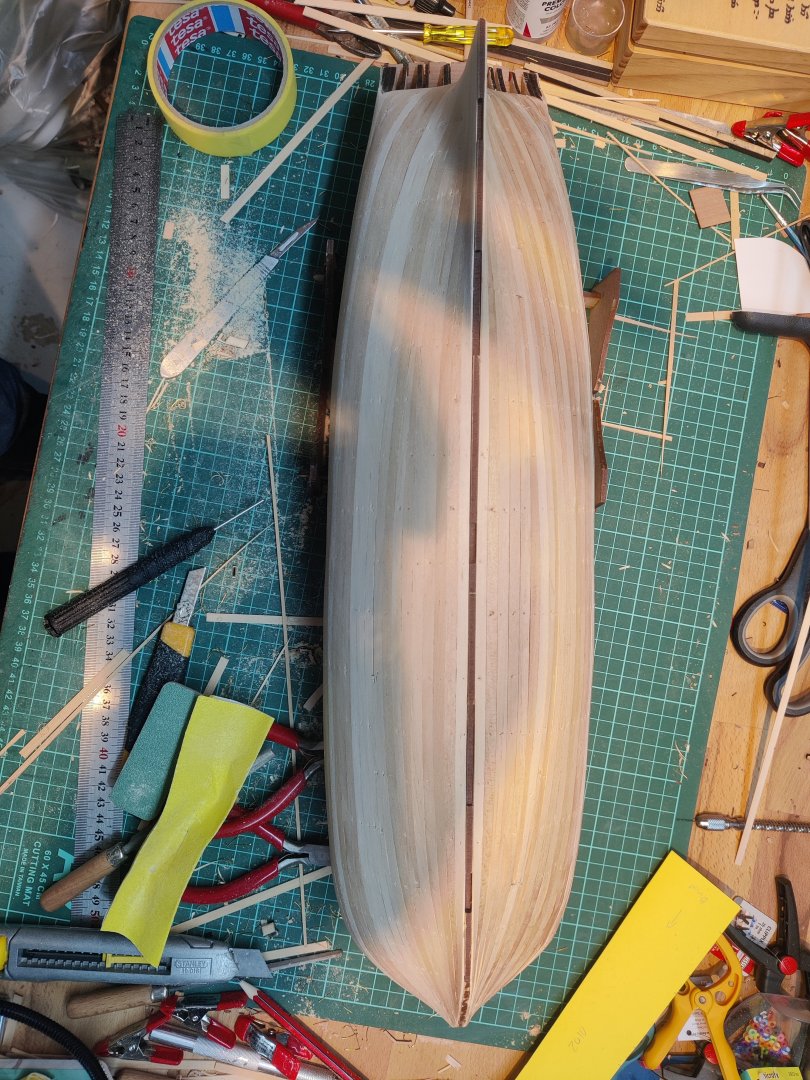
Log entry 11 - first planking layer is done! It took me a while since the last post, mostly because I have not spent very much time actually building, but the first layer of planking is now done! I am quite pleased with the run of the planking and even though it will never be seen, I used stealers to practice that for the next layer, if needed. I spent half an hour making a rough first sanding on one side, just to guage if I had been successful in my modifications to the hull shape, and I am happy to report that everything looks very smooth and straight after just a little sanding 😃. That is a bit of a relief, as it would have been difficult to fix any major issues with that at this point! I have a few thin gaps between planks, especially at the bow that will need a bit of filler, but it is quite minor I think. There are also a few localised dips where I will need a bit of filler, but it seems to be less than I had feared when I did the planking: fewer spots and less pronounced. So overall I am happy at this milestone in the build. Now more sanding, filling and sanding, before I move on to the next steps (which looks like a lot of fun!). BR TJM


- 148 replies
-
- 8
-
-
- Christiania
- Vanguard Models
- (and 1 more)
-
I would also like to help, if there is anything I can do, but we would have to deal with shipping between Denmark and Canada, which may be a bother! But I would be happy to assist!
-
It is looking great! I am surprised at how styrdy my thin mdf parts actually are. But of course some sort of streghtening is needed to prevent mishaps. Are you going to have the parts laser cut? I am asking because then you could use thin plywood bulwark patterns like on th Vanguard Models and similar kits, which will tie everything together. If you could faire the upper part of the hull and add these, I think you would be relatively safe? BR TJM
-
Thanks a lot! I think all in all it has been running over 5 months, so these rapid succession posts does not really show that! I estimate around 30 hours of design work for the Bornholm, so it does take some time!
-
QCAD! For all the design. I work at the target scale of 1:64 as I can then just open the file with the parts laid out in the laser cutter software and make no changes in that program.
-
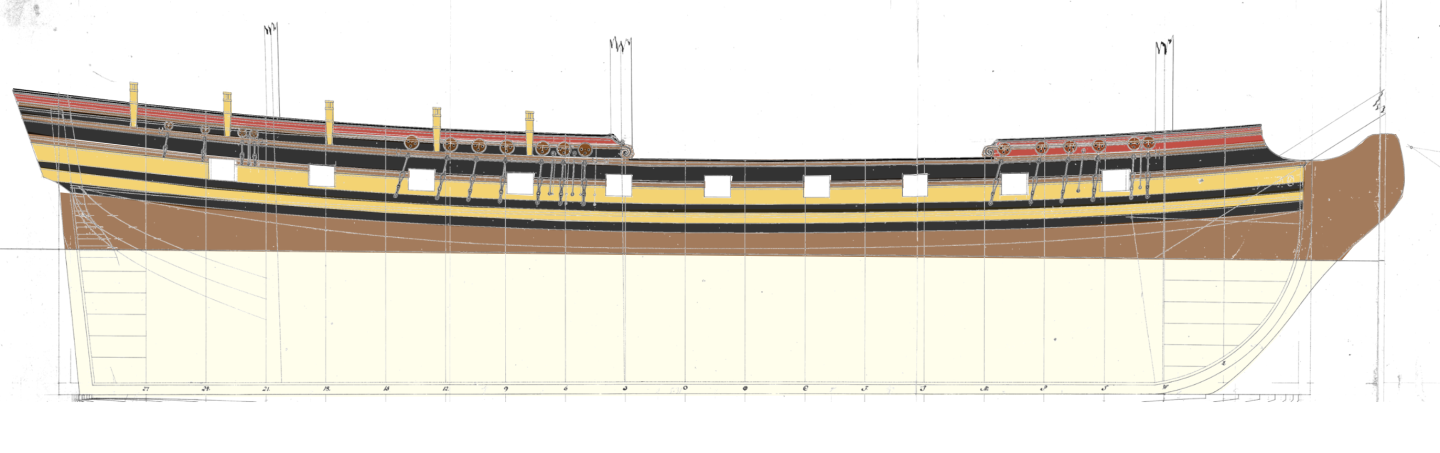
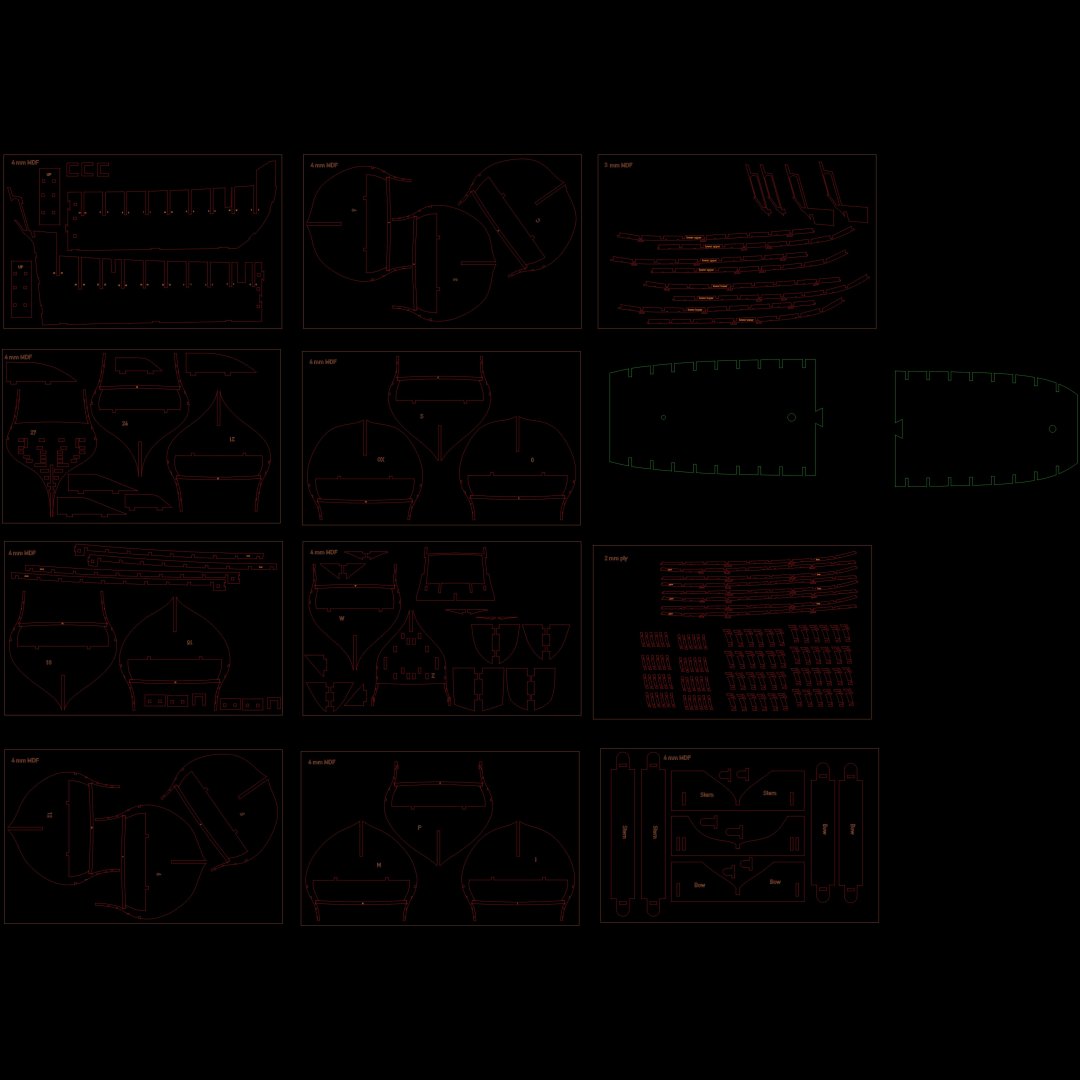
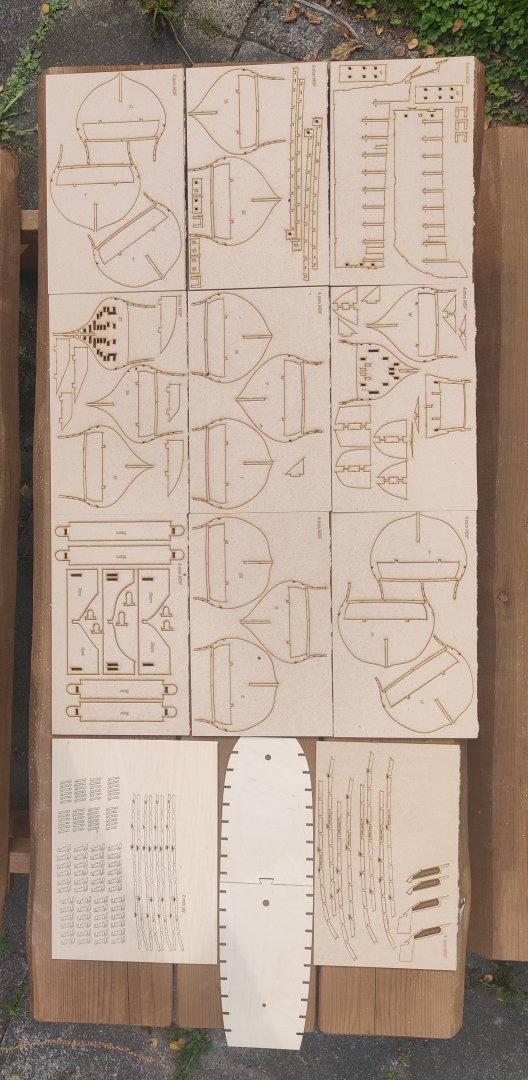
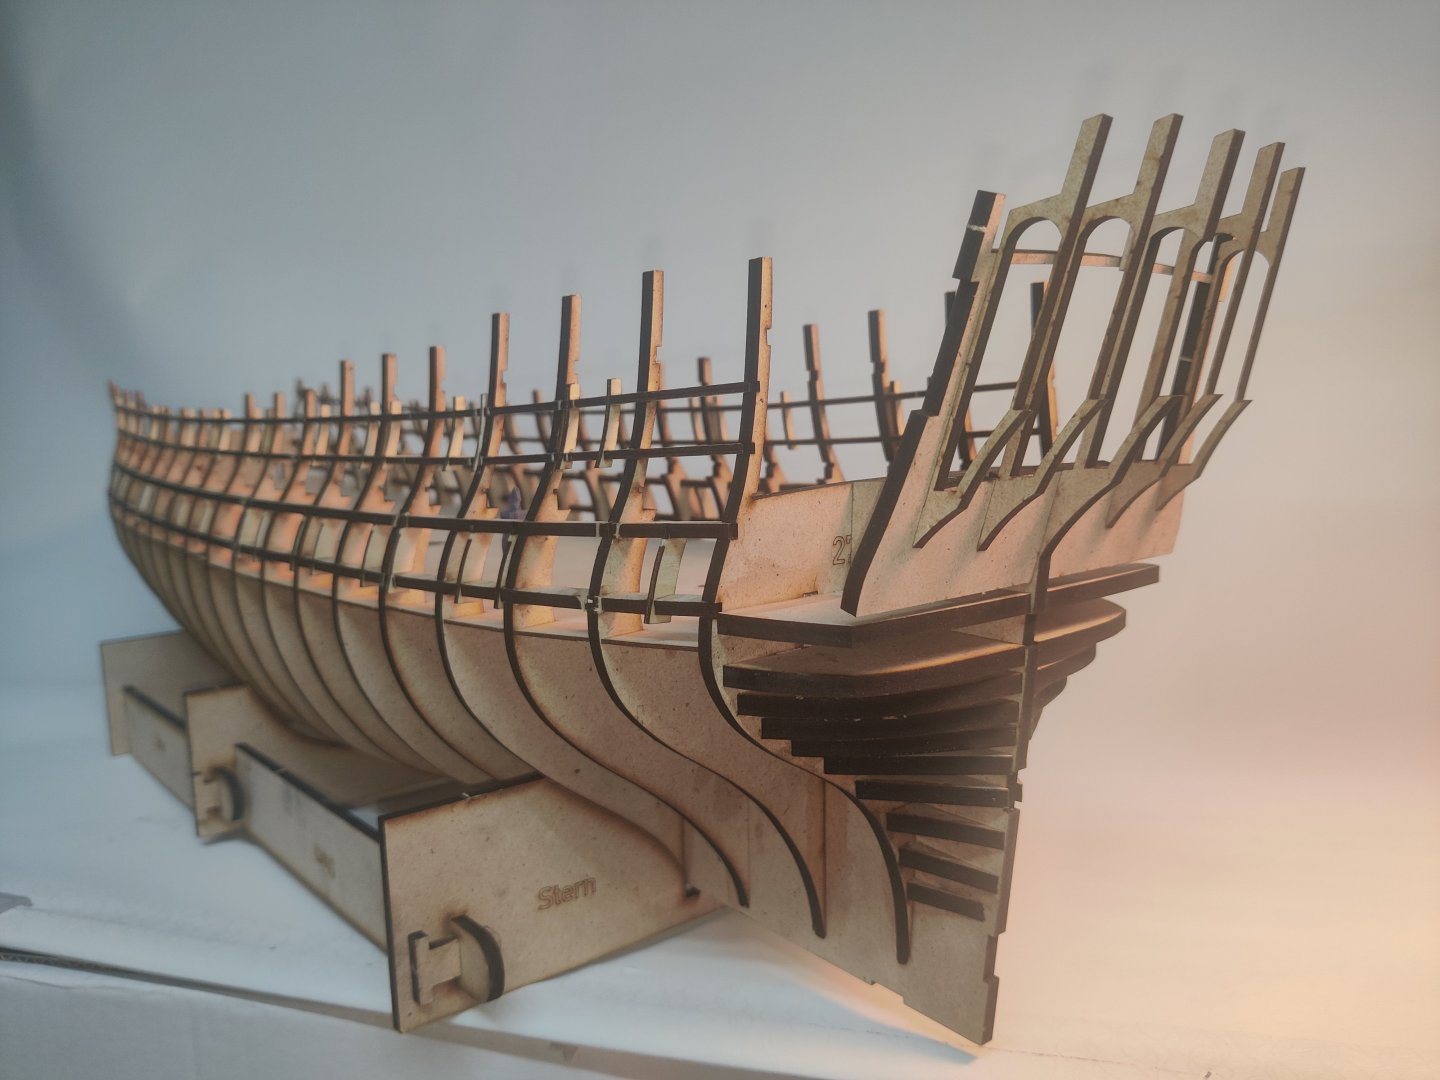
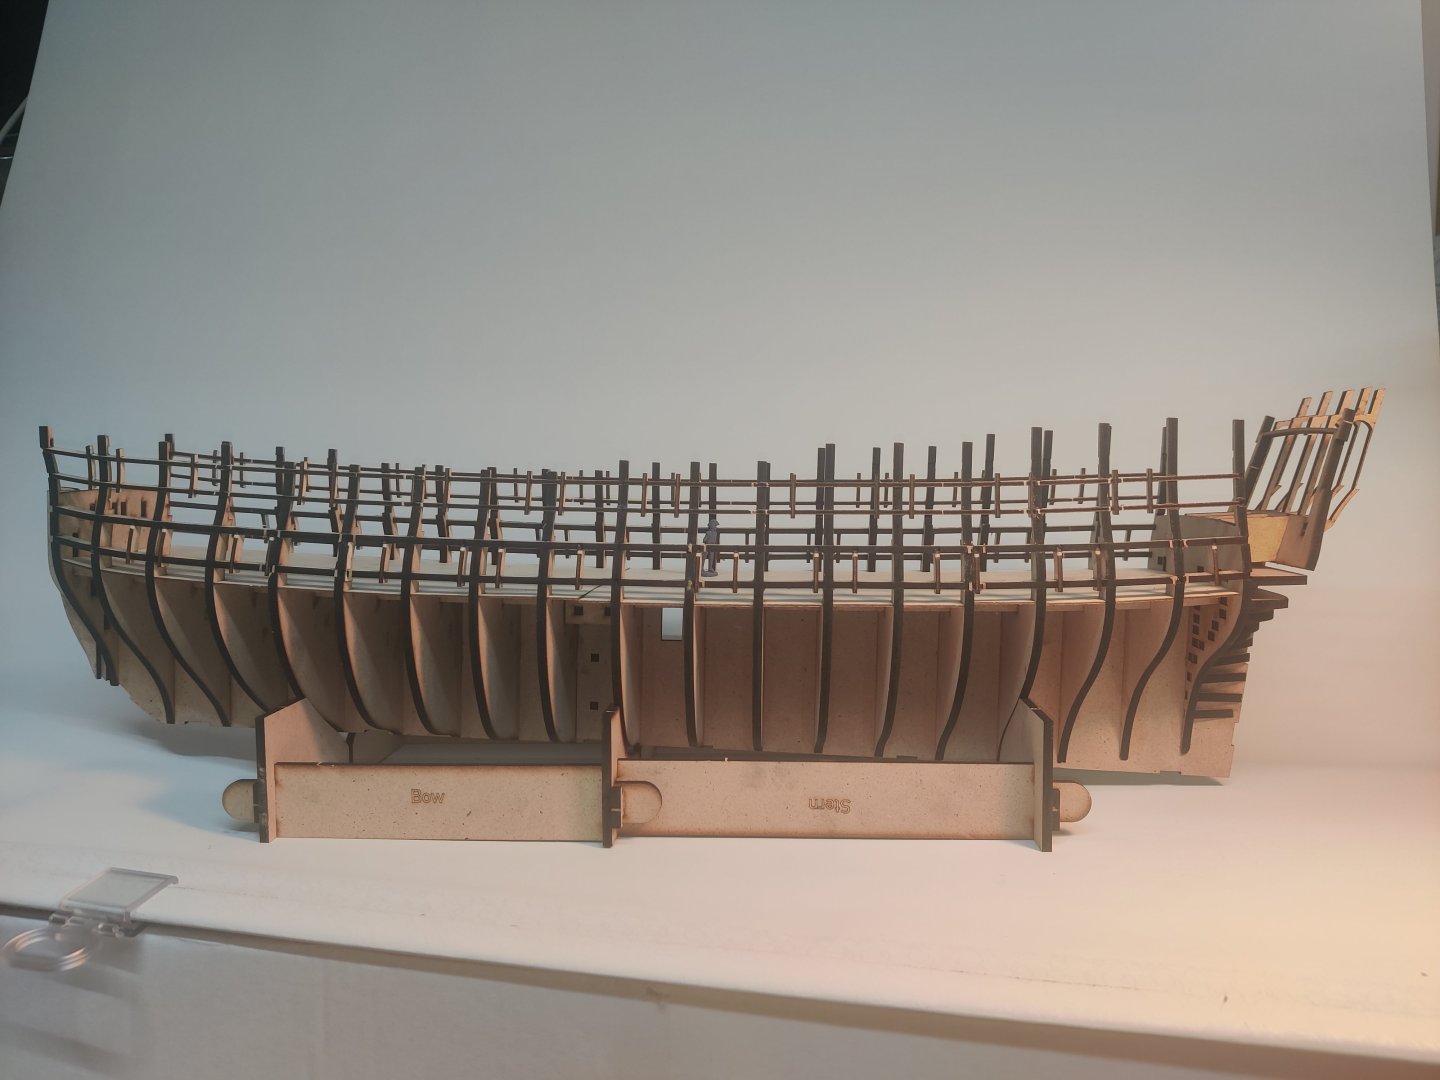
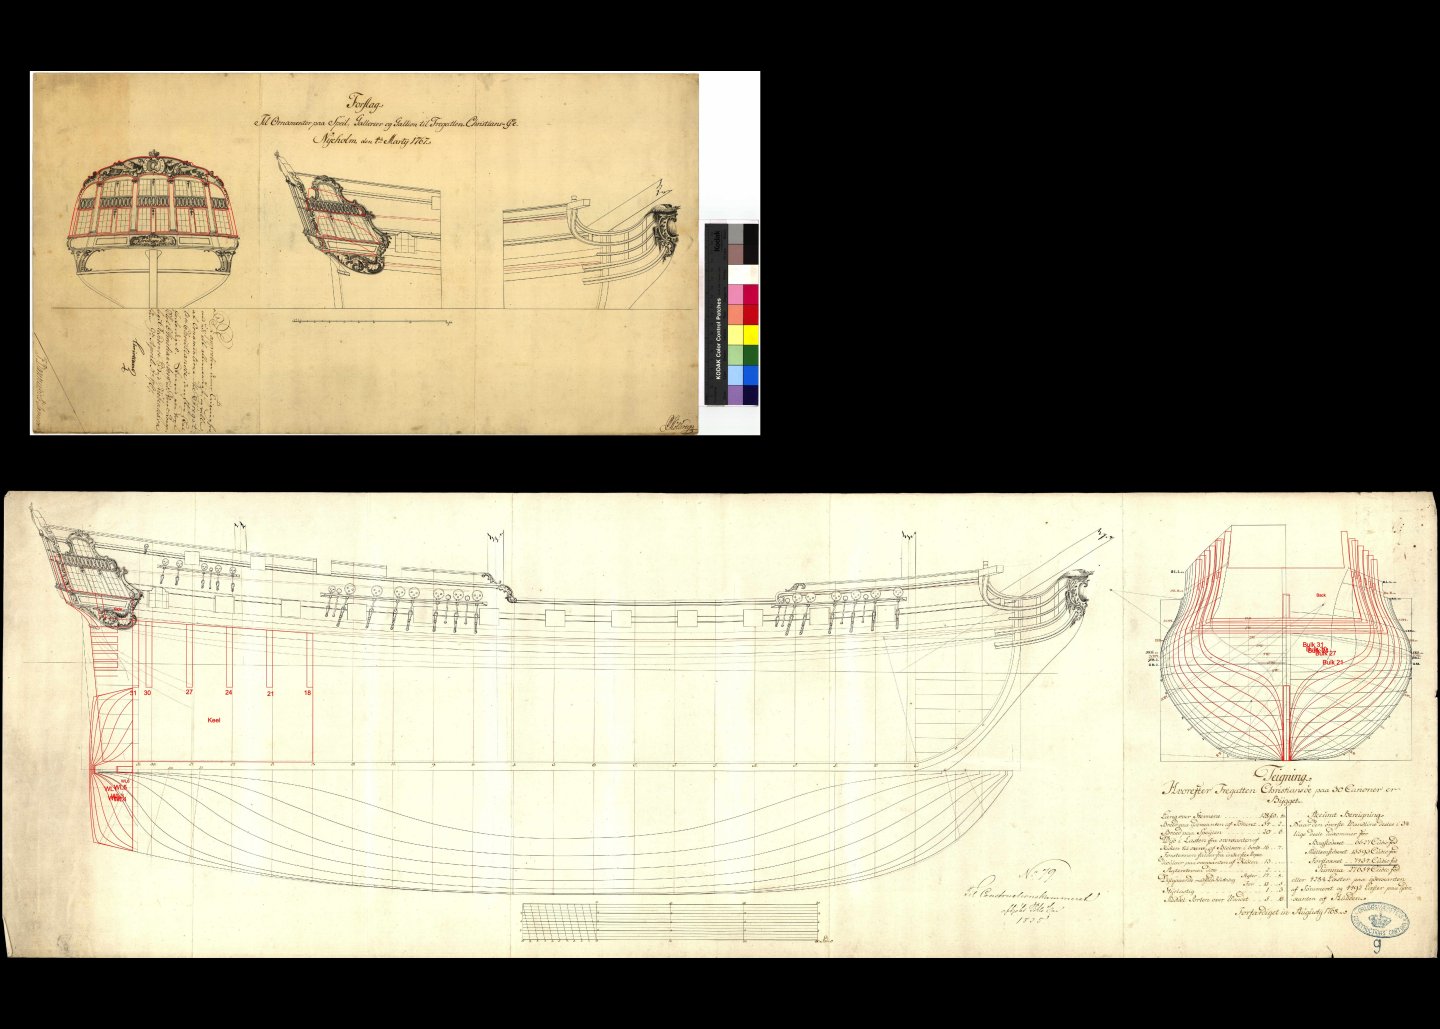
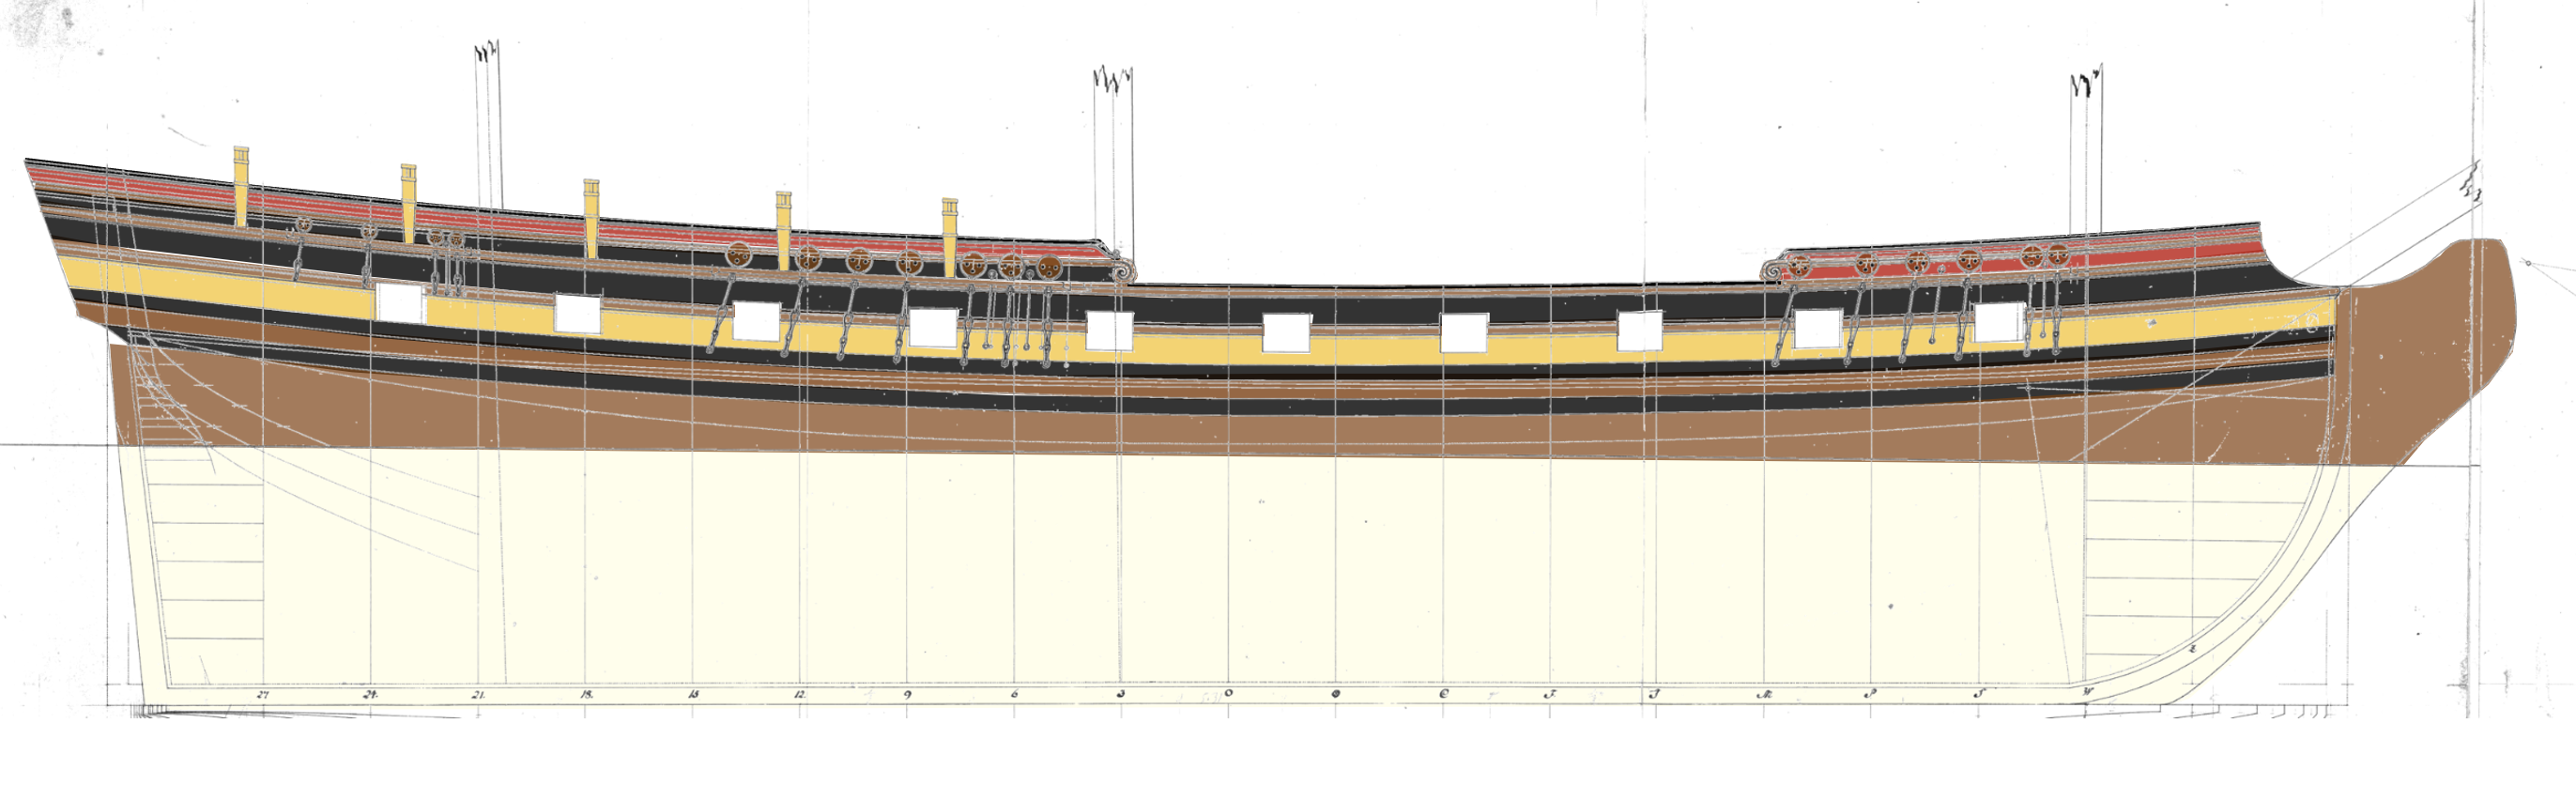
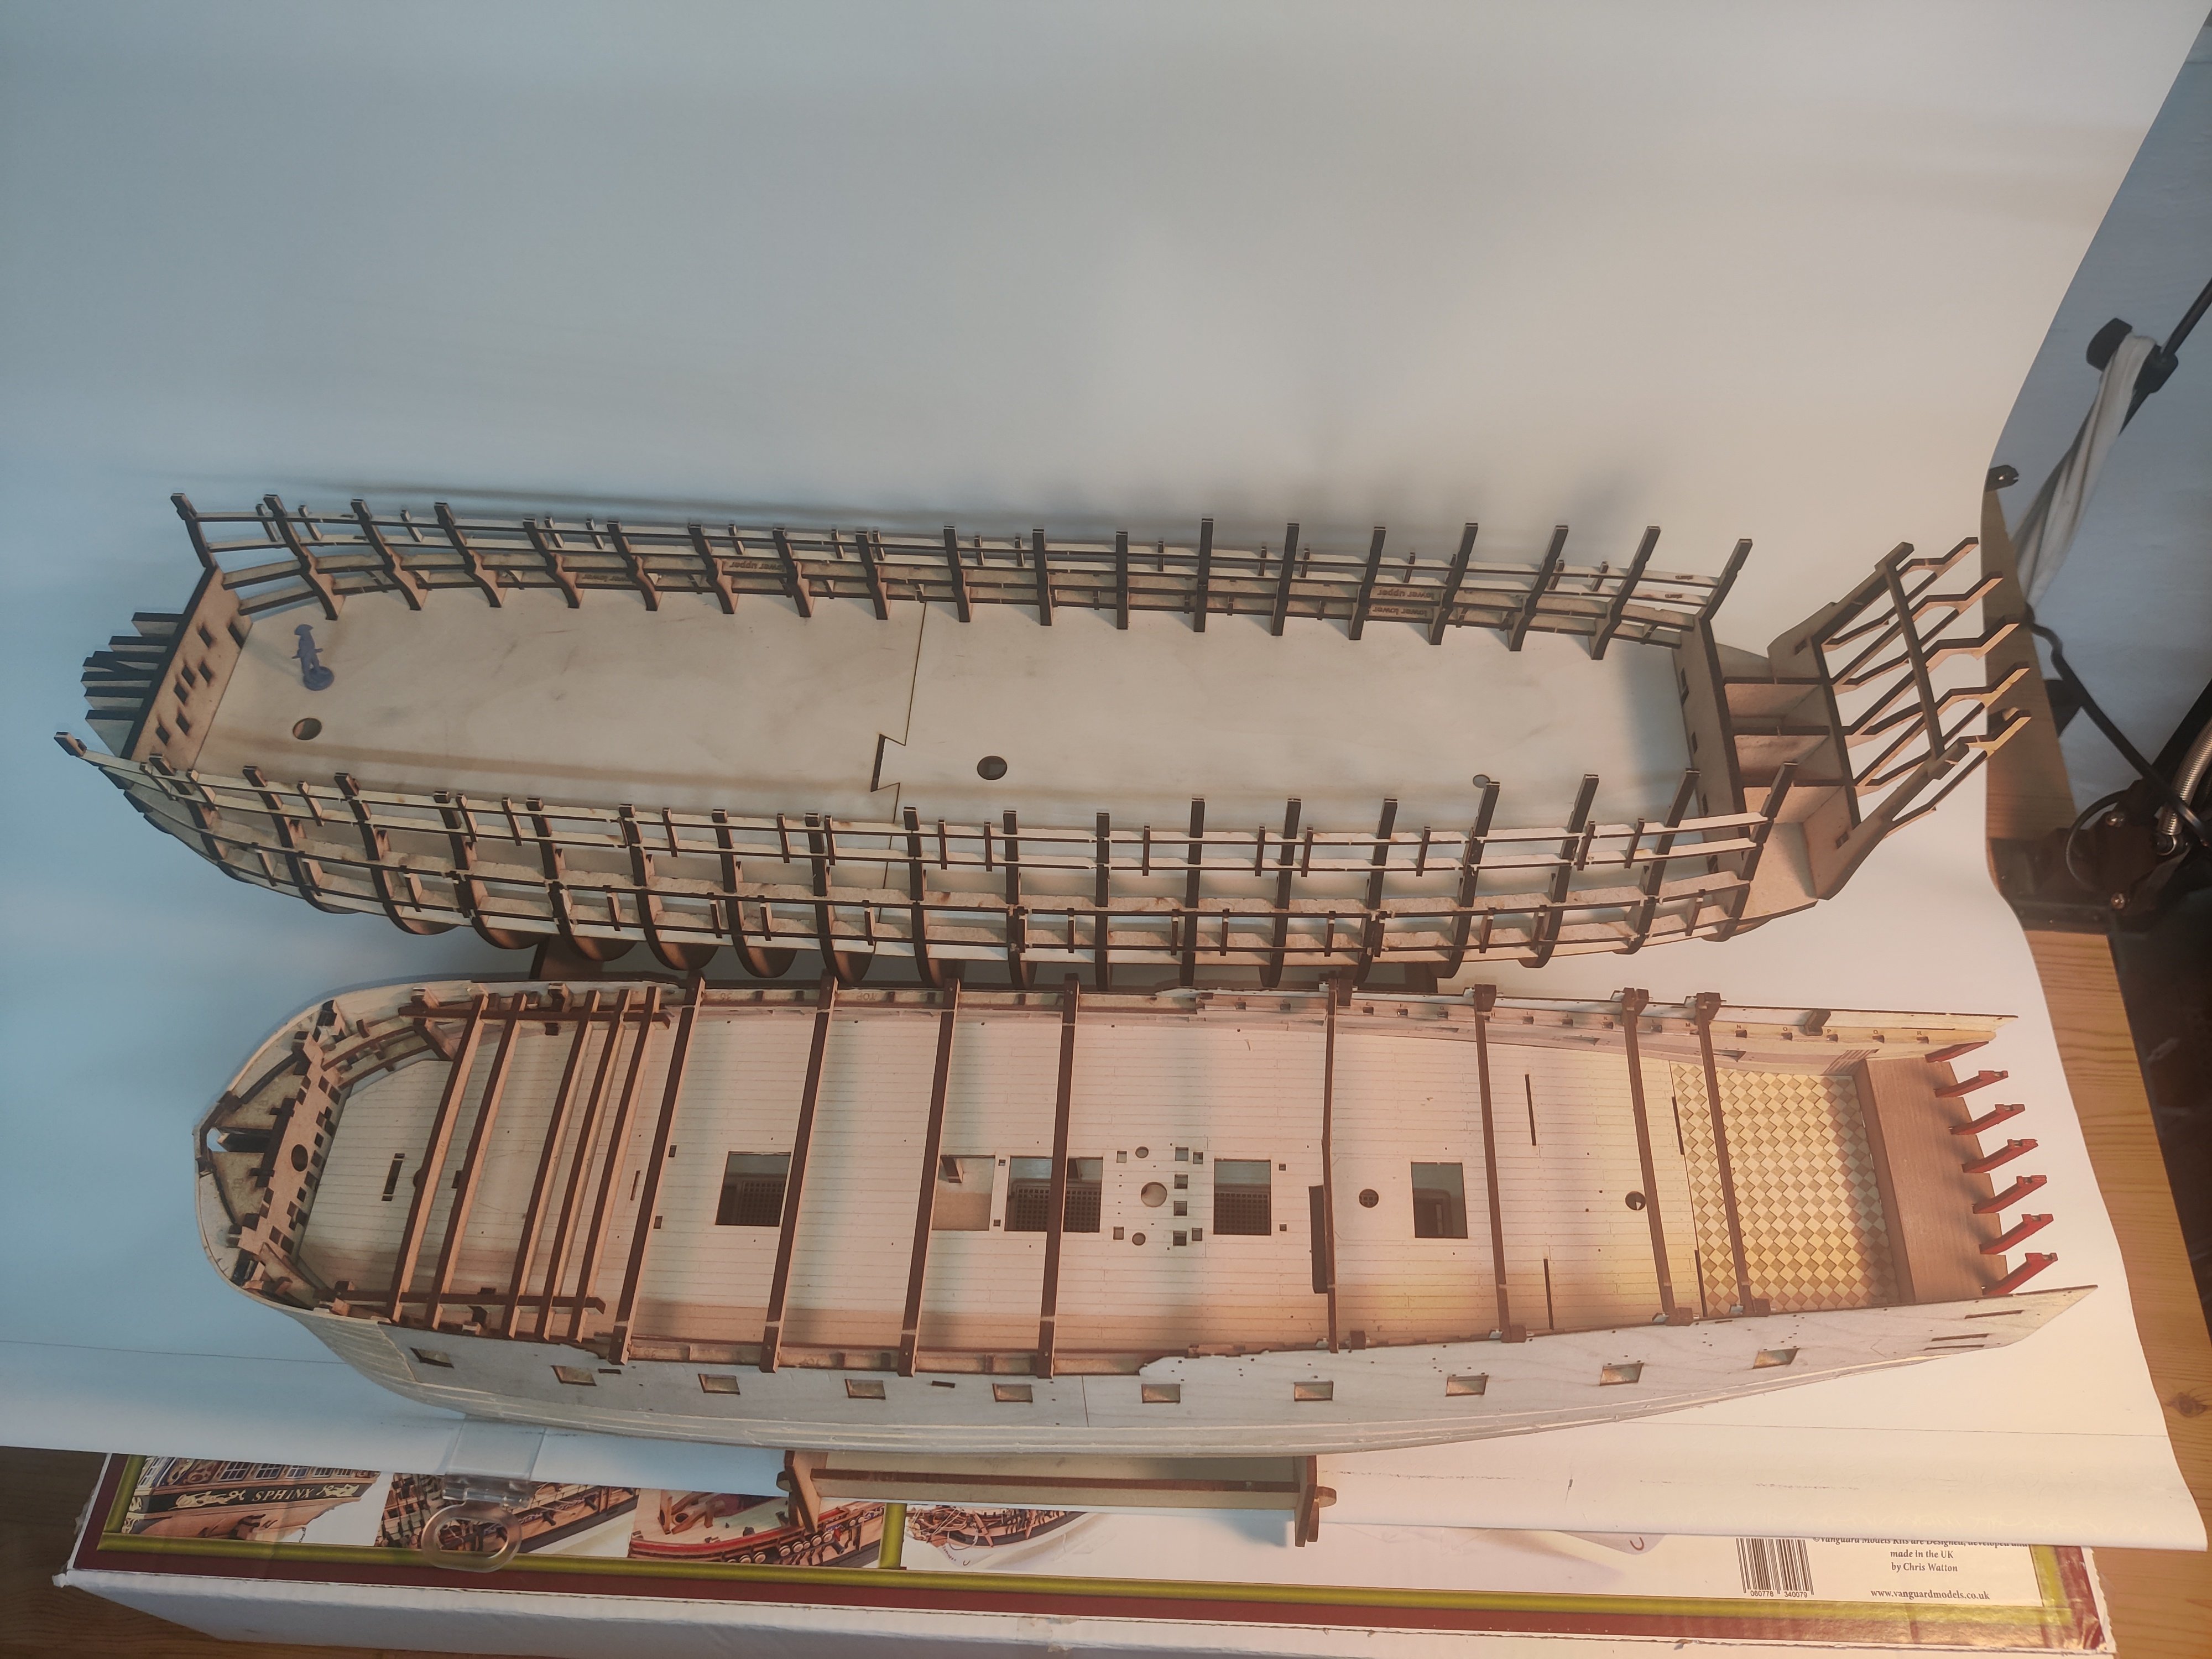
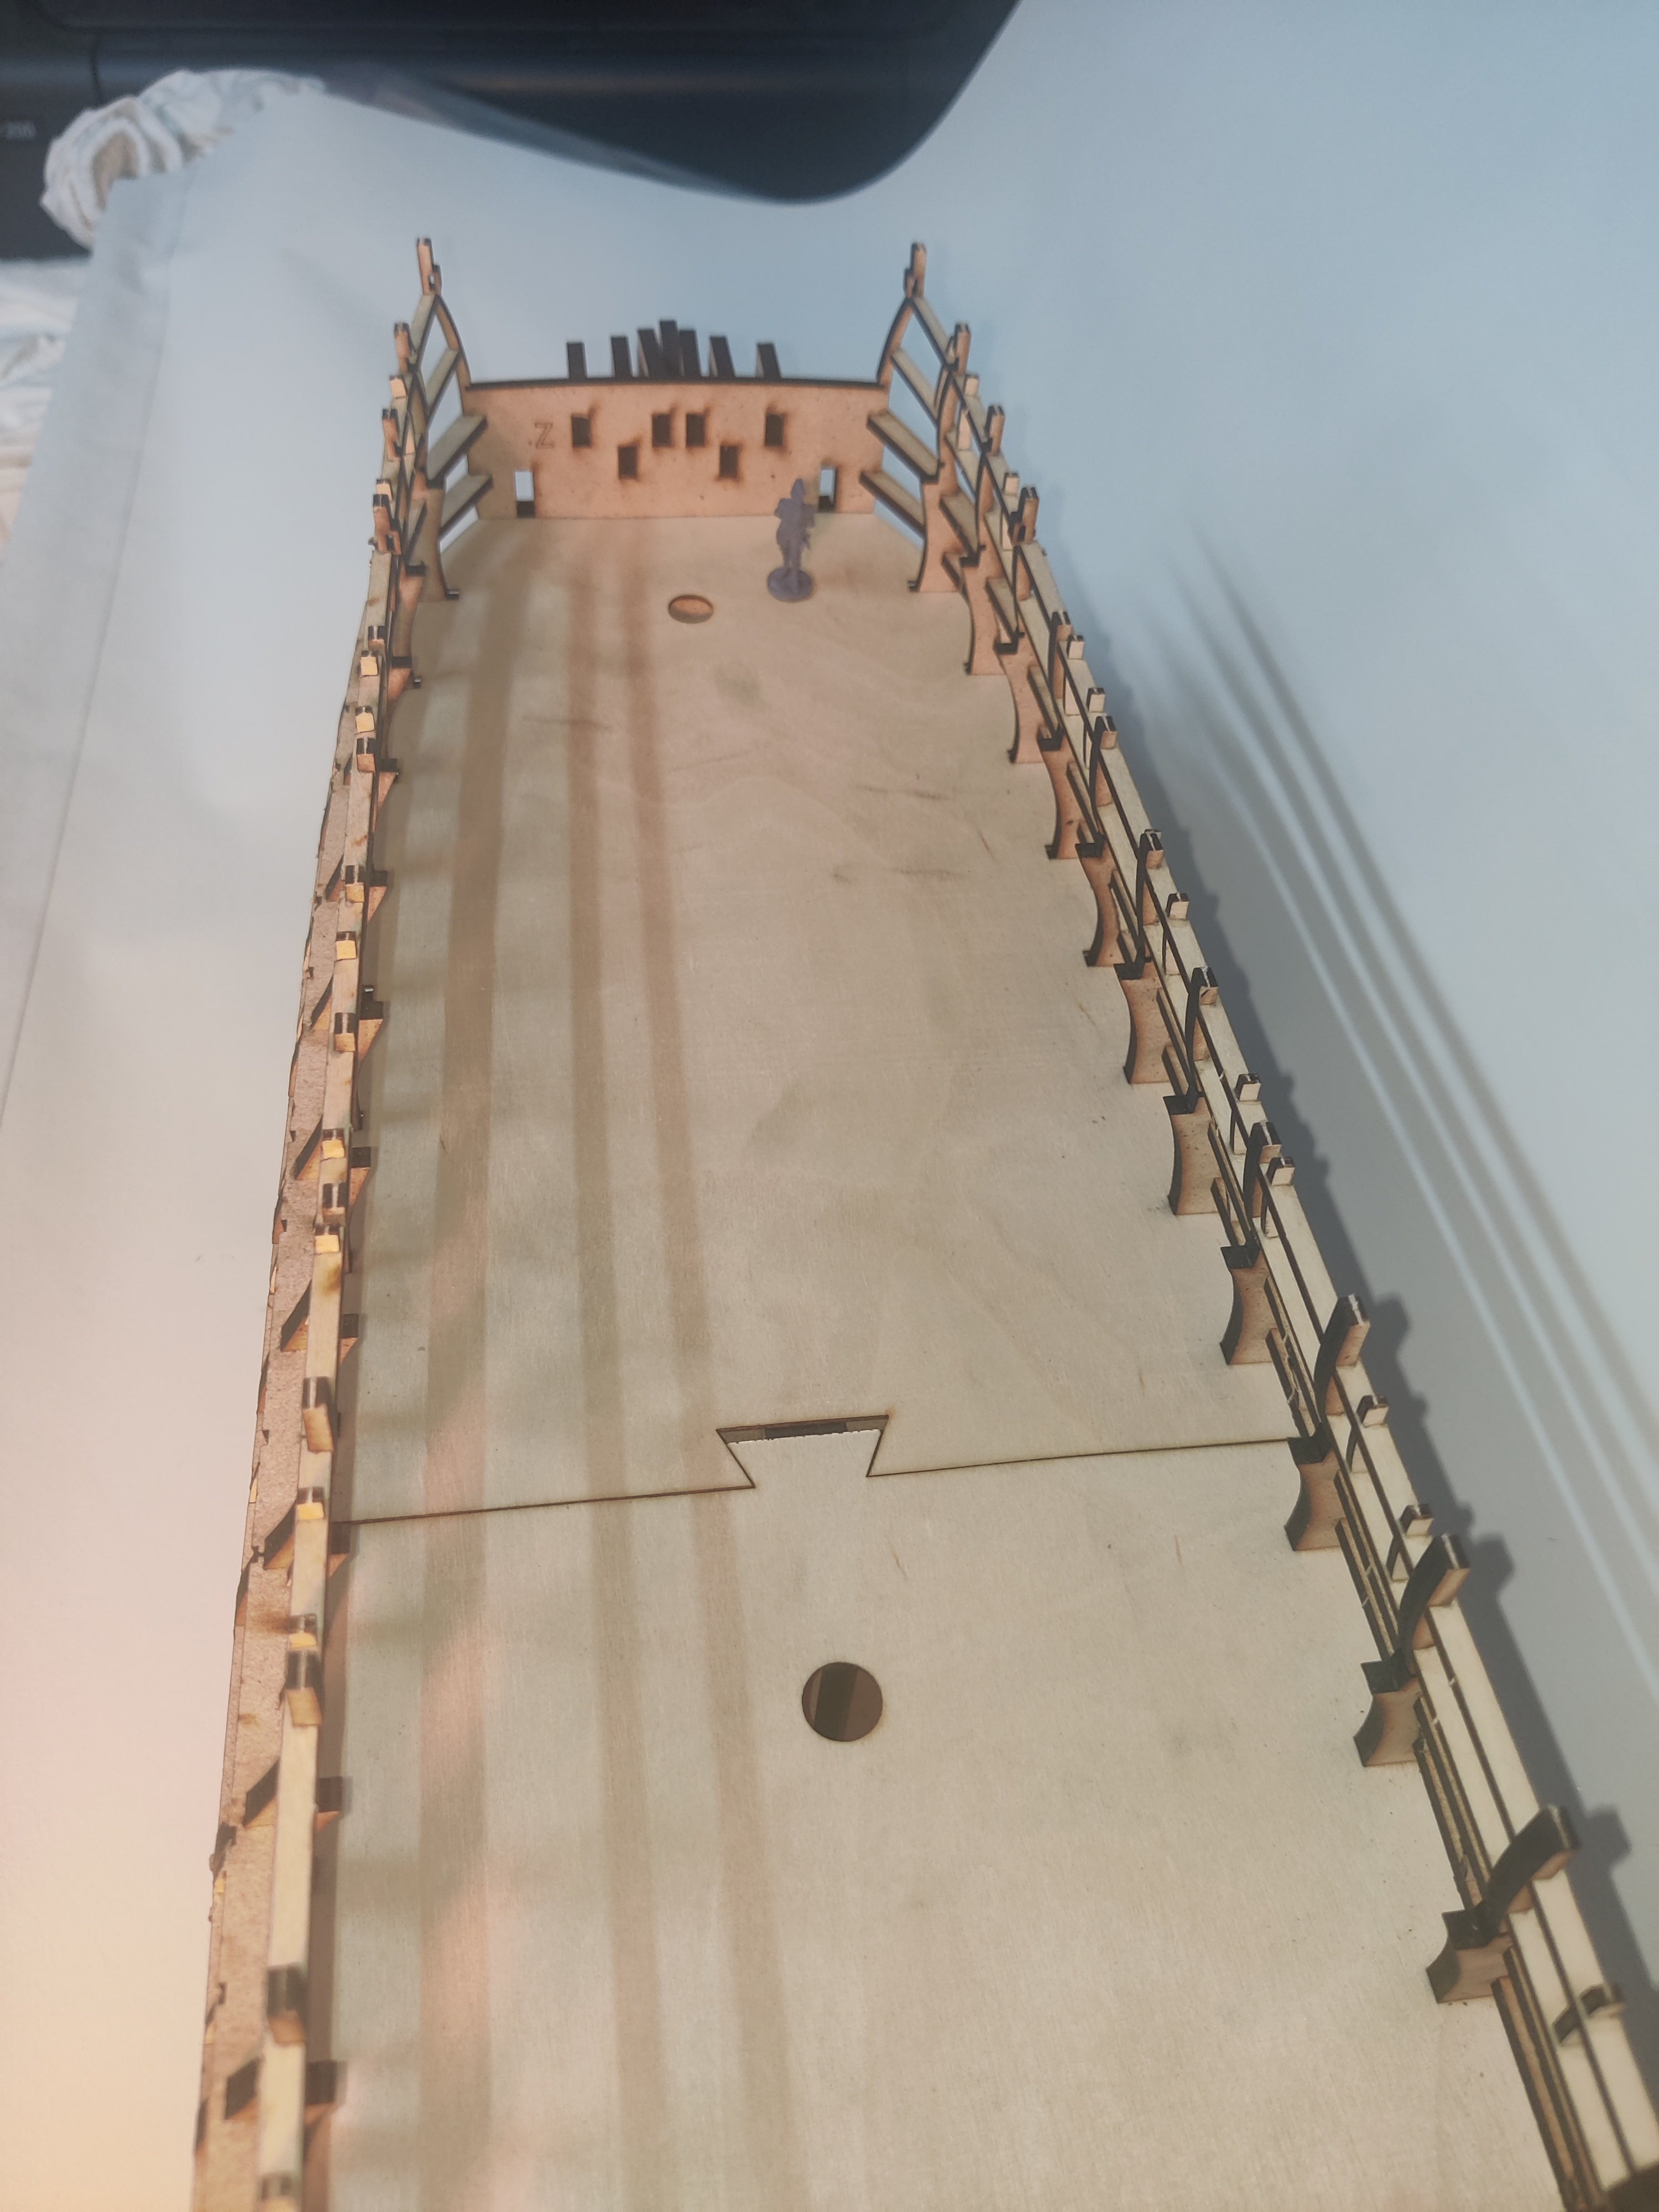
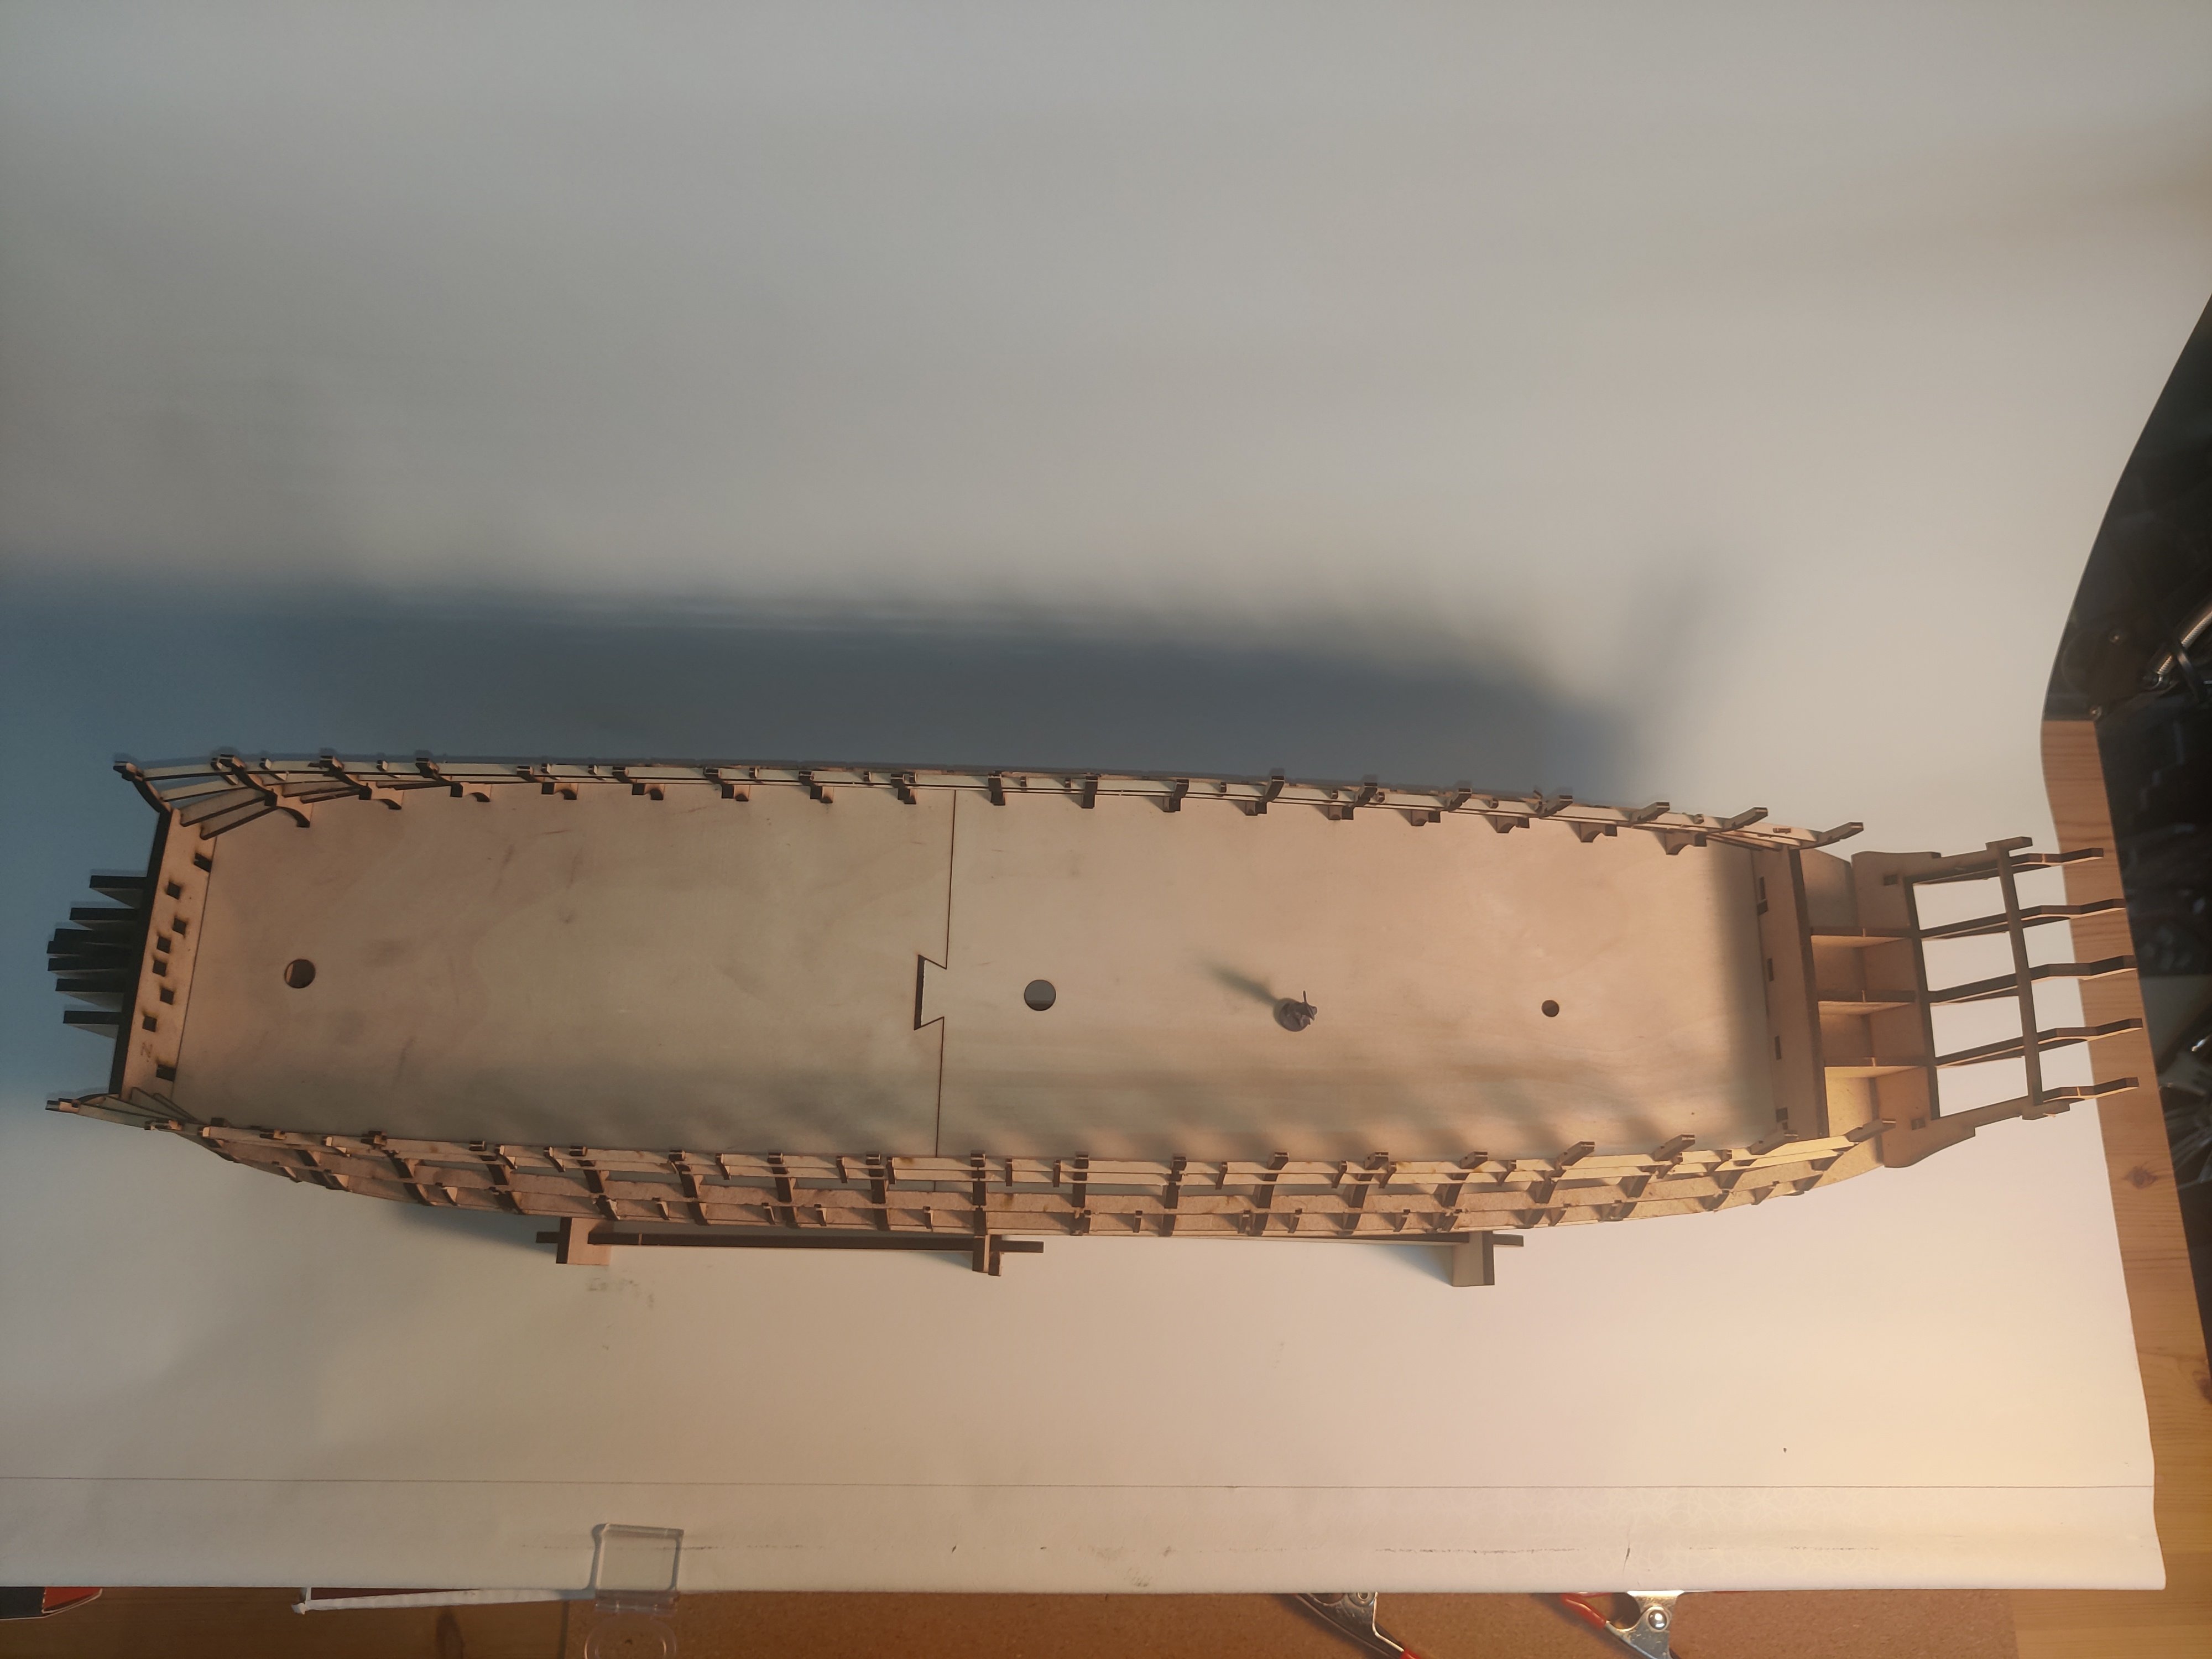
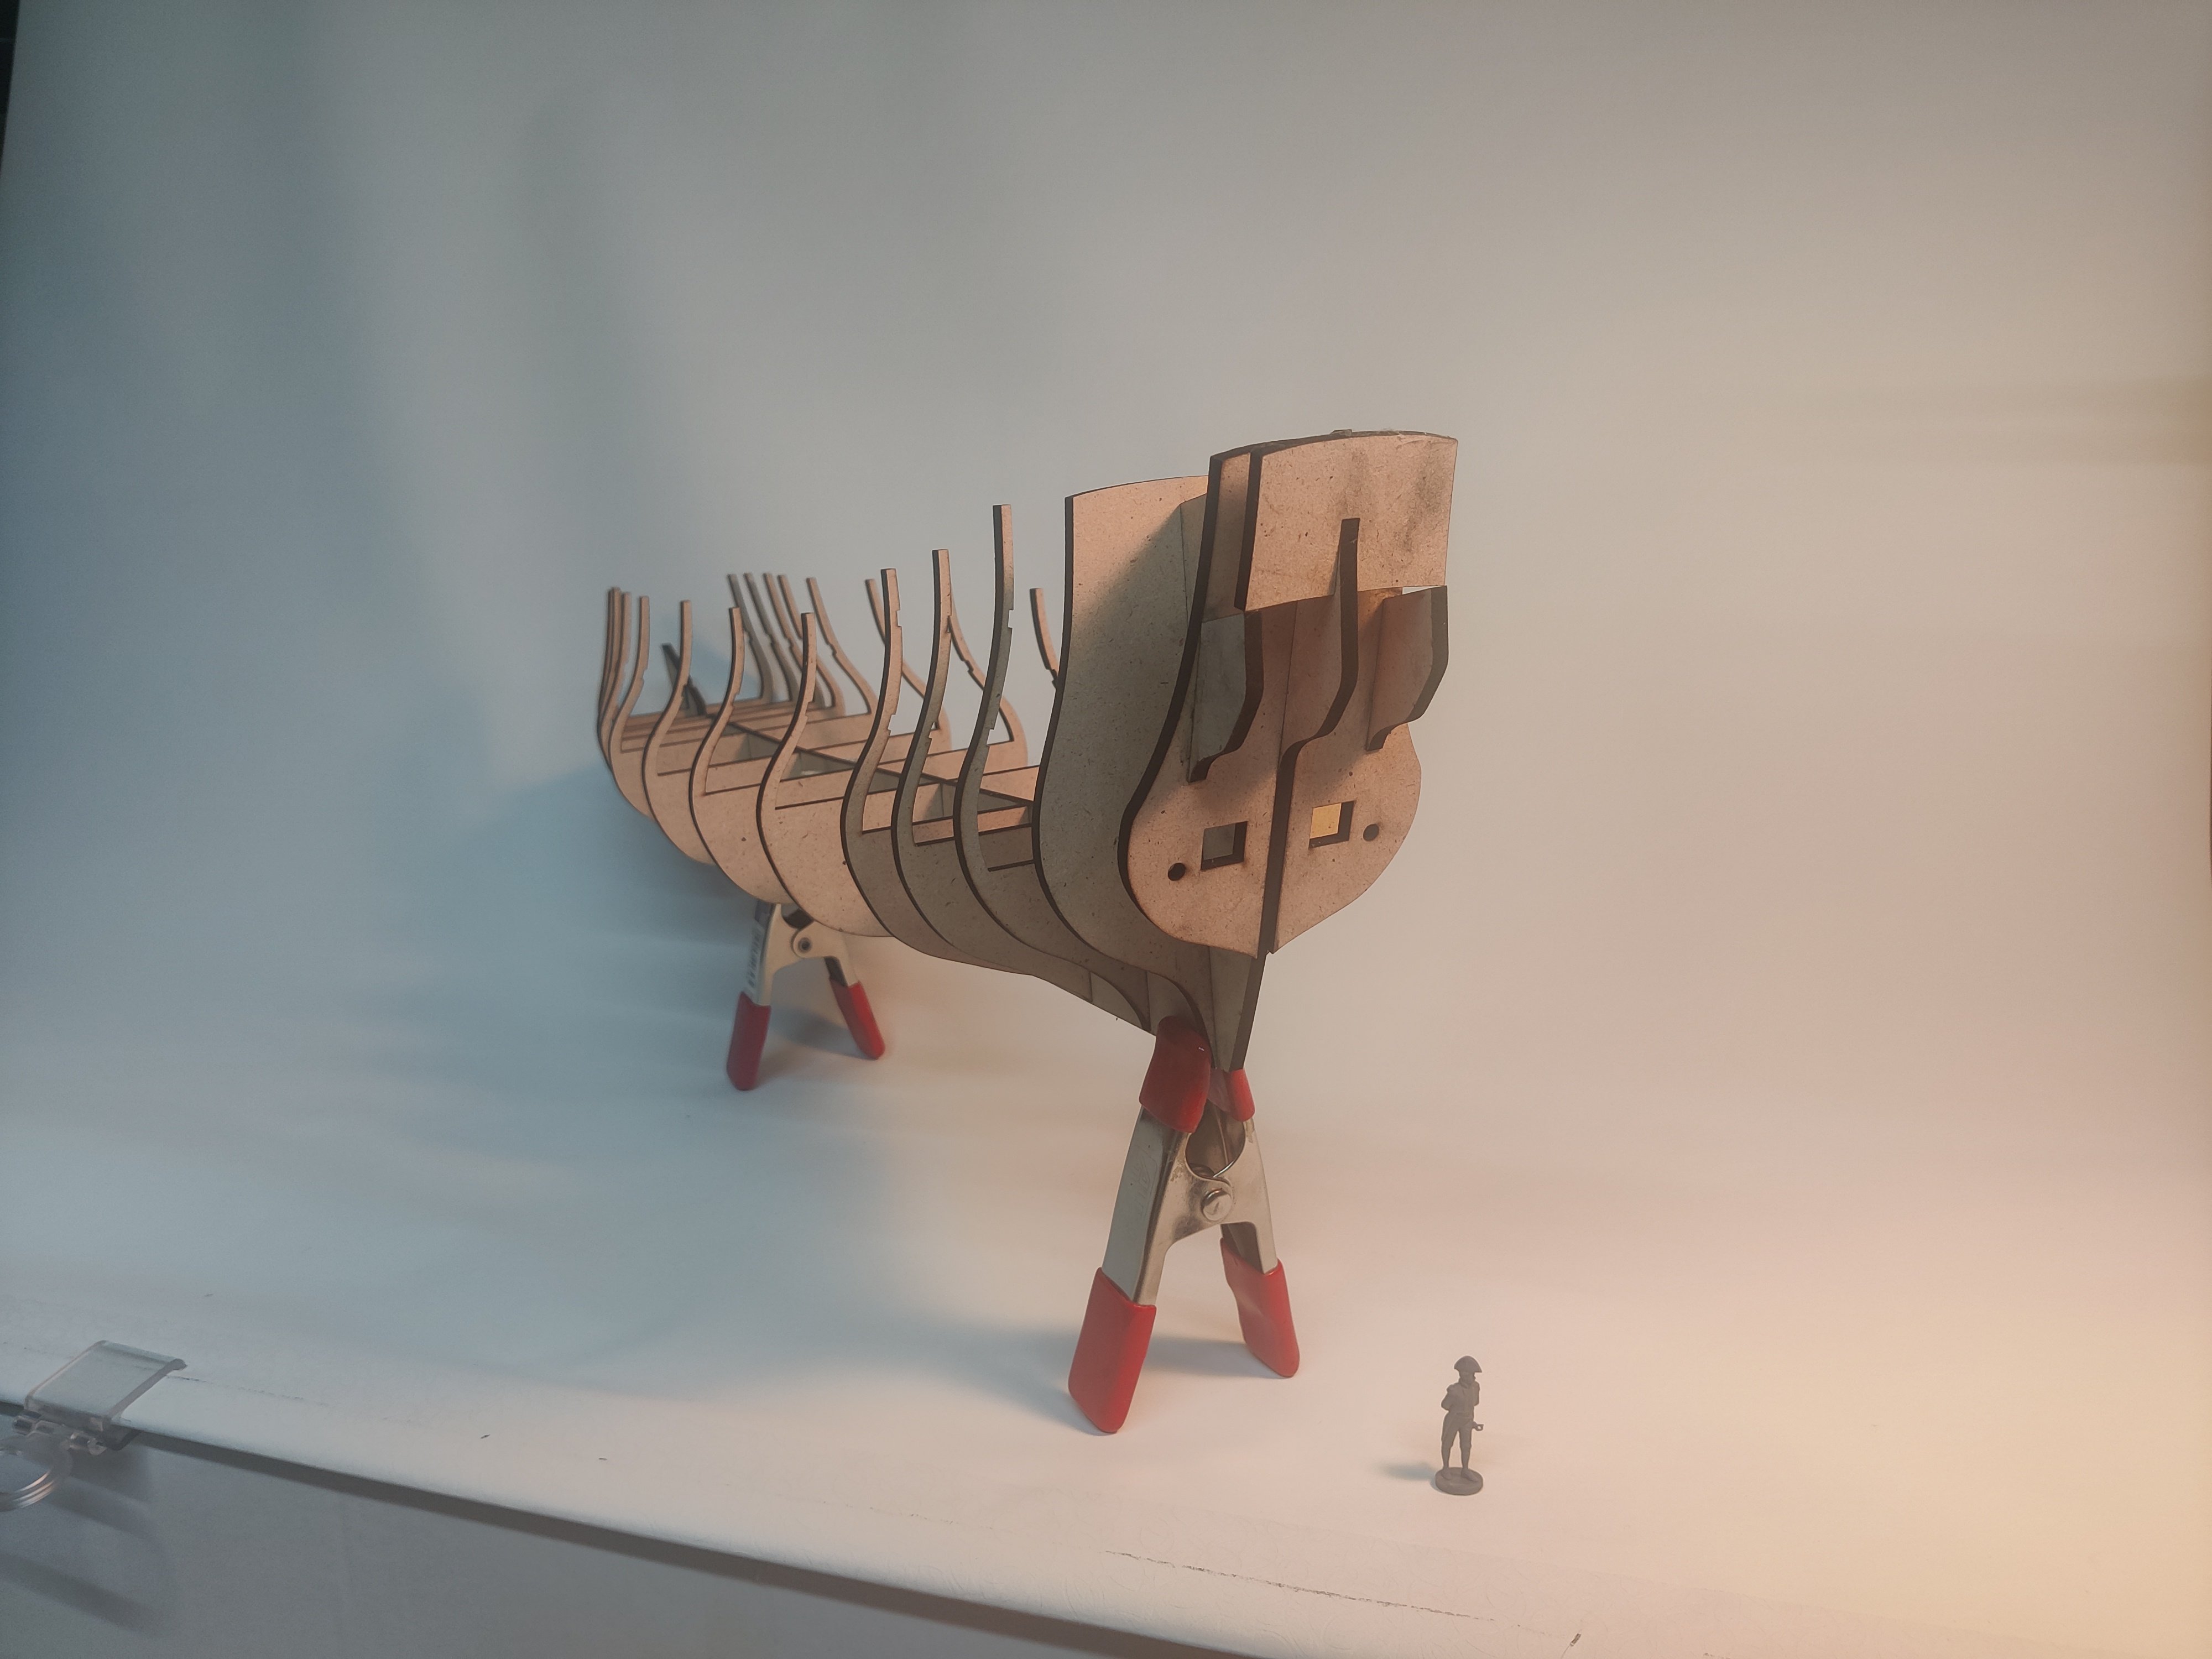
Heavy frigate 'Bornholm' I had a period with no access to the workshop, but 2-3 hours a day of free time with my computer, so I started adapting a much larger ship. The Bornholm, named after the island in the Baltic Sea, was an atypical ship for the Danish navy at the time it was built in 1748. Frigates usually had 18-20 cannon (8 pounders) or 30-36 cannon (12 and 4 pounders). However, this ship had 40 cannon on two full decks, 20 18 pounders and 20 8 pounders. It was therefore very heavily armed, more like the common 50 or 60 gun warships. Here's a few original drawings: I really like the profile and the simple ornaments. I thought of it as a Phinx with an extra layer of guns. It was 1 bit longer at 130 danish foot. This is an example of what @Thukydides mentioned above: a bit of paper warping in the original plans. Fortunately there are several copies of the same drawing for the main profiles and it is possible to correct any small issues in one plan by cross referencing to the others. I was starting up my Sphinx/Christiania build when I was making the CAD drawings for this so Iwas very inspired by the way Chris have designed the structure of that amazing kit. It was an interesting mental exercise to keep track of all the parts in my purely 2D design space. But it worked out quite well! Here is a look at the design in QCAD: And here is the cut files: It took a large amount of MDF to make all of these parts. And it took around 3 hours on the laser cutter. It only dawned on my how big this is in 1:64 when I was cutting it out. I thought it was just a little bit bigger than Sphinx, and while it is in some ways, it just looks much bigger overall! It was exciting to see all the parts fit together as planned and I only had to do minor modifications to the parts to make everything come together: This 'test' is what really gives me confidence that I can make a design that will work, at least structurally. While I have drawn the stern parts and bulwark patterns, I have not cut them, and won't do so until I decide to actually continue this as a real build. I would like to, but I will use the Sphinx kit to learn about all the other parts that are needed before I attempt to go further here. I am very aware that I have not at all started on the fittings and decorative elements and getting experience from the Phinx kit is an important stepping stone for me. I also have to constrain myself and not start working on too many projects at once or I will never finish anything! Heres a size comparison with my Sphinx-as-Christiania build in it's current state: This was the last if my tests for now and definitely the culmination. More will come, but at a much, much slower rate! I am working on the next one, but I want to spend time actually building my current project! I will post here whenever I have something to show. But it has been a great learning experience and I really enjoy the CAD element! Thank you for all your comments and likes so far, your inputs are all greatly appreciated! BR TJM
.thumb.jpeg.0bf112b5d14de2781b00071da8e4589e.jpeg)
.thumb.jpeg.d1d35eeddf6fcb921ec9cb2078e5dcd8.jpeg)
.thumb.jpeg.46d39a94becc9375683446531e3df788.jpeg)


-
That is interesting! But in Danish, 'huk' means 'cut' whereas a hook is called 'krog', so the name 'hukkert' does not seem to be related to hooks - unless it is a dutch ship type that we have adopted, along with a version of the name!
-
Thanks a lot for the nice comment! I used Amati 3mm mdf. I find the fit is a bit more loose than the 4 mm, likely because it is a hair thinner than 3mm.
-
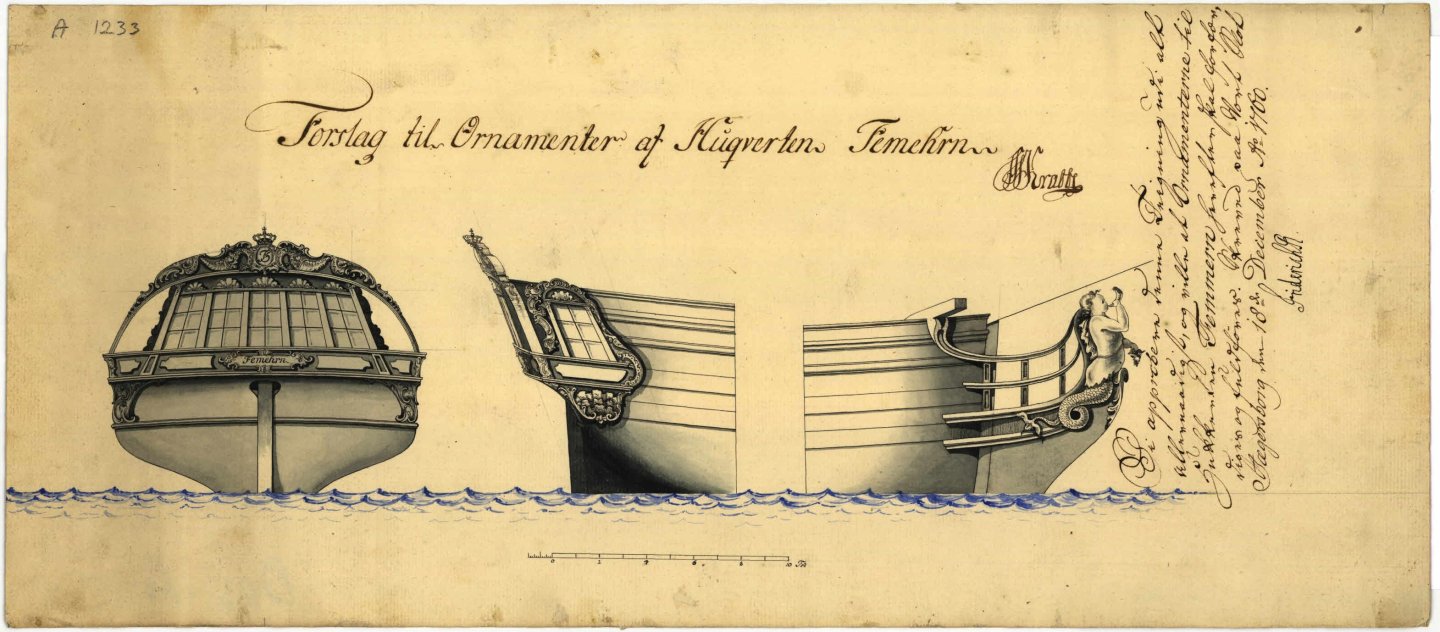
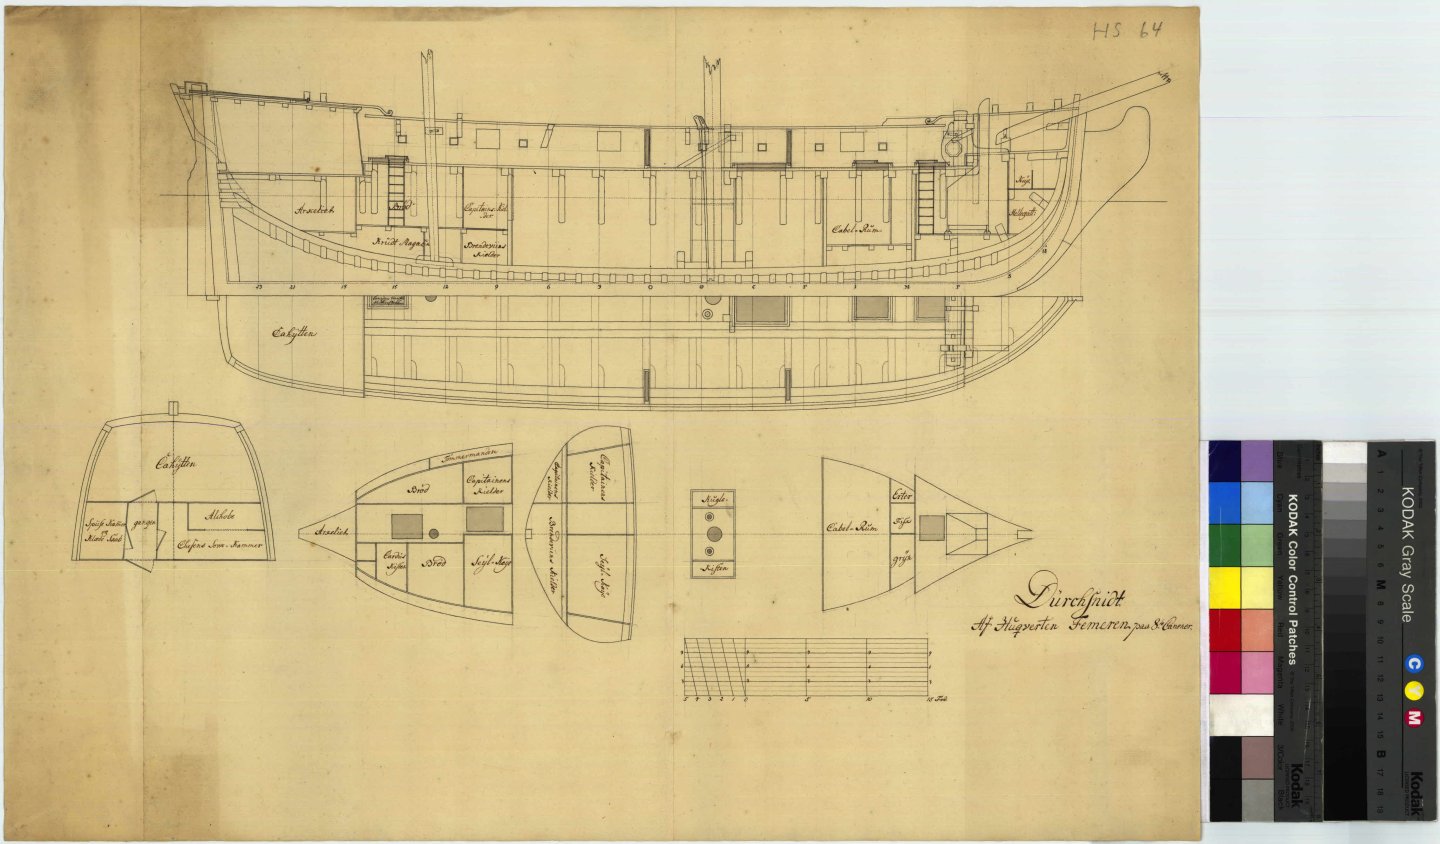
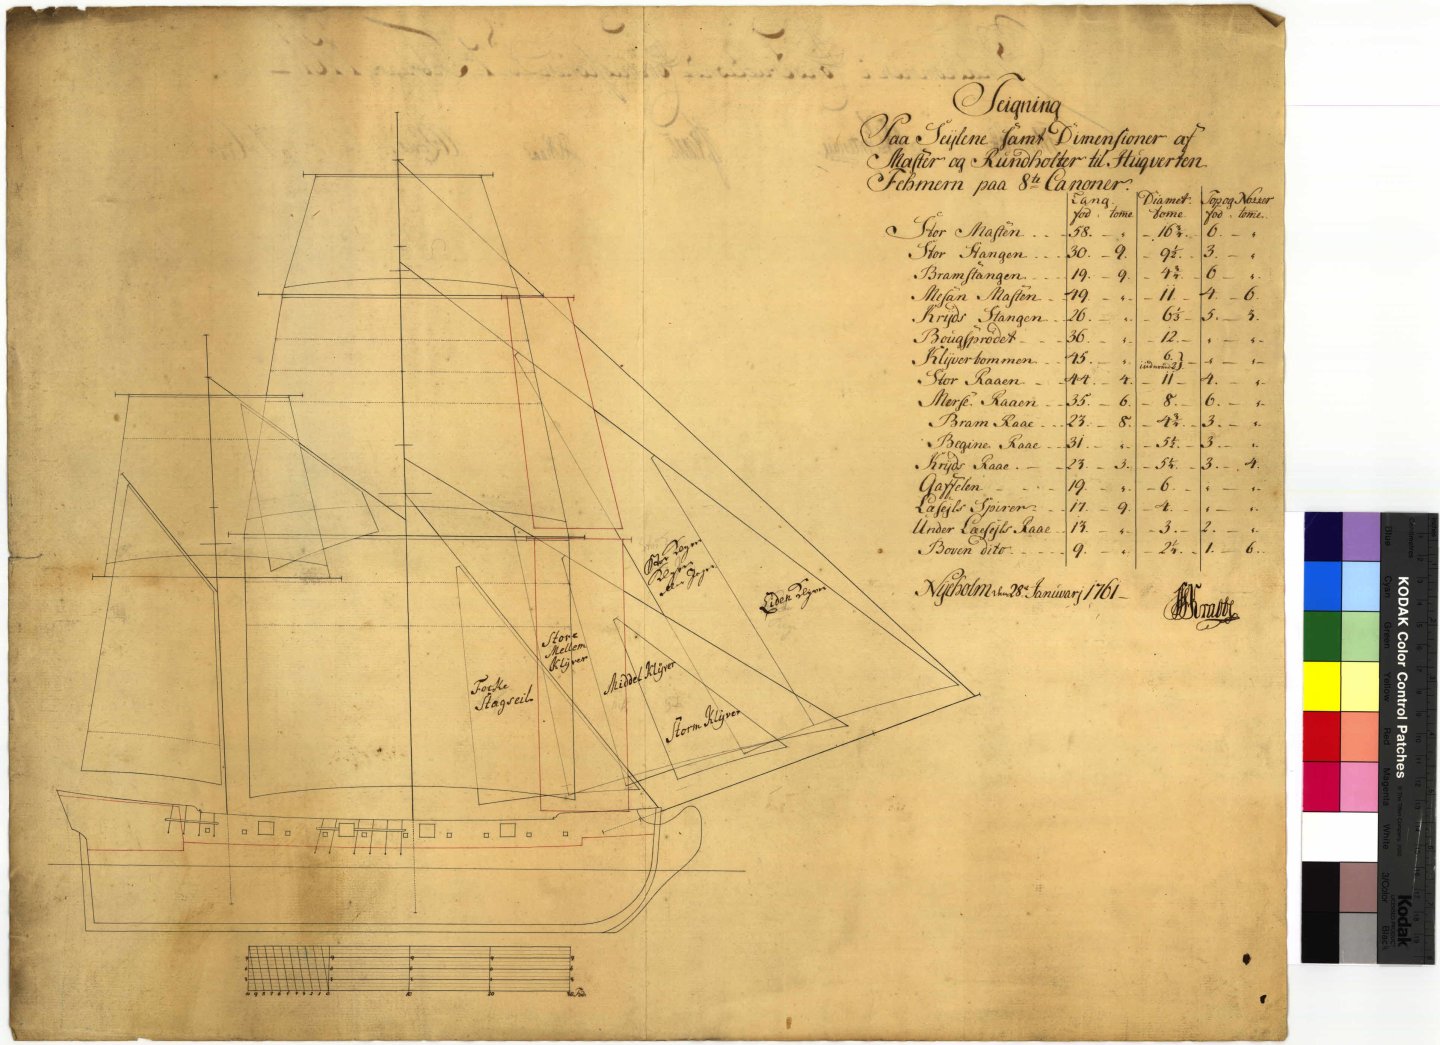
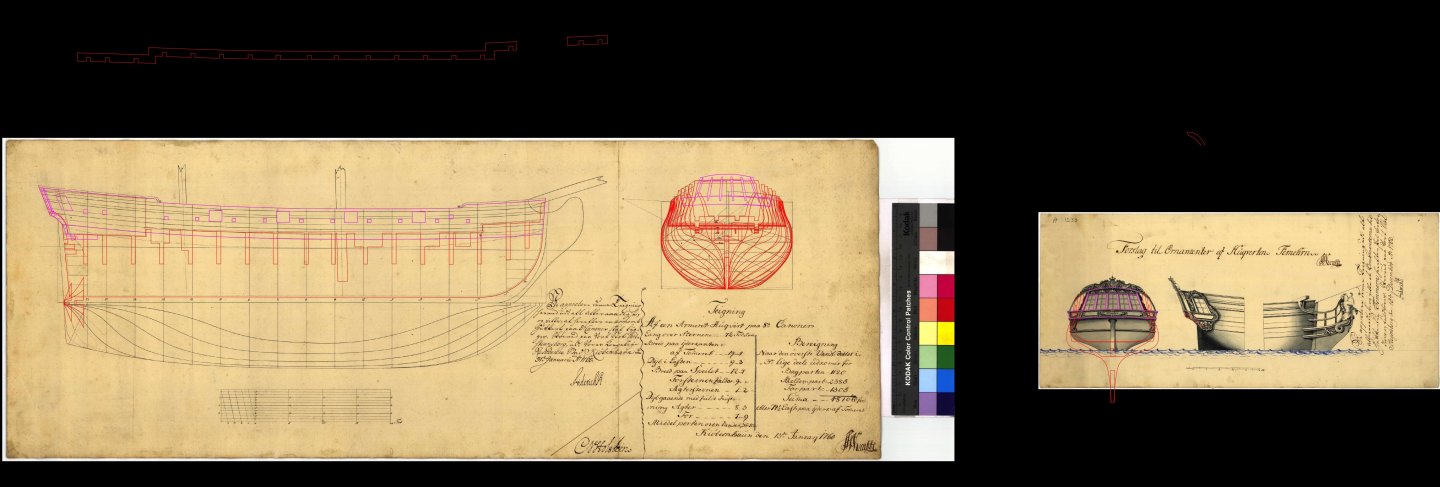
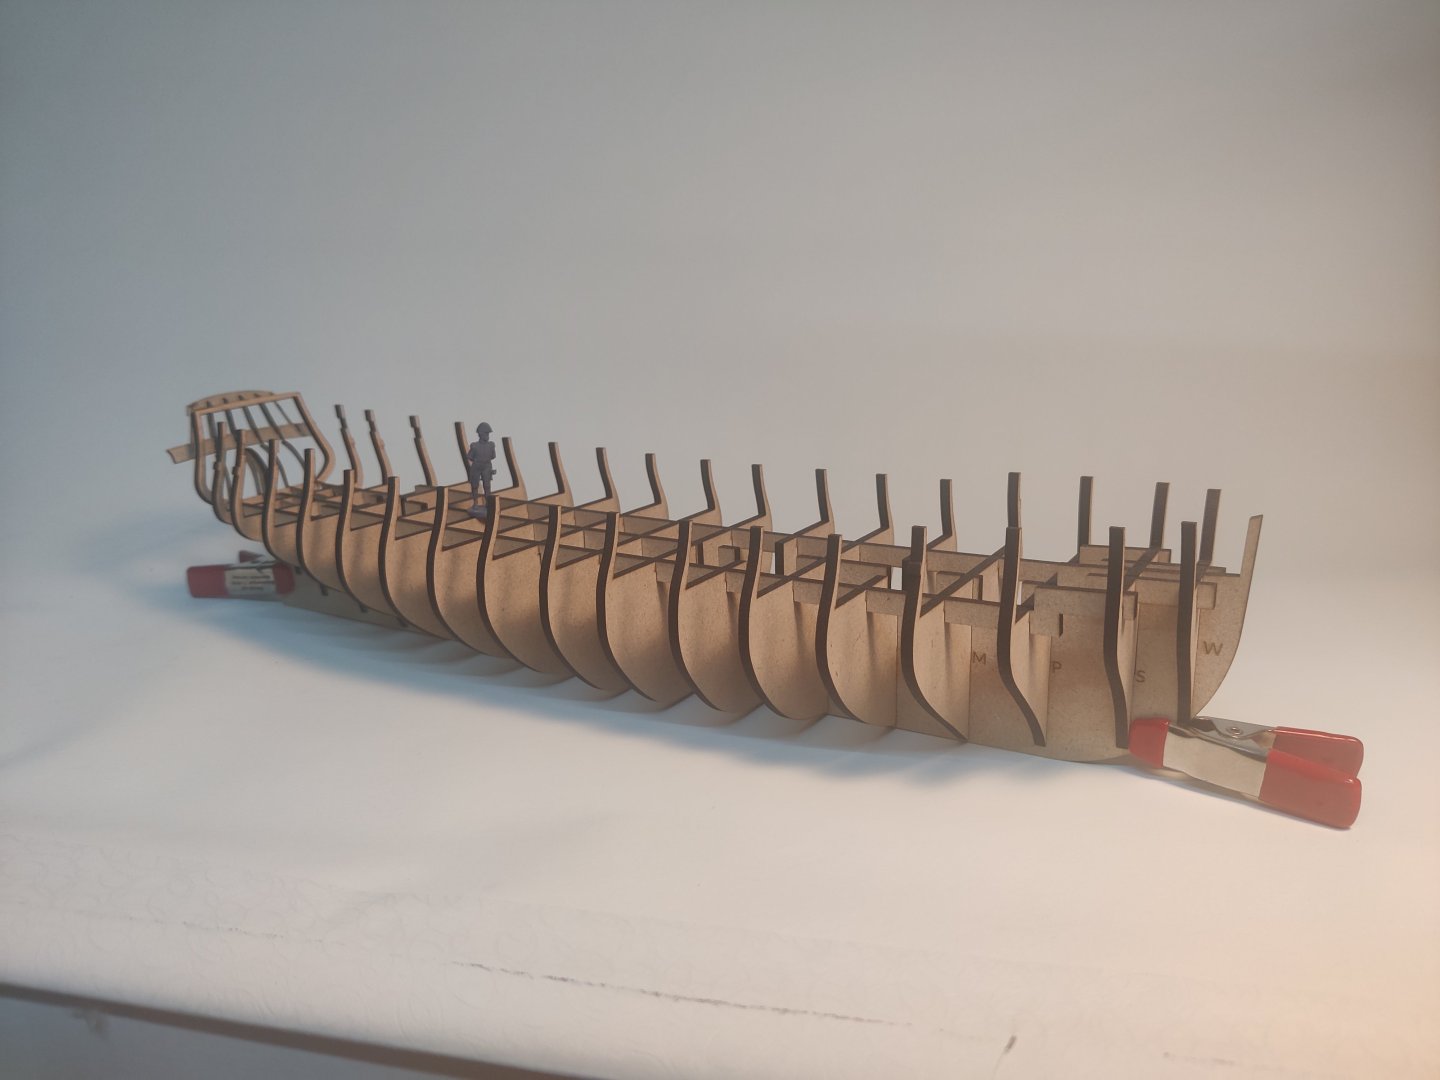
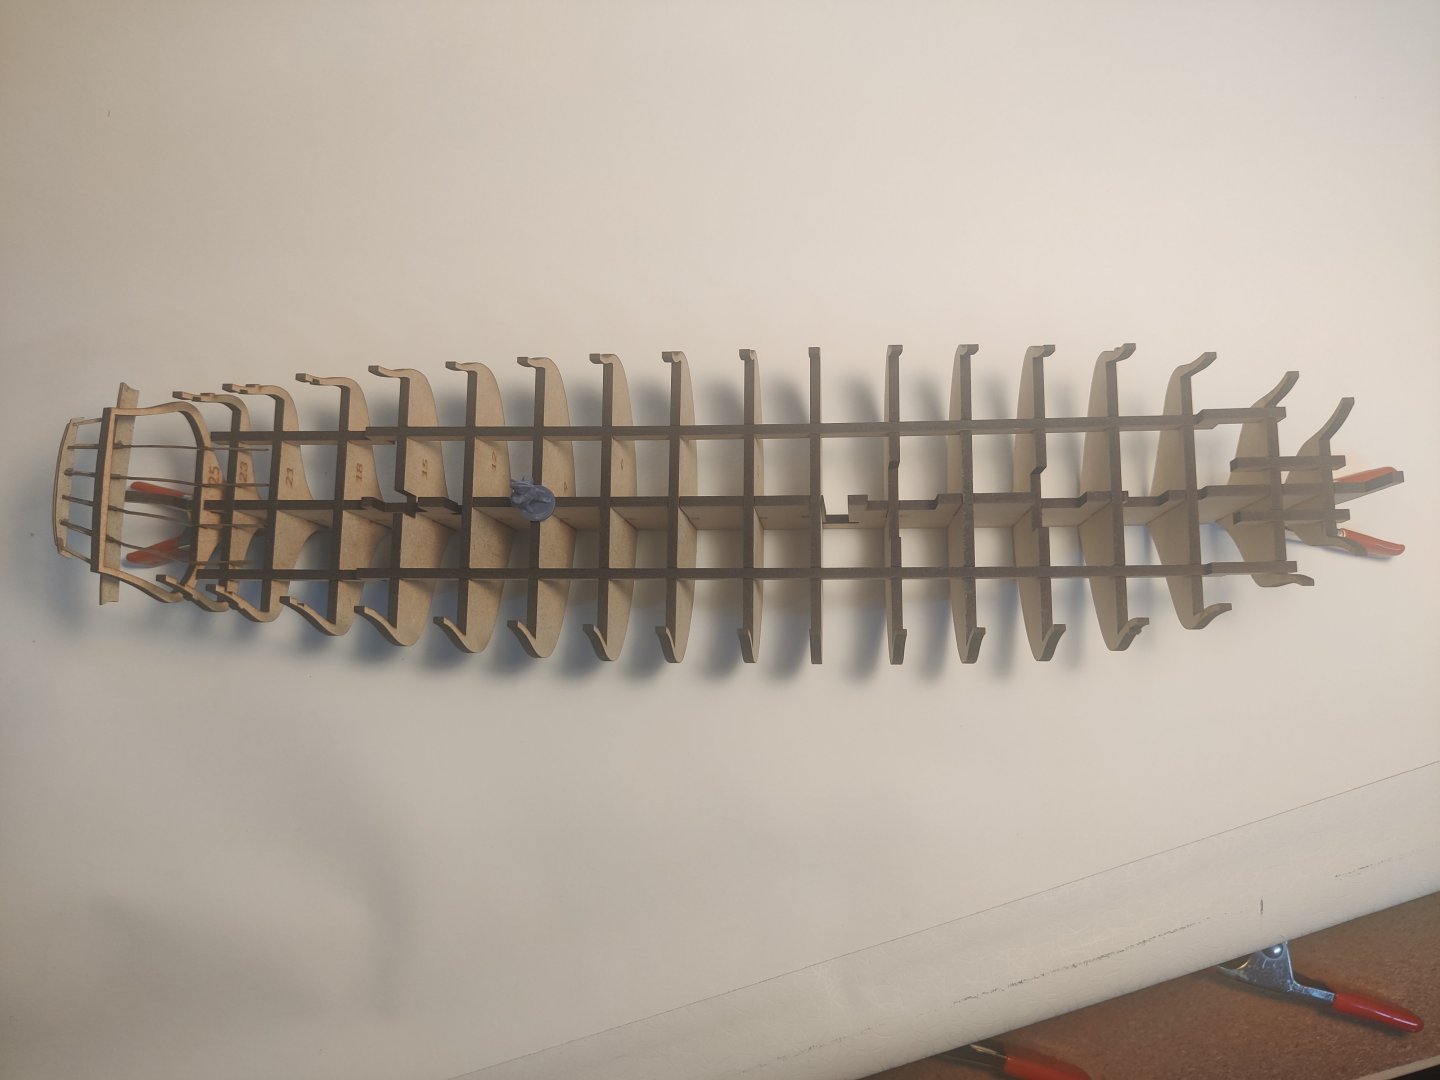
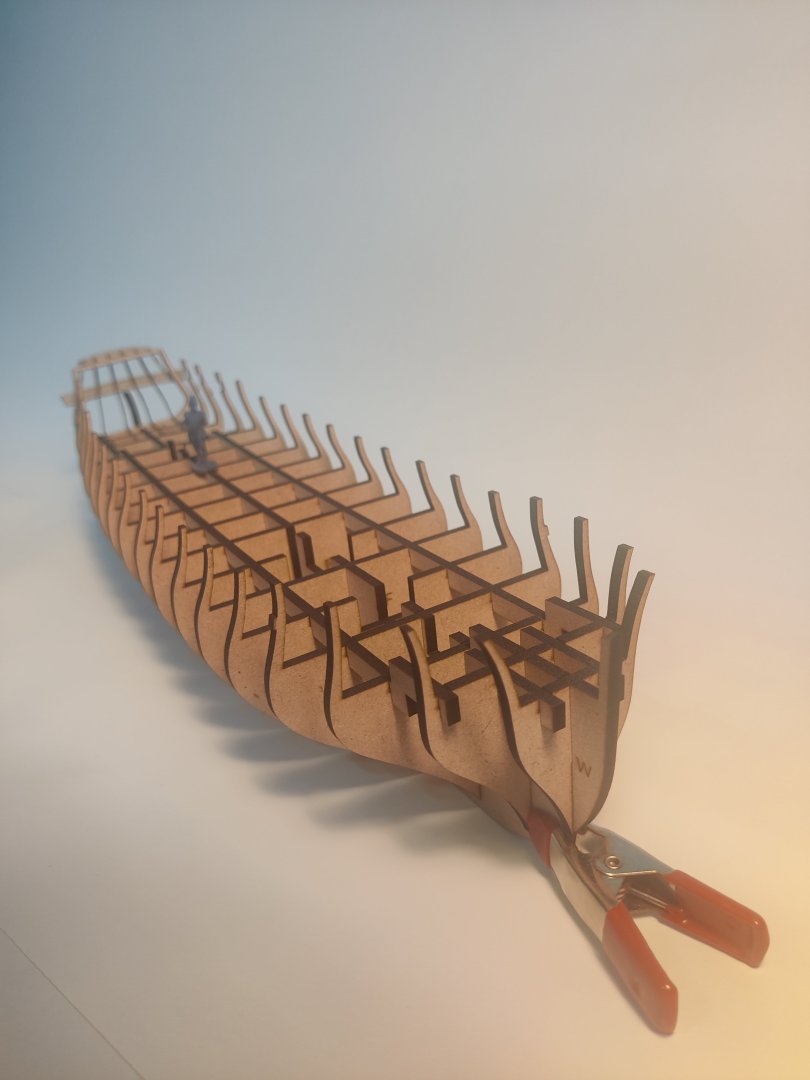
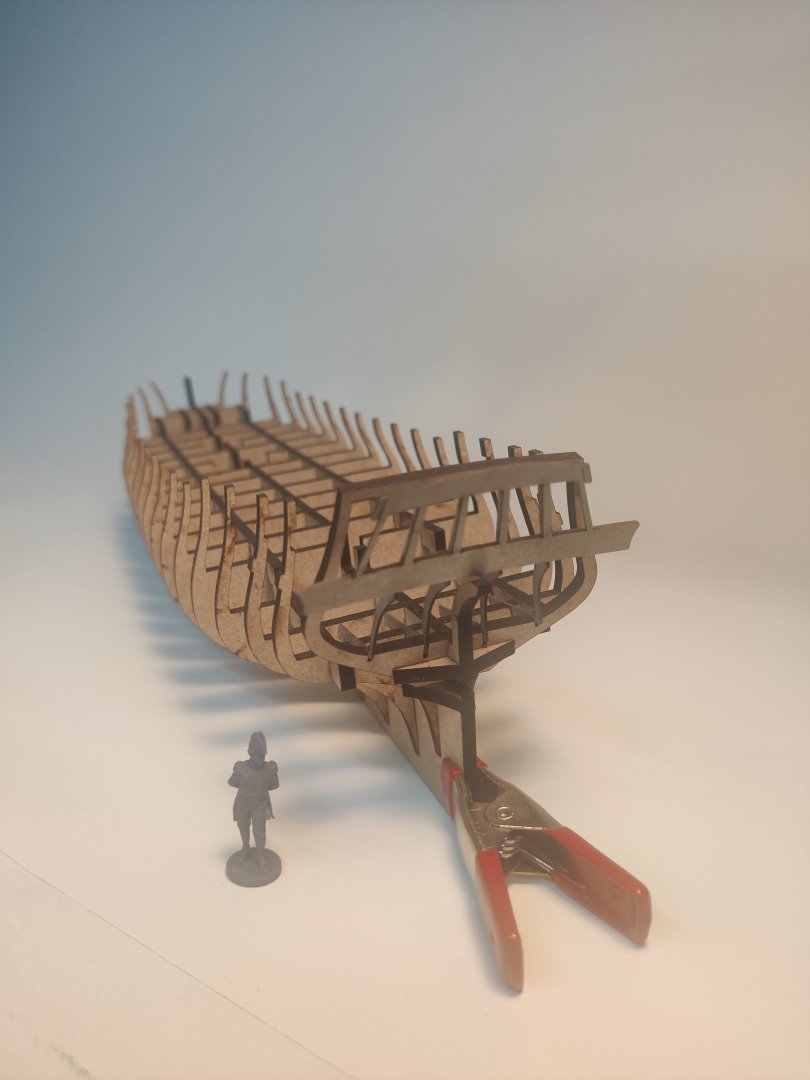
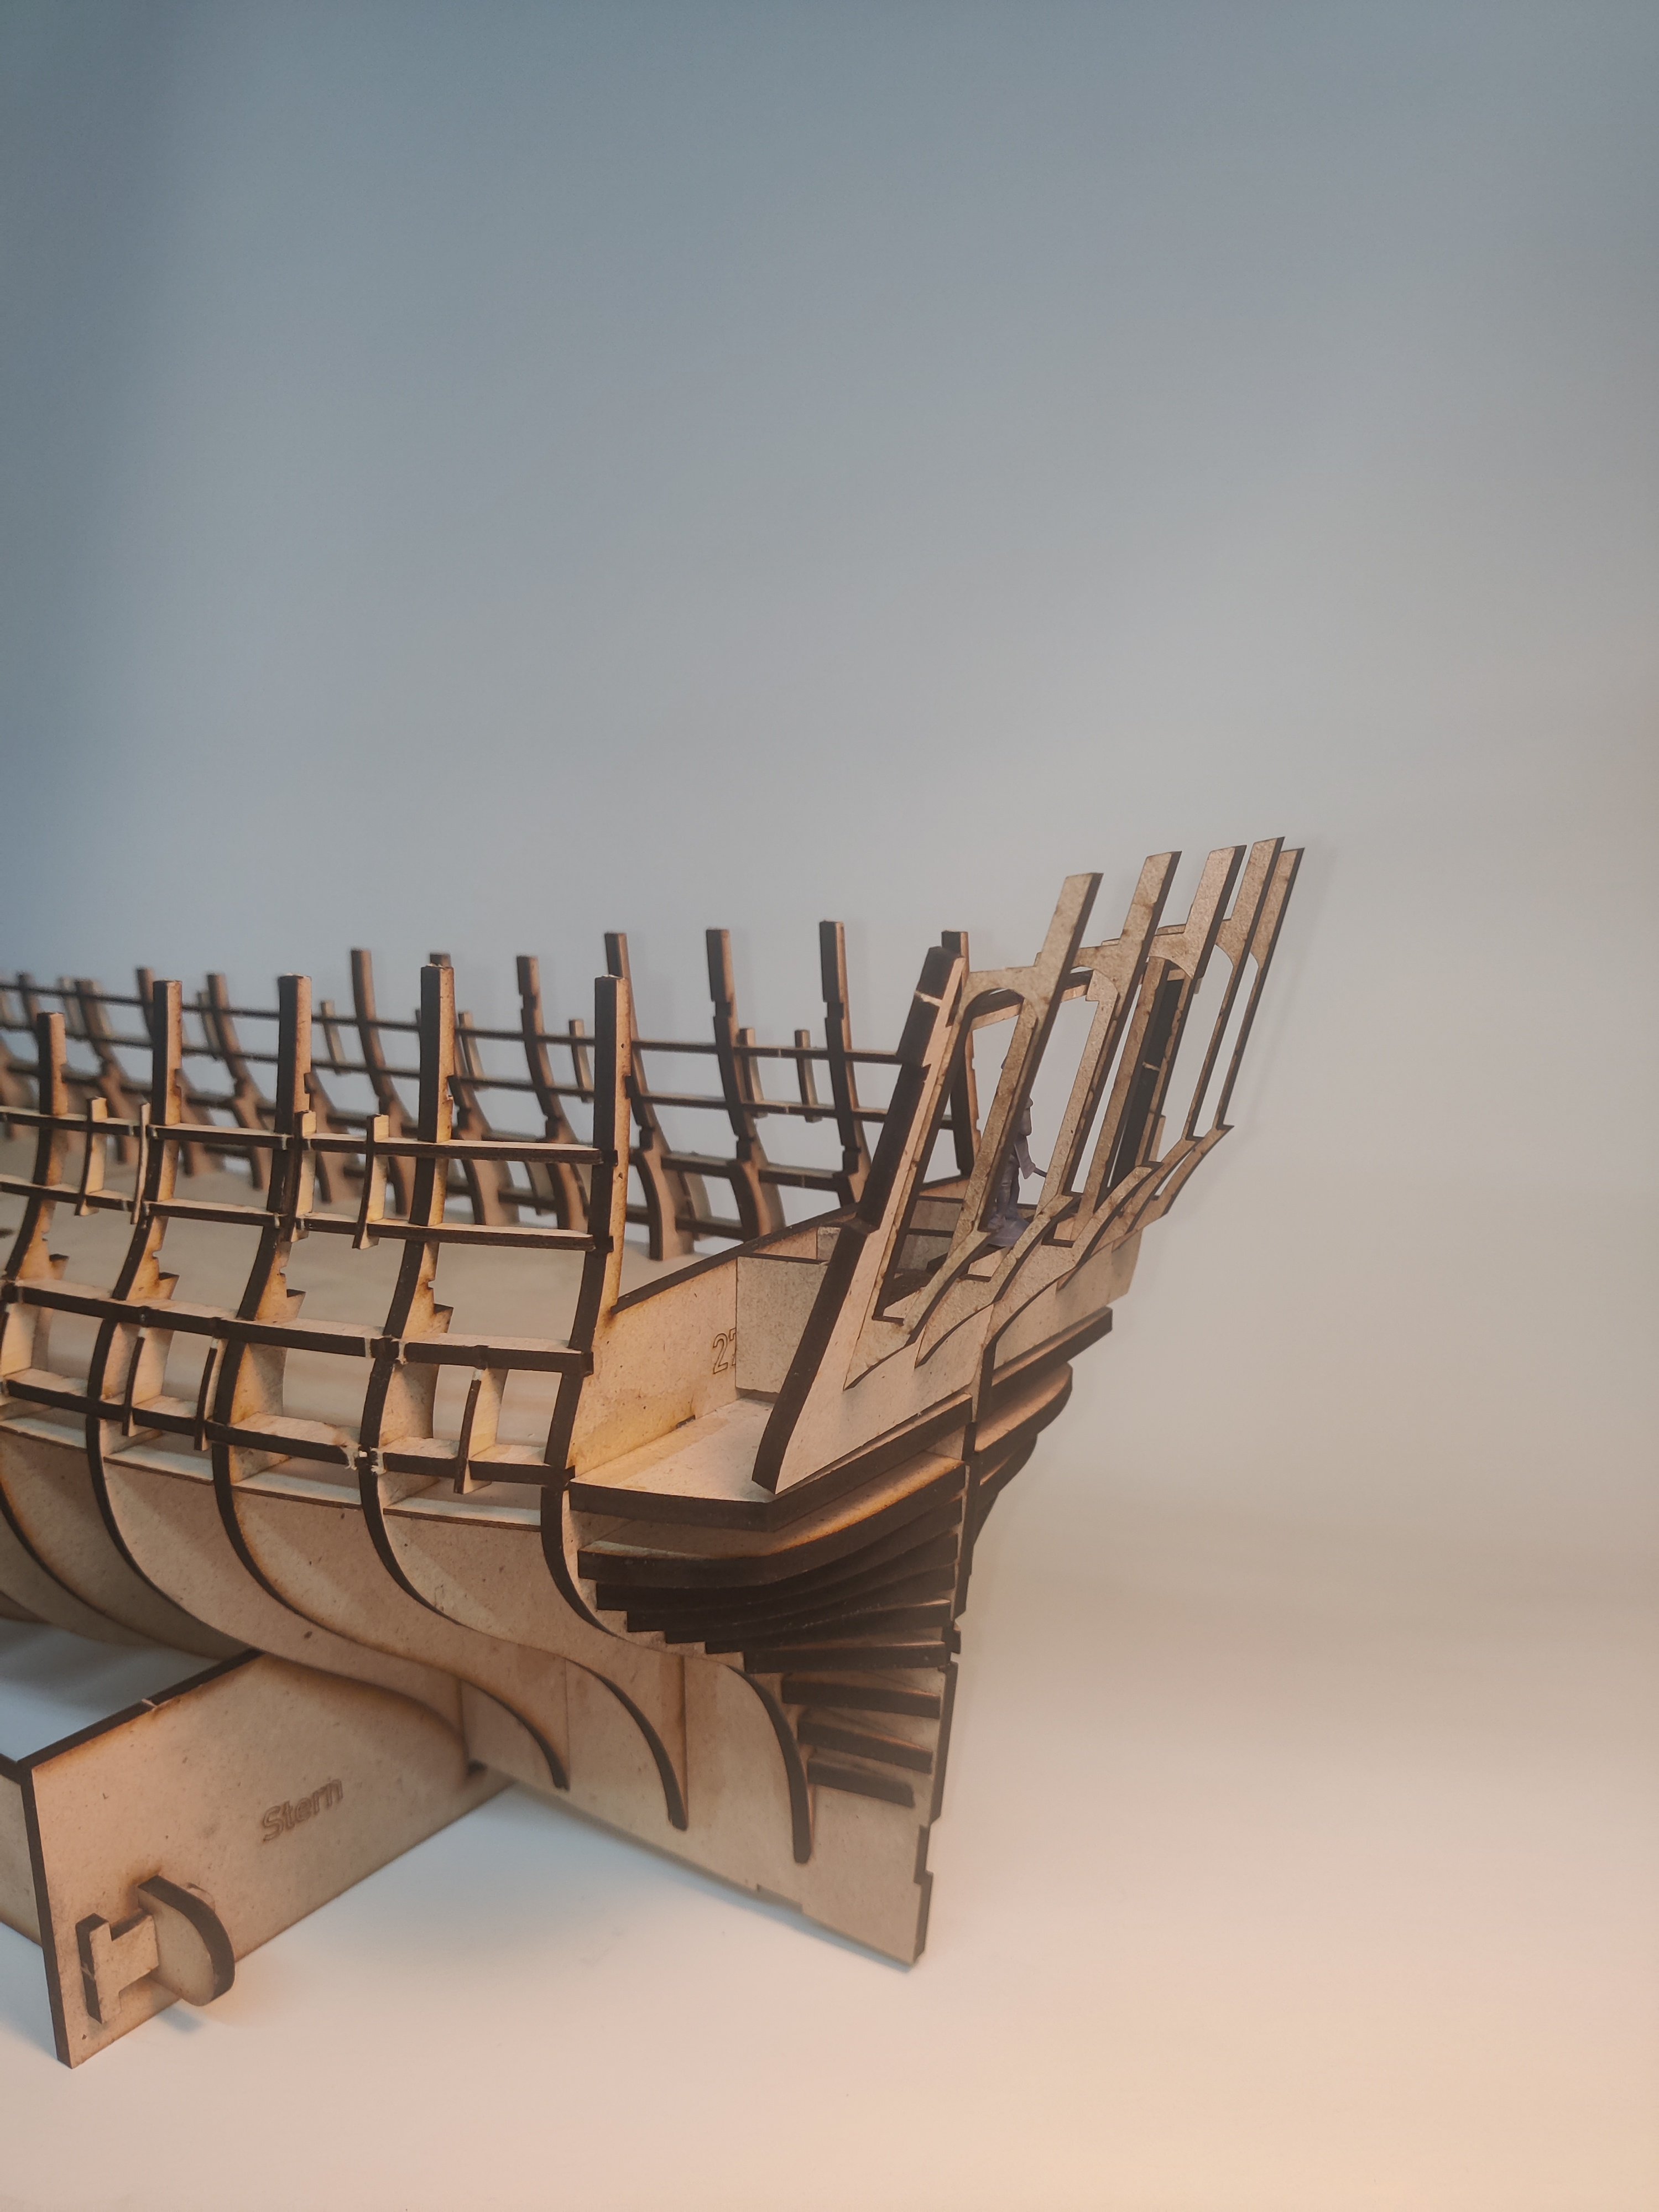
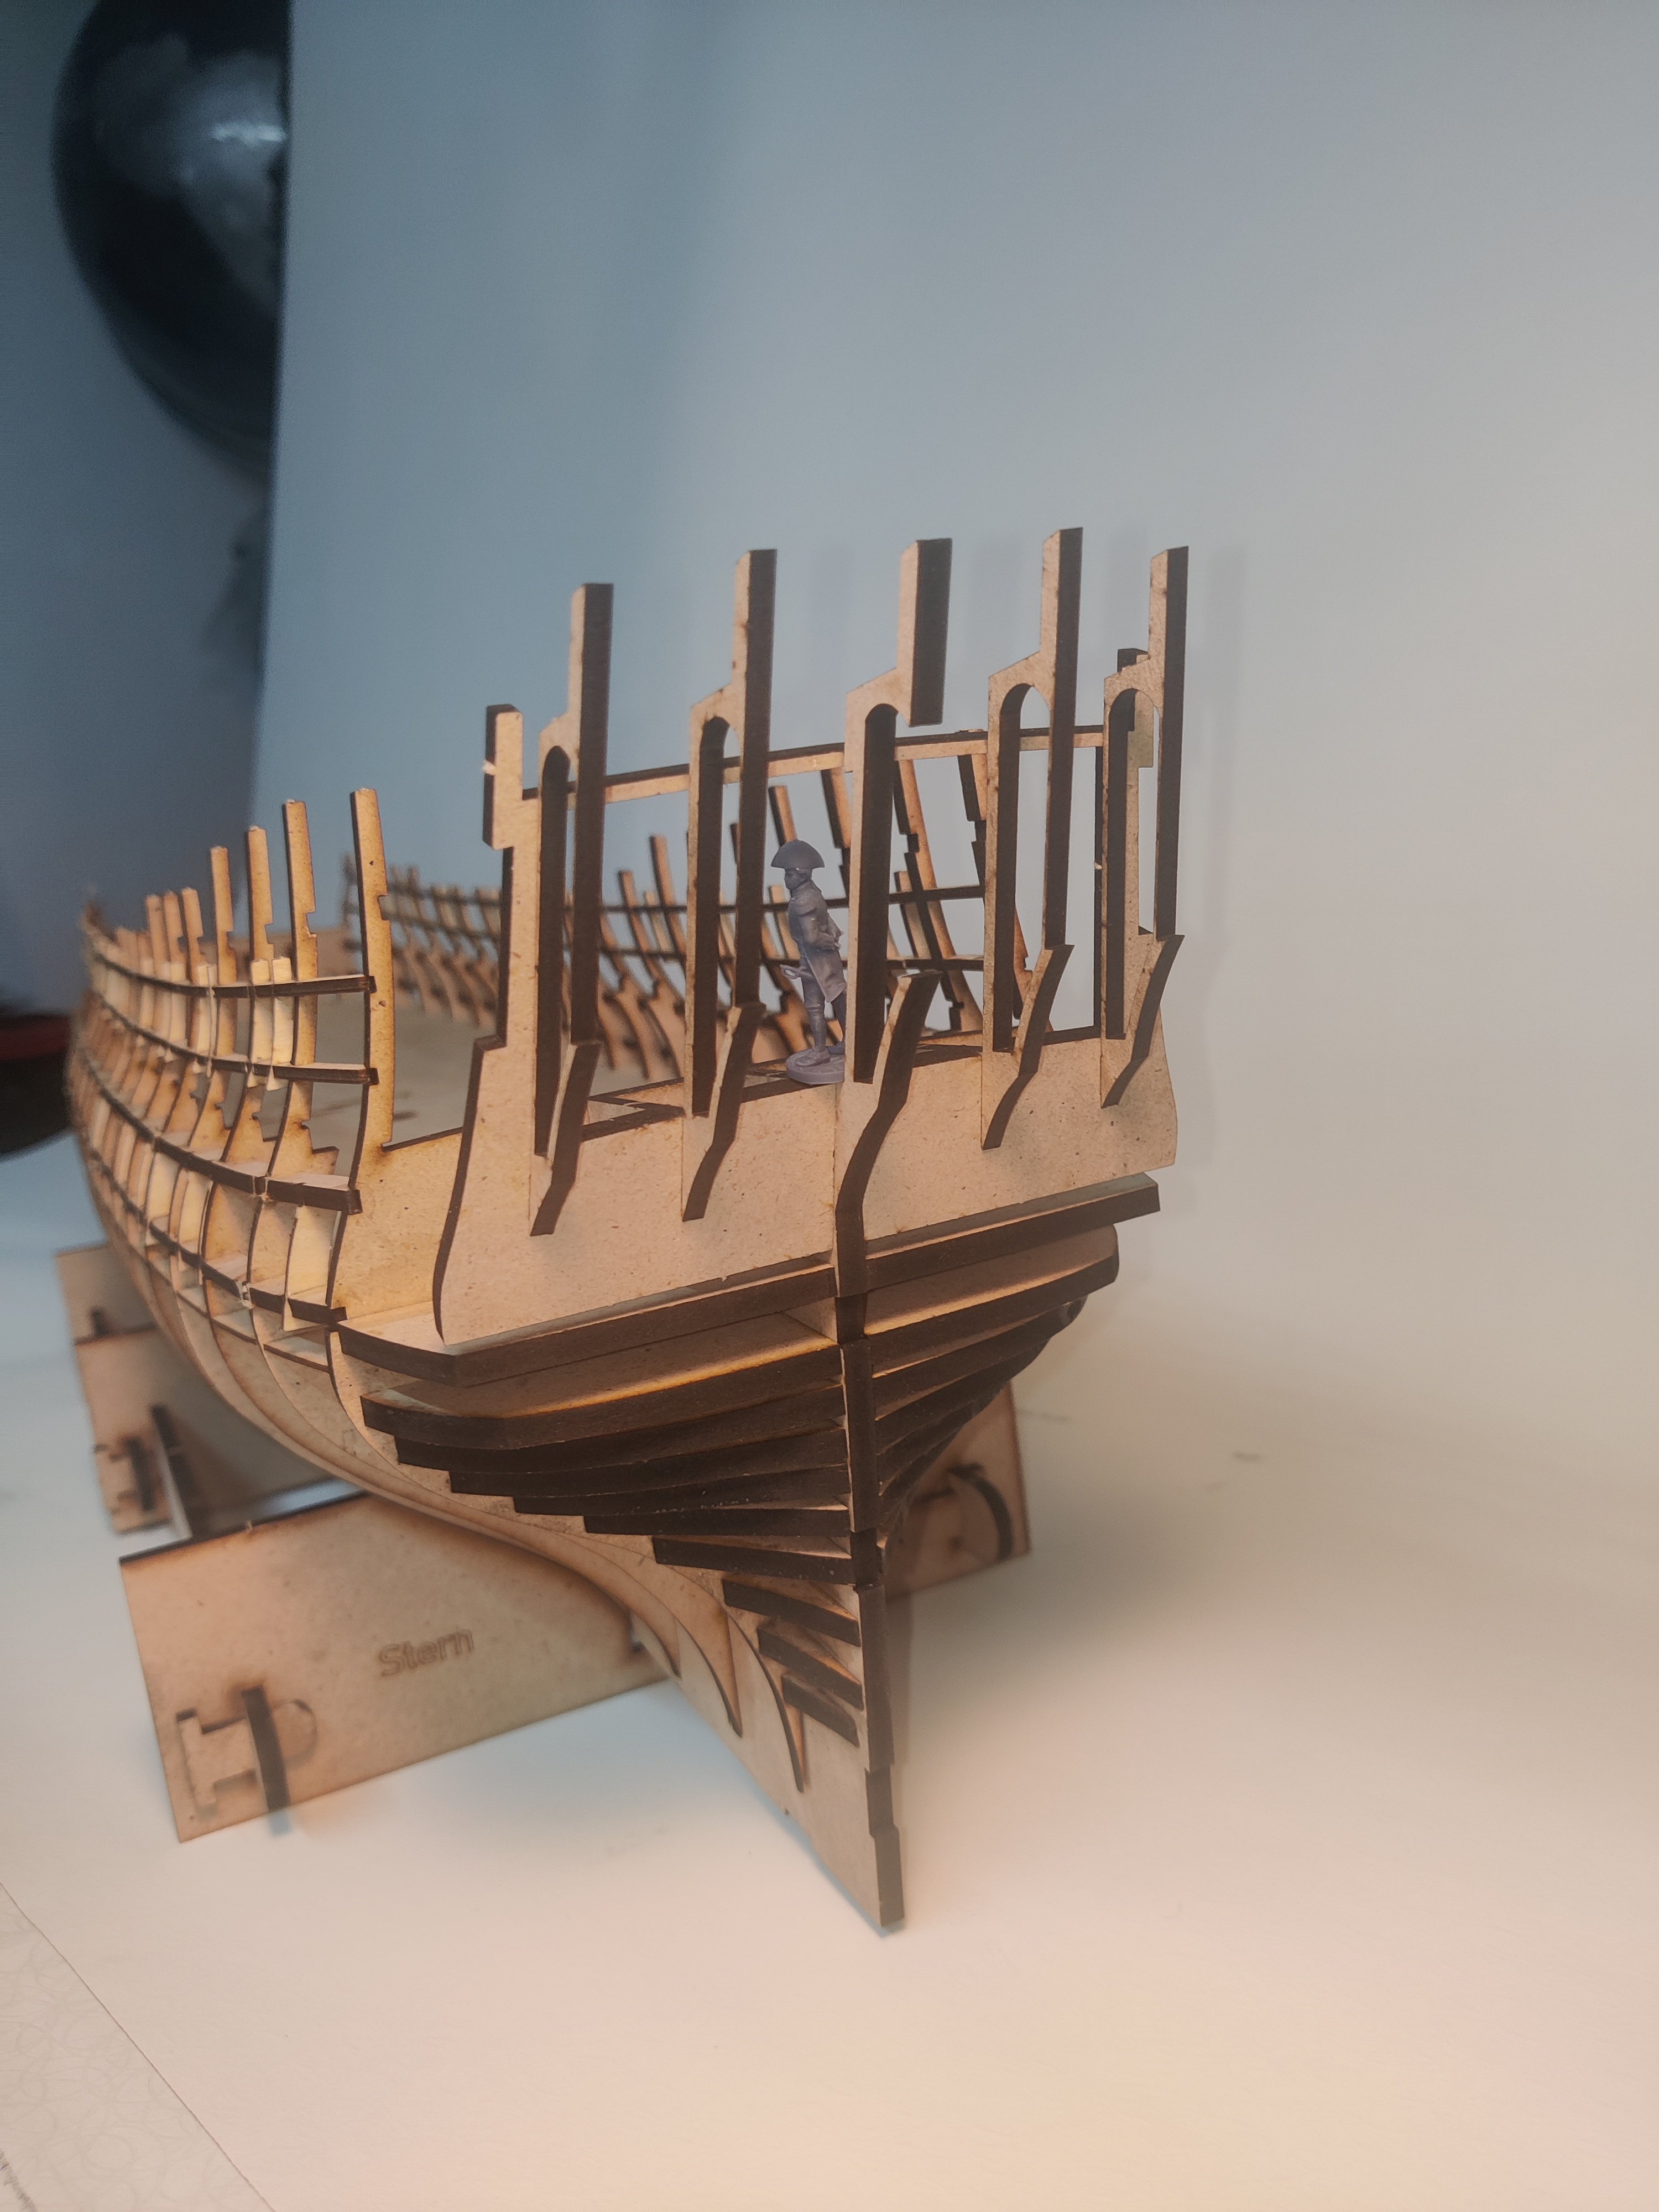
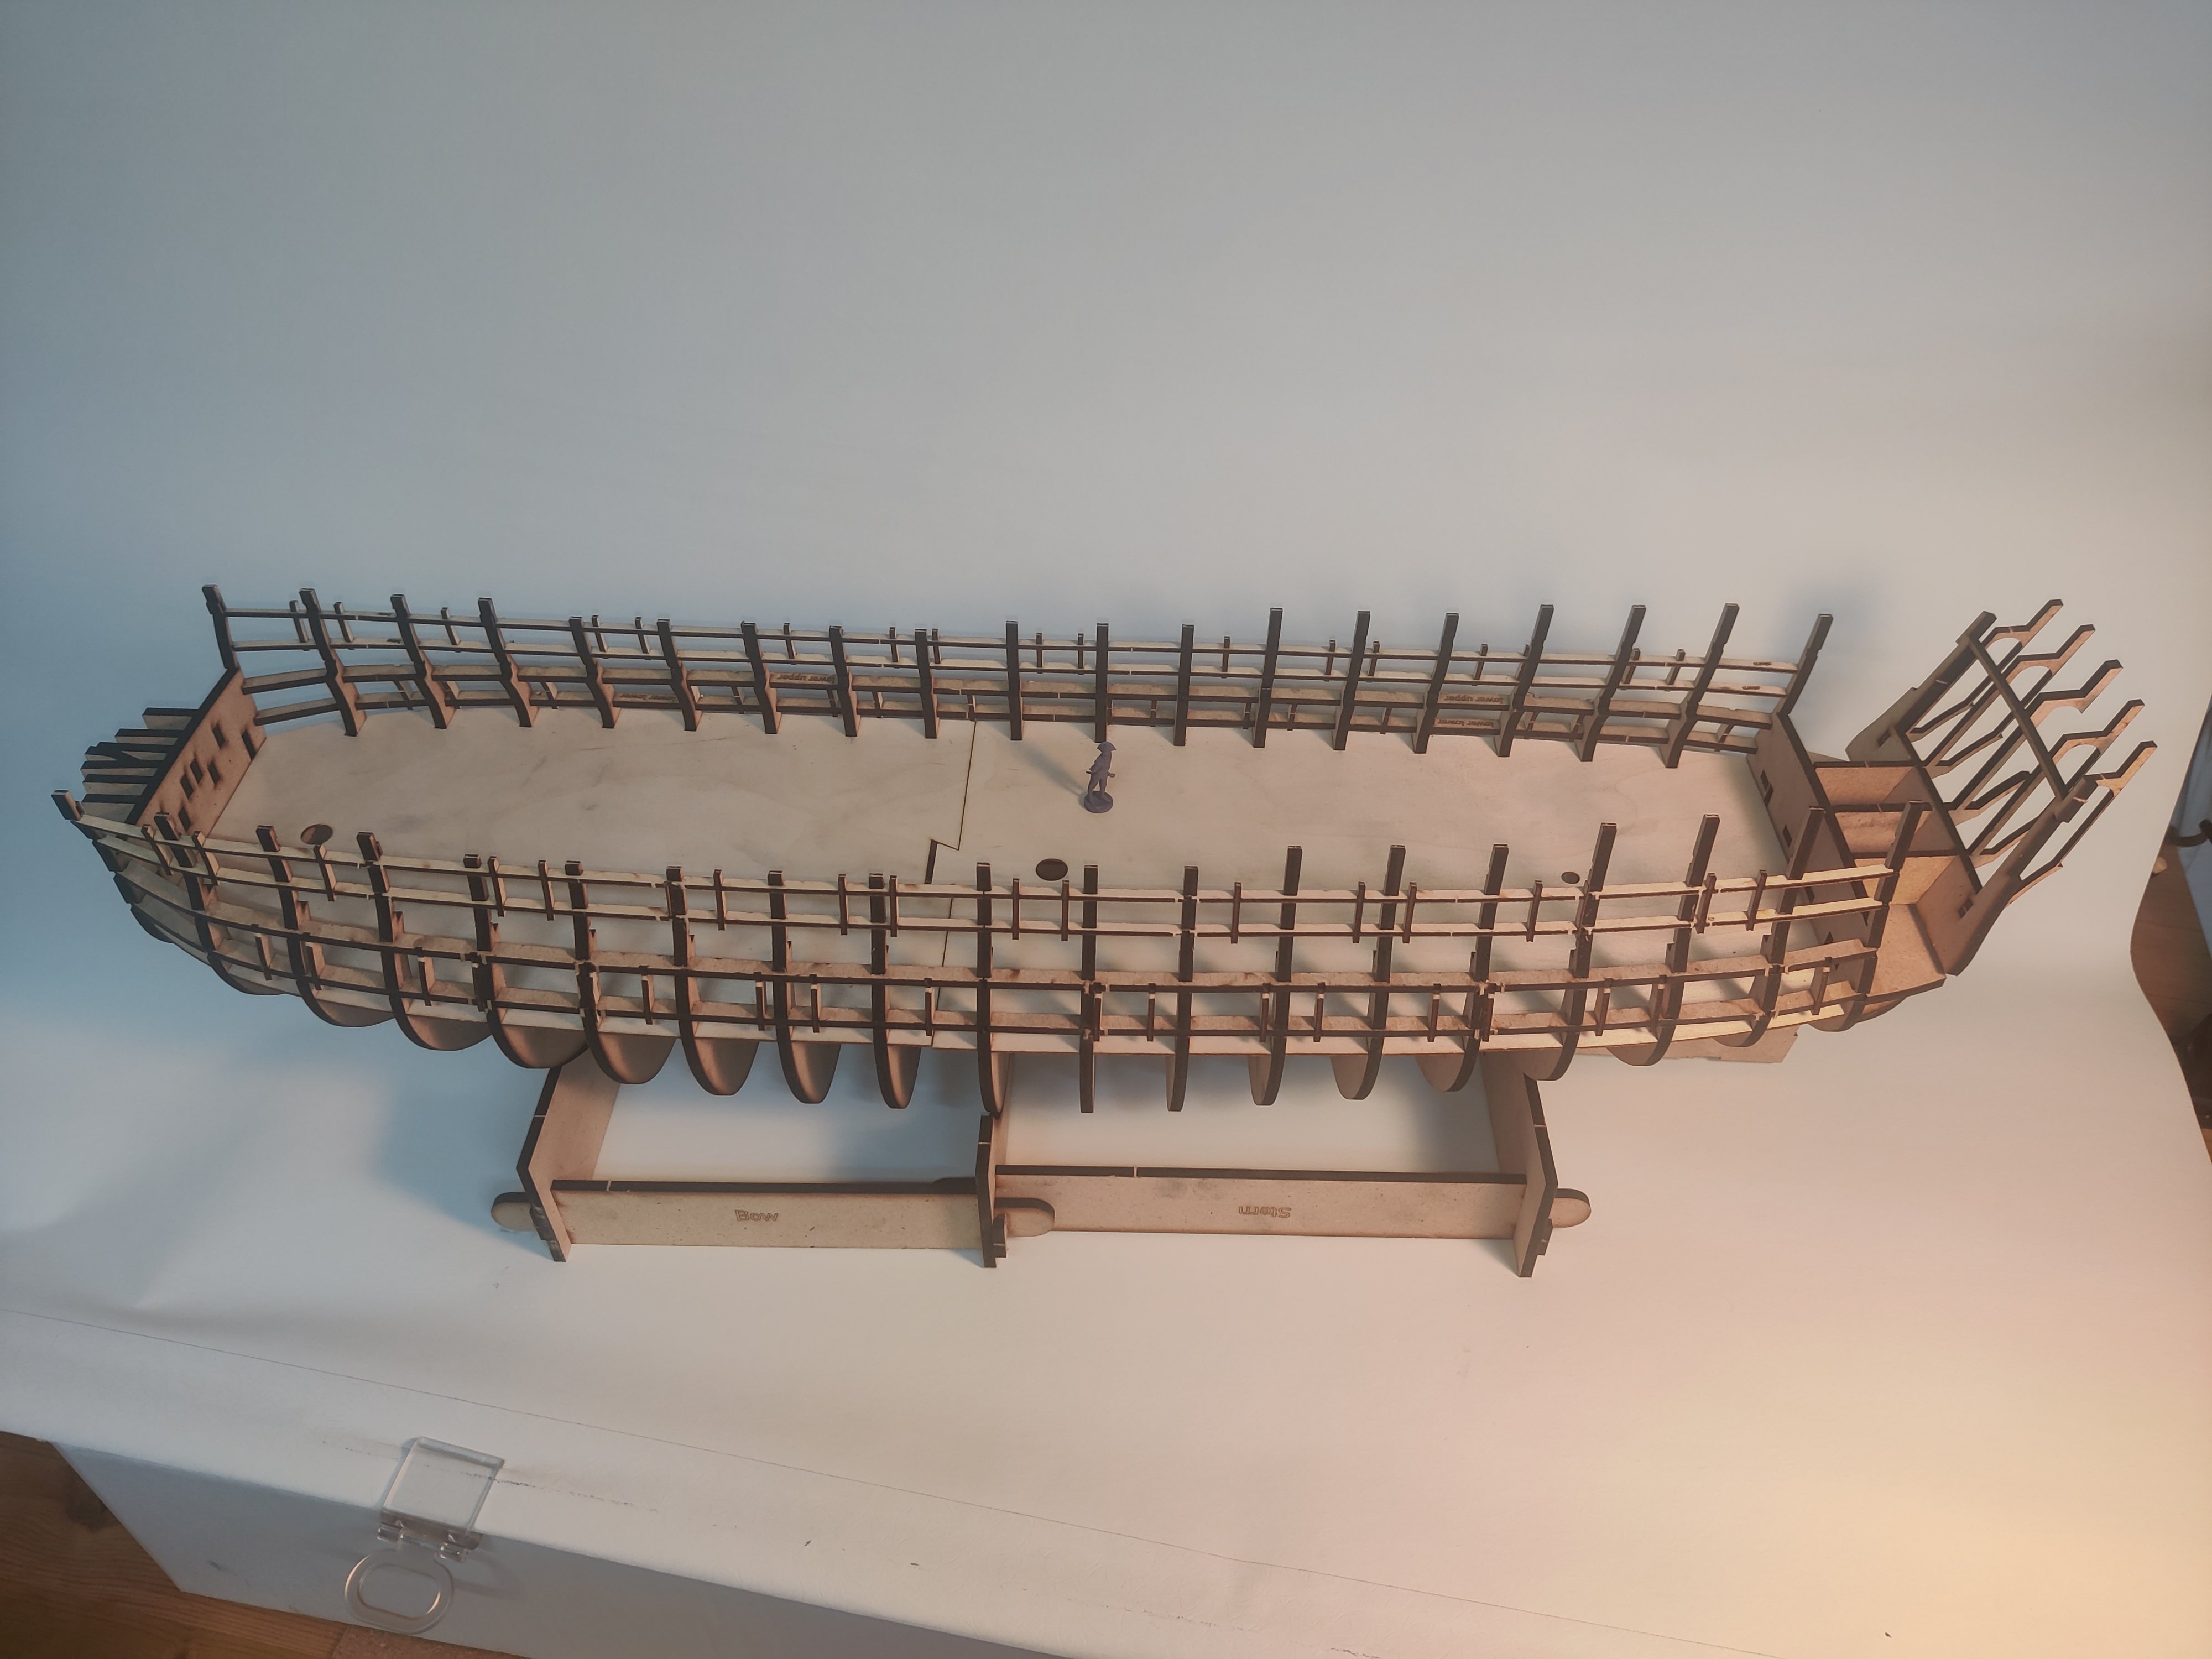
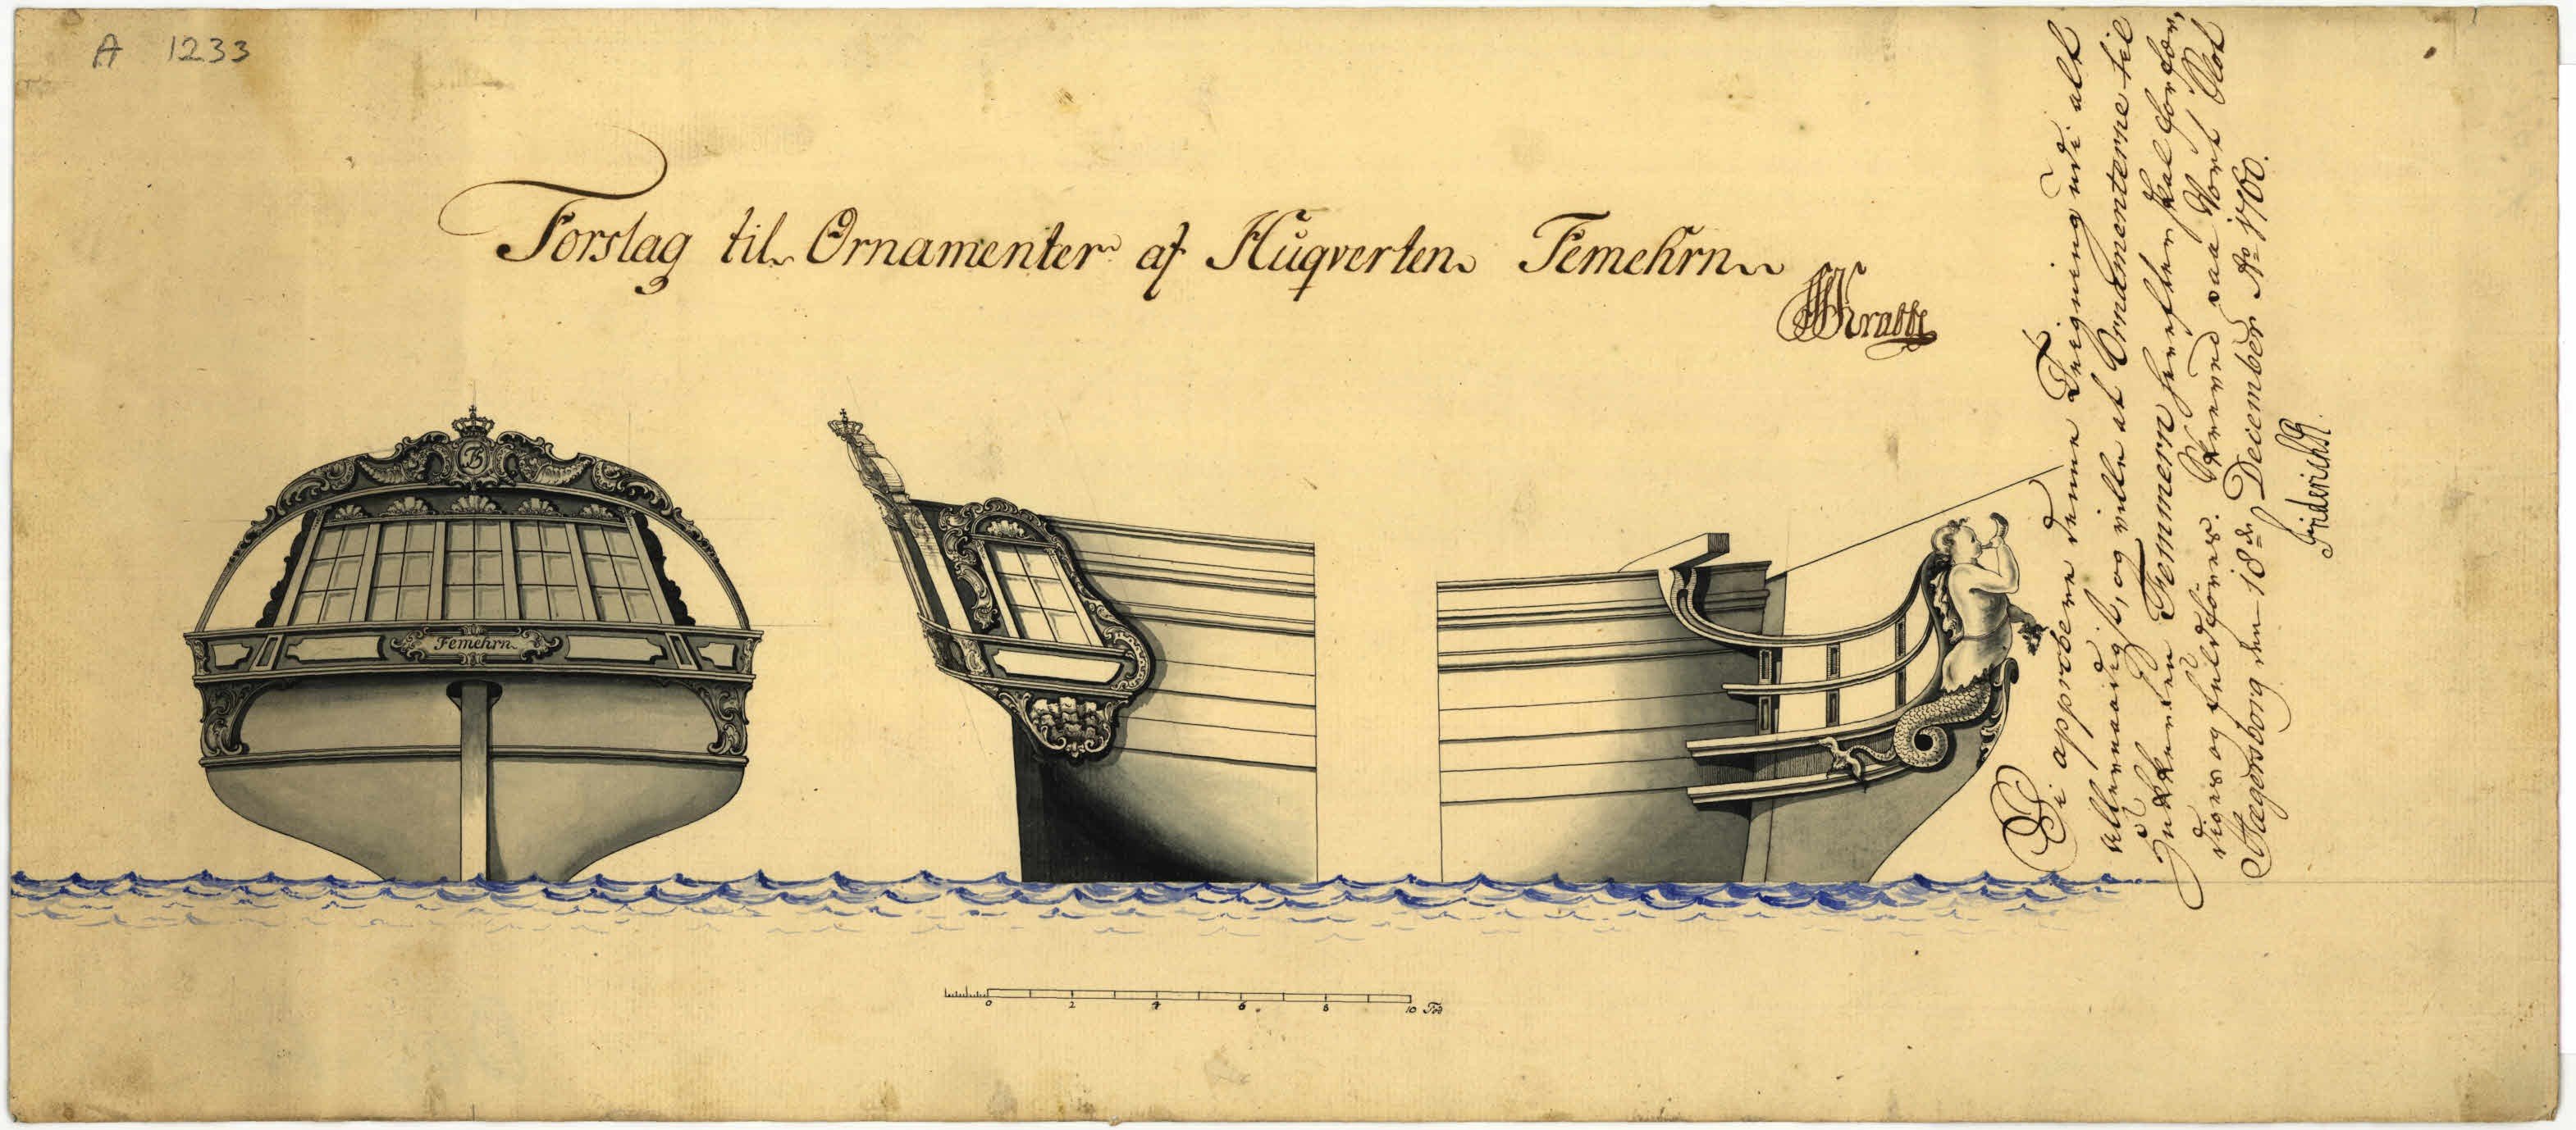
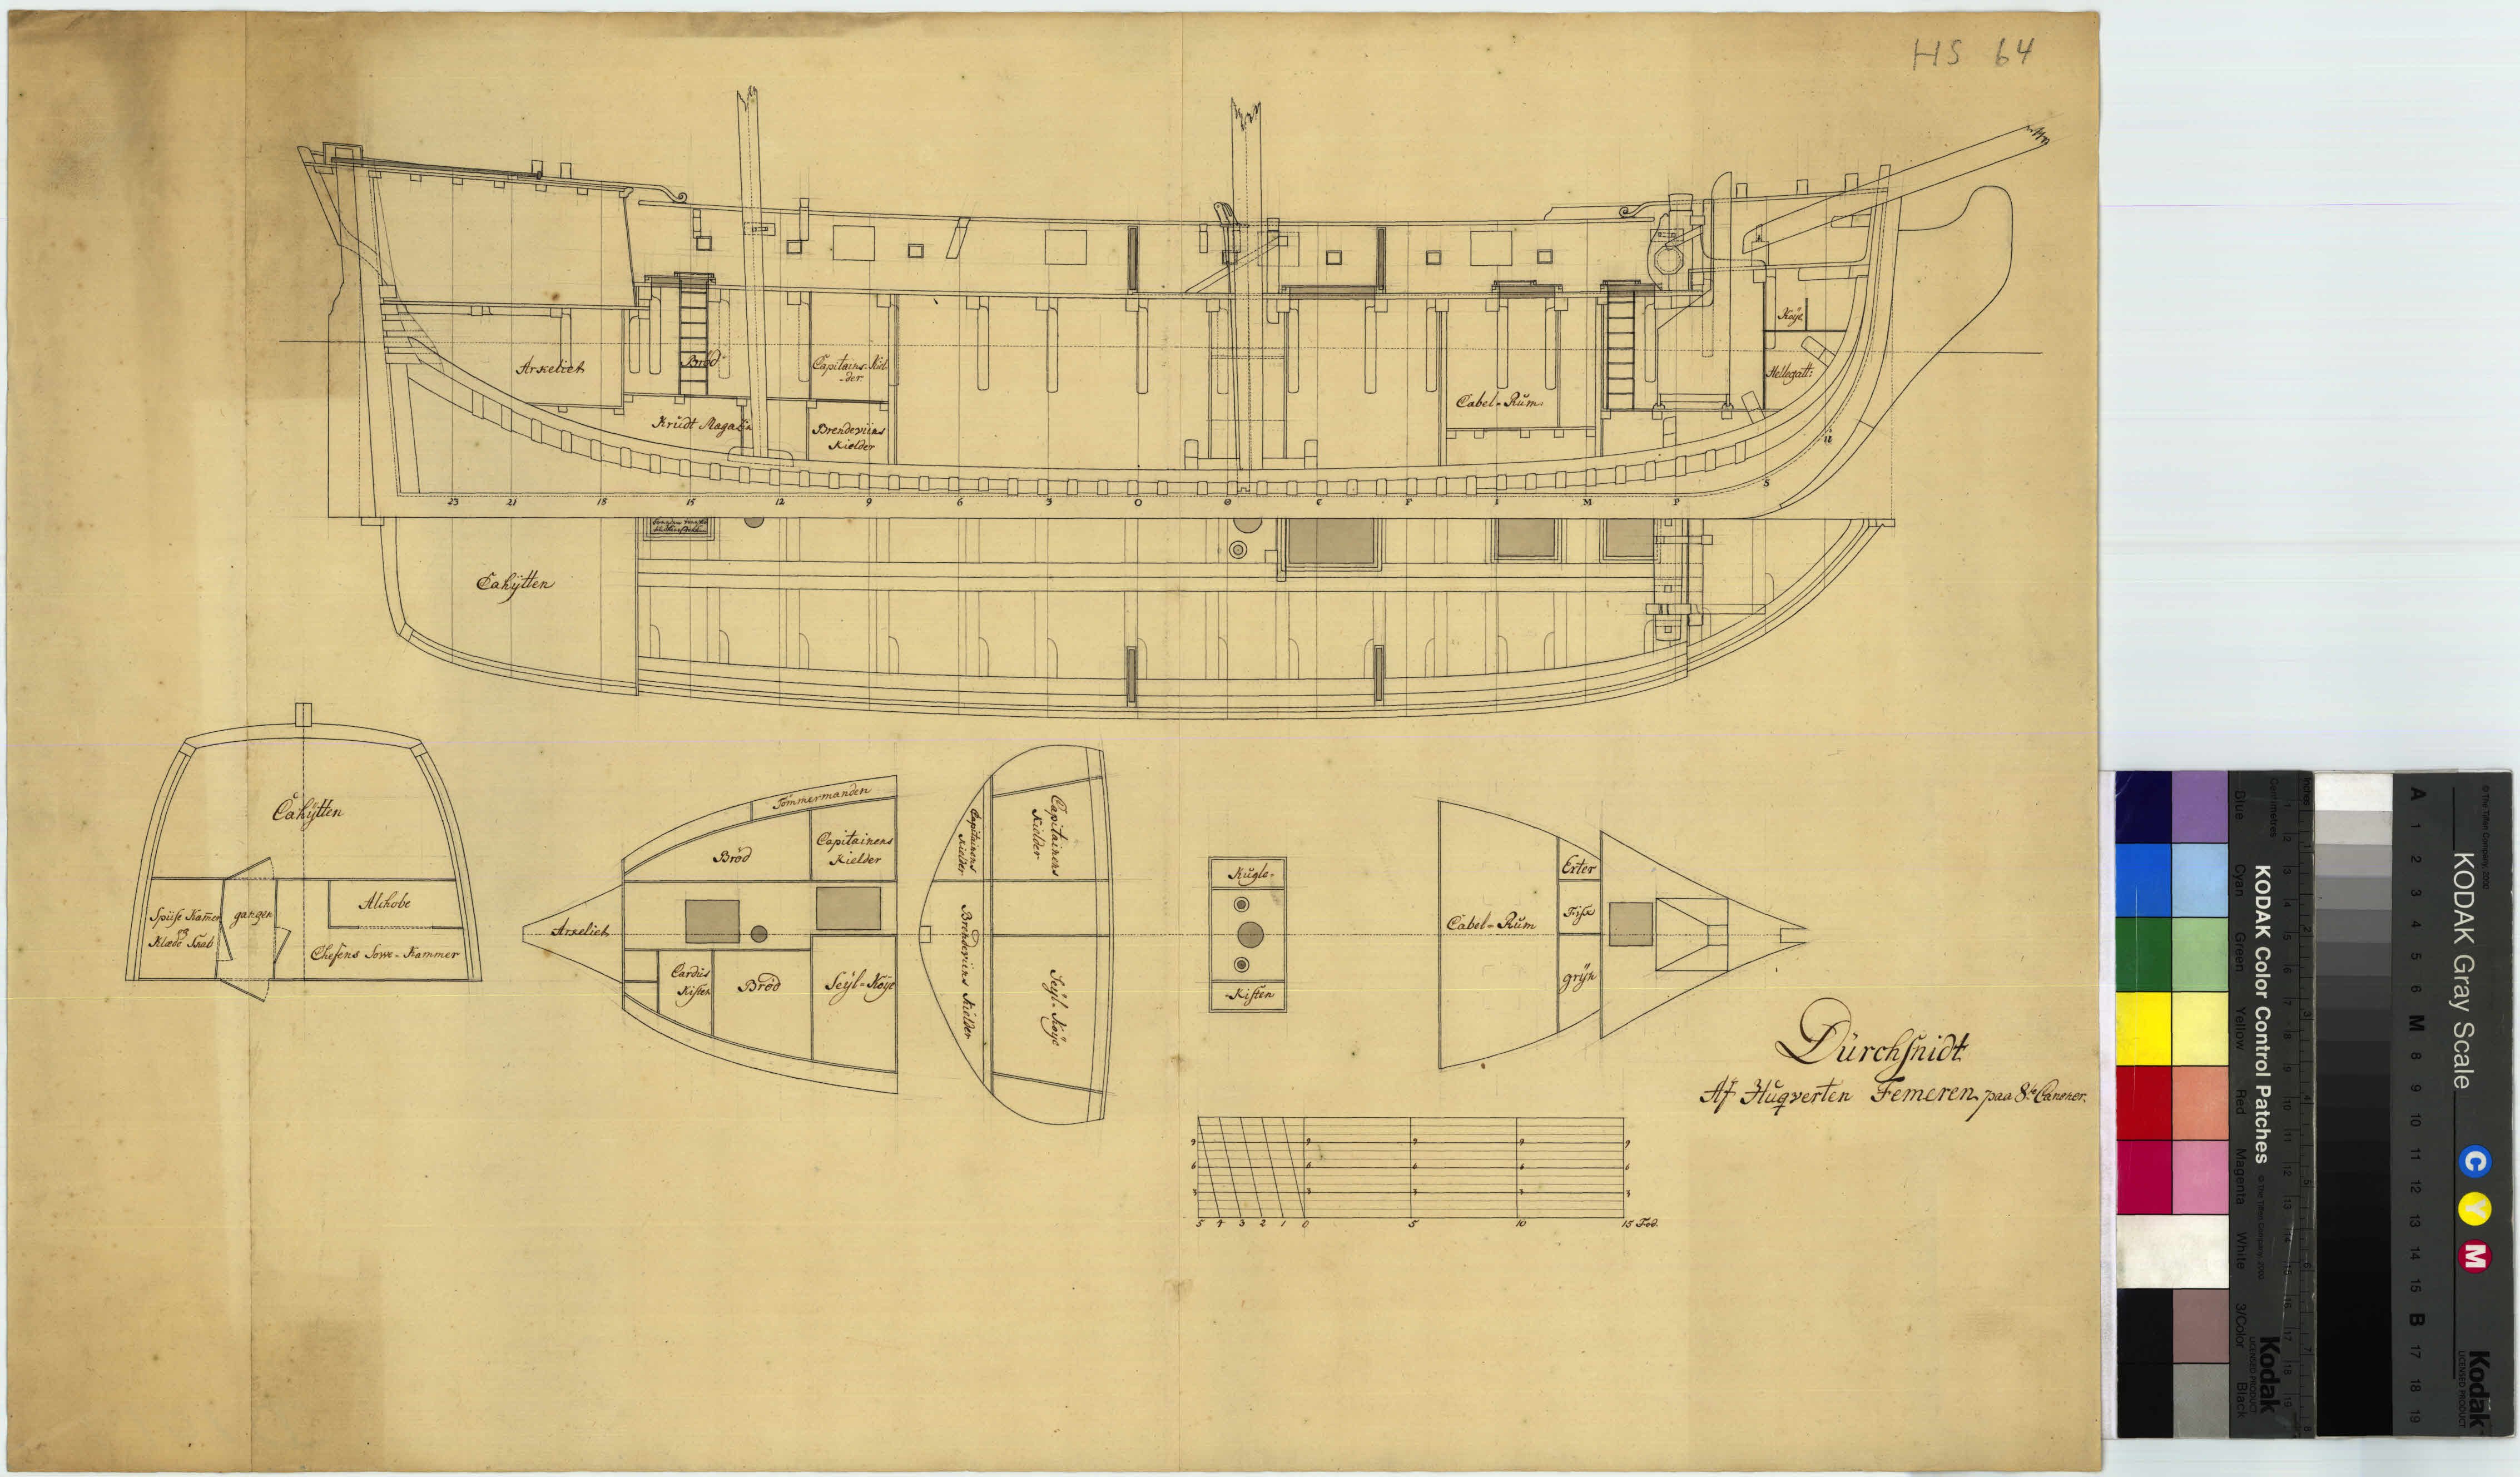
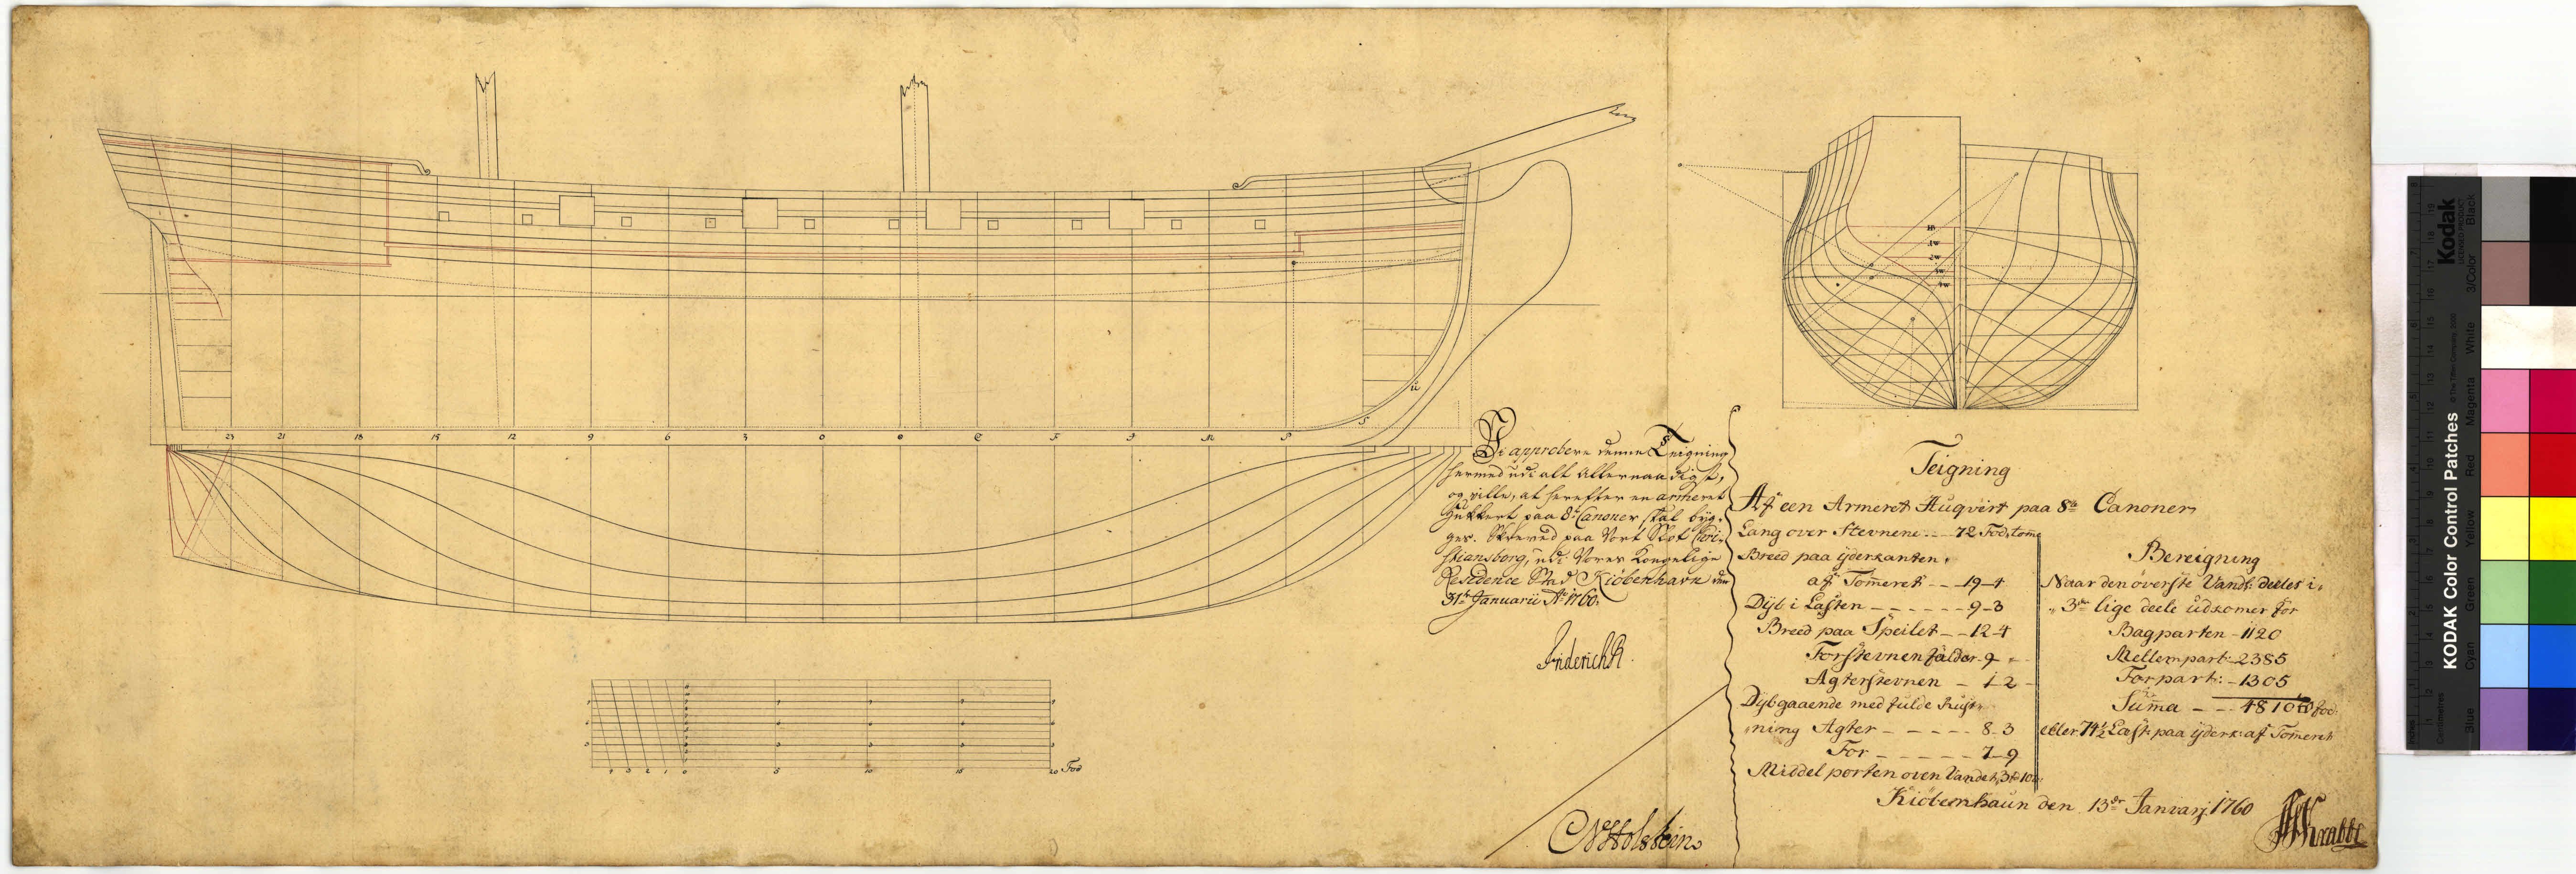
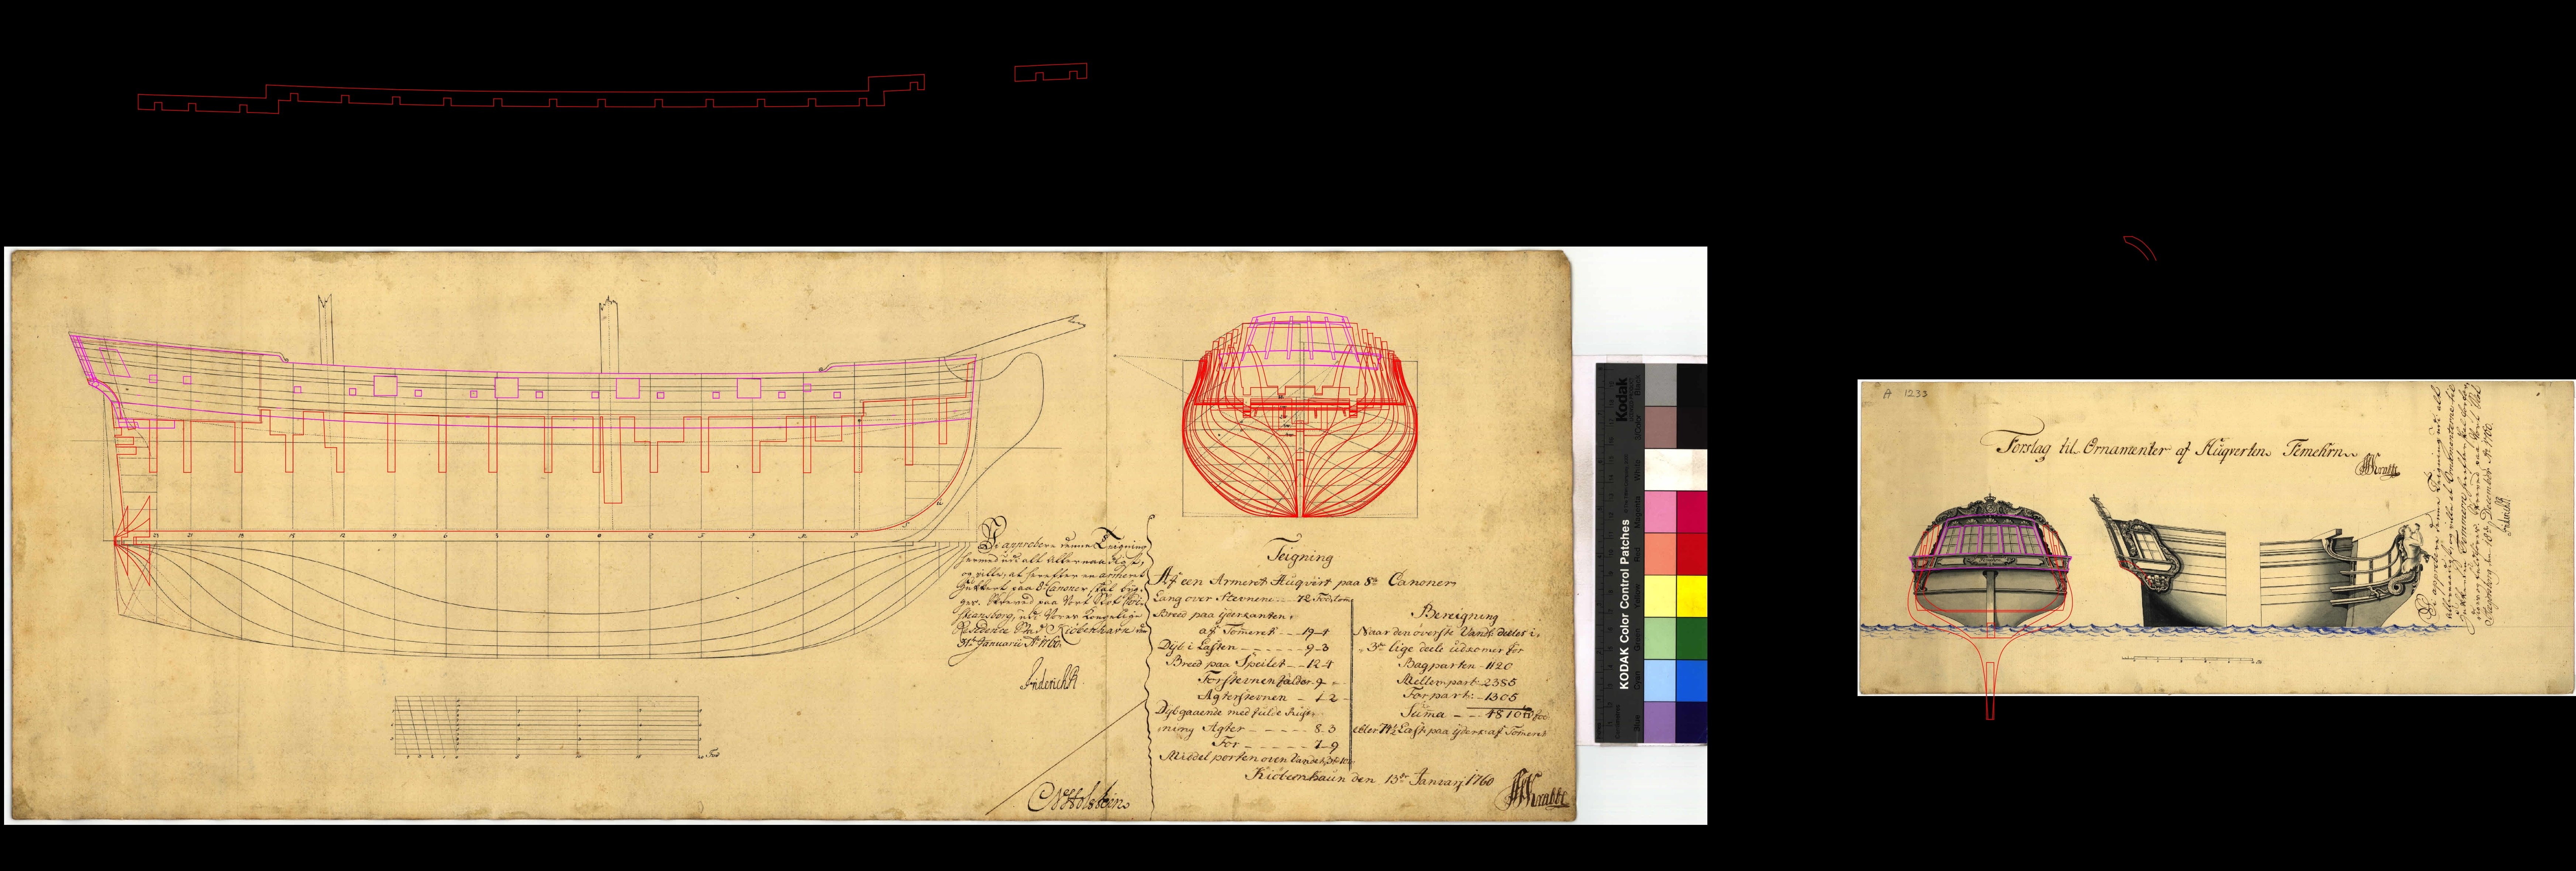
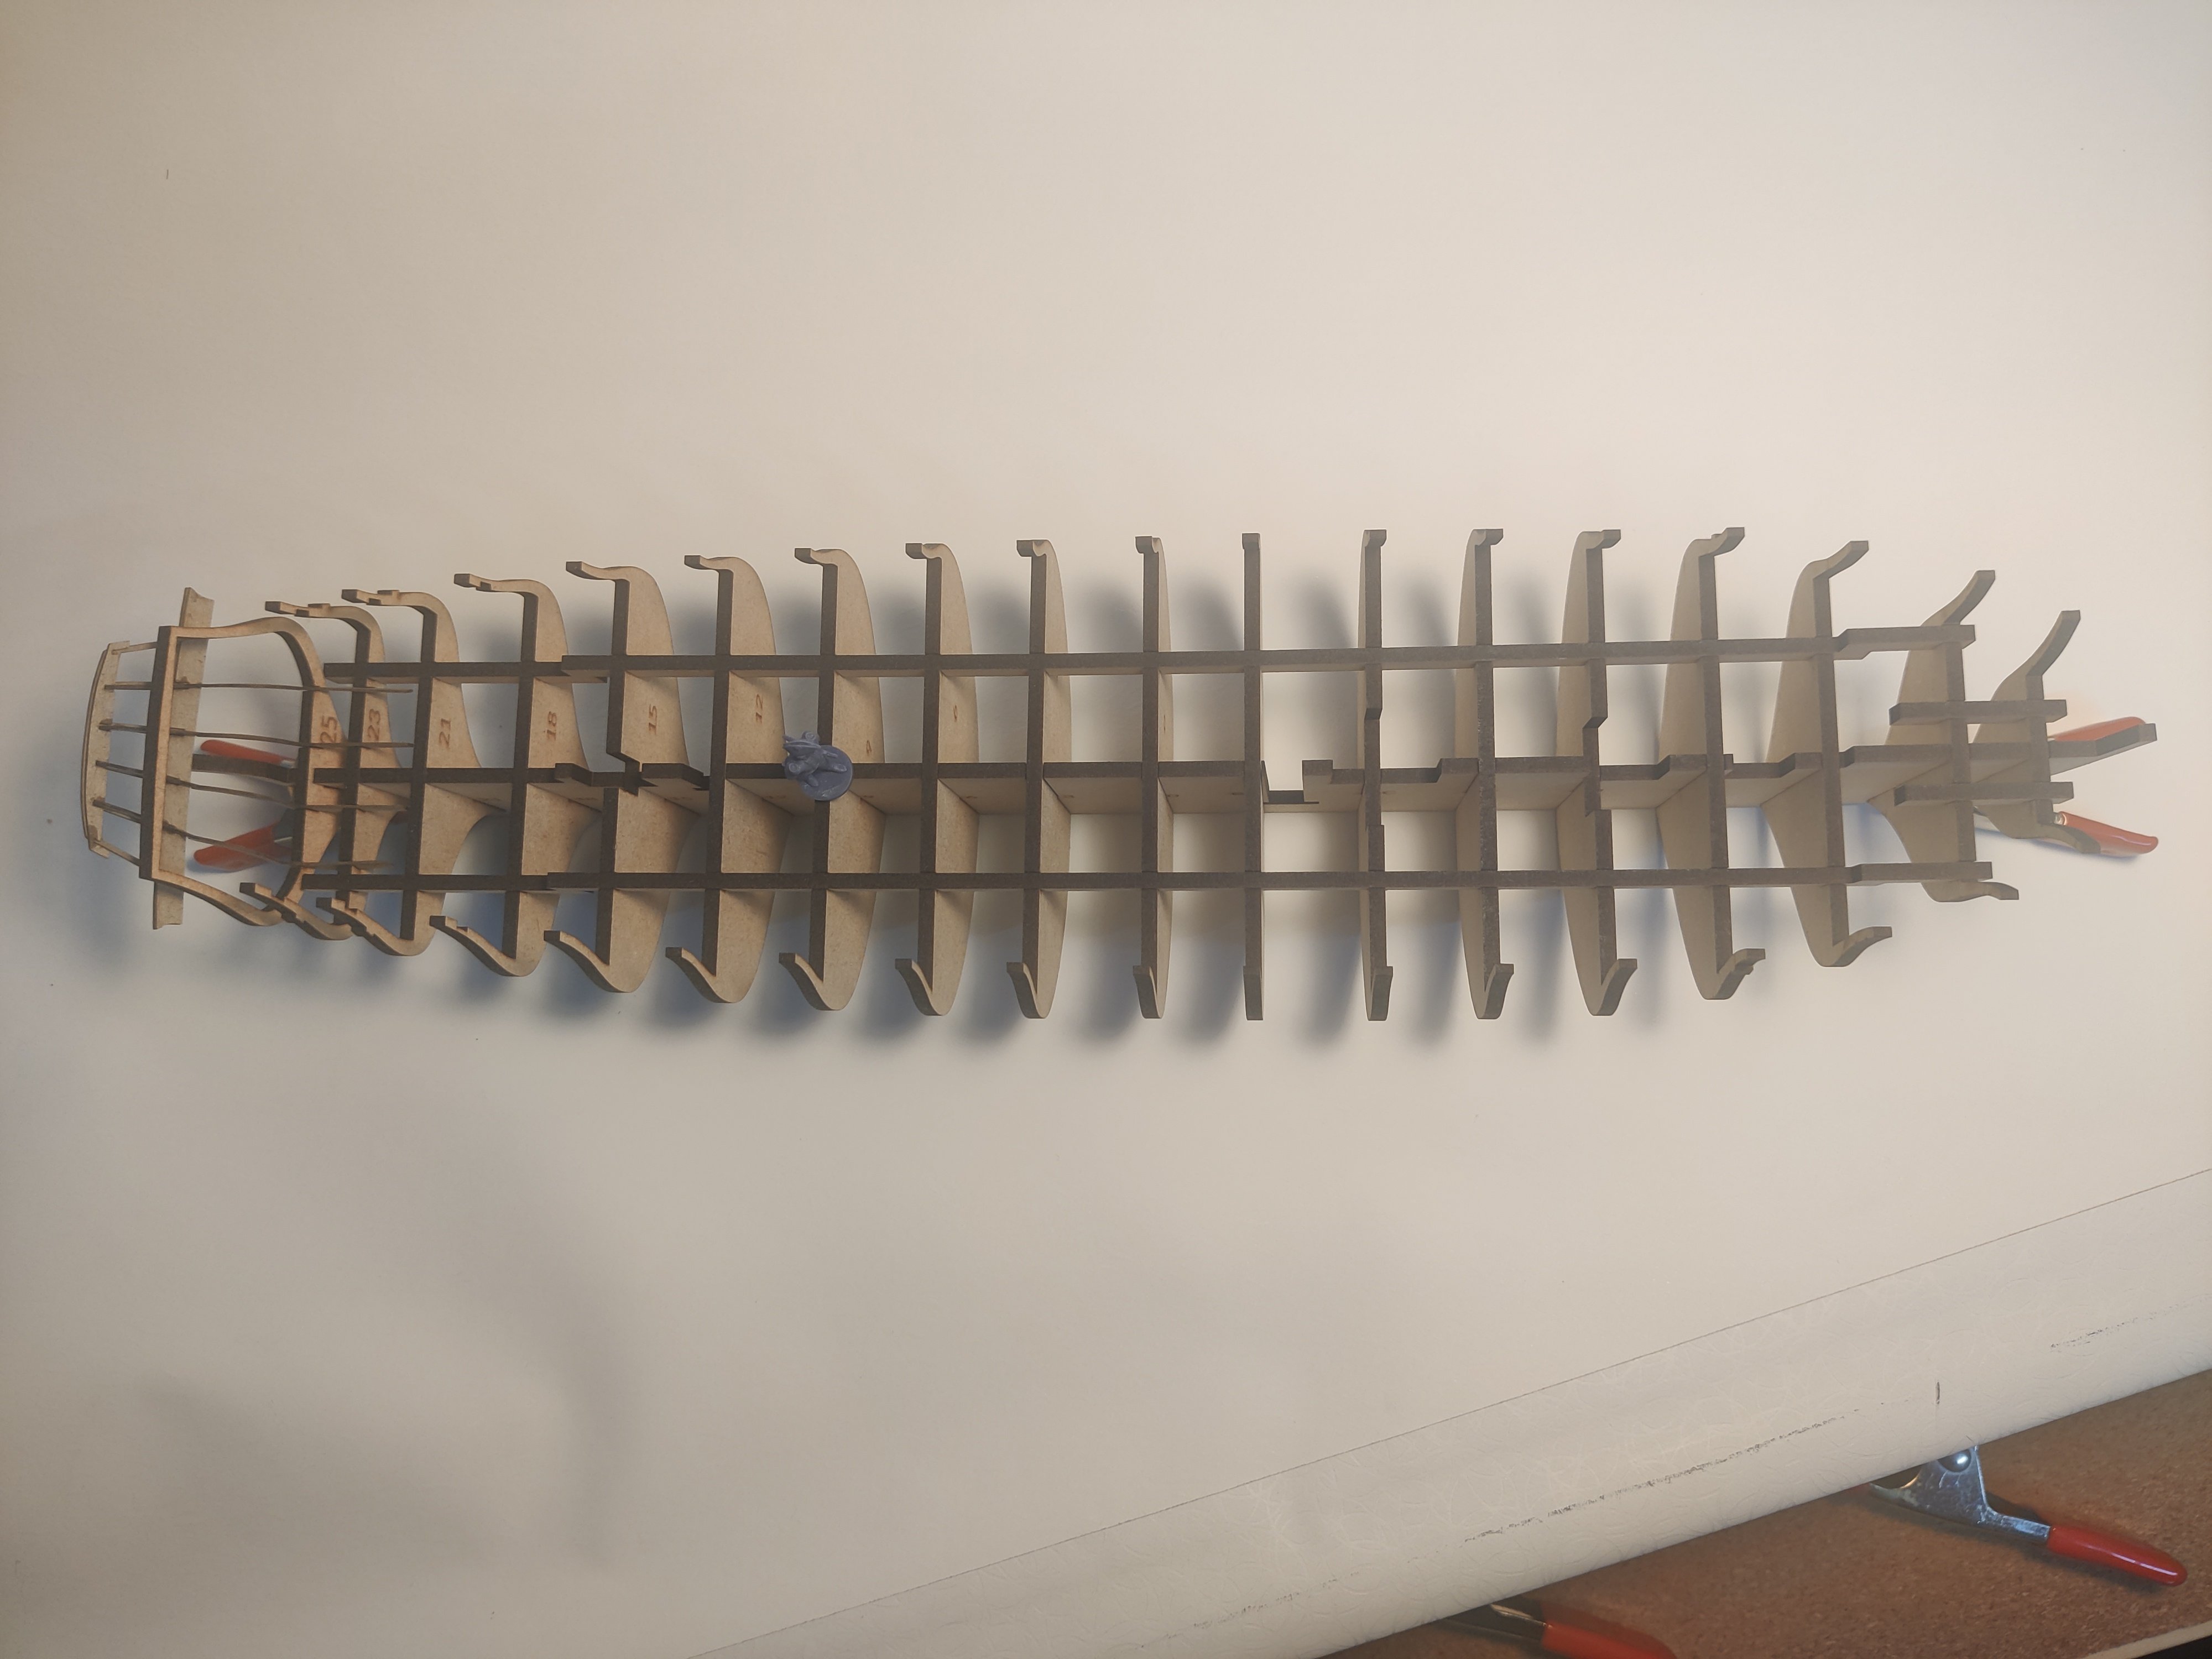
8 gun cutter 'Fehmern' For my next attempt, I wanted something small, but with high quality plans to work from. I came across a small 8-gun vessel that, despite its small size, had very nice ornaments and some fine details. In Danish it is called a 'Hukkert' which translates quite directly to 'Cutter', but it has two masts, unlike the vessels I have seen that are named cutters in English. If anyone has a better English term, I would like to know! I attach the sail plan below if this helps. Here are a few of the original plans: It only took a few hours to trace the keel and bulkheads and a little ekstra for the stern elements and bulwark patterns. I cut this out of 3 mm MDF and for now the stern elements and bulwark patterns are just 0.5 mm cardboard: The ship is really tiny - just 35 cm at 1:64 scale for the hull. I am very happy with how this turned out! I believe I could just glue this up faire the hull and start planking. It would also be easy to cut a deck in thin ply to plank on top of, or even just score the deck with a planking pattern with the laser. Whether I would be able to design all the deck fittings as well as the decorative elements of course remains to be seen! This one is definitely on the list of possible future builds 😁. As I thought I was getting the hang of this, I moved on to something bigger....🫣 For the next post ! BR TJM


- 41 replies
-
- 12
-
-
True! I agree that it would be possible to continue with this one, but if/when I do, I will probably prefer to take advantage of the learnings I have had! I aldo now think that the 4 mm dmf is a bit to heavy for the rear elements. It would be workable, I'm sure, but better with 2-3 mm material.
-
Thanks! I am using an Xtool S1 with a 20W diode head. Most will tell you a 20W diode is too small for the materials we need, and I am sure a 60-100 W CO2 laser would be much faster, but for hobby use, I find the small S1 to be absolutely fine. It is very accurate and have very high repeatability. The thickest material I have cut is 4 mm mdf which I can do at 5 mm/s (or two passes at 10 mm/s) it actually almost cuts through with one pass at 6-7 mm/s but I lile to make sure the cut is totally clean. I can't tell on the cut if one or two passes have been used, but there are a bit more soot on the surface when it does not cut all the way through. The Fides files above took perhaps half an hour or 40 min to cut. This is an image of it cutting 1 mm pear for my current Christiania build.

-
It looks very good indeed!
-
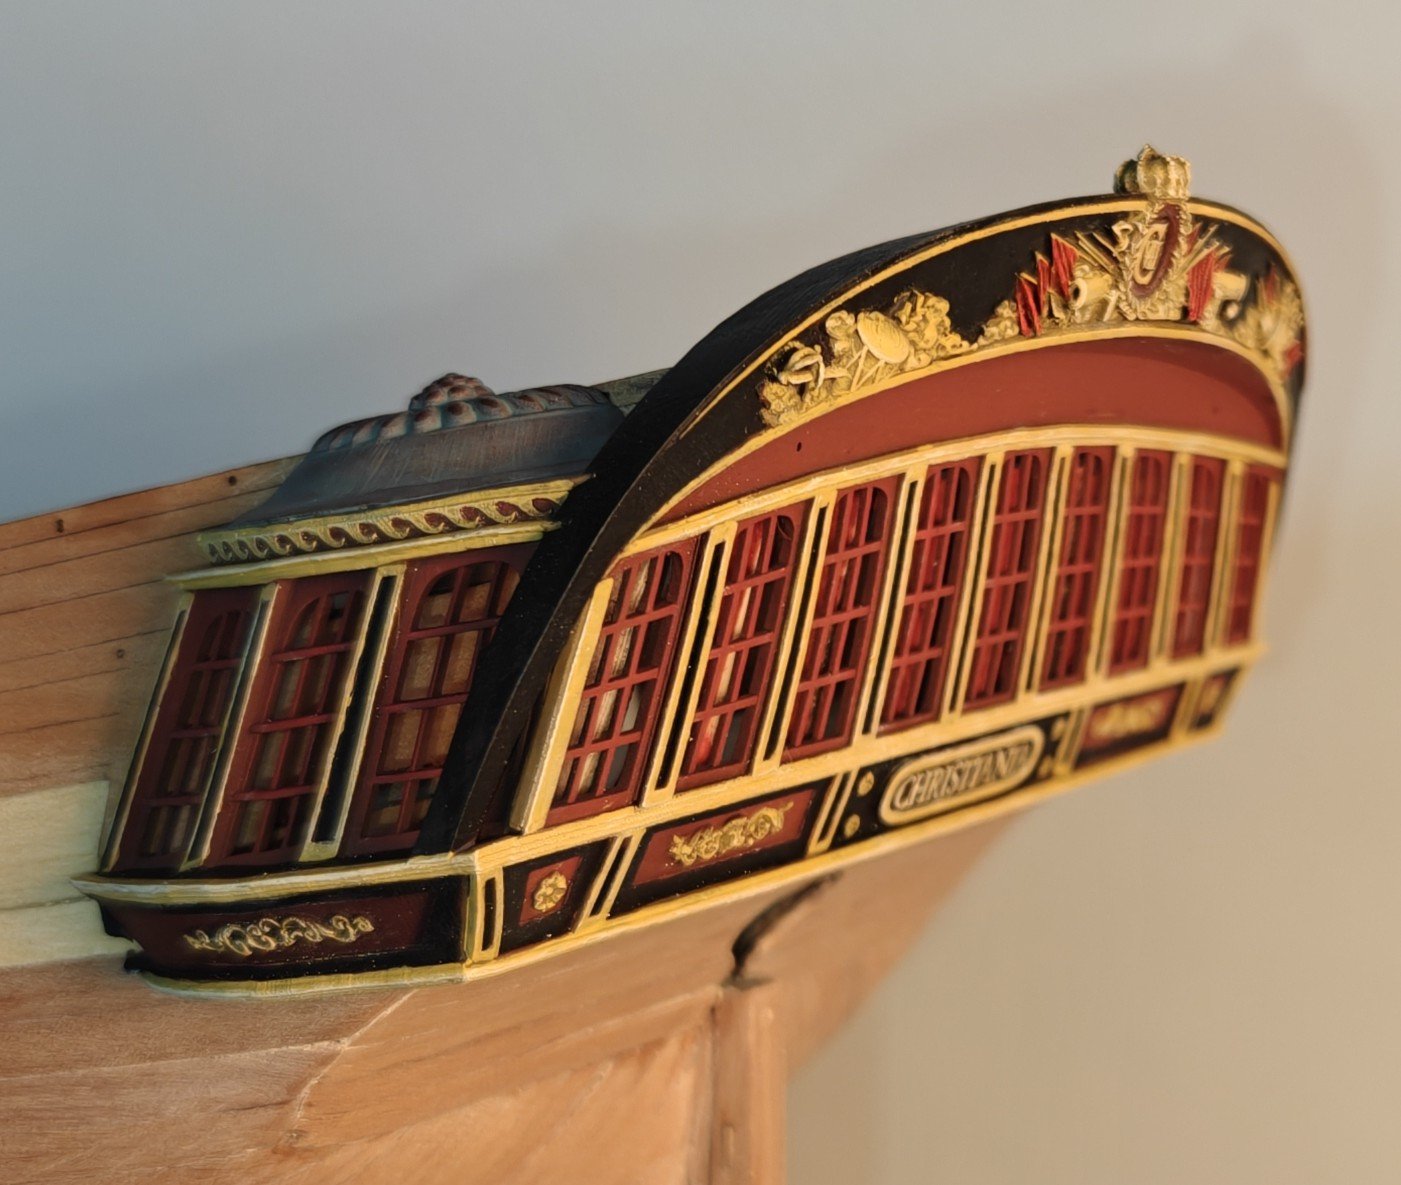
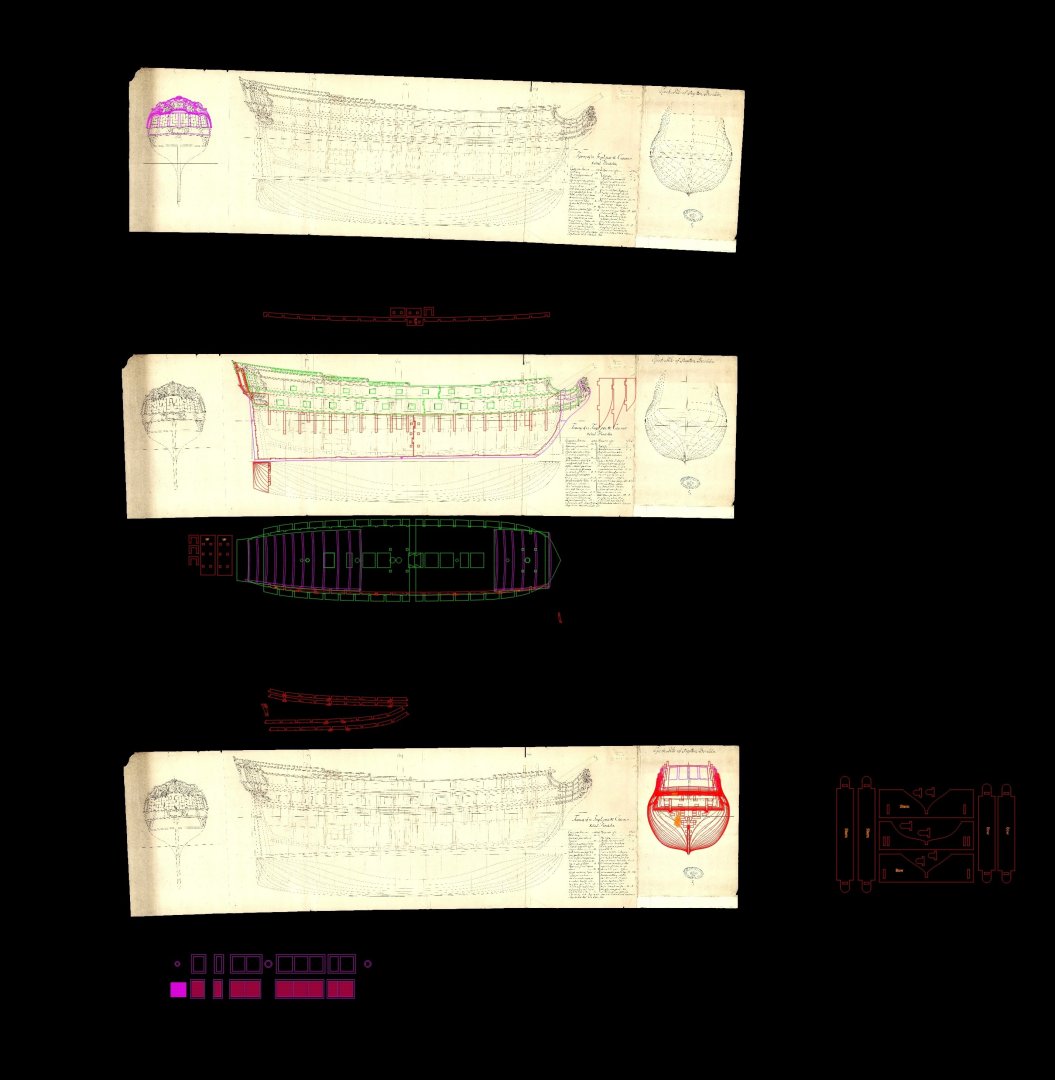
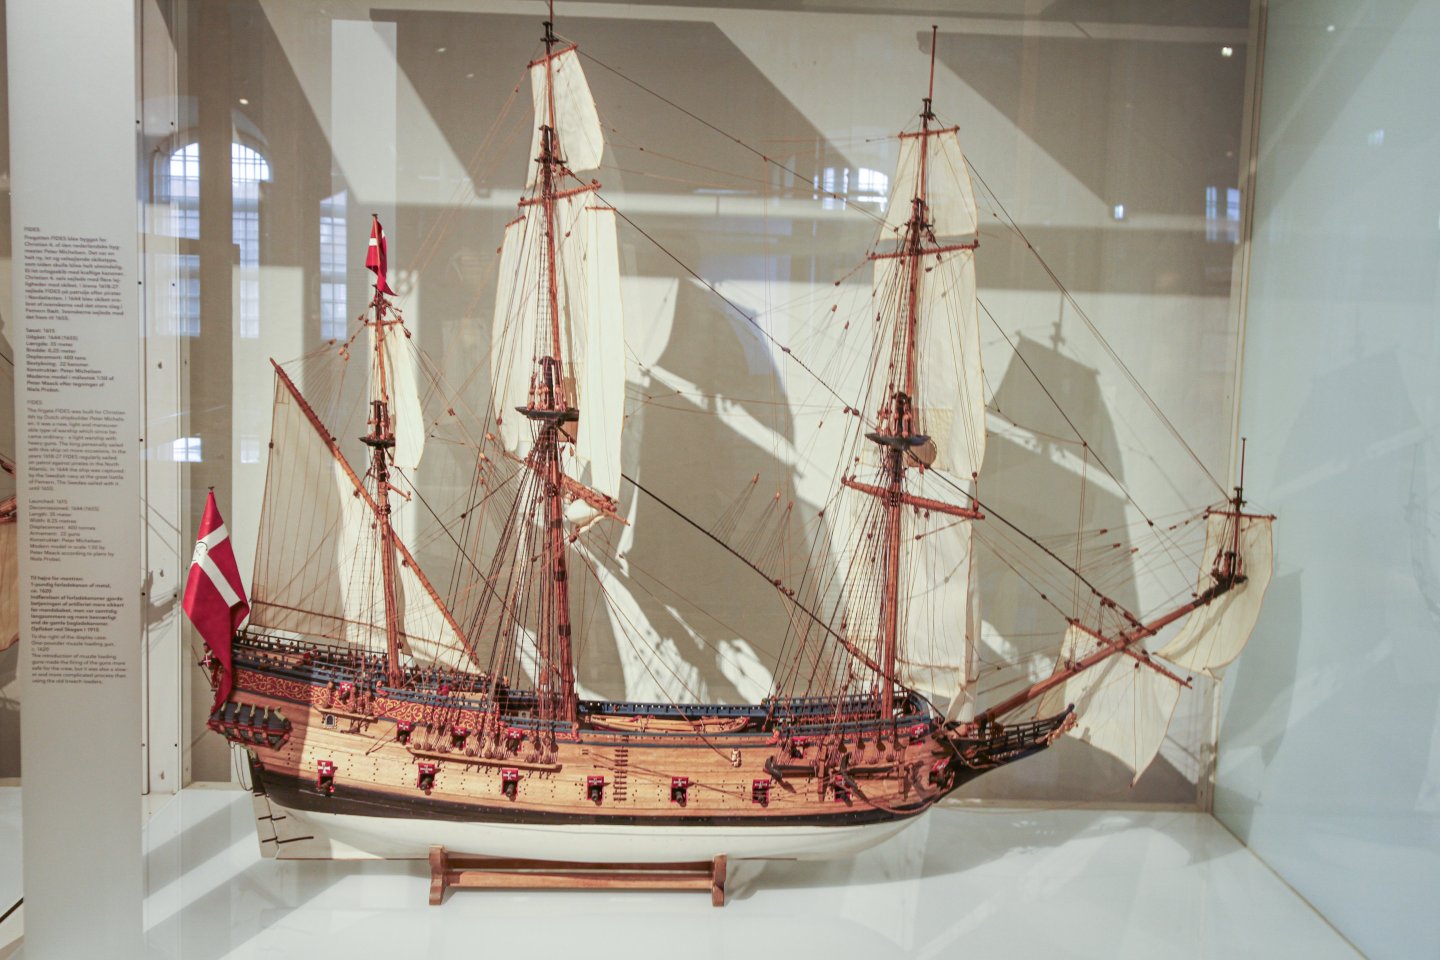
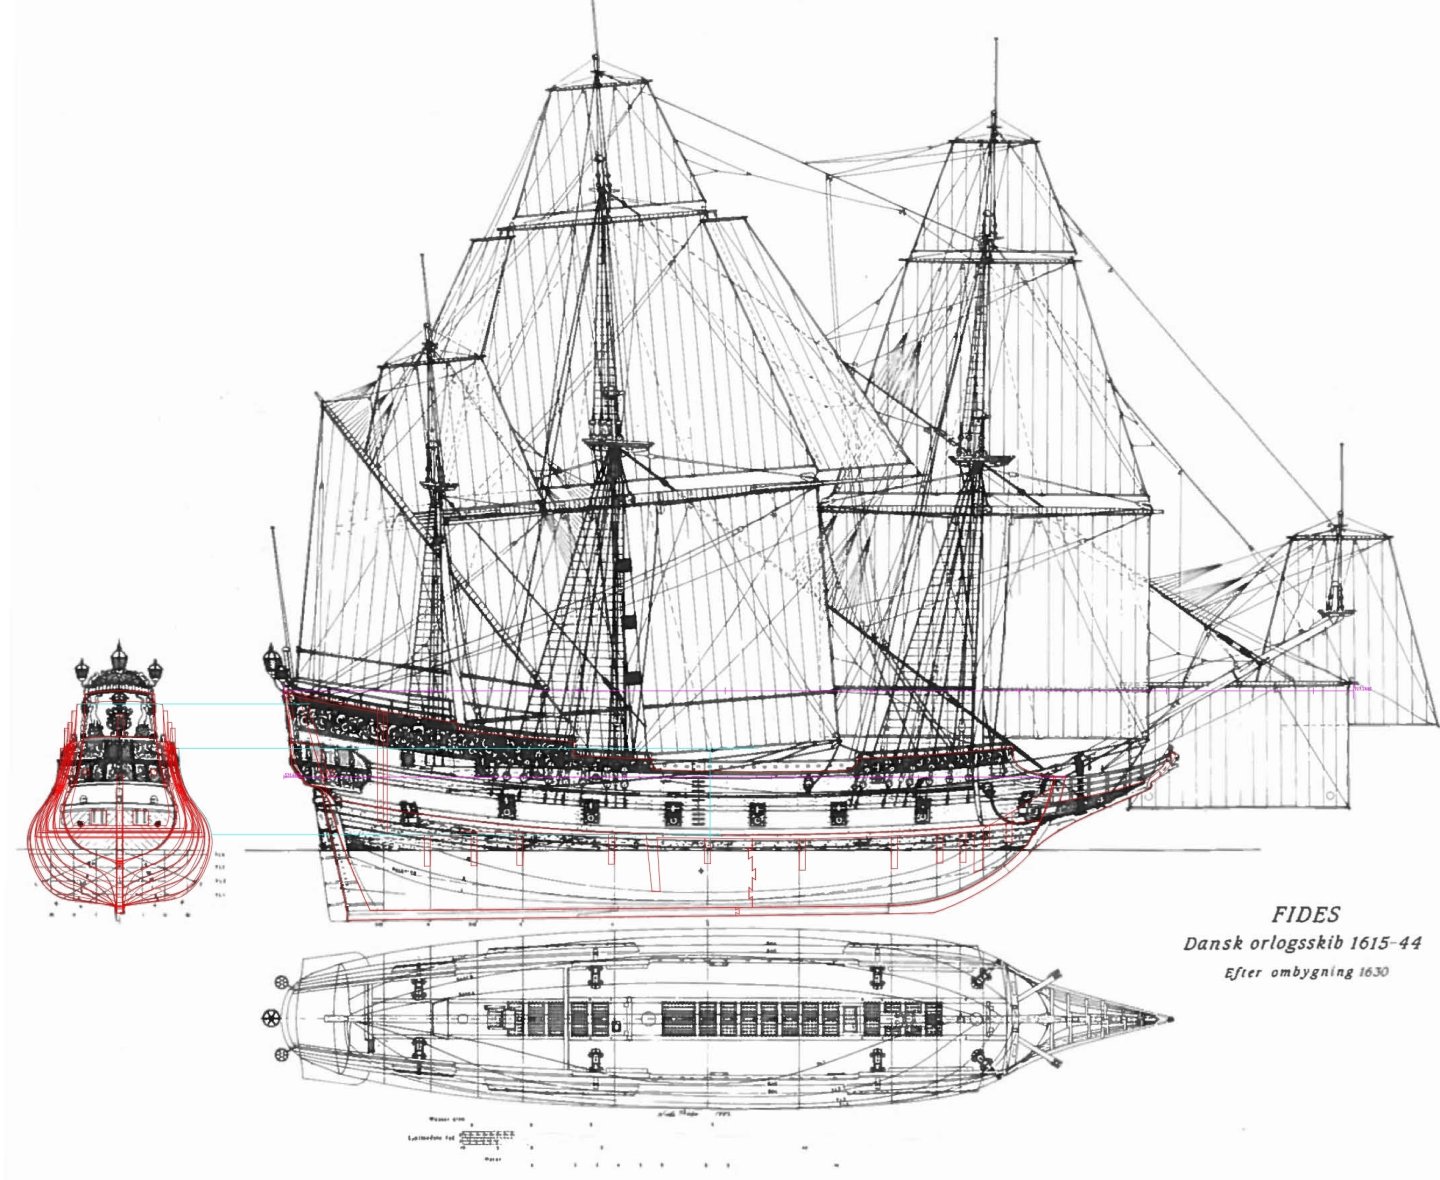
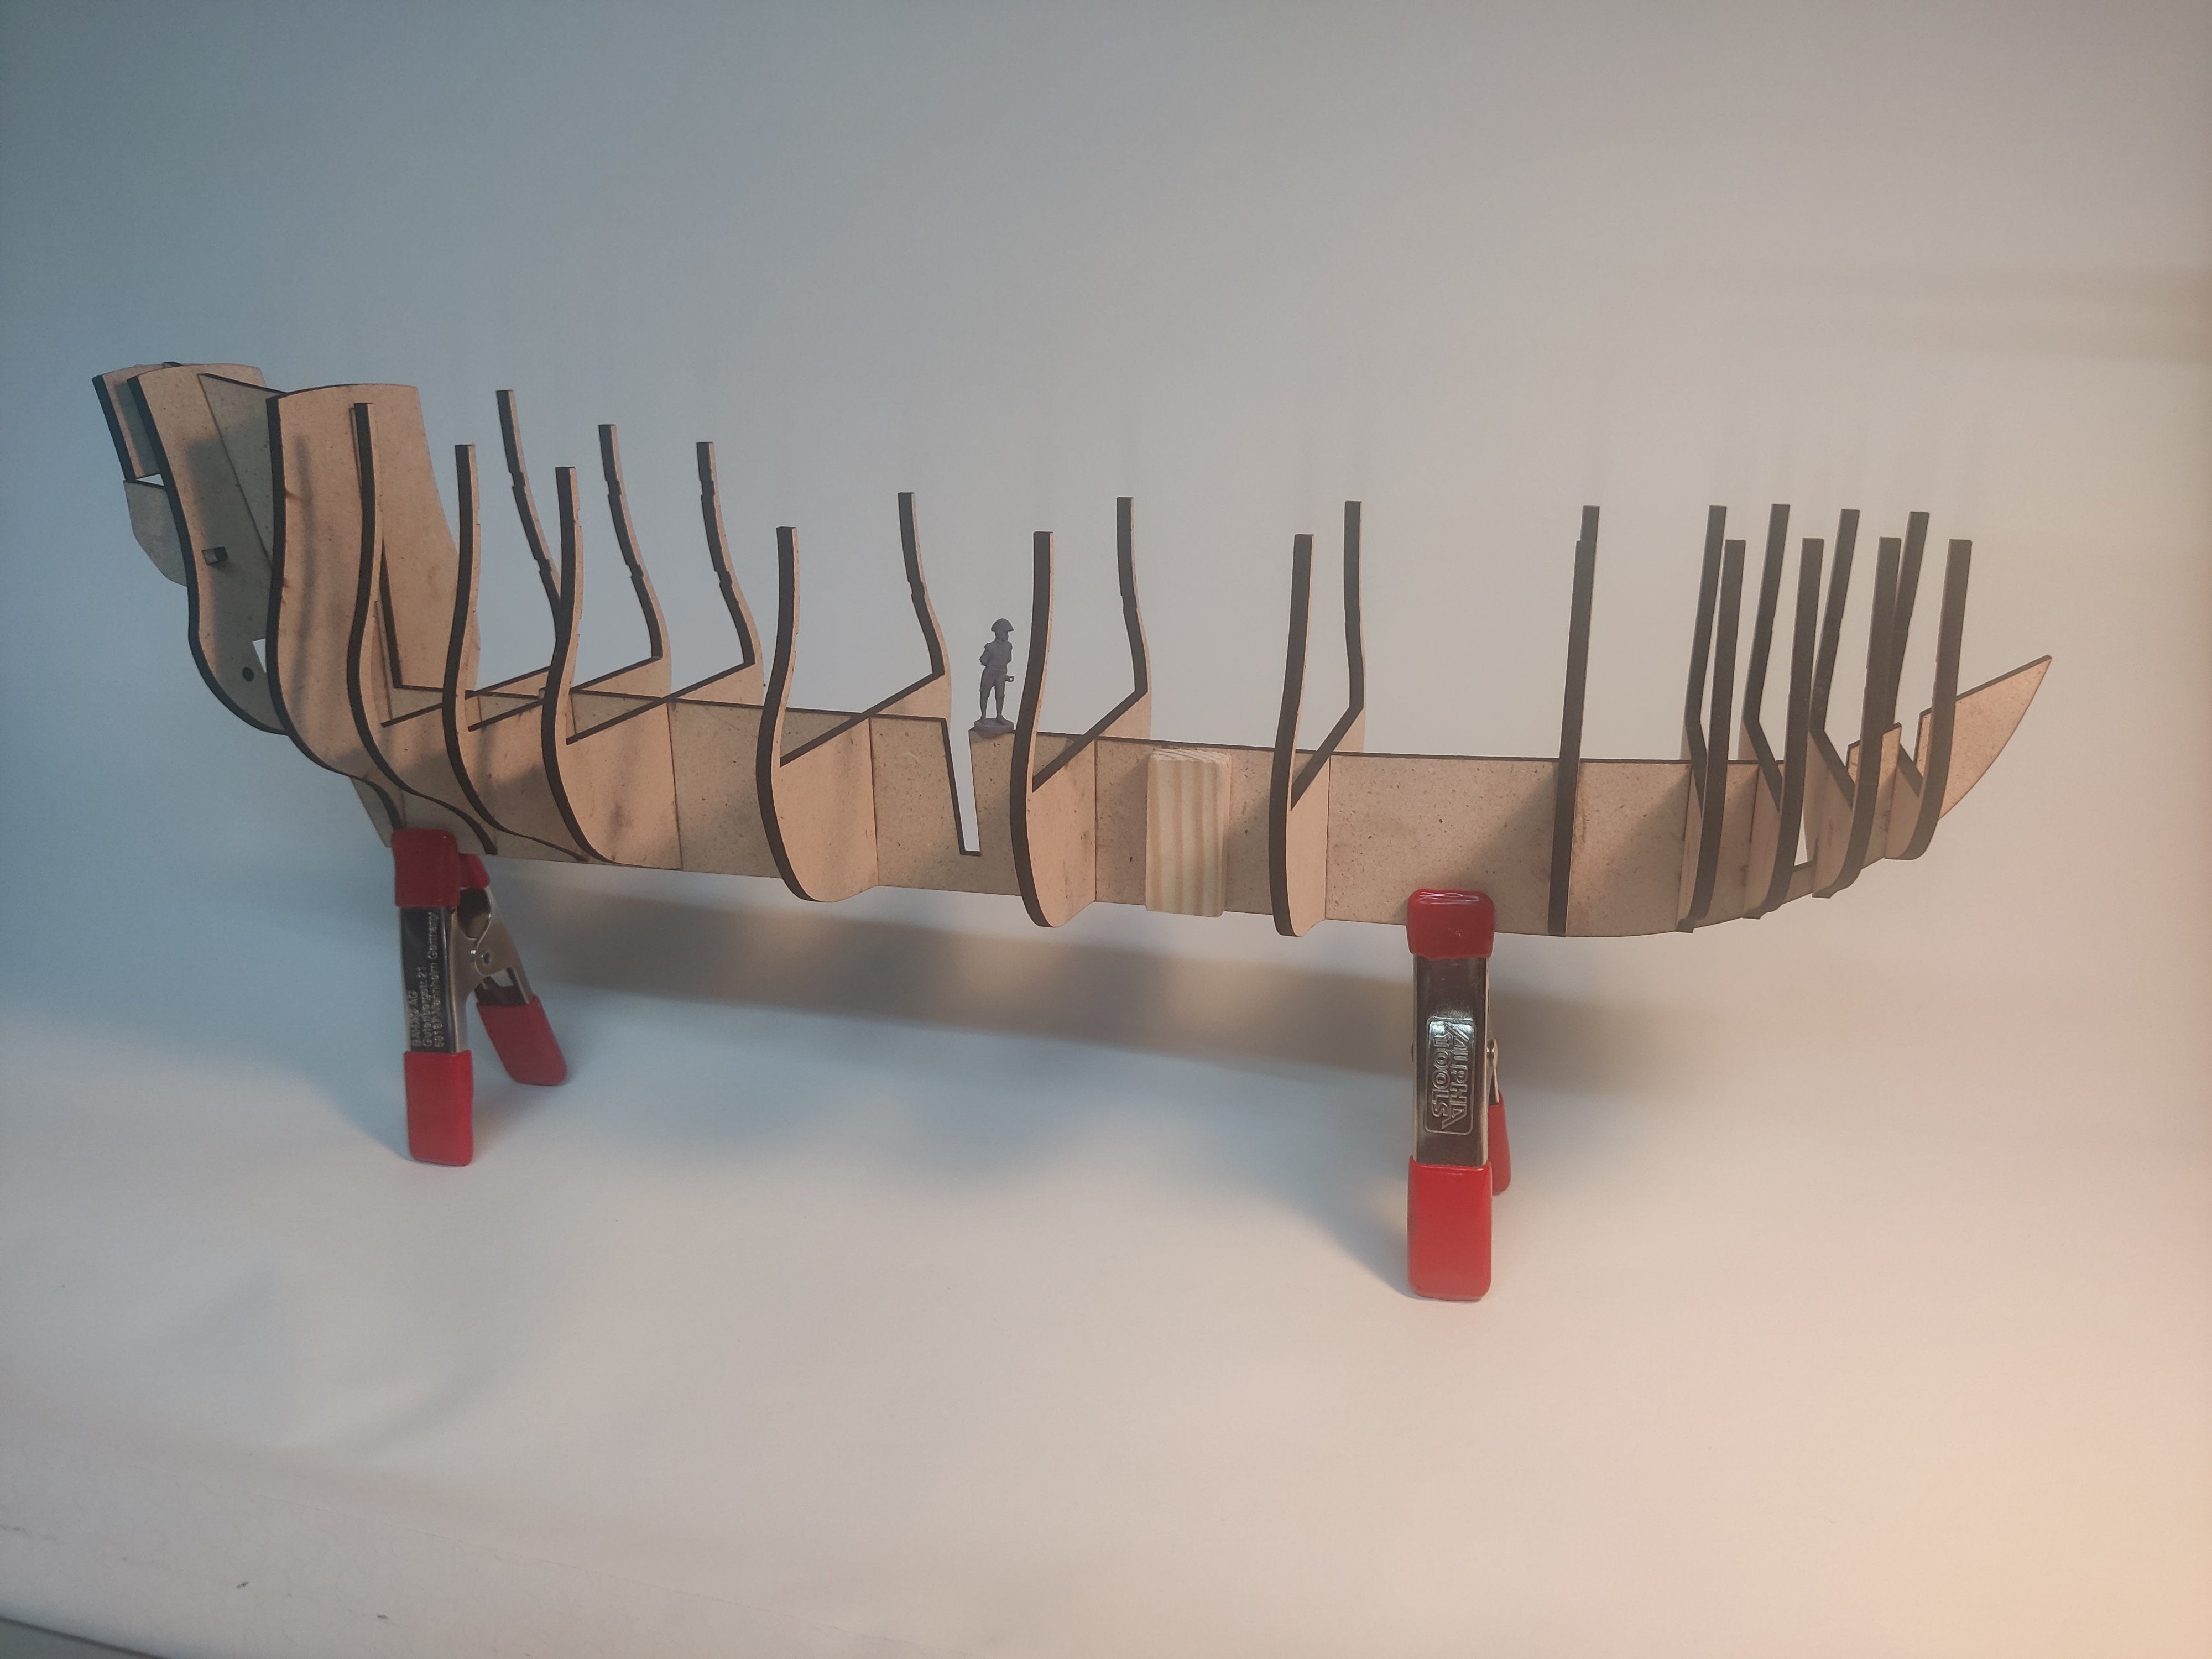
The frigate 'Fides' My next test subject was the frigate Fides from 1615. It is from the prime of the illustrious Christian IV, who drew the midship profile and handled the contract largely by himself. The king also sailed on the ship himself on a number of occasions. It has a very interesting history that I will not go into here, except to say that at that time, continental ship builders did not use plans, but worked full scale from mathematical principles and a good portion of raw experience. So no original plans exists for this ship, though we do have a few Van de Velde drawings for the ornaments! However, the preserved contract for Fides is so elaborate, that ship historian Neils Probst was able to reconstruct the ship with very high accuracy, based on the original mathematical principles described in it and the Van de Velde paintings. Here is a picture of a model from the War Museum in Copenhagen: My biggest challenge is that I only currently have access to a low resolution scan. I know high resolution plans exists, but have not made a great effort to obtain these. So this really is just a small test. Here are my cut files on top of the reconstruction drawing: I can't cut anything larger than around 30x40 cm, so I have to do the keel in two pieces. I was initially very happy that everything came together nicely, but have since come to the conclusion that more elaborate structural details would be needed if I were ever to continue with this as an actual model. I would need to add braces on the lower deck, and the simple strip of 1x4 mm planking down the bulkheads that worked fine for the small section of Christians Øe, would not be enough for this, especially withe the larger distance between bulkheads. It would also not be a very solid base for the forecastle and quarterdecks. I will definitely make a ship from this era (early 1600's) at some point down the line, but if I go with Fides, I will revisit everything and make a more elaborate structure. My latest efforts have given me many good leanings that I would need to apply here as well, but this was still an important step on the journey, even if this particular model will never move beyond this stage 😁. BR TJM


-
That makes sense! I totally agree that if the plans are not accurate any more, I will copy the mistakes. I have seen examples where lines a a bit wobbly, but actually most are in extremely nice condition and the scans are of excellent quality. In many cases, multiple original copies of the hull drawings exist, as there were several working copies, as well as a master which was often approved by the king. These doublets should allow for some identification of issues in the plans due to paper warping! But it is a good point! I guess I would also just accept some degree of uncertainty in the build. One of the next examples have some warped lines, but the final physical model looks ok. Thanks a lot for your inputs @Thukydides, much appreciated, as always! It gets me thinking abut things I have not really thought about yet!
-
I guess that is true, but I don't think it will be a problem. As long as you place the bulkheads so the the direction of the fairing works (offset towards the closest end, if that makes sense), you can faire the hull as you always would, faring until you just remove the char. And since I don't have a 3D model in the virtual world, I don't have to have the fairing modelled at all! At least I think that is so! I guess I am doing it the same way you would old school, just working acc. to the plans. Just, instead of copying the plans to a piece if ply or mdf, I draw the individual parts in CAD and cut them out with a laser cutter. This ensures reproducibility and low tolerances, but otherwise it is the same as all-analog 🙂
-
Sounds interesting, I may give it a look! I do really like QCAD and have been quite successful even if it is only 2D - I will give some examples in the next posts. But it is good to have a 3D option if I run into something I can't get to work in QCAD.
-
So they say, but it is extremely limited in terms of export functions. I was not able to get any export I could actually use on my laser cutter. The issue is the 3D. You really need access to the feature that takes all your 3D parts, lays them out and exports a 2D projection for your cut files. As far as I could tell, that feature is only available in the paid version.
-
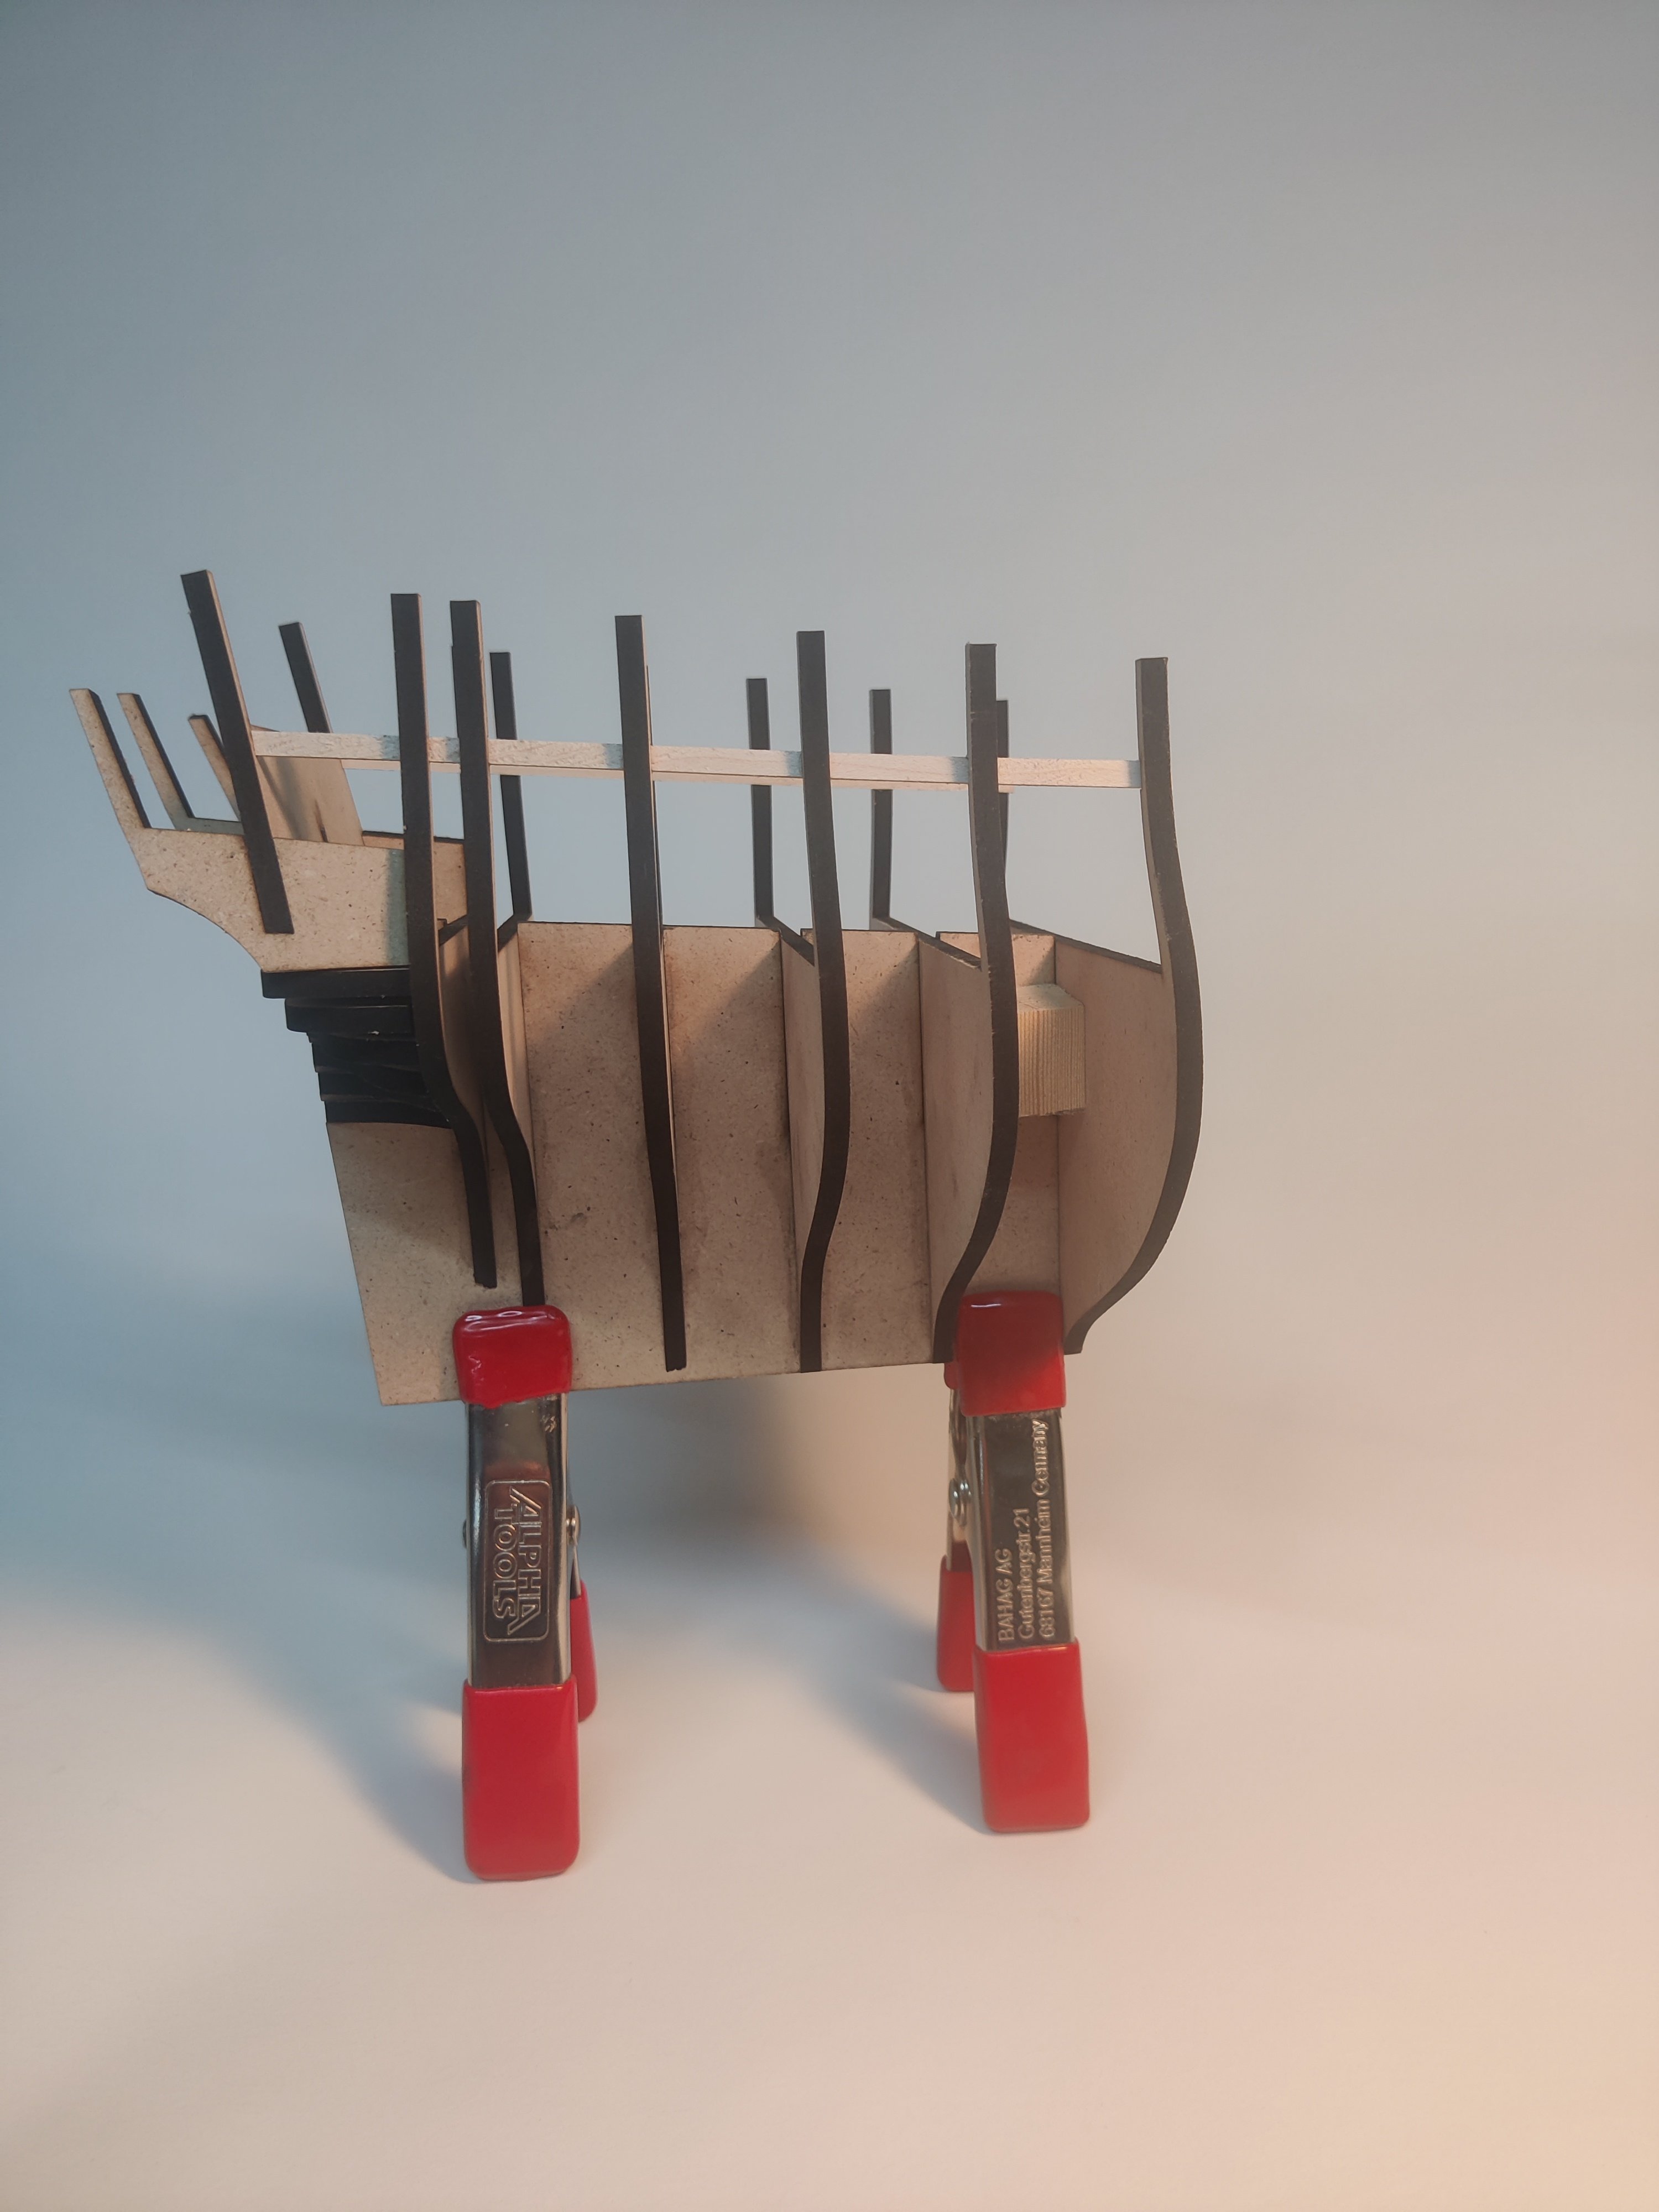
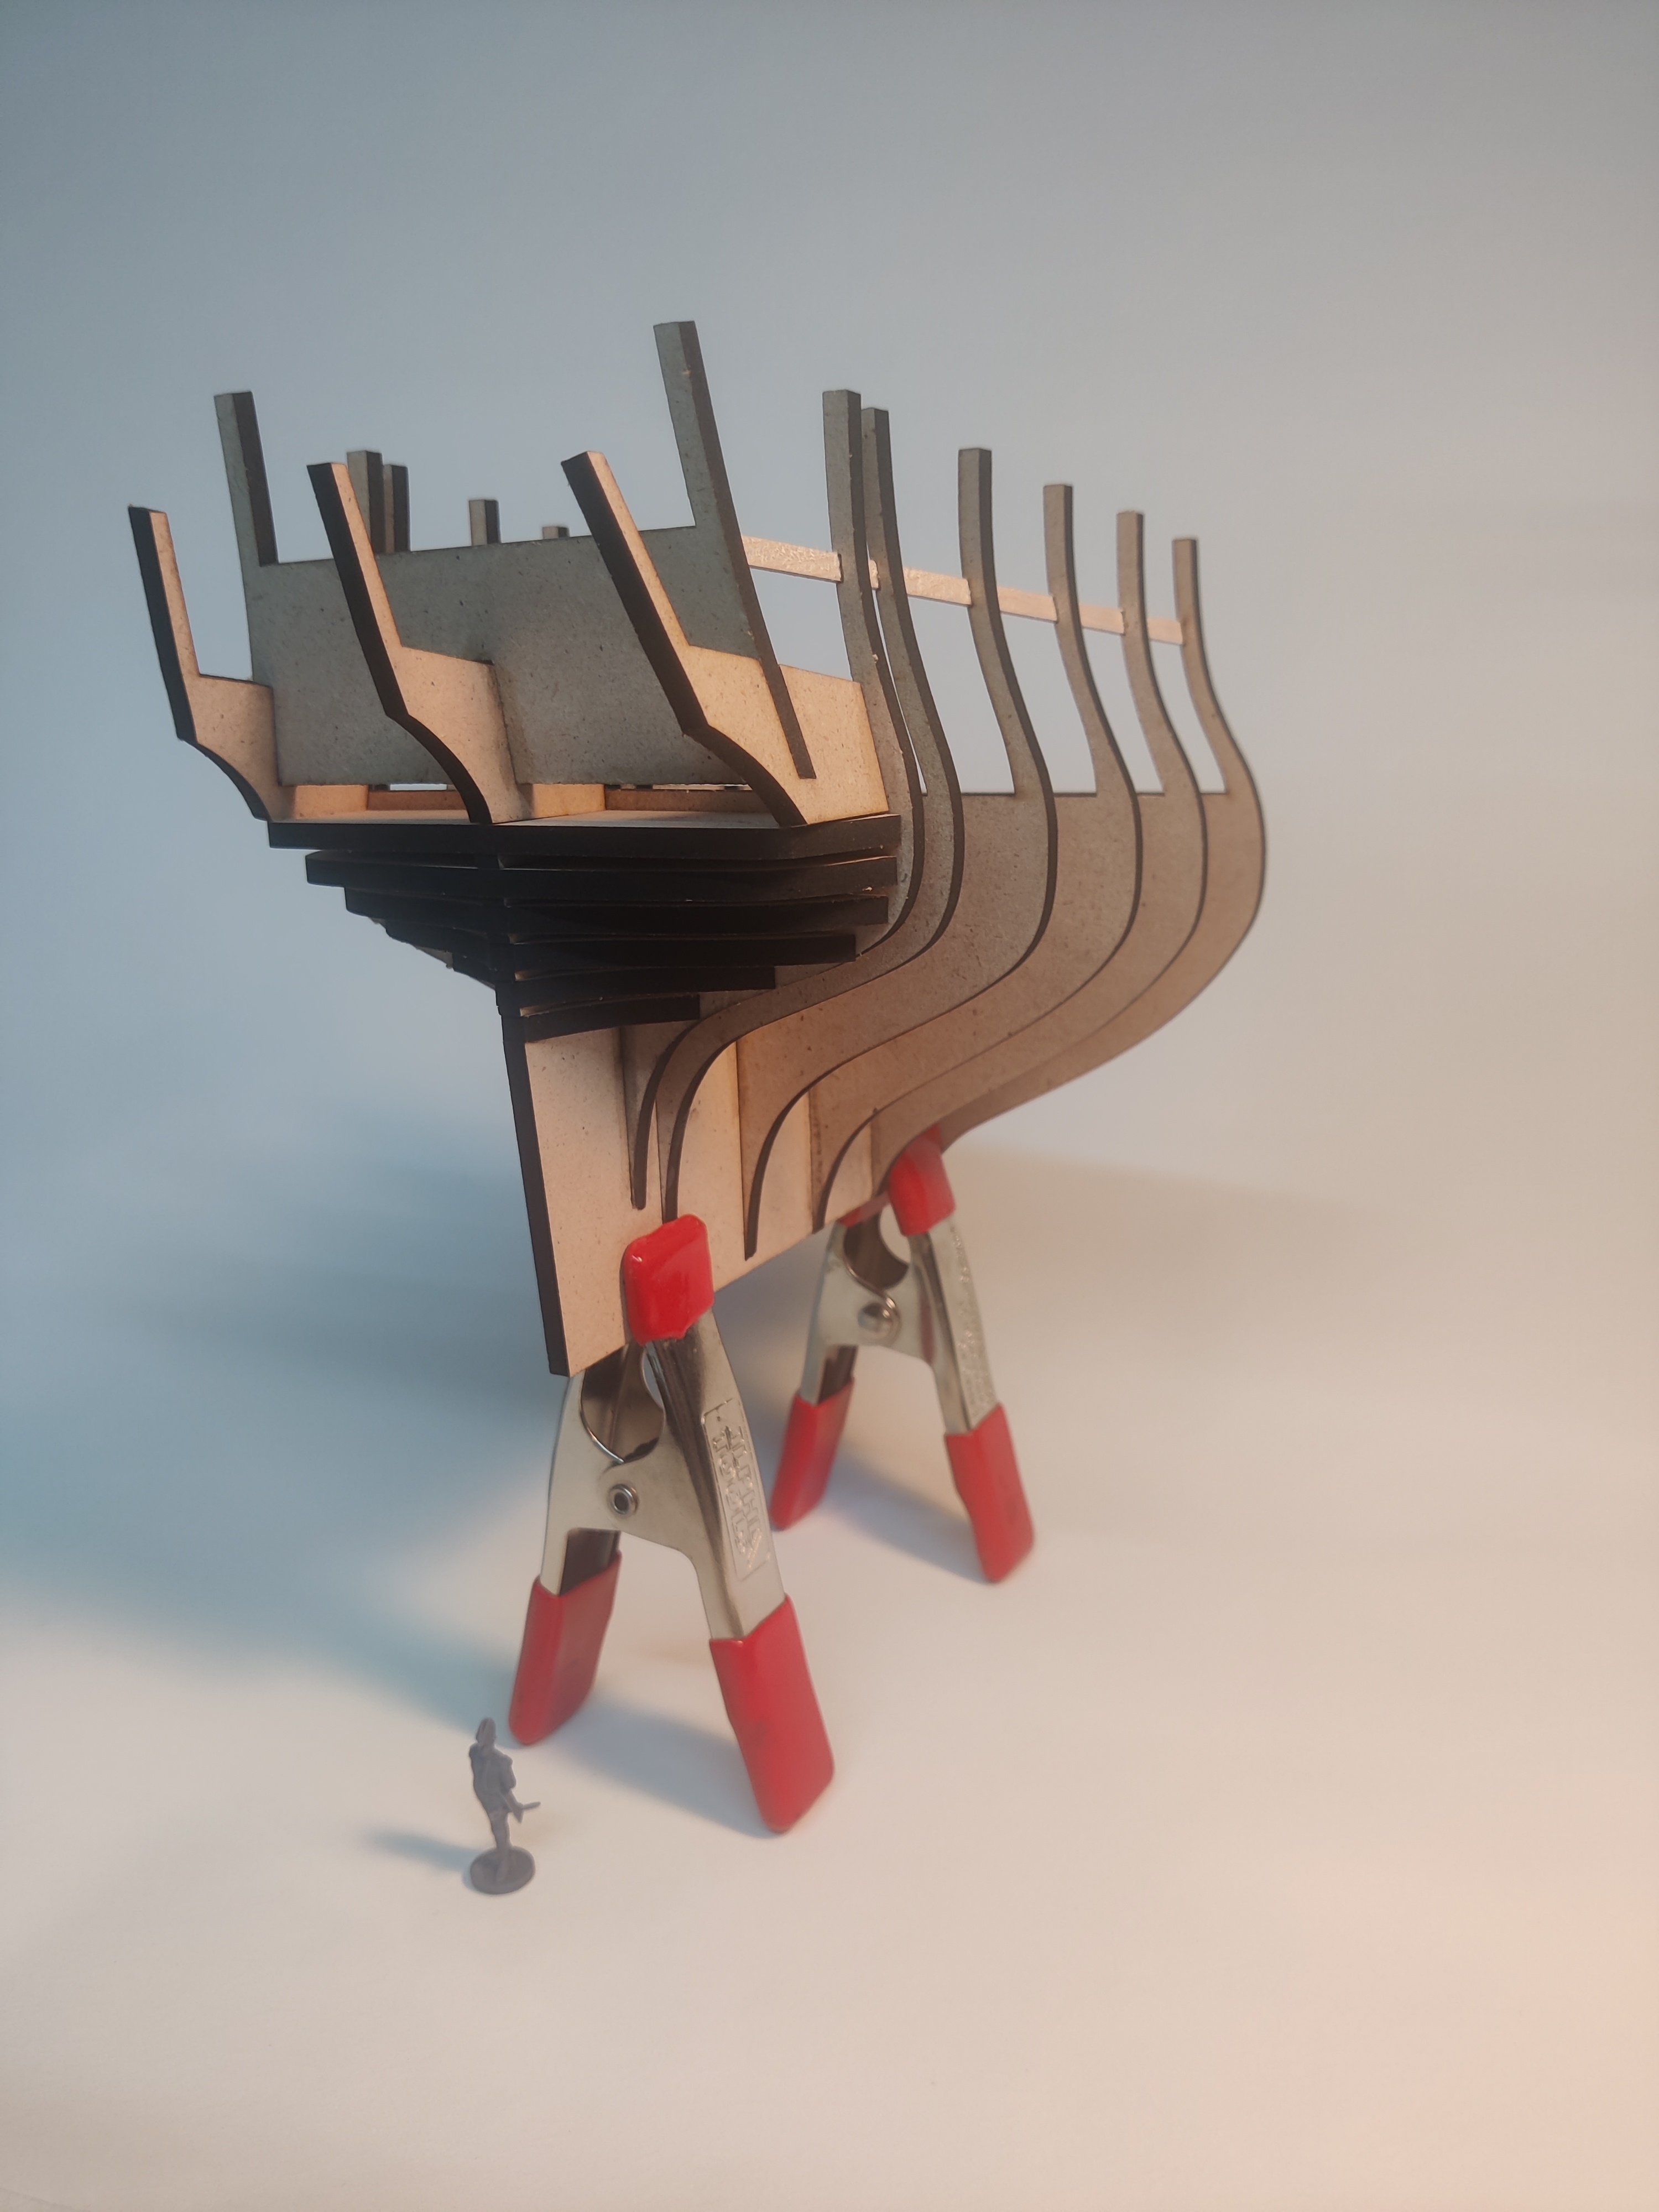
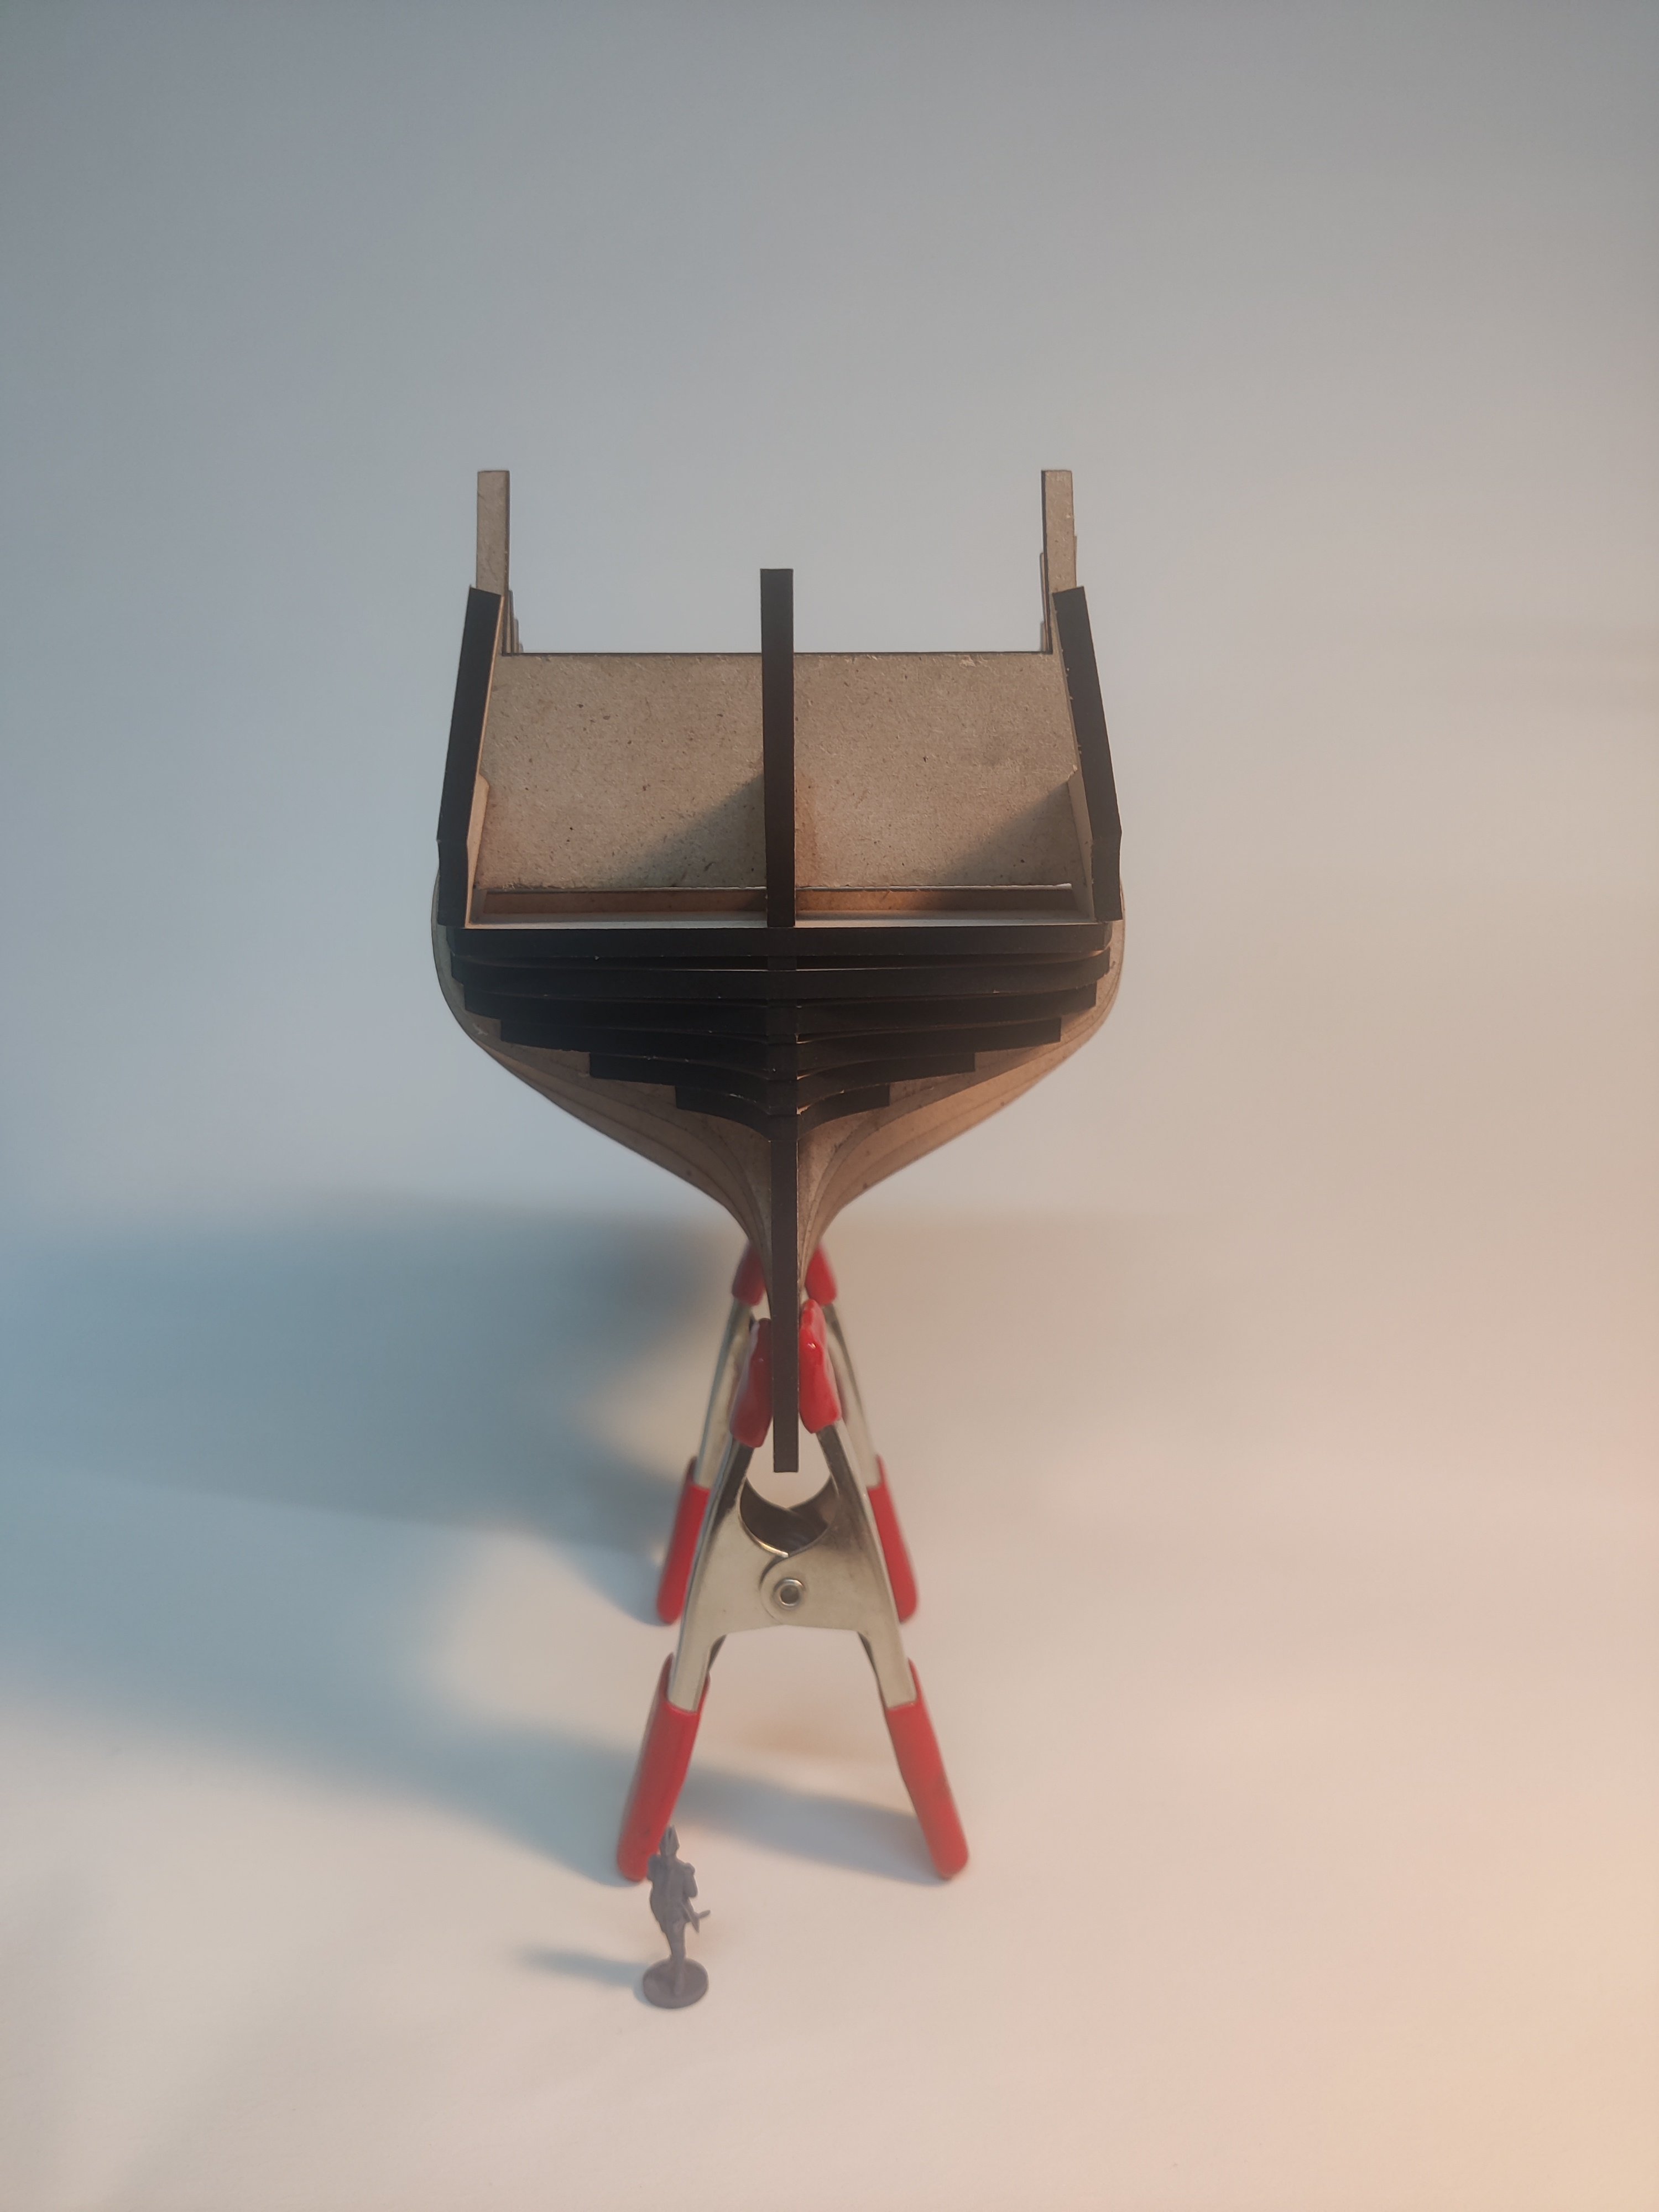
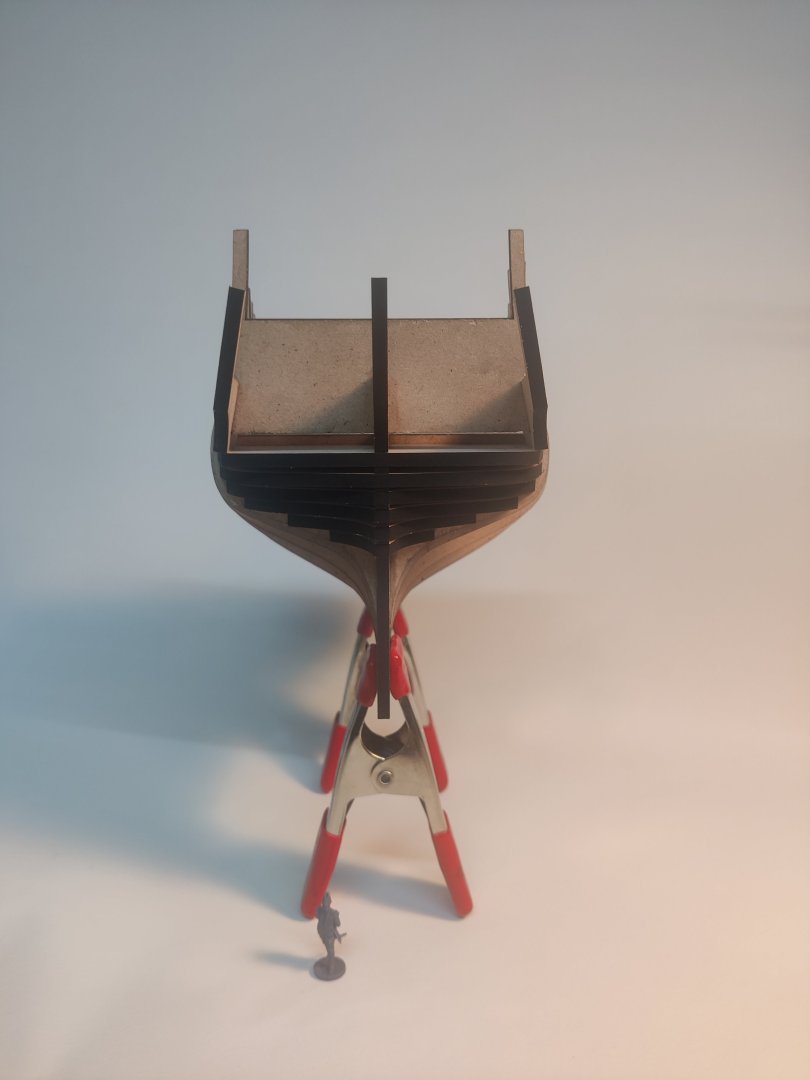
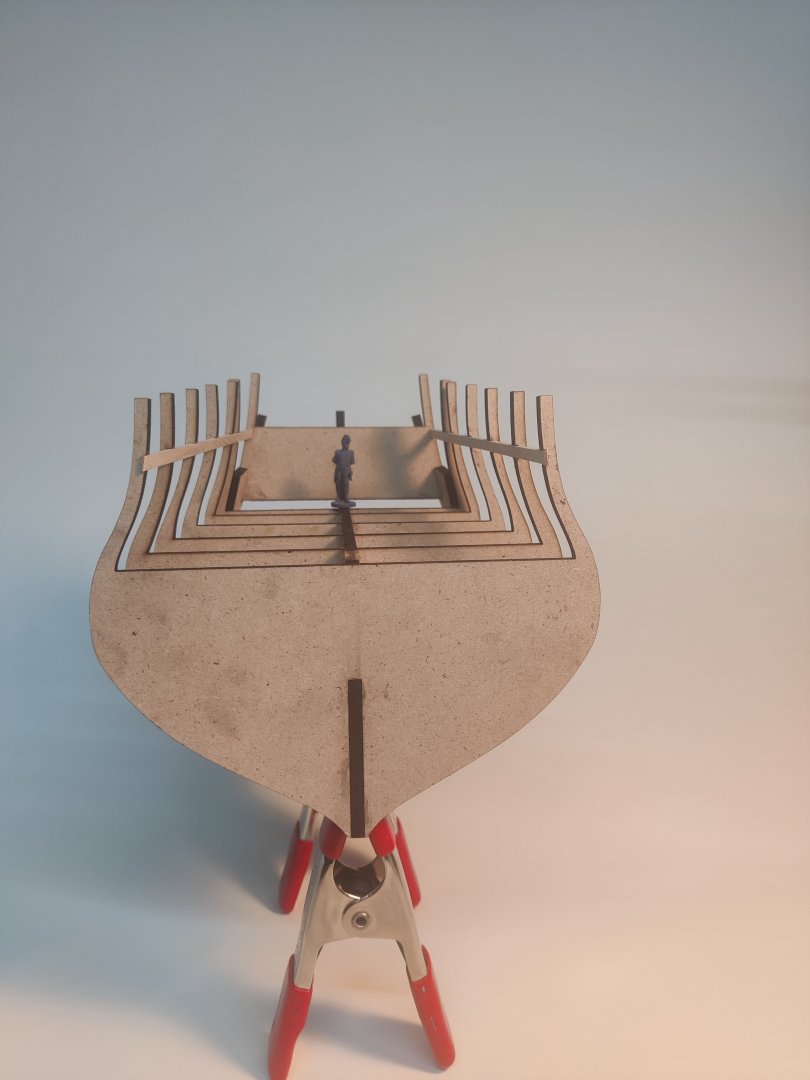
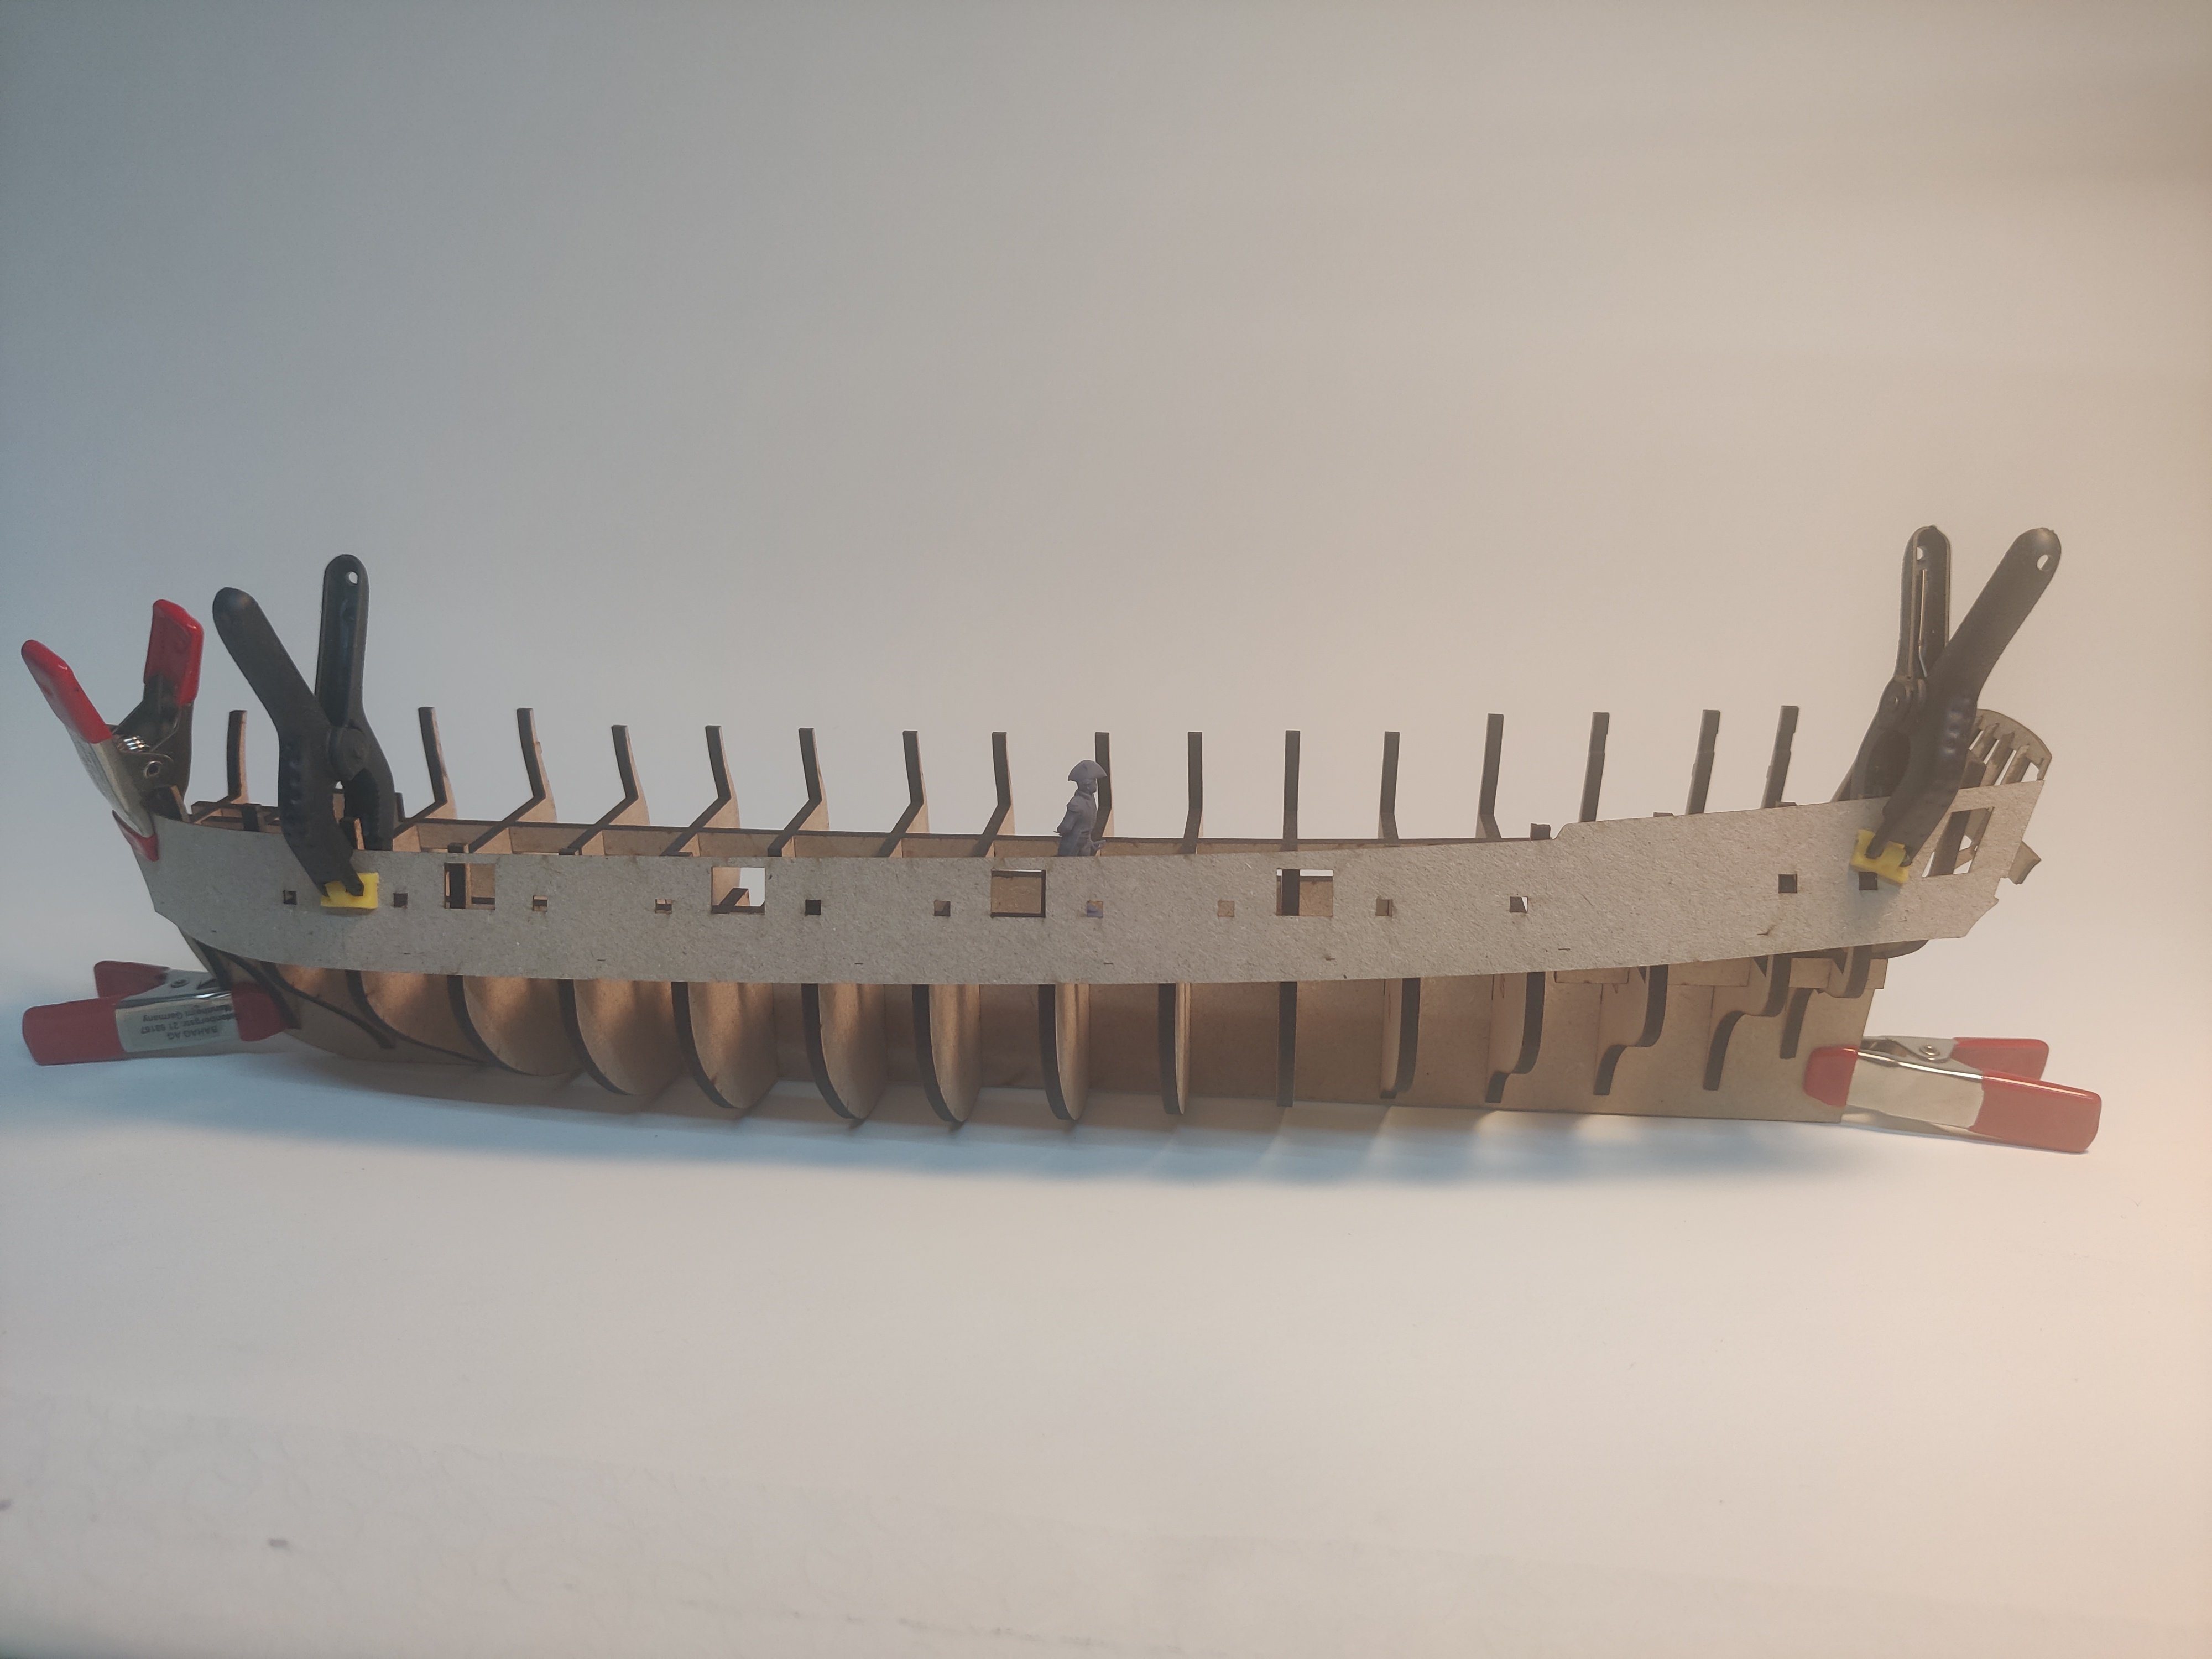
The stern of 'Christians Øe' My first attempt was a stern profile in scale 1:64 (I will stay at this scale as I like my models to be directly comparable). I found a nice frigate of 30 guns with what I thought looked like a nice subject, in one way complex (two stories, a balcony) and in another way simple (mostly friezes, no sculptures). Here is a few of the original drawings from 1767: The design I made is very simple: just a keel, the bulkheads and two side parts for the stern gallery. I made slots on the inside of the bulkheads for a 1x4mm strip to stabilise and double as base for the quarterdeck. This is probably a bit too simple a construction for a big build, but I think it would be viable on this small model. Here is a view of my part design: I cut out the frames in 4 mm MDF (from Amati) and found the fit to be perfect! Very tight, but workable. This would be a purely exterior model, as is probably evident from the rearmost bulkhead that blocks the great cabin. I cut it to include two gunports in the main gundeck, 12 pounders, and two on the quarterdeck, 4 pounders, on either side. I have not cut the rear panels and I have not designed the upper bulwark patters that I would cut out of plywood. Or it could just be planked, but I like the idea of using pre-cut parts where I can, to ensure correct positioning of features like the gunports. I know a lot of important design-work is missing, especially for the side galleries, but this was just a first smalle test. I may continue with this one at some point in the future when I need a 'smaller' project. In that case, I will open up a proper build log then. For now, it just stays on the shelf. Stay tuned for more in the coming days! BR TJM
.thumb.jpeg.dac81699dbb1526b7ae7910952651219.jpeg)
.thumb.jpeg.fbac4e01df03bab1e228505f53ae06be.jpeg)

-
I forgot to mention! I have tried a few including Fusion 360 (nice with the 3D capabilities, but it is not free anymore - it is actually very expensive!) and DELFTship (I just couldn't get used to it, did not feel intuitive), but I settled on QCAD after using the trial version a little. It runs very nicely, with no lag or hiccups, it has a (to me) very intuitive interface/GUI, I quickly leaned the keybord shortcuts, it is very easy to import an image file, scale it and draw on top of it for accurate reproduction, it exports in all kinds of formats and the native dxf format imports directly into my laser cutter software at correct scale - and it is cheap, just $40. Only downside is that it is only 2d, so everything 3D has to happen i my head, and the is no help to make slots in the parts, I have to do it all manually. But I really like it, and would highly recommend it to anyone in this hobby! Just be aware of what it doesn't do!
-
Hello all, For the past months, I have been dabbling in 2D CAD design. The grand aim is to be able to take the historical plans from the Danish National Archive and make a scratch built model from those. However, i am a CAD novice and have also only had my laser cutter for half a years time, so there is bound to be a steep learning curve on both of these components! Instead of going all out on a limb whenever I attempt my first scratch build (not before my current Christiania build based on VM's HMS Sphinx kit is done), I decided to make some trials. This thread will be about those, and my hope is to test out what works and what doesnt before I really dive into scratch building (a good while yet, still early days for Christiania!). I have already made 4 small test projects over the past months and the first posts here will be about those. I hope to get some feedback from this great forum, so that I may be ready to start building when my current build is done. More to follow soon, with my first attempts! BR TJM
-
Log entry 10 - even more planking.... I had thought that I would wait until the first planking layer was completed for this post, but the last planks are getting a bit fiddly, so here is a few pictures of the current state of things. 1.5 planks missing from one side and 3.5 planks for the other. I can now judge how the hull lines will turn out and I am very pleased. It is a bit more curvy than Sphinx, which I like. Hope to be back soon with a complete hull! BR TJM

- 148 replies
-
- 11
-
-
- Christiania
- Vanguard Models
- (and 1 more)
-
Log entry 9 - more planking I am slowly progressing with the first planking layer, adding planks symmetrically at a rate of about 4 planks per work session. I think the modifications at the bow has made it a bit more difficult to plank - it is certainly more difficult to get the planks to sit flat on the bulkheads compared to Flirt! Here's a bunch of pictures of the current state: I have tried to show the shape at the bow, but it is a bit difficult to photograph well. At it's most extreme it is more than 2 cm wider than Sphinx, so quite pronounced! I think I will finish this first layer in a weeks time or so. I am enjoying this operation much more this time around, so that is great! BR TJM


- 148 replies
-
- 11
-
-
- Christiania
- Vanguard Models
- (and 1 more)


.jpeg.99718b5f5b95a30a0ad9e3a814755b1d.jpeg)
.jpeg.80e39777618e67946111f34081766b9f.jpeg)
.jpeg.4ae4fa3ab324cbfaf5f547066c73a798.jpeg)


.jpeg.337b5d64191b9eb15c48617a077d1cb1.jpeg)
.jpeg.d670d9bfc419674c85e7b08dc4a598aa.jpeg)