
Supplies of the Ship Modeler's Handbook are running out. Get your copy NOW before they are gone! Click on photo to order.
×

FreekS
-
Posts
213 -
Joined
-
Last visited
Reputation Activity
-
 FreekS reacted to Piet in Hr. Ms. O 19 1938 by Piet - FINISHED - scale 1:50 - submarine of the Royal Navy Netherlands in service 1939 - 1945
Thanks to everyone for visiting and your like votes !
Okay, the build dock is turned around so I can work on the starboard side. I made the conning tower handhold rail and installed it. I also cemented the four steps in the rear of the con leading up to the aft gun deck and then prime pained the lower part of the con light grey. Final painting of the con will be done after the green is on the starboard side.
Well, I made the bold decision to install one mine bun with hinged lid - - - I should actually get my head examined - - - so much extra work, and I just hope it's gonna pan out okay. Keep fingers crossed.
I picked a spot between two bulkheads and lucked out that the aft one was close enough to act as the real thing. Actually, there are no solid bulkheads inside the ballast tanks, just steel framing, but don't tell anyone
I had to pick a lot of foam out that I used to give the thin planks I used for the hull some support. So far so good. Next is to figure out how to install the simulated pressure hull that can be seen when the lid is open. There is not much room to maneuver a lot of material through the opening. We'l see how that's gonna work out.
Oaky, here are a few pics of today's work.
This shows the starboard side handhold rail for the lower con. Same material as I used for the port side. I decided to make this off the boat, it made it a little more difficult to install but after some fussing with it it worked out okay.
Front view of the handhold rail installed.
Side view and you can also see the rear steps and it's painted.
Another view from the rear.
This picture shows the start of cutting out the opening for one of the mine buns. Standard procedure, same as I used when making holes in aluminum aircraft skins.
Here it shows the opening pretty well cleaned up. It'll need some reenforcing behind the lip for the door to rest on. I may use some file folder card, it's easier to let it flow along the curves.
Sometime last year John Texxn5 was goading me in doing this (and I was rather reluctant then) I did make a test lid just to see if I could do it. This is that lid but I have to make a new one, this one is not good enough, it needs just a little more of a bend and the little holes are a mess. No problem tough, it has to be good.
The bun itself will be made from styrene, if I can find that sheet - - - I must have put it in a real safe place - - - somewhere
Cheers,
-
FreekS reacted to Piet in Hr. Ms. O 19 1938 by Piet - FINISHED - scale 1:50 - submarine of the Royal Navy Netherlands in service 1939 - 1945
Well, I'm coming close to finishing the conning tower. The remaining tasks are the foot treads in the rear, the handholds and final painting. Oh yeah, let's not forget the AA guns, the antenna mast and the periscopes.
The foot treads are already made, they just need to be cemented on. Remember that I had a problem with them not wanting to stay glued? I'll have to retry it and hopefully reinforce them from the inside of the conning tower through the rear crew hatch hole Fortunately I left the crew hatches un-cemented and they can be removed.
I cut the tubing for the periscopes and the antenna mast. The actual periscope heads still need to be made and installed then they need to be checked for raising and lowering and adjusting the focus of the lenses Kidding of course but I'll cement a simulated piece of glass to the scope tip, at least it should look like it has a lens in it More detail work.
The cross arm for the antenna mast will have to wait till I'm ready to rig all the antenna wires.
Okay, now for the pics of today's work. btw, today was our 51st wedding anniversary! The Admiral said that she'll keep me a bit longer, am I lucky or what
This shows all the conning tower doors installed, closed and latched. The wide-angle lens distorted it somewhat. You can also see that the rear AA gun has it's elevation rack installed and that the snorkel exhaust shroud is on and painted flat black. The rear steps will go into the half-round holes in the rear.
This picture shows all the doors open.
This is the conning tower painted with a primer coat and the antenna mast, periscopes and snorkel intake installed. The tops of the periscopes are 1.5 mm copper tubes with a flat filed in them for the fake lens glass. The hand-hold rail will be just below the top level of the doors and between the upper foot holes. I'll wait with putting the O19 number on the con till the boat is completed.
Cheers,
-
FreekS reacted to Piet in Hr. Ms. O 19 1938 by Piet - FINISHED - scale 1:50 - submarine of the Royal Navy Netherlands in service 1939 - 1945
New center keel frame.
Well, I bought a new poplar plank for the center keel frame and ripped it to 79 mm wide and cut the bottom curves to match the keel dock.
It fits just great and without further ado I now also glued the dock keel sections to it. Instead of clamping I used brass brads and placed the assembly back on the build board for the TiteBond to cure.
In the meantime while the glue is setting I started to gut out the bulkheads. A slow painstaking procedure but rather easy on my band saw. I have a very narrow blade in it that allows me to follow the tight curves.
The final shaping is done on my Sears sanding machine. A very indispensible tool!
I could not resist trying the bulkheads for fit, even though the keel is still not secured to the build board. It looks like that the bulkheads will trammel out just great.
The line I am using is waterline #7, which just happen to be also the widest part of the hull and where the one and only “wale” or docking bumper is located.
As long as I can get all these lines at the same level I’ll have a true hull. I’ll check it on each side of course and may have to file the groove a little to ensure also a crosswise level.
Remco mentioned that it was difficult to see how long this boat will be without a known reference. So, I made the bow and stern keel pieces from a file folder and had the admiral, Gwen, take a picture with me holding it up.
I am now 5 feet 7 inches tall, or short, or 1,7 meter. Yeah, I shrunk one inch. Yeah, laugh all you young whippersnappers, you’ll shrink too when you are 79 years young.
Sorry for my grungy look in my work duds but it was a nice day and I’d rather wear shorts and shorts leave shirts. Wait till summer, than it’s only a short and bare feet.
New Center keel frame.
Piet cutting out a bulkhead.
Here I am checking the alignment of the bulkheads. Everything is still loose but could not resist a trial run.
The admiral took the pic with my Canon and the auto-focus ring startled her, ergo the movement.
Just to show that we are pretty close to the mark.
Here I'm holding the center keel to give all Y'all an idea how long this model is going to be.
Cheers,
-
FreekS reacted to Piet in Hr. Ms. O 19 1938 by Piet - FINISHED - scale 1:50 - submarine of the Royal Navy Netherlands in service 1939 - 1945
INTRODUCTION
This is the build log for Hr. Ms. O 19, one of only two submarines in her class of the Koninklijke Marine (Royal Navy). Please forgive me for making this introduction very personal because she was part of my life and therefore holds a very special interest for me. My father, Opperschipper (Adjudant) Petrus W. van Warmerdam, was with her from about one year before her launch September 22, 1938 till his promotion to Opperschipper in January 1941.
At the time he was placed on the build he had the rank of Schipper, with the added function of Quality Control and Assurance Inspector and liaison between the Navy and the ship builder Wilton-Fijenoord in Rotterdam, the Netherlands.
His second tour of tropical duty started right after his marriage to my mother in October 7, 1931, and they started a family while in Surabaya, the former Dutch East Indies. My sister and I were born there, November 14, 1932 and April 15, 1934. When his second six-year tour of tropical duty ended in the end of 1937 he had to return to the Netherlands. Of course his family, my mother, sister and I, followed shortly after on the passenger liner M. S. Christiaan Huygens of the Stoomvaart Maatschappij Nederland, Amsterdam.
When we arrived in the Netherlands we first stayed in Den Helder, the Royal Navy Base, but after hearing about the new class of submarines being build he immediately requested to be placed on them. Because of his expert technical knowledge of submarines the Royal Navy agreed and he and his family moved to Vlaardingen Ambacht, Narcisplein 3 to be exact, a small town near Schiedam, in March of 1938. Sjors and Anja know this area quite well.
The shipyard was located in Schiedam, the Netherlands and the boat he was assigned to happened to be the furthest along of the two in that class, mine laying submarines.
The original design concept for a mine lying submarine was completed in December, 1934 and assigned numbers O 17 and O 18. (Reference pictures can be found in the DRAWINGS section) However, the design was altered to a more squarish form amidships for better loading and discharging of the mines by engineer G. de Rooy. (Reference pictures can be found in the DRAWINGS section) Rumors have it that it is based on the design of the Polish submarine Orzel but cannot be confirmed. The Orzel was also a mine-laying sub but I believe that the mine tubes were carried inside the main hull and not on the side as the O 19 class subs.
The O 19 and O 20 were also the first subs equipped with “getrimd diesel system ,” where the boat could run on diesel power while submerged to charge the batteries and for ventilation. This is commonly known as “Snorts,” or “Snorkels.” Navigation was done via the navigation periscope.
The KM (short for Royal Navy in Dutch) used to classify submarines for domestic waters with O and those for the colonies with K (K stands for “Koloniën ” which means colonies). They were originally assigned the numbers K XIX and K XX, which was changed to O 19 and O 20 sometime during their fabrication. All subsequence submarines received the O designation till the end of WW II. After the war all subs received names instead of numbers.
The O 19 was launched September 22, 1938 with my father onboard of course and officially commissioned on July 3, 1939, my mother, sister and I were present for that event. I was standing on extreme left of the photo, hidden behind the bow flag, next to my mother. The ensuing trial runs were successfully conducted near de Scandinavian coast and the fiords where proof diving could be done more successfully. Although the boat was designed for a maximum depth of 100 meters these proof dives were limited to 60 meters.
Special tests were to be conducted on the voyage to the Netherland’s East Indies to measure geological differences in the Earth’s crust when sailing over the continuation of a mountain range underwater as well as wave action while submerged. She and her crew arrived safely and without any technical difficulties at the Navy Base in Soerabaja (old Dutch spelling) in September 1939.
My mother, sister and I followed in December of 1939 on the passenger liner M. S. “Johan van Oldenbarnevelt,” of the Stoomvaart Maatschappy Nederland. Both the Christiaan Huygens and JVO served as troop transports during WW II.
On January 1, 1941, my father was promoted to Opperschipper (Adjudant) and had to be transferred to a surface ship of the KM, which was the light cruiser Hr. Ms. Java. The reason for the transfer was dat that rank was not maintained on submarines. That was the second time in my short life that I saw my father shed a tear. He loved the submarine service that particular boat and the crew. As all submariners know these small crews on the subs become like a family. He hated the Java, that “old rust bucket,” as he called it and he was subsequently killed in action on that ship during the “Battle of the Java Sea,” 5 minutes before midnight on February 27, 1942. A long-range Japanese torpedo hit the Java in the rear port side just where his battle station is. Fortunately he never knew what hit him when the powder room exploded and 20 meters of that part of the ship just evaporated.
I have photographs of the wrecked stern section that lies 70 meters down on the sea floor and now have closure and sort of a “grave marker.”
Our lives changed dramatically shortly afterward when the Japanese successfully invaded the Dutch controlled Indonesian islands and made us “guests of the Emperor” of Japan, i.e. prisoners of war, and placed us into concentration camps for the duration of the war. Yes, even women, and children, all non military people were classified as combatants and came under military rule and in charge of the Kempeitai.
Fellow ship model builders, something you may not know but the Japanese High Command gave orders in the beginning of 1945 to exterminate all POWs in September of 1945. As terrible as the two atom bombs that destroyed Hiroshima and Nagasaki are, it saved millions of lives and is the reason I am alive today with two beautiful daughters and a grandson. My wife too was a “guest of the Emperor” in a concentration camp in Semarang, Java. It is also giving me the great pleasure counting all of you as my friends.
The O 19 served with distinction during the entire war and I am sure that my father would be proud of her and the crew.
Well then, this model is in memory of my father and I dedicate it to him and the crew he loved. The boat is still with us today, albeit as a wreck on Ladd Reef in the South China Sea (19.93 Lat, 174.57 Long). Due to a navigational error she ran right smack in the middle of that reef at low tide. And yes, the crew survived and was rescued by the USS sub “ Cod,” which is moored permanently in Cleveland, Ohio, as a museum. There are some interesting films on “YouTube” of the rescue
My model will be at a scale of 1:50 which translates to 1.6 meter and only shows the exterior of the boat, except for the side-launch torpedo tube assembly. This unit is mounted outside the main pressure hull, between the hull and the deck structure forward of the deck gun location.
It will be plank on bulkhead, using poplar wood for the majority of the build. For the deck structure I may use 1/32 inch plywood over a frame of poplar, covered with epoxy resin. The simulated hull plating will be 150 lb hot pressed watercolor paper over 1.5 mm poplar planking and epoxy resin. Other materials will be brass rod, brass and copper wire, plastics, cardboard material and whatever comes to mind to achieve the desired effect.
I’ll be using red Titebond glue, Elmer’s Carpenter’s WoodGlue Max, which is an interior/exterior glue and waterproof. Of course CA will also be used when appropriate.
I am still doing research on the original paint scheme at the time of the commissioning but that point is still in the future.
The drawing section is to follow.
Cheers,
-
 FreekS got a reaction from GrandpaPhil in HrMs O-1 by FreekS - FINISHED - 1:32 - RADIO - first Dutch submarine 1906-1920
More work done on the superstructure. Did some finishing work on the bow plates using epoxy resin. Needs a few more rounds I'm sure! Also built the rest of the side plates of the superstructure so that the shape of the boat is getting close
Also did some work on the hatch, periscope and the little hatch that closes the periscope hole when retracted.
Freek
-
 FreekS got a reaction from Elmer Cornish in HrMs O-1 by FreekS - FINISHED - 1:32 - RADIO - first Dutch submarine 1906-1920
More work done on the superstructure. Did some finishing work on the bow plates using epoxy resin. Needs a few more rounds I'm sure! Also built the rest of the side plates of the superstructure so that the shape of the boat is getting close
Also did some work on the hatch, periscope and the little hatch that closes the periscope hole when retracted.
Freek
-
 FreekS got a reaction from hexnut in HrMs O-1 by FreekS - FINISHED - 1:32 - RADIO - first Dutch submarine 1906-1920
More work done on the superstructure. Did some finishing work on the bow plates using epoxy resin. Needs a few more rounds I'm sure! Also built the rest of the side plates of the superstructure so that the shape of the boat is getting close
Also did some work on the hatch, periscope and the little hatch that closes the periscope hole when retracted.
Freek
-
FreekS got a reaction from GrandpaPhil in HrMs O-1 by FreekS - FINISHED - 1:32 - RADIO - first Dutch submarine 1906-1920
I have now completed the installation of the bayonet. It is glued in with epoxy glue and (hopefully) made waterproof with epoxy resin.
Next is to start to work on the outer plates of the deck section. These are difficult, I am using 0.8 mm triplex wood, which bends mainly in one direction. Especially at the bow it needs to bend in two directions. So I have installed some wood blocks as glue surfaces.
The two front hull plates have been glued in (compare with original foto on page 2).
The torpedo tube door will not be functional and has been glued in place.
All surfaces under the plates have been treated with epoxy for water repellency. Clearly there is some work to be done with plamuur/putty as there are a few unwanted curves in the wood. But that will be fixable I think.
Freek
-
 FreekS got a reaction from yvesvidal in HrMs O-1 by FreekS - FINISHED - 1:32 - RADIO - first Dutch submarine 1906-1920
I have now completed the installation of the bayonet. It is glued in with epoxy glue and (hopefully) made waterproof with epoxy resin.
Next is to start to work on the outer plates of the deck section. These are difficult, I am using 0.8 mm triplex wood, which bends mainly in one direction. Especially at the bow it needs to bend in two directions. So I have installed some wood blocks as glue surfaces.
The two front hull plates have been glued in (compare with original foto on page 2).
The torpedo tube door will not be functional and has been glued in place.
All surfaces under the plates have been treated with epoxy for water repellency. Clearly there is some work to be done with plamuur/putty as there are a few unwanted curves in the wood. But that will be fixable I think.
Freek
-
FreekS got a reaction from Elmer Cornish in HrMs O-1 by FreekS - FINISHED - 1:32 - RADIO - first Dutch submarine 1906-1920
I have now completed the installation of the bayonet. It is glued in with epoxy glue and (hopefully) made waterproof with epoxy resin.
Next is to start to work on the outer plates of the deck section. These are difficult, I am using 0.8 mm triplex wood, which bends mainly in one direction. Especially at the bow it needs to bend in two directions. So I have installed some wood blocks as glue surfaces.
The two front hull plates have been glued in (compare with original foto on page 2).
The torpedo tube door will not be functional and has been glued in place.
All surfaces under the plates have been treated with epoxy for water repellency. Clearly there is some work to be done with plamuur/putty as there are a few unwanted curves in the wood. But that will be fixable I think.
Freek
-
FreekS got a reaction from hexnut in HrMs O-1 by FreekS - FINISHED - 1:32 - RADIO - first Dutch submarine 1906-1920
I have now completed the installation of the bayonet. It is glued in with epoxy glue and (hopefully) made waterproof with epoxy resin.
Next is to start to work on the outer plates of the deck section. These are difficult, I am using 0.8 mm triplex wood, which bends mainly in one direction. Especially at the bow it needs to bend in two directions. So I have installed some wood blocks as glue surfaces.
The two front hull plates have been glued in (compare with original foto on page 2).
The torpedo tube door will not be functional and has been glued in place.
All surfaces under the plates have been treated with epoxy for water repellency. Clearly there is some work to be done with plamuur/putty as there are a few unwanted curves in the wood. But that will be fixable I think.
Freek
-
FreekS got a reaction from GrandpaPhil in HrMs O-1 by FreekS - FINISHED - 1:32 - RADIO - first Dutch submarine 1906-1920
After cutting the sub near the stern, I will now mount a bayonet so that the boat can be opened and a "tech rack" mounted in the stern section which can be pulled out of the bow section.
As the bayonet is slightly smaller than the boat, I glued some wooden rings into the stern section. As this section gets narrower to the stern these rings can be firmly mounted. The bayonet fits well in this (but is not glued yet).
The bow section gets slightly wider towards the bow, and thus the wooden rings have been fixed with three small wedges. These allow the ring to be precisely centred and allow the bayonet to be test fitted and the two halves of the boat connected. The wedges have now been glued in place and the next step is to fix the wooden ring with epoxy resin.
This was definitely a slightly scary operation - but it looks good - though only when the seal is proven to be water- and air proof will it be finished.
Freek
-
FreekS reacted to Piet in Hr. Ms. O 19 1938 by Piet - FINISHED - scale 1:50 - submarine of the Royal Navy Netherlands in service 1939 - 1945
My thanks to everyone who dropped in and your like votes.
It was still a little chilly in the garage but it's warming up, it was 55 F. I tried to finish the bridge today but could not complete the crew hatch there. The Admiral found a little brass looking bell dangling from a demitasse spoon. It's still a little too large but I hung it anyhow. I'm still going to look for a little bell though, like girls or ladies have hanging on a charm bracelet.
I also cemented the engine power telegraphs and repeaters and painted the bridge area. I'm pleased.
Then I made the most aft part of the aft gun deck. I made it out of brass sheet in the form of a T and soldered a 2 mm brass tube to the top for the flagpole / railing stanchion. The bottom leg of that T has a hole for the pulley to hoist the dingy out. I managed to shove this brass piece under the already existing deck and then covered it with a small piece of 1 mm ply as the continuation of the deck. For all practical purposes it looks like it's made out of one piece of steel plate. Still needs some dressing up on the bottom side.
Below that will be the aft deck spot light.
Next will have to be the rest of the hatch and AA gun bun hinges so I can start installing the deck slats and railing. I also need to finish the periscopes, antenna mast and the snorkel pipes.
You may have noticed that I am working my way down do the main deck.
Below are a few pics of how all this looks as of today.
We are looking at the starboard side of the bridge with the engine telegraph and repeater, the antenna brace with the Admiral's bell. It looks like I may to to some minor "body" filling under the railing top
This is looking into the bridge from a ¾ angle from the rear port side. The paint is really grey, it may have taken on the reflection from that piece of plywood behind the model.
Looking forward and sorry for not holding the camera horizontal. Here you can see the aft end of the rear AA gun deck with the flag pole / railing stanchion. Right below that is where the aft deck spotlight will be. What appears to be a hole below the flagpole is actually the vertical leg of the T where a pulley can be hung. Yes, the gun bun still needs to be dressed properly and that's on the to do list.
This is a ¾ aft side view of the bridge looking aft from the port side.
Port siide view of the conning tower. Ah yes, door hinges - - -
Cheers,
-
FreekS reacted to Piet in Hr. Ms. O 19 1938 by Piet - FINISHED - scale 1:50 - submarine of the Royal Navy Netherlands in service 1939 - 1945
I had to dedicate some time to protect a few of our cold sensitive plants today. We are expecting temps down to about 28 or 29 degrees F tonight. Fortunately it's only going to last till morning, then the temps are going back up. Wonder how cold it'll be in the garage aka the shipyard
I spend most of the day on metal work. I made two navigation or position light fixtures. These will be soldered to the antenna brace (see pic # 4) I'll have to remake them because they are a tad too small. No problem, it only takes me 20 minutes for each one, not counting the soldering though.
The major job for today was making the shield for the front of the cockpit / bridge. I decided to make it from brass sheet and the frame from a piece of 90 degree brass angle. It worked out okay and is now cemented on.
I also made the antenna brace and soldered to the cross bar to the upright posts. I can't cement them to the model yet because I need to drill several holes in it for the antenna wire, the ship's bell and solder the nav/position light fixtures to it.
Well, I guess that's all for today. Some pics below.
This shows the forward cockpit cover shield loosely laid on for fit. Looks good and is ready for the final trim and then cementing it on. I am using 5 minute epoxy for this so I can hold it down for a proper fit.
This is another shot from the rear.
A blurred picture of the navigation or position light fixtures. The second issue parts will be soldered to the sides of the antenna brace posts.
This then is the antenna brace made from brass tubing. The cross beam I made oval by squeezing it in the vice. It's soldered together and temporarily installed. I need to drill a few holes in the top bar for antenna wire and ship's bell.
Then we'll epoxy it in place and cover the tubes inside the cockpit with file folder paper to simulate sheet metal and paint.
I have already made the engine power setting telegraph and repeater, which are installed behind the antenna brace.
You can also see the cockpit shield cemented on.
Cheers,
-
 FreekS got a reaction from Piet in Hr. Ms. O 19 1938 by Piet - FINISHED - scale 1:50 - submarine of the Royal Navy Netherlands in service 1939 - 1945
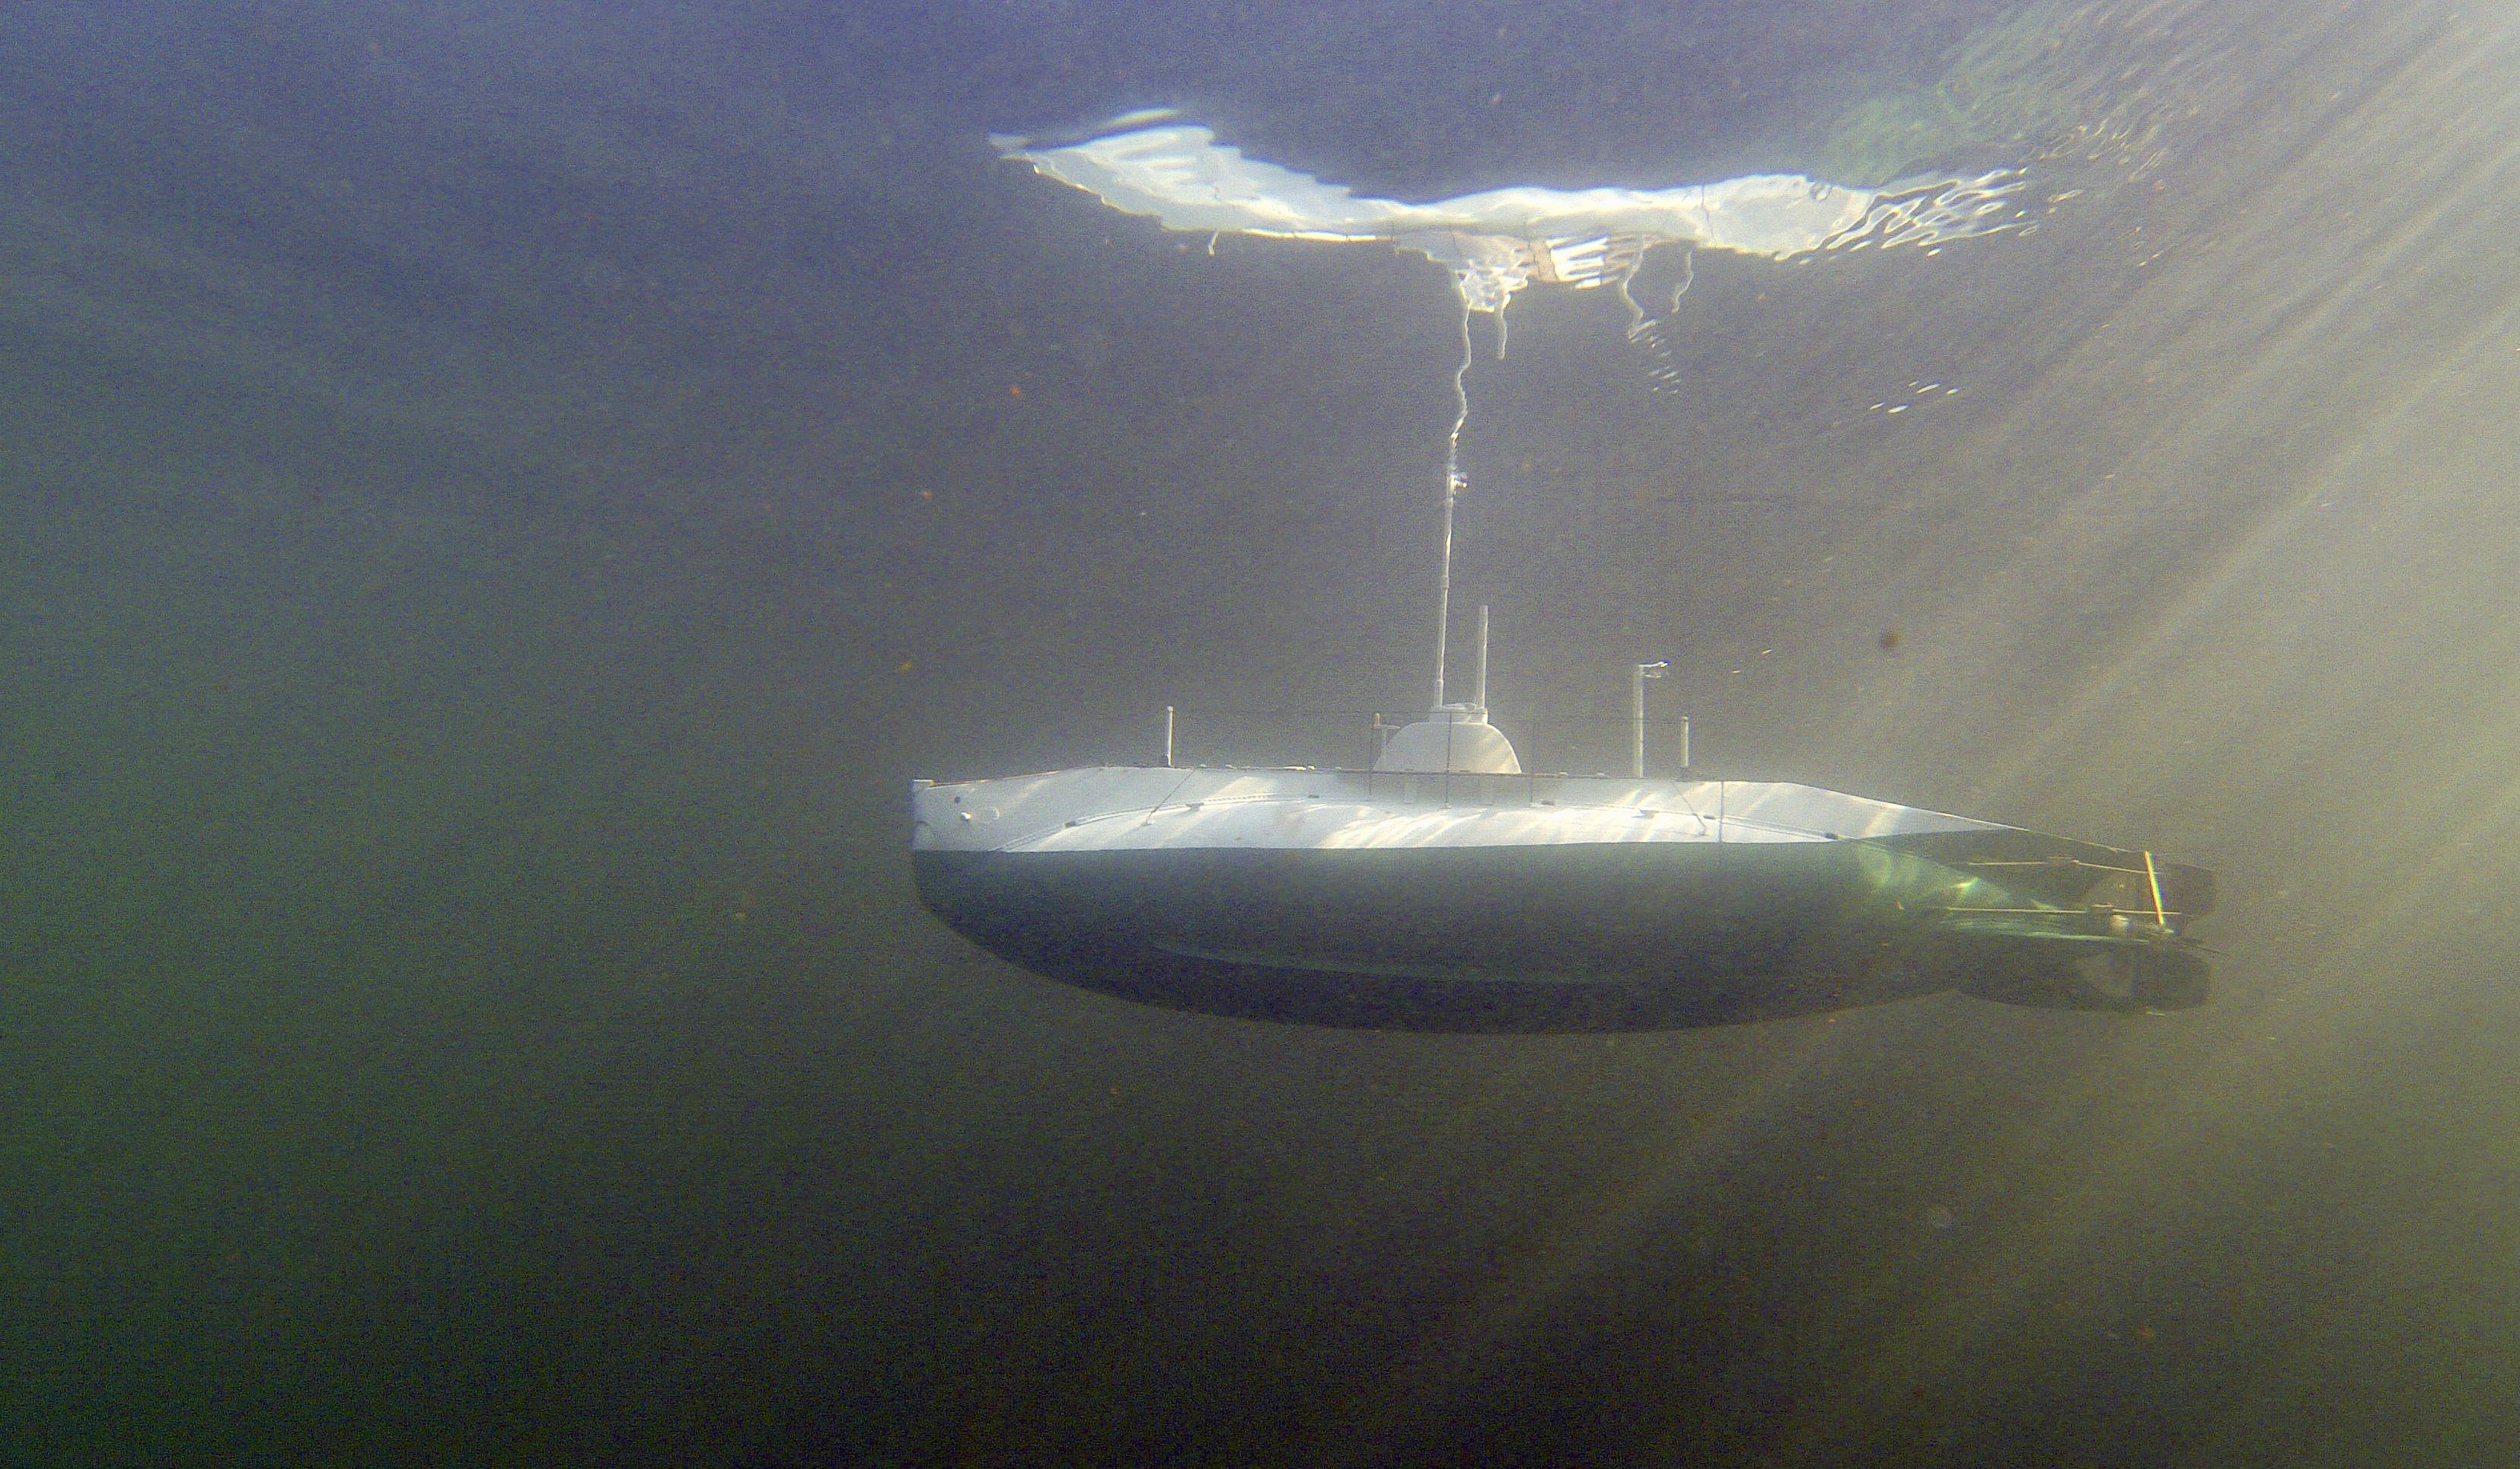
I remember this, took me two months to create the deck planking! Like you I cut and sanded individual planks to about 1 mm width and glued them on the dark grey painted deck. Then I varnished them. Boat has now had 19 patrols (and an equal number of dives and surfaces! ) and the deck looks a little weathered. Practice in the navy was for the sailors to have to sand these (with sand) regularly until they were truly white. I'm sure that went out with the first war patrols! freek
-
 FreekS got a reaction from PacificCrossRoads in Hr. Ms. O 19 1938 by Piet - FINISHED - scale 1:50 - submarine of the Royal Navy Netherlands in service 1939 - 1945
I remember this, took me two months to create the deck planking! Like you I cut and sanded individual planks to about 1 mm width and glued them on the dark grey painted deck. Then I varnished them. Boat has now had 19 patrols (and an equal number of dives and surfaces! ) and the deck looks a little weathered. Practice in the navy was for the sailors to have to sand these (with sand) regularly until they were truly white. I'm sure that went out with the first war patrols! freek
-
FreekS reacted to Piet in Hr. Ms. O 19 1938 by Piet - FINISHED - scale 1:50 - submarine of the Royal Navy Netherlands in service 1939 - 1945
Hello all and thank you for visiting and your like votes.
Today was a bit frustrating. I tried to cut 1 X 1 mm styrene strips for the deck slats but no matter how hard I tried I couldn't get anywhere with it. They keep curling and refusing to remain straight. I gave up and went to making 1 X 1 mm wood strips.
Yeah I know, it's more labor intensive but the end result was quite satisfactory. I'll have to go into mass production when it comes time to do the main deck
Actually, it goes rather swift once I have 1 mm planks cut. It's then a matter of sanding it smooth and by that time it's about 0. 8 mm, which actually looks a bit nicer. Then carefully cut the 1 mm strips from it a little over size so I can sand them smooth on the cut sides.
I made a few strips to plank the small recessed deck of the cockpit and it came out rather well, just a little cleaning up.
I also had to remake the aft AA gun deck. I forgot to the side overhang to allow for the gun operation. Oh well, such is life. Got to thinking about those dumb deck slats and didn't pay attention. At least it's a good excuse and I'm sticking with it Wont do that with the front gun deck though I'm running low on plywood.
So, tomorrow is making the deck slats for the aft gun deck - - - after I come back from the dentist. We are going to get the stitches taken out and an impression made for the two crowns - - - yippee!
The .8 X 1 mm slats are glued on to the deck in the cockpit or bridge. Yes, it still needs to be cleaned up some. The few rough spots in the front will be removed because the help post will be placed there. In the starboard front are a few cabinets and some "stuff" on the port side. That area is also covered with a weather shield so most of the forward slats will not even be visible.
This is a close-up view of the slats.
This shows the aft AA gun deck with the overhang I forgot with my first try. The overhang will have a 1 mm reinforcing strip glued to the underside as well as metal support braces. The area with the vertical supports will have an inner lining, that's why I left decking out between the verticals. The outside plating will cover it nicely.
The periscope housing is not glued on yet, first the slats to be glued to the deck plates
Cheers,
-
FreekS reacted to Panagiotis in Kilkis ex Mississippi (BB-23) by Panagiotis - FINISHED - scale 1:100 - Greek Battle Ship
Thank you mates....
Having decided to go with “Kilkis”, I started gathering information from wherever I could find them.
Again my Greek friend Falieros (an acclaimed modeler), from his personal collection, provided me some incomplete drawings, which along with information and photos from the magazine “Warship Profile no 39", gave me what I needed to re-draw the hull lines.
I chose to build the model in the scale of 1:100, not only because this is my favorite scale, but also because at this scale, the model will reach the 116 cm (45.6693 inc) very convenient length, that will allow me to carry it easily it in my cars’ back seat…
For those who are not familiar it's a big torment when you have to carry such a model in a trailer or on the roof of a car...
So for one more reason I felt happy...
I proceed with the “bread and butter” method and the first planks are set.
A difference from the previous models of mine is that in the middle of the first planks, I placed a vertical plank shaped as the side view of the hull.
By doing this, I have a guidance but also a support, when I’ll be placing the rest of the horizontal planks, shaping the hull.
Thanks
-
FreekS got a reaction from yvesvidal in HrMs O-1 by FreekS - FINISHED - 1:32 - RADIO - first Dutch submarine 1906-1920
After cutting the sub near the stern, I will now mount a bayonet so that the boat can be opened and a "tech rack" mounted in the stern section which can be pulled out of the bow section.
As the bayonet is slightly smaller than the boat, I glued some wooden rings into the stern section. As this section gets narrower to the stern these rings can be firmly mounted. The bayonet fits well in this (but is not glued yet).
The bow section gets slightly wider towards the bow, and thus the wooden rings have been fixed with three small wedges. These allow the ring to be precisely centred and allow the bayonet to be test fitted and the two halves of the boat connected. The wedges have now been glued in place and the next step is to fix the wooden ring with epoxy resin.
This was definitely a slightly scary operation - but it looks good - though only when the seal is proven to be water- and air proof will it be finished.
Freek
-
FreekS got a reaction from Elmer Cornish in HrMs O-1 by FreekS - FINISHED - 1:32 - RADIO - first Dutch submarine 1906-1920
After cutting the sub near the stern, I will now mount a bayonet so that the boat can be opened and a "tech rack" mounted in the stern section which can be pulled out of the bow section.
As the bayonet is slightly smaller than the boat, I glued some wooden rings into the stern section. As this section gets narrower to the stern these rings can be firmly mounted. The bayonet fits well in this (but is not glued yet).
The bow section gets slightly wider towards the bow, and thus the wooden rings have been fixed with three small wedges. These allow the ring to be precisely centred and allow the bayonet to be test fitted and the two halves of the boat connected. The wedges have now been glued in place and the next step is to fix the wooden ring with epoxy resin.
This was definitely a slightly scary operation - but it looks good - though only when the seal is proven to be water- and air proof will it be finished.
Freek
-
 FreekS got a reaction from ianmajor in HrMs O-1 by FreekS - FINISHED - 1:32 - RADIO - first Dutch submarine 1906-1920
After cutting the sub near the stern, I will now mount a bayonet so that the boat can be opened and a "tech rack" mounted in the stern section which can be pulled out of the bow section.
As the bayonet is slightly smaller than the boat, I glued some wooden rings into the stern section. As this section gets narrower to the stern these rings can be firmly mounted. The bayonet fits well in this (but is not glued yet).
The bow section gets slightly wider towards the bow, and thus the wooden rings have been fixed with three small wedges. These allow the ring to be precisely centred and allow the bayonet to be test fitted and the two halves of the boat connected. The wedges have now been glued in place and the next step is to fix the wooden ring with epoxy resin.
This was definitely a slightly scary operation - but it looks good - though only when the seal is proven to be water- and air proof will it be finished.
Freek
-
FreekS got a reaction from GrandpaPhil in HrMs O-1 by FreekS - FINISHED - 1:32 - RADIO - first Dutch submarine 1906-1920
Oooops !
-
FreekS got a reaction from Piet in HrMs O-1 by FreekS - FINISHED - 1:32 - RADIO - first Dutch submarine 1906-1920
After cutting the sub near the stern, I will now mount a bayonet so that the boat can be opened and a "tech rack" mounted in the stern section which can be pulled out of the bow section.
As the bayonet is slightly smaller than the boat, I glued some wooden rings into the stern section. As this section gets narrower to the stern these rings can be firmly mounted. The bayonet fits well in this (but is not glued yet).
The bow section gets slightly wider towards the bow, and thus the wooden rings have been fixed with three small wedges. These allow the ring to be precisely centred and allow the bayonet to be test fitted and the two halves of the boat connected. The wedges have now been glued in place and the next step is to fix the wooden ring with epoxy resin.
This was definitely a slightly scary operation - but it looks good - though only when the seal is proven to be water- and air proof will it be finished.
Freek
-
FreekS reacted to Piet in Hr. Ms. O 19 1938 by Piet - FINISHED - scale 1:50 - submarine of the Royal Navy Netherlands in service 1939 - 1945
Not much was done today. I had a dentist appointment for him to install the two embutments in my two implants in the left upper jaw. All went well but it took quite some time, 2 hours. He had to cut the gums open again and I mentioned to him that he should have put a zipper in it Okay, the Novacane is worn off and I have absolutely no discomfort, which is a good thing.
I managed to do some more work on the side panels though. I also cut the port side out and the door openings and made step holes in it. There is still some more detail work on them before I can glue them to the frames.
Now, Boris mentioned to me in a personal e-mail that the Vickers Pom Poms on the Dutch subs did not have handles on them in the back. Oh dear, yes, he is right. I used the wrong installation as a guide and now I need to remove these nice handles and add some other stuff. I don't know if I have enough room inside the buns for that stuff but we'll see.
Hey, that's what this forum is all about, helping each other - - - no matter that sometimes we have to take a step back before proceeding forward again.
Cheers,
-
FreekS got a reaction from Piet in O-16 by PacificCrossRoads - Dutch submarine - 3D rendering for kit prototype
In 1937, she did convoy duty in the straits of Gibraltar . general Franco had during the Spanish civil war issued a blockade of communist harbours and threatened to board ships in the straits of Gibraltar. The Spanish navy was divided into two, Francos Royalist forces and Communist ships which embarking Russion officers.
O-16 was lying in Lisbon after her return from the US and was ordered to immediately disembark Professor Veening Meinensz, who had performed gravity measurements on board, and join up with hr ms Hertog Hendrik and perform war patrols in the Straits of Gibraltar with war Torpedo's loaded in the tubes and the boat ready for action. this support action for the pantserdekschip Hertog Hendrik was crucial, as the Royalist fleet comprised three 15 and 20 cm gun cruisers superior to the Hertog Hendrik. after two weeks patrolling she is relieved by Hr ms Java, hr ms O-13 and hr ms O-15 and heads for home.
A nice example of deterrent by Dutch submarines.
(de Nederlandse Onderzeedients 1906 to 1966)
Freek