Yabuhebi
-
Posts
206 -
Joined
-
Last visited
Content Type
Profiles
Forums
Gallery
Events
Everything posted by Yabuhebi
-
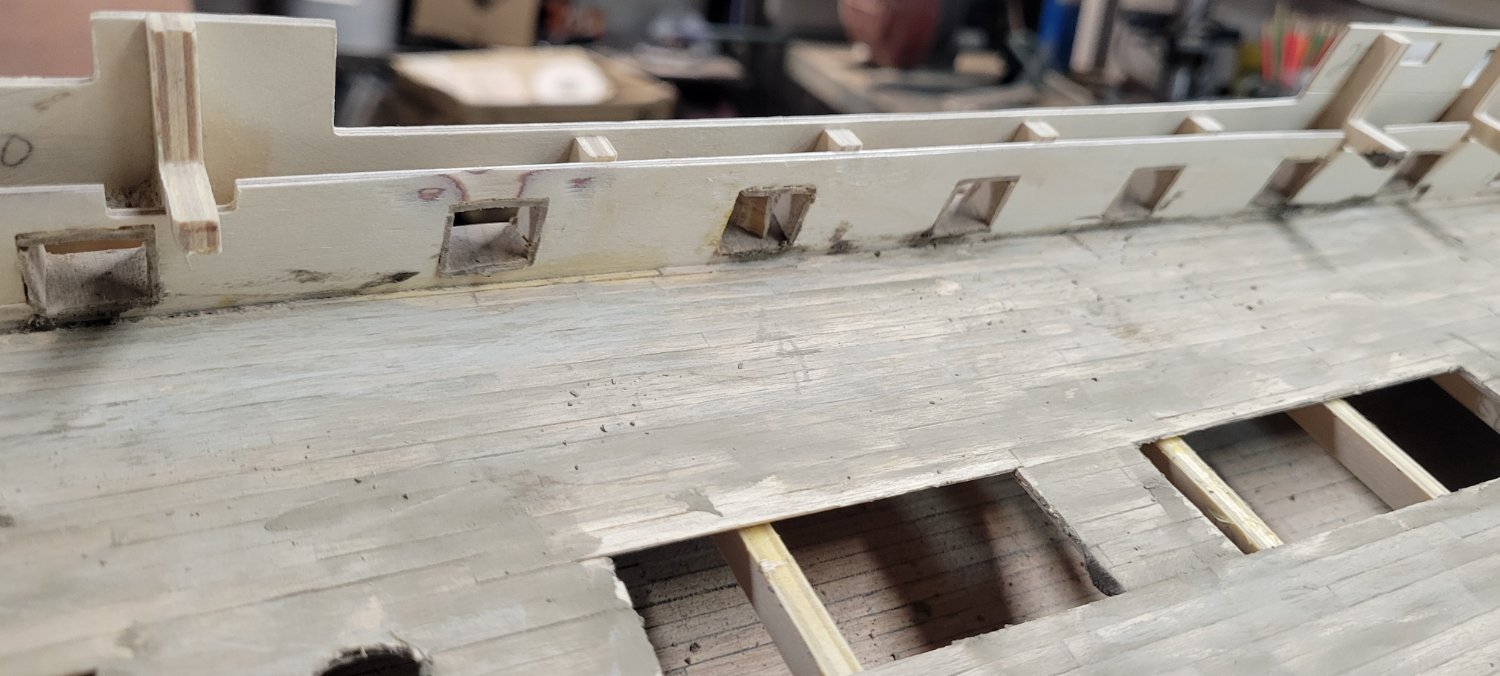
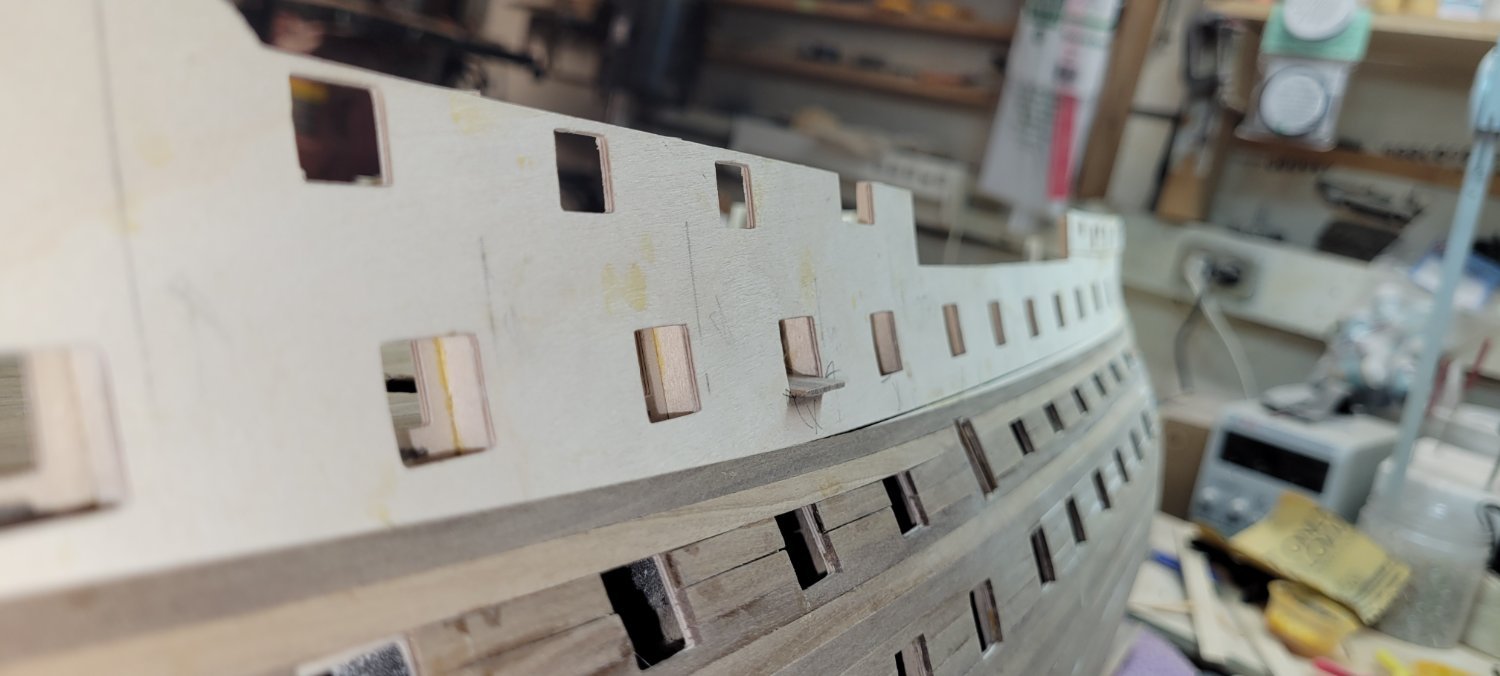
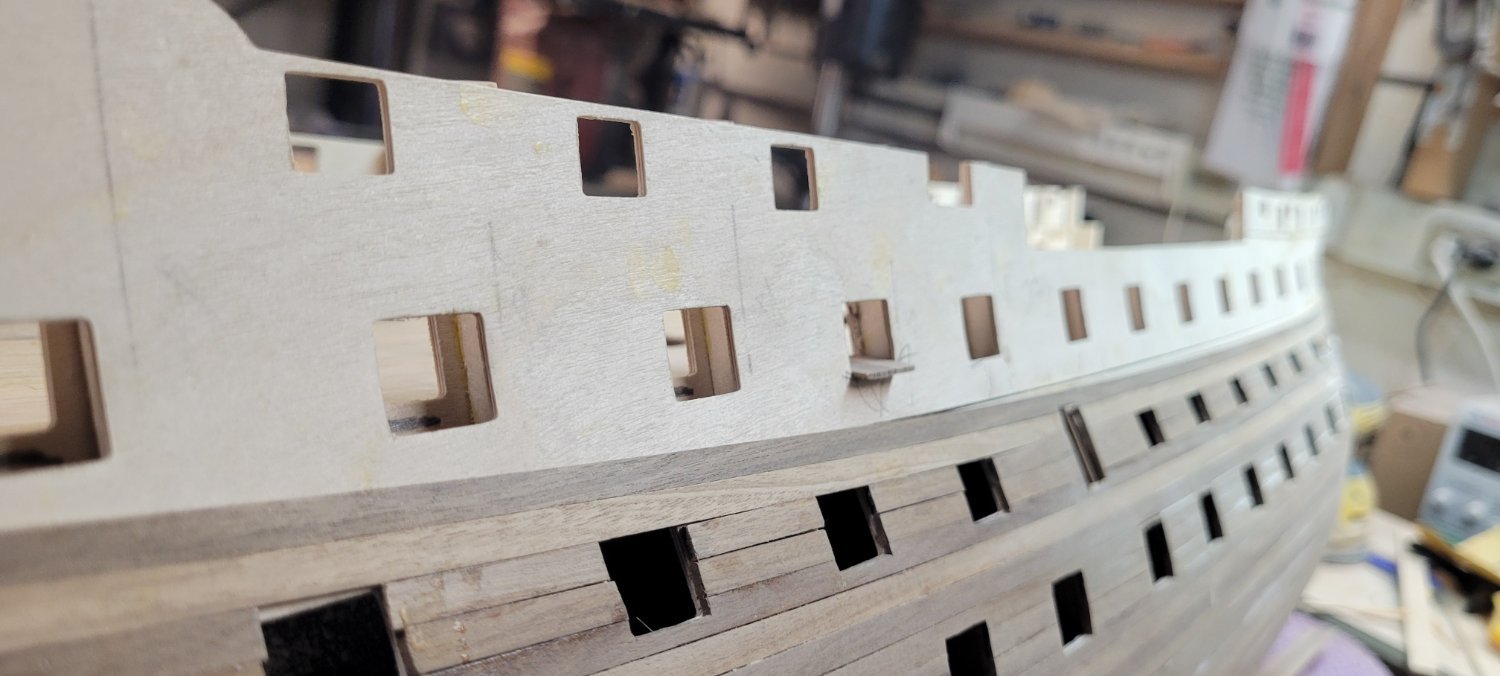
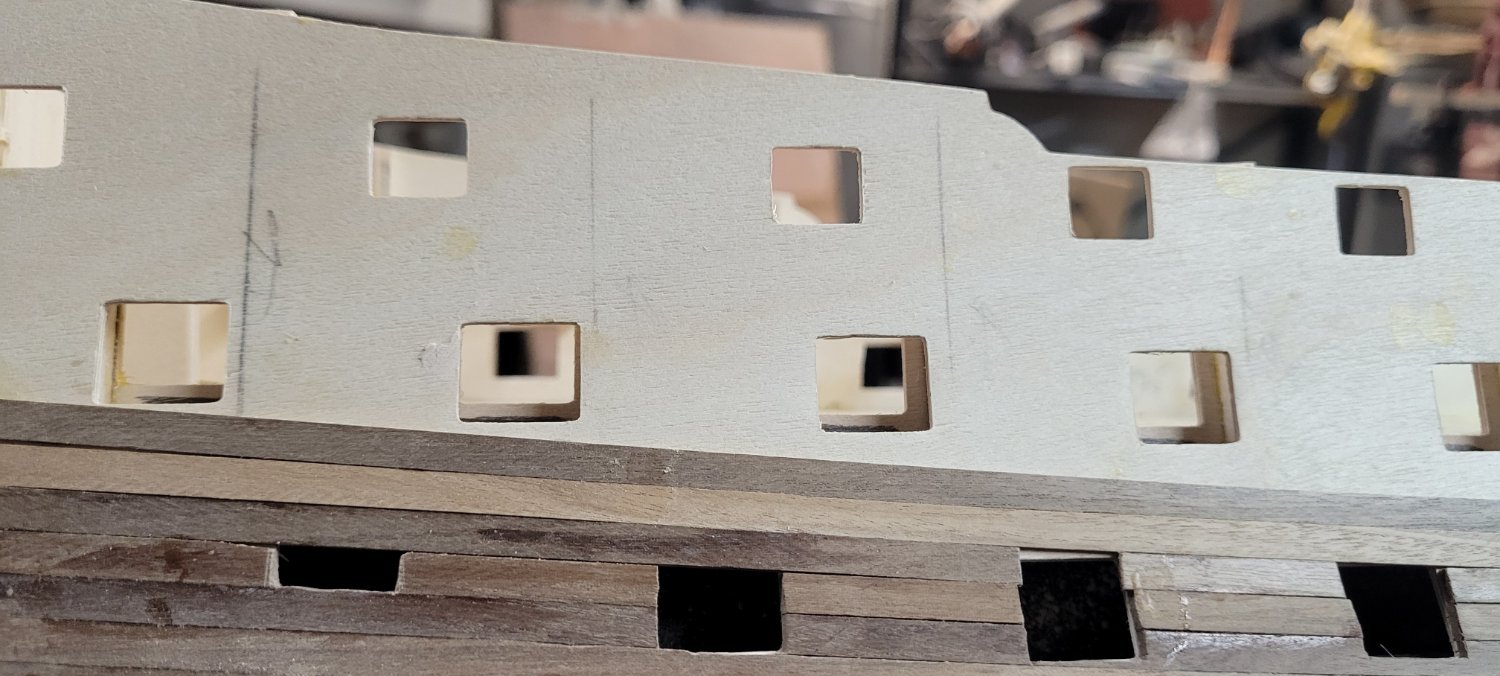
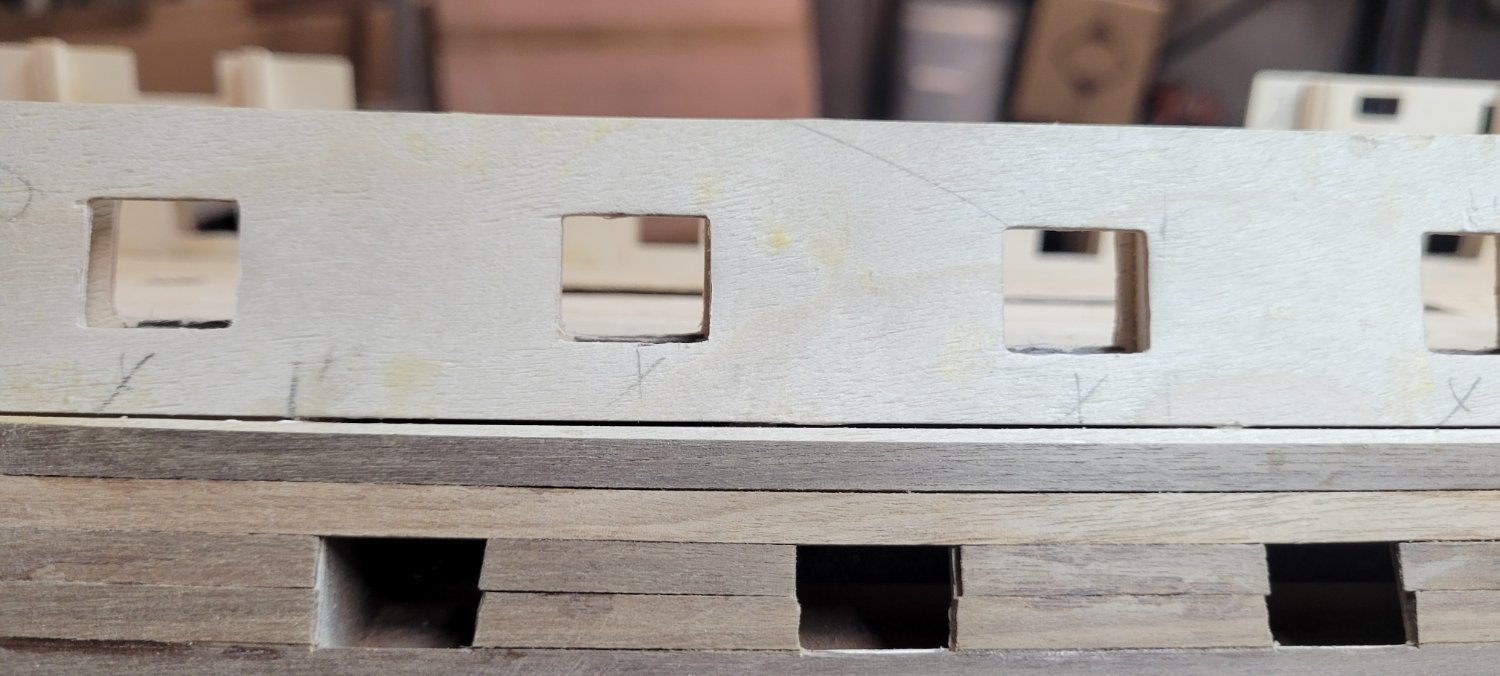
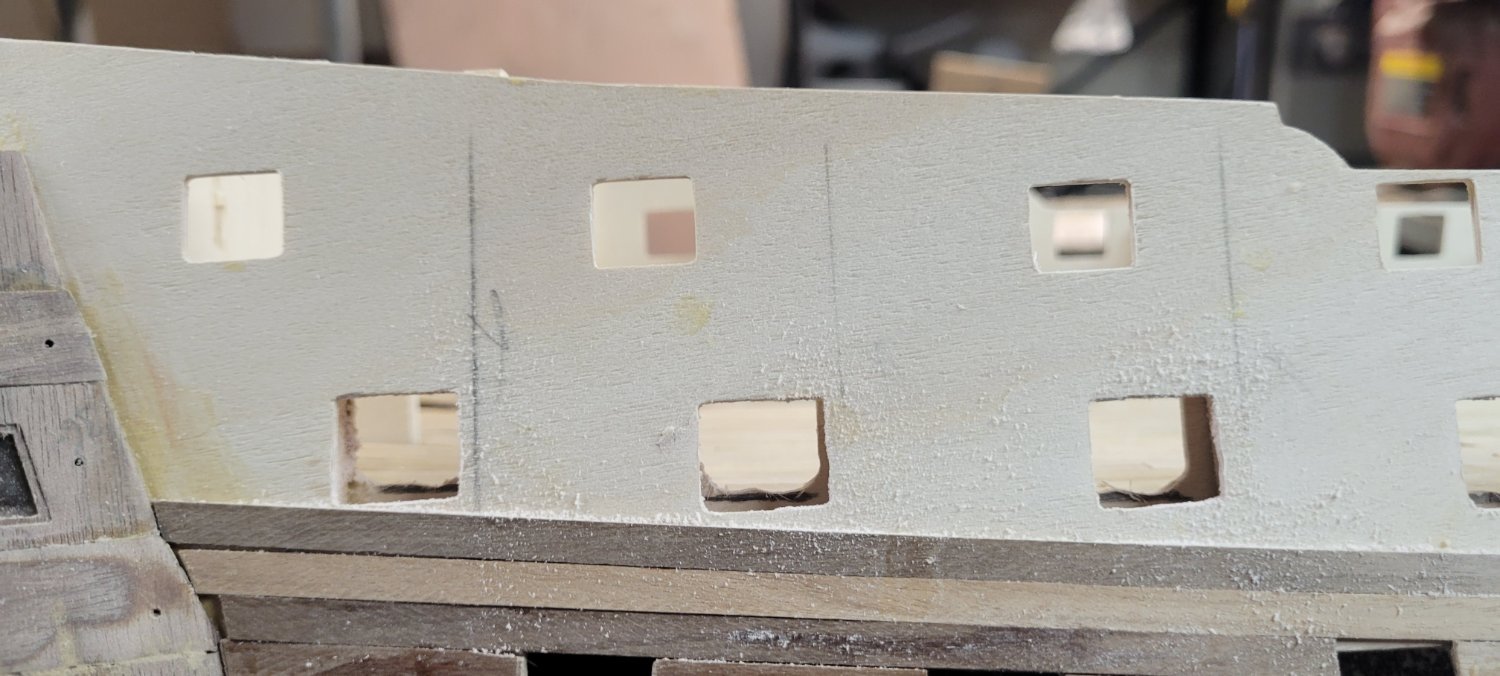
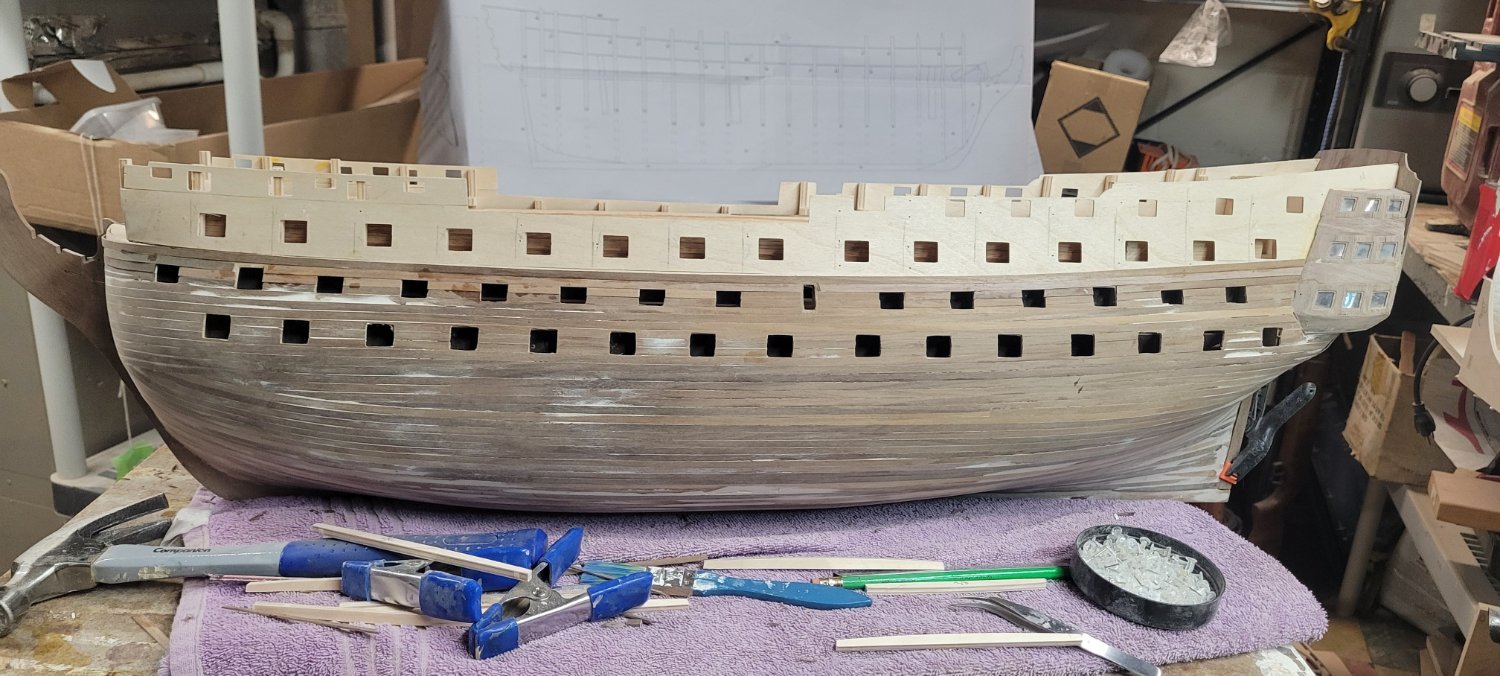
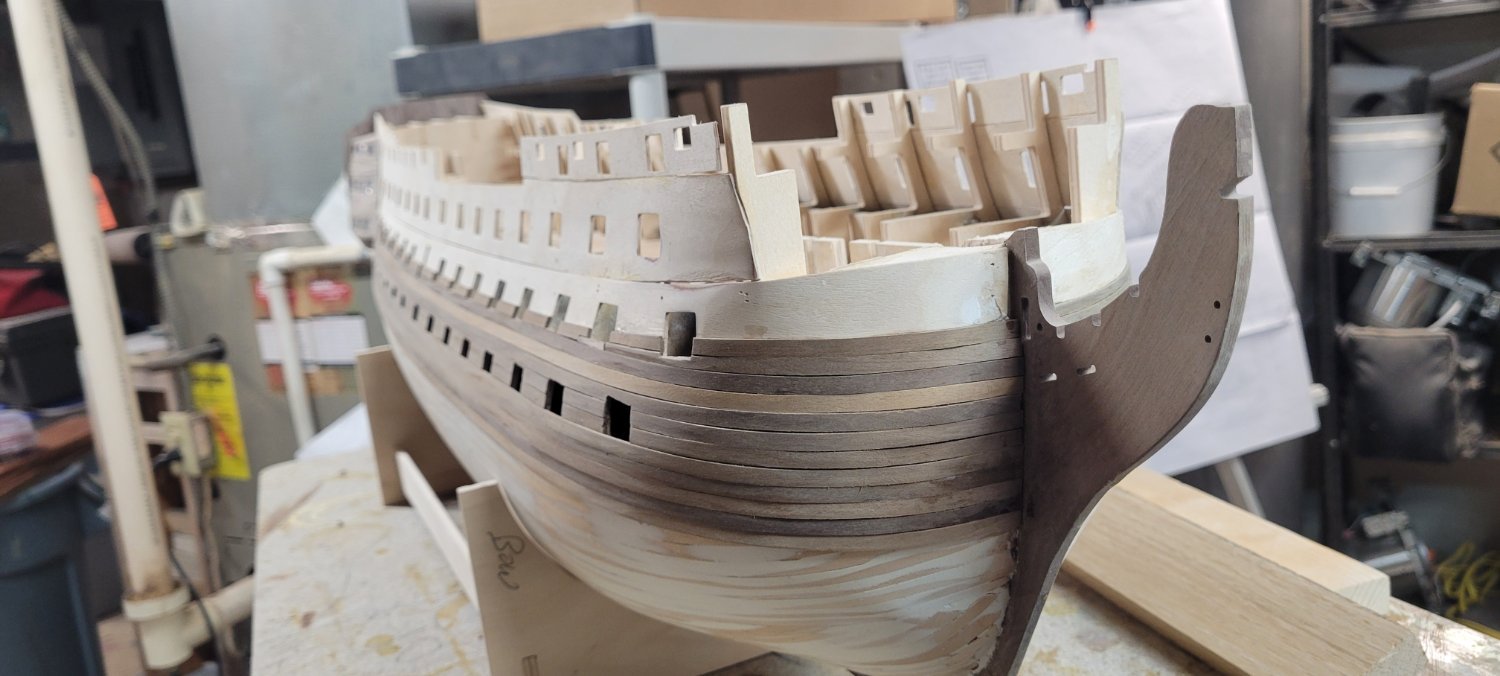
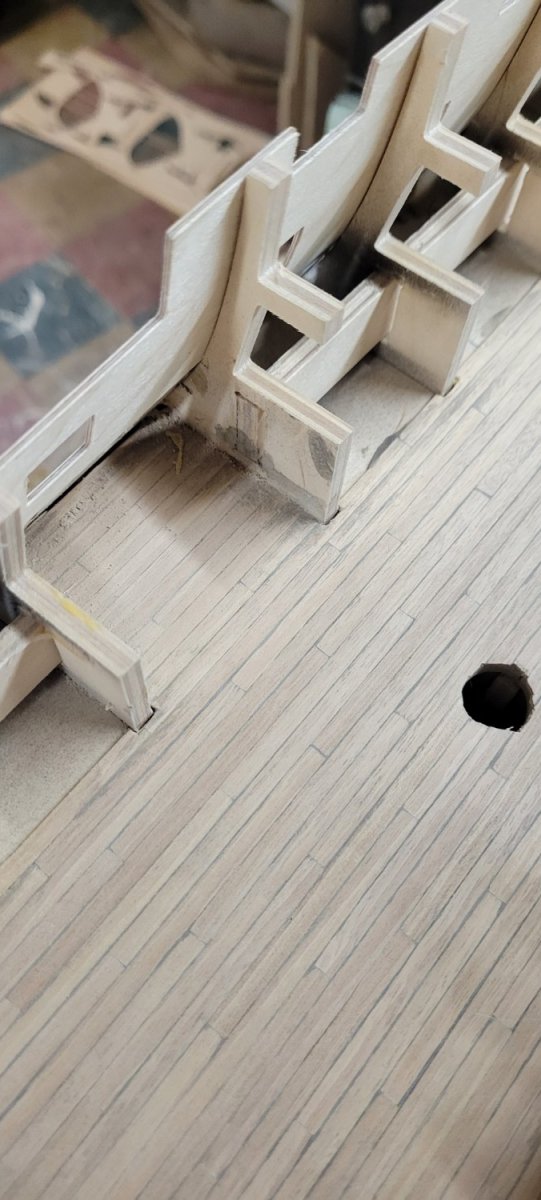
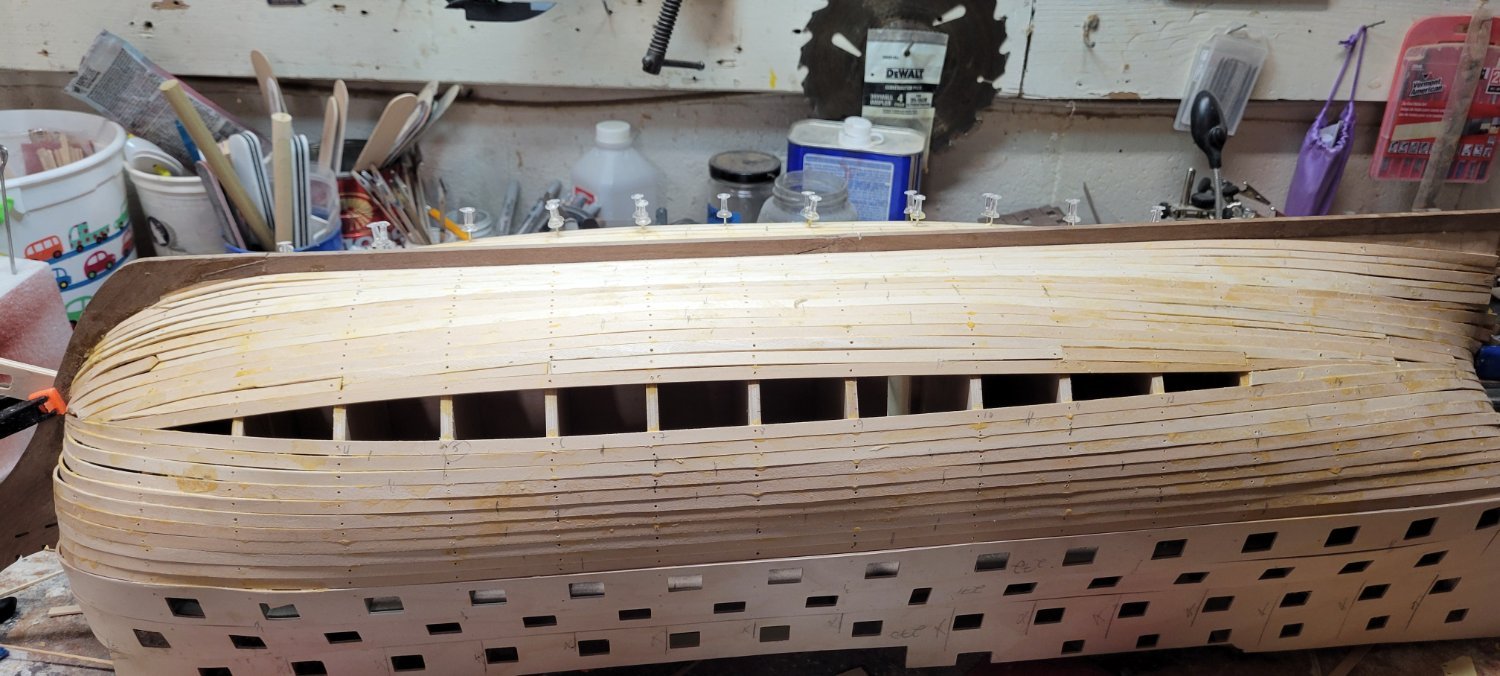
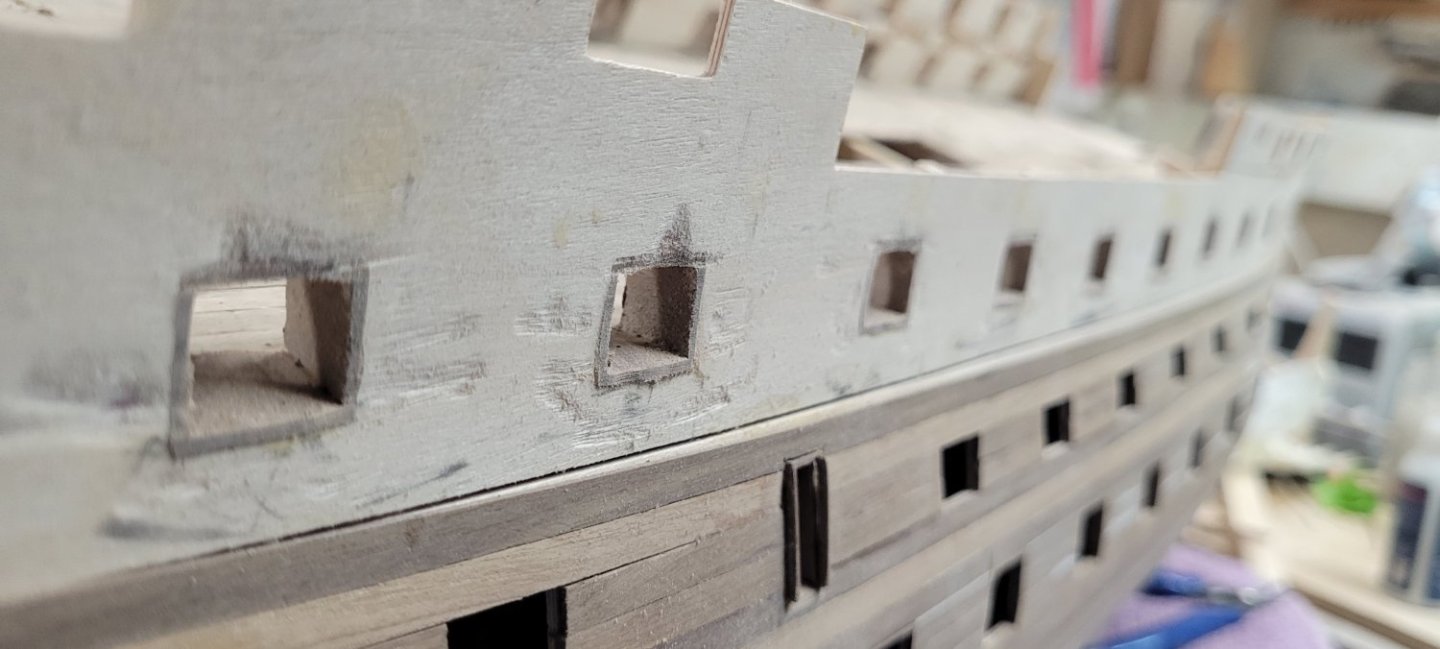
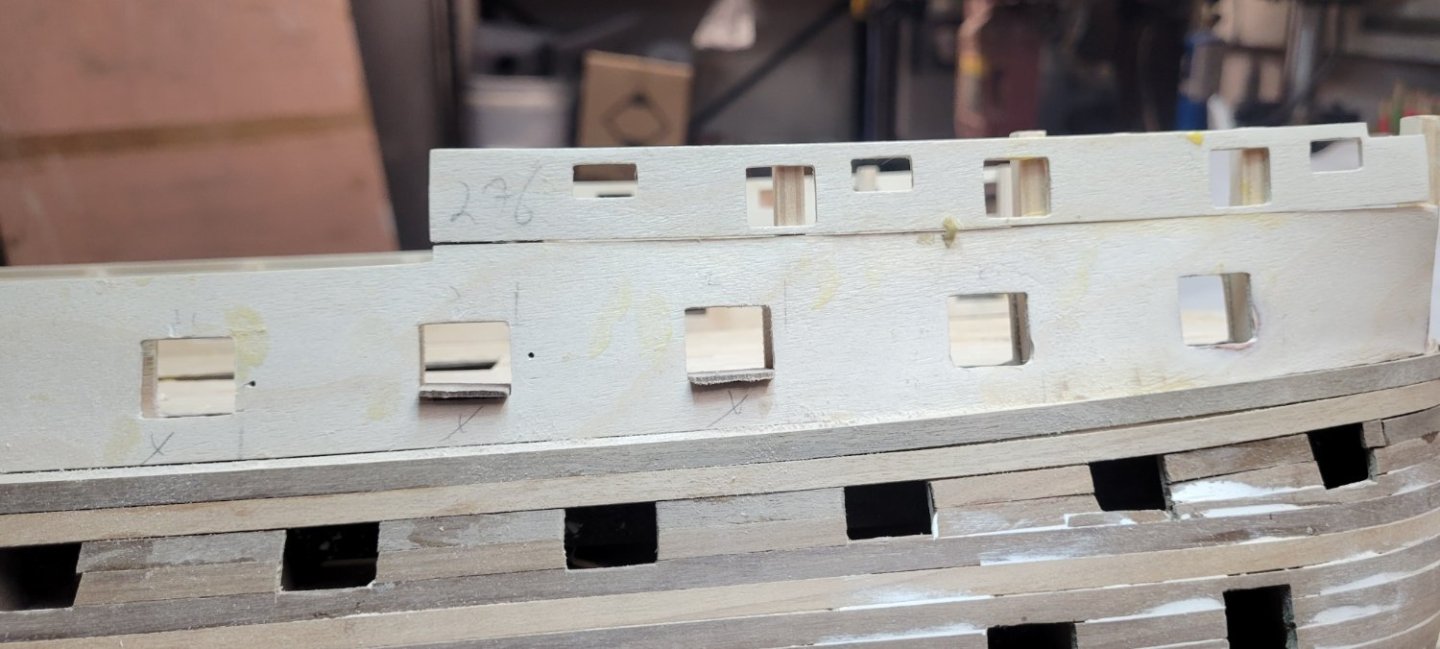
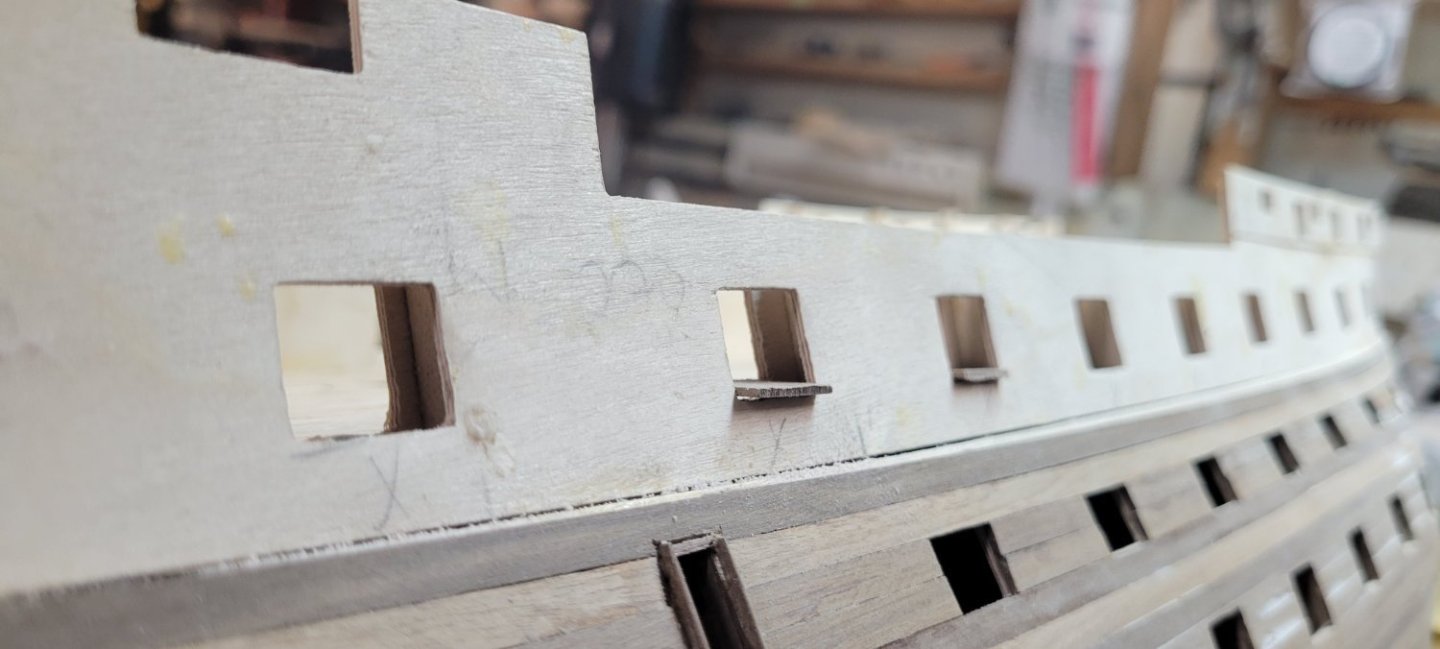
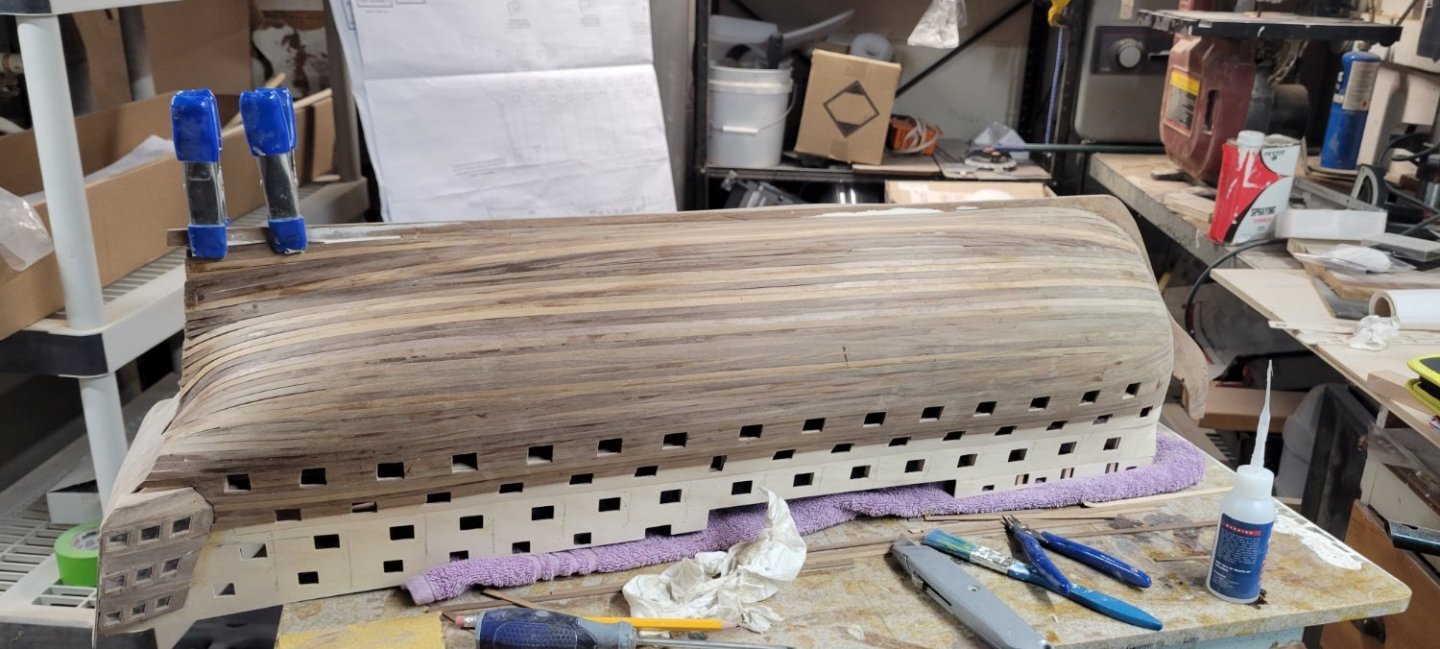
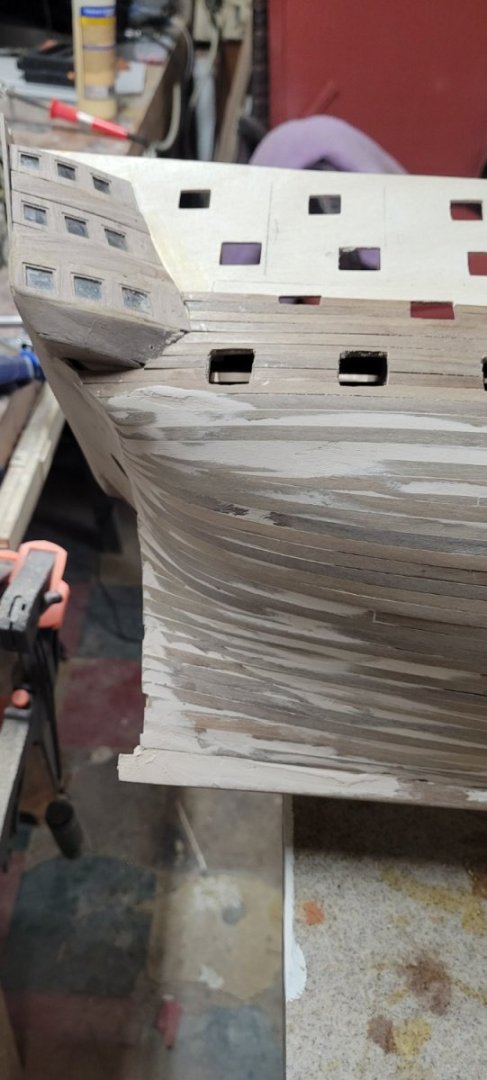
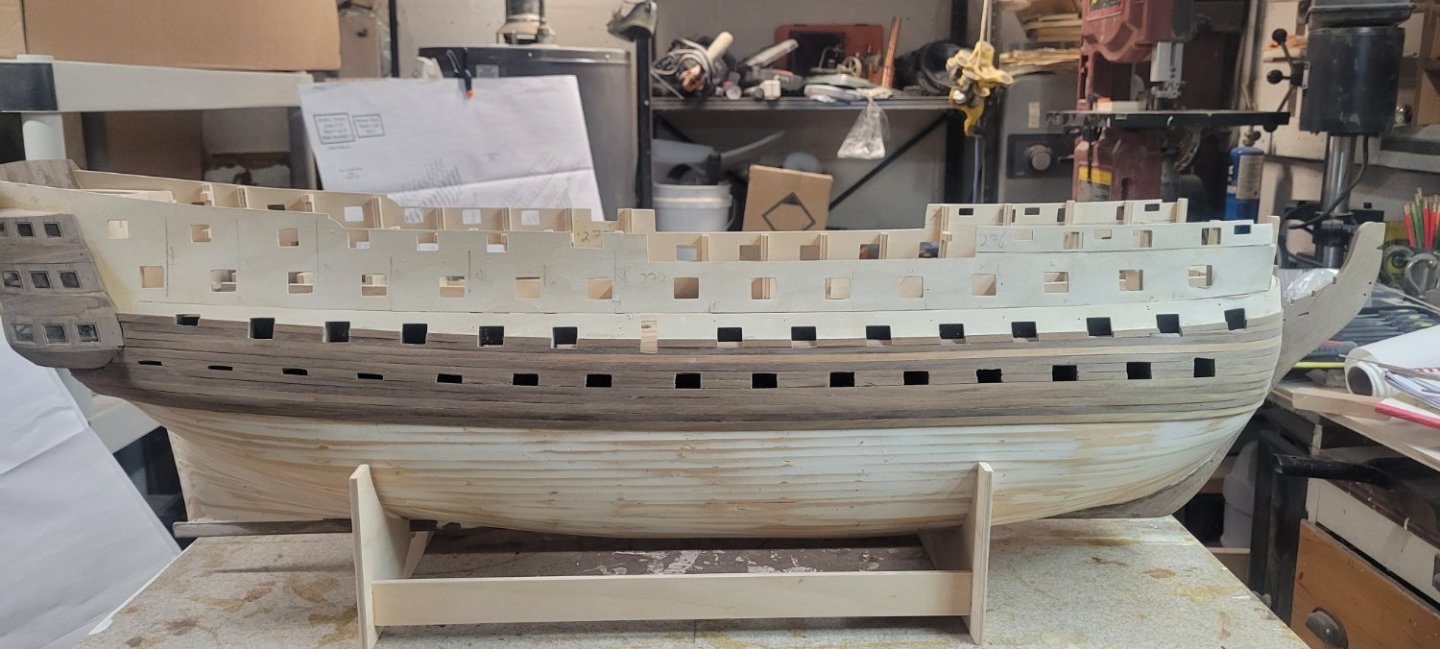
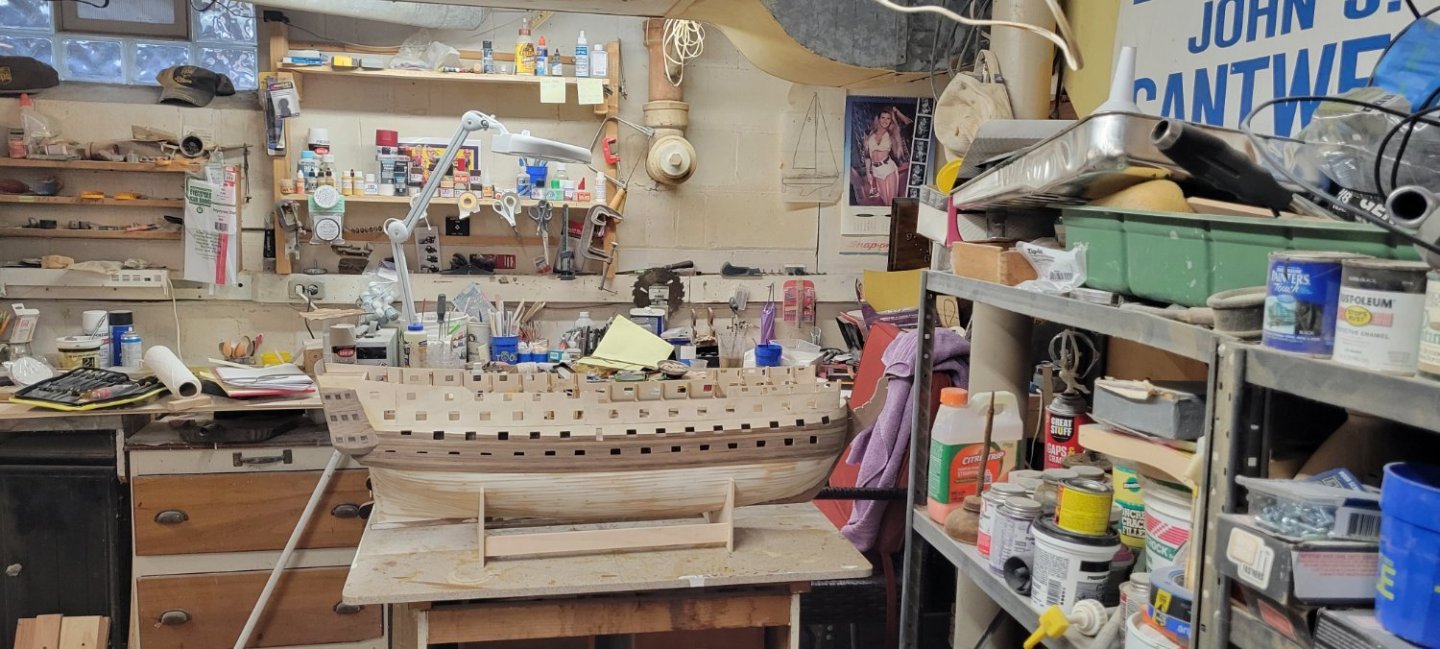
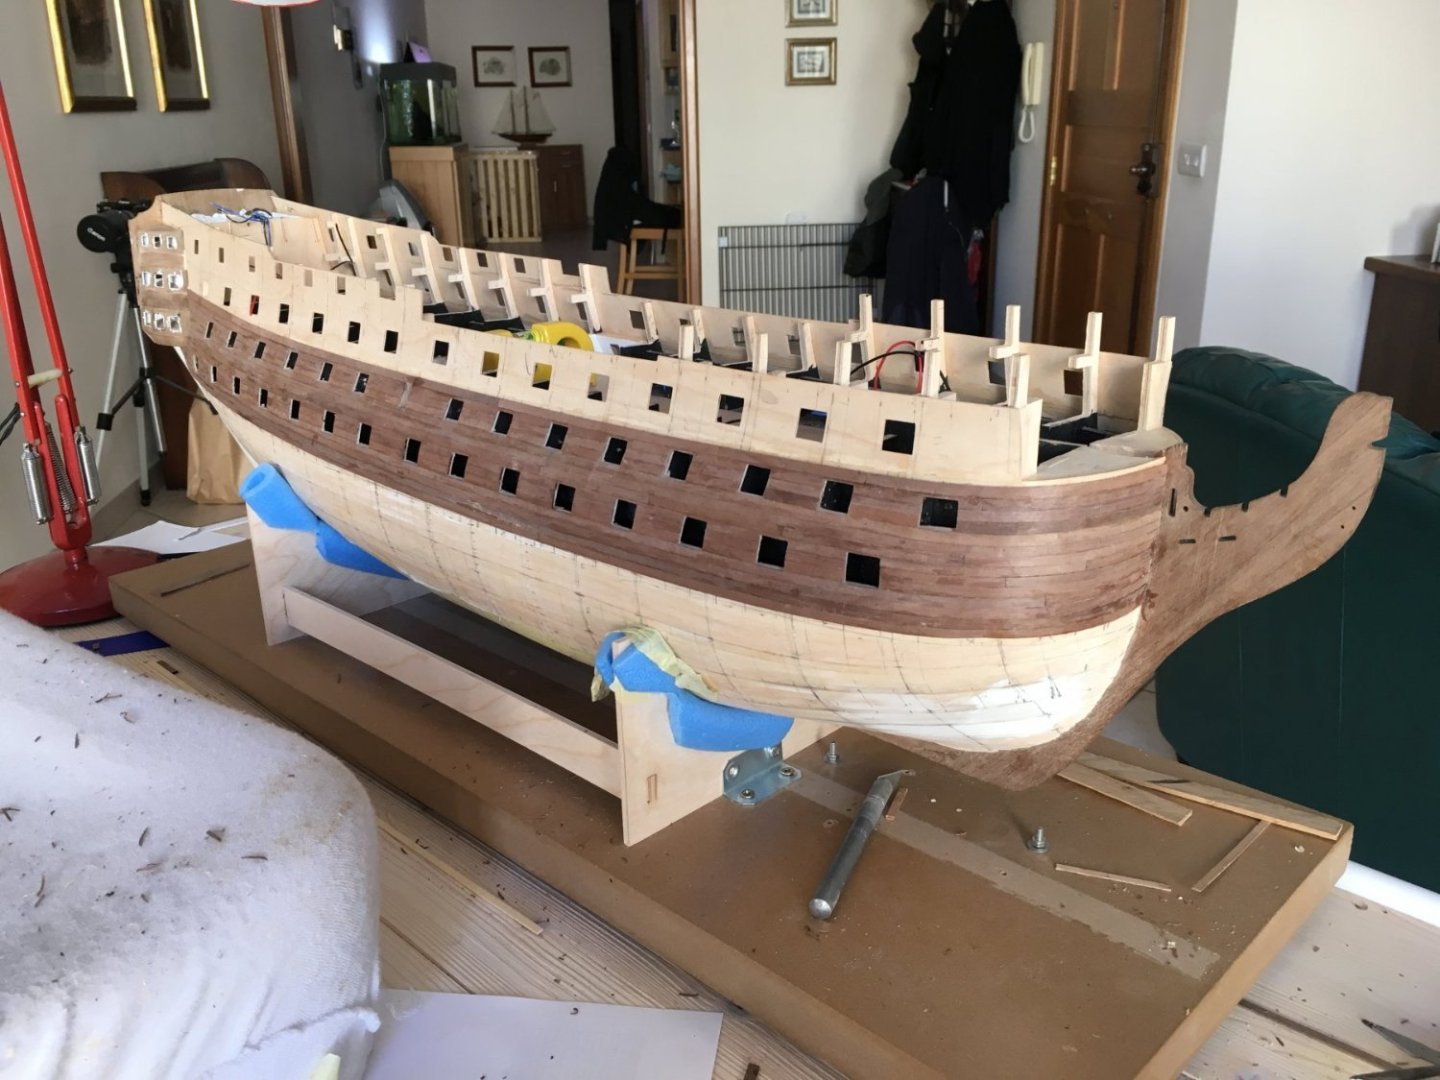
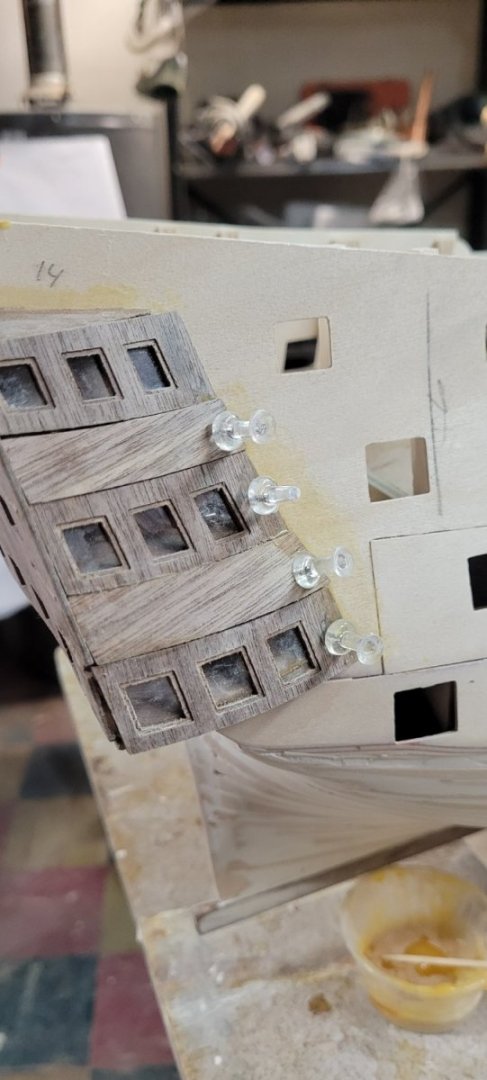
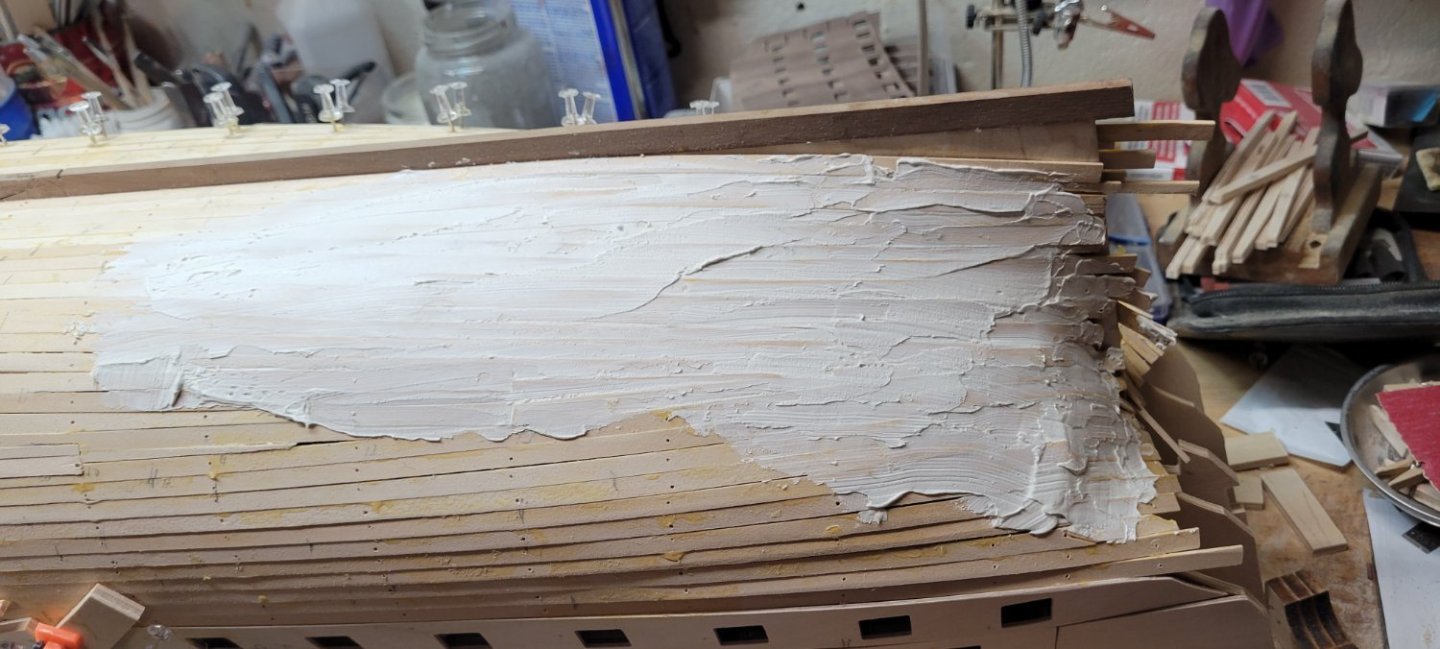
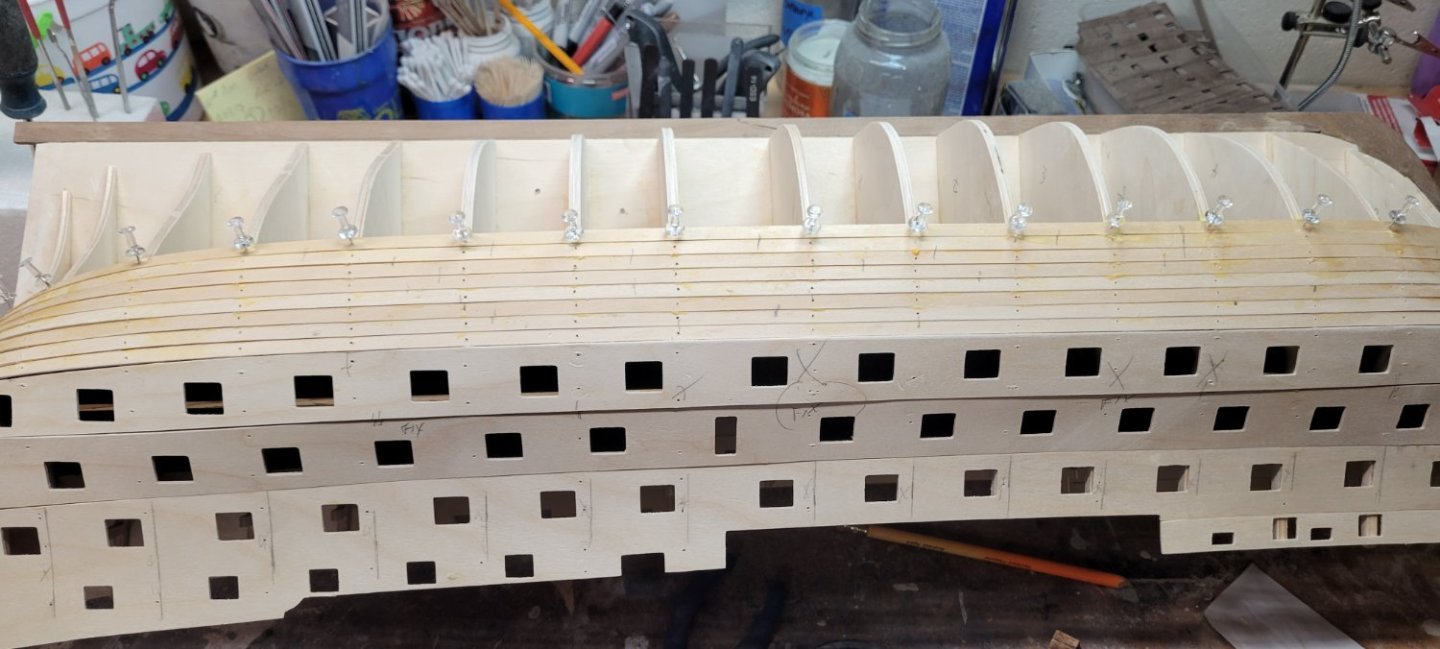
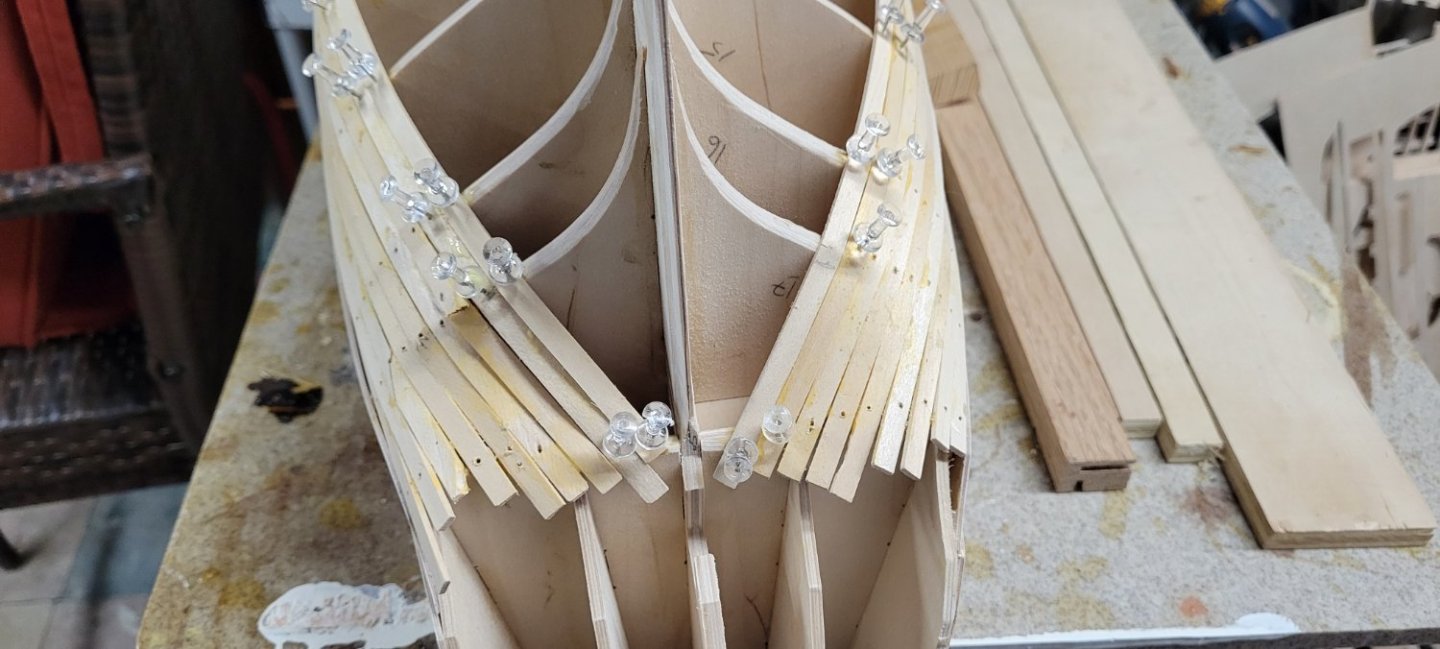
 Installed the first round of gun ports. I opted to install the sill first, then the header and the side walls last. With the side walls, I had to sand them into a trapezoidal shape and then install them from the back towards the outside. I tried to minimize the amount of excess that was showing on the inside bulwarks as it was very hard to trim them back. In the end I used the dremmel tool with a sanding barrel. I was able to get them sanded down to the template on the exterior and fairly close on the inside. You can see the rubbing, sanding marks, but they are flush. I added stained wood filler to the deck. While this filler does sand easily, it is very hard to get into the nooks and crannies of this deck. The little bulwark stubs are killers to your hands and fingers. After finishing the gun port liners, I installed the interior bulwark planking. The instructions require that you provide spacing for the camber beams. Honestly, with the next deck in place, you are never going to see that last level of planking....
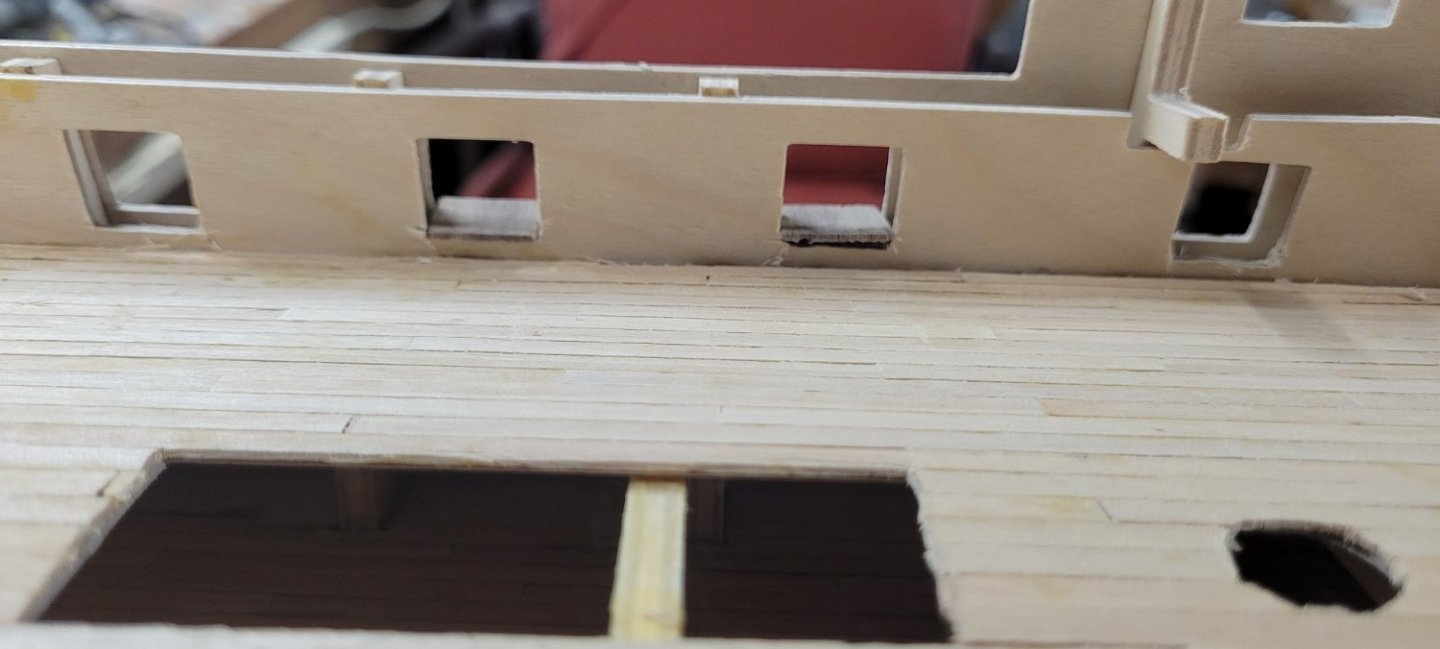


-
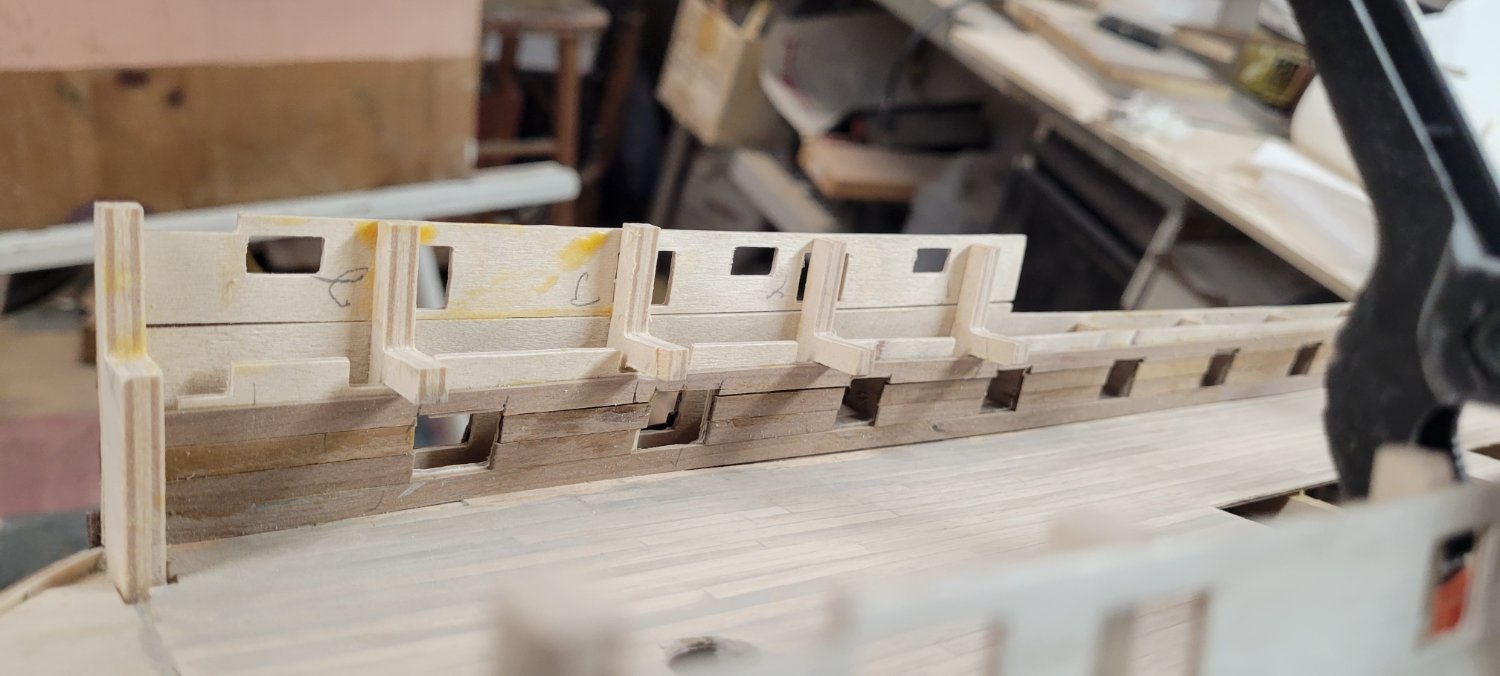
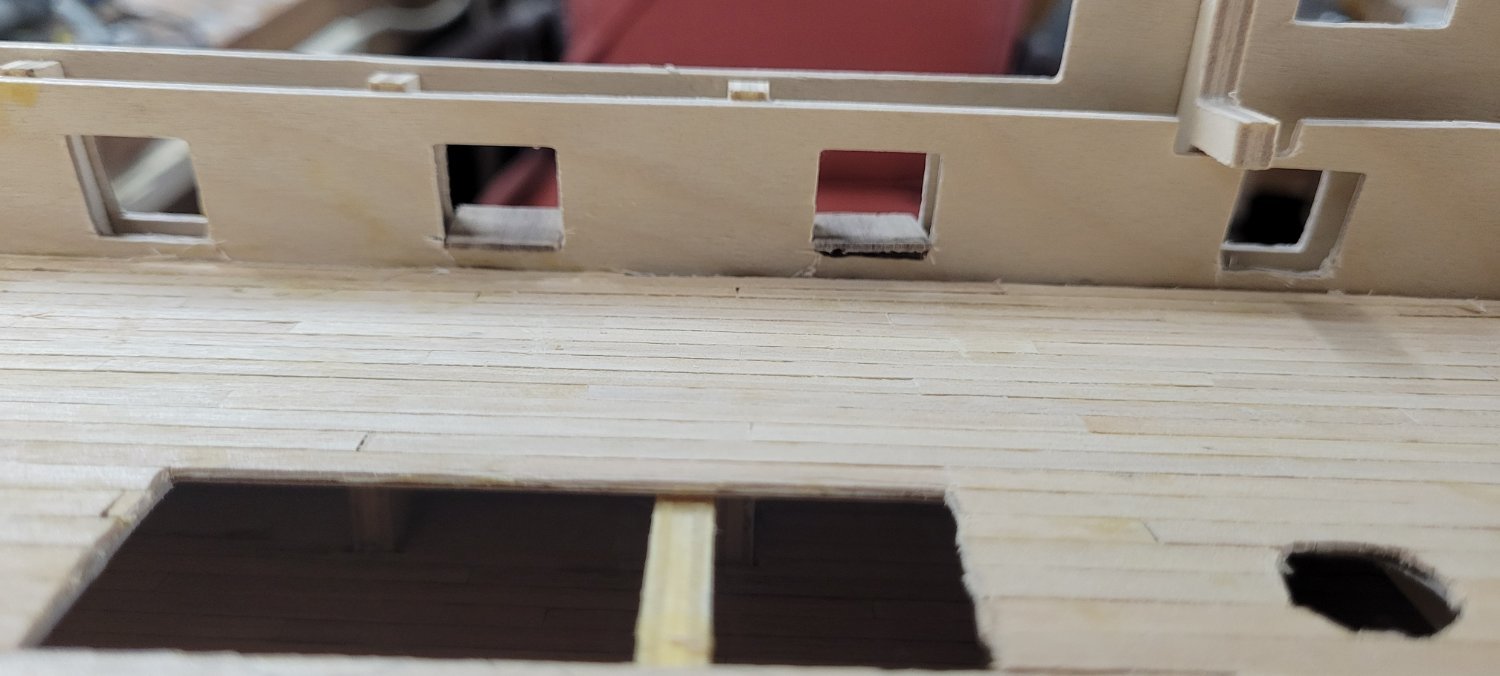
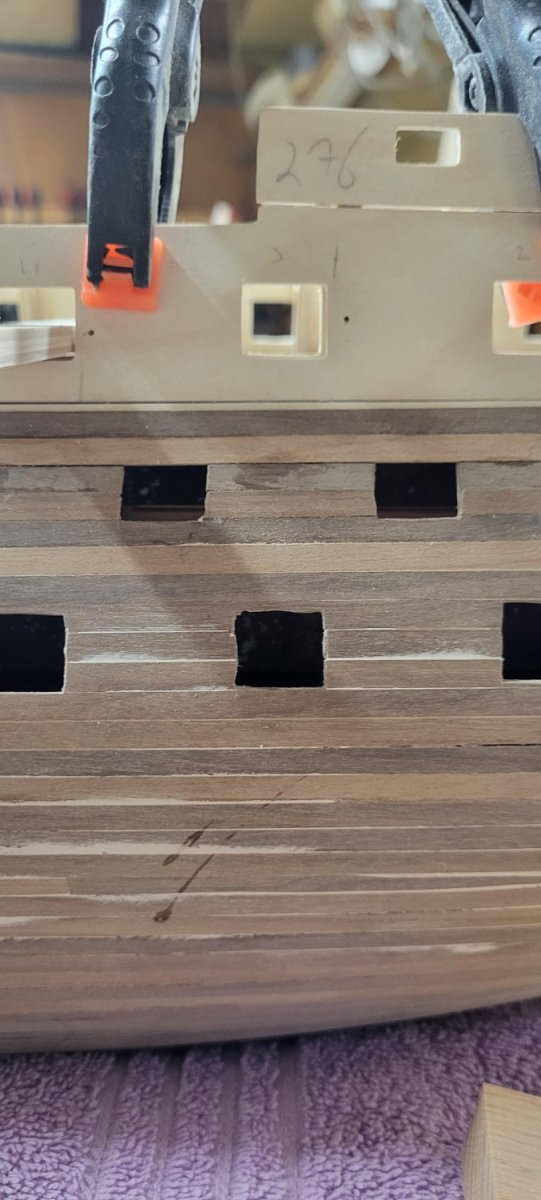
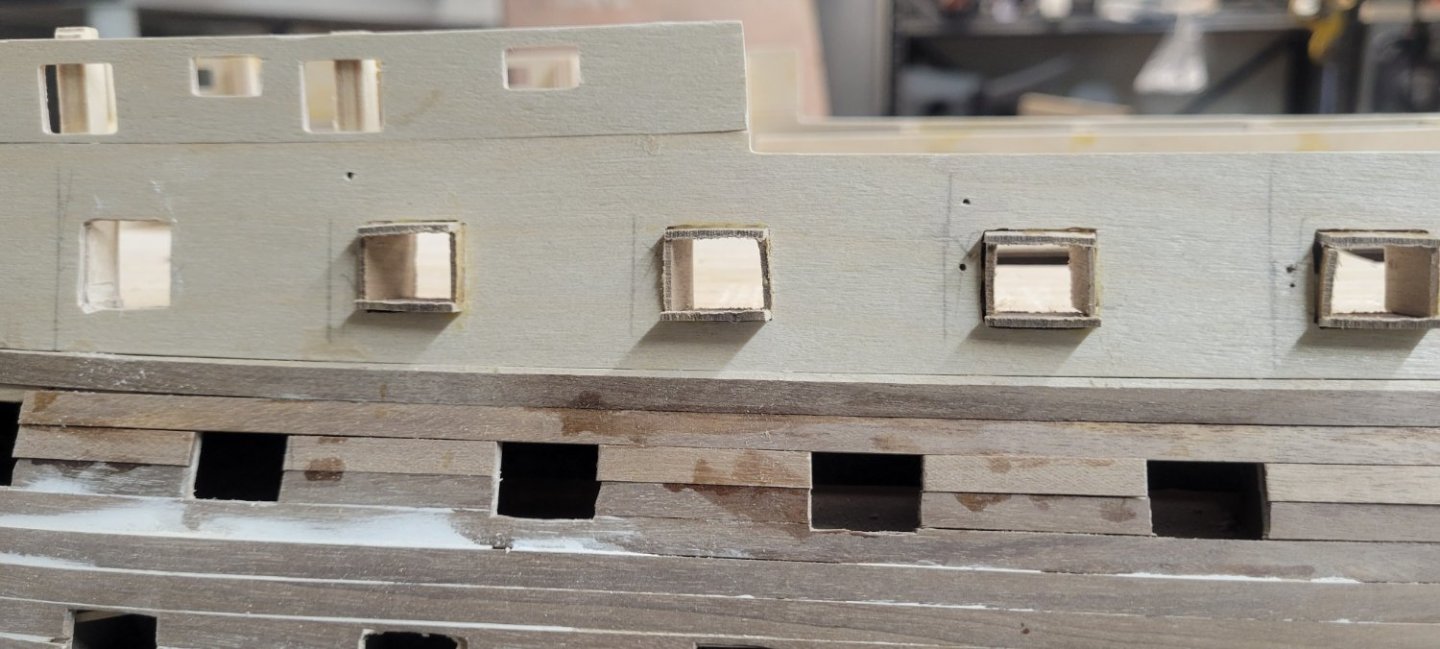
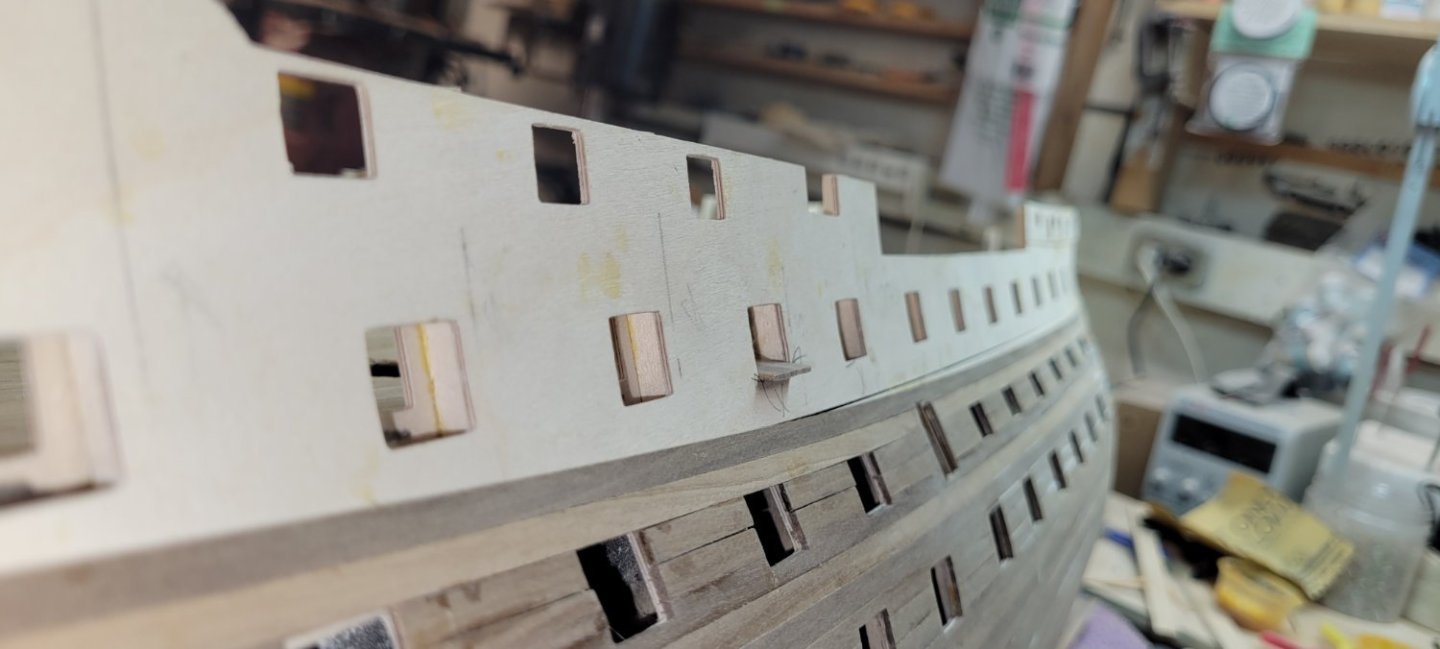
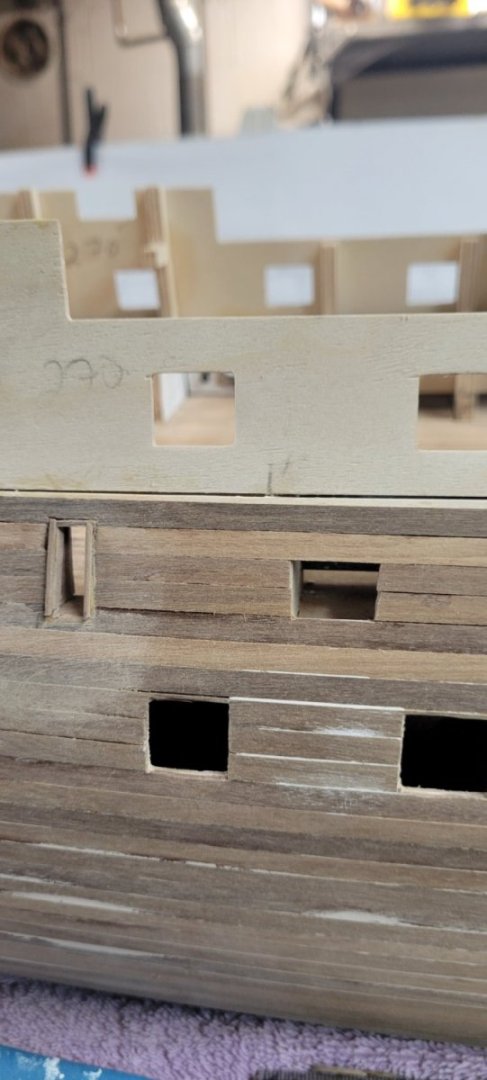
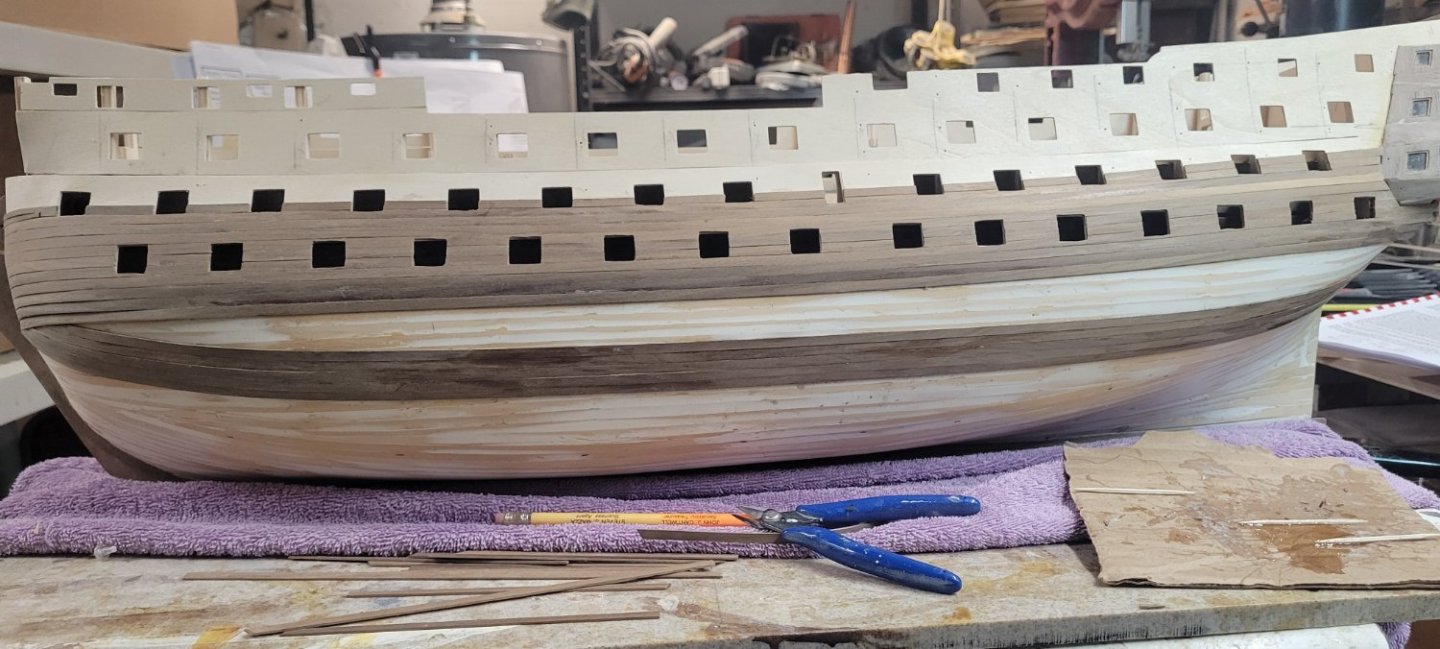
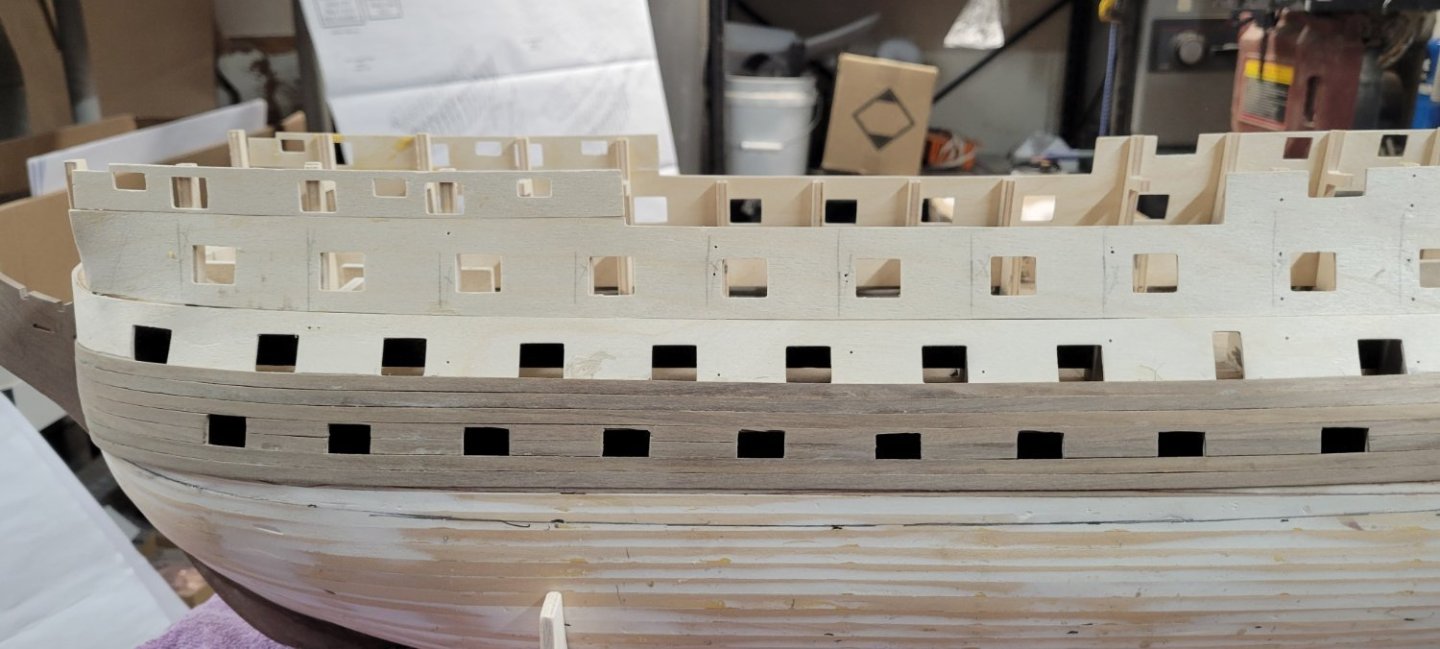
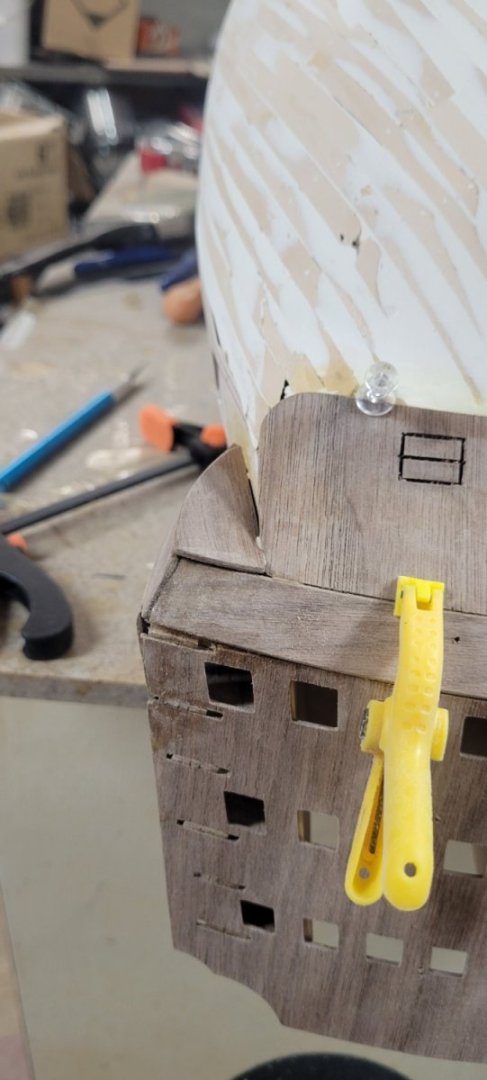
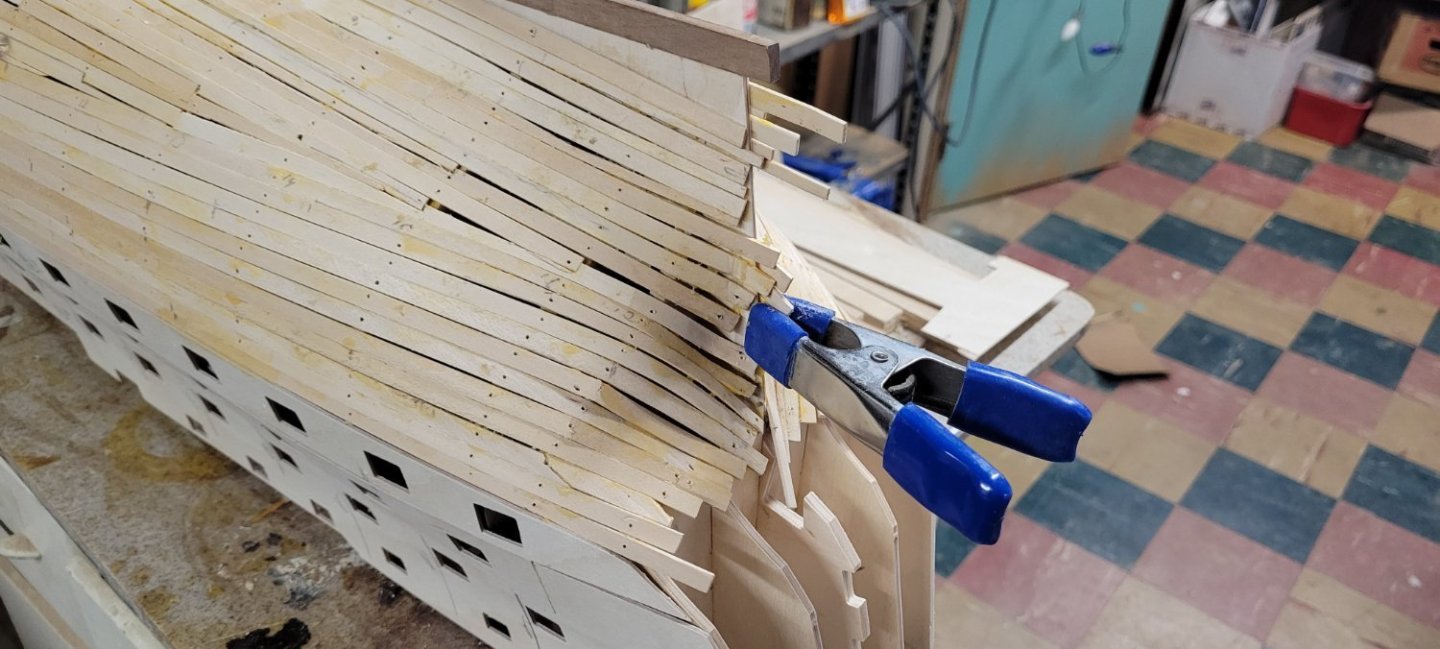
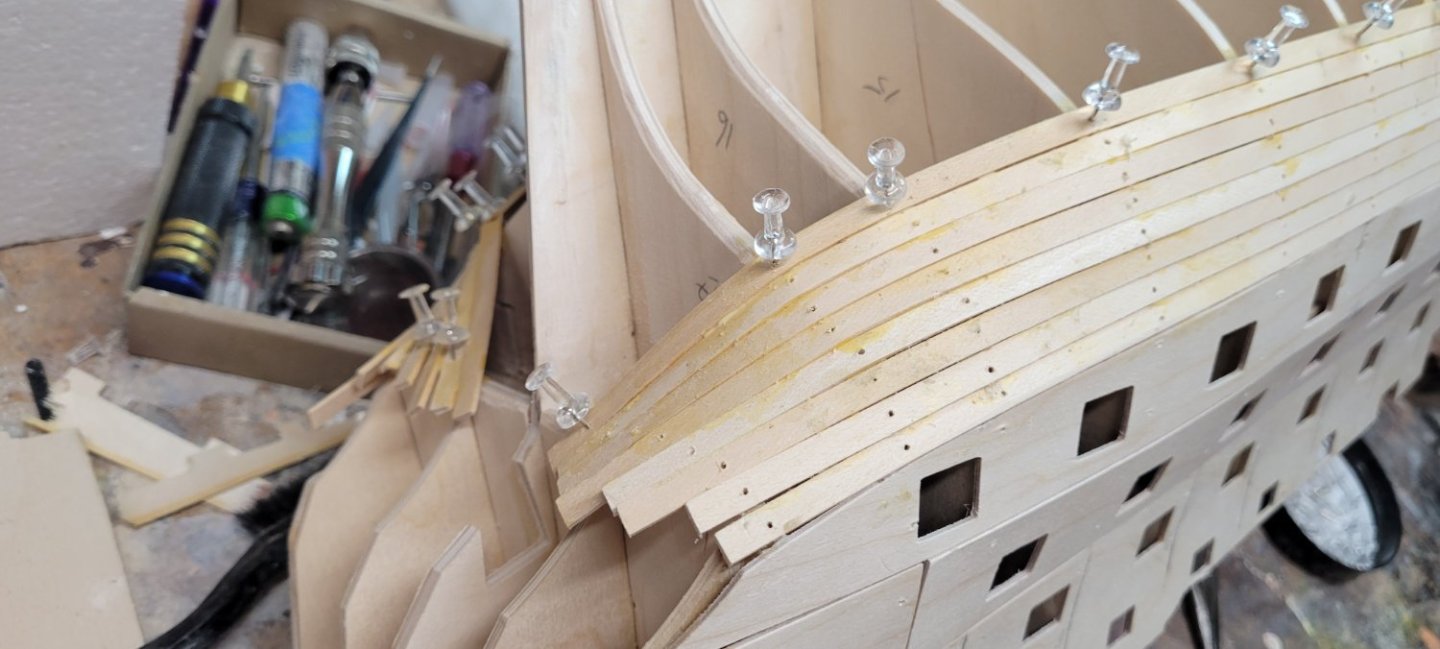
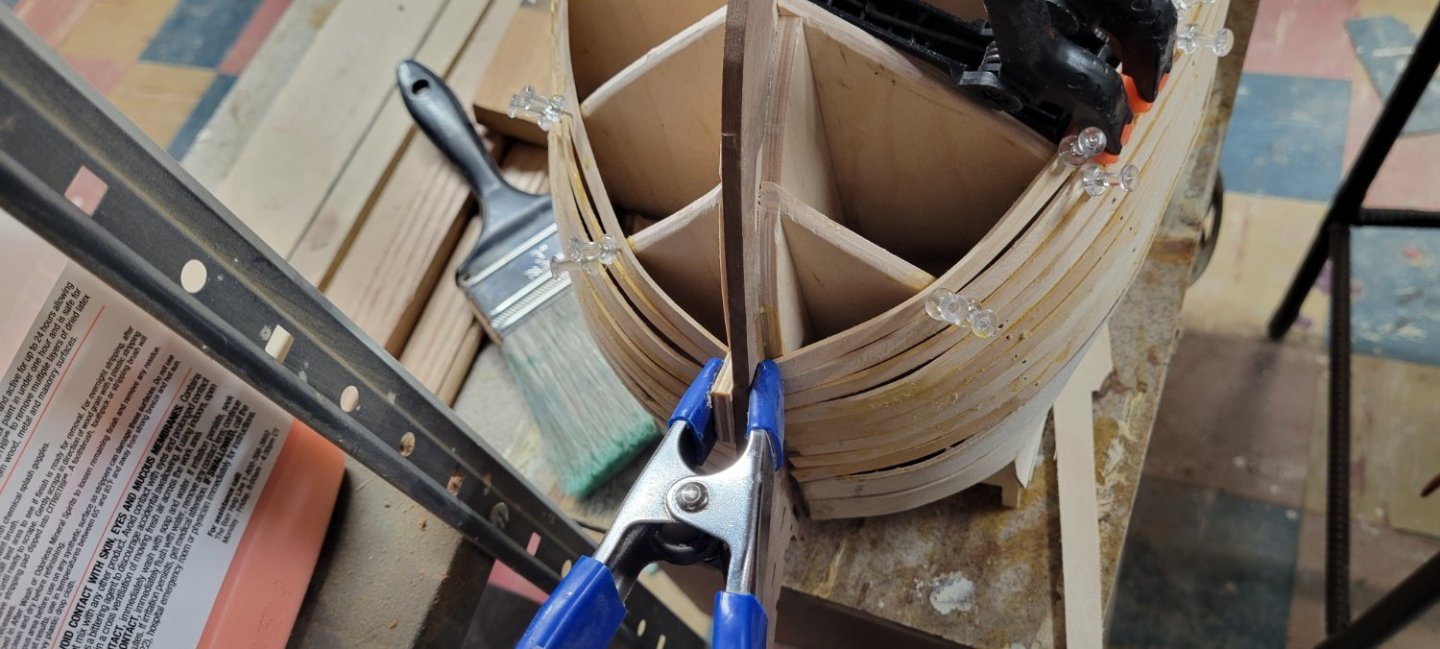
I went to start adding the gun port liners for the non-lid cannons on the stbd side and there is an alignment issue. This seems a common concern in the builds I have been watching. Either they are offset left or right or angled too high or low. It seems like in my case, some of the ports were fine while others were canted so that an sills I installed would be slanted downwards. There was also a bit of misalignment in some too. I did notice when I fit the inner patterns, they seem to have a bit of a curve to them. When I sanded them to make them fit, I didn't eliminate the curve. I used my dremmel tool to remove material from the inner pattern. I took a pencil and drew a line from the outside onto the inner pattern to give me feedback as to how much to sand away. The tip of the dremmel is the cone sander, so it isn't precise. I took an exacto knife after to clean out the corners and finished with a right angle file. I'll finish them up tomorrow and that should resolve the issue. Not overly concerned as the interior side will be covered by planks and I still have planks to add to the exterior. You can see the pencil mark before attempting to shave off the excess wood. Also the downward slant of the lower sill if I opted NOT to do anything. A better view of my guide to sand to. The results once I sanded the back area down. While they are just sitting there and haven't been fitted, they do sit much better. You can see how messy they start out after hitting them with the dremmel. But they do straighten out a bit in the end. This will also lower the interior side which will help with other builders concerns over the cannons barely fitting out the port because they are too low. We shall see!!!!


-
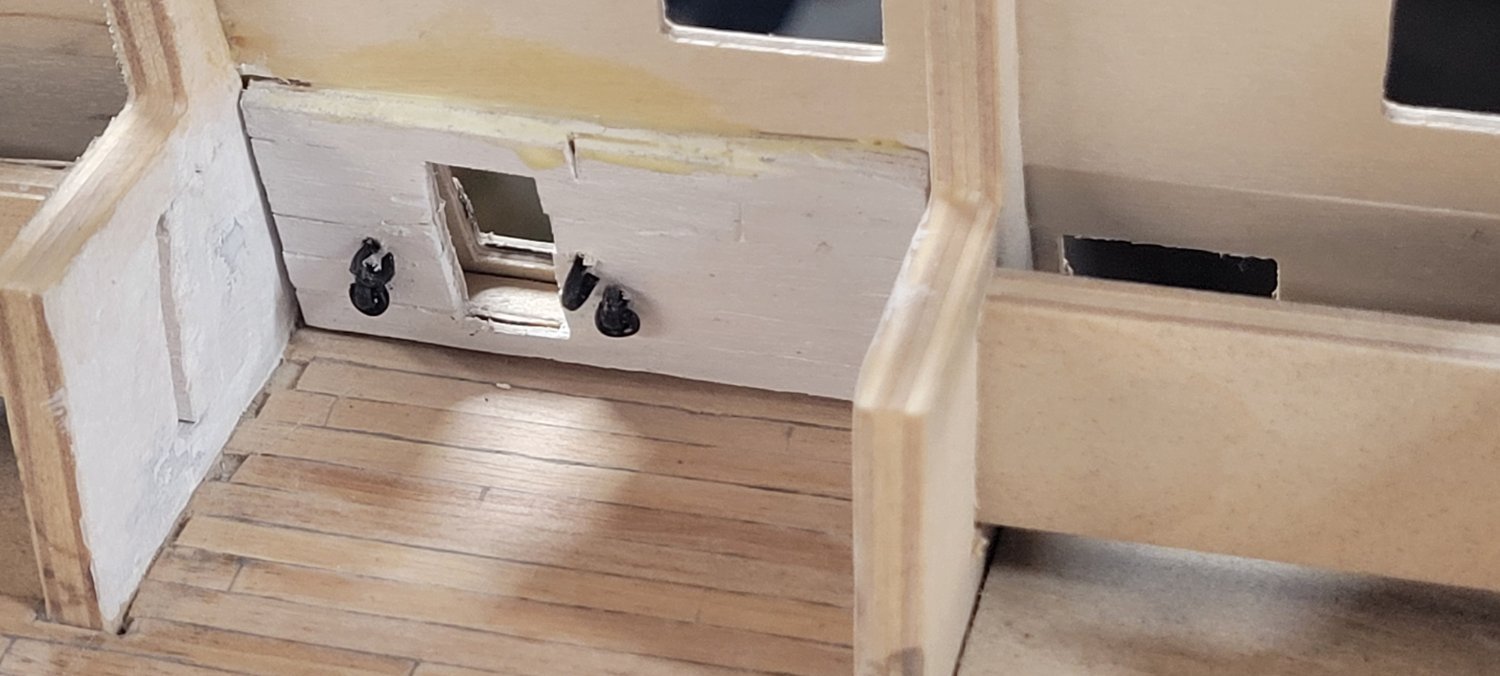
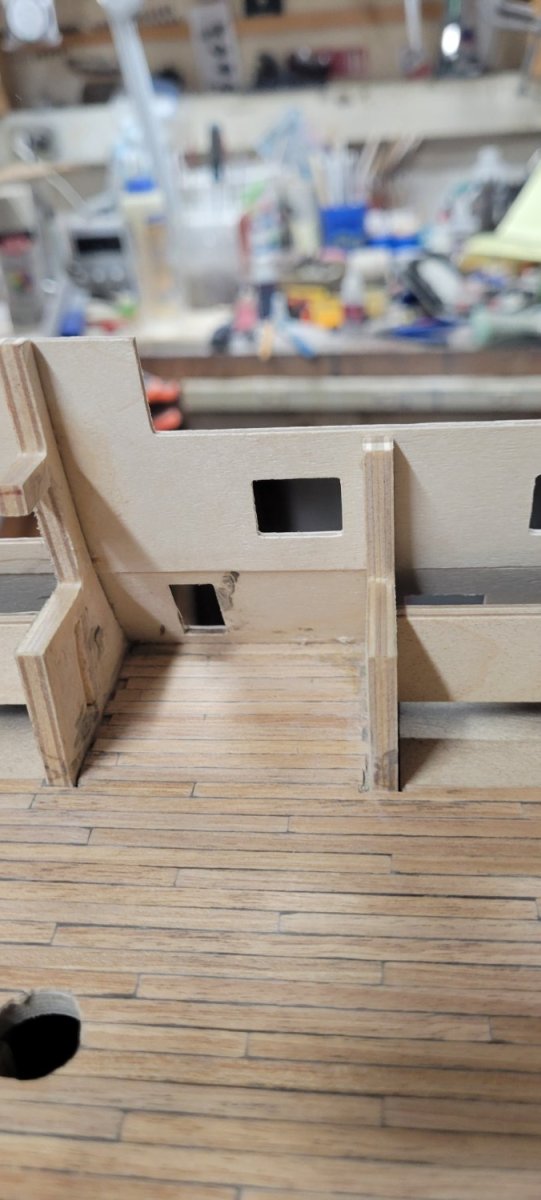
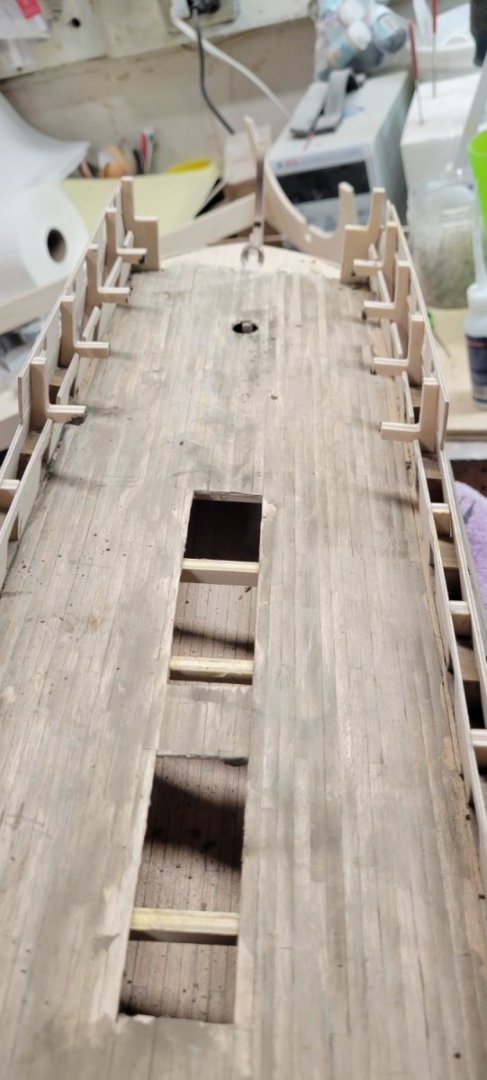
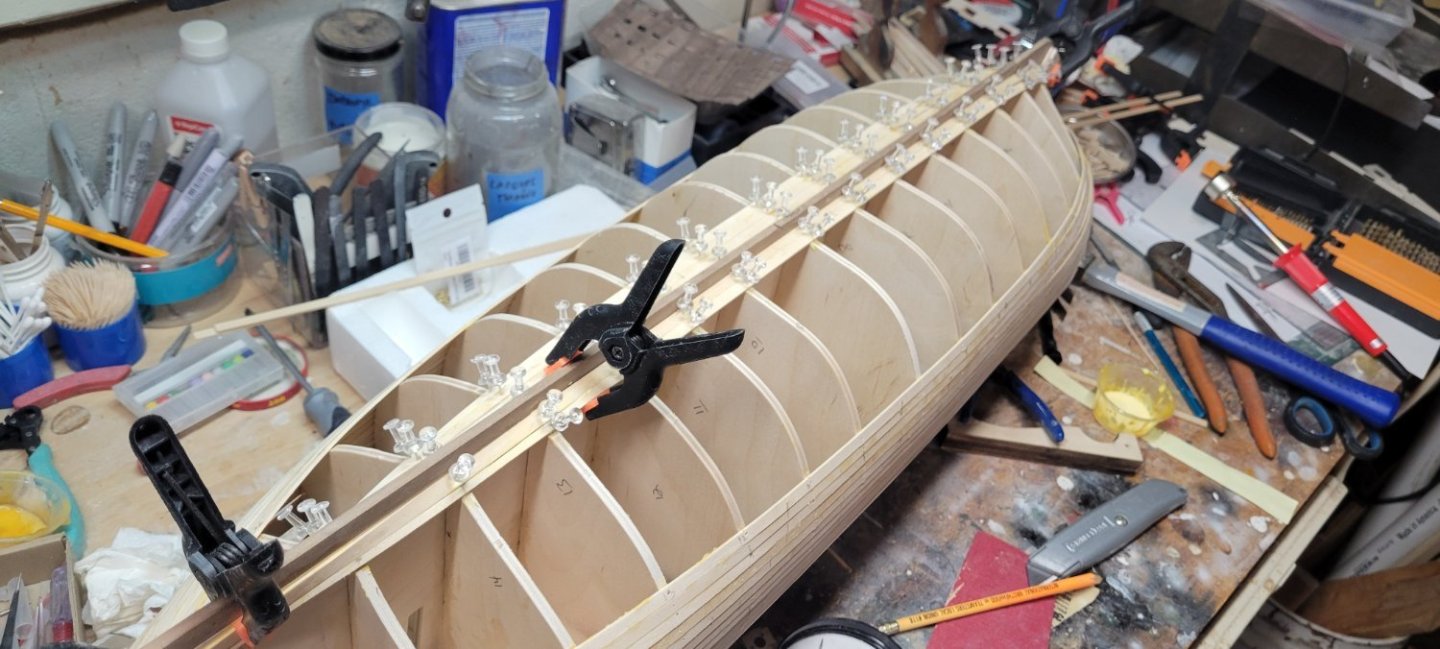
One of the manuals direction detailed the installation of 'mast sleeves'. I didn't understand at first, but it appears as if there are 2 rings that are glued together. They help to align and hold the masts to the decks. There is one set of sleeves on the middle deck. These parts are VERY FRAGILE. I broke them and had to glue them together. The sprue ticks interfere with their fit around the mast, but removing them is almost impossible due to the delicateness of the pieces. I was forced to glue them together. Once done, I painted them and glued the 2 together (so they are essentially 2 high) and installed them over the main mast hole (I think) I was able to get my dremmel sanding cone in and thin it out for the mast, but doing so broke the glue bond. I'll have to figure something out. You can see the sleeves and the interior of the other side entrance...with my custom paneling and cast iron rings!!!! I've seen a few builds that modified the entrance panels, trying to created the beveled look of the real panels. I tried thinning out some of the 1mm walnut to create that look. There is so little room to work with and when I put the cast iron canopy in place, it actually overshadows everything else. For now, I added some rounded strips to hide the raw joint between the open liners and the 2nd planking. I'll work on that later. Started the upper deck planking. Went pretty smoothly.


-
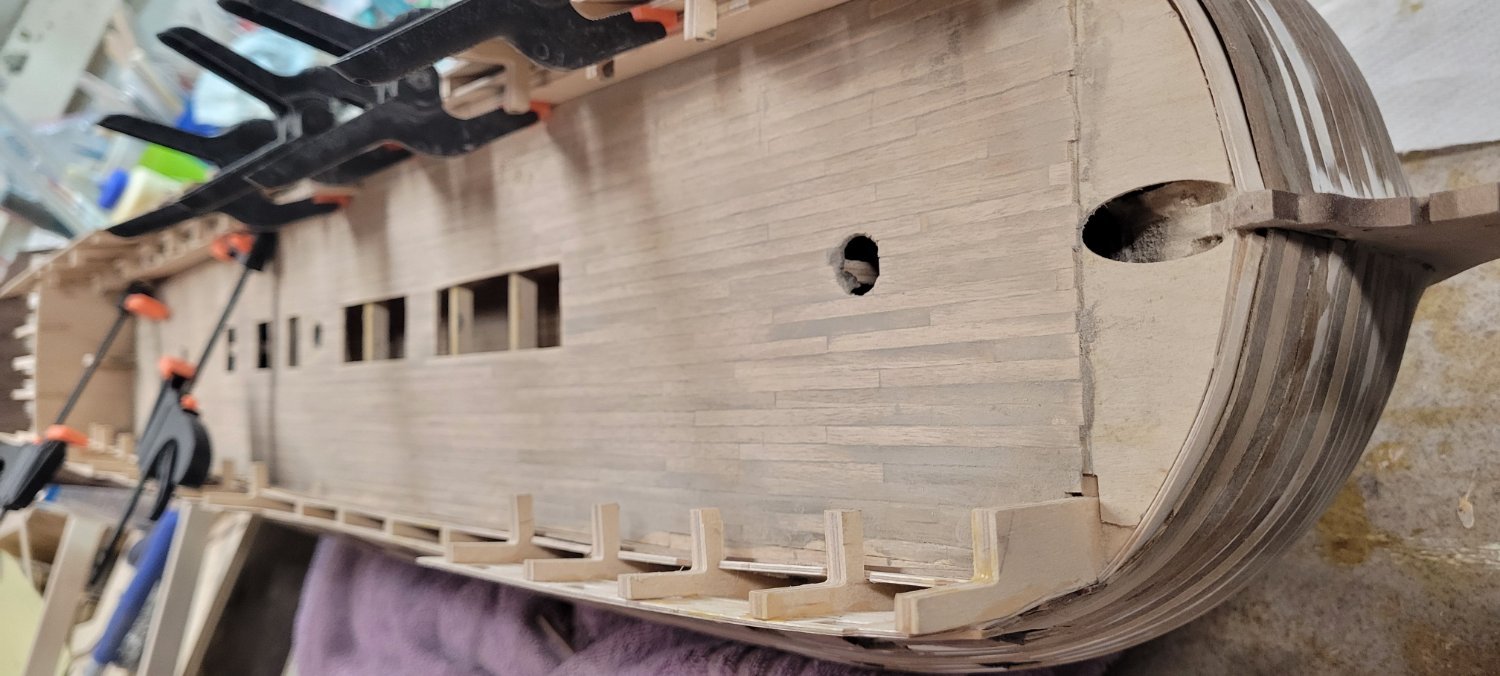
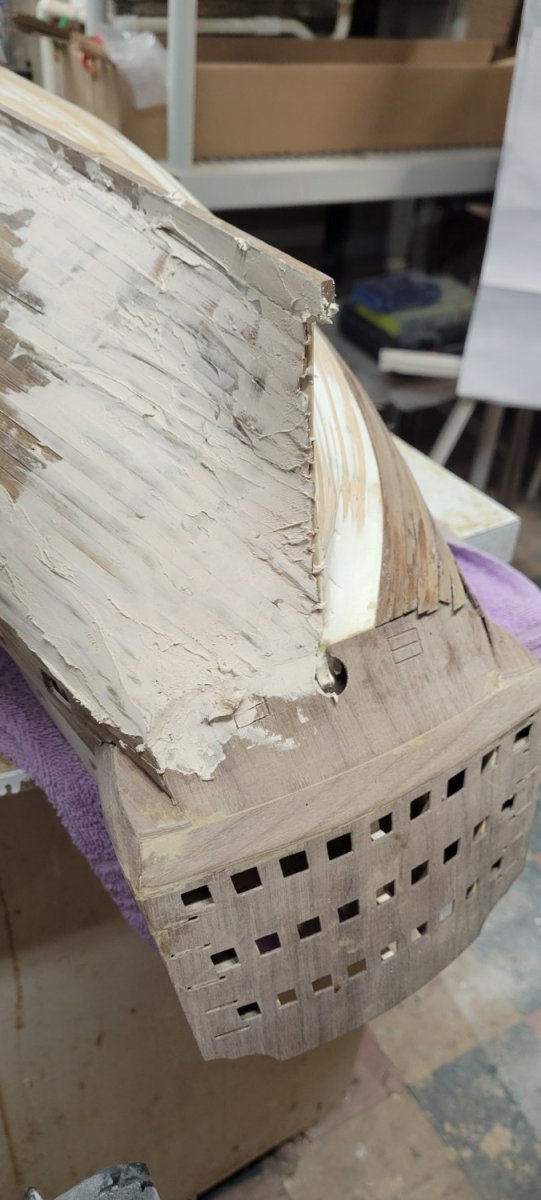
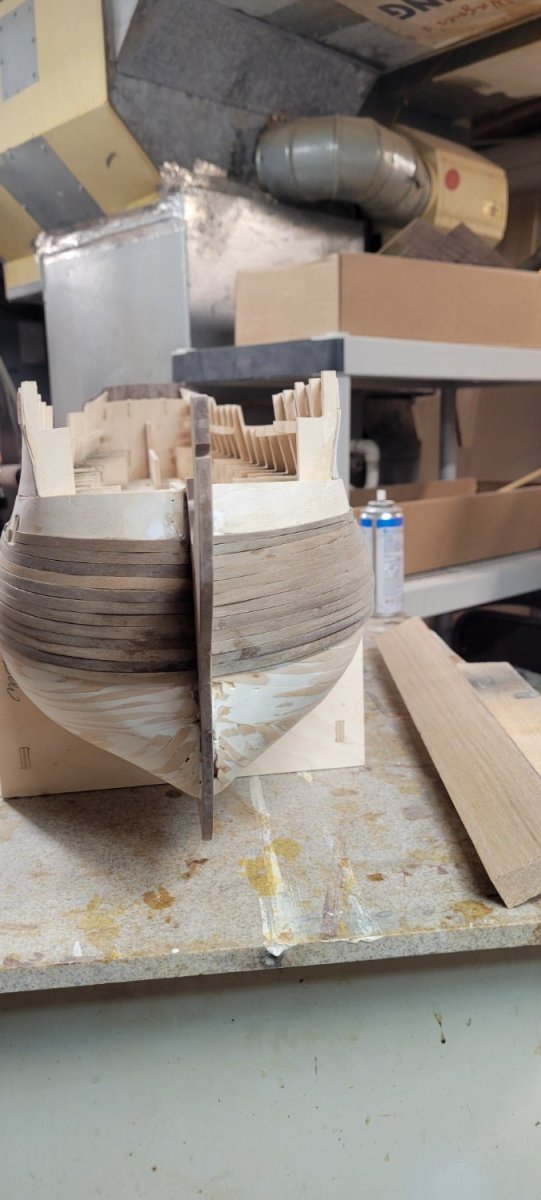
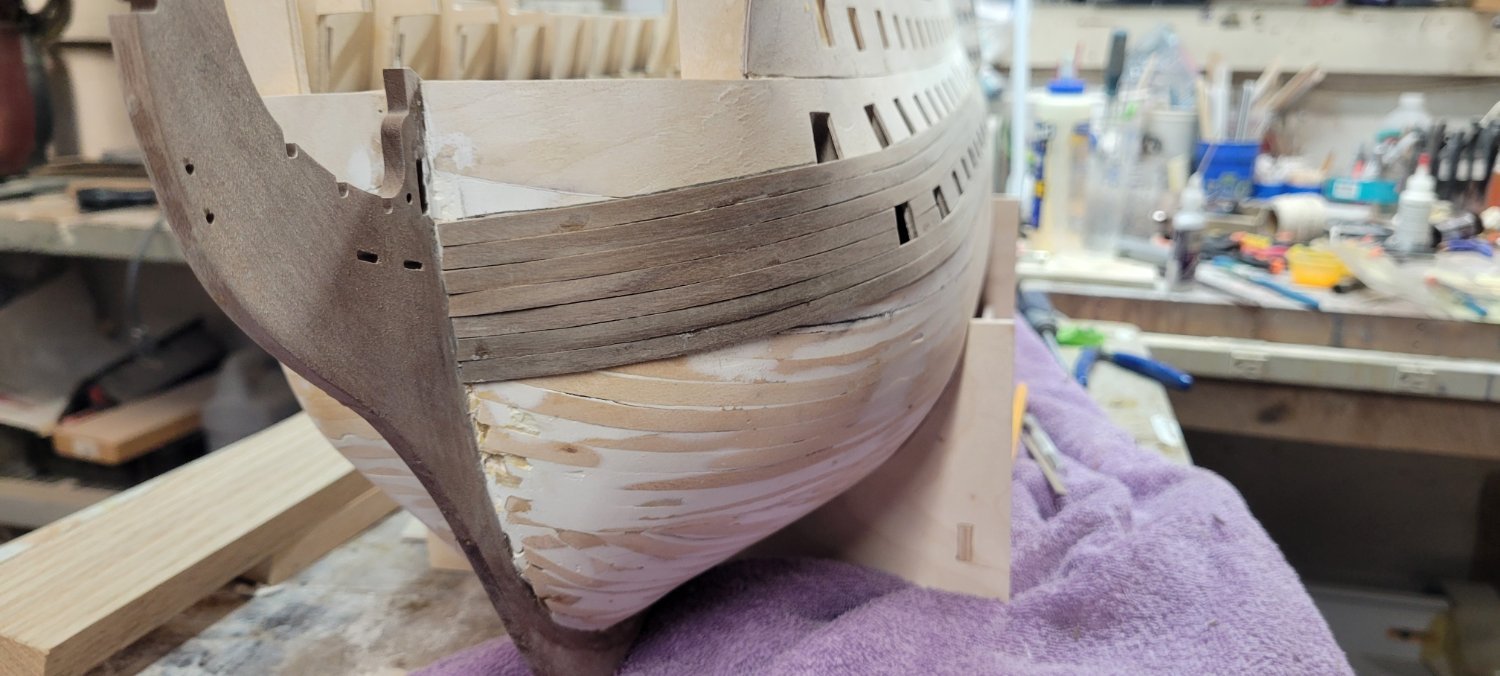
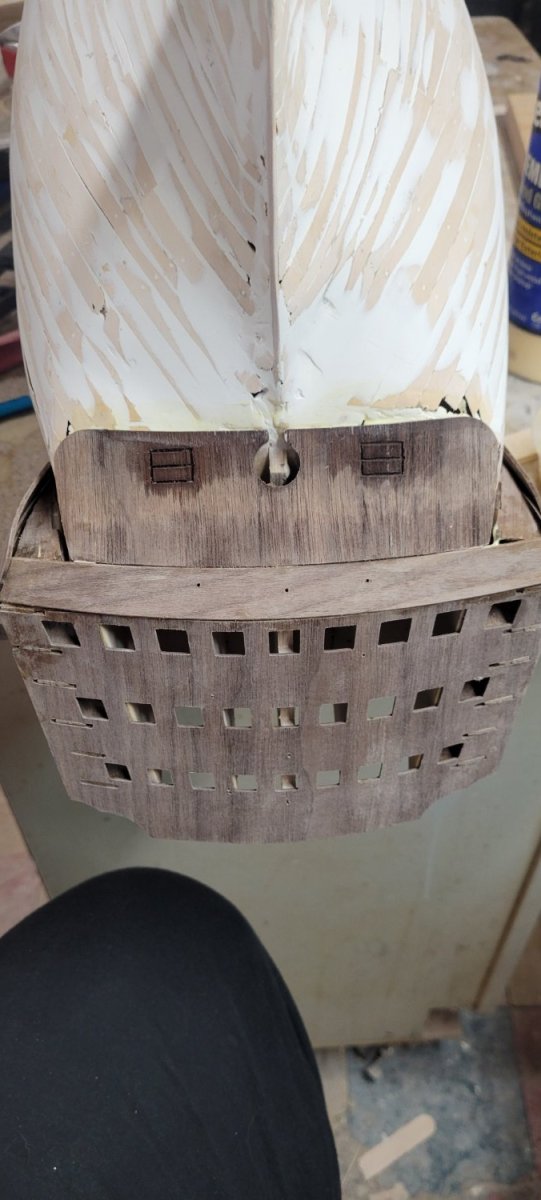
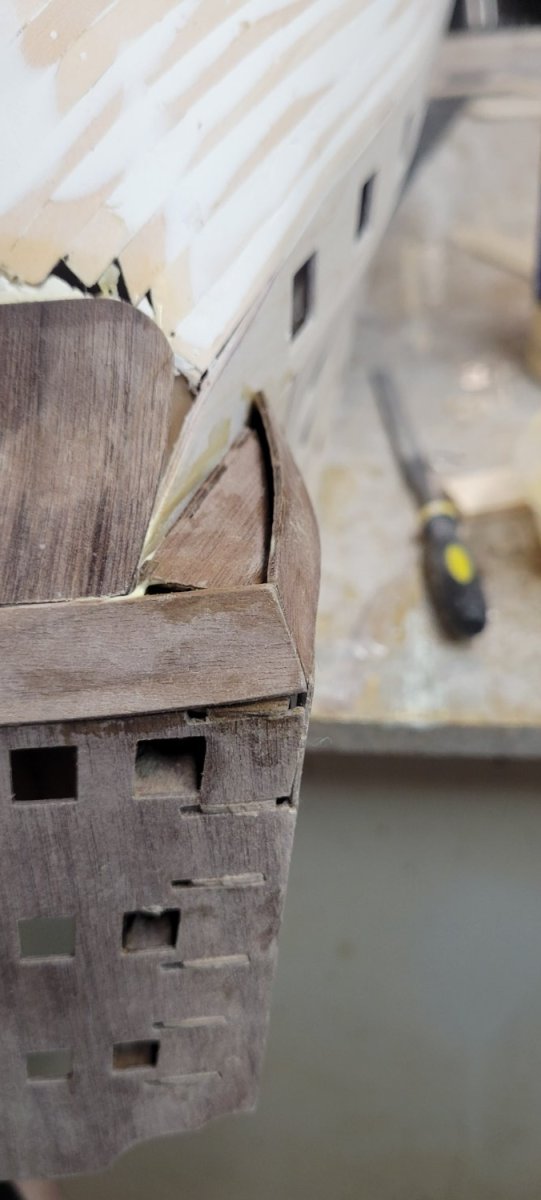
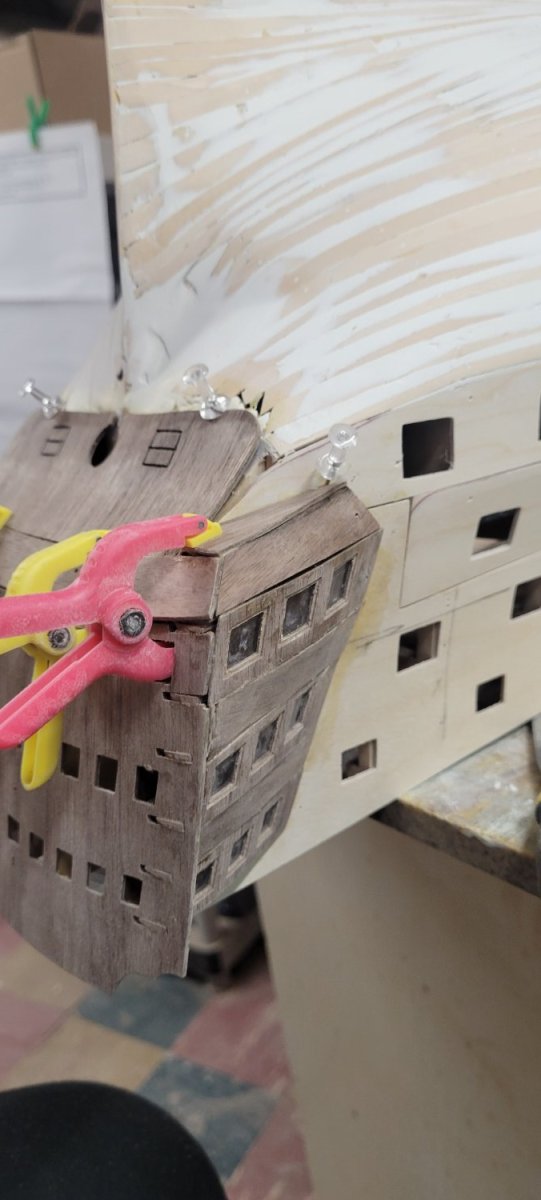
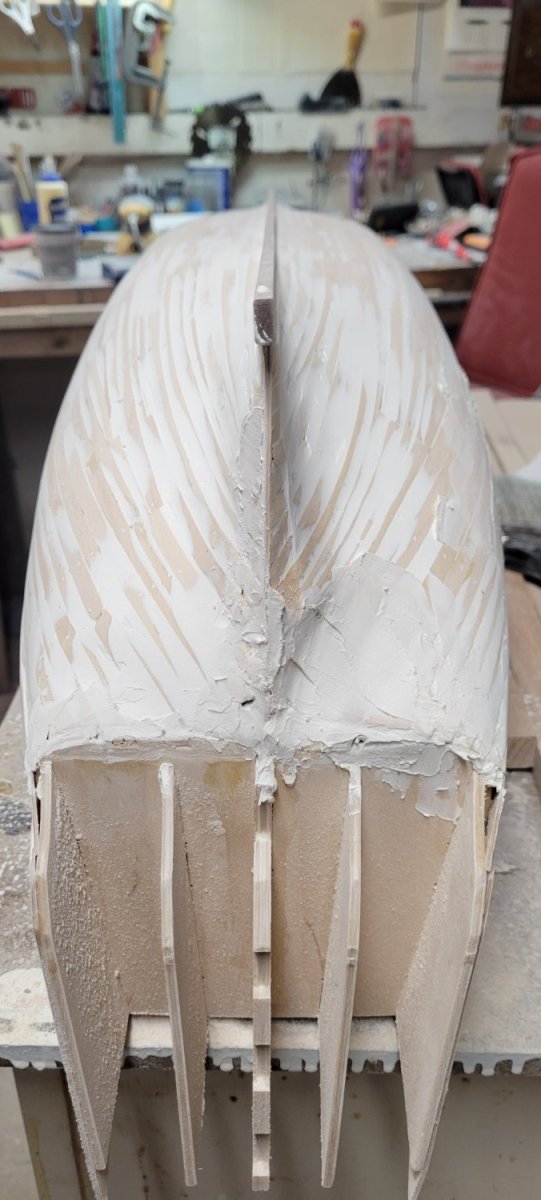
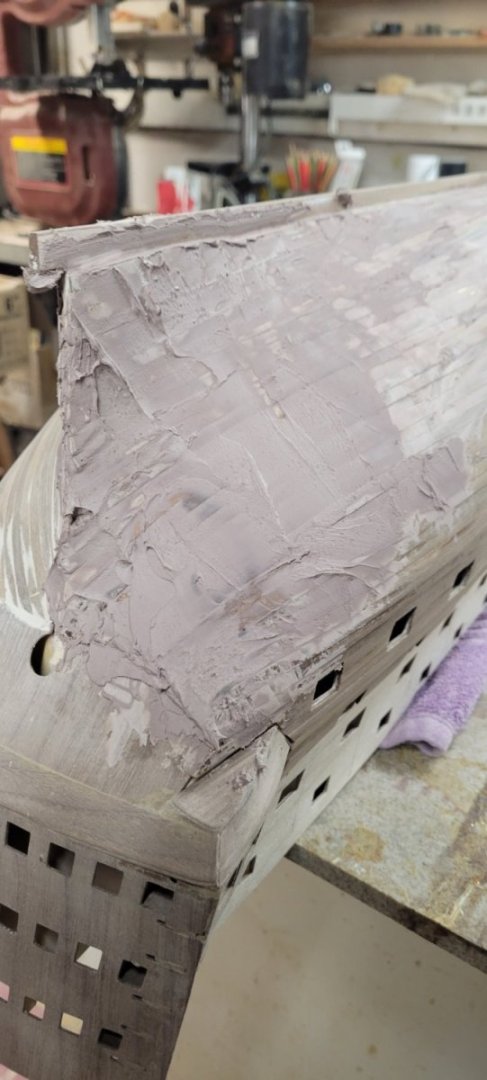
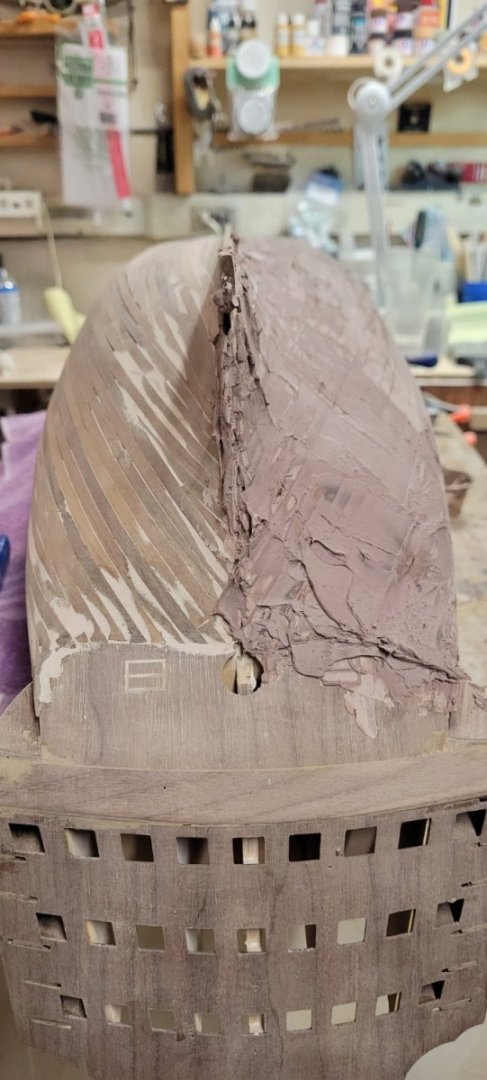
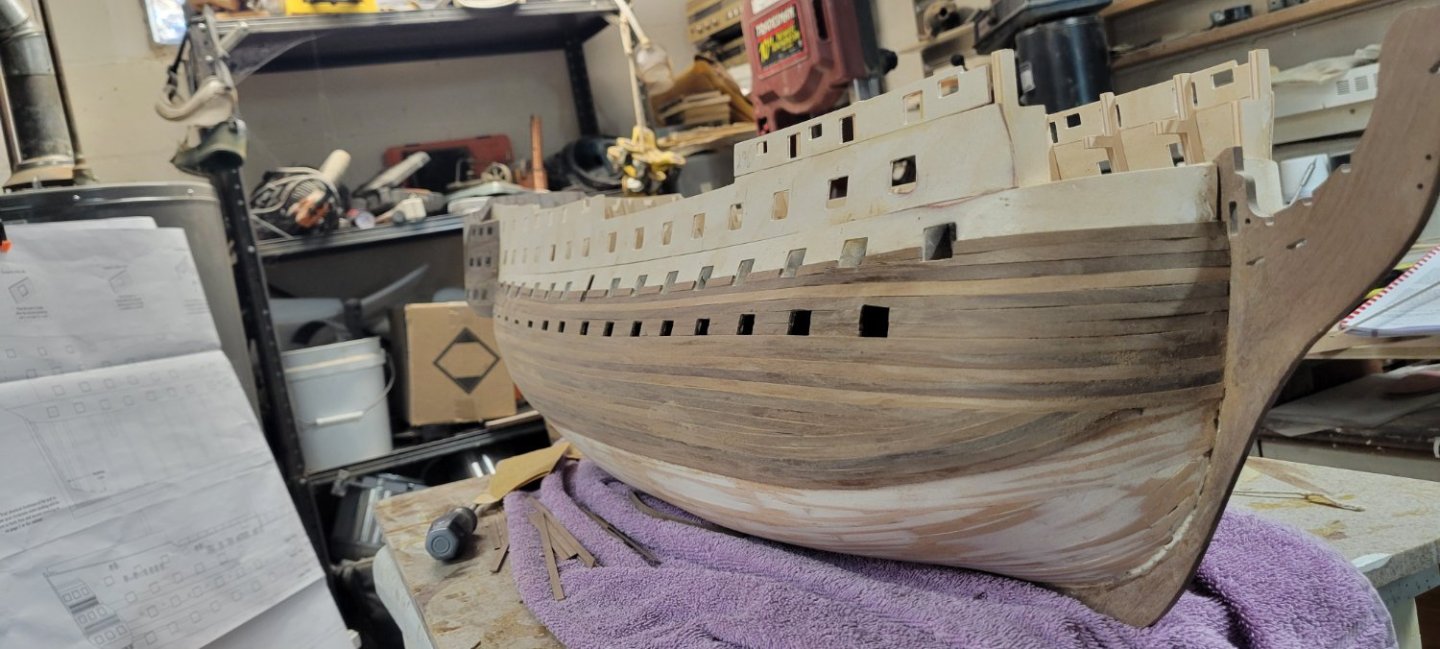
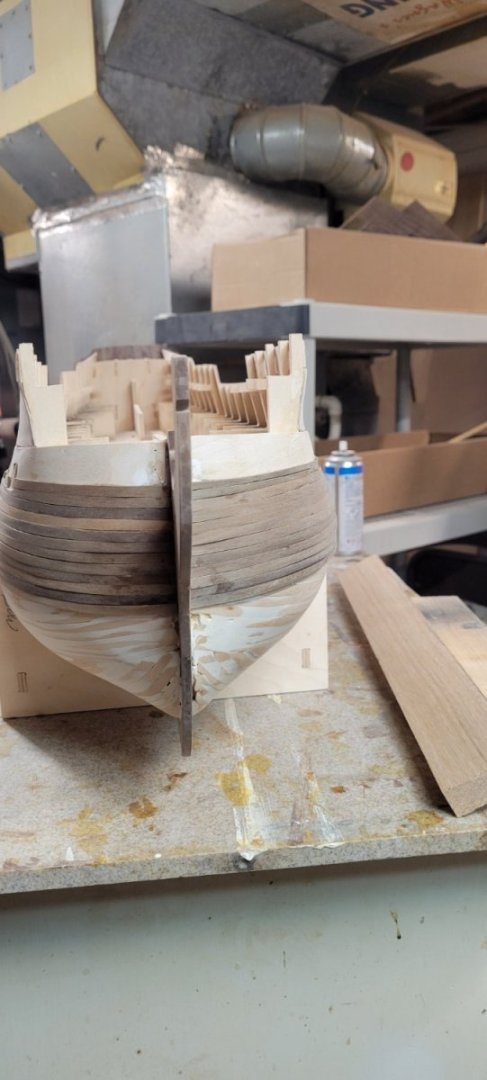
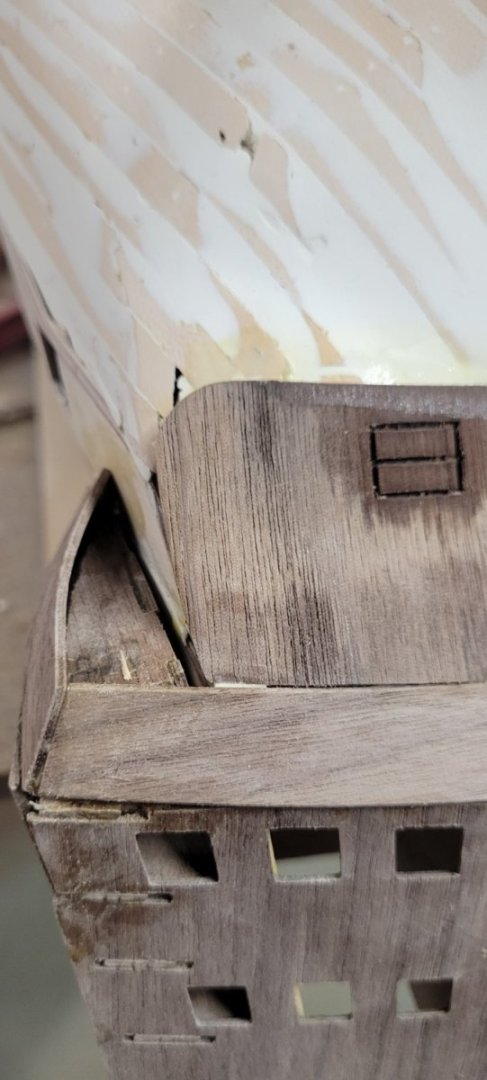
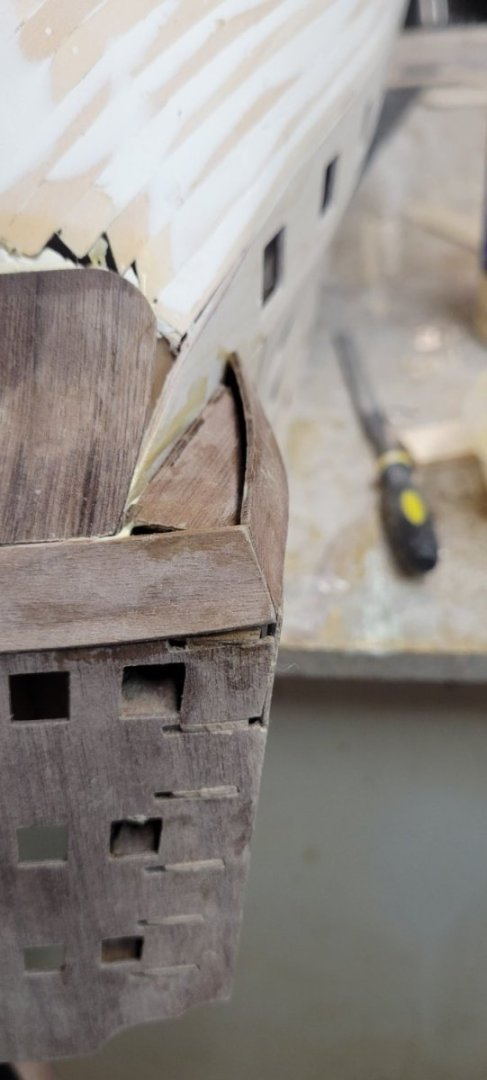
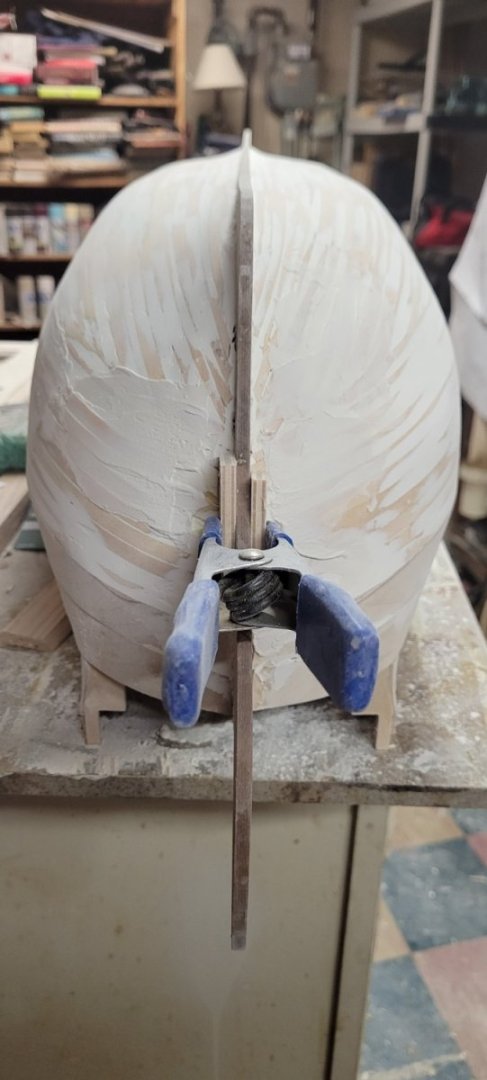
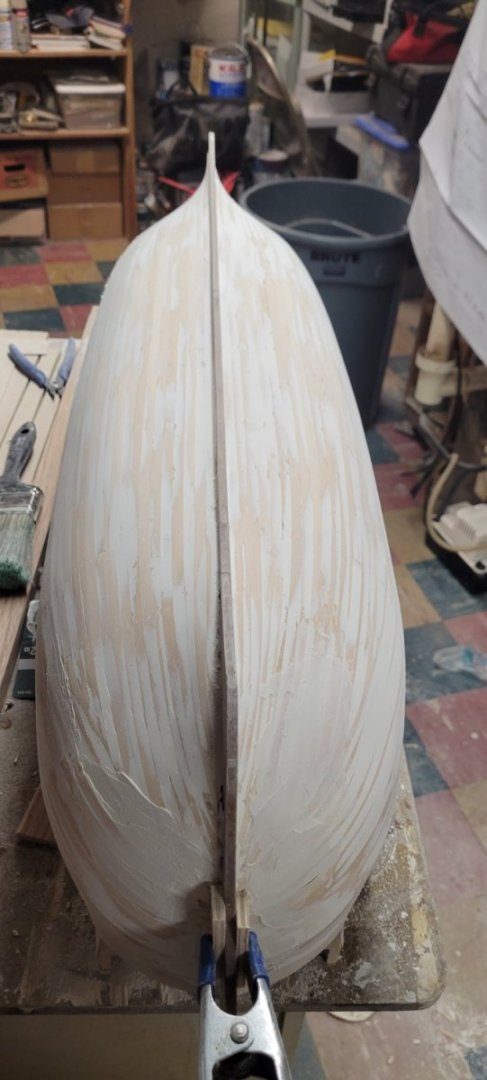
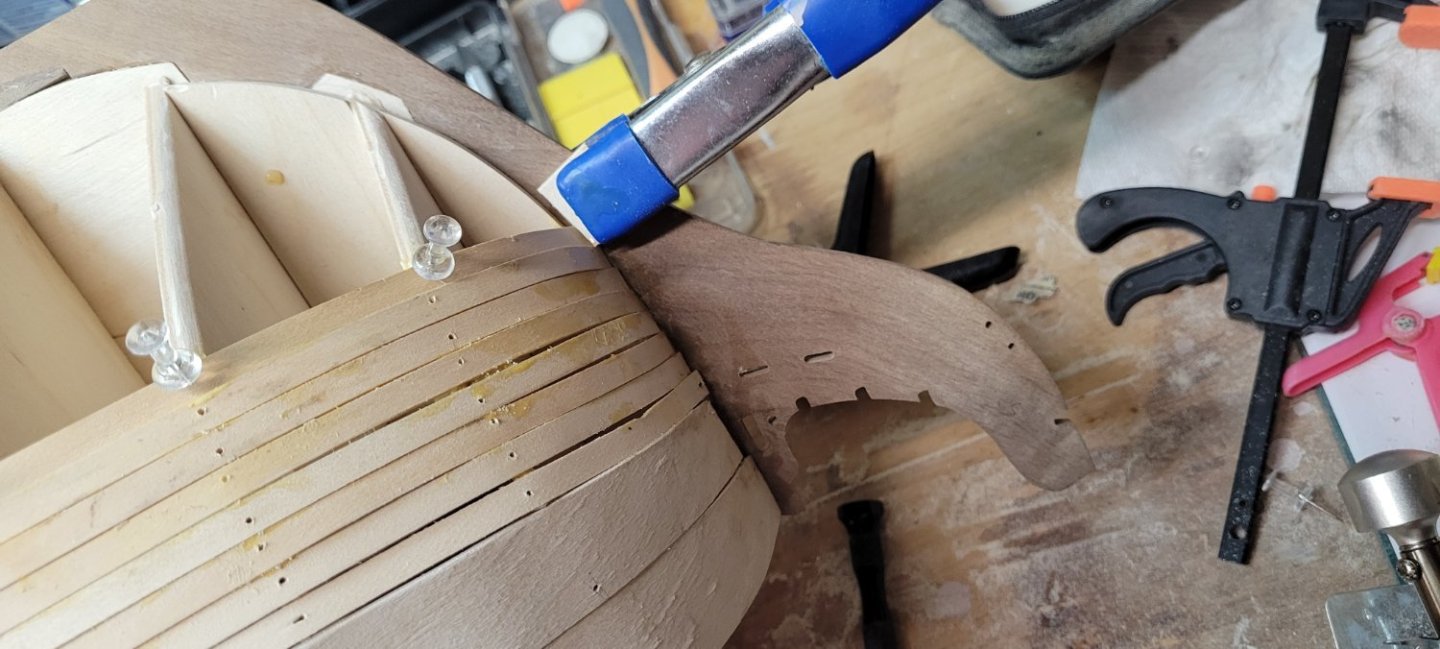
I know it looked bad, but I sanded down the filler and continued to shape the final hull lines. I attached the stern and I also attached the inner bulwark patterns. As I did this, it appeared that they were lined up pretty good. There was some fitting issues, but they had to deal with height and getting them under the bulkhead tabs for the next deck. I used a belt sander to remove about 1-2mm from the bottom of the patterns and they fit in nicely. I also planked the lower stern piece under the gallery. I think that is closer to what the current ship shows. I'll add the gun ports later.


-
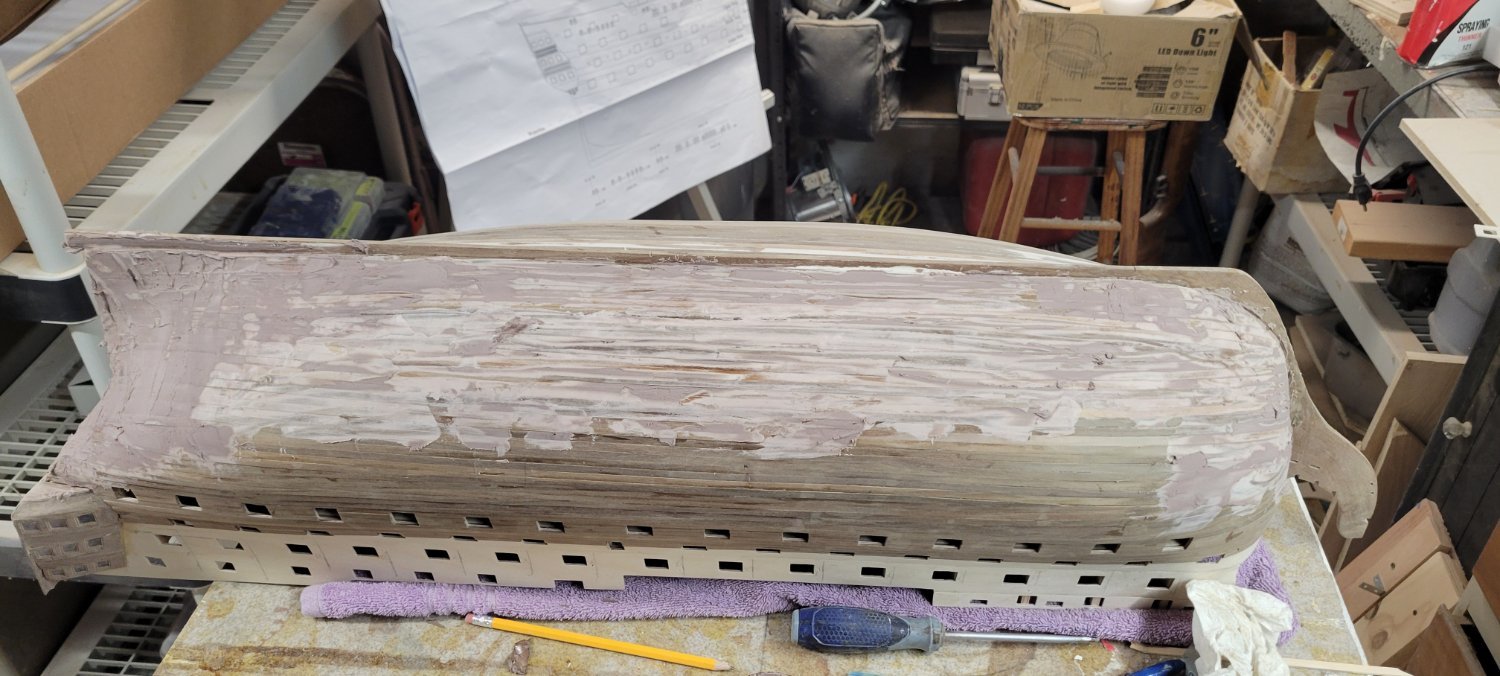
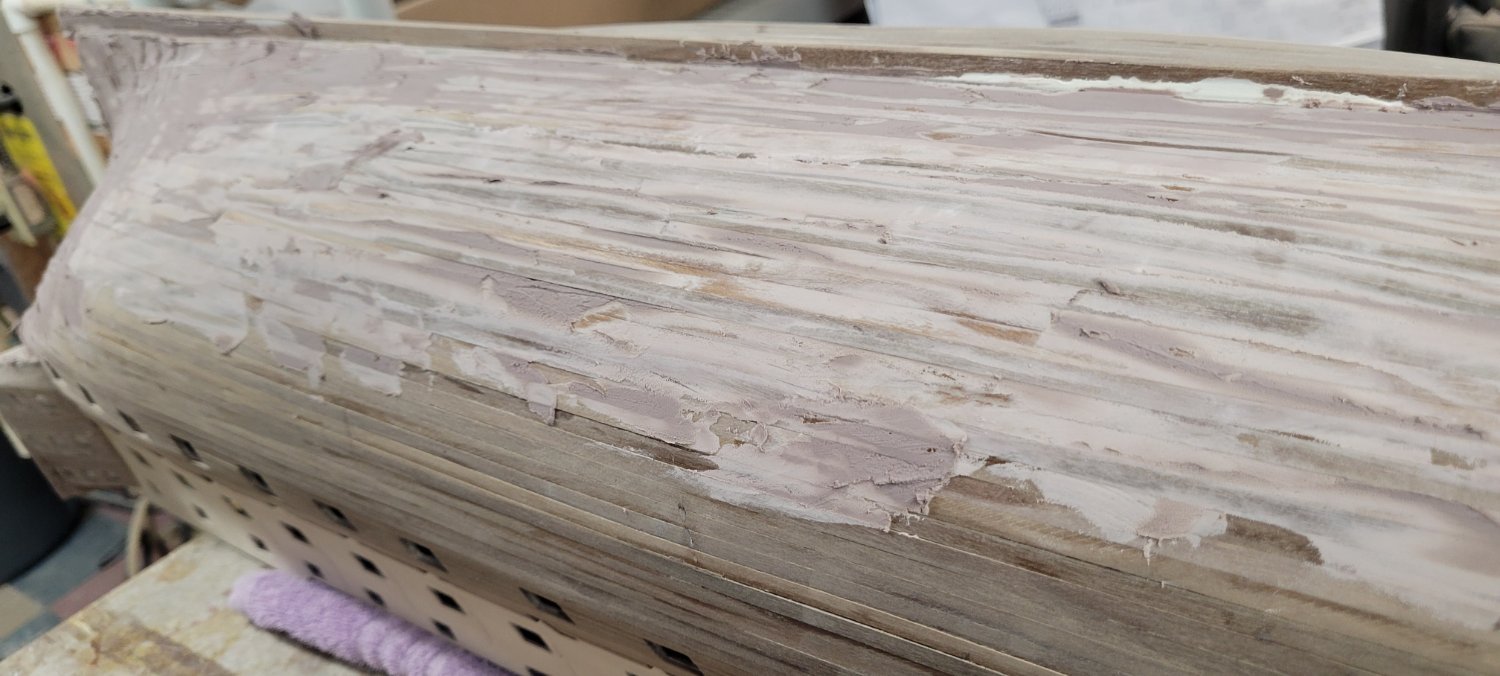
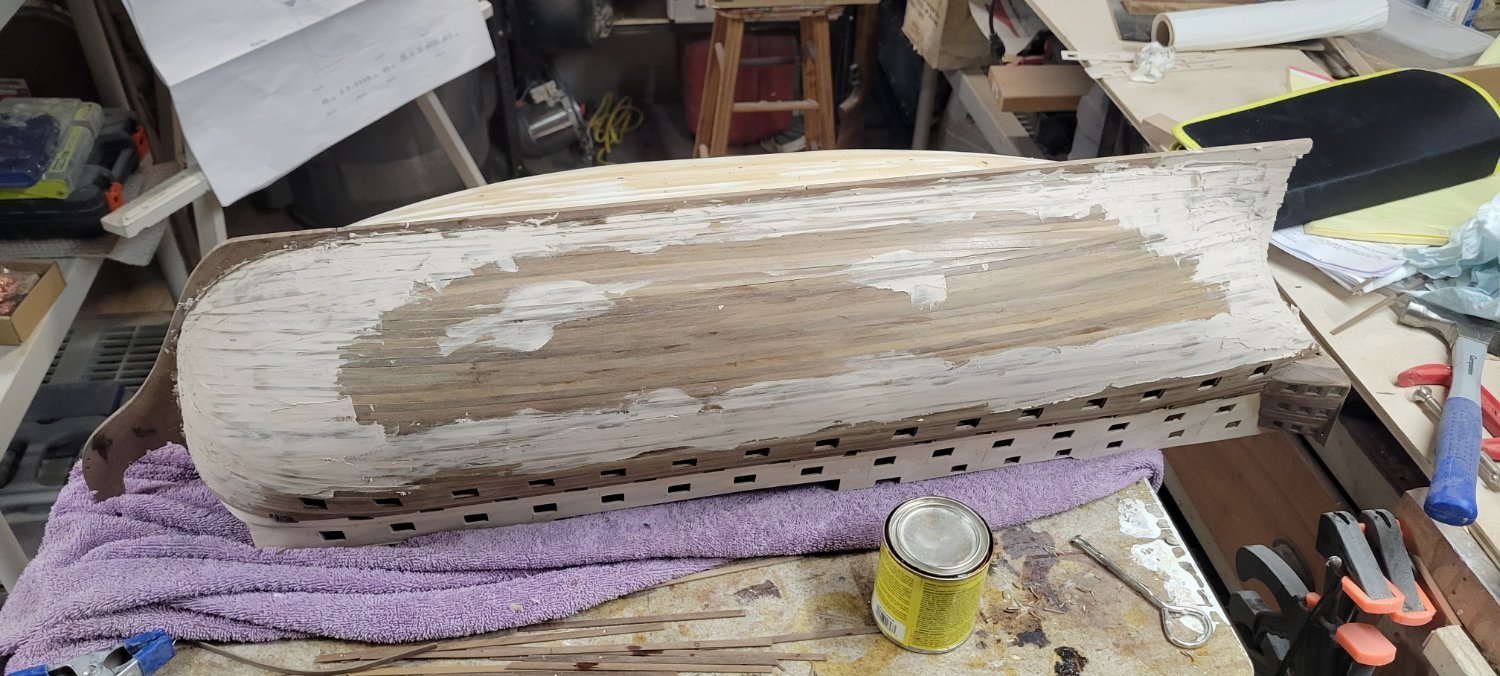
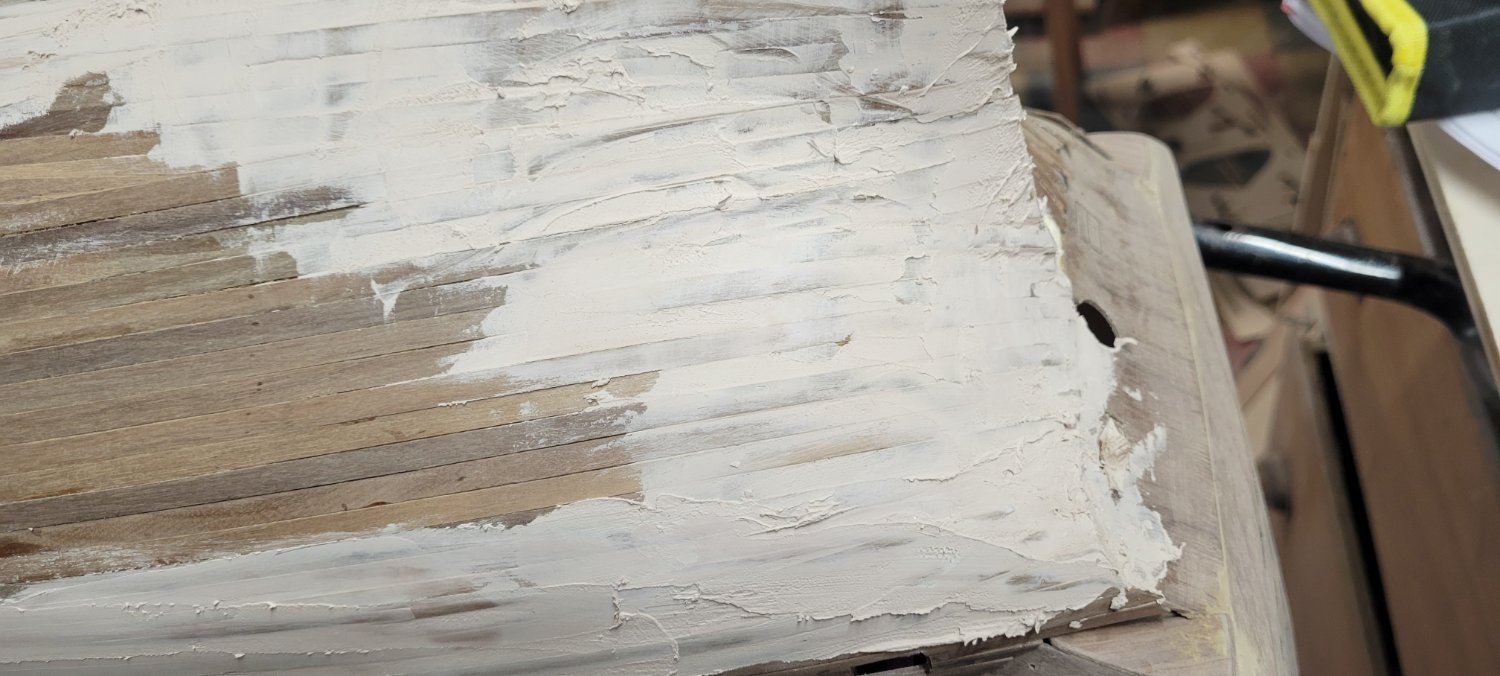
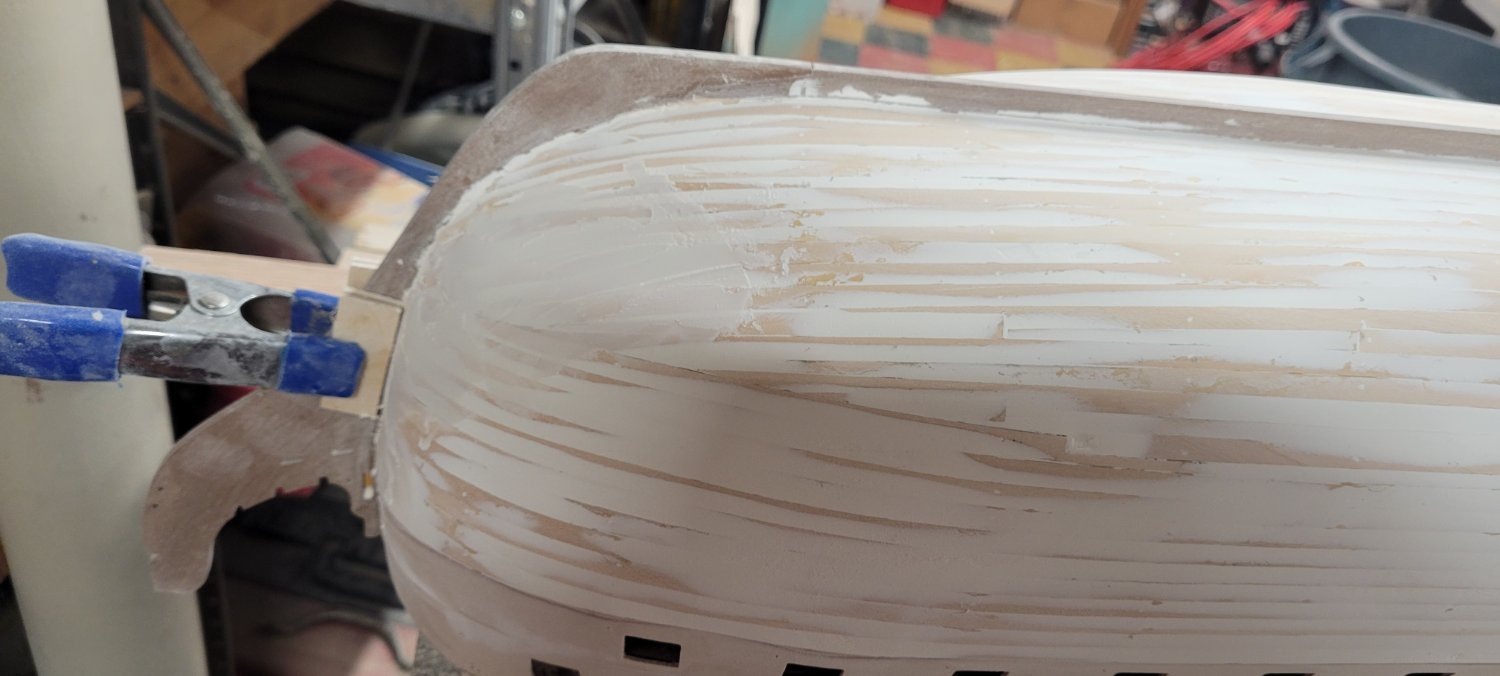
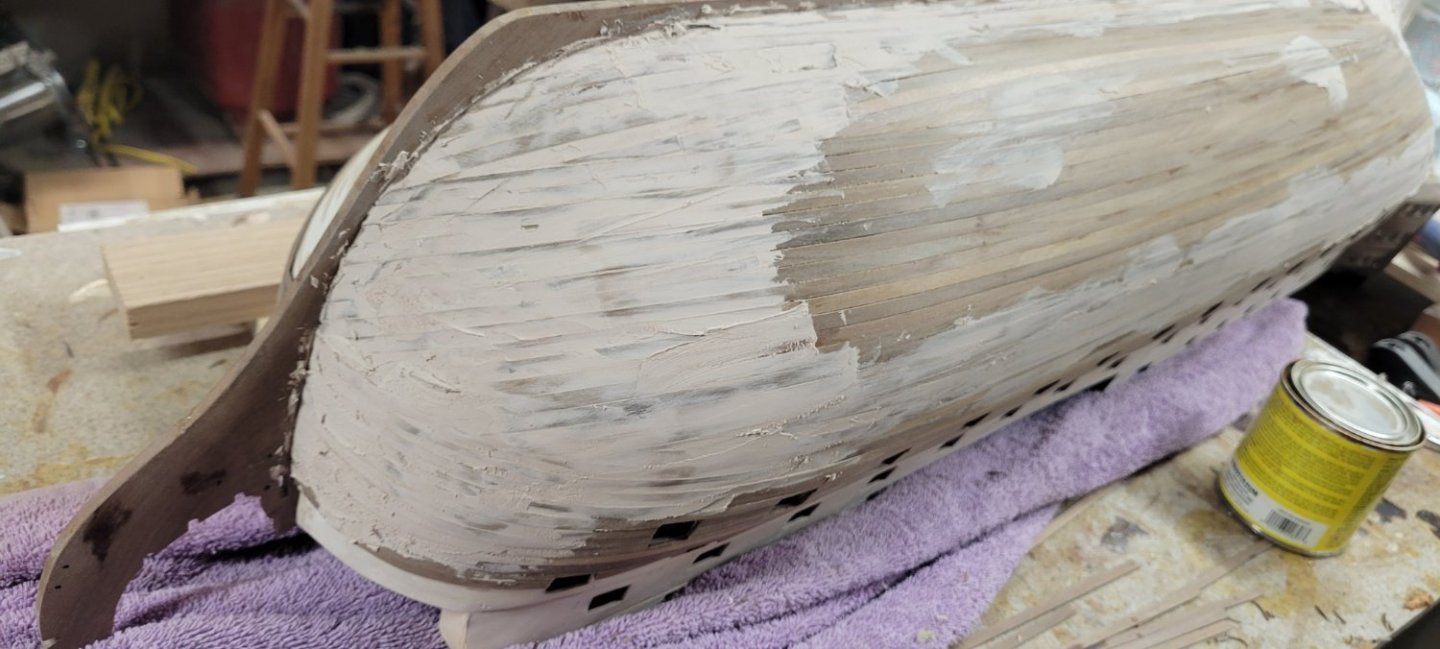
I added the wood filler and after it dried I gave it the first round of sanding. Once done, I looked for low spots and gaps and added a 2nd round of light fill. I know the pictures show a messy goopy disaster but this filler sands so easily that it'll be ok. Also, while I had some concerns about its stability as a good base for gluing the 2nd planking, it worked very well.


-
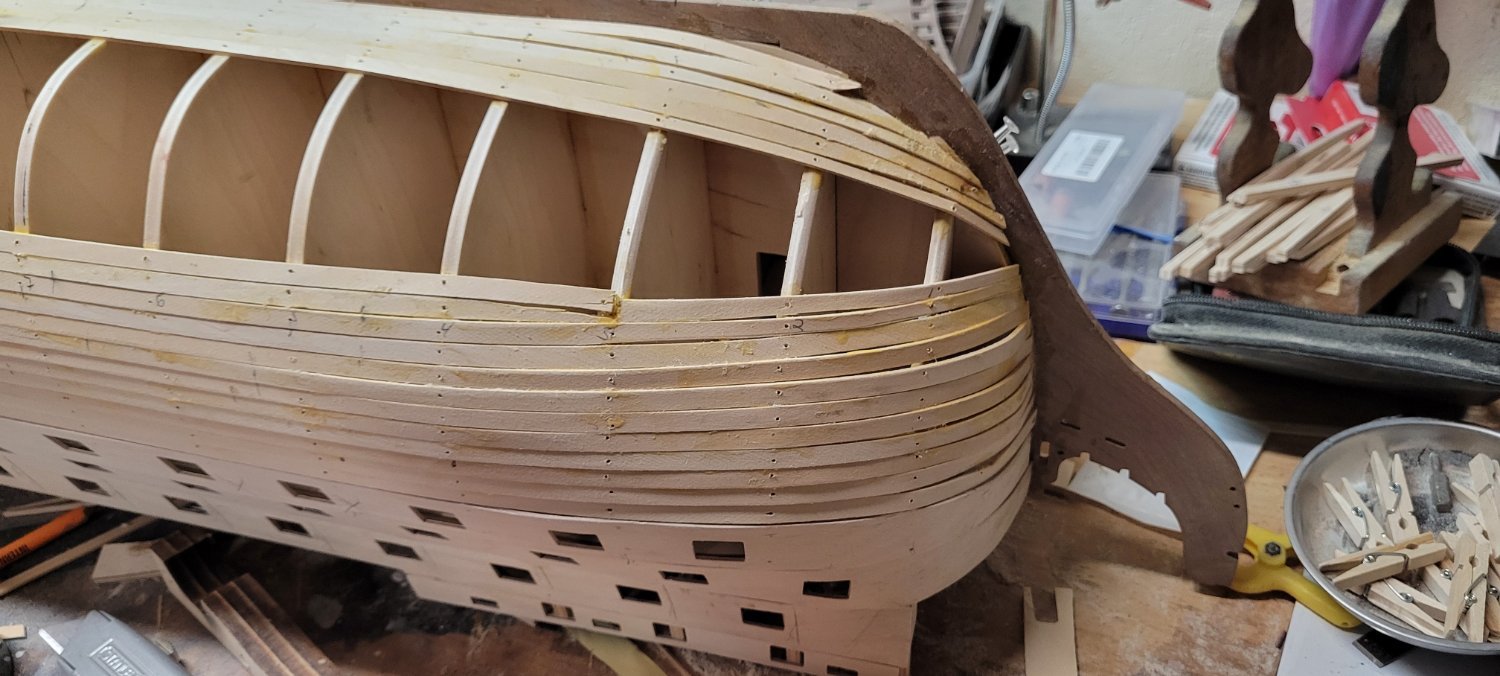
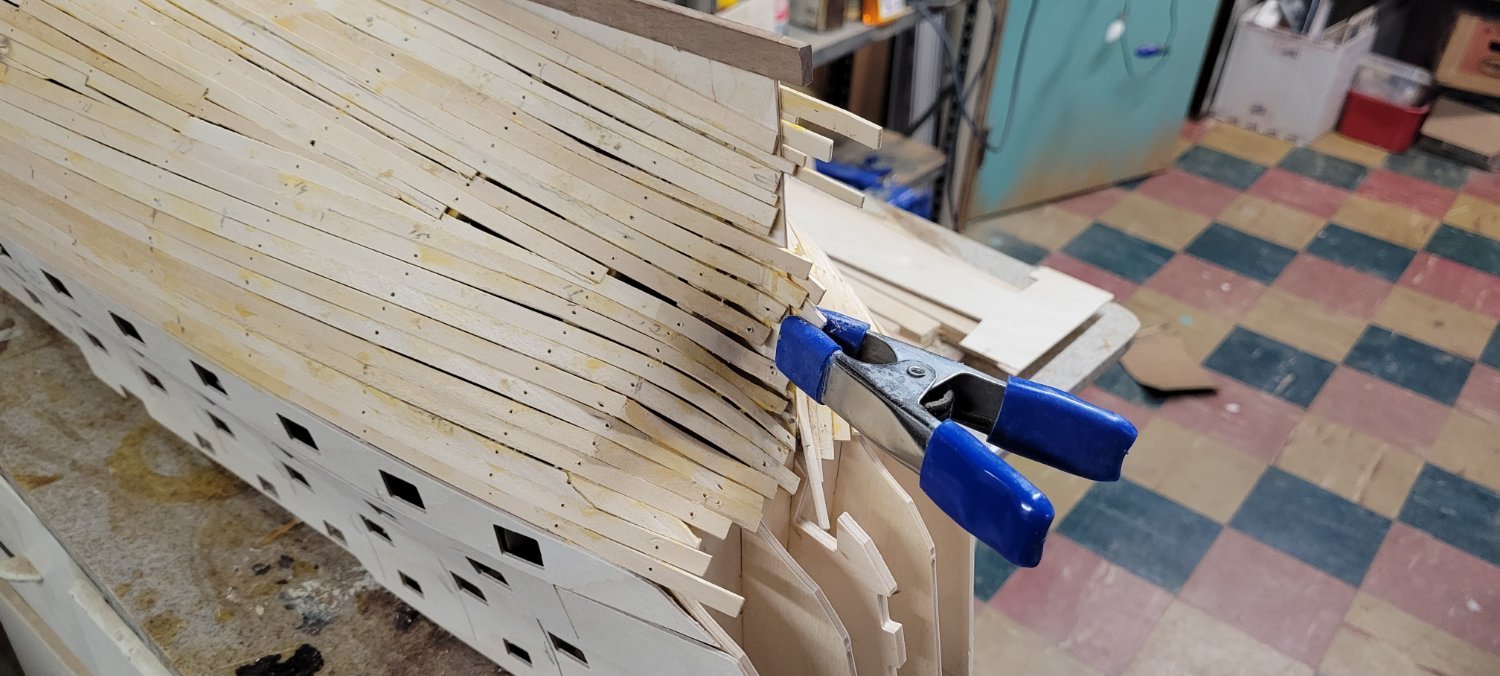
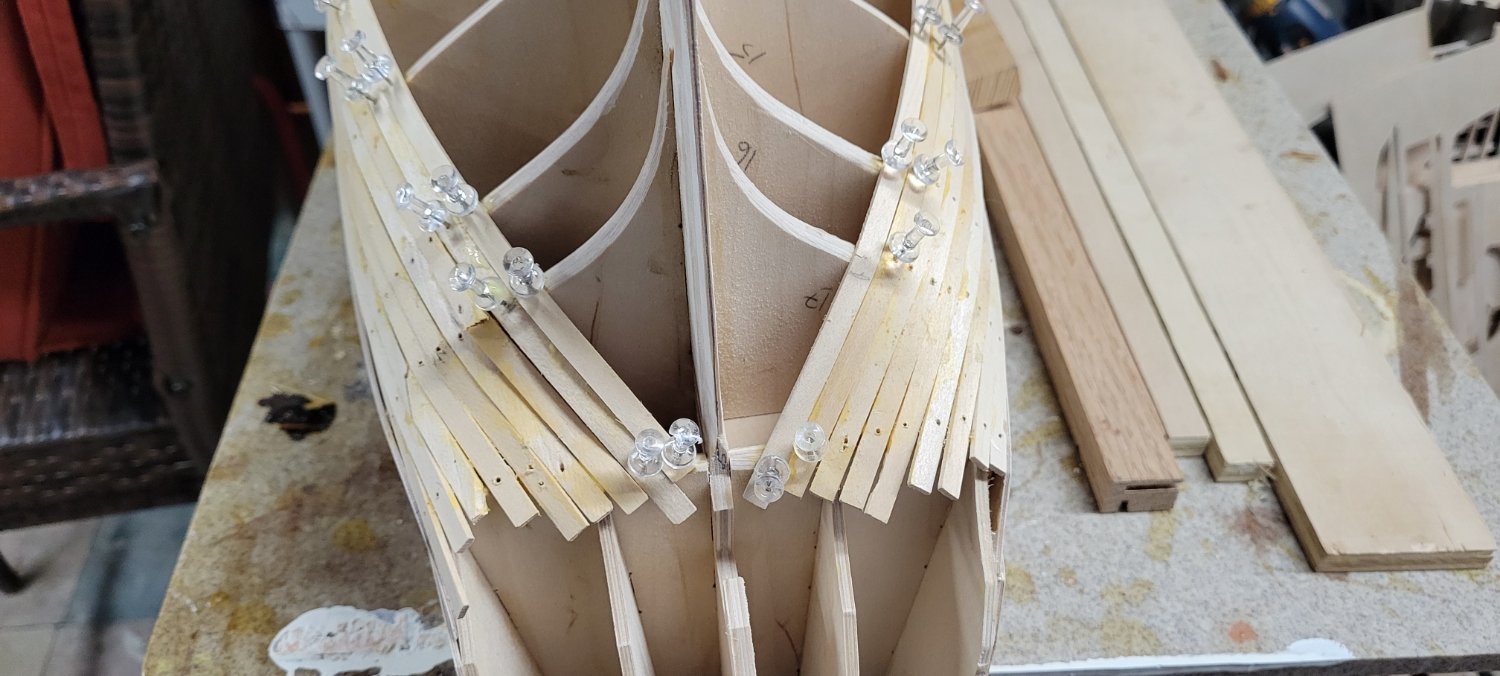
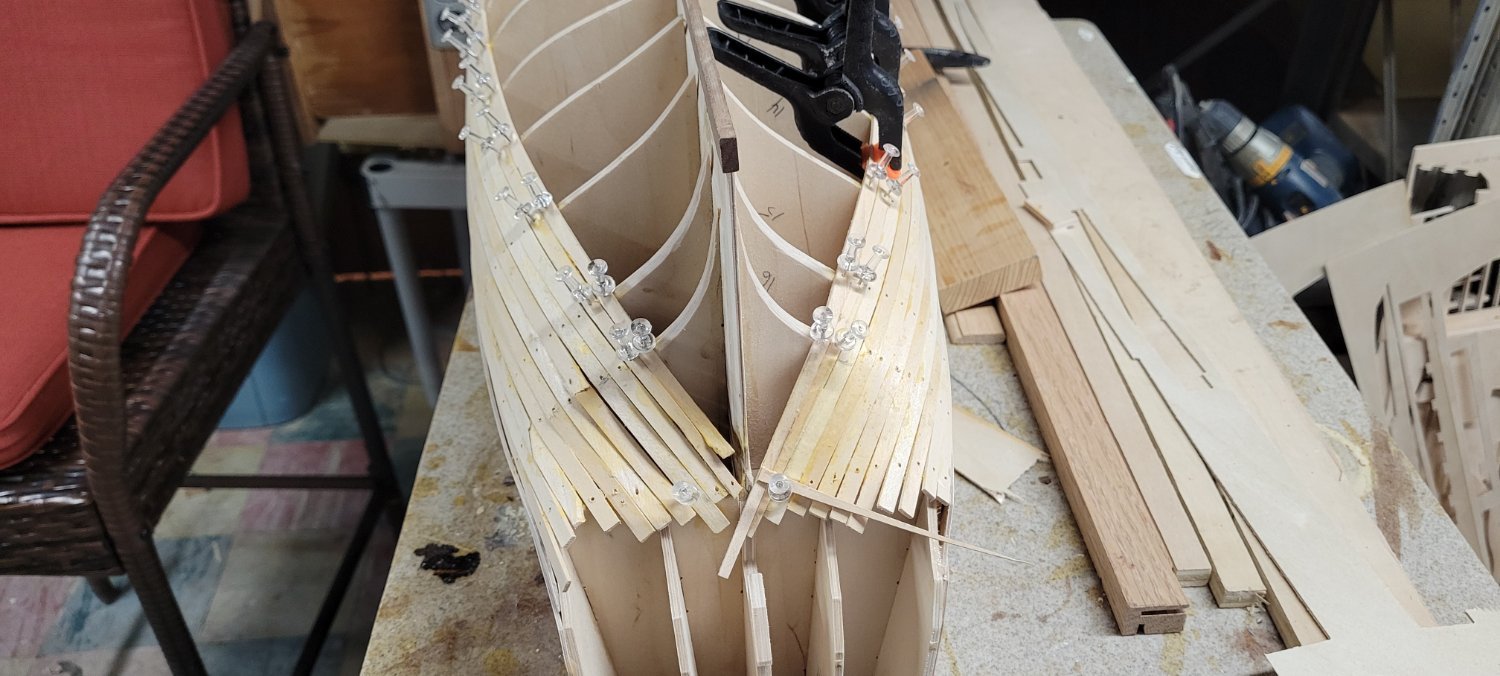
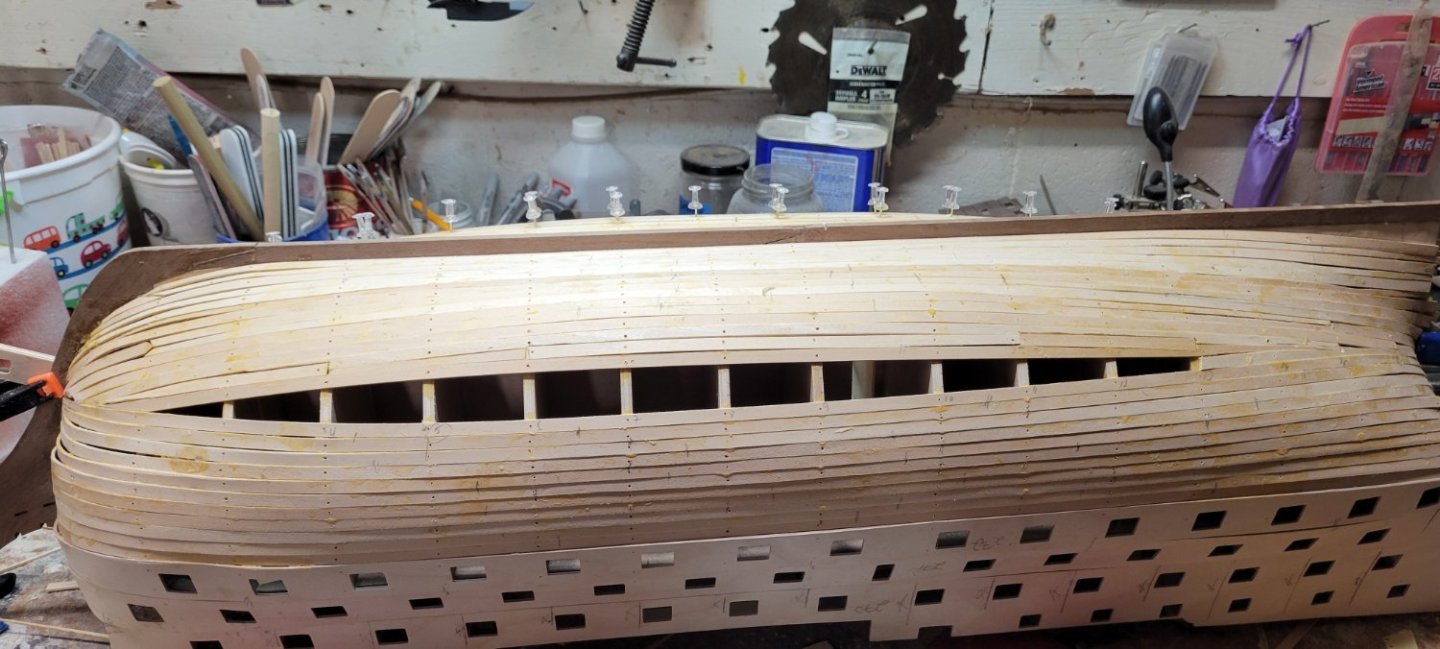
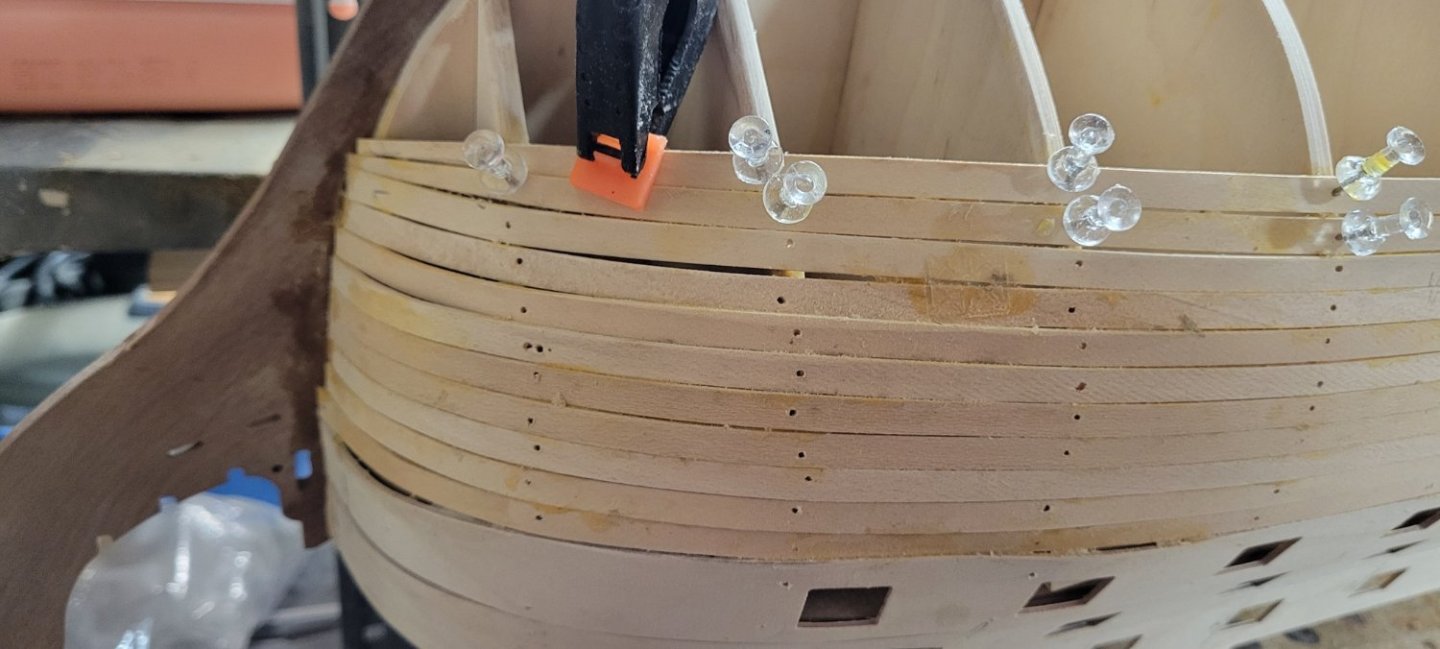
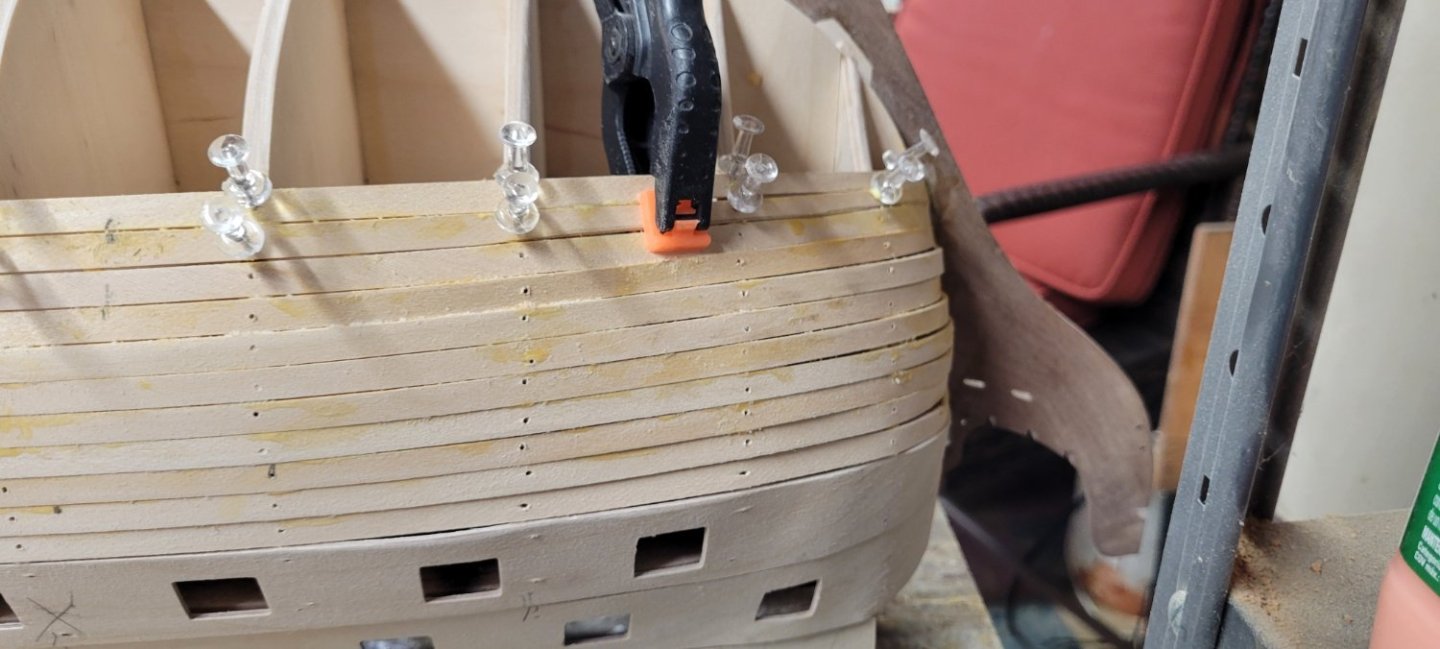
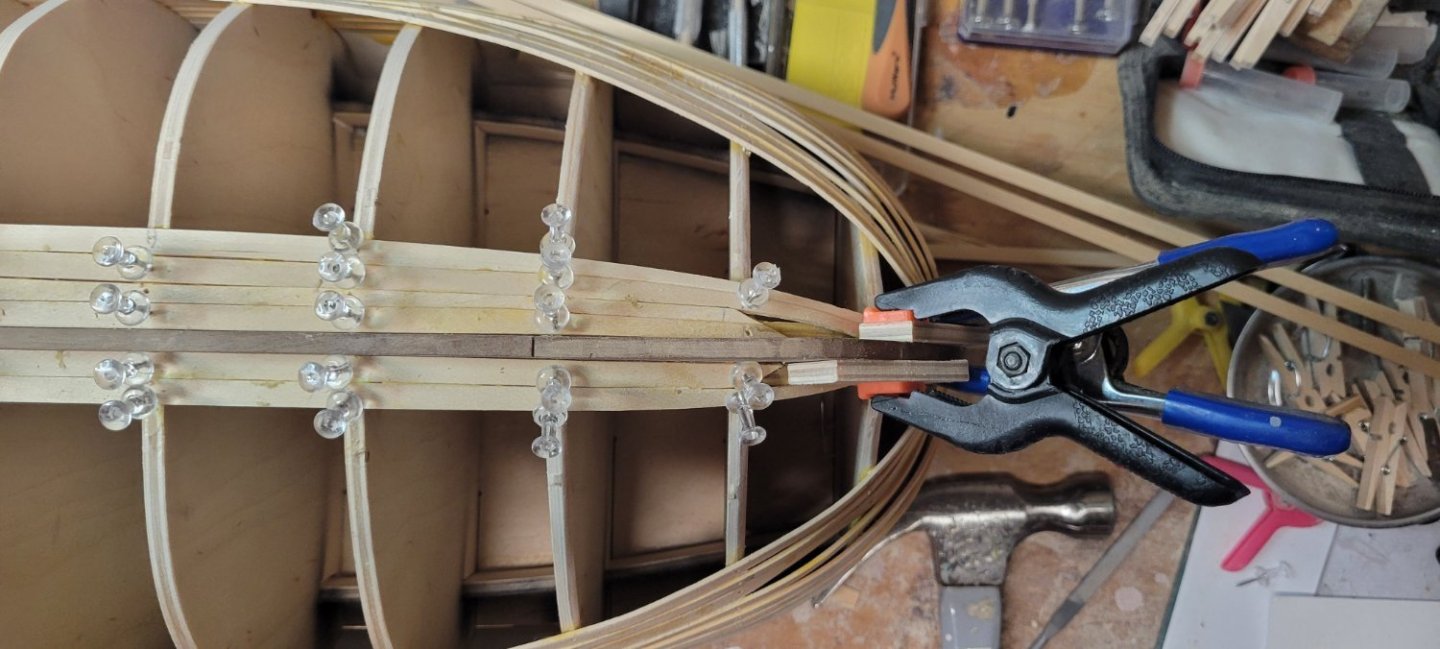
Alrighty! I started on the other side and thought just how hard and LOOOOONGGGGG it was going to be. I started laying down full strakes and about 6 or 7 down, I opted to add a strake midway between the remaining open space. This helped eliminate excessive twisting of the full planks but it then created a situation where I have to taper both ends of the remaining strakes. I had also mentioned that laying down planks and removing the excess CA glue was wreaking havoc on my finger tips. The glue just cakes on and it dries out the skin so bad. Using nail polish remover actually just melts the glue and smooths it out. A solution I have yet to try is to create a salt and water paste and that will dry out and flake the CA glue with the caustic affects of a glue remover. Also, it was suggested I get those micro tips for applying the glue. Now I have hundreds of them, but they never suited my needs when I was building my Titanic model. They didn't give me the control I needed when applying microscopic amounts of glue to hold 1/200 scale pieces together. Well I tried them and I did the remaining open areas in about 2 hours! What a difference. Finally it is done! Well not really, I still have to go up a few levels, and then a few more after that and then the wales and then.....and then..... I'll need to add a bit of filler, but I think it will look just fine once done and sanded.


-
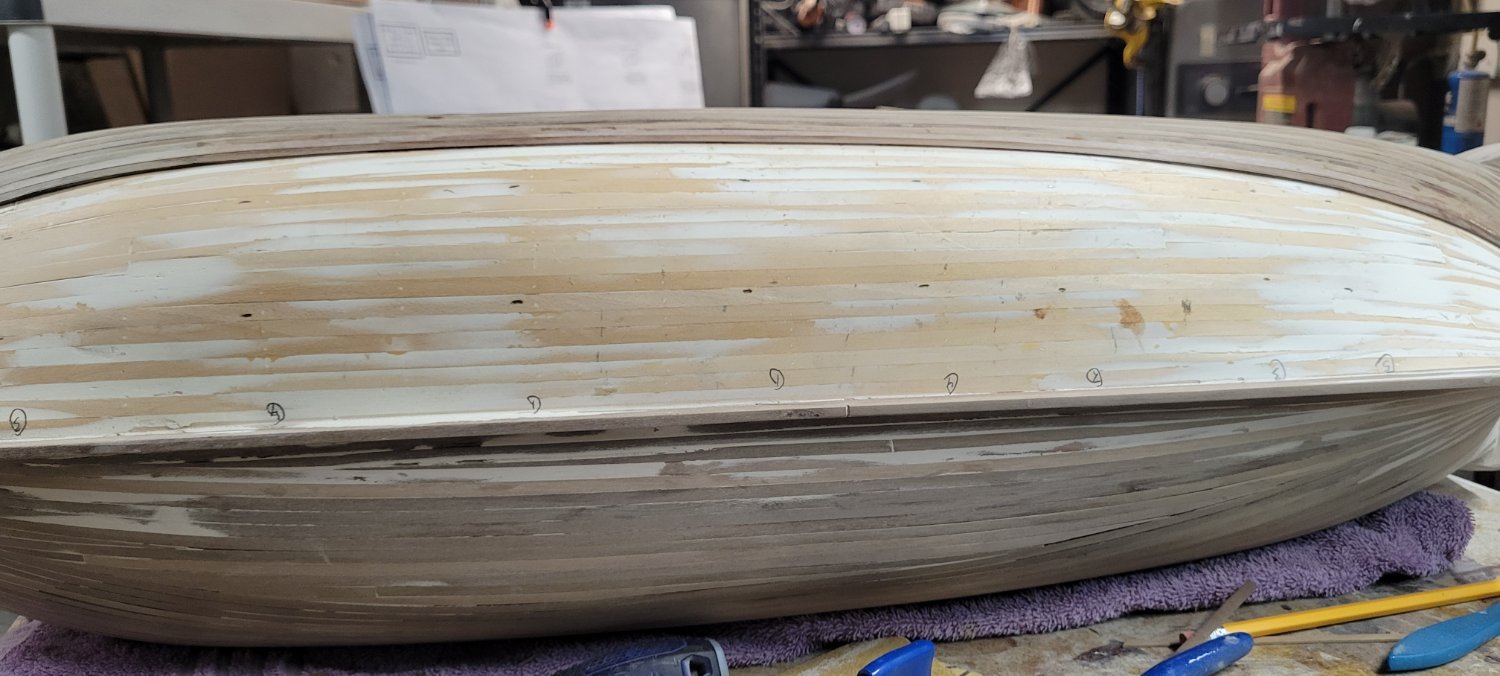
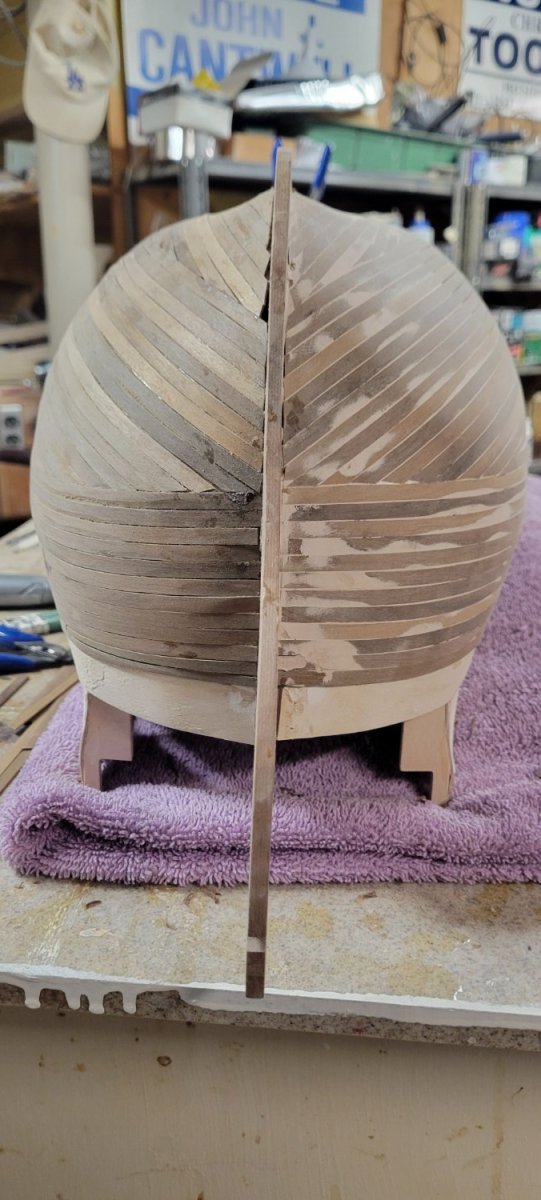
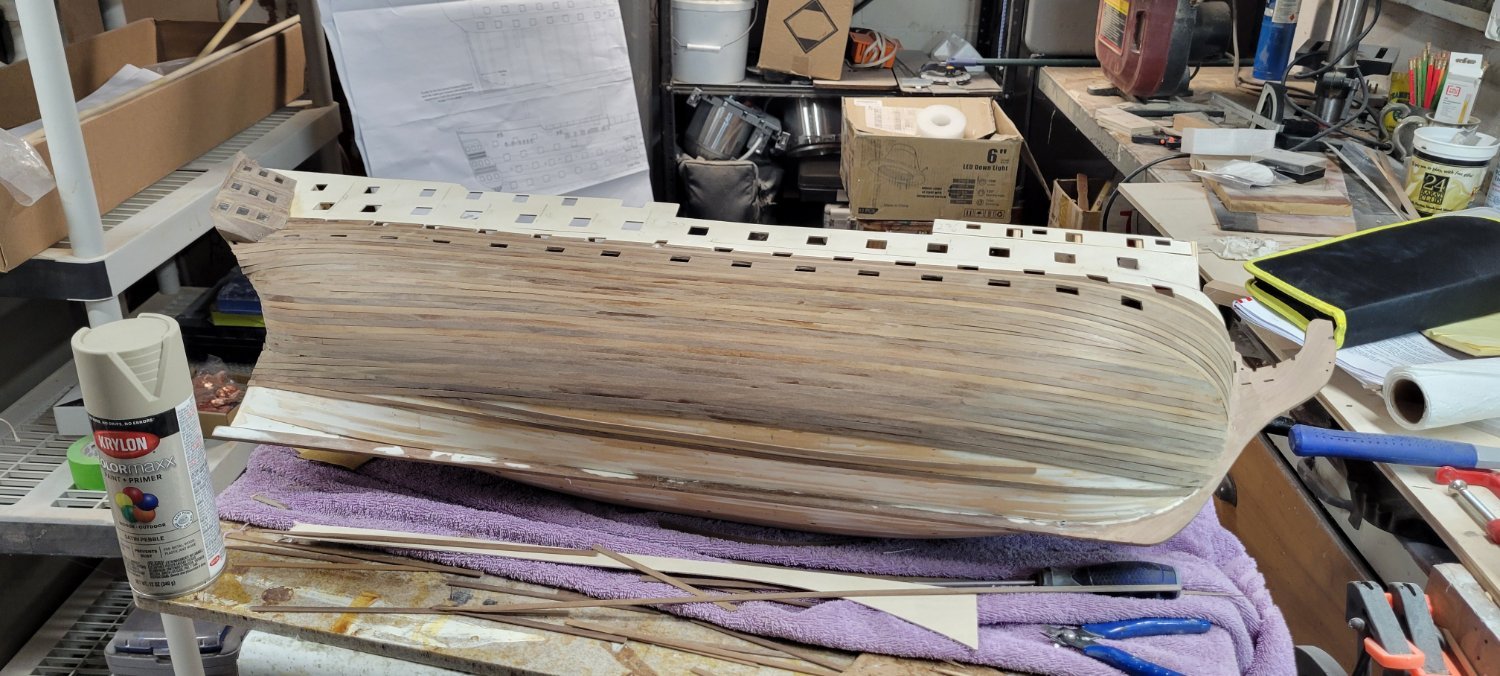
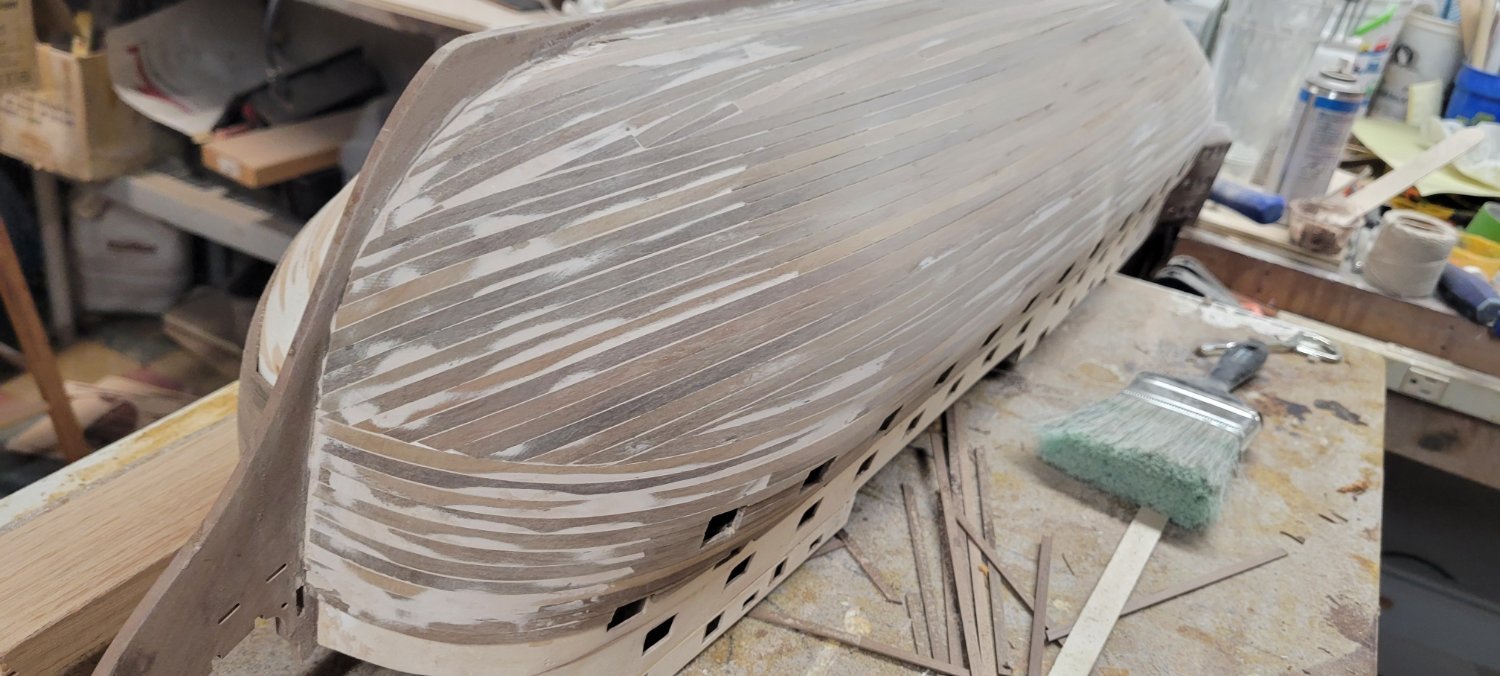
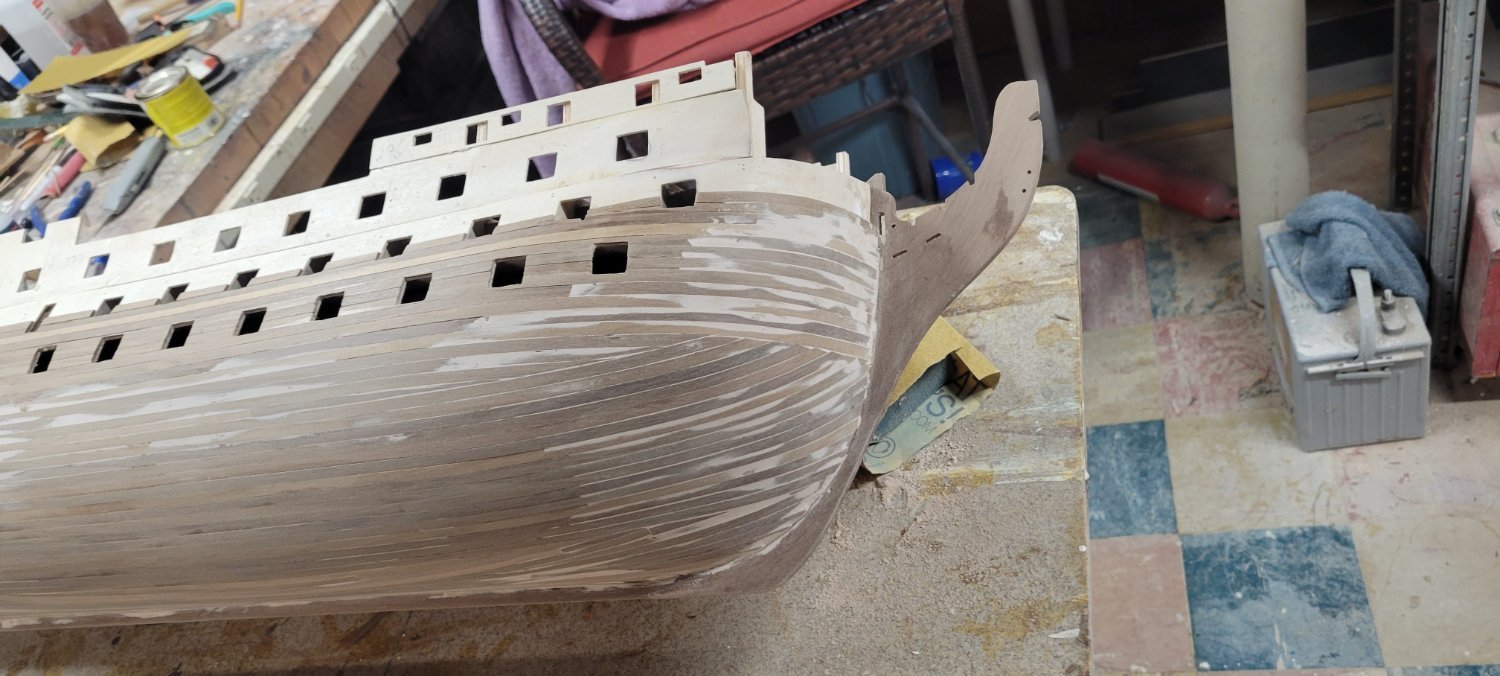
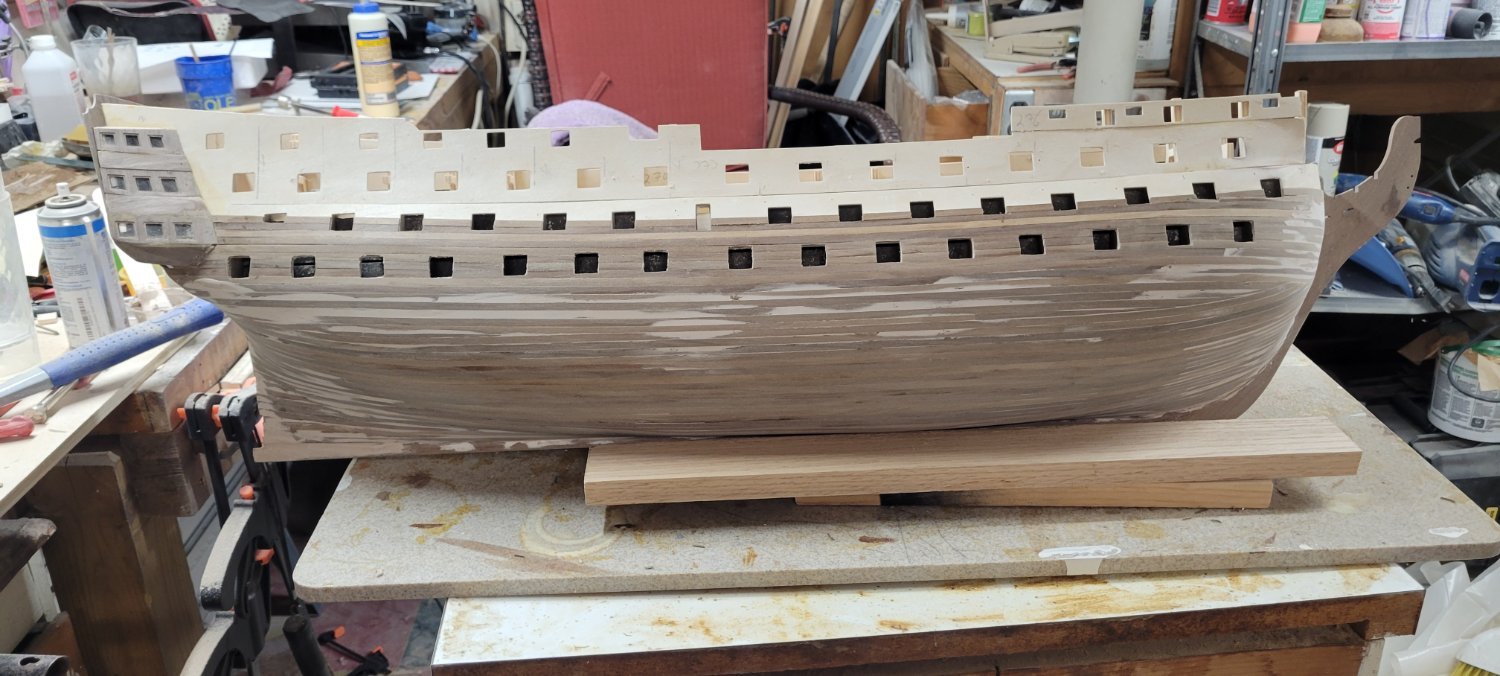
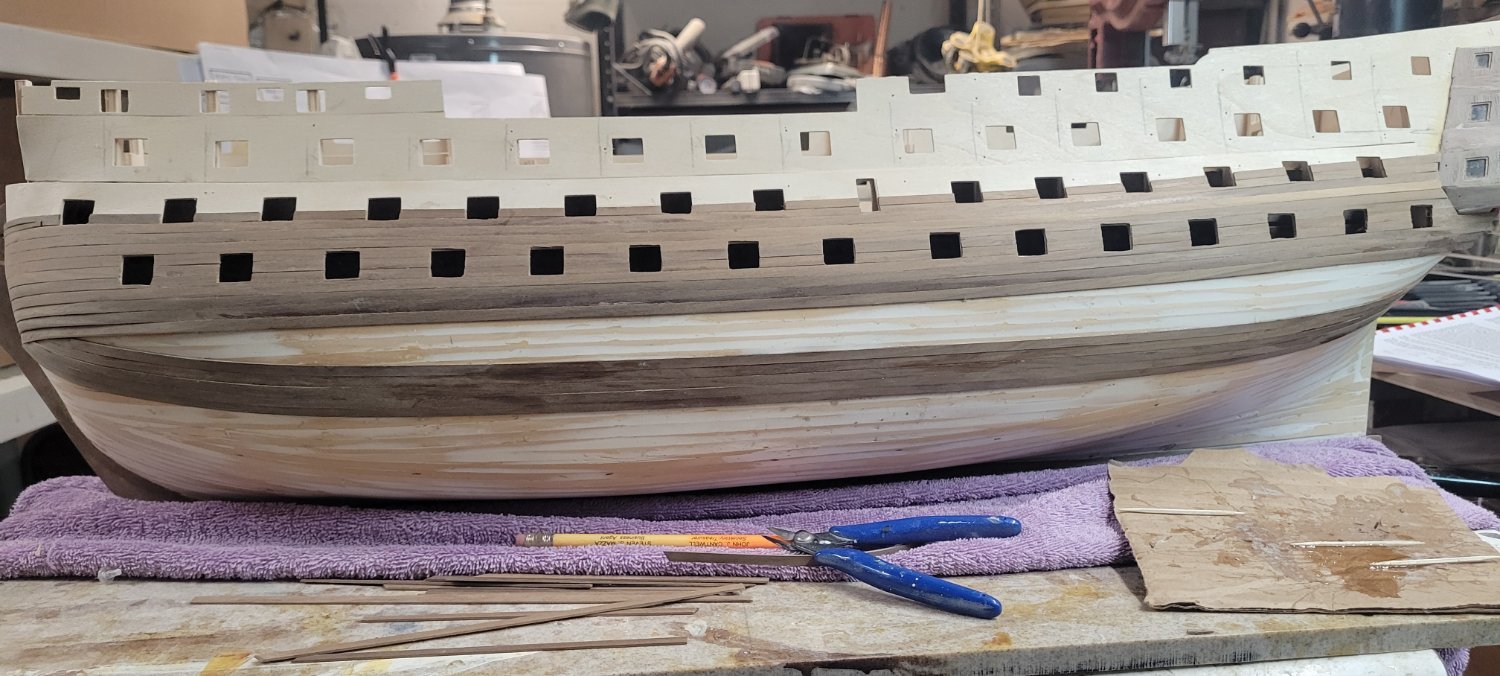
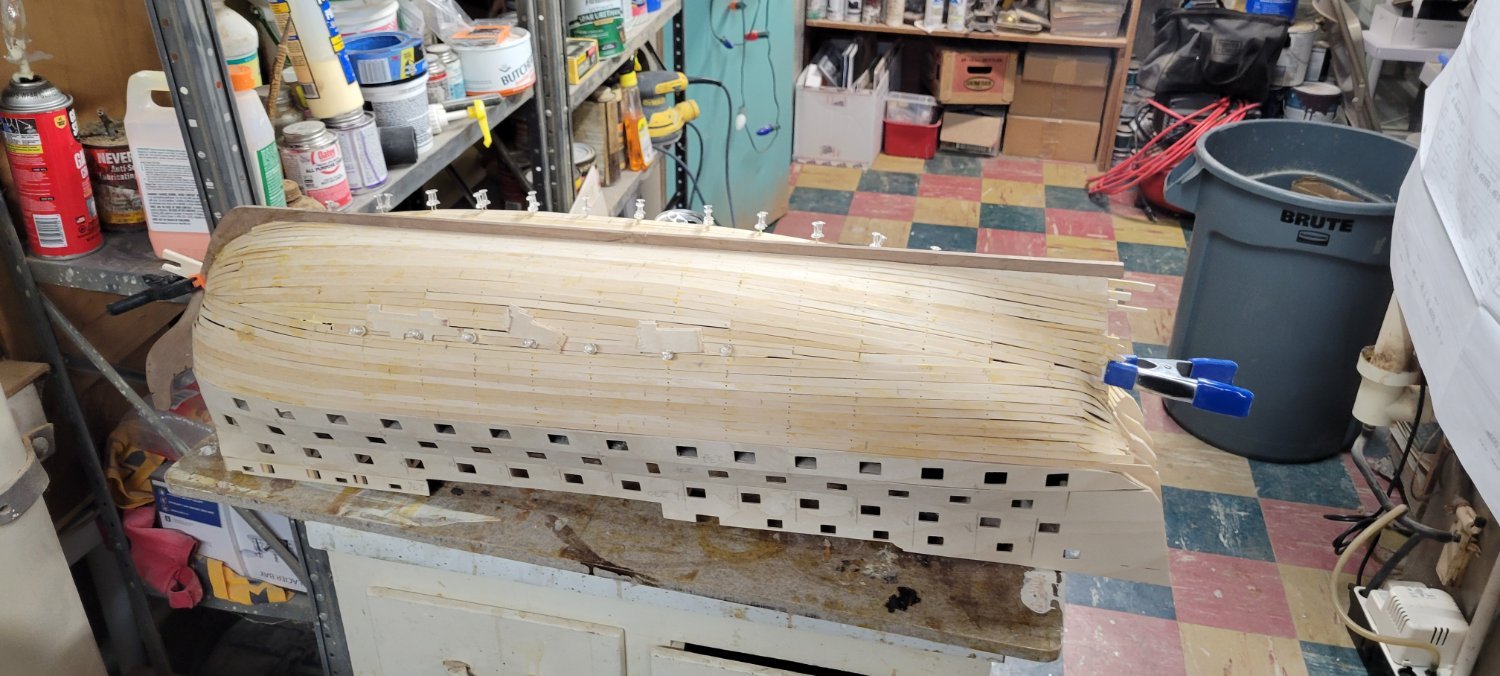
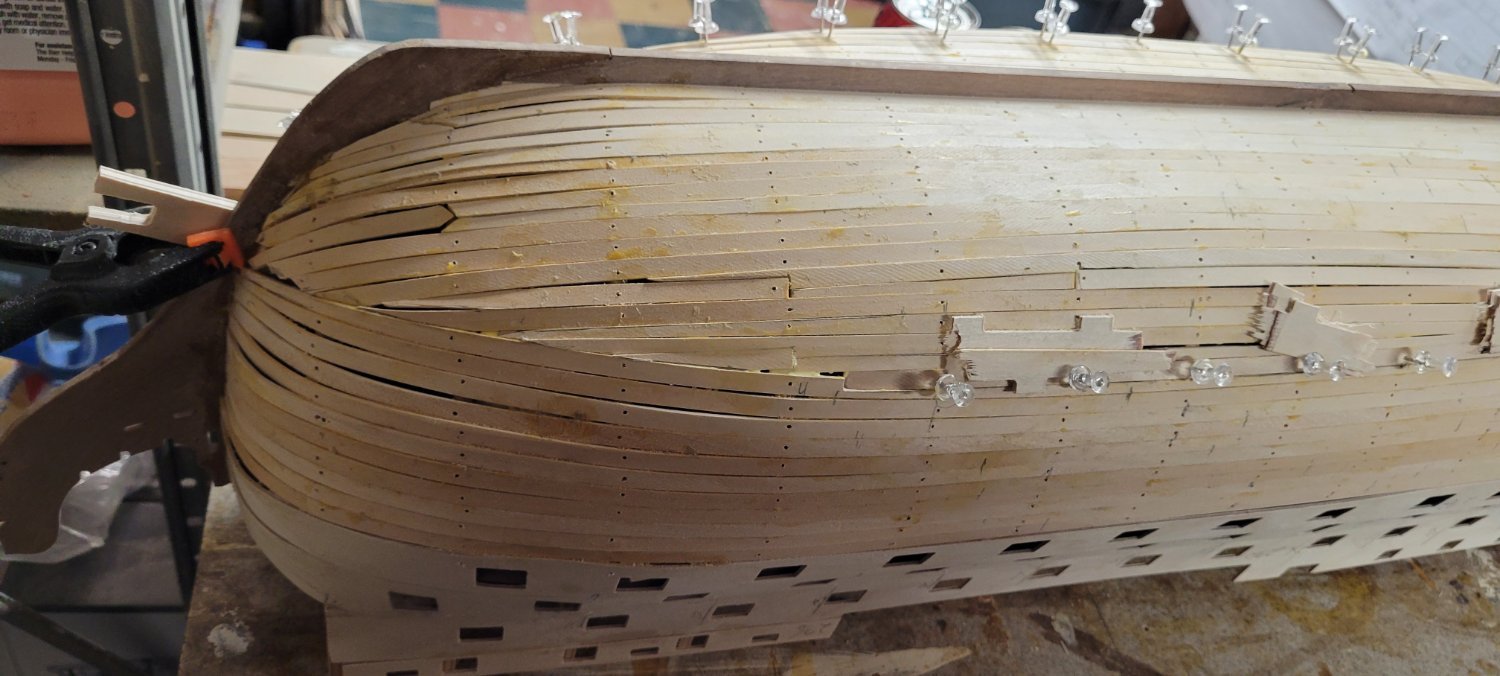
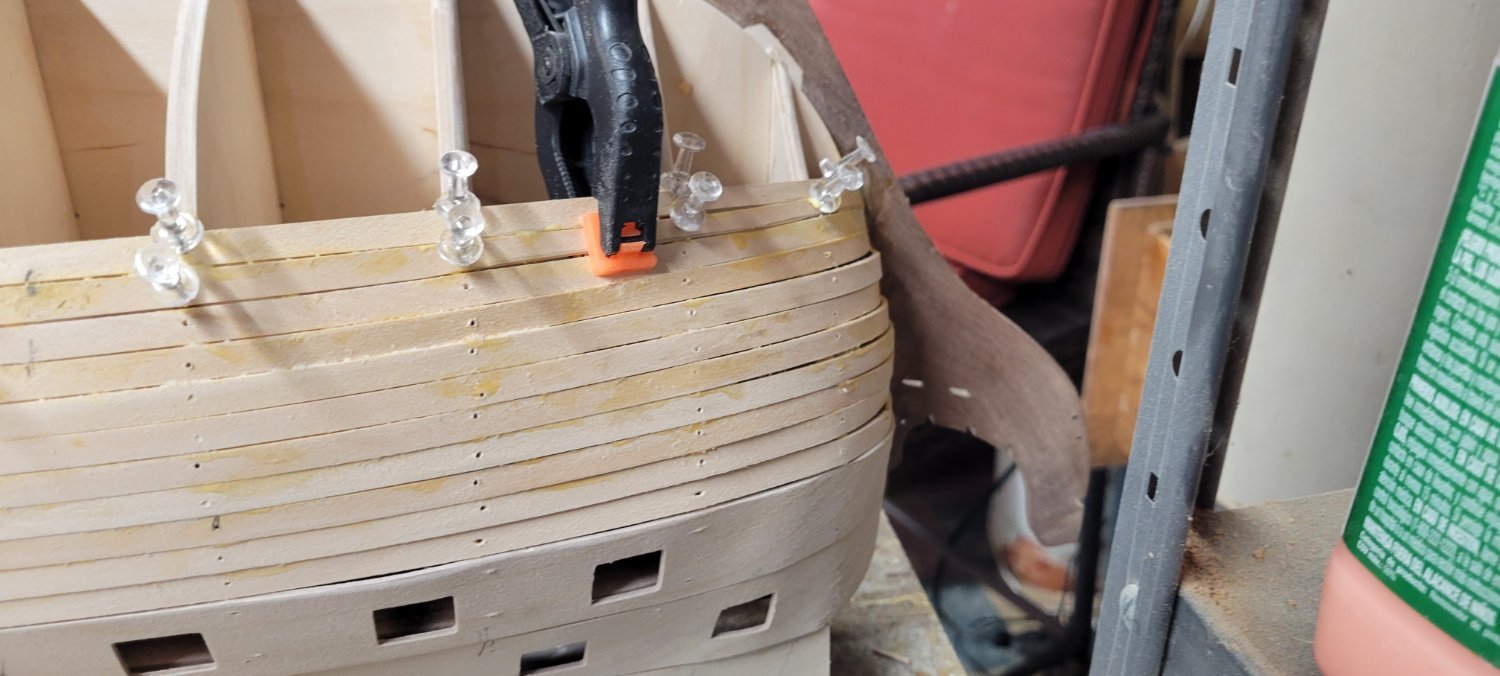
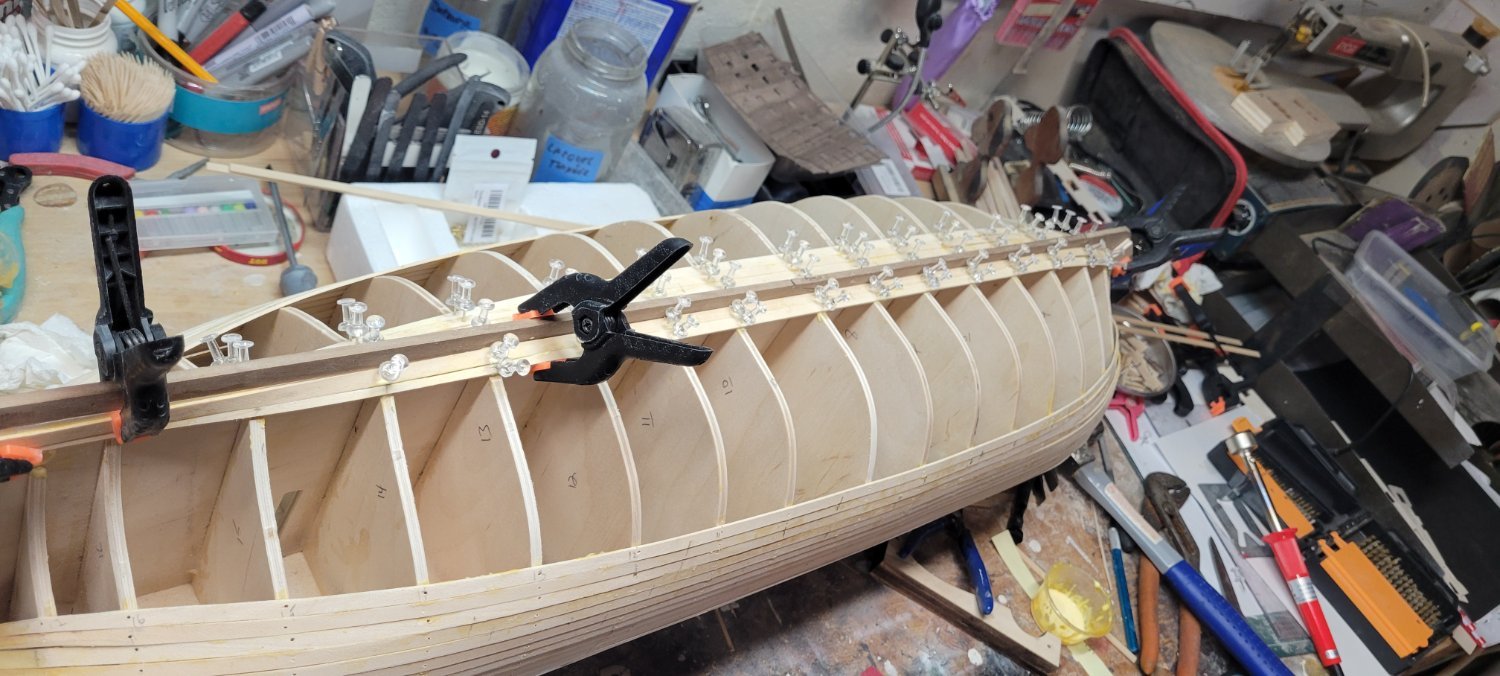
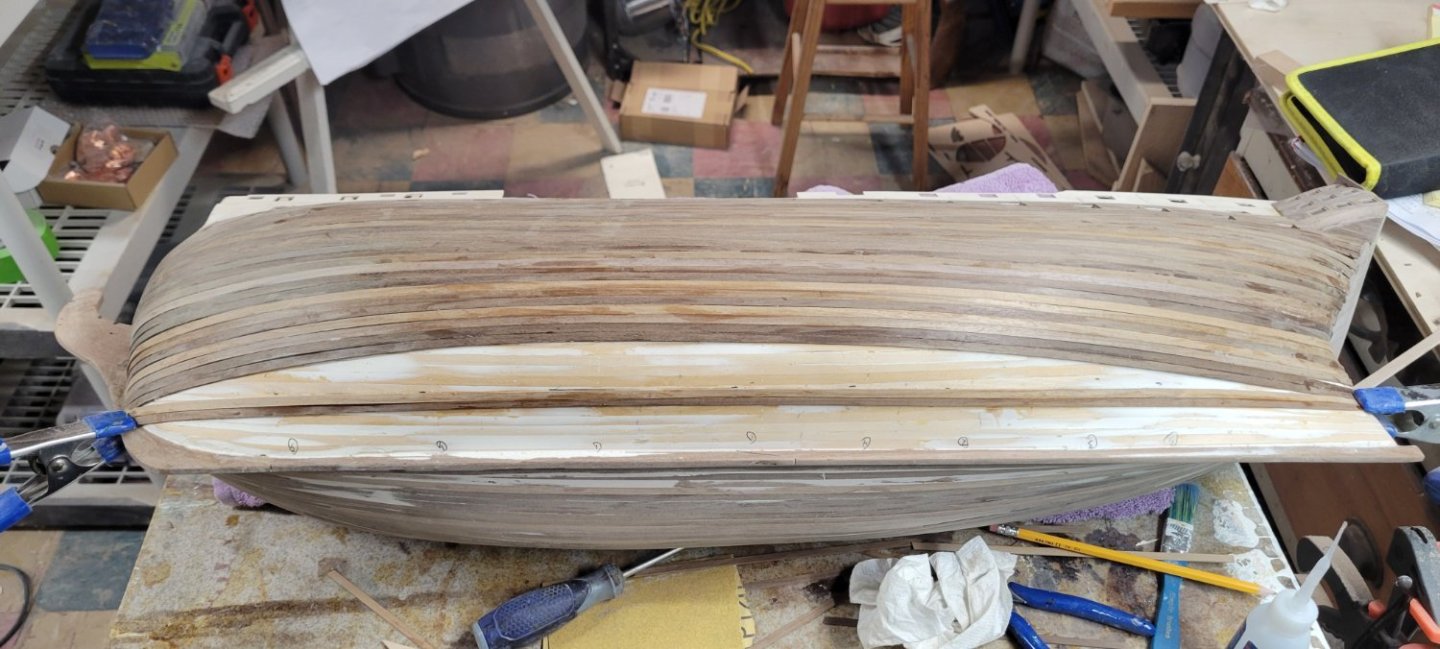
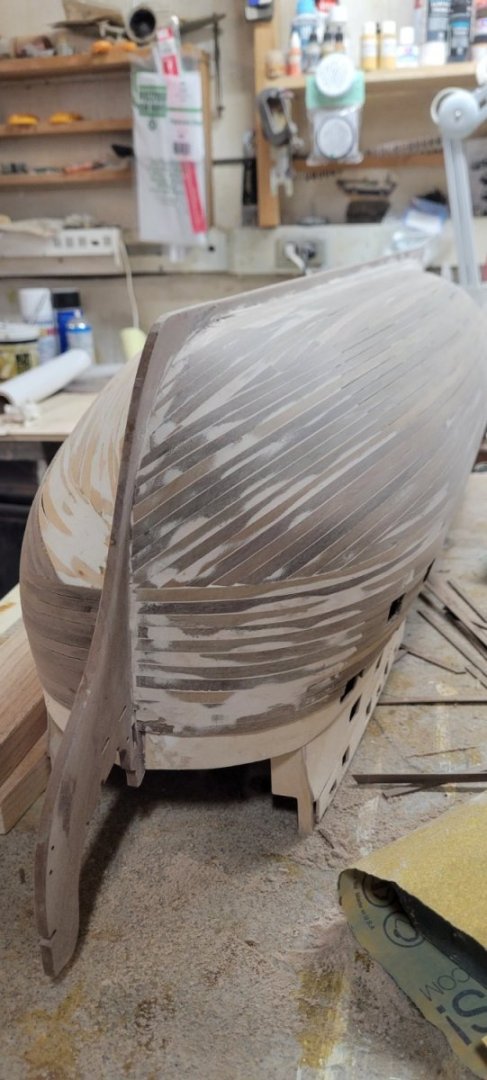
Moving on over the past few days I plodded along with the 2nd planking. It is unbelievable just how much time it takes to do each strake. A few days ago, I thought I had 2-3 hours to work on the boat before leaving and I think I did may 4 strakes in that time. Just so much time lining things up, final fitting, sanding and then gluing. After doing those 4, I start looking at the open hull and counting...so I have like 30 more to go on this side, that's EIGHT HOURS!!!! Sigh! I tried to plan ahead with remaining strakes, laying out a schematic of what needs to be installed. That took an easy hour or so. It at least help me visualize what was ahead. As I got towards the keel, I had to scrafice just laying planks one after another and start following the hull's lines. This helped reduce any twist or a need to bend or soak whole planks to compensate. However, that tactic then resulted in a need for a lot of stealer planks. Which take time to cut, sand and fit. I opted for that resigning myself to the fact that I couldn't hide from installing stealers based on my low level of experience. You can see that stealers are in my future!!!!! Angle cuts are my friend! Just keep saying that. Once done, I added wood filler to the hull, concentrating on the bow and stern as they showed to worst in spacing and clinkering. I did try to add some stain, but it didn't take as willingly as last time. Honestly, when I put the first round of sanding to the hull, I was quite happy with the final shape. Now doing it this way is NOT going to work if you desire to show the hull in natural wood, but since I plan on painting upper hull above the water line and copper planking the below waterline, this fill is perfect. Time to move to the port side!


-
Going to have splitting my time between the boat in the basement and the boat in the yard. We only have 4 months or so of really nice weather here and have to try and take advantage when we can. Spent all weekend sanding, filling and working on the rudder because it was 70 here....70!!!! That doesn't happen often. All the while I kept thinking....man I would have been done with the 2nd planking if the darn weather had just acted normal....drizzly/snowy and cold!

-
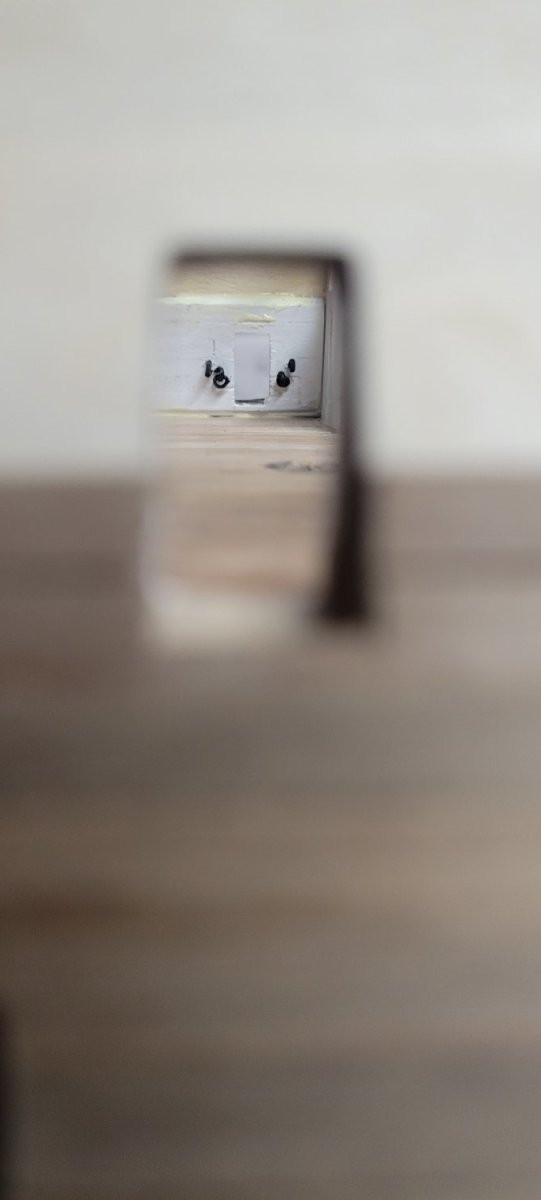
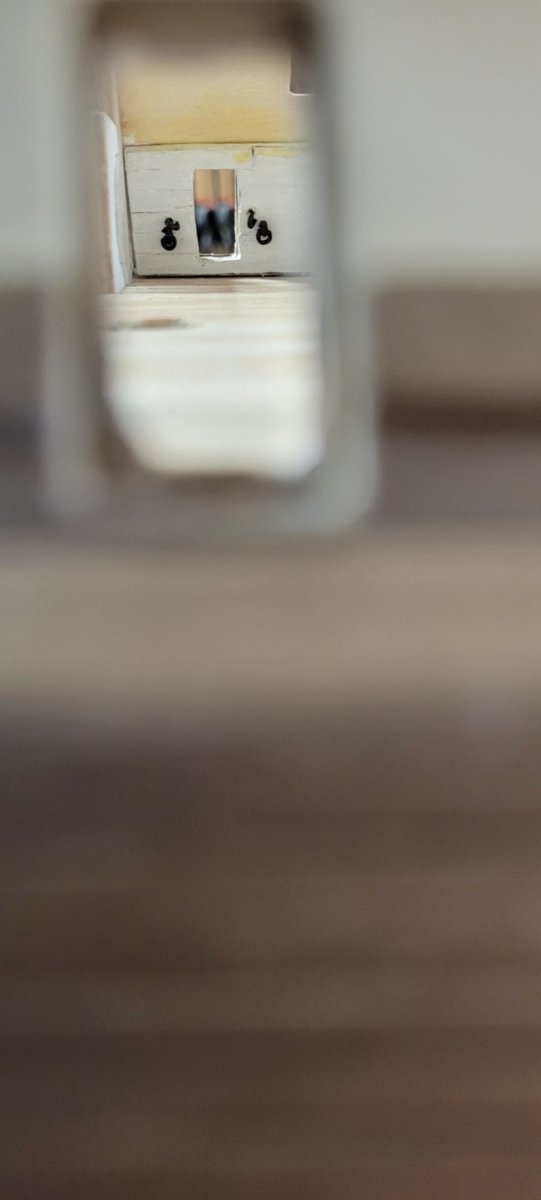
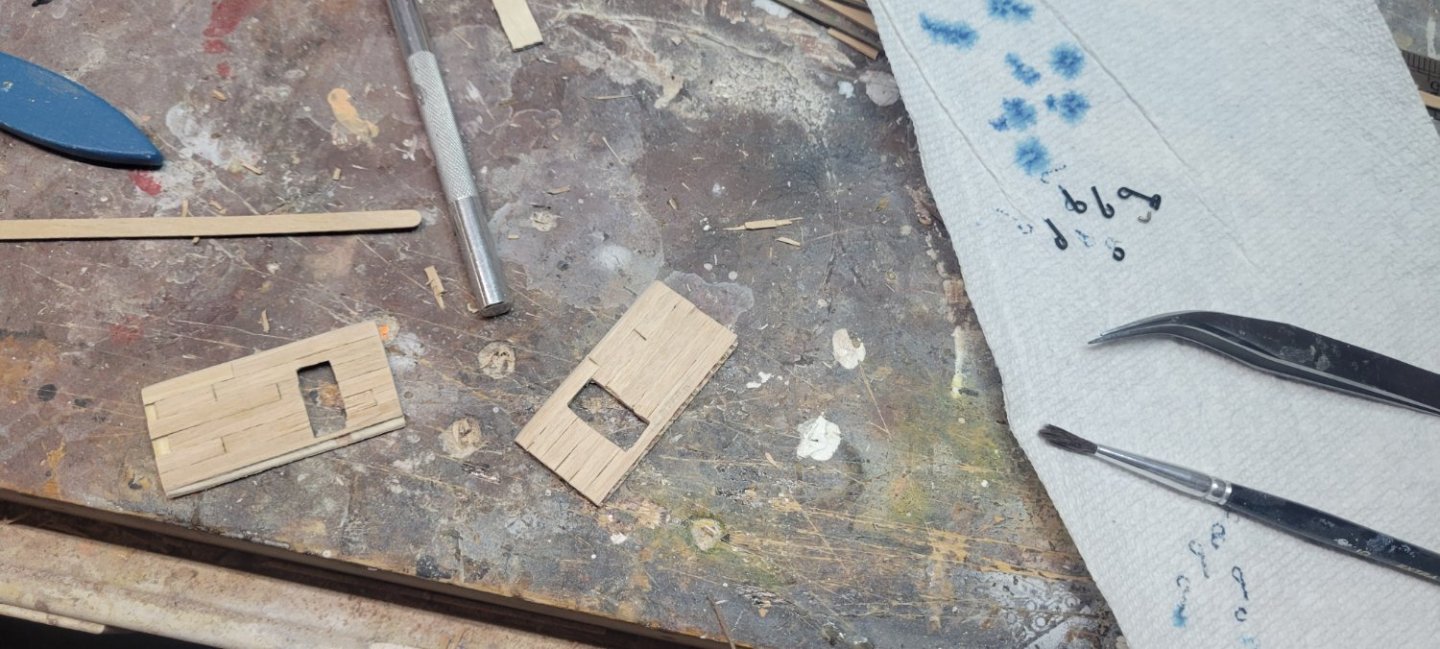
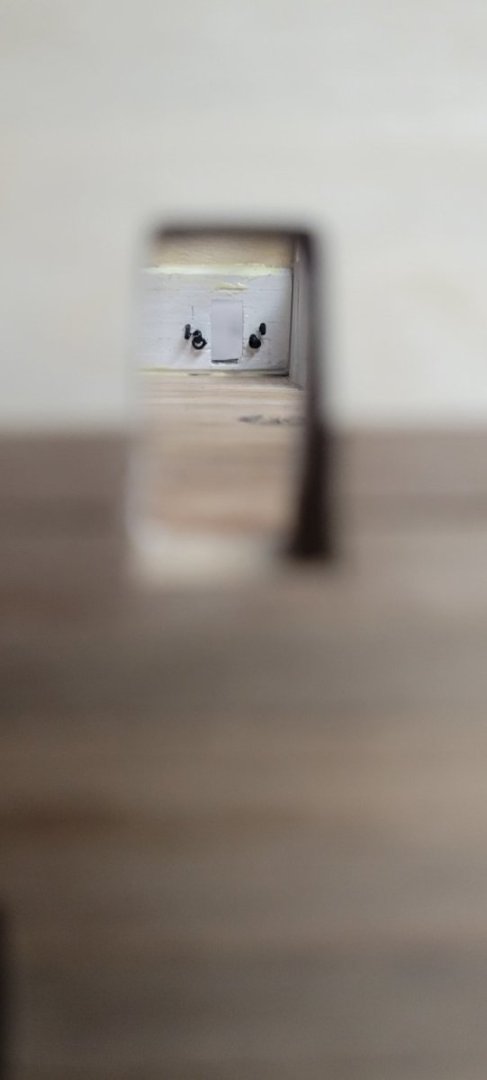
Tried my hand at building out the inside of the entrances. I just cut a few pieces of wood and covered them with deck scraps. I also had some 1mm or so brass wire from my previous model and created some rings, which I blackened. I had never used that stuff before and it was pretty easy and looks pretty good. Like all model pics, close up shots do more harm than good sometimes! But, looking through the doorway is pretty cool. It will be dark once everything is buttoned up, but I'll know! Also continuing work on 2nd planking. I went down about 10 strakes and laid a plank and then started going back up. The strakes lay a lot nicer on the hull and I am happy with them.


-
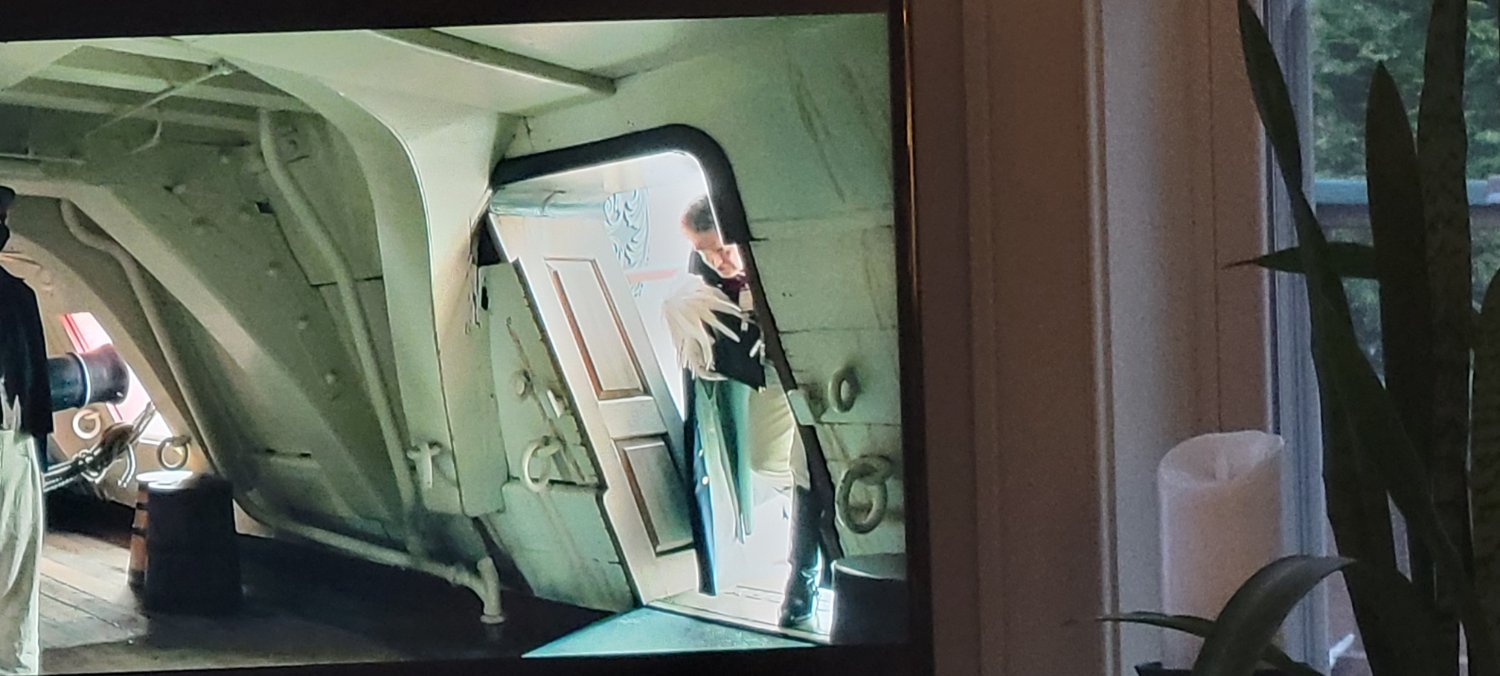
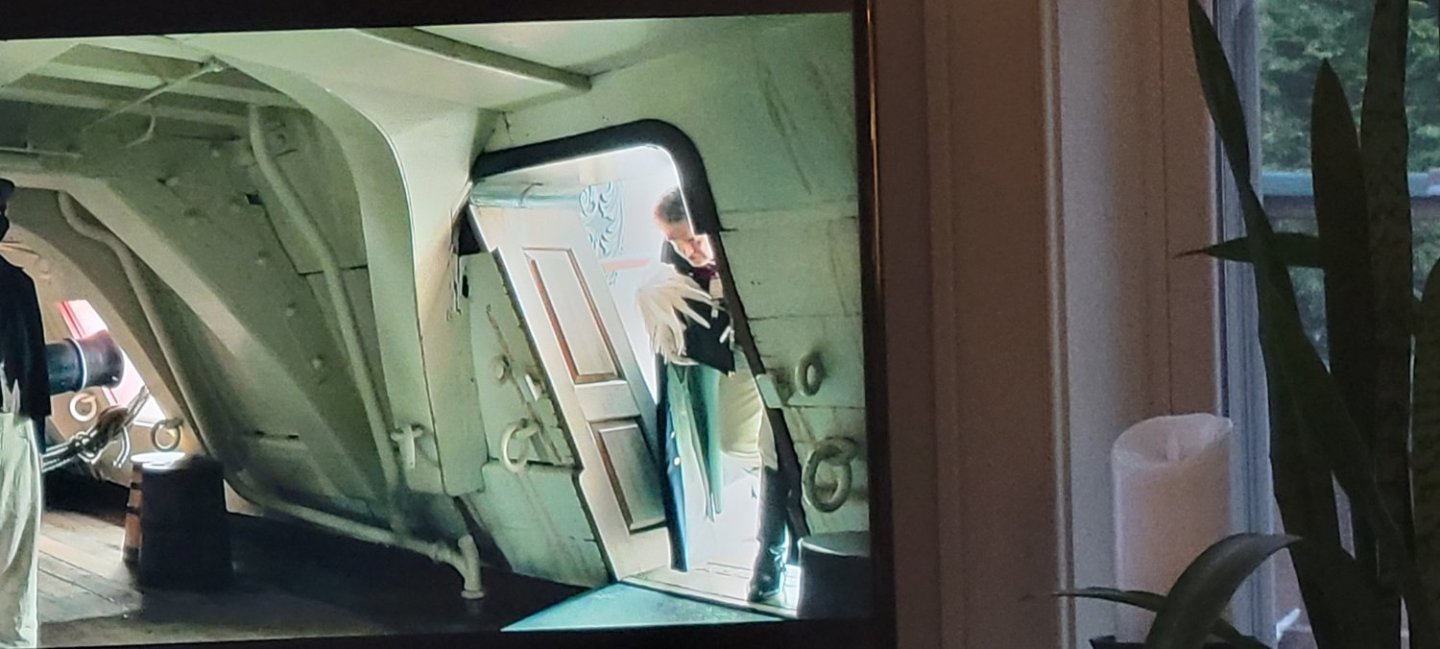
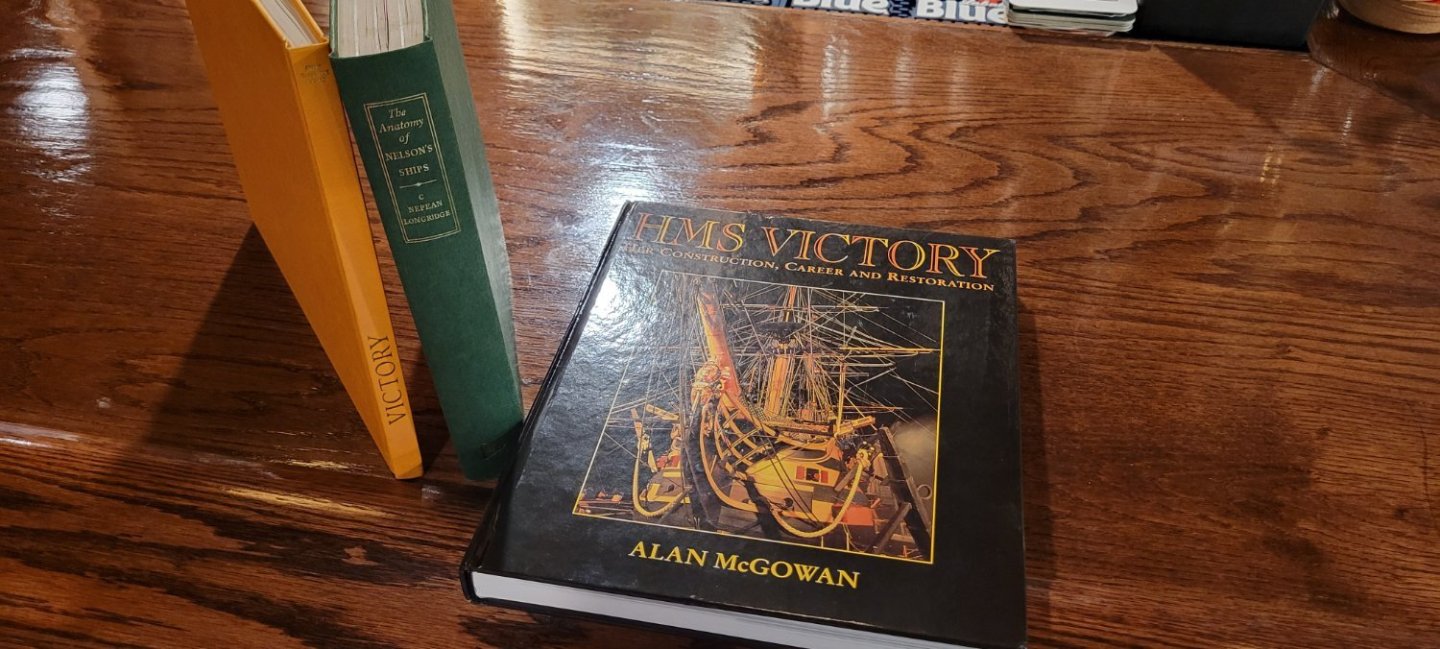
Still plugging along. I have the same number of planks on each side. I think that the next run are going to require 2 to 1 or 1 to 2 plank runs. I feel like I am close to the water line in the build so that anything I do to complete the 2nd planking after will be covered by the copper plates. My wife saw my progress tonight and doesn't want me to cover it with copper. I do love the great builds that are all natural. There is a perfect beauty to them. But I just can't wait to take a chance with the copper!!!! Sorry babe.... On a double side note, I received the 3rd and last book in my library of reference material today. I have McGowan's HMS Victory 'Her Construction, Career and Restoration', Longridge's 'The Anatomy of Nelson's Ships' and McKay's '100 Gun Ship Victory'. All three are just the best! I received McGowan's today and I can't stop smiling!!!! Also...I wanted to add a bit of extra detail to the interior walls of the 2 entrances. I have seen a few builds where the builders have added rings and painted the wall. I spent the last few days searching 'HMS Victory entrance pics' to no avail. I have dozens of pics looing INTO the ship, but nothing looking from the middle deck looking out. Then!!!!....as I was working on my laptop, I had the new Napoleon movie playing on the TV for background. I had already watched it at the movies, when I looked up and saw the HMS Victory. I know the movie sub titles said it was the HMS Bellerophon, but it was her! And then there it was! A shot of an English officer walking INTO the ship! I know it will be barely visible, but hey, how much of the middle deck can you see once the rest are in place? Yes, I still have some cutting to do. It is so hard!!!! I was able to even up the strakes with a little tapering and stealing. I know it looks sloppy, but it isn't that bad in my shop! Look!!!! So maybe a little knee from the ceiling, a few rings and some wall planking! That and a little detail work on the side panels in the entrance way. Might look cool. Also thought about adding the bits that would be mid deck running parallel to the mast as it runs upward.... I think as a new modeler, these 3 are all you need to really aid you in your build.

-
I see now after zooming in on some of my pics that I should chamfer the planks before setting them, that would allow a tighter fit. I will try that on the STBD side!
-
I think that's a good idea...almost like creating a 'contact cement' bond between the two. However, I am going to CA glue. I actually laid out 7 planks on the port side today. The picture brings out the glue sloppiness that I can't see in person. I noticed that when I was painting the Titanic. It would look great, smooth finish and great detail, then I would take a picture to post and all the imperfections of air brushing came to light. Same here. I just looked at a couple of other build projects and it appears their 2nd planking at the bow are running higher up than mine. If I look at the build below ( I am almost positive it is Robert29's build), and count down from the inner most gammoning slot, he has 5 planks When I count the same on my build I too have 5, but it just seems like his are more 'even' with the waterline. I suppose it won't matter in the end as I am painting my model and he didn't and if I make sure the wales follow the plan, the actual direction of the planking isn't the end of the world....if it is.....just sigh and pity me. Overall, I am pleased with the results. Looking up at the picture above certainly looks lumpy, but in real like I just love it! I still have to truck on and begin the hard planking, but I am hopeful! Thanks to all for looking in on me and offering help. Much appreciated. Chris


-
I understand, once I finish with the 2nd planking, I will address this if the kit hasn't done so with the figure head. VERY much appreciate! Chris
-
Hi Graham, I appreciate the encouragement. I did seal the deck with a matt finish. I didn't use a wood sealer, I only have wood pre stain in my shop and wasn't sure if that would work or discolor the wood. I used the matt spray clear coat on the wooden decks of my Titanic model and the wood accepts it very quickly and when it dries, it is un-noticeable. It did give some of the planks a different color, you can see it on the port side towards the front. This site doesn't really allow you to zoom into pictures, I save others and then look at them using my own viewer, but when I zoom in, the stain gives the grain a nice oaky feeling. So other than coloring not being consistent (I chalk that up to maybe sanding too hard in places), I think it looks very 1800'y! OH!!!! You are talking about the first planking!!! See!!!! Read the instructions thoroughly! Yes, I am going to stop at Home Depot today and get a can of wood sealer...again, not sure the pre-stain is really made to assist in bonding, only prepping the wood for stain. THANKS! Chris
-
Hello Allen; I may be lost in the terminology here. I know that I have tapered the stern to accommodate the addition of both plankings. But somehow, I do not think that is what you are referring to? The instructions haven't required that I taper the bow stem of the kit. I seems to me that after installing the stem to keel (or what the kit deems is the keel) both layers of planking will just lay up against the stem and not interfere with subsequent parts. So other than requiring that the bearding line at the aft end of the 'keel', I didn't see any reference to tapering the fore stem. Oh oh?
-
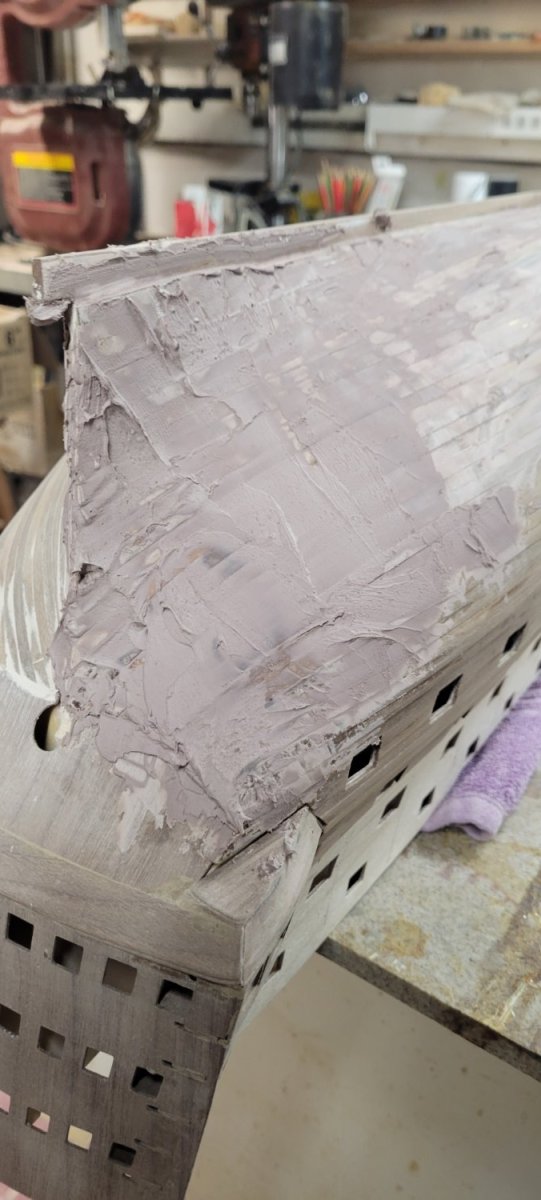
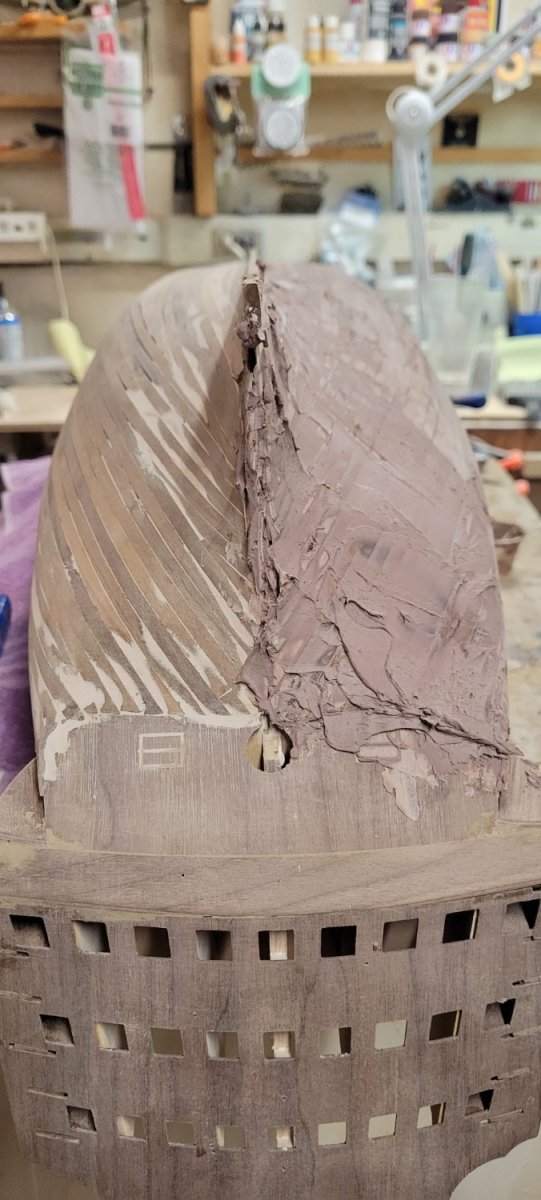
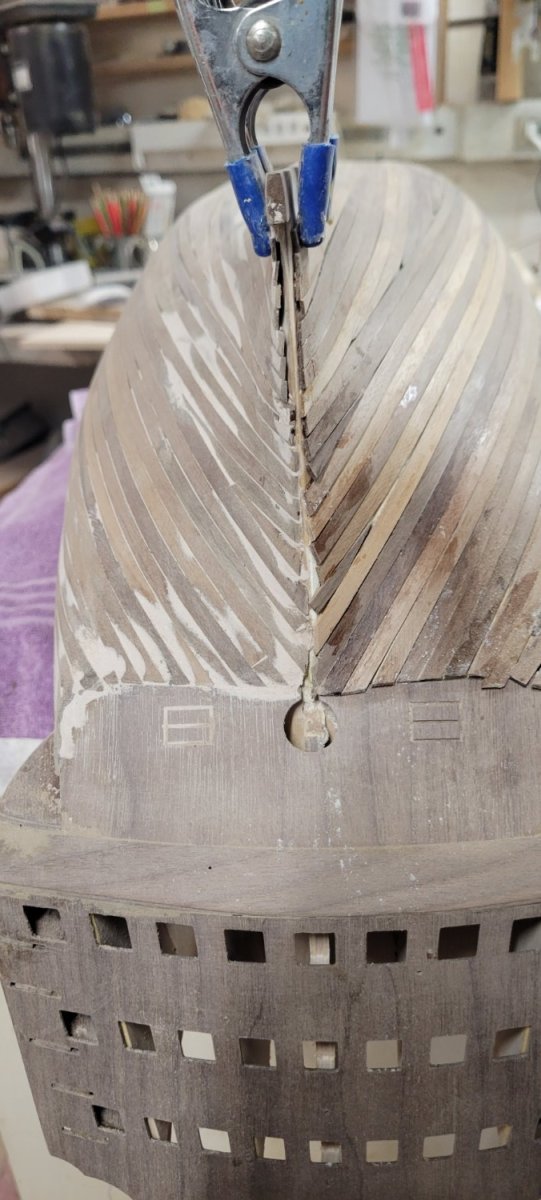
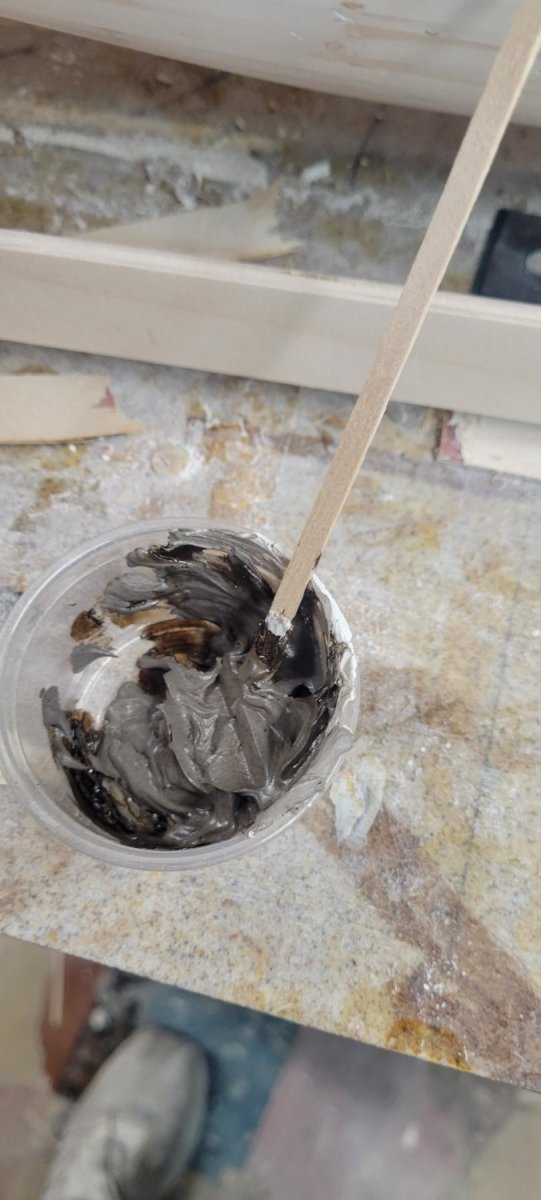
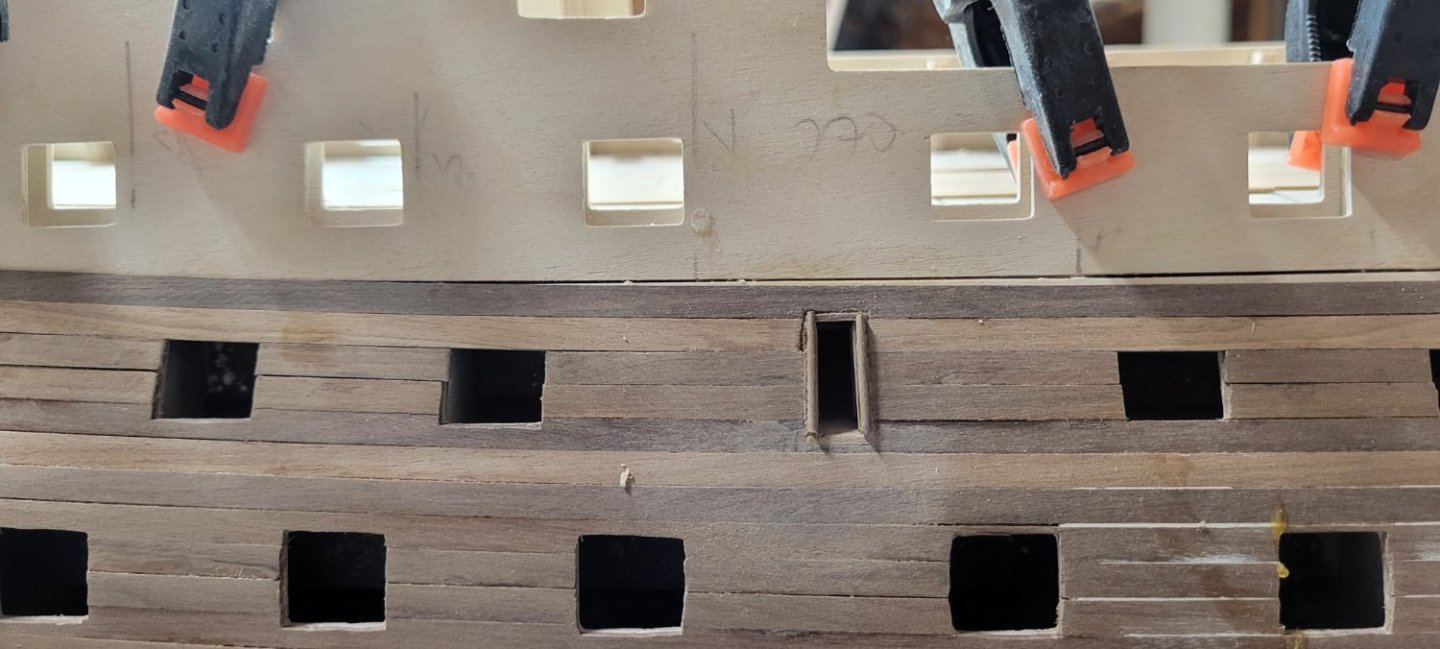
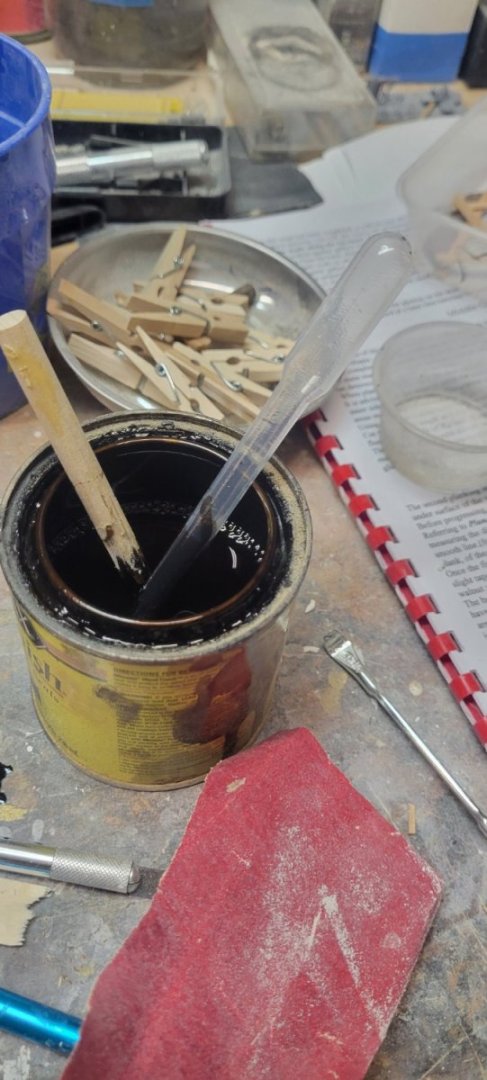
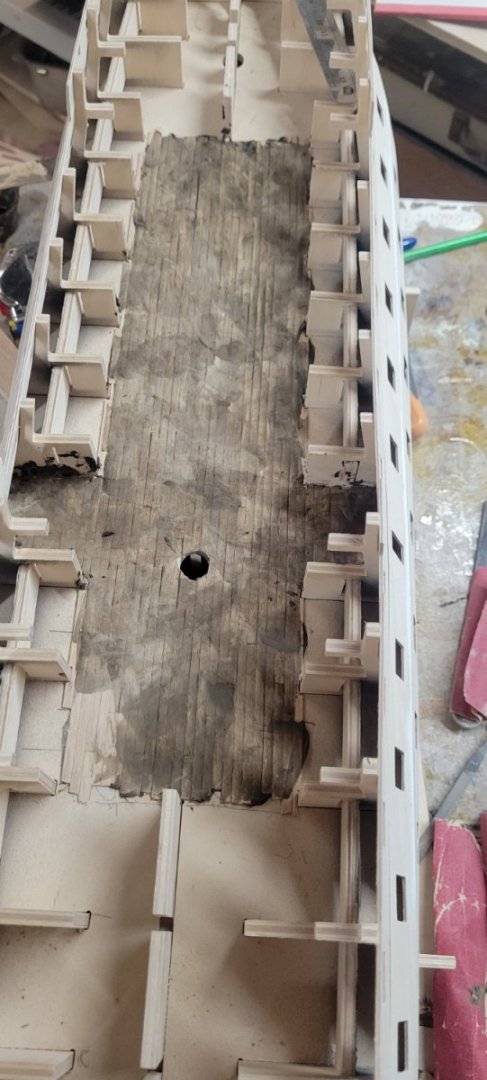
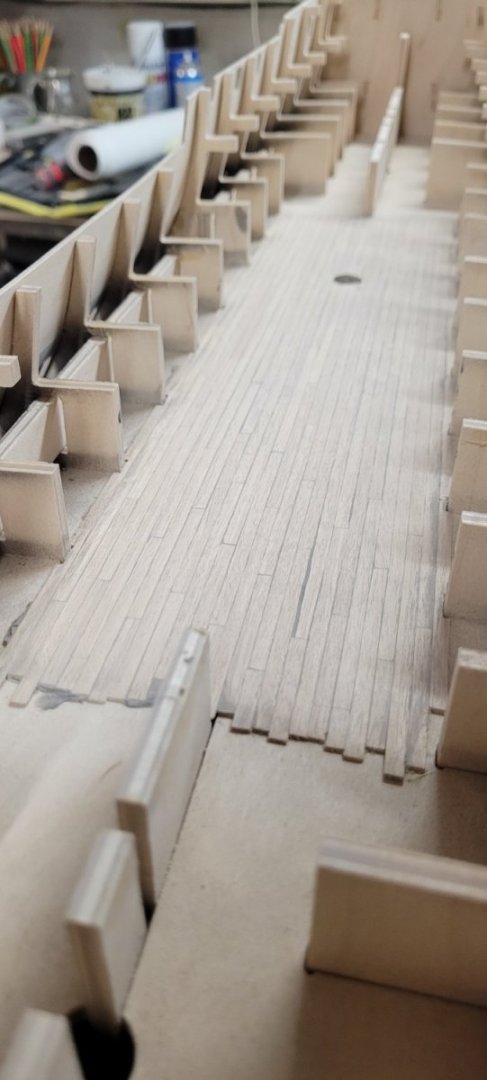
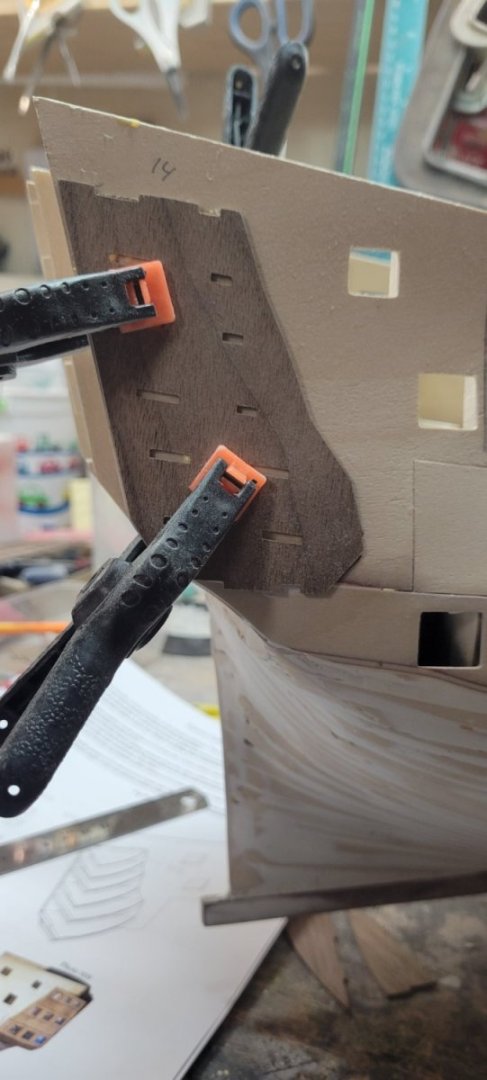
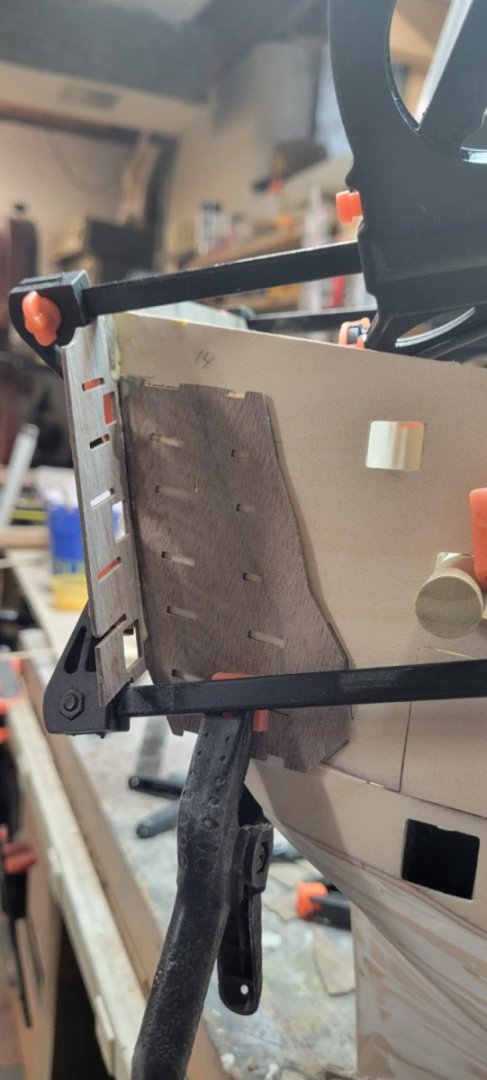
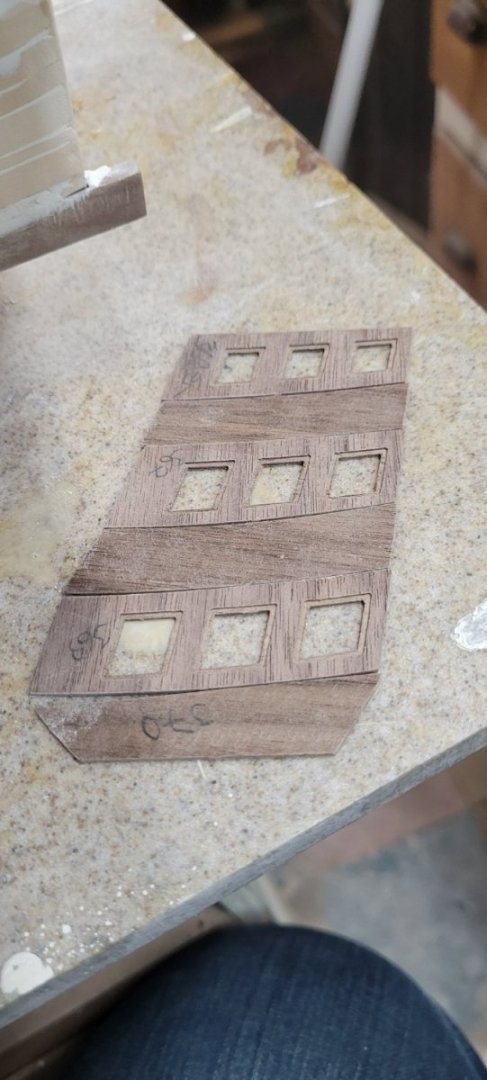
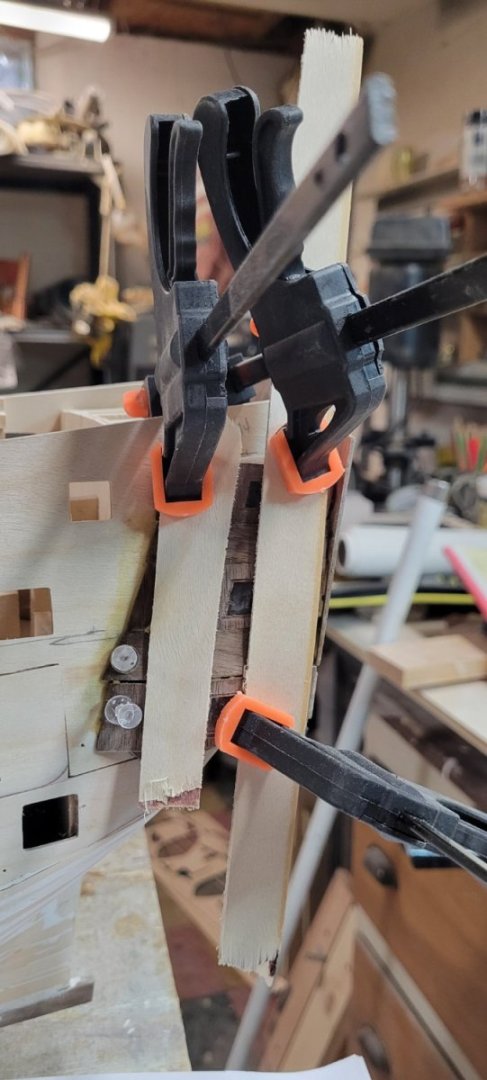
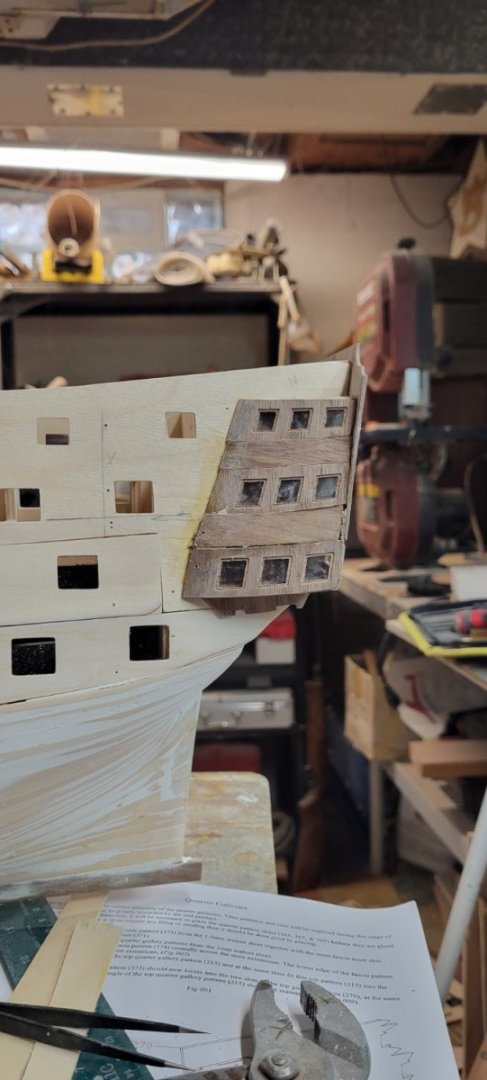
I finished the gallery pieces. It was very difficult getting #372 to bend in the direction that is needed. I tried soaking it in hot water in my microwave but it didn't seem to offer any more pliancy along its longer axis. So I placed it on a full size spray paint can. I wrapped it with a dozen or so rubber bands and then placed the whole think in a pitcher of hot water for an hour. That did the trick! There is a lower piece #220 that I think is supposed to be an angle to frame out the gallery bottom. I installed mine straight across and you can see there is now a void under the gallery. I decided I would just created a piece from the walnut sprue and cap it off, I can sand and fill after to smooth it out. I believe it will be fine once it is sanded and filled and ultimately painted. For the deck, while it is a deck with little visibility once the model progresses, I was not happy with some of the gaps in the planks. I truly thought that I kept everything tight, but spaces are there. I thought I would add some stain to the wood filler I have and see if I could smooth it out. I had a small can of old Jacobean stain and mixed it with a little filler. It was a kind of grey color, but that is kind of what happens when you apply this stain on white colored woods. After doing the whole thing (the little corner was my test piece and after it had dried it seems ok...) I thought, WHAT HAVE I DONE!!!! But a GOOD hour or so of sanding, block sanding, sanding with emery boards, with my fingers I think I got it all off. I really like what the stain did to the wood. It gives it an aged look and the fill in between looks like caulking of the right scale. It did fill some of the more aggressive holes I had, but that is ok too. After a final sanding with an 800 grit paper...I wanted 220 or 400 but grabbed the wrong one. It worked fine. I sprayed a coat of matt lacquer on it. It obviously sprays wet and creates a more yellow appearance, but when I did this with my Titanic build, once it dried it reverted back to its original color. I'll steel wool it tomorrow once it cures and maybe put a 2nd coat on. I'll have to see. On to the 2nd planking. I am dreading this as I want it to be perfect.


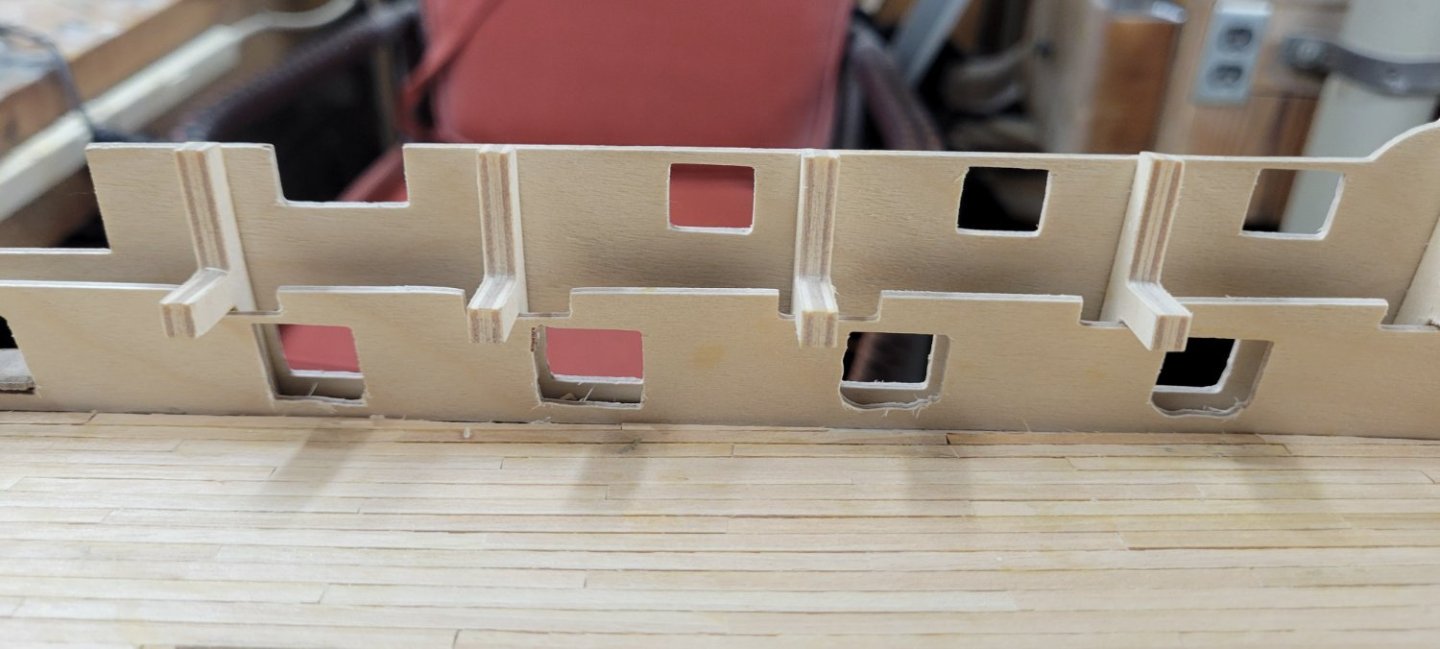
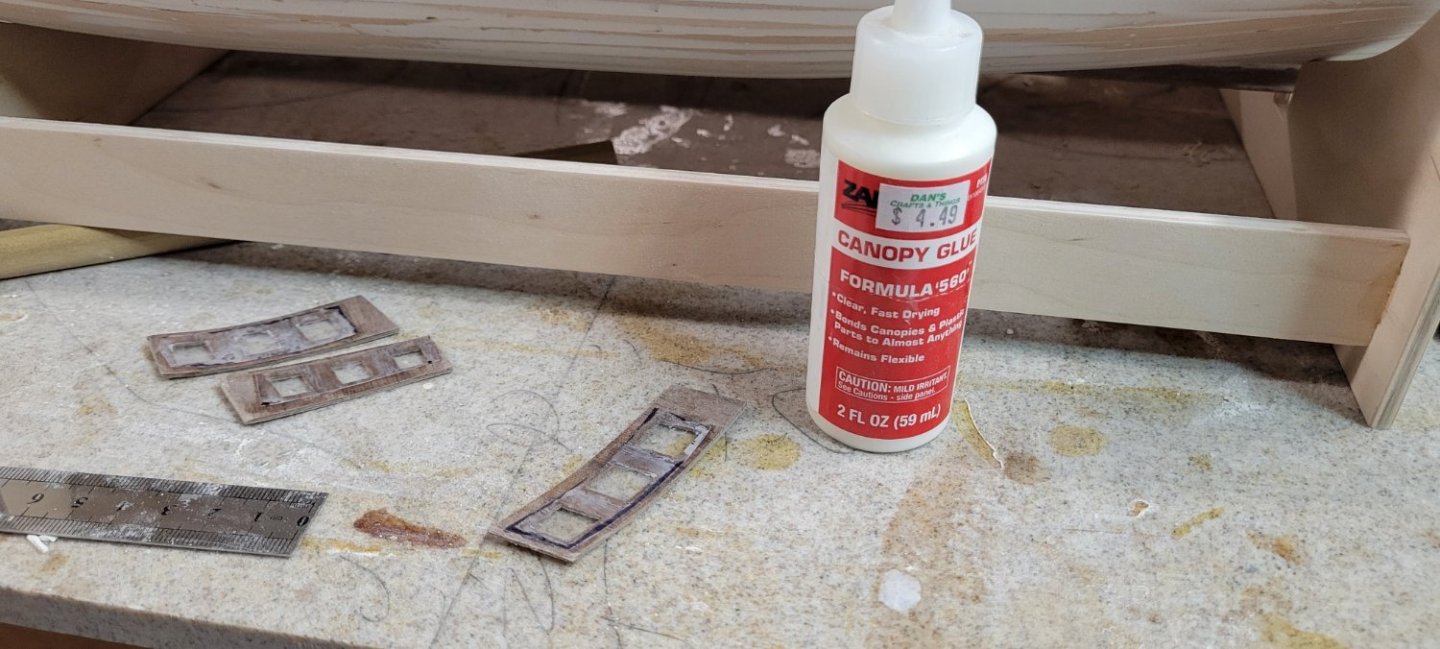
-
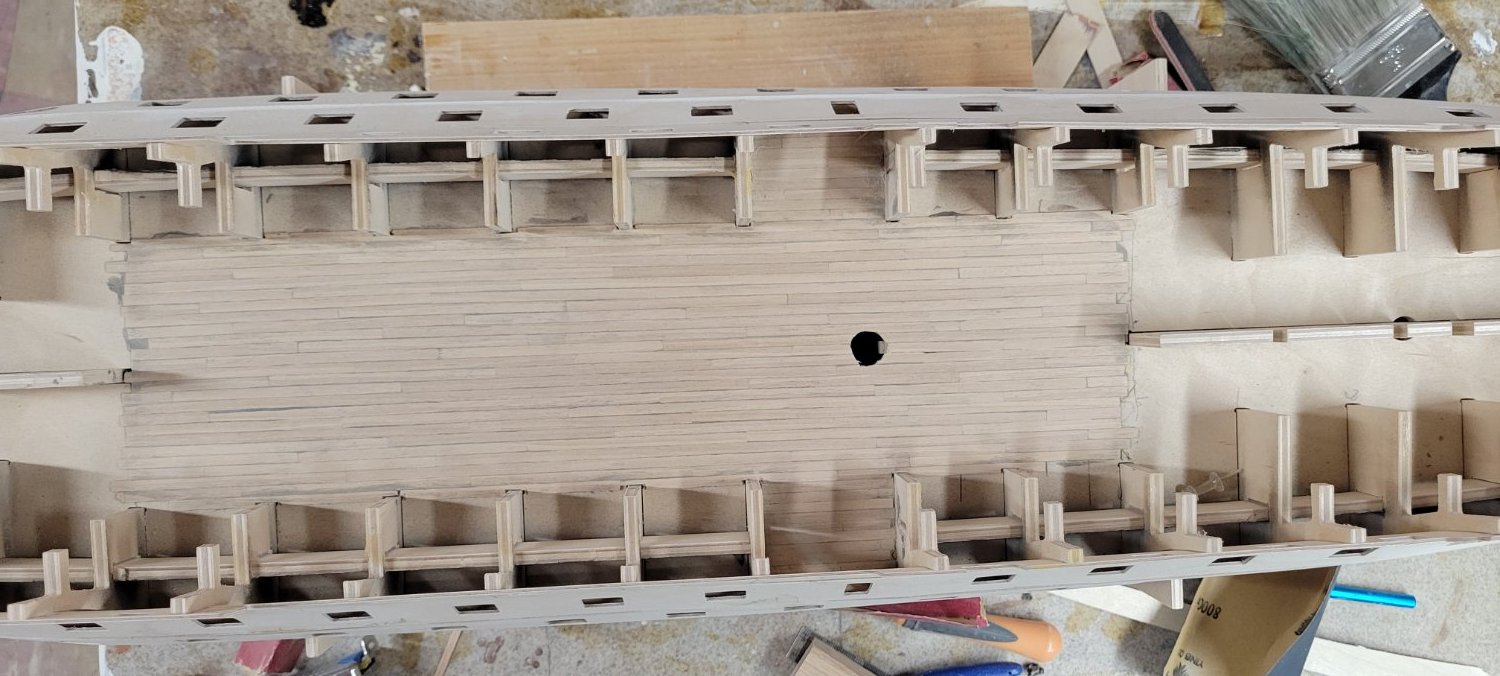
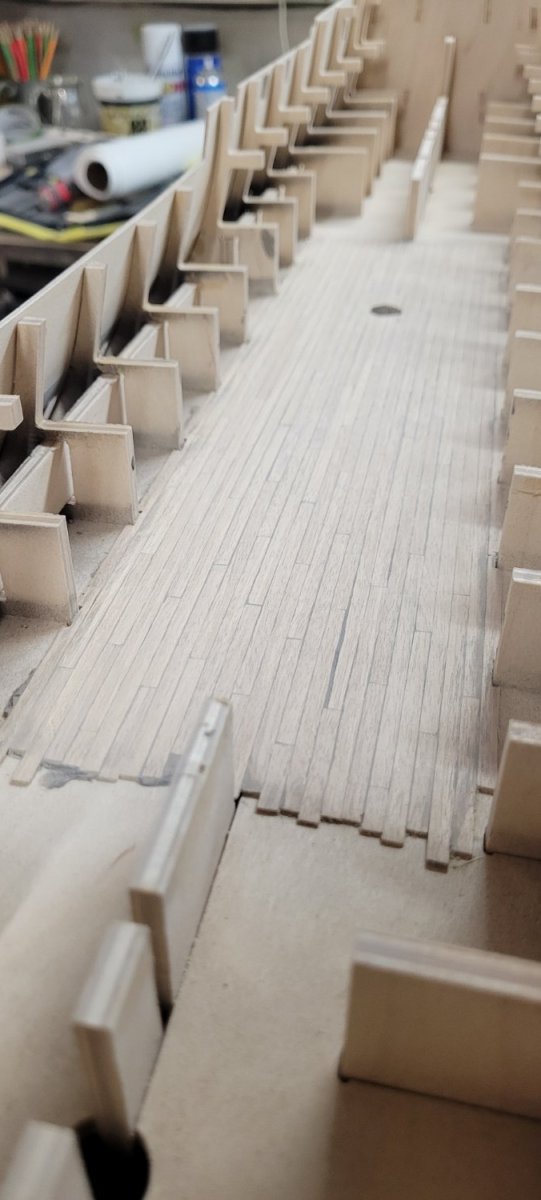
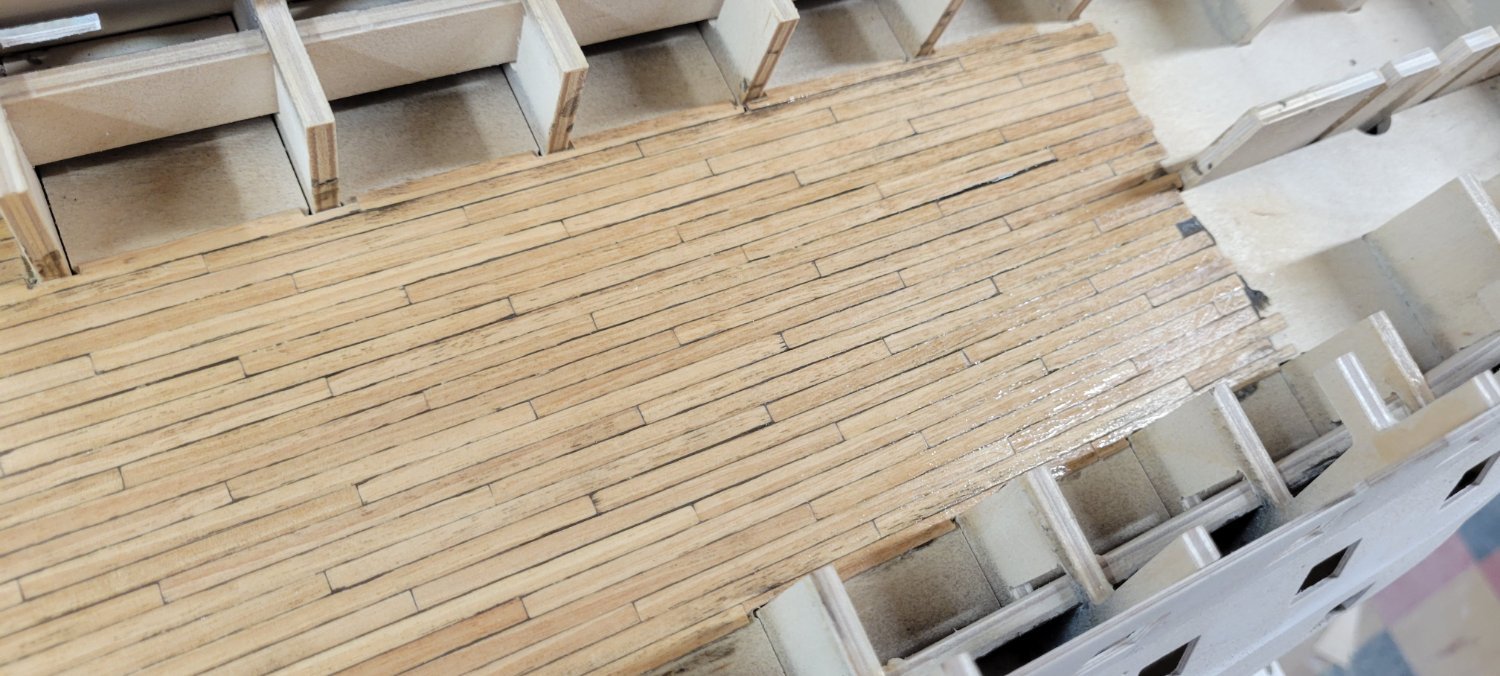
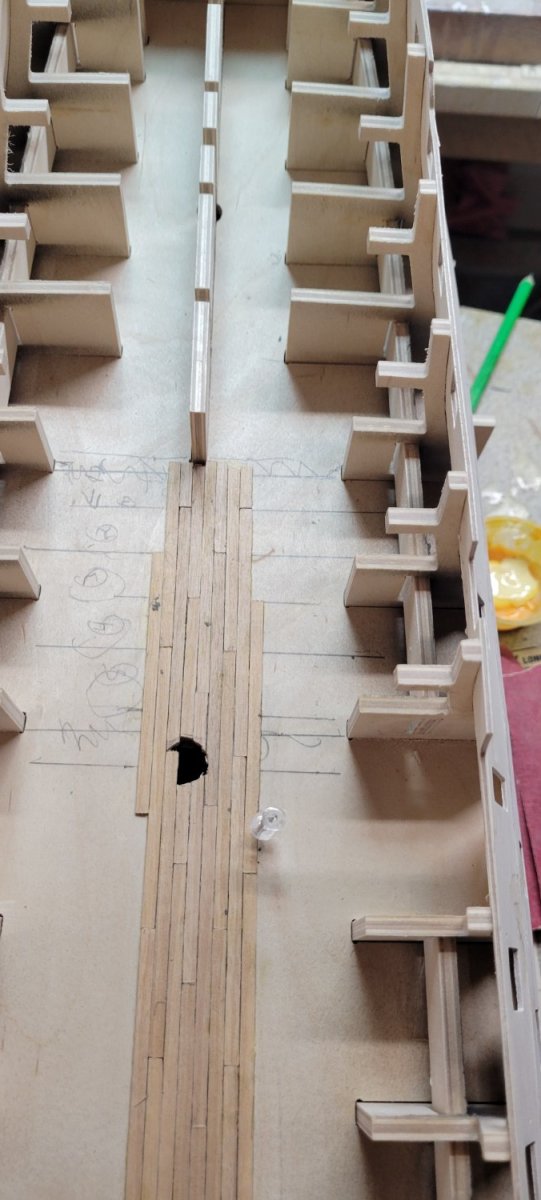
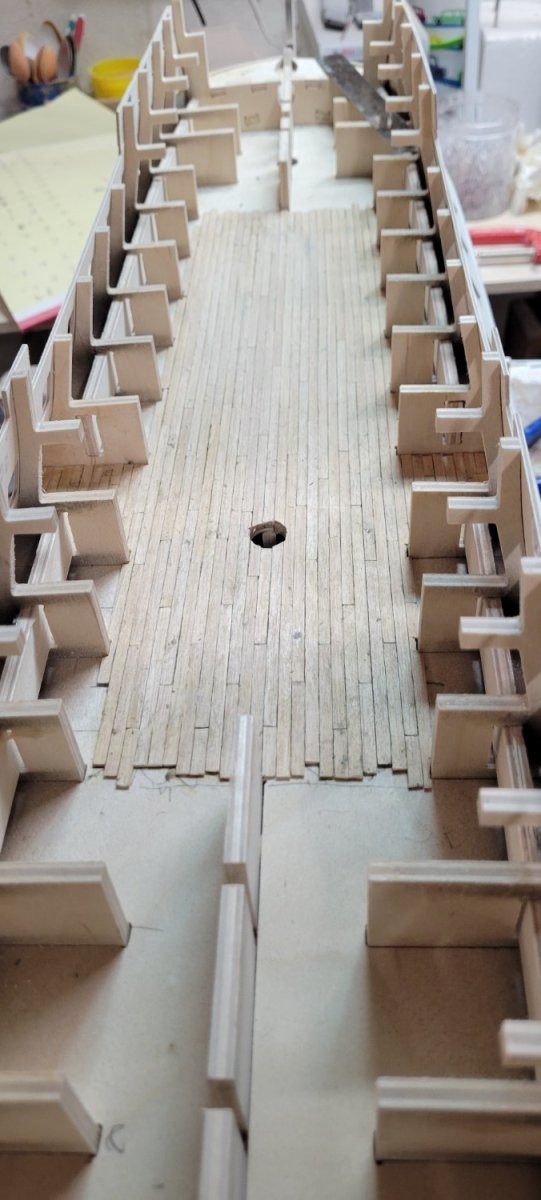
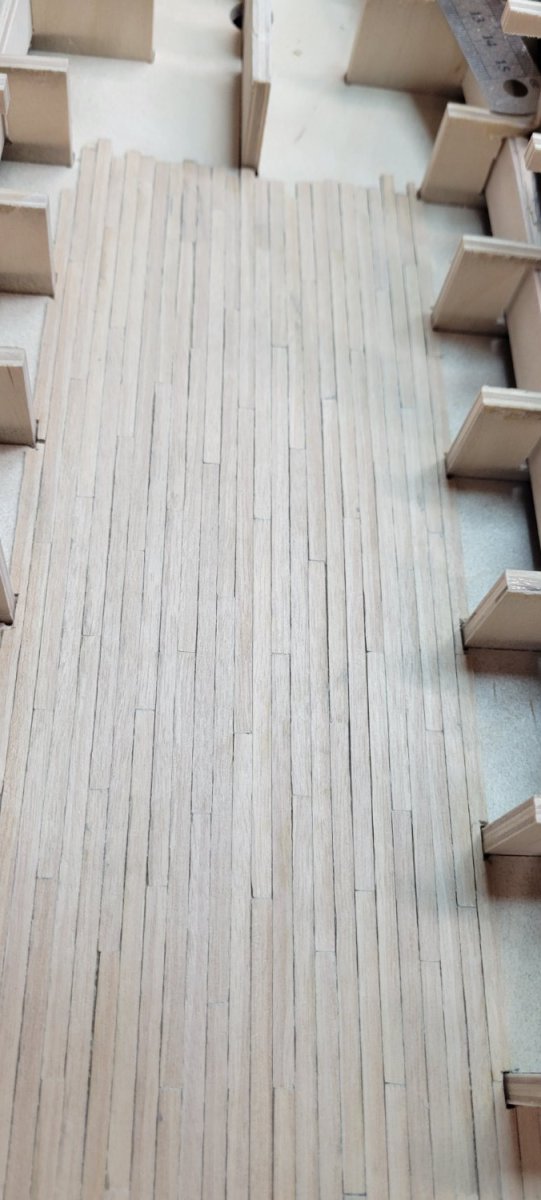
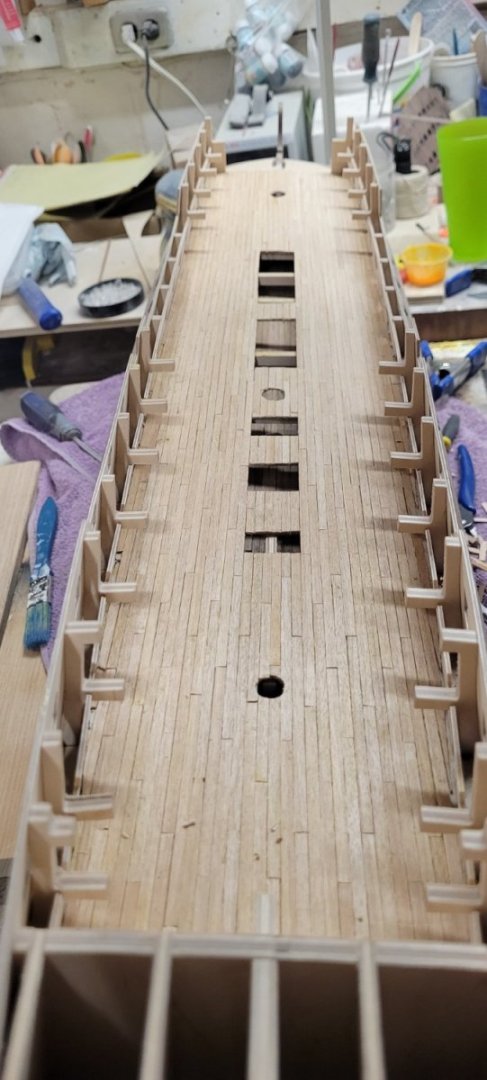
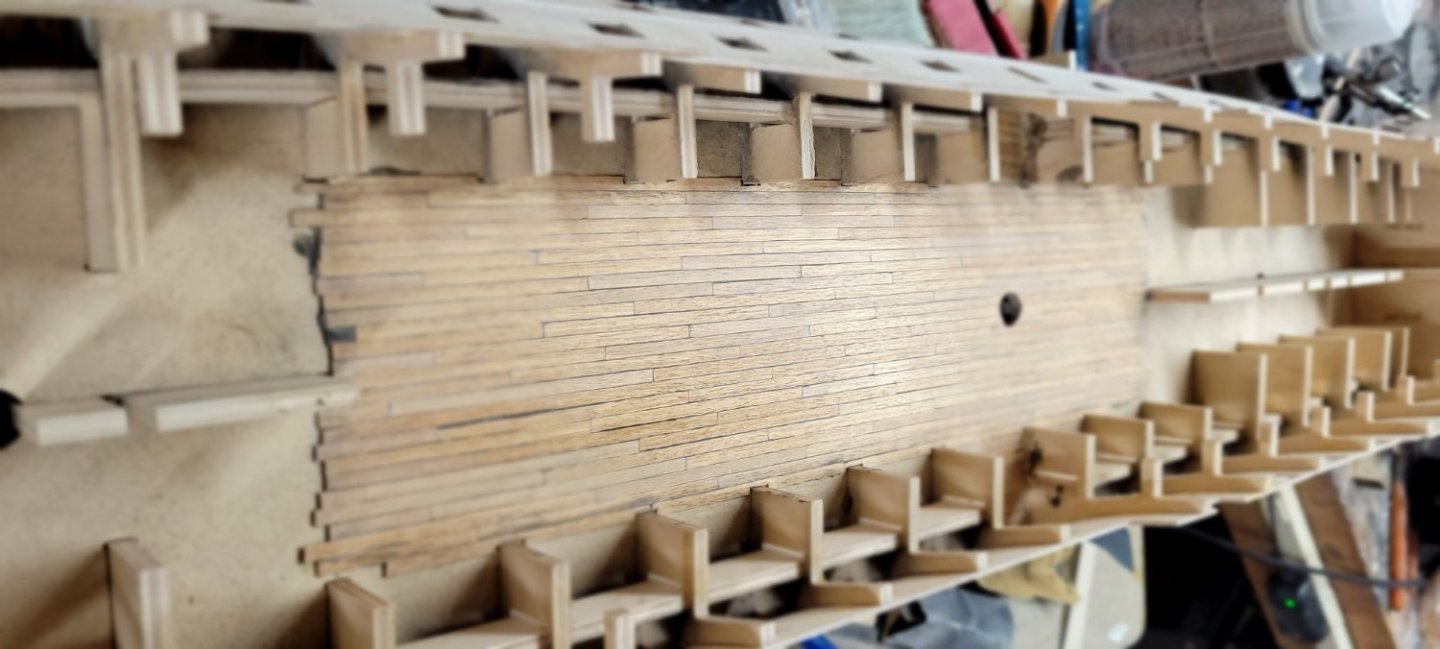
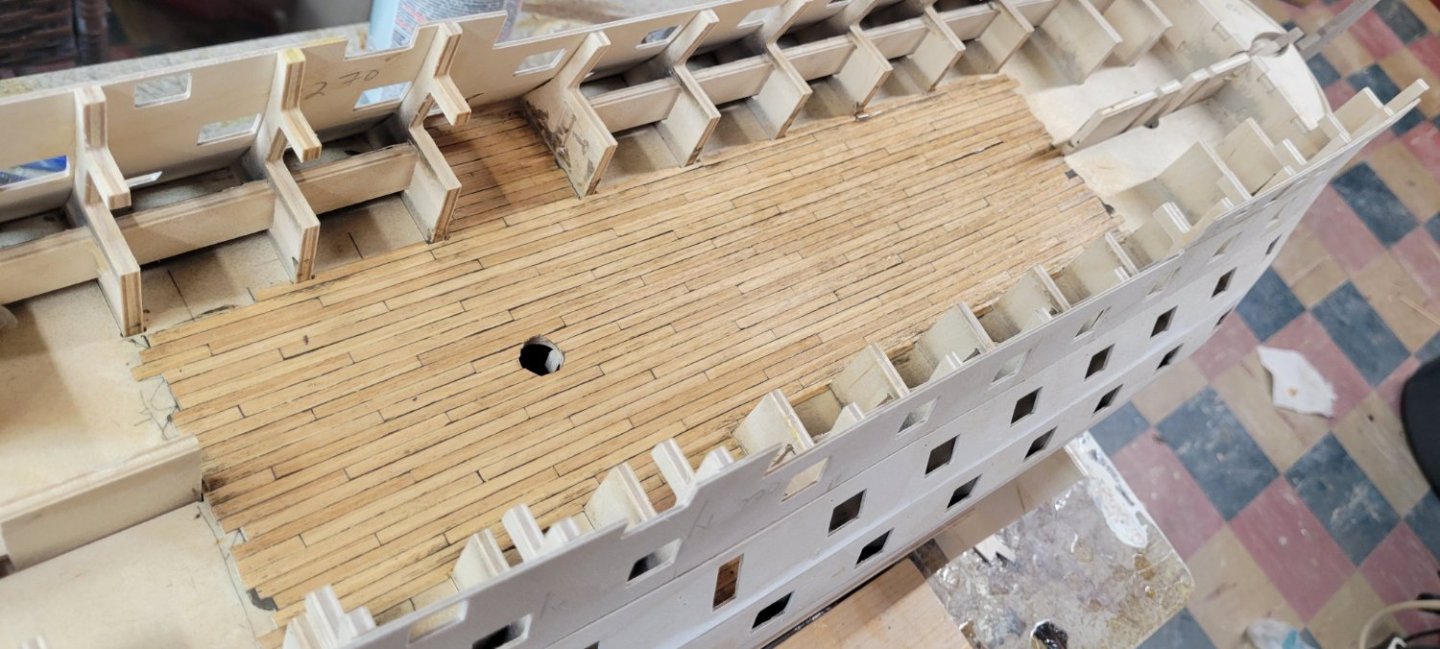
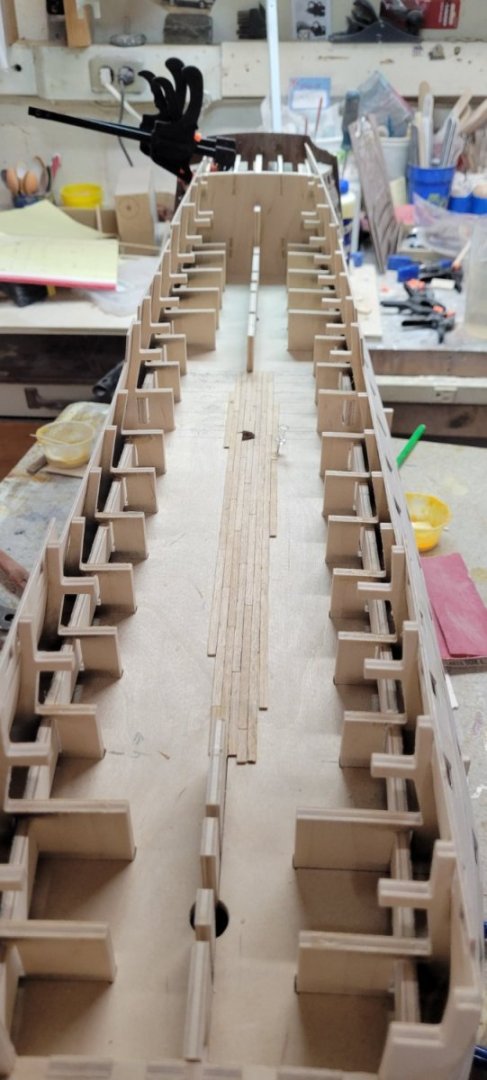
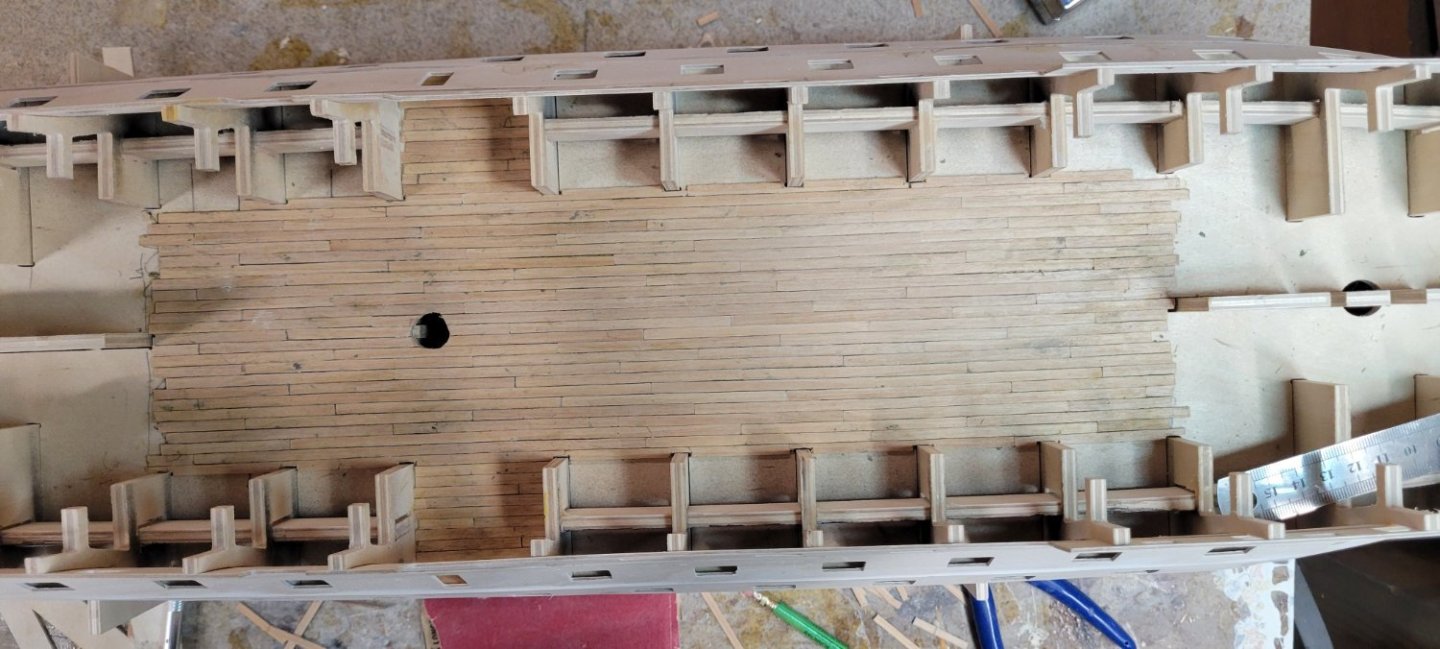
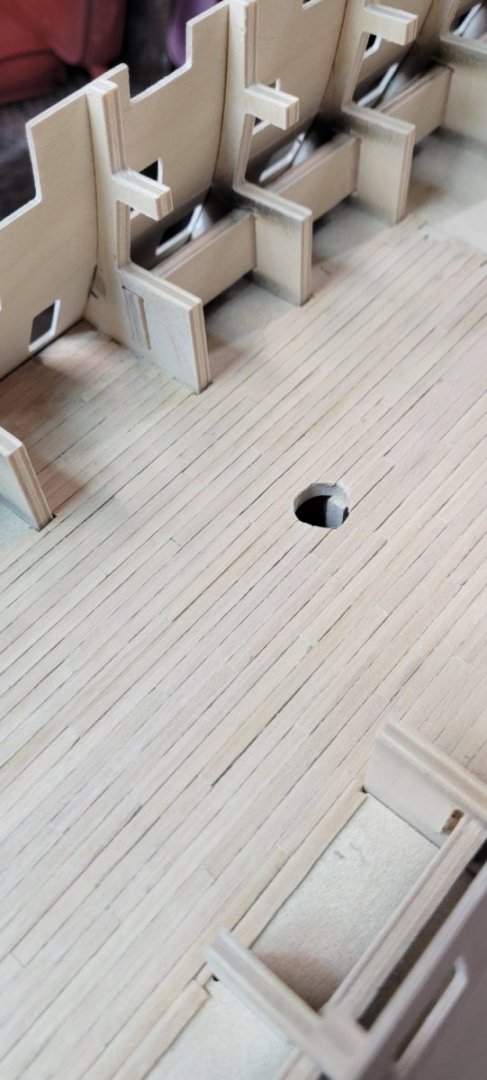
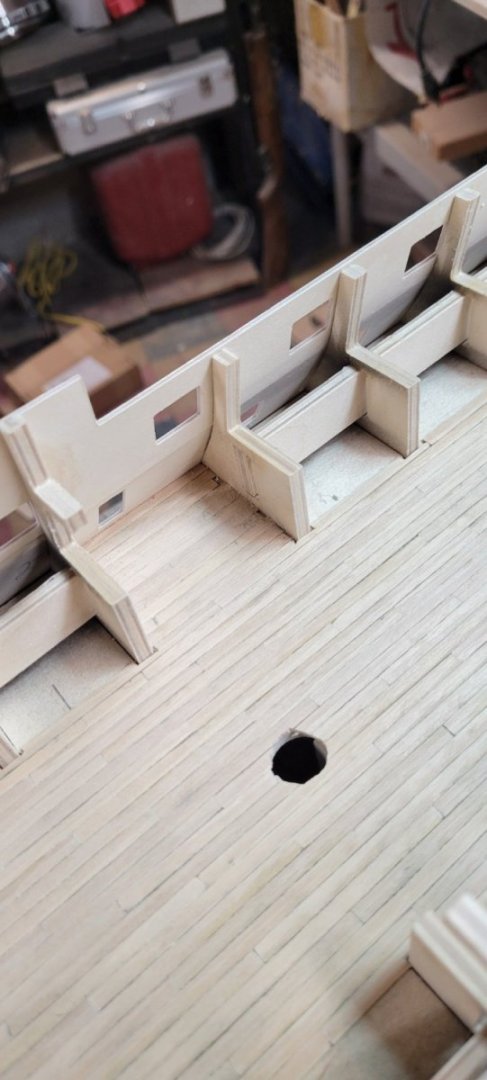
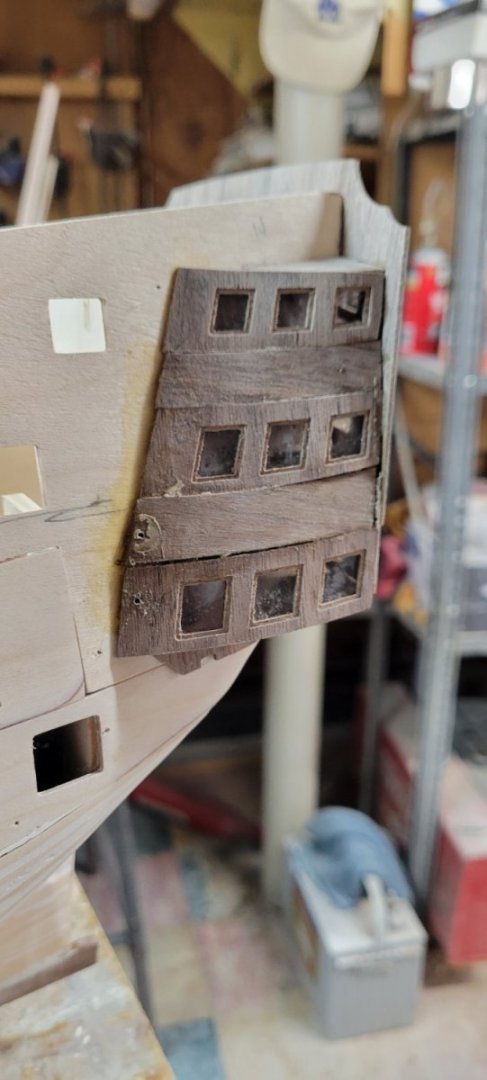
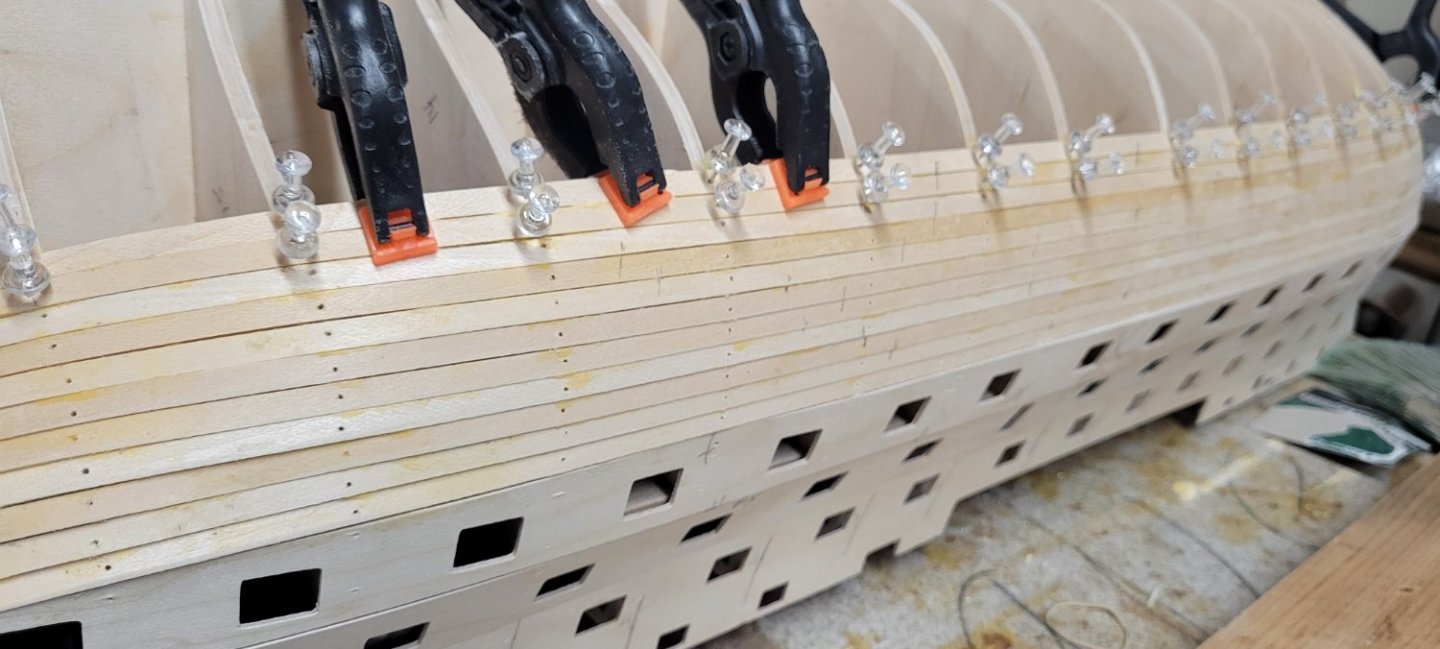
Boy!!! What a droopy, drippy mess that last picture was! But it is behind me...wood filler is still my friend and so far he/she hasn't let me down. Today I worked on the quarter galleries and while things dried, I also worked on the middle gun deck planking. First, working ALONE on the quarter galleries is actually much harder than anybody lets on. Maybe it's the first 'rite of passage' we have to endure...no one posts that doing this is almost impossible so that when it's done, we all feel like there must have been some easy, peasy way that veterans knew and wouldn't share with us rookies! Because it just sucked and I started thinking....I just finished the first planking and that was comedy of errors after looking at other builds and then I start trying to figure out the galleries AND figure out a way to actually glue them together. Whew. The plans are and they aren't pretty clear. I finally decided to just glue part #373 to each side, lining up the notches on the already attached gunport #270. I found that bending the window pane pieces was fairly straight forward and since they were delicate, they held their shape well. However the pieces in-between the window 'skins' were VERY tough to shape. In addition, I think they needed a round bend AND a bit of a twist to line up with the....tumblehome?....of the gun port. I ended up having to use map pins to drive in the edges to the gun port side. I used a piece of 1/2" dowel to help pull the stern sheet in. Laid out the quarter gallery skins to see how they will fit. I cleaned out the recess for the window framing using a pointed file. That seemed to work well, there are a few build logs that actually add skins to create a stronger recess to show off the window mullion/muntins? That's what I plan on doing. There is so much talk about being careful gluing the transparency to the back of the window frame skins, especially if you use CA glue. I have had good luck with Canopy Glue, it does not add a fog to clear plastic...there is a bit of cloudiness but nothing bad. Honestly, when I did my Titanic build, I would actually sand the backs of the window plastic to create a hazy view. It allowed light through (I had lit my model) while not taking away from the fact there are windows. I didn't do that here but I thing it would have worked fine since I am not adding lights. Coming up with creative ways to glue all the skins to the boat took some time. In the end, there is another level of planking that will butt up to this work and then I can contemplate adding wood putty to smooth the whole thing out. While waiting for glue to dry on the galley quarters, I cut the decking strips to 85mm. I did this based on the instructions for the upper gun deck planking. However, I used a 5 plank layout for the middle deck based on a deck planking instructional PDF. 85 divided by 5 into an even number, so I used the 5 butt pattern. Yes...I just got Anatomy of Nelson's Ship by Longridge today (WOOT!!!!!) and I see that he recommends the upper deck be planked in the 4 butt system, but nothing for the middle deck. I like the look of it and since very little of it is showing, I am happy. Honestly, it looks so dirty and gluey, but I couldn't be happier. I sanded it down, The pictures seem to show a lot of gaps between the planks, but that isn't the case. And yes, I did try to continue the 5 butt system into the entry areas....tried, I think I actually cut the planks for the first side but ended up just creasing the planks on the other side. Sorry, they were tough, but I think that once they dry out I can smooth them out with sanding and putty. I hope!!!!


-
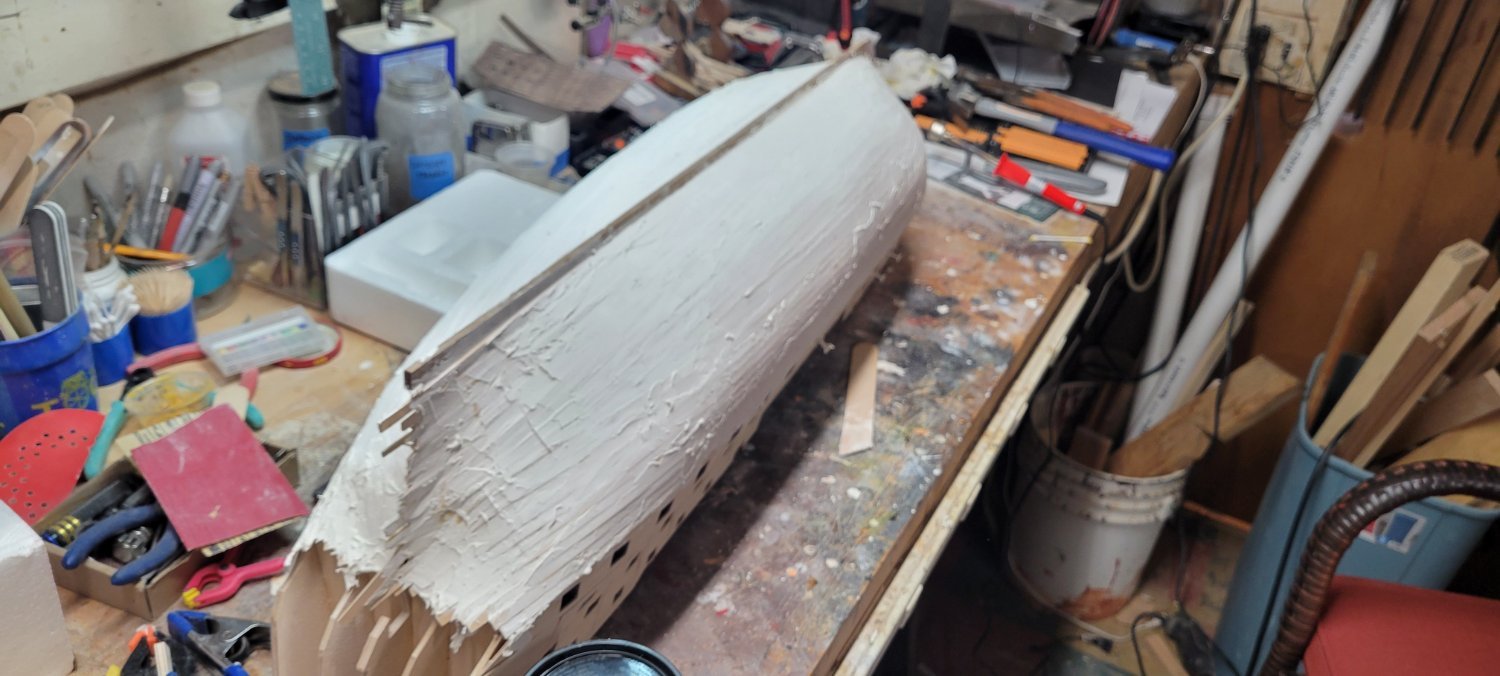
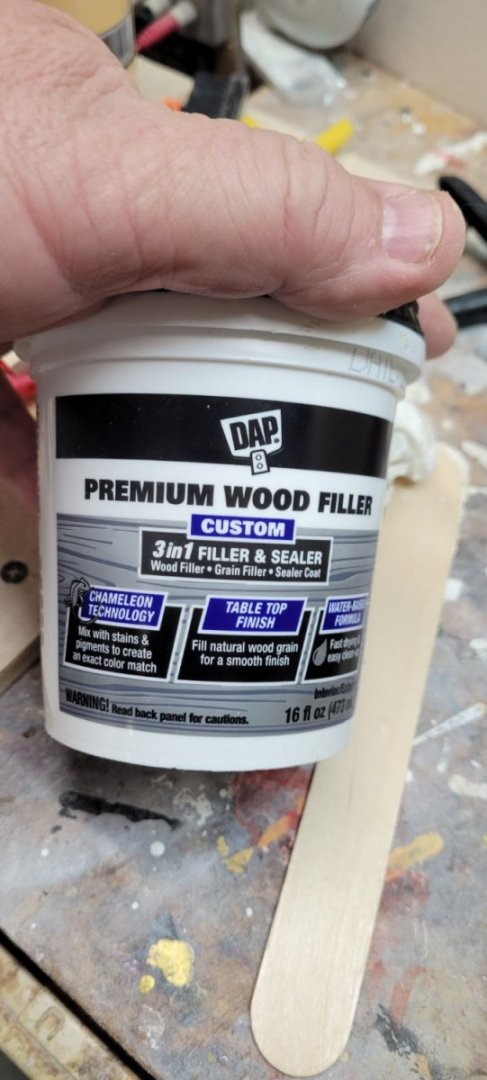
Finally finished the first run of planking. If this was a single plank type of model, I would have completely removed it and tried to start again. Very humbling process. I did apply DAP's Premium wood filler to the entire hull. This stuff isn't like normal wood putty that dries into a cement, gets into your finger tips when you don't wear gloves and takes hours to sand smooth. It's almost like drywall mud, it dried to a point that it is sandable in about 2 hours. When you sand, it is VERY dusty, again like drywall mud. But it sands down very nicely and levels well. After my first sanding, I can see some low spots and was able to add a new layer. I also worked at cleaning up the stern, using my Dremmel to cut away all the overhanging strips. I may have cut a bit too far and I'll check the fit with parts that build up the stern galley. I also had a few strips on the bow that didn't fit well, they were too long and bowed out. I cut them down a bit, glued them and will fair them tomorrow. I was getting parts ready for the task of setting up the galley but the kit was missing Sheet #3. Fortunately, Jotika sent a new sheet and it arrived today. I think that is pretty good service. I am missing one of the 12.7mm masts too, but Home Depot sells 48" lengths...sadly their dowels all have a bit of a kink in them...that's the problem with selling dry wood in a 'box store' instead of from lumber yards. The wood tends to warp and be a bit substandard. But for $2 or $3, I bought 2! I will take the next few days sanding and filling, then I'll clean my work area and take a look at the pieces for the stern galley. See you then!


-
I have watched so many planking videos, read so many PDF files on planking and I even joined the Nautical Research Guild to get some of their inside tips. Boy is it tough. I clearly did not have a plan and that lack of foresight is evident. I understand that I will be ok because this is just the first planking and I get to do it again with the 2nd layer. Hopefully, that will go better! For some reason, I decided to also work from the keel back up to the water line. You can see I tried to notch one of the strakes to keep things moving along evenly. Just a close up of 'what not to do to your model' pics! Today (2/25/24) I started getting close to the finish. Instead of trying to bend the strips into submission, I tried notching them out and running 2 into 1 strip. I think you can see some of my attempts on strips towards the stern (around bulkhead #14 or 15) I finished one side! Just gluing that final strip into place. But will she float? I wanted to see if I can correct all of the imperfections by applying some wood putty. I tried a different product from one I would normally use. This one has the consistency of frosting. I am curious to see how it sands once it dries and how long for it fully cure.


-
Well I have been moved!!!! Thanks to Allan for pointing out my 'ship out of time'. For me, there has been nothing more helpful than watching other build threads and video logs of builds. Especially when they are beginner builders. Sometimes when you watch an experienced modeler, they have done so many previous projects, they know what they need to do before starting. Their moves are effortless and the end result is what we strive for. With beginners, you see the learning as you go, a process which helps me. ...if that makes sense. Well, back downstairs, I'll have an update this evening and hopefully be 'close' to finishing my first planking layer! Chris
-
Allan; Lol....not many people get the user name! Been using it for years. I believe I have subscribed to Chuck's YouTube page and have watched them a few times. I find that I do a few strakes and as they dry, I come back upstairs and re-watch planking videos. As for where I am, I guess I just had 1805 in my mind. I wonder if there is a way to move my thread to the proper section? Thank you! Chris
-
I thank that's a great statement for new and rookie builders. It is just a base and sanding and filler (done correctly) will create a base for the 2nd planking. And then THAT planking is just a base for the copper plating (should you opt for that, which I am). So two times to create the ideal shape and perfection. I suppose today I will bring all of the pieces up and lay them out and check off their status. I did all of the wooden sheets and they are there and all of the dowels except the one 1/2" dowel. I guess it has to be done! ....on a non model subject, I am the Secretary-Treasurer of the Catalina 380 International Association. About 400 or so sailboat owners of the Catalina 380 (and like) models. We have 9 owners in Australia, none in New Zealand but mostly in Queensland and New South Wales. How someone would sail a US manufactured boat all the way down under is incredible. But I suppose daring to cross the Tasman Sea must be too much!!!! I always do Google searches of owners to see where they live. I think I would just love living in that area, the places to sail into, the 'proximity' to SE Asia.....just wonderful!
-
Whew! The planking is a bear. The darn map pins only let me do about 3 strakes a side before I have to wait till the glue dries. I did try to taper #11 here, there are a lot of gaps, but as I've read on other builds....wood fill will fix it. Yeah...wood fill will fix it I think creating backing support (solid wood blocking, balsa or pine?) between the bow and bulkhead #1 would have helped visualize and/or shape the planks on the bow. You can see where I did not wet the stern ends of the planks and paid the price. Also the #11 strake on the STBD side is way too short. Wood putty will be my friend. Sadly, WAY too much space between strakes at the bow. That and there is a lot of 'stepping' or clinking or whatever between strakes. However, from this angle, the strakes look passable. These next few pics look pretty good too. Almost like I know what I'm doing! I am NO OLHA BATCHVROV!!!! She makes it look effortless! This morning I decided to take a different tack and tried to start at the keel and work my way back up to the water line. I took measurements of the 'white' or open space remaining. It showed that the middle, longest bulkheads needed 18 uncut strakes (at 6mm each) I took the open space for each bulkhead and divided it by 18. In my mind, this gave me the width needed for that particular bulkhead while keeping full strips on the middle bulkheads. I only did the first 3 strakes but I think it might go ok. I am sure I am going to have issues when I get to the original work! We shall see!


-
The sheet idea is a serious issue! When I did the Titanic model, I can't tell you how much time I spent on my hands and knees looking for those teeny tiny irreplaceable pieces. I have found missing parts tin my kit too. I only have one of the 12.7mm (1/2) dowels and I am missing walnut sheet #3, which has a lot of the next group of tasks with the galley. There is no way I want to inventory the rest of the small parts right now. I guess I will have to worry about that later. I am sure it is frustrating for Jotika, it seems like there is a huge upswing in demand for this kit, despite the cost and they are struggling to fulfill orders. Most of us imagine these companies have huge warehouses with dozens of employees working under bright lights and foreman pacing the floor. I think in reality, there is probably a hand full of employees juggling internet orders, phone calls and filling boxes with model parts. Has to be hectic. Jotika is sending the part out today, I didn't bother asking for the dowel. Seems silly to try and send a 48" piece of wood through the mail. Our local big box hardware stores sell it for about $3USD. I'm about half way up the bulkheads with the first planking. Having some fitting issues obviously at the bow and stern and some 'clinkering?' of the planks. I spent about 3 hours last night on YouTube watching planking videos, especially so I'm ready for the 2nd planking task.
-
Hi Graham; Thanks for the tip about setting up display options now. I will most likely just go with a stand where the finished boat just rests on it, rather than create an internal rod type system. Also, you are right about adding fill to the fore and aft bulkheads. I am not doing that and it is evident. The bow planks between bulkheads 2 and 1 are suffering because of a lack of solid backing. There is a bit of stagger in the planks and not as much roundness from #1 to the actual keel stem. My thought as my impatience made me just move forward without it was this...I would have used small soft pine blocks (no balsa around here that I could get quick enough), I would have created a 2 templates, created a series of wedding cake triangles, glued them together, sand them into submission. After hours of doing that, I would have started Or, I could just press on and spend those hours after sanding, filling and sanding into shape. Same time spent, but it soothed my impatience. THANKS! Chris