DONATION DRIVE - SUPPORT MSW - DO YOUR PART TO KEEP THIS GREAT FORUM GOING!
×

MBerg
-
Posts
139 -
Joined
-
Last visited
Content Type
Profiles
Forums
Gallery
Events
Everything posted by MBerg
-
 Oh wow, that looks like a nice resource. Thank you. Can't get much for three dollars anymore. Boat plans sounds like a good deal!
- 69 replies
-
- 1
-

-
- Lowell Grand Banks Dory
- Model Shipways
- (and 2 more)
-
Yes, just the kit basswood. I used mixwax dark walnut, one of their regular oil based stains. I realized the combo kit I had from ME with the dory, pram and smack came with some satin clear coat. So I put a couple coats of that on top to seal it. I didn't really have anything else, and tung oil is the only thing I've used before.
- 69 replies
-
- 2
-
-
- Lowell Grand Banks Dory
- Model Shipways
- (and 2 more)
-
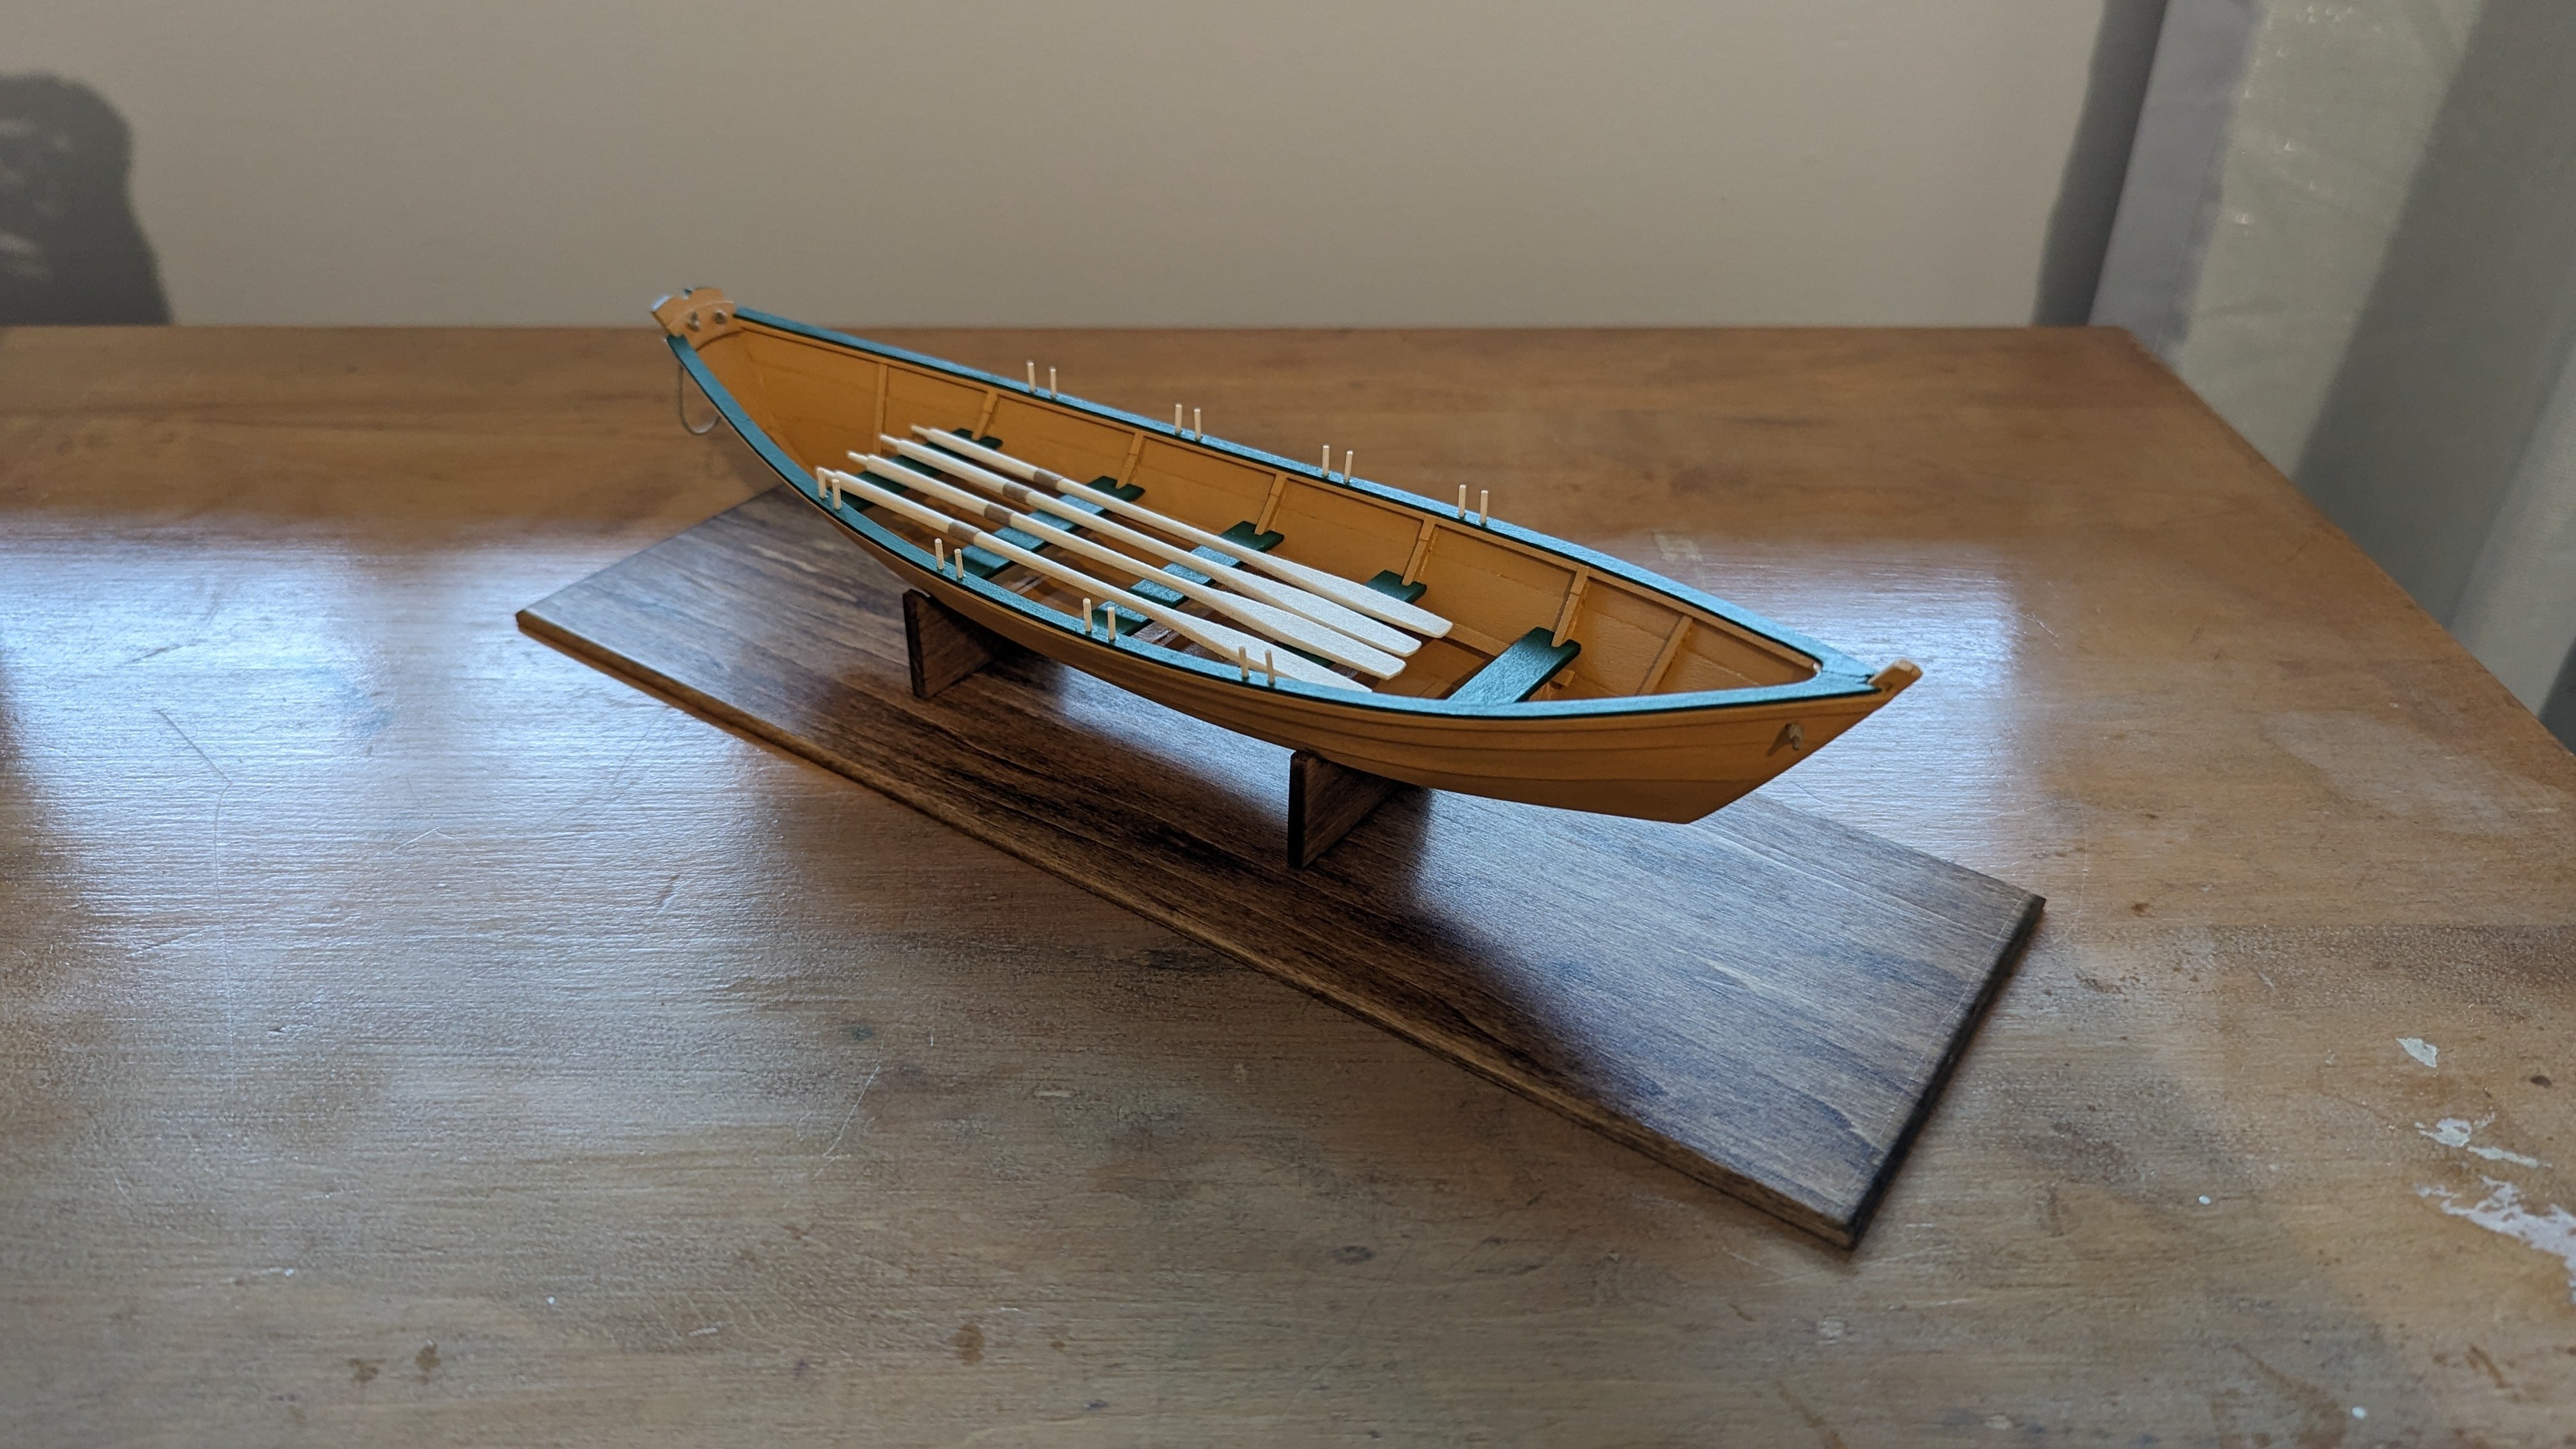
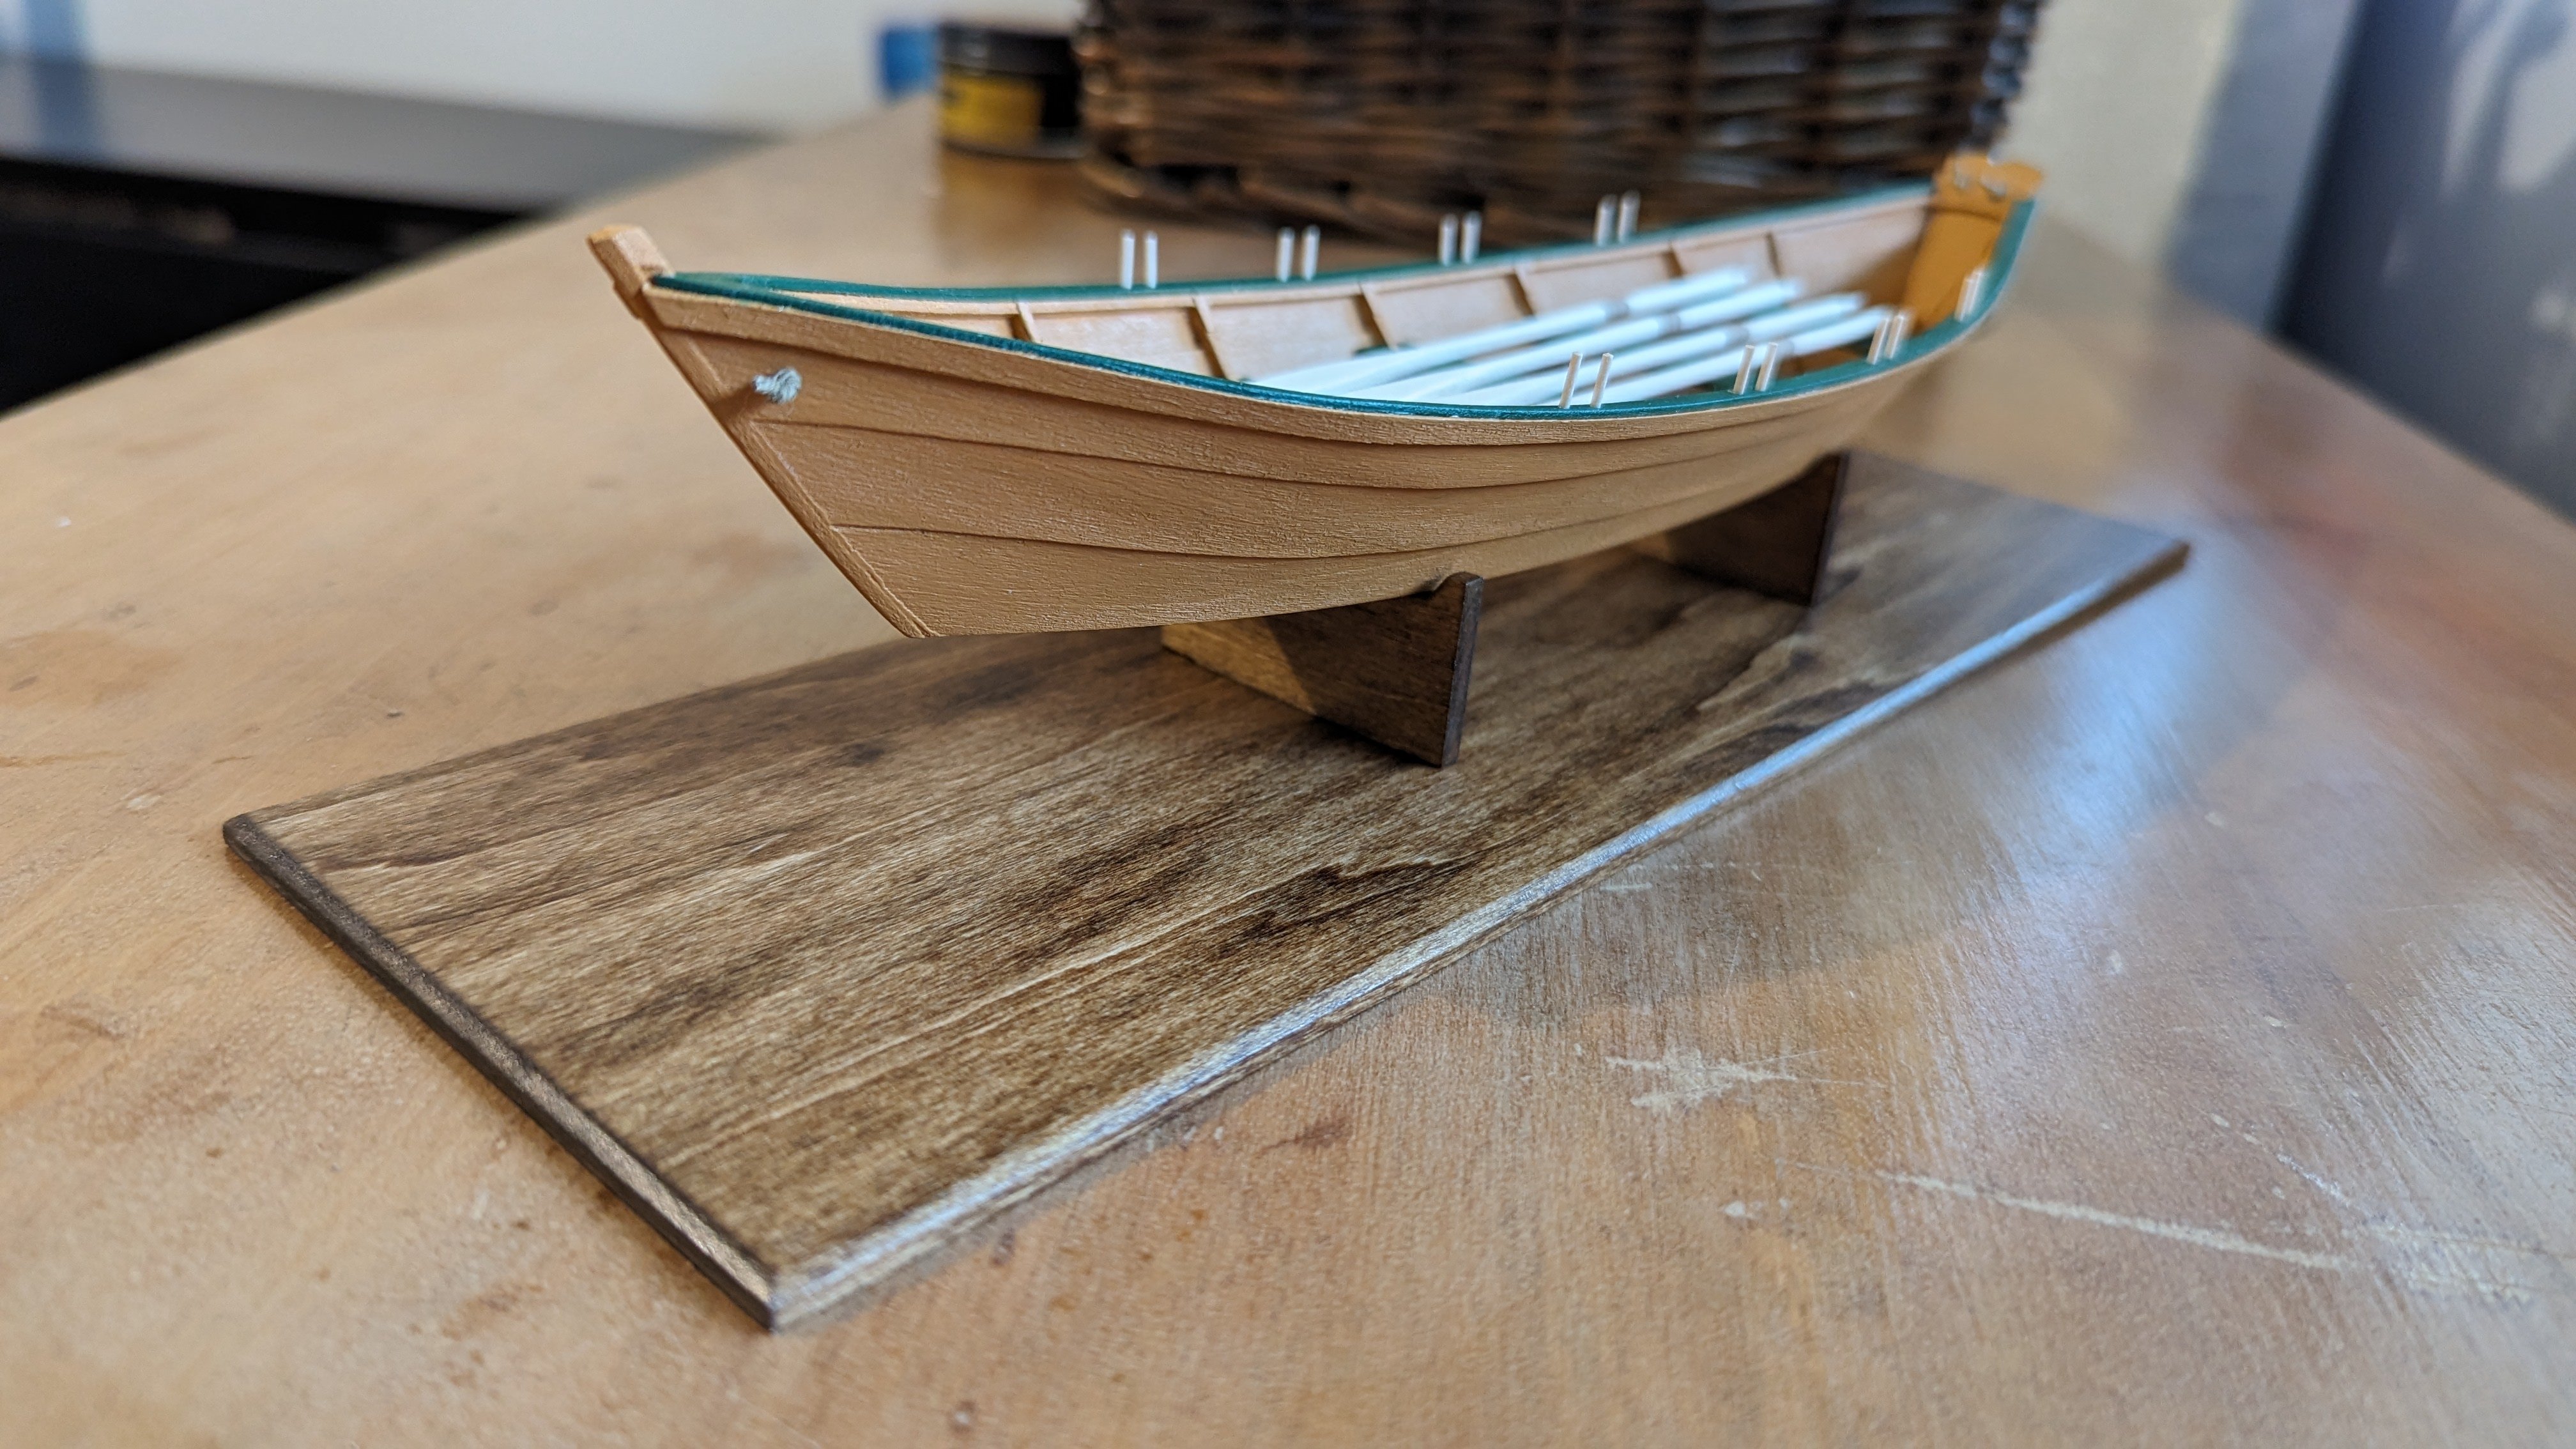
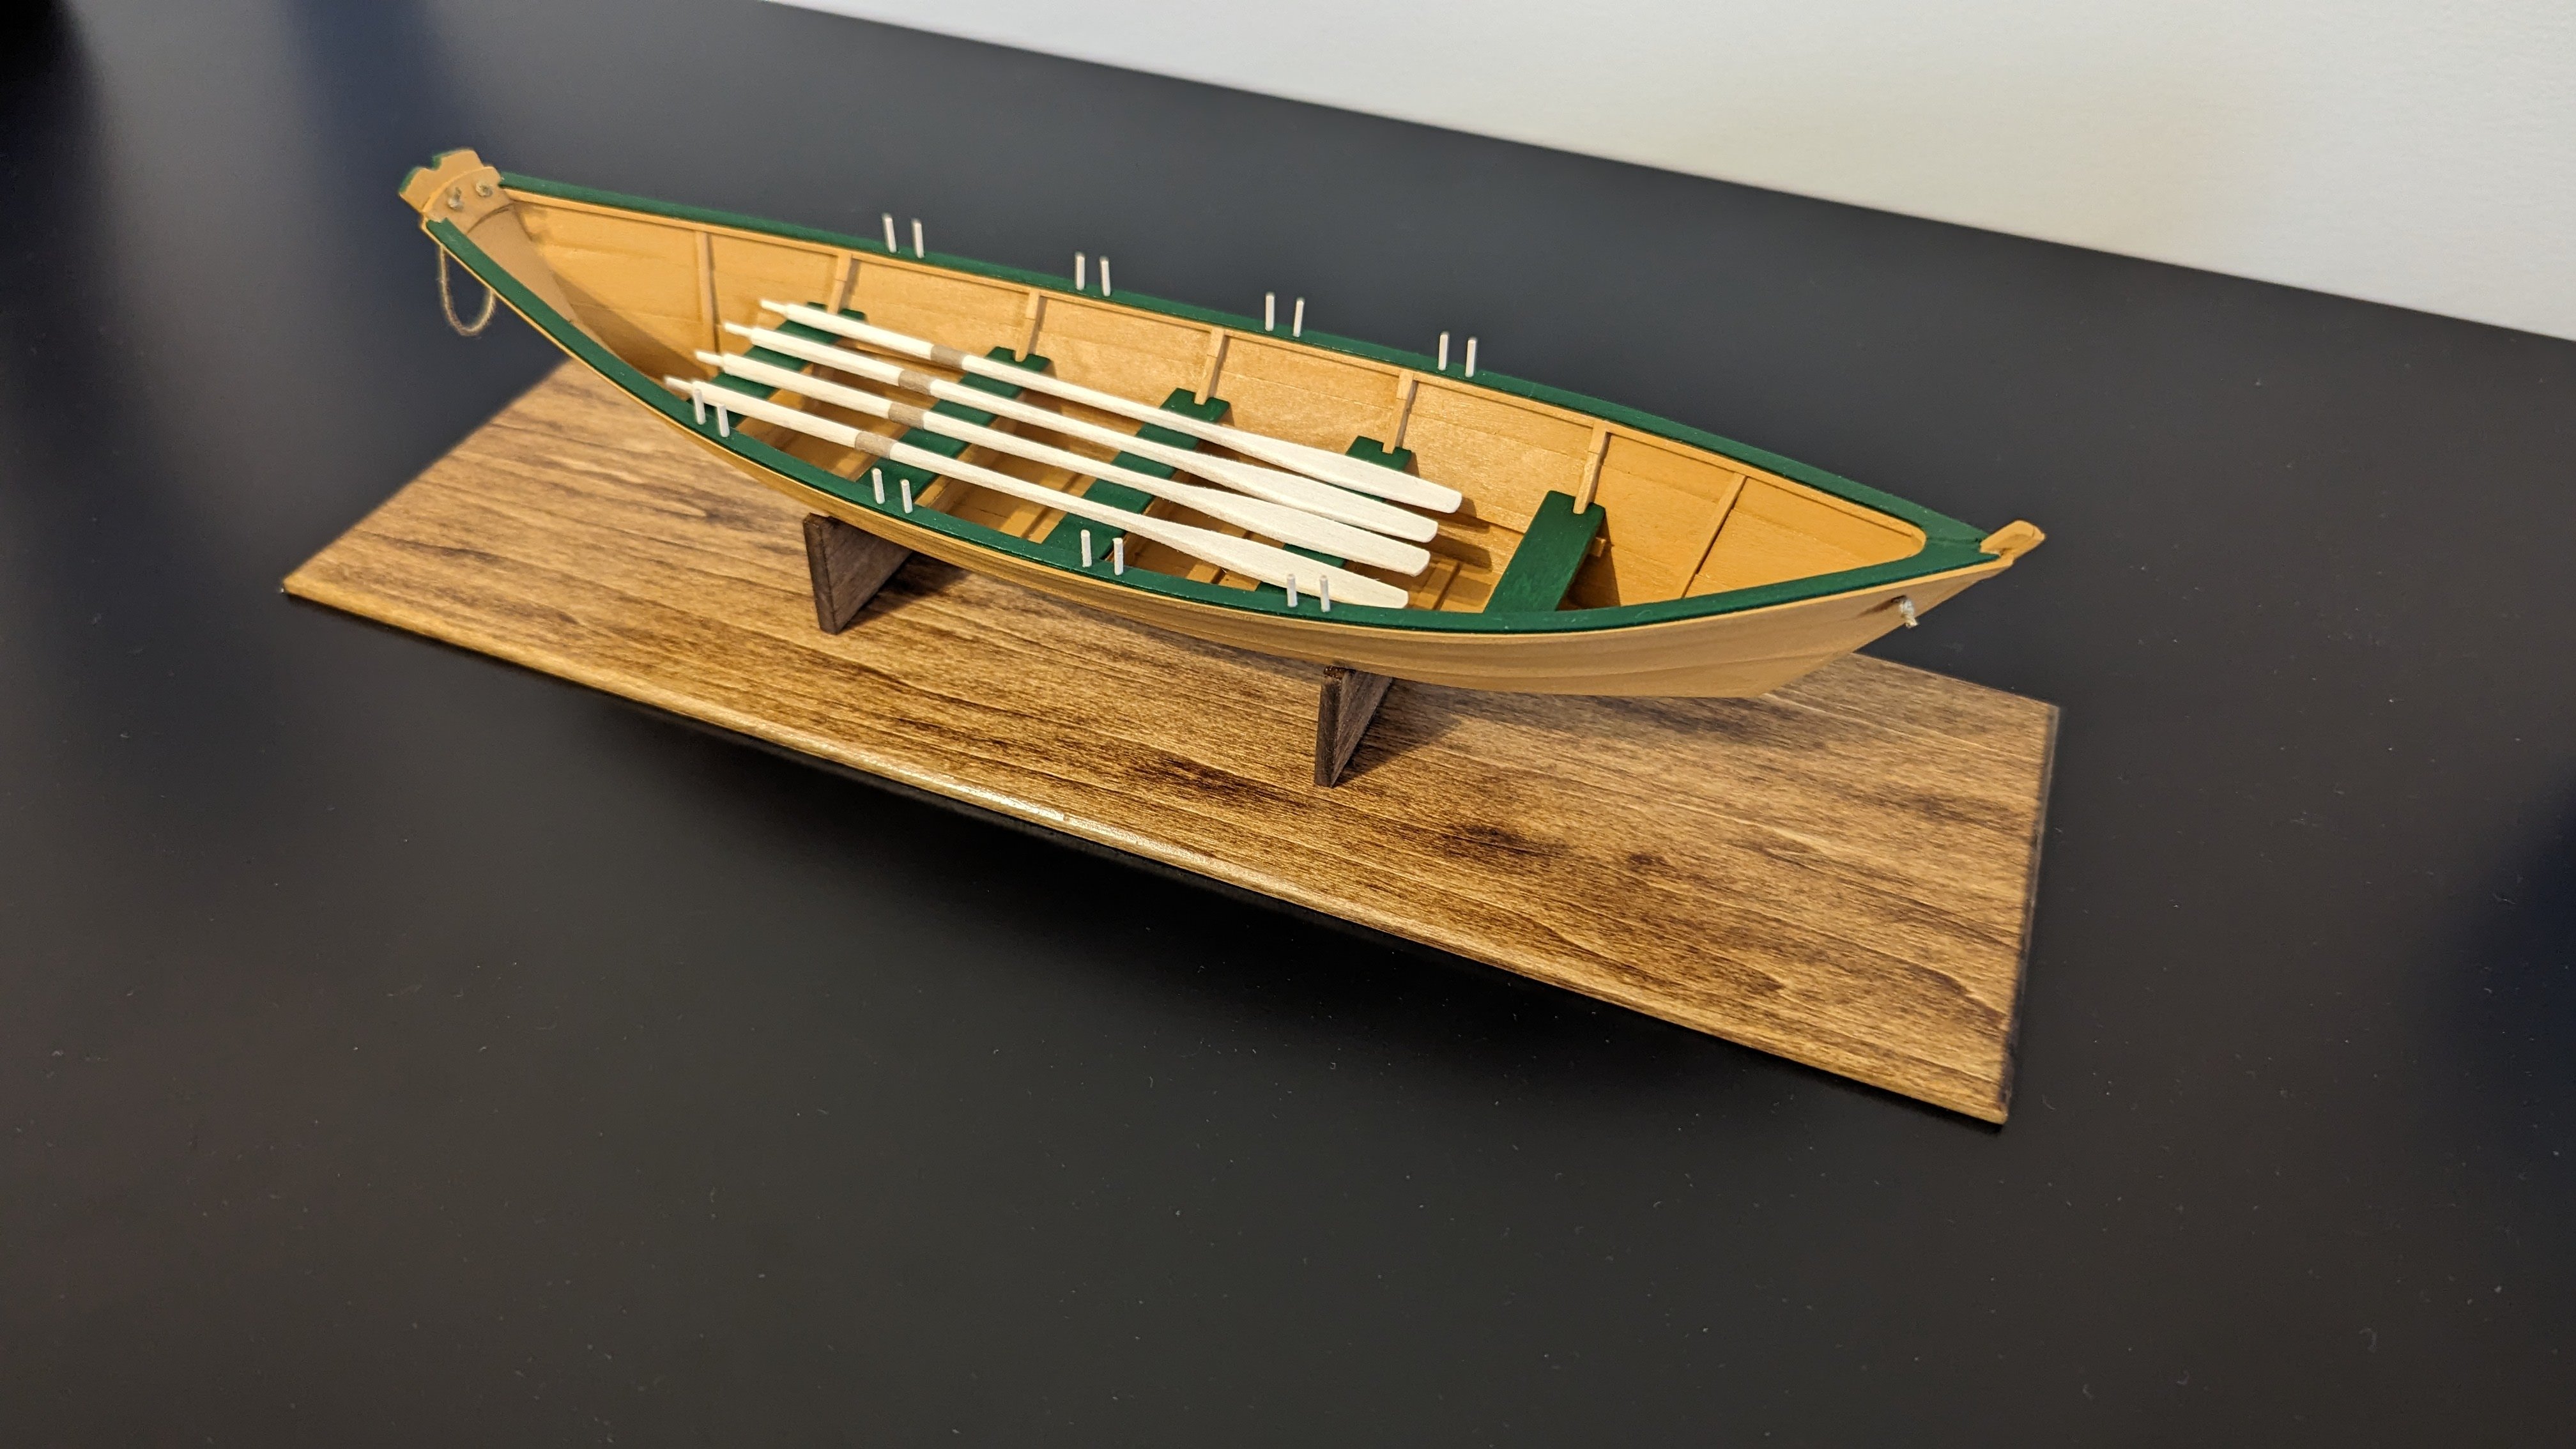
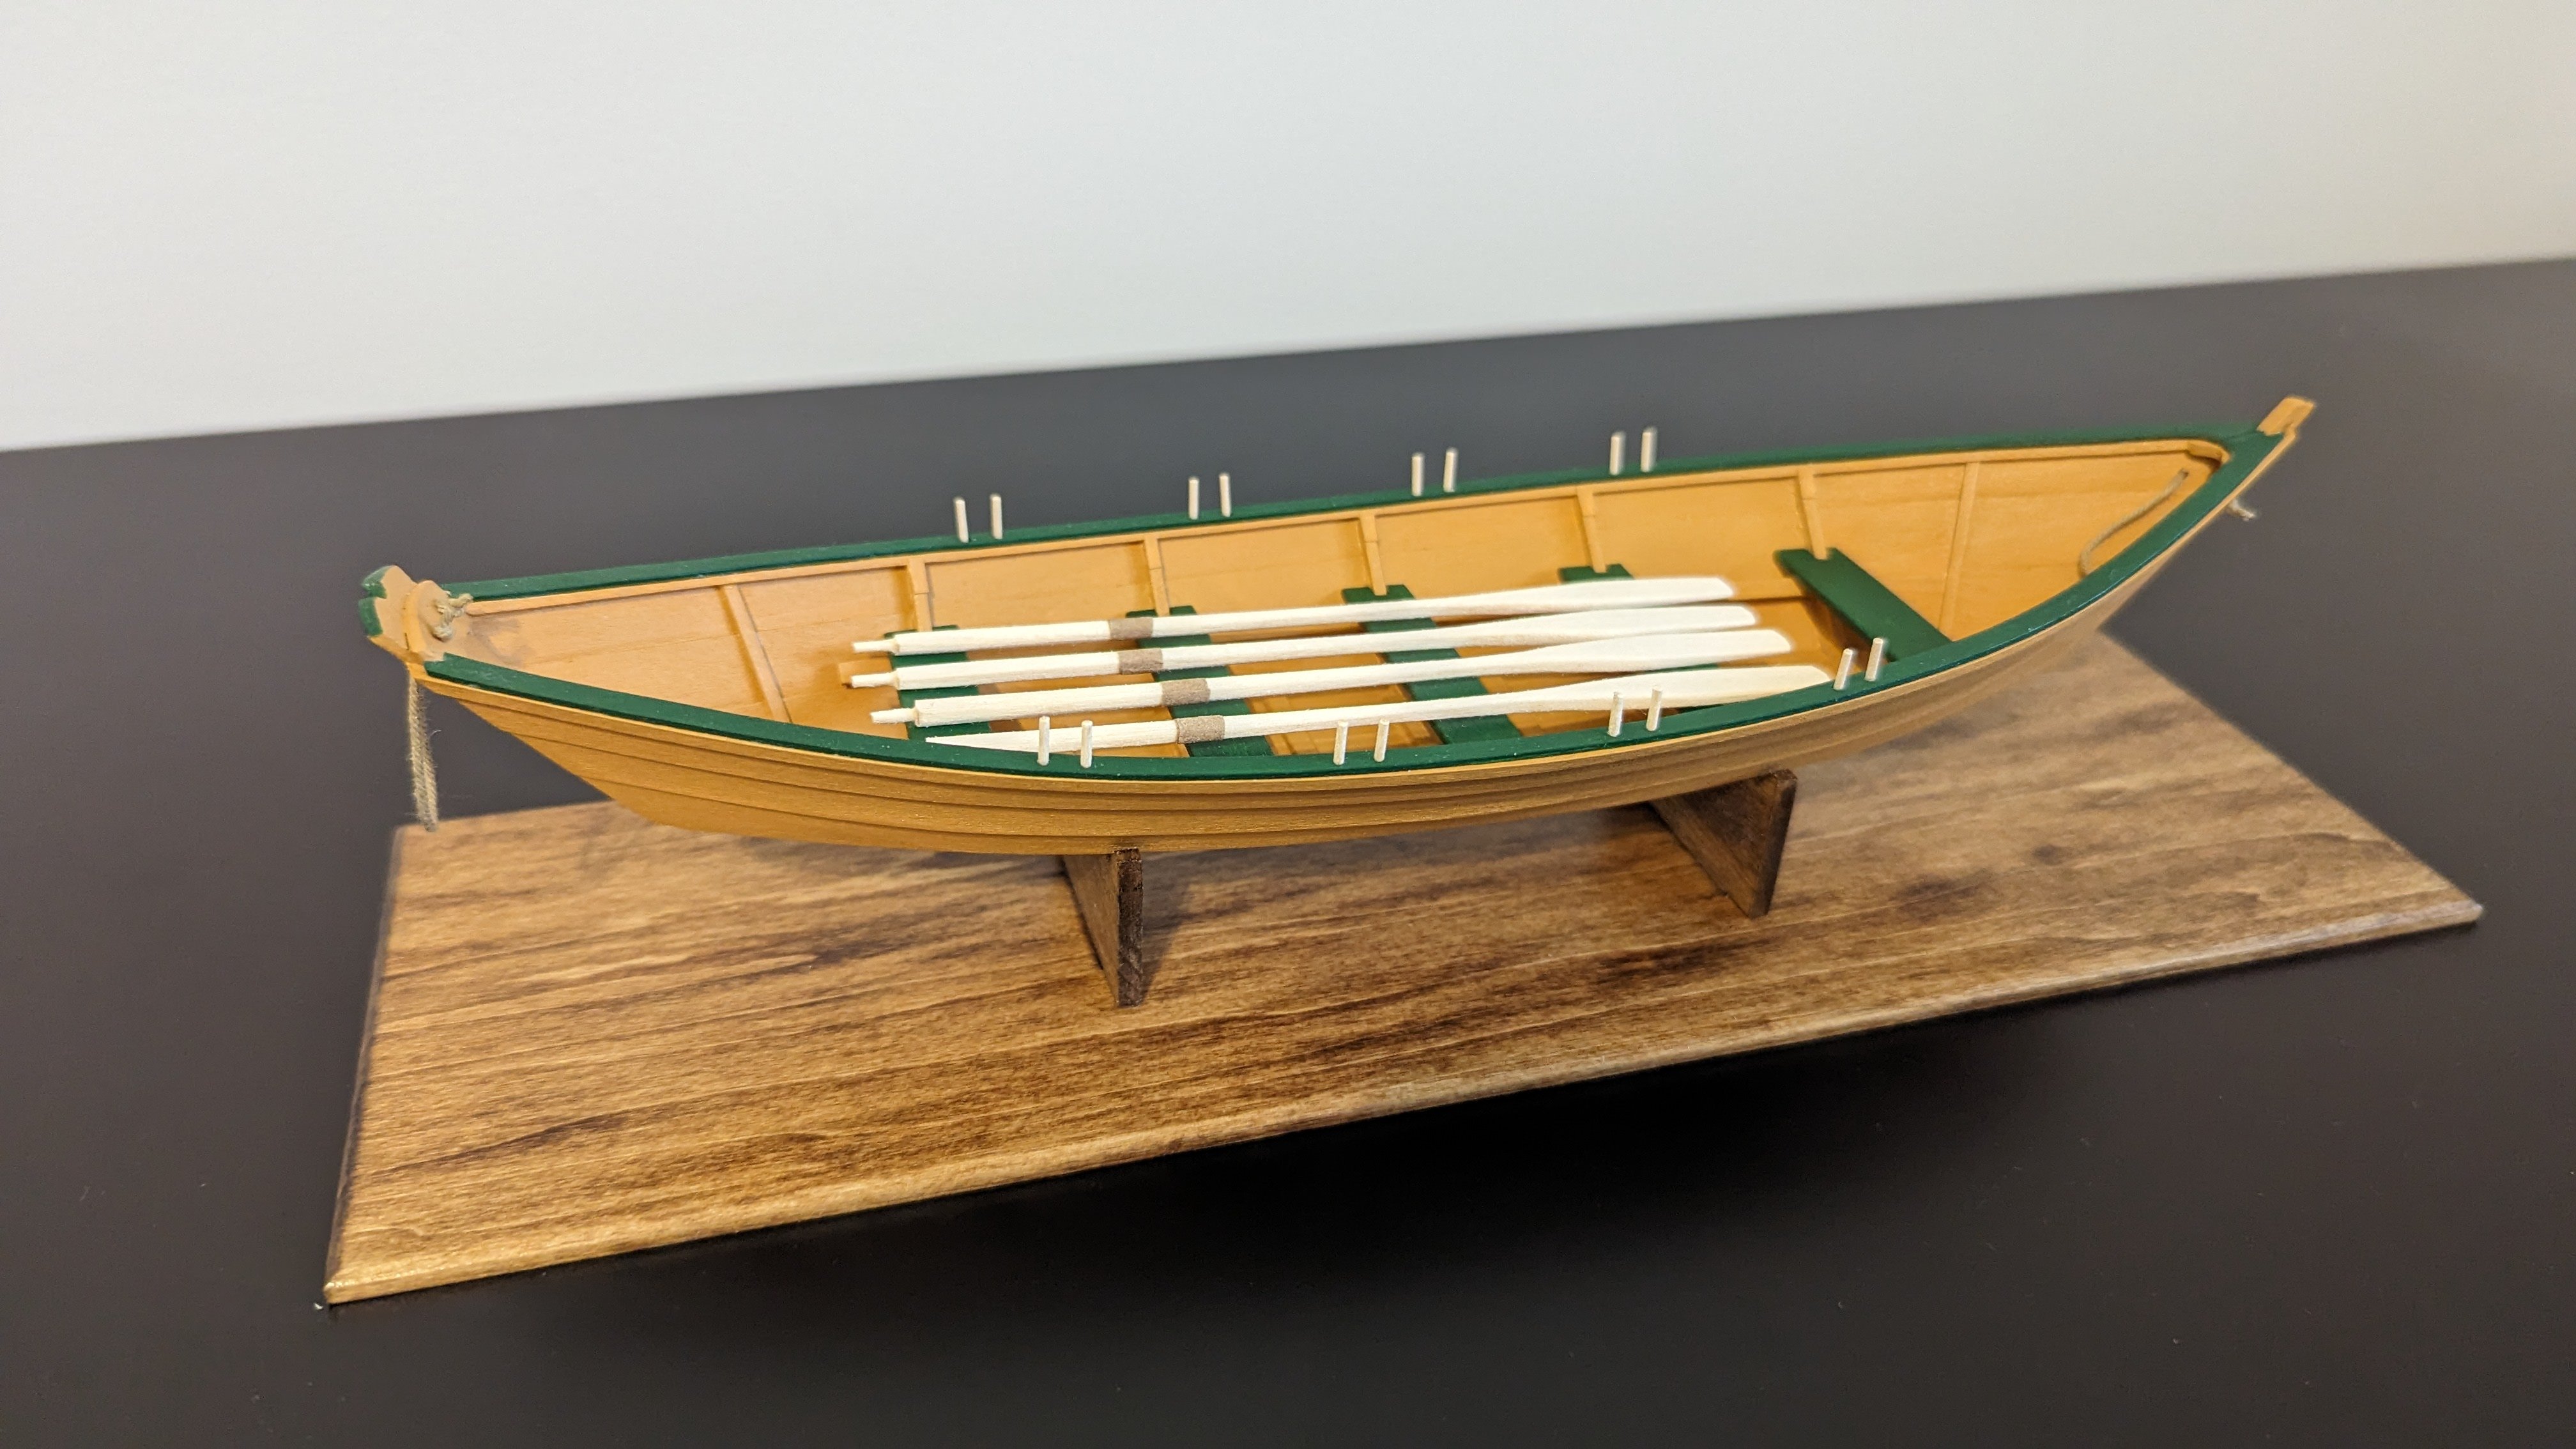
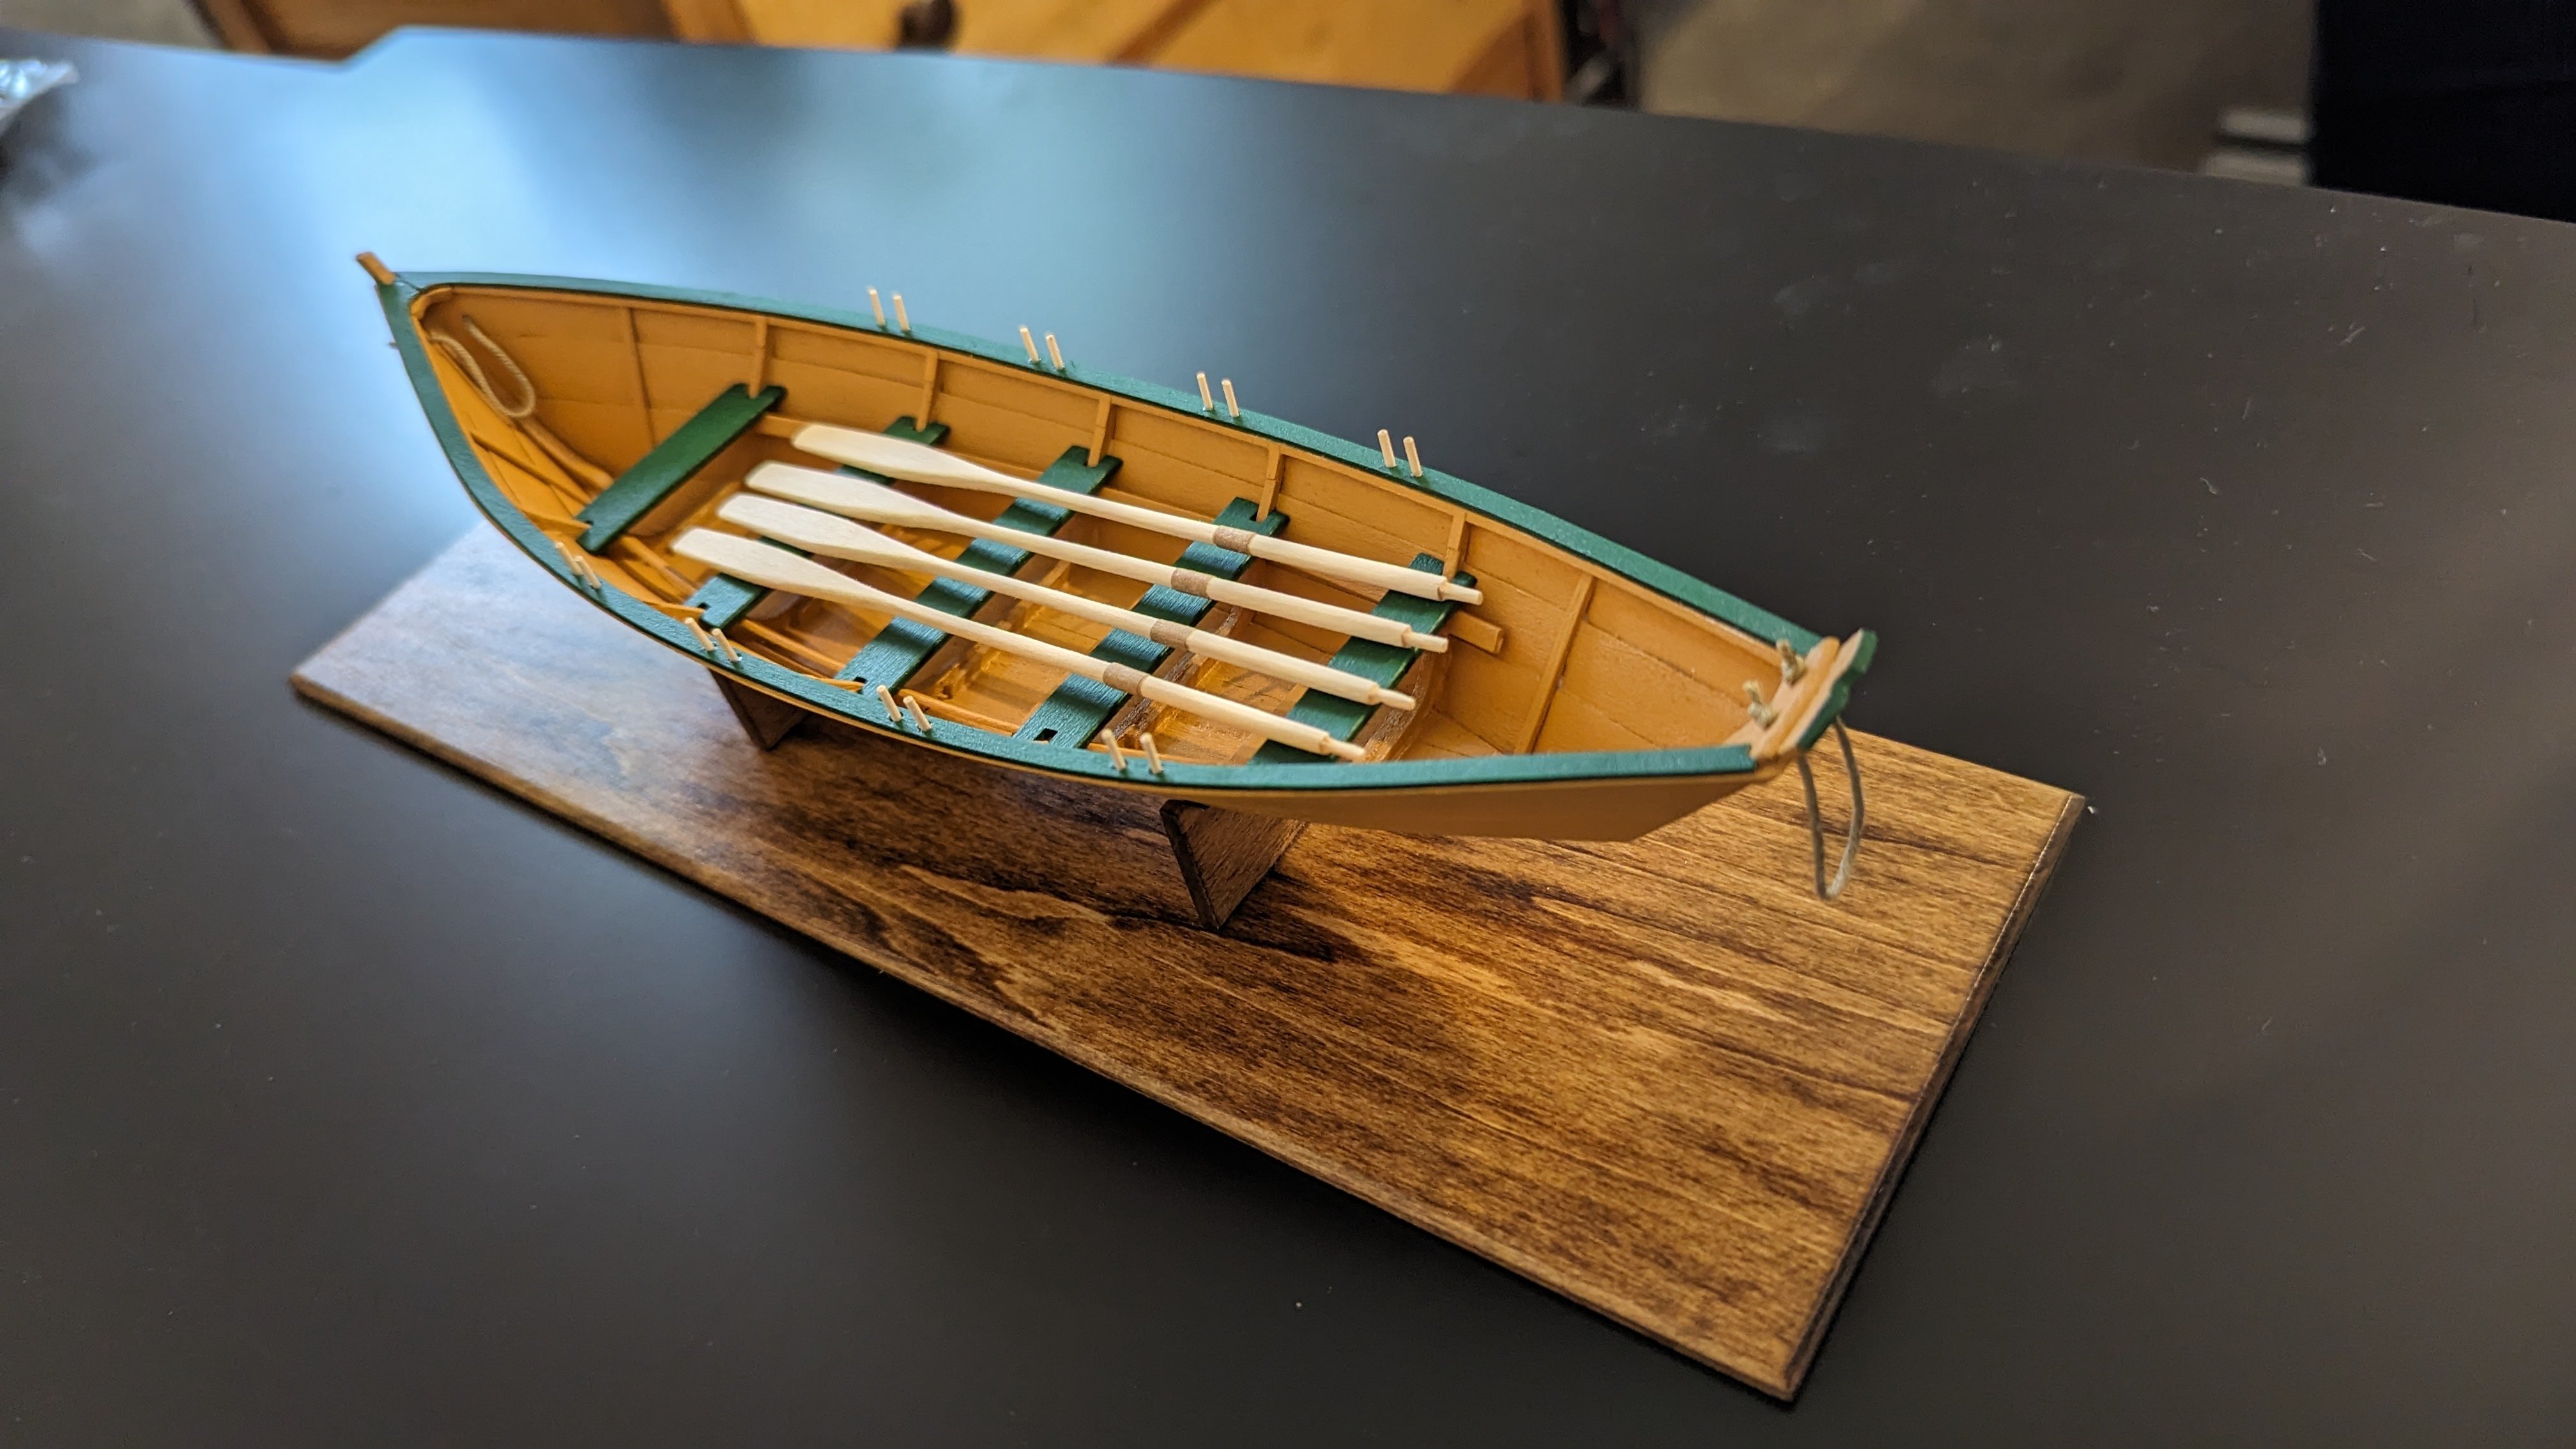
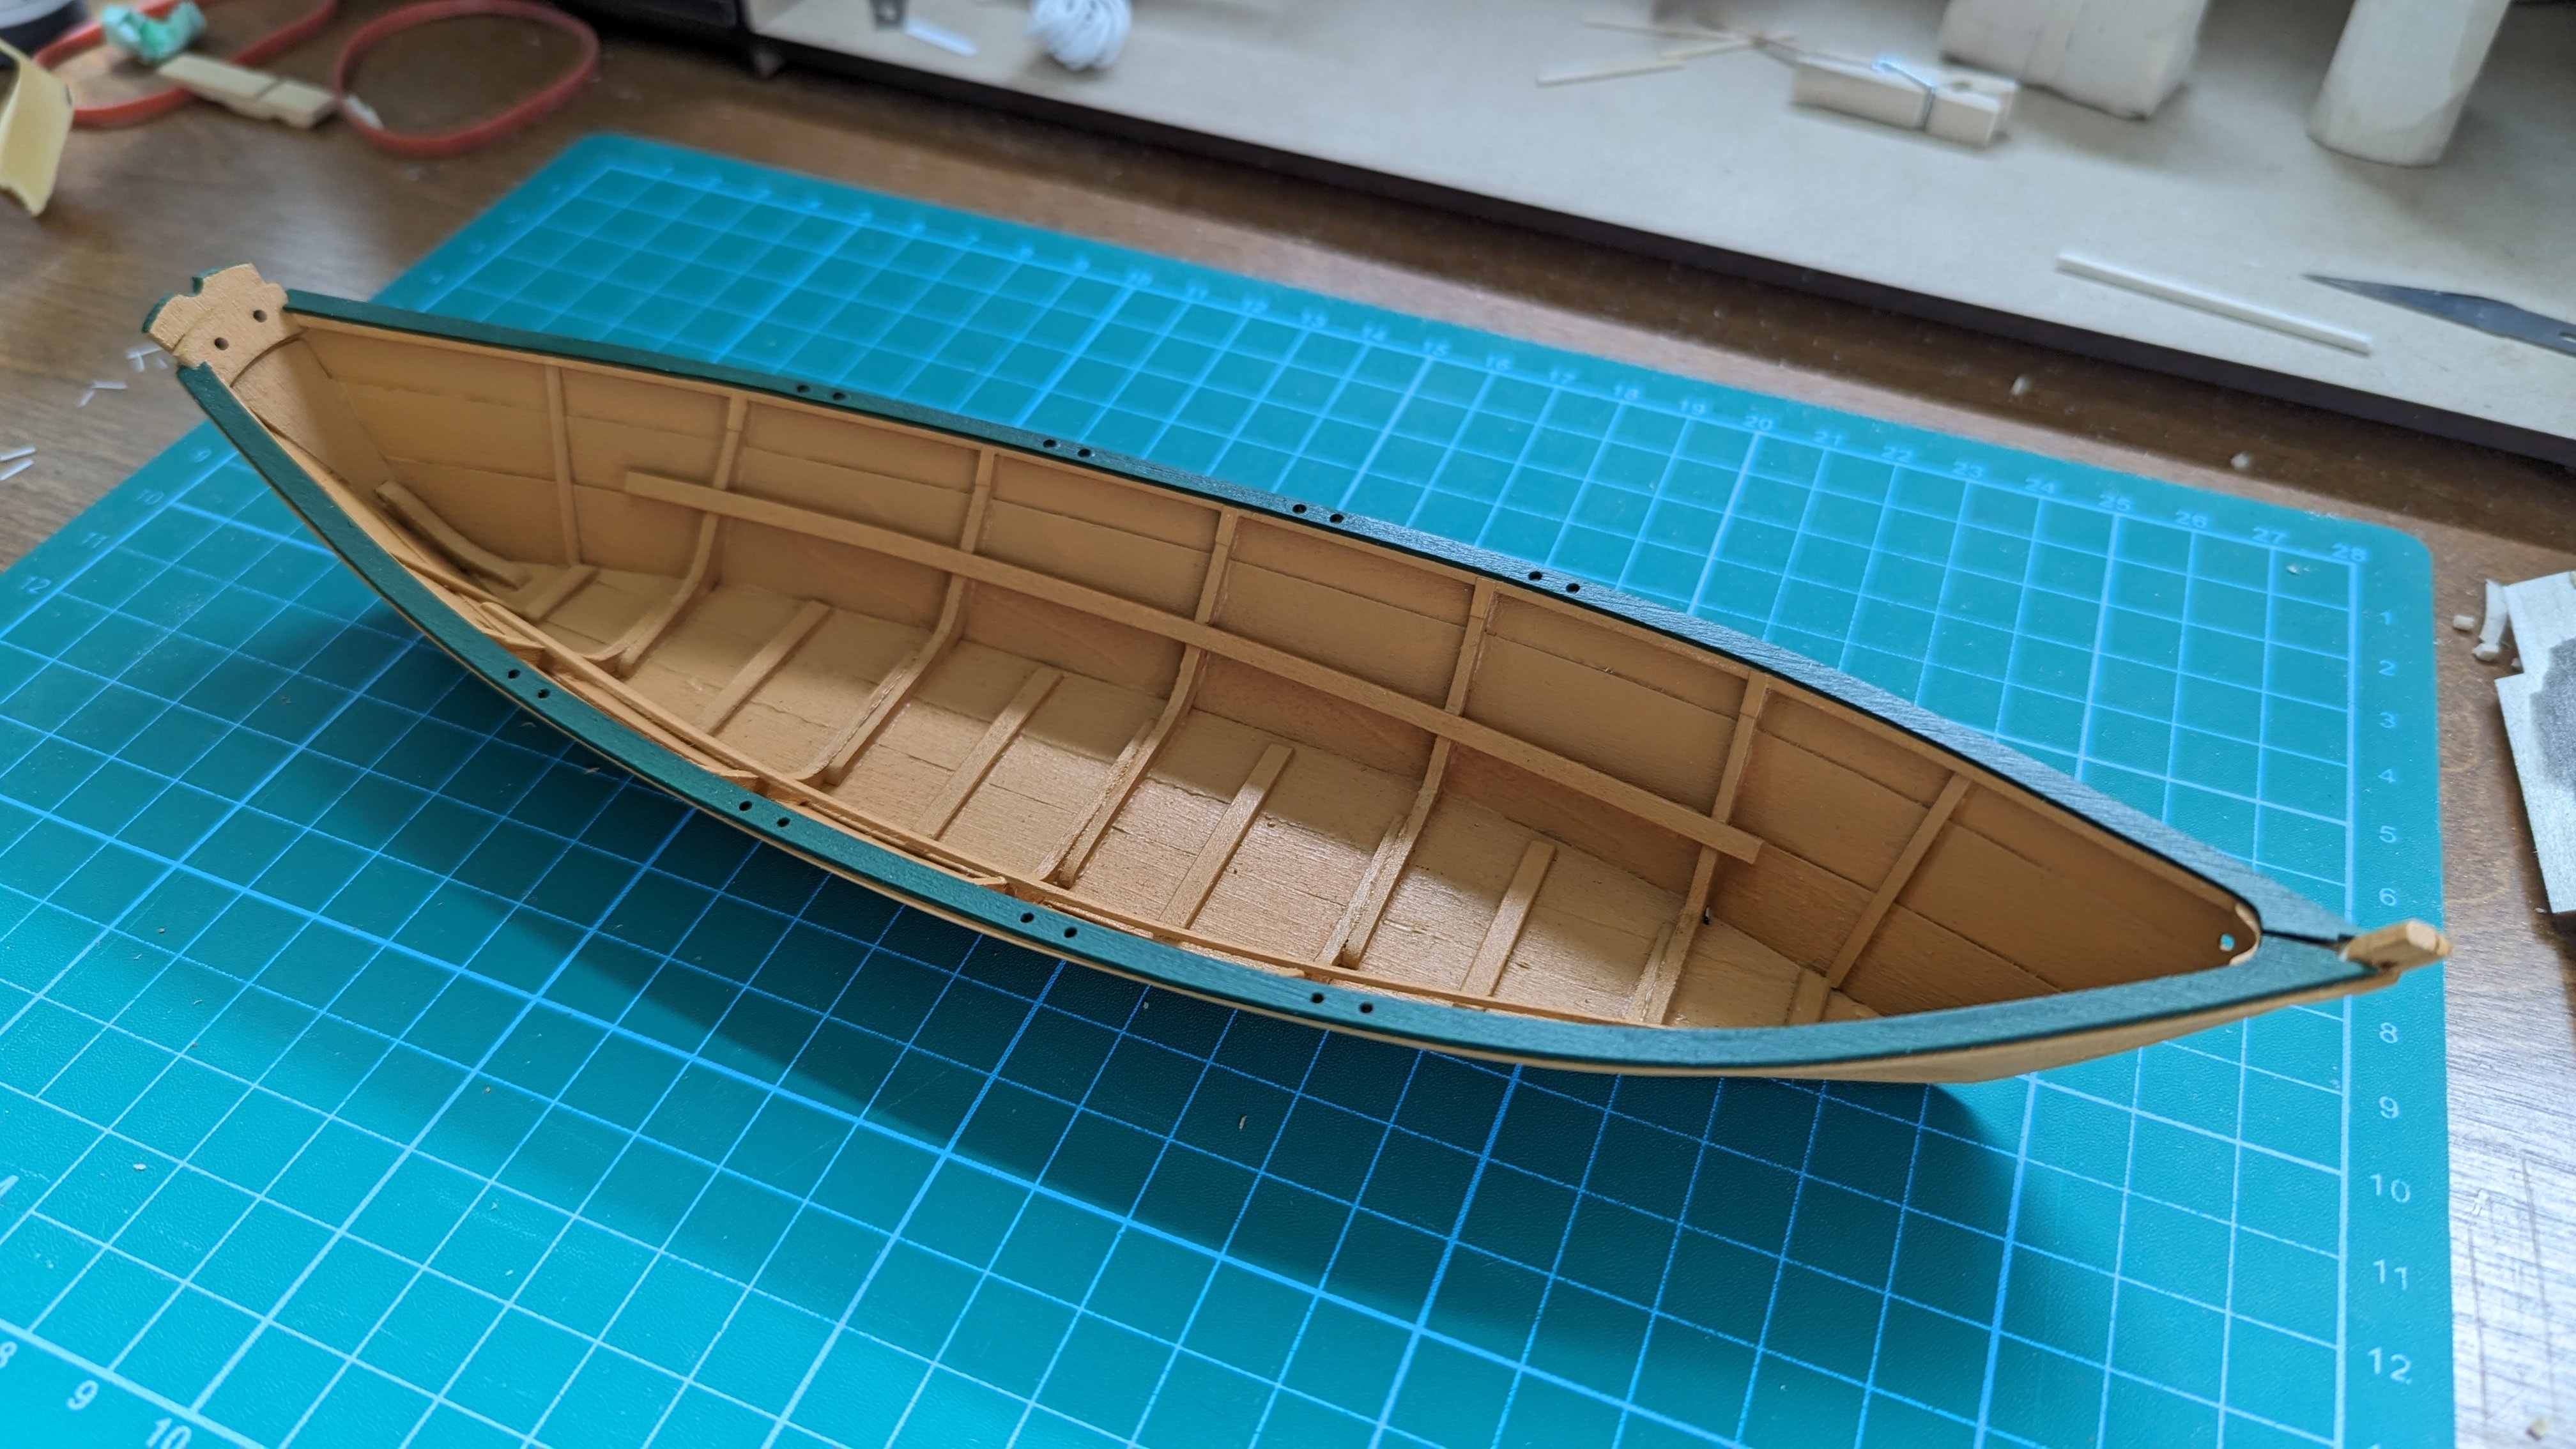
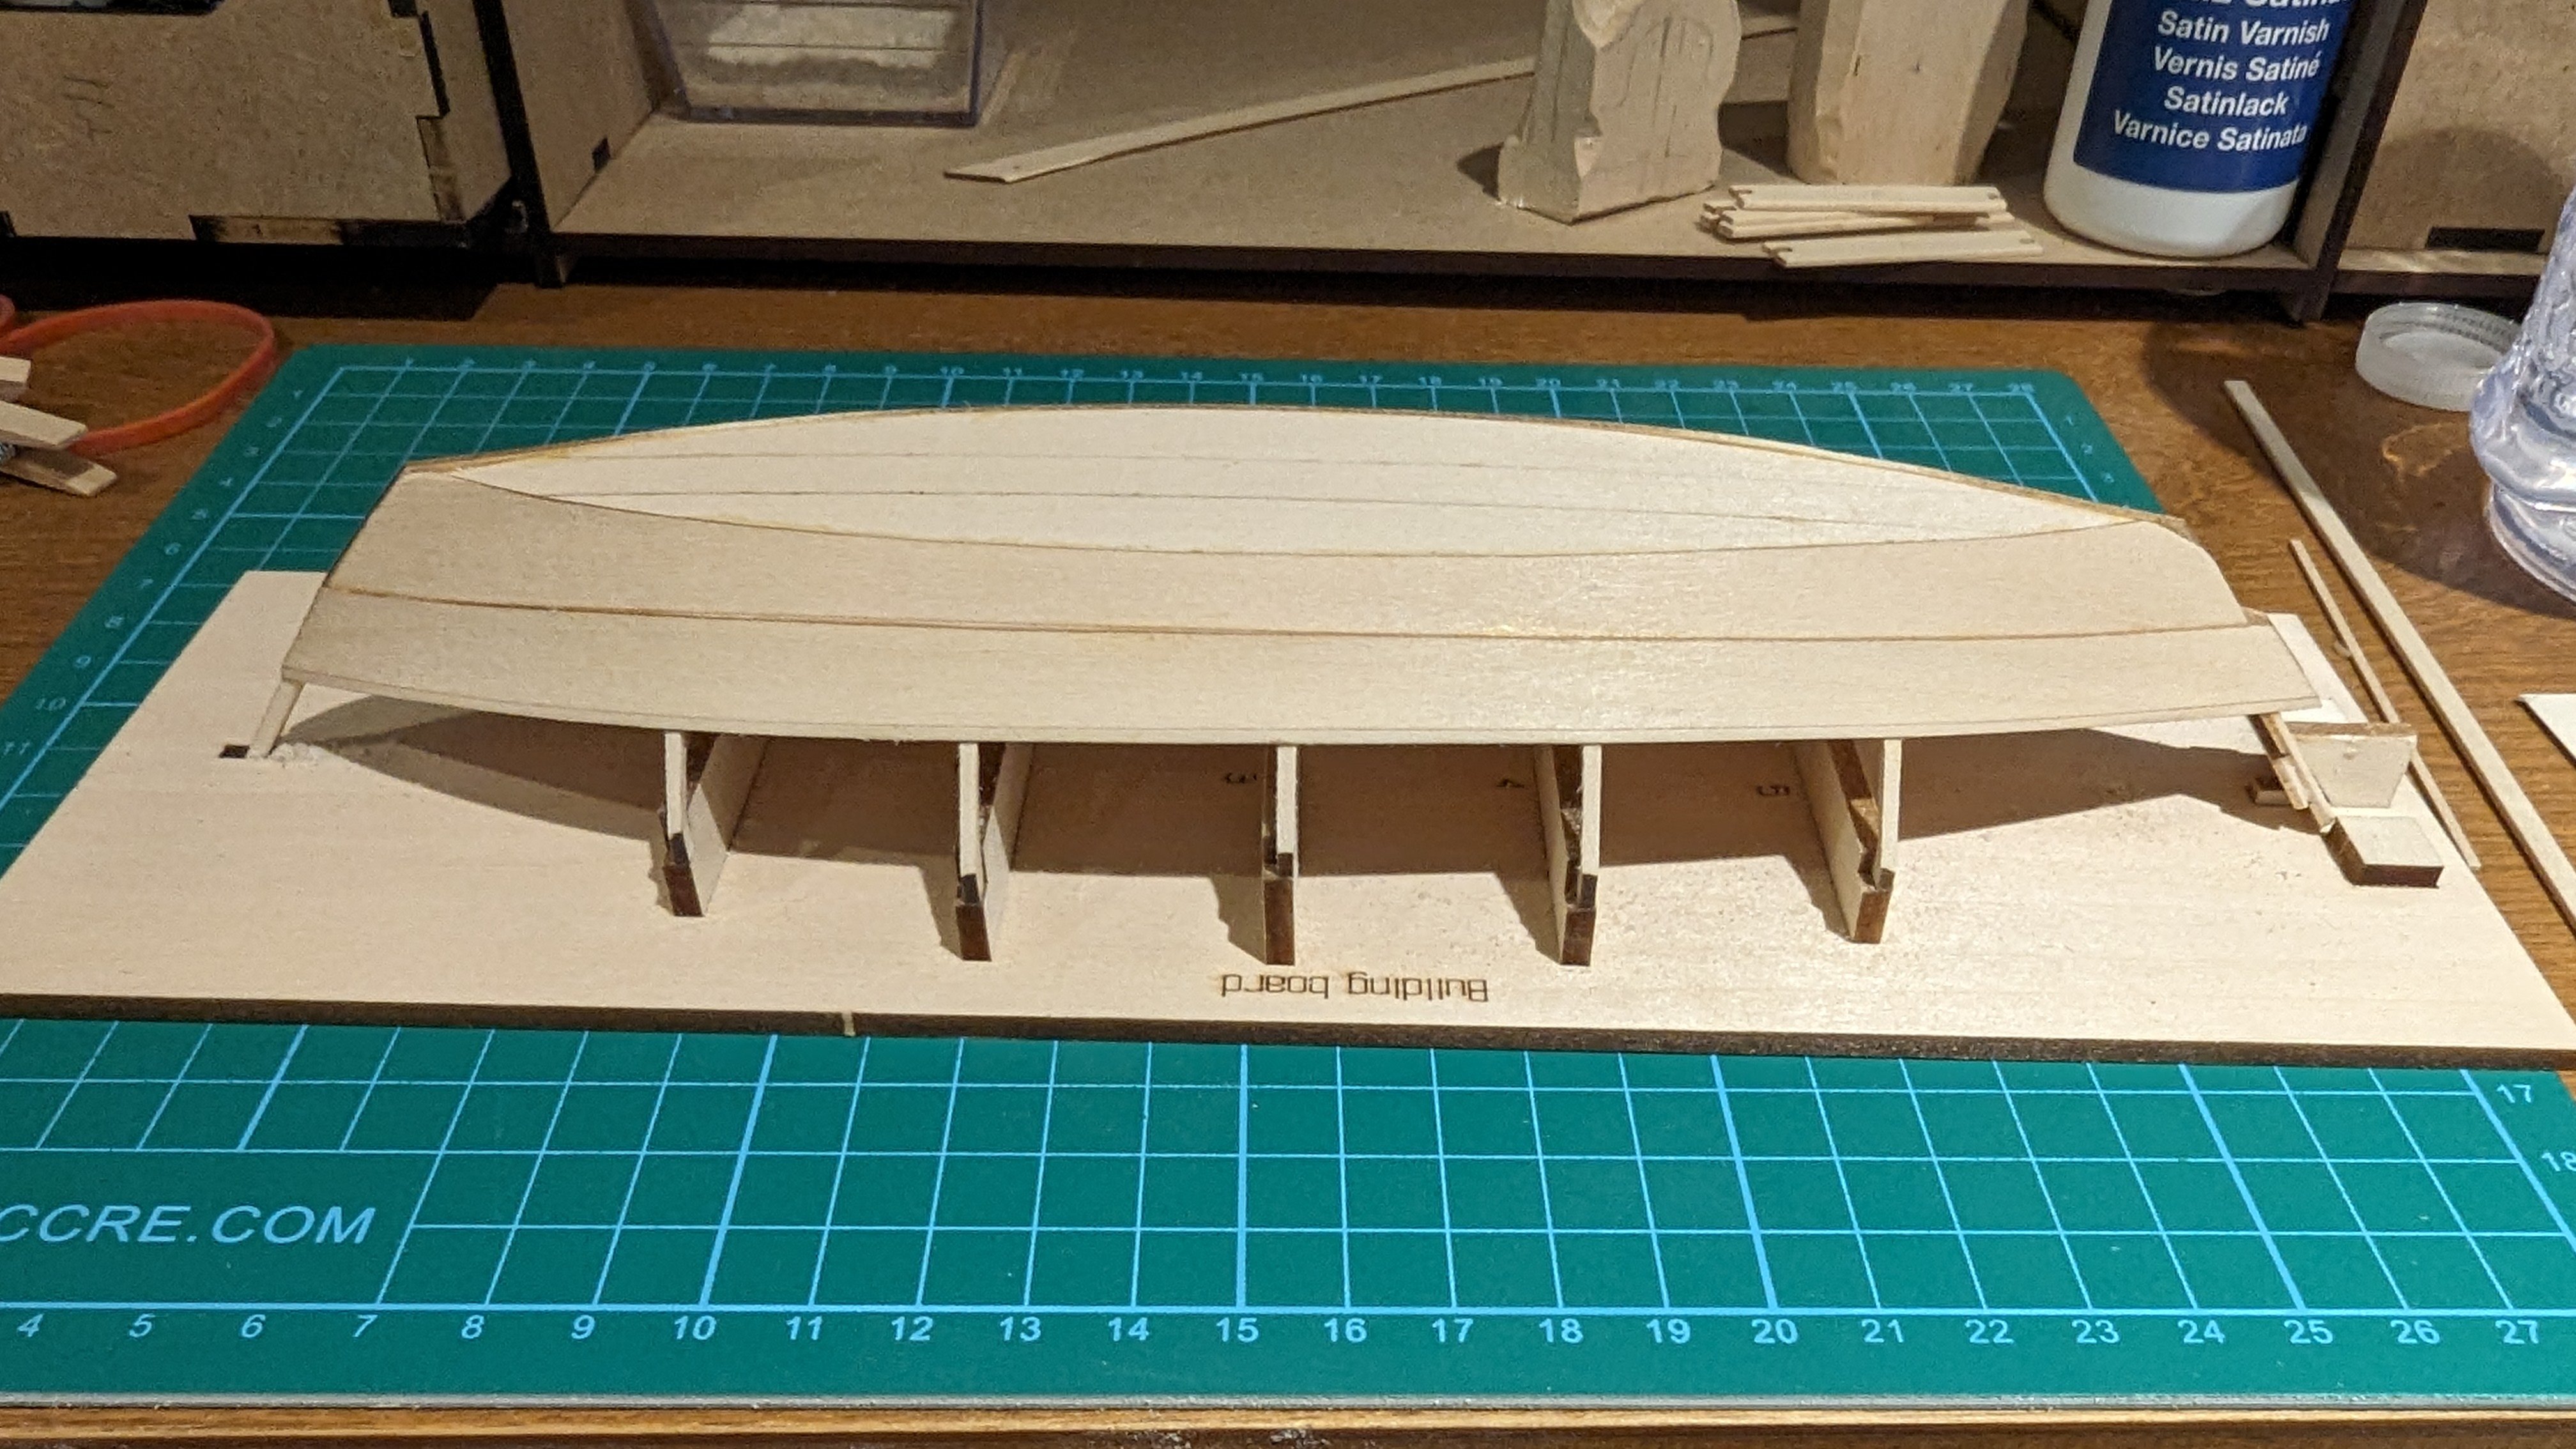
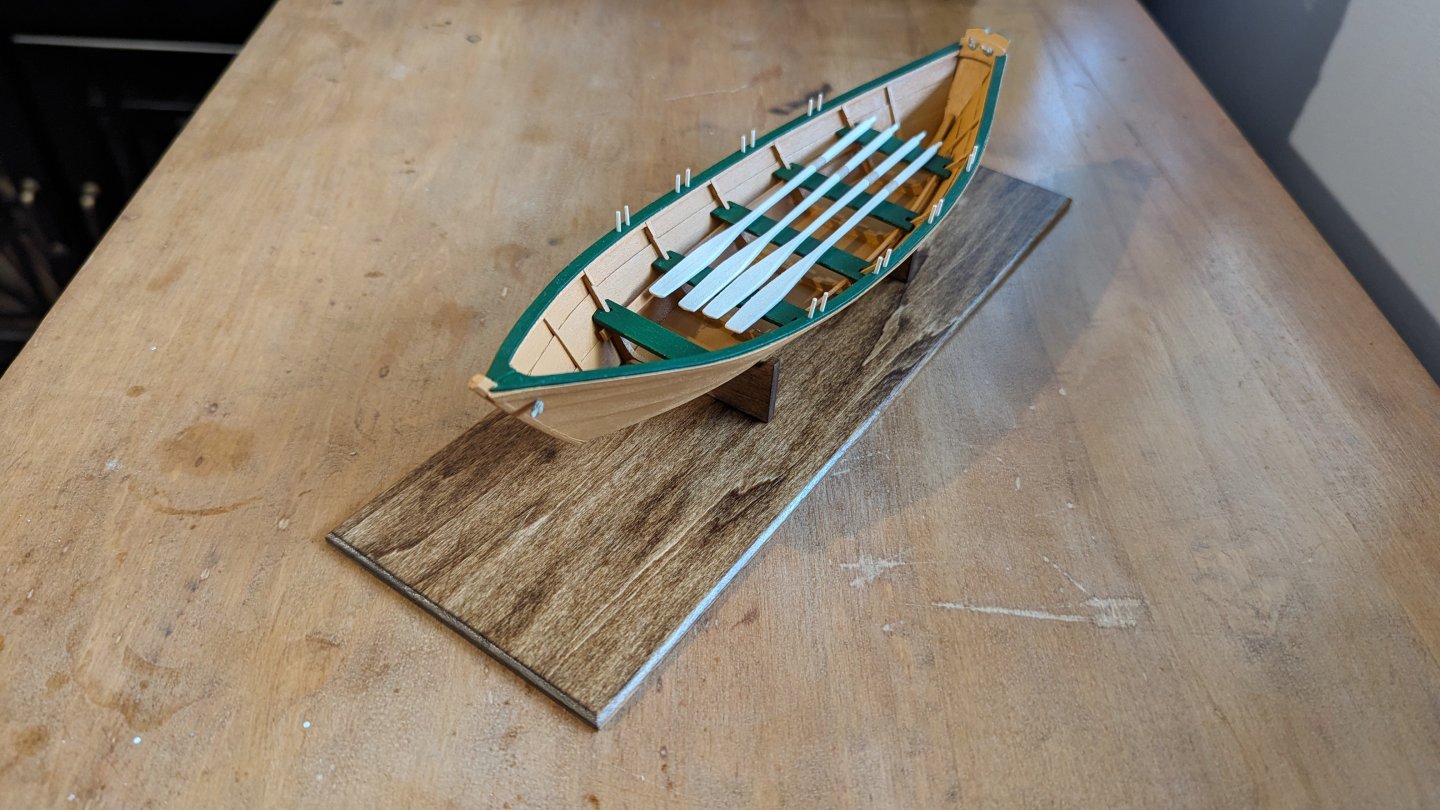
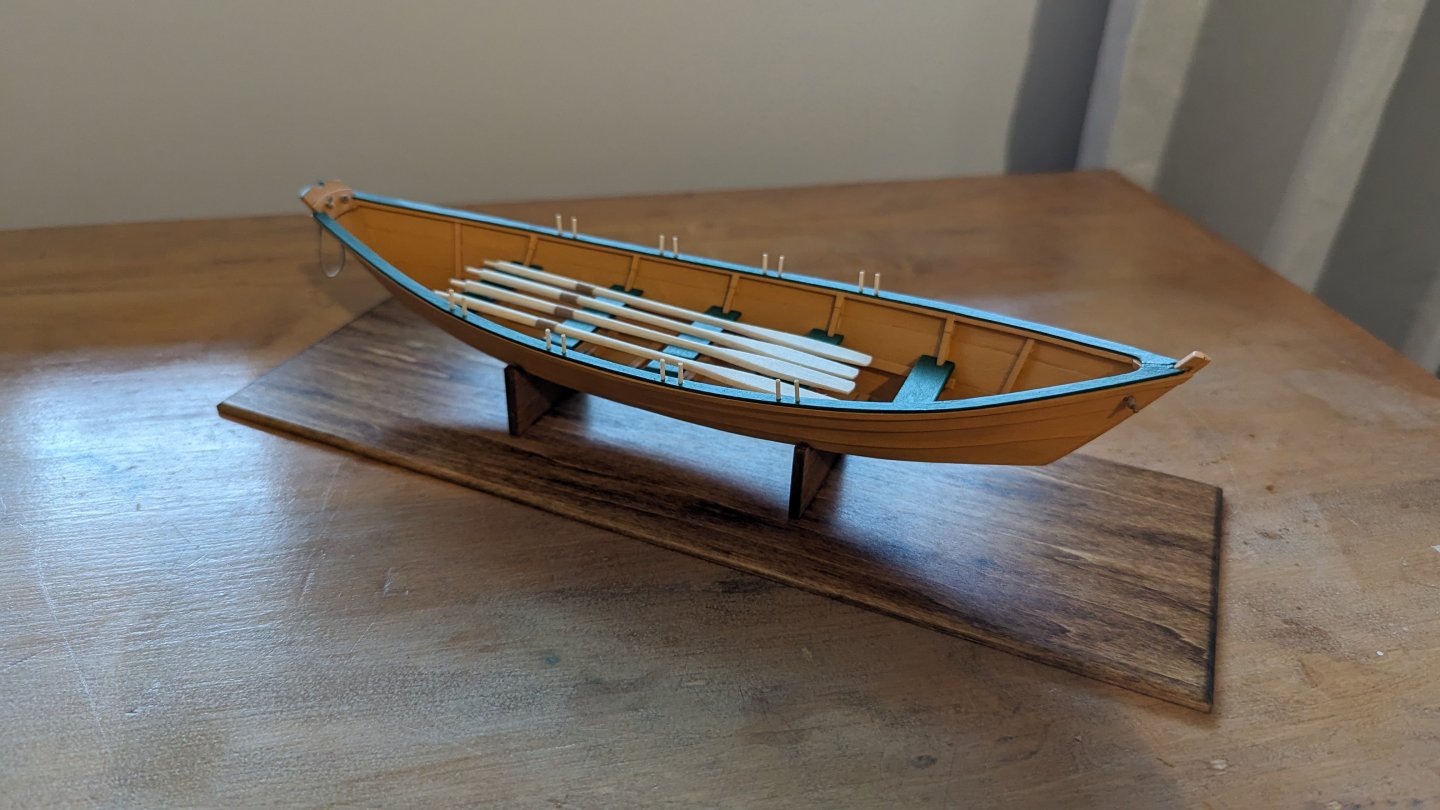
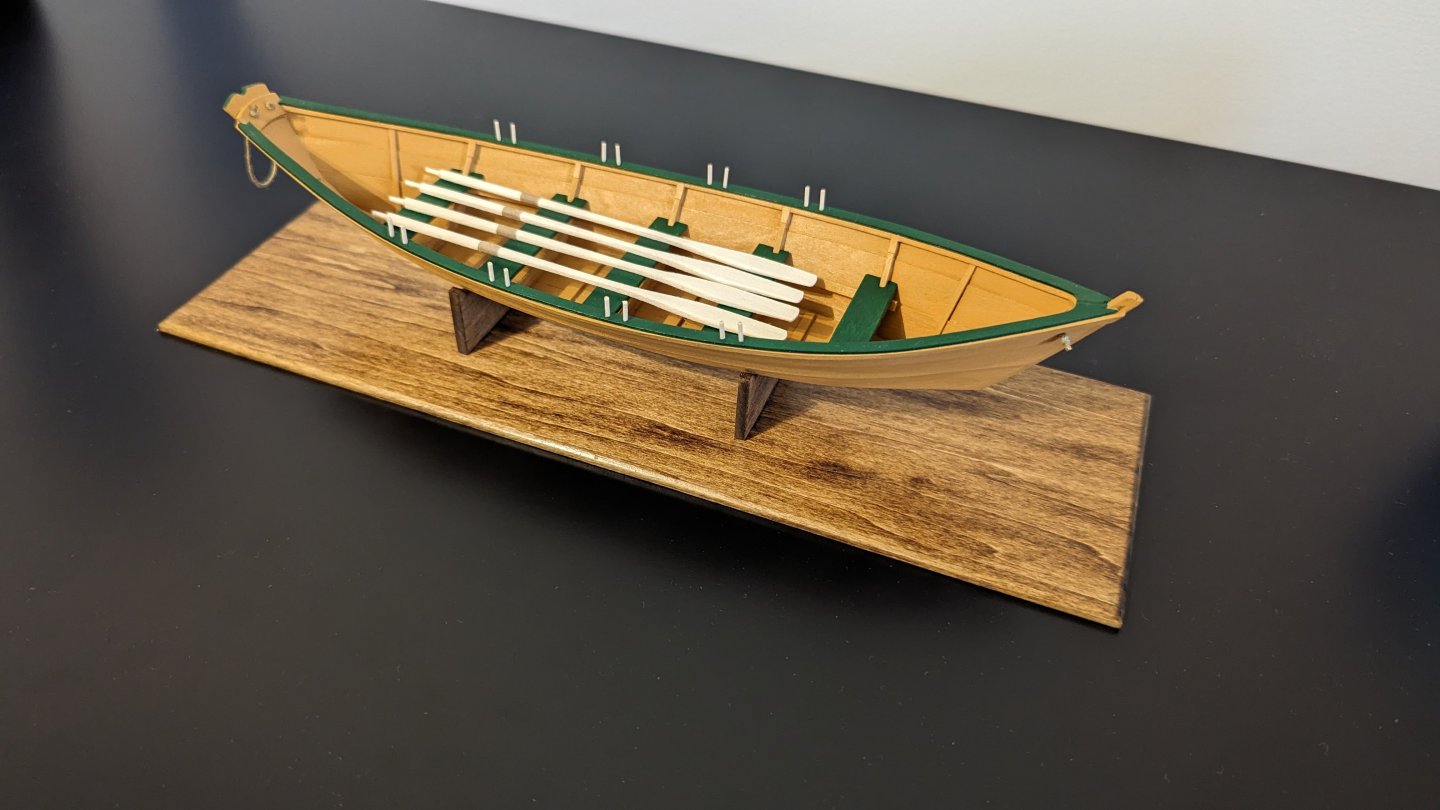
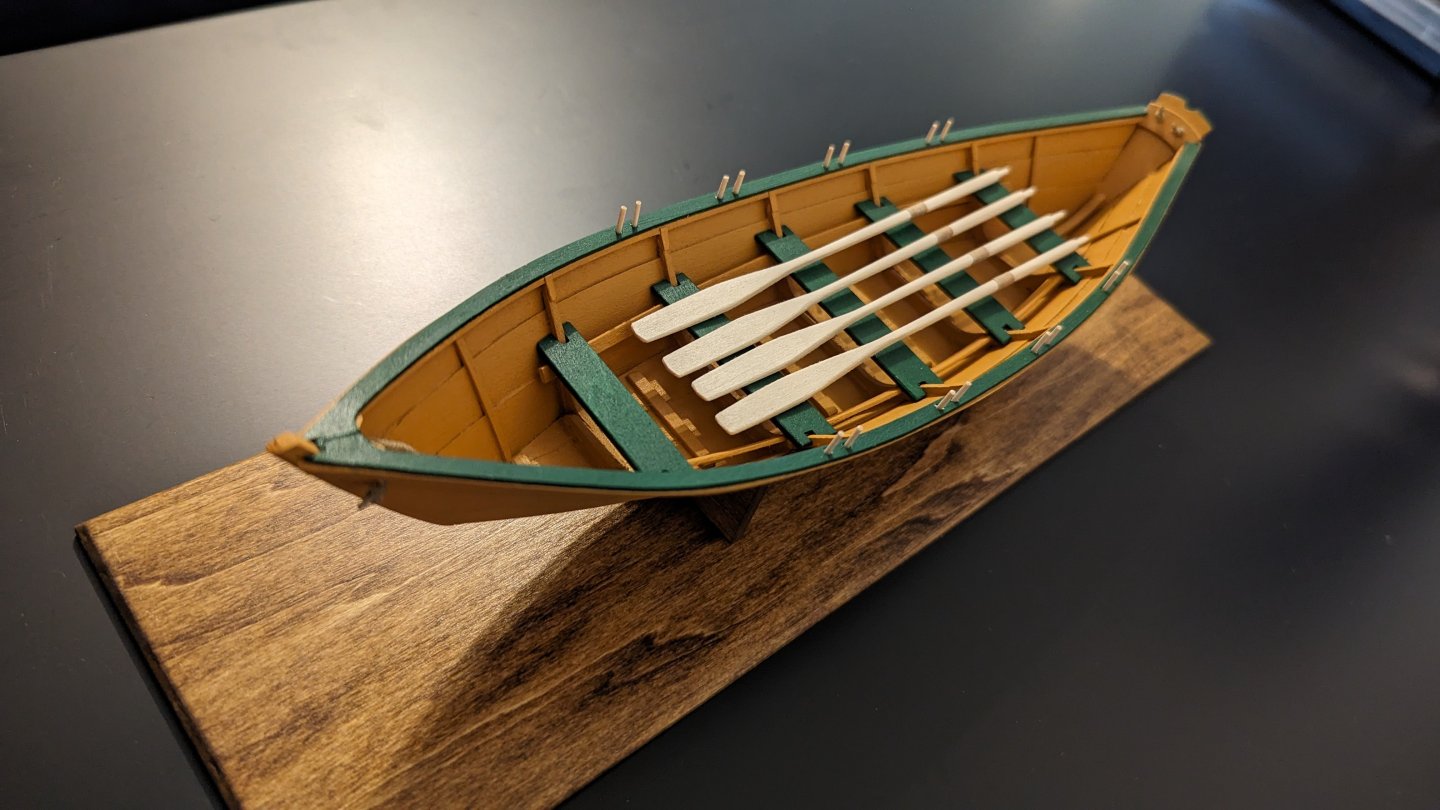
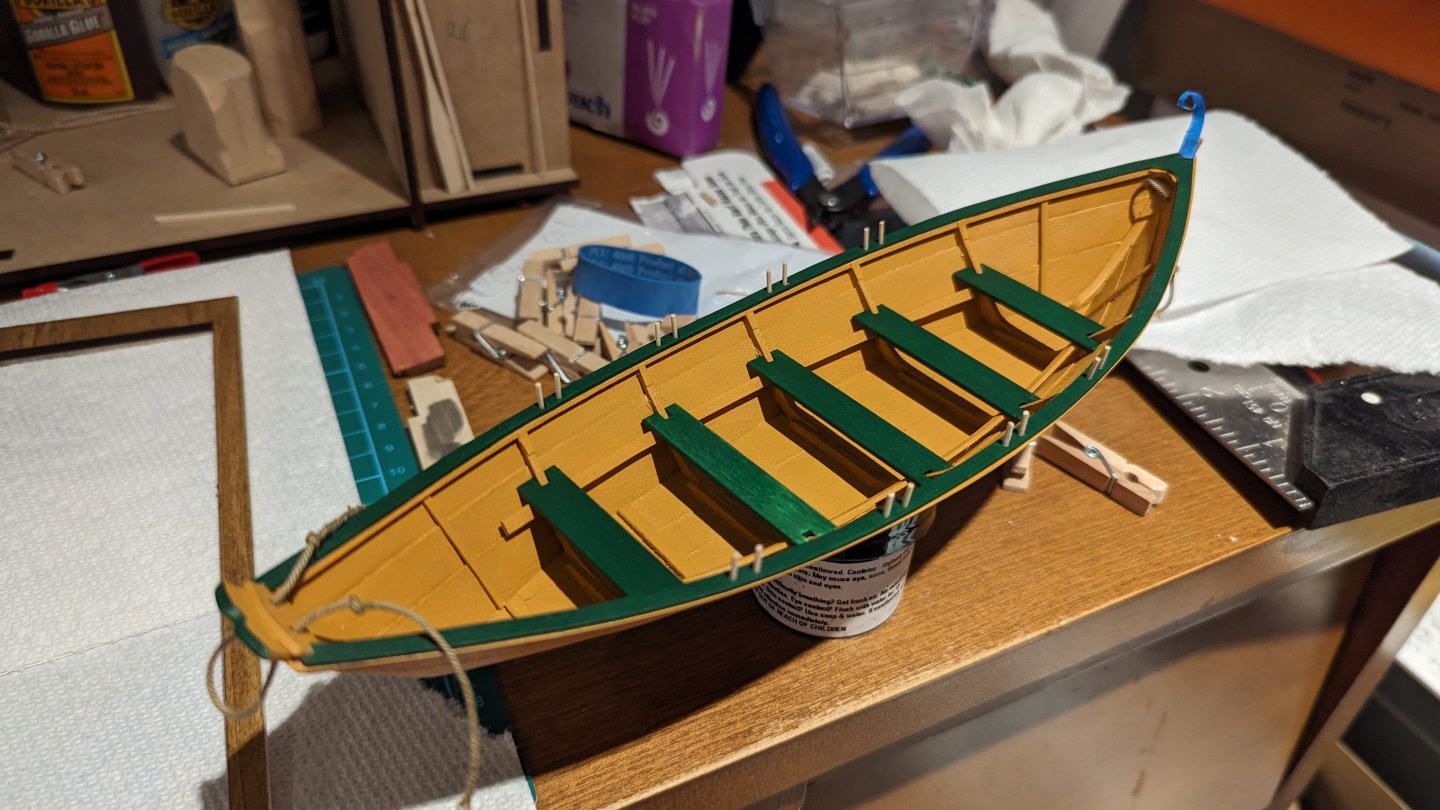
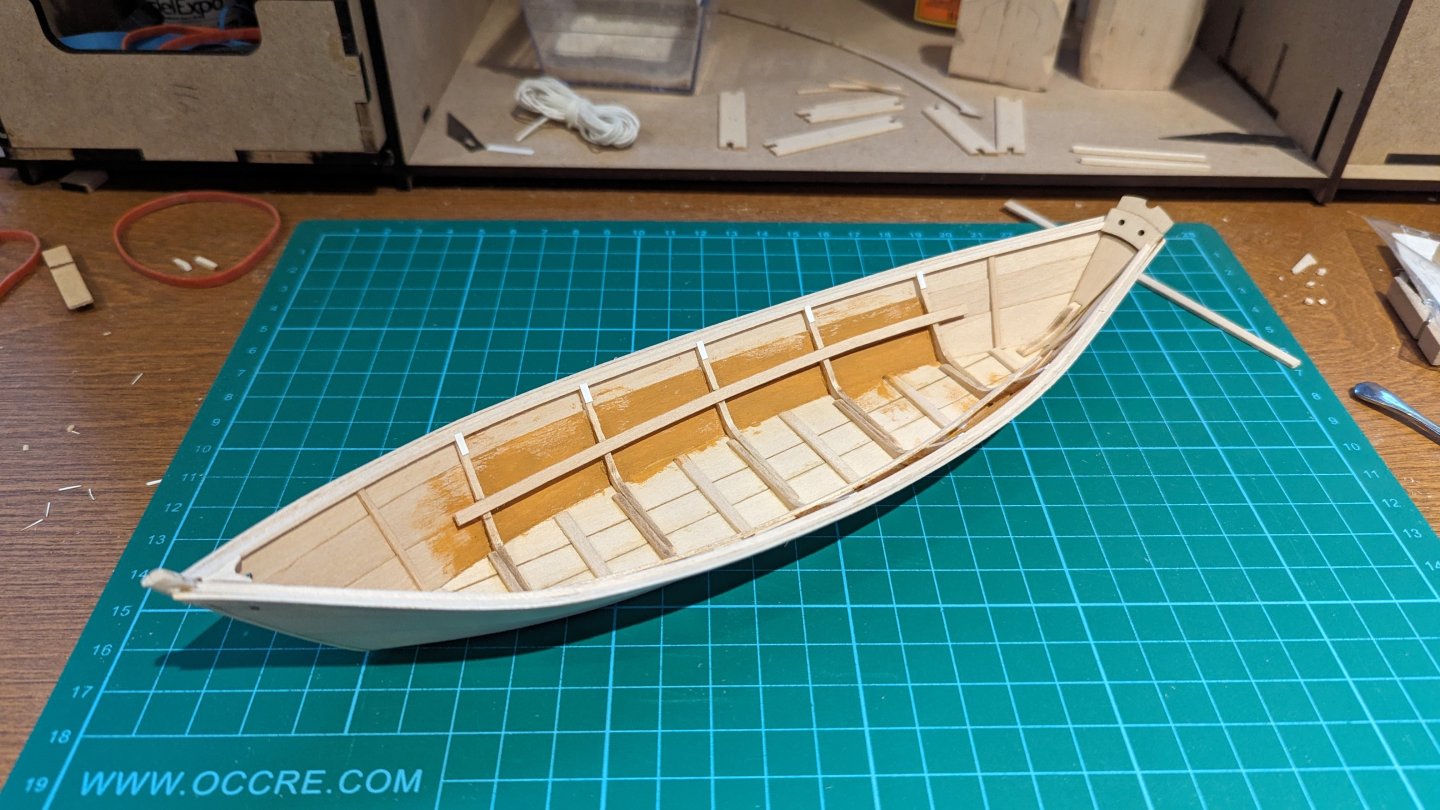
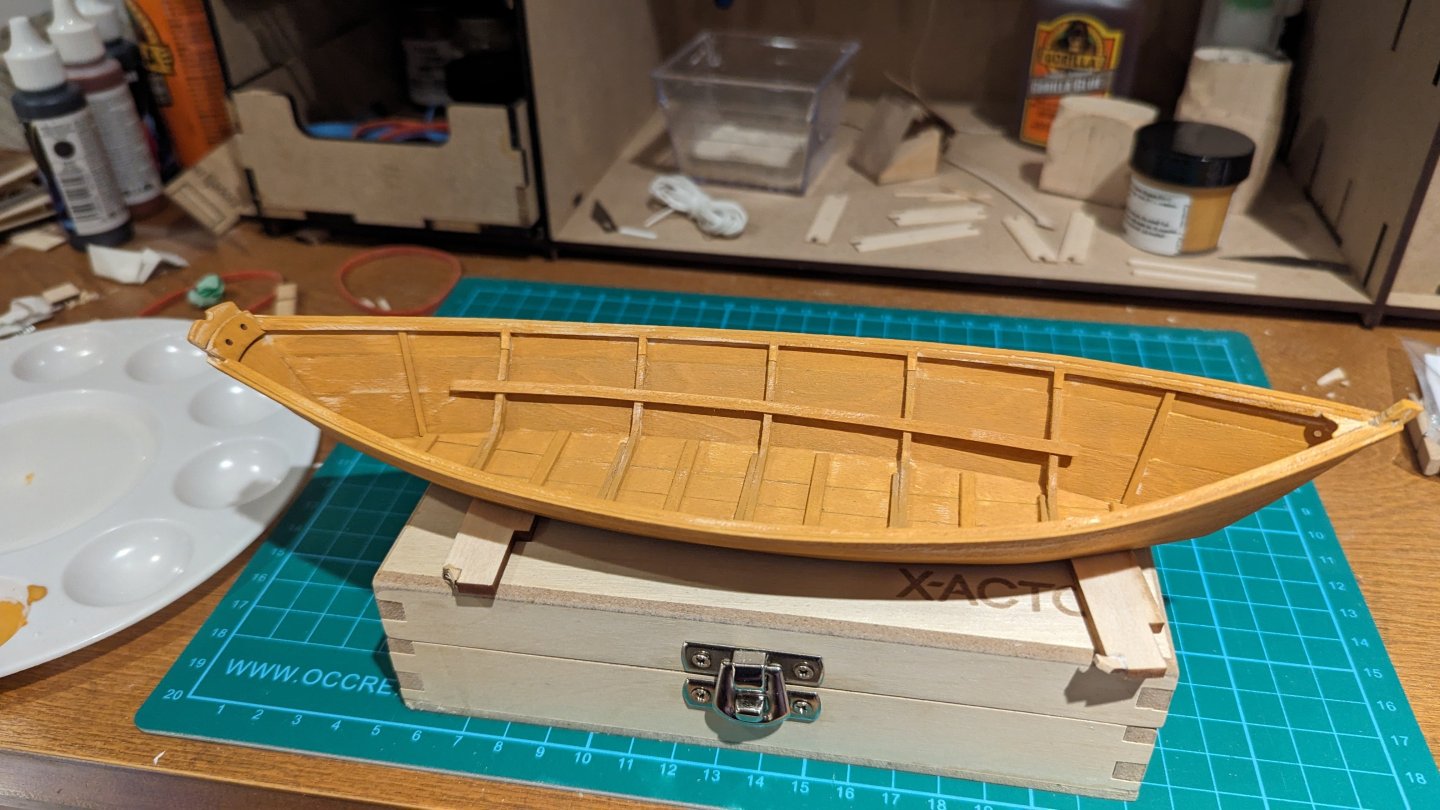
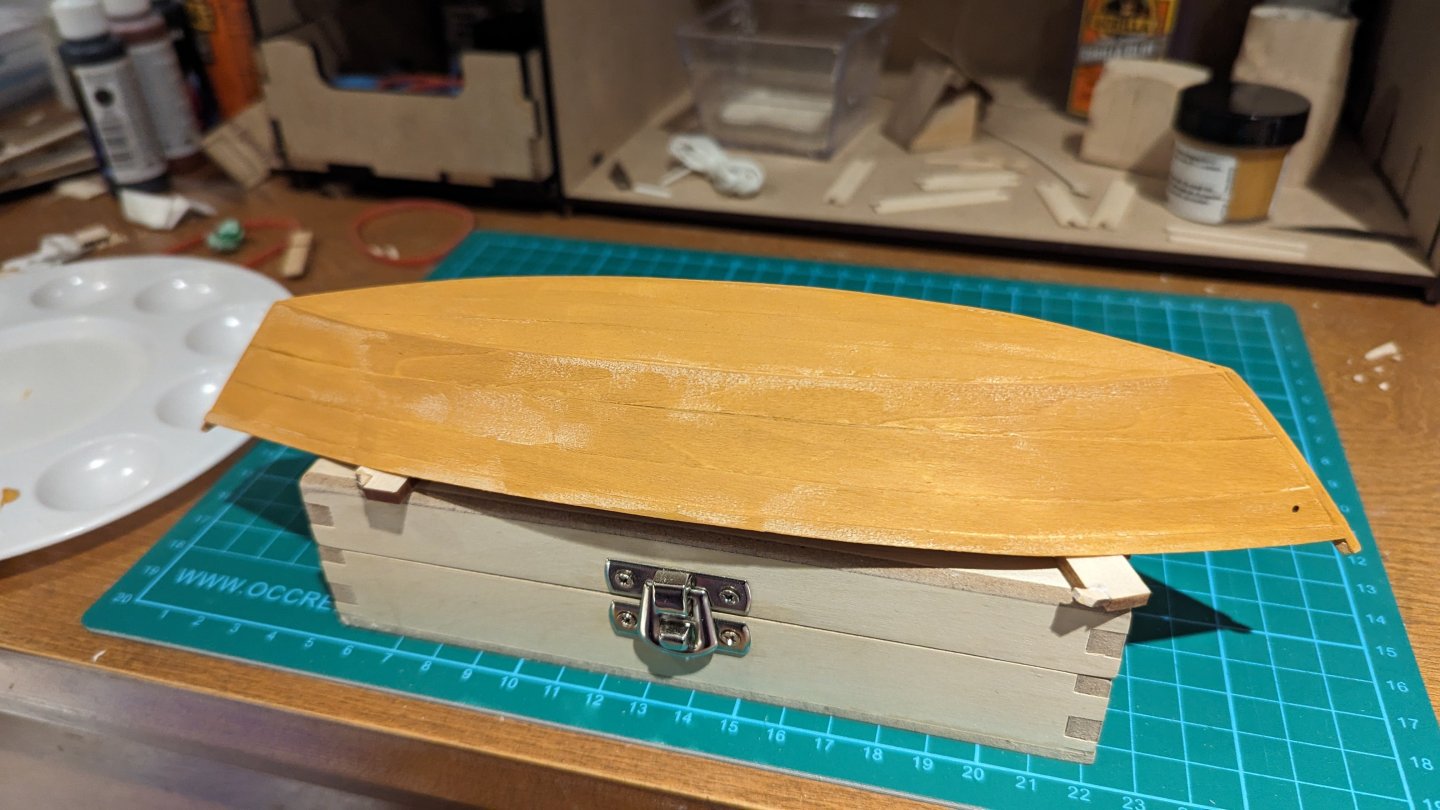
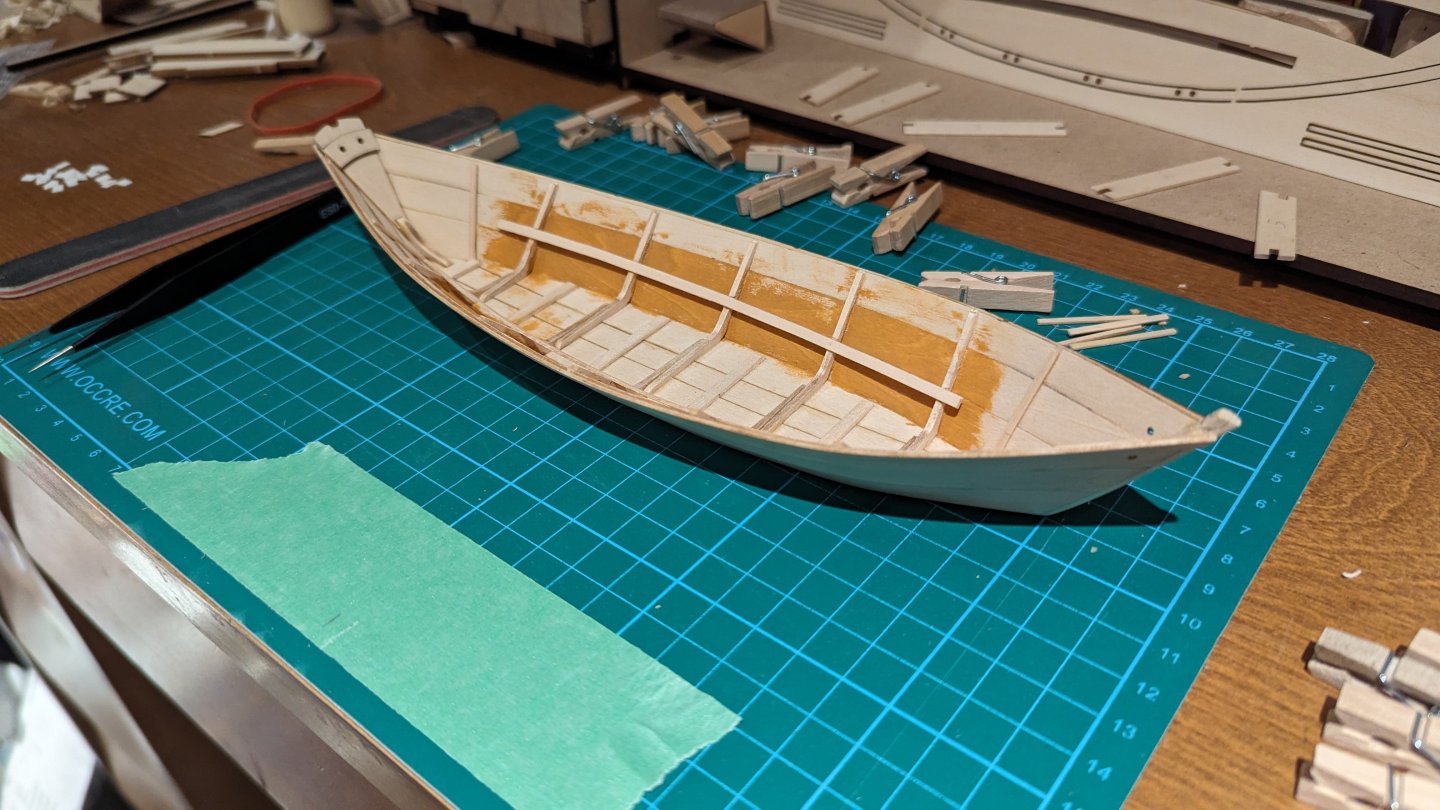
Completed Pics and final word Interesting how different the base stain looks when putting it on something dark. Finally, I enjoyed this build and wouldn't hesitate to suggest this kit as someone entering the hobby. I've decided to go onto the pram next and bought the plans for the real boat as well. Building this dory has inspired me to not only continue this hobby, but also think about one day building a real boat. In some years when my daughter is older, I think the life sized version of the pram would be a great project for us. Thank you all for the comments, the encouragement, the help and for following along. I'm looking forward to starting the pram and will be opening a build log soon. I'm still struggling a bit with my health issues, but I'm hoping to be over the worst. Matt


- 69 replies
-
- 9
-

-
-
- Lowell Grand Banks Dory
- Model Shipways
- (and 2 more)
-
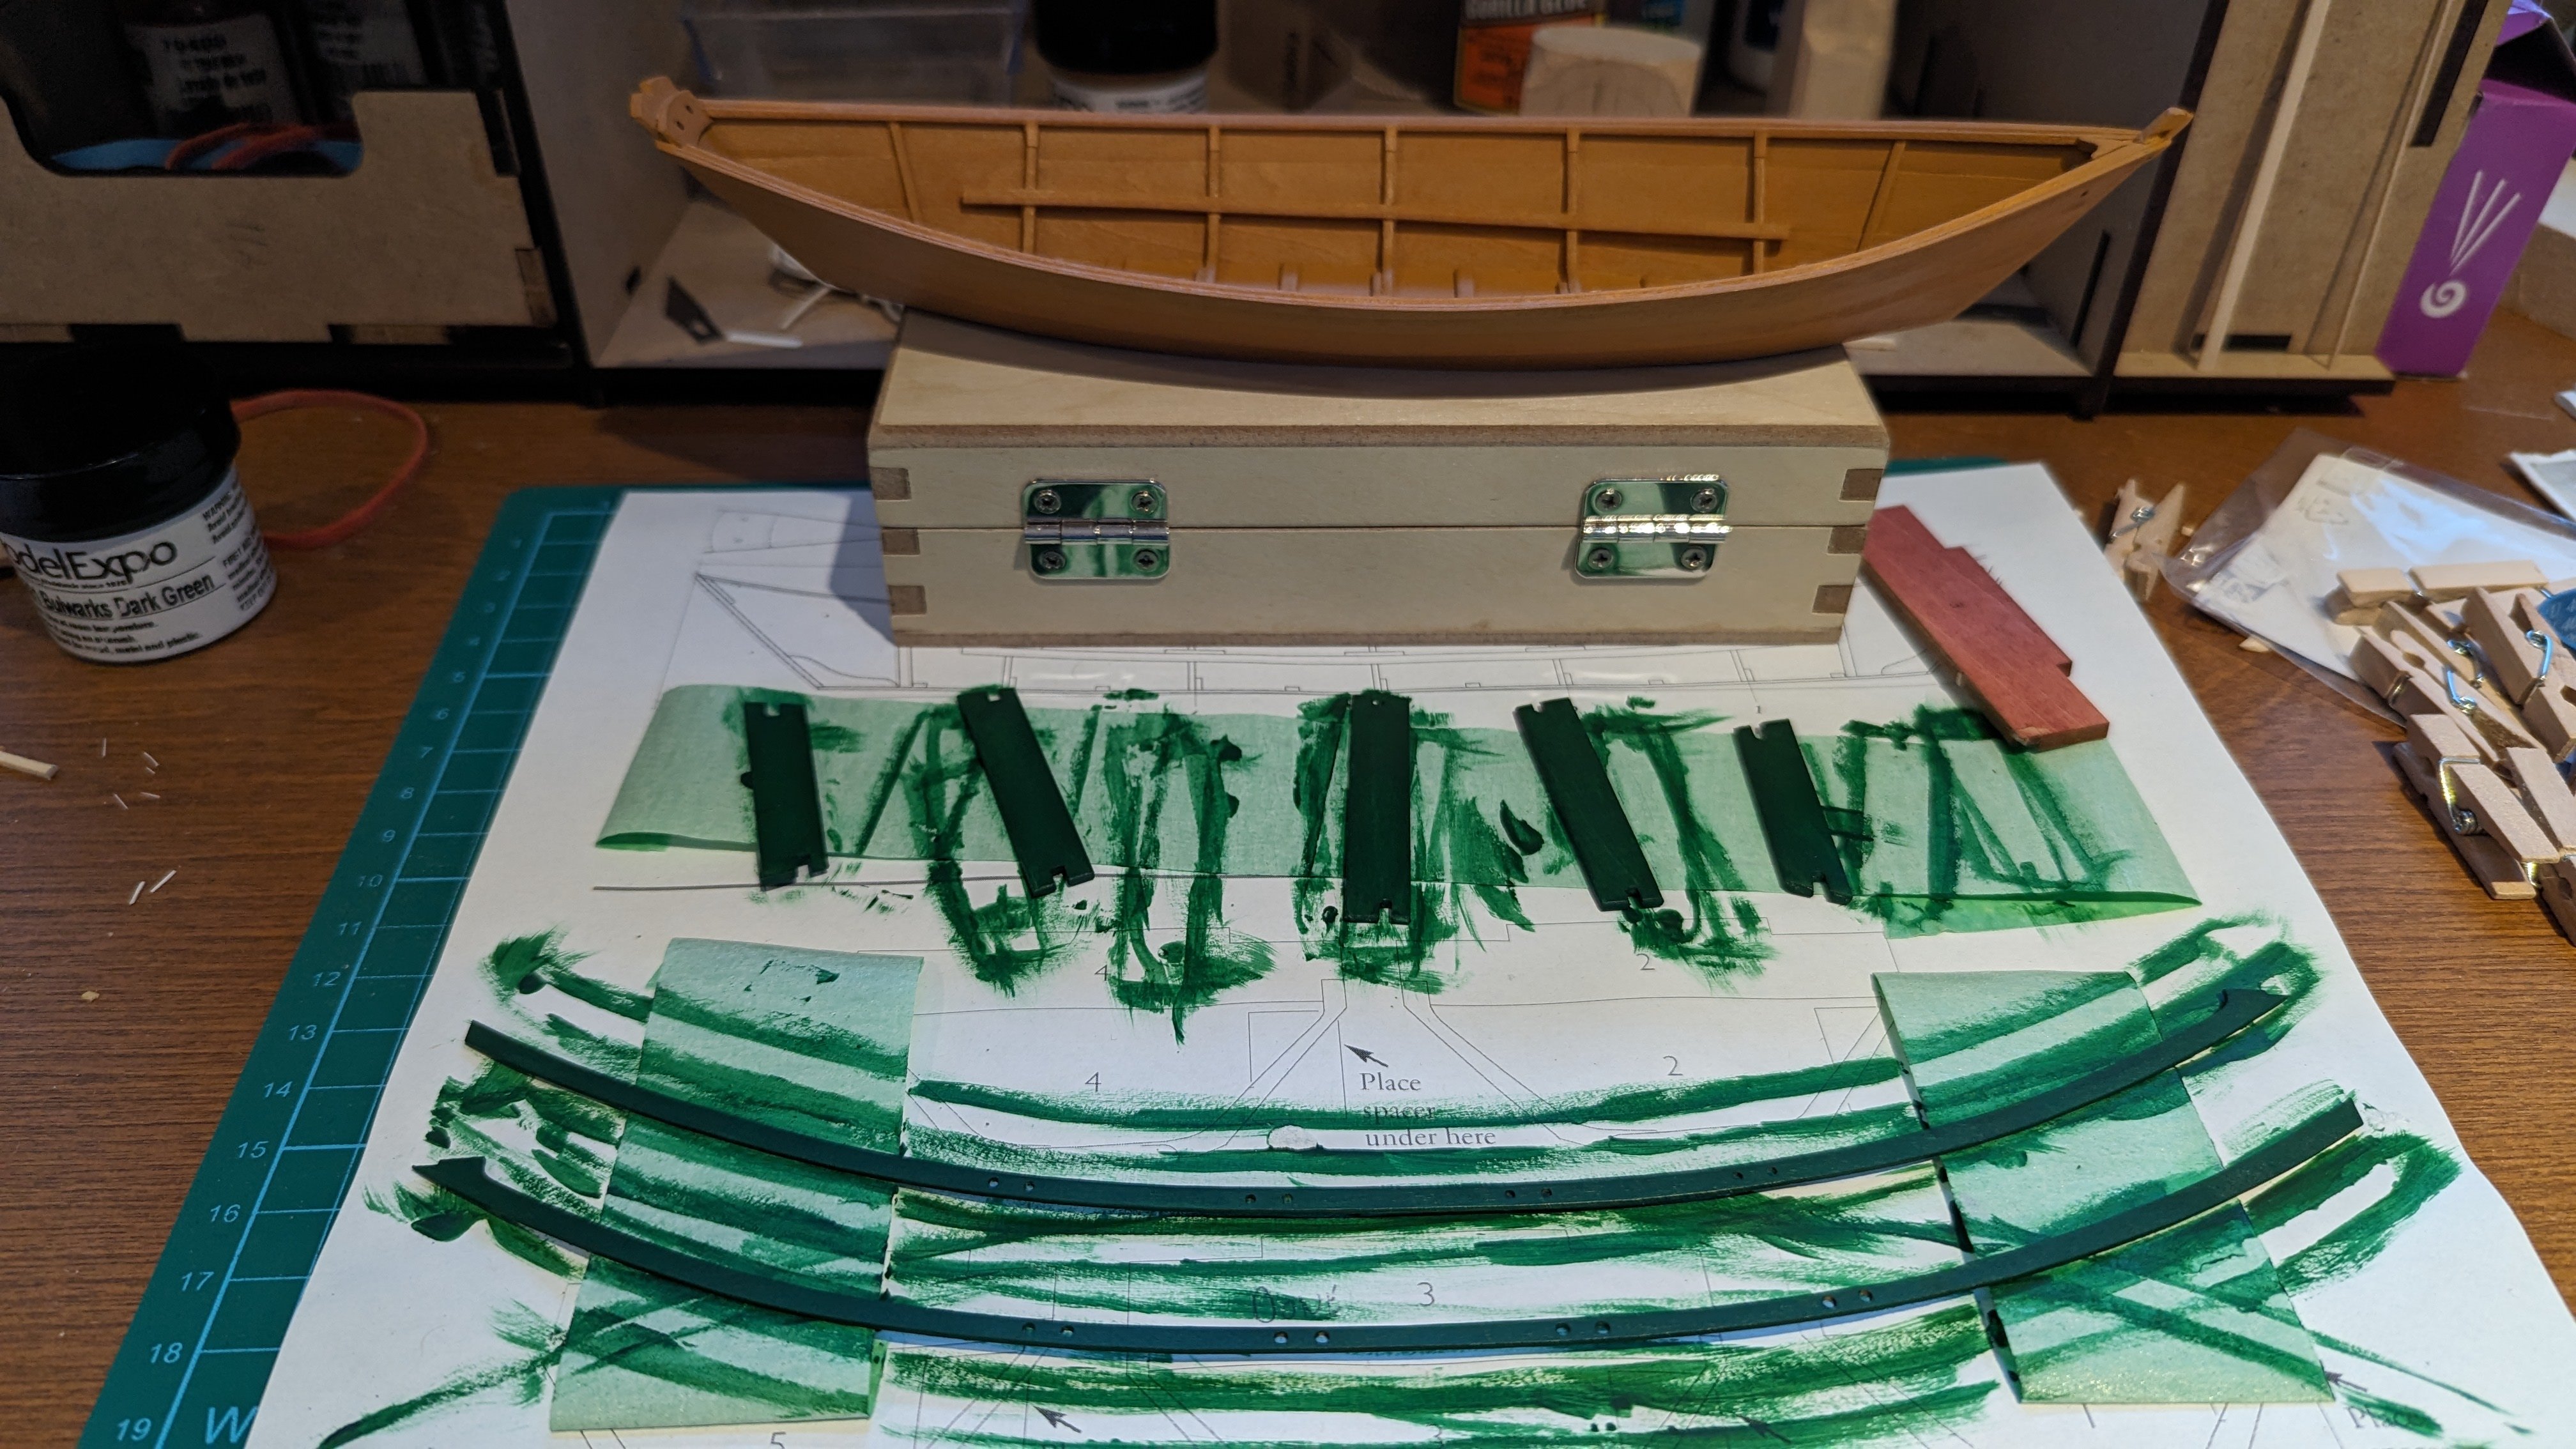
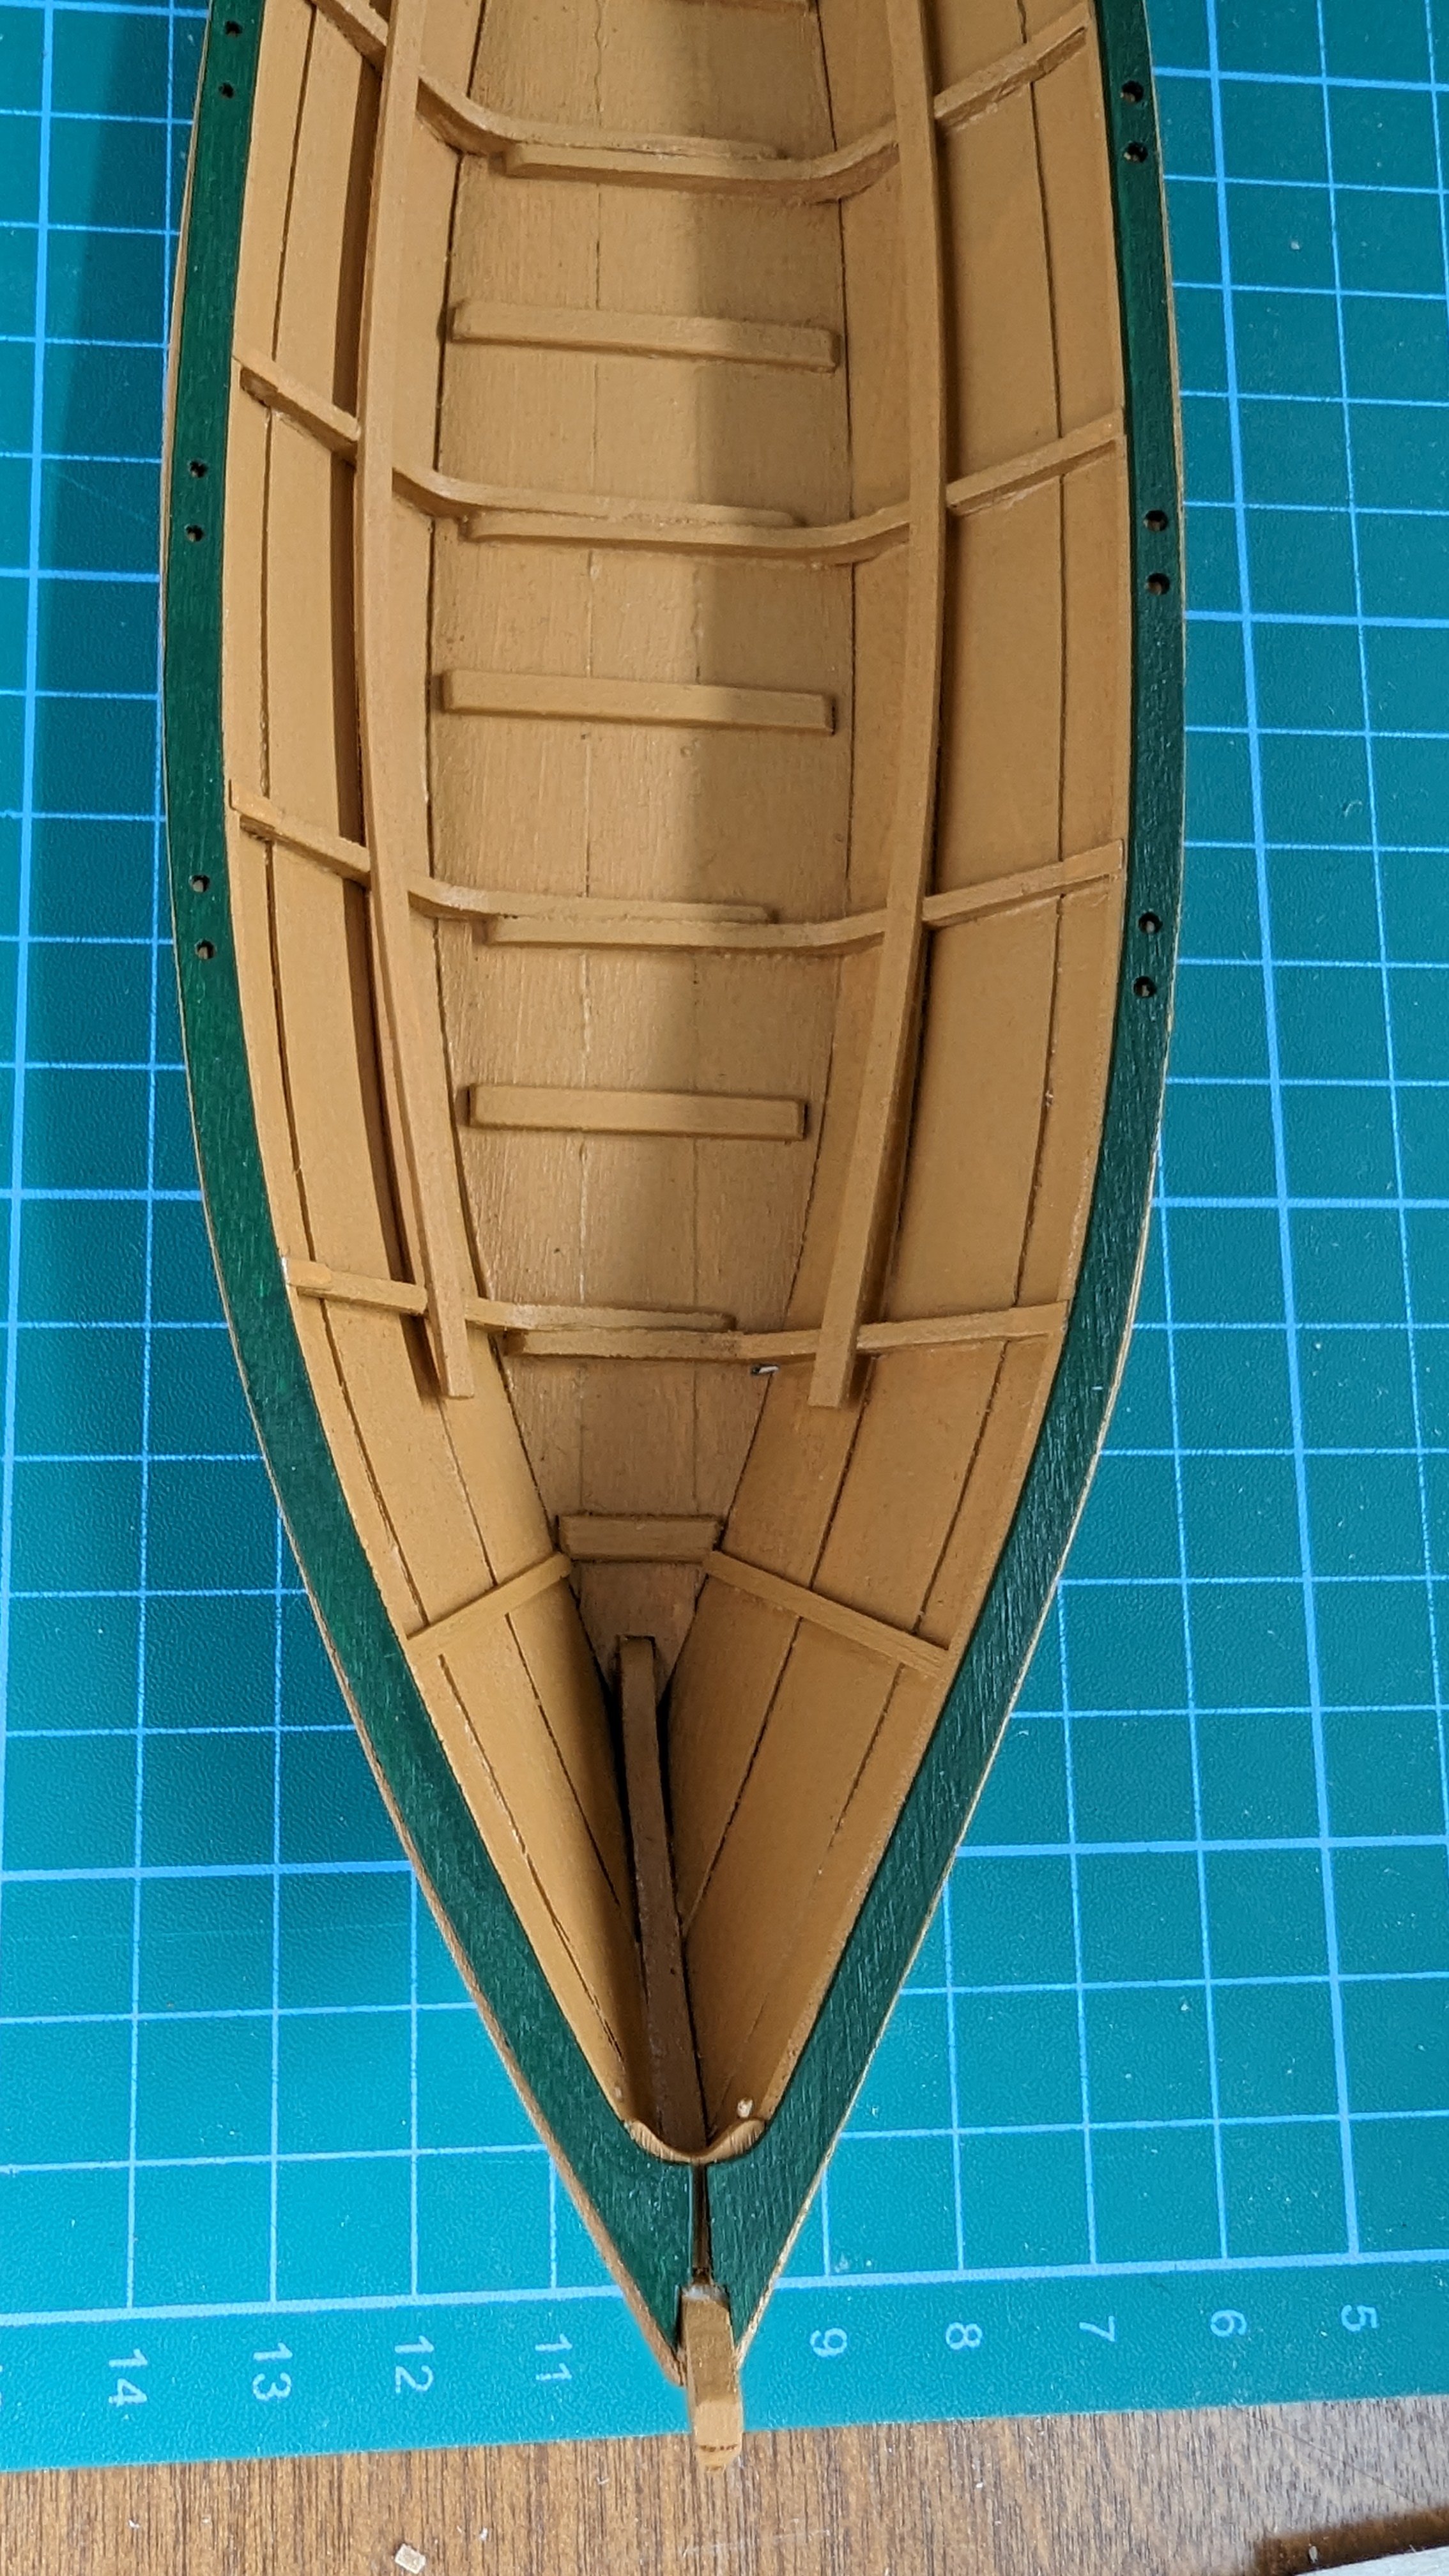
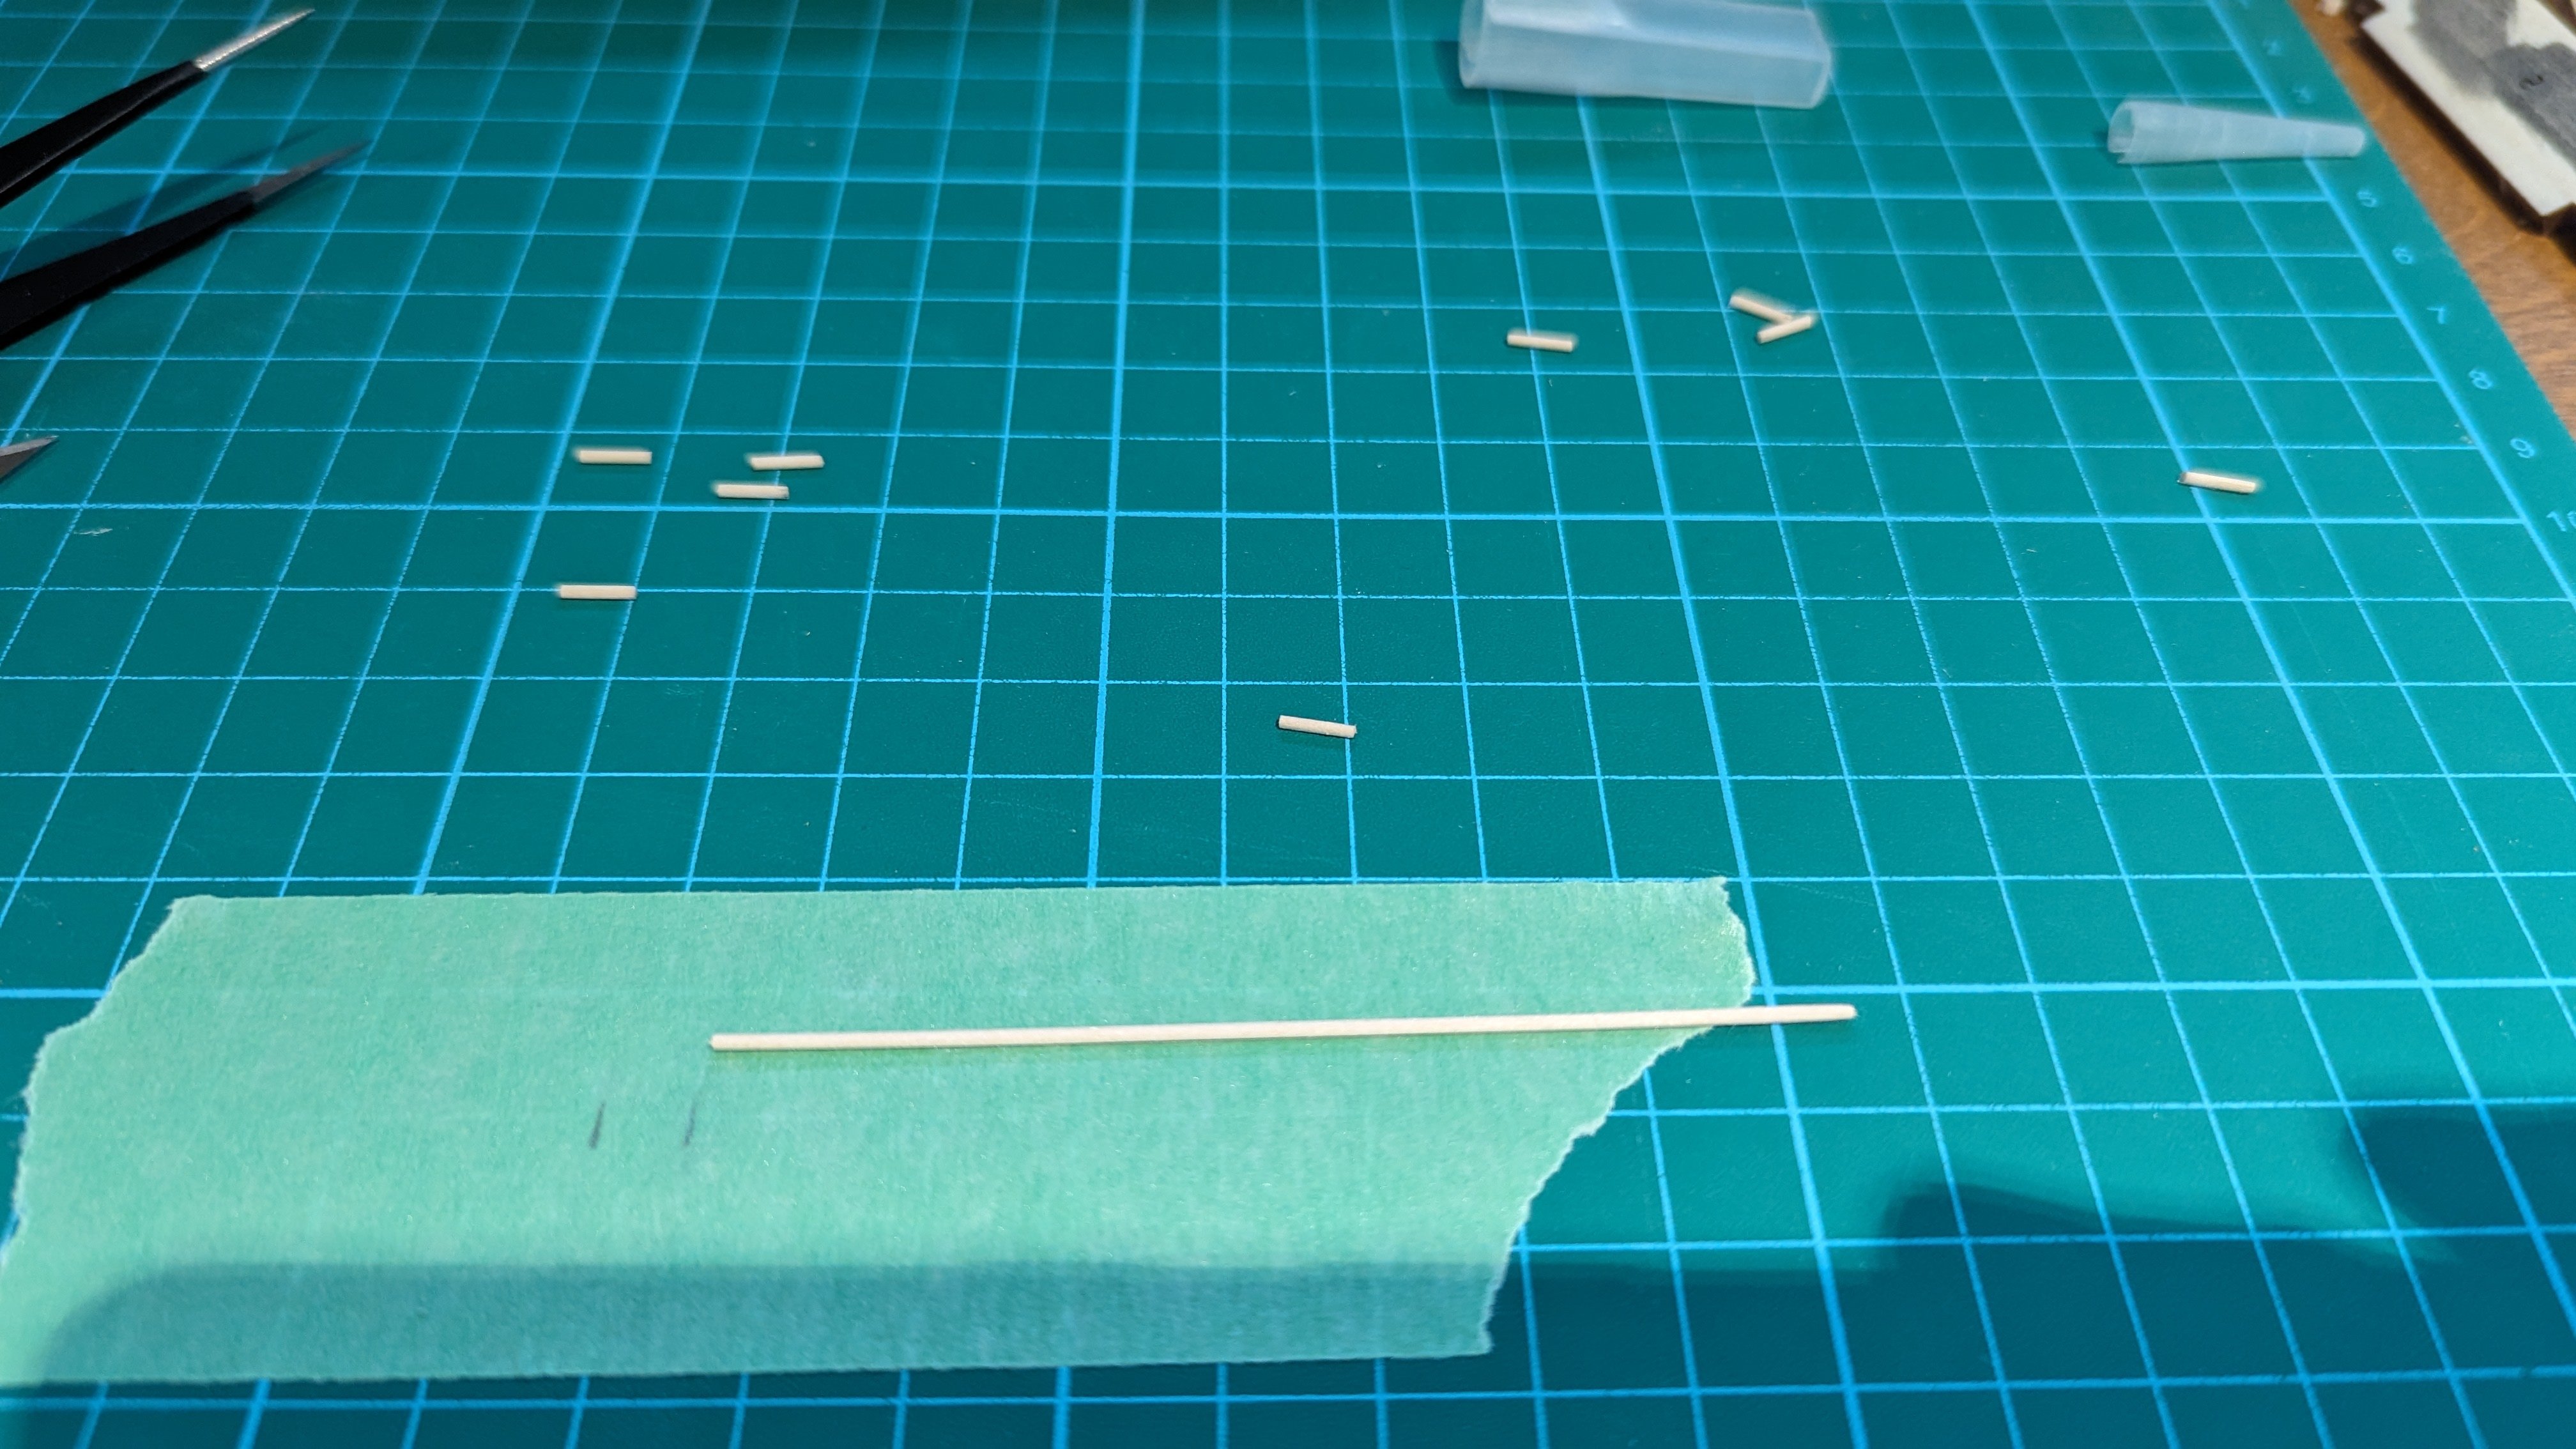
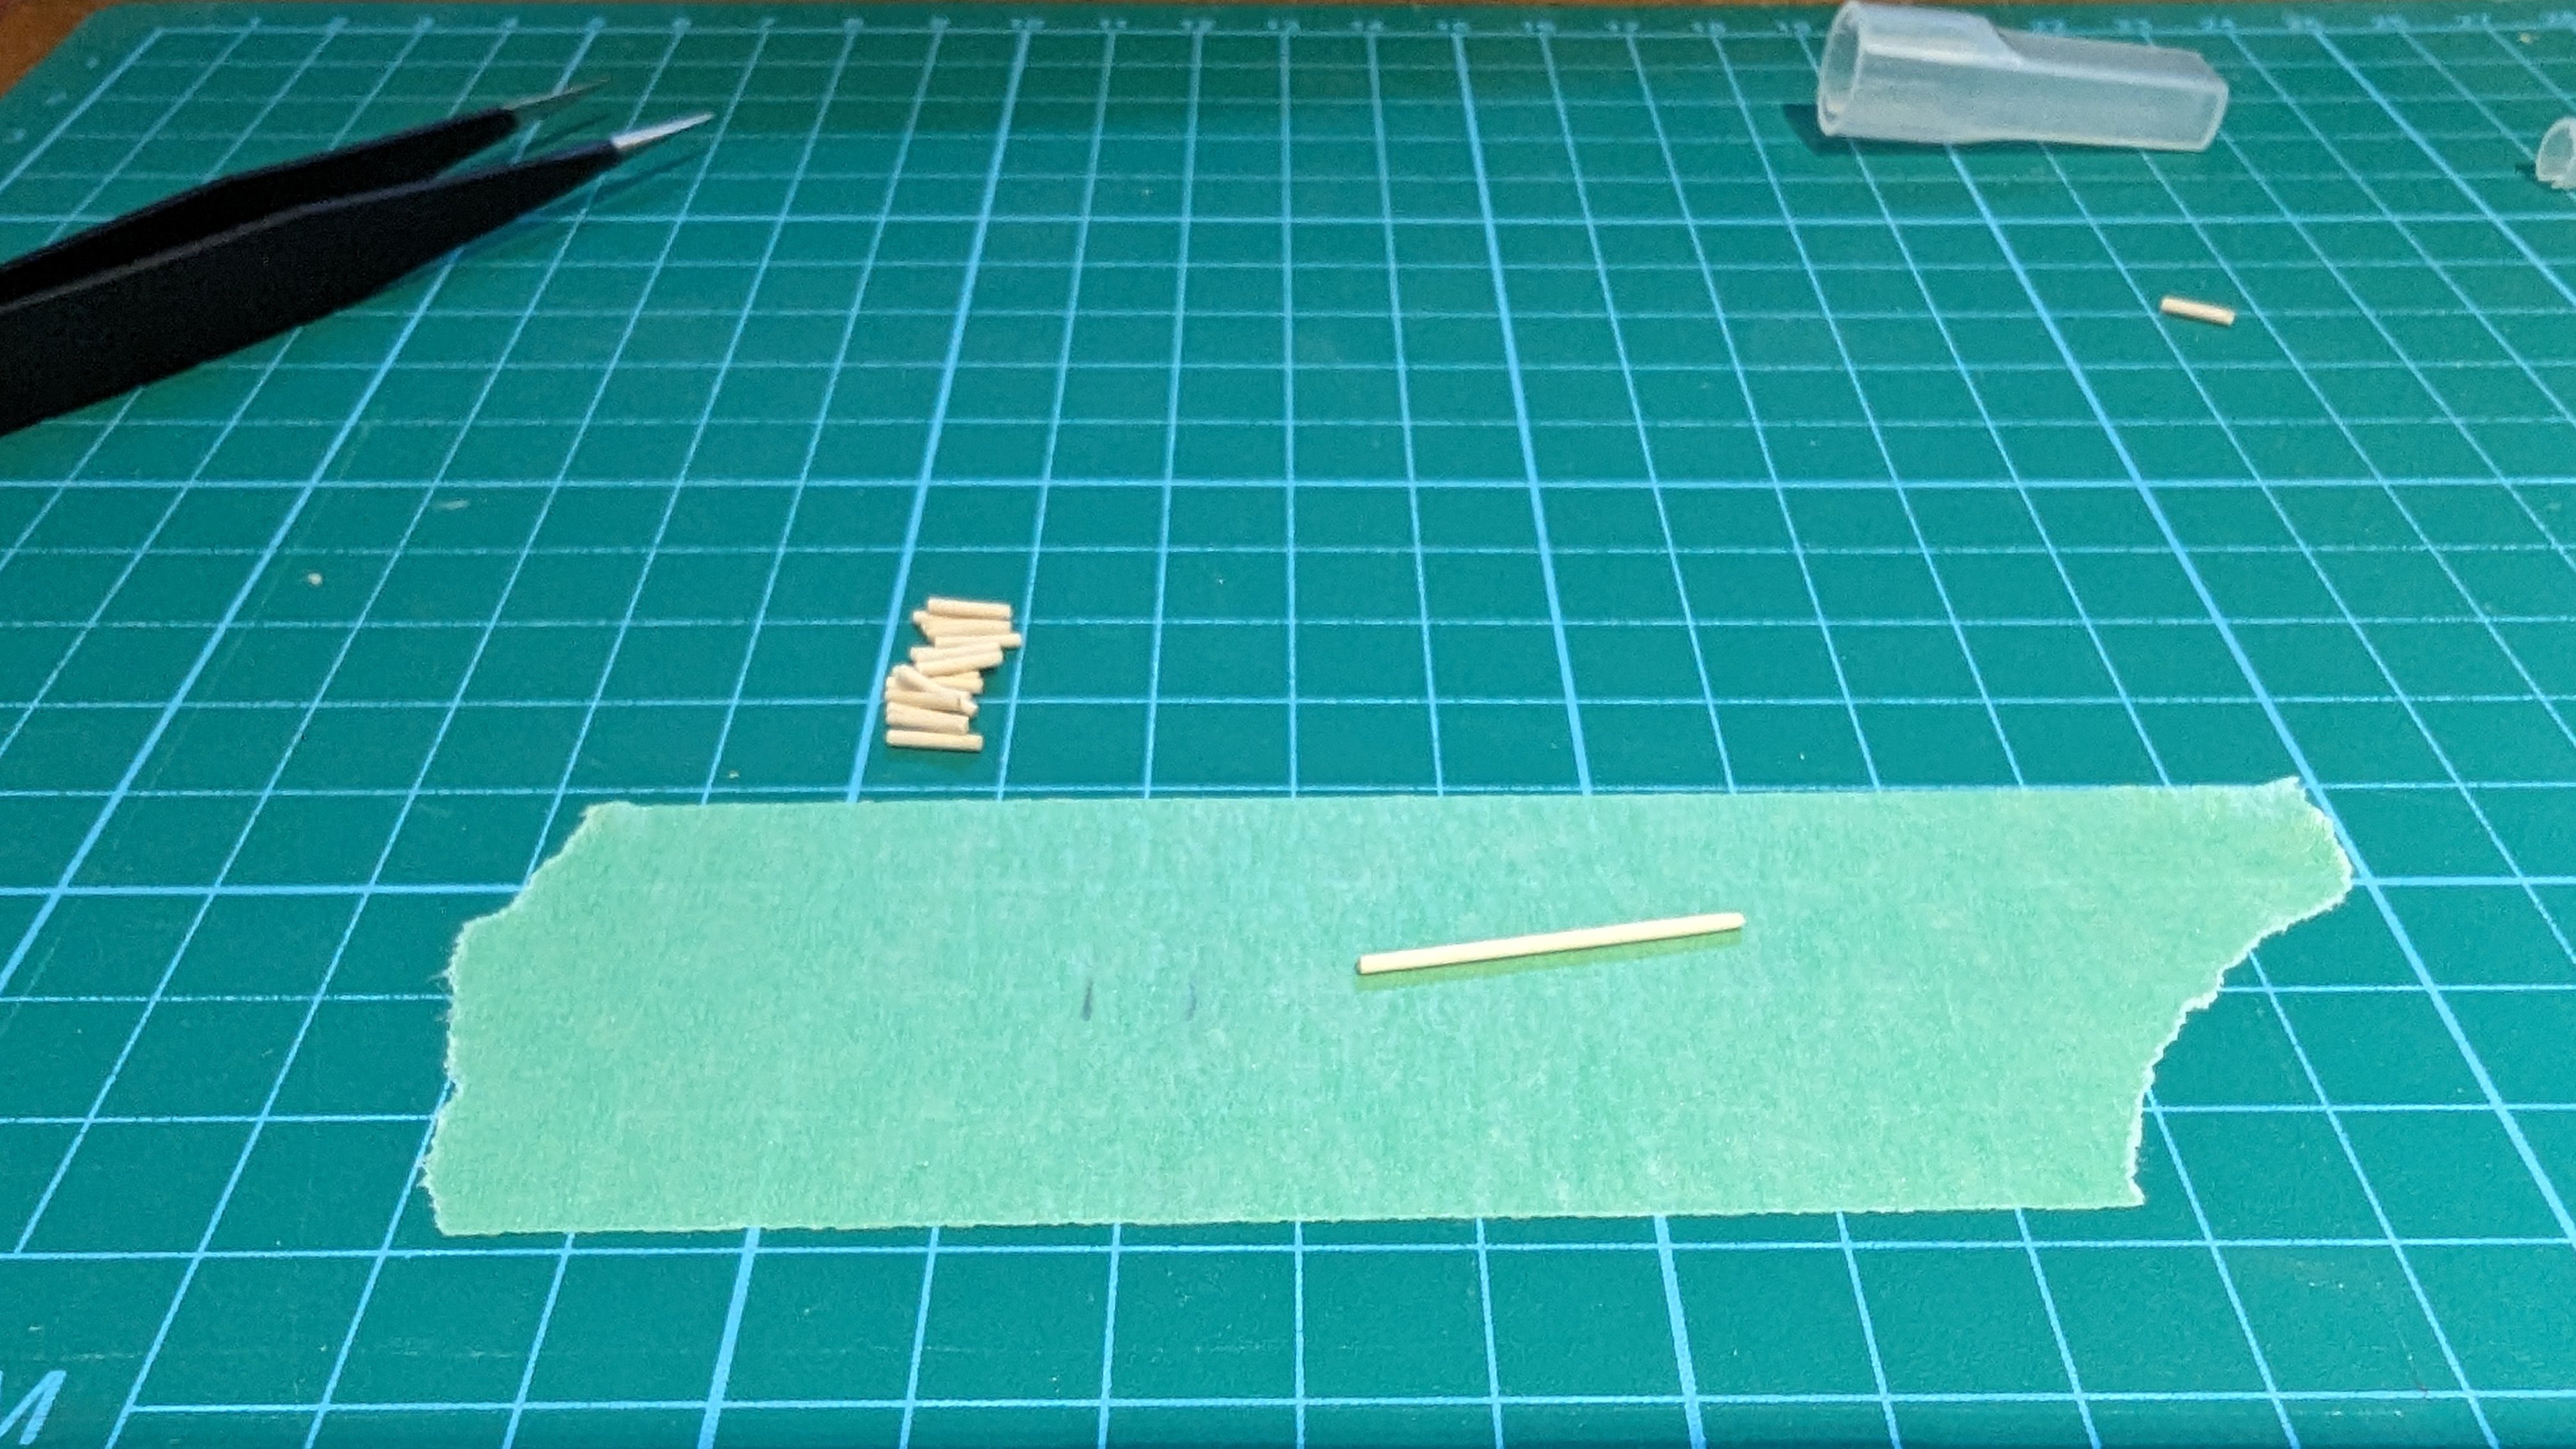
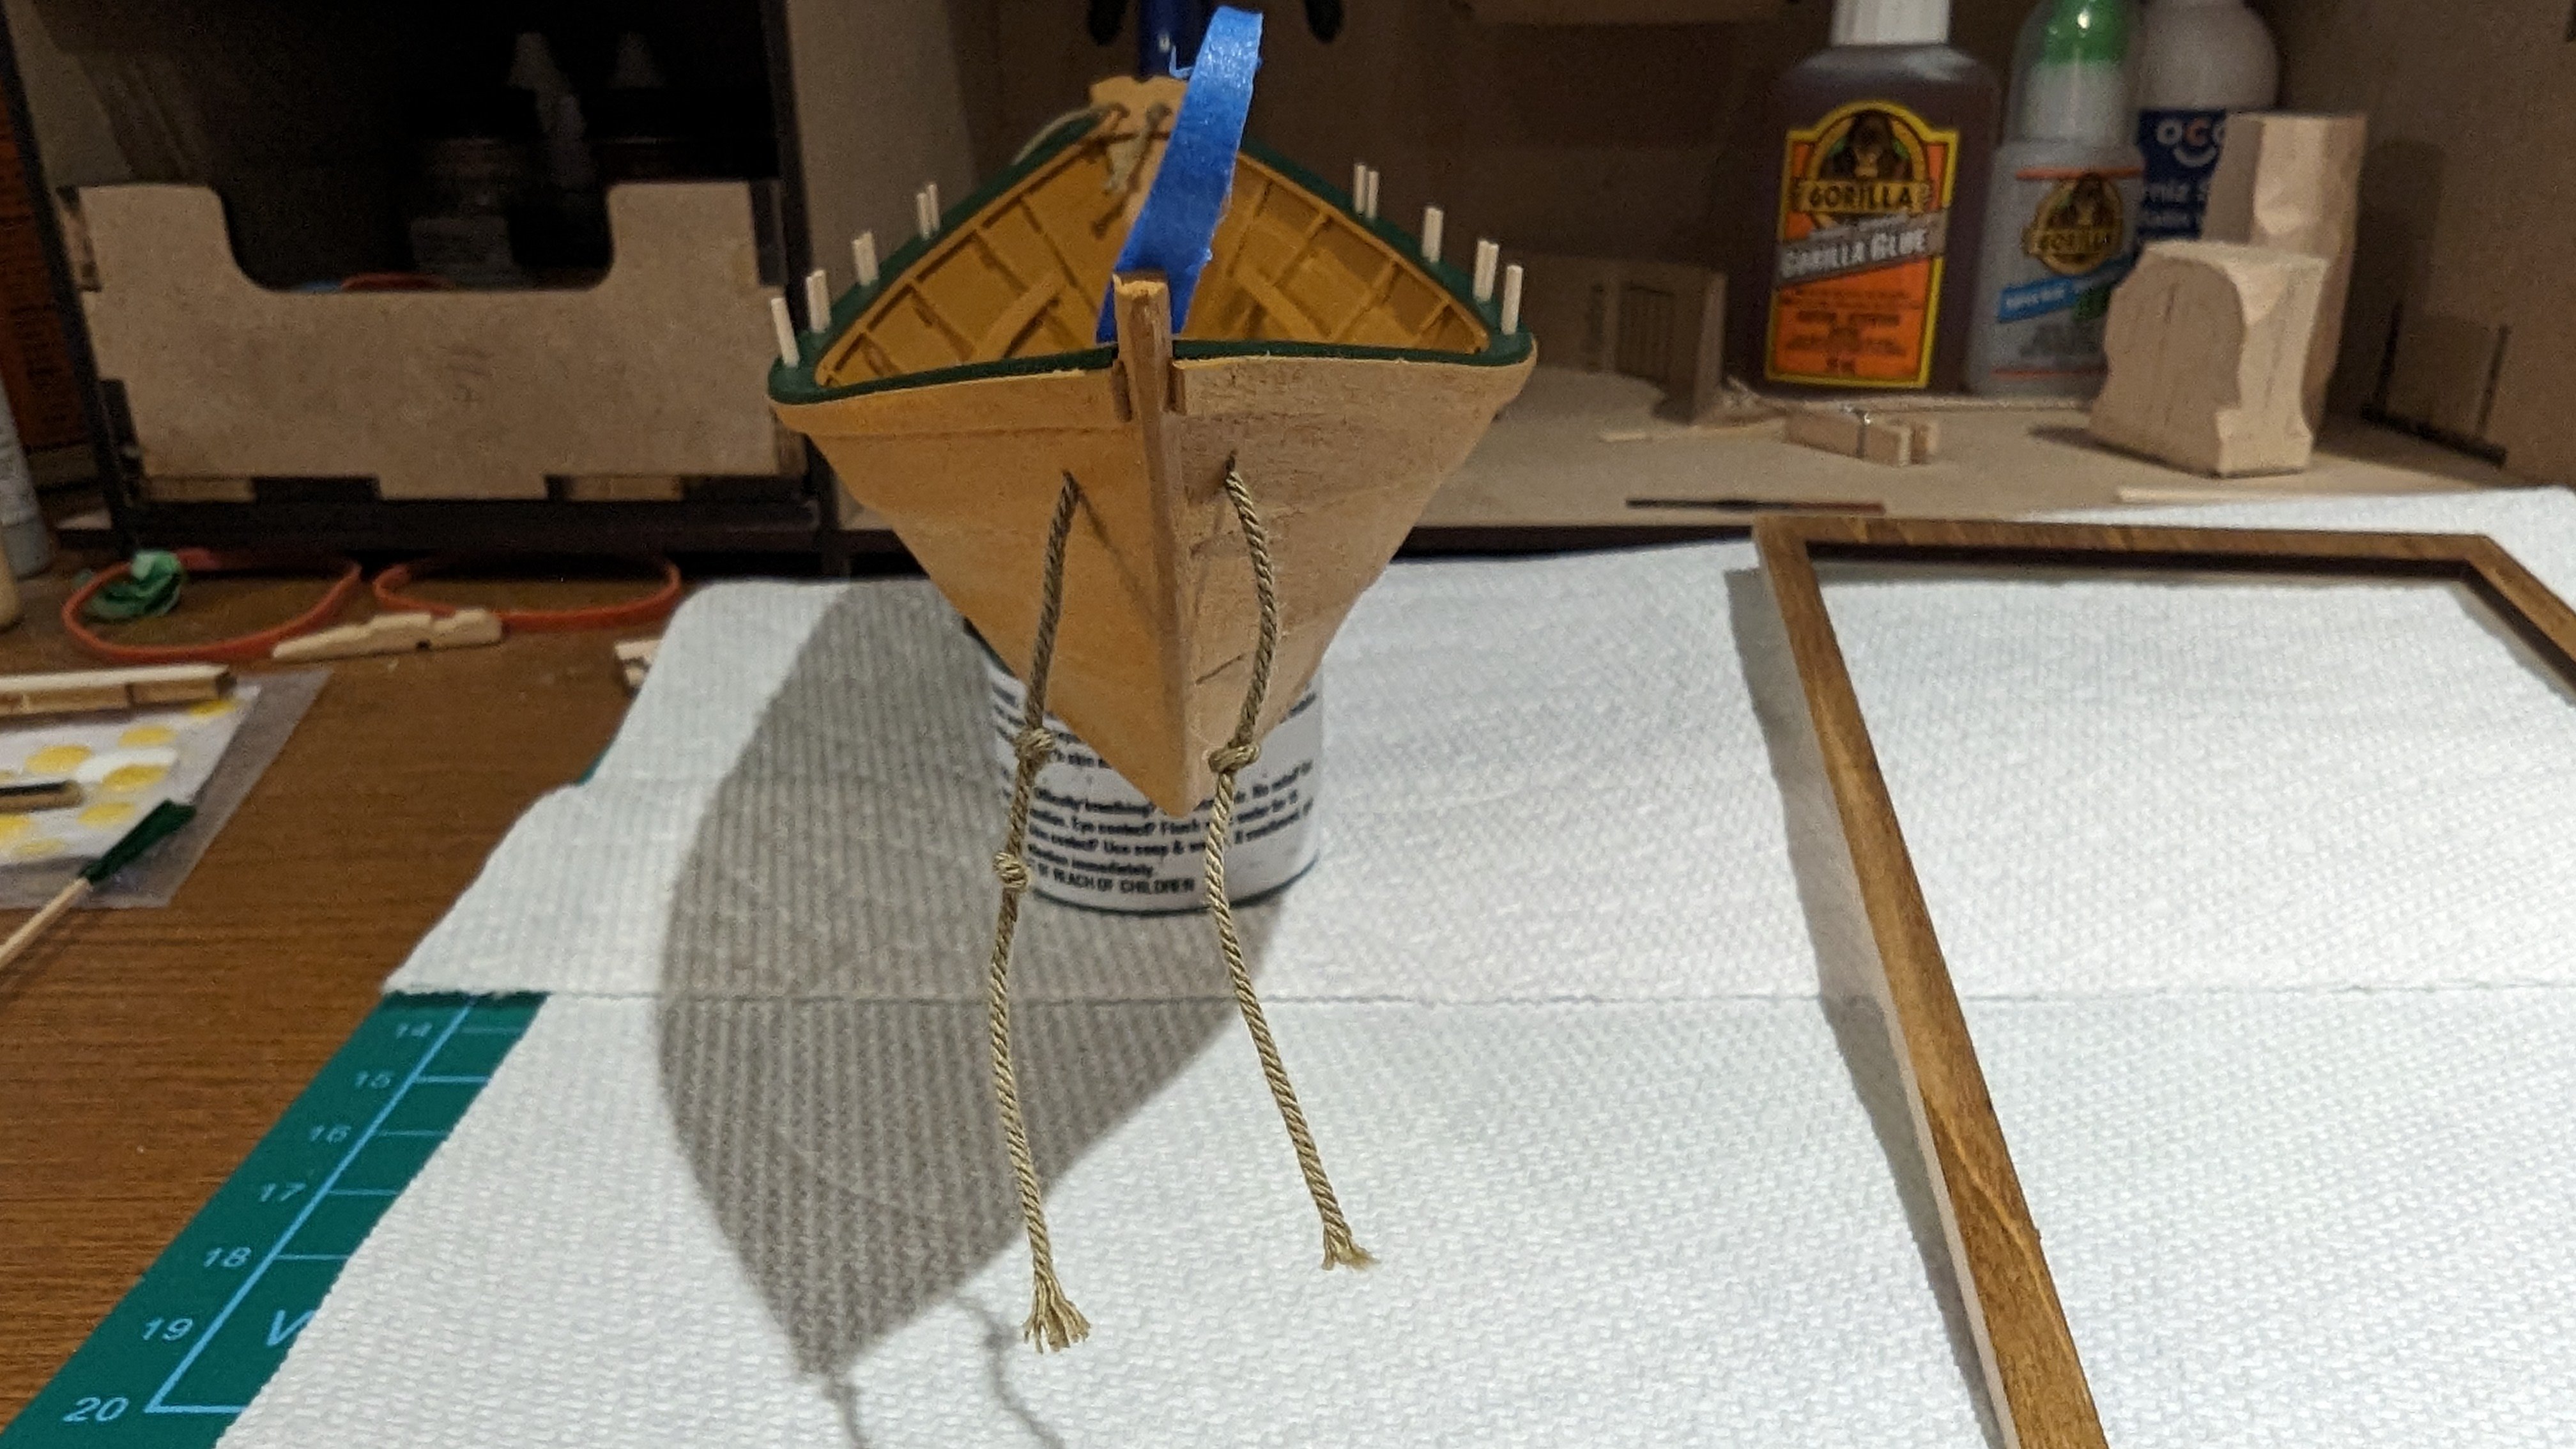
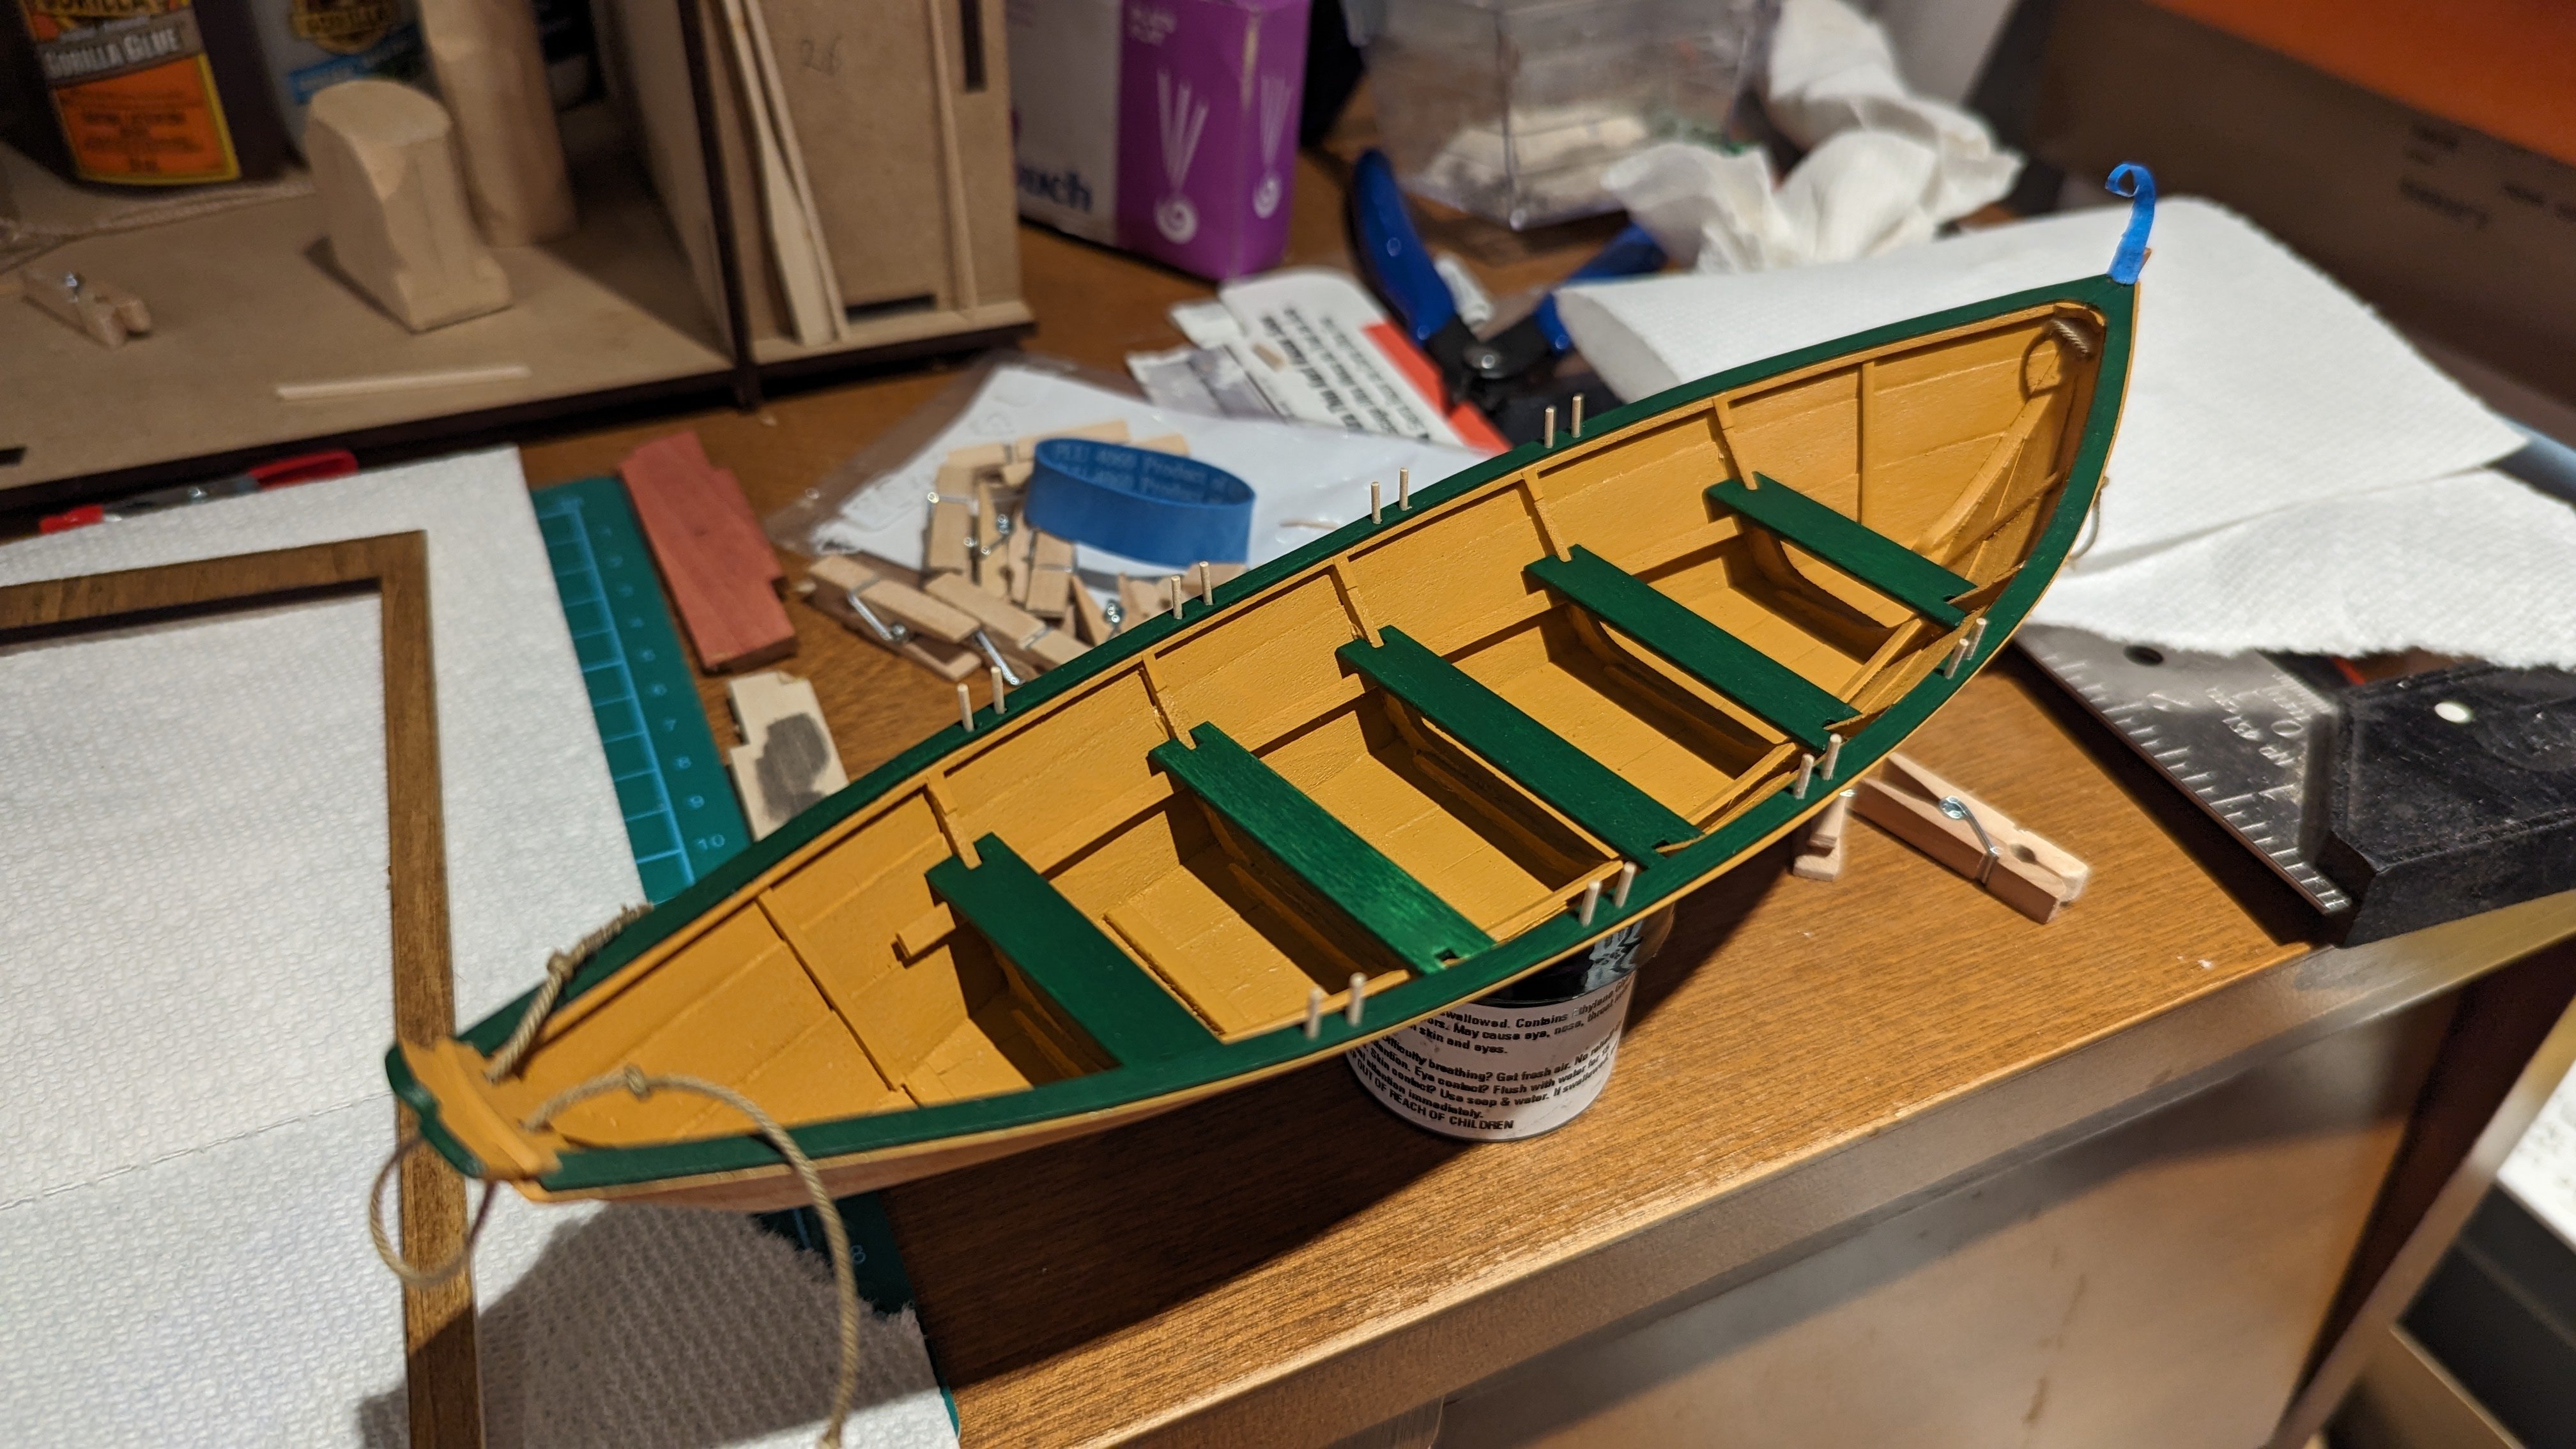
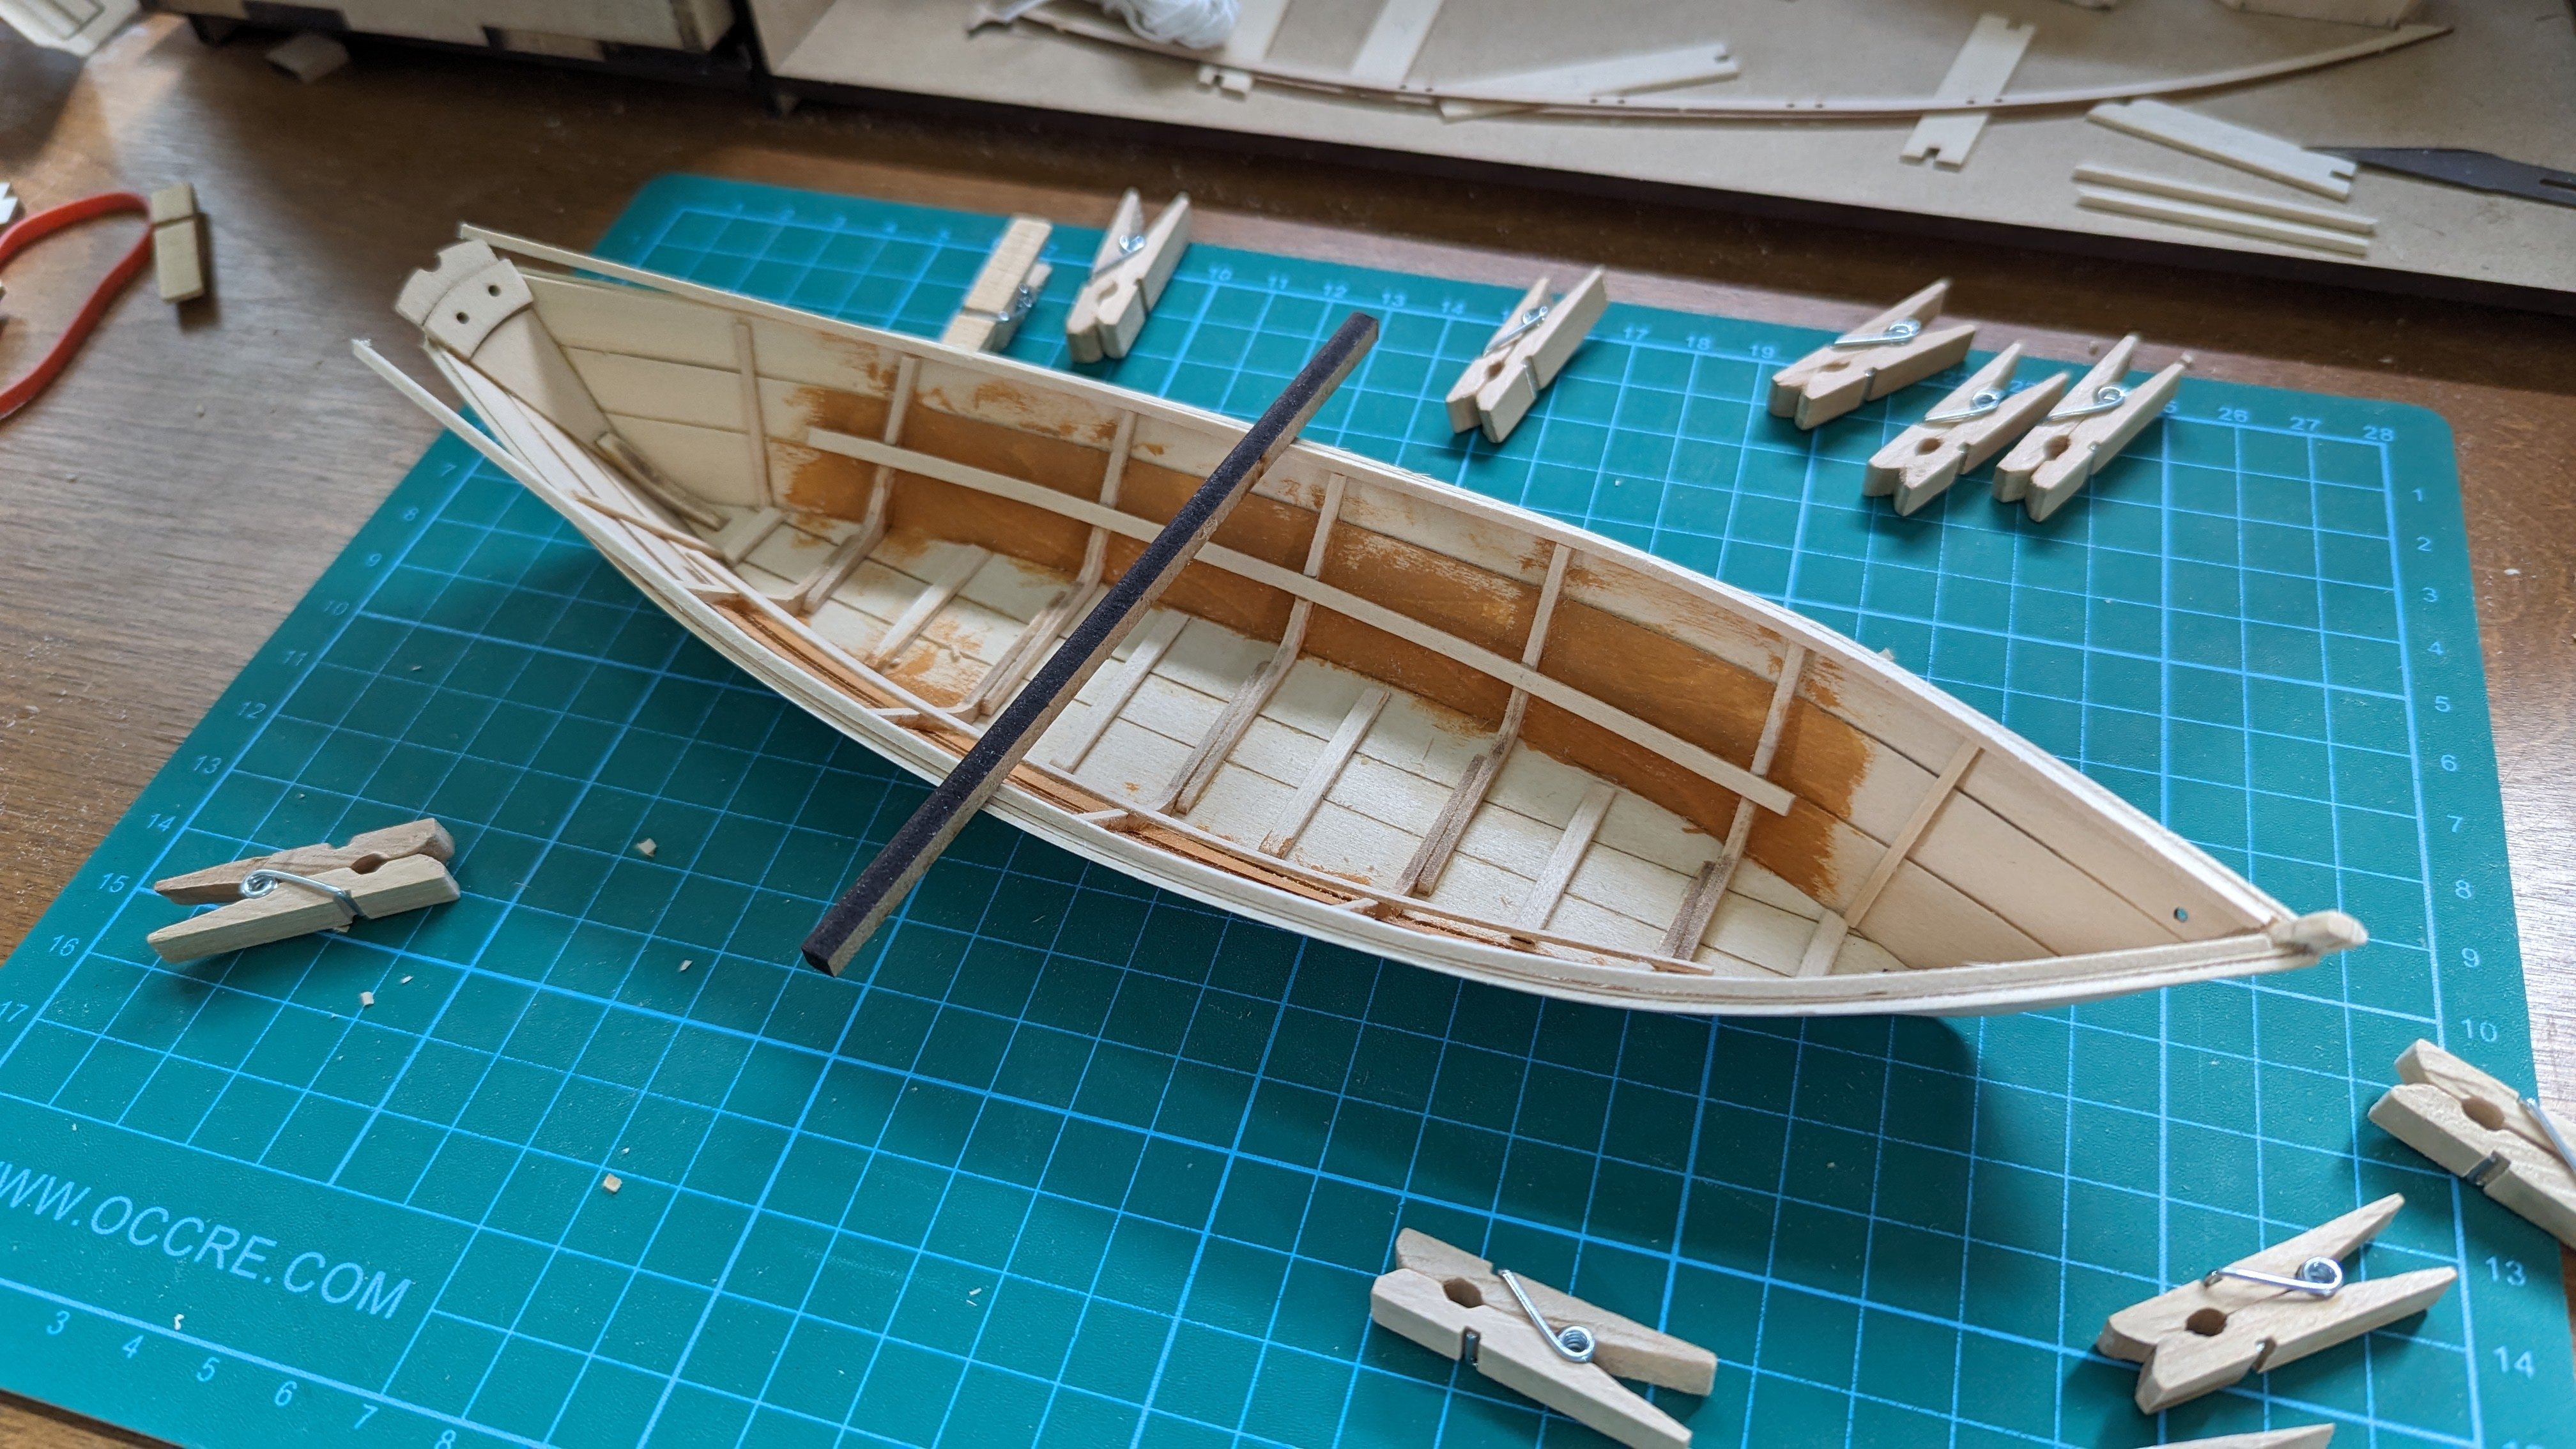
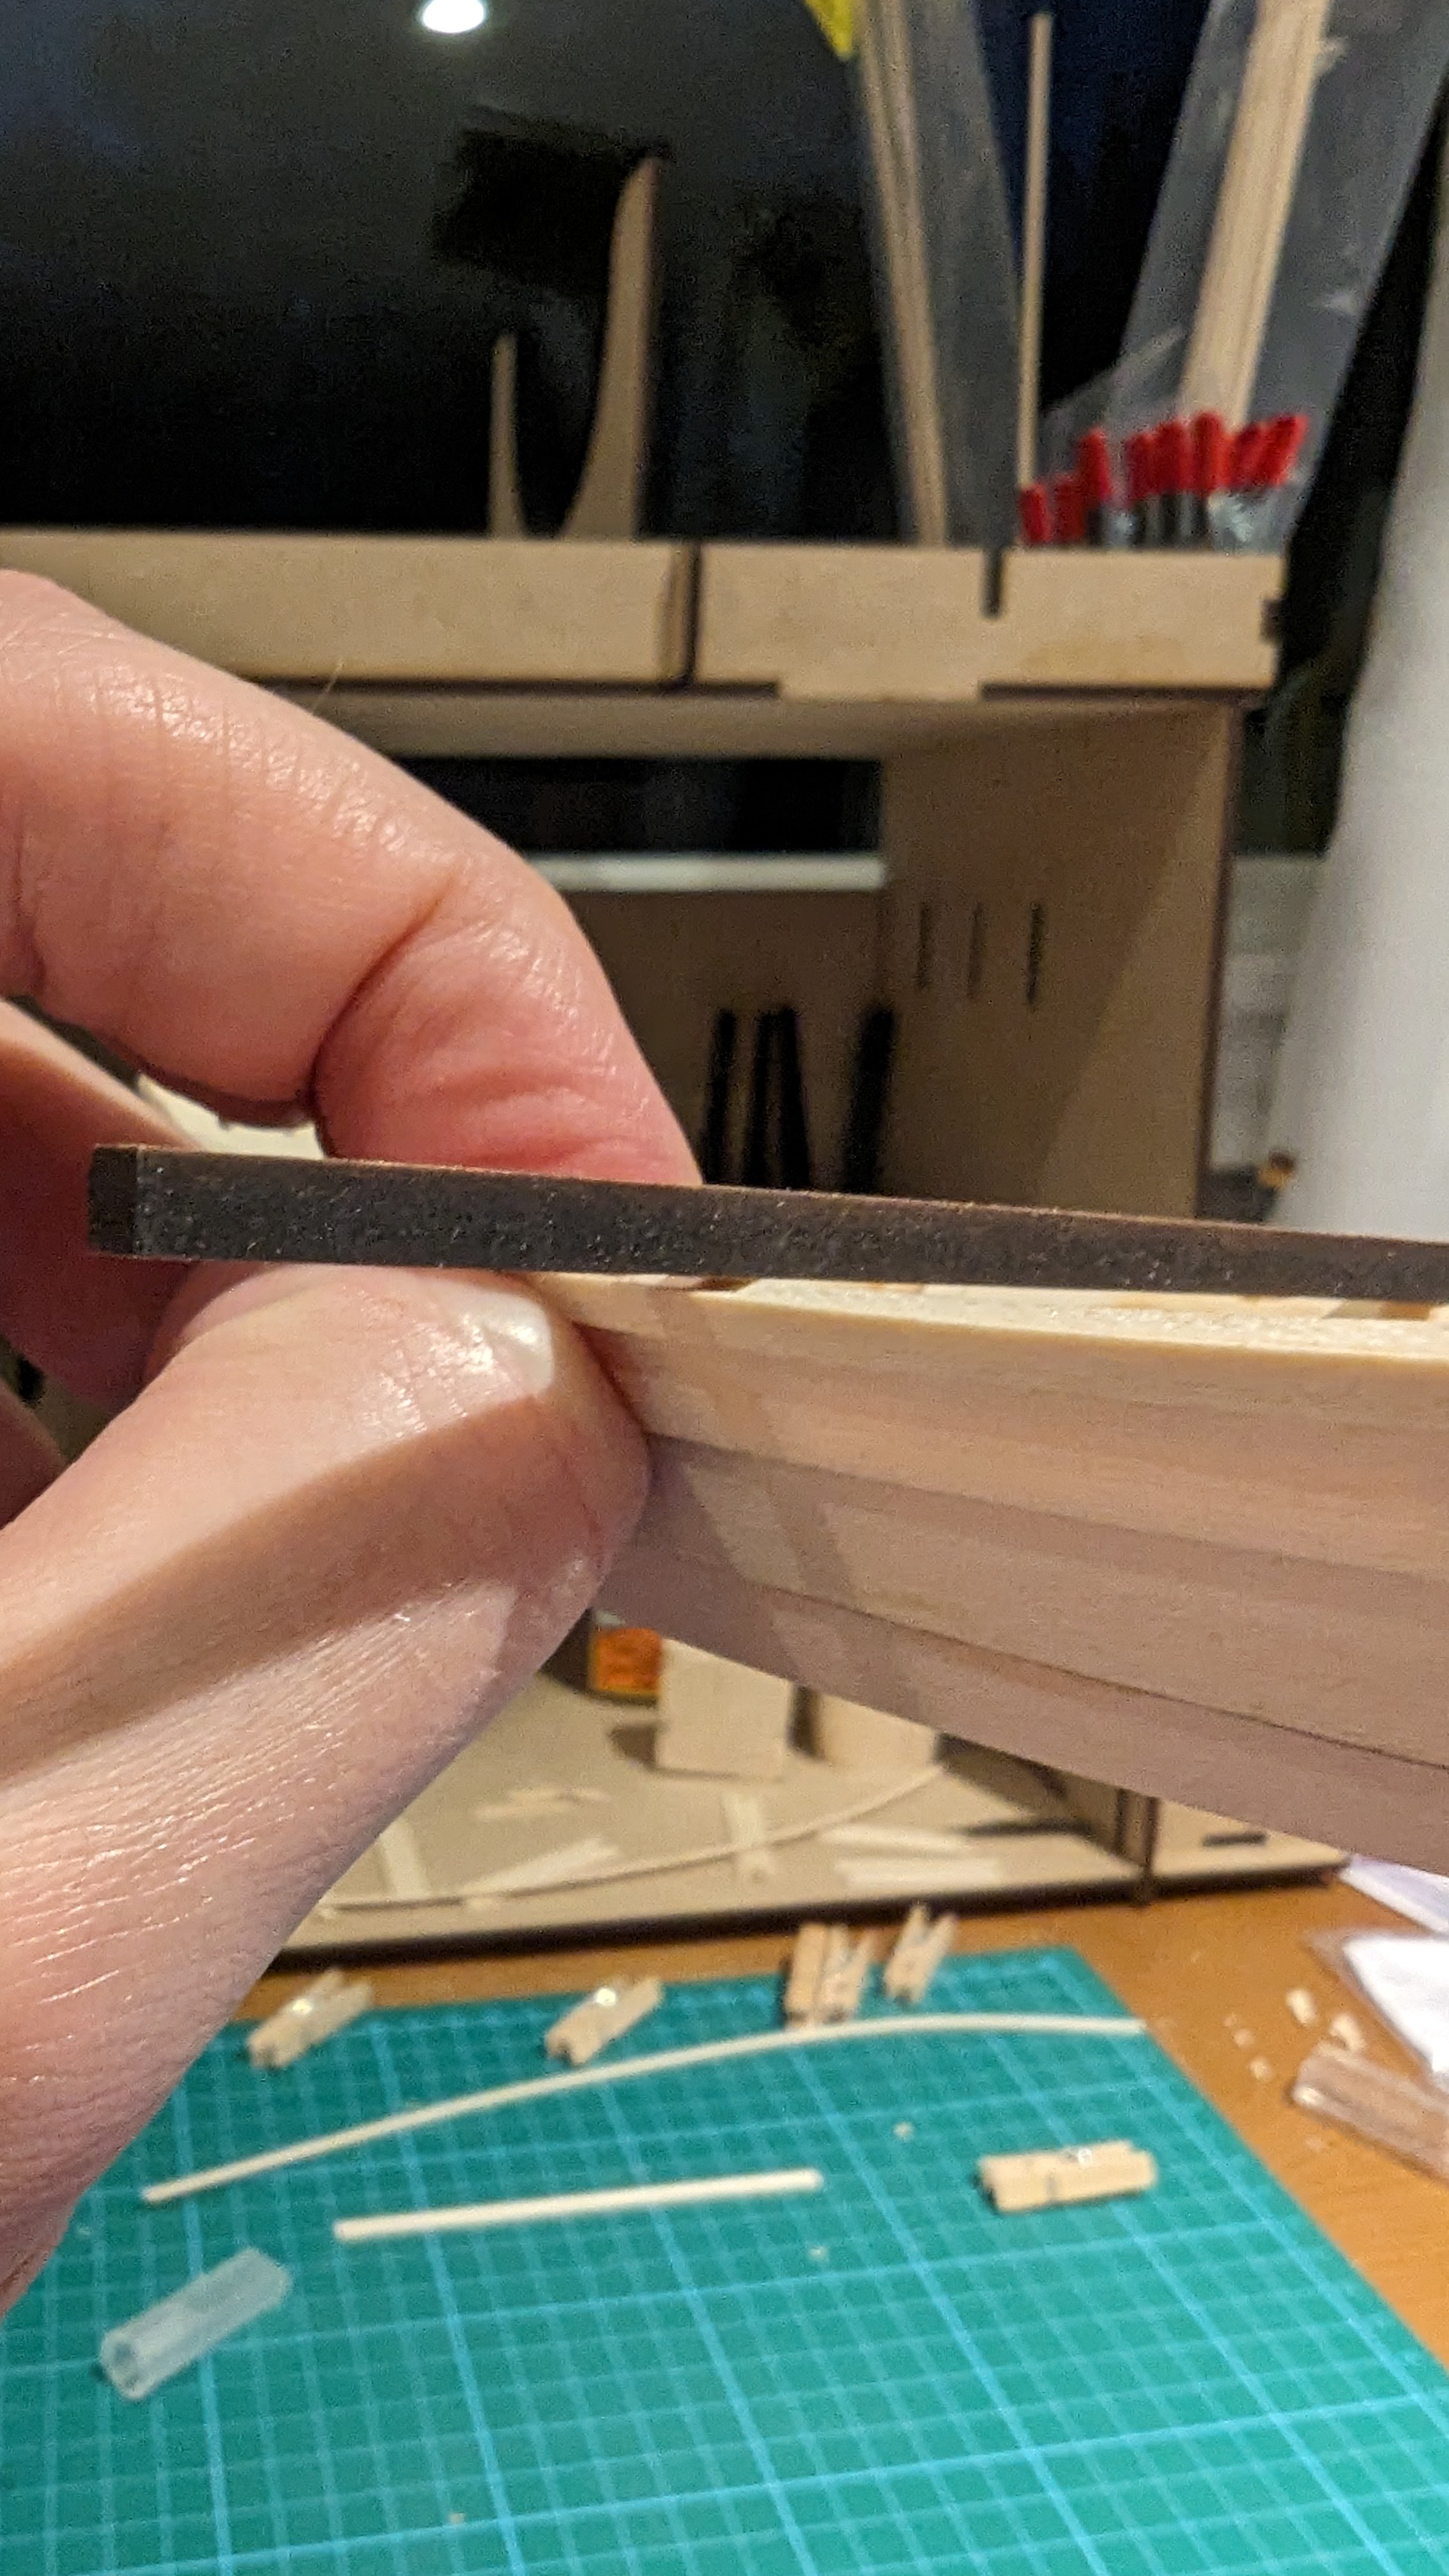
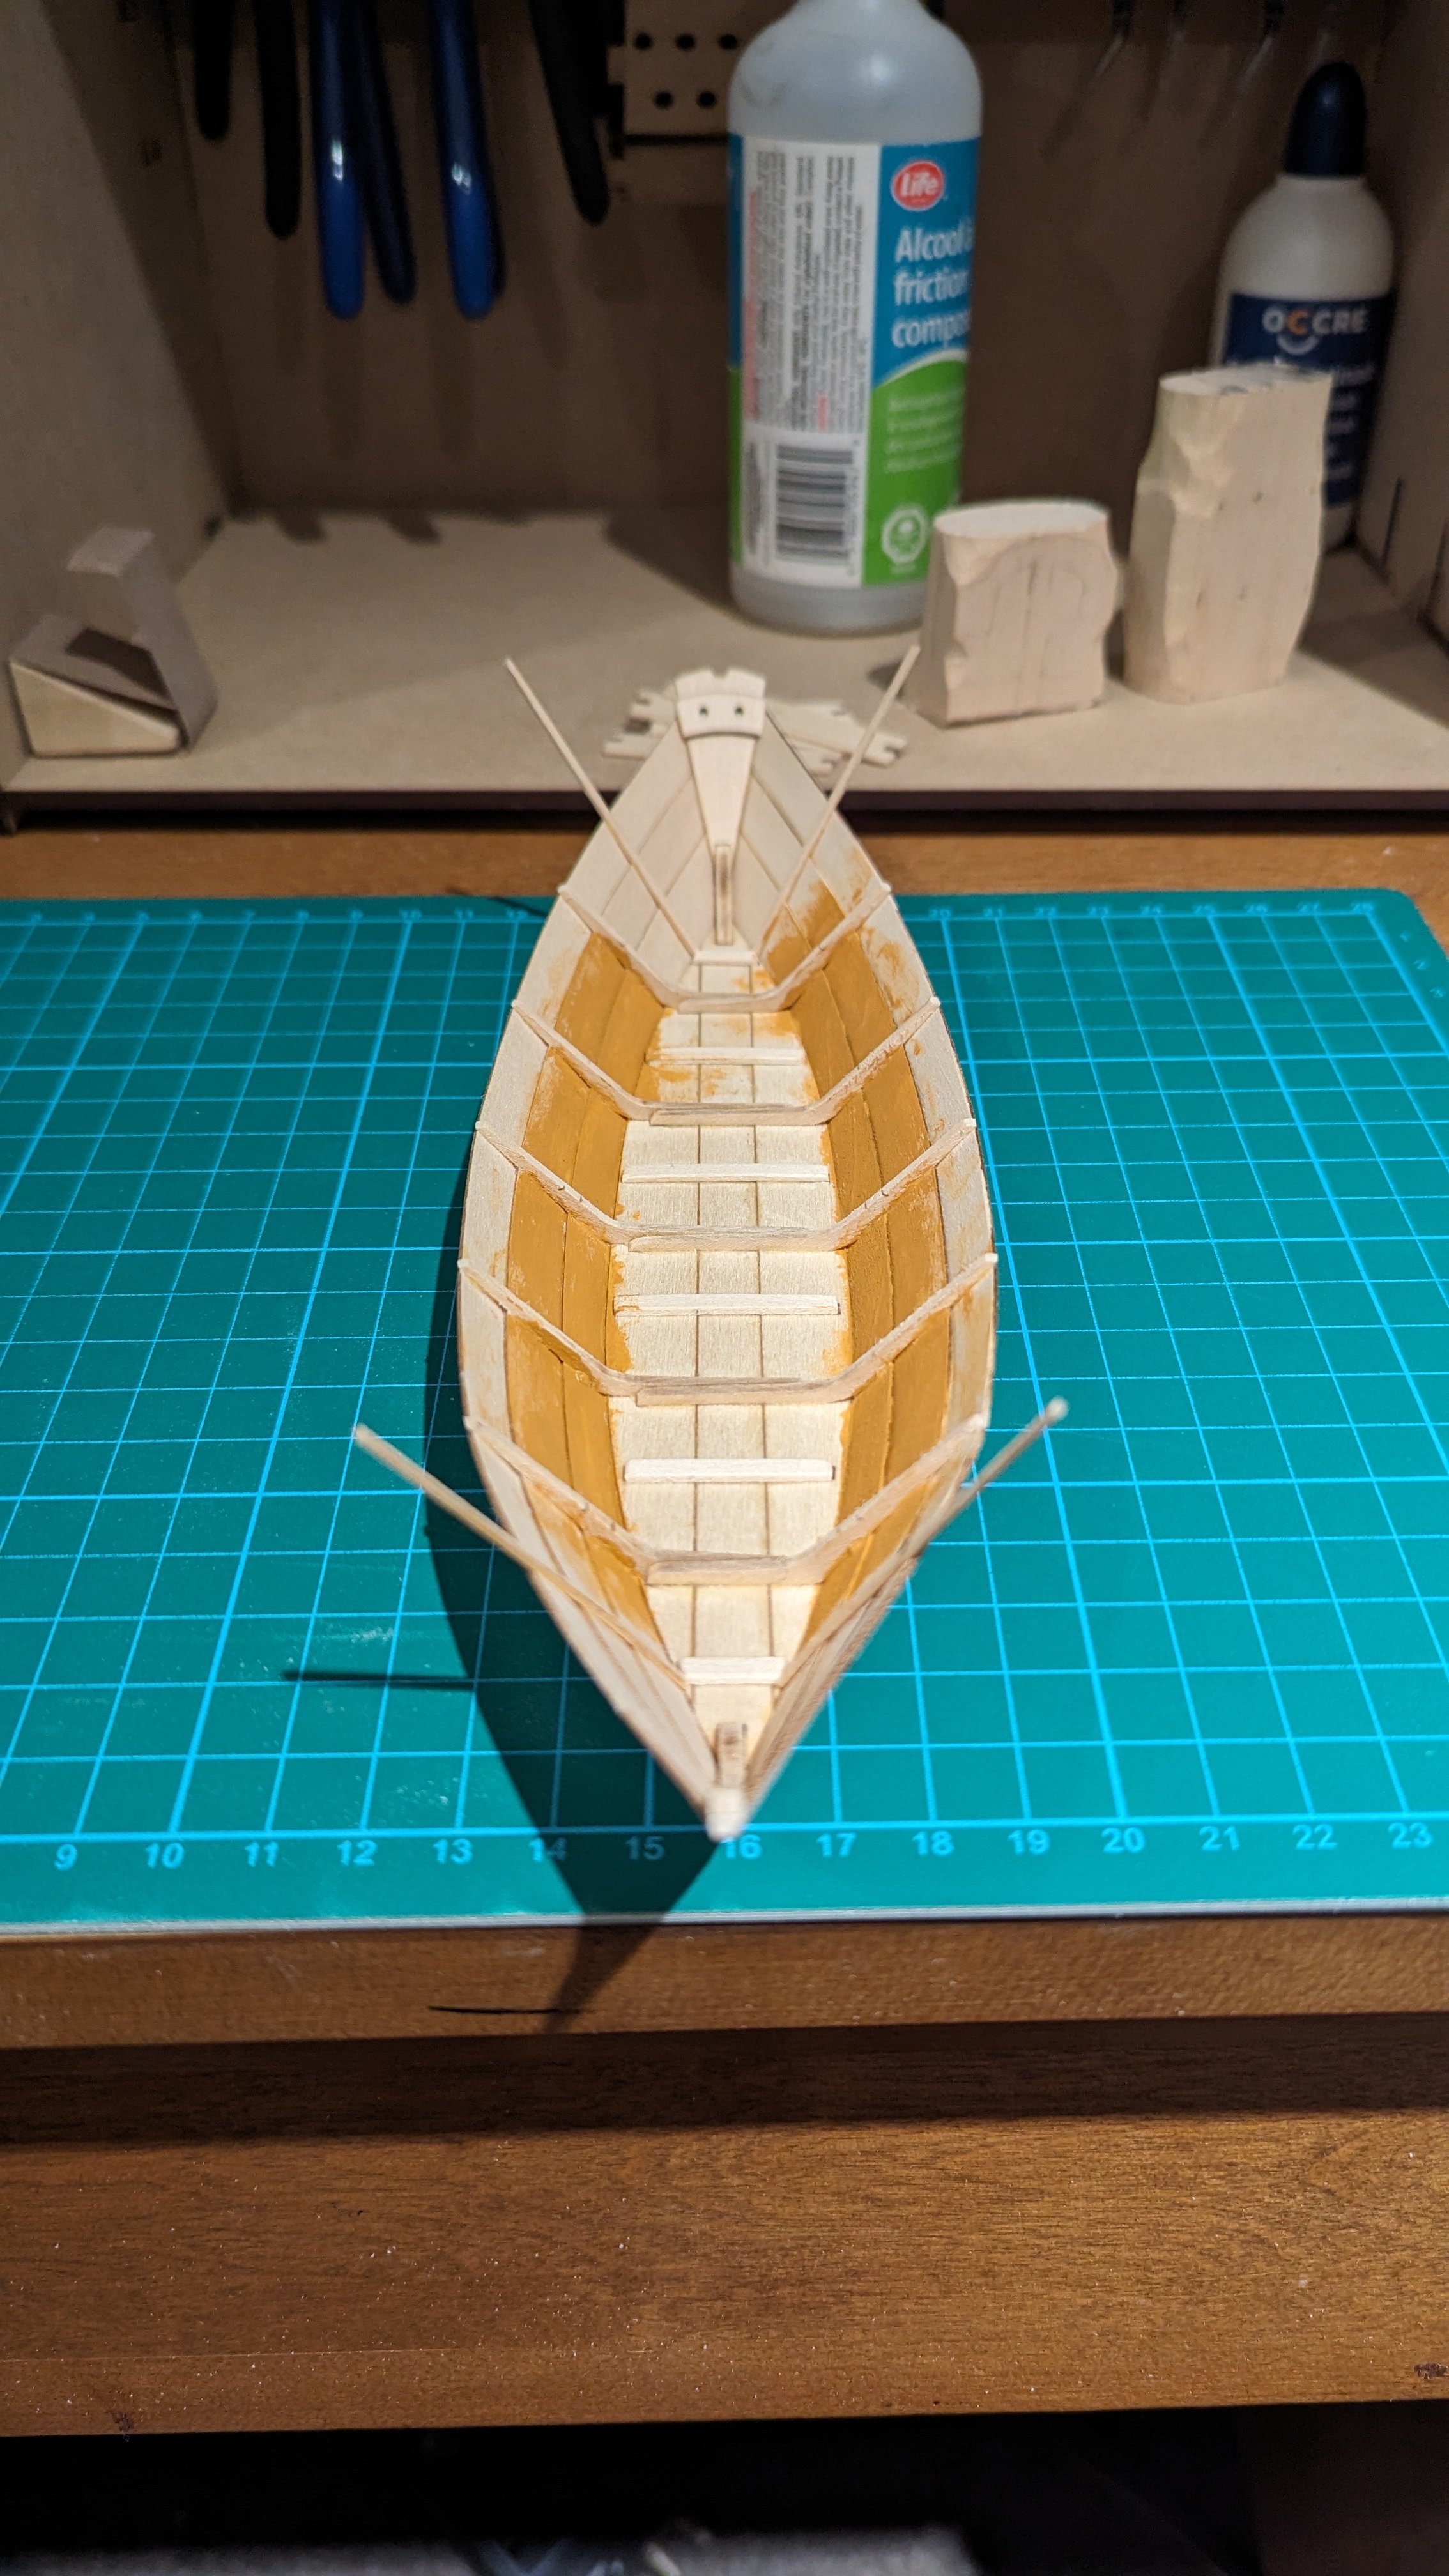
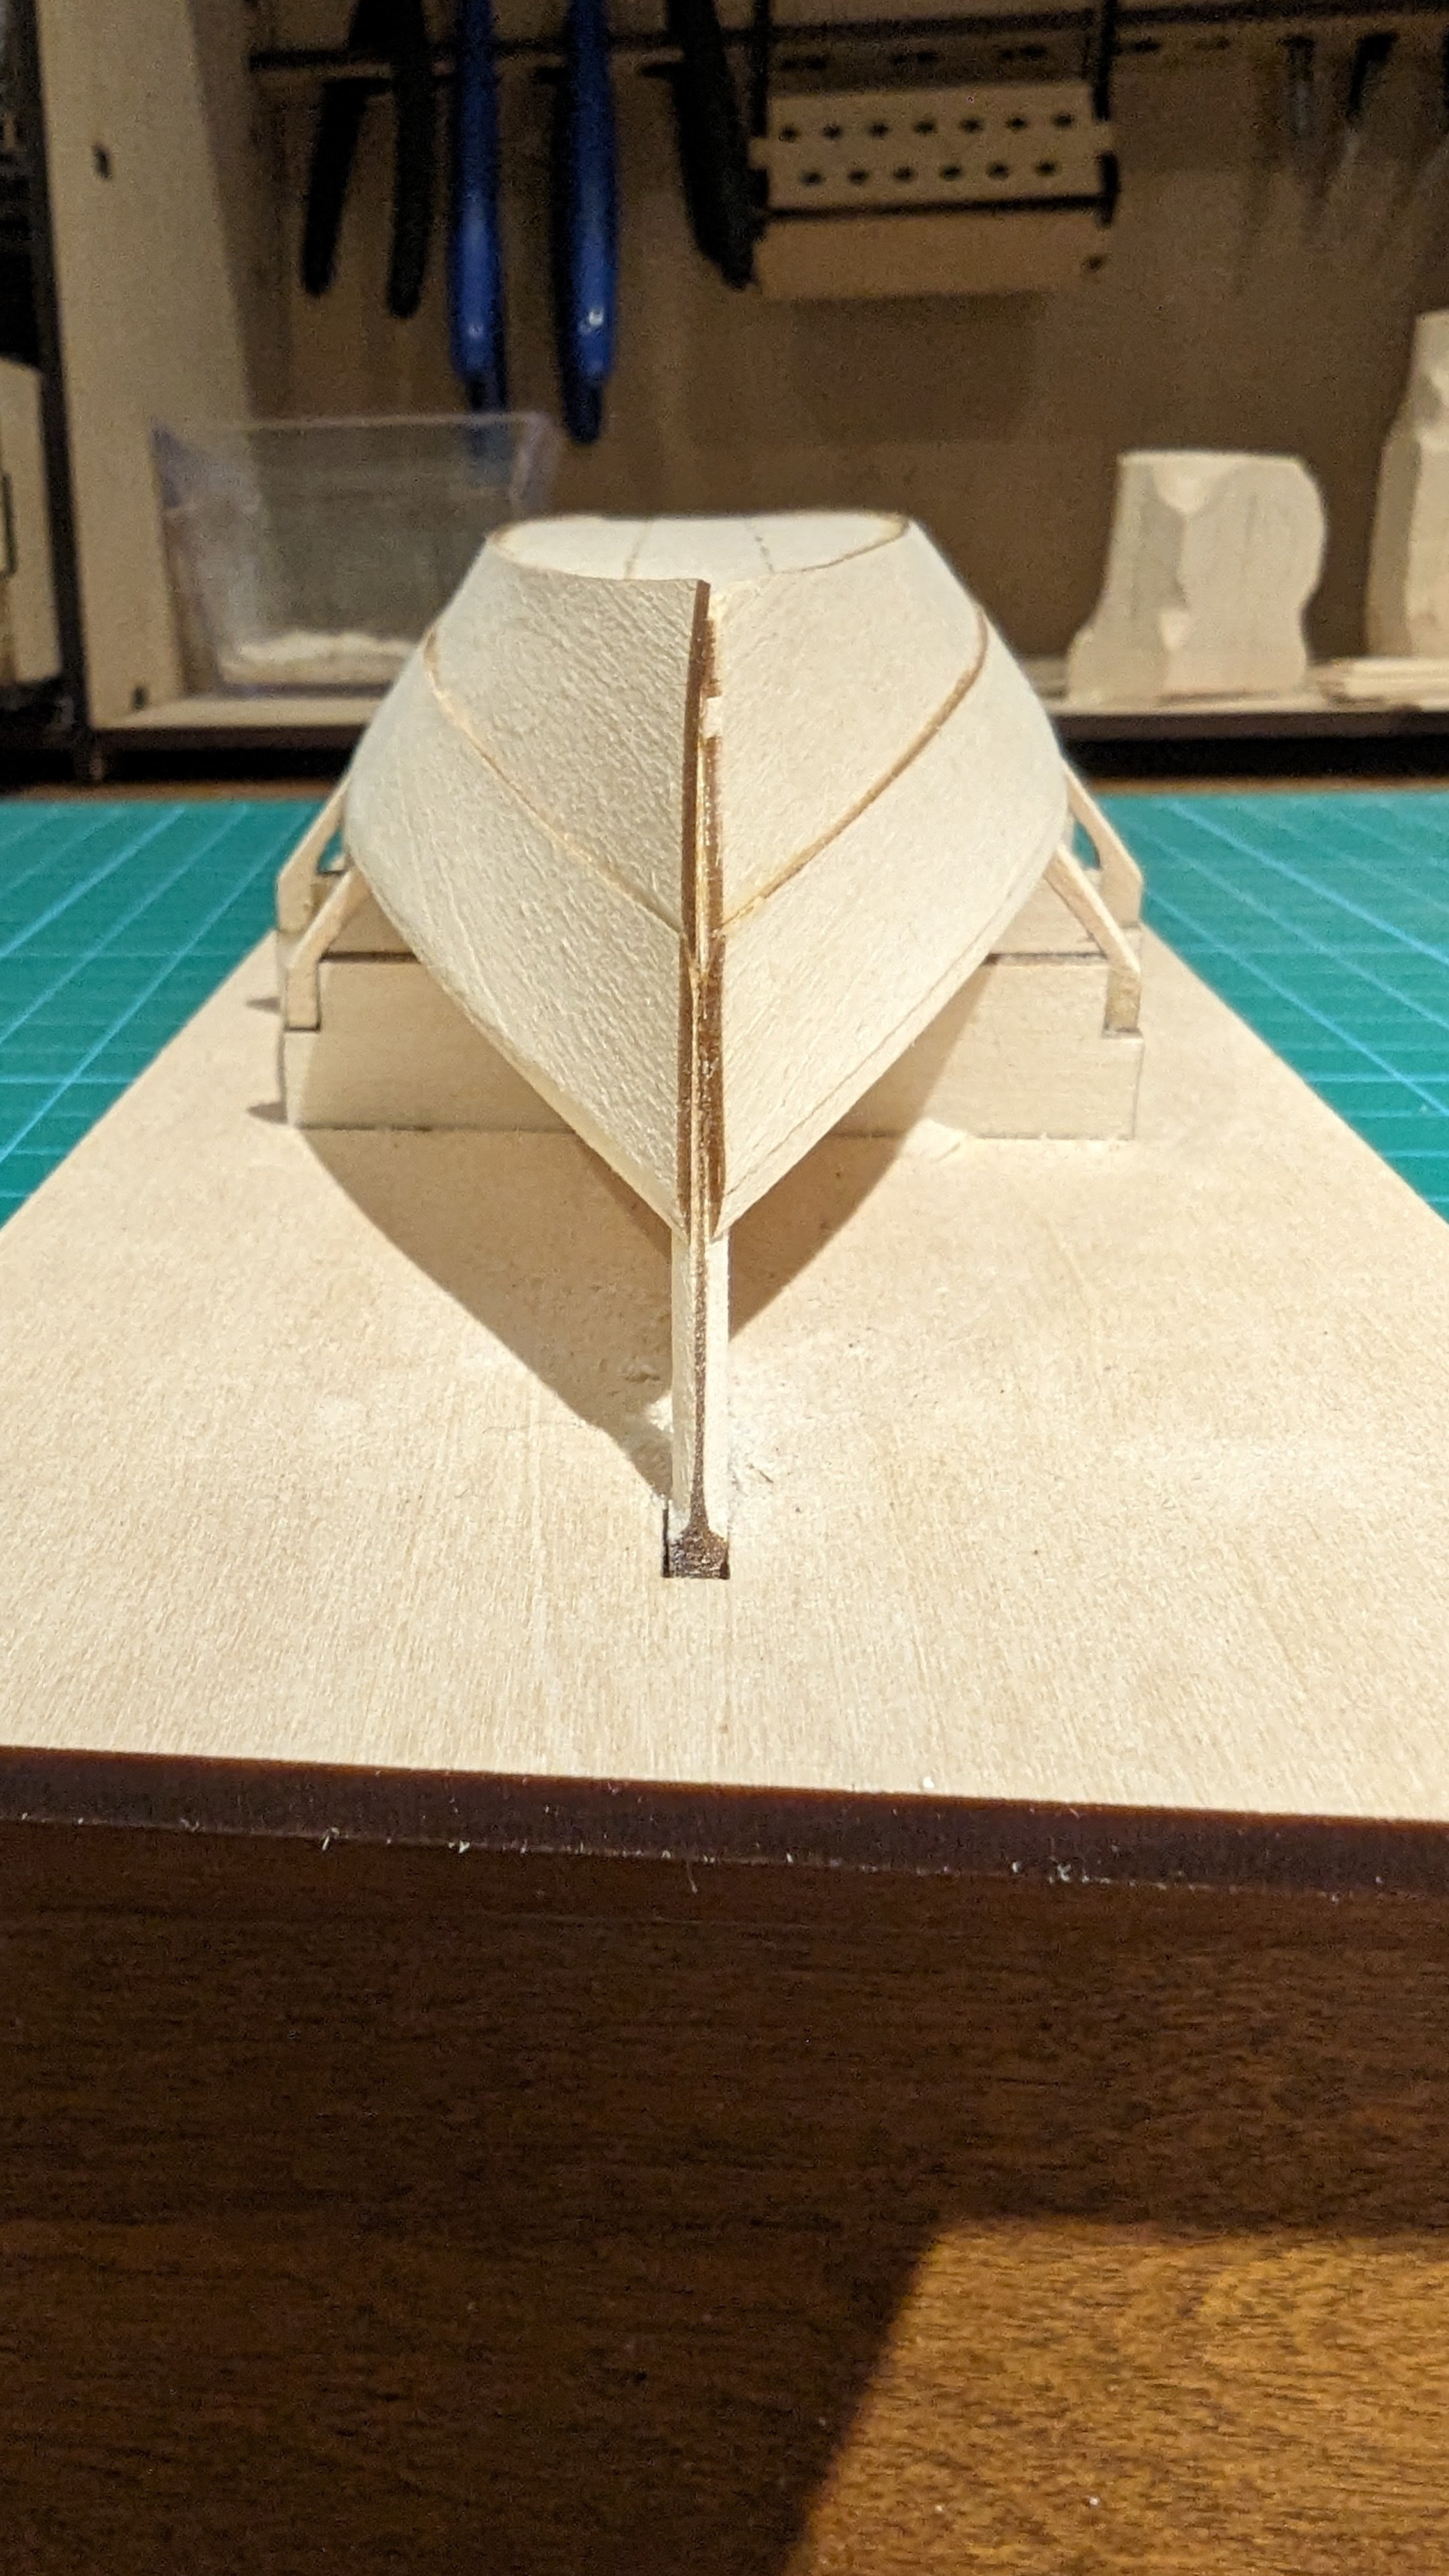
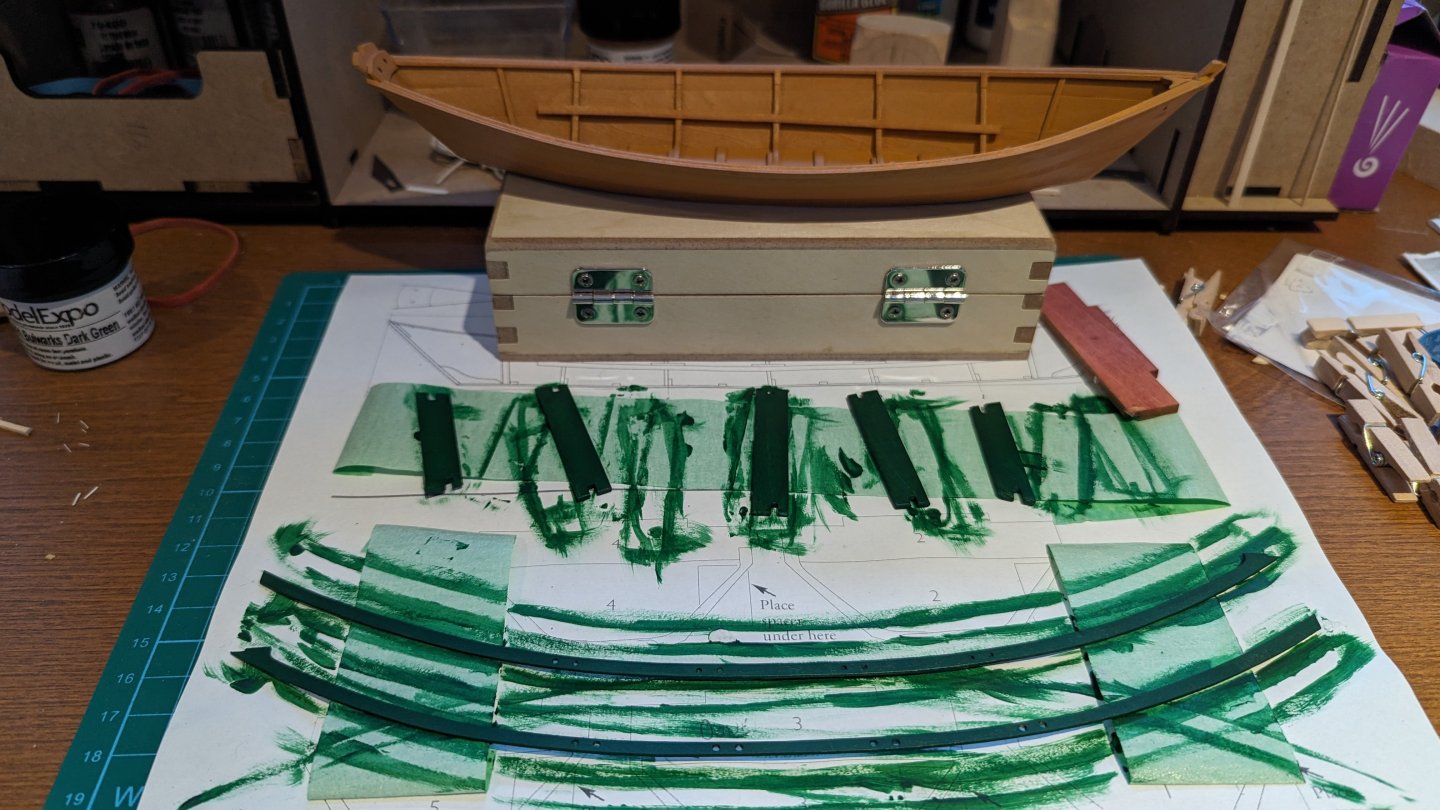
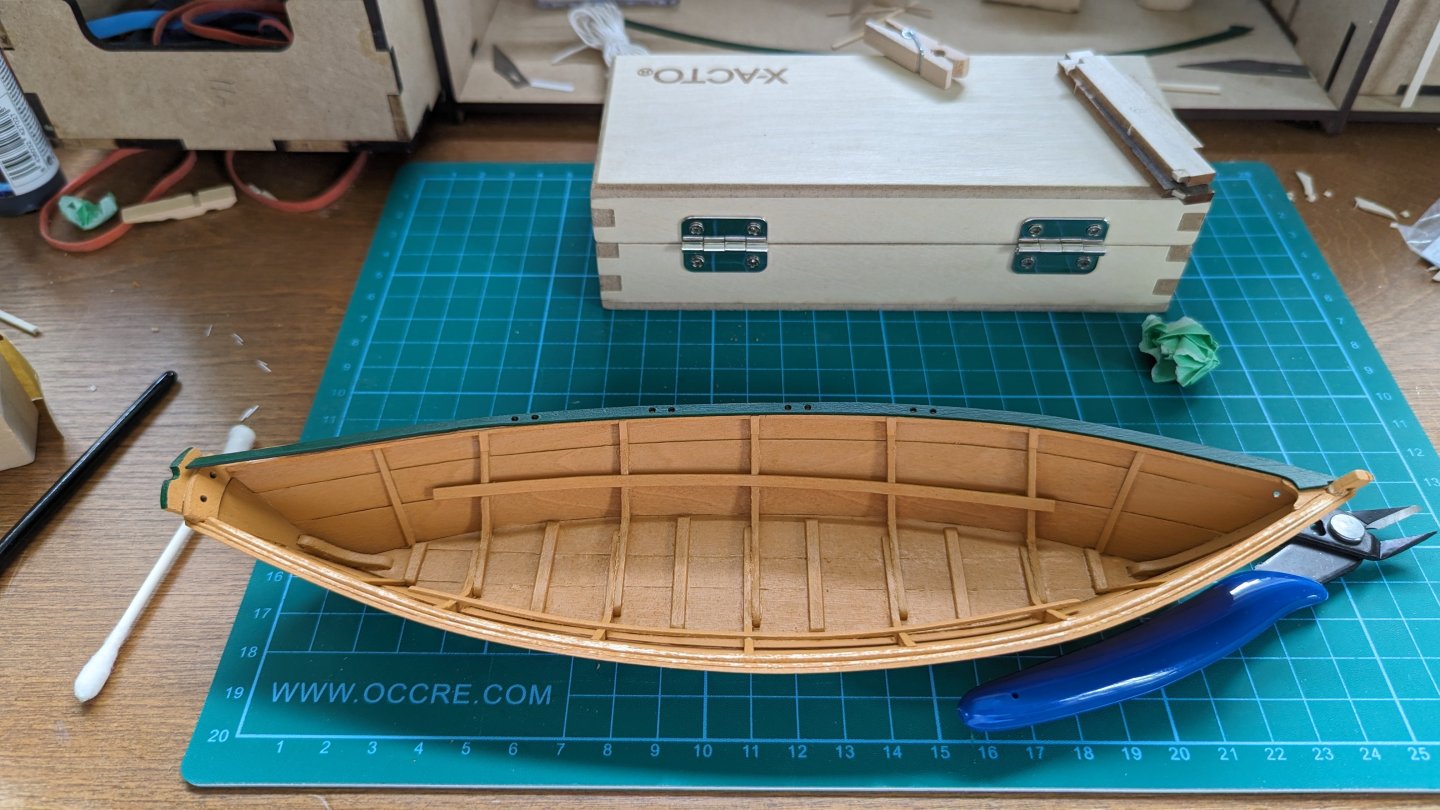
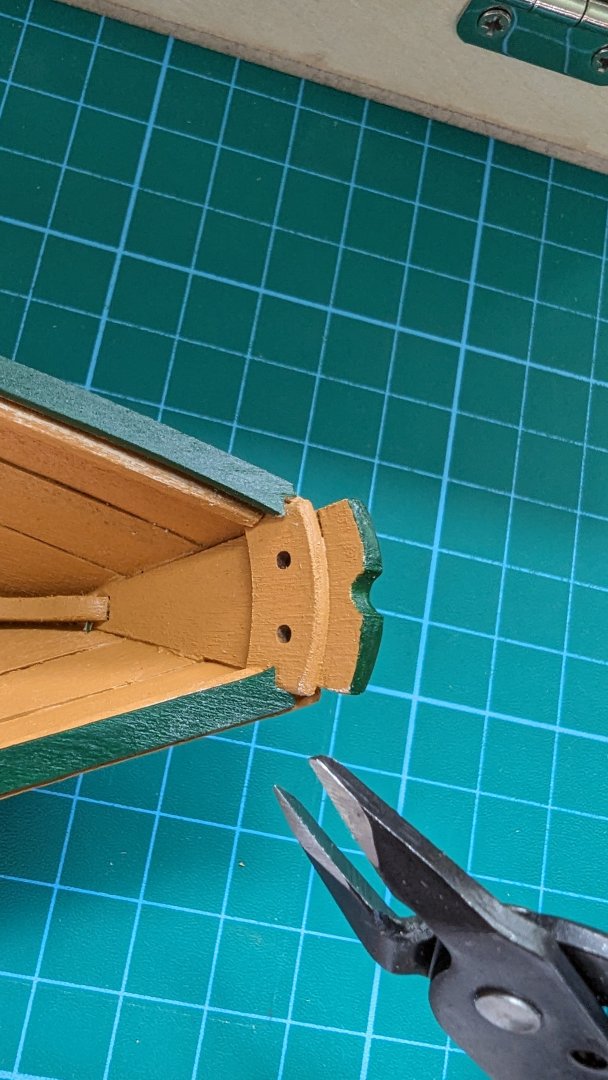
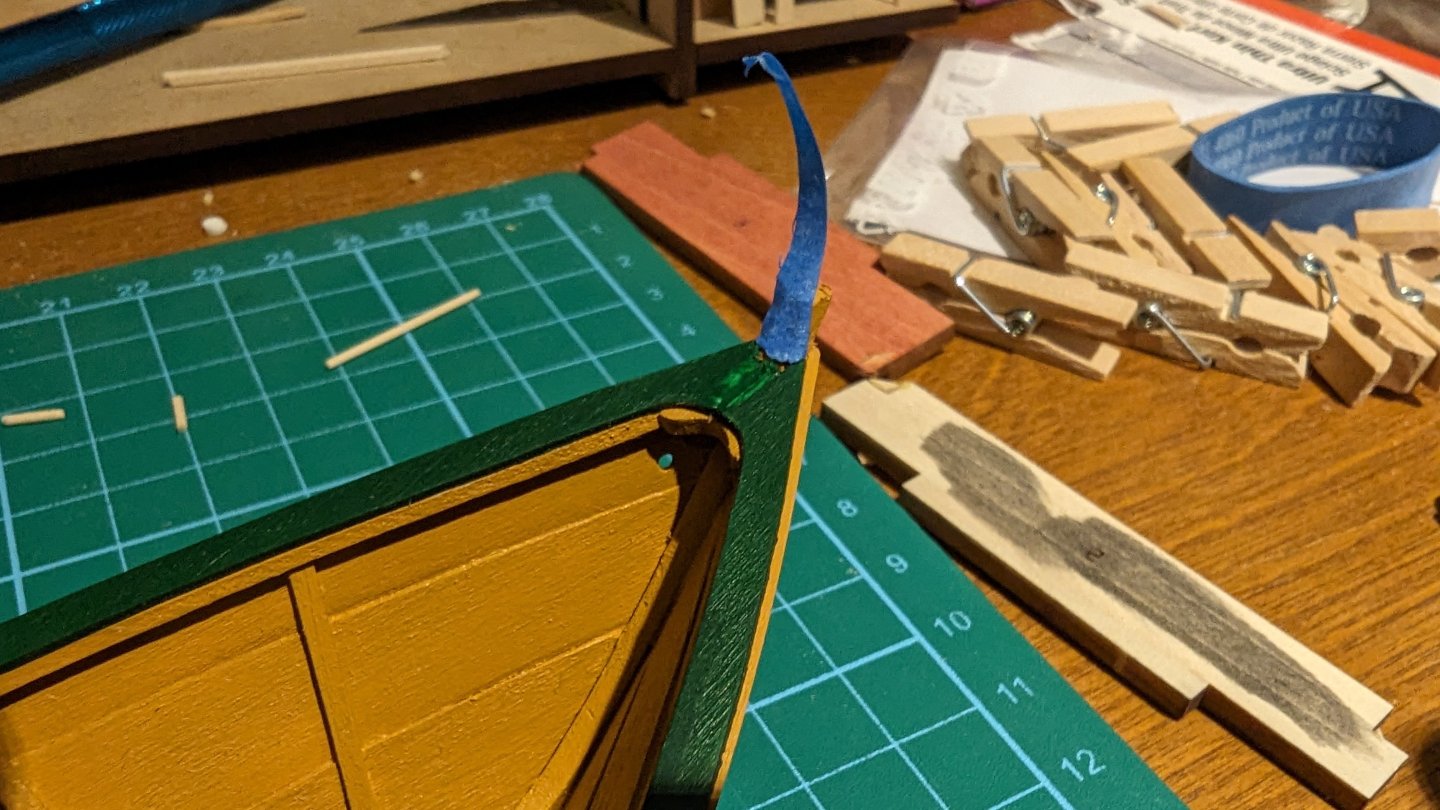
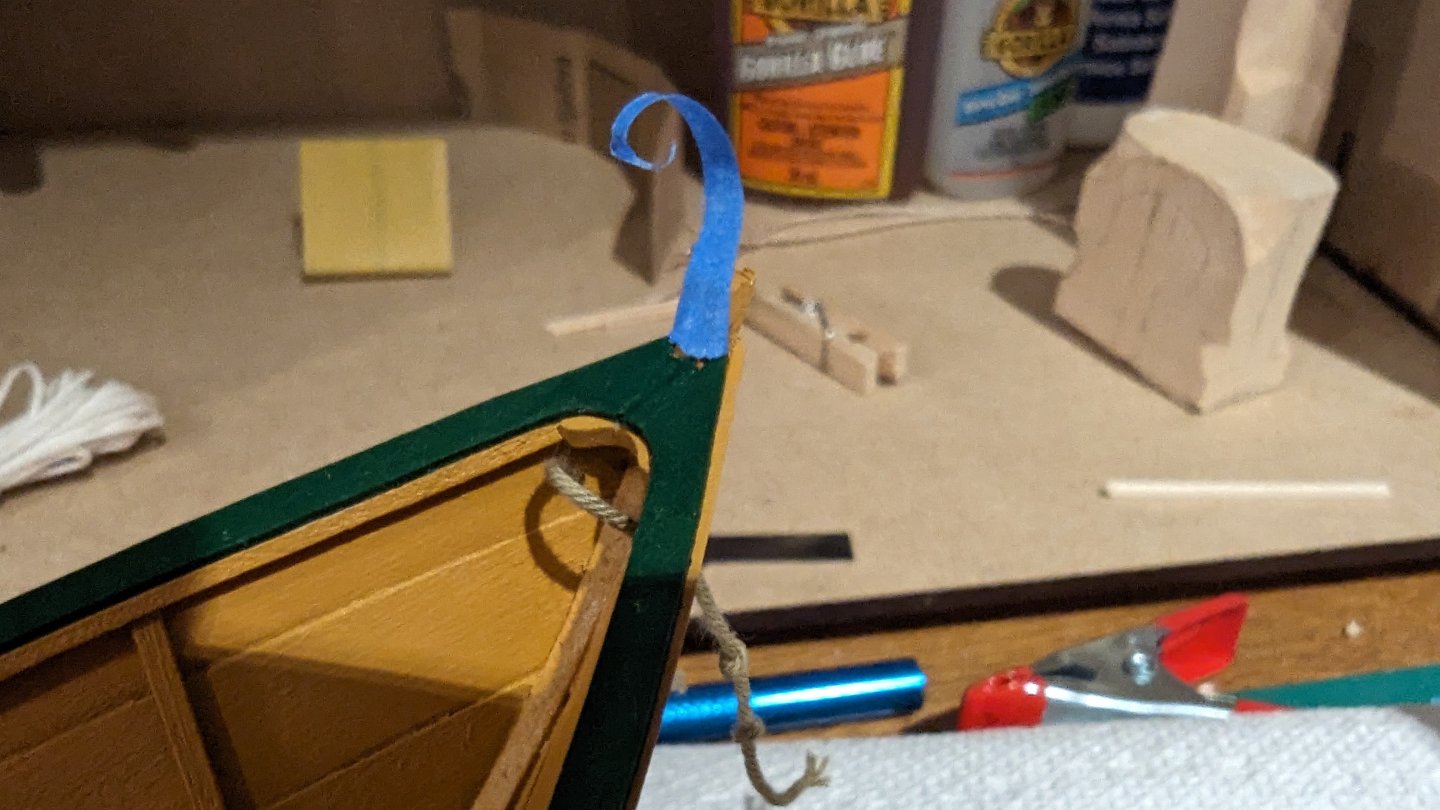
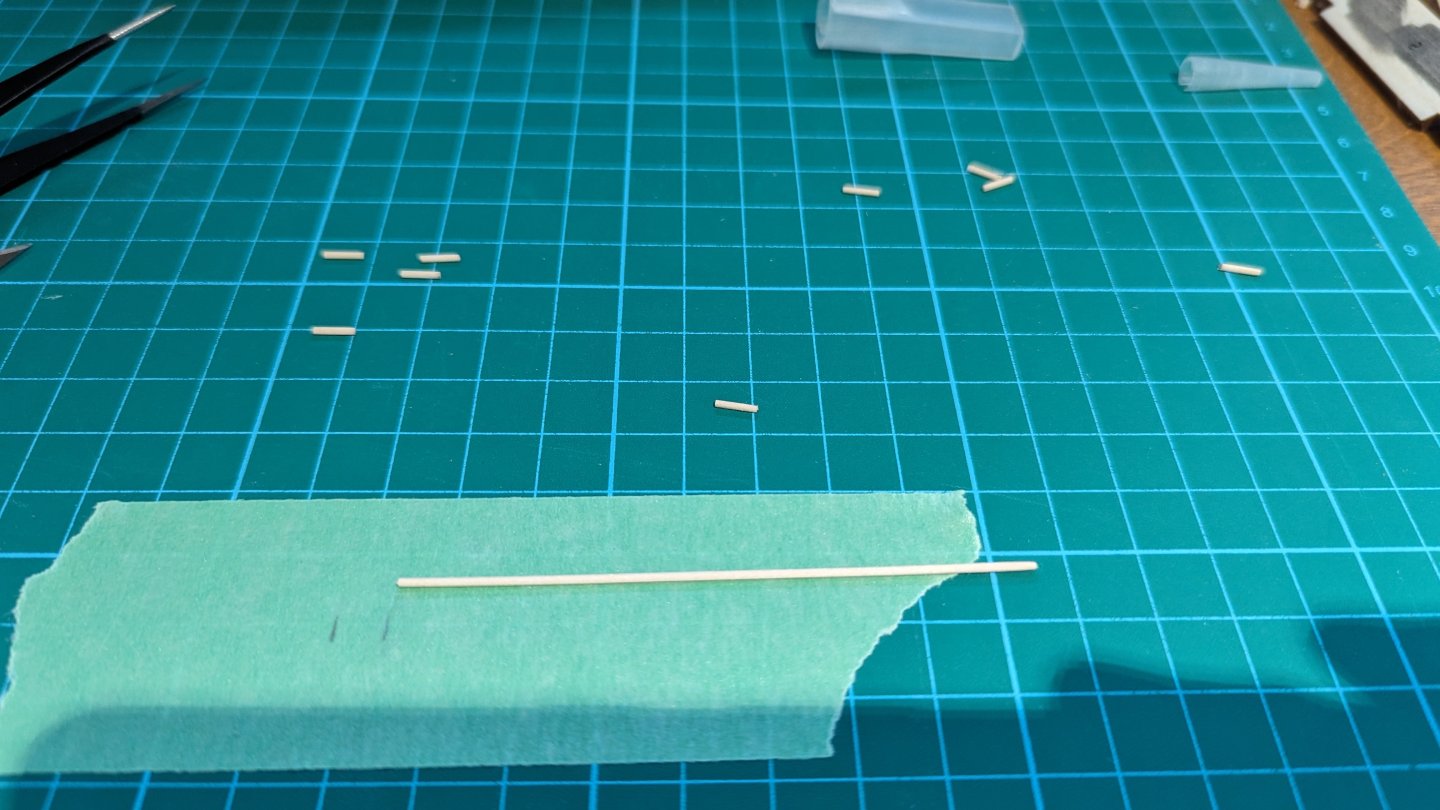
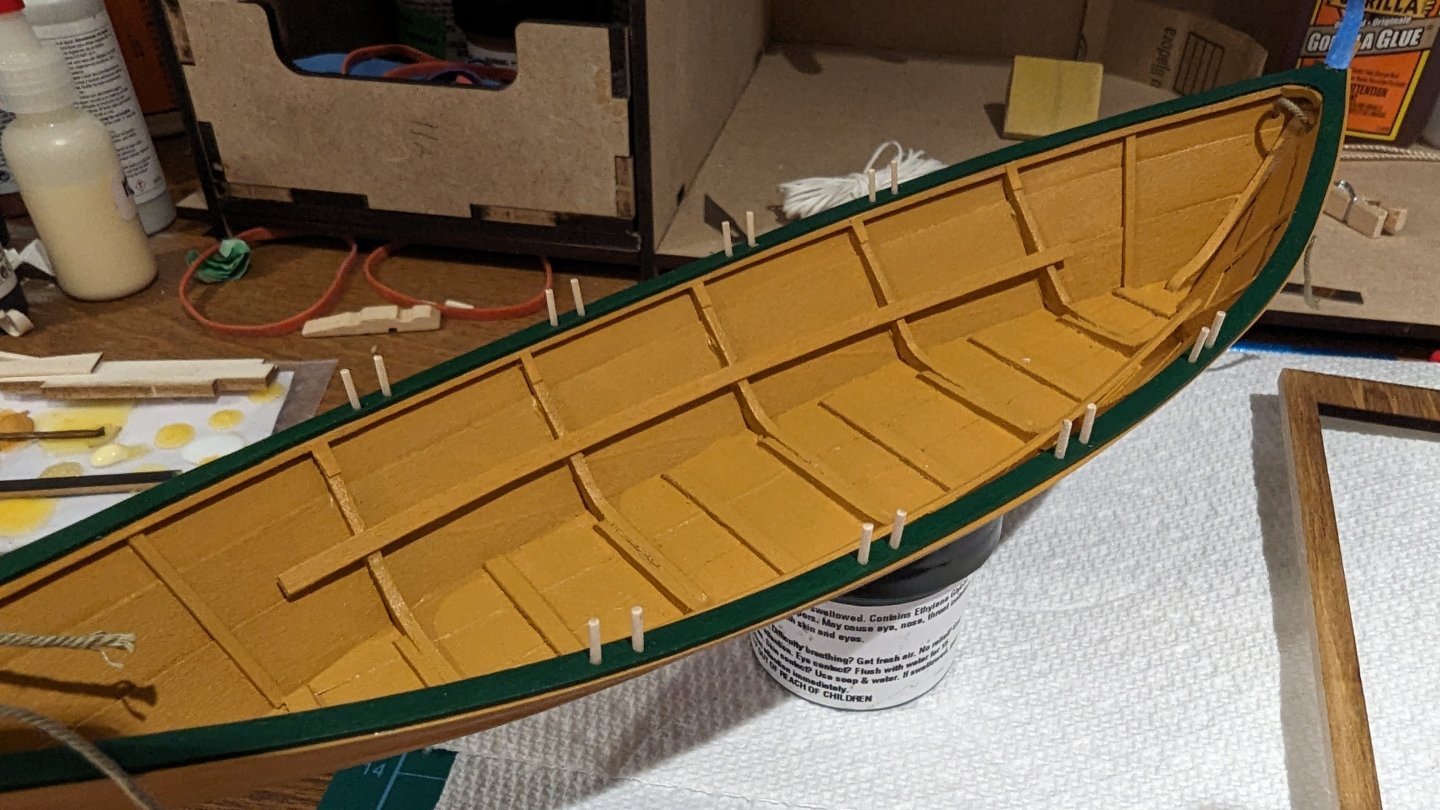
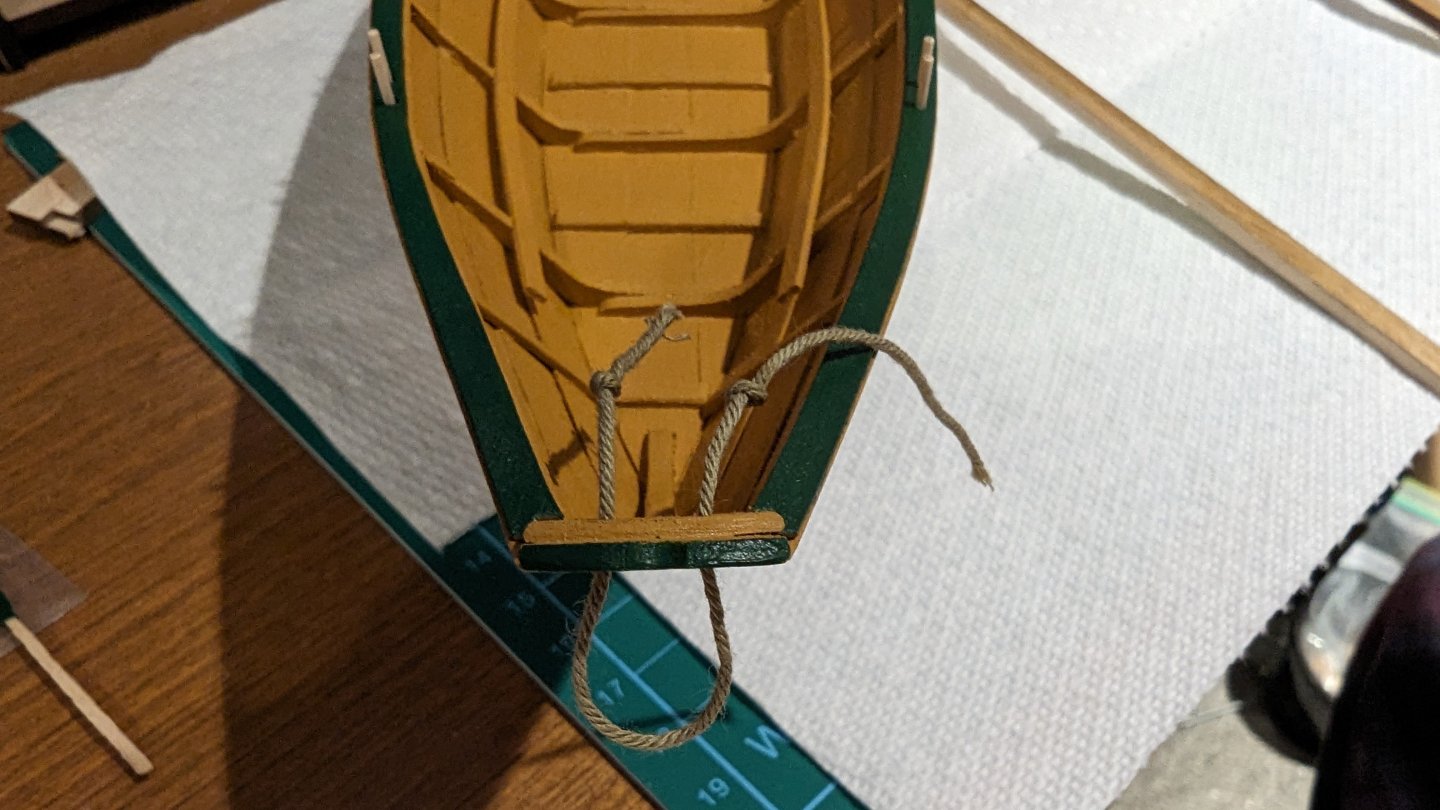
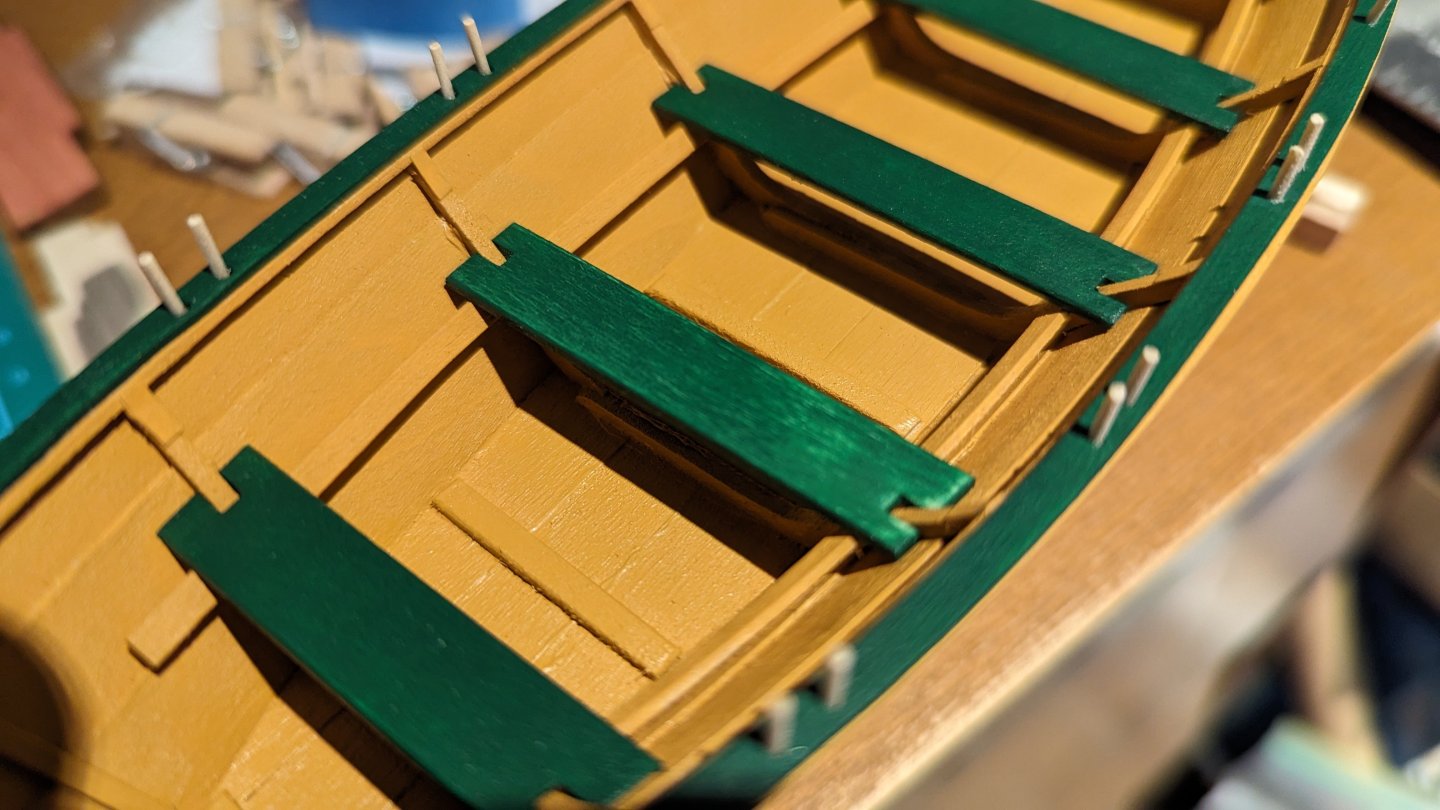
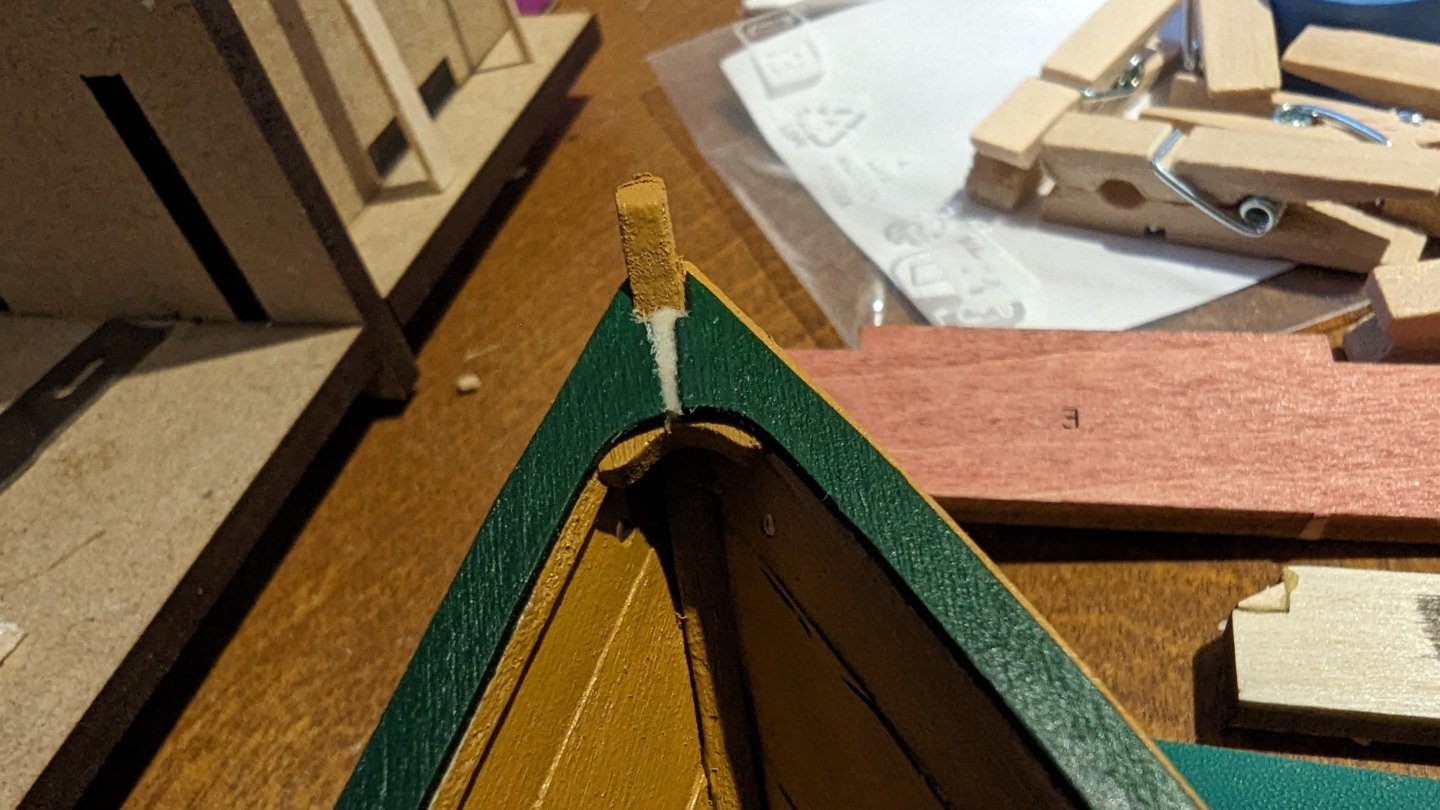
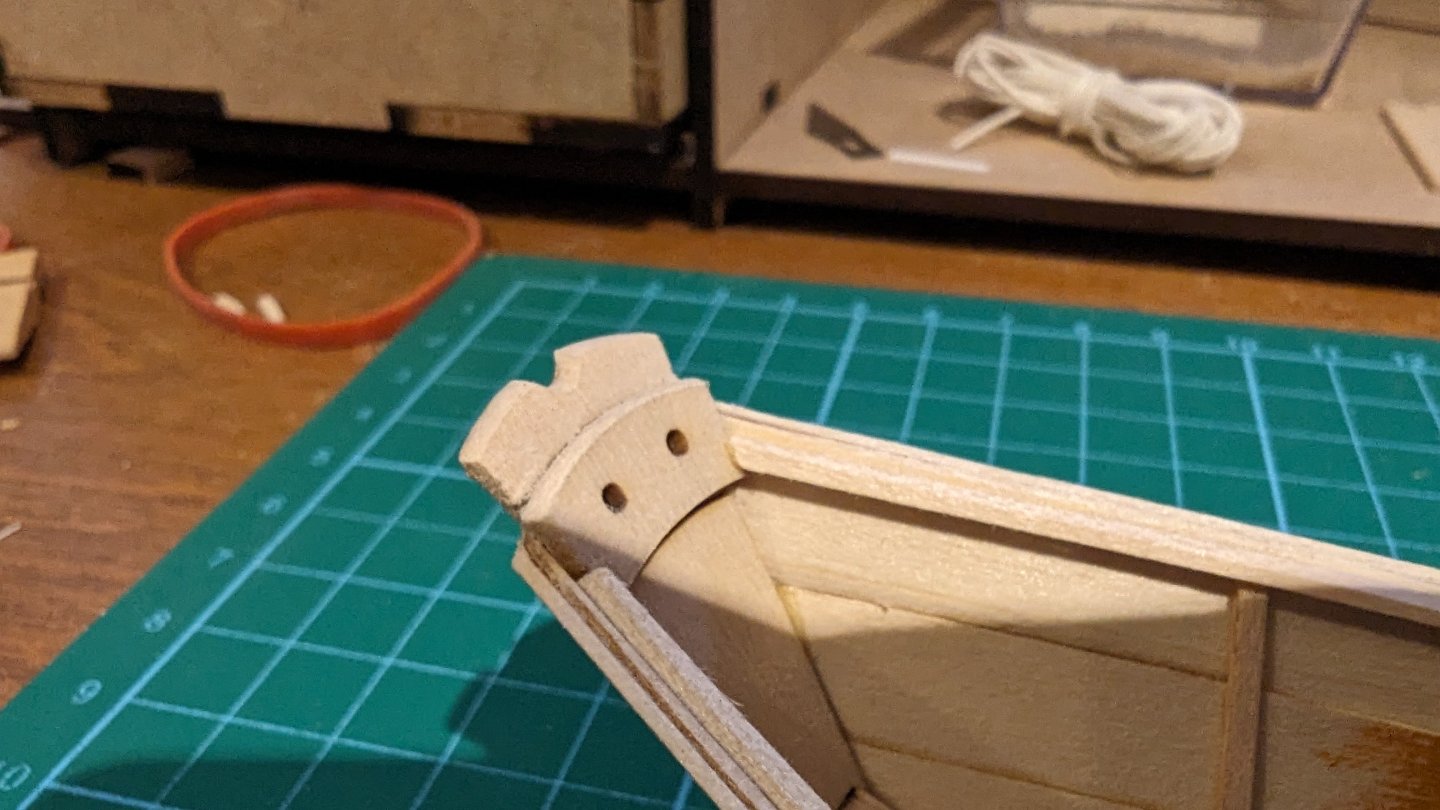
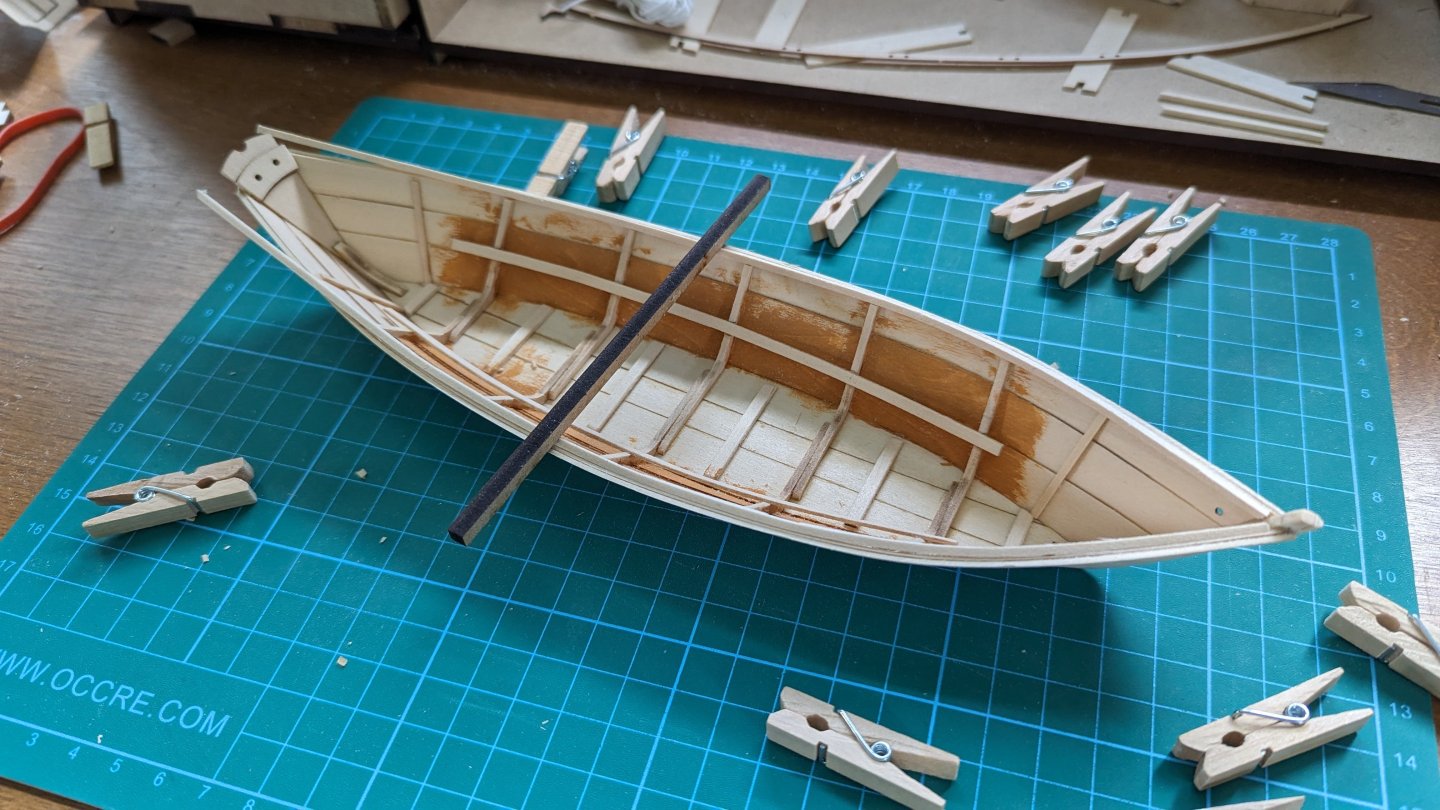
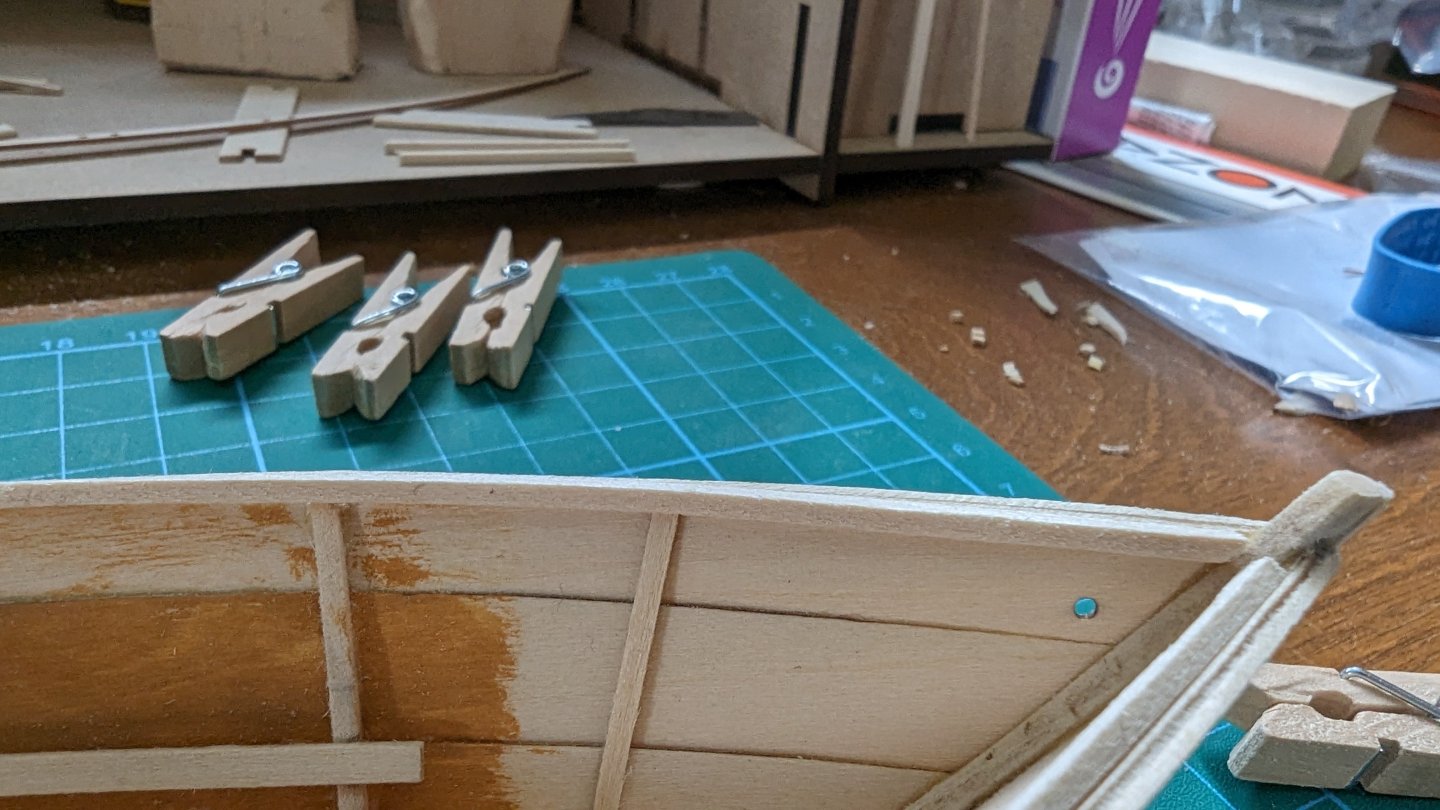
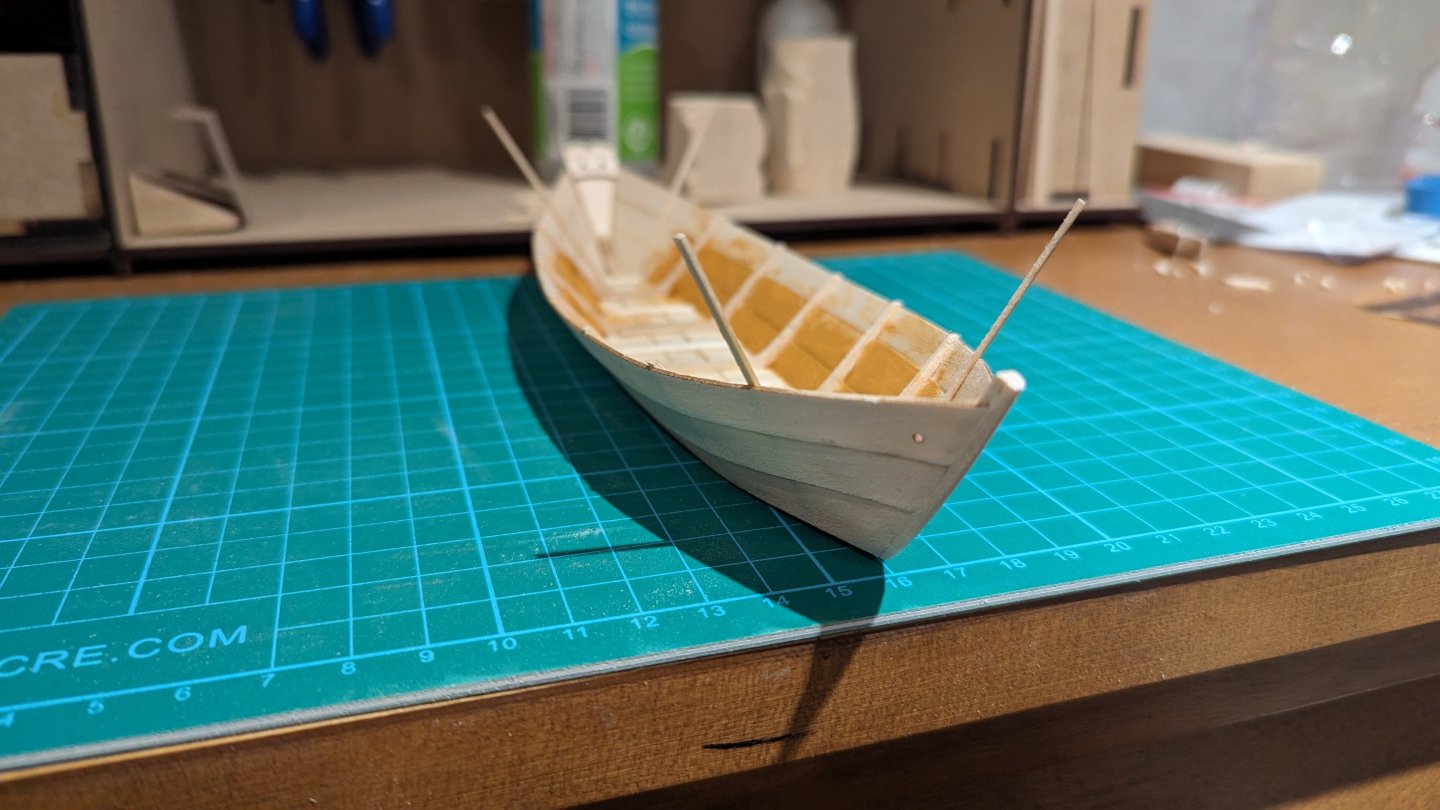
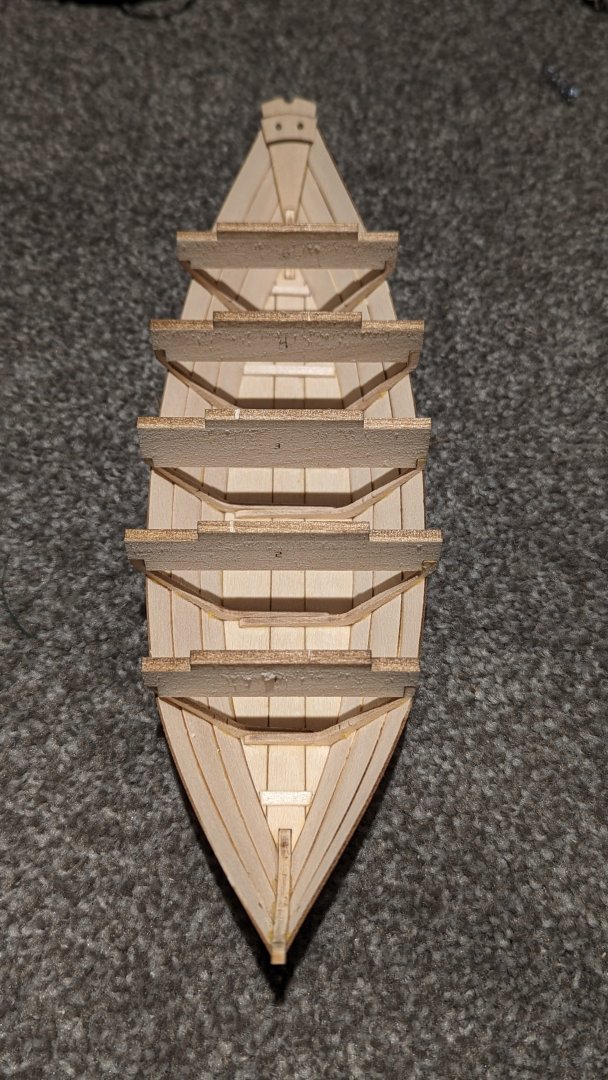
Log #12 - Complete The dory was completed quite a few days ago. It's taken many days to get the base completed as long stretches go before I'm able to get back to it to apply another coat of stain or clear coat. I assembled it tonight and will update my final log. I'll made a second post with the end result immediately after. Unfortunately, the steps I took since the previous posts aren't fresh in my mind anymore, but I'll do my best to remember. I started painting both the thwarts, gunwales and hull at the same time, alternating back and forth. The tip to use tape to hold down the smaller parts worked great. I can't remember if I mentioned this, but I used a print out and placed the correct thwarts in their correct locations accounding to the drawing as to not mix them up. Other than that, painting is painting. I don't think there's a whole lot I can say about it. I did, however, decide to paint the thwarts green to match the top of the transom and the gunwales. This was inspired by a thread on here regarding dory reference photos. (I'll see if I can come back and link it for those interested) I initially thought I would wet bend the gunwales, but after some thought and playing with them I realized that would be a little difficult to get them better than they are, and they're also quite thin so easily 'formed' while dry if taking it one step at a time. As per the instructions, I glued the first section, allowed it to cure some, then glued more, and continued my way aftwards (is that a word?). I made some comments on types of glue earlier. This is a step where yellow glue is preferred over white glue (maybe even CA, if you're crazy). Reason being is the cure time is reduced and the strength is increased. This reduces a lot of worries over it coming loose when conforming it with the boat as you go along. I did scuff up the paint to ensure there would be the best fit. I'm not knowledgeable here so I sanded, scraped with a sharp knife and made some random pin pricks to make sure the wood had ample contact with bare wood. I made a slight error by scuffing up part of the inwale in one spot that the gunwale initially wasn't going to fully cover, but just shifting the gunwale 1/64th or so while fitting it hid that blemish nicely. Note: I feel some incredibly thin tape to mask this off would have been beneficial. As I got closer, I started trimming the aft end. The side cutters/flush cutters that came with the toolkit worked very well for this. I ended up even using them to make a little notch where they meet the cleat. I wouldn't particularly suggest this as I almost screwed up by cutting with the grain. The wood split beyond where I was cutting and had it not held together well or split further I would've lost a check of it. From here, I went with the instructions suggestion of making some wood filler for where the gunwales meet at the bow (re: previous post). This worked okay, and would've worked better had I used more. I thought I put enough in, but I suppose it may have shrunk (or I thought wrong). It ended up painting on some primer, that I feel I should have thinned a bit more as it went on quite thick and gave that area a bit of a plasticy look. I also meant to very carefully apply it only to the filler, but I lost concentration for 0.05 milliseconds and got some of the gunwale so I did my best to even it out. The paint was struggling a bit to cover the primer so it took a few coats, but looked decent enough in the end. From the side I did, however, notice that it dipped down a bit (re: not enough filler). I also used a piece of painters tape to protect the stem. Making the thole pins was a little tedious, but not too bad. Parking out a piece of tape the correct length and rolling the knife across to score and break/cut them worked well. A few times I pushed a little too hard and the piece flew off into oblivion, but they give you enough material for many extras. Turning the square strip into a round dowel wasn't my favorite task, but it worked well enough. I just held it in one hand, sandpaper in the other and spun it around. Some sort of drill used as lathe would probably be nicer. I actually made these first, but then decided to add the beckets first before fitting these thinking they would get in the way and I'd be snapping them off. I'm glad a did because the beckets were a pain. First off, I saw many logs replacing the kit thread from something smaller. That was not my plan, I figured it could be scales as some thick 1.5" manila rope or something. The thread was tight, but I used the kit supplied drill bits to ream out the holes a little bit. I got the transom becket in without too much issue and started working on the bow/strake holes. The first one went in okay, but trying to get it through the second one that's threaded from the inside was the worst. Some notes on that: The thread is 1.5mm if I remember right. The largest bit supplied in the toolkit is 1.4mm 🫠 The thread is nylon (I believe) and I didn't realize it at the time, but I far prefer other materials (natural). I spent about 1.5 hours over 3 different sessions fighting with this thread. I found it difficult to get a clean cut. In the end, I got frustrated enough at the bow that I ended up yanking it out and dug some 0.8mm cotton thread out of a different kit. This was a dream to work with by comparison, and obviously the smaller size allowed it to fit easier through the holes. It wasn't quite the color I wanted for it, but it was close enough and after finishing, I completely forgot about it. The transom thread was cut off and replaced as well. Once I got the new thread in. I glued the knots with some diluted white glue and let it dry while I applied the thole pins. I just need to fit the thwarts and I'm done. As I'm putting them in, something is wrong. The thwart on the fourth frame isn't sitting right. I thought maybe I mixed up the #2 and #4.... Impossible, I had that genius idea of taping them to the drawing in their correct locations! It did fit well in the #2 spot, but so did the #2 thwart.... No thwarts fit will in #4. Then I realized what happened. Somehow I ended up beveling and finishing it upside down. When I flip it over, the frame slots line up. The paint job underneath was not as clean as the other side so I sanded it down and put another coat of paint. I sort of beveled it back in the other direction and dabbed some paint on. It fit in nicely and other than this record, nobody will ever know. Fixed:


- 69 replies
-
- 5
-
-
-
- Lowell Grand Banks Dory
- Model Shipways
- (and 2 more)
-
Thank you for the comment, and encouragement. And I also hope you're getting a nice lake breeze during the brutal week! I ended up finding some primer in a different kit and tried that - it worked, though I now understand the comment someone made in a different log about 'primer can make wood look like plastic'. Good to know about LePage, I'll put some on my buy list. I was just at Home Depot last weekend and picked up some Varathane wood filler, then later realized it says "will not harden to a sandable surface" Opps... I did not expect that much variation in the wood, that's quite crazy. I thought they had maybe cut a sheet out of balsa. All part of the learning experience! As for my log, apologies for the delay. I really meant to have this done before, or at the latest on fathers day, but hit a couple snags. One being the kit thread for beckets, and the other being a silly issue I caused with the #4 thwart. The main reason for my timeline goal was on Monday I knew I had to start my prep for a medical procedure on Tuesday. Then daughters birthday on Wednesday and was expecting to start a new build on Thursday. In any case, there were some unexpected results during the procedure, and recovery has gone far from planned. I've just recently started improving and feel well enough to spend time at the computer. Luckily I did manage to get the dory in a finished state, but I decided to stain the display board. With a lack of a readily available space for that and moreso due to the complications above, haven't gotten around to it. That said, I hope to get it stained and assembled over the next couple of days, and post the log. I've bounced back and forth a lot between the Model Shipways Pram and the OcCre Polaris as my next. As of now, I'm leaning toward the pram.
- 69 replies
-
- 6
-
-
- Lowell Grand Banks Dory
- Model Shipways
- (and 2 more)
-
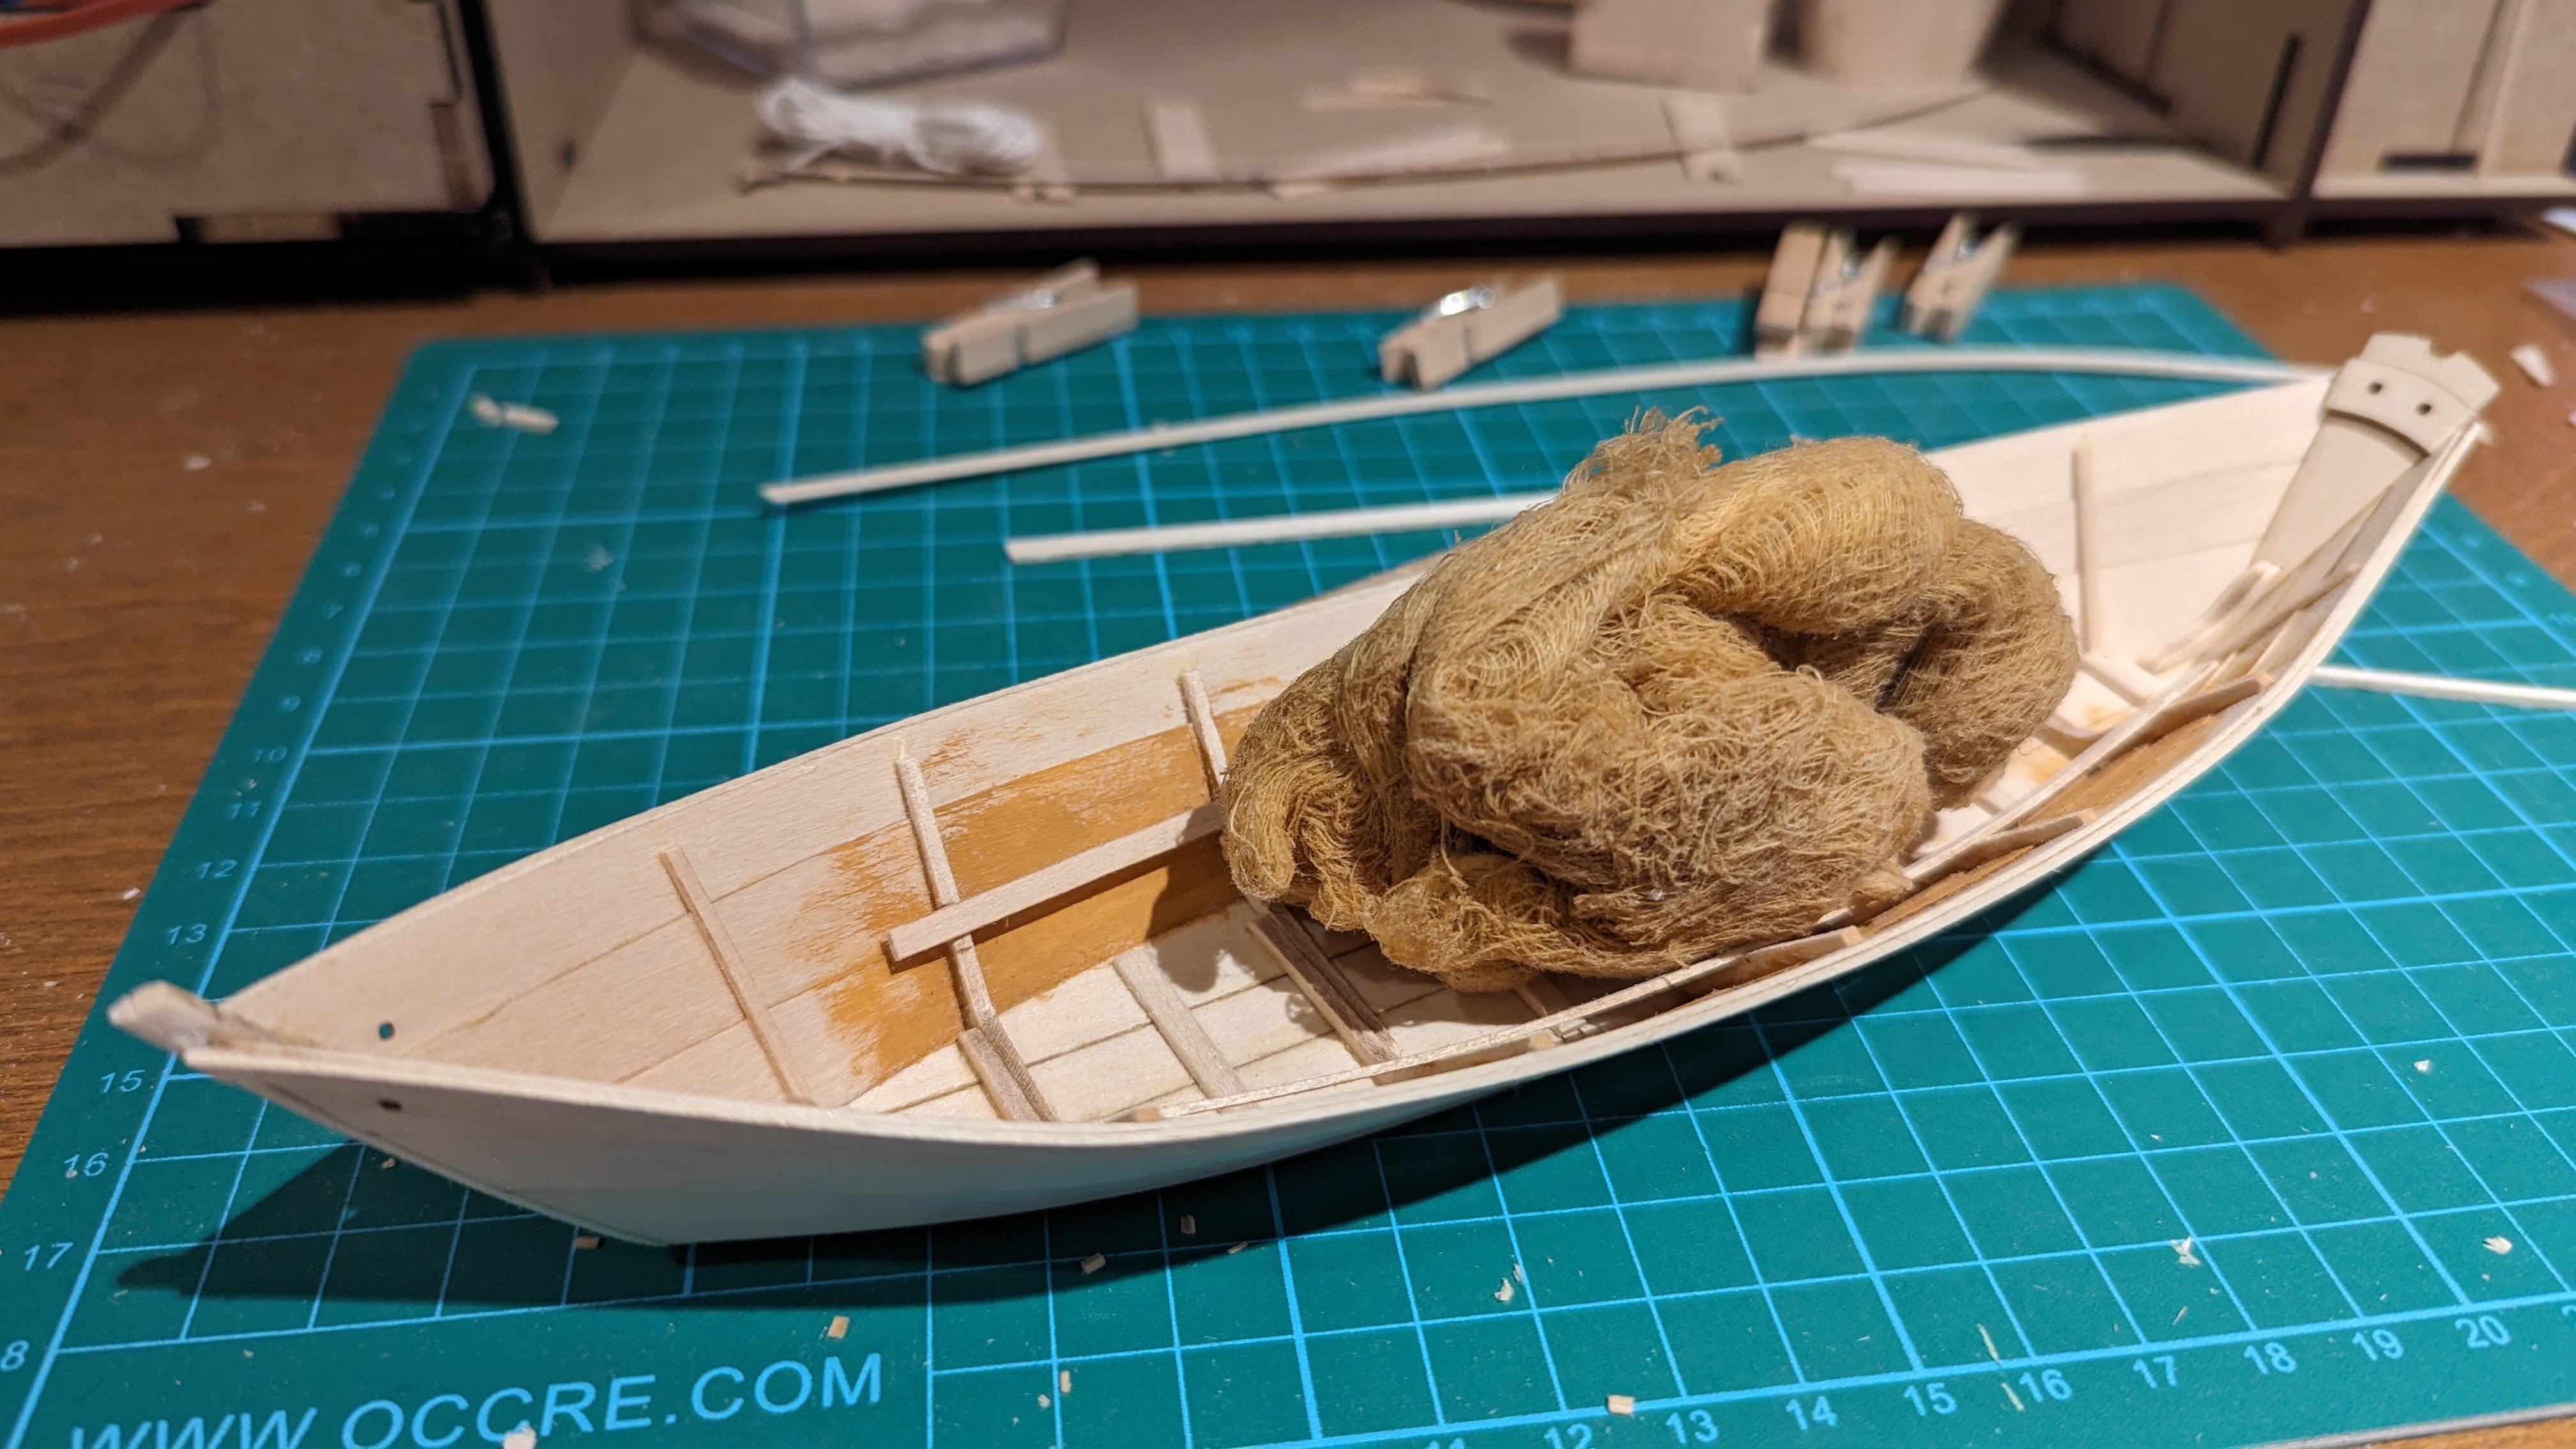
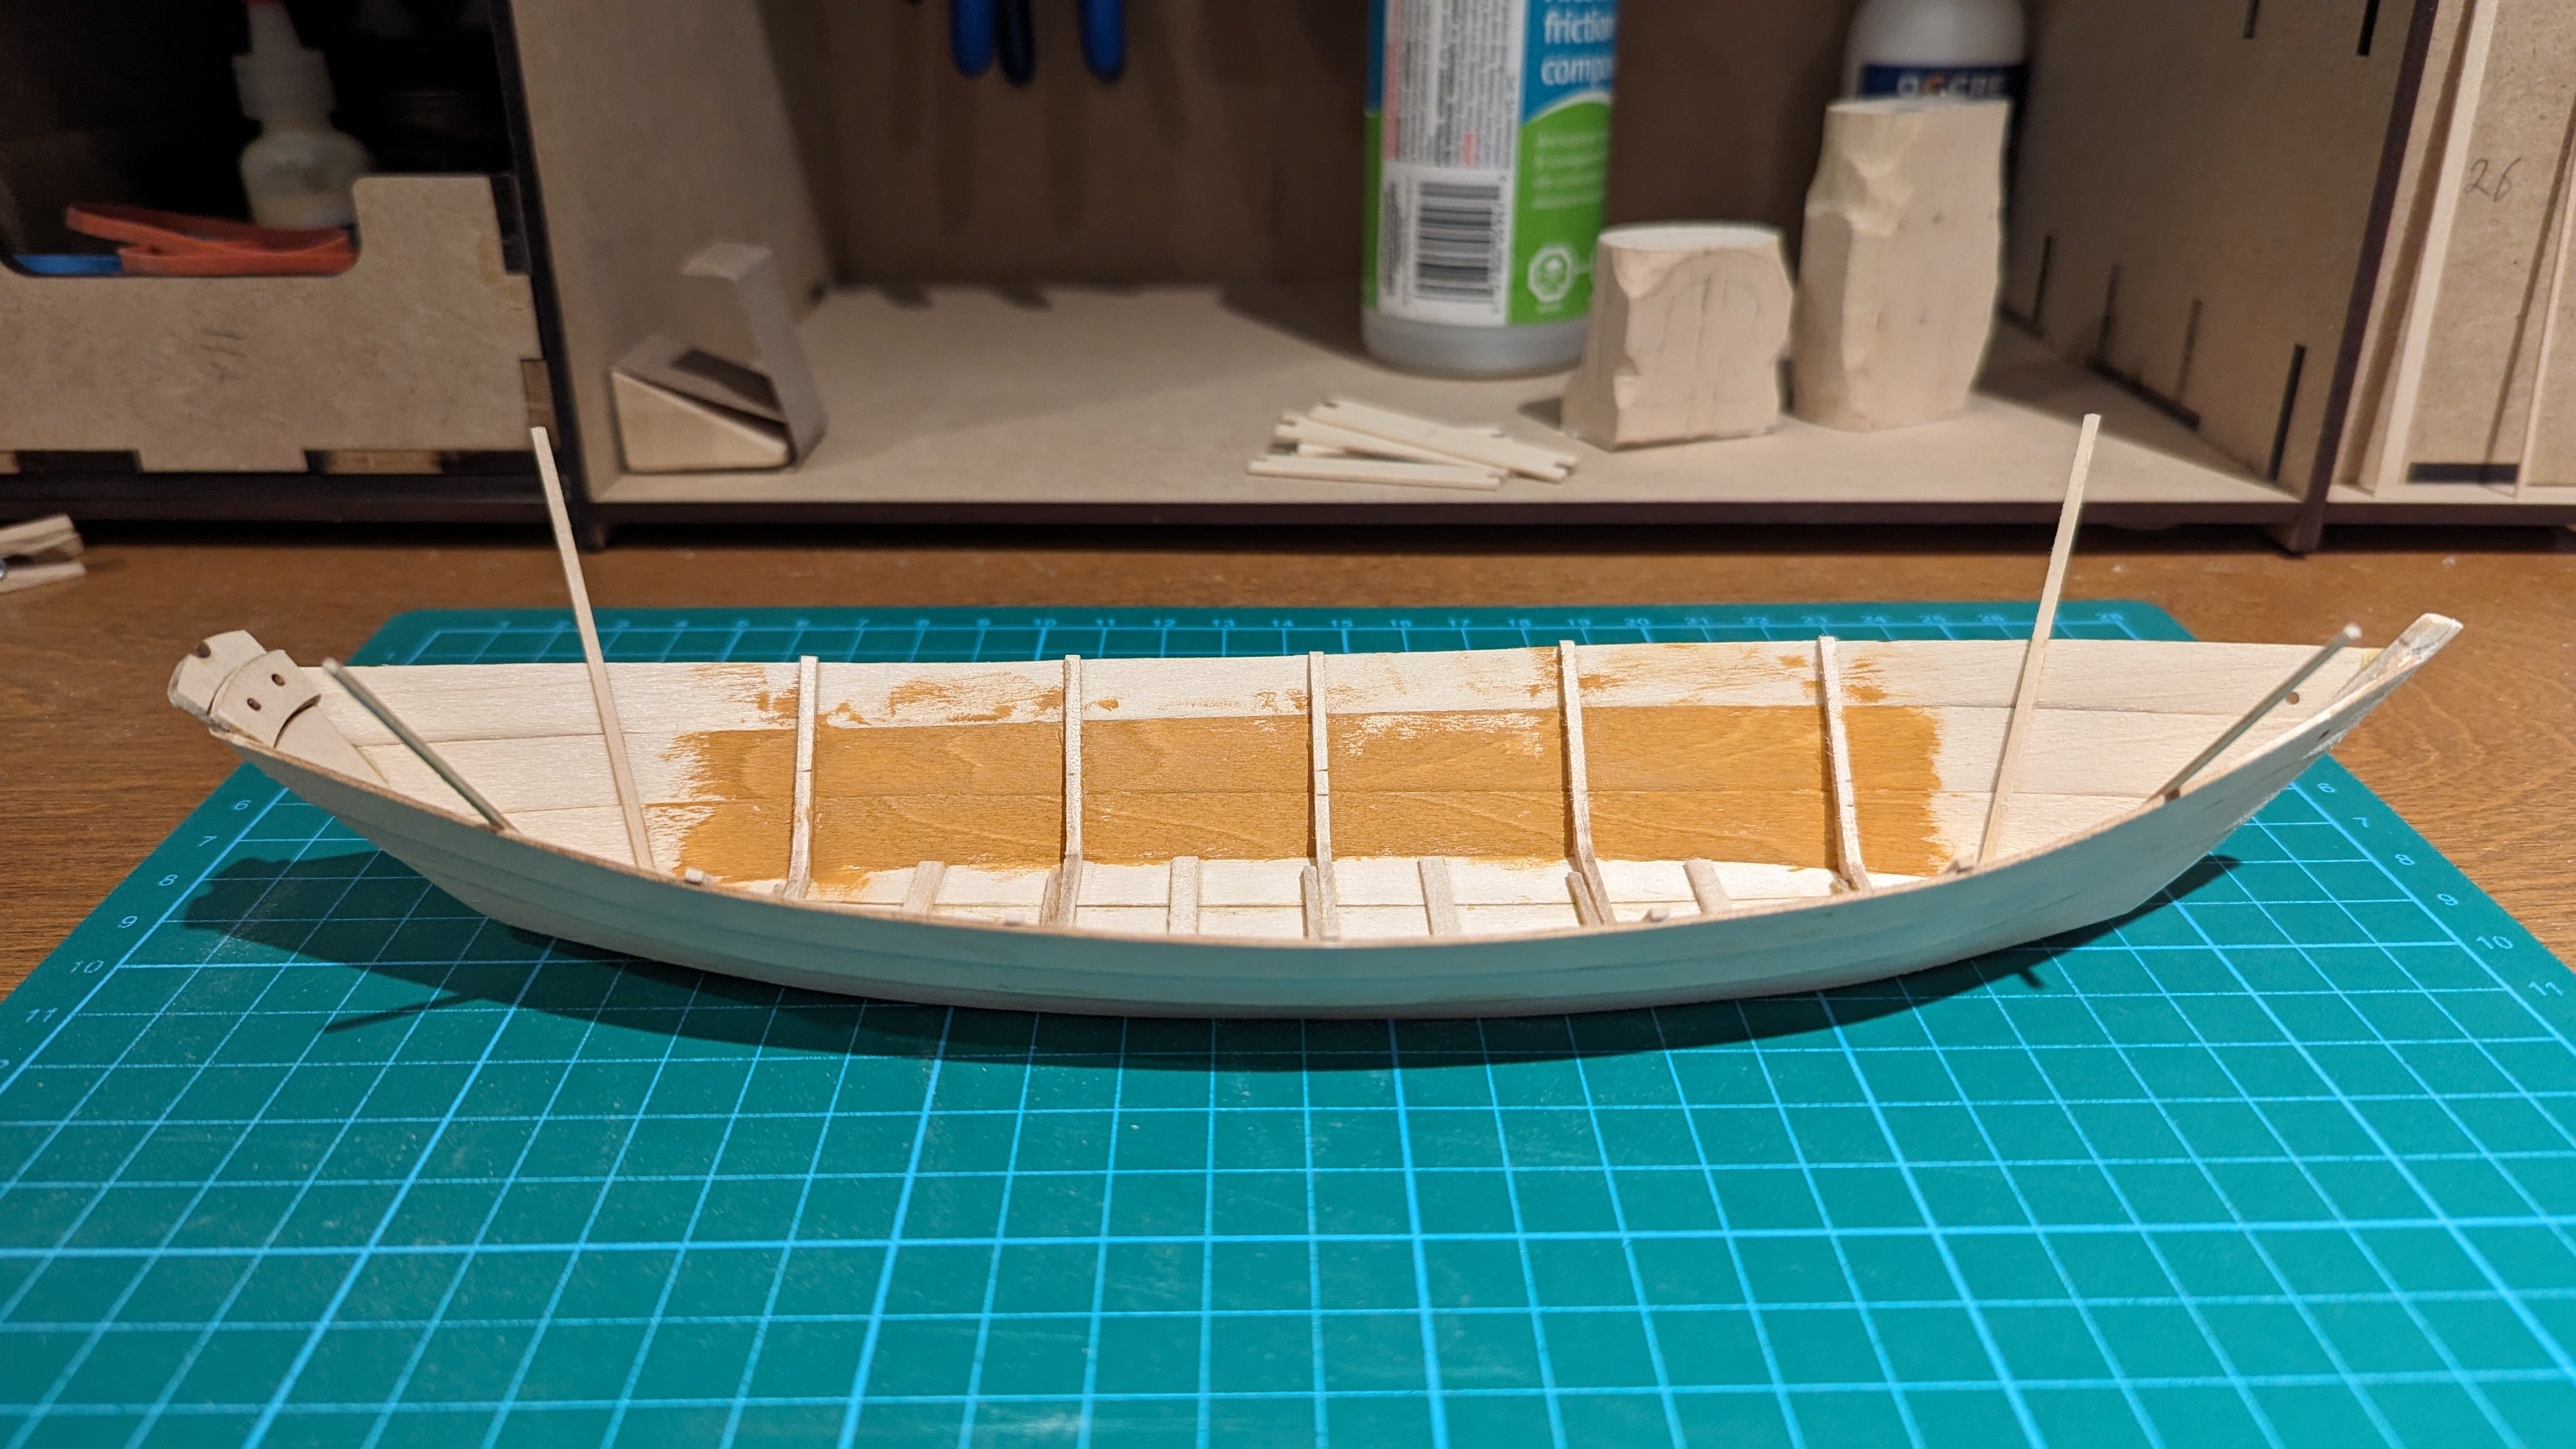
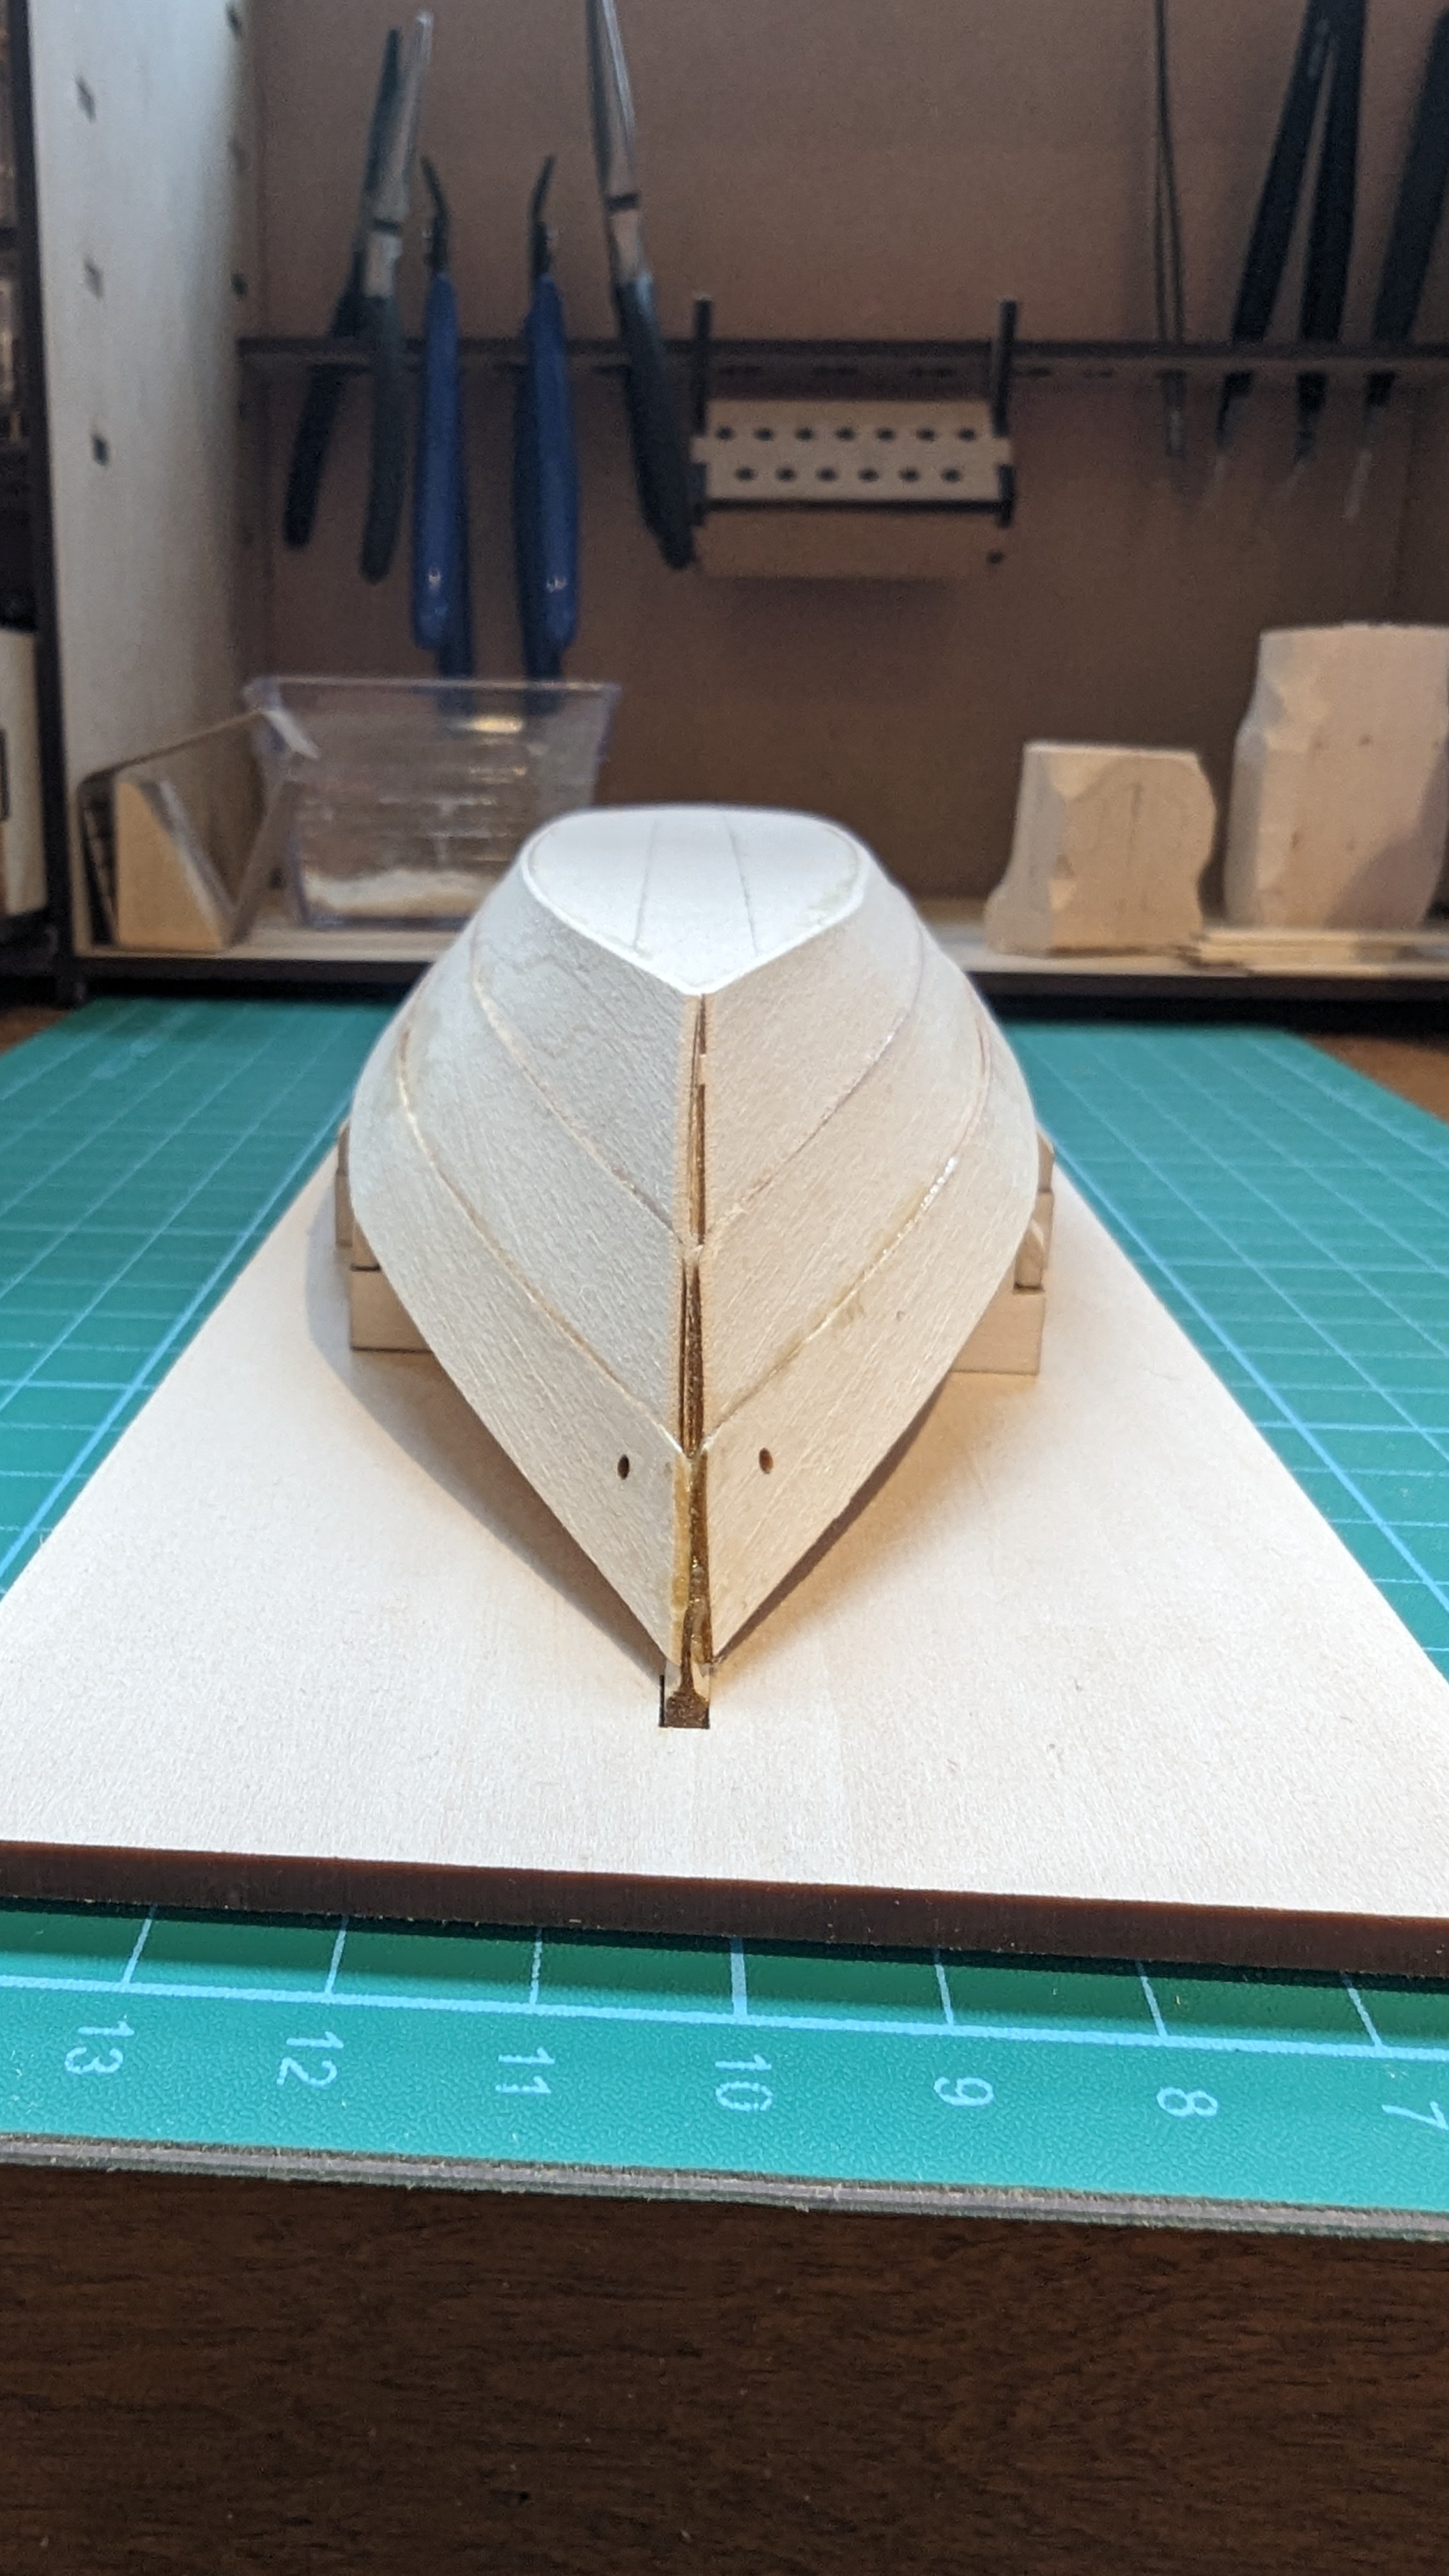
She's just about finished. I won't post a proper log, but I'm experimenting a bit and don't want to make a terrible mess. After fitting the gunwales, they suggest using filler to close the gap. I've done my best to make some form of filler from sawdust, white glue and water which seems to be a popular option. I have a question though. What's the best way to paint this? Should I be 'sealing' it with something or just let it dry, lightly sand and paint it? I also wonder if I should sand the painted wood beside it to help it blend better? Though not sanding that wood may be extremely tricky unless taped off well. Here's a pic of what I've got going on right now.
- 69 replies
-
- 4
-
-
- Lowell Grand Banks Dory
- Model Shipways
- (and 2 more)
-
Appreciate it! I just went through the first couple of pages and I really like what you did with the hull as well. I probably wouldn't have noticed that odd bulge in 'standard' kit, but now the damage is done and I may need to do something similar! No bother asking questions about it now, but you may randomly get a dm from me in a couple years for advice Look forward to future updates here and will check out the two Terror builds. Matt
-
Looking good. I'll be following this one, need to catch up. It'll be a while before I have the skills to start, but I just recently got this kit.
-
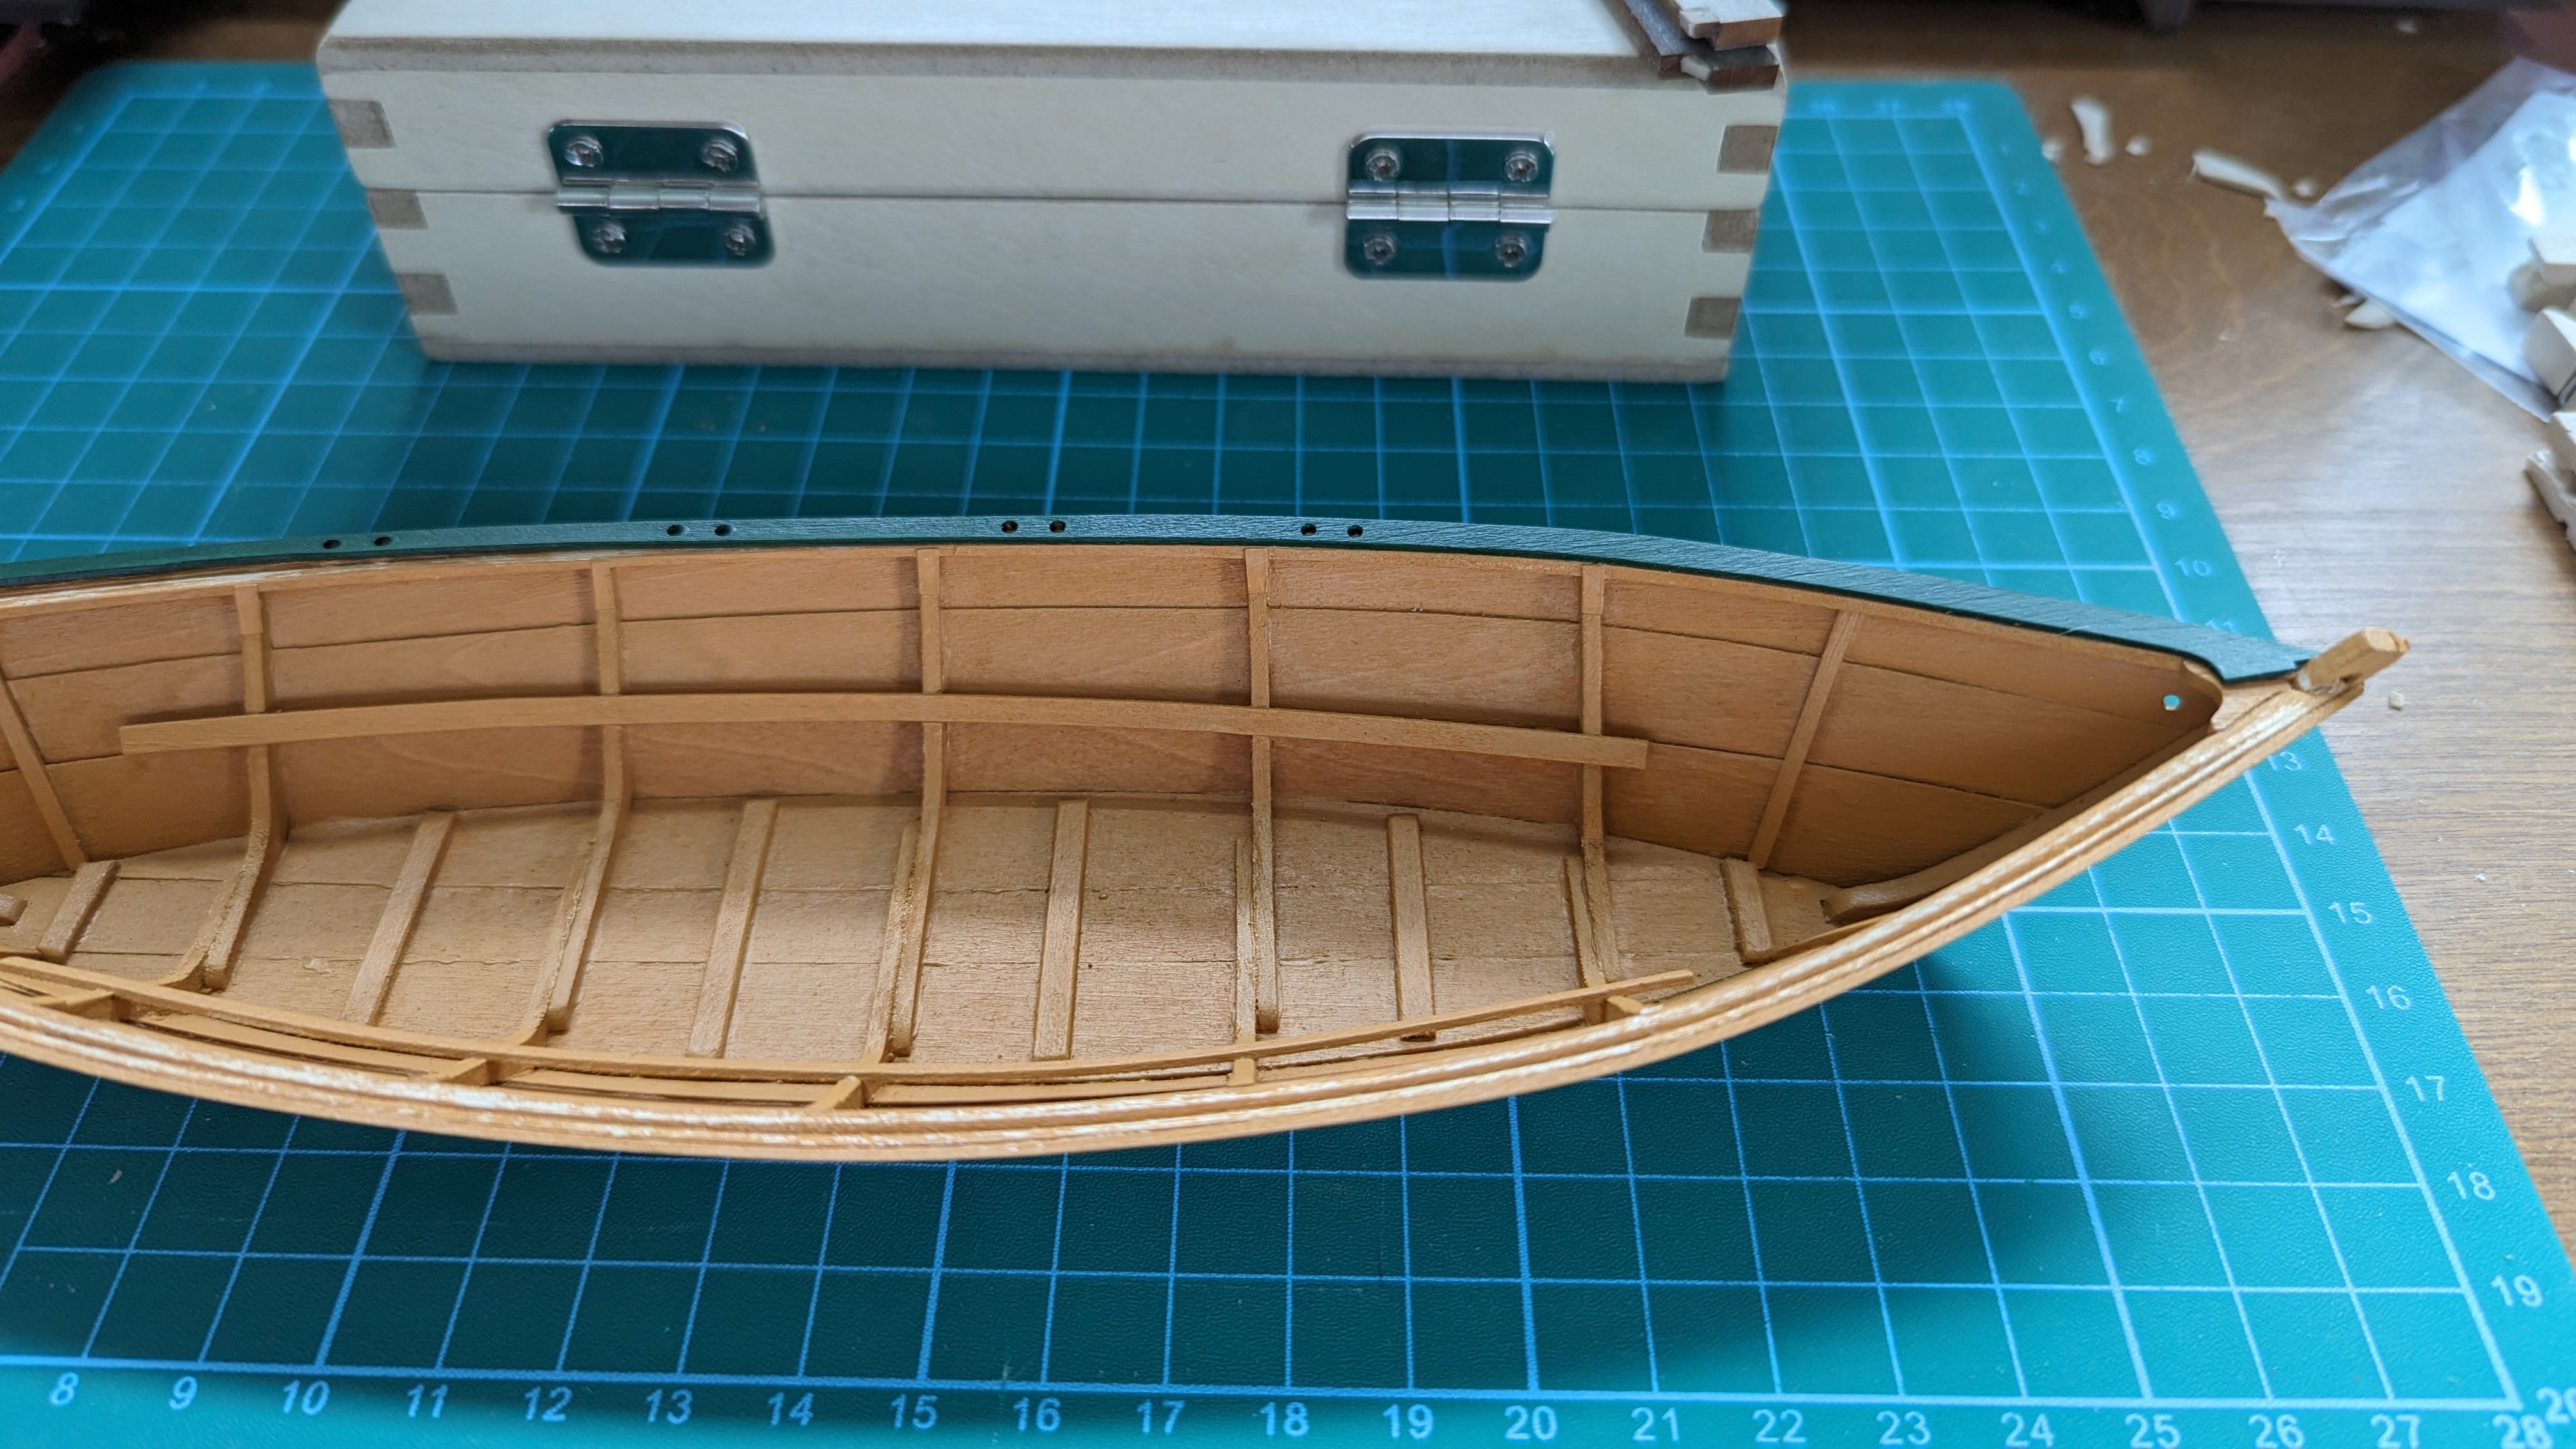
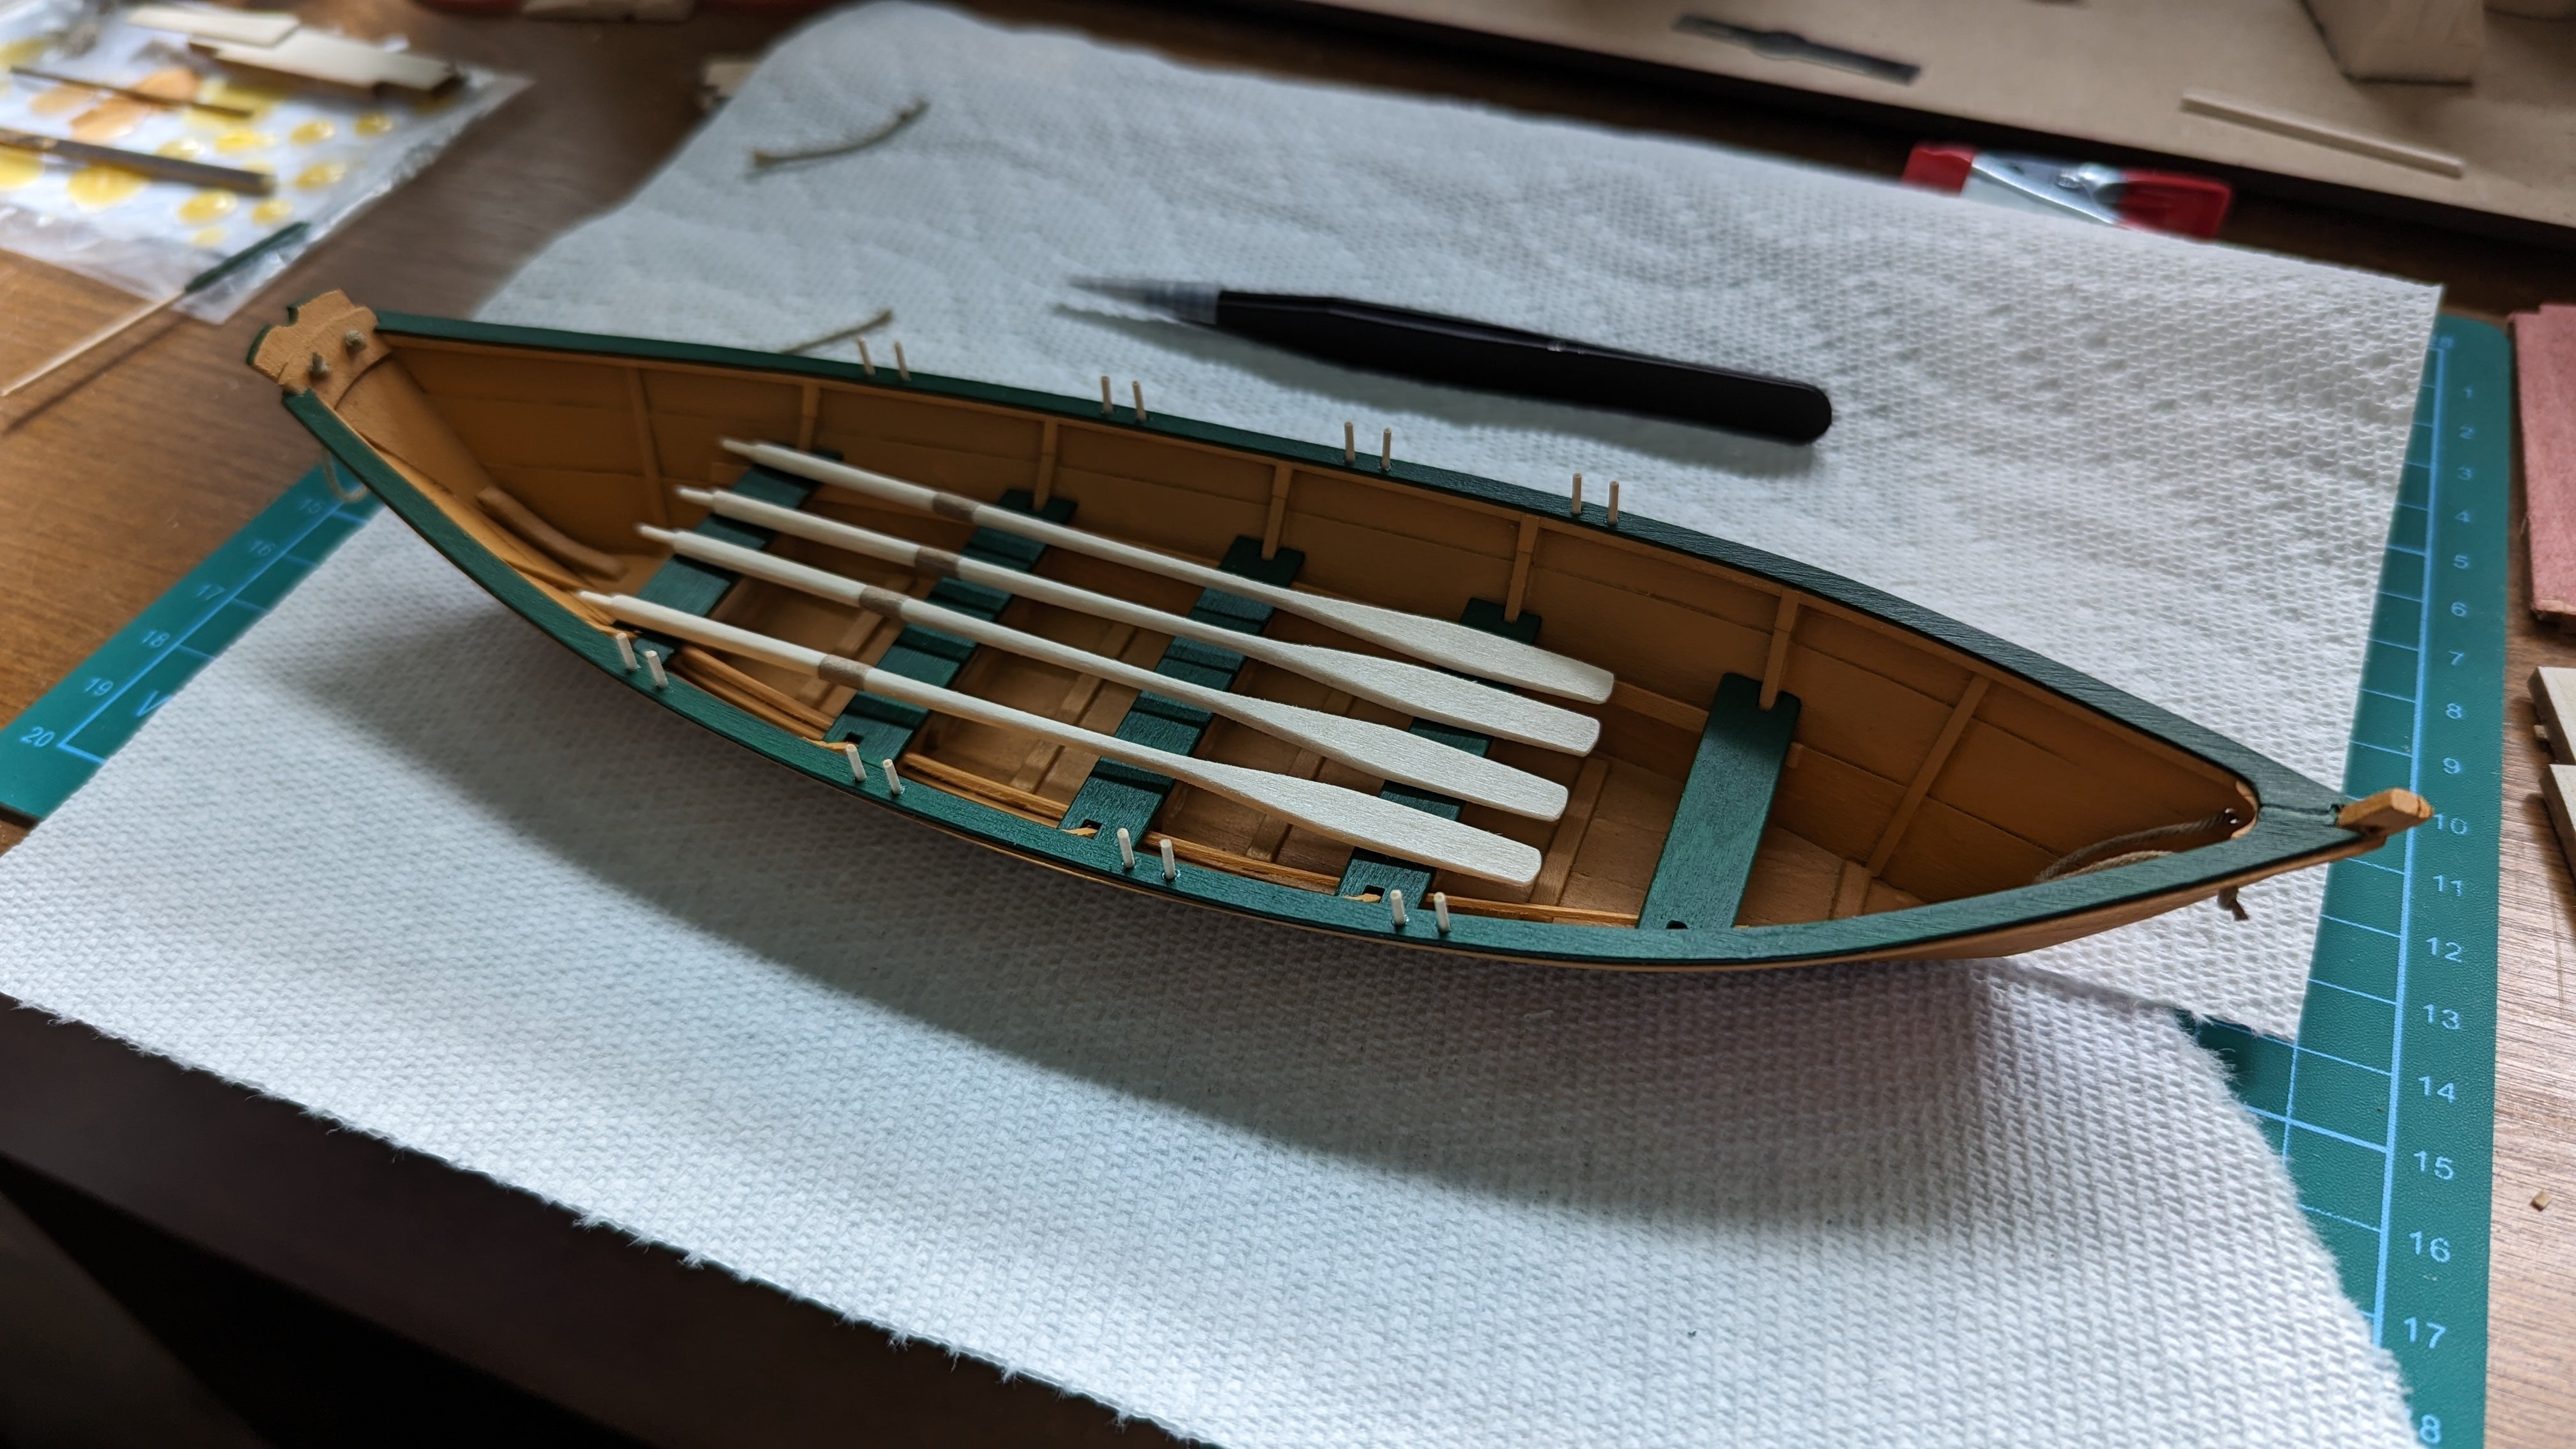
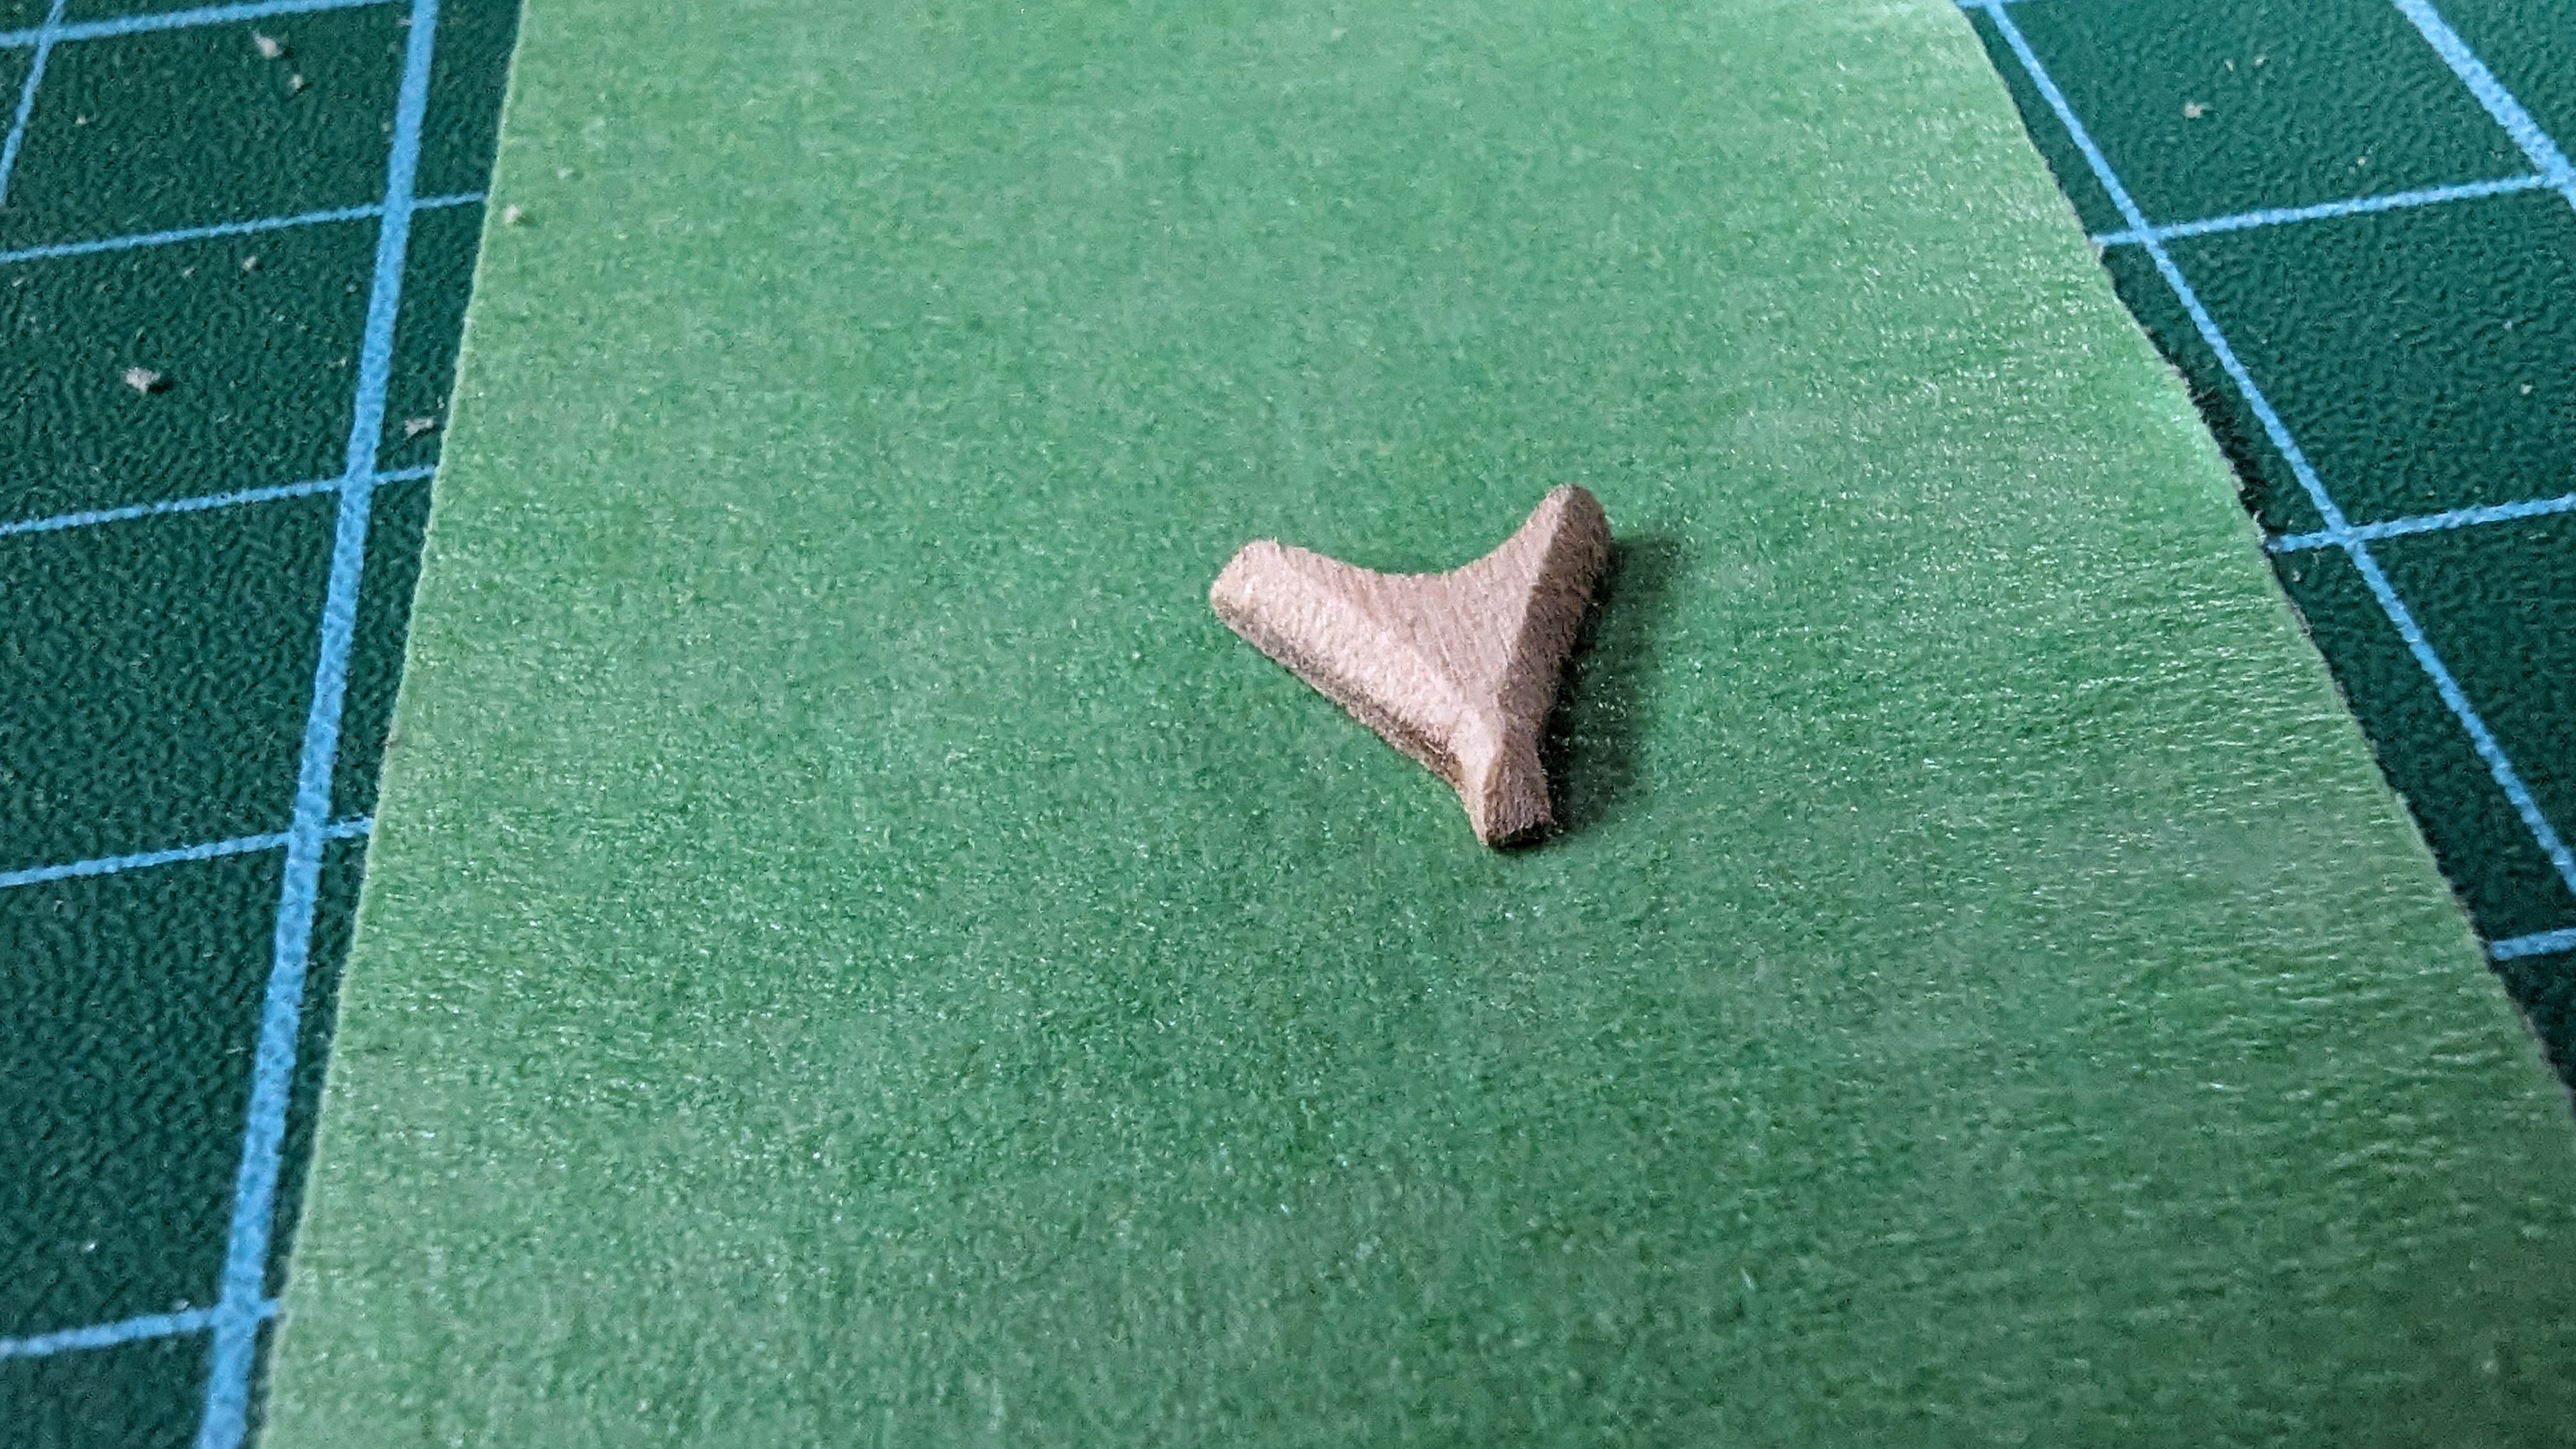
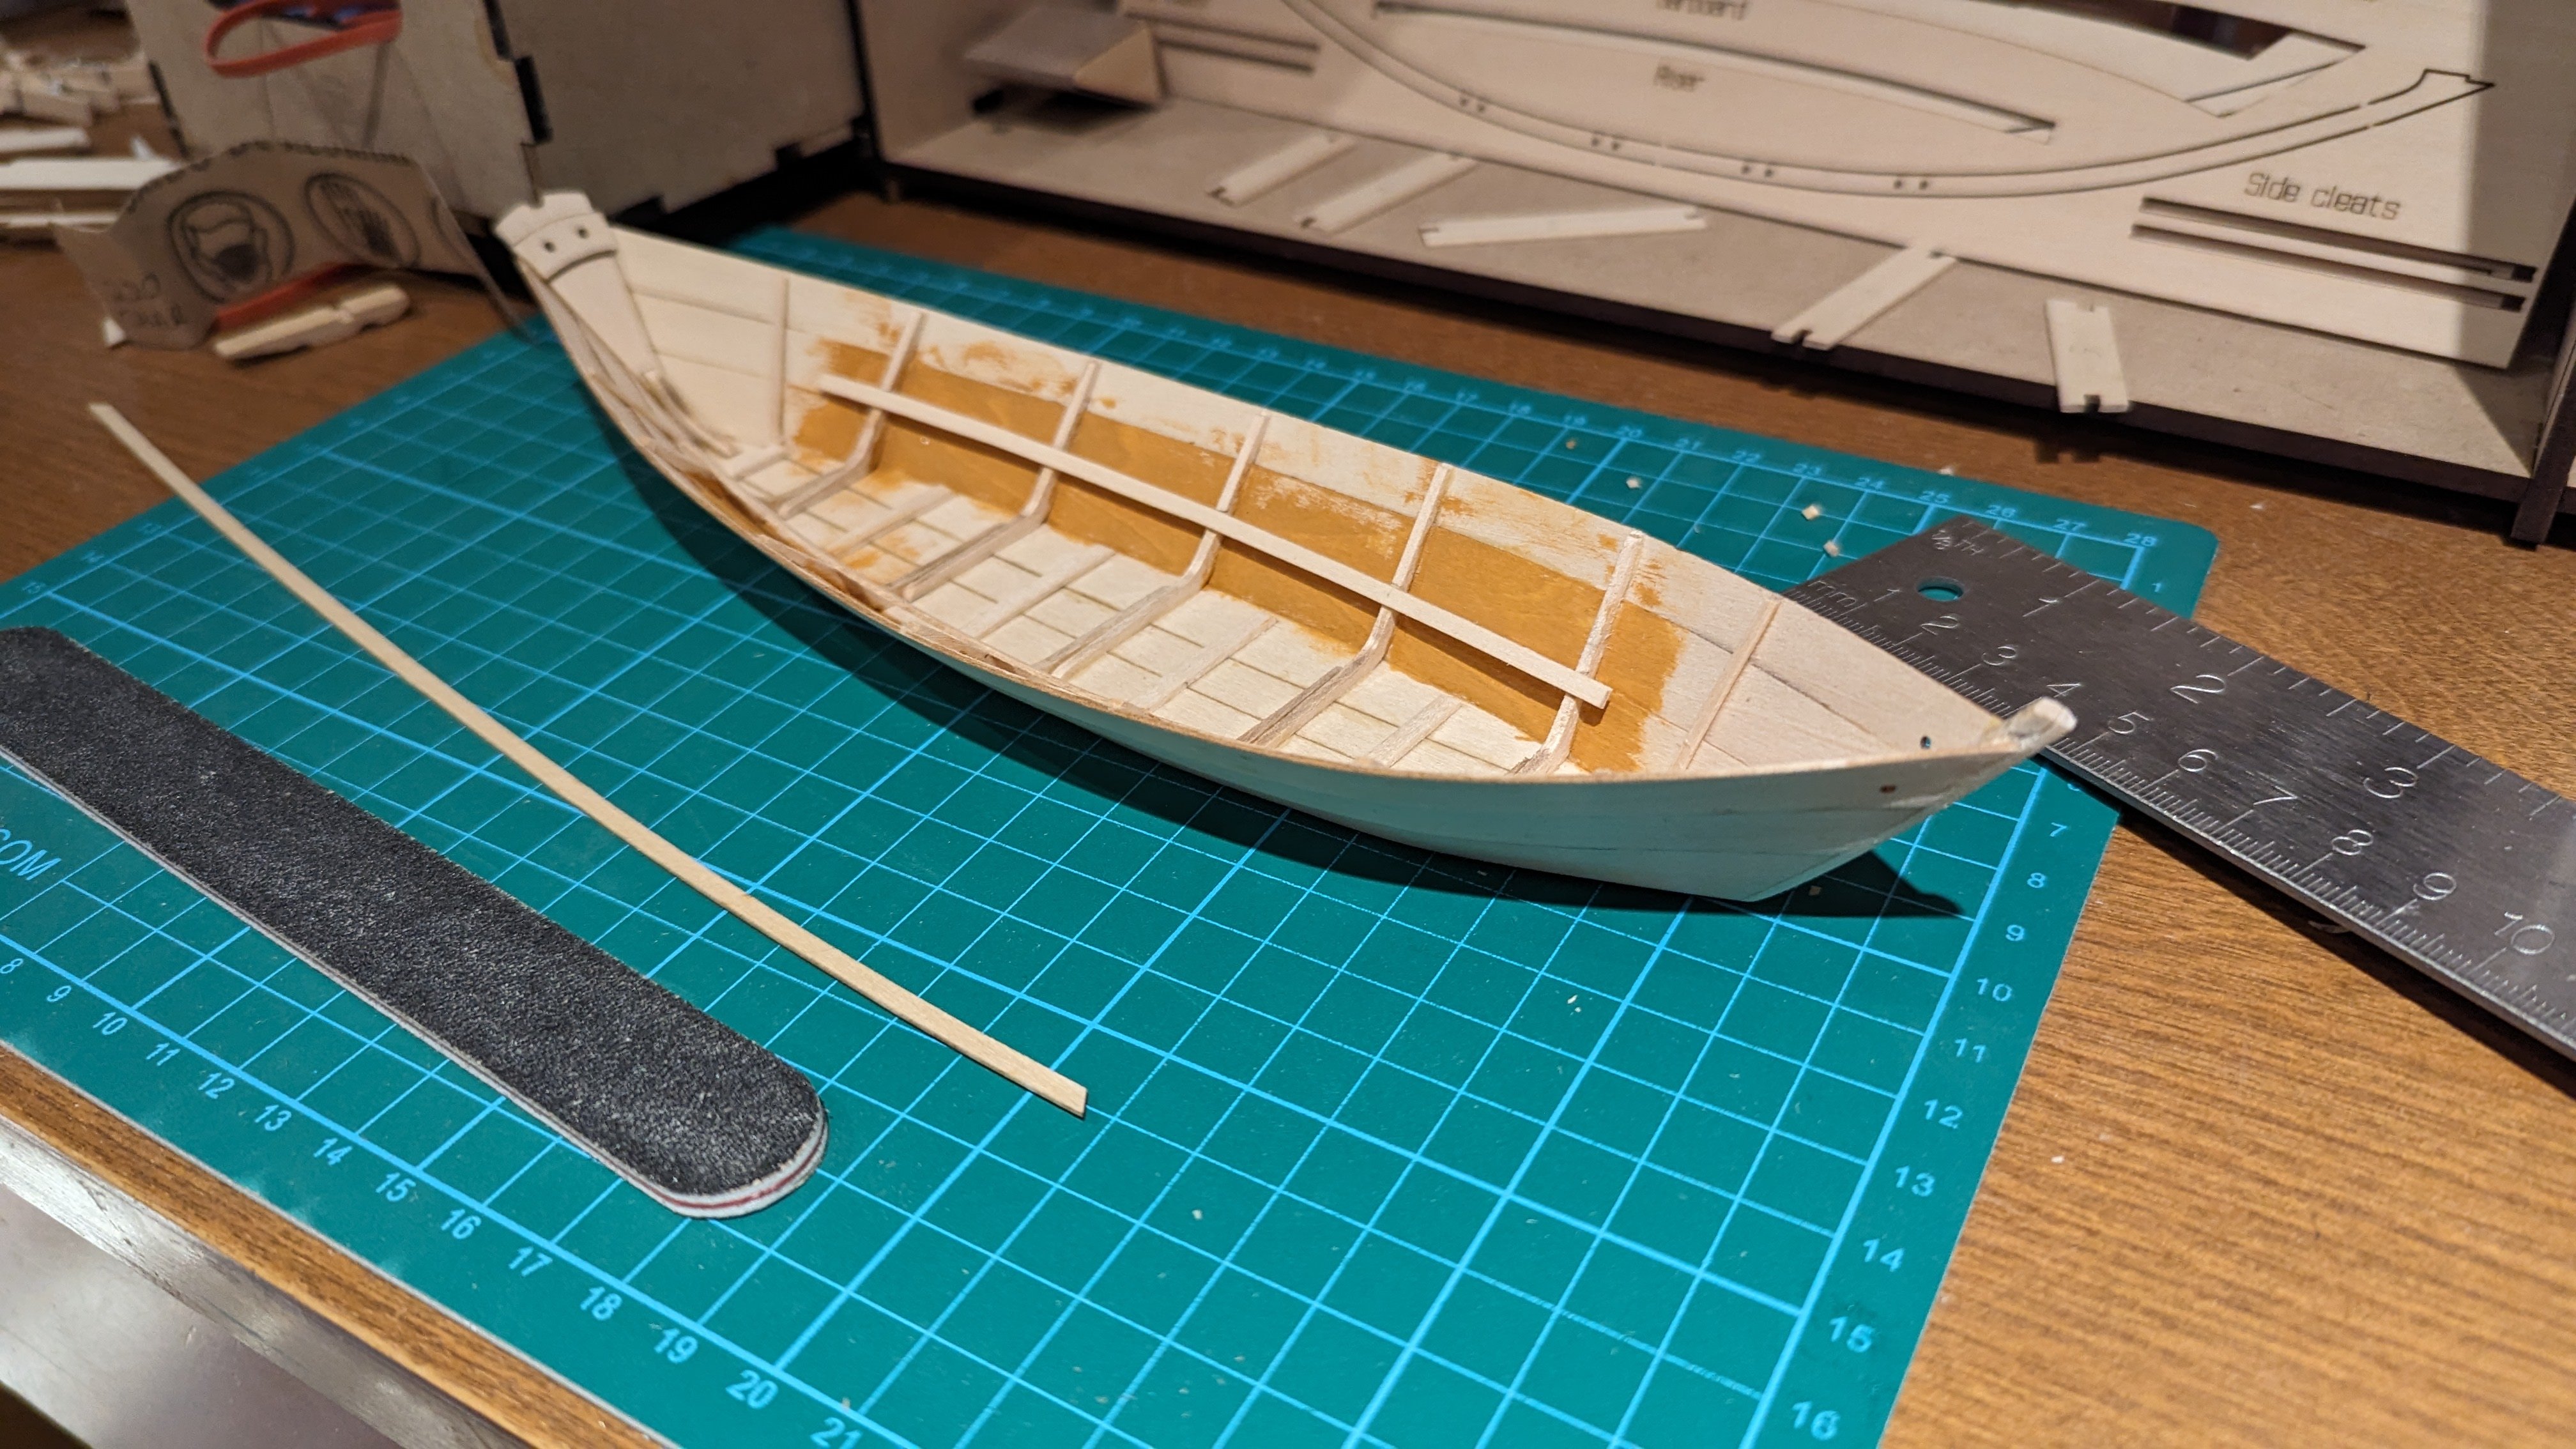
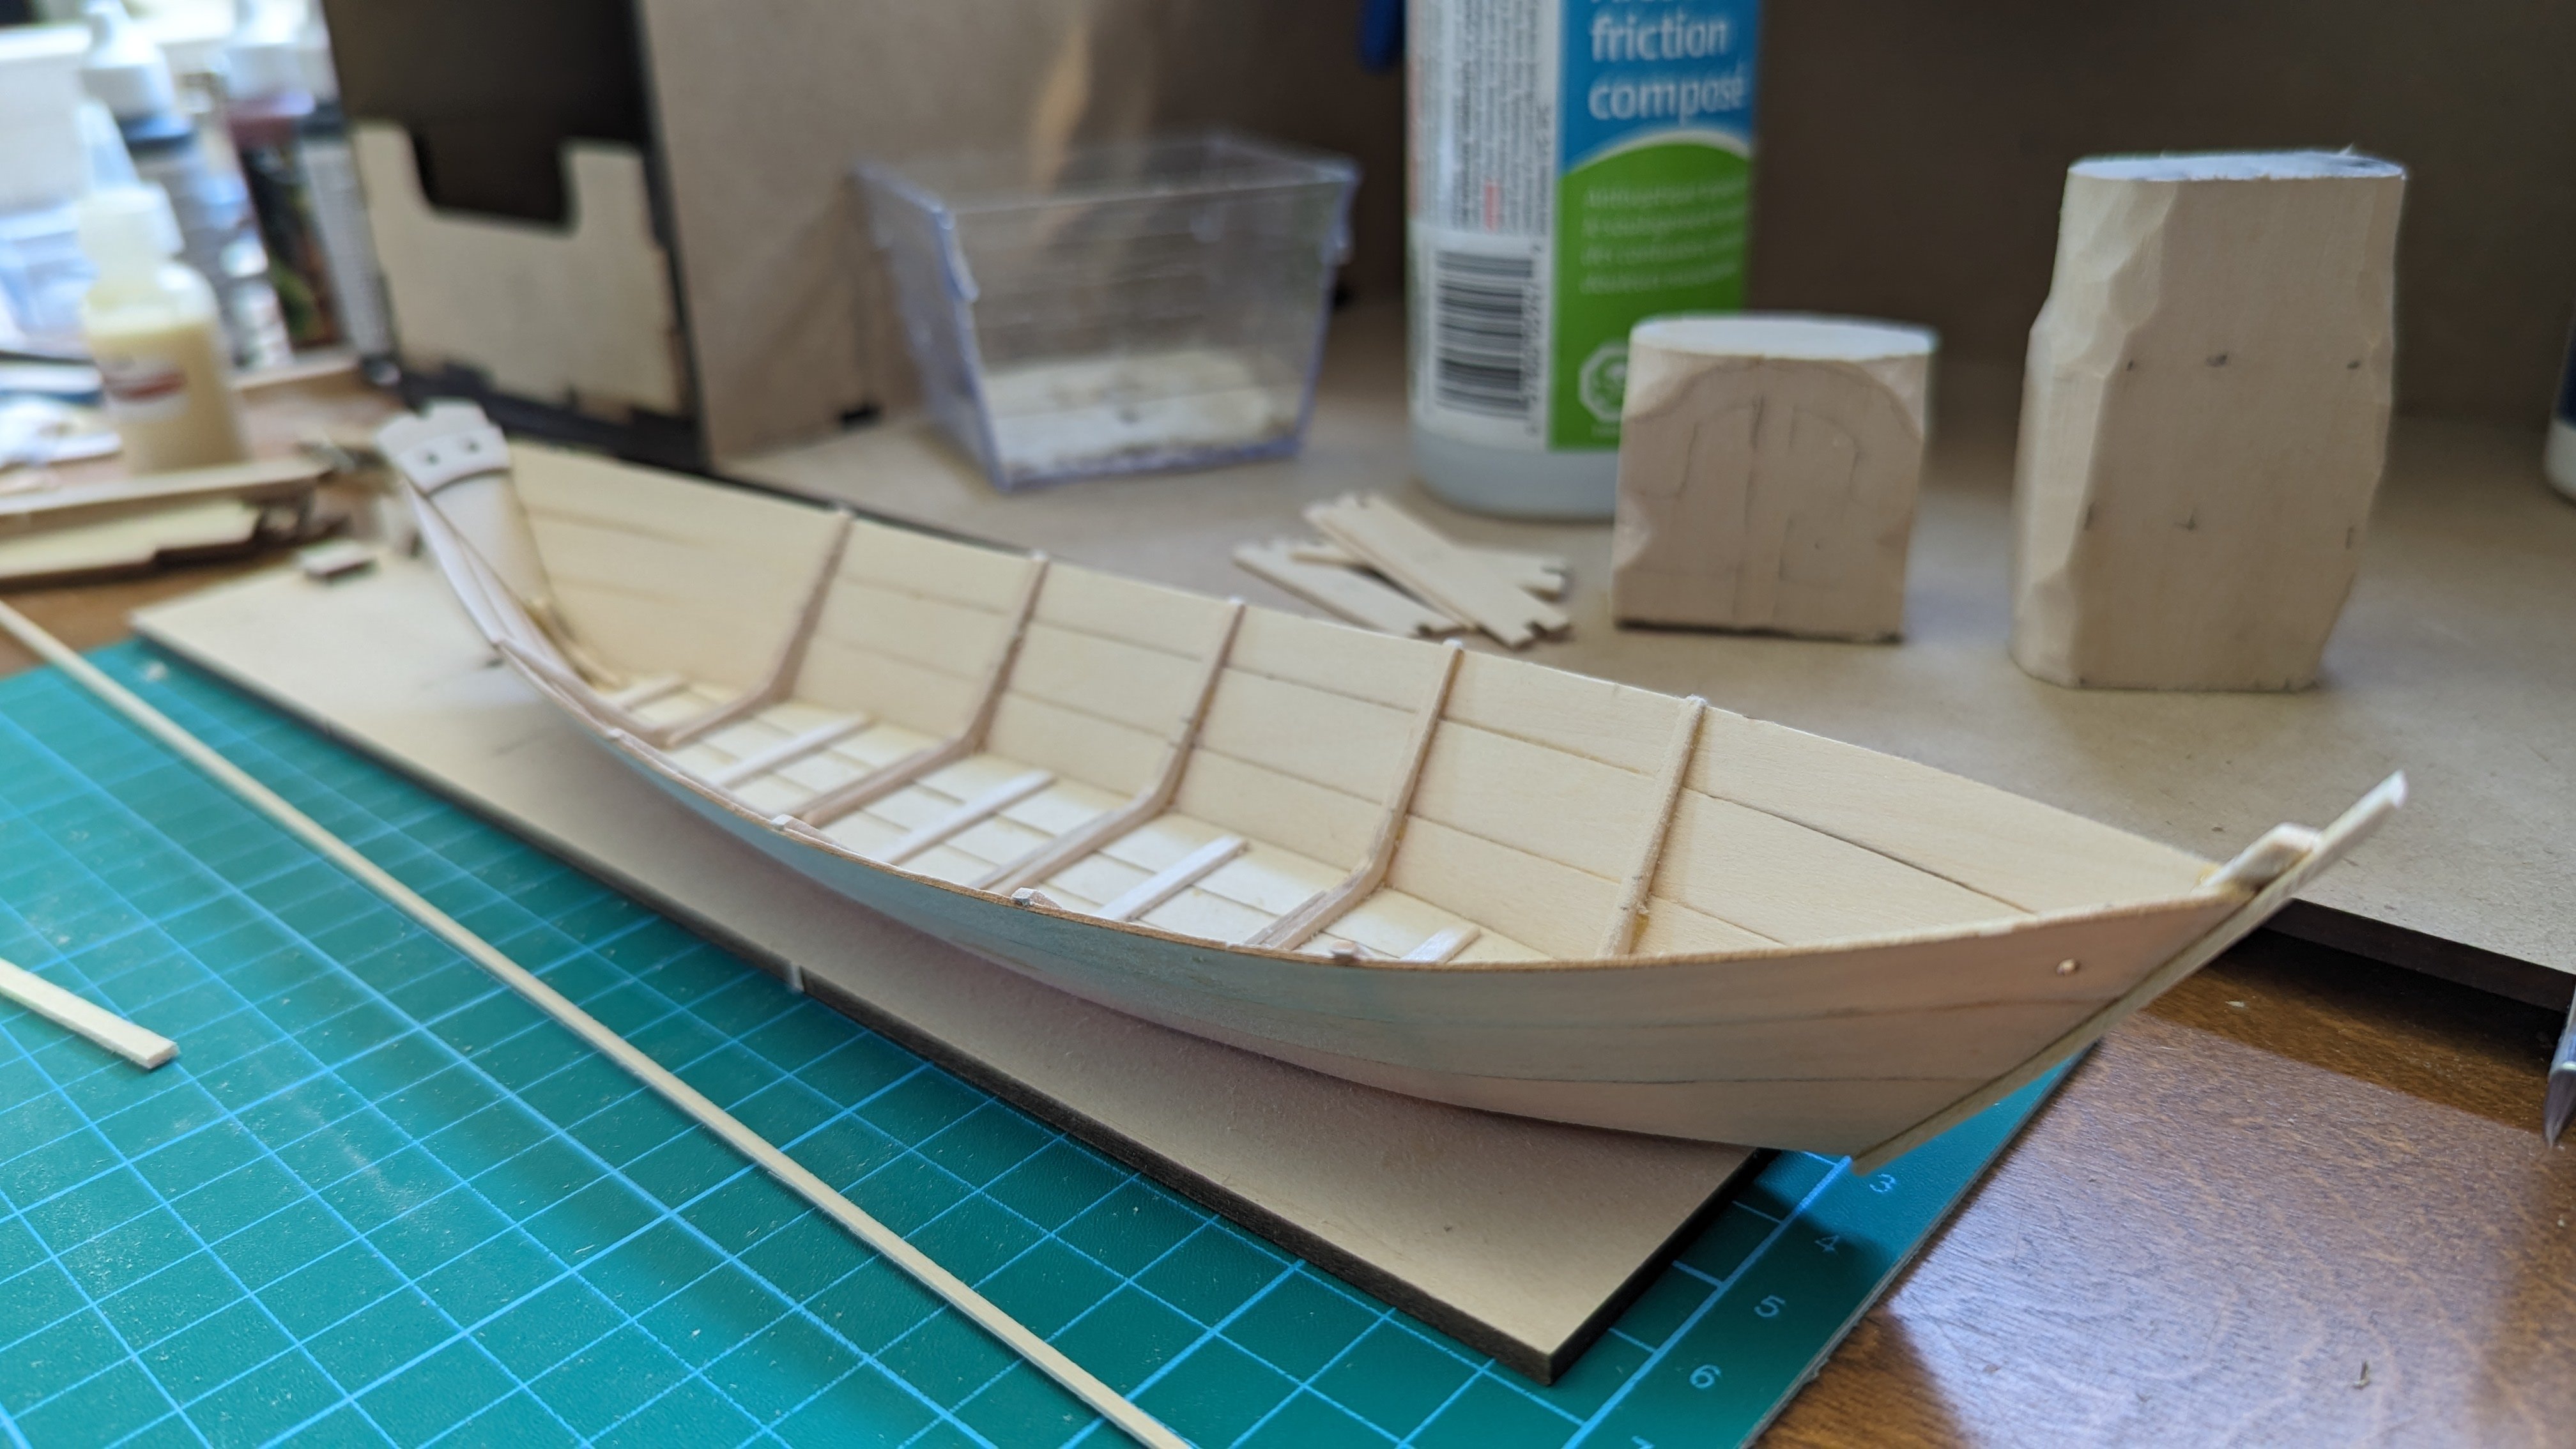
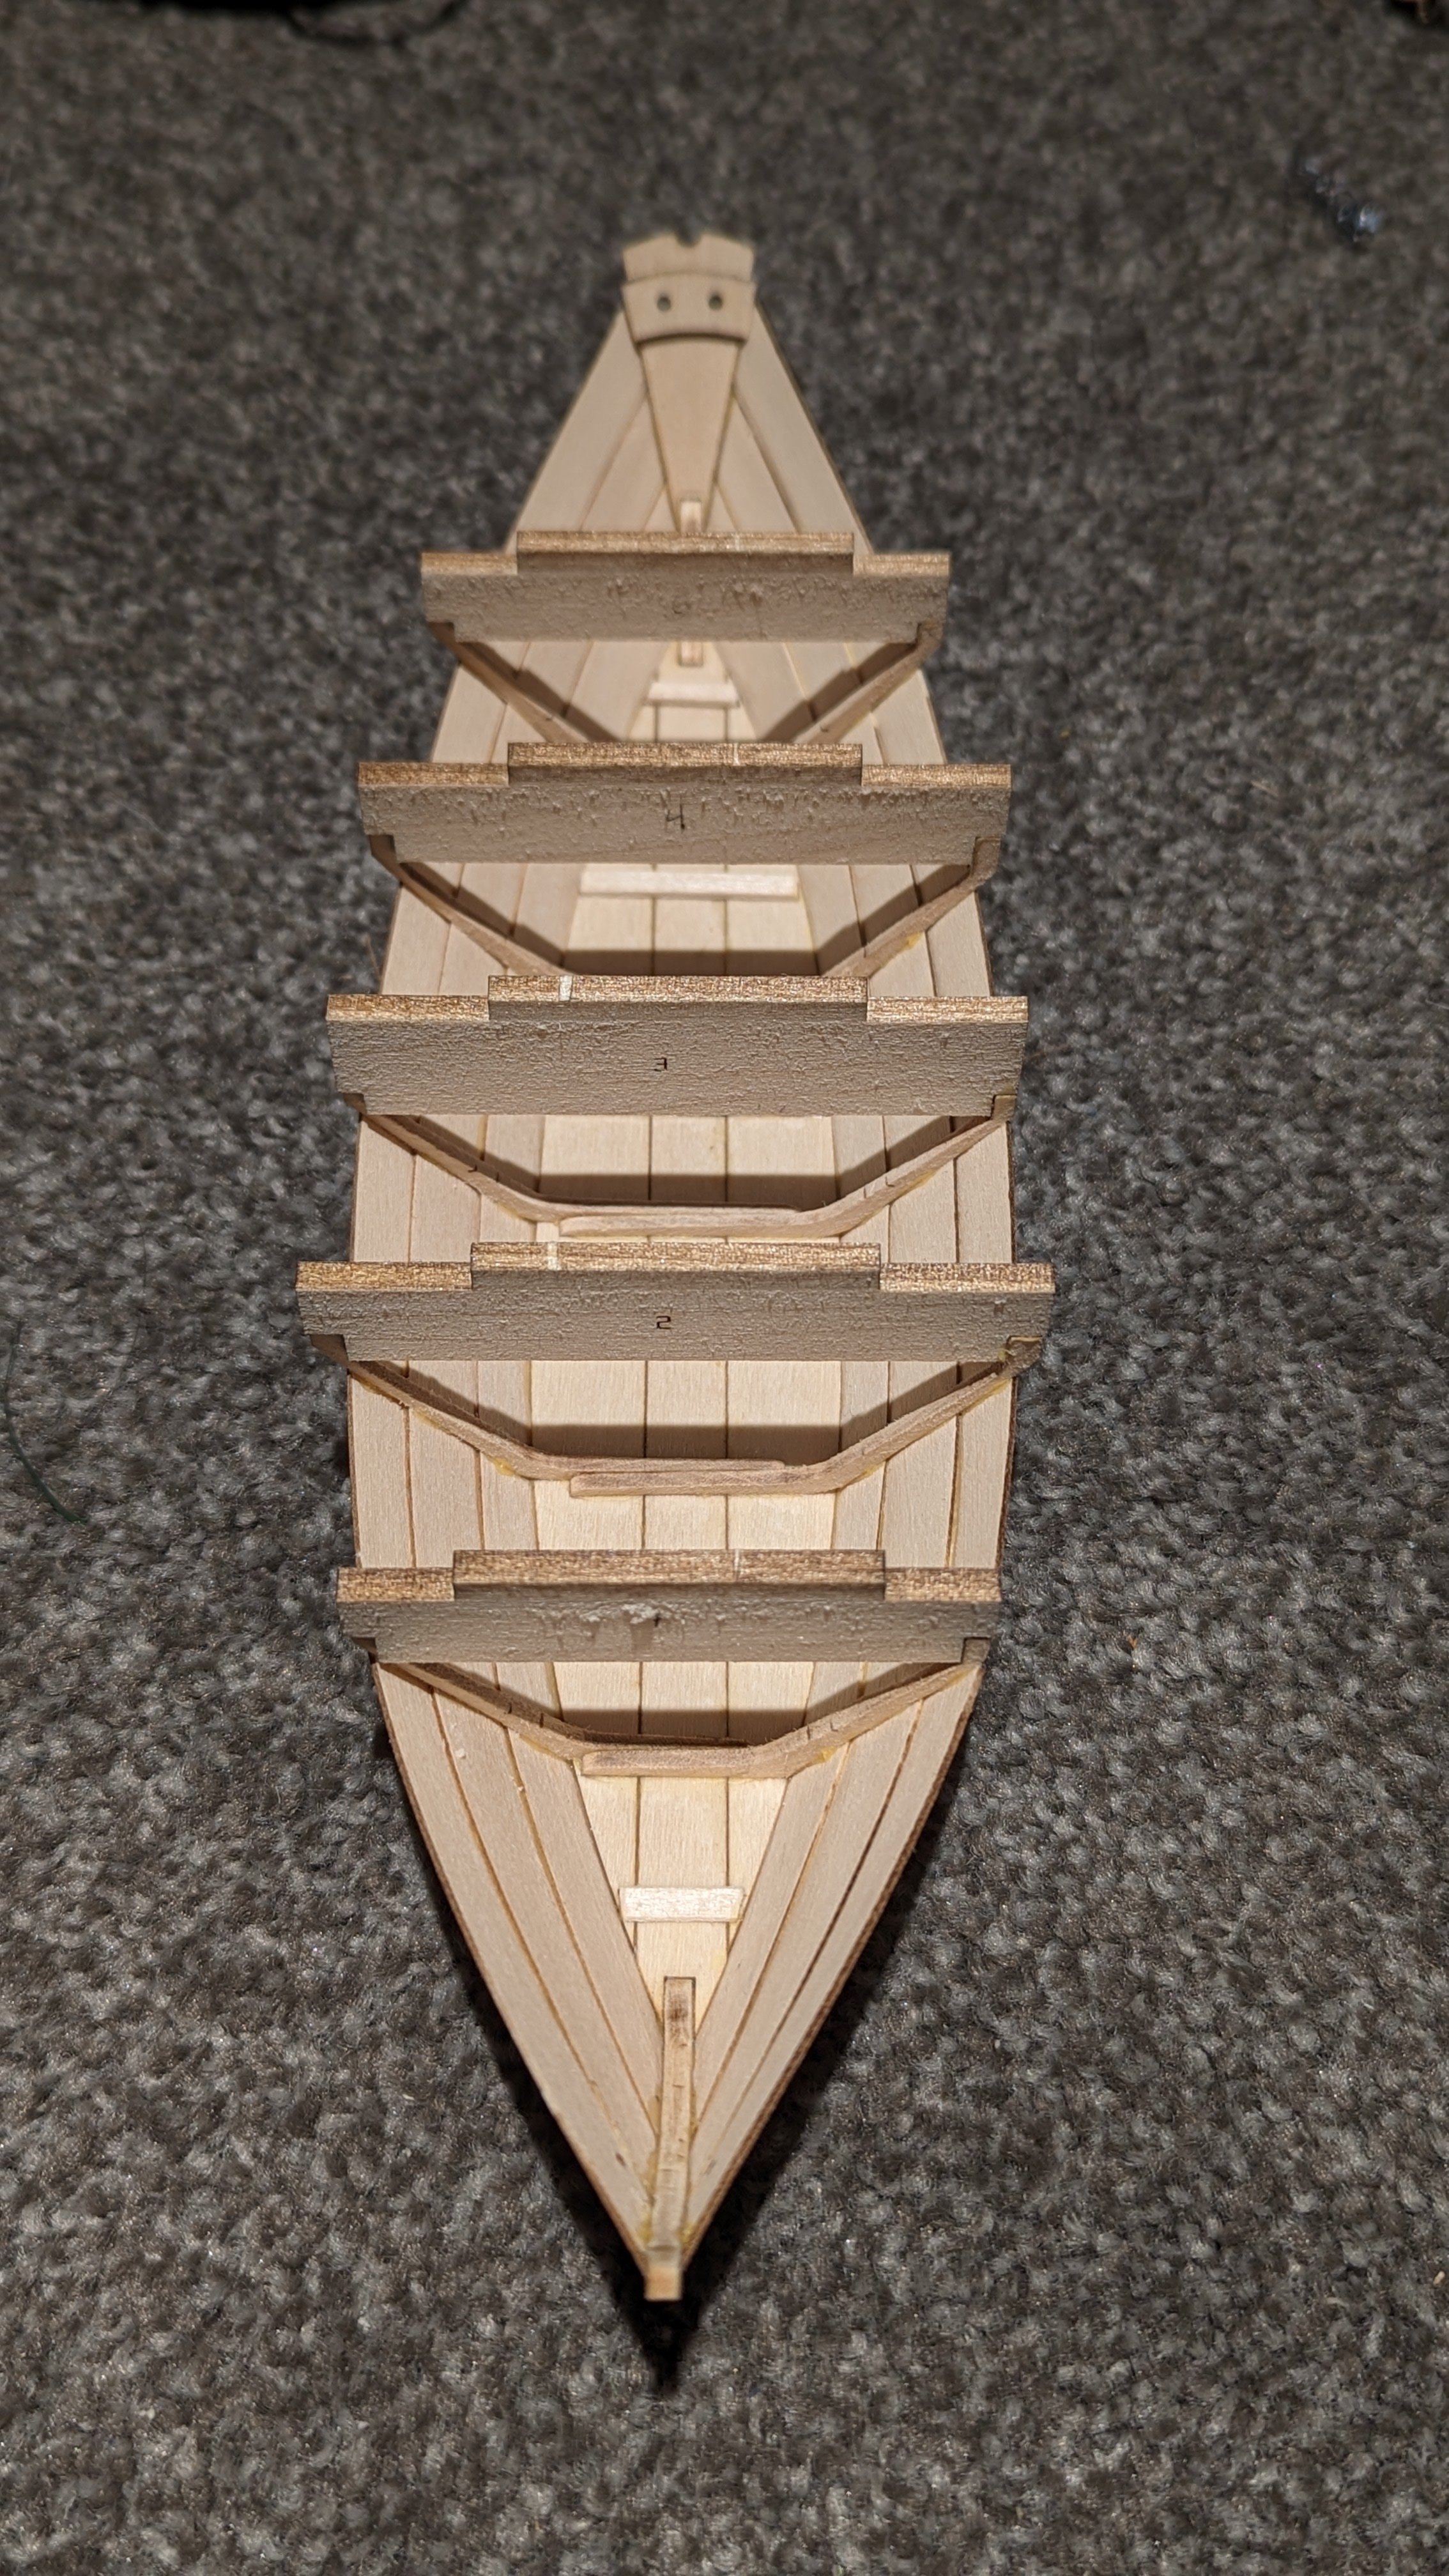
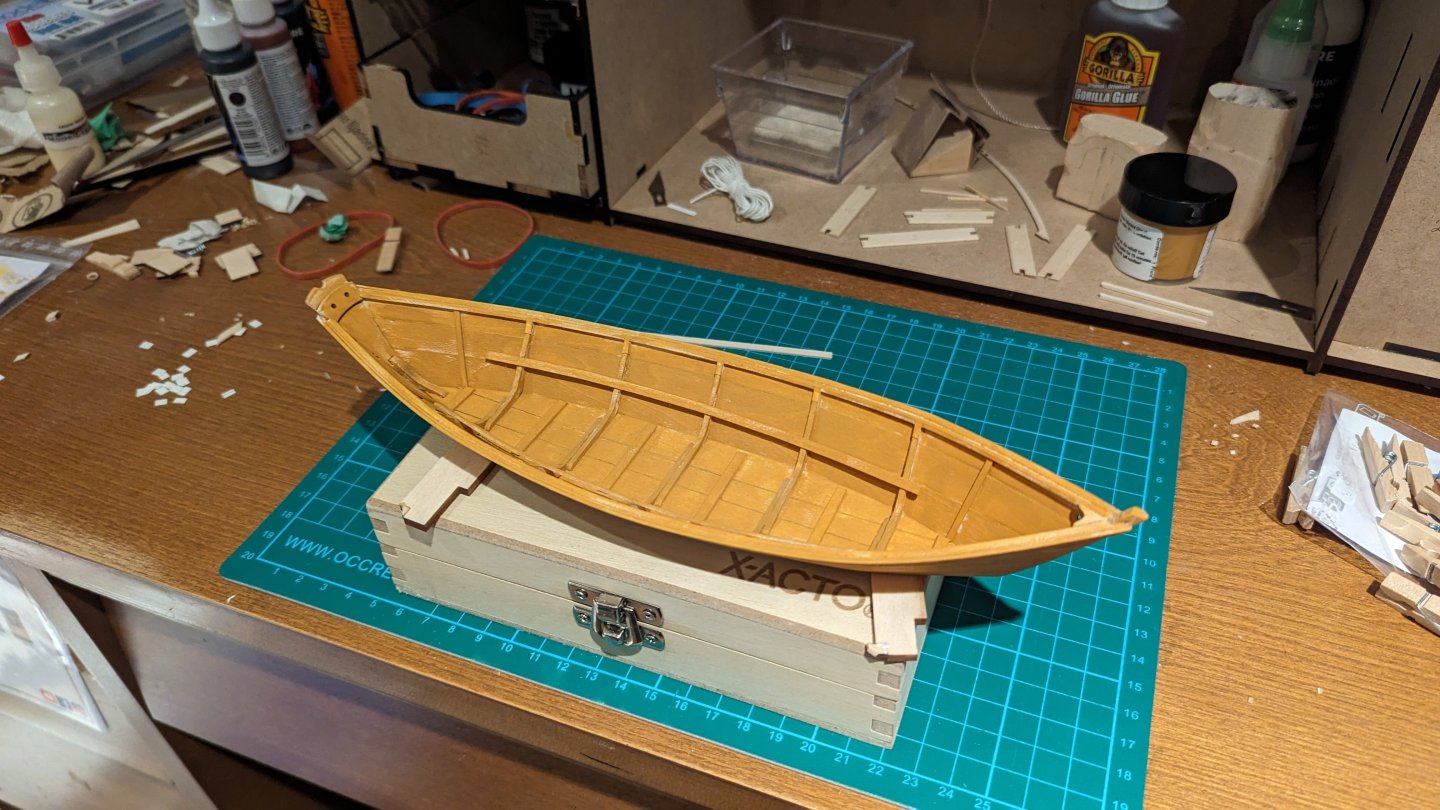
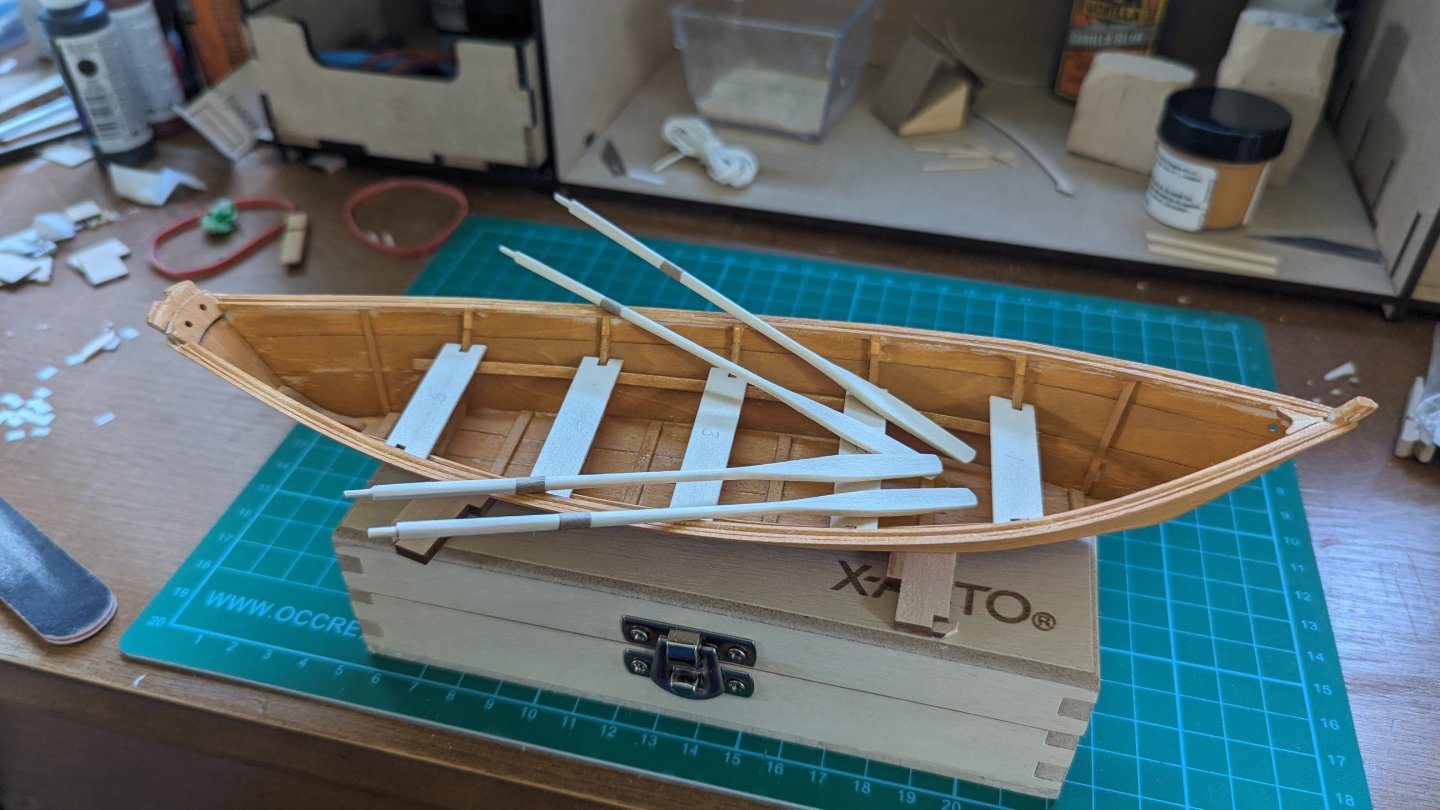
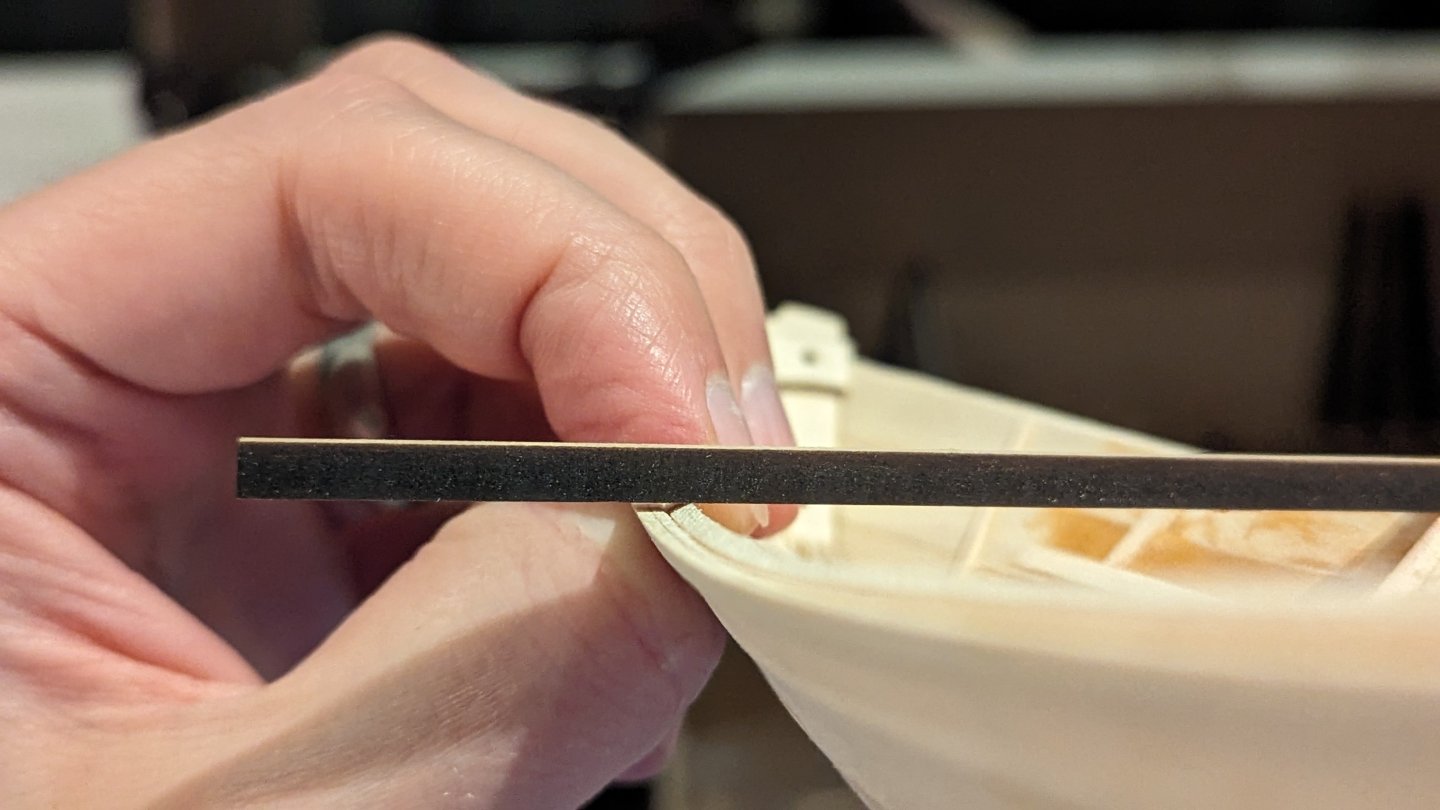
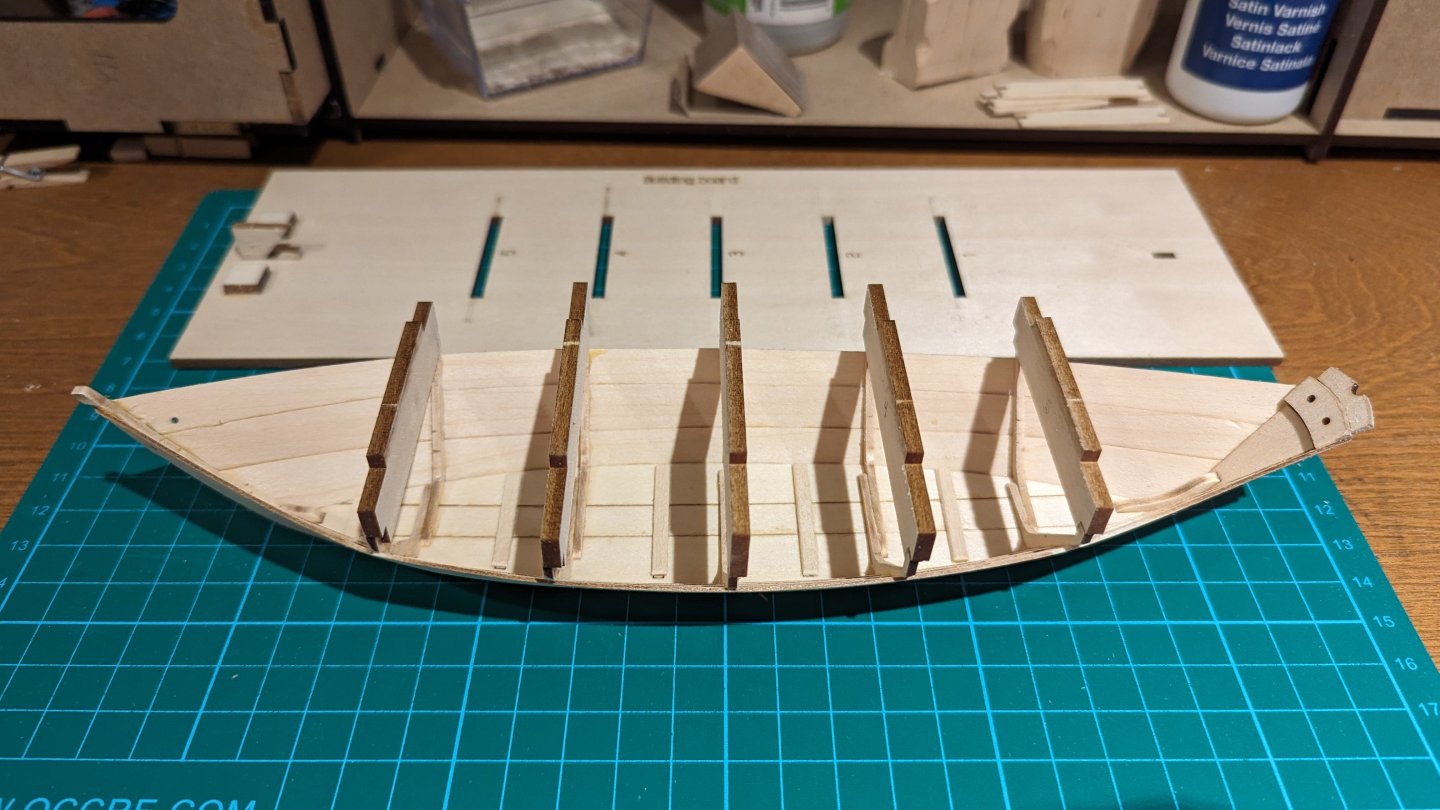
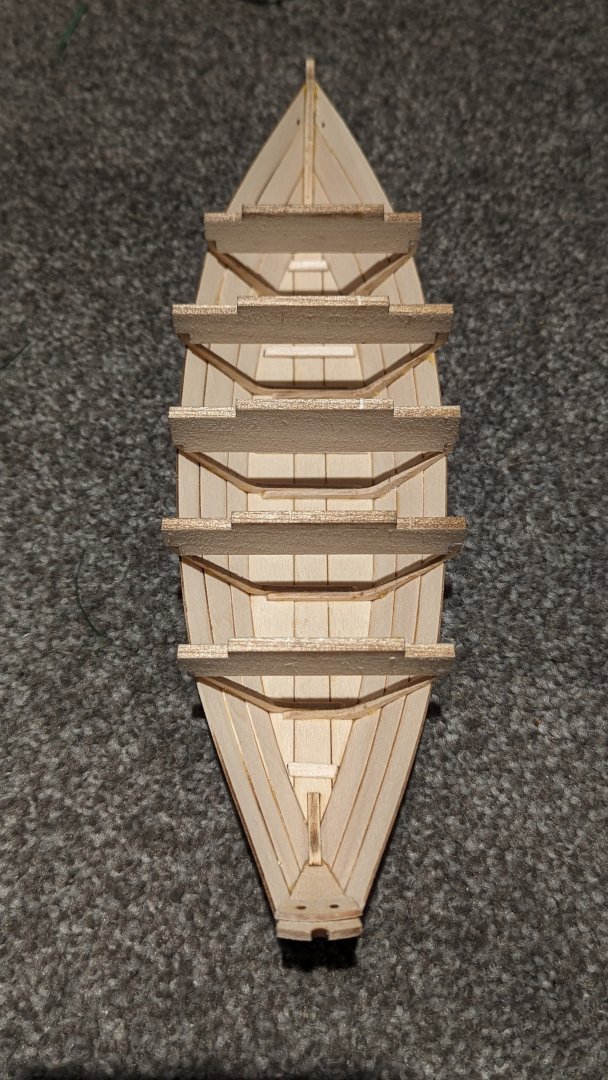
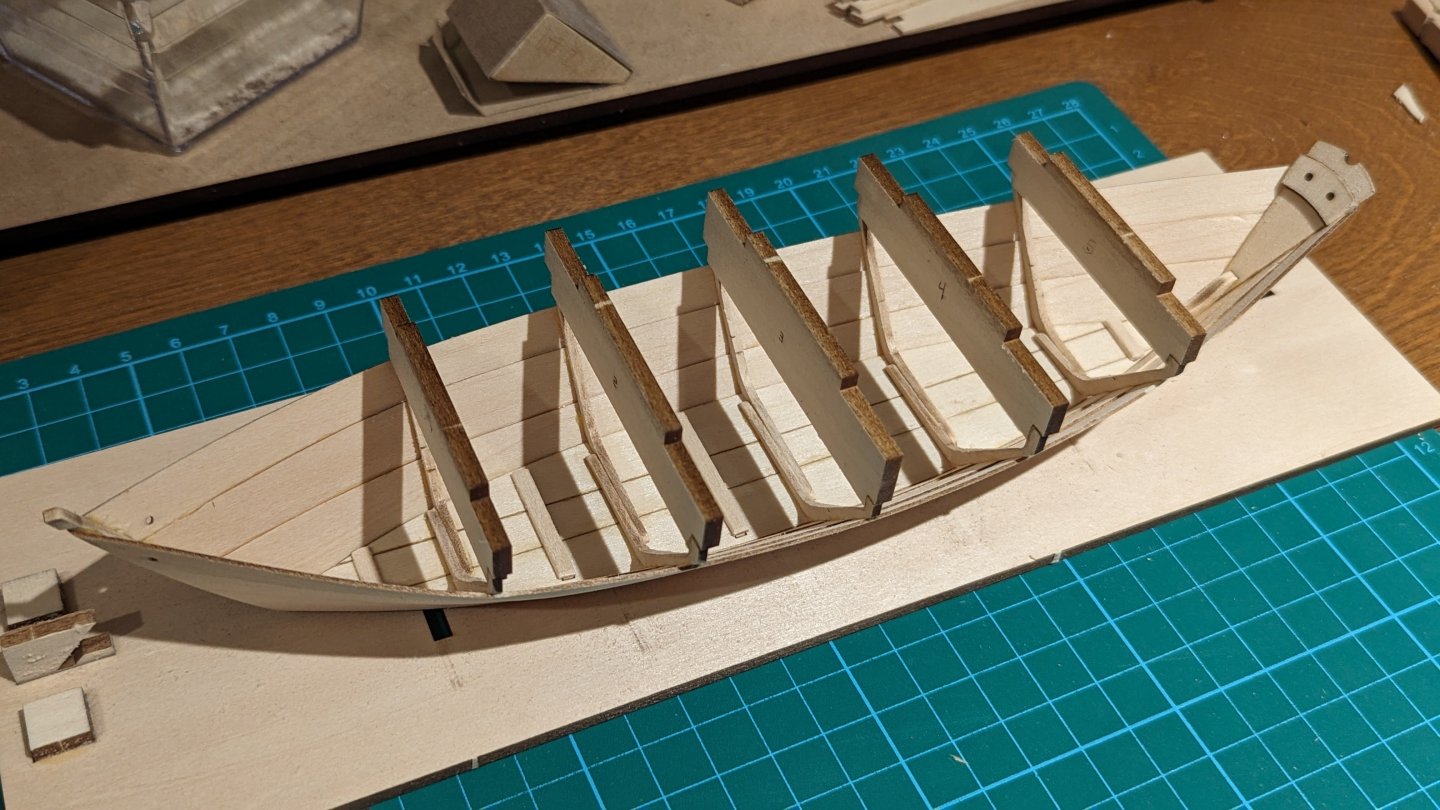
Log #11 The frames needed a bit more trimming before getting the gunwales on. After gluing them, I still felt they could've gone lower in some spots. It was very surprising how high the one corner sits since they sit at an angle. In any case, on they went, and were sanded flush. I then started working on the breast hook realizing how small it really was. I had a similar scenario as other build logs where the tip of the breast hook almost needed to be completely sanded off to fit. Instead of doing this, I decided to make a little notch in the gunwales. They're slightly offset to begin with so this gave it a more symmetrical, finished look. Multiple test fits and shaping required before a good fit. In the end, it fit so well I almost felt like there was no need for glue! The frame irons went on next. This part I found frustrating since I first followed the instructions and tediously made multiple at the suggested size. Other build logs and my experience showed that suggestion is far too large. I ended up making a second batch, which was again, too large. In the end, I tried my best to slice off little strips from the existing oversized ones. This was difficult to get perfect and some ended up being slightly different size, but we're talking 32nds or 64ths so it's not the end of the world. I doubt they had perfect manufacturing processes in 1800 😉 Next, the transom required some smoothing and shaping. I tried with a chisel blade first, but quickly realized how terrible this was going to turn out so I ended up sanding it down. A small piece of painters tape on the transom protected it while shaping the cleat. As for the semi circle on the top (I forget the name of) - I started with a file, but it was a little too large so I rolled a piece of sand paper around a small sculpting tool which worked well. Again, as others pointed out, the thwart on frame #1 needed significant shaping. I alternated between a small rectangular file in the slot and course sandpaper on the ends, eventually working it down to size. I found that when test fitting, if it rocked back and forth, it was the slot that needed more sanding or beveling(it was resting on the frame); however, when it wouldn't rock much, the ends needed to be taken in (it was resting on the hull). The #5 thwart needed some reducing as well, but not much. The rest were basically just beveled and ended up sitting very nicely on the risers. Finally, I was ready for the first coat of paint. This was my first real attempt at painting a model, or wood, or anything really, and I feel it went fairly well. I thinned it probably around 20%; or 1:5, whatever metric is used for paint thinning. This was very much eyeballed so 20% is a best guess. I'll likely grab a dropper for more control, but I basically just scooped up a bit of water in a bottle cap and poured a small amount on. The next log will likely finish out this build. I just applied the first coat on the cap rails, and the second coat of the interior hull. The second coat was a little tedious and I used a large flat brush to get most of it, then a far smaller round brush to get under the gunwales, sides of frames, especially around the risers, as well as little nooks and crannies. It took far longer than I expected and I kept seeing more tiny little spots that needed touching up, but overall I enjoyed the level of attention to detail and care that it took. Believe it or not, this little dory isn't my lifetime dream build; however, it's grown on me and I'm very happy to be spending time on it. Being that the thwarts and oars are already complete, I gave myself a view of what the finished build may look like.


- 69 replies
-
- 10
-
-
-
- Lowell Grand Banks Dory
- Model Shipways
- (and 2 more)
-
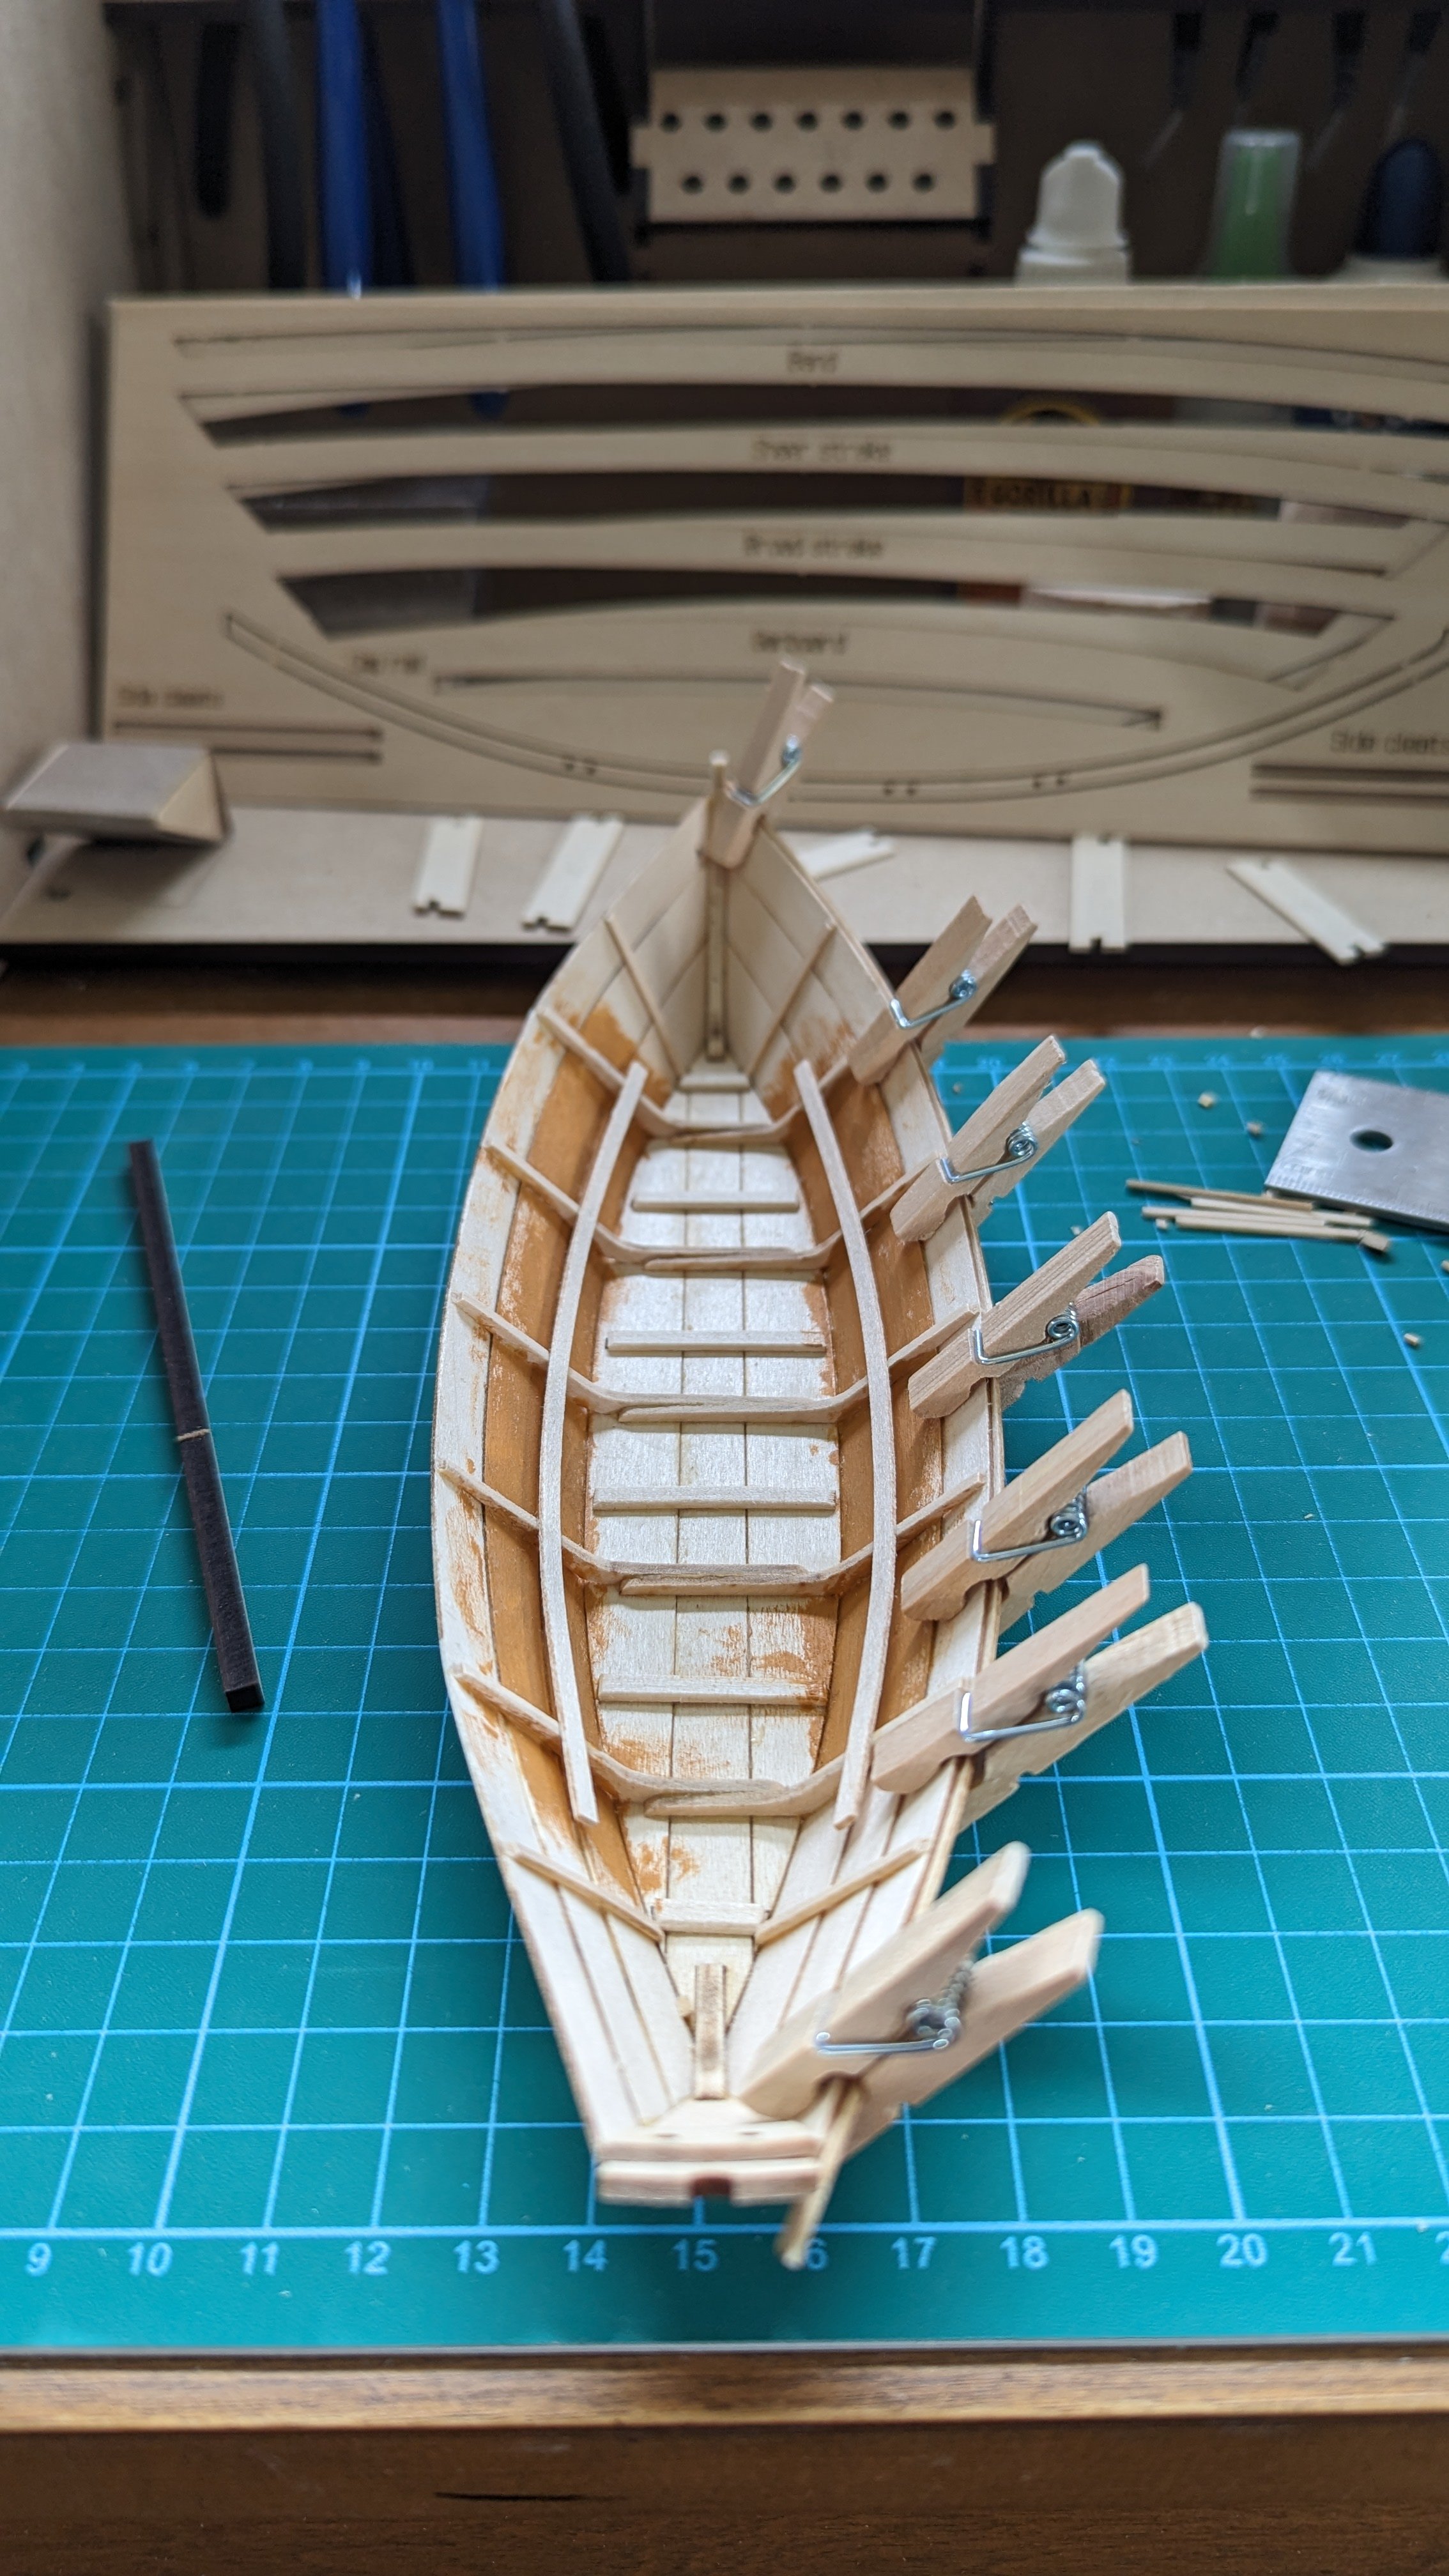
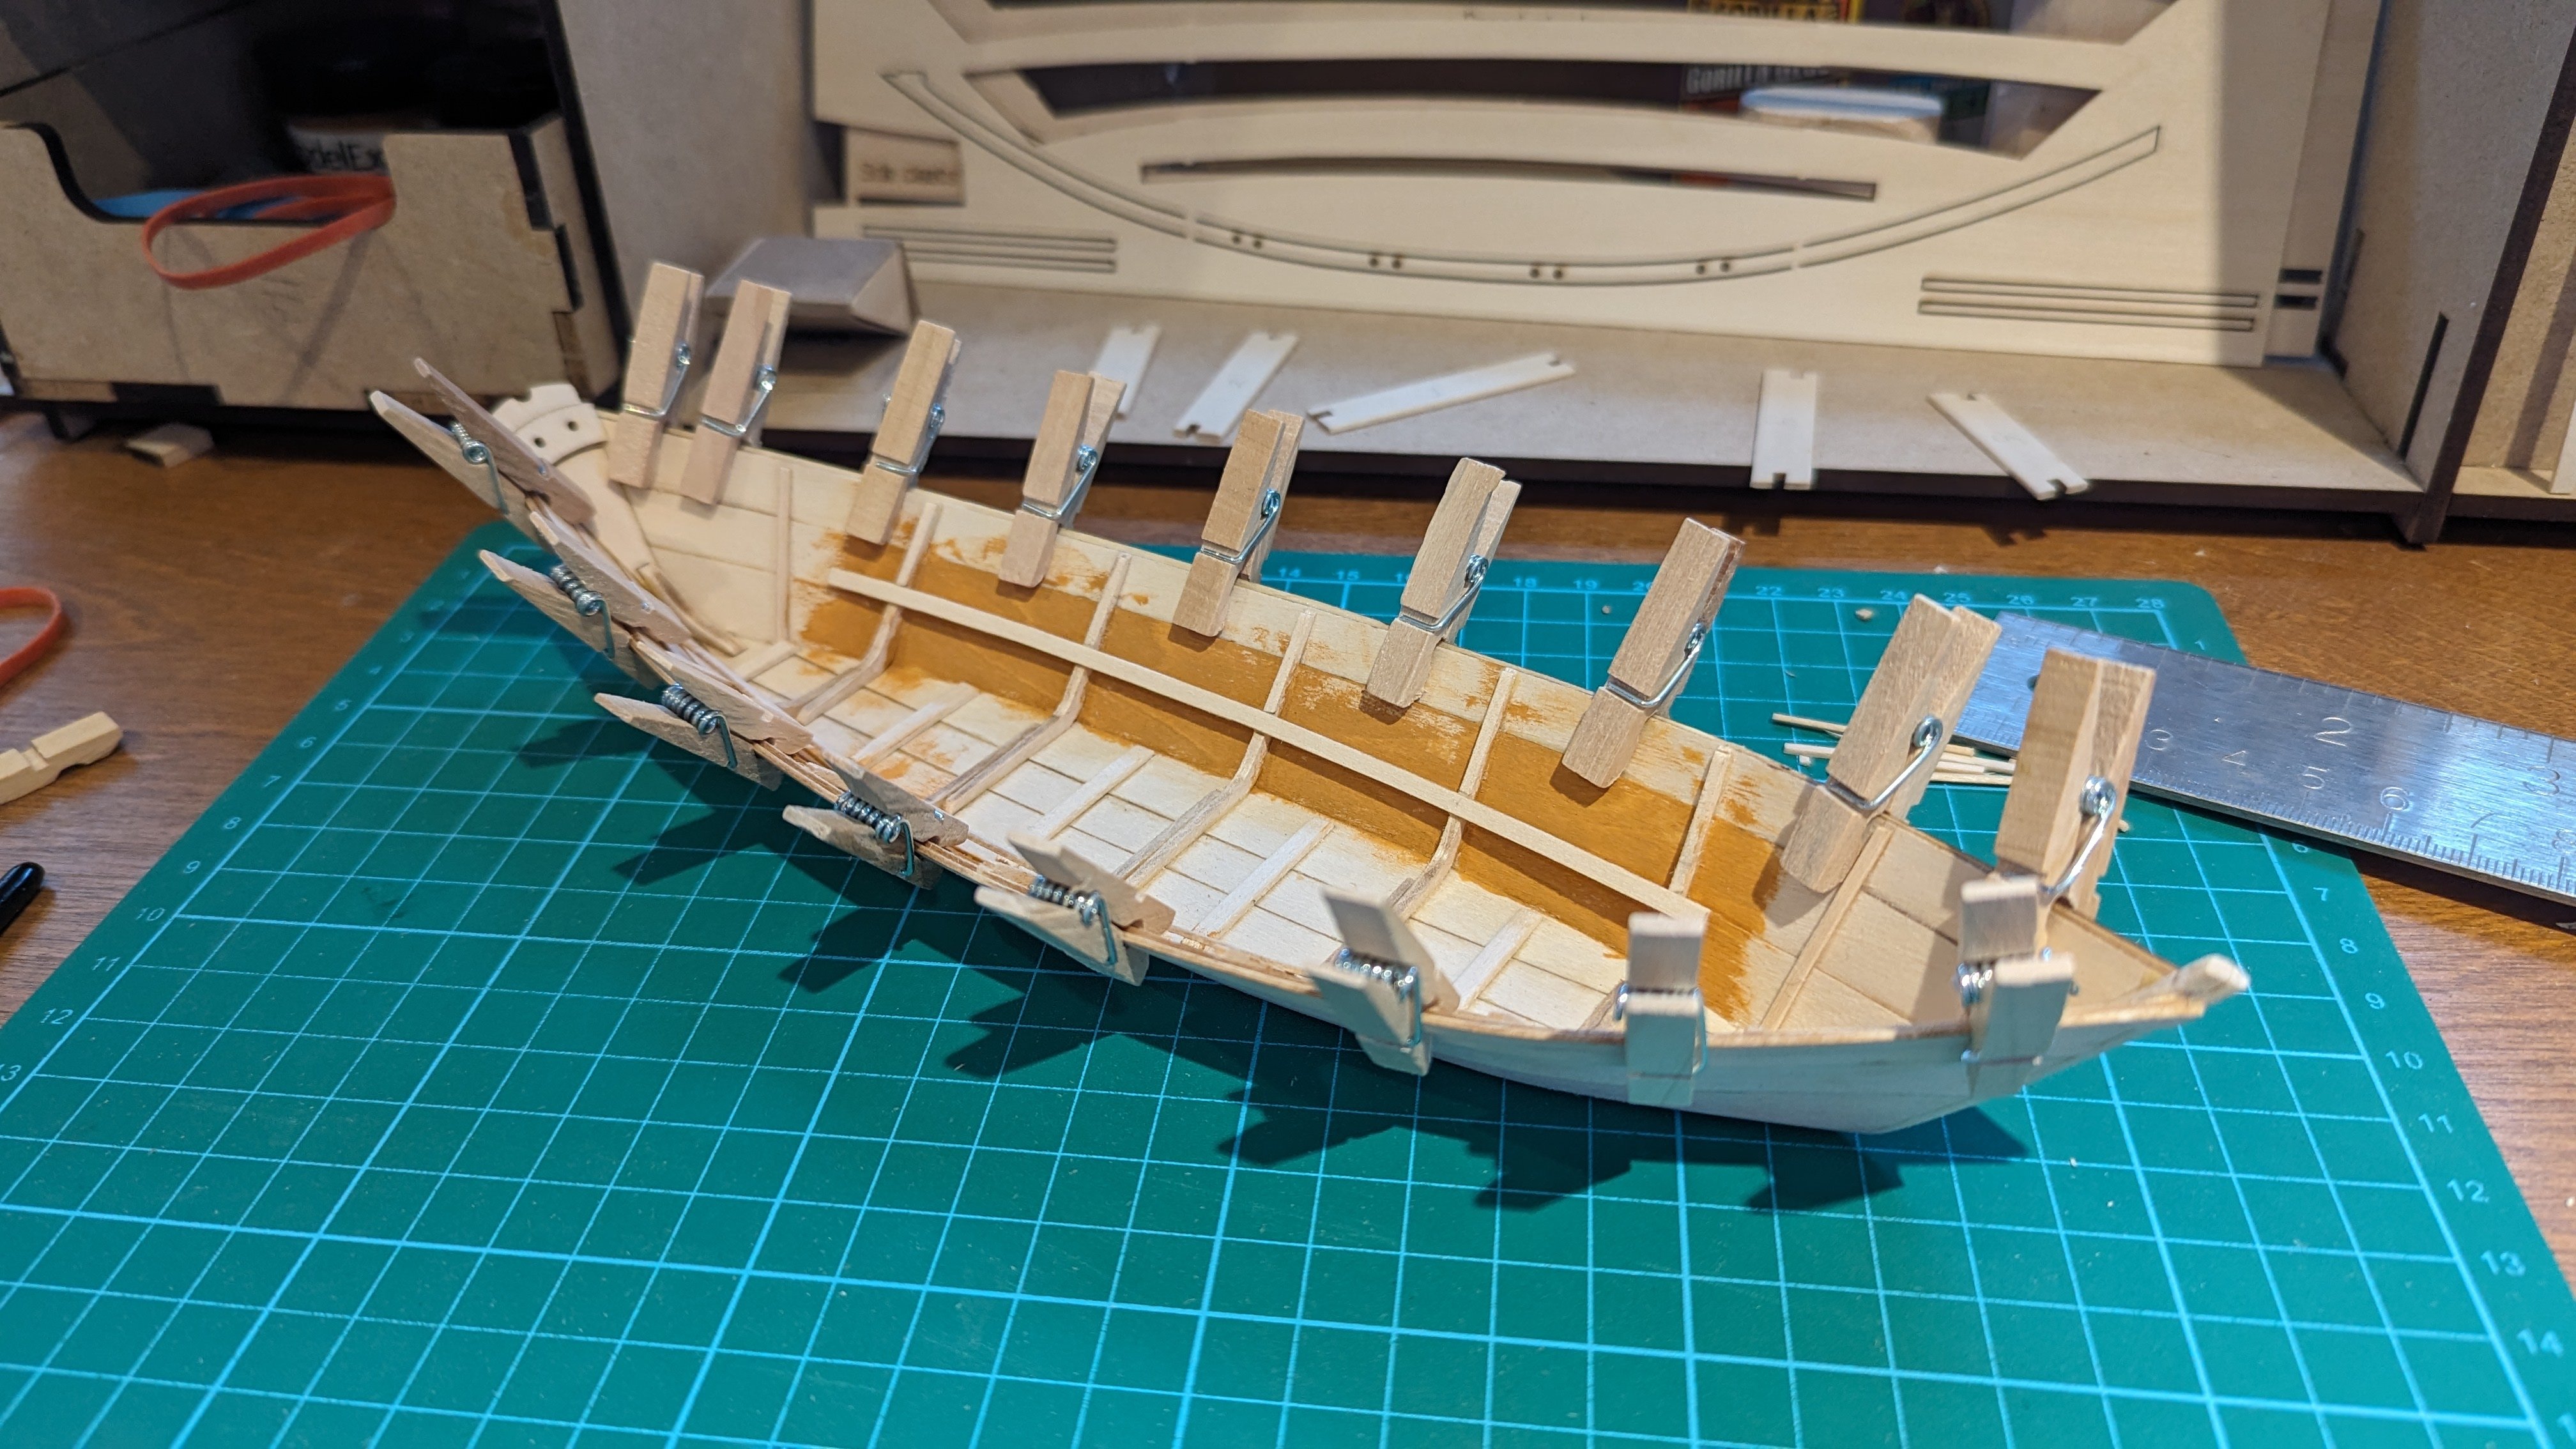
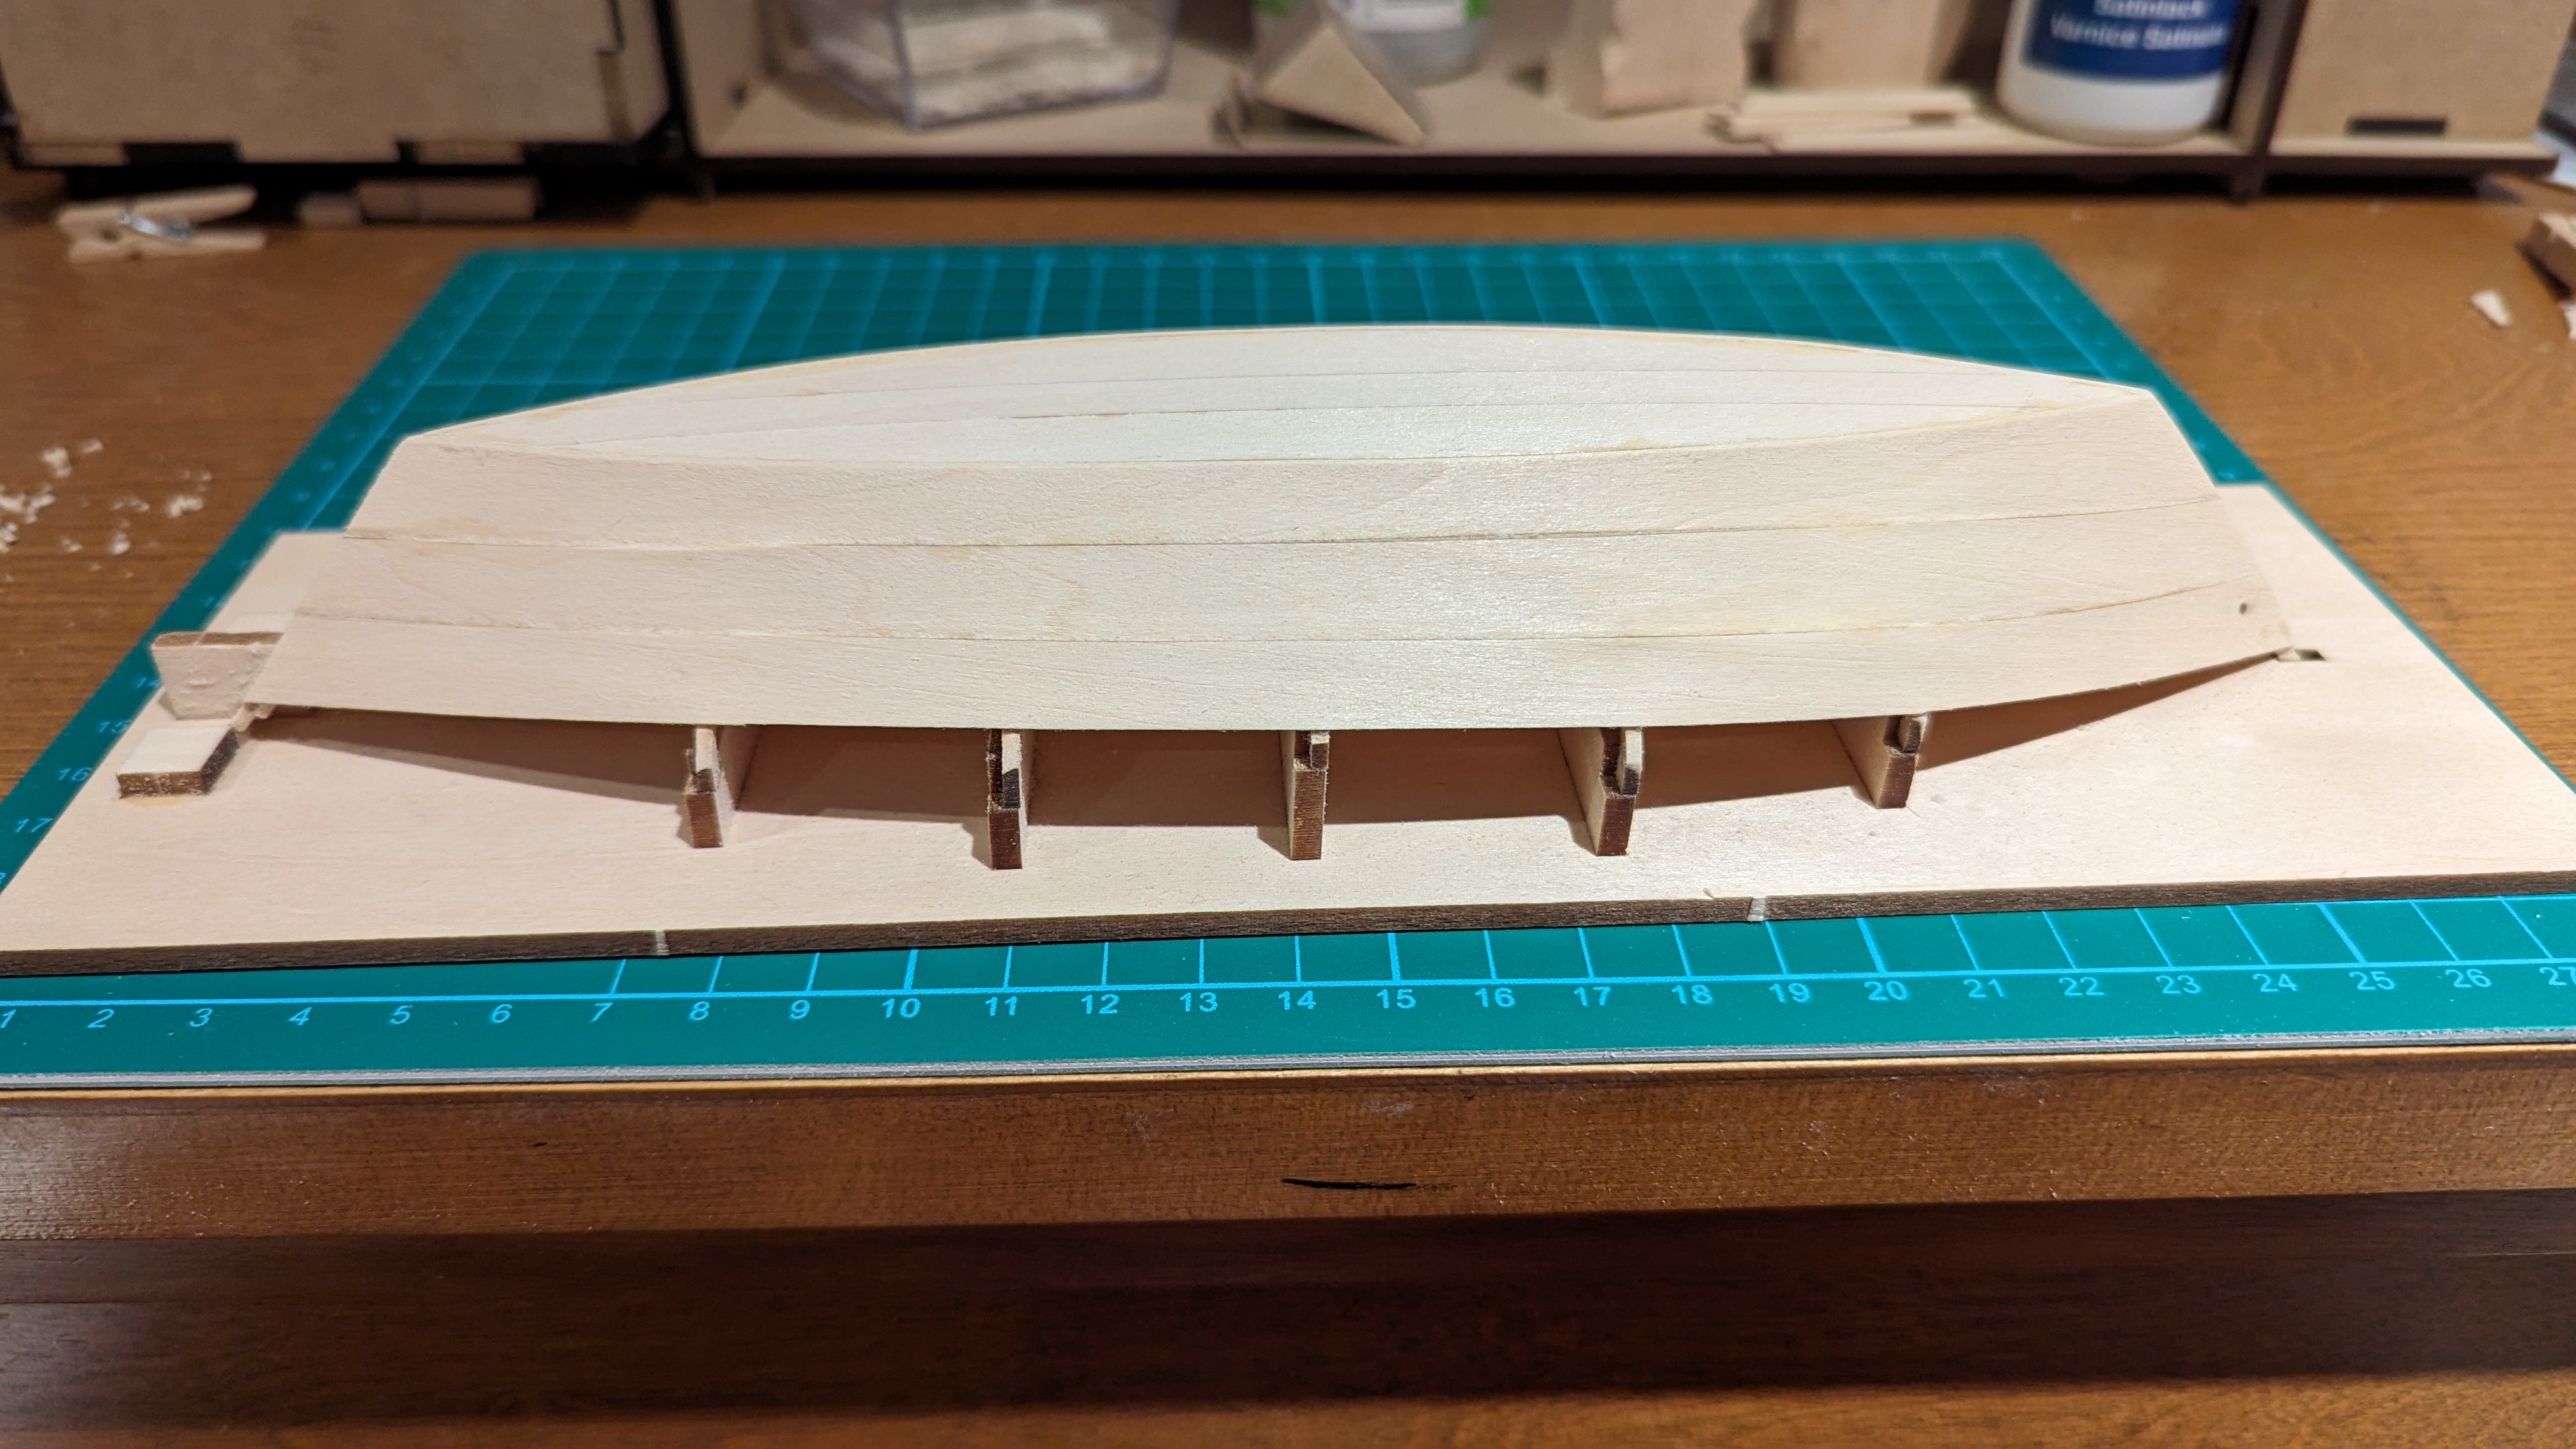
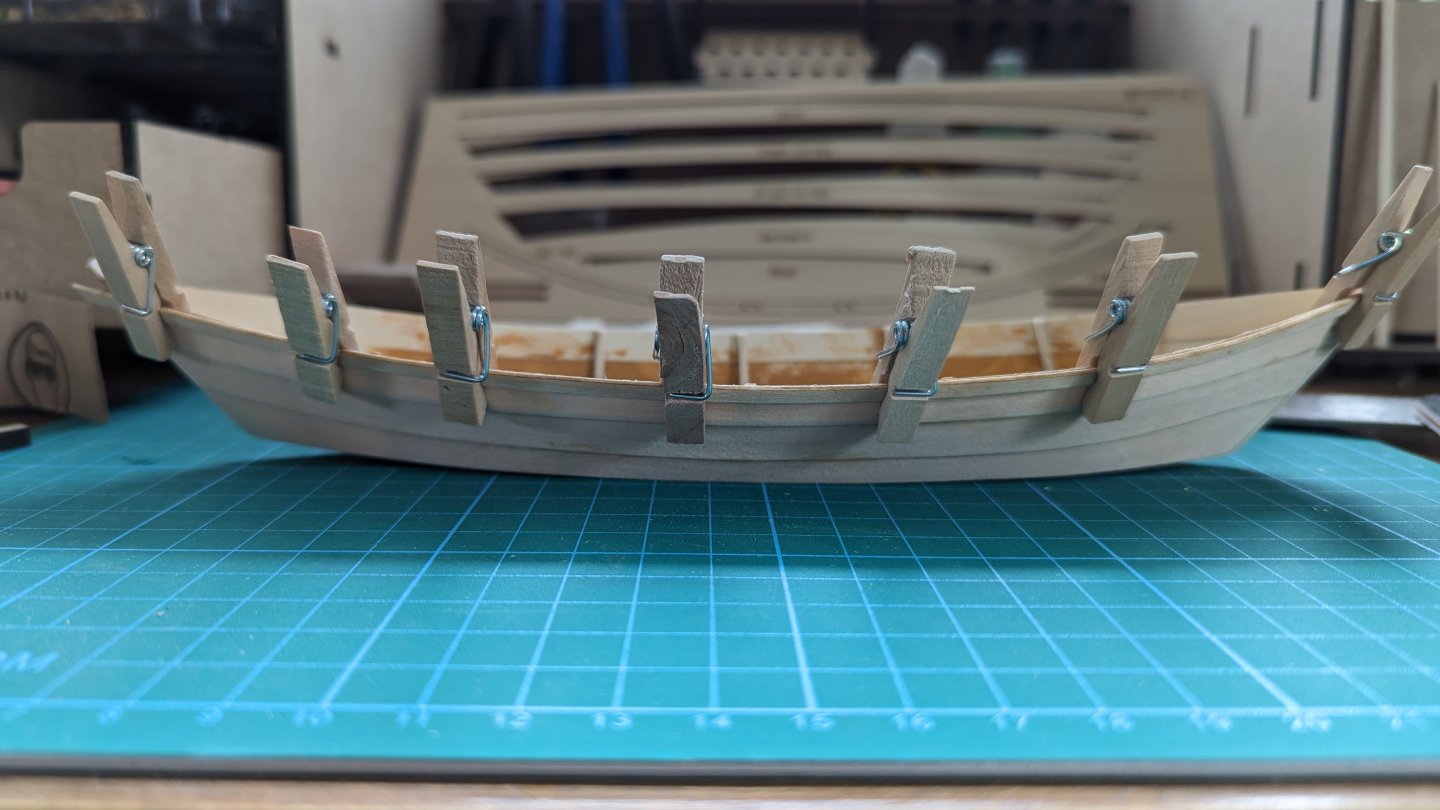
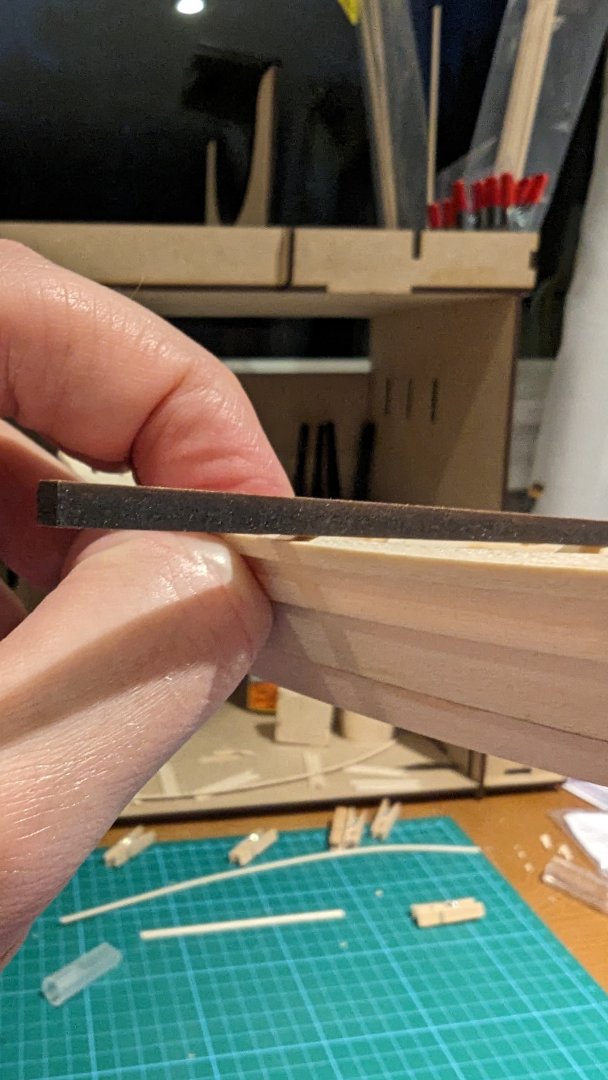
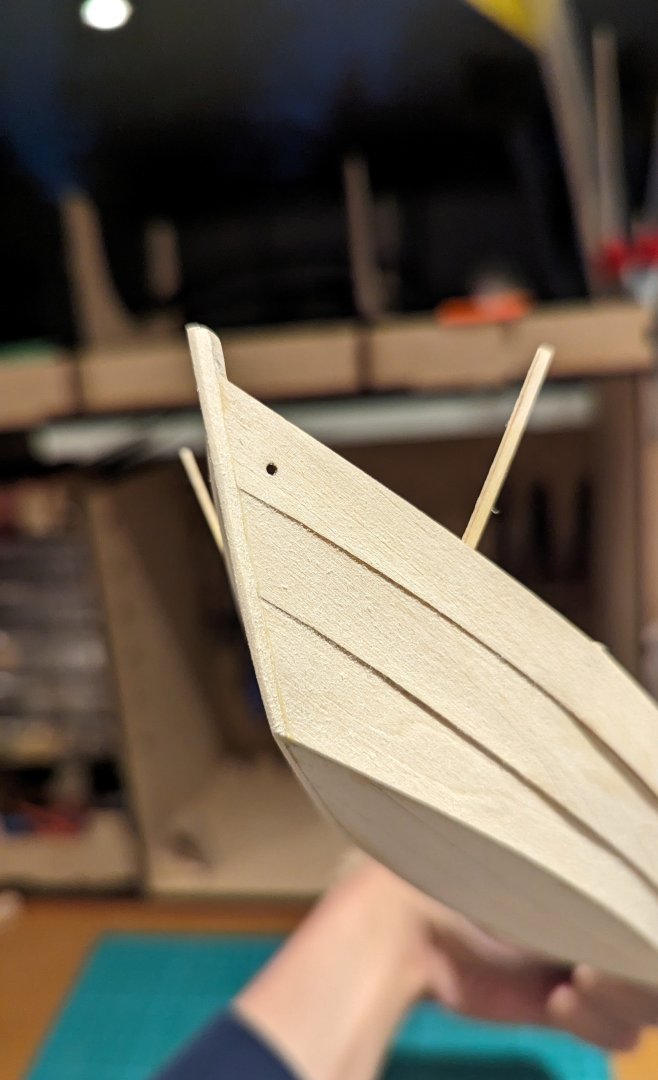
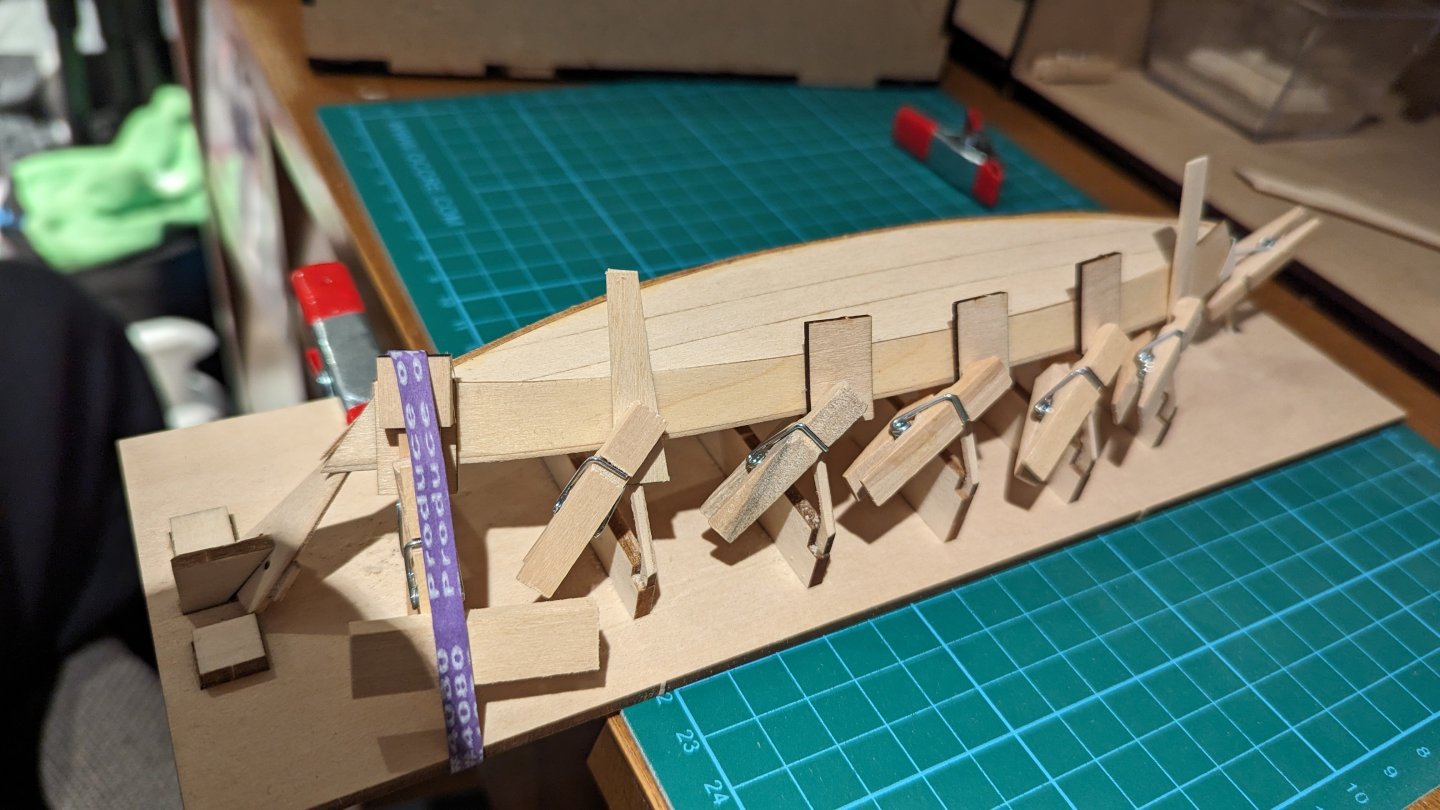
Log #10 Bands and gunwales. Progress is definitely going slower than I'd like, with more rain recorded this spring than in 50 years the outdoors is growing like a jungle, septic issues, work meetings, family duties, etc. I was hoping to have more in each log, but I think I can finish up where I am now and move along to painting pretty soon. Note: As I progress, I'm using the kit supplied yellow glue and am learning something. When you have to sand 'through' a dried glue joint, it's a lot harder to sand through yellow glue than it is white glue (I suspect). Although the hold seems far stronger, cure time when using finger clamps is far shorter, and I have zero concern over anything coming apart. Any sort of sanding, cleaning up or debonding required, is more difficult. That said, I feel the best would be to swap back and forth between yellow and white depending on the future work required for that piece. The bands went on fairly simply. I took extra time, whether necessary or not, to soak the bands for a minute, clipped them in place and had them dry before gluing. I set them a little higher than I feel I should have which required more sanding. The end result worked out. This 50 or 100 pack of mini cloths pins of Amazon have been incredibly helpful. Bands glued. As for the gunwales. The instructions said to bend them before gluing. Since earlier instructions purposely taught the skill of wet bending and drying in place, that's the route I went after first testing the flexibility of the 1/16" x 1/16" piece. I cut/sanded to fit the stem and left the aft end extra long. This meant that the bend wouldn't be perfect, but they would be 80% there when dry. Initially I thought I cut a couple frames too low. Boy, was I wrong, the gunwales were sitting way higher than I expected. This is good, far easier to remove than add. I worked my way down the frames, repeated test fittings to ensure I didn't take too much off. When test fitting, I used a straight edge to check the level between the gunwale and strike/band. Once I determined the rough height, I used a 1/8" strip to help gauge in between test fittings. My goal was to leave the gunwale a bit high so it can be sanded level as per instructions. That's about where I am now, the starboard side is ready for gluing. The port side will go a bit quicker since I've gotten the process down and know the general height that frames should be cut. Once the gunwales on are, I believe it's just the breast hook before painting both the hull and cap rails. Looking ahead. Since the rails are laser cut, I do intent to dry fit, and potentially wet bend them before everything is painted to make sure they go on nicely when ready. ( I don't think this would work well after painting) The closer I get to painting, the more I'm thinking about all the dust that has accumulated. I've tried blowing it, I've tried wiping it with a micro fiber cloth. I'm not sure what you people typically do to clean before and in between paint coats, but I pulled my tack cloth out of my old bow making kit (again, that's 'bow and arrow' bow, not 'bow' bow). This seemed to work well enough for getting the majority of dust off. (tack cloth not to scale).


- 69 replies
-
- 8
-
-
- Lowell Grand Banks Dory
- Model Shipways
- (and 2 more)
-
This is bang on. I would add, you're young so you may not have fully realized your tendencies. I would say most people get excited about something and dive in only for that interest, excitement and motivation to wain after weeks or months. You don't know yet if this will be something you're truly passionate about. I would suggest going a bit easier on your patience and bank account and starting with a true 'beginner' ship to first determine if this is something you will keep your interest in. However, if you're fine with the idea of an 80 percent chance to have a half finished project tucked into a corner or on the shelf then dive right into the Terror, the 20 percent chance that you'll journey on is worth the risk, in that case! Either way, good luck and welcome!
-
I cleaned up the cleats and tops of the frames. Something I've noticed is the inconsistency of the wood. Some sheets being far more transparent, softer (sanding parts takes seconds where other parts take minutes), flimsier, lighter color, etc. I found this difference between the starboard and port side plank sheets. I first tried to chisel out the side cleats and I needed so much pressure I was scared to go right though everything so I carefully carved it out. By the time I went to chisel the top of the frame, the chisel blade unexpectedly cut through it like butter. Luckily I wasn't too low and it only took off a tiny bit of the char at the very top of the sheer. Lesson learned, test the wood strength before assuming it was the same as the other. Just setting the blade on the frames and giving it a few light taps was all that was needed. I managed to get the seat risers on before dinner. When I mentioned gunwales earlier, I meant the bands. This evening I started working on them, and after being a little clumsier than normal, almost breaking one when sanding, getting close to going through the sheer with the chisel blade (mentioned above) and then going through the instructions trying to determine how far forward the bands should sit and the correct orientation, I realized I may have had one more glass of wine than acceptable for model making so I decided to keep it safe and walk away. 🍻 It seems @JacquesCousteau positioned the bands just shy of the false stem (thank you for pointing that out in your log), and some reference photos show either that or partway up the false stem so I'll do similar. Here's where we leave it tonight.

- 69 replies
-
- 7
-
-
- Lowell Grand Banks Dory
- Model Shipways
- (and 2 more)
-
I know this is a few months old, but I'm just fitting my seat risers. As I was waiting for them to wet bend I fit the thwarts in and found the exact same thing. On frame #1 it sat way higher than the mark. I'm assuming it has something to do with the design that needs fixing. In any case, I scoured a few build logs to see if anyone mentioned it and only came across yours. Hope this may help others down the line as well. I will be doing the same as you. riser is set on the designated mark, so I'll be sanding down the thwart. The thwart as is, appear to be too high when compared to the others. Edit: Fantastic job by the way - your model looks great!
-
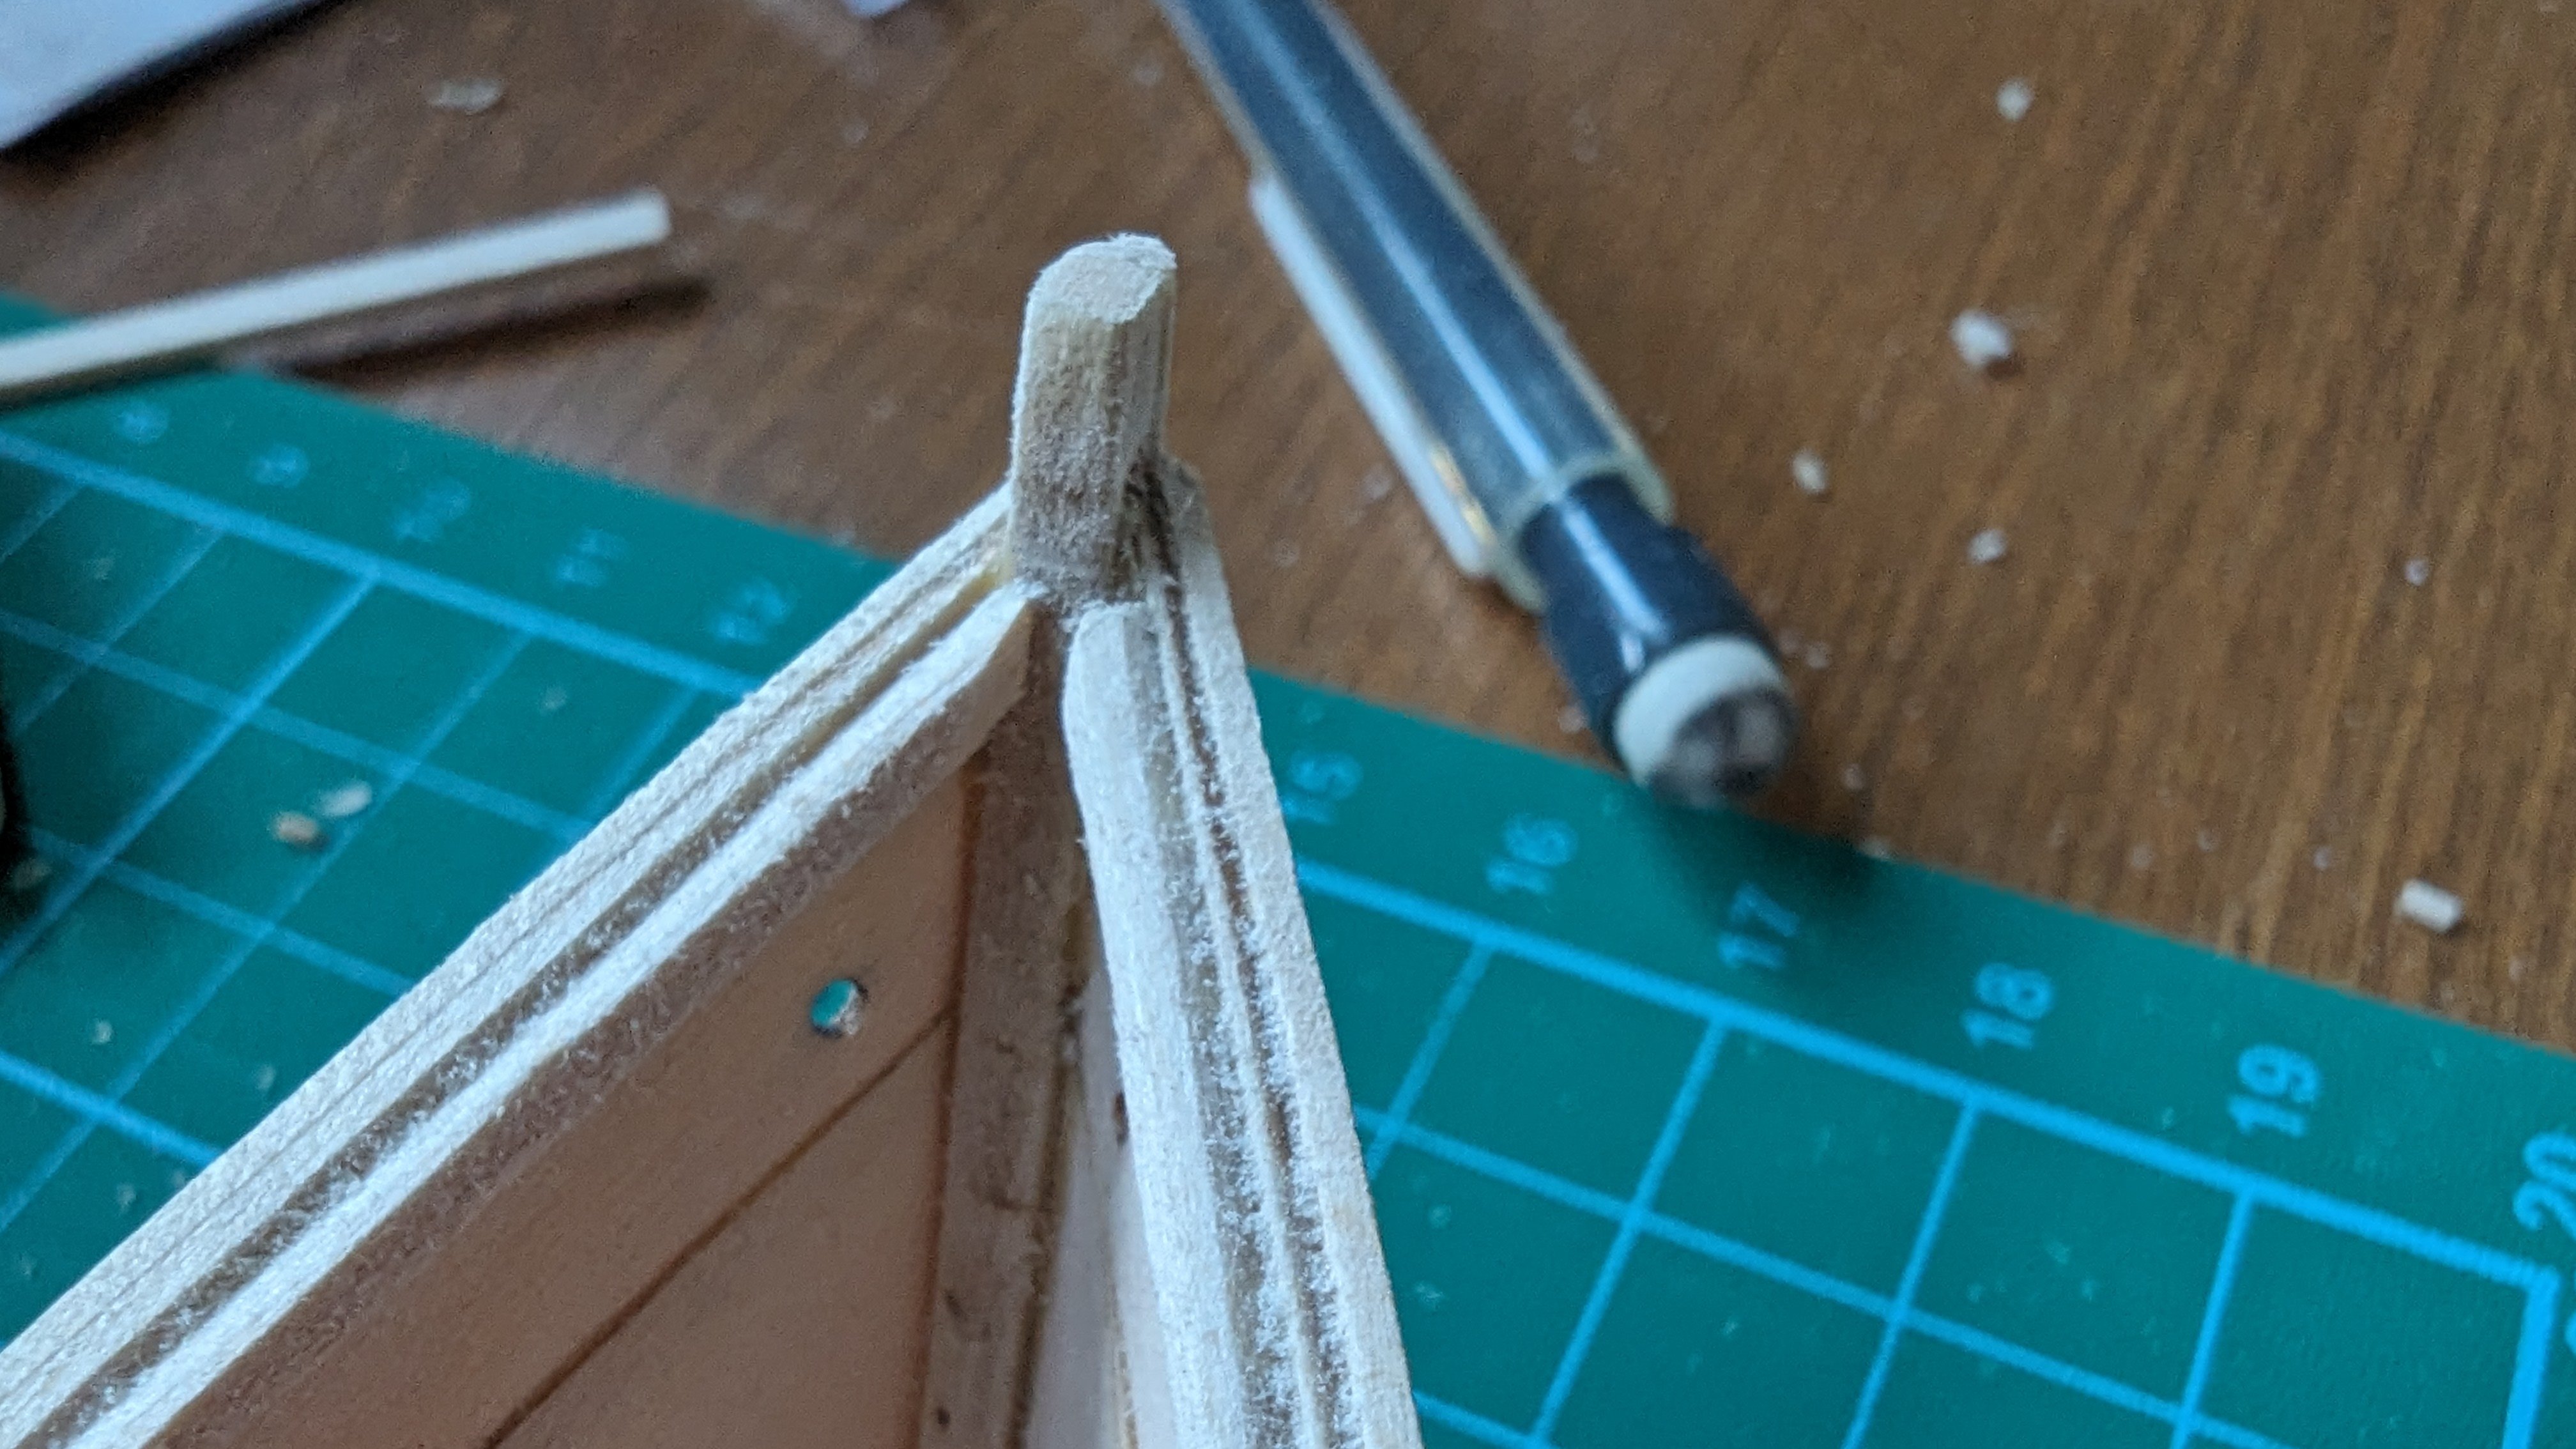
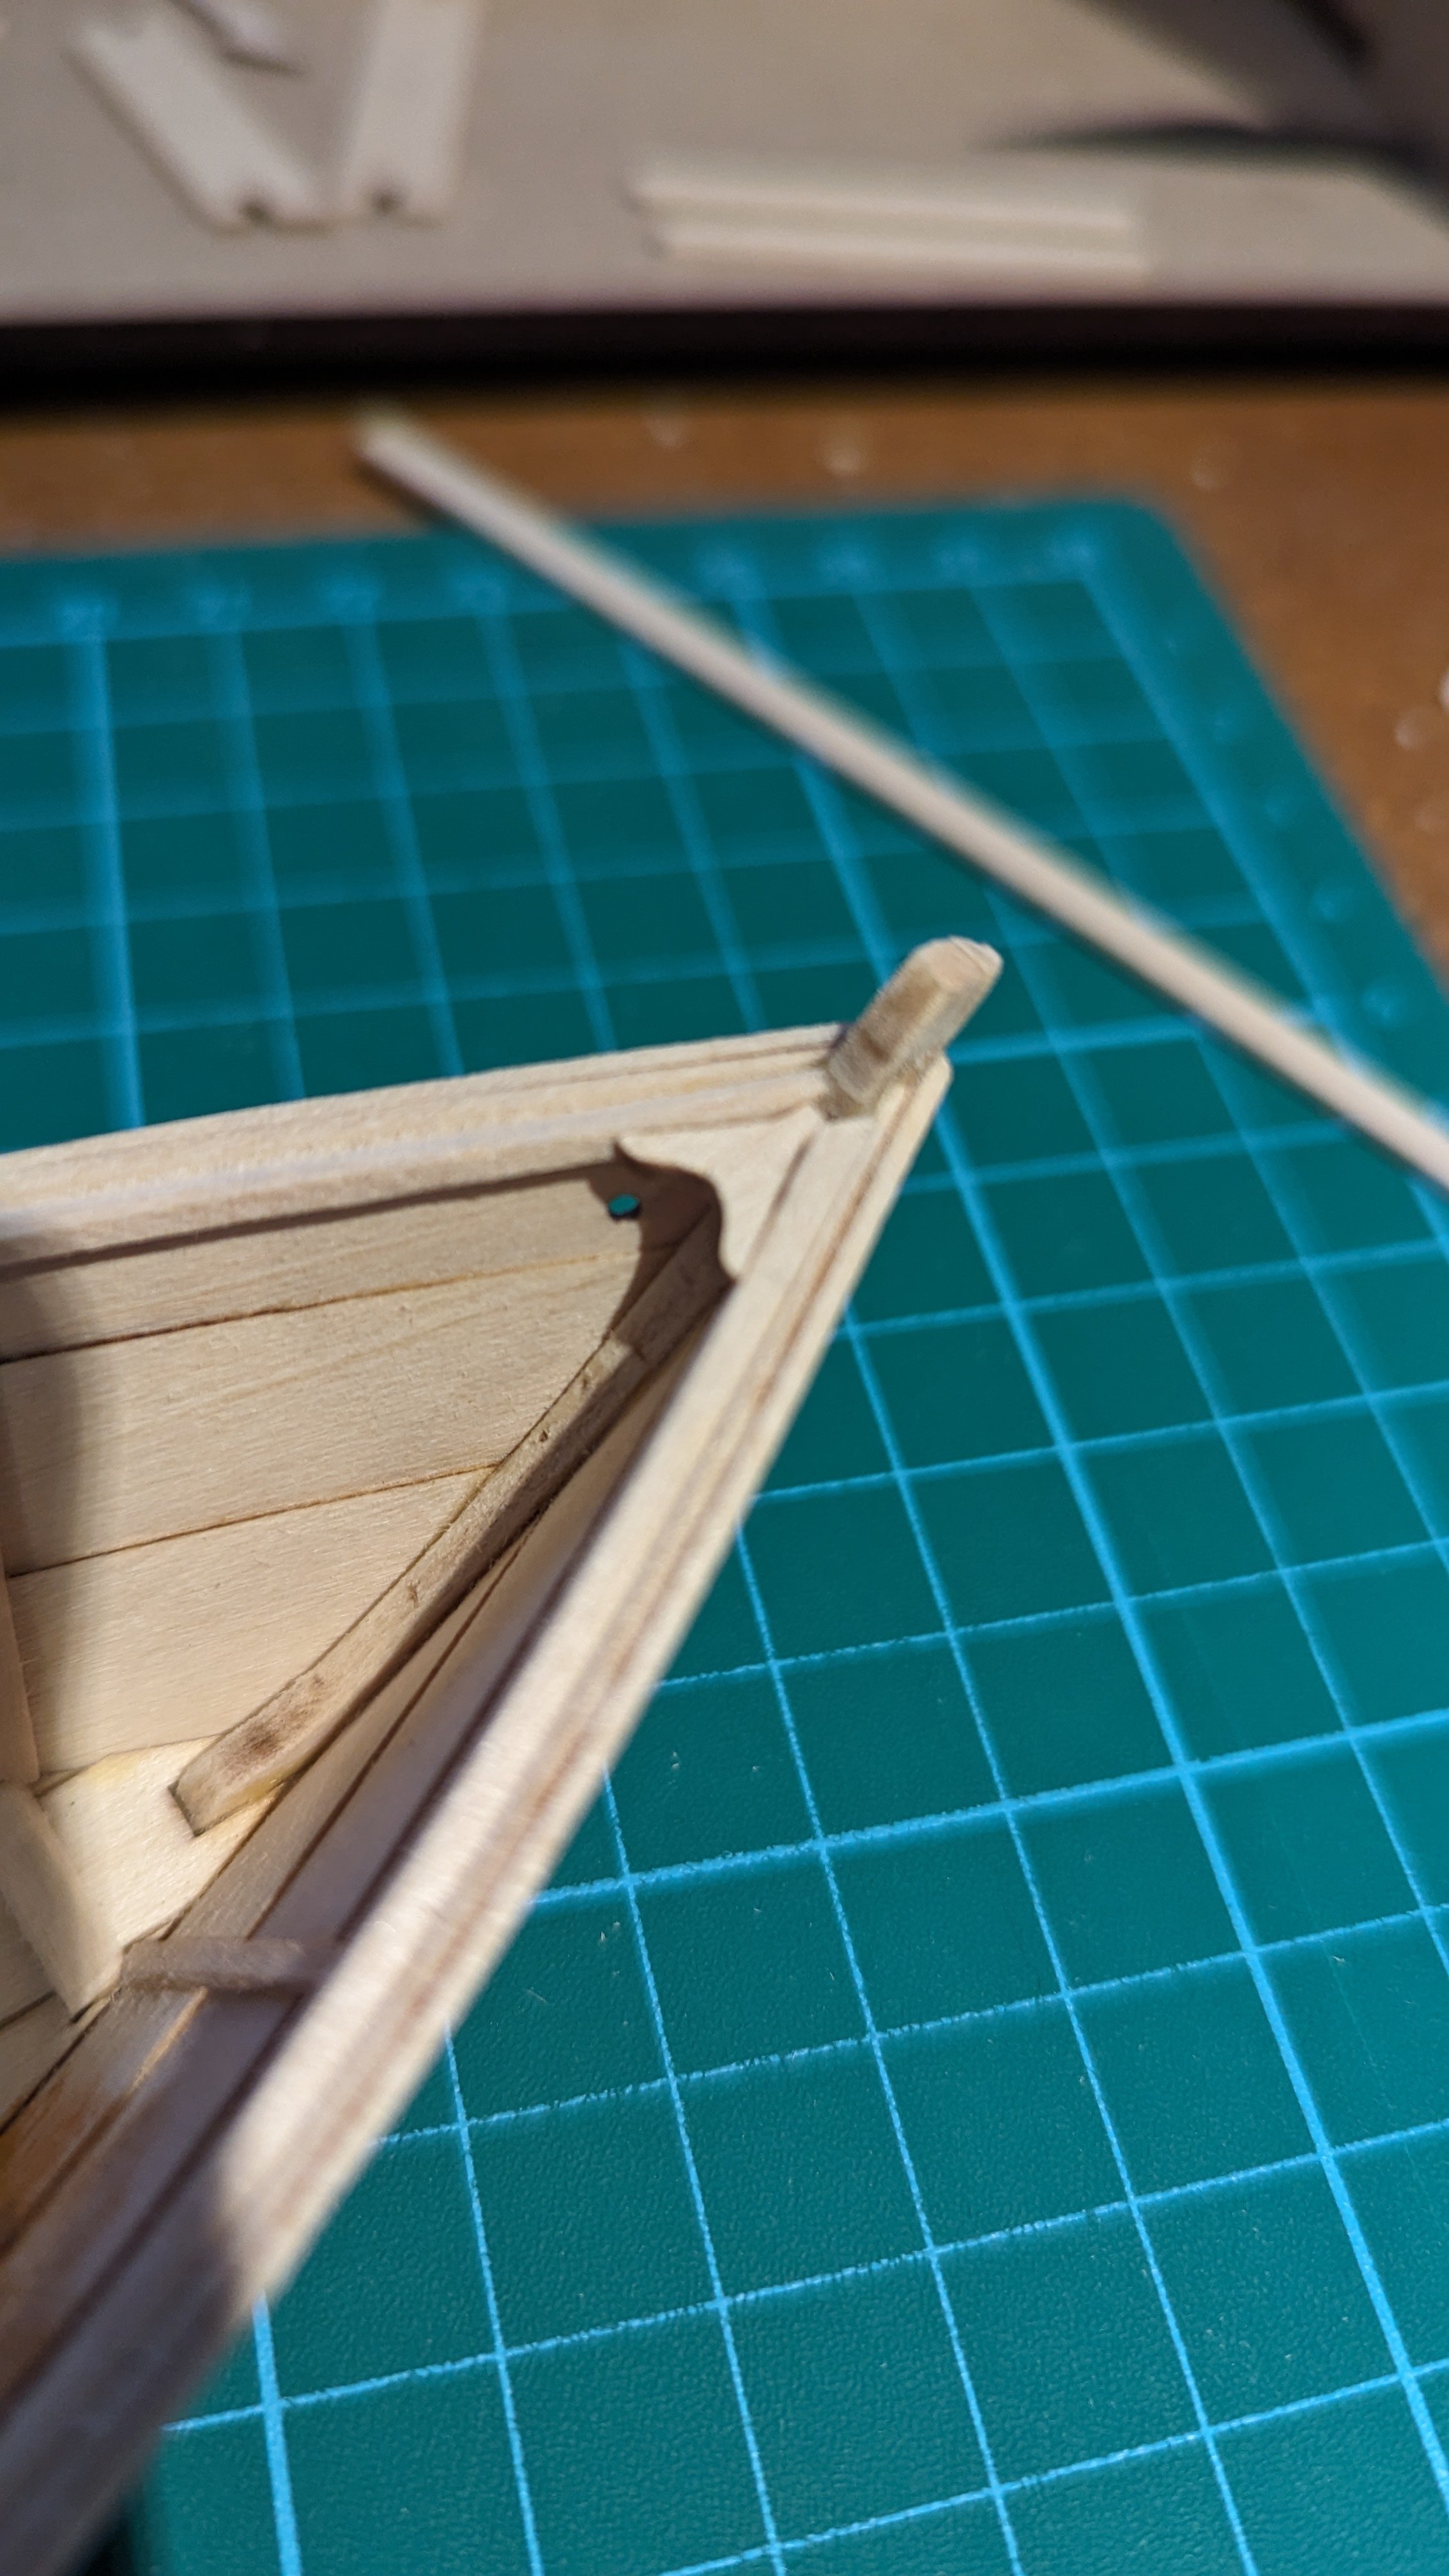
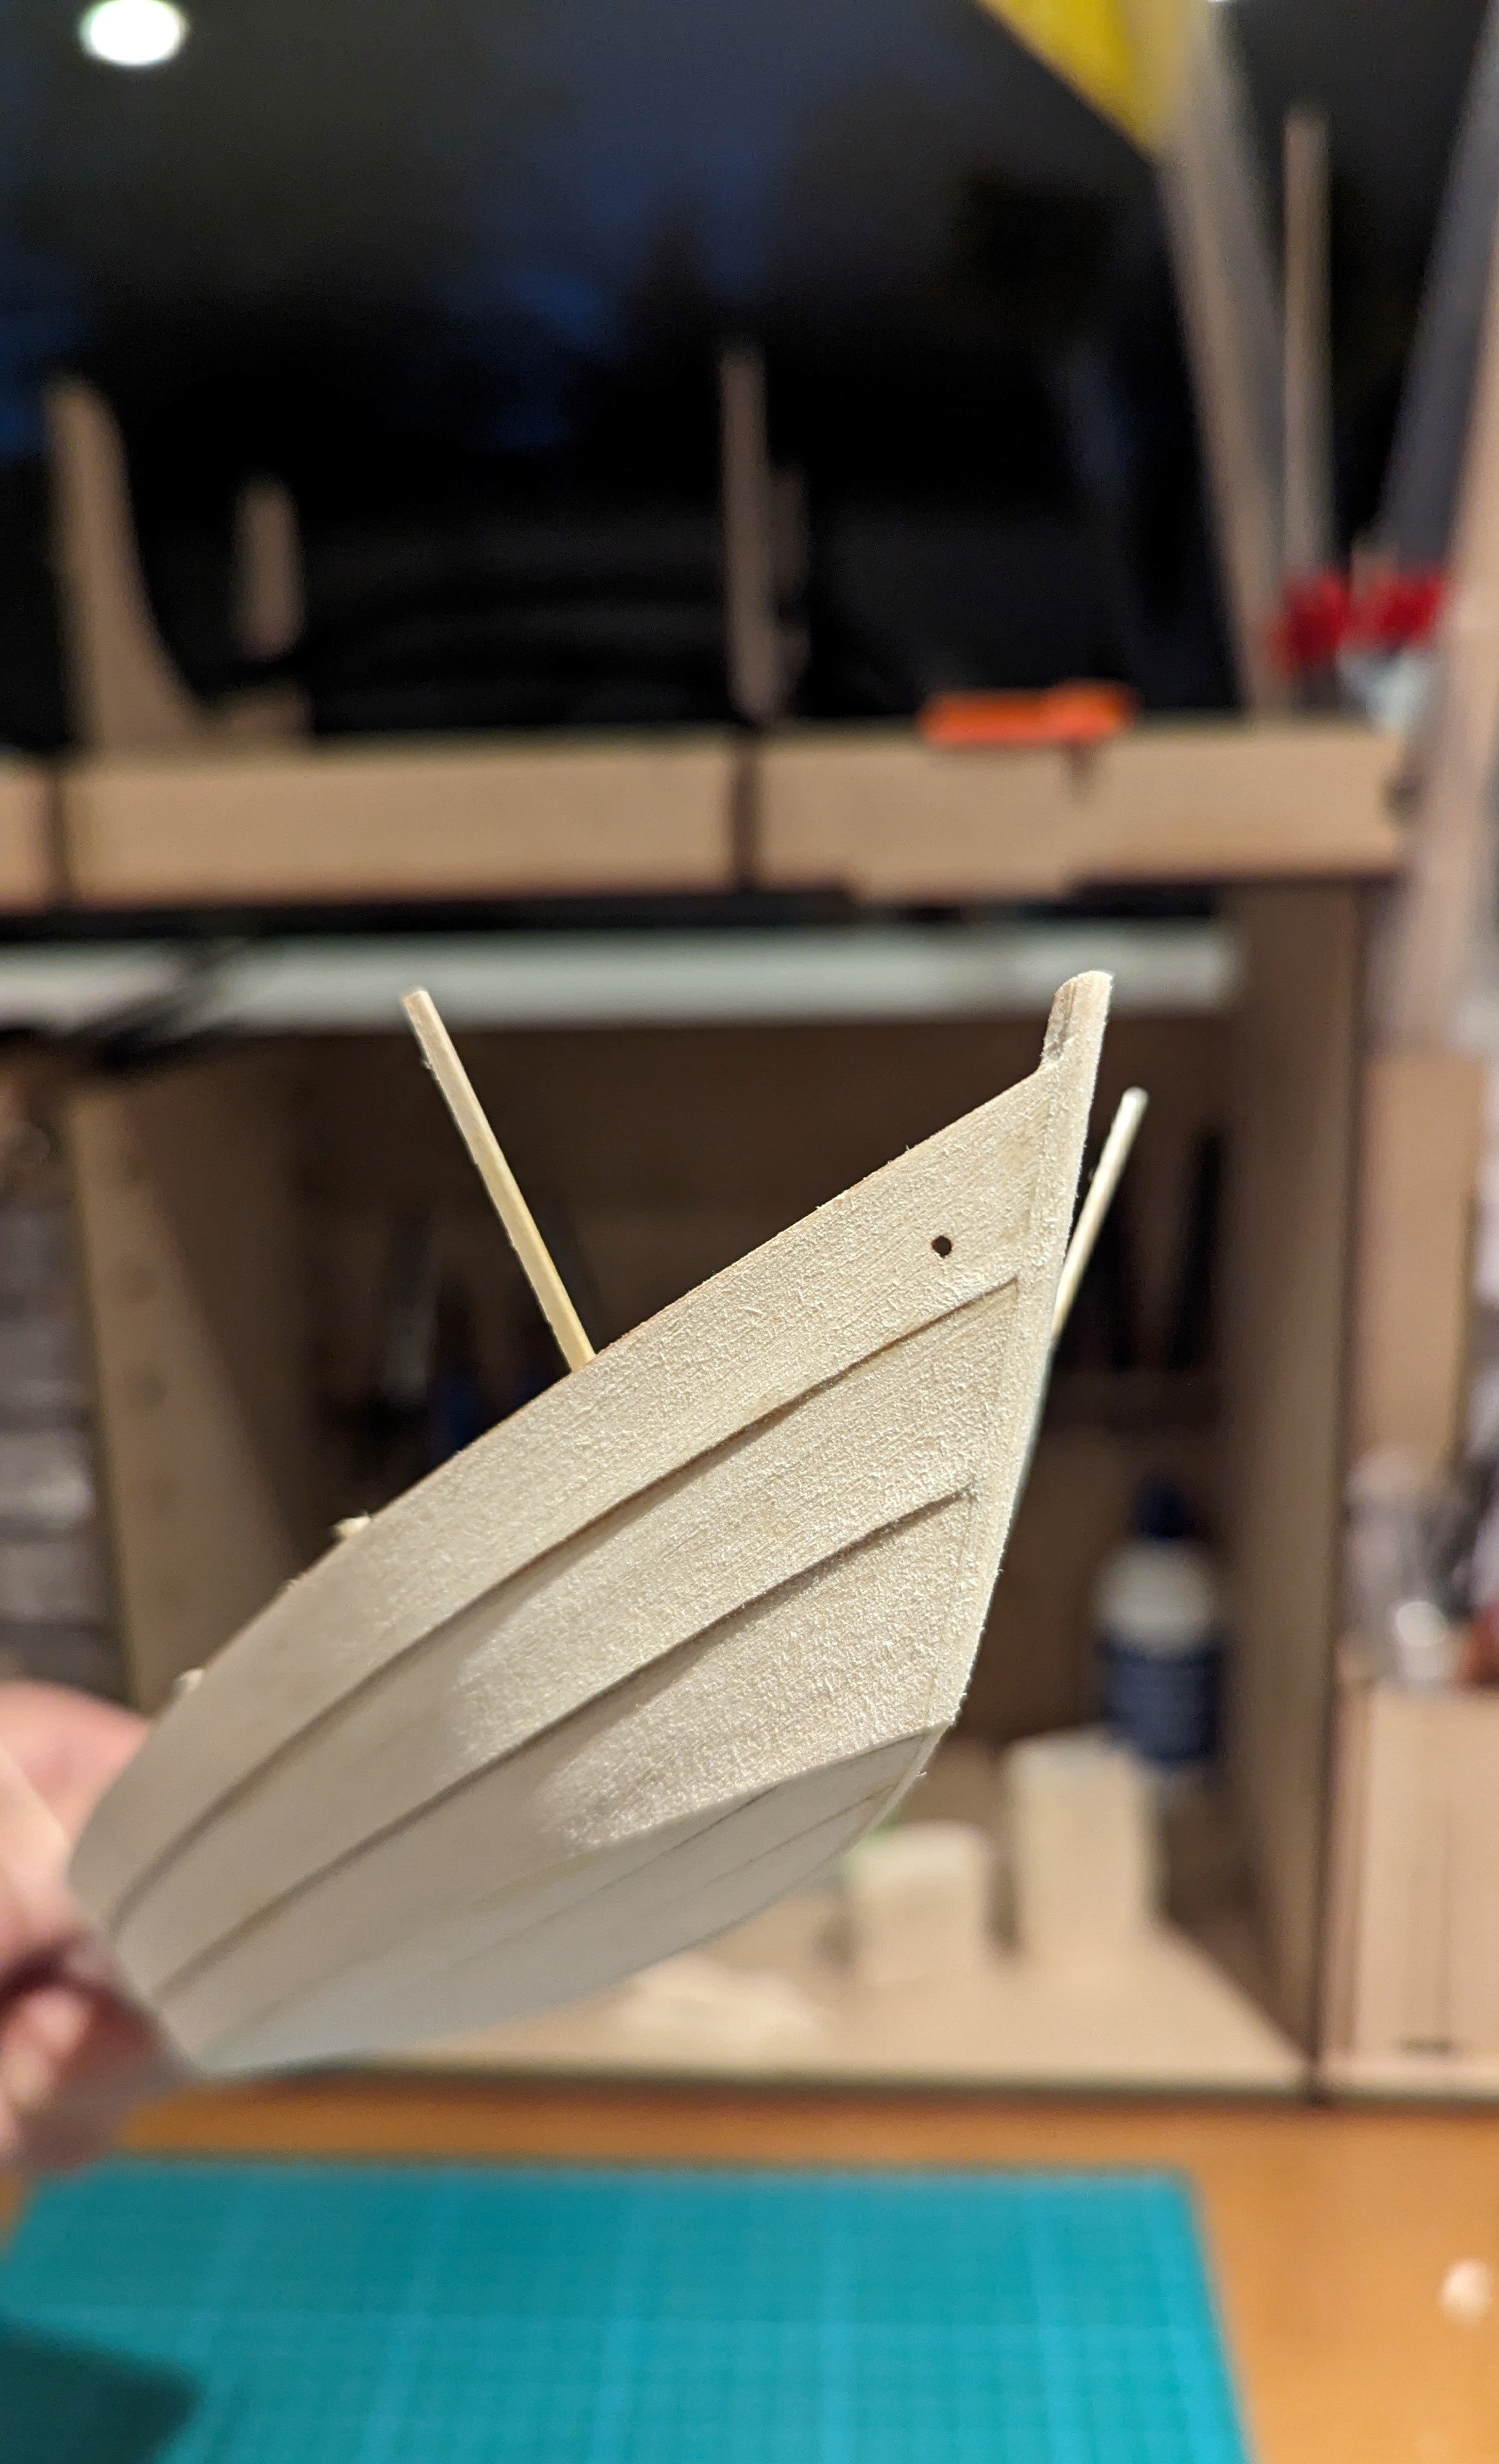
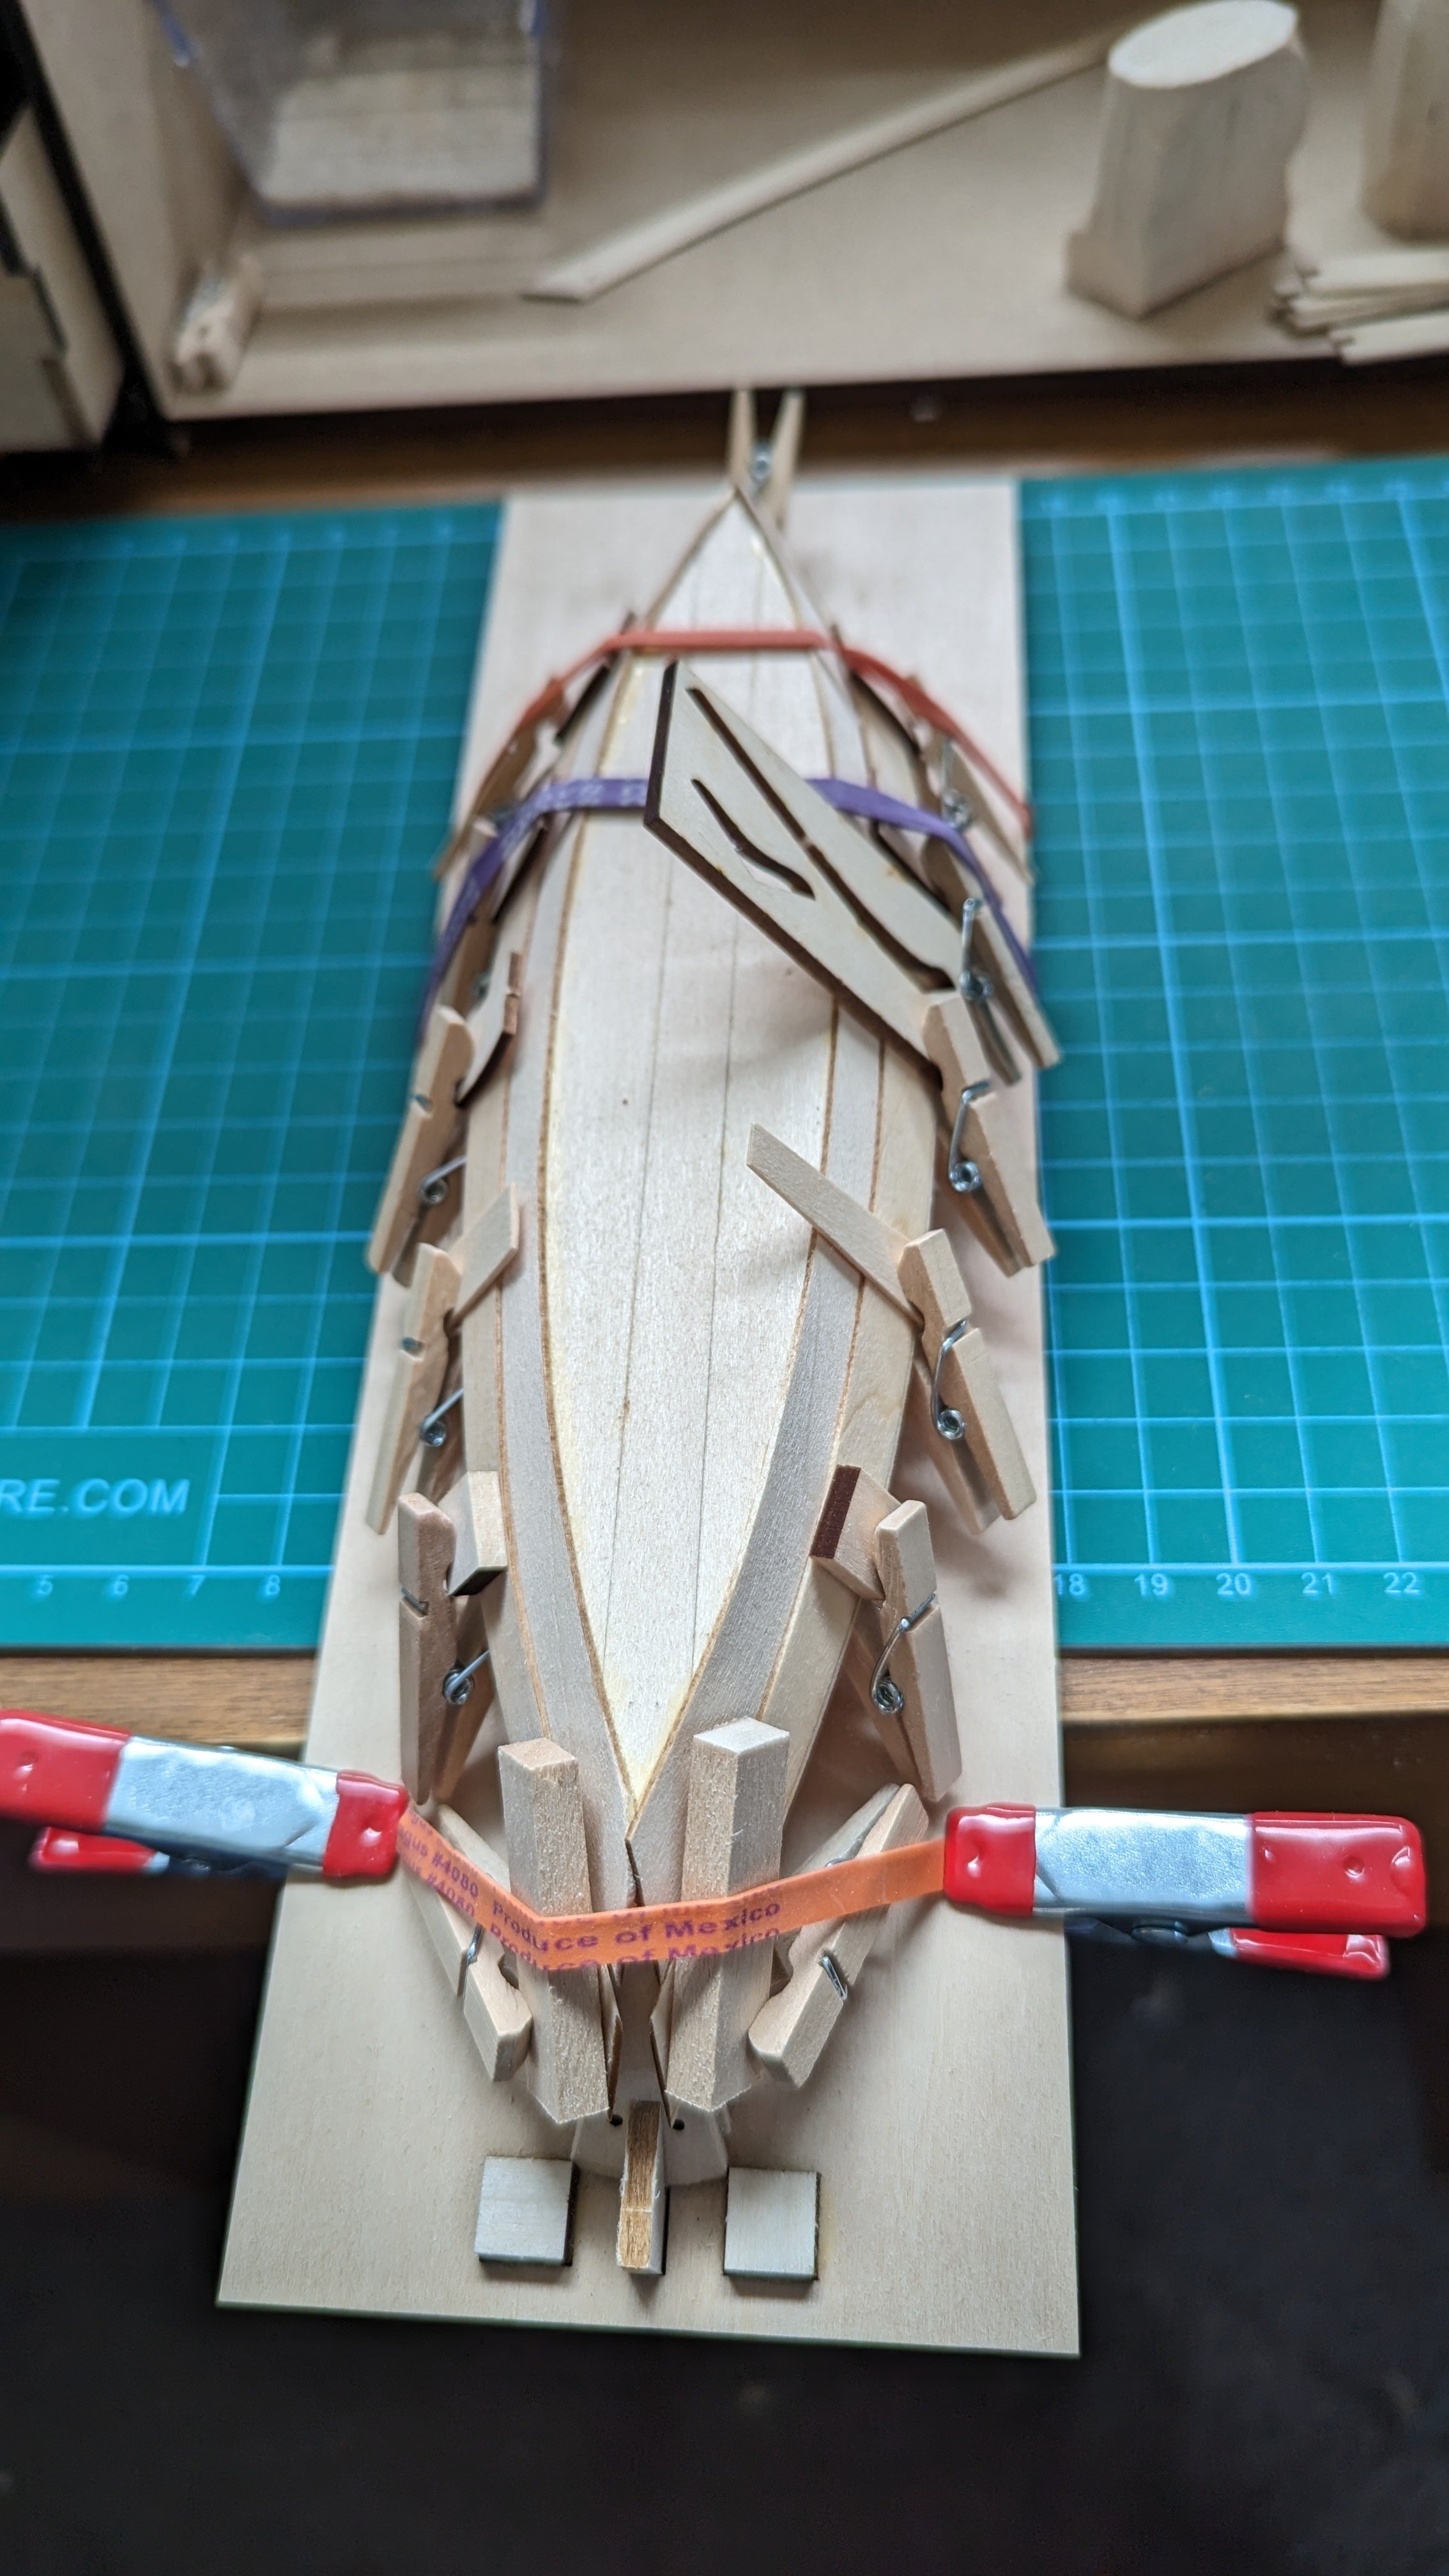
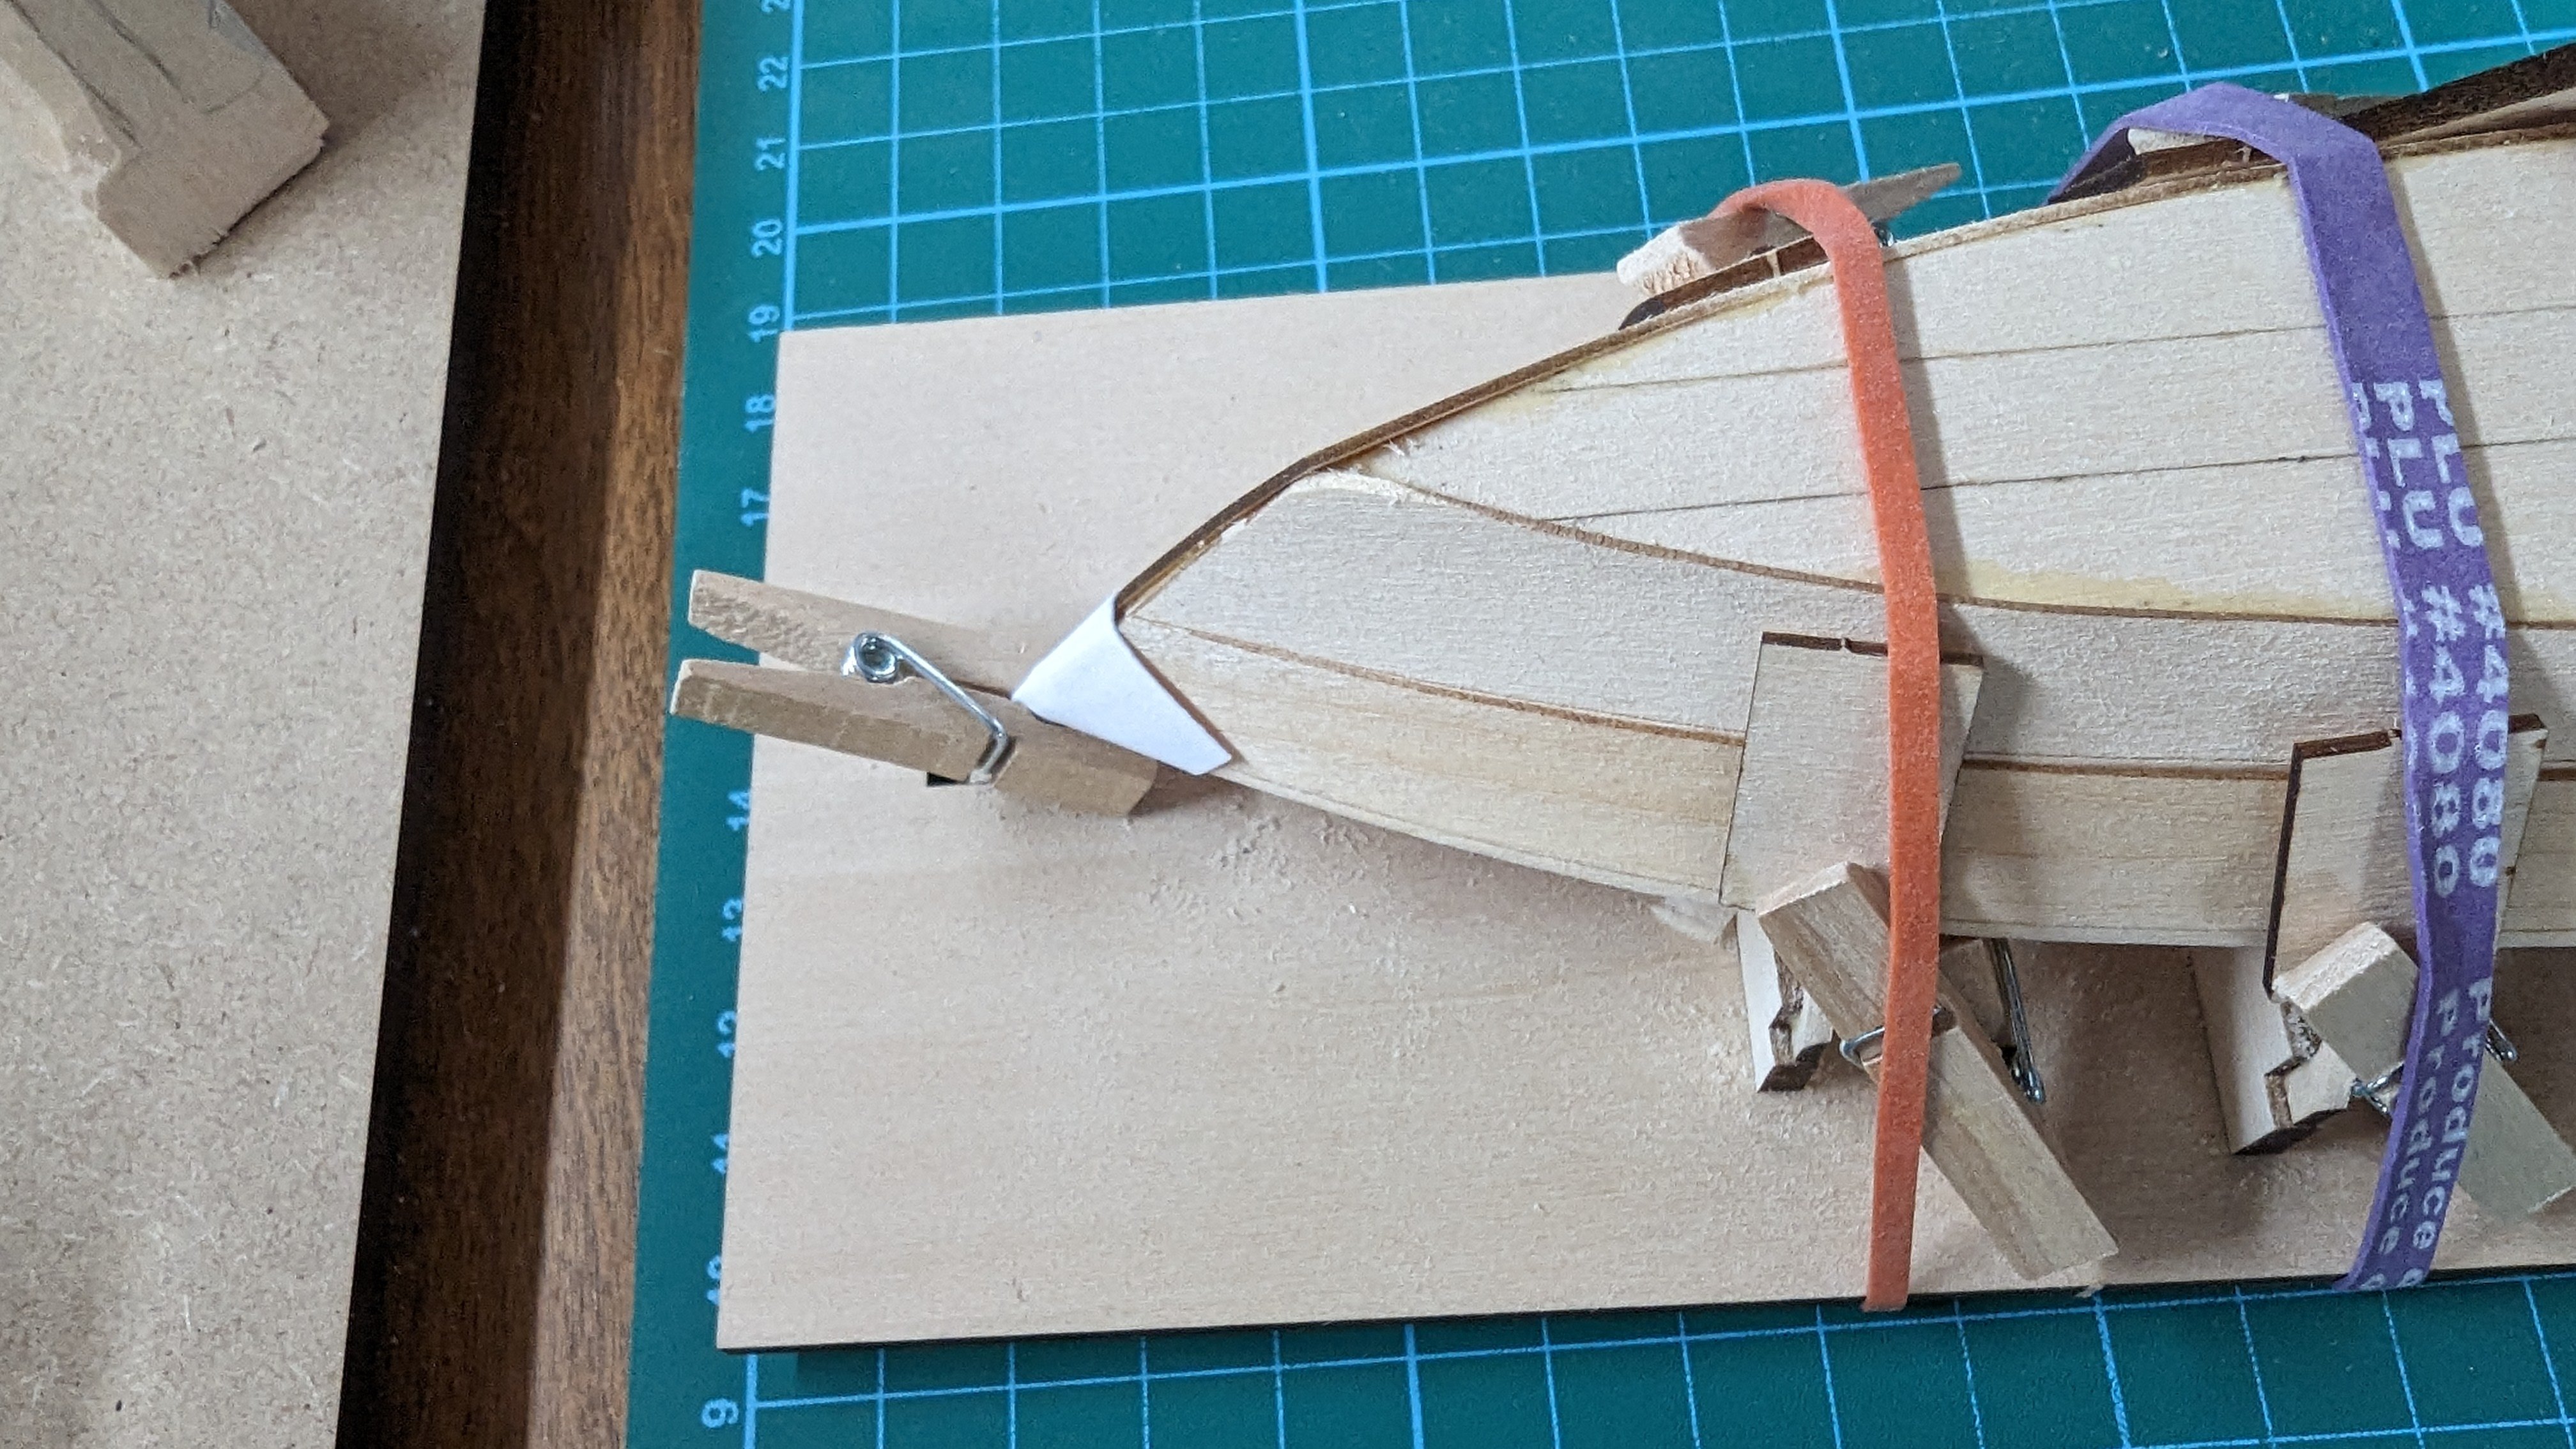
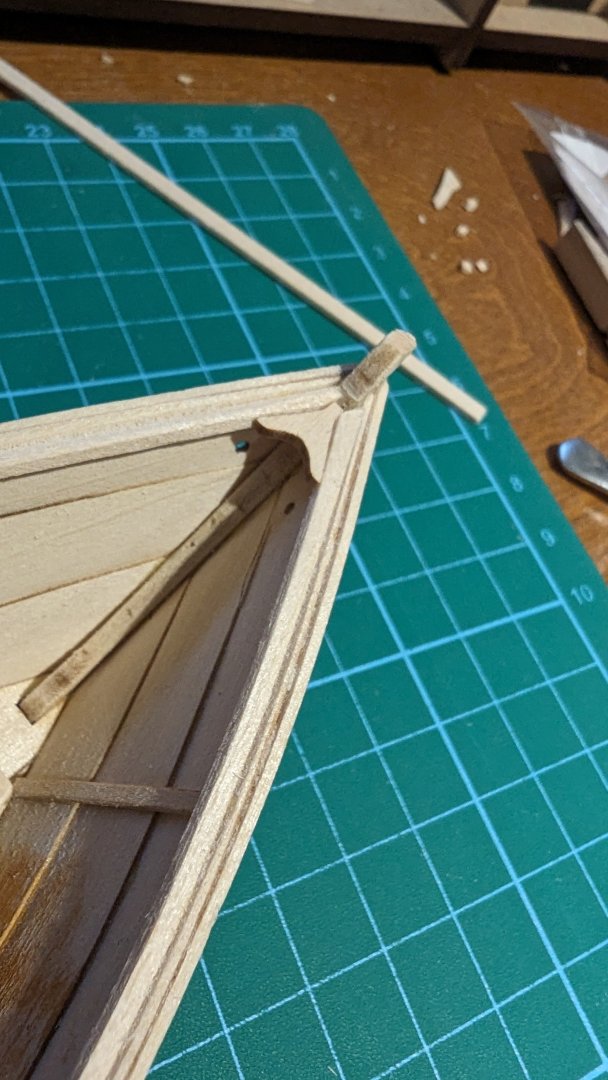
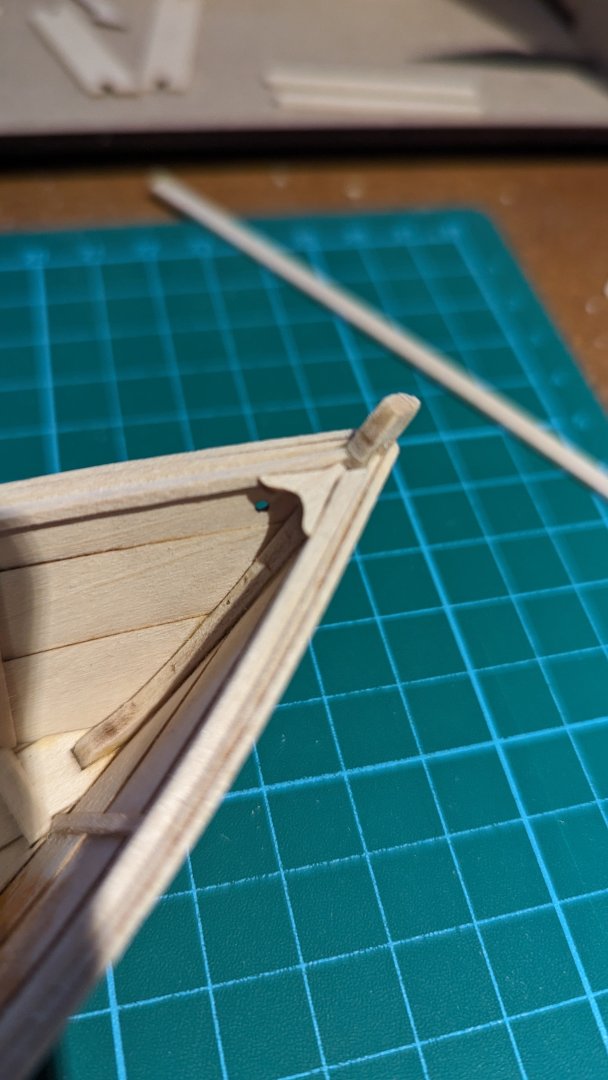
Log #9 I tend to get a little obsessive at times, and I felt this with the false stem. I spent far more time on it than I expected; however, in the end I feel it paid off. I did not trim it before fixing it, which offered a lot of flexibility while shaping it. The downside was more shaping, and sanding through the extra glue from the larger piece. I'm happy with the result here: In the picture above, I had already glued on the side cleats. These went on easily - I was in the scratch build mindset and had a bit of a brain lapse trying to figure out which piece of strip wood I needed to use for these, then (after a couple minutes and even checking some other build logs to no avail) realized there's still plenty of parts on the laser cut sheets and there they were. 🤦♂️ Pics are a little out of order as the next ones are right after I cut the frames back (before the false stem). Then we have a couple pics of where it sits as of now. Side cleats needing trimmed, false stem finished, and painted under the seat riser location. I hope to get the seat risers on (or at least bent) tonight, as well as trimming and working on the gunwales. Thanks for looking Matt


- 69 replies
-
- 6
-
-
- Lowell Grand Banks Dory
- Model Shipways
- (and 2 more)
-
Interesting. Are there particular sealers for that sort of thing or just any old varnish? (I must've been typing my reply when you posted) Thanks, I'm trying this. I feel like I remember reading someone mentioning they wish they had - maybe that was you. No chance to get a log in tonight, but the false stem is finished, cleats are in - though need to be trimmed. I played around with a bit of paint, ended up dumping a little bit more out than I meant to so after painting on some scrap, I may have gotten a little excited and started a thin coat on the inner planks before I put the riser on. Can expect a log sometime early tomorrow.
- 69 replies
-
- 2
-
-
- Lowell Grand Banks Dory
- Model Shipways
- (and 2 more)
-
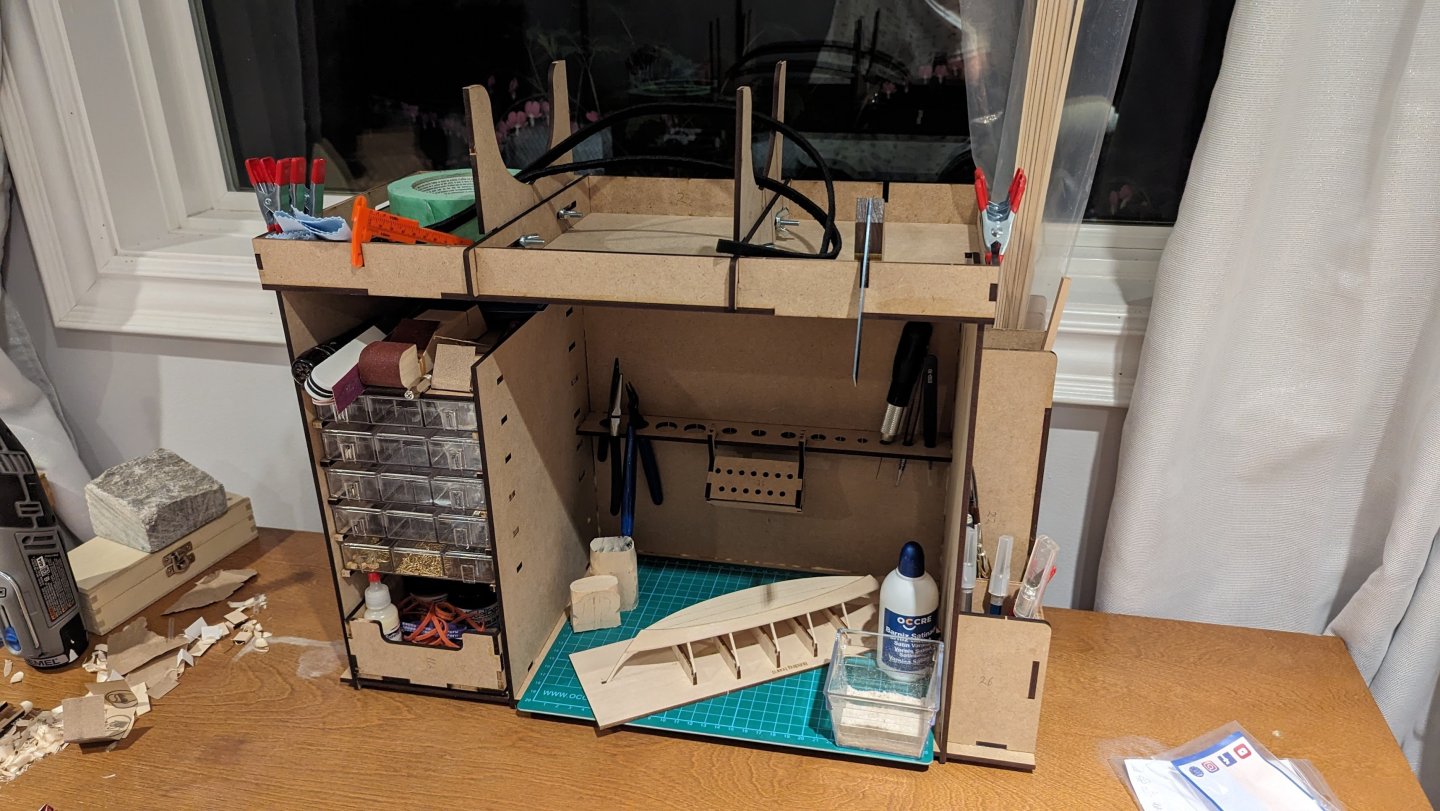
Thank you - great info. So I do need to dilute it, good to know. I'll look around for some of those trays, I was thinking plastic, but i like the idea of the metal one. I have a Michael's not terribly far away that may have it. Very good point. See, that didn't even cross my mind. I hope to get the side cleats on, trim and sand the false stem and likely test some painting this evening. Free time is running thin these days as summer draws nearer, but whatever I can get done... "No one should be discouraged, who can make constant progress, even though it be slow." - Probably Plato Will definitely need to check that out. I've always been an enthusiast and finally flew a Cessna 172 for the first time a couple months ago.
- 69 replies
-
- 2
-
-
- Lowell Grand Banks Dory
- Model Shipways
- (and 2 more)
-
I appreciate the comments! and yes, I think learning something new is a big motivator as well. I didn't get much time last night, but managed to get the false stem glued on. I noticed other builds used the left over from the cleats, which I could not find for the life of me. I assume I placed it somewhere in the void during the month hiatus and reorganizing the space. Luckily, I have a batch of 1/32 x 1/8 that I got for the lobster trap so I used that. Seems a bit thicker than the cleat strips, but that just means more sanding. No concerns there. I'm starting to think ahead to the side cleats, seat risers, and painting which is posing a couple questions. 1. My painting plan was to just mix some up from the bottle, stick it on a plastic sheet and lay it down thin and in multiple coats - my question is this: Should I be planning something different? I've seeing a lot of build logs with modelers not so happy with painting results, and help topics on painting. I thought it was fairly straight forward, but now I'm thinking that's just my ignorance showing through. 2. It seems some very light sanding may be necessary after the first coat. My thoughts don't follow the instructions, but is there any reason why I shouldn't paint and sand the inner planks between the frames before placing the seat risers? Surely that would make things easier.... or is my ignorance now starting to create a pile over here? I find when new to something, there can be a fine line between 'critical thinking' and "Oh! so that's why they do it like that!" Any advice is appreciated!
- 69 replies
-
- 3
-
-
- Lowell Grand Banks Dory
- Model Shipways
- (and 2 more)
-
Some of these aren't after fully sanding, but it doesn't look much different. Thanks for looking, Matt

- 69 replies
-
- 6
-
-
- Lowell Grand Banks Dory
- Model Shipways
- (and 2 more)
-
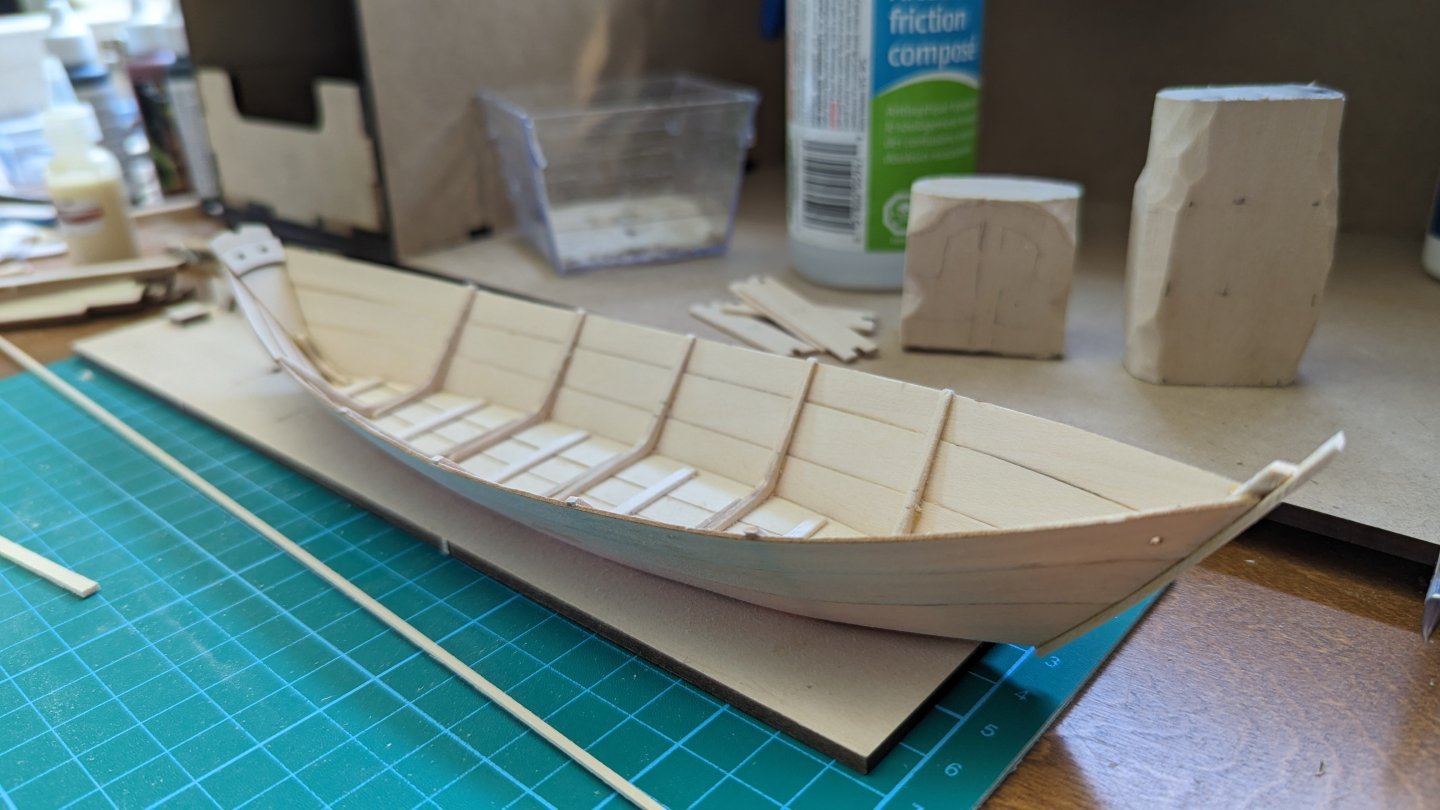
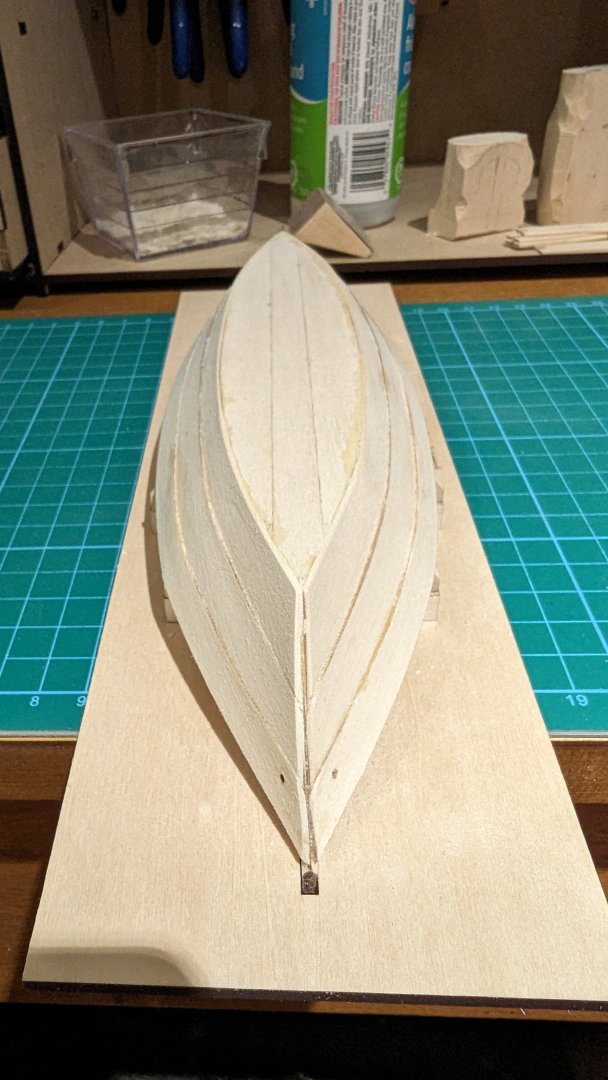
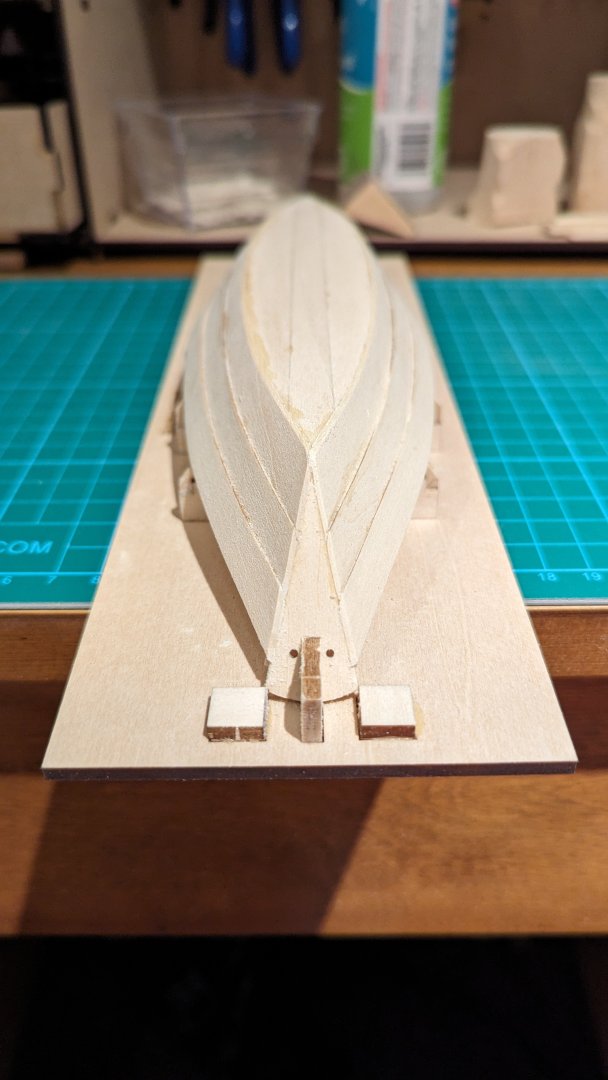
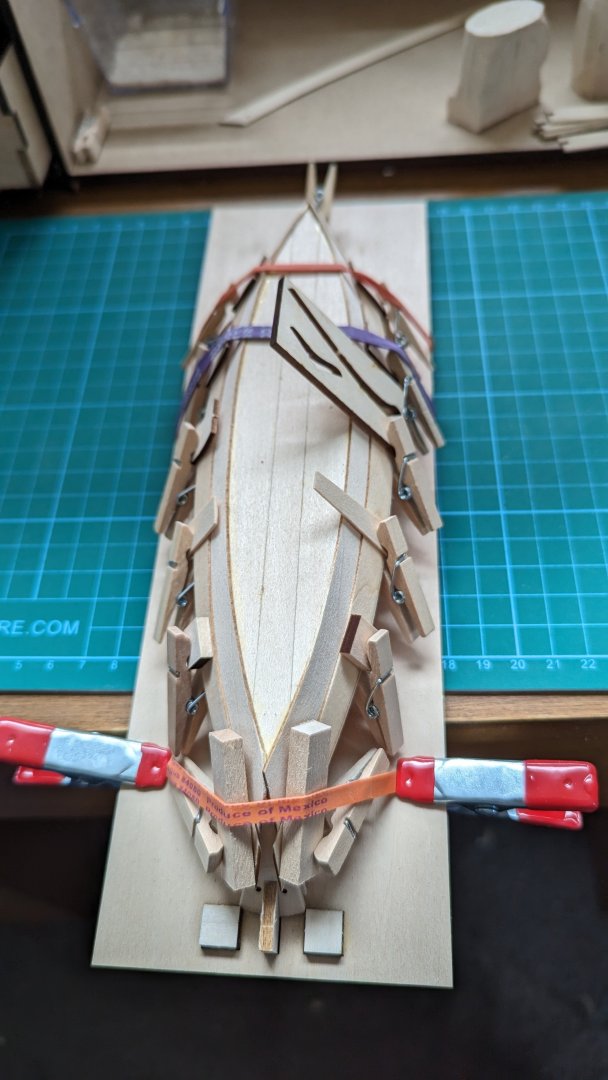
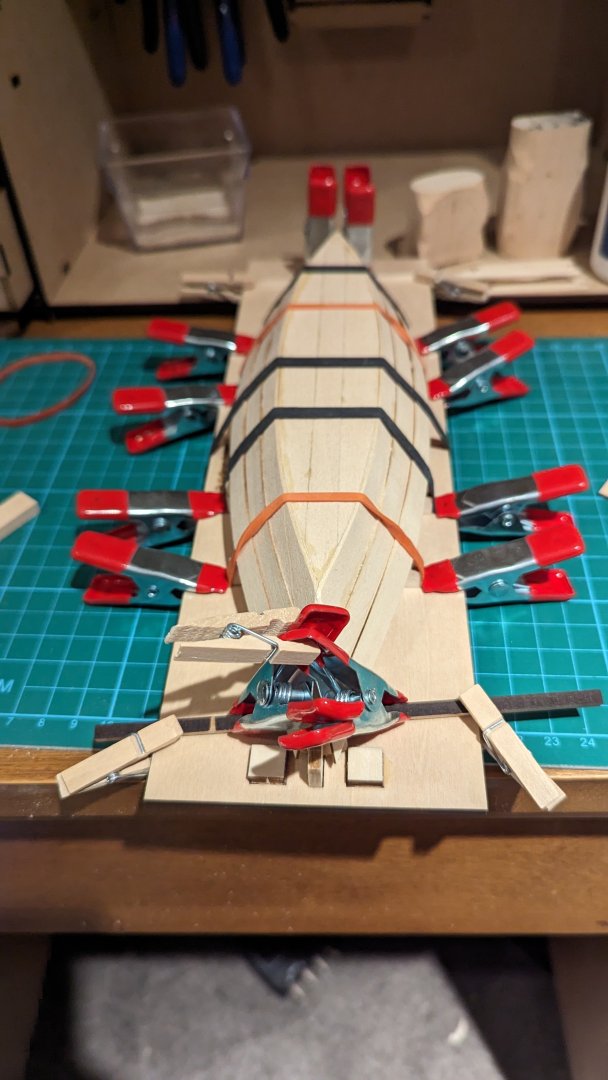
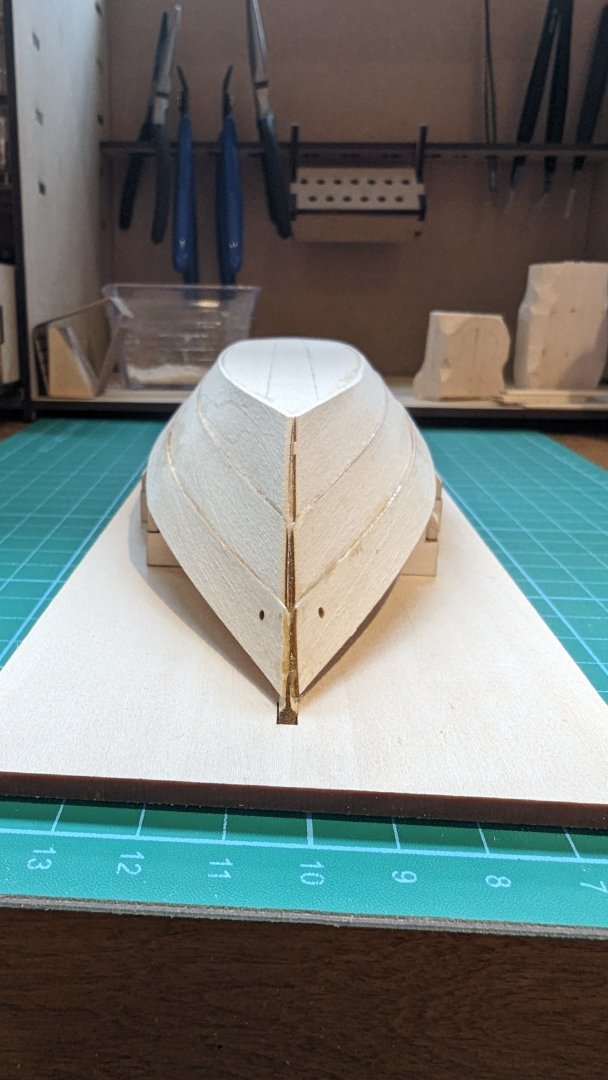
Log #8 I've made some pretty good progress over the last few days. Planking is complete, although not perfect, it's pretty decent and was a great learning experience. The boat is off the build board; but that was right before bed so I haven't even cut the frames back yet. Some 'questionable' clamping techniques and some not too bad ones: Starting to come together - looking pretty even: Wet bending the final planks: So far everything has fit very nicely. Multiple dryfit checks confirmed the strakes should go on pretty good as well. As I finished gluing the final planks, there was a small issue which I believe was partially caused by the defective laser cut offset in every plank on the port side. Not a massive issue, but I noticed in order to line everything up and match them correctly, the stern end needed a bit of a 'lift' which caused the plank to bend at a weird angle and bow out between a couple frames. Patience, a long period of holding by hand while curing and some diluted glue to get between the planks helped immensely and I was happy with the result. Once confident the glue was cured enough for me to let go, I started inspecting it and noticed the starboard strake was higher than when I initially lined it up. It must've slipped slightly while I was holding it because I made damn sure it looked good when I put it on. In any case, it wasn't terrible, but then it made the uneven rope holes (don't know the nautical name) glaringly obvious. I took about 30 second before I decided this needed to be fixed. I started running alcohol over the seam, praying that it wouldn't release the other board as well since they were both recently glued. I won't get into the details, but I wasn't perfectly happy with how this went. A big lesson learned in terms of giving myself enough time - I put myself into a rushed situation and butchered the inside of the plank a bit. In the end, I was able to pull it back to the first frame and refit it. Much better; however, still not lined up perfectly. I realized I placed the port plank a bit further forward than the starboard plank. I immediately wished those holes were left un drilled so I could line them up manually. After the hack job I did trying to debond part of the starboard side, I decided to wait until further inspection before doing any further damage removing an entire plank. After some thought I realized the unevenness will be less noticeable once the rope is in, and also isn't noticeable unless looking from 'underneath' the boat. On top of that, the breast hook is going to cover it up from the inside. Then I realized the breast hook is also going to hide the damage I caused on the inside of the starboard plank. I will still do the best I can to add some filler and sand it down, but this made me feel better about it I then trimmed the planks, sanded it all down (working on some of the excess glue as well) and was quite happy with the result. I was about to call it quits, but decided to take a crack at removing the building board. It came off about 100x easier than I expected. Really just slid right out as I pressed each frame up 1 at a time from underneath. In hindsight, I should've glued the defective side first and then the 'good side'. Since the entire sheet of port planks had defects, some of my flexibility was lost so I feel it would've been easier to use the good planks to conform to the needs of the bad ones. Finally, I spent so much time and attention making sure the planks were vertically aligned, I failed to make sure they were at the same distance from the front. Honestly, I didn't think this would be an issue since its all trimmed and sanded down, as well as a false stem being added later. Those sneaky holes changed that theory. I'll go ahead and post this, then leave a second post with just pictures of where I ended. Thanks for looking, Matt


- 69 replies
-
- 4
-
-
- Lowell Grand Banks Dory
- Model Shipways
- (and 2 more)
-
Correct. Or, well, will be a lobster trap. Need to pick up a couple supplies to finish it. Back to the dory for now. I think correct. I rewatched (probably for the 10th time) a build video on YouTube posted about a year ago. I only just noticed today that the bottom board sheet had serious wobble on his parts. That would tell me it's more of a laser problem, then a specific product line - especially since we all had it on different sheets. They've been around a long time, maybe their recent quality control has dropped off. Just yesterday I came across a couple year old thread on this forum regarding them and deals with some shady Chinese company so maybe they're going that route. I'll be being a little more cautious when dealing with them.
- 69 replies
-
- 3
-
-
- Lowell Grand Banks Dory
- Model Shipways
- (and 2 more)
-
Thanks! And thank you again for the help through messages. I had a browser tab open to where you made yours. Very helpful, and your idea of using bottle caps to curve the wood worked perfectly!
- 69 replies
-
- 2
-

-
-
- Lowell Grand Banks Dory
- Model Shipways
- (and 2 more)
-
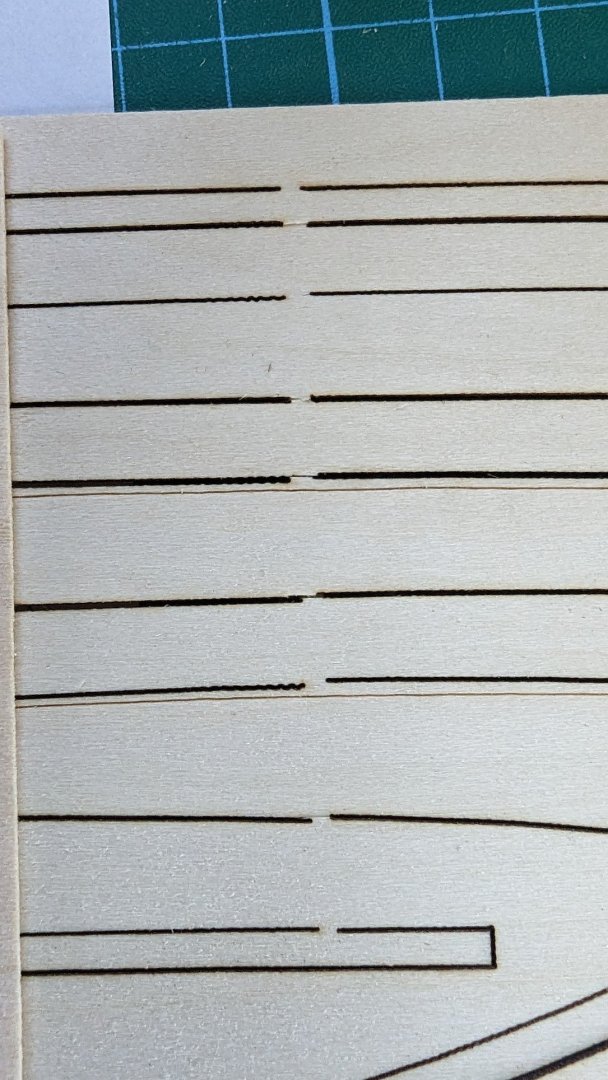
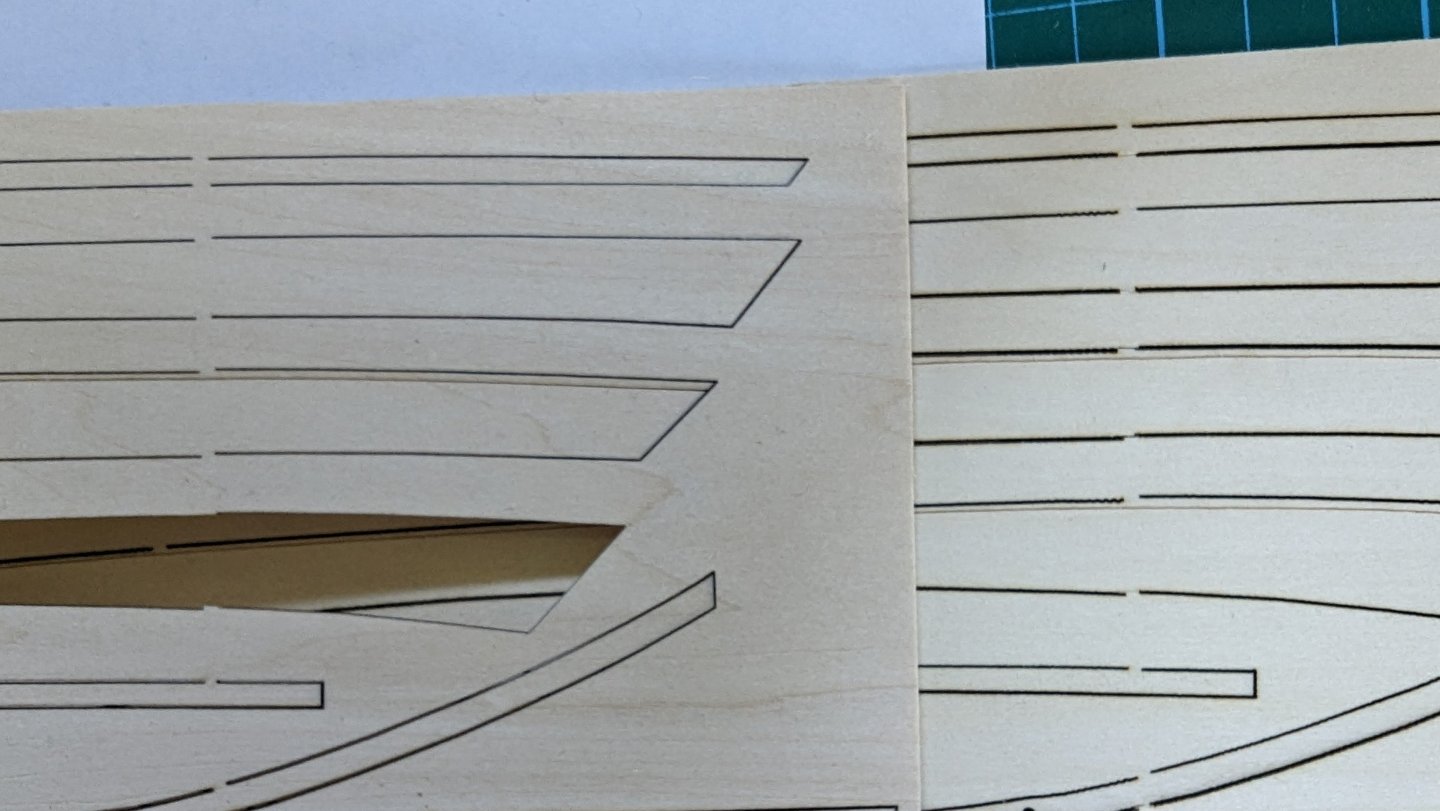
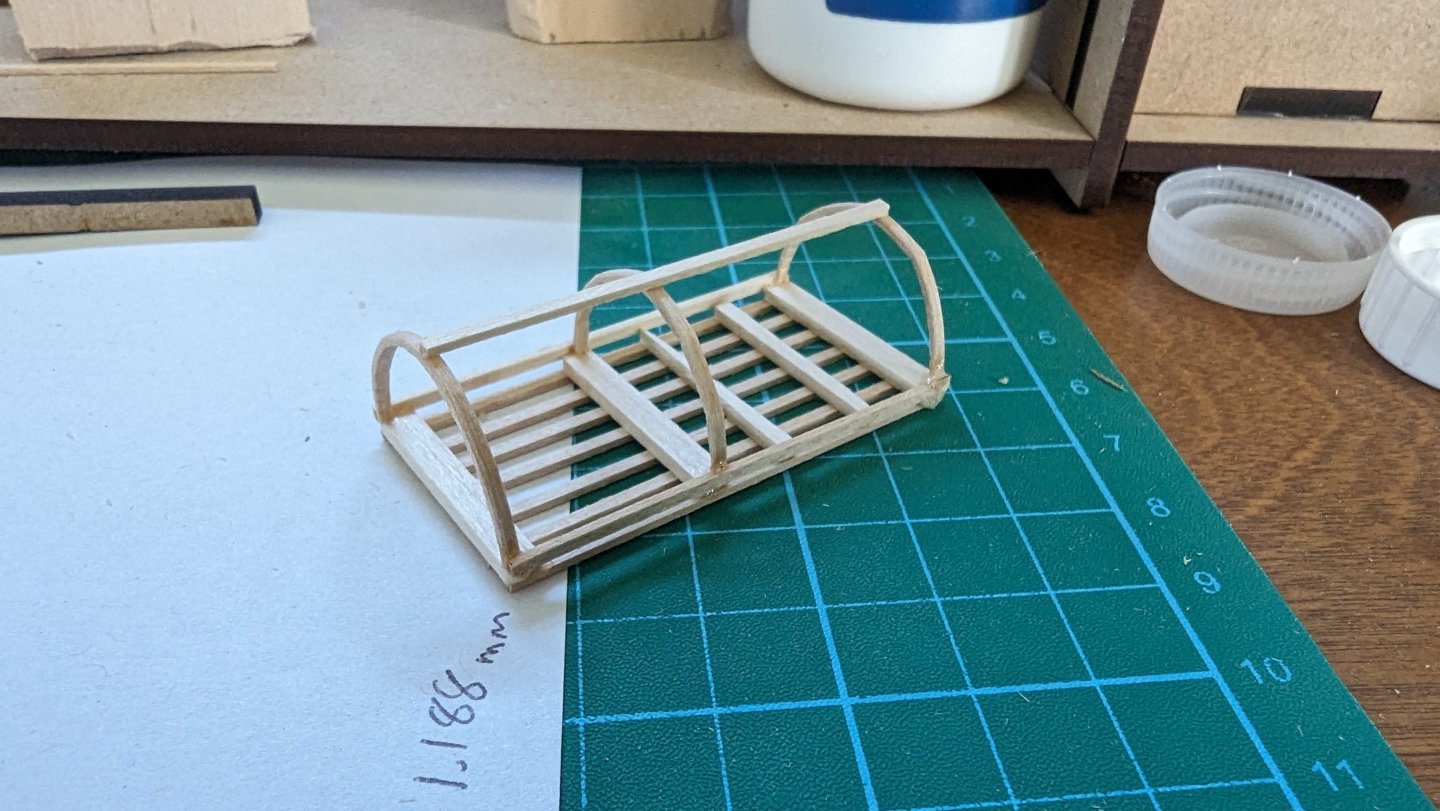
Warning: This is a bit of a long post that has little to do with the build as it should be. Skip to the last paragraph or two if you just want a update on the build. Okee. Back in business. Sorta. I gotta say, this is not leaving a great first impression of Model-Expo/Model Shipways (same company/related?). The replacement parts arrived today; after a month. I was pretty excited to get back at it just in time for the weekend... An incredibly thin sheet of basswood shipped across the continent in a yellow padded envelope, folded in half. After seeing that, I can't say I was surprised that the sheet was also snapped in half when I opened it. Still hopeful that the parts made it unscathed; it looks like a couple of them broke out of the sheet, but the parts themselves were in tact - good news! Then; hang on... these have the exact same problem in the exact same spots as the sheet they were replacing. Not only was the replacement as bad as the original, it was worse. There were more laser burns and the cuts were bigger and clumsier, and even wavy on multiple lines. What in the world are they doing over there? Maybe they should focus less on selling everything at 50% off and more on running a smooth operation. Did the laser cutter have too much to drink the night before? Why is every other line so shaky? A comparison of the original sheet on the left (nice, smooth, thin, cuts) and the replacement on the right (thick, darker, burned, wobbly) Now I'm in manufacturing; we laser cut 90% of everything we make. The only difference is steel instead of wood. First off, someone is clearly not paying attention with this machine. It badly needs a head adjustment, head replacement; some sort of maintenance. This should be detected during routine maintenance before manufacturing product for a customer, not after. Secondly, manufacturing is not an easy business, mistakes happen, I get it. It's how you handle the mistake that really matters and makes you excel or not. The fact that a defective part was produced, and there was likely zero effort to ensure the same issue wasn't replicated on the replacement is a terrible sign. I'm now thinking they have a corrupted laser file that needs fixing. Either way, I don't work there, it's not my issue to solve. There are rare cases where even when taking precautions, the same thing can happen twice. These guys seem to be quite highly regarded, so maybe that's what happened here. I can still give the benefit of the doubt, but this does not put them in a great spot in my books as is. In any case, there's only one thing to do, and that is move forward. I feel I can overlap some of the error -it's not that big. Scaling up to full size it would probably mean about 1/2" - 1" offset in the planks. Not unnoticeable, but not impossible to work with. Part of the concern is it is the same problem across all three planks. The bevels may be a little tricky to account for properly and lining up the correct starboard side with the incorrect port side may pose some problems. Maybe I will learn something I otherwise wouldn't. I wrote in another post that I ordered the next two boats in the series as a kit (which also came with another dory) as a significant discount so I will have a second shot at this build should I feel the need - hopefully the sheet is correct in that one! I may not post much as I work on the planks, but I will take pictures and expect to keep the build log up to date. I've been working on a lobster trap which I'll likely post more about later. I'll drop a pic of it below so I at least have some positive content in this post I need to sort out what I'm going to do for paint/wash, and netting before I continue to finish this up: Wish me luck!
- 69 replies
-
- 5
-
-
- Lowell Grand Banks Dory
- Model Shipways
- (and 2 more)
-
Thanks for the reply. Since this thing was staring at me while waiting for the parts I went back and started beveling the other planks. Ran some dry fits and ended up increasing the garboard plank bevel as well. I'm feeling better about the bevels than I was before, I'll just need to make sure I pay as much time and attention to the port side when I get there. Believe it or not, I still don't have the replacement sheet. Based on tracking, I'm expecting it to show up either today or tomorrow. Not all bad; the waiting has given me time to pick up a few extra tools, put together a more organized workspace, and read up on tips, historical accuracies, etc. I also caved last night from the Model Expo sales and ordered the next two boats in the shipwright series (the pram and lobster smack). The kit also came with the dory I'm currently working on so it may be interesting to revisit after founding these skills. I also picked up a non-beginner ship for a pretty good price. Up until now I've been rummaging through a plastic bin to grab tools, leaving them in random spots on the table, on a nearby box, chair or floor. This will help keep me focused on the build, rather than searching for a tool I just set down.
- 69 replies
-
- 6
-
-
- Lowell Grand Banks Dory
- Model Shipways
- (and 2 more)
-
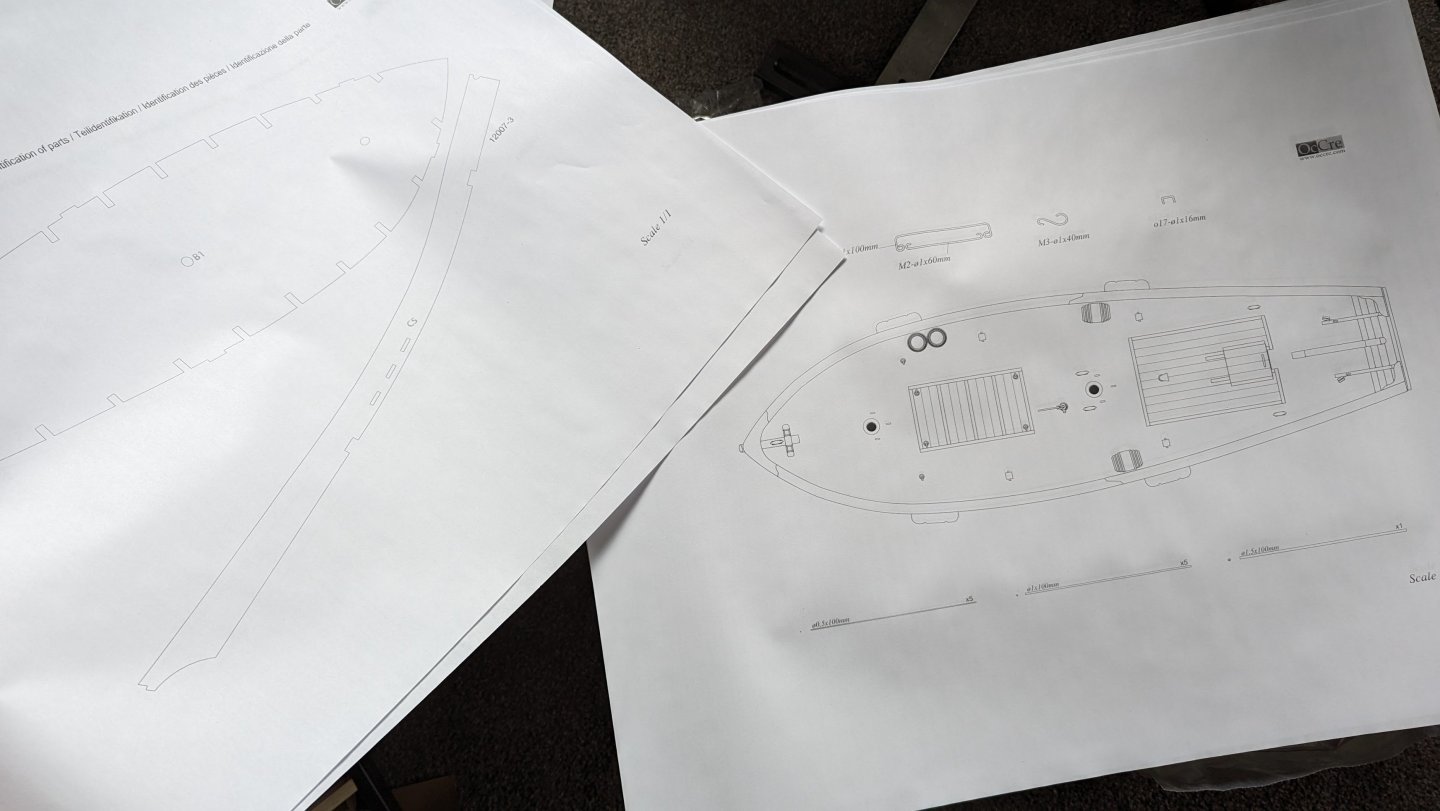
Appreciate the last two messages. I think I had to read jaager about six times before I started to figure out what you were talking about, but now I know Steeles a person and even came across a free ebook about naval construction on google books. This gives me a great starting point to get something more realistic and aesthetically pleasing than the instructions. I had some meeting as the office this week so went ahead and plotted a few copies of scale drawings which will help me plan this out and ultimately help track it when I start assembling. Thanks again to all!