
Sjors
-
Posts
5,536 -
Joined
-
Last visited
Reputation Activity
-

 Sjors reacted to Kevin in HMS Indefatigable 1794 by Kevin - Vanguard Models - 1:64 - Feb 2023
good evening everyone
thank you for comments and likes
day 90-2
a bit of progress since my last update
we now have a full gundeck, cannon allowance
hatches, with cannon balls are made up and fitted
all the deck beams are in
i may have a couple of beam supports to place into position
although these will never be seen, i am at present putting in hanging and lodging knees,
-
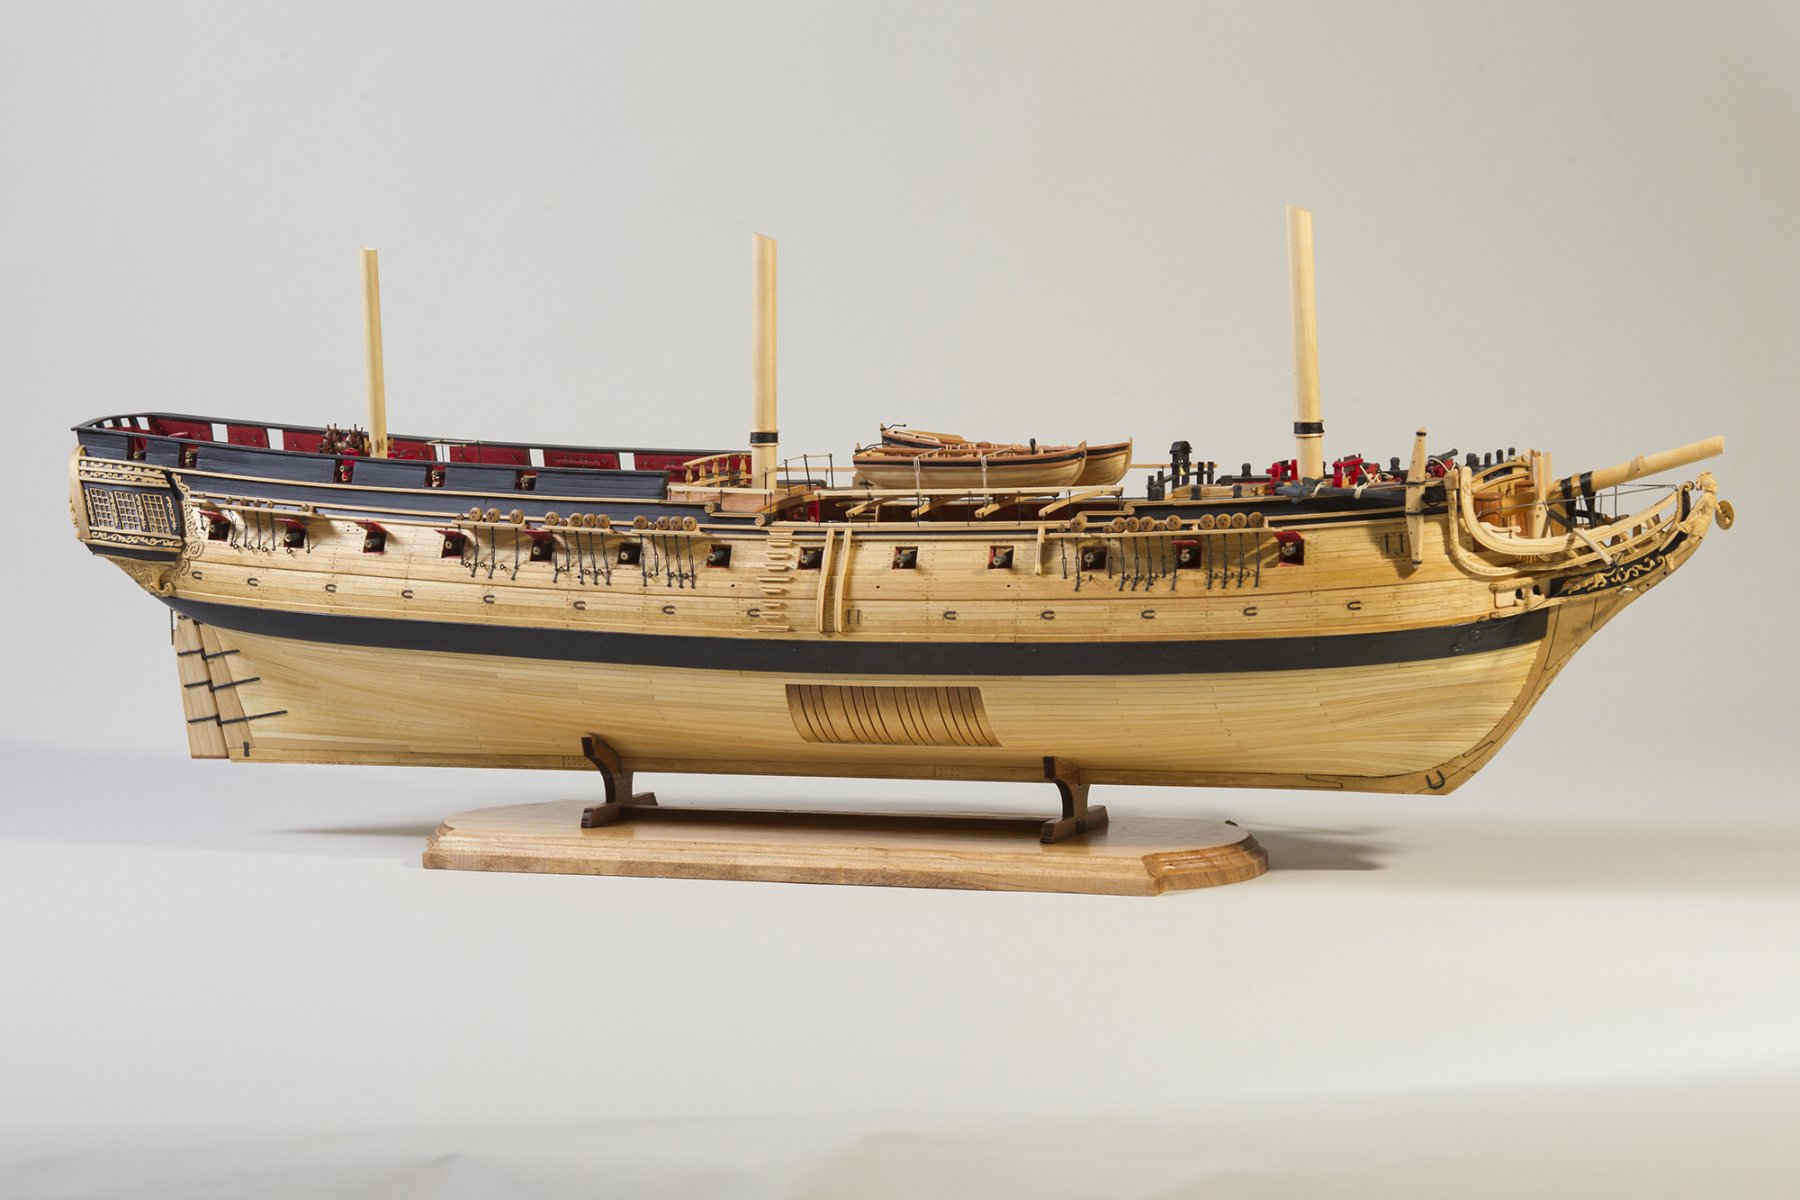
Sjors reacted to Blue Ensign in HMS Indefatigable 1794 by Blue Ensign - FINISHED - Vanguard Models - 1:64 scale
Post Thirty two.
The thing about wales.
0978
The lower strake (in Pear) of three, over which the kit Wales would be fitted has now been glued into place. It was possible to clamp this strake, so pva was mostly used.
0984
This too has been tapered by 1mm at the bow and left full size at the stern.
0991
The stern piece requires a sharp short bend with twist to conform to the transom.
Wales have been on my mind for a while now, and a decision has to be made.
On the kit the black strake is represented by a 4x1mm strip which is used to form the line of the wale. This fits directly over the previously fitted ‘marker’ strake.
Below this (3) strakes of 5x1 strip make up the wale. This equates to a wale depth of 3’ 1¾”
0977
The Adm. plan of Indy shows a wale depth of 27mm at midships. If this is at 1:48 scale, the equivalent @ 1:64 scale gives a 4’ 3” depth of wale.
0975
It could possibly be that the Adm. plan upper wale line includes the Black strake, the relationship between the line on the plan with the aftermost three ports compares well with the kit plan drawing.
The rub is that as far as I know the Black strake was not part of the actual wale but was a slightly thicker first plank fitted above the wale.
The use of straight strips in the kit is a simplification; the wales on this size of ship would have been made up using hook and butt, or at least top and butt, or anchor stock planking.
Chris has his practical reasons for simplifying the arrangement for kit purposes, but even so it would have been nice if only on the plan, the proper arrangement had been shown.
I have no direct reference to the wales on Ardent class ships but Goodwin’s The Construction and Fitting of the English Man of War 1650 – 1850 gives the proportions of the planking strakes, for the different patterns used.
The wale would consist of two strakes of two Top/hook and butt planks, locked together.
On a hull as large as Indy I think it deserves a more authentic looking wale but I acknowledge that in practice once the wale is blackened the effect is less evident to the casual eye.
Nevertheless, I still fancy having a go.
The Plan
I have decided to use Top and butt only, hook and butt is an added complication, and my aim is to give a visual representation of the different pattern of the wales on these ships.
The overall length of the wale is 826mm, which will require around 28 top and butts planks each side.
I shall be using 8mm as the depth of two planks matched together, which gives an overall depth of the wale of 16mm around 3’ 4”. This is deeper that the kit wale by 1mm, but is still slightly less that the depth given by Goodwin for a thirty-eight gun frigate of 3’ 6”
The planks will be of 120mm in length.
The touch 30mm in from the end. (¼ of plank length)
The touch depth is 2/3 the depth of the strake (8mm) = 5.33mm.
The butts are ½ the depth of the touch =2.66mm.
I will be using 6mm strip to form the planks.
0980
I made a rough scheme drawing to give me an impression of the look and proportions of the wale.
0981
I now need to see how I can produce a test plank that can be replicated in a jig of sorts.
To make the measurements easier I will try a touch of 5.5mm and a butt of 2.5mm, easier to see.
B.E.
26/05/2023
-
Sjors reacted to Kevin in HMS Indefatigable 1794 by Kevin - Vanguard Models - 1:64 - Feb 2023
good evening everyone
day 83-2
keeping to the instructions has seen this build progress quite fast, other builds i would have made bits, put them away and it would all come together as some time in the distant future, perhaps returning to it after i get bored, like on some of my larger builds
cannon carriages, are the thing that is stopping even faster progress, plus gardening and Assassins creed odyssey but its not a race, it is however, the most enjoyable build i have ever done, everyhting does exactly what its meant to do, perfect fits, and great quality materials
mast Dowling in the ensure decks line up
the deck beams fwd are fully fixed and the fwd deck has been test fitted the after deck beams are still in the process of making sure they fit
-
Sjors reacted to Kevin in HMS Indefatigable 1794 by Kevin - Vanguard Models - 1:64 - Feb 2023
good evening everyone
thank you for comment and likes
day 79-2
i have now put another couple of coats on the yellow banding and repainted the gunports linings
all the gun carriages have been made up, but only six have been fully completed with wheels and metal fittings the tabs that enable accurate fitting onto the deck were removed as the boxwood deck was to hard to get a decent slot, so the wheels have now been sanded slightly to enable a good 4 point contact to the deck and will be held in place with PVA
the ships oven is a lovely piece of resin and Photo etch, primed and black painted
forward deck beams, sanded to remove the char, and painted on the forward and after sides only, as some of these will be exposed, on test fitted they just dropped into place
nothing is fixed, but a few shots of how she is today
-
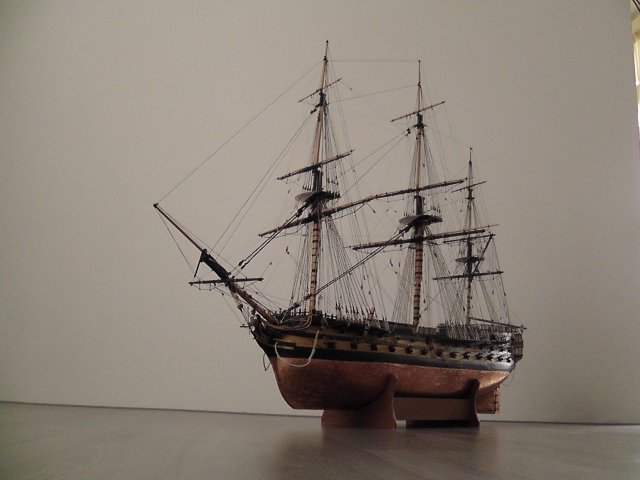
Sjors reacted to drobinson02199 in HMS Victory by drobinson02199 - FINISHED - Caldercraft - Scale 1:72
Main topgallant yard built and mounted. I included a pic of the rigging. Again, as with the topyard, I have rigged a strop to hold the yard down, and I'll cut that if something comes along later that does that.
Regards,
David
-
Sjors reacted to Kevin in HMS Indefatigable 1794 by Kevin - Vanguard Models - 1:64 - Feb 2023
2nd side banded, and quite even
-
Sjors reacted to kiwiron in HMS Victory 1805 by kiwiron - Caldercraft - 1:72
Time to set up rigging on the carriages. Clear the block holes, line up hooks etc. Lots of work so far and I'm only fully rigging 10 cannons that will be seen.
-
Sjors reacted to kiwiron in HMS Victory 1805 by kiwiron - Caldercraft - 1:72
Lol, I tried Auckland for a short time, hated the traffic jams. All dry here too. Trunnion nails were missing but I found some from a previous kit that work. Out of the 30 cannons for this deck you can only see 10, that will do for full rigging. The lower decks are dummy barrels, no carriages. Quarter deck has visible cannons but not many. The eyelets part 480 nearly need a microscope to see. Not a lot of work to go on these cannons. The breach ropes you used would be a perfect size. Take care. Ron.
-
Sjors reacted to Kevin in HMS Indefatigable 1794 by Kevin - Vanguard Models - 1:64 - Feb 2023
one side in the correct colours,, although more coats are required, also the banding has gone a bit narrow at the bow above the cheeks, to be sorted
-
Sjors reacted to Kevin in HMS Indefatigable 1794 by Kevin - Vanguard Models - 1:64 - Feb 2023
good evening everyone
thank you for comments and likes
day 74-2 you can blame Assassins creed Odyssey, for my lack of progress
the hull went to black as part of the preps for banding, the yellow has had about 5 coats, i will now redo the gunports before adding any more
the cheeks are now fitted, each one is 3 pieces in layers, i went for this colour scheme, as personally i think it looks better
things still need to be touched up
-
Sjors reacted to Blue Ensign in HMS Indefatigable 1794 by Blue Ensign - FINISHED - Vanguard Models - 1:64 scale
Post Thirty
A conundrum
I have spent the afternoon sorting and checking my planking strip.
(102) 900mm lengths of 5x1mm Pear strip is supplied for the hull planking.
There is quite a colour variation which may be split into three shades, Dark, light, and medium.
0956
In my kit (37) are Dark, (24) are light, and (25) are Medium.
0955
The shorter lowest selection in the above photos is Light pear from hobbymill.eu and from previous experience the colour is consistent.
0957
There is also a fourth category (16) strips, with vertical graining, that I prefer not to use.
Mixed colour shades applied either randomly, or by design, in the planking strakes is something that doesn’t appeal to my eye, but if the intention is to copper and paint the hull then this is of little relevance.
For me it means that there is insufficient strip to complete the hull without distinct colour variation along the strakes.
As I hope to leave the hull with a natural wood finish this is a little disappointing, but I infer no criticism of the kit.
My thoughts are turning to buying a new supply of timber from hobbymill.eu, an indulgence maybe, but this is a project that has already incurred a not inconsiderable cost, and I want to make it as good as I can.
I was quite happy to have a Pear lower hull, but the situation now provides the option of replacing pear with Boxwood, and also including wider strips for spiling.
There is only a small difference in cost between Pear and Box.
One of the general downsides of kit timber is the lack of wider strips for hull planking, which is really is a bonus in planking. Fortunately, wider stuff is now more readily available from specialist sources.
Using Pear I would have a contrast below the wale and a match to the stem, sternpost, and keel.
With Box these elements would provide a contrast to the main hull planking, and Box is my favourite modelling timber.
08070
Nevertheless, I have decided to opt for Pear as demonstrated on my Sphinx build, above.
I quite fancy a slightly darker lower hull, and if my planking standard falls below what I hope, then the hull will be coppered anyway.
I now have a few weeks wait for the new timber to arrive, but meanwhile I can fettle those gunports, and mark up the hull for the planking runs.
B.E.
11/05/2023
-
Sjors reacted to Blue Ensign in HMS Indefatigable 1794 by Blue Ensign - FINISHED - Vanguard Models - 1:64 scale
Thanks for the 'likes' and continuing interest Guys.
Post Twenty-nine
Planking continues.
After a couple of fine weather days and a Bank Holiday weekend enjoying the Coronation, I returned to finishing the Topside planking on the Port side.
0942
0944
0945
0947
0948
0951
0949
This marks the limit of the Boxwood hull planking, from hereon I will be using Pear.
Before I can get to the planking there is the wonderful world of tick strips and bandings to set up, and butt shift patterns to consider.
B.E.
10/05/2023
-
Sjors reacted to Kevin in HMS Indefatigable 1794 by Kevin - Vanguard Models - 1:64 - Feb 2023
doing things my way, i want to get a majority of the outer painting done before working inside the hull, might avoid all the dust that i seam to create
-
 Sjors got a reaction from Obormotov in HMS Indefatigable 1794 by Kevin - Vanguard Models - 1:64 - Feb 2023
Enjoy Kevin,
It will be a long journey so i’m looking over your shoulder to see what you are doing! 😀
Sjors
-
Sjors reacted to Kevin in HMS Indefatigable 1794 by Kevin - Vanguard Models - 1:64 - Feb 2023
good evening everyone
thank you for comments and likes
my mum is home again having had a mild hear attack, but going down with Covid hindered her stay in hospickle, she has been fitted with a stent and now getting stronger by the day at home,
with the boi being ill, my mum, wife and myself, it has been a long 1/4 of the the new year
day 57 of 59
the lower hull planking is complete, its a large hull to play with, esp when you want to make it presentable and not add any paint ot tiles, there is no symmetry between the sides, but yes, im happy with her
lots of sanding ahead, any suggestions for a nice varnish to bring out the best in the boxwood
-
Sjors reacted to Kevin in HMS Indefatigable 1794 by Kevin - Vanguard Models - 1:64 - Feb 2023
i used frames 4 to 14
so on attached photo working forward F- Frame number in MM
tuck to F13 about 200
F13 to F9 220
F9 to F5 220
F5 to bow 195
-
Sjors reacted to Kevin in HMS Indefatigable 1794 by Kevin - Vanguard Models - 1:64 - Feb 2023
good evening everyone
thank you for comments and likes
at last i have started to recover from this flu bug, totally wiped me out for the last week, but thats enough of me
progress has continued on my build, slowly, but i am happy with what ive achieved, hopefully the problem area, like the tuck will look better when sanded, oh and the boi wanted a mention
-
Sjors reacted to Blue Ensign in HMS Indefatigable 1794 by Blue Ensign - FINISHED - Vanguard Models - 1:64 scale
Post Twenty-four
At this point I skip sections 165-191 and move to fit the keel, stem, and sternpost pieces.
I want the keel pieces in place to modify the build board for the upright hull which will be used for most of the fitting out and detailing.
All these pieces fit together nicely.
Note: The keel facings are numbered 437/439 (Fore) and 438/440 (stern) – not as shown in the manual. The pieces are port and starboard specific.
0832
I found the trickiest part was fitting the stem facings. I needed to further tweak the planks ends using a micro chisel to allow the facing pieces to sit flat against the stem at all points, and line up with the peg slots.
The hull will remain inverted for hull planking and that board has been modified to protect the vulnerable stem piece.
0833
0835
The stem protectors can be swung in and out of position.
It would be a tricky issue if the delicate figure seating at the prow was to be broken off.
0840
0841
The upright building board has now been modified to support the planked hull.
0842
0838
Indy is now secure and sitting level, I don’t want this beast moving around whilst I am working on her.
On with the show.
B.E.
19/04/2023
-
Sjors reacted to Blue Ensign in HMS Indefatigable 1794 by Blue Ensign - FINISHED - Vanguard Models - 1:64 scale
Post Twenty-three
The Sanding business
0811
This is a lovely hull to sand, large enough to sweep along it with flexible sanding sheets and blocks.
0812
At the stern the planks are feathered into the false keel to receive the top layer.
0815
There were a few low spots that I filled and sanded and once I was satisfied with a blind feel test I deemed the job complete.
0819
The whole process was completed over two days, and the hull was finally given a coat of sanding sealer.
0821
Sanding sealer contains Xylenes, and is nasty stuff, best done in the open air and wearing a mask and gloves.
0822
At this point I dry fitted the stem, keel, and sternpost parts.
The stem fitted neatly into place with a light tap of the hammer, but before final fitting I was interested to see how the facings related to the curve of the bow planking.
0810
These facings of 1mm stuff are engraved with the lines that denote the various parts of the head and provide a rabbet for the second planking.
0830
I fined down the plank ends a little to provide more leeway in the rabbet.
I find it always pays to constantly look a few steps ahead in a build, and check what’s coming up.
B.E
18/03/2023
-
Sjors reacted to drobinson02199 in HMS Victory by drobinson02199 - FINISHED - Caldercraft - Scale 1:72
Here is most of the forestay rigging done.
Last picture shows some lines I've temporarily rigged through the boomkins and up to the jib, to try to keep me from pranging anything else.
Regards,
David
-
Sjors reacted to drobinson02199 in HMS Victory by drobinson02199 - FINISHED - Caldercraft - Scale 1:72
Well, it was bound to happen to me sooner or later -- a bad prang.
In this case, I was wearing a sweater while working around the bowsprit from the front. The tip of the bowsprit caught on my sweater without me knowing it, I moved, and SNAP.
I thought it would need a really stiff nail for repair, so I used a picture hanging nail, which is shown below. I THOUGHT I had it completely aligned when I dry-fitted the repair, but at the end of gluing it somehow had developed a slight downward cant -- which I'm going to have to live with since I'm not about to try to take it apart -- I really glued it on solidly.
I can think of worse disasters -- like dropping the whole model -- and all in all, this repaired fairly well given the total snapoff.
It took the jackstaff with it, and I'll probably add that back at the end of the build.
But there is that slight downward angle . . . Oh well.
Regards,
David
UPDATE: I was able to bend the sprit up some, and to a point where I can use the stays to finish the realignment. Final picture shows what it will look like when the stays are installed. I'm only putting a slight upward pressure on with my hand.
WHEW!
-
Sjors reacted to drobinson02199 in HMS Victory by drobinson02199 - FINISHED - Caldercraft - Scale 1:72
I've begun work on the forestays. Mizzen stays done; first main mast forestay installed. Closeup picture below of the heart blocks and lashings used to secure the main forestay.
Regards,
David
-
Sjors reacted to drobinson02199 in HMS Victory by drobinson02199 - FINISHED - Caldercraft - Scale 1:72
Bowsprit now permanently mounted and gammoning completed. The gammoning on this model is more than decorative -- it performs the same function as it would have done on the real ship: locking down the bowsprit tight.
Gammoning was tricky to thread behind the beak struts.
Regards,
David
-
Sjors reacted to Kevin in HMS Indefatigable 1794 by Kevin - Vanguard Models - 1:64 - Feb 2023
good evening everyone
thank you for comments and likes
day 47 2nd planking of the Starboard side
not been well recently, Not Covid like my mum has in ospickle, just flu, very tired and my gwet up and go, was got up and gone
however i try to do a bit on the build daily
my planking is improving, maybe to late to make this a good looking hull, the tapering is beetter, a lot less of it, so i decided to attempt a 4 plank butt system to push myself a little, it does take a little longer, the biggest issue is finding planks that are the same width, to avoid any gaps
-
Sjors reacted to Blue Ensign in HMS Indefatigable 1794 by Blue Ensign - FINISHED - Vanguard Models - 1:64 scale
Post Twenty-two
Countdown to completion
0762
0766
Three strakes left.
0768
0769
Two strakes left and getting a little tight at the bow.
0771
I could get a fit but I decided just for the fun of it to add a drop plank here.
0774
It extends from the stem back to the fourth bulkhead.
0776
0779
One strake only left to abut the drop plank.
Things have worked out pretty well with the remaining strake sitting below the hull round.
0783
A good supply of lime was provided in the kit; I have a fair number left over, but I did use a few wider strips, to form planks like the Garboard and drop planks.
0784
0792
0790
0787
It’s now a case of sand, sand, and sand again.
B.E
17/04/2023