HOLIDAY DONATION DRIVE - SUPPORT MSW - DO YOUR PART TO KEEP THIS GREAT FORUM GOING! (Only 20 donations so far - C'mon guys!)
×


vacotton
-
Posts
95 -
Joined
-
Last visited
Content Type
Profiles
Forums
Gallery
Events
Everything posted by vacotton
-
Aha moment: The yellow field in the middle of the GG array actually illuminates. All you have to do is capture that light without allowing it to escape. Very elegant. Verne
-
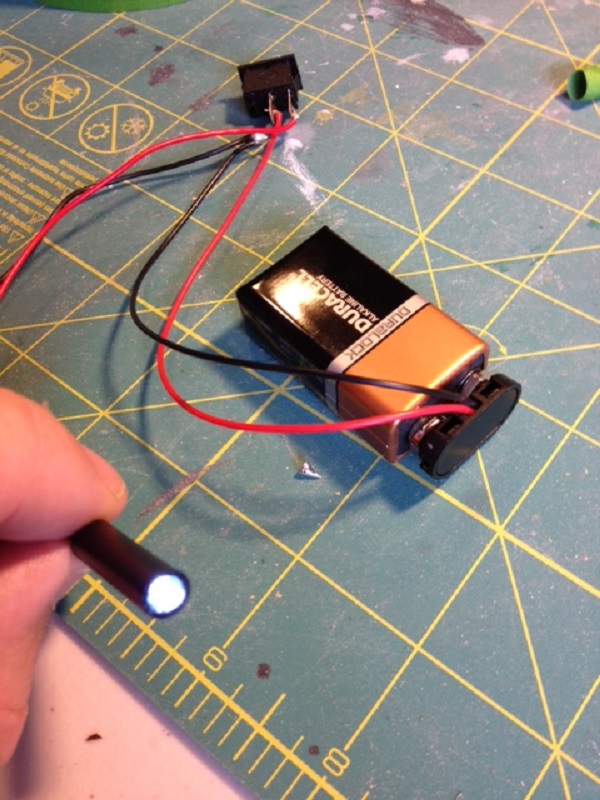
Dave, that makes perfect sense. In close quarters, verniers probably wouldn't work to well. I will pick up a pair of EKG's (sans chart ) soon. The square clear stock is on its way. Now, I followed you fine until you got to the array on the heat sink and then you lost me. I get the part about your power source: 110 AC from the wall, through the transformer/rectifier with 12V DC output. But how did you hook up the LED to the chip? Then it looks like you fastened a shower curtain housing on a board but that could be anything that allows the bundle of Fiber Optics to be connected securely and perpendicularly to the LED light source. Is this amenable to battery power with 9VDC? And finally, I read that LED's require resistors in order to vary the color and flicker. Is all of that taken care of in the IC on the chip or would that be another step that you have not covered yet? I am getting pretty excited about mastering this approach and I want to understand it completely. Verne
-
Thanks for the cautionary words, Dave. I think I found an old cooler that came with my old Core2 that I can tear down. I am assuming that the brass screws and the silver screws are only for the purpose of identifying polarity? Today I thought I would just go out and snap up some square clear 1/8 rod from my friendly local hobby shop. Not even a chance. That stuff is hard to get hence your link which turns out to be the cheapest place too. I am wondering if the round Plastruct stock will work as well as the square stuff. It's a lot cheaper off of Amazon: $7.50 for the round vs. $18.00 for the square stuff at US Plastics. Shipping is the killer. In the meantime, I am going to design more detail into the great room and continue planning the placement of the lamps. Verne
-
Dave, I read and re-read your amazing posts on your amped up fiber optic matrix system. I will be the first to say that this seems very daunting and in agreement with others that it would be nice to have a tutorial and schematic written in Word or as a pdf. I got my 100 feet of Fiber Optics today and it works. So now I will likewise cast about to find a heat sink in my old computer junk. Shouldn't be too hard as I am somewhat of a pack rat. It looks like the key to learning this stuff is experimentation although it is always nice to have you blazing the trail for the rest of us. My lighting plan will not be as complex as yours as this is an early 1800's version. Here's what I am thinking: Captain's After Cabin: 2 sconces on the starboard and port bulkheads. 1 candle on the table. Captain's and Commodore's State Room: 2 sconces. Quarterdeck areas: 1 Sconce apiece. Captain's Great Cabin: 4 sconces on the aft wall. 4 sconces on the forewall. Gun Deck: Although fictional, maybe 3 overhead lanterns to properly illuminate the deck so that details are visible through the spar deck viewing areas. This lighting should have a warmer, softer light than the cabin lighting which might be whiter. Thanks Dave for keeping me thinking. Verne
-
Hi Dave, What are the differences between EKG and vernier calipers? I am considering getting a caliper for the lamp project. Verne
-
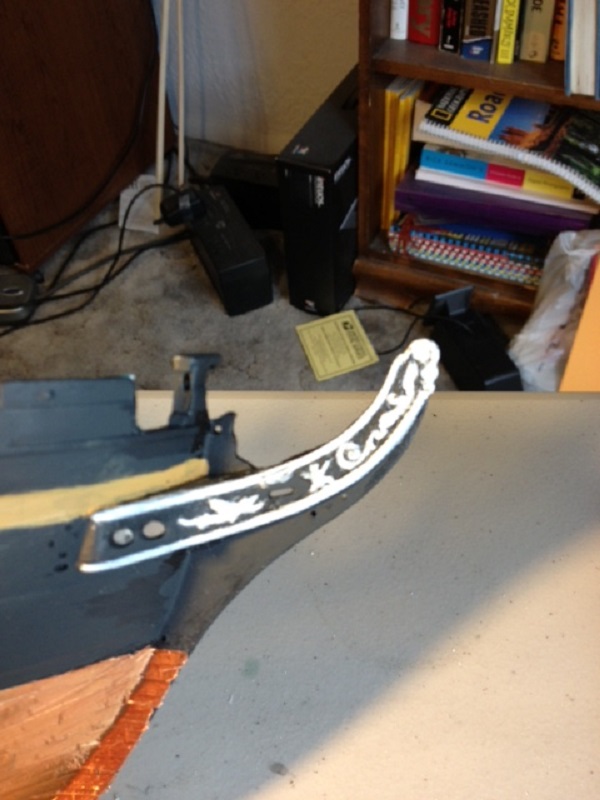
Well guys, I am killing time waiting for my fiber optics to come in so I have been looking at the transom and comparing what I found in Marquardt. The designs from the early 1800's are supposed to be per the Corne paintings. The Revell version doesn't even come close to any of them. Since I read that Revell did credible research too, is it possible that Marquardt got it wrong? Also is anyone planning on cutting the two carronade ports into the transom at spar deck level? So far, I have removed the "Constitution" and built in the two airing ports. Once I know how to go on the windows, I am considering making them out of cardboard with an exacto knife since K S is now out of the picture. Don't want to proceed though until I hear some consensus. Verne Postscript: Ah, negitore on that plan and I don't have a plan "B" either.
- 135 replies
-
- 1
-

-
- Constitution
- Revell
- (and 1 more)
-
Dave, Oh, lovely. I have been reading your other thread. Maybe I should have studied it a little more. So it sounds like I got a bunch of junk. Wouldn't be the first time for that. Verne
-
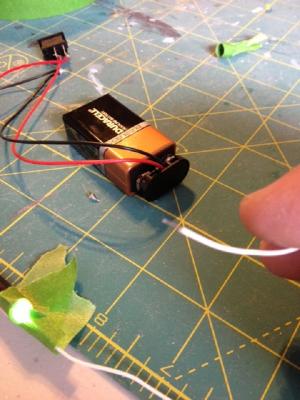
Here's what I have now. You can see white light coming out of the illuminator. Blinding if you look down the tube. And the filament attached to the illuminator tube. What appears to be illumination along the filament is the white cladding. No lighting at the tip of the filament. Dave, I don't know the wattage/lumens, but the illuminator is super bright. I have spent more time than I want to trying to get the filament to focus. The seller says that if any filament came with the illuminator that was not his doing because he just sells the illuminator separately. He suspects that I got some old glass stuff that had to be polished first, a real pita. I bought 100 ft of his plastic .75 and it should be here Thursday. Seller says that this is the newer stuff and will work for sure. Light in and light out. So we shall see. Verne

-
Thanks, Evan. I will get on that so that I will not have to hang the animals in the yardarms as Texxn5 suggested. Sure good to see you back again. Dave, maybe you can help me out on this one: I bought an Optical Fiber illuminator kit off of Ebay. Comes with the illuminator and a length of clad OF filament. Assembling the illuminator was no problem. It lights up. Problem is that no light passes down the filament from the LED to the other end. Is there something wrong with the filament or am I just doing something wrong here. Thanks guys, Verne
-
Got into a little bit of a rush and joined my hull halves before planning how I was going to get the gun deck in under the knees. Oops. Almost like building the proverbial boat in the cellar. No worries, I took them back apart before they cured so just a little bit of filing and I should be okay. Anyway, I am waiting for a fiber optic rig to get here and that would not do to have the deck already in. Plenty to do elsewhere. Verne
- 135 replies
-
- 1
-
-
- Constitution
- Revell
- (and 1 more)
-
You are right, John. Gives a whole new meaning to the term "Left him hanging out to dry". Did you see any mangers on the foc'sle or did the meat just drop out of the sky? Verne
- 135 replies
-
- 1
-
-
- Constitution
- Revell
- (and 1 more)
-
My neighbor came over to see what progress I was making on the Constitution and he asked if I planned to build a manger. Of course, I said yes. Then later I started searching the internet and my books for information about the manger. So far nothing has popped up except that one Captain Elliot was fired in 1835 for bringing livestock onboard a US Navy ship. I am reasonably sure that Constitution had livestock on board earlier in her career. Anyone have information about a manger and what it looked like and where it was located in the ship? Thanks, Verne
-
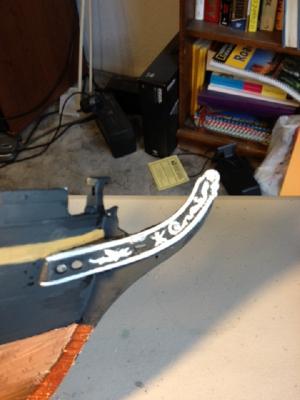
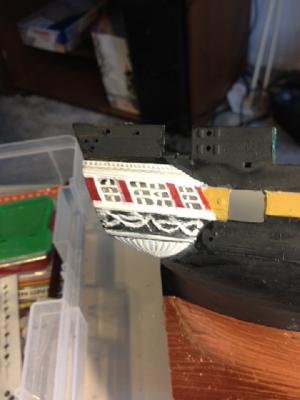
Okay. I am done painting the starboard gallery and focs'l or my head will surely explode. Couple of little things and then moving on to the port side. It's amazing how cruelly revealing pictures are! Verne
- 135 replies
-
- 1
-
-
- Constitution
- Revell
- (and 1 more)
-
Hi Watto, I have also built a great room in my build. Where did you find the furniture? I have looked all over and can't find them. Thanks, Verne (vacotton)
-
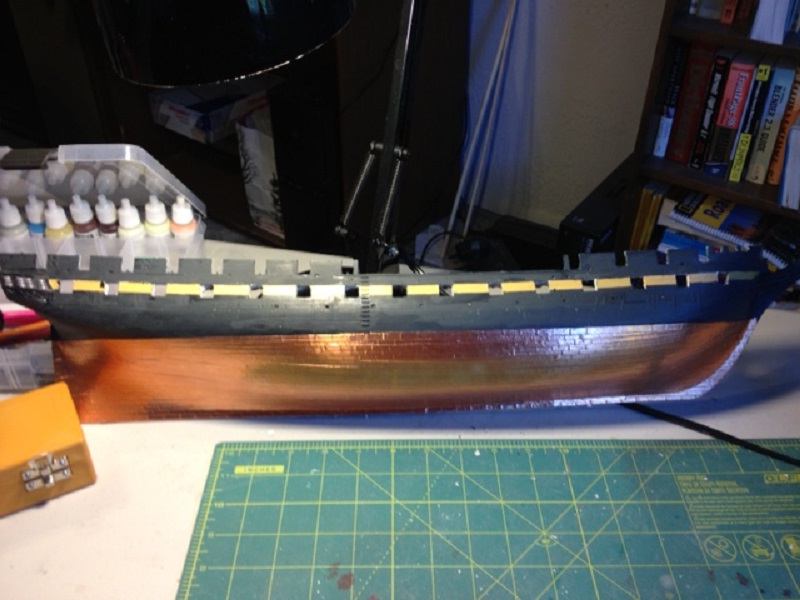
Dave, It sounds like we will be working through this optic fiber thing together. HO Furniture! 1:87. Close enough for me. I can make the table. As for the copper bottom: It's not your paint, I used 1/4" Studio Pro tape, available at Hobby Lobby for around six bucks for 32 feet. If you do that, don't be a goof like me. Start at the bottom, overlap and work up. A lot better once I figured that out. Verne
- 135 replies
-
- 1
-
-
- Constitution
- Revell
- (and 1 more)
-
Evan, I am sure grateful that you are back from vacation. Your informed, well researched comments really fill in a lot of blanks as I move forward with this build. I am committed to the "no doors, yellow ochre" version now. As for the stern windows, I was too late to get the K S PE so I don't know what to do about that. Dave, I am eagerly awaiting an optical fiber rig that I picked up on E-Bay. I think I will do the candle thing that you did in the aft cabin. Even though Prof. Tilley says that the gun deck was probably not lit at night, I may put in a couple of lanterns overhead. And then there's that captain's great room that I built. I am going to have to furnish it with a big table and some wooden chairs but I have no idea where to get furniture. Thanks guys for your comments, Verne

-
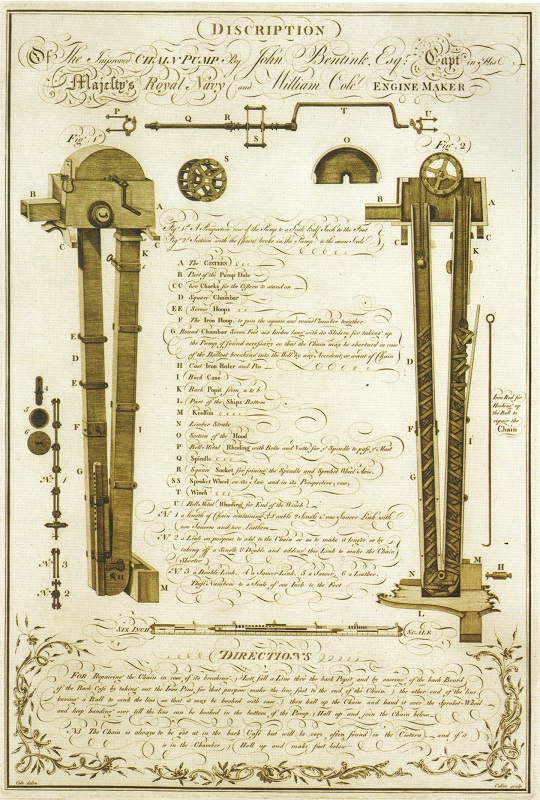
Welcome back, Evan. Too bad I didn't know that you were passing through or I would have invited you over. Good stuff about the roles of the chain and elm pumps. I figured that the chain pumps might have something to do with fresh water supply judging from those large cisterns. You can see from the attached diagram that there seems to be a sliding board that when lifted controls the flow of water to the outlet. Dave: It looks like the Navy moved on later on in the century. Can I assume that the nice brass pumps and fire engines visible in the "Navy Tour" came on board in the 1850's? Just waiting for the Vallejo #121 "Yellow Ochre" to dry. That will be my first coat on the starboard gun streak. I am with you Evan: After reading Cmdr. Martin's account on page 45, I am convinced that yellow ochre was the "Color of the Year" for fashionable frigates. Commodore Talbot had the Constitution's gun streak painted with ochre during the quasi-war with France before any hostilities ensued with Great Britain. Could this have been more an indication of our admiration for all things British rather than an attempt to fool them? Thanks for visiting. Verne

-
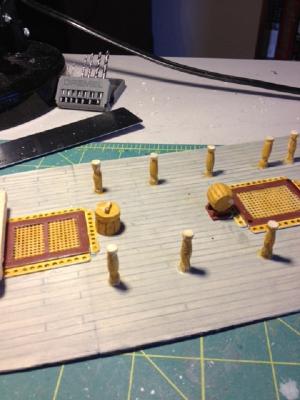
Closing in on the gun deck (sans guns). I will wait until I have the gun deck securely installed in the hull before even thinking about the guns as the have to be rigged one by one. Tomorrow the fine work starts as I touch up. I got the bitts fixed and painted and decided to paint the deck forward of the planking green. Created and painted the elm and chain pumps. Went out on a limb and figured that there is a good reason why the chain pumps are lined up the way they are and that is so that they can be "ganged" together on the starboard and port banks of cisterns. I went ahead and installed the elm pumps even though they seem to be a bit redundant with the chain pumps present. The ever vigilant Admiral suggested that I move on to something else as she thought that my gun deck was starting to get a little bit "precious". Ouch! . So I will start working on the starboard hull tomorrow after the touchup session. Thanks for visiting, Verne


- 135 replies
-
- 1
-
-
- Constitution
- Revell
- (and 1 more)
-
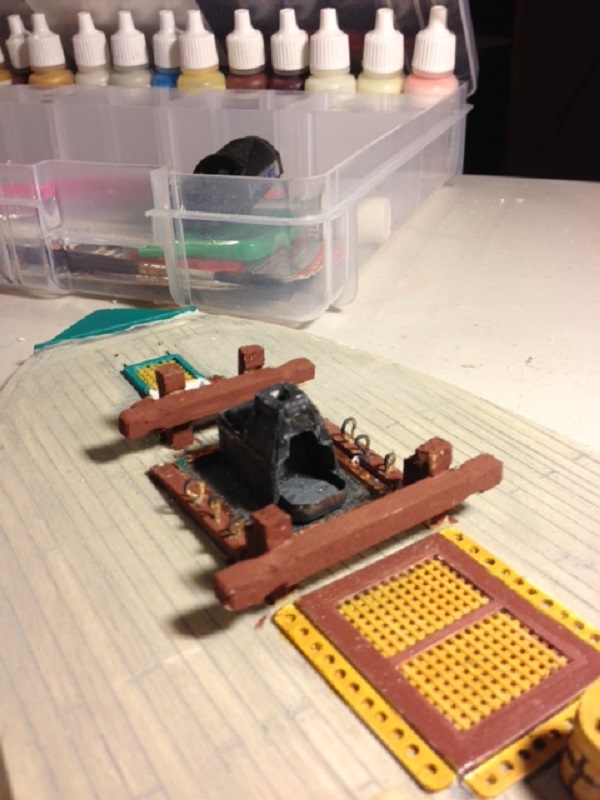
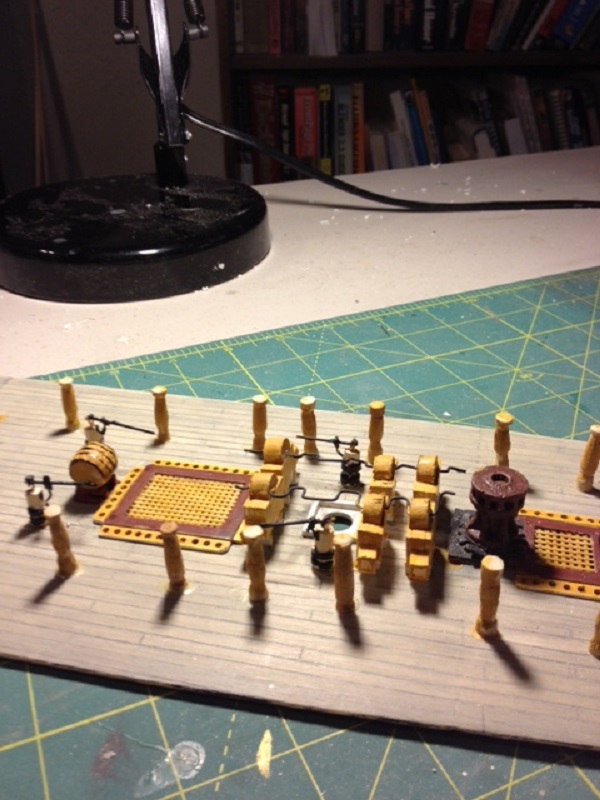
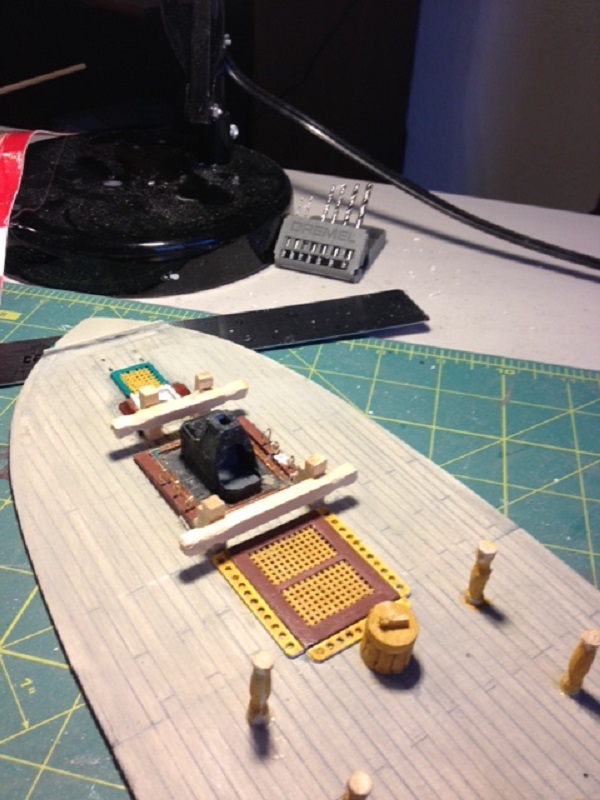
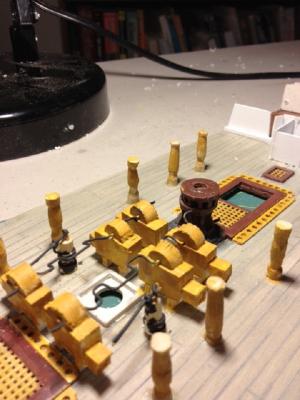
Well guys, I am done for today. Here's what happened in the shipyard today: 1. Completed the shot racks after learning how to use a pin vise after several attempts. The secret is to go very slowly a couple of turns at a time. Then look. Have to steer the bit along the pencil line. 2. Created the grog tub and the Scuttlebutt. Disappointed that I couldn't make hoops out of the .005 brass. 3. Created the bitts ala 1812. Things left for the gun deck: 1. Create the elm pump. Have the brass rods but have to get some dowling or styrene rod. 2. Make the chain pumps. Not tonight. I am tired and when I get tired, I get really stupid. 3. Paint the bitts. 4. Lots and lots of touchup. (sigh) Nice to dos (Maybe) 1. Look into making a circuit board for led interior lights. That decision must be made before I assemble the hull. 2. Create a false berth deck. No sense in cutting a hole in the gun deck unless there is a berth deck visible. 3. If I do the led system then furnish the wardroom. Thanks for all of the encouragement. It is really appreciated. Verne

- 135 replies
-
- 2
-
-
- Constitution
- Revell
- (and 1 more)
-
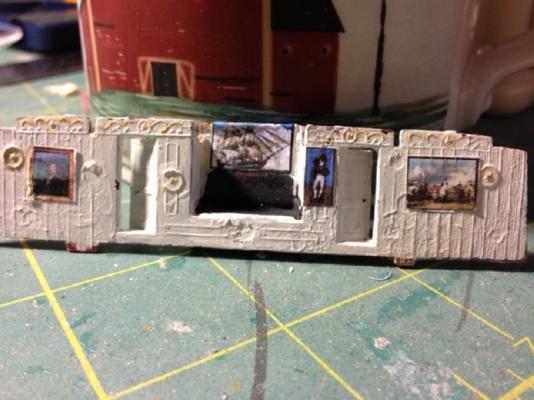
I changed out the bitts to the earlier 1812 version and added a brass handrail to the camboose. Note the notches that were cut into the forward afterdeck bulkhead above the Constitution picture. That had to be done so that there would be room for the beam that was added to the spar deck. All that's left to do on the gundeck is the pumps and some touchup work and then it's on to the starboard hull. Here are some pictures. Note the wardroom forward of the Captain's afterdeck. I haven't decided whether or not to furnish it. I made sure that I included President Madison picture in the skipper's office. Also note the chart on the skipper's table. Onward. Verne


- 135 replies
-
- 2
-
-
- Constitution
- Revell
- (and 1 more)
-
Hi Joe, Well, I have AOTS open right now and it's good enough for me. I should have read AOTS first before making the wrong bitts. Great diagrams. My only criticism is that the blueprints don't have dimensions so you sort of have to guess and eyeball it. The other book I bought is Commander Tyrone Martin's (USN Ret.) excellent and fascinating "A Most Fortunate Ship". Try to get the second edition as there is a lot more facts stuffed into that book. Another thing to do is to consult with the excellent craftsmen on MSW who obviously have spent countless hours researching and thinking about this vessel. Then follow this link http://cs.finescale.com/members/jtilley/default.aspx and contact John Tilley who is a professor of history at East Carolina University in Greenville, NC. He started his career as Assistant Curator for Collections at the famous Mariners' Museum in Newport News, VA. Other than digging on the internet and picking other peoples' brains, that's about all I have. If you find some more good stuff, please share with us. Regards, Verne
-
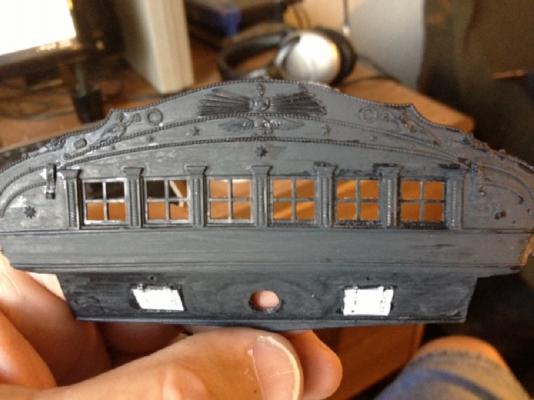
AndyMech: My neighbor completed the Victory and he lit it. So I think I might do that too. Either that or put a flashlight next to the ship. John, using MS Word was a brilliant suggestion. Here's what it did to the Captain's Room. Constitution above the couch. Cornwallis' surrender at Yorktown in the Commodore's stateroom and Hull's portrait in the Commander's stateroom. I don't know, maybe his wife gave it to him. The other guy is there by the door because the picture was of that period and the right shape.I can see that I am going to have to get the texture of the wall under control. Those planks fairly leap out. I also built the wardroom and Captain's pantry. Now the Navy photos are starting to make more sense. I will do some more things and then take some more pictures in the next day or two. Thanks for reading. Verne
- 135 replies
-
- 1
-
-
- Constitution
- Revell
- (and 1 more)
-
Yikes Kim, You have enough work to last you a lifetime there. What a trove! You could probably flip those kits as is and make a neat little sum. Verne
-
Hi rommoz13, Could it be texxn5's: http://modelshipworld.com/index.php?/topic/1796-uss-constitution-by-texxn5-johnf-revell-plastic-196-kit/?hl=texxn5. His is complete and very detailed. Verne (vacotton)
-
Rick: I share your thoughts about building detail that no one would ever see. I also concur that the more practice the better and I get a rush out of creating something that works. I was thinking of taking some good pictures of the gun deck before covering it up with the spar deck. John: Using MS Word is a handy tip. Sure would beat trying to hand paint microscopic pictures. Thanks, guys. Verne