


cookster
-
Posts
416 -
Joined
-
Last visited
Content Type
Profiles
Forums
Gallery
Events
Posts posted by cookster
-
-
-
Sherry, very nice build. Regarding the figurehead, awesome! I can't imagine doing that, what skill you have! Keep it up!
-
Hey Rich I answered your edge gluing PM question. Put glue on the edge butting against the previous plank. I'll take a couple pics tomorrow, pictures are better than words!
-
Verne, pardon me for chiming in our your LED issue. I didn't go back and read all your posts concerning the fiber optic setup, but I did take a look at the LED you bought and it's specs 9-12V, 900mA. It doesn't specify AC or DC, but I'm pretty sure it would be DC. All you need is a small DC power supply. You can get these at Digikey, Mouser or Newark just to name a few. Since it requires 900mA, an 1 Amp supply is what you need.
Here is a part# from digikey for a 12V, 1 Amp pwr supply.
http://www.digikey.com/product-detail/en/KPS1512/285-1412-ND/1631582
It's a little pricey, but it's not some cheap crap. I've used Lambda supplies at work for years and they're great. If this isn't in your price range you can look around and find something cheaper. Obviously check out the size and see if it will fit.
If you're mounting this outside the hull you can get small plastic project enclosures to mount the supply in, such as this.
http://www.digikey.com/product-detail/en/762/762K-ND/331625
there are lots of sizes, Radio Shack may still carry these in the store, they used to. I would recommend keeping it outside the hull as the supply will get warm, especially since you're using it at near its capacity.
You could also use a wall-wart (pwr suppy that plugs into the wall) and splice in some extra wire length if needed.
http://www.digikey.com/product-detail/en/EPSA120100U-P5P-EJ/T1061-P5P-ND/2235253
Just cut the end off, use a voltmeter to check polarity, then connect the wires directly to your LED. OR, get the mating terminal, connect to the LED with wire and have a male/female disconnect. That might be pretty handy.
Hope some of that helps!
-
Rich, I'll echo what Augie and Harvey said. Take some time if you haven't already and read the planking tutorials here on MSW. I read all of them and they help a lot! Especially the one by Chuck and his planking fan template. Just go to the planking section and they're listed there.
Looks like your planking with a harder wood than basswood. I've only used basswood planking so far, I'm sure hardwood adds some difficulty to planking. But, you'll be thankful that it doesn't ding like basswood and can be sanded to a good, sharp, true edge when you get to plank shaping.
I use carpenters wood glue and edge glue every plank. I'm not sure how many folks here edge glue but I swear by it. I can glue a plank and hold it in place for a minute or 2 by hand and it will be set in place. No planking clamps required! I also pre-bend all but the slightest bend planks. Use medium super glue to attach the ends of planks that have sharper bends. It will set immediately and you can then place the rest of the plank on the bulkheads.
I also ALWAYS pre-bend full planks around the entire curve (bow and counter for example). This way you get a nice consistent bend through the entire curve. Then come back and cut the plank into smaller lengths that span several bulkheads. Some people plank with full length planks, there's nothing wrong with that if that's your style (not prototypical) but it can add to the difficulty factor.
I'm no planking expert, there are many here that are WAY more experienced than me, but these are the things that work for me.
Good luck!
- Dullregard and augie
-
 2
2
-
nice setup there Mij. I hope Santa Claus brings me a mill this Christmas.... Do you like the Proxxon? For the money they seem OK from what I've read.
-
Safe travels Andy!
I won't even ask for a rigging manual, just a tutorial (collection) of steps you took while rigging. Newbies like me need lots of help, and oh yea pictures!
I'm still awed by that all that serving. I gotta get me a serving machine, or build one for sure... And then copy your methods

-
Looking good Rich! Just take your time and treat each plank like it's own model. No two are exactly the same!
-
Thanks you Hipexec! Don't know if I'd go as far as beautiful but hey, I do appreciate it!
-
Thanks Geoff!
No problem Andy!
-
OK, I think you're asking a couple different things...
"why put a wipe on poly on before painting"
In my case I'm painting over the black dye. I don't think the paint directly on top of the dye is a good idea, so I will cover the dye with wipe on poly, then paint the white stripe. I can also sand between coats of poly and really get things smooth. The white paint at that point would be the last step - finish wise. It does remain to be seen however how the white will cover over the black. I'm hoping for the best, but expecting the worse.
I'm thinking ahead to painting the outside of my Constitution cross section and was planning on just priming the wood before painting, probably acrylic paint, many coats
Yes, this is the method many others, including Chuck, uses. I just don't have the patience to put on 20 water thin coats of paint. I've painted cars and finished furniture off and on for 30 yrs and and i can't wrap my head around that method - although I do understand it. The purpose of putting the poly on before the paint would be to seal the wood, and sand between coats to get things good and smooth. Basswood is very soft and will soak up a lot of paint, or any finish for that matter. Primer would probably work, although depending on what type of primer you might need to thin it down a lot to keep from burying all the fine details under thick primer. And don't forget to sand between coats.
Good luck and hope I answered your questions!
-
Andy, I use oil based. I have used water based and it performs well, but it will raise the grain. It also goes on a little thick and "plastic" looking for me. But that's only personal preference. But cleanup is a breeze, you can't beat soap and water!
I'm old school when it comes to furniture finish. I was raised with enamel paints, mineral spirits and turpentine, so I'm not bothered my the "smells".
In fact, one of my favorite childhood memories is of the sign shop a good friend of my dad owned. Whenever I smell mineral spirits I immediately think of him and his sign shop. He painted everything by hand. The most beautiful lettering you've ever seen, freehand! Thinned that paint down and man did it flow, just like the guys that stripe cars...
Anyhoo, any of the oils rub in beautifully, so does wipe on poly. Brush on leaves brush marks no matter how careful you are. I know this is only a ship model, but I will strive to make it look as good as I can. I'm using poly in this case because I have to paint over it, not sure how well that would work on tung or danish oil.
-
-
"All it takes is a good resource to follow and a little patience"
Yes, yes, yes!!
-
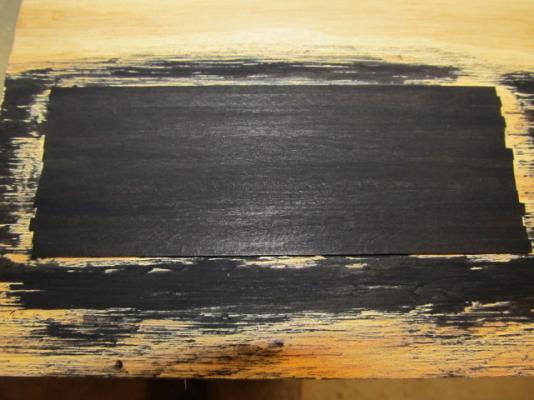
Yea Augie, I think it will work. Looks even better now with a couple more coats of poly. Can't wait to try this on some hardwood when I get to Confed, one day.
-
So here's pics after some wipe on Poly. This is after 3 coats, it probably needs a few more. But, not too bad - and it does look much better in person. You can clearly see each plank and that's what I was looking for.
Black is really hard for me to photograph too.... Need some real lights


Anyway, I'll add a few more coats of poly, basswood is really soft and soaks it up. Hardwood wouldn't be near this difficult to get a nice satin sheen on.
Next is painting on the white stripe.
-
Andy, the more I see of your rigging the more it makes me hope I can somehow come close to your results!
-
Good work MJ! I'll follow along. I particularly want to see how you use your mill to make parts.
How big will she be when done? Masted and rigged? OK, I'll stop with the questions.
-
I'm gonna use wipe on Poly. If I didn't have to paint the white stripe and bullwark green on top of the poly I'd probably use danish or tung oil. I will probably oil a lot of the bits and pieces down the road.... Just not the hull

Oil finishes are puurrrrr-tee

-
Patrick, you can get aniline dyes at any larger fine woodworkers supply type place (not Lowes or Depot
 ), although you have to look for them in some cases. I got mine from Woodworkers Supply, http://woodworker.com/c-Finishes/wood-stains-dyes/.
 There are three types of Dyes, with each type having varying colors available. Water based, alcohol based and oil based. I used alcohol based. Water based raises the wood grain, I don't like that. Oil based has to be mixed in a finishing medium (oil, shellac, etc) but can be thinned, and limits re-coating to some degree (if required). Alcohol based penetrates deep into the wood and doesn't raise the grain.
http://woodworker.com/alcohol-soluble-brt-yellow-golden-oak-aniline-dye-mssu-845-541.asp
In this case I used ebony black, 846-850, dissolved in denatured alcohol. There are LOTS of colors available, you can even custom mix them if you want, although I never have. I wish I'd thought of dyes earlier in my build, I would've dyed my inner bullwark and gunport planks before applying them. Oh well... I have used red dyes on cherry make the grain "pop" and give it that rich, deep red color without clouding the grain. It's a subtle difference vs stain, but if your a furniture finish snob like me you can tell the difference
 !
!Oh, and just like anything else if you ask 10 different furniture guys about dyes you'll get 10 different opinions, none either wrong or right - this is just what works for me...
The pics above don't do the sample justice, I hope adding the finish makes it really pop!
Anyway, good luck!!
-
Thanks Augie! I'm sure people will roll their eyes wondering what the heck? But if this turns out like I want it should be really nice. I've used dyes finishing furniture and I really like them. So we'll see where this goes..
If dyes work out like I hope, the colors on my future Confederacy should be a amazing (sorry for the lack of humility on that one!)
-
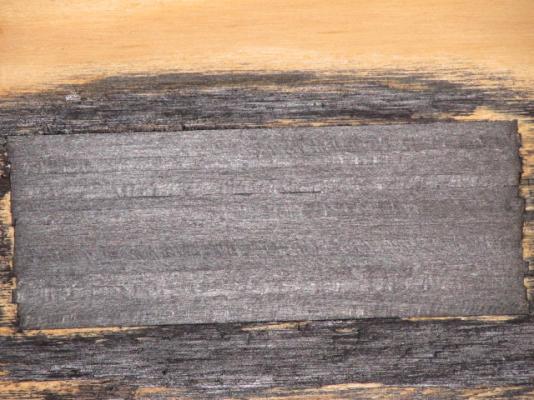
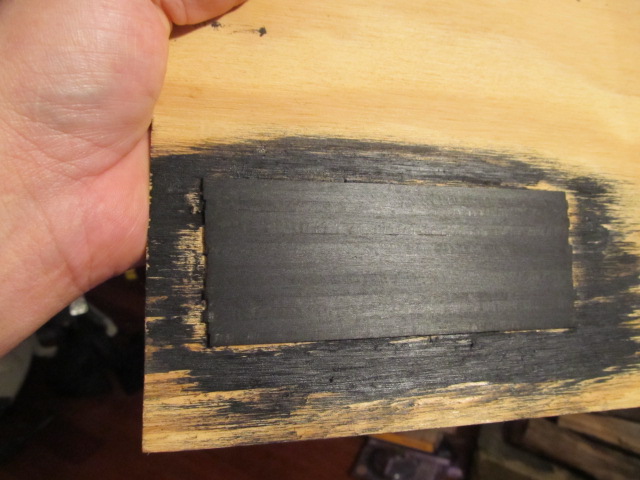
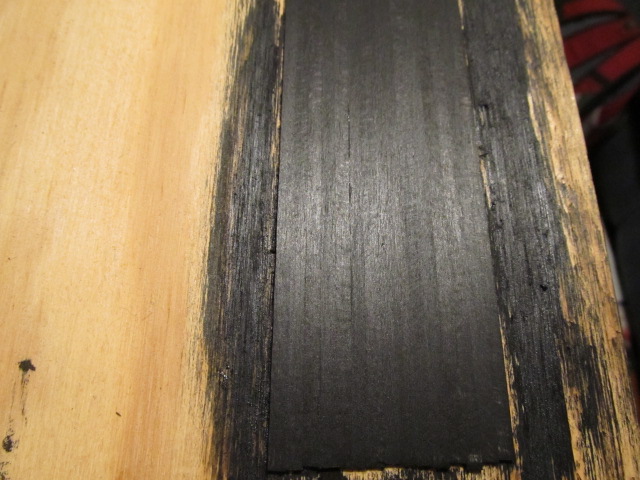
Finally made time to play around with my proposed finishing method for this model.
Black Aniline Dye
My 2 reasons:
1.) I hate brush marks. I know I could use Chuck's, and Dirk's, and others method of severely thinning down paint and applying many, many coats but that doesn't appeal to me at all.
2.) I've sanded away all the varying heights of the planks and carefully tried to eliminate any gaps between planks, This had to be done to get the hull smooth. (my car refinishing background bites me in the butt again!) But I did want to preserve the character of each plank and I'm pretty sure painting would have covered up the look of individual planks. It would've instead looked like one LARGE single piece of wood. Definitely not what I want.
Dye's, and to a lesser degree stains, should leave each plank looking like individual planks. But Dyes do not cloud the wood grain like stain. And, it penetrates mush deeper into the wood. Lots of people use dye to stain pearwood to look like ebony. I have yet to do this myself but I am going to try it.
So I made a test sample and dyed it today. Looks just like I want, in fact even better that I hoped! You can still see each plank.

The pics don't really show it but once I put the finish on I think it will look just right and you'll be able to see it better. I have to wait 24 hrs before adding the finish, so hopefully tomorrow I'll know how this will look.
I also dyed a few pieces by soaking them in the dye. I plan on making another test panel to see how deep I can sand without cutting through the dye. This is so I can sand down an area that has to be tapered, such as the Wales into the hull. This will be necessary on future builds.
I will also make a third test panel to test painting white and green over the black dye to see just how bad the coverage is going to be. My guess is horrible, but since the paint is thick maybe I'l be surprised....
-
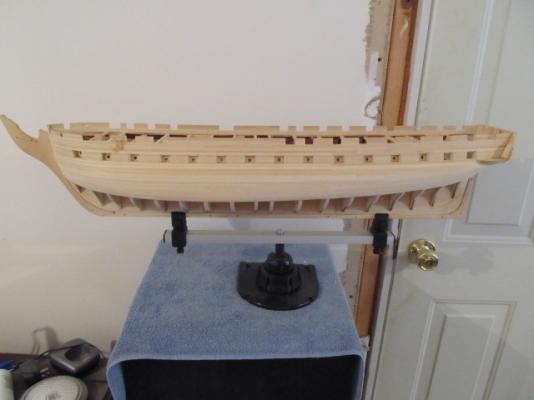
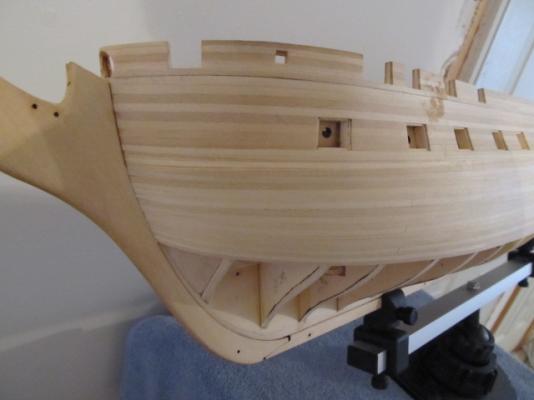
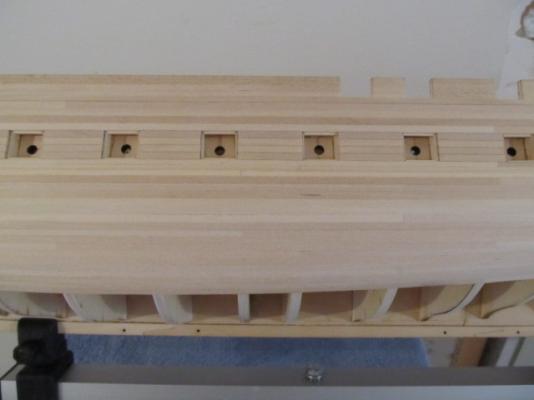
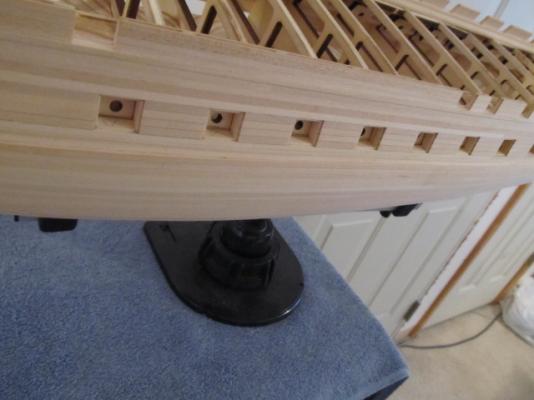
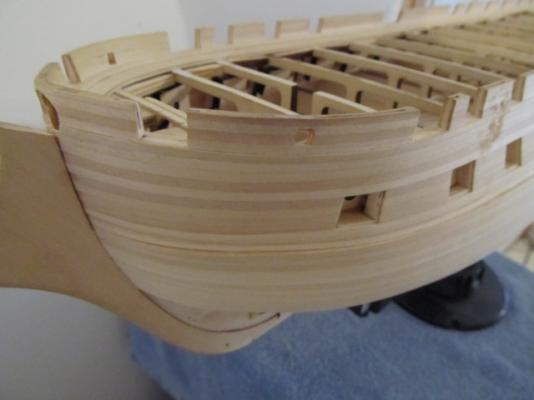
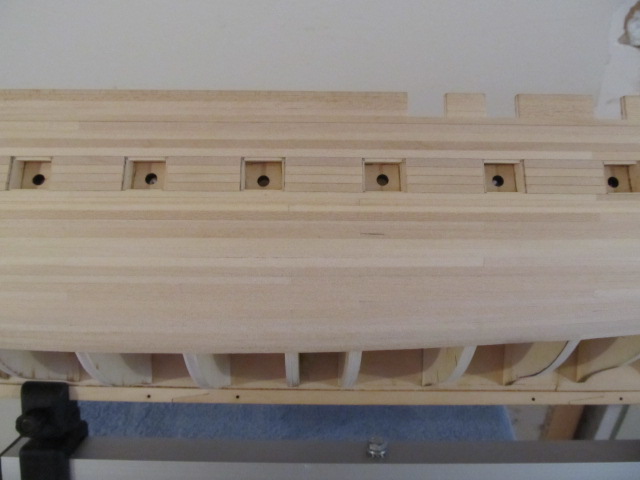
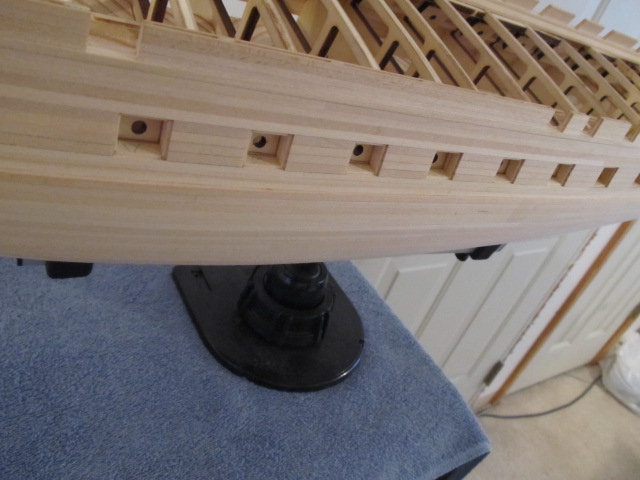
Well....... so I'm still planking.... Starting to worry a tad about the bow. I thought it was supposed to start taking a big up-turn at the stem. It is turning up but it isn't as steep as I though it would be. Am I doing something wrong? I am tapering and trying my best to keep the strakes in line, maybe I'm being paranoid since I am new to this.
I'm 2 belts of 5 below the wales on the port side, am about to switch to the starboard side. I do think I've finally got the counter figured out - at least until I hit the stern post
 And working up from the garboard plank at the bottom...
OK, pics...


-


USF Constitution by cookster - Model Shipways - kitbashed to 1812
in - Kit build logs for subjects built from 1751 - 1800
Posted
Mobbsie, Conny wouldn't look right to me without the black hull. And it's basswood, not the prettiest wood with a clear finish. With my perfectionist nature I'd look at that natural basswood hull and never be happy.... I am going to plank the deck with boxwood i got from Jeff at Hobbymill, so THAT should be pretty with a clear finish! Thanks for checking in!