BassicBill
-
Posts
96 -
Joined
-
Last visited
Content Type
Profiles
Forums
Gallery
Events
Everything posted by BassicBill
-
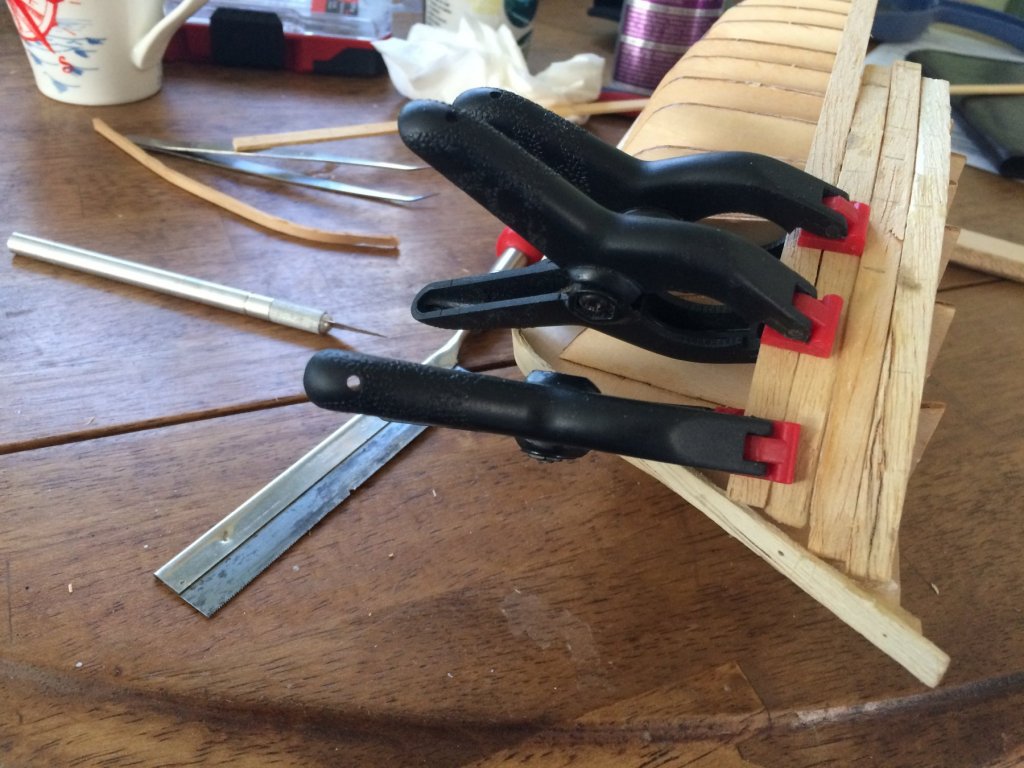
 Notice anything wrong with the pointy end? I have NO idea how I could have progressed this far without noticing the screw up coming. But there it is! Nw busy working to correct this ugliness. Sheesh! Still and all, I'm holding up adequately in spite of having an inordinate amount of fun;).Any
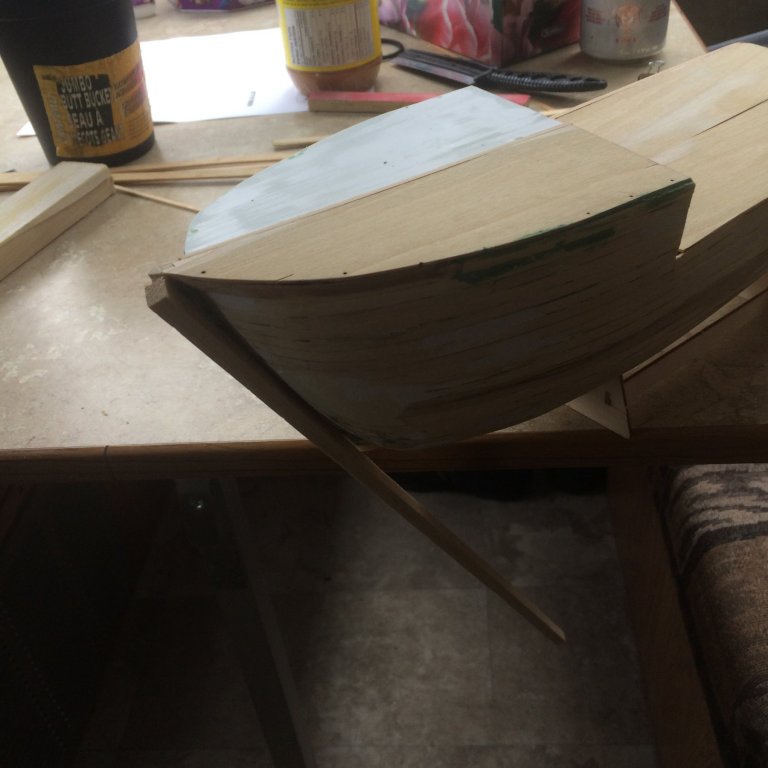
-
I have a thing for fishing boats, so I do. I built one in the 70's, however, as with almost all of that decade has slipped out of my memory. Regardless, while on vacation a couple of years ago, I stumbled on an LHS which was going out of business and selling my kit (608)at 25% of the regular price, so I snapped it up. It was the only Billings kit in the shop. My resolve to not go with a planked kit in future seems to be waning to some degree. Not so much that I'm tempted to order anything, entirely too much more work to be done on this kit, for that kind of foolishness. When I've made enough progress with this build, I'll likely start fooling with my MTB model. What the hell, the worst I can do is destroy it! ;).
-
Funny (okay, not all that funny),, but pretty much all winter long, I sat in our rented house on British Columbia's "Sunshine Coast, (read the 'Wet Coast') envisioning building this-cheer model as an R/C effort. howsomever, when We got home and I looked over what I had to work with, I had to quickly accept that my dream wasn't going to be fulfilled.bassically (and no doubt for the best), there woulda been an inordinate amount of bulkhead butchery required to find room for all of the electronics along with the running gear. Simply too big a job, (given my skill limitations) for me to accomplish, ( if I expected the result to leave the impression upon anyone that cared to look, to believe that They might be gazing enraptured by my workmanship) upon a model of a water-borne sea-going vessel of the maritime kind. I had to accept that my particular kit) wasn't/) (isn't) ever going to become an R/C boat. Being more than a little impulsive, I've already begun to ponder what I might tackle next. Thus far, I'm thinking that the Dumas, USS Whitehall kit might serve; but I simply don't have enough experience in this game to be confident. Does anyone have any thoughts on this concept? I know that I really am not much interested in doing another planked hull (preferring to go the moulded hull route.) I 'Do have a finished RN/RCN Vosper MTB model collecting dust & dead spiders -) And I recognize that I could consider converting its 1 piece hull to R/C, but I don't know; I just don't know. So I sit here in hopes that one of you can toss out an opinion or two, please.
-
Good Day. I am currently immersed in the construction of the Billings Boats Andrea Gail (608) boat, foreseeing the day when I'll need another project. I have an R/C racing boat that can provide most of the operating gear, at least I hope that is feasible. What I would prefer is a model of a British Commonwealth naval ship that I can buil as R/C, but those appear to be unavailable (at least in the size /scale that I seek. Perhaps most importantly for me is a kit that doesn't have to be planked. (I ain't sure that I've got enough years left to tackle yet another of those.As a Canadian, I'm not much interested in USN ships, but nonetheless find myself more and more curious of the USS WHITEHALL kit by Dumas. Anyone have any thoughts on this fantasy of mine? Is the idea feasible and/ or worth following up on? I shoul add that I'm an old, largely "poor", ex sailor and servant of he Queen who wants something relatively simple/" quick" to build, without being "cheesy. LHS support here in the great white Norh is pretty much unheard of, I rely on mail order but have the patience of a welfare recipient in a waiting line (okay, I have NO patience), lol). (Something along the lines of " Intermediate skill" would be ideal
-
Pooh! Found a chunk of 40 Grit! Not to worry though, I've got lots of lumber, from which to make dust!
-
I've been using sanding sticks for a long time, excellent tools for controlling/minimizing damage :). I've got me cutwater strips cut and partly laminated. Now Working on shaping them but wishing to hell I had a piece of 50 grit for this, lol! Onwards and upwards!
-
Get in the way? Yeah right! Like That could happen! As it happens, cleaning up my mess is coming along quite nicely. Remembering how pleased I was with the finish achieved on my kayak, I am coming around to that idea,more positively. I'll poke around the hardware store and see what they offer. I've had a look before, and also picked up a kit in the past (during my model railroad days, I recall that the resin had quite a translucent green tint to it, something I'd rather avoid, but then of course a couple coats of paint can, as you mentioned earlier, make a big difference. Also, I guess the resin will also serve to fill in some of the less conspicuous scratches and 'pock' / pin, holes where filler often vacates seams while sanding. I've also moved up to 220 grit which is giving me a more satisfying result. Then, A touch of light sanding when the stuff has cured and out comes the paint! Thank you, again for your encouragement and advice!
-
Admiralty, after watching me expend so many hours in trying to finish my hull, finally approached me with a suggestion to cover the hull in fibreglass resin. Having some experience with that product while building my kit-built sea kayak some years ago, I soon recognized that glossing the hull without banishing any and all blemishes would result in a very disappointing mess. Therefore, I have discarded this suggestion although that August 'body' has yet to be informed of my decision.
-
Great story, Popeye! Tough for me to relate though, not a farm boy, me. Not a city lad either, just a kid from the sticks who quit high - school while he still knew everything at 16 years of age and left home to become a matelot, serving his Queen and country by spending his years standing around on the deck plates in the main machinery spaces of HMC ships, when not actively involved in the swilling of rum and/or beer. my personal history aside, I find myself being unusually stubborn about this build. I intend to carry on with my patchwork with the conviction that I can indeed do a satisfactory job of it. (Hey, it's MY fantasy!) the patches seem to be almost complete (until I crush yet another piece. For the cut water, I'm thinking of sanding the existing stem flat, then scabbing on a thicker, squarish stip to the leading edge of that stem, hopefully gaining enough "meat" to allow me to adequately shape the sharp part and blend it in.
-
Addendum, those boatyard workers involved in this particular incident have since been excused from their duties following which they judiciously retired to the nearest wet canteen where they sensibly (more or less) slake their guilt as one might expect.
-
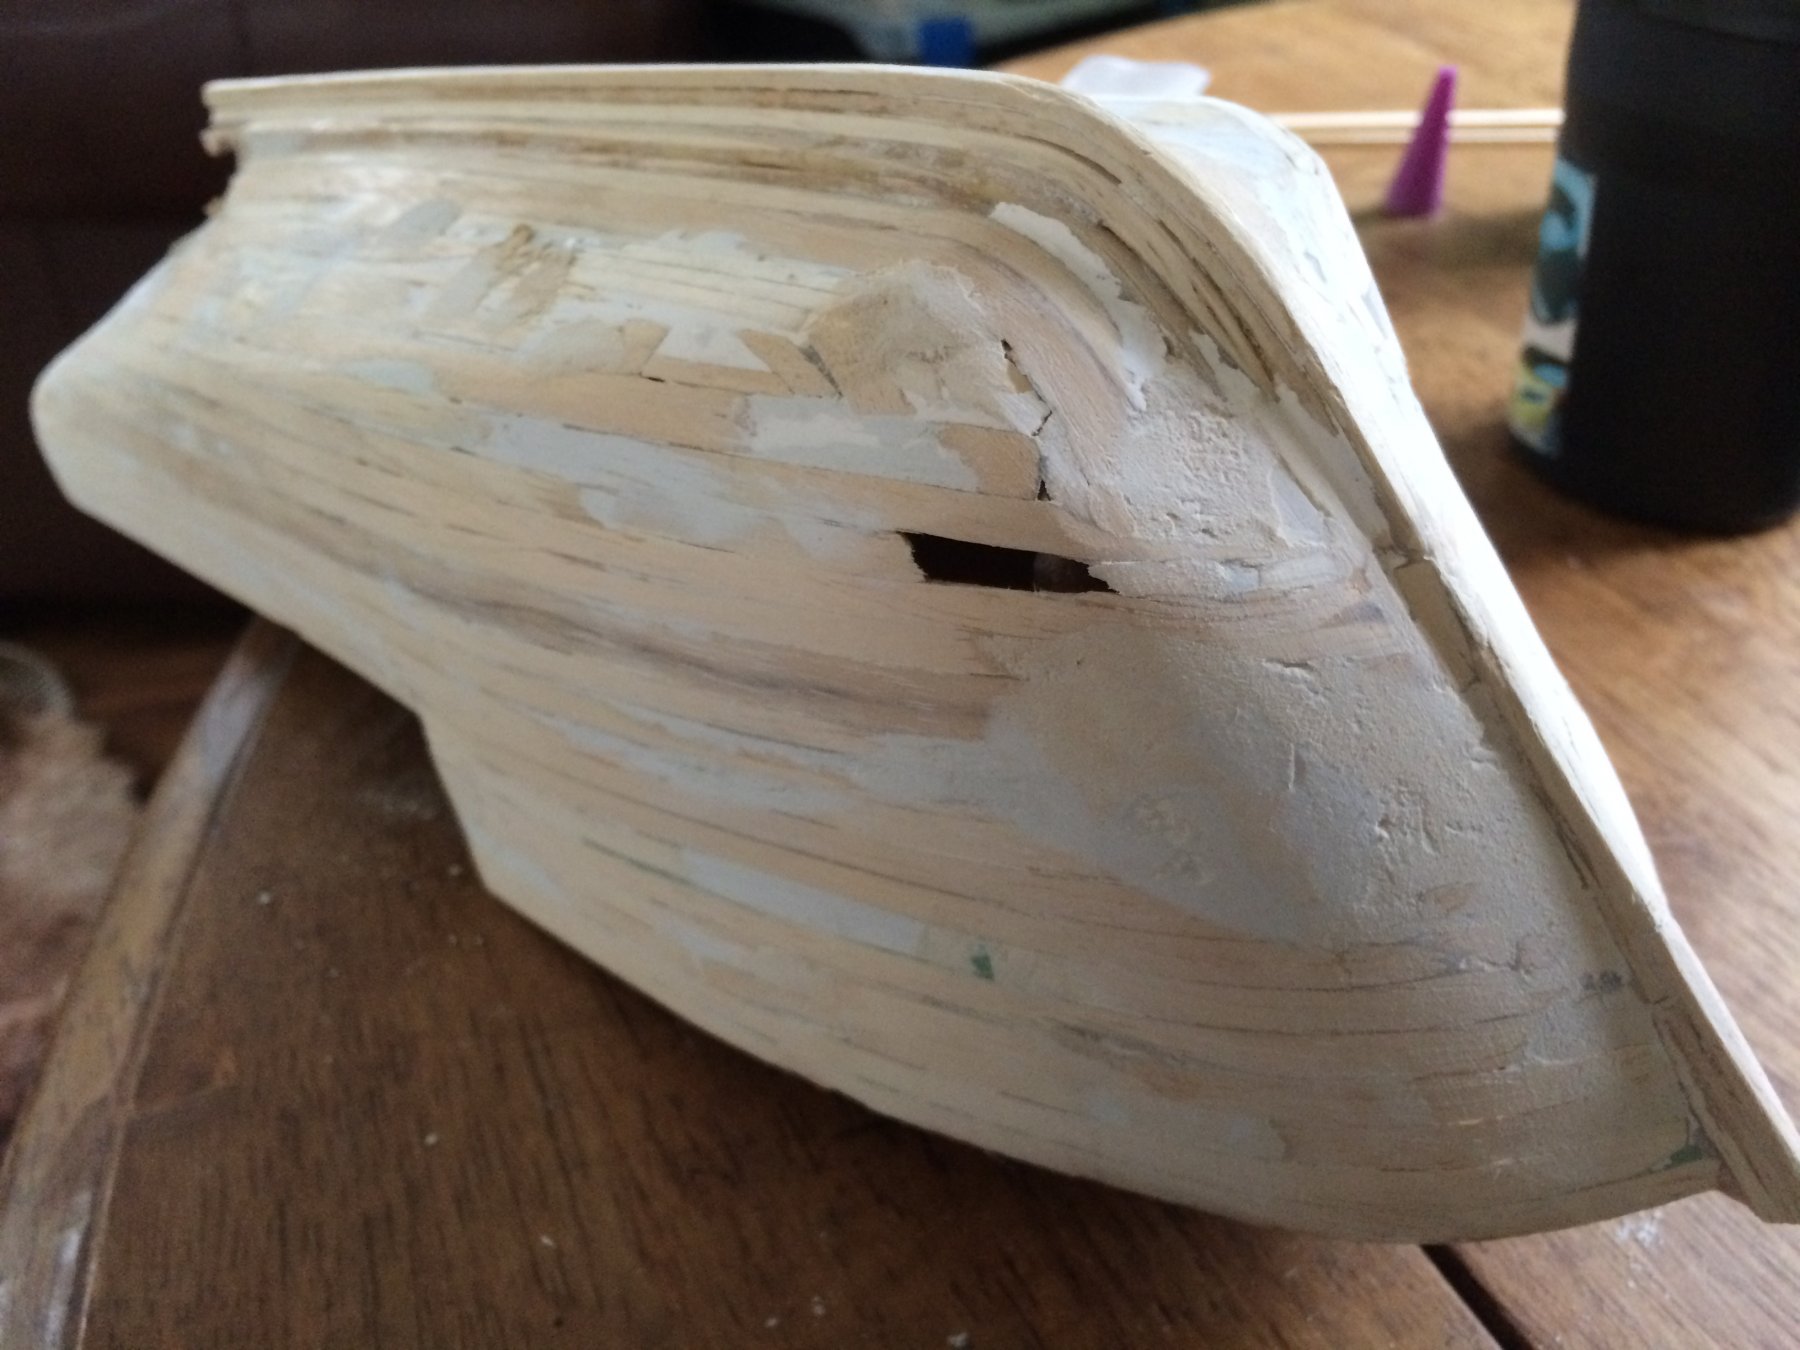
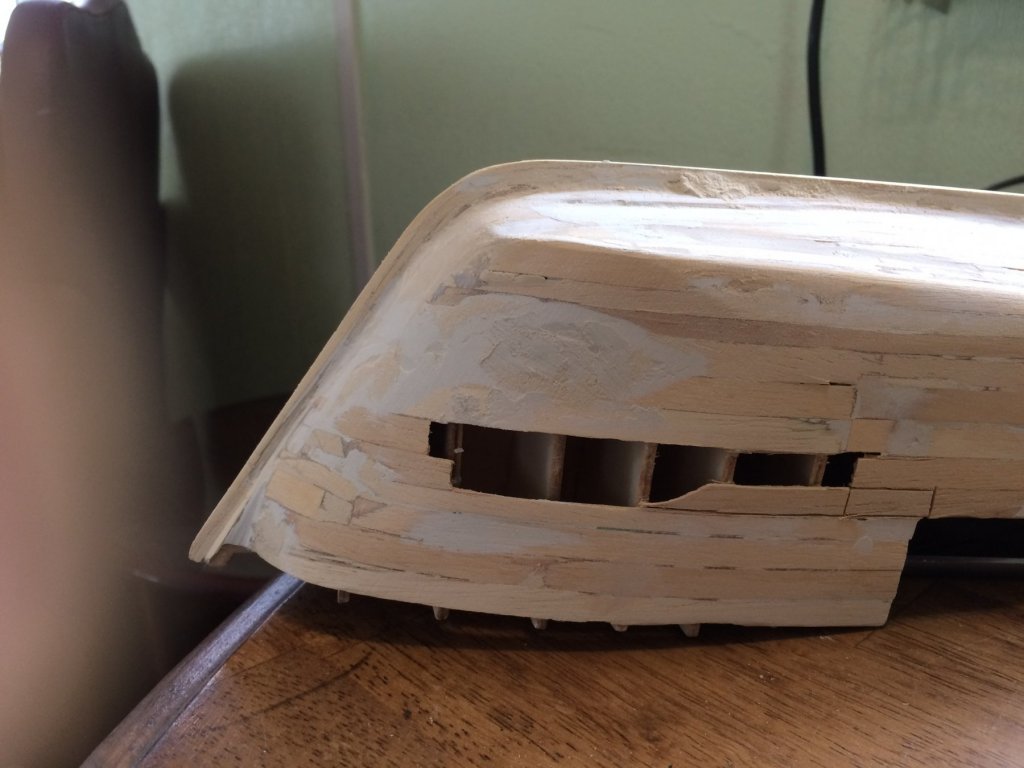
have finally completed the planking of my hull. It's not finished, as my photo shows, sad to say :D. No one has bothered to inform me that one NEVER EVER uses a power sander during these builds. Foolishly believing that I could manage well enough with my Dremel MultiMax, I took a stab at doing a "rough" sanding. My Bad! On several planks, I sanded through to daylight! On others, I merely wore them down to 'paper thin.' The photo shows an example, still requiring patching. I needed to do something like 8 of these repairs. This particular hole has since been patched and I work onwards, filling, sanding and filling some more. Once I've got the sharp end properly contoured and shaped, I'll apply a coat of thinned wood glue, before I get a coat of primer on the hull, allowing me to get on with the rest of this project. But MAN it takes a LOT of filling and sanding!! We're havin fun now!! Ah, yes, the fun continues unabated! Today whist hand - sanding, some ham fisted individual pressed too hard on a stbd. side plank of the paper - thin variety with unfortunate results. Having excised the affected portion, patching procedures are proceeding (just as one might expect of procedures. Further investigation resulted in a similar weakness on the Port side, which has also been cut out. The search for replacement lumber is expected this afternoon. Upon reporting this' 'oopsie' to Admiralty, I was favoured with an indulgent and well deserved smirk, for which I am grateful. But I'm now wondering, how much 'fun' can one man bear? Paul, this hull is single planked.
-
I have finally completed the planking of my hull. It's not finished, as my photo shows, sad to say :D. No one has bothered to inform me that one NEVER EVER uses a power sander during these builds. Foolishly believing that I could manage well enough with my Dremel MultiMax, I took a stab at doing a "rough" sanding. My Bad! On several planks, I sanded through to daylight! On others, I merely wore them down to 'paper thin.' The photo shows an example, still requiring patching. I needed to do something like 8 of these repairs. This particular hole has since been patched and I work onwards, filling, sanding and filling some more. Once I've got the sharp end properly contoured and shaped, I'll apply a coat of thinned wood glue, before I get a coat of primer on the hull, allowing me to get on with the rest of this project. But MAN it takes a LOT of filling and sanding!! We're havin fun now!!

-
Thanks again, Popeye! Planking is progressing steadily but slowly, and I think I like where it's going.
-
Planking proceeds at a snails pace. I bent, I glued, I trimmed I glued. Finally realizing that the hull was beginning to look worse and worse (The bow is looking really bluff; closer to that of an East Indiaman.) In frustration, off came plank after plank, followed by beginning at the 'Gunwales down, again, still wondering why it's done that way, rather than from the keel up; but ignoring the question and working downwards while focusing on ensuring that I get some decent flair to the sharp end. Happily, I'm able to delude myself into believing that I'll have the patience to complete the mammoth sanding job which I'm setting myself up for. Good thing I've got a ten year supply of wood filler! No sweat though, as I have a passel of sanding devices:D.
-
Even More great advice! Thank ou once again, Popeye! I had been edge gluing early on simply because it soon became clear that I'd have a real mess without doing so. My wider planking is not twice as wide as the material supplied but definitely wider. Were I less lazy, I'd go find my Vernier calipers an measure but I don't see that it's important. I am liking the results of using the narrower stuff for now
-
Popeye, thank you, sir, once again for your sage advice! I have, today, begun planking the Port Sid, using the narrower, kit - supplied material. I'm not especially confident that I have enough for the entire hull, however I can always go back to the wider stuff if necessary. But for now, this side is begging to appear as though it will come together much more satisfactorily (maybe I shouldn't have said that so soon....).
-
My planking continues at a slow snails pace, with four planks stuck on in over a week. Each of these has been removed then replaced due to my dissatisfaction with the results. I am especially unhappy about the forward ends are meeting at the stem. I've added a wide plank up the leading edge of the stem in order to facilitate a 'cleaner result, so far with disappointing results. At best I'll end up with a Lot of filling to do before I tackle the standing. Although I'm not certain, I'm thinking that my biggest problem is impatience and / failure to adequately dry fit, especially at the stem. Nonetheless, onwards and upwards!
-
I began planking the hull, however, because I have most of another Billings kit kicking around here, (Norske Love - which I abandoned after discovering that the strokes and resulting brain injury I've ended up with, had robbed me of the ability to understand the instructions or to do a decent job of building the hull. I then decided that I would use the planking supplied with that kit because that material is much wider than the stuff in the Andrea Gail kit. Also, there are a lot more pieces in the older kit and I figured that by using the wider planking, I can cover the whole thing much quicker (although it will still take me considerable time). To date I have just 4 planks stuck on there but I'm not too happy with the results and will likely take them off and restart planking. So far I'm pretty happy with the performance of my 'curling-iron for bending. Another two modifications I've made to my planking procedure include the addition of a false keel and a "false stem" (my own label..). My reasoning being, with those additions I have something to butt planks against at the stem, to help maintain a smooth "line" rather than a bunch of (what would probably look like a bunch of randomly placed planks. Also, a strip to help with alignment at the keel when I get down there. Anyone's think these were bad ideas? I do see that I've added a need for much more sanding but I can manage that, I'm sure.
-
Hey thank you for this, Popeye! I have absorbed your advice. Impulsive as I am, I had decided to go that route regardless (although I have yet to act on that that impulse). Also, I picked up a thrift store curling iron this afternoon and I'm really encouraged by its effectiveness as a plank bender (bending has been the most stressful issue facing me with this build, although I imagine other issues will arise) lol. Bill
-
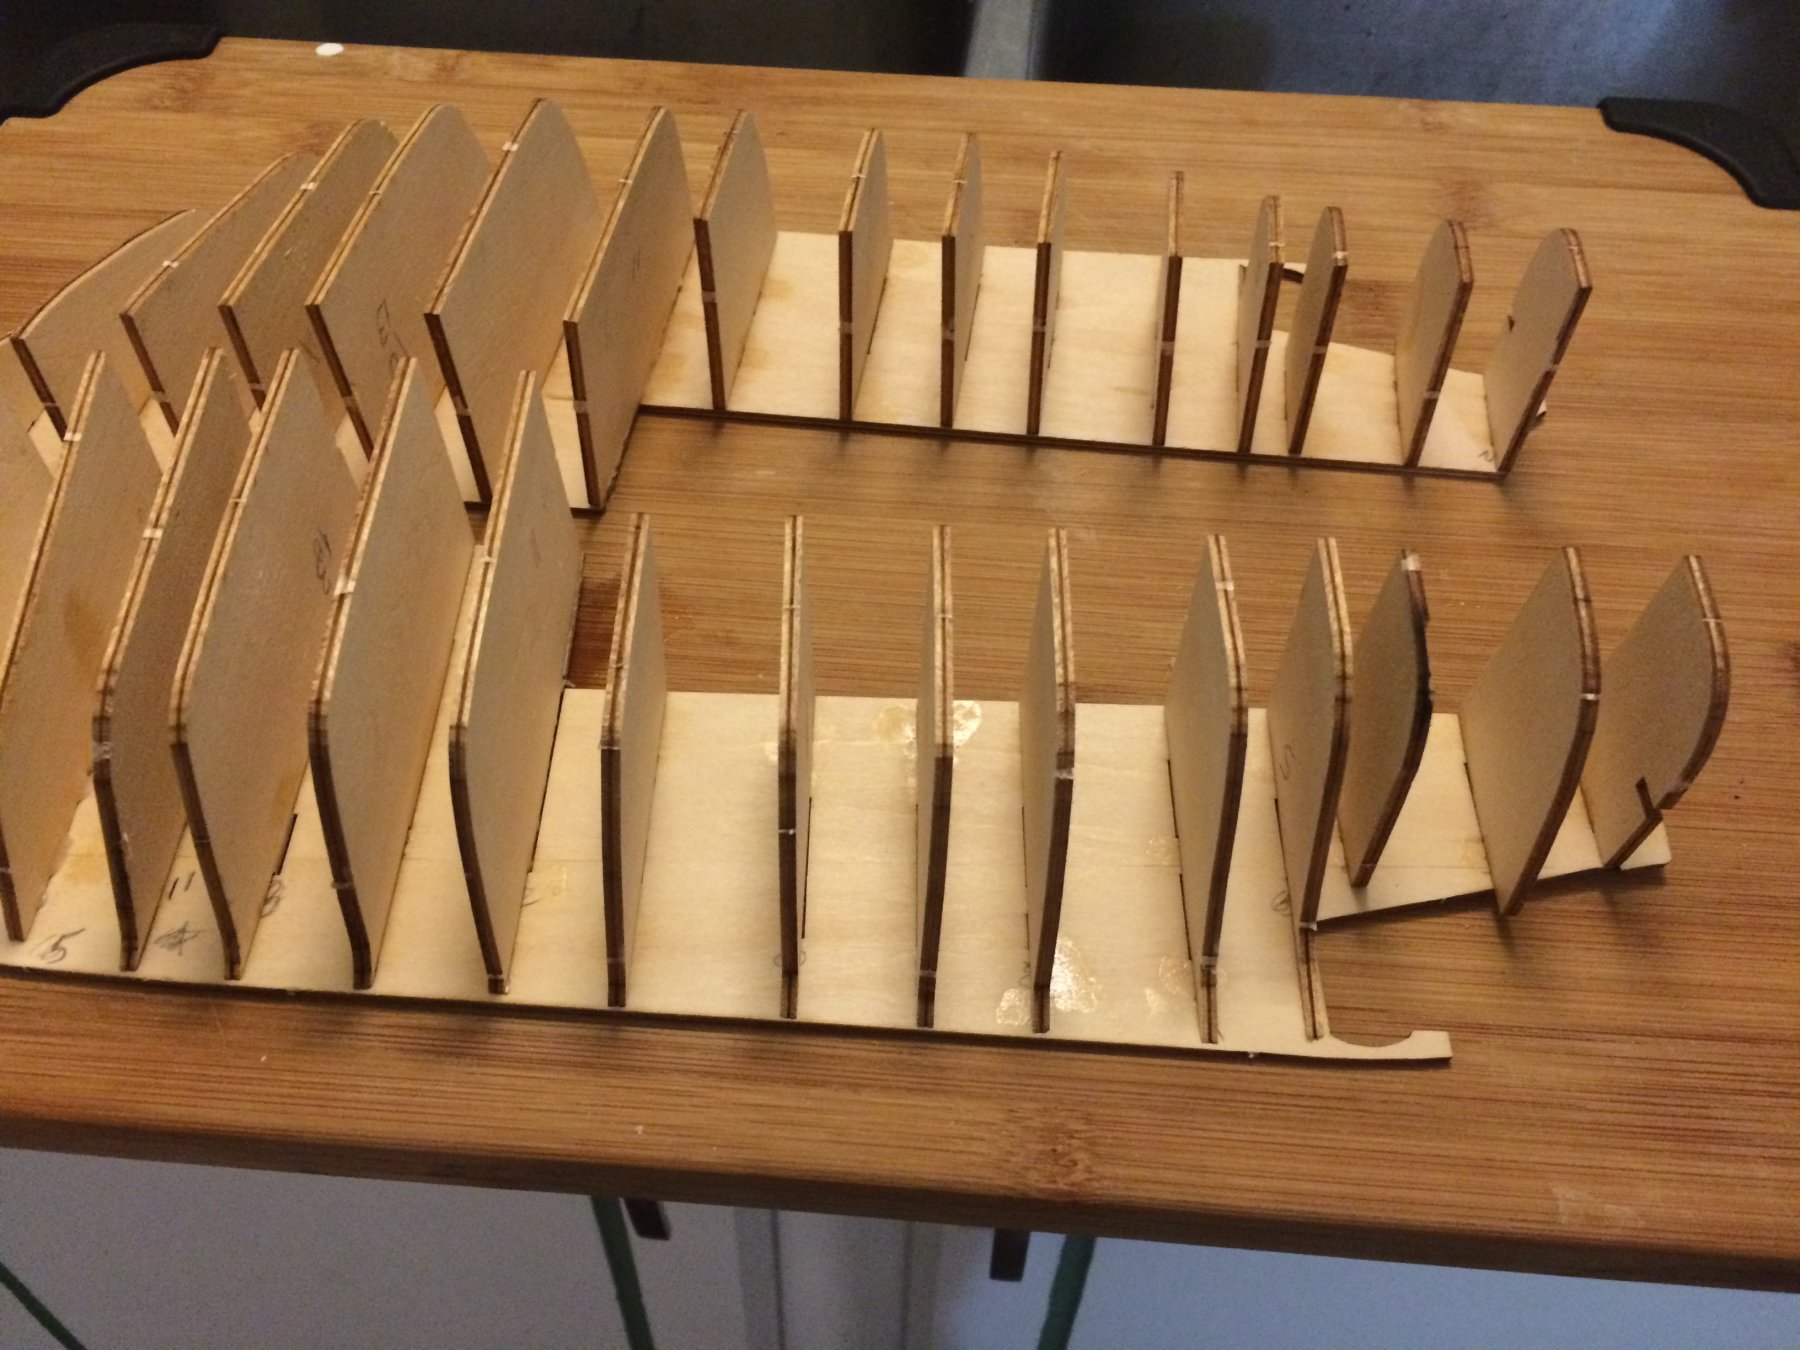
I started this build over a year ago but what with one thing or another, I have made only a very limited amount of progress with it. Brain injury sure introduces a bunch more challenges! Anyhow, I have the two hull halves about ready to begin planking. Billings directs that they should be planked separately, then the two halves be stuck together. In the meantime; While I experiment with plank bending (accompanied by the frequent discarding of broken planks) ; I fight with myself over rebelling - glue the two halves together now, then plank the entire thing. I really would like to hear recommendations one way or the other, from those of you who know better! ( Given My lack of experience,This clearly includes all of you)! Help please!

-
I like the green as well and I believe I'll stick with that. I'm pretty sure I can pick that up locally. Best of luck in finding an improved fittings kit!
-
I'm out of the shop for at least a week while I get my brain rearranged by the neurosurgeons. I'll try to follow along with you all while i'm laid up as best can but hospitals up here don't feature wifi. Cheers! Bill
-
I was visualizing a plywood 'grommet' actually (as you describe). I take no responsibility for any failures that might ensue My kit has plastic figurehead, scrolls etc. as well as plastic gun carriages - no improvements there, sad to say. A BIG back of wooden blocks et al. Brass guns, brass pintles & a few other items. Lots of plastic. On the plus side, I did find a bunch of pieces that I thought were missing (a belief I held due to a total lack of numbering on any of the parts supplied). So, I have what I need to do 35, 36 & 38.
-
My Norske Love came with wooden blocks. Nicely milled, clean.
-
Seeing the way you put 38 together helps make sense out of the drawing. I didn't get the colour sheet thing in my kit. Nor did I get the panelling that goes behind the 'openings' in the 35, 36 & 38 sub-structures. I suppose I could use balsa from a local shop for that. I'm with you on the darkness of the mahogany. Because I don't believe at all that any of these parts would not have been painted, I'm thinking along the lines of 'buff' or some such. Or maybe I'll give some thought to something that would compliment the green (buff might be attractive). I have lots of time to think about that. The only other builds I can find pics of show most everything left natural, which isn't helpful at all.