


kruginmi
-
Posts
630 -
Joined
-
Last visited
Content Type
Profiles
Forums
Gallery
Events
Everything posted by kruginmi
-
 I picked up a 1/96 propeller and lifting frame from Cottage Industries targeted for the Revell CSS Alabama for not too much money. Not an exact match but better than the kit supplied one: With some filing and shaping I could do something with that. I wish I had the lifting frame when I built out the prop area but I think I could modify to make it fit. Not too far out whack for what I see in pictures of the actual ship. When you put both together I have a good starting point for some filing and tweaking, on both the ship and supplied pieces. I will not have the lifting component actually rigged in to raise, but it will look the part. See how it looks. Always have the option to go to plan B and use the original (let alone scratch something up). Mark
.JPG.dc769172b0f9f91c273f422e1f2c5ae4.JPG)
.JPG.e240b48faa811ea5d8916ef43d1ce795.JPG)
.JPG.44c1d8a32b32c075608558bfd7235de2.JPG)
-
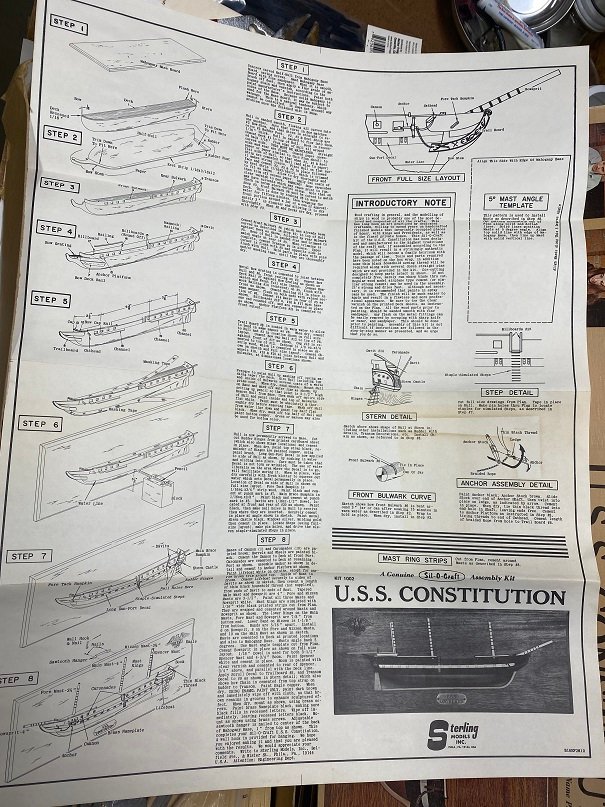
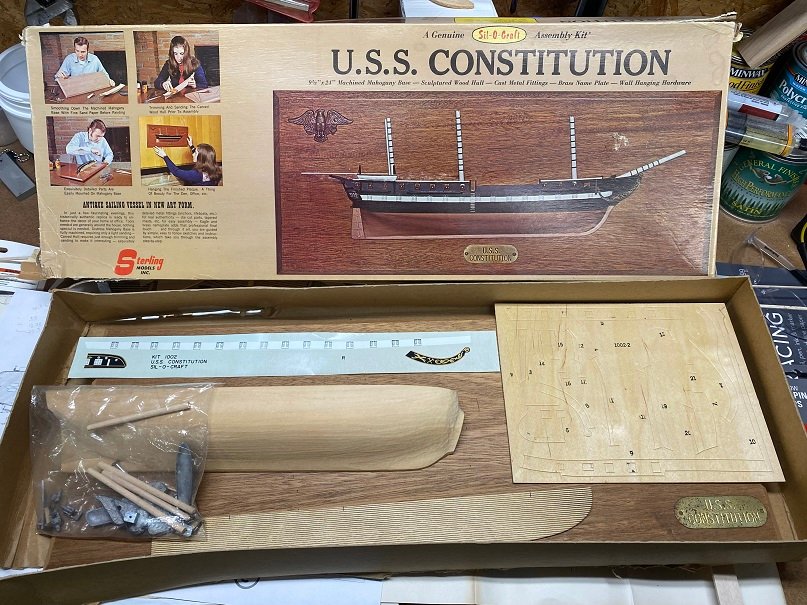
I have had this one tucked back in the stash. Don't even remember where I procured it. A 1/2 hull Constitution by Sterling Models. Biggest thing you notice is the 3/4" by 9" by 24" mahogany board supplied to mount it. Mixed media with cast metal, decals and brass name plate. Anyone ever run across this before? Definitely room for scratch (haha). No idea when I will get to it. A throwback to another time (given I come from the 60's, shall we say my childhood). Mark
-
- 4
-

-
Hey Mark, I purposefully posted that aircraft as a backdrop behind the current ship build. No intent for a separate build log. - Probably last you will see of it. (A26 Invader, Comet kit) Mark
-
Back on to the gun deck cannon backing pieces. Should have these completed this weekend and I am thinking carving of the stern blocks will start. It has been a bit of time since the last update. I had to shift focus onto a second project that jumped in priority. I left a small hint in the attached photo of what that could be. Let me see who can figure it out.... Only the smartest will figure it out. Let's get to that inner planking (did I say too much there?) Mark
-
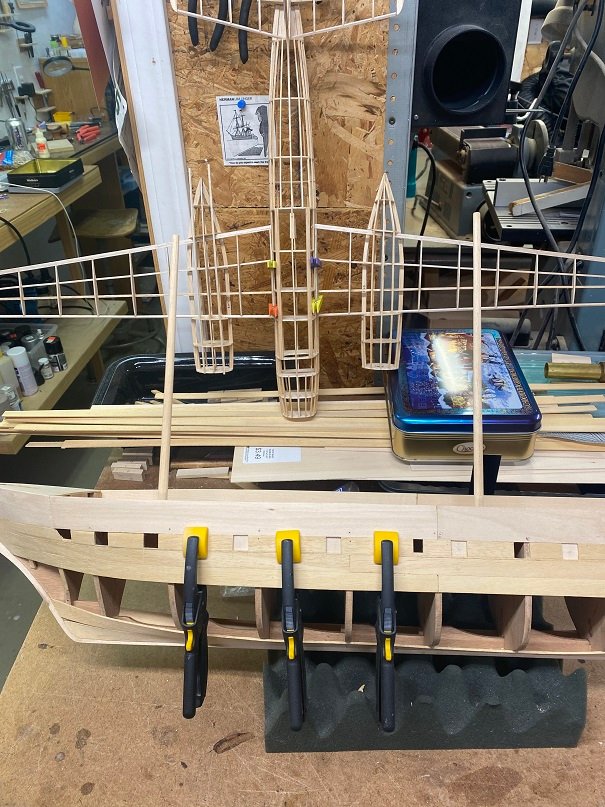
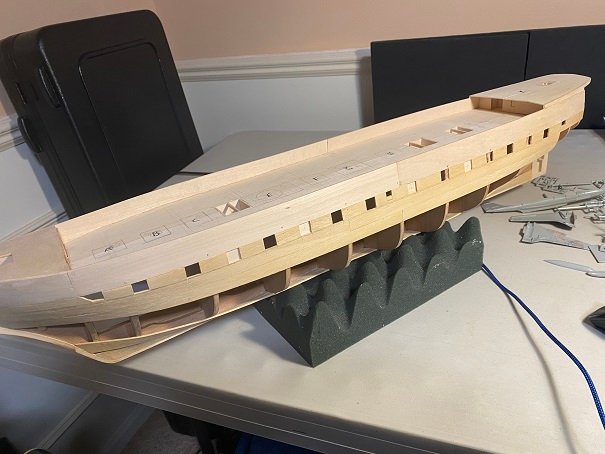
Big day today in the life of this model - it gets the holes for masts to allow those dramatic side shots: Now the 'masts' seen are from the original kit and will not be used. They were available and a consistent diameter less than the target masts so why not. I did need them to insure I had everything in alignment when sighting down the center line. First step was to attach the all important blocking for support and strength. Then securing to the ship stand and verifying level I got it on the drill press. I actually drilled twice. The first was with a smaller diameter hole to verify all was right before I enlarged with a second round. The moment of truth was when you sighted down all three 'masts' while looking at the hull. This alignment is beyond me with the camera so you have the closest I can get. Everything looks good. When I get the backings on the gun ports I can start planking again. I do need to have a look at the cathead's. I do not have them on my plans and need to insure they are still possible haha. Mark
.JPG.9ee8bb5620e8b12508738dc703b40f99.JPG)
.JPG.b94dc336ab80ea8e9dd1a8013fcc28b5.JPG)
.JPG.0b18d5a2a8147a8e6ae8656f078e1478.JPG)
.JPG.9c55ce89ef501b7b0c42fc96cc27de5f.JPG)
-
Wow, Anders - again you are giving new information. I followed the link but am at a loss given the language difference. I have no idea if they ship internationally, the cost to do so or how to navigate the menu options. I will work on a solution. I know your picks will show my best attempt at placing the cannon ports will be off somewhat. I did what I could with the information I had. Mark
-
Boy oh Boy Anders - you are making this hard. If I could find that book you pointed me at with all the information to make this more than a hit or miss model I would add the 2nd layer of planking. Even the cabin being added in 1874 draws questions. Am I making a 60's era model, a bit ragged and old (like myself) or a pseudo-replica. Luckily I can ponder that question for awhile until I finish the first layer and smooth it out with wood filler. Mark P.S. I should add - there is no figurehead in the kit. A rough picture to carve from a block. I have my first one under my belt (a Druid for the HMS Druid), but this is a different animal. I have put that issue off for closer to the end of the build haha.
-
Gun deck cannon ports starboard size complete (sans the last port). No backing plates. As a side note: Looking at the pics (again) of the museum ship the planks are evident on the side of the ship at medium to close range. One part of my brain thinks a doubly planked hull would be awesome, the other says knock it off. I am trending towards stick to the original plan. Mark
-
Thanks Keith,. I need to remember to review pics every week or two. The source plans I have are very 'lacking.' For instance, there is a vertical timber on the outside of the hull between some of the ports - not on the plans. Easy to add, just need to figure out how many and where. Seems like those 'what is that' still occurs at almost every perusal. Mark
-
Thanks very much for stopping by. I like you don't have to squint so much to recognize it as a ship now haha. Hey Anders - do you have any straight on shots of the aft deck house doors / windows? I am working on getting the facade made up prior to the (soon to be) mast placement. I have oblique shots and can wing it but if you have something better that would be great. Mark
-
Finished up one side with the gun deck ports. Like most things with ships, given the quantity of repetition your technique and speed increase. The aft most port requires the planking below to be added first. I have only put the backing on 4 ports so far. Doing some fine tuning with plank alignment. Mark
-
Time to make up the handy dandy cannon port sizer gauge (lower gunport). Time to walk around the hull and finish off the gun deck cannon ports. To repeat myself, the kit provides only the front half of the gun barrels, so a backing piece is required. This is actually a good thing because there is not inner structure holding up the plank between cannon port (why they weren't full cut out before this plank was installed. So I will work my way around going every other port to cut out and glue in the backing piece. The remaining hull opening provides perfect access for my clamp of choice. I had thought about framing out each port but the lids will be closed (with a circular center hold the cannon sticks out) and with the wood filler and smooth external finish I didn't deem the extra work worthwhile. This is 'IF' I keep up the quality and uniformity of each and every port. Not the time to slack. Lather, rinse, repeat. Cheers, Mark
.JPG.3d52824aacbefc3cb46c45763222c889.JPG)
.JPG.eb8297d505cbb51e5d8b4651d65df22d.JPG)
-
I also ponder (being prior military) the entrenched leadership and associated tactics and doctrine. All of it out the window. The inner fighting and clinging to the ways they knew. Can't imagine the chaos at all levels of ranks.
-
Hey Keith, thanks for the note. I live close to the west coast - in Grand Rapids. Grew up in Plymouth. Lived all over the United States but have returned (if you count the Army, add some foreign countries too haha). Definitely like this side more than the Detroit area. This transition time was so fleeting but that makes it so interesting. I keep getting drawn to more detail and scratch but keep in check based on it is/was a kit and I am not swimming in information about it. Keeping it fun and not sweating it. Mark
-
Had a little time, check that off the list. Tubs for Faux gun deck access complete. -Mark
.JPG.cf764e71eb606eee935c4b338bdffbe6.JPG)
-
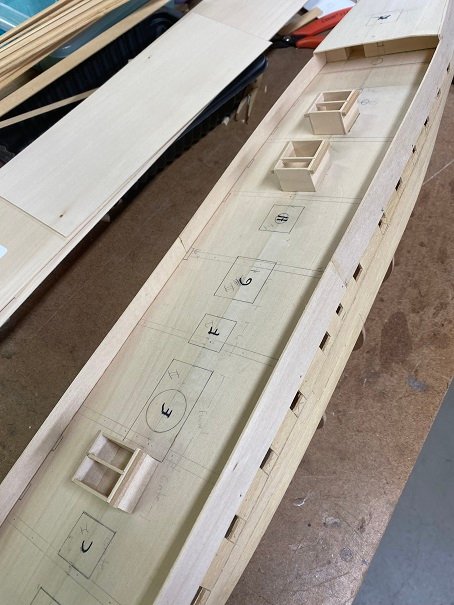
Great Anders, thanks for the help. I am not a member of facebook so unfortunately another source of info unavailable. I will forge ahead having fun in the process. With the time I have had I went ahead and make the 'tubs' to house the three ladders going down to the main gun deck. These will be inset into the deck (from below - why the planking is not complete) to give the impression of a full gun deck. After these will need to add the masts under deck blocking and drill the hole to seat the masts. Then the gun deck ports will need to be individually cut out and backing applied to secure the half cannon and lids. Then.....the planking can be completed. Stay Building my Friends, Mark
-
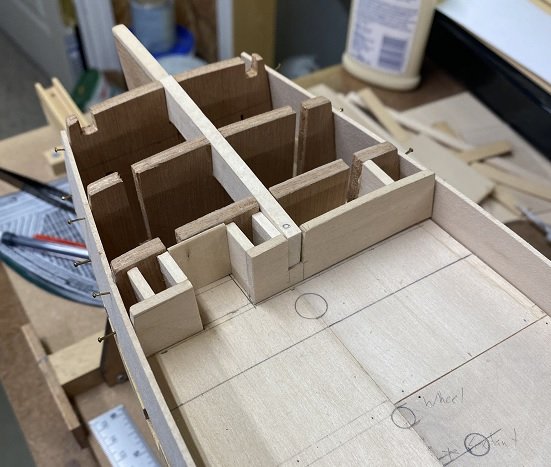
On the theme of the prop tunnel I decided to do the topside portion. This is a faux tunnel. It is covered by a timber housing the pulleys so is seen only on a limited capacity. Paint the tunnel black, add the deck and timber and all will be fine. With the center alignment component I had added way back in the initial alignment phase, it was best to cut a good access way to allow this to be cut away. This also allowed the making the tunnel off ship which was much easier. After gluing into place everything looks good. Again, this is a false deck - the real deck will be laid on top of this so clean up is very easy. A much needed improvement to the model - as well as a very cool part of the real ship. Mark
.JPG.ea8c406e8c7df88c96be8f13999b5a9c.JPG)
.JPG.7145fd4d030579a1d4bff9c9e71580d1.JPG)
-
Family activities (and I picked up a new guitar) have kept me from the workshop but today I wanted to make some forward progress. Before I forgot and was unable to, I made full size templates for all the stuff that emerged above the deck - like hatches and funnel mounts. Anything I need to make for these spaces can be measured off ship now. For the actual hull I built out the tunnel for the prop to enter into the hull. The model as received had nothing and I think the whole prop look was sub-par. This tunnel in the actual ship went all the up to the aft deck, where the ropes went to hoist or let down the prop. The tunnel will not actually functionally go all the way to the mid-deck (need the center bulkhead for support) but the illusion will be there since I will create a faux tunnel at the deck level. Once I plank around this I can sand to the hull shape. Cheers, Mark
.JPG.559ffc7e1dc0e0cbf31d0c672213e6c7.JPG)
.JPG.315d911e840fc4381b6dd0a5e871d63a.JPG)
-
Found the "Historien om Fregatten Jylland" (The history of the frigate Jylland) on Abe Books. Hopefully have it by the end of January. Look forward to the pictures. Mark PS: Next day order cancelled. No joy. I will keep looking.
-
Thank you so much Anders for the note! The question of the bow has truly been a head scratcher - comparing what the kit provides / defines and real life. Your pictures show it much more open than I even thought! Given the overall issues with the kit I have decided to do a mod to the newer kit, but still have it more closed in. If I had known sooner than the bulkheads could have been changed. The area under the grating will be painted black. It will look 'okay' at the 4 foot away level haha. The bow hull flair out was interesting given the lack of adequate support. Until I was in the thick of it just never realized the issues here. With your photos I will look to add a solid floor around the bowsprit. It makes sense for the deck to extent totally forward. It is surprising the lack of information readily available for a survivor still around. Anymore ideas or tips certainly appreciated. I will take a look around for those books referenced. Next step is to work on the stern. I am adding the 'tunnel' for the screw to go into the hull (reworked the lower purchase already). If nothing else I am having fun building this for my uncle. If I could get a good set of hull lines might attempt a second from scratch - my plans put me close already! Pull that hull down, slap some paint on it and get'r done. You have probably seen I have redrawn the masting, particularly the gaff poles. Mark
.JPG.33db97b22c4bef1a2251a52a86dc2054.JPG)
.JPG.ff42c846809e84bd3d670142b8122543.JPG)
-
Limited time today so changed gears a bit and looked aft. Figured out where I wanted the aft deck house forward wall and sized up the inset partition. I did this by eye off of photographs. The overhead deck continues past the mast to the line marked on deck. There will be a thin facade added to this wall of the doors and other such things evident on photos. Cut everything out and glued down. Working towards getting the forward and aft deck house's false decks affixed. The external planking comes up even with this. The aft section of the hull is to be carved from wood blocks supplied, that should be fun. It is a rounded stern so actually makes the most sense. -Mark
-
More progress on the bow. Lots of continuing issues with the non-symmetrical pieces and non-supports. Taking some hints from the new kit instructions and just trying things out I went through a lot of prototyping today, a big reason I like wood over plastic. The biggest challenge is that there is a hole in the fore deck over the bowsprit so the ability to just throw in supports is compromised. In the end I got something I like. The actual fore false deck will be replaced but the rest of the structure will remain. I also do not show I used 1/32" planking for the fitting of the bow components. The actual planking is 1/16". 1/32" is much more pliable and easier to work with when you are working to fit supports in. In the coming days the final upper planks will be added along with the final fore false deck. A good start to 2023. -Mark
.JPG.98a56e164fcf7ab356f821a197b1fbe0.JPG)
.JPG.ee2f6e2d9fe5a3fd1bfdc65feb1de774.JPG)
.JPG.7ff4a9b74119854db235ed45db15df85.JPG)
-
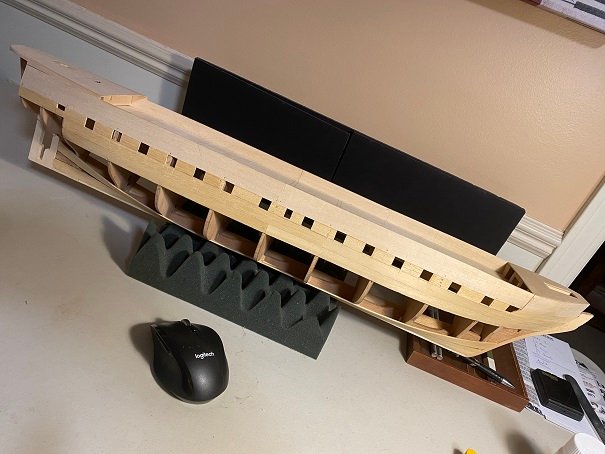
I was really not liking the bow. The fore deck provided just seemed very rounded for the ship. I also found the sweep of the planks coming up from below would require some real hijinks and bending to adapt to this rounded shape. In God we trust, all others bring data. I looked at the preview of the new plans by Billings (link provided above) and scaled up the fore deck outline to the dimensions I had. Lo and behold, there was a difference. This definitely was more in the ballpark and seemed to fit the lower planking much better. Applying this to the ship defined the horns in the forward bulkhead that needed to be shorn. I defined a line from this depth to where the last plank was affixed and removed this wood, continuing the swoop of the hull in a natural way. It was nice to see that the planks continued up to this deck (just clamped in place) merged almost too well with the deck as shaped. Note: The deck template is paper. I installed an additional support ahead of the bulkhead to help with the stiffness. Looking forward I am very happy with the change. Never 'assume' the kit is right out of the box. You are free to change anything you want. Have fun! The front of this ship still needs work. There is a pseudo bulkhead that straddles the bowsprit where the fore deck has a straight line leading up to the fore deck. And a good chunk of the center of the fore deck is cut away exposing the bowsprit and stem behind this component. With the good bones established this will be workable. The bulwark should marry in height with this fore 'false deck' The top railing of the bulwark becomes the waterway of the fore deck. Again, with the plan drawn I was able to provide the path to success for this to occur. All planking exposed above this deck will be removed. Having more fun that I should be allowed to have, Mark
.JPG.1ae5c8ffec90294c15301941653bb2e1.JPG)
.thumb.JPG.09b62e779a04dfa5f78f7df8f784f030.JPG)
.JPG.b1a6d29ce645d2350df73b10ee0d5180.JPG)
.JPG.dadfb38c158255514667505539fe3708.JPG)
.JPG.b03f2b978775e06aba34639dc0f6ee2c.JPG)
-
That is the HMS Druid, scratch, from plans from Harold Hahn. The latter part of the build is documented on this site.
-
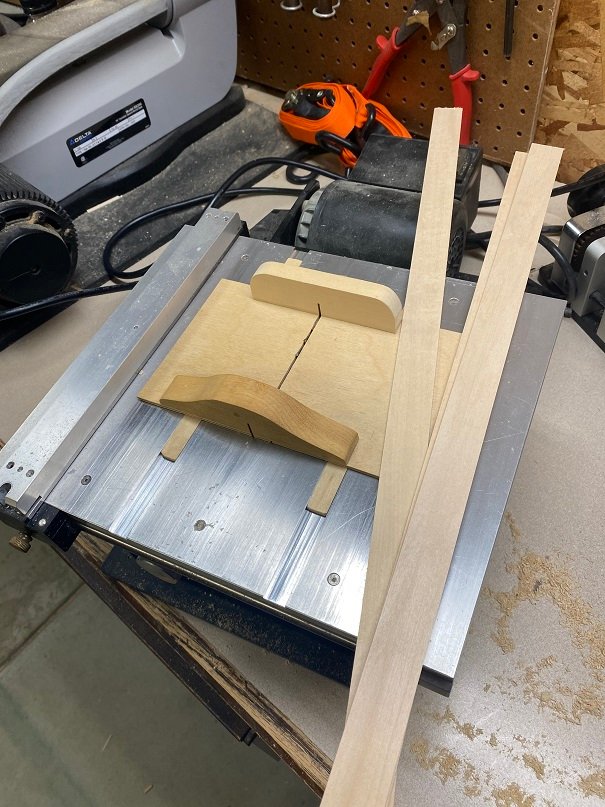
I went and cut 1/2 of the cannon ports out. These ports essentially line up with one plank width (done on purpose) so for strength I need to add the plank on top prior to cutting them completely out. Again, these will have a wood blank supporting all sides behind them - for the 1/2 gun provided in the kit. I then measured the plank strip required to get from the top of the cannon port to the top of the bulwark (not including the top cap). I cut a custom piece of 1/16th basswood to this size using my Byrnes Saw (love that thing). My intention had been to create bulwark supports prior to installing this plank but on consideration, it really seemed like it didn't need them to get the right shape. I still will install supports, just not anchored to the bulkhead sides. So I went ahead and glued a section on. I used 2 sections per side, split at the port of call opening. The brads are temporary until everything dries. Almost went together too easy. Clean up should be a snap. I got both rear sections in. The fore sections will be glued in two stages - there is quite a sweep up front so I will lock in the aft part solid, then work on the forward. A lot of unexpected progress. Here is to finishing this thing in 2023. Mark
.JPG.e7be76905189c5c2502459dc8d471af0.JPG)
.JPG.0642c74680caca5a68e713f929b9f503.JPG)
.JPG.3e4d2b38e0edbc92c0a3c363d405289b.JPG)