kruginmi
-
Posts
630 -
Joined
-
Last visited
Content Type
Profiles
Forums
Gallery
Events
Everything posted by kruginmi
-
 First of all, to all the Military Veterans out there I salute you. 1LT, 75th FA BDE out of Ft Sill. Desert Shield/Storm I managed to get my 1/32" basswood resupply. Then in two trips to basement I glued and nailed the decks down (1/2 at a time). Once the glue was set, I removed the nails. Even starting sanding the edge of the deck to the bulkheads. To say the hull has stiffened up is an understatement. Next big thing to start visualizing the planking is to set the bearding line. I cannot carve into the supplied ply, just not wide enough. Looking at the new kit instructions I found the parts list includes complete dimensions - very handy. I found the 'keel' was the same width, but they included two 1mm overlays (bearding line on down) to provide the ledge for the plans to land on. Makes perfect sense. Already drew them out, now to cut out templates and glue to the assembly. Should happen tomorrow. Cheers, Mark
.JPG.6966a63d4ca78af2baa826a8930b7876.JPG)
.JPG.def8abb1466c5e6c9fd73a4b9fcbd0ea.JPG)
.JPG.b3e153bb1f105e9c5dced24f7e62774d.JPG)
-
So, after a bit of a hiatus from this site and a return to document my Jylland efforts, I realize I never posted the final pics of the Lady Anne. To recap I configured the deck (Krug design) to handle the Pride of Baltimore II rigging and true to form that is how I outfitted her. She turned out pretty nice and met my expectations. Still haven't made a display case but I keep her close by my work at home desk to give me happy thoughts when I need them. Stay Building My Friends, Mark
.JPG.5cb6b1994a5588b6250aa86e3f8410ce.JPG)
.JPG.fe1f695612ab186803726e899a88ba7a.JPG)
.JPG.2f440be1cc600edebe7e68a98b0ce1e1.JPG)
.JPG.8ee022e2e46901192aed1a79755b64eb.JPG)
.JPG.ab7bea09099799bb3a9e0c05abb5efe1.JPG)
.JPG.3a6b047eeed0439a6ca0446ec0127bae.JPG)
.JPG.8277c529d6914111183da43fcb07161f.JPG)
.JPG.a33330cc22d33f7883efa0f22a9a31dc.JPG)
.JPG.c643e2536eb117187647e9858acc2d5e.JPG)
.JPG.b70c59ab651e127cc25636642dcbf559.JPG)
.JPG.6032c47fb1cedd945482655d93eb301b.JPG)
.JPG.de1f552efa08556abf06cdf655fb64a7.JPG)
- 128 replies
-
- 7
-

-

-
- artesania latina
- Finished
- (and 2 more)
-
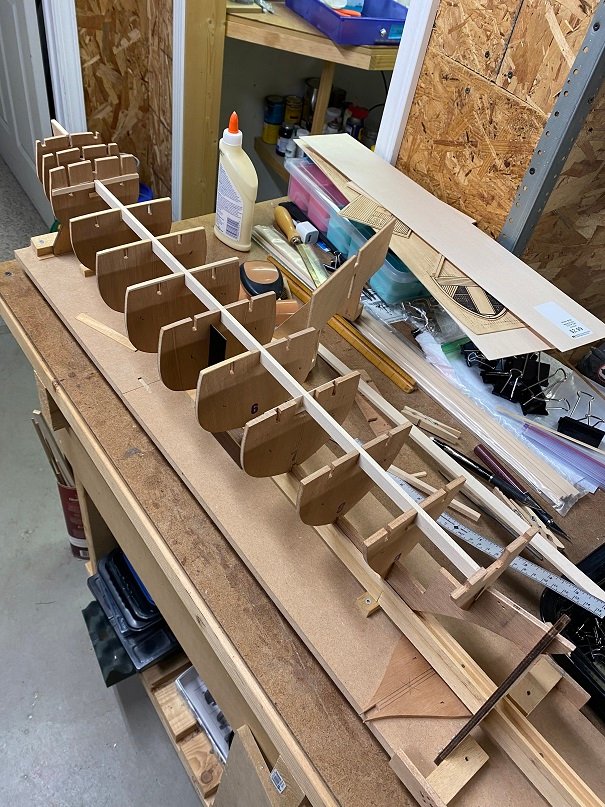
Small steps but it all adds up. Glued in the 13th slotted bulkhead, the last contained in the kit. As mentioned earlier, I will do two additional forward of this last but I need some structure present to identify sizing. There are also two subsections going from the main deck up to the fore and aft upper decks. I then proceeded to glue the central spine in. This was not in the kit. Given the wonkiness of the bulkheads I defined and cut the slot as well as provided the wood. This not only strengthens the hull but provides a good basis for the two part false deck. Sections of the spine will need to be eventually cut away (staircases and mast blocks) but the stability will be taken up by the planking. The side slots are ignored - they do not line up. I will glue in spacers between each bulkhead (one each side) for additional stability. I used glue fillets as opposed to glue in the actual joint. The wood in the kit was very porous and I found sucked in the glue and became super tacky very fast. My concern with the snug fit was that I would not be able to get the wood positioned after glue up before It became 'stuck.' Additionally, this was not a load bearing component. This will be fine. Tomorrow I hope to get the first half of the false deck glued up. If things go well I might be affixing the first plank at deck level this weekend. I will be adding the bulwark supports next to the bulkheads. Still need to decide on the aft deck size. Follow the model plans or follow the museum ship. Thinking to follow the museum ship layout in this regard. Mark
.JPG.14909bdfe8c20ebd8413f705869767e8.JPG)
.JPG.83784f3e77d6aa0b2fb01c78b9fcc066.JPG)
-
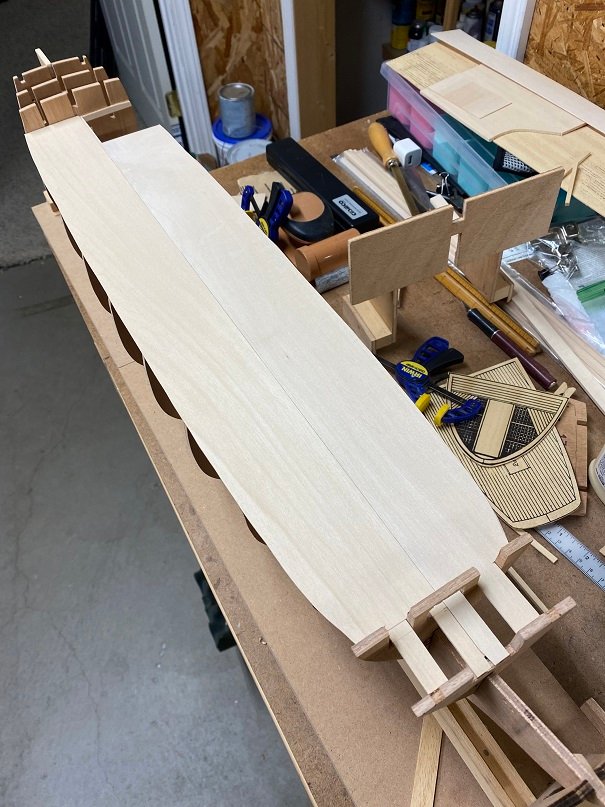
My intent is to do something every evening that I am home. Today the agenda was full but I still managed to get down to the shipyard. I cut out the false main deck. I of course measured three times and still managed to cut a piece short so I will need to go to the store for another 1/32" basswood board. Additional wood is required for the fore and aft upper decks anyways. Still a few touches to do before gluing these down. The decks are cut a little proud to allow sanding to shape. The rigidity of the hull will certainly be much greater soon. There is a camber to the deck side to side. I will glue and brad nail to affix, then pull the nails after the glue dries. Cheers, Mark
-
On to the rough in of the bow. This is a week spot of the model as designed and several changes will be made. The newer model had some good ideas so I used some of those as well as some of my own. The last two bulkheads were the following: You can see their lack of symmetry. The proposed changes were sketched in and then checked against the build as it stands today - primarily the location of the false deck support. Once satisfied I cut away the parts no longer needed. You can see the amount of bulkhead I cut away on the topmost one by seeing just a hint of the previous slots cut in by Billings. Verified by the plans I drew and by eye, comes out just right. This was one of those areas where drawing the plans presented a lot of intersection pieces at different angles. Best to get the base complete and then fine tune on the actual model. These were all the supports provided by the kit. I intend to add two additional ones. One below the forward end of the deck as well as one half way between for support and something to plank against. This will be quite sturdy eventually. Note: The bowsprit buts up against the forward bulkhead, coming down the stem. I did finally look at the supplied wood for the masts and spars fully expecting dowels. Nope. They are already sized and shaped. That will save some time. Part of me wants to scratch build them but again the intent is to make the kit my Uncle always wanted too. Stay Building My Friends, Mark
.JPG.dbab6fdb255b0d112c3d84ec179fff12.JPG)
.JPG.ac61cc9005c18a09c19239e91f9d00f3.JPG)
.JPG.3fd024a8f6a923f583959a93316bb4b3.JPG)
-
The fun times when the shape of a ship emerges in just a couple of hours. I have one bulkhead left up front, but am doing some major mods into how it fits the upper deck. Truth be told, this is about a month in. Each bulkhead needed extensive work for height, keel cut out and mirror shaping. But with the plans I drew and mods made, it fit together very well. The goal right now is to have the false deck attached by the end of the weekend. I will be adding spacers between each bulkhead for strength when sanding. Stay Building My Friends, Mark
-
My Uncle had this one bouncing around his house (un-built) since probably the early 70's if not before. He asked if I could build it which I happily said yes. Win - Win. I build a ship, there is a place for it to go. So here we go! Note: This is the 'original' kit and not the new updated one. Actually pretty rough in the wood department - especially pre-cut stuff. I have spent quite a bit of time getting the pre-cut bulkheads to be usable as well as drafting my own plans off of the supplied ones to make something that fits the actual model. I am just going to jump in from where I am. I kept updating and modifying the plans based on photos and the the Billings Boats downloaded mini plans for the updated model. Finally I just said lets make some wood shavings and glue something. We can figure stuff out as we go. This model is a biggie - 30" hull length. I am adding a 1/32" false deck below the planking. The supplied deck will not be used (doesn't fit and stamped lines). This drawing exercise was essential for figuring out actual locations and good stuff like aft deck rake and bowsprit angle. In this pic the rear three bulkheads have been glued and now am gluing the forth from the back. I abandoned the slots on the left and right in each bulkhead since they didn't line up. I defined and cut the central rib going down the middle. Yes, there are places where things go below deck (faux stairways, etc) but I want it straight and strong. Once the false deck is affixed as well as the top level planking cutting through this rib will be fine. You can also see on the central bulkhead aft how much wood needed to be added for the upper deck. So the build is on, with LOTS of scratch upcoming. Sooner than later need to figure out how far the aft deck goes (my plans show much farther than the museum ship has or the new plans show). Cheers, Mark
.JPG.5942cc515d4a264043adf0905de7b69a.JPG)
.JPG.090be82c3e91d54e738fdf62c007a08c.JPG)
-
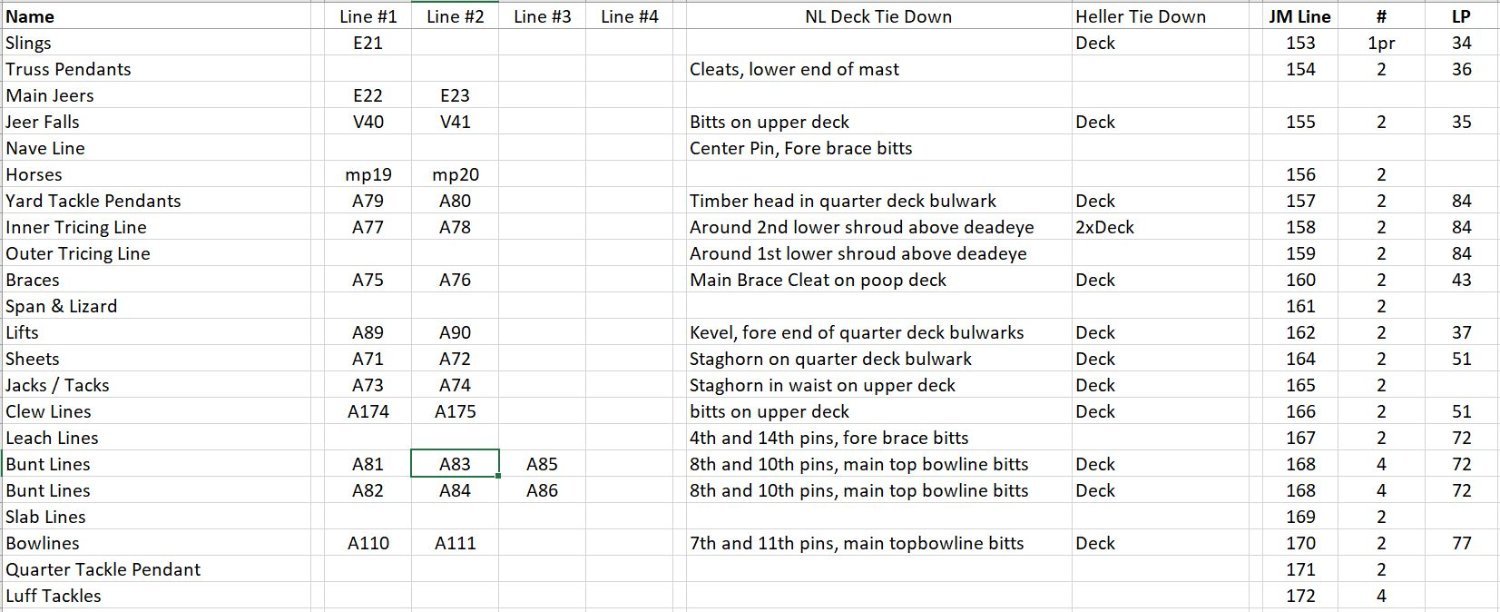
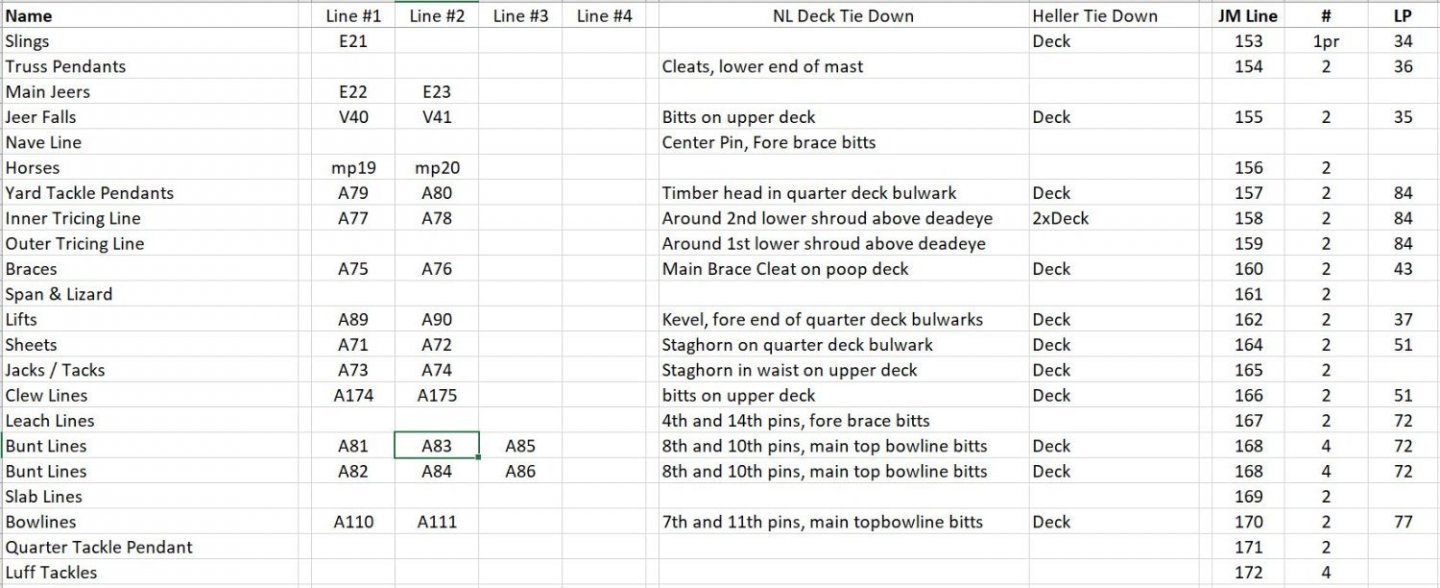
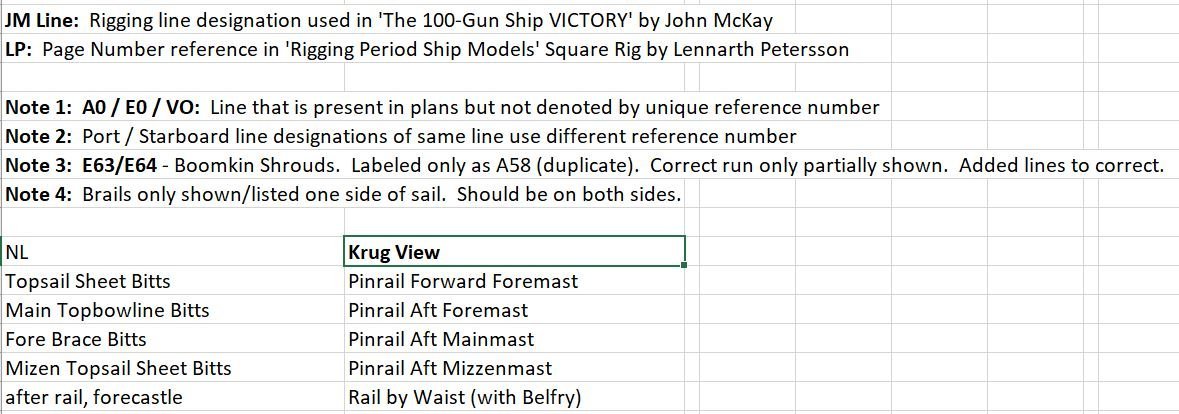
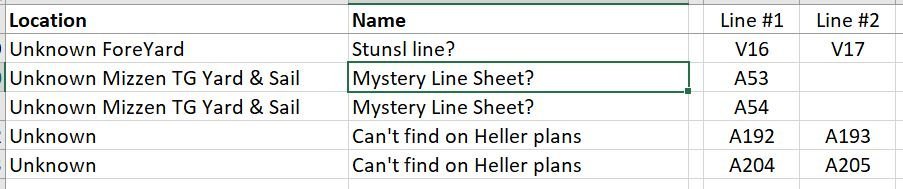
Thanks Mexspur. I provide as an attachment. I am pretty sure pretty accurate (haven't delved into the various backstays in depth). Again, it is my take and what I intend to do. Others can modify as they wish. Note: This is a decomposition of Heller 1:100 Victory lines defined in instructions. An enhanced legend is at the end. I also ID'd which lines I will not use but also, lines that are not present that I will add. Interesting to note none of the studding lines are present. I include a tab on how Heller defined their deck tie downs but will largely defer to Nepean for his definitions. My goal is to allow anyone making the model 'as is' to have more clarity on what they are doing and have more enjoyment. Mark Krug Victory Rigging Lines.xlsx
-
Summary: I created a spreadsheet that documents all the rigging lines defined in the Heller 1:100 victory instructions with cross references to Nepean Longridge's 'Anatomy of Nelson's Ships', Lennarth Petersson's 'Rigging Period Ship Models' and finally John McKay's 'The 100-Gun Ship Victory' I had looked around pretty sure someone had previously done the same thing but couldn't find any examples. At the final conclusion I got 8 lines I cannot define (missing from the instructions or just couldn't understand why there). There were also several (I assume) bowlines affixed to yardarms. Examples also show bowlines affixed to the sails that didn't seem to exist in other plans. I have attached some snapshots showing how it is formatted (using the Main Yard & Sail). I also have an Excel tab that documents the complete kit defined deck attachment points (which differ from actual practice). These differences mainly go down to the lack of provided cleats on the shrouds and elsewhere, forcing the designer to grab what they thought made sense from a build point of view. Still going through triple checking. Would anyone have any interest in this? Or is there a location that someone can point to that has a completed copy of such a thing. Mark
-
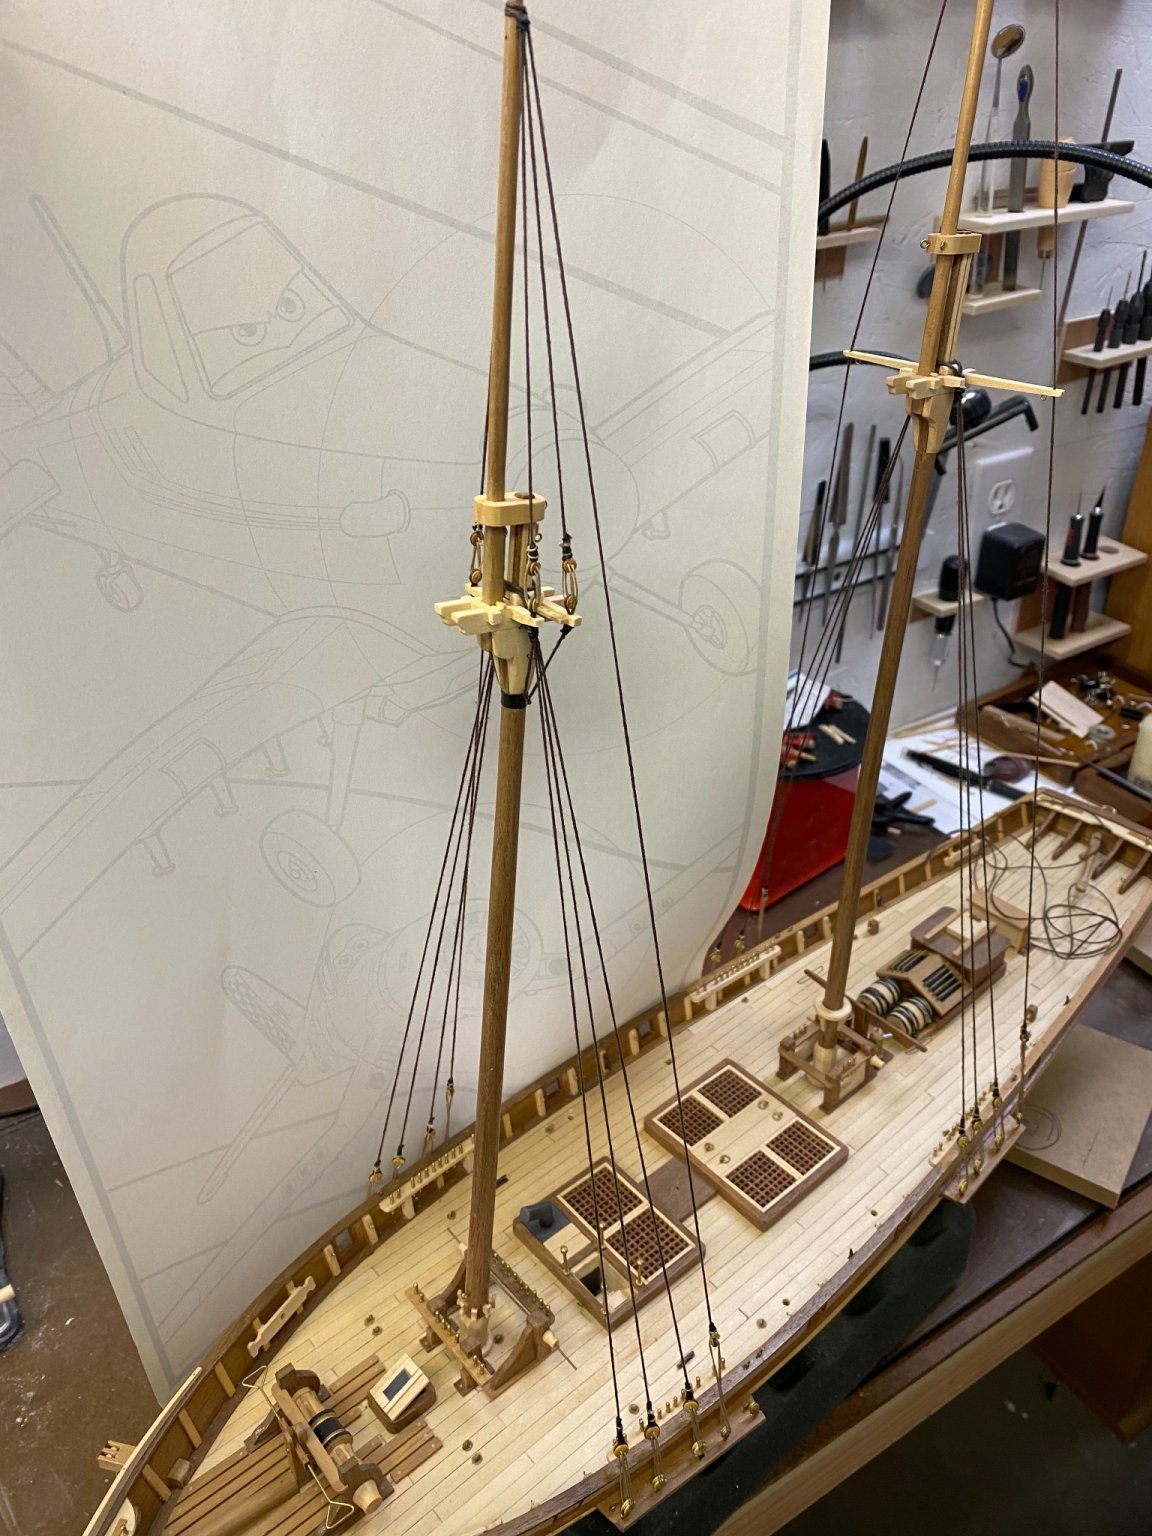
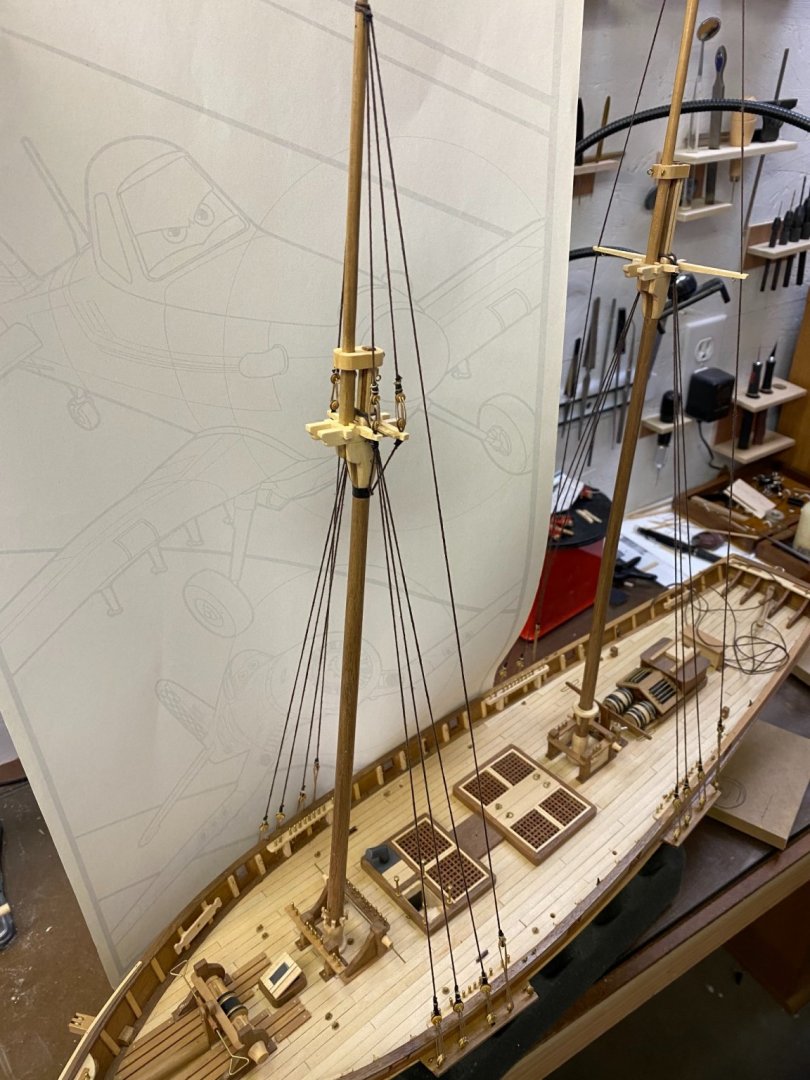
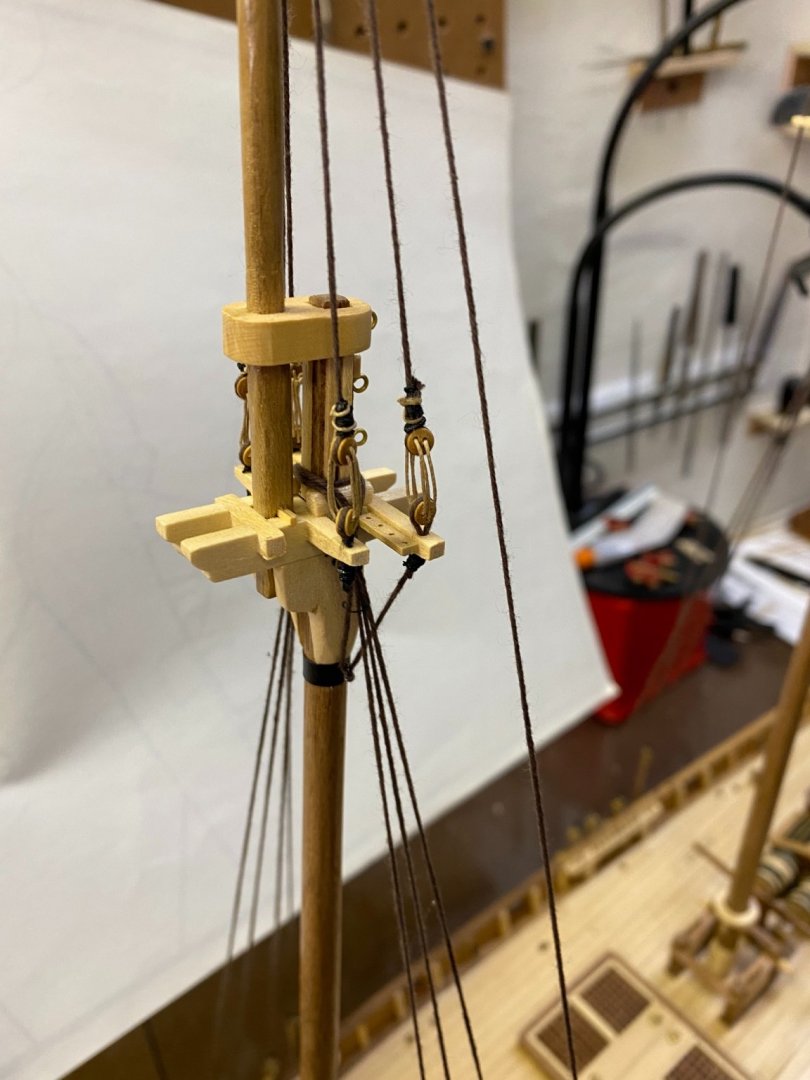
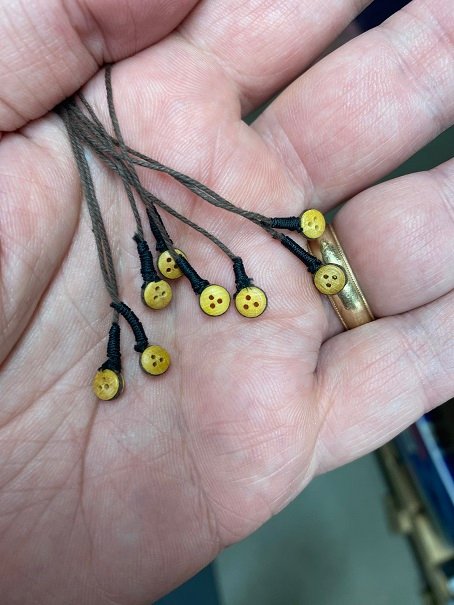
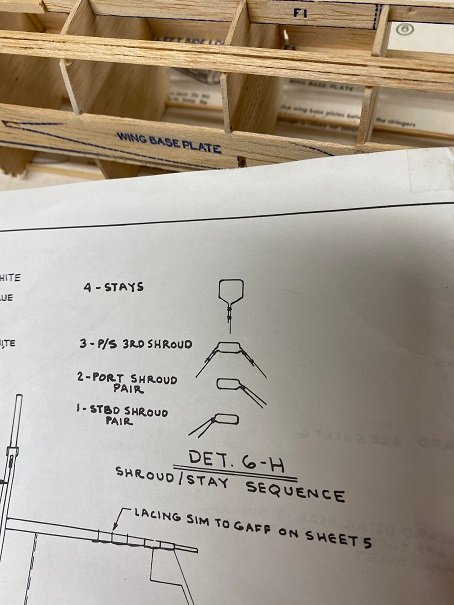
Worked on first of two main mast stays (both port and starboard) - pretty happy with the result. After I get the port one fashioned up will probably need to start on the ratlines. Not too many. Had to find (make) my 'Put'r There 3000' for actually rigging - especially to tie them up at the cleats. With the meat hooks I have for fingers only way to go. My essential tools in addition to this for rigging are two fly typing clamps (need more), hemostats and my vise for holding the clamps when possibly. Could also throw in my magnifying glass(s). Peepers just aren't the same as before. I am approaching this rigging as have some fun while doing stuff. So.....while I do look at suggested rigging thicknesses I also look at my supply and choose what I think would work. Having the blocks on hand showed the ones I chose that had to go through the blocks had to fit. Color selections are entirely on me (very liberating). I did decide early on that I was going to settle on two sizes of blocks from Syren for ease (and cost). My calculations over the whole ship showed 186 blocks required (single, double, triple - both sizes). The 1/8" were the smallest I wanted so therefore that and 3/16's were the answer. Having fun so will keep at it, -Mark
.JPG.0144089d3739b5e4930273bd8aa6f390.JPG)
.JPG.ec7560d964816aec2ec71ee527e39530.JPG)
.JPG.e54786aaabe4e741c76bfcf053c8263e.JPG)
.JPG.80e9152f501de0a1608713f84b632766.JPG)
.JPG.e9043e7d0499bcf296321766f89d2ffc.JPG)
- 128 replies
-
- 4
-
-
- artesania latina
- Finished
- (and 2 more)
-
So, got to this point today. Just 2 running backstays left on the foremast.
- 128 replies
-
- 3
-
-
- artesania latina
- Finished
- (and 2 more)
-
I need to up my game as I go forward. Currently Going through entire Ashley book of knots to ID potentially useful knots that I can use at scale. Then will make a cheat sheet for use. First question is how best to attach blocks to bolts affixed in deck (limited access) for last remaining backstay. Pondering snipping small gap at base to allow slipping on stropped block constructed off ship. Mark

- 128 replies
-
- 2
-
-
- artesania latina
- Finished
- (and 2 more)
-
Thanks Martin. Thinking about the diluted white glue. Will see how it looks. thread type made a huge difference Mark
- 128 replies
-
- 1
-
-
- artesania latina
- Finished
- (and 2 more)
-
I know the twisting is a common issue. I have tried quite a few things today, insuring the tension is uniform across all 3 threads, no thread is caught up in its hole, etc. I even wet the threads to see if any small fuzz was hampering. One thing I did find interesting is that if I do get the tension just right (basically very little) (or very slack) the deadeyes will align themselves correctly. However the shroud is quite loose. If you pull up on the shroud the upper deadeye will immediately start twisting around 1x, 2x, etc. Release the tension and it returns to the original startup. I know wood and most things hull, but this rigging stuff is a learning curve. I need to figure this out before I proceed. I am going to try some different thread and see if that helps any. BINGO: went with a same diameter but more 'waxy' thread and everything is behaving as it should. It makes sense but can't say I totally expected this. Phew. I need to redo all the shrouds but that is okay. Better product in the end.
- 128 replies
-
- 1
-
-
- artesania latina
- Finished
- (and 2 more)
-
Question: When rigging dead-eye to dead-eye, the upper dead-eye rotates to the side where the initial knot is formed. This causes, by the end, sometimes to be 180 degrees rotated from the desired position. I have been very careful to insure no twist is in the tie off line itself and everything is kept taught (but not overly so). This twist becomes more apparent the farther the deadeyes are positioned from each other. Any help for me out there? I will use a wood pole as the first ratline and could force correction with this, but am trying to work this out prior. Thanks, Mark.
-
My view is that the 'Harvey' configuration is the default basic kit way to recreate the look (less complexity). When the rigging in total is viewed, you can definitely make this assumption. The running backstay seems more accurate and befitting such a ship so that is what I will use. For the orphaned deadeye I will just punt and wait until all the standing rigging is complete and then ponder what would look best. Thanks for the comments! -Mark
- 128 replies
-
- 2
-
-
- artesania latina
- Finished
- (and 2 more)
-
So...coming up to a decision point and I throw it out for suggestions on what course to follow. The original 'Harvey' had two (2) fixed backstays off of the foremast. This was built before the grand awakening and change of direction. These directly attached to the two fixed points above the mast cap The 'opportunity' before me is that on the Pride of Baltimore II they only used one, with the second backstay being a running variety and fixed inboard of the bulwarks. I do have these connection points established on the hull. So what do I do with the second backstay deadeye? My current thoughts are to go with the PoBII configuration and not use the deadeye. I will have to throw some rigging on it to connect to the railing or something to avoid the inevitable - "Looks like you forgot something" (hey - actually think someone will look closely at this when done haha). My rationale is that this is a working ship and each captain has their own druthers on rigging. So.....the latest guy decided he liked a running backstay better. I could also just remove the deadeye and leave the hardware (damage at sea? LOL). Any other thoughts out there? -Mark
- 128 replies
-
- 2
-
-
- artesania latina
- Finished
- (and 2 more)
-
Alright, I need to know. How do you accomplish such nice rigging tie offs? I need an Eamonn intervention. My threads tend to go every which way except for where I need them (like evenly moving up the shrouds above the deadeyes). Teach me your ways..... The bigger the blob the better the job doesn't always apply LOL. Mark
- 1,039 replies
-
- 1
-
-
- ballahoo
- caldercraft
- (and 2 more)
-
Hey Eamonn, have to get to it while the iron is hot. Had some time off from work so just started. I can't promise so much activity all the time haha. Picked up a Stratocaster guitar and working to learn that. So many hobbies, so little time. All the best to You Eamonn, Mark
- 128 replies
-
- 1
-
-
- artesania latina
- Finished
- (and 2 more)
-
Hey Keith, born and raised in Plymouth currently in Grand Rapids. Went to UofM back in mid-80's. Love the Western side so much more than the Eastern. Mark
- 128 replies
-
- 1
-
-
- artesania latina
- Finished
- (and 2 more)
-
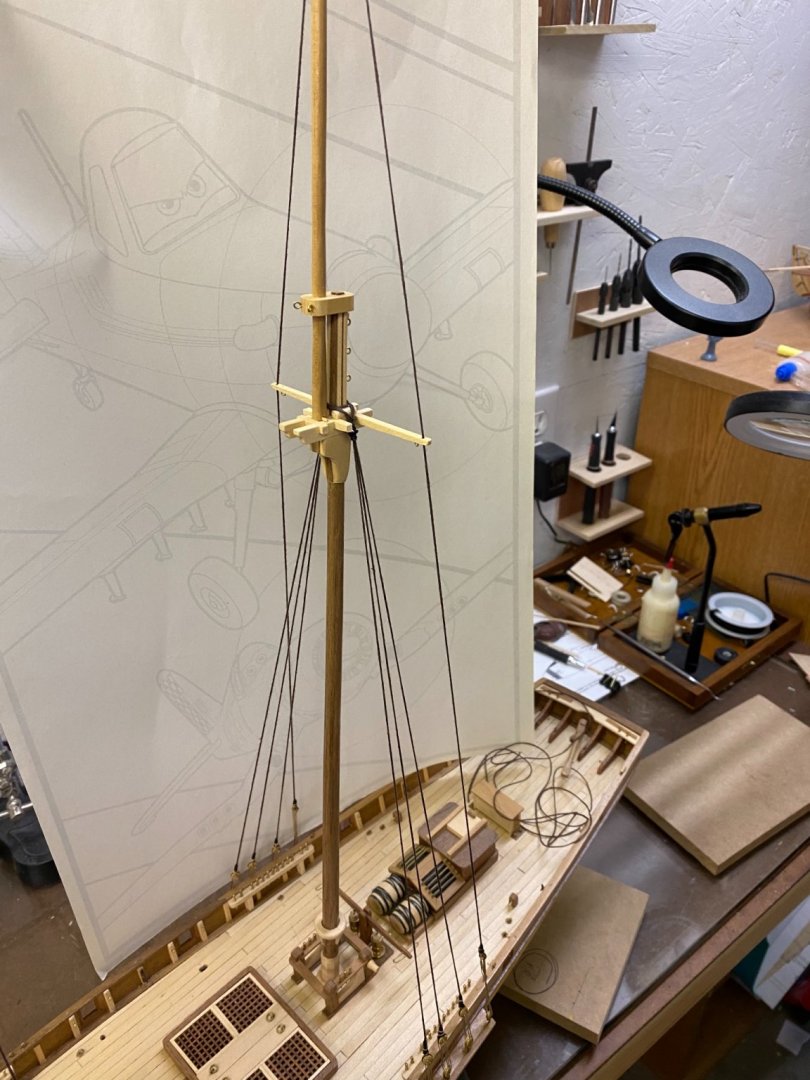
Moved on to the Fore-mast. Of course the chain plates had more eye-bolts in them so the jig couldn't be used the same way. So...time to adapt. I clamped to the bulkhead on the deck side. Then the process remains the same. It seems as soon as you get good at something, it is time to move on (haha). I have a few backstays still to go. Then came the all important check: are the masts in line and appear to be perpendicular to the deck...... I can live with that result. Stay Building My Friends, Mark
.JPG.62e02f398207bb3f65e99e025f043450.JPG)
.JPG.62fa563a8ea7d43a6fc1f2d8c401d2a9.JPG)
.JPG.219b49ef5bd2452eb19bce6a209fa688.JPG)
.JPG.f1f97f8332c1884d57709e6a6e78f177.JPG)
- 128 replies
-
- 6
-
-
- artesania latina
- Finished
- (and 2 more)
-
So this happened today. So much for removing the main mast for storage, guess I am committed now LOL. Next up is the fore mast. Funny how in the mind these shrouds took on the aura of the Victory, with seemingly thousands of ratline knots to tie. This is a LOT easier. Besides, every fifth run will be a wooden rod making it even easier. -Mark
.JPG.650ef91571d6780f5b90effbb6ae1670.JPG)
.JPG.5d4f68811c5a5129ba330235d896eb18.JPG)
- 128 replies
-
- 7
-
-
- artesania latina
- Finished
- (and 2 more)
-
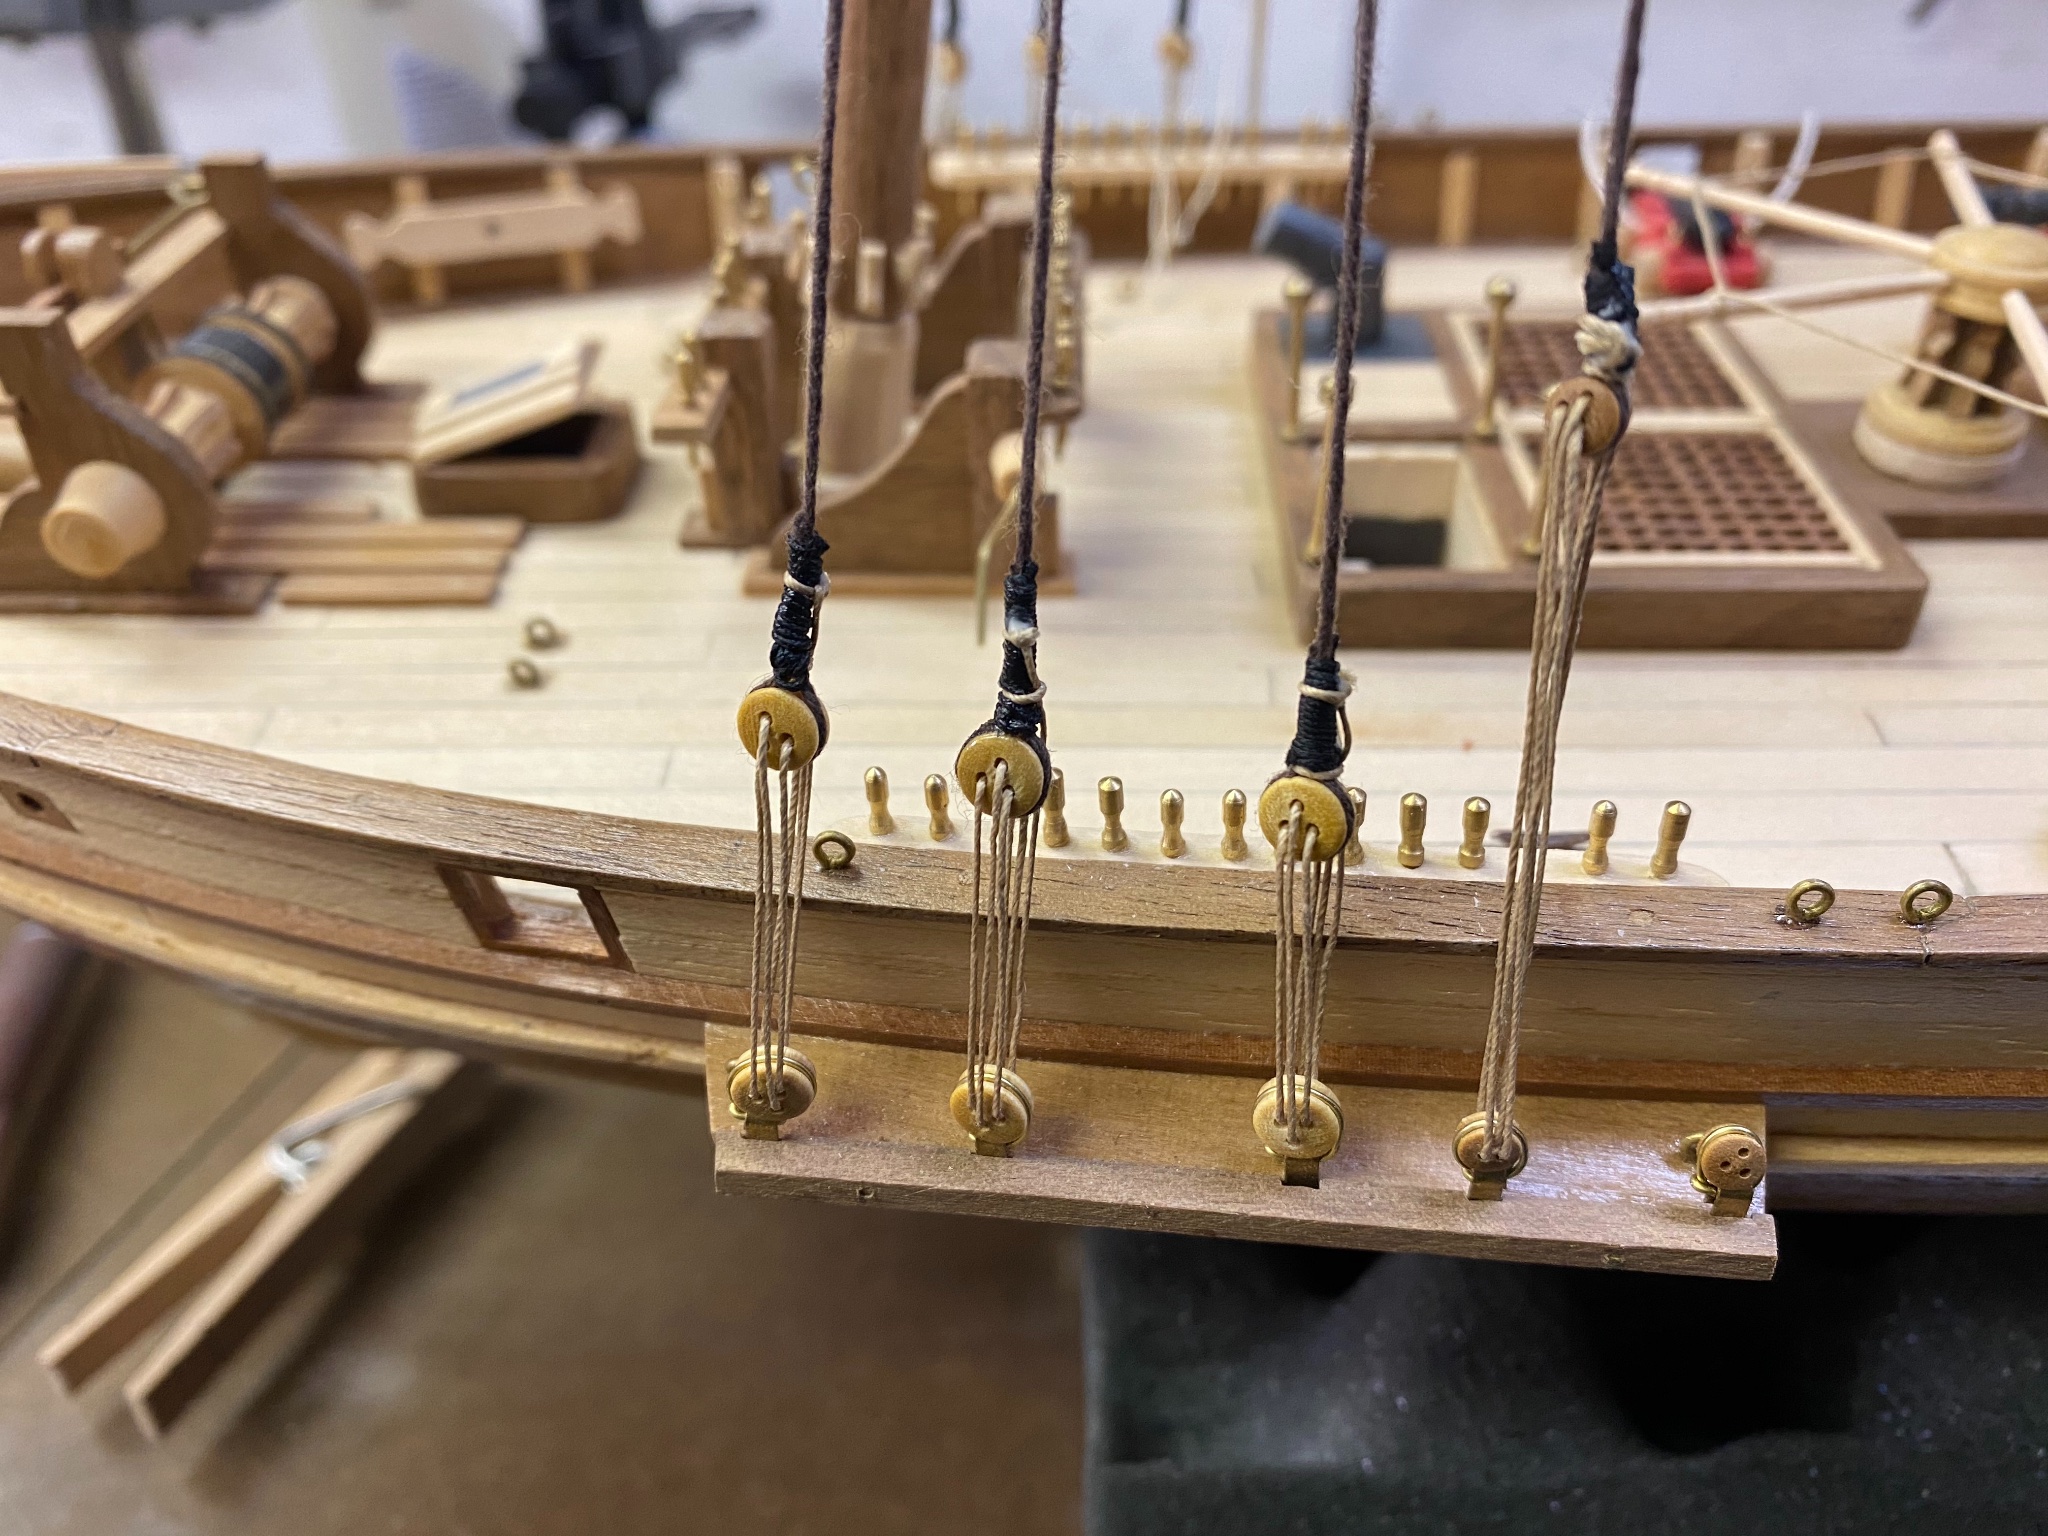
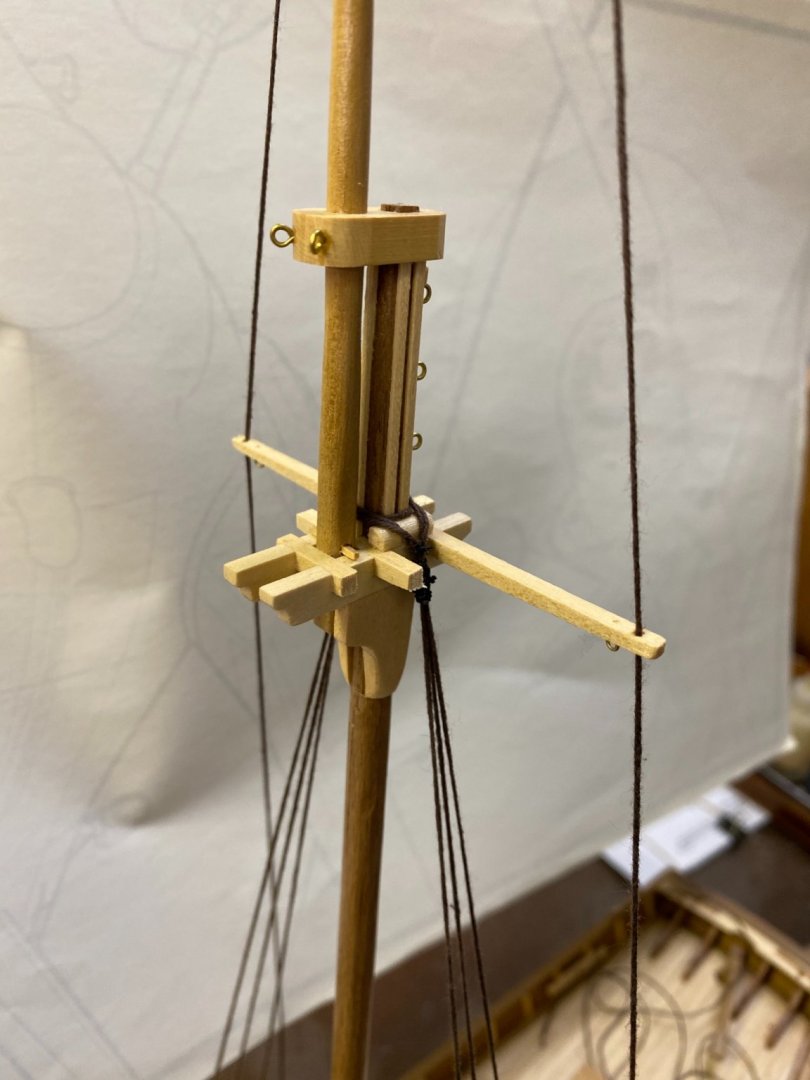
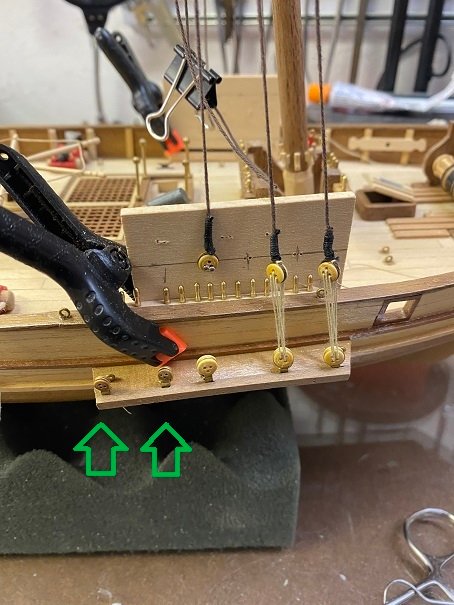
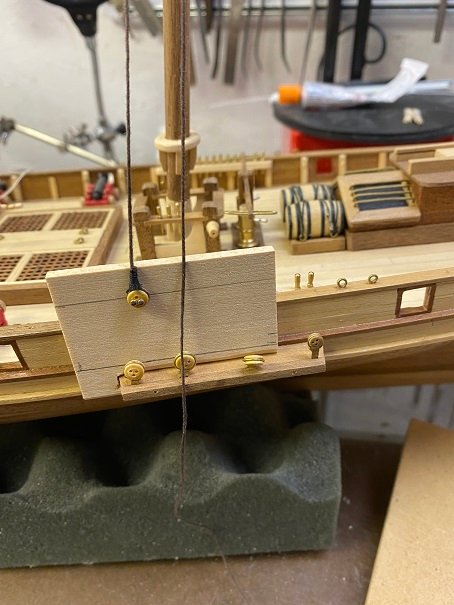
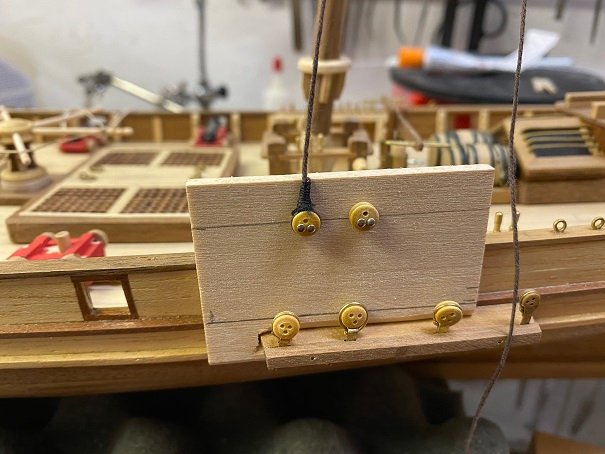
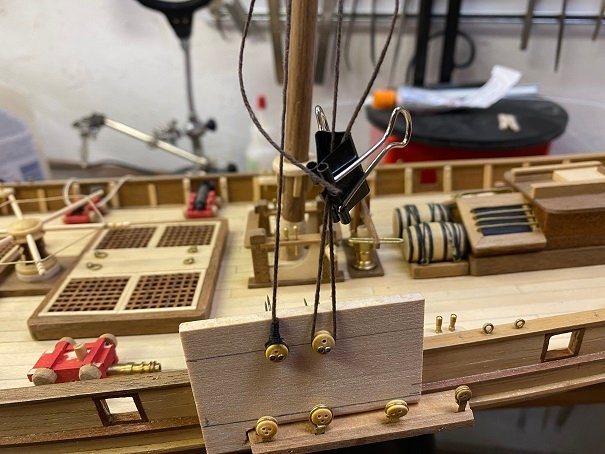
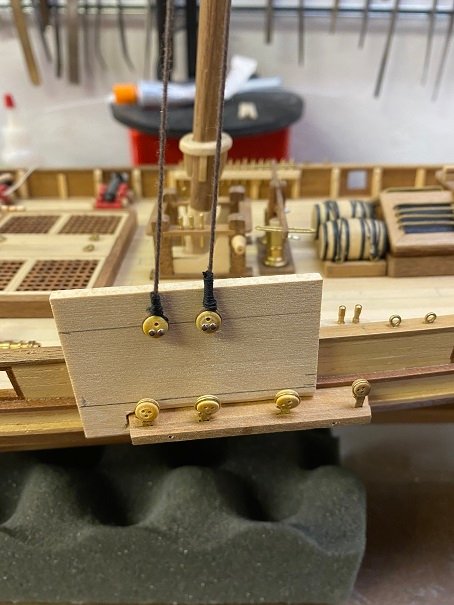
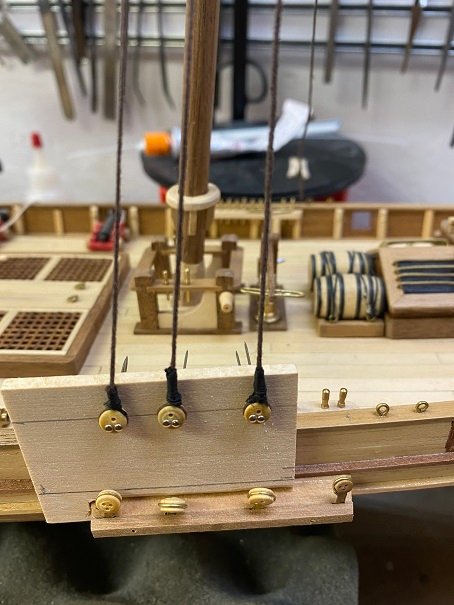
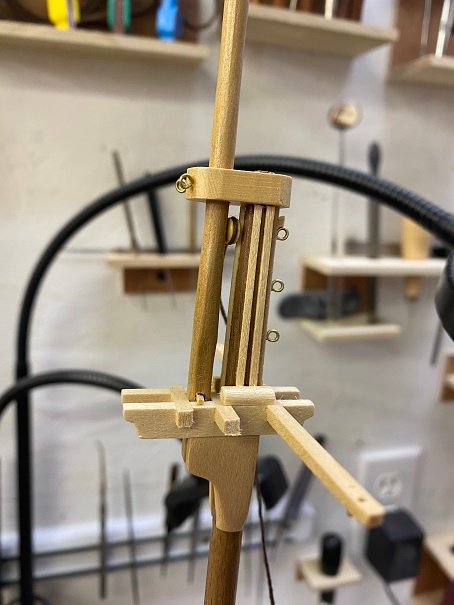
Another quick update - amazing what you can do when you actually sit down and do something. I wanted to get those 4 more dead-eyes affixed while I was in the zone. I only have two hands (with meat hooks for fingers) so I knew right away a jig would be in order. Pretty sure what I ended up making isn't original, but I built on the fly and it works for me. It slips onto the chain plates and allows me to (literally) pin the deadeyes in place, even the one not affixed to the shrouds. Then it is easy to tension, mark and affix off ship. The following sequence is self explanatory. Let me know if anything is unclear. This actually isn't the 'final' height since after they are joined to the lower dead-eyes, the shrouds are joined together near the trestle trees. The dead-eyes will be rigged with the jig in place (though nothing pinned). It gives a visual indicator of height to achieve. I will also be able to join the rear shroud with the rear of the opposing side a lot easier this way. Win Win. One key thing to check (LOL) is that the dead-eye block itself slips in between the main and top mast. Mine barely did. If not, tying would still be easier with all the slack present. I will make one jig for P/S mainmast and one for the P/S foremast (using both sides of the jig). I put this jig in the win column for me. Mark

- 128 replies
-
- 5
-
-
- artesania latina
- Finished
- (and 2 more)
-
A good quiet morning, a good cup of coffee and some good jazz equates to progress. Each mast has three main shrouds. Each side has one double ended and then two single ended (ones from each side are seized together) so.....only four more dead eyes to tie when I figure out the length required for the double ended ones. Might have a chance to get these masts set in this weekend. Now for some quality time with my Stratocaster. -Mark
- 128 replies
-
- 4
-
-
- artesania latina
- Finished
- (and 2 more)