HOLIDAY DONATION DRIVE - SUPPORT MSW - DO YOUR PART TO KEEP THIS GREAT FORUM GOING! (Only 24 donations so far out of 49,000 members - C'mon guys!)
×


SaturnV
-
Posts
170 -
Joined
-
Last visited
Content Type
Profiles
Forums
Gallery
Events
Everything posted by SaturnV
-
 Good to hear from you Daniel. Would love to see some pictures of your progress. I was going to start planking but got derailed by the frame issue. Now it is back to sanding for me. I am considering getting volume 2 of TFFM because this whole planking thing is making me nervous that I don't have enough information to do it correctly. Always doubt with me, its a wonder I get anything done on my models...... Richard
 -
Thank you Allen and druxey. Your descriptions are adequate for me to now make an informed decision. and Mike, you are correct, without any sort of idea of what I would be spending $70 on I have restrained from purchasing one. A missed sale for them.
-
Does anyone have the indexes of what is in each of the Fully Framed Ship Model Swan Class books? I have the first book but I can't seem to find this information on the website for the other books..... Thanks, Richard
-
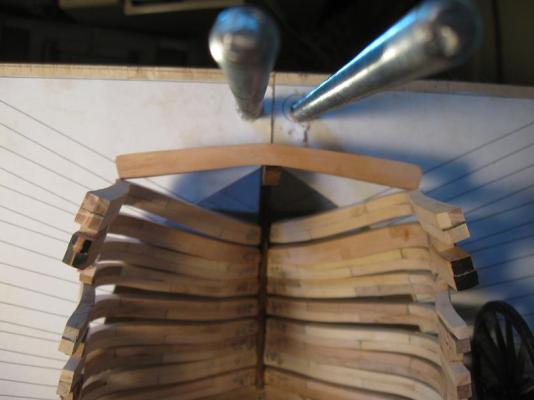
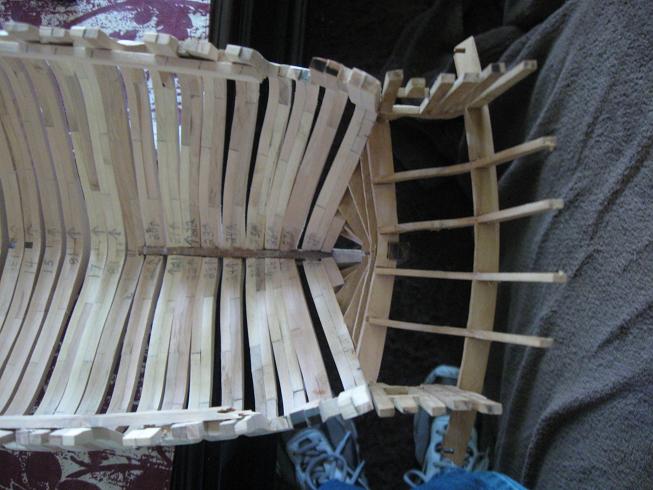
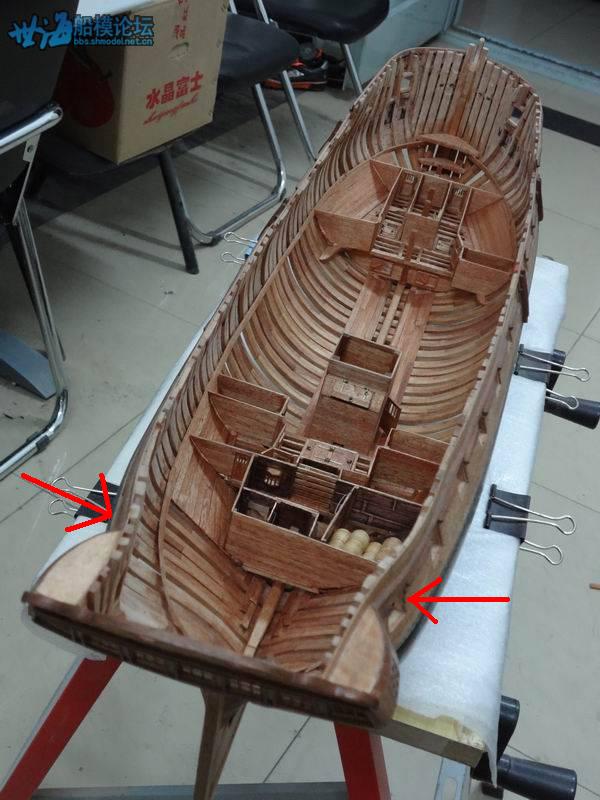
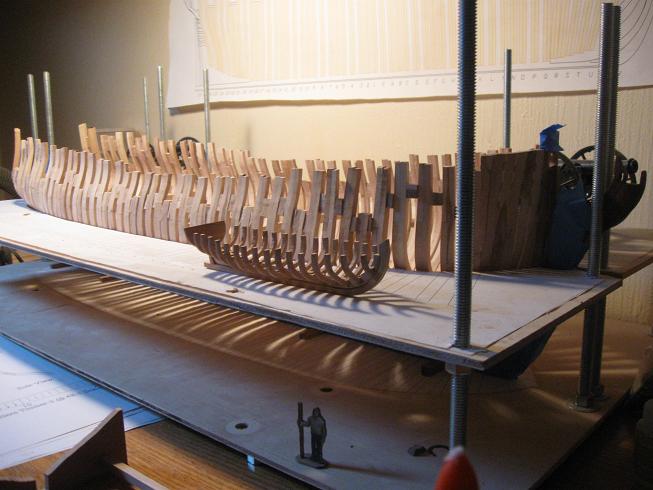
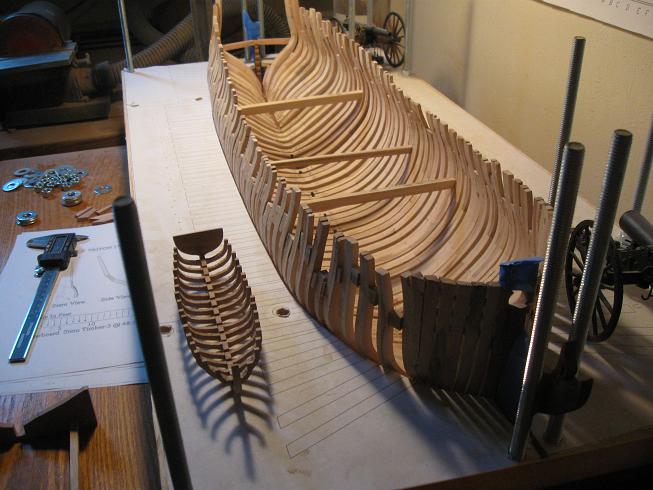
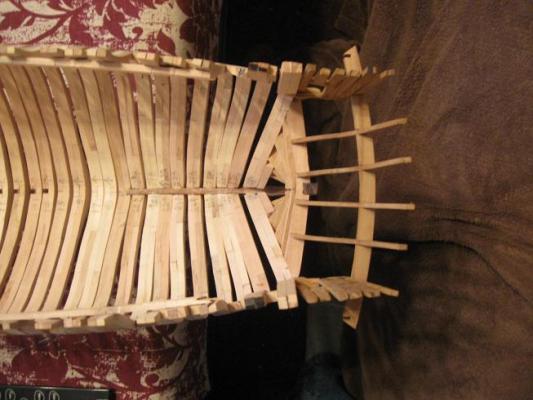
I believe Guy (The Leaner) and I (and possibly others) have frames 27 and 28 incorrect. I blame it on the frame jig. ;-) These frames turn inward at the stern if you lay them in using the jig. In reality they need to go almost straight back in line with frame 26 and the outer stern timbers. Daniel got it right - good job Daniel! To fix mine I had to “break the bones” of the top 1/3 of the frames and re-set them at the proper angle. This, of course makes for a nasty looking frame piece but this area is merely a support structure for planking so no one will ever know. I had to add some extra wood to the outside edge of frame 28 and will need to do a lot of grinding to the inside portion of that frame as well to make it all line up. Wish I would have caught that sooner. On a side note, I do not have a problem with the bulge that was discuss in a different forum topic. This seems to be just a matter of sanding correctly, not the fault of the drawing. In the below pictures there are before and after shots from above to show the difference. The last one is Wang’s model with arrows showing the mistake, er, incorrectness. All will line up correctly after planking so pardon the odd bends and warped look to the whole thing. Bending wood into the final shape you want is part of the process for me. I couldn't cut a straight line if my life depended on it. ;-) Just thought I would get that out there to help other folks who might not notice until too late. Richard


-
Thanks Juergen! Appreciate you stopping by the build log and for the comments. You do much better work than me. I learned quite a bit by observing your build. I'll be working on mine tomorrow for most of the day but much of the morning will be taken up with figuring out a game plan for the planking. I have a tendancy to take longer thinking about how I am going to do something than it takes to perform the task. Richard
-
Hi Mark, It grows (around here at least) and looks like apple but it has a darker center wood whereas apple is all the same light color. Crab apple also has the same strength and grain qualities as apple. Works well for what I am doing. All of the frames are either apple or the light colored part of crab apple and the keel is all dark wood crab apple. Makes a nice contrast. Richard
-
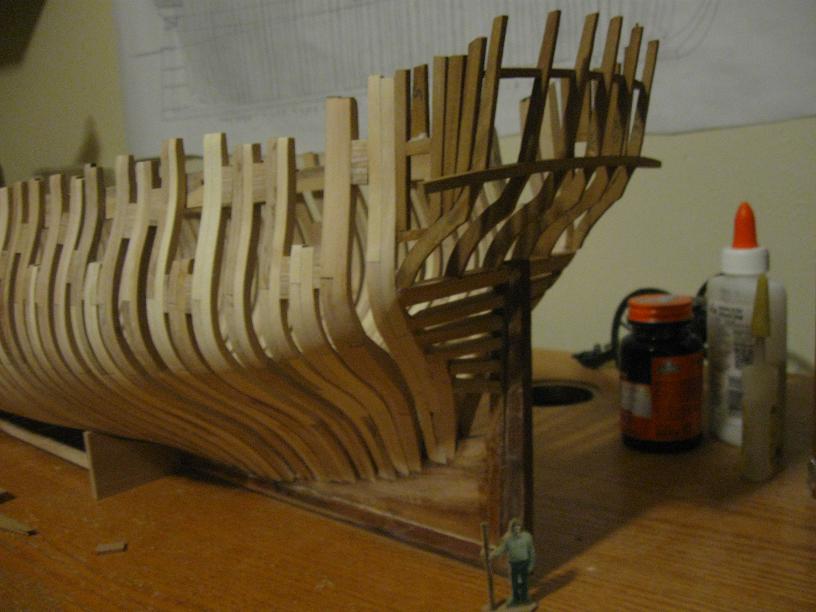
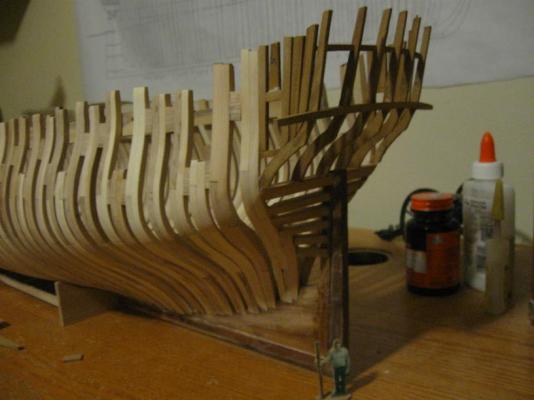
The latest pic of my latest progress. I have been working on the transoms, the quarter lights, the stern timbers, the counter top rail, and the quarter deck transom. All are glued in except the quarter deck transom because I am not sure at what height to place it at. If anyone has followed my build log from the begining you will note that I started this build using Russian Olive wood. The keel and other parts did not take well to this because of a lack of strength in the wood. I switched to crab apple after that and obtained satisfactory results. Now that I am on to the inner hull parts I am switching back to the Russian Olive. These parts will all be planked over both inside and out so perfect parts and strength will not be an issue. After a little sanding and regluing of some of the frames to the keel I will be able to start planking the upper exterior of the hull. Will probably start with the wales..... Richard
-
Capt'n Buddy is doing okay I guess. Since he turned 8 years old and got the infection in June his energy has been low and he lost some of his puppyness. He is healthy per all of the tests they did but there is something missing. All in all we glad that he is still with us and that he has been able to return to his duties as Captain. We cherish every moment we get to have with him. Thank you for asking. As to the QuaterDeck Transom, I will have to continue to look at drawings, photos and the like and try to make an educated guess. Once I get some substantial work done I will post some pictures. Richard
-
Hello all, Got the transoms put in and am now working on the Stern Timbers and Quarter Light frames. Anyone have a height dimension for the Quarter Deck transom above the bottom of the keel? It is not shown on the plans. I am figuring it would go just above the sash lights..... Richard
-
And the sanding continues. On and on and on and on........... Richard
-
Hi Guy, Thanks for stopping by and the well wishes for Captain Buddy. For the sanding, I have placed some interior supports on the frames and have done some more sanding. A heck of a lot better results now but there is so much sanding that needs to be done and lately no time to do it. I have had other projects going on for the admiral and I also have been working on the second longboat - the one with only half of the planking to match the Triton. This time I got the frames really thin for a more realistic look. I also got into the Metal Earth 3D models and that took up a bit of my Triton time. This weekend is Jeffco County fair and will be at the rodeo so no time for the Triton again. The following weekend I hope to get back at the Triton sanding, and cutting up my winter supply of cherry wood and Russian Olive wood so that I have something to work with when the cold temps come back - I can't run the bandsaw in cold weather. Happy modeling, Richard
-
Looking sharp Daniel! I think I am going to skip all of this work on the gunport joinery because on my model it will be covered with planking. Yours looks good though. Is using the level for correct alignment working for you? I have thought of doing this too but with all the variables like the levelness of the floor, the work bench, the model, etc. I was not sure if the whole thing would come out correctly. I am going to opt for measuring from above. Also, thank you for all of the PDF's you provide. Very helpful to me. Happy 4th of July to all! Richard
-
Yeah, I noticed that my Triton even with all of the things installed is still able to twist like a Twizzler candy strip in all directions. Gotta keep an eye on that as you go along. You may be able to force that out with the planking when the time comes. Your model does look good though. Keep up the progress! Meanwhile back at my project I am still sanding the outer part of the hull.... Richard
-
Daniel, Your ideas sound good and proper if that works for you. Maybe you should have a go at a longboat or other part of the ship that has to be done at some point in the build as a side project. How about a go at the figure head? Plenty of different types of things to do on the Triton model...... On a side note, I hope you let that poor child out of the sand before the crabs start picking on him! Richard
-
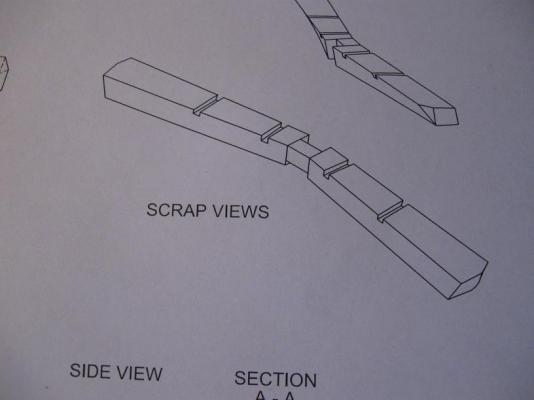
Thank you for posting the stern view. I have searched for one for a long time without any luck. Richard
-
Hi Daniel! We are all glad at home that Captian Buddy recovered. He is only 8 years old and has been with me since I started building wooden ship models. I would be lost without him.... No PDF. I used the lines from the AOS Pandora book and Chucks online build of a longboat to come up with a "plan". Strickly scratch built. Now I have to make it all over again for a skeleton version but it is all fun to do. I may do a yaw or a pinnance or a jolly boat too but that is further down the road. Richard
-
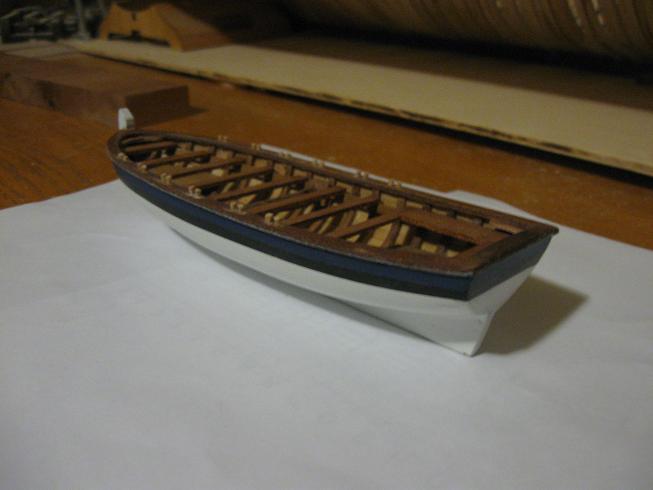
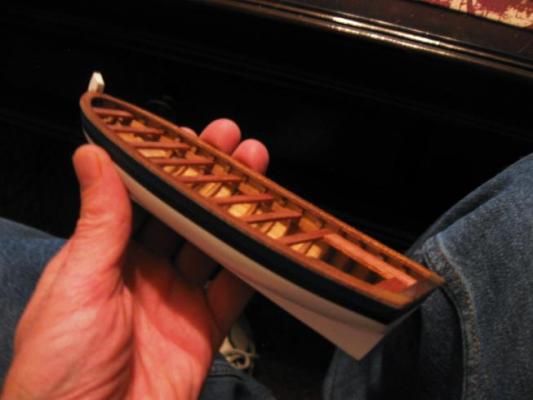
Hi all, Sorry folks that I have been away. Captain Buddy (the basset hound) got a major infection and we thought we were going to loose him. Many dollars later and some medical work we were able to save him and bring him back. He has resumed his duties as captain with the vigor of a puppy and we are all much relieved by this. Meanwhile, I have finally been able to make progress on the little longboat. I decided on a blue and black stripe on a mostly white overall paint scheme with stained wood for the interior. I still need to make the oars and a rudder. Here are some pictures. Richard

-
Mine was in the Transom Folder. Apparently it floats around from folder to folder. :-) Either way, I only had one drawing. Richard
-
I agree that those stern cants will sand out fine if most of the sanding is done from the outside in that area. The original complaint was a bulge but the more I examine it the more it looks like incorrect sanding was the culprit. Knowing this ahead of time is going to help a lot. Richard
-
Thanks again everyone for the comments. Daniel, I have not sanded the interior yet. Tried to do the outside but ran into problems so I moved onto a longboat build. But with a plan figured out I will be getting back to sanding soon. Richard
-
The frames that are thought to be incorrect are 26 through 28. But at the moment from where my model sits it looks like it just needs to be sanded properly. Only after sanding will I be able to tell for sure. Richard
-
Hi Daniel and Tim! Thanks for stopping by my build log. I have been informed that my longboat frames are too thick in the bow to stern direction. Because I will be planking the hull and installing thrwarts and floor boards I will attempt to just dremmel down the thicknness to a more correct size where the frames will be seen, leaving the rest of the frames thickness in place. Should be easy enough (famous last words). More pics when I get a chance here at work to download them. I can't download pictures from my camera to the Kindle Fire I have at home..... Richard
-
Hi folks. I started sanding the outer hull to get the correct shape for final sanding the transom pieces. I don't think it is a good idea to put on the transoms and then sand them because they are too close to the stem so I want to sand down the hull and custom fit the transoms afterwards. With that in mind I made the attempt to sand the hull. I experienced major problems with the sanding - It took half of a day to sand only 1/5th of the hull. At first I blamed the sand paper and went out and purchased some 60 grit so the sanding would go faster. This did not work. So I put the hull away whilst I think about it some more. After much thought I determend that the problem is that the frames being so loosely supported were vibrating at about the same speed as the palm sander so that the sandpaper was really not doing any sanding. The normal solution would be to press harder but the frames are too weakly attached for that. The final solution is to attach some planking on the upper portion of the hull on the outside and some at the bottom on the inside and sand in sections. I'll let you know how that goes. Meanwhile, I started making one of the longboats for the deck. Richard


-
Ah! That makes sense. I will print out that drawing and see what it does for me. Sounds like the answer though. By its very nature the wing transom should stick out on each side so this must be it. Thank you Randall! I feel stupid having not figured that out for myself. Richard
-
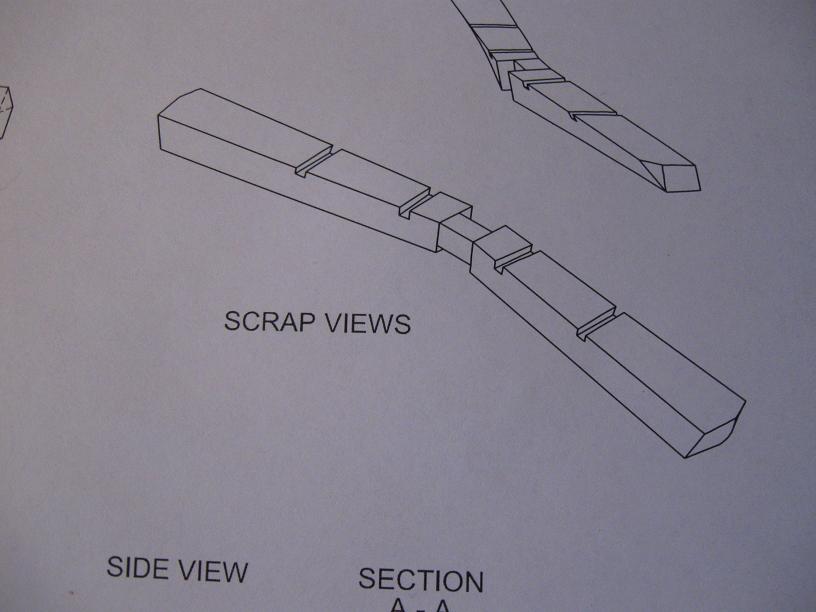
For reference......you can see where the tip(s) of the part just make contact with the frame 28. This may be accurate or I may need to sand a flat into each end so they are flush with frame 28. I don't know which is correct. Richard