maggsl_01
-
Posts
767 -
Joined
-
Last visited
Content Type
Profiles
Forums
Gallery
Events
Everything posted by maggsl_01
-
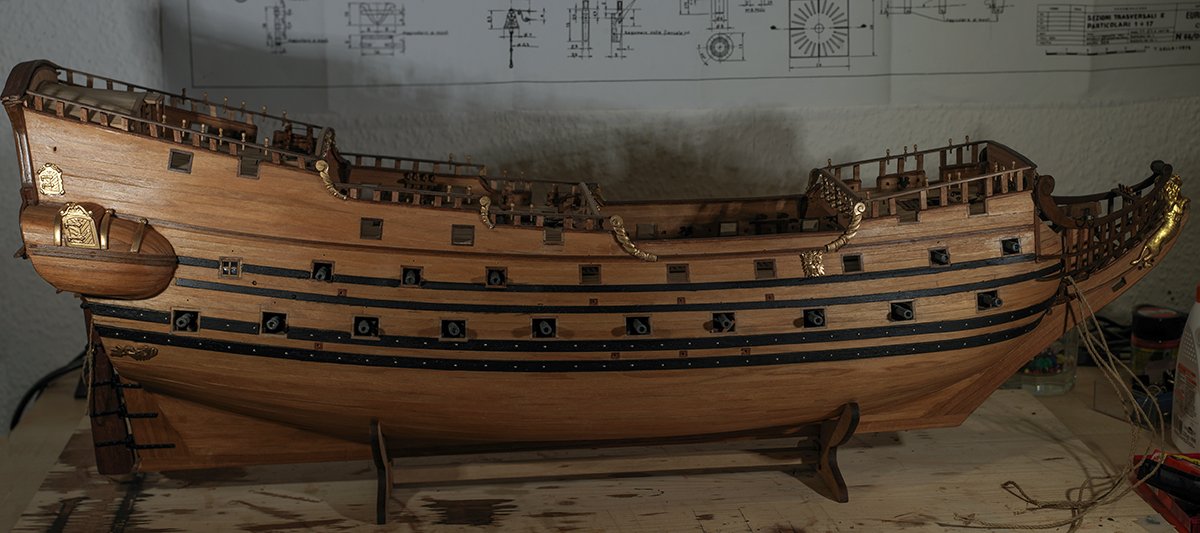
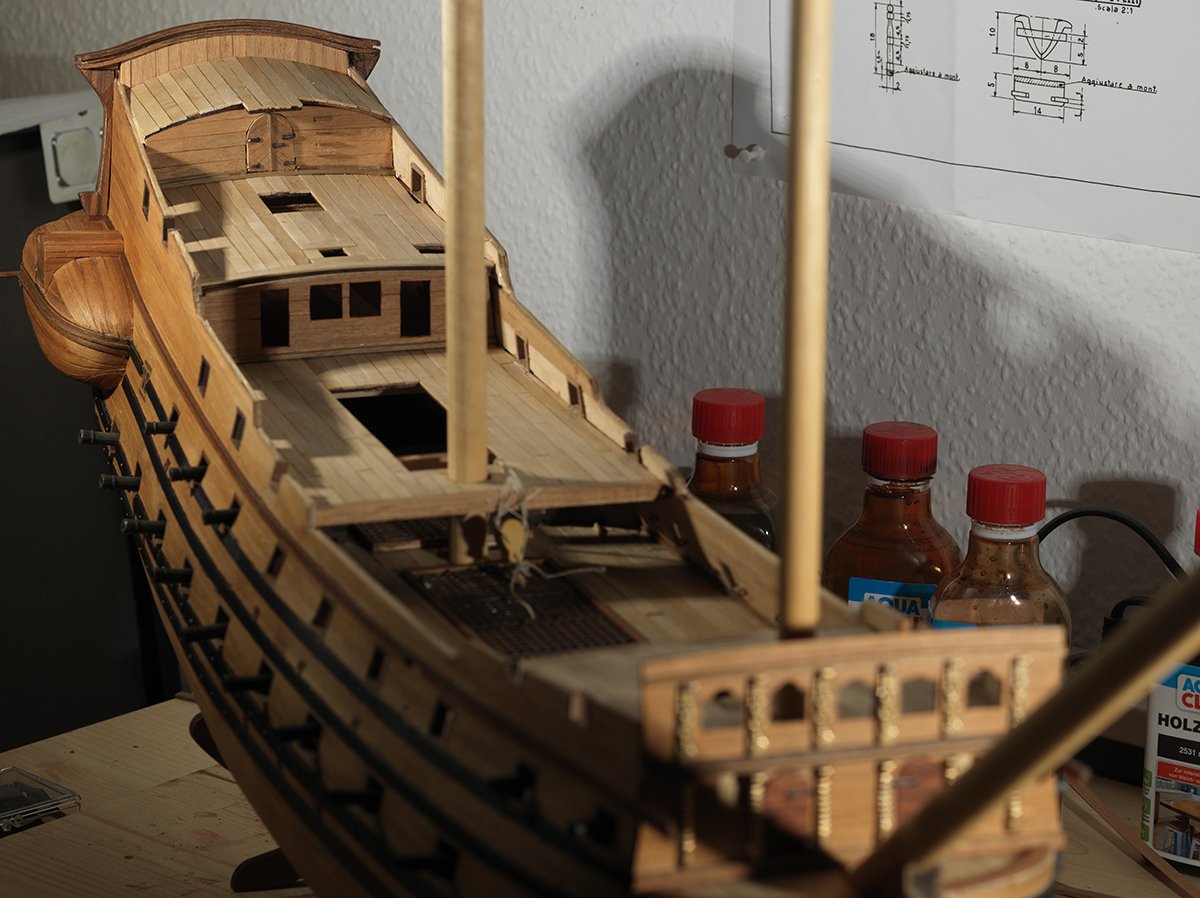
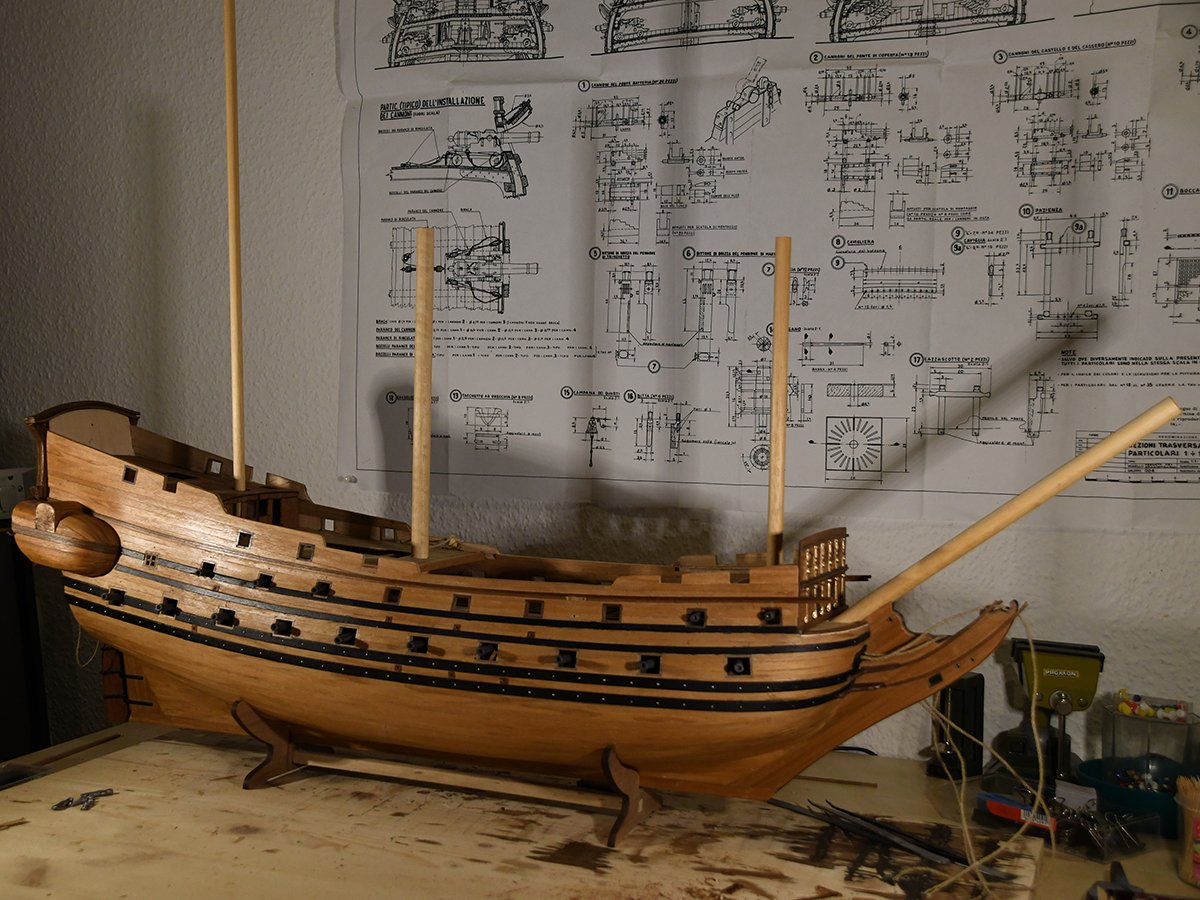
 Hi Pete, no, I will not use any sails. I am not so good in sewing . I am almost done with my build, the rigging is finished, and so are the anchors. At least I am preparing the gunport lids (? correct word?) and the final act will be to fix the lantern. Then my Friedrich Wilhelm is ready to enter the harbour... I hope to finish the model within the next week before the summer comes. A conclusion: the build is extremley fuullfilling but also a challenge. I did what I can do with my skill - far away from perfect but nevertheless - for me - satisfying. There are some mistakes that happend and which I noticed to late to correct wirth an appropriate effort. But all in all I think my interpretation is a nice and really decorative result. Euro Model gives you all you need to create a great model and to exercise your brain and really grow in yourself and your abilities. And by the way - it's a really BIG ship Photios will come soon... Best regards, M.
 -
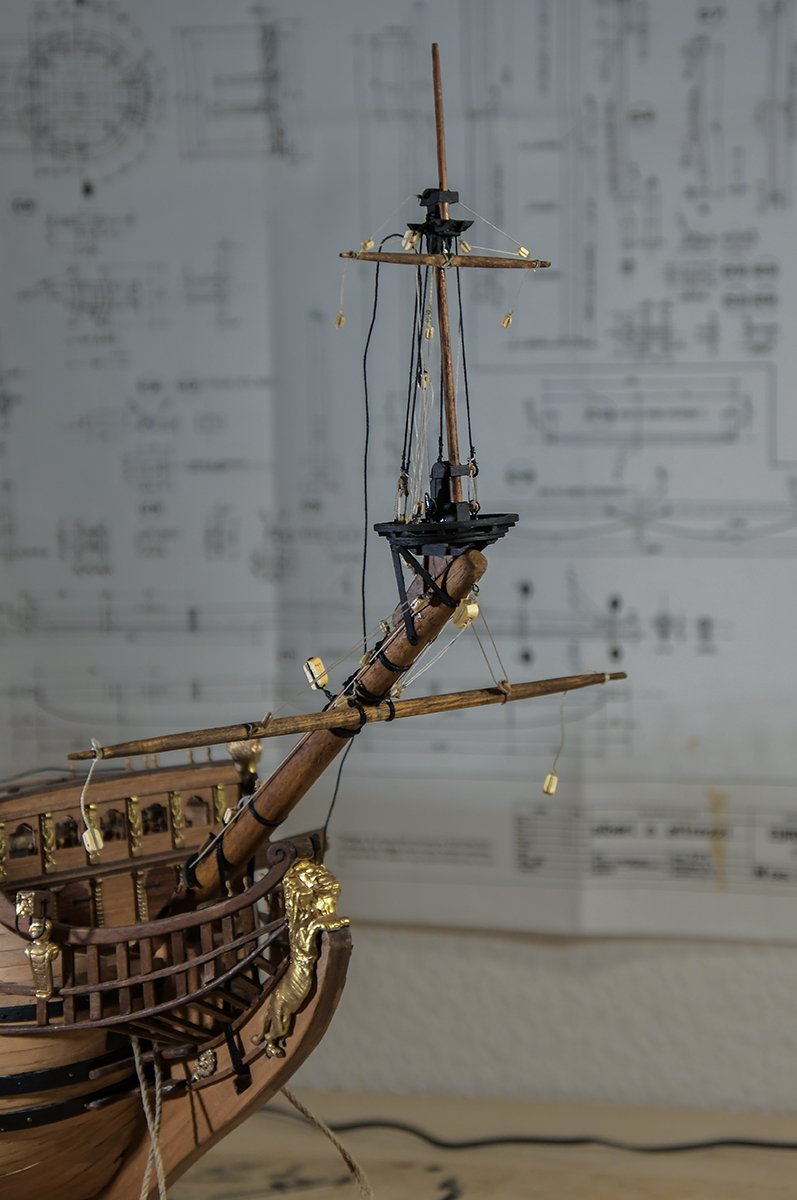
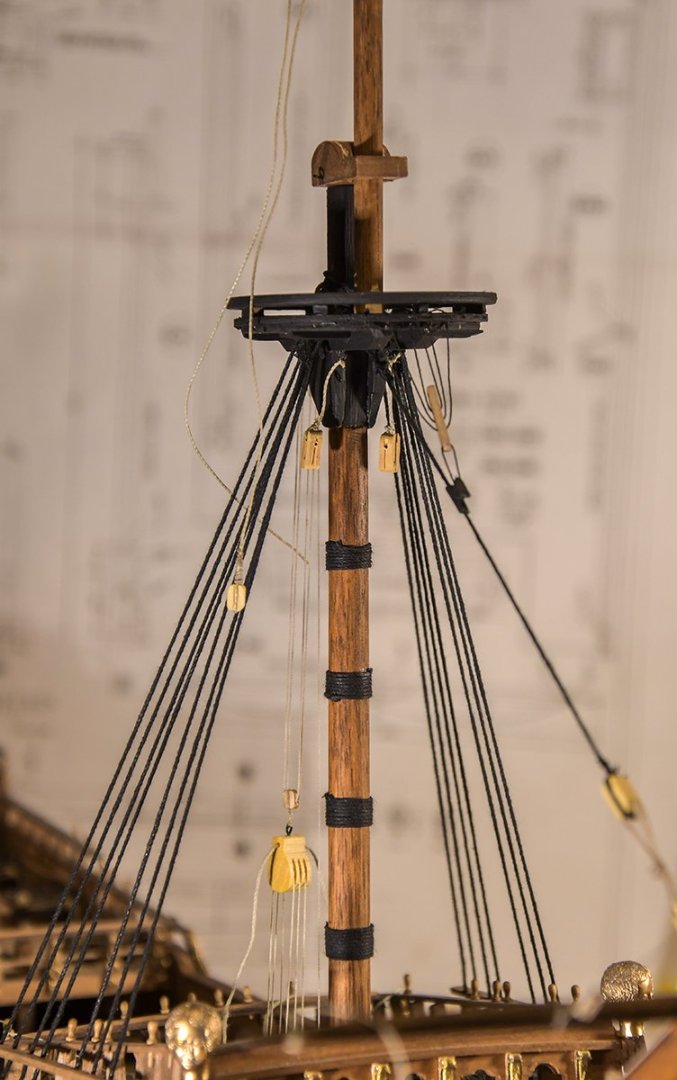
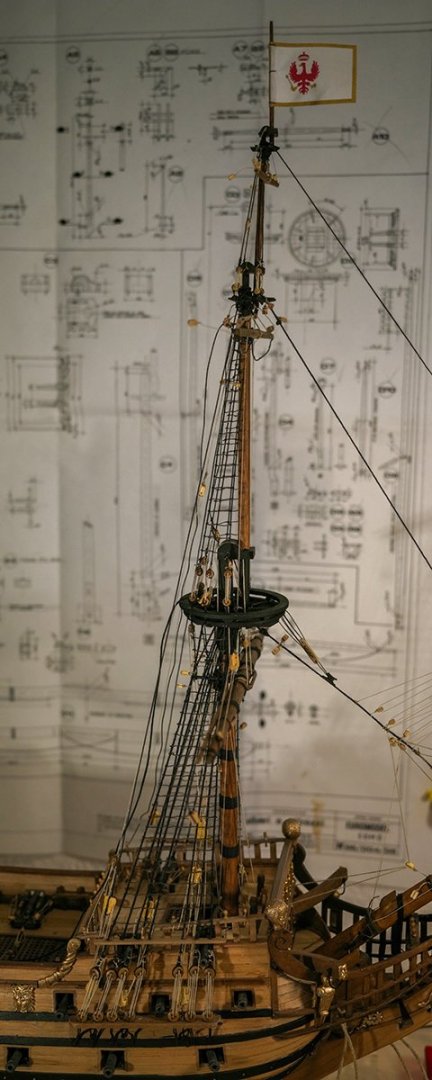
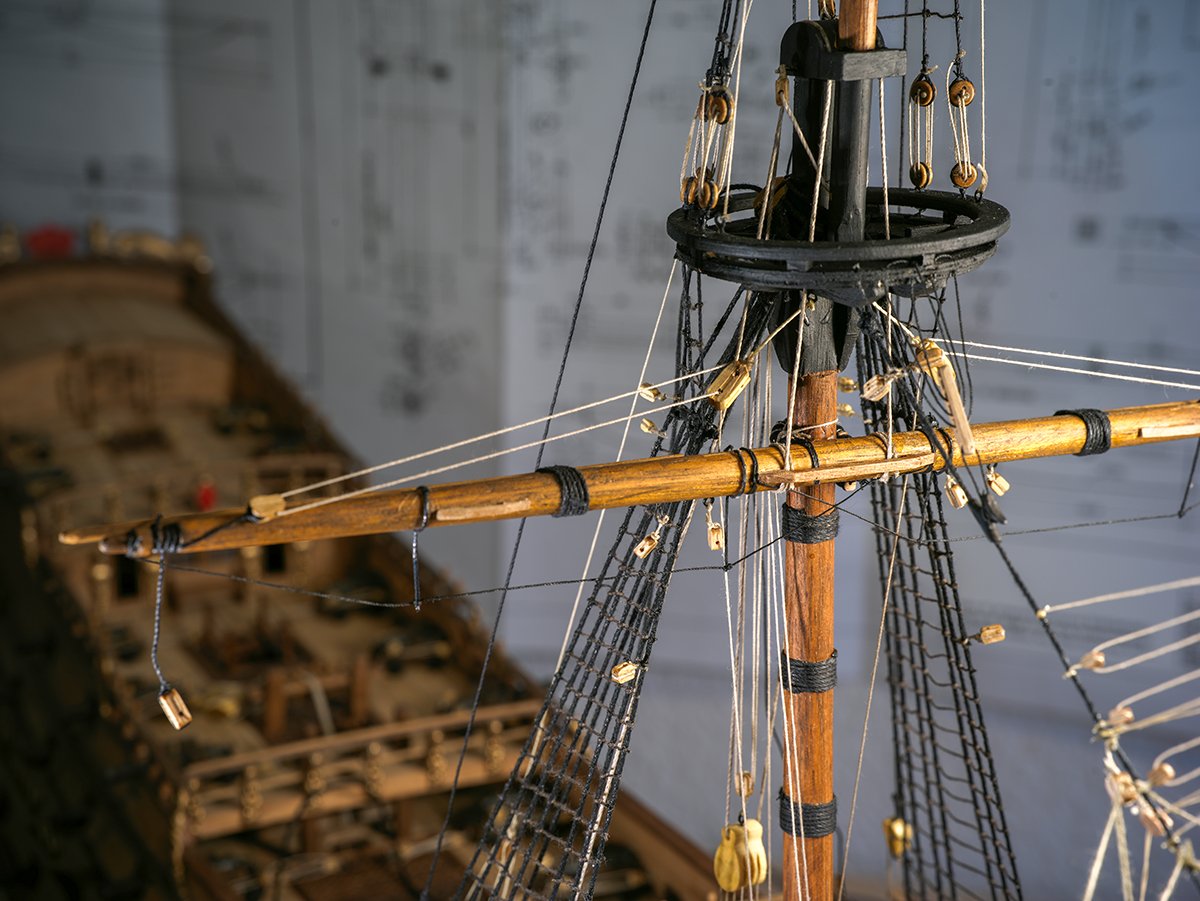
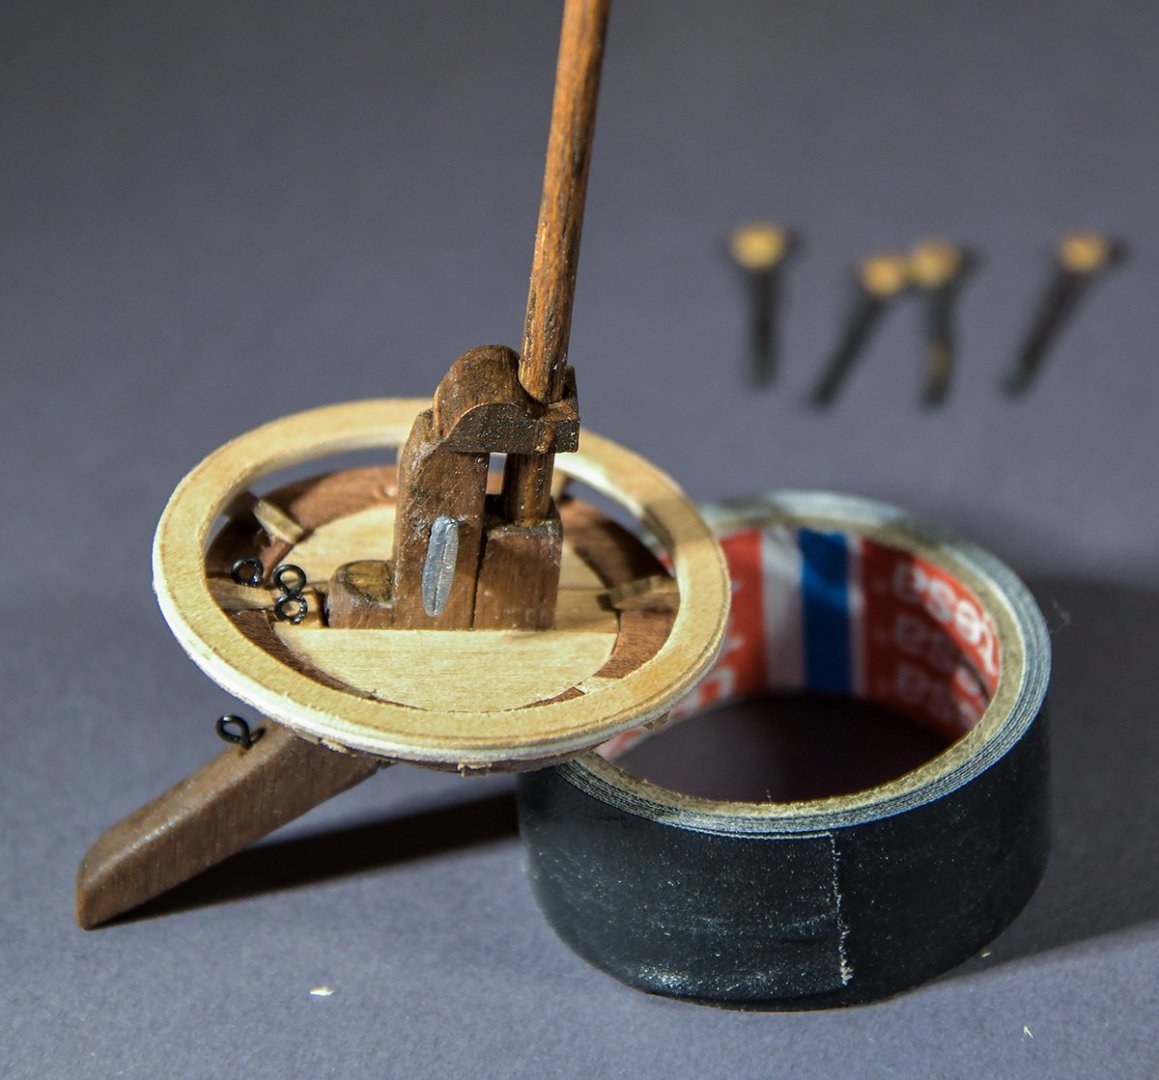
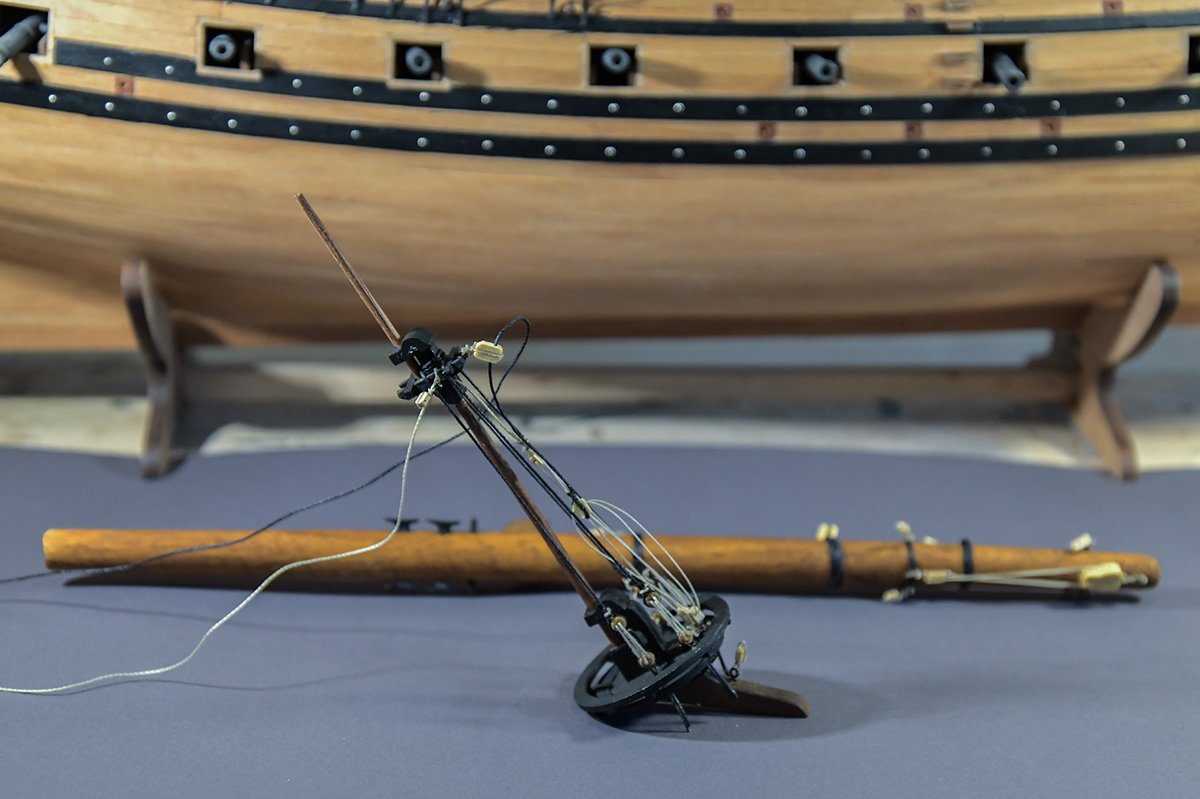
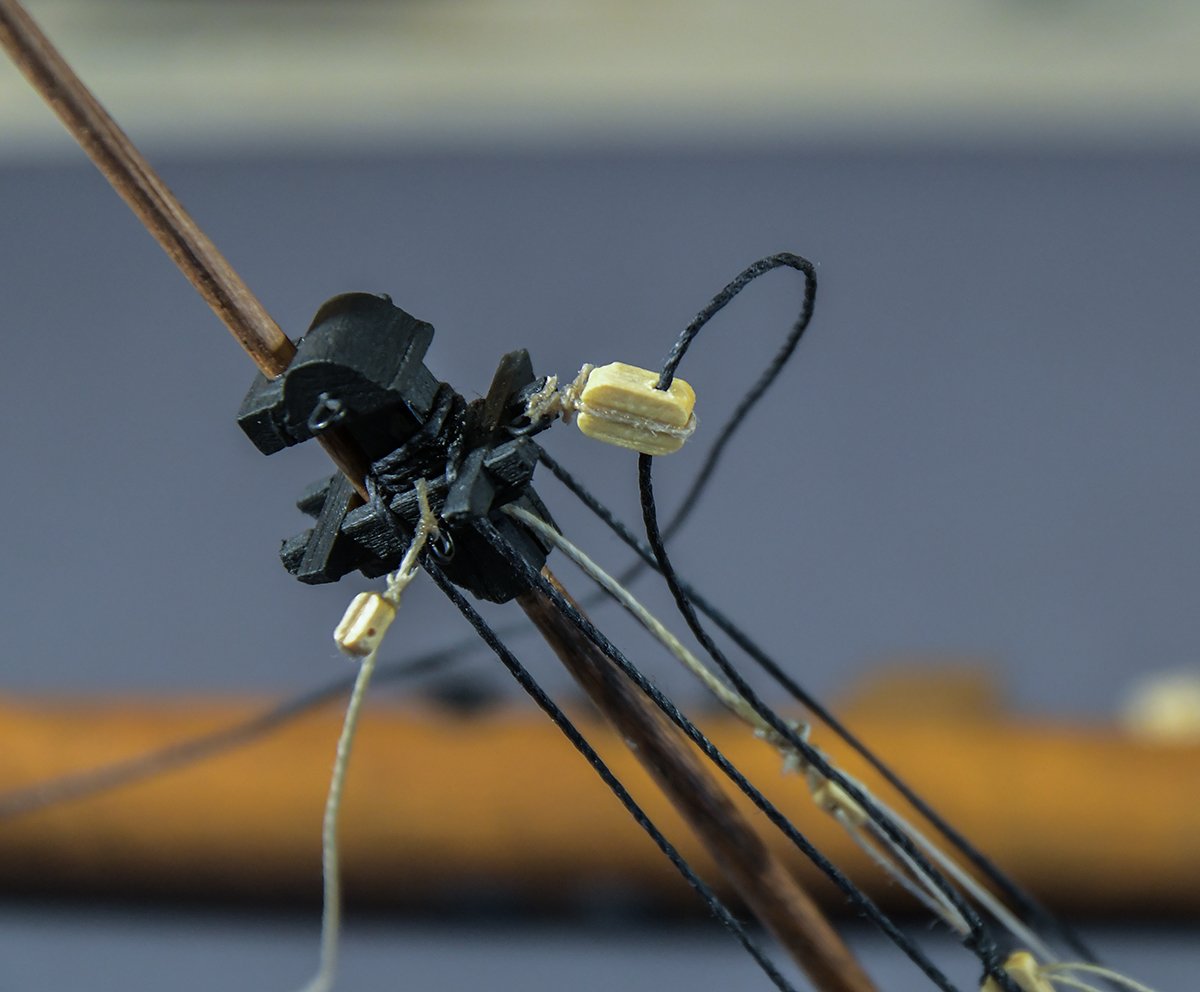
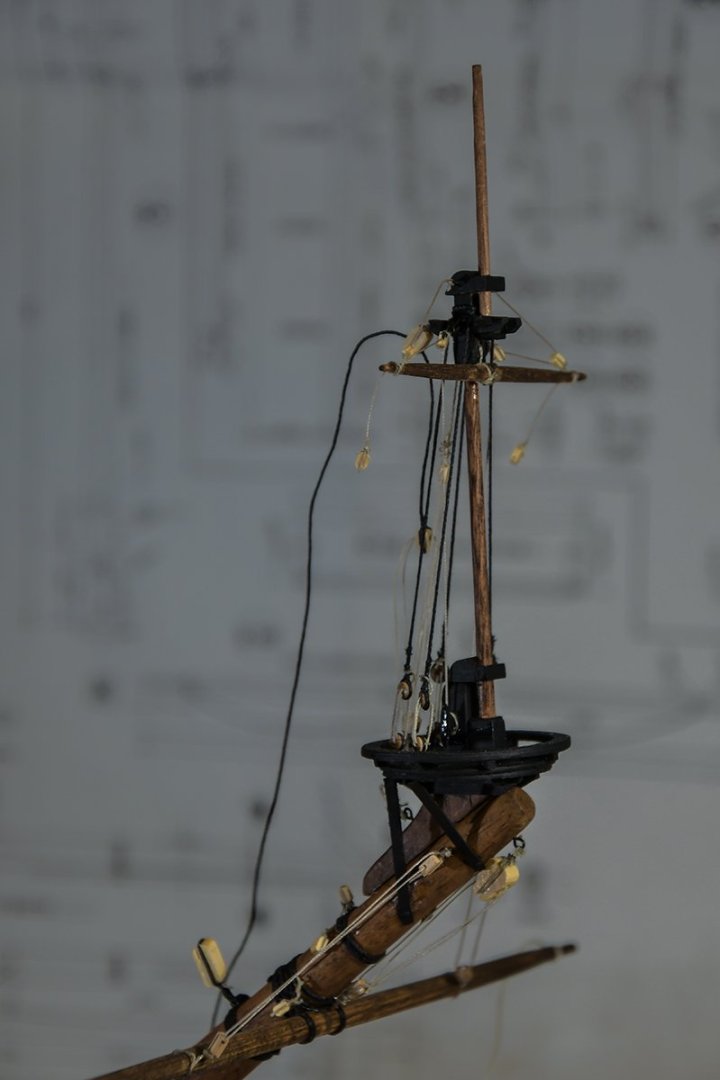
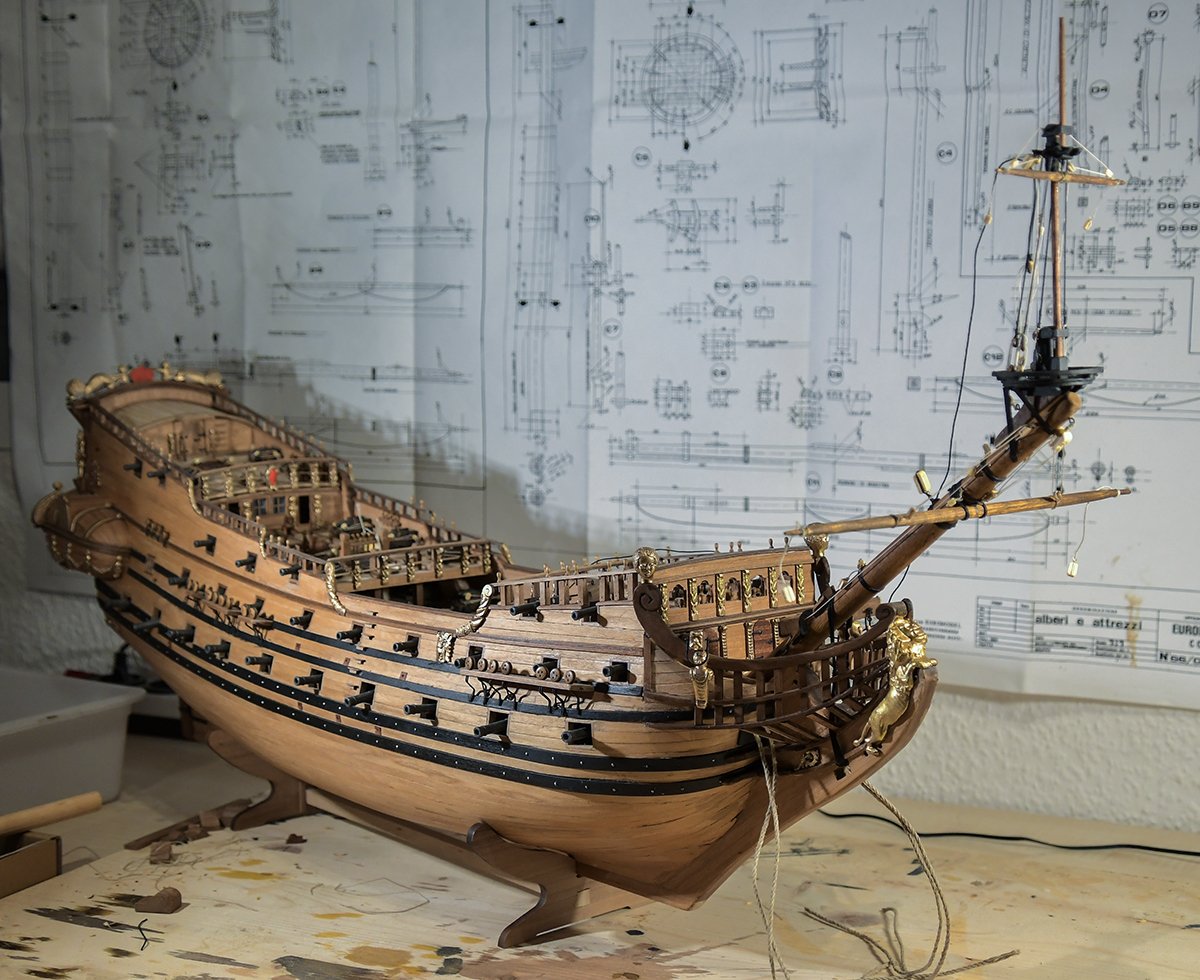
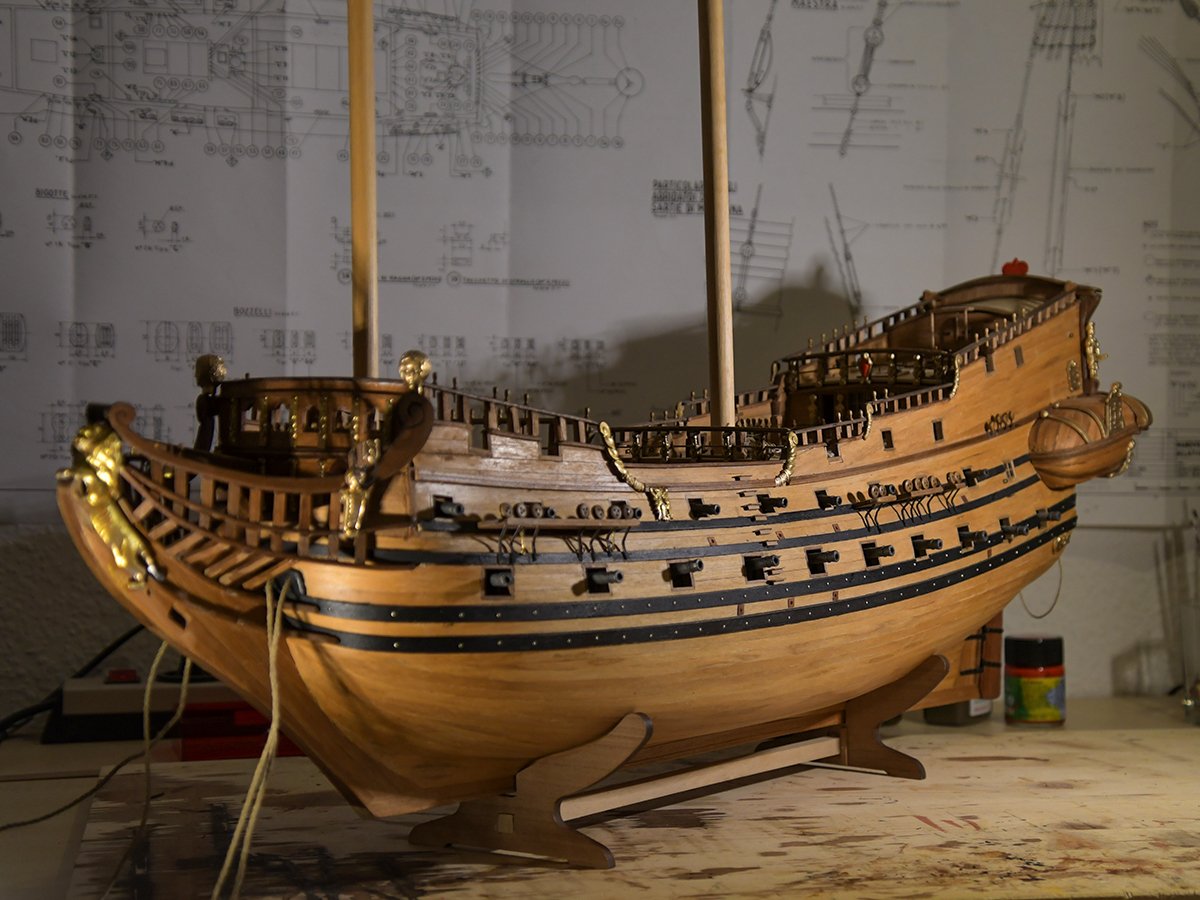
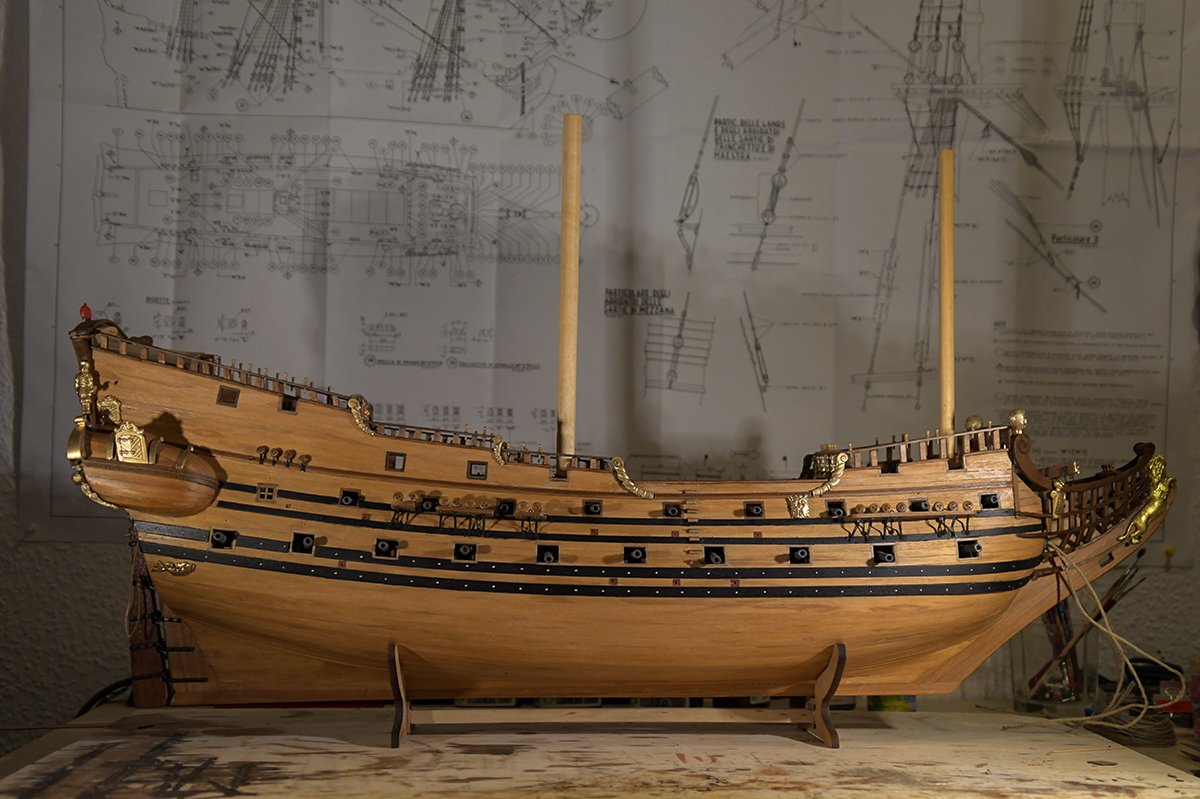
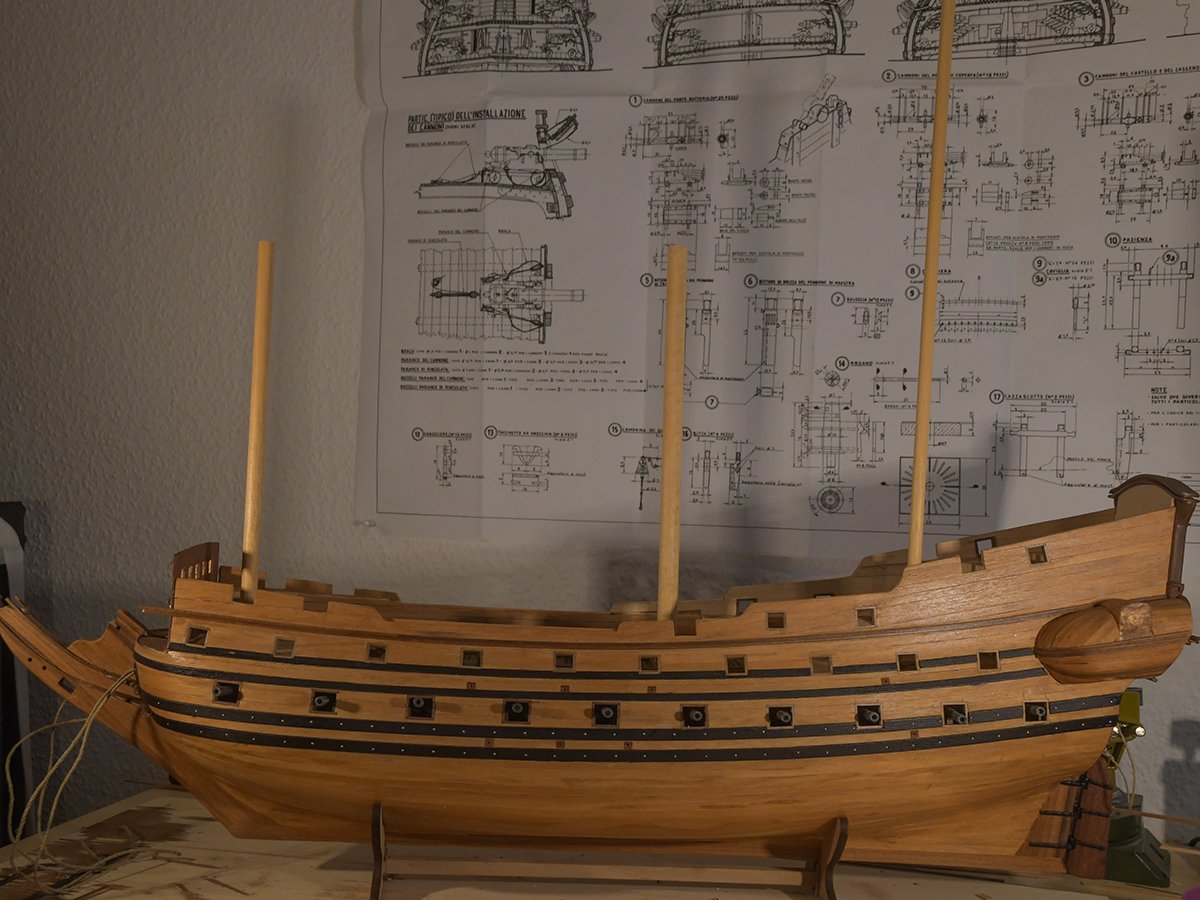
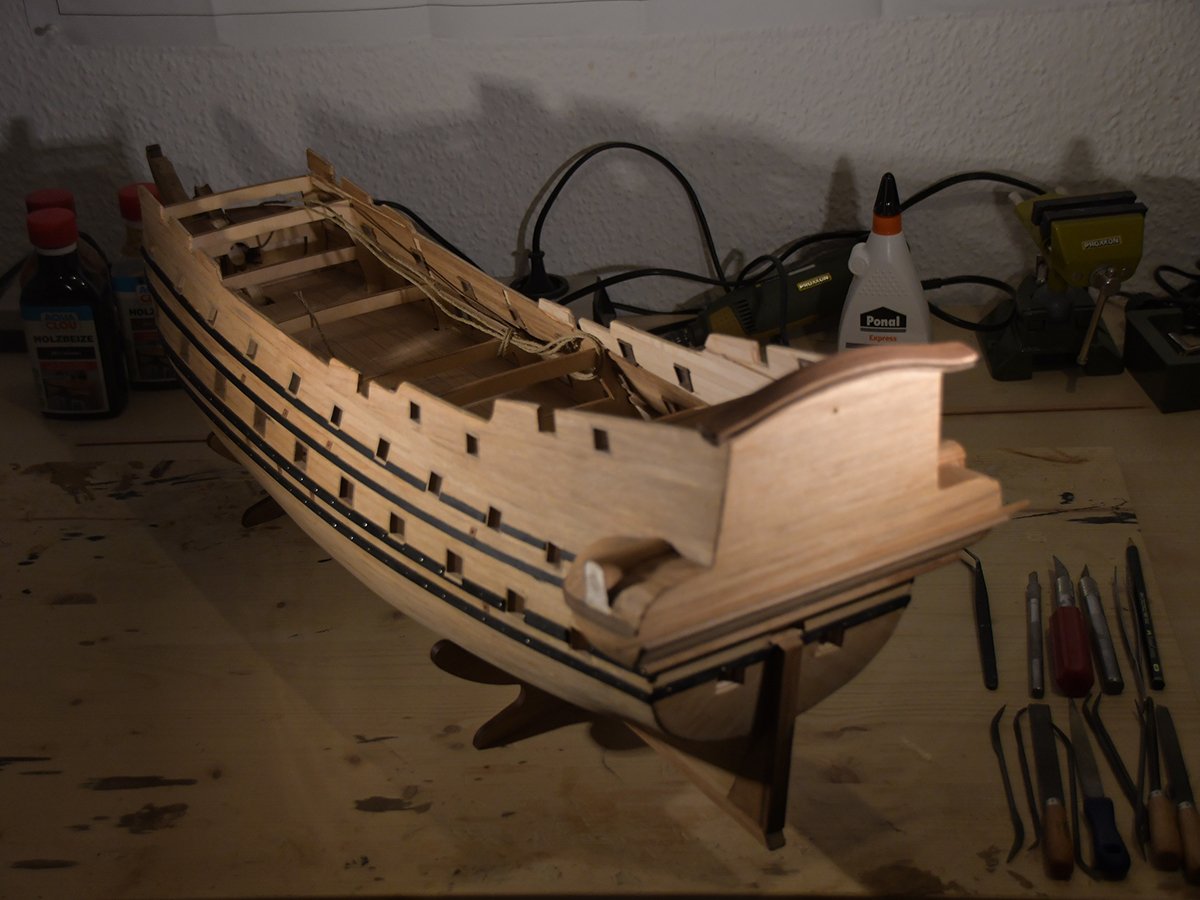
Cheerio my friends, I am glad to say: The first two sections of the masts are done. I finished the bowsprit and the foremast includig all rigging that can be fixed at this stage. The construction of the masts and yards is quite easy to do, the masterful plans give you any information you need - and even more fore the professional modellers who want to create their own blocks etc. In general, it is an overwhelming experience to work with these plans. They show every detail, every seemingly insignificant thing, with an accuracy that is unparalleled. However, this can also be confusing... Unfortunately, it is a bit awkward for the rigging that the standing and running rigging are not shown together in one plan drawing. This can lead to real confusion when attaching the blocks. It was only after a few hours that I immersed myself in the plans so much that I understood the actual system and I no longer had any problems. Euromodel forces you to read the plans very carefully and work through them. If you are a little careless, you will definitely pay for it later. But that is also what is special about this build: model building is raised to a high level and you experience a high level of satisfaction as a result. Even though my skills are nowhere near those of particularly experienced model builders, I am still very happy with the results so far. I try to work as precisely as possible, although there may be one or two simplifications in the execution of certain construction phases. But that doesn't matter, because the fun of model building should come first. Before I start on the main mast, I wanted to show you all a few pictures of how the construction is progressing. Have fun with them and as always - I look forward to suggestions, comments and feedback. Thank you all - and ahoi


-
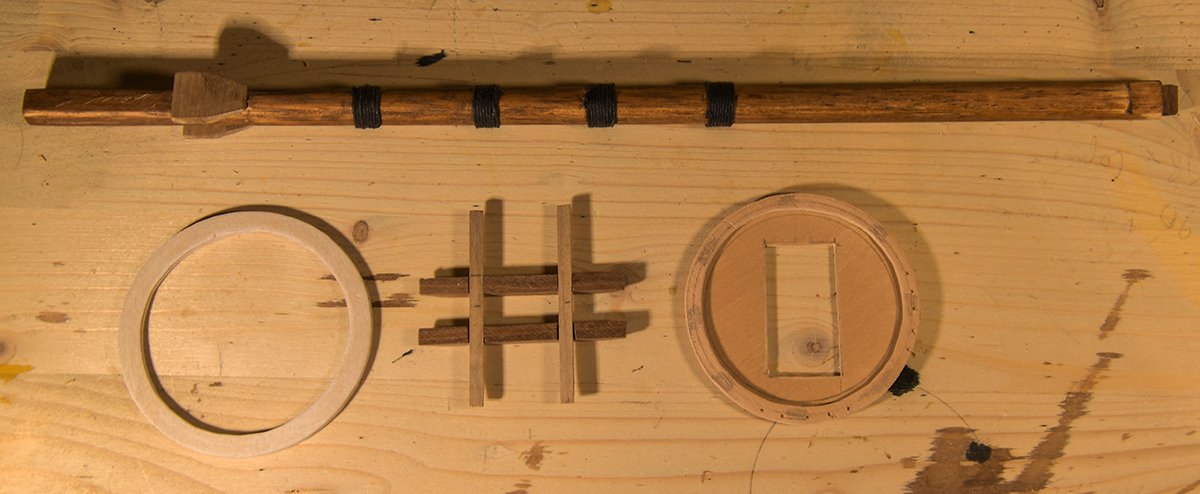
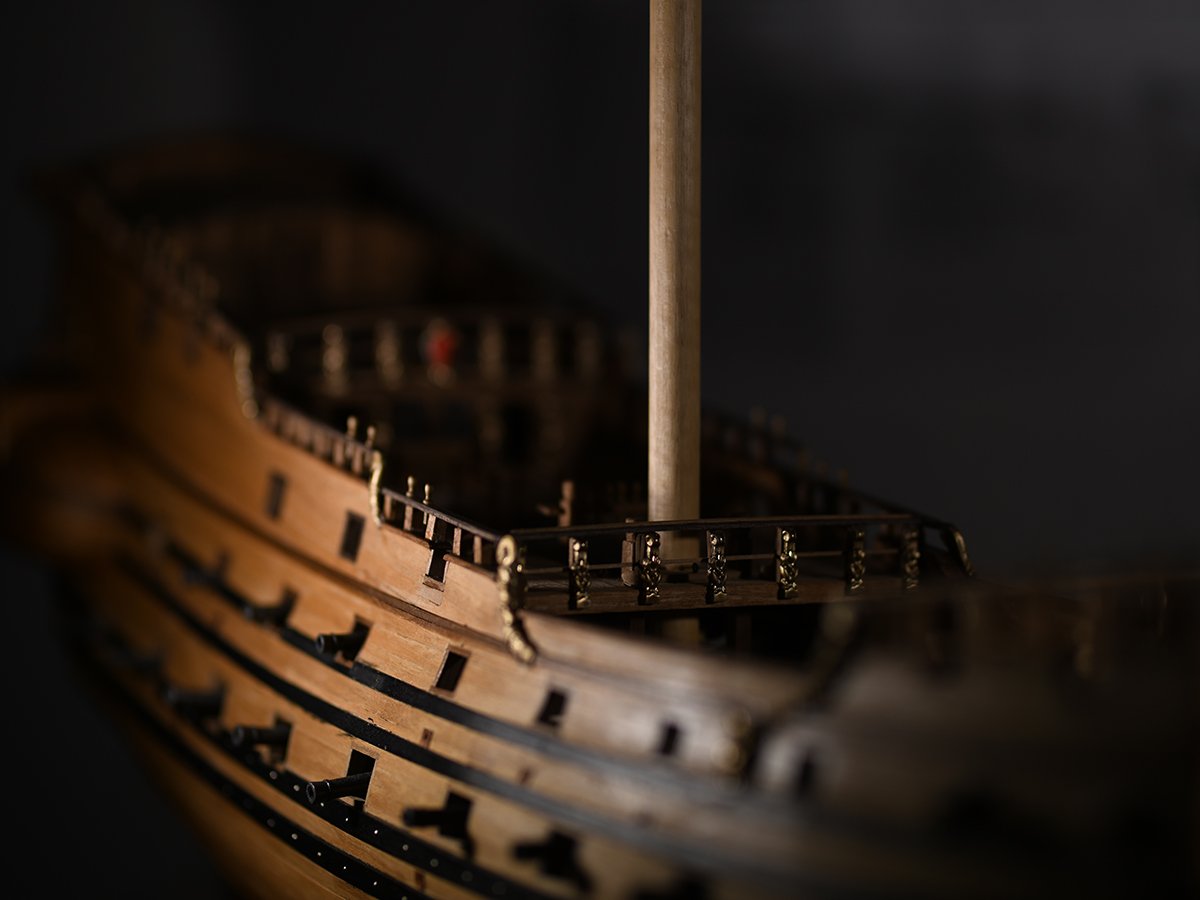
Cheerio fellow mates, as announced I startet with the masting and rigging. The first step was the bowsprit. As always with this model, I first consulted the interpretive files by piratepete007. His hints and tips are indispensable to find a way through the excellent but also some kind of confusing plans by Euromodel. All in all the construction of the bowsprit and the sprit topmast were not as complicated as expected. I think I got a nice solution with almost no simplifications except the chainplates of the topmast. I am quite satisfied and will now start with the foremast. I cut off the parts for the bowsprit deck with a jigsaw from plywood. IMO this comes out quite good and I will work so with the other mast decks too. At least I painted the parts in black. Some pictures will show the currently state of the build, more to follow. As always, I look forward to your comments and suggestions. Thank you all - and Ahoi 😉

-
Hello fellow mates and friends, after a long break, I am now devoting myself to my model of the "Friedrich Wilhelm zu Pferde" again. Almost two years ago, I finished the hull and all the superstructures and actually only wanted to take a short break. But then my heart started to give me problems, I had to go to the hospital several times, had a stent inserted and first had to regain my strength. I have now also finished my working life and am now retired. Now that I have fully recovered, I am back at the workbench. I am starting the final spurt and want to finish the FW by summer. Exciting tasks await me - the masts and yards have to be built and then the rigging is next. I will provide you all with texts and pictures as usual and look forward to every suggestion, every comment and every friendly contact. BTW - I just ordered the brand new kit from Occre, "Fram". Nansens and Amundsens expedition ship for the exploration of both the North and the South Pole can be a very interesting project and perhaps gives me inspiration to create a diorama some day. Cheerio - Max
-
Thank you so much Pete. Actually I am a little bit proud of it. With your fantastic files and some own brain work I came to this result. You know the kits better than anybody else and thus you know the challenges that have to be done. But every one can be solved with a deep satisfaction. I am looking forward to the next steps. But now it is time for spring and the last months of my business life. What would you recommend as next Project? I am Not sure if I want the Mordaunt or the Falmouth. Both are most interesting😁 Best wishes Max
-
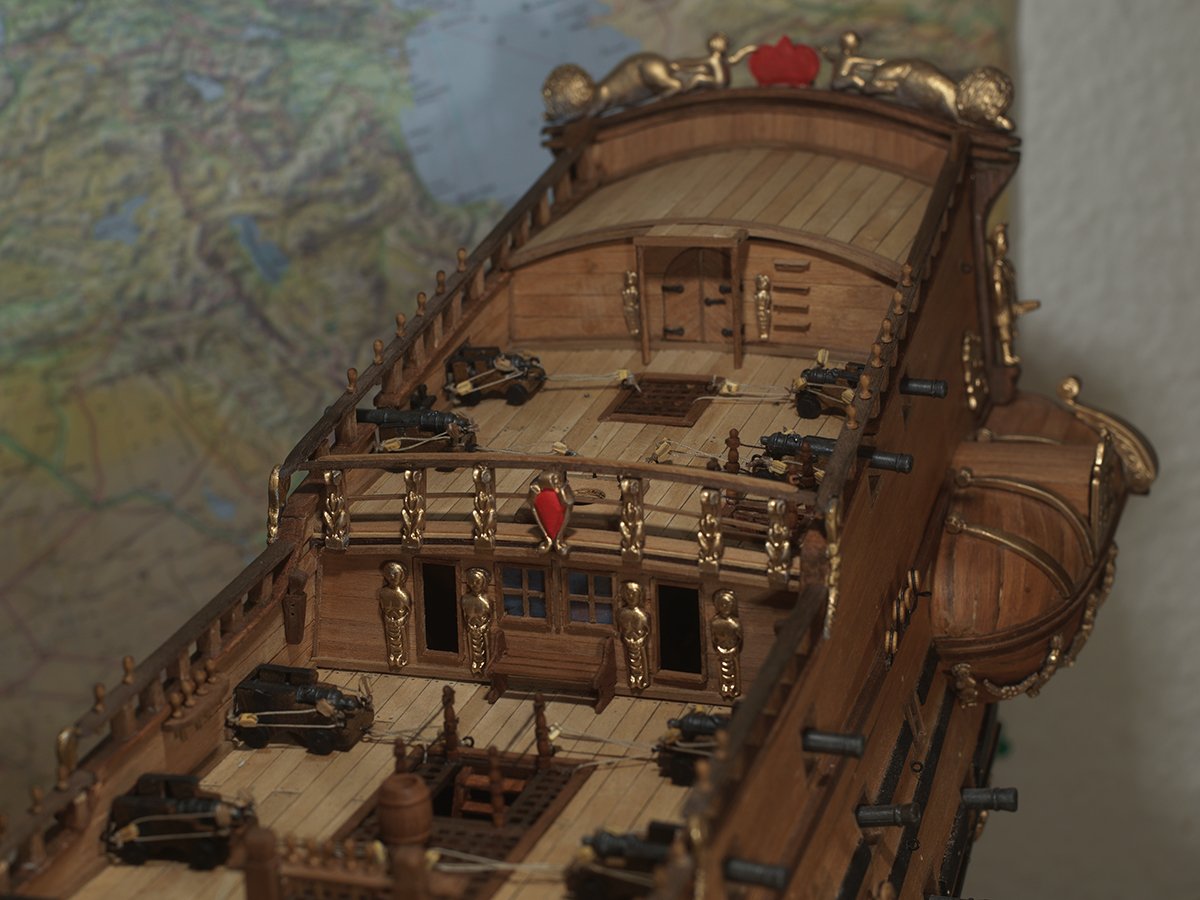
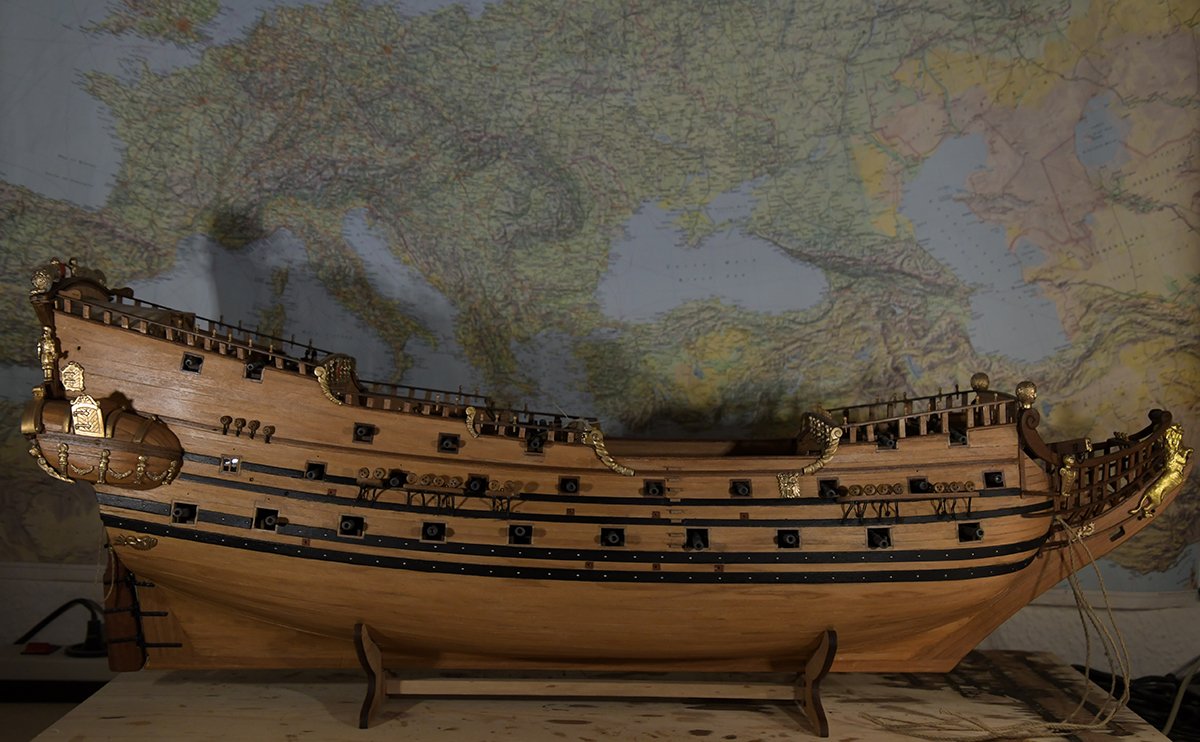
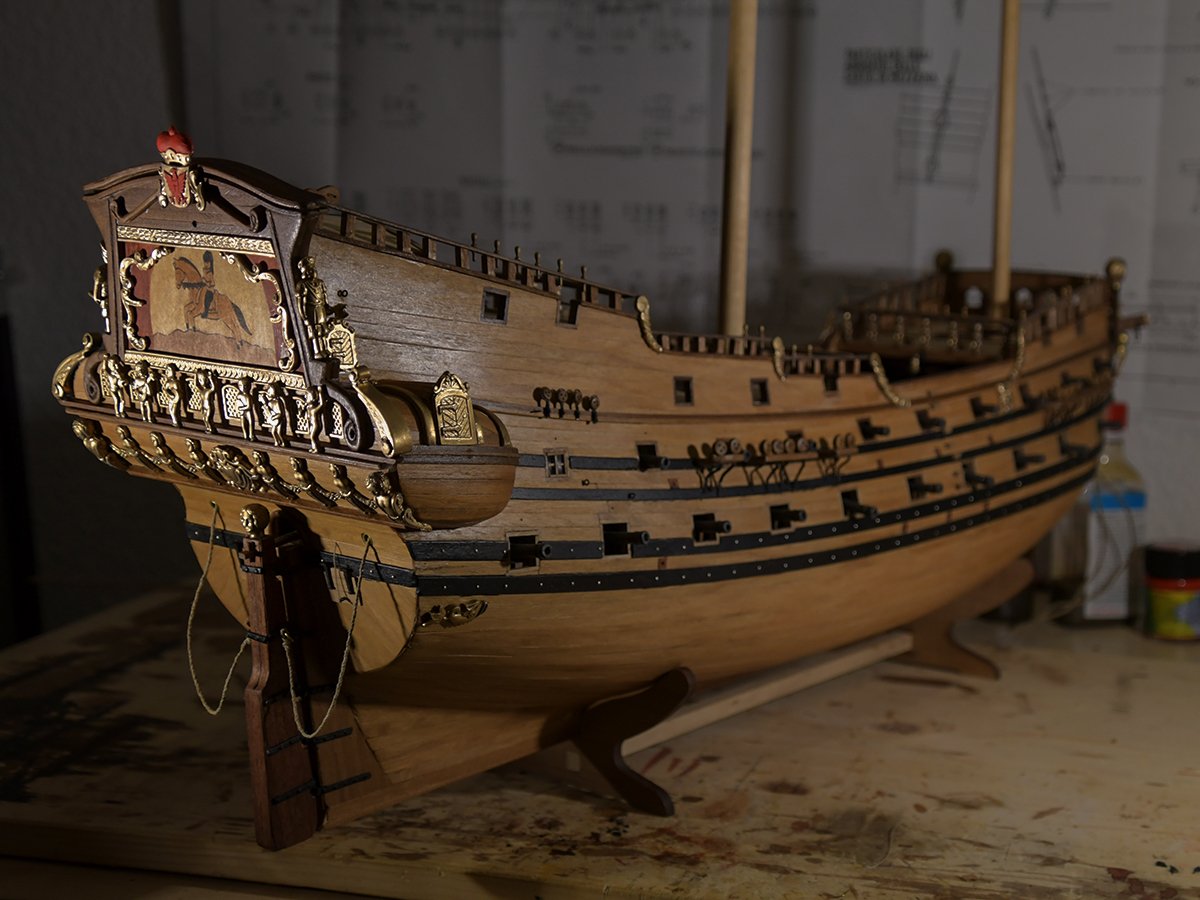
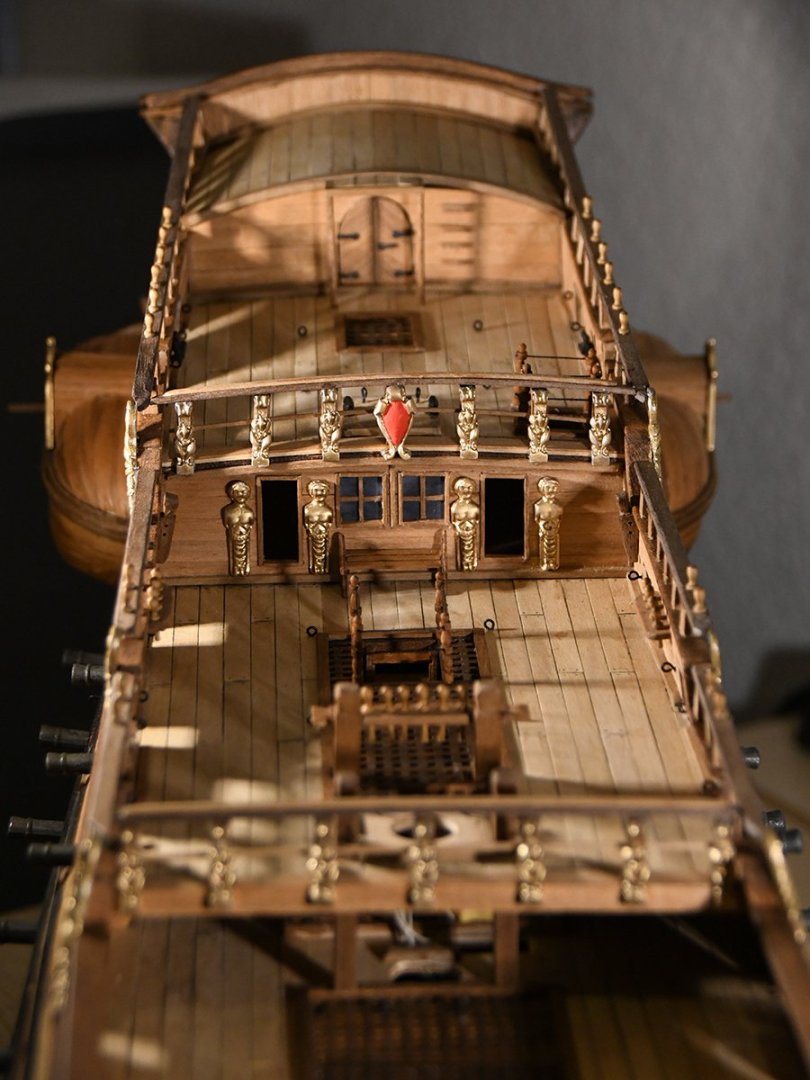
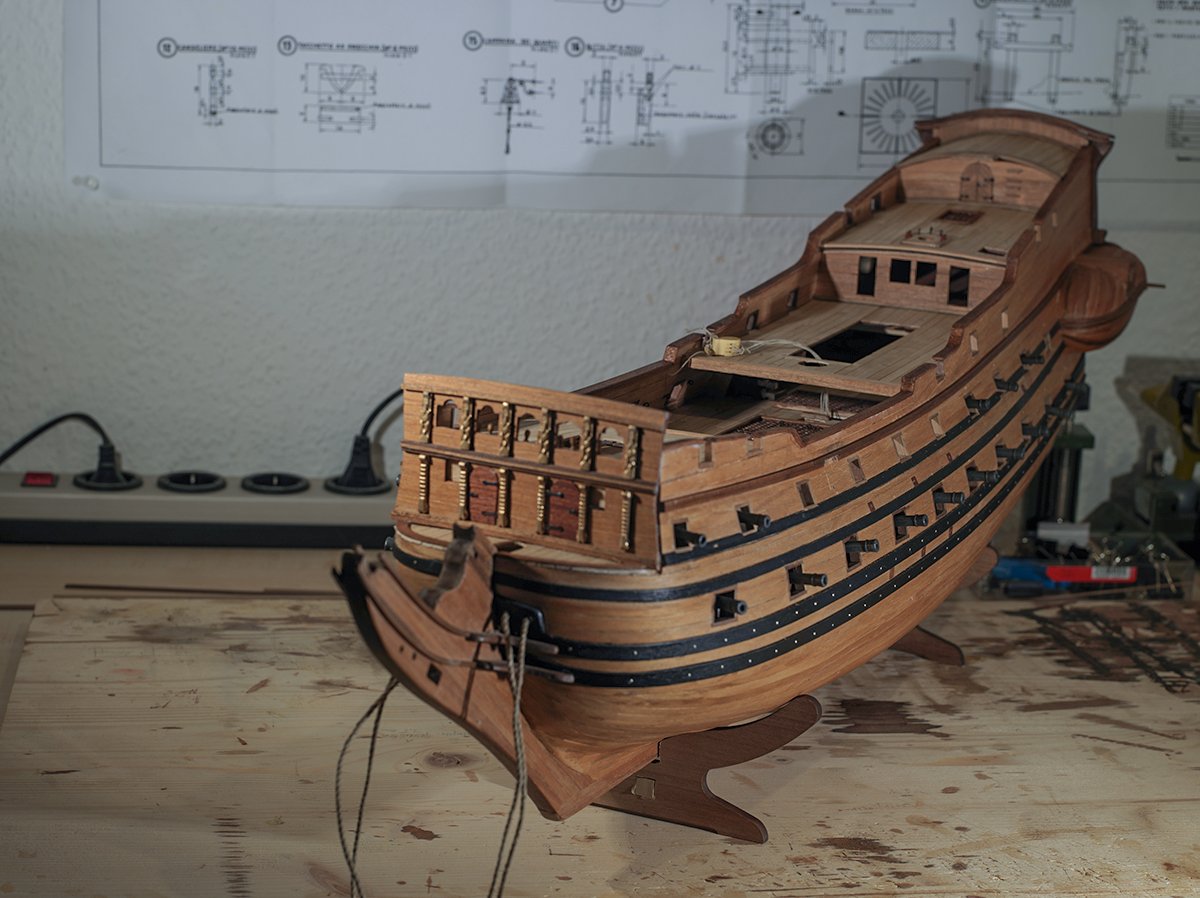
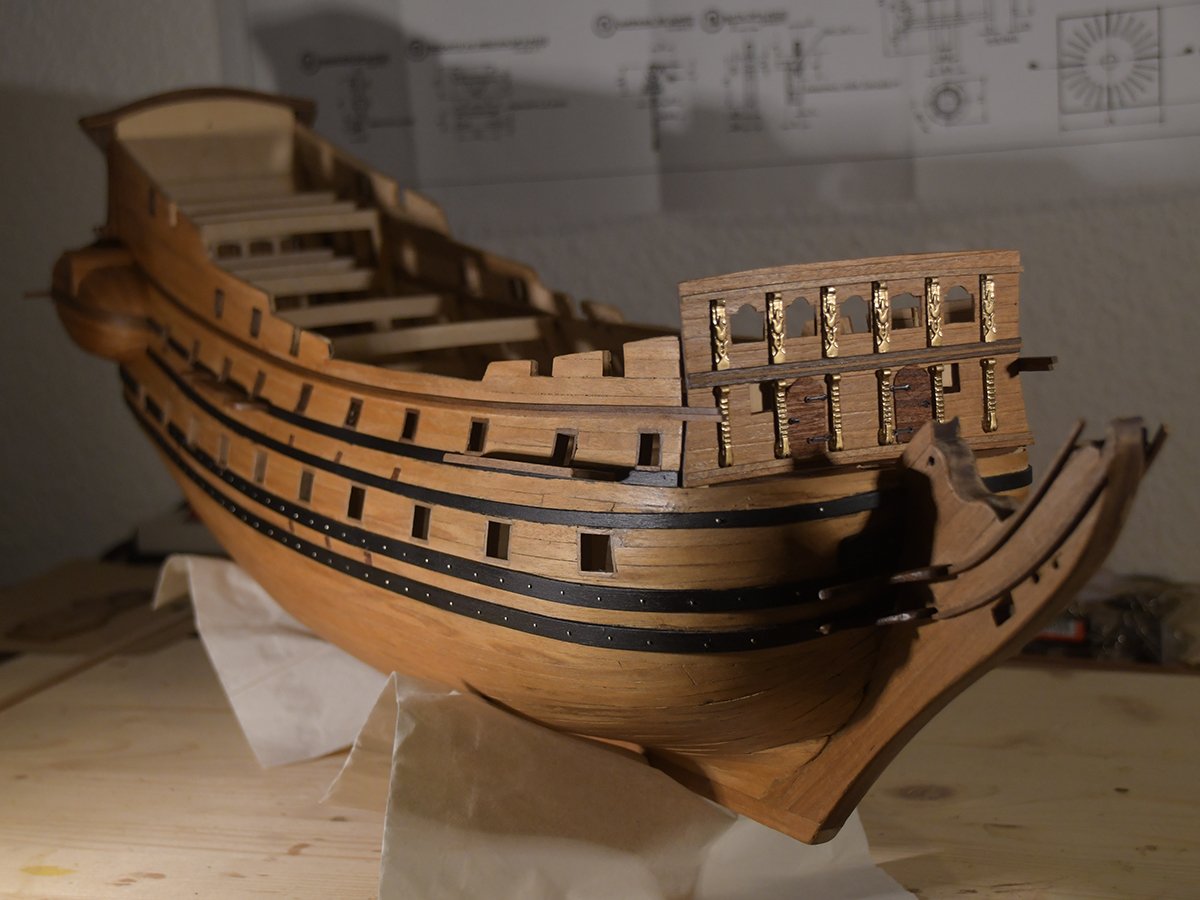
Cheerio again as mentioned in the post above I finished the first construction stage - hull, deck furniture, cannons, decorations - of the Euro Model Friedrich Wilhelm zu Pferde. I will have a break now before I start with the masts, spars and finally the rigging. I will retire in September. I think this will be a good time to restart building this extraordinary model. Please enjoy the pics and don't hesitate to tell me your thoughts about my FW. CU all again Maximilian


-
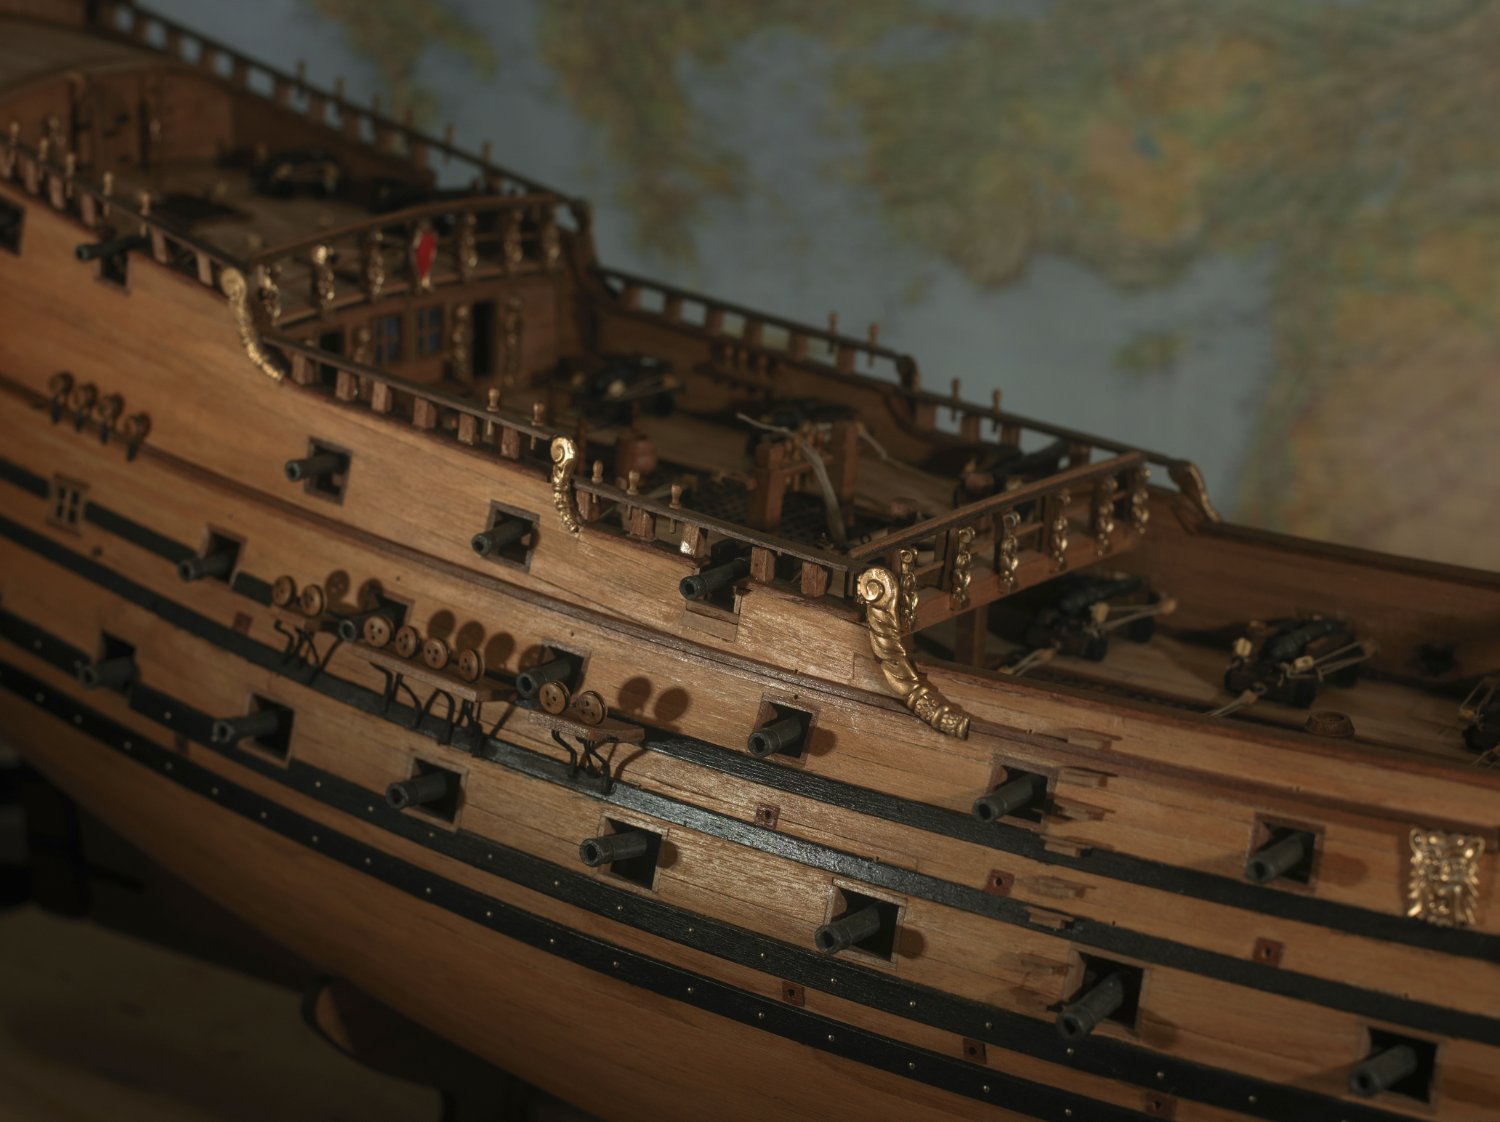
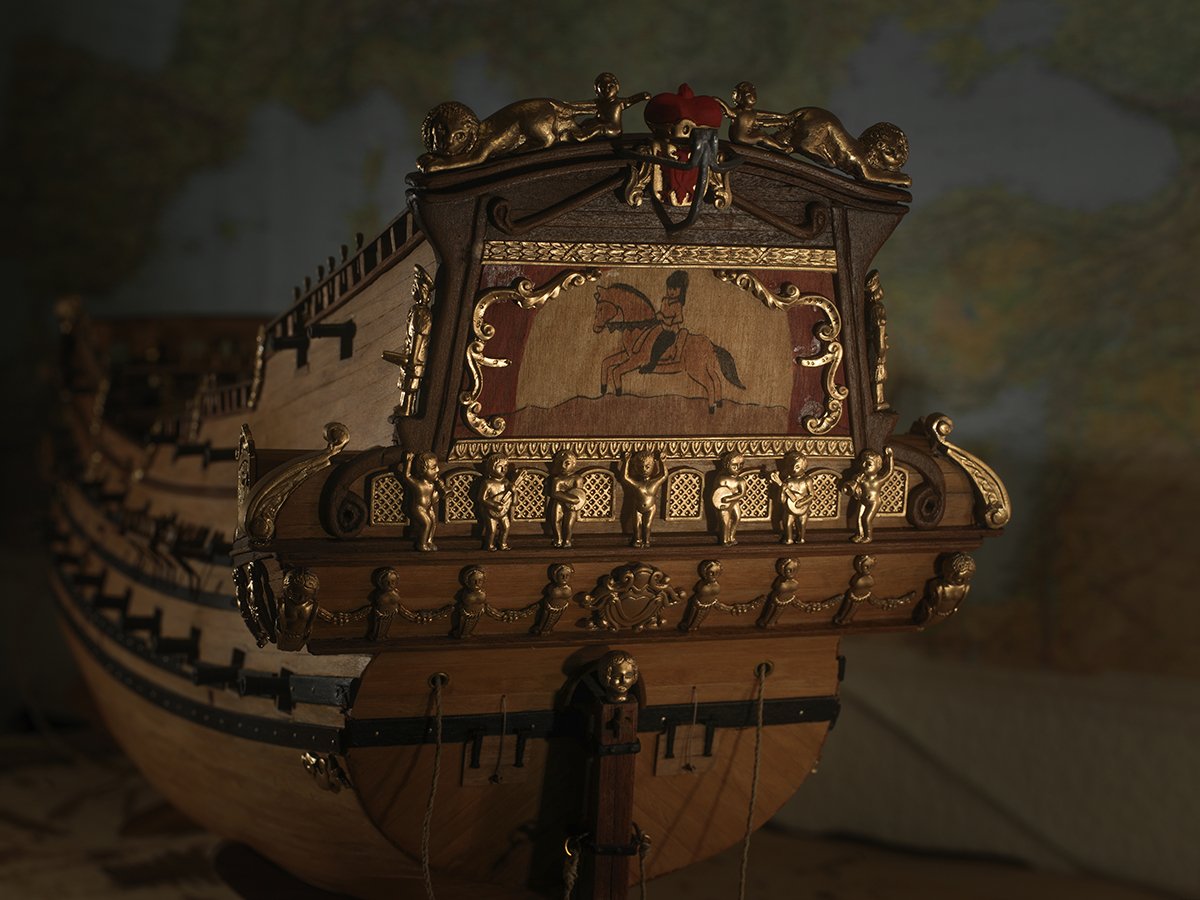
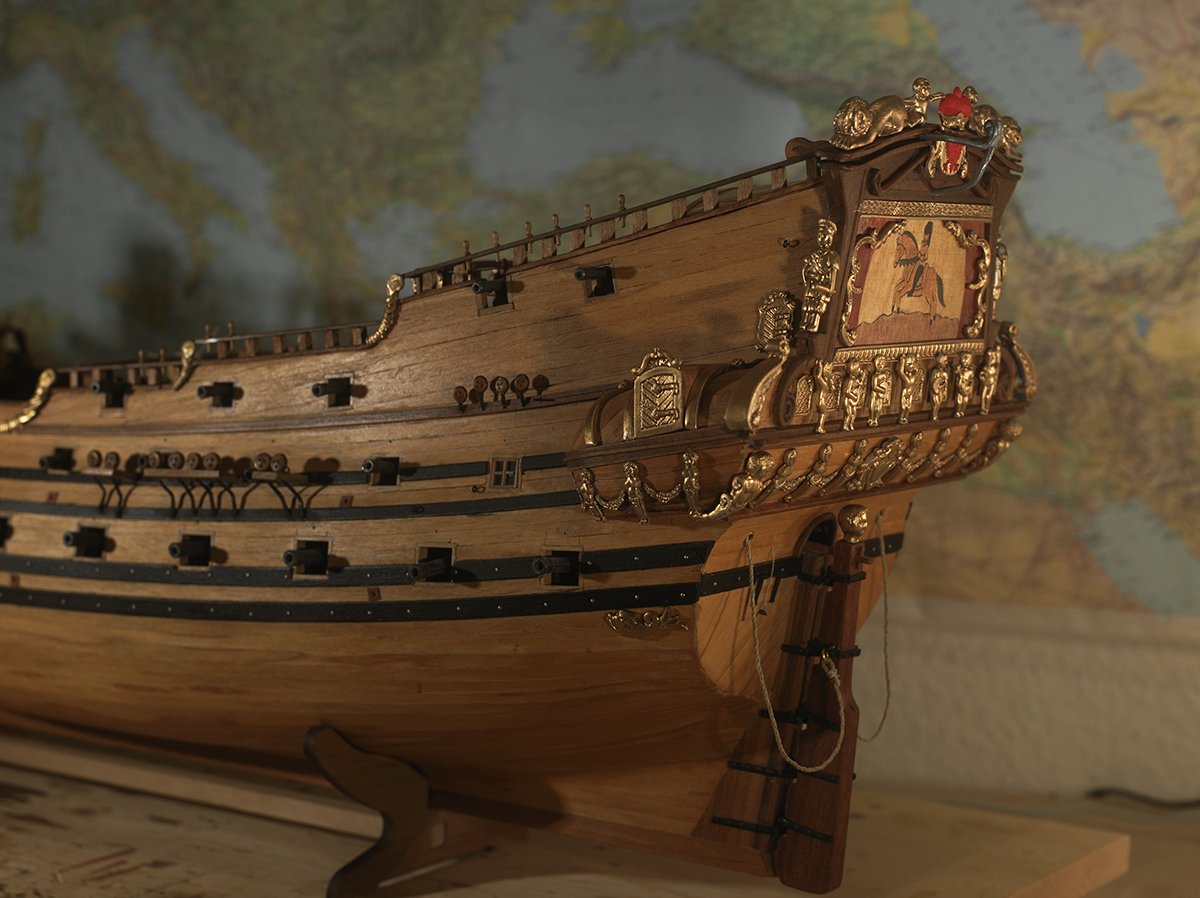
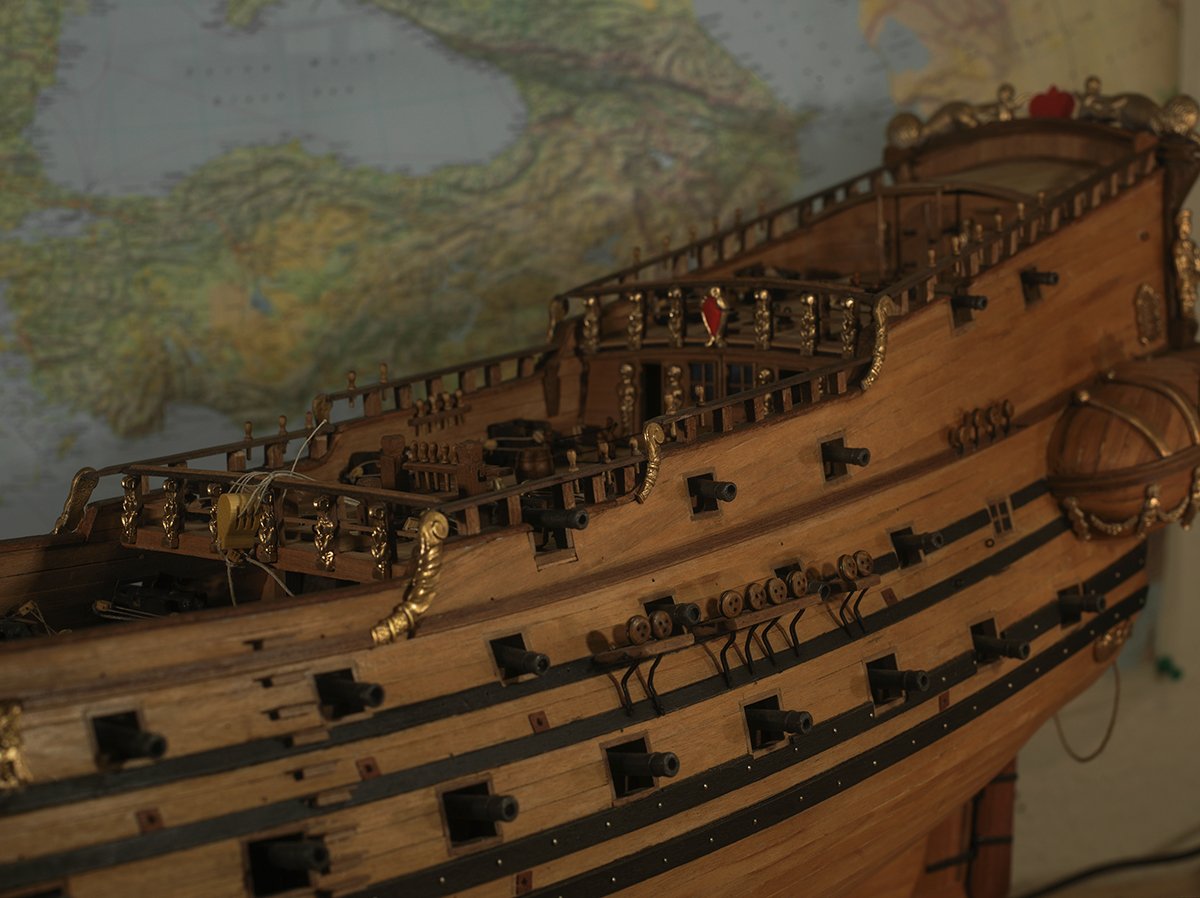
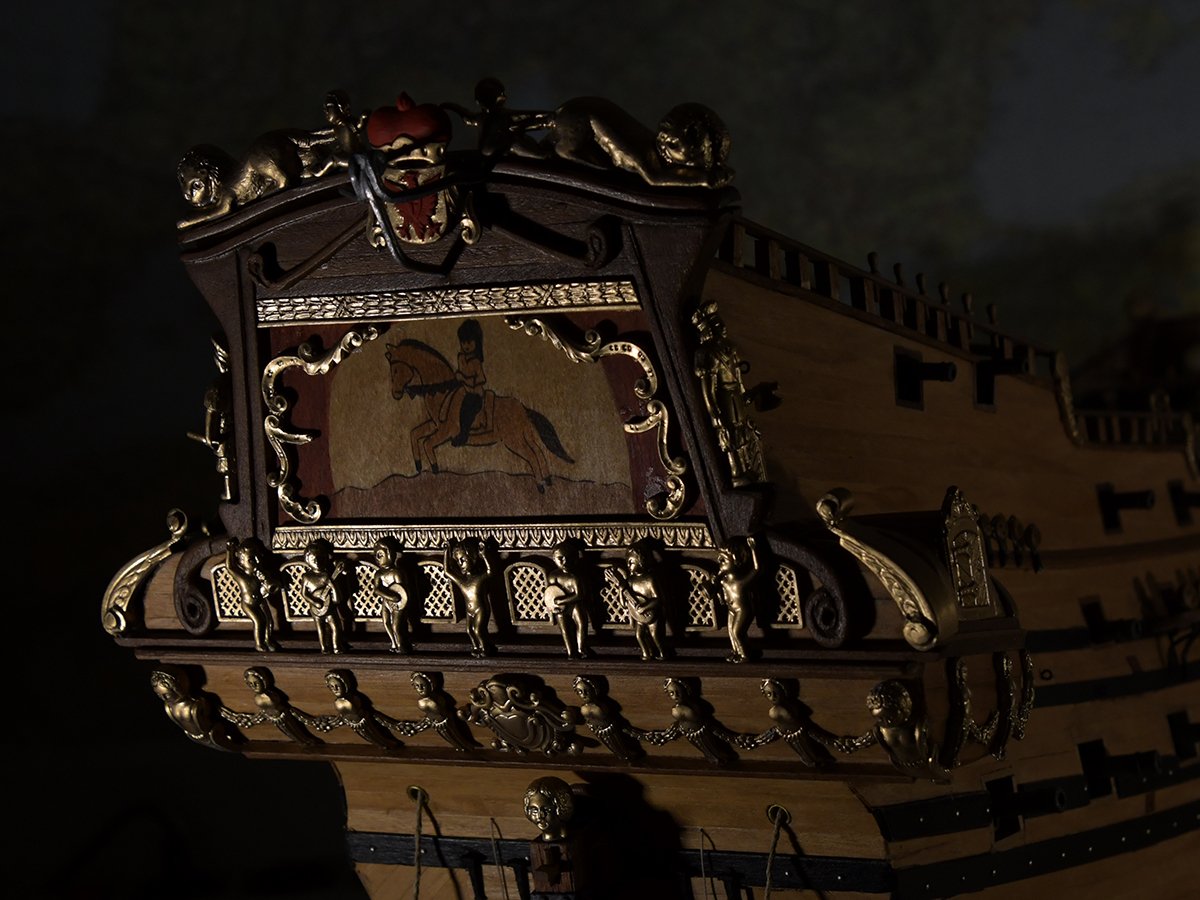
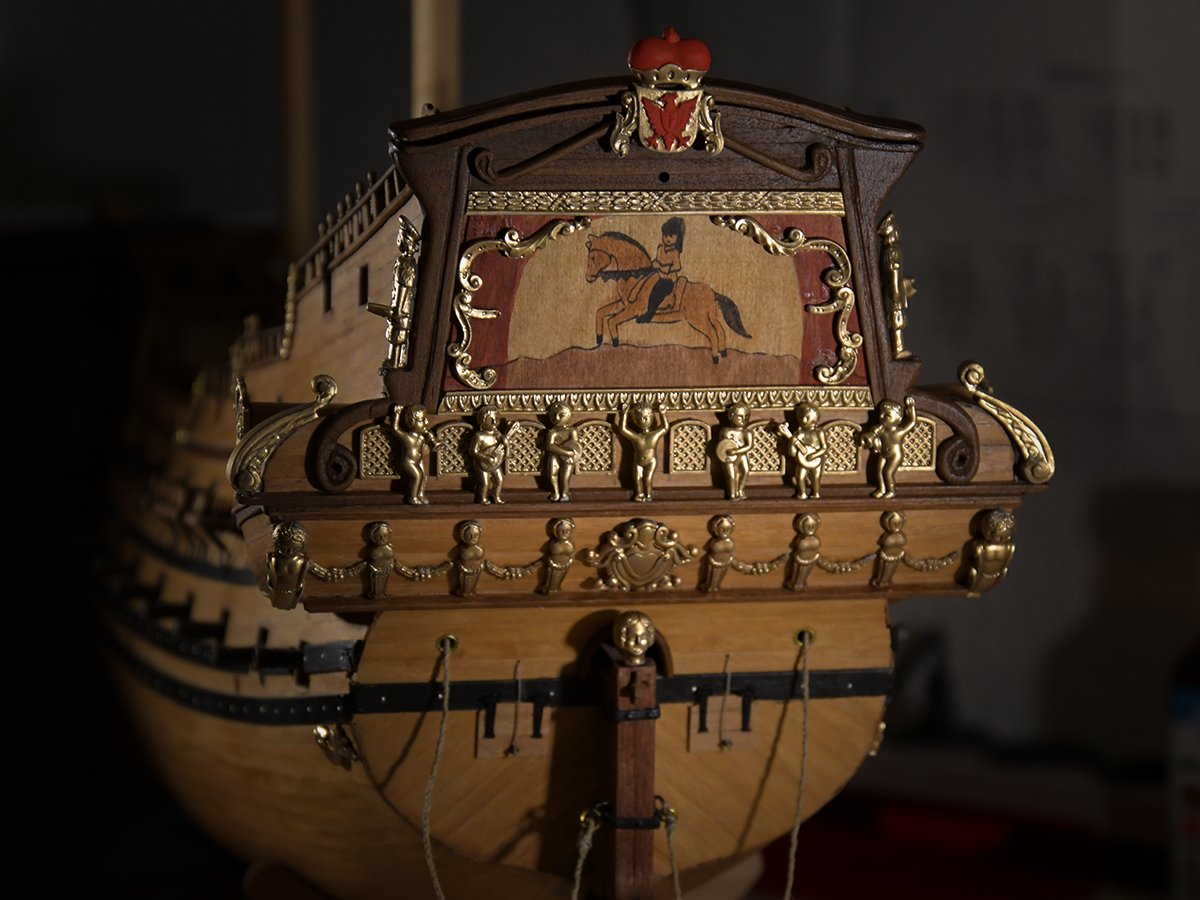
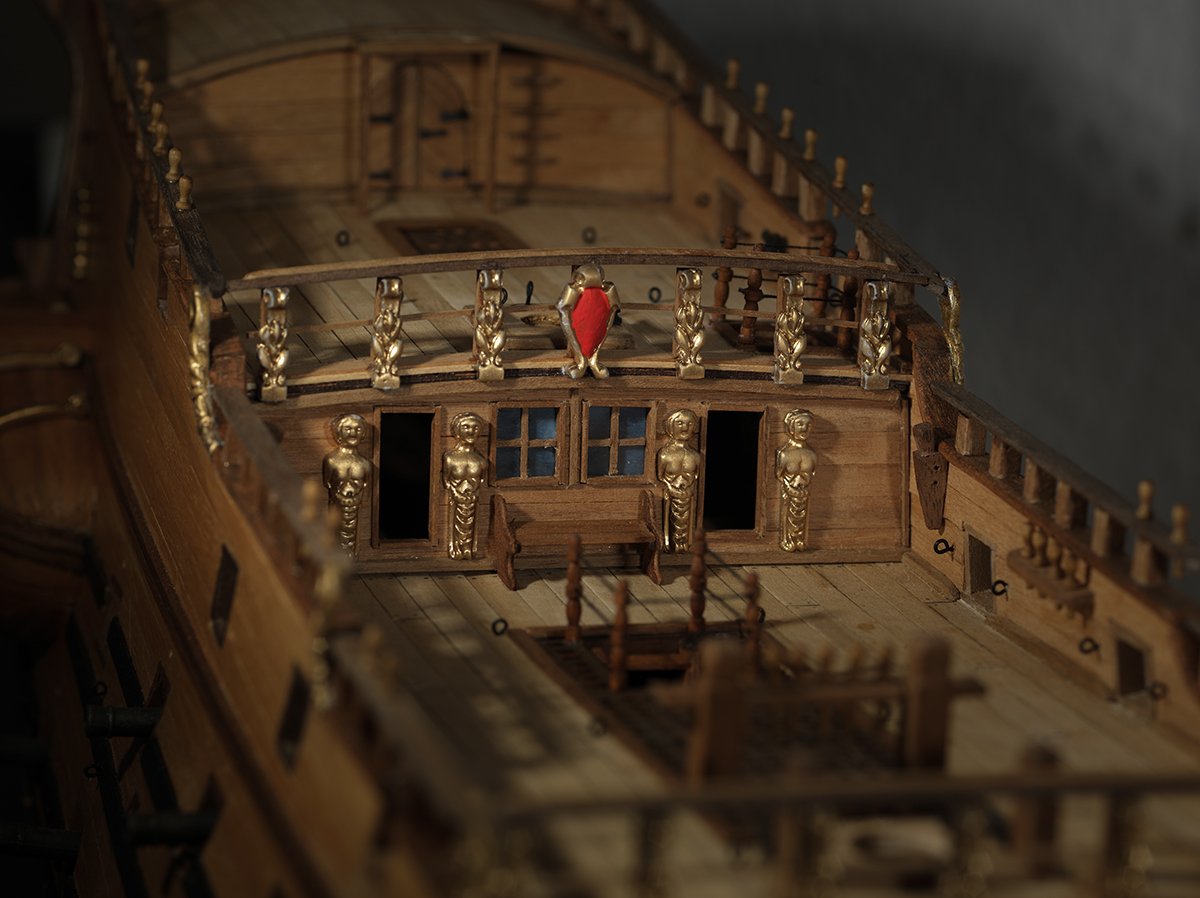
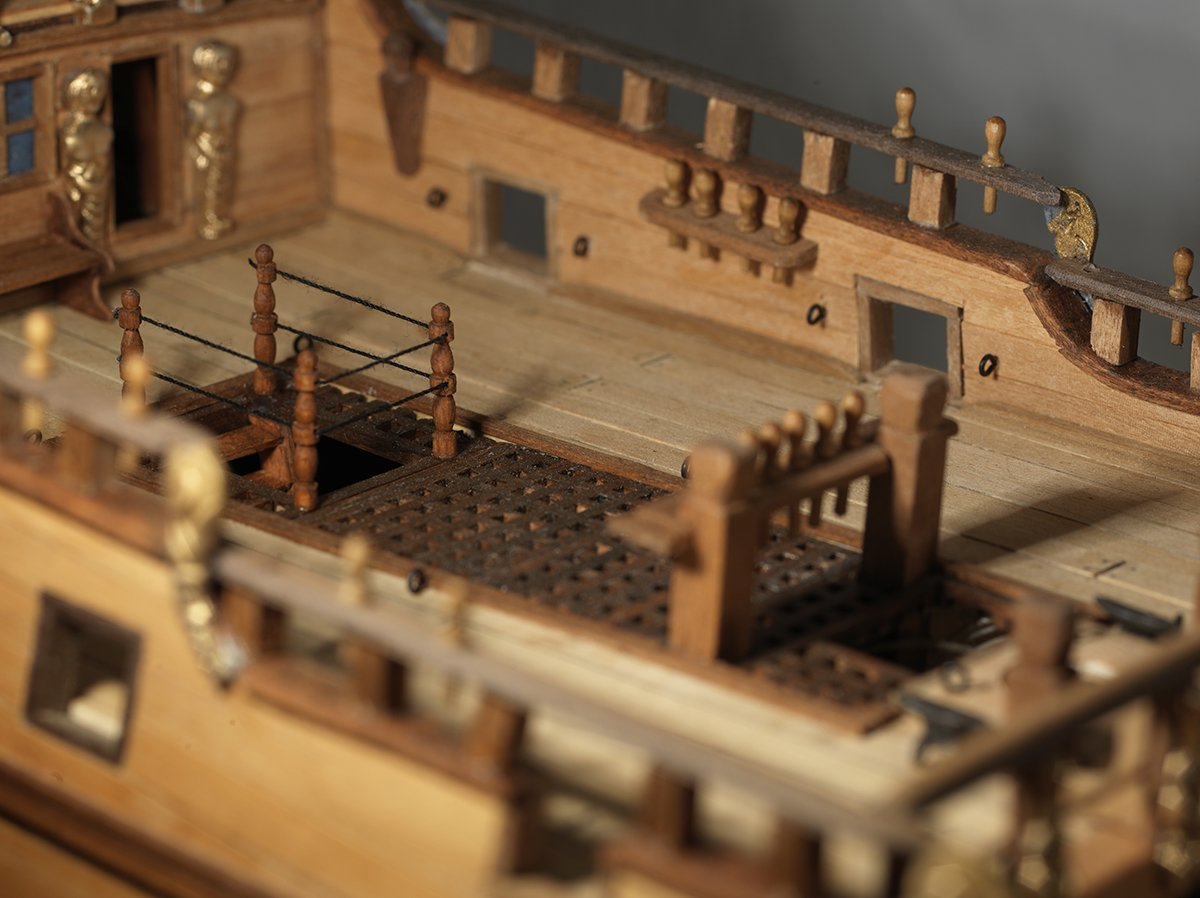
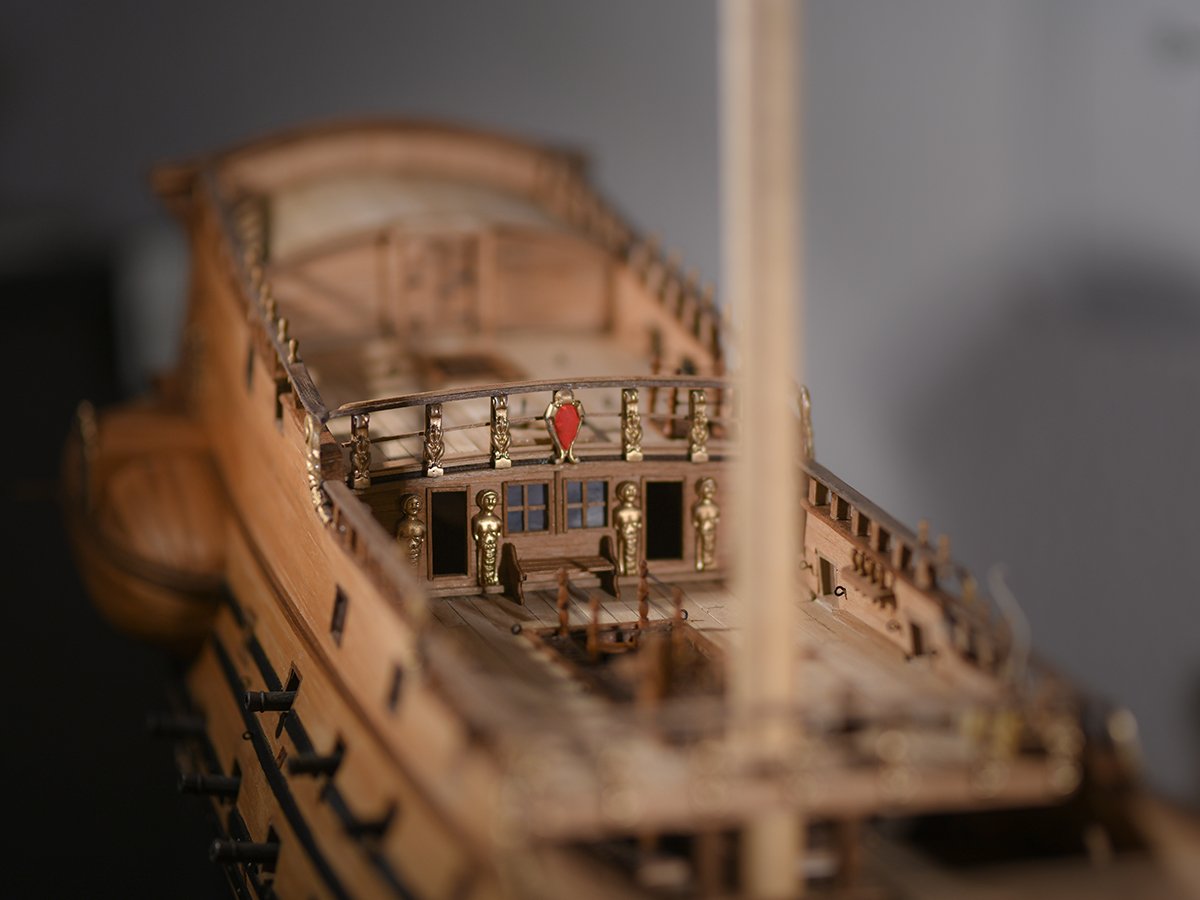
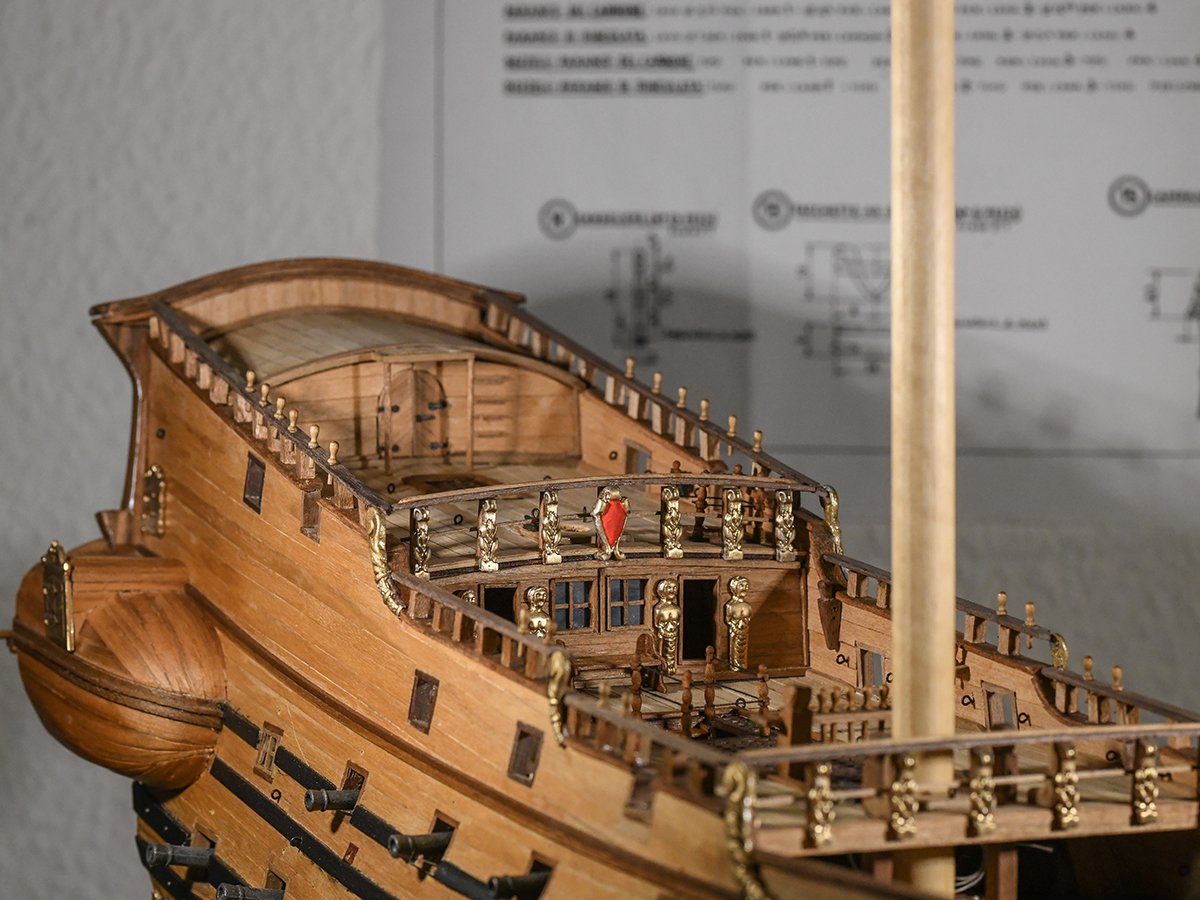
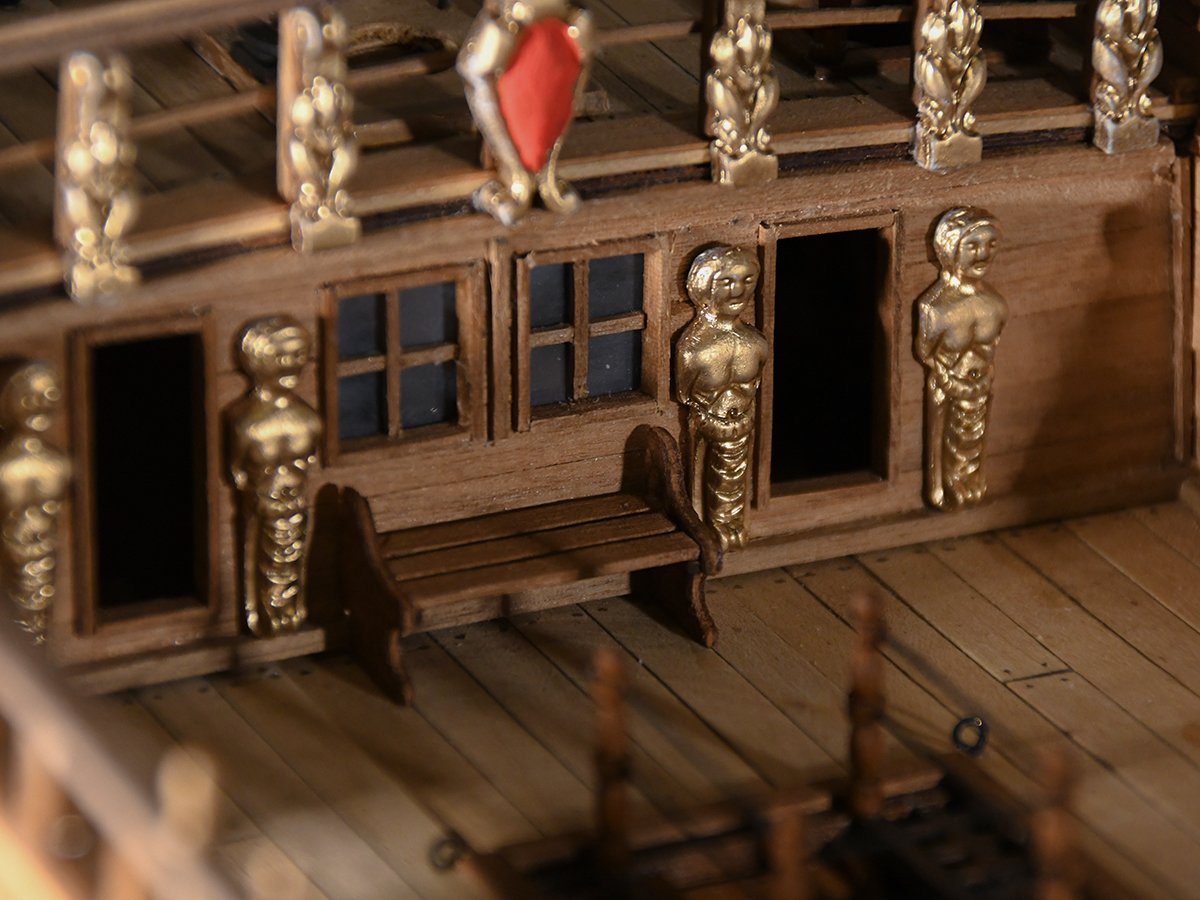
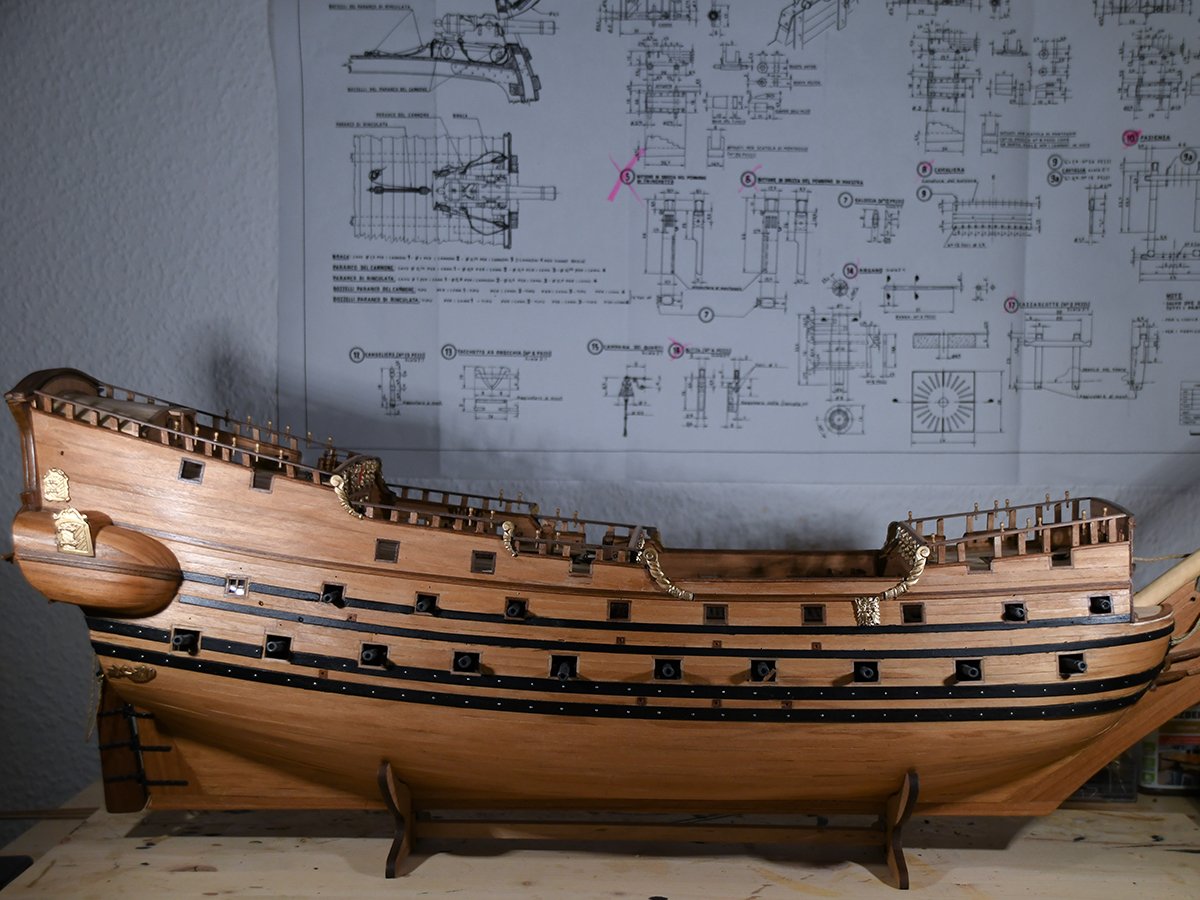
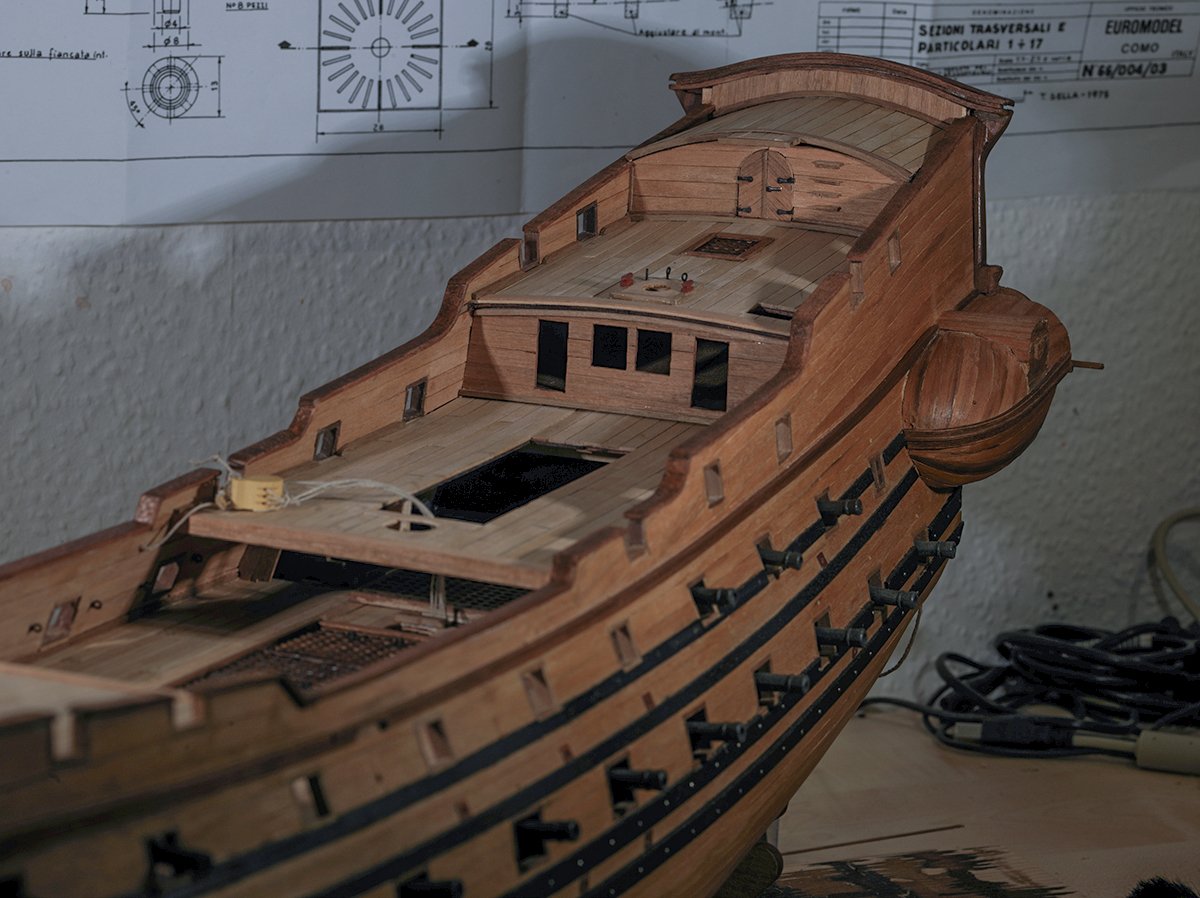
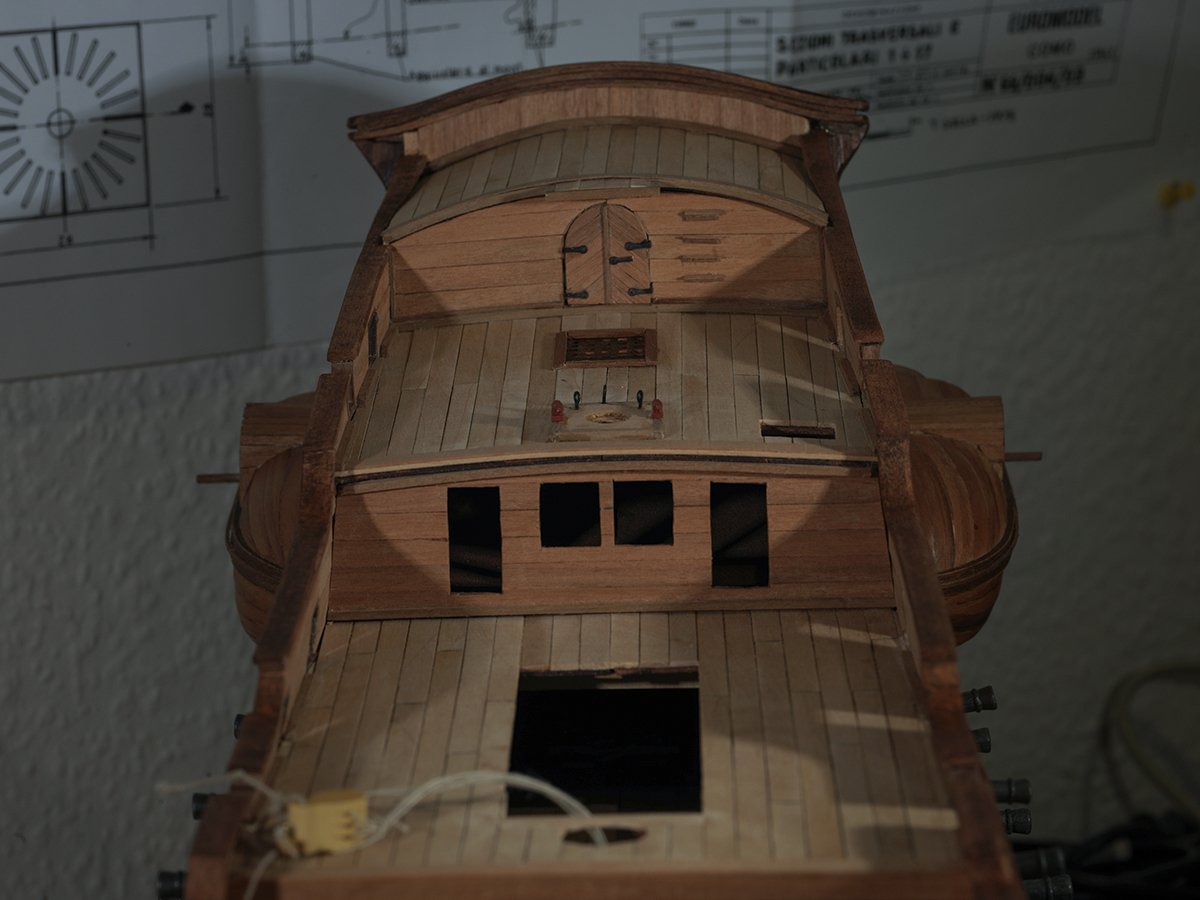
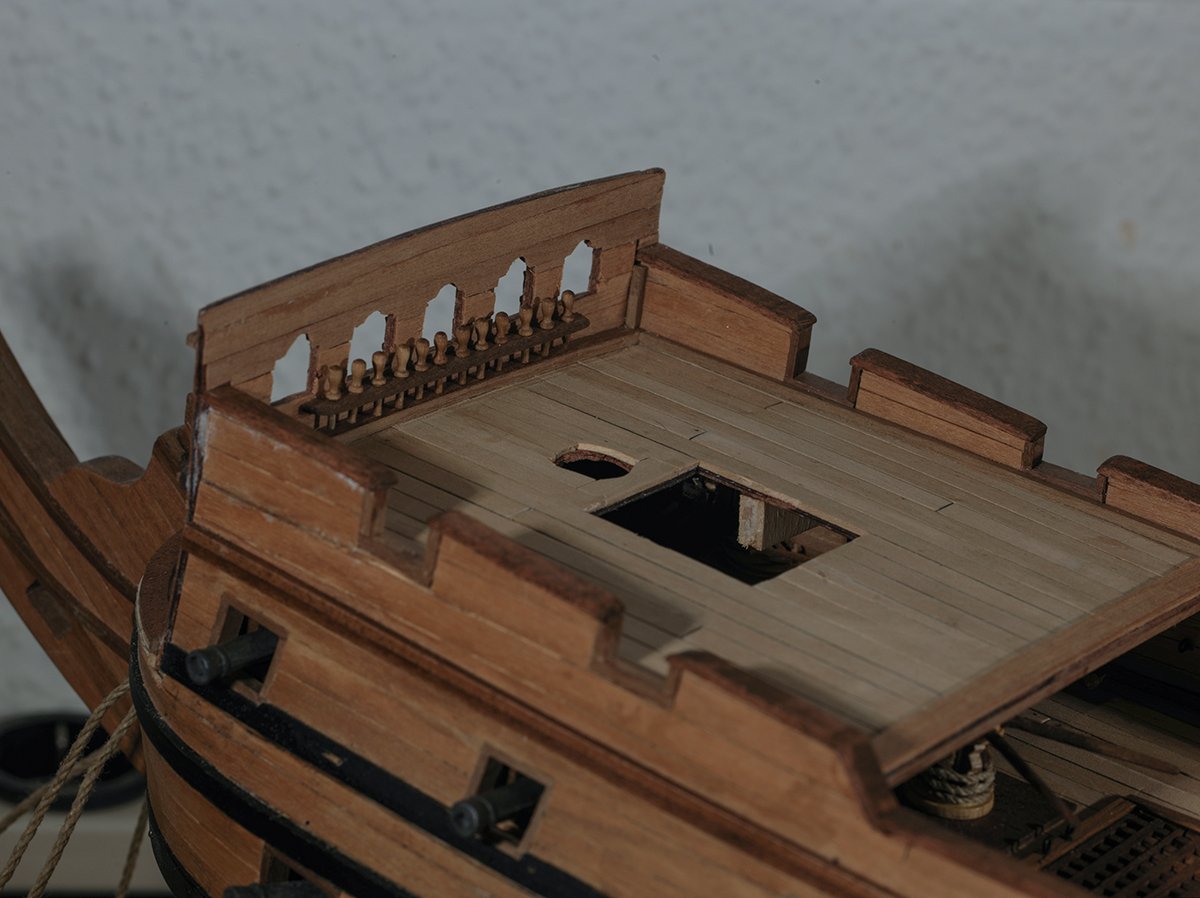
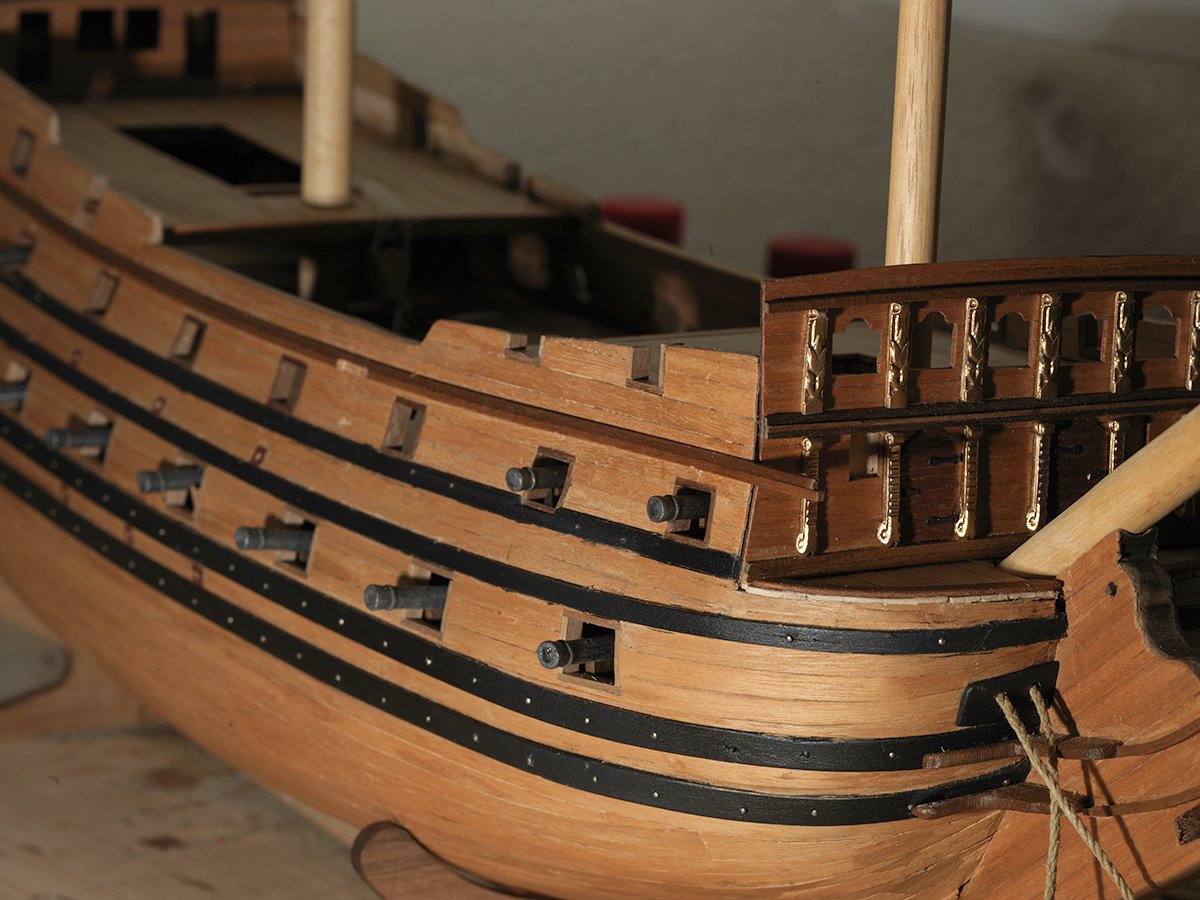
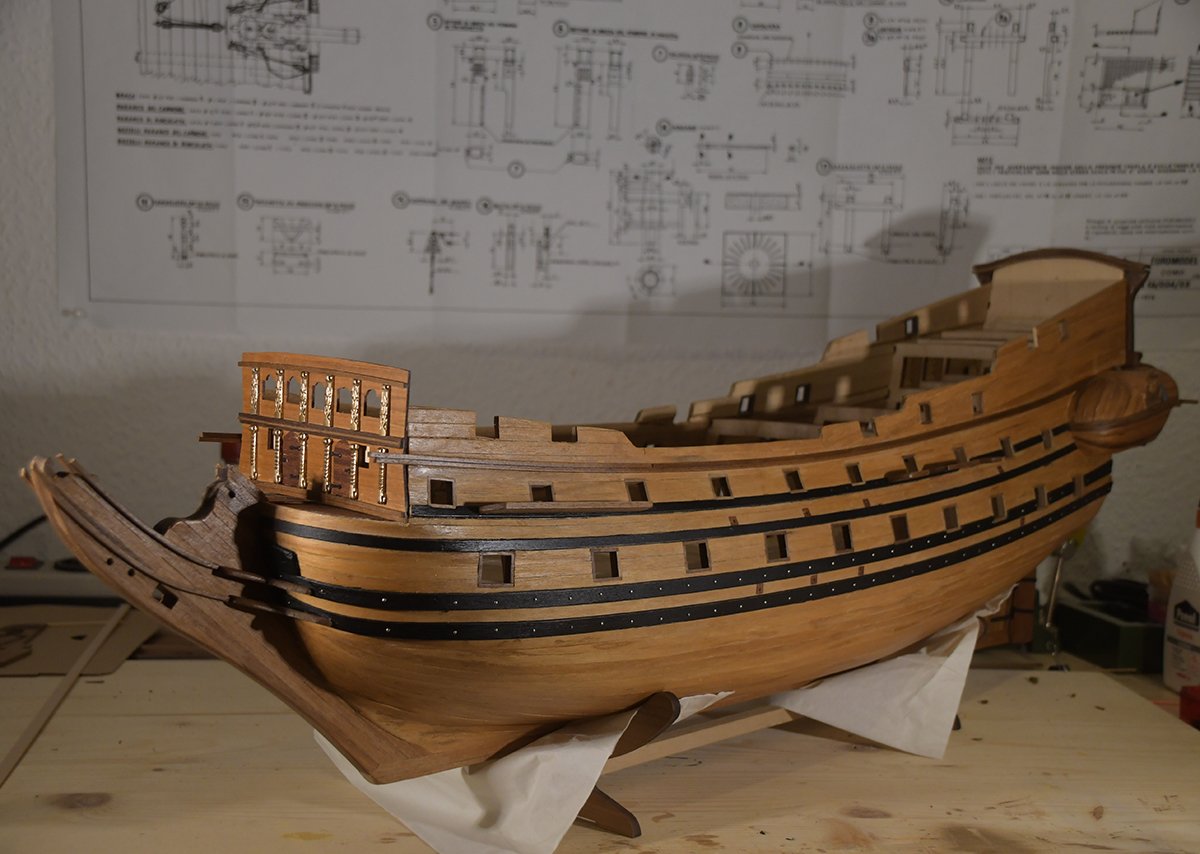
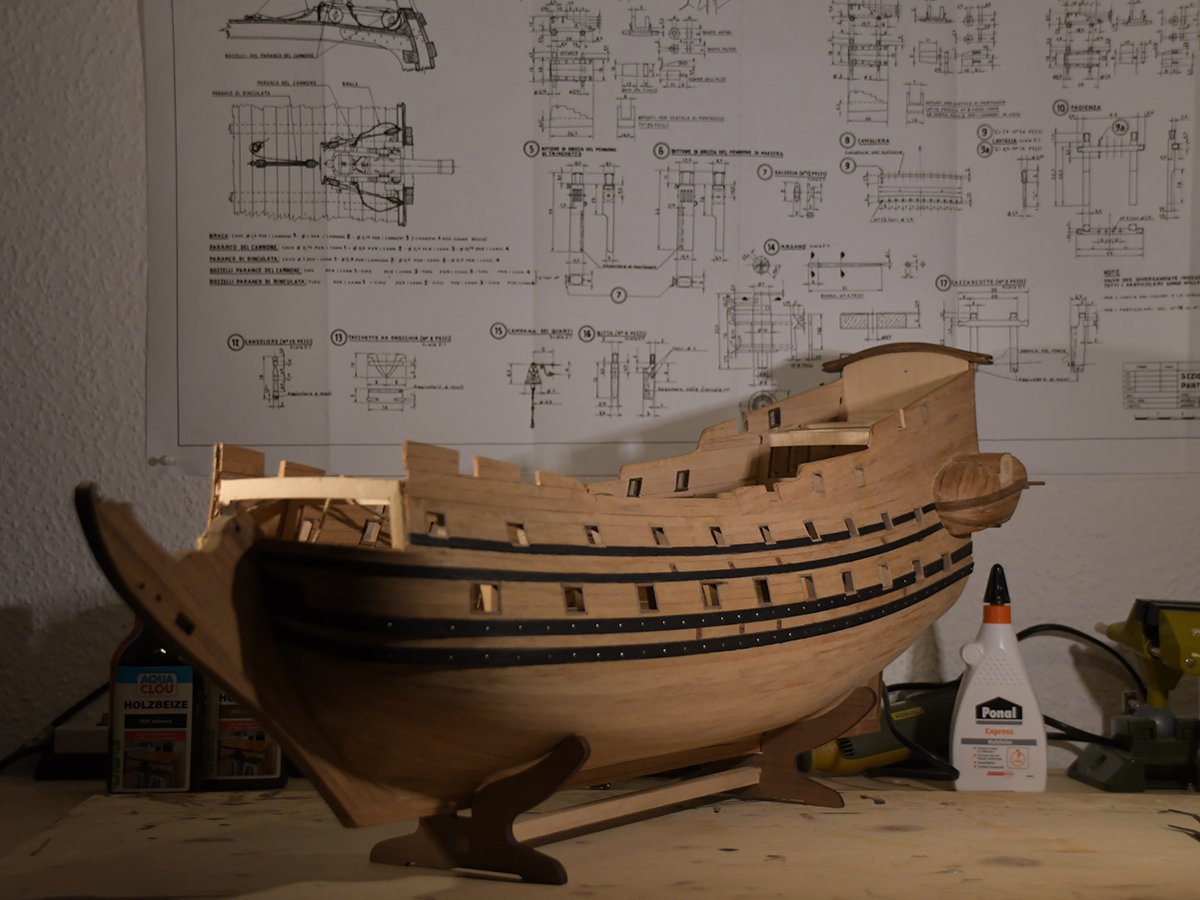
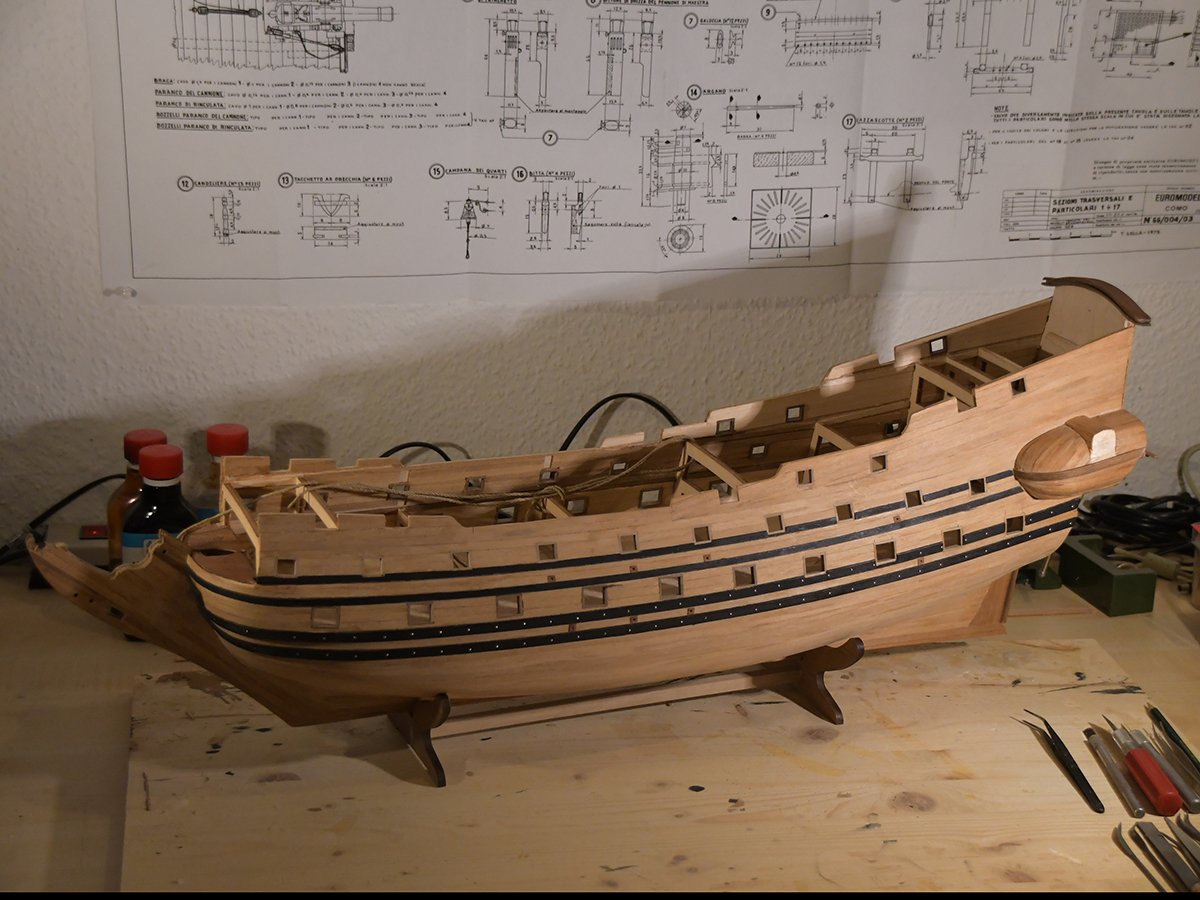
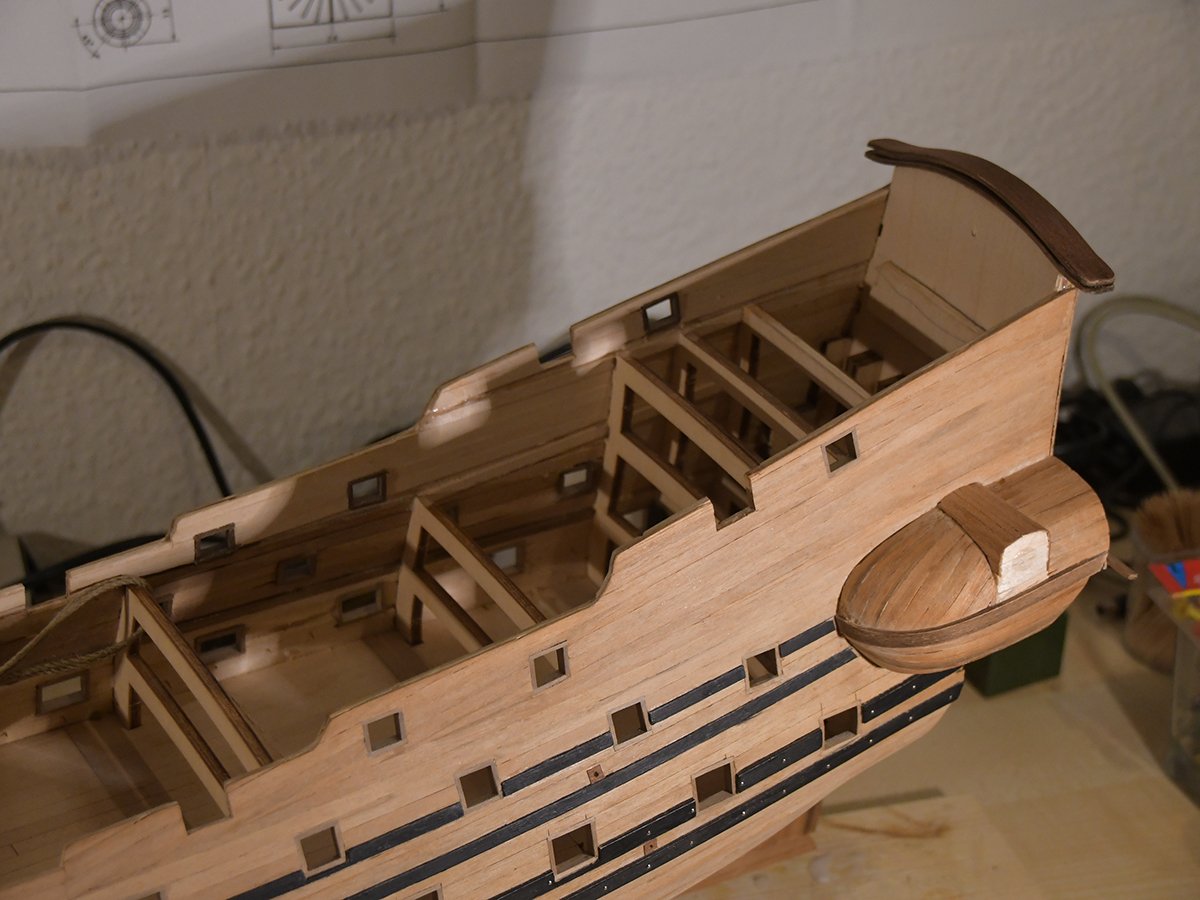
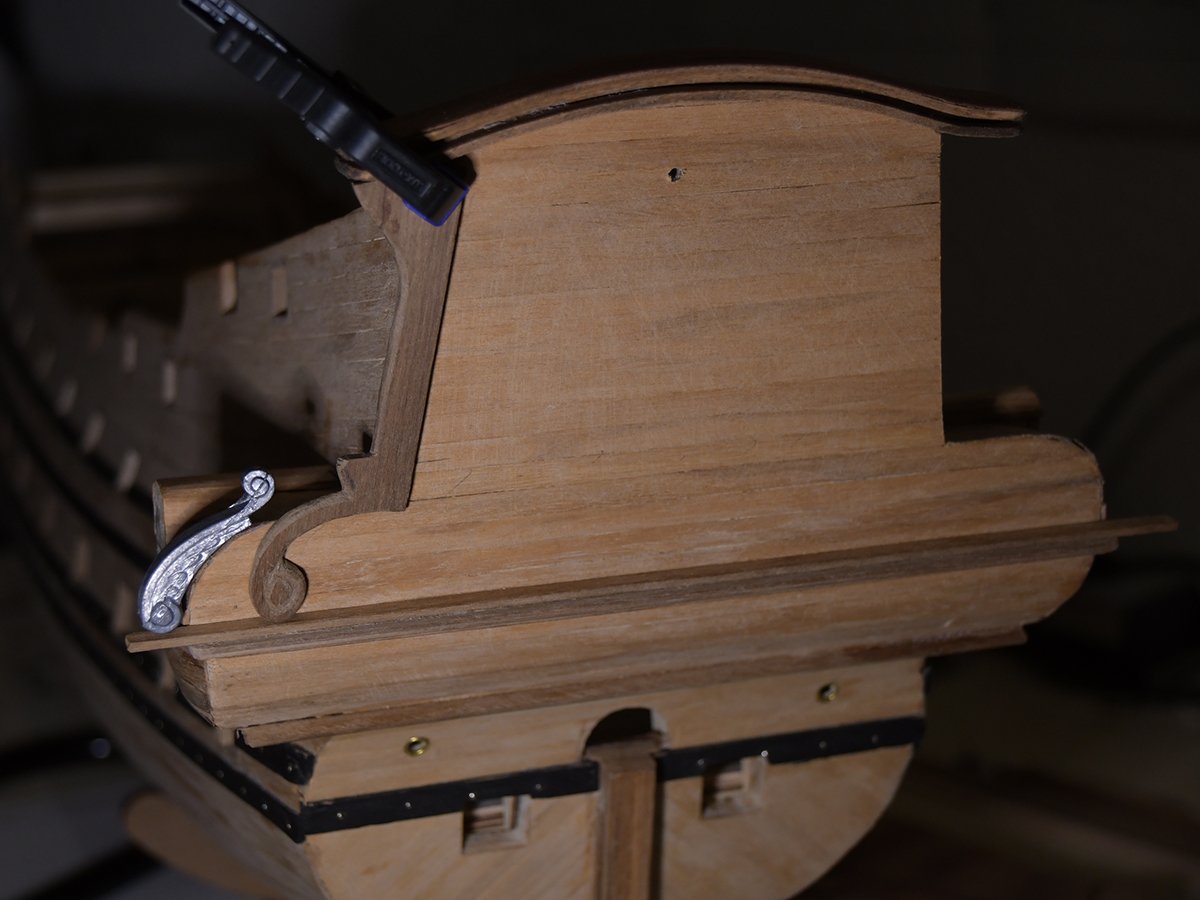
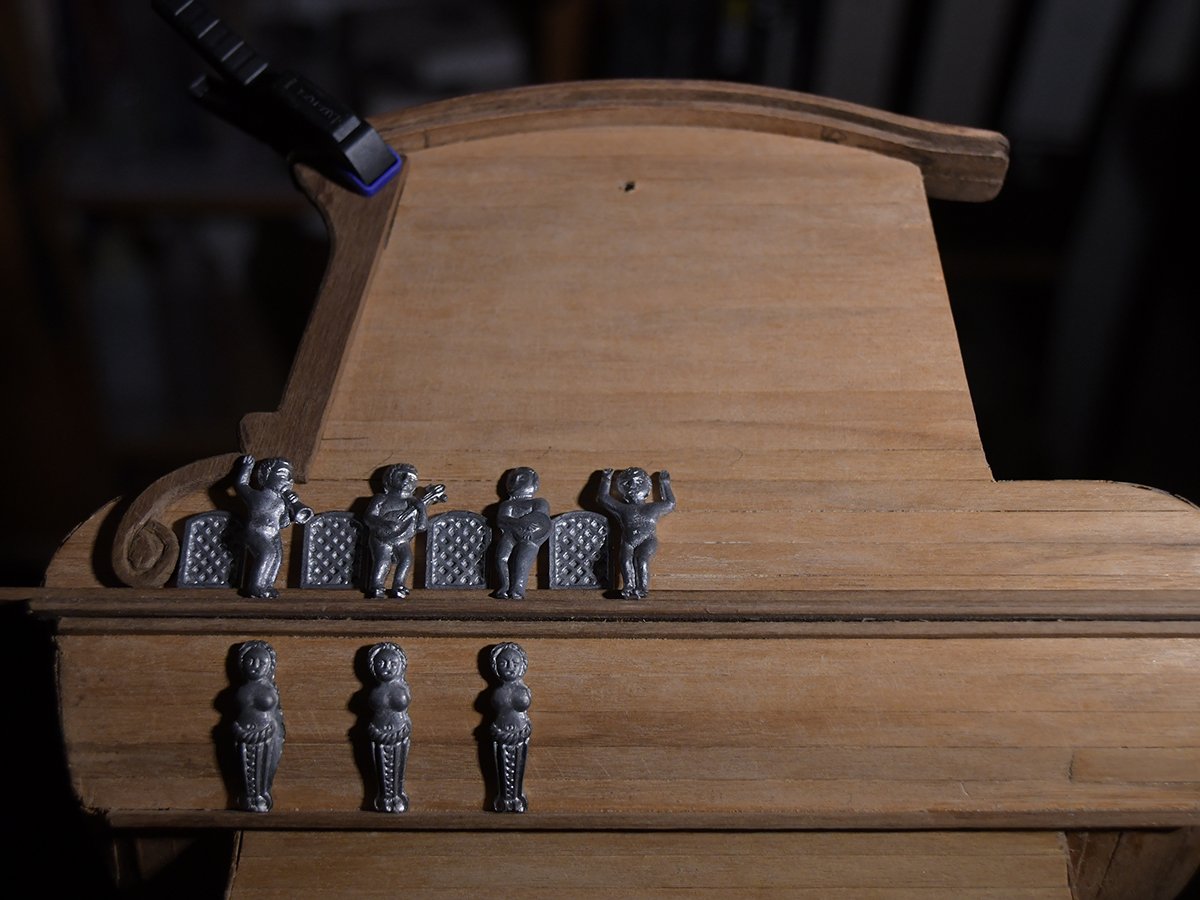
Hello my friends and fellow men (and women of course) it's time for another update, mostly with pictures. The work at the hull of my Friedrich Wilhelm step by step comes to its end. Still I have to build and install the remaining canons, some decorations are still missing - but that's it more or less. I think that it will take not longer than about two or maximum three weeks to finish this big stage of construction. I am very content with the quality of the figurines and other decorations. I used primer and some acrylic "antique gold", but there are some minor spots where I have to repair the color coating. After this step I will take a break before I start to construct the masts and spares and finally do the rigging. Before that I have to study the great Euromodel plans very carefully. So please take a look at the photos, enjoy it and as always don't hesitate to tell me your opinion and comments. CU soon with the final results of the hull construction Cheerio Max


-
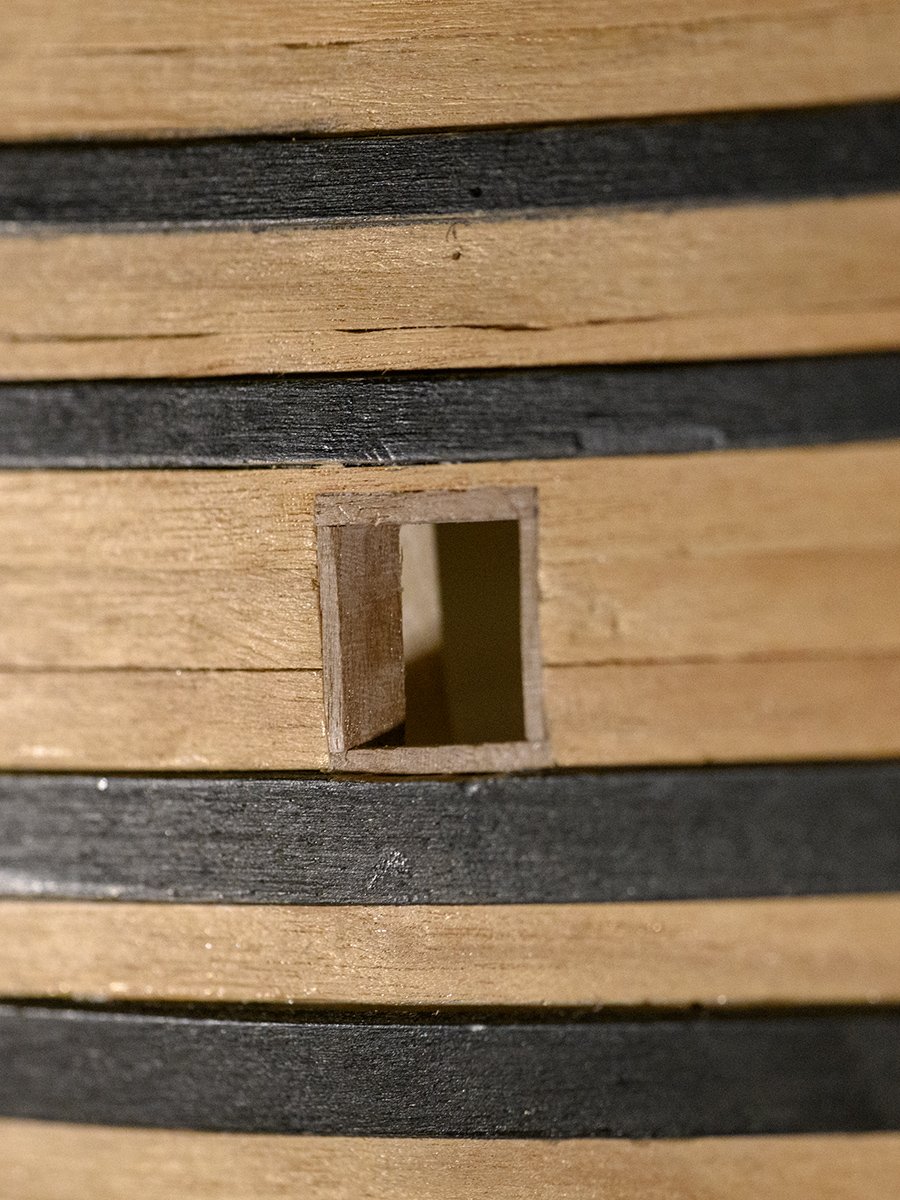
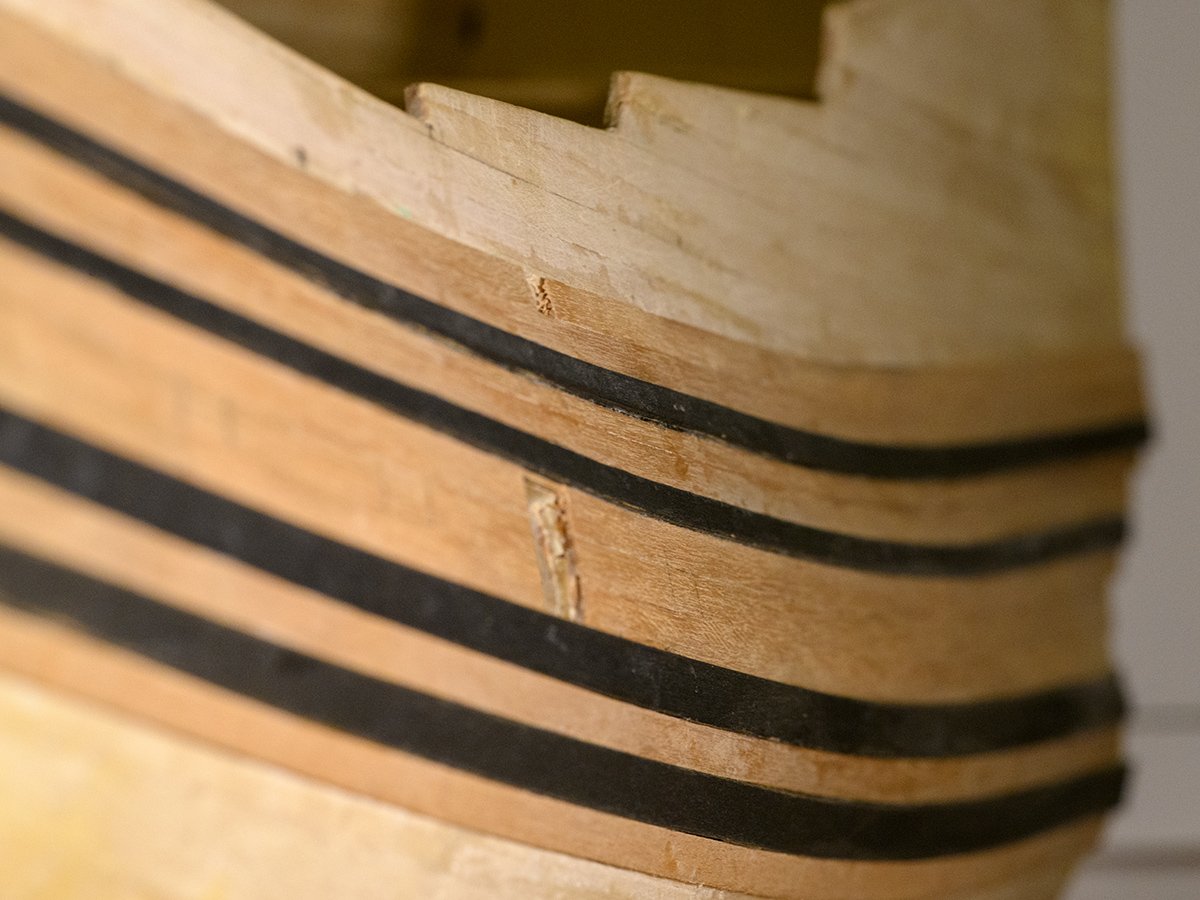
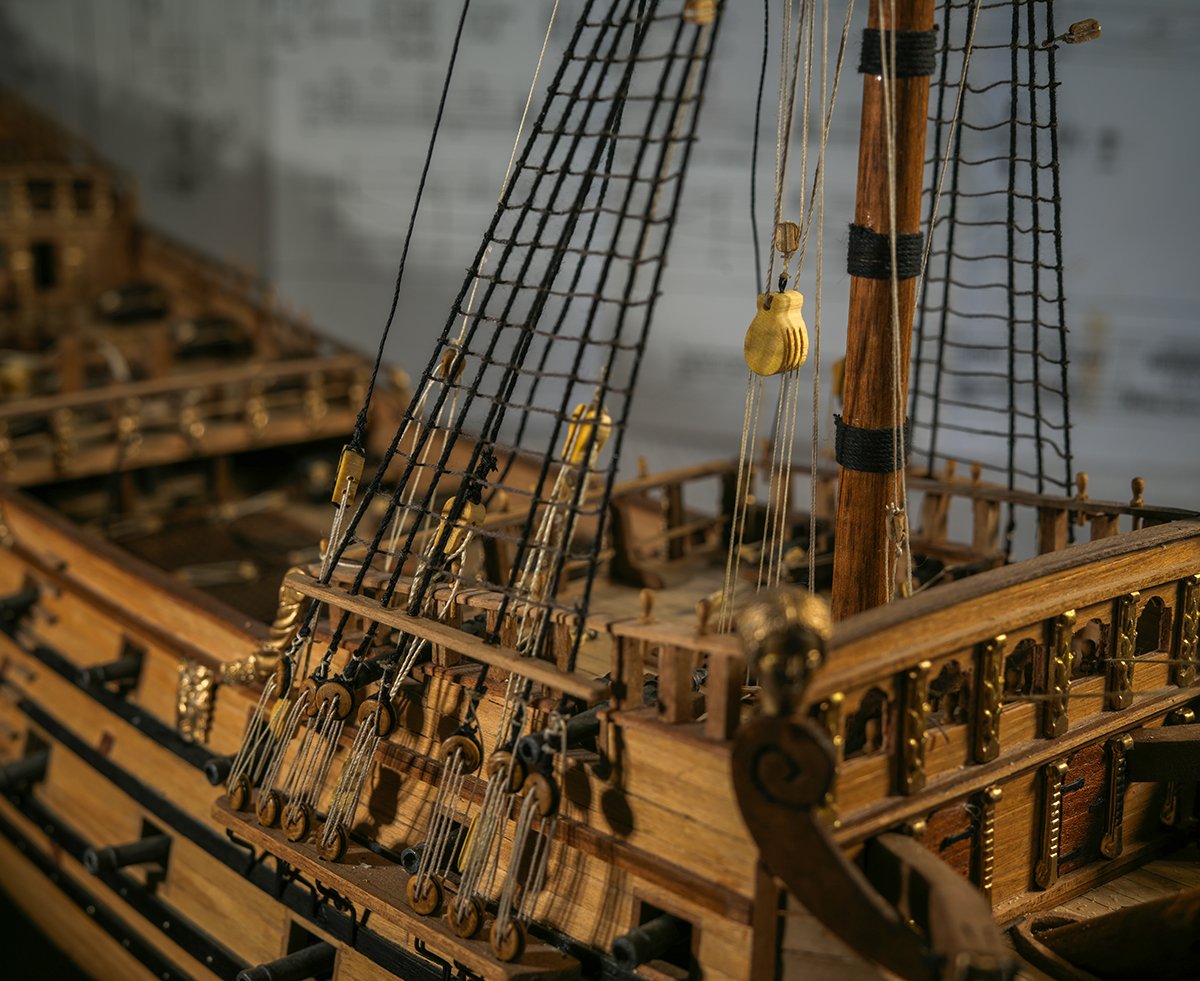
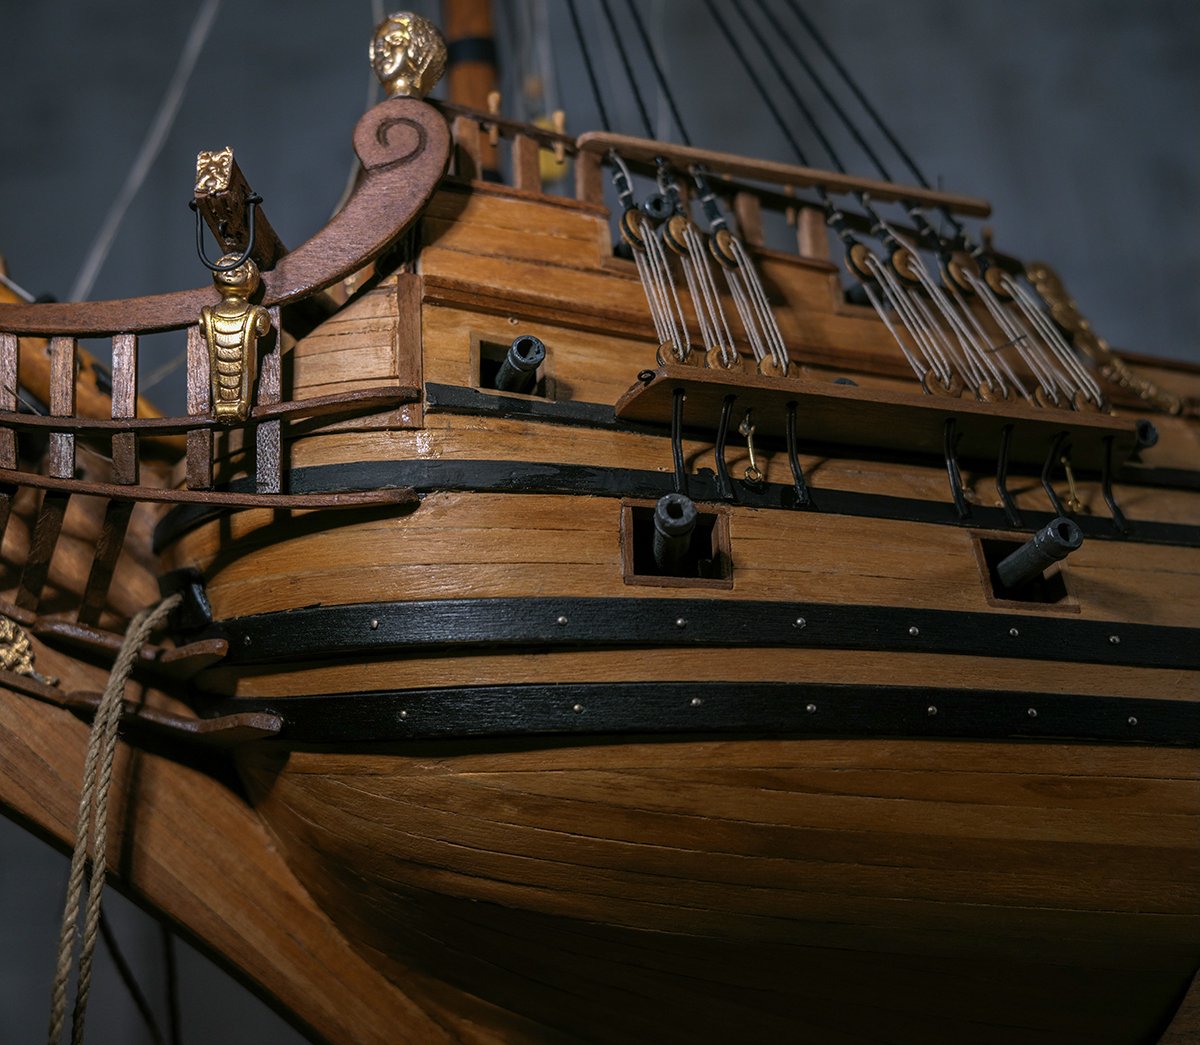
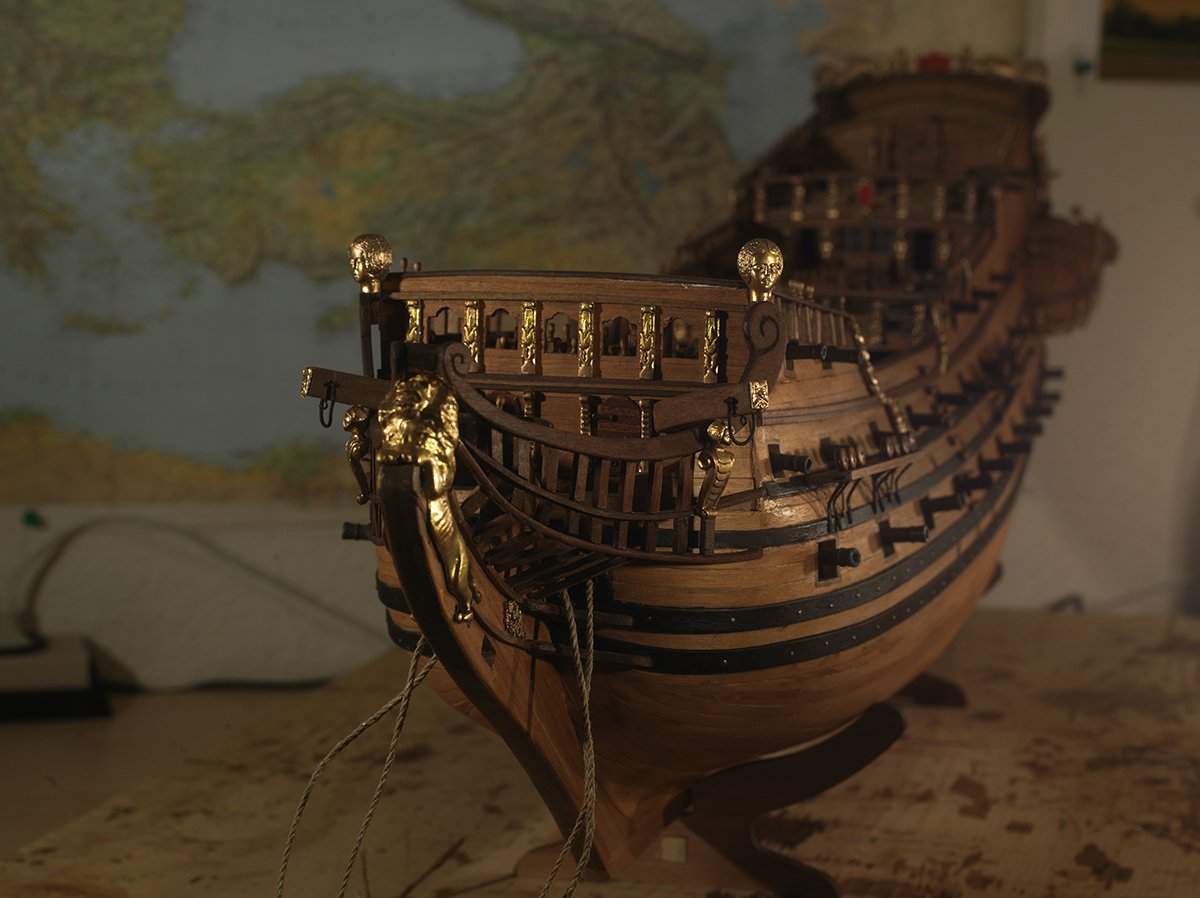
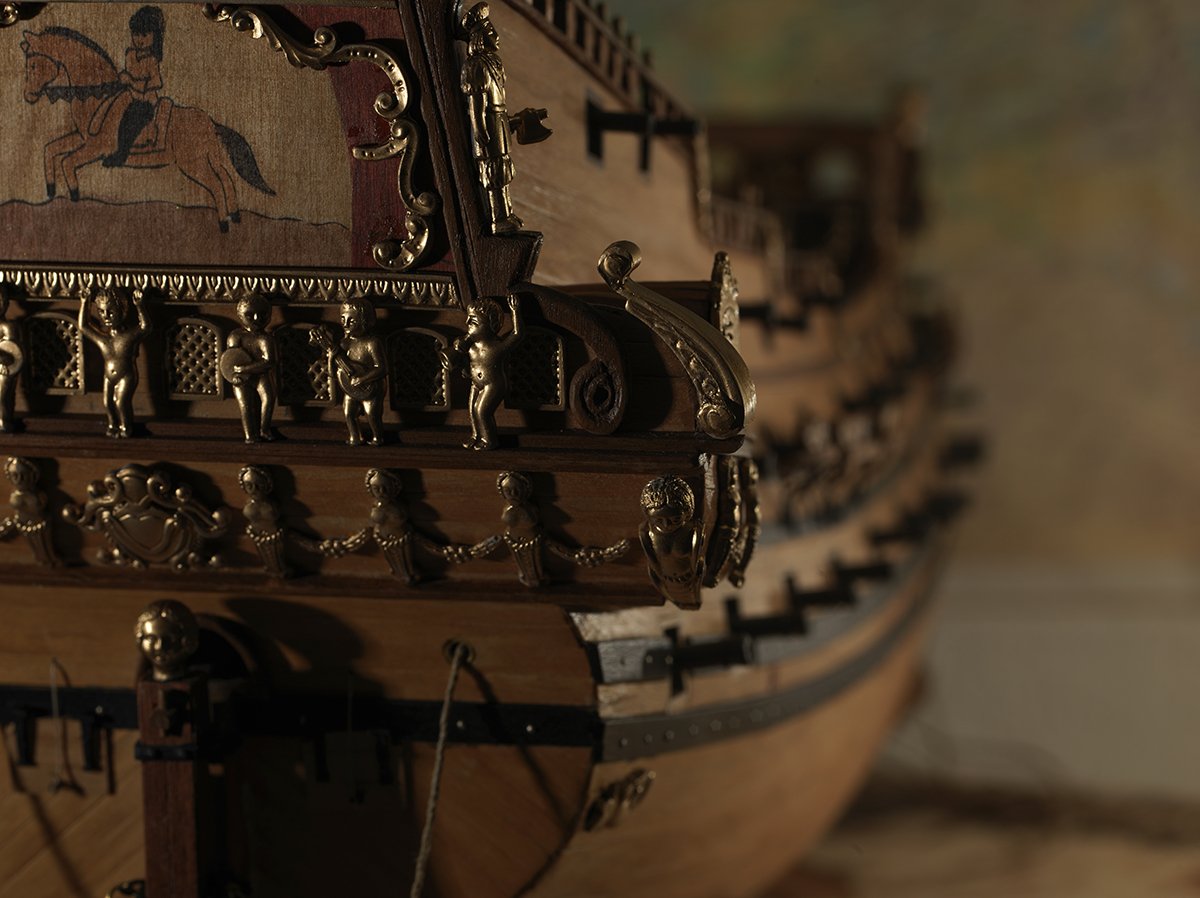
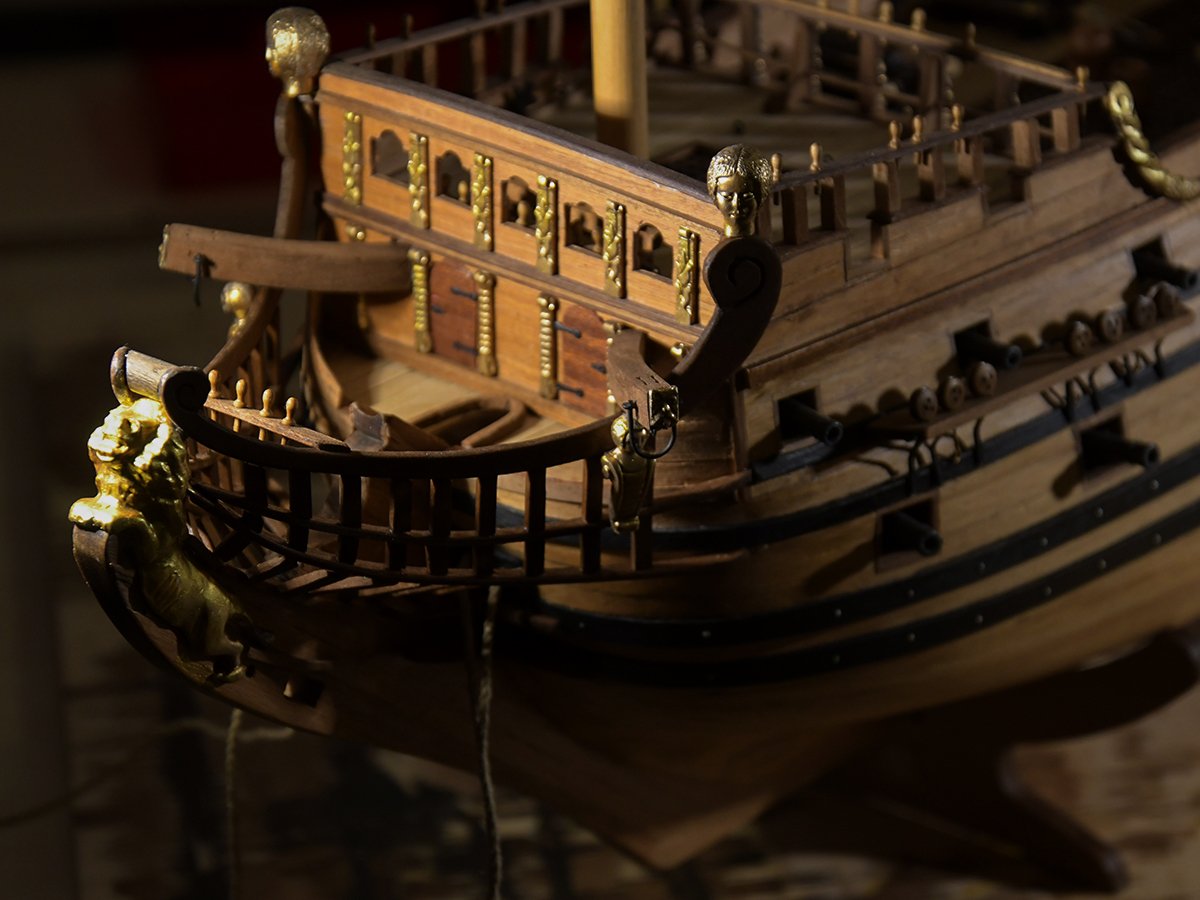
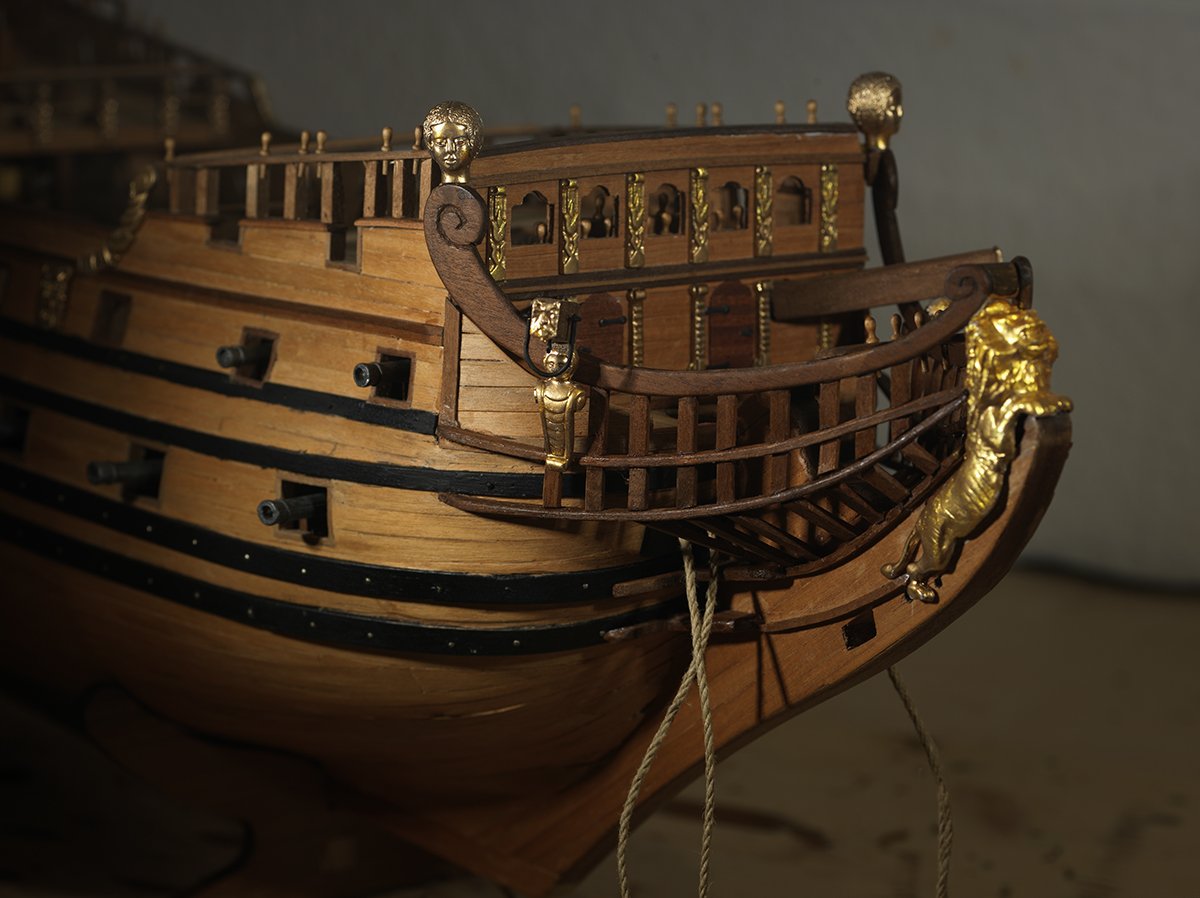
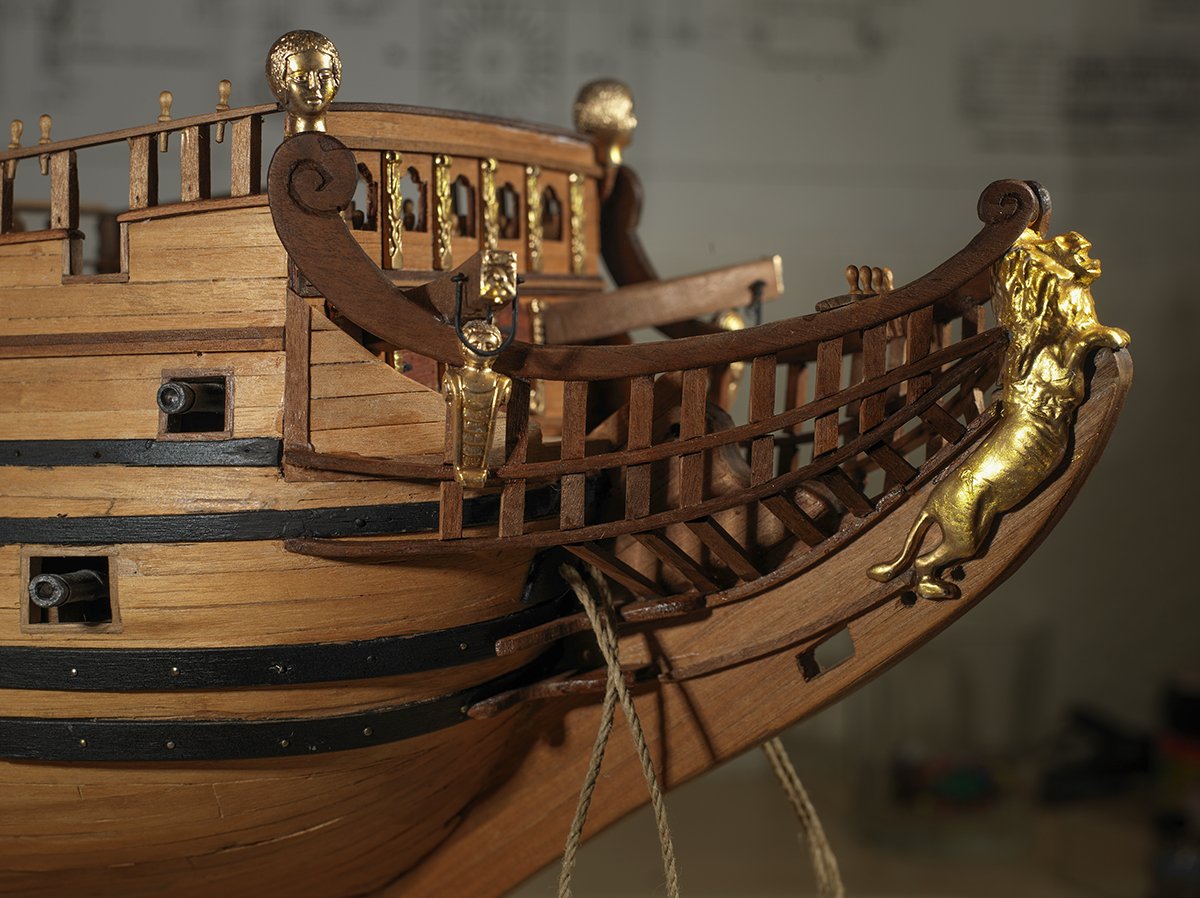
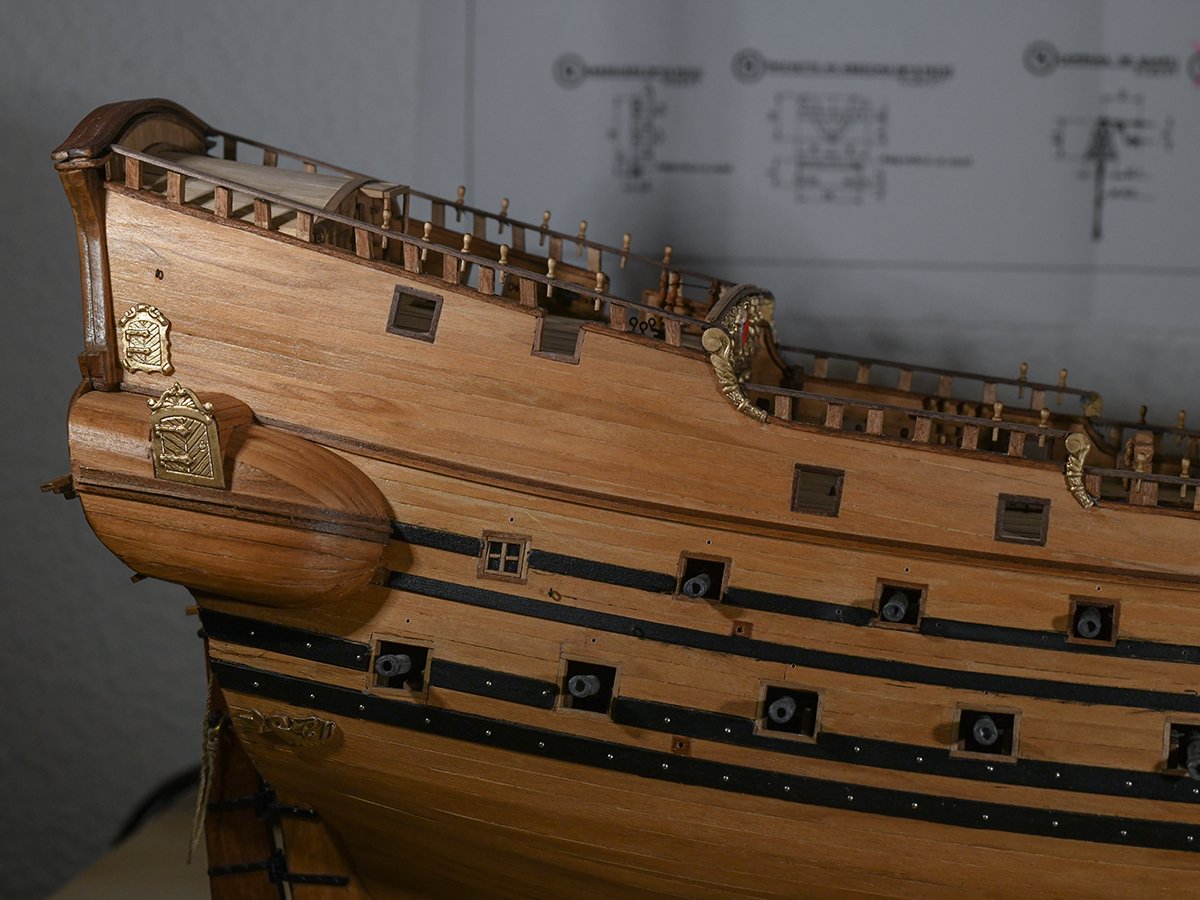
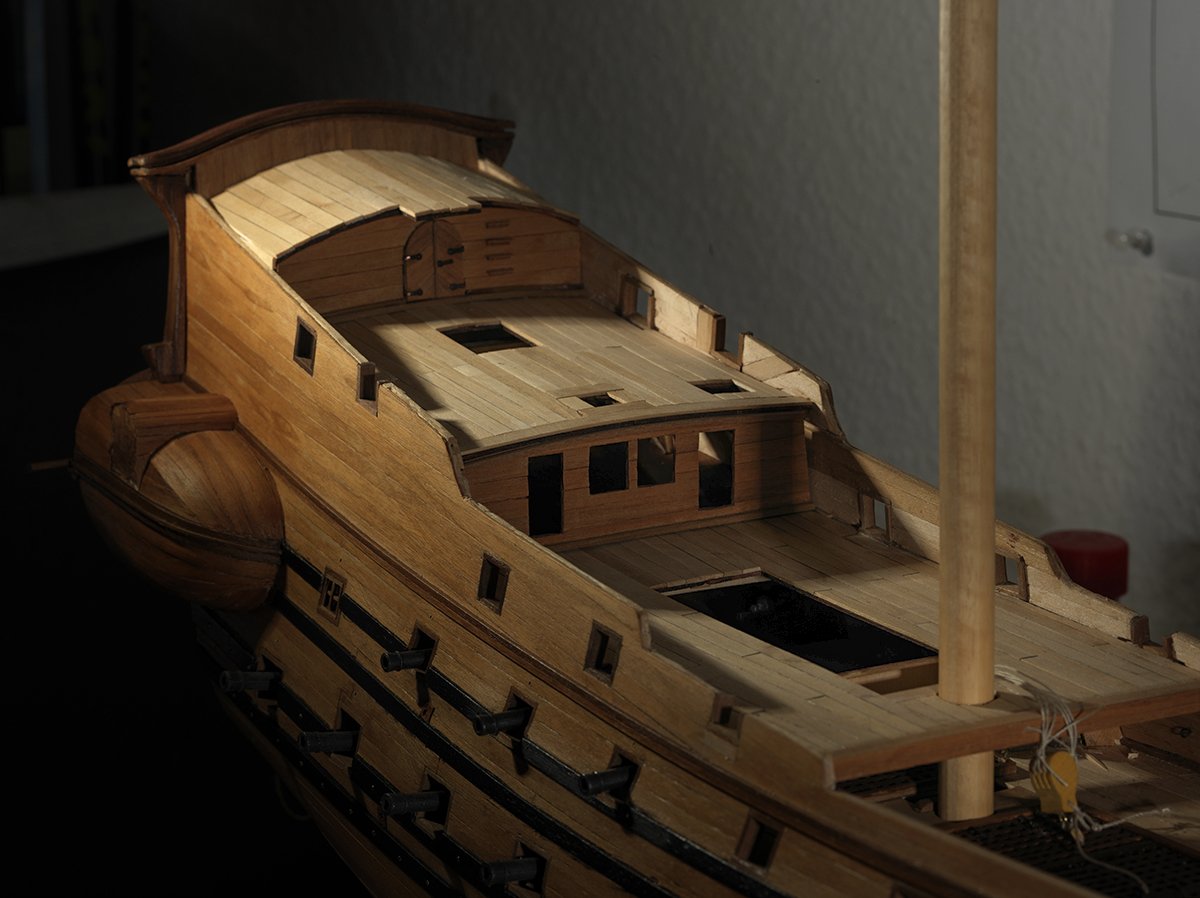
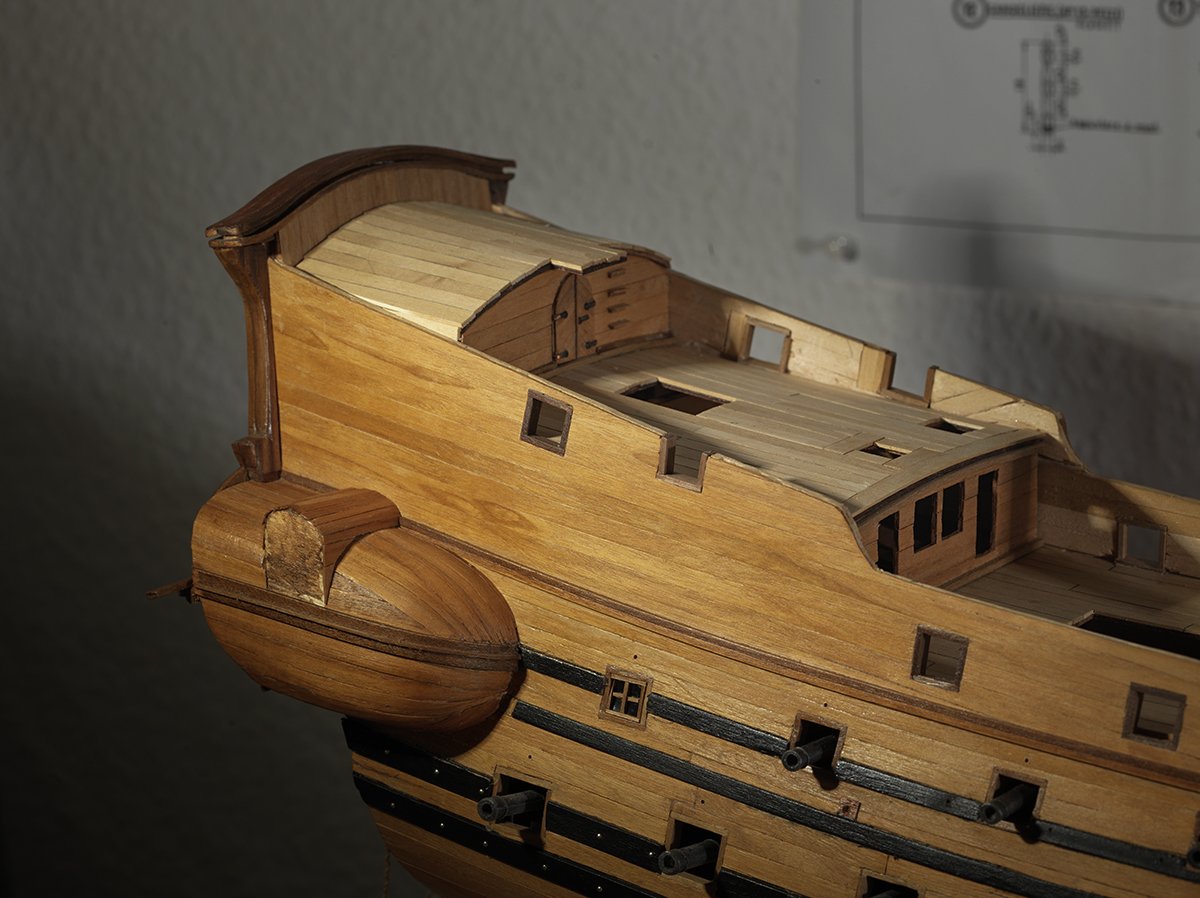
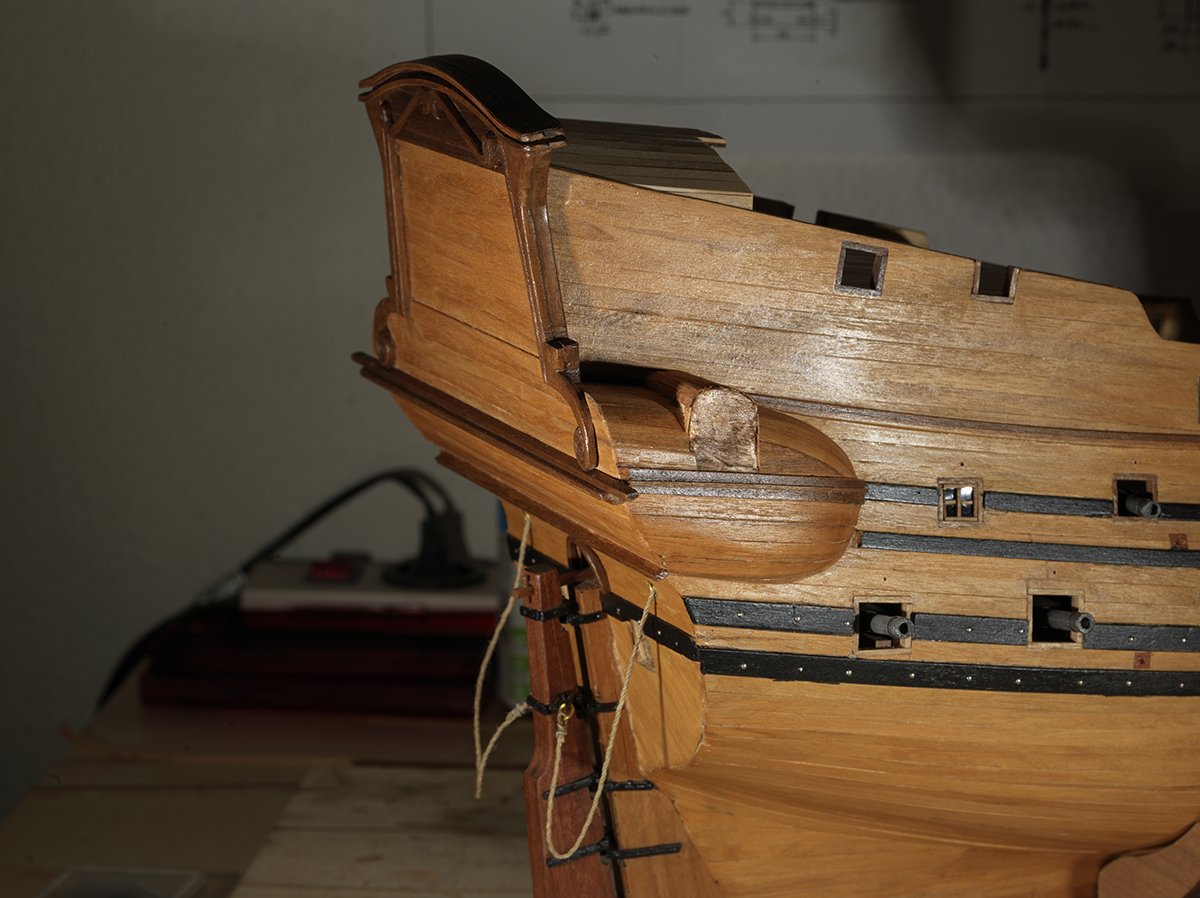
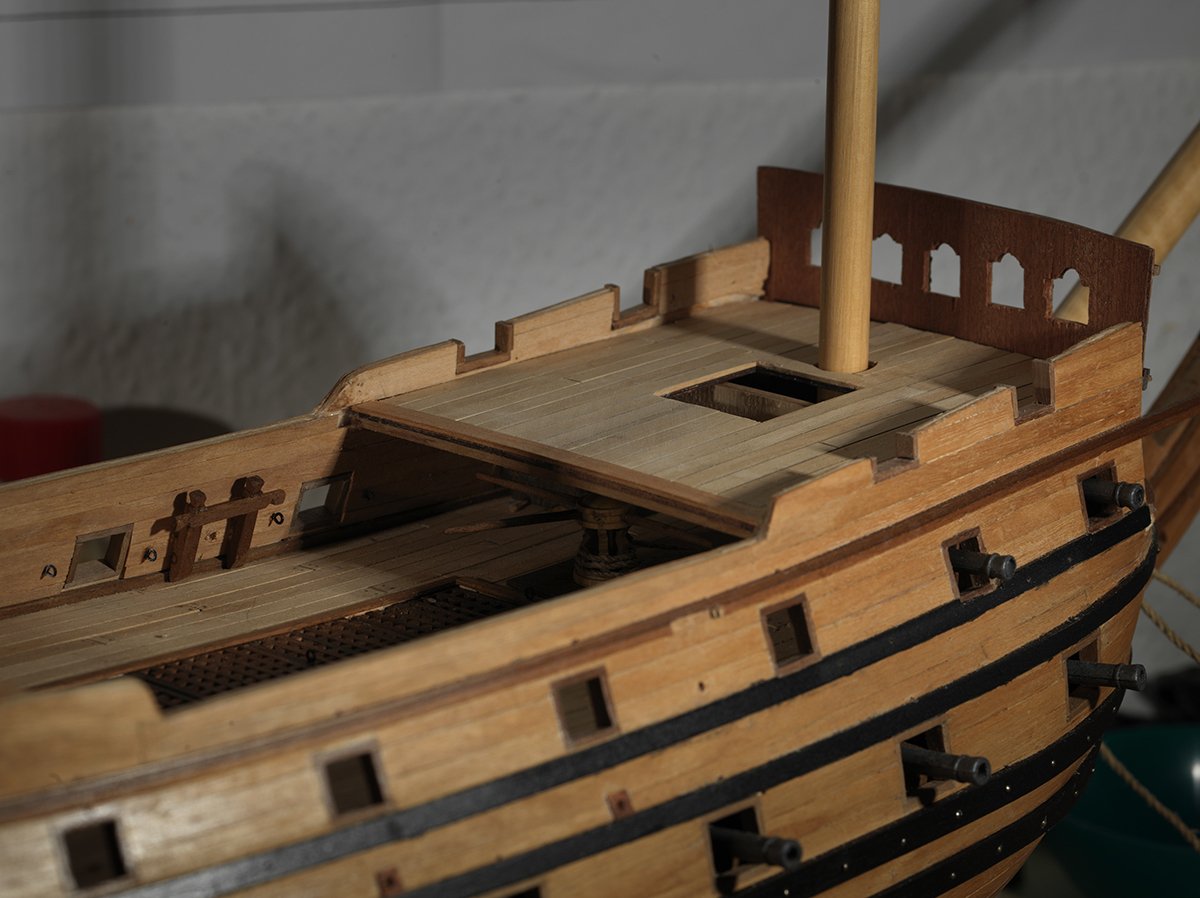
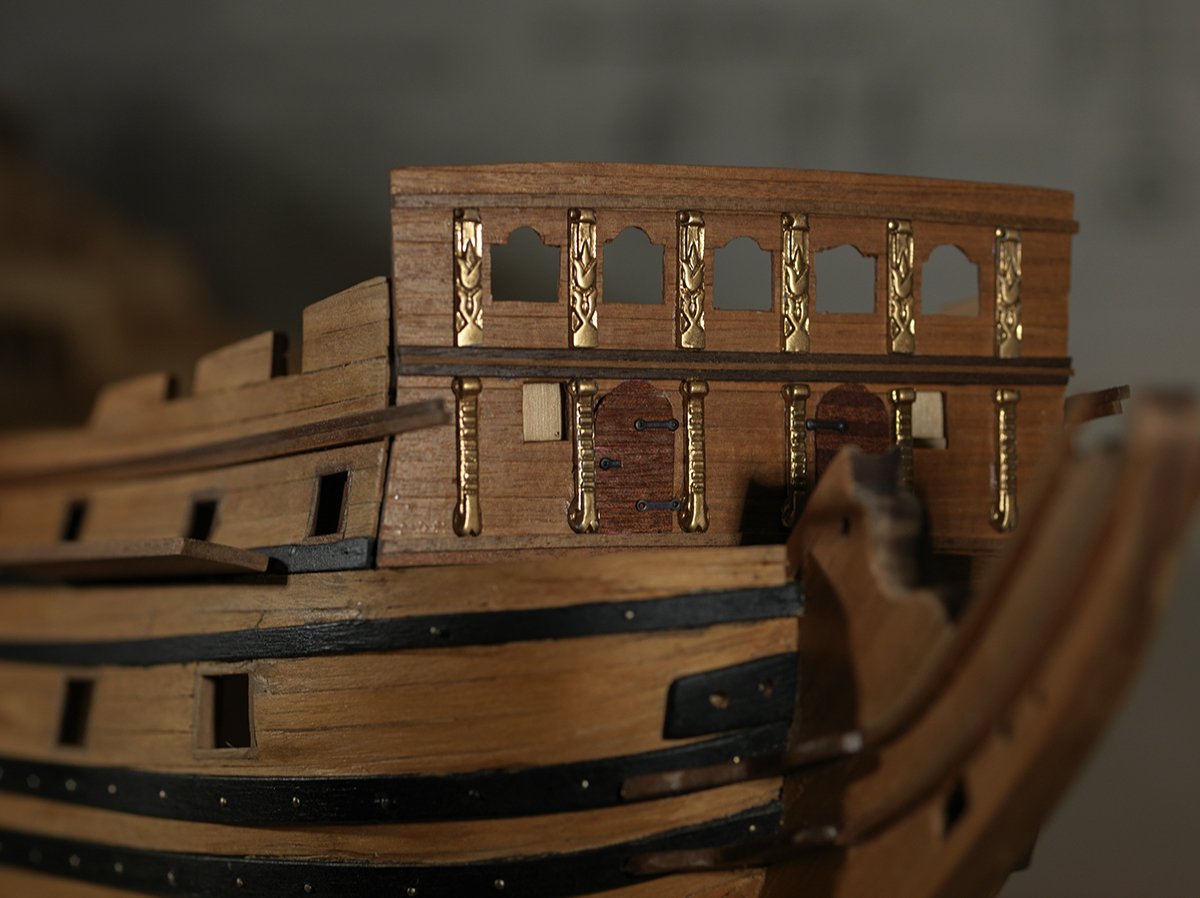
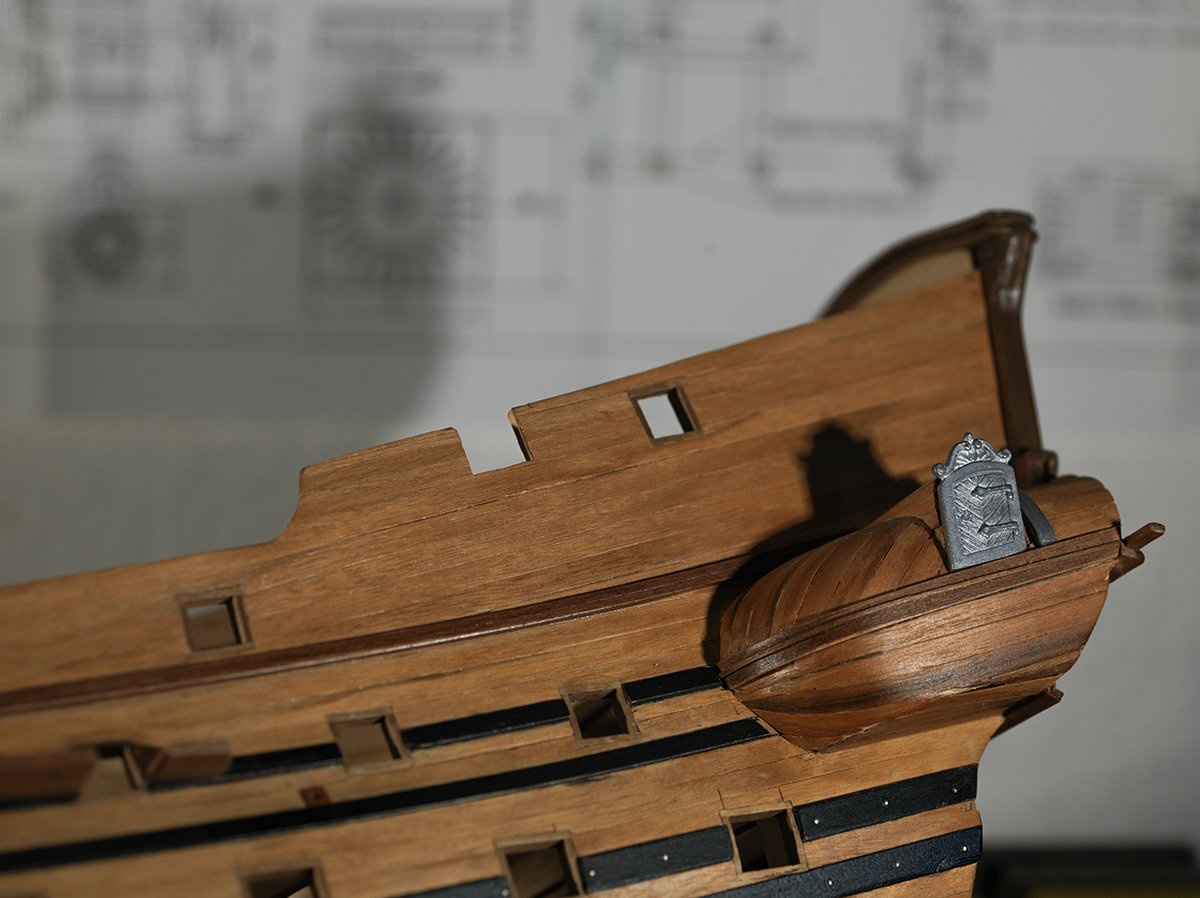
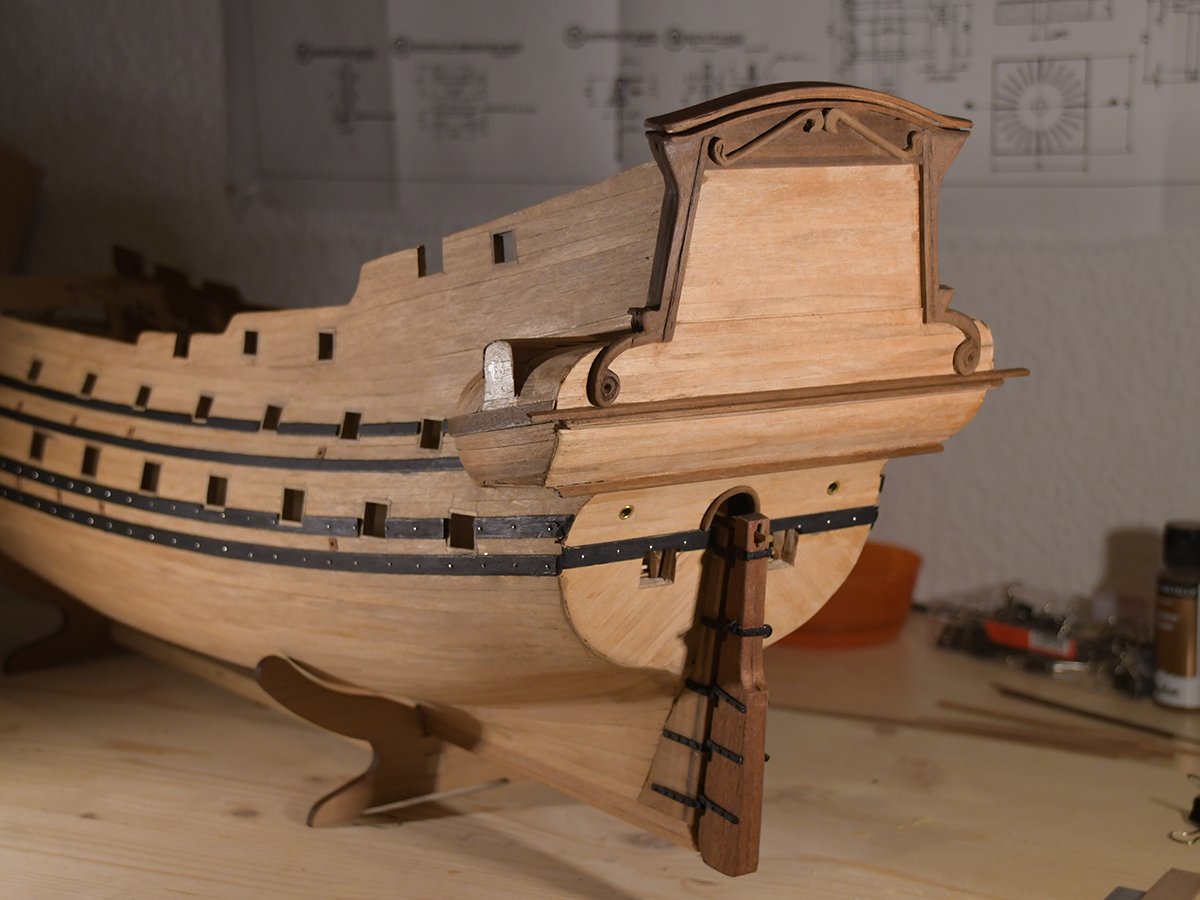
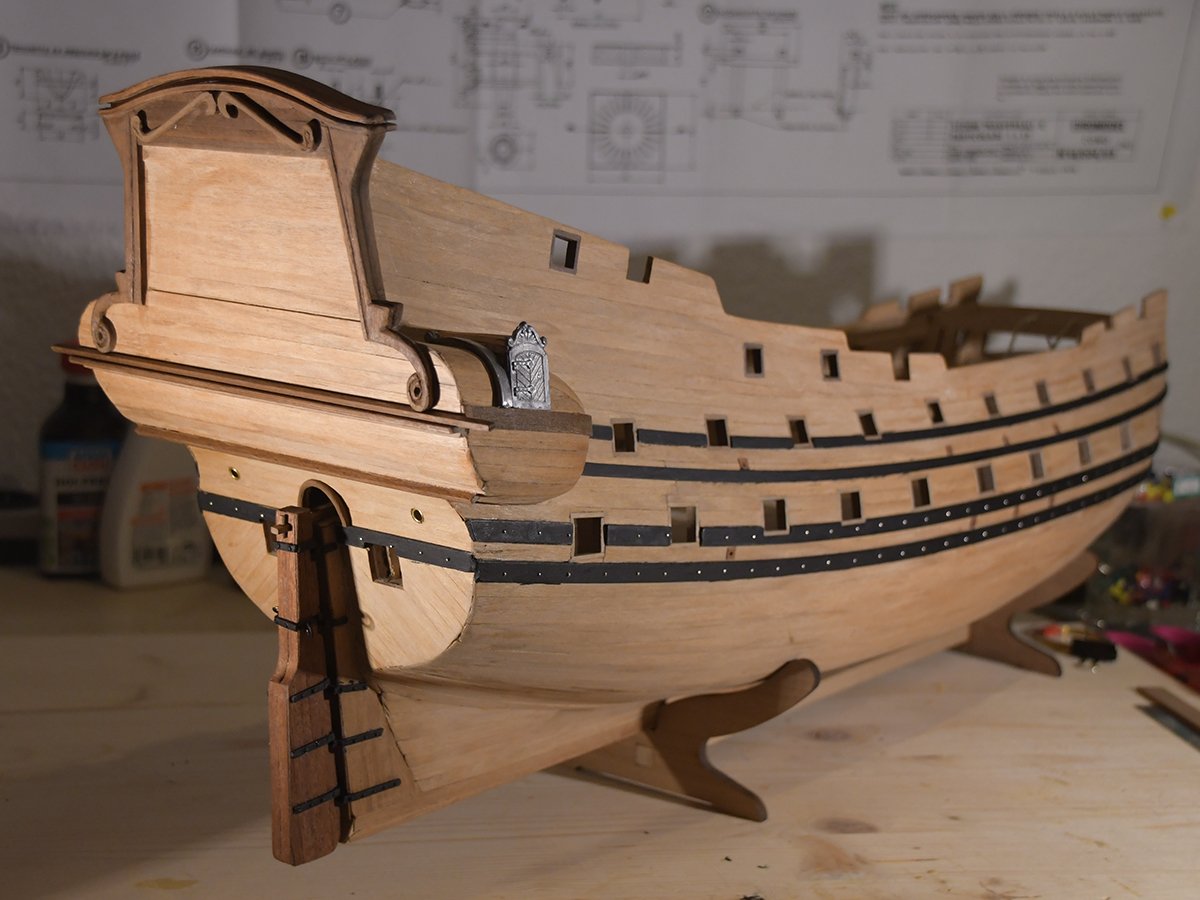
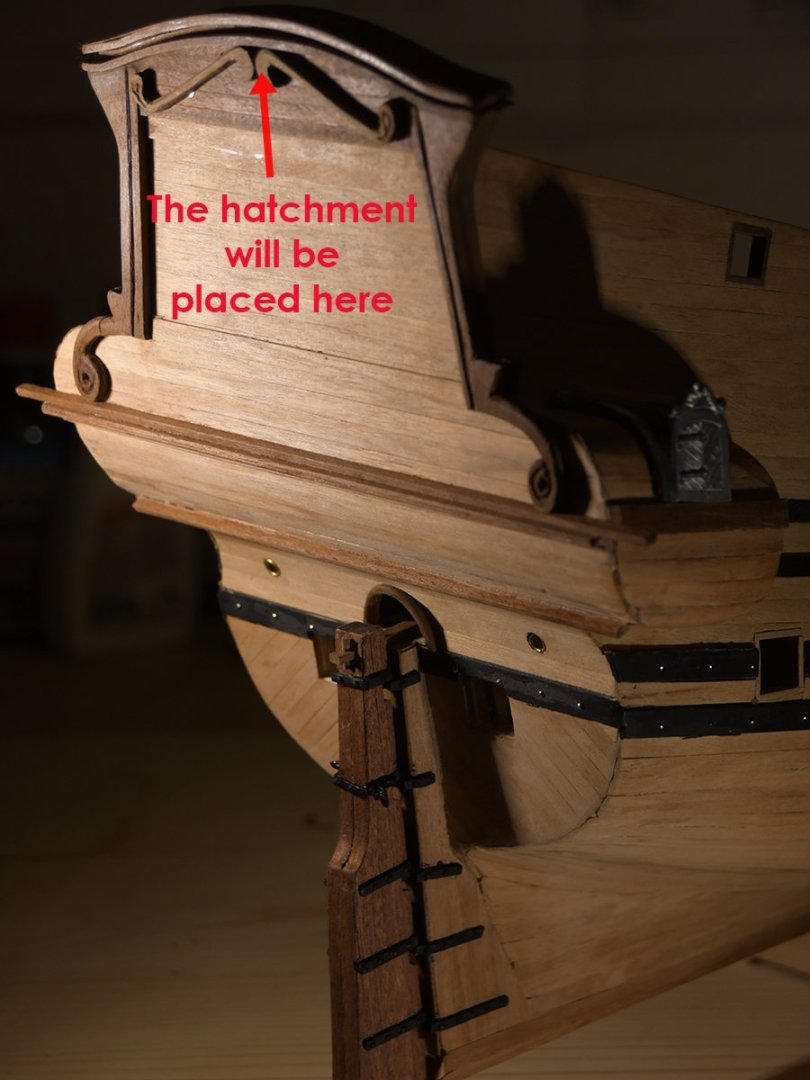
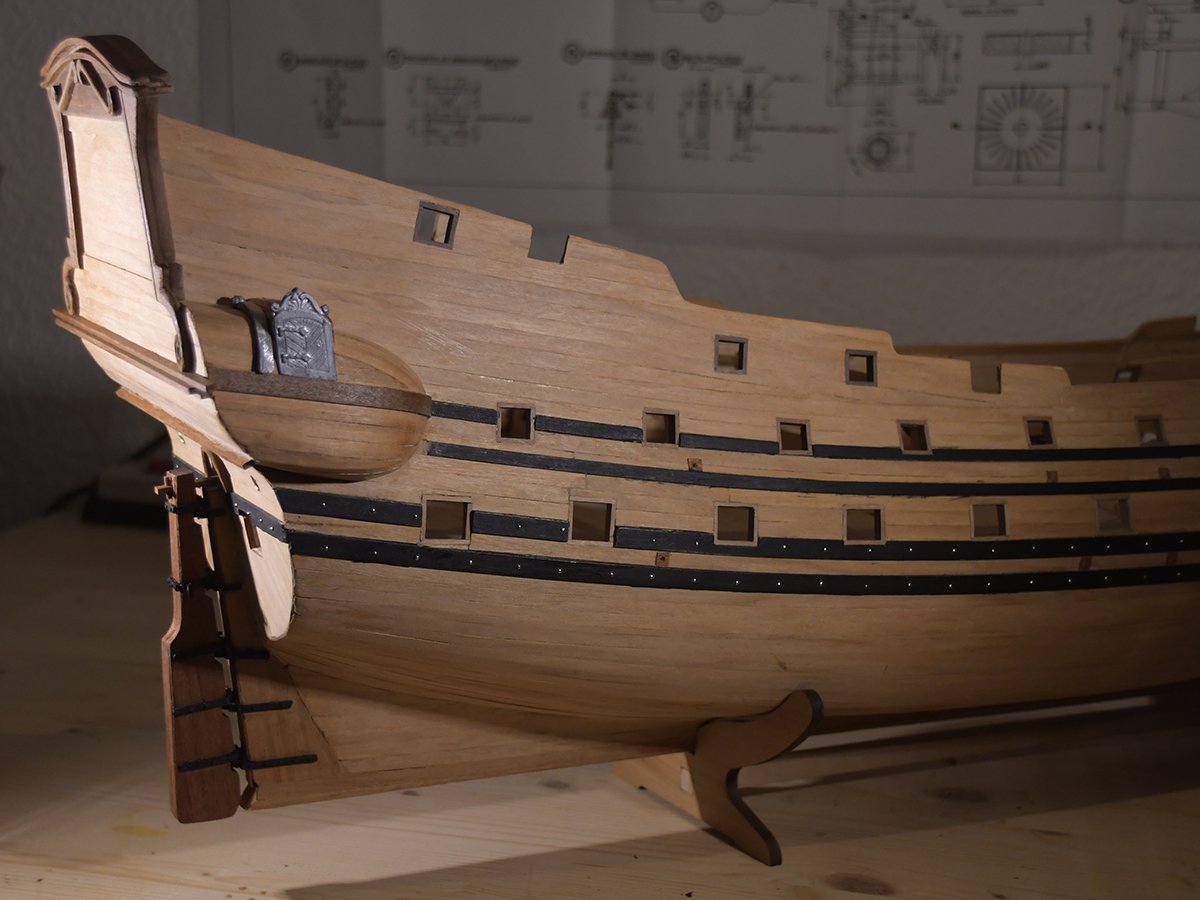
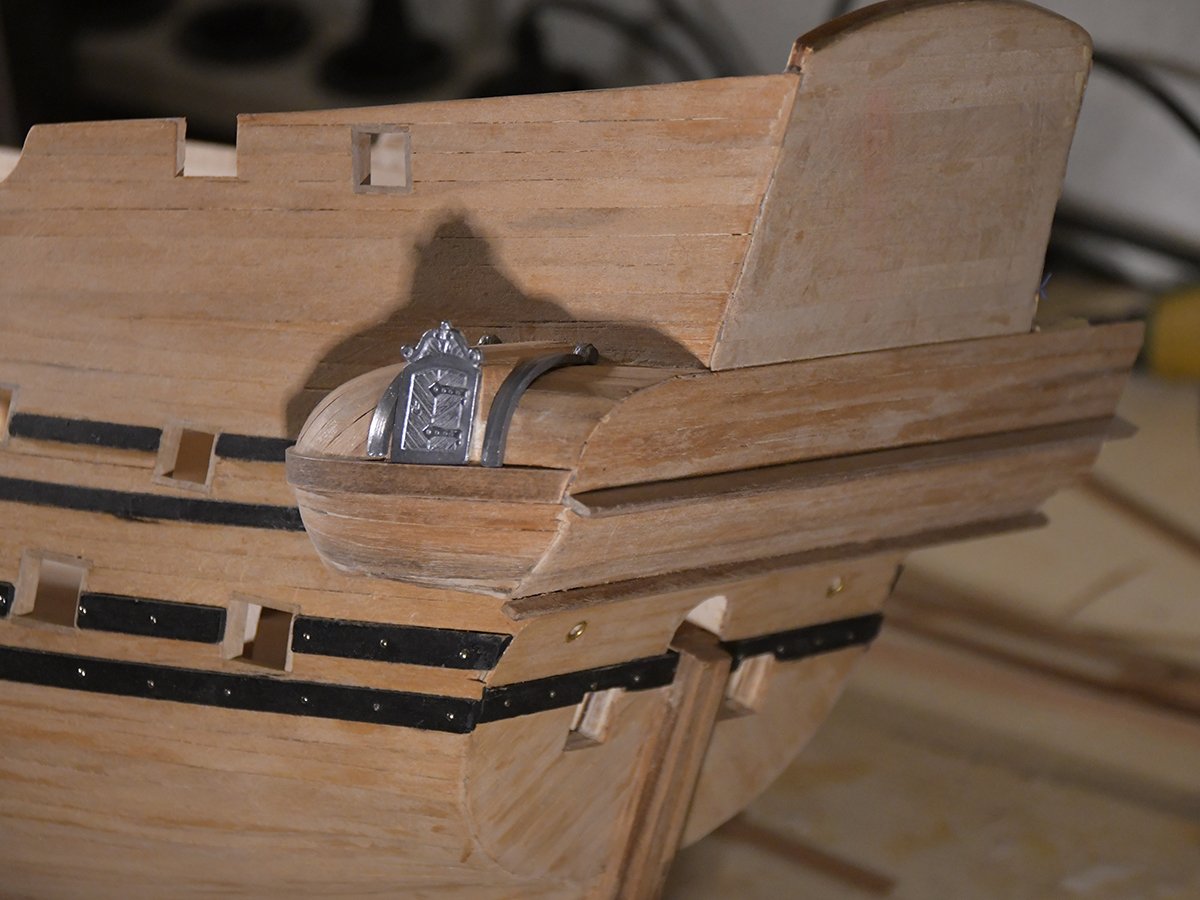
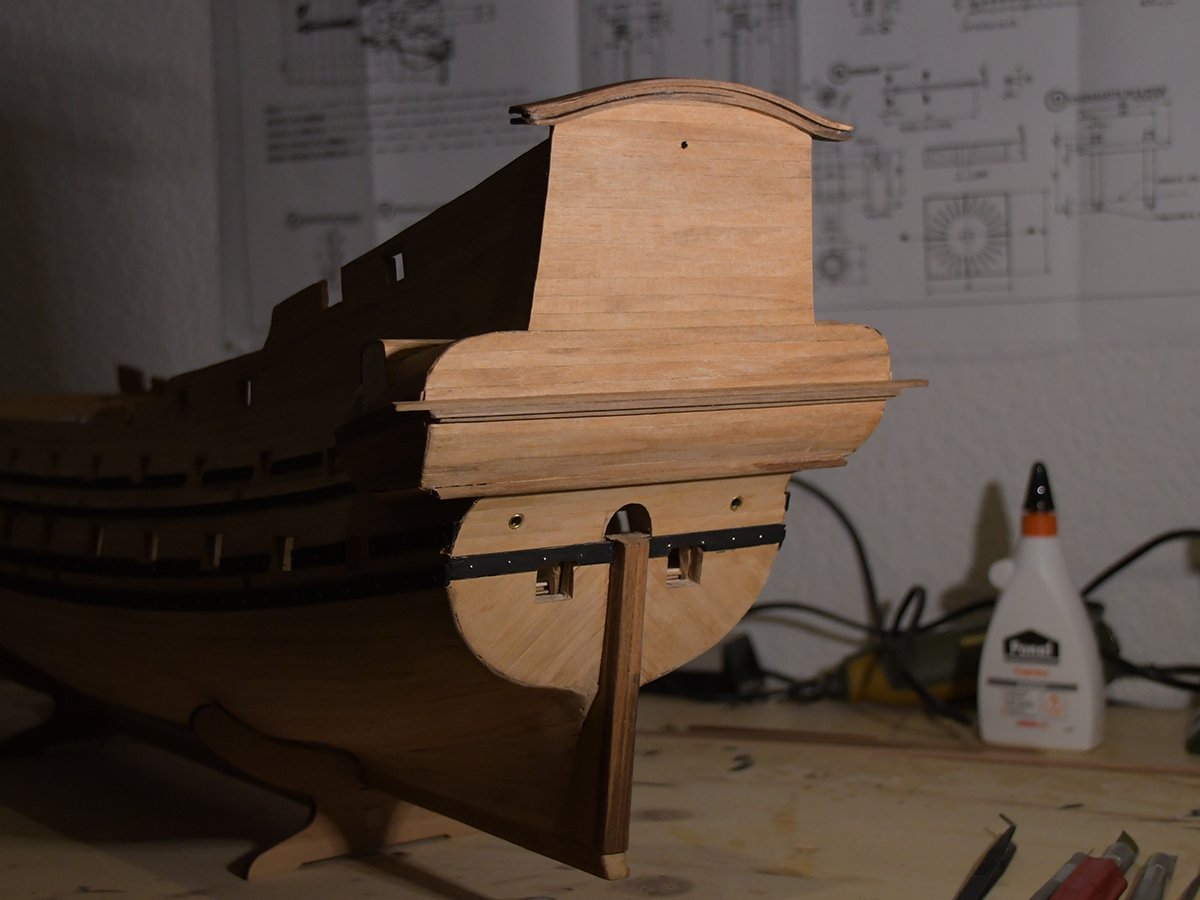
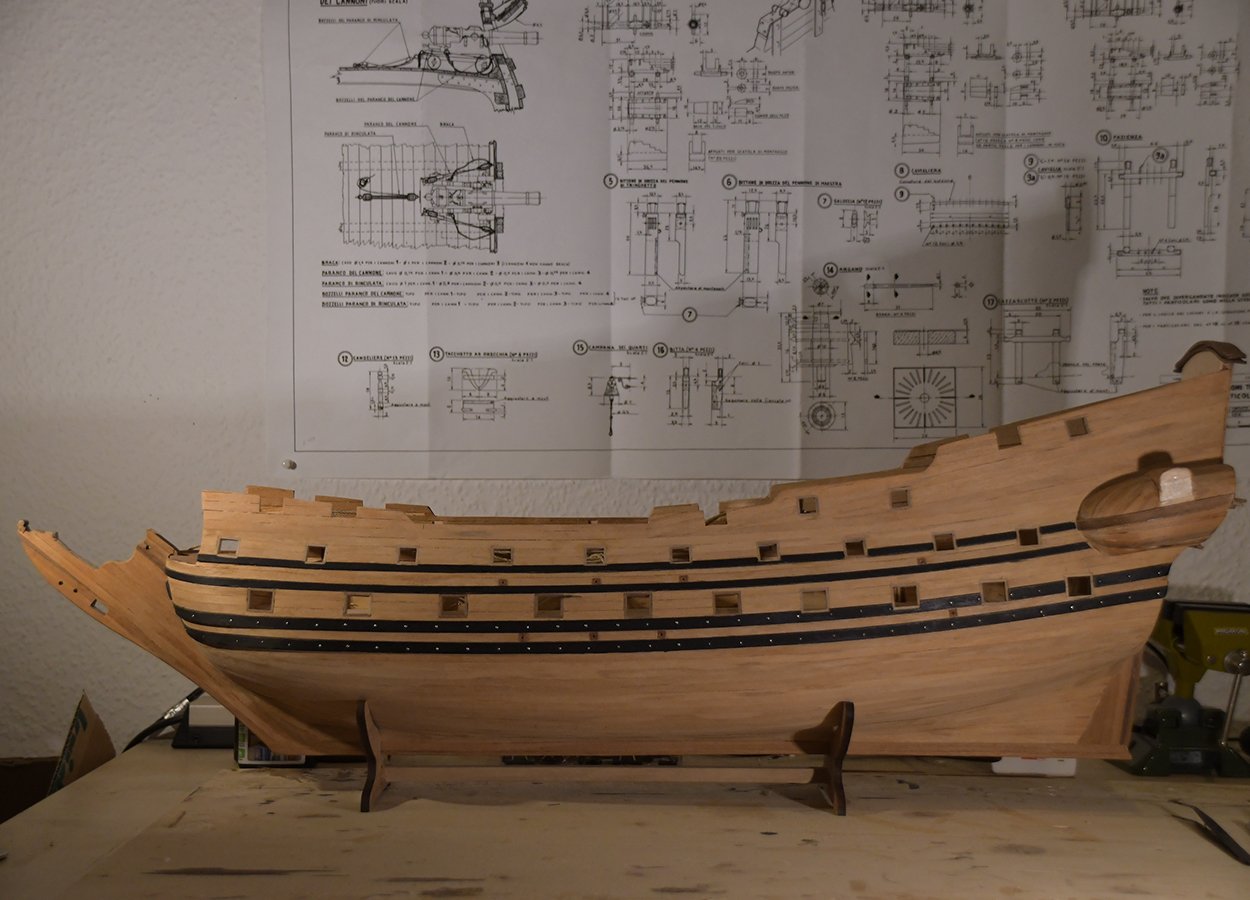
Hello my friends, it is time for another little update. The Friedrich Wilhelm grows more and more. These days I went over to the galion, what is a really tricky matter. I modified the build in the way that I did not double-bent the rails. I bent the timber in a horizontal meaning but not vertical. So the galion is not as pointed as the plans show. It is wider what has consequences to the appearence of the bow. For me it is ok as it is. It's the way I can build it, I don't have a higher skill. Probably it would be better to cut out the rails in the exact shape with a coping saw or to carve it. Nevertheless the result is quite impressing. Now the hull is almost done. I have to fix the decorations, to build the cannons, the gun port lids, the channels with the chains and some smaller details. All over the hull it will be necessary to repair some details that got affected during the build and all those things. I assume that I will be ready with this first grand step this year. I am not sure yet if I want to show the boats, as they will take a lot of space and hide some pretty details. But we will see...😉 As always - some pics. Enjoy and don't hesitate to tell me your opinion. Best wishes - and Cheerio Max
-
Hello my friends after almost four weeks it's time for an update. I finished some steps like the balustrades, the railings and some deck furniture. All comes good, I started the decorations. Everything seams to go on smooth and with no or just minor problems. The build is a challenge, as I said before several times, but there are no problems that will stay unsolved. Looking at the plans very carefully and with full attention, the interpretive files from Euro Model and at least thinking about the things you do and the progress you want to make will always lead to a proper way. And finally success. I hope I am right with this when it comes to the next step - the galion. But I am sure I alreday found some working methods... As always I present some photos to show the progress. Enjoy and as always don't hesitate to tell me your opinion, hints and remarks. Cheerio Max

-
Hello merry boys and girls, time for some new pics from the Friedrich Wilhelm. Still working on the inner planks and other interior stuff. I got the first reling in place, tghe secon on will follow quite later. I am not sure if I use the same size for the upper reling. Mr Mondfeld says in his book that it was commonly made in smaller size. As my first reling is in 7mm I could use some 5 or 4 mm timber. I will try and then decide what looks better. Last week I was in Milan and had a trip round Lake Como where Euro Model ist suited. I wonder if it will be possible to buy my next kit directly in Como as I go to Milan several times a year. I will ask Mr Mazzi from Euro Model if they have a shop... If yes this would be really exciting... Have a got time and Cheerio Max
-
Hi mates, today there is just a little update with pics. Between the construction of the gallery and the stern, which I have completed (without the decorations yet) and the construction of the bow section and galion (what I see as a BIG challenge) I have installed the decks, now planked all decks and I will continue with the ships interior so far (inner planks etc). This work makes a good progress and is not as far a challenge as other steps. After a few hours you see a nice result. So look at the pics and always have in your mind - all is in progress 😅 Cherrio Max
-
Hello mates, some update. Due to some busy days in the job there is just a little progress. Started planking of the decks. Try to get a good curve to the upper deck and proceed this for the poop deck. At the moment things go fine and I am hopeful to solve all challenges with the help of Pete's files and the study of the plans. The plans are so extraordinary... I always discover some new details by every look at them. Well, enough words, there are no real problem at the moment. Some pics show the way I am on. So far, see you later Cheerio Max
-
Hi Kirill, thank you for your posting. I followed strictly the plans of Euromodel with both the gratings orientation and the opening for the rudder pendants. I did not know that there was a difference, but the old drawings show this quite clearly. So - you never stop learning. Best regards Max
-
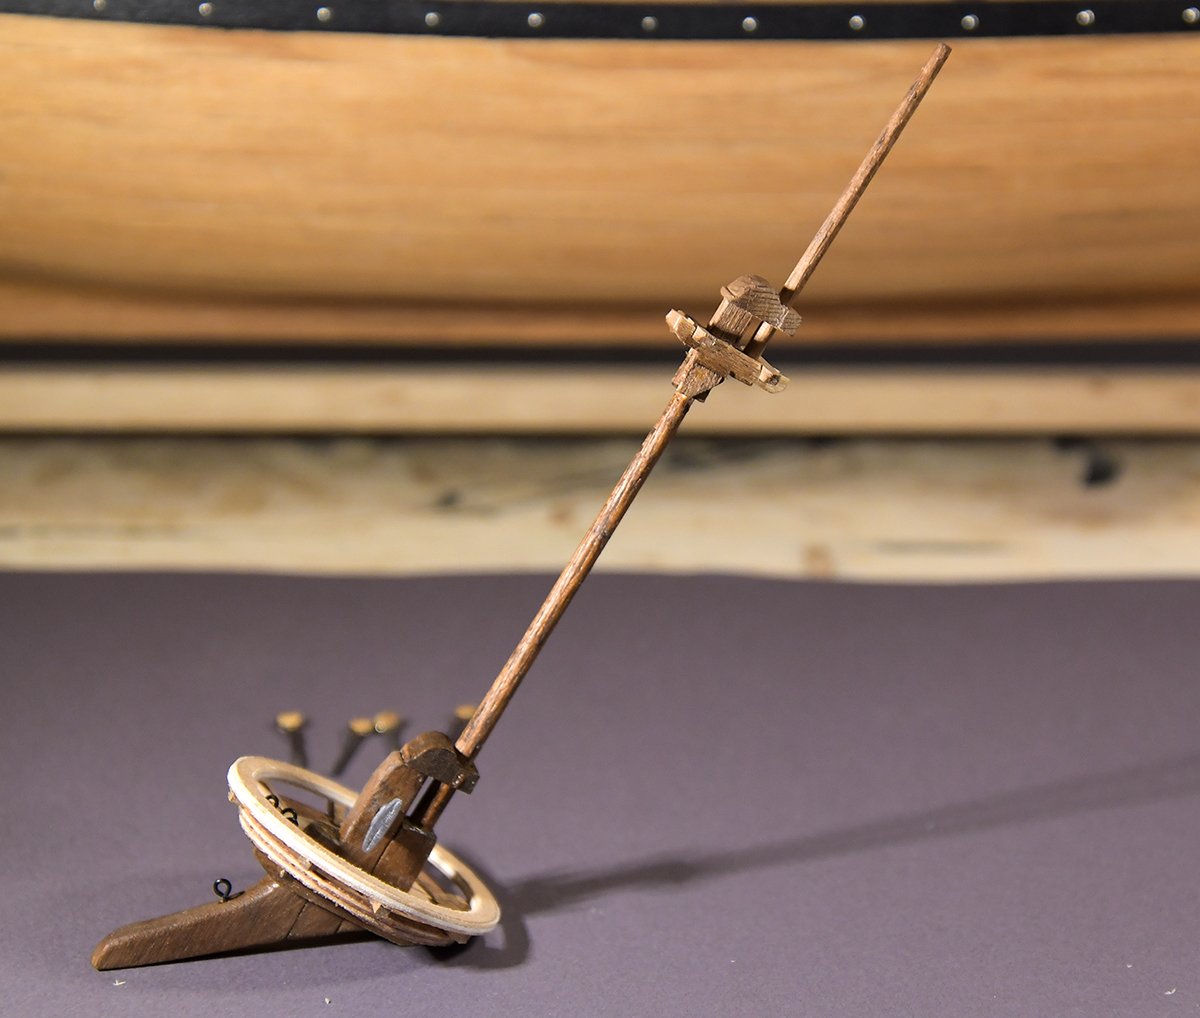
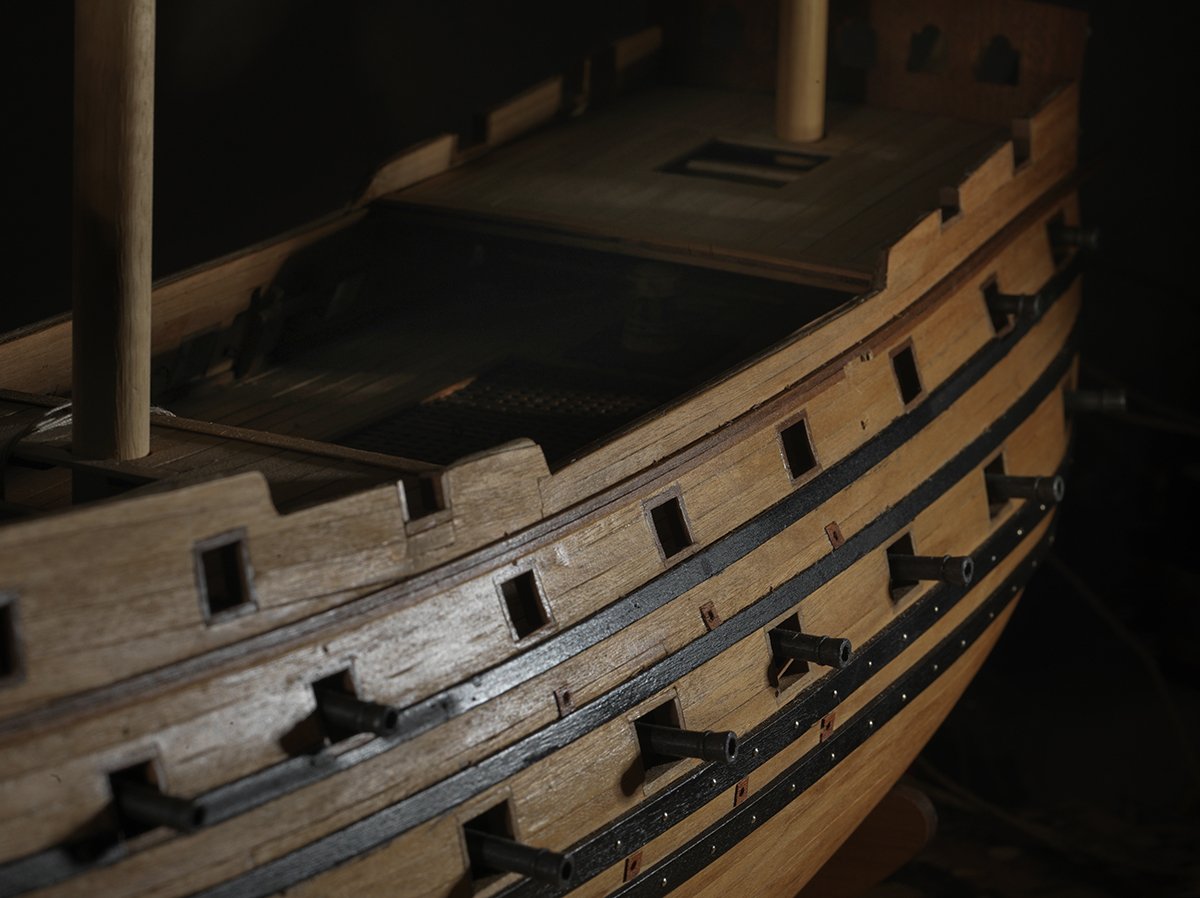
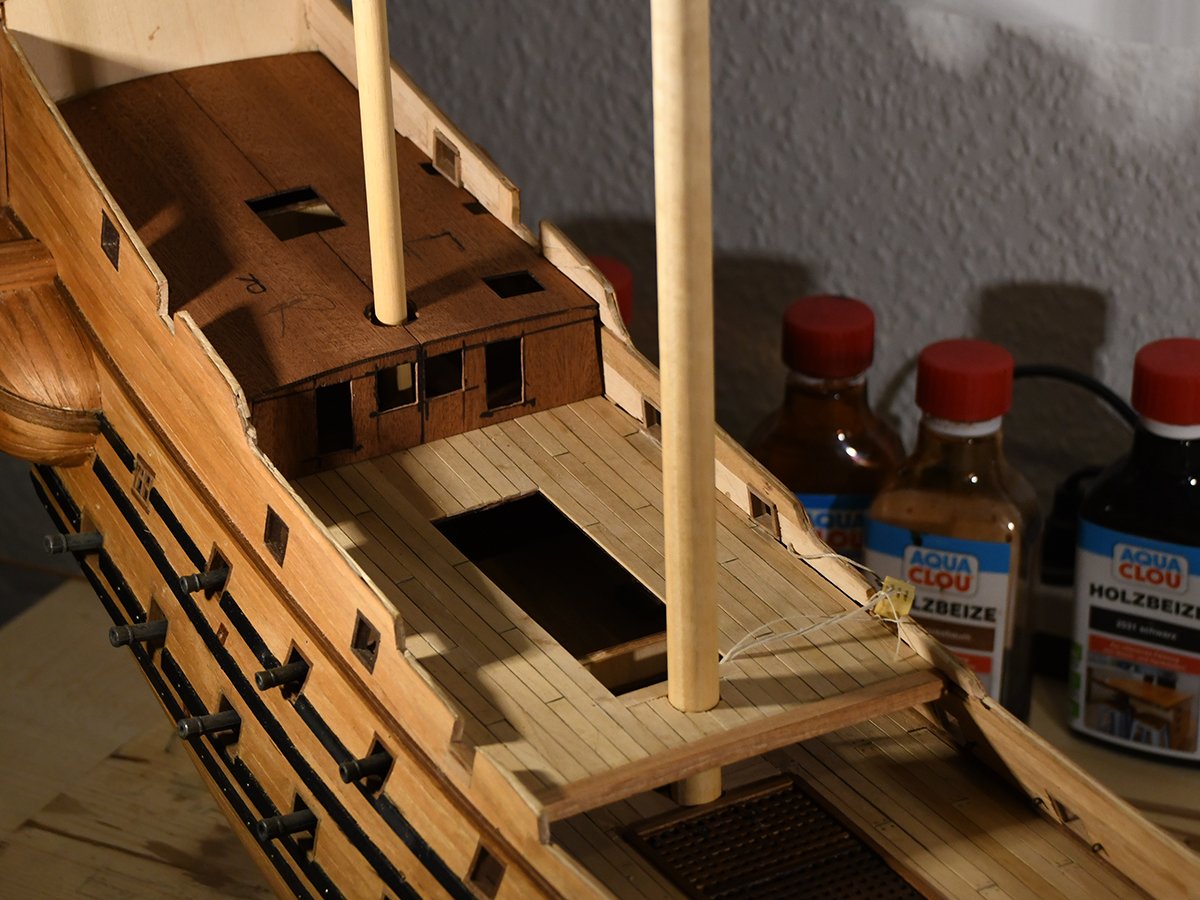
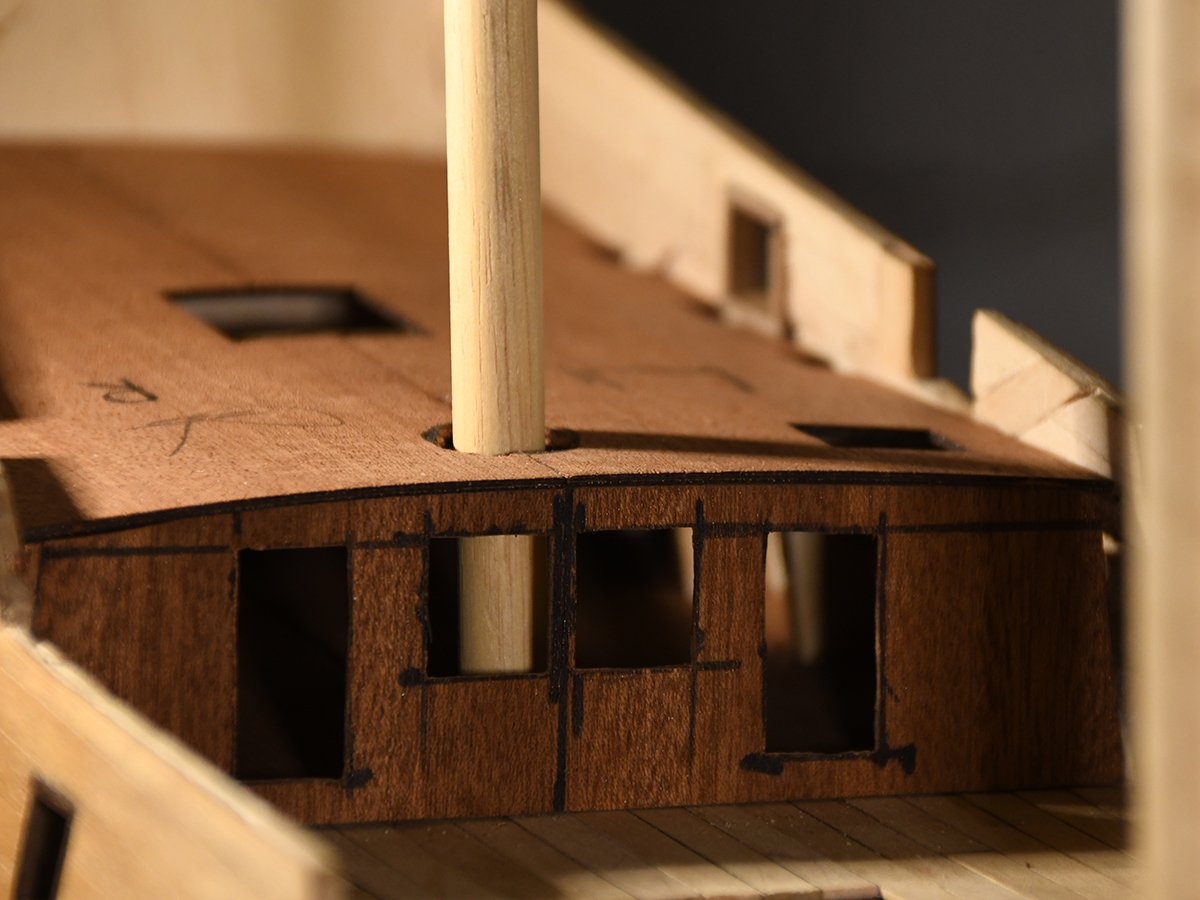
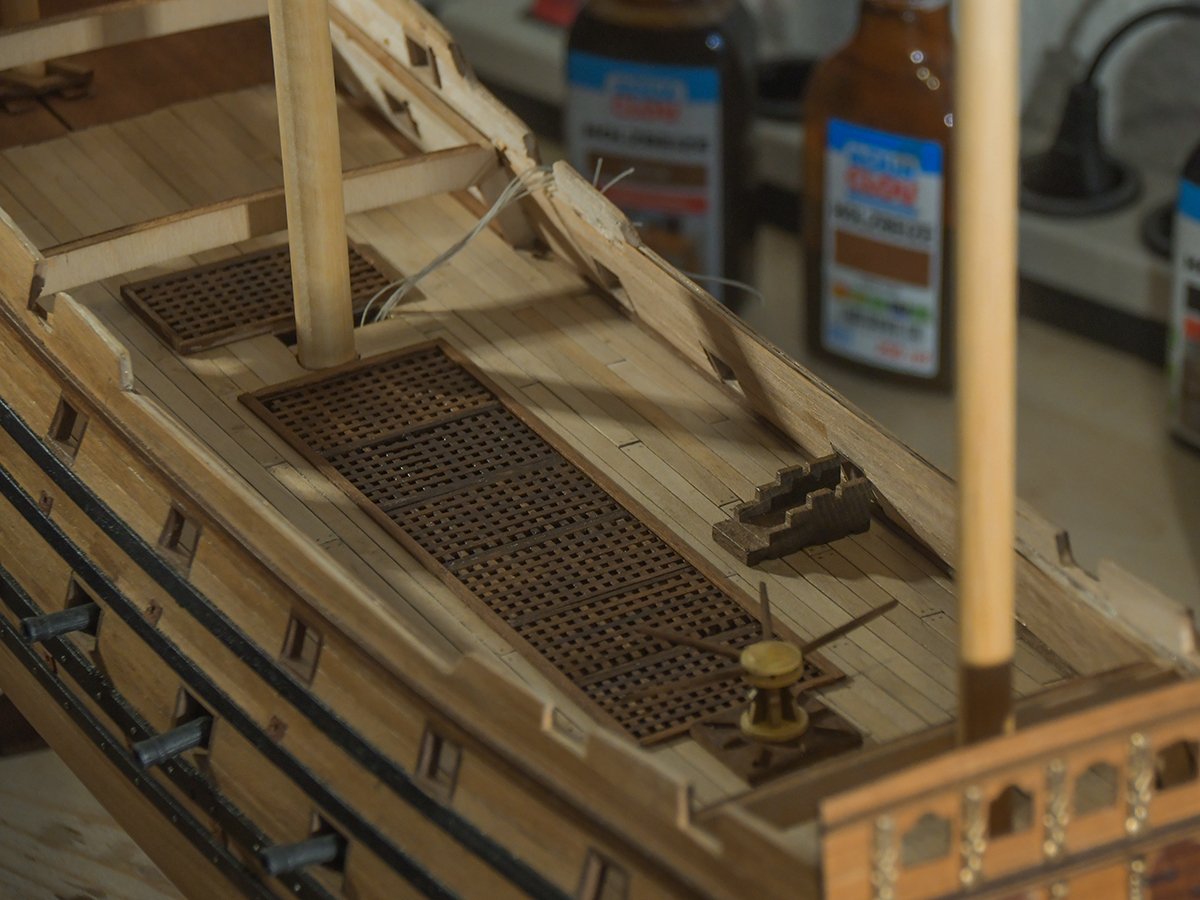
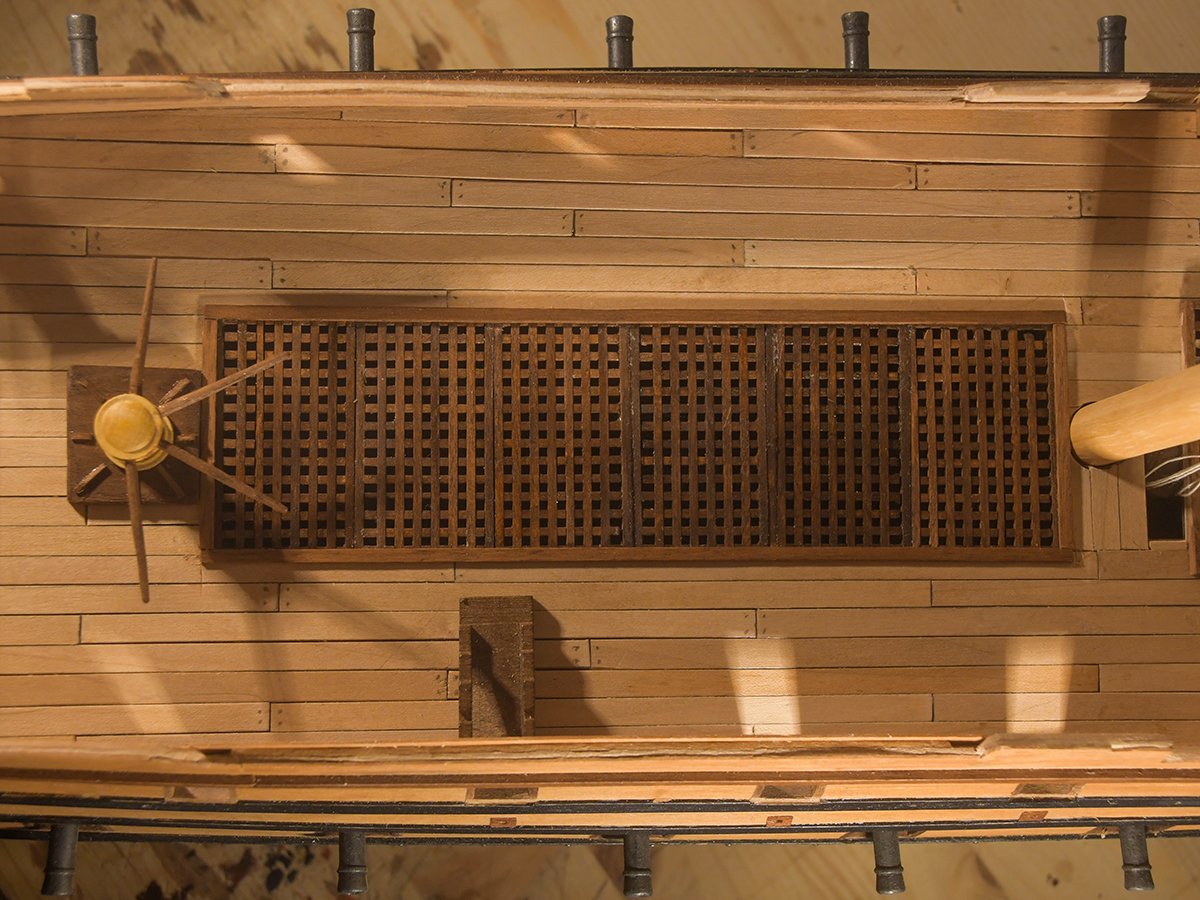
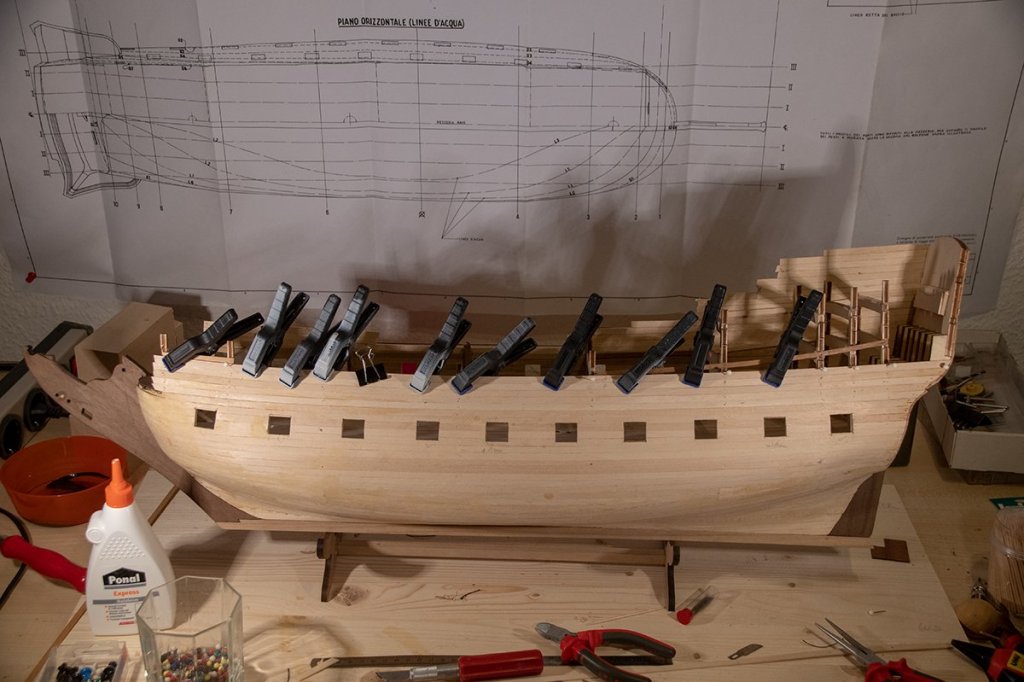
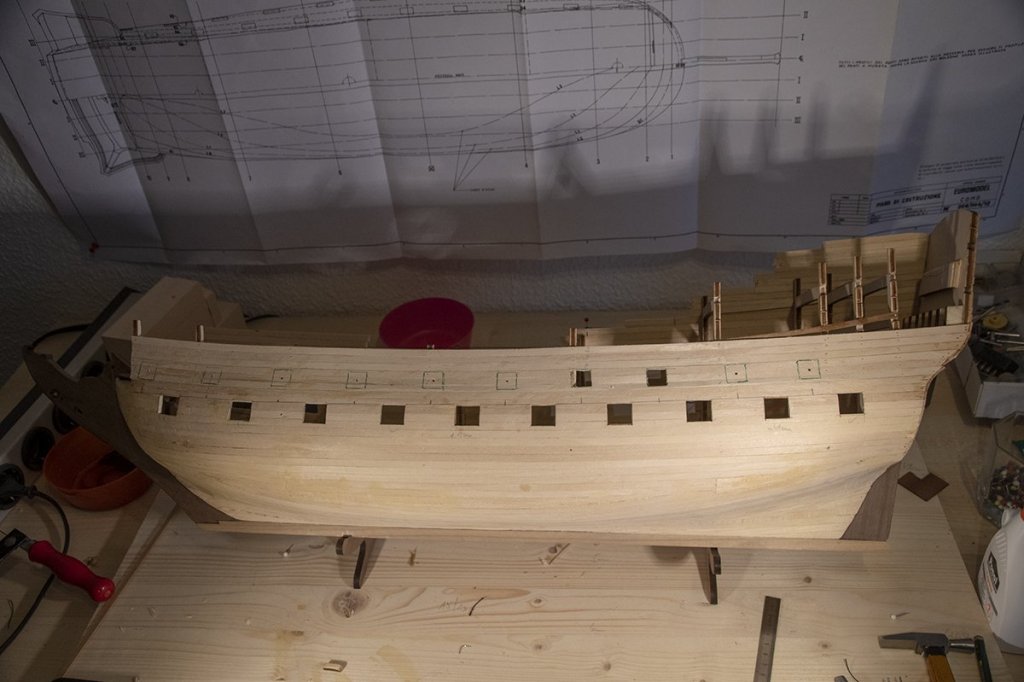
Hello again my merry men Time for al little update. I installed the main deck and planked it - maple that I stained before with a mixture of oak and a very small drop of black. I like the changing of the colors of the different strips very much. Next was to plank the inner side a second time, the gratings and the capstan. I stained the gratings with dark walnut for two times so the timber got a dark and shiny surface. I am not sure yet if I will show the stakes in the capstan as seen in the pictures. Perhaps I will remove them again. My first attempt of the grating was unsuccessfull - I build them as I did in earlier builts with a thick border (2x2 mm), but that did not fit or look good. The gratings need to be on the same level as the deck. I only attached a thin strip as a frame for a better appearance (although this might not be really correct). I expect a problem with the cannon's tackling as there is only a little space. But I will see when it is so far. Next will be to complete the decks and a final sealing of the inner ship. (Due to the light situation the color might not give the exact look). Thank you all and Cheerio
-
I am sorry - of course there are your excellent files and I have them all and printed and use them. But this was not I wanted to express - you surely know those booklets from e.g. Occre that show you step by step -like a plastic model kit. No doubt - without your writings and helpful pics I would have quit the build... Thank you
-
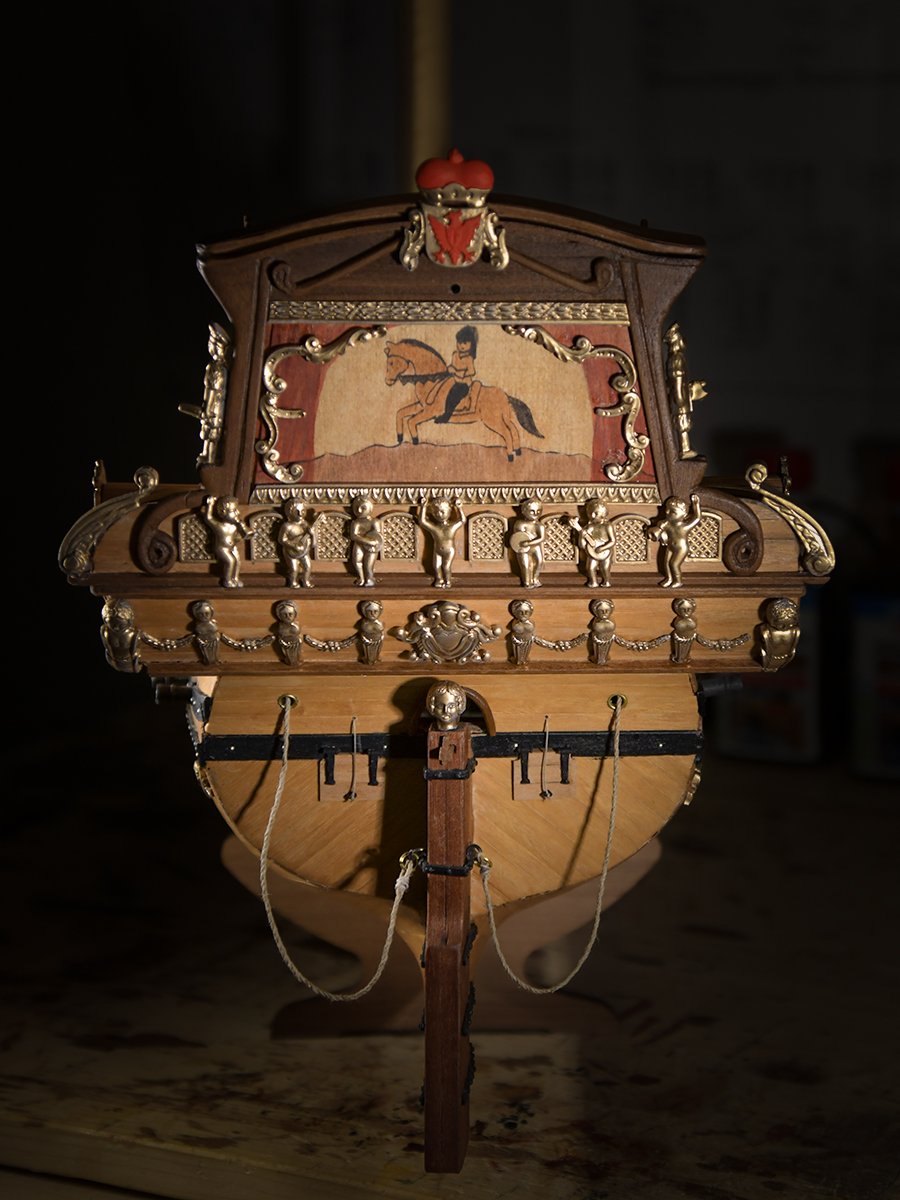
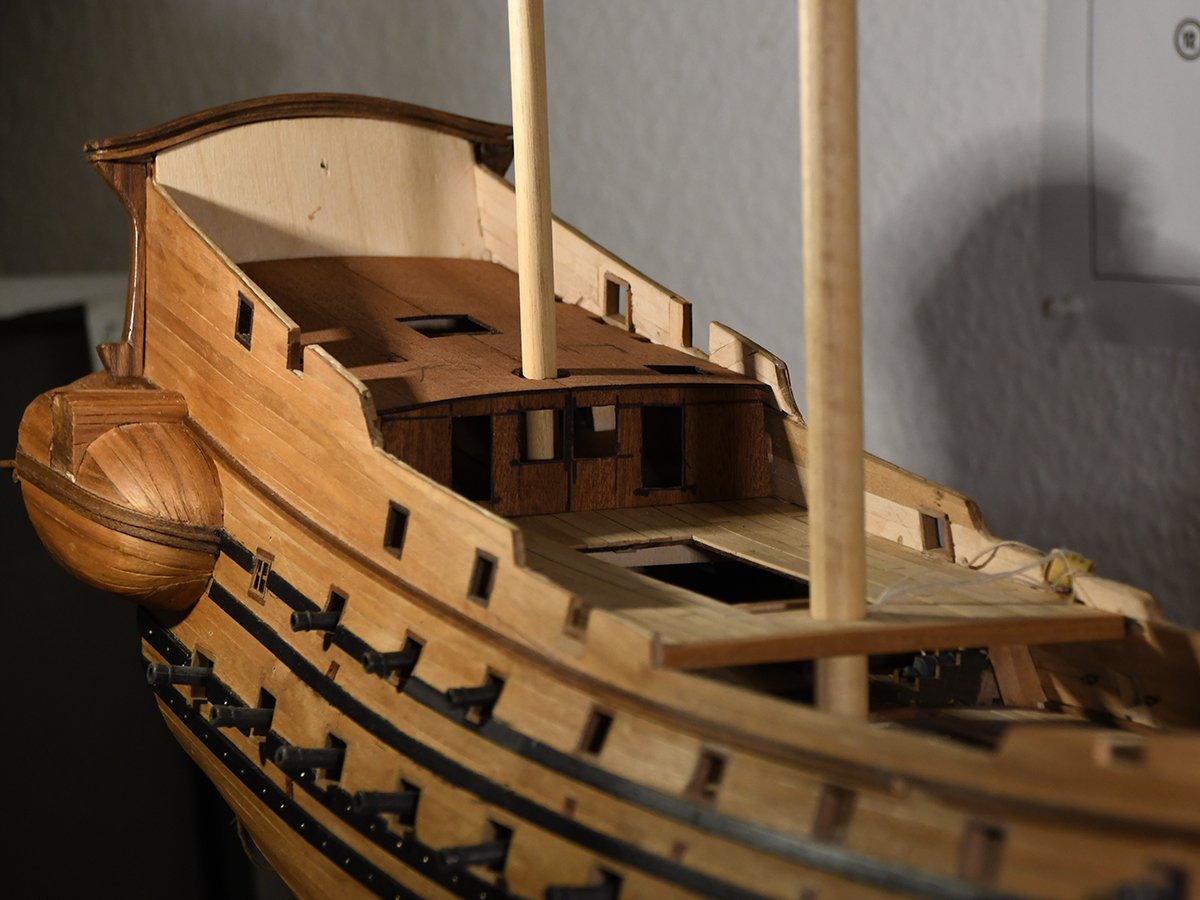
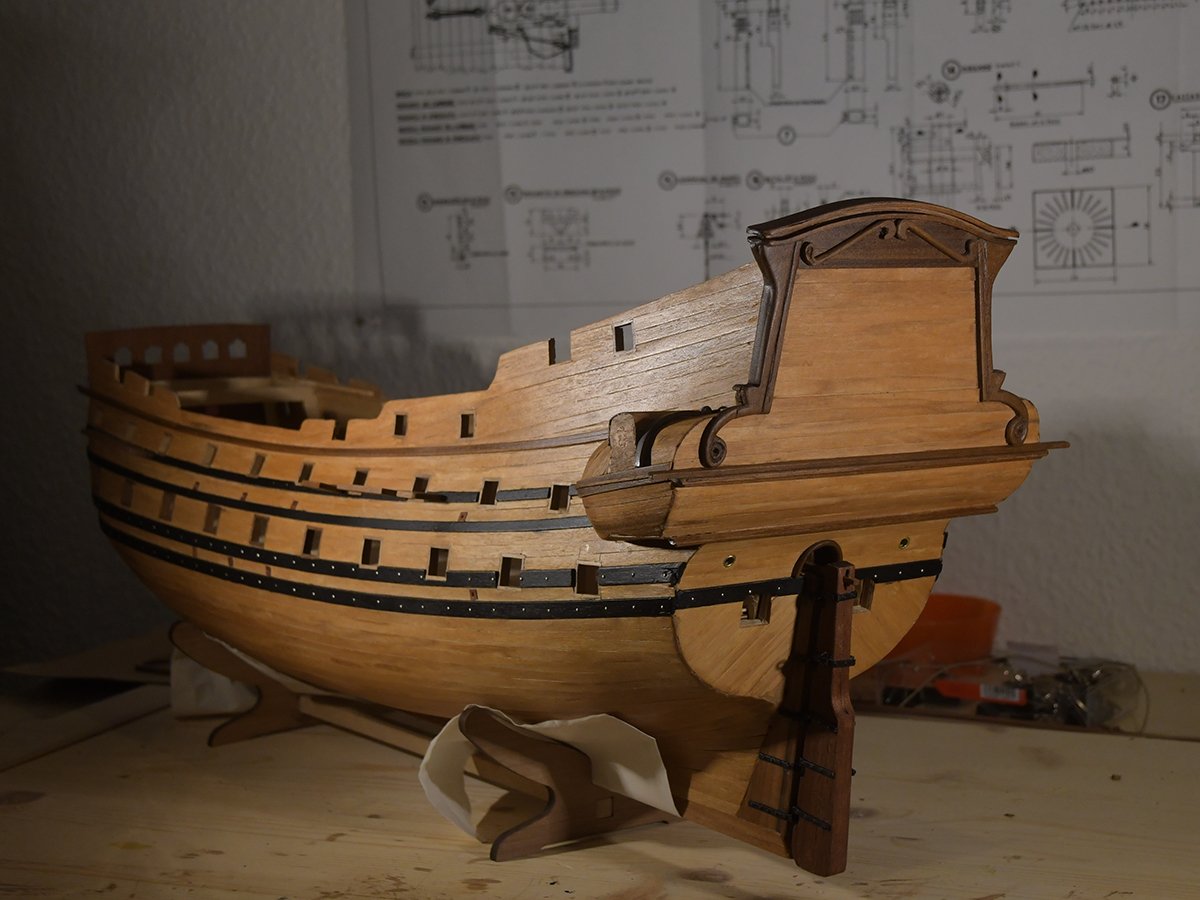
Ahoj, hello, cheerio... my trusty old friend Friedrich Wilhelm has made some further steps... I sealed the hull (three coats of a colorless satin finish). I actually decided not to paint the ship. I use different timber so there is a interesting change of natural colors. And I stain the strips whenever necessary. Furthermore I decided not to paint the figurines or the decorations so far - I found a wonderful golden color that fits perfectly to the timber. This model is largely idealized and not so much a lifelike replica. It's more the impression of a great and imposing ship. The more time and intensive examination I give to the build the more I come to believe that this model suits me and my intentions. There are so much great and beautiful kits on the market with details and perfect precut parts. And I would never say anything against this kits. But this special EuroModel kit makes you to create something own and new and wonderful. You don't glue parts together and in the end have a great model. To build a kit like this is almost a journey with so much crossroads, deviations and surprising solutions to problems you never would have had otherwise. And it's - not at last - a way to slow down yourself. Learning about the slow way of life... After these almost philosophical thoughts I will show some pics of the status quo (I also love photography so some pics may look a little bit different... ) I've done the major hull work so far. Next step will be to fix the cannons and the interior stuff that has to be done before the next deck will be installed. I look forward to this work. At the moment I don't have any further questions and I'm getting along well with the plans. That's it for the moment - Cheerio my friends
-
Hello again, @Pete and Murphy You both are right and that are just my thoughts: I paid so much attention to the planking so I would like to see and show the results (the more as I am quite content with it... ) But the impression of a covered undwrwater ship as it might be seen in many museums or just here in the forums is so beautiful... I am still not sure what I will do - but in any way it will be right Thank you mates for the input... Cheerio Max
-
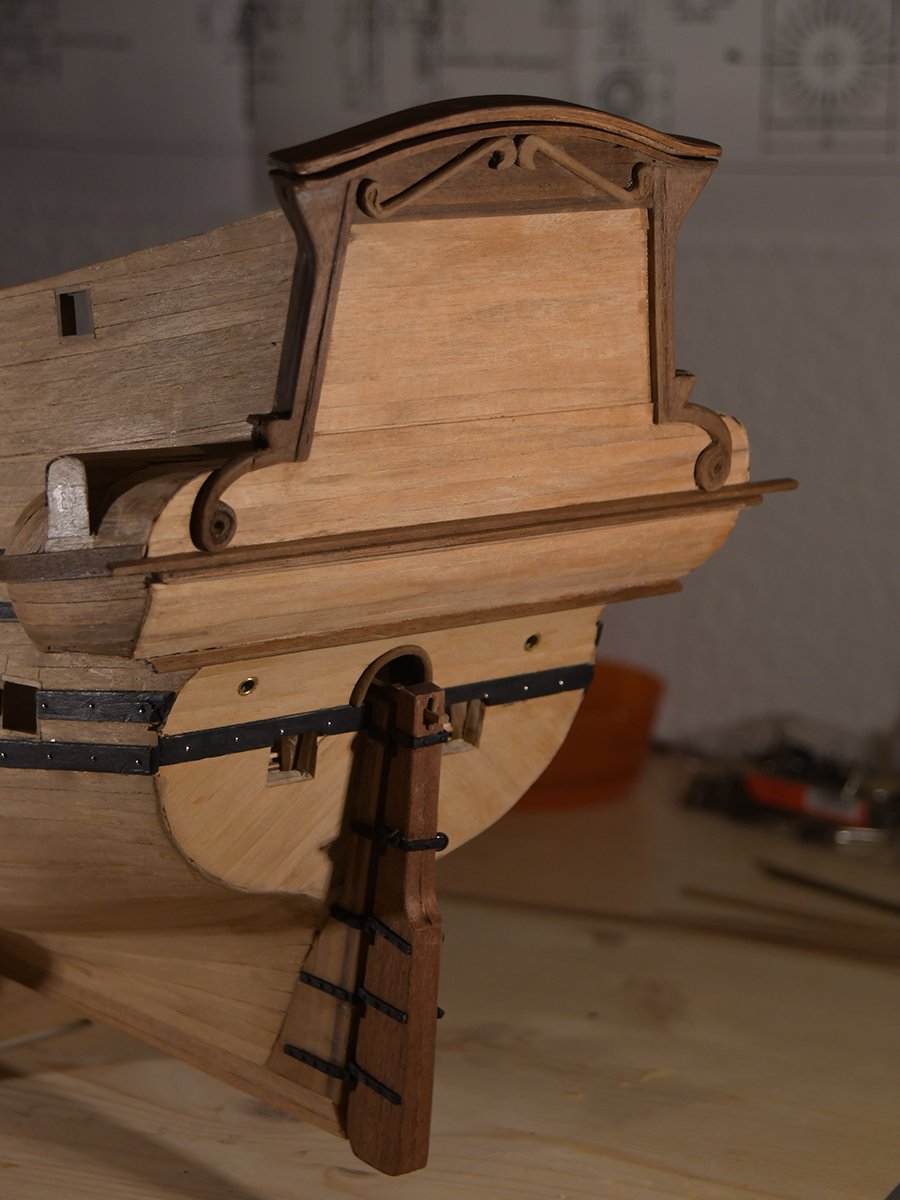
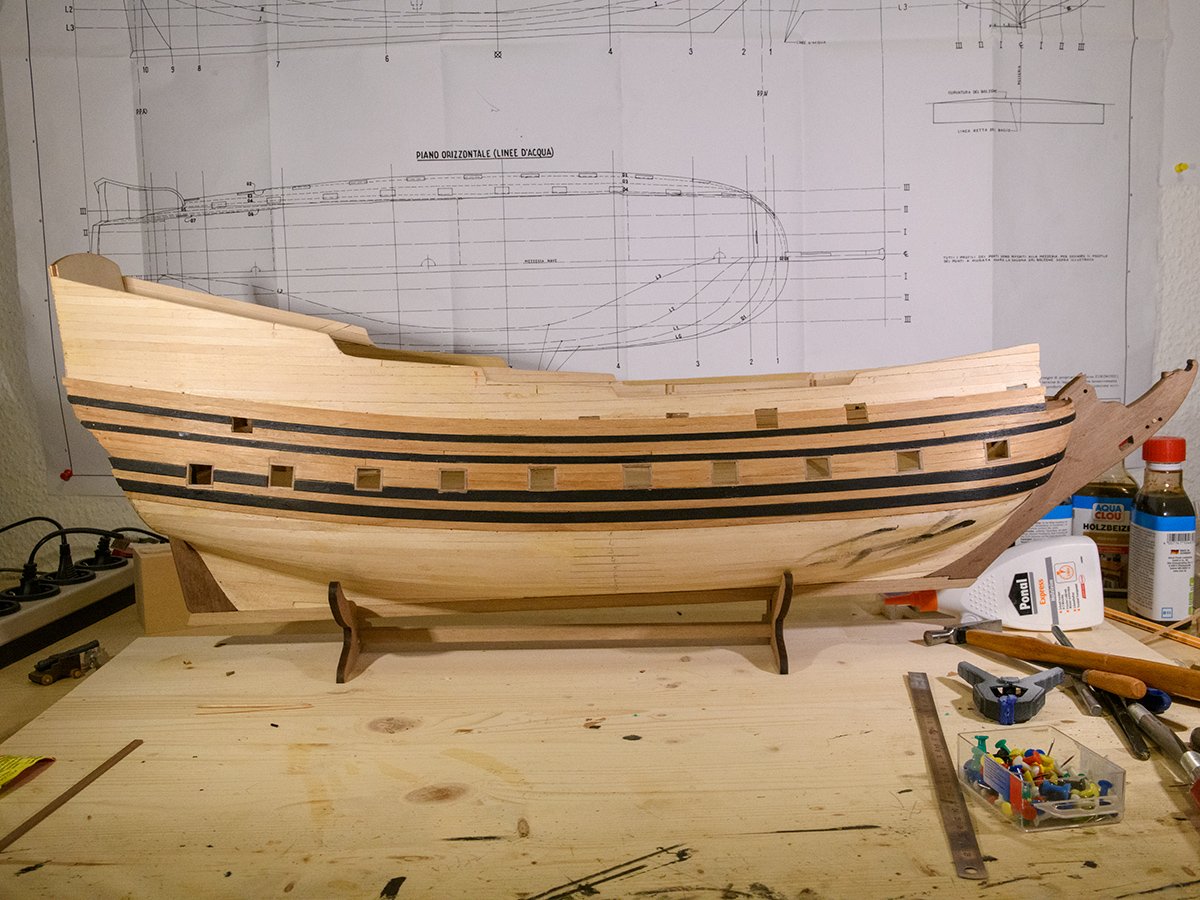
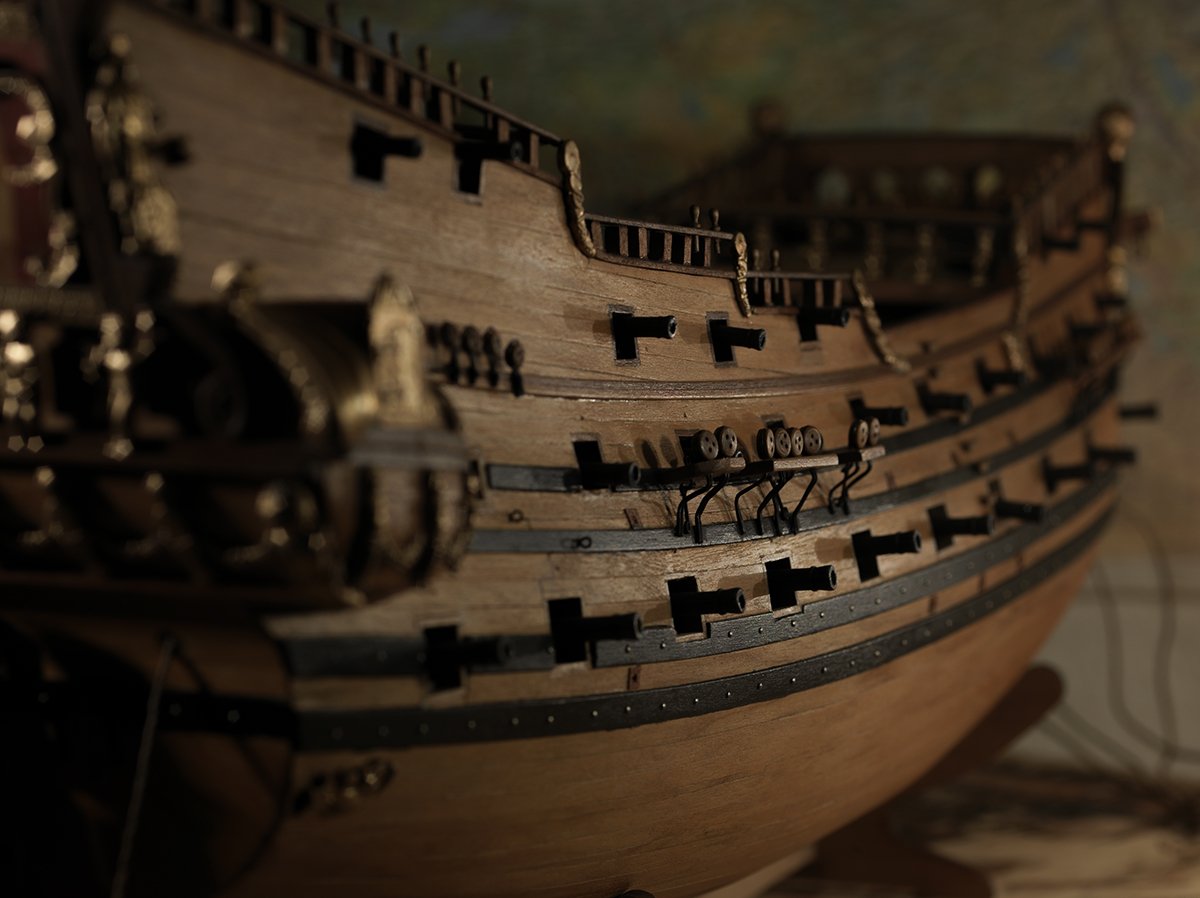
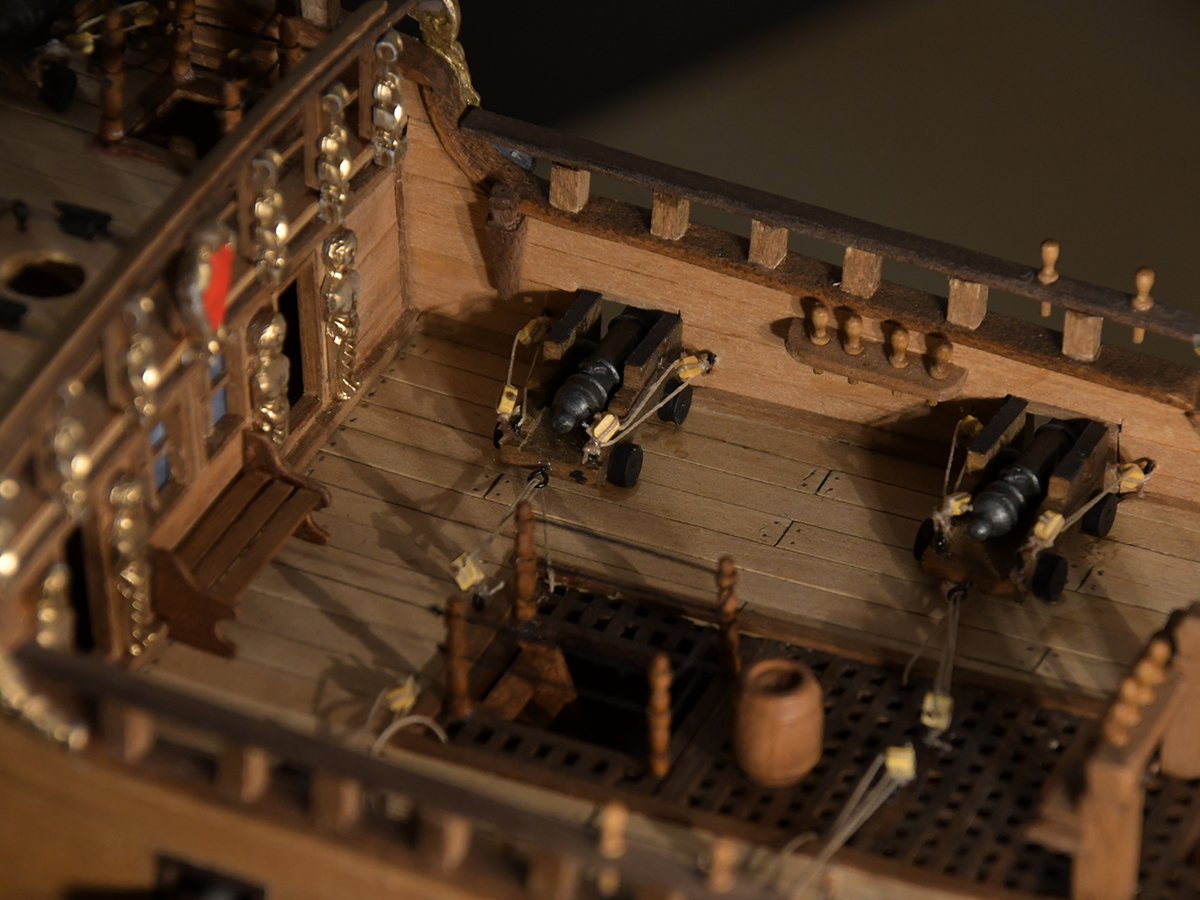
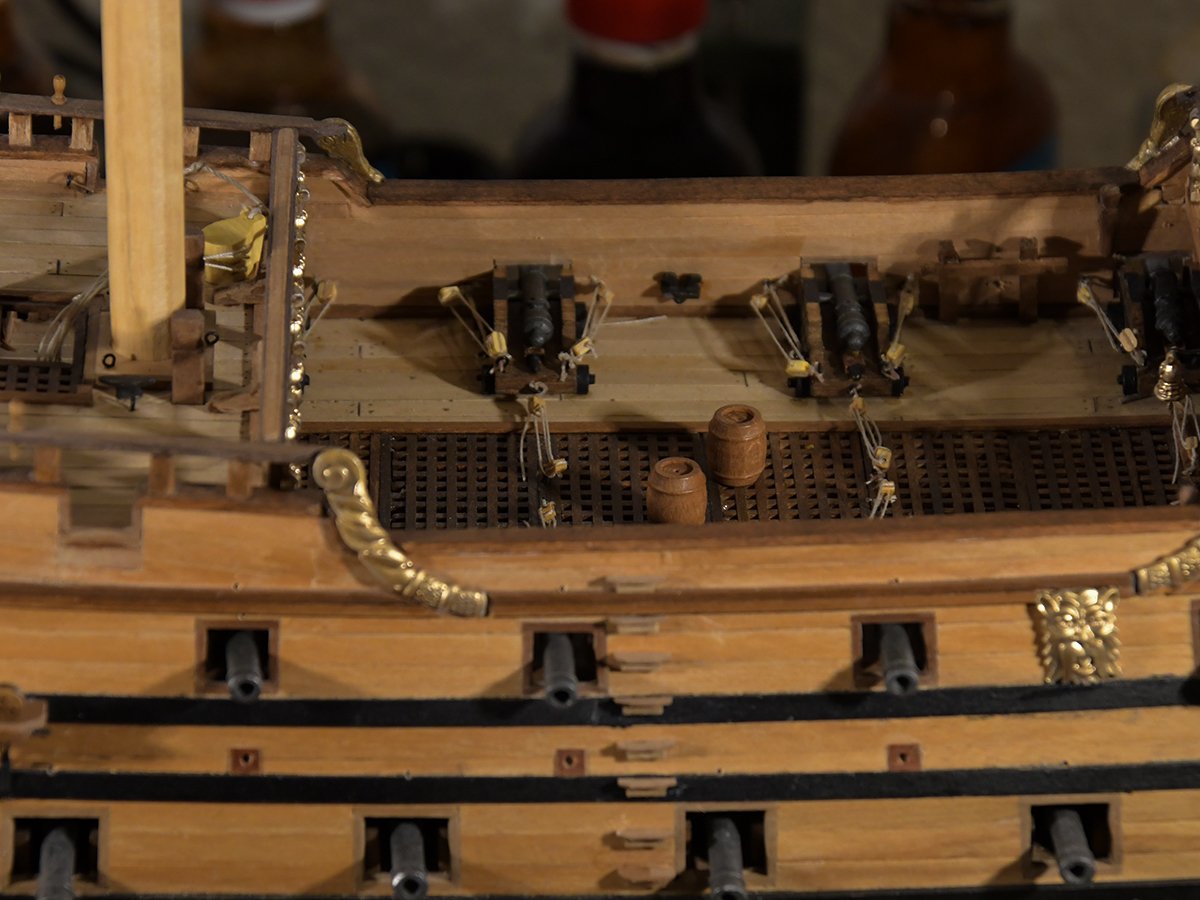
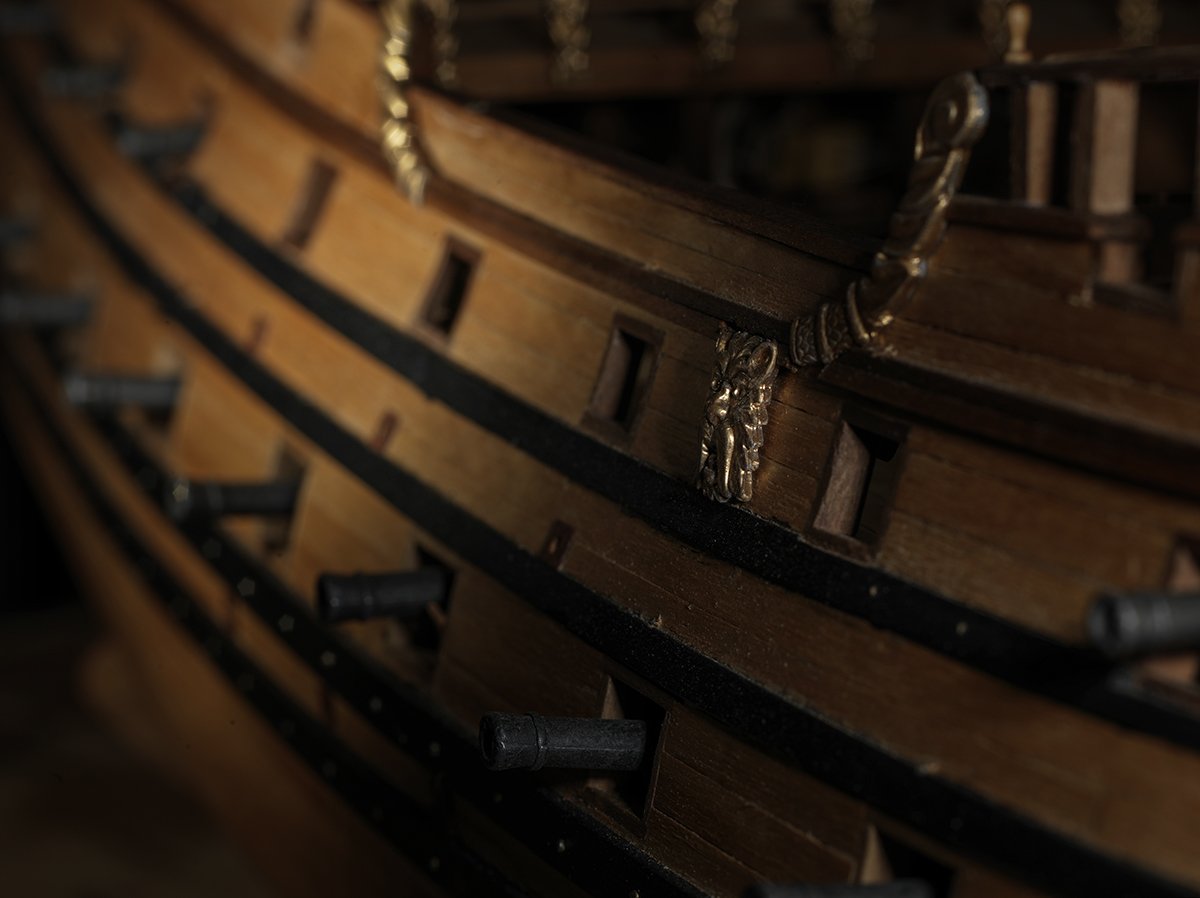
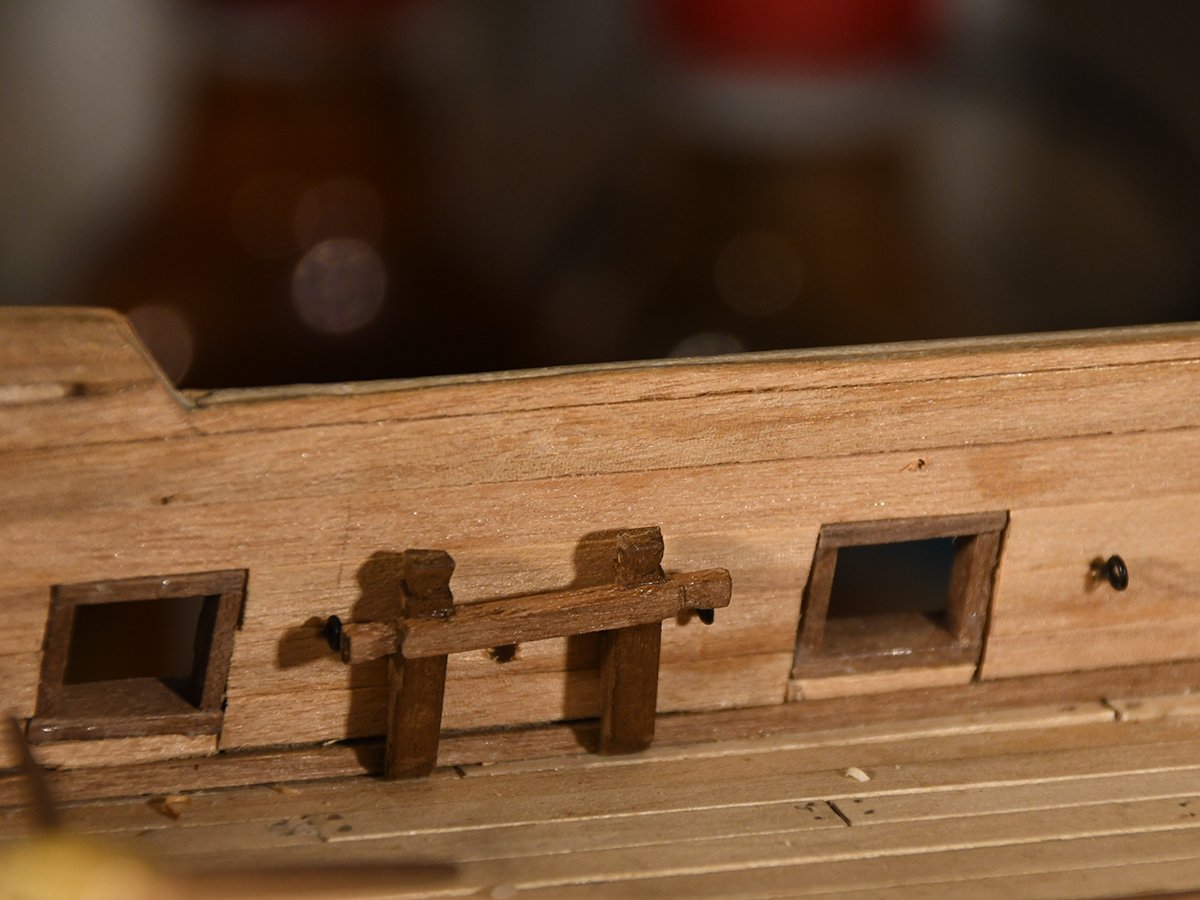
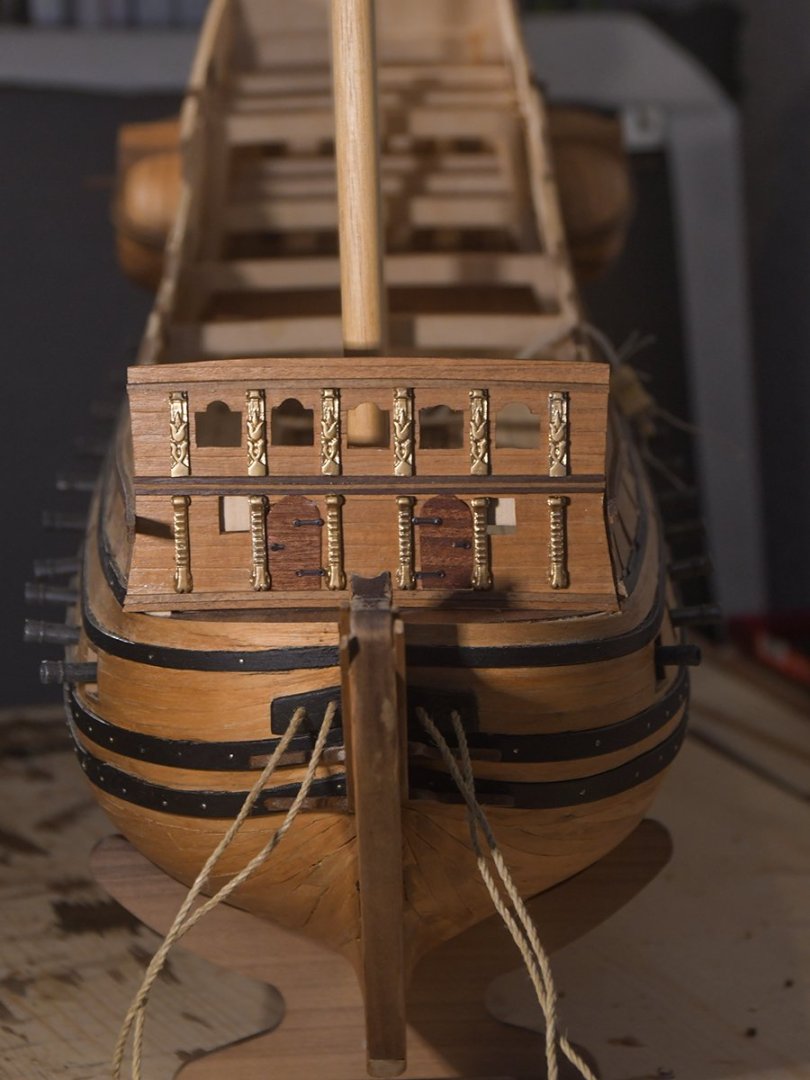
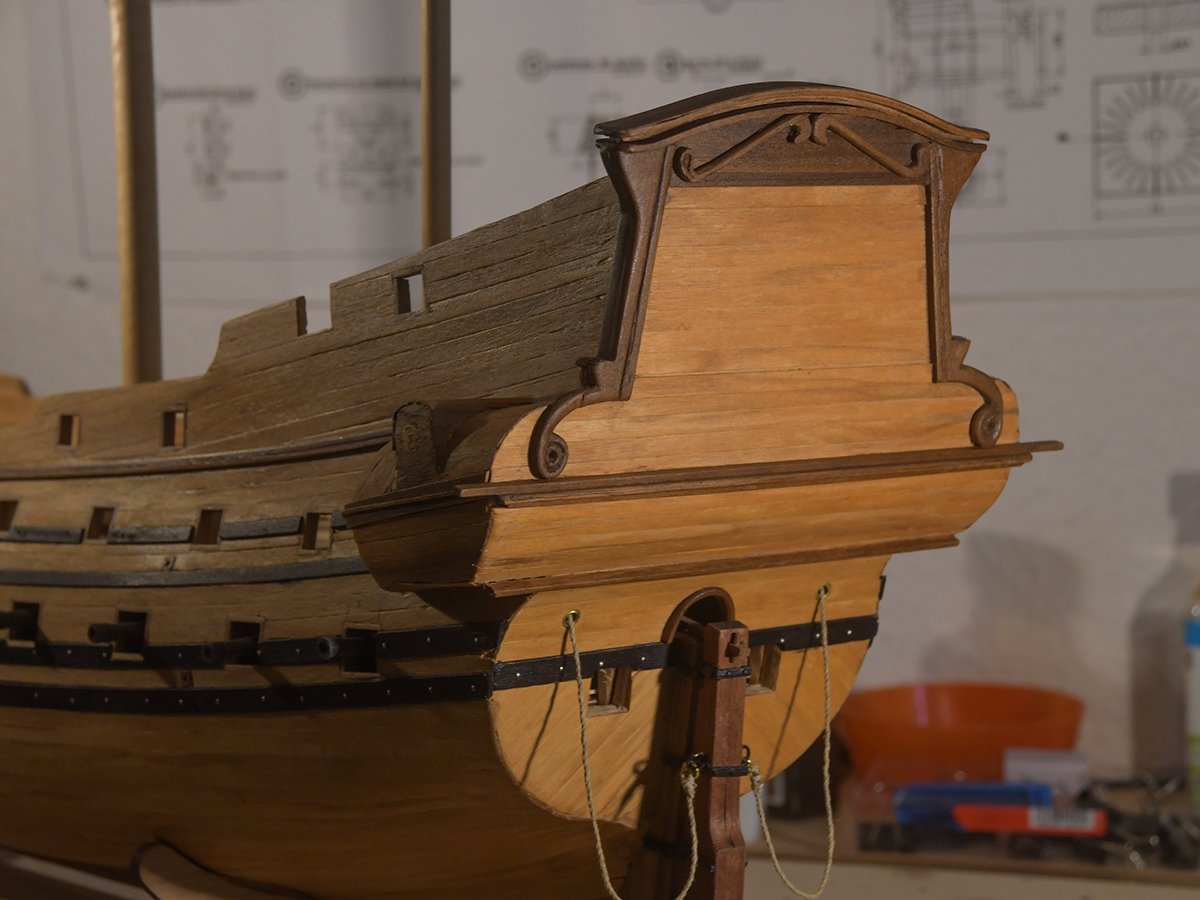
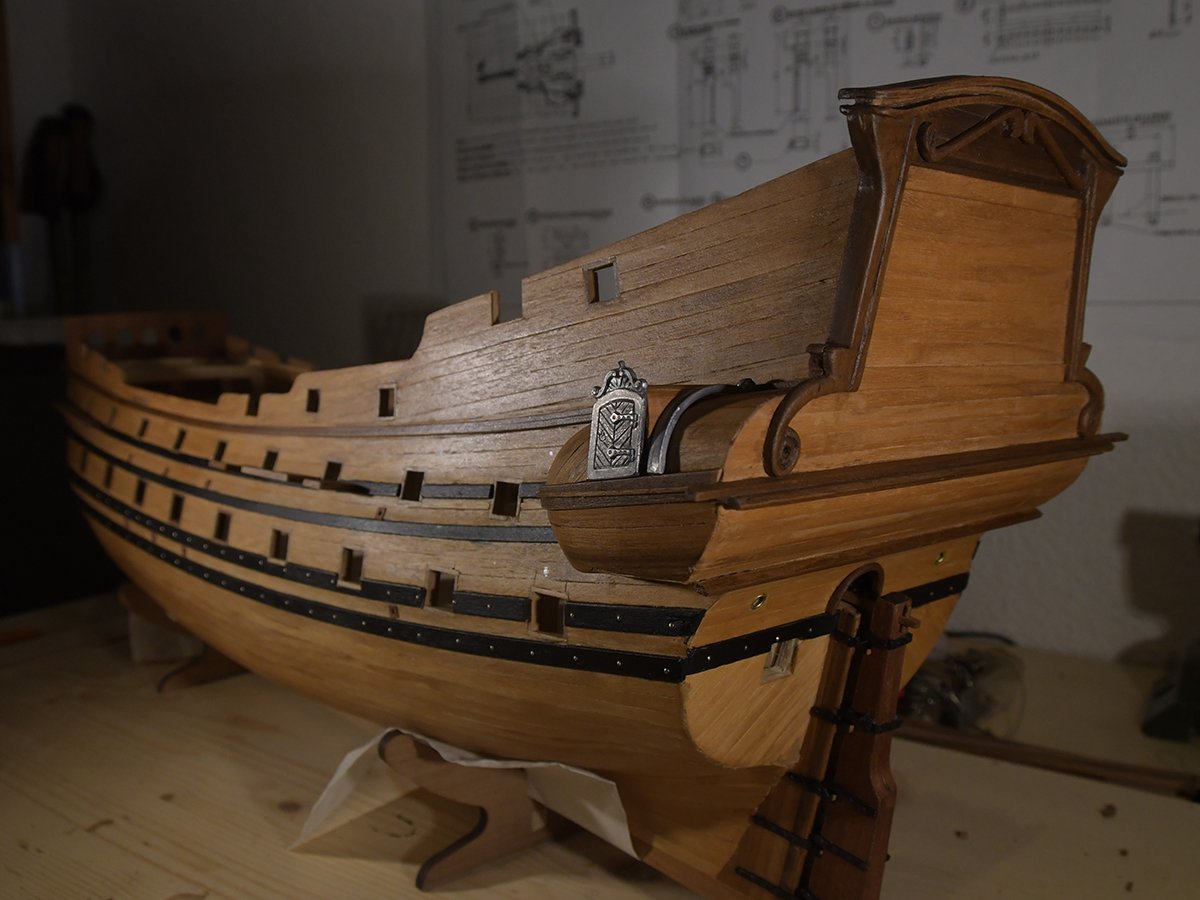
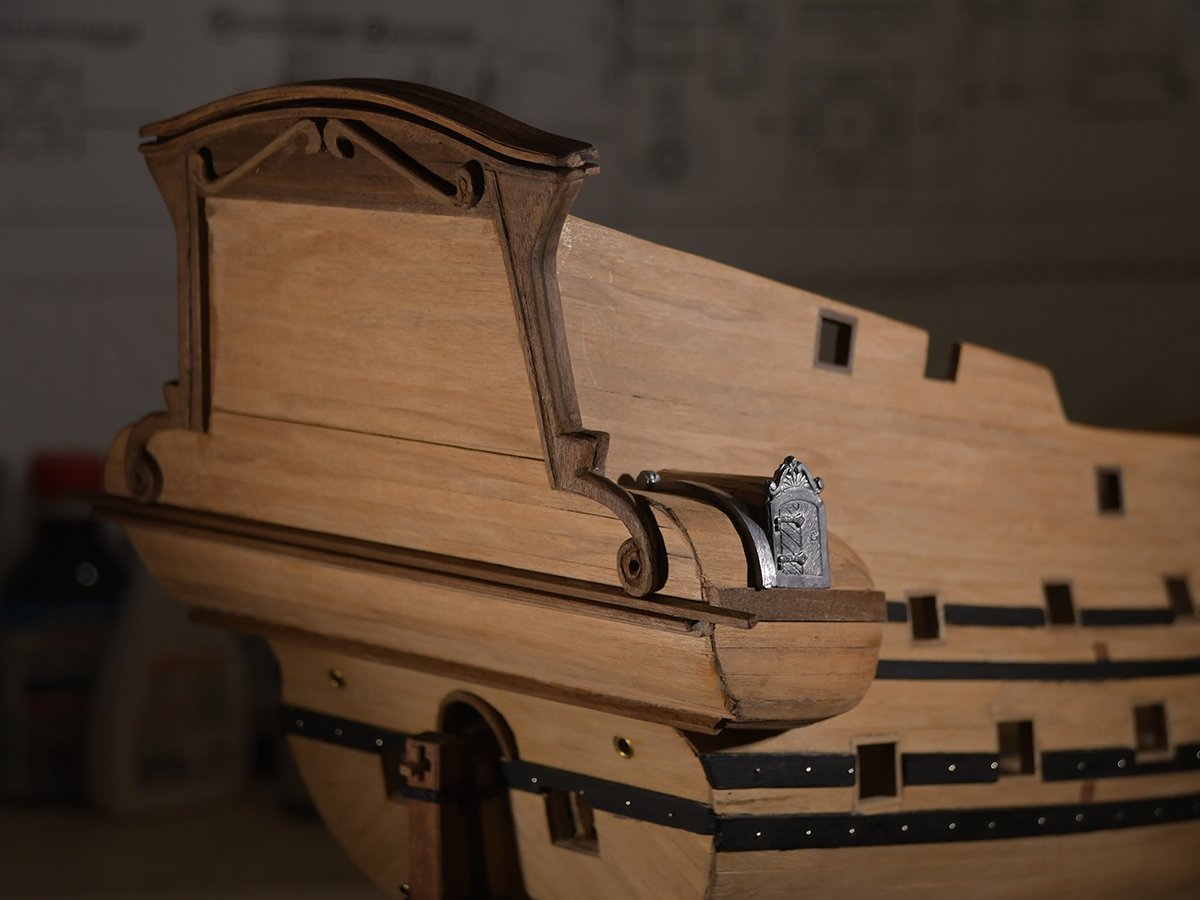
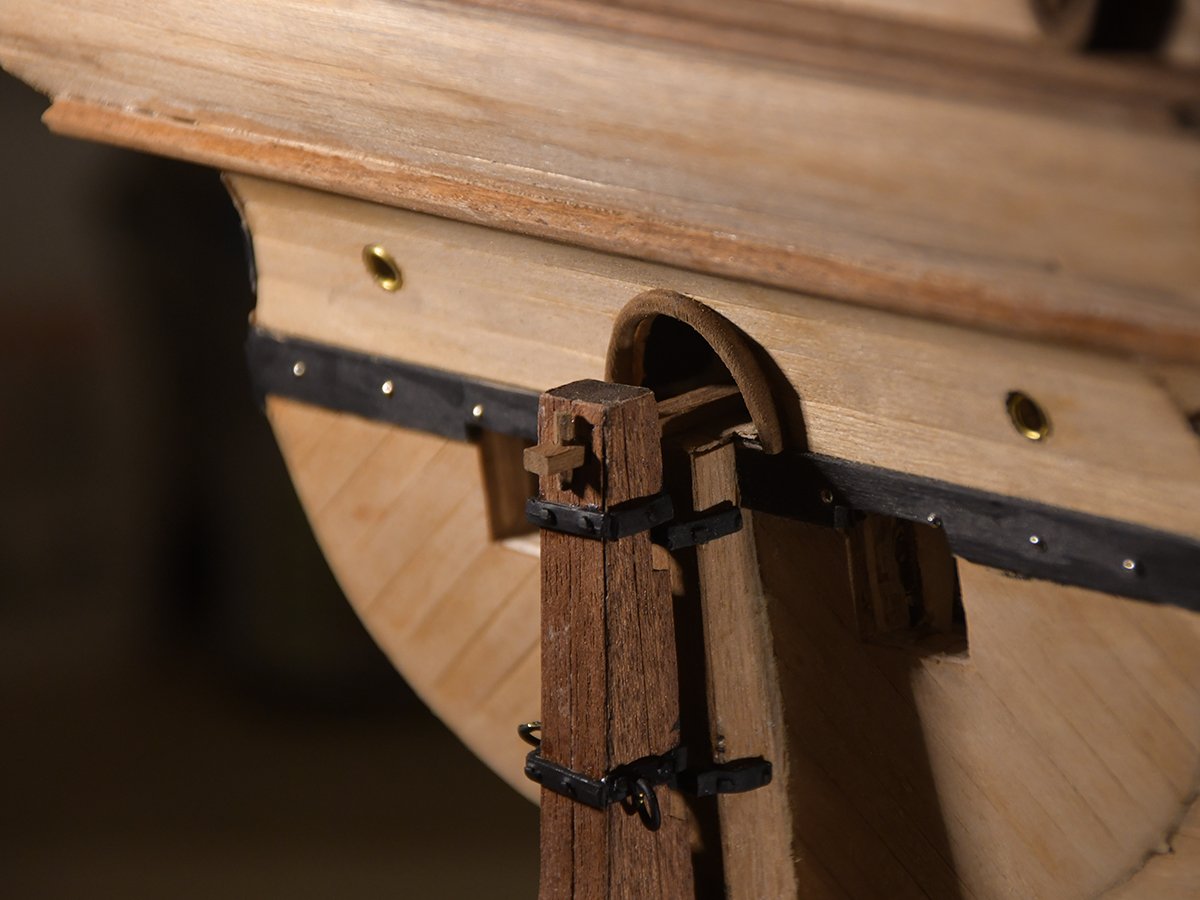
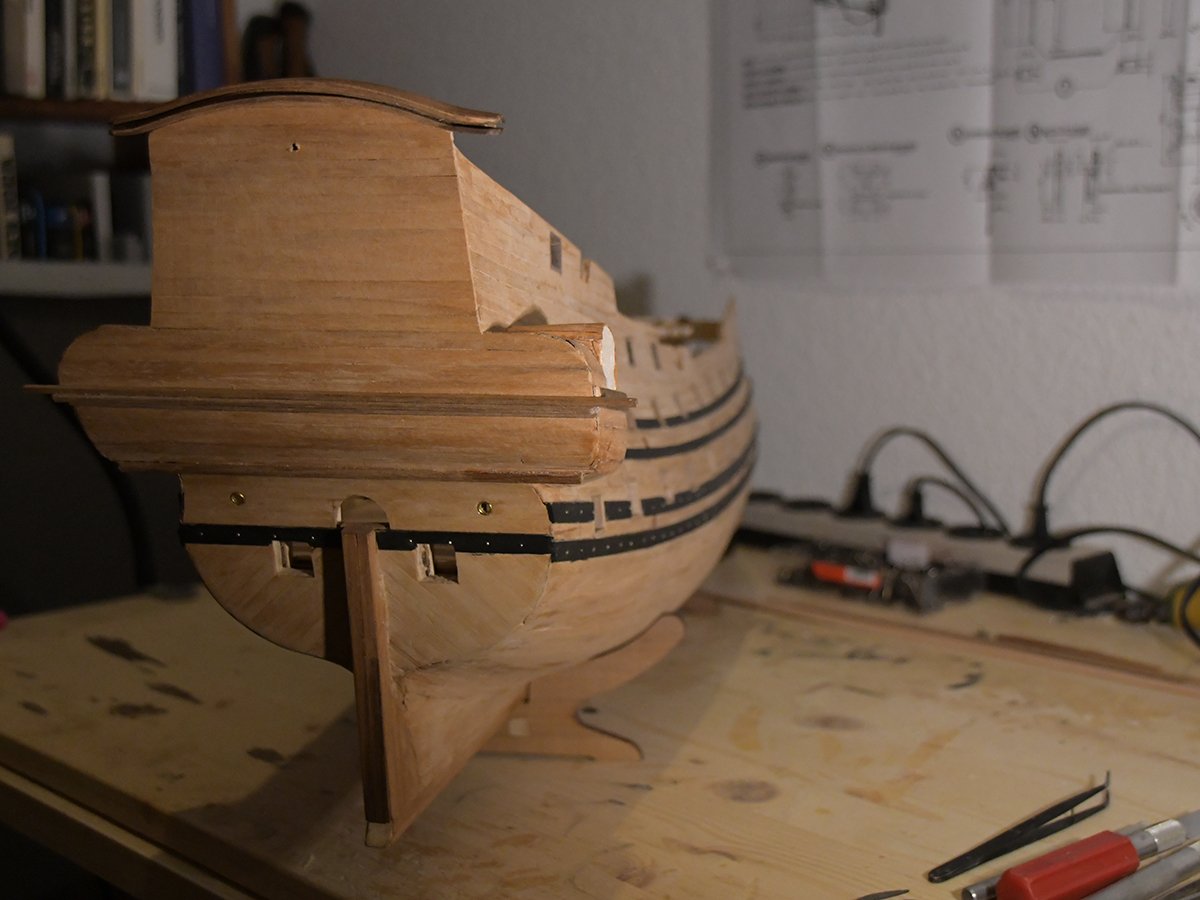
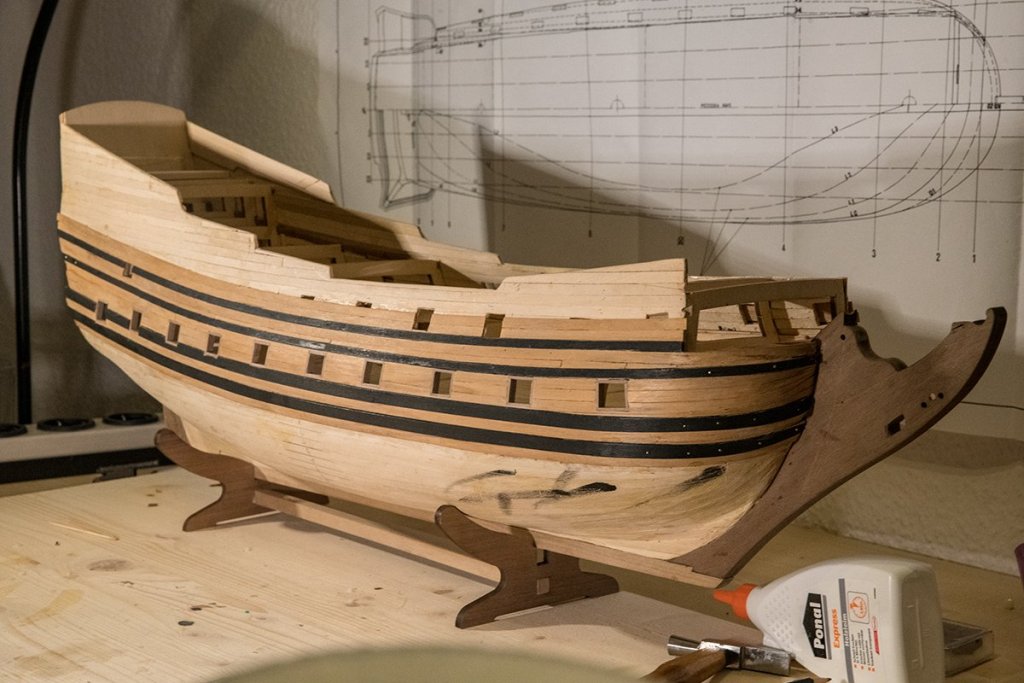
Hello my mates and jolly folks... got some little progress on my Friedrich Wilhelm. I finished the stern preparation so far and added the rudder. Too bad I planked both the rudder itself and the stern. So the hinges are not as wide as it would be perfect. As the material is soft metal cast I could widen the hinges a little bit. I am content with this, but it is not perfect... The stern's wooden decoration was all made in scratch also the galleries, that I planked instead of carving. I used balsa wood for the galleries's bodies. That worked very fine and I am satiesfied with the shape and the alignment to the whales. Next step will be the sealing of the hull after sanding...sanding...sanding... I think you know what I mean I have a big problem with the colors... Should I follow the instructions that tell me to whiten the lower hull beneath the waterline and to paint the upper part green as Brandenburg navy usually was? And what will I do with the figures and the other decoration parts? Paint or just use some bronze on them? I am not sure yet. Tell me if you have an idea... After sealing I will start to fix the cannons on the battery deck, build up all parts on the battery deck and then go on with the upper decks. A lot of work and fun waiting for me. Enjoy the pics so far. Cheerio Max


-
Hello merry men and jolly folks, the Friedrich Wilhelm takes progress. I came back to my shipyard some weeks ago and continue the built of this remarkable model by Euro Model. As you all may know there is no manual, there are no descriptions what to do and most of all there are barely precut parts. Just the frames, the keel and the decks. Everyrhing else is to the modeller. Grateful there are Pete's interpretive files available at Euro Model so you get some hints and help. That makes the Euro Model kits a challenge - but it is absolutely satisfying to get along with the plans and some brainwork and to find the solutions. I wíll add some pictures to show the progress. I've done the second planking and will continue to create the stern with the gallery and all the decoration's preparing. I started carving for the first time and try to give the model a touch of baroque. Hope you like the pics and don't hesitate to tell me what you think about the status quo. More to come hopefully soon Cheerio Max

-
Hello my freinds and mates, due to several family business and personal changes I had to break the build - I had neither the patience nor the feeling you need for such a project. Well, I will retire soon and now I am willing to proceed the build. When the summer heat is gone and everything comes to a calm and flowing mood I will be back. Hope this will be soon I just prepare my room to be a shipyard again. CU soon Cheerio
-
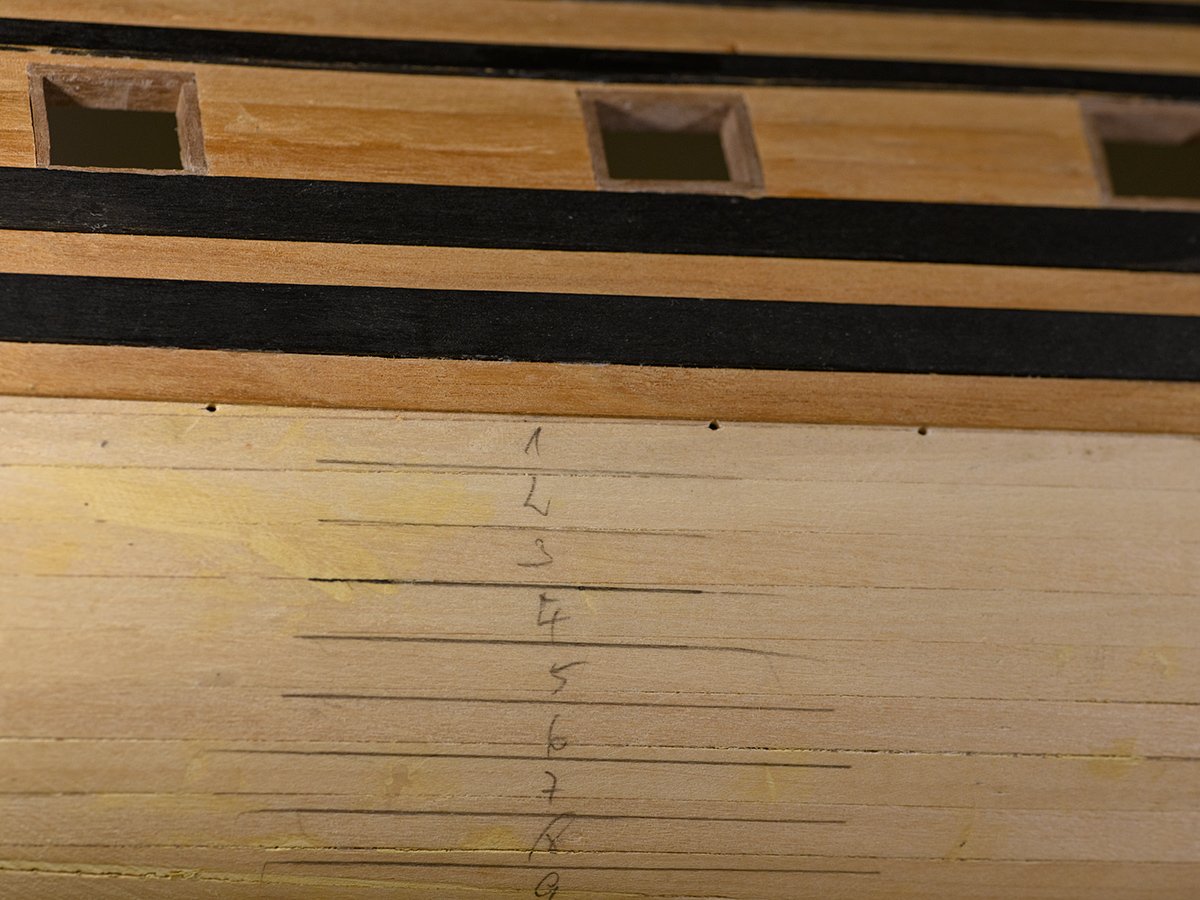
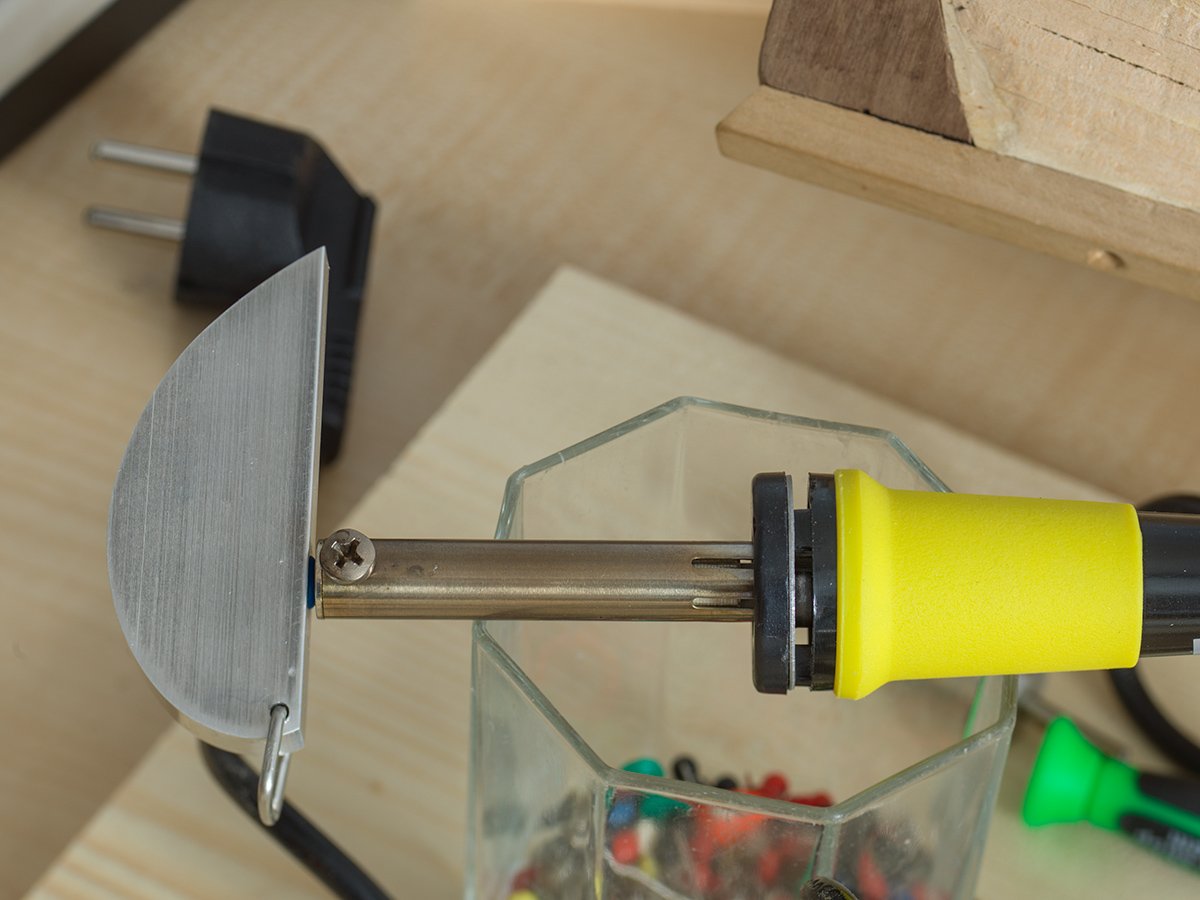
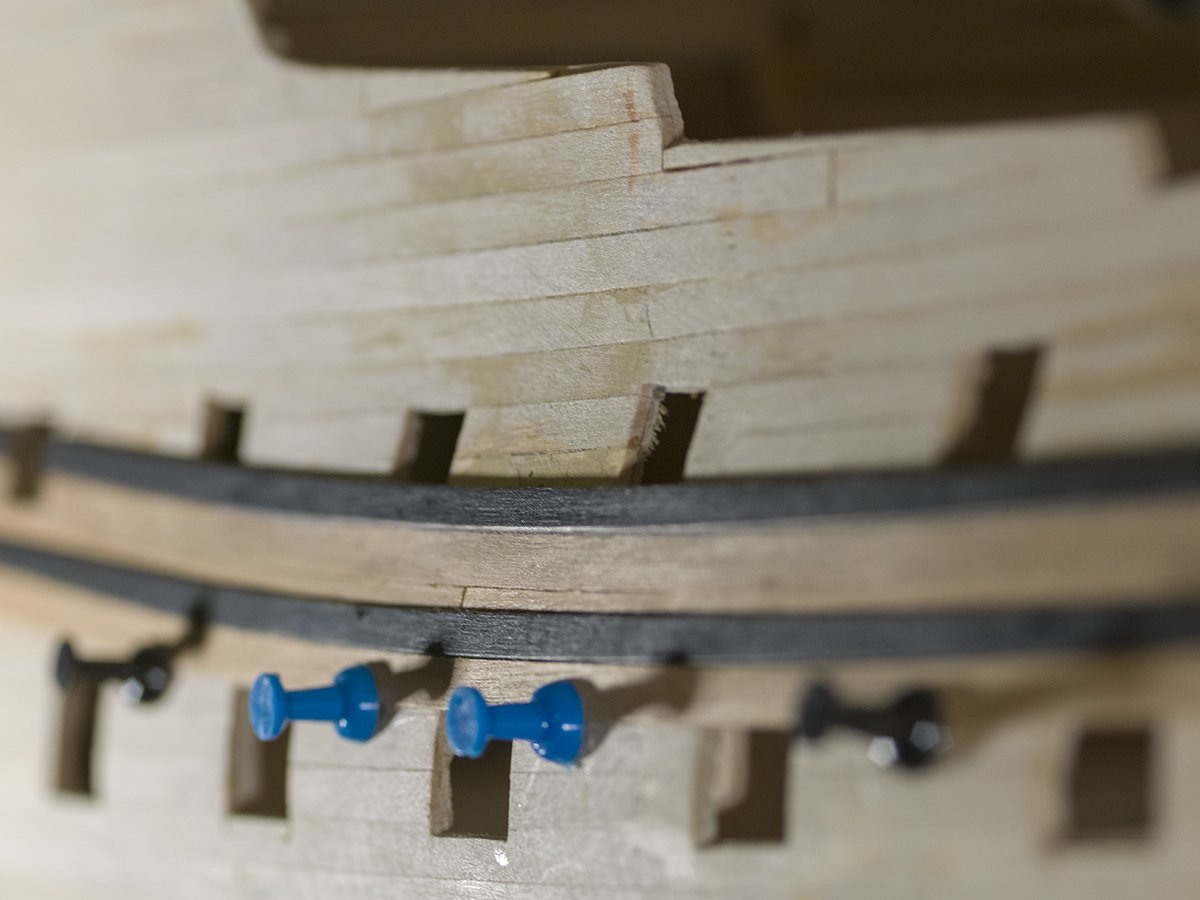
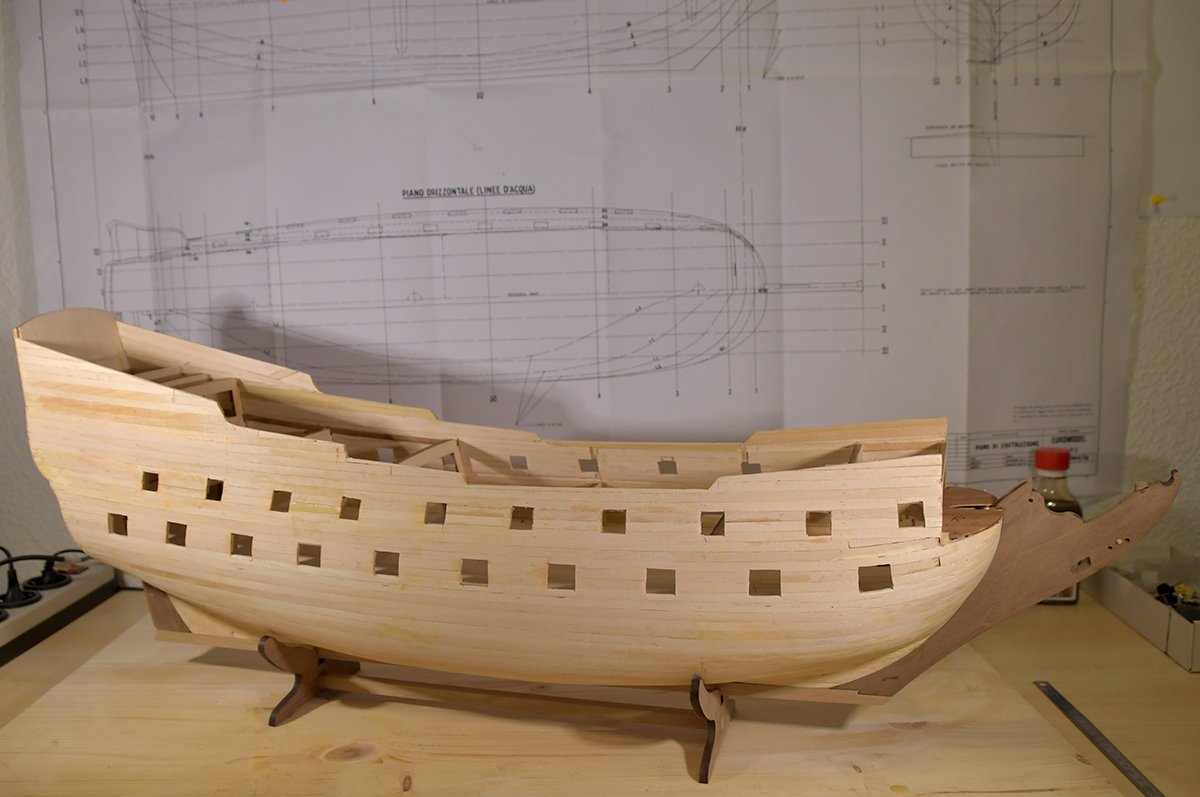
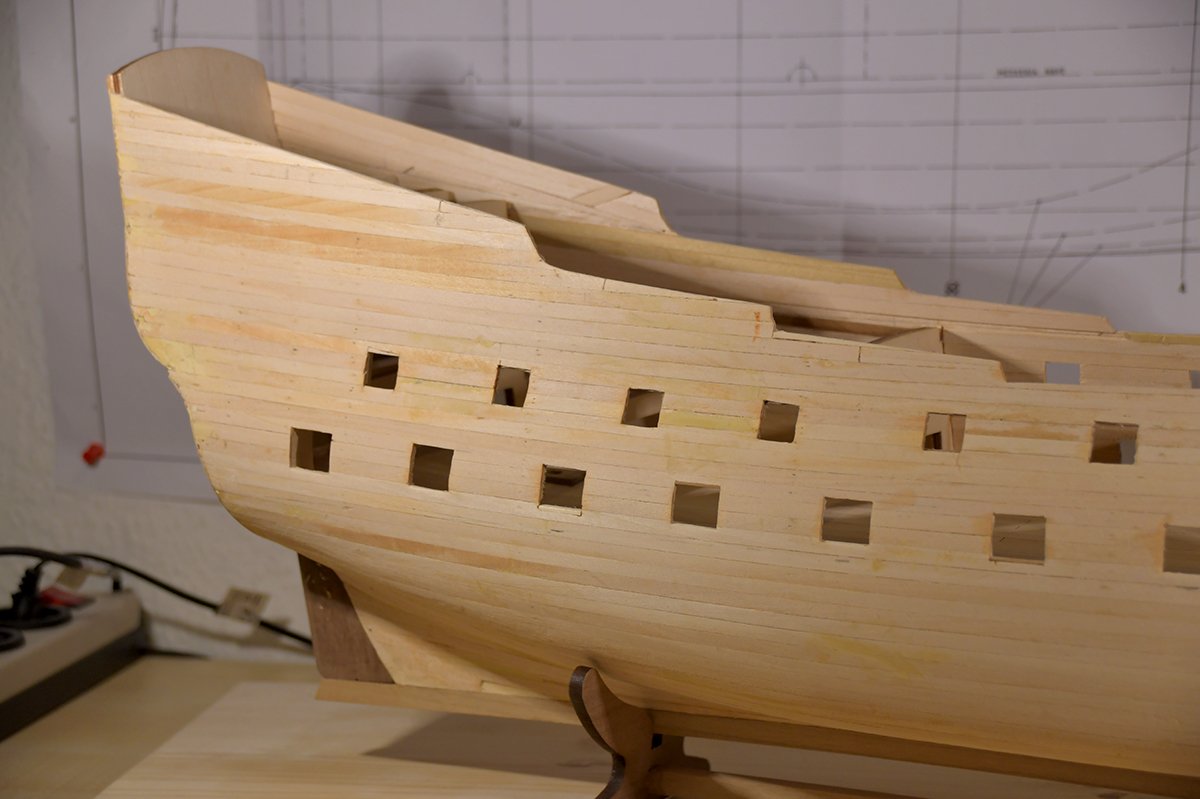
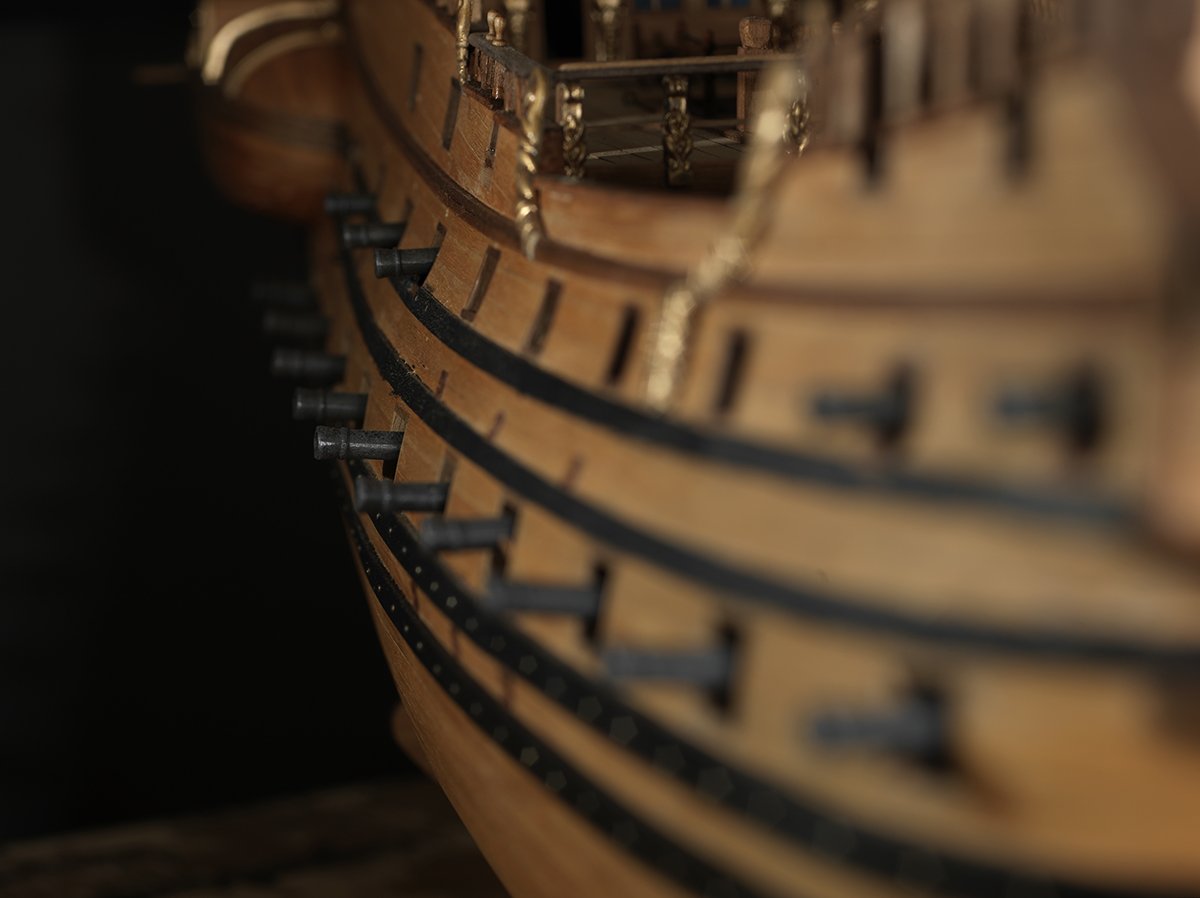
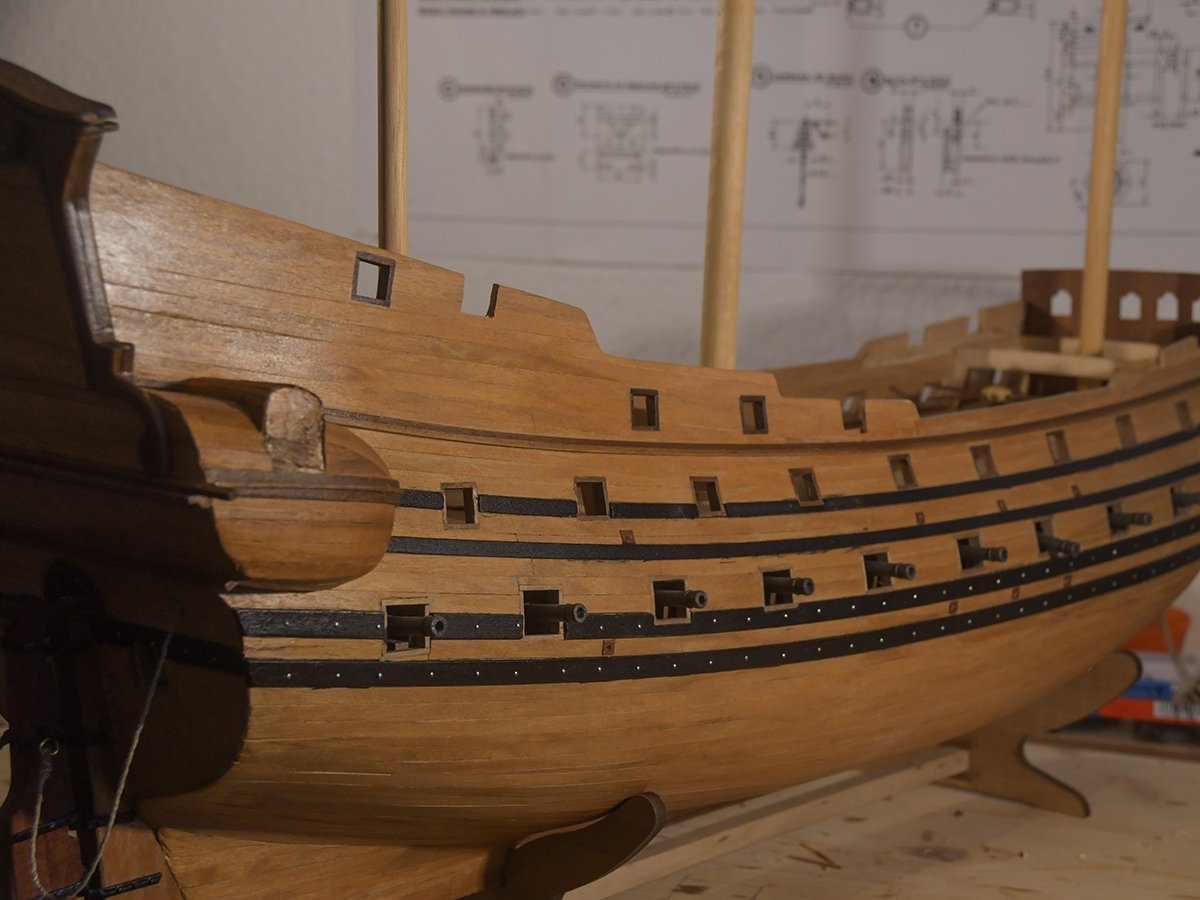
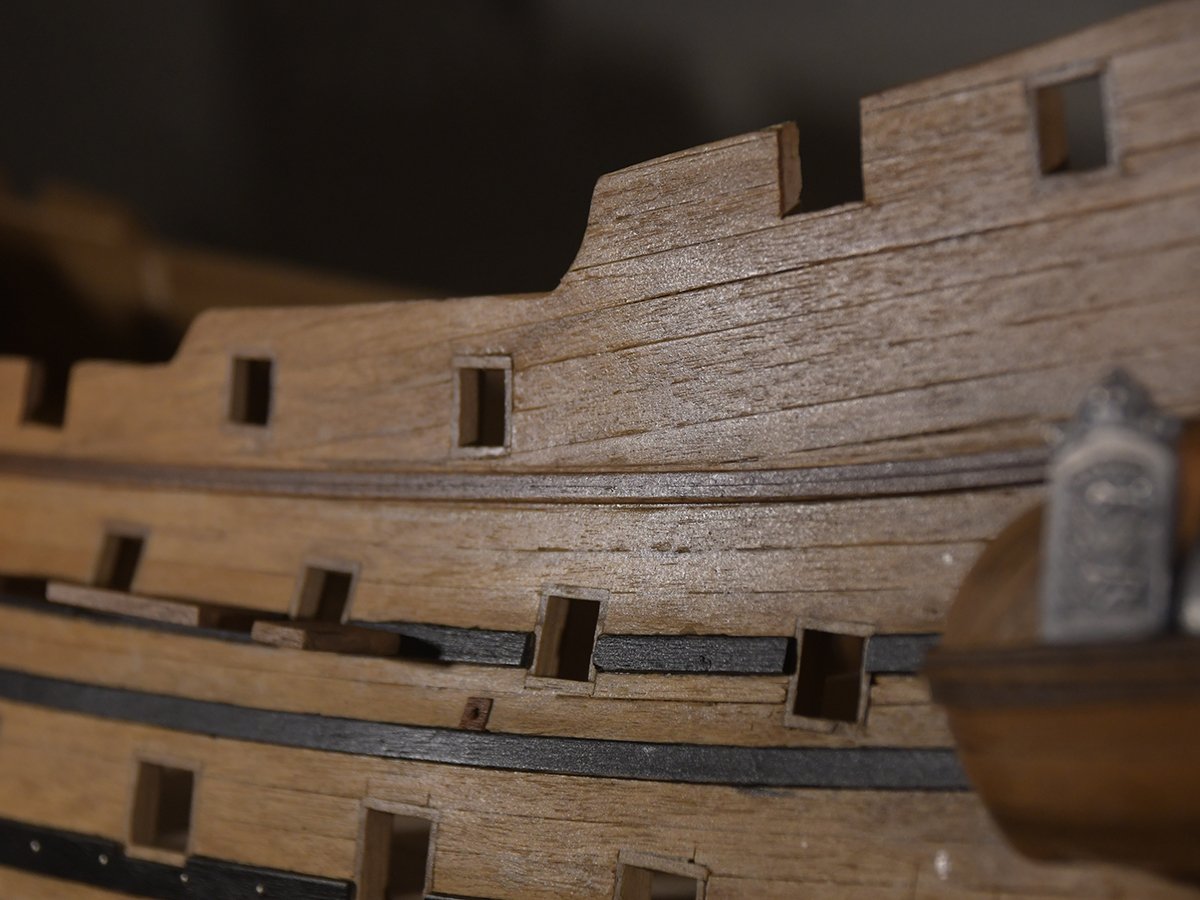
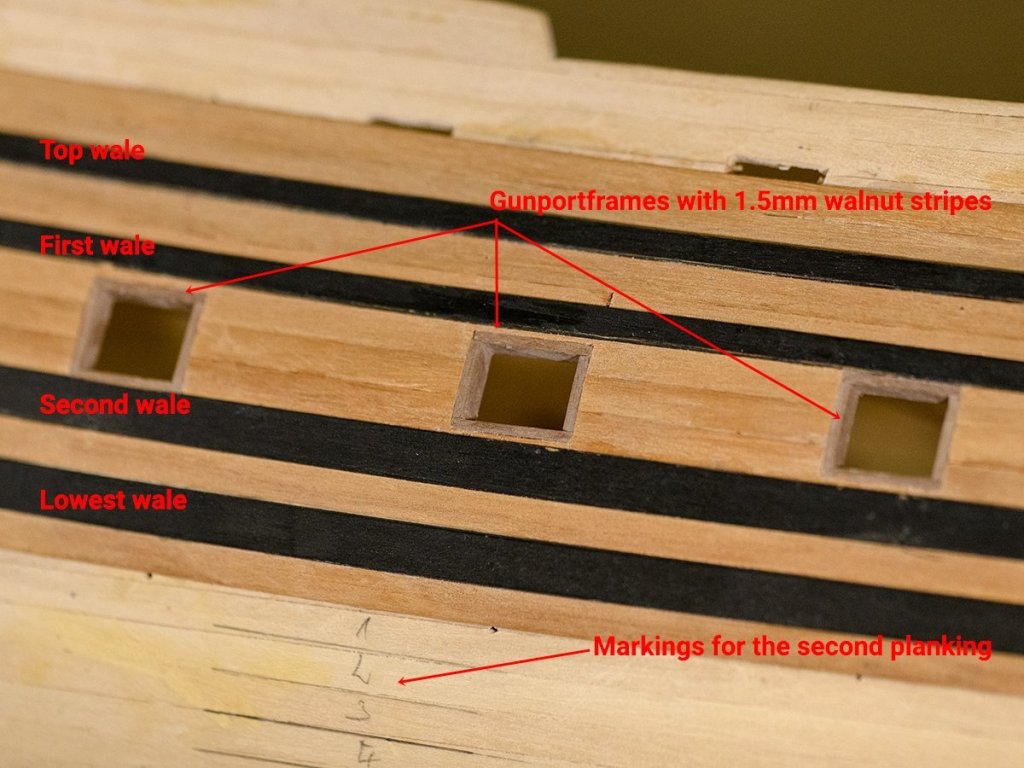
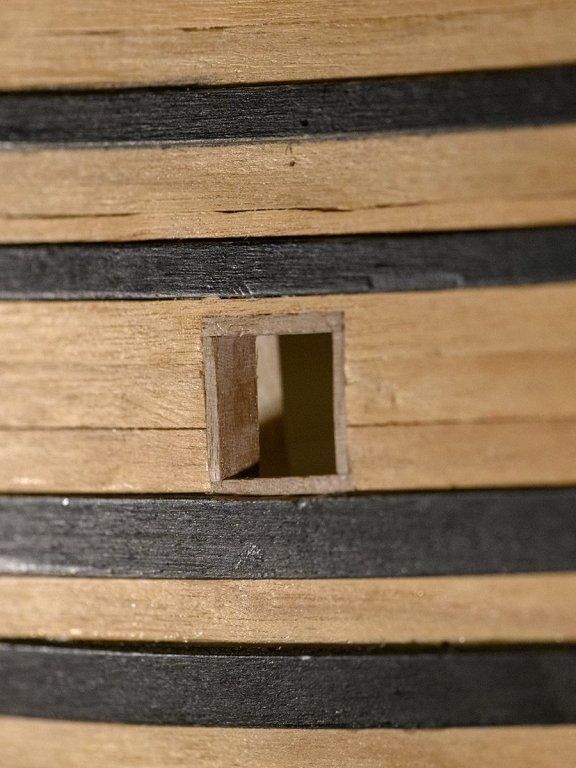
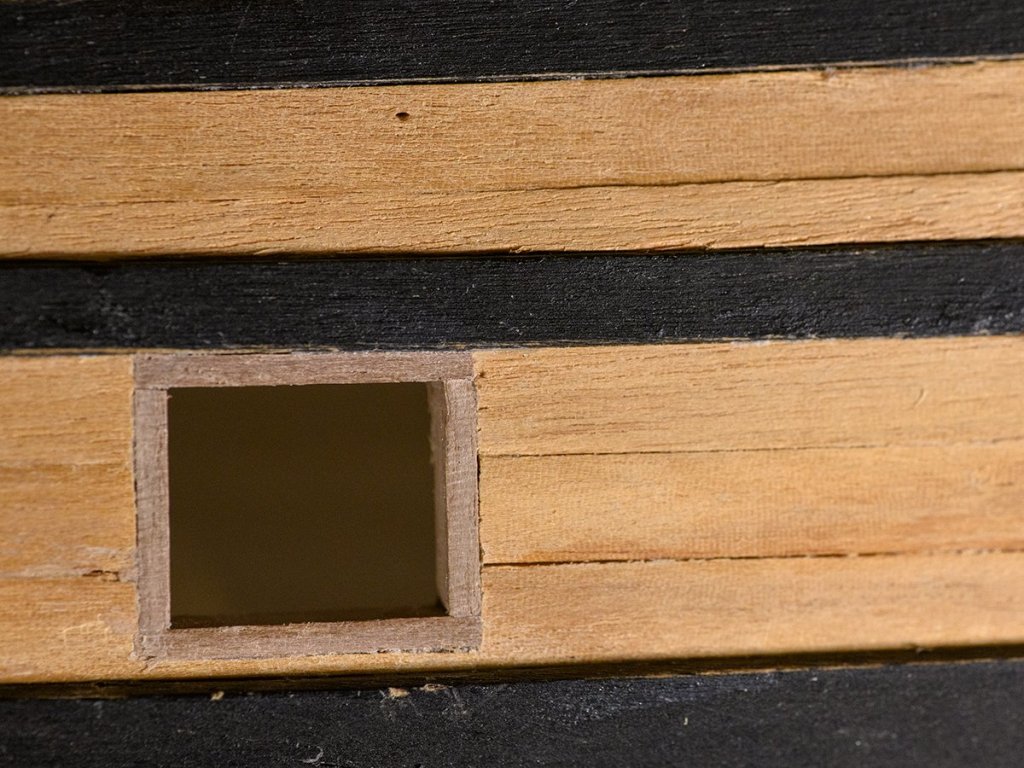
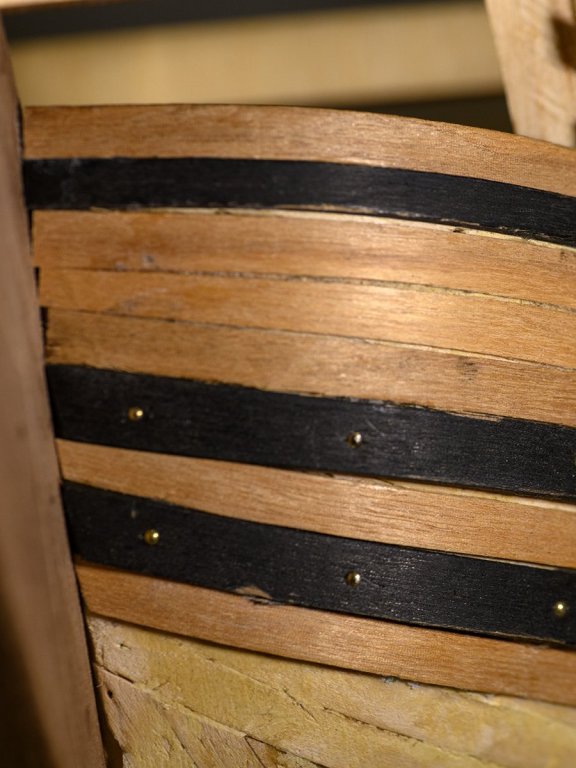
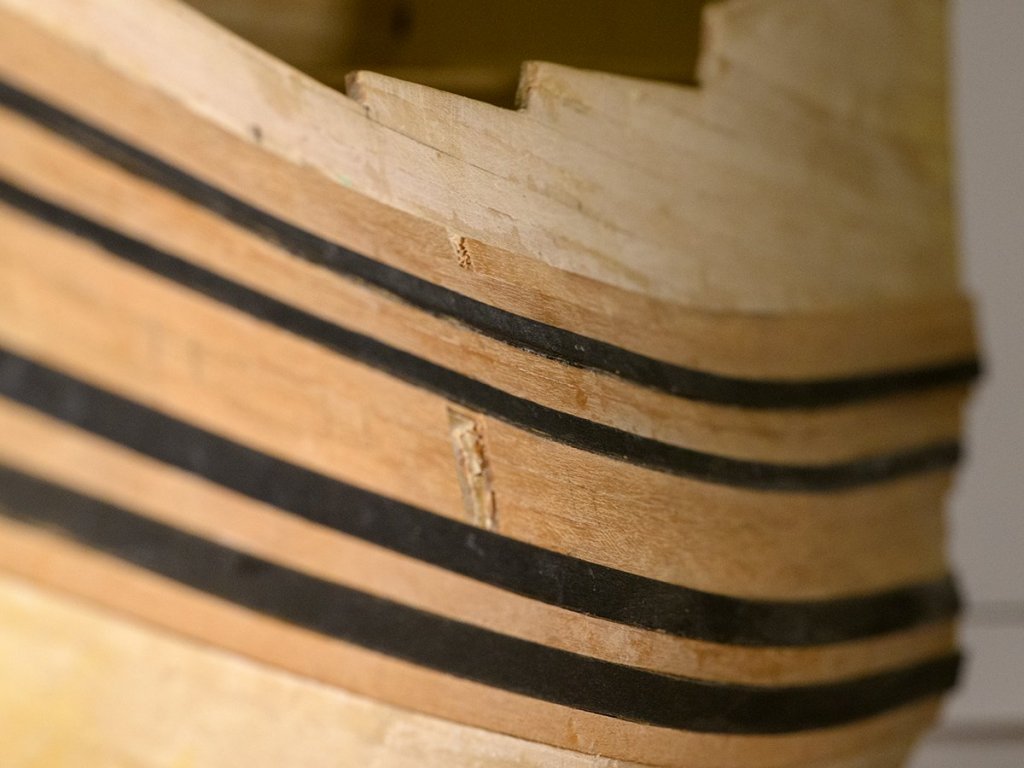
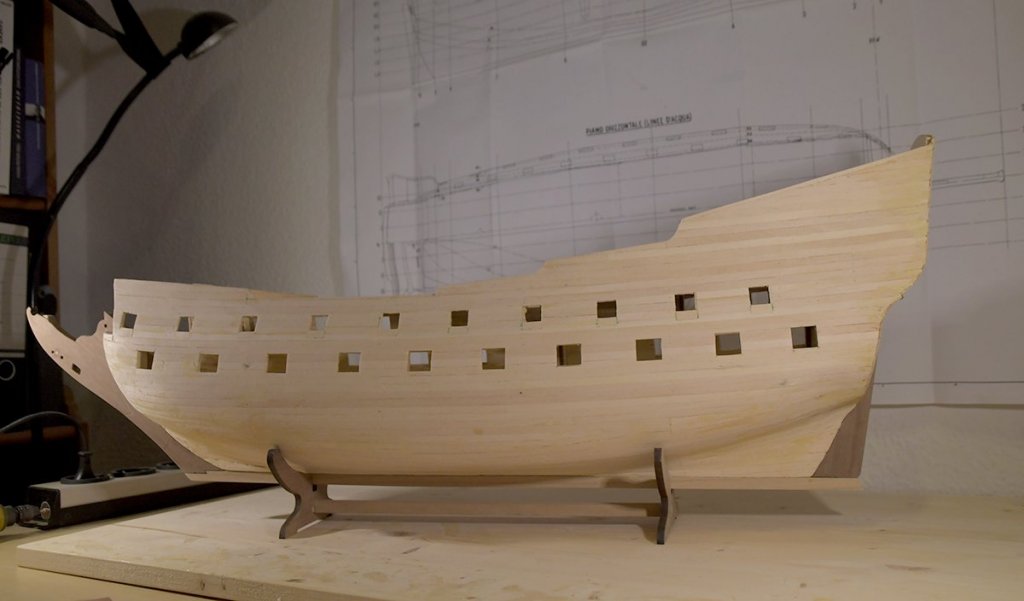
Hello my merry friends, a long time passed by... almost four weeks since my last entry. I passed the challenge to fix the wales and to start the second planking in exact curvature according to the wales line. It was tricky to bend the wales especially the stronger ones. But I found a way with a lot of water, a new tool - a bending iron based on a soldering iron with a profile that gives perfect curves - and most of all a huge amount of patience. All in all I think the wales look quite good and the shape is exactly correct to the plans. Indeed it's great if you have a strong hull construction so you can fix the wales with clamps in the right position. I made a pic to show how thick (almost 5 mm) the hull itself is. That gives freally a good basement for further work. In the pictures you will see minor gaps (less than half a millimeter in real - I used a macro lens to take the photos) that will have to be filled up later, and of course the wales have to be mended. But thats just a rainy day job. I stained the wales so the process of mending will not be too critical - just along the surface. Nest step will be to construct all gunports and frames, after this I will start the second planking of the remaining hull. Still it's fun although Iit takes a lot of time - much more as spring starts and later summer will prevent me frm building. As usual I attach some pice to show the progress my interpretation of Friedrich Wilhelm zu Pferde comes along. Cheerio Max


-
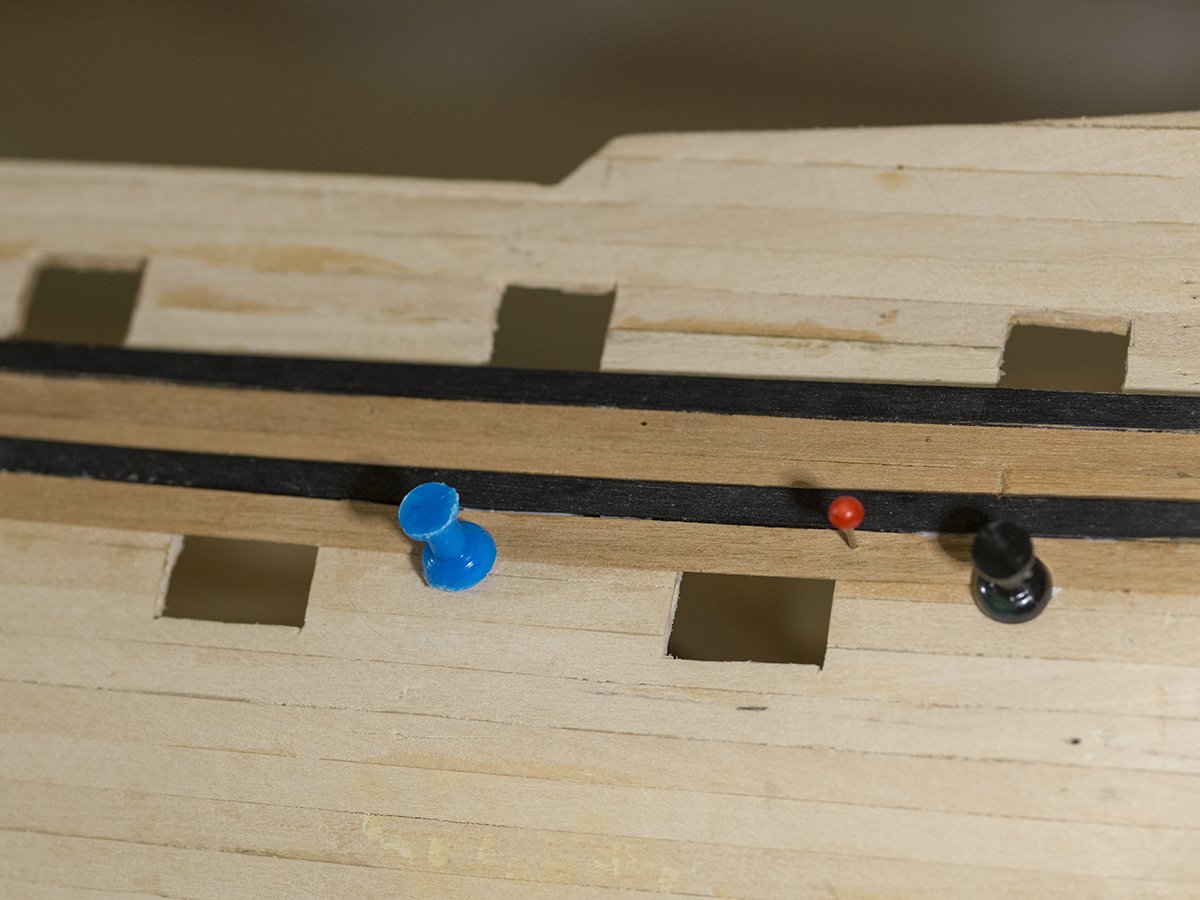
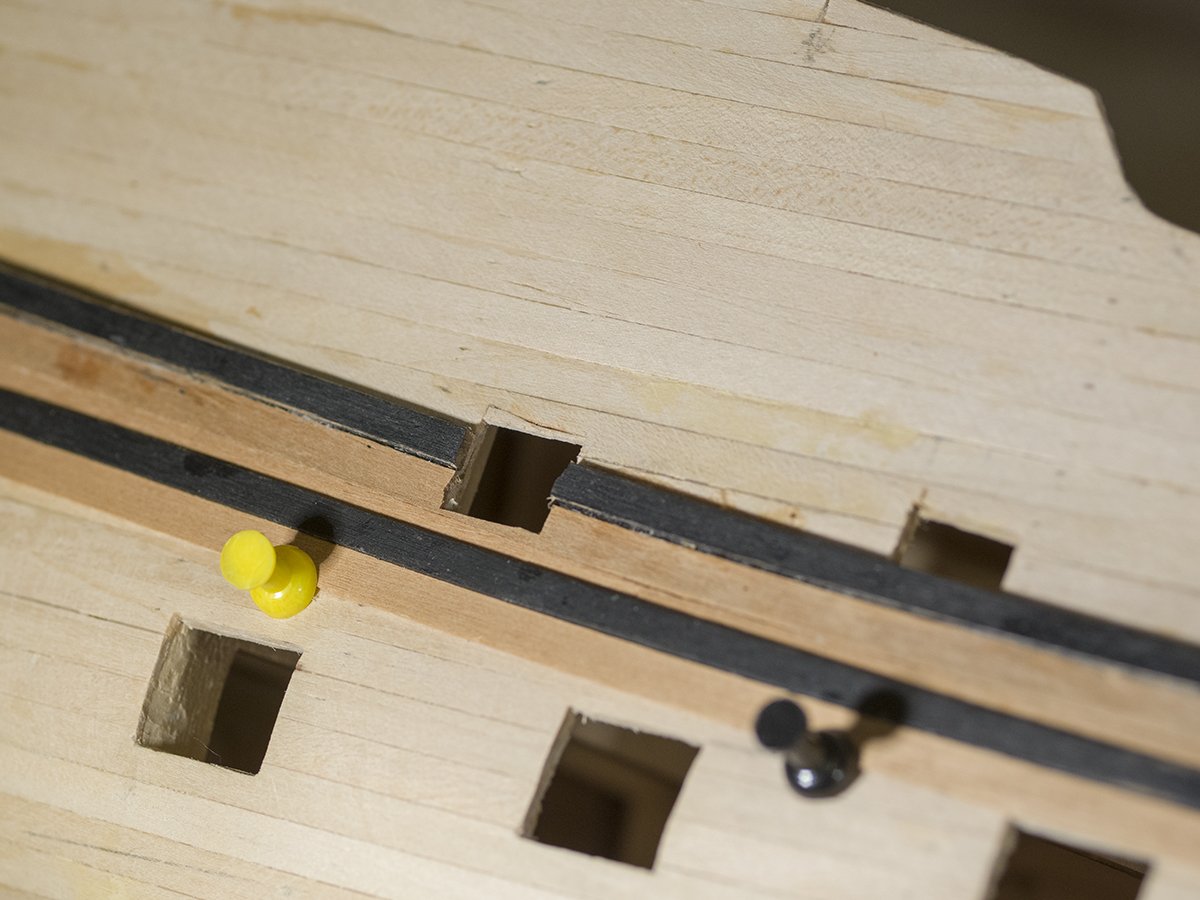
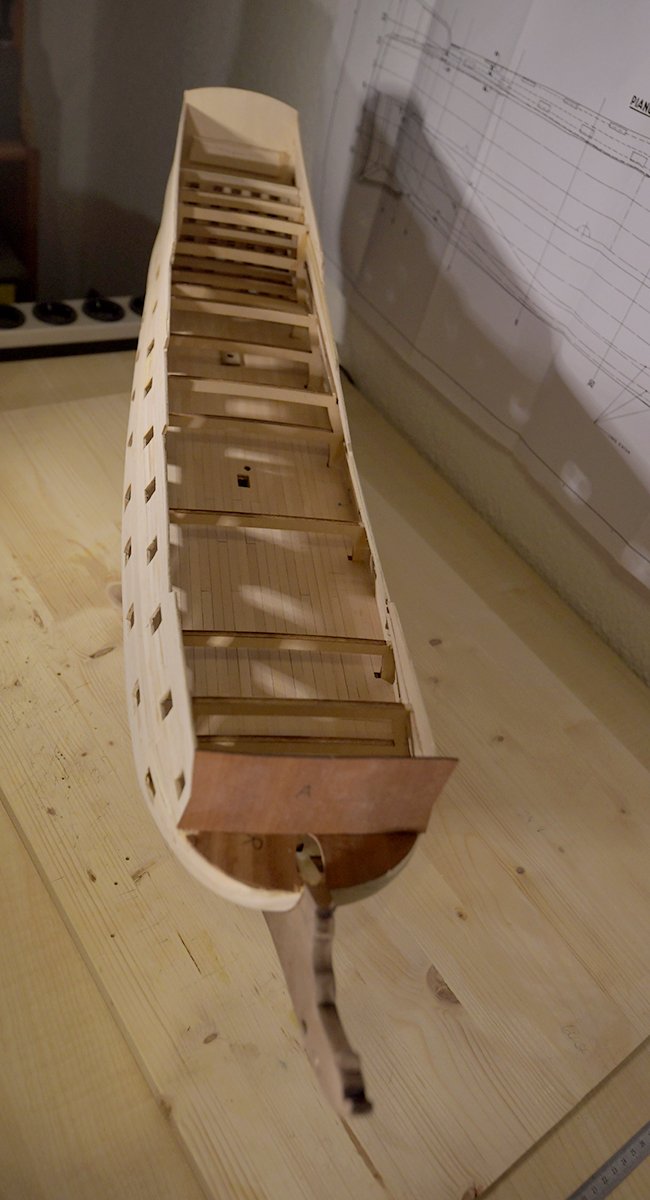
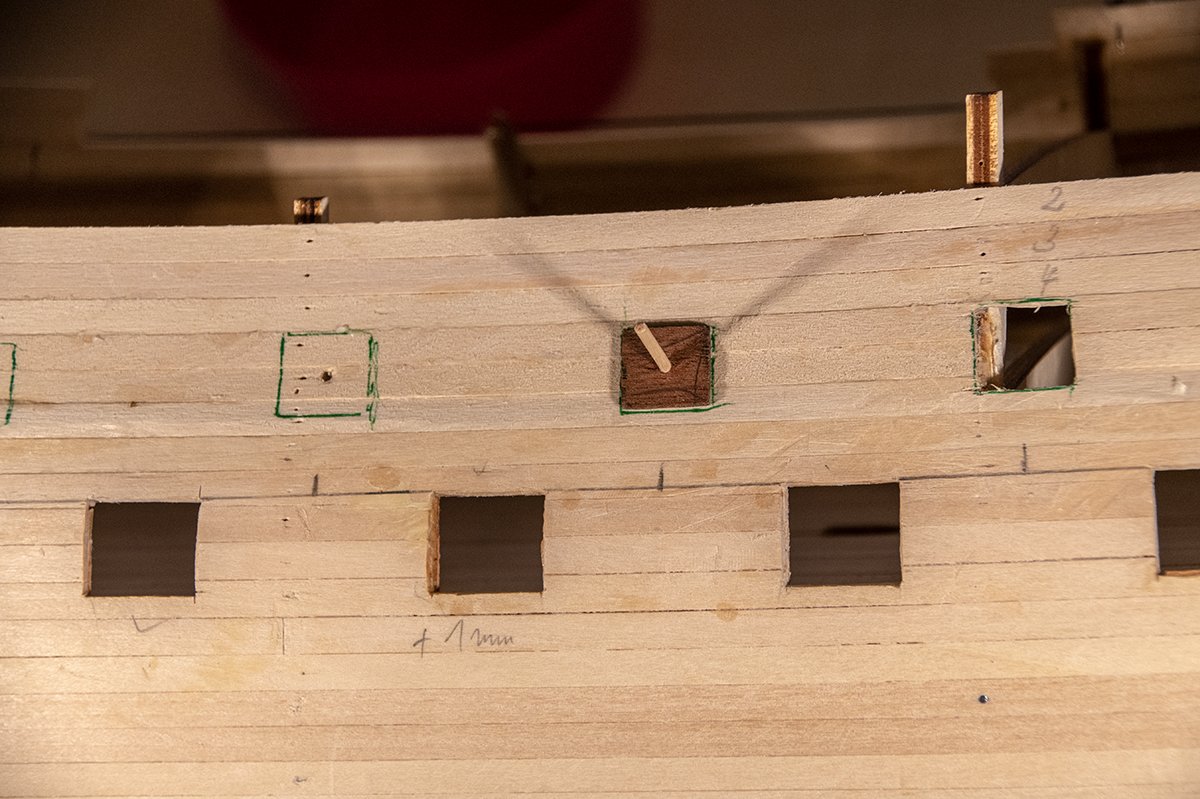
Hello my friends and fellow mates, again a little update. I started with the second planking. First I had to decide if the whales will be fixed upon the first or the second planking. I decided to fix them upon thre first planking. As piratepete says, the whales were historically mounted before the ships were planked. So the alignment of the planks oriented to the whales. It's a little bit difficult to get the right curvature and amount of bending - but it works. I stained the whales black, that gives a great look. The big challenge of the whales still is to come when the wider whales (8mm/2mm) have to be bent. Actually I wanted to frame the gunports before second planking - but this would not work. You cannot fix separated parts of the whales - this would never work. And for the needed curvature of the planks it would also never give a satisfying structure. So I will cut off the planks and whales after the work is done and afterwards I will fix the frames for the gunports. Next I will go on with the whales and the finish the second planking below the whales. Pretty nice work, I estimate some weeks, as I will have to sand the strips for a perfect surface, taper strip for strip, and then glue them and let the glue dry. But as you all know (and I think - love) building a period ship is like some kind of organic grwoing. And this will need its time. As always - some pics show the start of the second planking (with some minor damages at the bow that will be repaired later) Cheerio Max


-
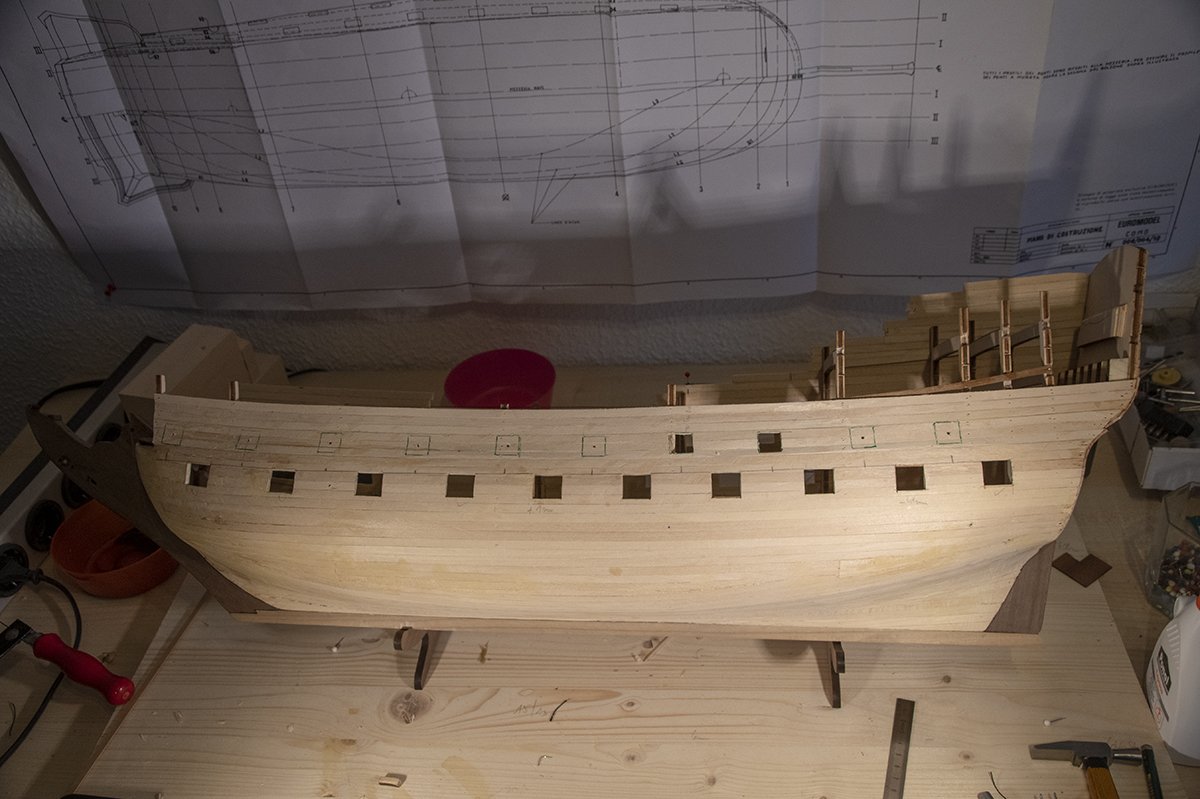
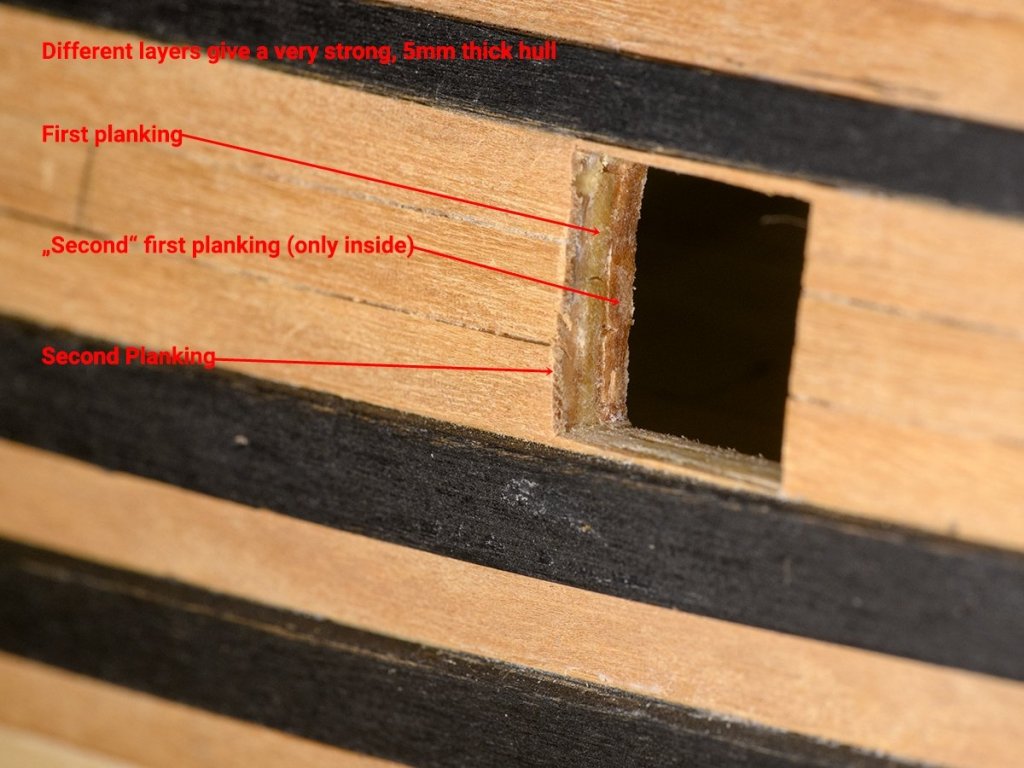
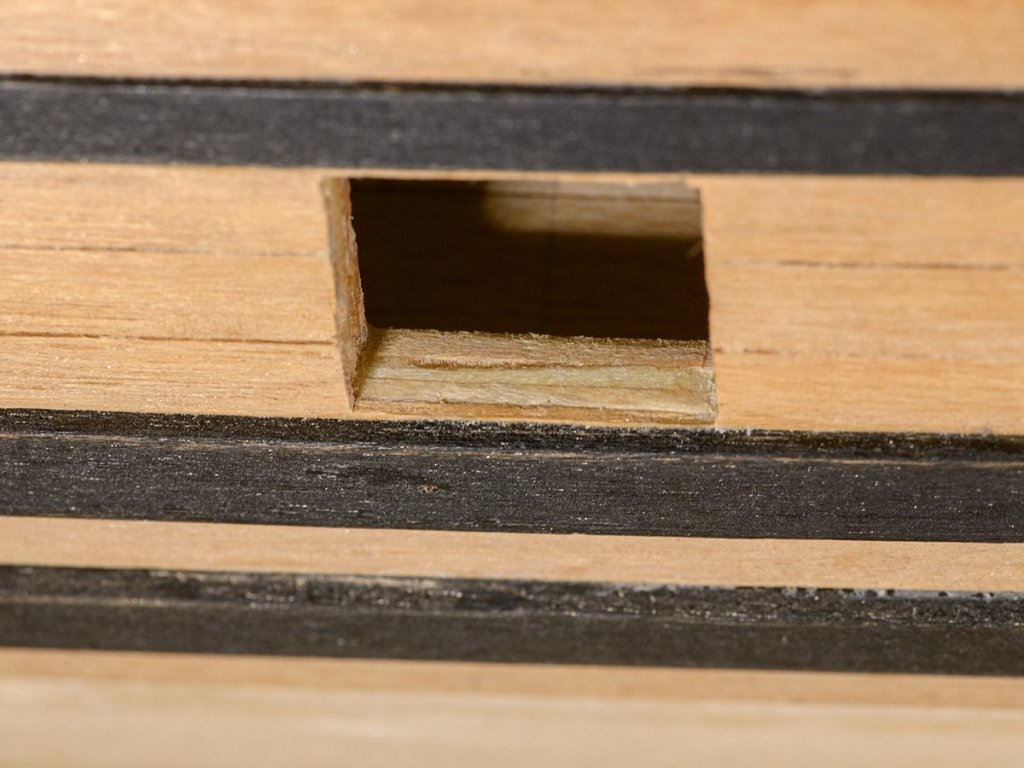
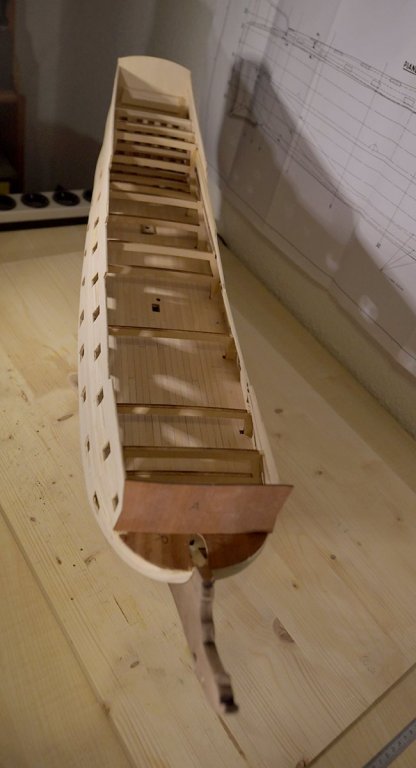
Hello my friends time for a little update. I was quite busy the past weeks for business stuff as in the company some major changes will have to be done in the next months... new boss, new littles bosses etc So I had not enough time for my hobbies. But now it's going on again. I finished the first planking of the FW completely - inside with some spare wood as you won't see it after the second planking. But I think this additional effort gives some more stability to the whole construction. Sanding, filling, sanding - as usual. The next step will be to make the frames for the gunports and then I will start the second planking. We will see - springtime is here in Germany, weather conditions are good, a garden and the Admiral are waiting... so perhaps the second planking will take some time All is good so far, I do net regret the build for a single second as it is just fun even when there are challenges - as to create the correct shape of the hull. But the plans are so amazing and show every detail - as small as it might be - but you have to study the plan very carefully. If you do it feels like a flashback into the 17th century on a big shipyard. You can almost hear the tools of the craftsmen, you can smell tar and the salty breeze from the ocean... Some pics as usual - Cheerio Max


-
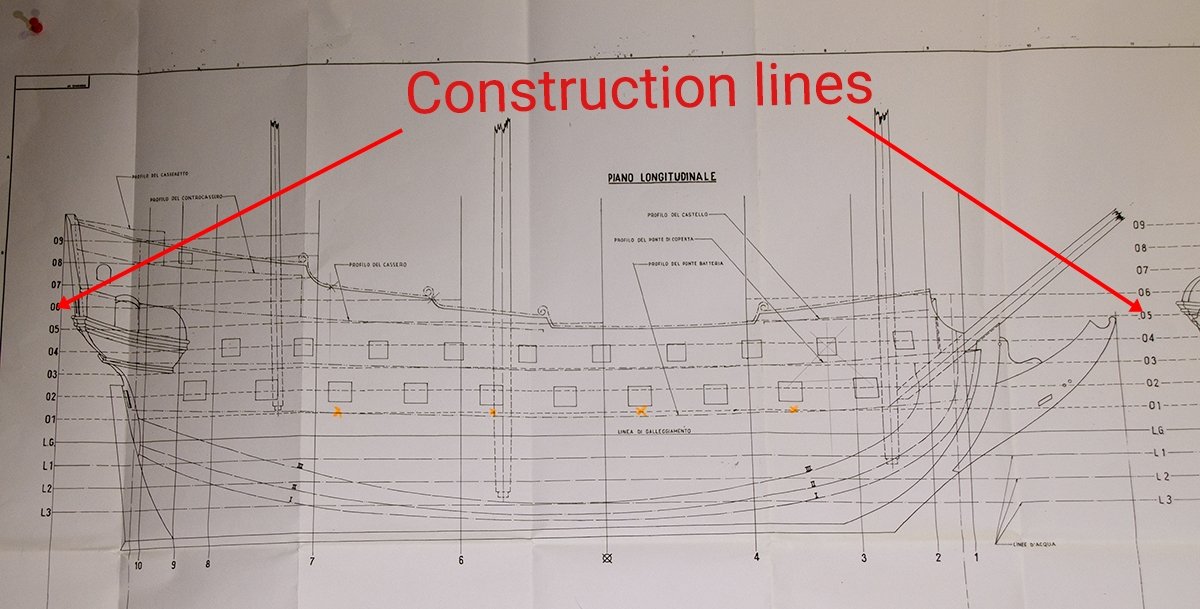
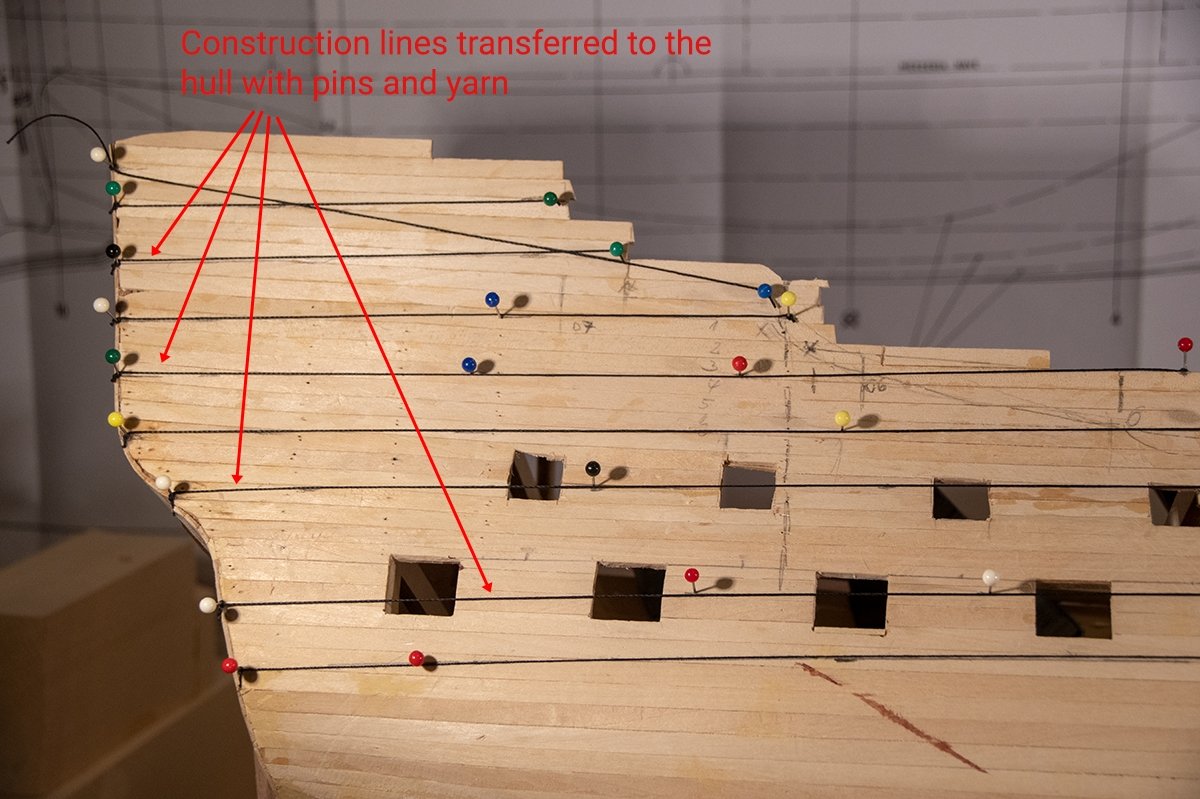
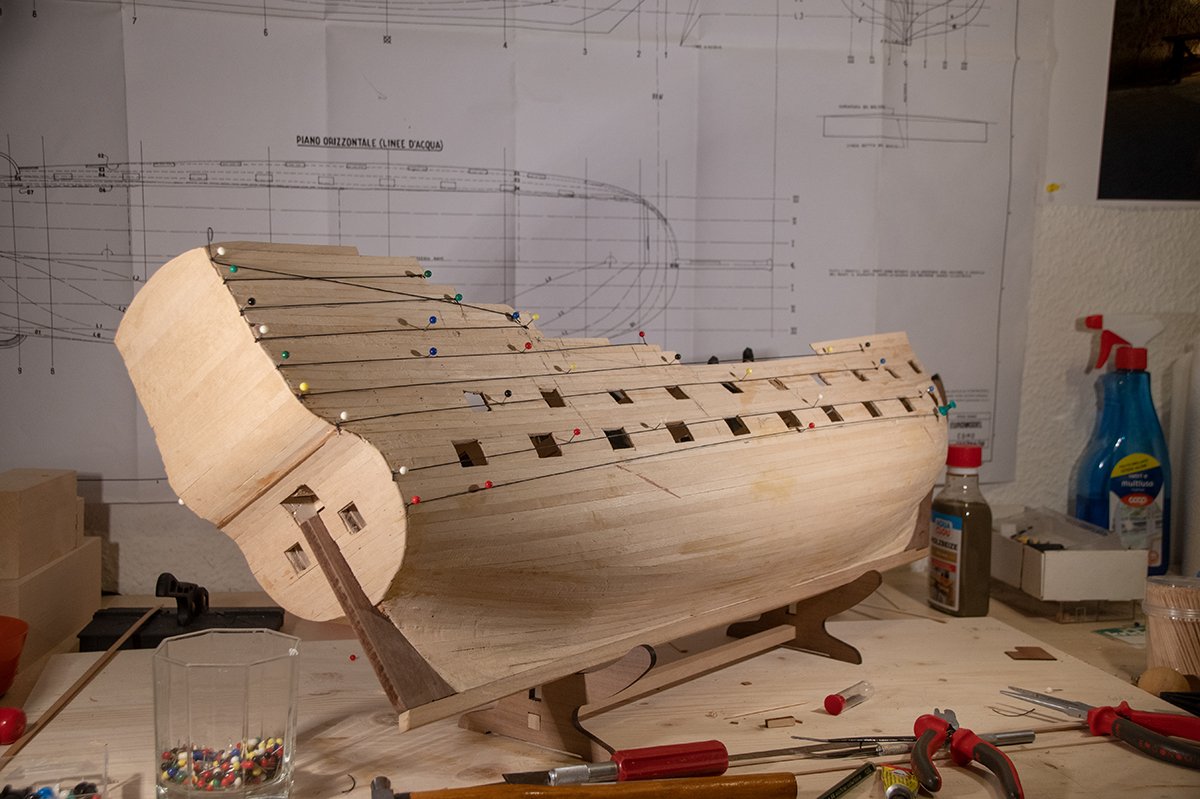
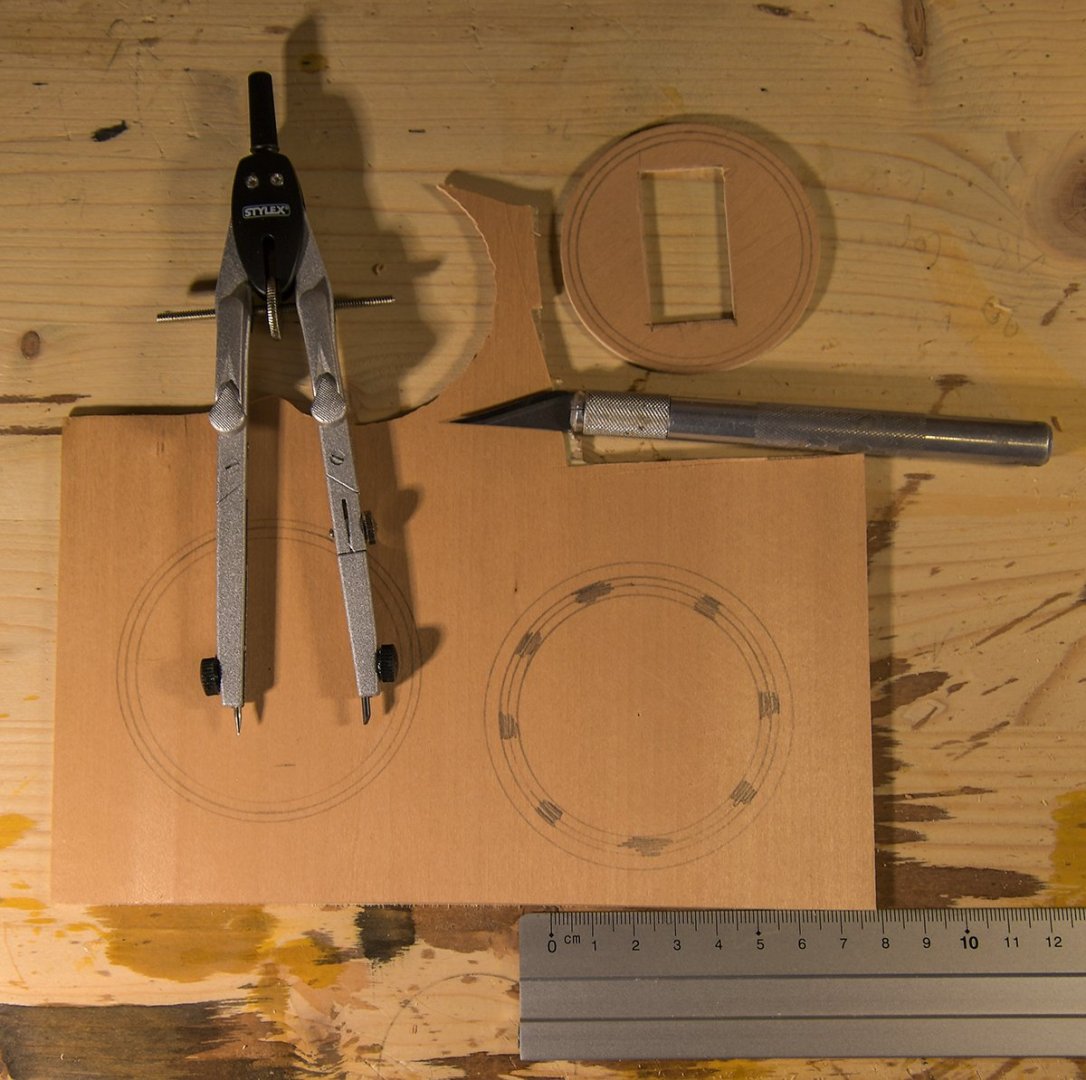
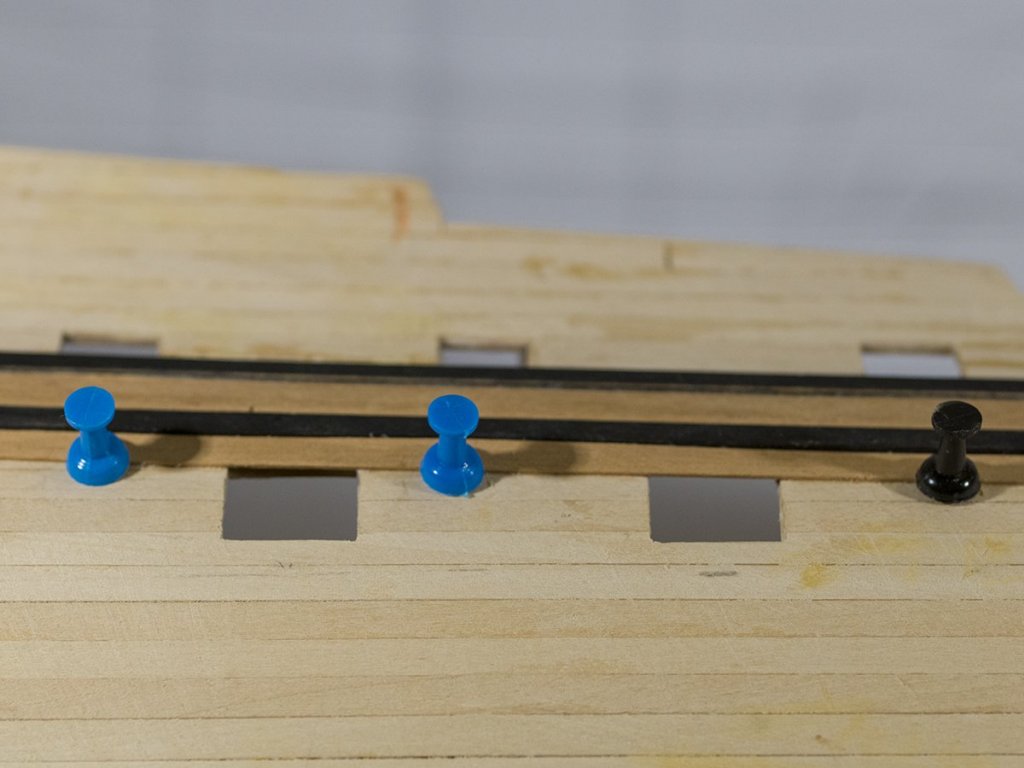
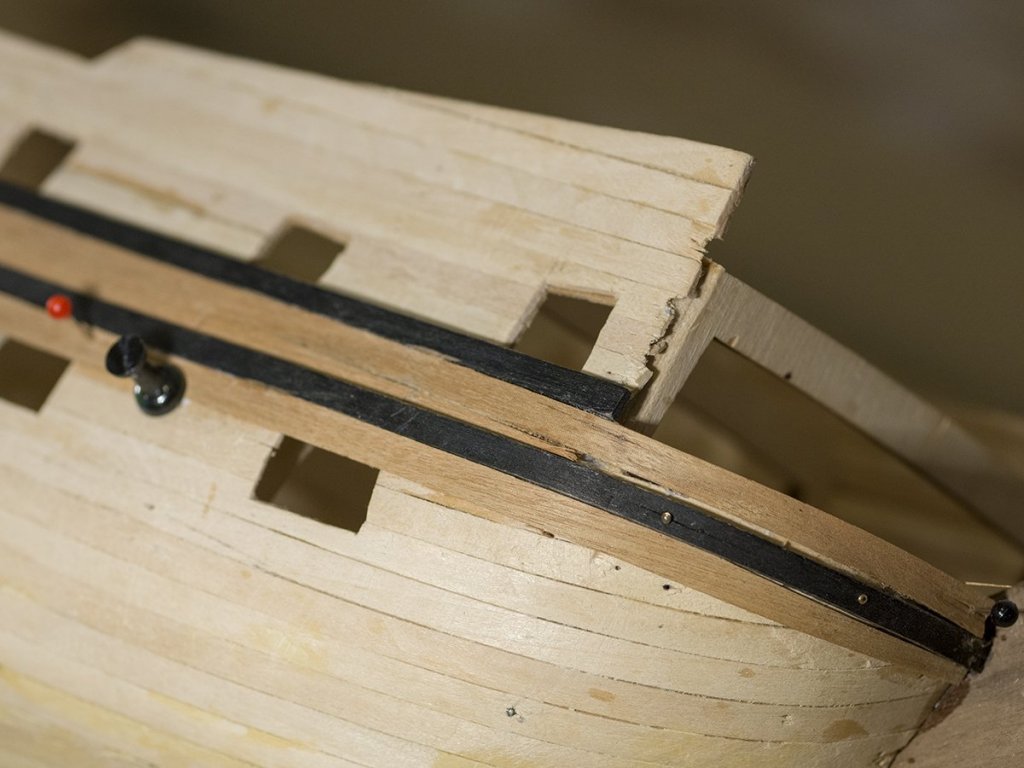
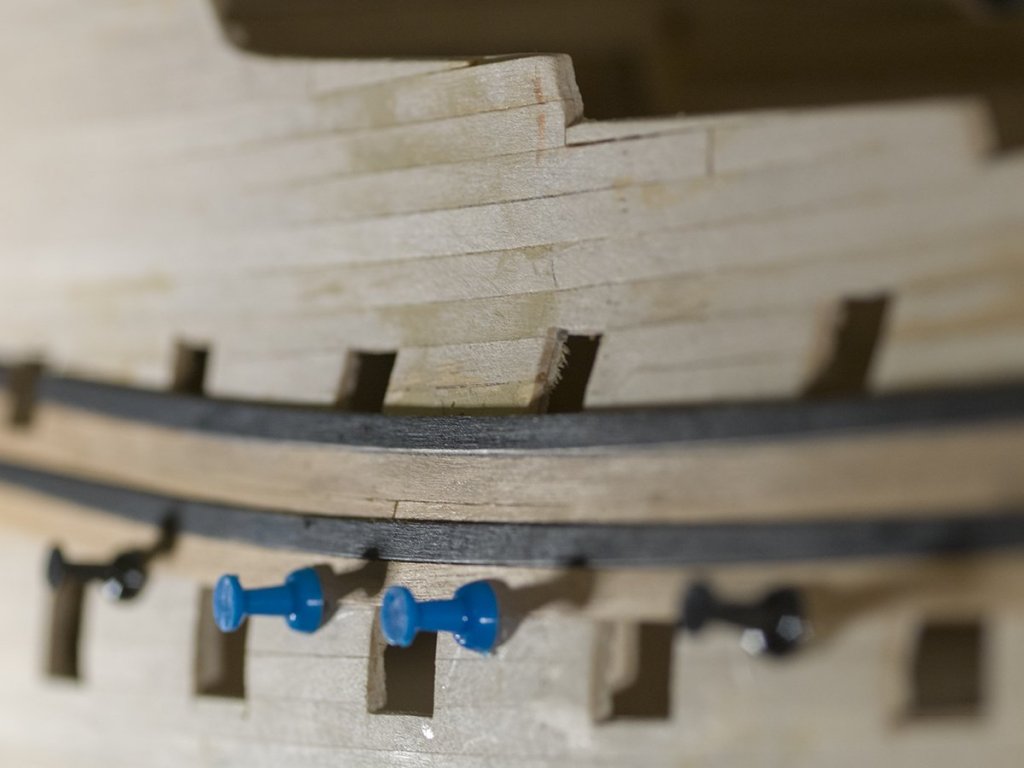
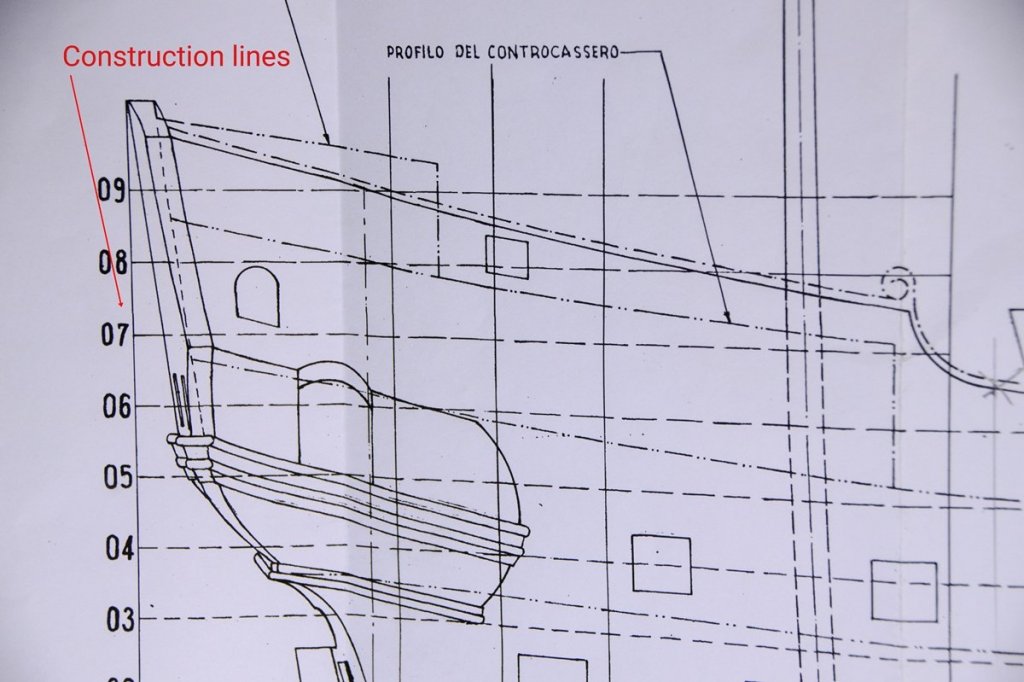
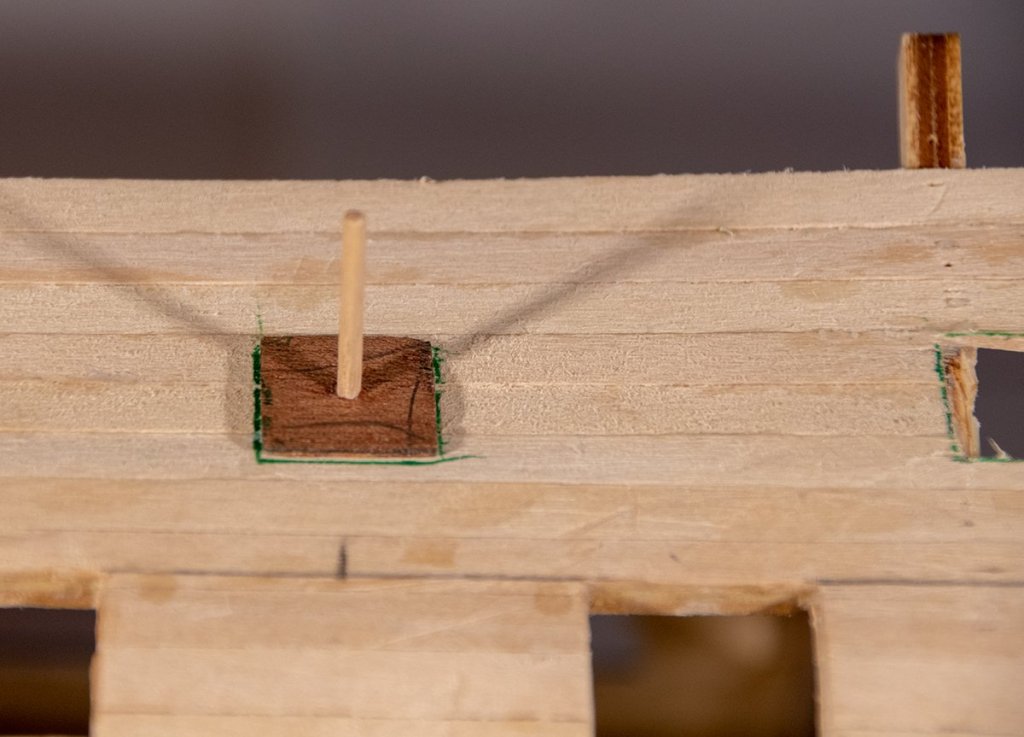
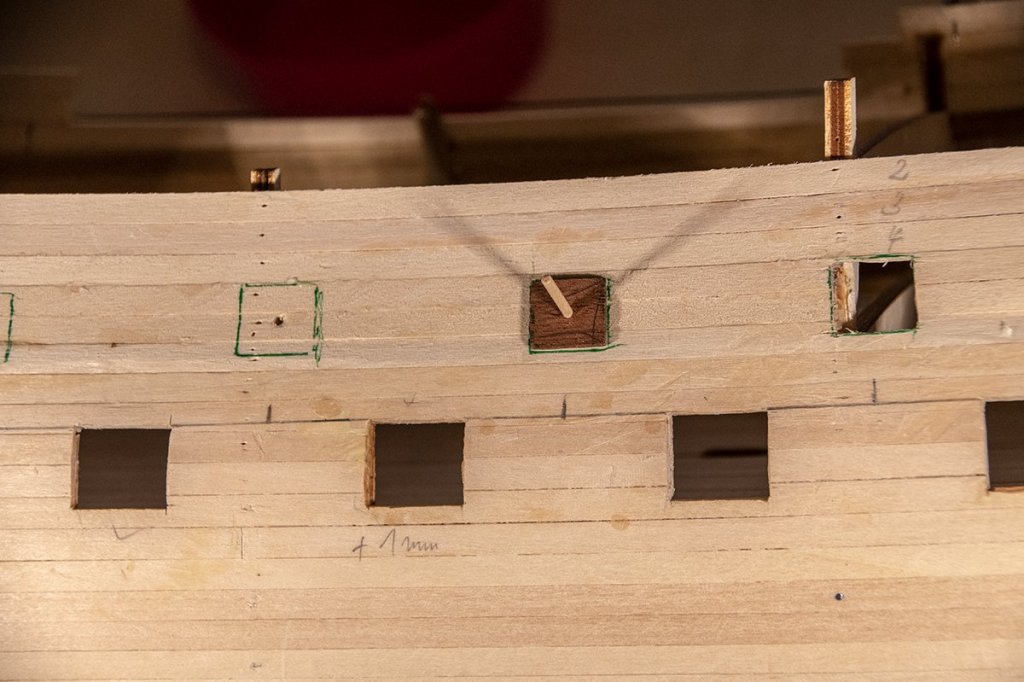
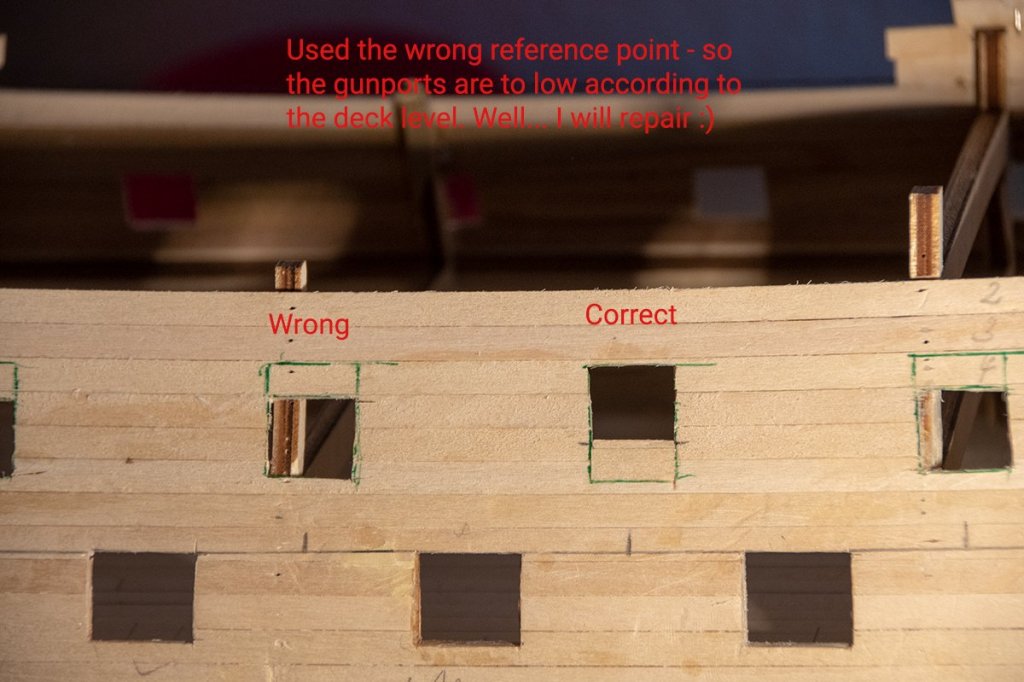
Hello again time for a little update. Still working on the first planking of the portside. Everything goes good - it's just me who fails So I cut off the gunports according to a false reference point. That means... do it again But thats not a problem just a loss of time- but I goit time enough, so nothing really happened. I try to upload some pice buit I had problems before. Hope it will work now. Cheerio Max PS Upload worked... So you can see the construction lines on the plan and my way to transfer them to the hull. I used pins and yarn. According to the lines I can determine the correct position of the shape.


-
Thank you Pete... Indeed I am a very enthusiastic photographer too - so I love to take pictures and to show them. This model demands to be accurate for a good result... and to be - as you said - meticulous for a very good result. My goal is a very good result Without your interpretive files it would not be possible to reach this level. Best wishes Max