HOLIDAY DONATION DRIVE - SUPPORT MSW - DO YOUR PART TO KEEP THIS GREAT FORUM GOING! (Only 20 donations so far - C'mon guys!)
×


maggsl_01
-
Posts
767 -
Joined
-
Last visited
Content Type
Profiles
Forums
Gallery
Events
Everything posted by maggsl_01
-
 Thank you so much Simon. I feel that my skill grows with this model, my patience and the ability to avoid mistakes or to recognize difficult challenges before they turn to become a problem. And most of all - the plans urge you to be cautious and keep attention to every step you make - much more as plans of other producers. The lack of detailled instructions force you to think and to do some investigations - internet, Pete's interpretive files, MSW, pictures, historic sources. That's - for me - what makes this special kits so unique. There are many tripping hazards to pass but every hour with this kit is not lost time but time that I win. And I am still at the beginning - not even the first planking is completed Looking forward what will come the next years. Cheerio m.
 -
Hi katsumoto... I am not sad... its was meant in an ironic way. everything is just great 😁😁
-
😁😁 hi Y.T. ... its was meant in an ironic way.
-
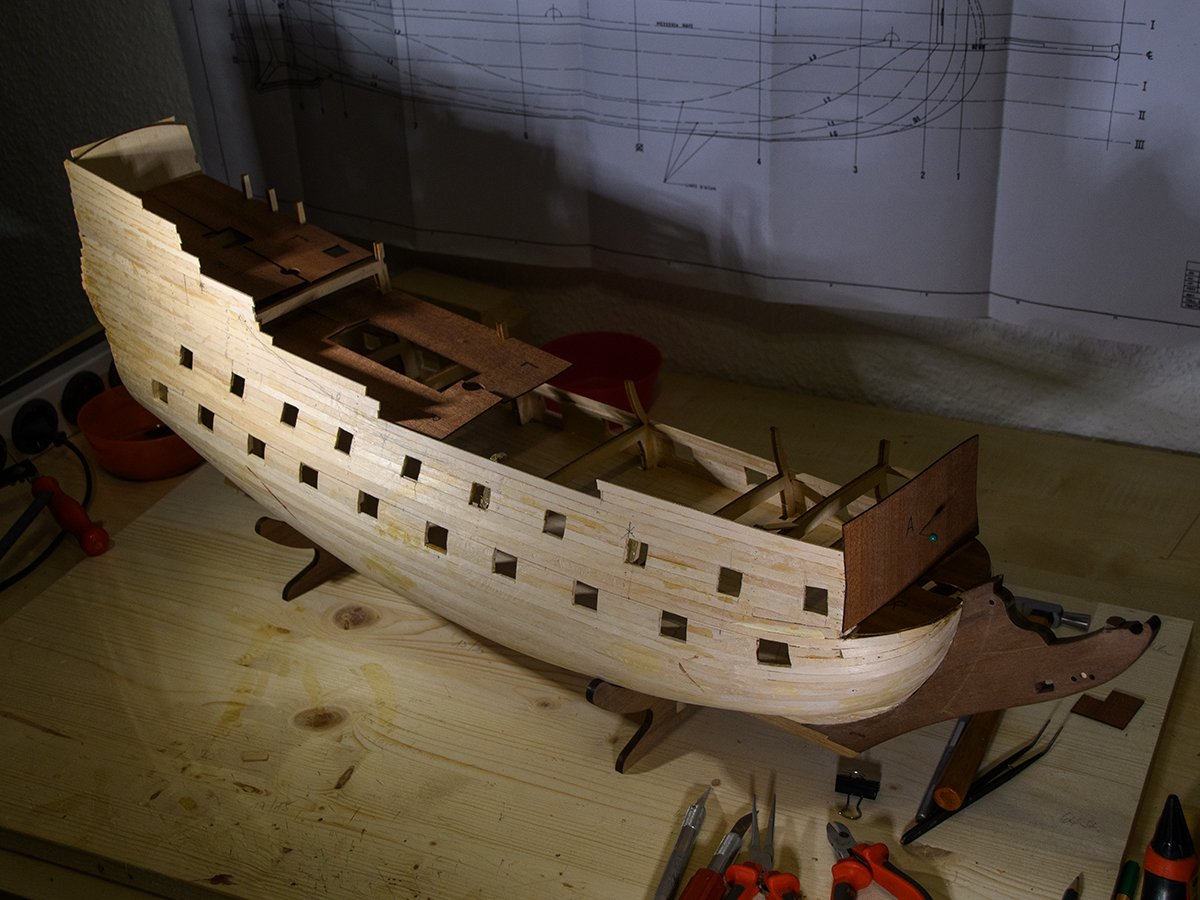
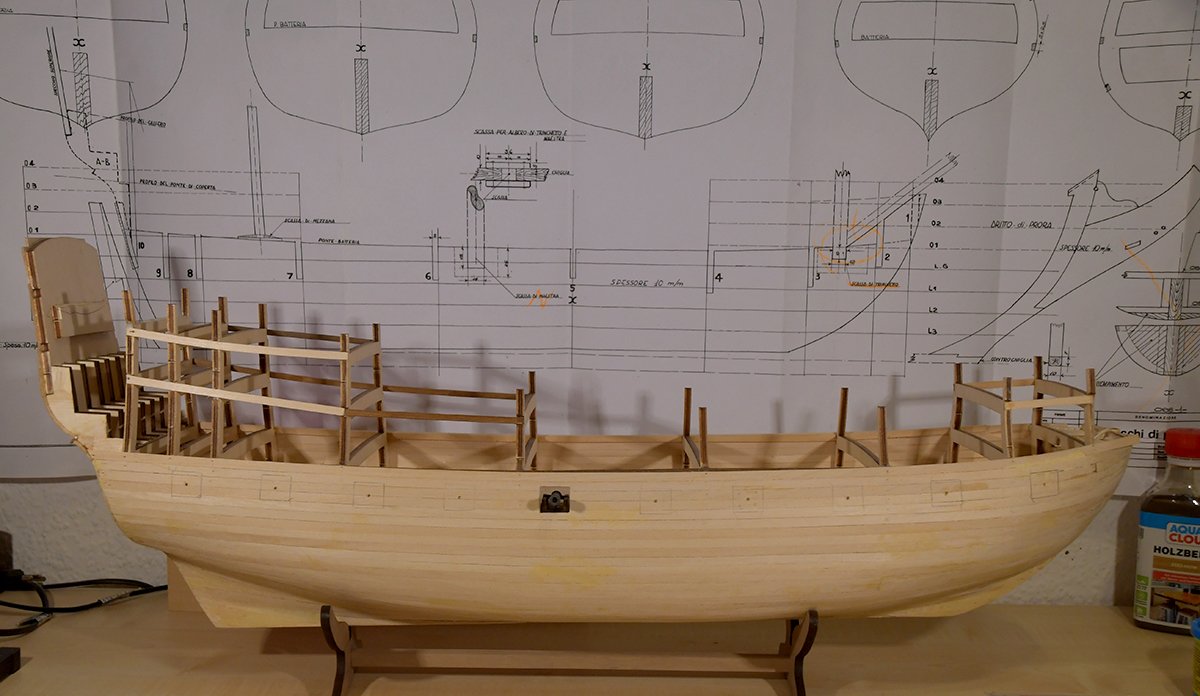
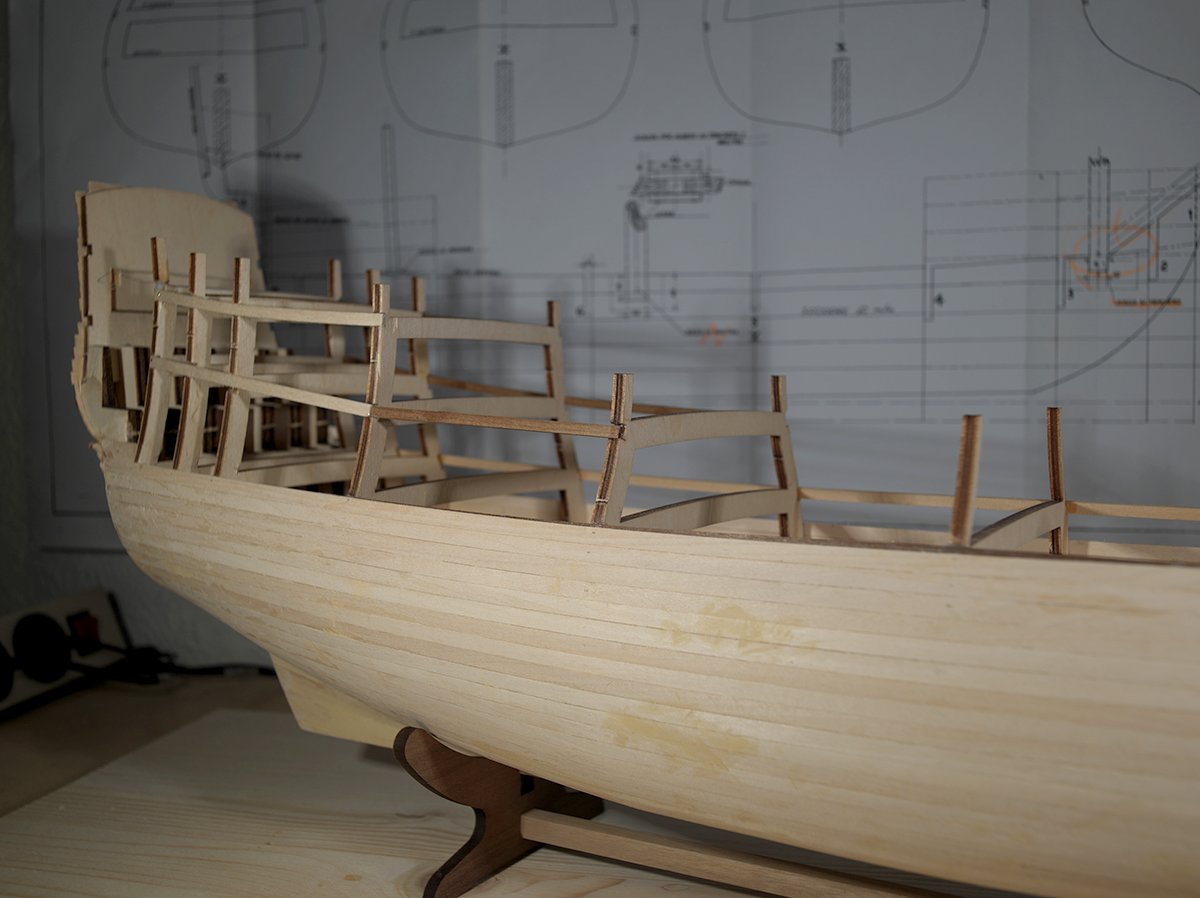
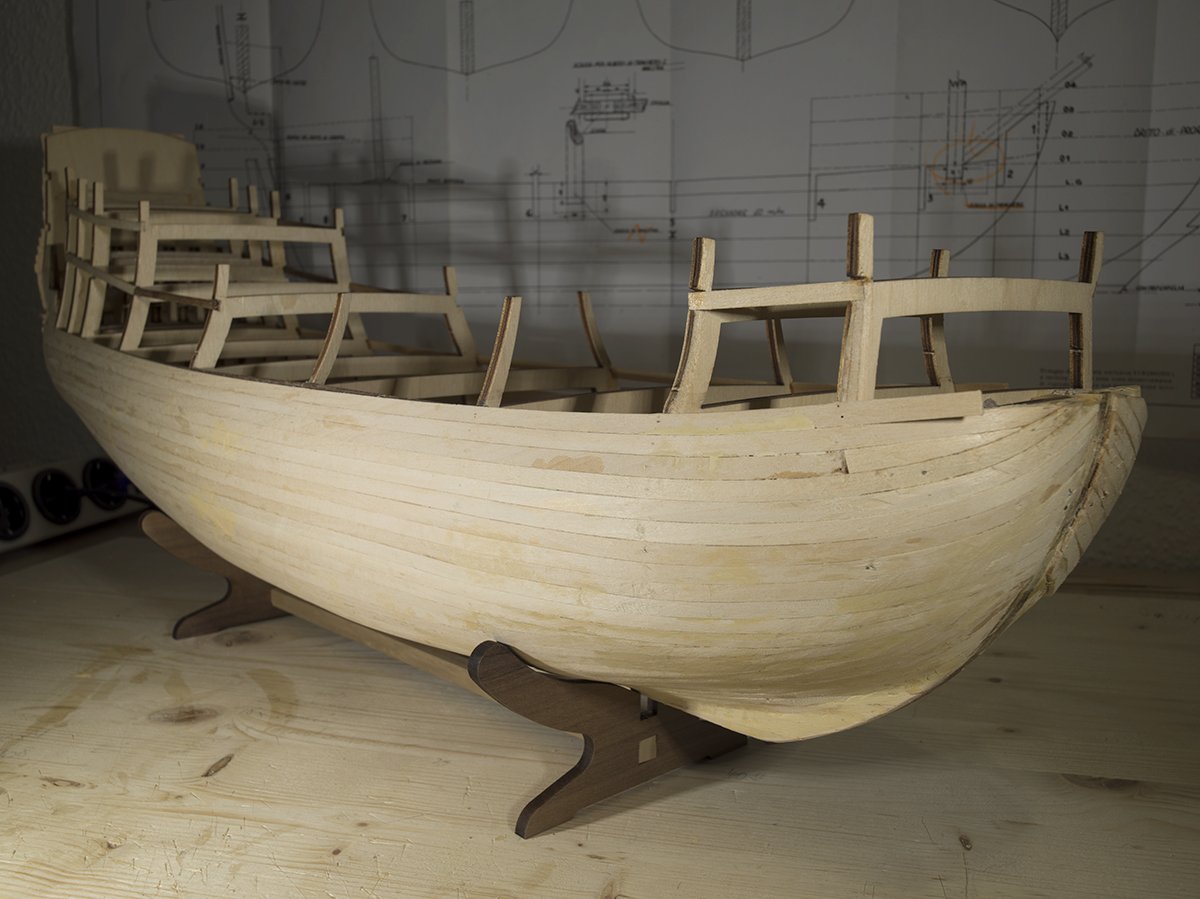
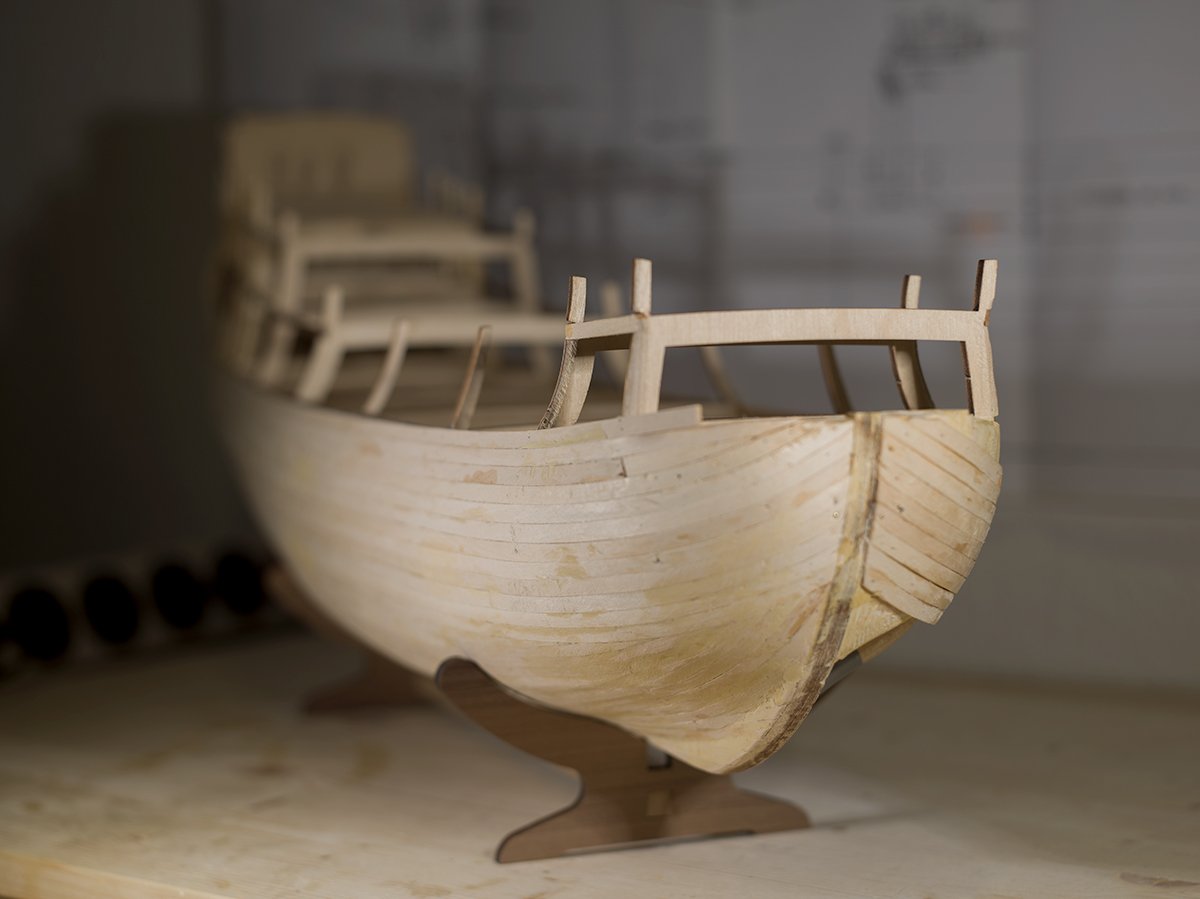
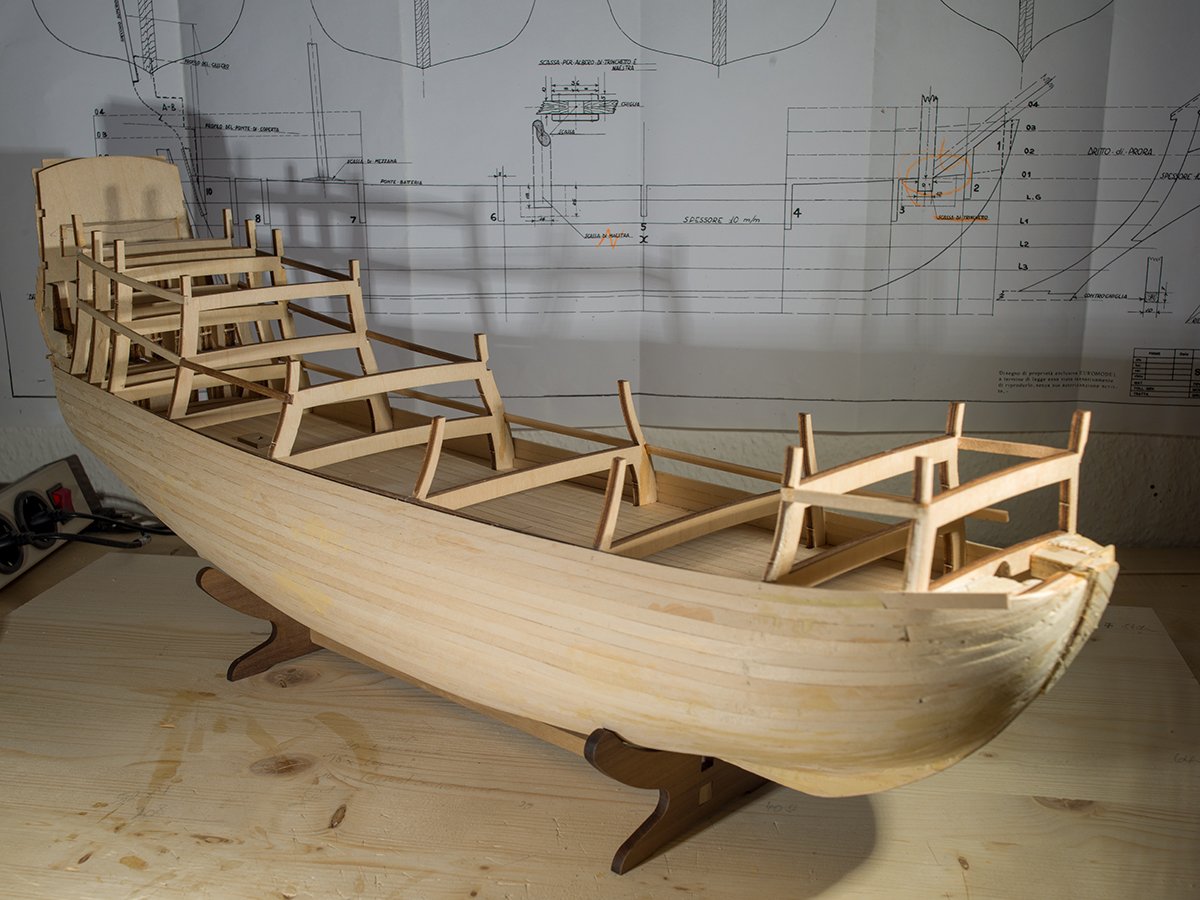
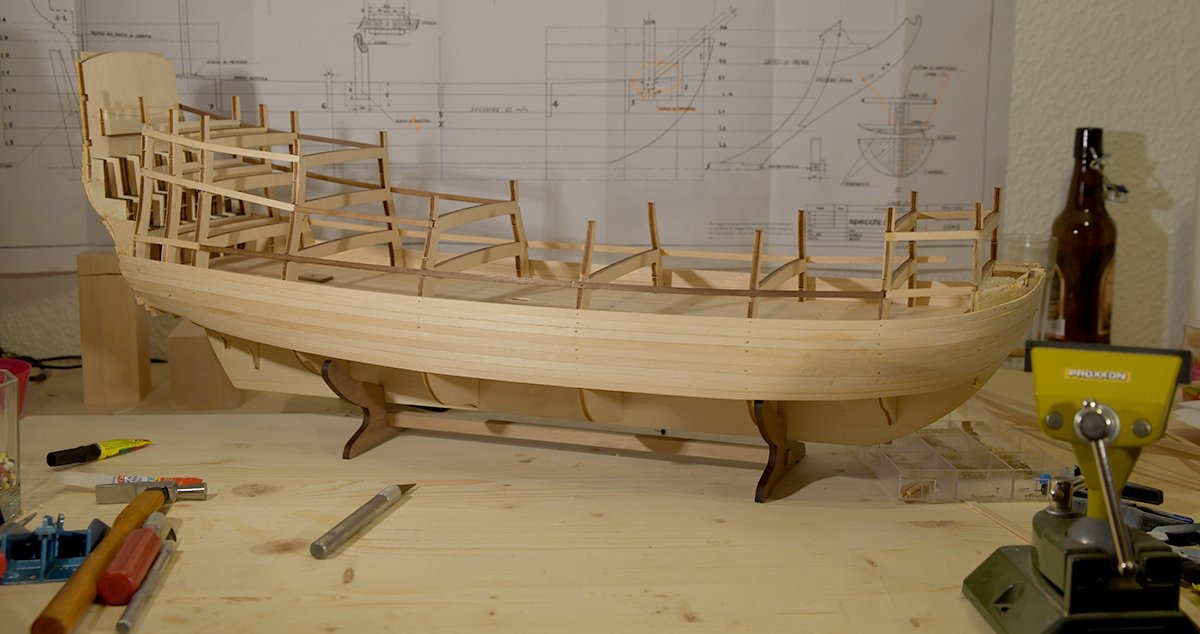
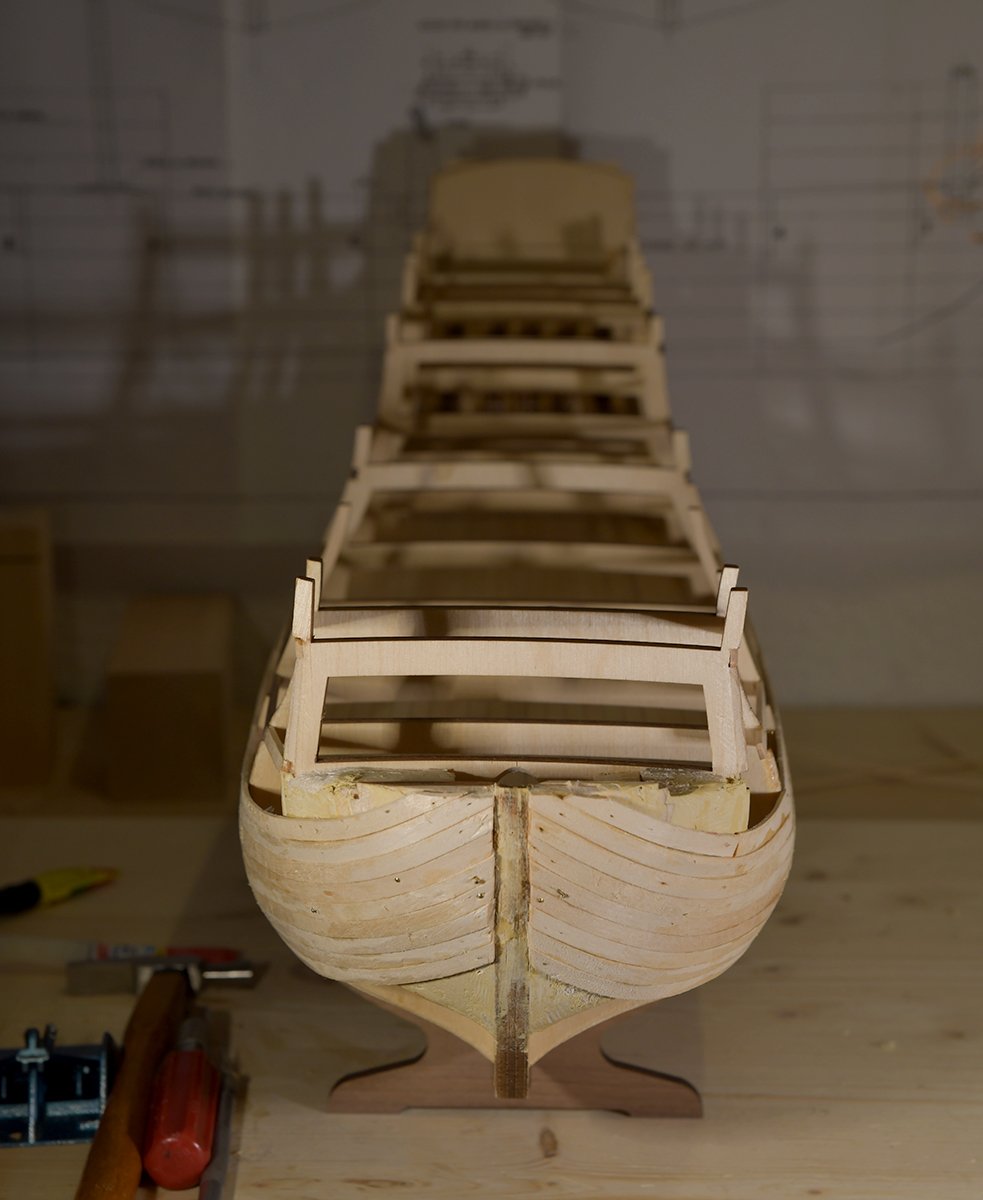
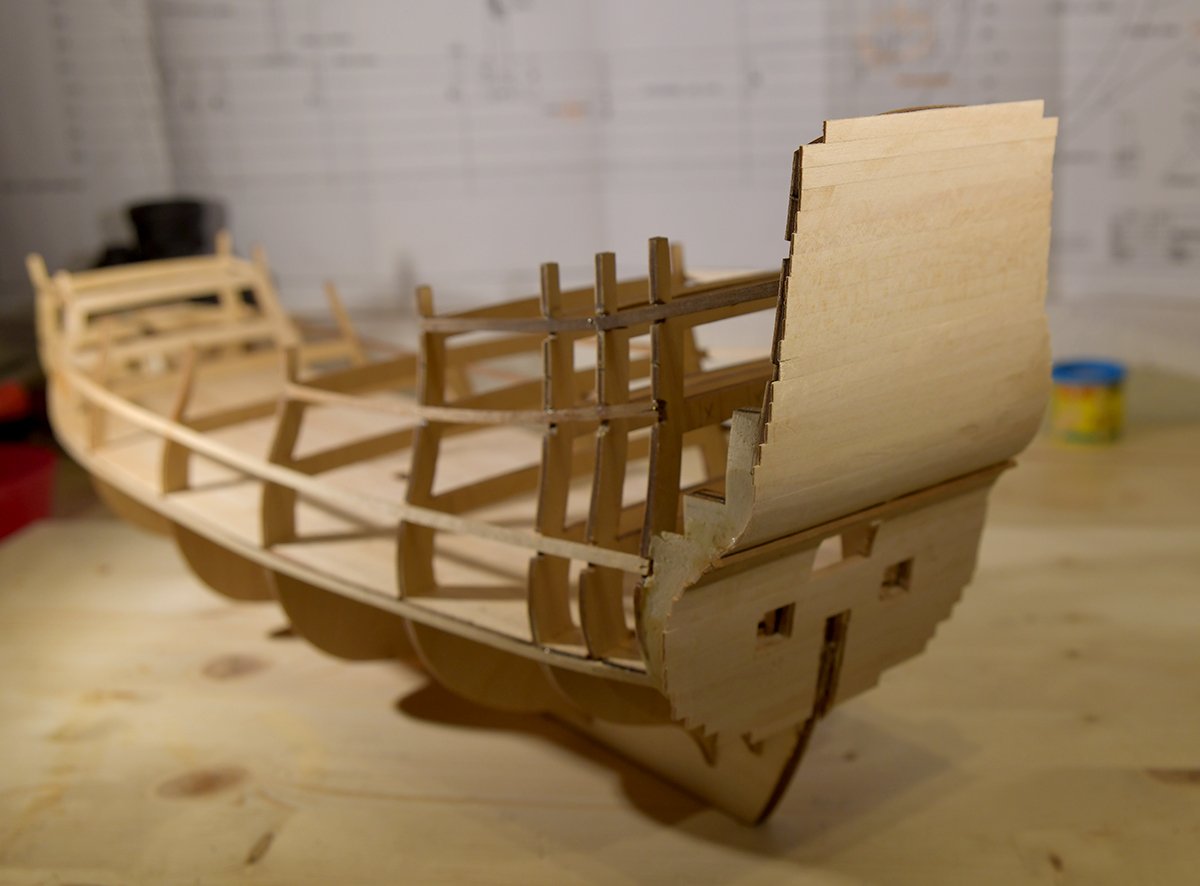
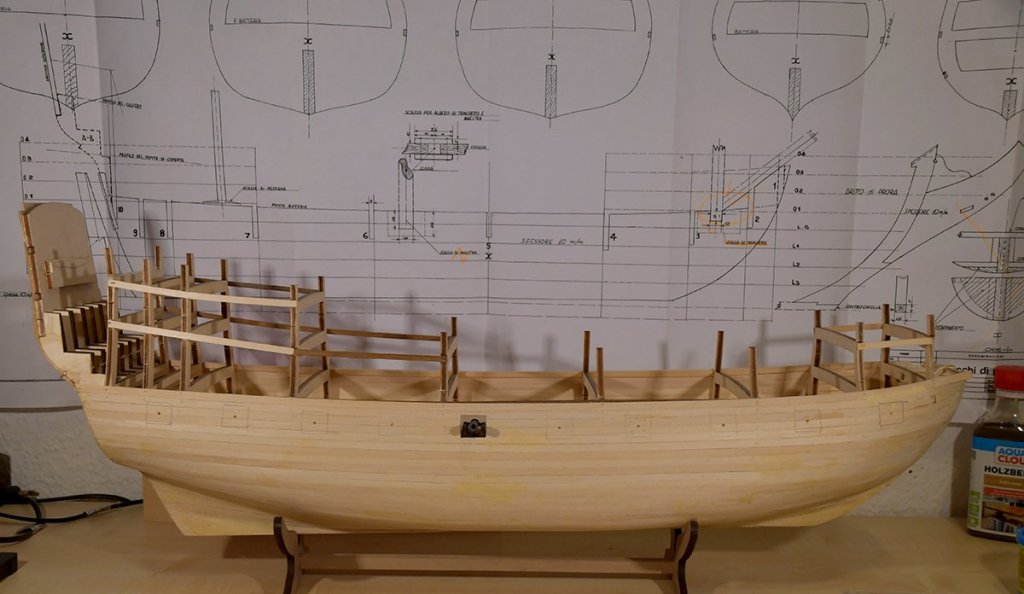
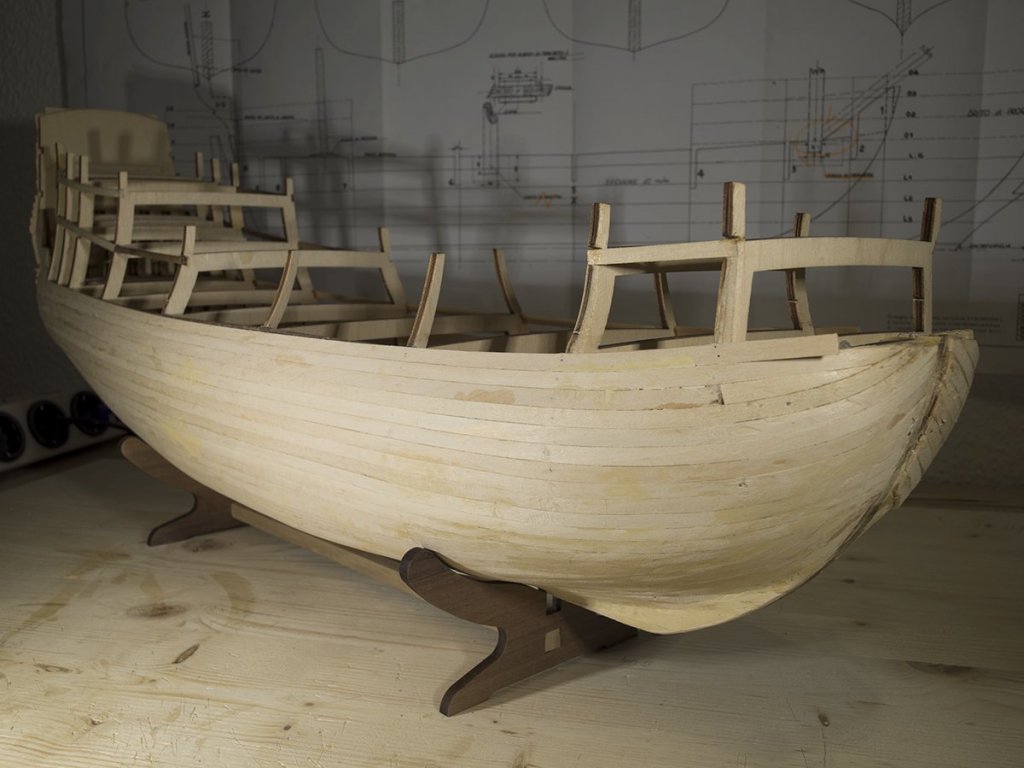
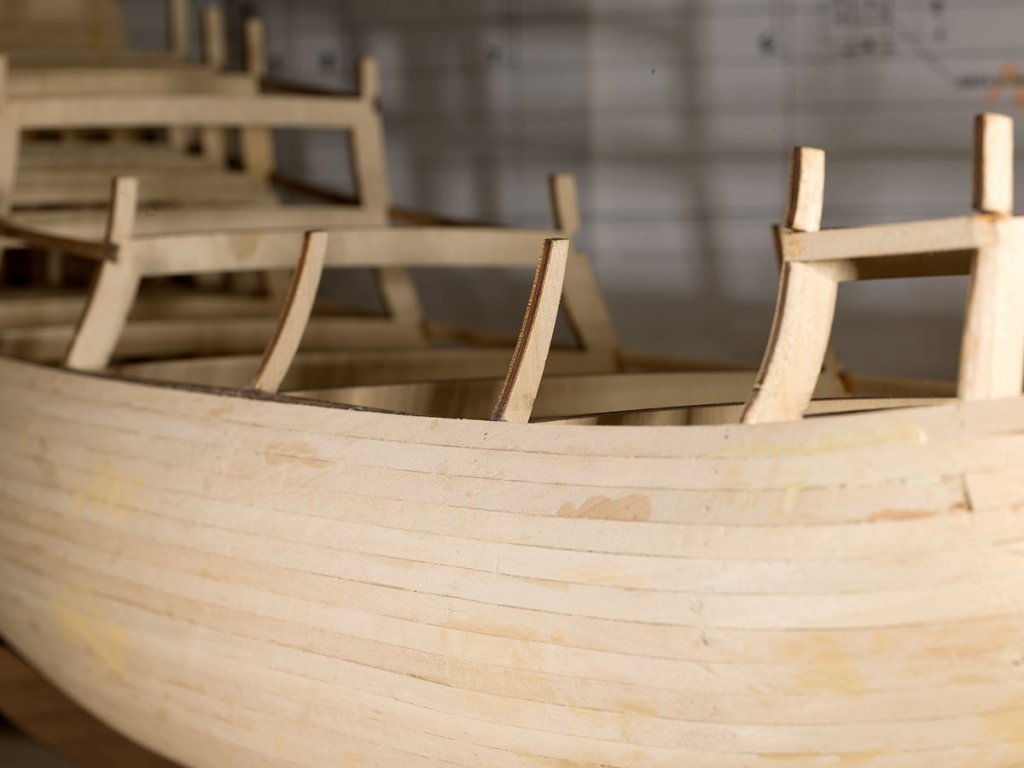
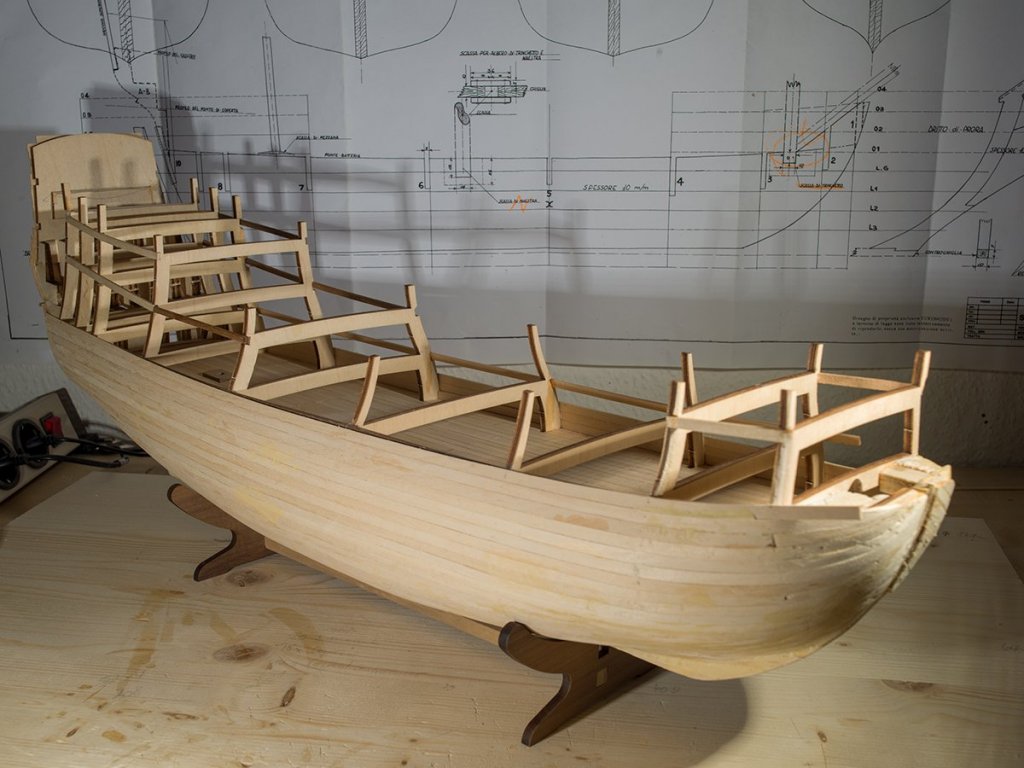
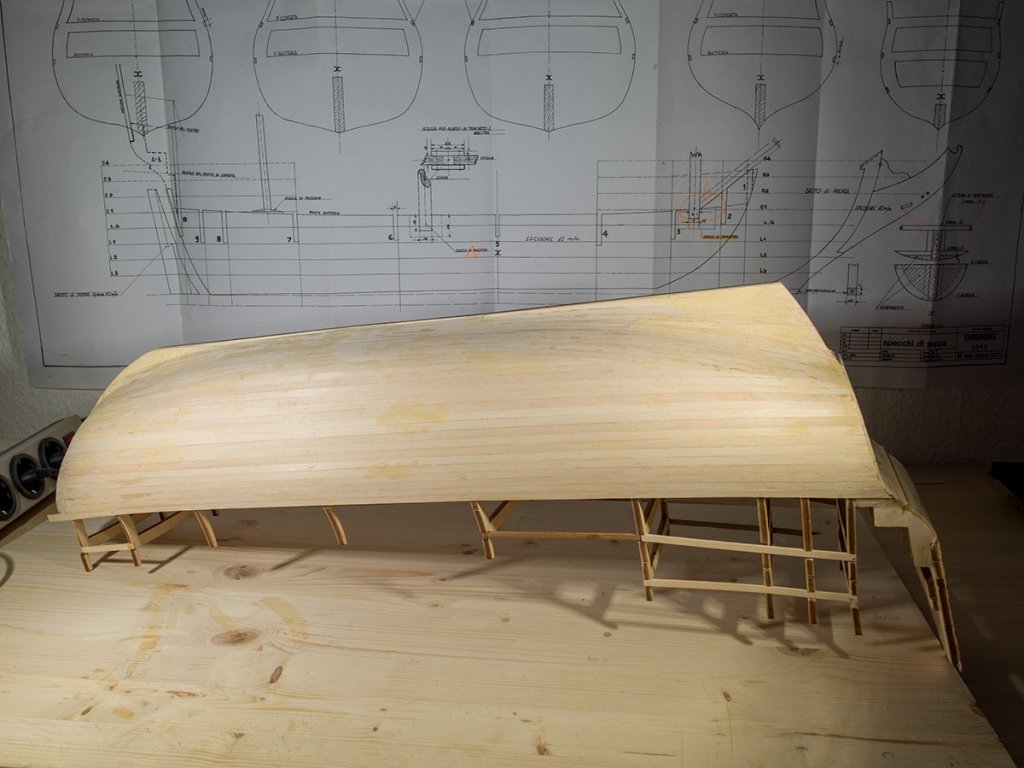
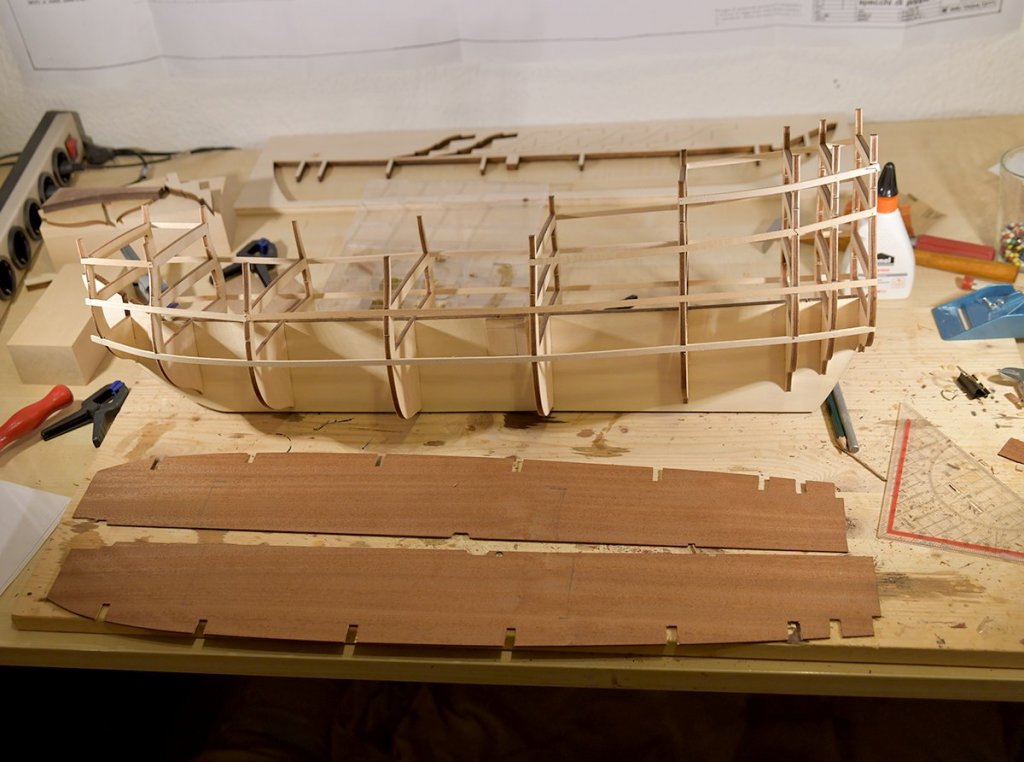
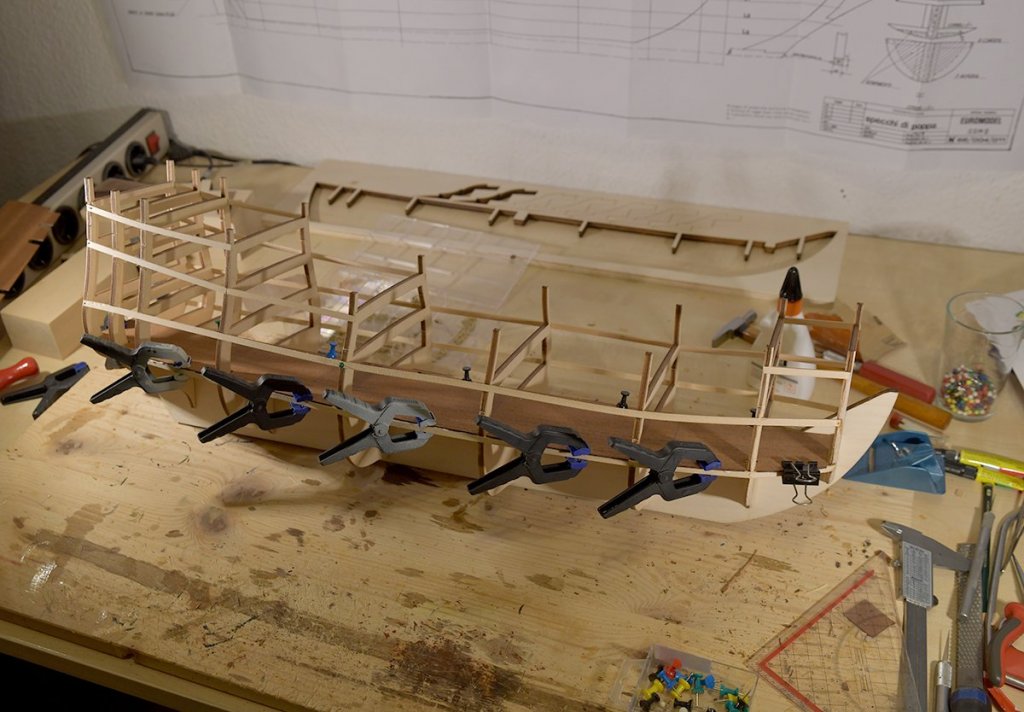
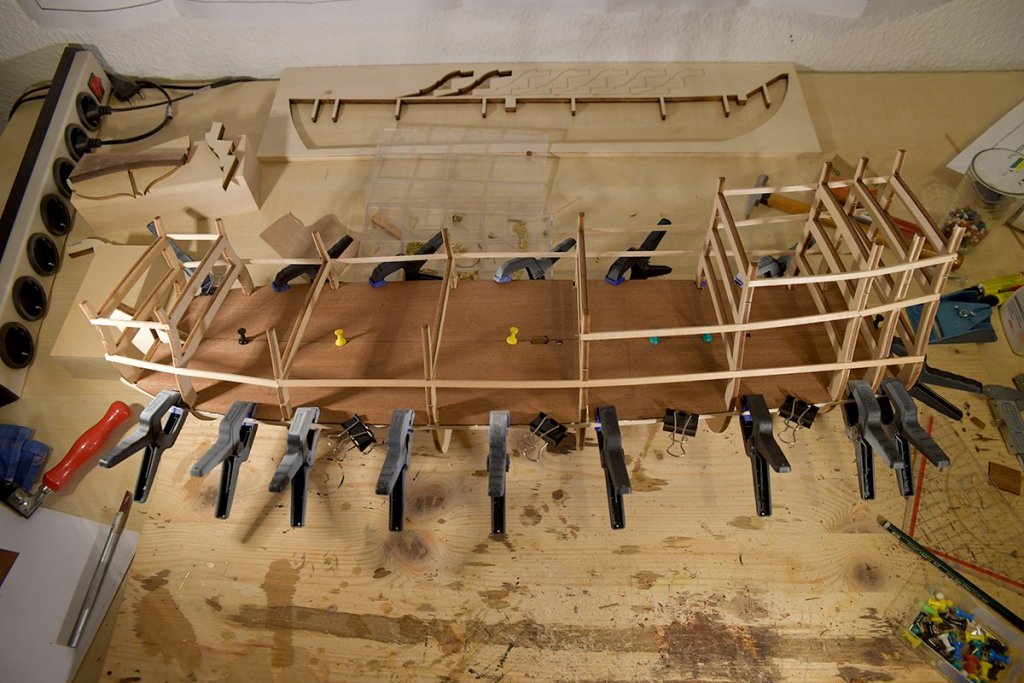
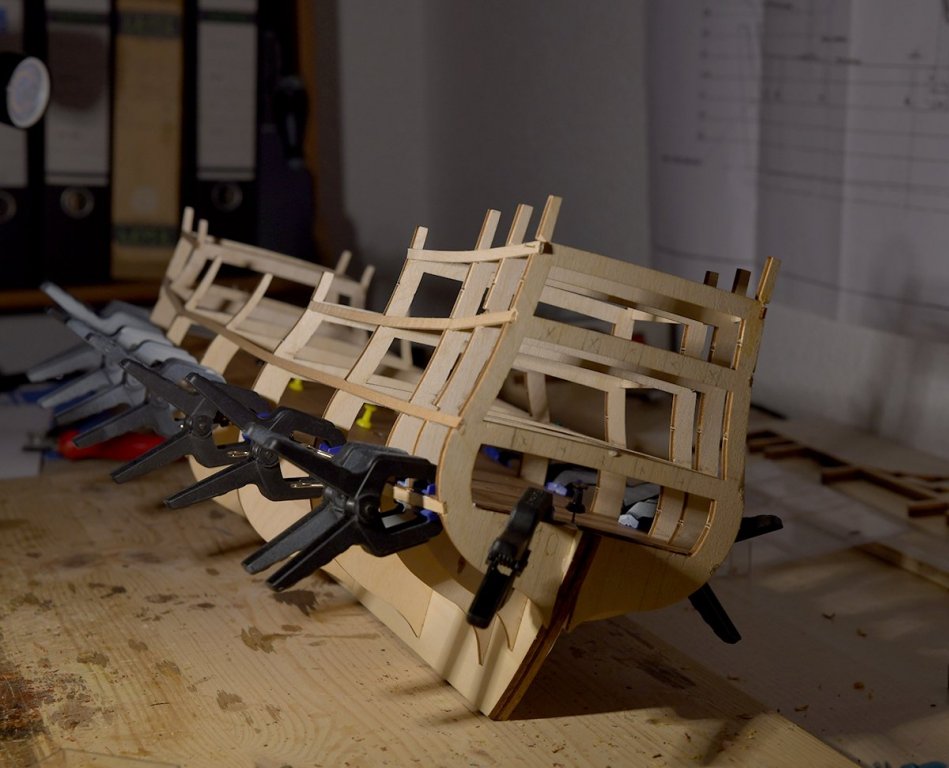
Hi my friendss, it's time for a new update. I am sad to tell you that I have nothing to ask, nothing to critizise - everything goes so well. It's just a wonderful build that has its challenges but no problems so far. The planking goes step by step, all fits and with the usual work on a wooden ship you will get a great model. I strengthened the hull with a second layer. Primary I wanted to do this only along the gunports but I decided to stabilize the whole hull. Next step is to plank the portside too and prepare it with the gunports and further features. Then a little bit sanding and very few filling. Then I will mark the hull with the essential lines according to the plans so I will get a well shaped hull at least. It's amazing to watch the progress. Thank you for your attention - and please don't hesitate to watch the pictures. Cheerio Max


-
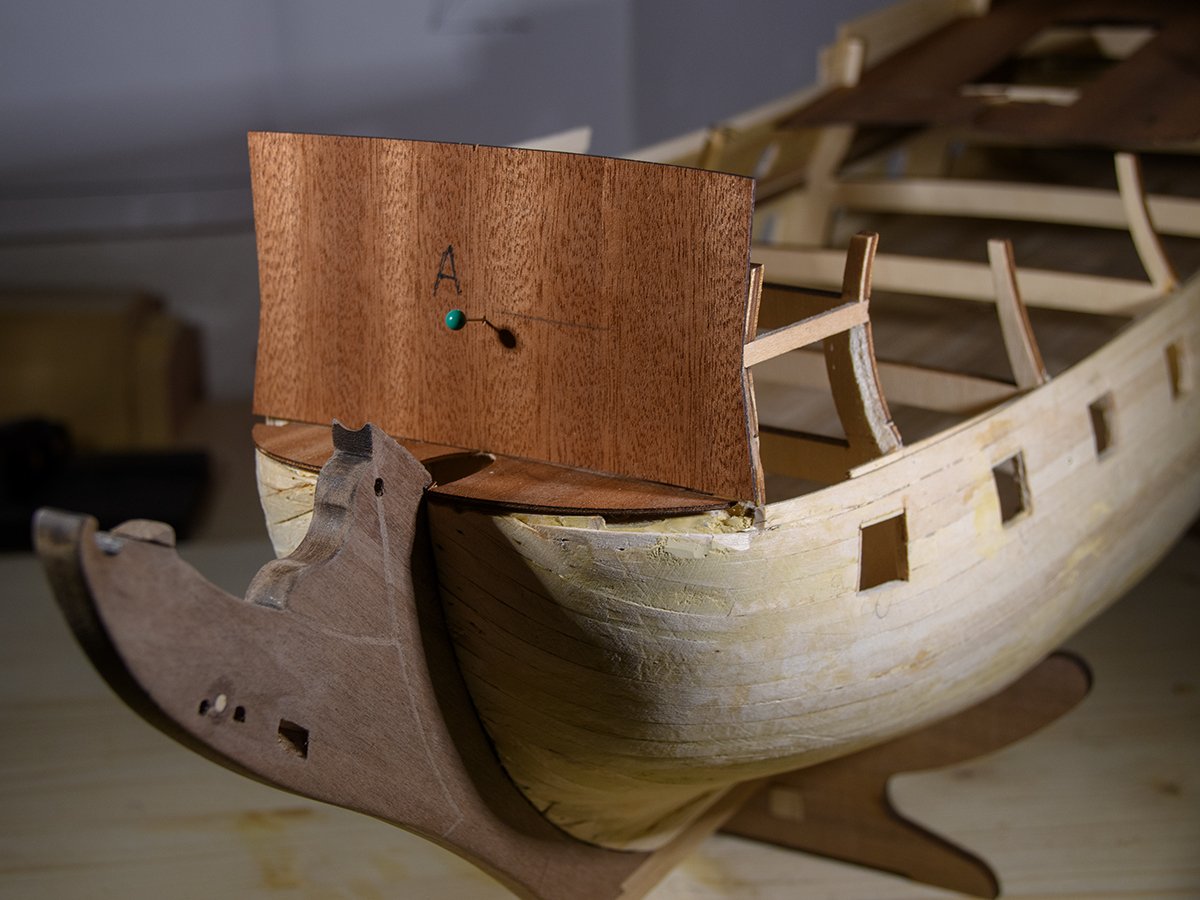
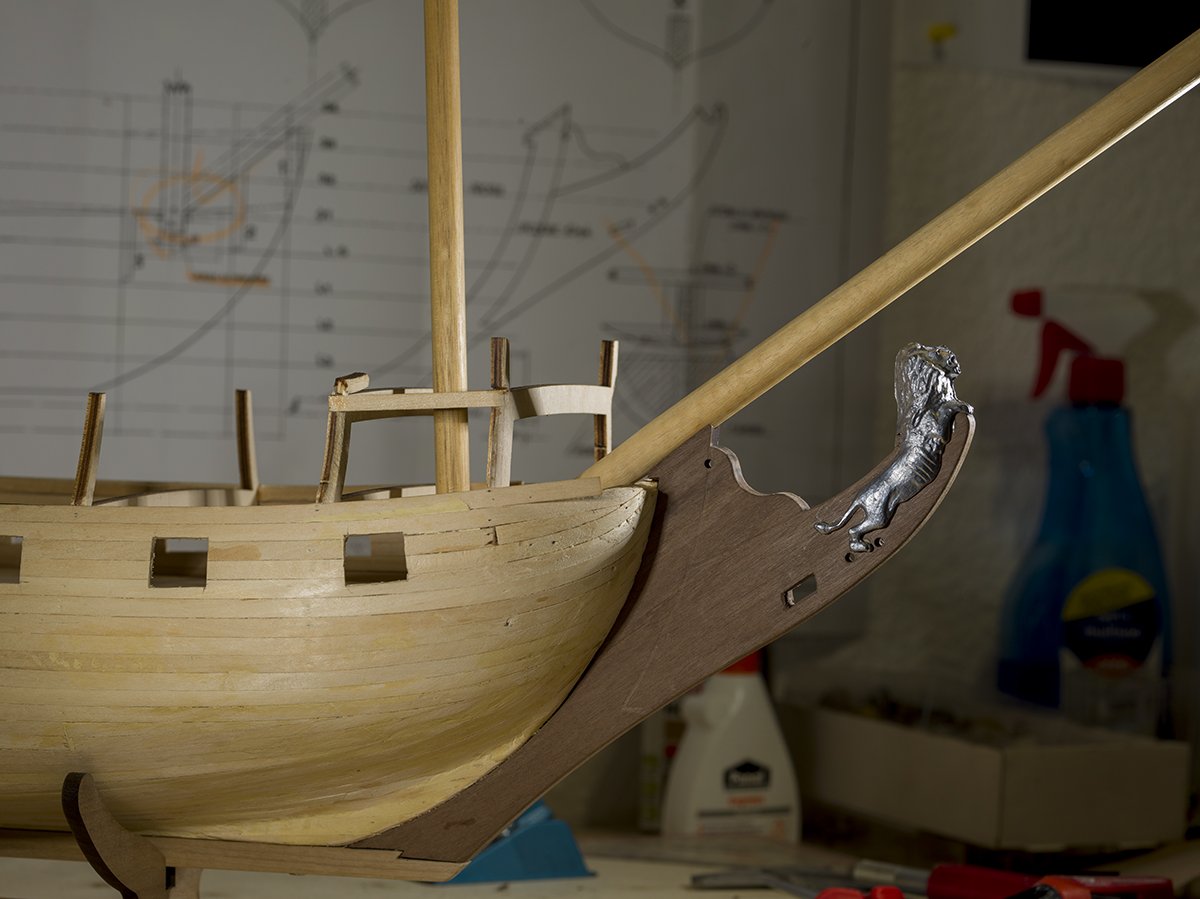
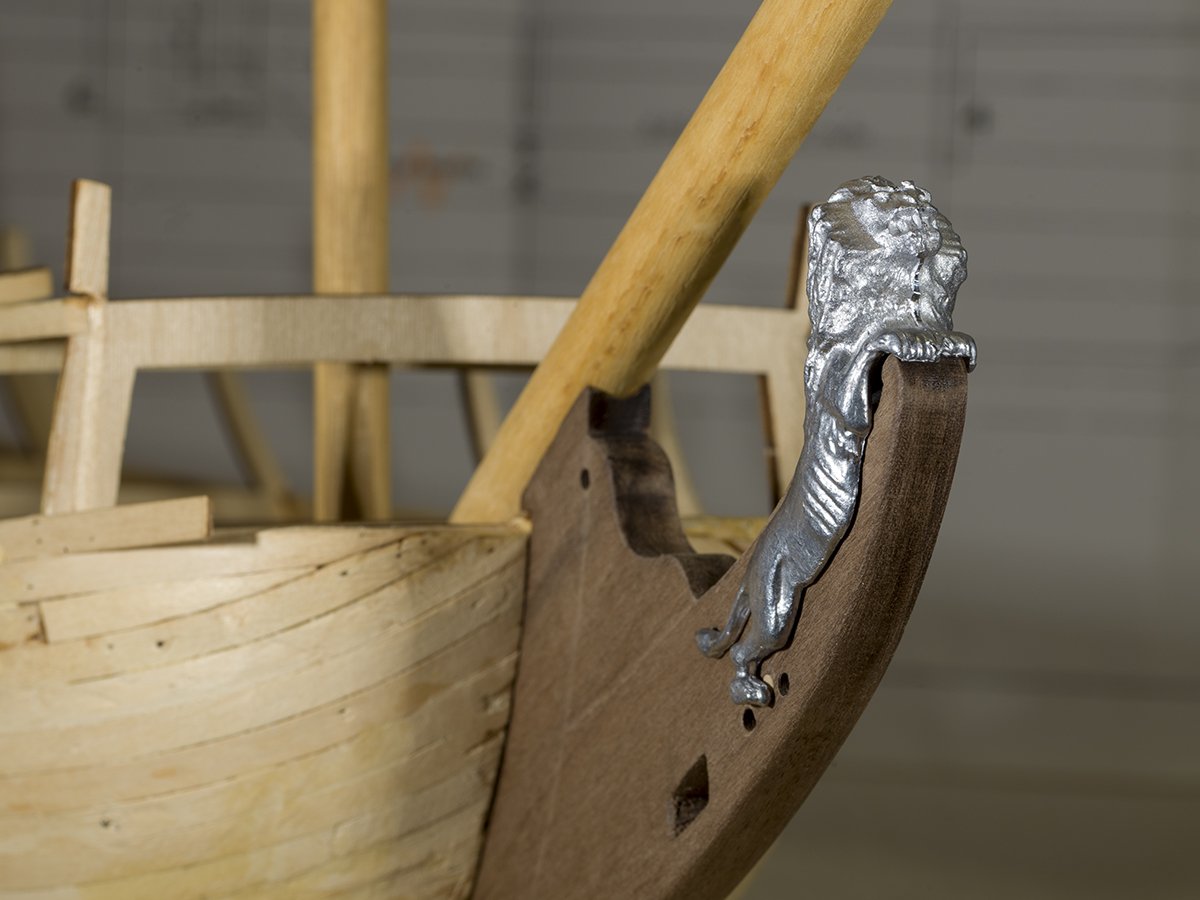
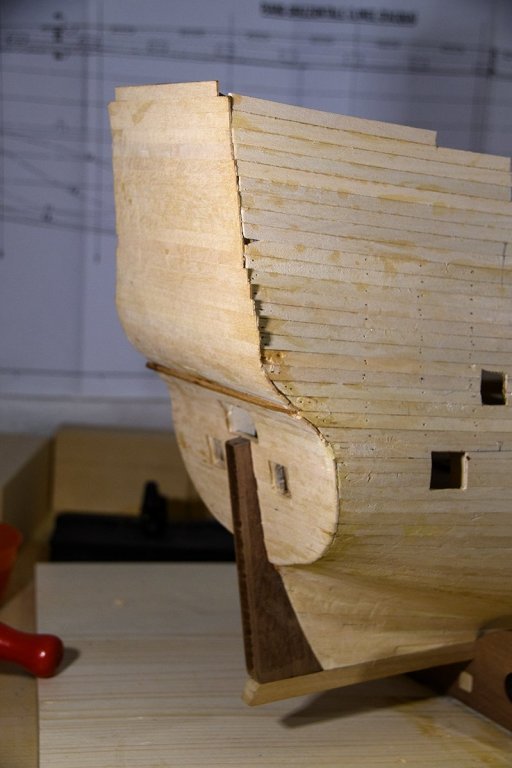
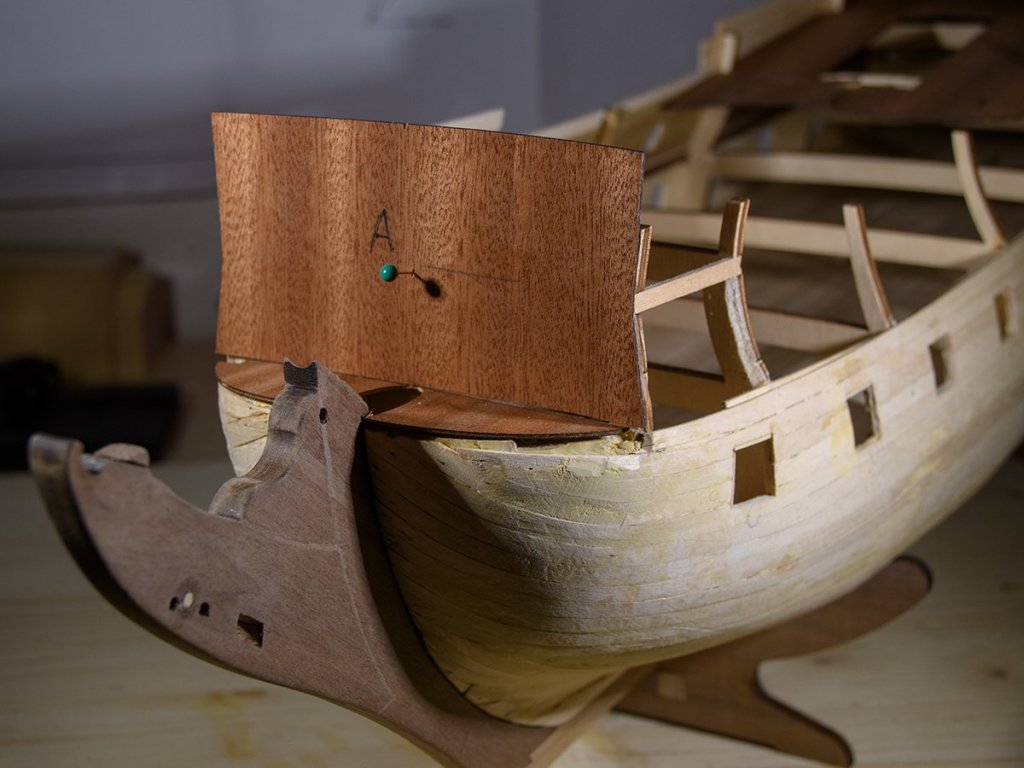
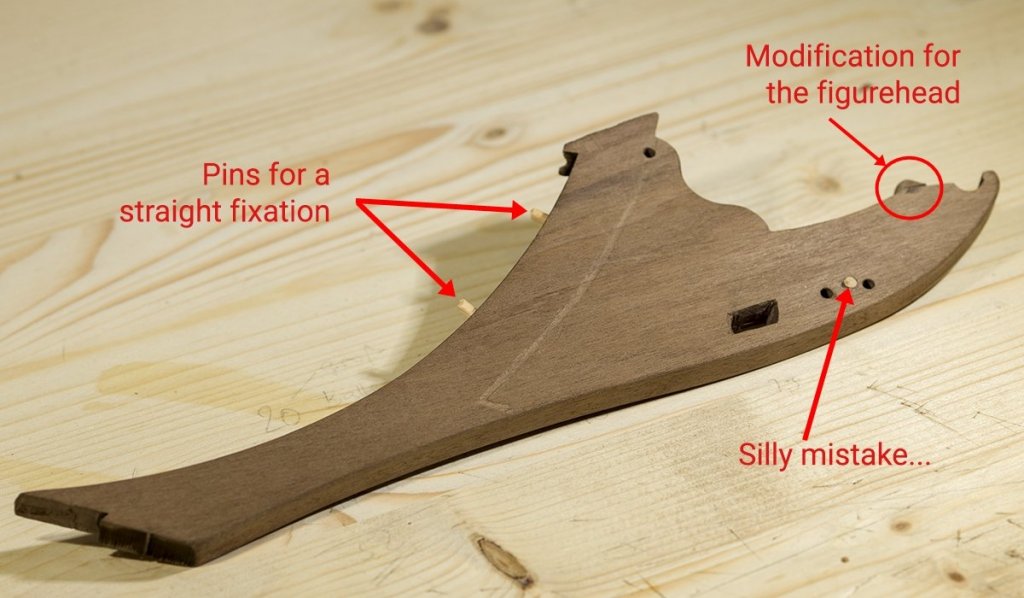
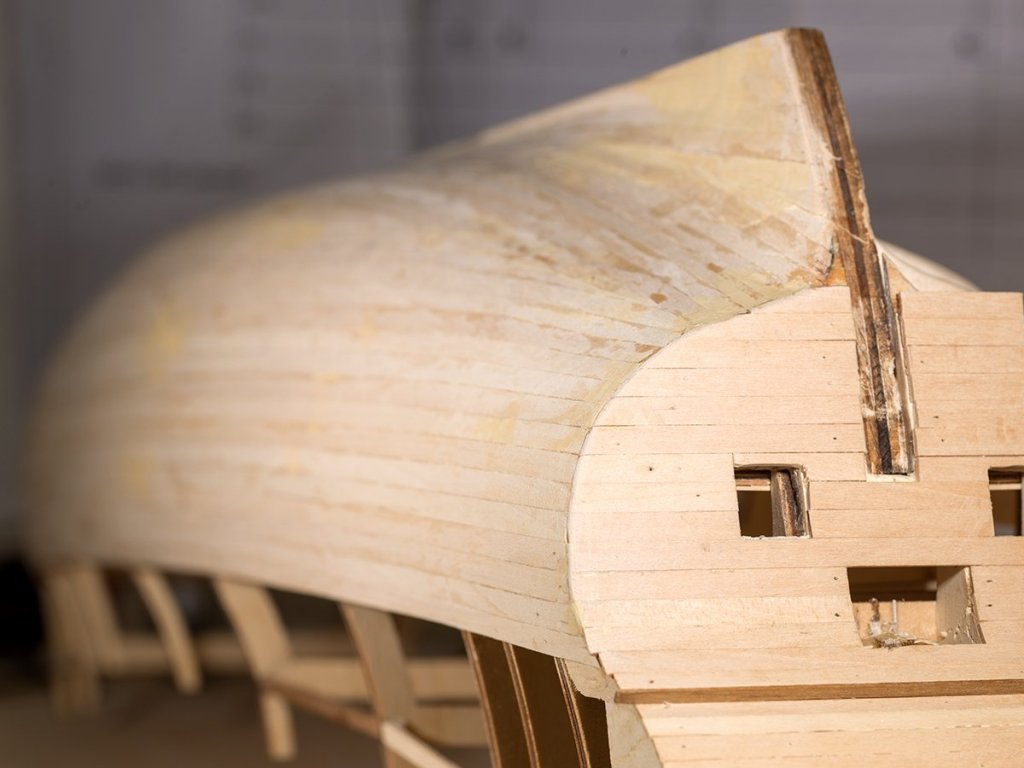
Hello my mates and merry friends, another little update. I finished the gunport cutting, "second" first planking an other preparations of the hull to start the second part of the first planking - upwards from the maindeck level. I ordered some additional timber - 1.5/6mm walnut - for the gunport sills. I tried to use 2mm or 1 mm - both dimensions did not make a good solution. 1.5 is perfect. I will not paint the sills or the gunports but I will use the natural color. Second was to prepare the stem post and false keel. Both was good to be done, the stem post got its wholes and a little modification to give the figurehead a proper fitting. You have to cut off some timber to make the lion roar - but all is within a acceptable tolerance. The bowsprit sits perfect on his knee and all further preparations could be done very well. Its a lot of sanding and fine fine tuning. But thats why we all build ships, isn't it? At least I fixed the false keel with four screws and a lot of joiner's glue. I will remove the screws later. I am very pleased with this kit so far. As usual some pics... the figurehead has not been glued yet Cheerio Max


-
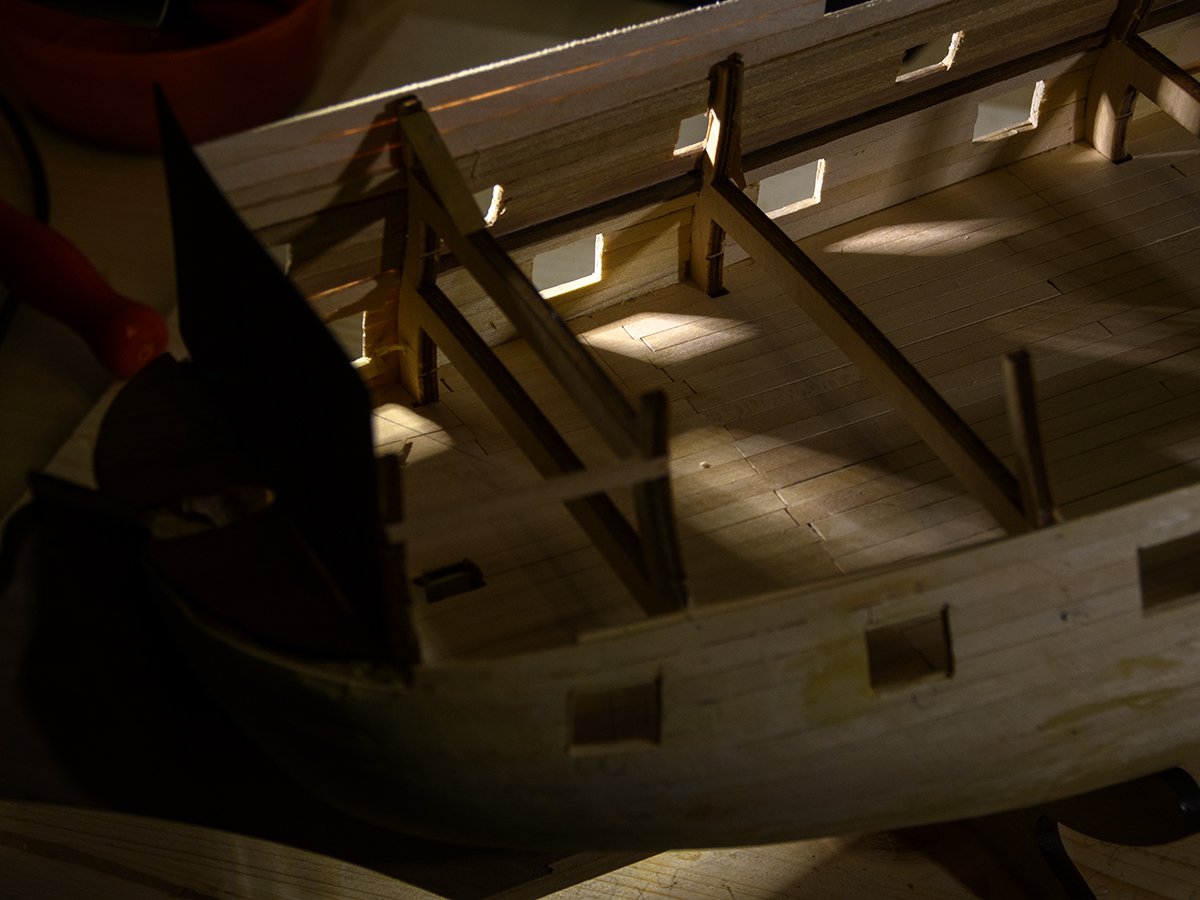
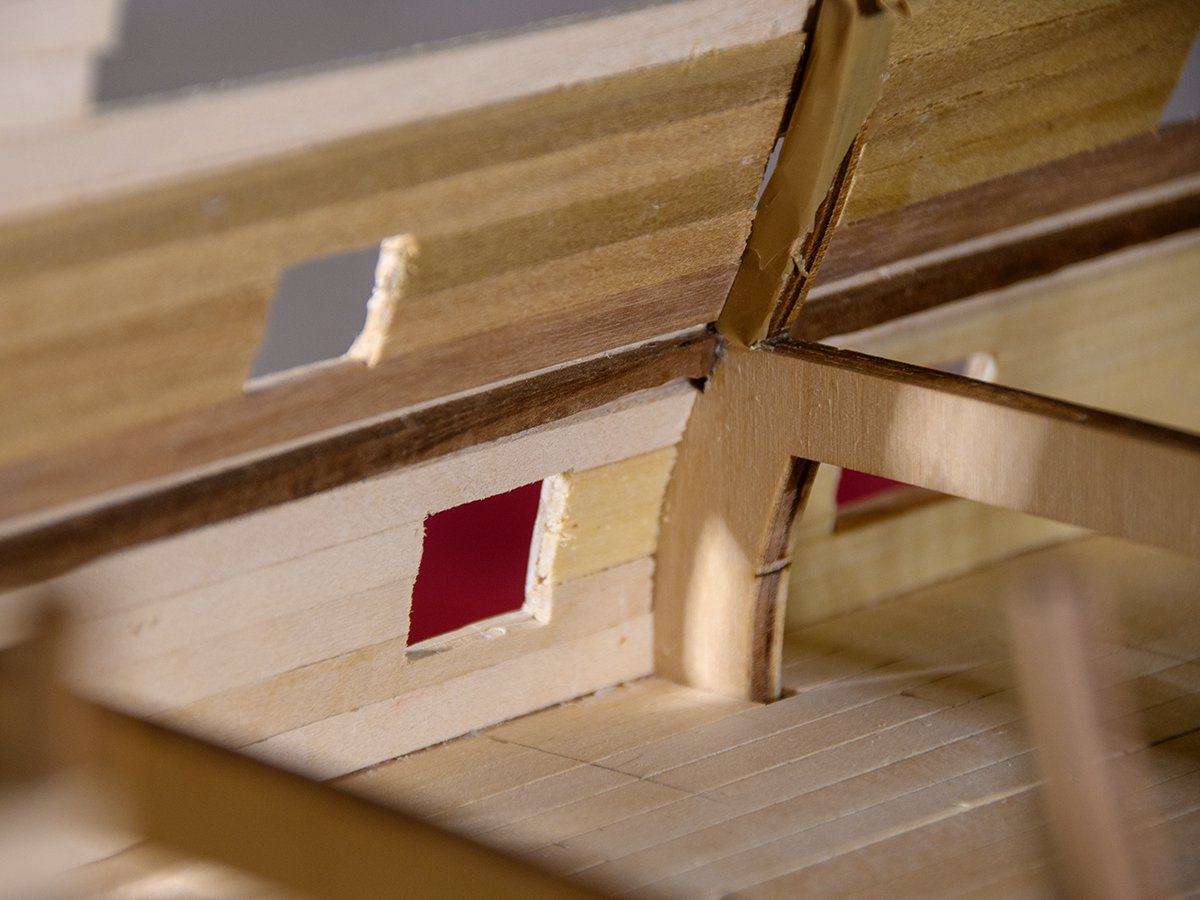
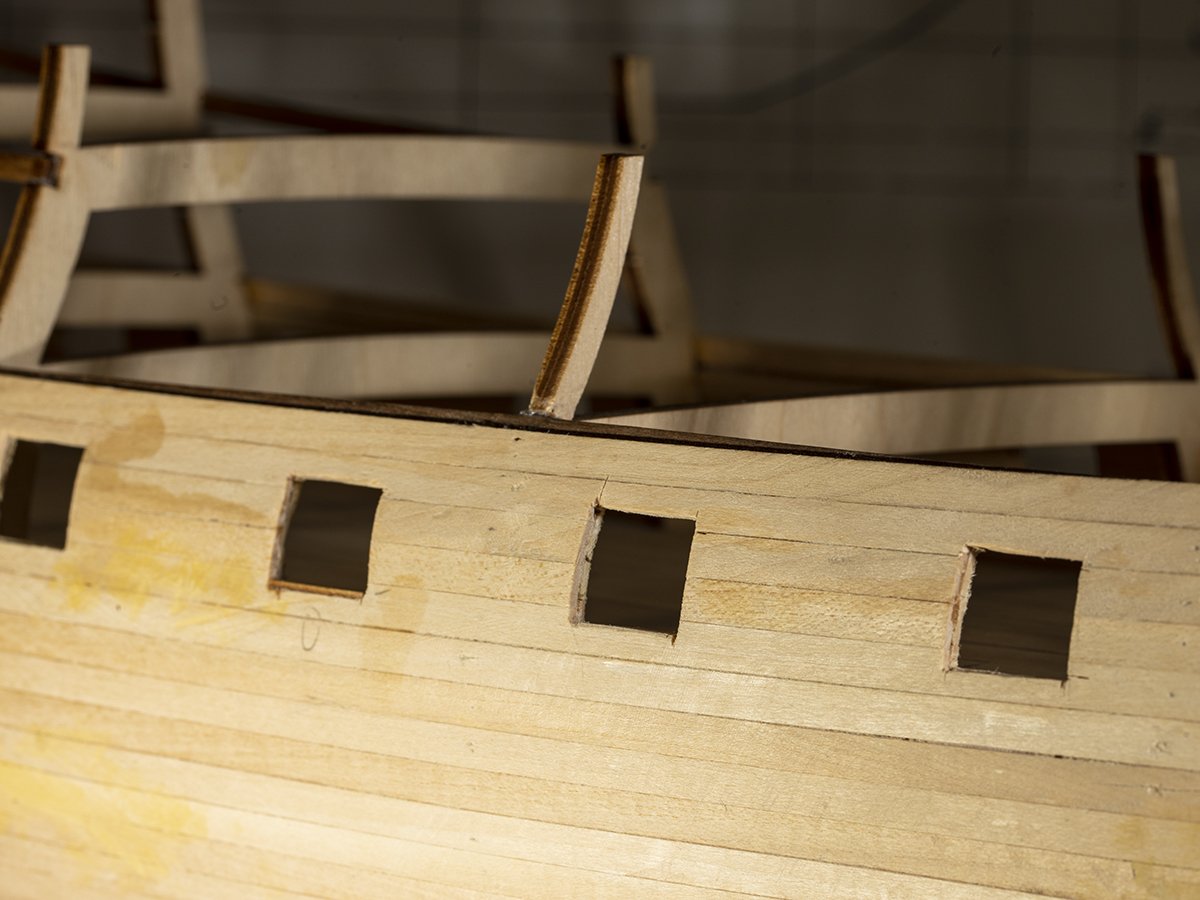
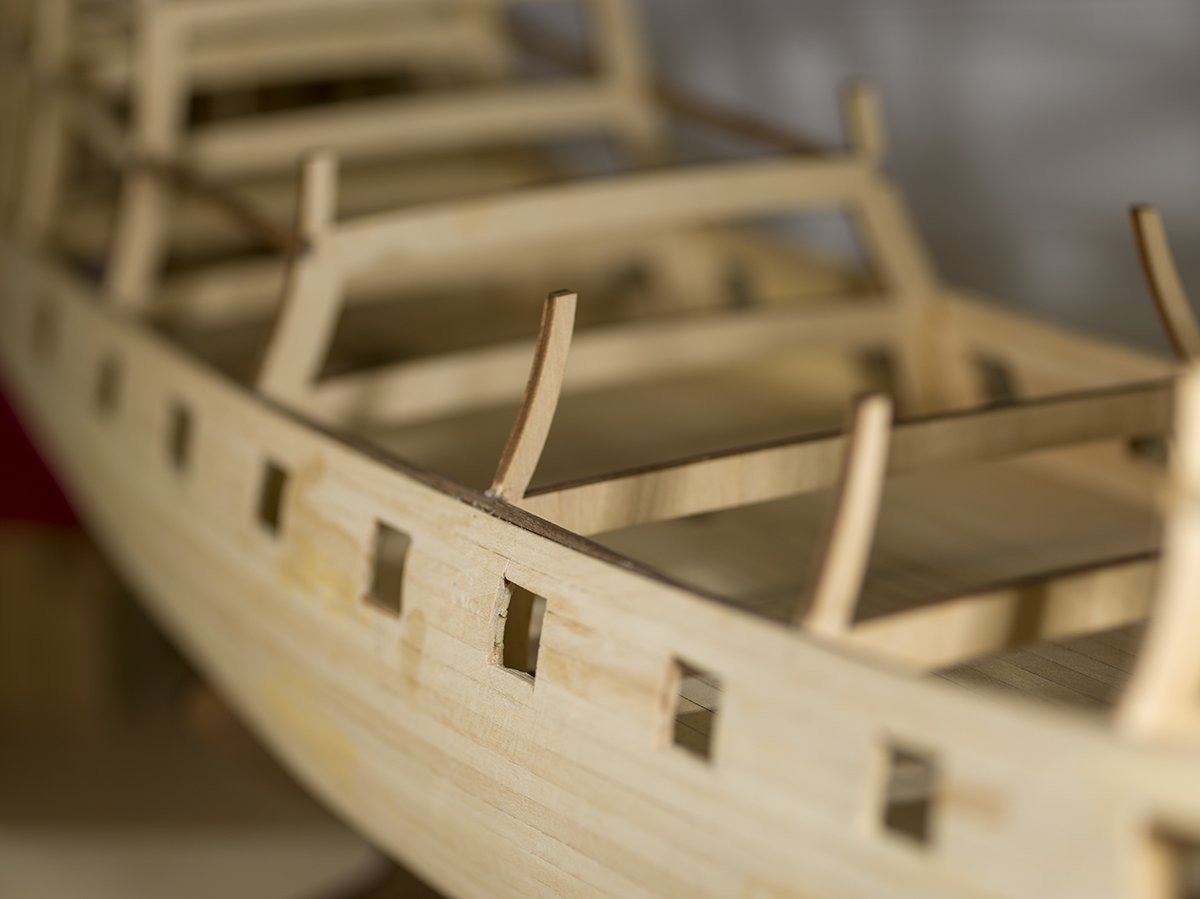
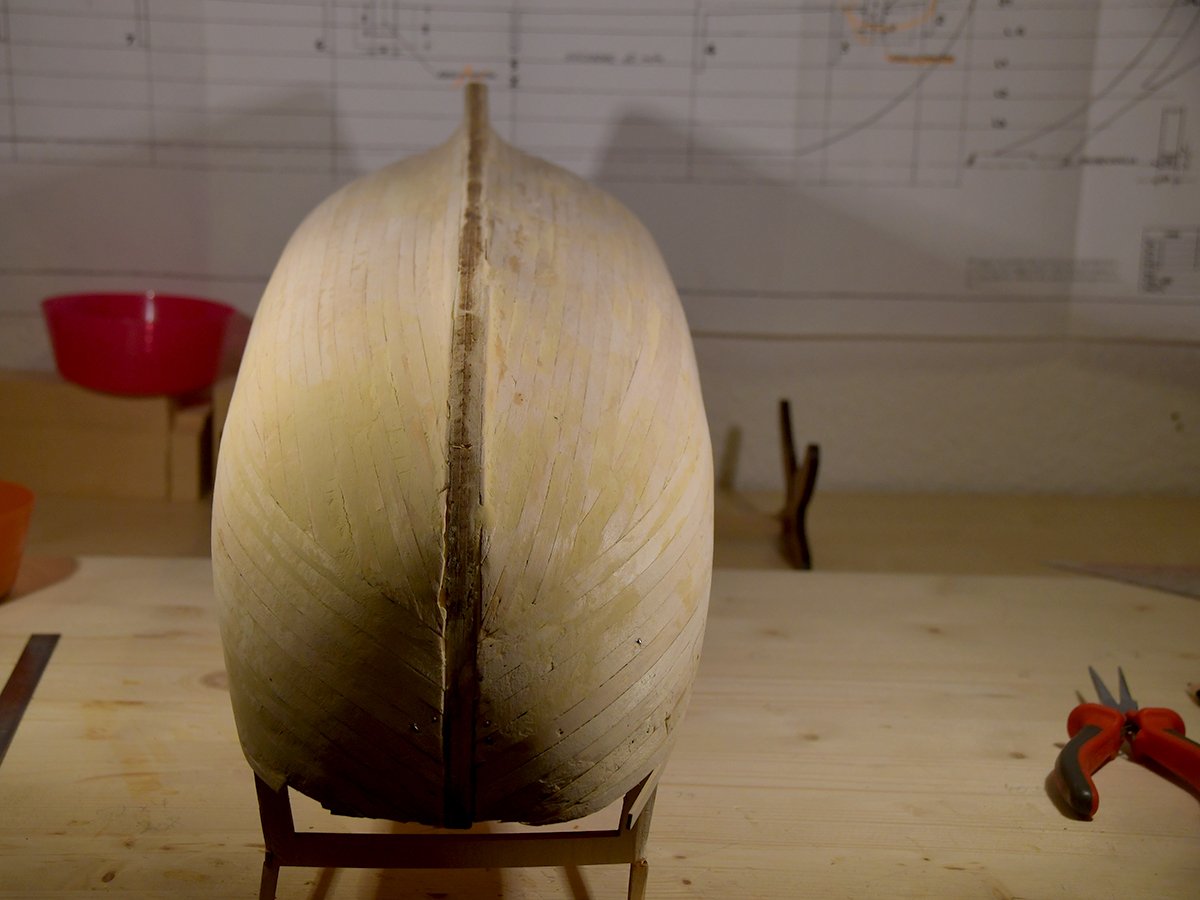
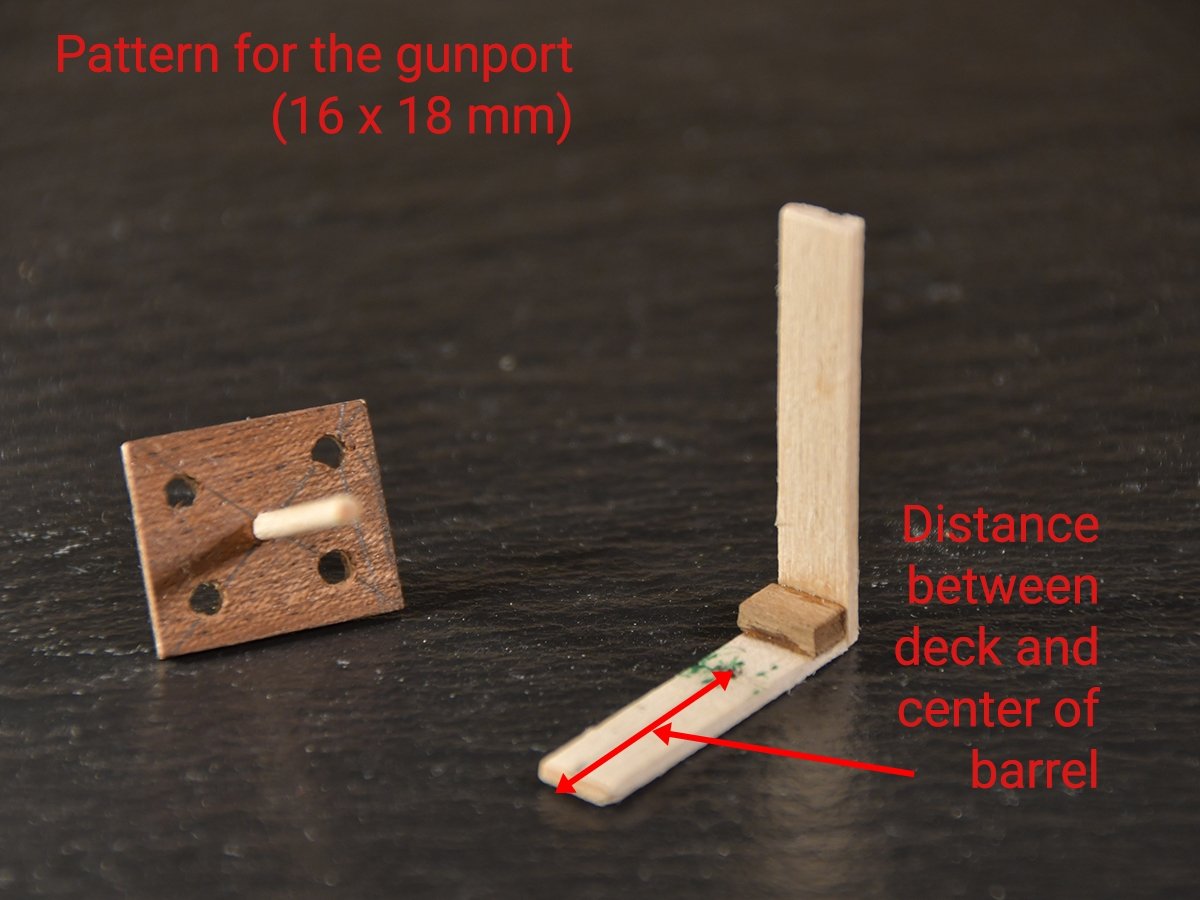
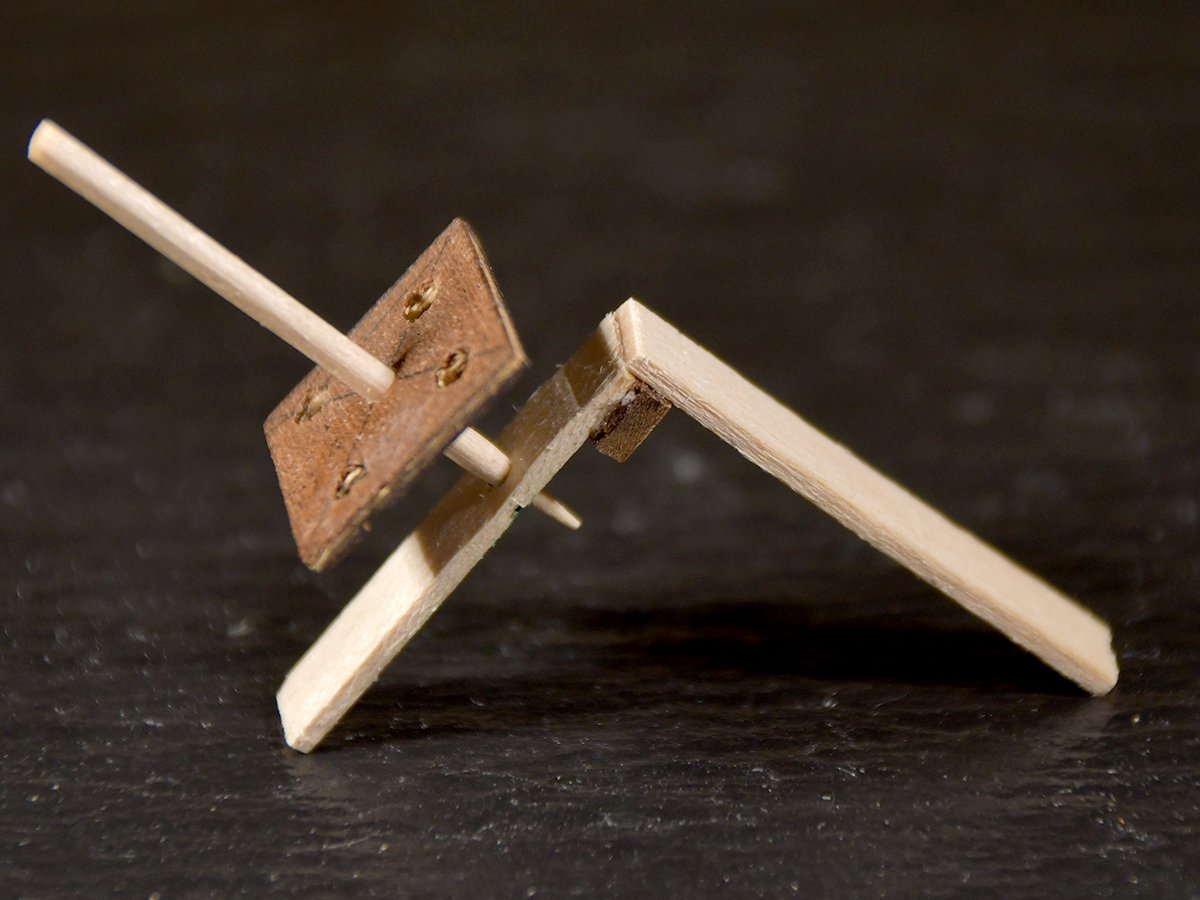
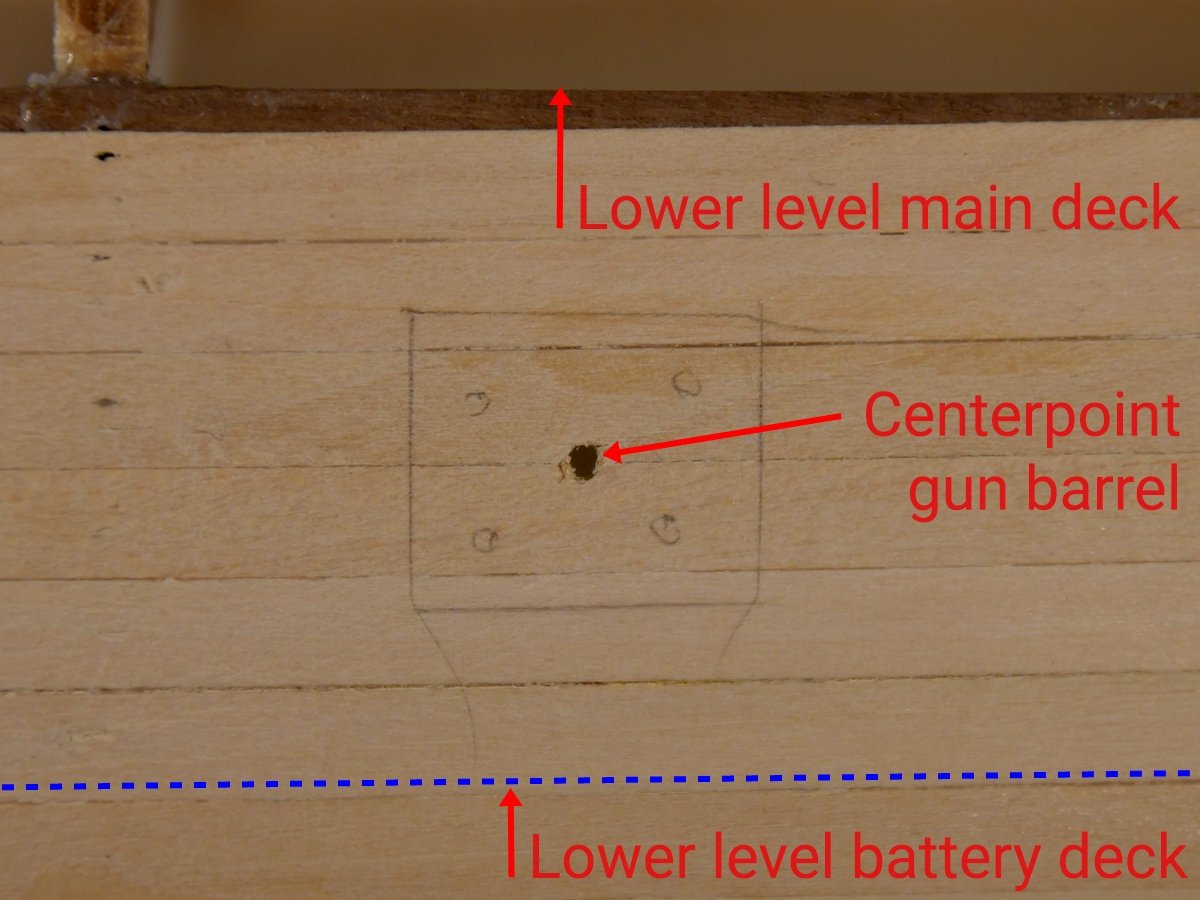
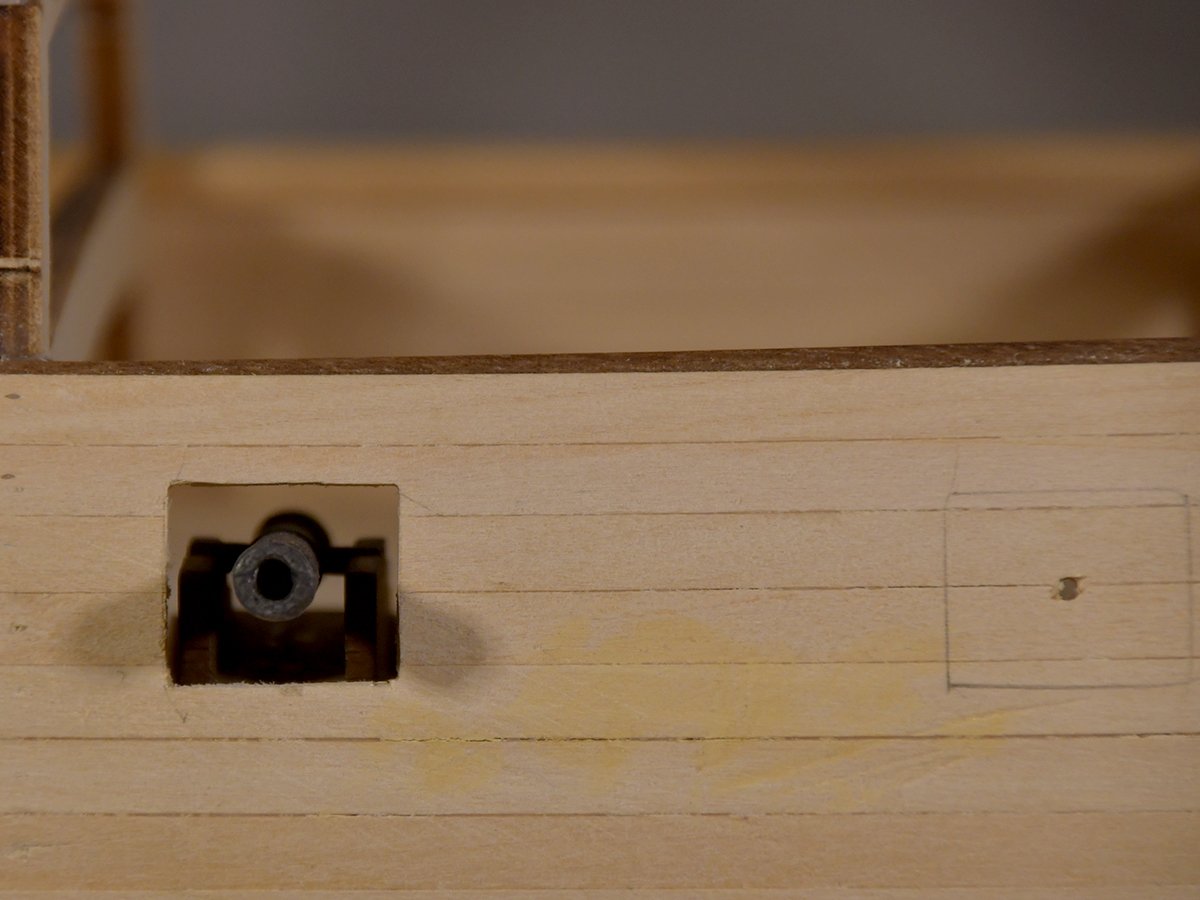
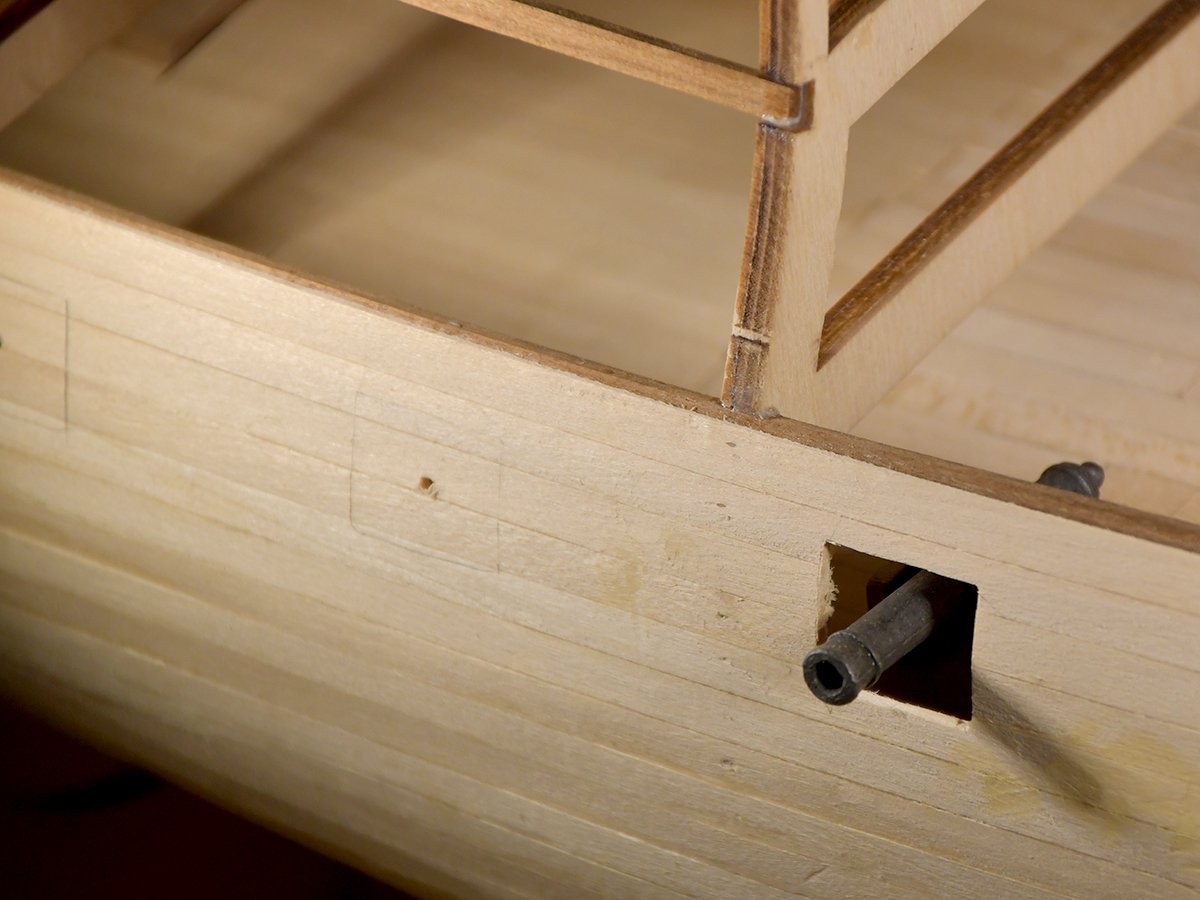
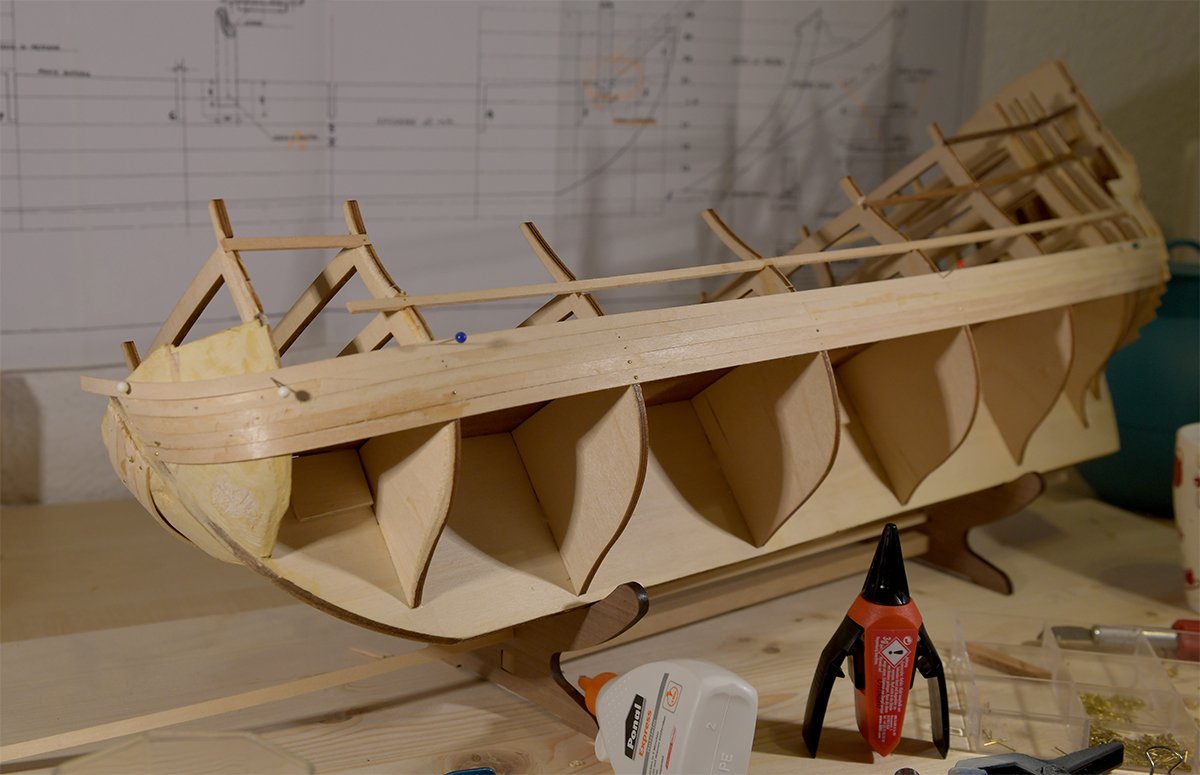
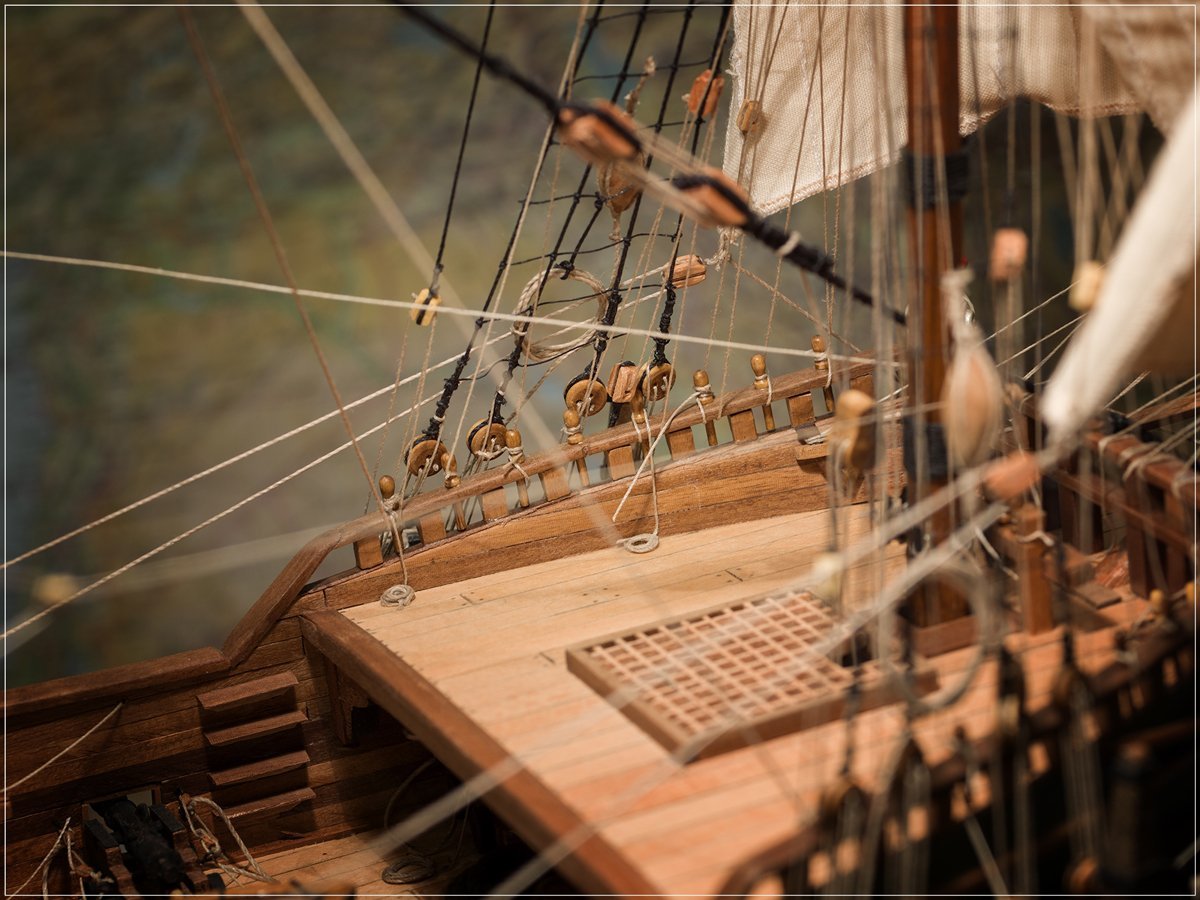
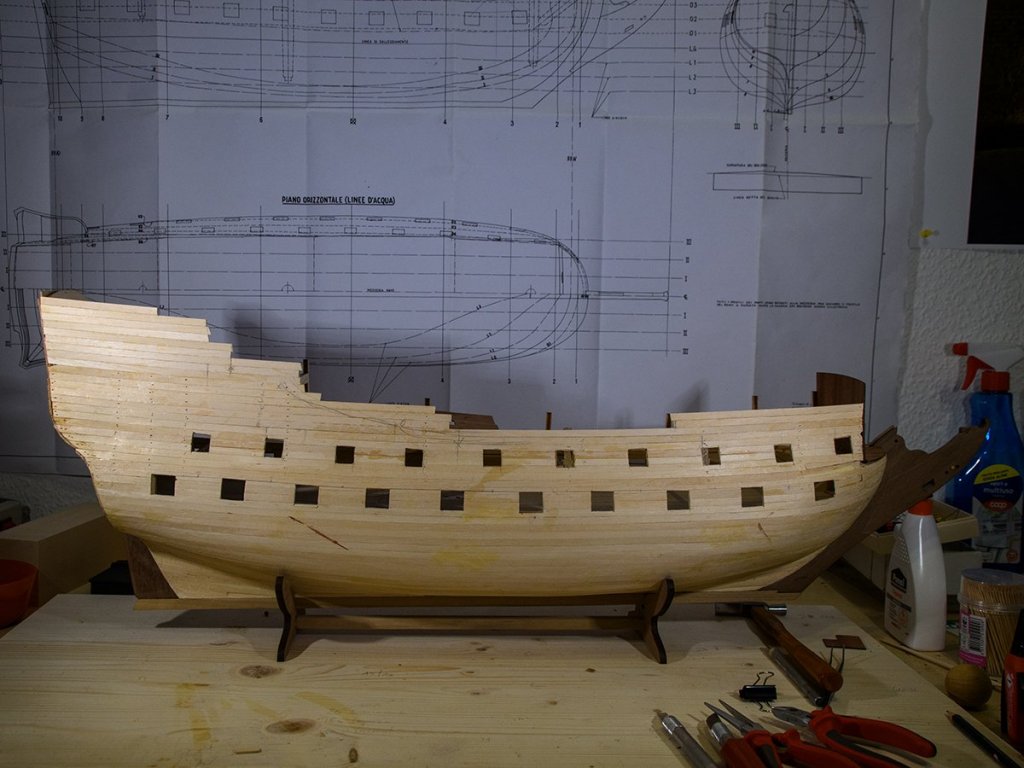
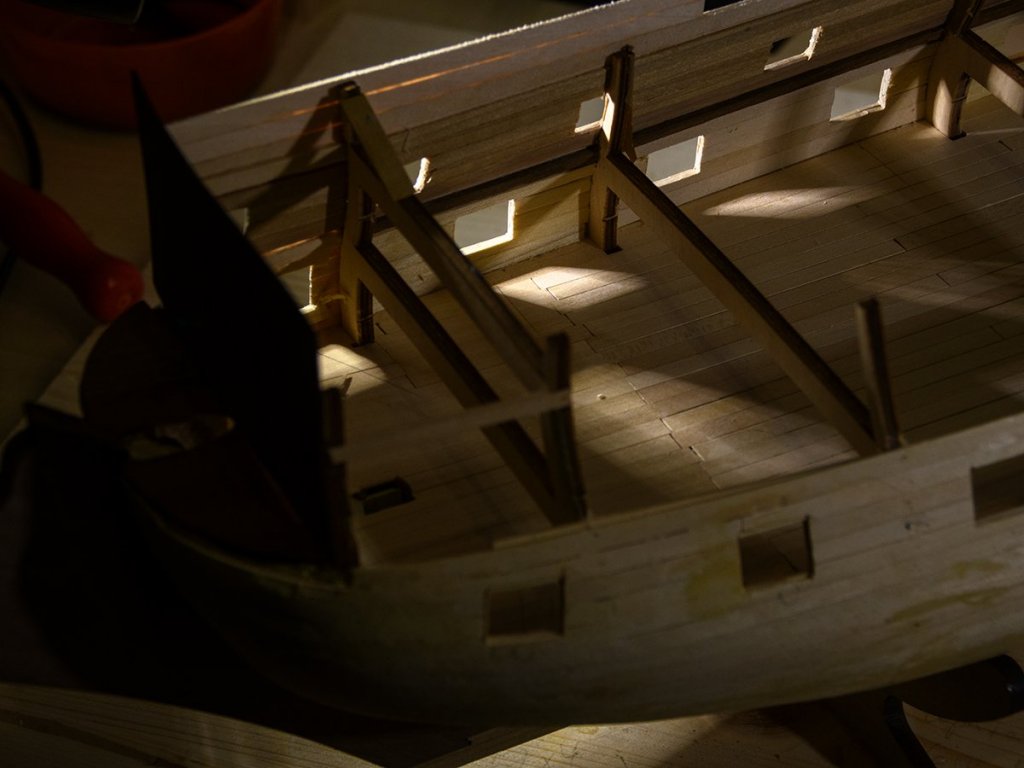
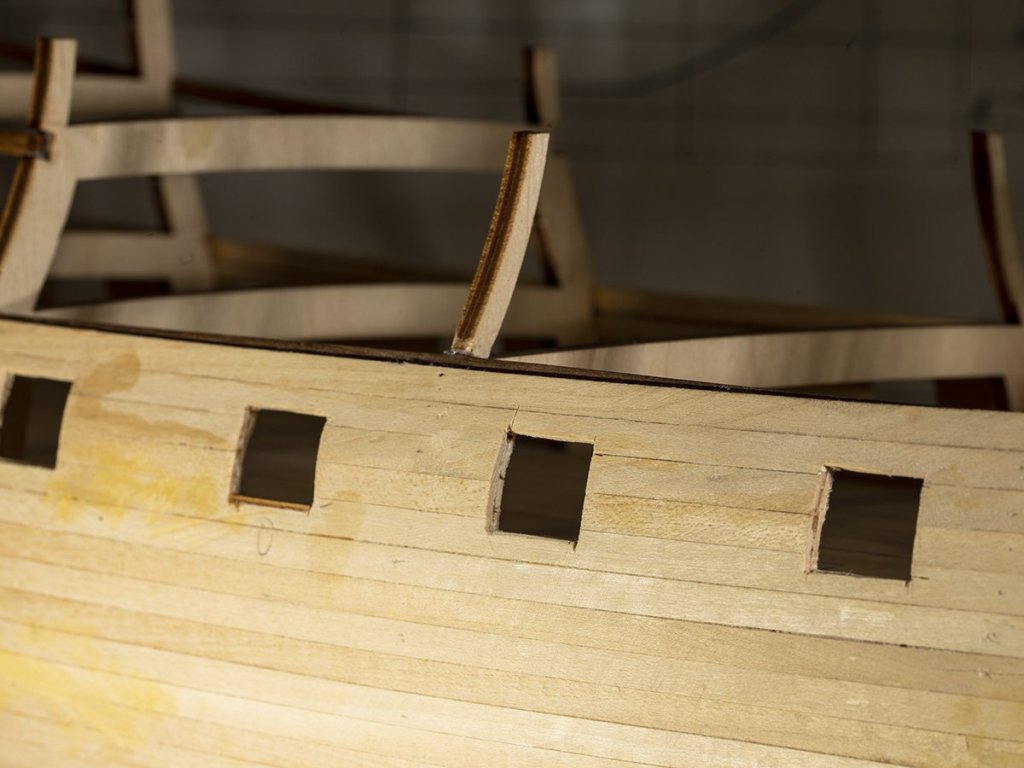
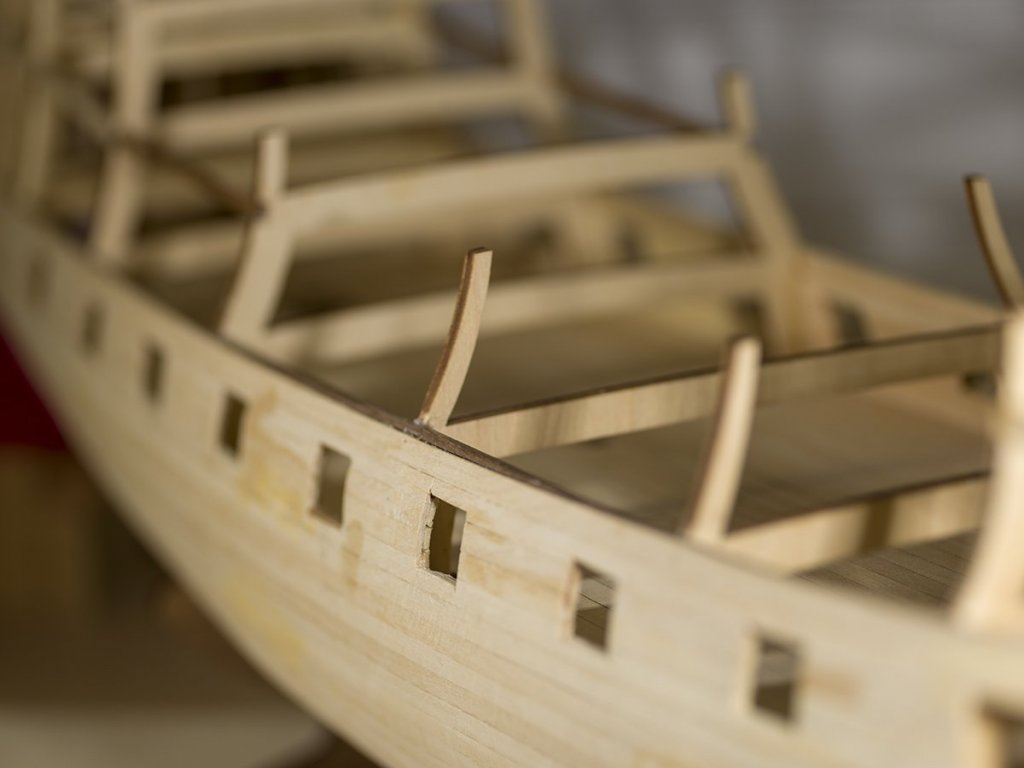
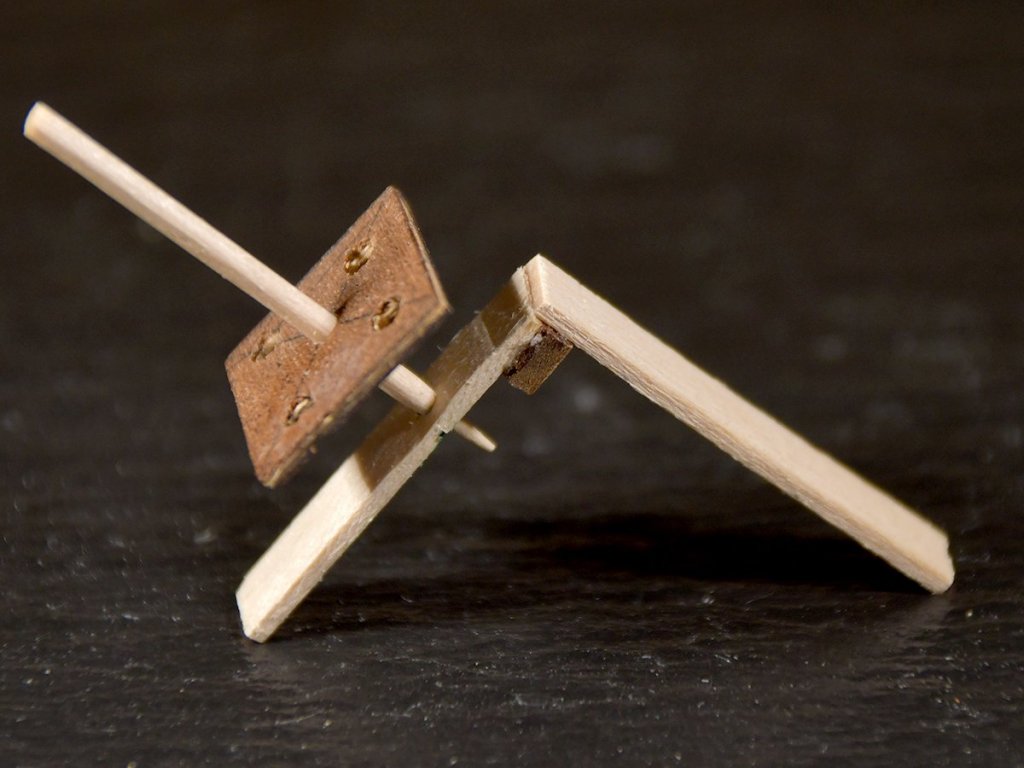
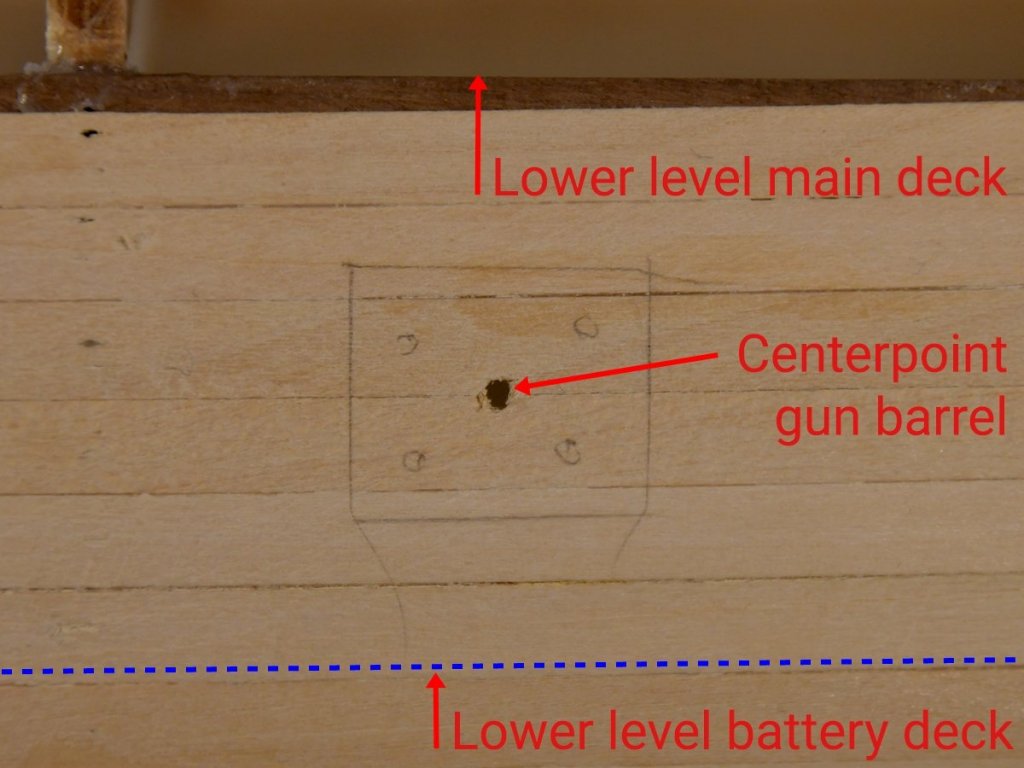
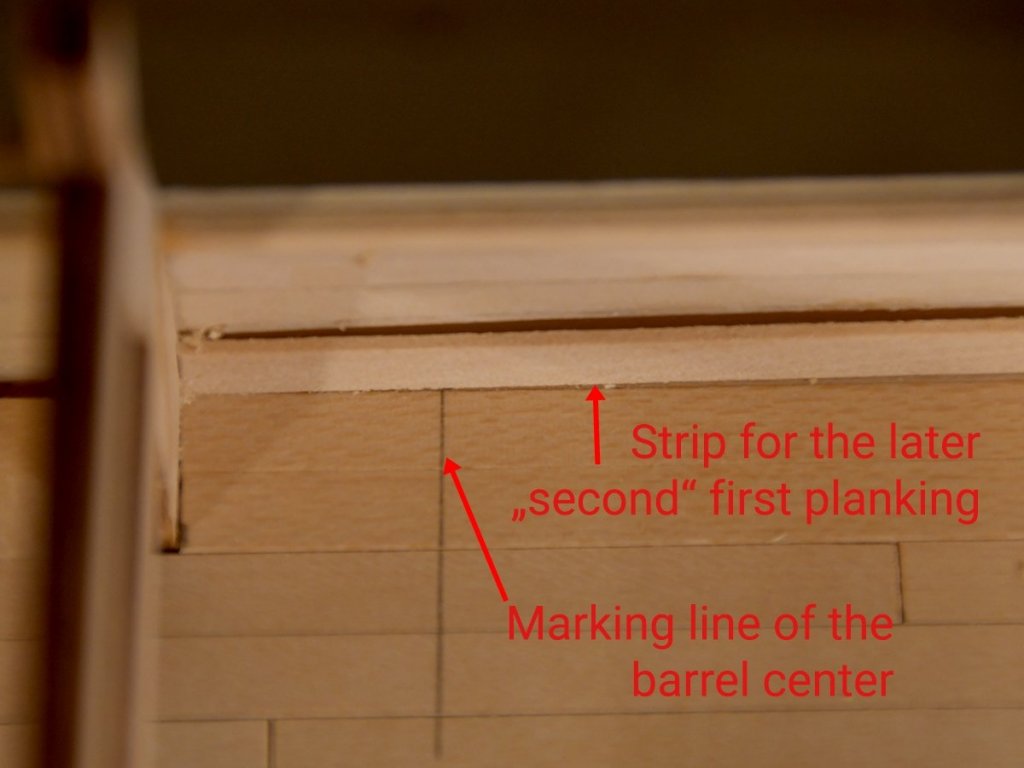
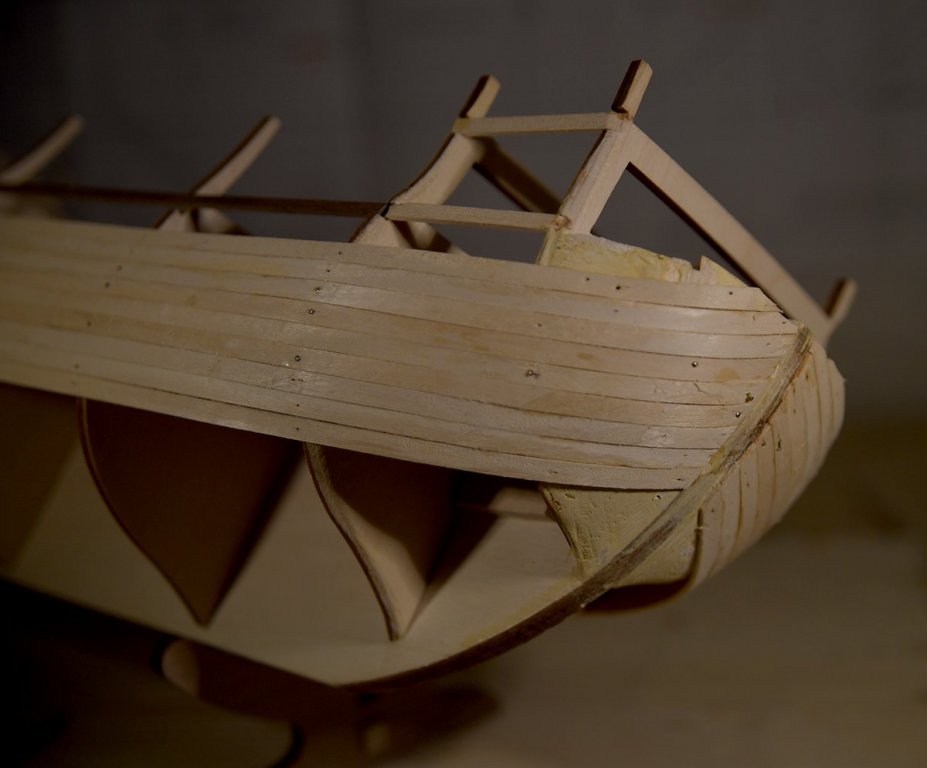
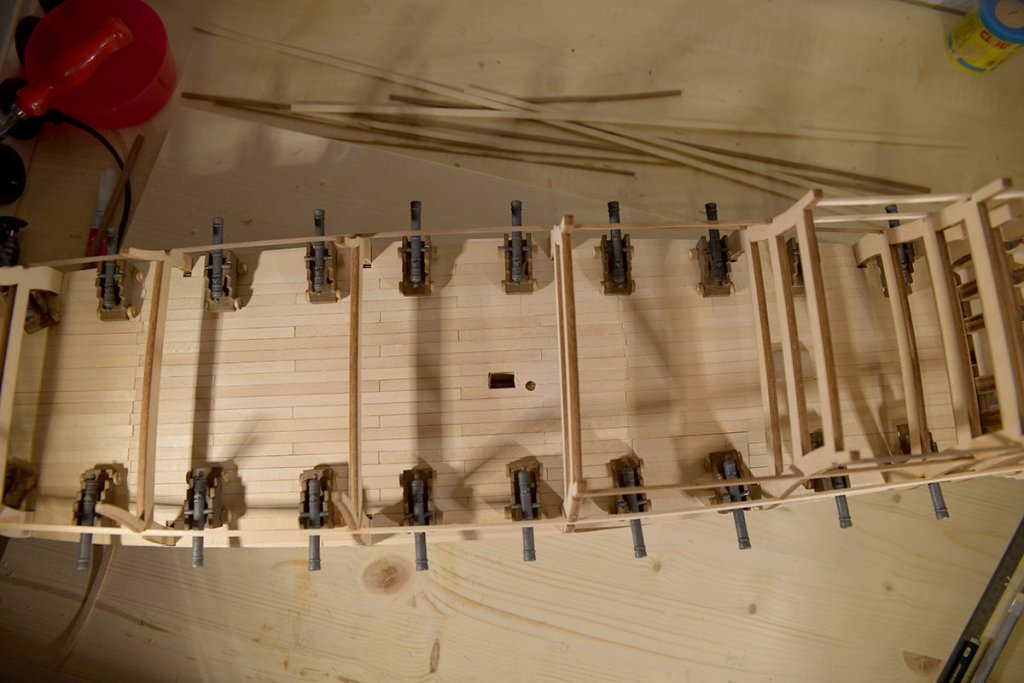
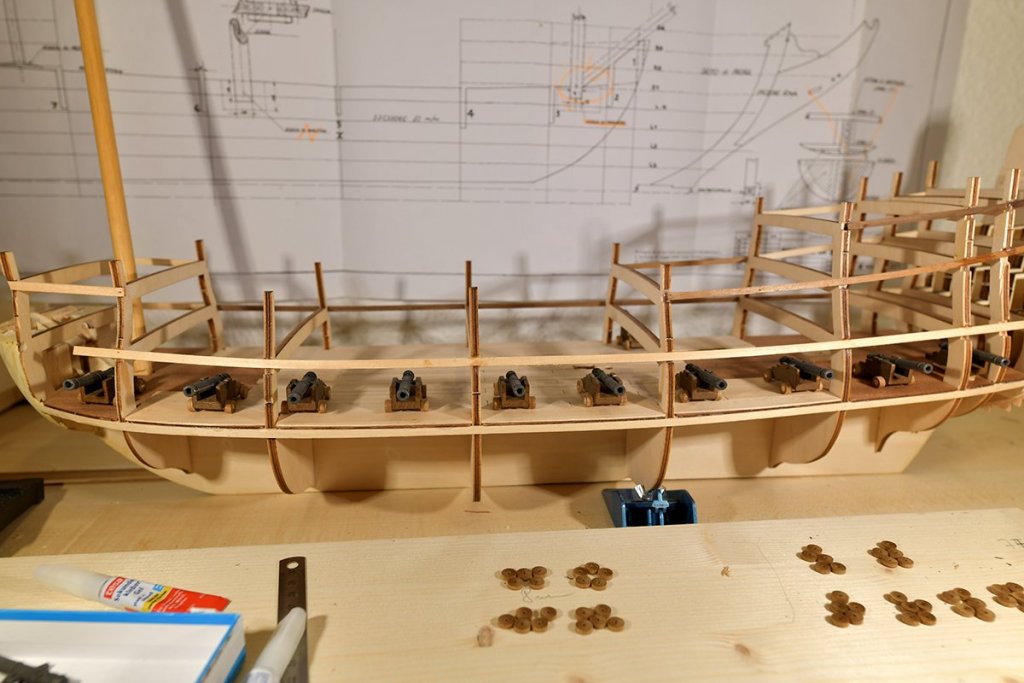
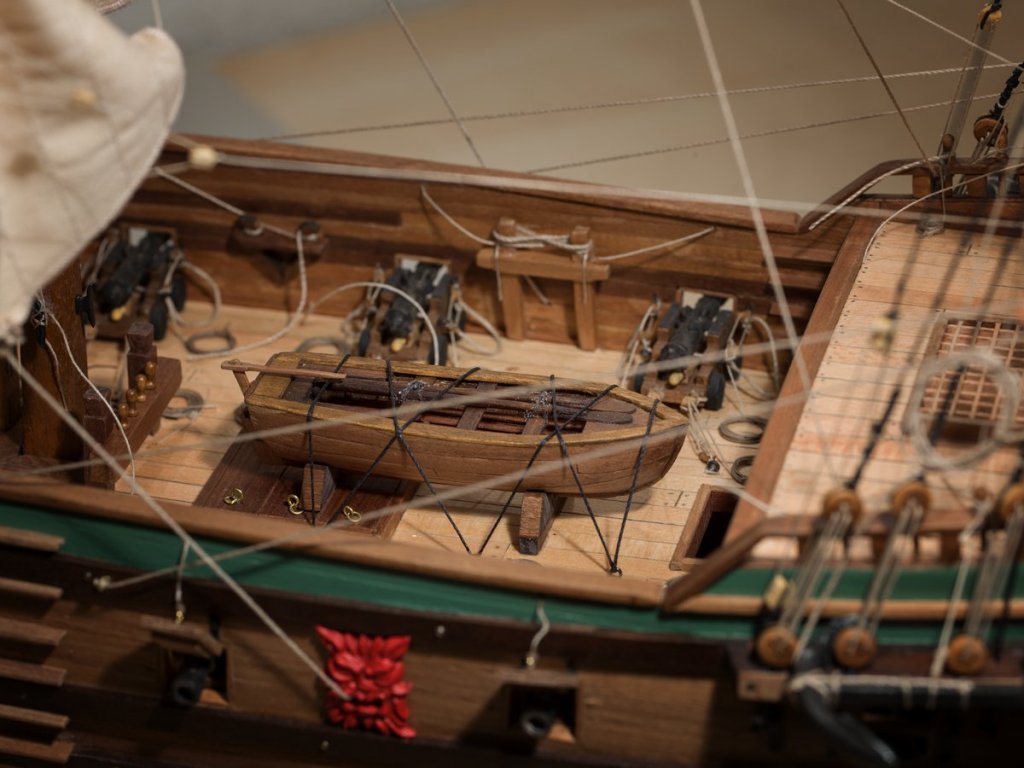
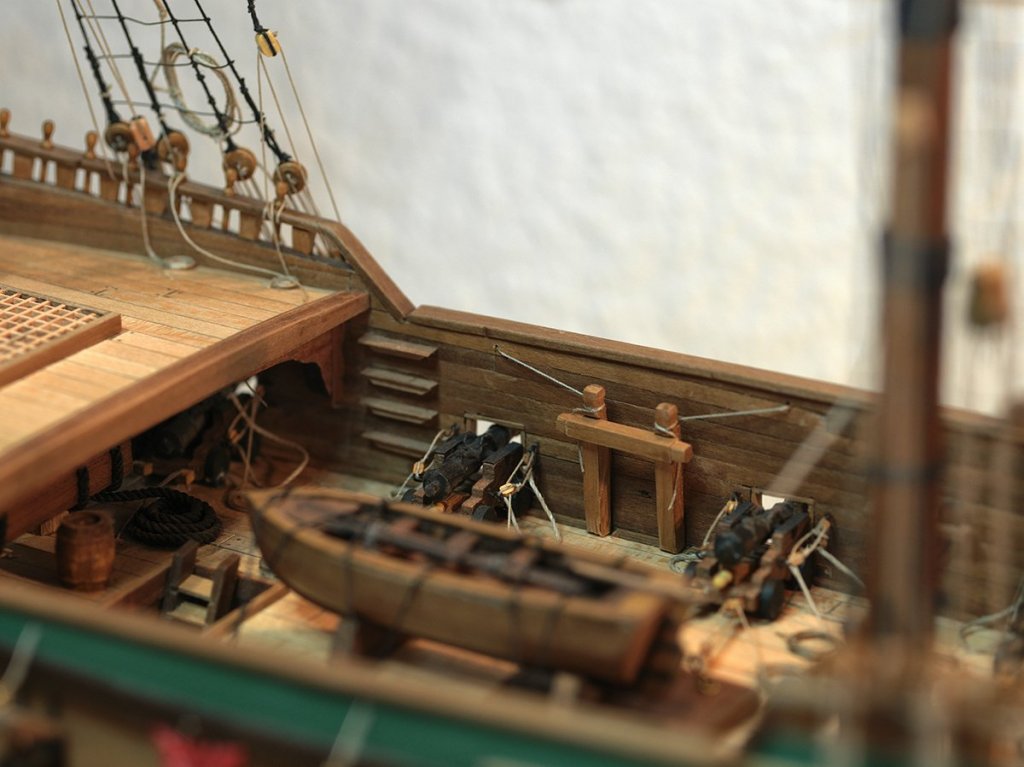
Hello again my friends, time for another update. I finished the first step of the first planking. The hull is planked below the main deck level on both sides, all is plane, filled (not so much necessary) and sanded. I will prepare the battery deck now for the later insertion of the guns. Therefore I made two tools: First an adapter for the correct height of the gunports. The center of the barrels has to be 12 mm above the deck level - according to the plans. So I cut off a part of a strip, marked the middle line and made a hole exact 12 mm above the beginning of the strip. I had marked the center line of the guns before I started planking. This is the lower reference point. Here I fixed the adapters middle line and marked the barrel center point through the hole with a pencil. Then I used a pin to puncture the marking. That's all. Now I drilled a hole through the hull. Now the pattern for the gunports were used. I cut off a piece of plywood with the correct measures (16mm x 18 mm), made a hole in the center and sticked a toothpick through. This toothpick fitted in the hole in the hull - and voila: I could line the gunport along the pattern. Now the gunports will be at the exact height following the curvature of the deck with the correct dimension. I will cut off the 20 gunports of the battery deck, mount the inner second planking for more stability and a good fitting of the gunport sills. As usual some pics are attached. Cheerio Max


-
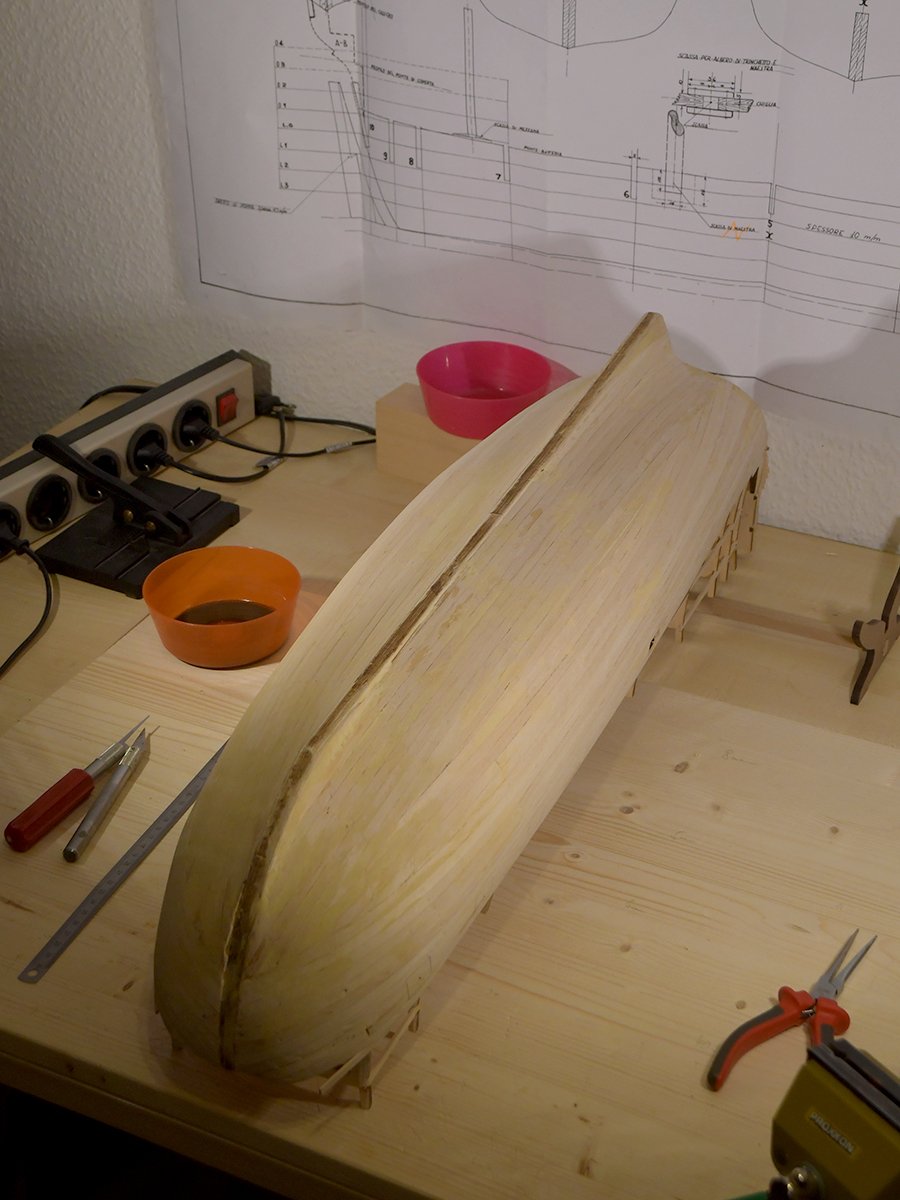
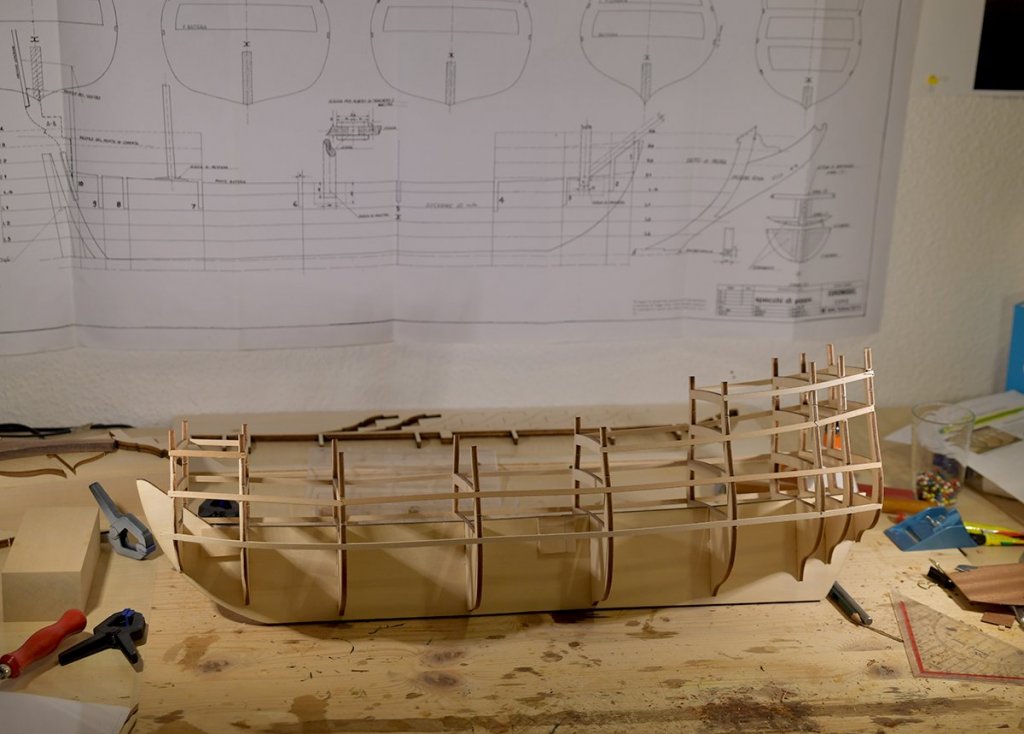
Hello my friends, a few pics show the progress. I have finished the first half of the first step - the planking of the starboard side below the maindeck-level. I used a planer and sanding paper and some wooden filler. All in all it was a pleasure to plank the hull. I cannot see any problems so far. It is the fifth hull I plank so I've got some expierence with this job Just look at the pics and you will see what I mean - it's a phantastic build. Next week I ill plank the portside, then I cut off the gunports and will do a second planking along the inner side of the gundeck. Cheerio Max


-
Hello my friends, it's time again for a little update. Of course I could not let the weekend pass by without some work on the FWZP. Due to the very bad weather - even the dogs did not want to take a long walk - I decided to start first planking of the hull. The provided material - limewood strips - is really excellent. It's very easy to bend the strips after a hot water bath, the timber is sliced very exactly and cut into 1.5/6mm strips. It's very comfort to work with it - I know kits with much more worse material. I started at the gundeck level and will go to the keel and upwards to the lower level of the main deck at a first step. When I have finished this work I will sand and fill up some smaller gaps. After another sanding I will cut out the gun ports of the battery deck. After this a second layer along the inner side of the hull (battery deck) will follow. I do this for a maximum of stability and for a good fitting of the gunport sills. As usually some pics in the attachement Cheerio Max


-
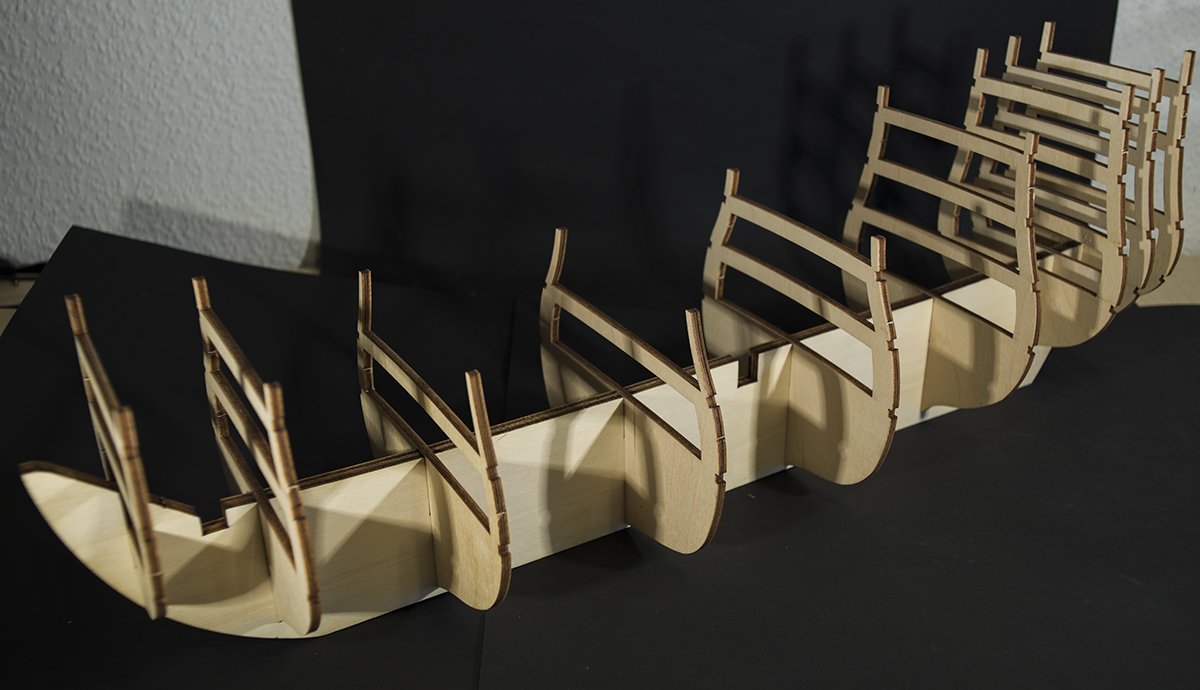
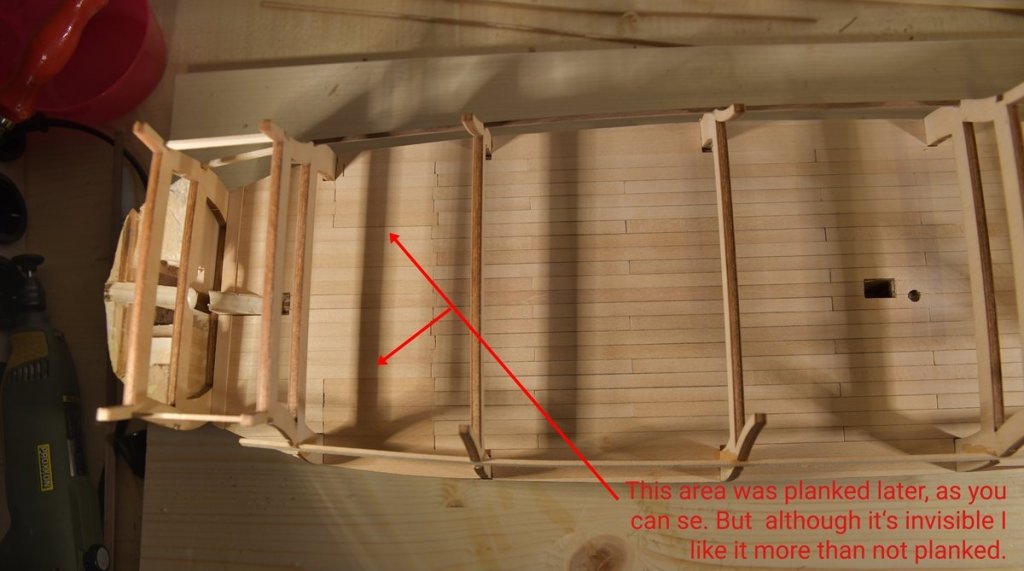
Hello again I was busy today and prepared the skeleton of FWZP for the first planking. Therefore I first decided to plank the entire battery deck. I had done this before just for the probably visible area below the opening in the main deck as I perhaps will leave one or two gratings opened. But at least I thought I have to plank the rest too. Its not visible and in this matter it would not care if planked or not. But I knew it - and thus I started to create a proper surface. Just a pity that the pattern of planking is not correct... The first planking of the stern is done, also the last fine tuning on the bow, the stringers and the frames. I marked the correct position of the guns so I can cut off the ports later. I will have a break now til monday. Then I will probably start the first planking. Cheerio Max
-
Hi Pete, thank you - what you say is just the way I understand this kit. And this is just what it makes so exciting. It's not only glueing parts together and some day you have a model like any other modellers have. No - it's brainwork, it's thinking about solutions, it's improving your own skill, getting expierence.. and at least, as you say, create a model, not only assemble parts together. Regards - Max
-
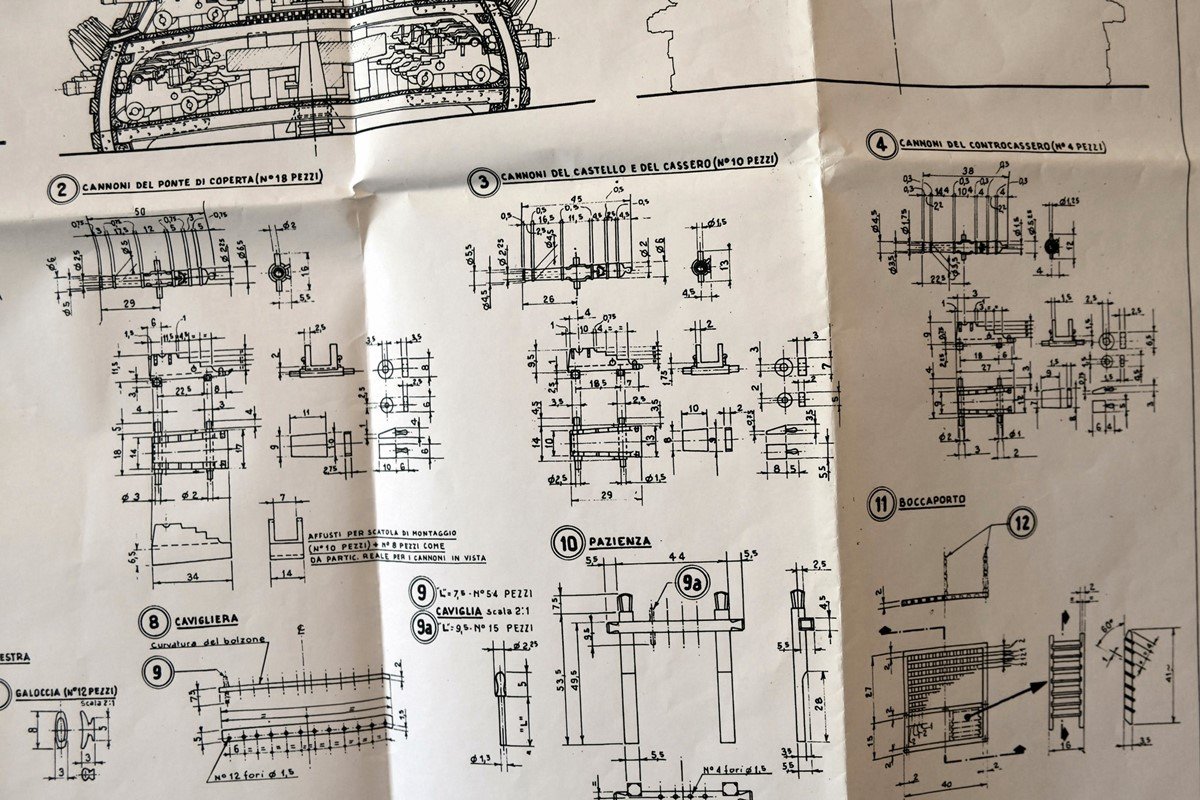
Hi Pete, thank you. I know your interpretives and use them as you mentioned: I will take ideas from it but don't understand them as "rules to be followed". E.g. I build a flat transom and will sure do a lot of things quite different (as my skill is not 10+ 😂) But they give so much hints and tipps to come along with this wonderful kit. I enjoy every minute - even when the challenge is quite powerful How did you solve the problem with the last gun before the stern? It has to be placed between frame 8 and 9 to be on the correct place according to the plan. I decided just to use the carriage without the wheel - thus the gun will fit into the place. I will surely write whenever I come to a dead end Best wishes from Germany, the "home" of the Friedrich Wilhelm zu Pferde... Max
-
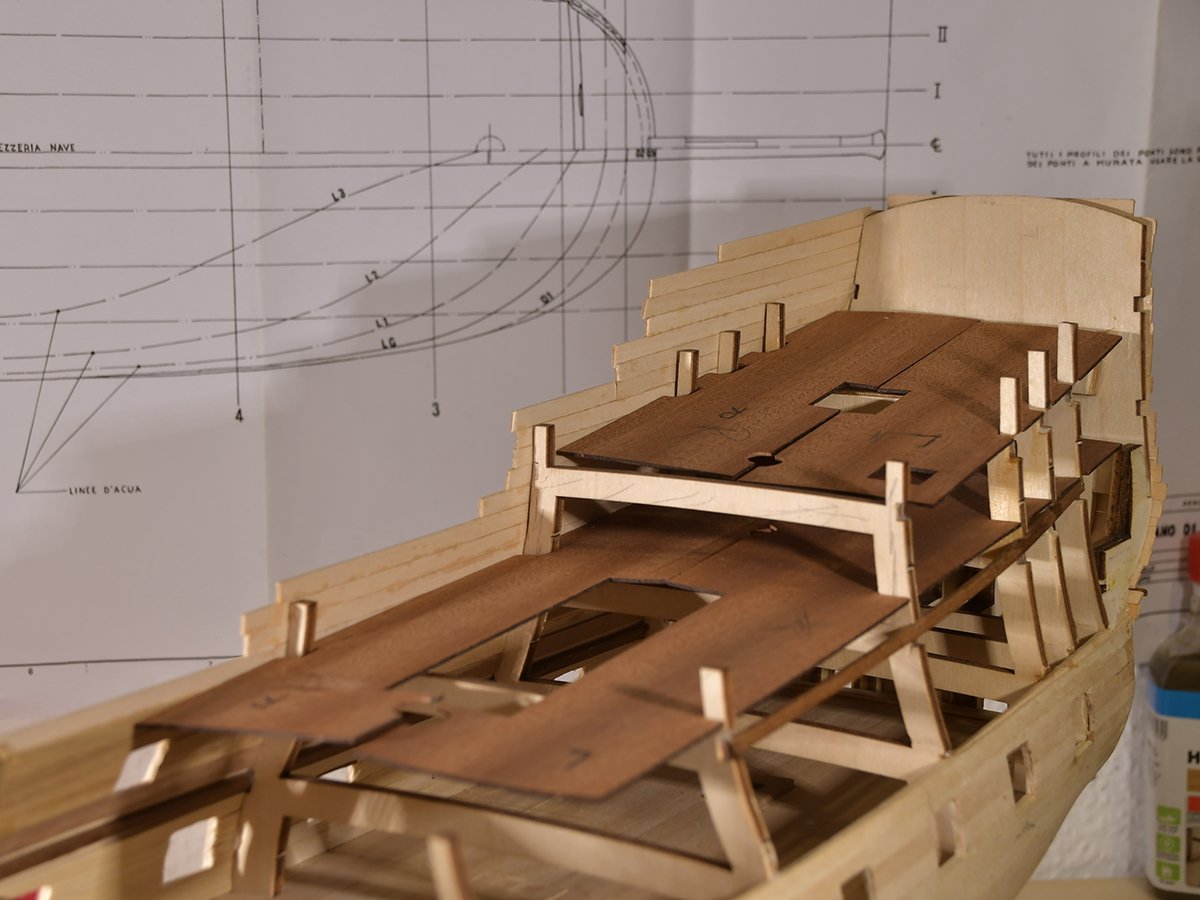
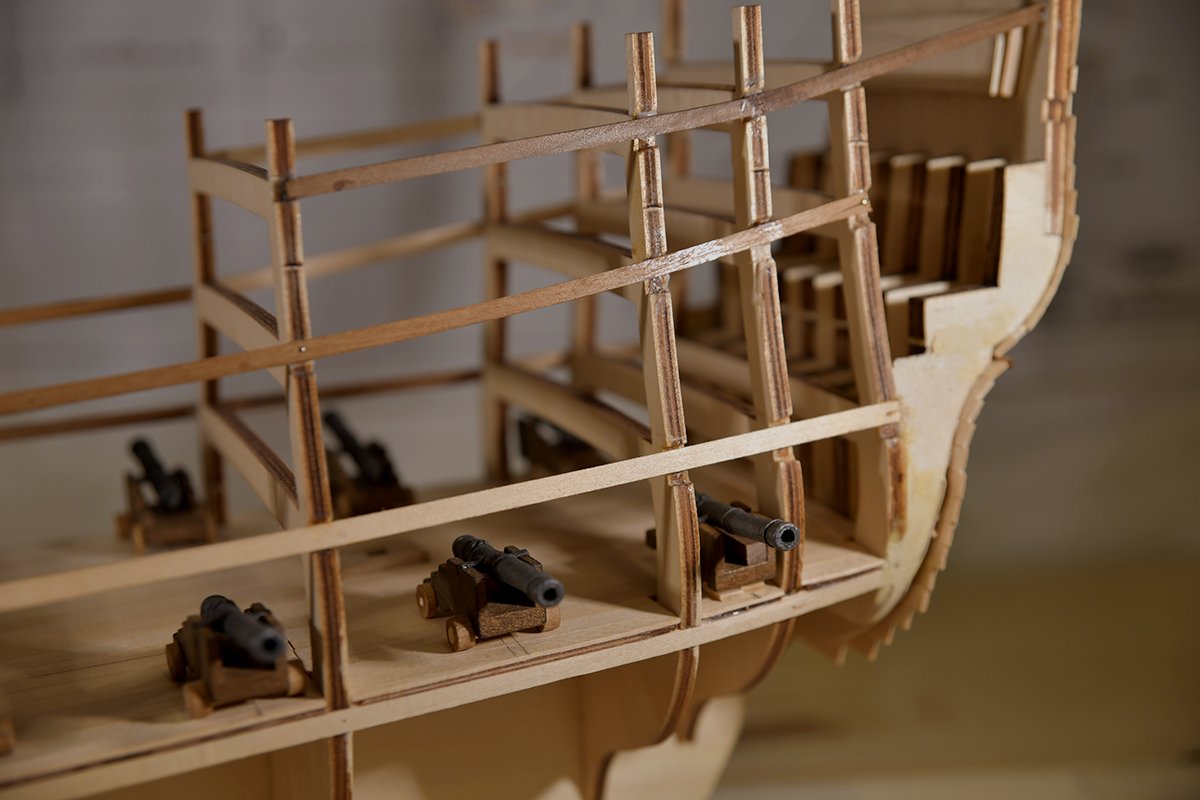
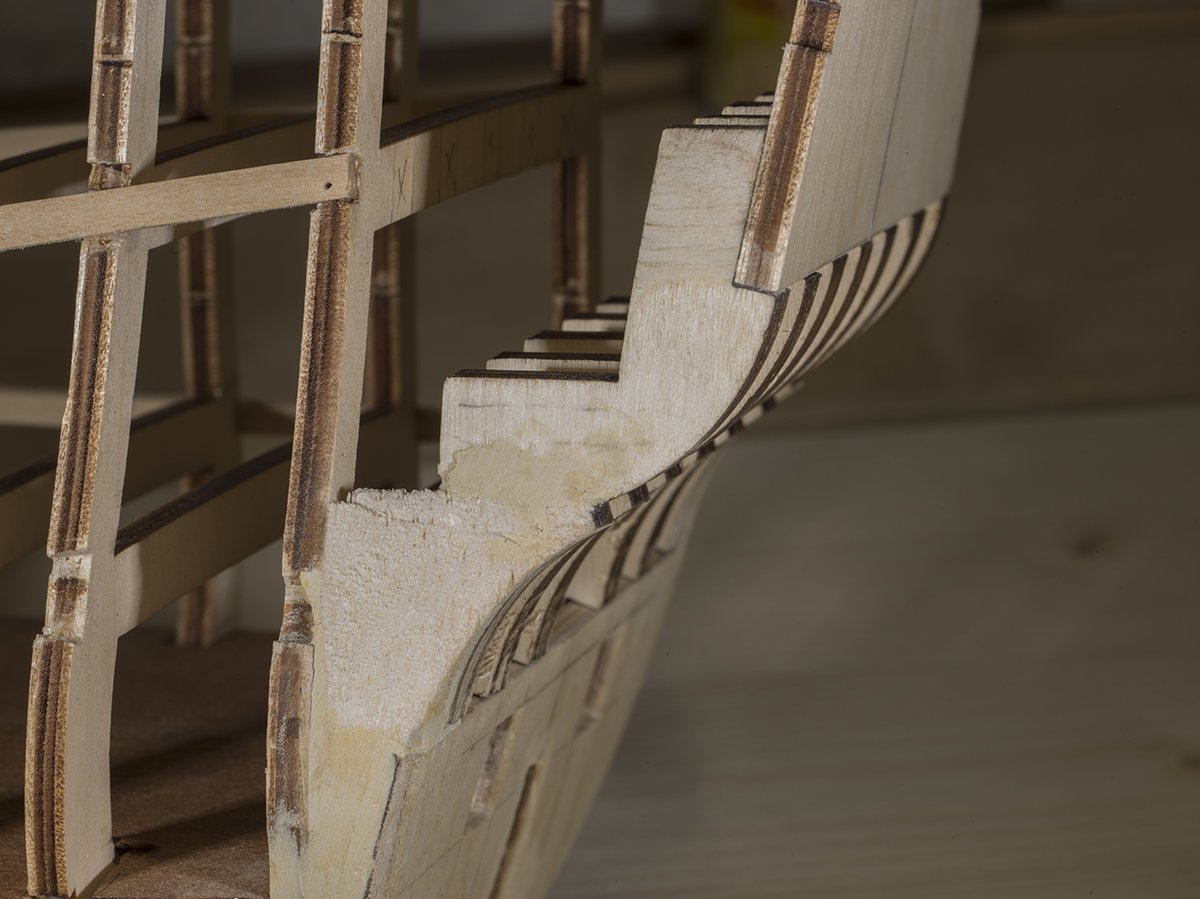
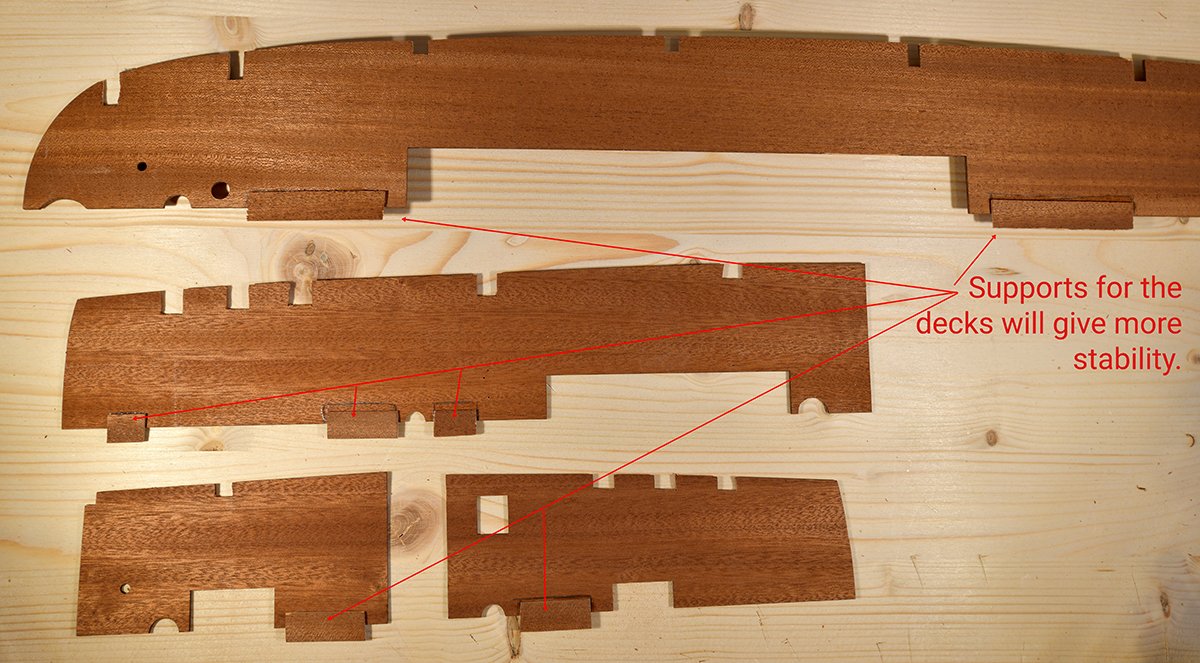
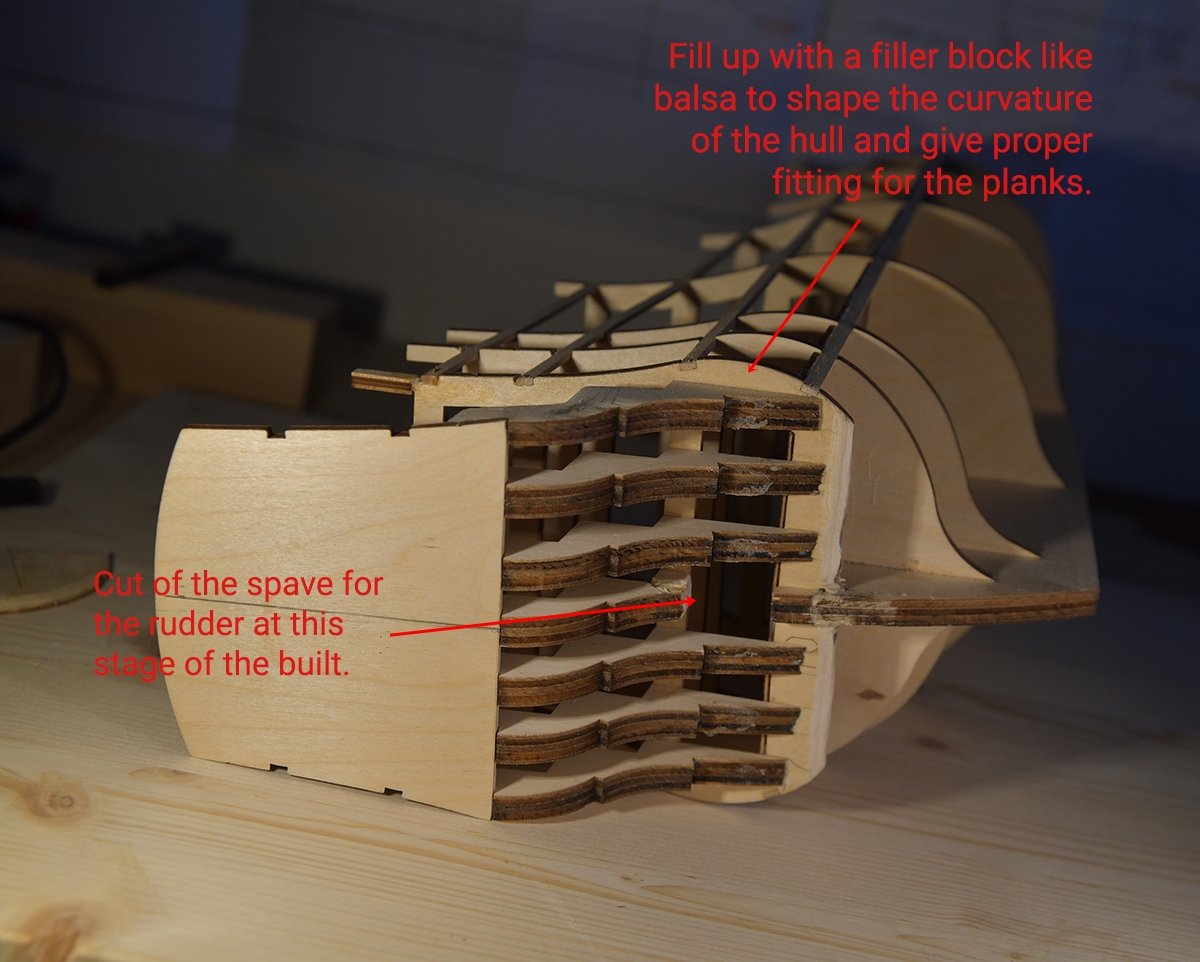
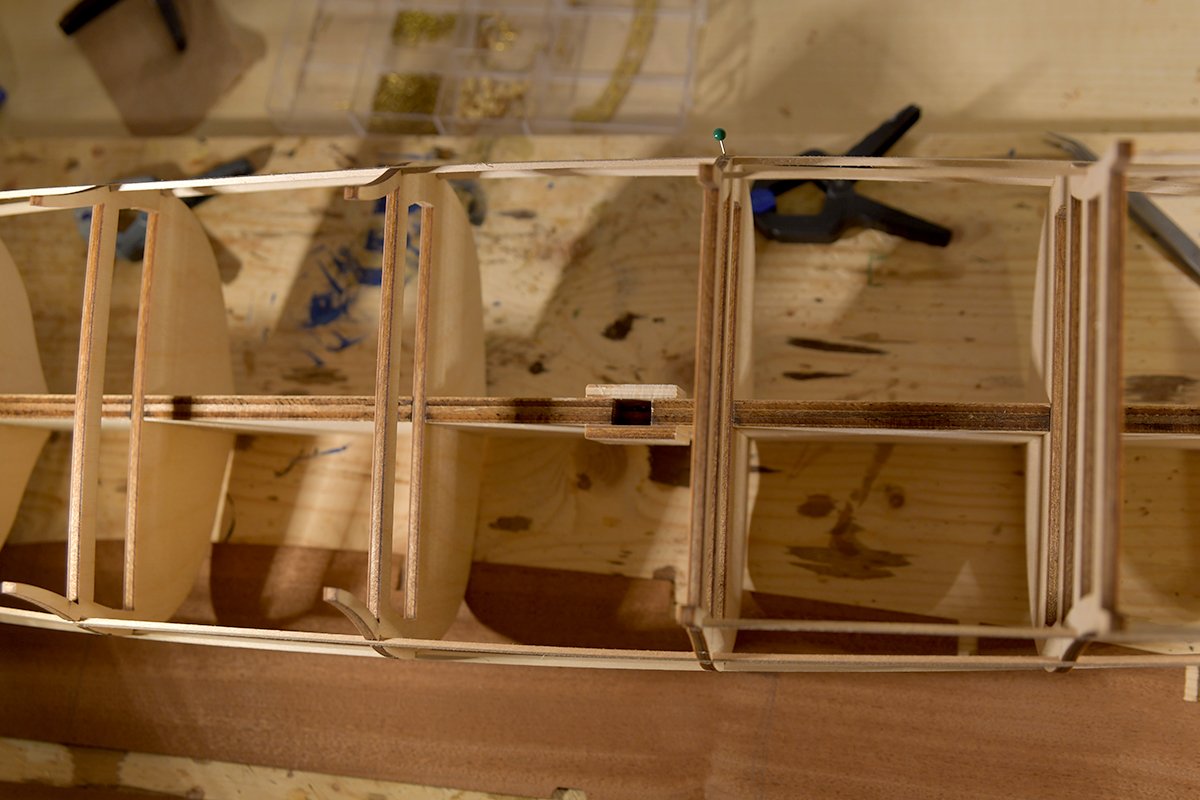
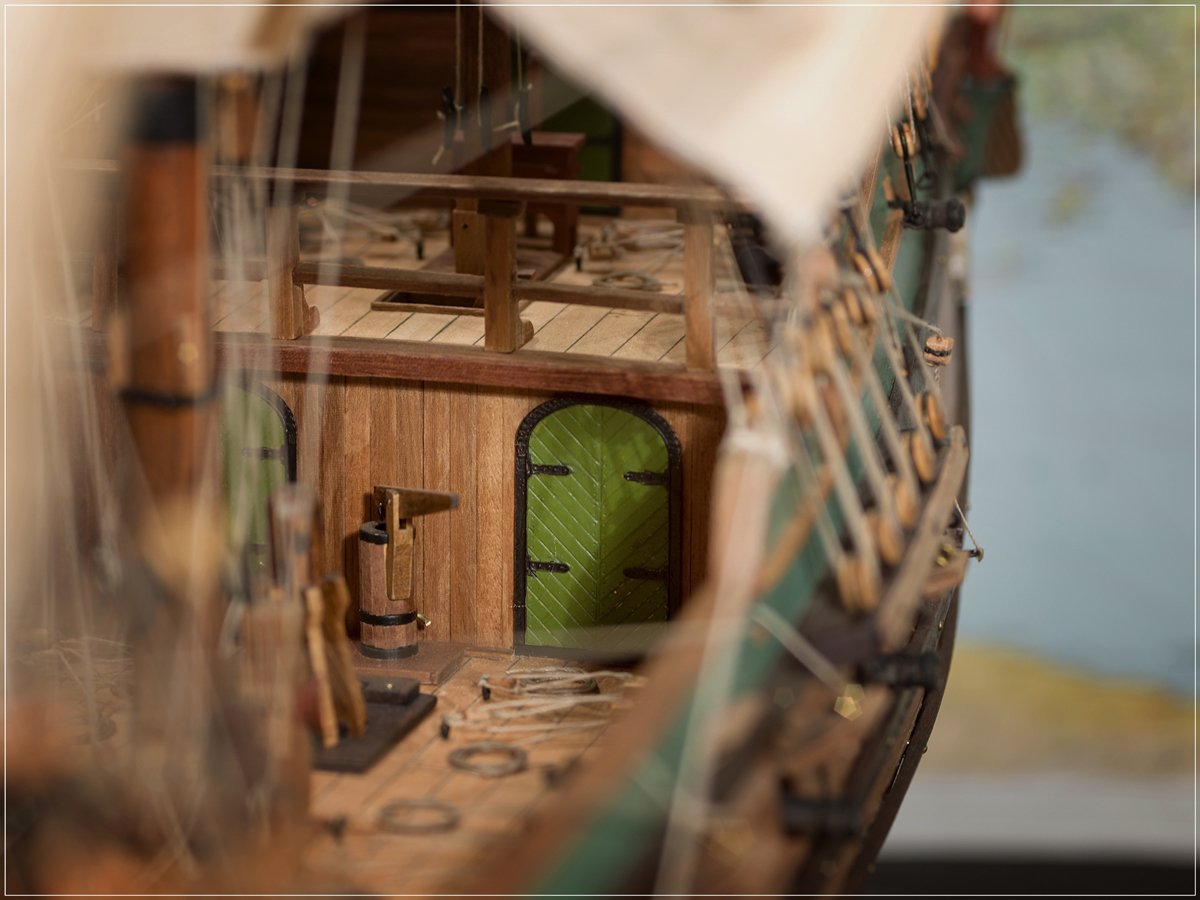
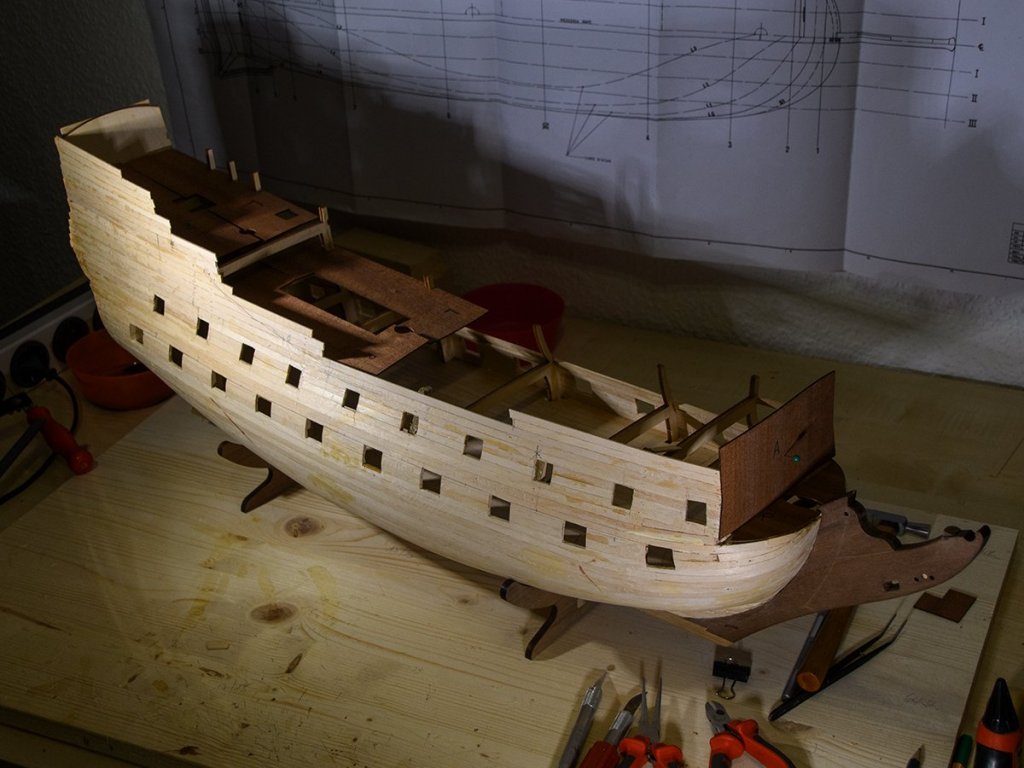
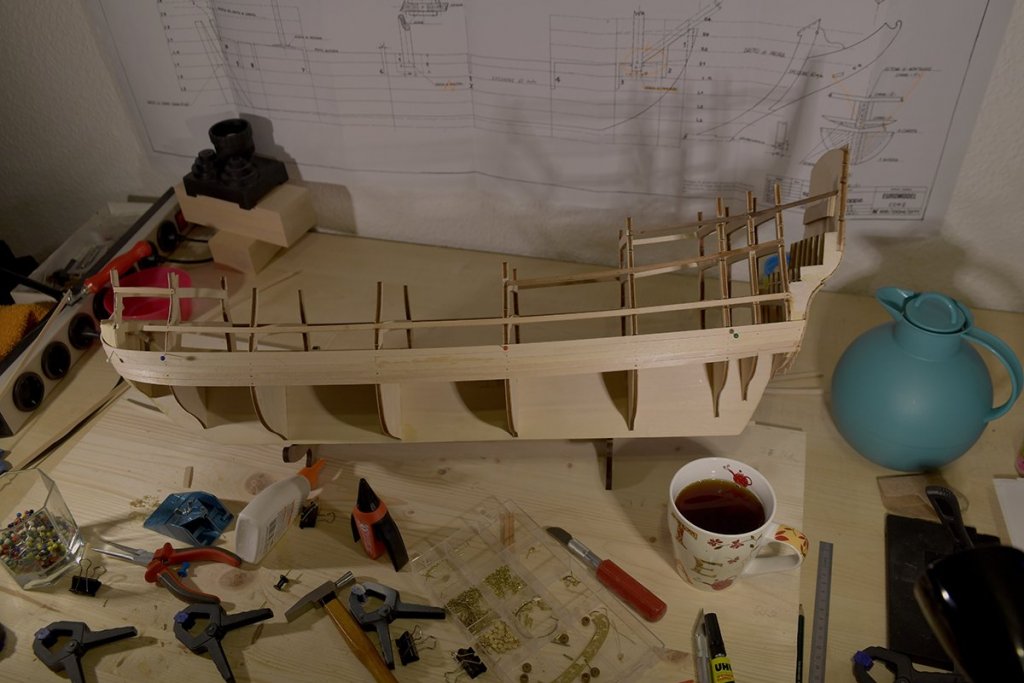
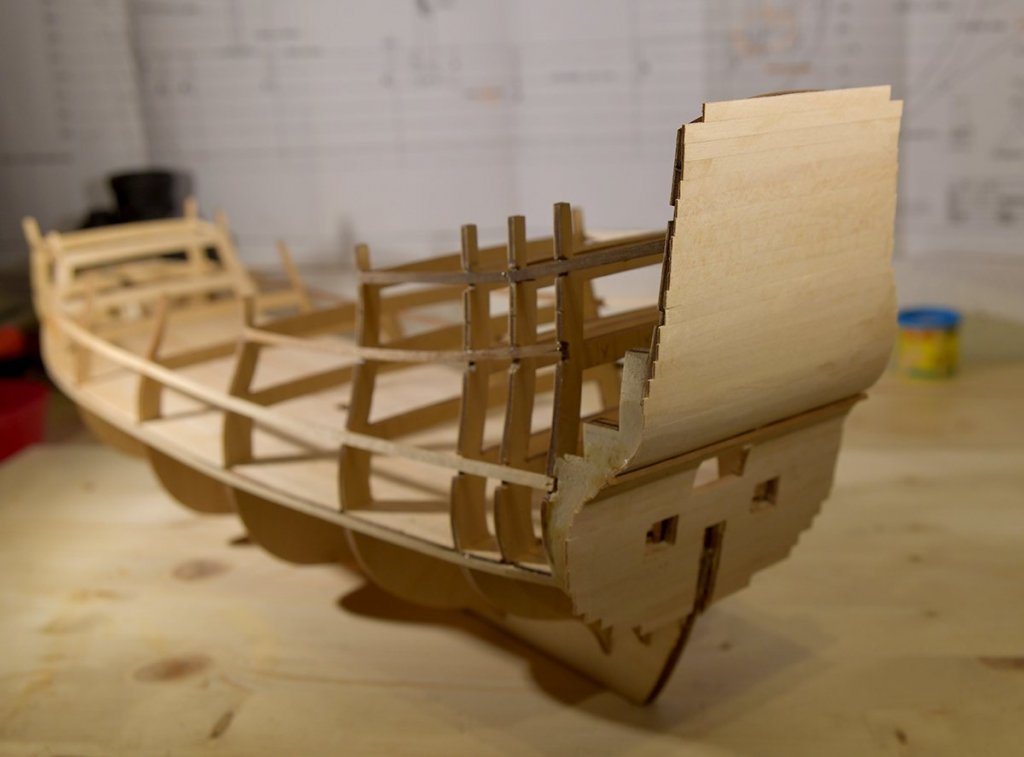
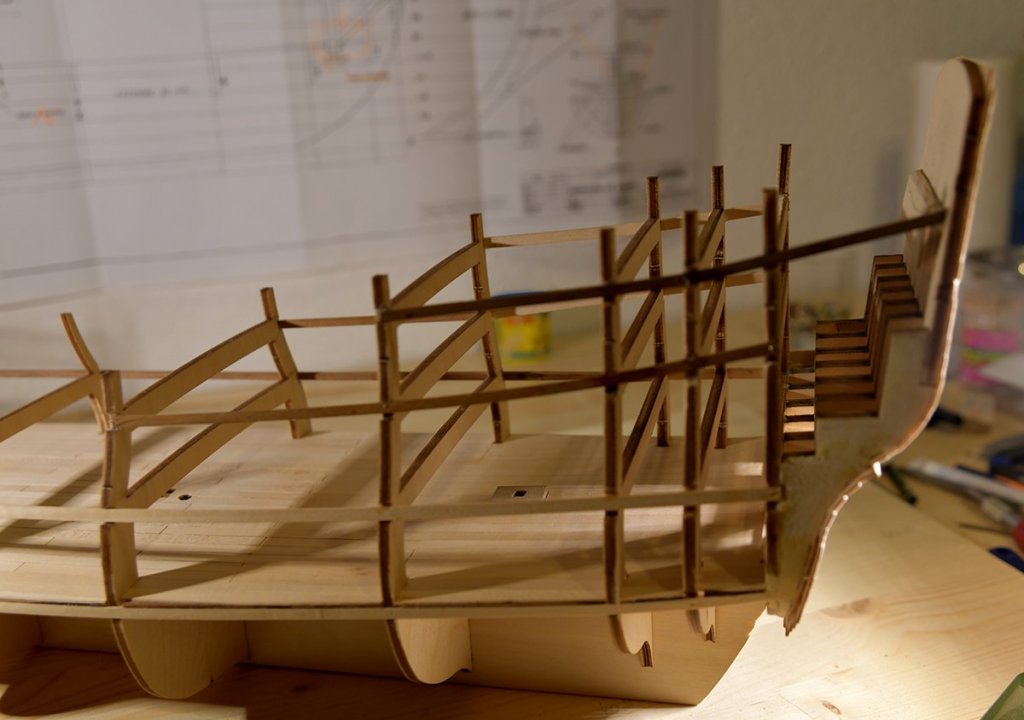
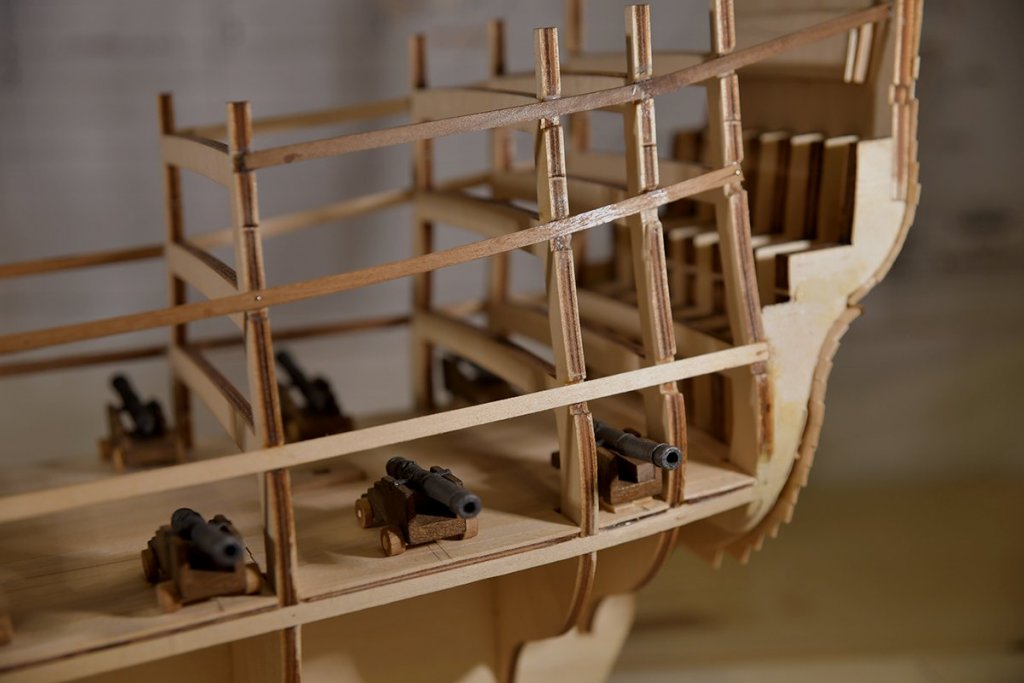
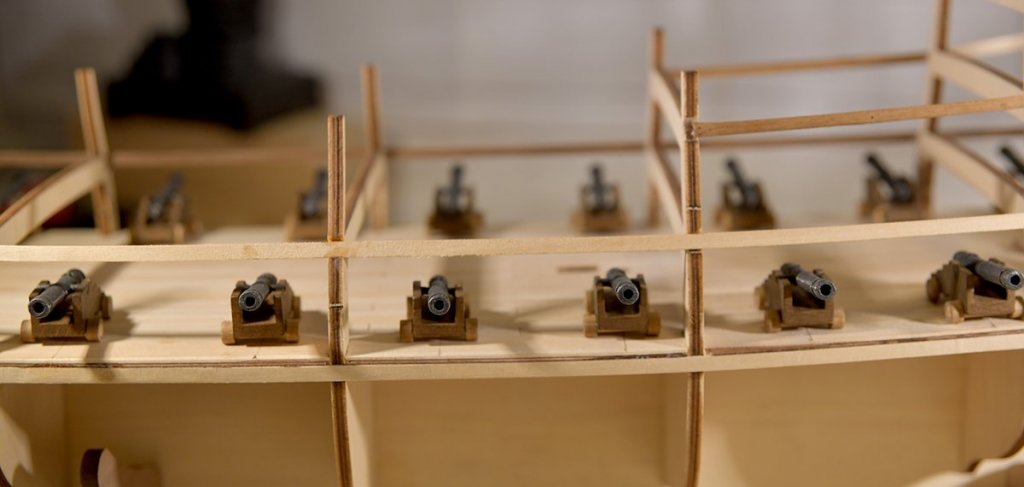
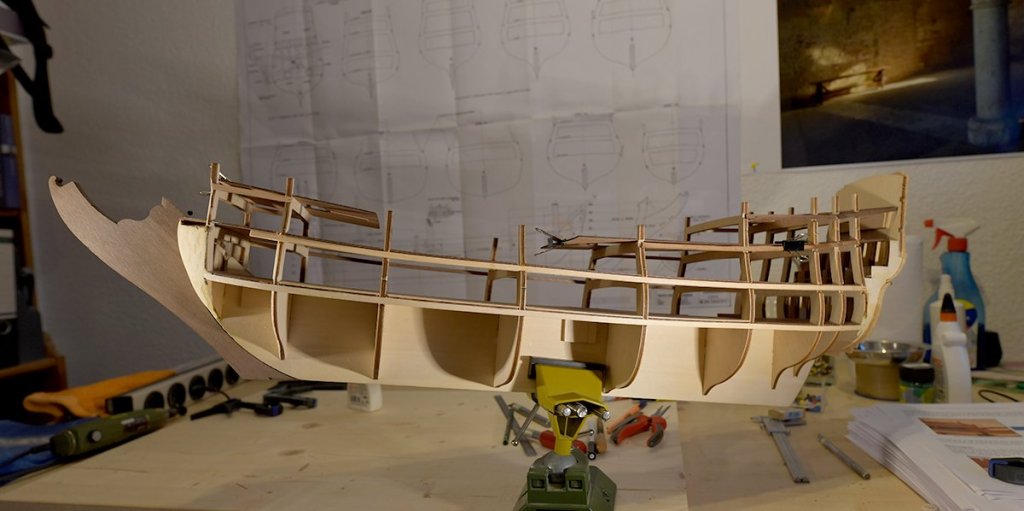
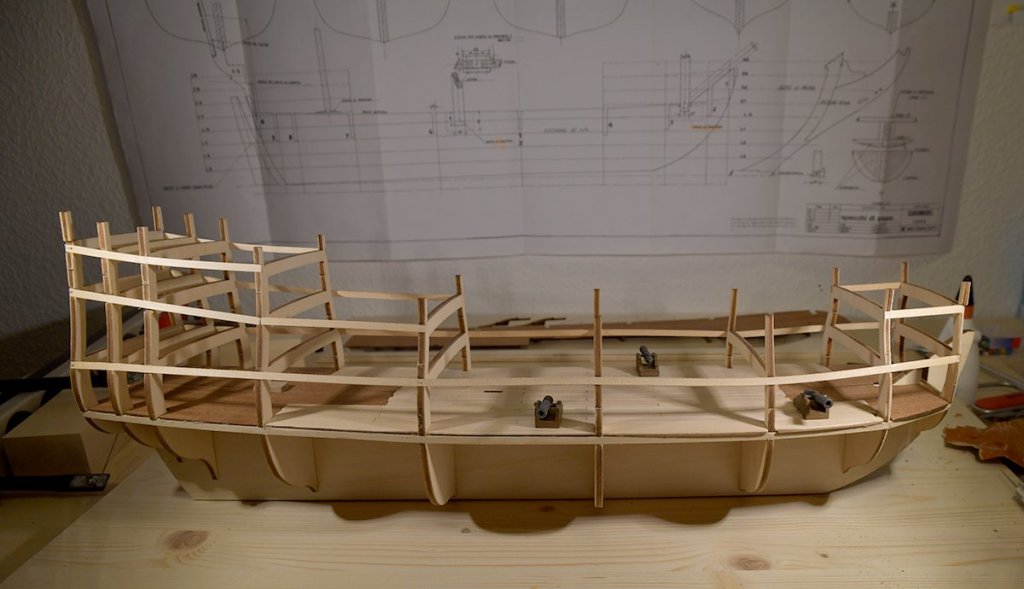
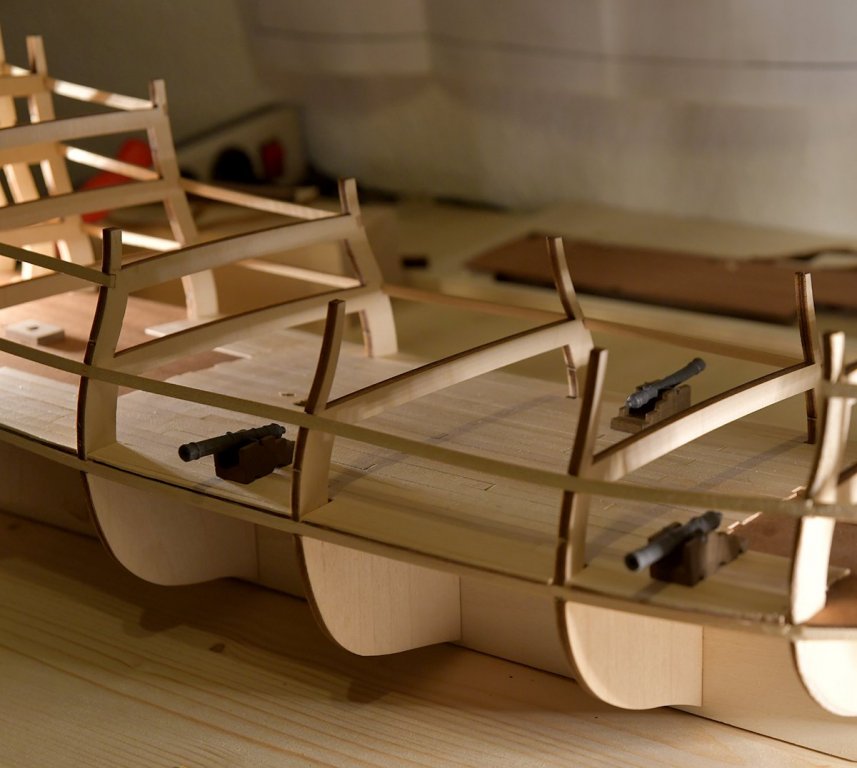
Hello mates, after the holidays a little update about my work on the FW. A mentioned before I completely renewed the stingers (except the already installed battery deck). It's quite a lot of fine tuning to do, but at least you get the stringers fitting. I was surprised - although this is my fifth built and I should be used to it - that especially this detail work is so much relaxing. The more you understand the function of the parts you work with the more you become a part of the ship. I always feel like travelling in the time... often I listen to Youtube-Videos that tell me about the historic navy. I have prepared all decks for the later use, especially I fixed some supports on the lower side of the deck halves. This will give more stability to the decks - as I hope. The bow fillers - I changed the timber: I used balsa instead of the provided limewood - are in shape and all further preparations are done. Next step is to create the guns on the battery deck. As this guns will no be seen later - just the barrels go through the ports - I will only make some basic work - gun carriage, wheels and the barrels. There is no need for rigging. Later for the visible guns on the main deck I will take more care for a detailled and historic correct impression. The interpretive documents by piratepete show a very good way to reach this goal. The first planking will be the next challenge... I think I will start next week. Cheerio Max


-
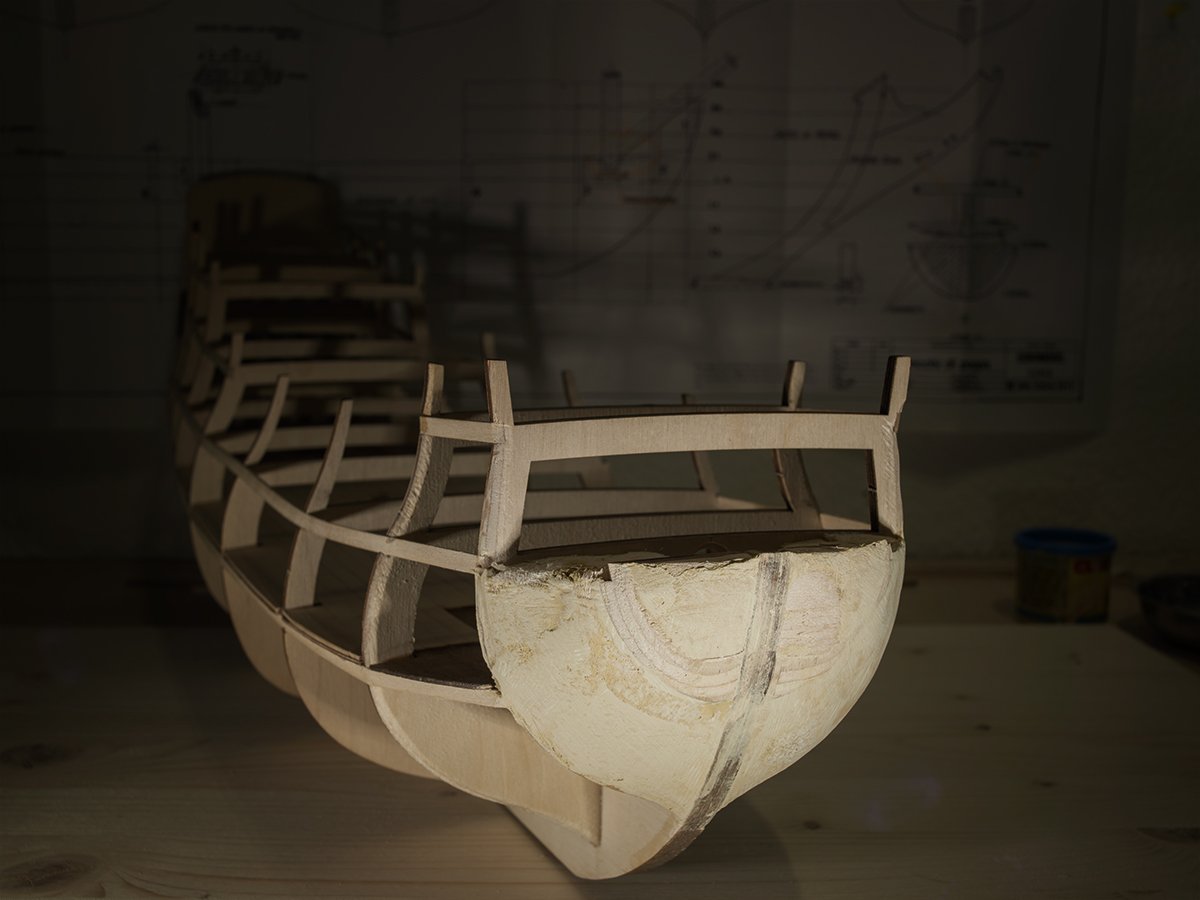
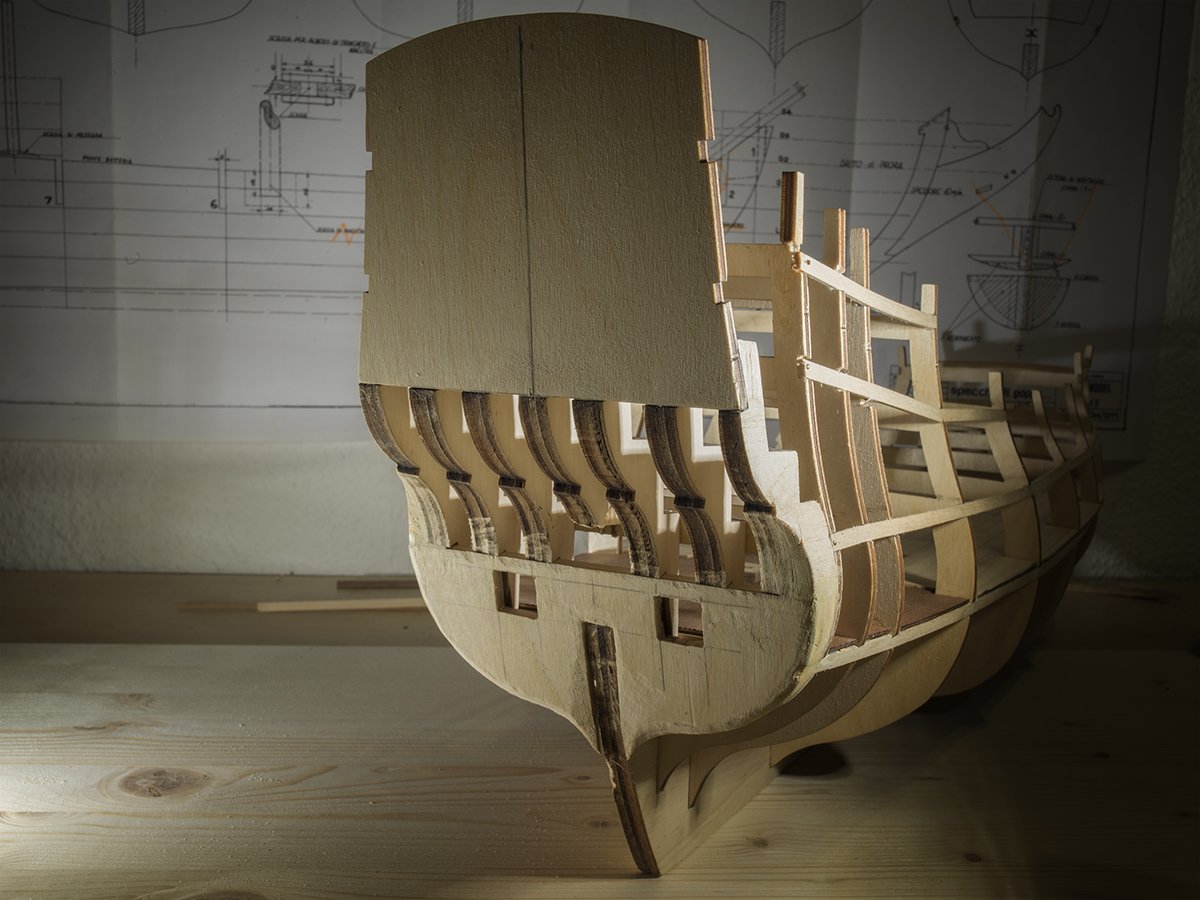
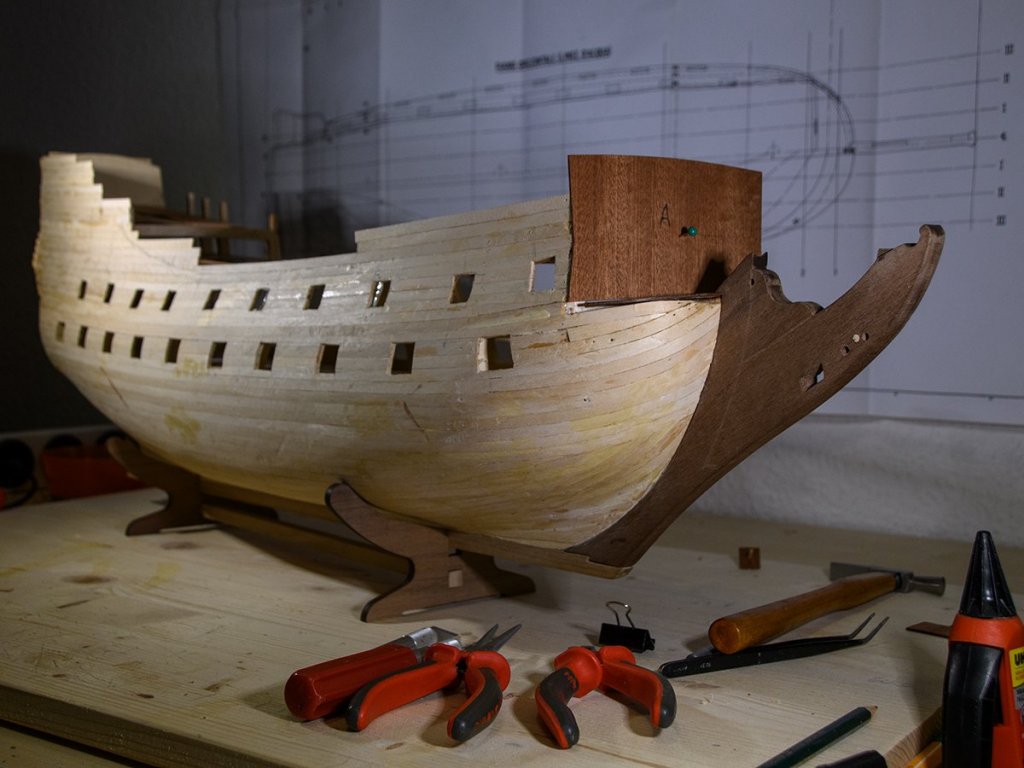
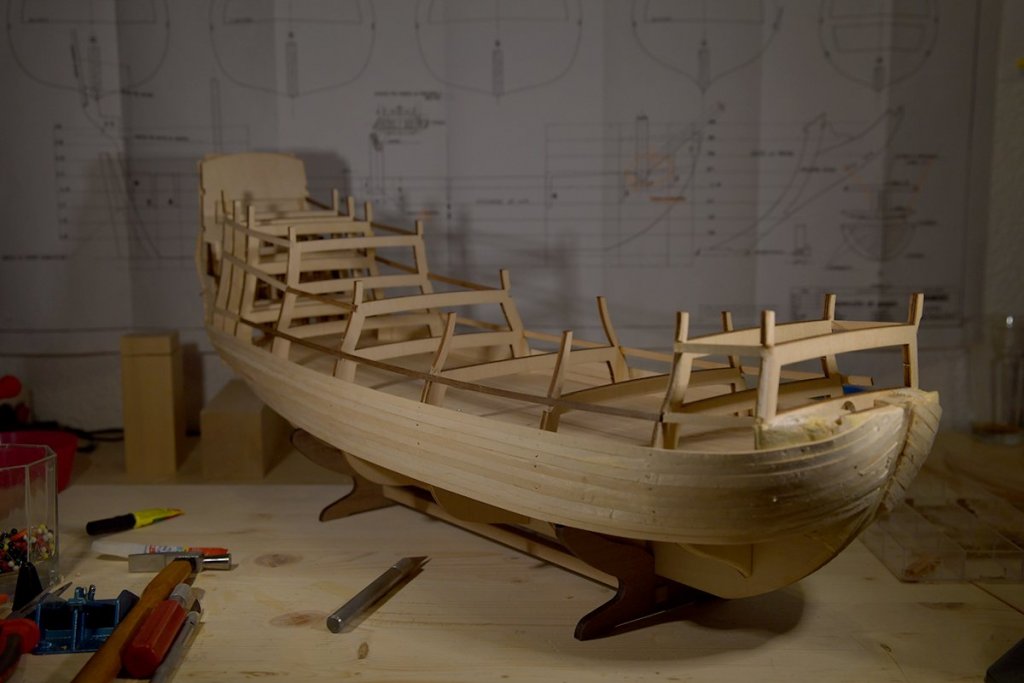
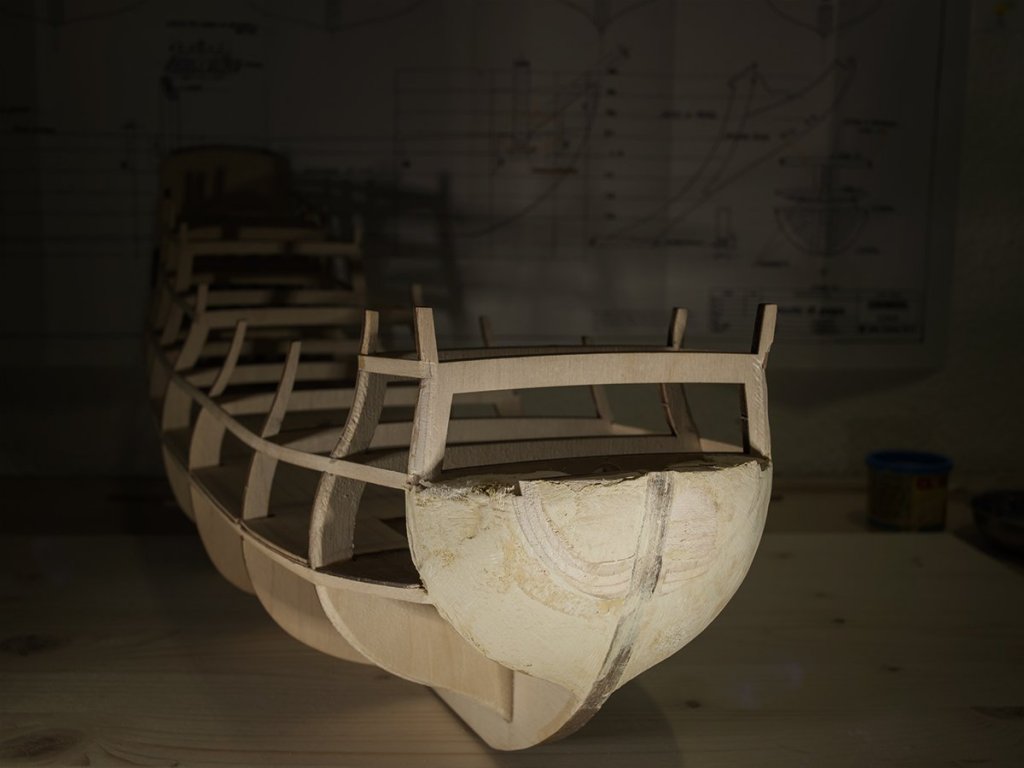
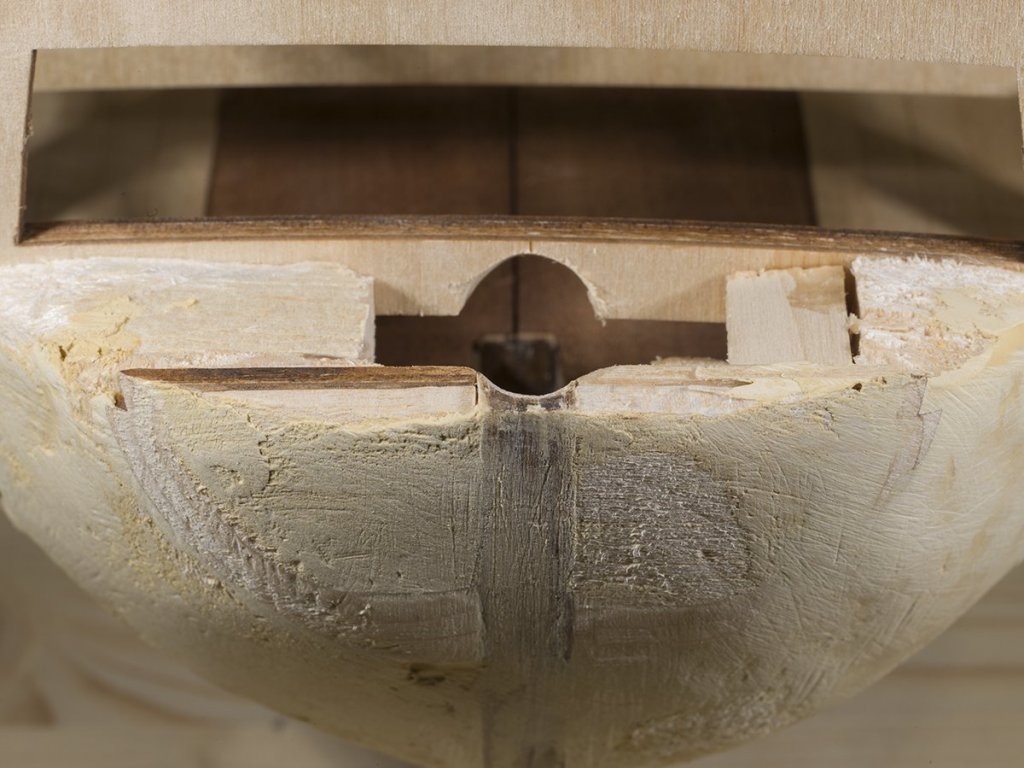
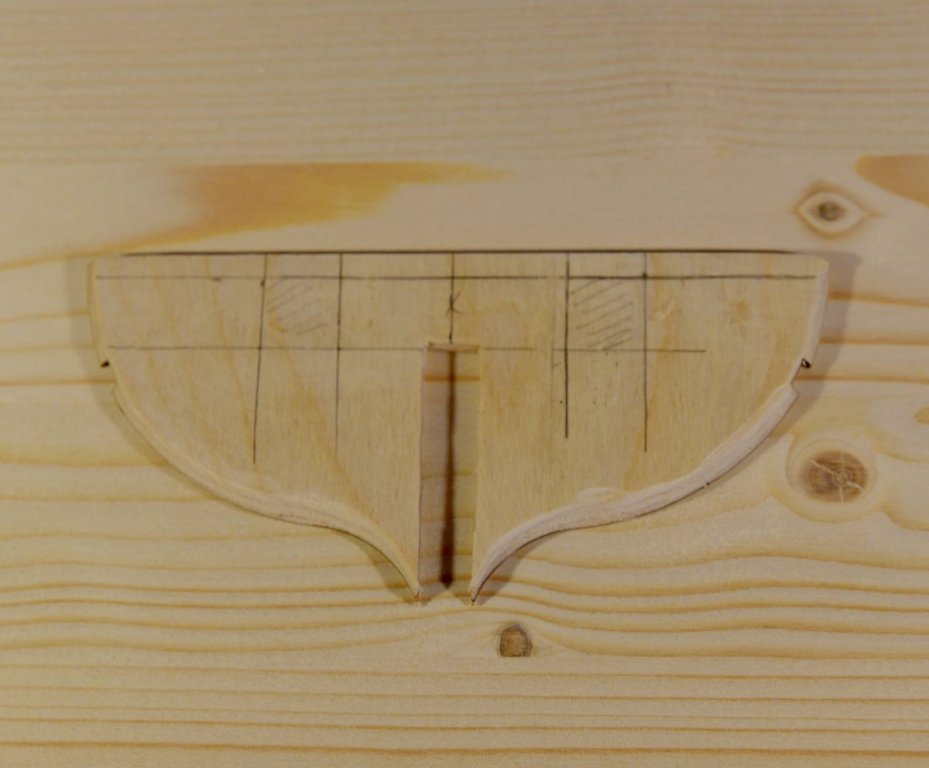
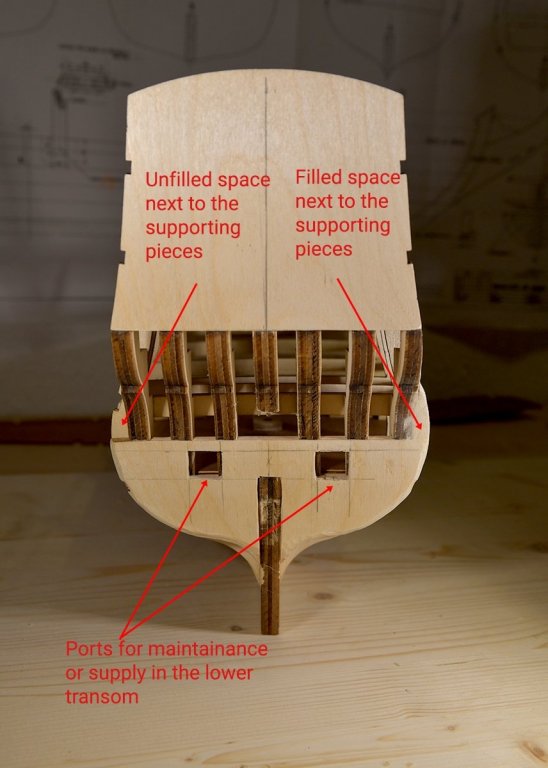
Hello again time for an update (I am in vacation from mid Dec to mid Jan - so I have time enough for my shipyard ) Working on the stern. Up to now all works quite easy and good. As piratepete says in the interpretive document you have to make a major decision - curved transom or flat transom. The parts provided are made for a flat transom. It's quite difficult to bend the plywood and the supporting pieces of the stern construction. I decided to take the way to the flat transom. It's my interpretation - and so it's ok to me. Nevertheless there is a lot of sanding and cutting off to do - but the plans are so good that you understand all - as soon as you have understood the plans But nothing is a problem just a very calm and contemplative way to the final ship. As usual some pics in the attachement. Cheerio Max


-
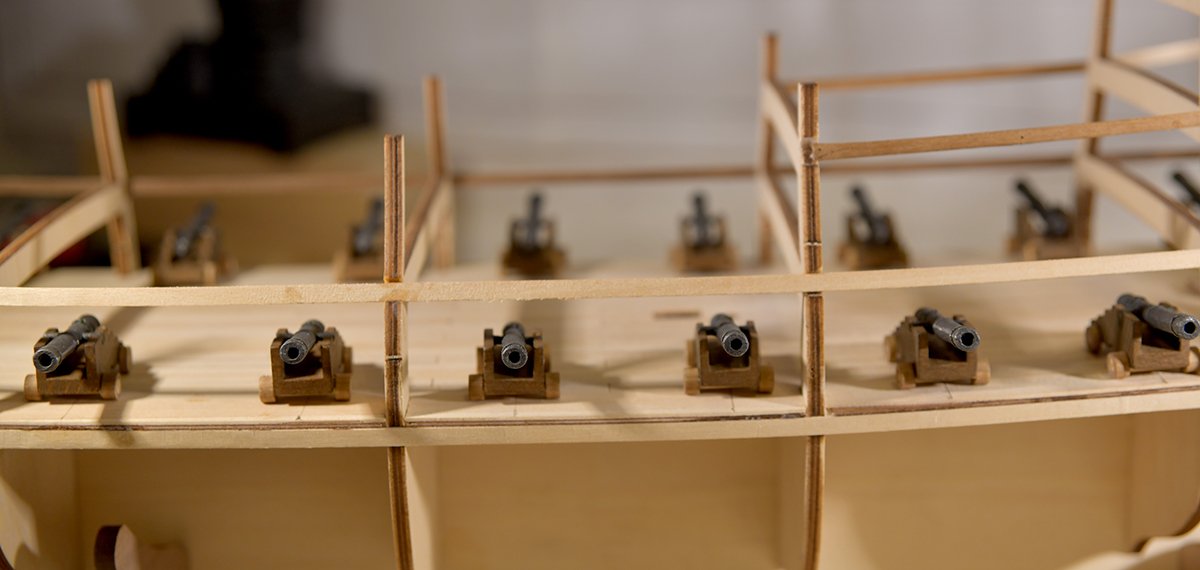
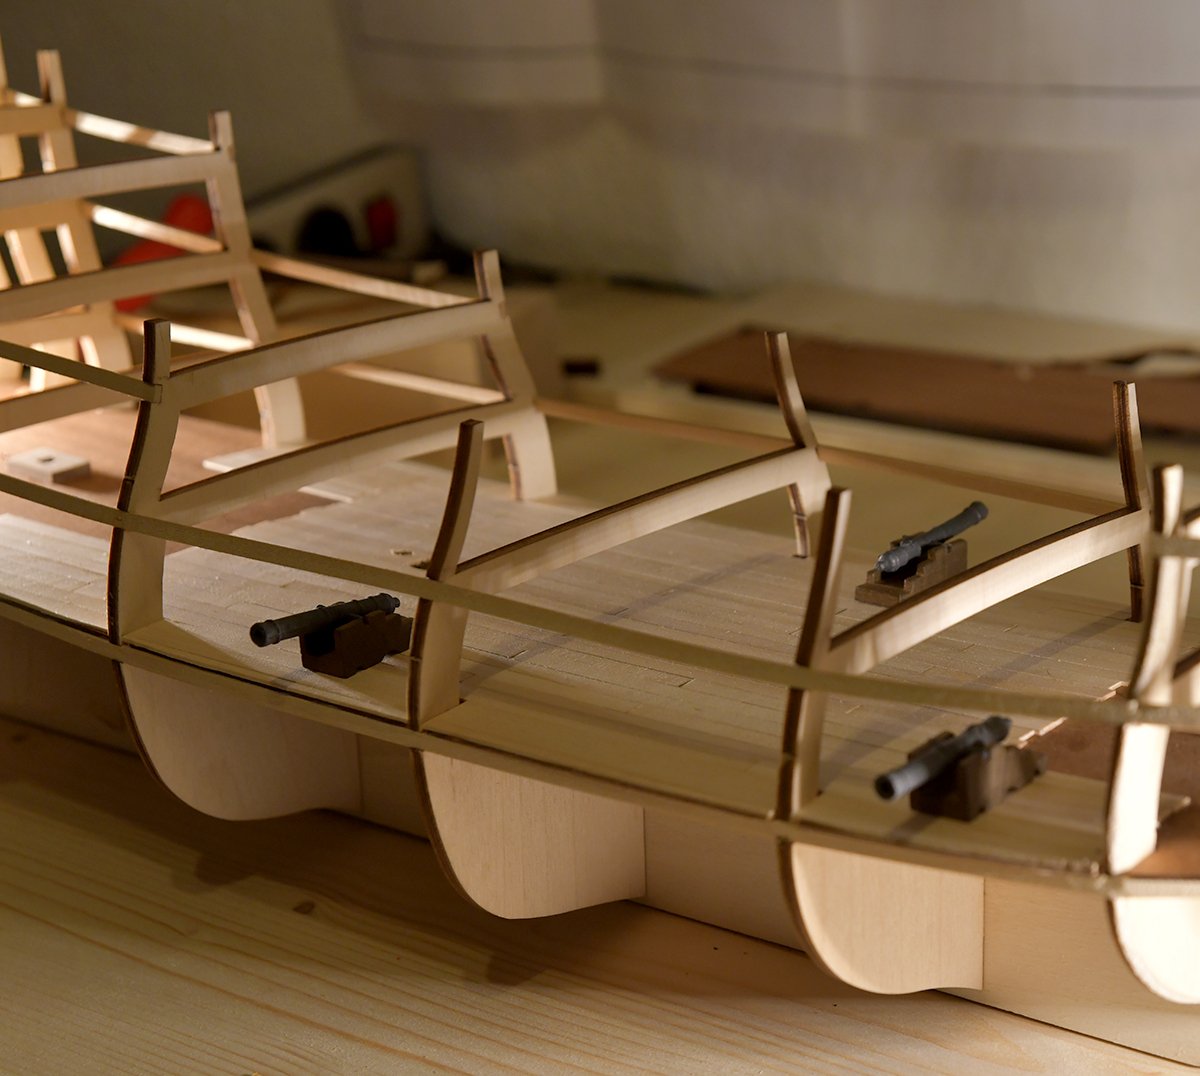
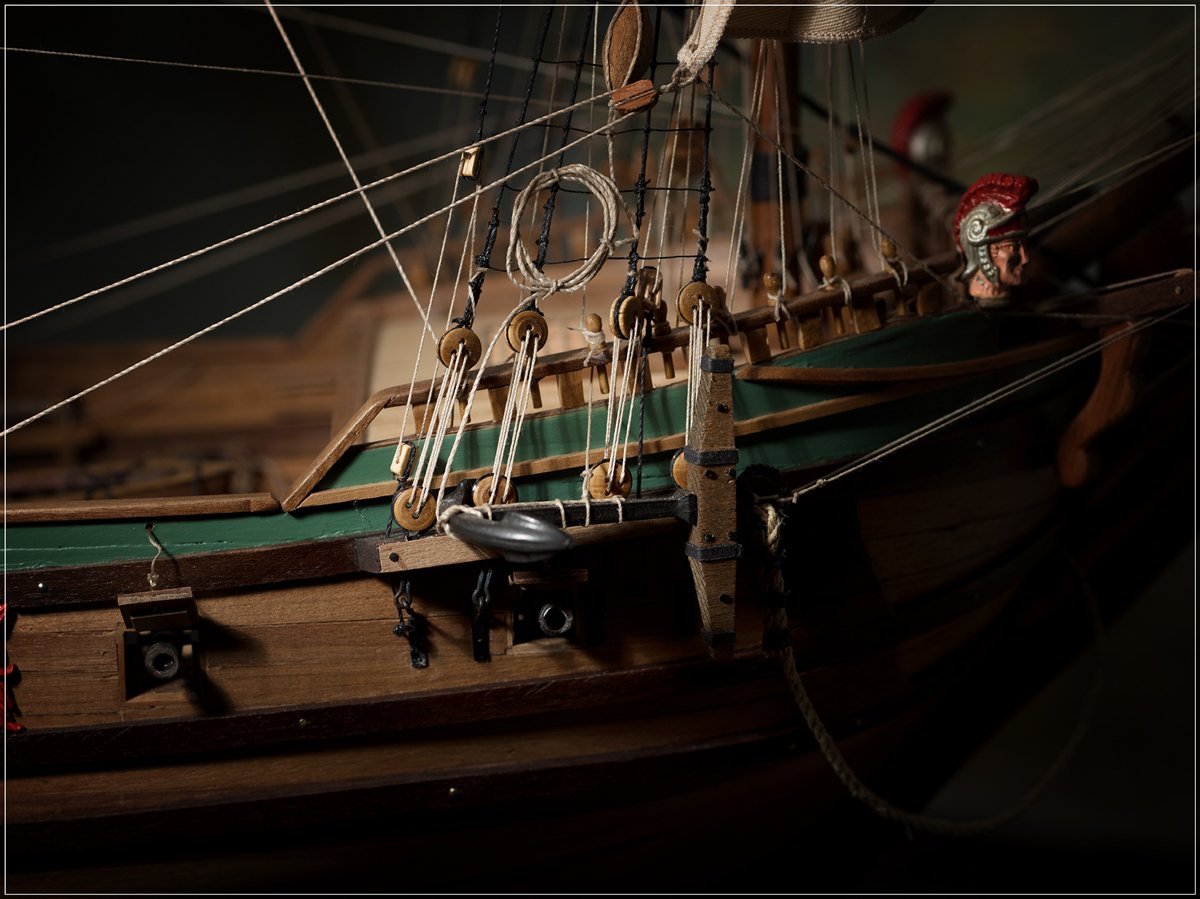
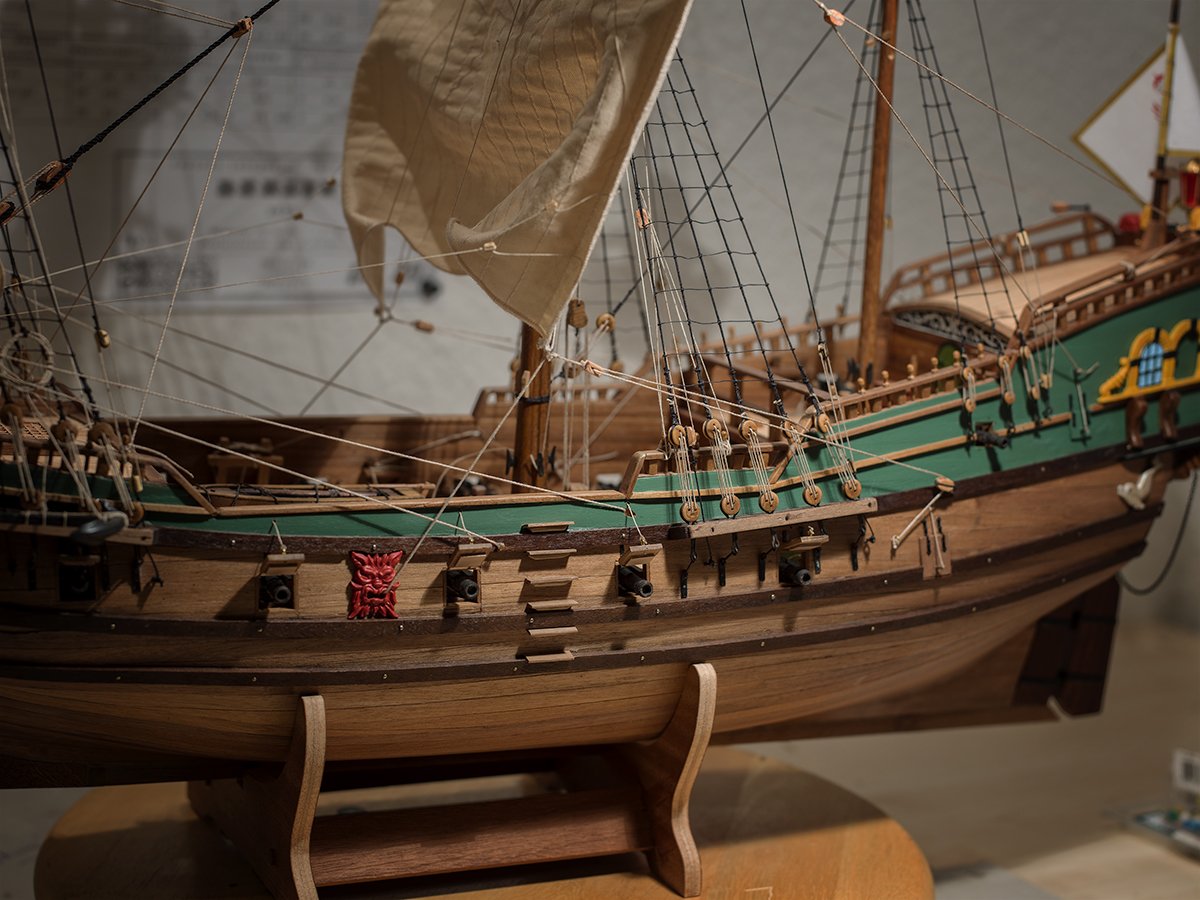
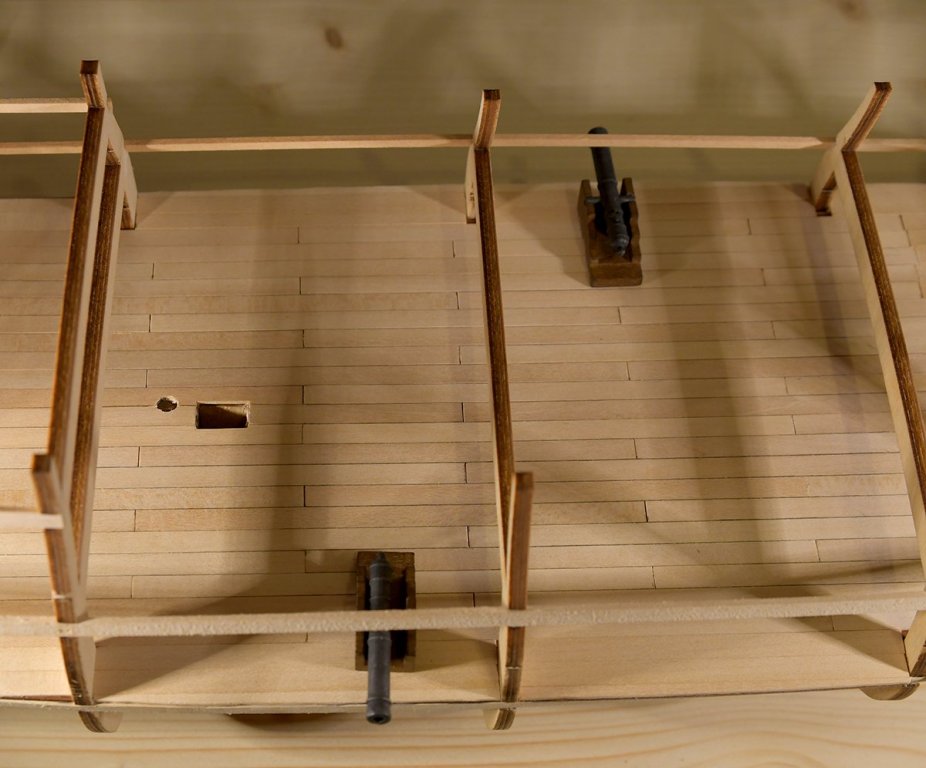
Hi mates and friends another update: I planked the battery deck where it may be visible through the gratings. I used maple strips as Mr Moonfeld says the decks where planked with light wood. The provided walnut seems to be too dark for deck planking. You can see the size relations of the cannons to the deck in the attached pics. All good so far - just thinking about the Derfflinger by Euro Model and the Royal William... Got another seven years to get retired Cheerio Max
-
Hi Mark just found the gallery pics from your FW. I see you painted all decorations in gold. I was thinking about to paint them in a wooden brwon color and a kind of bronze. I will try both and compare... but this is future At the moment I plank the battery deck where it's visible through the gratings and along the guns place. I will also use maple for the main decks and not the provided walnut. I don't like the dark color for the decks. I hope in some years my FW will be a s beautiful as yours... btw - you built a flat transom? regards Max
-
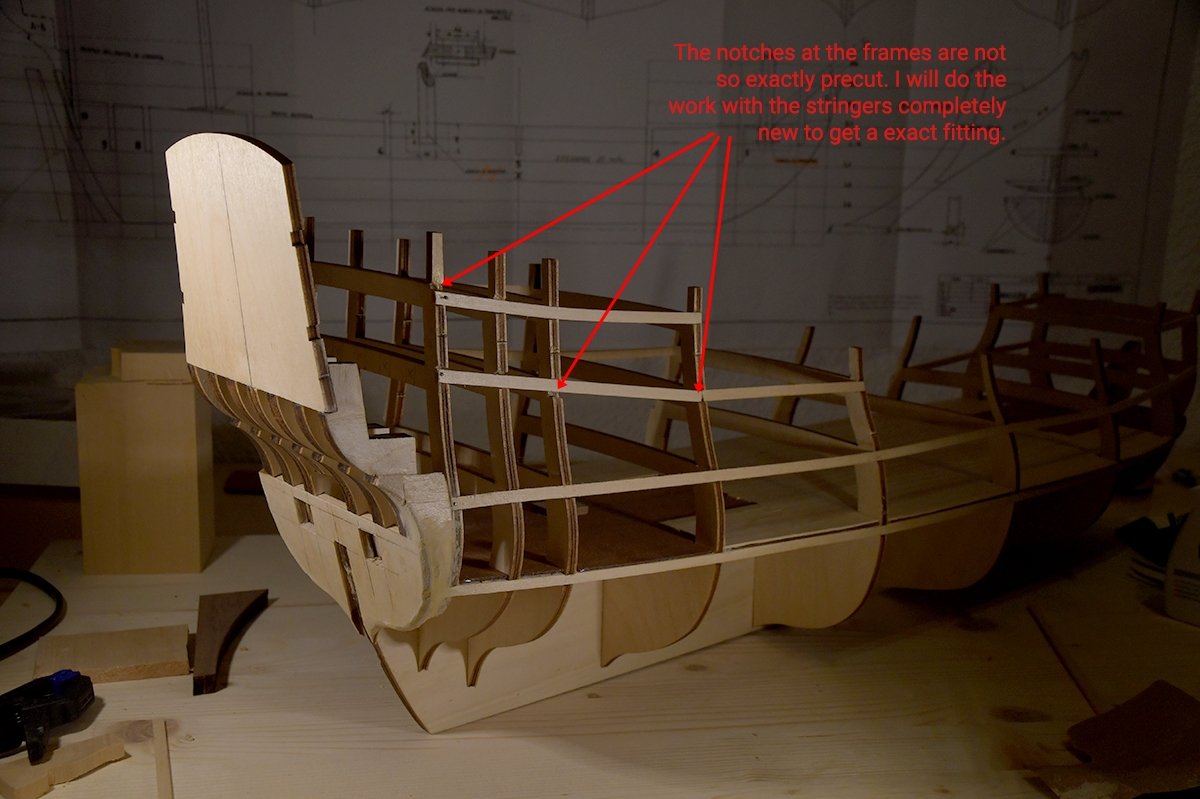
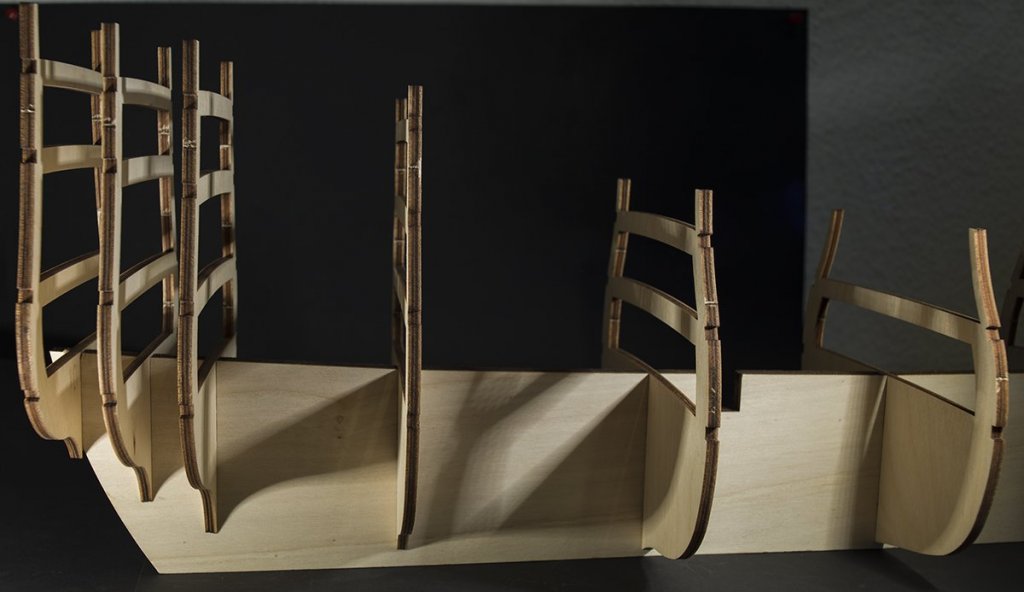
Hello friends and mates, a small update to my FW. I started to construct the hull and all went good so far. The frames were excellent precut, almost no further work had to be done as the usual. Nevertheless I was surprised that the notches in the frames for the stringers are not as exact as they should and of course could be. There is quite a lot to work with this notches to get the stringers so tight and straight that they will fulfill their job and fix the decks. Oh... the decks... another disappointing expierence. Although I controlled the precut notches they did not work properly. I had to widen all notches to get the battery deck fitting on the frames. I did not expect such a bad preparation by Euro Model... It's not a challenge you can't win, but in my opinion it could have been done better. At least all is ok and works fine. I glued the battery deck in its place and later I will plank the deck partial, were it can be seen from the main deck. Thank you for your attention - and as usual: some pics show the progress so far. Cheerio Max

-
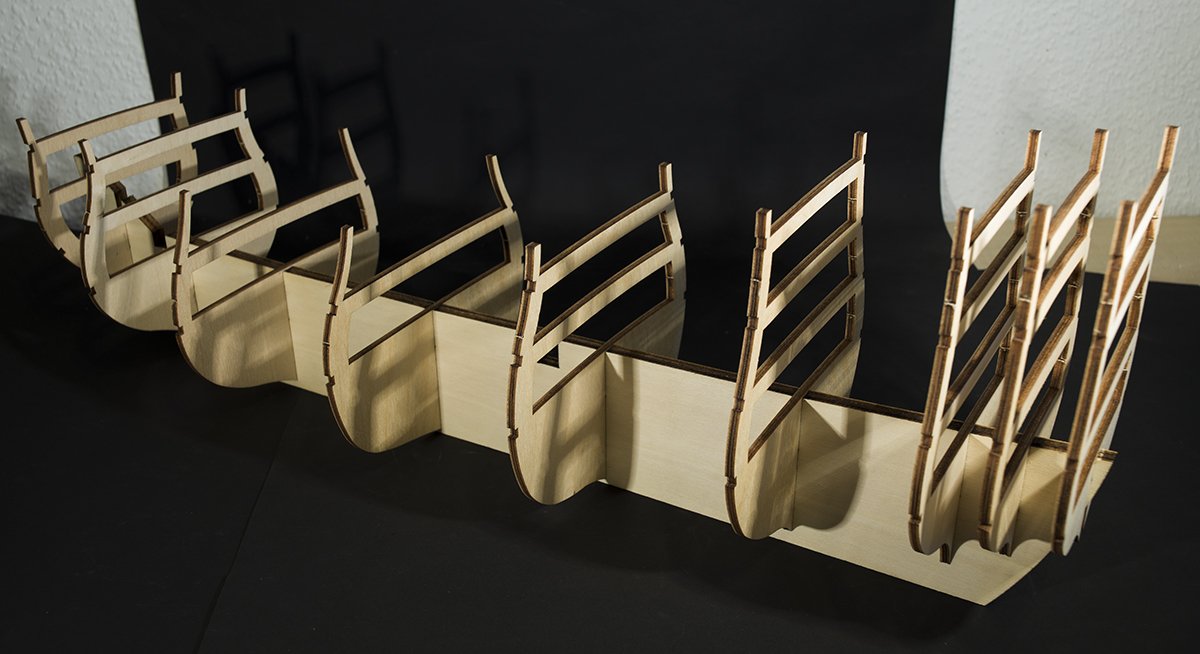
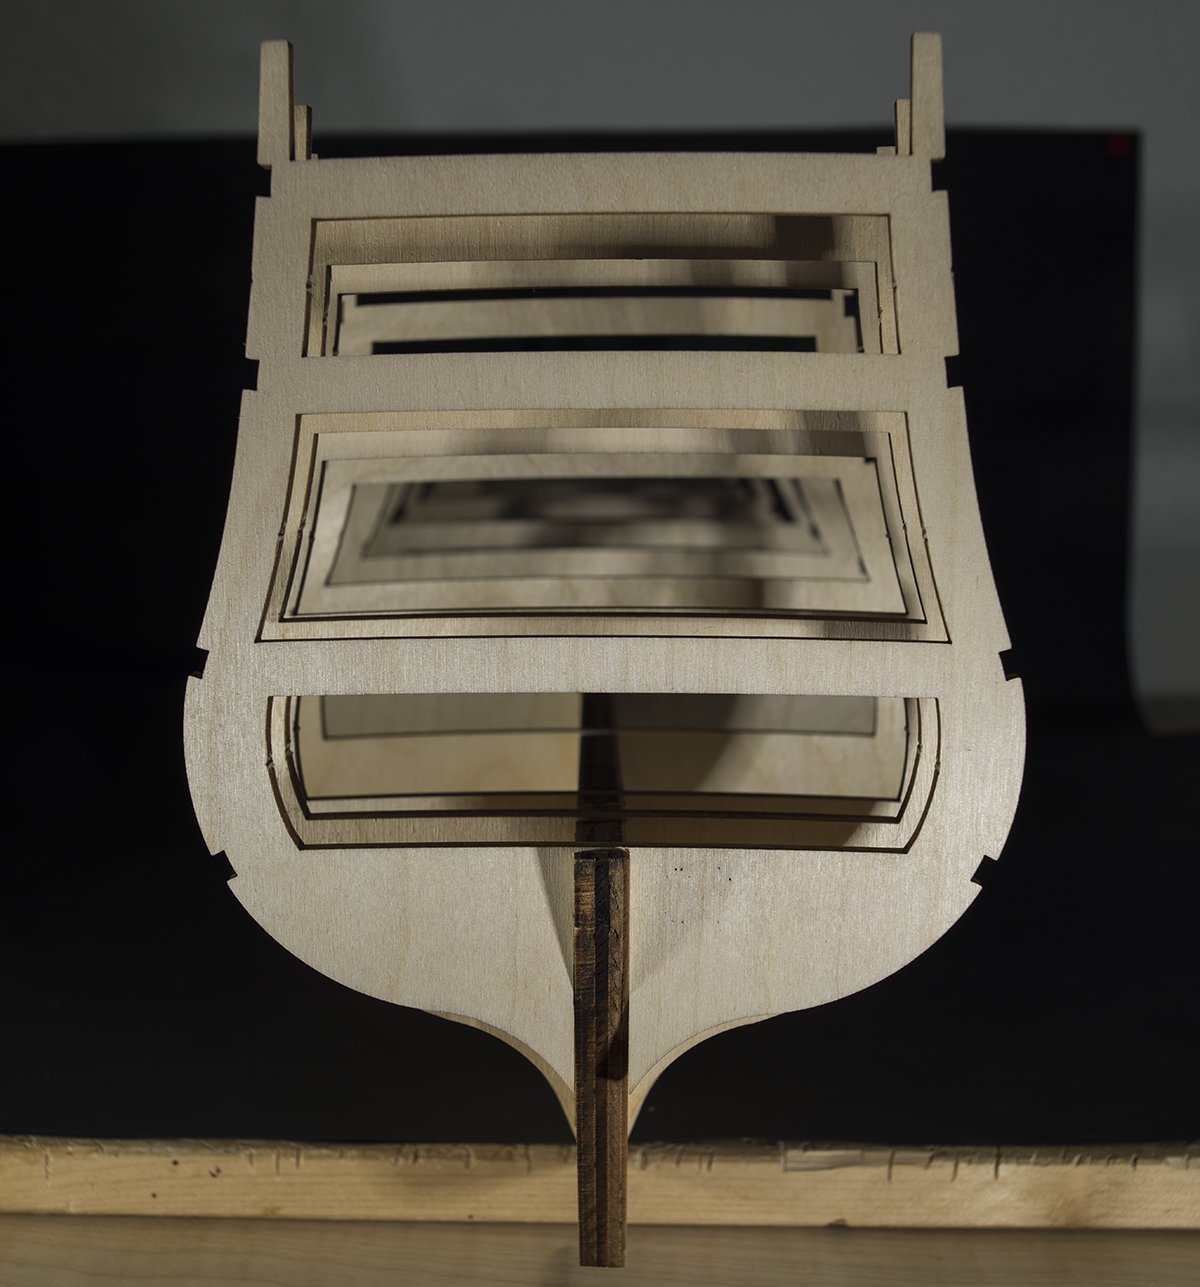
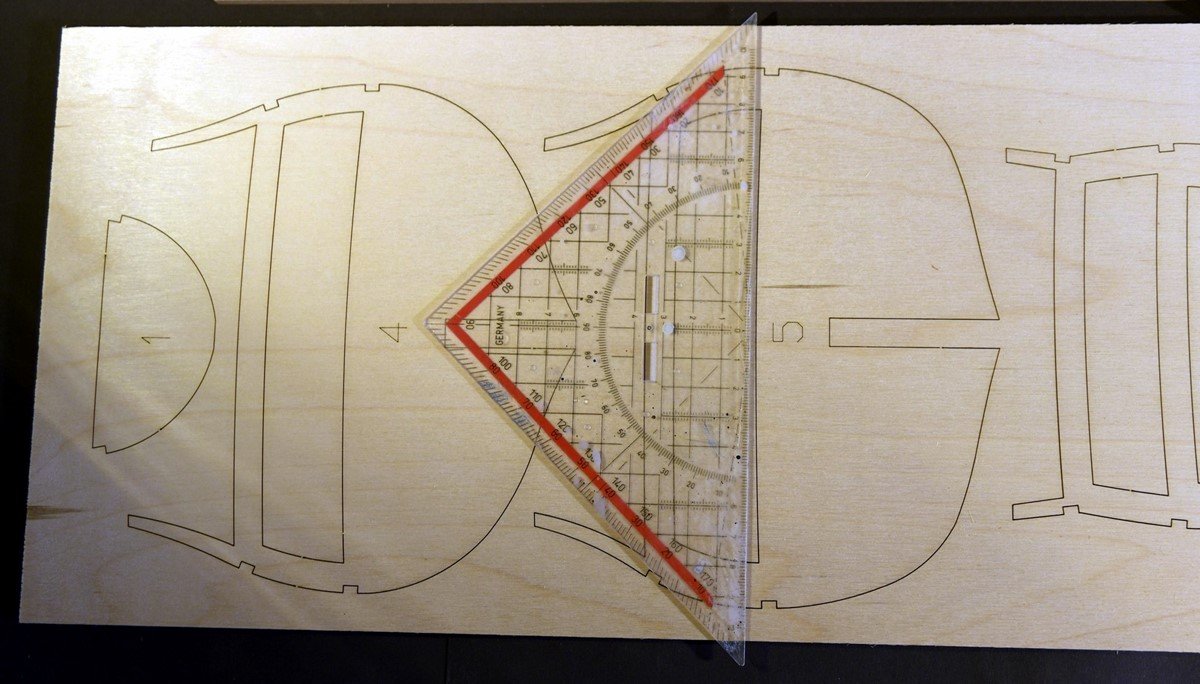
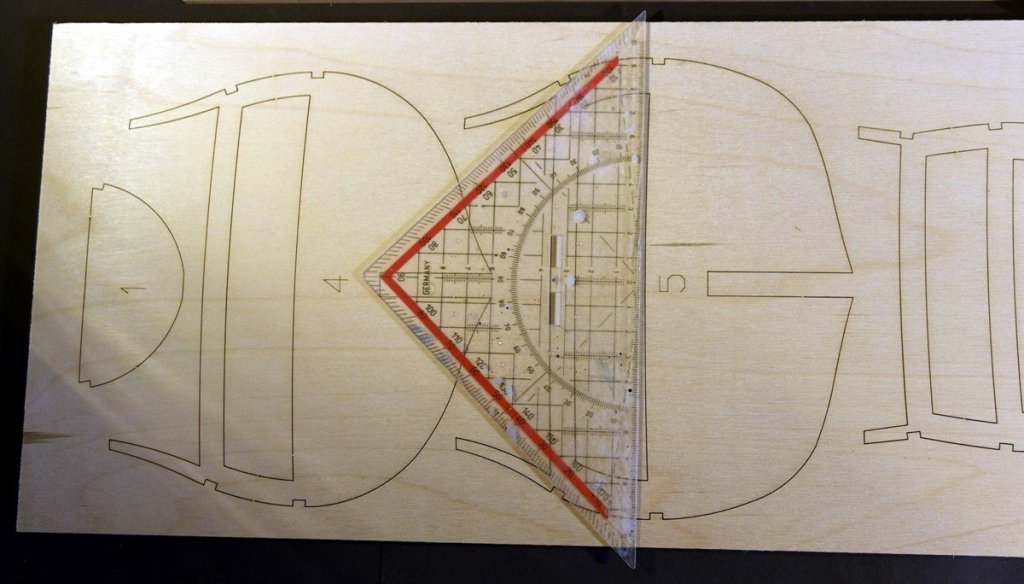
Hello again... I did the first step - I startet with a dry-fit test of the keel and frames. The first test is excellent - there is NO further work to do on the frames, the material (frames: 5mm plywoob, keel: 10mm plywood) is extreme good quality. Everything fits perfect, just clean the parts an prepare it for the later planking. If the rest of the kit - esp decks - has the same quality it will be a fun to construct this ship. Although the material is quite thick I will build in some cell strengtheners between the frames. The model will be at last almost 100 cm long, so any additional stability is good, as Pete recommends to do. Just a few pic are attached to show the very first step - not any clue used. Cheerio Max


-
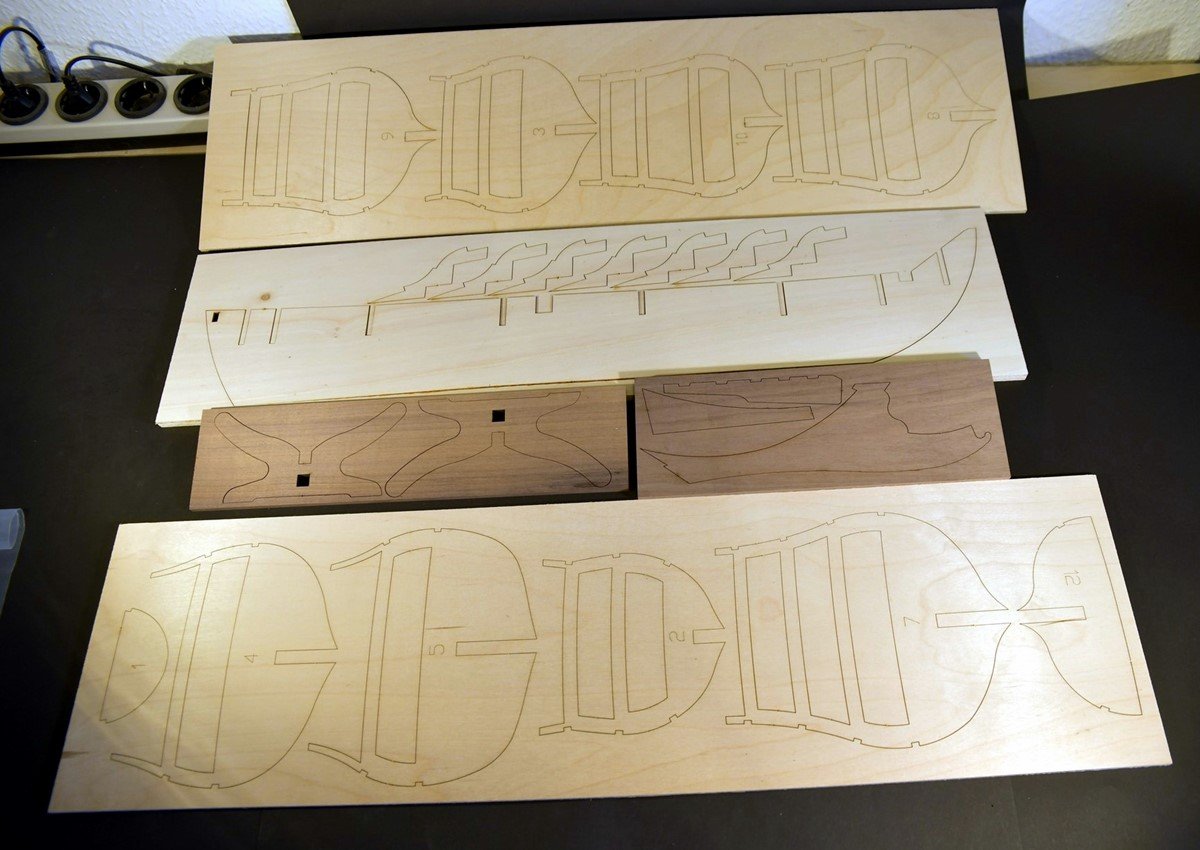
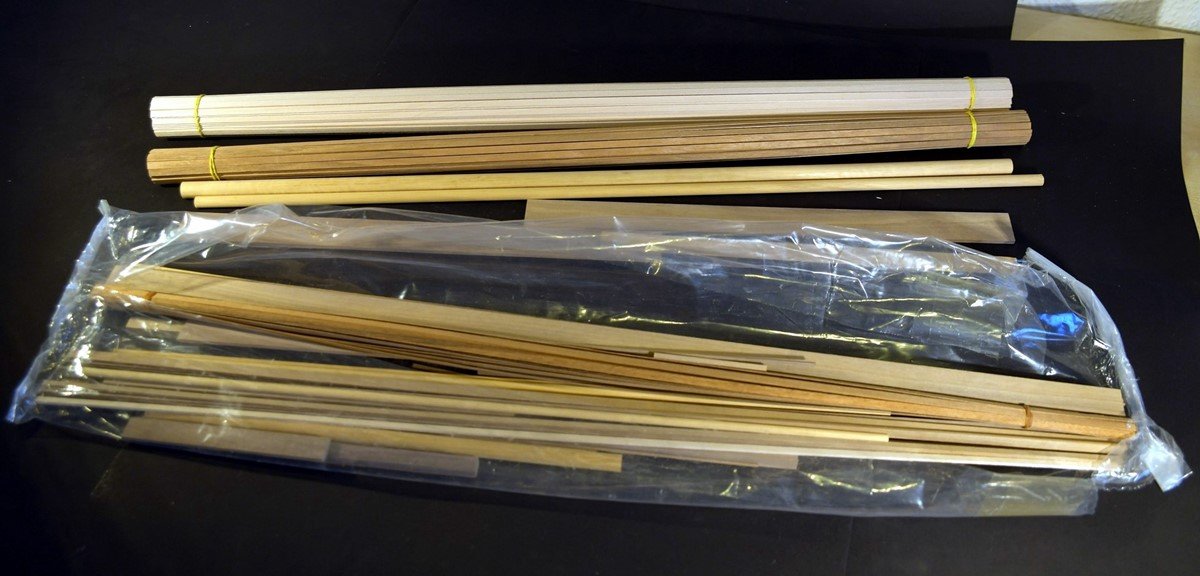
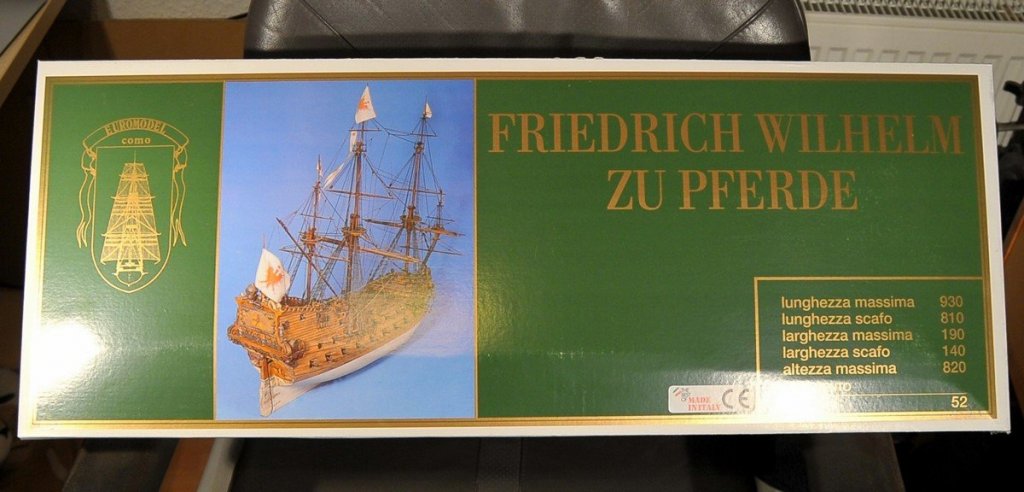
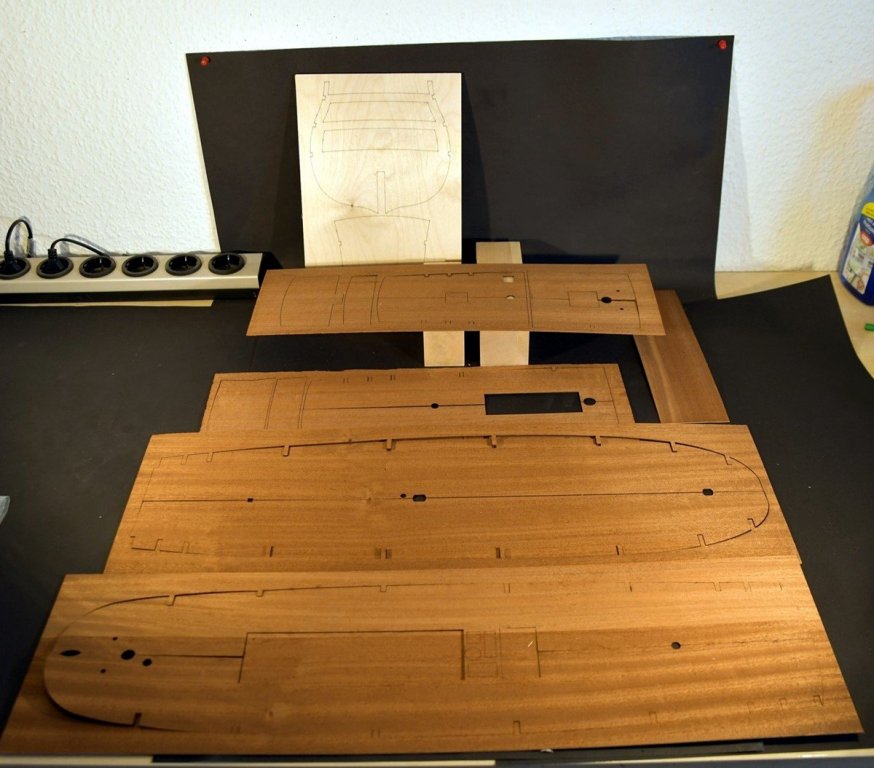
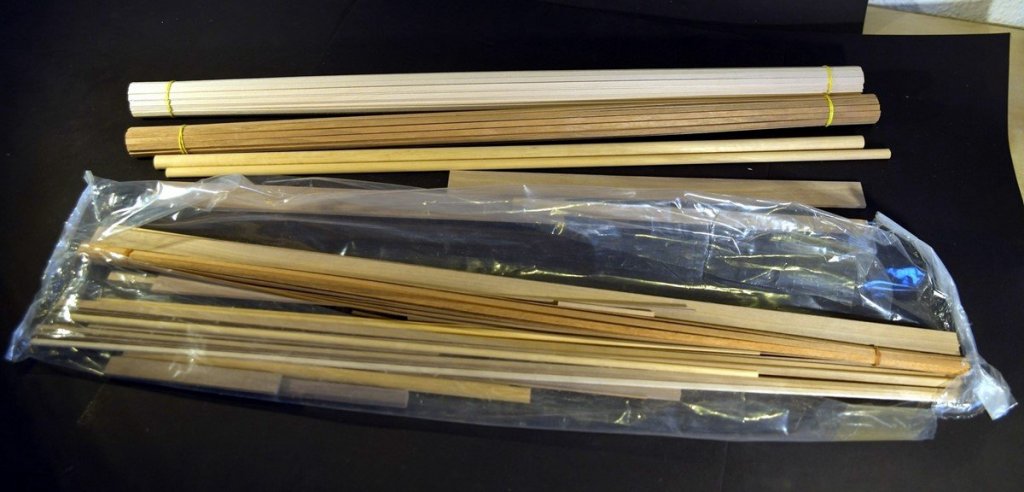
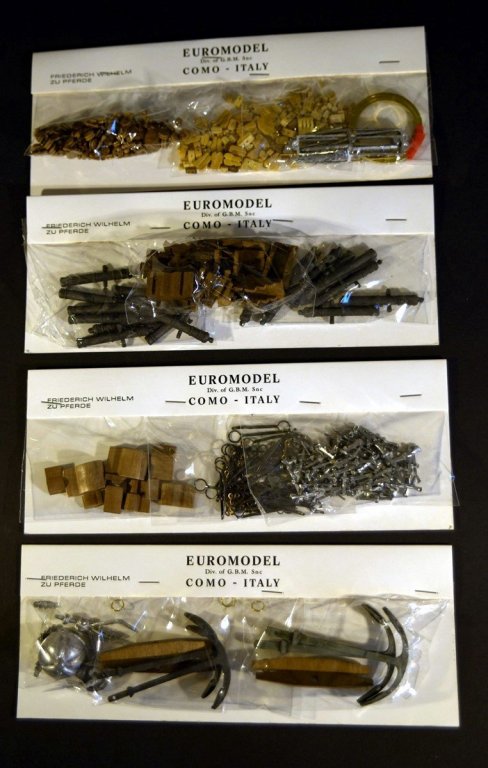
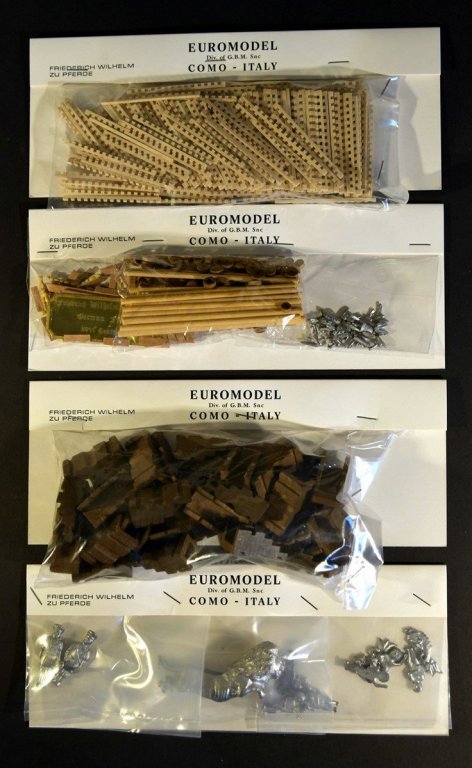
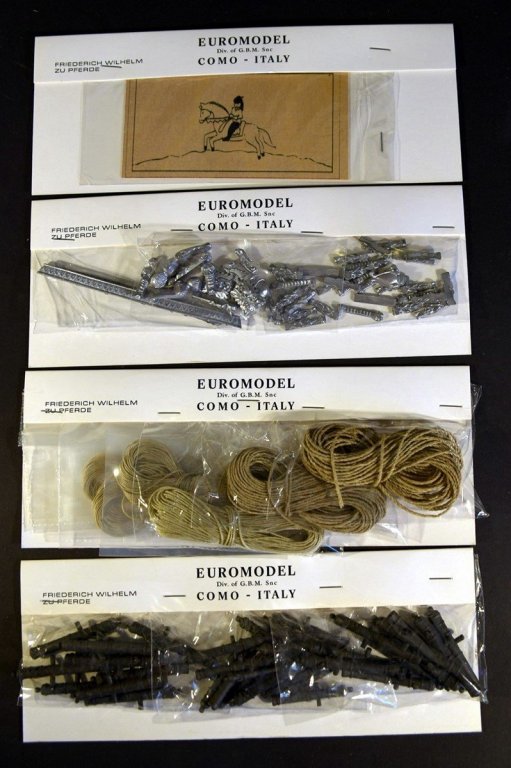
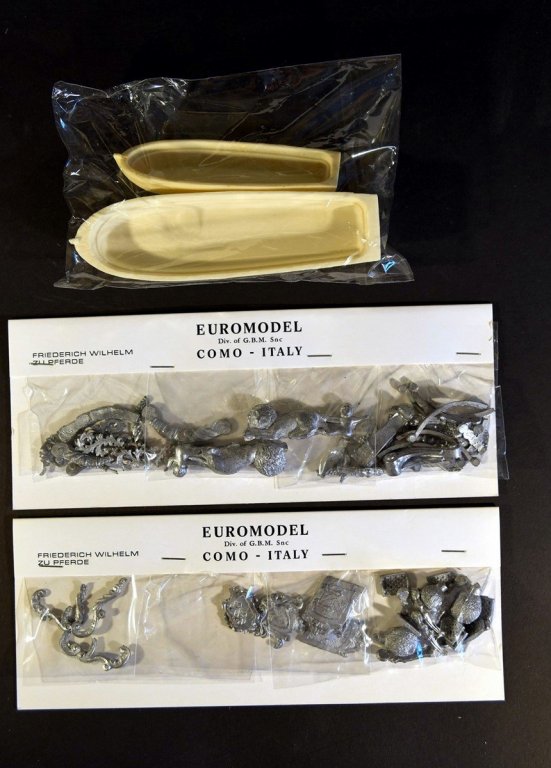
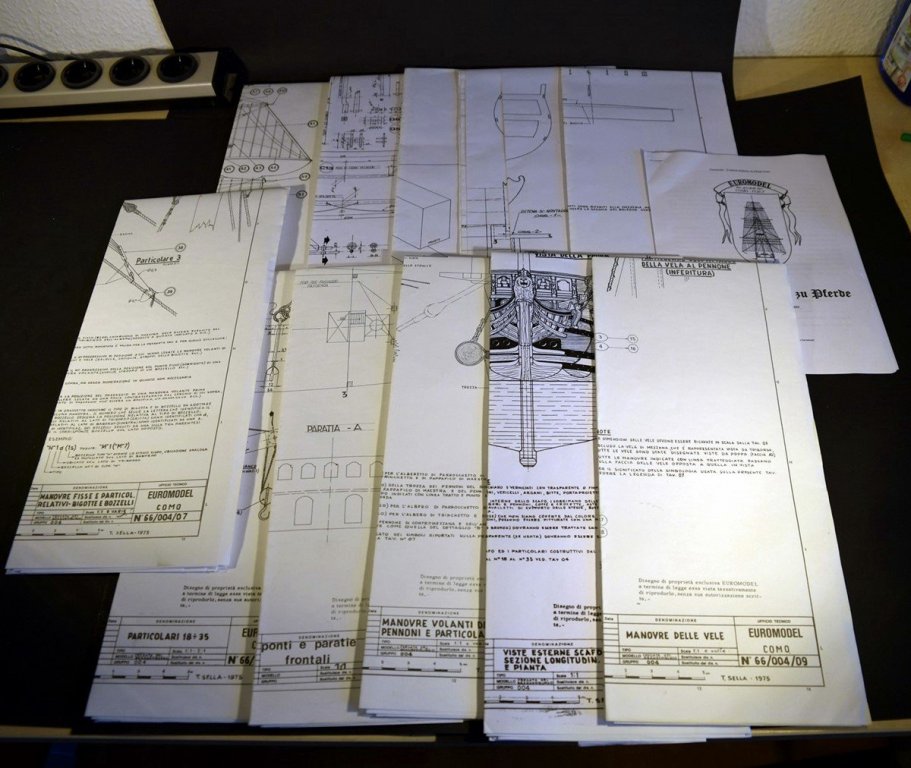
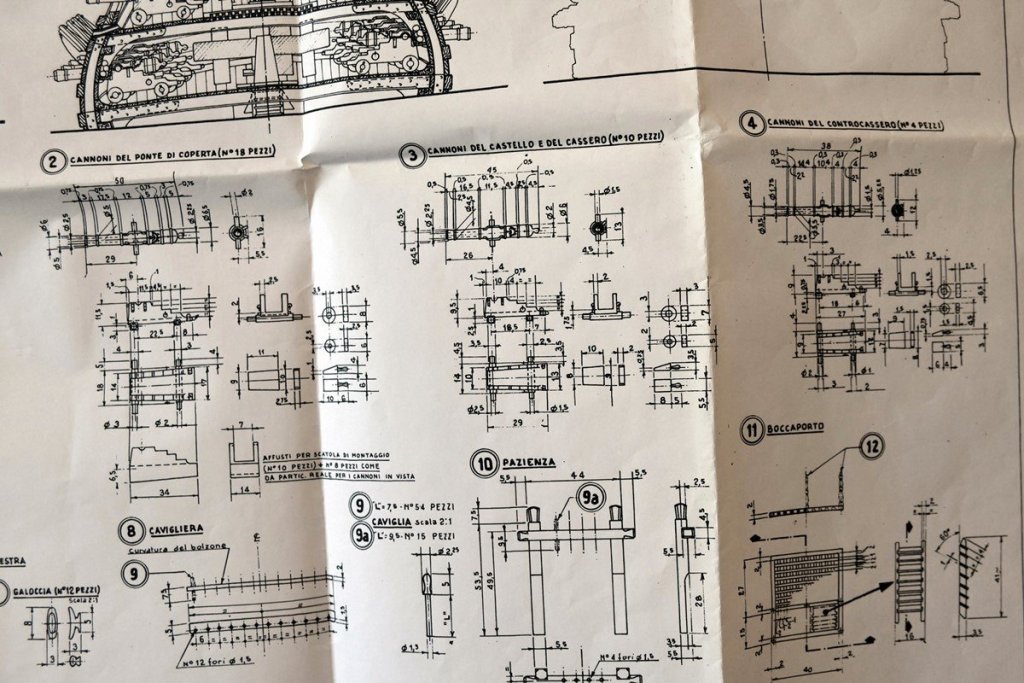
Hello mates and friends, now some pics of the kit and its content. There is a lot of timber - seems to be top quality - some lasercut parts - frames, decks, keel - and a lot of stuff from block, yarn, canons up to any kind of decoration. There are NO prepared parts - you have to create everything by your own. 12 sheets of plans (including sail instructions, but no material for sails), a small booklet, a CD-Rom with additional advives. Thats all. I am looking forward to start and will begin with the construction of itemsd like bollards, canons etc. After this I will start the hull's construction. Cheerio Max


-
Hi Mark, thank you for your attention. I am not sure how big this project will be. The plan give so much more informations as I thought and the interpretive documents by Peter Coward are almost frightening with their detailling. But I want to create a really really good model - so I will look and be grateful for every kind of help I will NOT put sails on it as I think it's not necessary. Cheerio Max
-
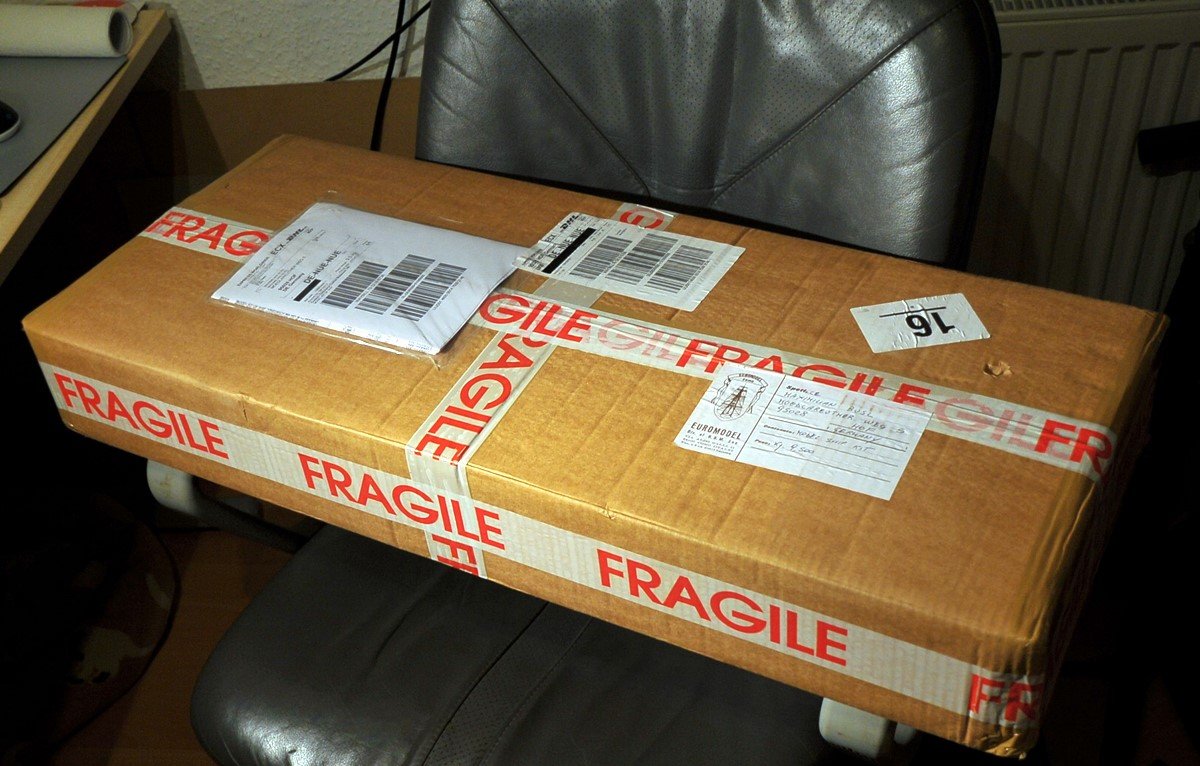
Hello my friends and fellow mates, after a long break I come back to my shipyard. I have a very challanging projekt to solve - the Friedrich Wilhelm zu Pferde. I plan a construction time of more than four years for the vessel. The box is full of material of obviously finest quality. I will take some photos an publish them the next few days. I downloaded all the interpretive documents available at the Euromodel site written by Peter Coward. After studying the book I will go to the working space with great respect - though I do not know how far I will follow the modifications. But I want to build a real good model further than the not-modified one. I decided to start now although I actually wanted to wait till I am retired - but this will last another 6 or 7 years. So long I did not want to wait. I will be back soon with some pics of the box and the material. Cheerio Max
-
Hi Ferit, I will have a look on the plans tomorrow (thursday) and send you a pic thanks for your Kind words Cheerio Max
-
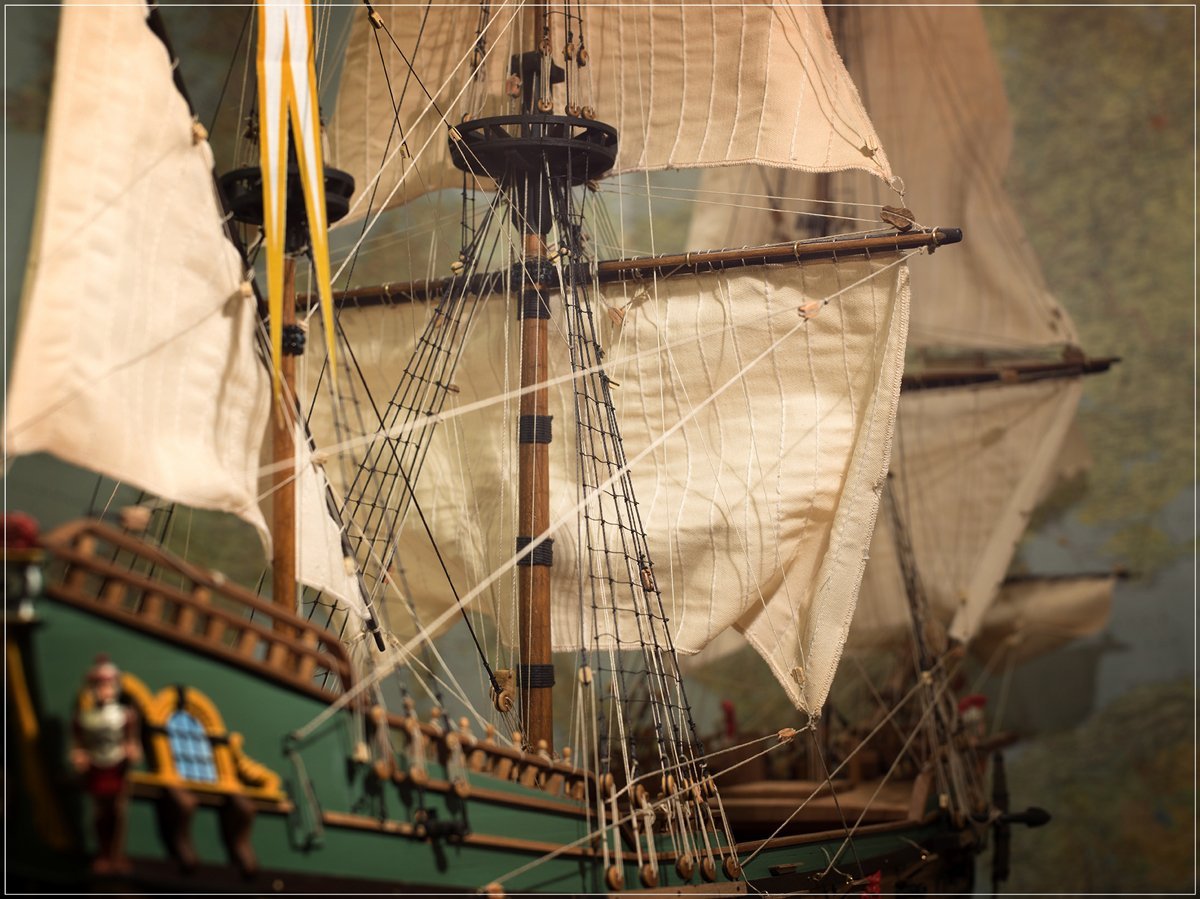
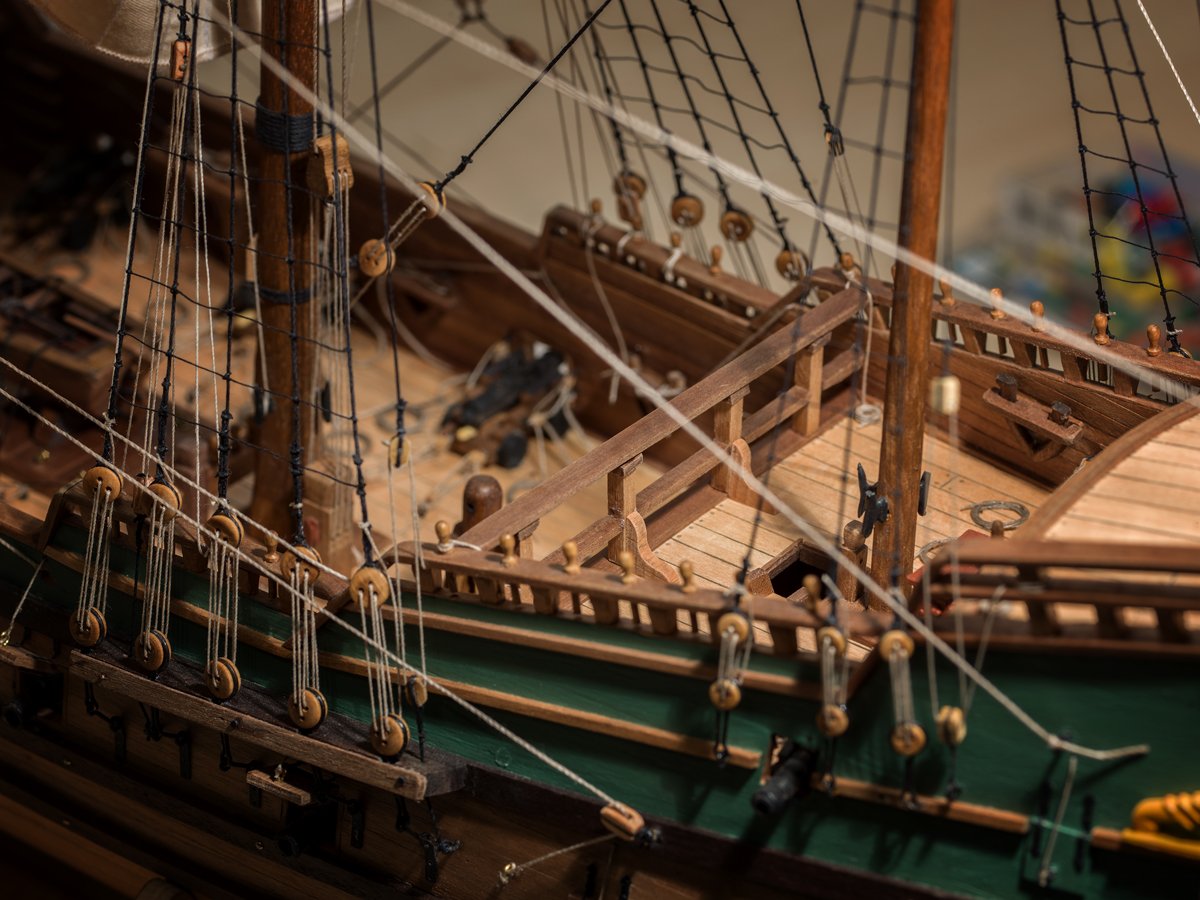
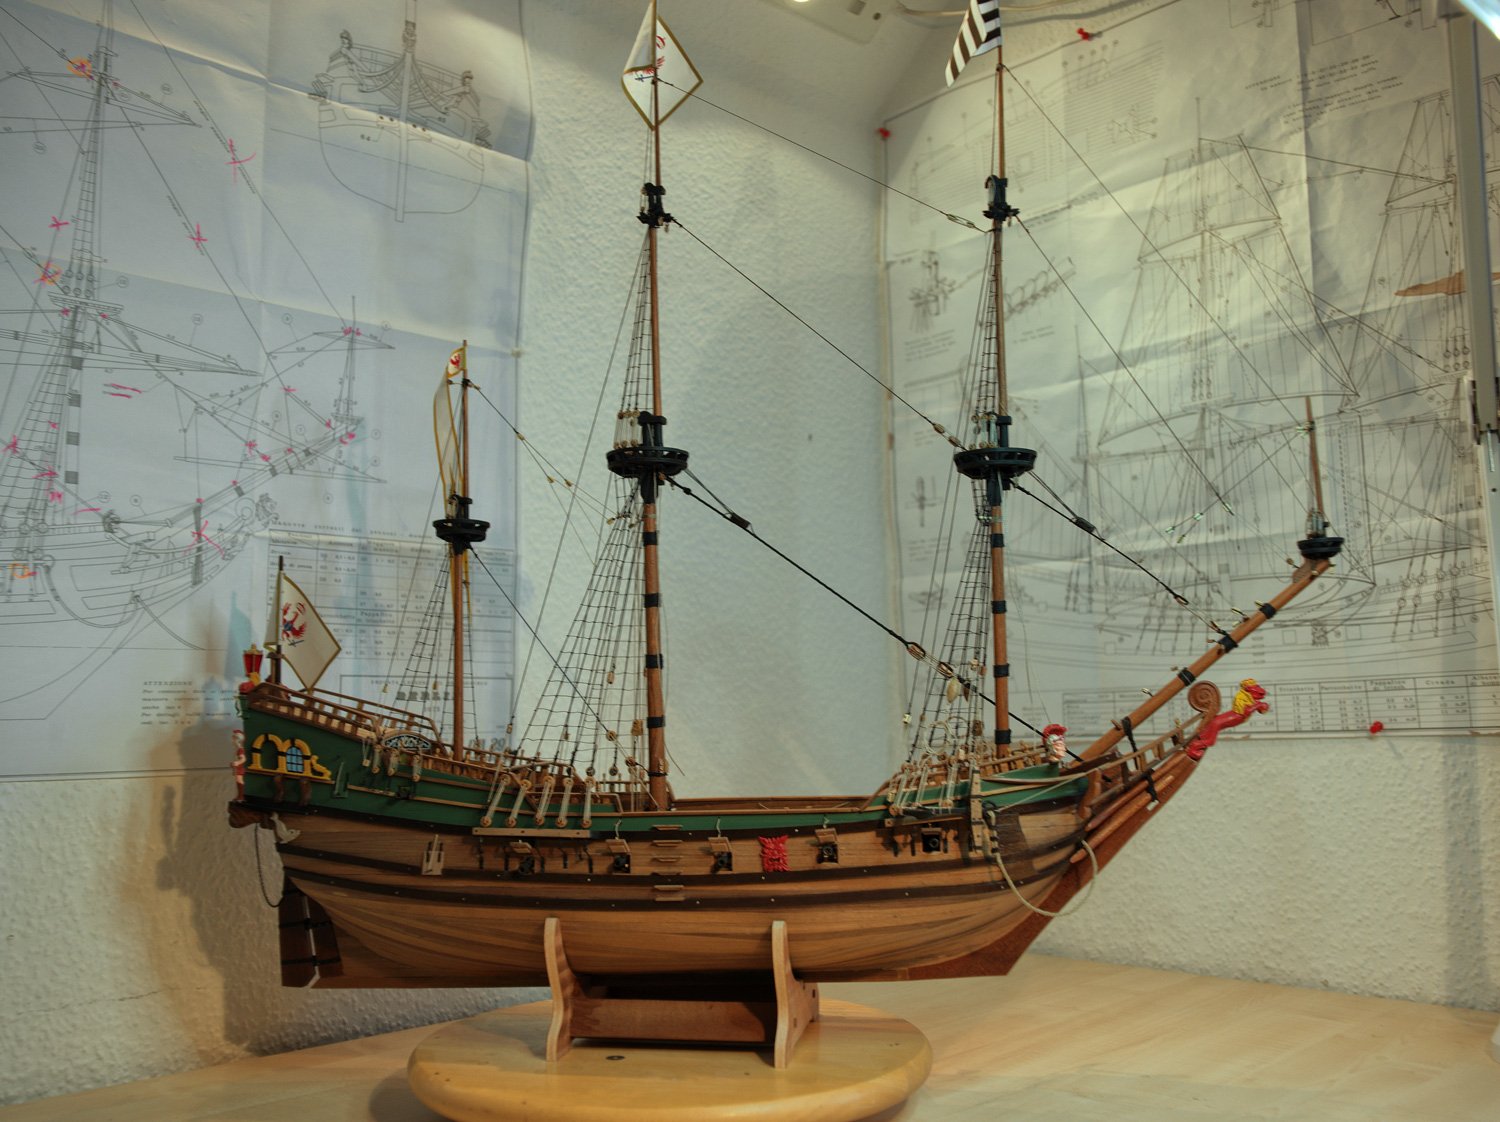
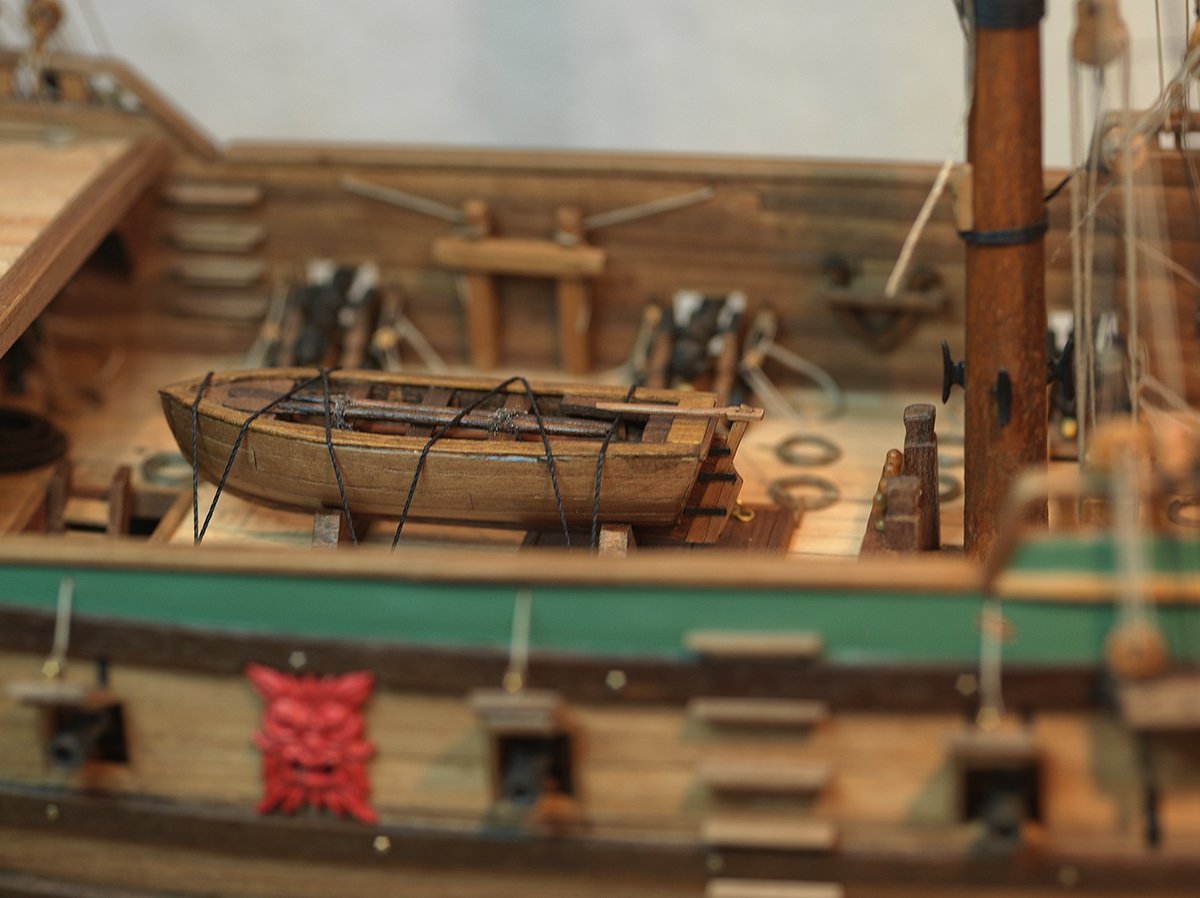
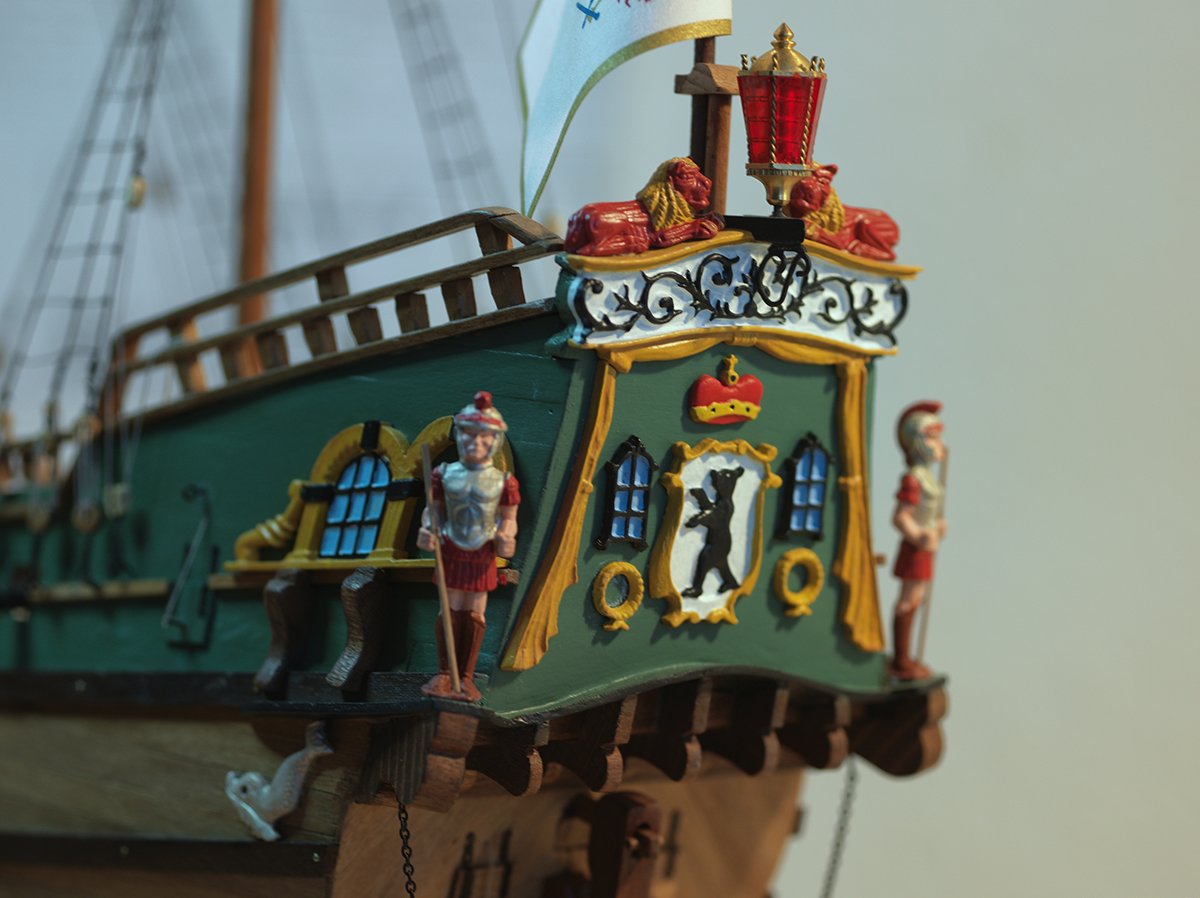
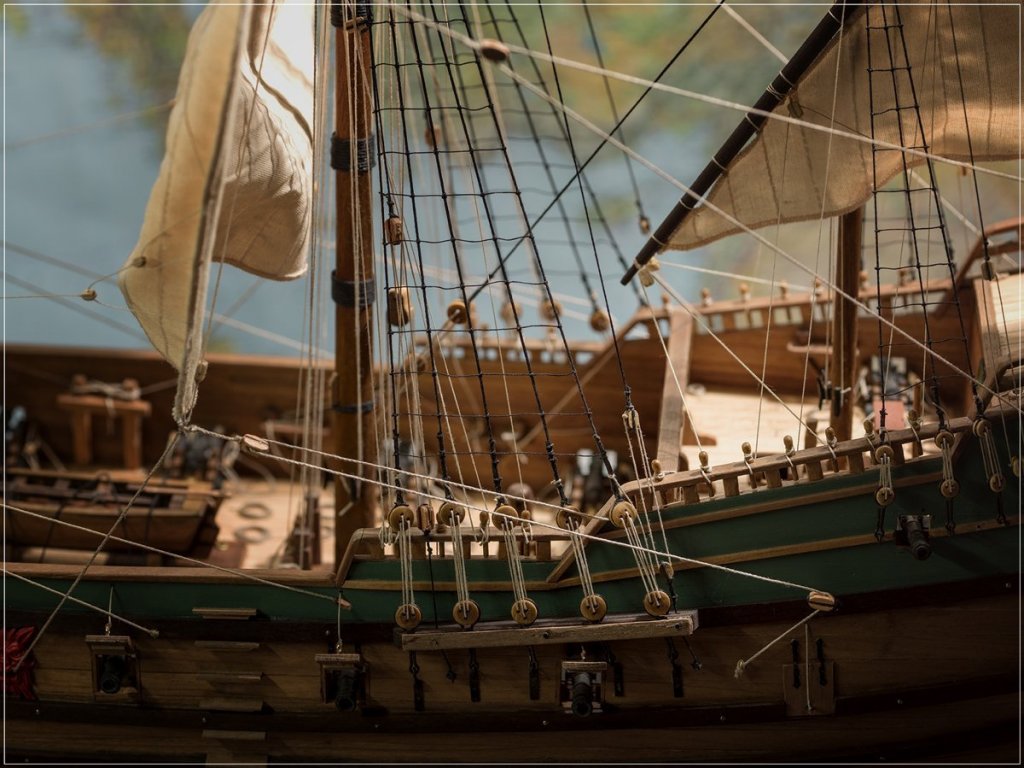
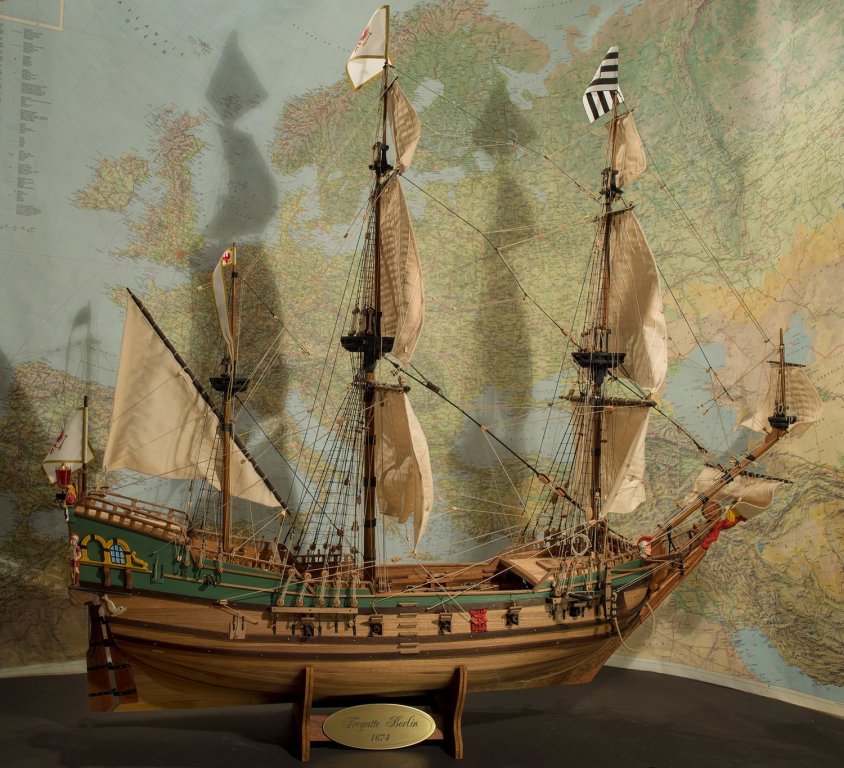
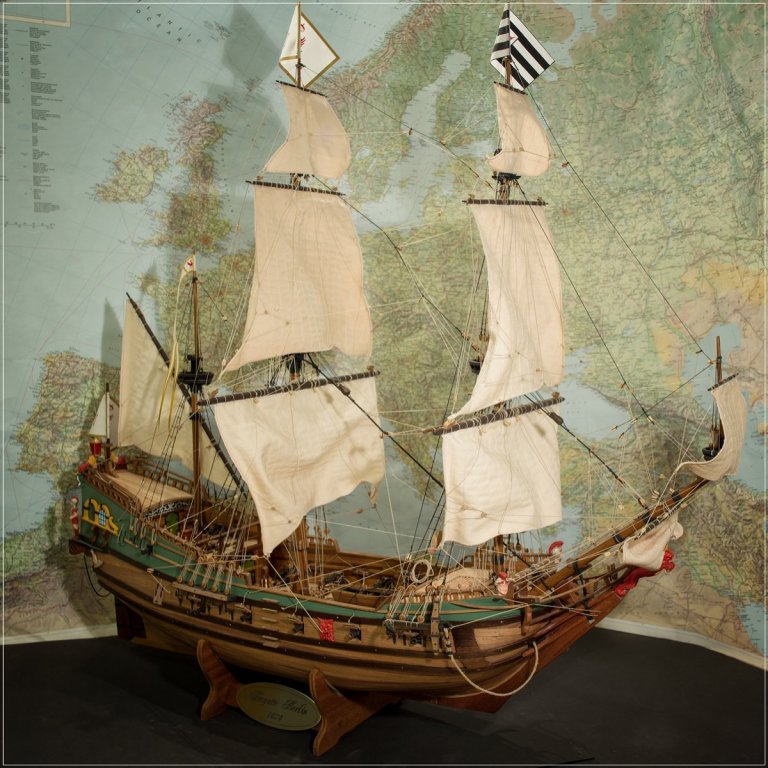
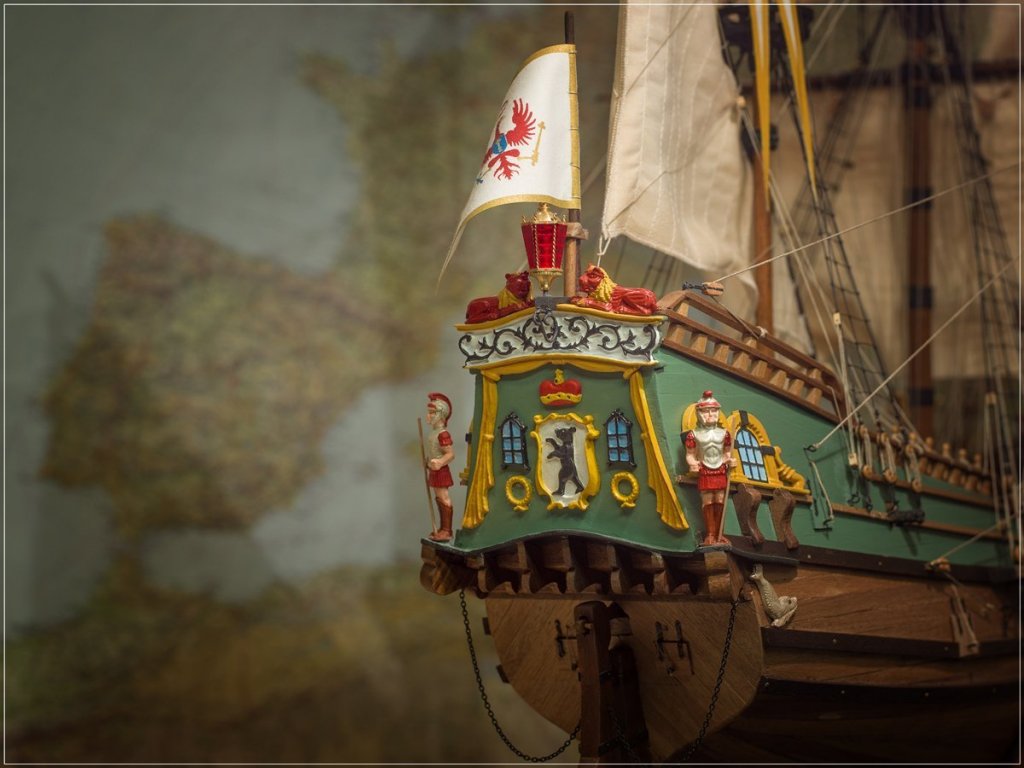
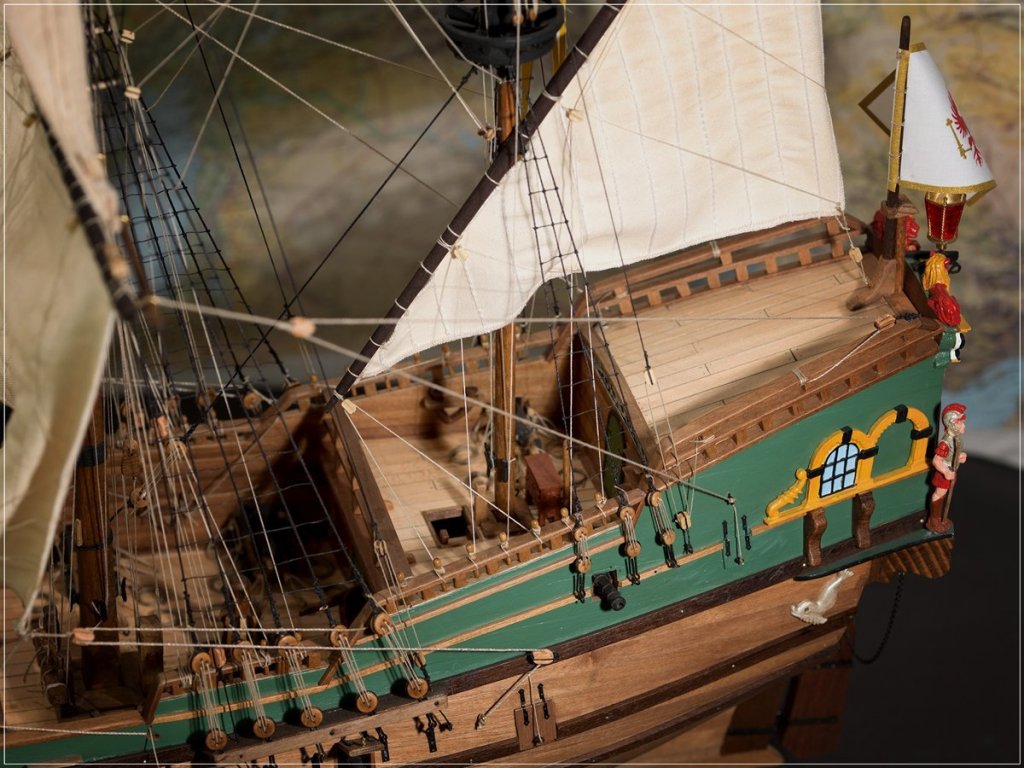
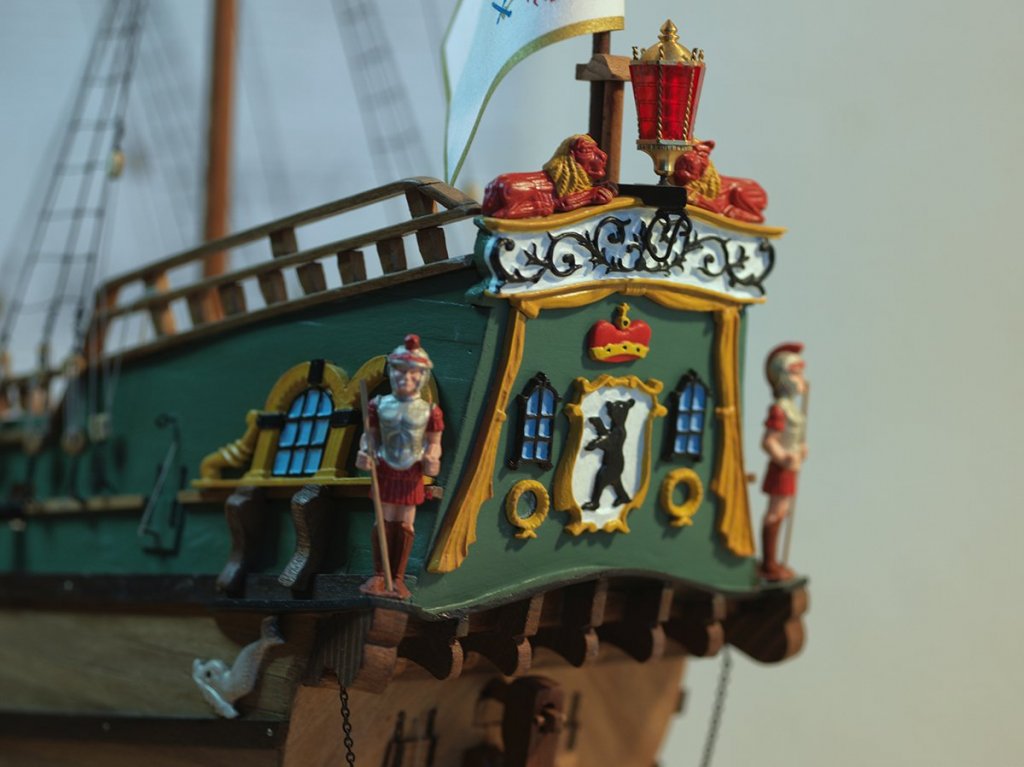
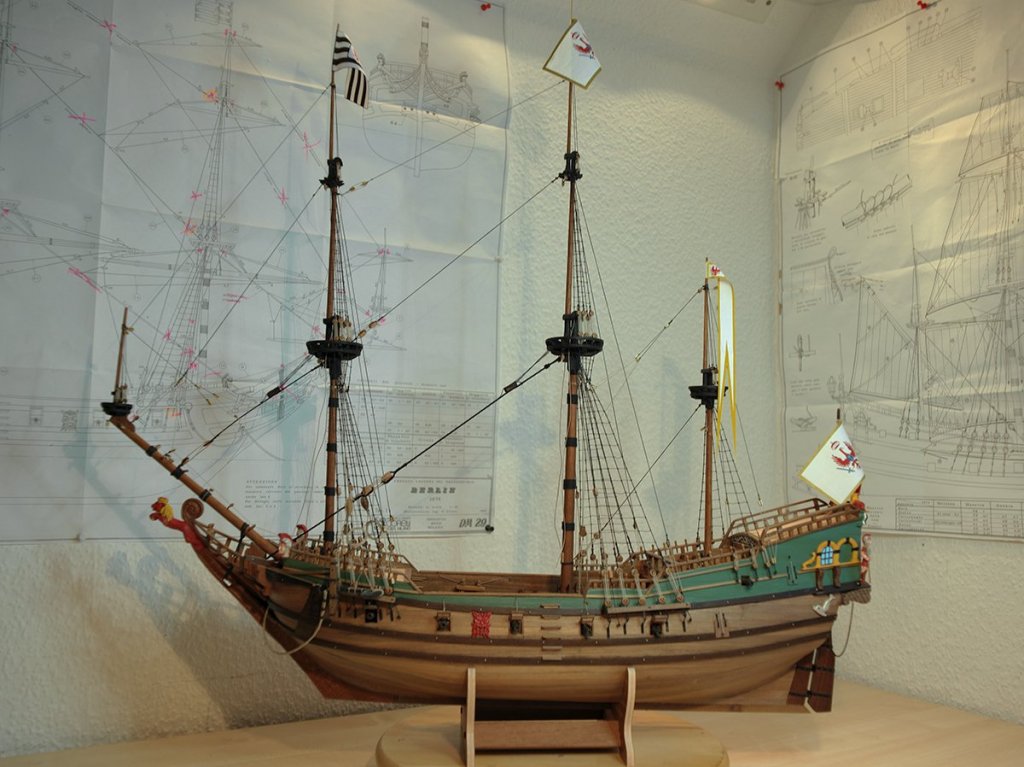
Hello my friends this is the last entry in my build log "Fregatte Berlin", Corel, 1:40. I finished the work on this wonderful modelship. Most of the time the build was a pleasure. Some words about the kit: The timber is good but I changed the 4/2mm stips for the hull into 7/1mm - this looks better and you can work with this strips better. The prefabbricated parts like decks or frames are not state-of-the-art, but with some work all goes into place The brass parts are quite good. I decided to paint them according to the color-scheme I found in the WWW. I like it but I do see that the colored parts can look a little bit like toys. But I don't mind The plans are somewhere between good and awful. Especially if you want to put sails on to the the ship the rigging plan is difficult to understand. As I did some ships before I got along - but a newbie will have problems. The drawings themselves are good. The model needs some modifications - deck planking, additional parts, but this is whats modelling is for Tricky was to change square bars into masts. I was surprised how good the result was at least. I filled the space between the frames with balsa wood and got all togehther into the correct shape. I was not convinced that a single planking without a strong and stable substructure would work. All in all as a conclusion: Yes, I loved this build (with some doubts as in any relationship ). It's a really nice model, quite impressing an authentic. The price is about 420 - 450 Euros in Europe. That's a lot and not approbiate imo - at least you have to buy some additional items like flags (the ones provided with the kit are not usable) or black yarn for the standing rigging. No - this kit is not suitable for beginners. You have to know a lot (and I do NOT know enogh) about modelling period ships. I would recommend this kit to everyone who wants to have a unique model, has enough expierence and a lot of patience. I enjoyed the 18 months that I spent with the Fregatte Berlin. It will adorn my office. The next project will be Fregatte Friedrich Wilhelm zu Pferde by Euromodel. This will be a real challenge, I expect a building period of at least three years. Just for studying the plans I will need a year... They are so full of details. I have all interpretives that Euromodel offer on their site and I did understand yet that very much of the parts have to be carved and made by myself. And that you can build the ship "out of the box" or cahnge into a museum-like gem. I will decide for a way inbetween this extremes But I will not start with the FW before 2019 or 2020. The next years I want to travel around the world. That's it for the Moment, please enjoy the pics (you can find more in the gallery on NRG) and feel free to tell me what you think about my Fregatte Berlin. I will follow the discussions on the board for sure - infected with the modeller's Virus CHEERIO Max


- 82 replies
-
- 16
-

-
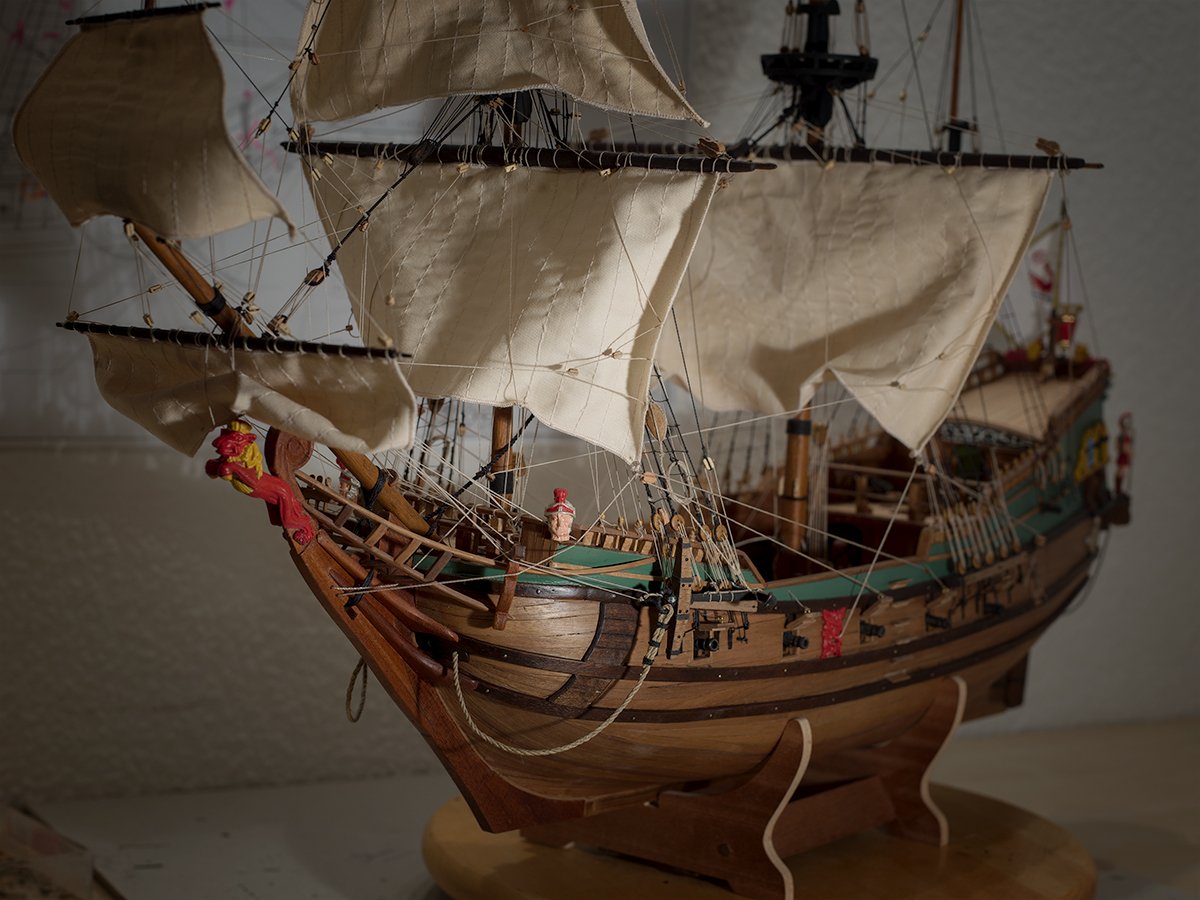
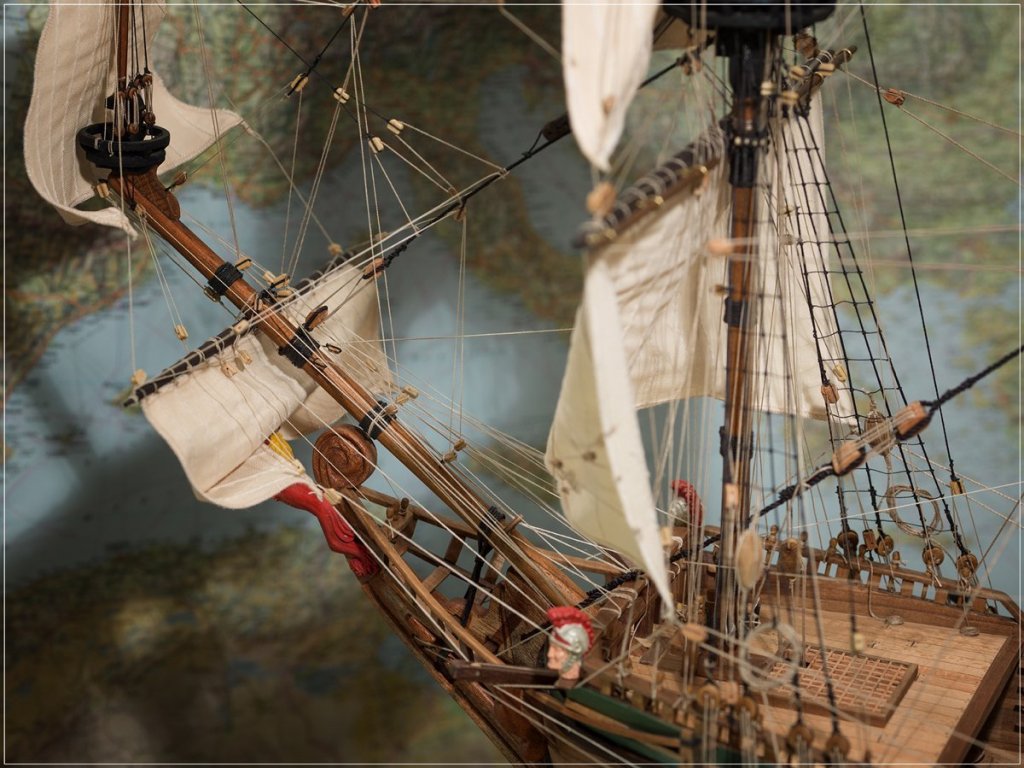
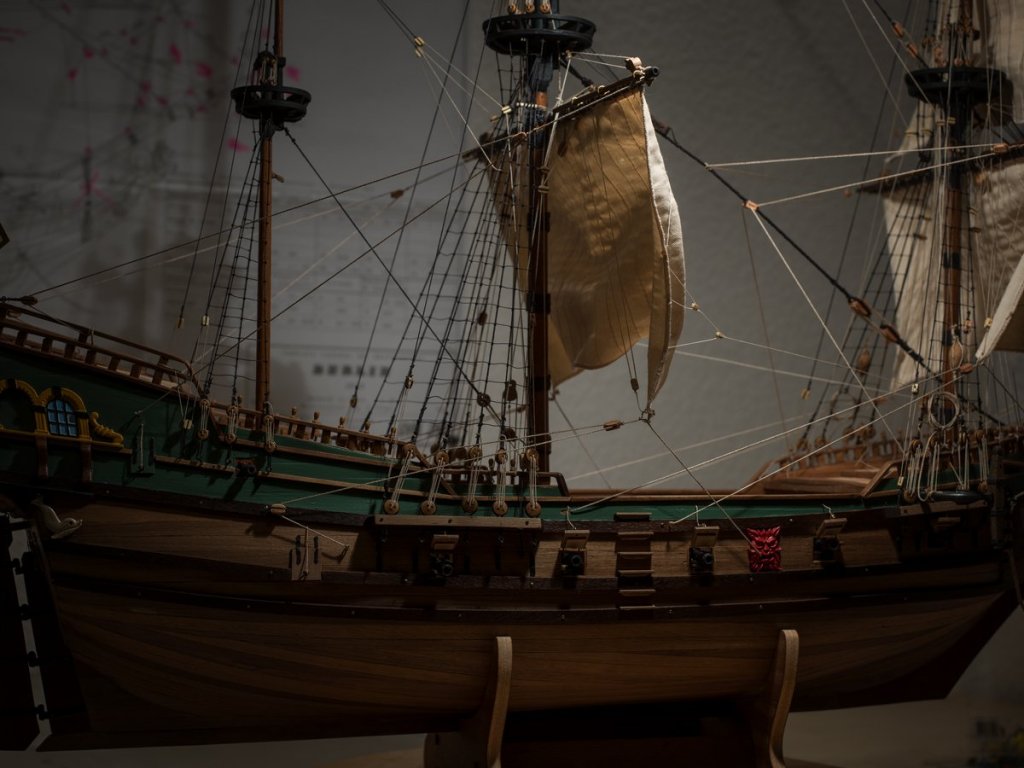
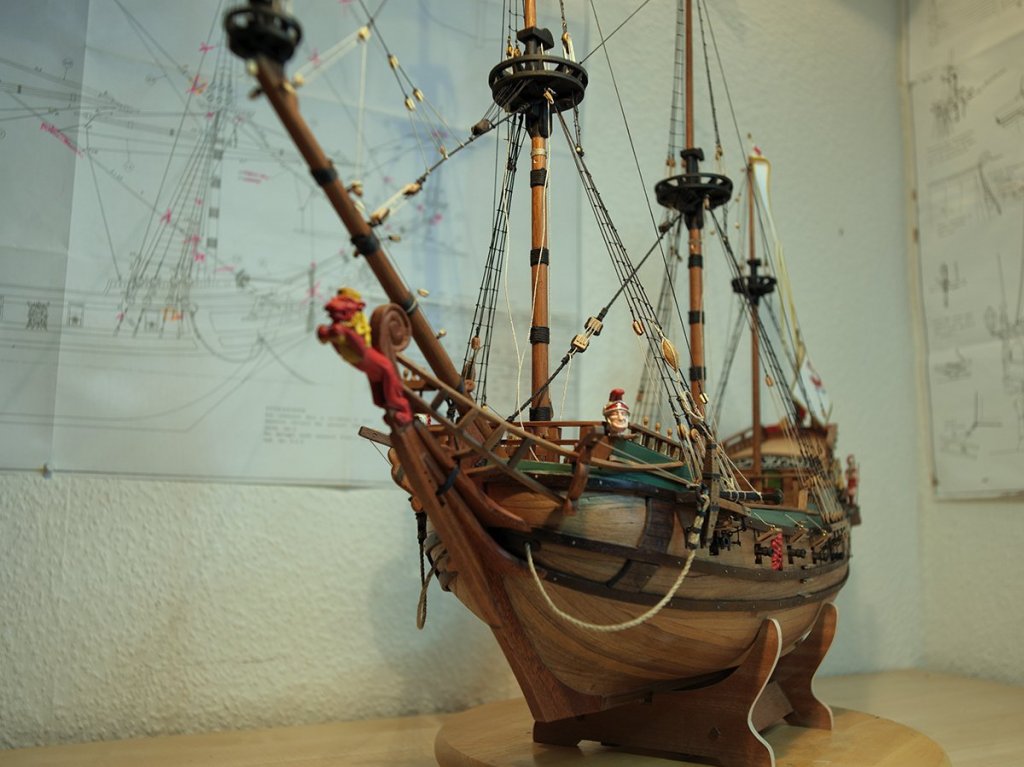
Hello my friends it's been a long time since my last entry. Well, I was busy with the sails. The rigging is going on very well, there is no real problem around. The plans could be more clearly, but if you take your time and read the drawings exactly you will have no problem with the sails. I still have to make three sails then the Fregatte Berlin will be fiished. Some coils are necessary and some smaller jobs as always. No more words - just enjoy the pics. They show the status quo (no... not the band :)) Cheerio Max


- 82 replies
-
- 14
-
-
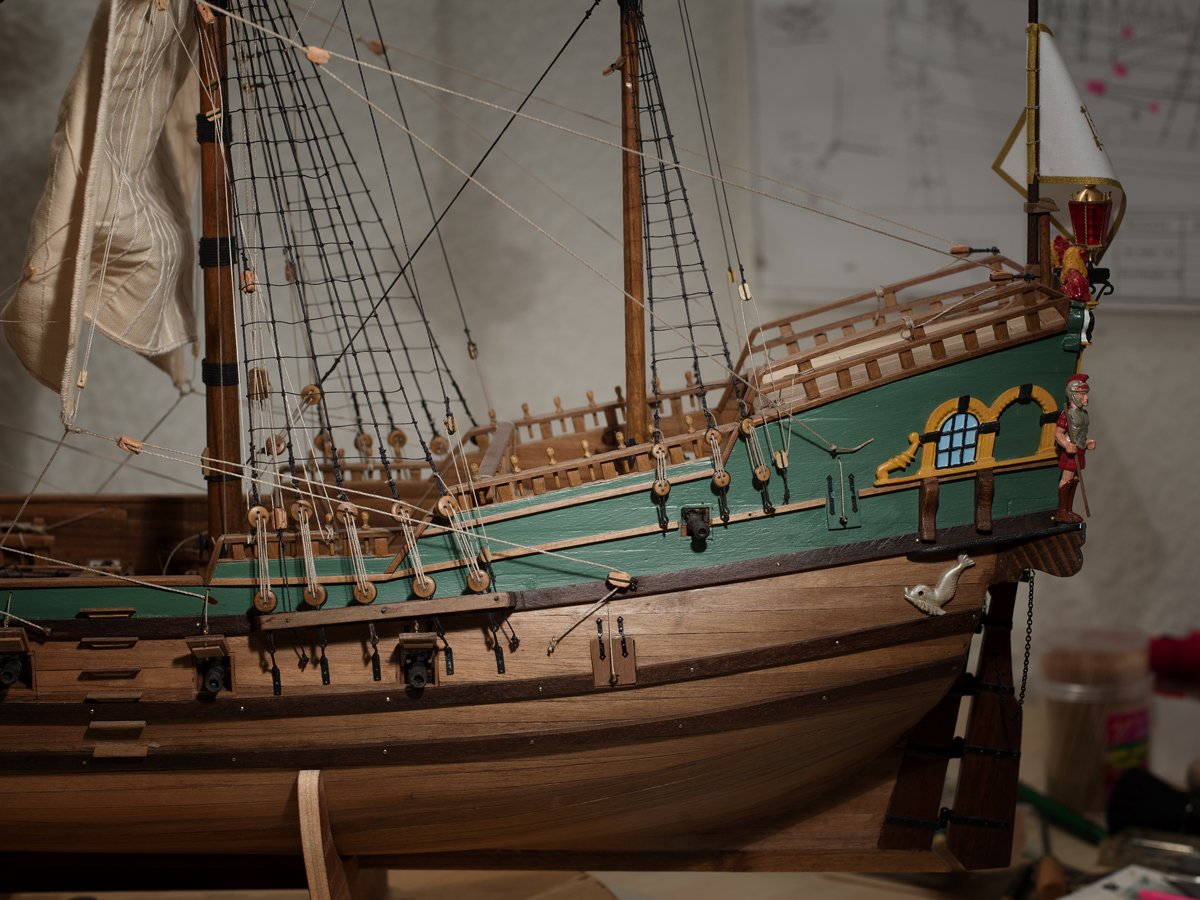
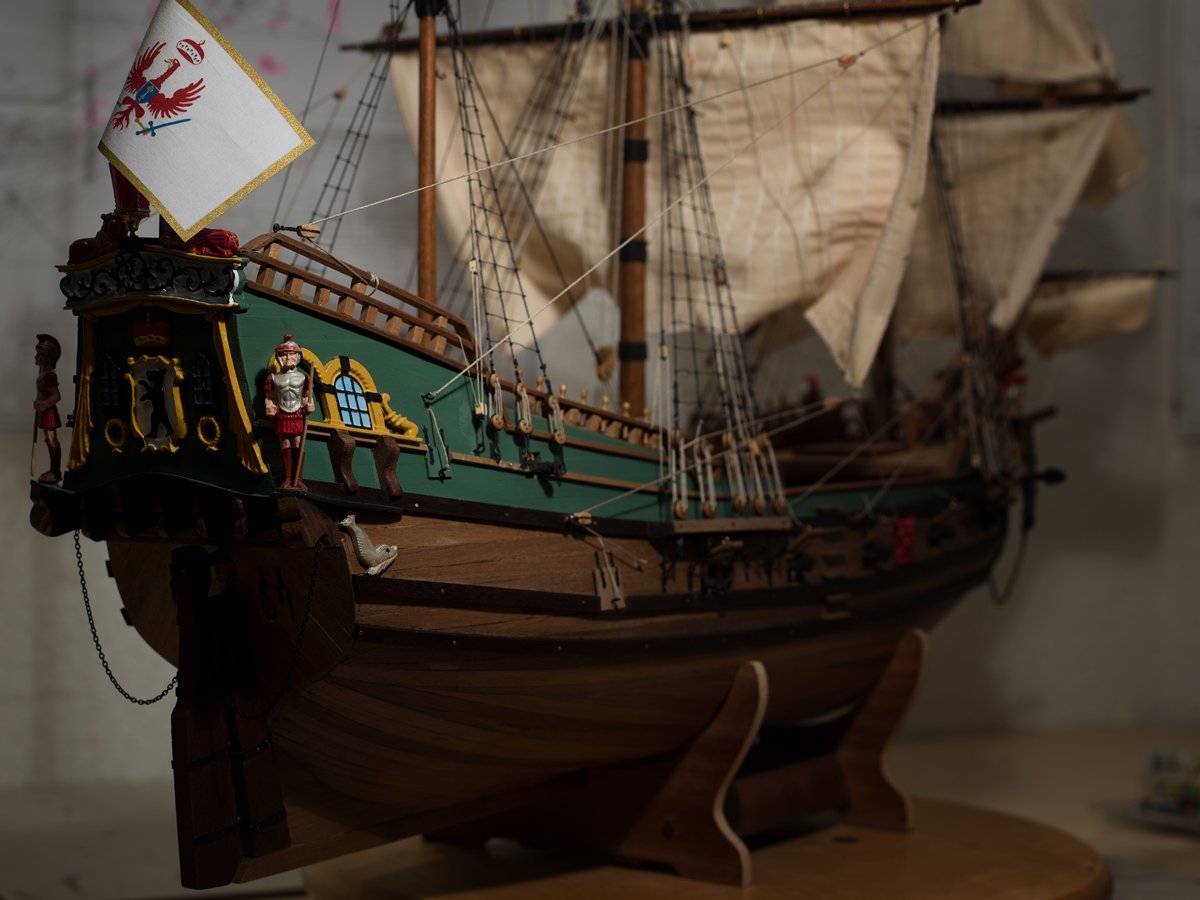
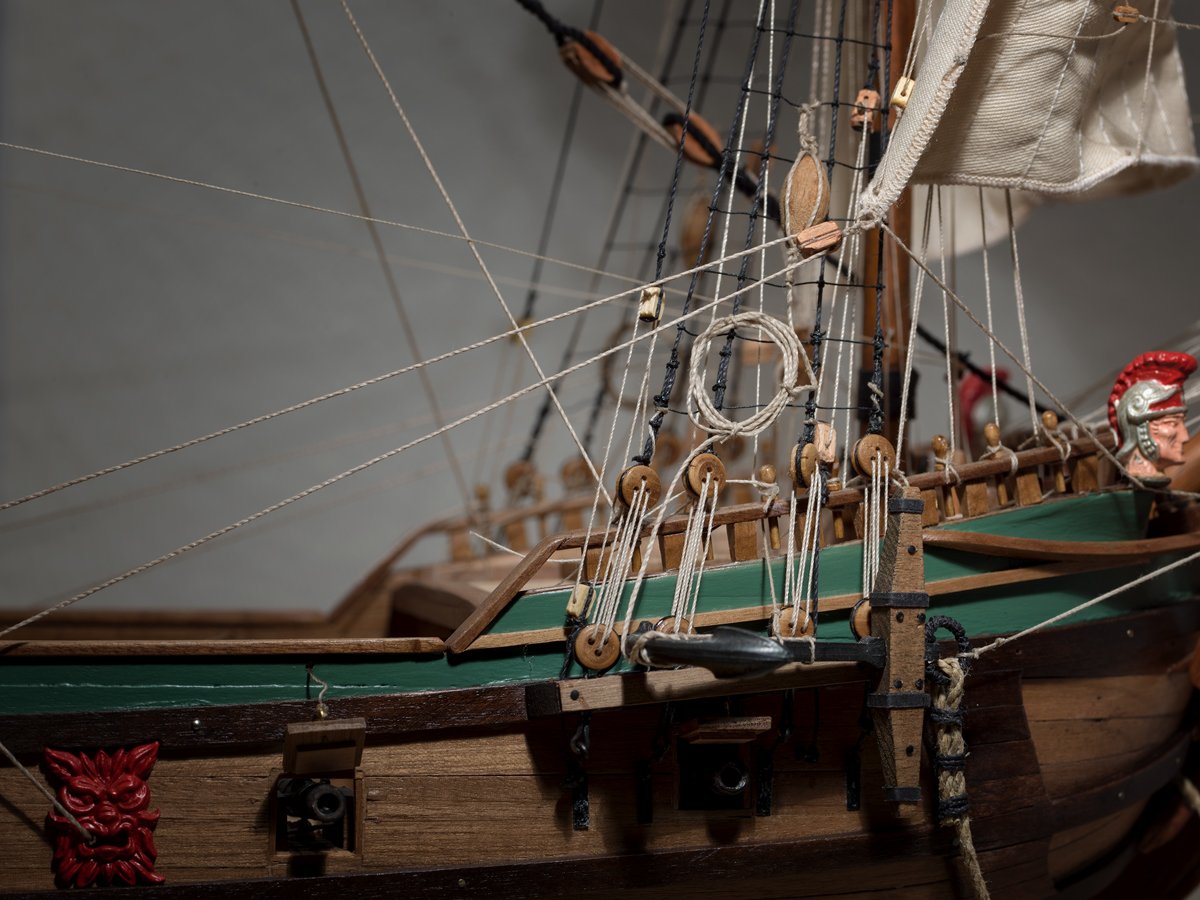
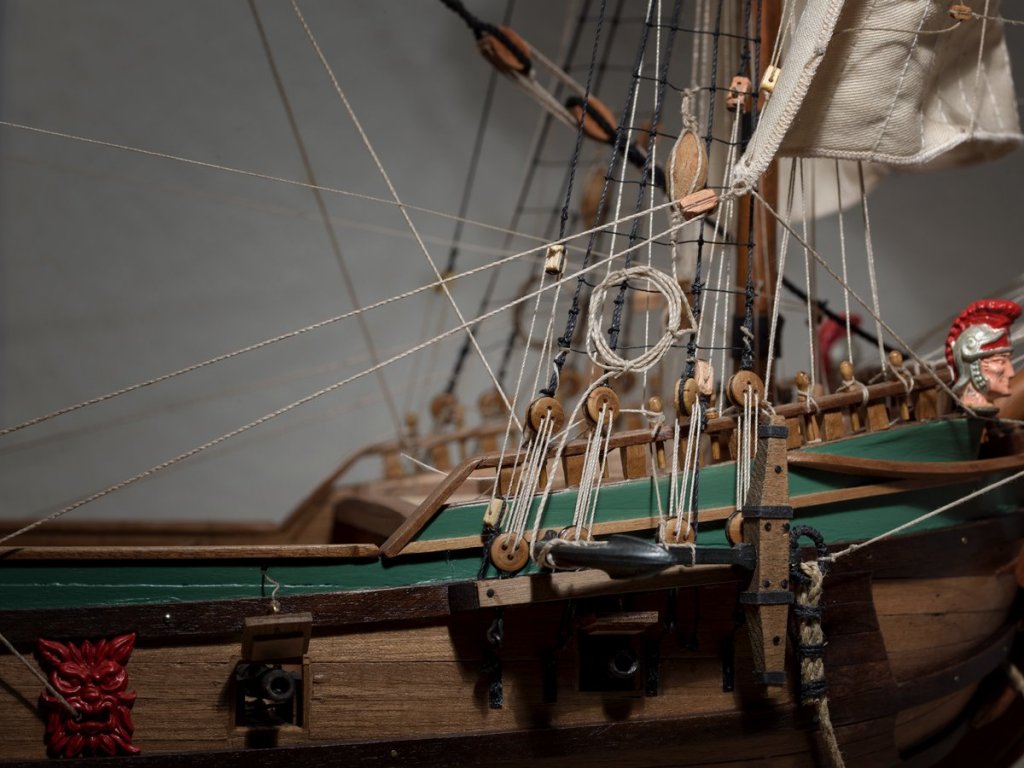
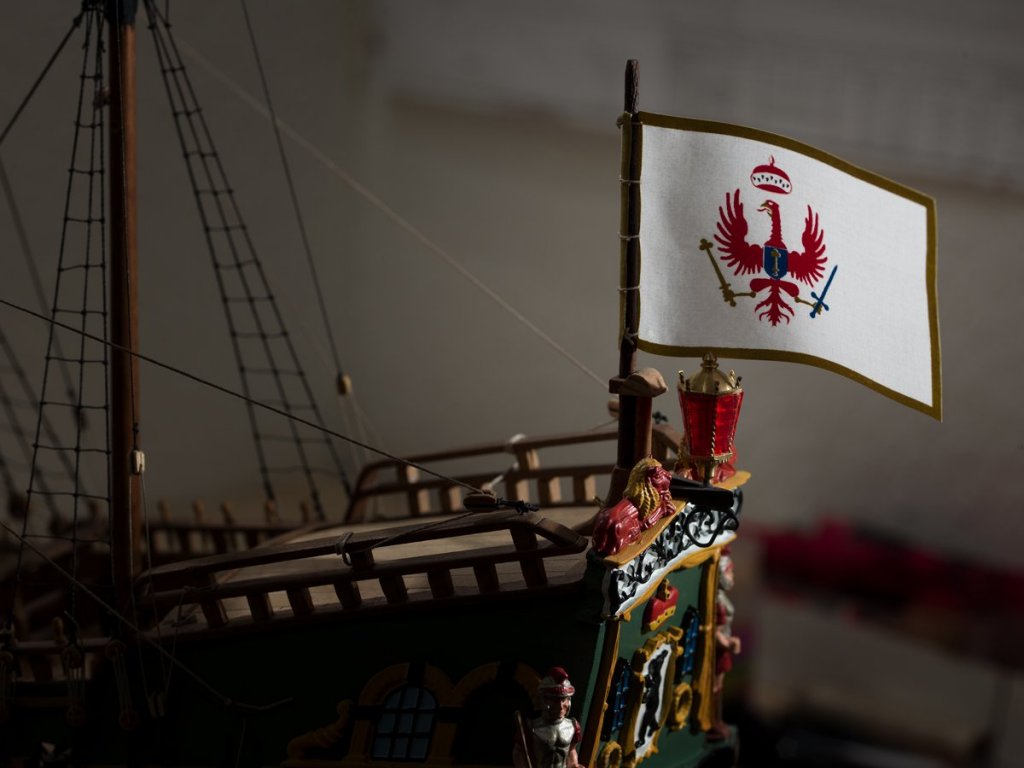
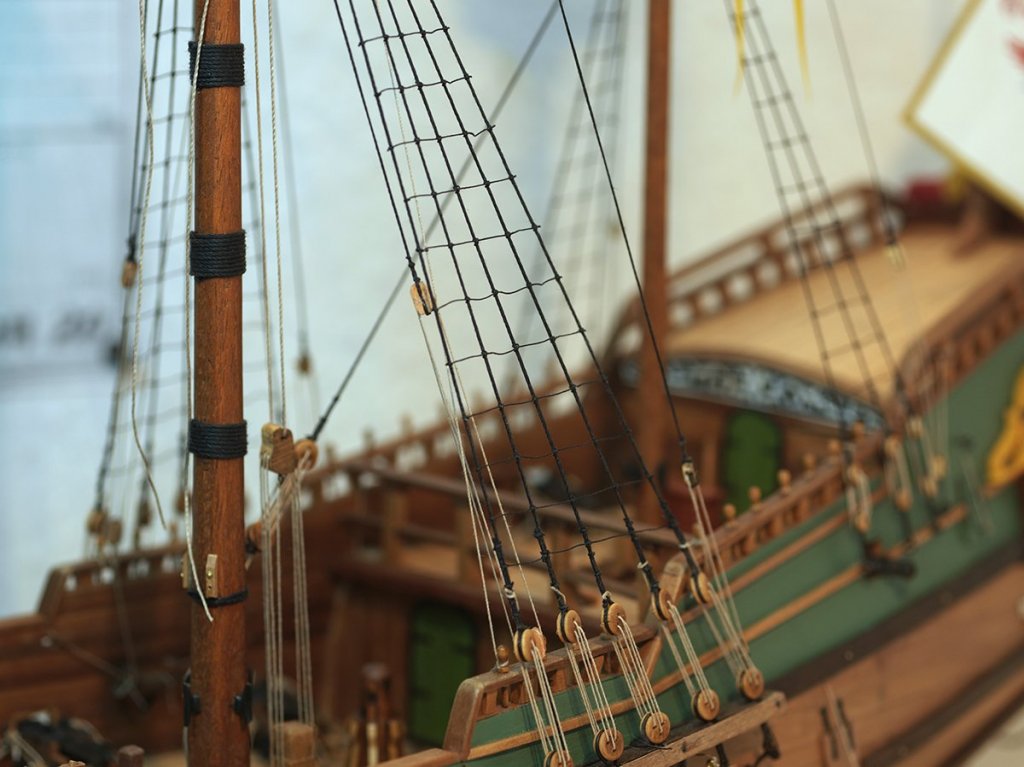
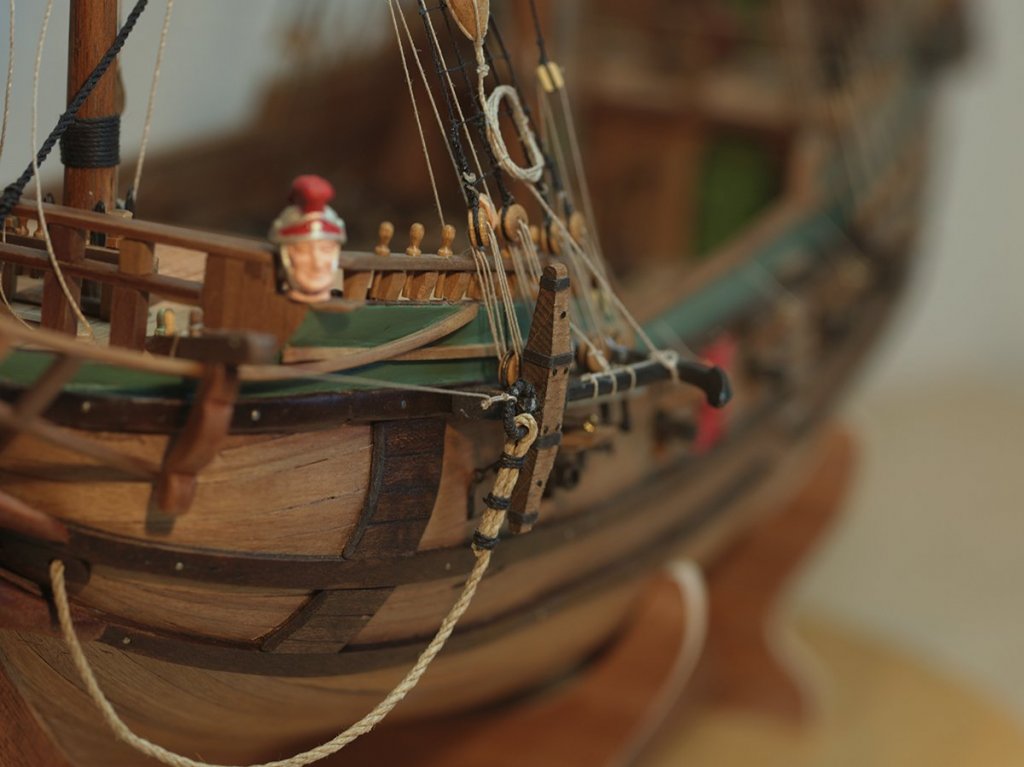
Hello Julian, sorry for the delay - was not online for some health reasons... I just used an common pencil. I just spotted on the wood - thats all. Nothing special, no filling. Just patience - that is what you really need - but we build period ships, so patience is my second first name Hi mates, just a little update. As I cought me a terrible summer cold with fever and all that stupid stuff I am in delay with the updates. I worked on the standing rigging and finally finished it. I love this work so much and I am quite content with he result. Especially the ratlines make a good impression to me. I used very thin yarn (.25mm) and this looks very nice. At least I fixed the anchors - but they need a lot of work to be done. The provided kit's anchors are nothing more than a useful base for the real anchors. I tried to get them a little bit more realistic, I also build up two buoys and additonal items. The flags are not fixed - I replaced the Corel flags with really good and high detailled ones and I also replaced the lantern with a beautiful one I found at the after-sales market. The Corel lantern is not good. So I will go on with the yards, the sails and the running rigging soon. I think I will have two more months fun with the Fregatte Berlin. Just enjoy the pics - and don't hesitate with critics and praise Cheerio Max


-
Thank you Jean-Pierre... I will try to Change the Position as I also think it is too much sticking out... just don't know how to manage... but I'll find a solution