rvchima
-
Posts
712 -
Joined
-
Last visited


-
 BLACK VIKING reacted to a post in a topic:
de Havilland Tiger Moth by rvchima - Easy Built Models - 1:17 - balsa
BLACK VIKING reacted to a post in a topic:
de Havilland Tiger Moth by rvchima - Easy Built Models - 1:17 - balsa
-
rvchima reacted to a post in a topic:
Seguin by Phil B - FINISHED - BlueJacket Shipcrafters - 1:48
-
Canute reacted to a post in a topic:
USS Constitution by rvchima - Mamoli - 1:93
-
Canute reacted to a post in a topic:
USS Constitution by rvchima - Mamoli - 1:93
-
mtbediz reacted to a post in a topic:
USS Constitution by rvchima - Mamoli - 1:93
-
mtbediz reacted to a post in a topic:
USS Constitution by rvchima - Mamoli - 1:93
-
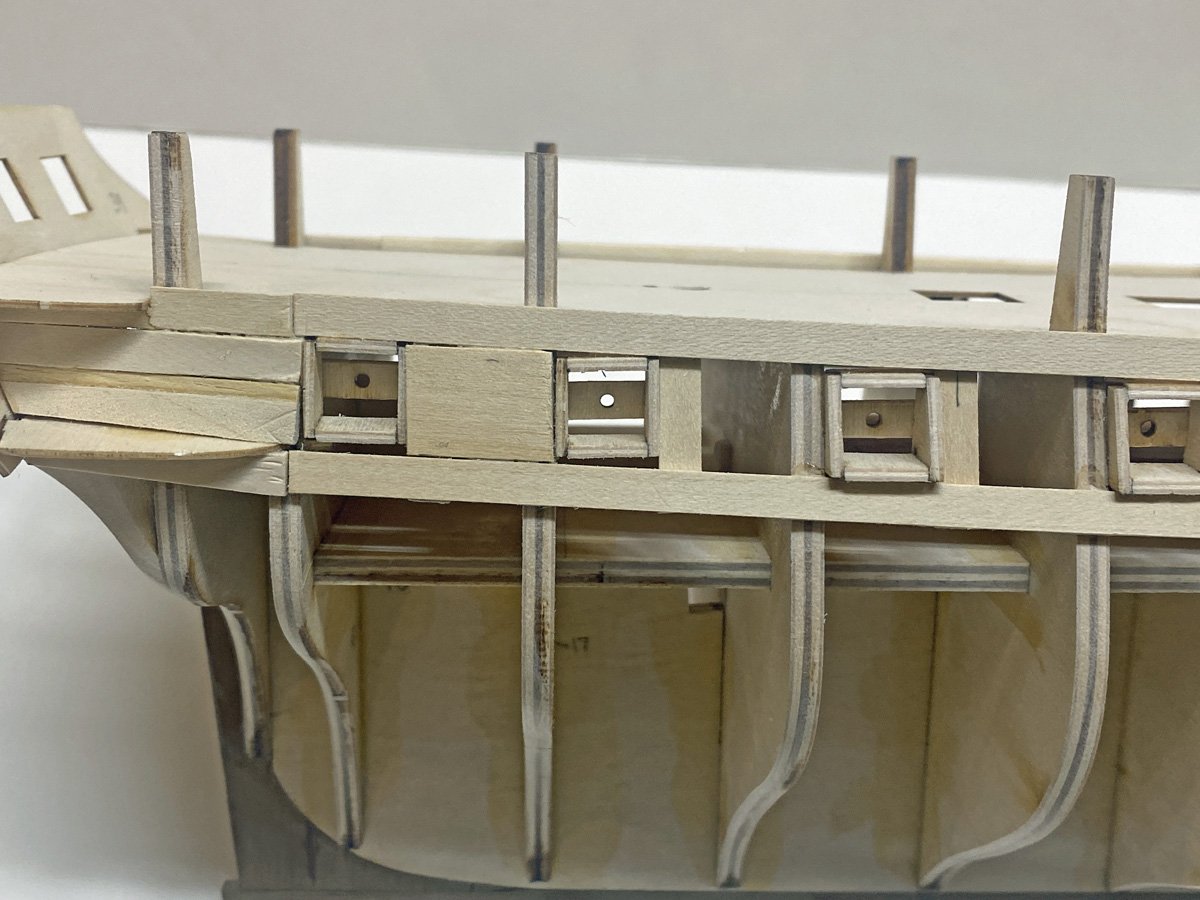
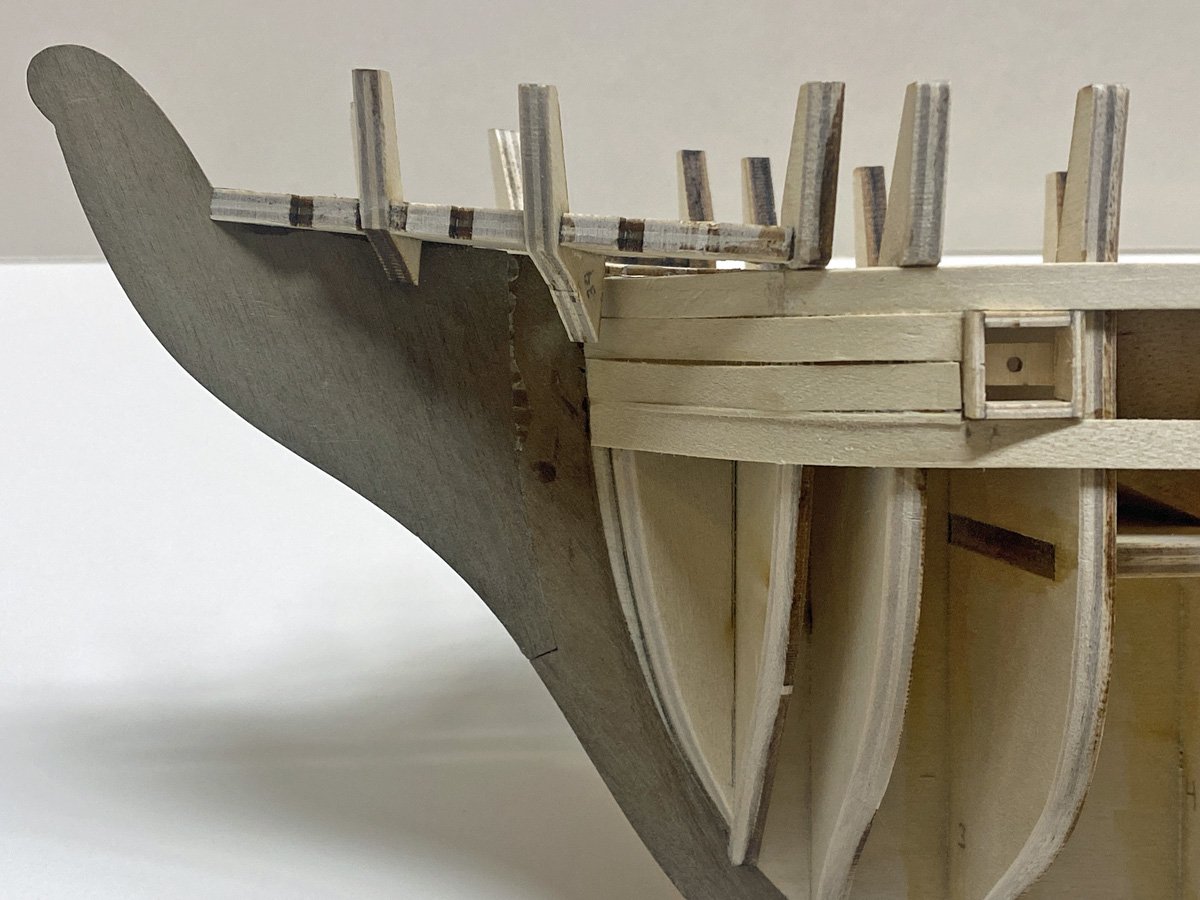
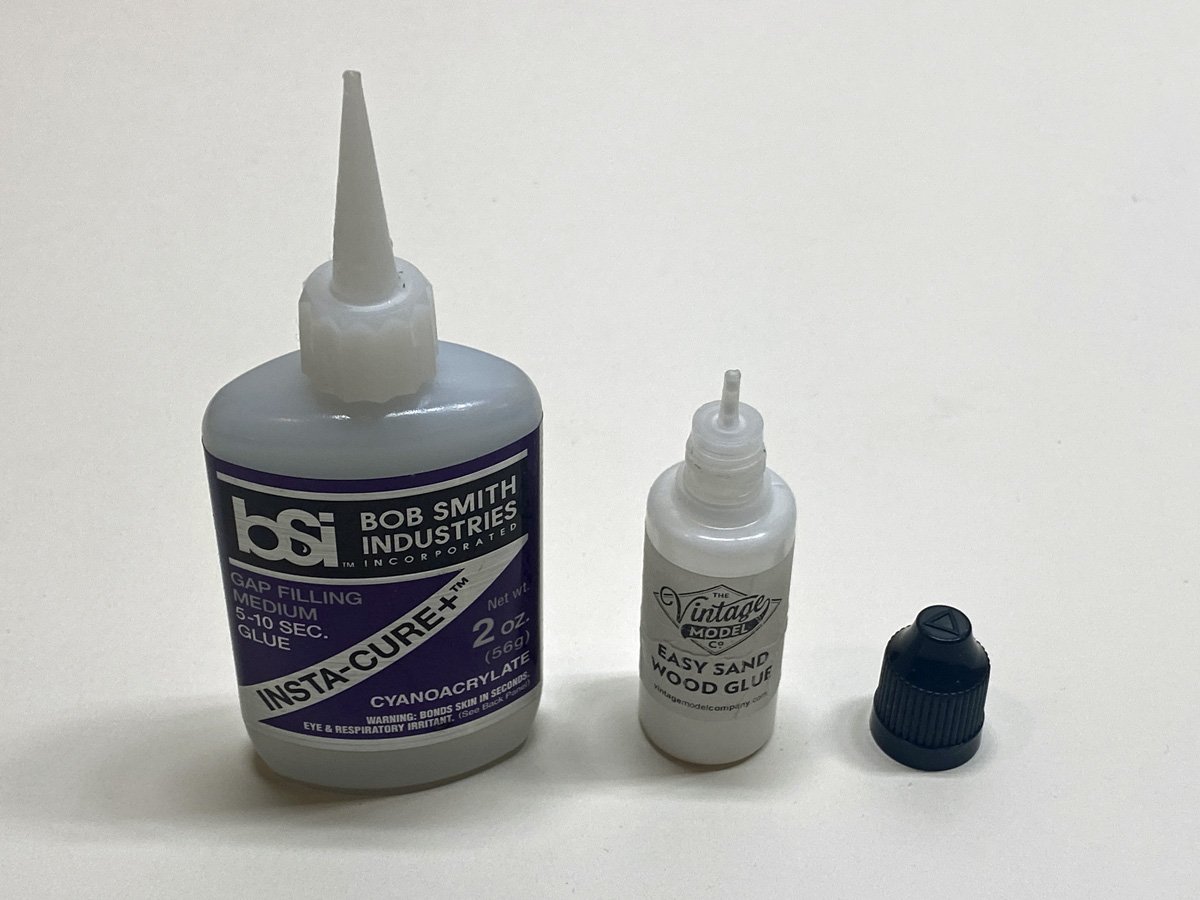
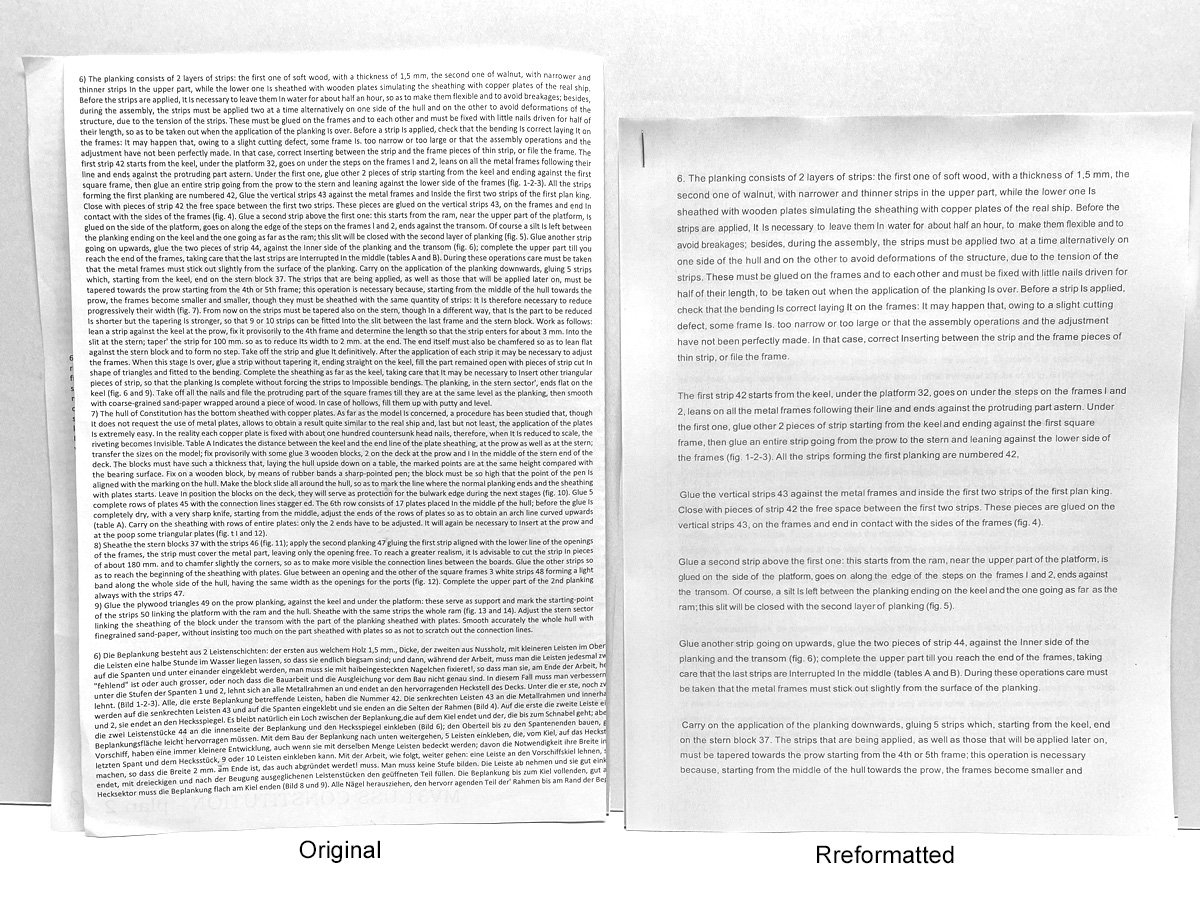
 Initial Planking The planking instructions are actually pretty detailed, but they are all jammed into one gigantic paragraph and are very difficult to read. Just for "fun" I scanned them, did optical character recognition, imported them into Word, and reformatted them. They are now a lot easier to read, but I'll probably never do that again. The gun ports are installed before planking begins. The bulkheads have laser-scribed lines showing where the ports should be attached, so I tried gluing a few by eye. Big mistake - they ended up terribly misaligned - and so, deconstruction. I ended up tacking a plank where the top of the ports should go and aligned them with that. Then I glued that plank permanently and added a second plank along the bottom of the ports. The planks are nominally 1.5 x 5 mm, but they actually measure 1.58 to 1.61 mm thick - 1/16". They are thicker than most planks that I've worked with before, and absolutely have to be soaked before bending. My hot bending tool won't bend them unless they are wet. The first pieces at the bow are a little sloppy but at least there is plenty of material to sand to shape. For planking I use a method recommended by Frank Mastini in Ship Modeling Simplified, where you glue the edges of the planks with carpenters' glue but hold them to the bulkheads with CA - no nails required. I recently posted some photos of a Westland Lysander kit by The Vintage Model Company that I built. The kit came with the nicest little bottle of white glue with a nozzle sized perfectly for plank edges. It is necessary to add a support to the free edge of the gun ports to support planking between the ports. It would be perfect if if two planks filled that space vertically Of course the space is a little too tall. But why bother with planks at all? The area is flat and will get another layer of walnut eventually, so I cut some 1/16" sheet and will use that to fill the space.
-
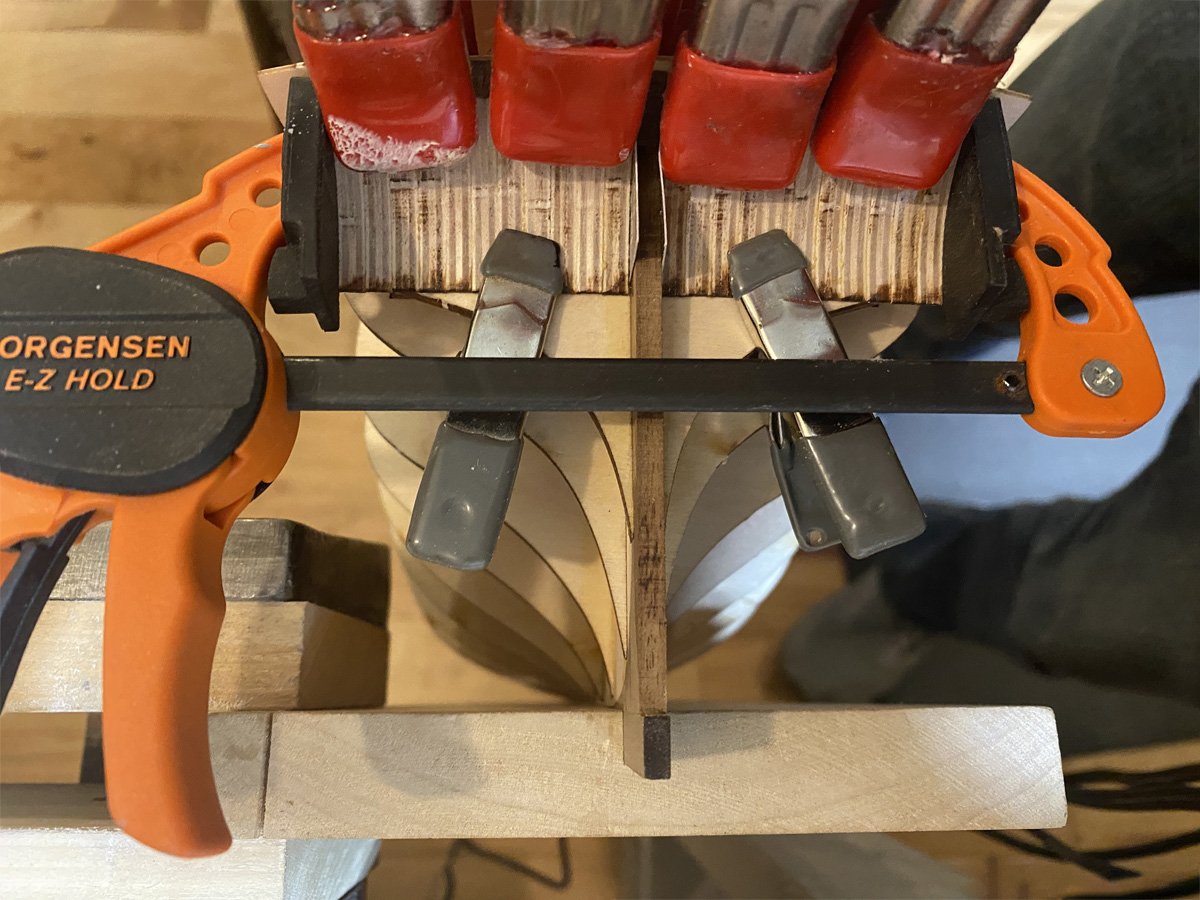
Don, My plans show the laminated pieces and two strip pieces. However, the transom fit perfectly on the laminated pieces without the strips so I left them off. I'll probably be sorry later.
-
Canute reacted to a post in a topic:
USS Constitution by rvchima - Mamoli - 1:93
-
Canute reacted to a post in a topic:
USS Constitution by rvchima - Mamoli - 1:93
-
rvchima reacted to a post in a topic:
HMS Sphinx 1775 by Ronald-V - Vanguard Models - 1:64
-
rvchima reacted to a post in a topic:
HMS Sphinx 1775 by Ronald-V - Vanguard Models - 1:64
-
Ryland Craze reacted to a post in a topic:
Seguin by Phil B - FINISHED - BlueJacket Shipcrafters - 1:48
-
Phil, Beautiful work on your Seguin! I love the crew and all your little details - the ice chest with spilled ice, the coal pile, ladders, etc. Congratulations on a job well done.
-
 rvchima reacted to a post in a topic:
Seguin by Phil B - FINISHED - BlueJacket Shipcrafters - 1:48
rvchima reacted to a post in a topic:
Seguin by Phil B - FINISHED - BlueJacket Shipcrafters - 1:48
-
rvchima reacted to a post in a topic:
Seguin by Phil B - FINISHED - BlueJacket Shipcrafters - 1:48
-
rvchima reacted to a post in a topic:
Seguin by Phil B - FINISHED - BlueJacket Shipcrafters - 1:48
-
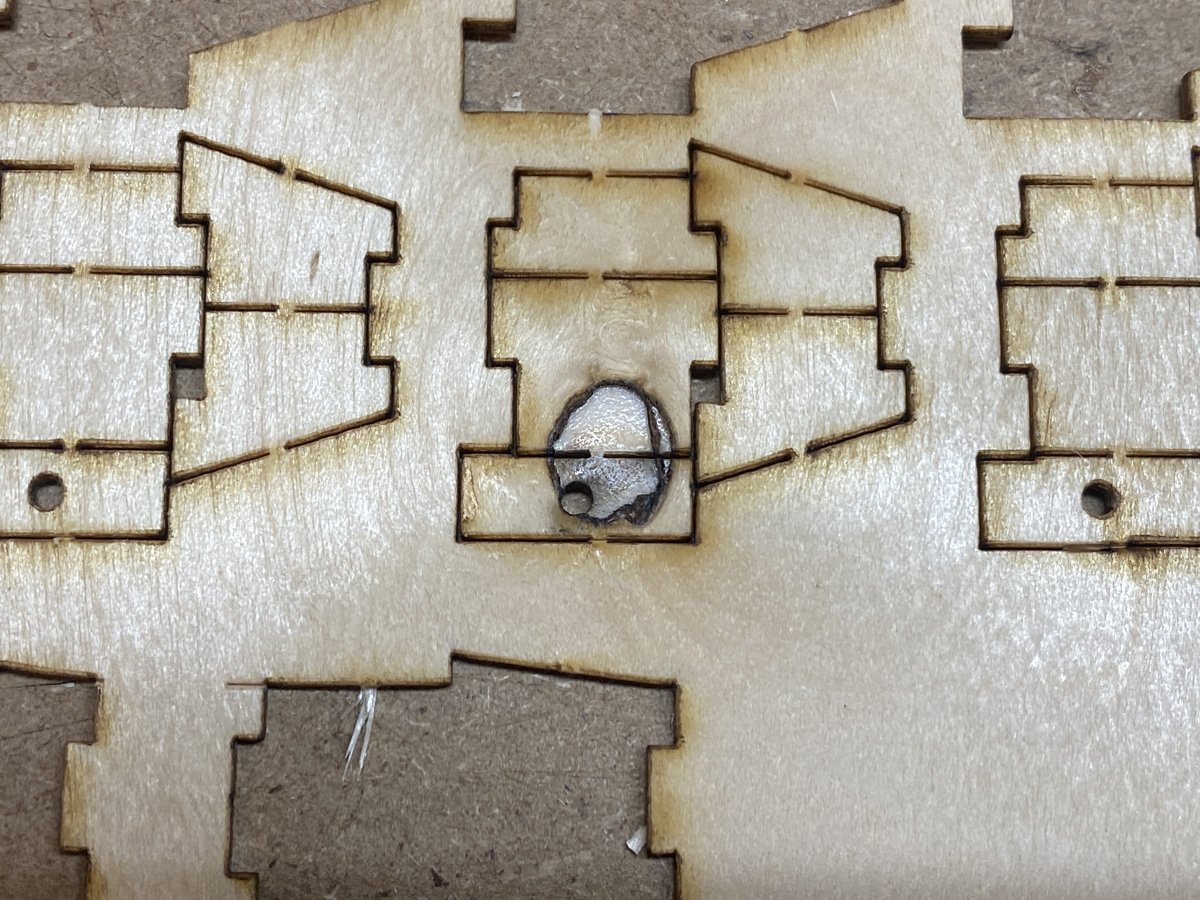
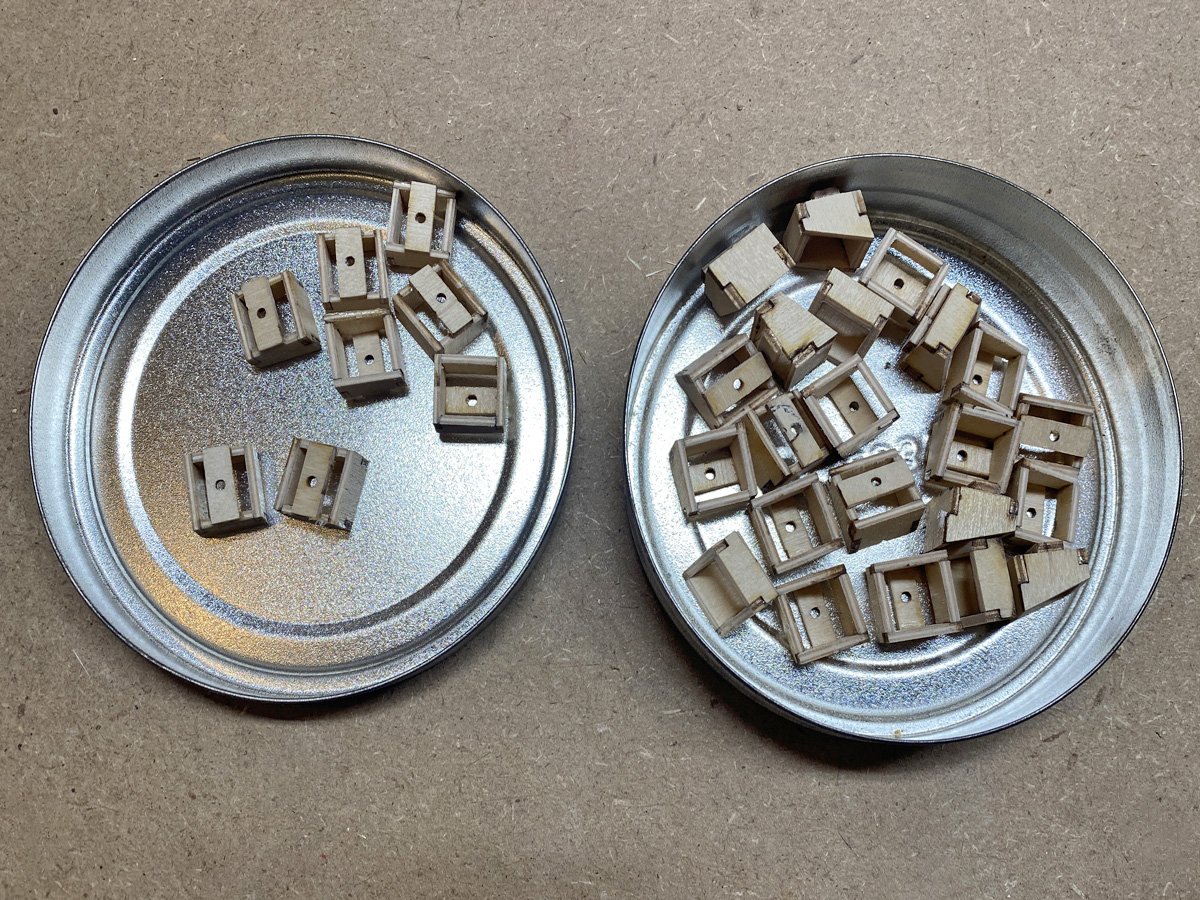
Gun Ports The old Mamoli kit had cast metal gun ports that apparently required a lot of clean up. The Dusek kit has 30 gun ports in 2 sizes that are built up from thin ply. I thought that it would be tedious to build 30, but I got them done in a few hours over 2 days. The ply had a couple of laser burn marks that I fixed with filler. The parts are held in the ply with tiny tabs that are not on the glued edges, so you can assemble the ports without sanding. I dabbed the pieces with CA accelerator on a small brush, and glued them with medium CA. Then I sanded the fronts and backs with a small disk sander, and added the small back piece that holds the gun. It seems like that back piece should cover the whole port, but you probably won't see it on the finished model. Next up: sanding all the bulkheads to shape before planking.
-
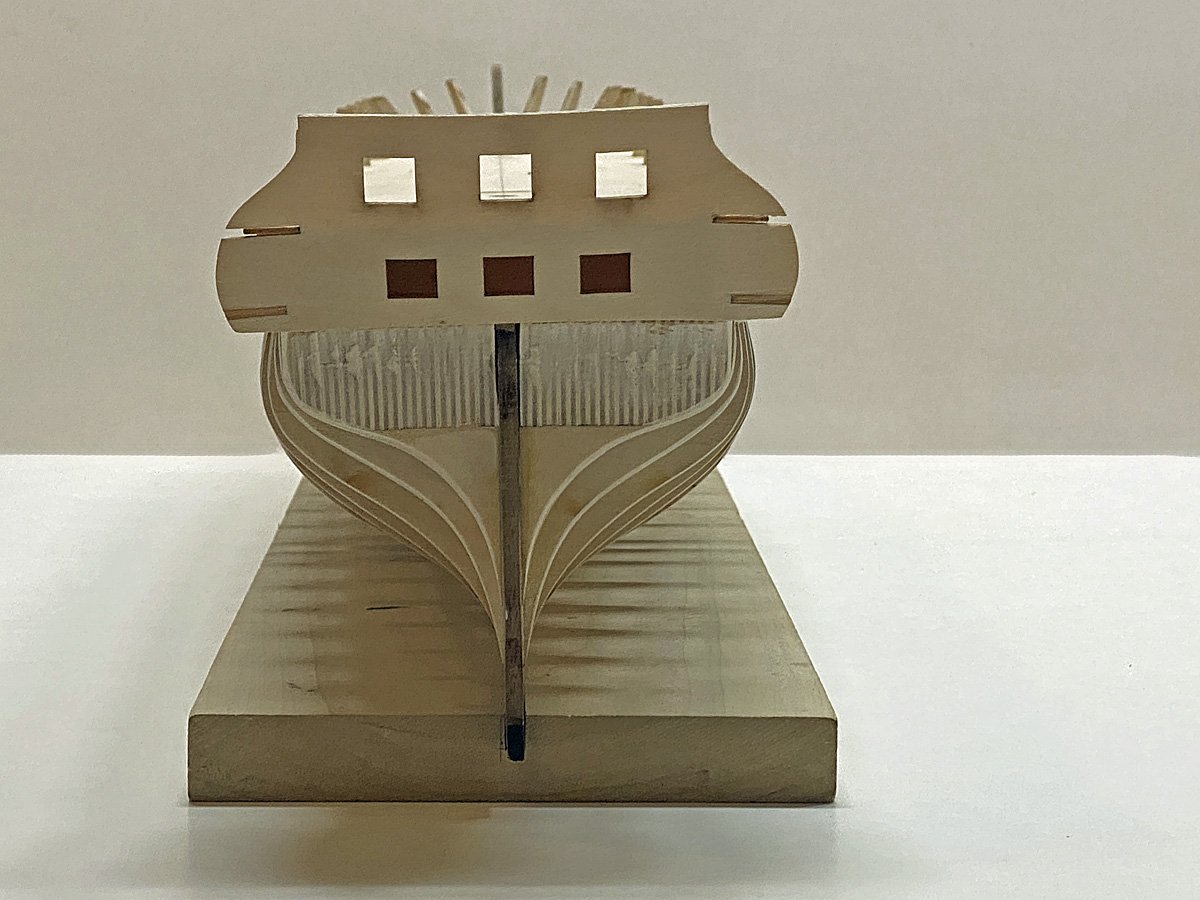
Stern This was an area where the instructions made no sense at all. The stern is filled in with 22 pieces of ply shaped roughly like quarter-round moulding. The instructions have the wrong part number for the pieces, and say that they should be separated from the deck with some unspecified strip wood. The pieces fit almost perfectly below the lower deck, so I just glued them in place. I suspect this is another modification to the old Mamoli kit that did not get corrected in the instructions.
-
Canute reacted to a post in a topic:
USS Constitution by rvchima - Mamoli - 1:93
-
schooner reacted to a post in a topic:
USS Constitution by rvchima - Mamoli - 1:93
-
Hi Jon, I searched through most of the Constitution builds on MSW before I decided to take a chance on the updated Mamoli kit, and I have skimmed through all of the ones that you mentioned. Maybe it wasn't obvious that I was being sarcastic about the clown reference. Although the new, laser-cut parts are a pleasure to work with, the old instructions are extremely confusing and have not been completely updated to the new parts.
-
Frank, I just skimmed your build log. First, I am surprised what all you have had to rebuild/replace on an expensive kit. But second, I am amazed at the clever things you have come up with do do so.
-
rvchima reacted to a post in a topic:
USS Constitution by g8rfan99 - BlueJacket Shipcrafters - 1/98
-
 rvchima reacted to a post in a topic:
USS Constitution by g8rfan99 - BlueJacket Shipcrafters - 1/98
rvchima reacted to a post in a topic:
USS Constitution by g8rfan99 - BlueJacket Shipcrafters - 1/98
-
rvchima reacted to a post in a topic:
USS Constitution by g8rfan99 - BlueJacket Shipcrafters - 1/98
-
rvchima reacted to a post in a topic:
USS Constitution by g8rfan99 - BlueJacket Shipcrafters - 1/98
-
Frank (g8rfan) and Don (Kelp), I will keep an eye on your work. aIt will be interesting to compare the different versions of the Mamoli kit to the Bluejacket kit.
-
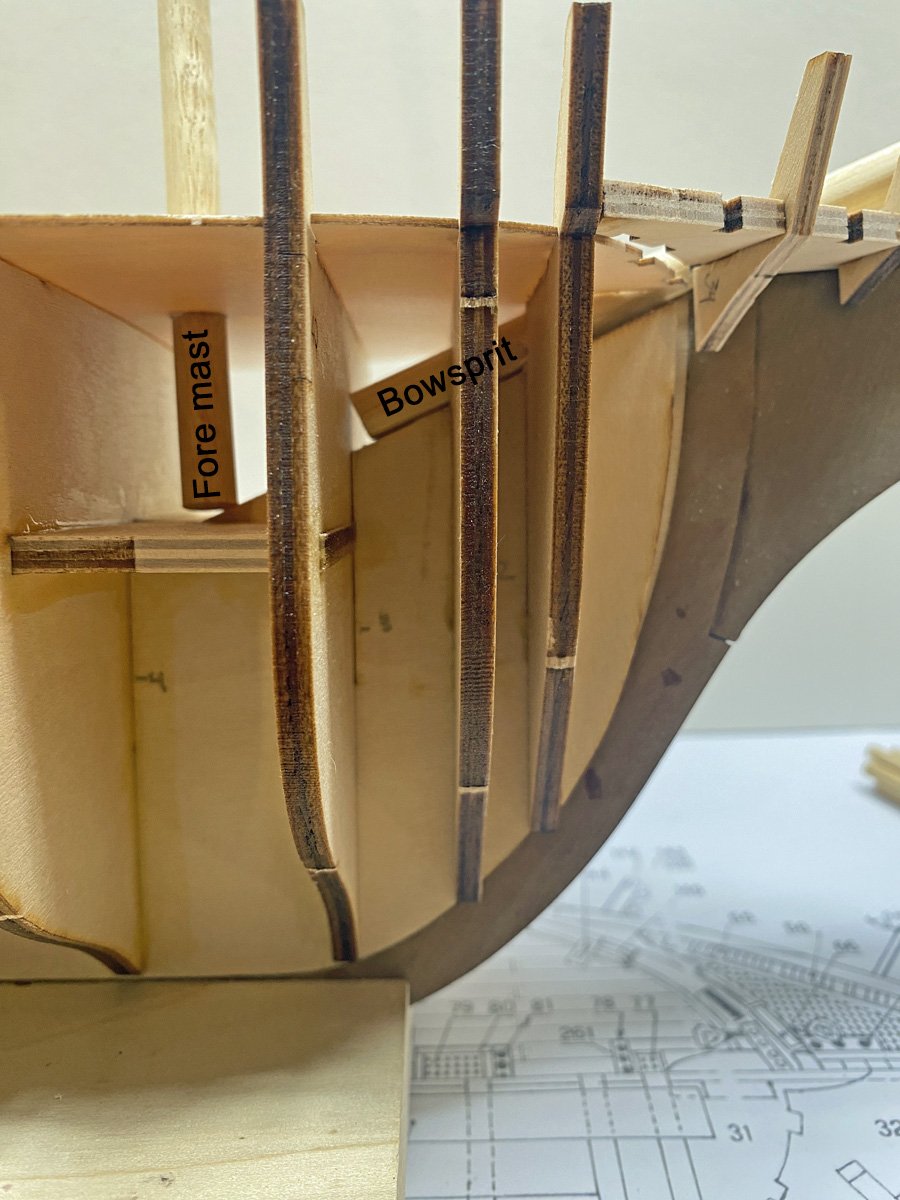
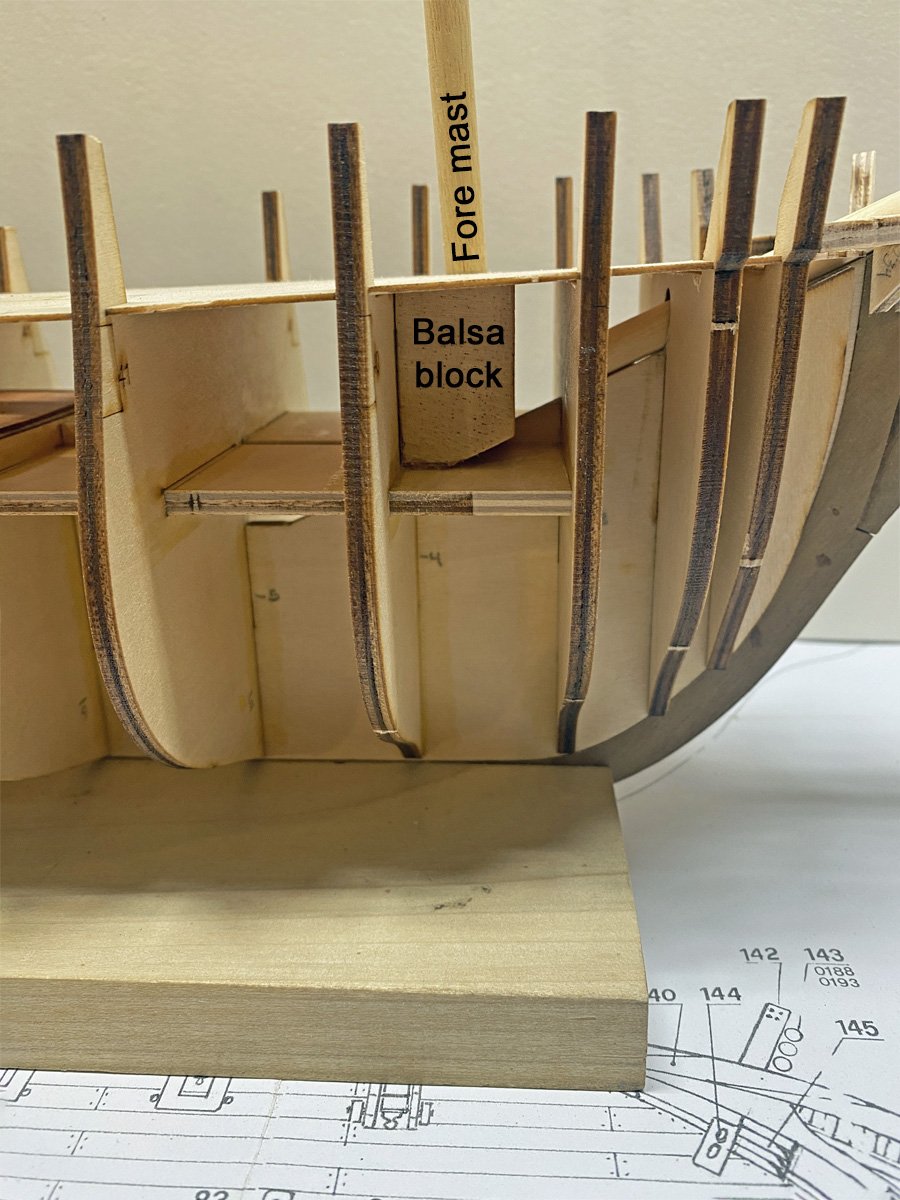
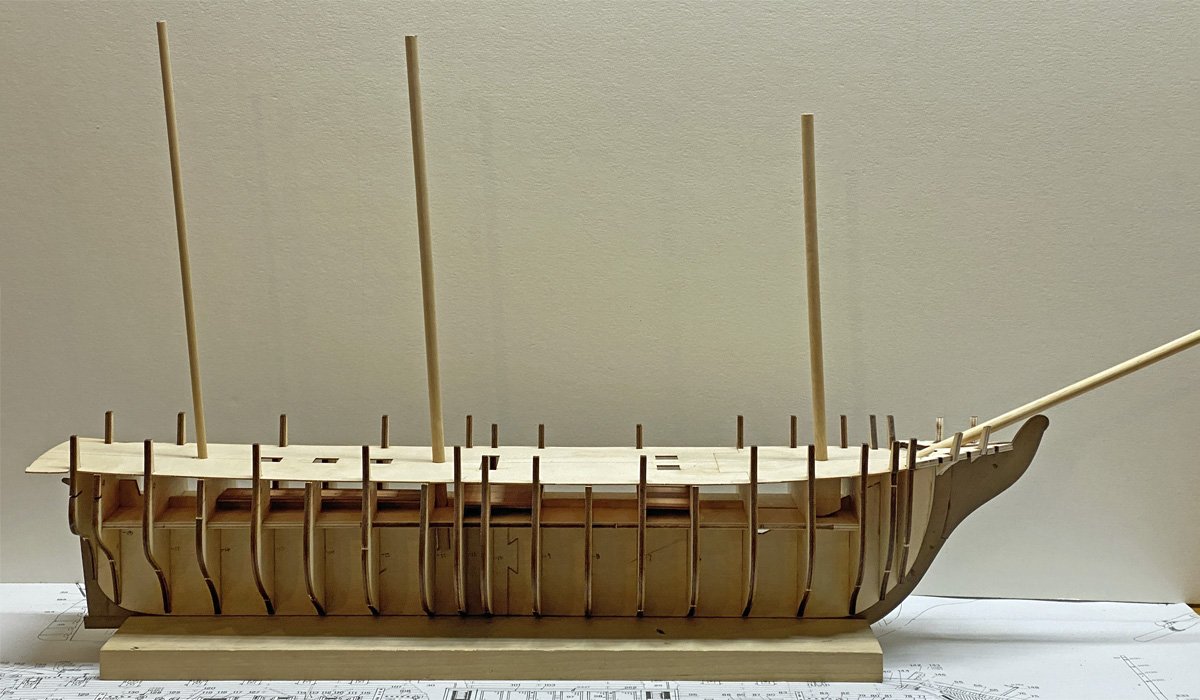
Checking the Masts Although kit instructions never mention this, I learned a long time ago that this is a good time to check that the bowsprit and masts fit and are well supported. The bowsprit, main, and mizzen masts fit perfectly with just a little enlargement of the holes in the deck. They all extended into notches in the keel and are nicely supported. But there was no absolutely support for the fore mast. This seems to be an oversight in Dusek's revision of the kit. I added a block of dense balsa and drilled a hole at the same angle as the main mast. Now the masts are all aligned and solid.


-
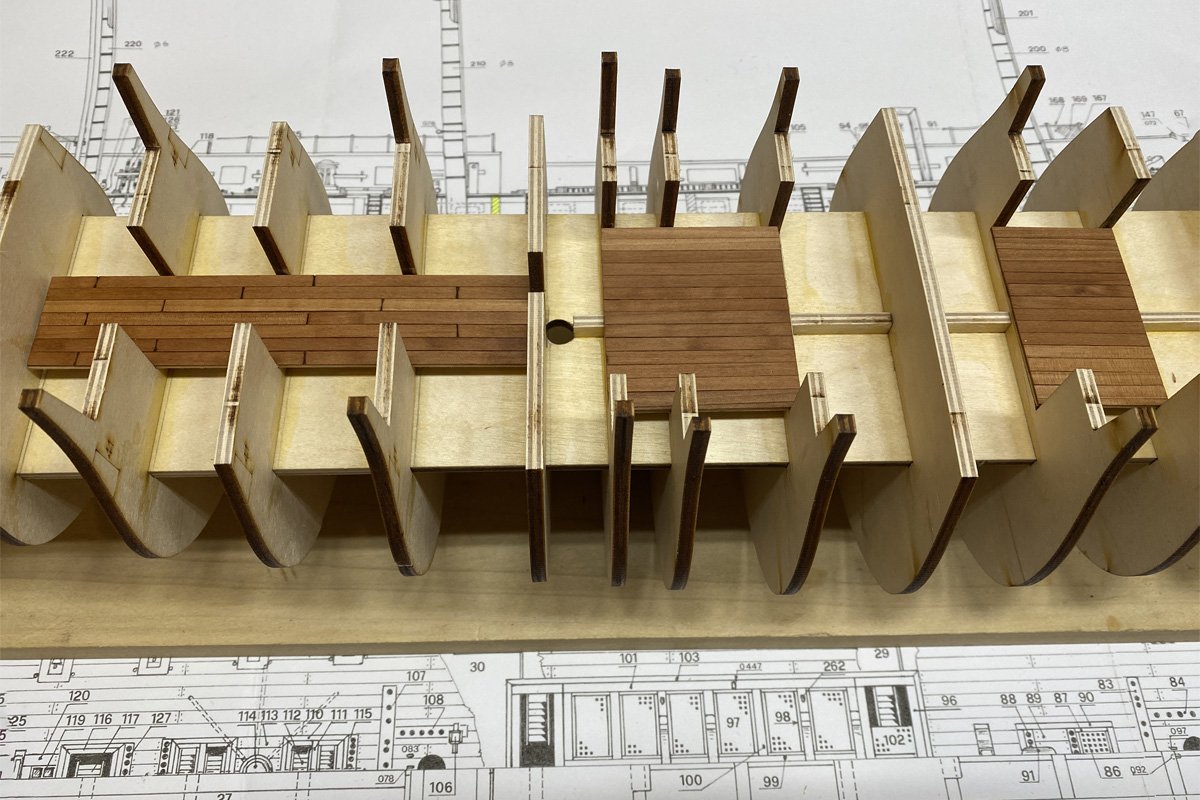
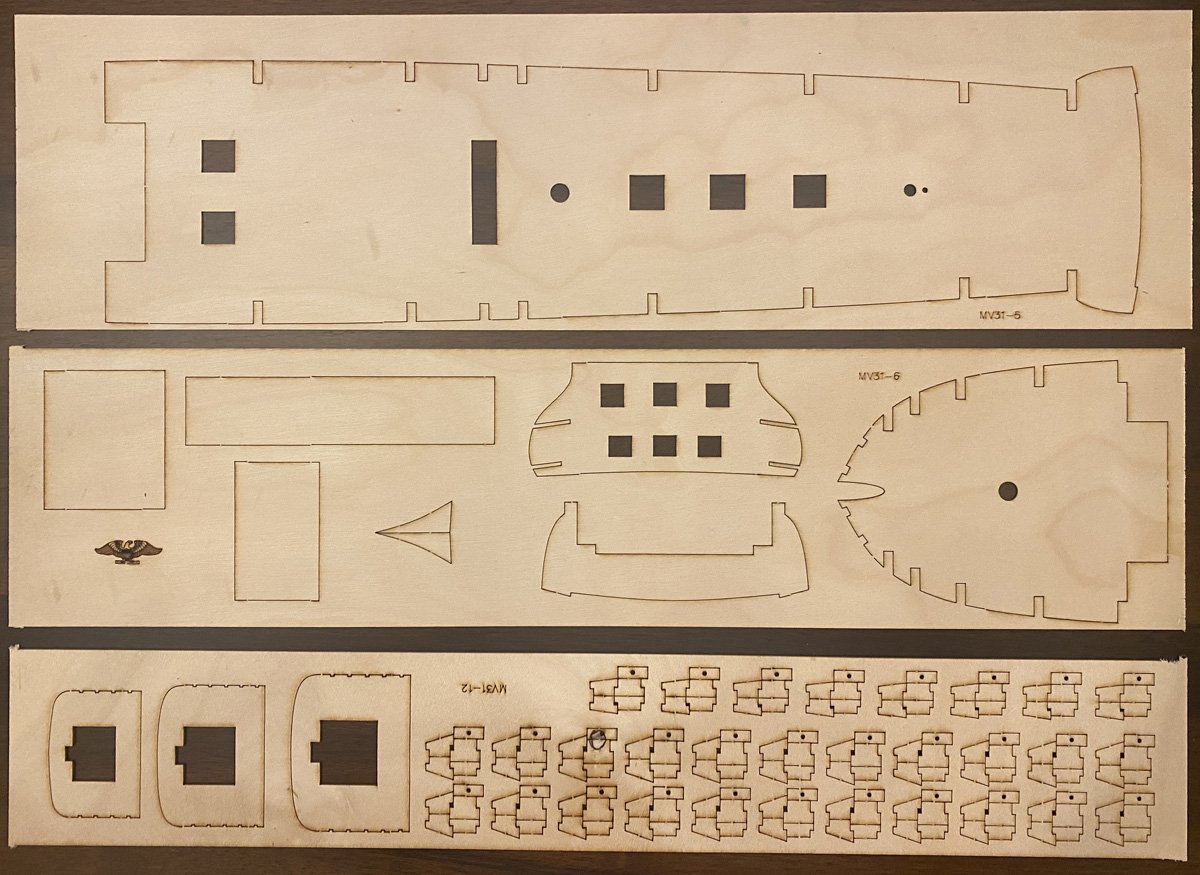
Decks The planked areas in this photo are false sub-decks that will barely be visible through multiple, tiny hatches in the main deck. The instructions didn't say anything about planking them, but why not? Just to illustrate how good the laser cutting is on this kit, the main deck pieces fit on perfectly with absolutely no cutting, fitting, or sanding. See all the tiny hatch openings? I'm SO glad that I planked the sub decks. 😜
-
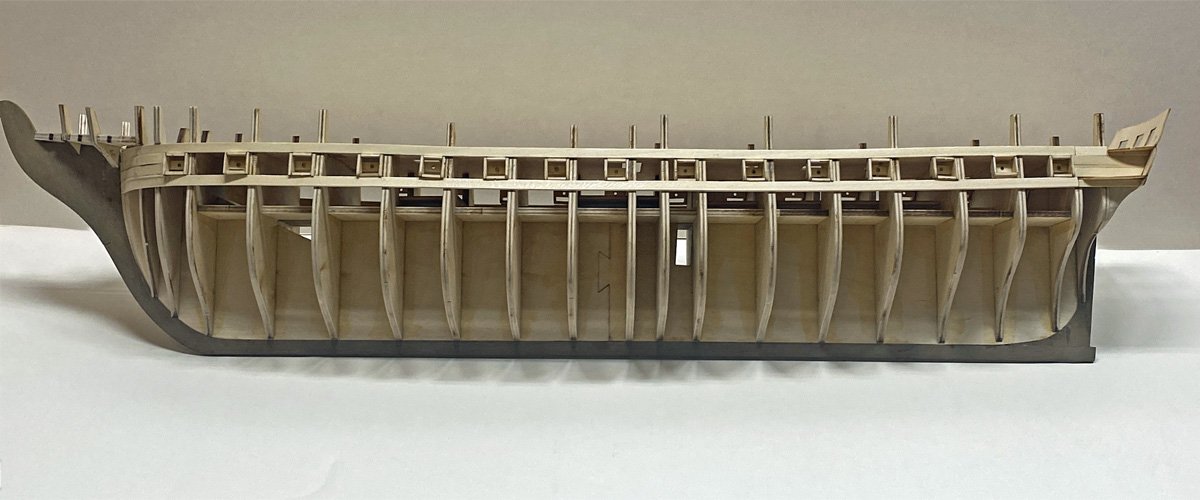
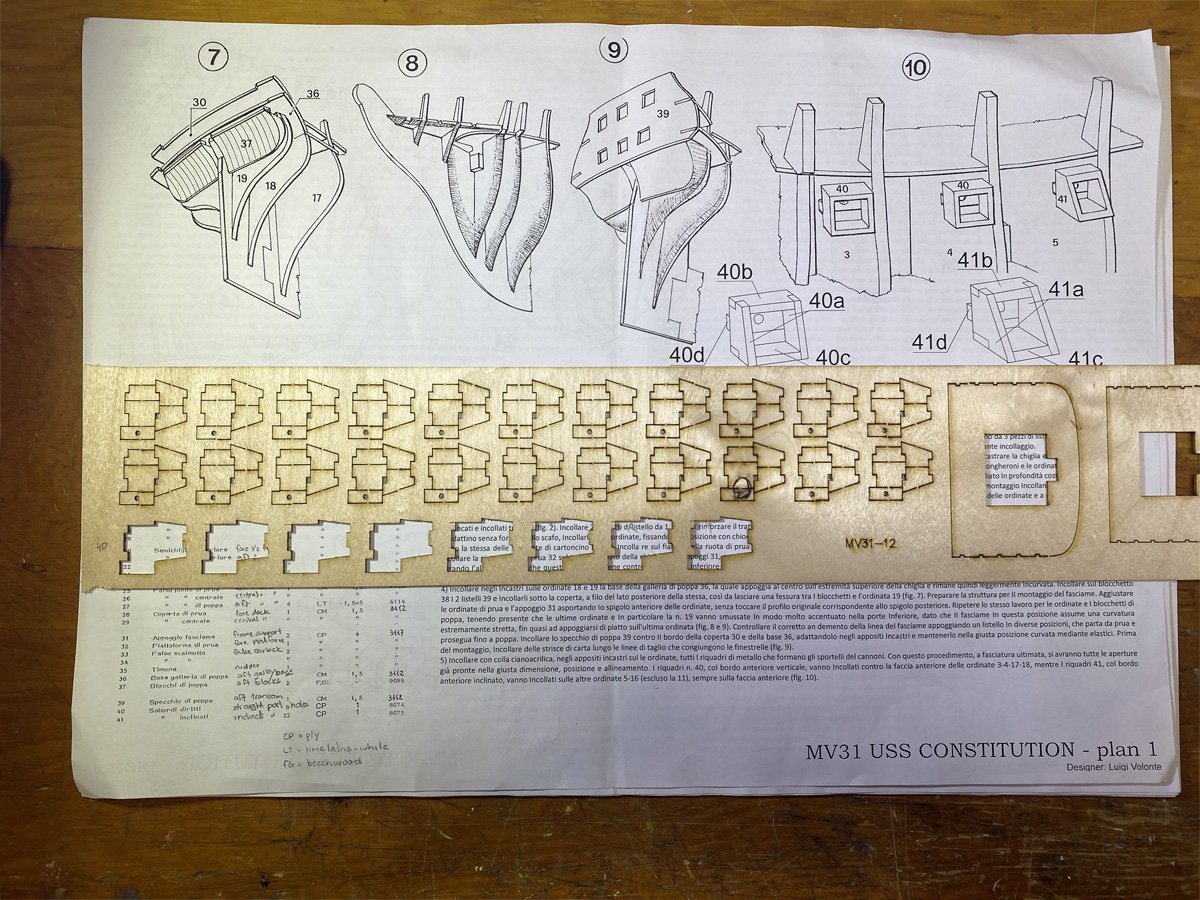
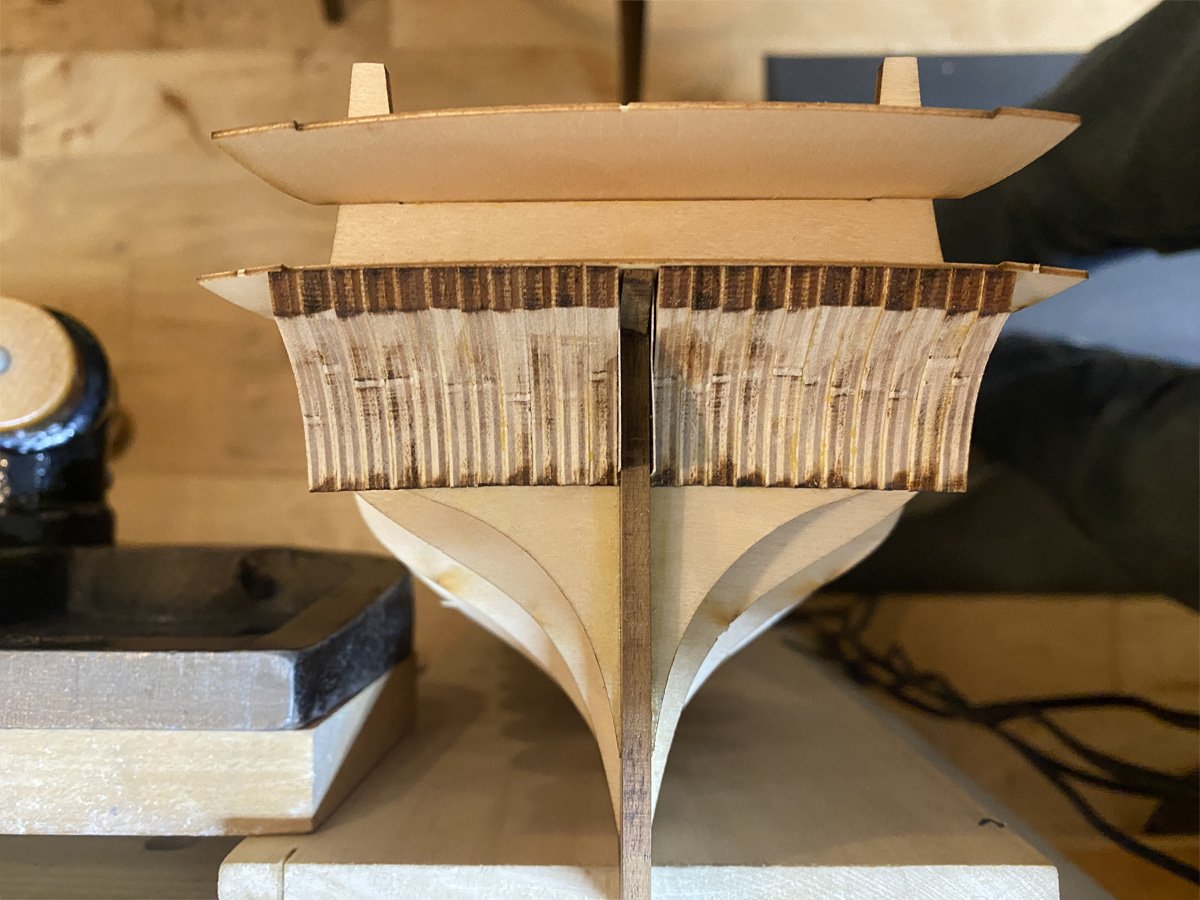
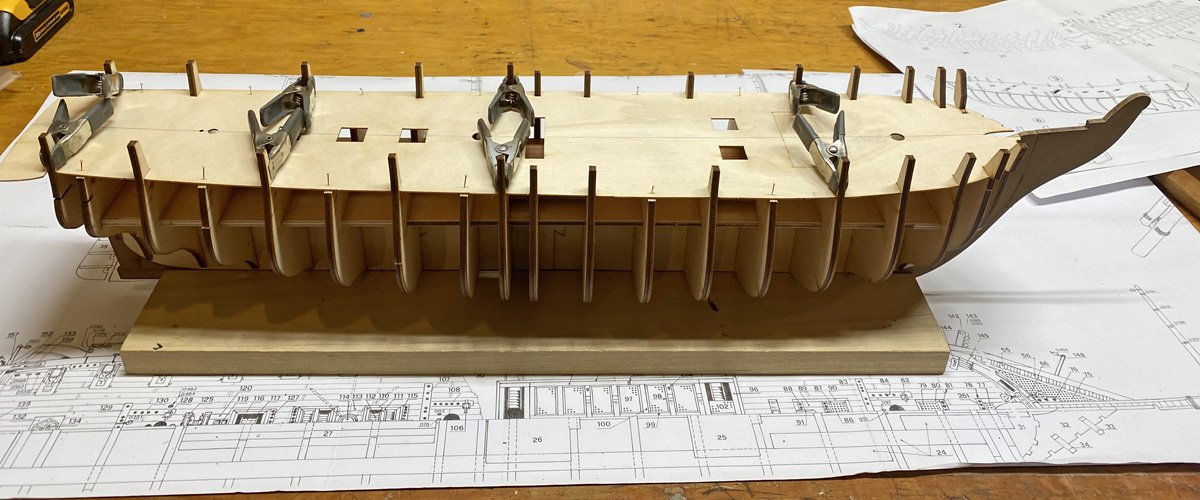
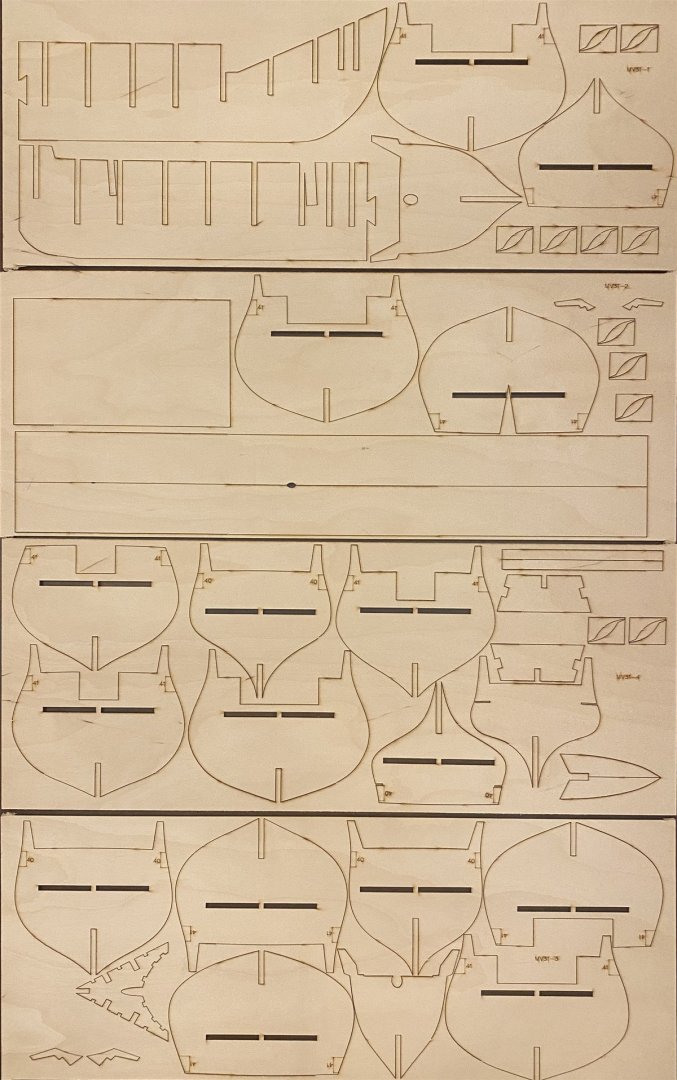
Keel The first few words on page 1 of the instructions say: "Pin clown on a flat wooden board ..." I looked unsuccessfully through all the parts for the clown, but finally realized that the instructions have some errors in translation. So I pinned down the keel parts and thought "That's still going to be a big model." But not much bigger than my Sphinx, at least until I add the bowsprit. Incidentally, the actual Sphinx ship was about 167' long, while the actual Constitution is much bigger at about 305' long. I added the 19 bulkheads and two longitudinal supports. The laser cutting was perfect but I did have to file the laser char out of all the slots for the longitudnal supports. It's pretty clear that Dusek has modified the internal structure but not updated the drawings.

-
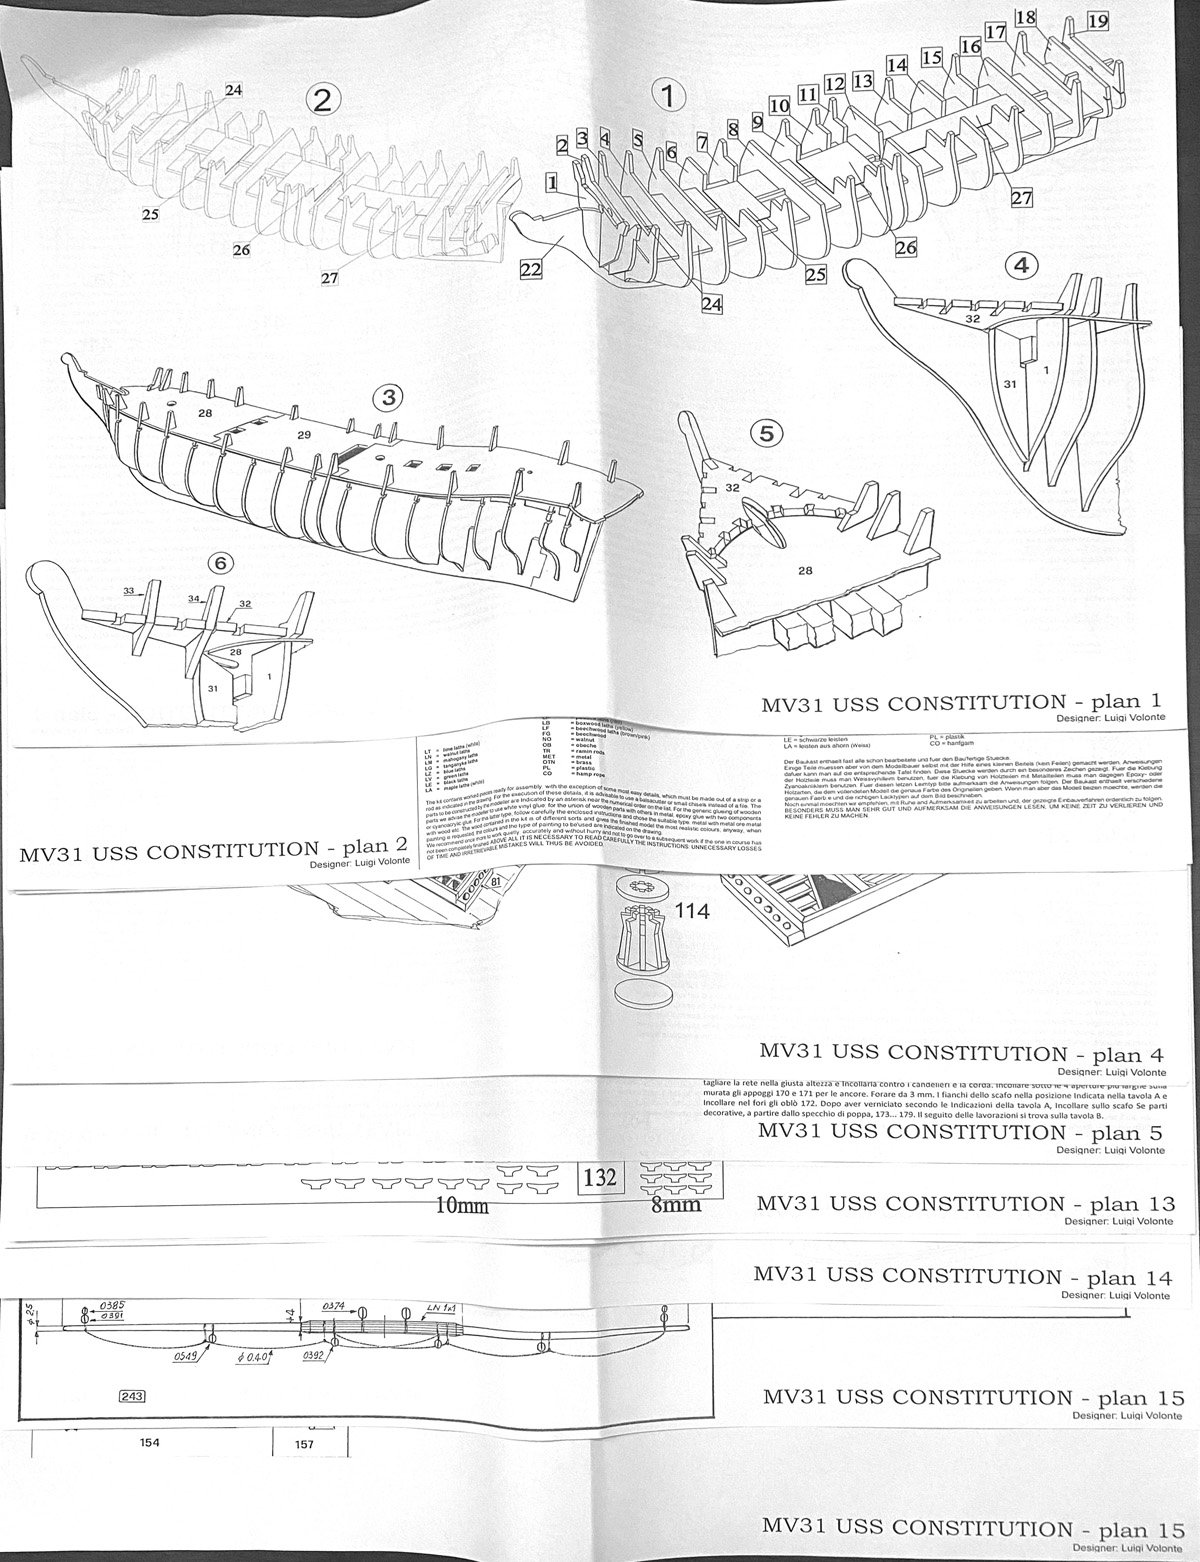
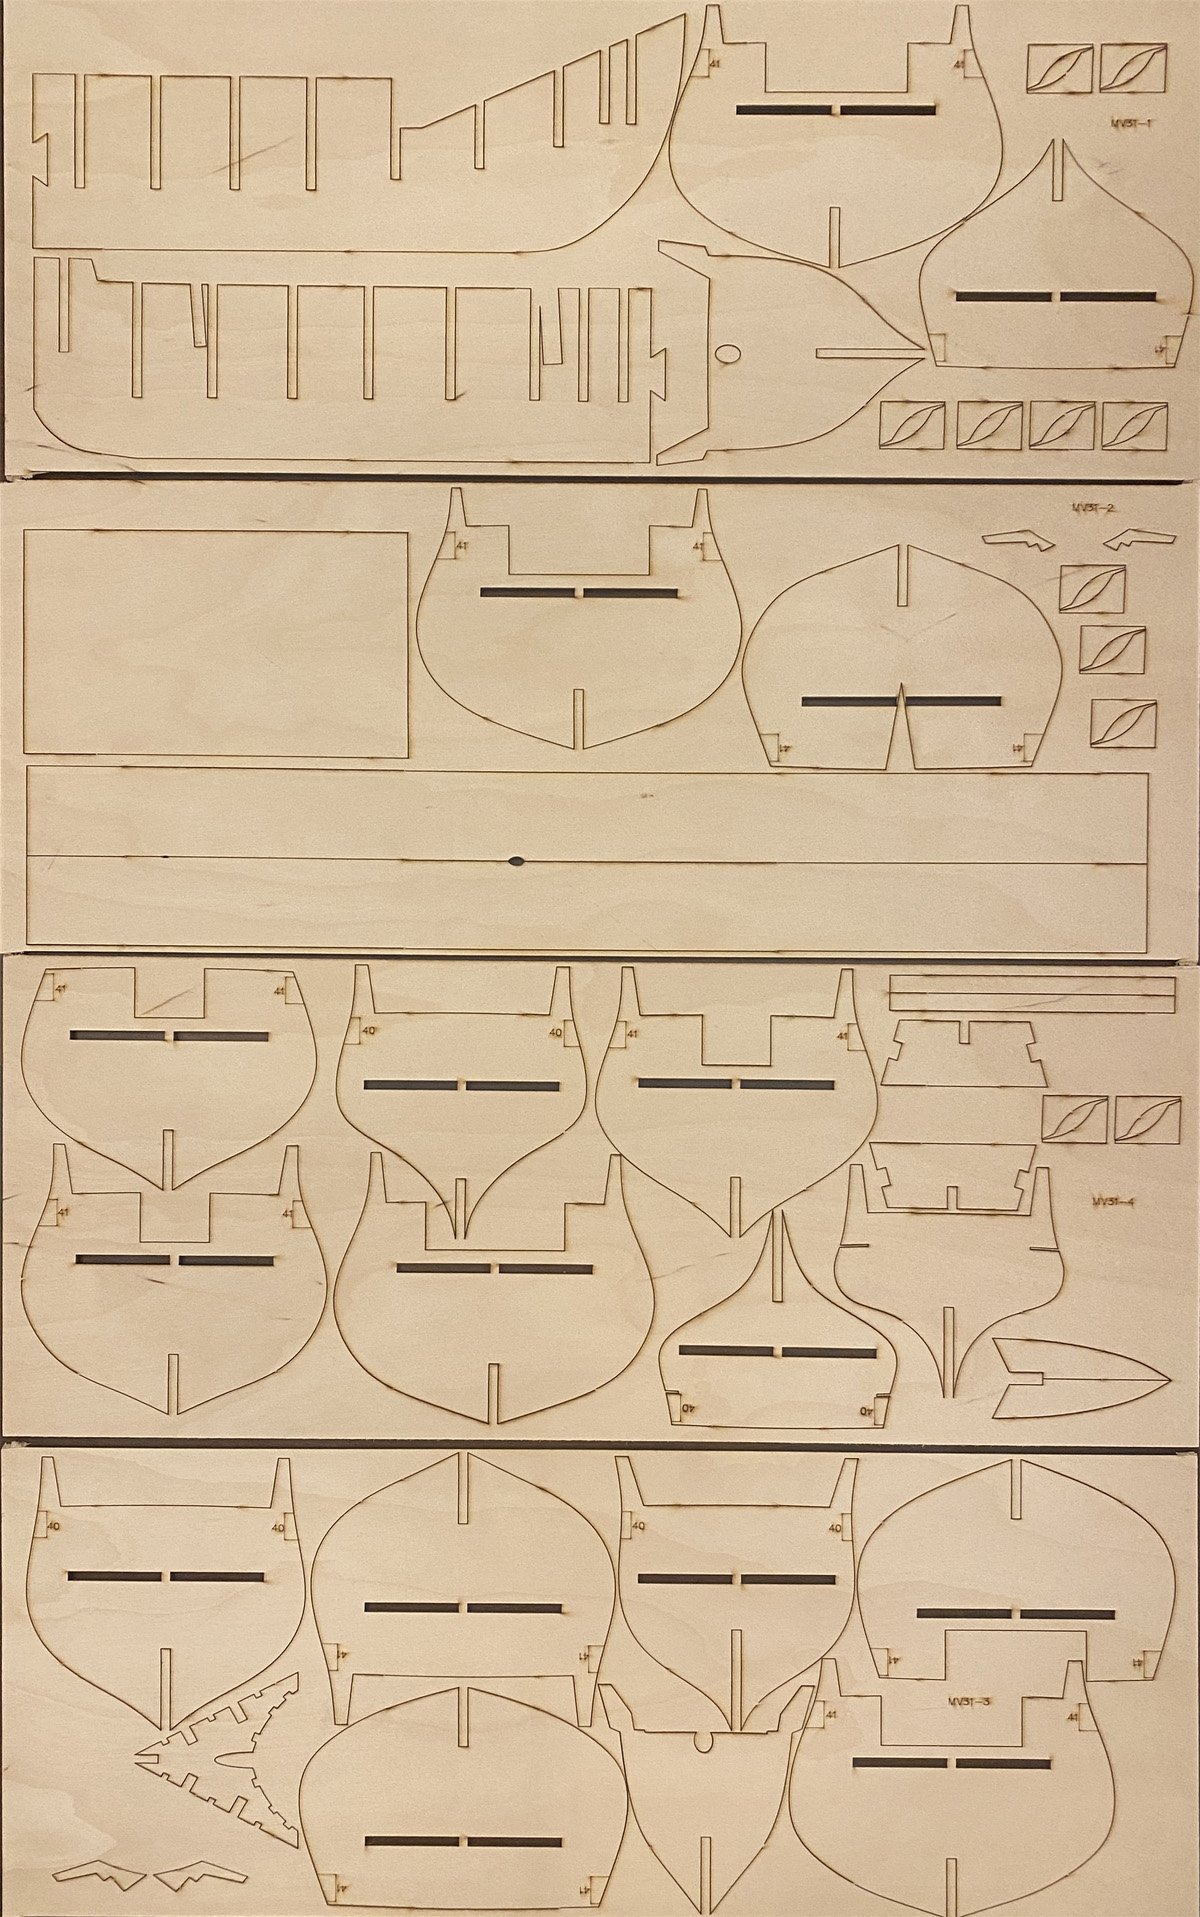
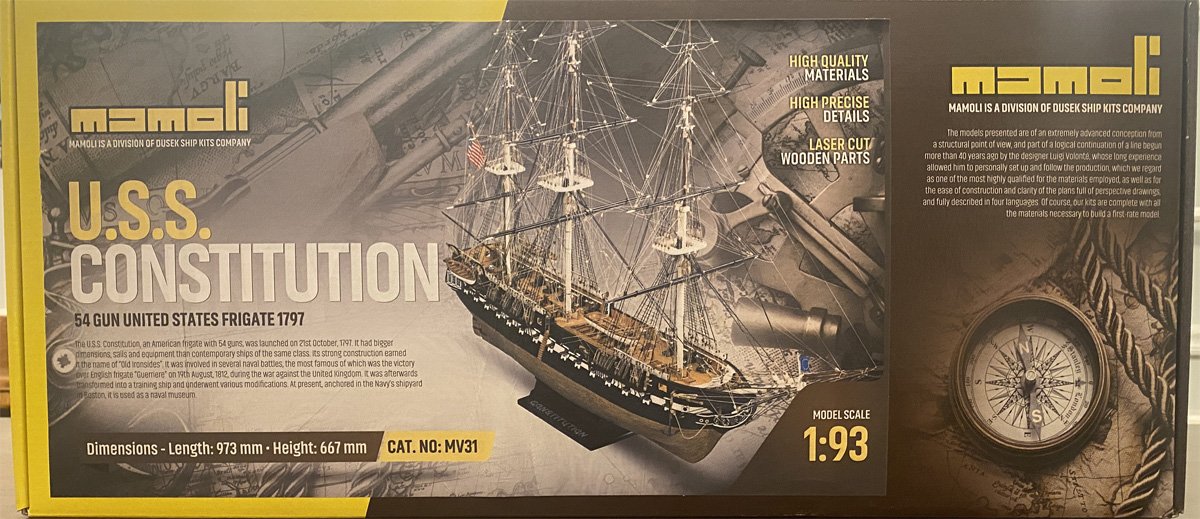
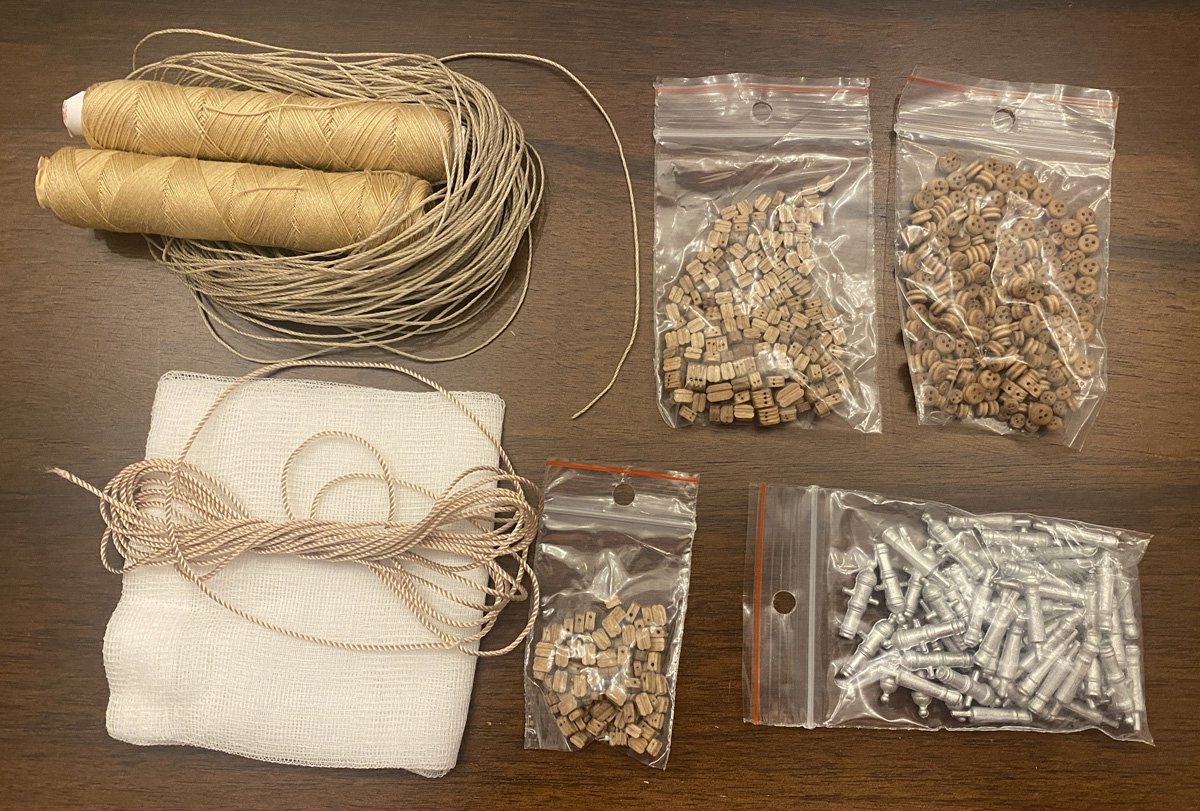
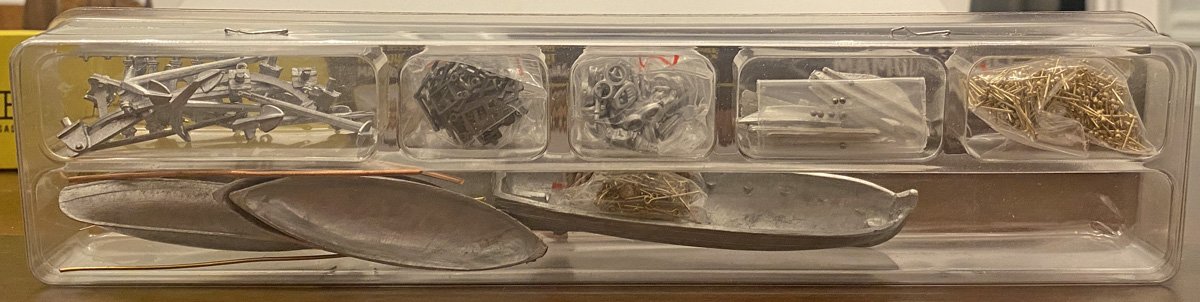
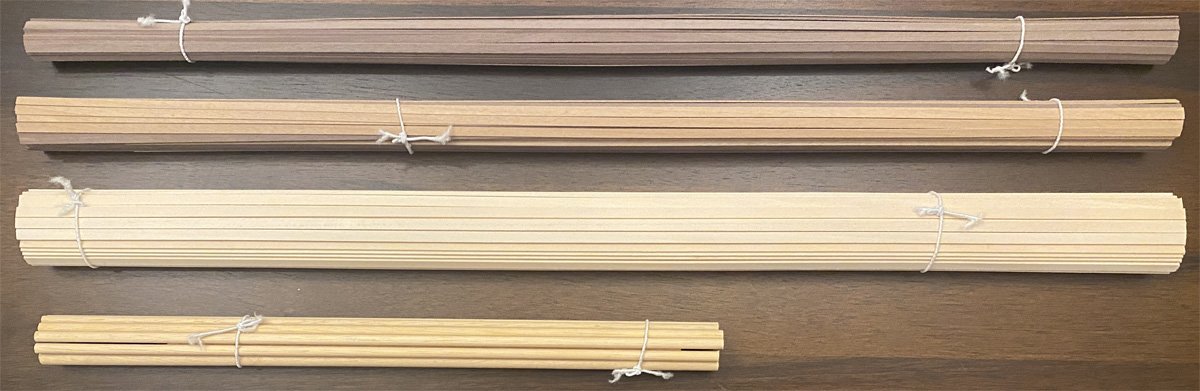
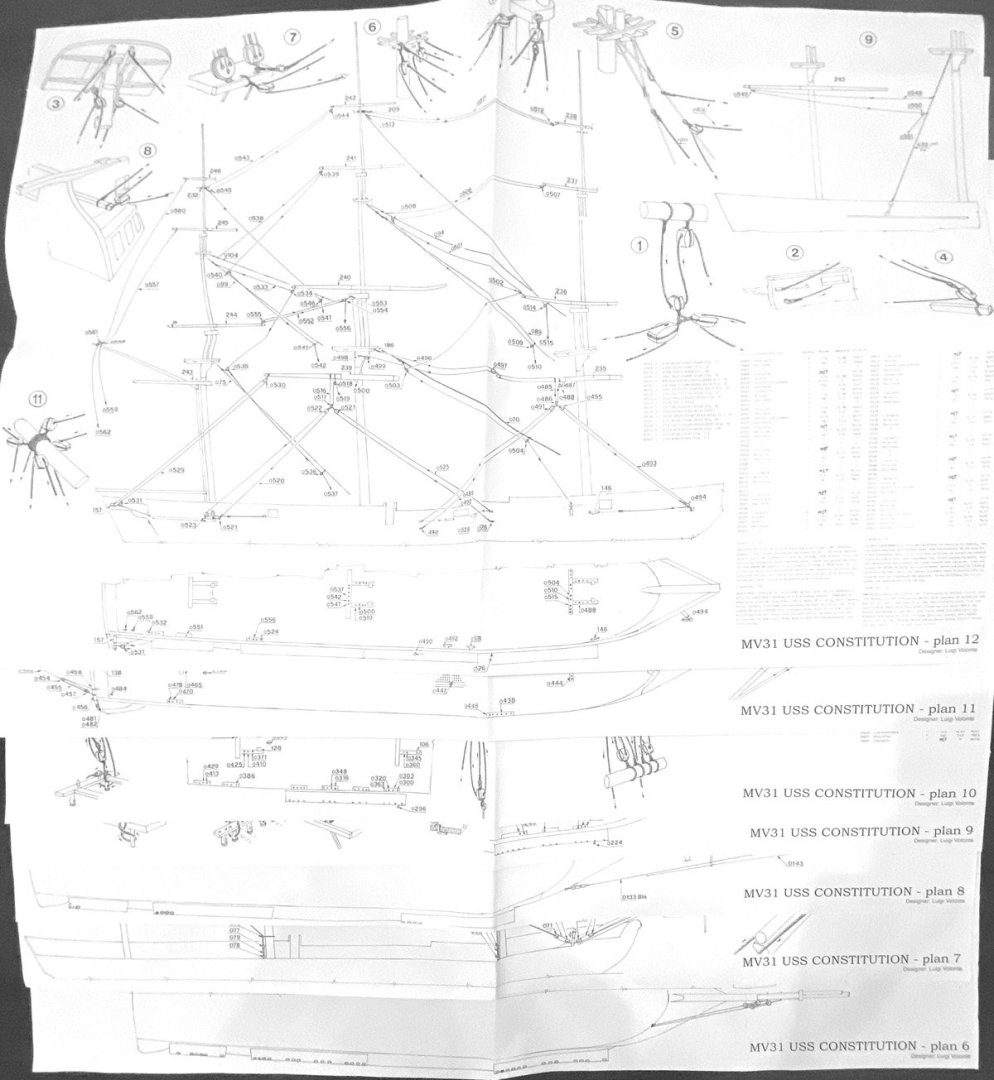
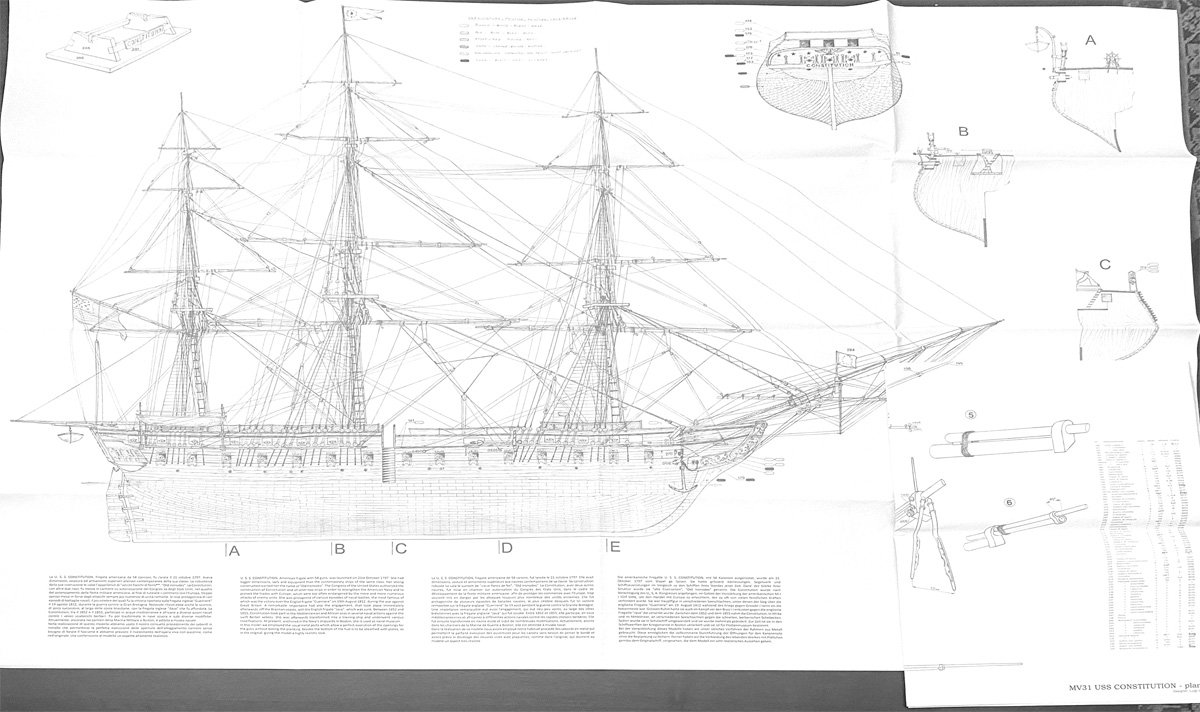
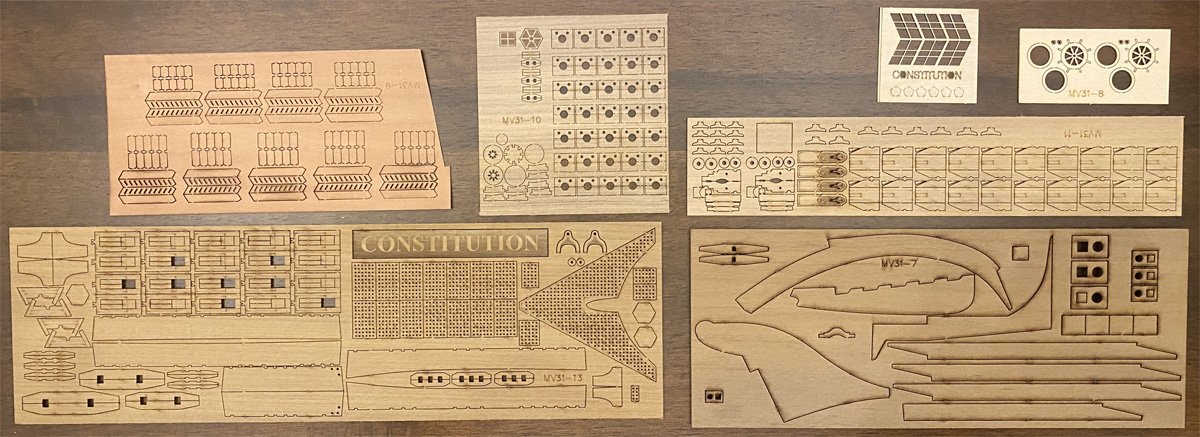
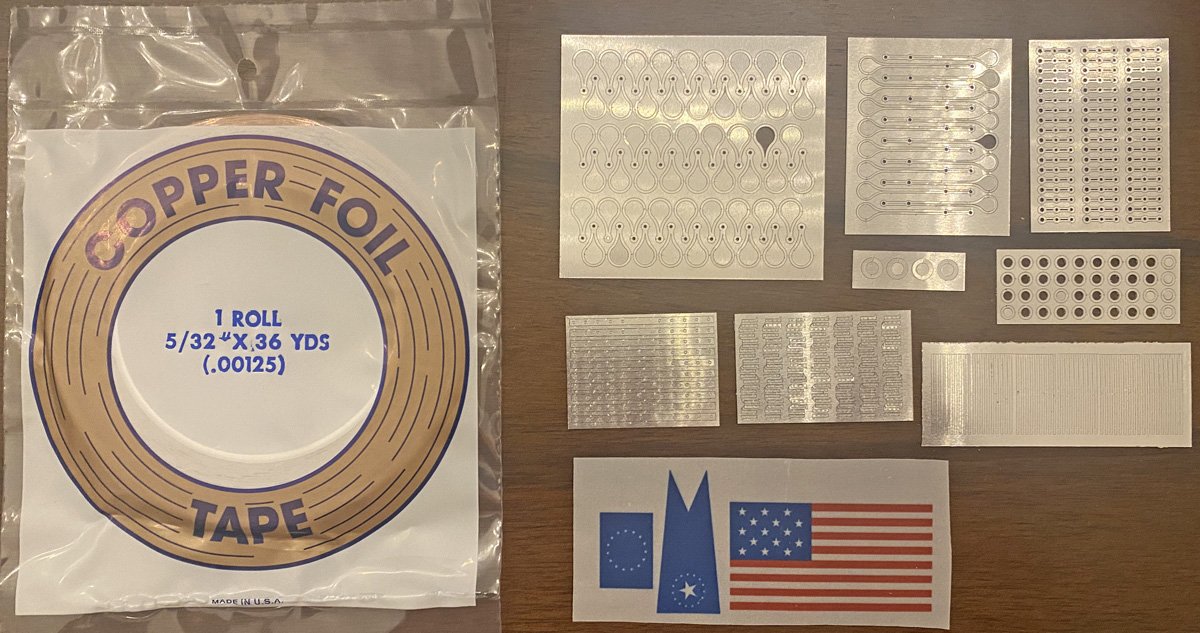
What's in the Box There aren't many build logs of of the Mamoli/Dusek Constitution on MSW so it might be useful to show some details of what's included. Everything is tightly packed in a sturdy box with a nice photo on the front. 14 pages of double-sided plans and instructions, 16.5" x 11.75" 7 pages of single-sided plans 16" x 23" 2 full-sized drawings plans 46" x 33" 4 sheets of heavy laser-cut plywood. I've already used some and the laser cutting is perfect. 3 sheets of lighter laser-cut plywood. I think that the 30 small parts on the bottom board will make up into gun ports. The older Mamoli kit had cast metal gun ports which were unpopular with builders. These ports should be easier to work with, and cheaper for Dusek to manufacture. Several sheets of miscellaneous wooden parts 4 bundles of planks and dowels A box of cast parts including the ships boats Rigging line, blocks, deadeyes, and cannon. Here's my first concern - there is no black line for the standing rigging. Looks like I will be ordering black line eventually. I don't know what the gauze is for. Some photo etched parts, flags, and a roll of copper foil. The older Mamoli kit came with a bag of green wood chips that were supposed to look like copper plates but looked more like shingles. The copper foil will look much better, but I already have three rolls of copper foil with printed nail patterns like I used on my Sphinx.

-
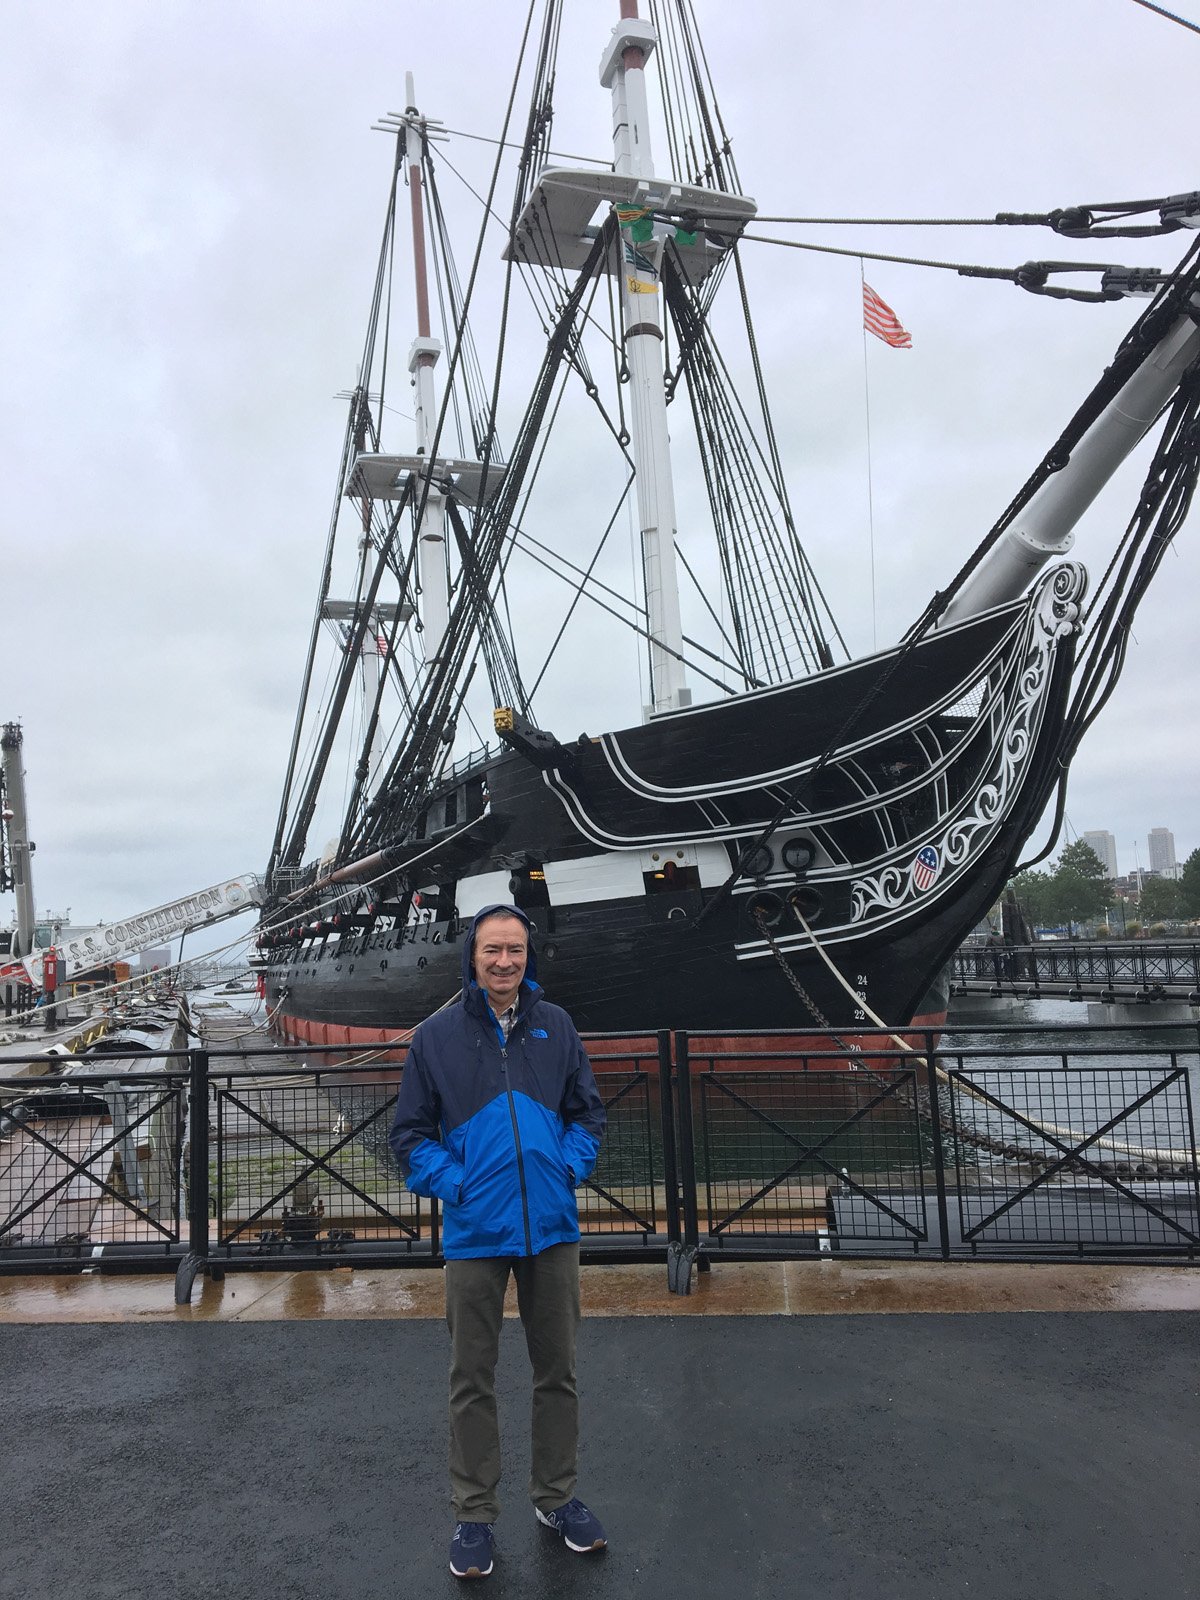
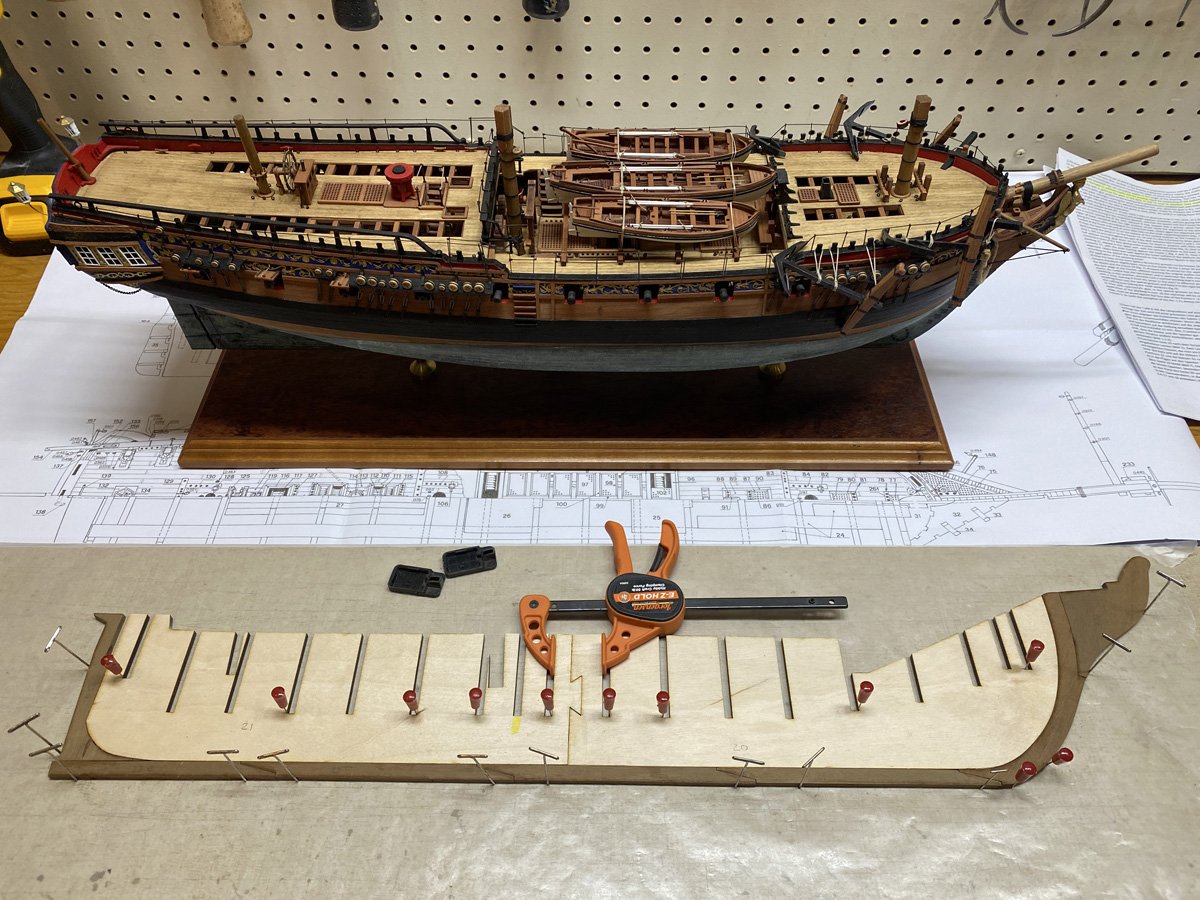
I visited the USS Constitution ship and museum in Boston Harbor in 2017. I knew then that I wanted to make a model of the ship, but it took me a while to get around to it. There are a LOT of Constitution builds on Model Ship World representing kits by several companies in different scales. Company Scale Length Billings boats 1:100 36” Bluejacket Shipcrafters 1:96 40” Mamoli/Dusek 1:93 38” Model Shipways 1:76 48” I know, the scales x lengths don't quite add up. The Bluejacket numbers give a longer ship than the rest. Most of the build logs on MSW are for the Model Shipways kit. It looks like an excellent kit, but I just can't deal with a 4 foot long model that would need an even bigger case. I decided to go with the Mamoli/Dusek kit, which was offered by Model Shipways but unavailable when I started looking. So I got on their daily email list. The Mamoli kit popped up eventually, and then before Christmas they offered all imported kits at half price. I snatched one up and gave it to myself for Christmas. For your information, Mamoli models was a well-know Italian producer of model ship kits from the 1980s through 2014, when their company was completely destroyed by fire. Daniel Dusek from the Czech Republic acquired the license to produce all Mamoli kits in 2016, starting with the Mini-Mamoli line. There is an interesting thread by Mr. Dusek here. Model Shipways / Model Expo recently took over production and distribution of the Mamoli/Dusek line in the US. Since Model Shipways already has their own kit of the Constitution, It will be interesting to see if they convert the Mamoli version to their own line.

-
Thanks Chris. I was thinking about you and all your card models while I tried to enclose the nose and cockpit. I used canopy glue like the Pros do!
-
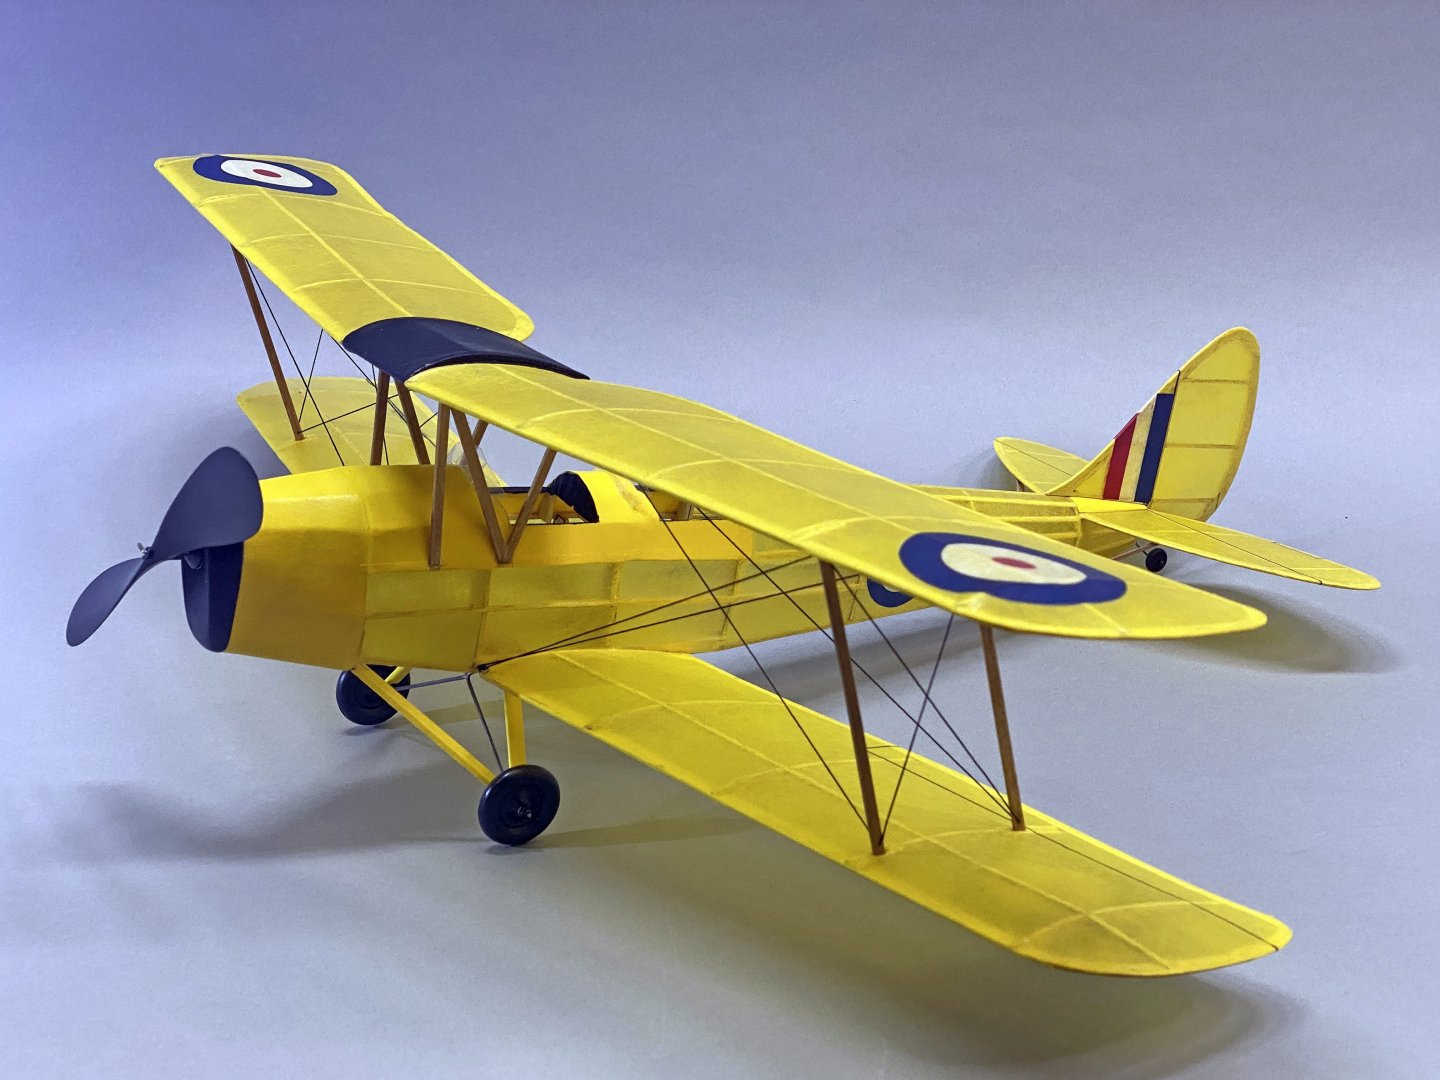
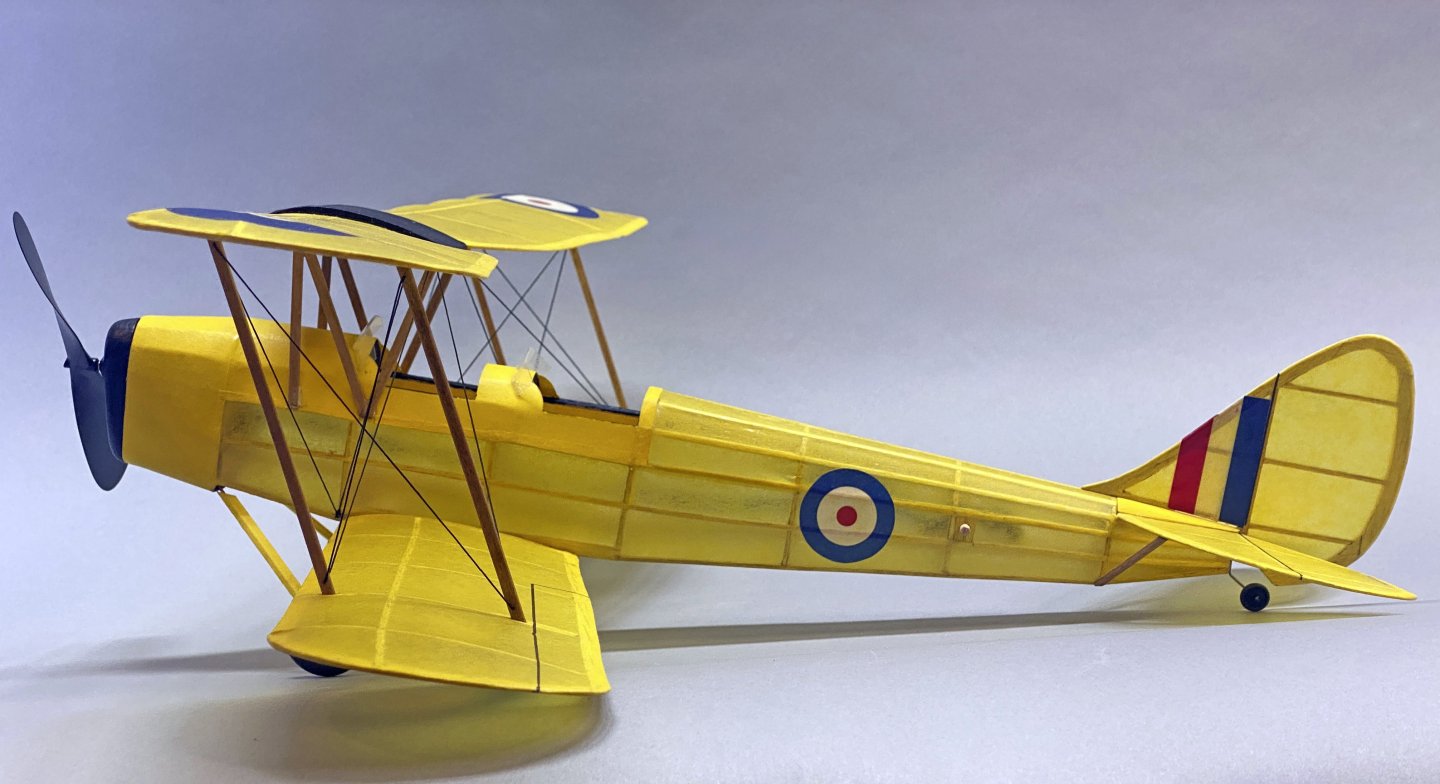
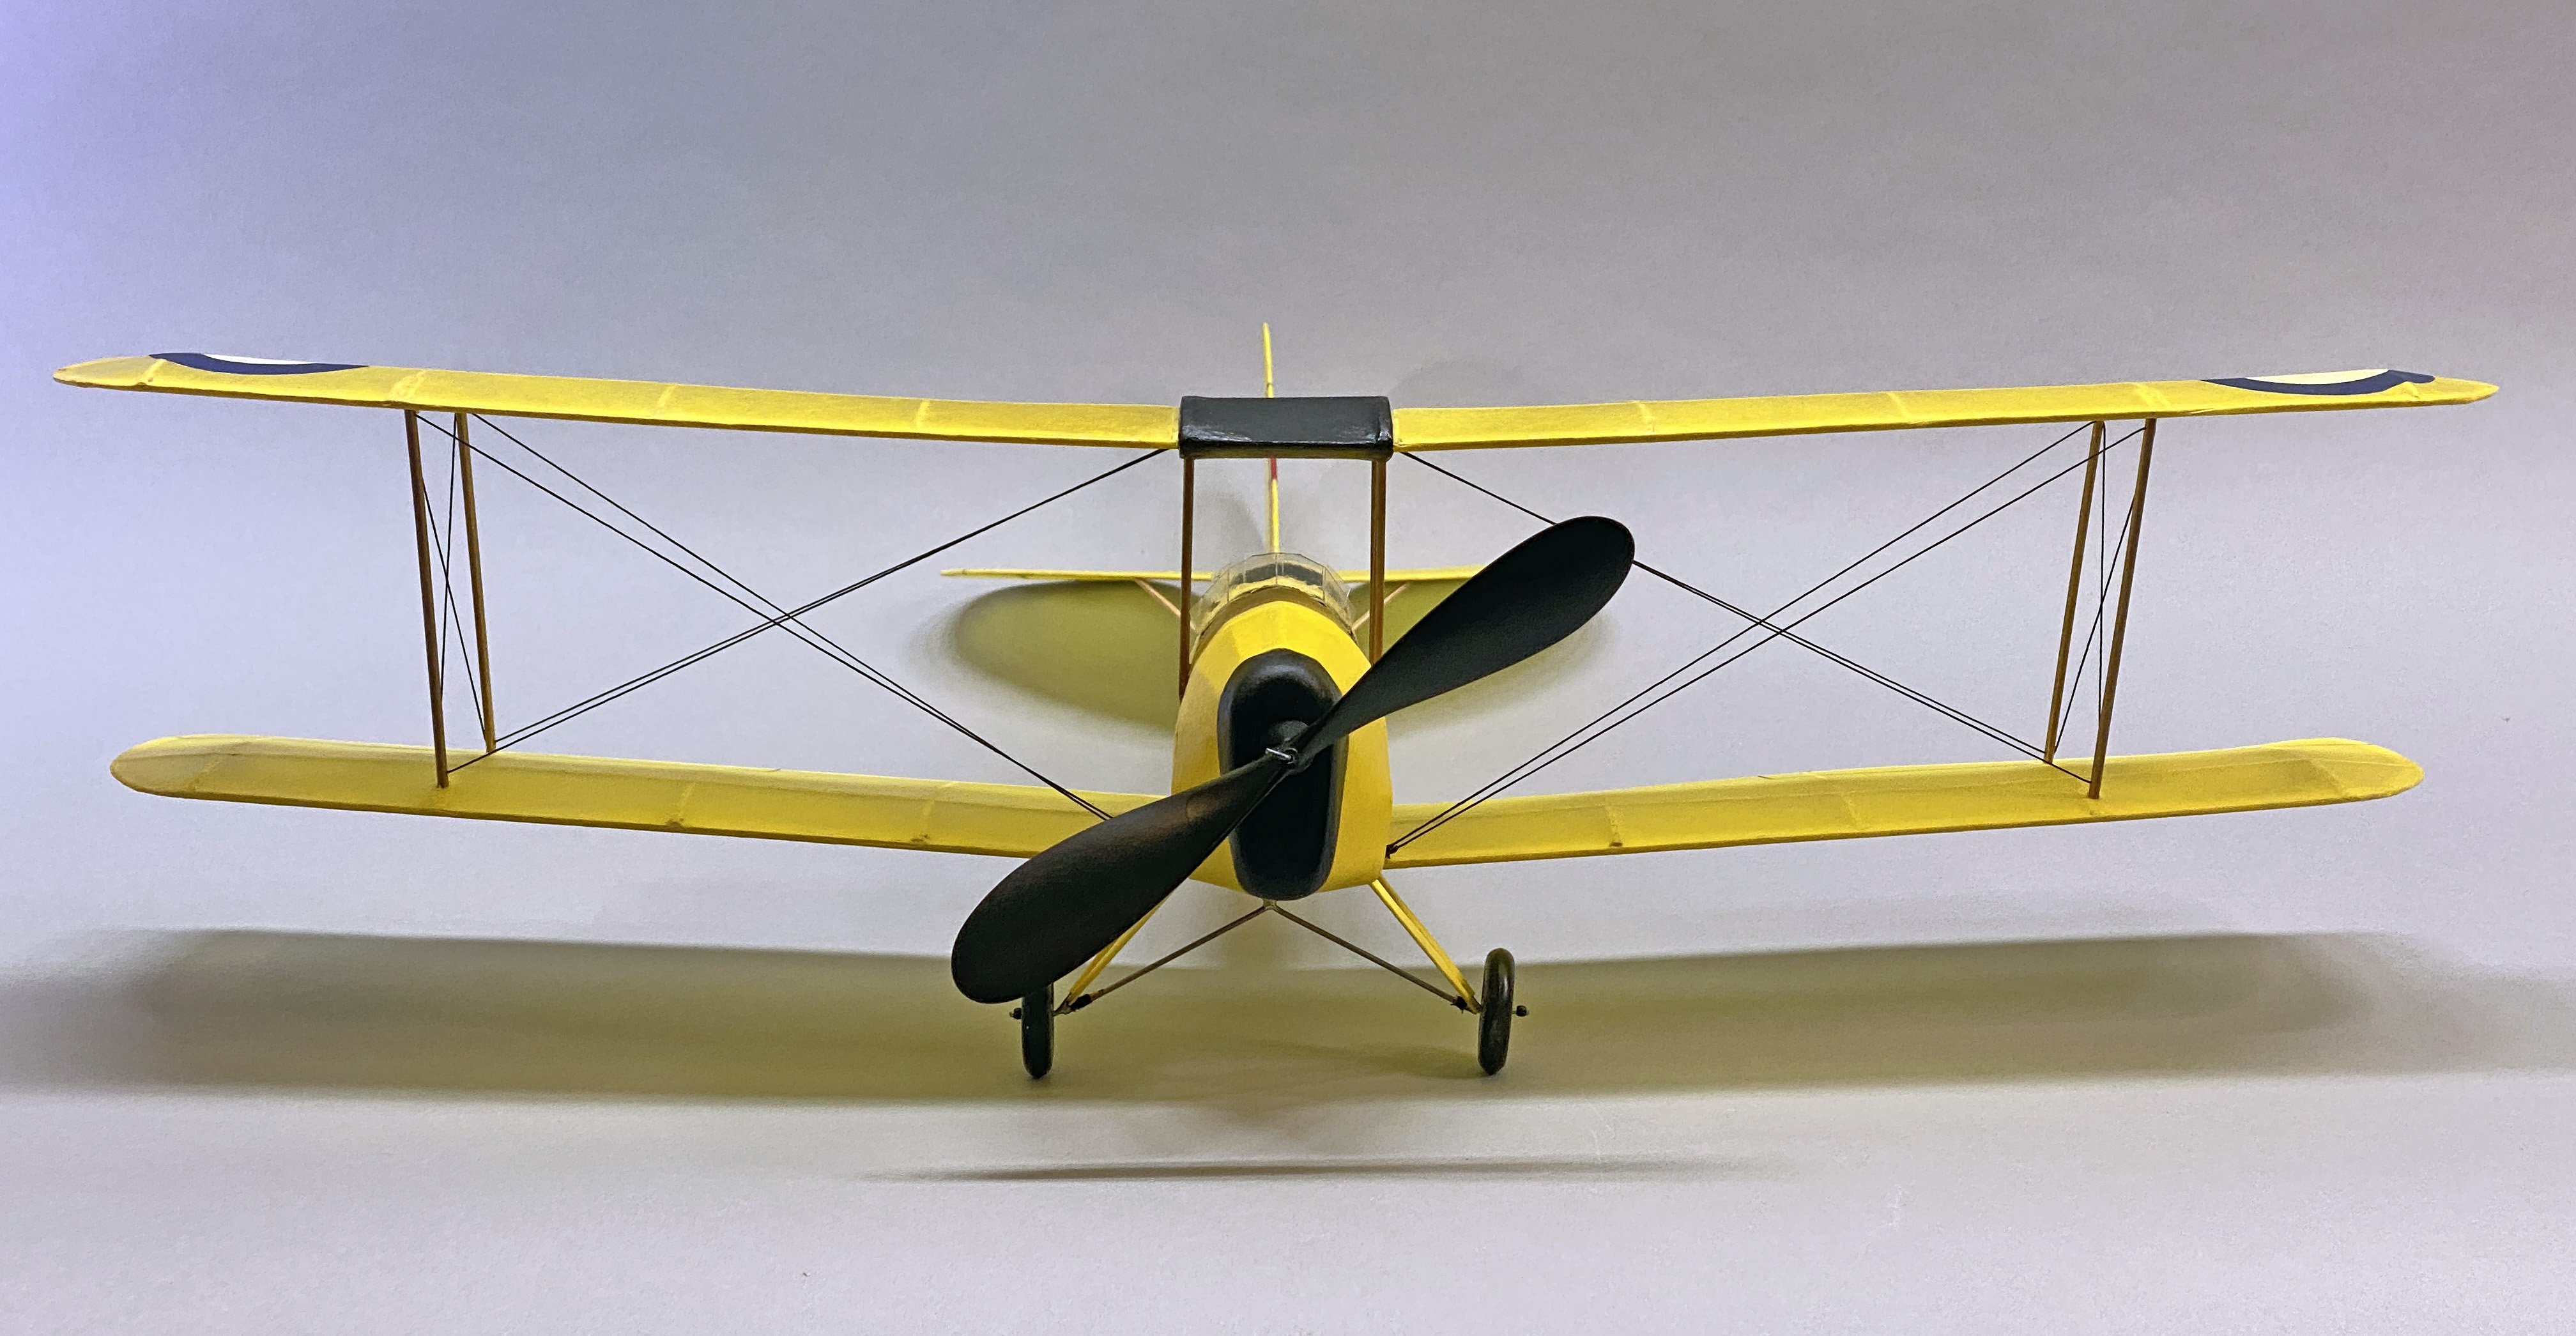
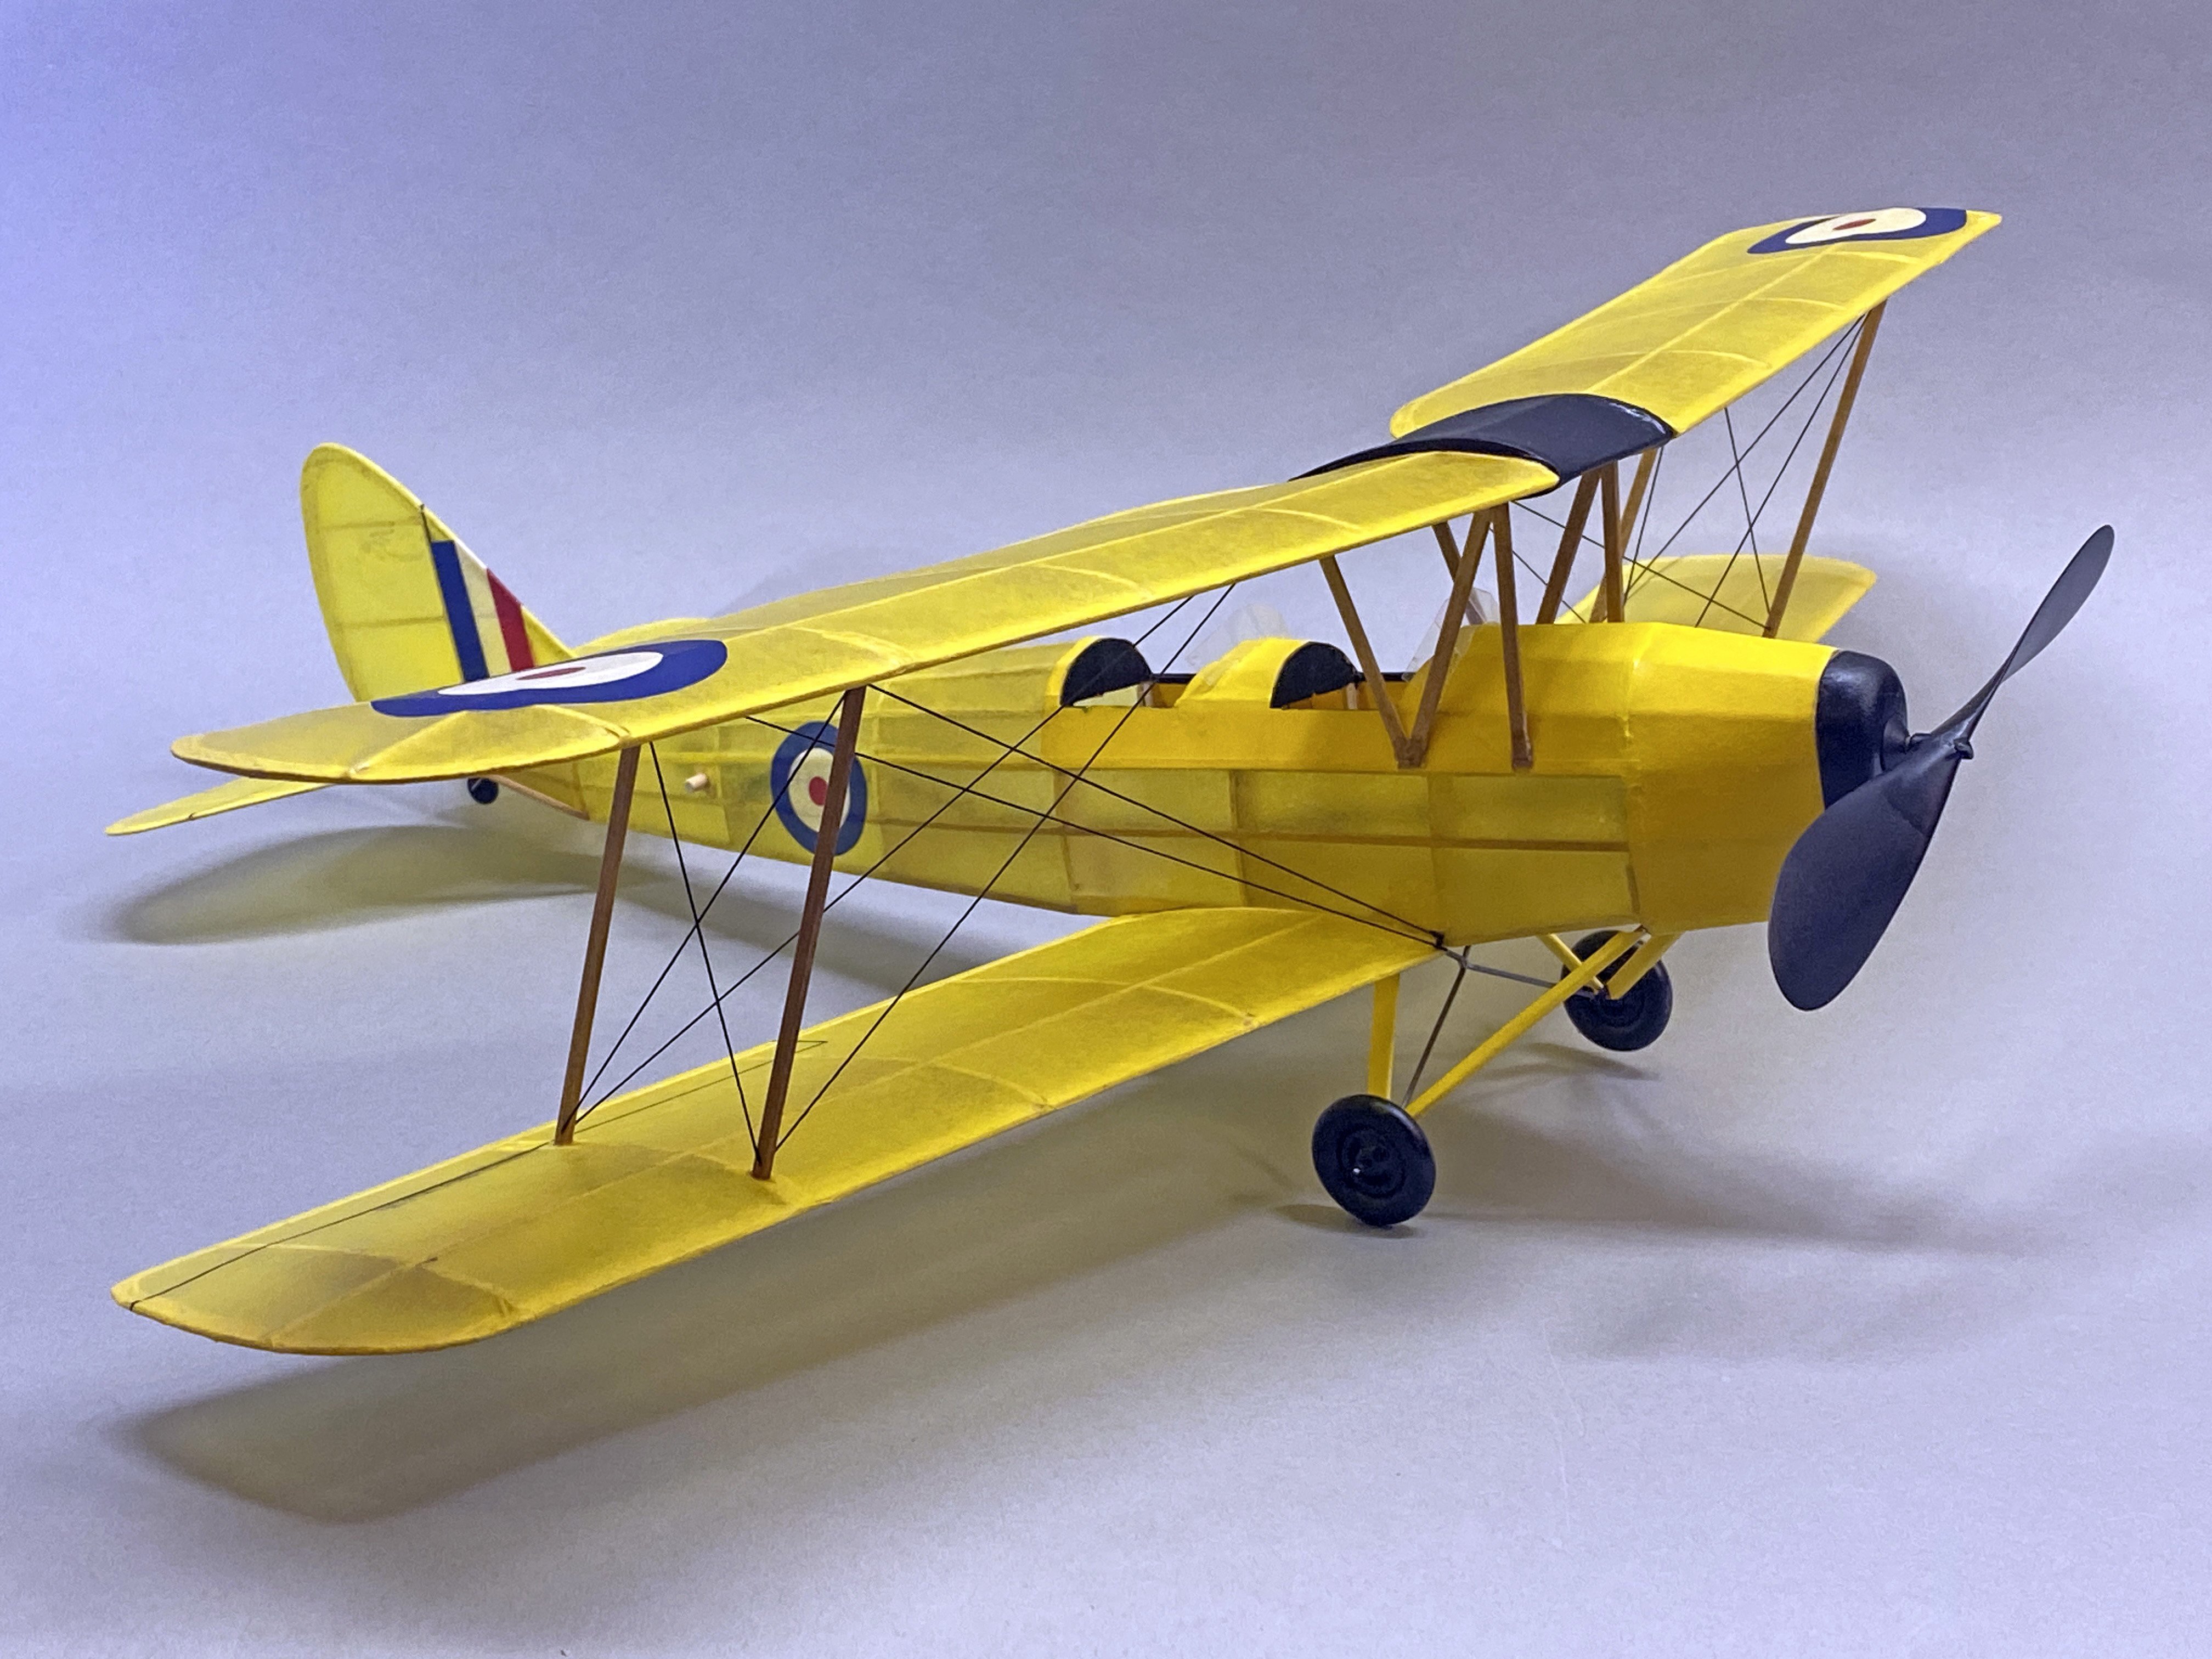
I just completed yet another stick-and-tissue airplane model, a de Havilland Tiger Moth. The Tiger Moth was an aerobatic trainer biplane built in the 1930s and used as a primary trainer by the Royal Air Force until the early 1950s. The model has a 20" wingspan and took 7 weeks to build, with Christmas in the middle. The kit is made by Easy Built Models, which is one of the most misleading names for a company ever. The kit included some of the softest balsa I've ever used. Simply pressing a part into place often broke the matching part. I had to replace many of the wing spars and fuselage stringers with stronger wood. The parts in this kit were not laser cut like most kits today. That's OK by me - I've made plenty of models from scratch - but the lines printed on the balsa were too wide, and thus hard to cut to the correct size. The black ink showed through the yellow tissue and had to be sanded off. The plans, dated 1986, showed a general outline of the wings, fuselage, and tail, but no details of how to attach struts or anything else. Luckily I've made enough model airplanes in the past that I knew to build mounting points for everything. The plans vaguely show a covered nose and cockpit area, but do not include patterns for any of those pieces. I found some yellow card stock and basically made a card model of the forward fuselage from scratch. The landing gear construction is quite complicated and not at all obvious from the plans. Thank goodness for Google. The kit did not include enough wire for the landing gear, but did include some terrible vacuum-formed wheels. I used some beautiful 100 year old aluminum wheels from my grandfather instead. It is always difficult to align the wings on a biplane model. It was especially hard on this one since the plans do not show the distance between the wings or the length of the interplane struts. I made some complicated jigs by trial and error to get everything right. The rigging was also not obvious from the plans, and Google saved the day again. The plans do not show the location of the center of gravity, but I suspect that mine is much too far aft. I'm not sure where to hide any weight at the nose. I usually enjoy building old stick-and-tissue model airplanes, but this one was very frustrating. There are at least two other companies that sell balsa models of the Tiger Moth, and I would recommend either of them over this one.