

ollyweb
-
Posts
40 -
Joined
-
Last visited
Content Type
Profiles
Forums
Gallery
Events
Posts posted by ollyweb
-
-
Hi there:
It seems I've had to divide this post in two - I was having trouble uploading some of the photos in the last post - not sure why....let's try again
hamilton
nice work....bellissima, bravo
Gianni
-
Hammock rails and netting
The hammock rails were added, and .5mm thread threaded through the holes, the netting I used on my Pegasus build looked to small and fine, I did have some other netting that I had from the Pegasus build, the problem being it was red, but looked a better size, so I painted it mat black and it came out ok, so I decided to use it. My method for fixing the netting, is to line up the netting to the top edge and sew it to the rail thread as it the photos, then tie the netting into the bottom corners of the cranes, and then trim to to hight of the other crane upright and sew as the first side, and then just trim up and tie in any bits that need it, and final touch up the paint.
The hull is now completed with just a few touch ups required I will take some photos and add them soon.
netting
cranes added
sewing on netting
attachment=161383:sewing to top thread.jpg]
netting finished
fantastic work, I will take my cue to update the Unicorn
Hello
Gianni
-
A bit of progress around the rear end. I have now added arches, pillars and sills around all the lights.
I will soon be re-attaching the thinned, rear casting. Before doing so I am trying to decide whether to paint it as per John's version above or whether to 'guild' it. Will the guilded version be more in keeping with the natural wood effect of the rest of the ship? I am not sure. Below is a photo with the casting held temporarily in place with clothes pegs. Any views on this point?
Also I think the galleries should have been mounted about 2mm lower to make the lights line up better. Something else for others to look out for.


The arches and pillars also unfortunately highlight the higgledy-piggle nature of the glazing bars on early Corel plastic casting.
Hello Jan, this solution to the stern I like very much and is very similar to the ships of the class "Pallas", beautiful arches, I would have left more space under the windows as I did in my Unicorn for the name of the ship, but not I know if it is right.
You're doing a very detailed work.
At the moment I am dedicated to the bow area "snakes" inspired by the work of Ray on his Diana:
Hello
Gianni
-
I have been away from the workshop for much of the last 6 weeks so progress has been rather steady. I had intended to start rigging the cannon but discovered I had only ordered sufficient 2mm blocks to do one third of them. So before putting in a fresh order to Cornwall models I decided to get a few other jobs done to see if I needed any other items.My main work was fitting gratings around the bow area of the ship. I had previously ordered some Mantua 1.5mm beech grating for the cluster around the main mast. I had been unable to source the Corel variety. When I received the Mantua gratings I was very pleased with the quality. It is much less fragile than the Corel offering.The question was - did I have enough to do all the gratings including those in the bow?The gratings took a lot of fitting to get them in to place. I don't think the Corel grating would have stayed in one piece with all the sanding and filing that I did. The bow on my Unicorn is distinctly asymmetric so I had to be careful that the lines of the grating didn't accentuate this. I think I managed reasonably well.The foremost grating inclines upwards, which it probably shouldn't, but it does now cover some of the horrors in that area.After the lousy weather of the last 3 months it was nice to have a day of sunshine. So I took a photo of the old tub out in the fresh air.I have ordered the extra 2mm blocks plus some trim to try to improve the area around the stern.First, though, I am away from the workshop again for another week. I will be in the London area and I am taking the opportunity to make my first visit to the NMM. It has an exhibition of Turner paintings on display at the moment - I will get to see the painting of "The Fighting Temeraire" amongst others.Then on my return I hope to make some serious progress on the Unicorn.
Hello Ian really very nice work on the side of the bow, all those gratings is not provided in the kit but in all the ships I've seen it improve the realism.
Bravissimo
Gianni
-
The decision to revise the stern was a great idea ... your work is very thorough and well done.
compliments
Gianni
P.S. I also modified the stern but unfortunately I thought of this when the model was already completed. -
-
hi Ian....i recived a message "
The gallery is for images of completed models only. The admin team will be deleteing the folders. You should start a build log of that model for in progress projects. Dont hesitate to ask me any questions.
Chuck"I don't find my post about Unicorn Upgrade and the gallery is deleted.
I will try to open a new wip about Unicorn but I don't will create a gallery.
By Gianni
-
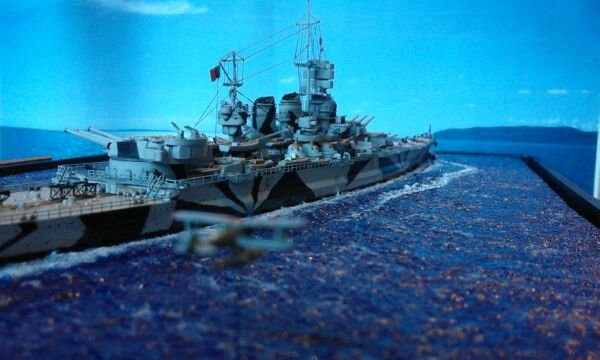
Hello Ian, unfortunately do not have enough time to devote to this hobby.la family ... my job and a second job .... an online shop (www.olivero-modellismo.com) but last year I izing the battleship Roma and I started hAdmiral Hipper in 1:700 scale:
http://oliveromodellismo.altervista.org/joomla/corazzata-roma
http://oliveromodellismo.altervista.org/joomla/admiral-cruiser-hipper-1941
by by
Gianni -
Hi again Zyxuz,
Since I've been thinking about color schemes too, I took a look through my Gardiner book which uses pictures of models at the RMG, and have been picking out some color schemes that I think can work well with the Unicorn. Since you're thinking about this too, I thought I would pass them along - hope they are helpful.
1. Sloop c. 1710: http://collections.rmg.co.uk/collections/objects/66358.html
2. Sloop c. 1710 (very similar to Corel's scheme for Unicorn): http://collections.rmg.co.uk/collections/objects/66359.html
3. Gualaloupe (very similar to Unicorn): http://collections.rmg.co.uk/collections/objects/66470.html
4. Thames (white painted under thick black wale): http://collections.rmg.co.uk/collections/objects/66457.html
5. Lowestoft (gorgeous ship with white under black wale): http://collections.rmg.co.uk/collections/objects/66300.html
6. Mermaid: http://collections.rmg.co.uk/collections/objects/66279.html
7. Minerva (uses blue and red accents like you were thinking): http://collections.rmg.co.uk/collections/objects/66278.html
8. Diana (also uses blue and red accents): http://collections.rmg.co.uk/collections/objects/66533.html
Just for fun, this Samarang is incredible - one of my favorite models in the Gardiner book:
http://collections.rmg.co.uk/collections/objects/66666.html
What a nice picture ...I'd like a lot "Minerva " and "Diana"....but it's possible to buy a plan?
By by Gianni
-
Now on to the rotisserie.I made the top (smaller) pulley from a slice cut off some thick walled brass tubing. In this case the tubing has a 2.3mm outside diameter with a 0.7mm diameter bore. I have various sizes of this type of tube which is useful for making small pulleys and sheaves. Actually I used the lathe to part off the pulley to 0.3mm thickness, plus I included a 0.2mm thickness boss. I soldered the pulley on to a length of 0.7mm diameter N/S rod which fits in to a hole drilled in the stove's hood.In the following photo this pulley and rod are temporarily fitted. The thick walled tube is lying alongside the stove.Well - progress will stop on the stove for a week. I am heading off to deepest Herefordshire with my wife looking at houses - a retirement move.
Unbelievable ... this is spectacular work you have been really very goodGianni
-
Hi Ferit and John
I'm glad that you like it.
Thanks for the advice John. It's always a great help for me because it's often very hard to find the right english term
This work is really fantastic ... I will follow him carefully, congratulations, you're really very adept at your job.
I wanted to achieve in the future HMS Leopard in scale 1/75 with the help of plans John McKay
Gianni


HMS Bellona by harlequin - FINISHED - Corel
in - Kit build logs for subjects built from 1751 - 1800
Posted
Un lavoro stupendo, vederle tutte e 3 allineate è bellissimo
Gianni
Beautiful work , HMS Bellona it's my preferite