HOLIDAY DONATION DRIVE - SUPPORT MSW - DO YOUR PART TO KEEP THIS GREAT FORUM GOING! (Only 69 donations so far out of 49,000 members - Can we at least get 100? C'mon guys!)
×


grayarea
-
Posts
101 -
Joined
-
Last visited
Content Type
Profiles
Forums
Gallery
Events
Everything posted by grayarea
-
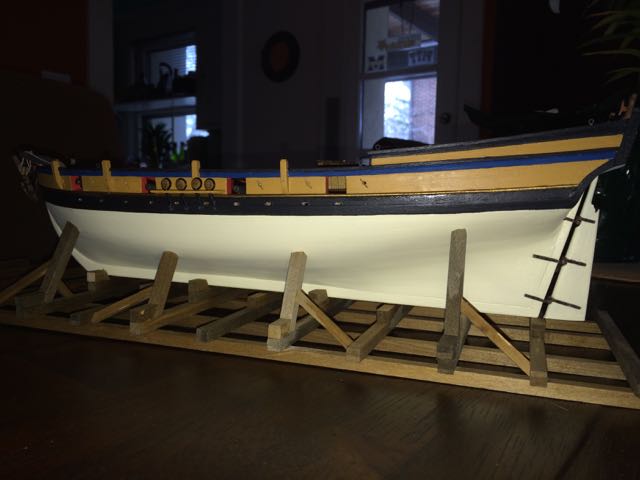
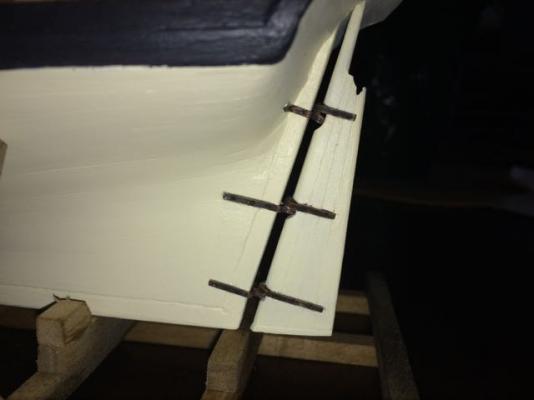
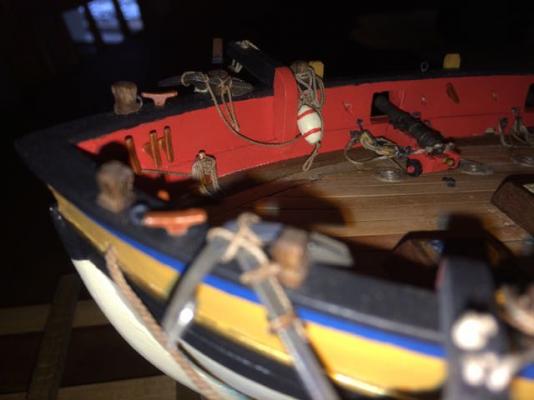
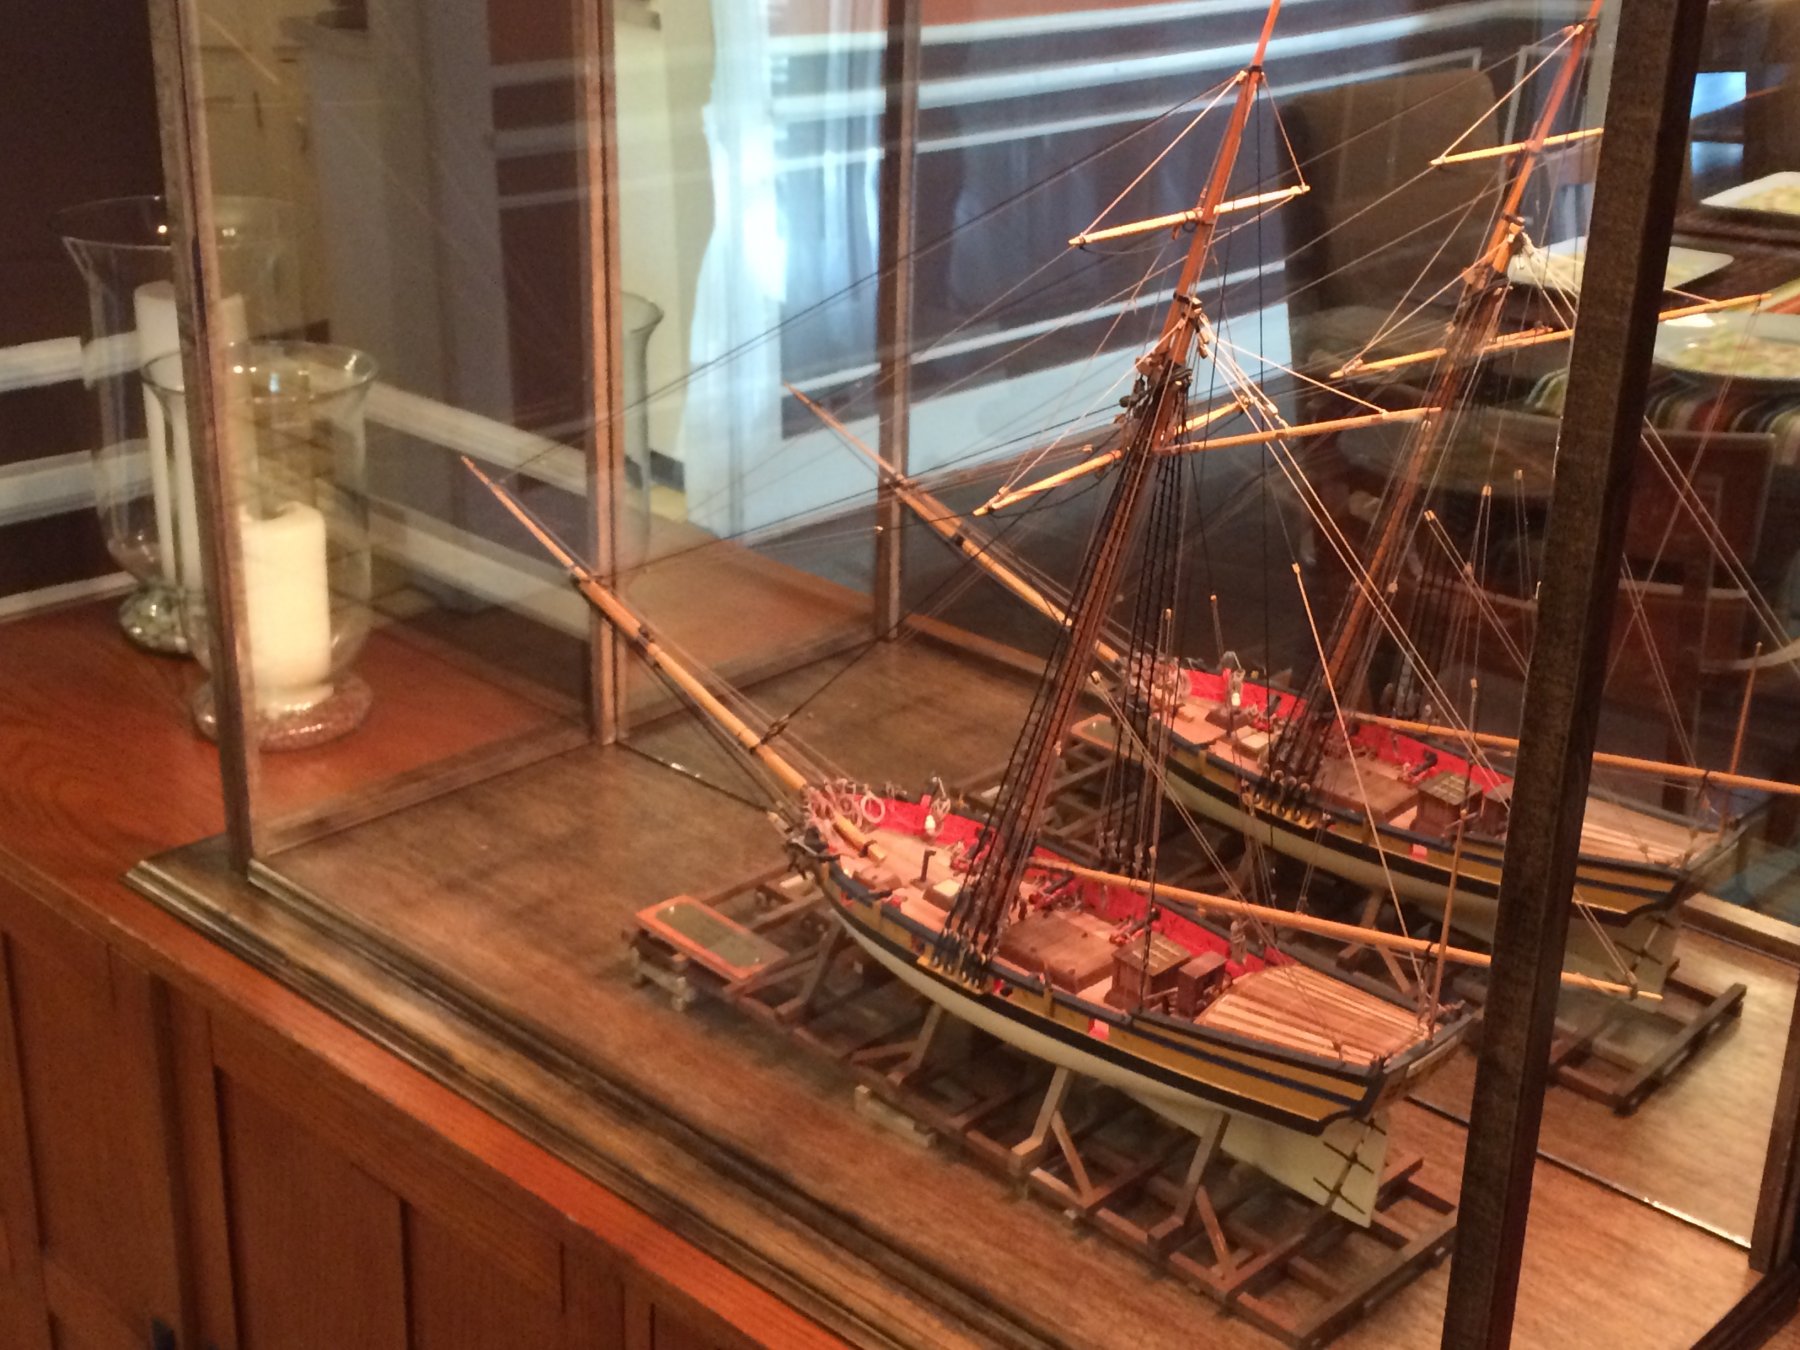
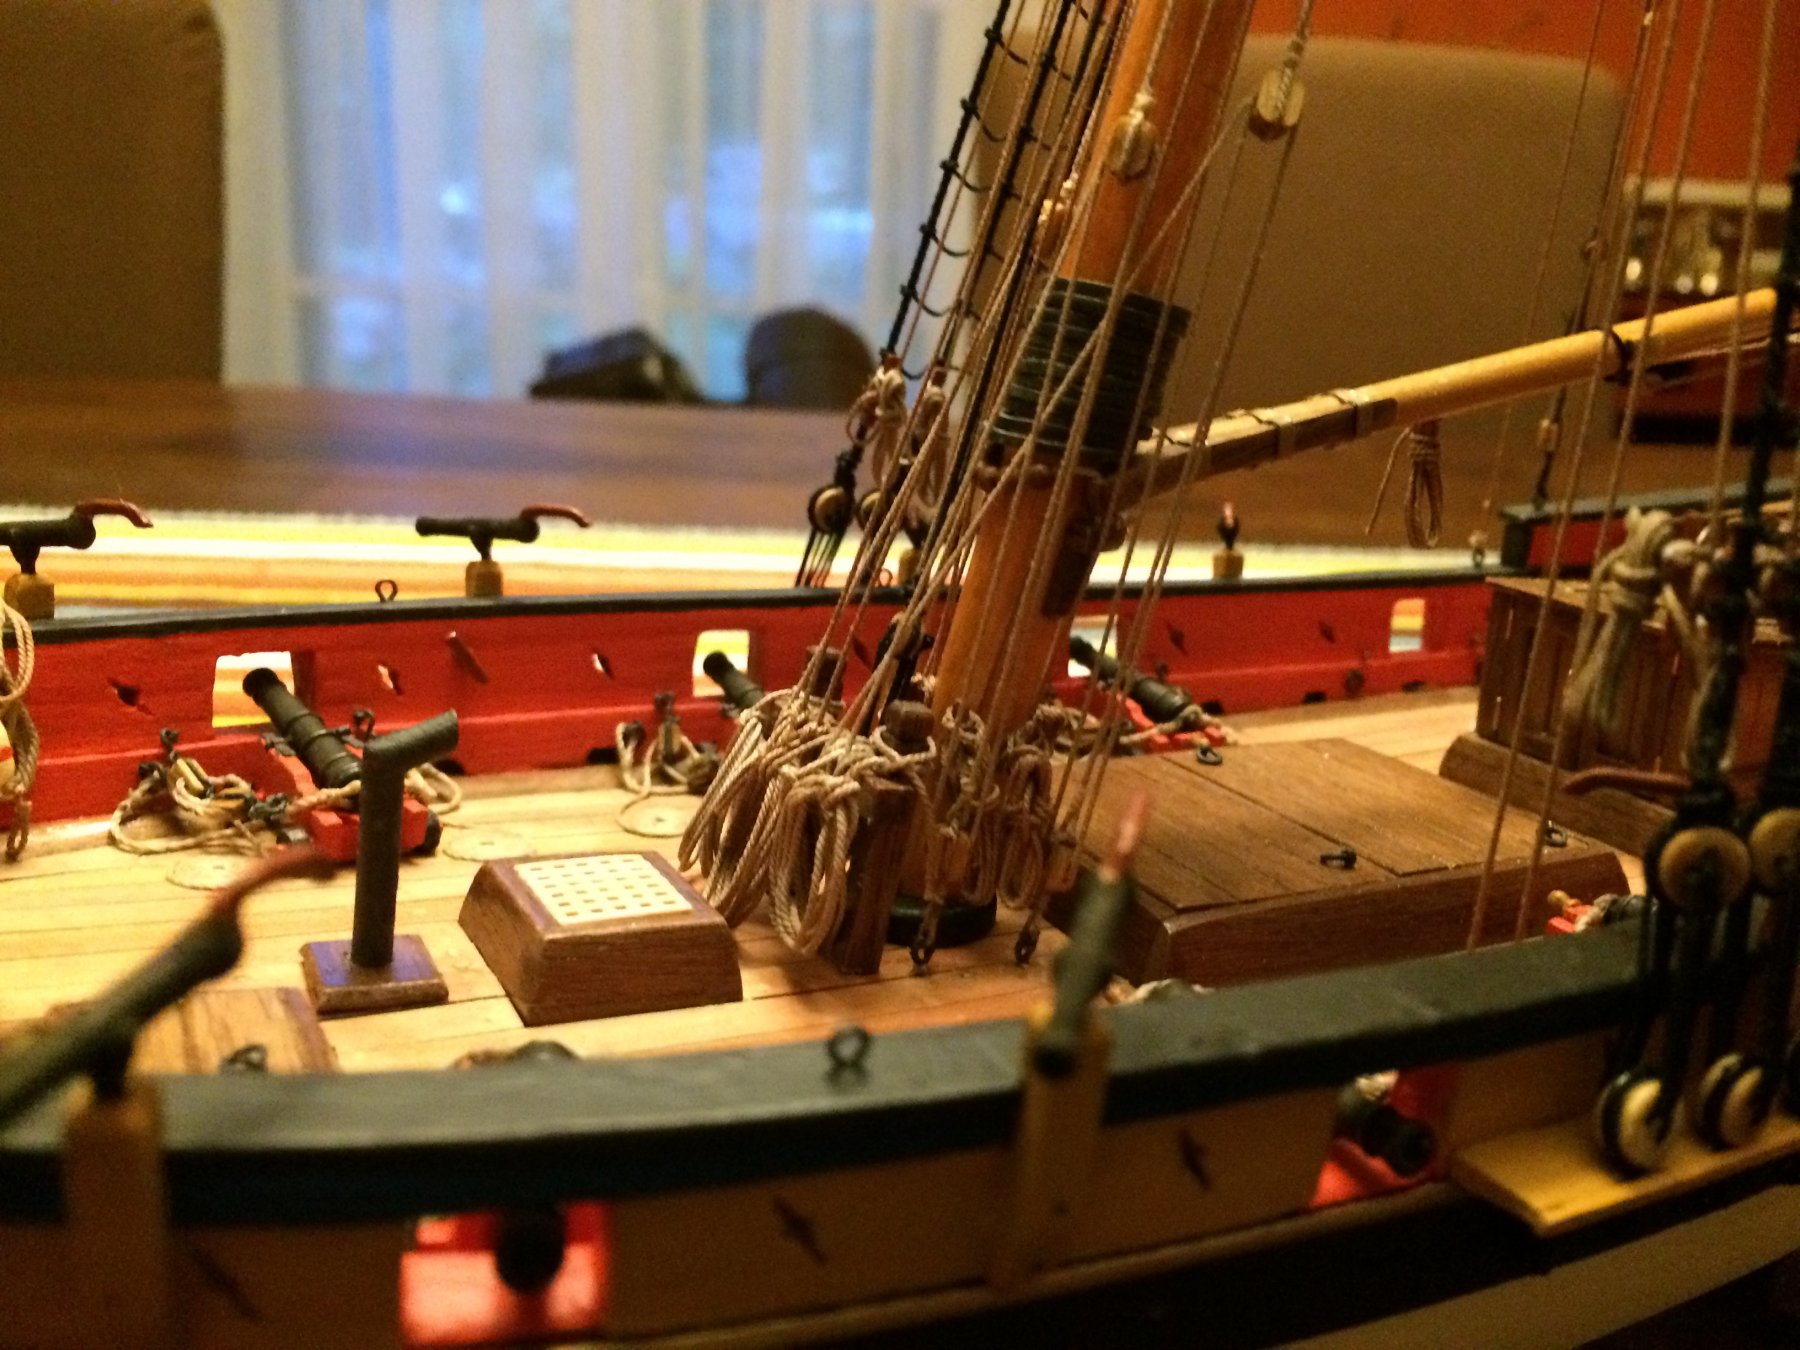
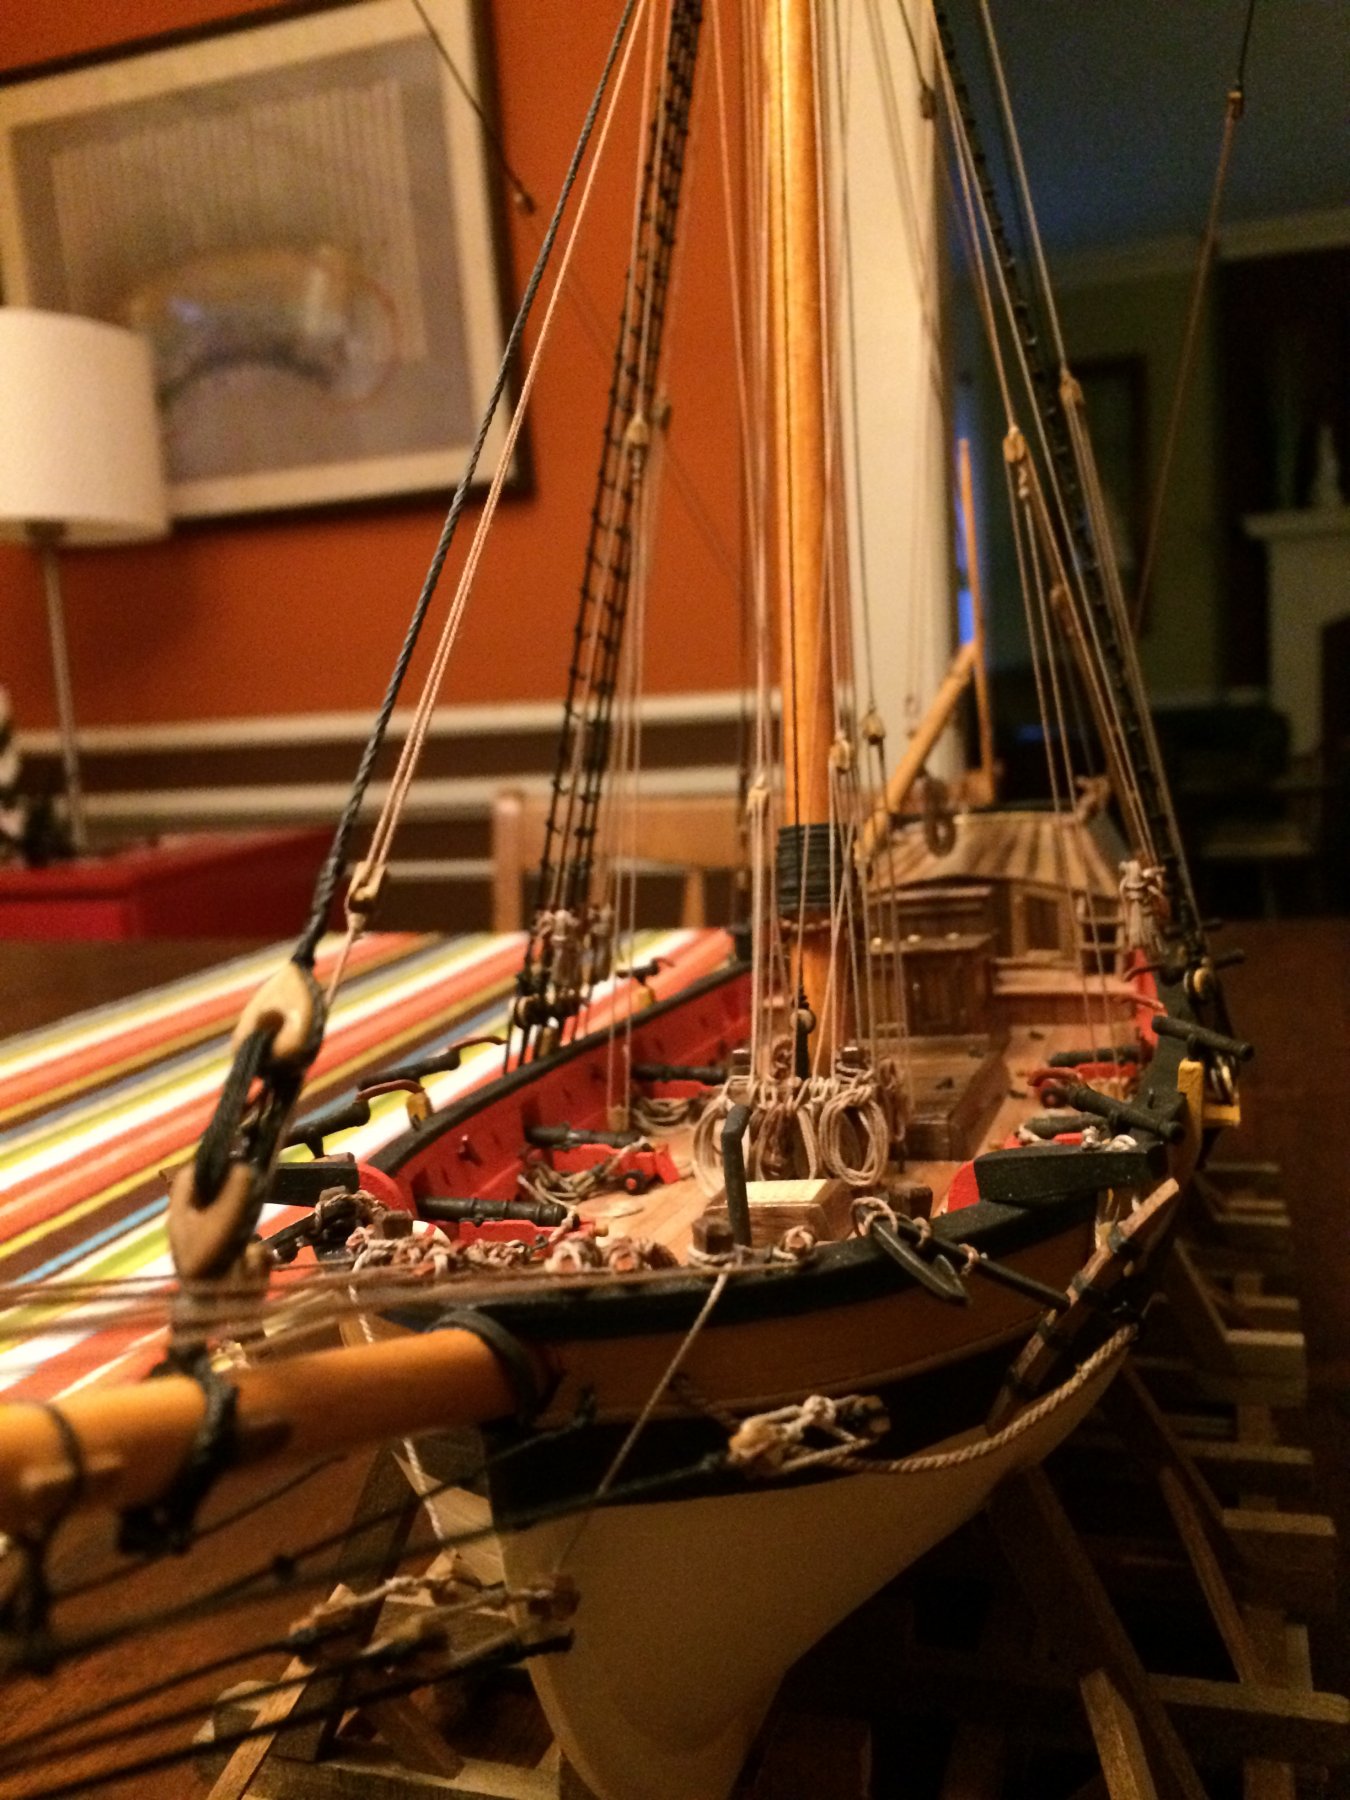
 One final shot of my AVS on display. I made the case using standard molding and UV-filtering museum-quality acrylic that I found online for a shockingly good price. The back panel is a mirror, which I protected by gluing fiberboard to its back side. The process was to make the "glass" box first, using acrylic glue; it's strong stuff and needs to be used with good ventilation. It goes into the cracks with a syringe and welds the two pieces of acrylic together. With reasonable care, it was easy, neat and effective. Then I reinforced the box by gluing square molding to the inside joints. I used household Goop, which seemed to be the right adhesive based on online research, to glue the wood to the acrylic, and also to the mirrored back-panel. It was my first time using the stuff; it's very effective. I wish I had been a little bit neater; some of it shows at the joints and it's really tough and hard to remove. Then I put together the exo-skeleton of molding. It does add more strength to the construction, which is quite rigid and not overly heavy, but its real purpose is cosmetic - to cover up the glued acrylic joints. The base is just a piece of stained poplar with decorative molding glued onto the edges. That's because I don't own a router to have made the edges myself. I purposely left about a quarter-inch of play all the way around between the cover and the base-molding that holds it in place. Black felt under the base and at the bottom of each corner of the cover gives everything a nice finished look. I played around with ideas to be able to open the case from one end, but all of those added a lot of complexity to the job. So this case needs to be lifted off over the top of the boat; there is some risk in it, and it's 100% a two-person job. But it's not something I plan to do often.
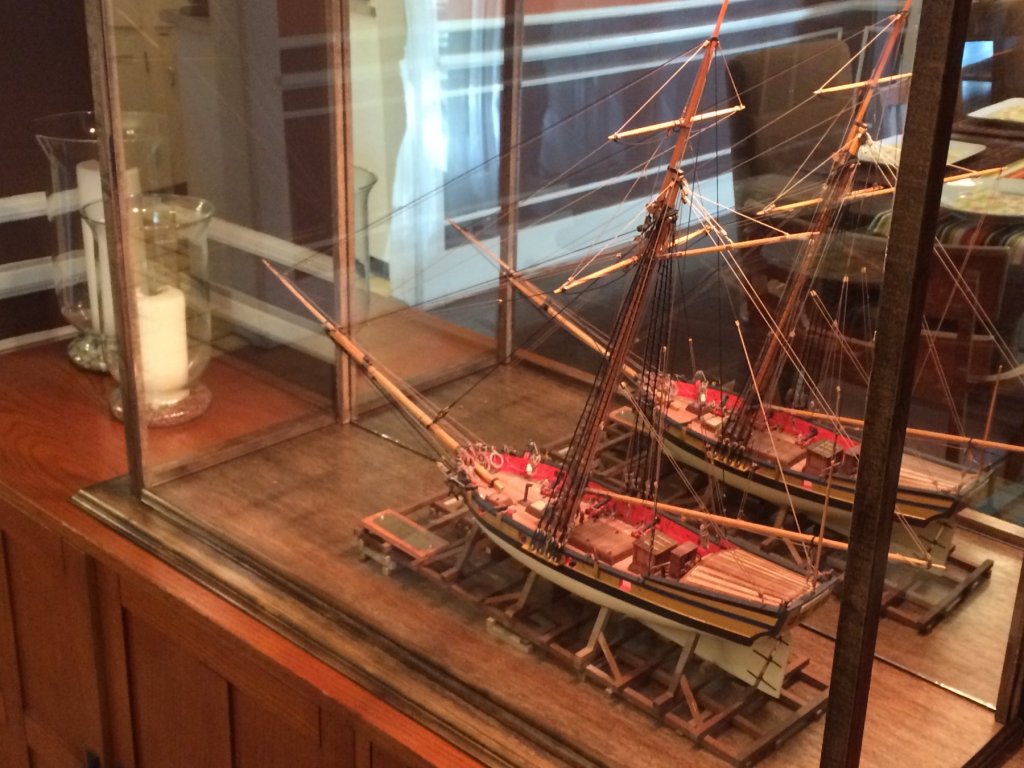
- 164 replies
-
- 6
-

-
- model shipways
- armed virginia sloop
- (and 2 more)
-
I don't have plans yet for my next build. I have at least one hobby too many and an unrelated project that I want to finish over the next year. And then I'll decide what to build next. As mentioned above, I like the idea of building the brig Niagara. But I'm also curious about what other kit brands have to offer. Any suggestions on brands to try other than Model Shipways are welcome - and particularly why you'd recommend them.
-
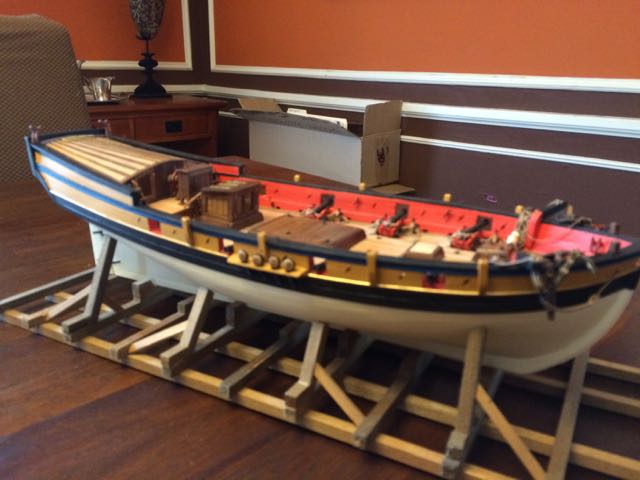
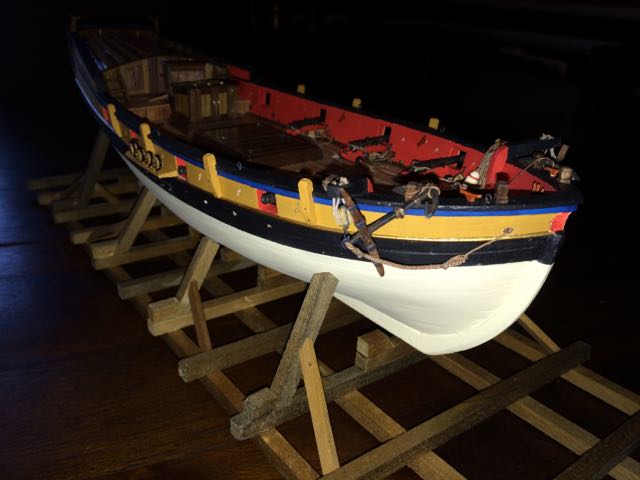
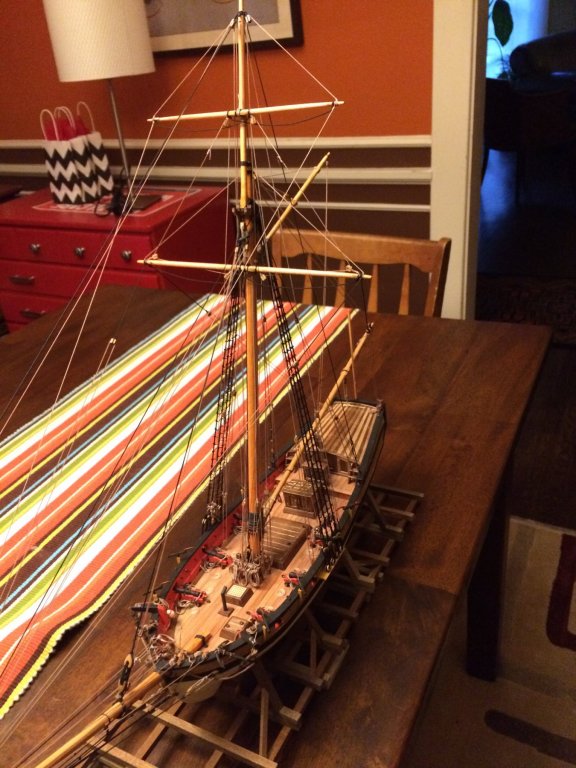
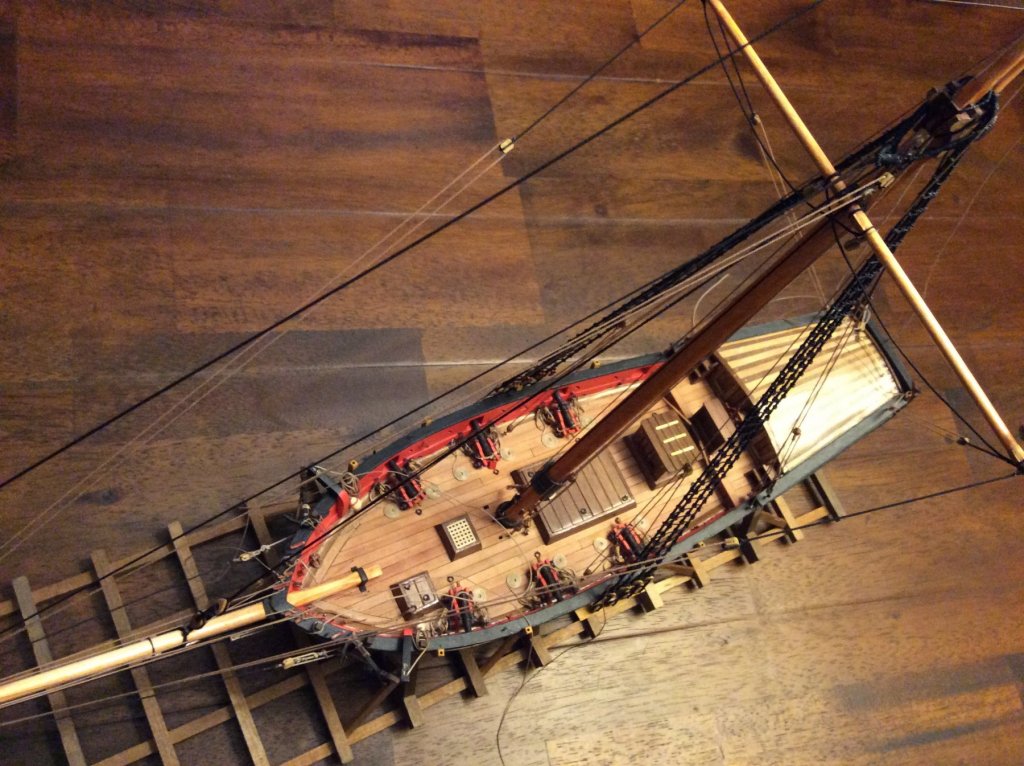
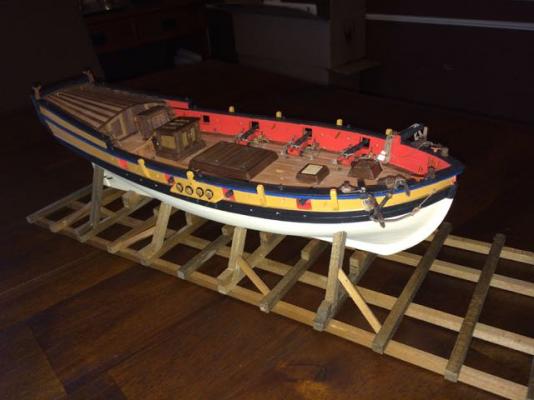
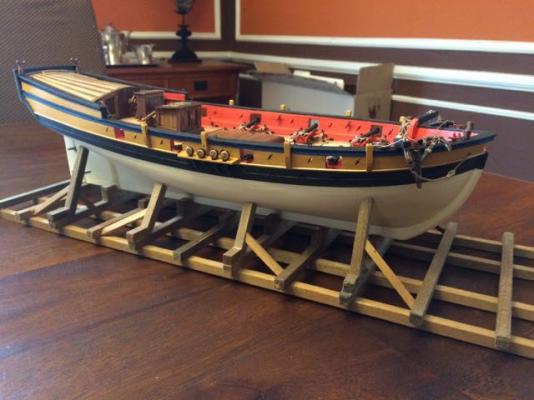
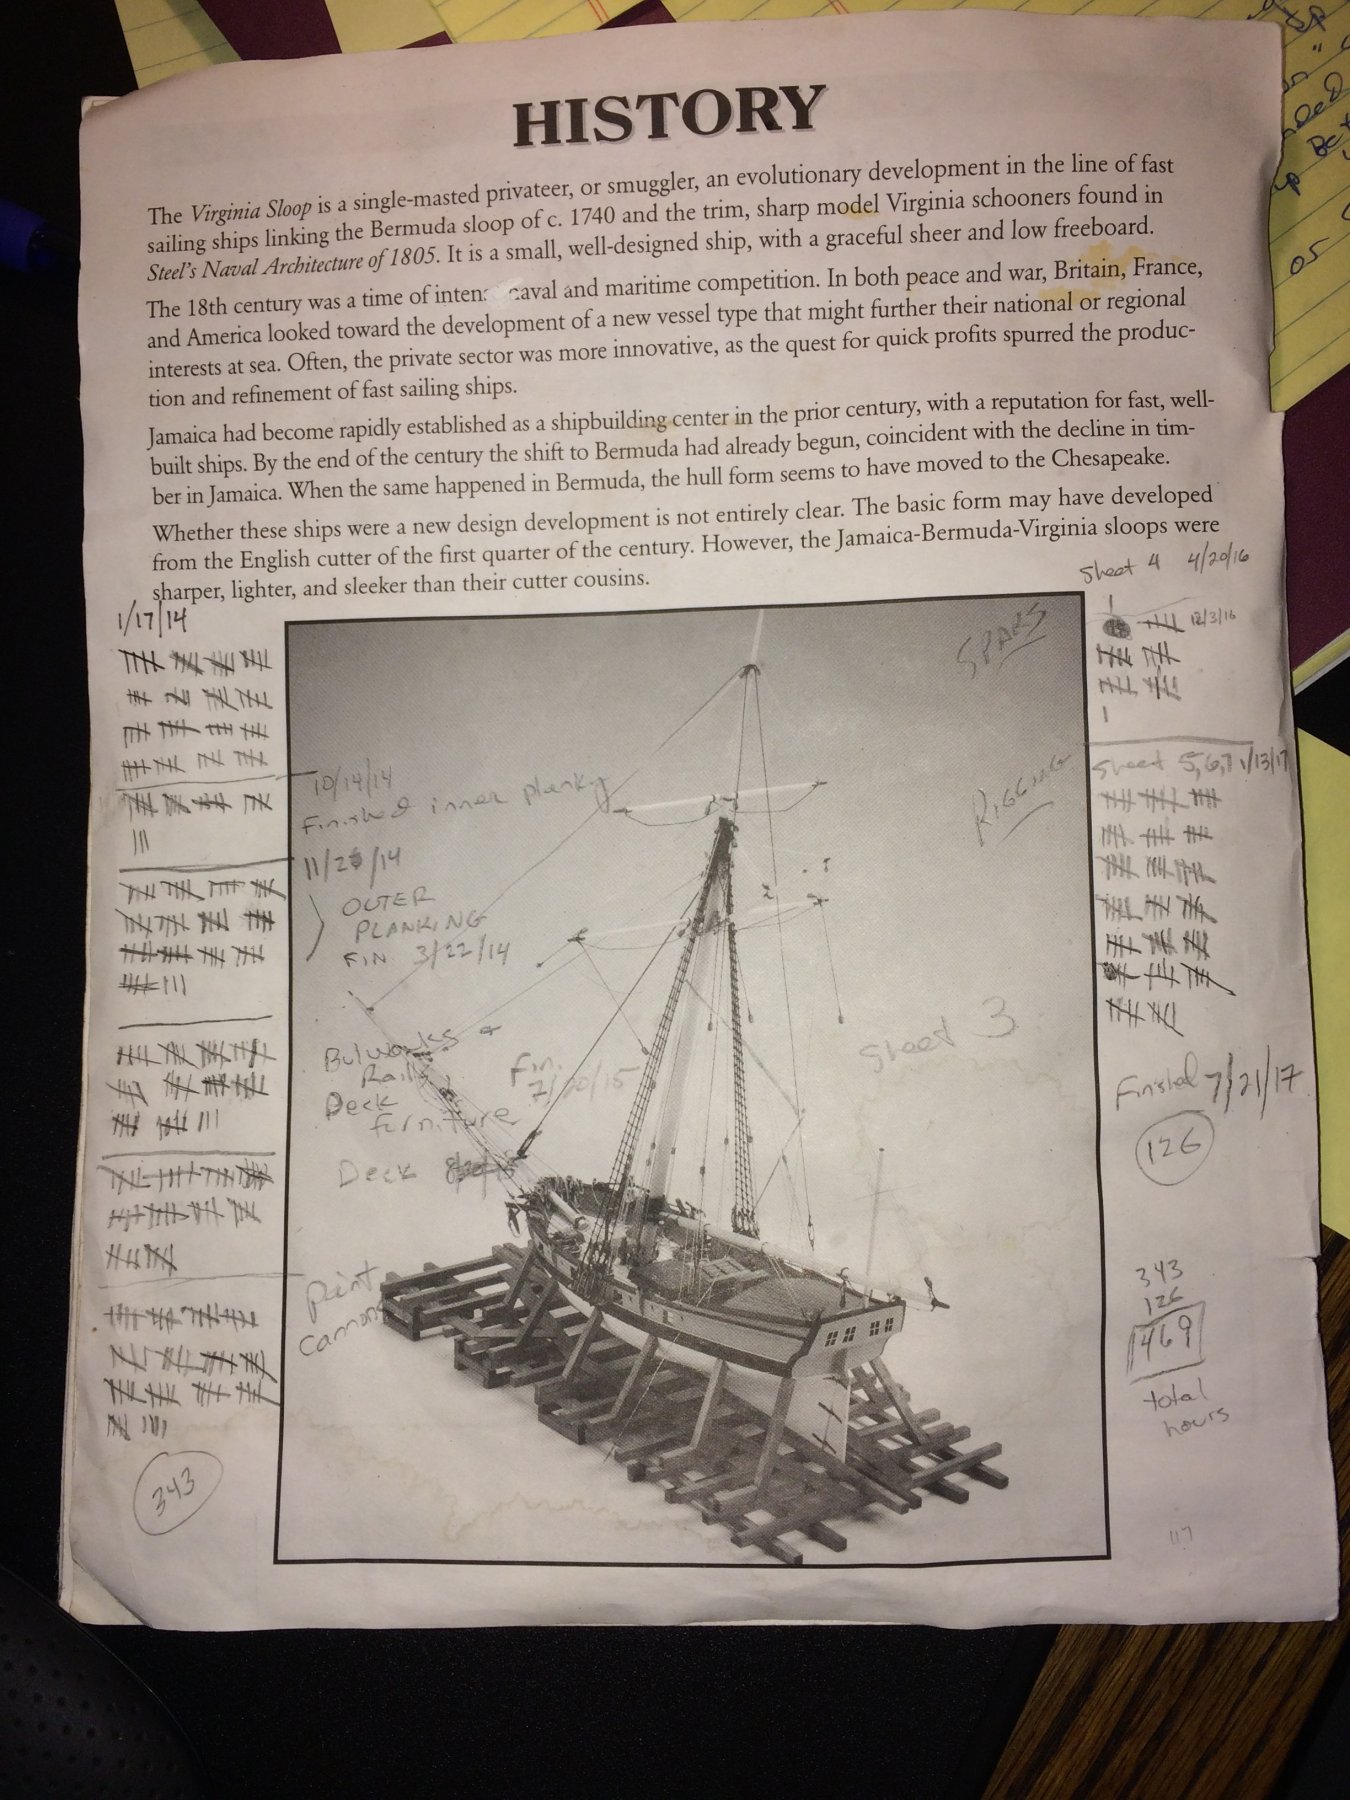
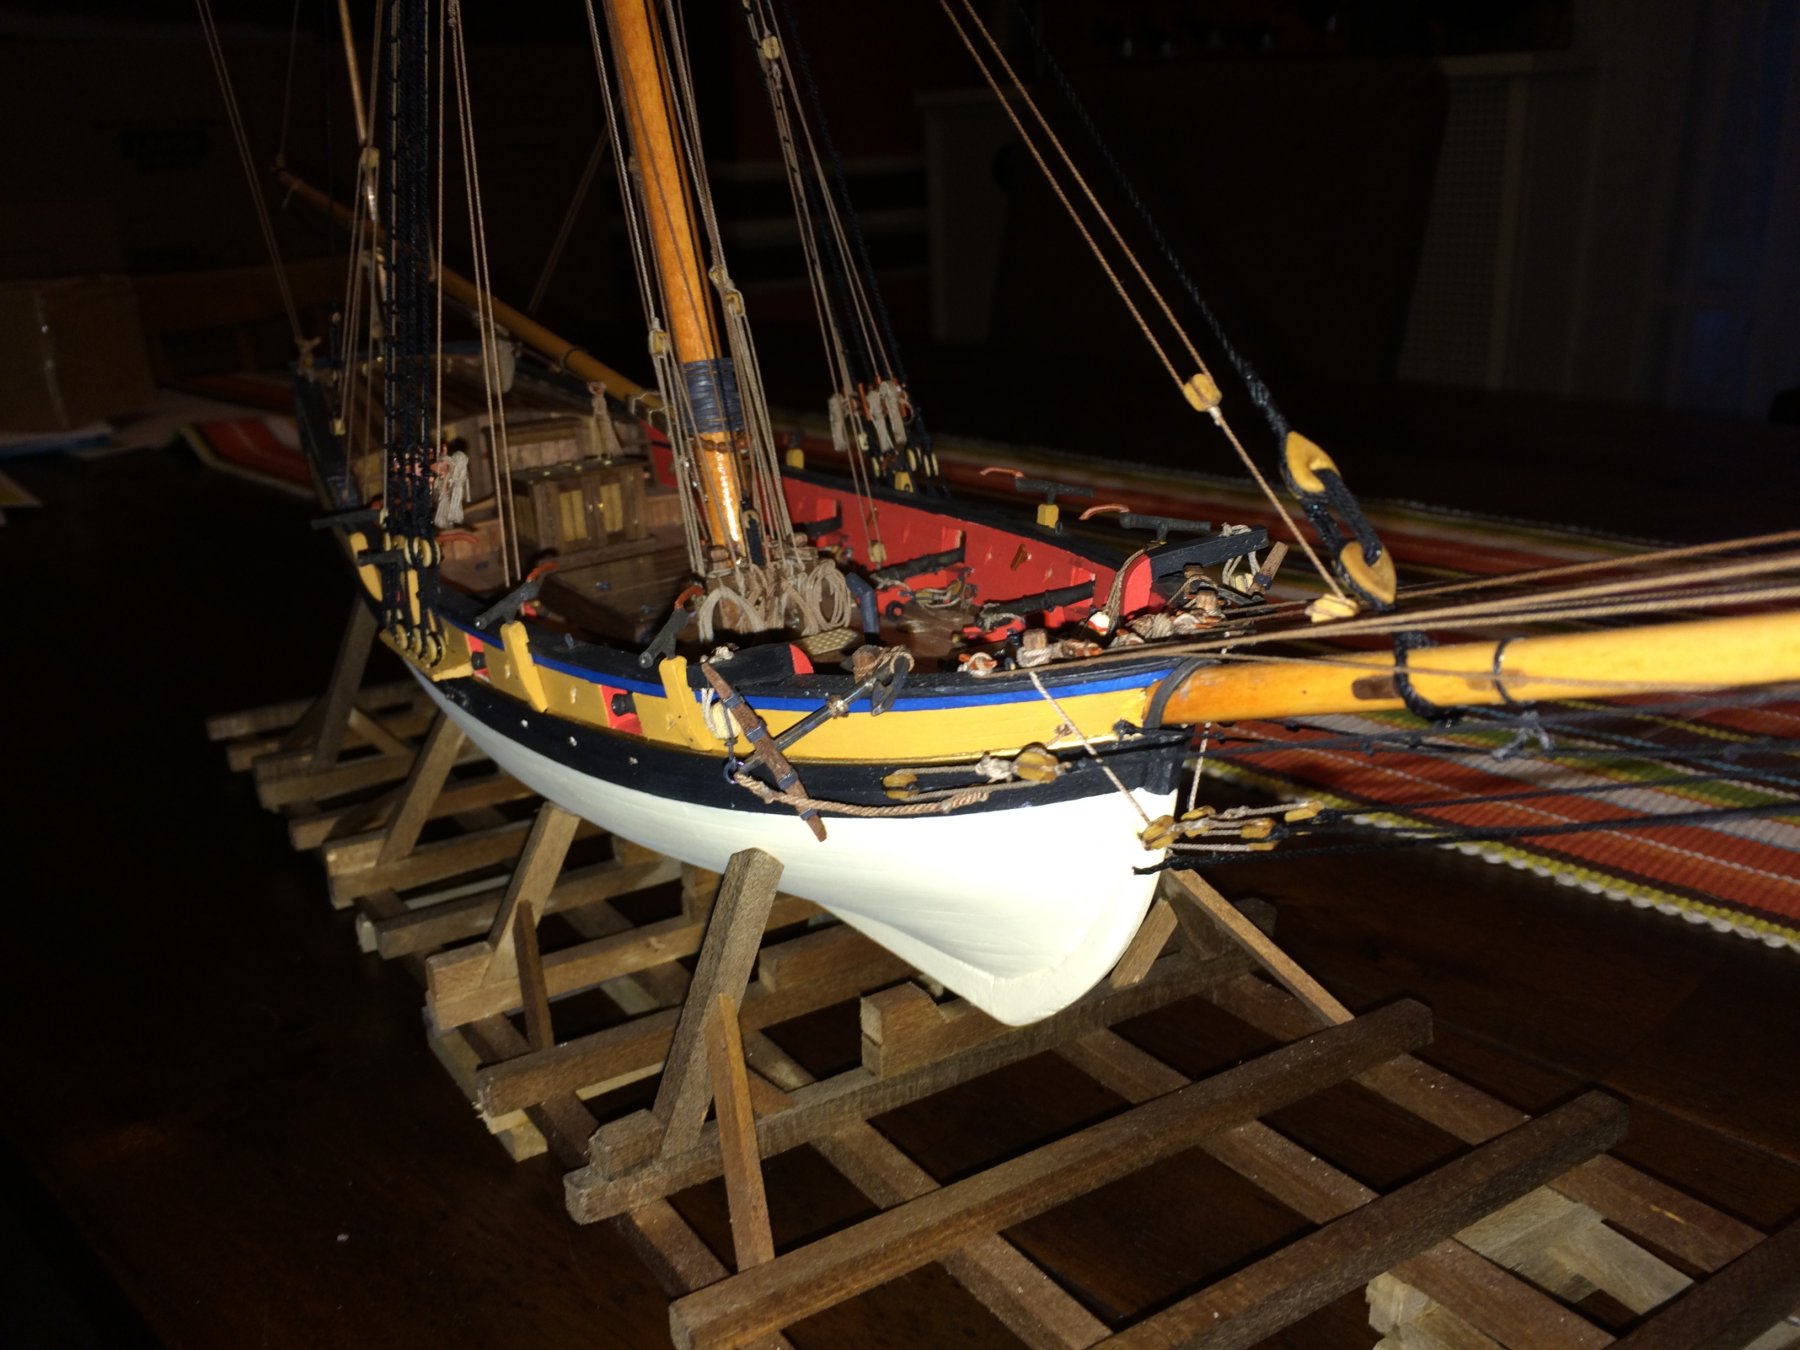
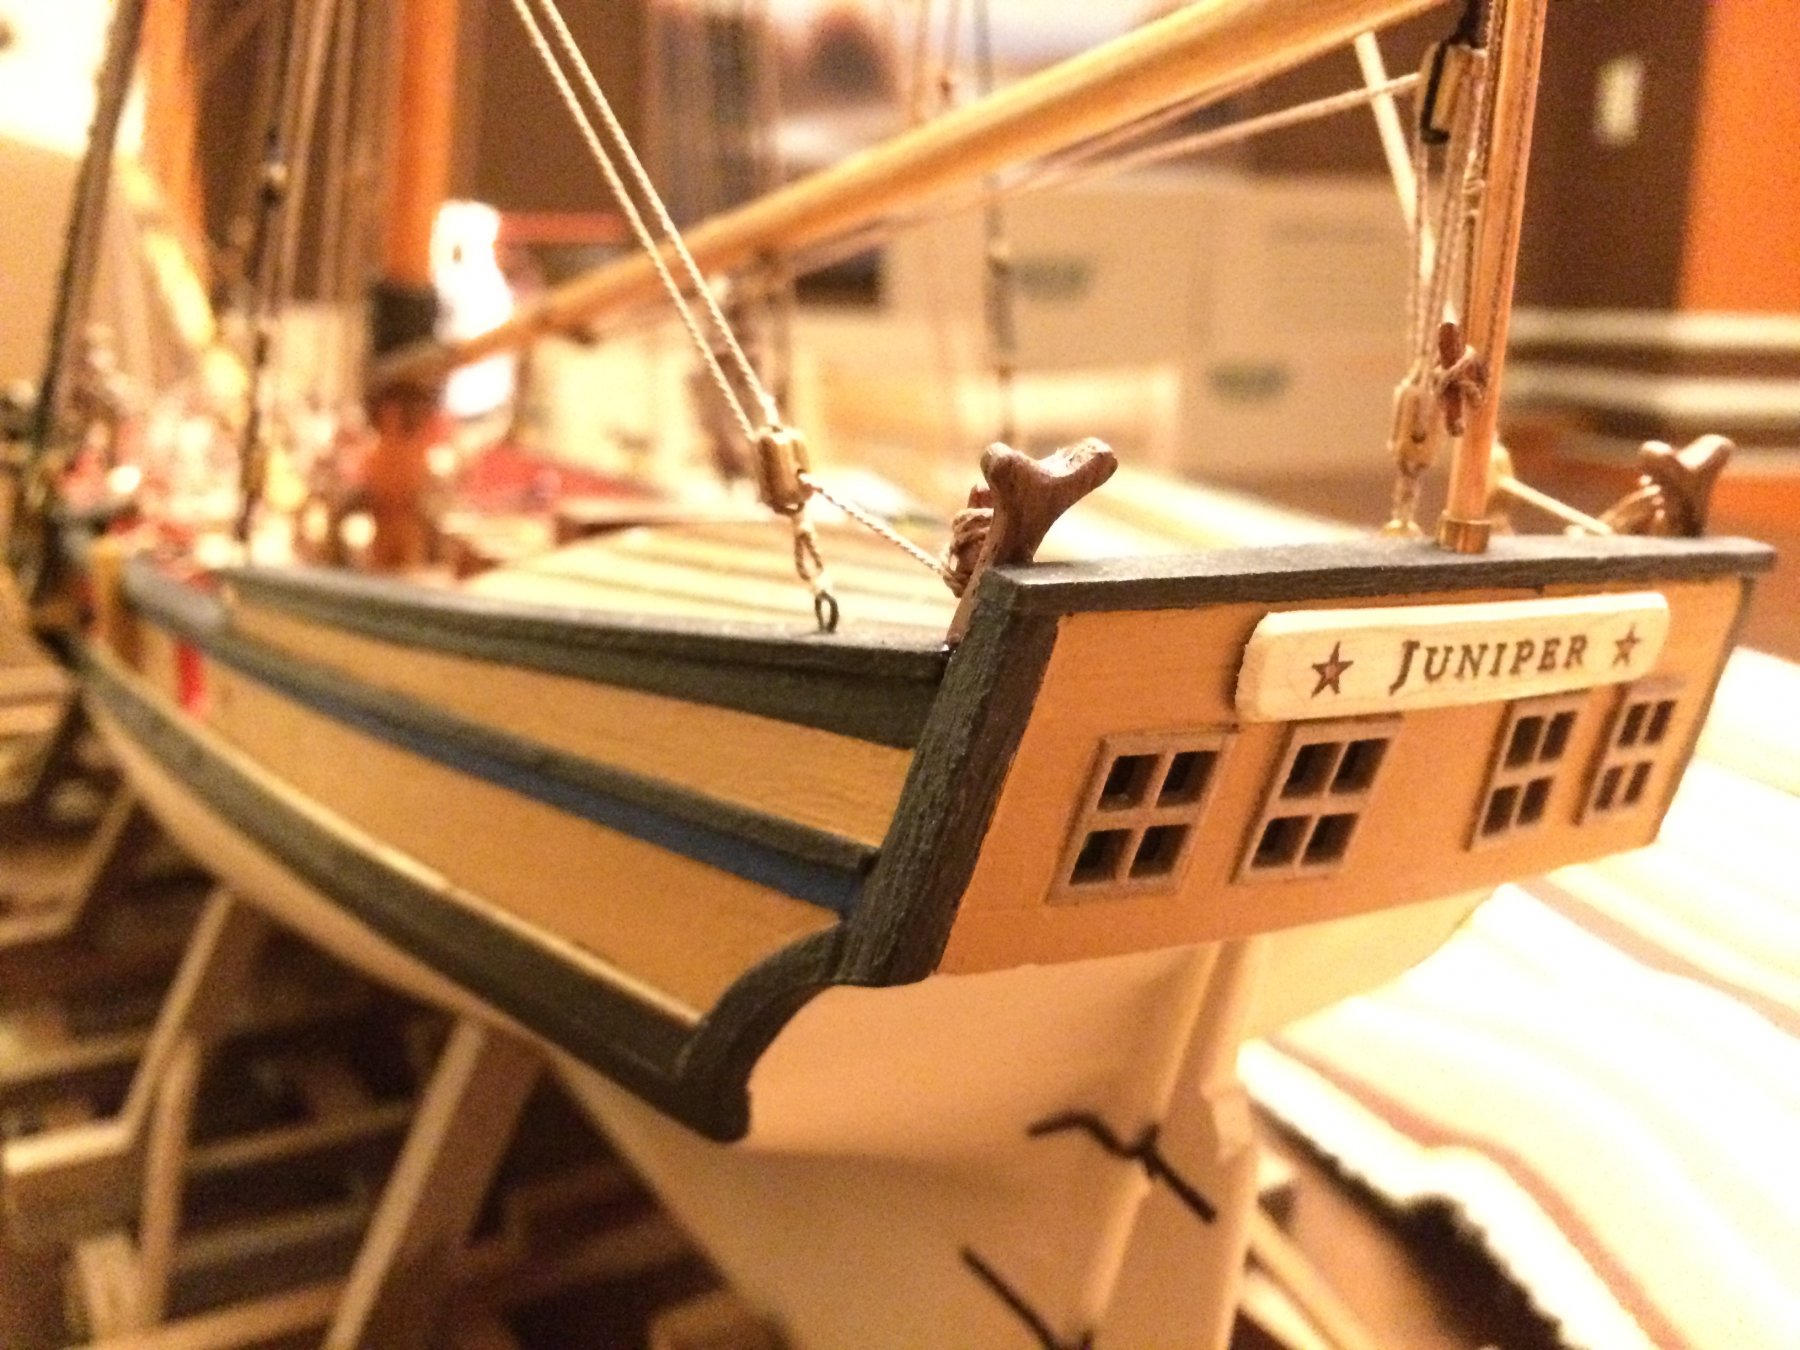
Project finished. Jan. 17, 2014 - July 21, 2017. 469 hours. It's funny, after that amount of time, that I put on the flag staff and that was it. Done. Simply nothing left to do on a project that often seemed as if it would/should never end. No abmiguity, not one more little thing. Simply done. I enjoyed every moment - even the rough ones. I've been planning to build a display case and have drawn up plans. I hoped to use acrylic with a UV filter to protect the model from sunlight and reduce the weight of what is likely to be a very fragile box. Then I priced it out; the acrylic alone will cost over $400. Even UV glass would cost about $300. So now I'm looking at regular glass. Heavy and not protective against fading. But better than letting dust accumulate on the rigging. After that, I'm going to take a break for a year or so. I have another project - entirely different - that's been waiting none-too-patiently. But once that's finished, I'll reward myself with another model to build. Perhaps the brig Niagara - which won the Battle of Lake Erie in the War of 1812 under Commodore Oliver Hazard Perry (don't give up the ship). Being a Lake Erie sailor, it has local significance to me, and the living replica is located just 90 miles from my home in Cleveland - so part of the build will include necessarily include at least one field trip for photos. Anyway, here are some final pics. I'm happy with the way she turned out for a first build. And thank you to everyone who provided encouragement along the way. I enjoyed the community. I'm not completely in love with the way the name plate came out. I wanted the lettering to pop, but the white background pops just a bit too much for my taste. But I don't hate it enough to risk the damage of trying again. It's one of those imperfections along the way that you deliberately decide to live with.


- 164 replies
-
- 8
-
-
- model shipways
- armed virginia sloop
- (and 2 more)
-
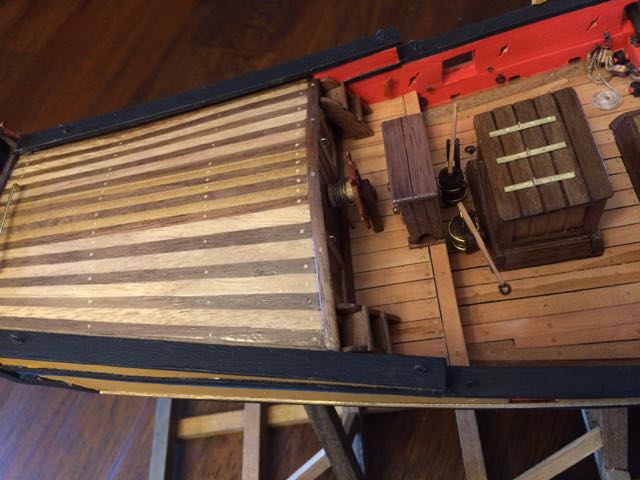
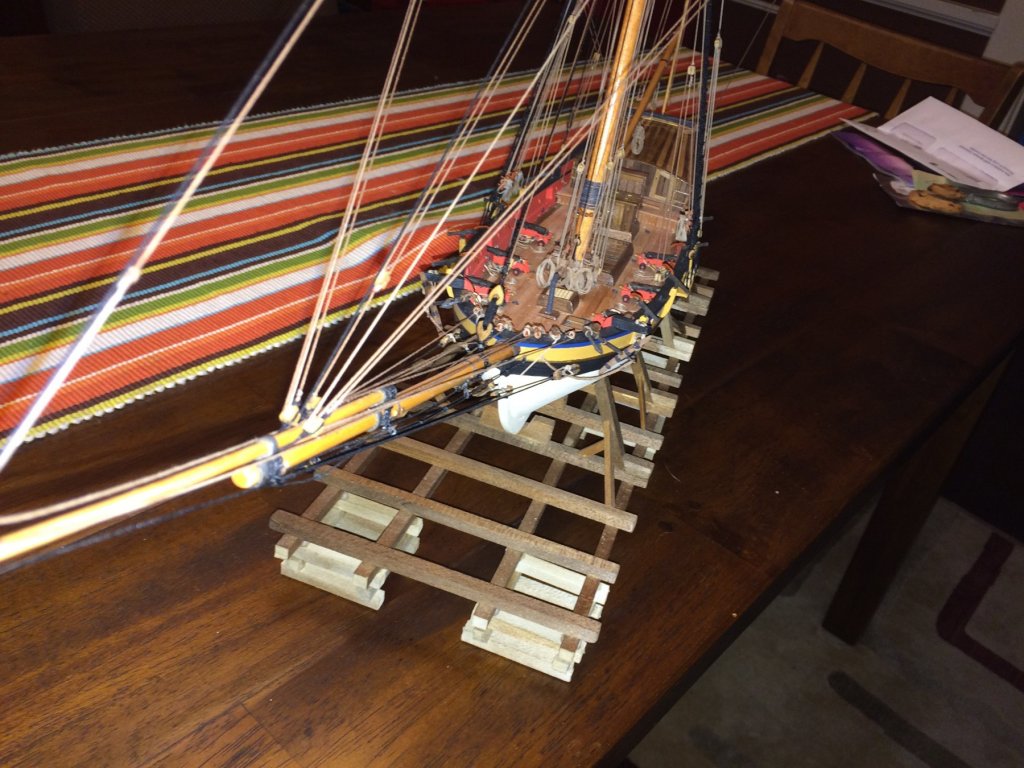
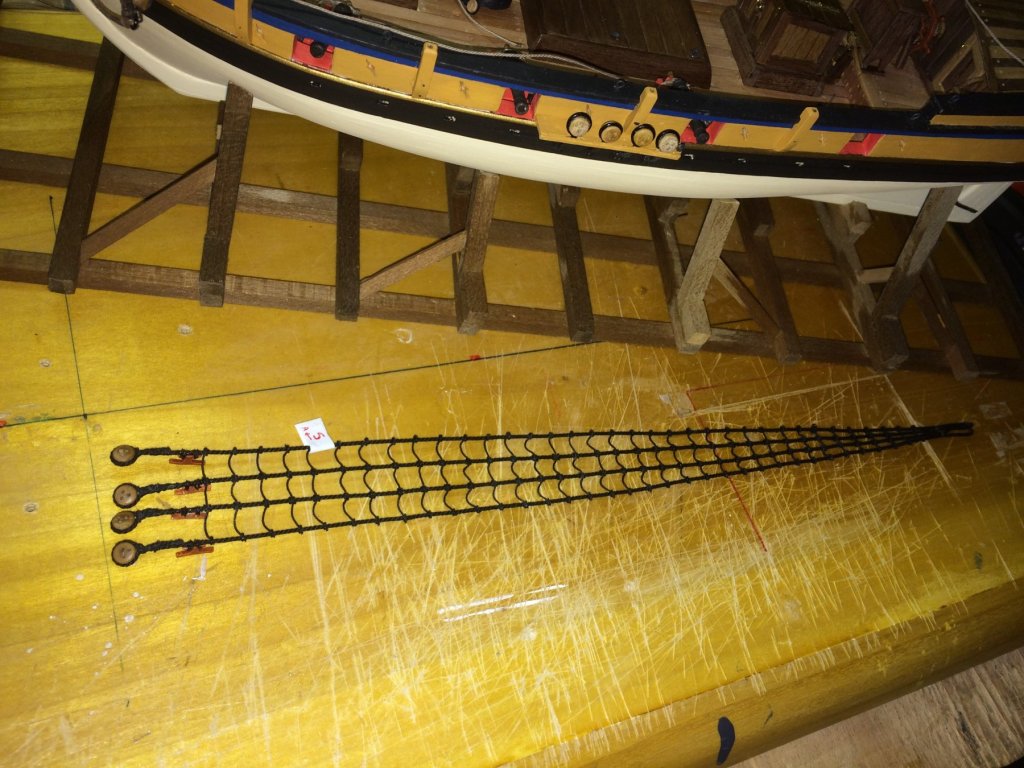
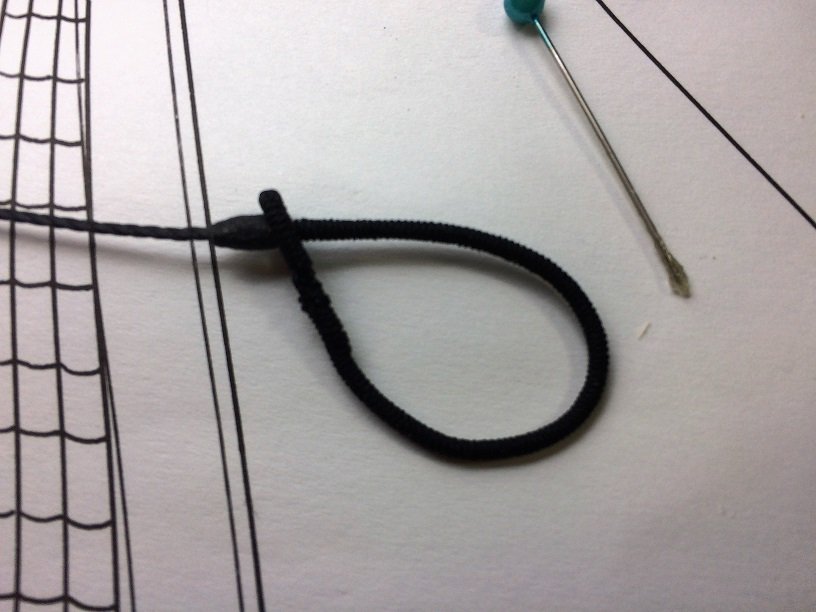
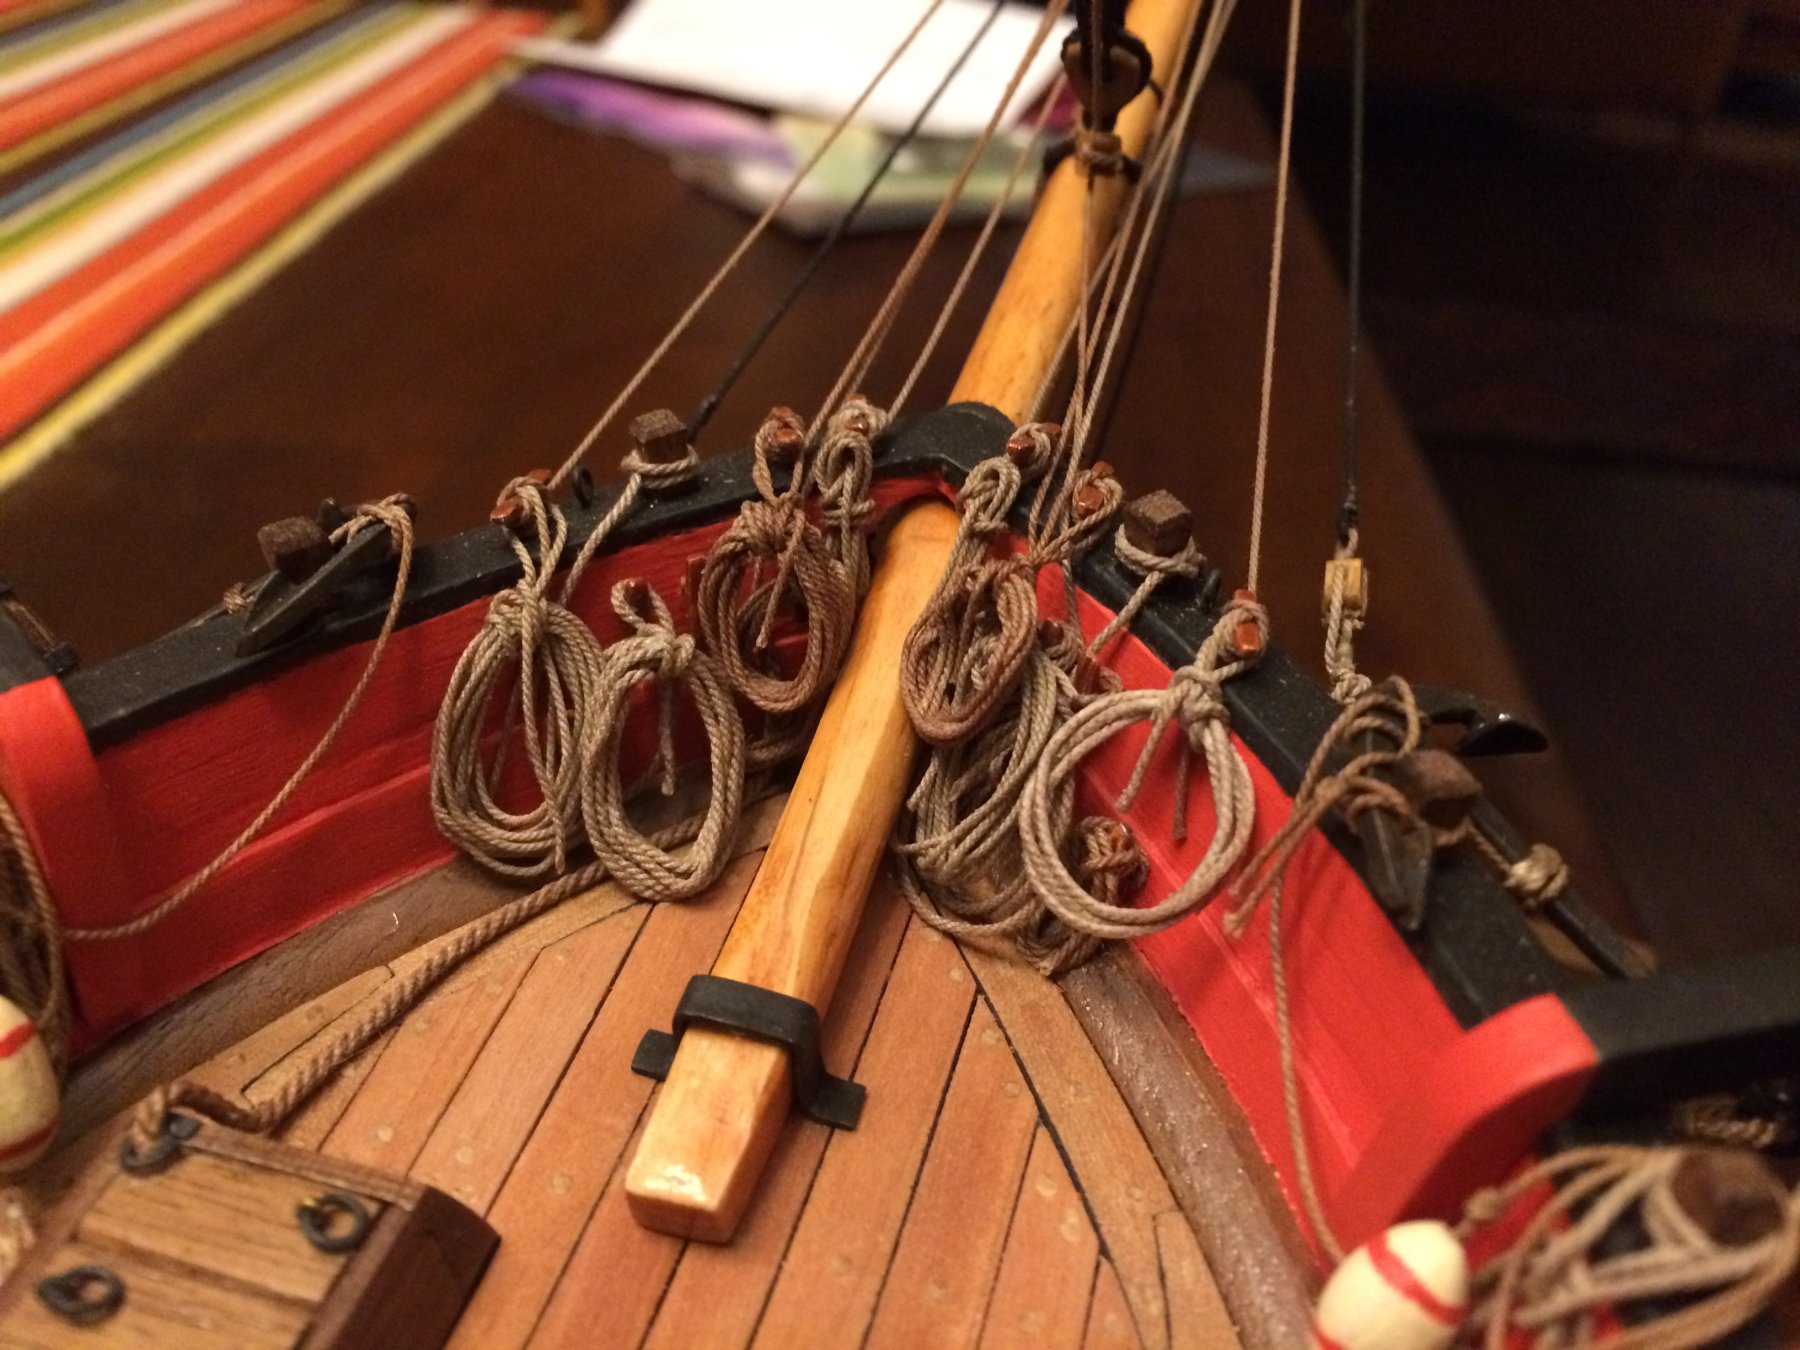
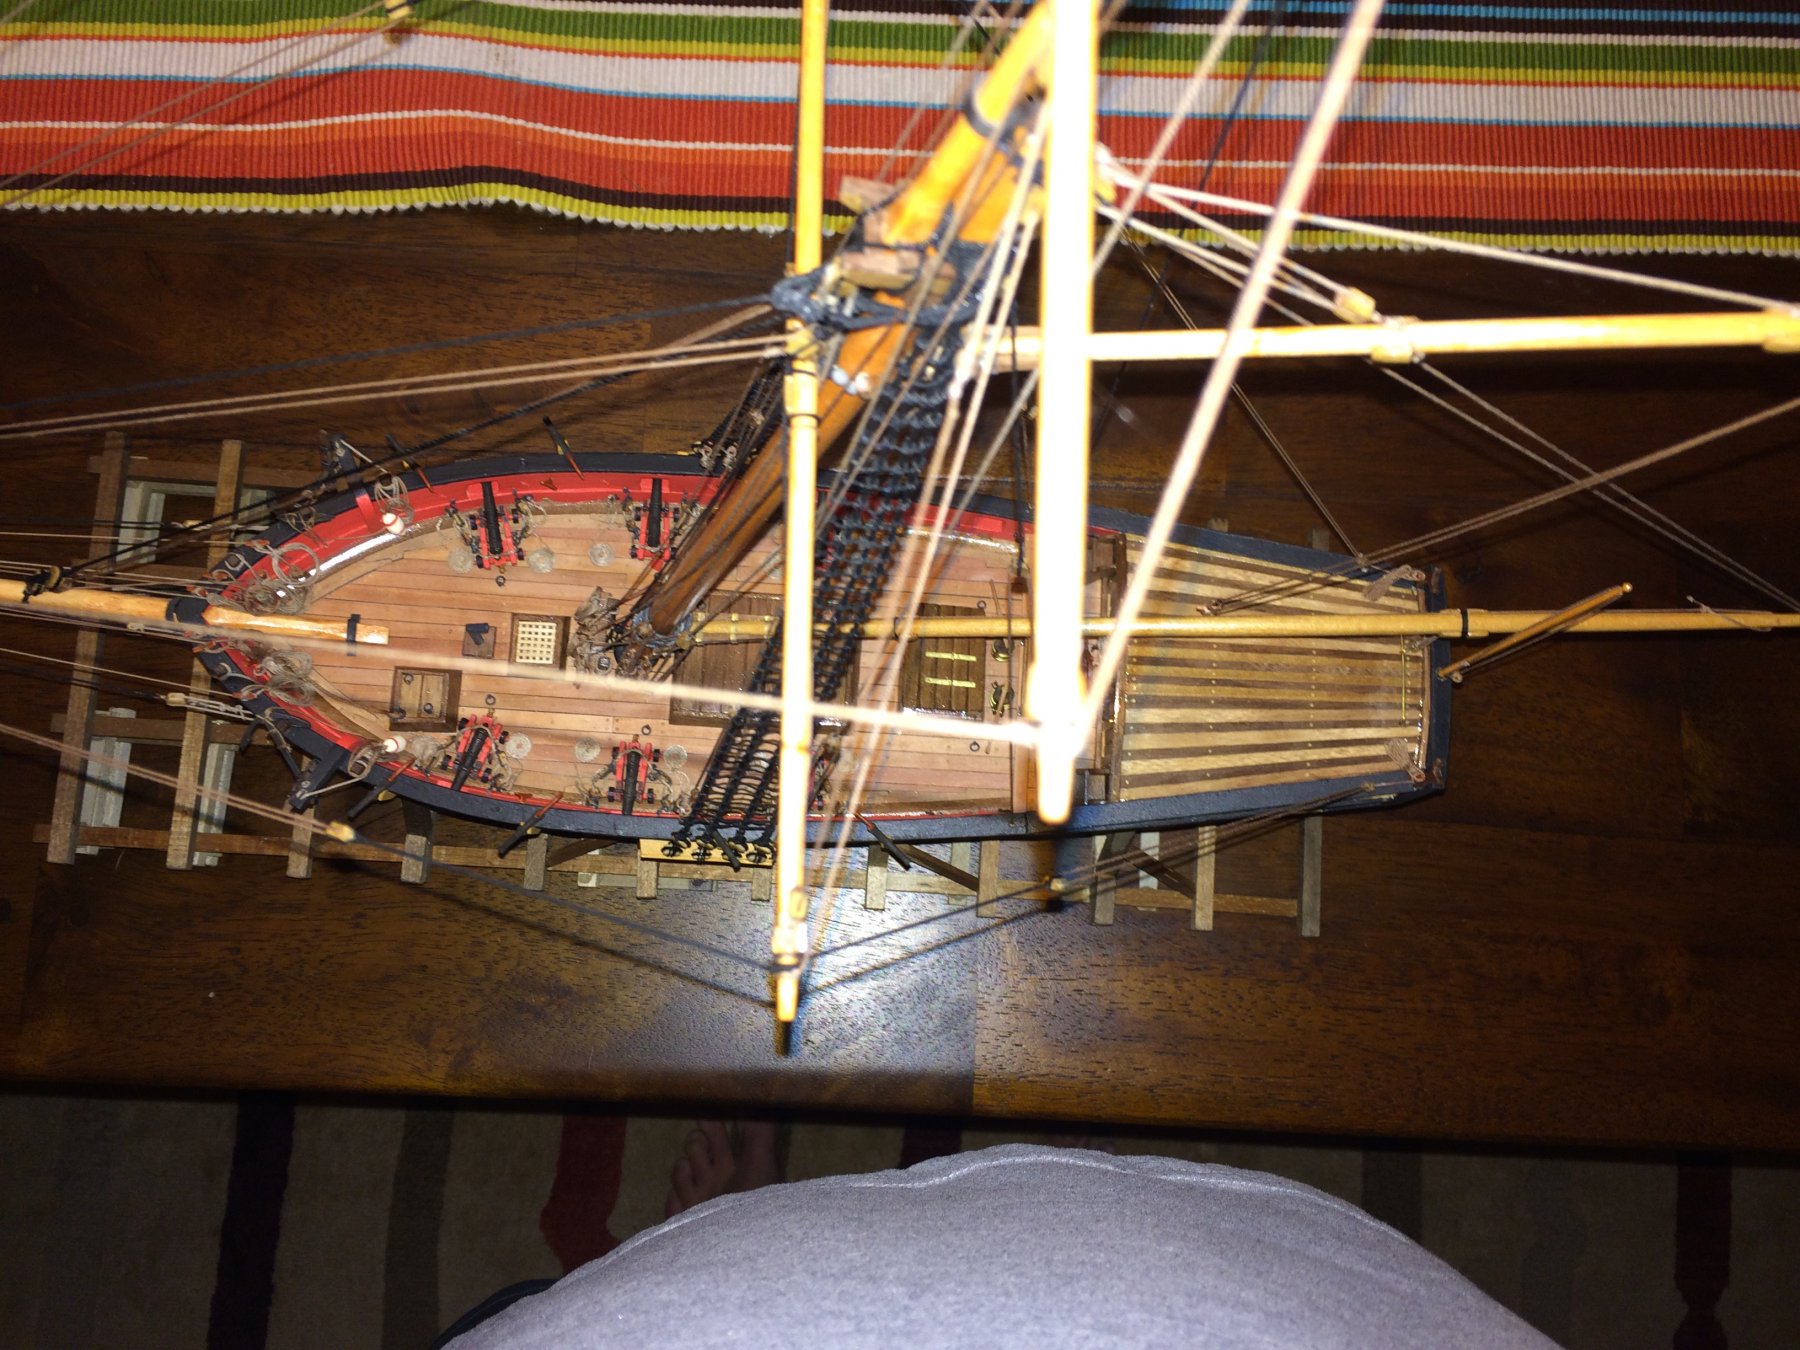
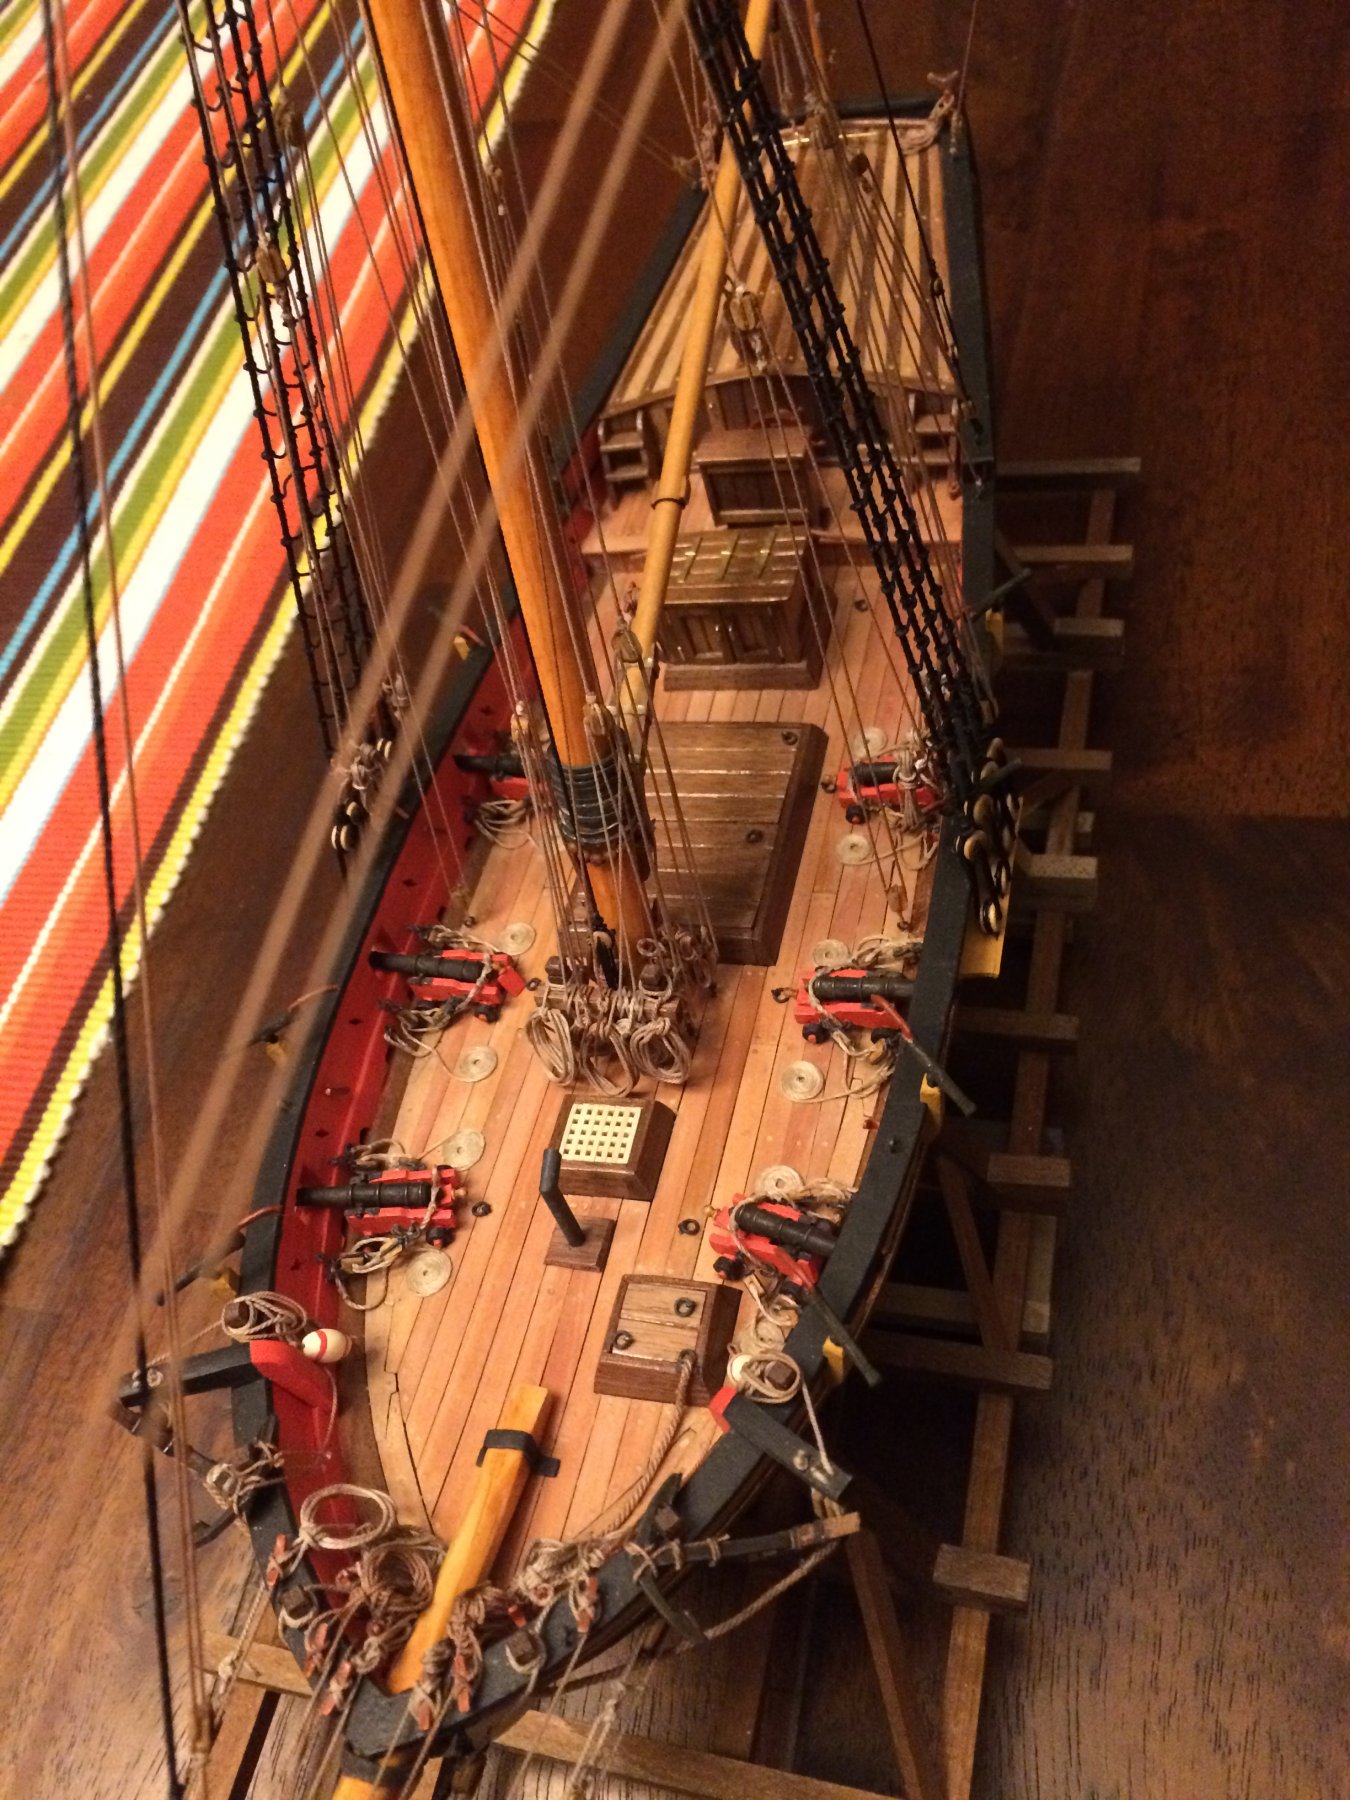
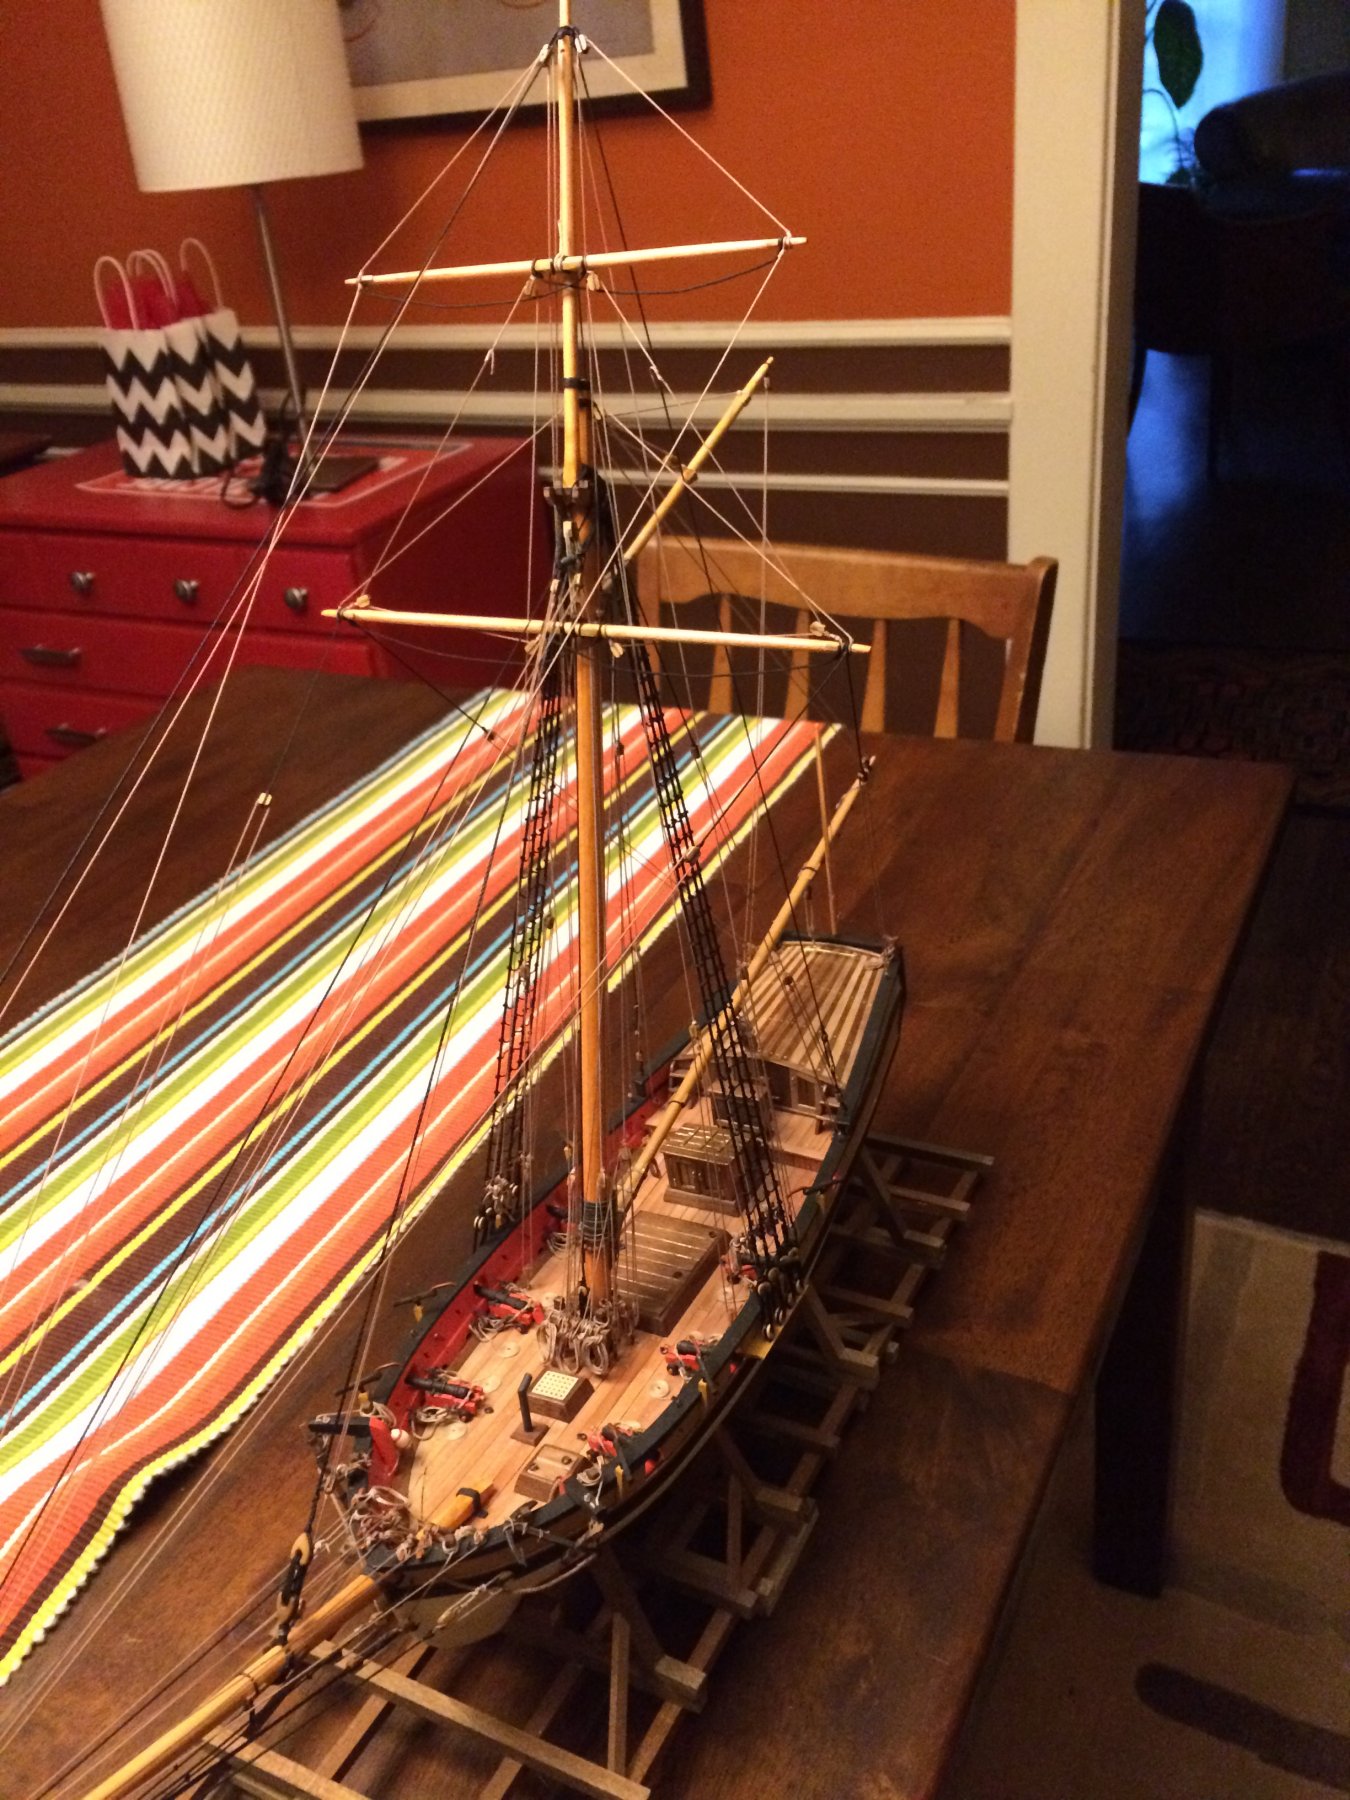
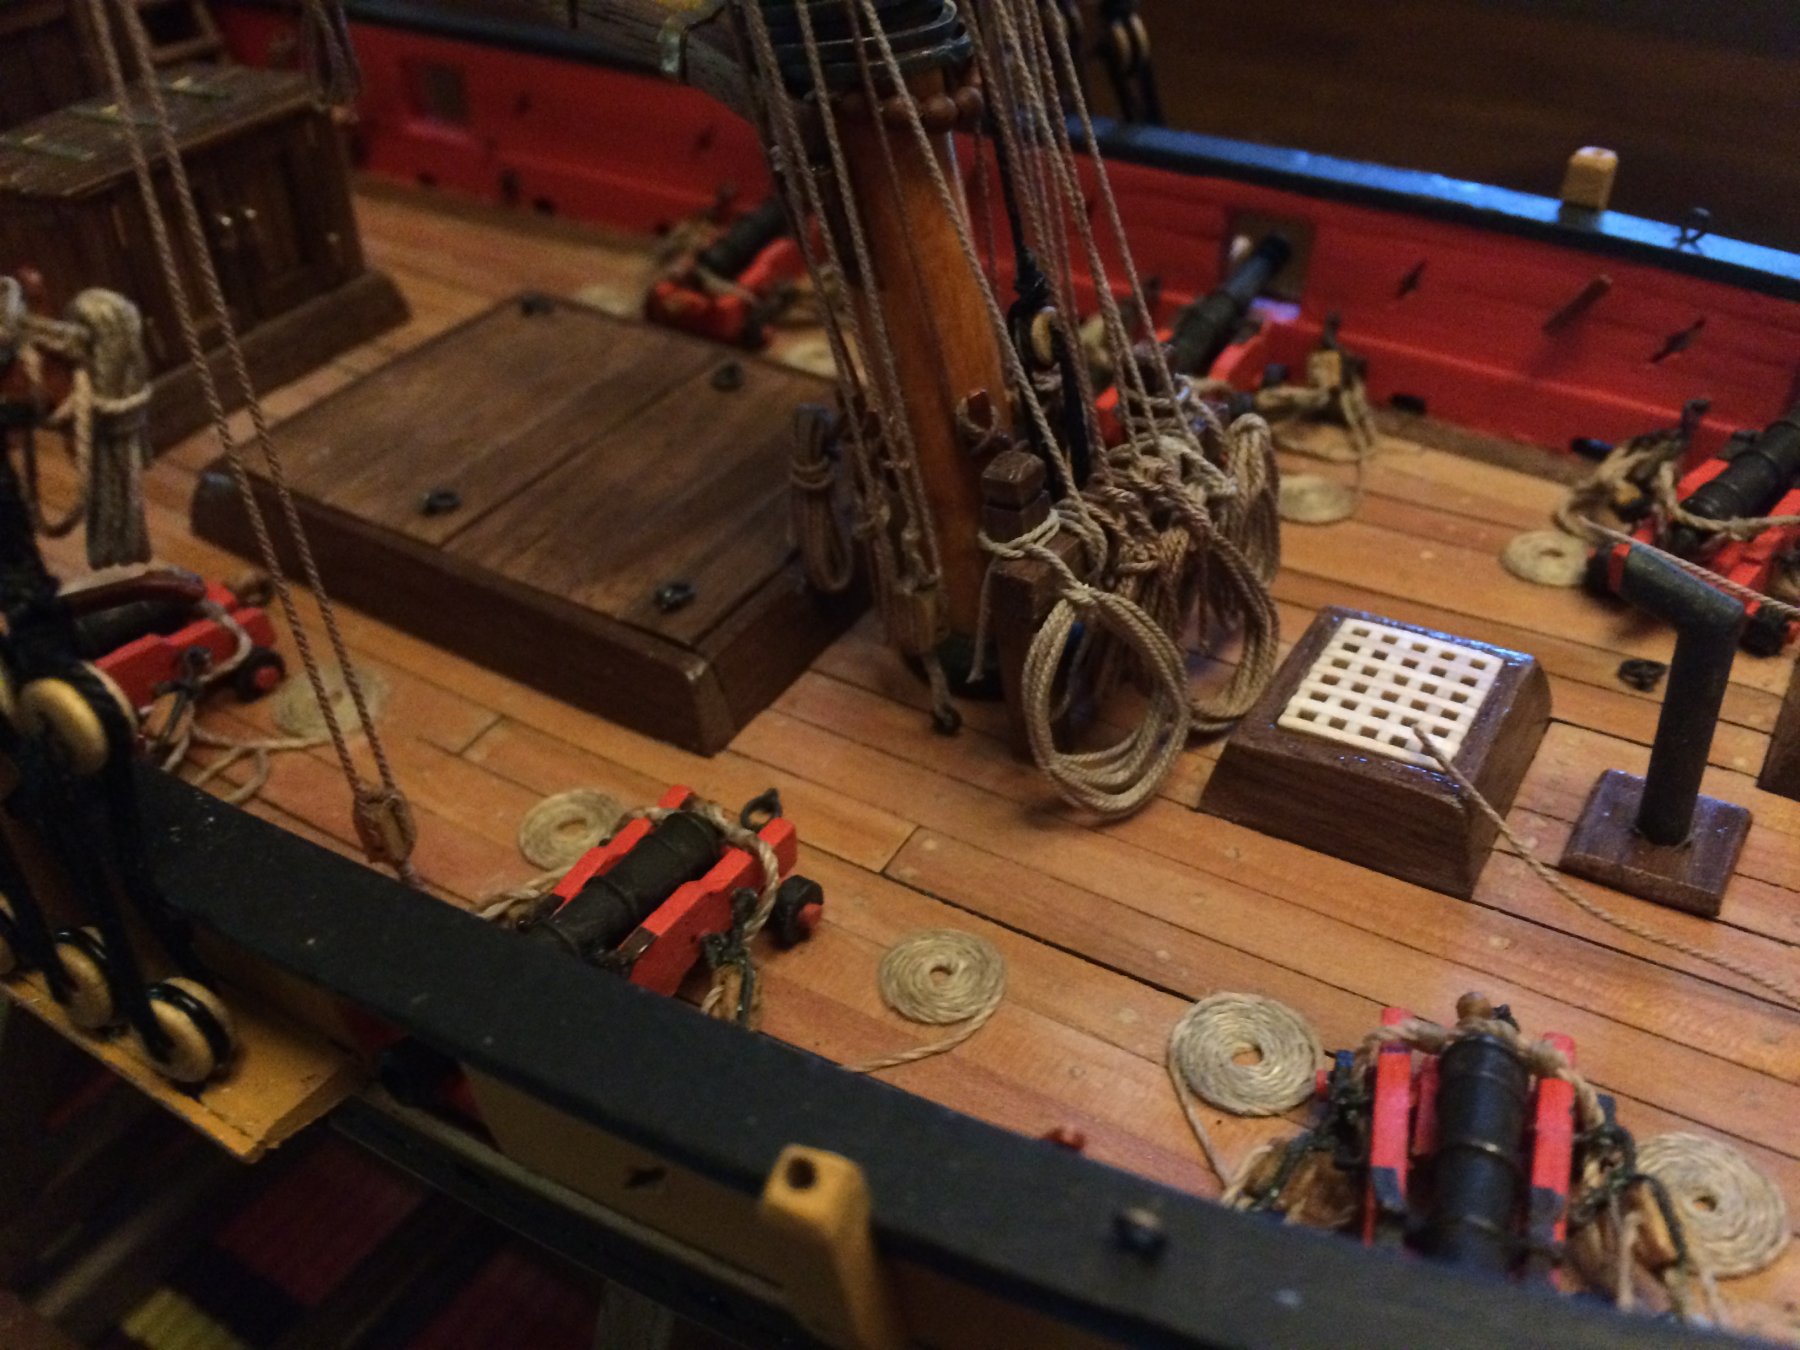
I'm still plugging away, an hour here and an hour there. It's summertime and the basement workshop gets moist and unpleasant. So I keep the model on the dining room table (I'm on borrowed time with that), and carry it downstairs when I work on it. I'm literally tying up loose ends - coils. I'm down to my last 10 or 12 of them, all at the bow. After than, I just have to put in the swivel guns and the flagstaff on the stern, and it will be done. I'm starting to think about a display case, and am realizing it involves tools I don't own. All the bites that hold the coils together are real; I made them the way I was taught when I was first learning to sail. As everyone here surely knows, getting them to lay or hang naturally is no small trick. Here's what it looks like.


- 164 replies
-
- 11
-
-
- model shipways
- armed virginia sloop
- (and 2 more)
-
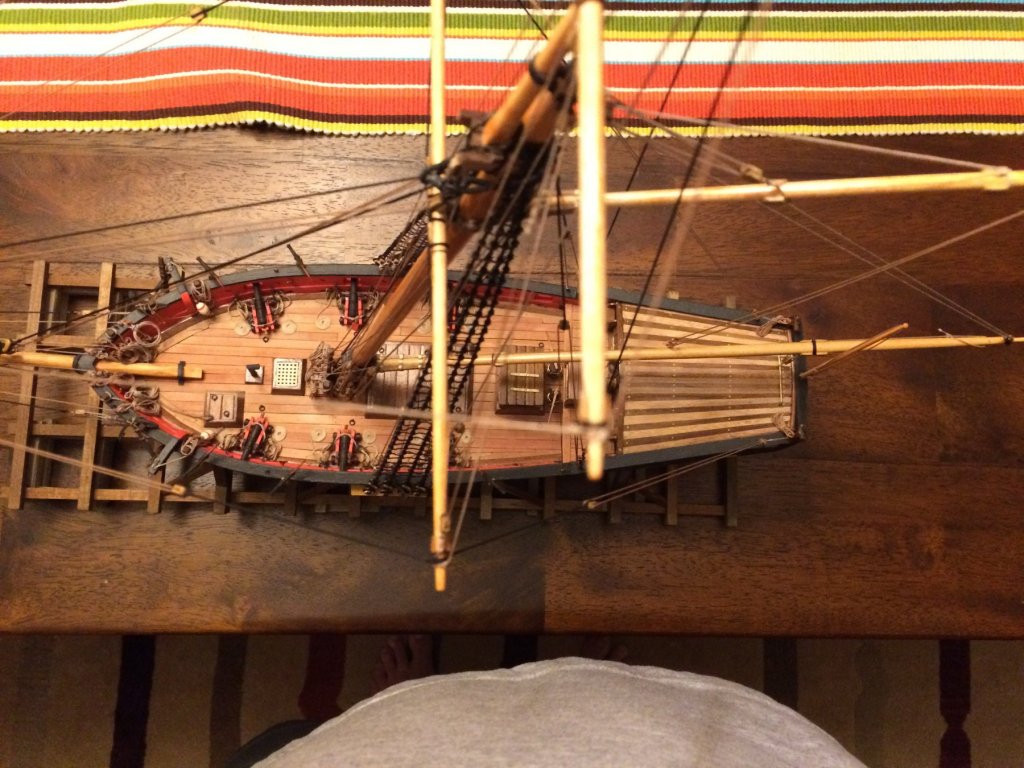
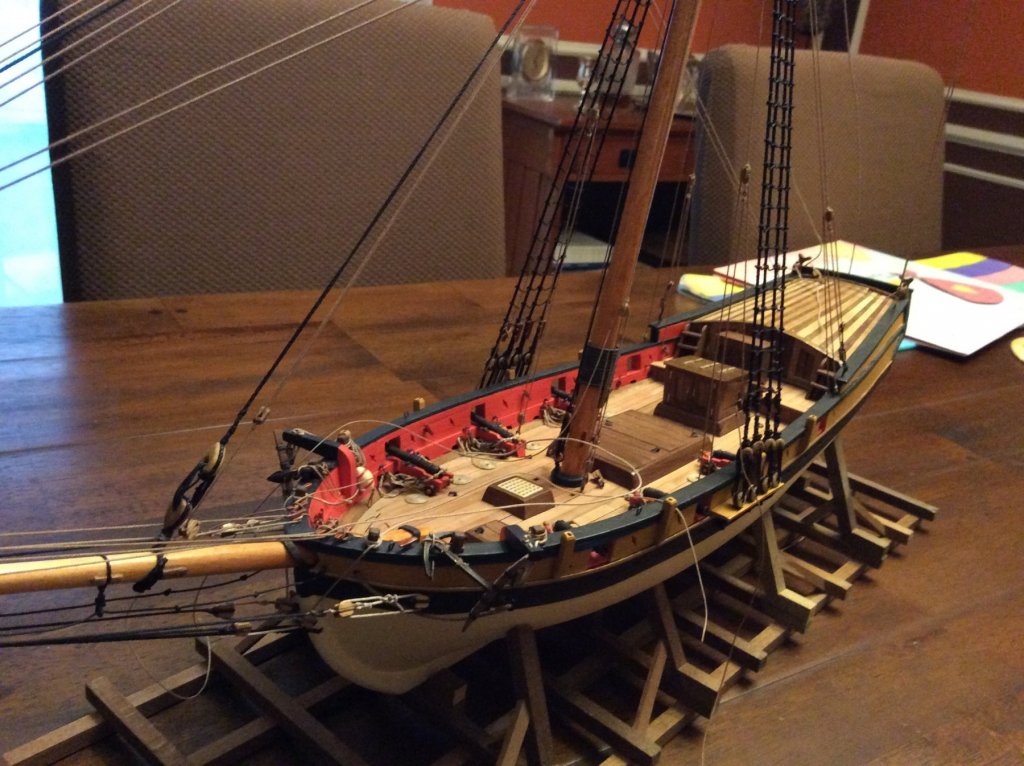
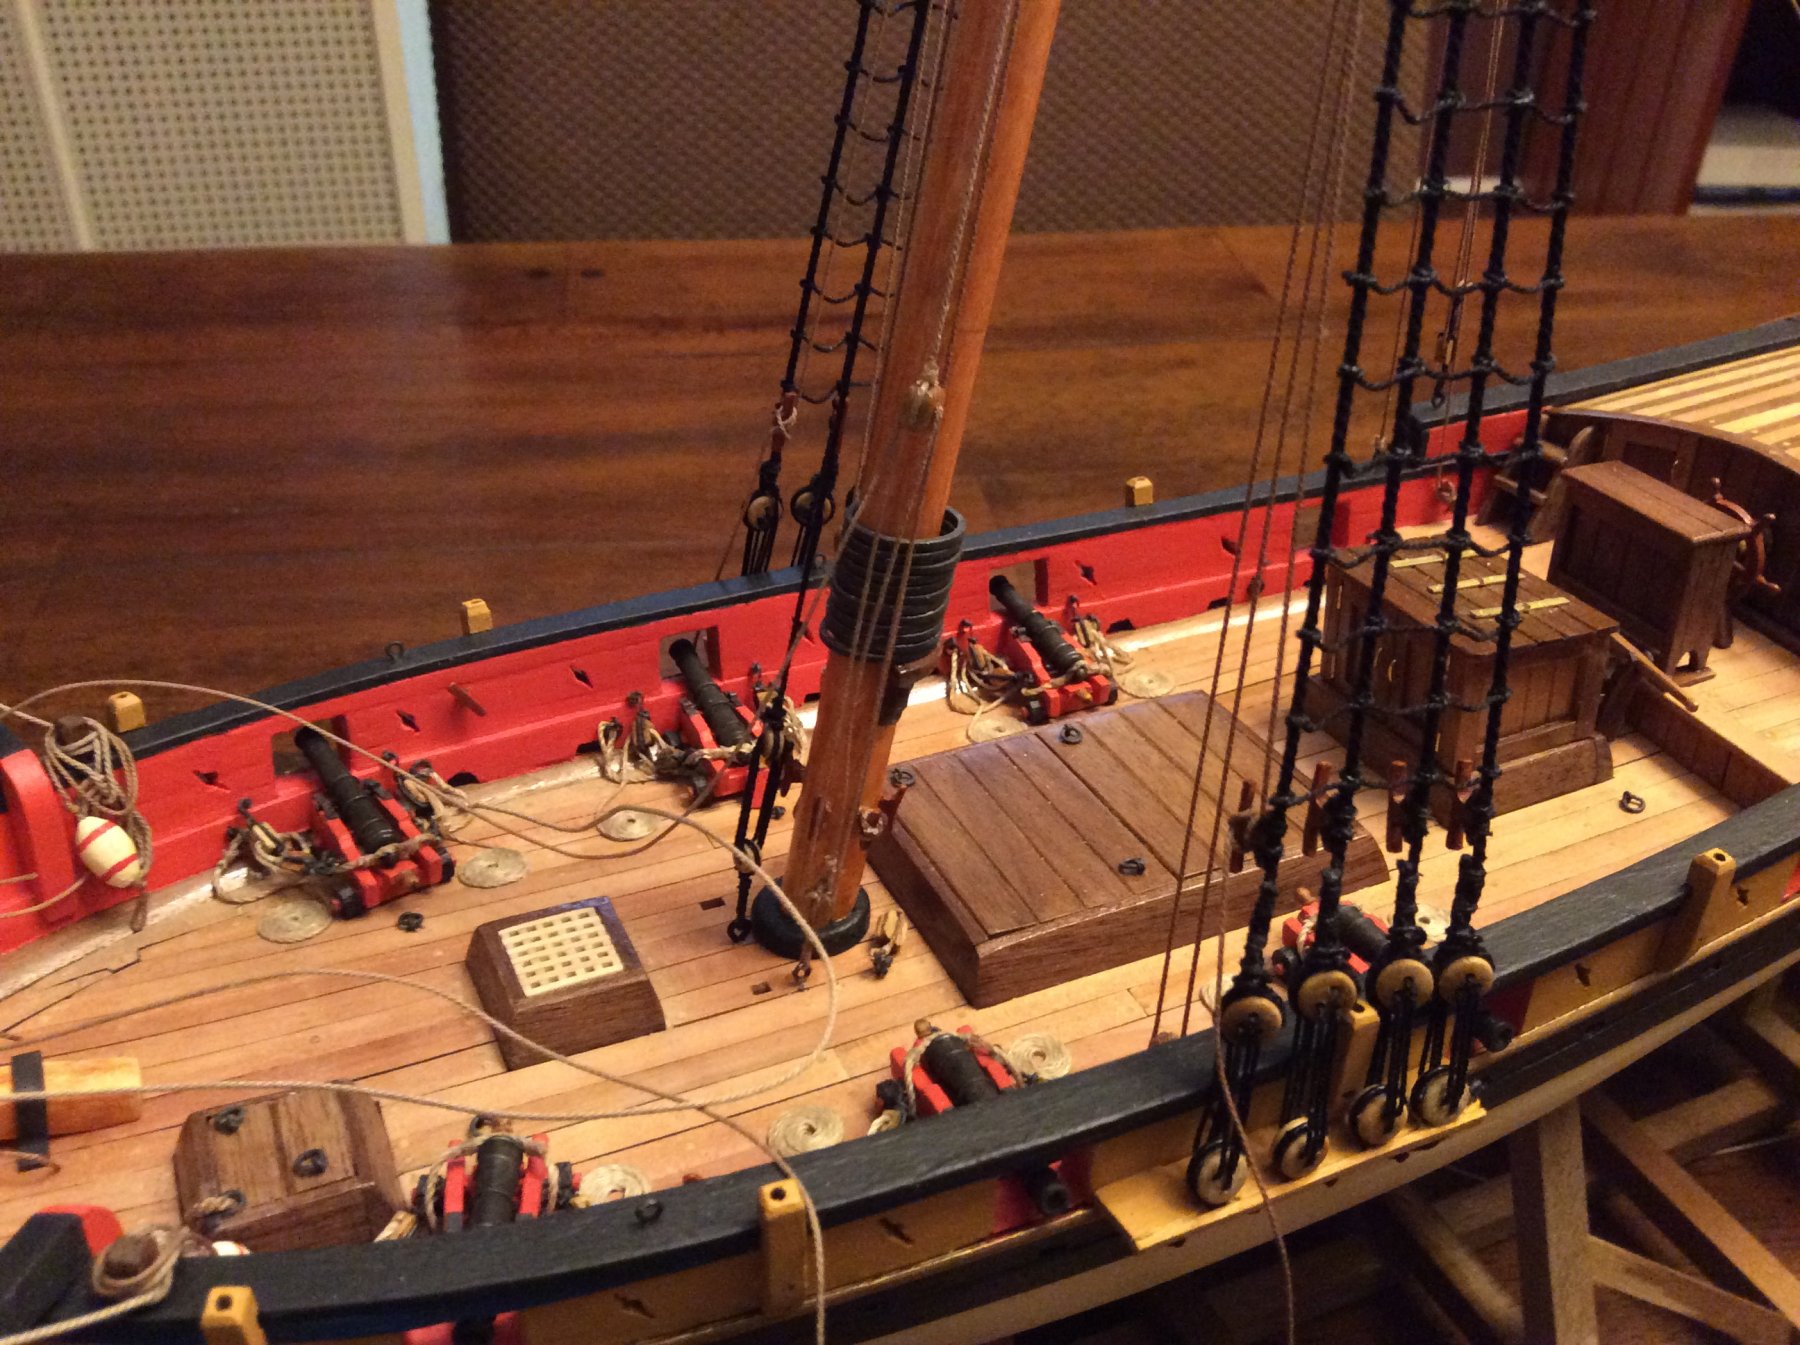
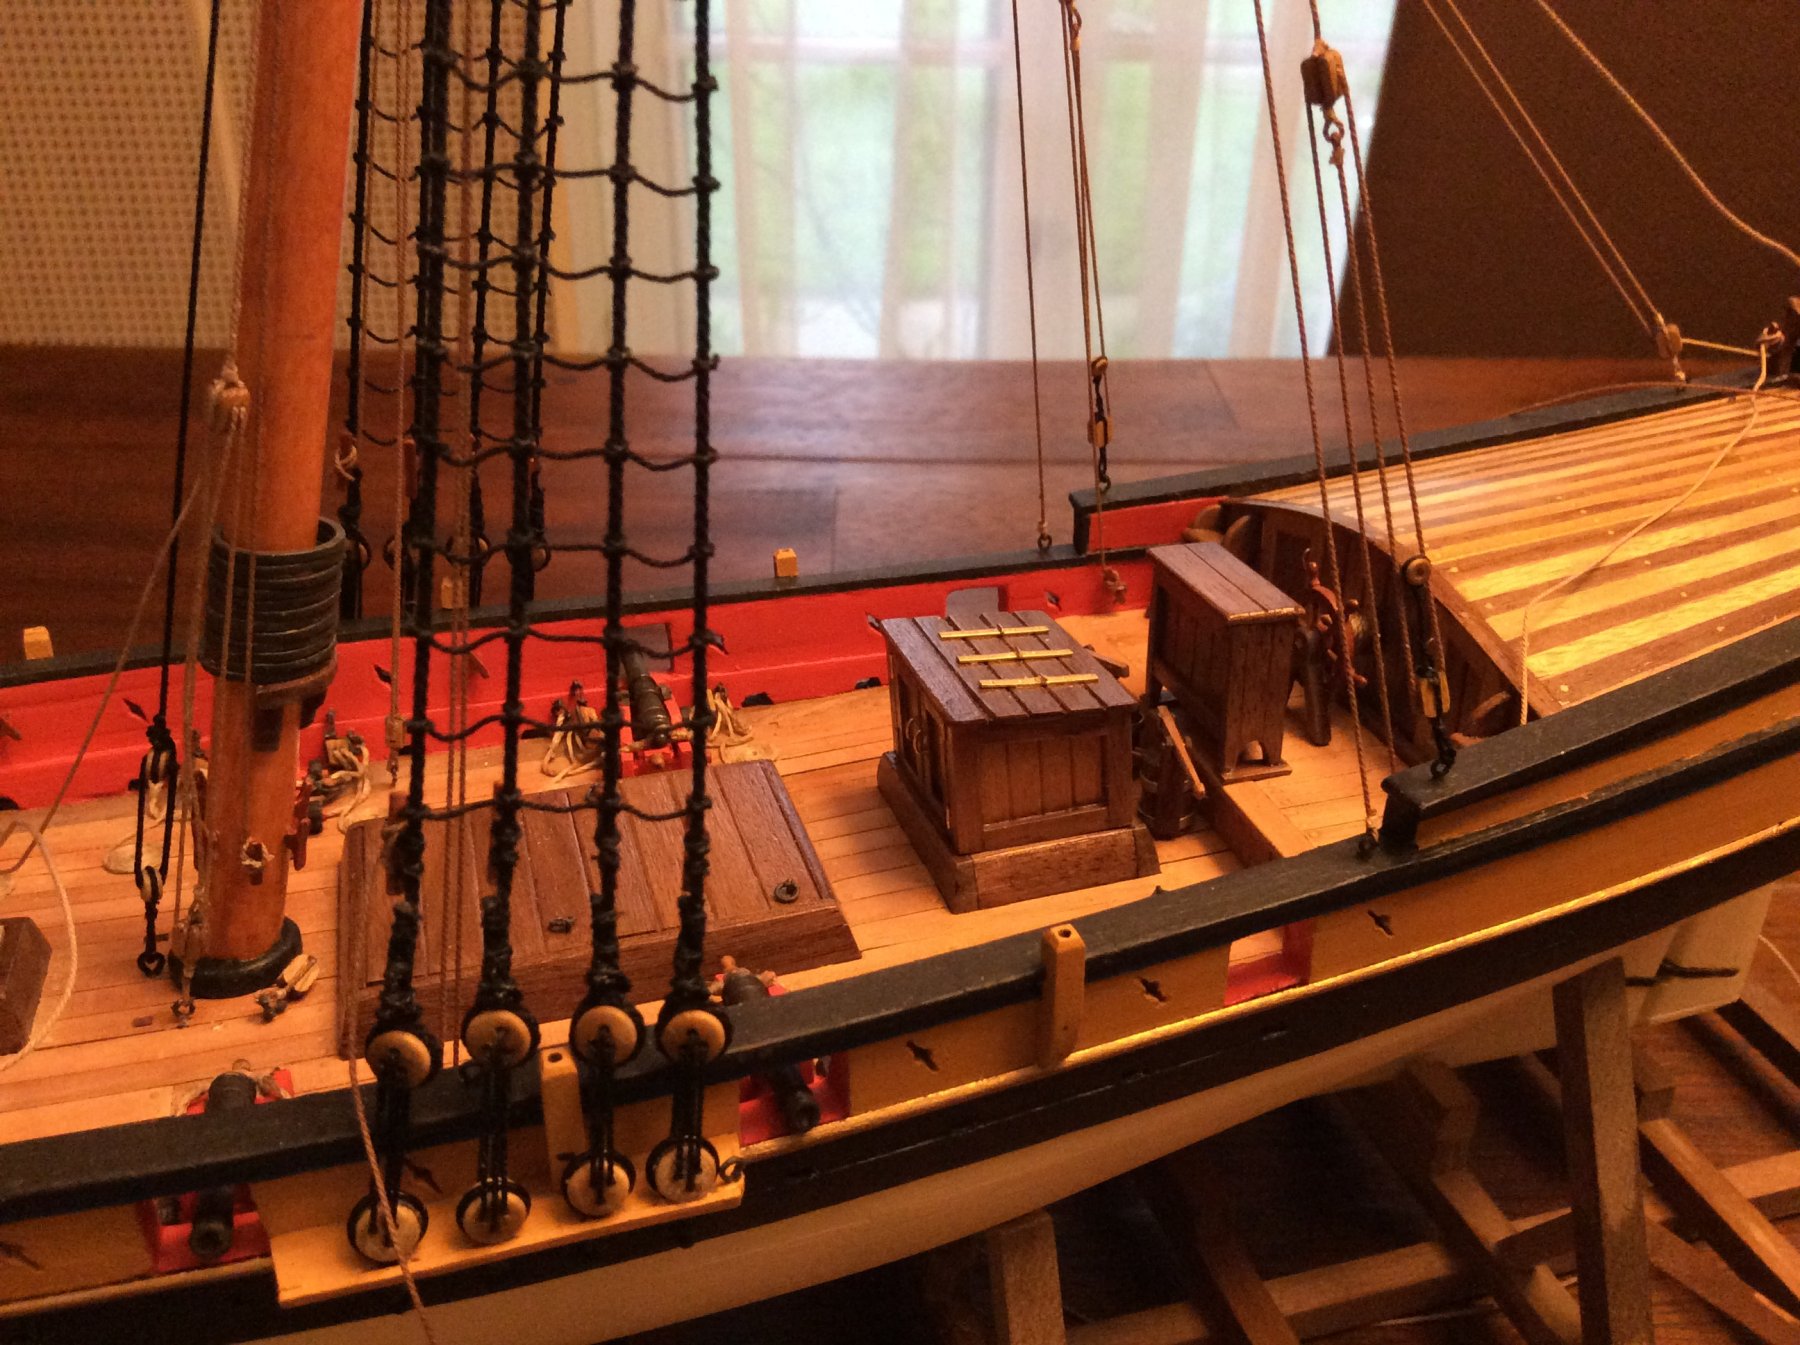
I've been making my way through the rigging. I've been picking my order as I go, doing what seems to make sense next, with an overall game plan of avoiding getting my fingers and tools twisted in the rigging that's done. So I tend to work on related systems (e.g. Forestay and associated halyards) rather than in the layers of standing and then running rigging. I'm also trying to minimize doing the more intricate work on the boat itself. Like the parrels - I much preferred doing those on the workbench than on the mast under the forestay. But it means working several steps ahead; Igor example, I needed to have the tops'l yard ready to rig and on the topmast before I installed the flying jib stay. So I'm working several steps ahead. The whole thing is fraught with peril, and I've made a few layering mistakes. But nothing I couldn't re-rig free of damage. Next up are the topmast backstays, and the rigging for the tops'l yard. I haven't been finishing off lines lines as I go. I can see where it will cut off access to some of the cleats that aren't yet occupied - especially at the bow. That will be a tedious last step. The big lesson I've learned is to let the lines sit overnight before gluing in the cleats and washing the line with dilute white glue. They have a lot of stretch in them and they need to settle.. and I've caught a lot of errors that way. I'm enjoying the rigging. I thought it would move a bit faster, but im in no rush. Here are some photos.


- 164 replies
-
- 7
-
-
- model shipways
- armed virginia sloop
- (and 2 more)
-
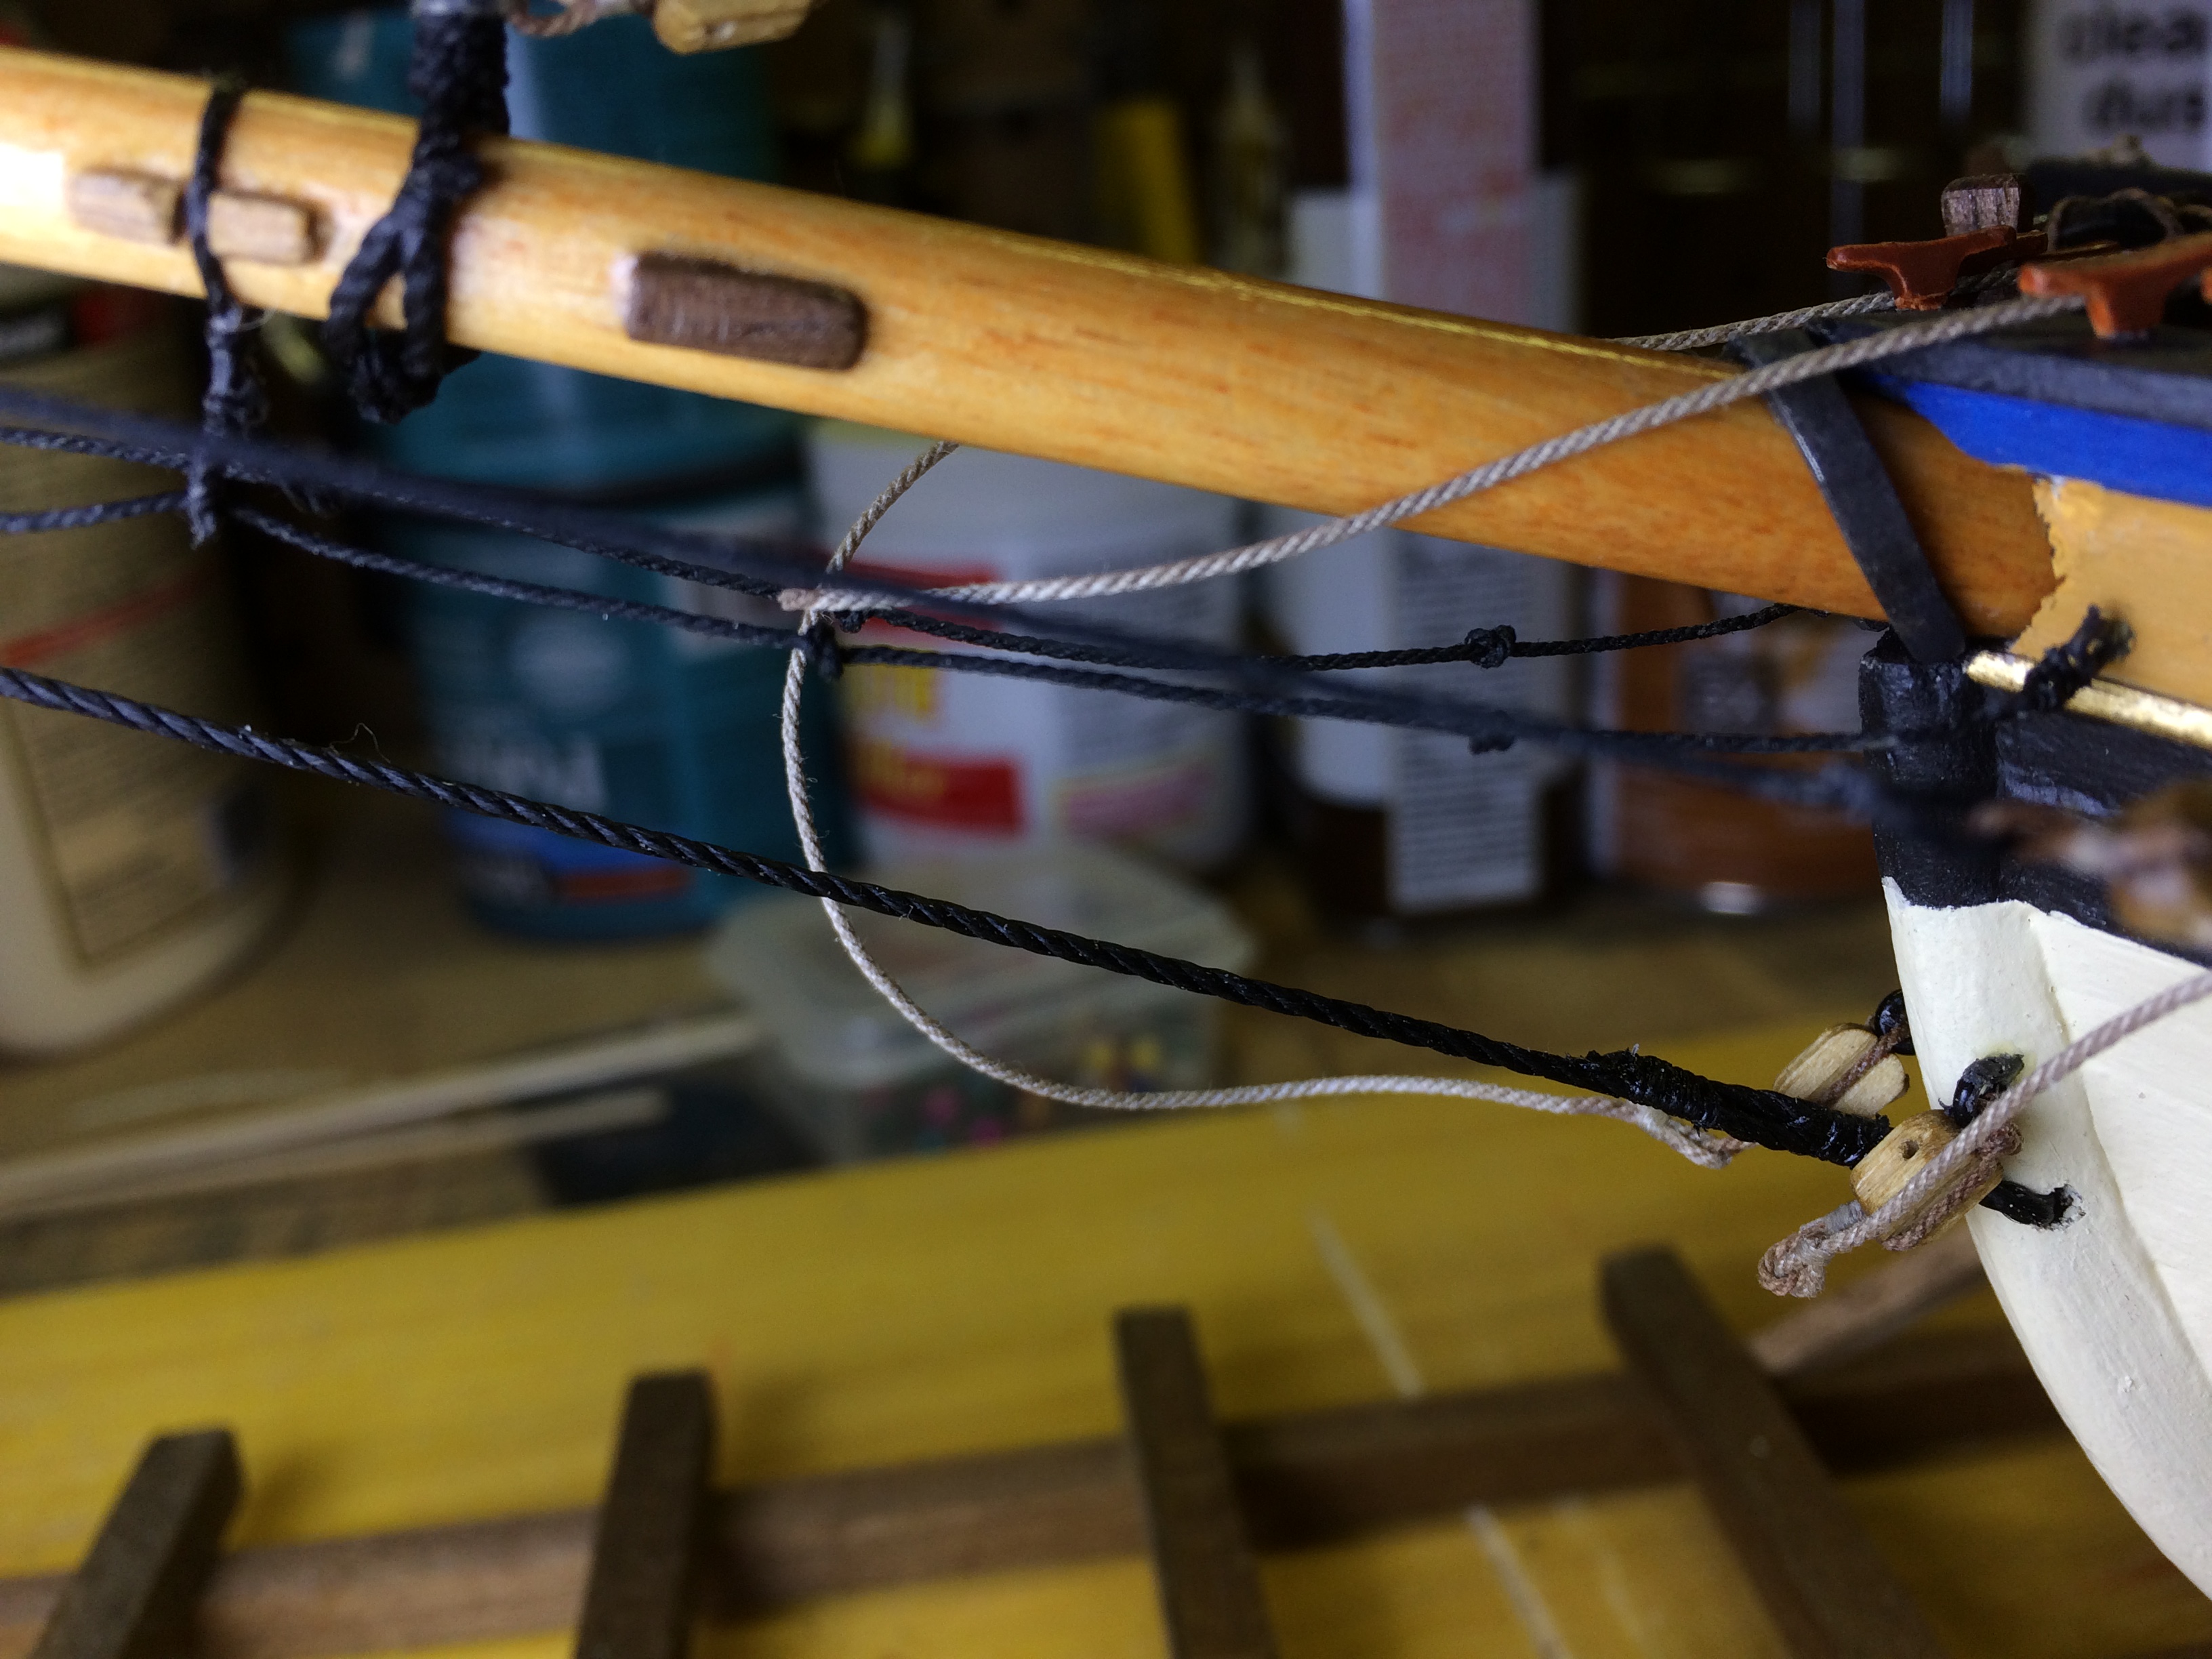
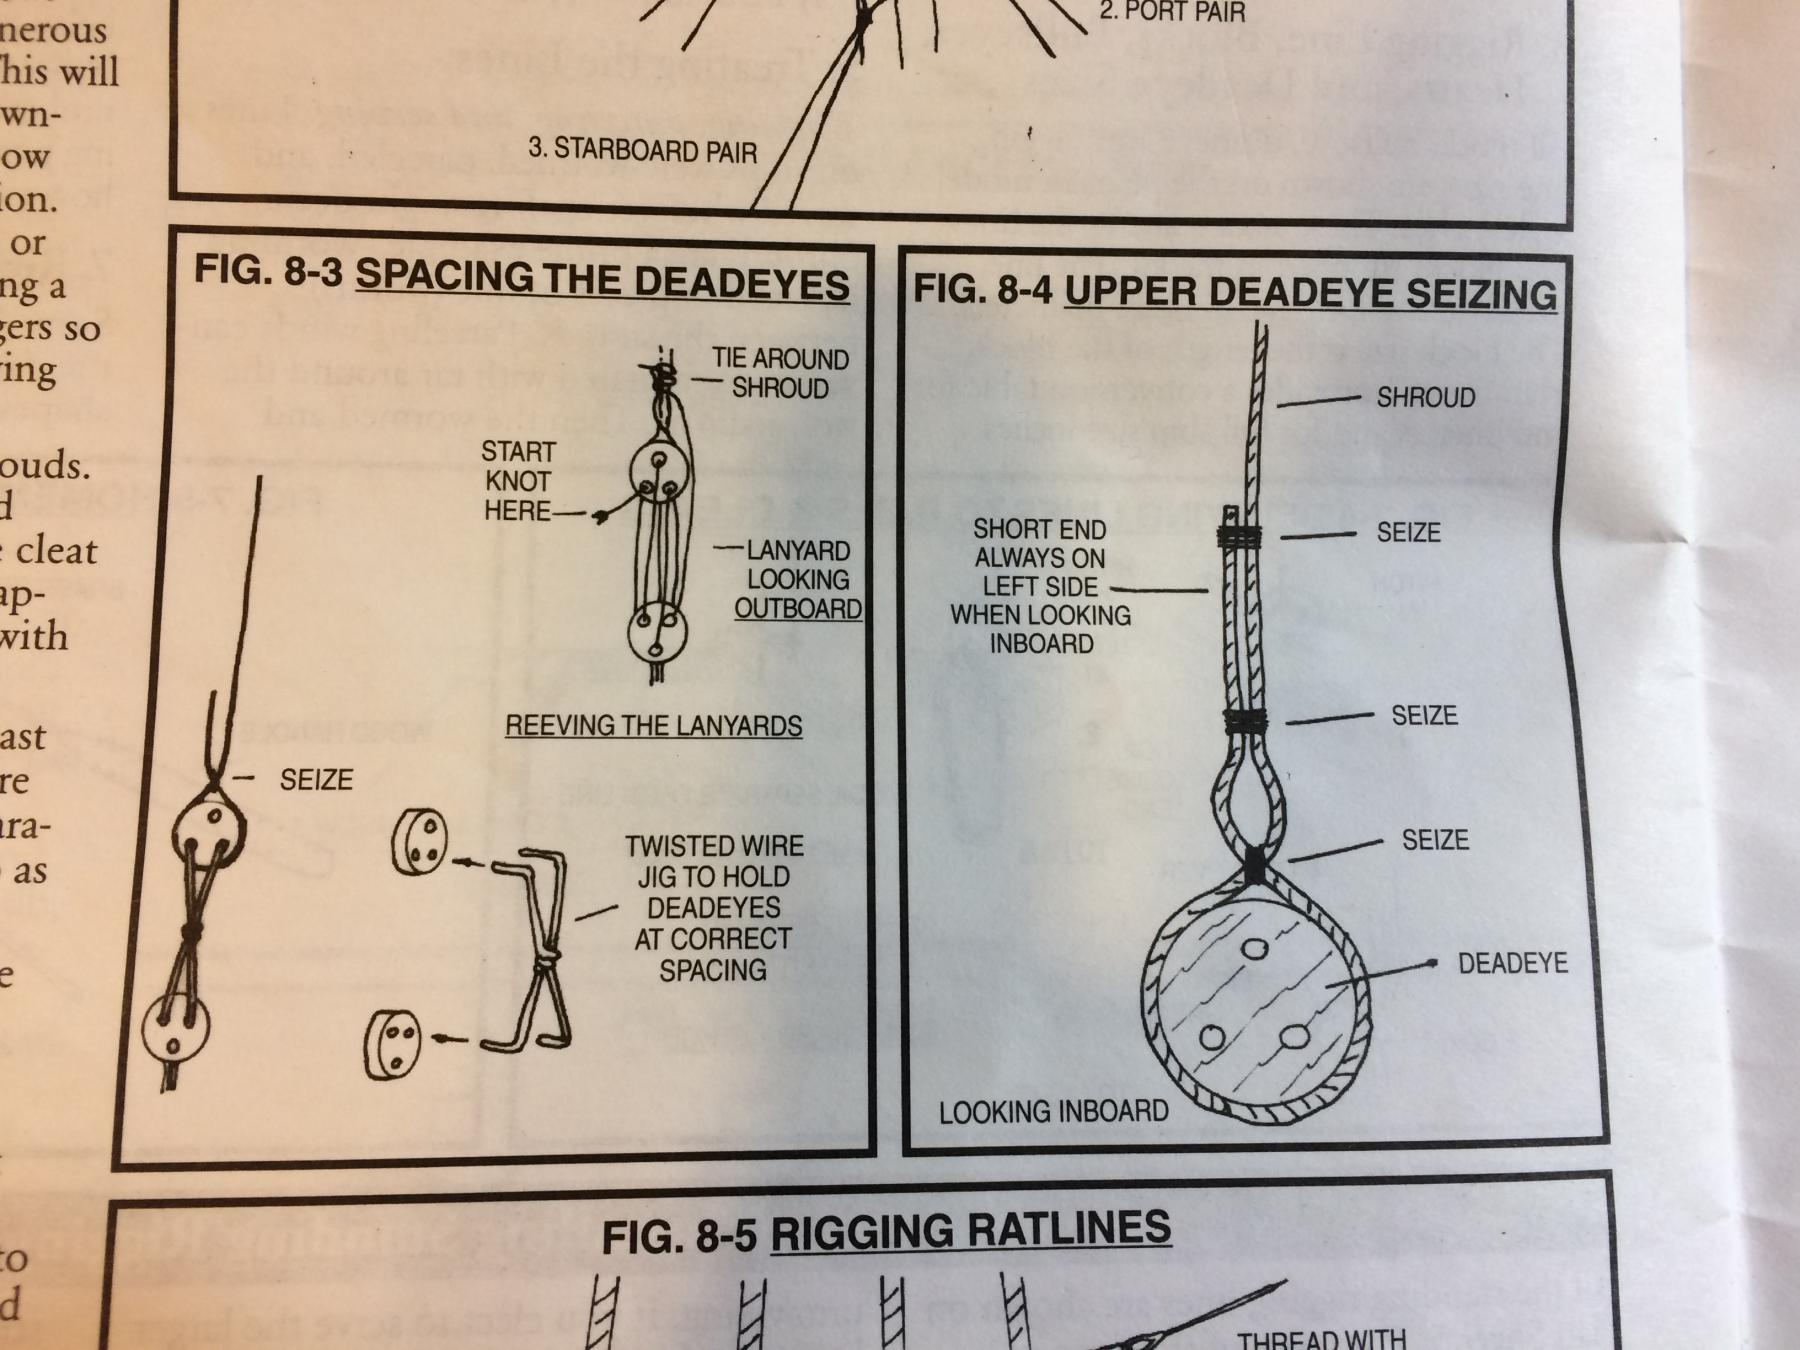
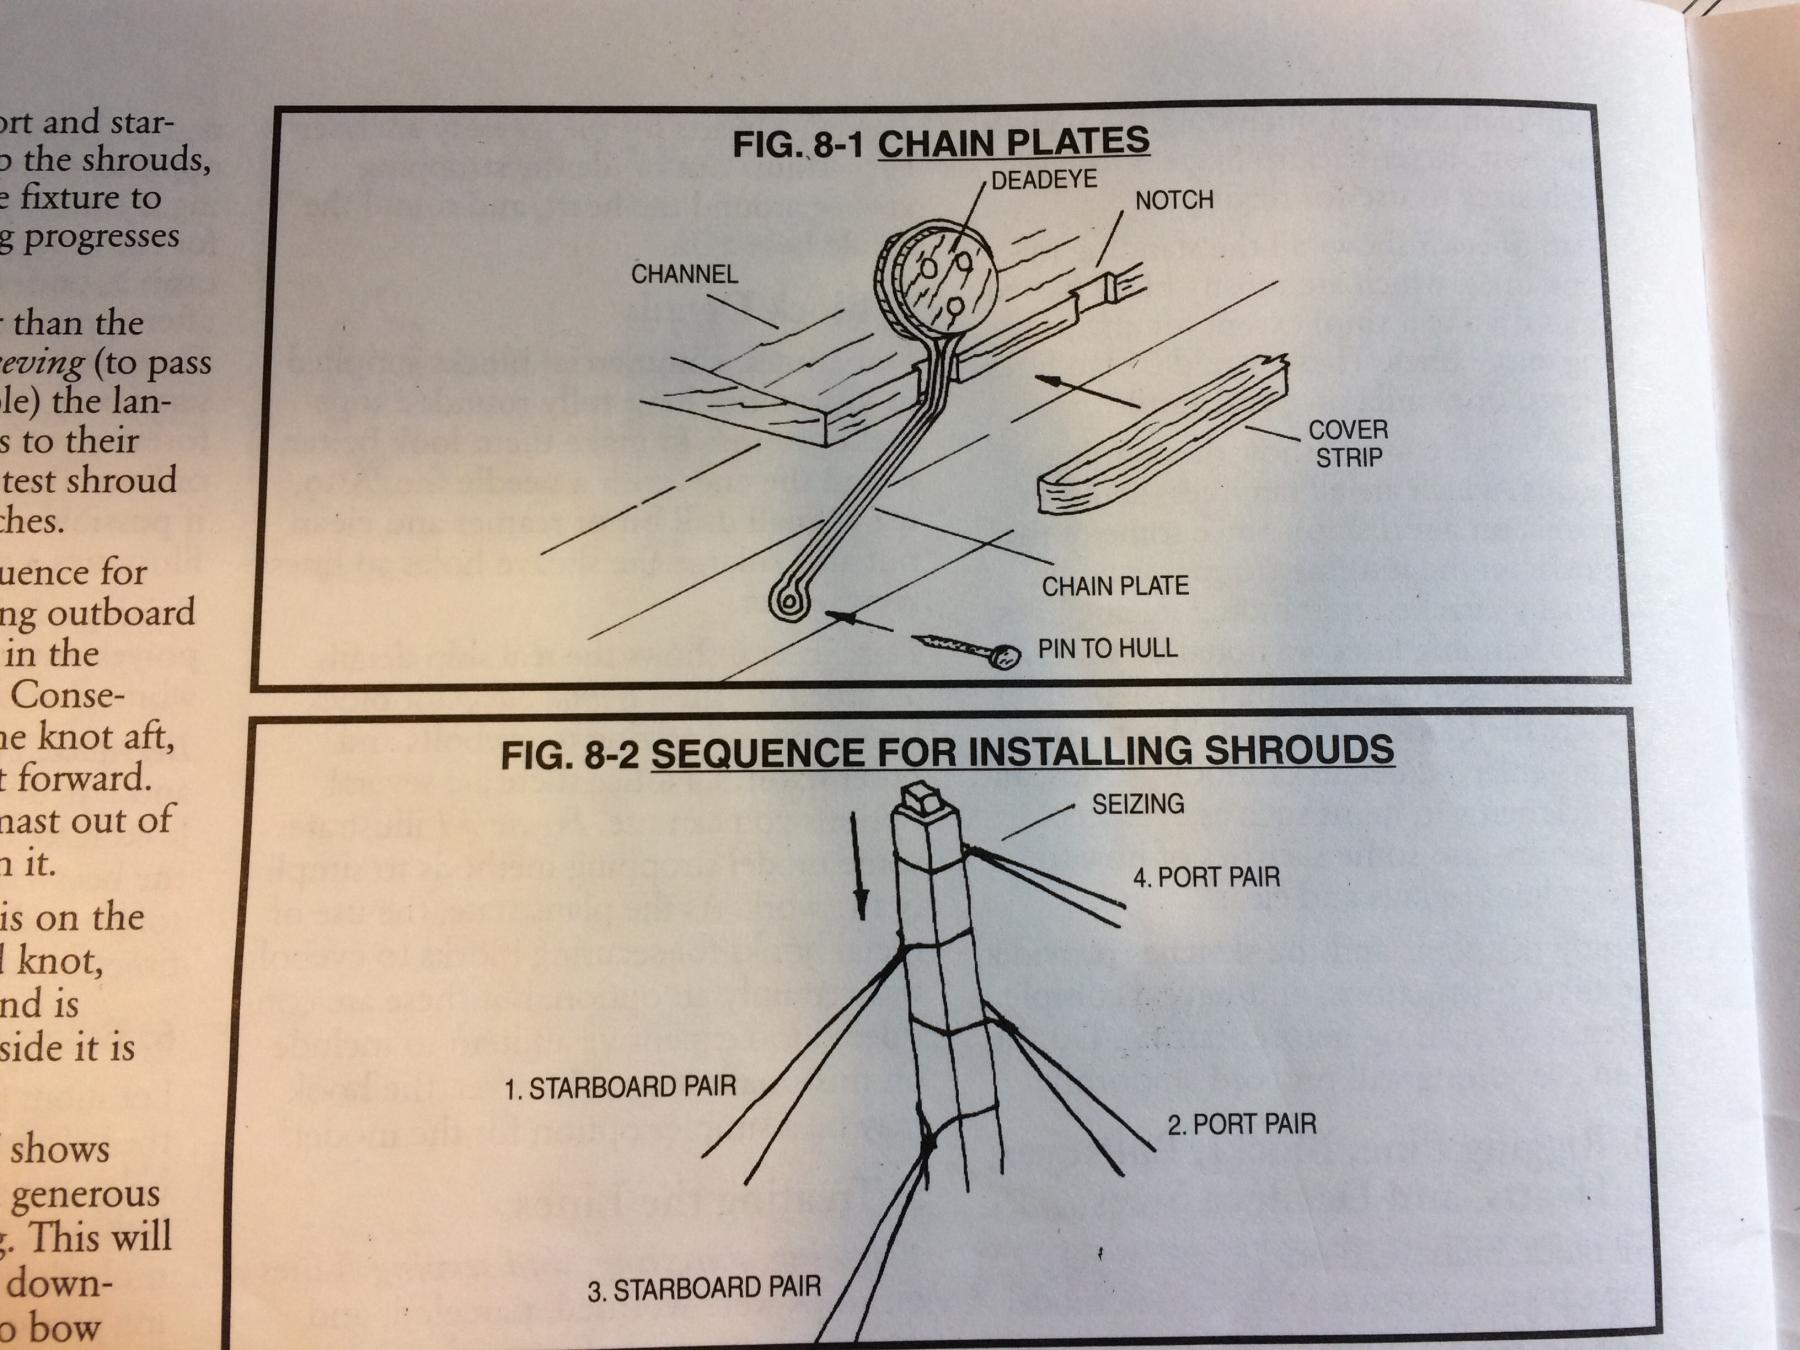
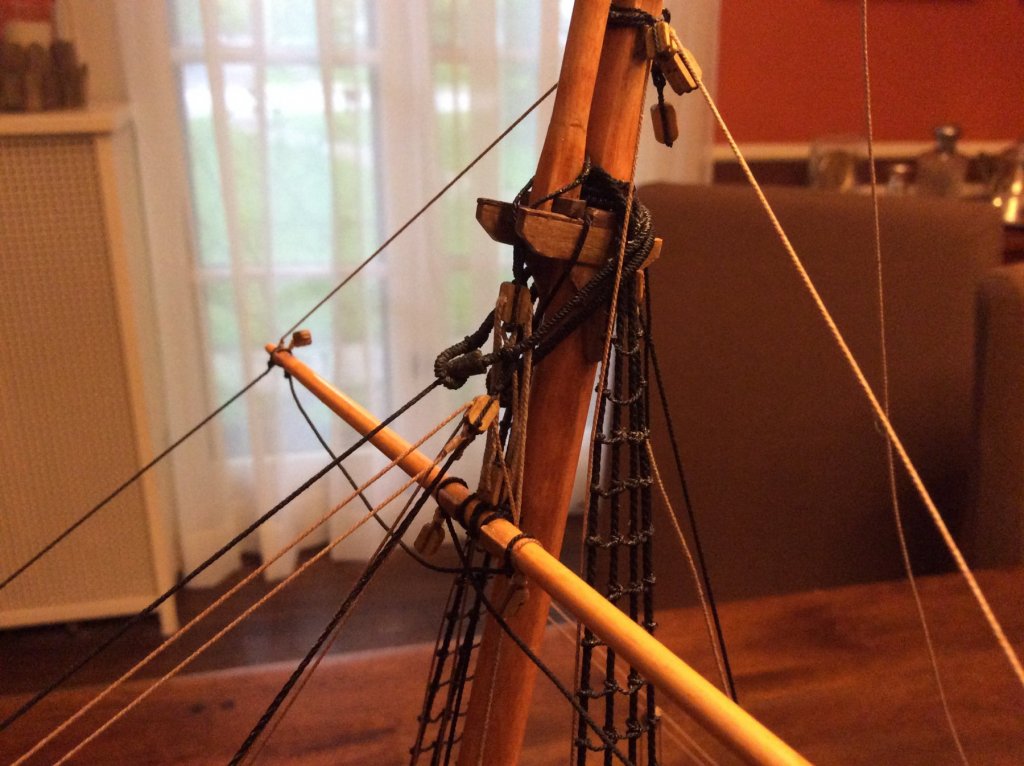
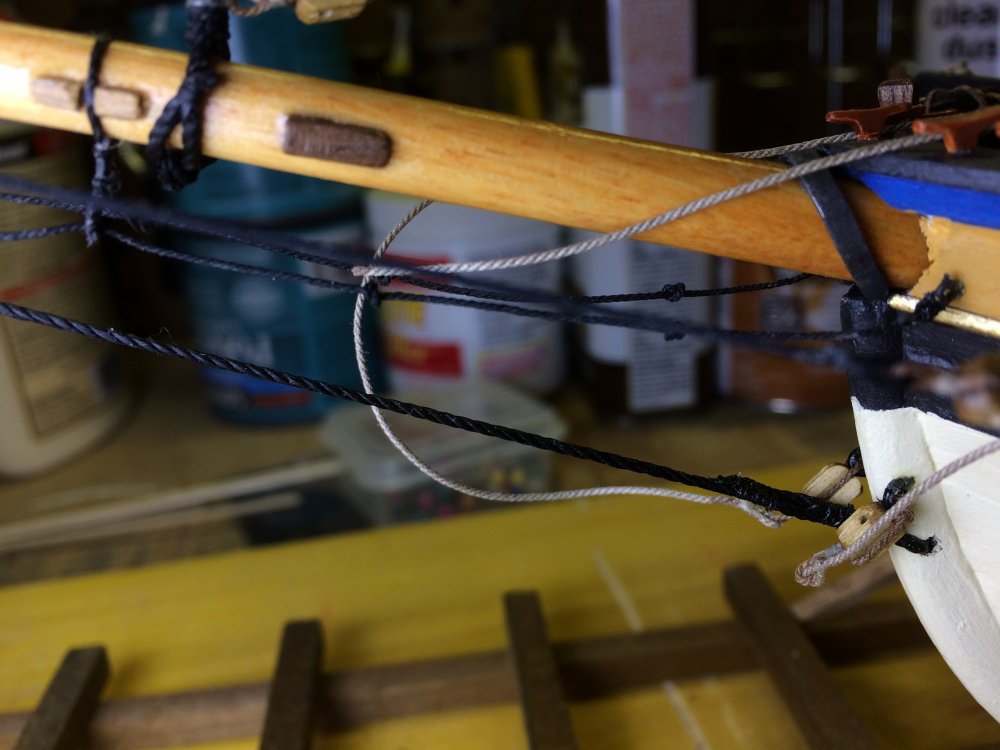
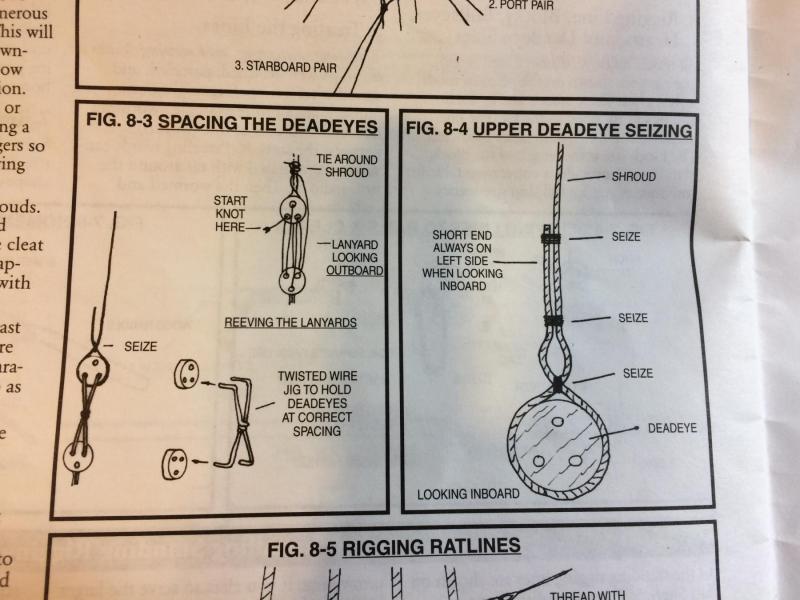
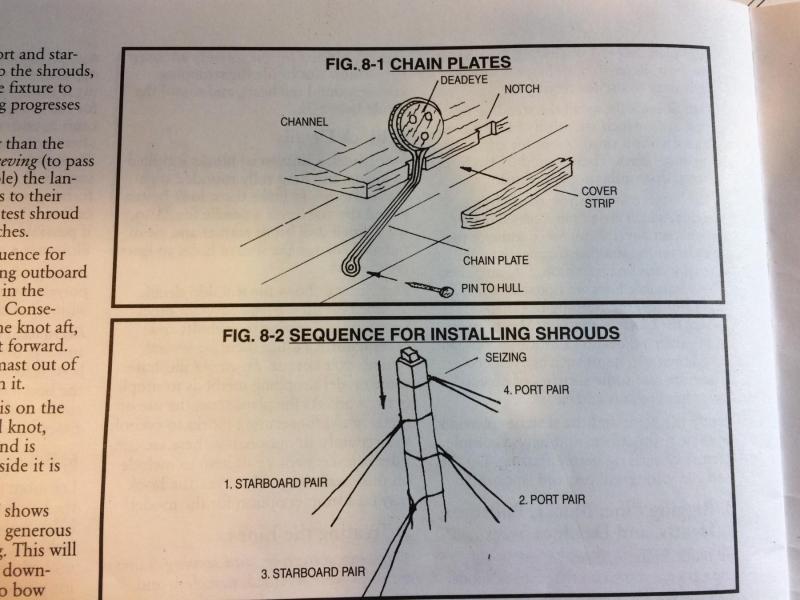
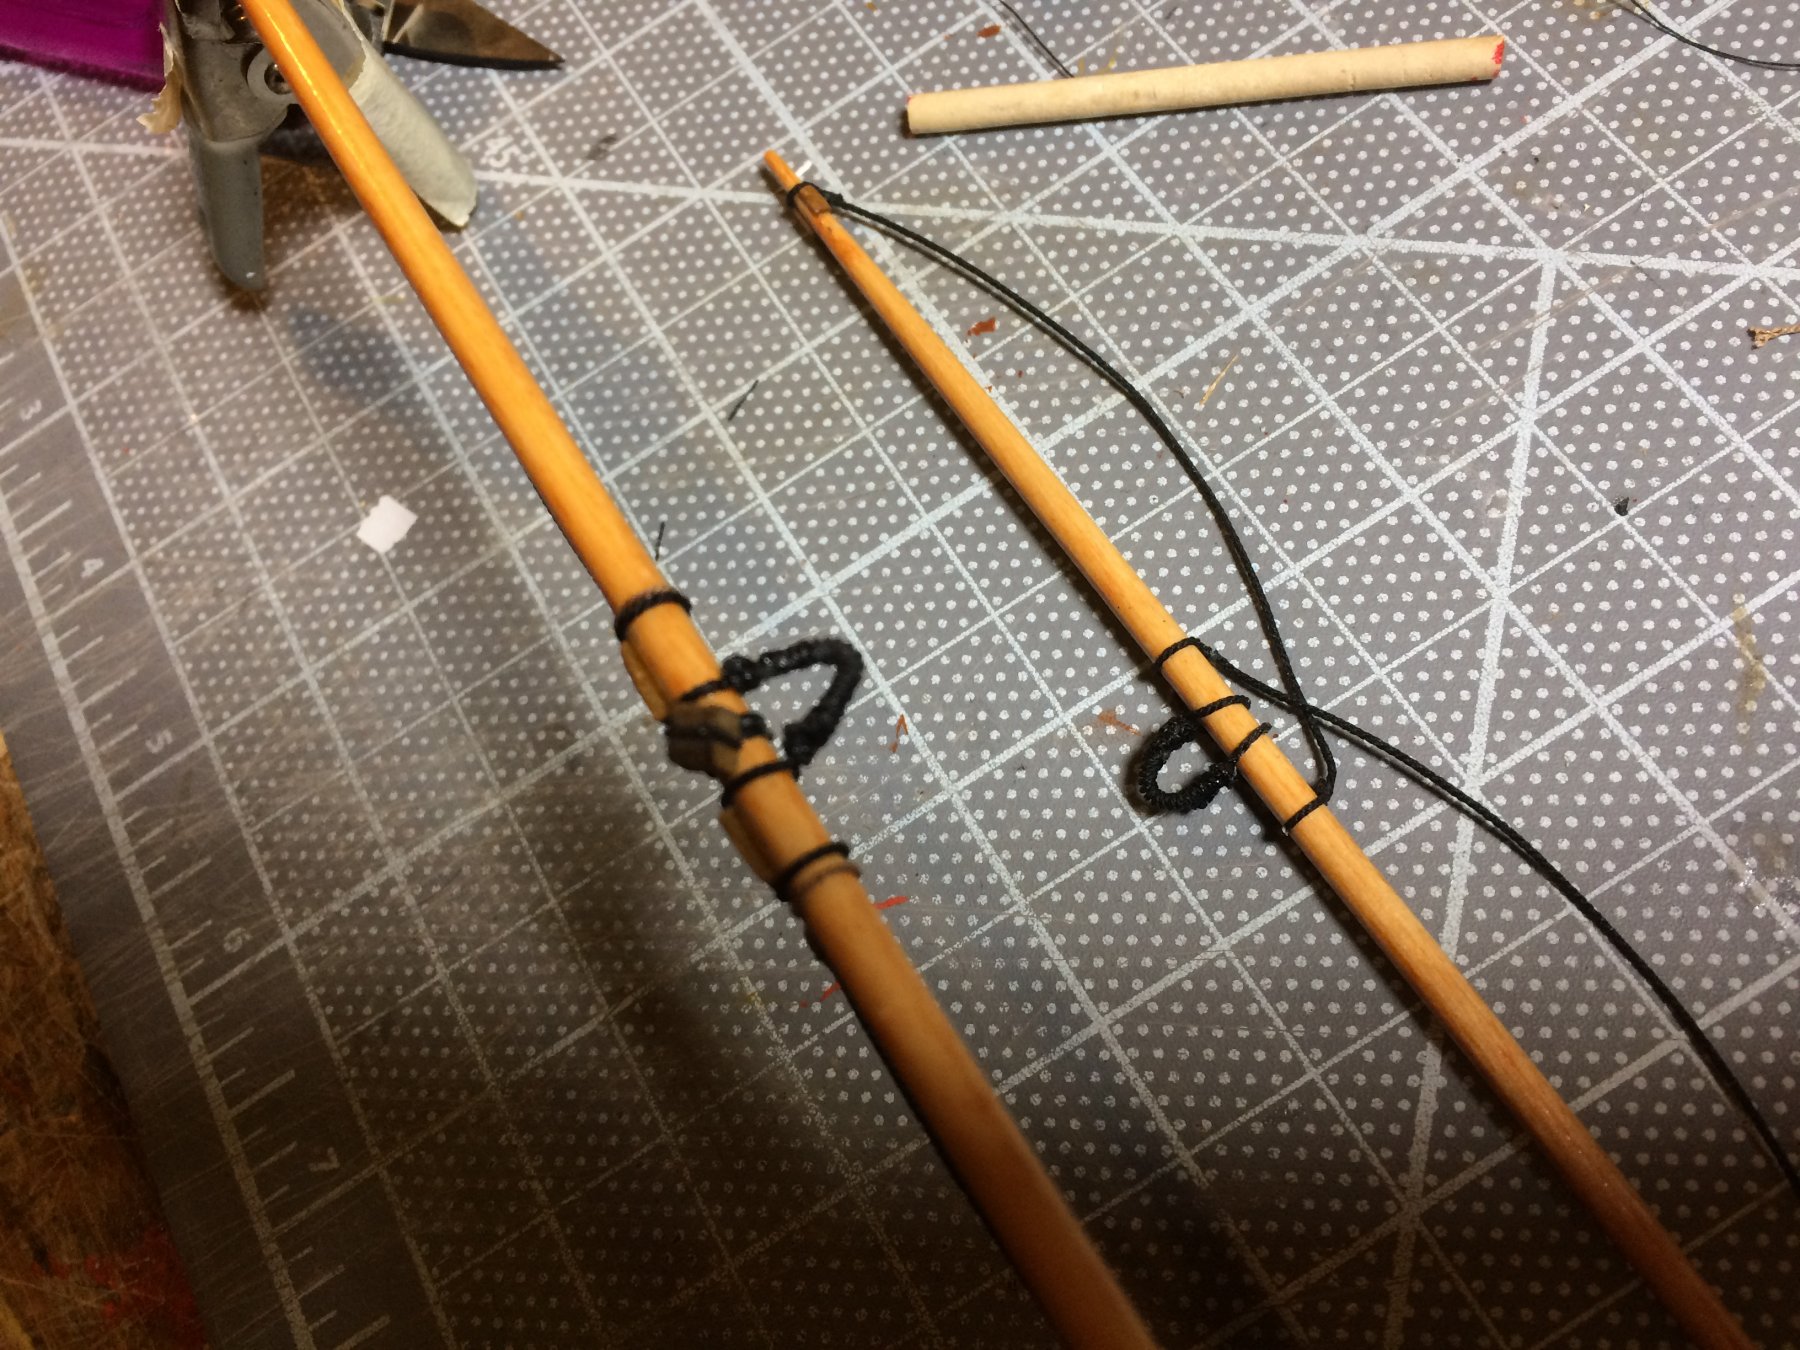
Gunther, It will be touchy work to layer/alternate the shrouds but they will go. I've already had them on and off a couple times without the ratlines. The first time was to build the loops at the top - when I left plenty of tail at the bottom. The second time was after the loops were finished, I put them on the mast - correctly layered - and got the deadeyes set at the right length and held in place with a knotted thread and a tiny bit of CA. The hardest part of this process was making sure the mast was straight up-and-down, which I did with a teeny, tiny plumb bob, smooth jazz and no small amount of Bourbon. Once I was satisfied everything was true and the right length, I removed them and finished the deadeye splicings. Then I put them on again to test the length and was satisfied. Once the ratlines are done, I'll put them back on along with all the other spaghetti that I've been preparing. They are toward the bottom of the pile of line at that part of the mast, so if I need to cheat a bit to widen the loops and create 1/32" of extra tension, I'll be the only person who knows. (Except for all of you, and I'm pretty sure you won't tell.) The technique for getting the shrouds on is straightforward; hold them all at the top section of the main mast and loop them on in proper order, then lower them into place and arrange them. The real pressure is to make sure I put on every system in the correct order. With all that said, this is my first build and it could all go terribly wrong. My goal isn't to get all the rigging set up beforehand; just the items that look like they'll be really difficult. If I've really screwed up, there will be 2 options to fix it: 1: Adjust the height of the mast from the bottom as needed - the only piece I'd have to redo is the ring at the base of the mast. This is probably good for up to 1/8" in either direction. 2: Throw away 15 hours of work on the shrouds and start over with the mast in place. I'm prepared to do either but fingers are crossed that I won't have to. Meanwhile, here are the parrels. I'm really glad I didn't have to affix these with the mast already secured.
- 164 replies
-
- 4
-
-
- model shipways
- armed virginia sloop
- (and 2 more)
-
Here's how I keep my line. Rather than letting it get tangled in the little plastic bag, I wrap it around the neck of prescription bottles. I keep the empty package inside the bottle even though I write the dimensions on the label. Because I'm a bit anal retentive. But if you're on this forum, you have at least a little bit of that in you too. Here's the starboard shrounds/ratlines completed. Here's the port side in progress. One of the shrouds - at the bottom of this picture - is just a little bit long. About 1/32" - close enough to fake it and too close to fix it. If you look closely at the top of the shrounds, you'll see a brad stuck in between them at the top of the wood work surface. That's to tension the loose shroud. I plan to lose that odd space in the mass of lines where the top mast attaches. Getting each ratline even without distorting the shrouds is a slog. Much harder than with the first set. It'll be some kind of wonder if I don't have to discard this one half-way through and start over.
.thumb.jpg.b2050290e148e6e24a99e0846f1b0db2.jpg)
- 164 replies
-
- 4
-
-
- model shipways
- armed virginia sloop
- (and 2 more)
-
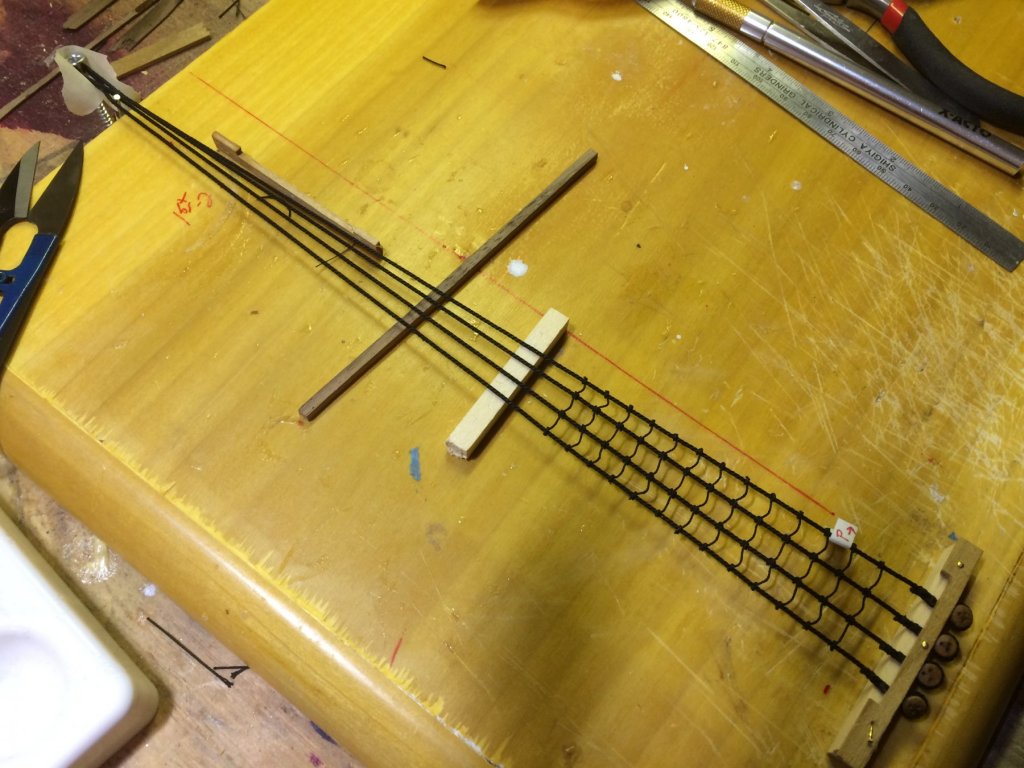
Rigging continues. I'm on my second set of shrouds because I didn't read the documentation carefully enough and learned the hard way that the deadeyes need to get spliced on before the ratlines or else you'll ruin the ratlines in trying. I came to the realization over time, so it wasn't too rough of a lesson. I had finished one set and was about a quarter of the way through the second. So no more than about 200 tiny clove hitches. It also gave me the excuse to redo the shrouds using nice Syren linen line instead of the polyester that came with the kit. Because I ran out of the polyester. I'm much happier with this second set. Once the shrouds are done, I'll double-check the drawings to make sure I have as much done as possible before affixing the shrouds and mast. It seems every time I look, another small assembly jumps out at me that I wouldn't want to install once the mast is firmly in place. But I feel like I'm getting closer to the point when I can start connecting all the rigging systems I've been building to the mast and boat. At that point, progress will seem to go very quickly - for at least awhile. Below: The 2nd try at ratlines - about 2/3 complete. Below: This was the first attempt at shrouds and ratlines, since discarded. I'm more satisfied the 2nd time around. Closeups of the 2nd try: Below: The served forestay, followed by the completed forestay with mouse - which I carved from a small dowel and painted black. I looked at various techniques to weave the mouse more authentically, but, well, no. Not this time around at 1:48 scale. The mast rigging shot below is my first run-through, with old shrouds pre-ratlines/deadeyes. I've since removed the topmast, which is making the second attempt at the shrouds and other rigging much easier. Below: Port-side shrouds, before jigging to tie on ratlines.
.jpg.92bfbdc95a9786dd88f1adf1f87a1557.jpg)

- 164 replies
-
- 7
-
-
- model shipways
- armed virginia sloop
- (and 2 more)
-
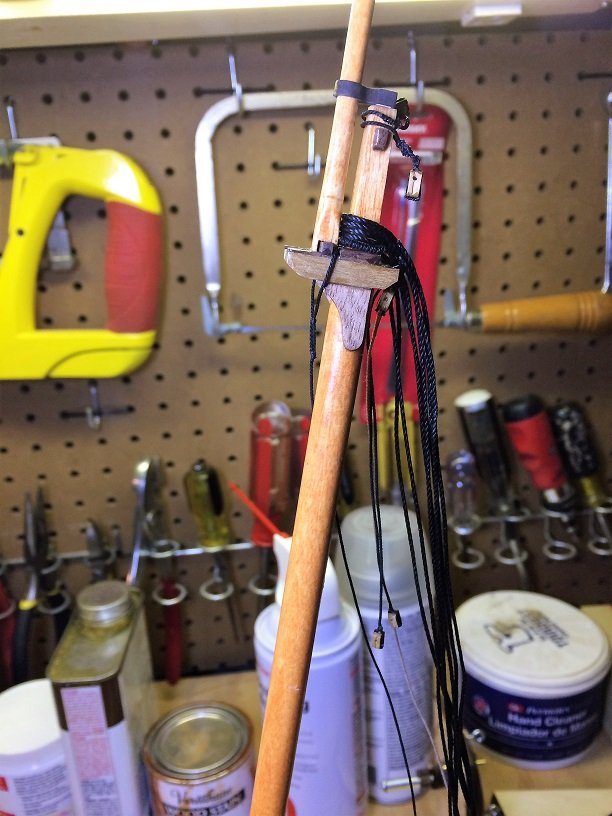
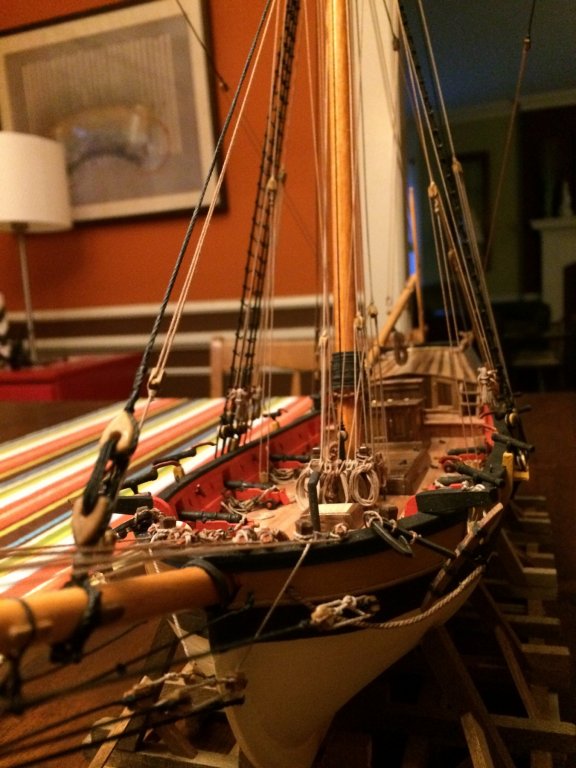
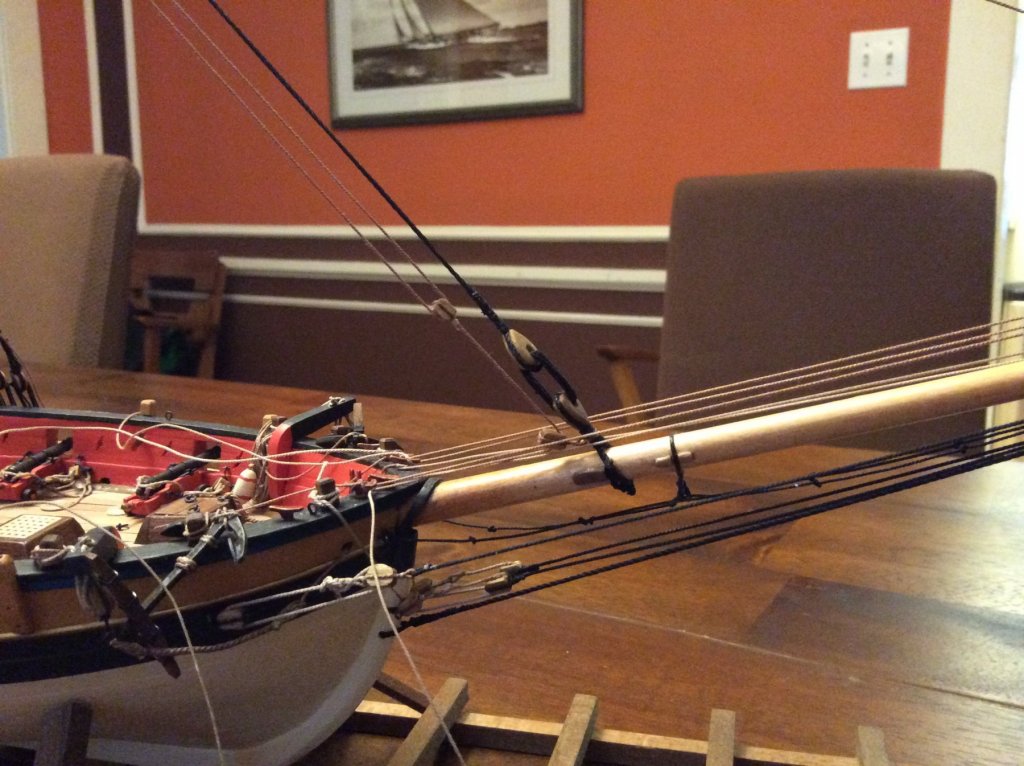
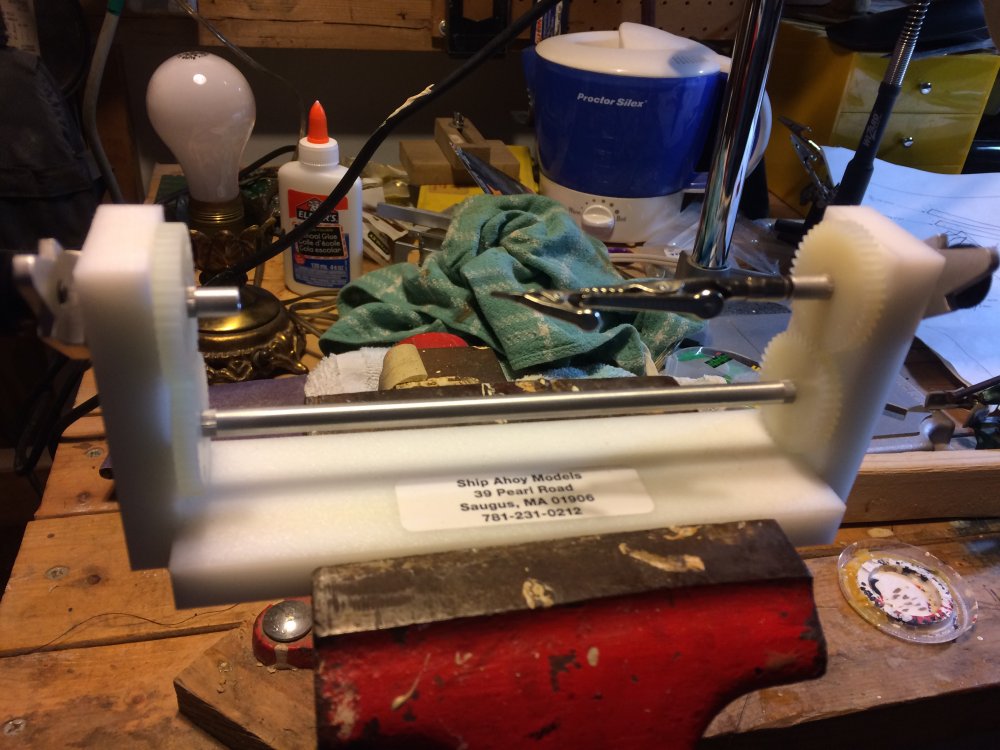
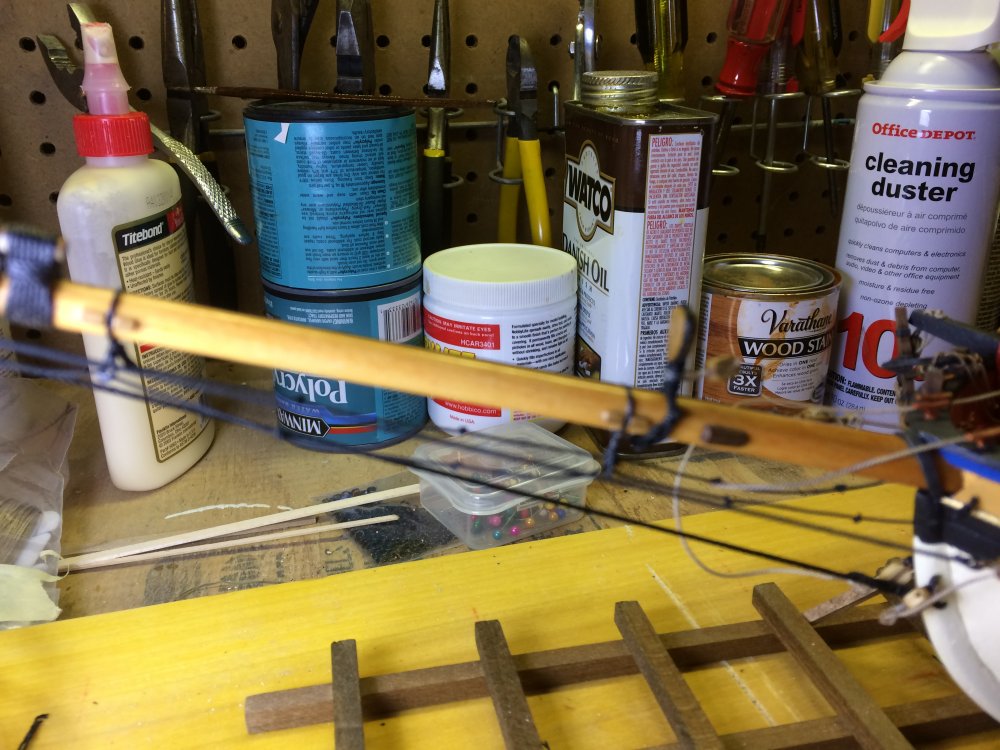
Bit by bit her rigging is coming along. I've got the bowsprit rigged and affixed. Here's a shot of it with a short focal range and a perfectly focused background. Here's a closeup at the bow - and in focus. I'm just noticing the rough edge where the bowsprit emerges for the first time. I'll have to clean that up. I'm rigging the mast now and am most of the way there. It looks like a real mast being prepped - lots of spaghetti, all of it making perfect sense to me and to nobody else. I've love to show you a photo, but it was either out of focus or it wouldn't load. A serving tool from Ship Ahoy Models arrived and I managed to get the forestay spliced, served and moused on the first try in less than 2 hours. I've got a nice picture of it; it woulndn't upload. But here's the serving tool. It's well-built and operates smoothly. Part of me felt like I should make my until this arrived; I couldn't have come anywhere close to this and would have spent far more time and just as much money trying to work it out. That's all I've got. I'm disappointed; I wanted to show more stuff but ... out of focus or wouldn't load. I'll try again in a couple days.

- 164 replies
-
- 5
-
-
- model shipways
- armed virginia sloop
- (and 2 more)
-
Thanks. I if couse investigated on the Internet after committing to the change. It took about 4 minutes. I had it right the first time.
- 164 replies
-
- 2
-
-
- model shipways
- armed virginia sloop
- (and 2 more)
-
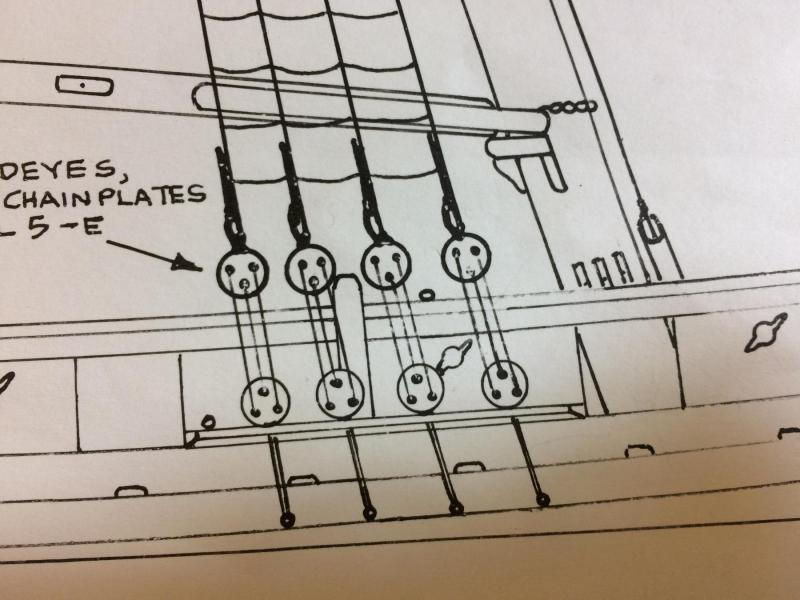
Feeling annoyed. Do the double holes of a deadeye go up or down? Based on the instructions, I put them all upward on the chainplates. I did this months ago. Now I'm rigging and notice they face down. So I just tore apart the port-side chainplates and reversed them. Two hours later, after the reconstructive surgery, I noticed this. Make up your mind. So now what do I do? Change the other side? Leave it half-and-half - knowing that it will show when I have the shrouds rigged? First I'm going to walk the dog.


-
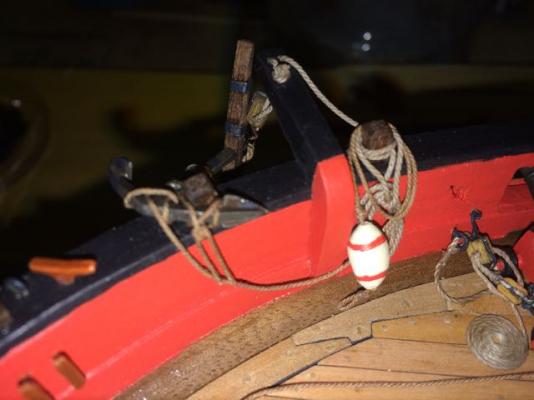
Broken hearted. Literally. In rigging the strop to hold the forestay, the forceps I use as a clamp cracked the heart. Gluing it back together isn't a possibility; it's not a clean break and there are tiny shards of walnut missing that make a repair harder than carving a new one. Which I've decided not to so. My CA glue is going bad and I'd like a rubber-gripped clamp for holding these small parts, as I've broken several blocks the same way. So I'm taking the easy path on this one and ordering a package of 10 hearts. But here's a thought for Model Shipyard: There is a lot of room on that large sheet of laser-cut walnut parts. Would it be so hard to program a couple extra hearts into the laser? I sure would have been nice to have an extra.
-
Zolten, you remembered. I've ordered Syren line and it is much more enjoyable to work with. It looks better too. That's Syren on the yardarm. I may still use some of the crappy stuff that came with the kit; finances are such that I don't need to be ordering all sorts of extras. But anywhere a line needs to drape, or where it's likely to be hard to work with, I'll use the good stuff.
- 164 replies
-
- 2
-
-
- model shipways
- armed virginia sloop
- (and 2 more)
-
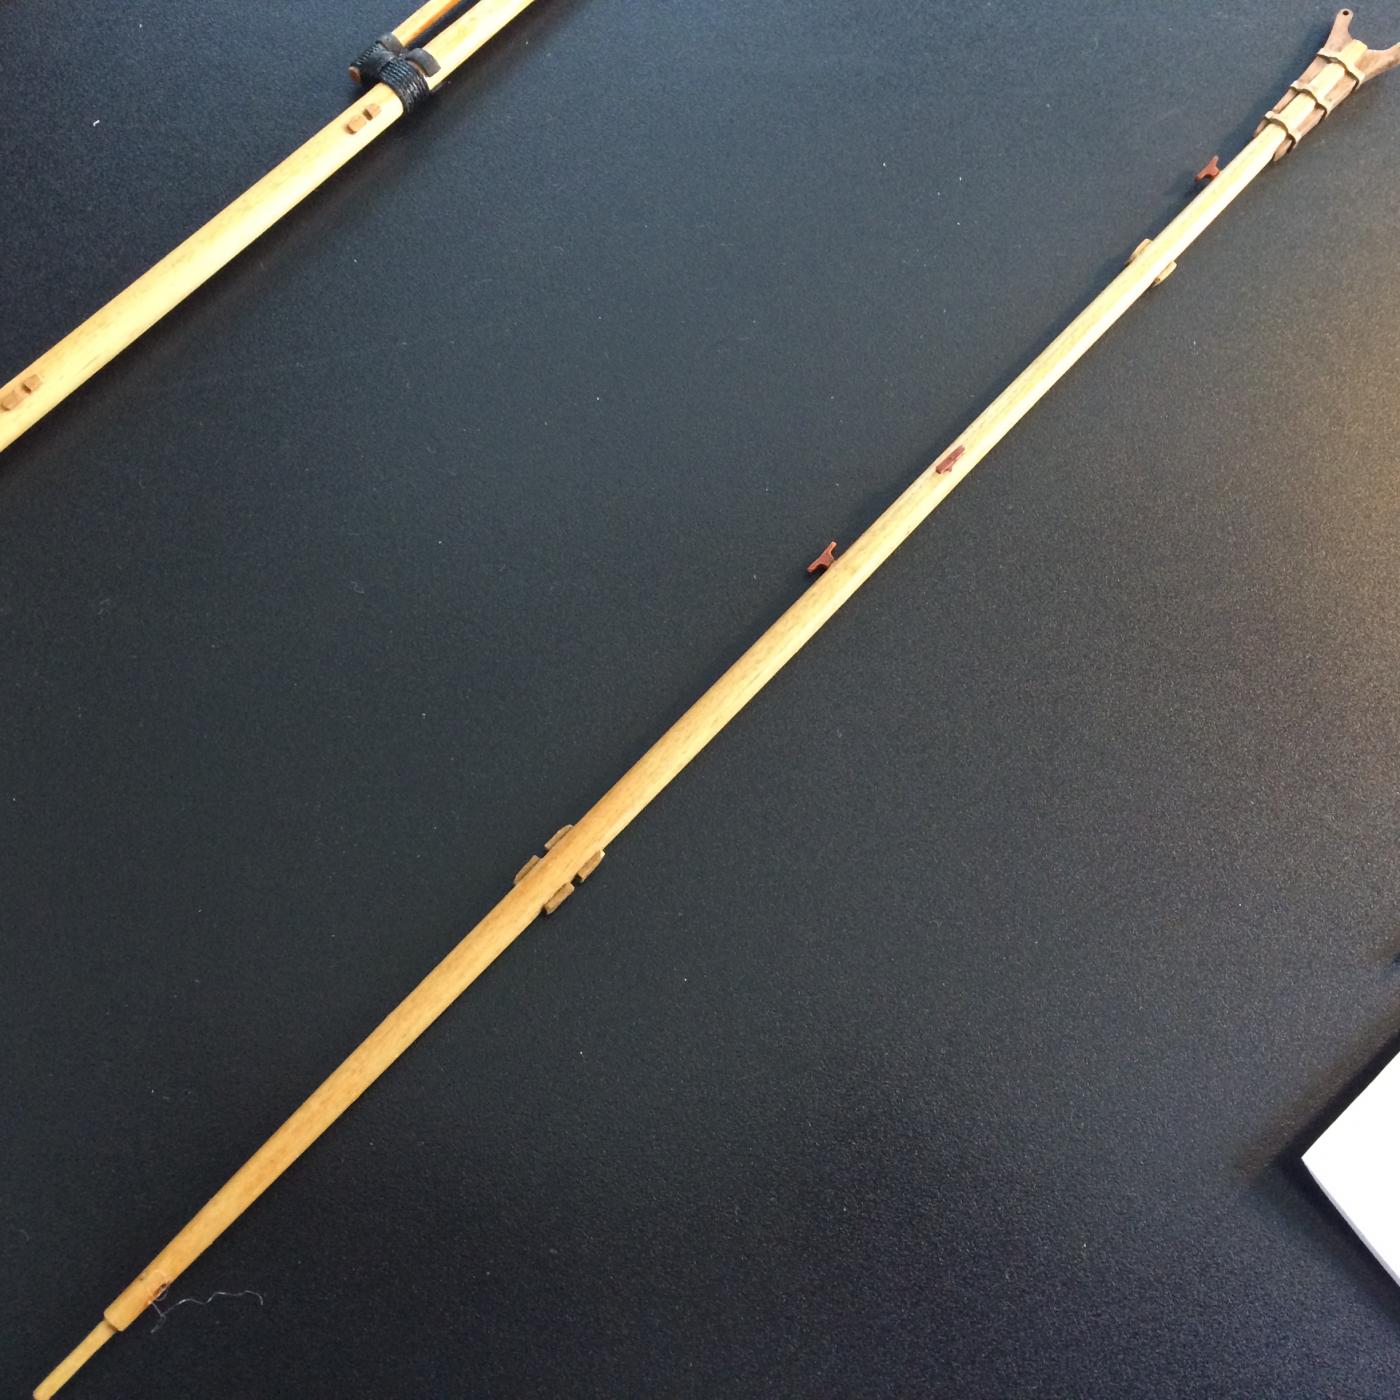
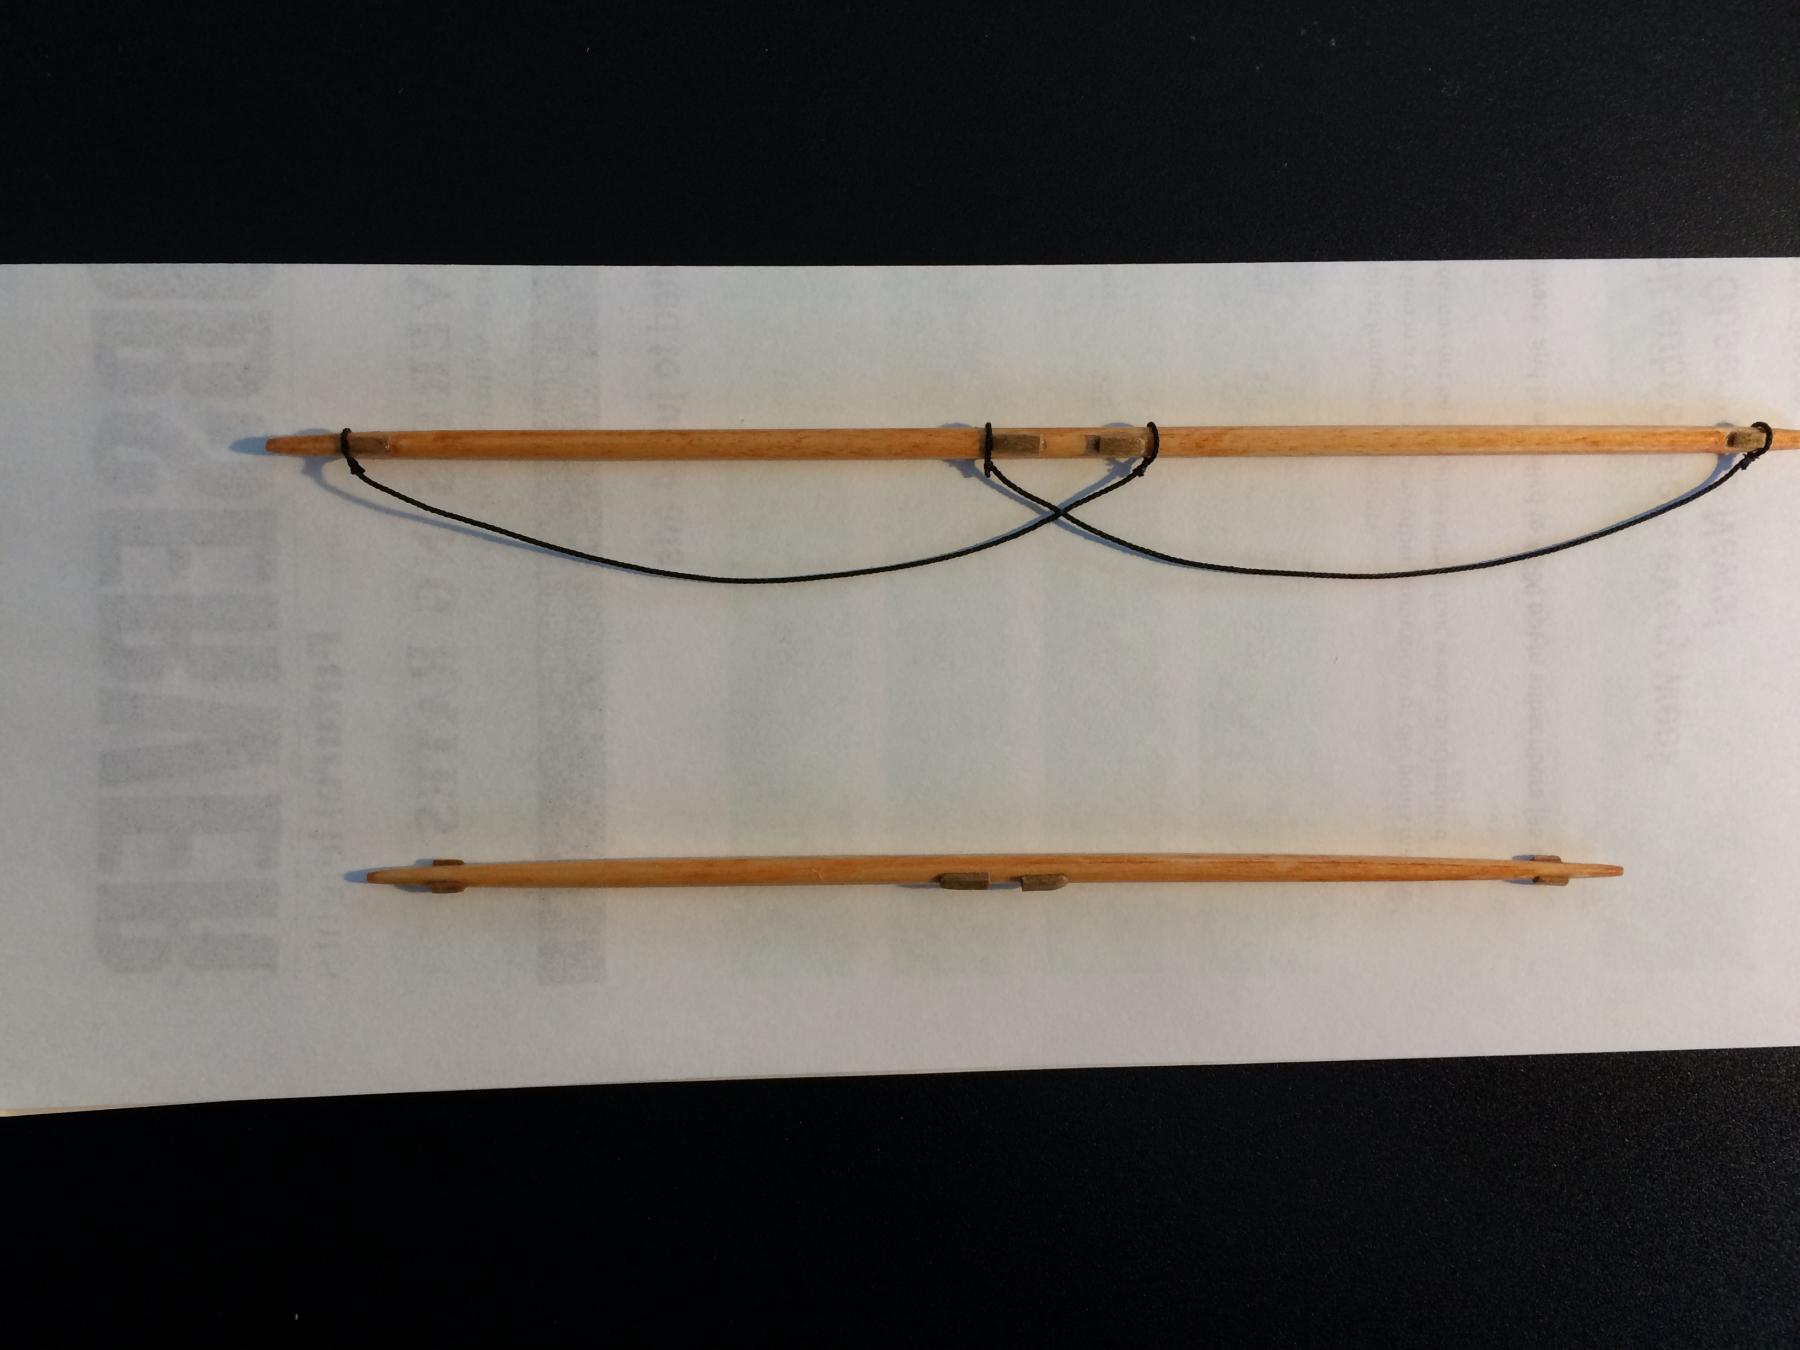
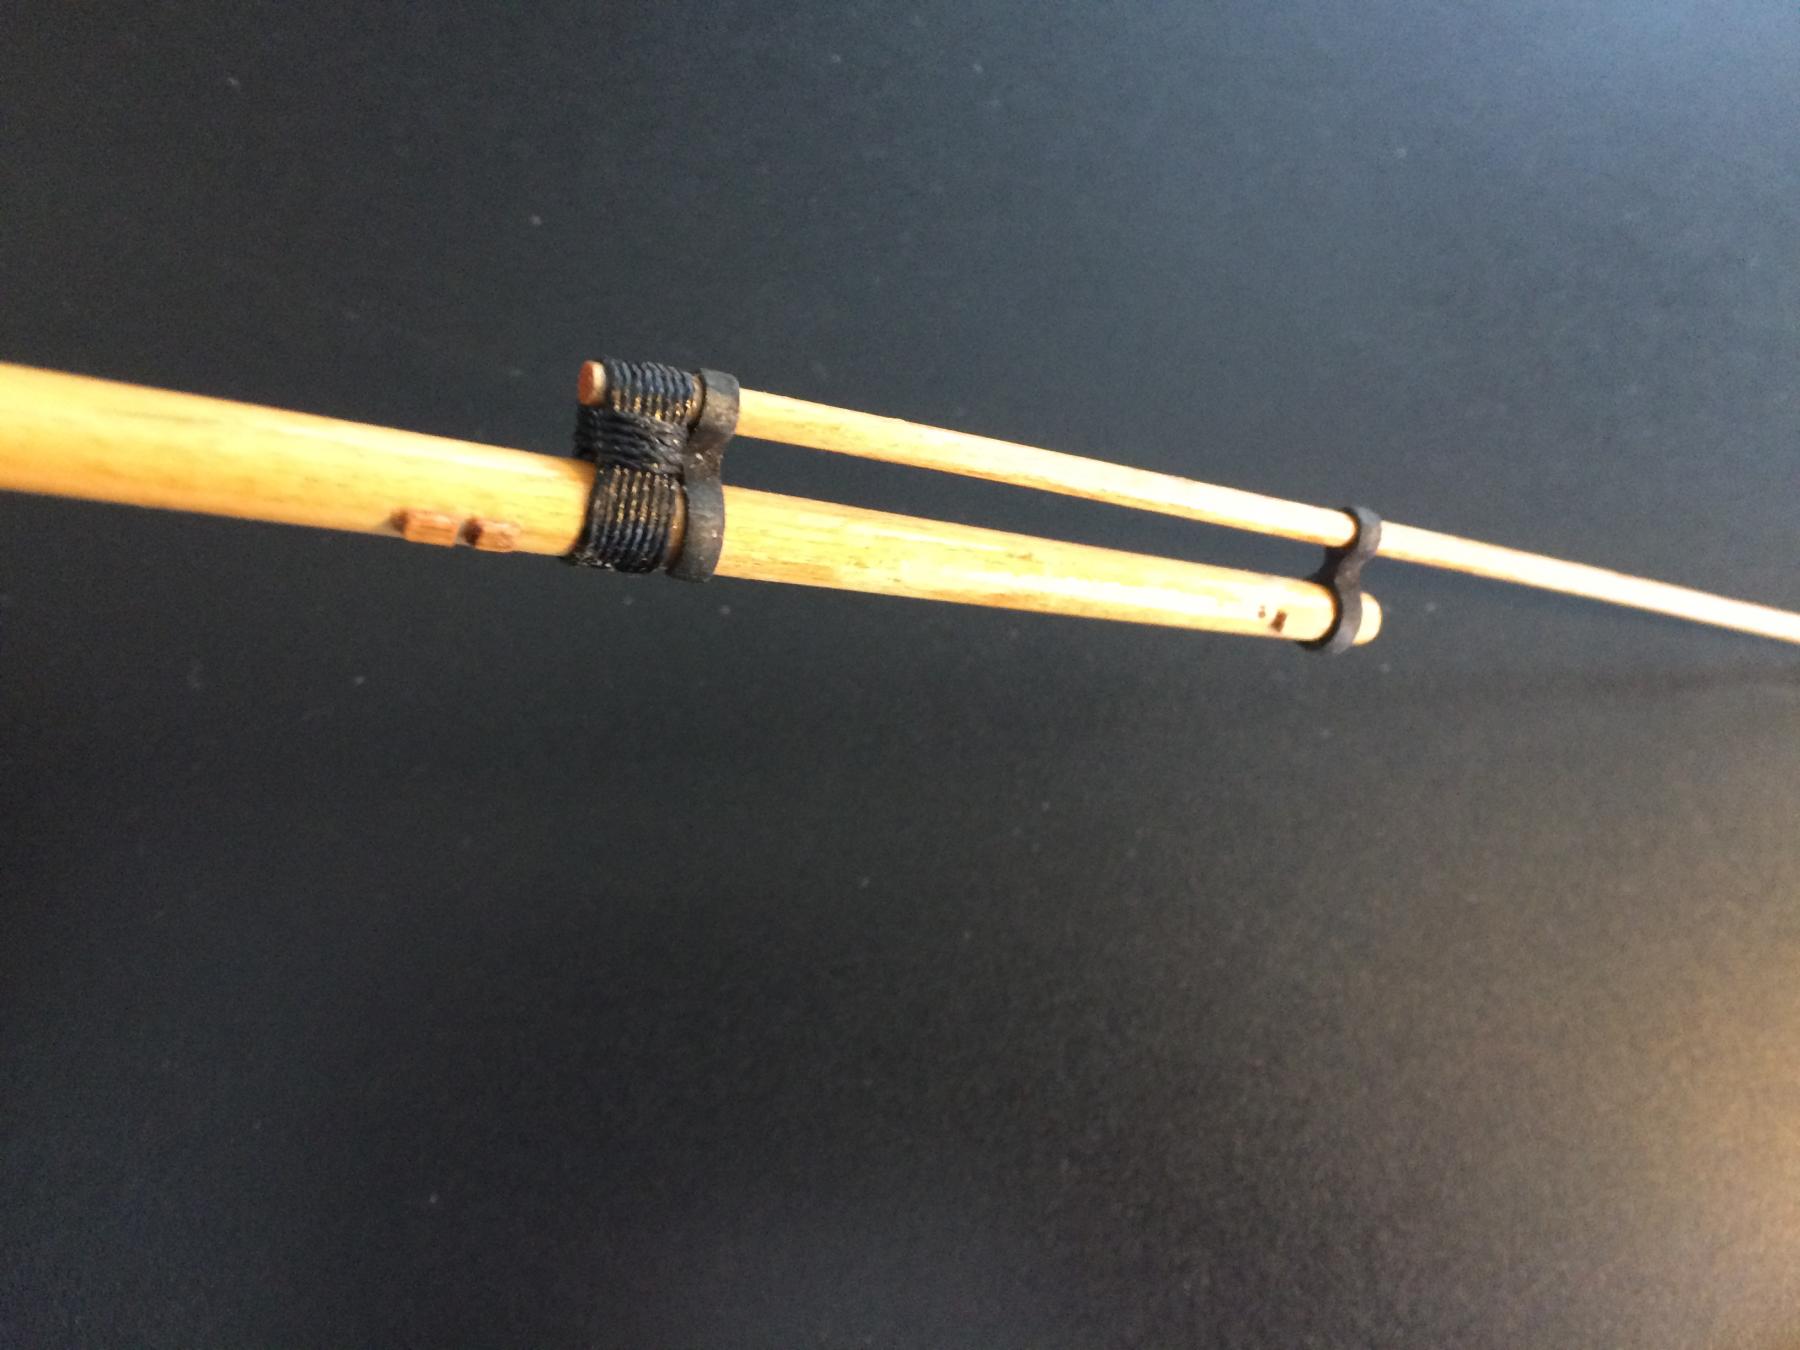
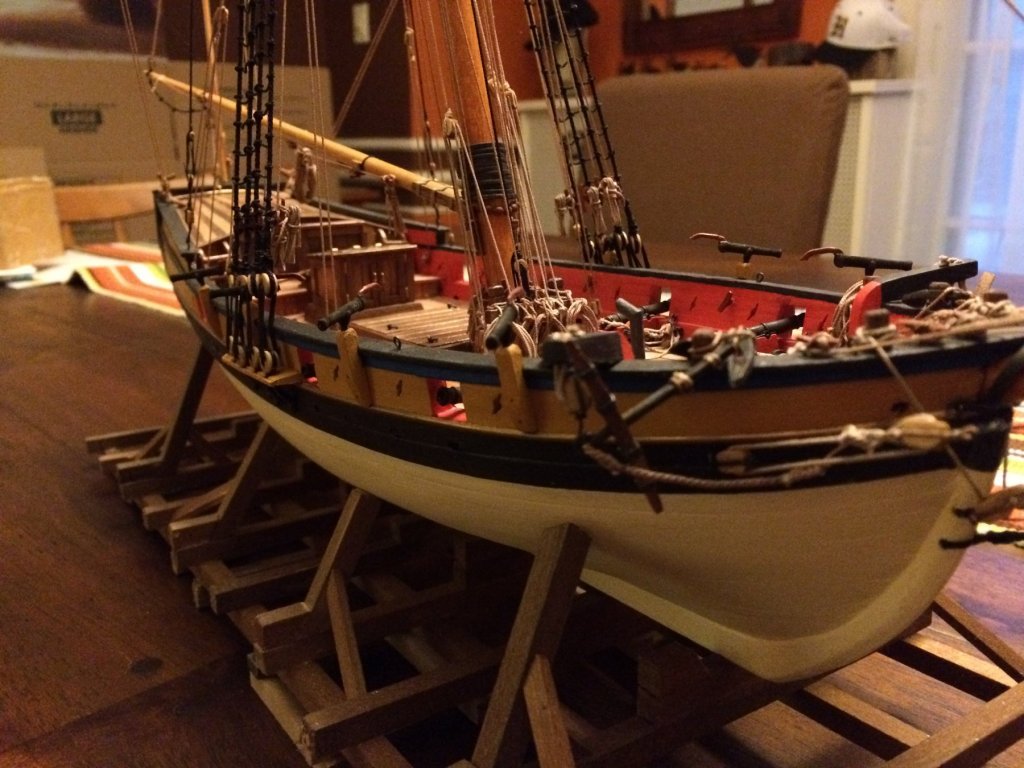
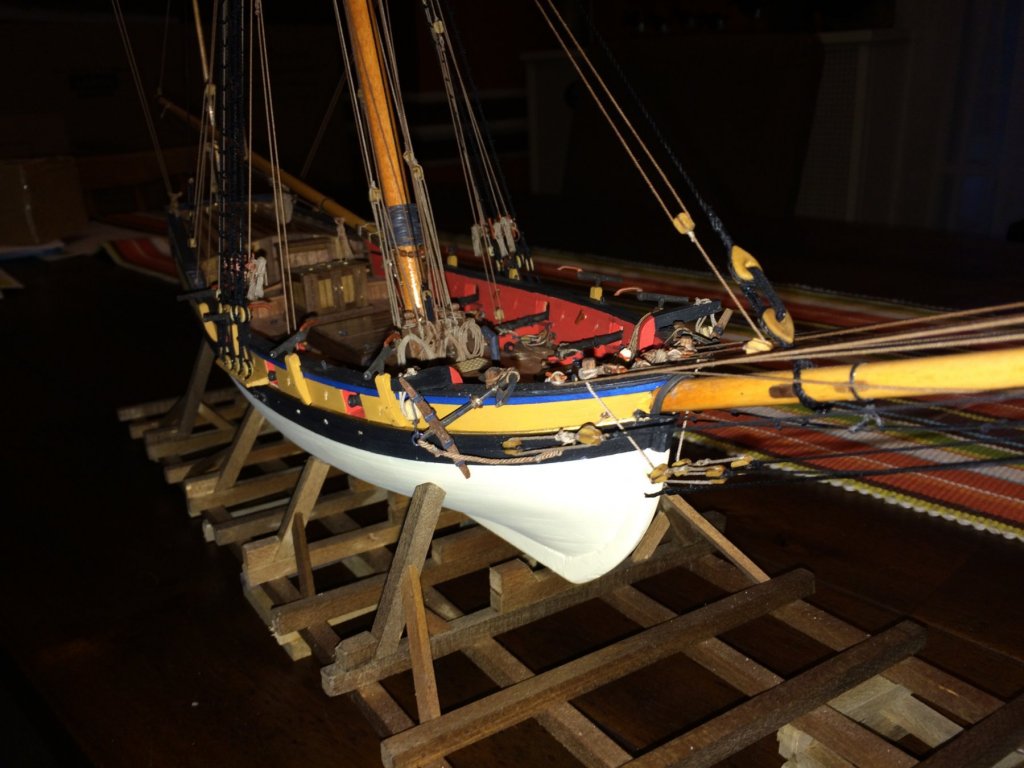
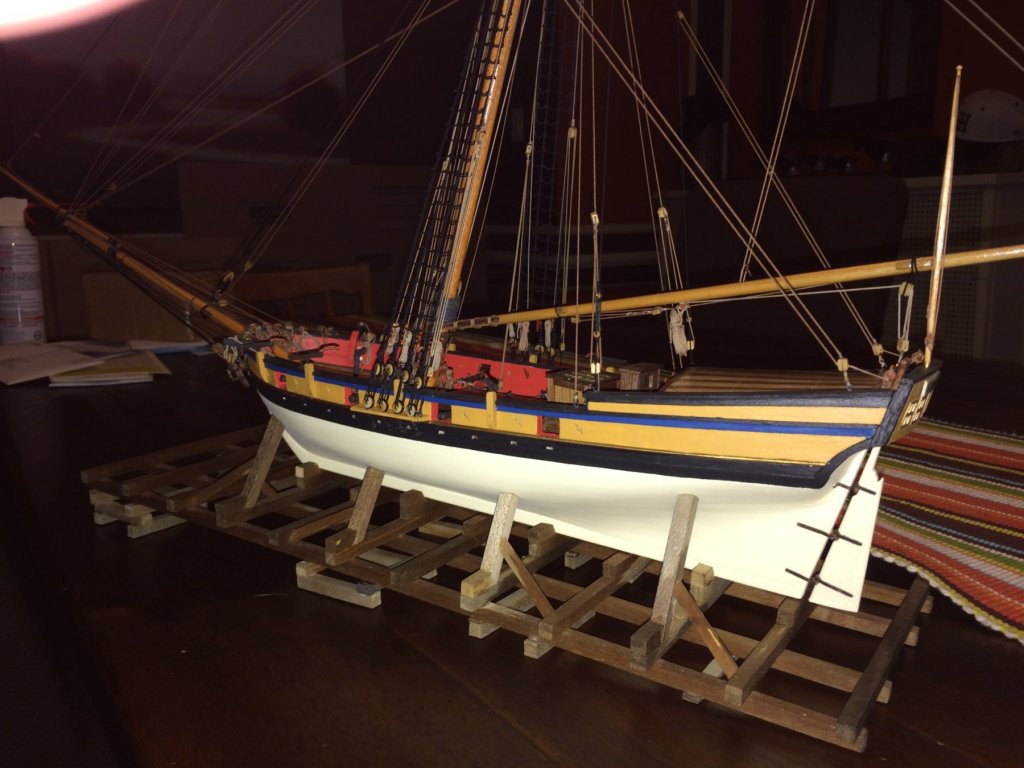
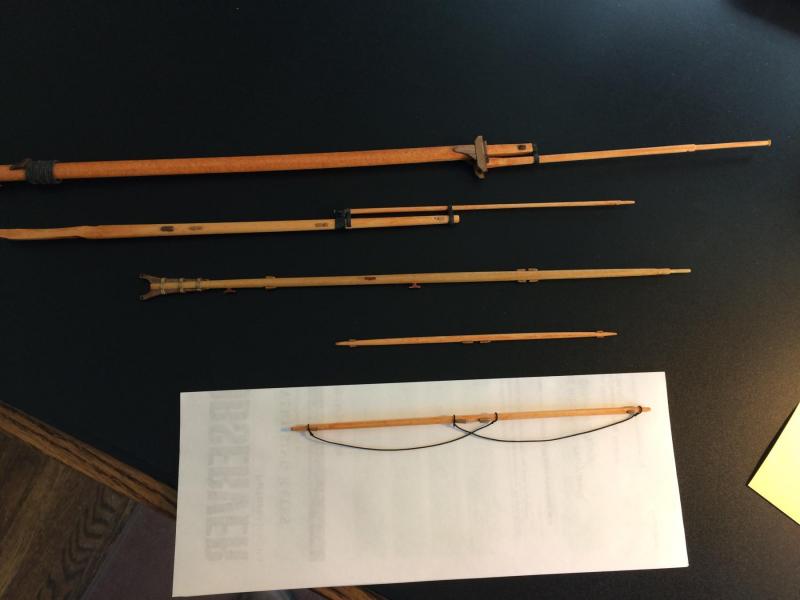
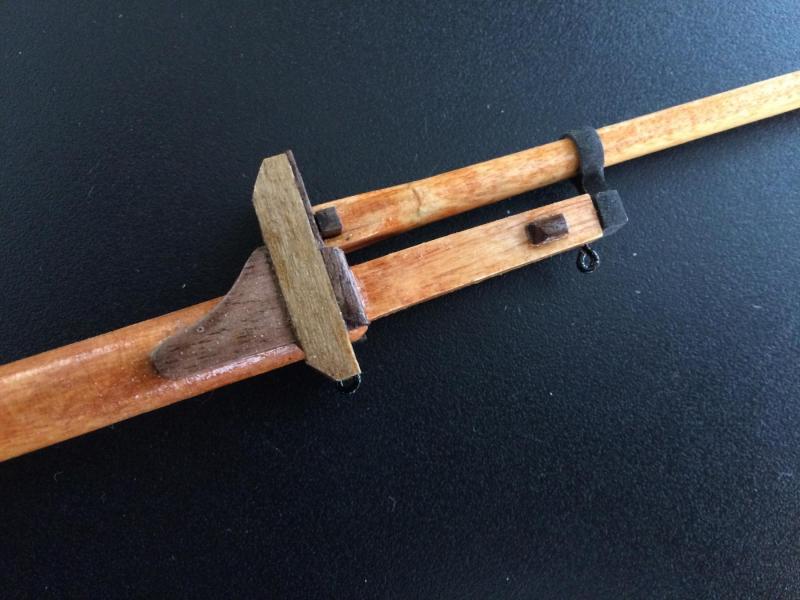
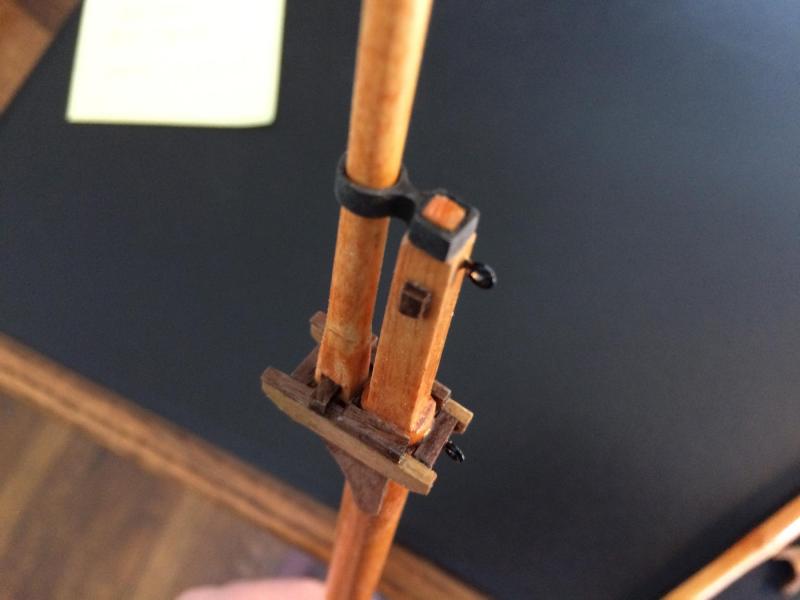
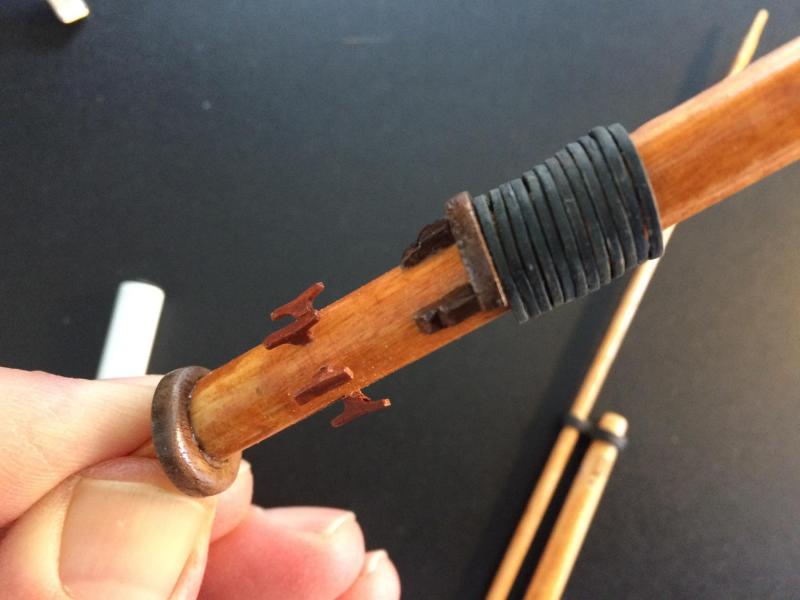
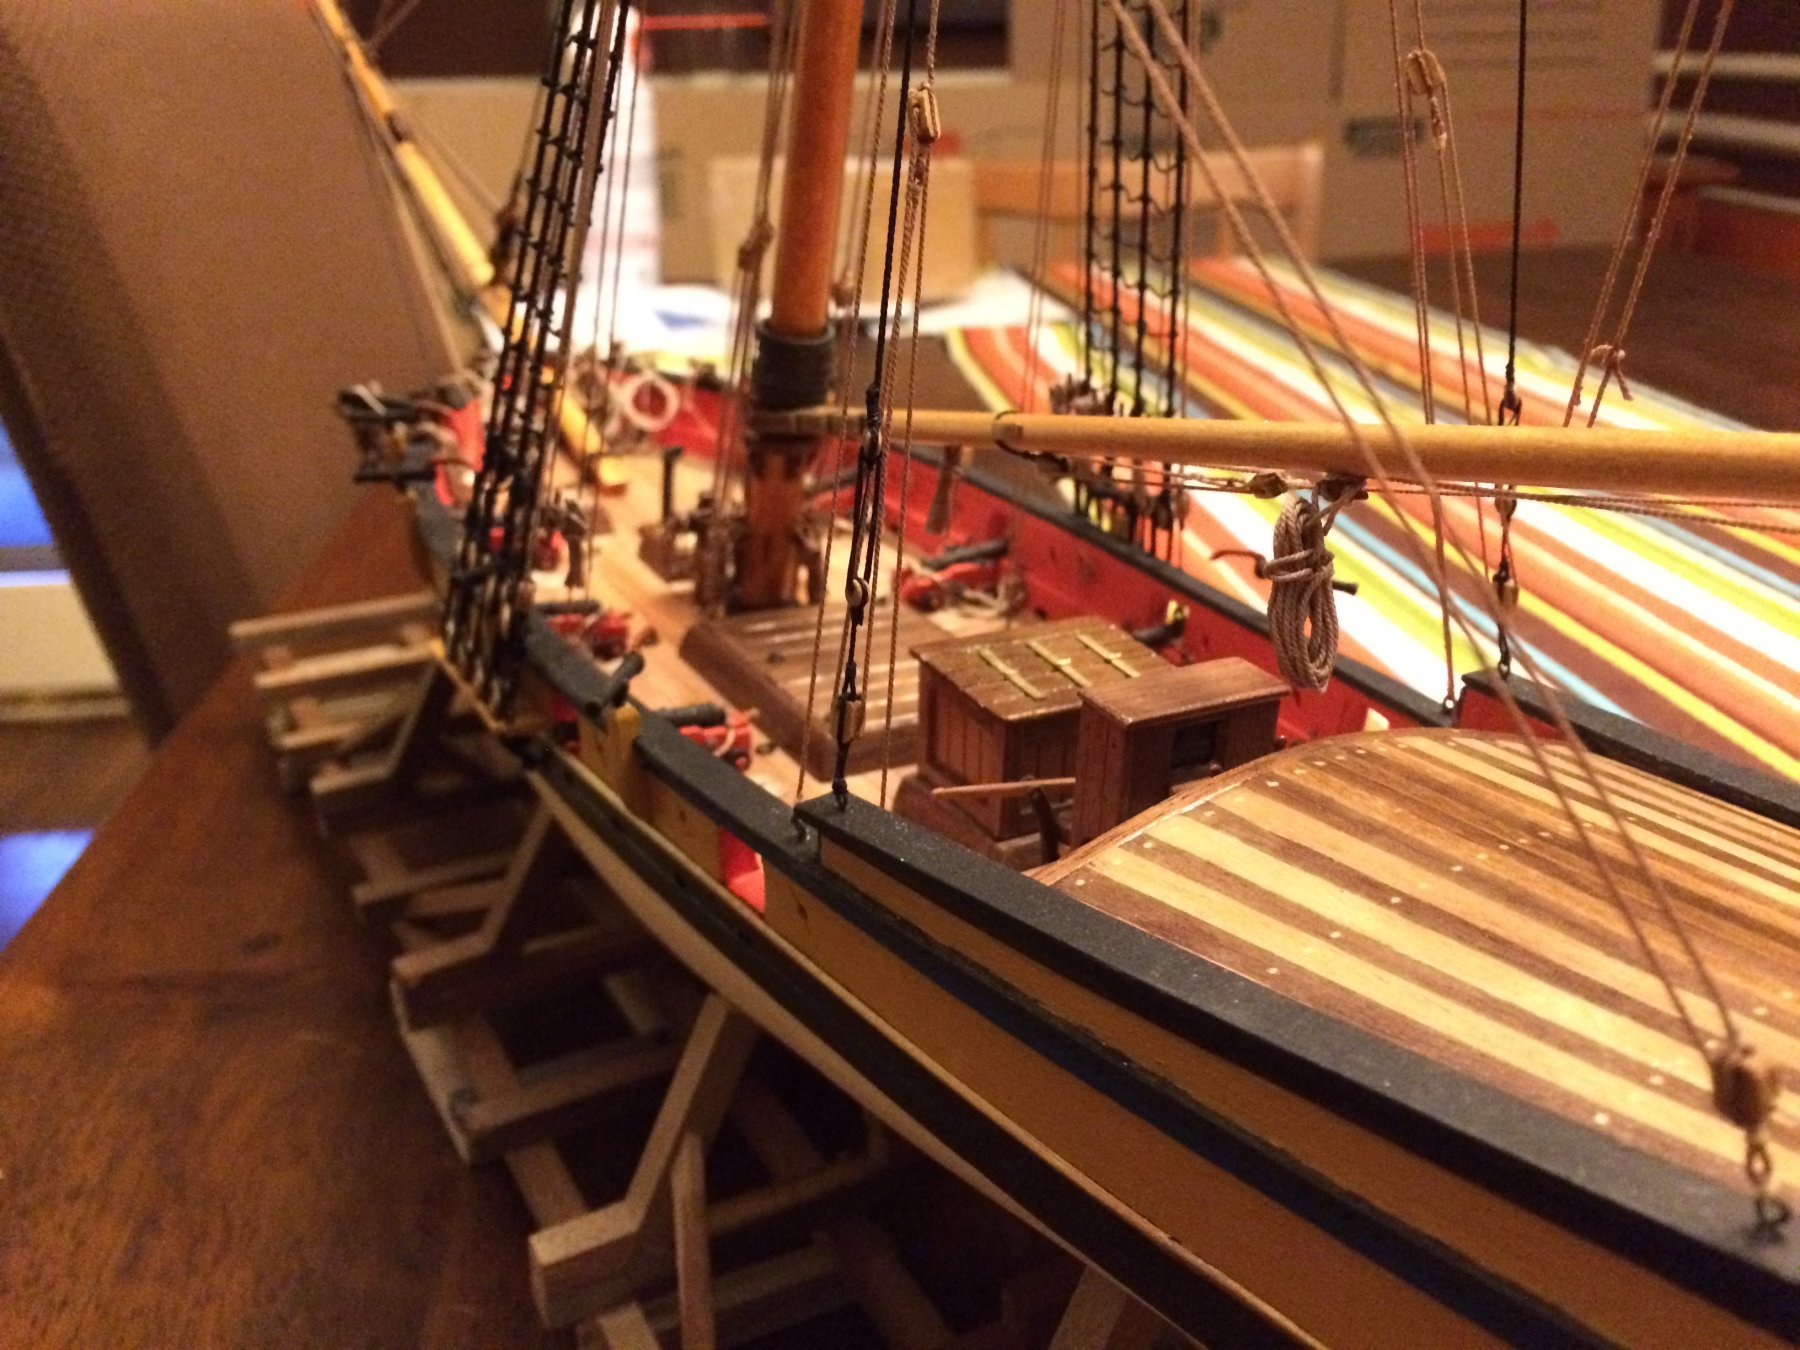
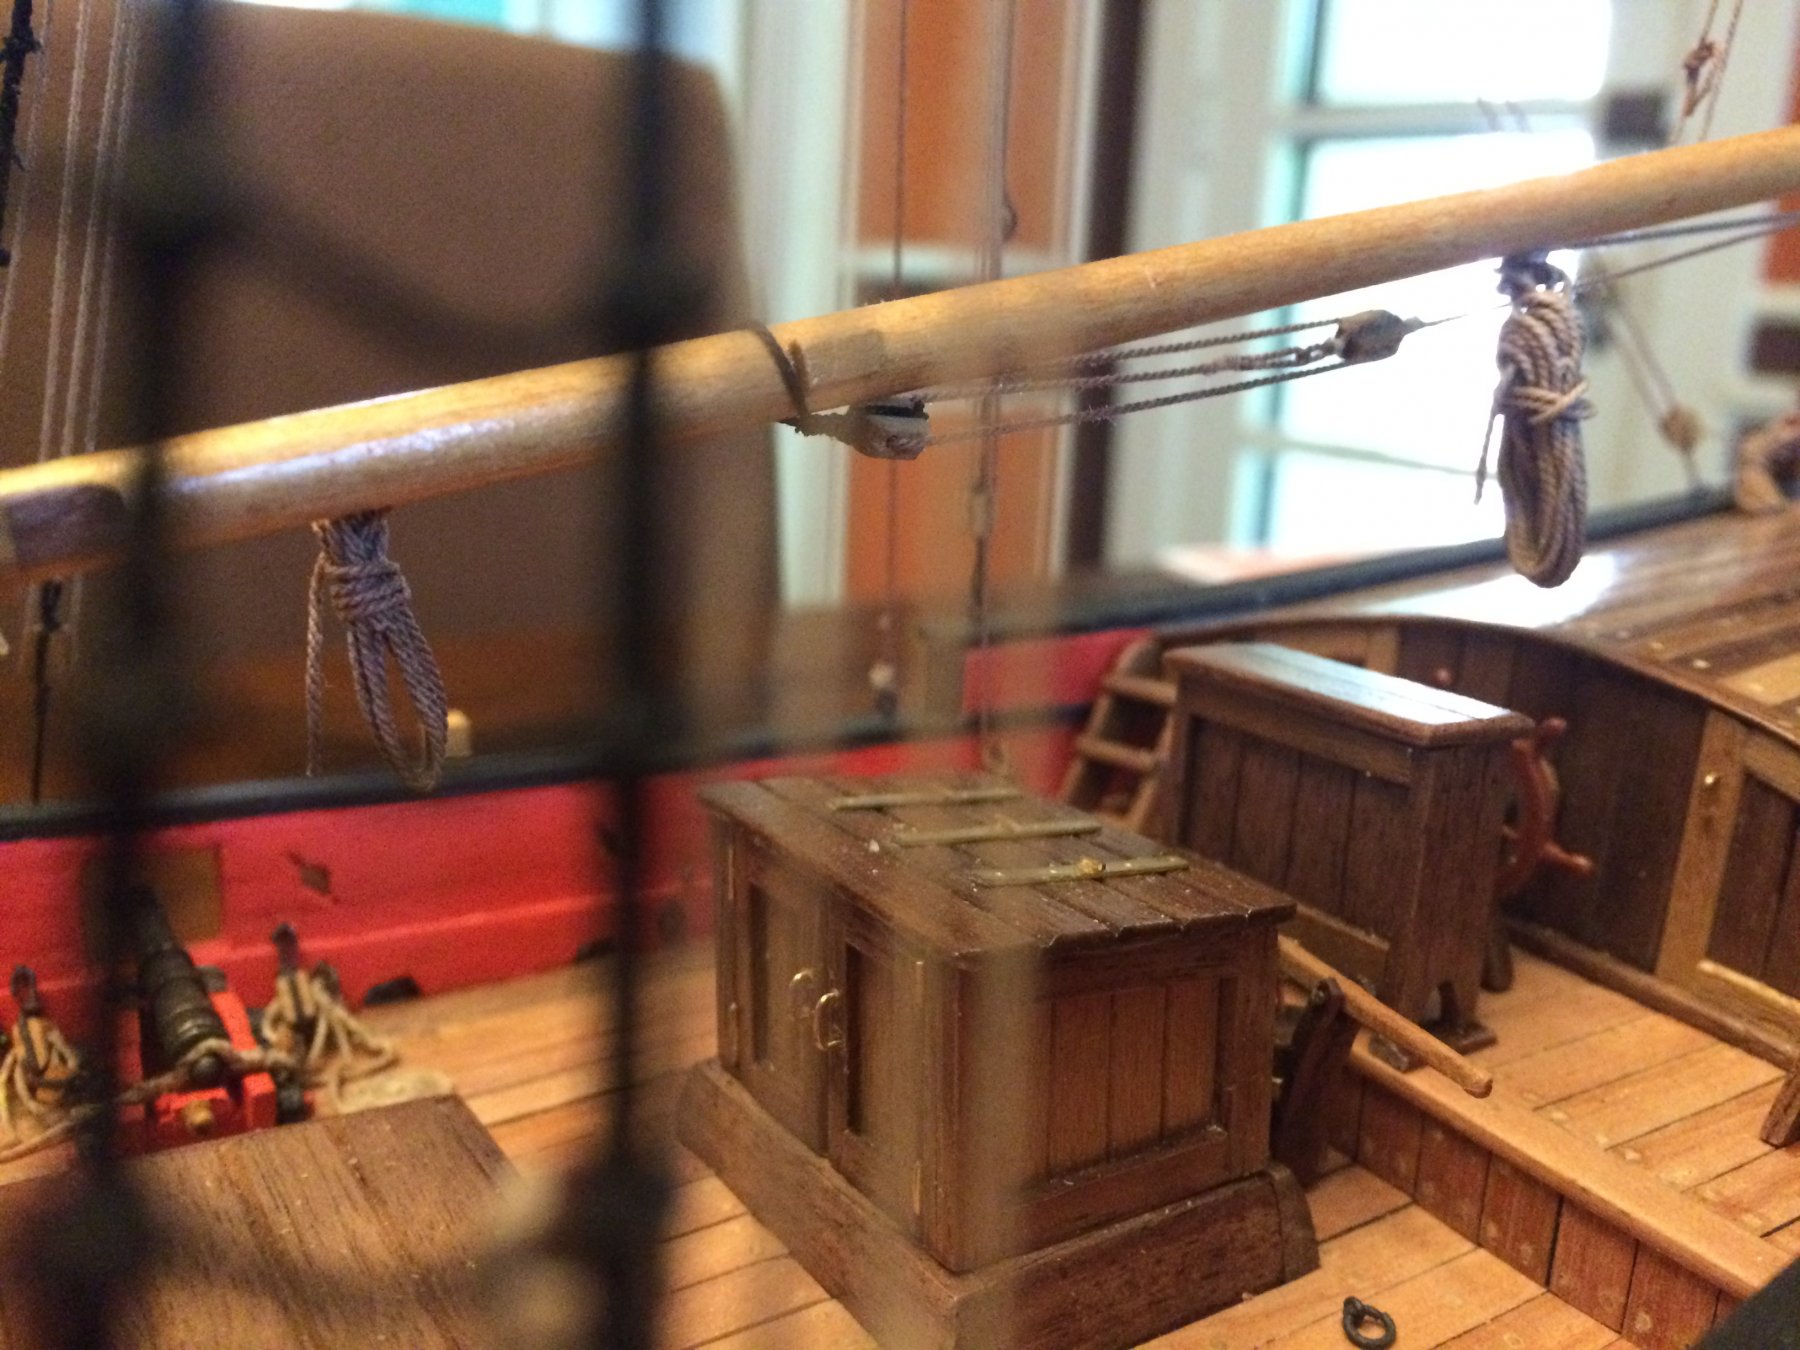
After finishing the hull in April I took a long break away. It was a combination of work kicking my but, a summer that refused to give way to fall until almost Thanksgiving, and simply needing a break before jumping into a new phase of the model. But I started again in October on the spars. I took this series of photos a few days ago; missing are the gaff and flag staff - which are both now well under way - and footropes on the upper yard arm. I decided I want the spars natural rather than painted. I stained them with a light walnut stain before varnishing to get the orange look. There is some inconsistency in finish; the mast is darker than the others; I suspect the larger dowel simply had larger grain that took up more of the stain. But the color difference is exaggerated in these photos and doesn't bother me at all. The mast was enjoyable. After building the cross trees as indicated in the plans, I ended up removing the forward cross brace; it seemed an unnecessary restriction to putting the two parts of the mast together. So I put did that first and then fitted a new cross brace after the fact. I started the bowsprit twice. I was unhappy with my initial effort to transition the inboard end from square to round. I'm not all that happy with the second effort either; the octagonal portion looks a bit random. But I decided to live with this imperfection. You can the wandering ridges below. The dimple in the sprit is where it will pass through the hole in the bow. It will be hidden under the main rail once installed. It was a shortcut to get the bowsprit to sit right on the deck without further rounding out the hole (I was running out of room and did a bit of damage in fiddling with it, and just needed to get my fat fingers out of there). The hole for the jib halyard - at the outboard end of the sprit - is supposed to run top-to-bottom, which is how I first had it. Then I took a look at the next sheet in the plans, and it showed the hole running side-to-side. After filling it and redrilling, I noticed another note - perhaps in the book- that explained it clearly as top-to-bottom. I'm going to enjoy looking at that boo-boo once the whole thing is under glass. The main boom (below) was most notable for the amount of sanding it took to get the shape right. But I was happy with how it came out. The "brass" straps that hold the walnut chocks on the inboard end are made form pewter etching foil - standard inventory at the art supply store. It's much easier to work with than the brass strip provided. When I used the same stuff on the cannons, I blackened it. Here I used bronze paint from the standard paint set. The yardarms were a breeze. I'm doing the footropes now on the upper yard. In the photos here, the footropes need a little dot of glue to hold the in place - since taken care of.


- 164 replies
-
- 3
-
-
- model shipways
- armed virginia sloop
- (and 2 more)
-
I've been meaning to post these photos for the last couple weeks, but work has gotten in the way of progress on the boat AND posting updates here. I've finished Sheet 3. My next activity will be on the mast, but I don't expect to get to it for another week or so. At the suggestions above, I did try the Syren line and see why it's so highly recommended. Much more fun to work with than the stuff that comes with the kit, and much more realistic. I'm not sure if I'll use it for the standing rigging, but I plan to do all the running rigging with the Syren line. Meanwhile, here's how she looks.


- 164 replies
-
- 8
-
-
- model shipways
- armed virginia sloop
- (and 2 more)
-
Based on the advice of so many I've ordered a sampling of Syren line. If the difference is as great as you say, I'll raid the cookie jar and order a bunch. I'm thinking running rigging anyway - wondering if the stuff the kit supplies is still adequate for standing rigging.
-
You guys are killing me. But I suppose it's better than when I was playing with full-size boats. A suggestion to upgrade the line on my last boat would have cost about $2k.
- 164 replies
-
- 1
-
-
- model shipways
- armed virginia sloop
- (and 2 more)
-
David, Thanks for following and for the nice comments. On my next build I will definitely look for a different approach to the flemish coils. And depending how the early work goes as I progress to rigging the spars, I may still end up buying new line based on the feedback I'm receiving here.
- 164 replies
-
- 2
-
-
- model shipways
- armed virginia sloop
- (and 2 more)
-
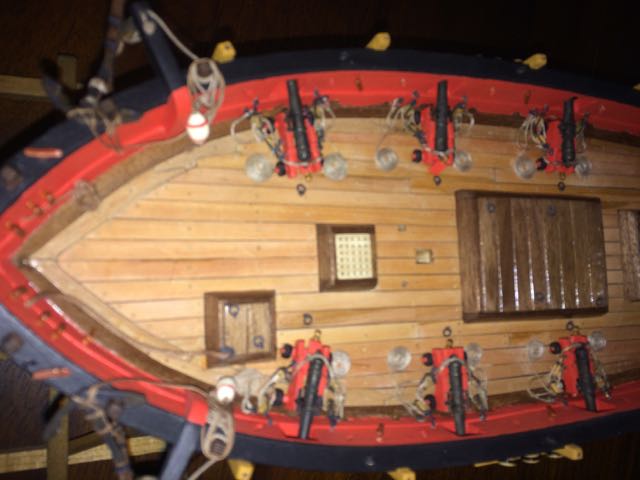
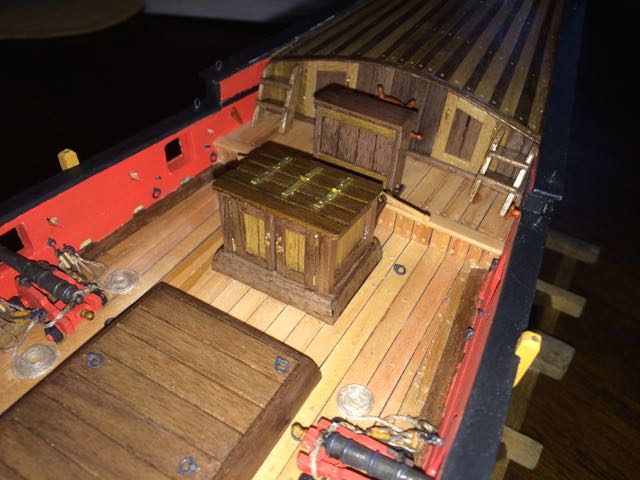
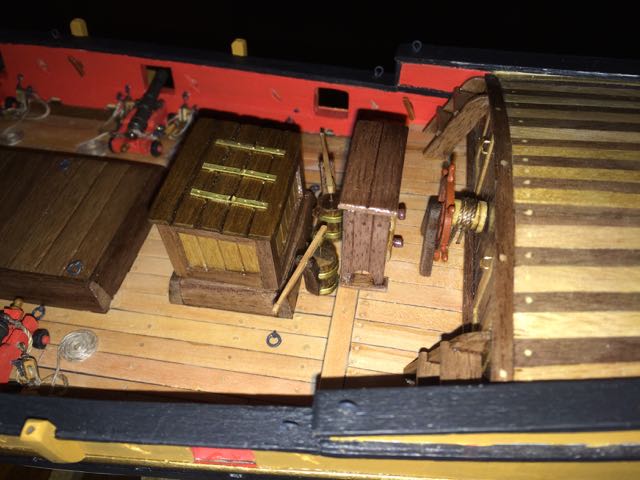
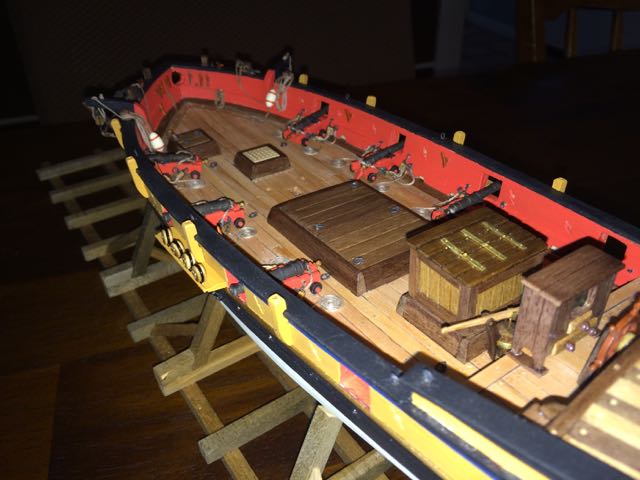
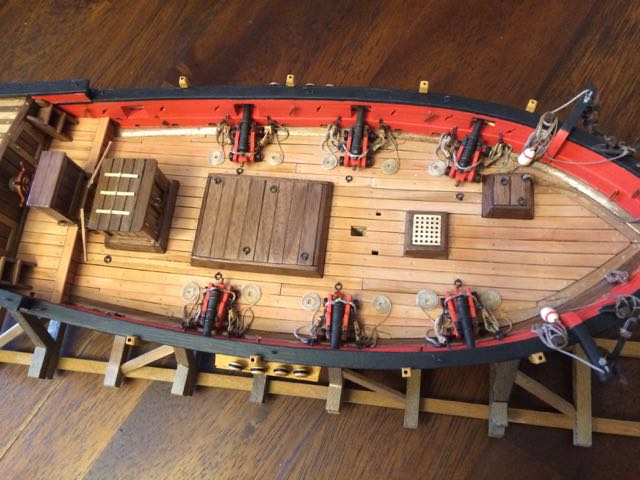
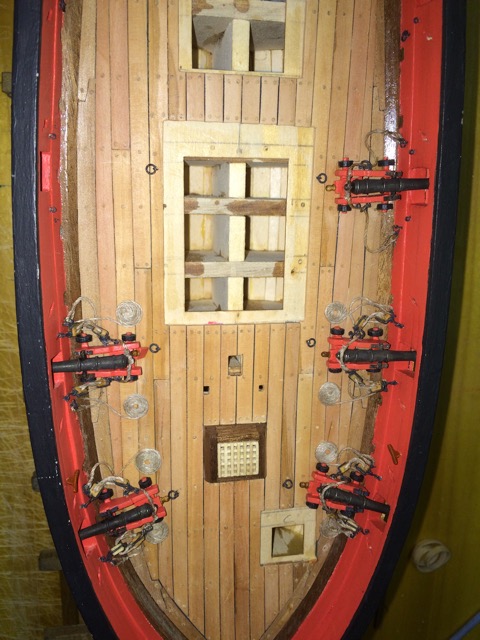
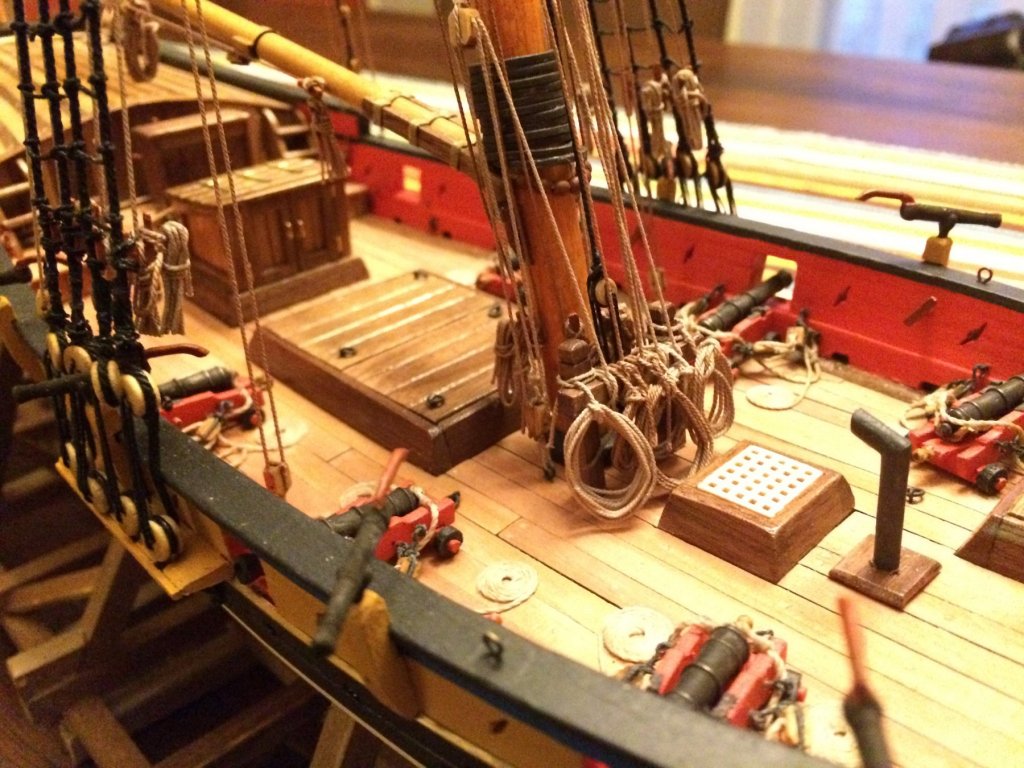
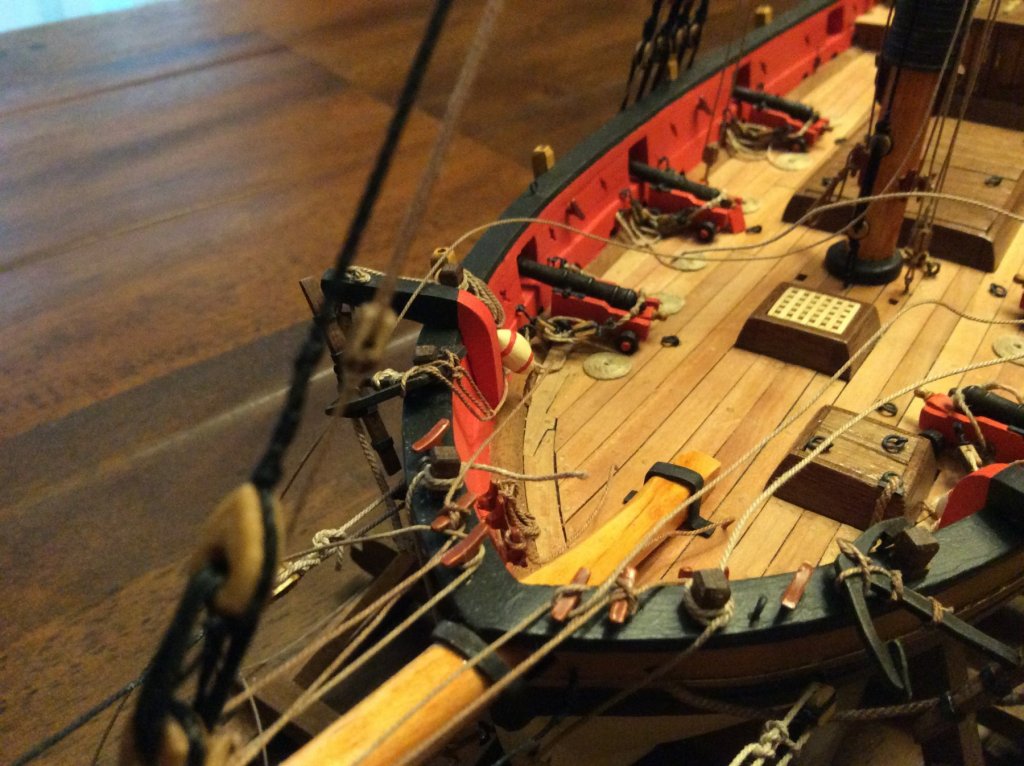
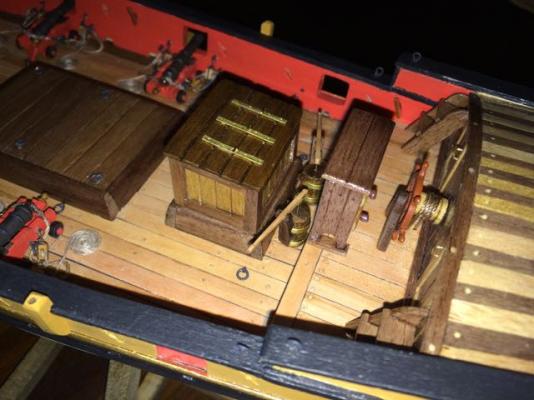
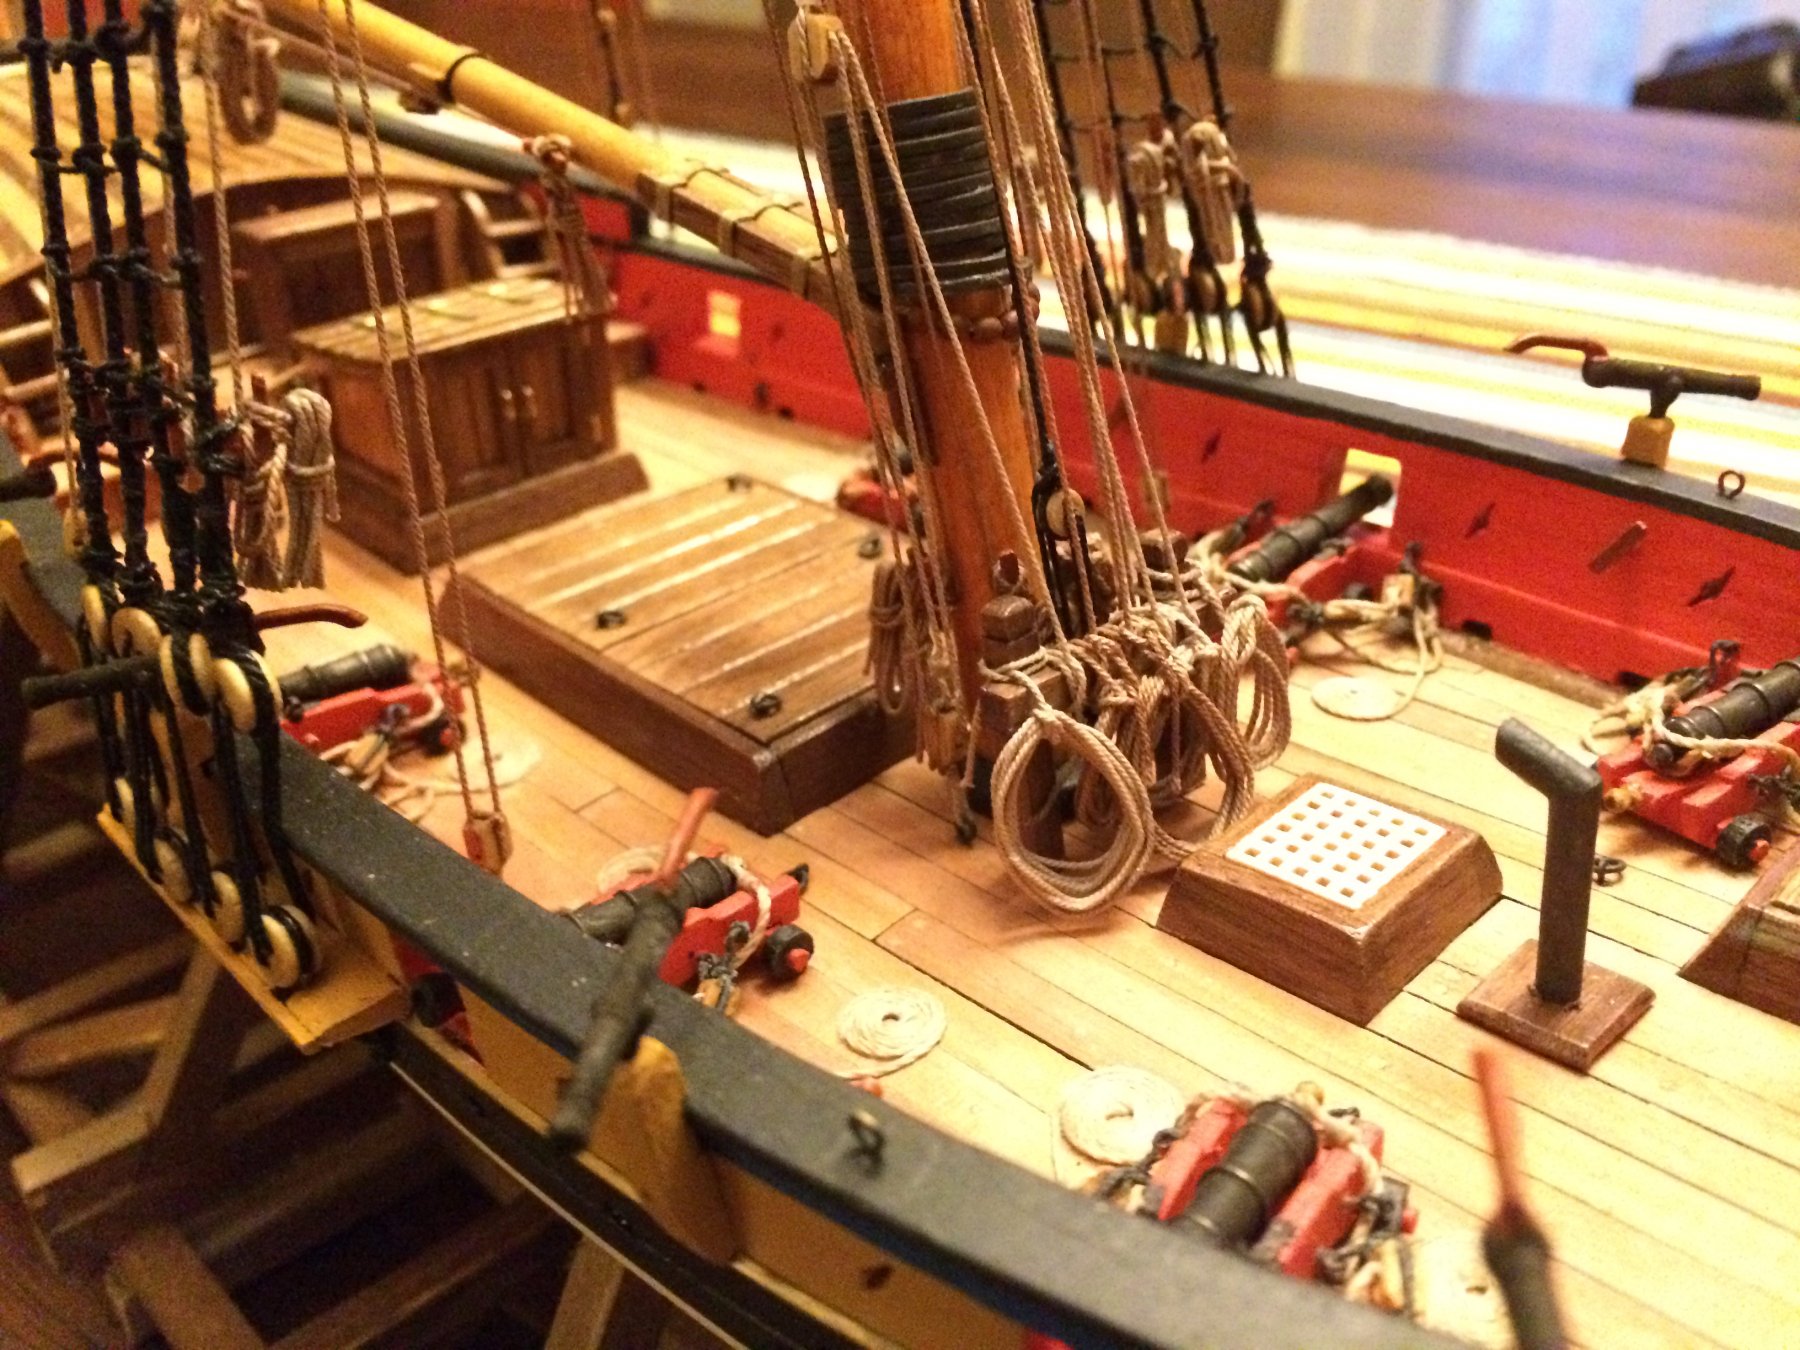
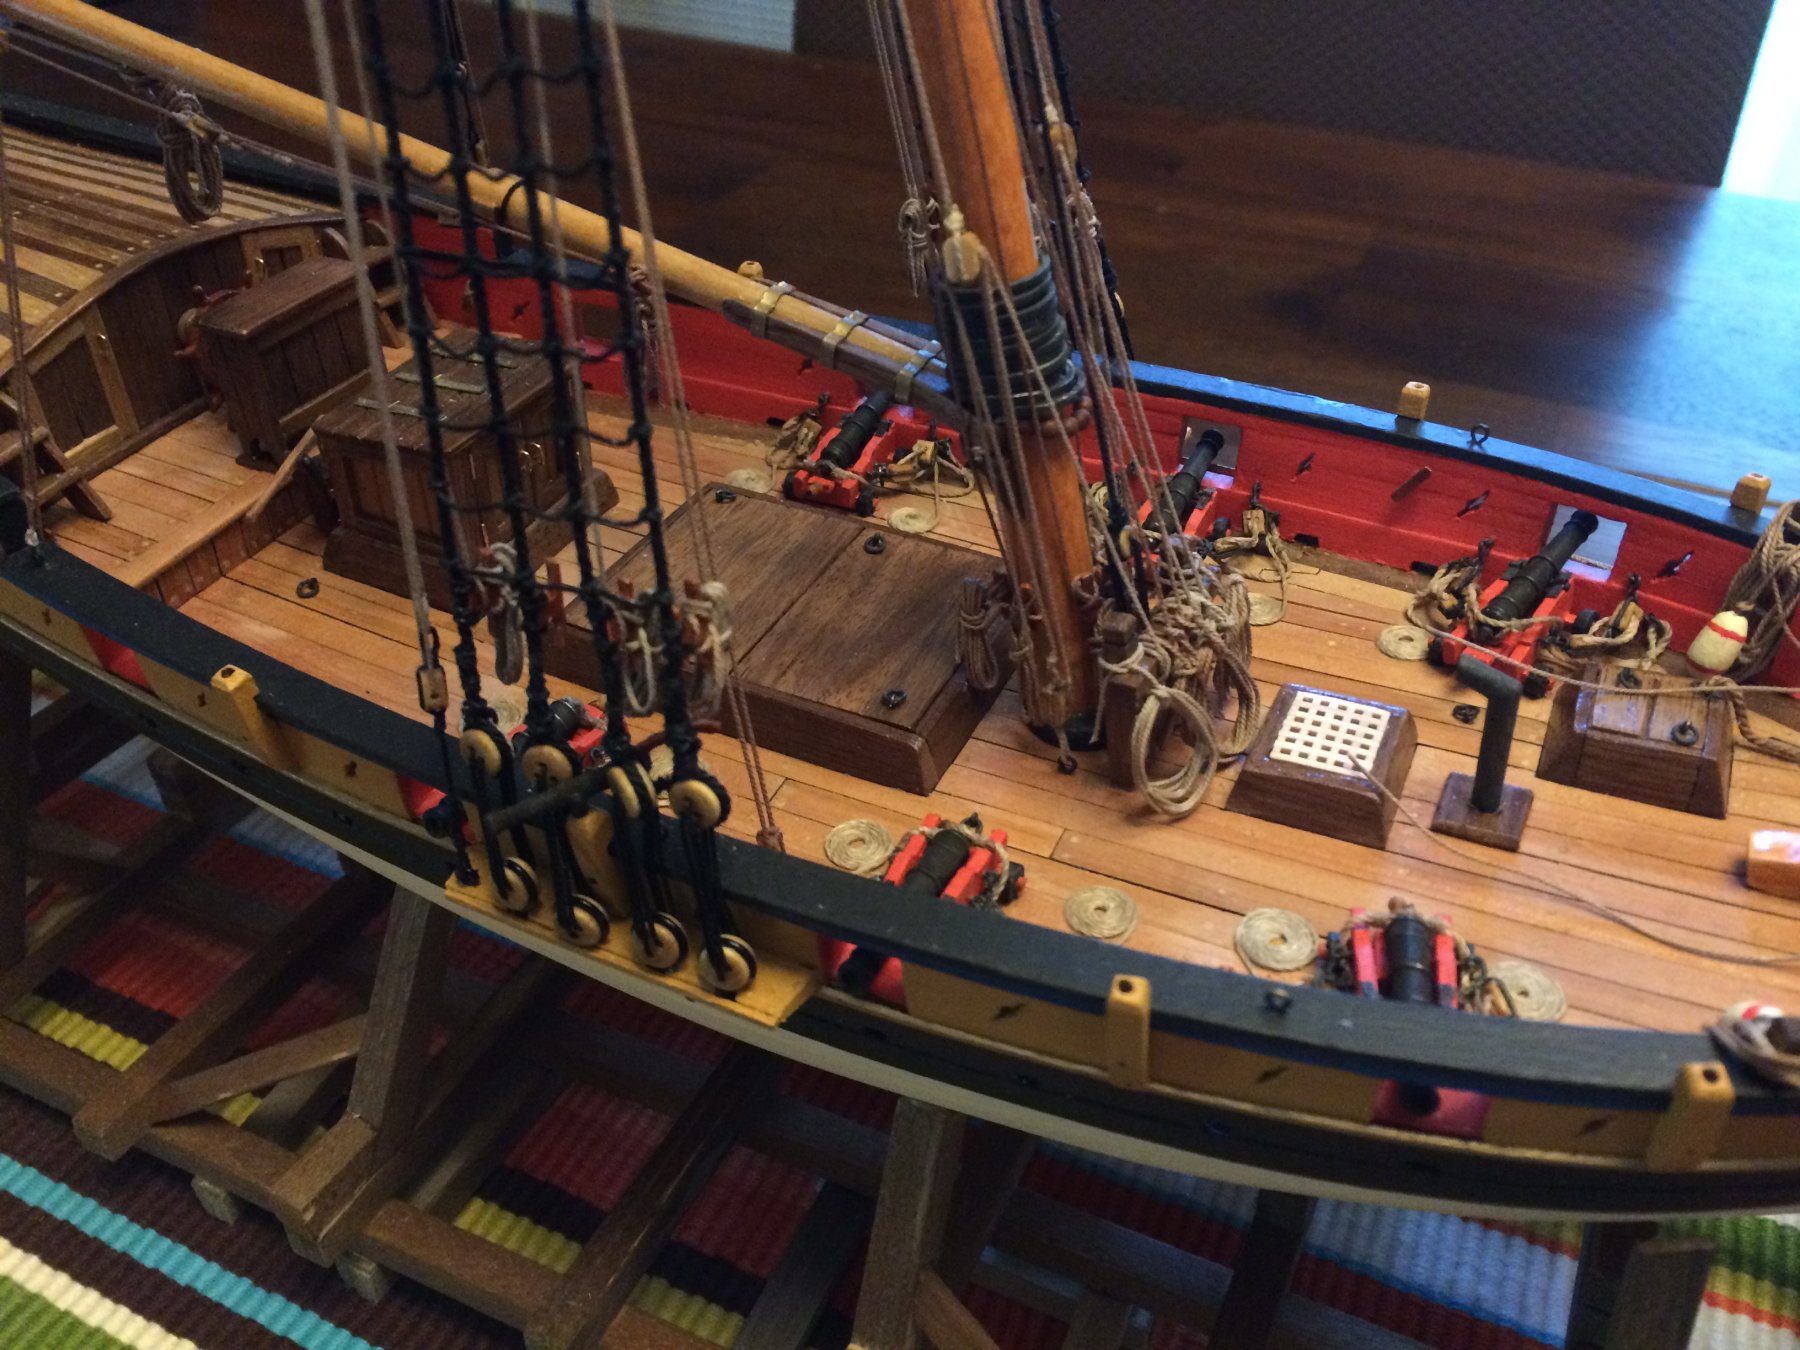
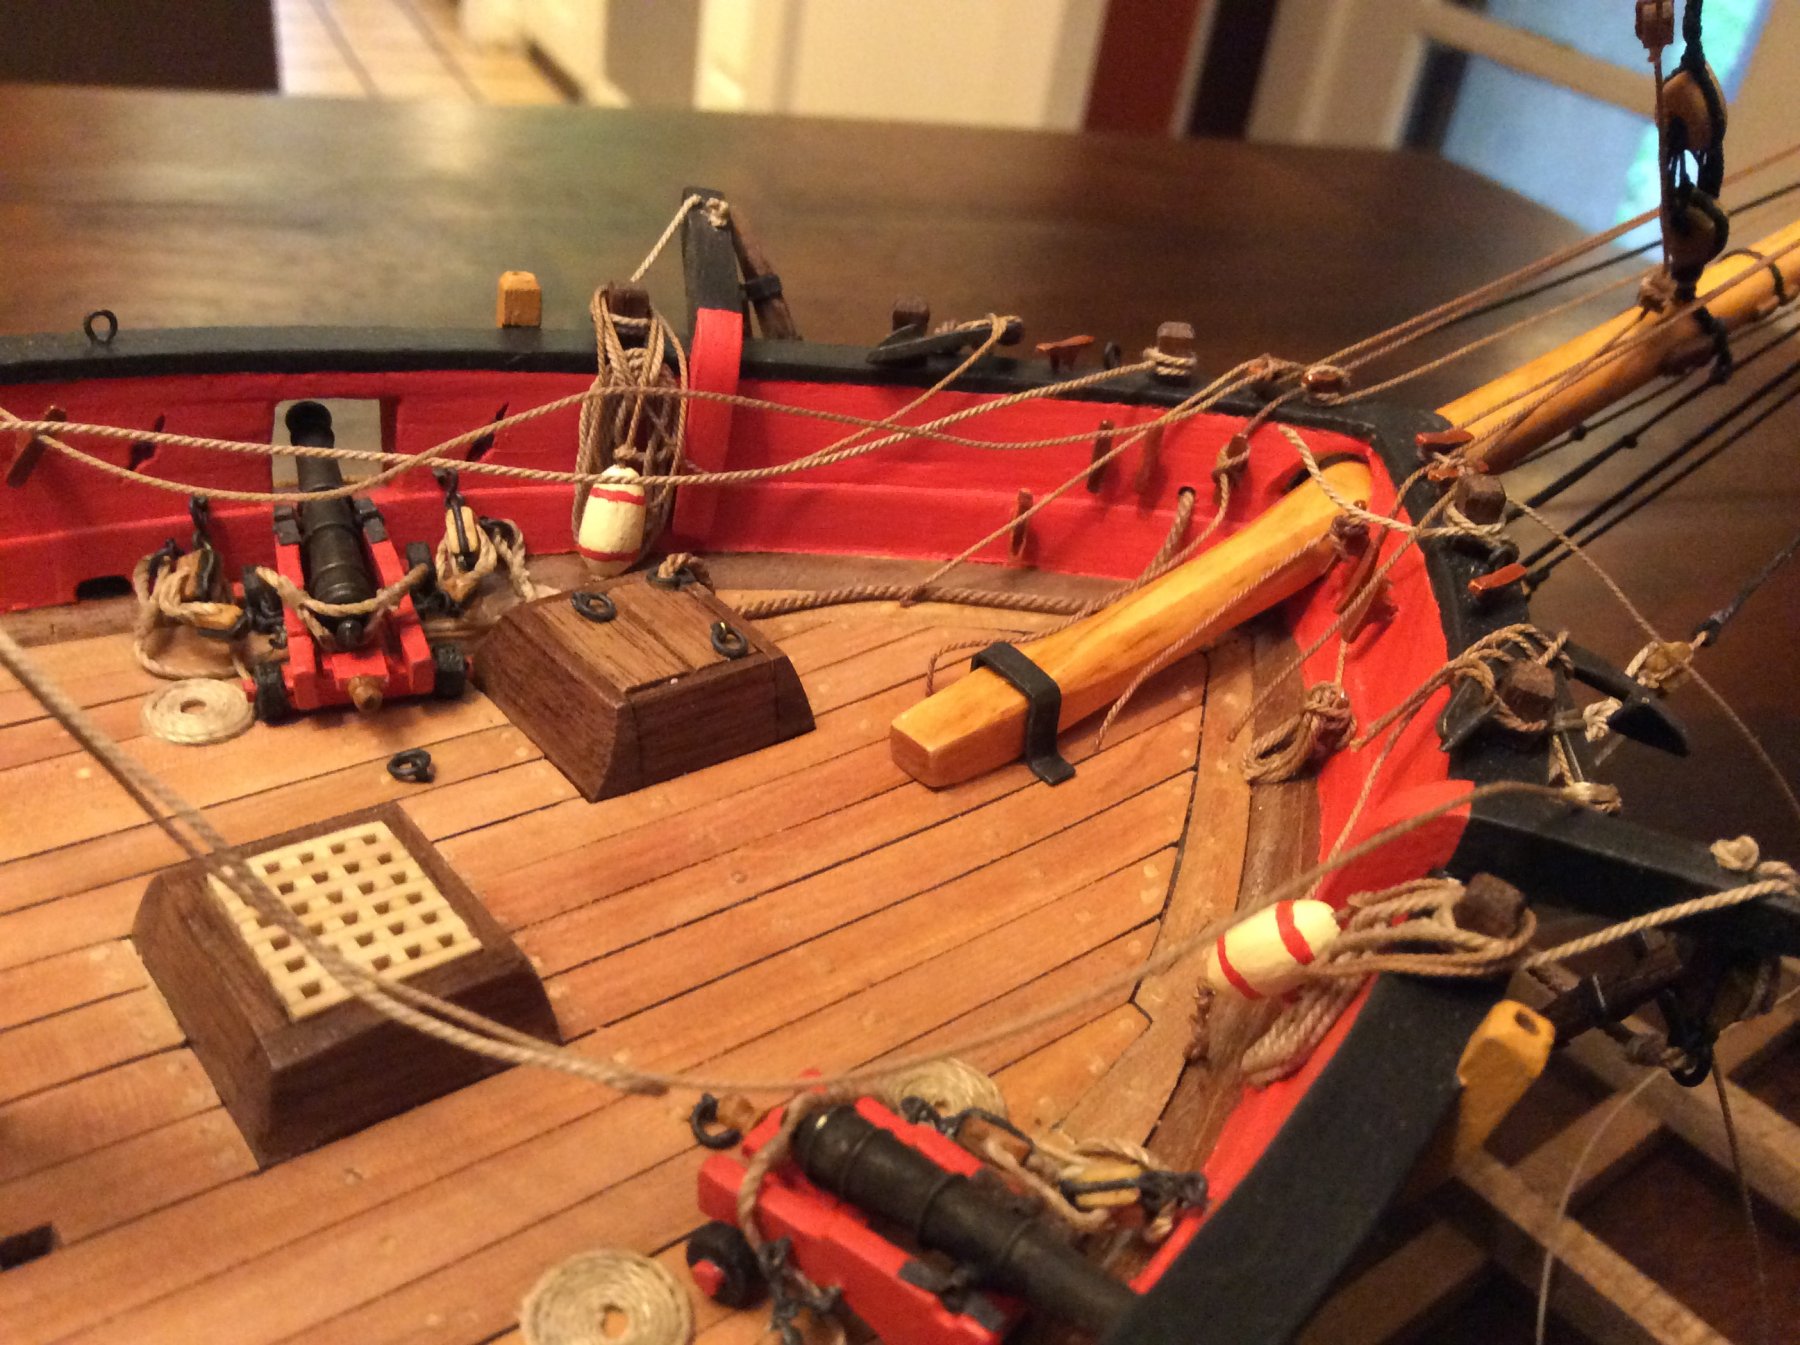
Thanks for the encouragement Grant. I've just passed the 2-year mark working on this, so I'm clearly comfortable taking breaks. But I do love working on it and there is no danger of my not finishing it eventually. I went back to the workshop yesterday and made nice. I talked gently and said encouraging words. This ship is more like a cat than a dog. She was indifferent - unspooling another Flemish on me as soon as I touched it. But she also yielded a bit. All 6 cannons are rigged and resting comfortably. Today, despite the unseasonably warm local forecast, I'm looking forward to starting in on the anchors and catheads, and making what looks like fast progress when I finally get to affix some of the many finished deck details that have been sitting in a container since I fashioned them months ago.
- 164 replies
-
- 1
-
-
- model shipways
- armed virginia sloop
- (and 2 more)
-
Yes, Brian, I'm using what came with the kit. I'm glad to hear it's not just me. I've considered ordering the Syren line that everyone speaks so well of, but this is my first build and I bought this kit for a lot of reasons - one being that I don't have to worry about every last decision. So I'm determined to make the best of what's been provided. The only aftermarket purchases I've made so fare were pear wood for the deck (great decision) and blocks for the cannons that were more to scale than the ourptsized blocks provided.
-
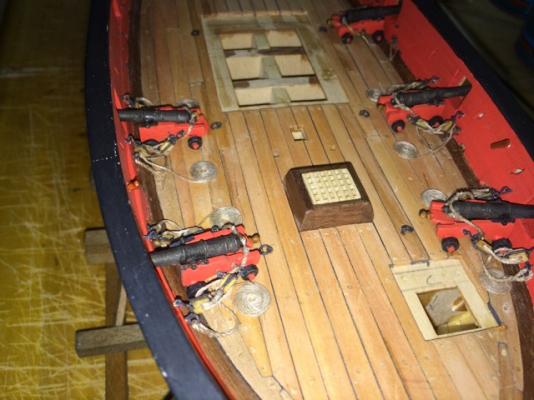
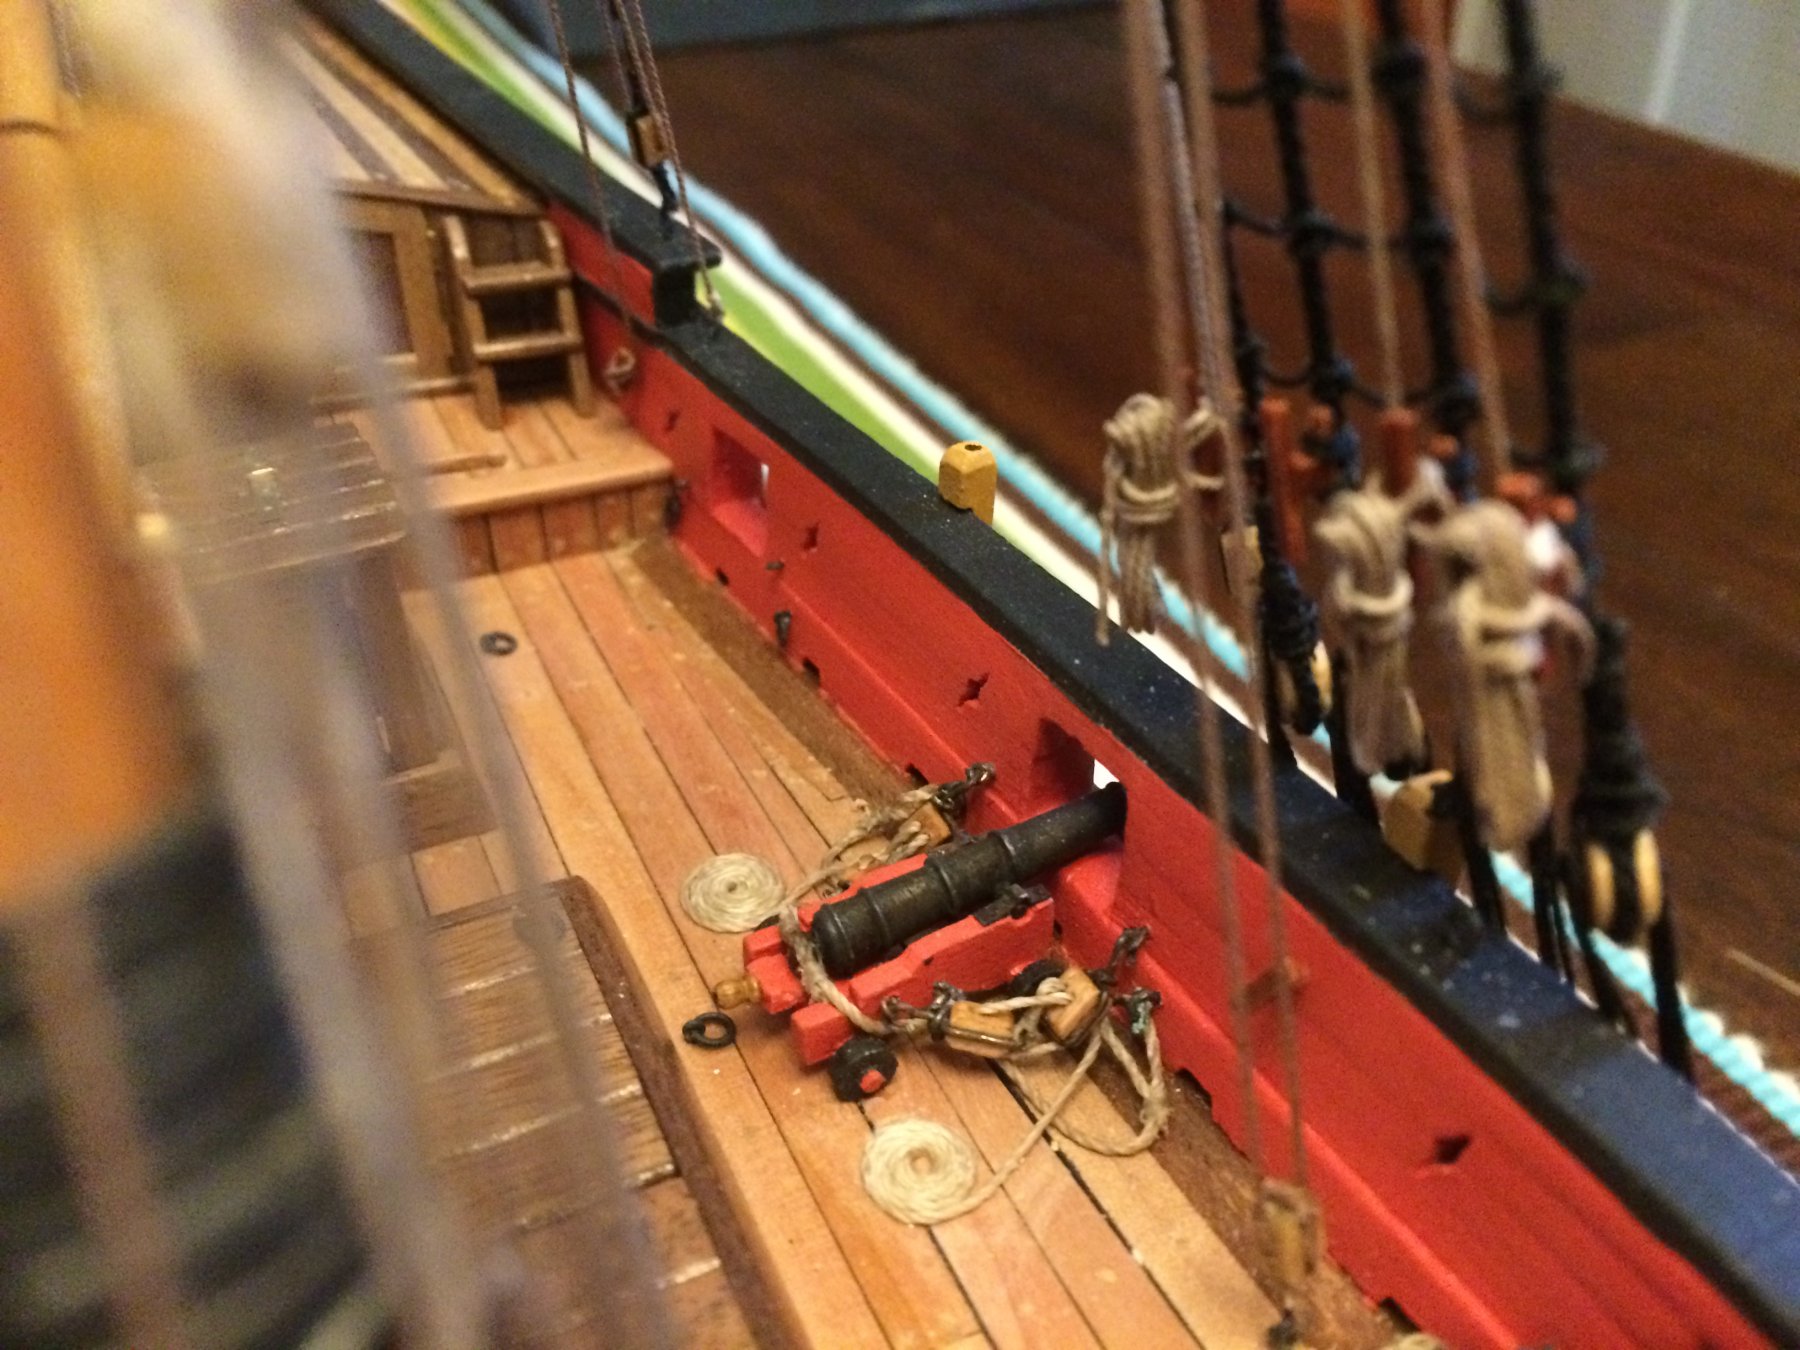
My model and I are not on speaking terms at the moment. After successfully placing 4 cannons and rigging with little drama, the 5th is fighting back. I've had rings pulling out of the bulkhead and carriage. I'm on the fifth try rigging the starboard tackle after the flemish has repeatedly uncoiled while I was getting the blocks connected and in place. I've learned how to re-coil the line while still attached to the cannon, but apparently not really because I've done that twice and it uncoiled again both times. The line gets too compromised after two tries, so then I've had to unrig the whole thing and put in a new line. I've done that twice now. I've put nearly as many hours into the cannons as I did on the outer planking. I probably shouldn't keep track of such things. And I've still got the 6th cannon to go; I hope it decides to play nice. Thinking on it, I think I've spent half of my actual working time hunting for the pair of tweezers I just put down. Does that happen to everyone - losing the tools you're using right in front of your eyes? Plus I've got the dropsies and bumpsies. I keep hitting the hull with my magnifying lenses when I try to get up close. Just dragged a wet paintbrush across the freshly repainted main rail. And for every block I've worked with in the last week there are two on the floor. There are several small rigging hooks down there too. Amazing little things; they don't just fall out of your tweezers - they leap. Each time I go to the workshop for a session with my hobby, I put my yoga practice to work - ready to enjoy whatever the model gives me. I figure I might work for a couple hours or 15 minutes - the model will tell me. What it's been telling me is that I'll spend two hours to make 15 minutes of progress. I've managed to keep my sense of humor about it, but I think I'm about to take a couple days off.
-
Thank you Brian. I take it to mean you're soaking the line in water, and then brushing on the glue once the line is in place. I've been using the glue mix to wet the line, and I've been creating the drape by "shaping" it with carefully placed weight. As I said, I'm going to stay consistent for the rest of this build, so I'll have whitish line for the cannon rigging. But I'll give other rigging a soak and see if I can improve the effect as you suggest.
-
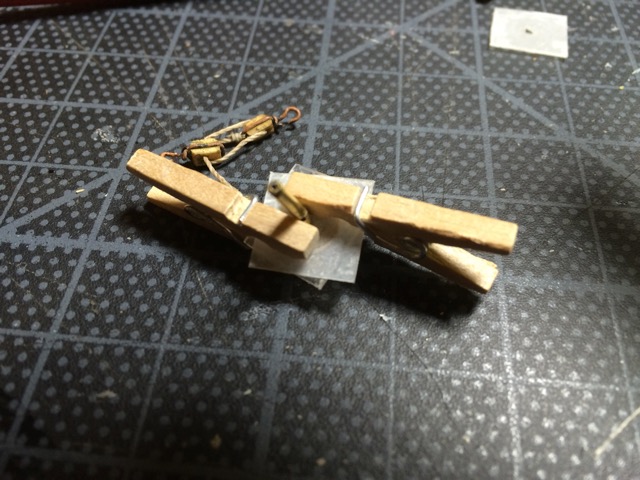
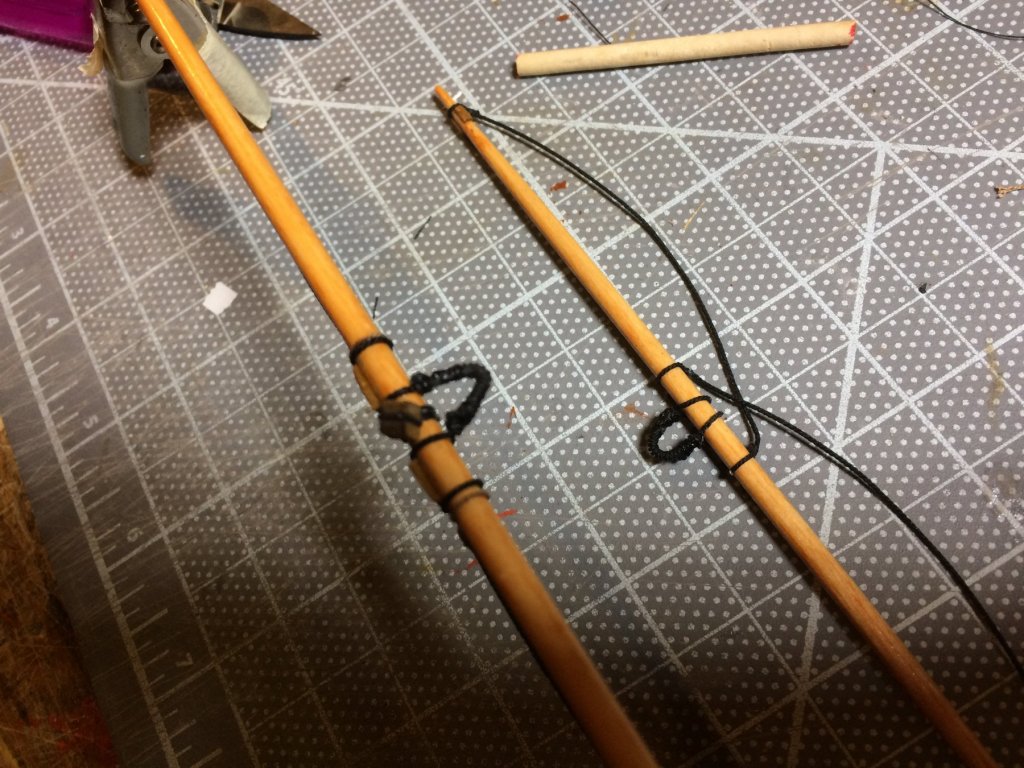
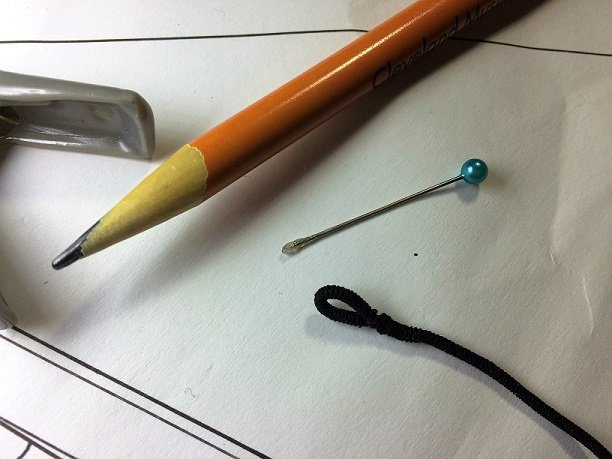
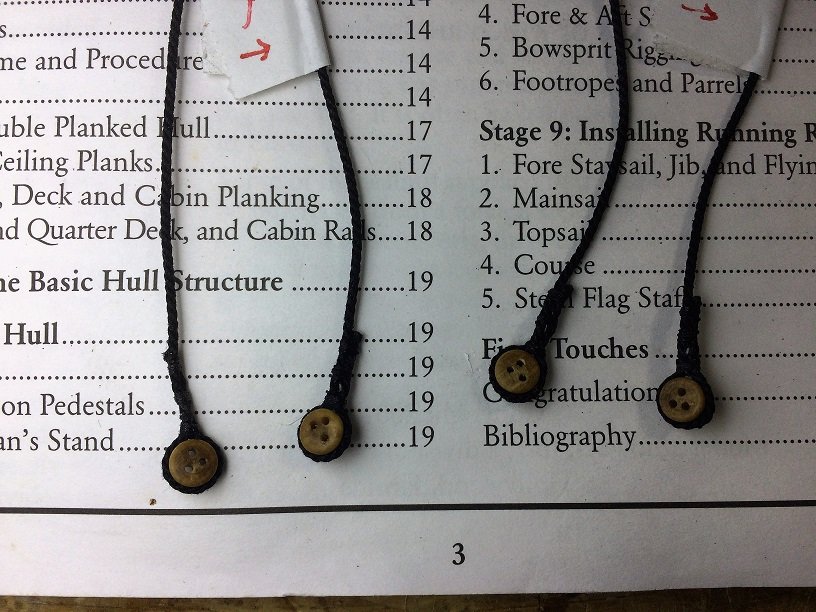
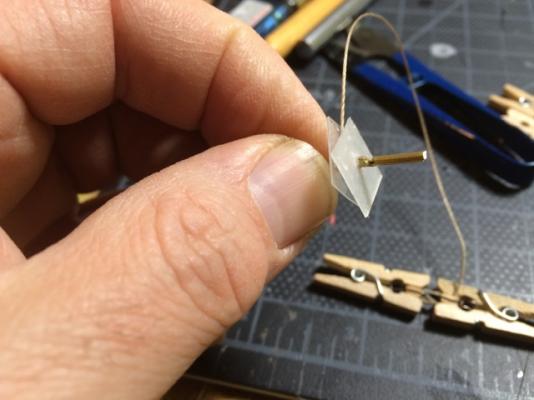
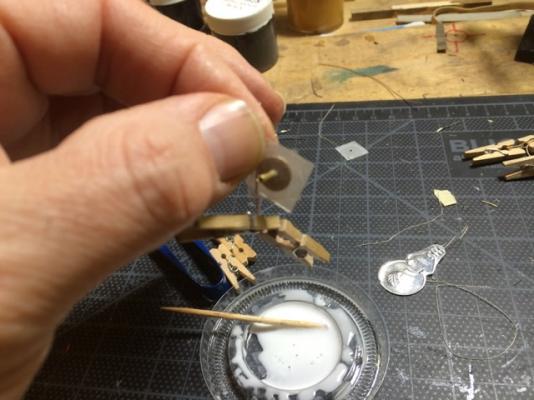
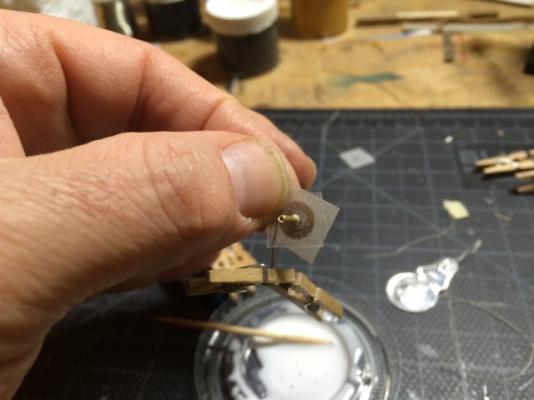
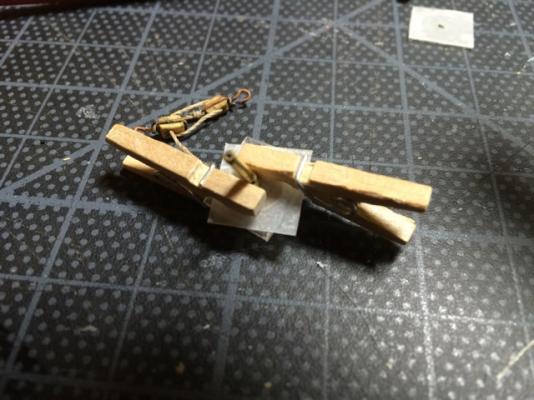
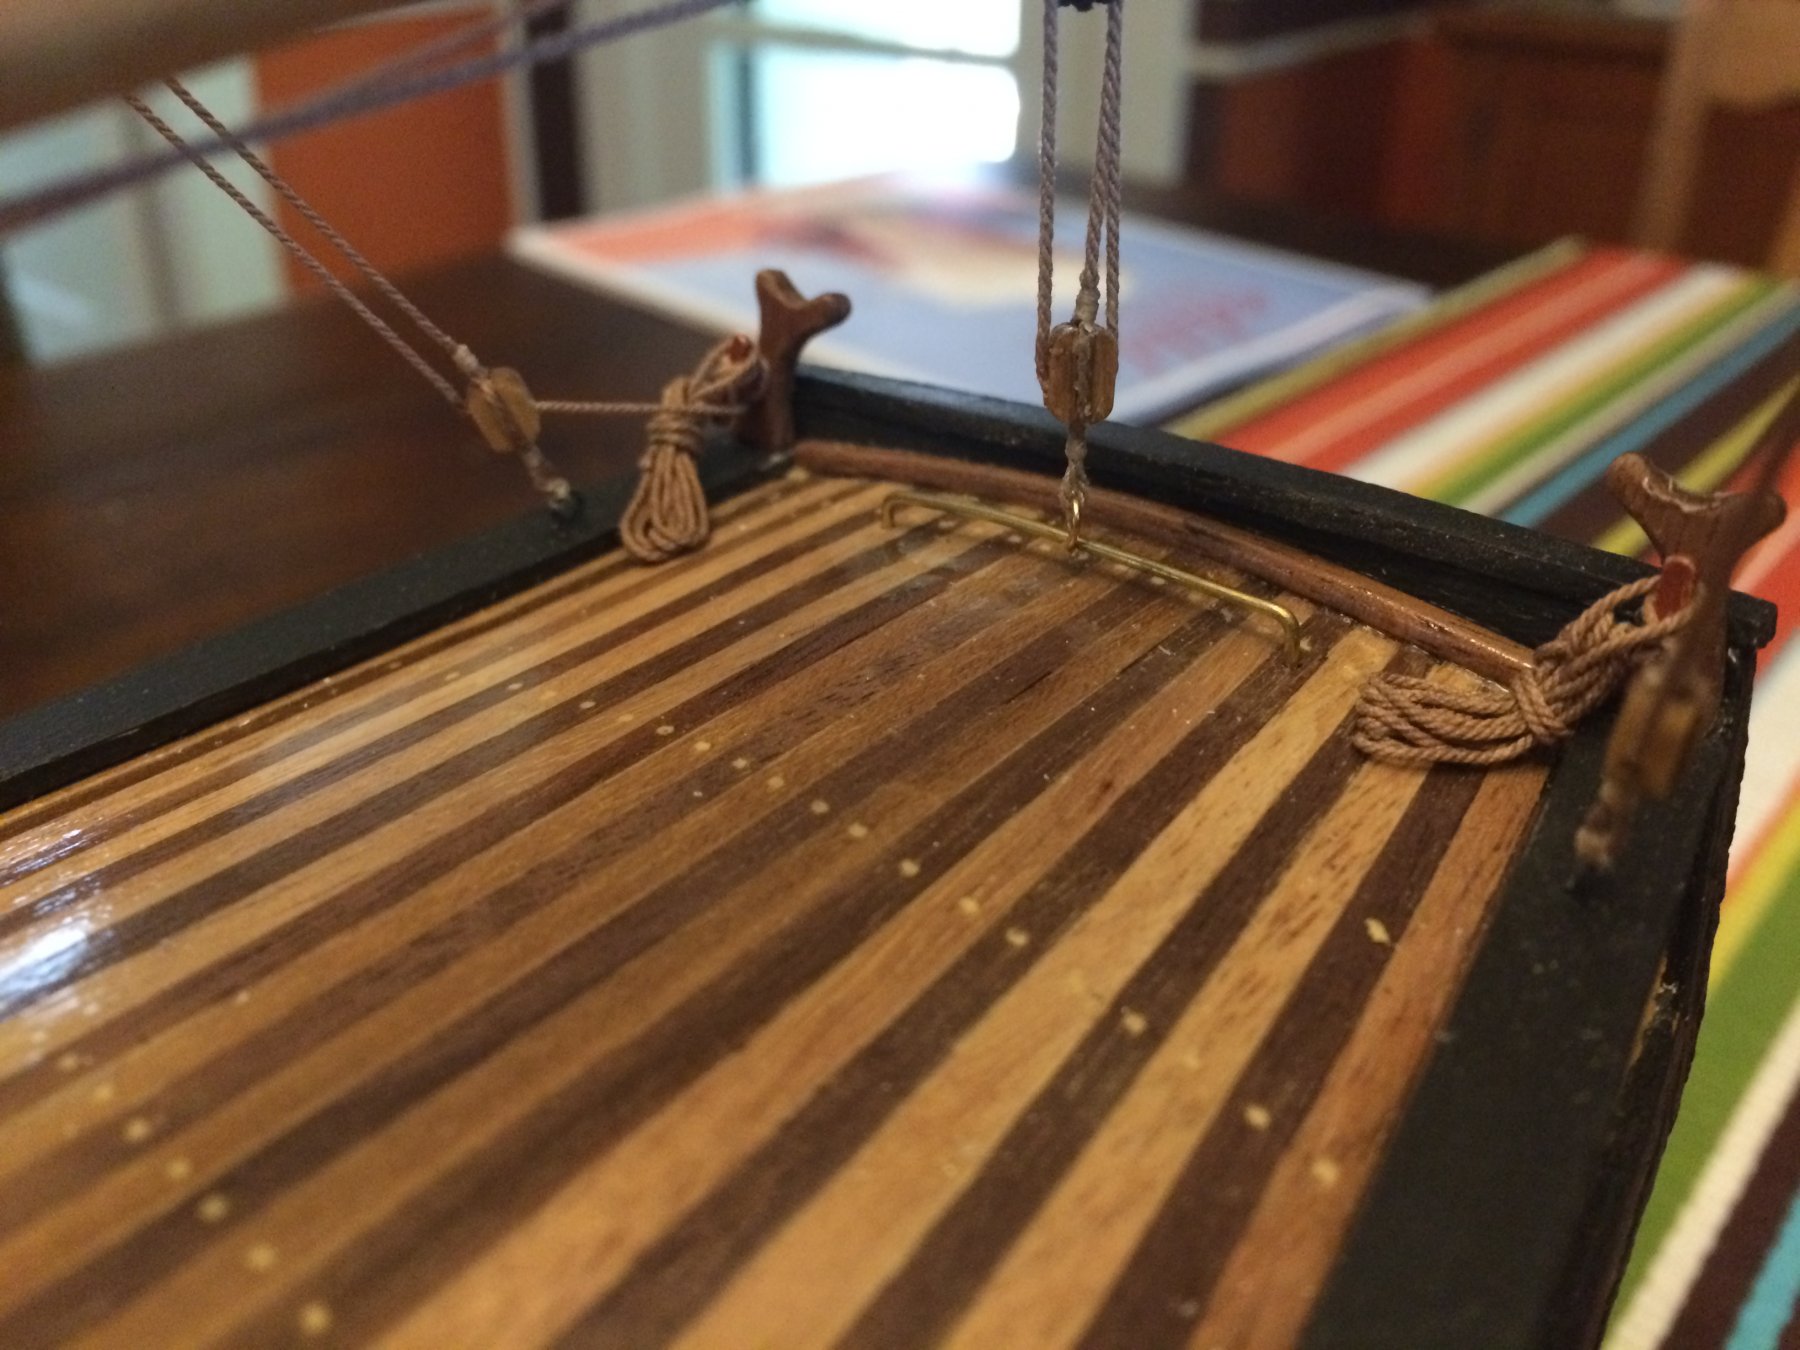
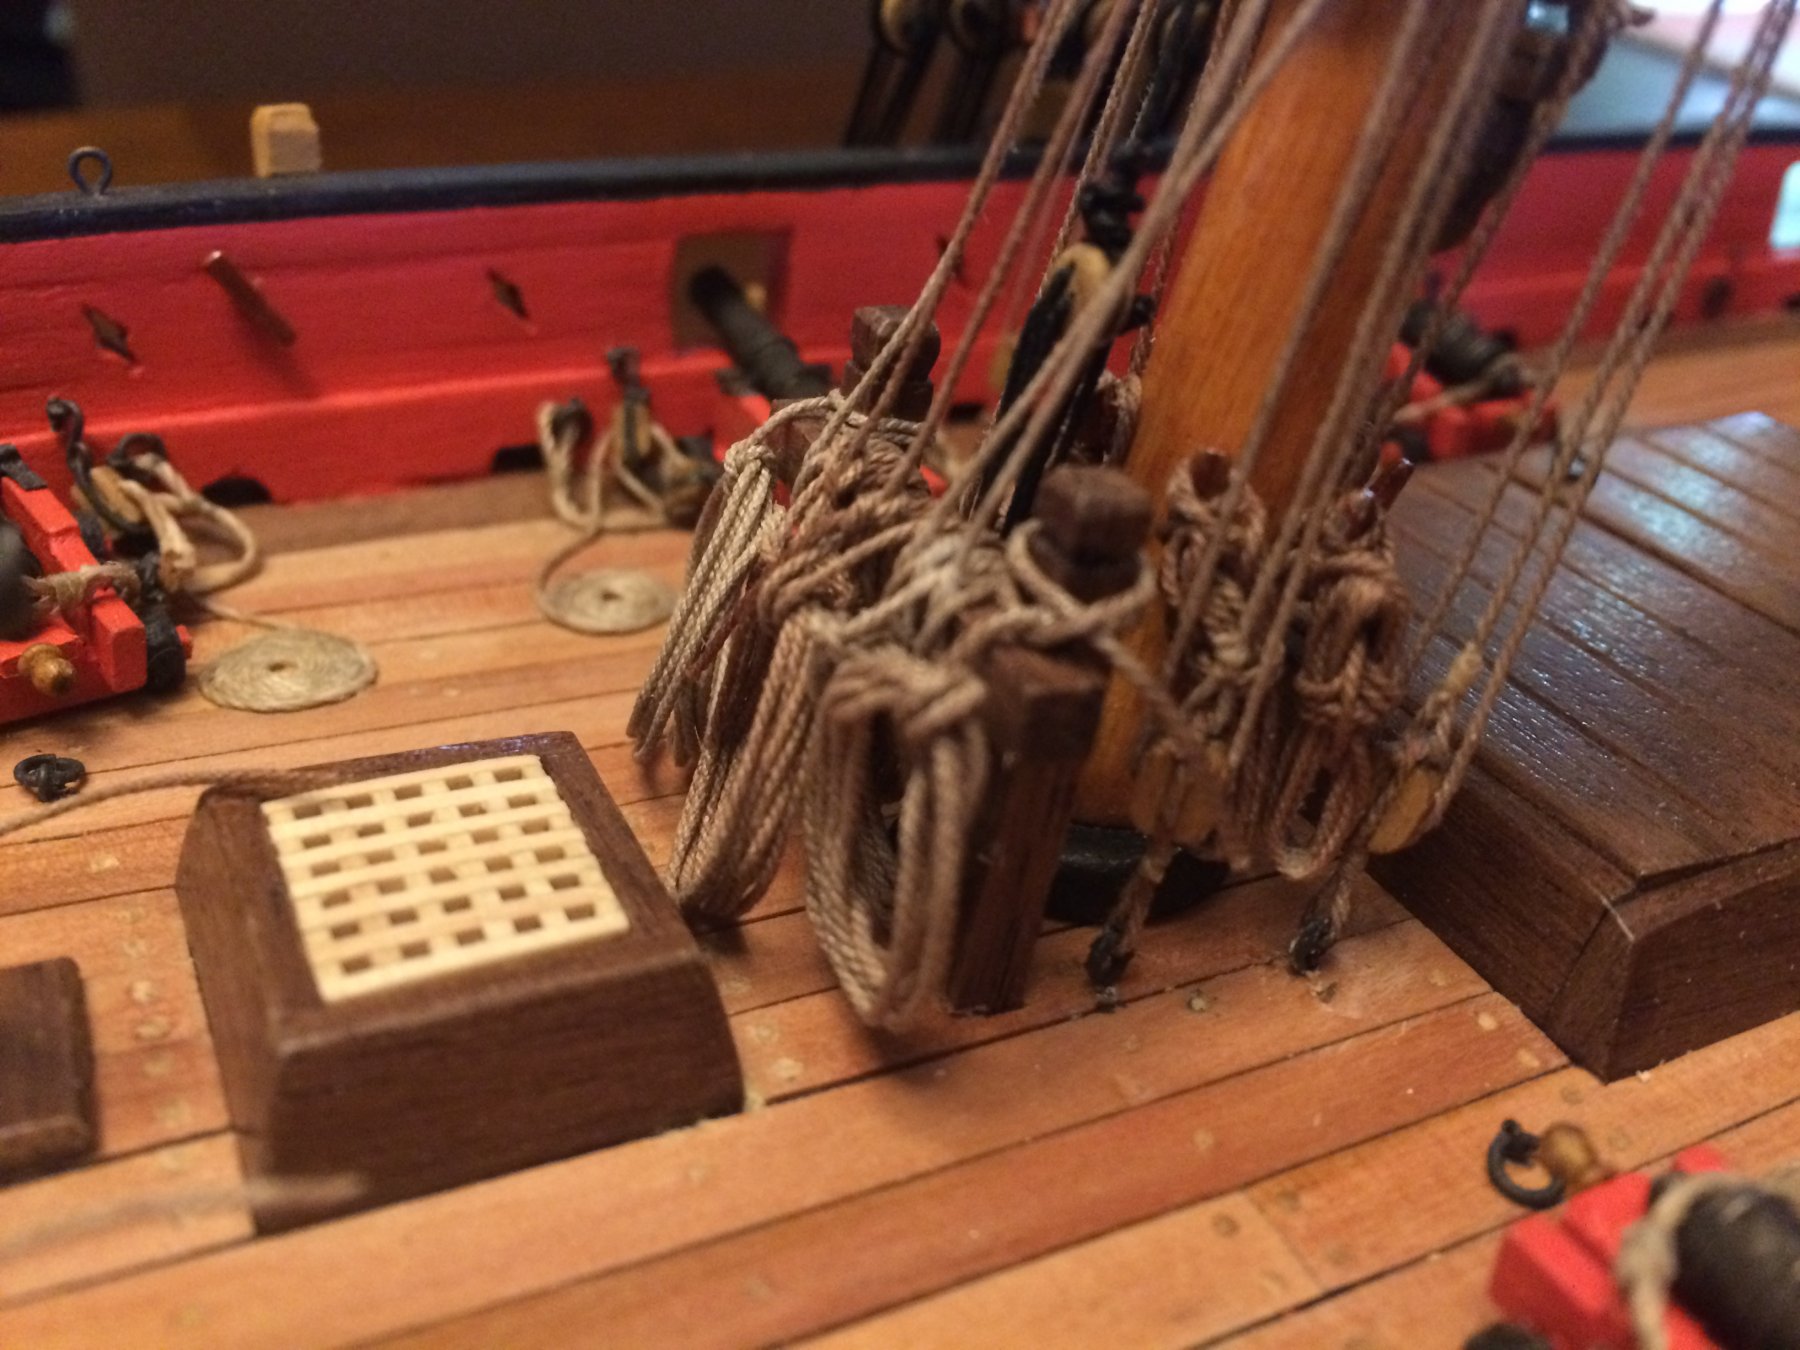
Here's how I settled on making flemish coils. The challenge for me was having the bitter end of the coil at the center. I could wrap the coil OK from the outside, but in my former sailing life, whenever I made a flemish coil, I started with the bitter end and spun it so the coil built outward. In miniature, I couldn't manage to get my coils started in the middle without the coil coming out elongated. I thought it would be so much easier if I could fashion a spool and make the coil by spinning it. For the hub of the spool, I used 1/16" (OD) brass tubing that I had around. I had to experiment how to lock the line in to place. I settled on cutting a notch into the tube; I inserted the bitter end of the line into the notch in the tube (easily done by wetting the very end with a bit of super-thin CA, and then cutting the tip of the hardened line on the bias). For sides of the spool, I used squares of plastic (approx 1/2" square - cut to the squares on my cutting board) taken from clear plastic food containers like the kind you get with takeout soup. White glue won't adhere to them. I drilled a 1/16" hole at the center. I slide one side of the spool onto the hub, and carefully pass it over the notch; it tends to want to pull the line apart into its separate threads, so it takes a lot of care not to snag it. But with practice I can now get just to the other side of the notch so it locks in the thread. The closer I keep it to the edge of the notch, the less bitter end I'll have to cut off later. The I put on the other side. In the photo above, the second side goes on from the left-hand end. (At this point, you want the notch in the tubing out of play; all the action now happens on one side of the notch.) Then I glue up the line with diluted white glue, and gently wind it around the spool. I have to keep gentle pressure on the two sides, so the line does't double up on itself inside the spool. But it works pretty easily. Then I clamp it to dry. Removing the coil is just a process of carefully undoing everything in reverse order. I snip off the bitter end before removing the sides, so the coil doesn't get pulled apart. Some nuances: 1) The line has to be cut to length before starting; that's the nature of winding from the bitter end. 2) The glue takes a long time to dry, because it's sandwiched between 2 pieces of plastic. So I've got two spools and basically do two at a time and then leave them overnight. 3) I make sure to wind the same way every time so my coils will look uniform on the deck. 4) Built up glue on the outside of the coil scrapes off easily with an X-Acto or a probe once the coil is secure on the deck. I'm reminded that my other experience with flemish coils in my sailing life was to view them with a certain amount of scorn. They were a nice way to dress up the deck, but they're really not functional. They tend to hold water and stay wetter than a traditional flake, and they're a bit of an affectation. At regattas, people would kick them when crossing boats in a raft. Here's my progress, with 4 cannons done and the 5th part way there. The white-glue mix seems to be whitening my lines more than in photos of other people's work that I see. Is mine not dilute enough? (I'm at 50/50 glue/water). Am I using too much? It's too late for this build; I'll keep it consistent from here on out. But next time, I might want lines that look new rather than weathered.


- 164 replies
-
- 4
-
-
- model shipways
- armed virginia sloop
- (and 2 more)
-
Zoltan, Those are really nice flemish coils. Thank you for sharing.
- 164 replies
-
- 2
-
-
- model shipways
- armed virginia sloop
- (and 2 more)
-
Thanks for that. It calms me down. By the end of the weekend I'll have tried getting at least one of the cannons set. I still have to do the block and tackle but will probably do one gun at a time - just for the sake of variety.


.jpg.2a3b4676013e65ed680810306dae438f.jpg)