HOLIDAY DONATION DRIVE - SUPPORT MSW - DO YOUR PART TO KEEP THIS GREAT FORUM GOING! (Only 69 donations so far out of 49,000 members - Can we at least get 100? C'mon guys!)
×


grayarea
-
Posts
101 -
Joined
-
Last visited
Content Type
Profiles
Forums
Gallery
Events
Everything posted by grayarea
-
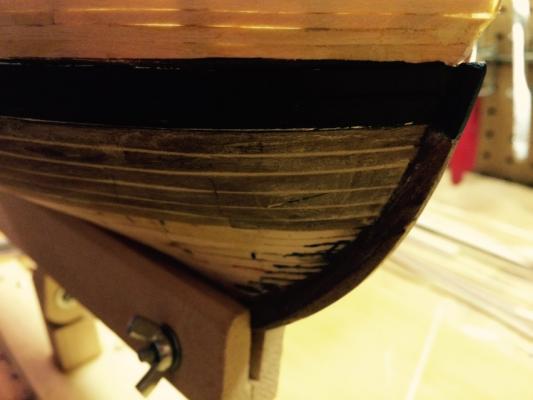
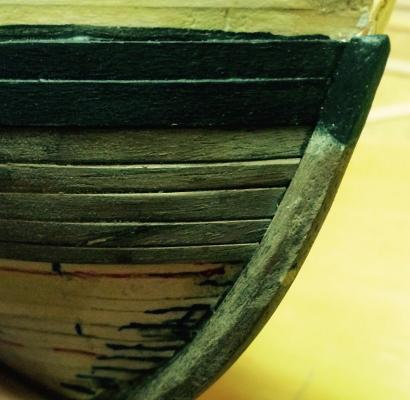
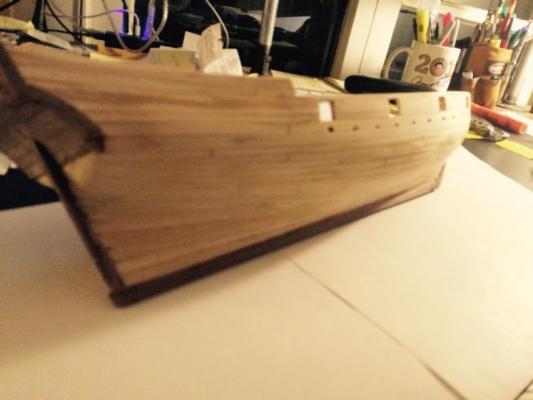
 The picture of a project that is not going well at the moment. I had been beveling each strake to emphasize the woodwork. I hated it. All it did was emphasize the flaws. It was bad advice - at least for a beginner. So beforeI got any farther, I filled in the bevels. So here's a picture with the filler sanded and the first few unbeveled strakes in place. Nobody's going to have any trouble seeing the individual planks; I don't have to worry about that. Now it's smoother and I'm happier with it. But I'm pretty sure that no matter what I do, it's always going to look a bit different from the rest of the hull. Unless I go ahead and give the whole thing the same treatment. I hope to avoid that, but I'm open to the likelihood of it. Meanwhile, I've finished belt A on the Wall side and have marked it on the other side, which I intend to work on this weekend. It looks pretty rough in the pictures, but not so bad to the naked eye. In dim light. If you squint.
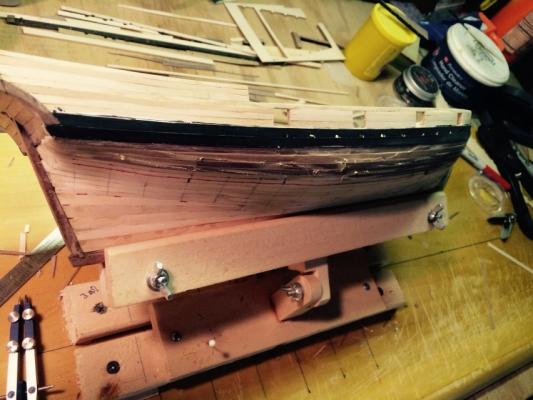


- 164 replies
-
- 4
-

-
- model shipways
- armed virginia sloop
- (and 2 more)
-
Brian, those are .030 planks. I hadn't thought about beveling the underside; I can see why it makes sense. But wherever it was that I read about beveling the outside was specifically for a painted hull. I give it a 50-50 chance that I'll end up filling it all to get rid of the bevels - which will be a big pain in the neck and I'll hate myself for it if that's what happens. So far, I'm at peace with the transom curves. I've been bending them with true steam - holding the plank over steam from a small hot pot, rather than soaking the plank and bending it with a hot iron. I've built a small bending jig that holds the long end of a plank in place while I hold it over the steam with pliers. As the wood softens, I bend the plank in small increments using tweezers until it's eventually bent 90 degrees. It takes patience and about 5 minutes once I actually start bending the wood. But in the early going, the walnut seems to be holding up to it.
-
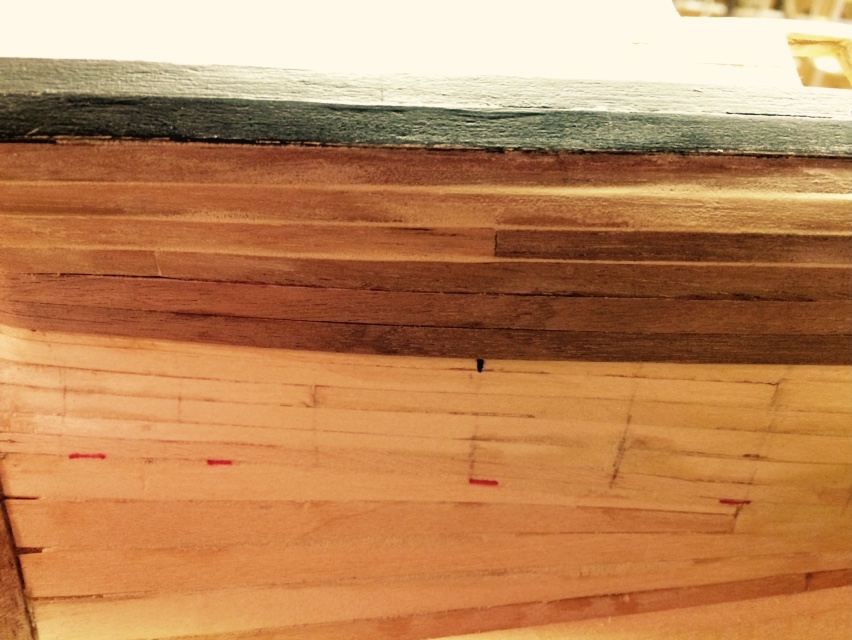
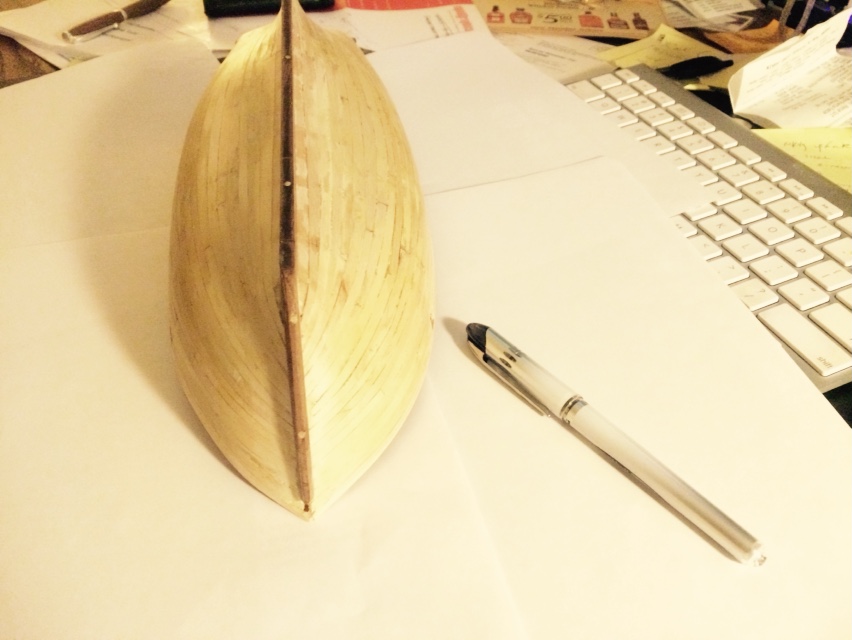
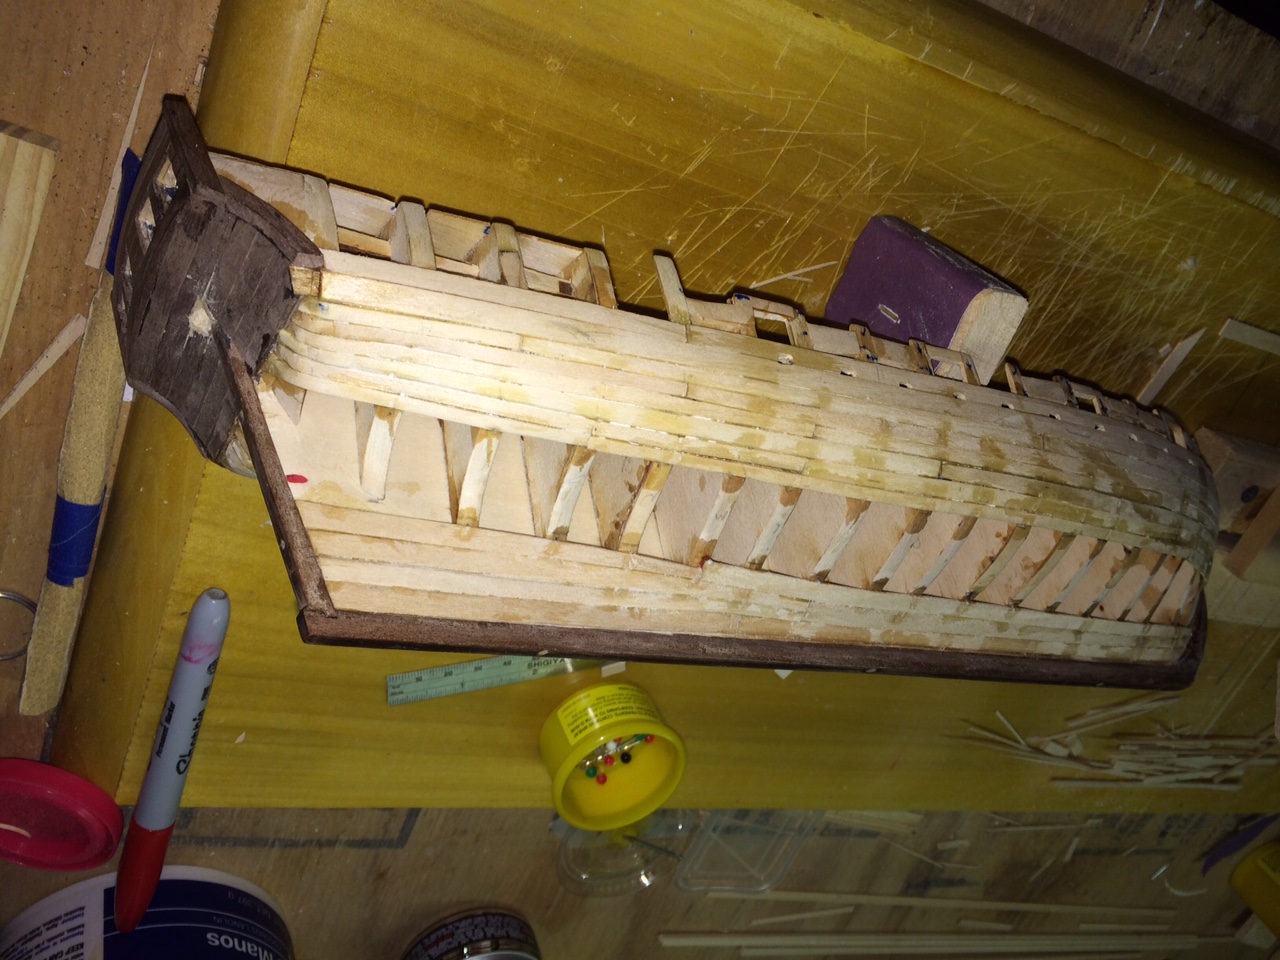
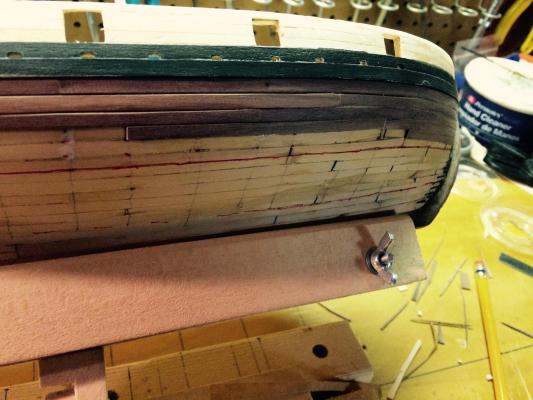
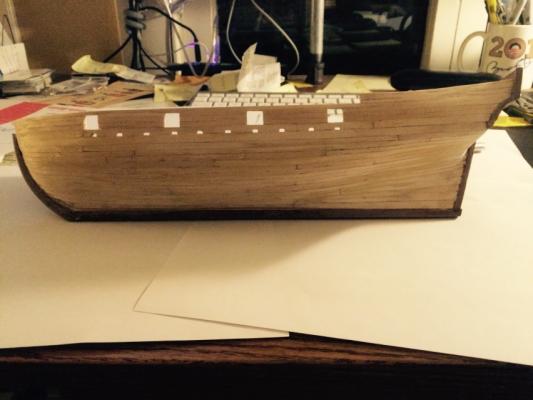
Planking the hull with walnut I've started the walnut layer. Not sure yet how I feel about it. I'm struggling to make the planks even and the curves smooth - although I'm doing much better at it this time than with first layer. I'm also annoyed that the width of the planks varies so much at the bow. I think this will be my wall side. One suggestion I had readone place or another is that you can put a small bevel on the edge of each plank so they stand out a little bit when painted. I'm regretting that decision too, because it seems to exacerbate every imperfection - while adding a few more in the process. But I'm committed now. So I'll stick with it and if I don't like the result when I start priming, I can use wood filler to fill in the bevels and smooth out everything. It all depends on whether I feel I want to emphasize or de-emphasize my crapsmanship. I've bent two strakes around the stern and am happy so far with the curve and the makings of a good, clean edge where they meet the transom. Obviously, more work is needed there and I'll wait until I get the side - or the whole stern - done. The best news is that another day has passed without gluing my thumb to the hull. Some photos - which I'm reluctant to post because they made everything look wavier, rougher and blotchier than with the naked eye.

- 164 replies
-
- 1
-
-
- model shipways
- armed virginia sloop
- (and 2 more)
-
Looks great Brett. I'm guessing the hole and single fid are all about authenticity. Your solution looks fine to me, unless you're going to be showing this off to people with grounding-sensing radar who are going to judge your worth as a person by peering into solid wood.
- 129 replies
-
- 1
-
-
- armed virginia sloop
- model shipways
- (and 1 more)
-
I'm impressed with all of you, frankly. I'm on my first build with the AVS and based on everyone's input, I've got some pear planking on the way to upgrade the decks from bass wood. But other than that, I planning to build straight from the box. I've been watching this thread about the cannons and decided that if anyone ever wants the definition of "geek", this is a great example. I mean that in a good way and hope nobody takes offense. But really, how many places in the world is there a conversation about upgrading the cannon castings for your wooden ship model?
- 831 replies
-
- 3
-
-
- Armed Virginia Sloop
- Model Shipways
- (and 1 more)
-
Thanks Brian. The wear is a big part of my thinking.
-
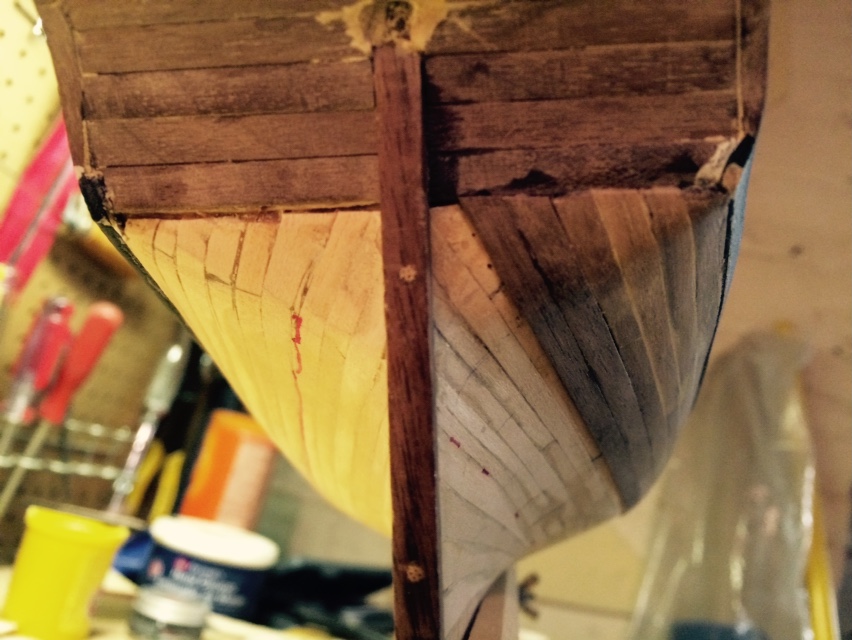
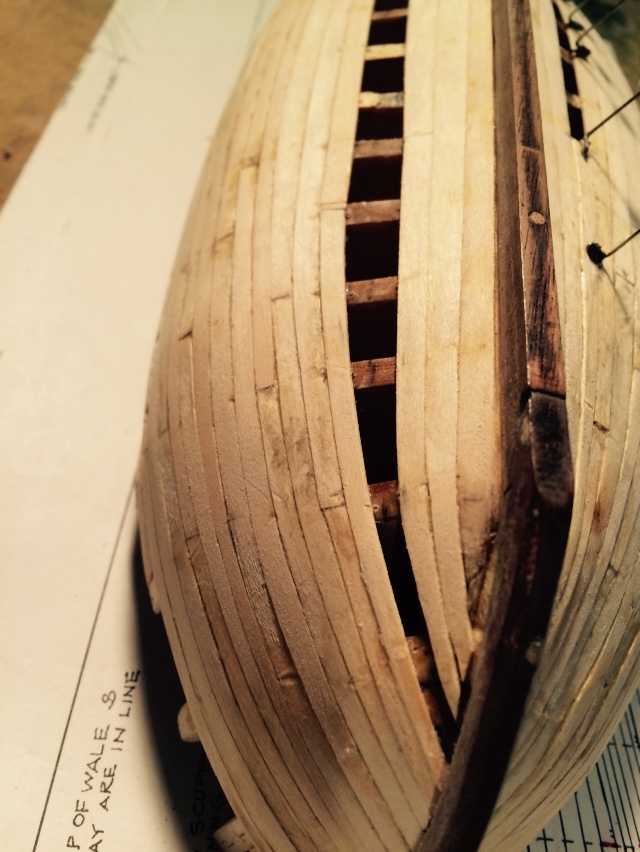
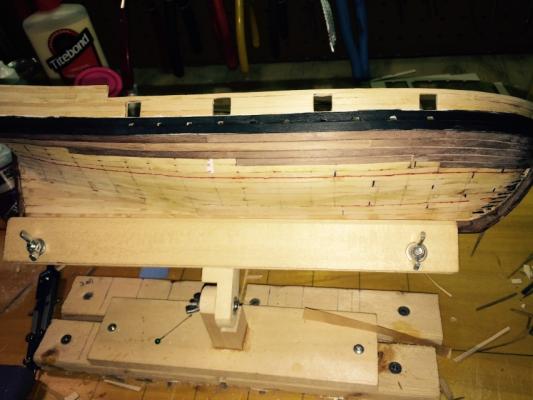
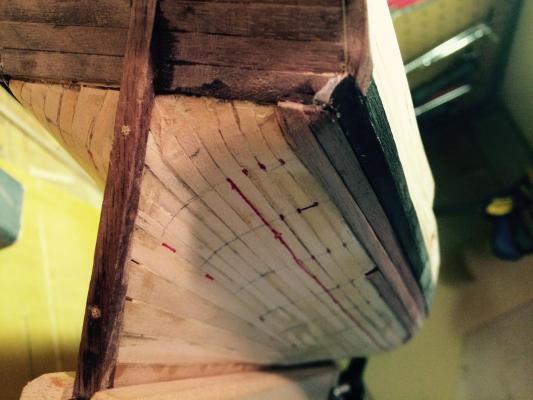
After finishing the first layer of planking, I needed some time to regroup and reorient. I've been doing a lot of reading about techniques - this forum, the plans, and the practica. Then I did the walnut wale and black strake. It was straightforward and I feel good about the way it looks. My one unique take on this fabrication is that I did the black strake in pieces - with one long piece that spans all the scuppers. To do it over, I'd use a single piece. But back when I was doing the basswood black strakes, I made an identical walnut copy at the same time by clamping two planks together. It was my solution to create scuppers in both layers. Yes, I now know I could have made artificial scuppers. And I still have to match them up with the insides scuppers when I put in the bulwark ceilings - which I hadn't figured into the equation the first time around. It wasn't a mistake so much as an unnecessary detour. Anyhow, I find myself a bit immobilized and am looking for thoughts on which direction to go next. I assume I ought to paint the wale and blackstrake before laying down the nearby planking above and below. Then I could do the ceiling buwarks like Brian did (http://modelshipworld.com/index.php/topic/8085-armed-virginia-sloop-by-gunthermt-model-shipways-scale-148/page-16). I see the sense in it. Or I could do the hull above the black strake. I see the sense in that too. Or I could move right into the lower part of the hull. Also reasonable. I'm wondering what reasons others might have for going in a particular direction next.

- 164 replies
-
- 3
-
-
- model shipways
- armed virginia sloop
- (and 2 more)
-
The Stock that comes with AVS is actually now mixed. Some of the walnut is 1/16" and some .020 - but actually .030. That's where my confusion started, though I really just didn't have the patience today to sort it out.
-
I went to the workshop today to begin my outer layer of planking. I found I had suddenly lost the ability to identify 1/16 x 3/16 walnut stock - even with a digital caliper. I accept that as the Universe suggesting I take the day off.
- 164 replies
-
- 2
-
-
- model shipways
- armed virginia sloop
- (and 2 more)
-
Hmm. Build a gun carriage before I sized the gun ports. That would have been a good idea. The consolation for the trials involved in this hobby is knowing that the real boats built during this period were notorious for being less than symmetrical. And I've raced on a few modern boats that were always faster on one tack than the other - no matter what anybody did to tune the rigging and straighten them out.
- 831 replies
-
- 2
-
-
- Armed Virginia Sloop
- Model Shipways
- (and 1 more)
-
Brian, I'm just catching up with your build; it's beautiful so far. Your pace is certainly faster than mine and you've documented a lot of details - so I'm looking forward to using your own experience to solve many of the challenges I know lay before me. Unlike you, I'm not thinking very far ahead about processes like treenails and decking material. My brain power is fully occupied just to make sure I'm taking things in the right order to make each subsequent step as easy as possible. Thanks for sharing and the great photos.
-
Brett, I did hear about the scuppers after I'd already managed to make a matched pair of inner and outer planks with real scuppers that line up. The outer planks have been waiting for months with matching scuppers already carved into them, so I'm looking forward to putting them in place. But on the next build, I'll take the easier route on that step, because I'm not at all sure yet how this is going to work out. Brian, I wouldn't have found full-length strakes to be easier at all. I do have some that are quite long, but I was happy to cut off every strake at some point and just start fresh on the next curve.
-
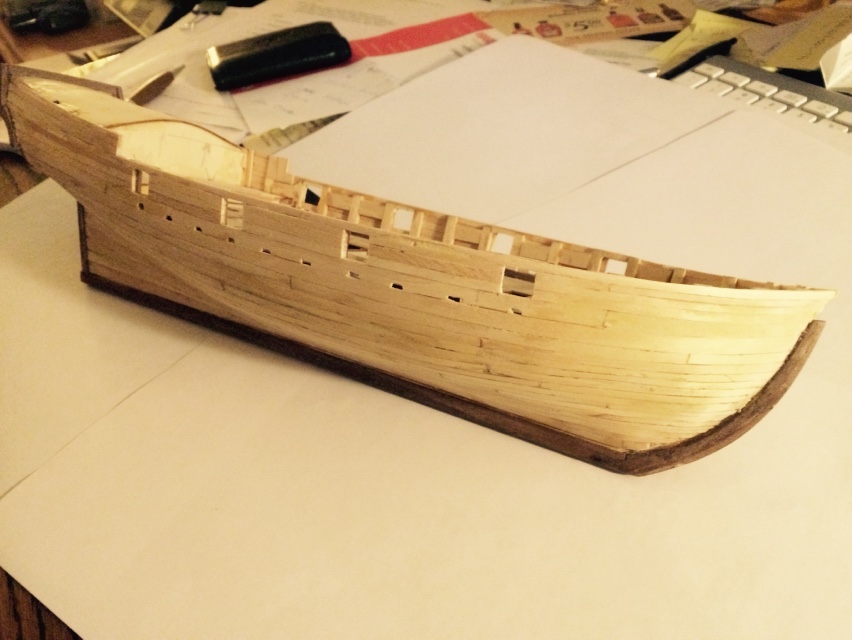
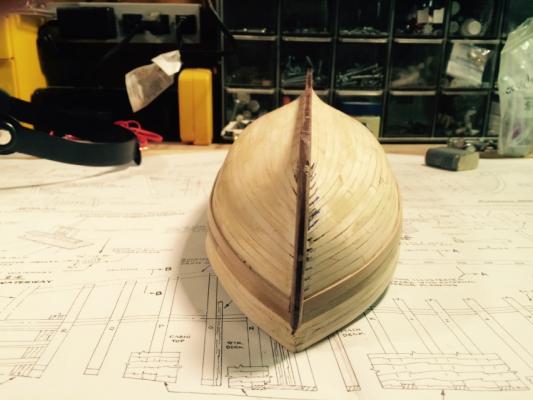
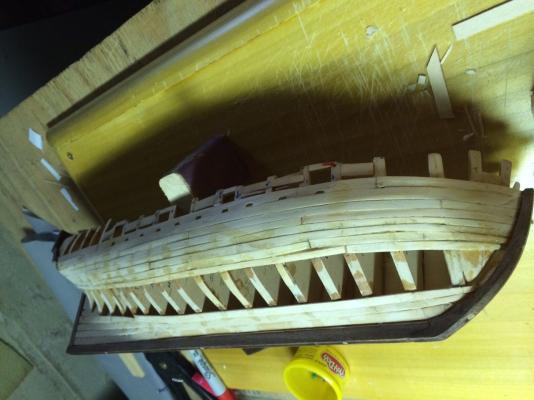
Except for a little mopping up, I've finished the first layer of planking. I've been keeping rough track of time spent and I'm at about 75 hours on the build to date. I know that's not fast; not sure if it's slow. But it's the right pace for me. I've been adding some wood filler to fair the hull - catching some of the places where I had gaps or was a little aggressive in bending planks along the grain, resulting in some laps that needed to be smoothed over. I've sized the cannon ports but have stopped short of finishing them, since I still have to add layers on both the outside and inside. Funny to have spent so much time at this point and still have no more than 3 pieces that will actually show in the finished model. But that's also a good thing. Not being an experienced woodworker, I needed the learning curve of the inner layer and now feel better prepared to tackle the hardwood layer. Though I'm sure that too will have its share of blemishes. I struggled to maintain an authentic planking pattern, and frankly stopped worrying very much about it - except to plan how I'll do better on the outside layer. Since I struggled most with achieving the right curves at the bow, I think my approach will be to plank the bow section first - being most careful to use that as the launching point for an authentic planking pattern. Once established at the bow, I don't think I'll have any trouble maintaining correct distance between places where planks end. The other thing I'll need to concentrate on is achieving more uniformity in the width of adjacent planks. Again, I think the secret to that, for me, will be getting it right at the bow and letting everything flow back from there.


- 164 replies
-
- 4
-
-
- model shipways
- armed virginia sloop
- (and 2 more)
-
Yes, I'm planning to paint the hull. Having never been much of a woodworker, I'm probably a few builds away from building one in the buff. I like the realism anyway of the paint job.
-
Thanks Brian. I appreciate the reference to the planking section; I wasn't aware of it. I've never allowed myself to forget that the role of the first layer is to form a good, fair base for the second. But as this is my first build, I'm glad for the opportunity to learn with a layer that's going to get covered up.
-
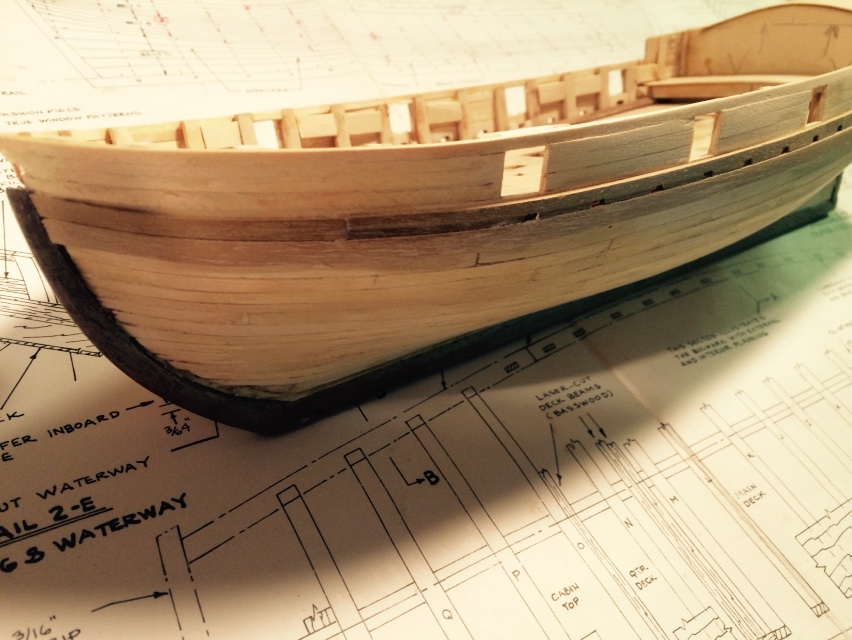
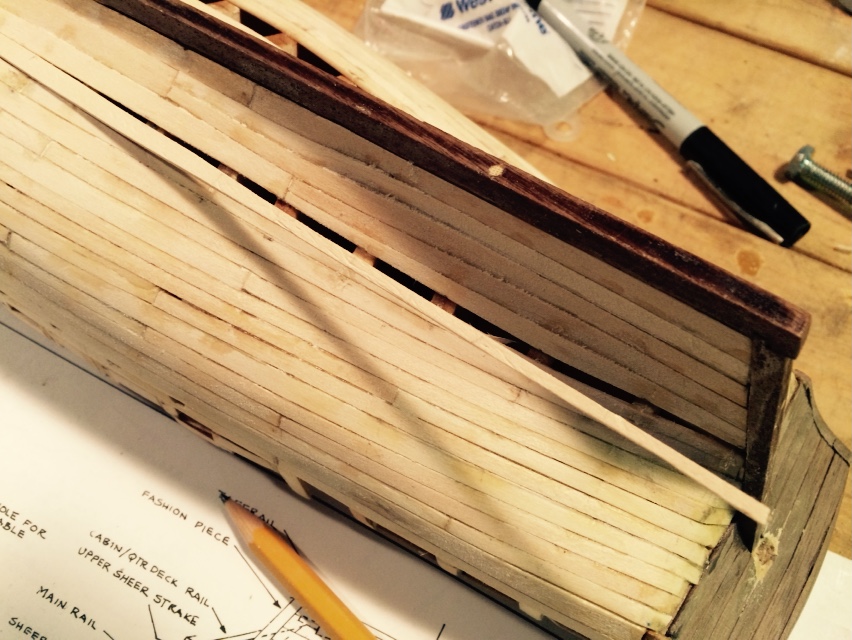
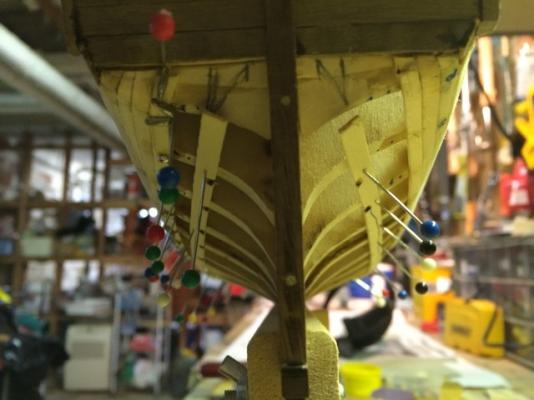
The weather has started to turn, so I've returned to the workshop and am making progress on finishing the first layer of planking. My biggest challenge, consistently, has been carving the curve at the bow – particularly higher up toward the wale, where the planks are a bit wider and the curve toward the stem is more extreme. As I've worked farther down, I've been able to make peace with the process - thanks largely to the reduced inward curve toward the stem, and the ability to put some bend into the narrower planks along the length of the grain. I'm also not satisfied with the lack of uniformity in the width of the planks at the bow. The plans seem to show varying widths and I tried to match those in Belts A and C. But I seem to err toward oversized, which means the planks in Belt B are all narrower than shown in the plans. It looks odd and I'll be happy to cover it it. When I tackle this aspect in the hardwood layer, I'm going to aim for a uniform width of all planks where they meet the stem – at least below Belt A. I'm already thinking about how I'll set up a jig or gauge to achieve that. I'm glad there are two layers of planking; while I'm fatigued from the process and could use to move onto something new, I'll look forward to the chance to put what I've learned to use to make the hardwood layer look better. I've got some trepidation about the hardwood being less forgiving, but like everything else in this process, I'll just take it one plank at a time and keep sipping the bourbon. At the very least, I feel like I'm getting better with every plank. And I still have plenty to do before getting to the hardwood layer anyway. I'm just about to close up the bottom of the hull, but I've saved the planking above the wale - so that will be next. Then I'll need to fair the hull. Probably January, at this rate, before I pull out any hardwood planking. WIth that said, here are a few recent pics. That hole in the bow above is just from two consecutive planks that I managed to cut a tiny bit short. It looks a whole lot worse in the photo. I plan to fill it when fairing the hull so the hardwood layer will have a good surface to adhere to. The last plank on the starboard side is fitted and ready for glue.


- 164 replies
-
- 2
-
-
- model shipways
- armed virginia sloop
- (and 2 more)
-
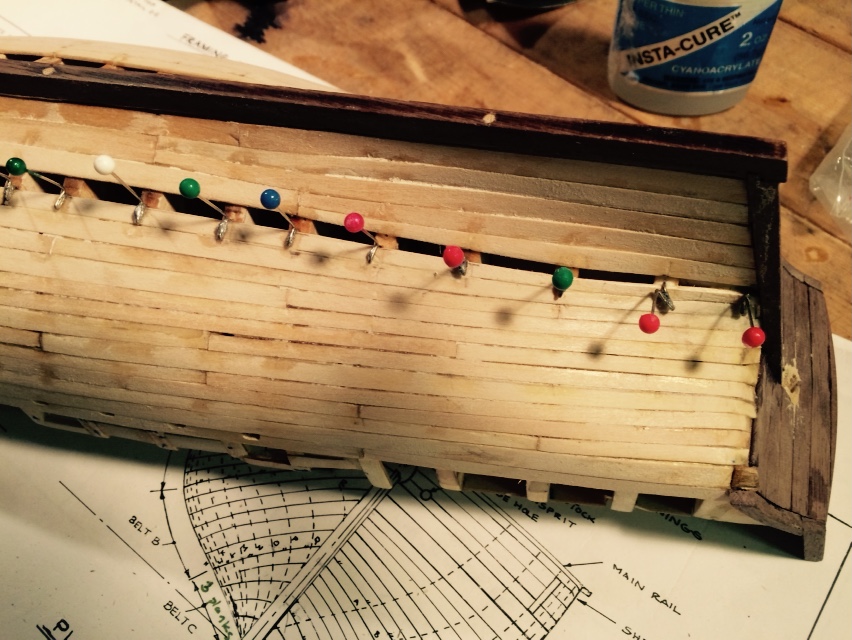
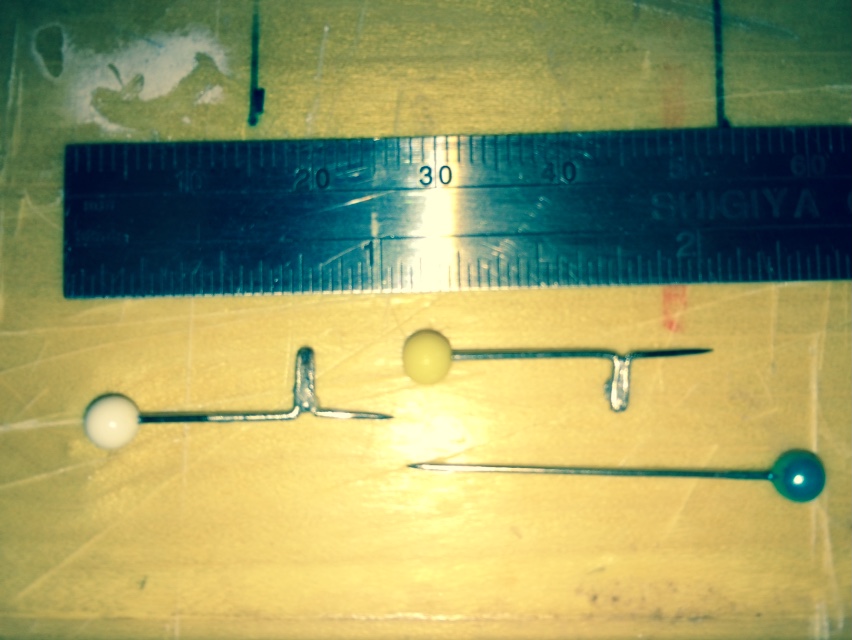
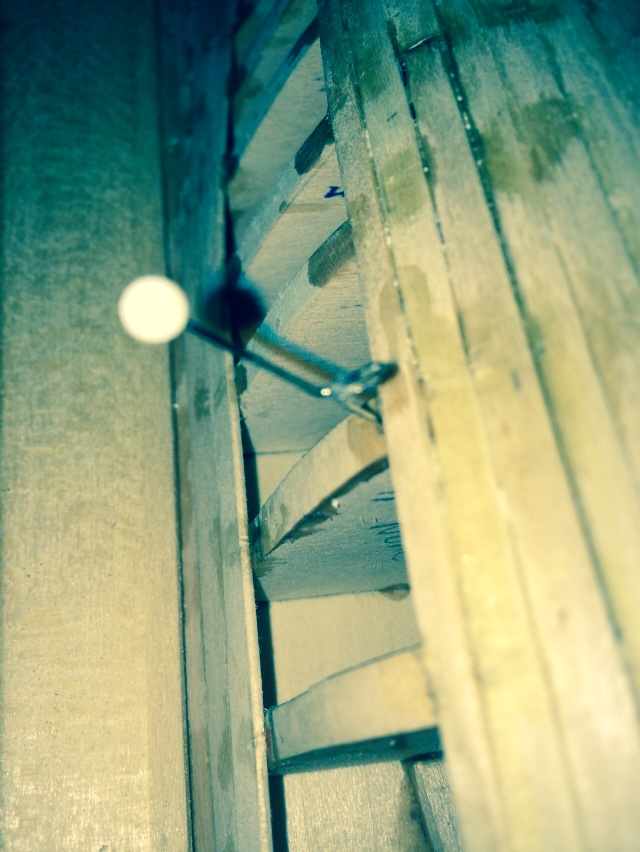
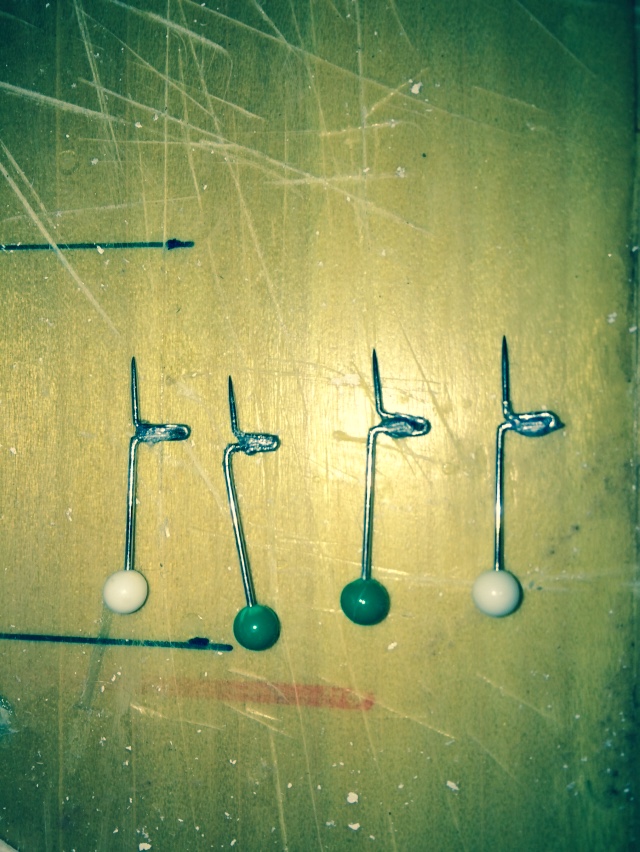
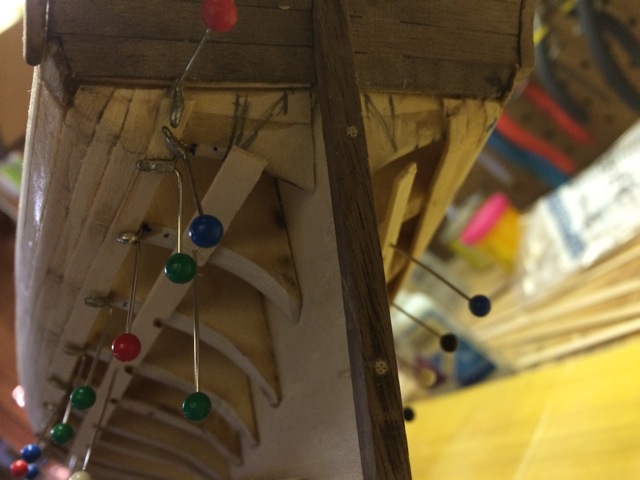
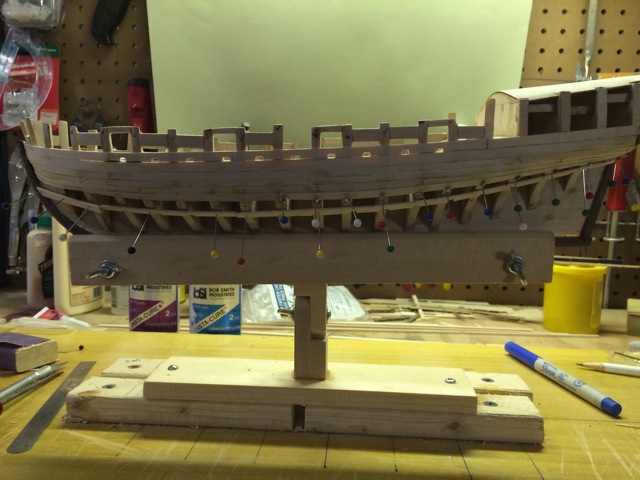
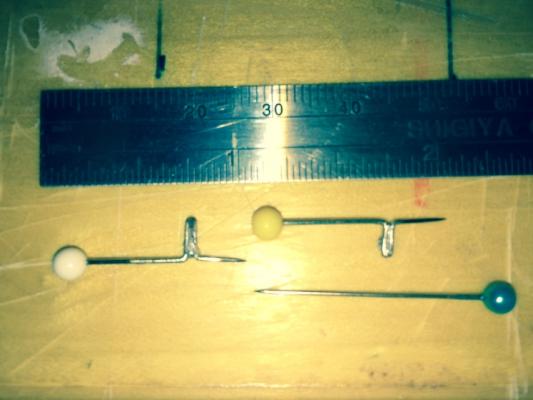
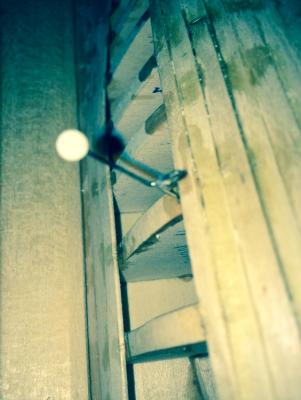
I'm a bit embarrassed to respond to your request Eamonn, because I picked these up from someone else's build log. But it was several months ago and I don't remember whose it was, so I can't give proper credit. So let's just emphasize: I didn't invent these. With that said, here are the clamps: To make them, take a 1.5" straight pin, bend it 90 degrees, then 180, then 90 again until you have them shaped as in the photo. Then apply a little solder at the bend, so they hold together when you push and pull at them. You can make a pile of them in about 45 minutes, once you get rolling. Here's an example of one in use. It goes into the bulkhead, and the protrusion in the clamp holds the plank fast against the bulkhead and tight up against the adjacent plank. The beautiful thing about them is that the hole made by the pin is always going to get covered by the next plank. I don't see any reason why I shouldn't be able to use them for the outer layer of planking as well. They'll go right into the first planks without regard to bulkhead locations. They do break over successive uses, so I've had attrition and have since made a second batch. Such an elegant little tool, I wonder that everyone doesn't know about them. I feel fortunate to have stumbled on them early in my first build.

- 164 replies
-
- 3
-
-
- model shipways
- armed virginia sloop
- (and 2 more)
-
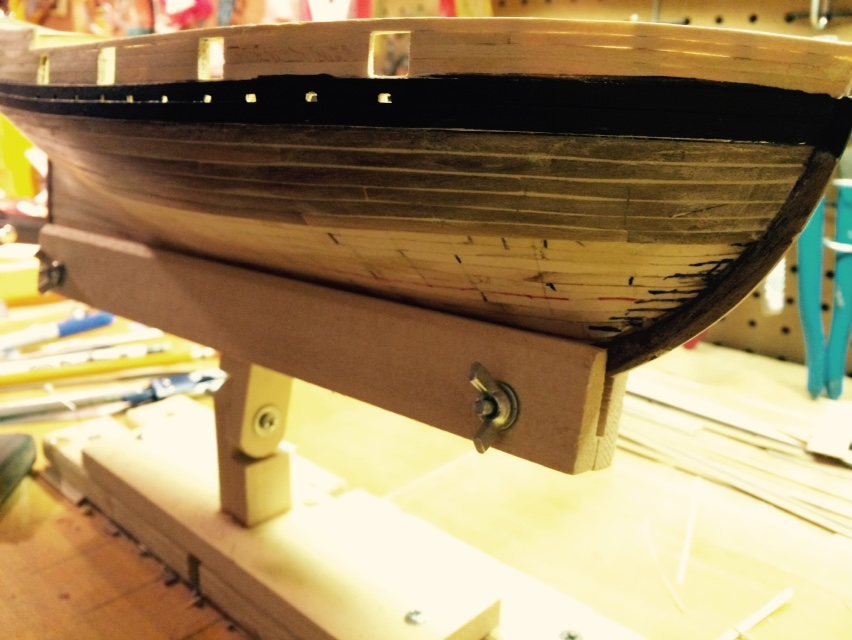
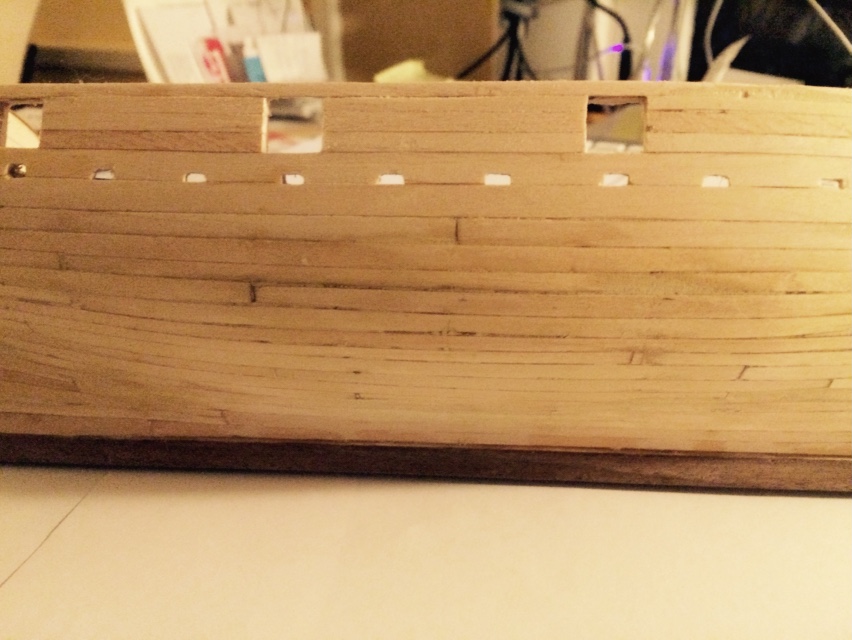
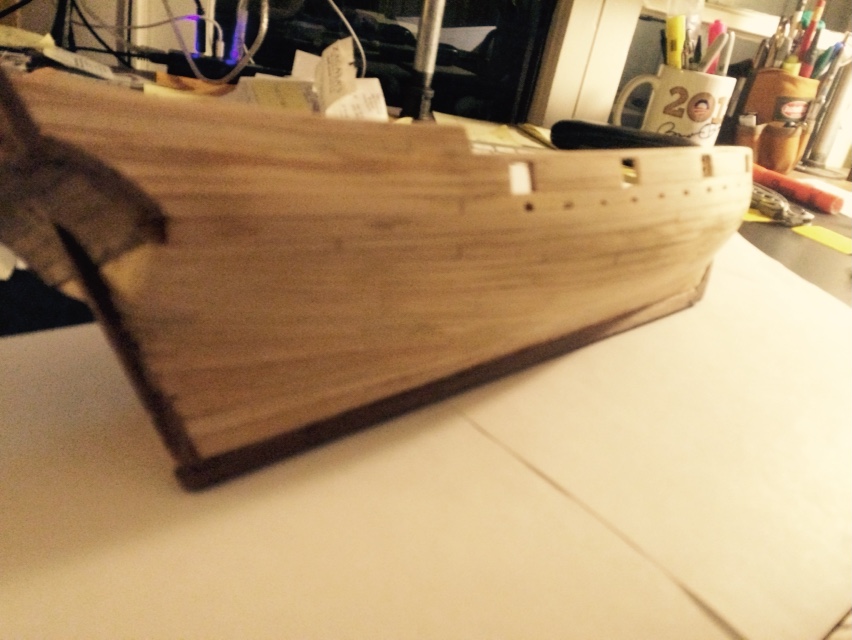
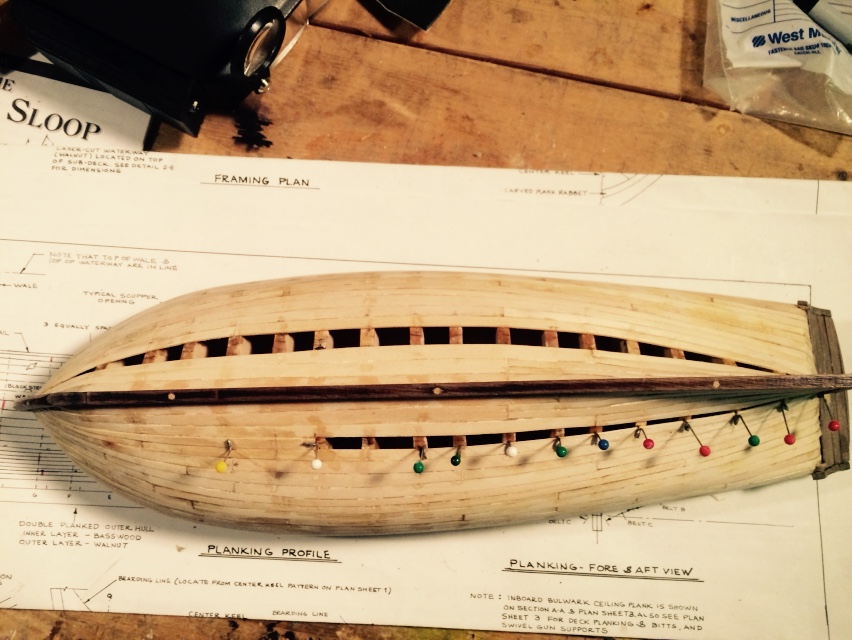
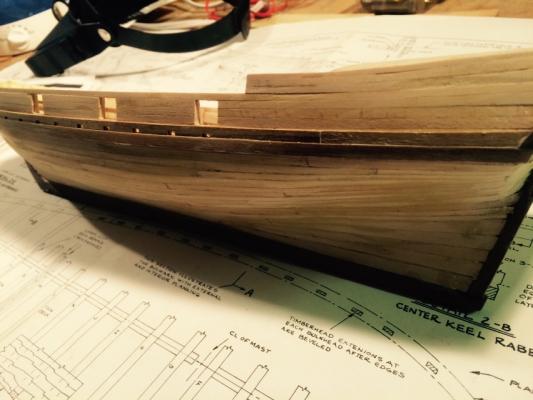
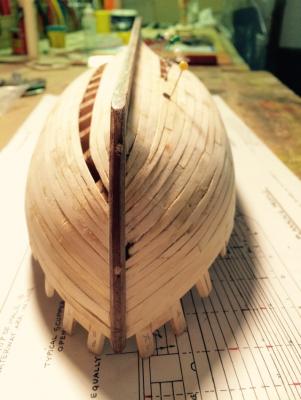
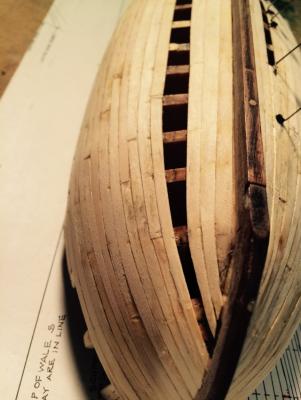
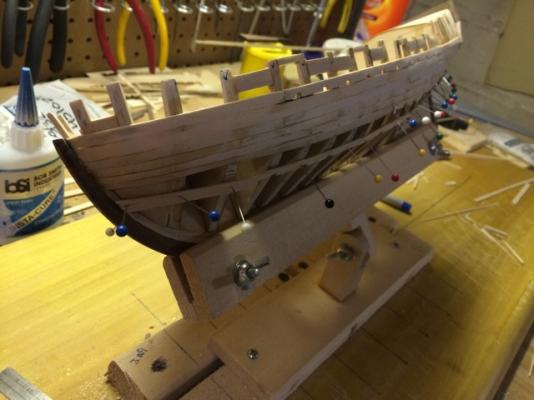
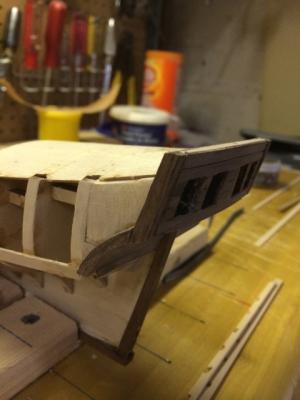
Here's a couple photos of Belt C, which was actually pretty easy. I've only finished this Belt on the starboard side. Port side awaits for colder weather. I don't know why my images are suddenly importing upside-down, but I'm going to leave them, rather than try to upload again. You get the idea of how things look.

- 164 replies
-
- 3
-
-
- model shipways
- armed virginia sloop
- (and 2 more)
-
Dave, Your build looks beautiful. I'm guessing that's where I'll be a year from now - and I hope it looks nearly as good as yours. I'm using a combination of Bob Hunt's practicum, the instructions provided with the kit and experiences recorded in build logs here. I don't have the same gripe that others seem to have about the instructions being inadequate or out of order. It's obvious there is more than one way to tackle each step of this craft. An enjoyable part of the process for me is simply comparing the information available (including build logs), coming to an understanding how things are supposed to go together and how they're supposed to look, and then deciding how best to approach it based on my skills. It involves a lot of time sitting with the plans spread out on the dining room table - nowhere near where the build is actually taking place. But so far, my many mistakes have been small, and I've been able to recover from them.
-
Brian, Thanks for the note and the kind words. My build has been on vacation since the weather turned beautiful and the outdoors beckoned. But today is the autumnal equinox. Cooler weather is arriving, and every time I pass by my build - waiting calmly in its keel vice - the itch to get back to it grows a little stronger. I do still have a lot of fall cleanup to do around the house in preparation winter, but I expect to take up the consistent work again over the next several weeks. Meanwhile, I have continued to put in an hour or two at a time here and am surprised at how far the planking has come since I last posted photos here. In fact, I've gotten far enough that I'm guessing my build log won't be one of the best at documenting the various trials involved with the first layer of planking. Before beginning, I made about two-dozen plank clamps from 1.5" sewing pins. I got the idea from the build log of someone here who has built many beautiful models. I meant to credit him for the idea, but I got it so long ago I don't remember whose it was. But you can see the clamps in the photo below. There work beautifully; the hold the plank tightly to the bulkhead and allow fine adjustment so you can snug the new plank's edge closely to that of the adjacent plank. This series of photos is from late April 2014. I began planking with Belt A. I carefully measured and marked the location where Belt A should end on each bulkhead and then pinned a batten in that location as suggested in the instructions. If you're paying attention, you'll notice the batten is one of my discarded attempts at creating scuppers. No scrap is completely useless. If you read any build log for this boat, you'll read about how touchy it is to make the sharp bend at the stern, where Belt A planks turn nearly 90 degrees to meet the transom. And they tell the truth - it's touchy. But I honestly had less trouble with this than I do with shaping the curve in each plank at the bow. You need to take into account both the upward rise in the plank along with the inward bend - which will cause the plank to rise naturally anyway. Unfortunately, the proscribed turn and the inward bend don't quite match. Add to that the taper in the width of each plank, and the job became a matter of careful trial and error. I couldn't figure out any way to translate what's on paper onto a plank of wood. One may exist, but I had more success holding each plank against the bow, marking on the plank where it wanted to meet each bulkhead and slowly using those marks to create a curve that usually looked something like this. . where each bulkhead would mea - a combination of fitting, marking and trimming as many times as it took to get a shape that fit well. Here's a photo of a discarded plank in progress: There's lots of glue everywhere. I'm using CA to afix the plank to the bulkhead, but using white carpenter's glue on the edge of each strake to join the planks to each other. It's the CA that's making the mess, as I'm using super-thin/fast-setting to to ensure a good bond between plank and bulkhead. I was self-conscious about how blotchy the build looks in the photos, but looking around at other build logs, I'm realizing this is simply what a model looks like in progress. At least a rookie build. I'll have to reevaluate my gluiing method for the second layer of planking to I don't have quite as much mess to clean up. There is certainly a lot of sanding in my future. But I've faired the bottom of a real boat; the work required here isn't going to bother me.


- 164 replies
-
- 3
-
-
- model shipways
- armed virginia sloop
- (and 2 more)
-
Looks great. Nice progress.
-
Brett, Your build is looking great. As a first-timer, this is an elementary question but what do you use as filler when sanding and fairing your first layer of planking?
-
Looks great. I'm enjoying your progress. I'm still planking Band A.
-
D'oh! I'm not building real scuppers out of some twisted need for heightened authenticity. But I've got them set already through 3 layers - both black strake layers and the spacers where those exist. Just 1 more layer to go, which I figured to do from the outside with a micro-drill and small files. Maybe I'll figure out how to fake them afterall. But I have time and my mind is kind of done with the project until later in the week.
-
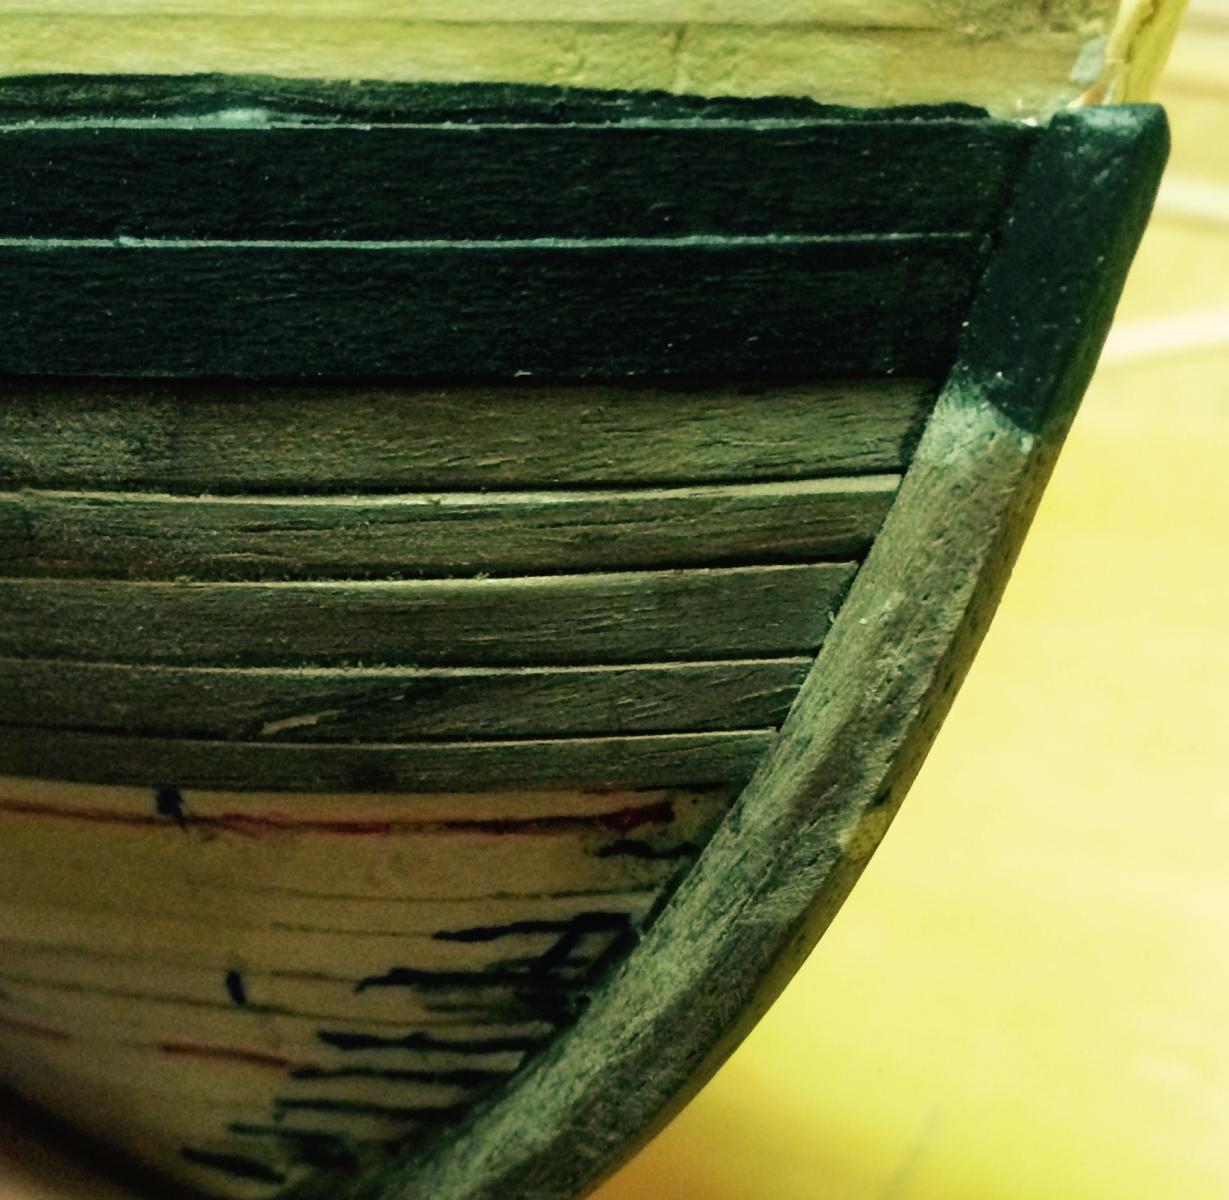
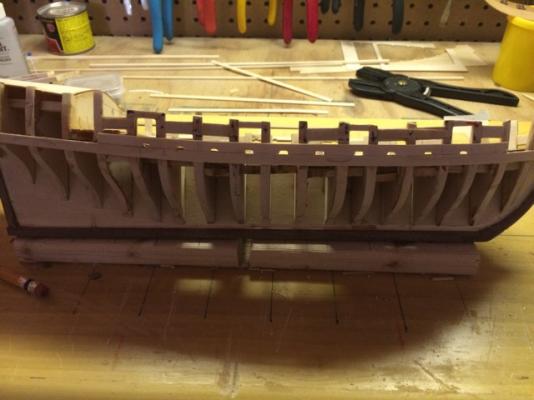
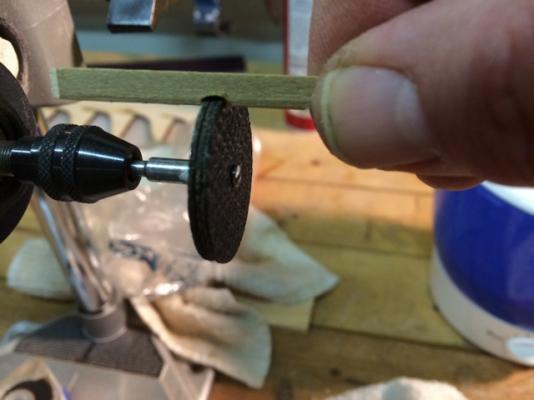
As spring has come on and work has been through a busy cycle, I haven't posted, but I have continued to take an hour here and there on the boat. The wale and fashion pieces went fine. Between the practica and the instructions, there are - as noted over and over again in AVS build logs - conflicts. My approach has been to reach as much information as I can find, spend time studying the drawings and the boat, and then forge ahead as I seems most logical to me. Based on this, I worked on the wale and fashion pieces simultaneously, then I put on the wale before gluing on the fashion pieces. I haven't done any final sanding on the fashion pieces; I'm too likely to go too far. So I will wait until I get the 2nd layer of planking on before working to make joints flush. The black strake gave me trouble - specifically the scuppers. Here's a graveyard of rejected black strakes. I couldn't settle on a method to provide 10 consistently shaped scuppers. I finally settled on a technique using 3 cutoff wheels mounted on my dremel to cut the right width. Then I just had to get the depth of cut right and round out the corners with a riffle. I did two layers at a time - basswood and walnut. I set aside the walnut layer for now, and will have them handy when I begin the second layer of planking.

- 164 replies
-
- 3
-
-
- model shipways
- armed virginia sloop
- (and 2 more)