Search the Community
Showing results for tags 'dremel'.
Found 8 results
-
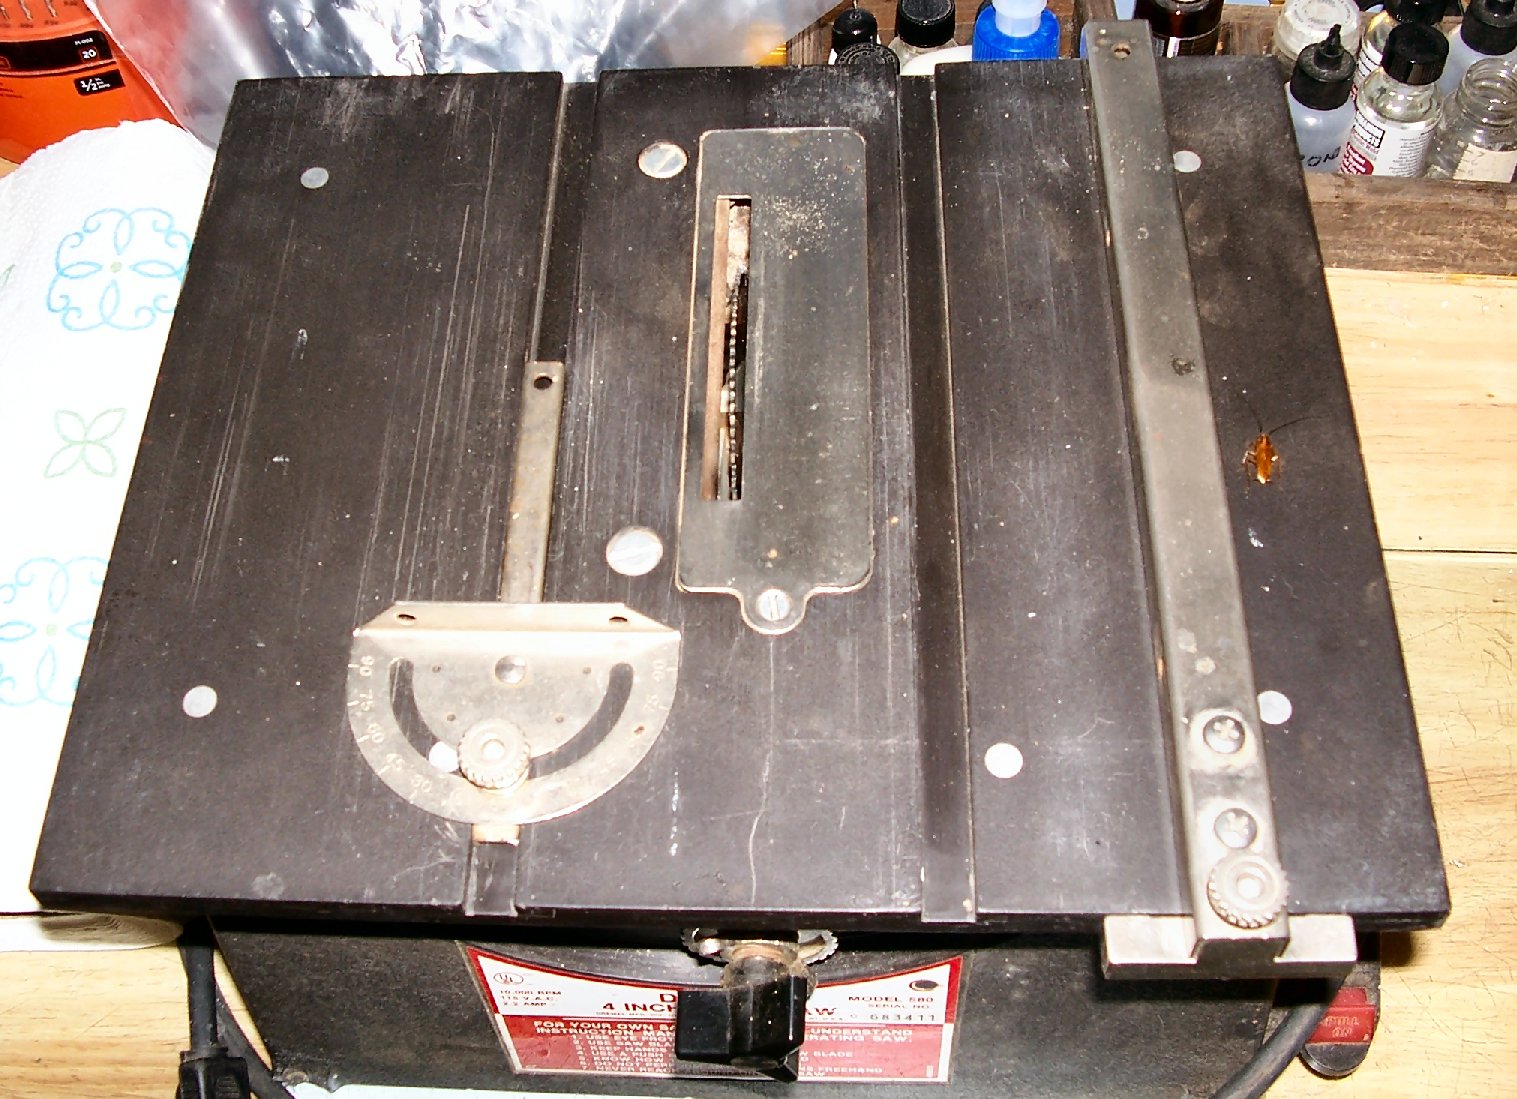
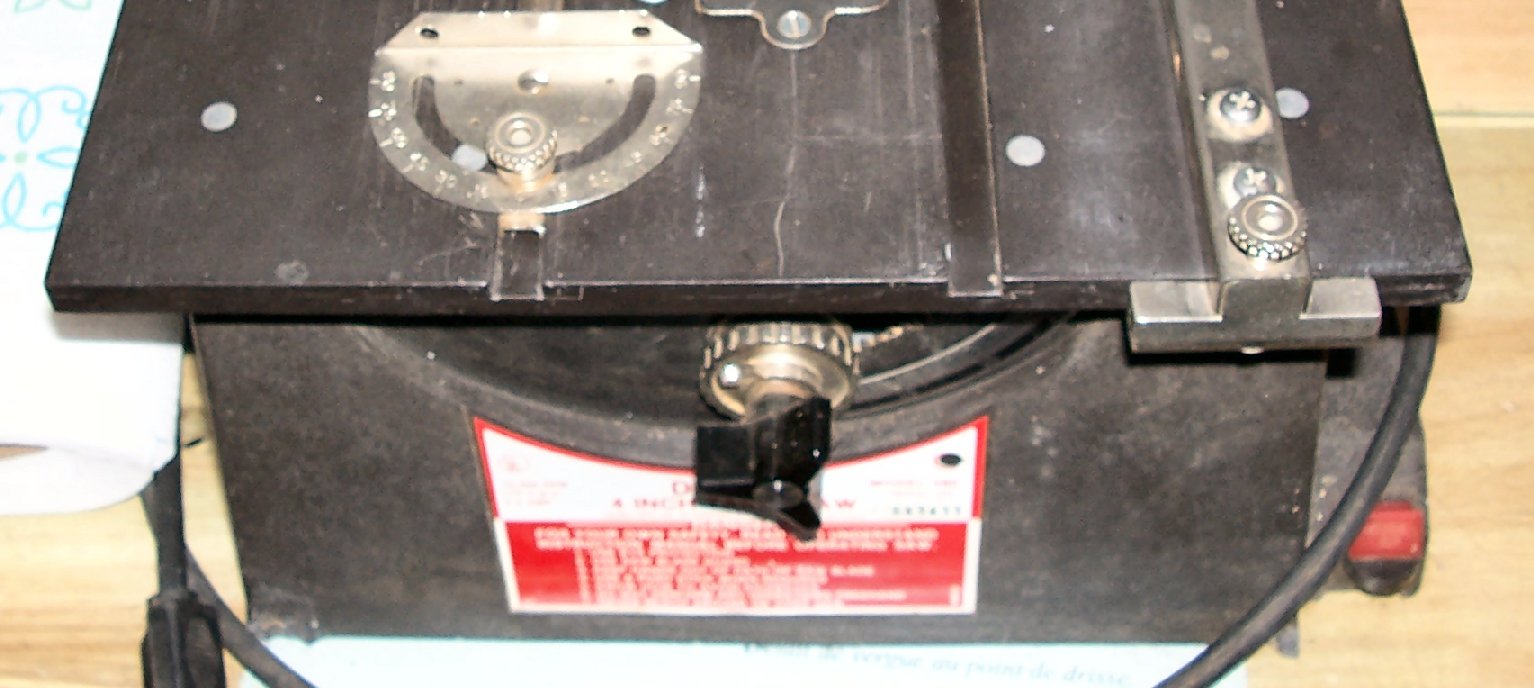
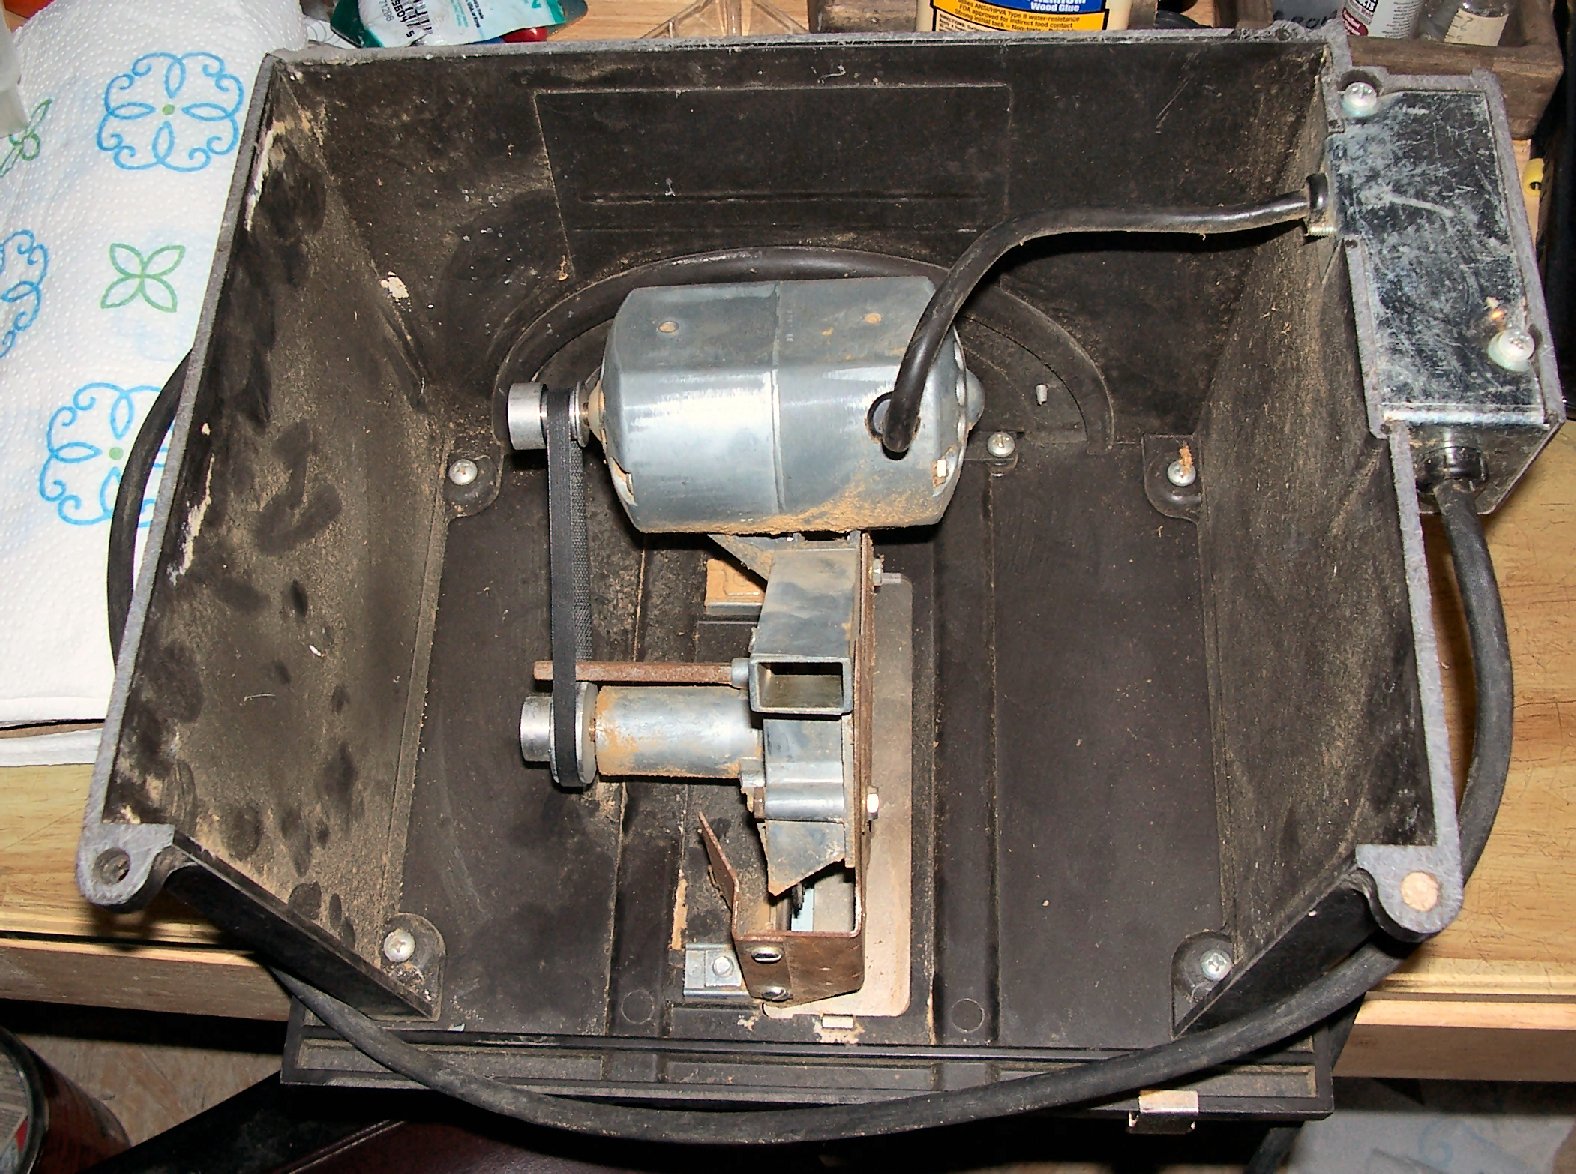
 Part 001 I looked at my available options for a modeling table saw. The contenders are: 1. The Harbor Freight type 4” table saw (many similar types of this basic type of saw). 2. The Proxxon table saws, the cheapest is in my price range, the others cost enough that they are almost as expensive as the Gold Standard Byrnes table saw (see below). 3. The old Dremel 4” table saw. 4. The Byrnes table saw. The best and the Gold Standard, but well over my present funding level at about $500 with shipping. I hope to get one of these in the future, but that is at least a year or more away. The Harbor Freight type table saws are poorly built, and the blade height adjustment is by raising the table, on I’m sure poorly fitting leg/slides. It also does not have a fence. The saw blade slot is cast integrally with the table. This prevents you from cutting thin pieces, as they will tend to be pulled down into the slot. On a regular table saw the blade comes up through the table in a removable insert. If you are cutting thin pieces you replace the insert with one with a thinner slot. In many cases you put a solid plate in and run the blade up through the insert, giving you a zero clearance fit. Of course you need a carbide blade if it is a metal insert, but you can make a thin wood insert from hobby plywood for a regular steel blade. I can’t imagine the Harbor Freight type having good enough tolerances on the table slides for this, even if you can attach something to span the slot. Prices on these range from about $40 to over a $100. The cheaper Proxxon saw has a fixed blade height, also no insert, and only a 2” diameter blade. It does however come with a small plastic fence that does not span the full depth of the table. Prices range about $125 to $200. The Byrnes saw is built more like a machine tool, rather than a saw, and has a large array of available accessories, but it comes with a matching price tag. If you have the money get this. The Dremel saw is no longer made, but is available used for about $125 to $225,with shipping on Ebay. It has a blade that can be raised from under the table, as in a standard large table saw, and the blade can be angled also as in a standard saw. The blade is belt driven and the motor is more powerful than the Proxxon and HF type saws. It does come with a fence that spans the whole depth of the table, and a miter gauge. It has a removable insert. The base is a thick plastic, but durable. There are some accessories available in the aftermarket, but the sources are drying up. The blades and belt are still readily available, though. I chose this route as it falls within my price range, and has more standard table saw features, including a blade insert. My saw did not come with a blade protector, some of the later models did. The blade raising/tilting mechanism is not as sturdy as I would like, the miter gauge is a bit loose in the slots, and the fence is not the most robust, however. I will attempt to remedy some of these faults as this build log continues. The saw is eminently usable, though. This log will not be a regularly updated one, but I will relate all my experiences with both using and upgrading it as time goes on. Here are pictures of the saw as I got it. The first shot is the top. I noticed when I was editing the photos, that I had a visitor. I’ll have to fog the shop, this week. This is the front with the blade raising and tilting controls. These are the same types as a standard table saw. The power switch is on the lower right corner. If you look closely you will see that both front mounting lugs are broken off. The seller did not pack the saw well, and I guess the box got dropped at some point! Both lugs were in the box, though. I assume that they were still attached when it was packed, otherwise I’m sure they would have disappeared before the unit was sold. I’ll glue them back on with epoxy. I am not sure what type of plastic the base is molded of, so using a plastic cement may not work. If I had to guess, I would say ABS plastic. Here is the “guts of the saw from underneath. This is also similar to how a standard table saw is built. Notice though that there is no back to the saw. At one point there was an aftermarket back available, with a vacuum outlet, but they are no longer sold. I will make my own back for mine. Note that the rust is not atypical, the metal parts were not painted when built. It does not affect the operation of the saw. The saw ran well when I plugged it in, with the belt running smoothly. To start with I will disassemble and clean the saw mechanism, using the tips on this site. https://karincorbin.blogspot.com/2009/07/ye-olde-dremel-table-saw.html I will also need to come up with a support for the back of the blade mechanism when making fine cuts. This support may have to be removed to tilt the blade. I have to think more on this idea. Until the next part, thank you for reading my thread.
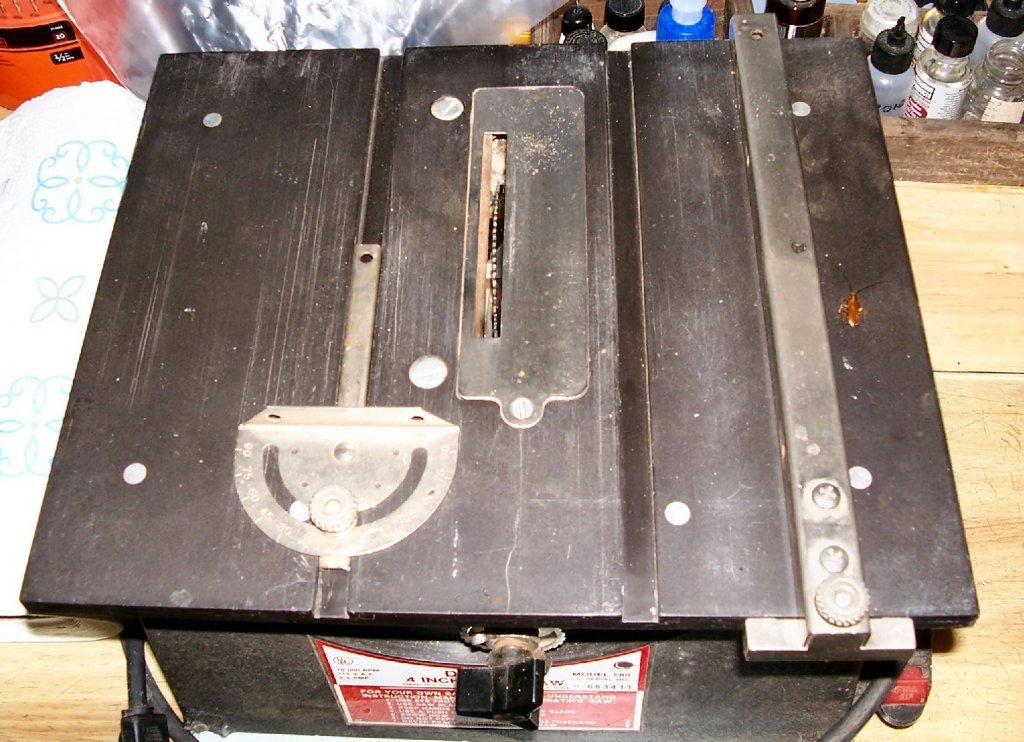


- 67 replies
-
- 11
-

-
 I'm in the market to upgrade my workshop. I have several kit boats under my belt, and being retired I am spending more time in the workshop. I'm currently finishing up on the Pen Duick and eyeing a Shrimp boat next. I have been using a Dremel drill press to drill small holes in 1/8 or 1/16 brass strips. I have not been happy with the results. The drill bit can bounce around on the brass, and there is too much play with the unit when I switch it on which causes me to try to realign the work piece after the power is on. I solved some of these issues by using a on/off foot pedal, and using tape on top of the brass to help steady the drill bit on contact. But I'm still itching for an upgrade. I do not have an XY table, and I have never used a Mill or a Lathe (yet). I do see myself wanting to try Mill/Lathe capabilities sometime in the future as I grow my skills in modeling. I have been looking in to Vanda-Lay industries tools for the Dremel as an option. I could get their Acra Mill Plus with all the attachments for around $450 + tax and shipping. This would give me a Mill, Drill Press, and Lathe. As well as XY and Z control. Or I could start with the Drill Press Plus with Vice, and Drill Press table for around $215. But I wouldn't have XY precision (I'm not sure I need that), and no Mill or Lathe. Their products look good, but they are based on a Dremel which may be an issue with precision, but it could be good enough for an average modeler. I'm OK spending up to $500, but not interested in getting up in the $1000+ high end micro tools. The boss would not approve. I could start with the drill setup now and ask Santa for a Mill or Lathe down the road. Does anybody have a recommendation? I have also considered the Micro Mark 3 speed Drill Press for $300 when I add the XY table, Proxxon TBM 115 for around $315 with a XY table, or the Proxxon MF70 Mill at $400 which include XY I think. I also could go cheap with a Euro Tool DRL300 from Amazon for $115. I suspect some will say get the Proxxon Mill for $400, but to date I only use a drill and the mill looks awkward for mostly drilling. Thanks for your thoughts, Bill
- 9 replies
-
- 4
-
-
- Vanda-Lay Industries
- Drill Press
- (and 2 more)
-
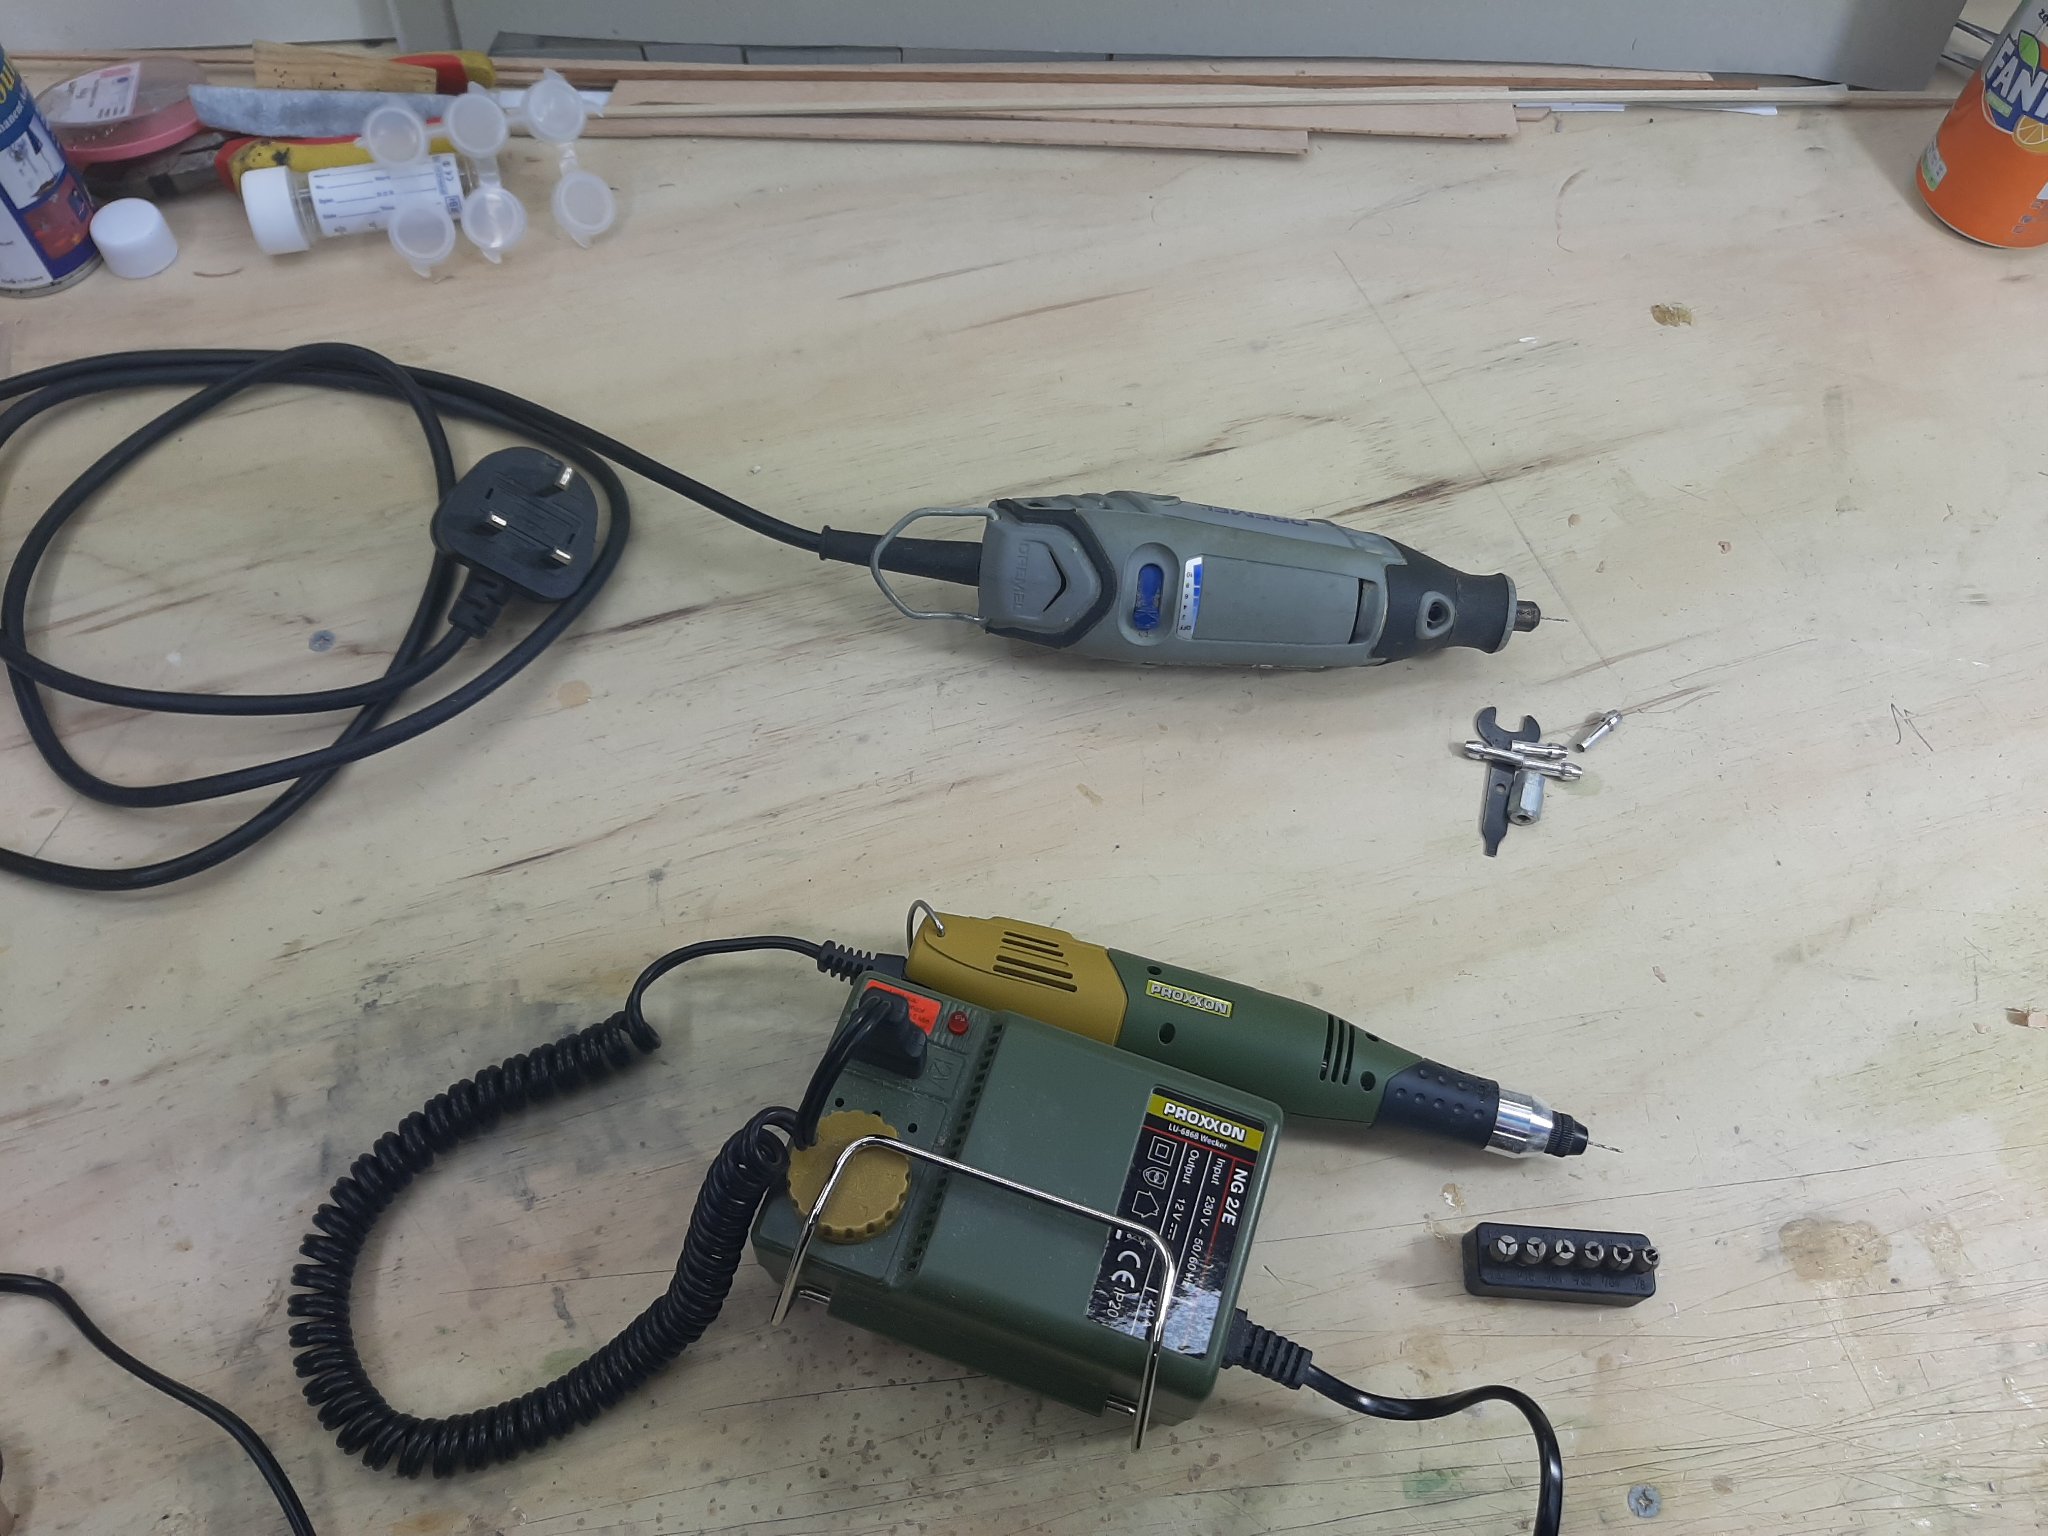
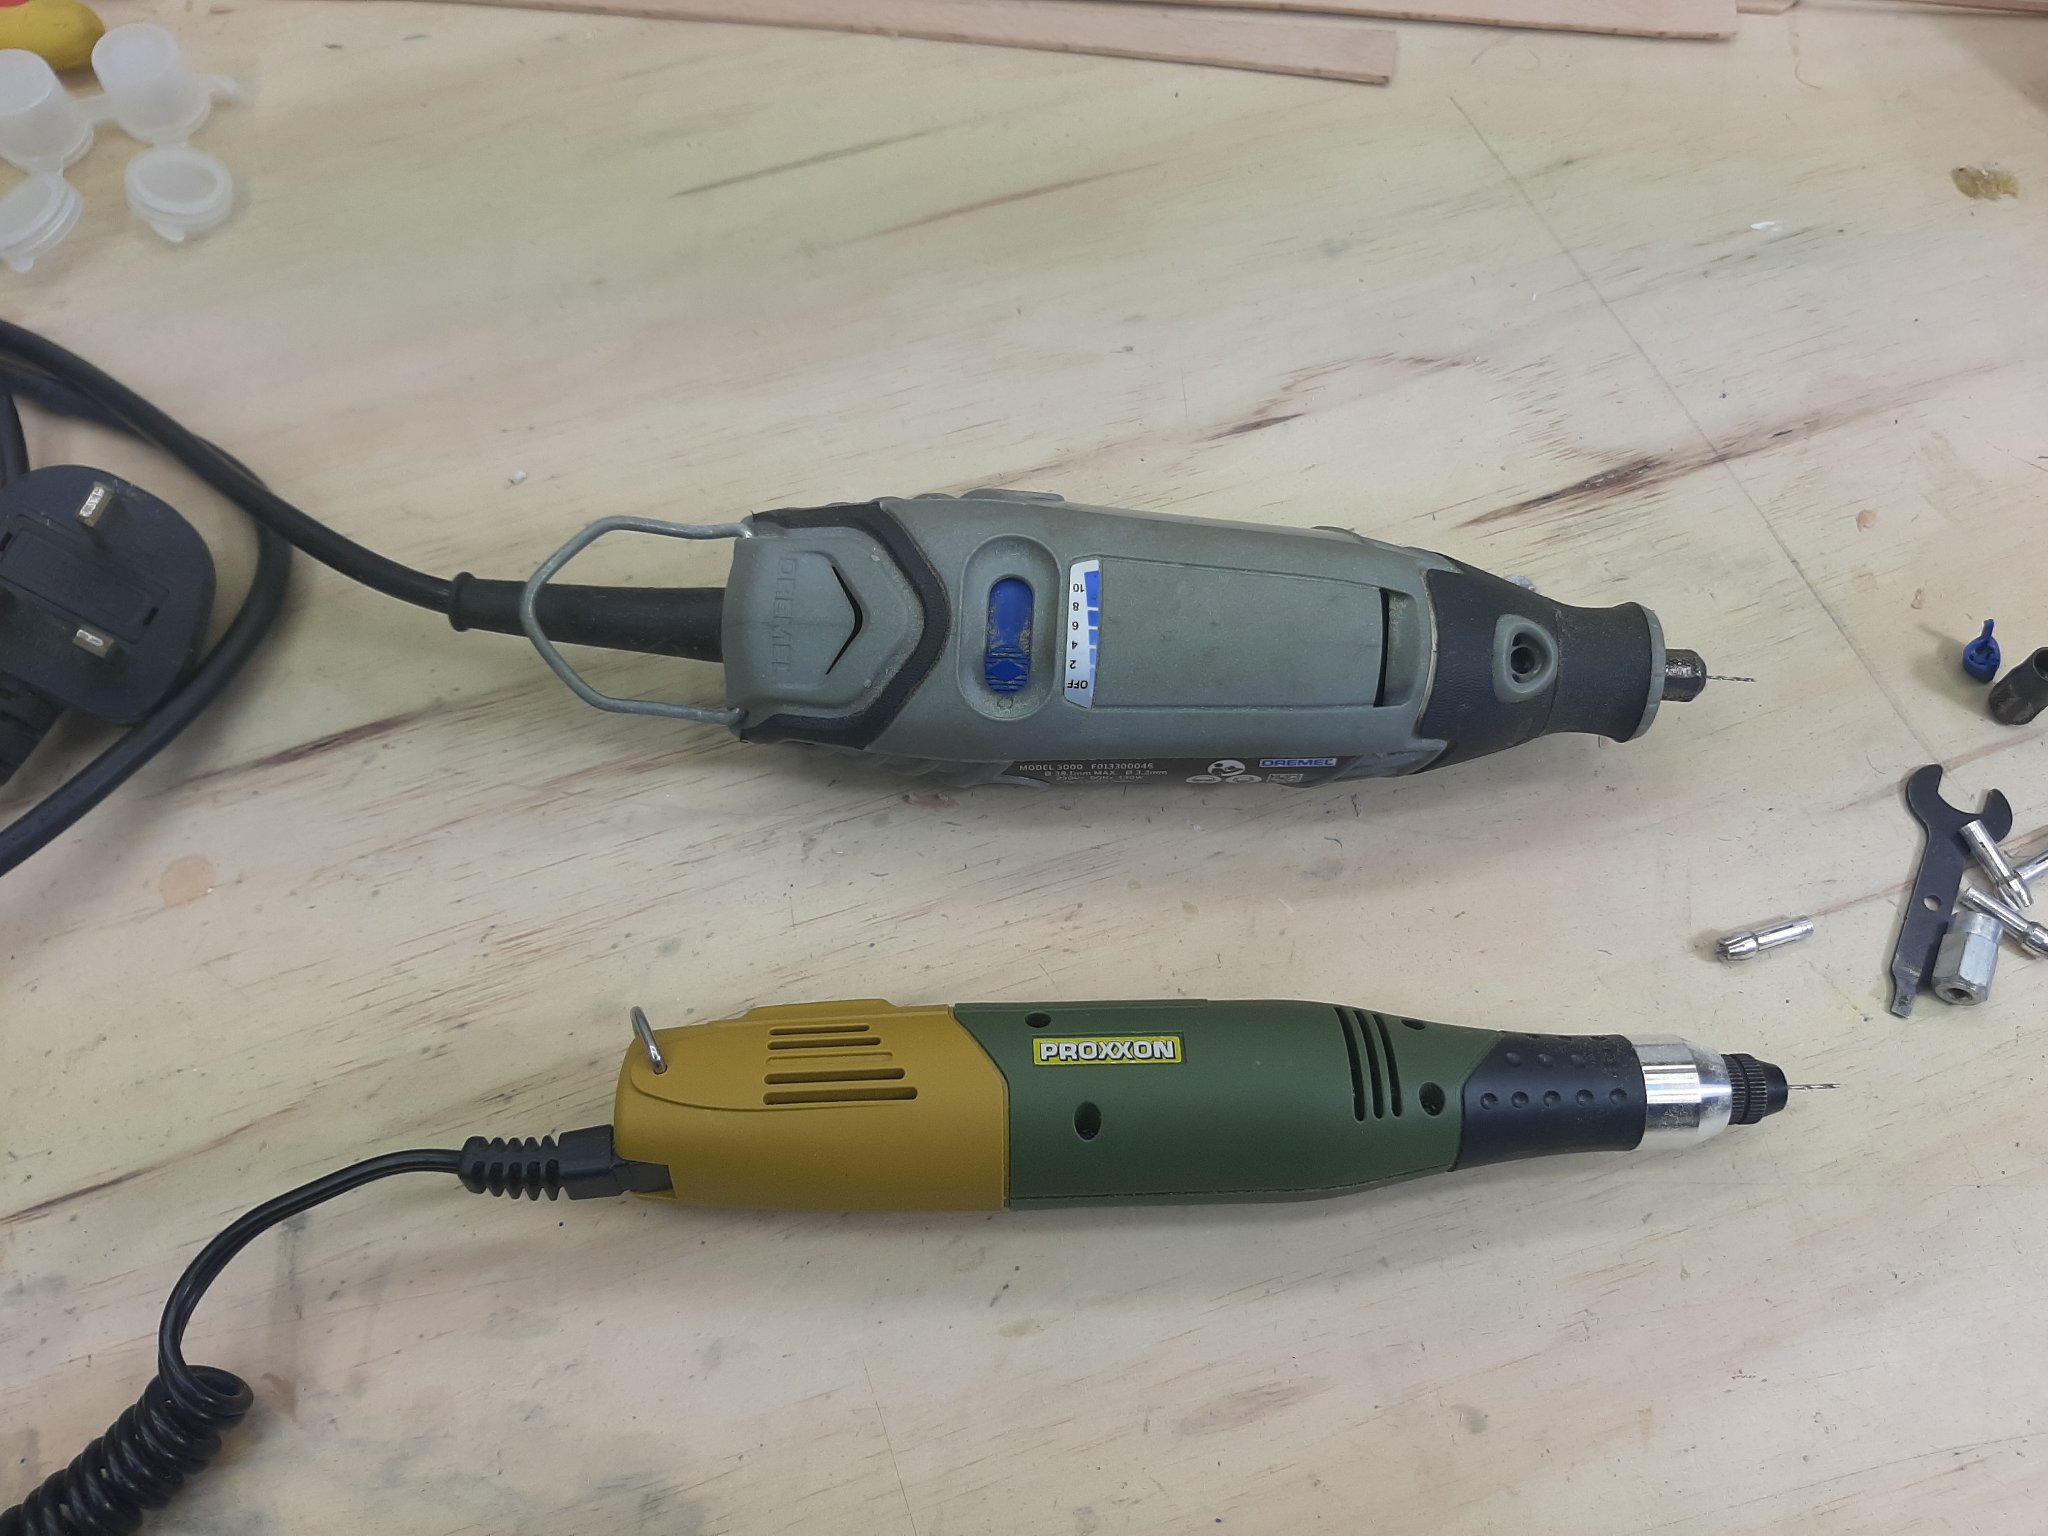
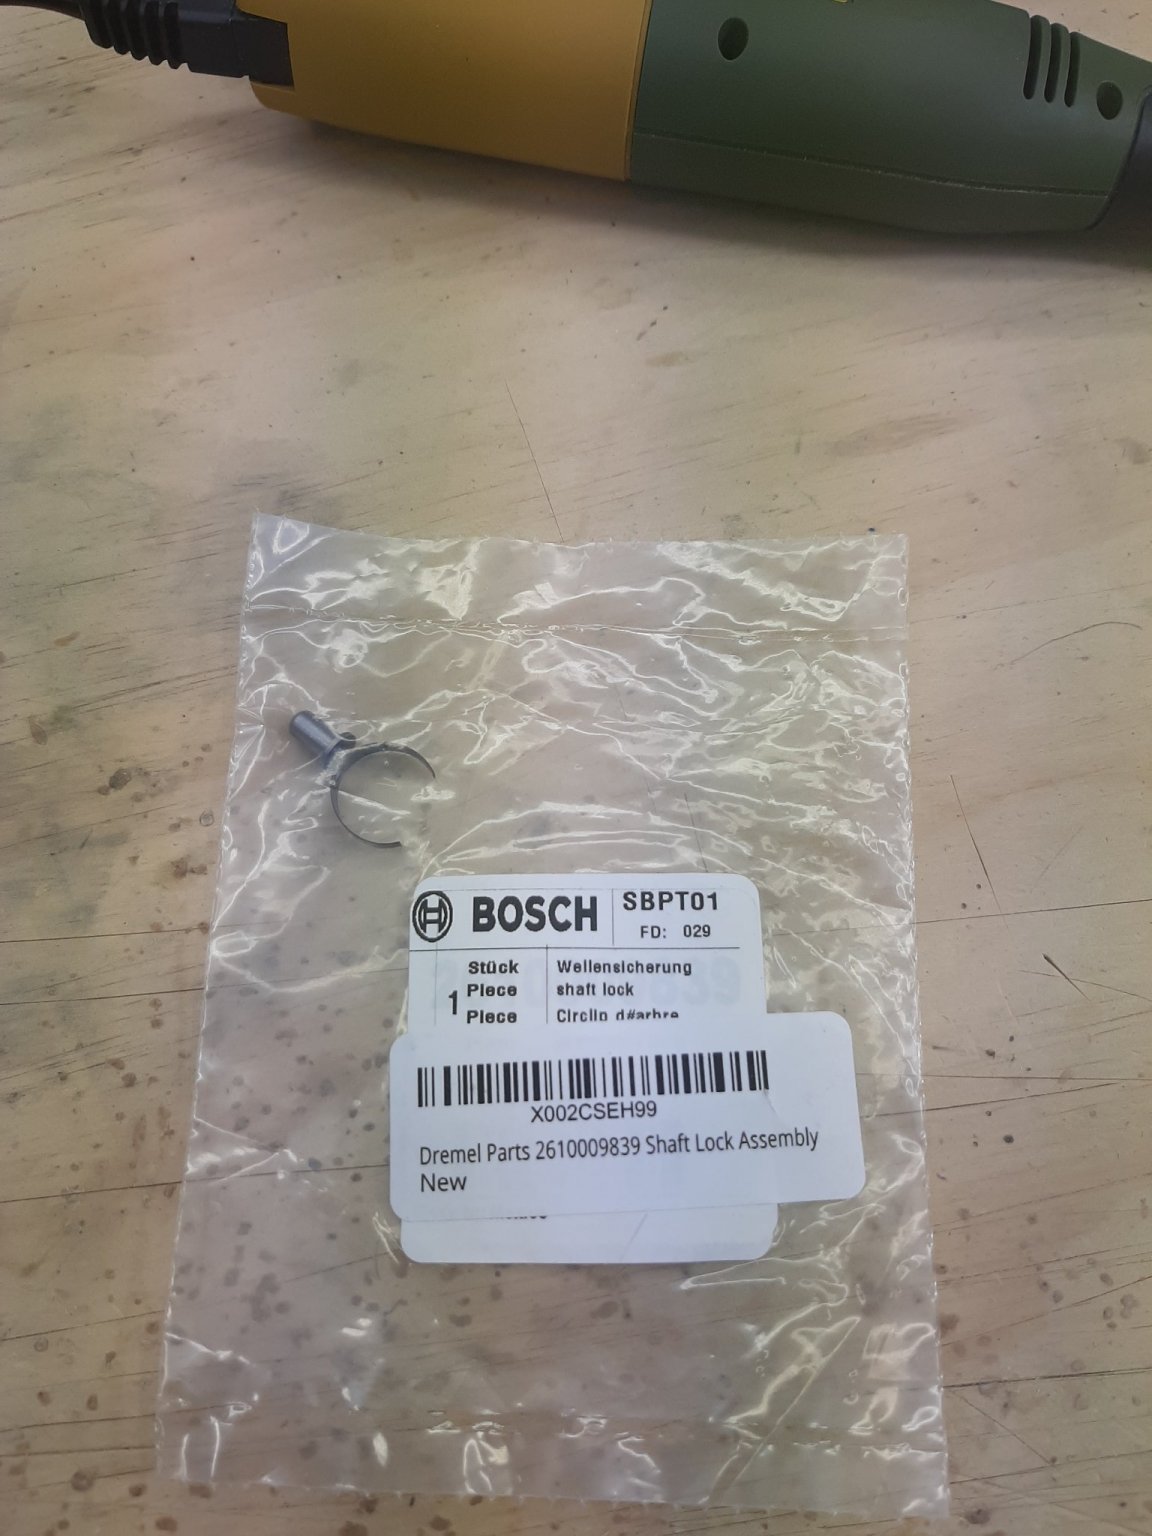
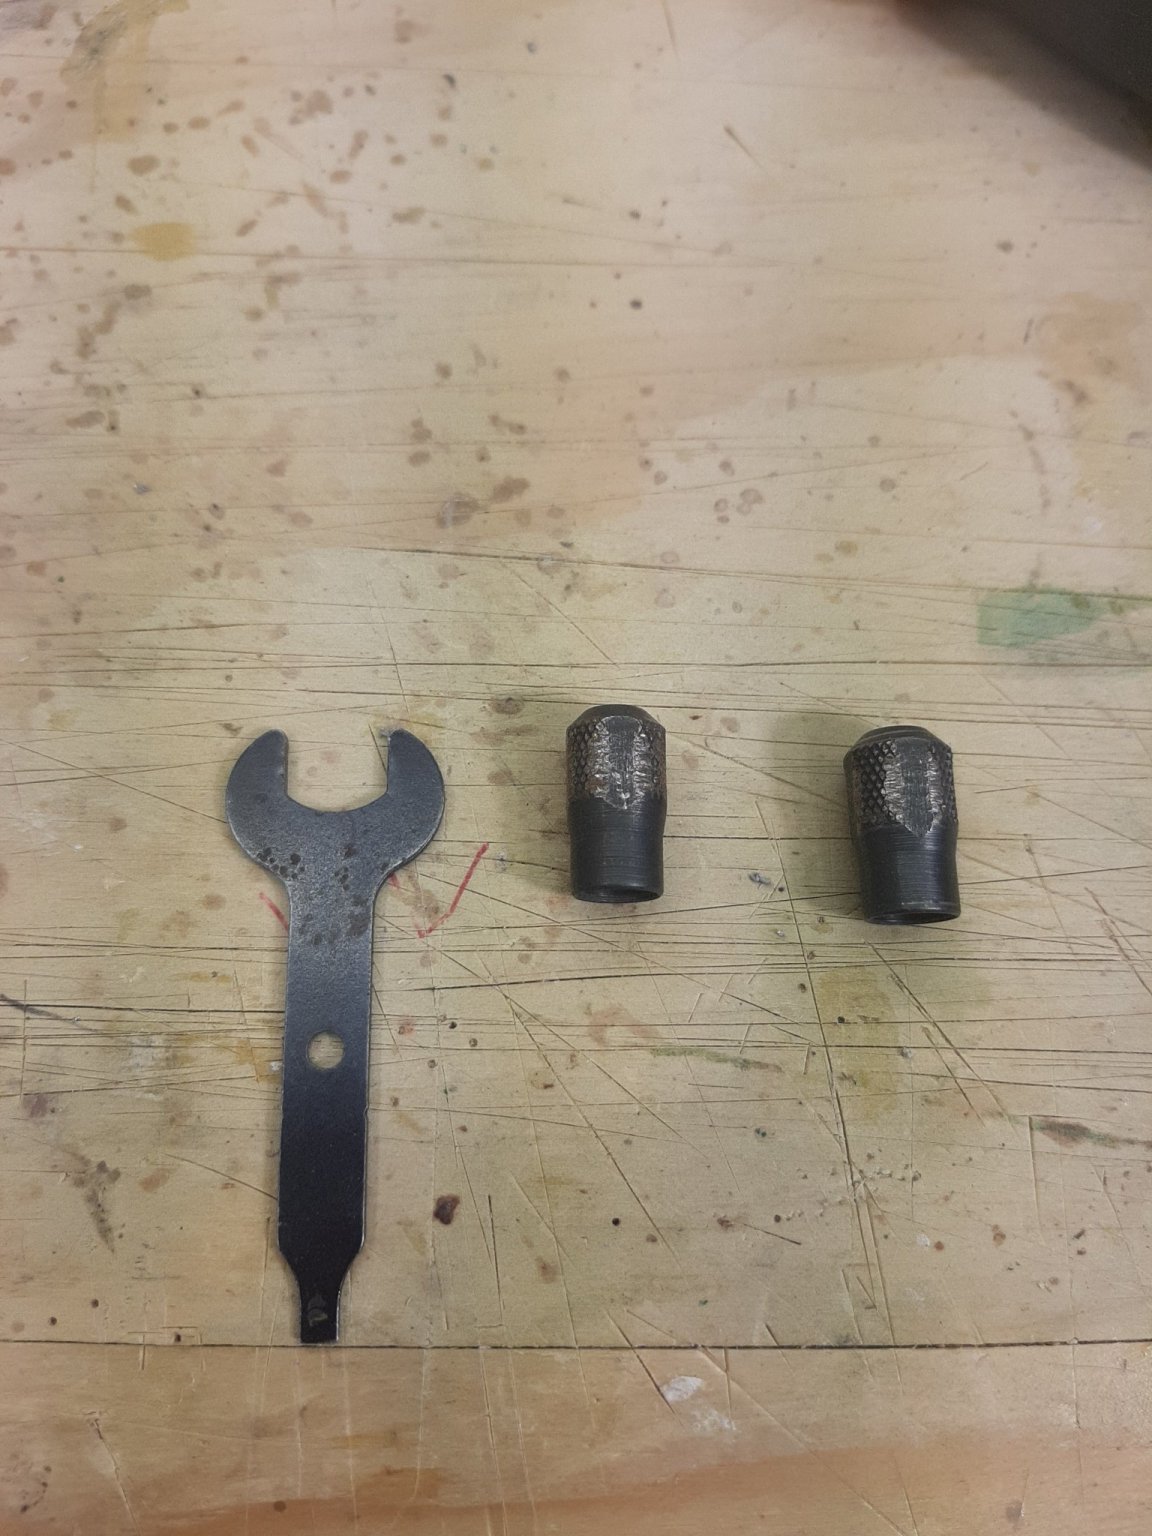
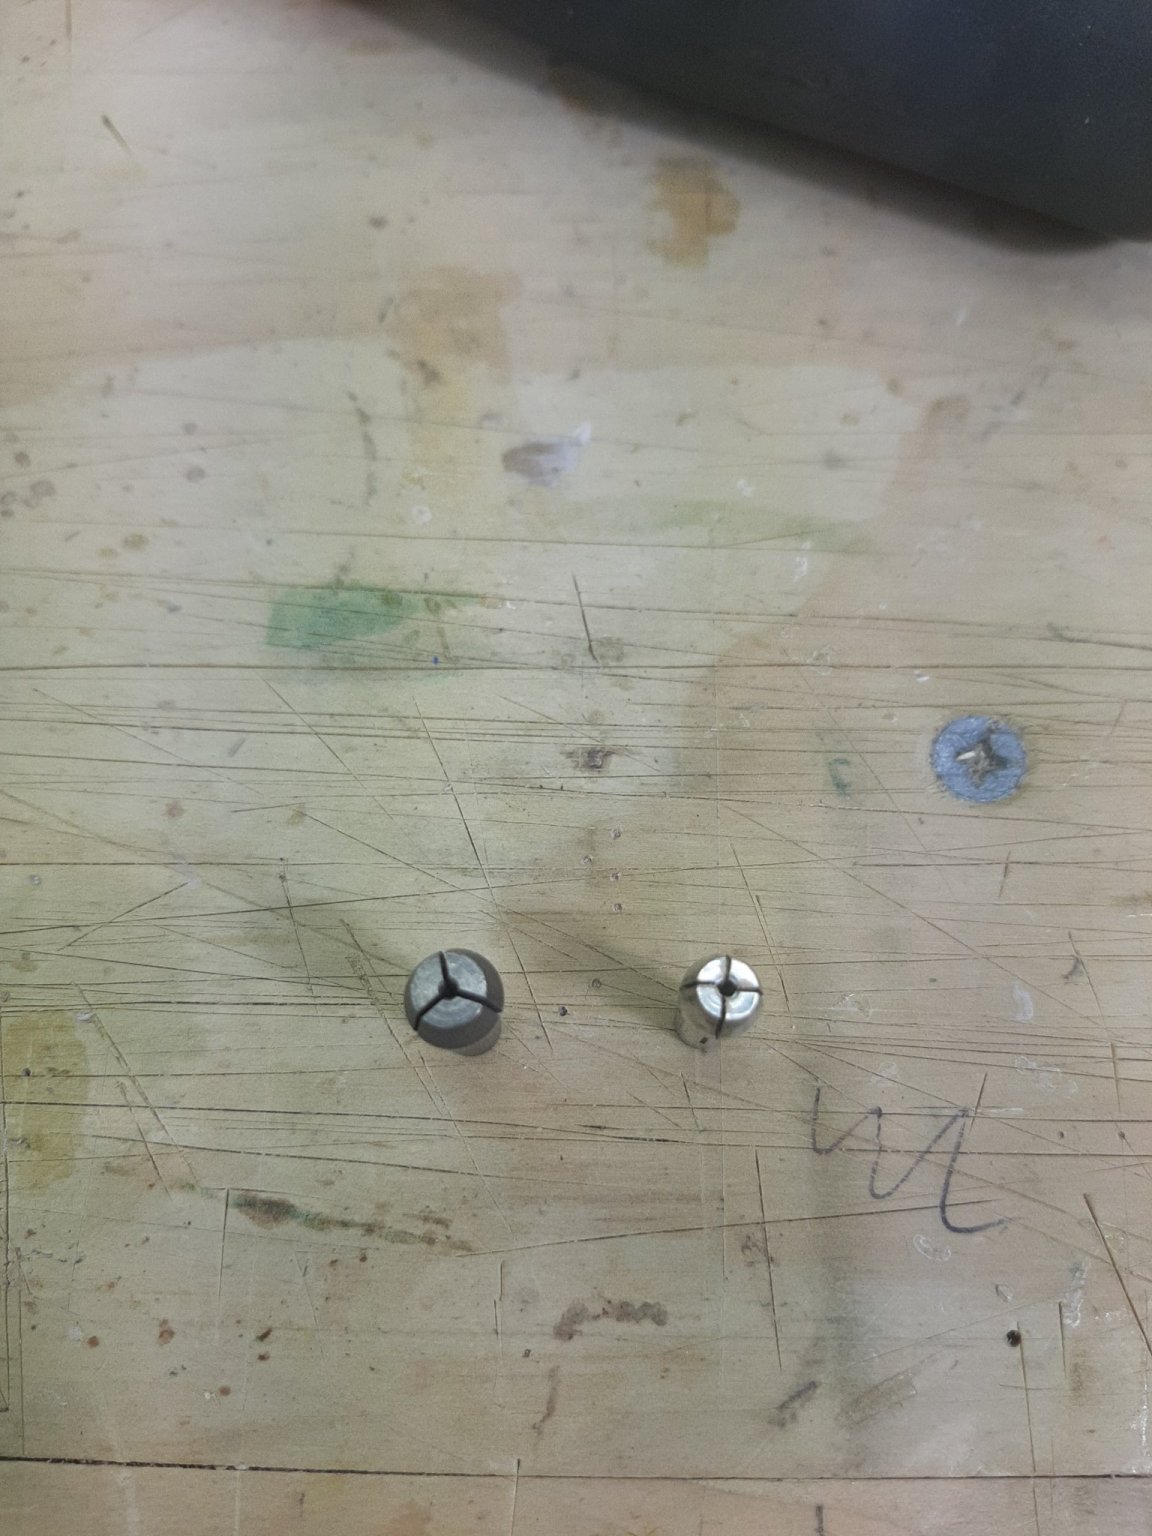
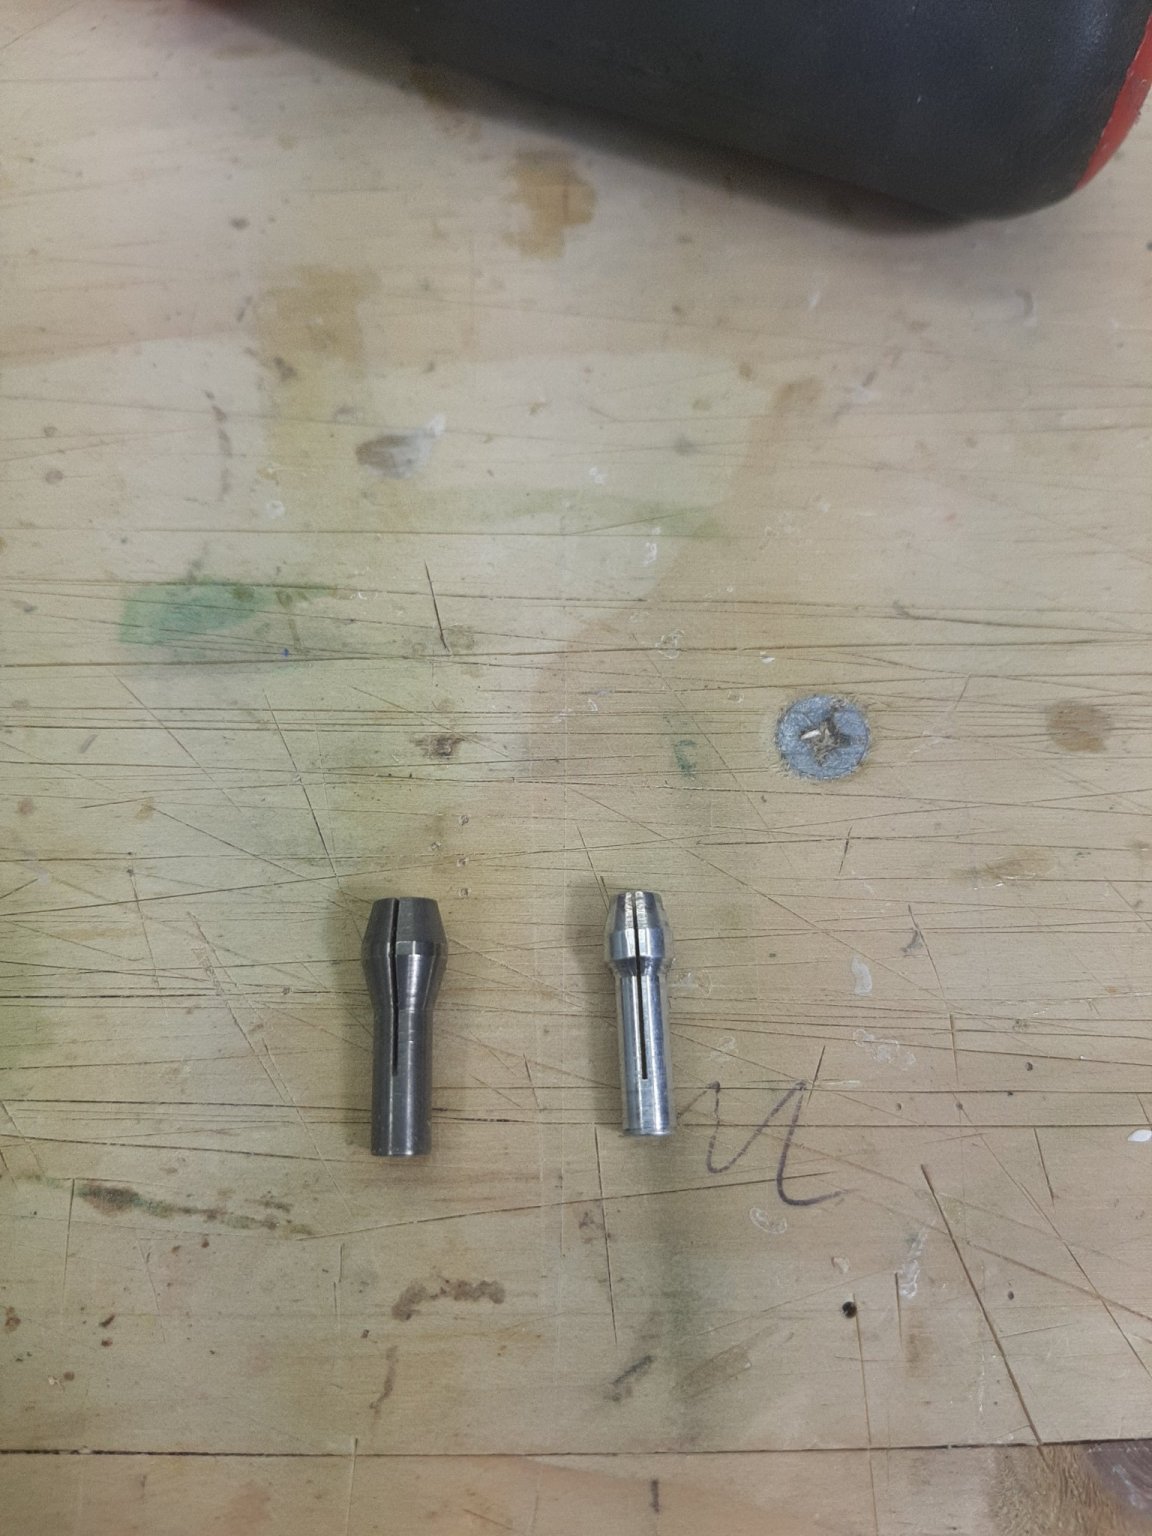
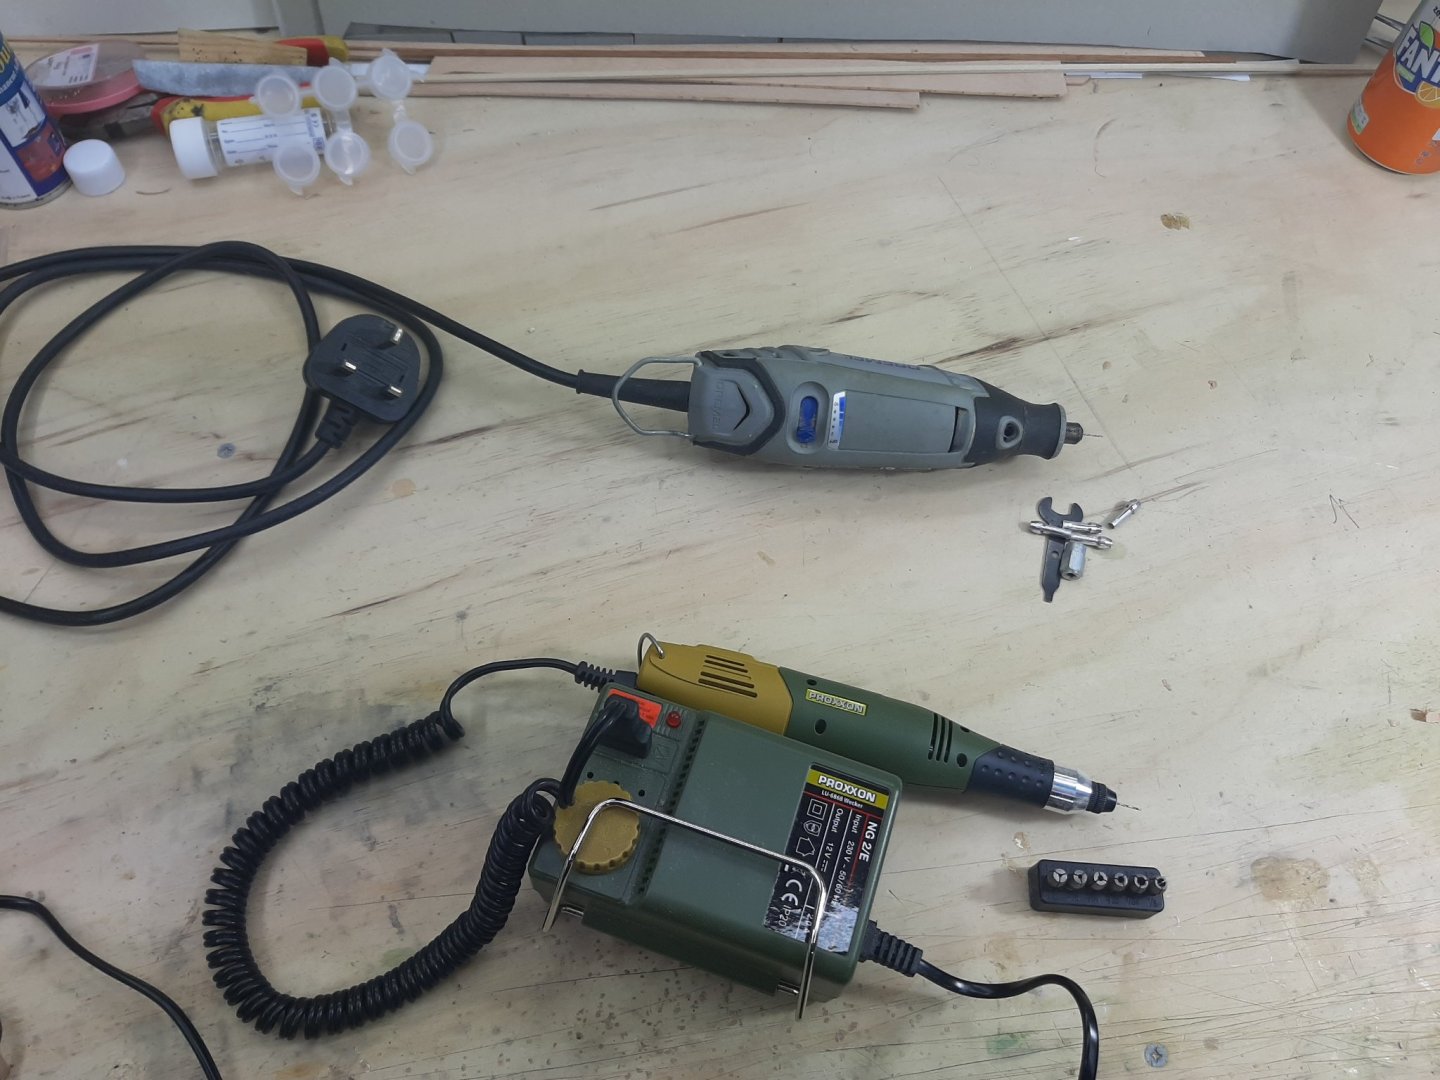
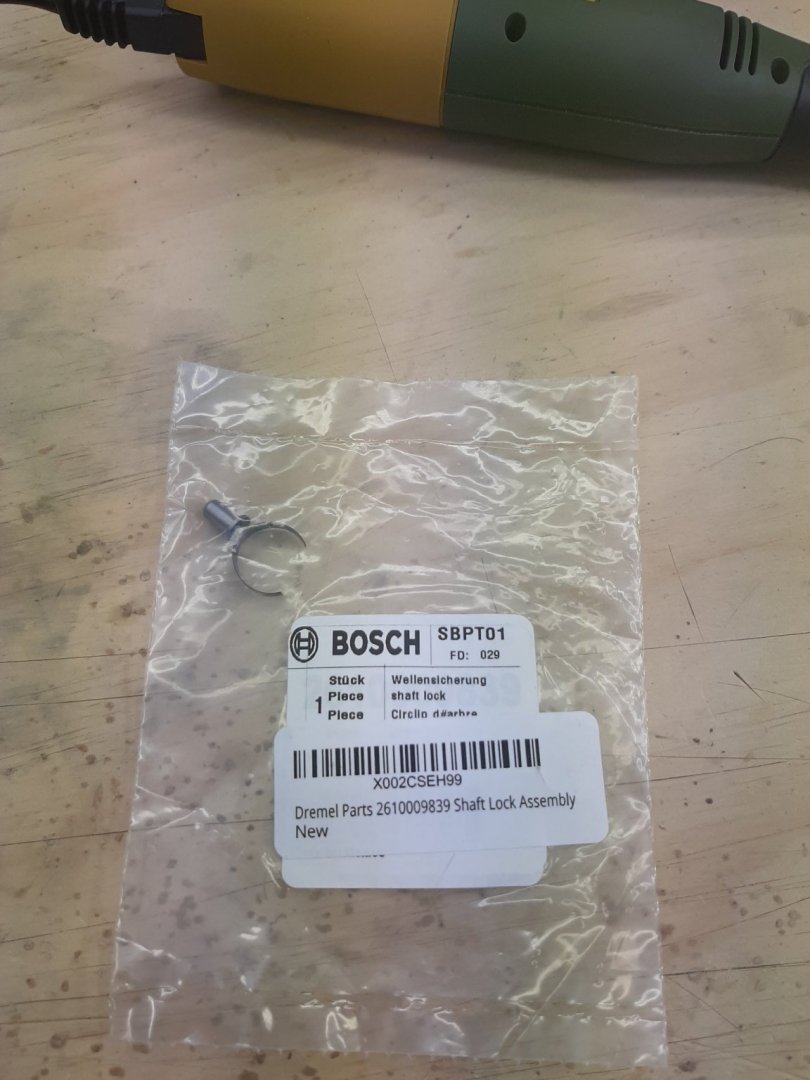
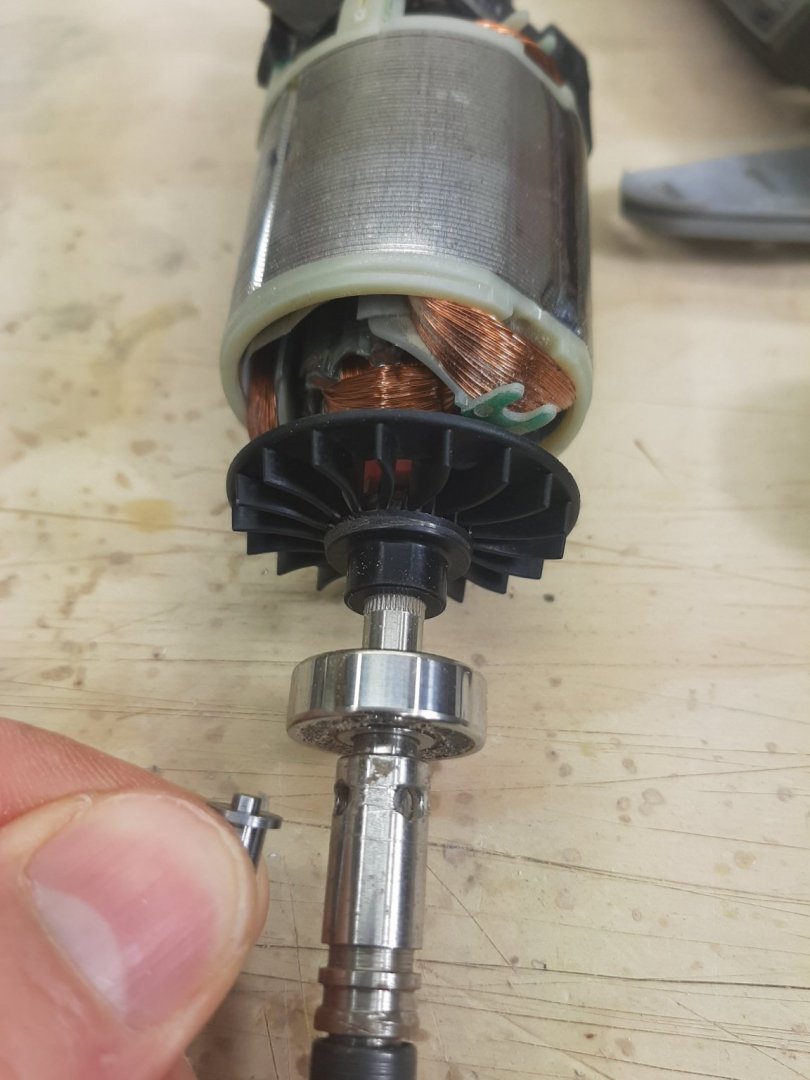
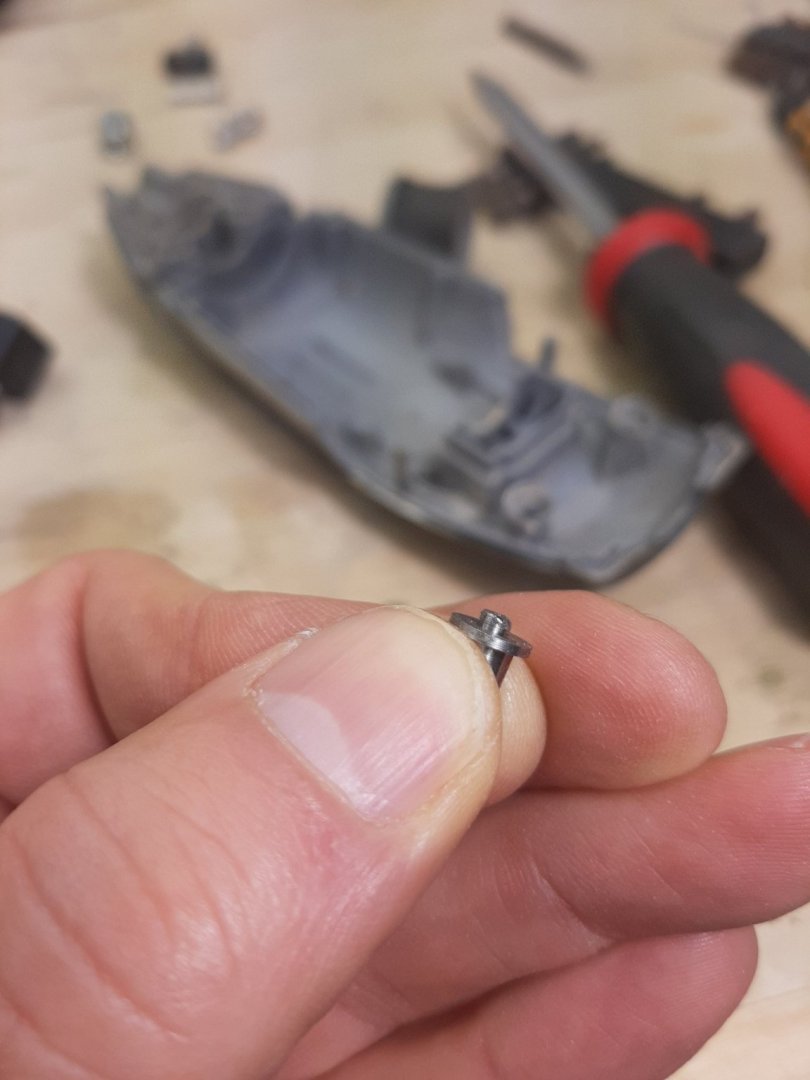
Dear all There do not seem to be too many information on the performance of the Proxon rotary tools and especially how they compare to the very common Dremel. I thought I d post my experience and opinion on this issue. I got a Dremel 3000 with the flexible attachment about 4 years ago. It recently failed and I bought a Proxxon Micromot 60. Now, in my opinion the reason the Dremel failed is actually a design and material fault. It has a locking pin so that the shaft will not rotate and the jaws can be unlocked. This is however very shallow, engages the shaft maybe less than 1 mm and the pin is not hardened-nor is the shaft. So it is a matter of time to get worn and then simply the jaws cannot open. Replacement is £15 in the UK. I was actually given a replacement locking pin but after installing it the whole assembly is a bit worn so it does not work very well and cannot take much pressure and even the new pin slips. Better to buy a whole new unit at £45. In regards to the flexible shaft, personally I did not find it useful at all. Some pictures now. The most common complaint is that you absolutely have to buy the Proxxon power source. I already had it so buying the Proxxon made sense. Now, the Proxxon is smaller and lighter. It only needs finger tightening whereas the Dremel needs a small wrench-this is actually important. The Dremel goes up to crazy speeds but due to lack of torque it slows down. The Proxxon seems to have a lot of torque and does not slow down-less vibration as well but only goes to 20,000 rpm or so and it is more pleasant to use. This is the locking pin that commonly fails. It is tiny. I have not seen the pin on the Proxxon but it seems to have much longer travel and be more robust. Actually, I installed the new pin and tried to unlock the chuck. I did not operate the tool but just by trying, the pin already got worn! Another piece that got worn is the part that compresses the collets as well as the wrench. The collets are also different. The Proxxon ones are larger, harder and have three jaws. They look and probably are better but I have had no issue with the Dremel ones. Overall, the Proxxon seems to be the nicer tool but is more expensive. Proxxon also makes a 220 V version that seems pretty good and more powerful. The Dremel may be better for DIY but for modelling, this Proxxon tool is very nice. Ona final note, I bought the Proxxon chuck to replace the collets but apparently it cannot be fitted on this tool-shame Vaddoc


-
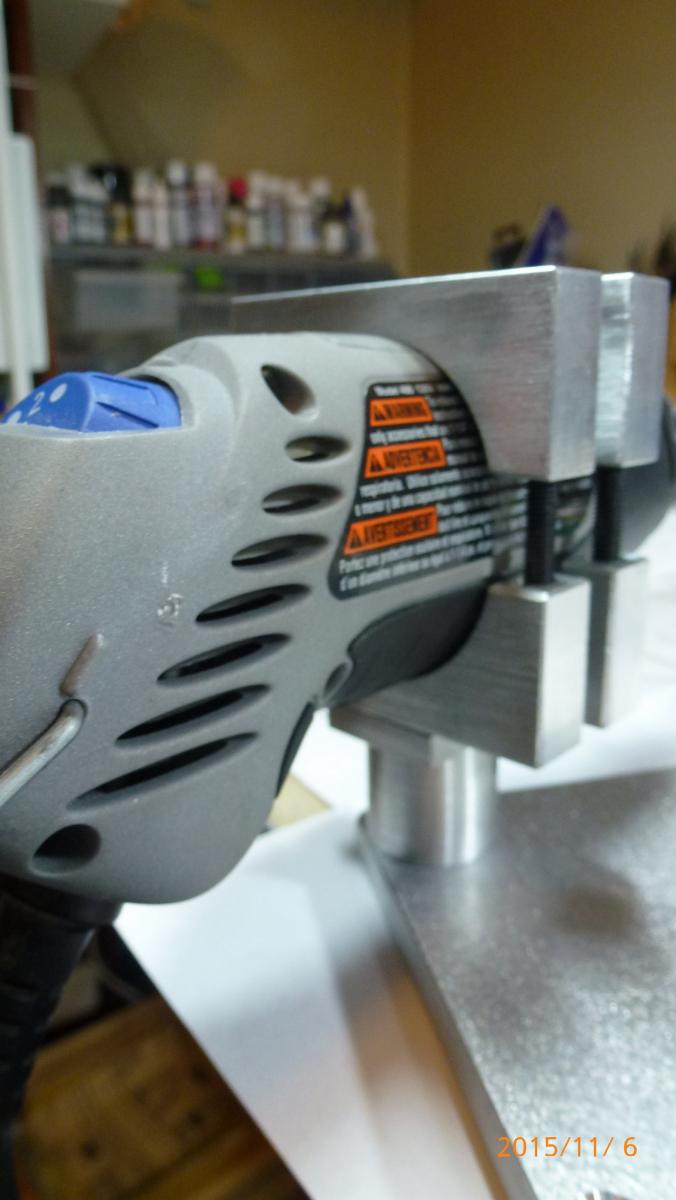
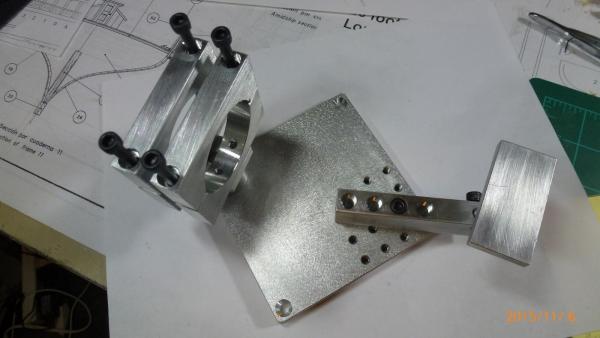
 Hello, I thought this milling fixture for a Dremel tool might be of interest to builders. I haven't built one and so I can't attest to its precision. But if it were built with care it might be serviceable. The thin jam nuts on the lead screws should take up backlash. One thing that might be an improvement is to make adjustable gibs for the ways, such as are found on Sherline mills. Another possible improvement might be to install sintered bronze bushing/bearings or 8mm skatewheel bearings and threaded rod instead of the wooden bearing blocks, although the hard maple bearings should last a long time if they are soaked with oil. http://woodarchivist.com/1624-diy-milling-machine/ The rest of the site might be of interest to you as well.
- 13 replies
-
- 7
-
-
- dremel
- rotary tool
- (and 1 more)
-
Came across this router base by accident, Small for Dremel, but much sturdier than what Dremel offers as I can tell. For the price this little tool will be on my wishing list.
-
This review and introduction of the VandaLay Industries - product Hold it Plus - is from a pure personal point of view and not related to the company. I bought this along with another tool that will be reviewed as well. Vanda Lay is located in Irvine, California and is a small family business. I was impressed by the courtliness of the owner himself when he answered the phone and I realized I had caught him on personal time, together with his wife they were on their way to get one of their kids. He took time with me and the order over the phone, excusing that one (this particular unit) was not complete for direct shipping. He said probably by Friday he had time to do something about it. As I was not in any rush to get the " Hold it Plus" I was very surprised receiving my whole order five days later!! That's including shipping. The bottom holding piece is cnc'd from heavy aluminium, other pieces of aluminum is very lightweight and I am suspecting it is T-1011 (aircraft aluminium). All the pieces fits perfectly together. The assembly is easy even without instructions. It is very straight forward. Think "Bottom plate and work upwards." One of the areas that are need of Loctite is the assembly of the drill frame. Here the Loctite Threadlocker Blue 242 is a good choice. It holds and locks but still when needed easily broken. One locking screw seems to be missing, both in pictures from the company itself but also not part of the "kit" The locking screw I am looking for is for the swivel base of the drill. Most mini drill i.e Dremel, Proxxon and more are supposed to fit with the "Multi fit clamp" Here I would recommend adding some kind of padding, both for more even tension but also for not get any marking on your power tool. I have the Dremel XPR 400 the most powerful of the Dremels, when turning it on , even without the padding there were no vibrations. On the other hand, here is where I would like to see a more model shaped clamp. There is way to much space for the powertool to start wandering off the line of work. I don't think "One Clamp fits all" is the way to go. As for the other tool from this company I am to make a review of I am afraid it will be the same as for the fitting. There are room for improvements. Overall, I do look forward of working with this accessory especially for small part jobs. It is sturdy and will last forever. I am working on creating an instruction for this tool, both assembly wise but also for various work. One area I notice this can be useful is making many belaying pins in a sequence, like a mini lathe.

- 19 replies
-
- 10
-
-
- VandaLay
- Industries
- (and 6 more)
-
I was trolling some forums of other hobbies, and ran across this home built vacuum hold down saw for ripping veru small pieces of wood. I am posting the link in case anyone is interested in the idea. I do think the concept has merit ! http://www.railroad-line.com/forum/topic.asp?TOPIC_ID=20046 It appears to work quite well. With a little bit of refinement, could likely be a great tool on the cheap ! - Joe
-
Ahoy Mates Has anyone used a rheostat to slow down their Dremel tool? I know some motors are “OK” with this and but others are not I need to drill treenail holes in my hull and would like to use my Dremel, but at a considerably slower speed. Dremel does not list this as one of the accessorries
.thumb.jpg.6fd4c1b78768bb3efd745ab810936005.jpg)