HOLIDAY DONATION DRIVE - SUPPORT MSW - DO YOUR PART TO KEEP THIS GREAT FORUM GOING! (Only 68 donations so far out of 49,000 members - Can we at least get 100? C'mon guys!)
×


myxyzptlyk2003
-
Posts
172 -
Joined
-
Last visited
Content Type
Profiles
Forums
Gallery
Events
Everything posted by myxyzptlyk2003
-
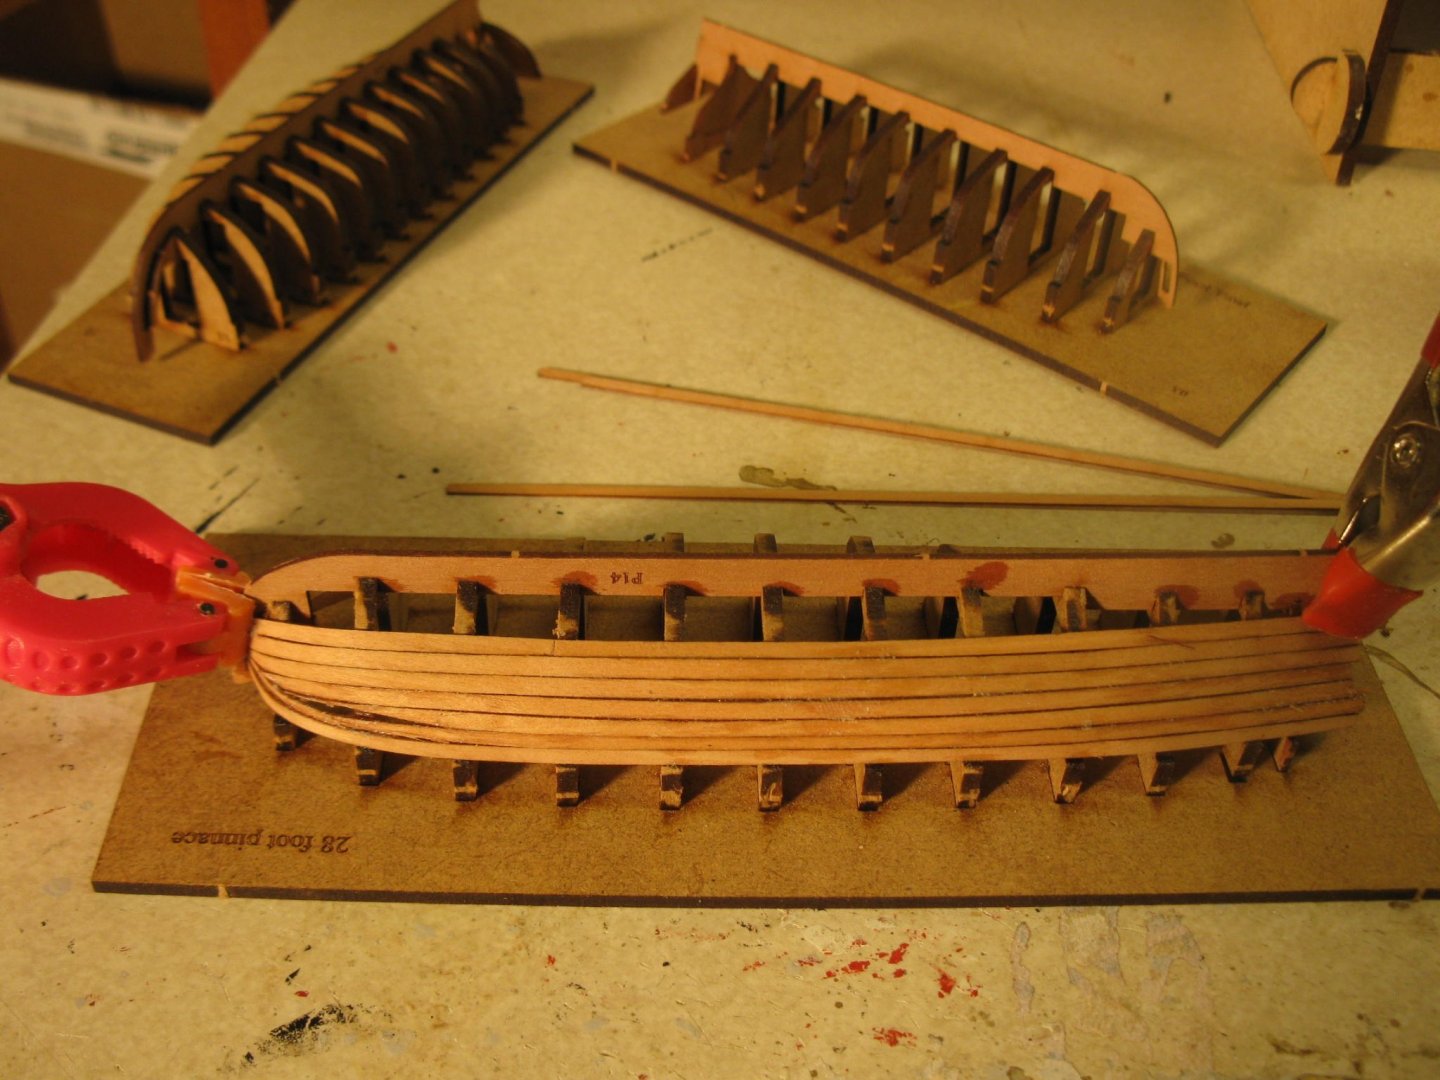
I have never been any good at single planked models. And at my age, I believe I will never attain any degree of competence in that area.
-
Given the level of frustration I am experiencing with these small boats I will probably end up "cheating". Caldercraft makes some very nice small boat kits with resin cast hulls that I have used in the past on their larger models with great results.
-
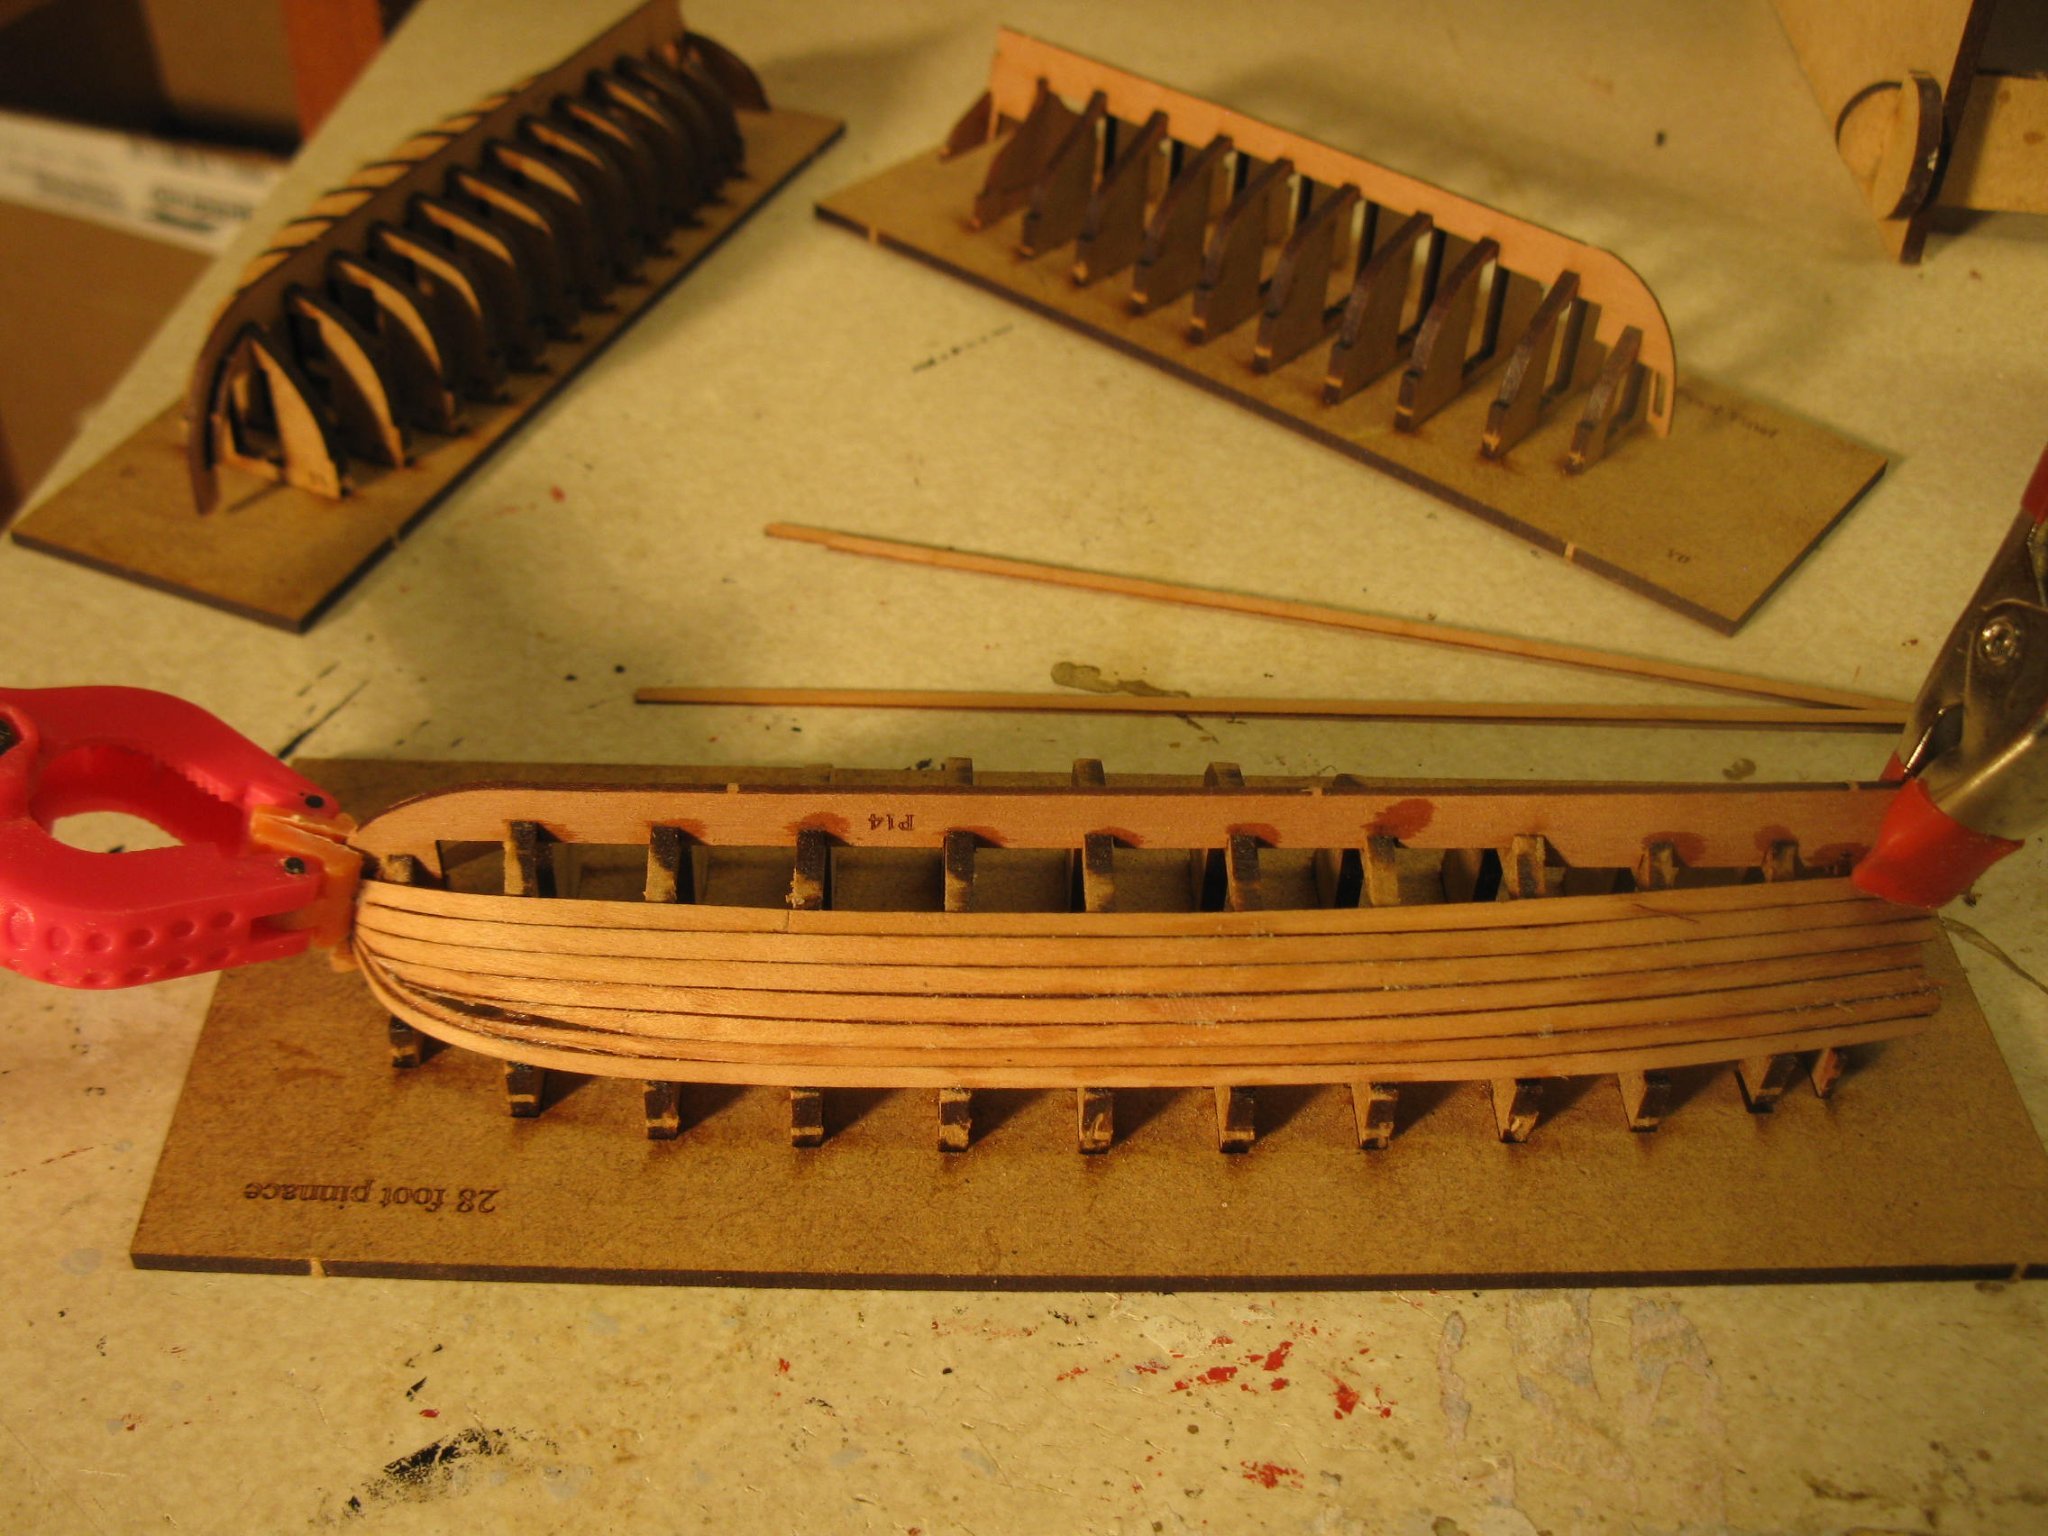
I am definitely tapering the planks. Absolutely have to. And the fairing was pretty decent I think. The problem is completely with me. These are such small planks and relatively fragile pieces. If you get a bit heavy handed with sanding and fairing you are going to break things. This is my first attempt at something of this small scale. My experience with the larger hulls led me to be able to apply some significant pressure when fairing. Not so with these boats. I'm sure I will do better on the other two boats.
-
I guess my concerns about my ability to build the ship's boats is justified. I'm very unsure of my ability to work with such small, fine planking. I'm sure I will be using a lot of filler. But I'll just keep plugging away. Updates will not be nearly as fast as my previous posts. As always quality parts. But be careful. Particularly with the stern pieces. 1mm think stern bulkheads break VERY easily. So use a gentle hand particularly when sanding. Also it appears there is not a great deal of excess planking material so be careful about wastage.
-
I just hope the Amati version isn't going to be like the Caldercraft HMS surprise ( 6years and counting?) For the original poster. At this point in time, I would definitely go with the Caldercraft if for the buildability if anything.
-
Hi Best is always a subjective opinion. I've built the Caldercraft version and loved the experience. Prior to that I had attempted one of the other European brands and couldn't finish it due to my perceived lack of quality/detail. One word of warning. The Caldercraft kit is huge and requires a very large case if you are going to display it.
-
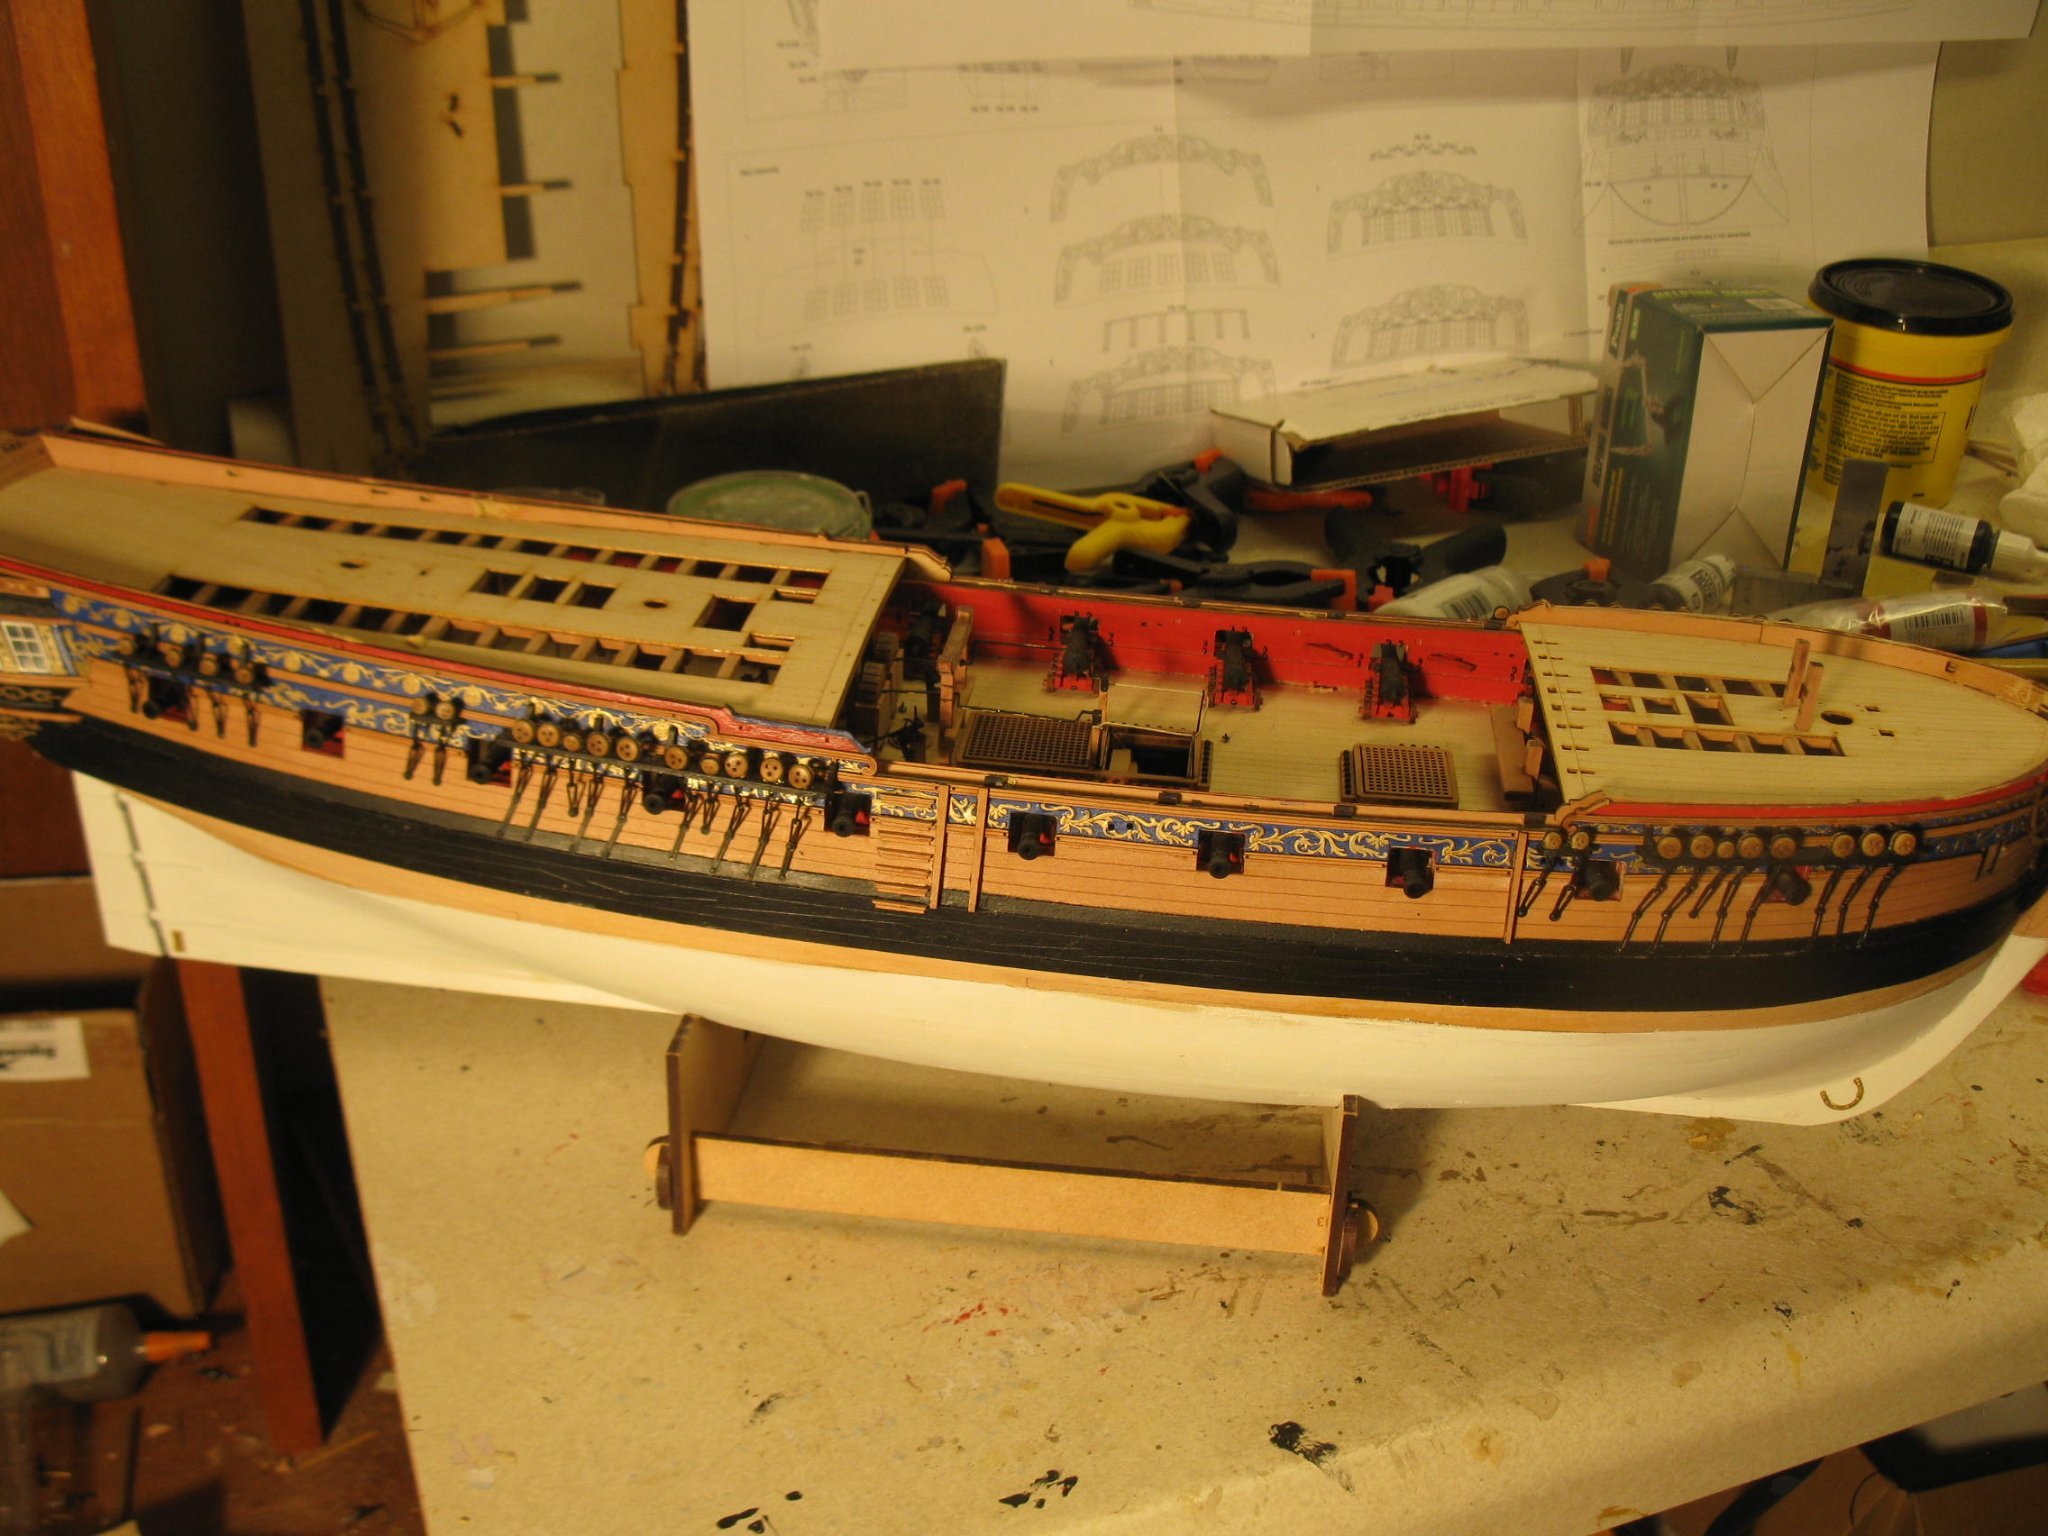
Now it's on to the ship's boats with lots of uncertainty on my part. This will be the first time I have attempted building such small boats. Given the quality of the instructions and materials I am fairly optimistic that they will turn out fine. All that's left to do is string the photo etched pieces that were installed today. Up to step 690 in the instruction book and other than the boats there doesn't appear to be much more to do besides lots of touchups and refining of small details. I am sorely tempted to rig this model but there just isn't room in the house. So Chris, when is the next big model coming out??? I'll be one of the first in line to get it.

-
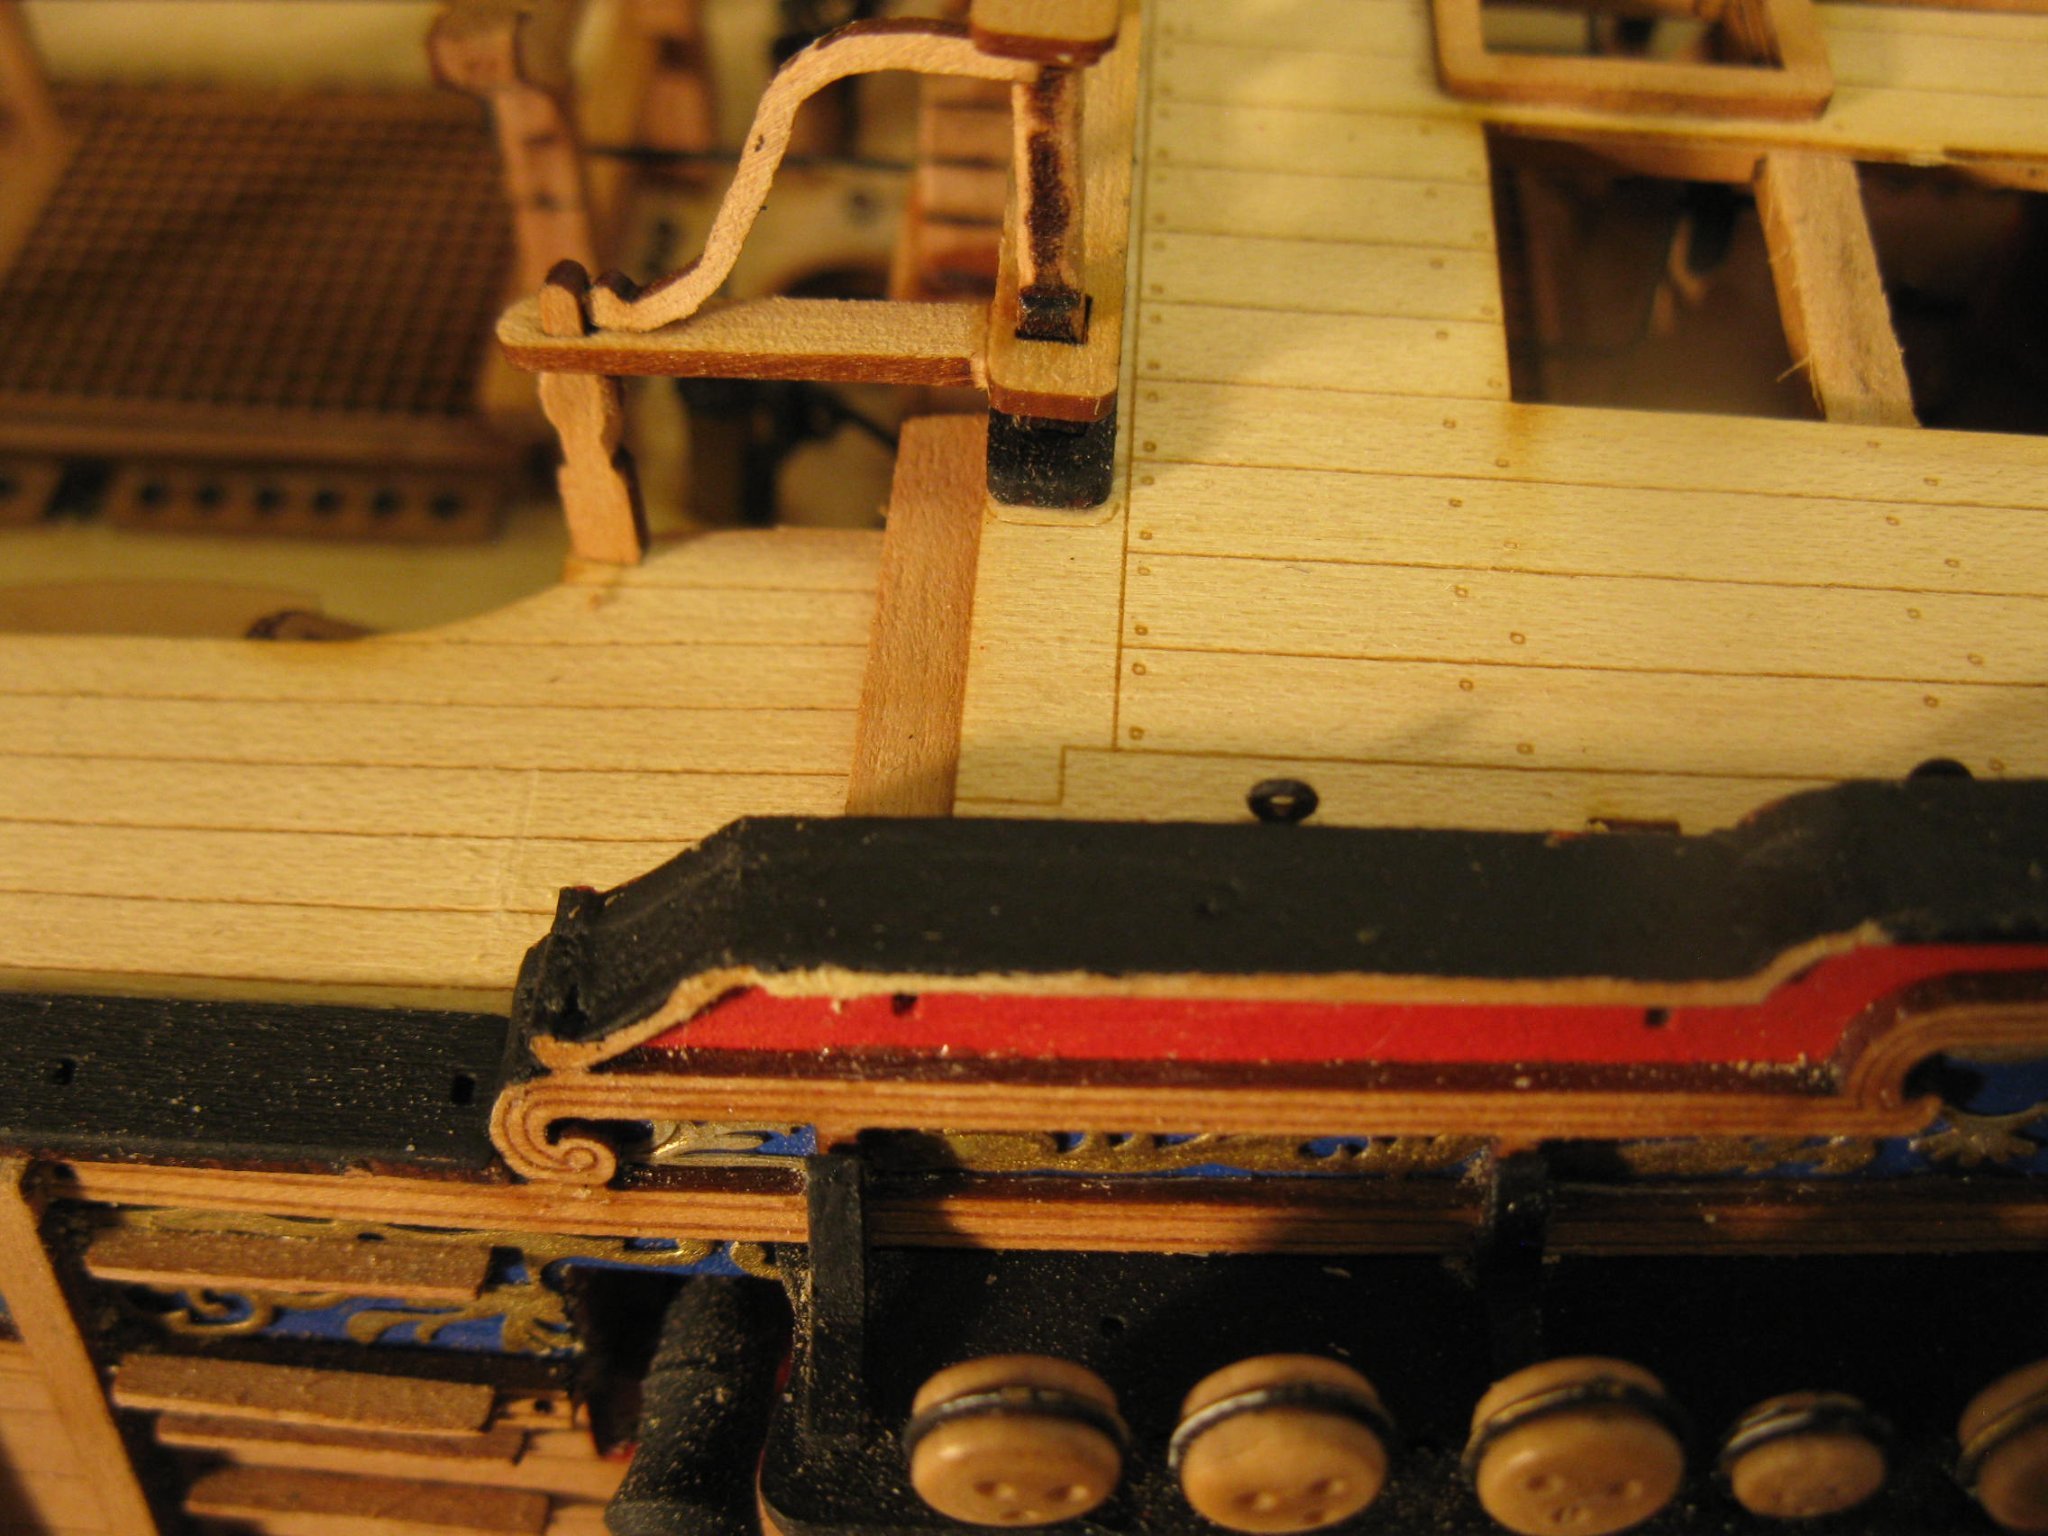
Thanks. It must be that when I got to the stage of sanding that area even I didn't like the fact that you would see the layering of the various pieces and not realizing that those slots were there for a purpose, I just used wood filler to even out that whole area. Actually, I kind of like my solution as that whole area if very even and the timberheads sit nicely.
-
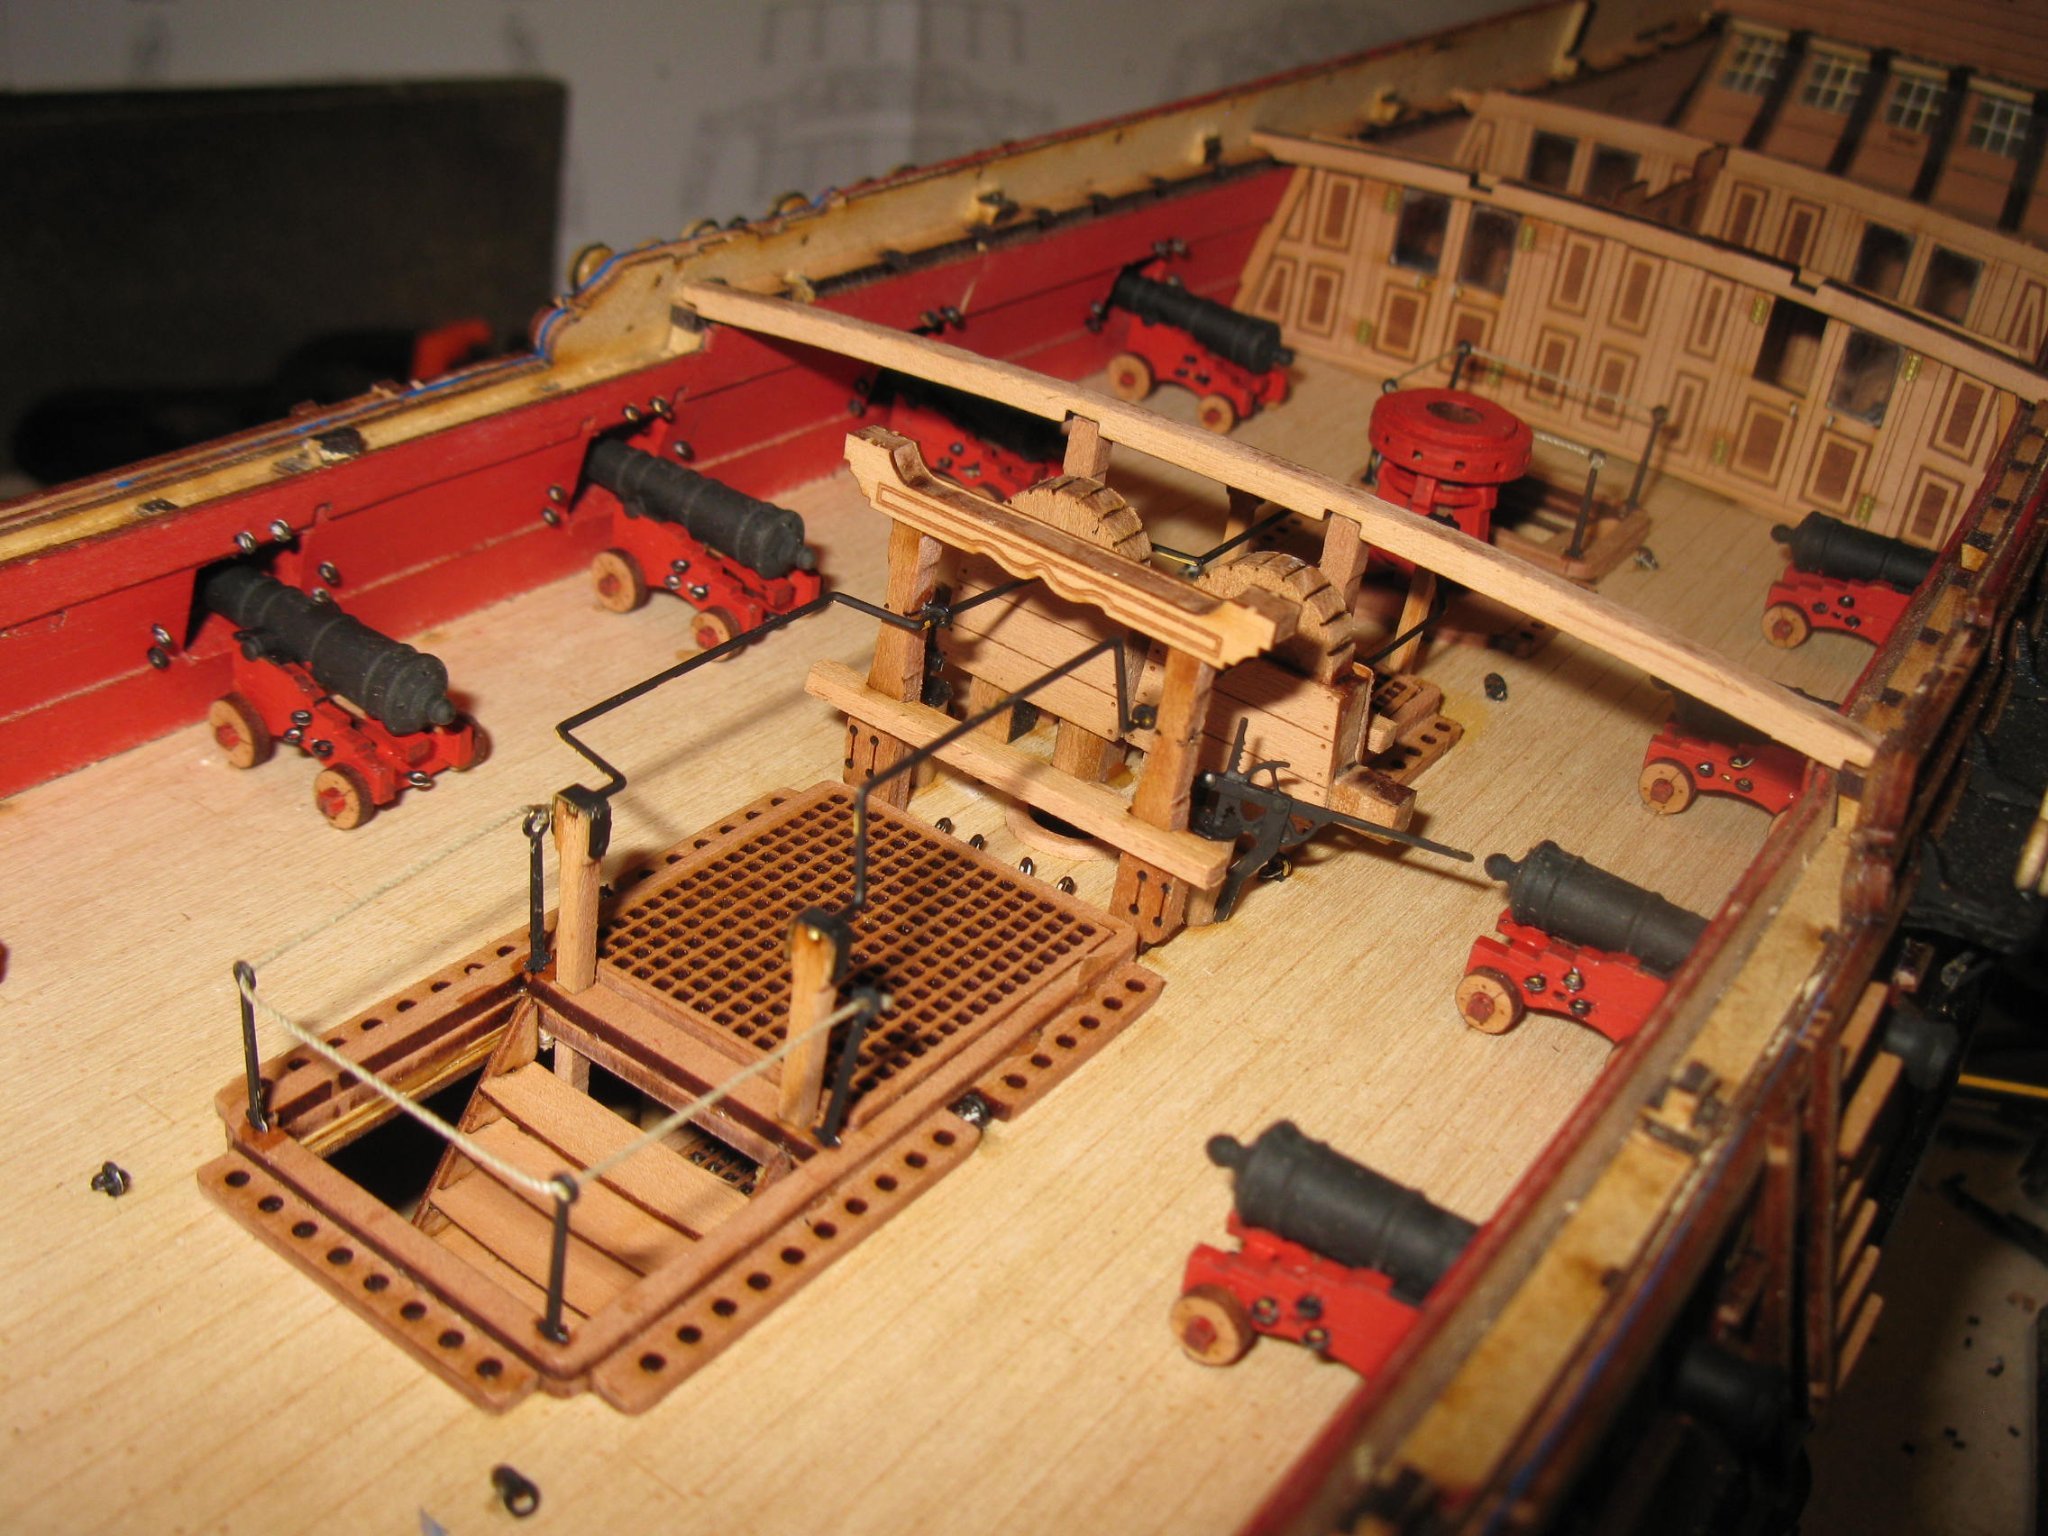
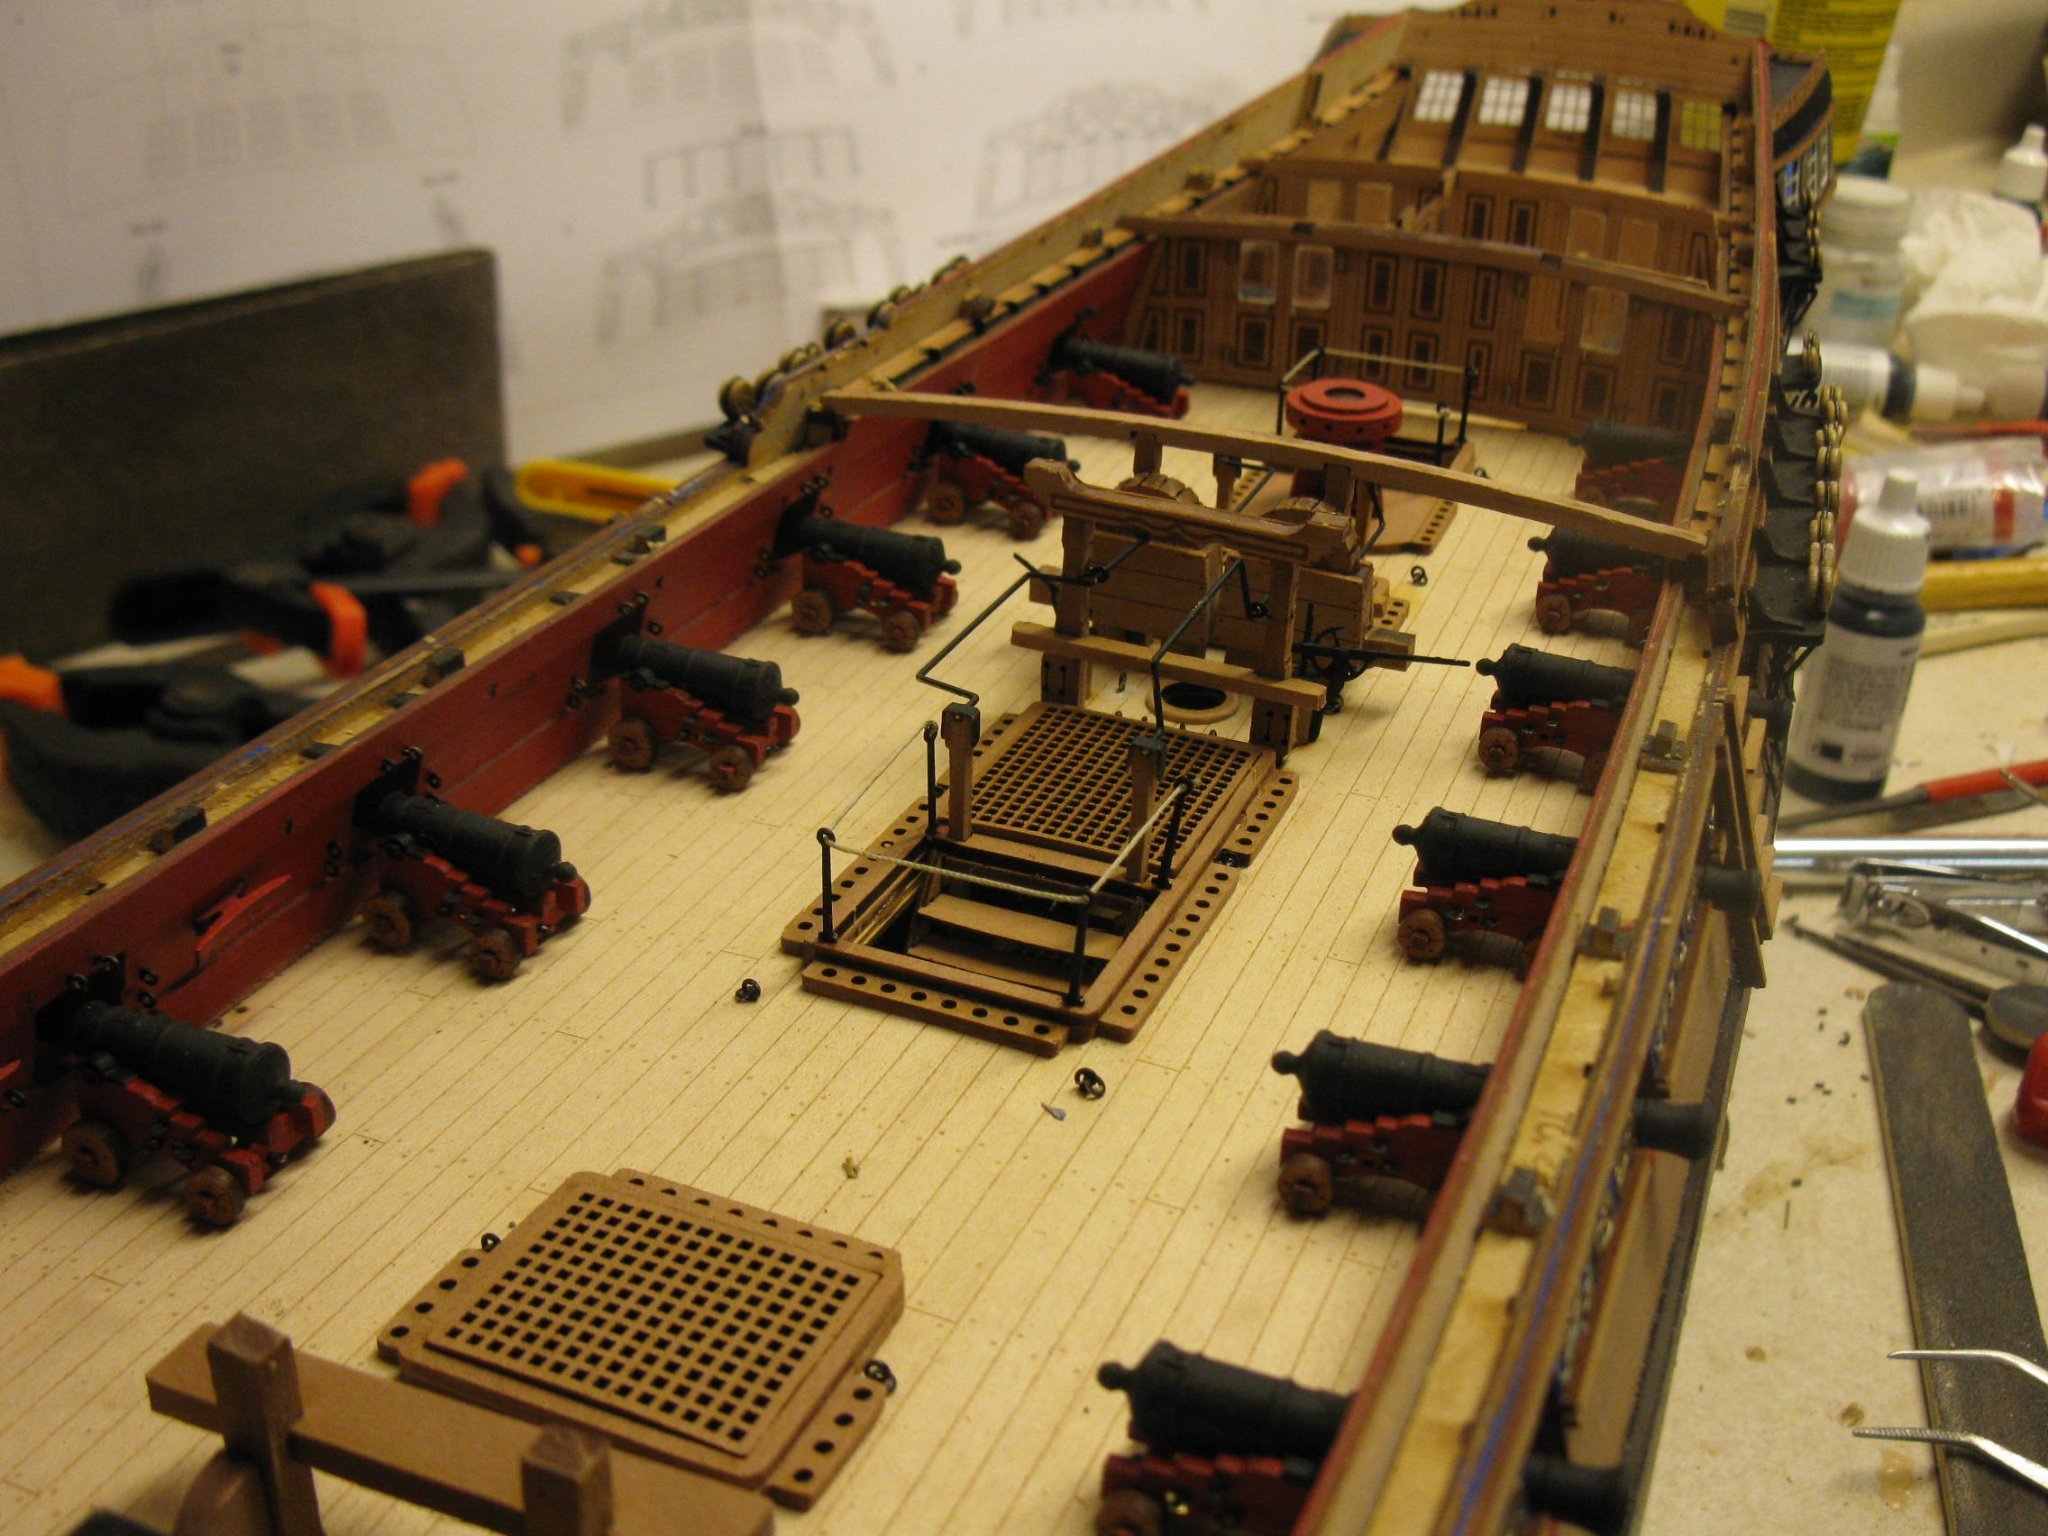
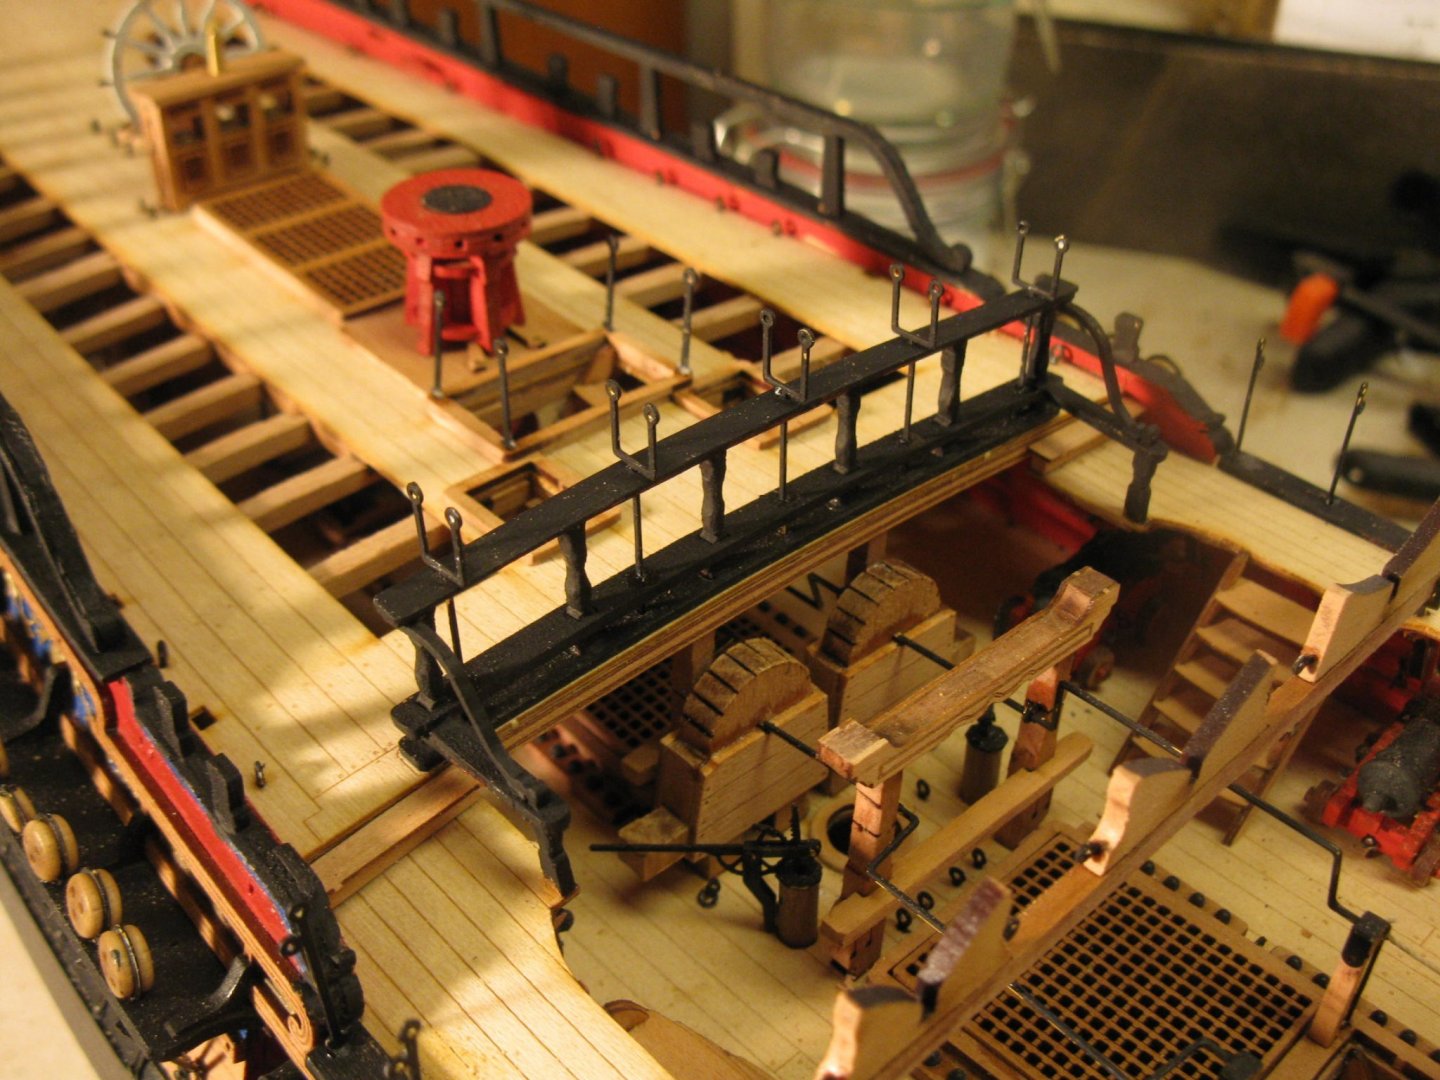
While working on the boat cross beams I learned that when you install the chain pump handles do NOT have either of them vertical. They will interfere with the beams. On the prototype it appears they interfere just a bit. I have one of mine almost vertical and it will require notching the beam by about 1mm just like Jim says in his prototype build.
-
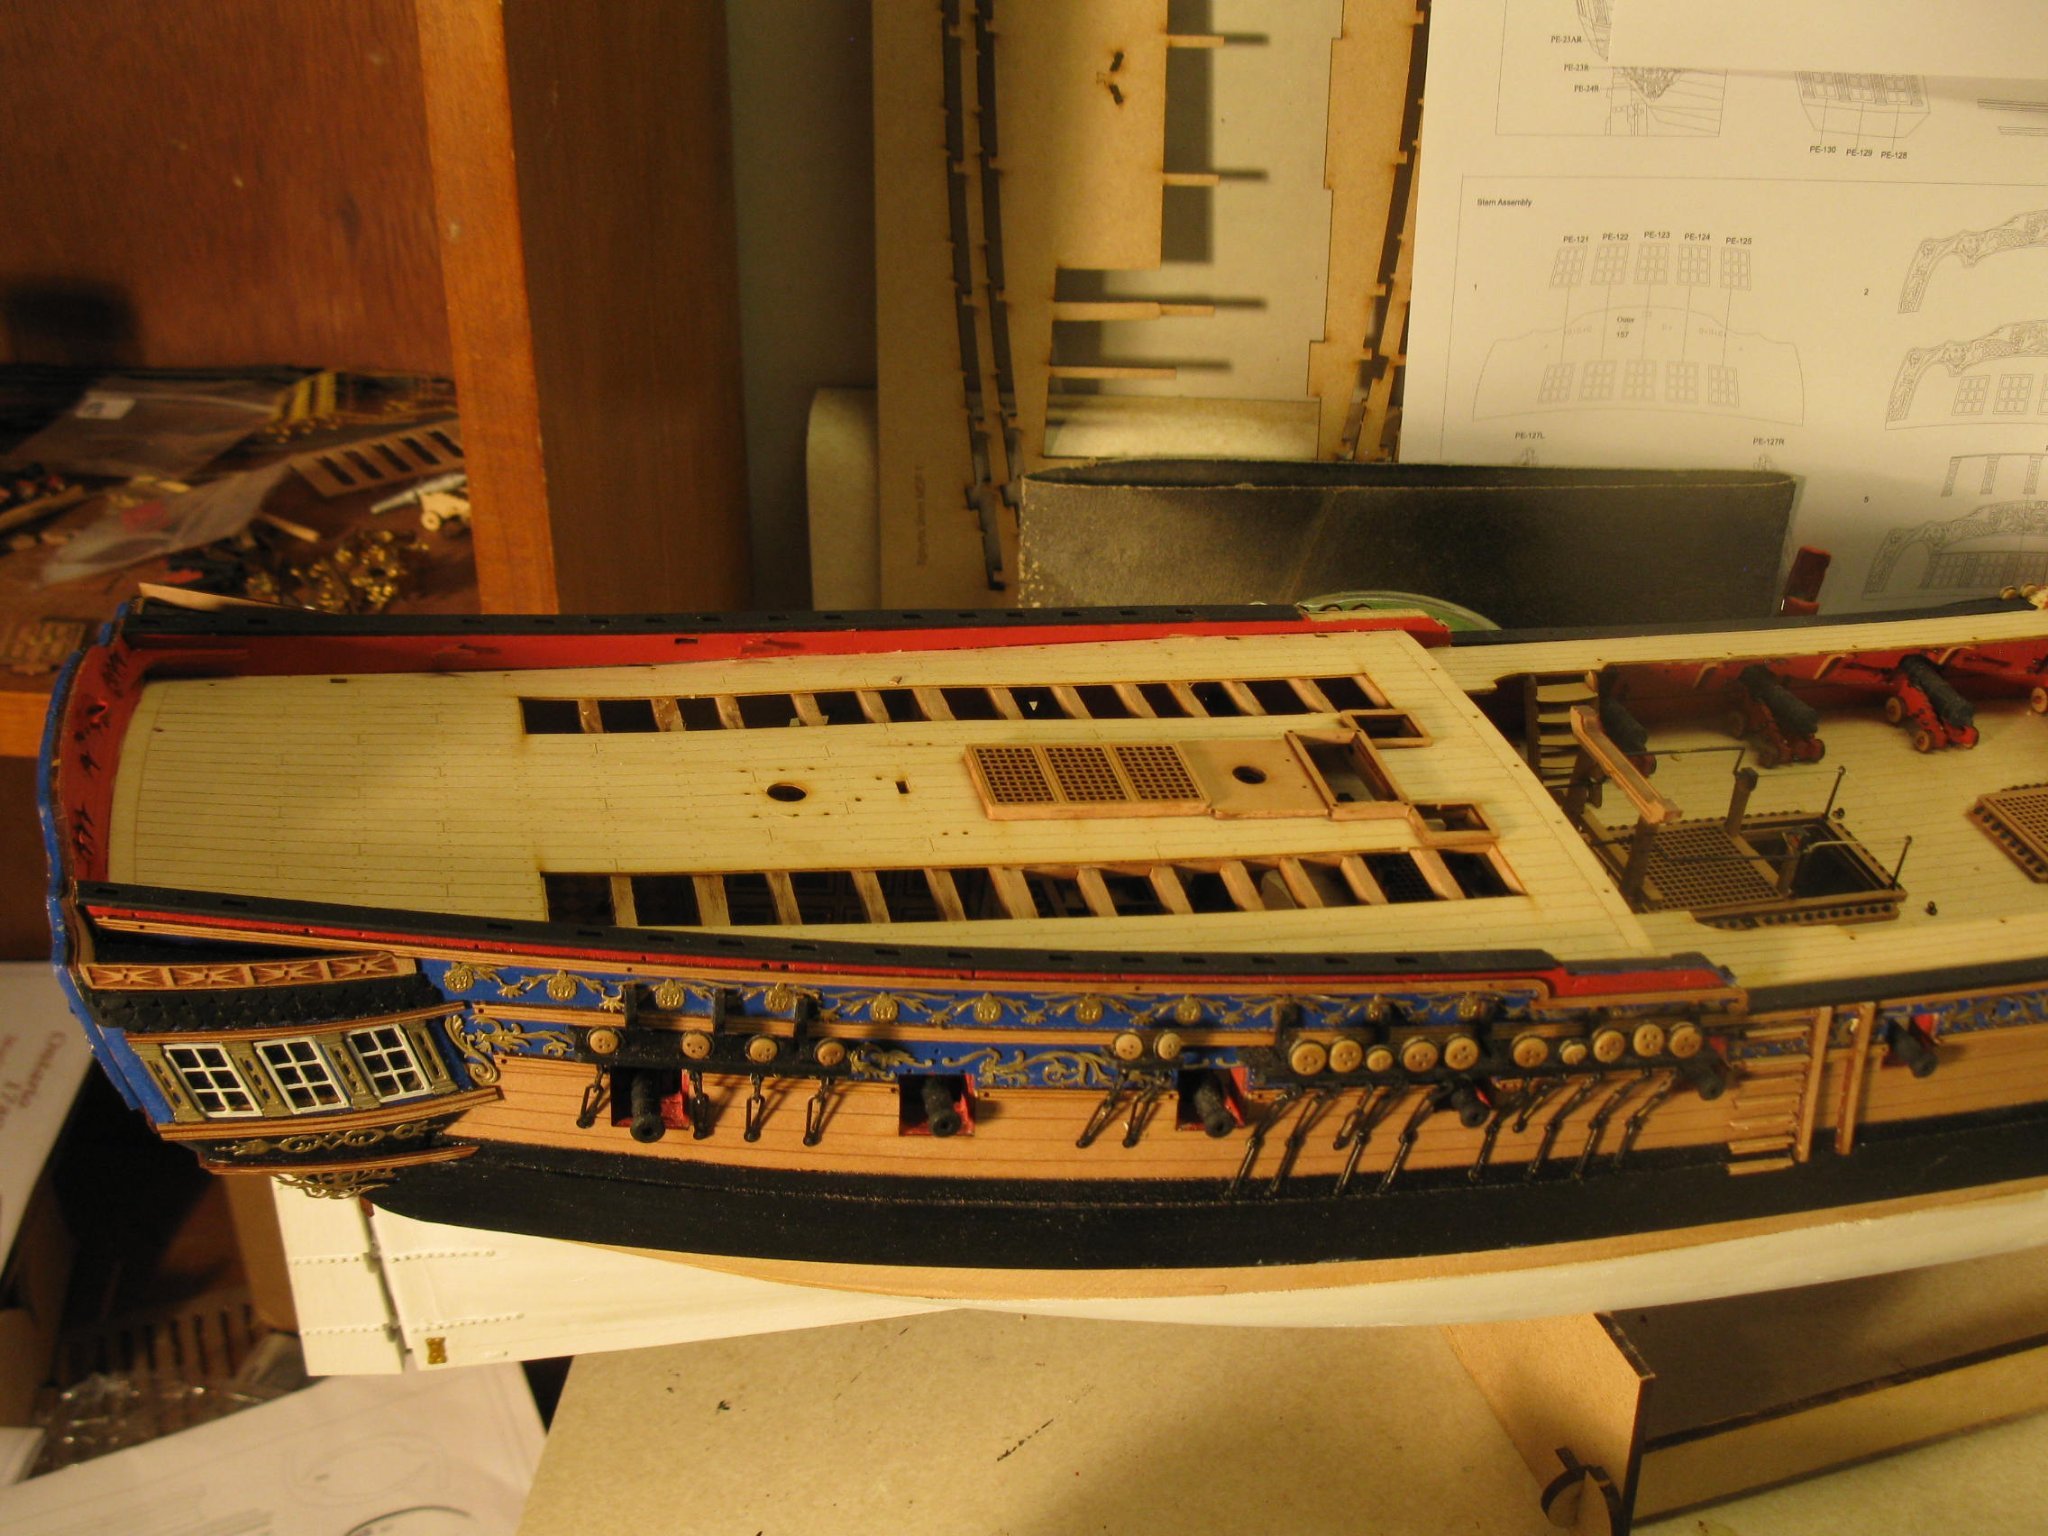
While I'm sorely tempted to mast and rig this model, I just can't. I already have 6 Caldercraft kits including Victory, Diana, Snake, et al, rigged and encased. Plus about 6 other kits of various manufacturers finished and encased. There just isn't any room. So it looks like I am nearing completion. As you can maybe see from the pictures I had no problem placing those 4 timberheads where I missed the slots. I think it was the right decision to not include the galley doors. They just didn't make any sense being there. And given the positioning of those doors, in real life who would use them. Looked to be very tight quarters with the bits directly in front of the doors. I am concerned about my ability to construct those ship's boats. They are are so tiny and my planking skills are not the greatest. I am just hoping that given the quality of this kit that maybe they won't be much of a problem.


-
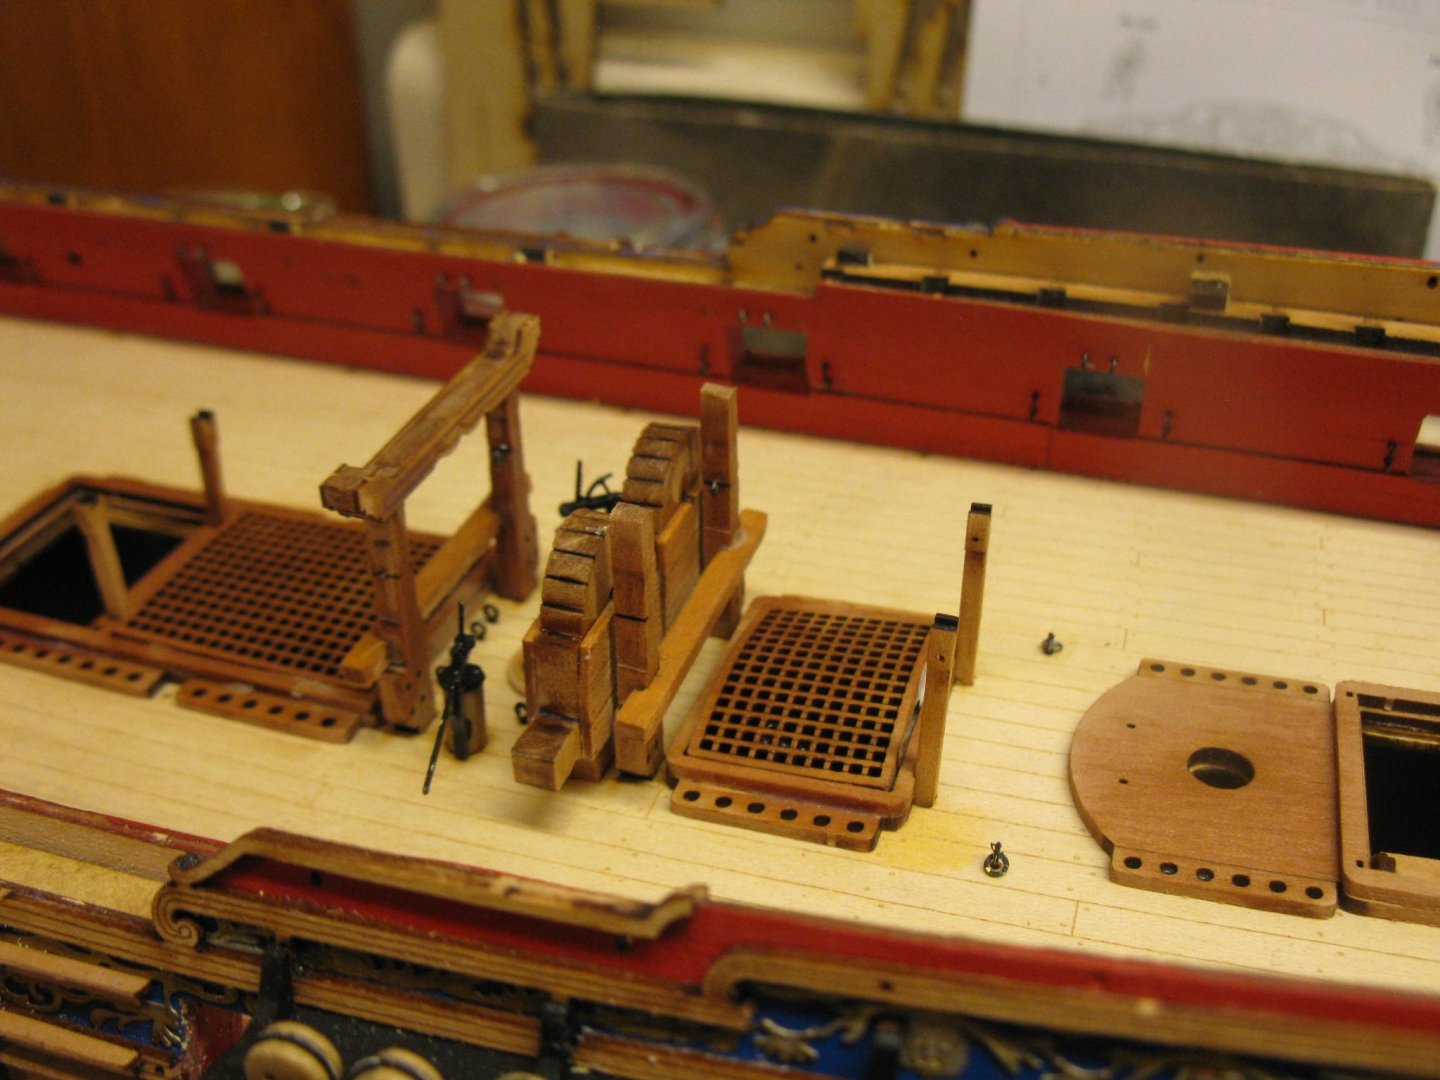
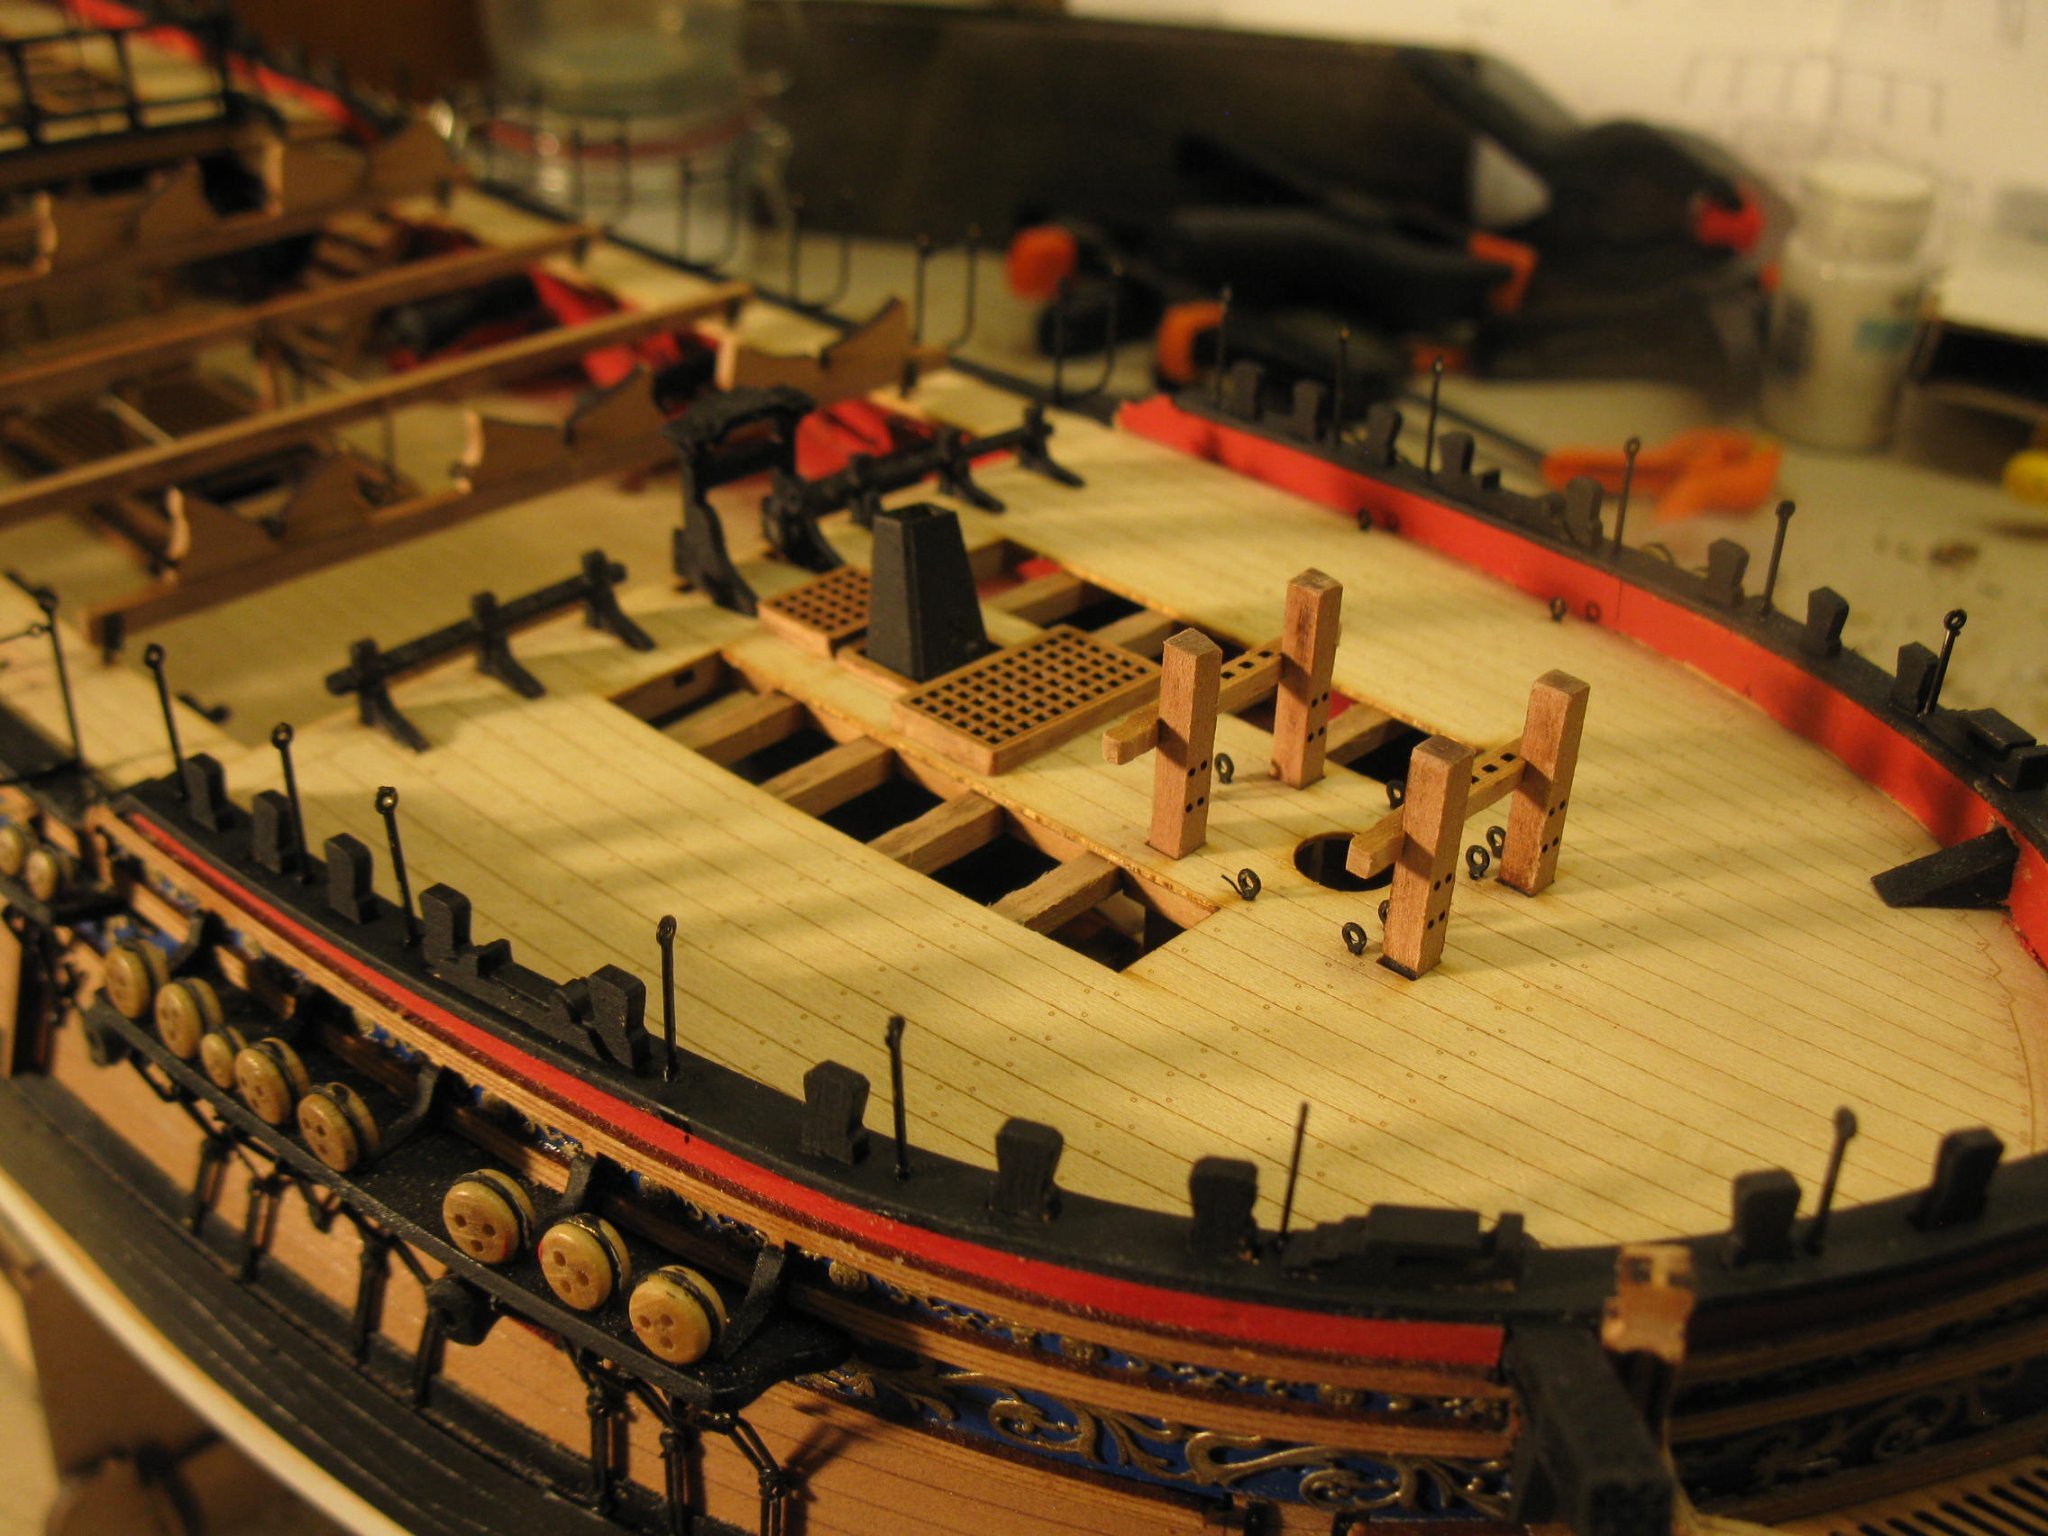
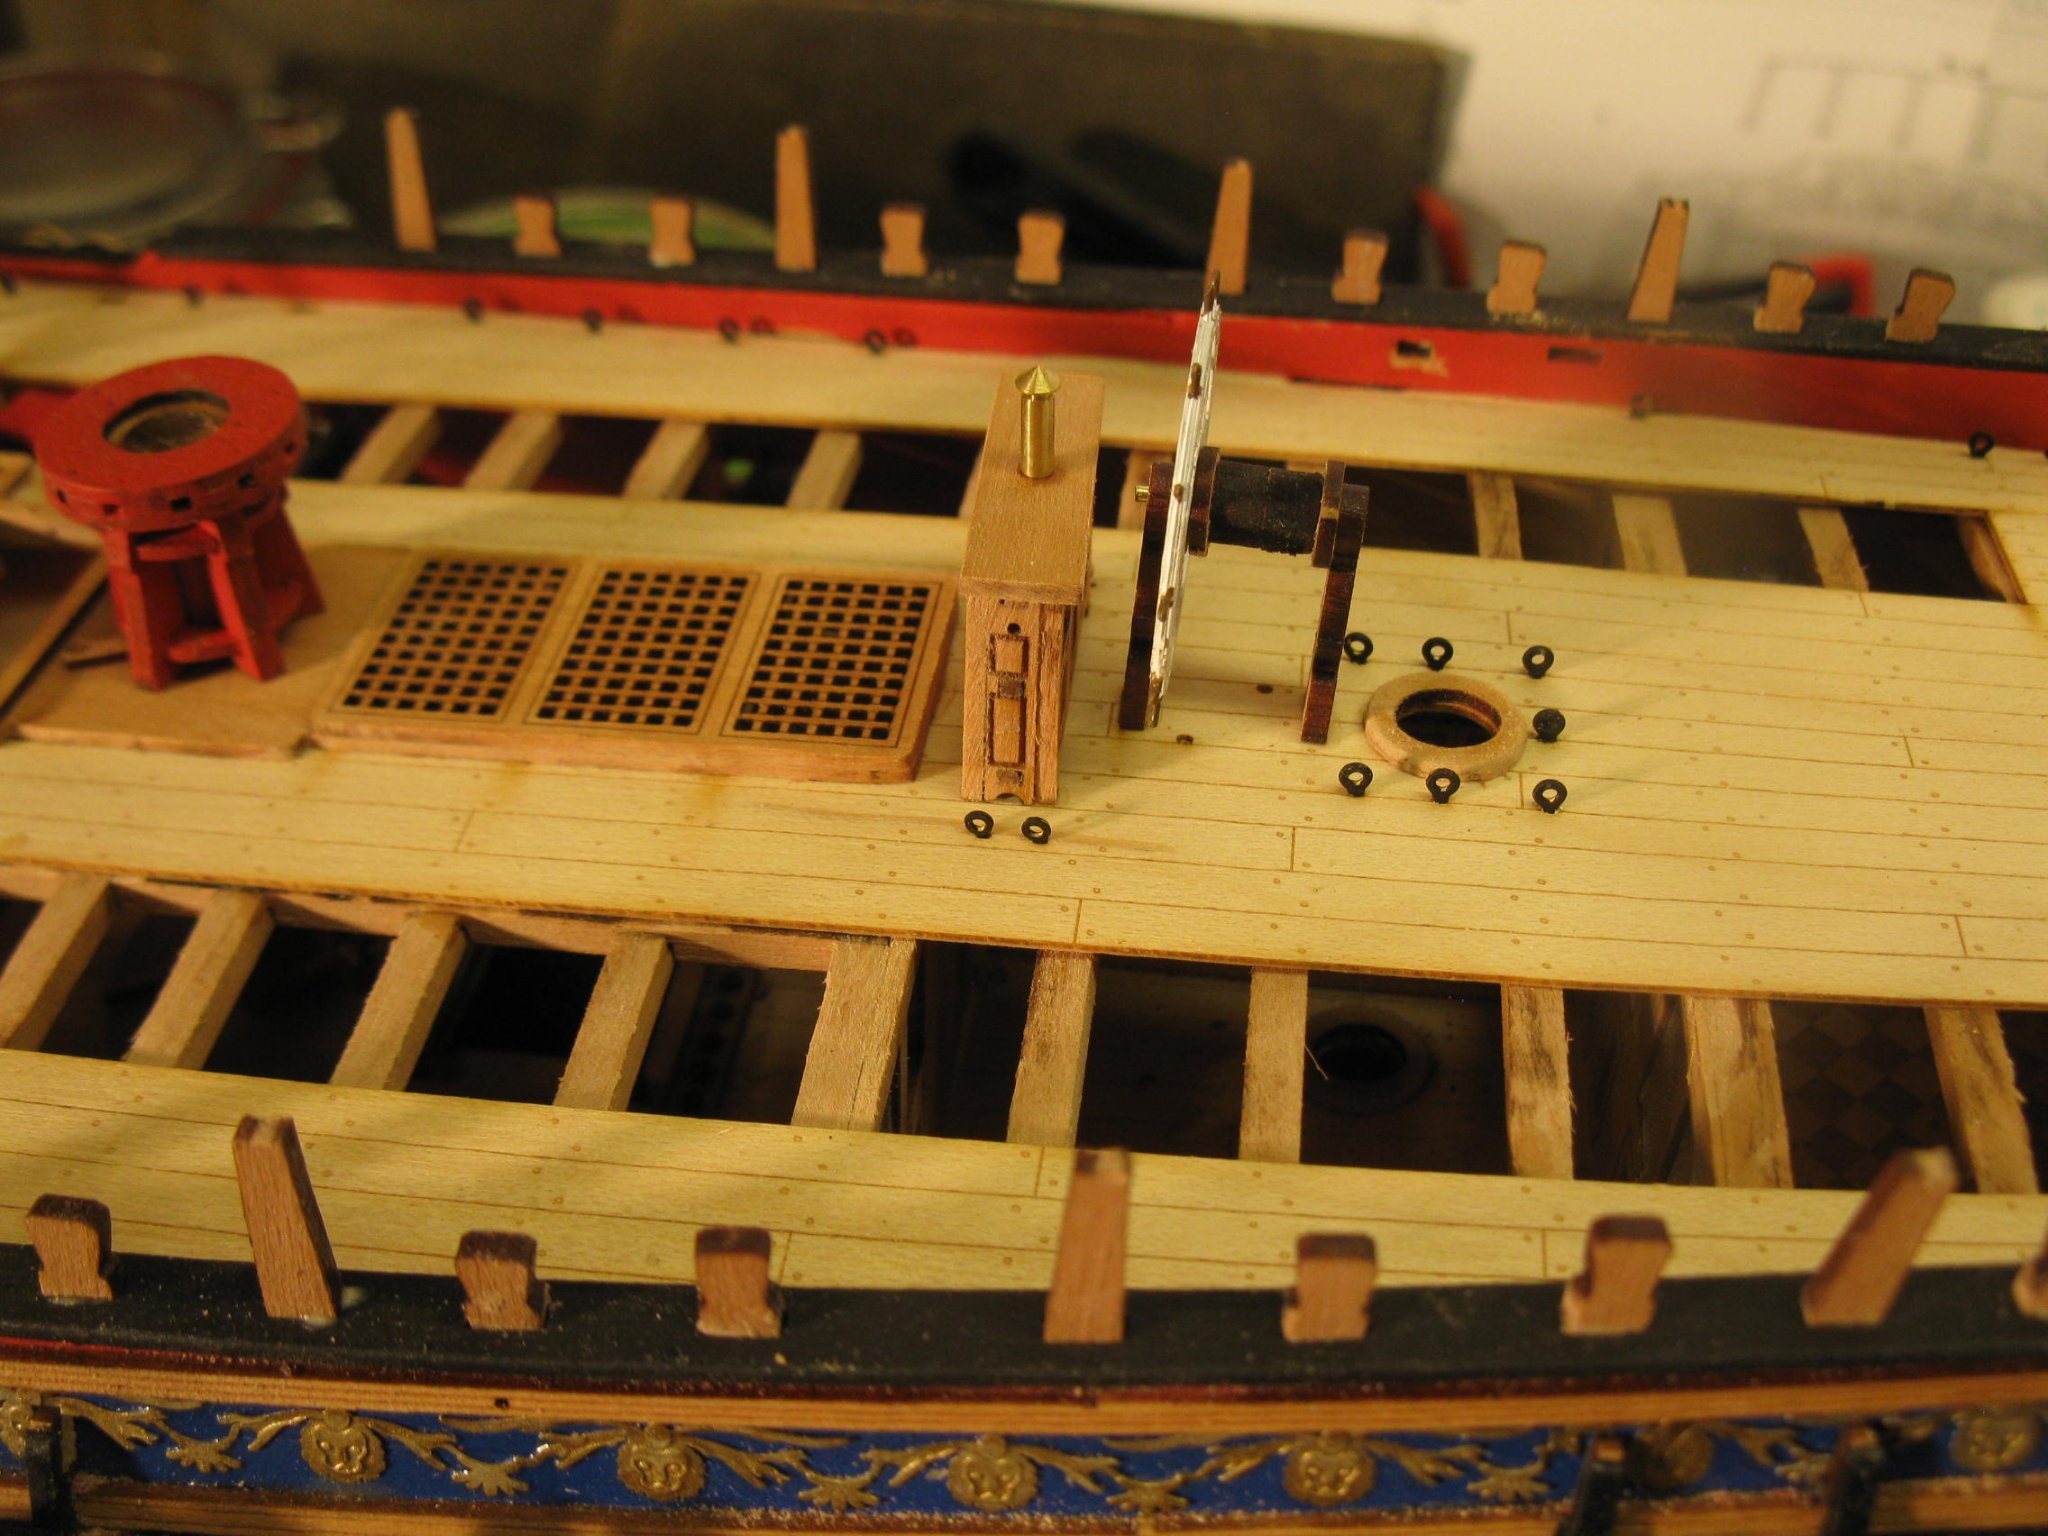
The first picture here shows that area that I thought something was missing. According to Jim above there are supposed to be 2 slots in this area. As you can see there are none. And while I did use filler to even out this area I definitely do not remember any slot. Either way, it will be an easy matter to attach two timberheads to this area. The other picture shows the aft section with a lot done. The timberheads, wheel, binnacle and in front of this area are in. Now for a bunch of painting


-
I am not seeing any slots to fit those timberheads.
-
The only thing about James' pictures, they clearly show the slots for the timberheads. That wasn't just sanded smooth.
-
I have just gone through James's prototype build log again, and for that issue with the gunwales that I am having, again, I don't see any mention of a piece going there but there are numerous later pictures showing something there. Not a huge issue since I think my solution will work well.
-
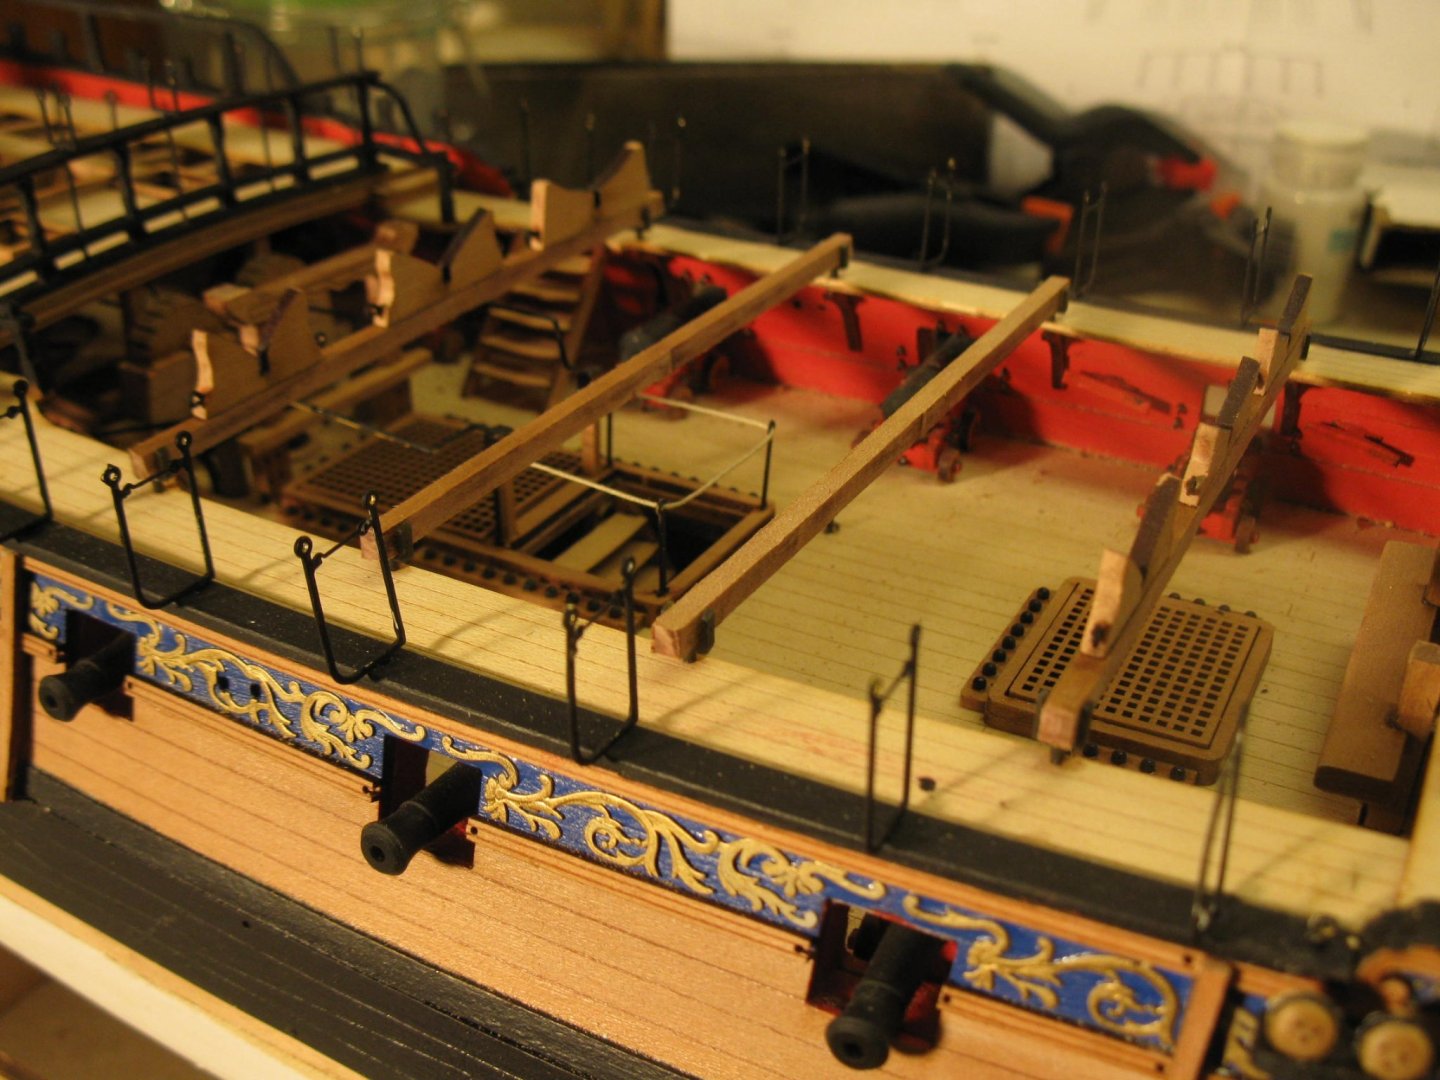
Progress continues but at a slower pace. Lots of painting at this stage so it takes time to let the paint dry. I may have found something that is missing. If I have goofed up let me know. It has to do with the gunwales. The fore, mid and aft gunwales are very straightforward but on both sides just aft of the mid gunwale and parallel to the main channel there is a short section that looks to require a gunwale but I don't see any reference to it in the instructions nor do I see anything resembling that piece in the laser cut sheets. But the picture in step 581 appears to show a piece there with two opening for later pieces. Since I couldn't find any corresponding pieces I just filled in the space with wood filler and finished and painted it. Once I get to the place with adding pieces in those two openings, I'll just drill a hole there and attach the pieces. (after posting this I am going to go down to the workroom and look again for those pieces). As I mentioned before I left the galley door frames off for later addition. As it turns out after thinking about it I wonder why even have those doors there. There is no "room" that would require doors. On this model the door frame would just be sitting there. As built on the model, sailors would not have to go through the doors to get to the stove. They could just go around the frame. I am going to leave that assembly off entirely.

-
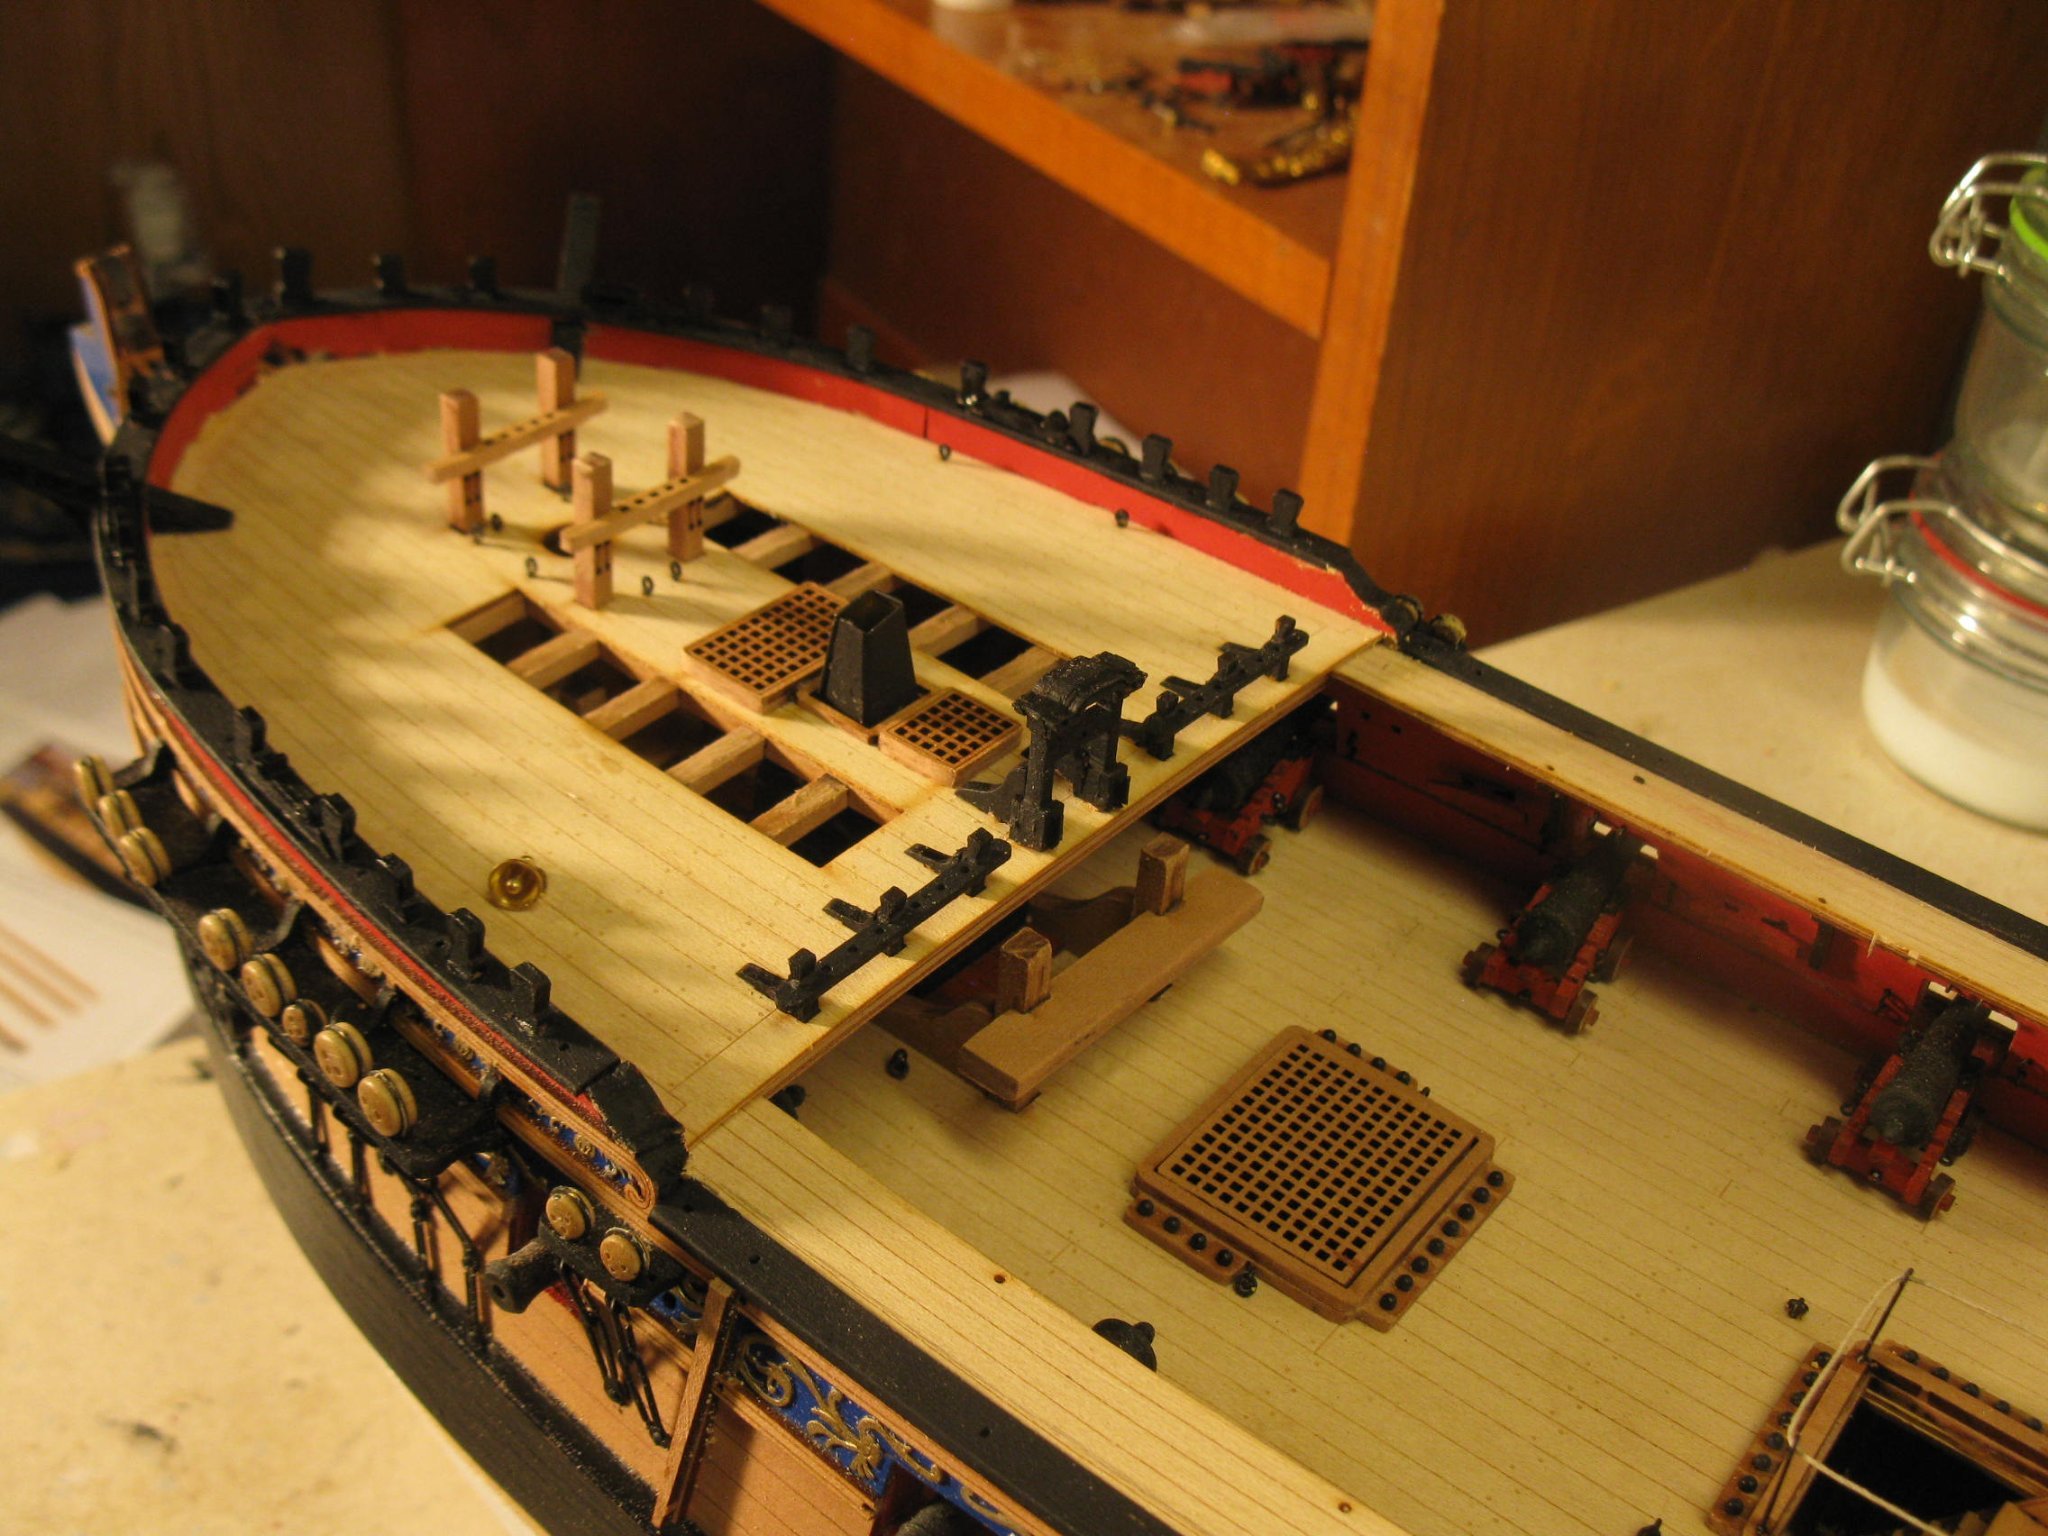
The quarterdeck and the forecastle deck have been applied as well as the bulwark sections. The deck sections required just a bit of shaping to fit. I did note that in the forecastle area after you have placed the beams, there are 3 sections of MDF frames protruding above deck level. These need to be removed. Later pictures show them removed but I didn't read any mention of this process unlike the process being mentioned for the quarterdeck. Still an easy and intuitive process.

-
As the saying goes, Haste makes waste. But I really don't feel like I'm speeding through this. Just steady daily work maybe averaging 1-2 hours a day. It's just so easy when so many parts are prefabricated and require minimal prep work.
-
Yes. As I get closer to the end I will try and add some lighting. It's just that my work space is adequately lit for building but not adequately lit for photos. And flash doesn't help any.
-
Sound reasoning for not getting this get at this time. Having built over 20 kits from various manufacturers, this kit is like no other. Super high quality parts with most of the parts prefabricated. Thoroughly enjoyable build. I'm even tempted to get another kit because this one was so much fun. Can't wait for Chris's next big kit. If you can get permission definitely buy this kit.
-
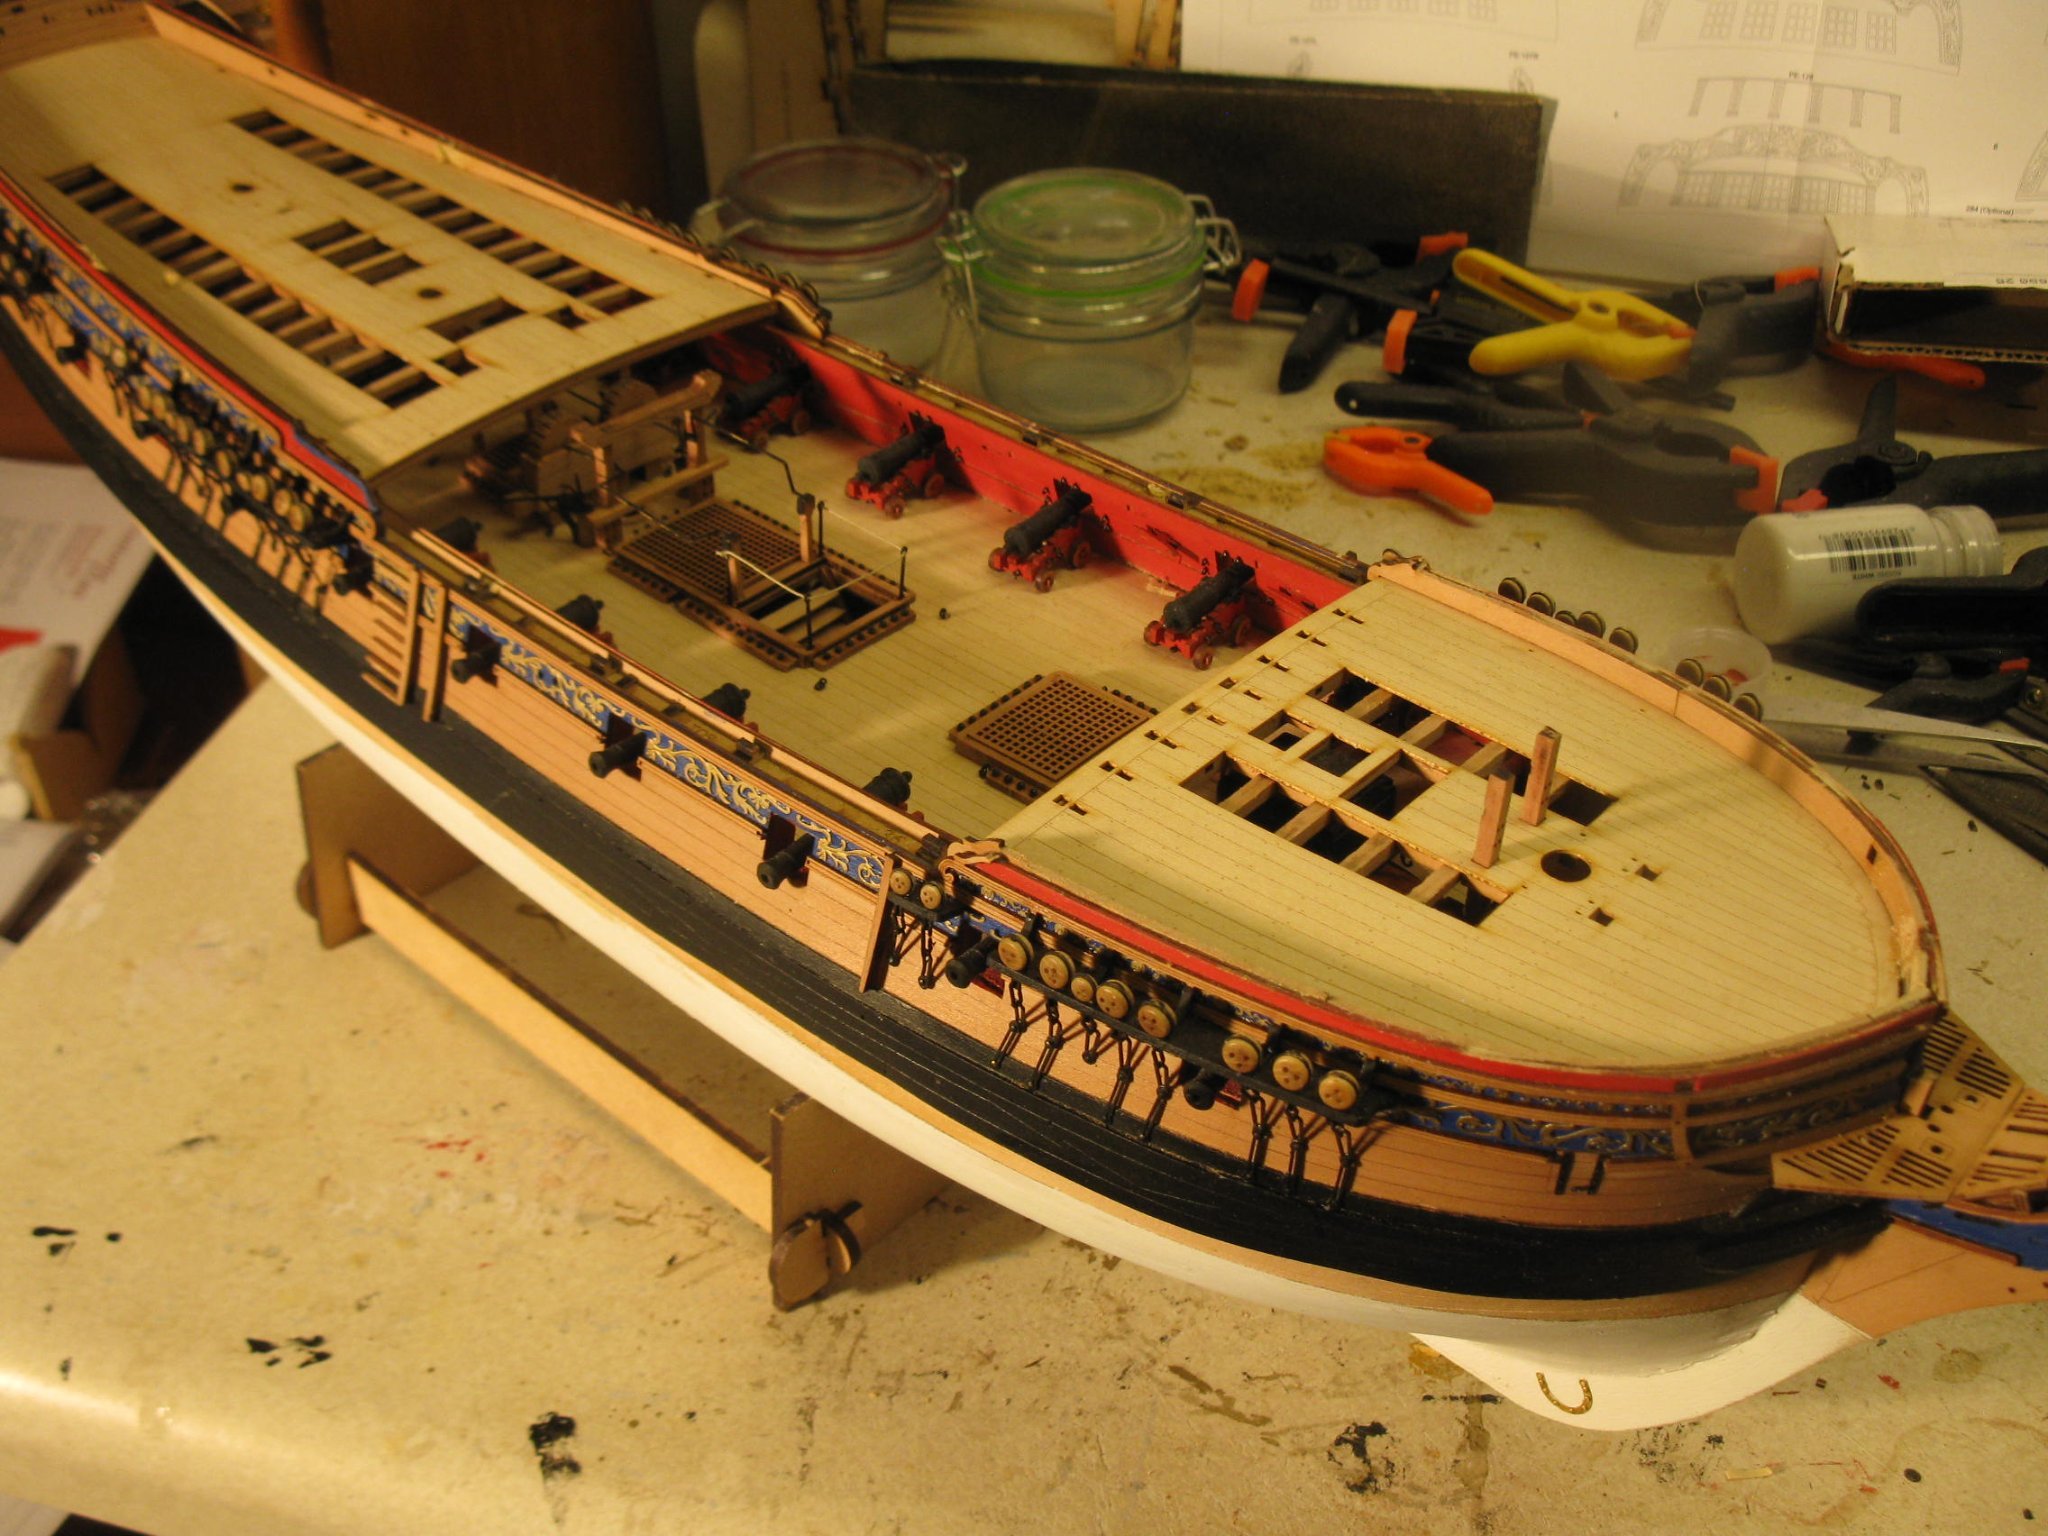
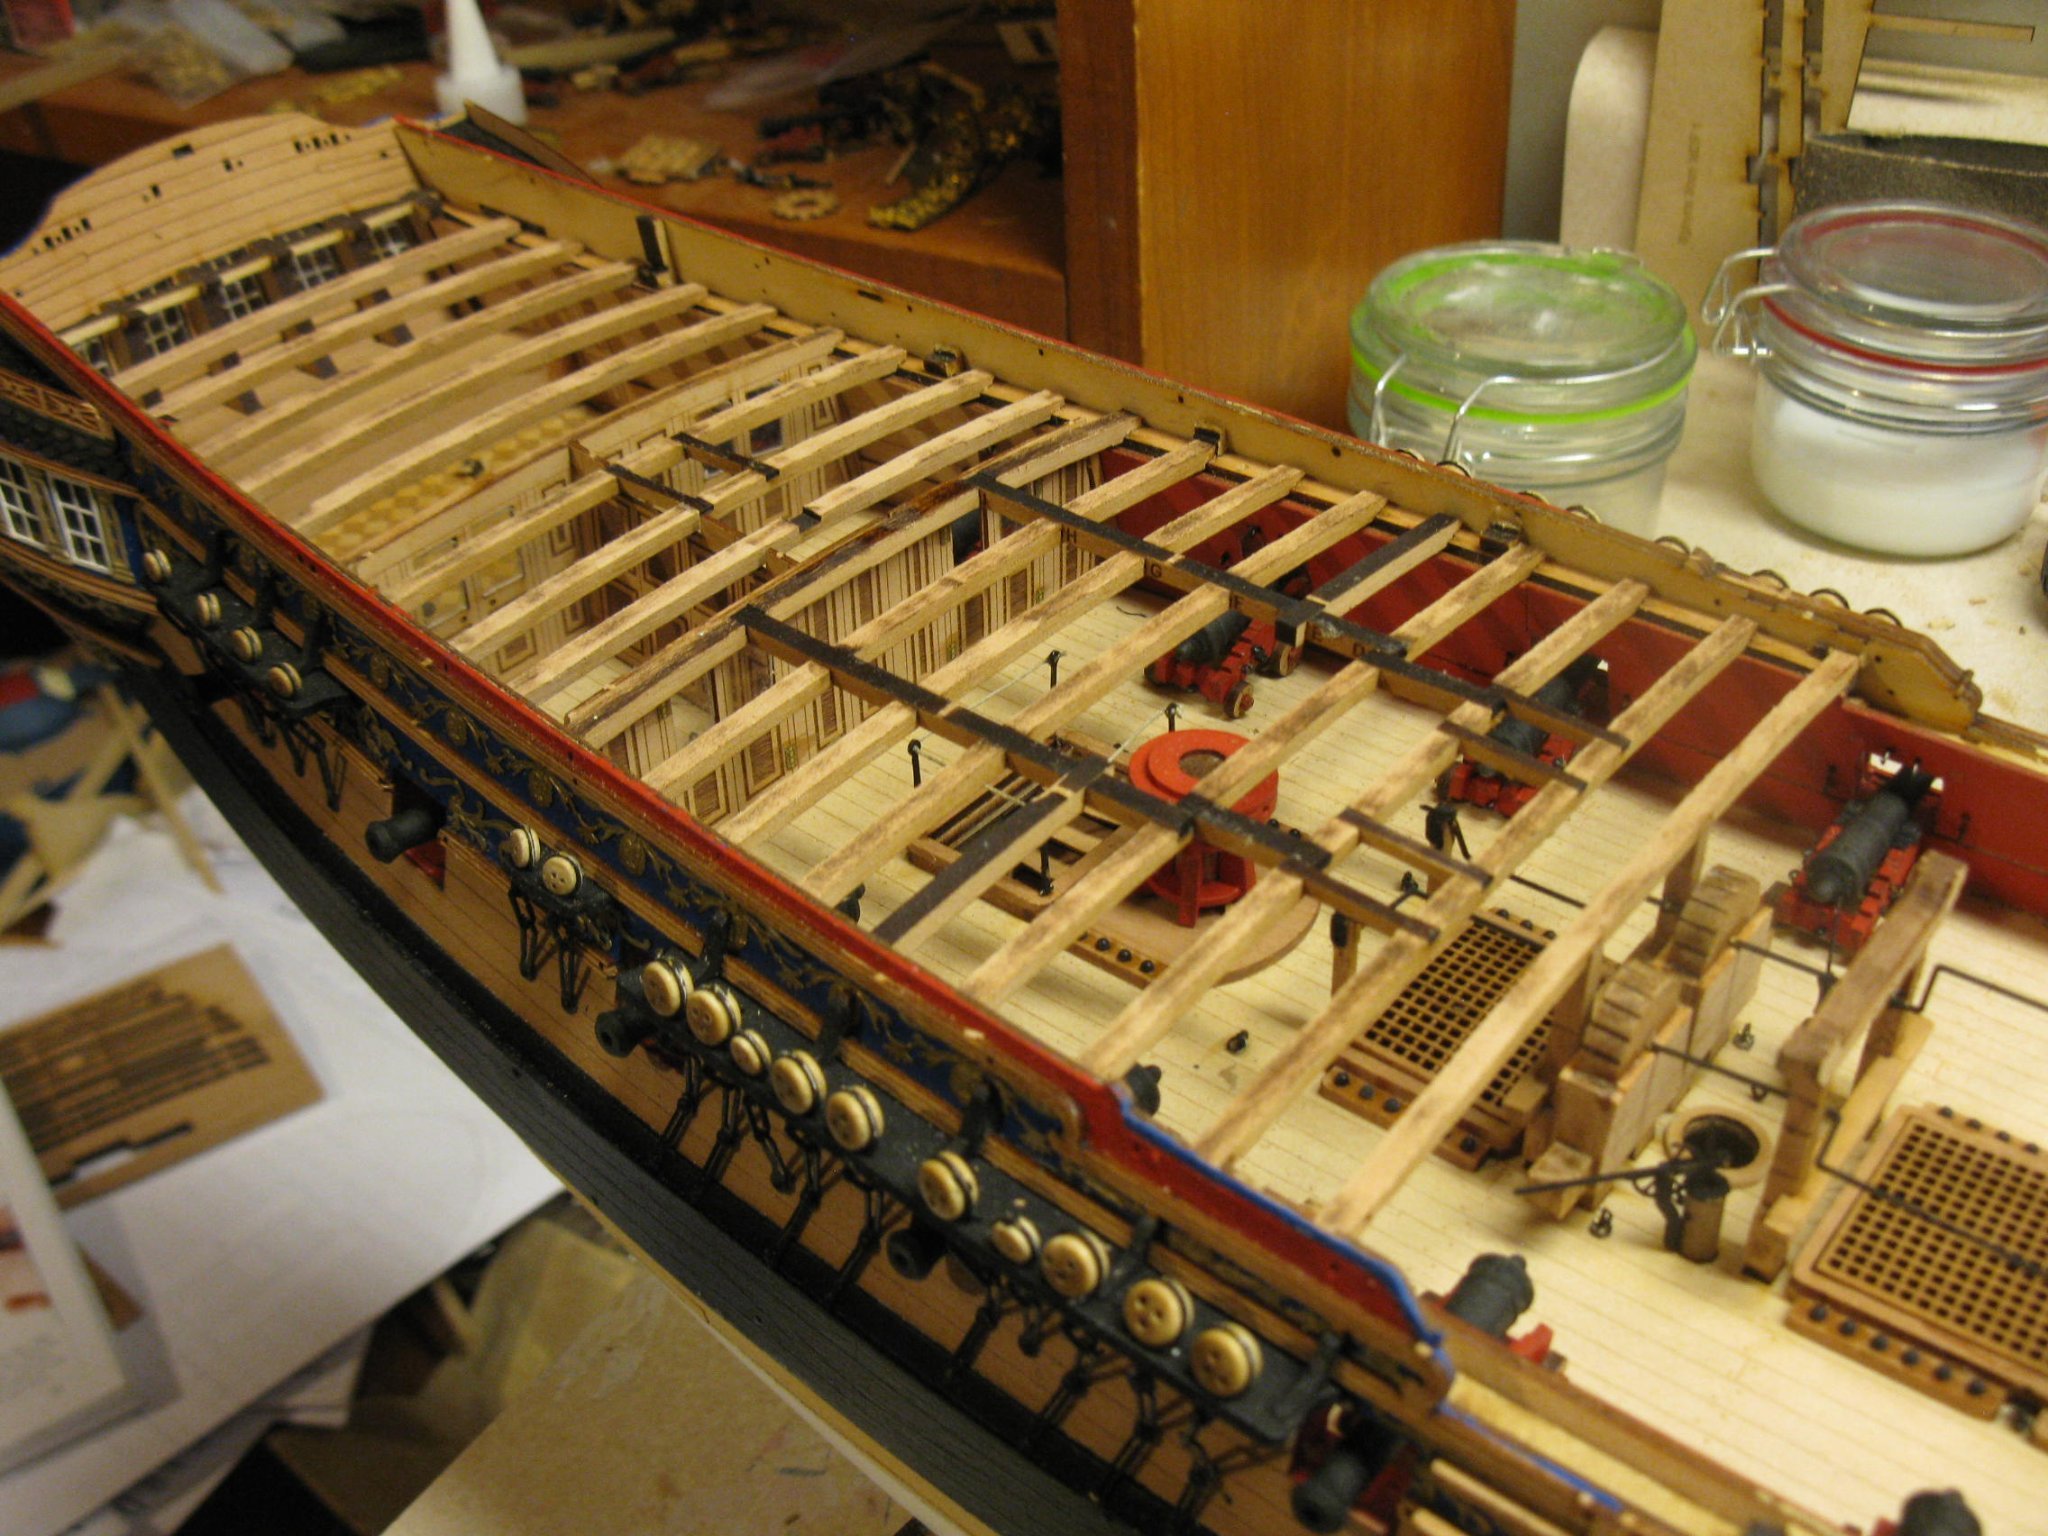
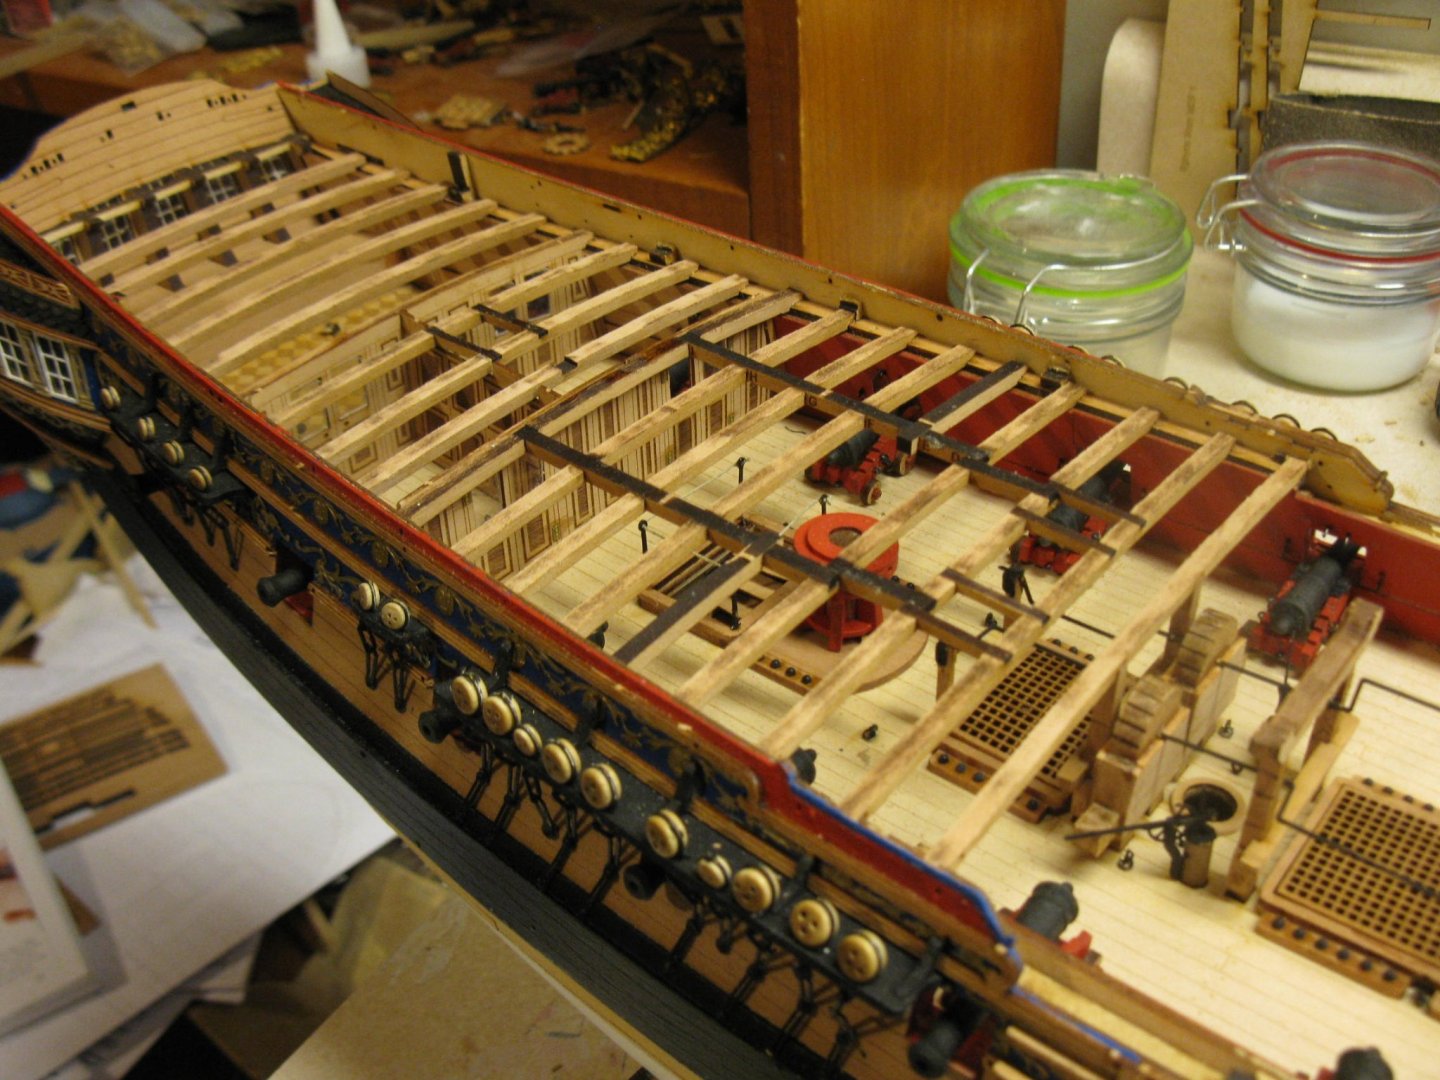
I have all the deck beam installed. The forecastle beams went in perfectly. Nice, tight fit. The directions indicated I needed to bevel the MDF slots in order for the beam ends to sit on the bulwarks. Turns out I didn't need to do that as my beams all sit on the bulwarks nicely. While I used the spacers as required during the build process, I found some of the aft beams required a bit of trimming to fit. Not the slots but the ends were a bit too long and didn't allow the placing of the beams. Nothing major at all. I found it a bit puzzling that while the transom piece fit perfectly indicating the correct spacing of the sides that I had to trim the beams a bit. I have test fitted the deck piece and it will only require very minimal sanding to get it to fit. So I am not sure why the beams required some trimming. Also was totally unable to thread the anchor cable from the inside or from the outside. I will end up just stuffing some of the cable into the hawse holes and applying a tiny bit of CA to hold the cable in place once I get to doing the anchors.

-
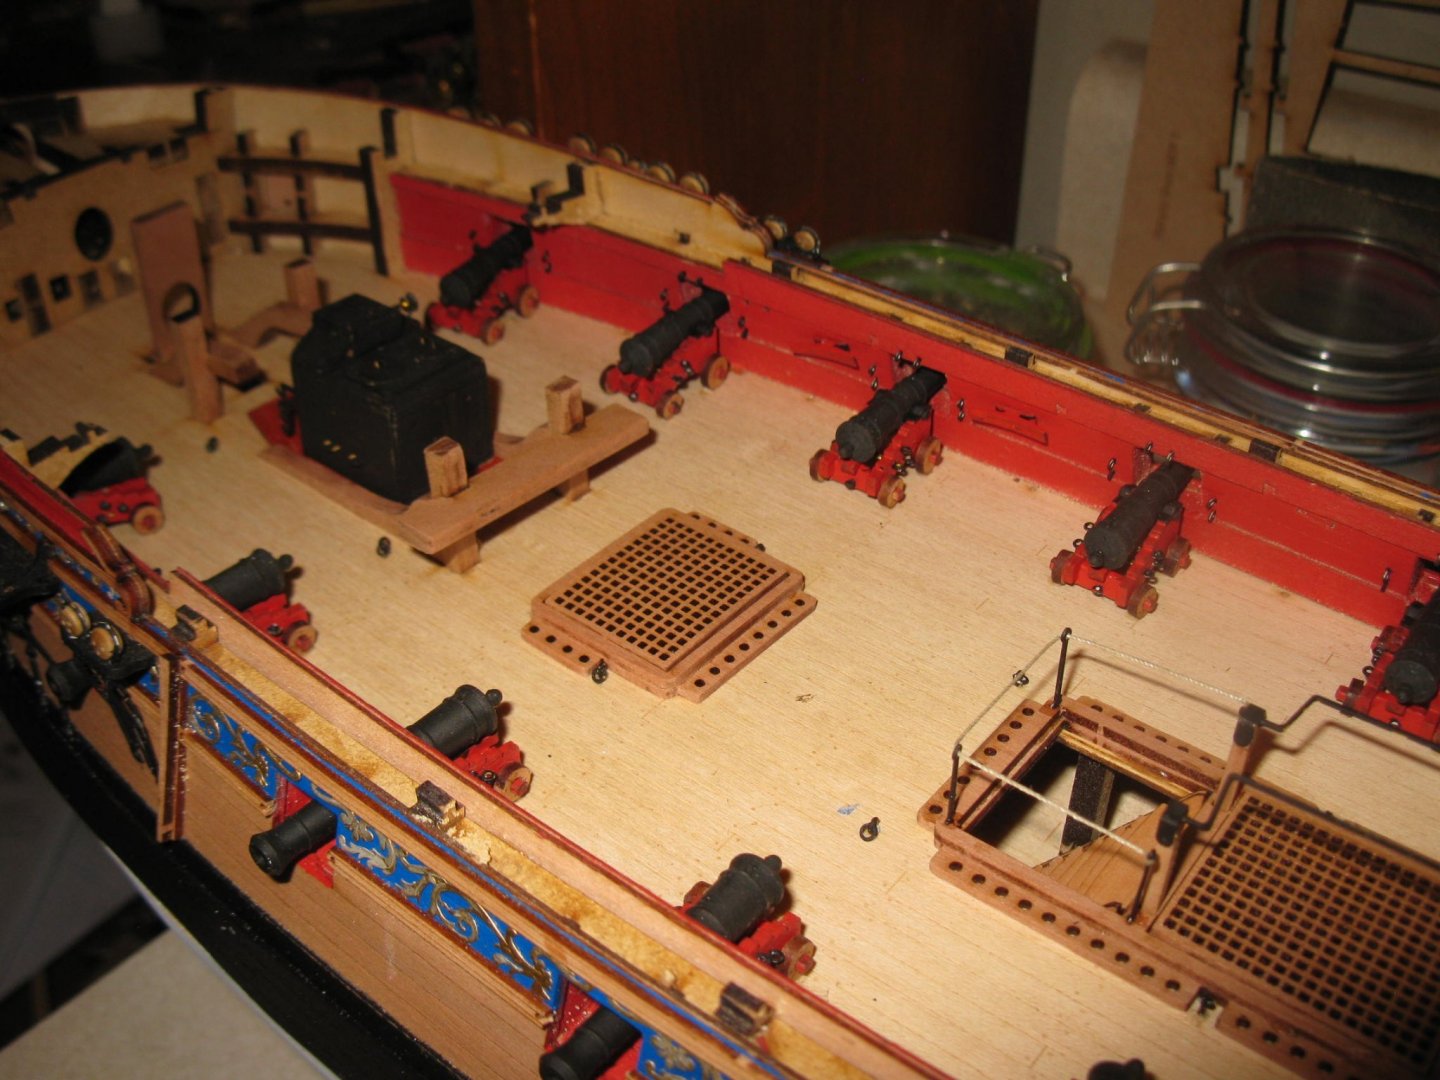
all the cannons are built and installed. For those of you who have built lots of kits it will be tempting to build the gun carriages completely and then add the cannon barrels. You can't do that with this kit. Be sure to follow the kit instructions closely. Now on to the deck beams.


-
That speaks to the quality of the kit and instructions.
-
Have pretty much completed the gun deck pieces. I left the galley doors off for now and will put in place when I get to that part of the upper decking. One word of caution. For the galley door frames that outer frame is EXTREMELY fragile. So thin that I don't see how anyone can put it in place without it breaking. Fortunately, it is an easy repair and unnoticeable when finished. Will be working on the guns shortly.

-
I think the part you ended up using was a part #29 from the 3mm MDF sheet. It has roughly the same shape as 481. As I was building this I kept noticing part 29 on that sheet still there. That sheet has parts for the hull bulkheads and I kept wondering what I missed because I thought all the parts of that sheet should have been used. The only thing that kept me from making the same mistake you did was that I kept referring to the plan sheets for all of the parts and searched for the right number. Step 223 finally shows the use of part 29 (although I don't remember my part 29 having the numbers 29 engraved on them like they show in the picture. For all builders it's really important to refer to the plan sheets for part numbers and locations. Later in the build there are numerous parts that look the same. It would be easy to mix things up without referral to the plans.
-
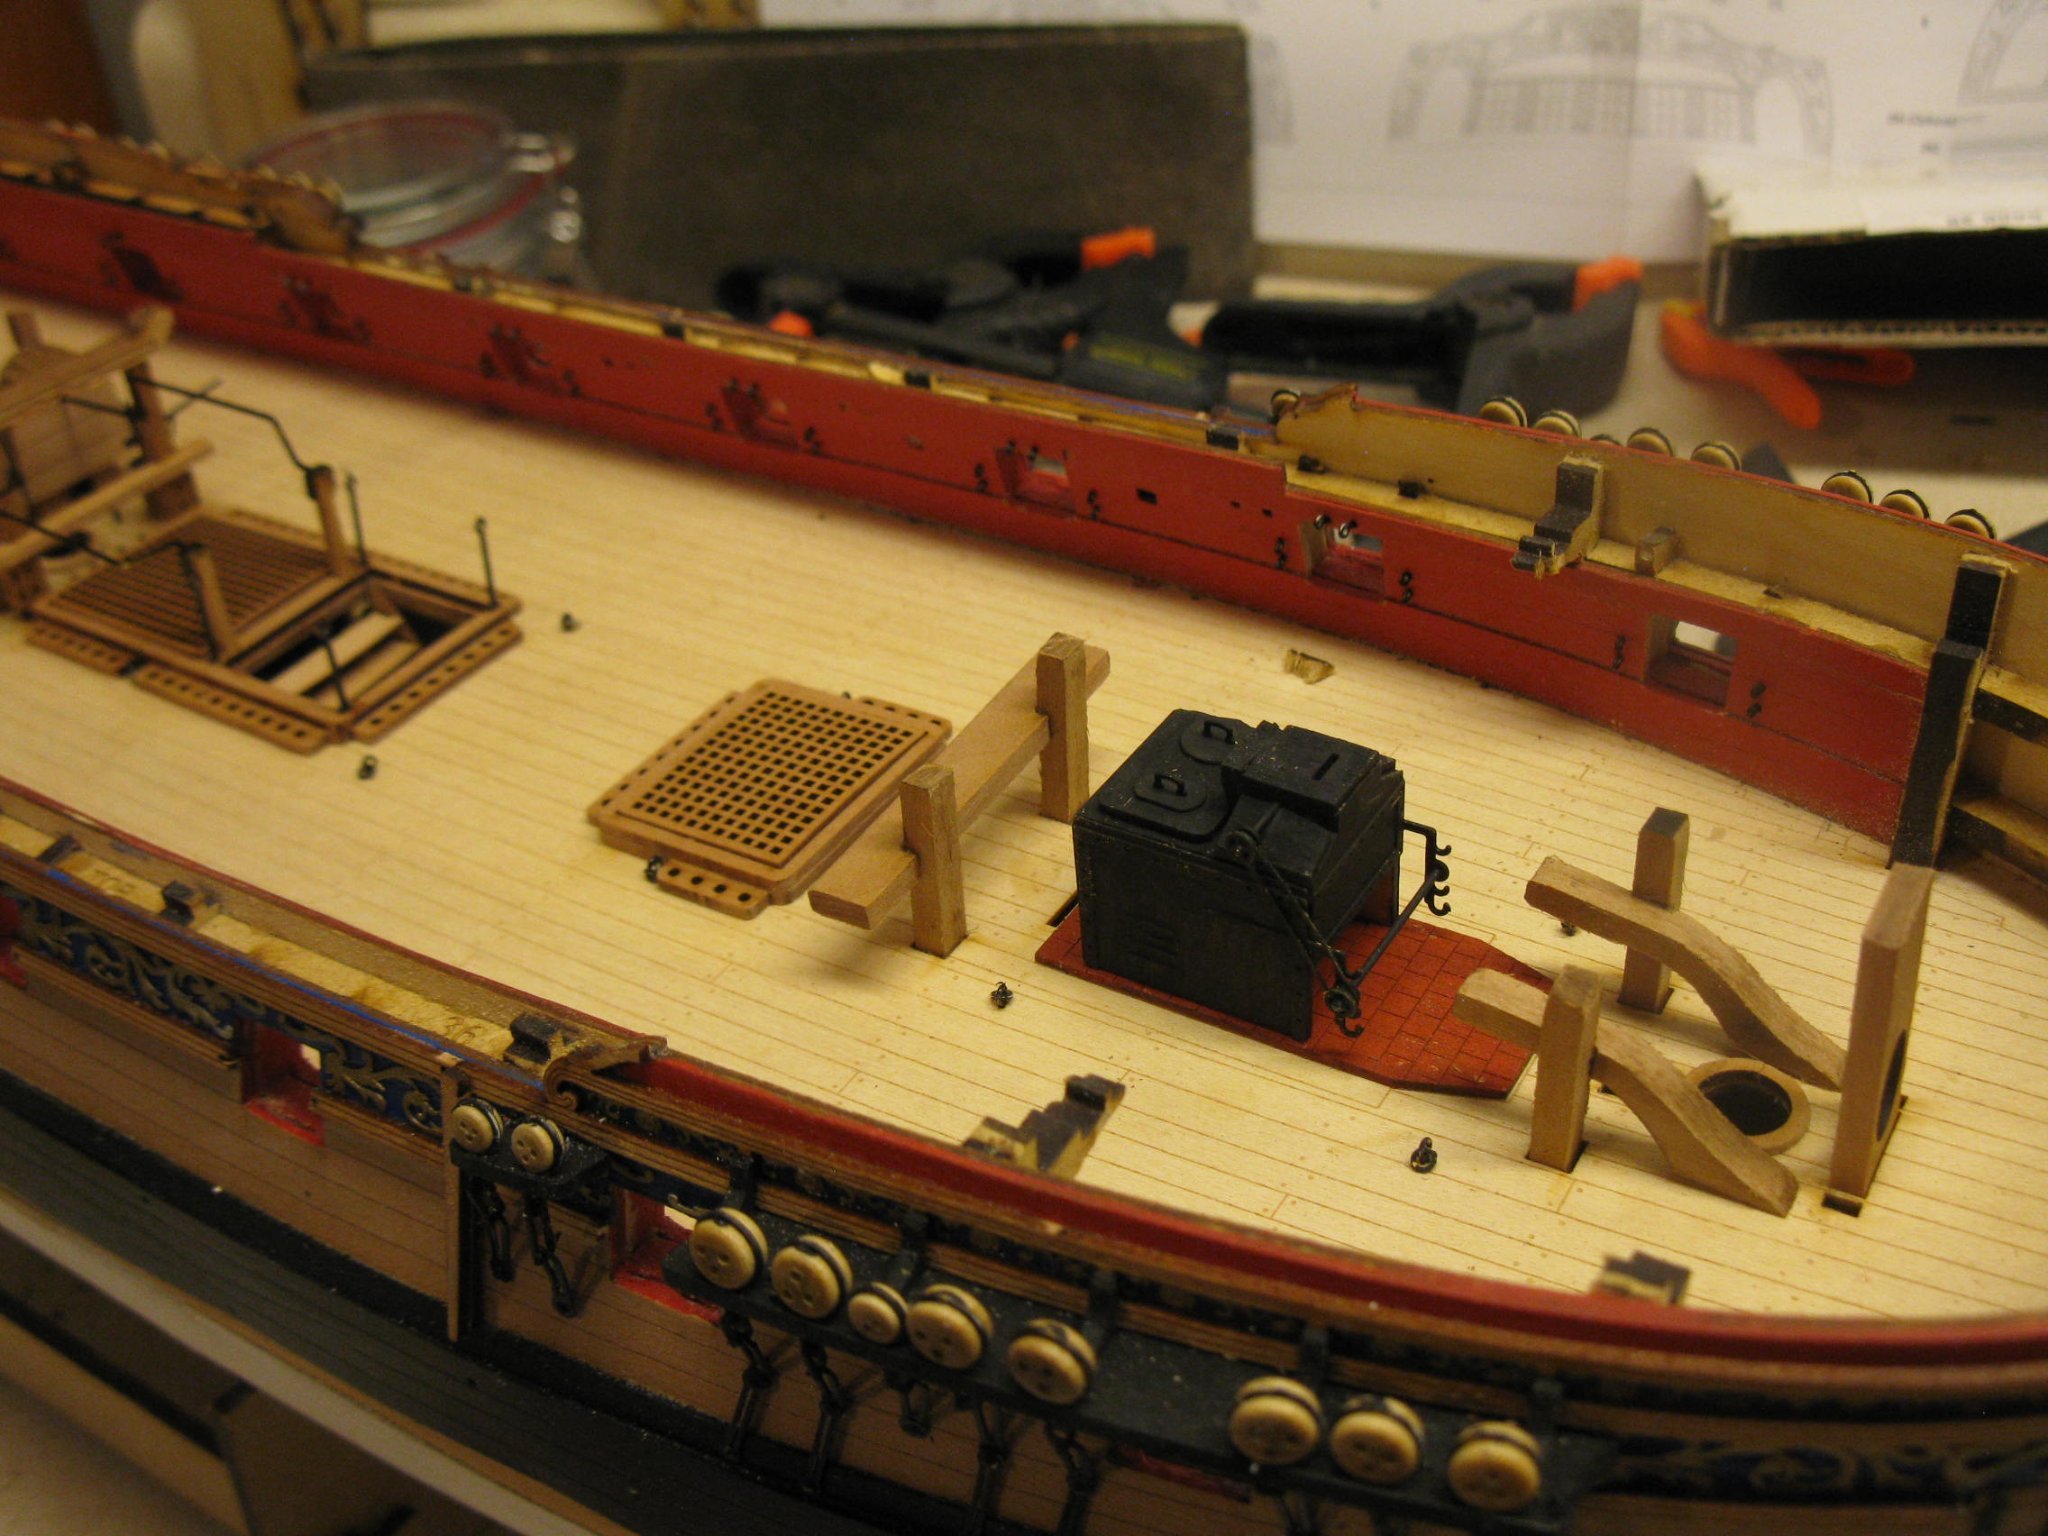
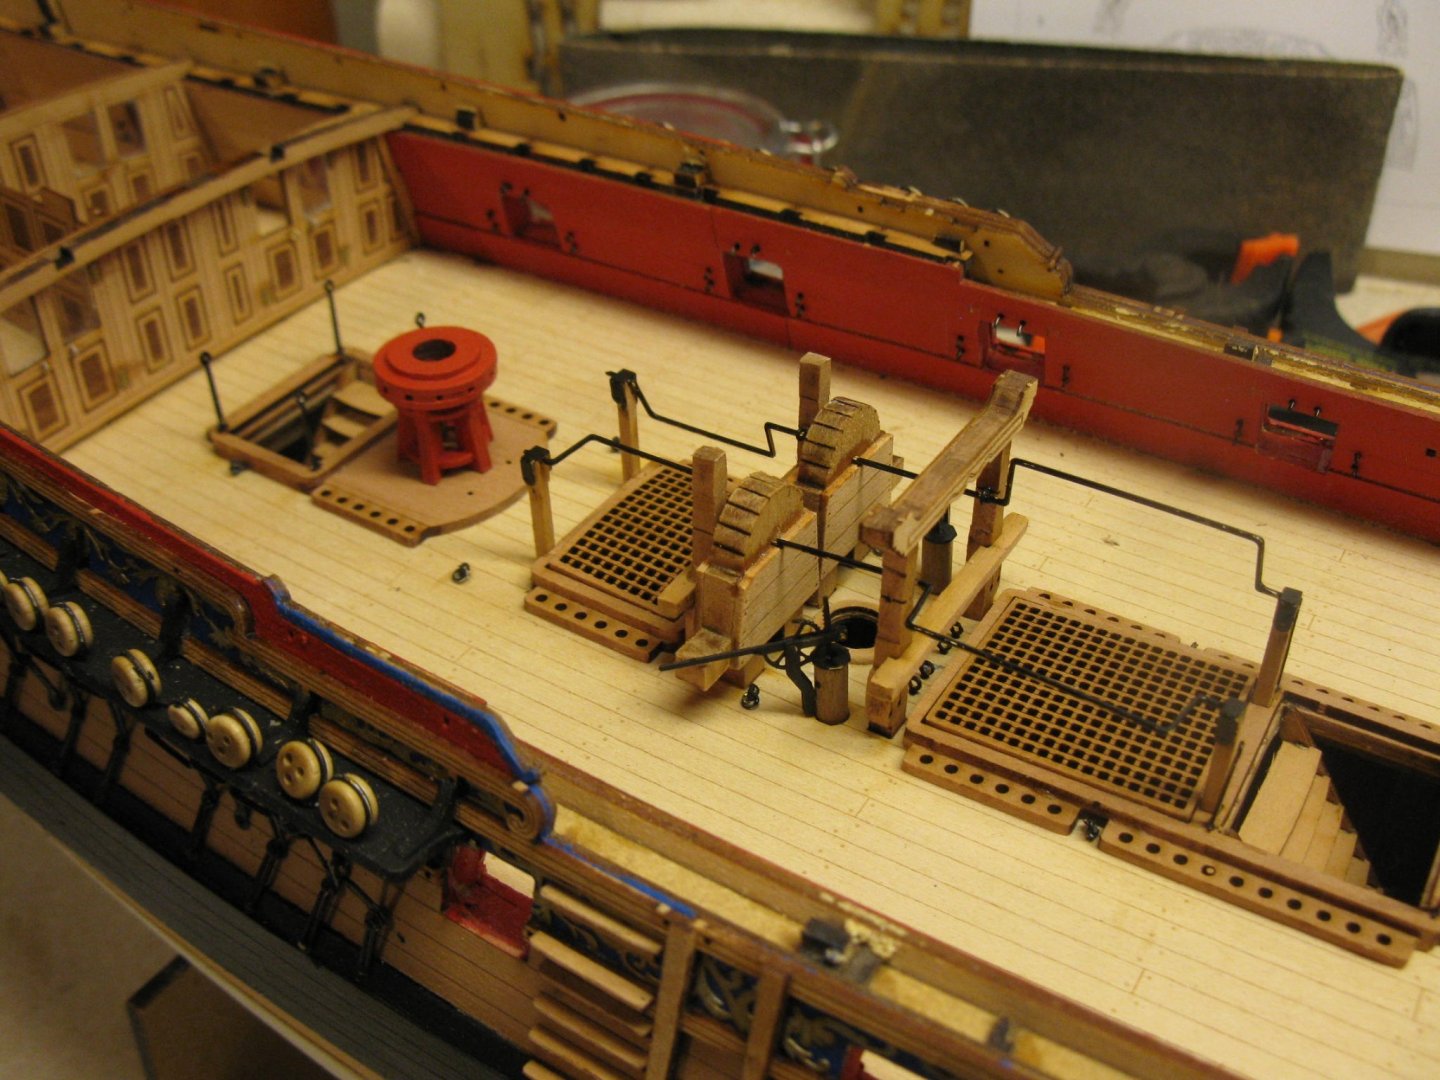
Finished the pump area. Very straightforward assembly process. Now on to the stove/oven.