

igorcap
-
Posts
226 -
Joined
-
Last visited
Reputation Activity
-

 igorcap got a reaction from GrandpaPhil in Swedish Privater by igorcap - Chapman's frigate
Then I begin to create base hull. Pine strips are glued to frames using a stapler. Total of two layers. First layer must be dried at least one day. After drying, staples are removed and surface is processing with plane .
-
igorcap got a reaction from GrandpaPhil in Swedish Privater by igorcap - Chapman's frigate
Then I get shape of "thick" frames from 3D for the manufacture base hull. A detailed description of my technology manufacturing basic ship hulls can be seen here http://sailmodel.ho.ua/present/pres_e.htm
-
igorcap got a reaction from GrandpaPhil in Swedish Privater by igorcap - Chapman's frigate
I use extensively in their work 3d-modeling and CNC, so I started by creating a 3D model of frigate. Using this model I check all structural elements and can get shape of frames and other parts
-
igorcap got a reaction from GrandpaPhil in Swedish Privater by igorcap - Chapman's frigate
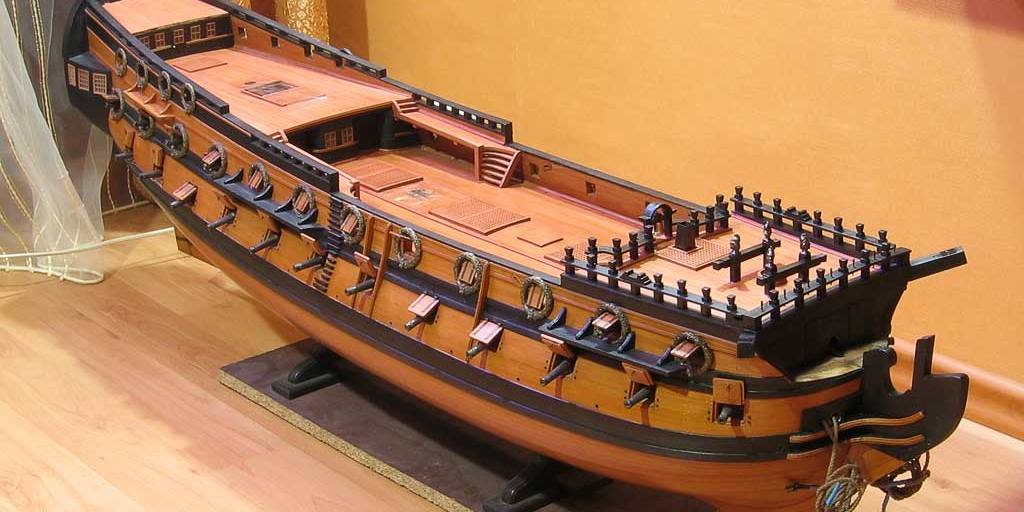
Hello everybody !
My favorite theme in modeling is Swedish shipbuilder F.Chapman and his ships. Previously, I have built a model of the Swedish privateer on Chapman's drawings from album «Architectura navalis mercatoria» (can see in the Gallery http://modelshipworld.com/index.php/gallery/album/208-swedish-privateer/)
In 2011 I started to build another model of this album - a frigate (sheet XXXIII). This project was repeatedly interrupted, but I went back to building of model.
I will show gradually all steps of building model.
Baseline - Chapman's drawing. Analysis design of frigate has shown that this is an earlier and smaller version of the well-known series such as frigates Bellona (1782).
Swedish Maritime Museum have excellent model Bellona 1/16. Photos of this model give additional information about the hull detailing and rigging.
-
 igorcap got a reaction from allanyed in Decor set for model of French corvette "L'Aurore"
Decor set for model of French corvette "L'Aurore".
I show photo after CNC milling and final photo of decor on model. Model by Vadim Kuzmin
-
 igorcap got a reaction from ggrieco in Large size wooden models of guns.
Wooden models of guns for subsequent casting of metal. Large size, large scale, this work was interesting.
-
igorcap got a reaction from ggrieco in Head figure for Pegasus model
Pegasus took his place permanently
-
-
igorcap got a reaction from ggrieco in Head figure for Pegasus model
Client received a Pegasus. Trying successful.
-
igorcap got a reaction from ggrieco in Head figure for Pegasus model
Thank you!
I have not kept sketches, but only one ...
-
 igorcap got a reaction from archnav in Head figure for Pegasus model
Head figure for Pegasus model. First, design model in 3D, then CNC mashining and manual finishing of.
-
igorcap reacted to ggrieco in Heroine 1838 by ggrieco - FINISHED - Scale 1:24 - Western River Steamboat as she appeared before hitting a snag in the Red River
I was just able to finish the steam wipers and the throttle housing before the holiday break. I played around a little with the lighting and exposure time and think the photos turned out a little better. I think the secret is as little light as possible when photographing brass.
-
igorcap reacted to ggrieco in Heroine 1838 by ggrieco - FINISHED - Scale 1:24 - Western River Steamboat as she appeared before hitting a snag in the Red River
The 8 year old computer that runs my mill gave out early in the week. It has made a lot of parts in the last 2 years and was well worth the $28 that I paid for it from Ebay. I just paid $50 for a replacement and hope it performs as well. I was only able to make a handfull of parts but, I finally got the time to start assembling the engine.
Parts for the cam frame supports.
Completed cam frame supports.
The engine minus the rods levers and wipers for the poppet valves.
I have never been able to photograph brass well. The suface shows every scuff and rub mark. Blackening will give it a much more even appearance.
Steam wipers and supports.
-
igorcap reacted to ggrieco in Heroine 1838 by ggrieco - FINISHED - Scale 1:24 - Western River Steamboat as she appeared before hitting a snag in the Red River
I finally have most of the machinery parts machined. Time to have some fun putting everything together. Each model requires over 250 nuts and bolts just for the machinery. The nuts and bolt heads range in size from 1 1/2 to 2 1/2 inches. I found that 0-80 and 00-90 screws work for most of the bolts on Heroine but could only find screws with hex heads. Heroine only used square headed fasteners.
I milled the nuts in three different sizes (scale 2 1/2 shown in photo) The holes were milled slightly undersized and drilled and tapped to the proper thread.
Completed flywheel bearings notched into the cylinder timbers.
Starboard flywheel bearing as it appeared before excavation.
The parts that make up the valves for Heroine's engine.
Valves ready to be soldered.
-
igorcap reacted to ggrieco in Heroine 1838 by ggrieco - FINISHED - Scale 1:24 - Western River Steamboat as she appeared before hitting a snag in the Red River
Not a lot of visible progress this week. I spent most of my time finishing the hull planking on the second model. I was able to start milling the sixteen bearings that will be needed for the flywheel and paddlewheel shafts.
Roughing cuts on the main flywheel bearing
Last few passes of the finishing cuts. Used a 10% stepover, probably should have used 5%
Bearings and buttress plates before drilling the bolt holes.
Bearings before being notched into cylinder timbers. The buttress plates were mounted forward and aft of both the main flywheel bearing and the engine sole plate. The sole plate, bearings and buttresses were all notched into and bolted directly to the cylinder timber and wedges were driven into the notches in the buttresses. An interesting feature of this wreck was that the buttresses were only fitted on the bearing and sole plate on the starboard side of the vessel. Kevin an I were curious to know if this was typical for steam engines. If anyone has an idea about this arrangement, we would love to hear it.
-
igorcap reacted to ggrieco in Heroine 1838 by ggrieco - FINISHED - Scale 1:24 - Western River Steamboat as she appeared before hitting a snag in the Red River
Hello Everyone,
Several years after the excavation, we think we have enough information to attempt the reconstruction model of this early steamboat. The excavation provided some wonderful information about the hull up to and including the deck and Dr. Kevin Crisman's research has provided the details of the appearance and arrangement of the upper works.
I've already started on two 1:24 waterline models for the Oklahoma Historical Society. The finished models will be complete reconstructions with cutaways highlighting the machinery and other artifacts recovered during the excavation on the hull.
The next couple of months I will be focusing on the engine and boilers. The research is ongoing and I'd love input from anyone interested in steamboats and steam engines.
Although we have a good idea about the overall appearance and layout of the vessel, there is very little info out there about construction details, joinery etc. I would like to make these detailed and accurate as possible so any ideas that anyone has would be greatly appreciated.
-
igorcap reacted to ggrieco in Heroine 1838 by ggrieco - FINISHED - Scale 1:24 - Western River Steamboat as she appeared before hitting a snag in the Red River
I had a pretty frustrating week trying to assemble the boilers. I'm not satisfied with the appearance of the .01 thick brass. Embossing rivet heads in it created some distortion in it that was difficult to eliminate. I'm just happy to be done with it.
Brass plates with embossed rivet heads.
Testing fit of boiler plates.
Blackened boiler plates.
The steam drums were constructed similar to the mud drums with the addition of the flanged pipe for the steam supply line.
Front of firebox and panel inserts blackened.
Panels inserted.
Kevin's notes point out that Heroine probably had a brick lined ash pan but not an ash trough to the side of the vessel. He points to an example excavated from the wreck of the New Orleans. Several firebricks were found in Heroine's remains measuring 4" X 8 1/2" X2 1/8.
Brick lining of the firebox
Brick lined ash pan added. I added the wooden plugs where the boiler caps should be. They will provide a fastening point for the boilers breaching and will not be seen.
Boilers almost complete. I still have to add the feedwater check valve and safety valves.
Next week I will finally get to work on the upper works. After a frustrating week with brass sheet, I'm looking forward to getting back to woodwork. Below is Kevin Crisman's reconstruction of Heroine's profile.
-
igorcap reacted to ggrieco in Heroine 1838 by ggrieco - FINISHED - Scale 1:24 - Western River Steamboat as she appeared before hitting a snag in the Red River
I got a little bit more of the boilers done this week. We have very little of the actual boilers so they will be a little simplified. I will be including the mud drums, steam drums and safety valves. Fortunately, we do have a standpipe and check valve for the feedwater line. I'll add the check valve next week.
All the parts for the standpipes.
The standpipes actually stood several inches taller and ended with a flange for the boiler tube. The sheathing of the flame bed sat on the arched webbing.
Completed standpipes minus the checkvalve. I didn't notice until looking at the photos this morning that the webbing didn't seat properly on the tops of the tubes in a couple of spots. I'll have to correct that on monday.
Making the mud drums and steam drums.
Dummy endcaps for the boilers. Everything else will be sheathed in .01 thick brass.
Covering the boiler tubes.
Port side of boiler sheathed. I still need to add wide strips on the boiler tubes to represent the overlapping plates. The holes for the standpipes still haven't been drilled underneath so it doesn't sit flush on deck yet.
-
igorcap reacted to ggrieco in Heroine 1838 by ggrieco - FINISHED - Scale 1:24 - Western River Steamboat as she appeared before hitting a snag in the Red River
This week I completed the last significant part of the machinery. We are fortunate to have the feedwater check valve still attached to one of the arms of one of the standpipes. The valve comes off of the standpipe at about a 45 degree angle. The probable location of the water line suggests that the valve could not have been on the port-most standpipe but the exact location could not be determined from the remains. I opted for the inboard port standpipe because it places the valve closest to centerline. In Alan Bate's Western River Steamboat Encyclopoedium he mentions that one method of preventing breakage in the long steam and water lines was to include a length of pipe with a large radius curve. This seemed to work well in this location.
Standpipe and check valve being lifted from the river.
Check valve parts fresh from the mill and lathe.
Check valve in place on the standpipe. The valve had a short foot cast into the bottom of the body. This indicated the the valve probably sat on a block to support its weight.
Safety valves and steam line from the steam drum to the engine added. This steam line will be slung from the deck beams of the boiler deck. I'm leaving the lever and weight off of the safety valve until the boiler deck goes in. I can only imagine how many times I'd knock it off if I had to work around it.
-
igorcap got a reaction from GrandpaPhil in Swedish Privater by igorcap - Chapman's frigate
Next, I need to remove fragments of technological frames. I took a short video that showcases simplicity of this process
http://sailmodel.ho.ua/present/09098288.MP4.mp4
-
 igorcap got a reaction from Wintergreen in Swedish Privater by igorcap - Chapman's frigate
Next, I need to remove fragments of technological frames. I took a short video that showcases simplicity of this process
http://sailmodel.ho.ua/present/09098288.MP4.mp4
-
igorcap reacted to Chuck in Boxwood carved figurehead for "ATALANTA" by David Antscherl - 1:48
Just thought I would share these incredible pictures of the figurehead for the Swan Class Sloop "Atalanta" by David Antscherl. The figure is boxwood with a stem of swiss pear. The brackets and trailboard carving are also boxwood. Note the gold leafed apples. Just stunning carving by hand and almost hard to believe possible at this scale. Its so tiny. I love the facial expression.....Mona Lisa smirk... Enjoy!!!
The glass dome is just 4" in diameter.
Chuck
-
 igorcap got a reaction from CharlieZardoz in Swedish Privater by igorcap - Chapman's frigate
Next, I need to remove fragments of technological frames. I took a short video that showcases simplicity of this process
http://sailmodel.ho.ua/present/09098288.MP4.mp4
-
 igorcap got a reaction from GrantGoodale in Swedish Privater by igorcap - Chapman's frigate
Then I begin to create base hull. Pine strips are glued to frames using a stapler. Total of two layers. First layer must be dried at least one day. After drying, staples are removed and surface is processing with plane .
-
 igorcap got a reaction from Mark Pearse in Swedish Privater by igorcap - Chapman's frigate
Hello everybody !
My favorite theme in modeling is Swedish shipbuilder F.Chapman and his ships. Previously, I have built a model of the Swedish privateer on Chapman's drawings from album «Architectura navalis mercatoria» (can see in the Gallery http://modelshipworld.com/index.php/gallery/album/208-swedish-privateer/)
In 2011 I started to build another model of this album - a frigate (sheet XXXIII). This project was repeatedly interrupted, but I went back to building of model.
I will show gradually all steps of building model.
Baseline - Chapman's drawing. Analysis design of frigate has shown that this is an earlier and smaller version of the well-known series such as frigates Bellona (1782).
Swedish Maritime Museum have excellent model Bellona 1/16. Photos of this model give additional information about the hull detailing and rigging.