jonny.amy
-
Posts
346 -
Joined
-
Last visited
Content Type
Profiles
Forums
Gallery
Events
Everything posted by jonny.amy
-
 Hi everyone, sorry for the very late reply. I've been away with work and on holiday over the last 10 days or so, so unfortunately the build log and Convulsion have fallen by the wayside! But things are getting back to normal now at work and at home, so I'll hopefully get an opportunity to carry on with Convulsion tonight or tomorrow night. I have started knocking the lower main mast and I've started to tie the ratlines to shrouds on my Loom-a-Line, and I am so impressed with how quickly they can tied on the loom-a-line. But the main balls up on this, is that I cut the shrouds to the length required, but forgot to tie the loop at the end of the shroud (to slip over the mast) and subsequently they are slightly too short. So Idea No 1, is to cut fabricate the Mizzen mast tonight, and clip off one of the shrouds and use it for the mizzen. Idea No 2, is to not use the loom-a-line at all and do it the "traditional" way, but risk the rate lines being rubbish?! ------------- BigCreekDad - that's a beautiful example of Convulsion! Absolutely beautiful!! I hope I can do my kit the same justice you have given yours! Cheers, Jonny
- 215 replies
-
- 1
-

-
- convulsion
- caldercraft
- (and 1 more)
-
Just a heads up Gents, I should be able to give you a solid update on progress tomorrow night! I have a day off tomorrow, so I can get some serious work done on Convulsion! Cheers Jonny
- 215 replies
-
- 1
-
-
- convulsion
- caldercraft
- (and 1 more)
-
Looking great Eamonn, keep up the good work! By the way I sent you a PM
- 1,039 replies
-
- 1
-
-
- ballahoo
- caldercraft
- (and 2 more)
-
Unfortunately, I gave up the Semi-Pro to Pro level sailing when I turned 17 (by that time I'd been on the yacht racing scene for 6 years - started off with my father on a friends yacht and that's where I found my true passion) when I was offered an apprenticeship in Petrochemical Engineering (to which I then specialised in Civil & Structural Engineering). After that I have raced at a club level on various boats, X332's, Swan 36's, Swan 38's, 1 Tonners, 1/4 Tonners, 3/4 Tonners, J/109, J/105, Dufour 34's, Farr 40's, and many more. When I turned 18, I went in to a joint venture with my grandparents, and bought a Hunter Sonata for £4000, kept it on the Hamble for a season, configured it for single handed sailing, and with a decent breeze, she was a stiff little boat that was a quick as sh** off a shovel! But after the first season of sailing her every weekend, I winter-ized the boat, and popped a disk lifting the outboard out the engine well in the cockpit. Which meant the boat was sold (not my decision), and that's when the problems arose!
- 215 replies
-
- 1
-
-
- convulsion
- caldercraft
- (and 1 more)
-
Cheers Ken, I will do! Yes I have a surgery date and it's been approved by the Surgeon, and my work have given me the go-ahead, so finally I'll be sorted! I've had a number of back issues in the past - I used to yacht race on a semi professional level, and I had to give it up for a few years because I managed to slip a disc, lifting an outboard motor out of my own boat, so I'm very pleased to get surgical assistance with this issue!
-
Morning all, Just a quick update for today - Not a lot was done last night, but I got a few little bits done. For example, I managed to fit all the brass eyelets to the Mortar Bed covers, and I painted the largest Mortar covers red as well. I also managed to build and fit one of the grated areas (on the quarter deck - not that Convulsion has one). Tonight should see further priogress with the decking (still on my to-do list) and building of more hatches and the companion-ways (fingers crossed)!! Also, had a Surgical Consult yesterday about an issue with my back, and I require an operation on lower back that's scheduled in for early in the New Year, so come January I'll have a cheeky 2 or 3 weeks off from work! Can't wait! Cheers, Jonny
- 215 replies
-
- 1
-
-
- convulsion
- caldercraft
- (and 1 more)
-
Ken, You're right, I am going for a "weathered" look Thanks for the kind words. I chose Convulsion over Granado purely over size, but I'd love to build another Bomb Vessel myself, and I'm currently weighing up whether to get Granado or HMS Snake next! I just have to persuade the Admiral that we need to expand the "fleet". I think we would need a bigger house though! In all honesty, I'd love it if she took up the hobby as well, but I know she likes doing her own thing! I'd also love to build a scratch model in the Admiralty Styling, and Royal Shipyard of Plymouth (a US company) make some fantastic looking kits of Rattlesnake, Fubbs, Halifax, and Kingfisher, but their kits are so extensive and detailed, I think it's just a dream I have to build myself up to! http://www.royalshipyard.com/Home.aspx Cheers Jonny
- 215 replies
-
- 1
-
-
- convulsion
- caldercraft
- (and 1 more)
-
Eamonn, I know where I went wrong with the last post.... As I had a large number of photos to add to the post, I went through inputting them in to the text, but as I was doing so I deleted the photo from the attachments folder below (as a self checking exercise), so the pathway to the photographs was lost.... All in all, a silly mistake!! Cheers
- 215 replies
-
- 1
-
-
- convulsion
- caldercraft
- (and 1 more)
-
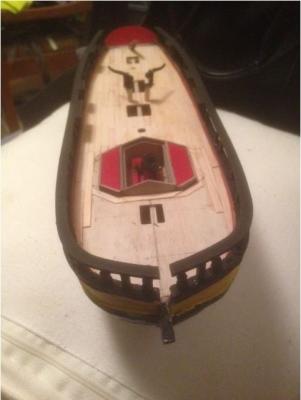
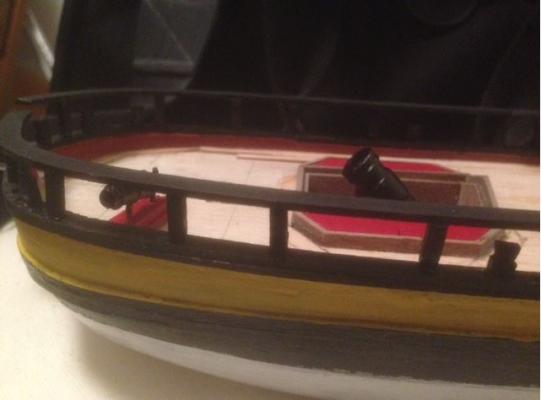
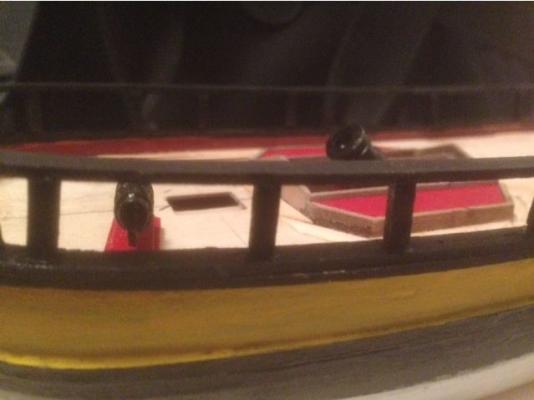
********** See Post above *********** Waterline: Caprails: Mortar & Mortar Bed: Elm Tree Pumps: Carronade No. 1: Sorry about this guys! Cheers Jonny


- 215 replies
-
- 3
-
-
- convulsion
- caldercraft
- (and 1 more)
-
Can anyone see the photo's? I'm not sure if they've been uploaded or not....
- 215 replies
-
- 1
-
-
- convulsion
- caldercraft
- (and 1 more)
-
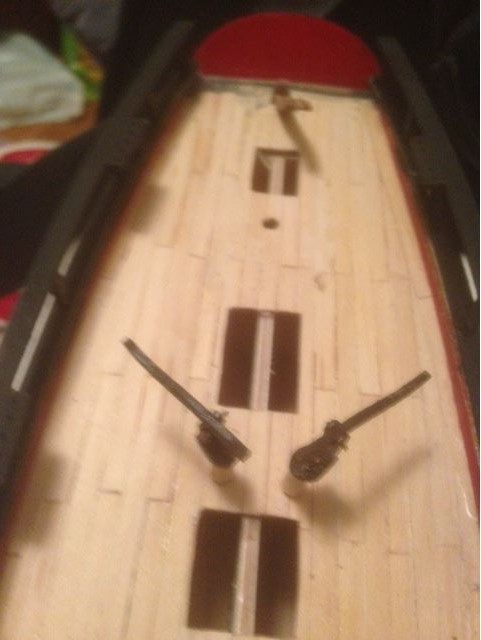
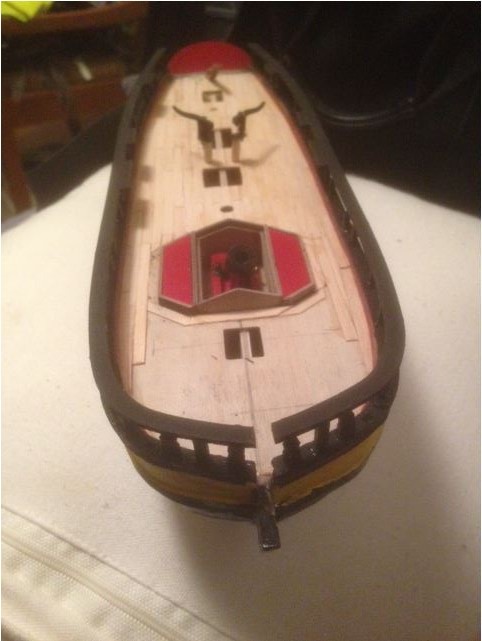
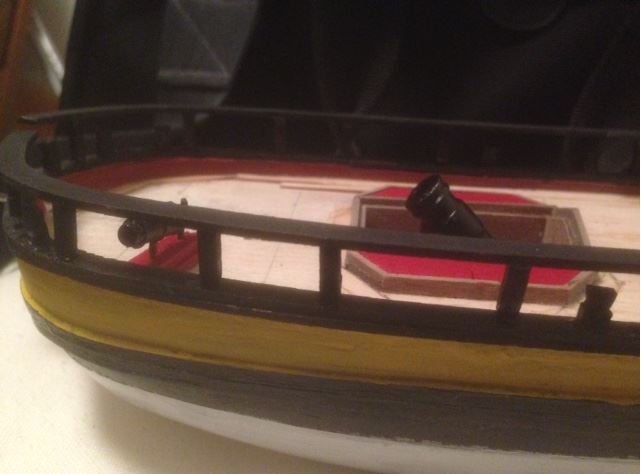
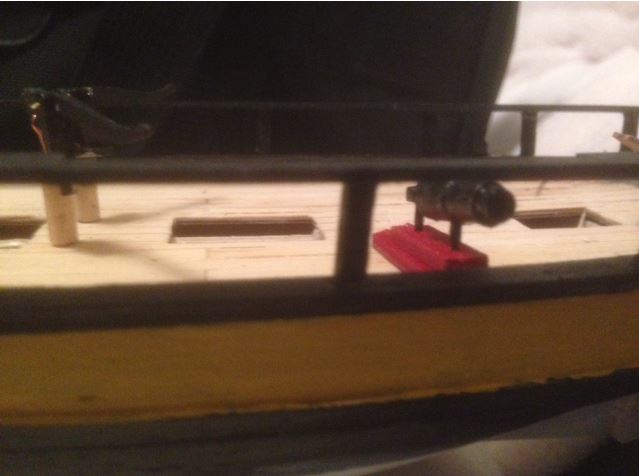
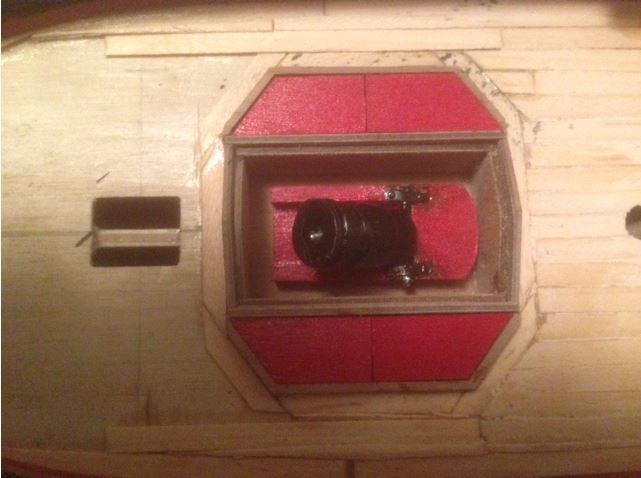
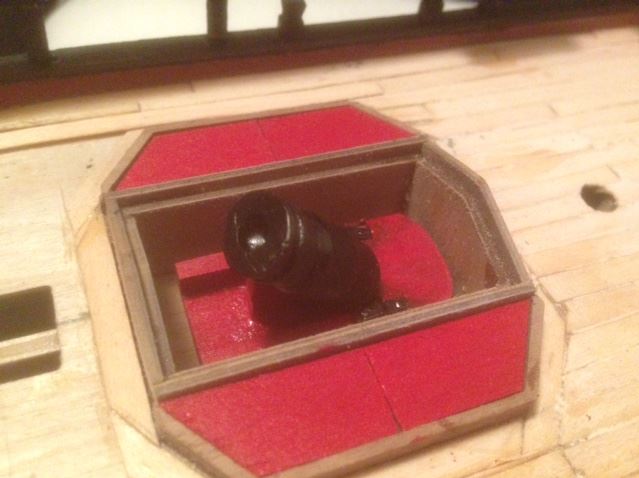
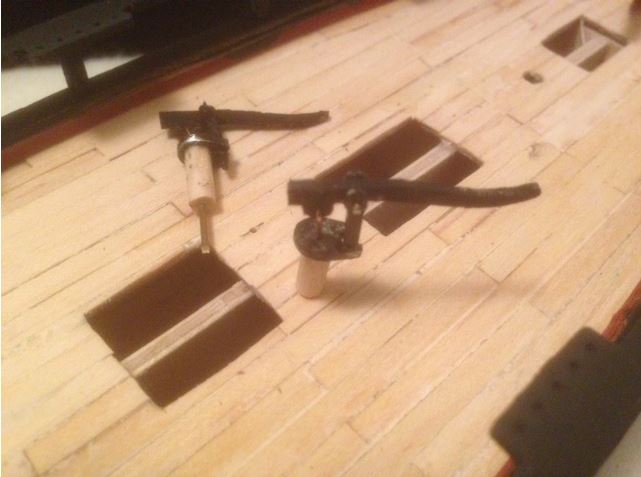
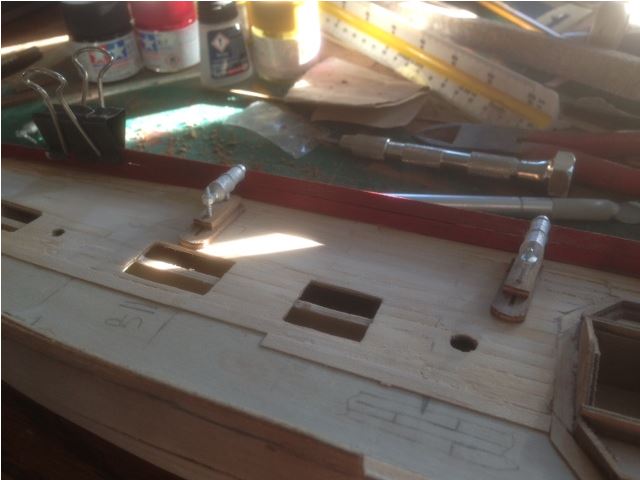
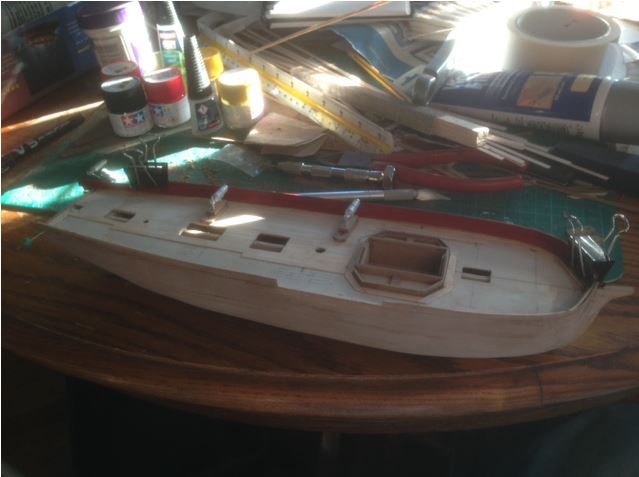
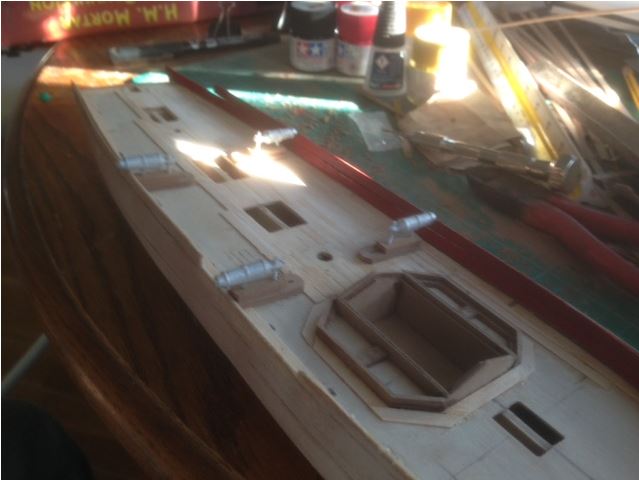
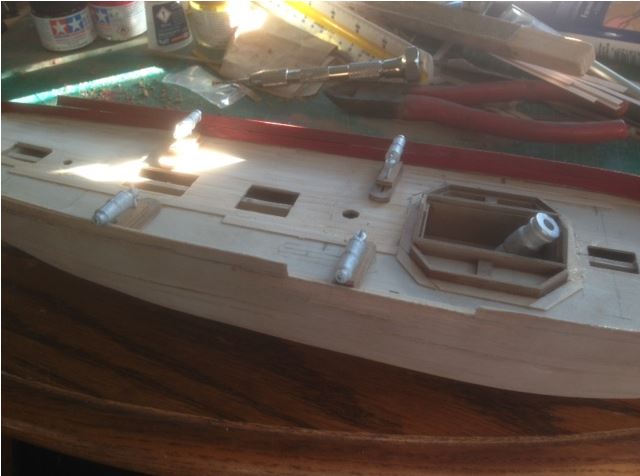
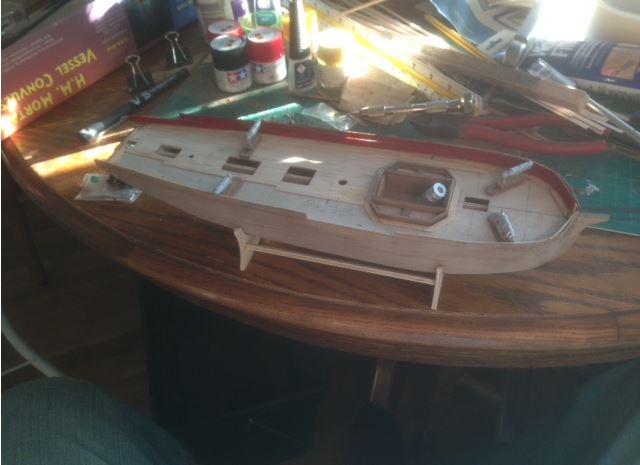
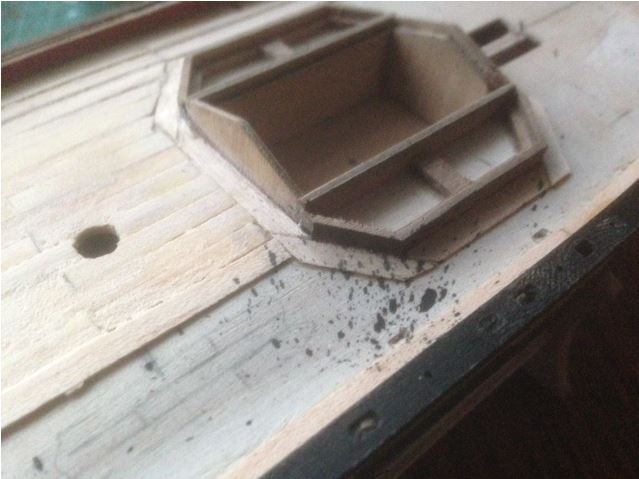
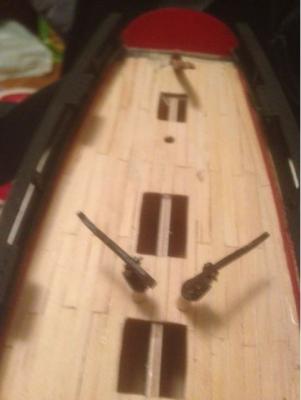
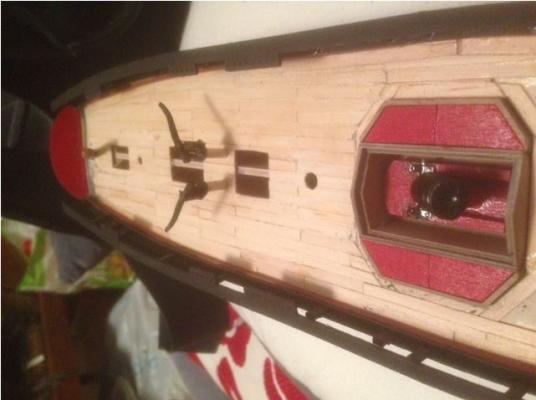
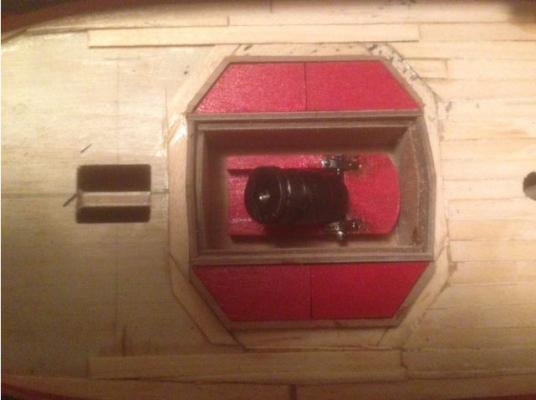
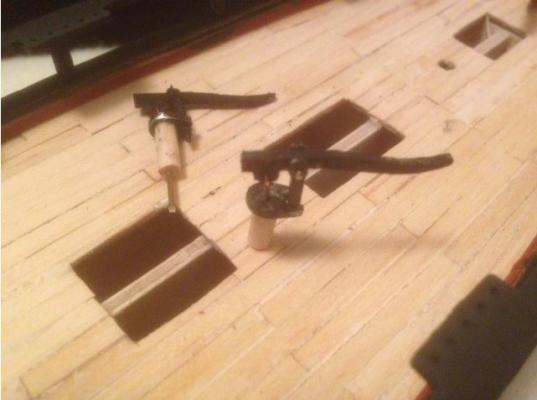
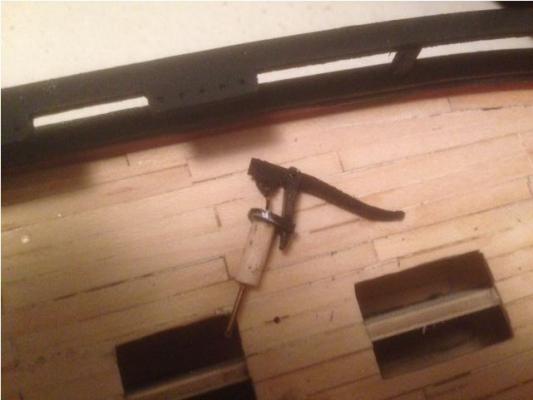
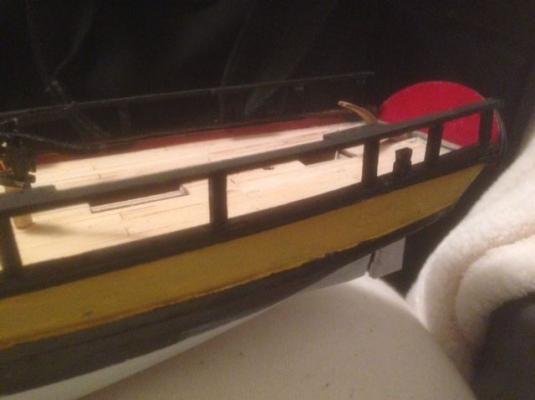
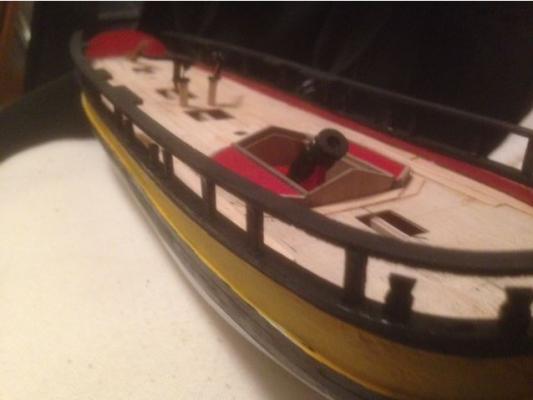
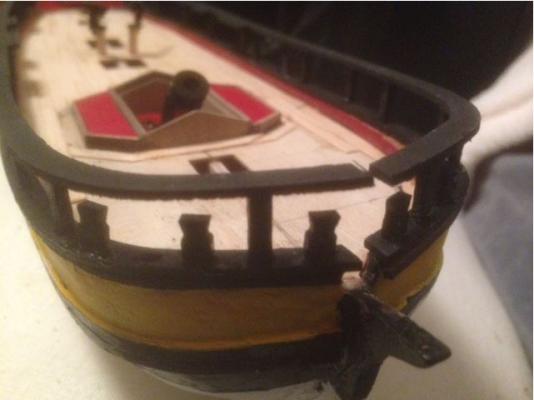
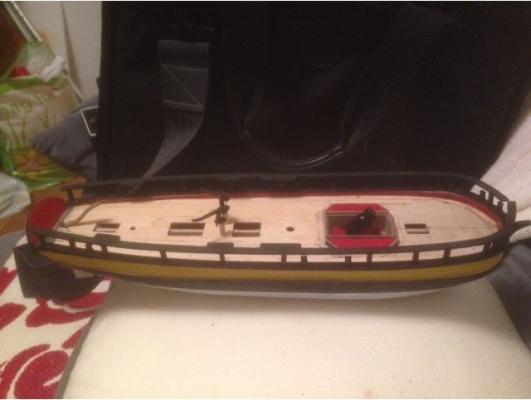
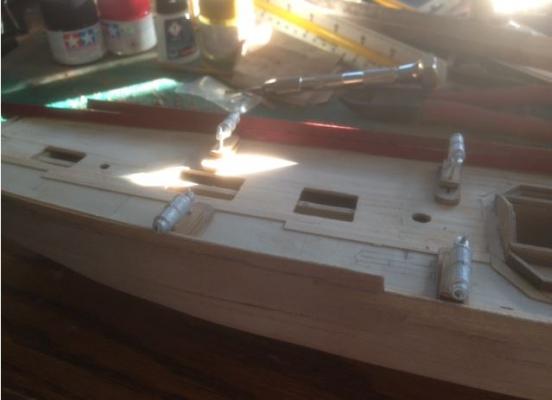
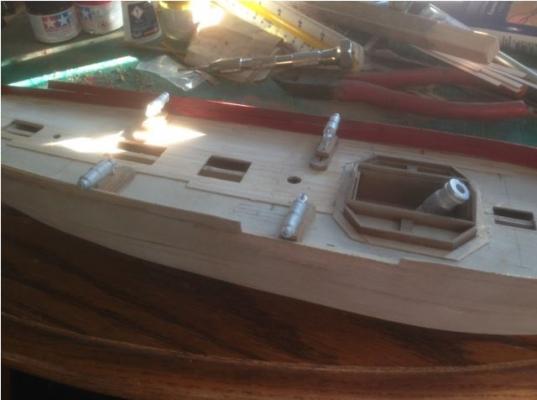
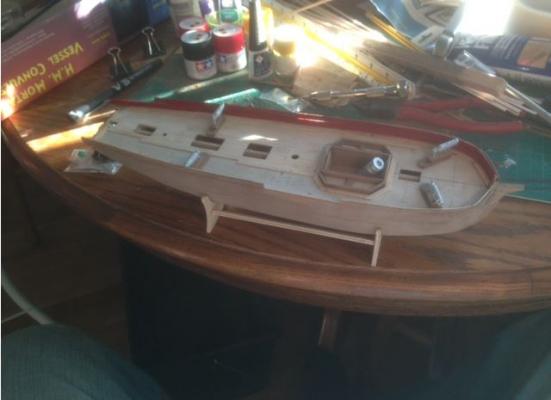
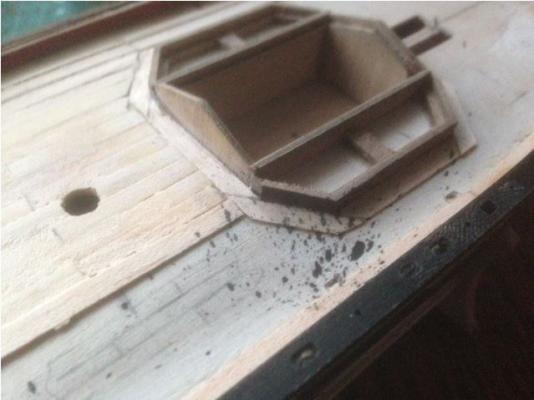
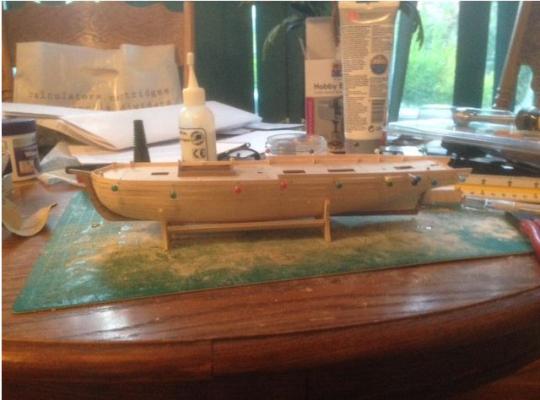
Good morning All, Well todays picture day, and I can confirm I have plenty of photos for you! So progress on Convulsion has been varied over the last week or so, as I've had periods where I have made little or no progress, and then there have been periods where I have blasted through the construction. So first of all, I'd like to say thanks to everyone who has given me great advice with colour schemes and painting. But the first observation I must make is that spray paint out of the "rattly" can is just too unreliable, and the paint is far too thin for a decent coverage of paint. So next pay day, I will buy myself an early Christmas present, and buy a starter airbrush kit. I might even bug the "Admiral" enough that she will buy it for me?! So this is what I have worked on over the last week or so... First I sanded down the black undercoat on the underside of the hull and marked the waterline 6mm under the wales as described in the instruction manual. Masked out the whole vessel and sprayed the under water profile white, handy that I had brought some 6mm wide Tamiya masking tape from my local hobby shop! But... like the black spray paint, I found it was very watery, and it gave a very uneven coating of white. So had to leave it to dry and touch up the lighter areas with the spare white paint I had from President. Overall the finish is much better now, but with the Tamiya paints I am using, I find they are very watery, so some touching up on the waterline is required where the white has run over the line, and the counter painting of black has run in to the white (none of the local model shops around sell or can supply Admiralty paints, so the Tamiya paints will have to do)! Very annoying! Does anyone have an idea of how I can thicken these paints up? I thought about maybe adding a bit of PVA glue to them, but I'm concerned that might take an age for the paint to dry?! So my next venture was cutting out and cleaning the Capping Rails - easy enough. They were then spray painted black with 2 coats of Matt Black. Again easy enough... but then came cutting and painting the uprights and bollards. I built a cutting jig to the uprights, cut them to 10mm in length, and put them aside. I decided to cut 24 instead of the required 22, just in case there was a problem with any of them, which proved to be a bloody good idea!! Cutting out and cleaning up the bollards was easy enough, and once I had checked and double checked all the numbers and locations of them all, I decided to paint them. Plan A - Spray painting them outside the front door in the dwindelling light was a very bad idea, as each tiny piece was blown from one end of the box lid I use for painting to the other. Plan B - Spray painting the pieces pinned down to the cardboard box lid... to avoid damage to the members, I pinned them down with 2 alternating pins set apart diagonally from each other pushed in to the cardboard, not the thin pieces of wood. This method resulted in a messier version of Plan A. Plan C (after a lot of thought and a suggestion from the Admiral) - pouring paint in to plastic shot glasses from our house warming party a few months back! Eureka! This worked all the pieces were evenly coated and all the excess paint was recycled and poured back in to the paint pot! The next challenge was fitting the caprails, uprights, and bollards to the hull! Damn this was easier said than done!! After a lot of swearing, a mini tantrum, and cigarette and a beer to calm my nerves, I finally got both sides on. I groaned at the fact that I had completely forgotten to install the bollards (used to tie the vessel to the dock when not at anchor, along with many other uses), but this was quite possibly the easiest part of the build, as I chamfered the bottom face of each bollard to fit in the holes prior to installation! With a pair of fine nose tweasers and superglue all the bollards were in place with no stress at all!! As you can see from the photos, I still have not finished decking the bow, but I honestly lost the will to live after installing the caprails and uprights, so it's still on the to-do list! So last night I started on Deck fittings, building up the Mortar, the Elm Tree Pumps, and one of the 4 Carronades. Everything has been dry fitted at this moment in time as I still have to finish of the decking and I still need to build all the grating, hatches, companionways and fit all the brass eyelets on to the deck. The Elm Tree Pumps: The Mortar & Mortar Bed: Carronade No. 1 (name pending): As I am finishing work early tonight for a consultation with a doctor & surgeon about a problem with my back, so I will hopefully beable to get a lot done tonight after the Doctor tells the Admiral to take me to the glue factory! Cheers Jonny
- 215 replies
-
- 1
-
-
- convulsion
- caldercraft
- (and 1 more)
-
Hello everyone, Just a quick update today, as I'll be uploading a load of photos tomorrow. But I got the caprails and stanchions in place, painted the waterline/under water profile, and that just needs a quick tidy up. So good progress was made this weekend, but not as much progress was made as I wanted. Tonight I will finish off the deck planking (I've been putting it off for a few days now), and I will be hopefully be able to start putting the Compainionways and Grating together. Cheers Jonny
- 215 replies
-
- 2
-
-
- convulsion
- caldercraft
- (and 1 more)
-
Morning Chaps, Just a quick update to say not much has happened this week due to various reasons (mostly the Admiral's doing), but I will make sure I get the deck planking finished tonight, and start building up the deck fittings. The first activity after completing the deck planking, will be adding the cap rails, then spray painting the waterline / under water profile, then it will be adding the rudder and tiller, then build up the Elm Tree Pumps, Grating / Hatches, and the Companion Ways. So come Monday/Tuesday, I should have a decent update for you all! Sorry about the slow progress recently. Cheers Jonny
- 215 replies
-
- 2
-
-
- convulsion
- caldercraft
- (and 1 more)
-
Quick update on progress, I tried sanding out the black stains from the spray painting fiasco, and I found that it is going to be harder then I expected. Unfortunately I had to give up early last night as I'm on antibiotics for a problem with my back, and over the last 3 days have started to give me severe stomach cramps, so I hit the hay fairly early last night as lying down was the only relief to the pain. So hopefully tonight I will be fighting fit, and I will be able to sand the stains out, and finish off the deck planking. I also spray painted the Caprails last night, so tonight I may spray the rest of the assmeblies to go in between the Gunwale and Caprail. Cheers, Jonny
-
Also, I may start taking the photos on my digital camera rather than my iPhone, as I think I'll be able to get clearer photos of my progress. But I need to make sure I can get my PC at work to read my digital camera, as my laptop at home is pre-historic and takes an age to start up let alone do anything. Cheers, Jonny
- 215 replies
-
- 1
-
-
- convulsion
- caldercraft
- (and 1 more)
-
Ken, Just a quick update on the paint scheme.... The white coat on topsides worked really well, thanks for that tip, it was really helpful and one that I had completely overlooked on Sunday. The paint is still a bit thin, so I might have to switch it up for some of the paint I used on President, but I wasn't too keen on the colours provided with the kit, so I might mess around tonight with colours. Next step will be marking the water line, sanding the hull down for additional grip for the paint, and masking that out for spraying maybe tonight or tomorrow morning. Also I fitted the Port side bulwalk last night, so I will start building up the bulwalks shortly, and then it is time for deck fittings. I will hopefully provide some photos tomorrow, or thursday with the finished paint scheme? Cheers, Jonny
- 215 replies
-
- 1
-
-
- convulsion
- caldercraft
- (and 1 more)
-
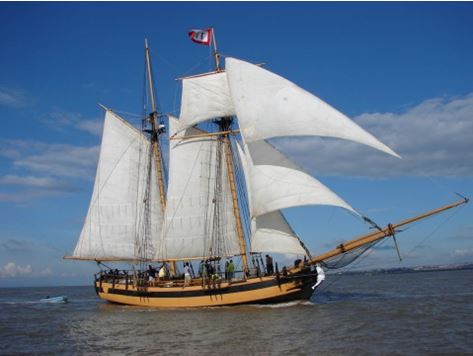
Ken, Thanks for the tip, I'll do that tonight once I get home from work. The yellow is only going to be on the bacnd between the gunwale and mainwale, but I have some white left over from President, so I'll paint the band white tonight. I was thinking about taking the yellow down to the waterline, but I am not sure. Here is a picture of HMS Pickle (chosen because of the similarity of size of the ships), and the yellow occre has been taken down to the waterline, but I'm not sure about that on Convulsion. My reckoning is that a ship of this size would have minimal (if any) decoration, so I think a Yellow Occre band between the wales and black down to the waterline probably would give an accurate representation of a ship of this size?! Cheers, Jonny
- 215 replies
-
- 3
-
-
- convulsion
- caldercraft
- (and 1 more)
-
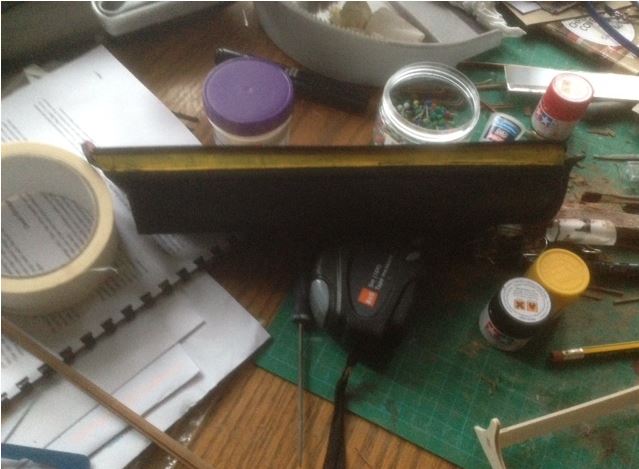
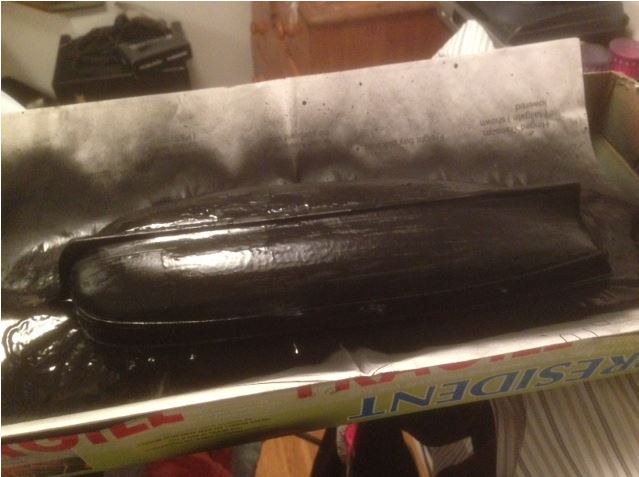
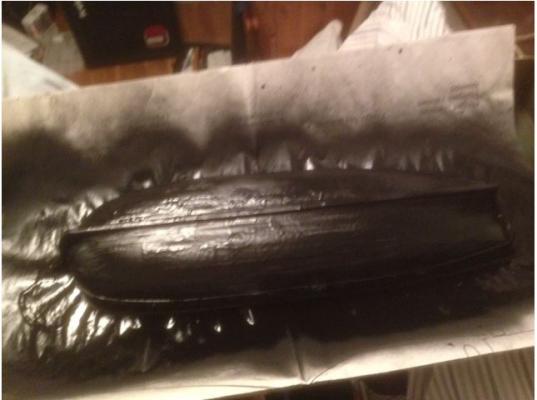
Morning All, Update on convulsion for the previous 5 or 6 days... So, when a few things have progressed on the convulsion build in the last few days. As I explained previously, I had Friday off from work, and I thought I would spend most of my day working on Convulsion, but I ended up Christmas Shopping and tidying up the flat for our guests to stay over on Saturday night (which they didn't - very annoying). So progress was slow on Friday, but I did manage to paint and fit the Spirketting Boards along the inside of the Bulwalks. This spurred me on to try dry fitting the Carronades amd Mortar, but I was surprised with how soft the White Metal castings were, and how easily they bent (and bent back in to position). I'm glad I dry fitted the guns, as I found that the carridges required some modifications to the pre-drilled holes. Using a Pin Vice and a 1.5mm DIA drill bit, I made the holes fo the supporting post and the elevating screw larger, allowing for tight but accurate fit. I practiced the art of compromise successfully once the Admiral came home from work on Friday night, as she wanted to go out and get Cocktails at a very pricey hotel bar near by, and of course I couldn't say no when I was told we were going! I'll admit to being under the thumb with her, its much easier to just say "yes Dear"!!! So all progress on Convulsion had to stop for the day. Saturday, a glorious day, was spent in London along the South Bank, in Covent Garden, and Liester Square, the Admiral and some friends. I had the privilage of seeing the replica of the Golden Hinde captained by Sir Francis Drake in 1577 - 1580, which has circumnavigated the globe on several occasions. I could not believe how small it was, even at 102ft in length, she still looked very cramped and looked like she would be a handful to sail even in shelter waters. After the Golden Hinde, we ensued trying the local beers at several pubs along the South Bank. Needless to say, Sunday was forecast as write-off. So once I was feeling better on Sunday afternoon, I decided to cut the topsides to the correct profile, and cut the walnut planks to stern profile. I also dry fitted the Transom, and planked and painted it to match the spirketing at deck level. Then I decided to fit the Main Wales, and the Gunwales, but I found the plans called for two set of Gunwales above the Main Wale, but I found that Caldercraft had only supoplied 3 No. of the 1.5mm Square Walnut Strips for the Gunwales, so I had to compromise, and fit only the Gunwales along the top of the Bulwalks. Crisis averted, I decided now spray paint the model (minor F*** up happened here with the masking). The Minor F*** up: So after I sprayed the whole model black as a base colour, I flipped the model over to check my masking had not let any paint seep through.... And it did, the rudder post hole let a direct spray of black paint bounce around inside the masking and stain the planking round the stern and some staining around the mortar bed.... A lot of swearing proceeded and I gave up for the night! Apart from sanding out the stain is there any way I can get these out? I'm rather kicking myself I didn't mask this area a lot better, but I thought I had done a decent enough job on masking. I need some advice from my fellow modellers?! Lastly, I woke this morning around 5 am and decided I would test the Yellow paint I bought on friday, and apart from being quite thin, I'm fairly happy with the colour. What do you guys think? Cheers, Jonny


-
Morning All, An update will come later on today. I have tomorrow off from work (best thing about working 9 day fortnights) so I will be up early to get as much done as possible before having to tidy up the flat for our friends who are staying on Saturday night. The progress this weekend will slow as I'm in London on Saturday during the day, and I'll more than likely be sleeping off a hang over on Sunday. Made some progress last night, but I'm not entirely happy with my efforts with the decking, so I'm not sure what to do?! BigCreekDad, I funnily enough had a very similar experience with the Admiral when we moved in together. I wrapped up my record player (combi turntable and speakers, nothing flash) in about an inch thick of bubblewrap all the around it before the move in to the new flat, and as the box was light weight and one of those things we could chuck in a cupboard until we needed it, I gave it to Lucy to carry from the van to the house. But a few weeks later I tried to turn it on (had been to a garage sale and bought a mint condition copy of Rumours by Fleetwood Mac for 50 pence - normally it goes for £25.00+) and found the box was dented and she later confessed to dropping it on to the lounge floor and shoving it away in to the cupboard before I would notice! Oh well!! Cheers, Jonny
- 215 replies
-
- 2
-
-
- convulsion
- caldercraft
- (and 1 more)
-
Ken, Funnily enough, I had the same thought about a storable work surface for either one of us, and I'm thinking if I buy her a decorators wallpapering table that will fulfill her requirements, and she could sit in comfort on the sofa to do it (she works on her feet all day), so I think that might be the answer! See my Admiral and I have been together a year or so, so it's still early days, but I'm trying to get her involved in model ship building too! That or playing guitar?! Cheers Jonny
-
Also, I forgot to mention that I've taken a few photo's of Convulsion next to President. I will post those later on. Cheers, Jonny
- 215 replies
-
- 1
-
-
- convulsion
- caldercraft
- (and 1 more)
-
Morning All, Just a quick update on Convulsion (and a mini rant). Last night saw minimal progress as I was requesitioned by the "Admiral" (she is now the Admiral because she definitely rules the roost) to go grocery shopping at our local Asda Superstore (part fo the Walmart chain for any yanks reading this). At this point, I sparked up the plank bender, dired off three strips of walnut, poured myself a coffee and got myself suitably unwound from work. Needless to say this was a great disappointment, so I bargained with her and said I would go after laying three planks. Thankfully she is a kind woman, and she said yes! So my progress resulted in a grand total of three planks on the Port side of Convulsion. Once I got back from my grocery shopping expedition, I found out why she did not want to come shopping with me.... She had cleared Convulsion away, putting all my off-cuts in with the good strips, and then wiped down my cutting mat and started making Christmas cards! They are good Christmas cards to be fair... And please, don't get me wrong, I'm happy she has her own hobbies and interests (for instance, card making, cross stitch & sewing), but all I wanted to do was close up the gap between the keel and waist to Port last night! Maybe I'm being selfish???? Still I suppose some progress is better than no progress. How do you guys get around your Admiral's when you want to continue with your pride and joy? Cheers, Jonny
- 215 replies
-
- 1
-
-
- convulsion
- caldercraft
- (and 1 more)
-
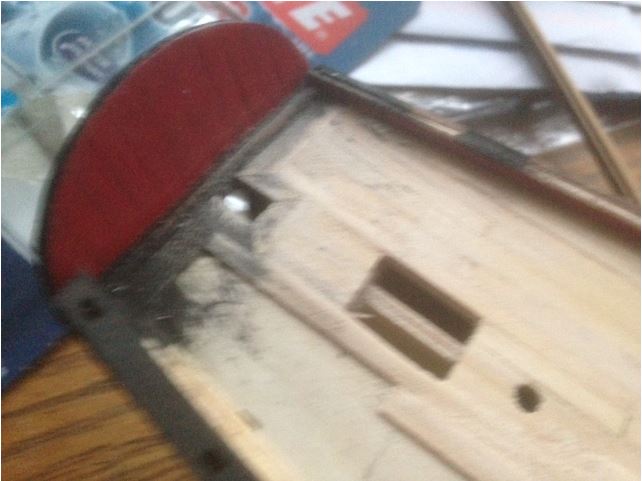
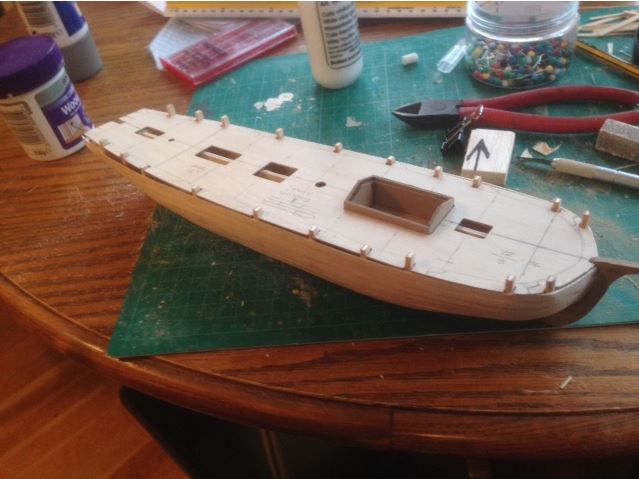
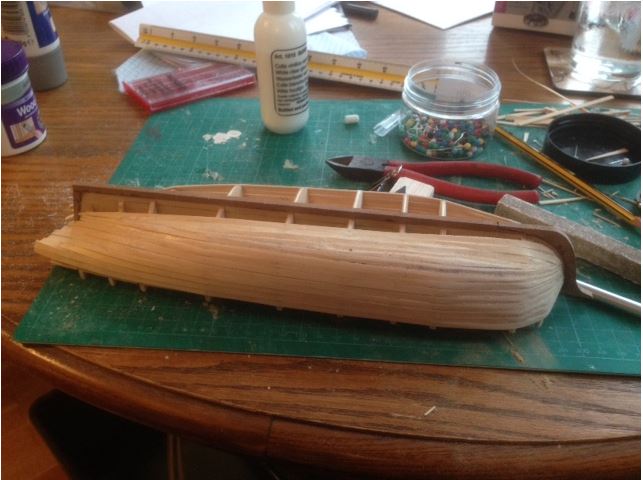
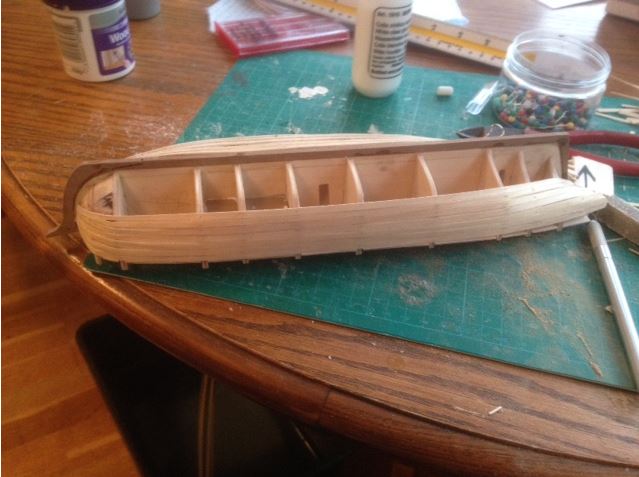
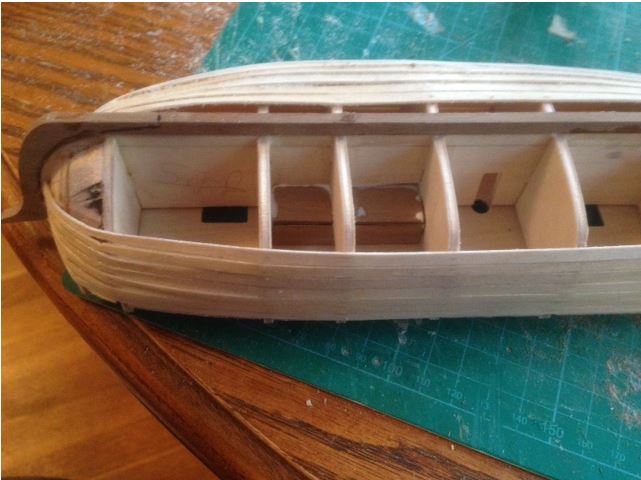
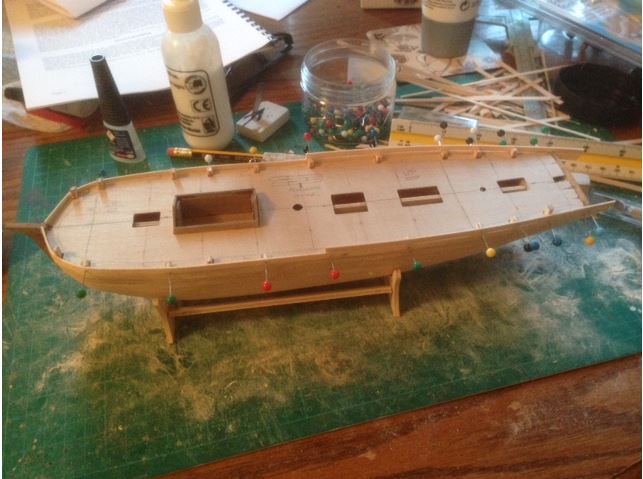
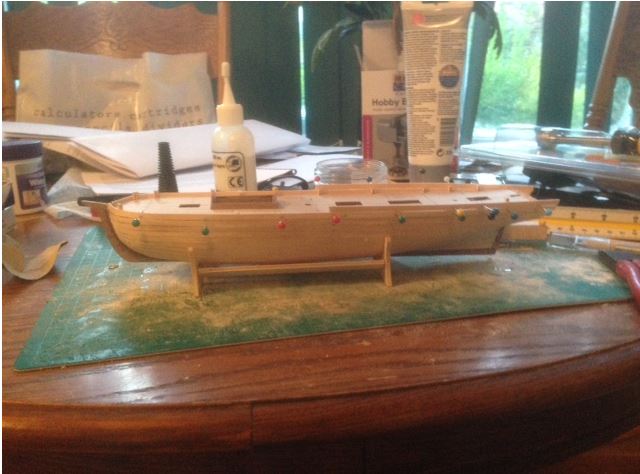
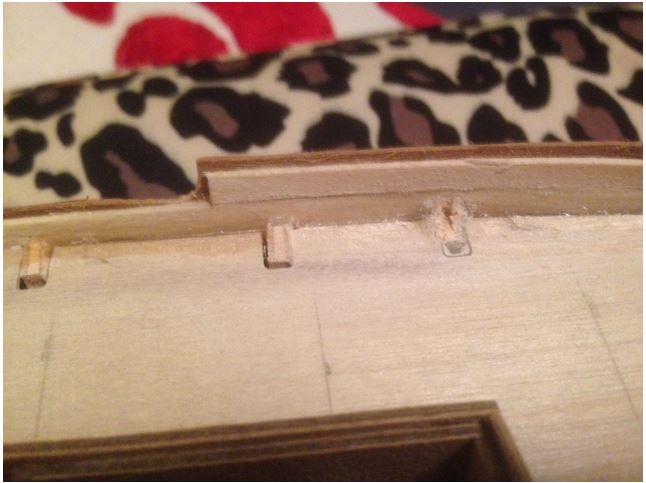
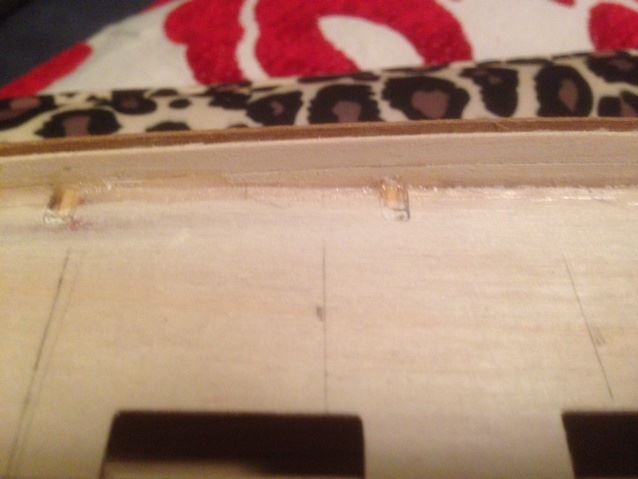
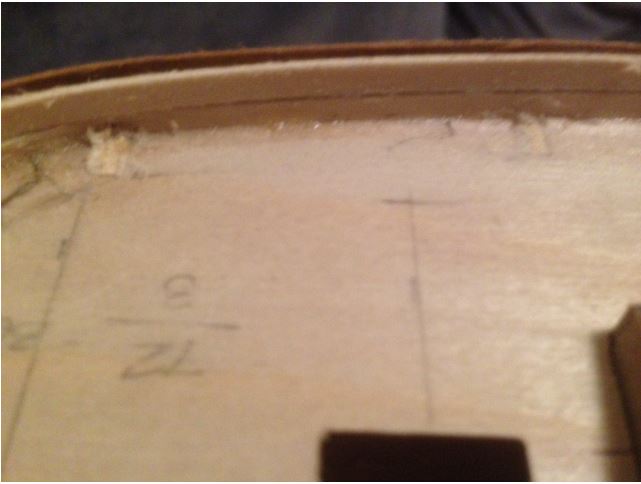
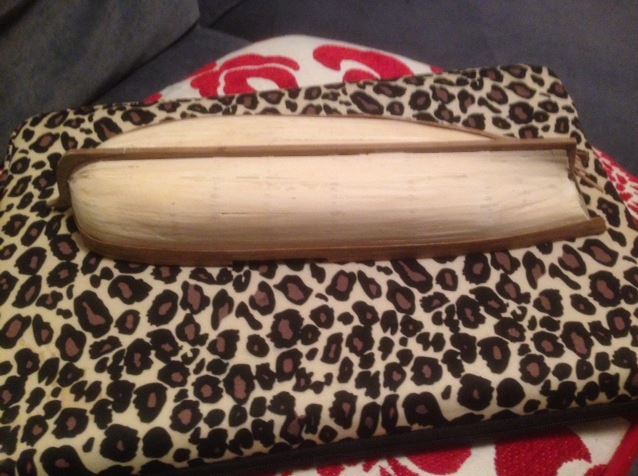
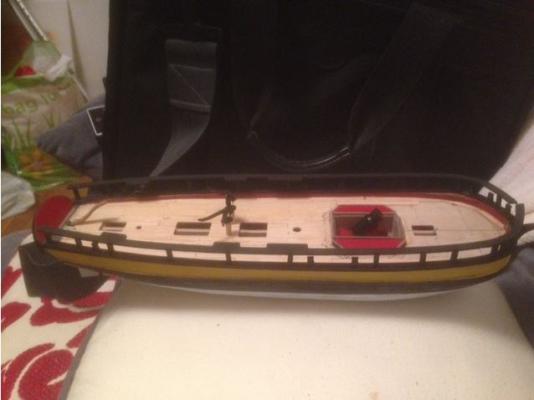
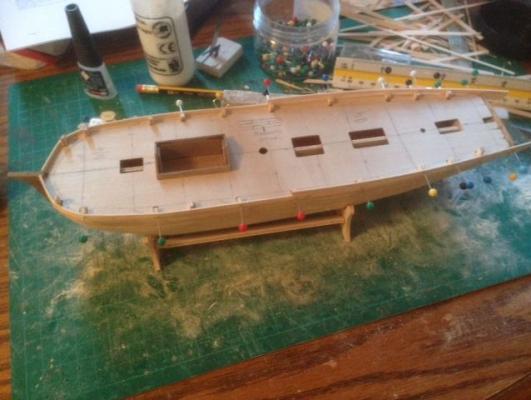
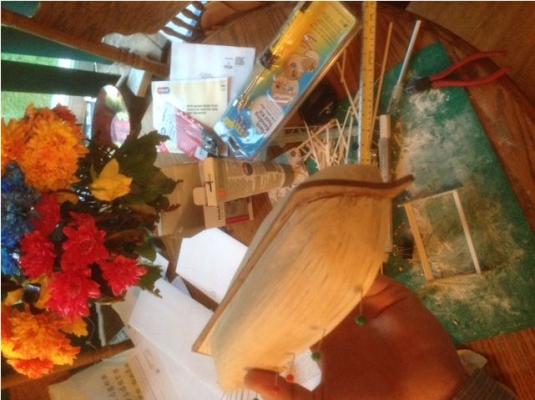
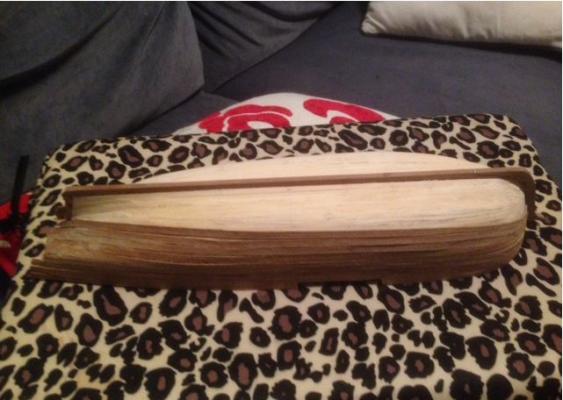
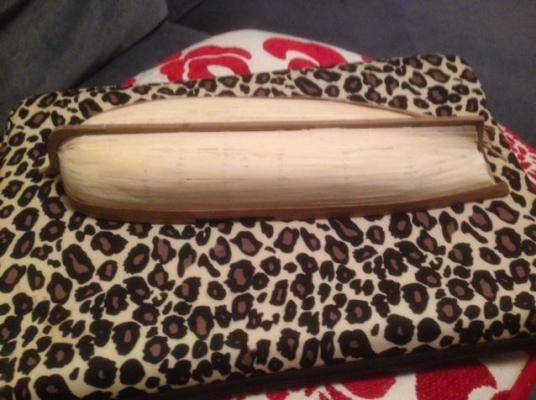
Good Morning All, As promised, here is the next series of photographs of my Convulsion build. So this weekend saw some large developments in terms of progress on the model. I have managed to complet the first phase planking, filing, sanding, smoothing, more sanding, more smoothing, making lots of dust and meeting small milestones in the model construction sequence. So the reason for not fitting the deck before the first planking phase was so that I could still gain access to the inside of the hull so I could run PVA down the bulkheads after the first planking phase was complete. Again to add strength to the model. It was probably over the top, but I did not follow this principle whilst building President, and I had a number of loose planks where the glue used on the bulkhead snapped whilst putting the second layer of planking on. I was very happy with myself that I remembered this problem and I'm happy with my simple fix! Also my intention was leave the deck off the model so I could deck it out sperately, but I came to the conclusion I had to glue it down first, and ensure it is level before decking can commence. I assembled the Mortar Bed to ensure it fitted in the slot provided and fitted through the opening provided on the false deck. This was not the case (as described earlier on in the thread), so after much diliberating and a bit of swearing, I decided to trim Bulkheads 3 & 5 down by 1mm each to suit the Mortar Bed. The fit was tight, but with some 80 grit paper on a balsa square section, I got the Mortar Bed to fit in the slot with no problem at all. The images below show most of the process. So once I got home from work last night, I started to play with my Plank Bending Iron.... This is quite possibly the best thing I've ever bought!!! It took the stress of visable planking mistakes out of the Second Layer of planking!! I found soaking the walnut for about an hour was the most effective methoid of getting the required bend in to the plank. But if you think of using one of these be careful where you hold the iron (very obvious I know), but my slight lapse of concentration last night meant I burnt my fore-finger on the spindle between the handle and hot element!! Yes I am an idiot!! I then decided to put the walnut Topsides on first so I break off the Bulkhead uprights, and glue the deck down properly, as shown below. Feeling proud of my achivements, I decided to stop at that point for the night, cook dinner, watch a bit of tv and carry on reading Master & Commander (my father has just given me the whole O'Brien Series as he has read them all and wants the space back of the book shelf). BUT.... after dinner, and reading only half a page of Master & Commander, my imagination and determination was fueled again and I decided to start running the Walnut down the Port Side from the Topsides. Next thing I knew it was 23:55pm and Lucy (my girlfriend) had given up on job hunting online and gone to bed.... nearly an hour prior my realisation she wasn't there any more! I must admit, she is the best Admiral ever! After 4 months of living together, I've had President out on the dining room table virtually every night, built a 1:20 scale model of a "modernized" Gaff Cutter of my own design (for a Classic Boat Magazine Design Competition in 2011) and now Convulsion. I have a feeling she's a real keeper!!! Any way, heres some of the Walnut planking progress taken this morning (the Leopard Print laptop bag is Lucy's not mine)! That's it for now guys, I'll hopefully have a shorter post tomorrow. Cheers, Jonny


- 215 replies
-
- 3
-
-
- convulsion
- caldercraft
- (and 1 more)
-
Hello everyone, just a quick update. I've been very busy at work today and did not even have a lunch break to put my next update on here, so I'm sorry about that! But I will promise one for tomorrow, as the weekend saw some decent progress on the kit. Also, tonight I will be testing out my new Plank Bending Tool, so I try that bad boy out on a few walnut members for the topsides. If I can get the topsides sanded down and the rest of the hull to a smoothness I'm happy with (a small amount of filler was used on this layer to [obviously] fill some gaps), I will start laying the Walnut topsides, eventually working my way down to the keel. Cheers for now, Jonny
- 215 replies
-
- 1
-
-
- convulsion
- caldercraft
- (and 1 more)
-
Paul, I have loosely fitted the deck to ensure a nice fir between the planks and the deck. I planked the deck as my first effort on President, and hated the gaps that were left after the bulkhead uprights were broken off for the spirketing. So yes, you are right, I will plank the deck before gluing it down, to ensure I have a nice finish on the planking. Also before I do that, I want to run a few lengths of the walnut strip to the topsides before I snap them off, to gain additional strength in the hull. A full log of this weekends build activities will follow shortly. I will also try to get a copy of my build plan on here for future reference! Cheers Jonny
- 215 replies
-
- 1
-
-
- convulsion
- caldercraft
- (and 1 more)