edbardet
-
Posts
133 -
Joined
-
Last visited
Content Type
Profiles
Forums
Gallery
Events
Everything posted by edbardet
-

Shipybuilding Blender Model
edbardet replied to edbardet's topic in CAD and 3D Modelling/Drafting Plans with Software
Jagger Thanks for the feedback. I want to concentrate on the boatyard and the tools - not a specific vessel, nor a specific yard. I am using the book as a starting point, so the time frame will be relatively limited to the 18th century and 19th century, centering on 1800I have obtained many digital tomes and have used them in the past. I was luck to find Dodds and Moore on line.Your statement about learning a tool, is spot on. The 'immediate feedback' is a key element. Ed -
After drafting / building several models I drifted away from physical building, I started an earlier post (since removed) about using Blender for a Whitehall skiff. I have to admit I was not as enthusiastic as I was several years ago. The duration of the project was the problem. I spent a several years on the last one - the Whaling Ship Morgan. So - going to start on something where portions of the project can be 'completed'. How many of you have read or have copies of "Building the Wooden Fighting Ship" by Dodds and Moore? (1984). Much on Tools, Techniques and Methods. Focused on a 74, built at Woolwitch. It's the first reference book I've actually 'read' and enjoyed. Anyway I am going to continue with my learning of Blender and then start on the tools and equipment. Not sure how it will progress. (Static, Textured, Animated, incorporated in Shipyard setting) I'm of course looking up things on the 'net, but if any of you know of other books of this vein, please let me know. Ed
-
I'm just starting out with the 3D approach to modeling and as such look through posts for techniques. It would be, I believe, a great service to the community if the authors would post, in their title, the software being used. For example in one it was many pages later that a screen shot showed the software in a heading. Just a suggestion Ed
- 1 reply
-
- 1
-

-
Thanks Denis, I think this is the easiest way. Reminds me of a discussion from years ago regarding development of a raked transom. Some ways took pages and i just took a couple of sentences. Ed
-
Am I being dense? Wouldn't it be easier to put a cube of a known dimension and scale the drawing so that a similar distance is the same. IE I have 2' station lines and I scaled the drawing so that they were at the same distance as a 2' cube. Shouldn't this work?
-
Peter, I was using your post but the '50 pixels per foot' has thrown me. How did you come up with that? I have the image in, centered and set at 0,0 for the forward point. Thanx, I'd like a bit of help. Ed
-
I'm sorry, but I can't find a post about this subject. It concerns setting up the measurements in blender. The author showed how it was done by, I believe sizing the image and setting up the right measurement parameters. If any one recalls the post I would appreciate the link. Or if anyone has a method, please let me know. Thanx, Ed
-
Swan class 3D model in progress
edbardet replied to dvm27's topic in CAD and 3D Modelling/Drafting Plans with Software
Well - I guess the bar has just been raised These results are really unbelievable. I definitely want a copy whenever it is available. As an aside. I would pay a good deal for the .ble files as I think they would be of immense value to anyone, like moi, that is working with Blender for the first time. I would sign any non-copy, non-distribution clauses necessary. Ed Bardet- 104 replies
-
- 1
-
-
- pof swan series
- swan
- (and 1 more)
-
The several people who are using Blender show great results. The Blender tutorials I've gone through are very skimpy on how to get scanned drawings into blender, setting up WL,Offset and frame planes, etc. Is there anyone who knows of a tutorial for accomplishing this? I'm wondering if downloading / buying a book meant for architectural drawing would be the way to start. Would it be better to do in TurboCad, with which I have used for several model plan creations, and then importing it into Blender as a 3D object that retains individual parts for rendering? If I've missed a thread in MSW please let me know. Thanks for any help. Ed
-
Need CAD type program
edbardet replied to Sambini's topic in CAD and 3D Modelling/Drafting Plans with Software
Thank you very much. I'm still having trouble finding how the interior was done. May I have a link to Rene? ( PM or email) Thanks -
Need CAD type program
edbardet replied to Sambini's topic in CAD and 3D Modelling/Drafting Plans with Software
I have used the free version for hull development. What was used for the interior detail. Frames bulkheads, ladders etc.? -
Returning to the fray.
edbardet replied to edbardet's topic in CAD and 3D Modelling/Drafting Plans with Software
Jaager; Some good ideas. The virtual model will have all the frames and their various joints and I was thinking that doing the parts in CAD and then having them as a 'stack' of parts in blender, then showing how they went together. I did all my drawings for a 1:24 Morgan in TurboCad, then made individual patterns for each futtock for cutting and installation. I was thinking of doing the same, except importing the parts into Blender for rendering and assembly. I think I'm going to spend some time with Turbocad and look at what it can do for high quality rendering and developing a walk thru. Ed -
Returning to the fray.
edbardet replied to edbardet's topic in CAD and 3D Modelling/Drafting Plans with Software
No problem- If you are a 1"tall person and someone placed you in a completely finished POF model, you could 'walk-thru' it. I want to the same in a 3d ,model. Have the camera location move through the completed virtual model. My bad - re blender - should have been capitalized. It is a graphics package similar to Cinema4D or any of the others, but Free. Ed -
Cheers, I'm Just returning to modelling after several years off. I am 'forced' due to age, etc. to no longer build POF in wood so I am going 'Virtual'. My model will start with scantlings taken from historical references and finish with a walk-thru 3-D model. I'm looking at a working class boat 1700's era. Now looking at a collier. Any reference recommendations as to using blender in this type of environment? Should I develop my lines in cad (frames etc) or do it all in blender? Should be a multi year project. I love the research necessary. I've looked at several posts and this seems to be the most active forum around - great members.
-
Another option i you have a medical type friend - suture scissors. They are sometimes discarded after one use. They have a little grove and curved tip that allows you to grasp the exact line. Ed
-
Using water and ammonia may help. Ammonia reacts with the lignin in wood, which is the adhesive material holding fibers together. After soaking the wood in a strong ammonia, bend it to the shape desired. As the ammonia evaporates the water in the air replaces it in the lignin and restores to original glue strength. This is smelly and some people do not like the smell. In an industrial / commercial operation, wood is placed in a strong vacuum resistant chamber and the air withdrawn. This takes the moisture with it. Anhydrous ammonia is then introduced and allowed to penetrate. The wood is then bent and allowed to replace the ammonia with the water from the air.
-
Save your broken scroll saw blades and mount them upside down in the same handle you use for knives. That gives you a saw for confined spaces. The reverse mounting gives you better control. Ed
-
Andy- That's what tugs are supposed to look like Ed
-
Allanyed made a comment about milling your own wood that I would like to second. I believe that a saw and thickness sander, even a home made one, is a valuable addition to anyone's work shop. Milling your own wood seems to result in a lot of waste and it does take time. But I costed some out several years back and it ended up being in the vicinity of 25% savings on the list price, plus no postage. There is one advantage to milling your own wood and that is utilization. Being able to thickness larger pieces allows greater flexibility in layout. I've used both wood from a big box store and billets from a local hardwood supplier. I'm not speaking against buying dimensioned wood, but merely saying that milling your own should be considered. Ed
-
Nigel- I just ordered a copy of the book - should prove an excellent resource. I browsed it on line and the information about supplies, scantlings and labor will make good reading. I've exchanged a couple of e-mails with Julian Kingston who is director of the Lenox Project. Seems like a nice guy and is a witty writer. Ed
-
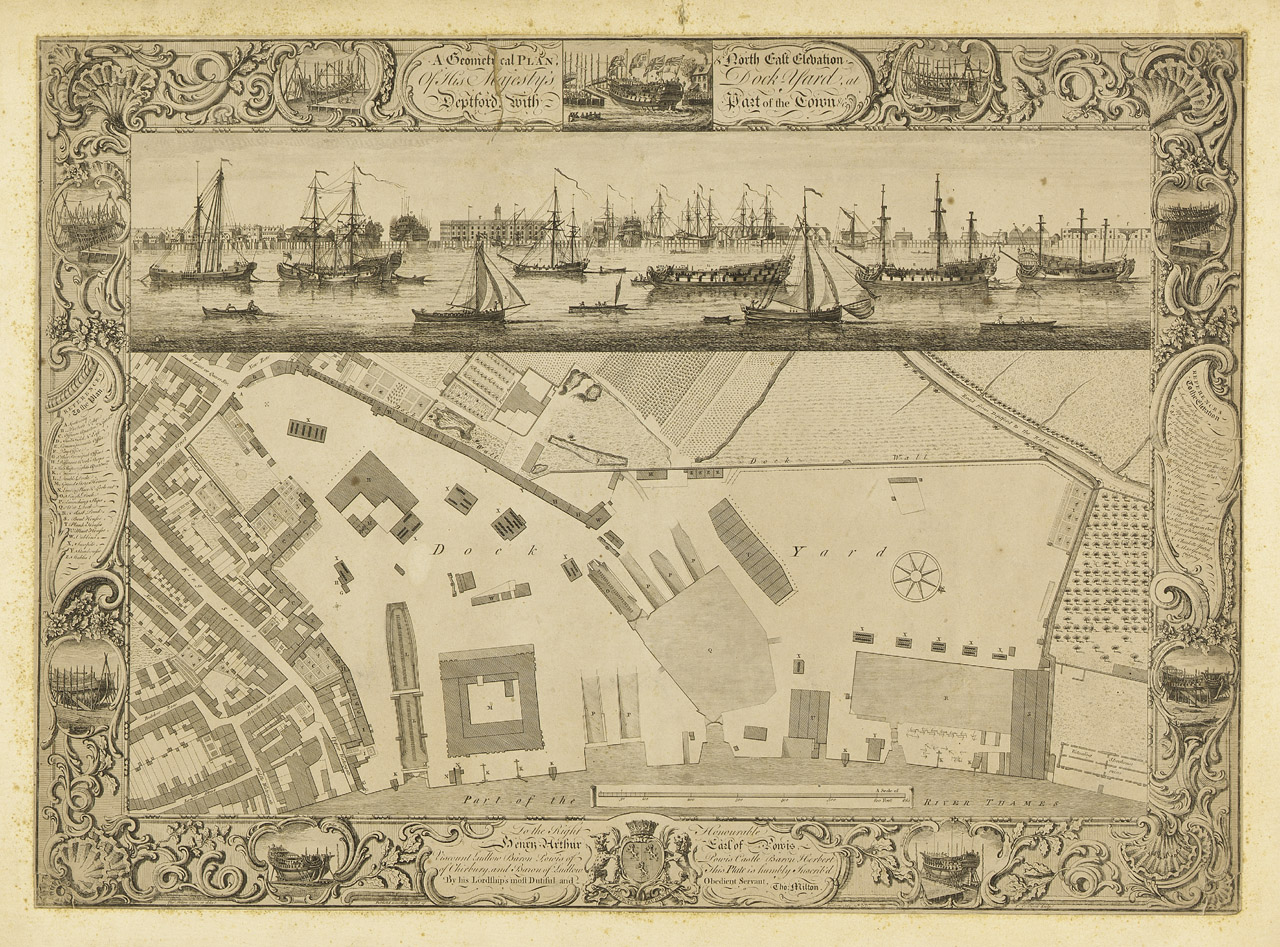
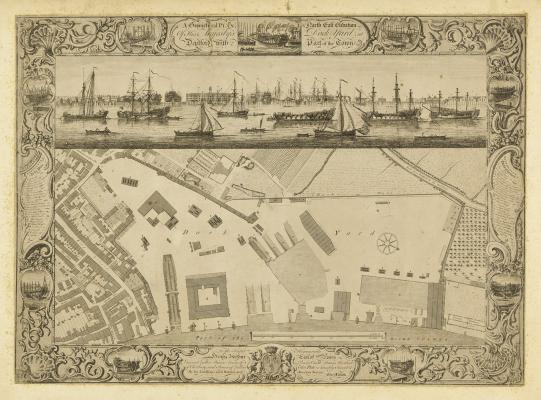
I think I opened Pandora's box. Doing more research has been fascinating. Evidently there is a big fight going on between Chinese Real Estate tycoons and the city of Deptford over preserving / developing the shipyard area. The Lenox was built there and they are trying to get a reconstruction / training project going. I ended up getting a e-mail and photos of the legends from the head of the Lenox project who has one of the original maps. Ed
-
Question on Shipyard Fixtures circa 1774
edbardet replied to edbardet's topic in Nautical/Naval History
Mark - Do you have a copy of a book that has the Deptford map? My next post was asking for the legend on the map.Dodds and Moore just has the one from Woolrich. Ed -
Mark - They are the ones I e-mailed. Still no reply. I put the wrong initials in the post - woops. Ed
-
I'm starting a 3D Graphics Shipyard Model and have several good photos from the NMM. These will allow me to model the various buildings and partial ships. I've contacted them about the attached file ( A map of the Shipyard) in regards to getting a copy at a high enough resolution to read the legends and have not heard from them yet. Does anybody have a higher resolution that has readable legends? The original picture taken at the museum was 1280 x 947 but it has been scaled. As I get going I will post a log on MSW. Thanks, Ed
-
Question on Shipyard Fixtures circa 1774
edbardet replied to edbardet's topic in Nautical/Naval History
mtaylor - Thanx I did not see an opening at the ends, but looking again it does seem like there is one in one of the photos. It must have taken a long time to steam since they had to let out the steam and heat as they opened the top. WackoWolf - ThanxYep that is a traditional setup with a boiler and a box. I just was not sure of the thing in my pictures. Ed