HOLIDAY DONATION DRIVE - SUPPORT MSW - DO YOUR PART TO KEEP THIS GREAT FORUM GOING! (Only 24 donations so far out of 49,000 members - C'mon guys!)
×


_SalD_
-
Posts
829 -
Joined
-
Last visited
Content Type
Profiles
Forums
Gallery
Events
Everything posted by _SalD_
-
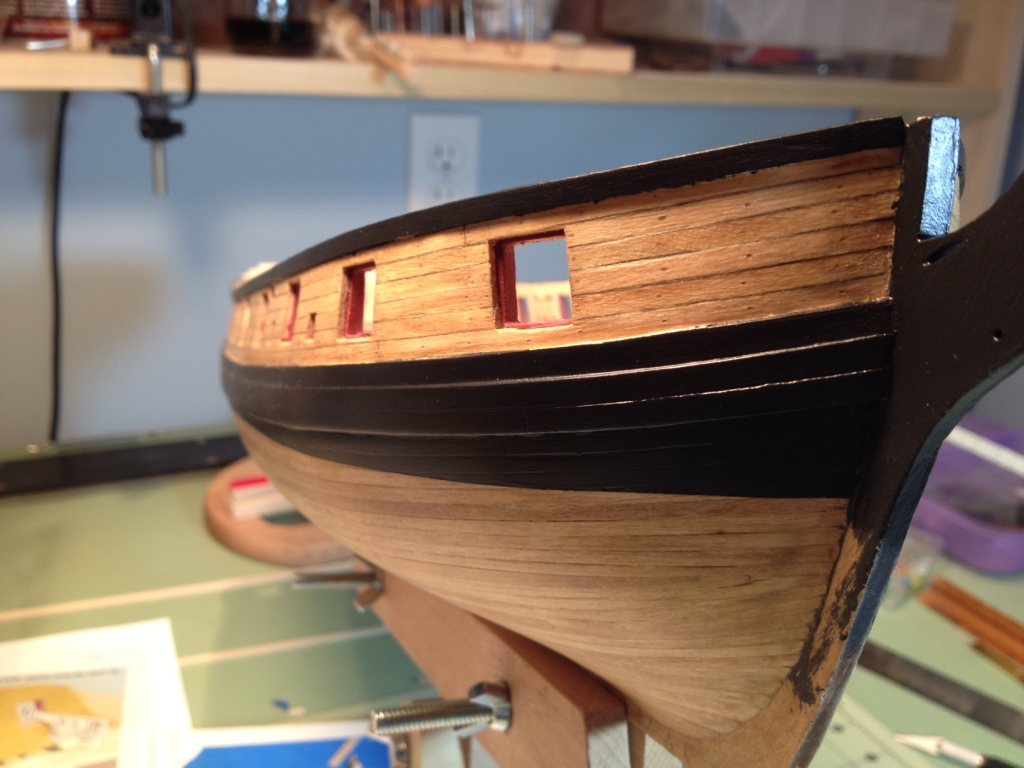
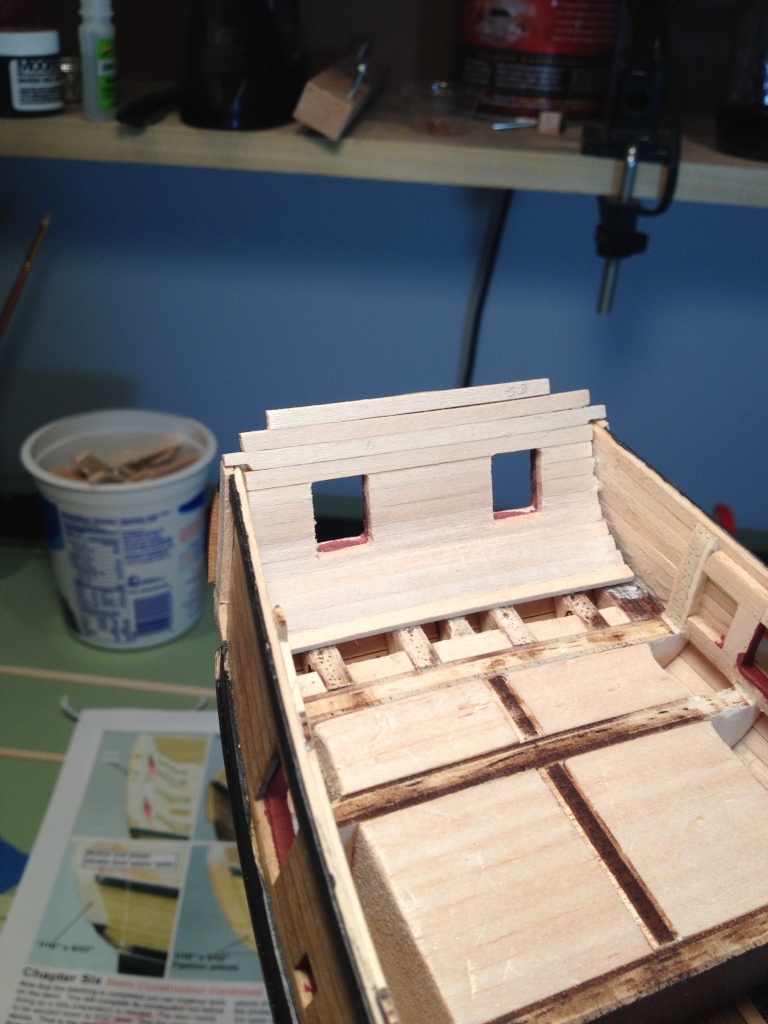
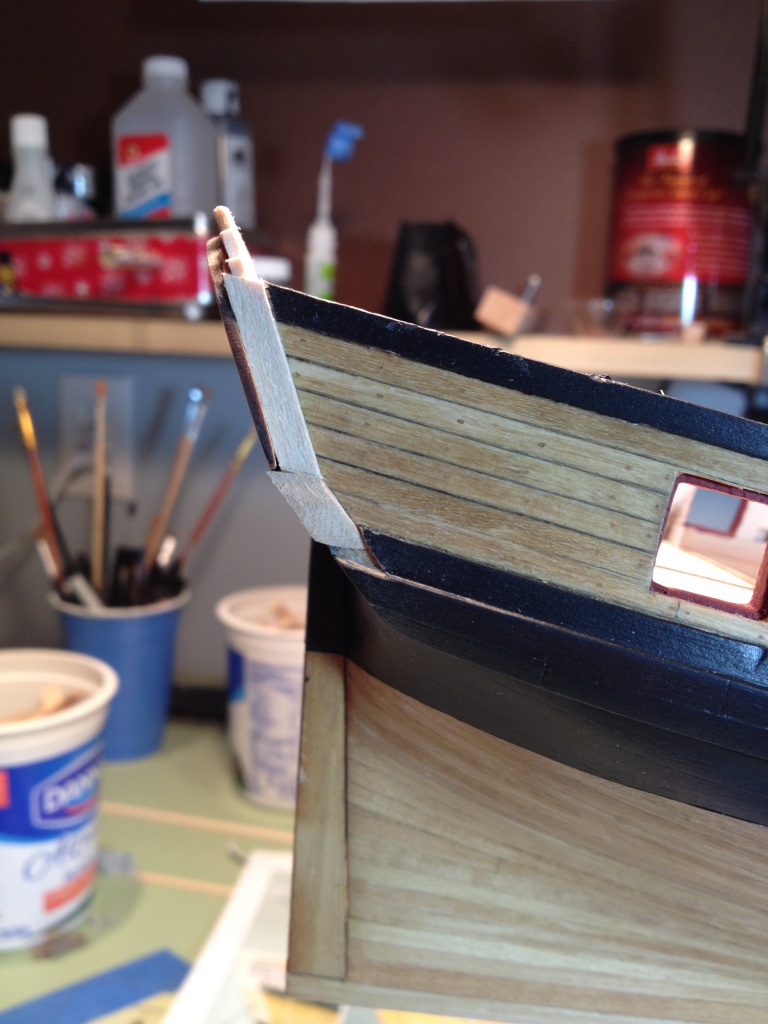
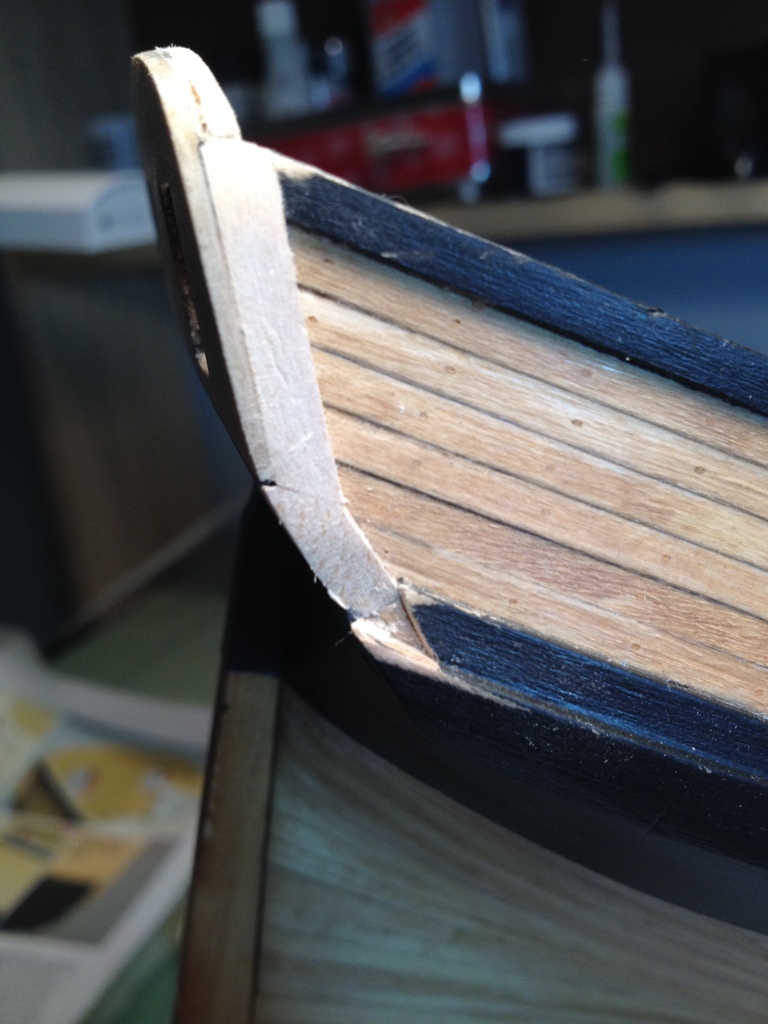
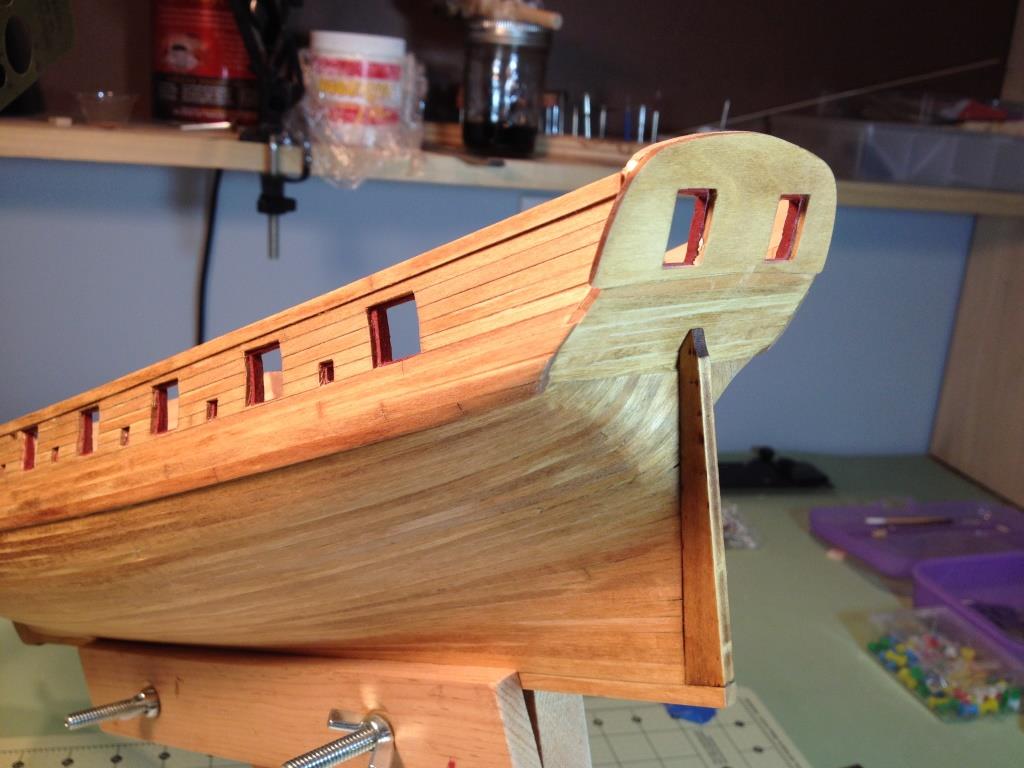
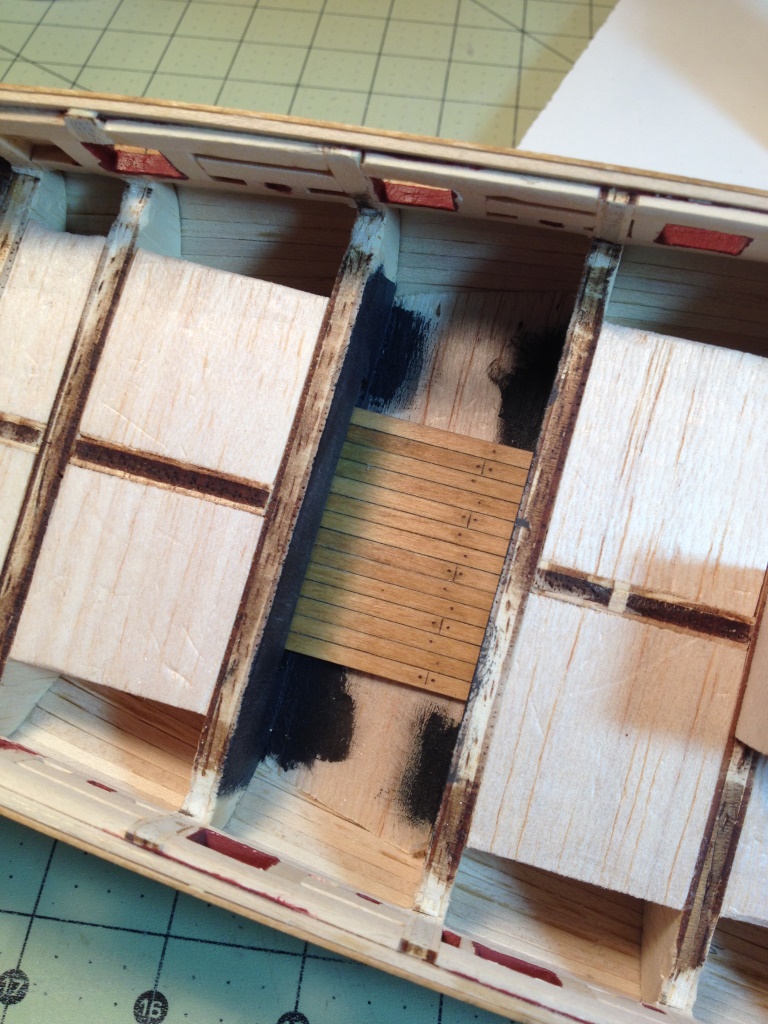
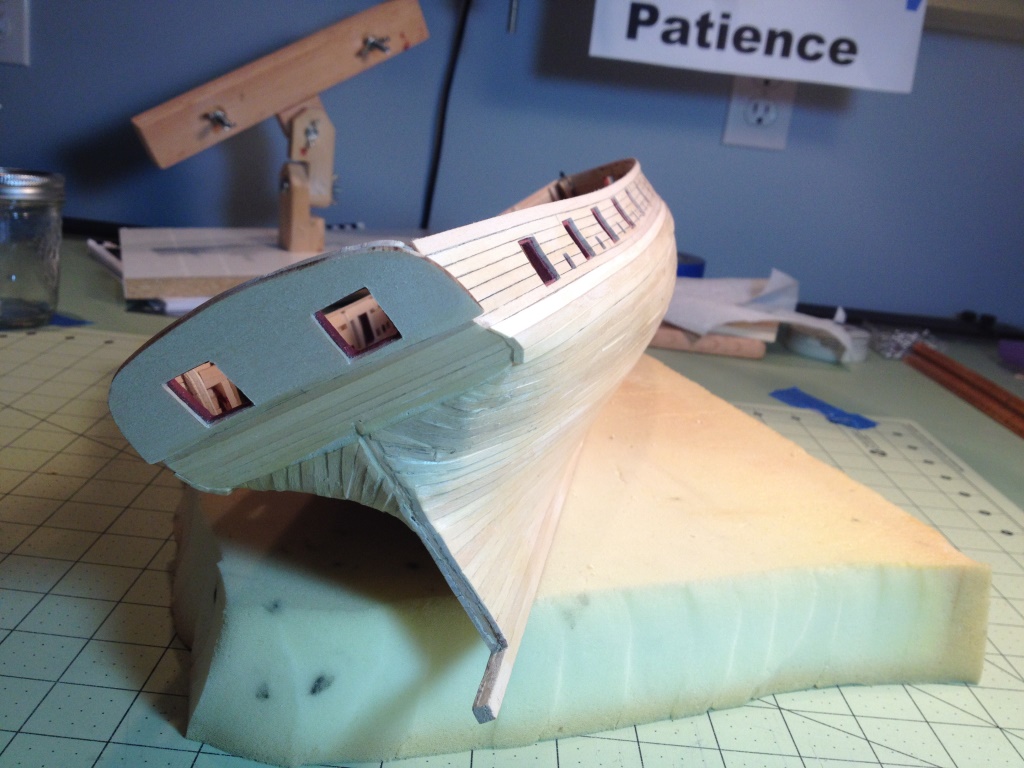
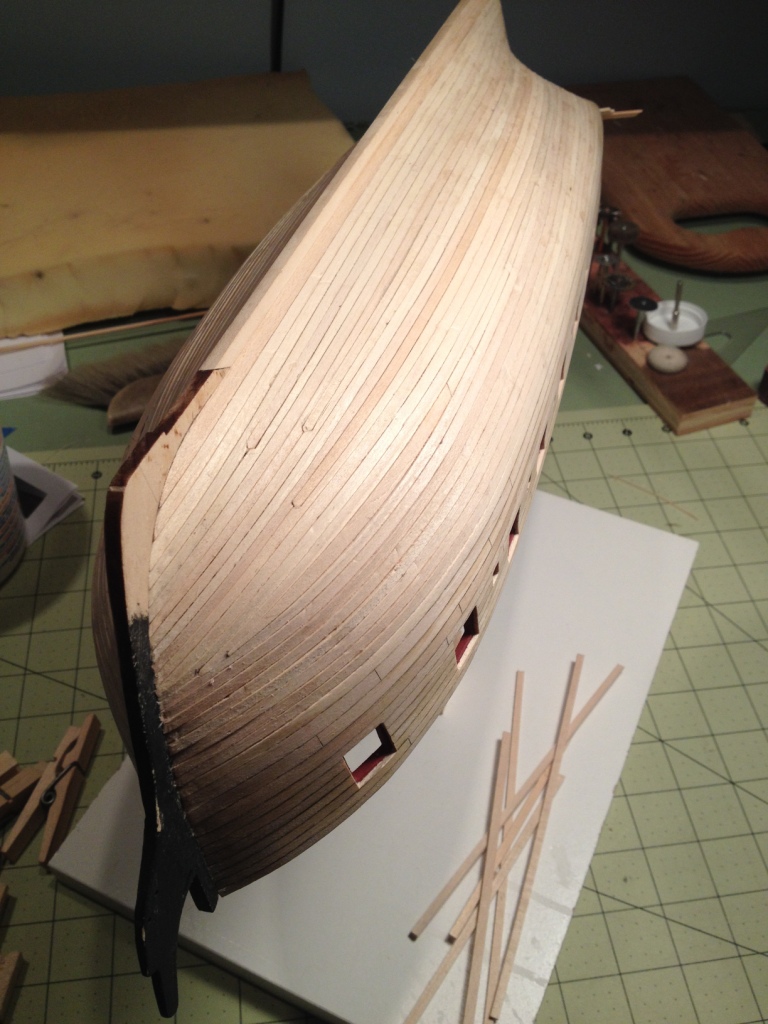
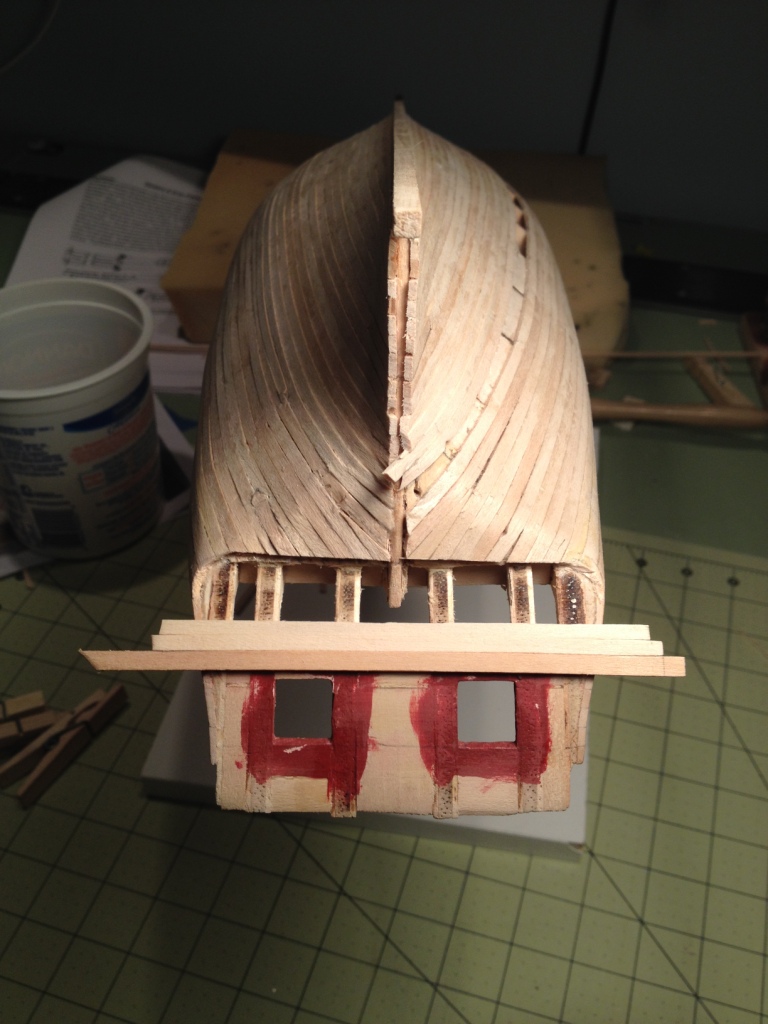
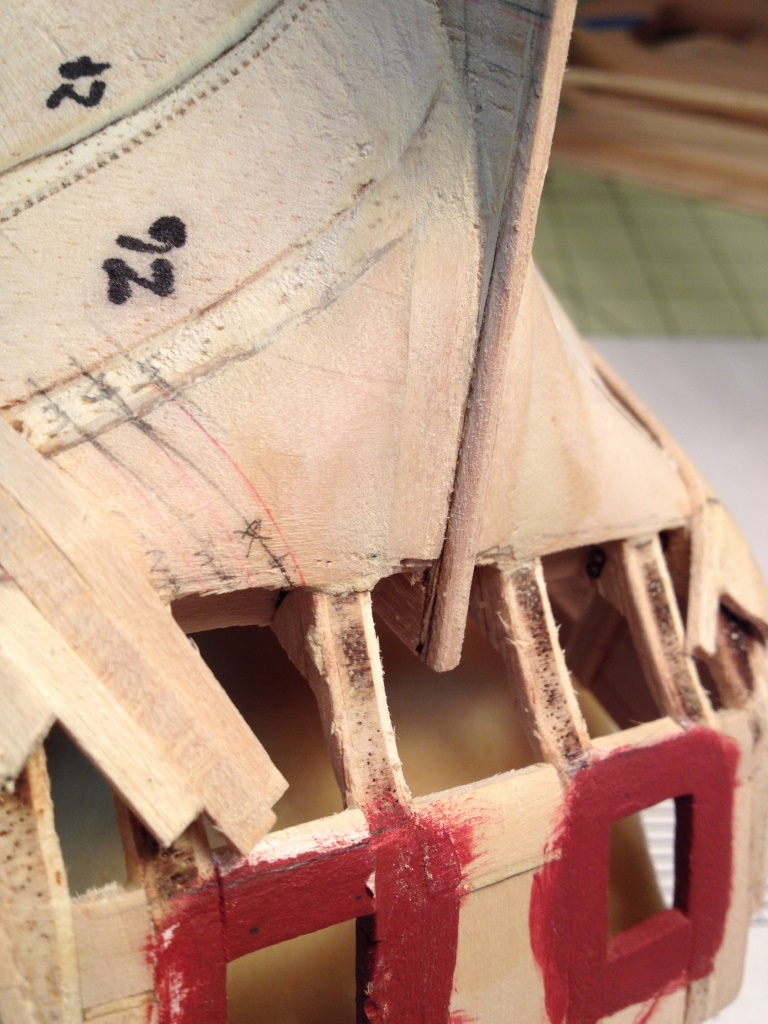
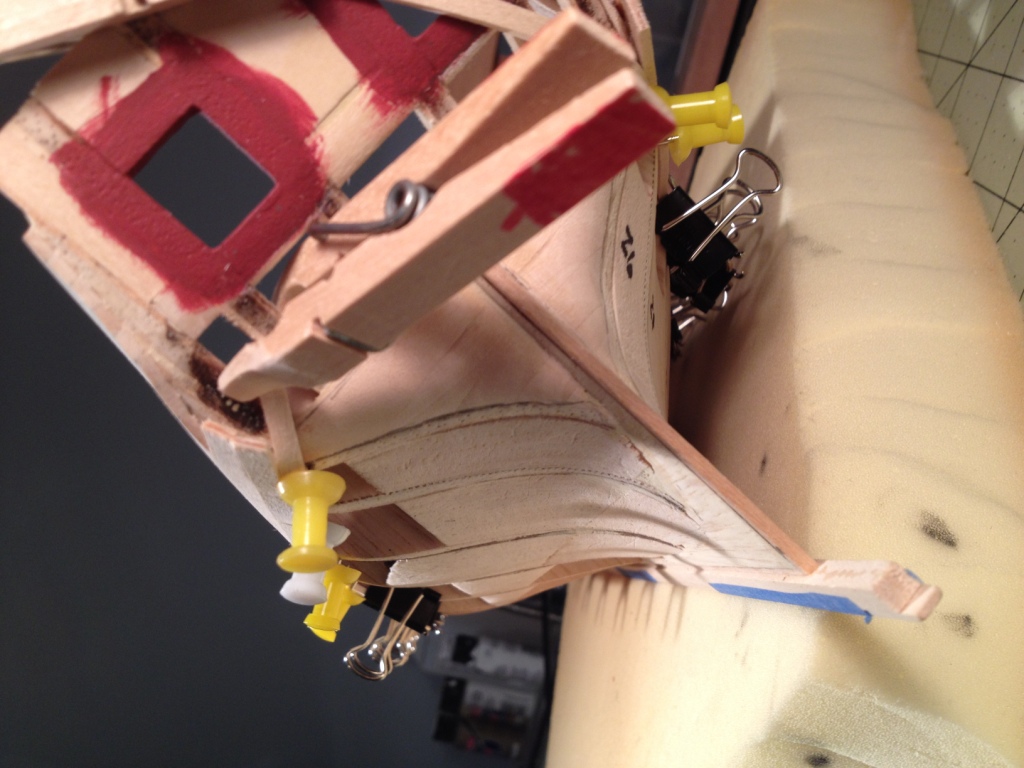
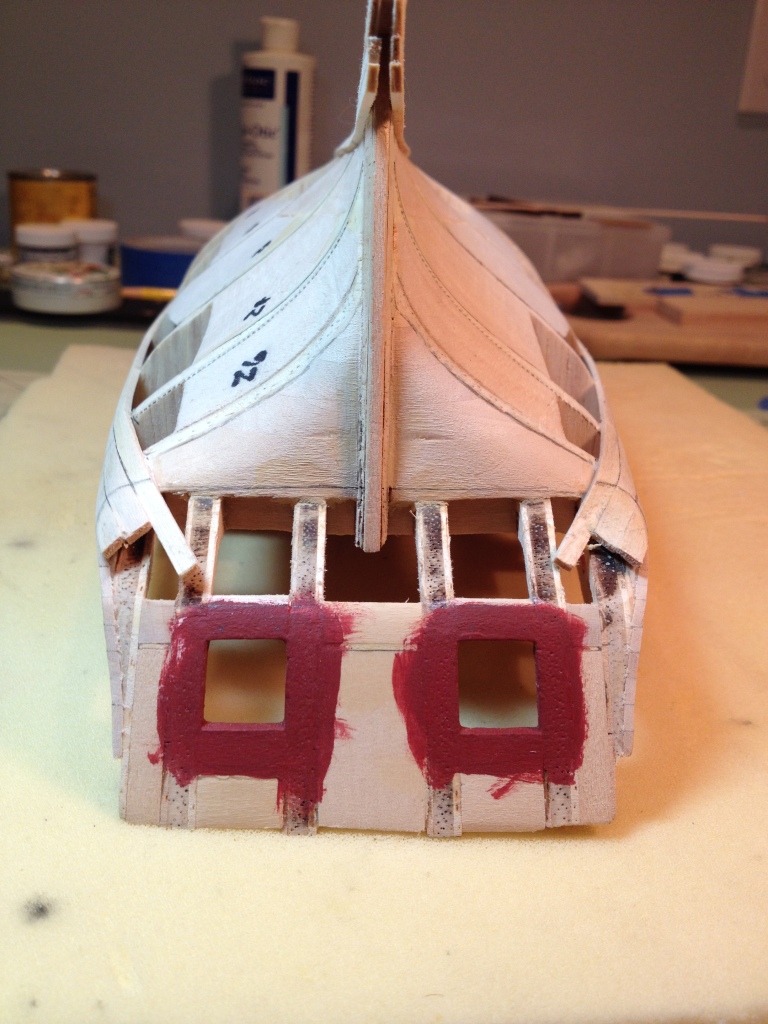
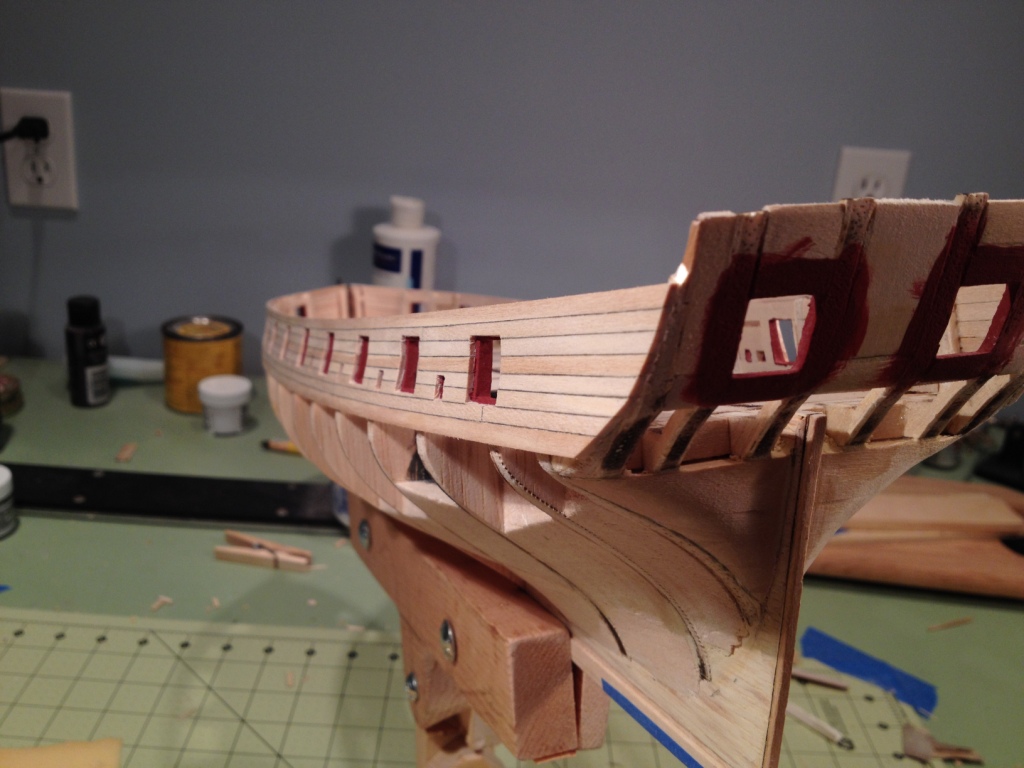
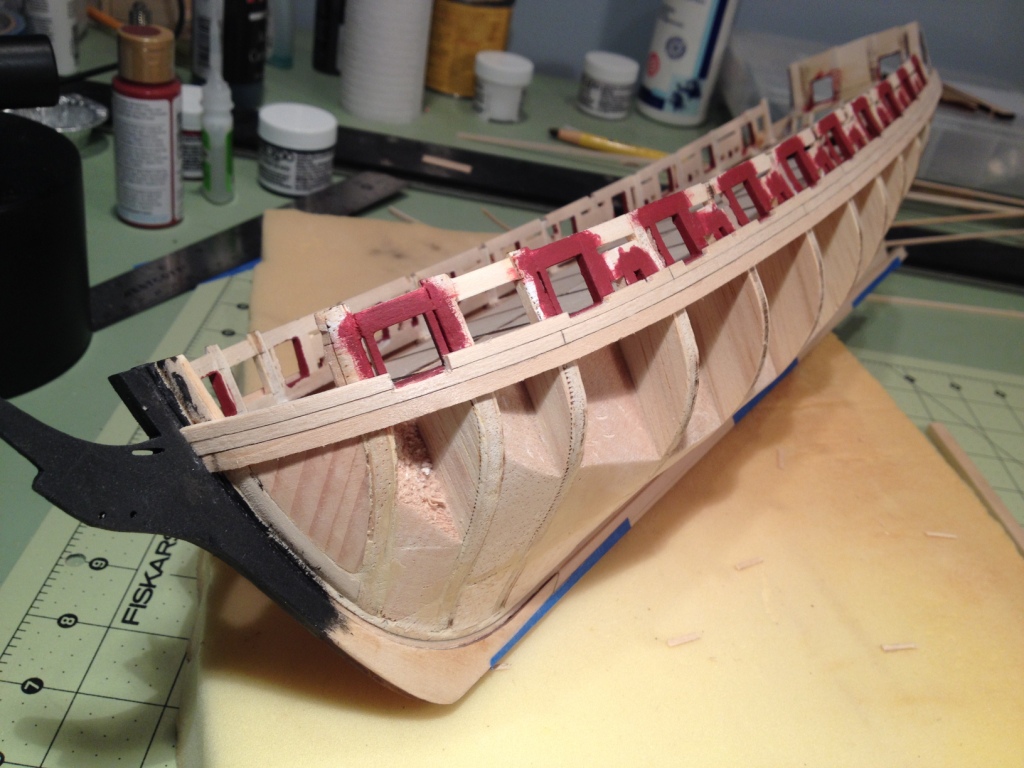
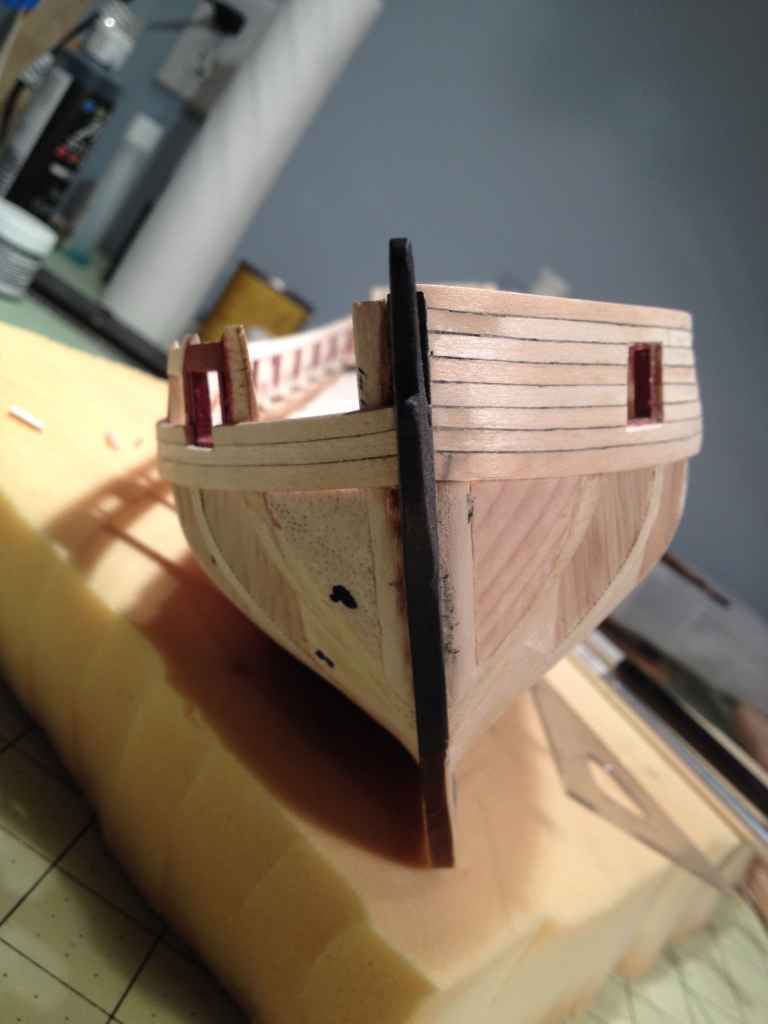
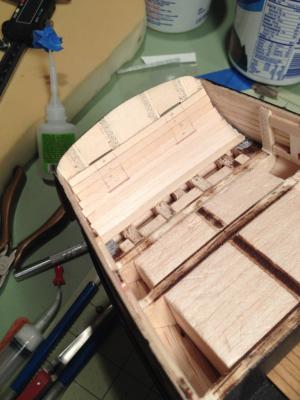
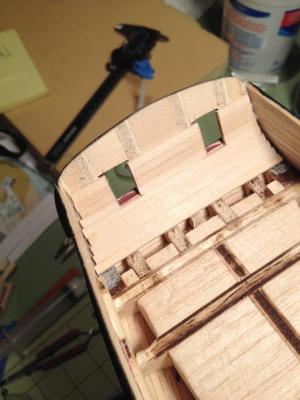
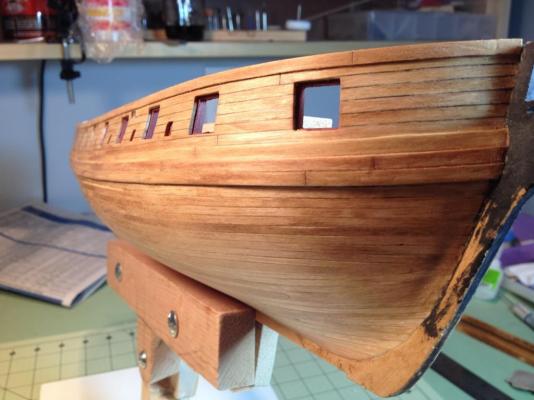
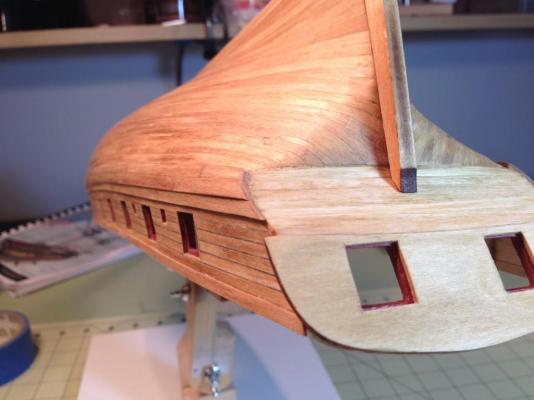
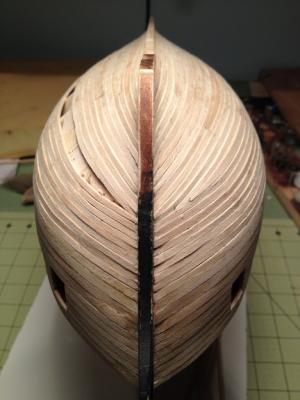
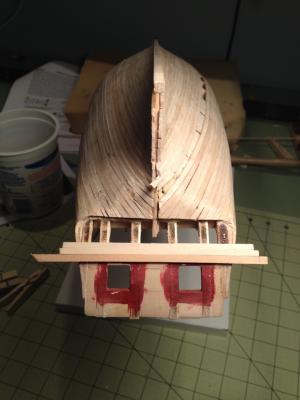
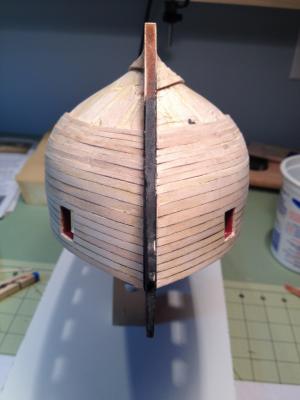
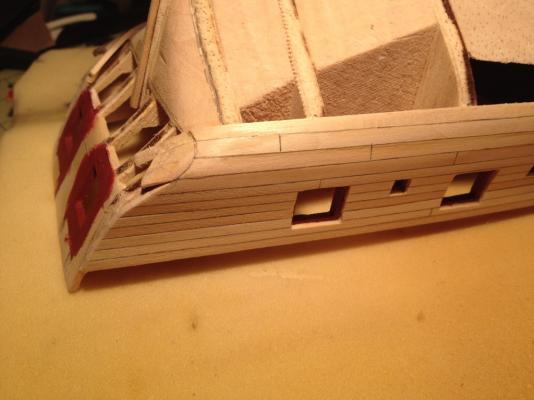
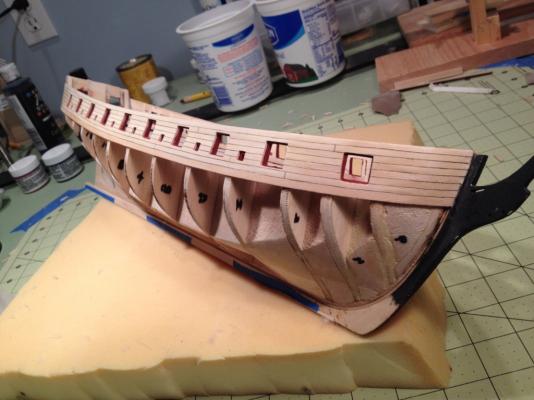
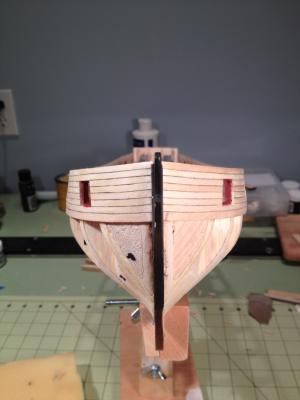
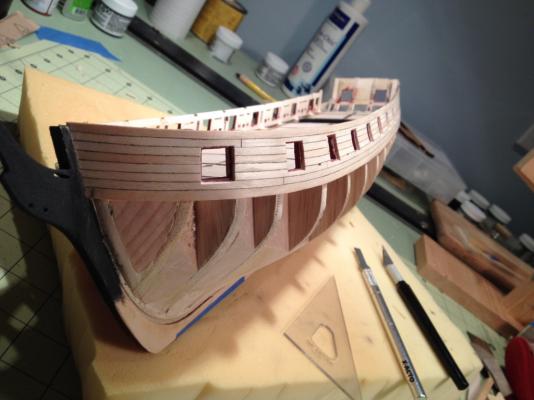
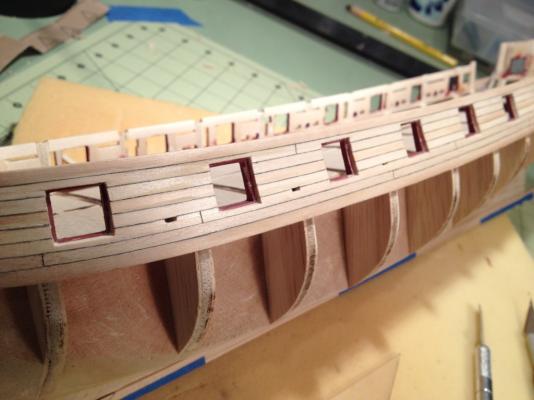
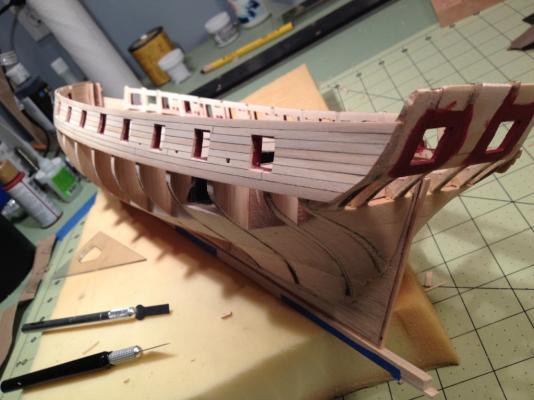
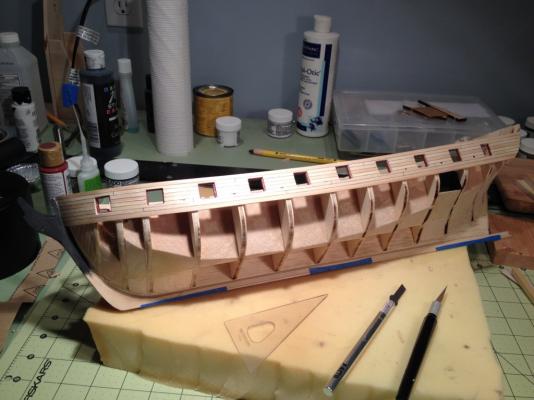
 Three coats of paint and I’m done with chapter 5. Chapter 6 – The Stern After sanding the stern to the required thickness I started to install the planking. I decided to place all the planks to the full width of the stern and not in small pieces around the gun ports, similar to how I installed the upper outboard hull planking. After installing the planks over the gun ports I cut a rough opening with an x-acto knife (Note to self: Don’t be so cheap! Change the blade once in a while.) and then sanded the edges to the proper width with an emery board. After finishing the planking I cut the sheer plank and upper wale for the transom filler and fashion pieces. For the transom filler I used the 1/16 x 5/32 wood strip as called for in the instructions. For the fashion pieces, after trying to get the correct shape with the 5/32 wide strip and not succeeding, I opted to use a 3/16 wide x 1/16 thick piece instead. This worked out better because with the extra width I was able to get the piece under the transom and to shape it into the correct form. I also make the fashion piece(s) out of one piece of wood instead of two. After all the pieces were glued and dried I sanded everything to the shape of the transom. Finally (I know it a little late now) I check my gun port position with the gun cutout just to make sure everything was in line.


- 659 replies
-
- 11
-

-
- syren
- model shipways
- (and 1 more)
-
Thanks Augie, when the Admiral is happy life is good. I didn't use any pre-stain. You can't see it in the pictures but the finish is a little blotchy in places. Not bad though. I glad you and the others have posted your builds so I can learn from the best. Thanks again. Thanks to all for all the likes also.
-
Thanks Patrick, the treenails are finished, that's a lot of holes! You are right the they do add a nice touch to the appearance of the ship. Thanks Thomas, I do have a few low spots in the planking you can't see in the pictures where the plating is going. I'm not sure if I should fill them in since they will be covered by the plates. I do reference your build of the Syren quite often. I used your drilling technique for the treenails.
-
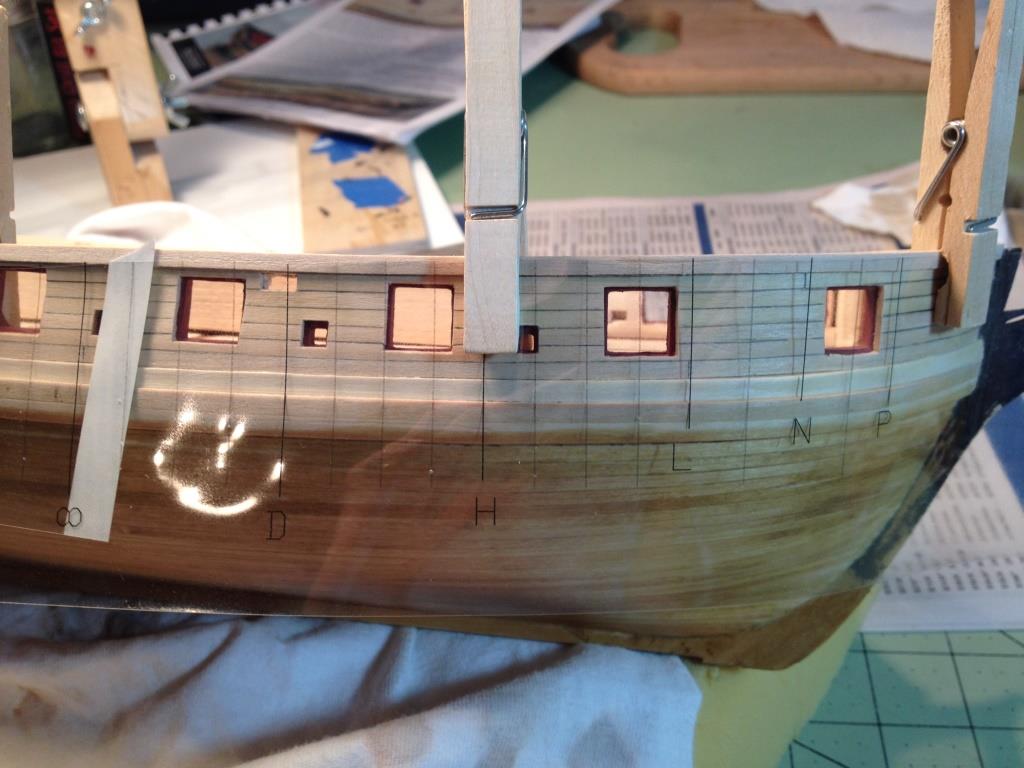
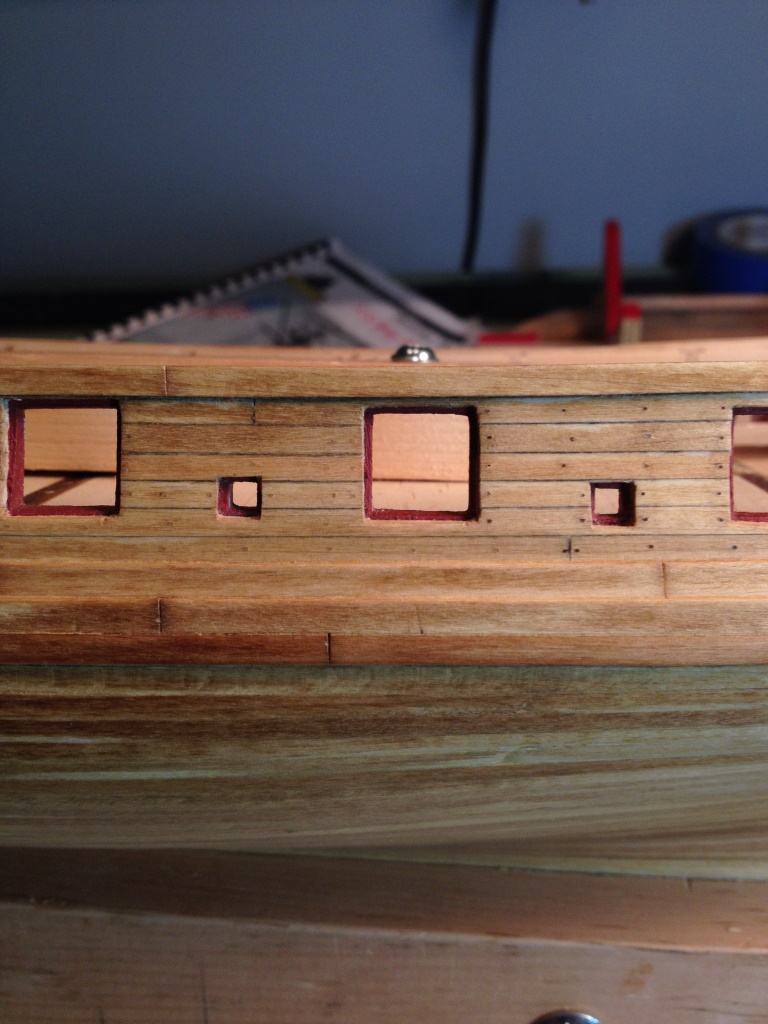
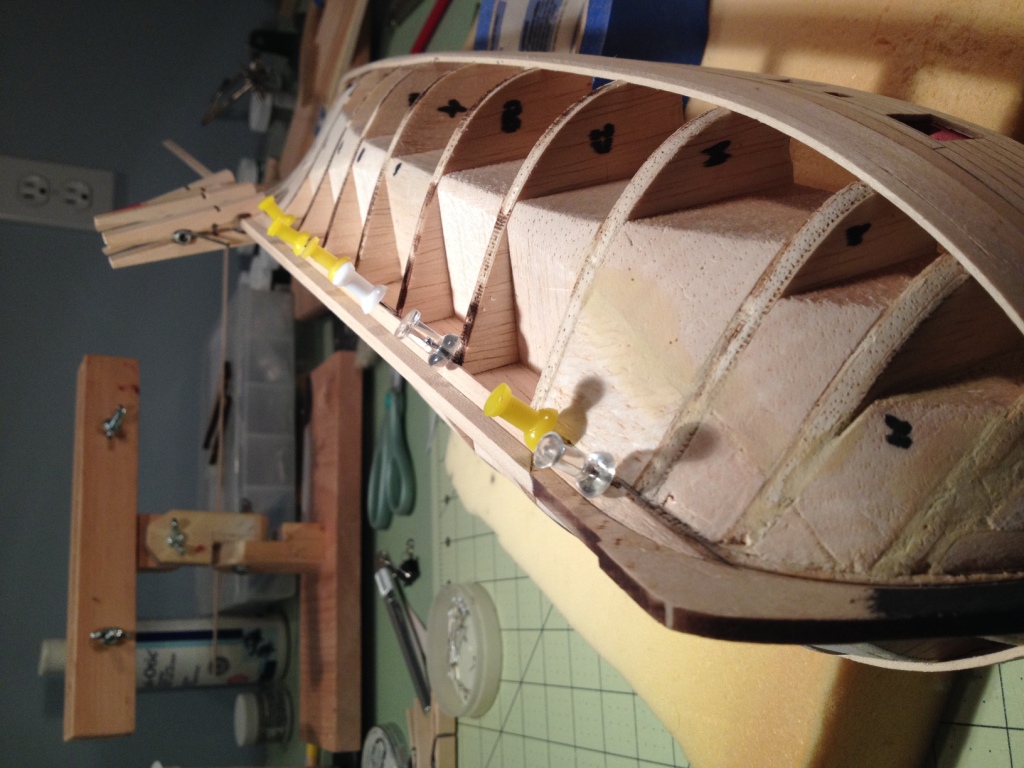
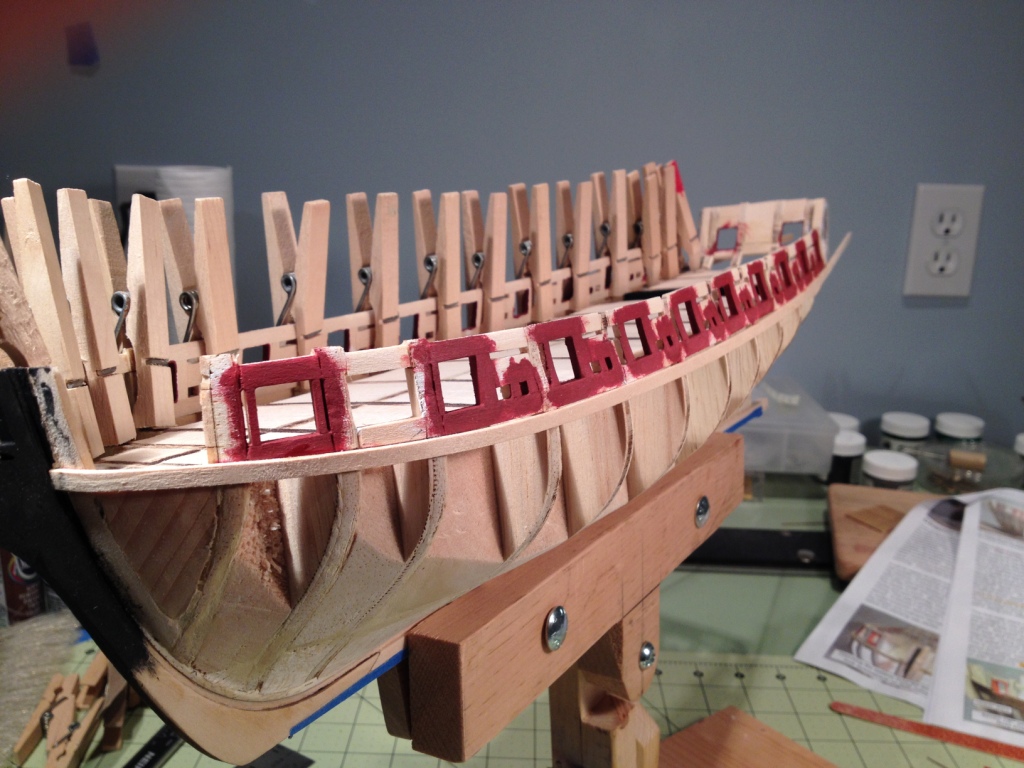
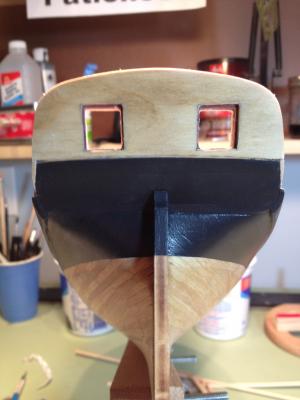
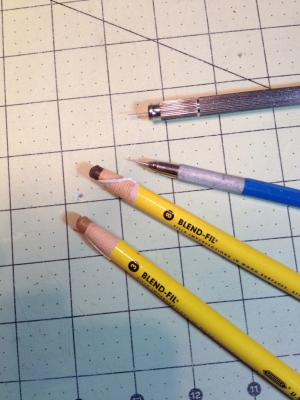
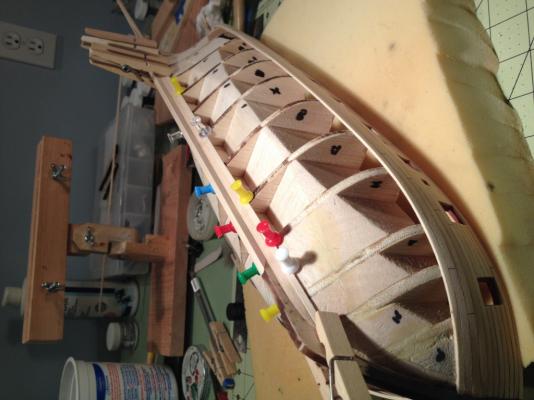
Almost finished with chapter five!! The hull is sanded down and stained. Reading through a number of Syren build logs here on MSW regarding staining the hull I decided to go with a 40-60 mixture of golden oak and natural stain. I tried this mixture on some test strips and liked the shade however when I used it on the hull itself the color came out a little darker than what I was looking for. It’s not bad in fact the admiral really likes it so I guess it’s a done deal. For the treenail layout instead of drawing lines on the hull I used something similar to what Dirk did in his build. I used a transparent sheet to print out the reference lines denoting the location of the bulwark’s. Holding this sheet on the side of the hull with clothes pins I was able to make small indentations into the planking by poking holes through the plastic sheet with a compass point held in a mechanical pencil. To make the holes I used a pin vise with a 0.02 inch (0.5mm) drill bit and then rounded them out by inserting the tip of the compass point. To fill the holes I first tried a dark shade (#8 minwax) blend stick but thought the holes stood out too much. I wanted a more subtle look so I went with a lighter shade (#3) blend stick. The holes can be seen when you look at the hull at different angles so you can tell they are there, but they don’t over power the ship. Treenails on left of the gun port are the lighter shade,darker to the right. After marking the waterline (not one of my favorite tasks) I taped the hull ready for painting. Almost forgetting, I finally glued the lower deck in place.


- 659 replies
-
- 14
-
-
- syren
- model shipways
- (and 1 more)
-
Thanks Patrick and everyone for the likes.
-
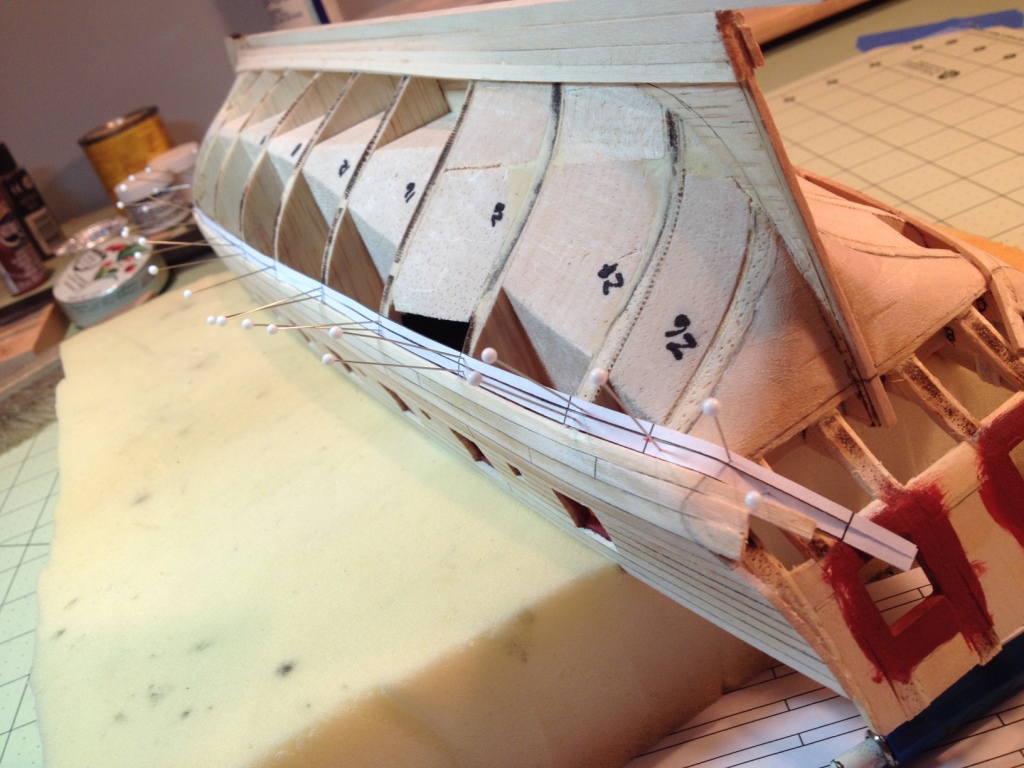
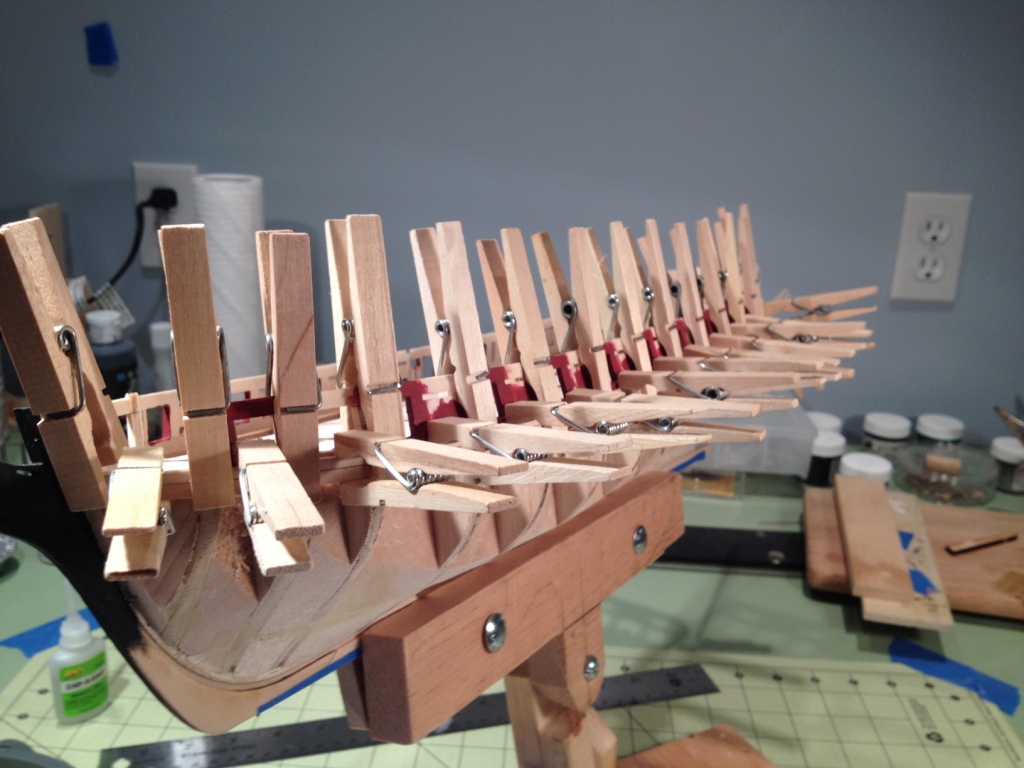
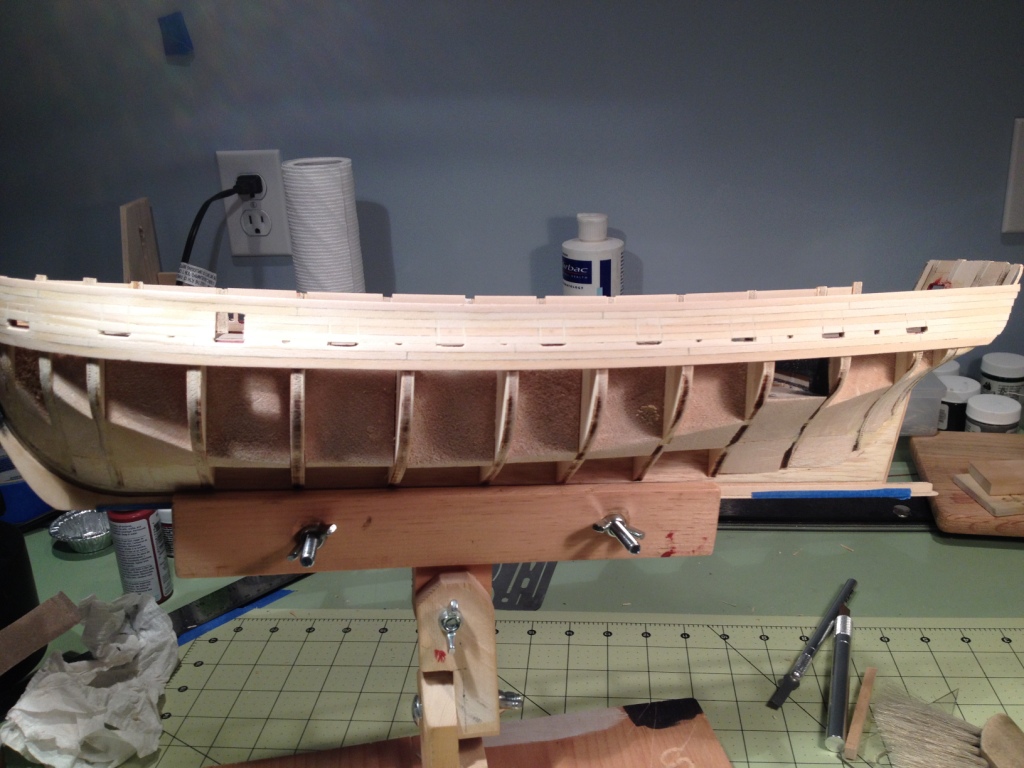
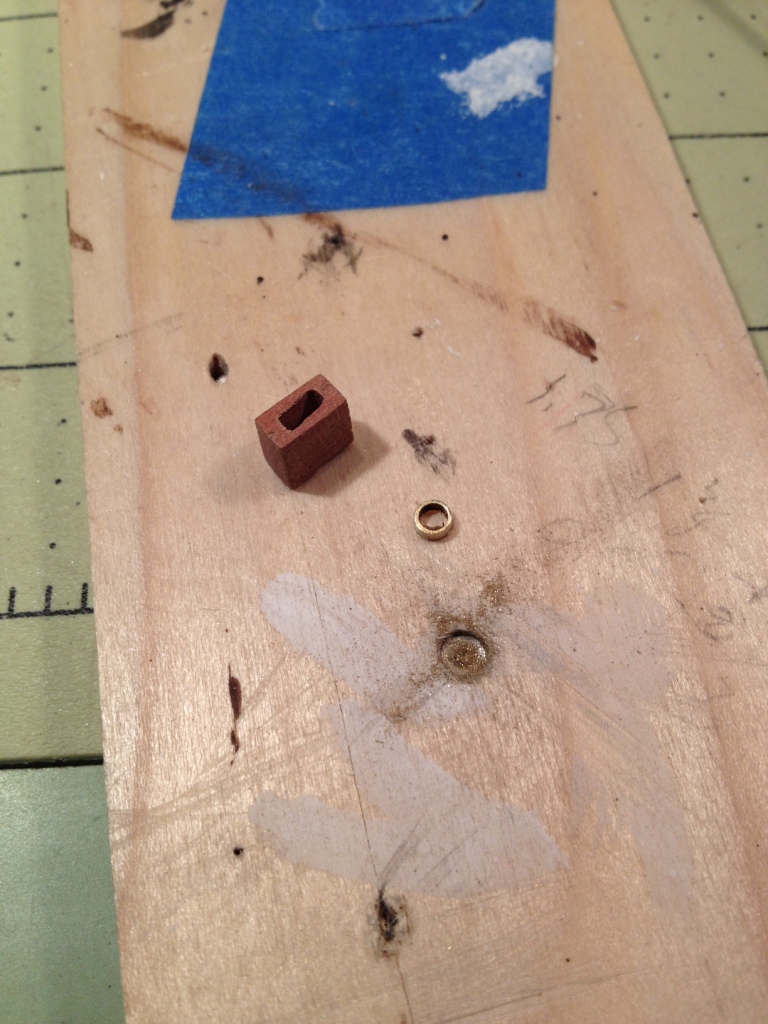
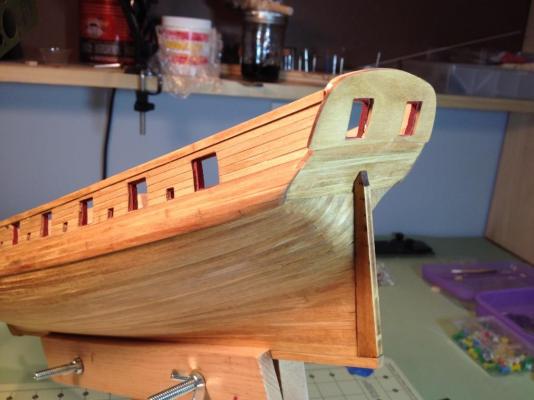
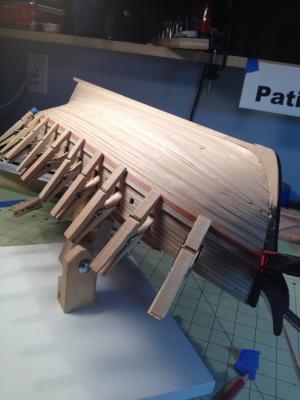
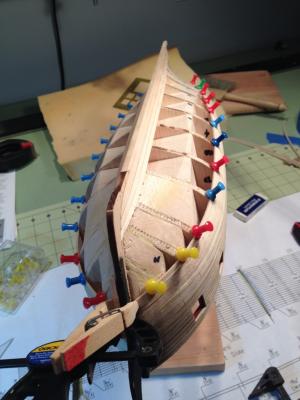
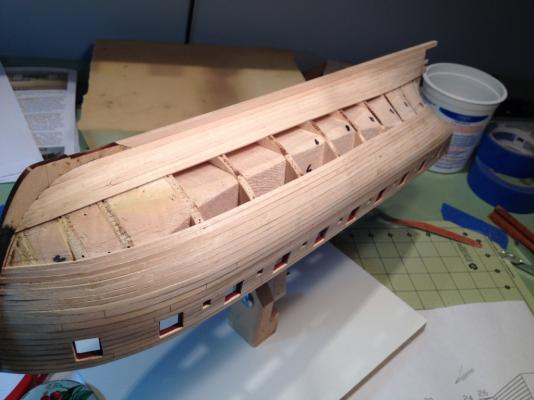
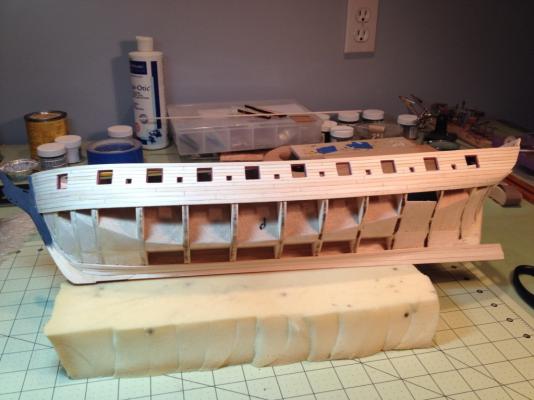
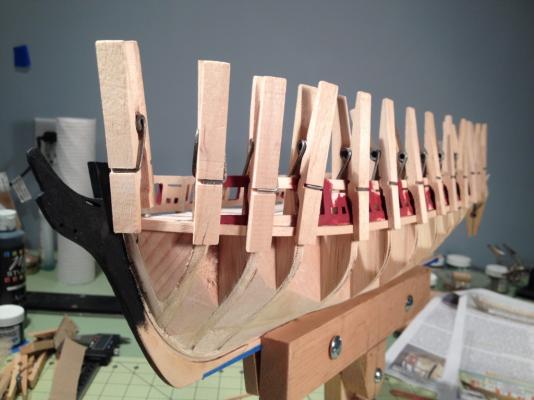
I thought I would update my log while waiting for the blizzard to hit southern New England. They are predicting 20 to 30 inches by tomorrow night. Well I finally found the piece of planking I was looking for the past several weeks (the last piece). With the hull finished I moved onto the stern and completed the counter and transom. Next I added the second layer of planking to the wales. In hind sight I should have formed these planks at the same time I was doing the first set of wales and kept them for later so I could have glued them right in place. Since I didn't do that I used a set of pins that I modified to hold the plank in place after soaking. I inserted the pins along the seam between the second and third wale to give me a support for the new wale and to hold it in place while it dried. I have to apologize to the person who's log here on MSW I learned how to make the pins but I just can't find it now. Once this wale was dry and glued into place I used it to form against for the upper and lower wale. When dried they were glued in place. The sheer strake was then soaked and clamped in position until dry and then glued in place. Prior to gluing the sheer strake on I cutout the four opening for the sheaves directly below it. The sheaves were made from pear wood with a small piece of 1/8” diameter brass tube for the pulley held in place with a toothpick for the axle. They are not glued in yet, I will do that after all the sanding and finishing is done. All in all I am pleased how the hull came out for my first attempt at a POB ship. I still need to sand the hull down and do some treenailing. Something to do while waiting to get plowed out from the blizzard.


- 659 replies
-
- 12
-
-
- syren
- model shipways
- (and 1 more)
-
Thanks Patrick. Planking is a lot of work, and I thought solid hulls were tough. There were times I thought I should have started with a smaller ship but I'm almost finished. The mini sander helps a lot. Two things I always have a problem with are hand sanders and circular saws. I could never sand evenly or cut a straight line to save my life. Thanks everyone for all the likes also.
- 659 replies
-
- 2
-
-
- syren
- model shipways
- (and 1 more)
-
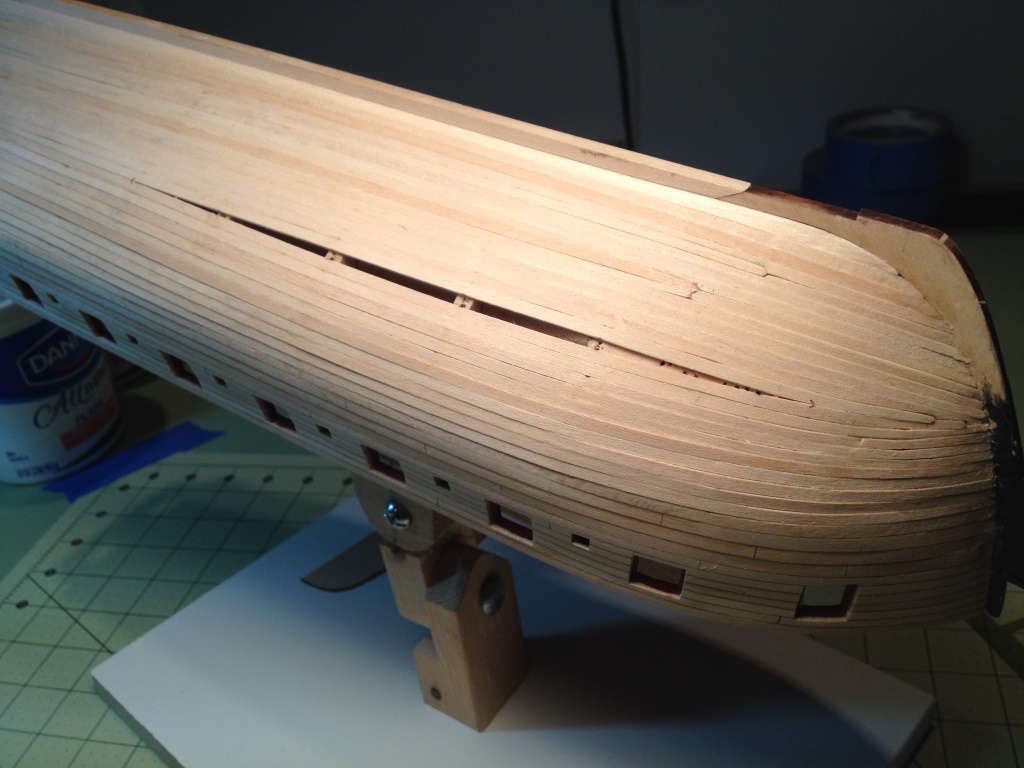
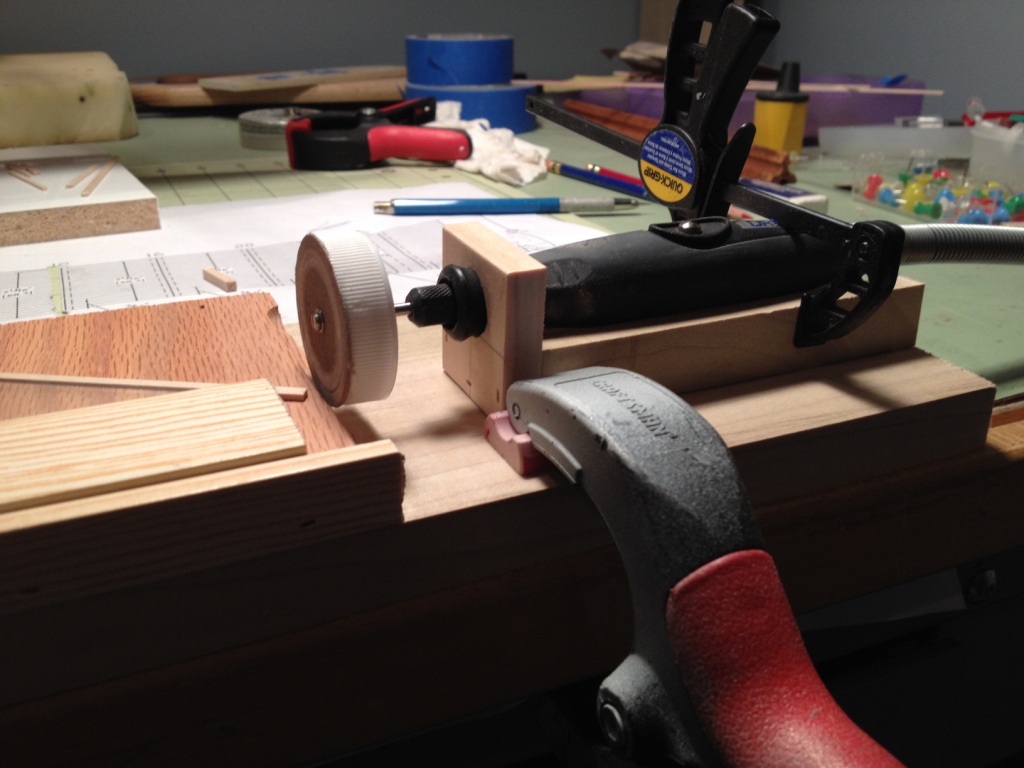
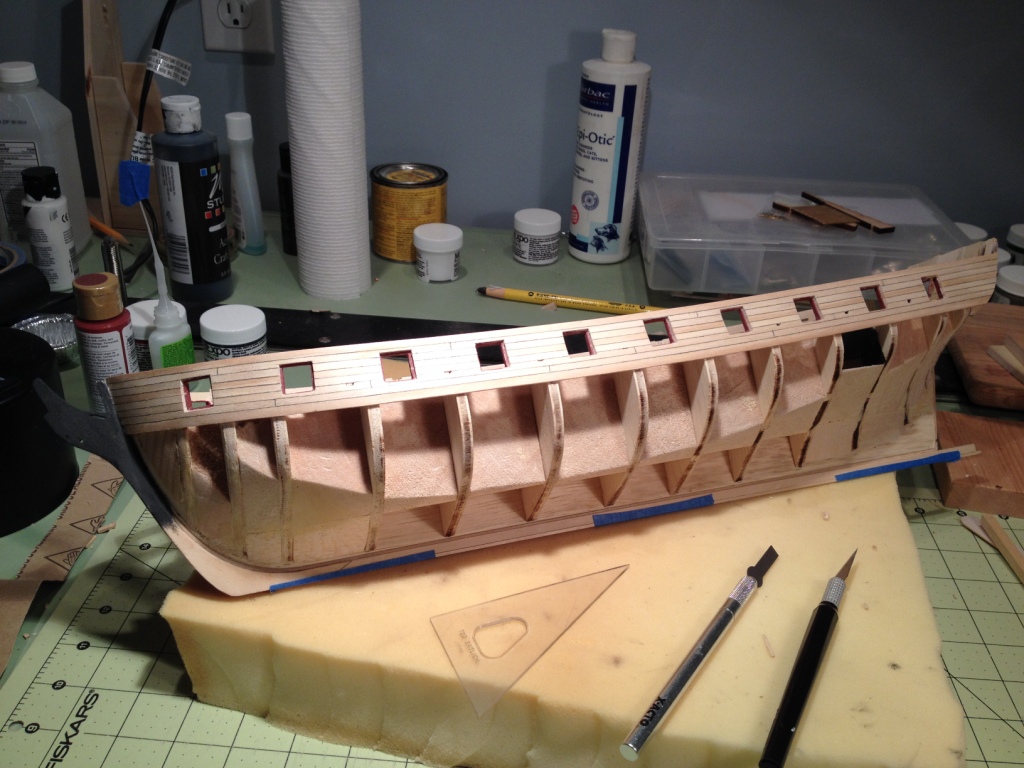
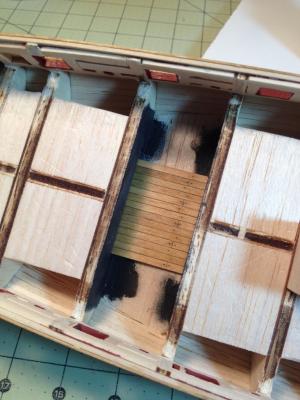
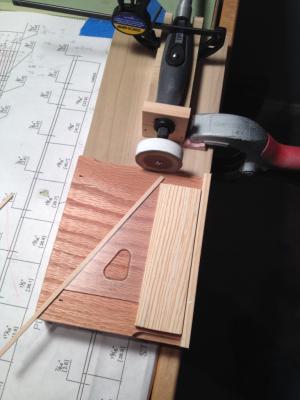
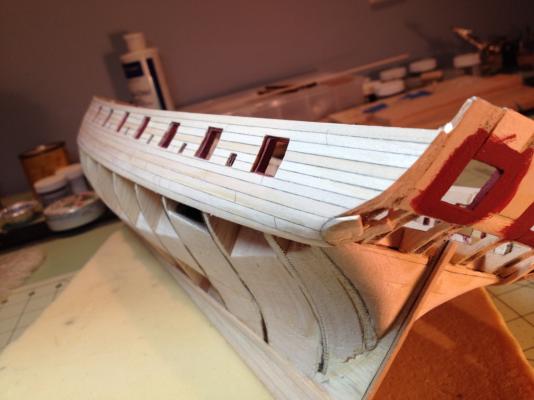
Update on the planking. Starboard side is complete and only a few more planks to go on the port side. (Phew!! ) One thing I’ve discovered is that even the best laid plans can go awry. After carefully laying out the planking profile for the hull I’ve ended up using a few partial planks at the center of the hull. I didn’t bother shading the edges of the planks to simulate the caulking since the hull is going to be plated. Starboard side, not sanded yet. Port side with a few planks left to go. Bow I’ve also started planking the counter. Planks around the tuck look a little ragged but they should clean up okay with the final sanding. On a separate note, I’ve always had a hard time keeping a square edge on the little pieces of wood that I sand. To help me do a better job I made a little disc sander for my dremel flex-extension with some scrap pieces of wood. I made a holder that the end of the extension sits in and is clamped in place. For the disc I used a cap from a vitamin bottle and cut out round pieces of sandpaper, of different grit, held in place with double sided tape. Now I can sand the ends square or at an angle using different drafting triangles.


- 659 replies
-
- 13
-
-
- syren
- model shipways
- (and 1 more)
-
Thanks Tom, I use AutoCad everyday in work so I find it easy to draw out the parts I need and plan ahead for the things I'll be working on. Sort of like shop drawings.
-
Thanks Augie, This method seems to work well but I keep trying new things. Jimz66, I'd be happy to post more pictures but it will have to wait until next week. I'm on vacation in sunny Florida right now. 70 degrees today and not missing the cold weather back home . Thanks Joe, hope you're staying warm. I'm on vacation this week and next so I'm going to miss the meeting this coming Saturday. Thanks Patrick, It's going slowly but I'm getting there. Hull is going to need a bit of sanding I think. And thanks all for all the 'likes'
- 659 replies
-
- 1
-
-
- syren
- model shipways
- (and 1 more)
-
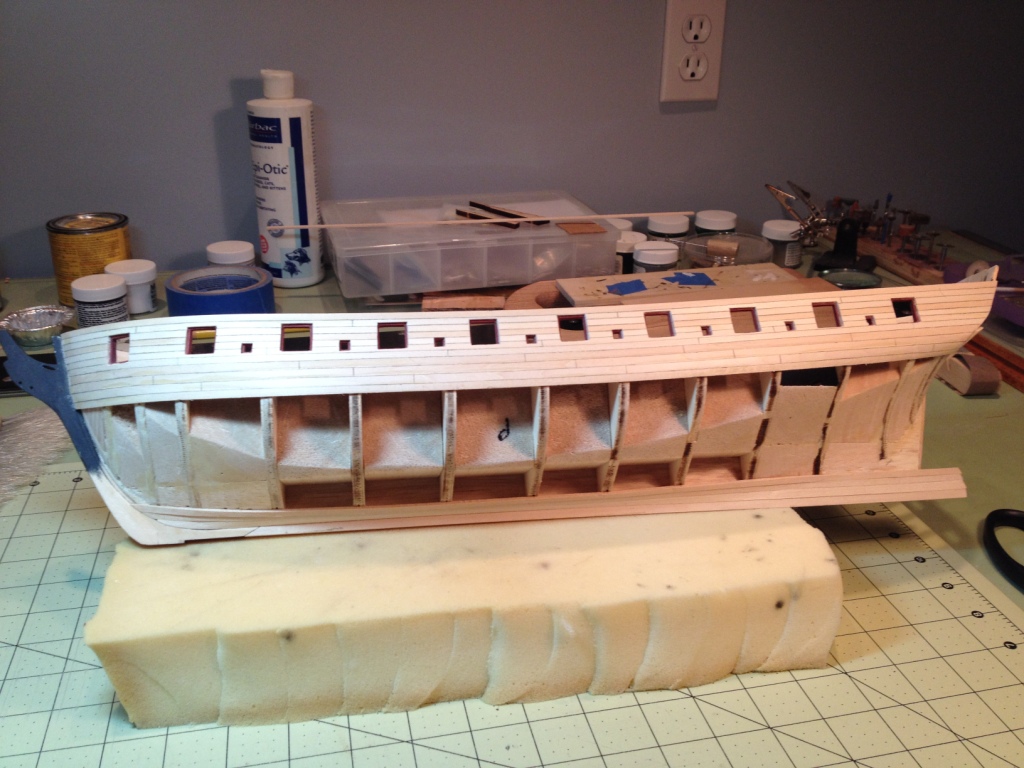
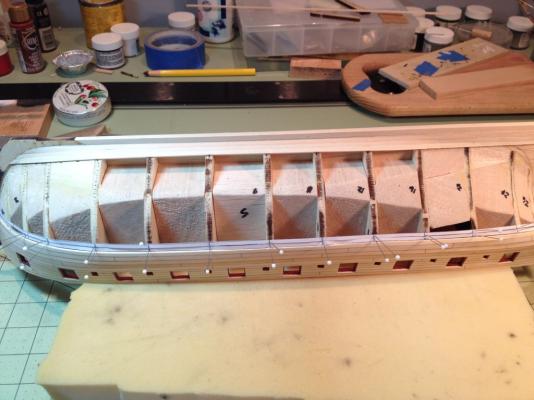
The hull planking is coming along. It took me a while to put that first plank on but now that I’ve started I’ve developed a system that seems to work pretty well for me. First I made two templates from the plank pattern I drew as part of my “planking-plan-of-attack”, one for the planking of the bow and one for planking the stern. I colored them with a red pencil to help distinguish them from other planks. Using these templates as a guide I sanded eight planks at a time, four for the starboard side and four for the port. The red color on the edge of the template came in handy as an indicator as to when to stop sanding. As soon as the red color became lighter I would know the planks were close to their final profile. I would sand each plank individually and compare it to the plank pattern to get its final shape. To form these planks to the shape of the hull I would first soak and steam them and then place them in position on the hull itself. I would do this on each side of the hull. After letting them dry overnight I would do any final sanding and then glue them in place one at a time. Planking progress to date One minor faux pas I discovered while laying out the planking at the stern was that I did not place the counter filler along the bulkhead former correctly. When placing the filler I stop it at the bearding line and not at the rabbet. Fortunately it wasn’t a hard fix so I added fillers to both sides of the stern and it sanded them smooth.


- 659 replies
-
- 8
-
-
- syren
- model shipways
- (and 1 more)
-
My feelings exactly
-
Patrick, very nice work on the stern timbers and your first picture has made me feel better about writing port and starboard on the sides of my ship. I thought I was like cheating or something to do that. Great work as always.
-
Thanks Patrick, I hope the wood planking will be as easy.
-
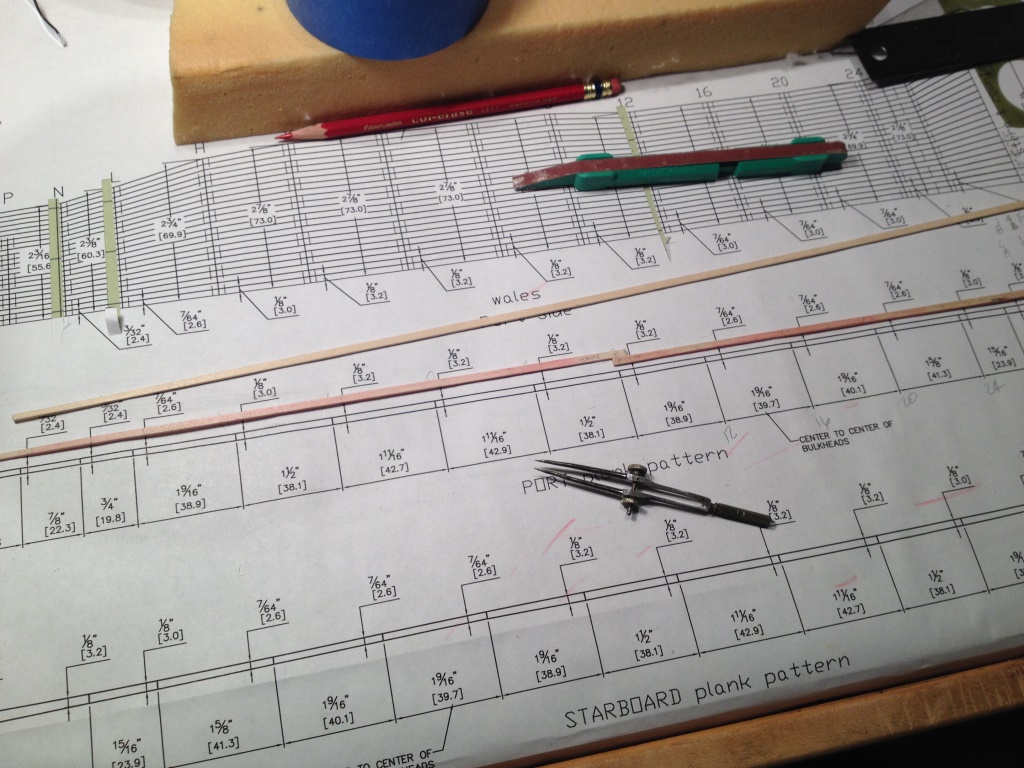
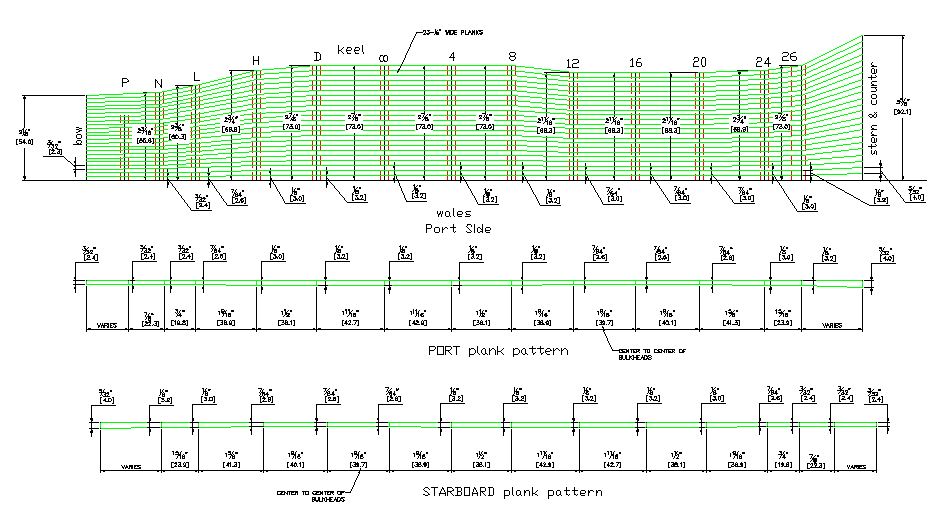
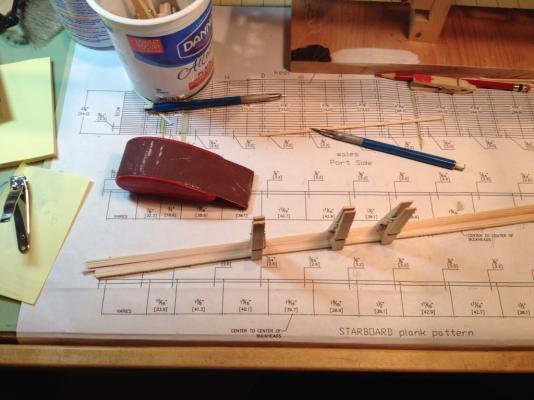
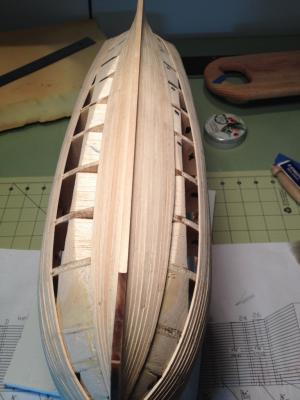
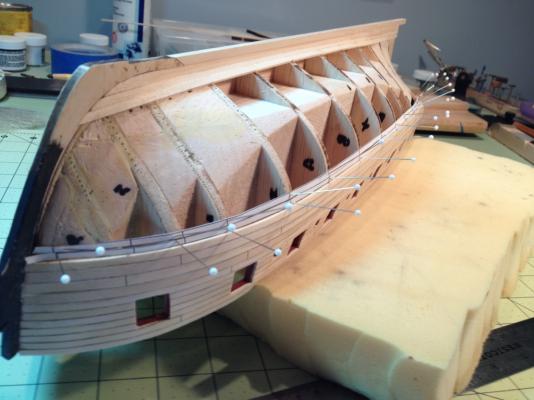
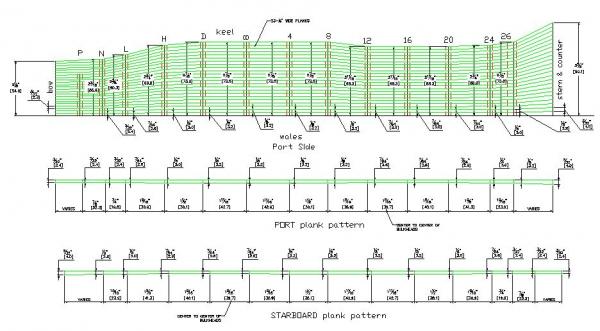
Prior to starting my planking I read “Planking the Built-Up Ship Model” by Jim Roberts , “Simple Hull Planking Techniques for Beginners” by Dirk DeBakker and Greg Brooker, and studied many building logs here on MSW. All these references were very informative, however, and I know this might be a little over kill but for me personally, having more of a visual type learning style, I decided to draw up, as Chuck calls it, a ‘planking-plan-of-attack’. I started by measuring the gap along each bulkhead between the planking by using a tick strip. Next I measured the length remaining to be planked along the curve of the bow and the total distance along the stern and counter and finally the distance between each bulkhead. With these measurements I drew vertical lines representing the centerline of each bulkhead at their measured length and spacing. The dimension at the mid-ship bulkhead was 2 7/8”, which would require 23 planks @ 1/8” wide to cover the area. I used this number to divide the length of all the other bulkheads to determine the width that the plank should be at each bulkhead. Using these dimensions I drew up a plank pattern for the port and starboard sides. To test this planking shape I made a few copies of the pattern, cut them out and pinned them to the hull. They appeared to fit well and had no puckers (clinkers). I will use this shape for planking the bow. For the stern I will either need wider (5/32”) planks or use steelers. My thoughts are that I would use this pattern for about 7 or 8 planks and then re-adjust if need be to account for creep or ,heaven forbid, I don’t shape every plank perfectly.

- 659 replies
-
- 12
-
-
- syren
- model shipways
- (and 1 more)
-
Thanks Dirk Thanks Augie, I needed to sand the planks a bit to get them to line up and I think the starboard side is a bit lower but if I stand far enough back they look perfect. Thanks Patrick, There are a few dents that don't show up in the photos but I'm happy with it so far. Lets see what happens with the remaining planking.
-
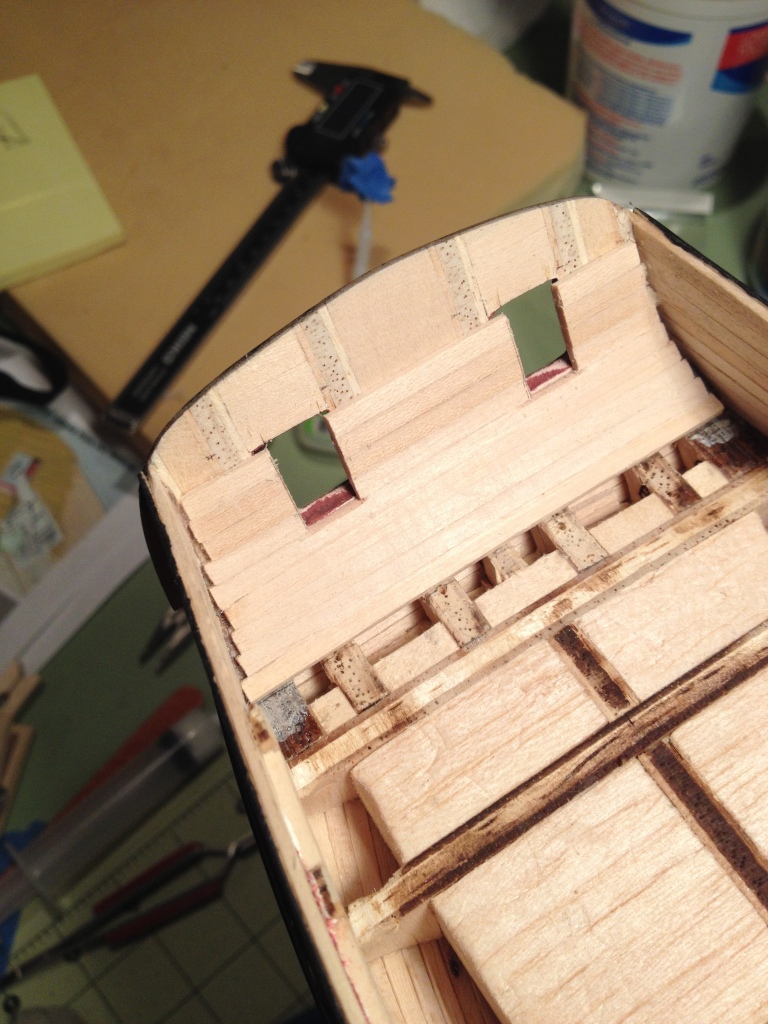
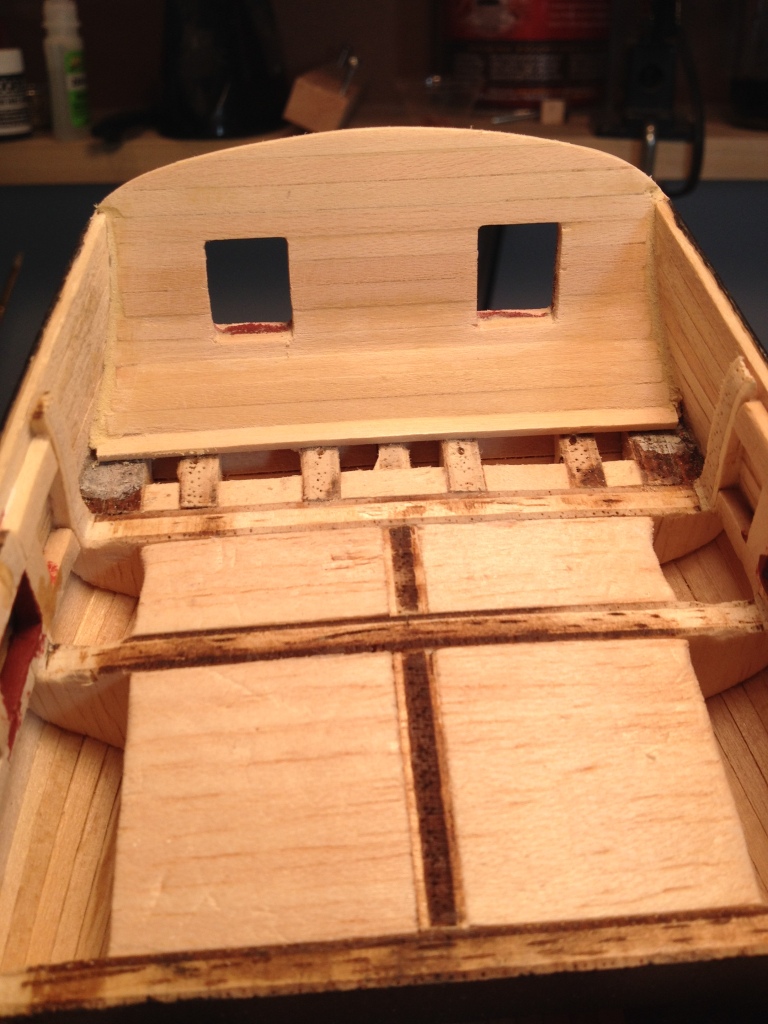
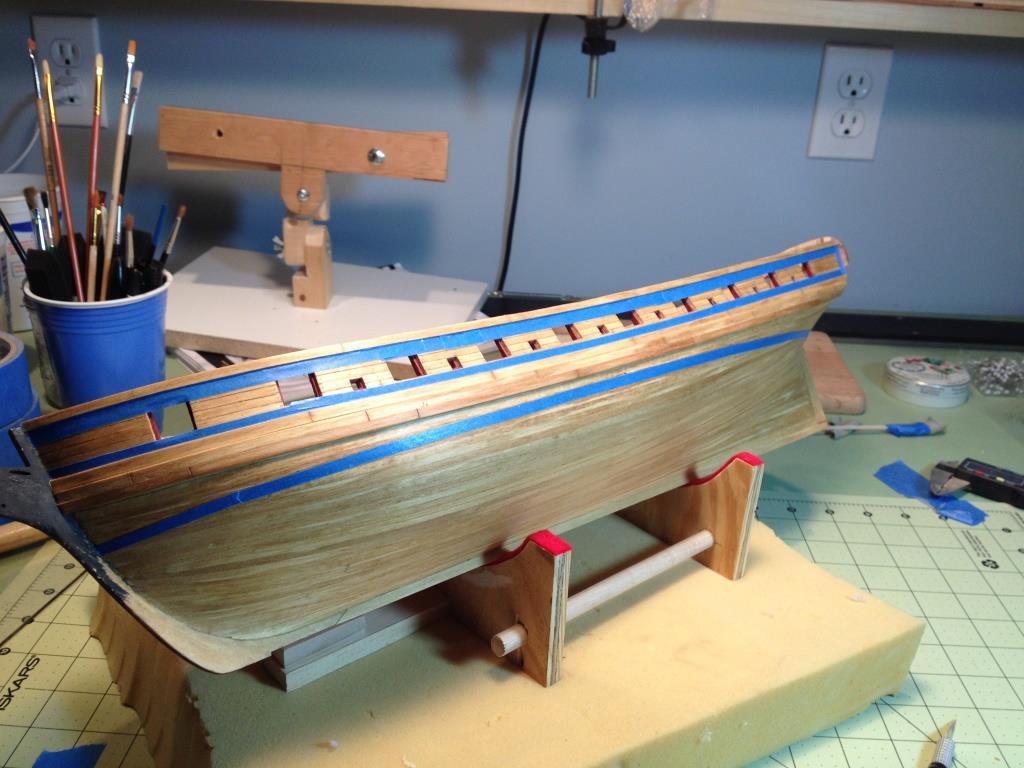
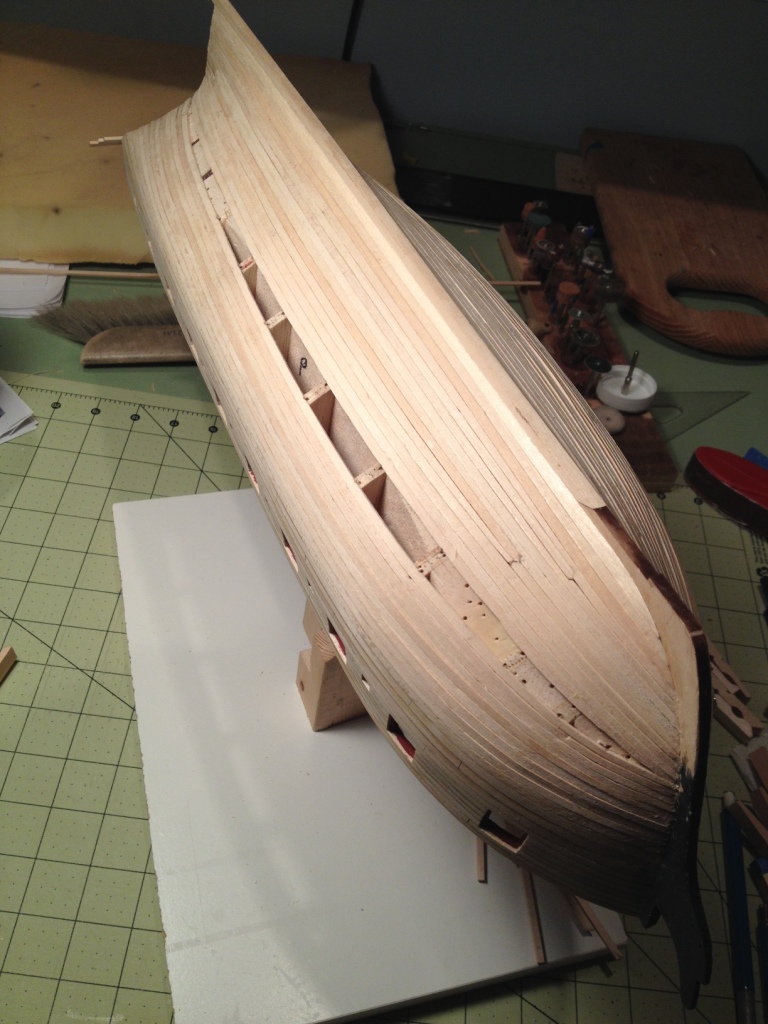
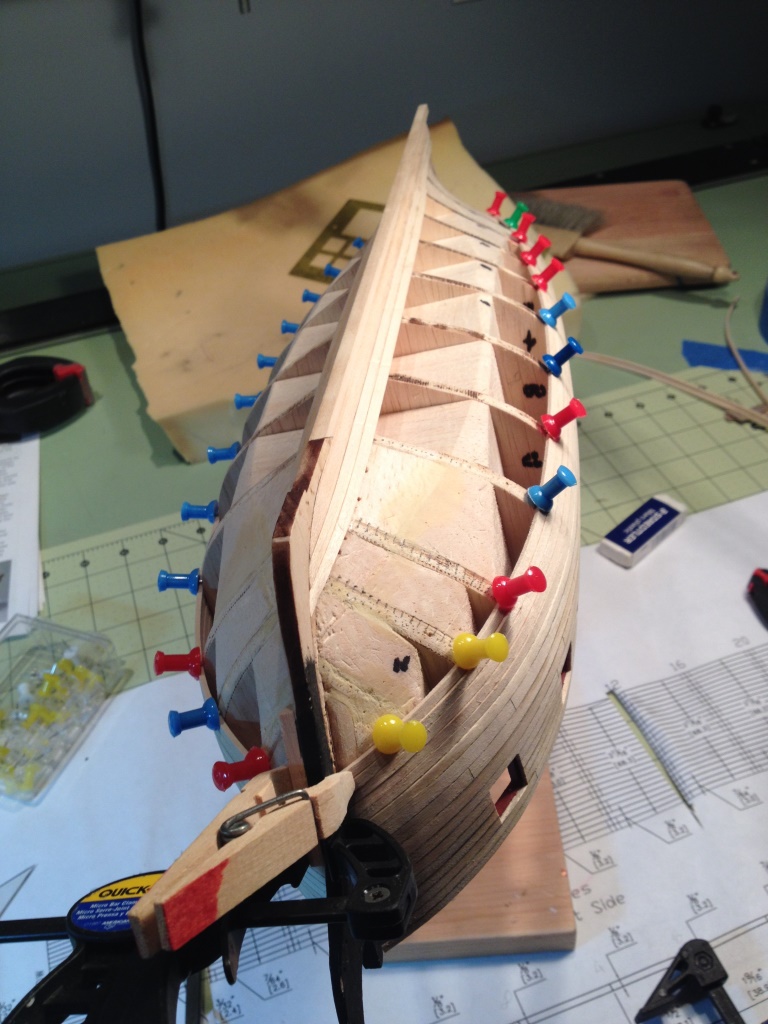
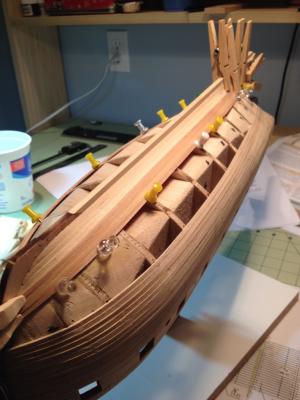
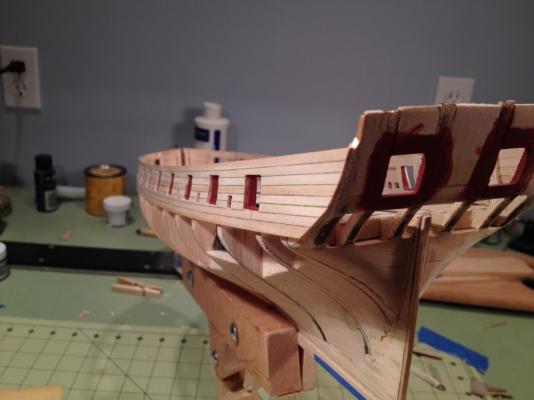
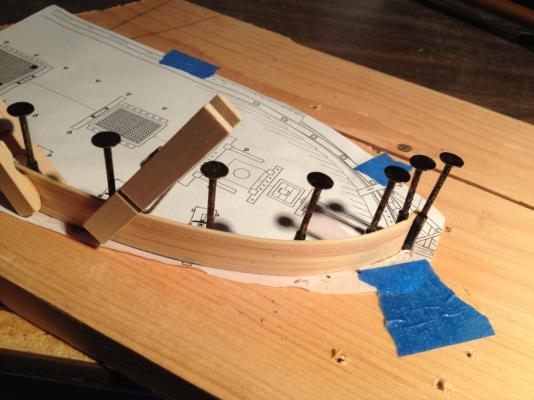
I finished placing the two 5/32” wales below the top most wale and the first 1/8” plank below them. I also completed placing the garboard plank and the two 1/8” planks above it. To shape each plank to conform to the shape of the hull I soaked and steamed each plank and then temporarily pinned them to the hull. After letting them dry in place I removed them and glued them back into position. The one deviation I made from the instructions was that I decided to skip Step 2 and not install the counter planking or the transom at the stern until I finished planking the hull. I decided to do this for two reasons. 1) Because of the way the counter planking and transom fit over the ends of the hull planking, I thought it would be easier to shape the counter planking if the hull planking was already in place. And 2) I thought it would be easier to ‘tuck’ the hull planks around the counter if the planking was not on the counter yet. I guess I’ll find out if it was a good or bad decision. Forming the second wale in place Wales glued in place and forming the first 1/8" plank Bending the plank around the 'tuck' of the counter Garboard glued in place Forming the first 1/8" planks above the garboard. Did both port and starboard sides at the same time. Push pins seemed to work very well at holding the planks in position. Planking at the counter Garboard and first two planks in place Port side with simulated butt ends of planking on wales to get an idea of how the second layer of wales should look. Stern. Pencil line on the counter denotes, what should be, the location of the bottom edge of the last plank of the counter. Sorry for all the photo's, just a few more


- 659 replies
-
- 15
-
-
- syren
- model shipways
- (and 1 more)
-
Patrick, glad to hear from you. Use whatever you'd like and thanks for looking at my new build log. This ship is certainly a lot different than the solid hull Phantom, a little bigger too, which is good so I can see it better.
- 659 replies
-
- 1
-
-
- syren
- model shipways
- (and 1 more)
-
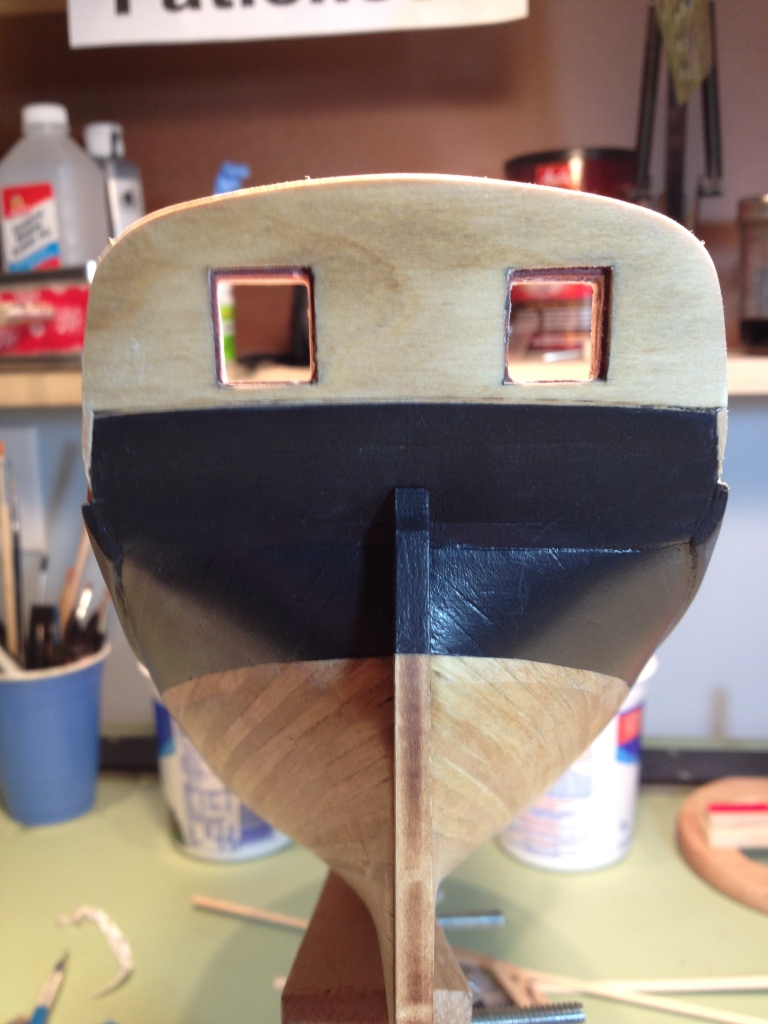
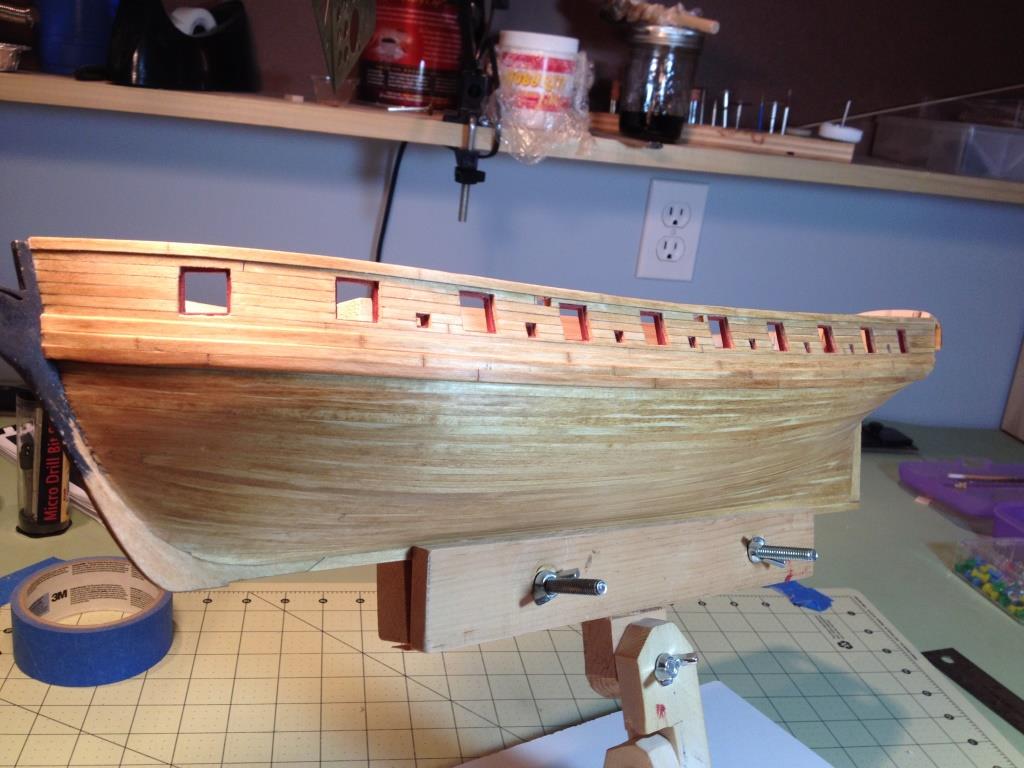
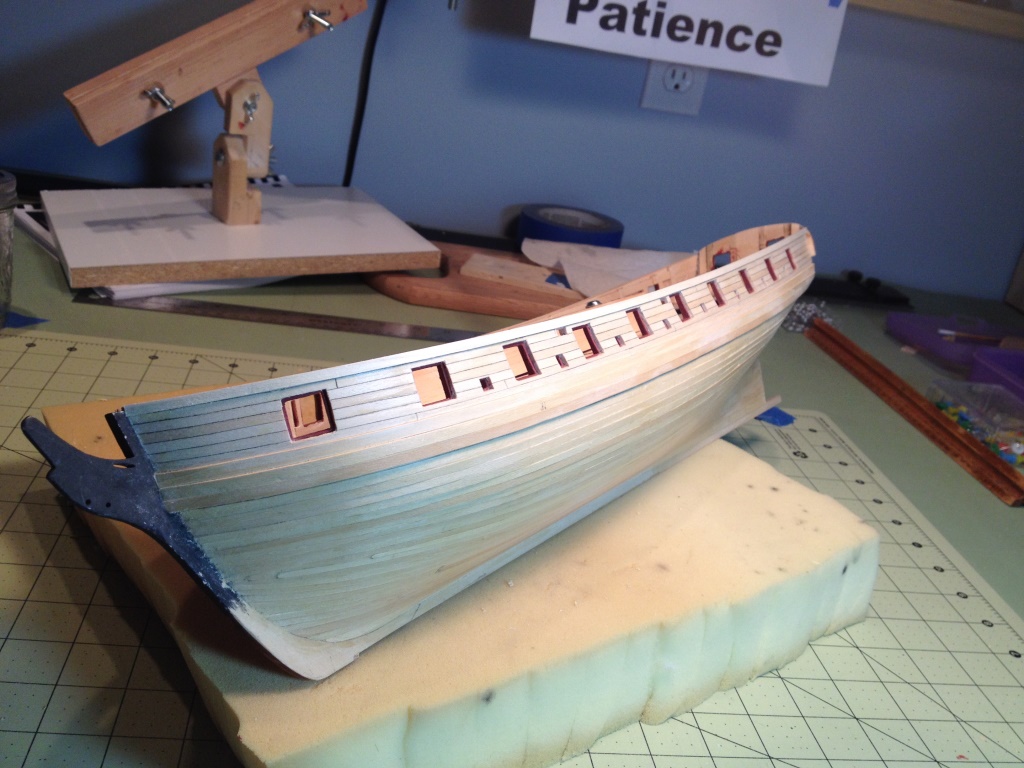
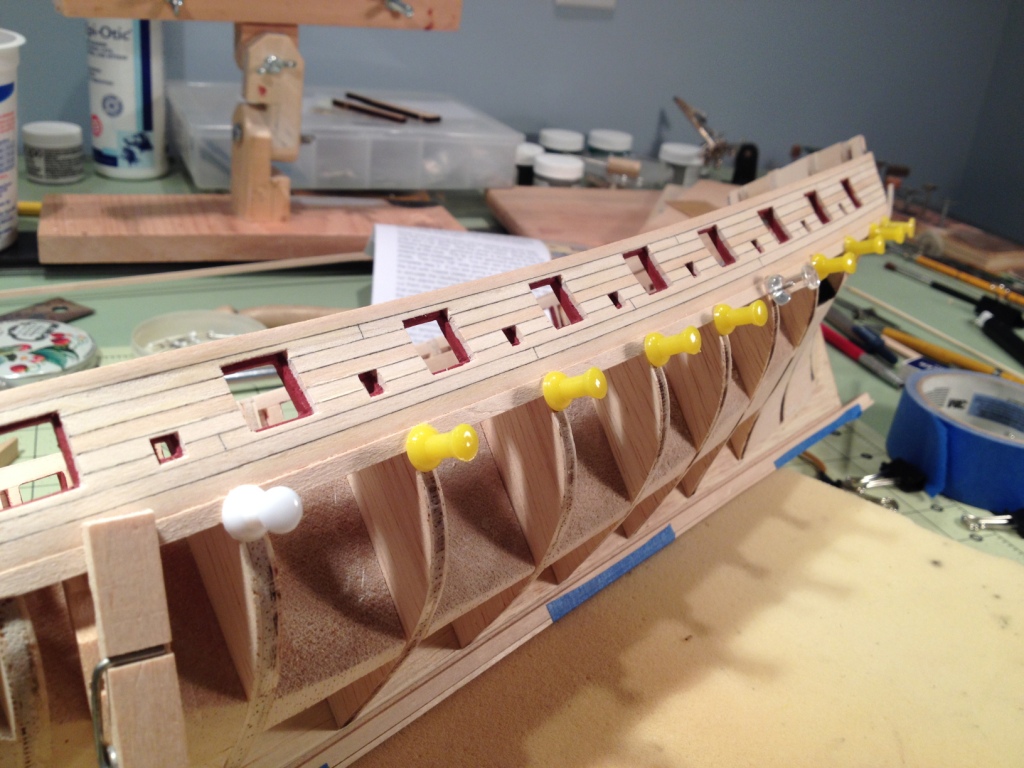
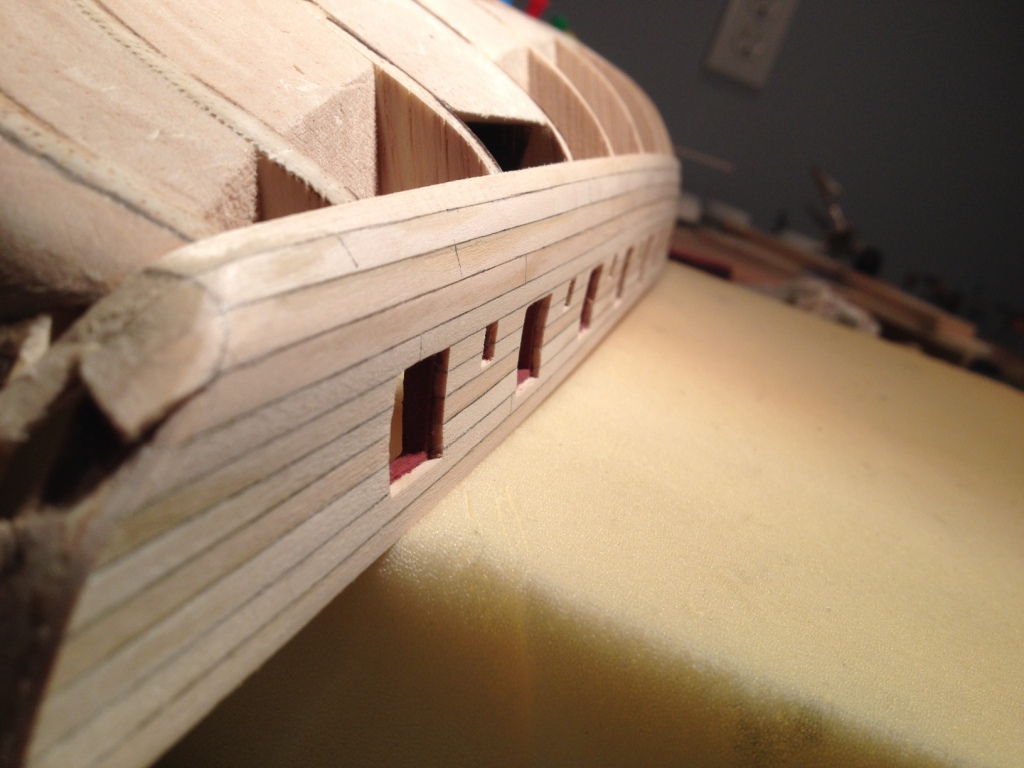
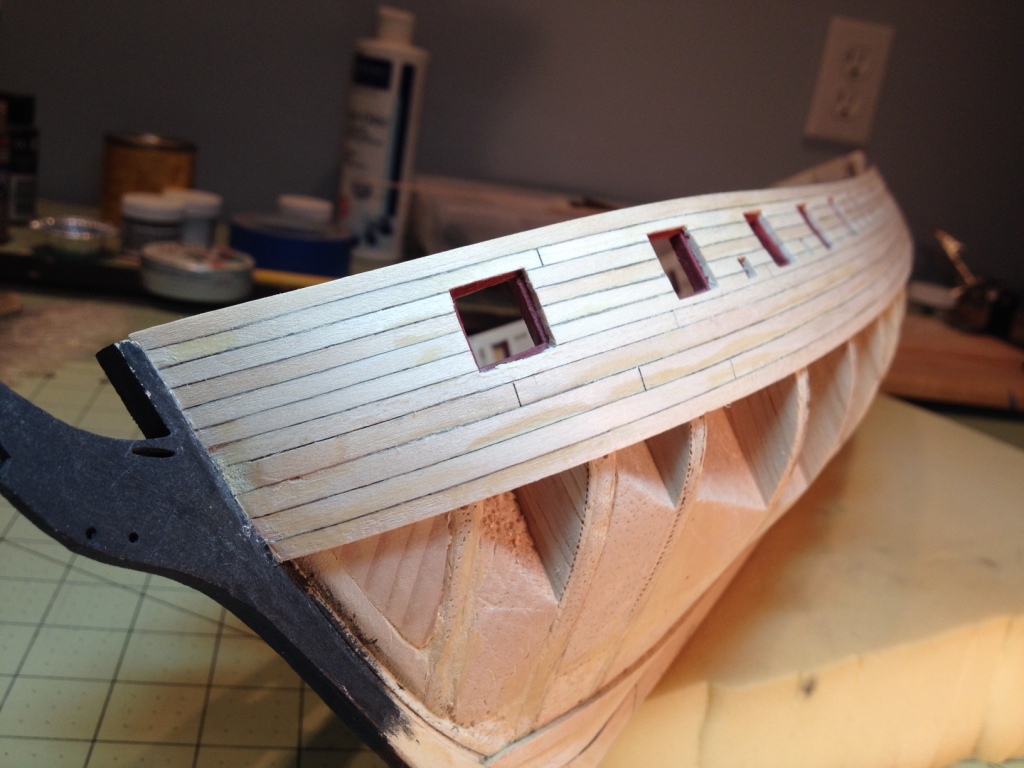
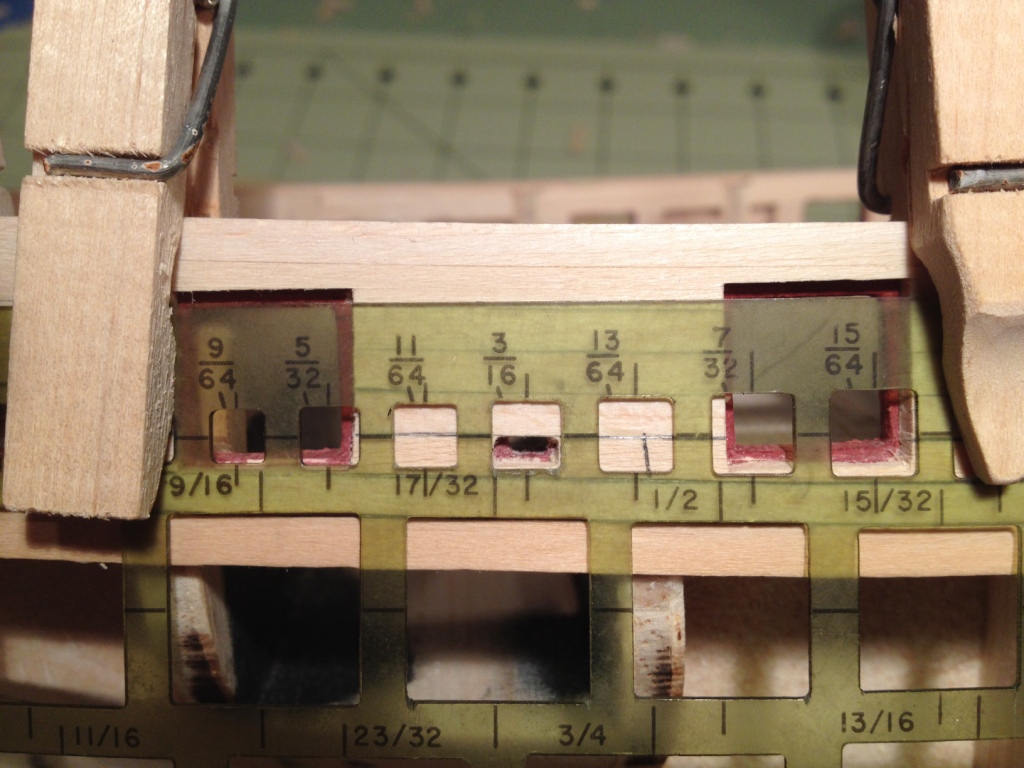
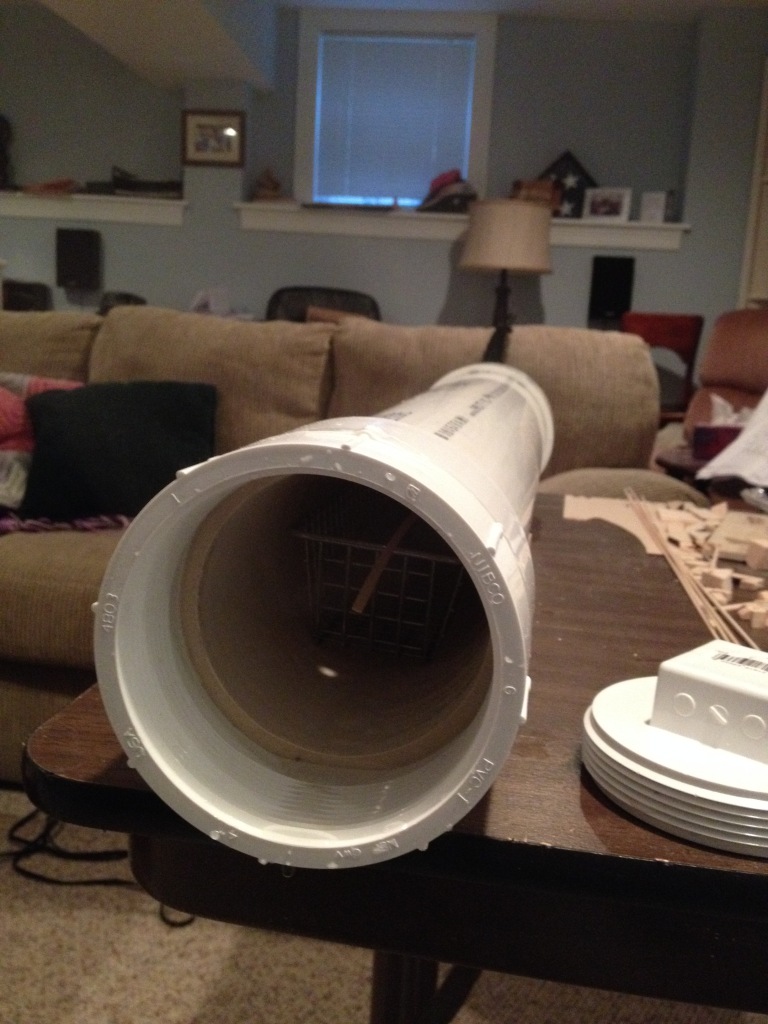
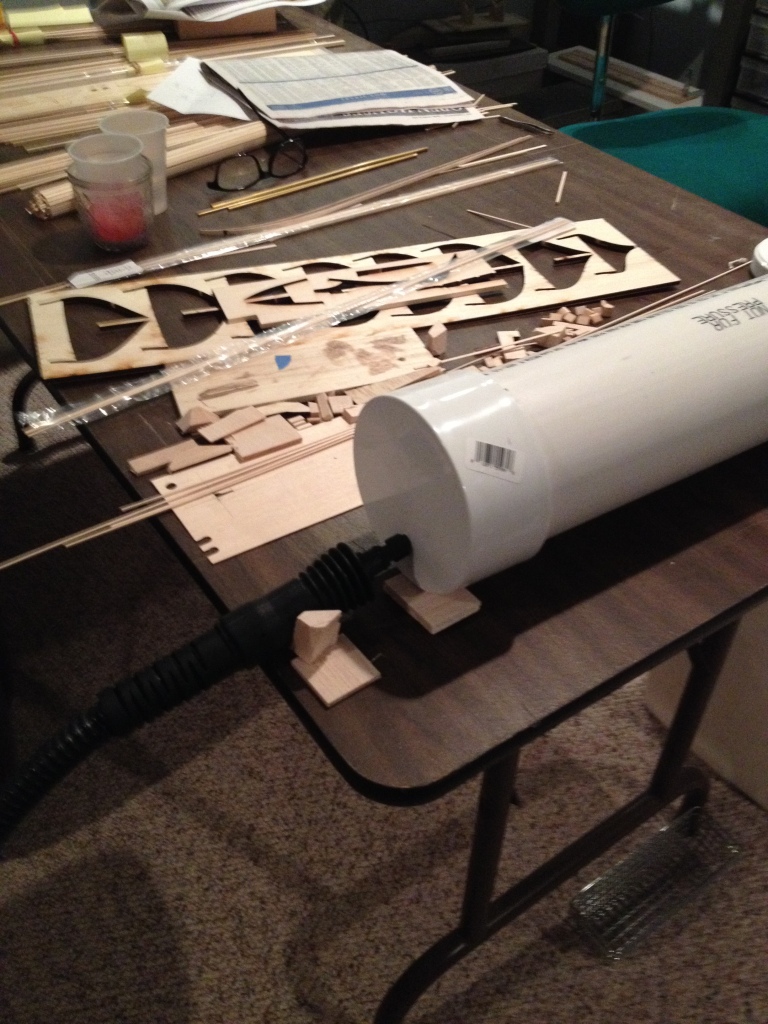
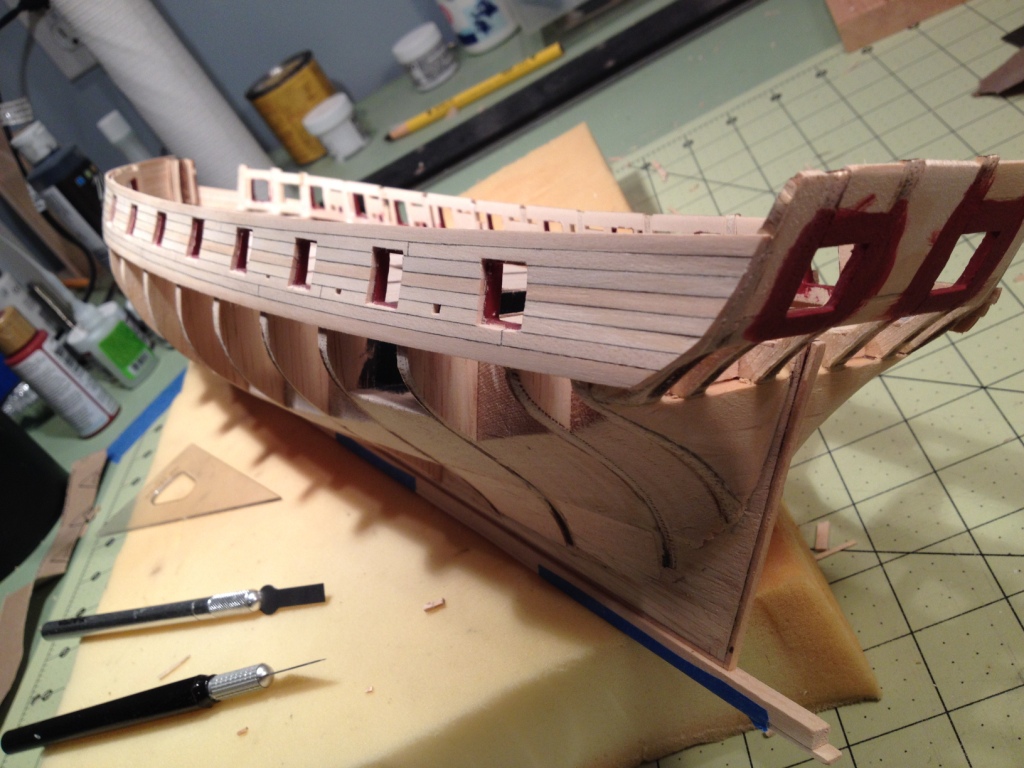
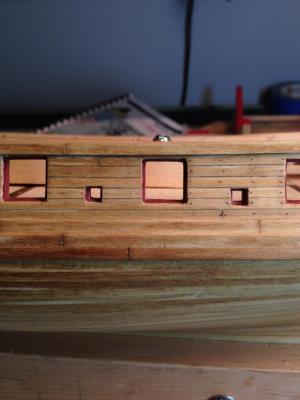
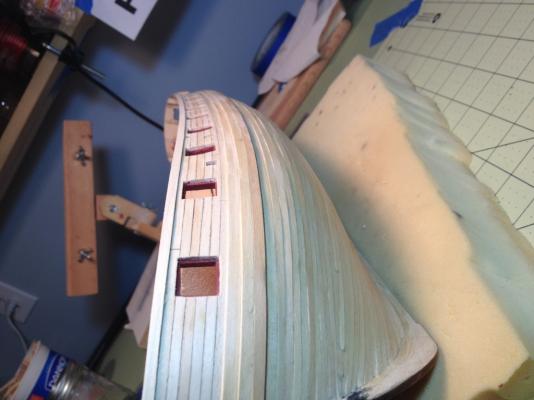
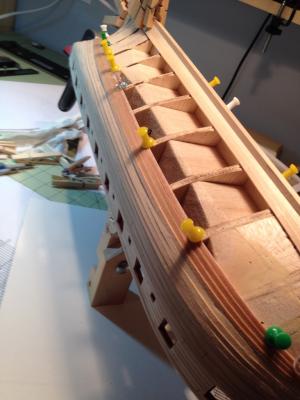
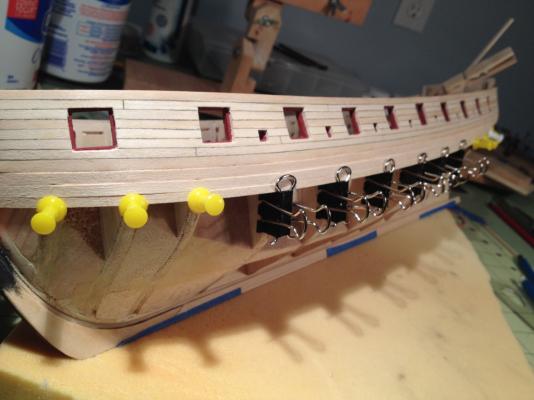
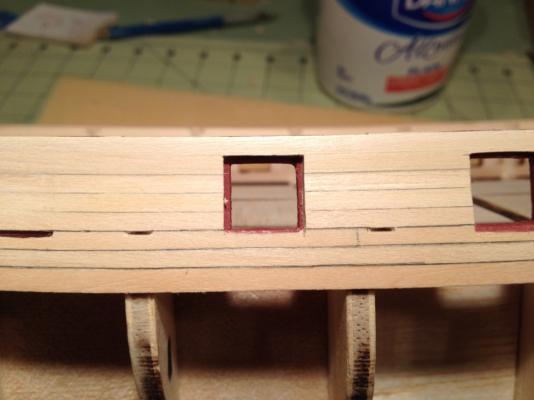
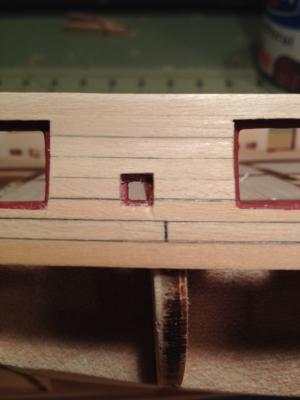
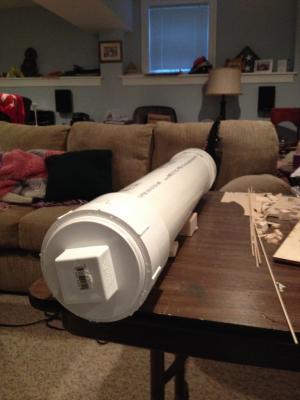
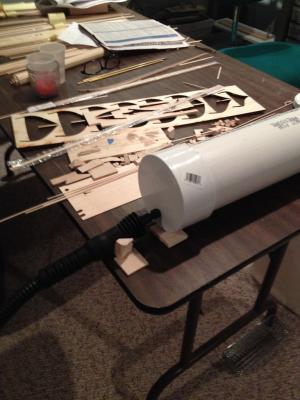
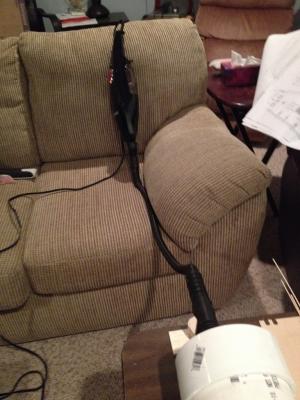
Finished planking above the wale on the starboard side. I used the same procedure as the port side gluing the planks on in one piece. The only difference on this side was that I used my old drafting square template as a guide to cut out the gun ports and sweeps. For the gun ports I used the 17/32” template based on the 15/32” gun port frame plus 1/32” frame width all around. For the sweeps I used the 3/16” template. Once the template was in place I used my x-acto knife to cut the plank. You just need to be careful not to cut too deep to avoid cutting into the frame. Finished starboard side. Planning ahead, I thought it would make planking the hull easier if I could steam the planks to make them more pliable. This is what I came up with. Used a two foot long, 4” diameter pvc pipe with an end cap and a thread end cap; drilled a hole in the end cap and inserted the hose attachment for my HAAN’s steam cleaner; used a small wire basket inside the pipe to support the planks. It works fairly well, tried it out and the plank came out very pliable after a few minutes.


- 659 replies
-
- 13
-
-
- syren
- model shipways
- (and 1 more)
-
Thanks RR, and thanks to everyone for all the 'likes'
-
SgtSki, Funny you should ask. I just did something similar for the planking above the wales on my Syren where I used one continuous piece instead of smaller individual pieces. Take a look at my latest Syren post to see if this helps make up your mind. I know it's not how it was done on real ships so I guess it all depends on how realistic you want to be. (don't tell anyone and they'll never know )
-
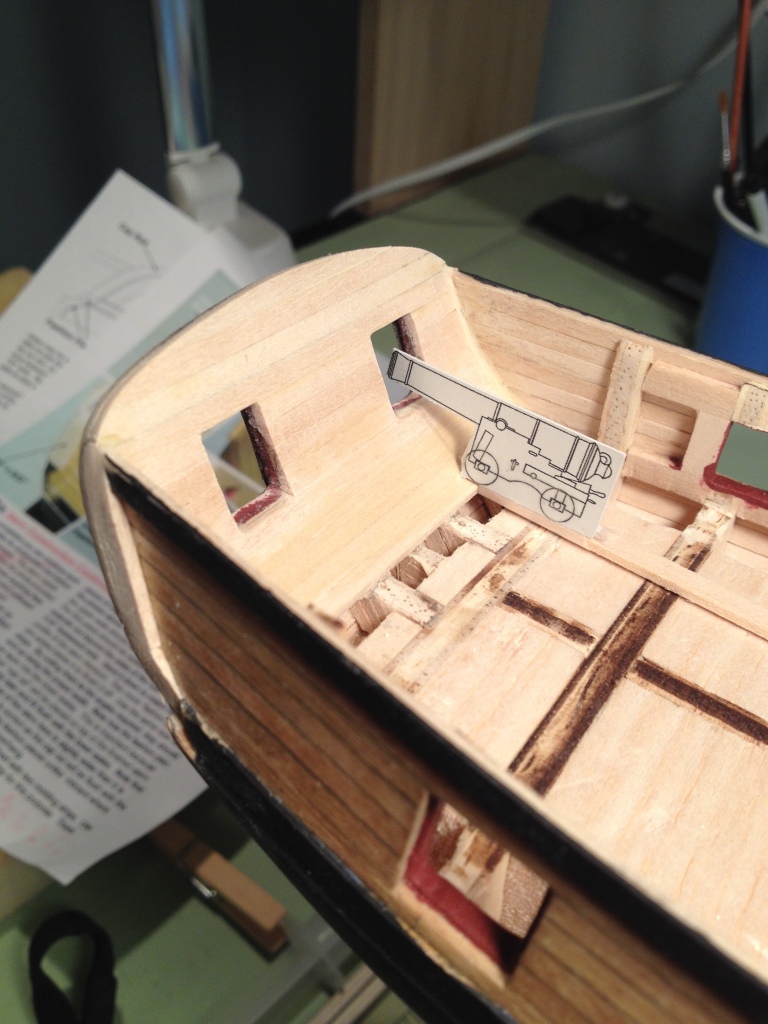
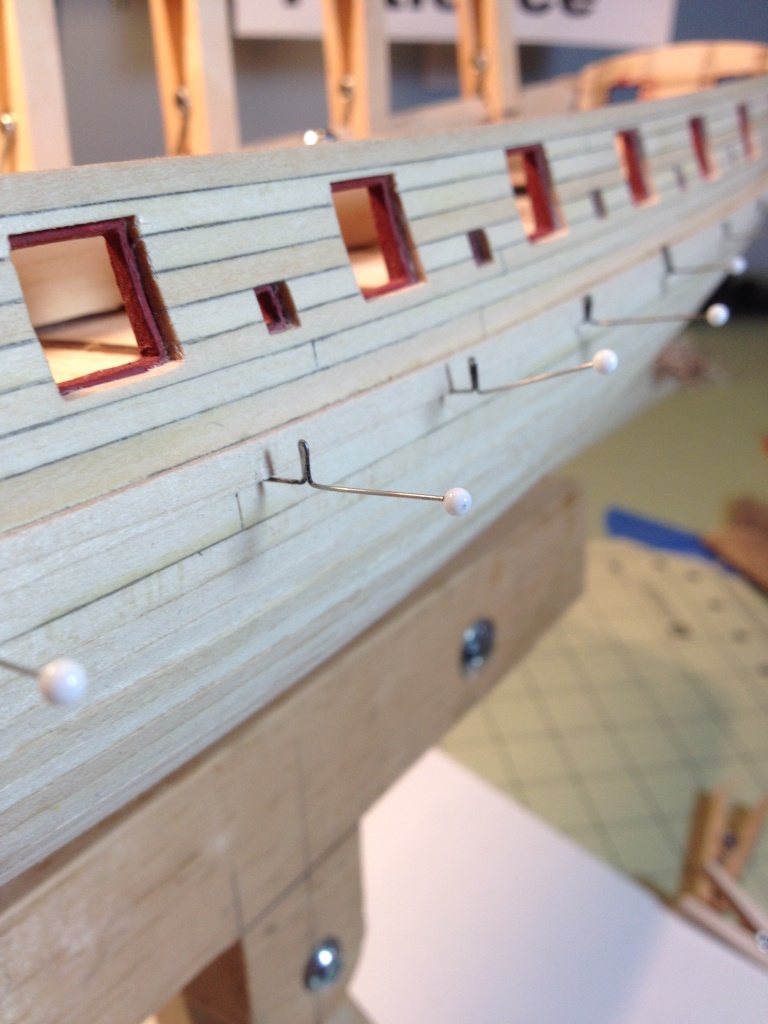
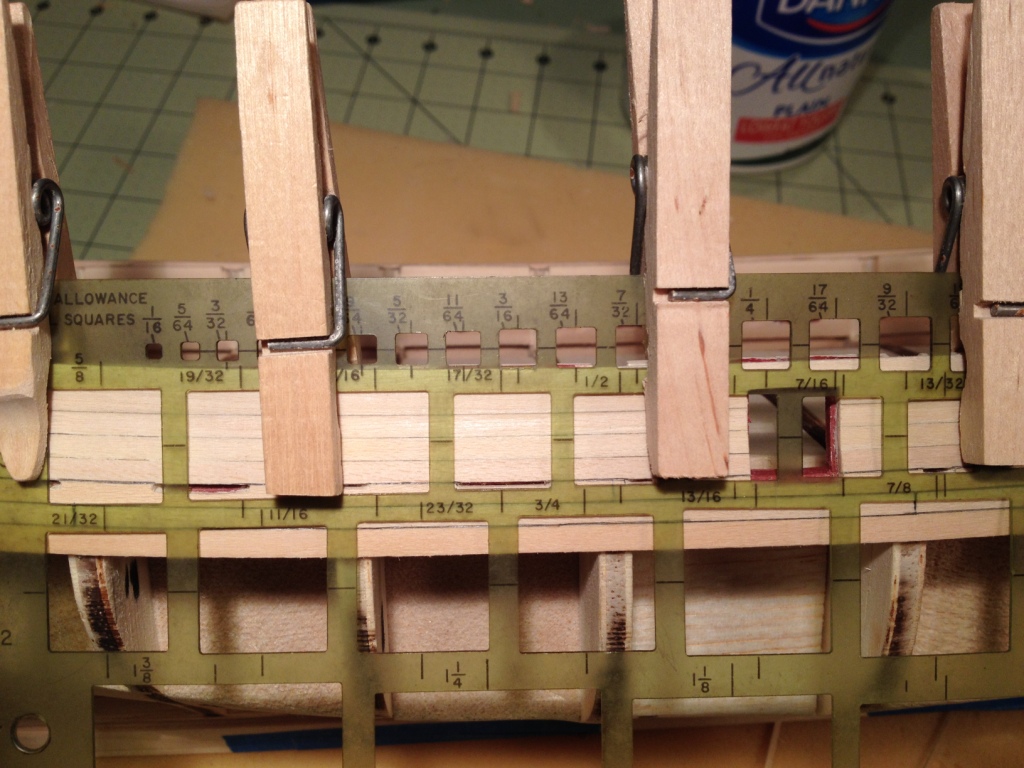
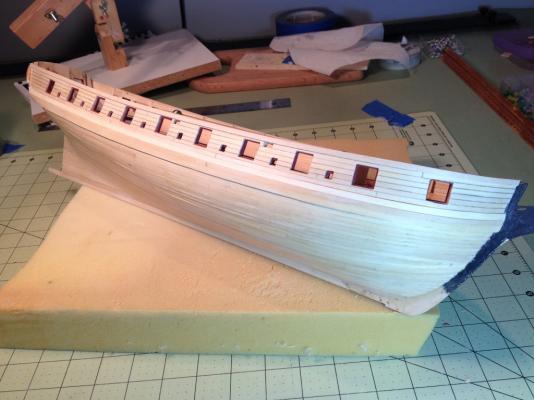
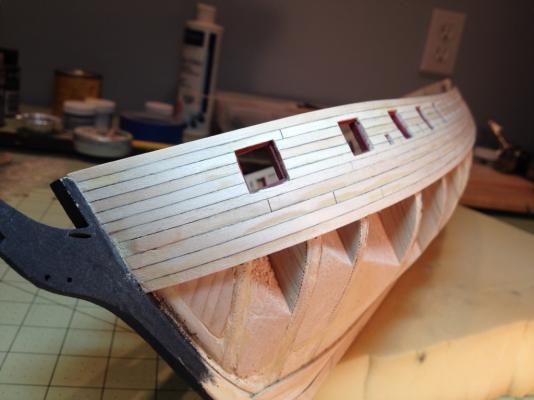
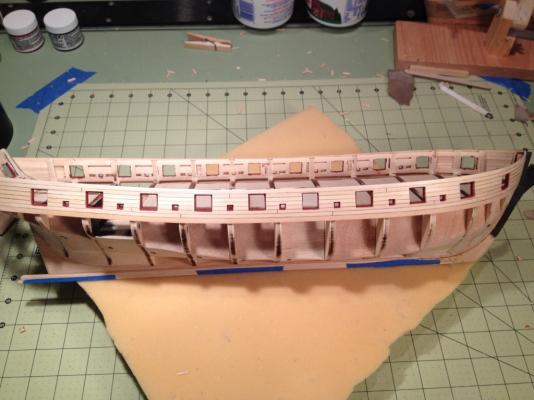
I tried a little different approach for placing the planking above the wales than what is described in the instructions. After pondering the pros and cons of placing these planks in a number of pieces as per the instructions or in one continuous piece I went with the one piece. I know it’s not the way it was done way back when but the practical side of me took control and decided to deviate a bit from the norm. Before setting the planks I use my jig to pre-bend the bow end of the planks. Prior to setting the first plank I cut in four grooves across the plank to denote the faux ends that would have been made by the individual pieces. For the second plank I notch out for the gun ports and sweeps but kept it as one long plank. Clamping the first plank in position First and second plank above the wale The remaining five planks were all set as continuous pieces from stem to stern. Then using the notches in the second planks as guides I cut out the gun ports. I still need to do the sweeps. I took care not to get glue on the exposed portion of the gun port frames so the planking would not stick there.


- 659 replies
-
- 20
-
-
- syren
- model shipways
- (and 1 more)
-
Brian, great work on the ship, I like your fancy edging. Looks like your new camera takes terrific pictures, I like that B&W picture with color. Happy Thanksgiving to you too.
- 831 replies
-
- 1
-
-
- Armed Virginia Sloop
- Model Shipways
- (and 1 more)
-
Thanks Chuck, Measuring up 7/8" up from the top of the wale the top of my last plank will be a tad (+1/16") over the bow fillers. Is that acceptable or should I move the wale down?
- 659 replies
-
- 1
-
-
- syren
- model shipways
- (and 1 more)
-
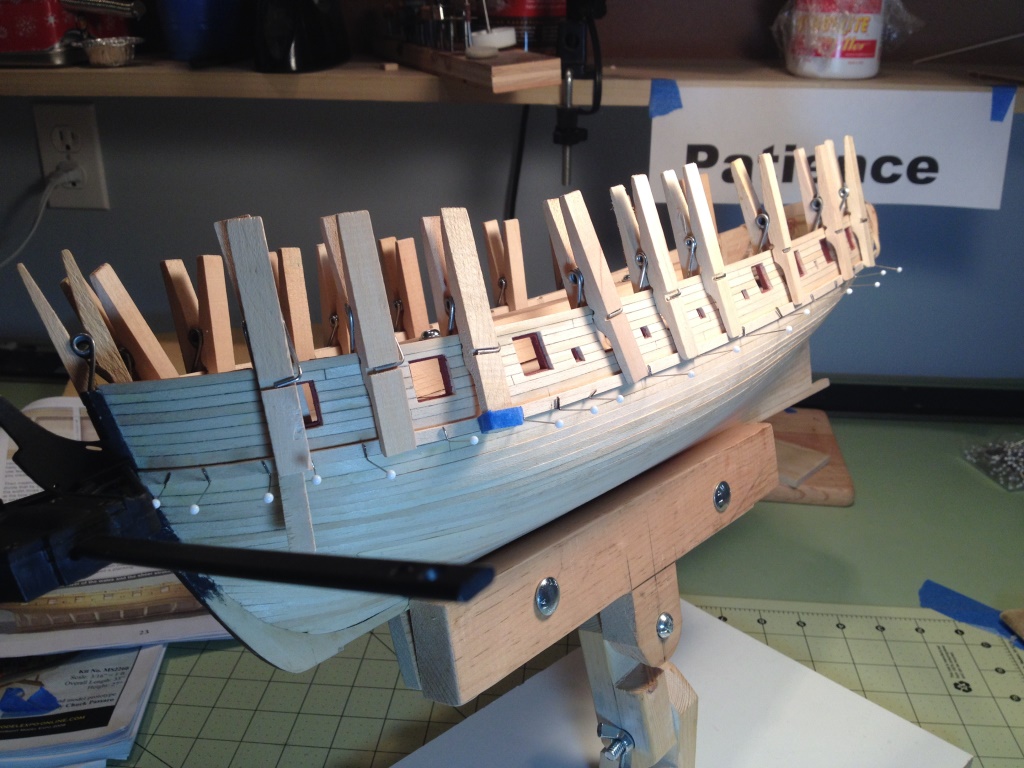
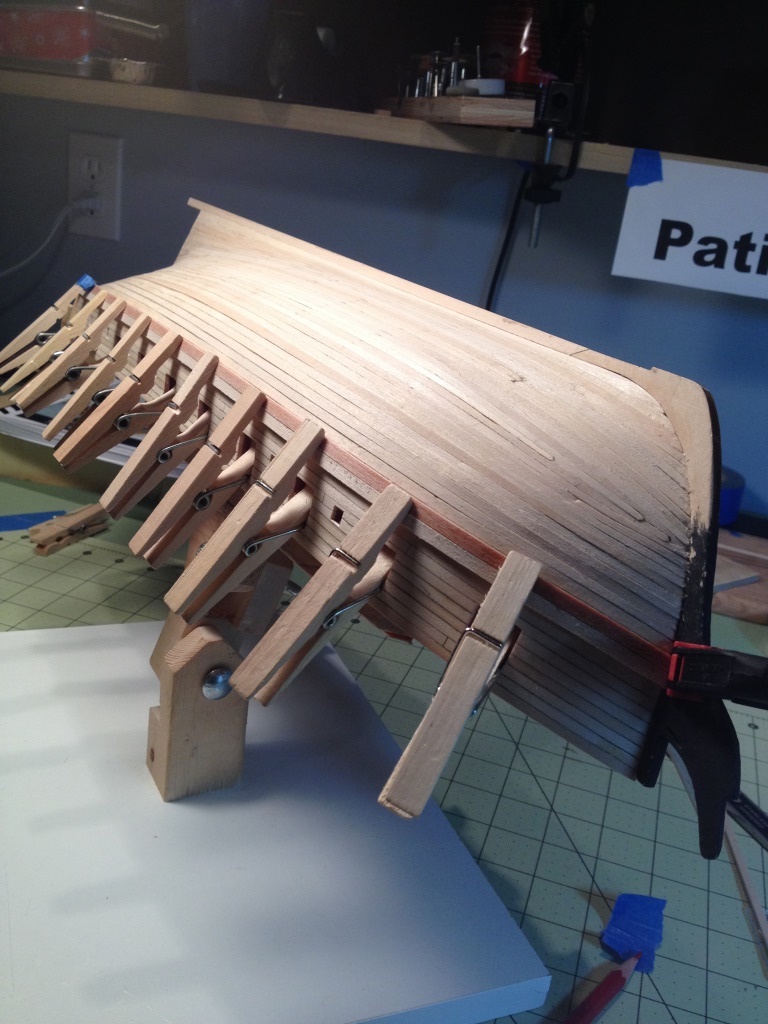
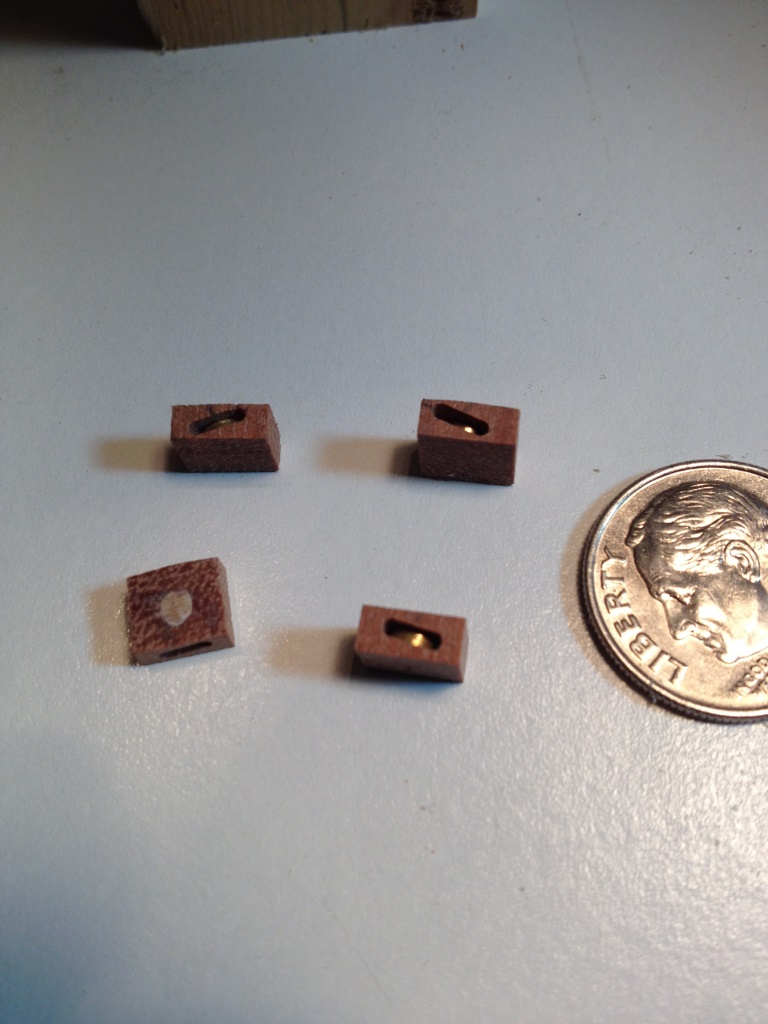
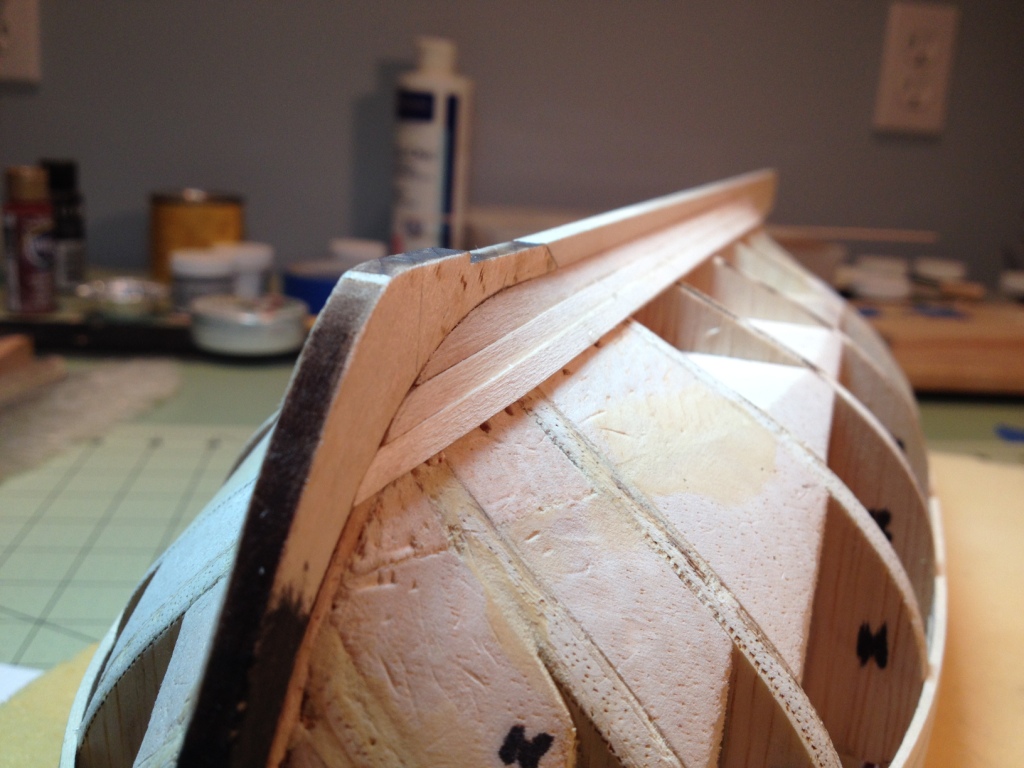
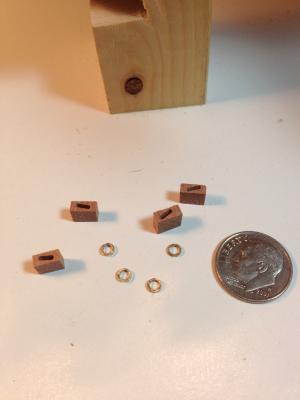
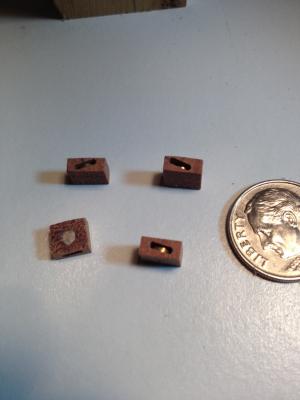
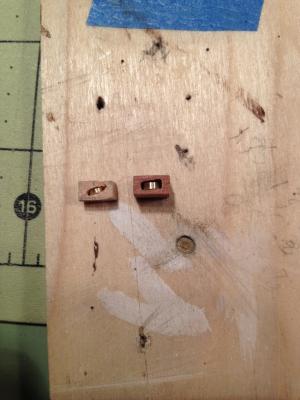
After pre-forming the port wale to the curve of the bow in a jig similar to what Chuck described in his instructions I ... (takes deep breath) glued and clamped it to the hull. After that side dried I glued the starboard side. Note to self; buy more clothespins in order to do both sides at the same time. I like using the clothespins because they seem to be gentler on the wood surface. Still working on the sheaves. The prototype I made from basswood doesn’t appear to be that bad however the first attempt at the final sheave….not so good. I tried using pear wood for the sheave but I don’t have a proper tool to carve out a small enough slot in the hard wood. Oh well, back to the drawings board or maybe I’ll just use the prototype.


- 659 replies
-
- 8
-
-
- syren
- model shipways
- (and 1 more)