-
Posts
51 -
Joined
-
Last visited
Content Type
Profiles
Forums
Gallery
Events
Everything posted by Davemc
-
.thumb.jpg.31273b535b82e53d104538017f8a7b21.jpg)
Oseberg by Davemc - Billing Boats
Davemc replied to Davemc's topic in - Kit subjects built Up to and including 1500 AD
thanks -
.thumb.jpg.31273b535b82e53d104538017f8a7b21.jpg)
Oseberg by Davemc - Billing Boats
Davemc replied to Davemc's topic in - Kit subjects built Up to and including 1500 AD
-
.thumb.jpg.31273b535b82e53d104538017f8a7b21.jpg)
Oseberg by Davemc - Billing Boats
Davemc replied to Davemc's topic in - Kit subjects built Up to and including 1500 AD
Sides just about completed, now the decision as to how to work the bow & stern. I think it will be trial and hopefully not too much error, I intend taking down the layers of ply on the boat itself rather than the scroll work, but the final decision will have to wait until I have completed the removal of the first layer. -
.thumb.jpg.31273b535b82e53d104538017f8a7b21.jpg)
Oseberg by Davemc - Billing Boats
Davemc replied to Davemc's topic in - Kit subjects built Up to and including 1500 AD
-
.thumb.jpg.31273b535b82e53d104538017f8a7b21.jpg)
Oseberg by Davemc - Billing Boats
Davemc replied to Davemc's topic in - Kit subjects built Up to and including 1500 AD
I gather that I will have to drill the oar holes in the top plank using the plans as a template, any hints on doing this without causing damage would be appreciated! -
.thumb.jpg.31273b535b82e53d104538017f8a7b21.jpg)
Oseberg by Davemc - Billing Boats
Davemc replied to Davemc's topic in - Kit subjects built Up to and including 1500 AD
-
.thumb.jpg.31273b535b82e53d104538017f8a7b21.jpg)
Oseberg by Davemc - Billing Boats
Davemc replied to Davemc's topic in - Kit subjects built Up to and including 1500 AD
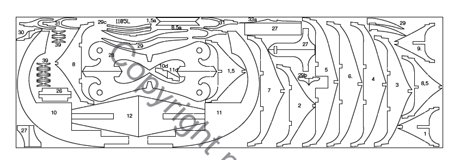
Attached is the diagram in the Oseberg manual, which I found different from the materials supplied, two separate pieces arranged in a different way, fortunately I soon realised the symmetry of the construction and was easily able to work out the position of each frame. -
.thumb.jpg.31273b535b82e53d104538017f8a7b21.jpg)
Oseberg by Davemc - Billing Boats
Davemc replied to Davemc's topic in - Kit subjects built Up to and including 1500 AD
Thanks Michael Dave -
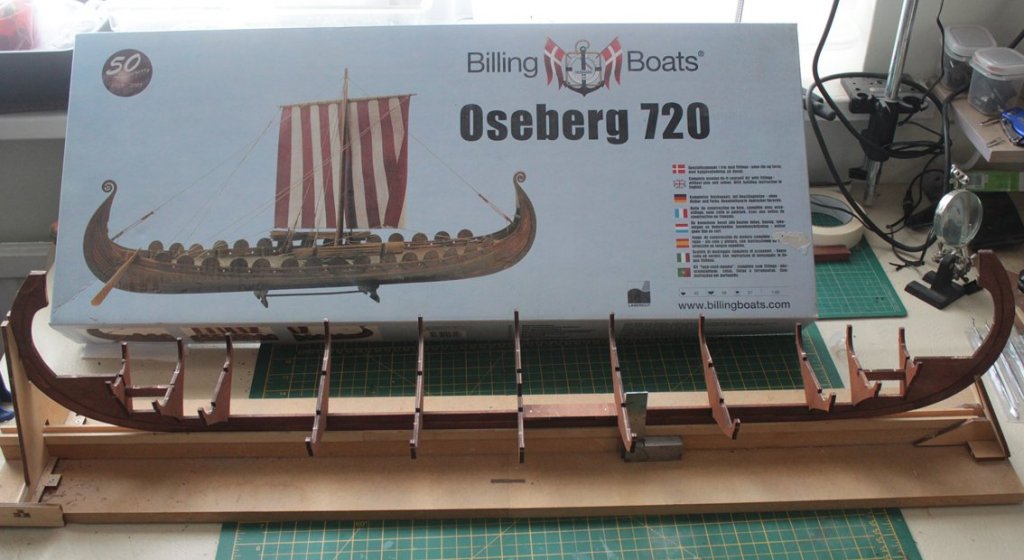
Having completed HMS Cruiser and HMS Snake I decided I needed a break from Rigging😕 and having seen Jack P's build log I have decided to try the Oseberg. After an initial confusion at finding that the laser cut frames were arranged in a different pattern to the diagram in the plans I have set to it and started the keel. I have decided to stain the wood dark mahogany and have stained the frame and planks with two initial coats. I have mahogany veneer to cover exposed plywood edges, but otherwise will be using the wood supplied Photos to follow
-
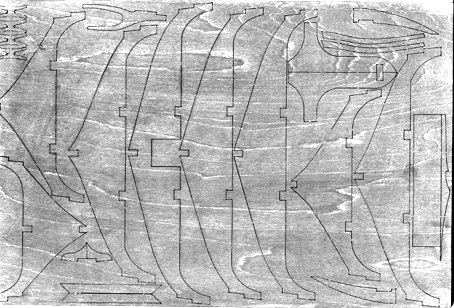
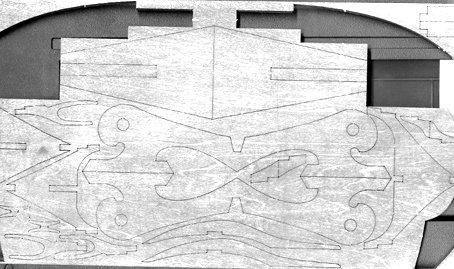
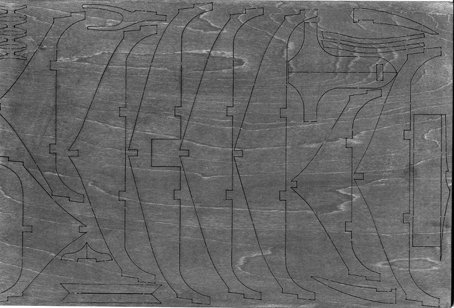
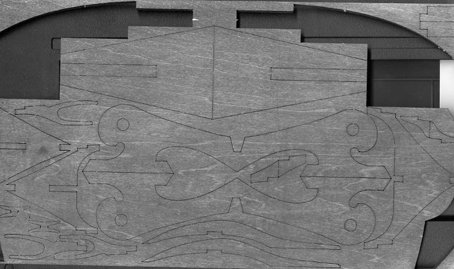
Hi saw your log and the great results and decided to try my hand at building the Oseberg, unfortunately the plans do not correspond with the laser cut frames! I have attached images of the laser cut wood. If anyone can help with the numbering I would be grateful. Dave
-
.thumb.jpg.31273b535b82e53d104538017f8a7b21.jpg)
HMS Snake by drtrap - Caldercraft
Davemc replied to drtrap's topic in - Kit build logs for subjects built from 1751 - 1800
I cannot remember if the numbers on the plan were correct or not but I soon learned not to seal and trim the lines as after all were fitted I had to go around and re-tension a number of them. Dave -
.thumb.jpg.31273b535b82e53d104538017f8a7b21.jpg)
HMS Snake by drtrap - Caldercraft
Davemc replied to drtrap's topic in - Kit build logs for subjects built from 1751 - 1800
Sorry beyond my knowledge and skill level Dave -
.thumb.jpg.31273b535b82e53d104538017f8a7b21.jpg)
HMS Snake by drtrap - Caldercraft
Davemc replied to drtrap's topic in - Kit build logs for subjects built from 1751 - 1800
-
.thumb.jpg.31273b535b82e53d104538017f8a7b21.jpg)
HMS Snake by drtrap - Caldercraft
Davemc replied to drtrap's topic in - Kit build logs for subjects built from 1751 - 1800
I worked from the back having first put in the stays -
.thumb.jpg.31273b535b82e53d104538017f8a7b21.jpg)
HMS Snake by drtrap - Caldercraft
Davemc replied to drtrap's topic in - Kit build logs for subjects built from 1751 - 1800
looking good -
Thanks. Went to a local hardware store, bought a piece of shelving, then used a plane, to shape the edge, and deep mahogany varnish to finish
- 25 replies
-
- snake
- caldercraft
-
(and 1 more)
Tagged with:
-
- 25 replies
-
- snake
- caldercraft
-
(and 1 more)
Tagged with:
-
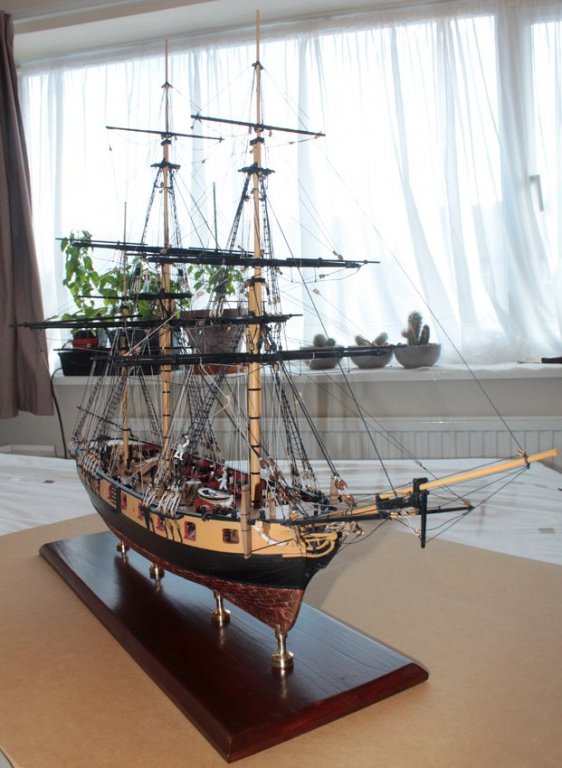
when completed and doing a tidy up of the ship I intend using starch on the foot ropes, but only when finished as my large clumsy hands and fingers keep bashing things. To help with the footropes I also made a spacer from dowel, it fits between the foot rope and yard when tightening the ropes. I have fitted all yards to the mast, completed the rigging of the gaff boom etc to the mizzen and the spirit-sail to the jib. I am now working from the fore yards to the stern, having nearly completed these, so soon to tackle the main yards.
- 25 replies
-
- snake
- caldercraft
-
(and 1 more)
Tagged with:
-
.thumb.jpg.31273b535b82e53d104538017f8a7b21.jpg)
HMS Snake by drtrap - Caldercraft
Davemc replied to drtrap's topic in - Kit build logs for subjects built from 1751 - 1800
i use counter weights -
Quick up date, not everything has gone to plan, one or two errors, and customised areas. Busy fitting the yards at the moment, still a lot of adjustments to make.
- 25 replies
-
- snake
- caldercraft
-
(and 1 more)
Tagged with:
-
.thumb.jpg.31273b535b82e53d104538017f8a7b21.jpg)
HMS Snake by drtrap - Caldercraft
Davemc replied to drtrap's topic in - Kit build logs for subjects built from 1751 - 1800
Rotate the pictures on your computer before you download them to the site -
.thumb.jpg.31273b535b82e53d104538017f8a7b21.jpg)
HMS Snake by drtrap - Caldercraft
Davemc replied to drtrap's topic in - Kit build logs for subjects built from 1751 - 1800
thanks for the reassurance Stergios was wondering if I had made an error. -
Completed the Bowsprit and Jiboom, but not fitting them yet as I am too likely to damage them. Fitting the Chain Plates now before starting the masts at which point I hope time repairing my mini lathe will be rewarded!
- 25 replies
-
- snake
- caldercraft
-
(and 1 more)
Tagged with:
About us
Modelshipworld - Advancing Ship Modeling through Research
SSL Secured
Your security is important for us so this Website is SSL-Secured
NRG Mailing Address
Nautical Research Guild
237 South Lincoln Street
Westmont IL, 60559-1917
Model Ship World ® and the MSW logo are Registered Trademarks, and belong to the Nautical Research Guild (United States Patent and Trademark Office: No. 6,929,264 & No. 6,929,274, registered Dec. 20, 2022)
Helpful Links
About the NRG
If you enjoy building ship models that are historically accurate as well as beautiful, then The Nautical Research Guild (NRG) is just right for you.
The Guild is a non-profit educational organization whose mission is to “Advance Ship Modeling Through Research”. We provide support to our members in their efforts to raise the quality of their model ships.
The Nautical Research Guild has published our world-renowned quarterly magazine, The Nautical Research Journal, since 1955. The pages of the Journal are full of articles by accomplished ship modelers who show you how they create those exquisite details on their models, and by maritime historians who show you the correct details to build. The Journal is available in both print and digital editions. Go to the NRG web site (www.thenrg.org) to download a complimentary digital copy of the Journal. The NRG also publishes plan sets, books and compilations of back issues of the Journal and the former Ships in Scale and Model Ship Builder magazines.


