HOLIDAY DONATION DRIVE - SUPPORT MSW - DO YOUR PART TO KEEP THIS GREAT FORUM GOING! (89 donations so far out of 49,000 members - C'mon guys!)
×


craigb
-
Posts
72 -
Joined
-
Last visited
Content Type
Profiles
Forums
Gallery
Events
Everything posted by craigb
-
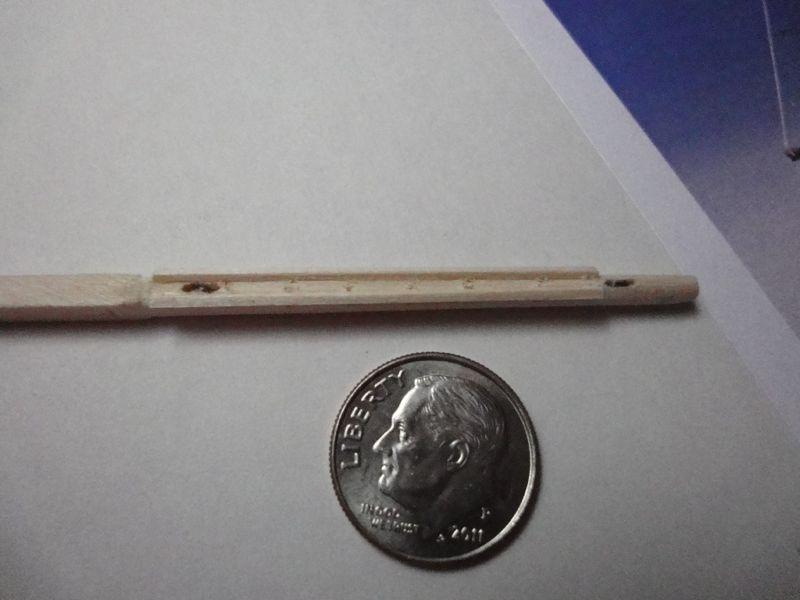
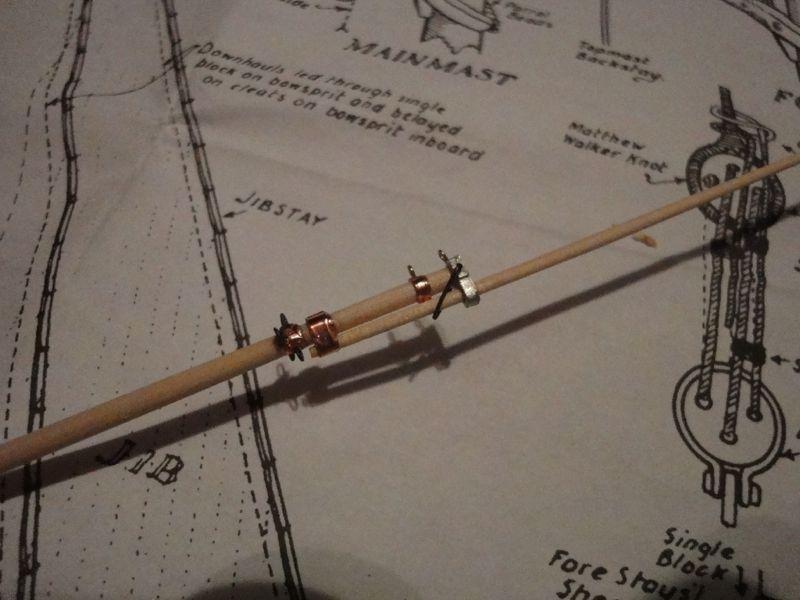
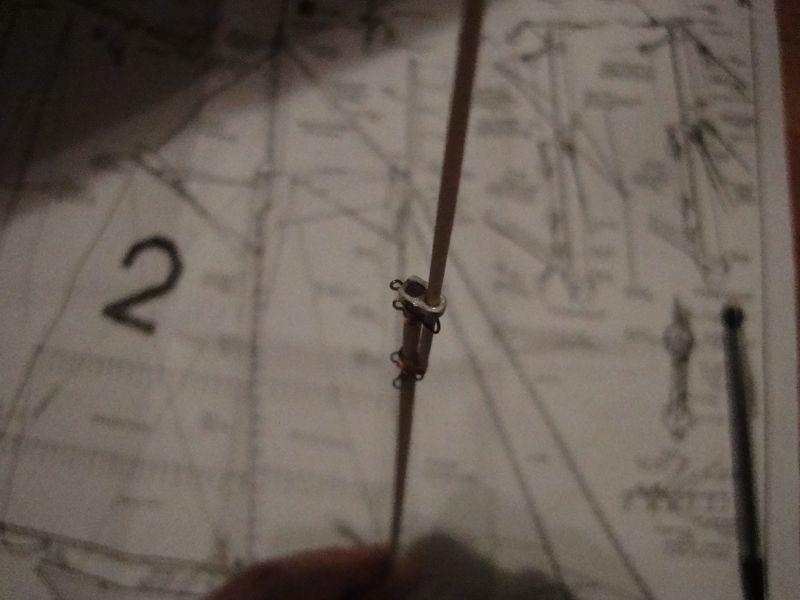
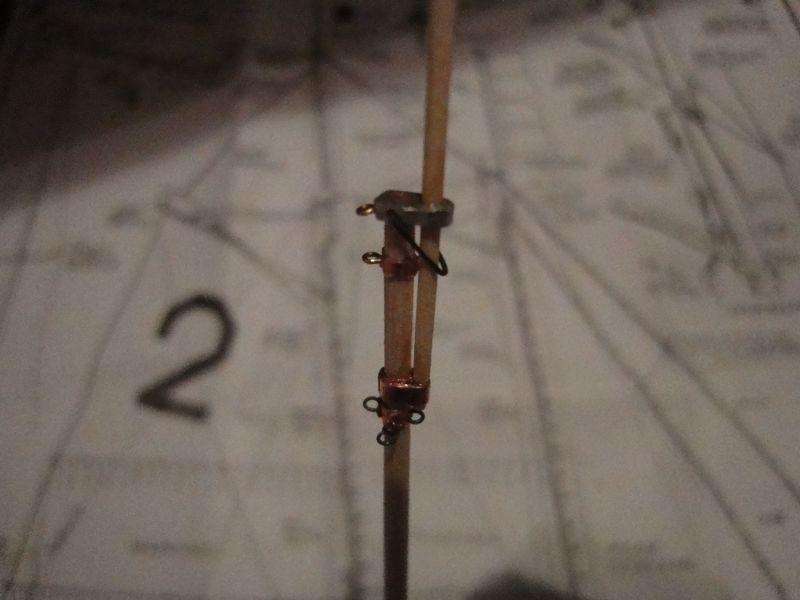
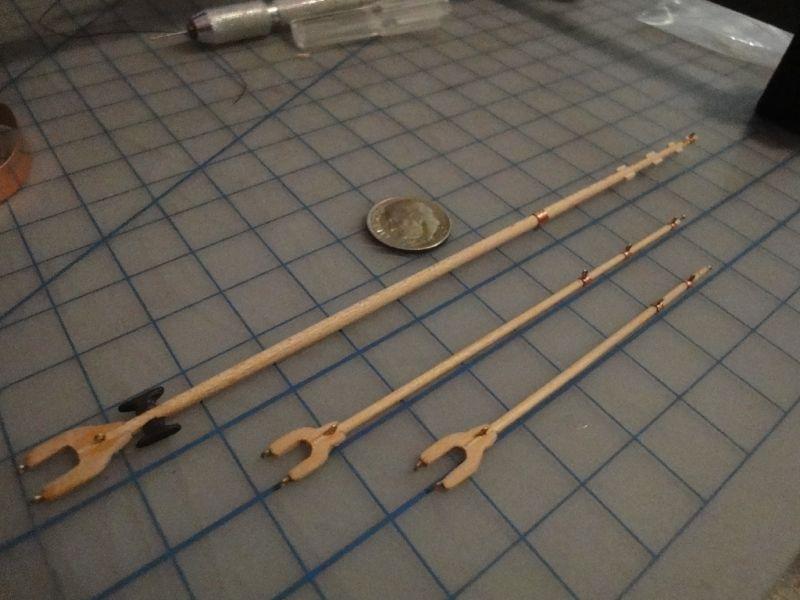
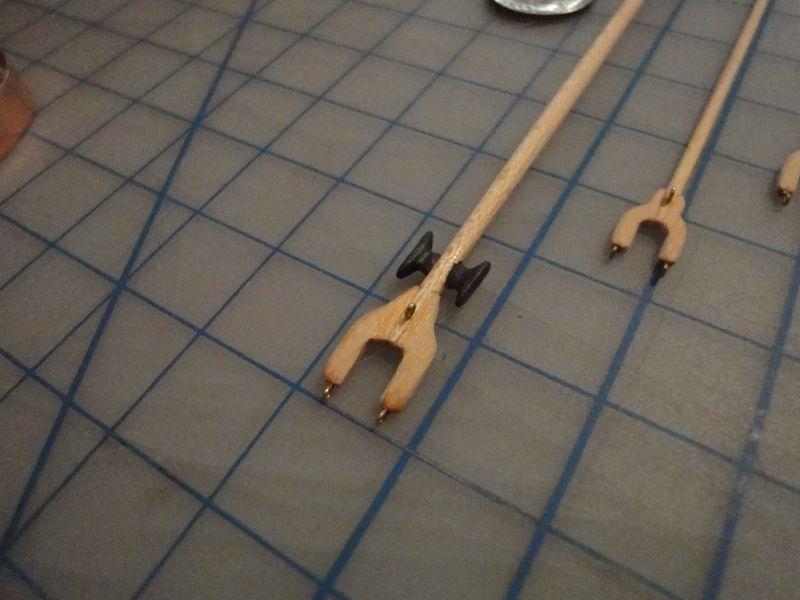
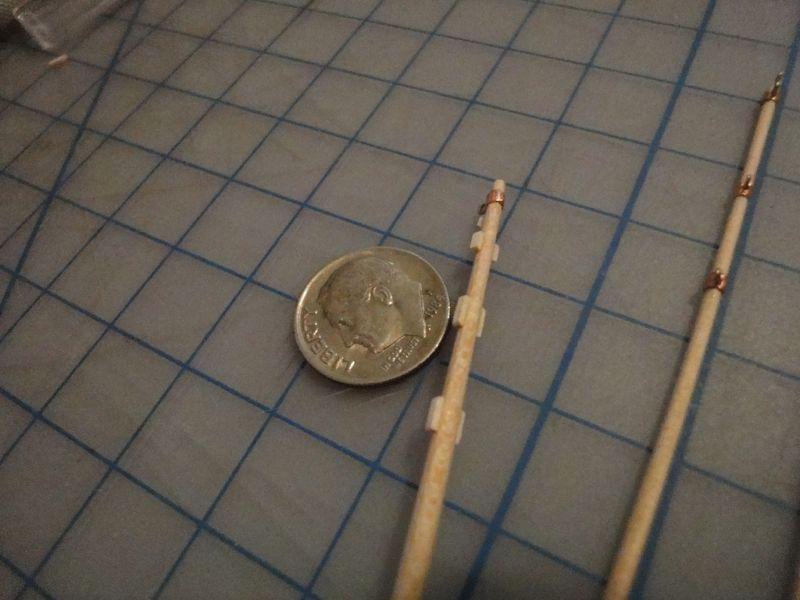
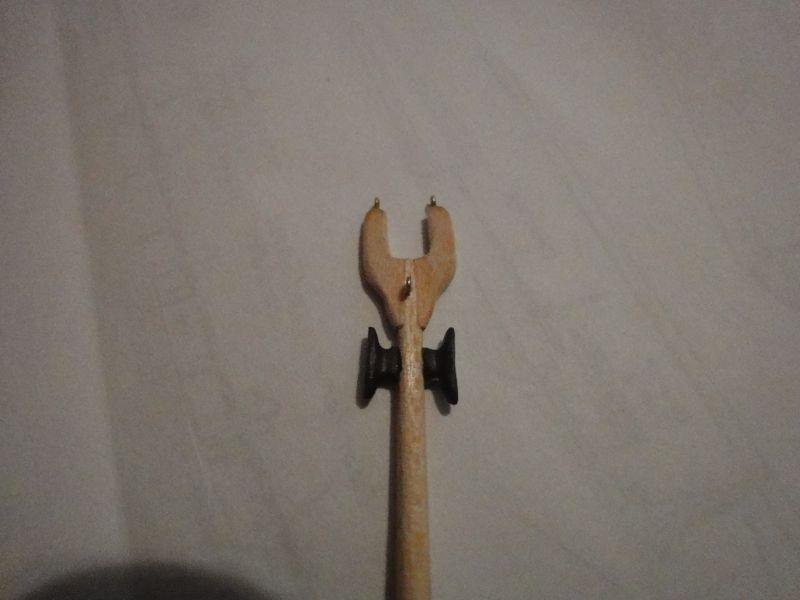
 At this point, the hull proper was essentially complete, and the build moved on to the masting and rigging phase. After having the temporary bowsprit mounted, it was time to create the real bowsprit. This is actually a very complicated piece and took a while to build. Several others have said that building spars and the bowsprit in particular is their favorite part of the build and I cannot agree more. It is such a central part of a real sail boat as well as a visual draw in a model that you can't help but love it. The symmetry of the tension on the various lines running through it, as well as the complex changes in cross section make it a wonderful example of visual interest. Also it is TINY! It still amazes even me, who fabricated the part, that it is even possible to make things like this. All masts and spars were carefully made as follows: -Measure diameters on the plans using digital caliper, and check for accuracy frequently during fabrication. -Chuck up dowels in cordless drill, and sand to match by hand. One hand on drill speed, other on sandpaper. Feel is everything. -When in doubt, make spars and masts UNDERsized. Chunky spars and masts on a model look weird and ruin the effect -If it is messed up, or breaks, throw it away and start over. Dowels are cheap. Eyes at the mast heads were made by making tiny loops of wire, then gluing into tiny holes in the mast. Mast bands were left over copper sheeting that I didn't paint, adhering to my policy of shiny=interesting (I'm a very simple creature!) When drilling holes in the top of a mast that you already spent like 10 hours making, you DO NOT want to snap the thing off and start over. See above: GO VERY SLOW. Like, take 10 minutes to drill a single, tiny hole about 1/16" deep. If something feels "off" for WHATEVER reason, STOP. Take a break, and come back. 10 hours to totally re-make a part instead of waiting another 10 minutes to figure out what is going on is silly, to say the least! After building up the masts (fore and aft virtually the same way) the spars were created. These, again, are absolutely tiny so go slow. Much, much thinner than toothpicks. Drilling tiny holes in parts that you already invested hours in fabricating is tedious. Go slow. Can I say GO SLOW enough!? Despite all this, making these tiny, intricate parts was the most satisfying part of the build! The cleats at the base of the main boom are chunky and oversized at this scale. It would be better to make scale ones instead of using the kit provided ones, but, eh, I was lazy? More importantly, the hole in the boom needed to mount them is about 75% the diameter of the boom itself! Go VERY SLOWLY when drilling these holes. A fraction of a millimeter either way means flaking out through the side of the boom. Maybe it would be best to file the "pin" in the cleat to a tiny diameter, then drill a hole for that. With all the "fo-real" fabrication done, the only step left is running the lines. See next post! cheers! --cb
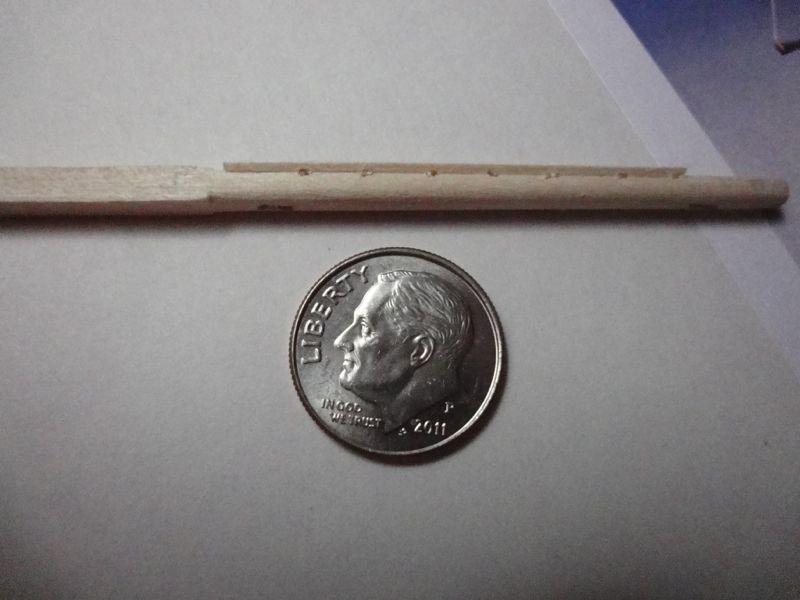
- 20 replies
-
- 1
-

-
- phantom
- model shipways
- (and 1 more)
-
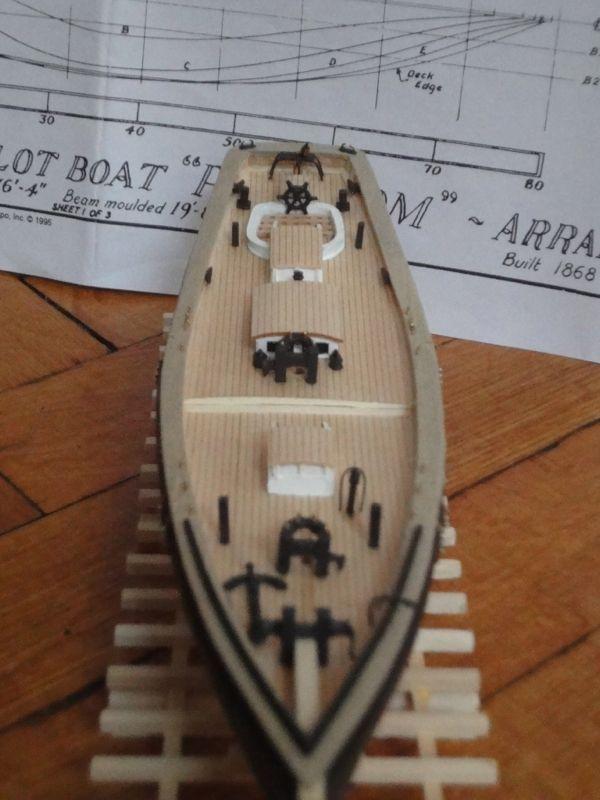
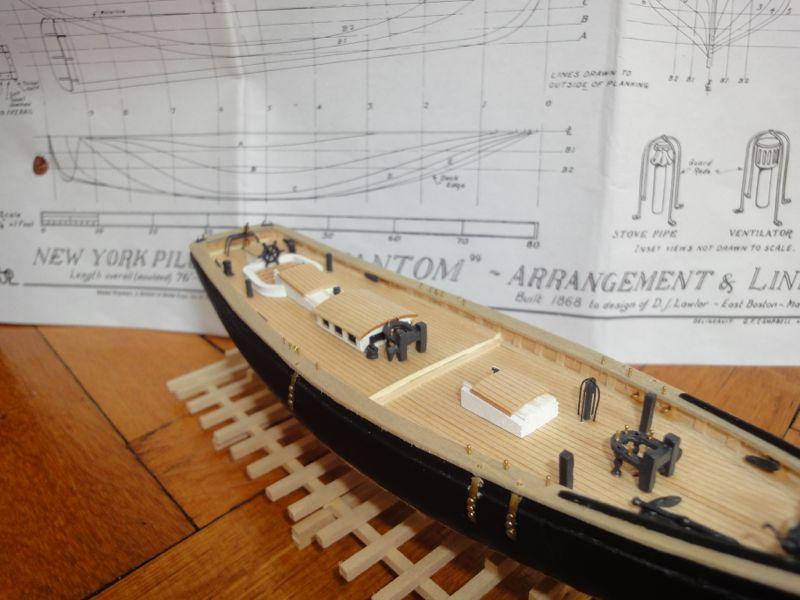
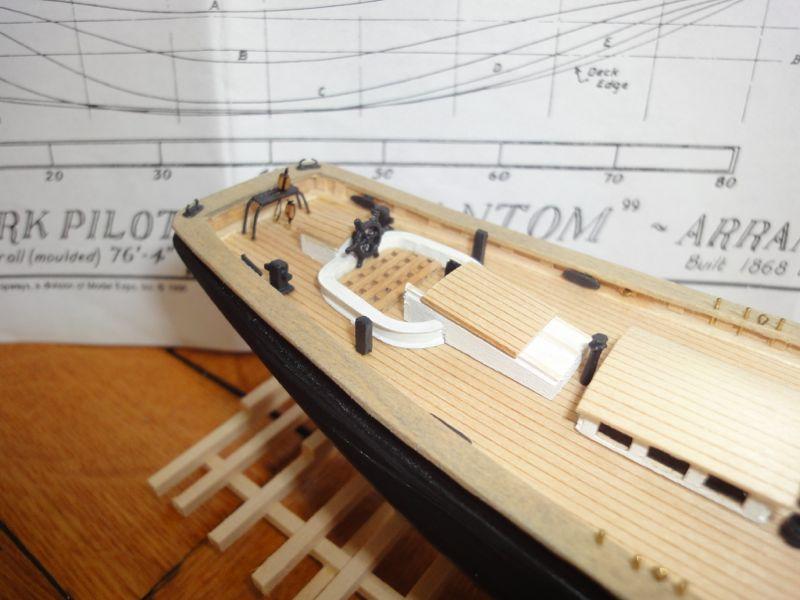
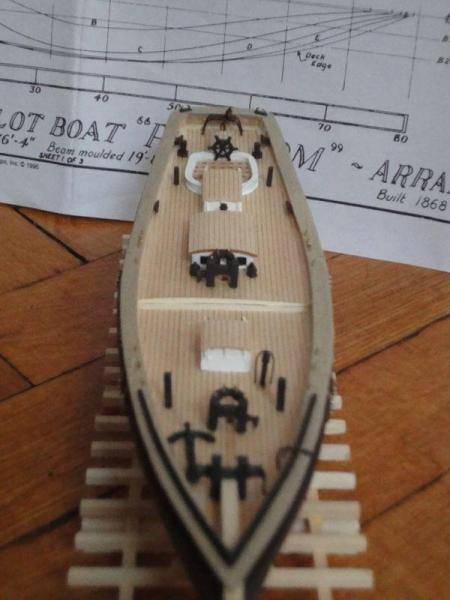
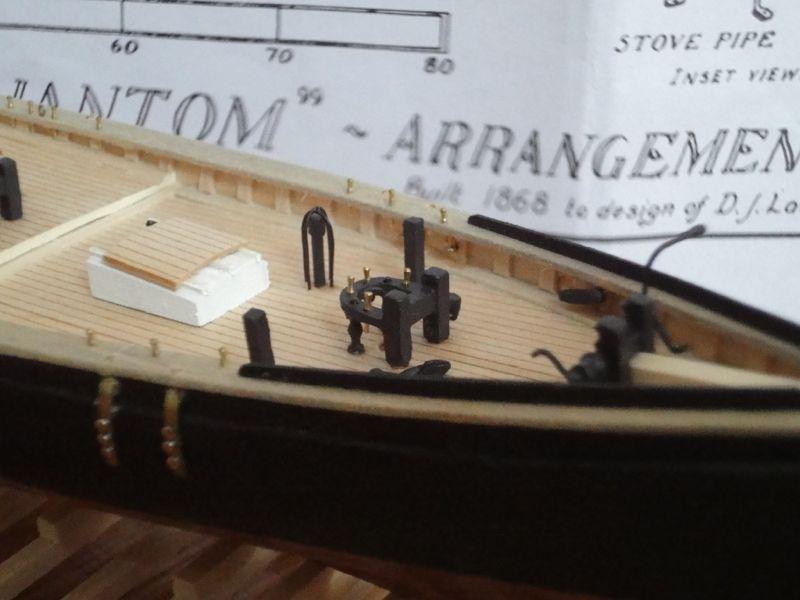
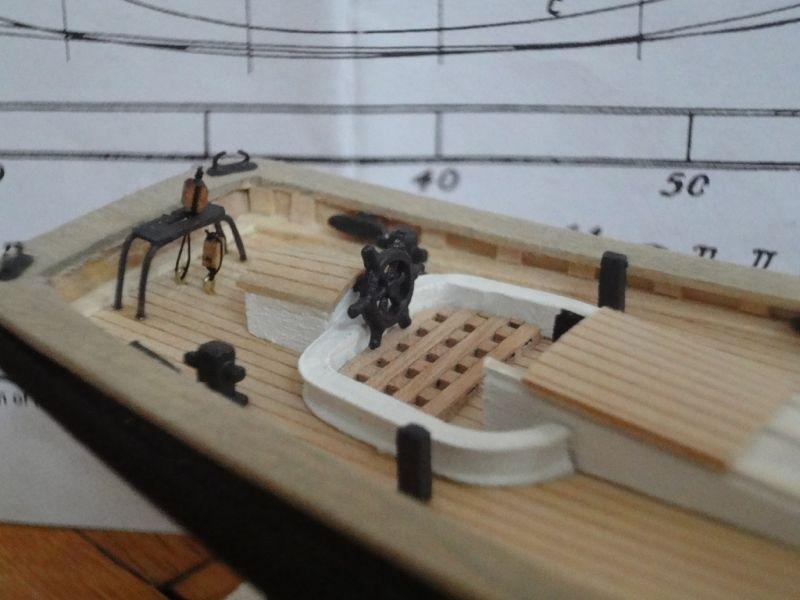
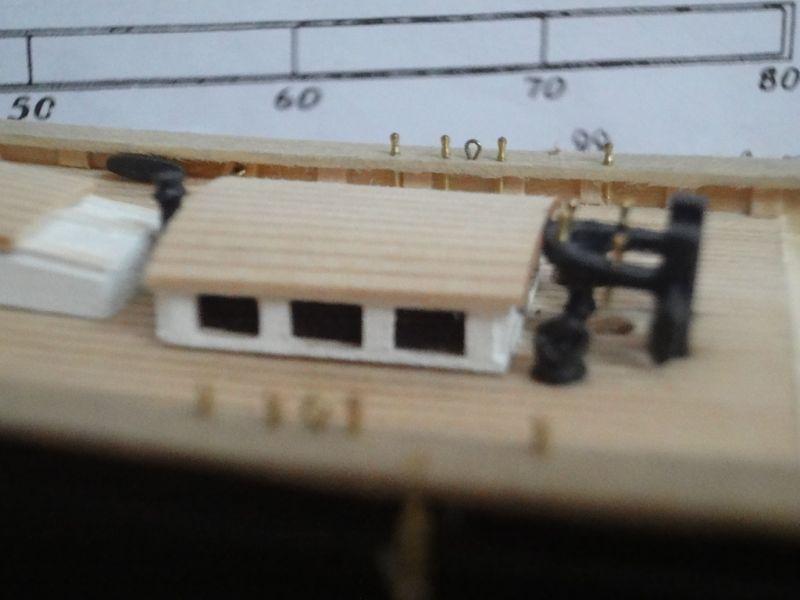
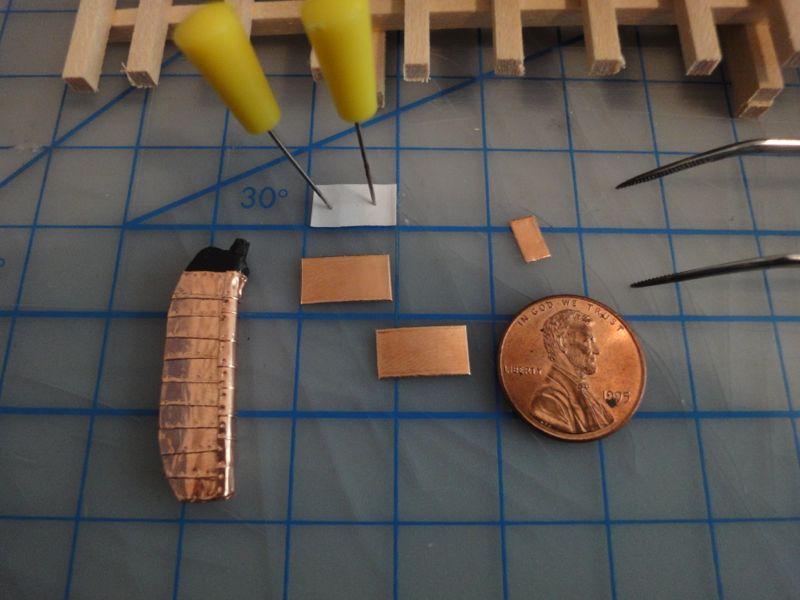
Now we begin the creation of all the deck furniture. It was a less interesting part of the build for me. Don't know why. For sure, though, the true character of the boat became obvious, and the detail in the deck furniture really adds to the charm of the model. First up is building the traveler assembly. I LOVED doing this. Working with tiny parts, filing metal, and using blazing hot soldering stuff gets me excited. Two pieces of brass plate were soldered together then wire bits soldered to that, all with the help of my amazing holding jig (more later on that!). This piece is tiny! After clean up and painting, it looked great! The traveler was bent to shape according to the plans and the legs mounted in little holes carefully drilled in the deck. Tying a block in place under the travleler was a nightmare job made easy with the holding jig. This was an exciting time as well: the first block was mounted to the sailboat. Like I said above, making the deck stuff (cabins, skylights, hatches, etc) was boring for me. Sanding blocks of wood to shape and gluing on things wasn't as much fun as other parts of the build. More "assembly" than "fabrication" I guess? Again, not sure why but this is probably a personal thing. In any case that is a long winded way of apologizing for not having in-progress shots of making all the little "fiddly bits" The deck stuff does add a ton of interest though. The posts were drilled end-wise and tiny diameter wire pushed in then mounted in tiny holes in the deck. This was critical- if they were just glued in place they would have been knocked loose numerous times. And with utmost frustration. Often I would notice one leaning at a weird angle. It was just bent back up straight and life went on without acute increase in blood pressure. The wheel's shaft was veeeery carefully center drilled and a small bit of wire inserted to make it a lot longer. I was worried that it would easily break off if not adequately pinned into the wheelhouse. This shot, I believe, adequately shows how small these parts really are.
-
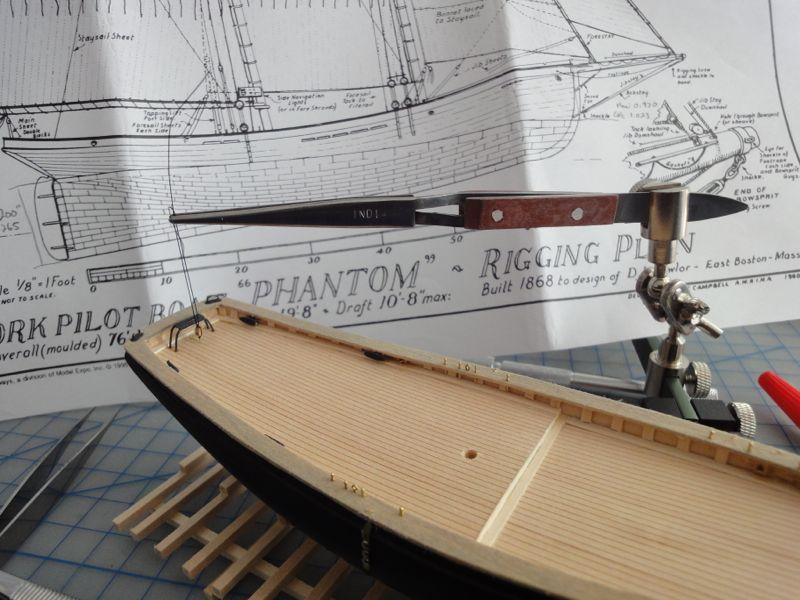
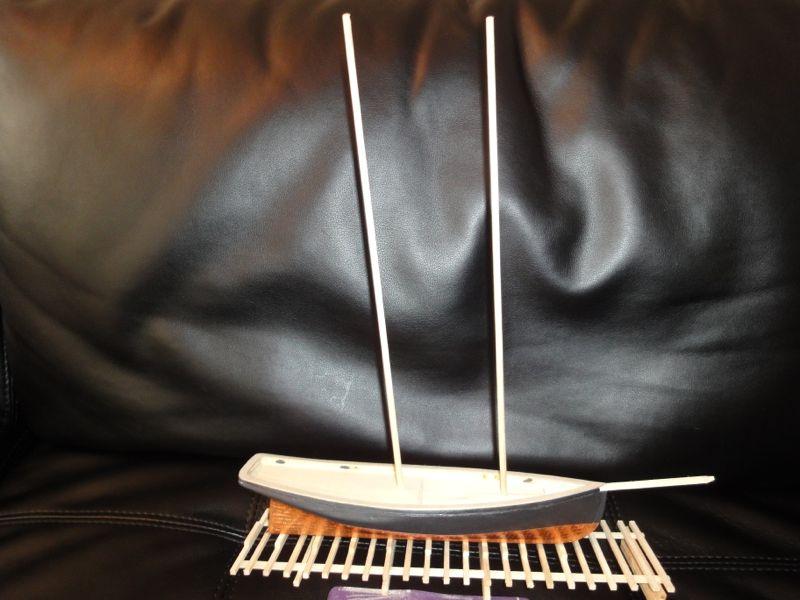
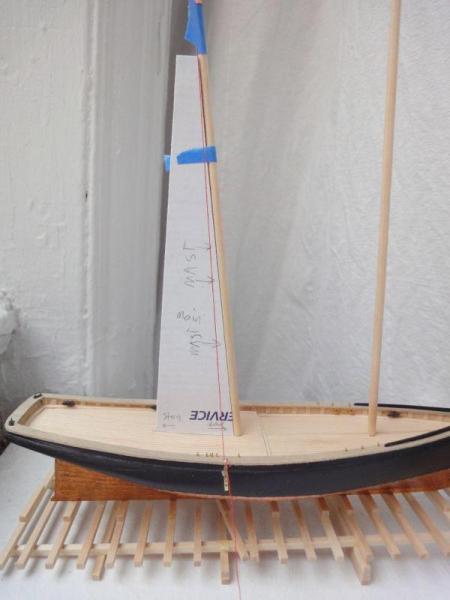
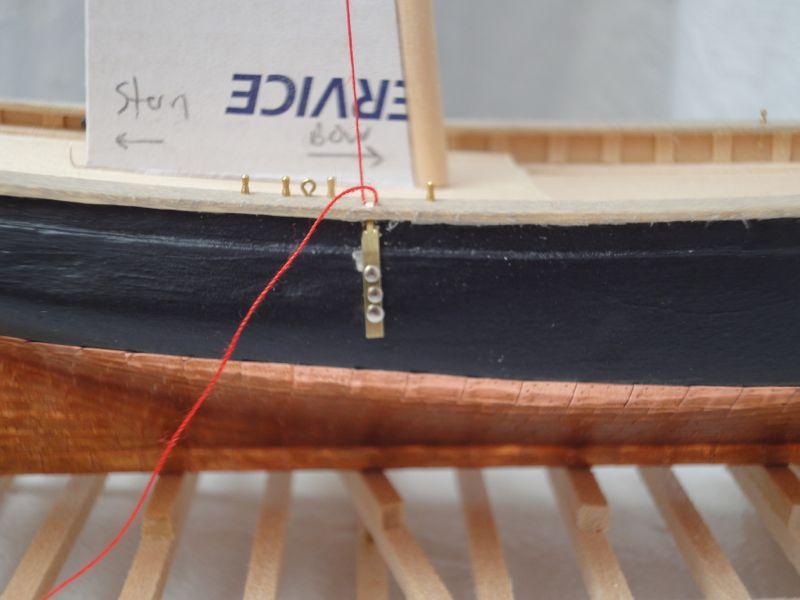
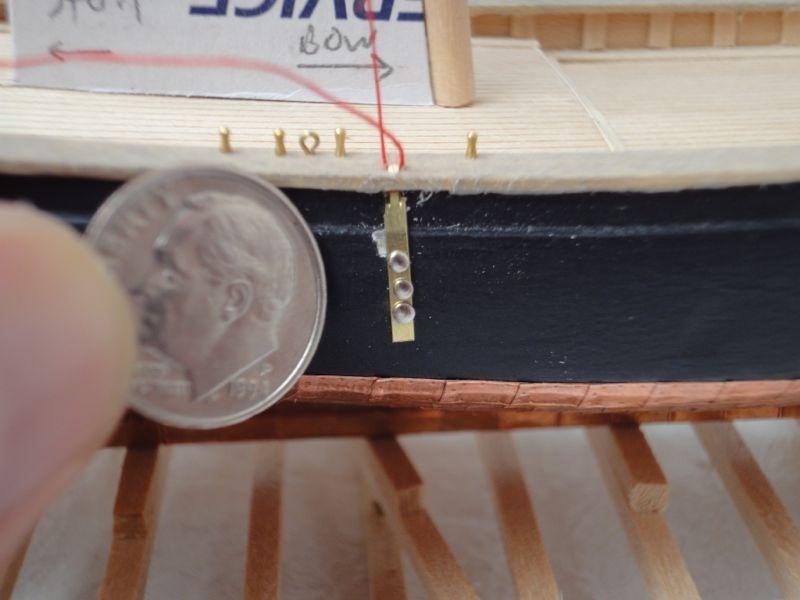
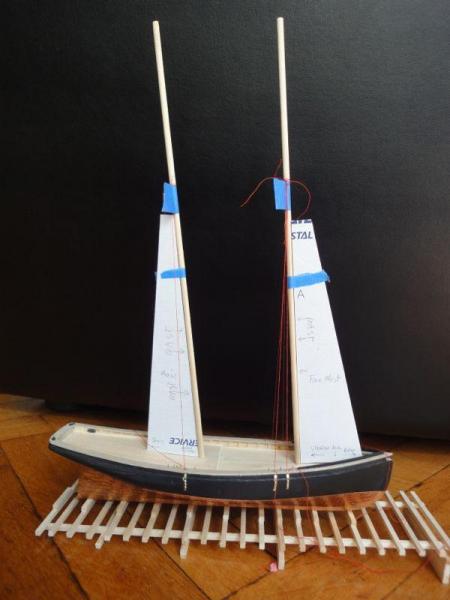
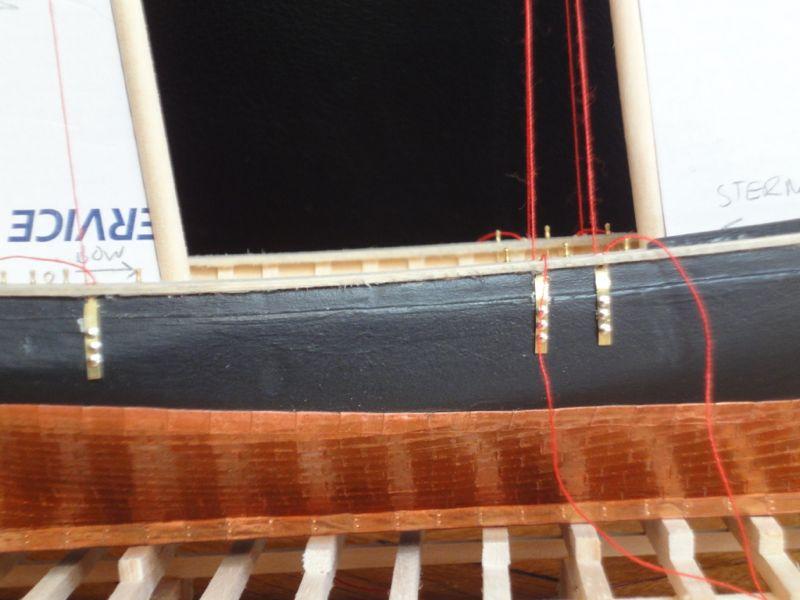
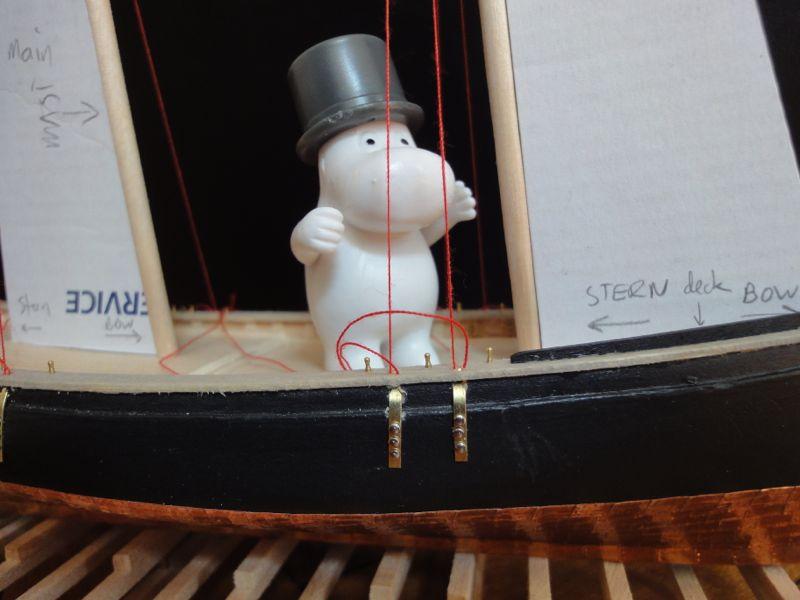
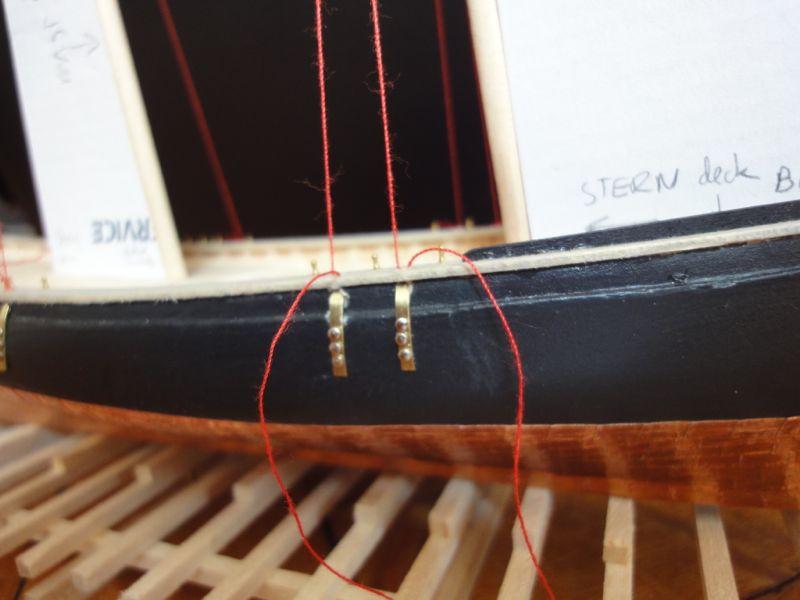
With the hull looking good, I couldn't help but put a couple of holes in the deck and mount a couple of faux masts to "see how she looks." The masts are raked at the proper angle and height (more or less) but not tapered at all. It is amazing how a few minutes worth of work alters the appearance of the entire model. From clean hull to actual sailboat, in this case. With that fun out of the way, actual mast steppage took place. First I carefully measured and created a cardboard template to get the rake "just so." Red thread was used to lay out the shrouds and position the chainplates at the appropriate location and angle. It should be noted that chainplates follow ONLY the angle of the shroud, not any other angle like plum, or rake of mast or whatehaveyou. You can also see the pins in the caprail. I elected to leave everything that was brass and shiny.. shiny instead of painting it. It is a model. Not a minature sailboat (although I'm sure that statement could ignite a flame war!) Creation of chainplates was done the good old fashioned way, as detailed above. Hand filing, hand drilling. Lessons learned: go slow. Doing it once very, very slow is ALWAYS faster than doing it fast and having to re-do it later. Drilling the holes in the hull for the chainplates resulted in flaking off of the black hull paint that had to be corrected later. The pins that hold the chainplate to the hull were kit-provided and cut a bit shorter but the head was not altered. It isn't "scale" but is "easier." The holes in the hull were located from the chainplates, and the bolts pushed in without glue for this fit up phase. The same was done for the formast which has two shrouds. The cardboard rake angle template was put fore of the mast to make it a bit easier to work aft of the mast. Also to avoid the step in the deck. The cardboard templates sort of looked like sails, giving the boat a very pleasing appearance. It seems trivial, but marking "stern" and "bow" on the rake angle templates really helped to avoid screw-ups. When in doubt, always label stuff! A slightly different angle showing that the larboard and starboard sides (I love POB novels) were done at the same time. Note that the friction of the chainplate eye mounted flush with the caprail was enough to keep tension on the shrouds. Cutting an appropriate hole in the caprail without flaking it out and to allow proper fitting of the chainplate eye was a tedious process that, thankfully, got much easier as I became proficient at this task. Yet another skill totally meaningless to day-to-day life but satisfying as a scale ship modeler. At this point, Moominpappa became involved. Bonus for those of you that can make even a bit of sense of that without using Google. With the prelims of mast mounting complete, attention focused on creation of the deck furniture. cheers!
-
Hello! I have started my Emma build log, and have already very much enjoyed watching your build for inspiration. I agree, this is definitely a "build it your own way" type project. cheers!
-
I remember reading your log when I was considering my own build. It was very inspirational and a marvelous example of taking a "simple" kit and truly making it something special with extra details like the true planked deck, just to name one thing. Thanks again for the inspiration, and for re-posting this as an inspiration to others. cheers!
-
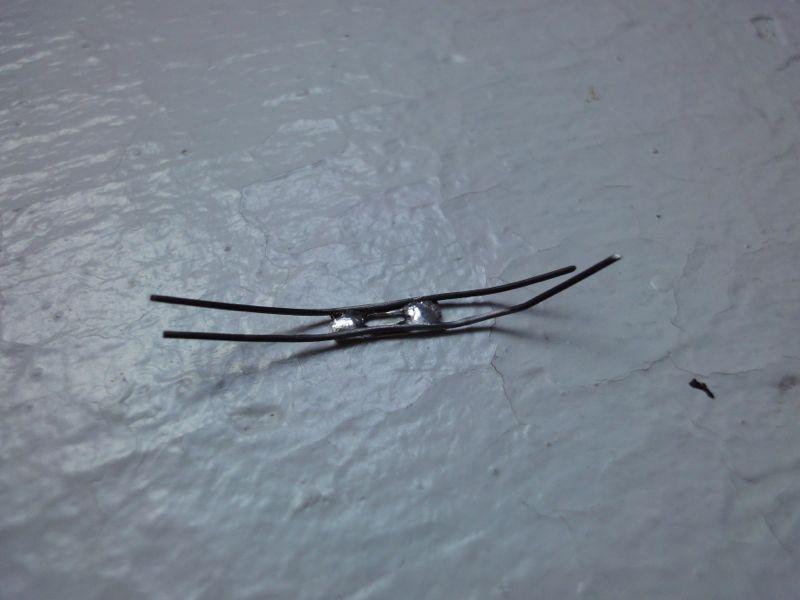
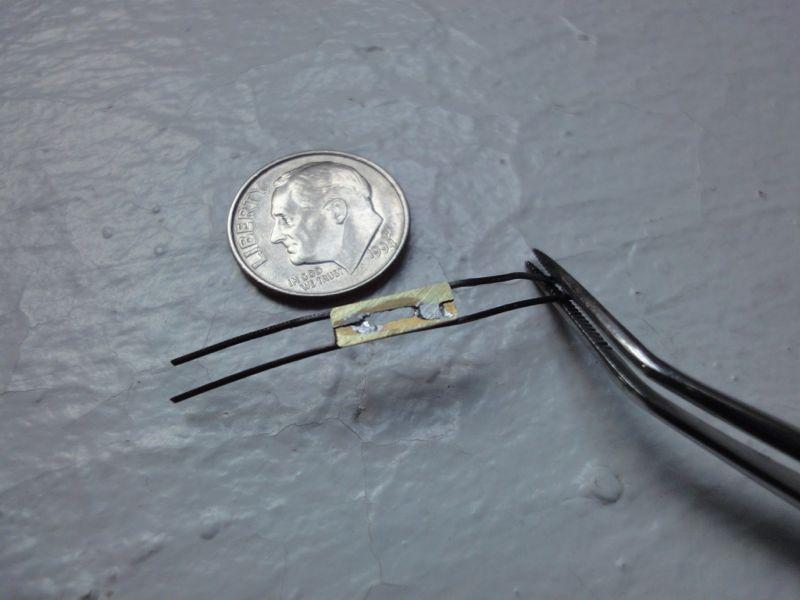
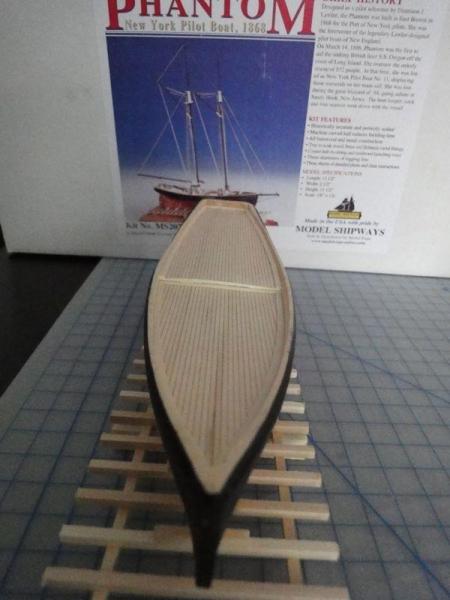
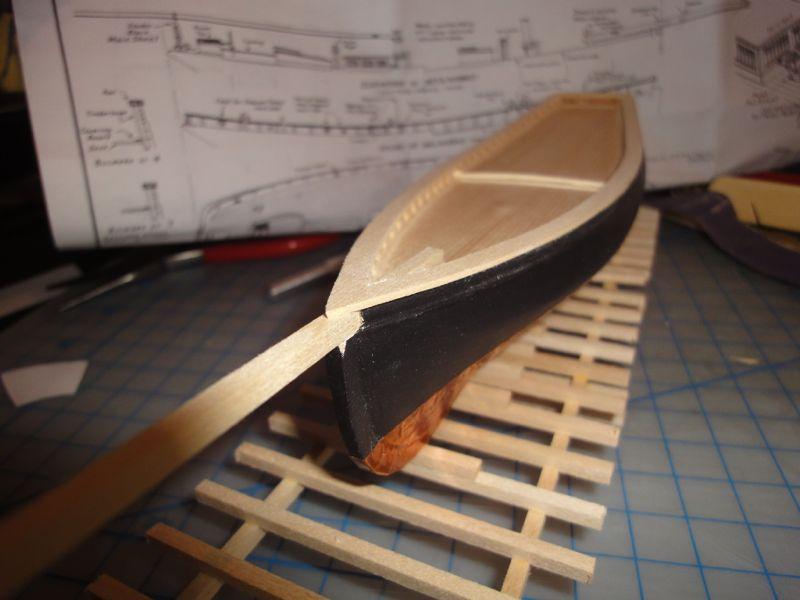
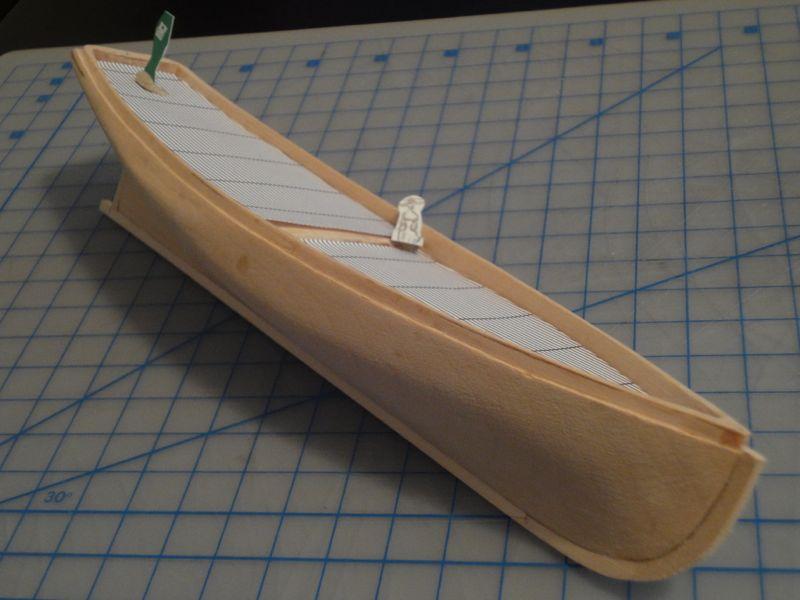
Well, here it is, my FAVORITE PHOTO OF THE ENTIRE BUILD. So much so that it gets its very own post! It might not look like much, but there is a ton going on here. You might not agree, but I like it because it tells a bunch of stories all at once. First, the boat in the middle has the caprail fitted and stained with “Weathered Oak” which is a sort of blue-grey stain. Additionally, all the cleats were painted and glued up under the caprail, as were several shiny brass eyelets that are barely visible. Over on the right is the sheet of basswood from which the caprail was cut, and also a test-stained area can be seen there too. I mentioned early on that my kit didn’t have the wood for the caprail. So I called Model Expo and they mailed me replacements. Good company, that! However, after reading Chuck’s practicum, I just went out and bought a sheet of bass, held it tight over the top of the boat and traced the caprail. I carefully cut the entire thing out in one piece. It was a shockingly easy solution to what I thought was a terribly complex piece to build, what with the curves and everything. Also over on the right is a dime, and that tiny black spot under the dime is the fairlead which is a piece of bent wire super glued to a piece of cardstock. I did NOT like building this. Just didn’t enjoy it. The wire was hard to hold and it kept falling over and I got super glue on my fingers. Woe is me Over on the left is the cut out core piece from fabricating the caprail. I used my 90 degree angle jigs to clamp some pre-soaked splashrails to the nearly exact curve desired, and didn’t have to make a new jig! Bonus! I’m glad I don’t throw things away until the project is over. My wife.. not so much a fan of not throwing things out Well that is it for the re-upload for tonight. I hope to post the rest tomorrow, complete through the end of the project. Cheers!
- 20 replies
-
- 3
-
-
- phantom
- model shipways
- (and 1 more)
-
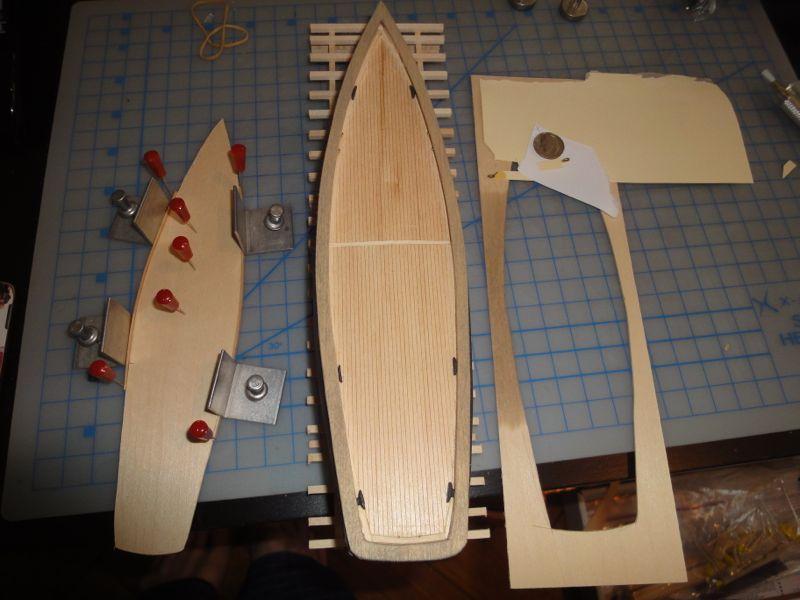
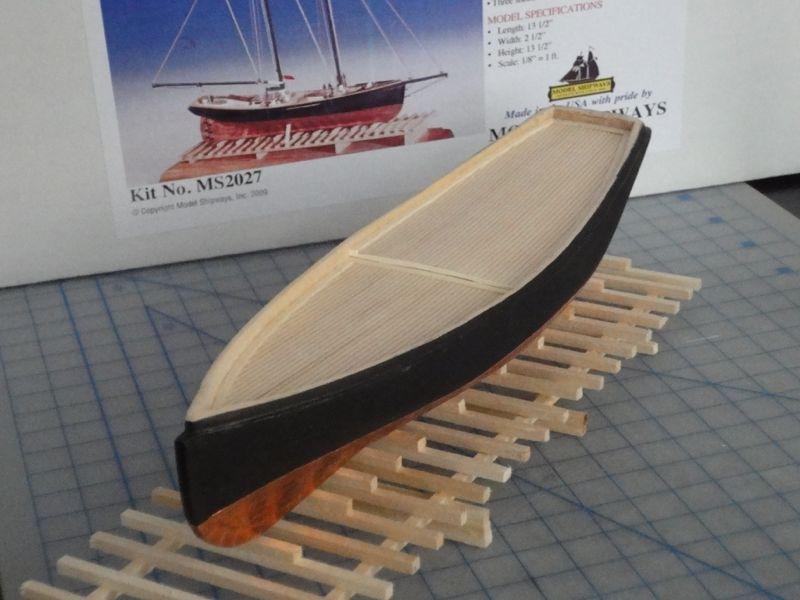
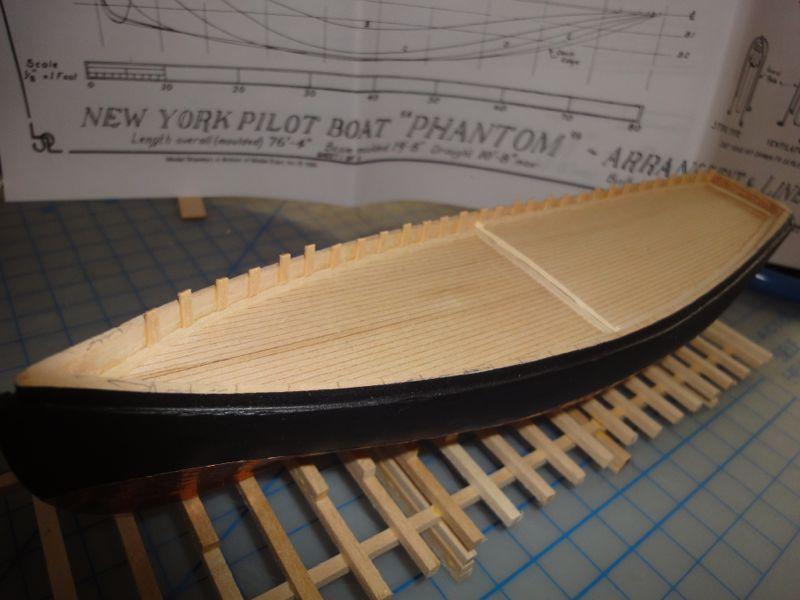
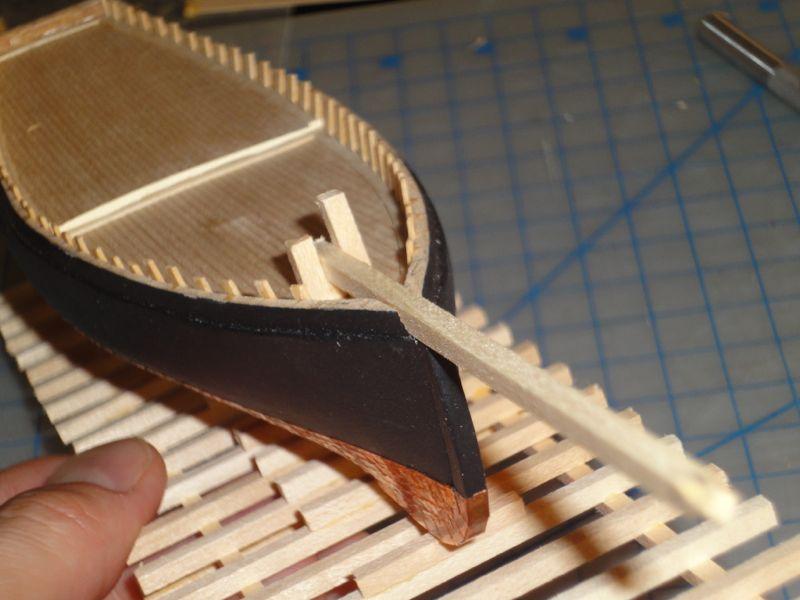
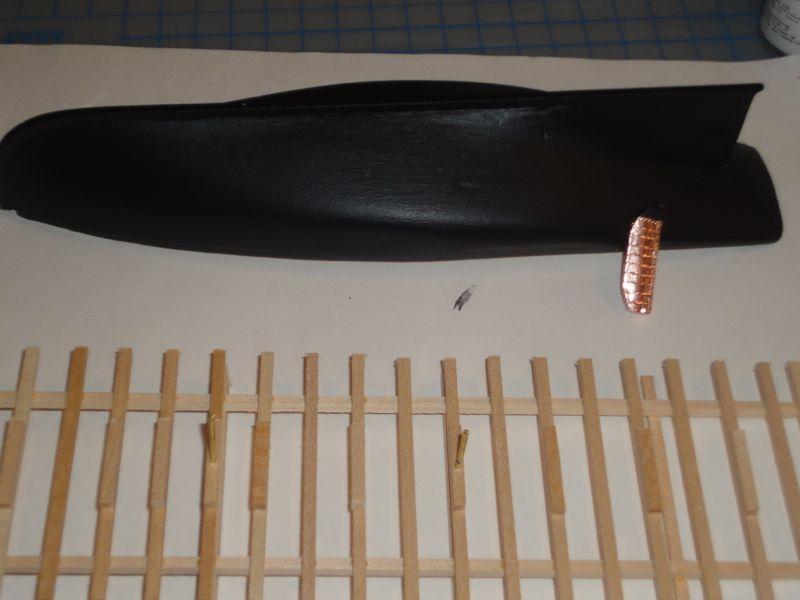
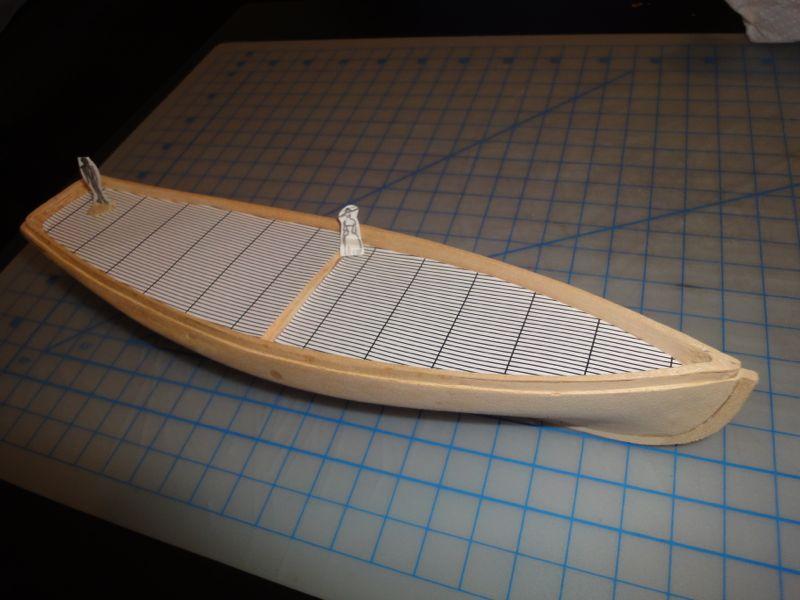
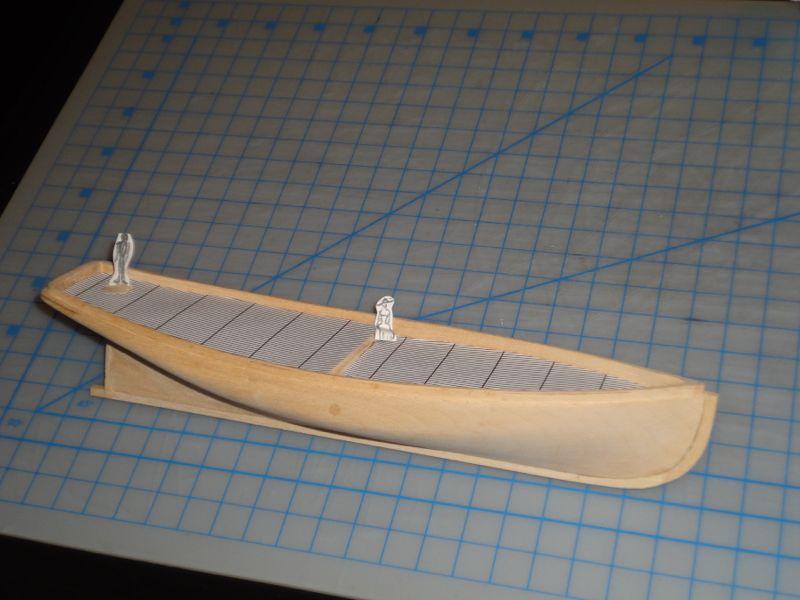
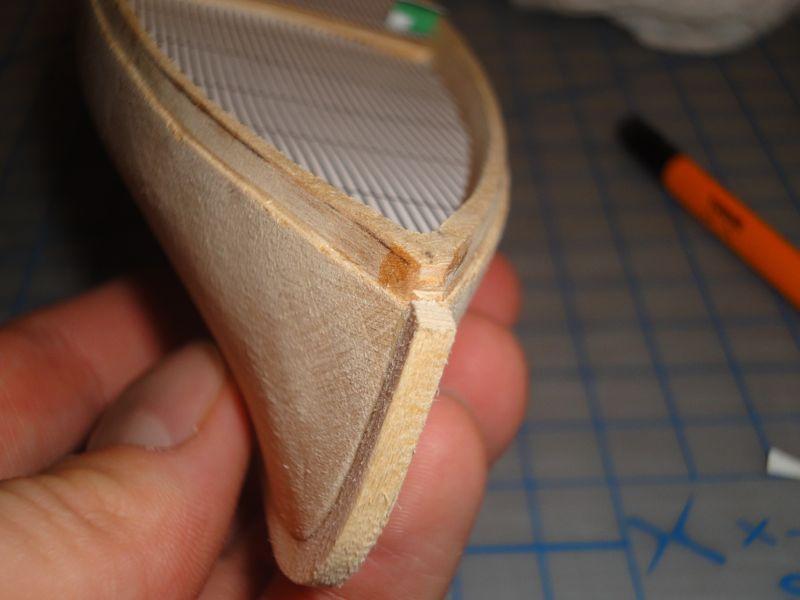
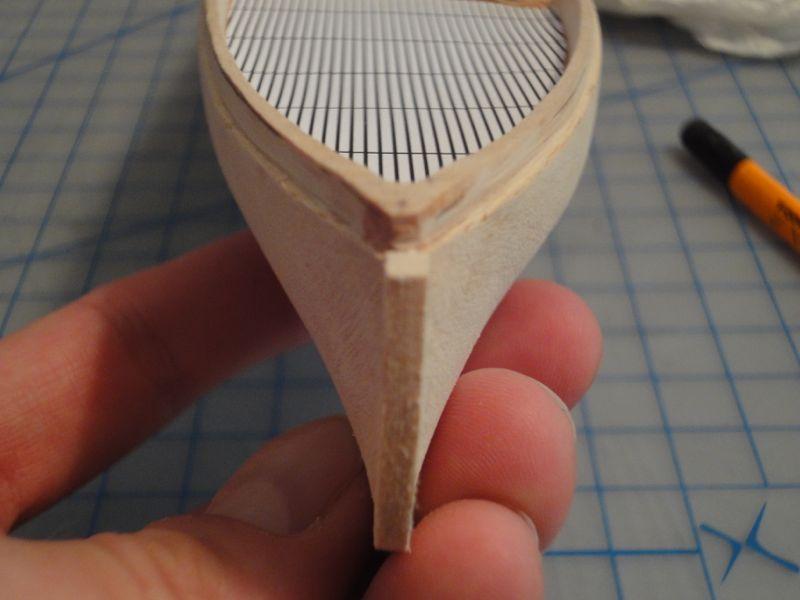
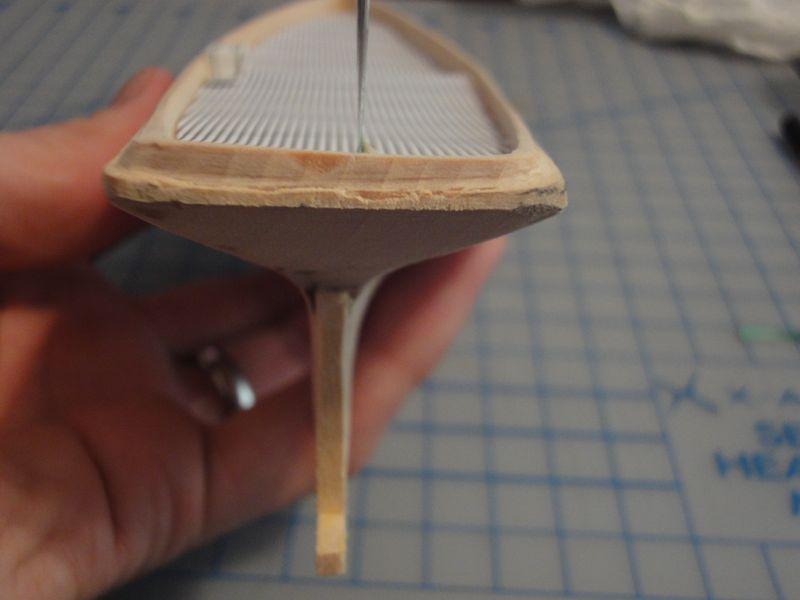
The pre-scored faux decking was cut to shape using a cardstock template. Mucho care was taken to make sure the centerline of the hull lined up with a crack in the deck. In retrospect, I don't know if this is "correct" but it sure made locating the CL easy for the rest of the build. Bending the sheet in two axis-es wasn't too fun, but not as bad as expected. The deck has a camber left-right, as well as being concave from fore-aft. At this scale it is barely noticeable though. But I know it is there The step was covered with a piece of cardstock per Chuck's recommendation. I couldn't really get the gap to be perfect, and eventually settled. Then the waterways were forced in place, which was easier that expected considering it had to be bent edge-wise. The hull has now assumed a very classy, sleek shape. The deck stantions (I think that is what they are called?) were then marked, fitted, clipped off long then sanded flush. The notch for the bowsprit was carefully cut, and a mock bowsprit used and fit into a temporary bits/winch up in the bows. The caprail was then cut and fitted carefully making sure the bowsprit fits under. The making of the caprail is detailed in the next post, my "FAVORITE PHOTO OF THE ENTIRE BUILD"
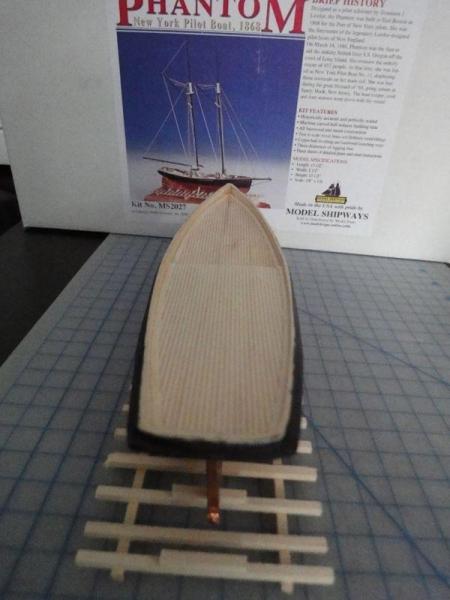
- 20 replies
-
- 2
-
-
- phantom
- model shipways
- (and 1 more)
-
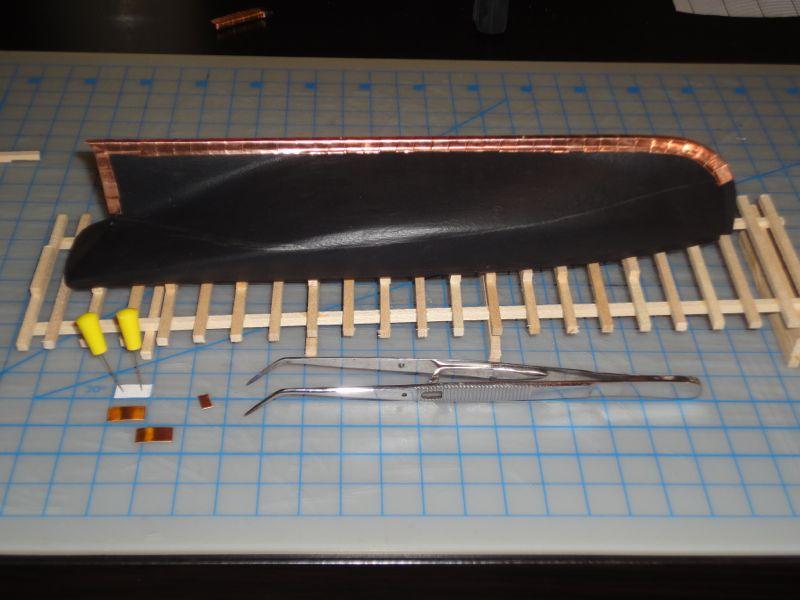
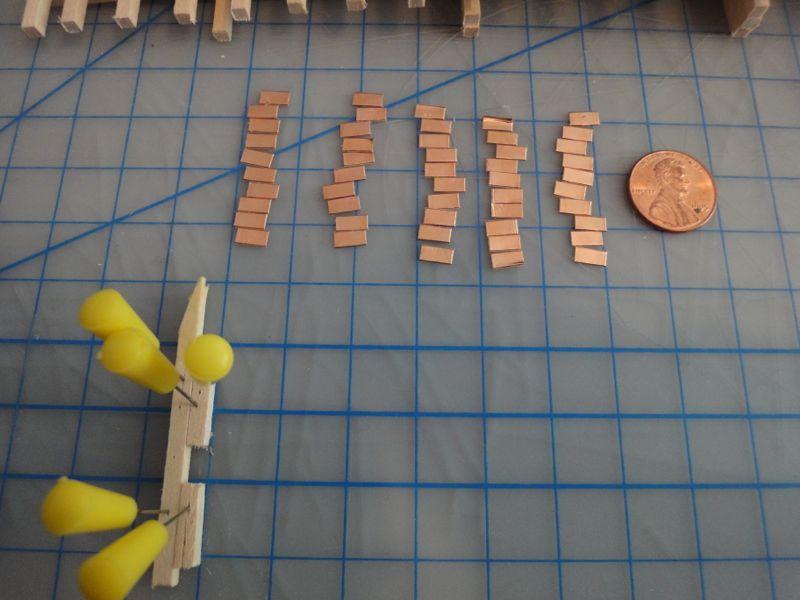
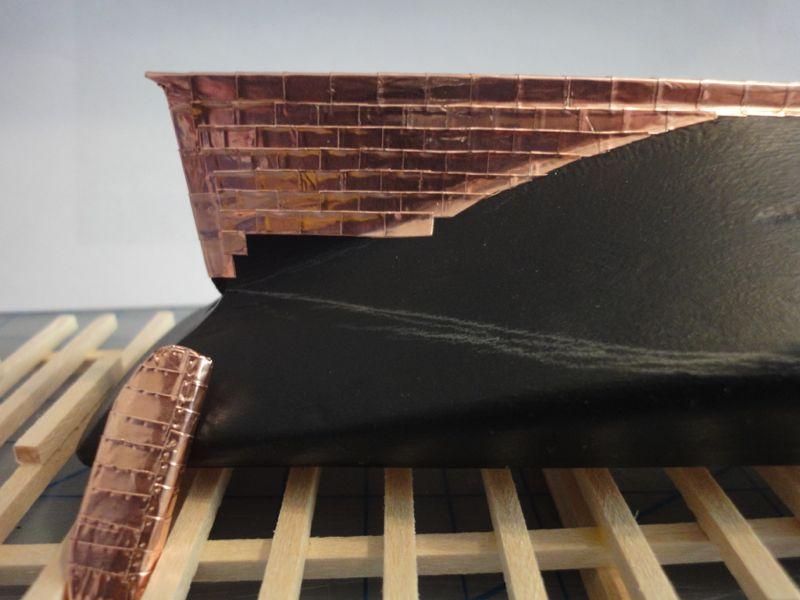
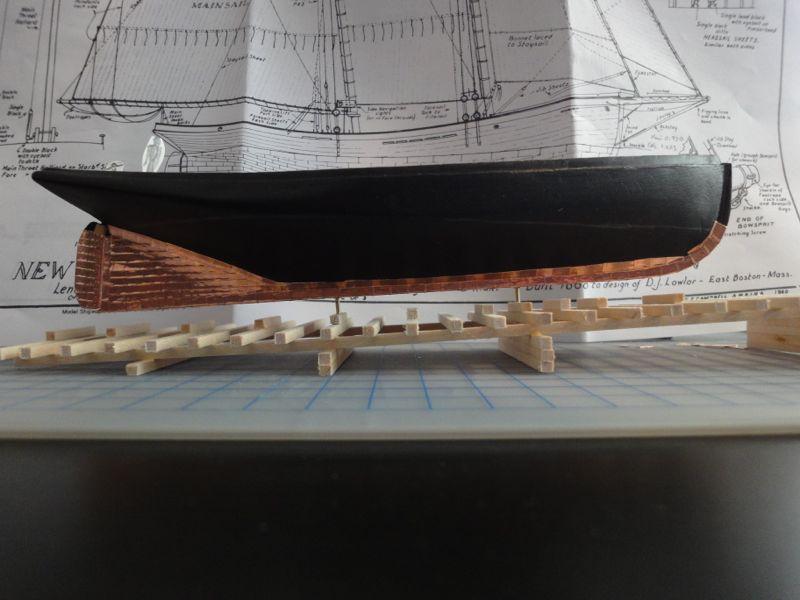
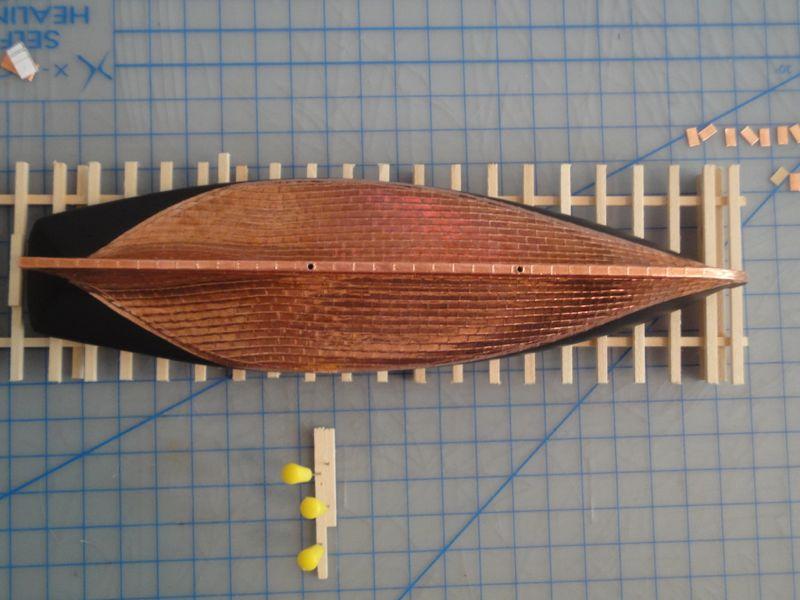
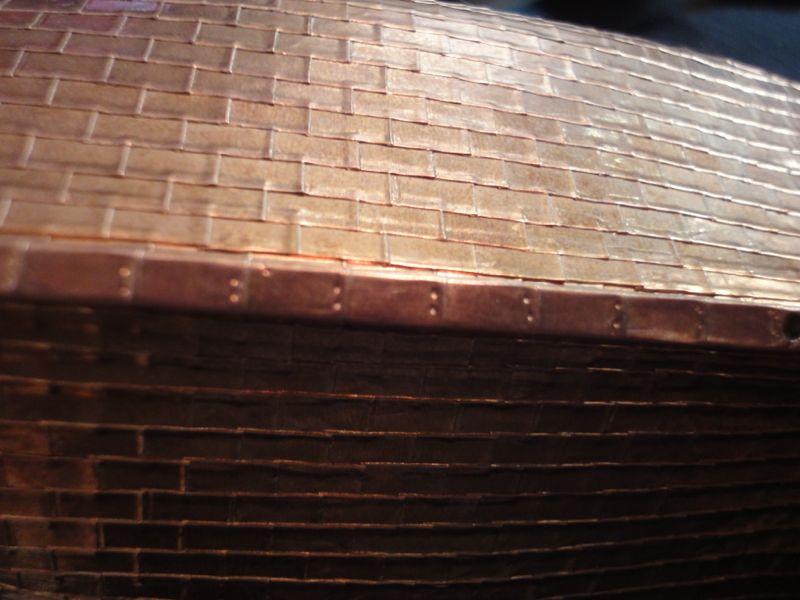
The hull coppering began. I found the monotony relaxing rather than the expected super-boring. Certainly the copper hull is a focal point of the entire model. It very satisfying to point to it and be able to say, "yes, I did it. I cut them all individually and placed them one at a time." The keel was done first. Angled, locking tweezers are ESSENTIAL for model ship building. I have probably a dozen different forceps etc, but use these 99% of the time. These copper "tiles" are tiny! I made them in batches of 50 to maintain sanity, using a little jig learned from another MSW poster who's name is lost to time. ***EDIT: CHECK OUT SteveM's excellent build log. That is where I first saw this*** Thanks Steve! The keel was done first in a regular brickwork pattern. The wall of shiny copper was incredibly satisfying to see. Test dimples are seen easily in the rudder. The copper quickly oxidized in the air, no doubt helped by the finger oils and regular handling. I love the patina. The remainder of the hull was coppered. Care was taken to have the runs of copper be equal on both sides of the hull. Transitioning from the brickwork of the keel to the brickwork on the main part of the hull required one (only one!) extra long tile on each side. The finished coppered hull was beautiful and gave me a real sense of accomplishment. I'm glad I didn't skip coppering the hull.


- 20 replies
-
- 1
-
-
- phantom
- model shipways
- (and 1 more)
-
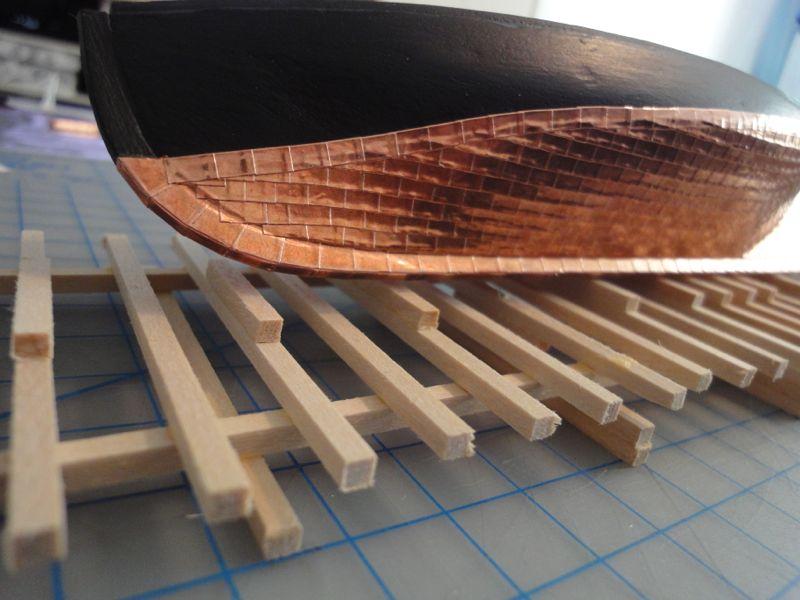
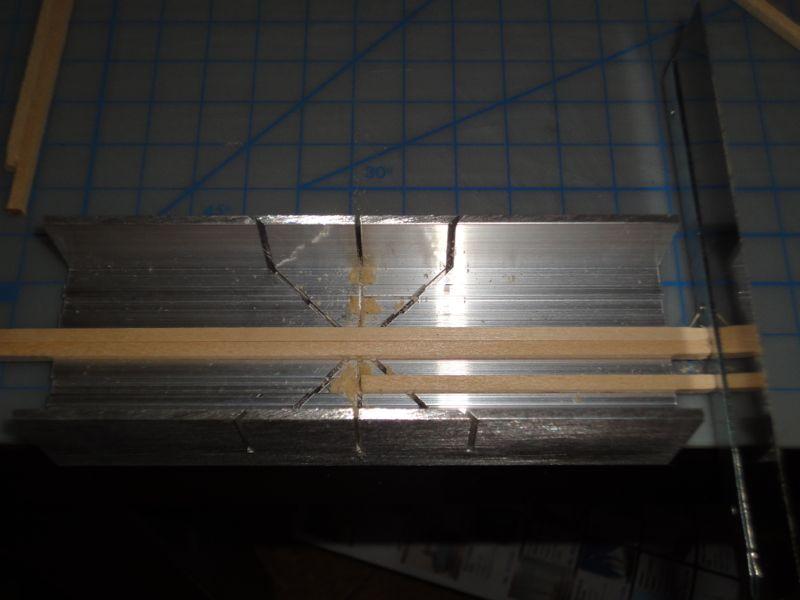
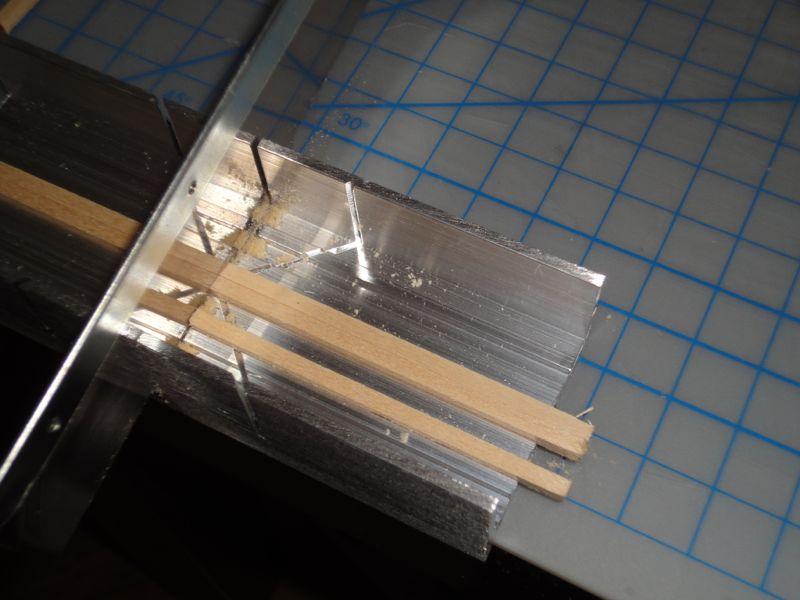
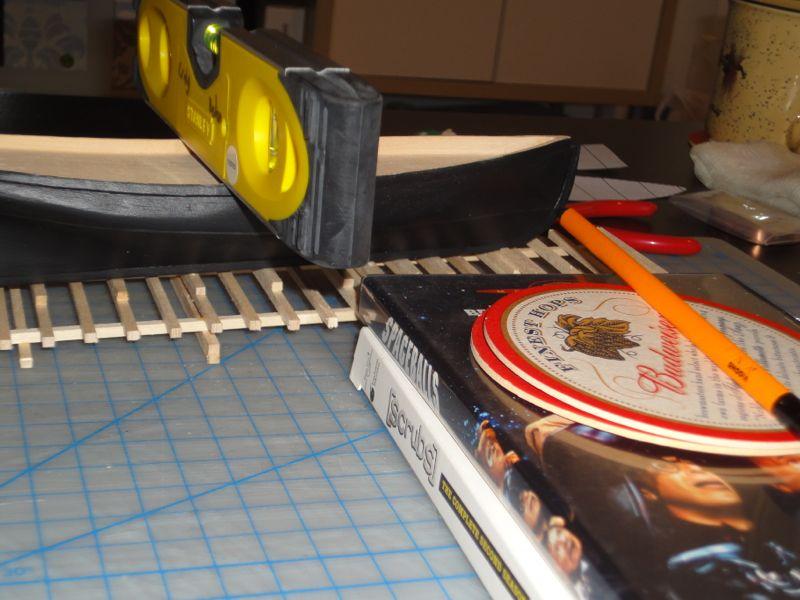
Next up was construction of the shipping ways. I LOVED this step. It very much reminded me of building wood airplane wings, which was always my favorite part of building balsa planes. The crossmembers were all cut to exact same length using the tool kit's miter box. One "master tie" was used as a spacer to line everything up, then the pieces were cut two at a time. Having these all be exactly the same was massive overkill, but I was just pleased to use a simple but very precise technique that may come in handy later. An airplane wing sort of looks like building the shipways, no? On the ways for the first time! The hull was painted (see second post for details), and the rudder test-coppered, complete with little dimples to simulate rivets. The shiny copper was beautiful! Marking the waterline with the uber-scientific method of stacking whatever was closest at the time and running a pencil around the hull. This actually involved a LOT of measuring and re-measuring and comparing to the plan before committing to a waterline. Any slight asymmetry in the hull will become obvious by this step.
-
After the hull was shaped, I cut the "step" in the outside slowly and carefully. The step in the deck was cut too carefully using the chisels from the "boat builders tool box" that came with the Build For Free set up. I even managed not to blow out the stern where the wood is all end-grain. I couldn't resist making some scale paper figures and some printed out decking. There is a pretty noticable dimple in the starboard side there- the camera shows all blemishes! It is not really visible in the finished model and I didn't use filler either, so if your hull isn't perfect, don't sweat it too much. The stem and stern were slowly sanded to shape. Again, the camera makes it look pretty rough but in life, it isn't so bad. I was also using emory cloth. Don't do that! It is useless. Note also the keel and stem proper fitted up. The Stern was finished, the sternpost fitted up, and the keel left a bit long. This makes it look like there was a bunch of flake-out around the step in the hull at the stern. Cursed camera! Looks much better in real life. I promise At this point, construction of the hull was basically complete I will re-iterate that I really didn't find shaping a solid hunk of wood very much fun. Maybe some other people do? I also loved coppering the hull which, by all accounts should be dull, monotonous work. Go figure!


-
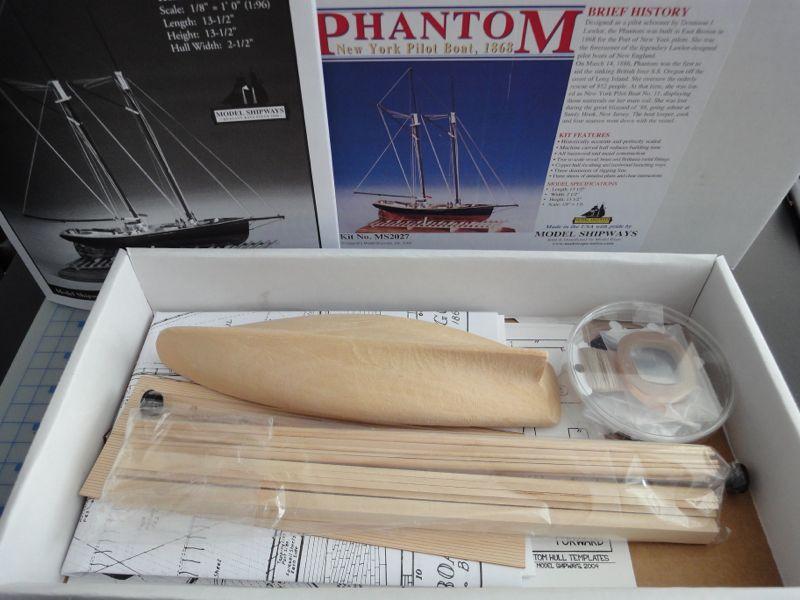
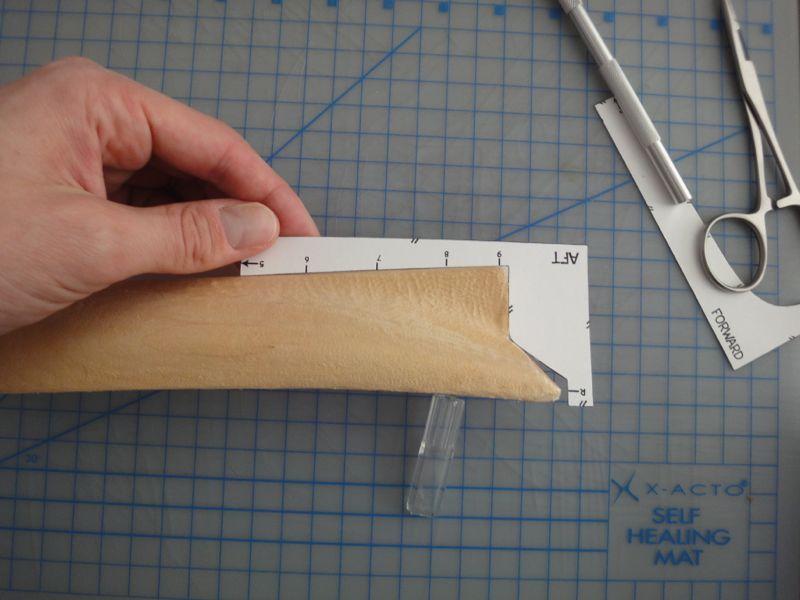
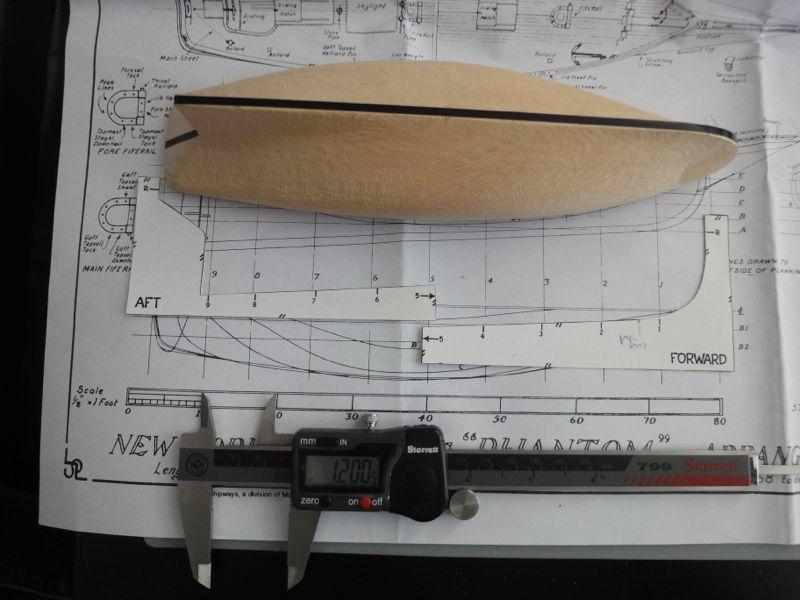
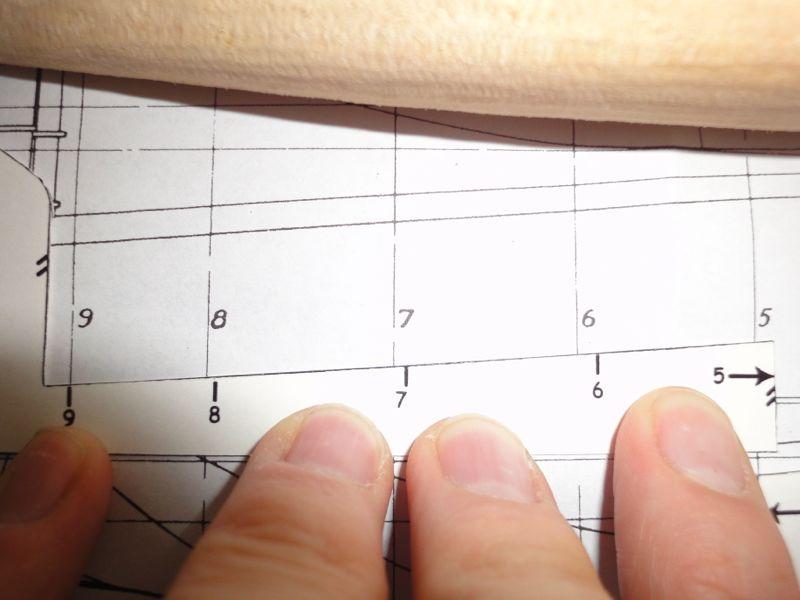
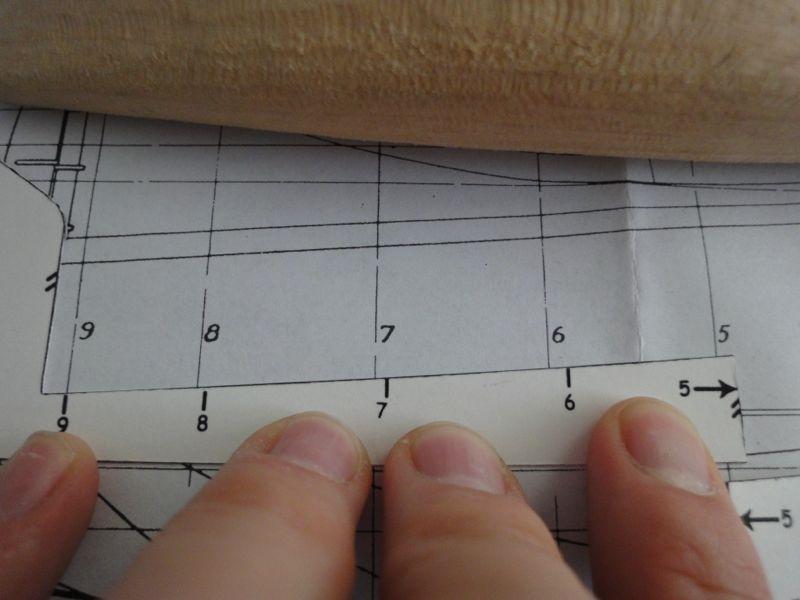
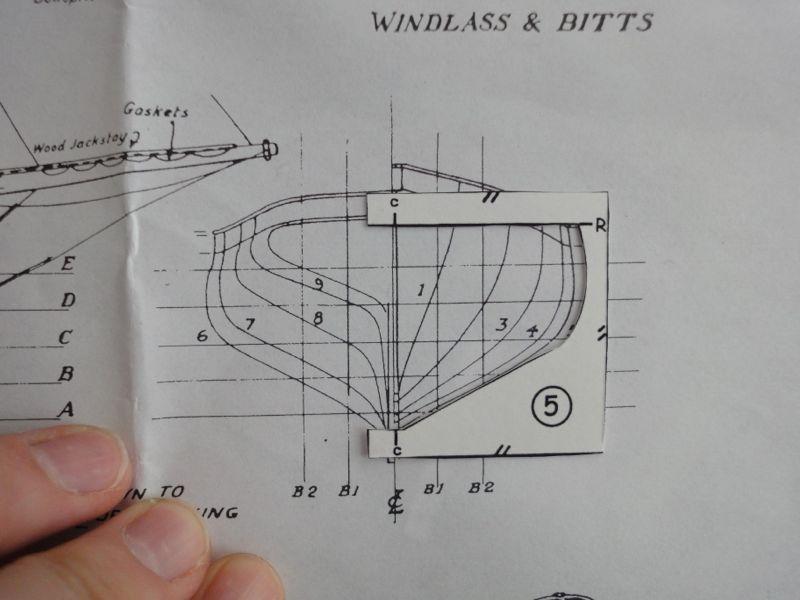
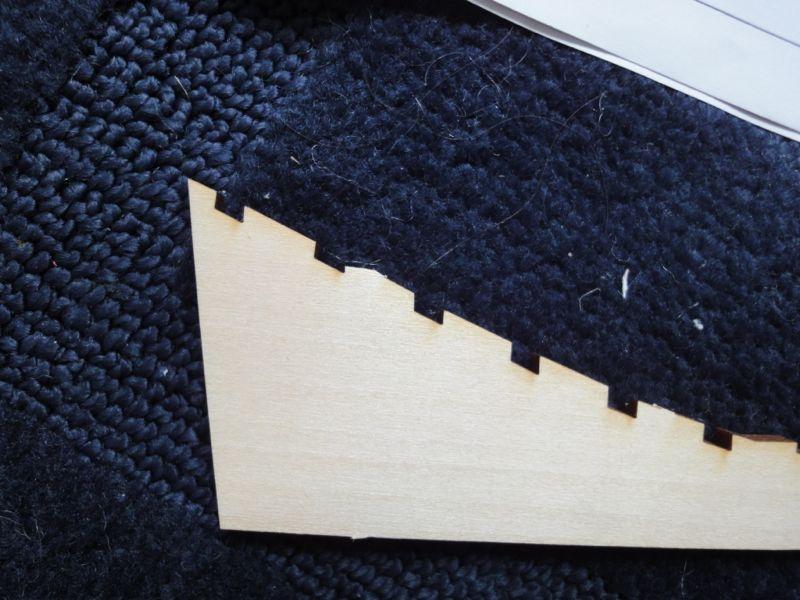
The kit The template didn't line up too well at the stern, and needed some help. The card templates that came in the kit didn't match up well to the plans. I sort of ignored this and just tried to get the outlines "close enough" I also used some drafting tape to mark off the width of the keel The hull profiles on the plans were actually pretty far off from the provided templates. Being lazy, I just stuck with the templates.
- 20 replies
-
- 1
-
-
- phantom
- model shipways
- (and 1 more)
-
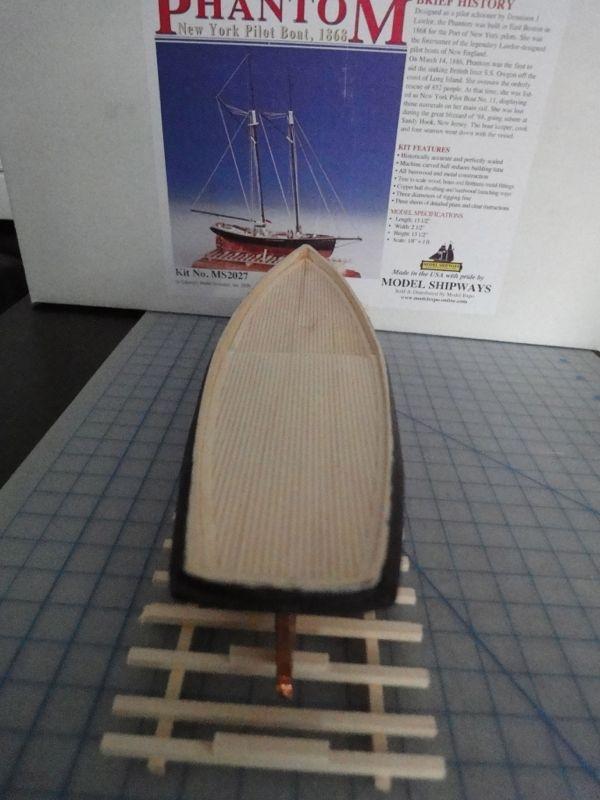
My current comments during the re-posting are in [brackets] Day 0 · 1:00 Read Mr Pasarro’s practicum · 0:30 Ordered Kit Day 1- April 30, 2012 Start 11:30am Finish 5:00pm. Total time 5:30. · 1:00 Printed Mr Pizarro’s practicum, opened kit, read directions while eating breakfast (I doped the Ford TriMotor and also finished building and painting the plastic pieces for painting) · Spent about 5 hours gouging and shaping hull · Spent about 1 hour headscratching over retarded plans and messed up scale. Problems already. Hello all, I have purchased and started the Phantom kit by Model Shipways. My goals for this build are 1) Build in a reasonable amount of time- 6 months so I can get the refund. 2) Clean build with appropriate deck fittings, etc. I have done a good amount of sailing, and having things in the wrong place would bother me when look at the model. 3) Little worry for historical accuracy, hull shape, scale, etc. This last bit is mostly a concession to the kit itself, as explained in more detail below. Having a deck fitting in the wrong spot is glaringly obvious to a casual observer; having the hull shaped “wrong” will be nearly impossible to detect, and I don’t much care anyway. “Boat shaped” is good enough. Regarding the last point, out of the box I was quite excited. This quickly turned to confusion. This kit has significant problems with the plans as drawn and the hull templates. The short version is they appear to be drawn at a different scale, possibly as the result of duplication errors? Plan problems: 1) 1” on the plan is 1.2” in the real world. 2) The kit specifies a 1/8” by 1/8” keel, but the keel is 1/8” by 1/32” on the plans. [re-post note: this doesn't make a lot of sense but basically I was really confused by the scale conversion process] Template problems: 1) Does not at all match up to plans. See photo below. 2) Wrong shape anyway 3) Templates forward of station 4 not account for the flat where the keel beds; the centerline as marked is directly at the break between the curved hull section The remedy for all this is simply to ignore it. If I had to build this boat again, I would not even bother shaping the hull, just sand the keel area flat, glue on the keel, finish sand and call it a day. Instead, I gouged and carved away for hours to arrive at something that looks almost identical to when I started. Also, I only have emery cloth, not wood sandpaper, and it doesn’t really work on the bass. So tomorrow morning I have to go to the hardware store and get some sandpaper and wood filler. [i ended up not using the wood sealer] I will never build another solid-hull model again unless I just ignore hull shape. Day 2- May 1, 2012. Total time spent: 0:30 going to Home Depot. · Went to Home Depot, bought wood sandpaper (nice stuff- back is sticky so doesn’t slip) also bought wood filler and a rasp. Didn’t end up using filler or rasp (see next day). [Cannot emphasize enough how nice that sandpaper is! the sticky back keeps it from sliding off the sanding block] Day 3- May 2, 2012. Total time spent: 8:00 · Finished shaping hull with sandpaper · Built and fitted stem, stern, and keel · Built and fitted rudder · Created “step” along outside of rail · Gouged and shaped deck step, aft rail, and rail area around bow to shape · Finish sanded hull Day 4- May 3, 2012. Total time spent 8:00 · Built ship ways. Easy, straightforward build. Nice results. · Final finish sanding of hull. Decided that I like the slightly-less-than-perfect look of the hull, didn’t use filler. Anyway, most of it will be covered with copper. 20 total copper tiles cut and fitted. · Tack rag before paint and between primer sandings · Painted hull and rudder: 2 coats of white primer sanding in between. · 4 coats of “Hull and spar black” by brush. First coat looked very spotty and crappy. Final coat looks great. Did NOT sand in between color coats. Waited 30 minutes between coats · Couldn’t resist- cut copper strips and covered rudder with copper. Gorgeous result. · Decided to go for it, used tweezer tips to put tiny dimples to simulate copper nails. Looks great too! Day 5- May 4, 2012. Total time spent 9:00. Total copper tiles laid today: 43 on keel, 188 on hull = 231. Running total 251. · Laid out waterline. o Used the shipping ways to establish proper angle fore-aft. o Used framing level and MkII eyeball to establish left-right symmetry. Confirmed by measuring down from rail at deck step with digital caliper o Used Scrubs DVD + Spaceballs DVD + 2 Budweiser coasters (from the factory!) plus pencil to form high-tech waterline height gauge. · Copper! Copper! More Copper! Method: o Cut 50 tiles at a time to stay sane. Used a simple jig made of bits of 1/8” wood (see that other guy’s build log) o Quickly got good at pulling copper off backing without creasing and distorting copper. o Placed tiles, attempting to keep small overlaps. o Burnished down edges with pencil eraser. o Trimmed edges as necessary at coppering pattern transition area. See Mr Passaro’s practicum. · Coppered keel first (3 hours?). Used bigger tiles, 1/4 x 0.47”, total 43 cut and laid. Took like 2-3 hours! · Coppered straight-line aft keel area. Took about 3 hours a side. Took care to match left and Right sides, and maintain brickwork type pattern. · Coppered first curved hull keel line. Took about 30 minutes a side. Cut a total of 200 ea. 1/4 by 1/8” and used 188 of them to do keel sides and first run hull. Worked hard to maintain symmetry. · Discovered no wood to make cap rail. Emailed Model Expo and am expecting new stuff to arrive soon [i felt kinda bad after this: I ended up no using the material they sent me; I just cut a singe sheet of thin bass wood to the entire cap rail in one piece] Day 6- May 8, 2012. 5:00 total. · Cut 150 more copper tiles. Installed about 120 of them, equating to four full runs on either side. · Day 7 and 8- May 21-22, 2012. 18 Hours total. · Cut and installed the rest of the copper tiles. Total estimated coppering time: 40 hours. · Dimpled same tiles to simulate rivets. · Fitted, cut and glued simulated decking. · Hull proper mostly complete. Day 9- June 8, 2012. 2:00 total. · Fitted and glued waterway. · Fitted trim piece of manila folder on step of deck. Not too happy with results. Day 10- August 4, 2012. 3:00 total. · Cut and fitted bulwark stanchions. Took much less time than expected, about an hour. Left long, sanded flush. Easy. · Cut bowsprit notch and fitted temporary bowsprit for upcoming caprail installation. Looks really cool. · Cut caprail from one piece of bass sheet from The Red Caboose. Was significantly easier than expected. Sanded inner and outer edges. Looks great, adds a lot to the model. I highly doubt the thickness of the bulwarks and caprail are to scale, but the overhang inboard and outboard looks good on the model. · Fitted cleats and eyes under caprail. Painted cleats too (duh). Left eyes shiny brass. · Realized I forgot to cut scuppers. Don’t care. Hull looks clean without them anyway, and unless you are some kind of naval buff, no one will know/care. Also didn’t drill for the two random holes on the side. For the pumps? · Decided to skip installing the rudder for now: fragile and will probably break off if installed now. Will be a finishing touch at the end of the build. Day 11- August 8, 2012 6:00 · Stained caprail. Whopping 2 minute job. Subtle but really sets off the model. · Soaked and formed splashrail using the cut out middle from the caprail as a former. Let sit for like 4 hours. Marginally effective. Sanded to shape, cut notch with file, then painted. Glued in place. Again much easier to glue in place than expected. · Added caprail details: Pins and eyes were laid out in relation to masts. Left un-glued for now in case things need adjusting. Will super-glue in place later. · Cut tenons in Fore and Main masts. Carefully measured and drilled holes for mast tennons in deck. Stepped masts for the first time. Very excited. Built cardboard templates to get mast rake angle correct. · Built stern fairleads from bent wire superglued to manila card. Then painted and glued in place on caprail. This job sucked and tried my patience. Least favorite step so far. · Drilled holes for Main chainplates in caprail, somewhat messing up the paint. Will have to fix later. · Filed, drilled and bent the two Main chainstays (one starboard, one larboard) from small brass strip. About 1 hour work each. **Go slow when drilling tiny holes in brass** (I broke a drill bit getting too excited). · Stepped masts again, used temporary red rigging thread to get chainplate angle correct. Drilled holes in hull for chainplate nails, and temporarily installed chainplates. Still need to remove, re-paint hull chips black, then permanently mount chainplates and rig deadeyes. Day 12- August 9, 2012 5:30 · Built and installed the 4 foremast chainplates. Est time 30 minutes each at this point. Took photos. · Built traveler from brass strip stock and wire; soldered it together. This was fun. About 1.5-2 hours mostly getting all the soldering stuff out of boxes. · Installed first blocks: the one right in front of the traveler and the traveler block itself. Use of the “third hand” soldering jig thing is ESSENTIAL. About 30-45 minutes per block! Tedious but really fun. · Built the wheelhouse and the cabin entrance. Didn’t paint them yet. · Played with cockpit combing and built wood seat for the top; which is sloppy looking and not necessary so I’m probably not even going to use it. [at this point I stopped with this diary ] [ After all the deck furniture was built, I did the masting and rigging which was really the most enjoyable part of the entire build]
-
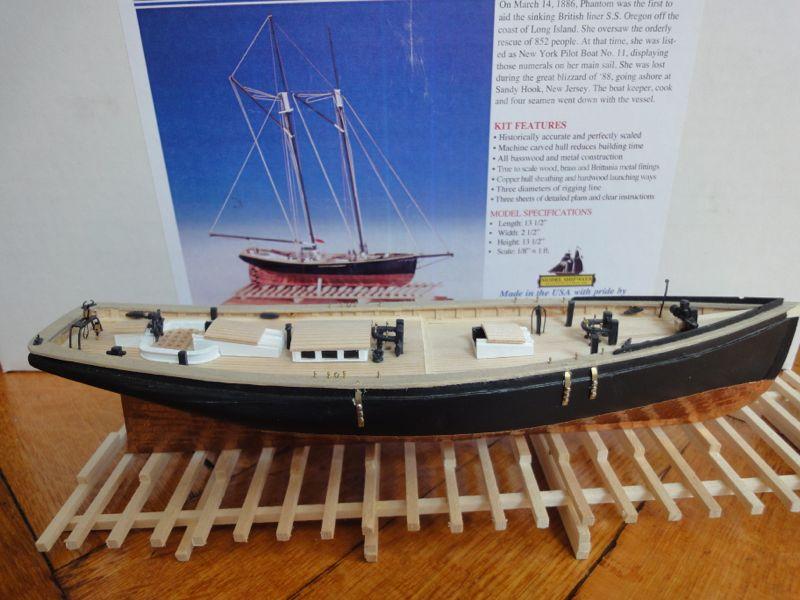
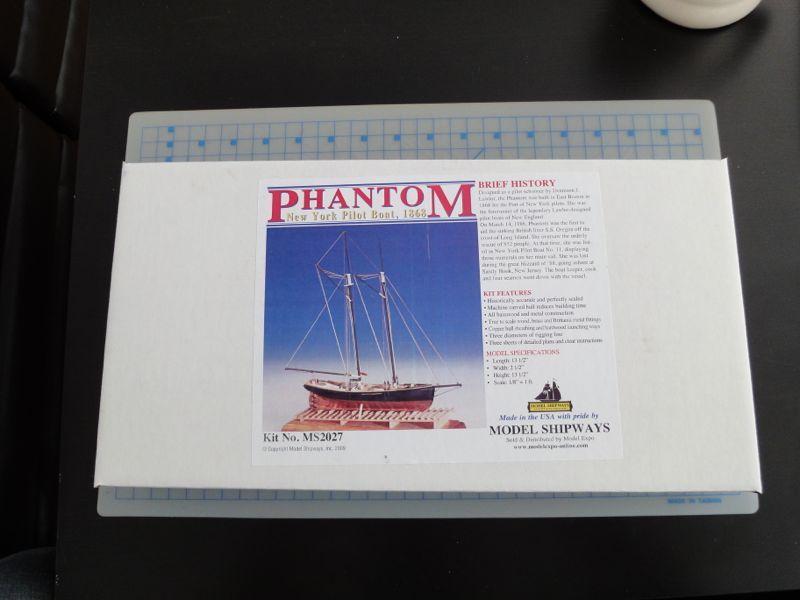
Greetings everyone that weathered the storm. I happy to re-present my build of the NY Pilot Boat Phantom. I currently live in NYC, and it is great to imagine this sleek vessel slipping up and down the Hudson. I built this sometime between about April 2012 and August 2012, within the allotted 6 months for Model Shipways' "build for free program." True to their word, they credited me back the approximately $100 for the kit and paints and tools, which I used to buy my current project, the Emma C Berry. I cannot recommend this enough for beginner ship modeler. Combined with Chuck's amazing supplemental instructions, the build was a true pleasure. I can easily see how, without that, it would be frustrating to the point of turning off many a hopeful model builder. As I built the kit, I kept a sort of personal journal of how long things took to do. Then I realized that it might be helpful for others, especially beginners like I was (am?). At some point, about the time I started rigging the model, I stopped keeping such detailed records. I'm going to just basically copy-paste my build notes in the next post, then start re-uploading the photos with a few comments. Cheers! The infamous "what am I getting into?" shot!
- 20 replies
-
- 1
-
-
- phantom
- model shipways
- (and 1 more)
-
I look forward to the lot of us building this charming boat together.
-
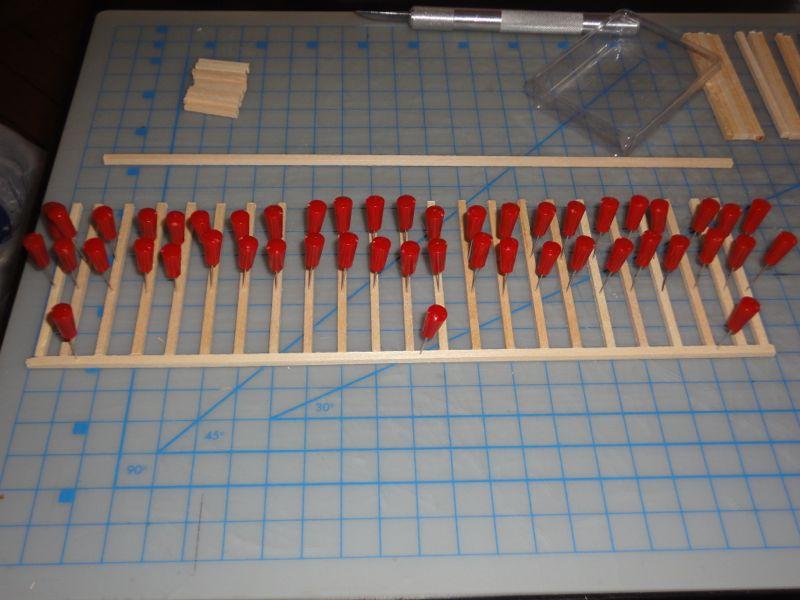
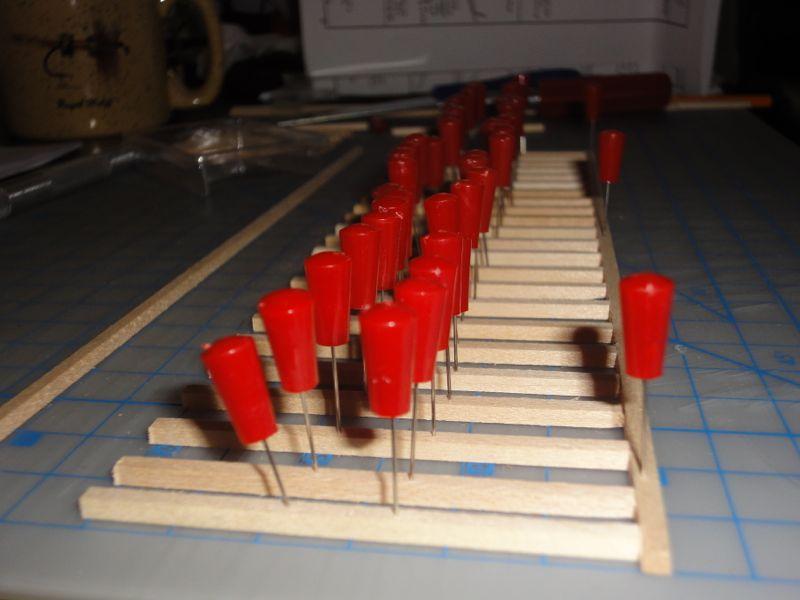
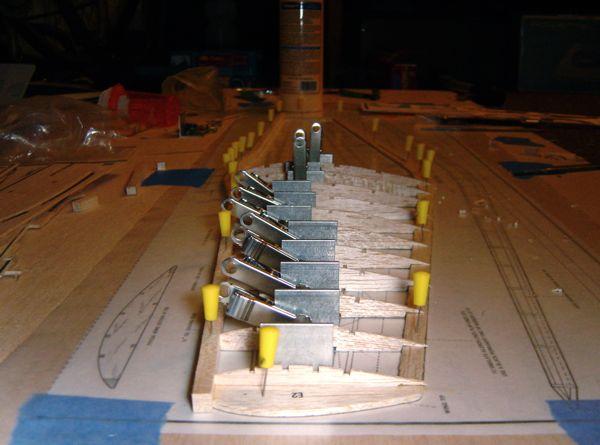
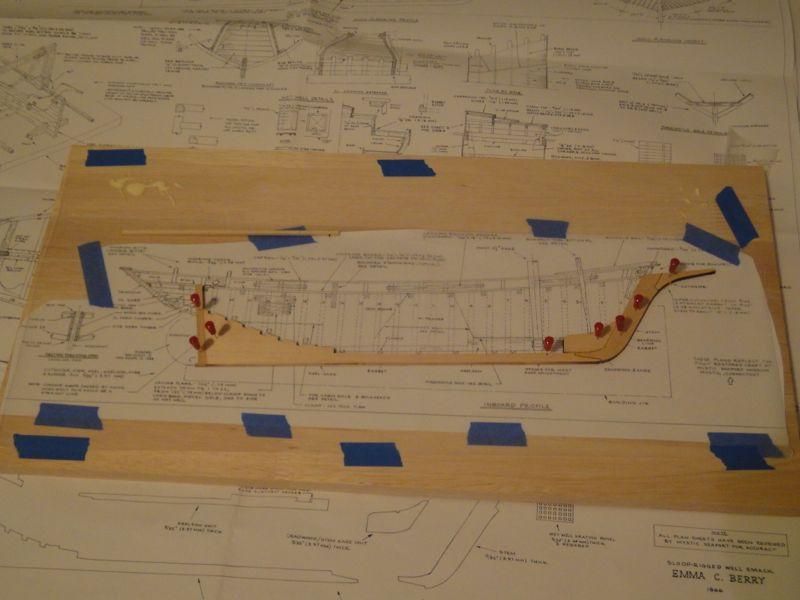
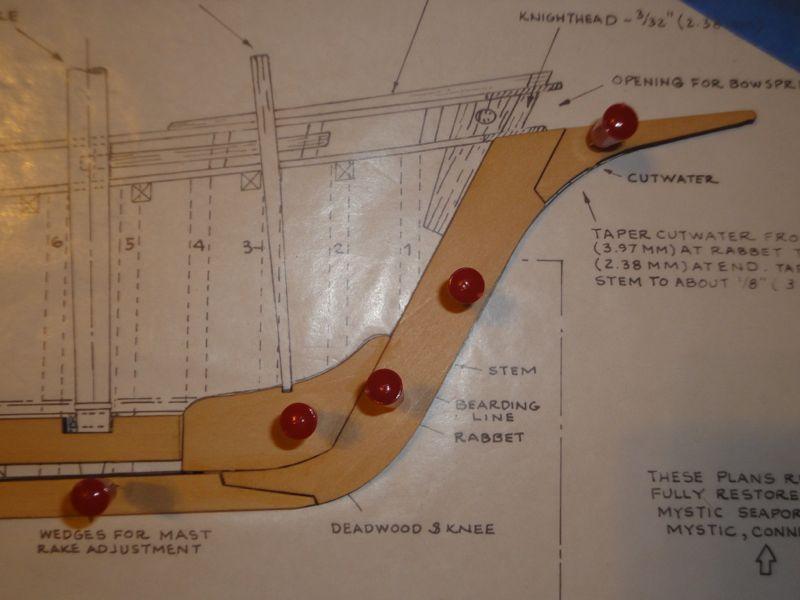
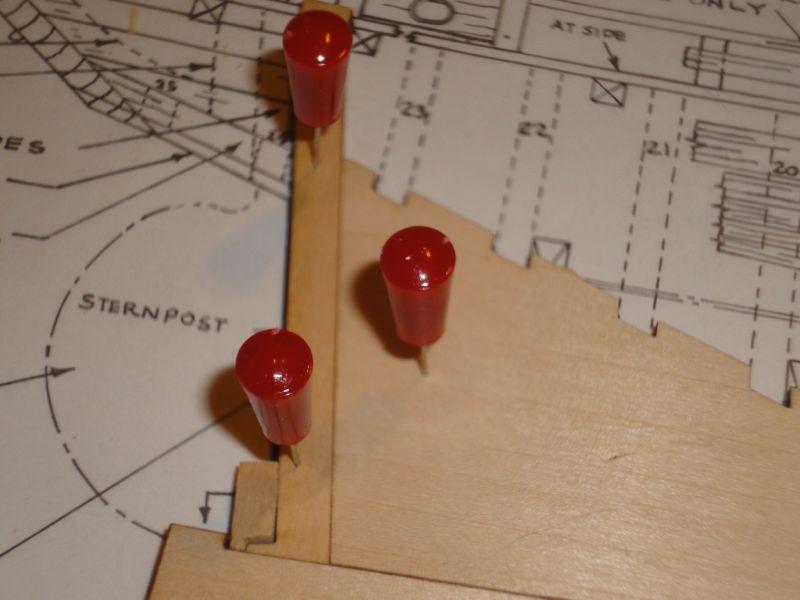
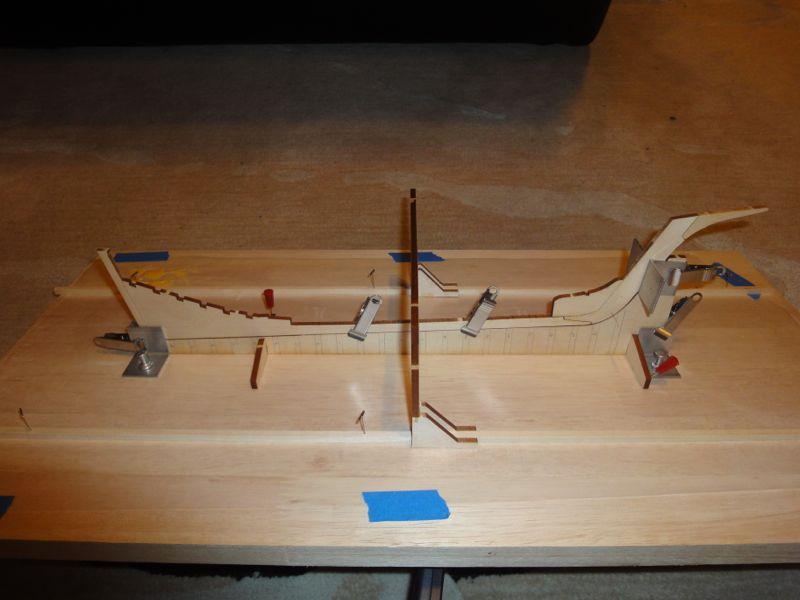
ASSEMBLING STEM AND LAYING KEEL I didn't take the obligatory "kit contents" photo and now I regret it. I was a little curious as to how nice laser cut parts are. It promises perfect fits right out off the bat. So, the first thing I did was mess up cutting the very first piece out buy chipping a corner off. This might not be a good omen! Moving on, I started the build airplane-style: by cutting out the plans, taping waxed paper over it, then laying out everything before gluing. The fit wasn't as seamless as I'd hoped with the laser cut parts. But it is tolerable, I guess. On my last build, The Phantom, I swore off ever building a solid hull model ever again. I hope this kit doesn't make me swear off laser cut kits because that seems to be the new standard! Sanding off burn marks is already not very fun. In any case, my next kit will be Chuck's Syren (already on the shelf!) After that, though, I think the only way I will be satisfied is to scratch build. And I already have some Hahn plans for that one (the Pelikan!). Wow, I should really get busy with this hobby! The stem was assembled and glued into place after all the dry fitting I could stand. This took about 2 days I also put the framing jig together. This is a very nice touch in the kit. I used my aluminum 90 degree angle jigs and clamps (purchased from Micro Mark a decade ago) to make sure everything was true. Last thing I want is a messed up jig to loft a bunch of messed up frames! The stern was a teeny bit short, so I spent way too long (like, an evening's work) making a little block to space everything correctly. This little bit was critical to getting the stem to sit right on the building jig and at the proper height from the building board. This was all laid out flat before un-pinning and assembling the building jig. I also marked all the frames' positions with a pencil, but that isn't shown in this photo. The keel is officially laid! Project underway! Like everything, I took a long (LONG!) time setting up the building jig. Everything was measured a bunch of times for square (using a digital caliper) and making sure it was centered perfectly. I can't help but feel that the time spent here will go a long way to making things line up right for the remainder of the build. Next time, lofting the first frame. cheers!

-
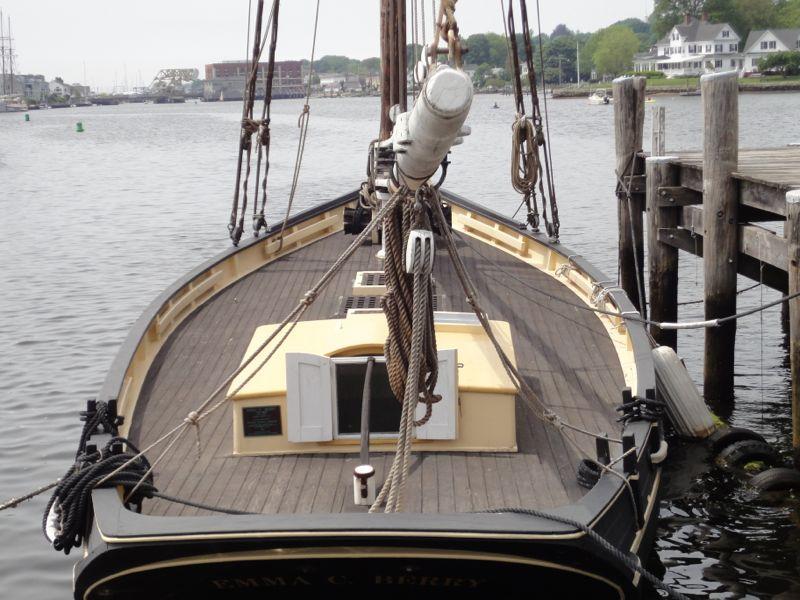
Hello everybody. I'm starting my Emma C Berry build. I had previously built the Phantom kit, also from Model Shipways, and used the "build for free" credit to purchase this kit. Emma C Berry, at Mystic Seaport in May, 2010 I hope to elaborate more in the future on my goals for this build, my model building background, and maybe even some product review stuff, but for now, I will just start the build log already! Edit: Please check out my photos of the real Emma C Berry at Mystic Seaport! TABLE OF CONTENTS Stem and Keel Lofting Frames Clamps Deck Beams Wet Well Mini tutorial: Acrylic Wet Well Faux Planking Bunks Ceilings Cheers! --cb