Moxis
-
Posts
314 -
Joined
-
Last visited
Content Type
Profiles
Forums
Gallery
Events
Everything posted by Moxis
-
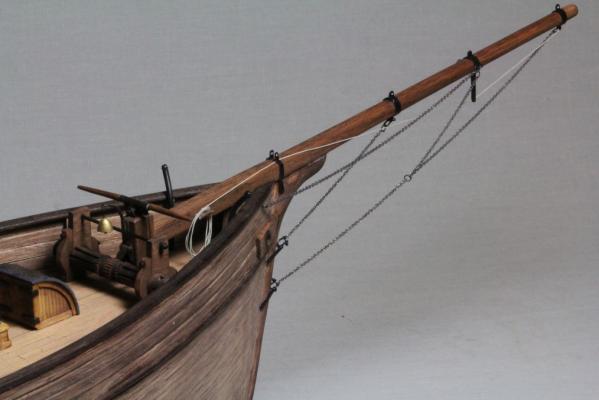
 Next I started to make the bugsprit. It was made of alder, which is local, cheap, soft and very tight grained wood. Not very often referred here, but I like it very much. Coloured again with oak stain. Chains are bought from a jewellery shop, being silver, because I didn`t find anywhere thin enough made of brass. Darkened with Carr`s brass darkening stuff. Shackles are of 0,56 mm soldering tin and insect needles. The rope is from German Morope, being 0,25 mm beige rope. I don`t know the function of this rope, and whether it is correctly laid, because there was no information in the drawing. But I am sure the specialists among you could give more advice for this. Another thing: I would like to edit the heading of my build, but don`t know how to do it. I wonder if you could help me. To be continued..... matti
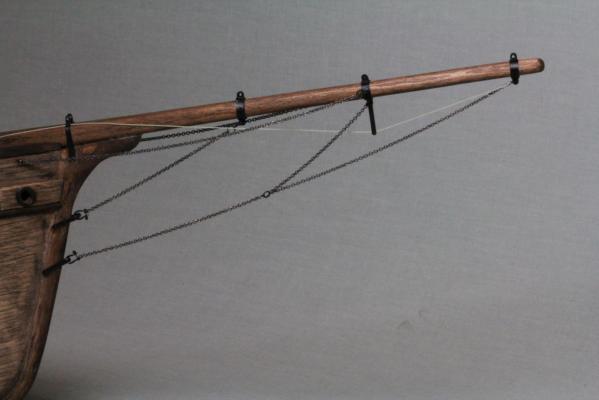
-
There are different grades of birch plywood available. I use always aircraft grade plywood which is normally 5 to 10 plys, depending of thickness. Very good flat material, easy to saw, sand, etc, and keeps it's dimensions perfectly. Normally lumber yards sell worse quality board which warps, is not homogenous, etc.
-
Thanks again aviaamator and Patrick. The pulleys are there in the slots. However difficult to see because they are dark brown. Also diameter could be a little bigger.
-
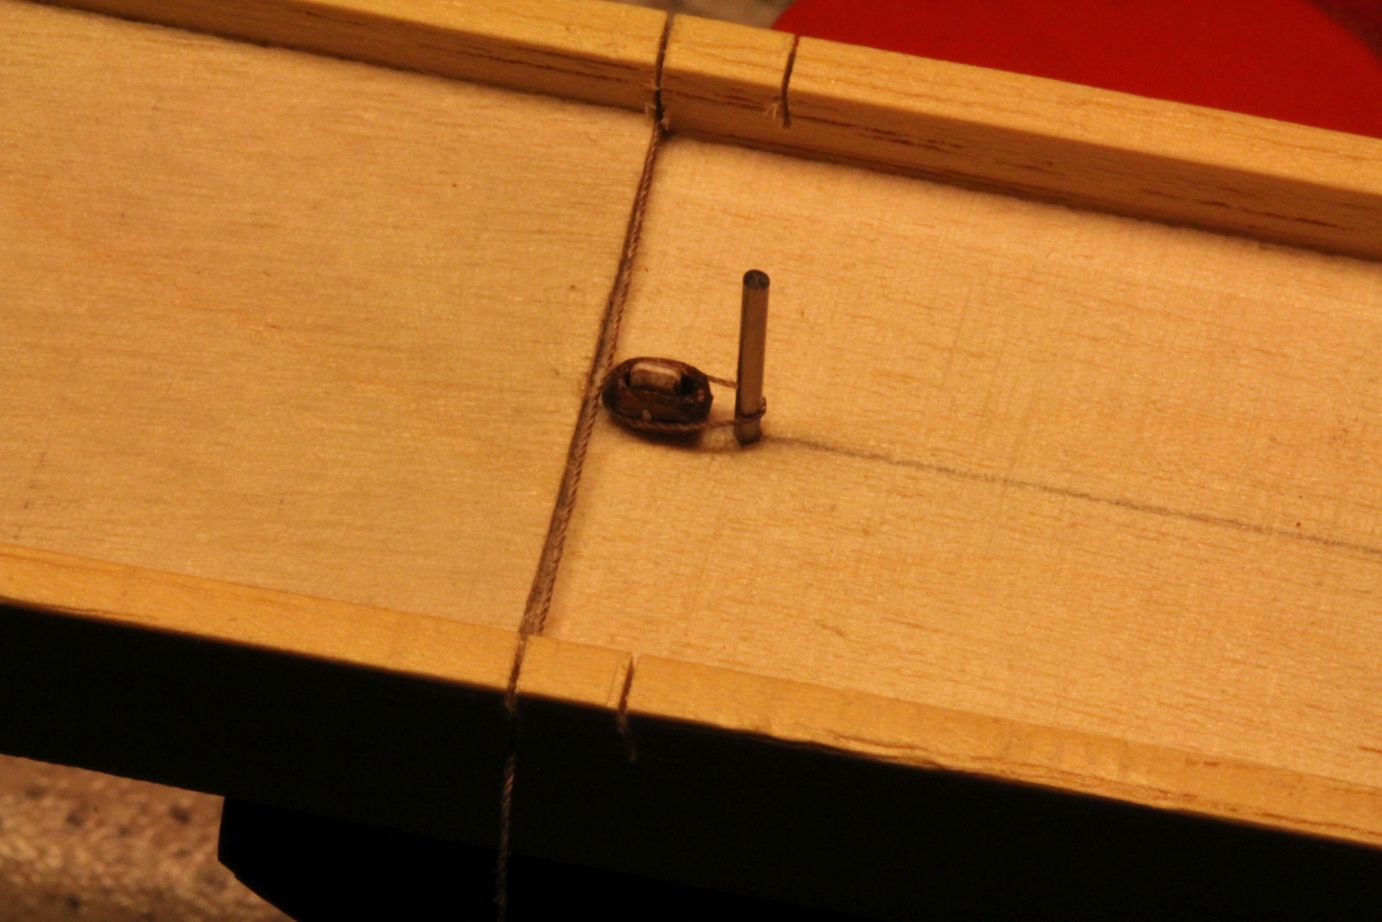
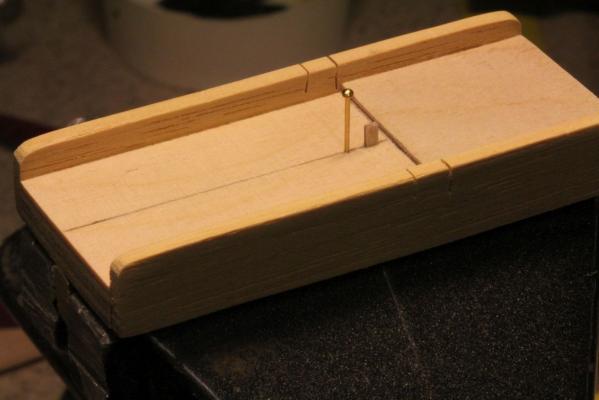
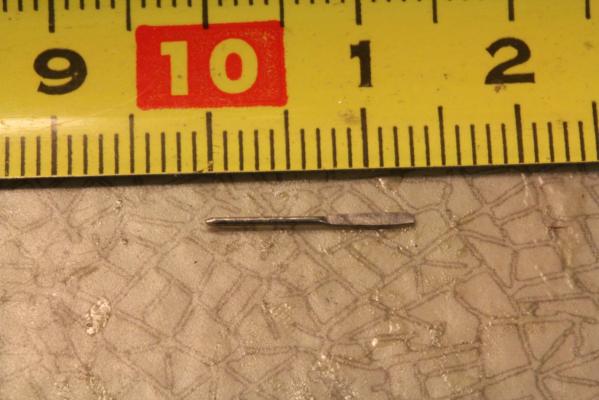
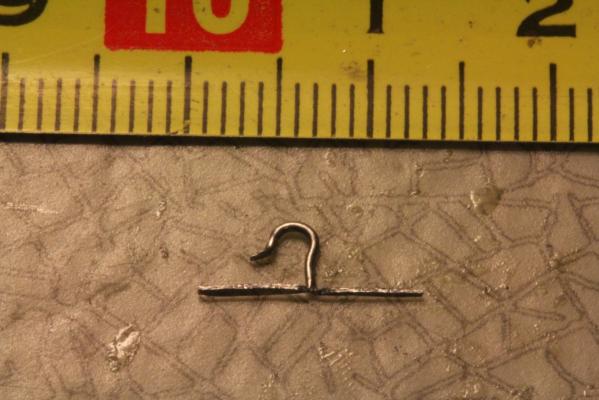
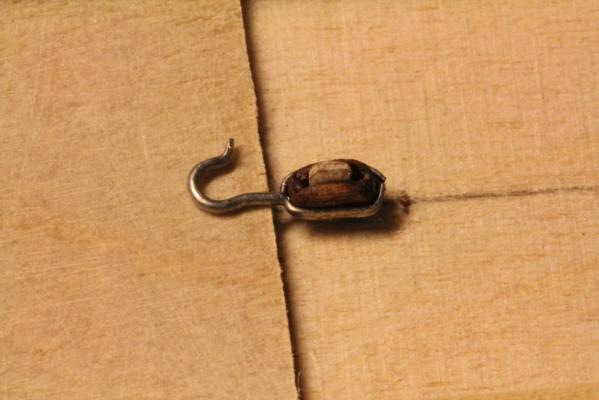
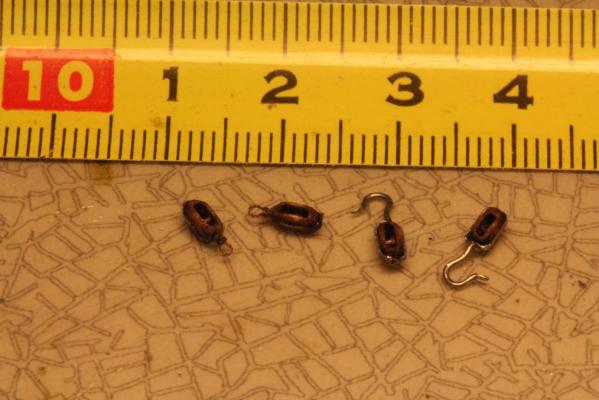
After having found the right method for block production, a further development had to be made. Almost all the ship`s blocks have some sort of strap around it, made either of rope or metal. I was wondering if I could find a way to produce these too, without spending the rest of my life making them. And for this reason I built a small jig using some plywood and strip pieces: With this jig it is possible to produce both types of strapped blocks. The metal strap was made using a piece of 0,56 mm soldering tin, first by flattening other end of it: The flattened part was cut in two, and other end was formed as a hook: And finally the block was attached into the jig, metal halves were bent around it and secured with tiny drops of epoxy glue: The blocks with strap made of rope were made by first wrapping a piece of 0,12 mm thread around the pole and block: Second piece of thread was used to make a seizing between the block and pole: And finally we had both types of blocks ready: It is sure that the thin soldering tin is not capable to hold heavy stresses, so when attaching it to other parts of rigging, care must be taken. To be continued..... matti

-
Thanks for your kind words Patrick, aviaamator and bdgiantman2, and all "likes". I am glad that my humble build interests you. bdgiantman2: I too like the lines and simplicity of this ship. I am glad that I chose this one as my first attempt to build a wooden ship model. Bigger and more complex ships with their numerous guns and rigging parts would have been too much for my skills. But I will learn. Who knows what next.... matti
-
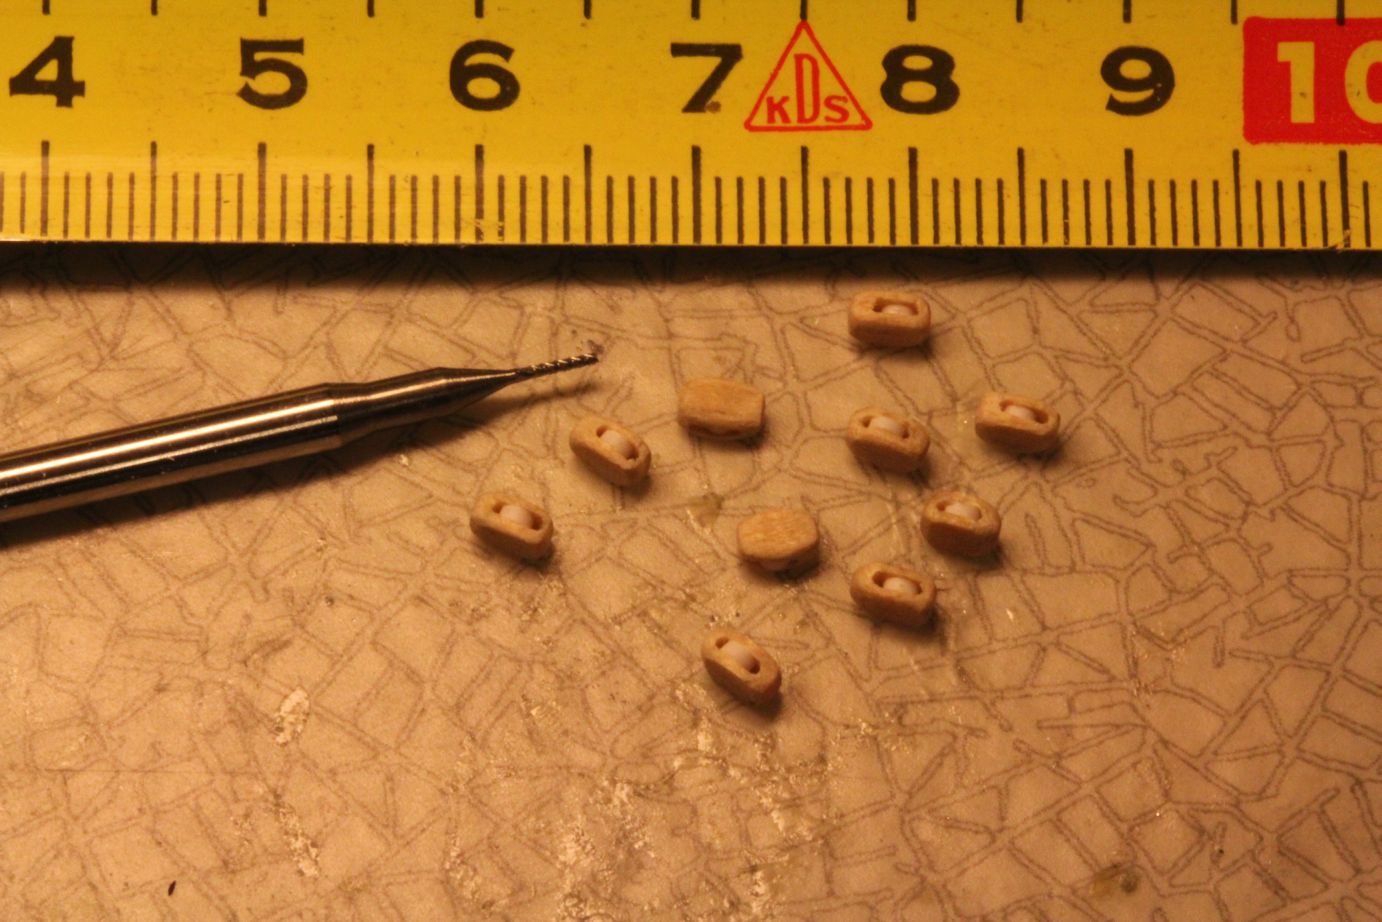
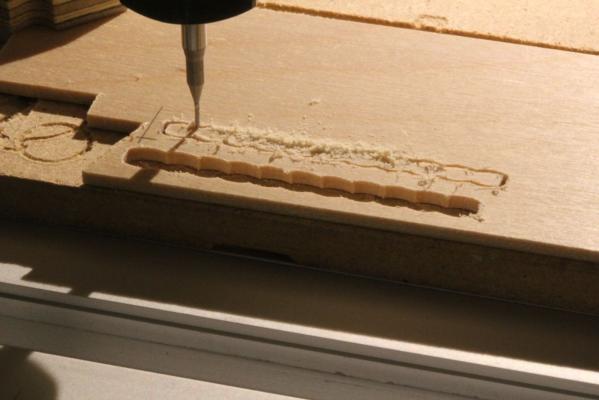
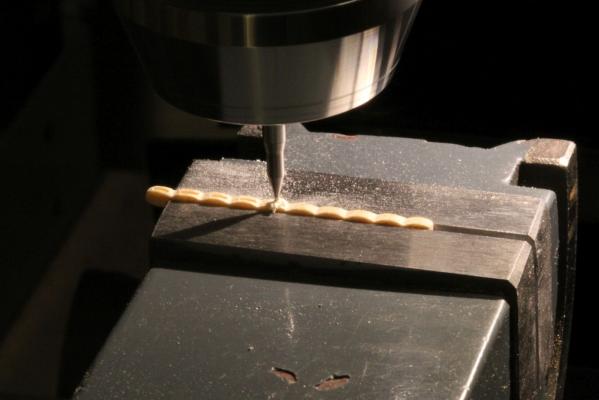
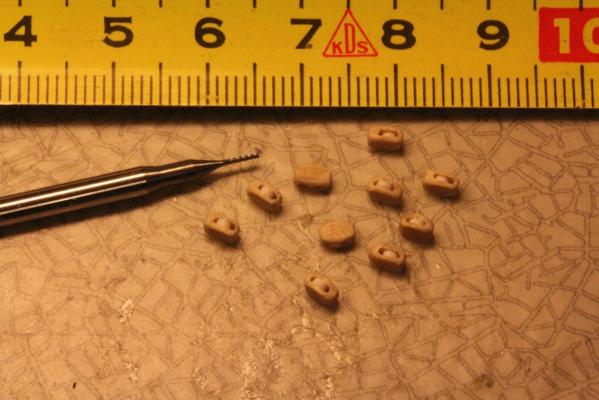
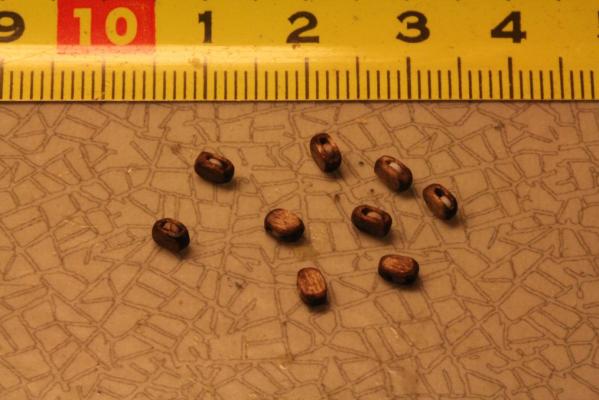
Now that the rigging phase is about to start, I had to prepare myself by starting to make the blocks. According to drawing the smallest blocks are about 4x3x2 mm, so there is no need to make very small "microblocks". Again I chose birch to be my material for these, and made first about 2 mm thick piece of it. From this a strip containing 10 pcs billets was milled with a cnc router. Because my machine doesn`t have fourth axle, the slots for wheels had to be milled using manual machine with 0,6 mm cutter. 0,5 mm thick wheels were cut from diam. 1,6 mm styrene rod and inserted into the slots. Finally the blocks were separated from strip and sanded manually & stained with oak colour. I could very easily have made working blocks by drilling axle holes to the blocks and wheels, but I thought these stationary ones to be enough for my build. Outer form milled in CNC machine: Slots for wheels milled using manual milling machine: Blocks separated from the strip and wheels inserted: Final stained blocks. Wheels to be coloured brown and glued: And now the only thing that remains is to make hundreds of these, including some double and triple ones too, but that is another story.... matti
- 95 replies
-
- 14
-

-
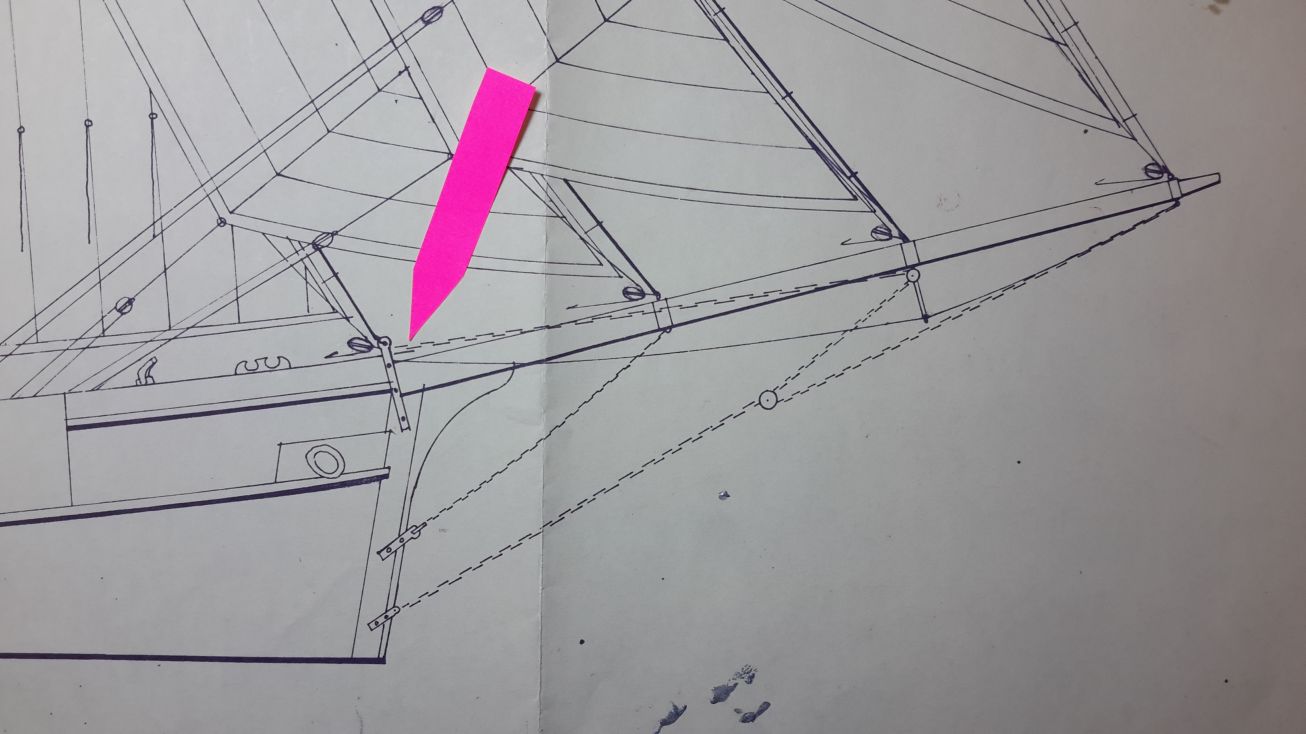
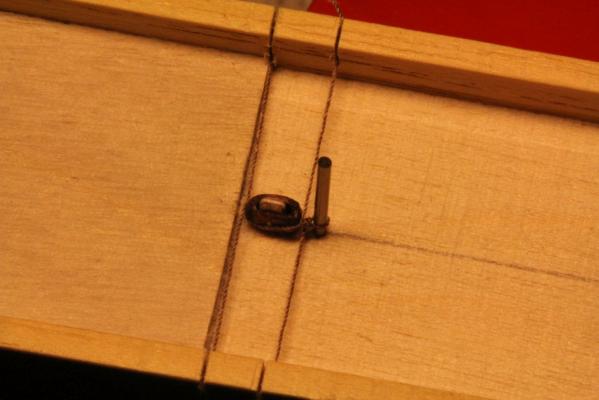
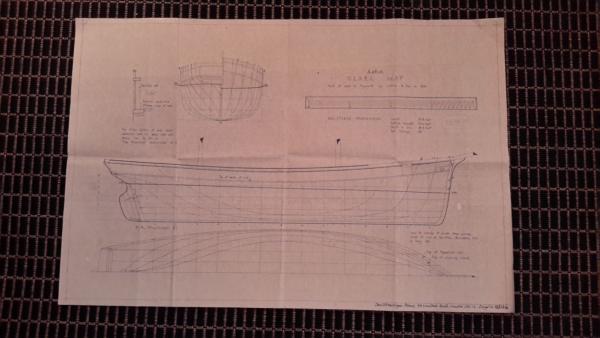
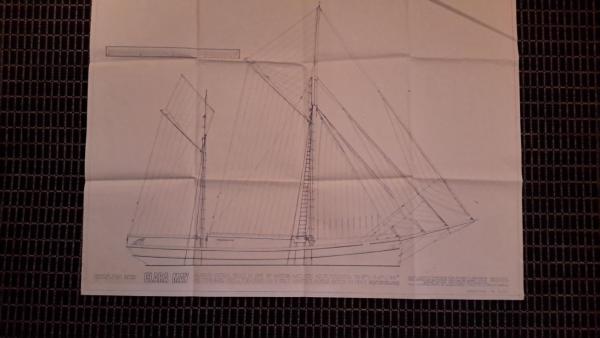
I started to make the bowsprit with my build, but encountered immediately some problems. According to plan there are one chain and one rope coming from the bowsprit towards the hull, but it is not shown clearly, where in hull these should be connected. I wonder if any of you could help me with this? So where are connected the chain and a rope below it marked with red arrow: matti

-
Hello Frank, I am glad that you like my humble build. Hopefully I have soon something new to show. Matti
-
Hello, Now that I shall start thinking of rigging of my build, a wooden ketch Clara May which is in scale 1/48, I am totally confused about the thicknesses of the cords and threads which I need. I would like to place my order for all necessary cords at the same time, but what to order? There are hundreds of different materials and thicknesses available, but which of them to choose? Matti
-
Thanks Tom and Patrick! Tom, hys hys, there are some additives in Finnish coffee which we must not reveal to anybody
-
Thank you very much for your comments Nils and Patrick. I am glad that you follow my humble build even when you are such "superbuilders" yourselves! Matti
-
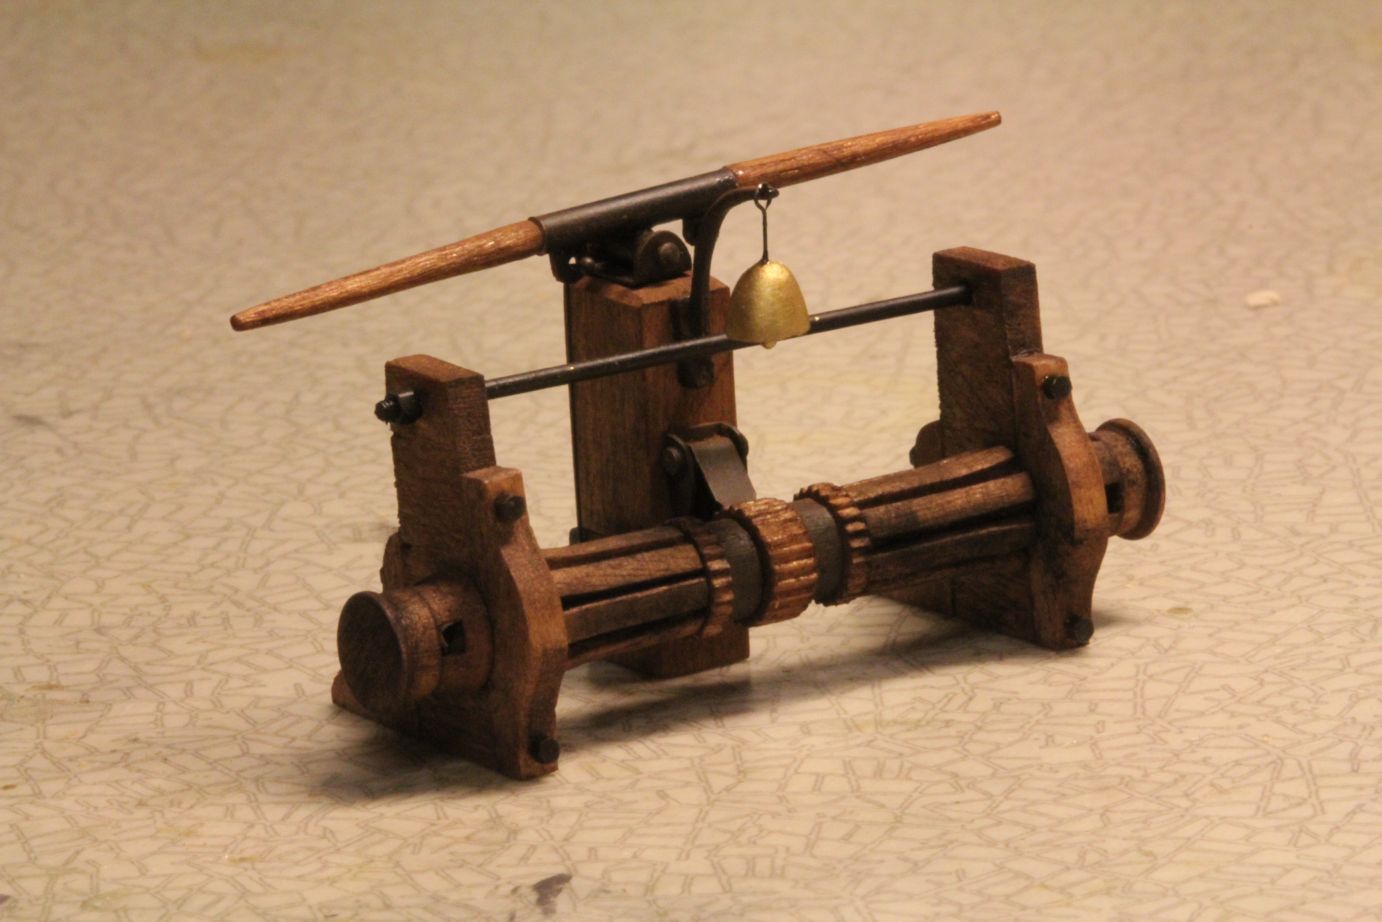
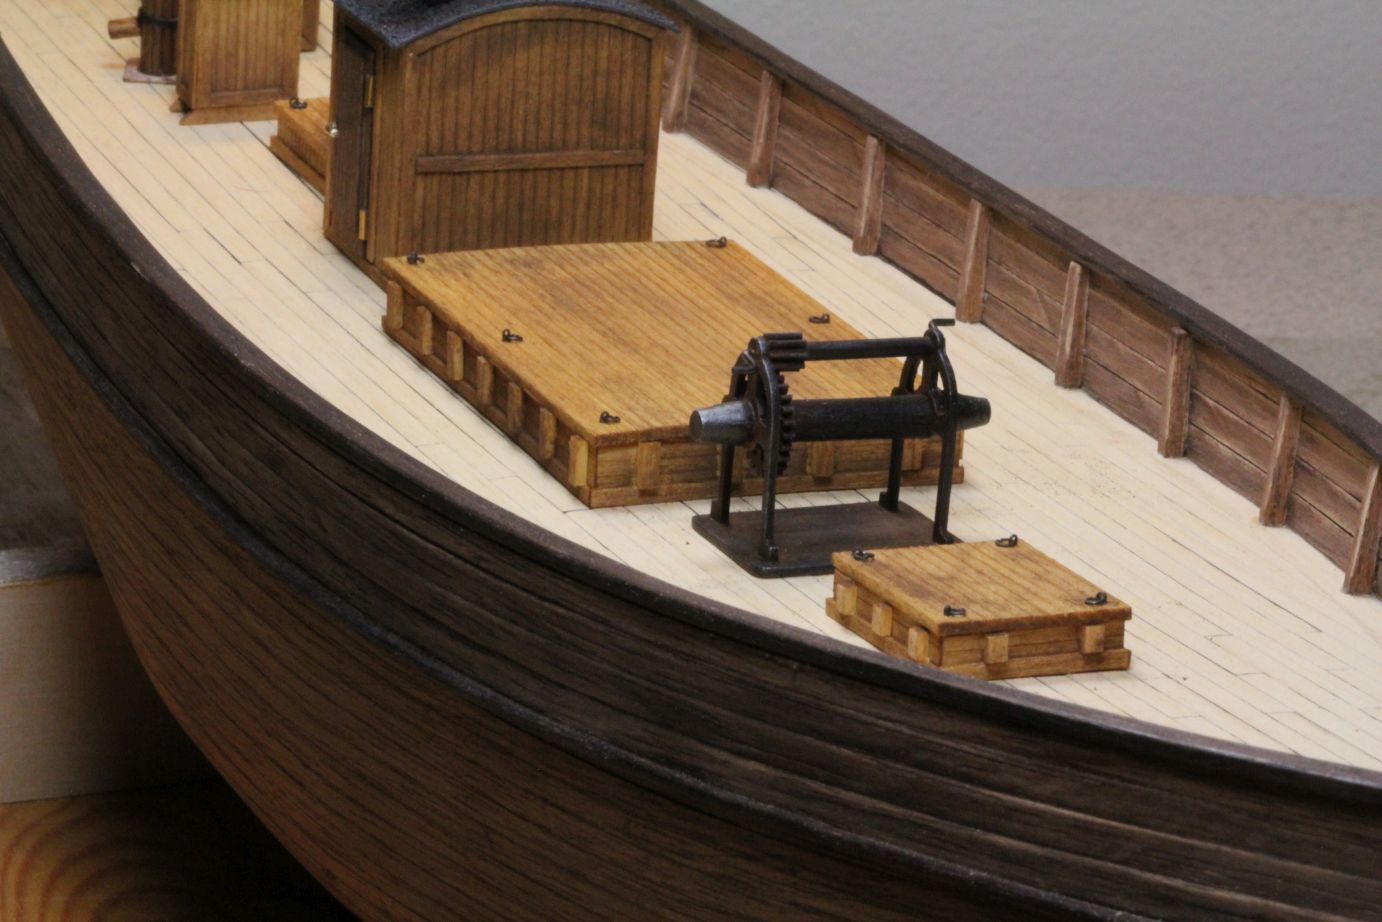
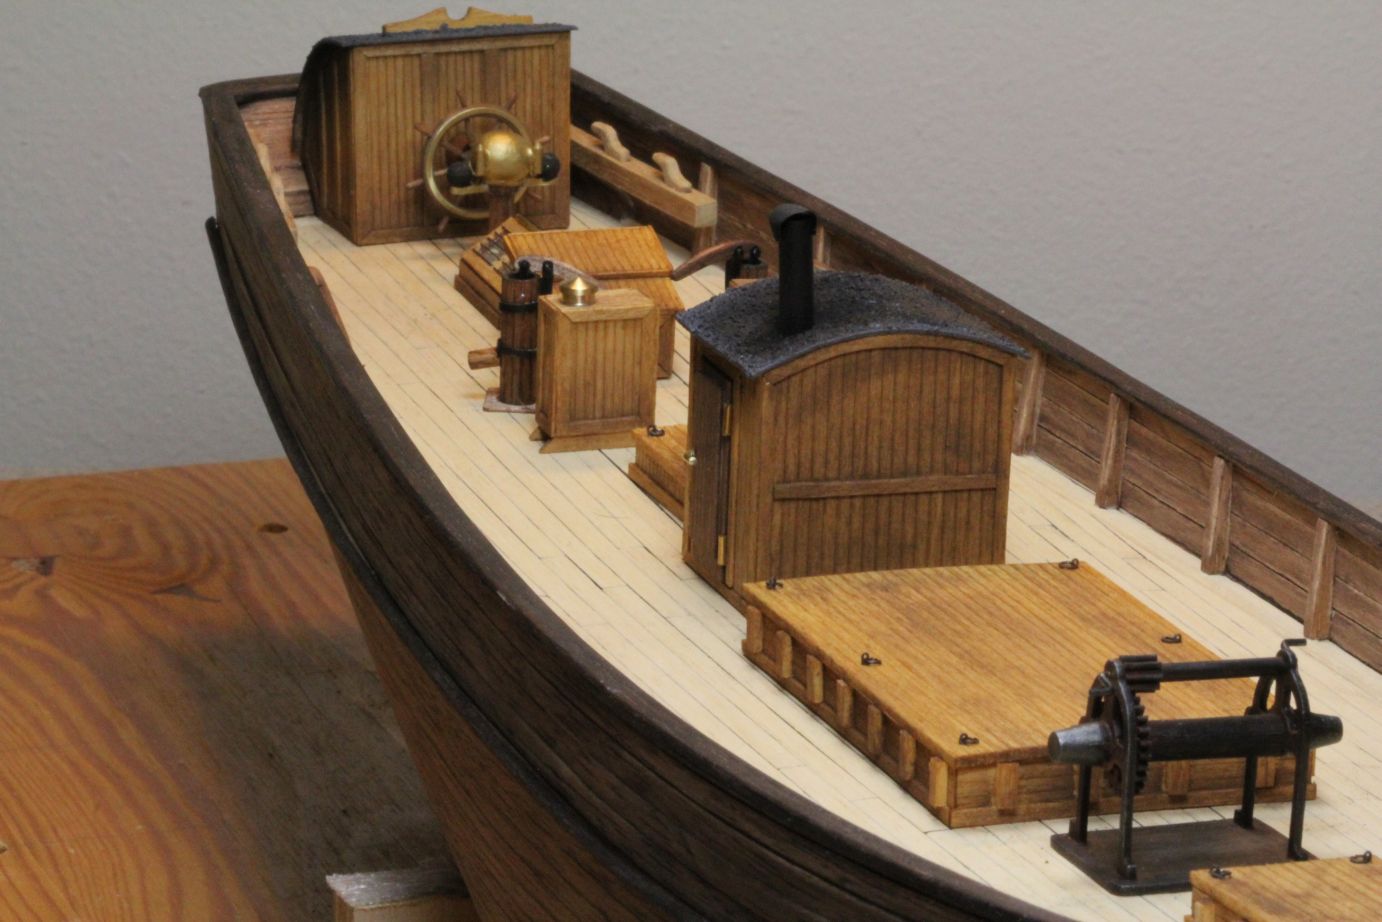
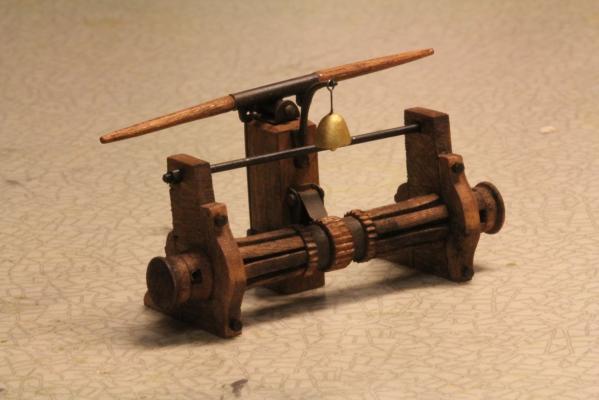
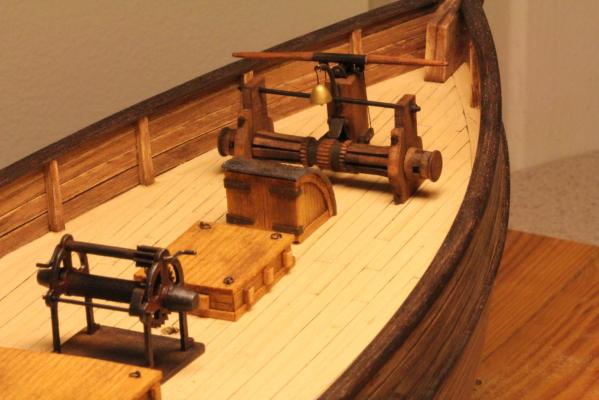
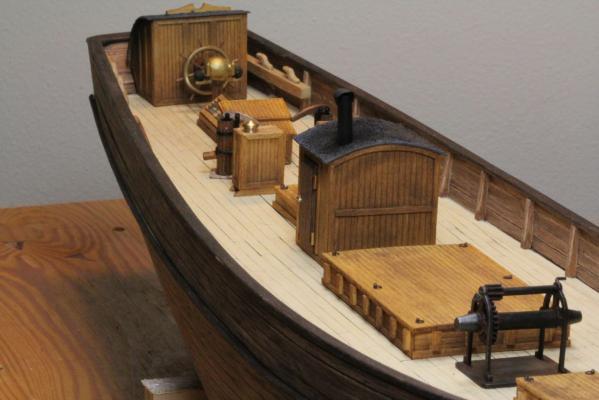
Now that the holiday season begins to be on the right side, it is time to continue shipbuilding again. The last structure on deck is the windlass. It was made of different bits and pieces of birch, the "metal" parts are styrene. Gears are milled of birch too, using the dividing attachment at the milling machine. Brass M1 bolts and M1.4 nuts were also used to represent the fasteners that keep everything together. For the ship`s bell I turned a small piece of round birch dowel which represented the inside form of the bell. This was primed, greased (to separate the cured shell from the form) and covered with the stuff made of epoxy and microballs. When cured the shell was removed from the form, and we had a beautiful thin walled bell which was painted with brass colour. Windlass and ship`s bell. Structures located on deck.
- 95 replies
-
- 10
-
-
Wonderful Nils. I am going to place my order for these immediately. From time to time it comes needs to build something that looks like made of metal with all the rivets and boltheads, so this is an answer to my prayers. Thanks a lot! Matti
- 2,625 replies
-
- 4
-
-
- kaiser wilhelm der grosse
- passenger steamer
- (and 1 more)
-
Hello Nils, After having joined this wonderful community for a short while ago I have followed your extraordinary build very carefully. All superlatives have been said already many times and I fully agree with them. However one question has not been answered before, which I have in mind, namely: Which brand of self adhering aluminum tape are you using for plating, and where are you purchasing that? I remember already 50 years ago when building models of WW2 fighters we used to use aluminum foil with riveting made with small gears dismantled from old alarm clocks, but the foil didn't have this self adhering film. The foil was glued into aeroplane wings and hull with contact glue, but that was a messy and not always succesful method. So your way to do this seems to be a superior procedure, and could be the way if I ever should need to copy a riveted surfaces at my builds. At the same time I wish a very best New Year to you, your family and all the colleagues at the forum! Matti
- 2,625 replies
-
- 5
-
-
- kaiser wilhelm der grosse
- passenger steamer
- (and 1 more)
-
Hello Nils, Patrick, Wyzwyk, Michael and avsjerome2003 and thanks for your kind words. I am glad that you like my humble build. #wyzwyg: I eat like a horse and sleep like a log, but not in the workshop. I think when you are retired and have nothing else than time, you will stay at the workshop longer than "normal" people. And because wife has her own hobbies, and doesn't have anything against, so why not. Happy New Year to all of you. I hope Santa has brought you all necessary things to be used at the workshop. matti
-
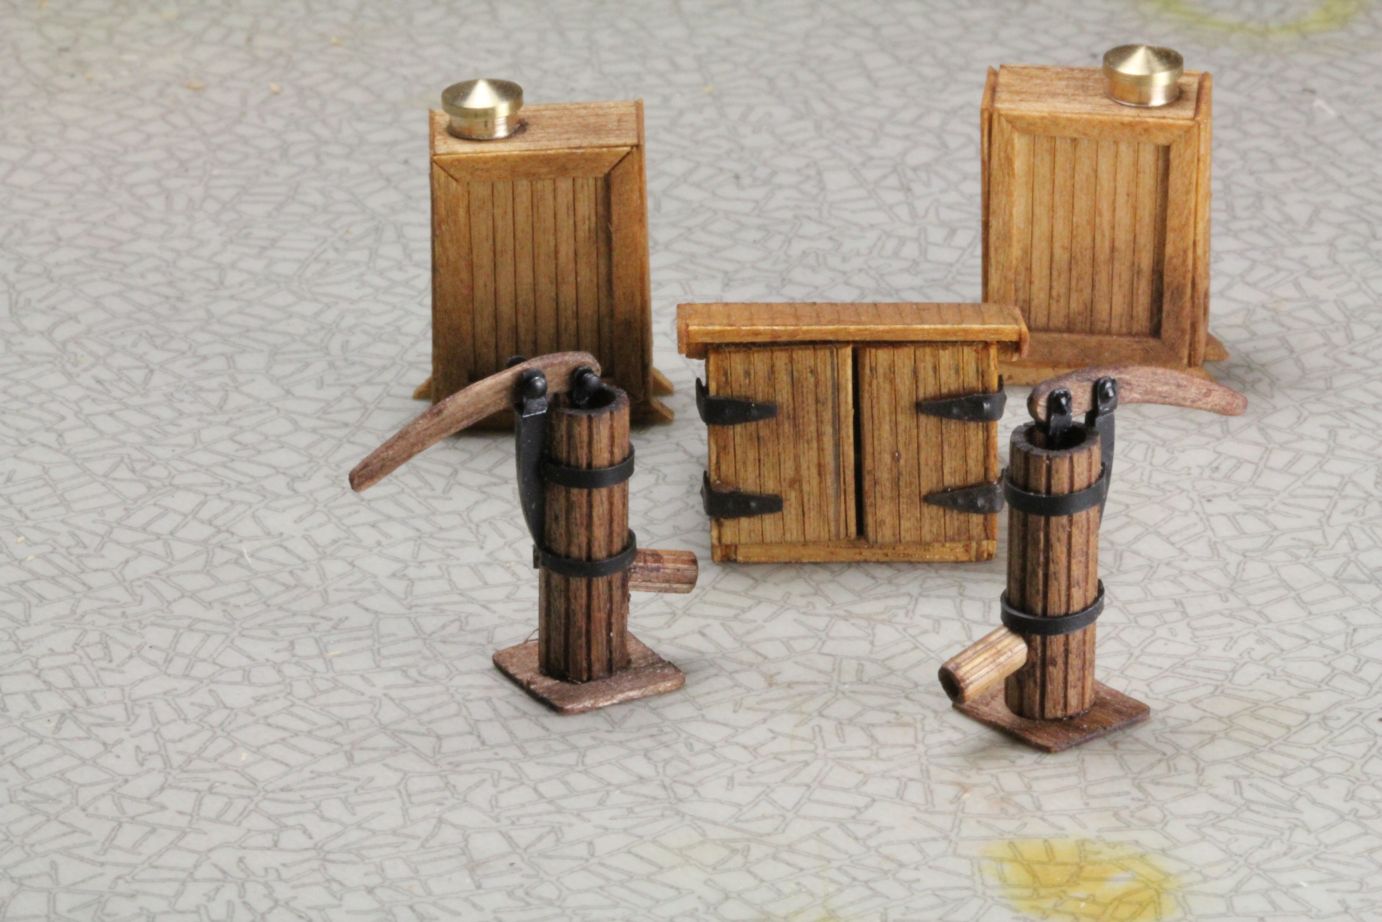
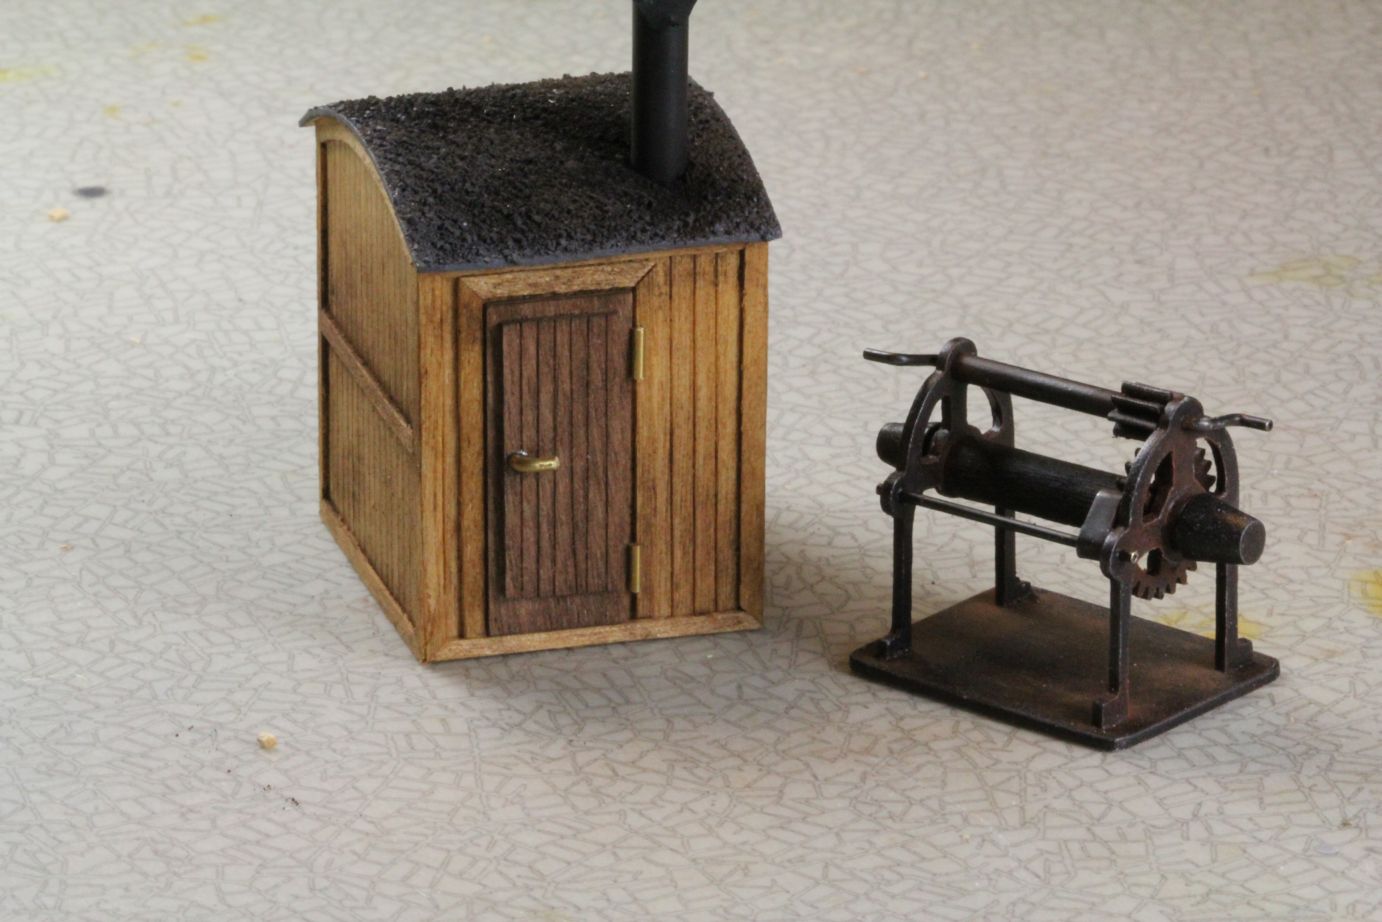
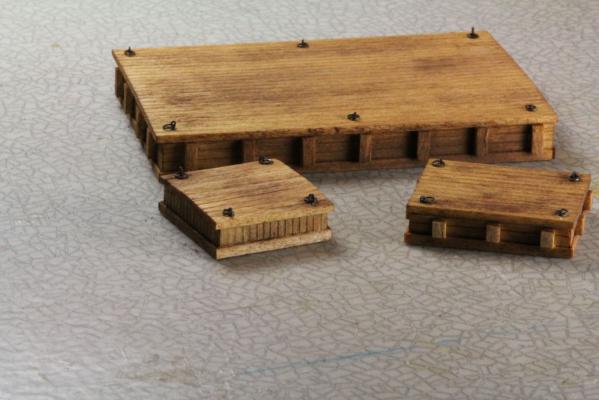
Thanks for your kind words Omega1234, Mark and Tom! And again some more deck structures. Pumps, hatch and some sort of cabinets. All made of 1 mm birch plywood and 0,6 mm veneer: Cargo hatches: Pentry house and winch: And everything arranged on the deck but not yet glued:


- 95 replies
-
- 16
-
-
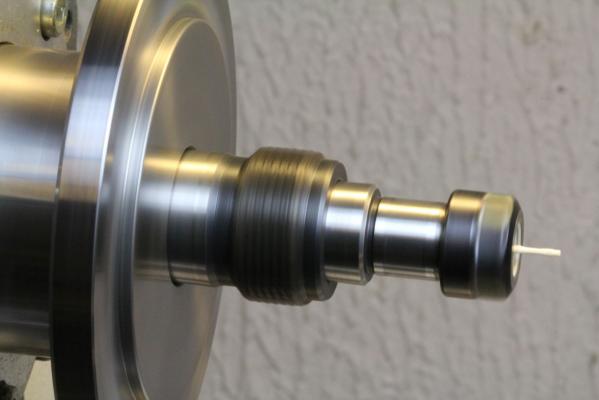
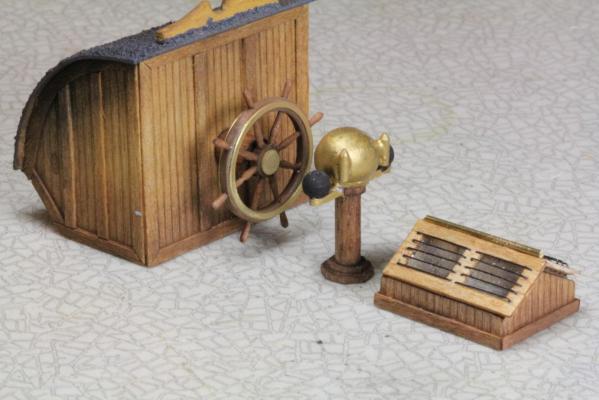
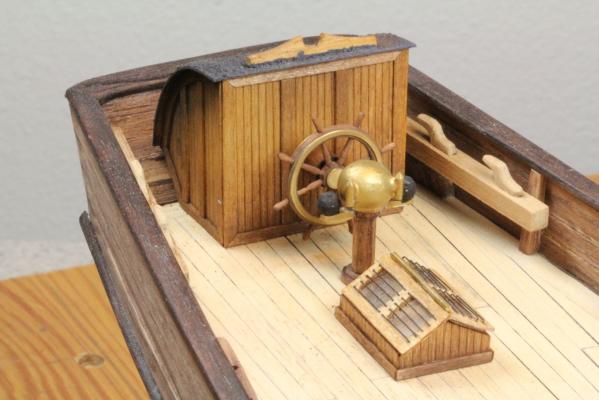
First of all, very merry and peaceful Christmas to everybody! Santa Claus has started his trip to all parts of the world from Korvatunturi in Finland where his workshop is situated. Don`t worry if it takes a little more time than normally, because we have no snow here in southern Finland: http://youtu.be/9LDtPR8xHNg And again it is time for a short update. I started to make the deck structure. First the rudderhouse, helm, binnacle and skylight. Material for rudderhouse is 1 mm birch plywood. Framing is cut from 0,6 mm veneer. Roof was made by scattering thin sand on the roof which was soaked with diluted glue. Then painted with Vallejo colours and weathered with Mig pigments. Spokes for the helm were turned from dia. 1 mm birch dowel. Other parts are 1mm birch veneer and 0,3 mm brass sheet. The binnacle stand was milled octagonal from birch dowel. Brass looking parts are resin and styrene. And finally the skylight is made of 1 mm veneer. The black metal bars are 0,25 mm insect needles. Turning the helm spokes in the lathe: Rudder house, helm, binnacle and skylight: And the structure on deck. Not yet glued:
- 95 replies
-
- 17
-
-
No problem aviaamator, just keep good advice coming. And happy Christmas & New Year to you. matti
-
Thanks for reminding me aviaamator, I have to do them as soon as possible. Shiloh, I am always open for advice and questions, they are more than welcome before I make some crucial mistake. matti
-
Thanks a lot Tom! Yes, only one month shipbuilding, but 60 years aeroplanes, cars, tanks, dollshouses etc. etc. And I agree with you, now that I have been lurking here watching other people's projects, I wish that I wouldn't have started my own. So wonderful and beautifully built models that I hardly ever can do the same. Ok, I will learn, and when me and my wife are satisfied to what we do, isn't that all that matters. I too wish to you and everybody here who is reading my humble build, very happy holiday season! matti
-
Thanks Patric and Tom! Now that I have gathered experience of ship model building about a month, I have to say that this is really nice hobby. So was car and tank building too, but I think this is better. And Tom, when I was nearing my retirement years, I purchased so many tools and machines I could, because I knew that after retirement there is no more money to spend on them. I have been making models almost my entire life, so I knew that this is going to continue also on retirement. After all you must have hobbies when you have nothing more than free time. Without them life is going to be very boring.
-
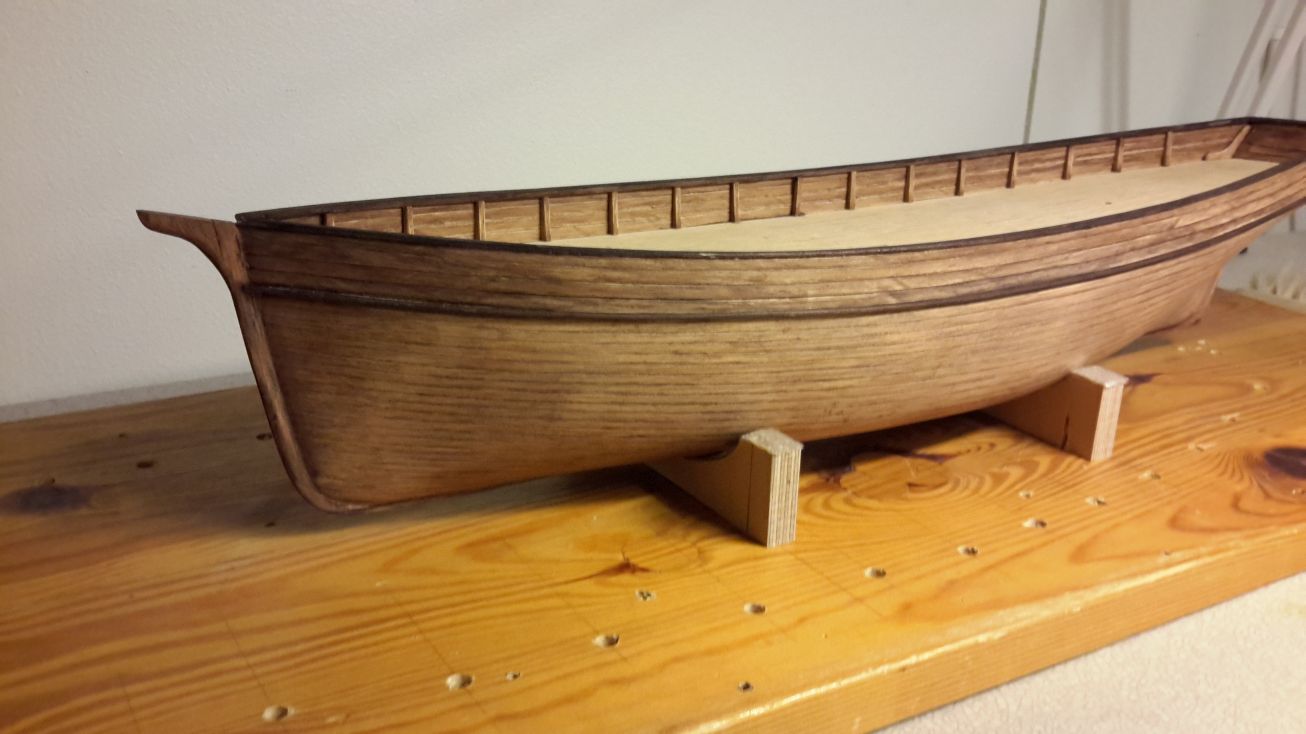
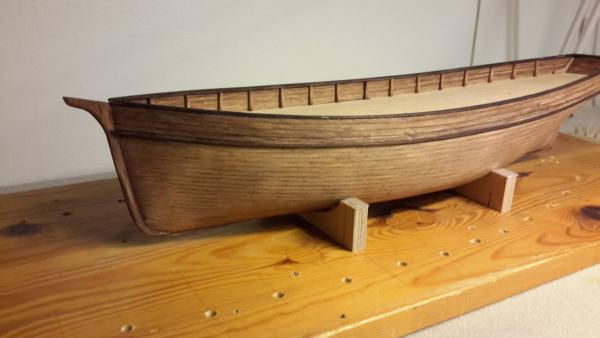
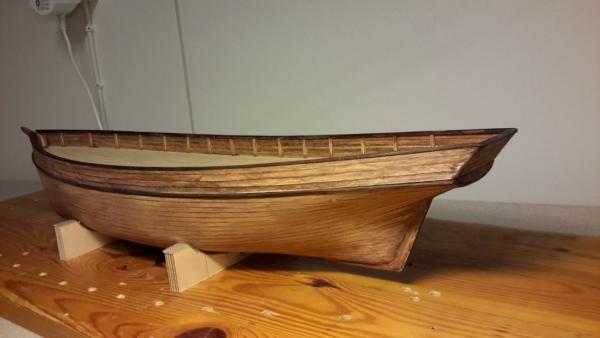
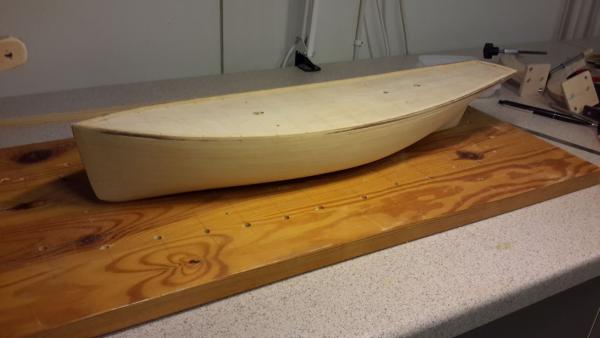
Thanks guys for your kind words and comments! It is time to write some update. Next I was building the bulwarks. To support them as rigidly as possible, 1,5 mm steel pins were glued into the holes provided at the edge of the deck. On those pins came bulwark supporting pieces cut from solid birch. And finally planks for bulwarks were installed: At the same time the stem, keel and sternpost were cut from solid birch, sanded and glued. The whole hull was then coloured with oak stain and sanded lightly to represent somewhat weathered outlook:

- 95 replies
-
- 13
-
-
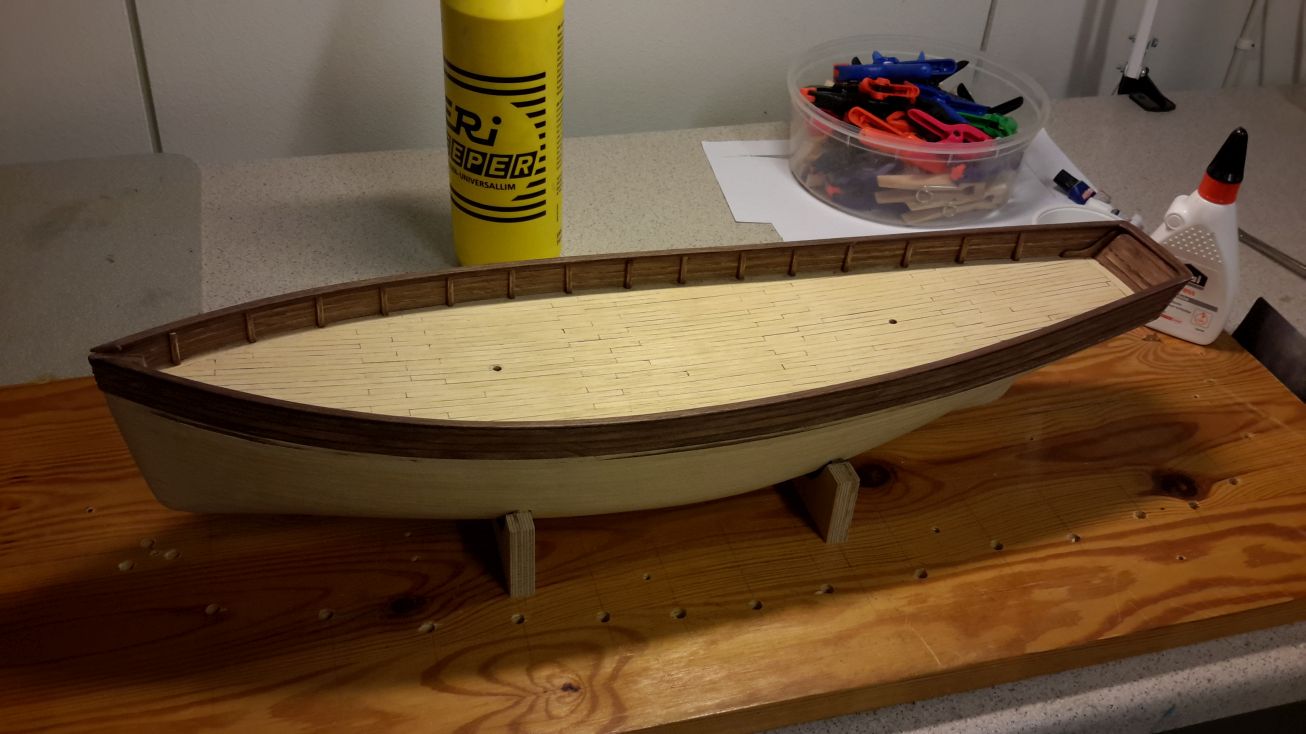
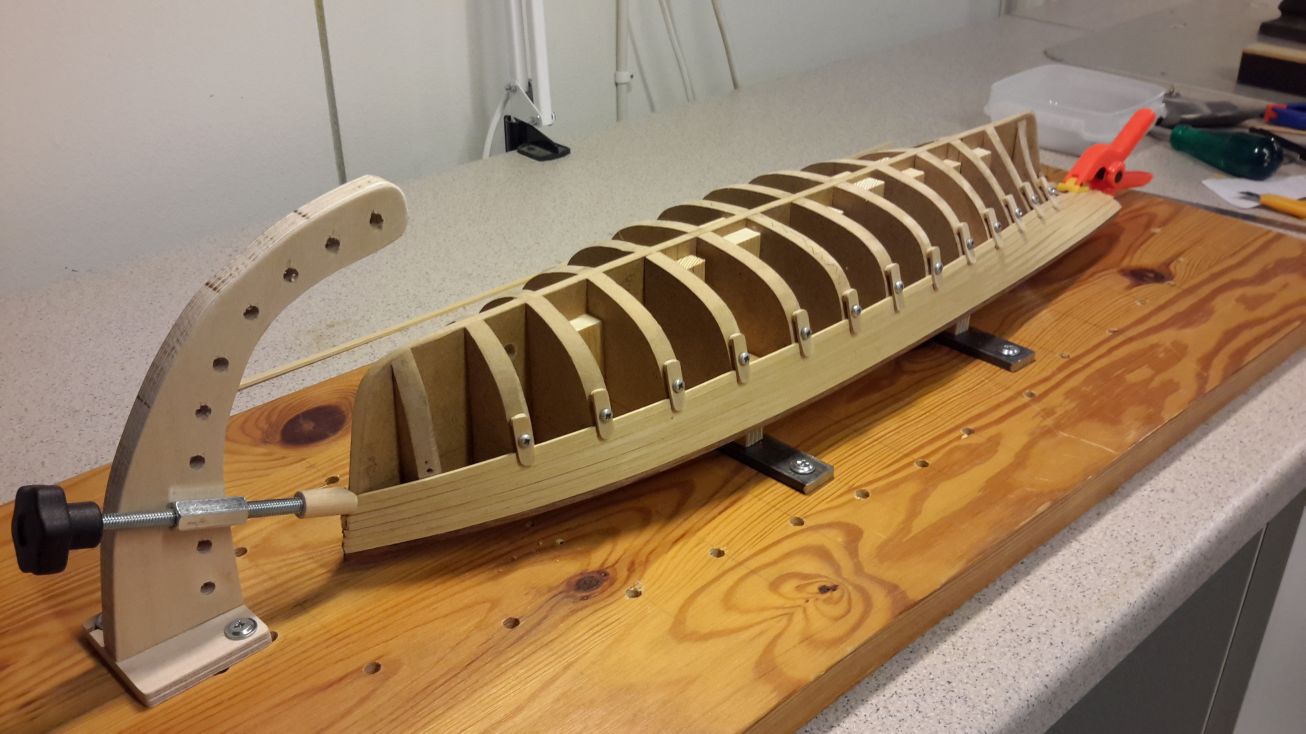
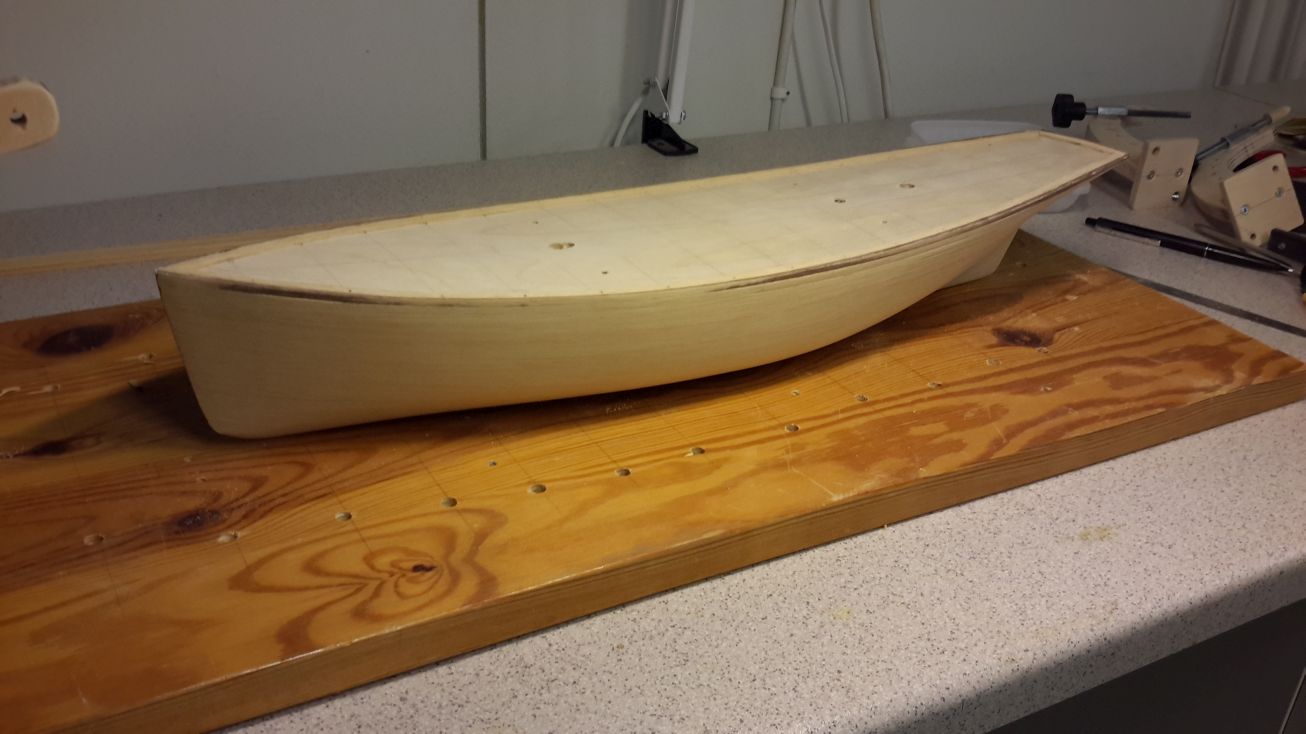
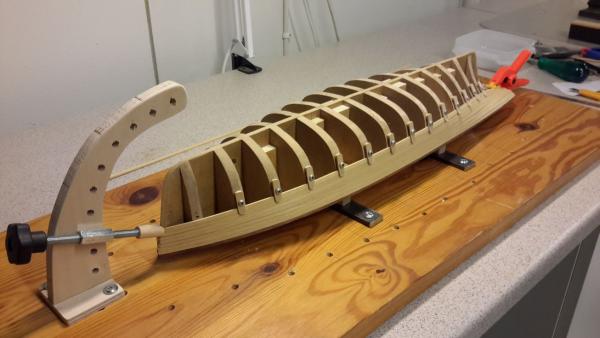
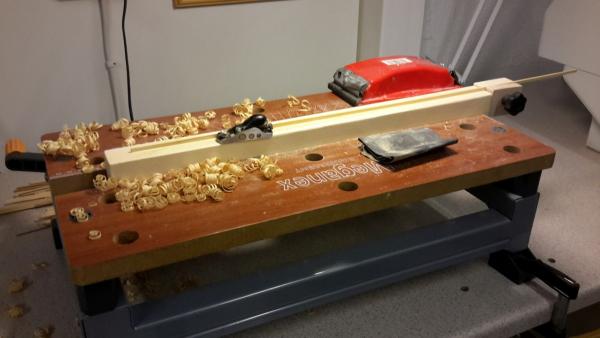
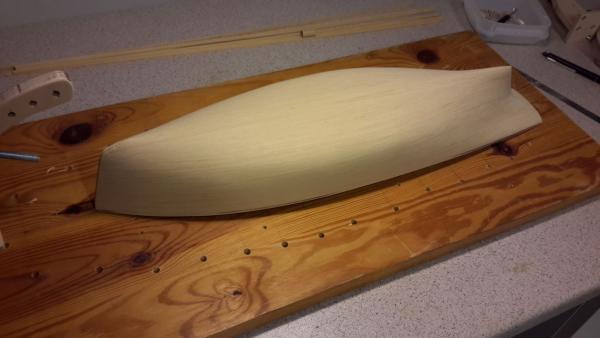
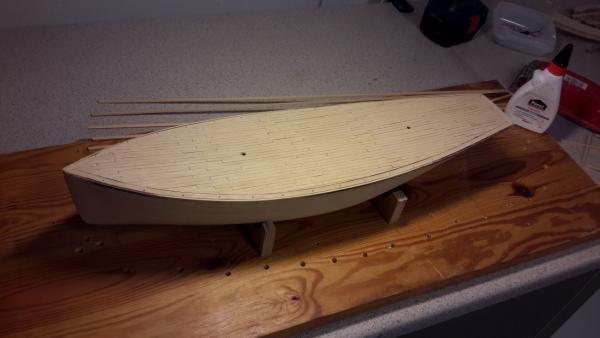
Thanks Nenad, Jim Lad and aviaamator for reading! And now to actual building. I selected the Plank on Bulkhead method for this model, and decided to make the bulkheads out of 8 mm MDF. I know the purists among you will say: "Wrong decision", but this was made because MDF is cheap, easy to cut, sand etc. and it is very obvious that the model will never see any water when standing at our bookshelf. The planks were cut out of birch, which is also cheap, local and can be used as solid, veneer and plywood. And it is very tight grained so small details can be easily made out of it. So here am I, half of the planks glued and no problems yet: I didn`t want to use any nails which would be seen on the planks, so I made curved jigs like the one in picture to keep the ends of planks steady during the glue setting. Very nice tool for tapering the planks is this tiny little plane made by Veritas, and the attachment where the plank was fastened during tapering: And finally after few days work the planking was finished, and the hull was sanded smooth: A false deck made of 1 mm birch plywood was installed: And deck planking made using again 2x4 mm planks sawn from birch. Caulking between the planks was made by blackening the plank`s edges with soft pencil: To be continued...
- 95 replies
-
- 21
-
-
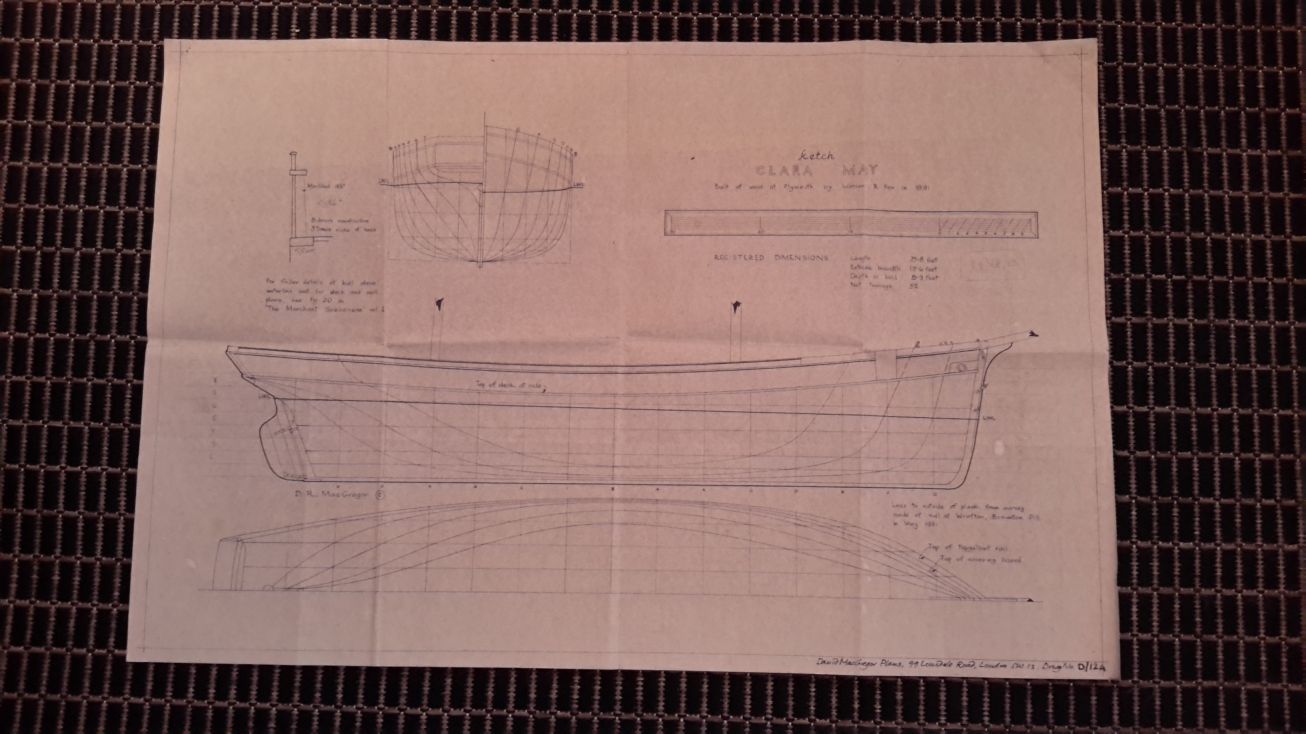
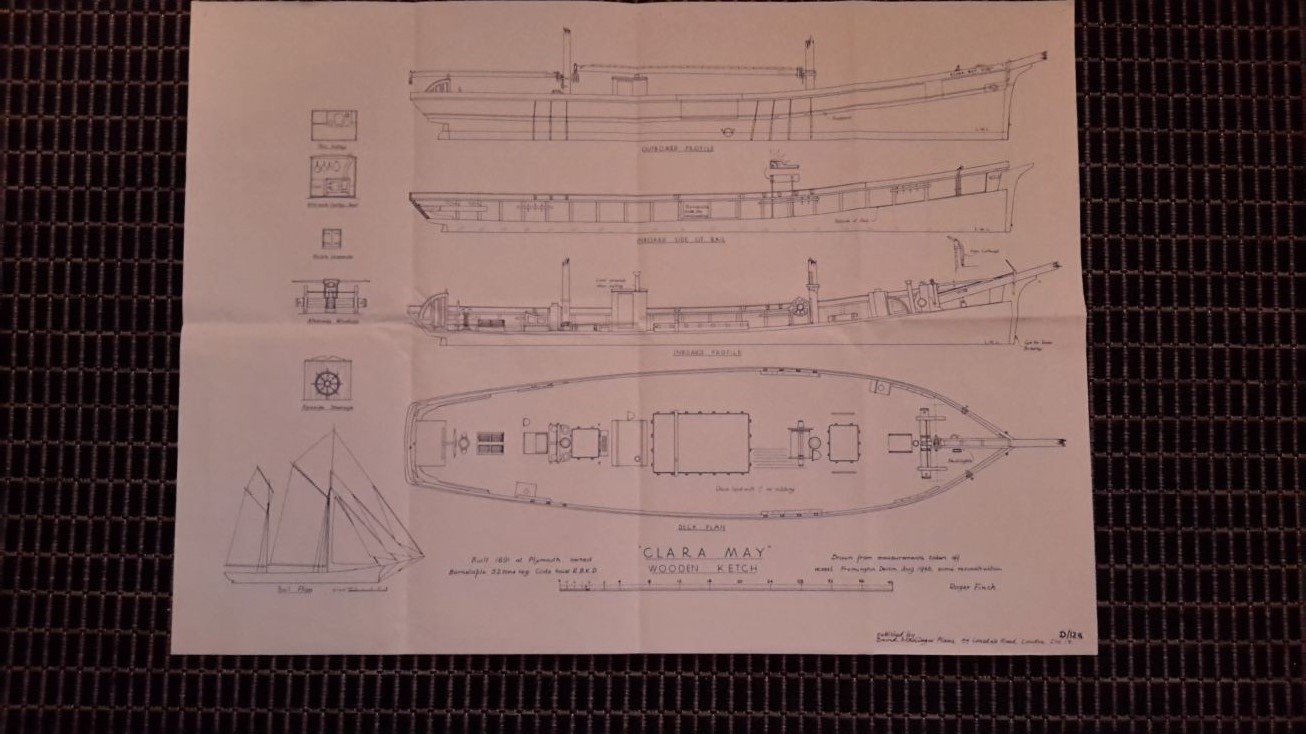
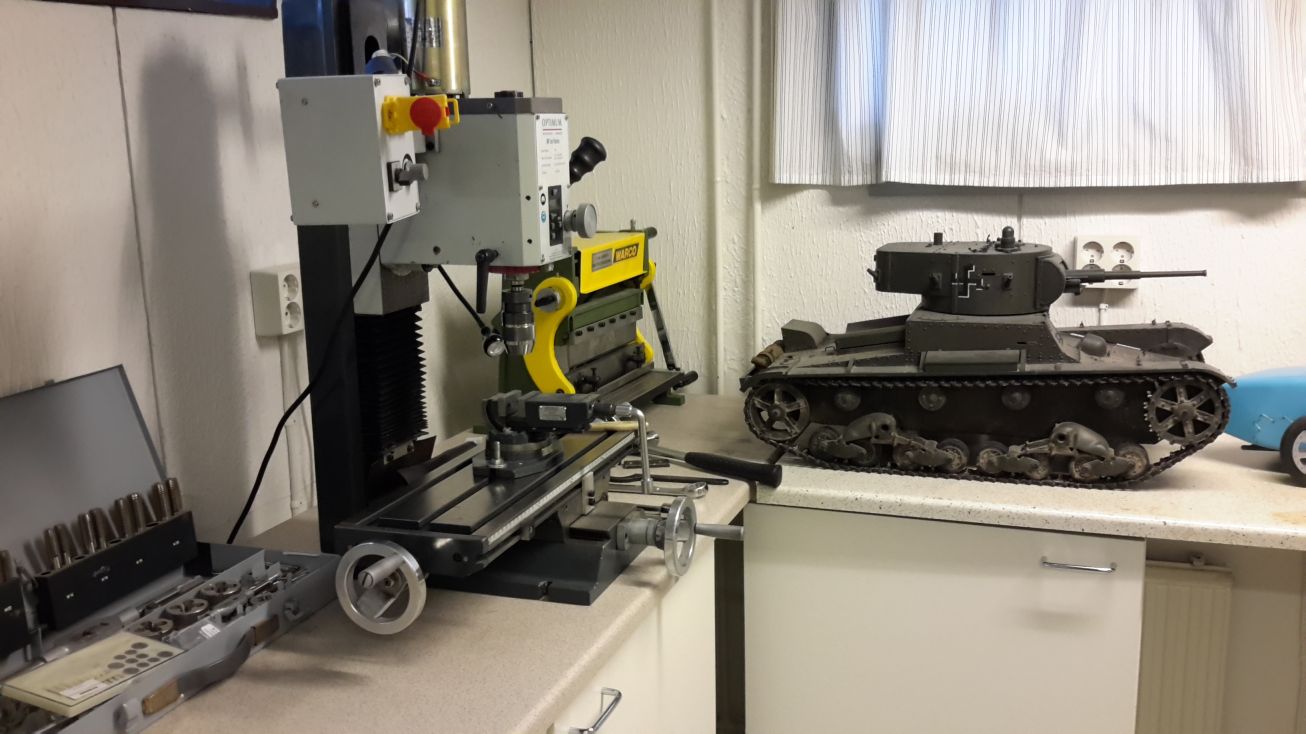
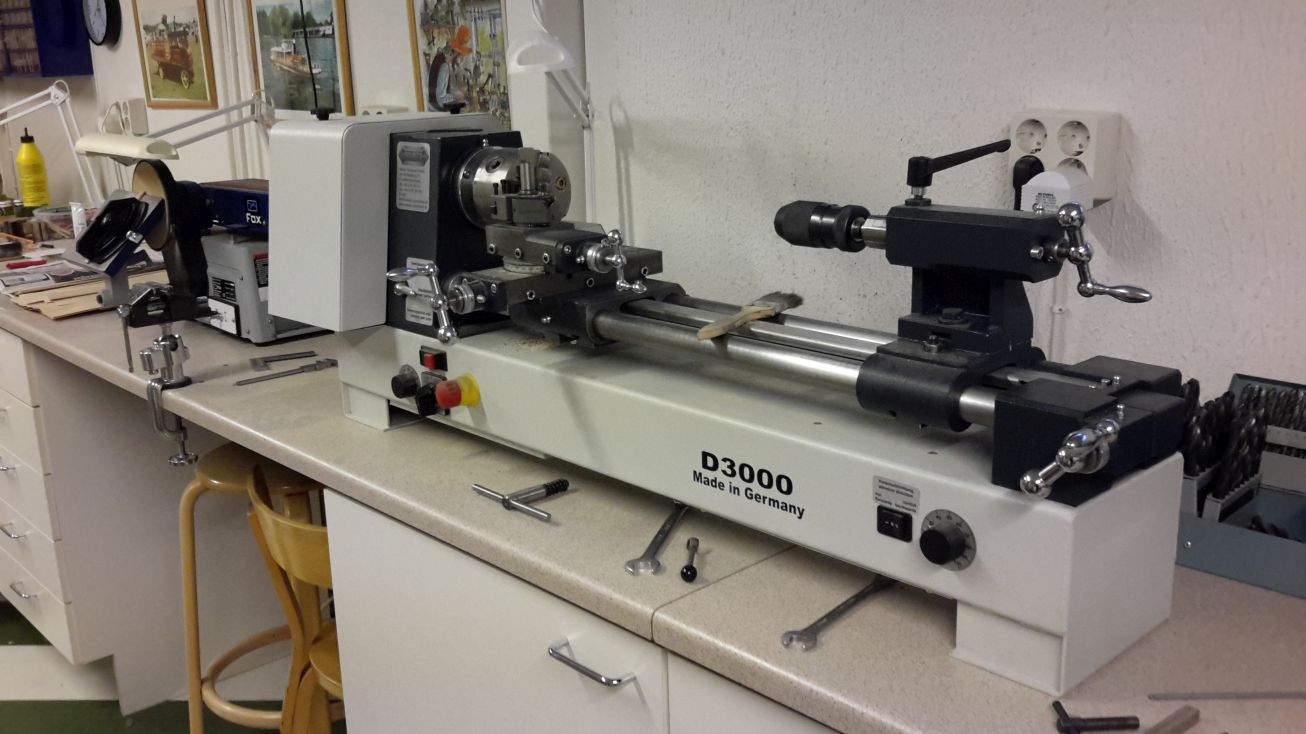
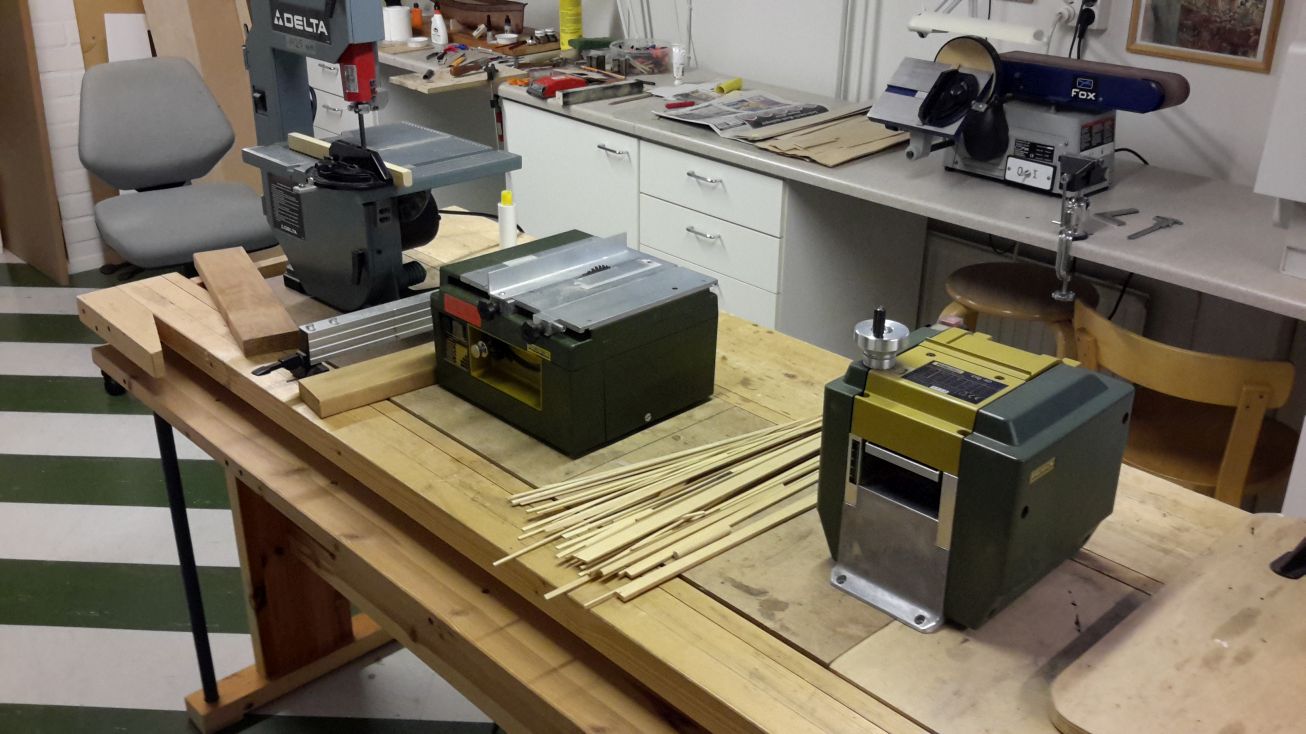
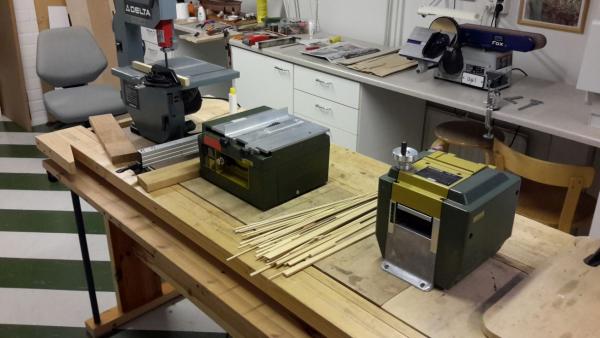
Hello, Thanks again for all of you who have welcomed me into this forum and encouraged to start a build log about my present project. As already mentioned at the introduction area, I am building a wooden ketch Clara May after David McGregor plans, which I obtained already about 14 years ago, but never really started to build it. Soon however I found out that the plans could have been better to show more details as they do, but I think that with help from the forum all questions can be solved. The reason to choose this as my first wooden ship project was, that the hull & superstructure are simple enough for the first project, and that the outlooks of the ship was appealing to me. I chose scratch building instead of a kit because I happen to have a rather well equipped workshop to be able to cut all my timbers by myself. And having scratch built already a couple of tanks and cars in 1/6 scale I was not afraid of the work which might be ahead. And thirdly, when scratchbuilding you can freely select your materials and are not tied to the ones included into the kit, which are not always the best possible. So here we are, in the beginning. The first pictures show the plans of the ship and some of the equipment which I have in my workshop. To be continued...


- 95 replies
-
- 16
-
-
Clara May
Moxis replied to Moxis's topic in Discussion for a Ship's Deck Furniture, Guns, boats and other Fittings
Thanks a lot guys for help! I think too that the round things on both sides of the mast are pumps, and the rectangular "boxes" are tanks, perhaps for water, because on early days she didn't have engines. I think this matter is closed and I can continue my build! Regards Matti