


Hekk
-
Posts
2 -
Joined
-
Last visited
Recent Profile Visitors
184 profile views

-
 cristikc reacted to a post in a topic:
Chesapeake Bay Crabbing Skiff by Hekk - Midwest Products - Small - first build
cristikc reacted to a post in a topic:
Chesapeake Bay Crabbing Skiff by Hekk - Midwest Products - Small - first build
-
msberkman reacted to a post in a topic:
Chesapeake Bay Crabbing Skiff by Hekk - Midwest Products - Small - first build
-
ccoyle reacted to a post in a topic:
Chesapeake Bay Crabbing Skiff by Hekk - Midwest Products - Small - first build
-
yvesvidal reacted to a post in a topic:
Chesapeake Bay Crabbing Skiff by Hekk - Midwest Products - Small - first build
-
yvesvidal reacted to a post in a topic:
Chesapeake Bay Crabbing Skiff by Hekk - Midwest Products - Small - first build
-
GuntherMT reacted to a post in a topic:
Chesapeake Bay Crabbing Skiff by Hekk - Midwest Products - Small - first build
-
Salty Sea Dog reacted to a post in a topic:
Chesapeake Bay Crabbing Skiff by Hekk - Midwest Products - Small - first build
-
Salty Sea Dog reacted to a post in a topic:
Chesapeake Bay Crabbing Skiff by Hekk - Midwest Products - Small - first build
-
Sorry for the length between posts. I made some initial mistakes and was embarrassed of what I thought was going to be a failed build. However, some wood filler and sandpaper has gone a long way towards making those mistakes less noticeable. All of this is a new experience for me and by showing what I've done wrong, maybe someone else can learn from mistakes I've made. I used a spare piece of wood to create a square to help line up the stern post and stem. The three wood frames in the middle help support and shape the hull. Only the outer two will stay in the boat. The middle frame is simply an alignment tool. The keel batton was the first large piece I had to glue down. As you can see, I am not very tidy with CA glue and probably would have preferred to just use wood glue. Getting glue all over is a recurring mistake I've made in almost every step of this build. Getting the bottom plank glued to the stern post and stem was more difficult than I thought it'd be. Unlike previous pieces, I had to actually bend the bottom plank in order to get it to touch both sides. Once I figured out how to get it clamped down ok things went a bit smoother. I didn't take pictures of several steps here because I thought I had destroyed the model and was quite frustrated. There are two lengths of basswood that had to be lined up and bent to touch both stern post and stem, as well as the bottom plank all the way around the boat. There is some room for forgiveness here because the wood is about 1/2 inch taller than it needs to be and must be cut and sanded down to match up to the bottom plank. The mistake came in attempting to clamp the basswood in a secure enough position to ensure everything was touching. CA glue gives almost no time for any adjustments once the wood is touching each other. My claps were too strong and broke through the basswood and glued a portion further back on the stern post. This ruined the shape of the hull and I couldn't separate the pieces once the glue set. I solved this with the use of wood filler and 400 and 800 grit wet sanding to apply layers built up to the shape the hull should be. All of this will be painted anyway. So as long as I ensure the finish is smooth, it should be almost unnoticeable. Forward and aft thwarts added (walnut) and fore and aft decks installed. With the decks on, you can't see the crooked hull from where my clamps broke the basswood. Right now I am busy cutting 44 pieces to add to the inside walls of the boat. My gluing is terrible and I am considering painting the decks instead of sealing with polyurethane. I may just buy some minwax and test it out of some sprue pieces I put glue on to see what effect it has on the finish.
- 8 replies
-
- 6
-
-
- Chesapeake Bay crabbing skiff
- Midwest Products
- (and 1 more)
-
GuntherMT reacted to a post in a topic:
Chesapeake Bay Crabbing Skiff by Hekk - Midwest Products - Small - first build
-
justsayrow reacted to a post in a topic:
Chesapeake Bay Crabbing Skiff by Hekk - Midwest Products - Small - first build
-
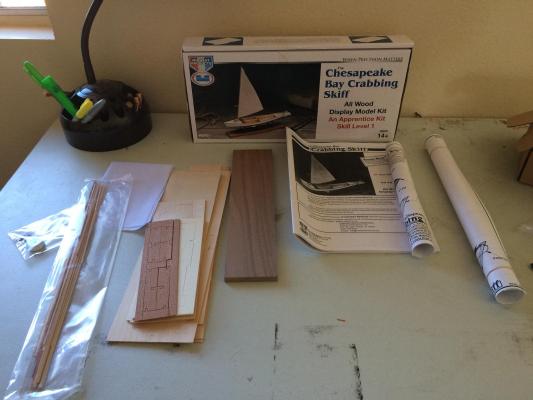
Hello everyone. I recently purchased the Chesapeake Bay Crabbing Skiff kit from Midwest Products as a birthday present for myself. I have zero experience building wooden ship models and no real woodworking experience. So all of this is 100% new to me. After looking around at some other kits and reading recommendations, I decided on this skiff because I didn't want to get too far over my head and thought this build could give me skills necessary to complete more complex stuff. Looking around, I haven't seen any real detailed build logs for these easier kits (maybe I am just bad at searching) and hoped that maybe by starting one, I could help others who are new to this hobby. With that said, I hope to keep myself accountable by posting updates here as well. This won't be a fast build because everything is so new and I still need to pick up some tools I don't have. With the introduction out of the way, let's get started on the first update: The model kit arrived today. I pulled the components out and laid them out to have a look. This is the first time I've seen a wooden ship model kit first hand and I was surprised at how delicate some of the pieces look. It looks like I am going to have to cut the sail out myself which is a little worrisome but I am sure I can cross that bridge when the time comes. Here is the bottom plank laid out and sanded with 400 grit sandpaper. The instructions tell me to use a building board to attach one of the die cut sheets for use as a jig. I have no spare wood lying around to use so I will need to make a trip to the store. I also need to pick up a few tools like a razor saw and 1/32" and 1/16" drill bits. I am pretty sure I can hold out on picking up beeswax for a couple more days until I get closer to messing around with the sail. That's it for today. I will go to the hardware store in the morning and try to pick up the missing stuff. Hopefully you will see another update in the next day or two.

- 8 replies
-
- 5
-
-
- Chesapeake Bay crabbing skiff
- Midwest Products
- (and 1 more)

