
Drazen
-
Posts
389 -
Joined
-
Last visited
Content Type
Profiles
Forums
Gallery
Events
Everything posted by Drazen
-
 ... and we go to the other side... which has to be more or less - symmetrical. For this, I simply scanned the part, mirrored it in the Photoshop and glued it on another boxwood stripe. Now, I am working with my own pattern and no more with the pattern from the plan. Drazen
- 487 replies
-
- 6
-

-
- ship of the line
- 80 guns
- (and 1 more)
-
What came out was a coarse "prototype". I checked the fit into the frame. Drazen
.thumb.jpg.e0e34b0d2231eddd45a2d248ffc8f8cb.jpg)
.thumb.jpg.9371cbc1448af4cccf9acacb795db285.jpg)
- 487 replies
-
- 10
-
-
- ship of the line
- 80 guns
- (and 1 more)
-
Than I made a piece of stripe which fits right into the frame. I took boxwood and bent it on the steam. The stripe out of the plan, I glued on the boxwood stripe. After that, I started to work on the shape - bit-by-bit. Drazen
.thumb.jpg.5eb29e01ddfa27120c20e2ebfcfdfe3c.jpg)
- 487 replies
-
- 8
-
-
- ship of the line
- 80 guns
- (and 1 more)
-
Since the pattern was not 100% clear, I needed to understand the forms. I made my own drawings about general shapes I want to get Drazen
.thumb.jpg.f91a01fc91d36ad755a67e61b03e6069.jpg)
- 487 replies
-
- 10
-
-
- ship of the line
- 80 guns
- (and 1 more)
-
Luckily, the pattern was similar as I have on my plans. So, I cut the part of the plan and check if it fits into my frame Drazen
.thumb.jpg.1b467f48fa546c689bac021d0d26c4d7.jpg)
- 487 replies
-
- 8
-
-
- ship of the line
- 80 guns
- (and 1 more)
-
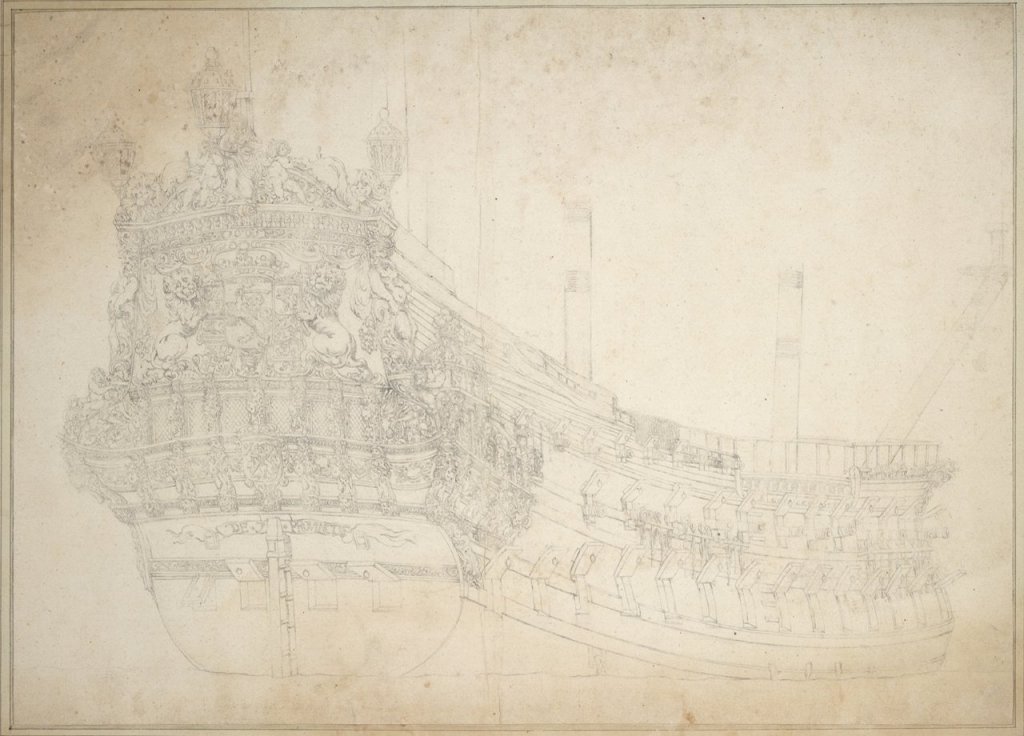
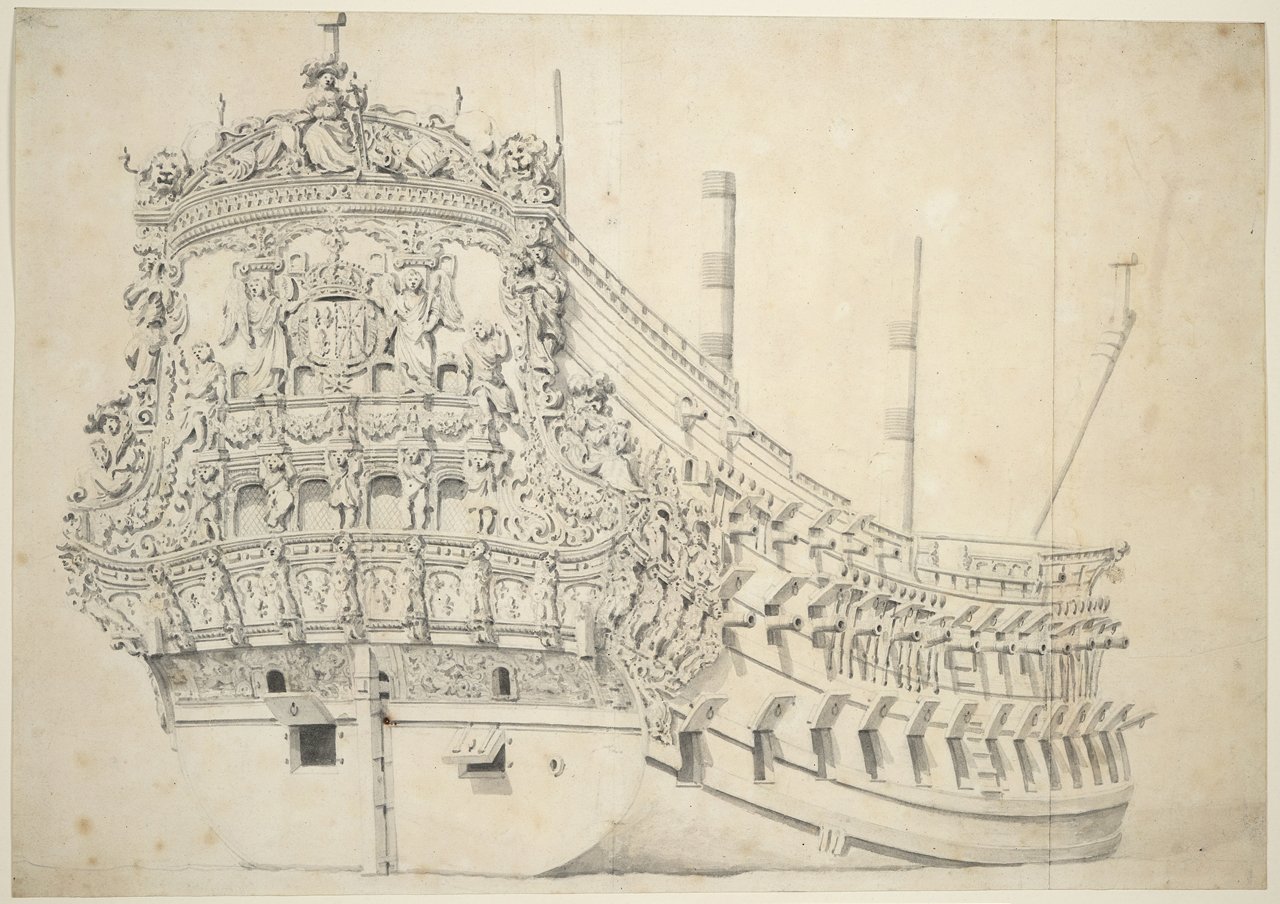
.. difficult process on deciding on the decoration form/pattern. There are different decorations on the van de Velde drawings for the same ship. Also the models from the museums are not following the same pattern. I decided to follow the drawing here - second from above. Drazen
.thumb.jpg.5fe60dc605a791a166ec43432b218a80.jpg)
- 487 replies
-
- 9
-
-
- ship of the line
- 80 guns
- (and 1 more)
-
Than, I ground the inner shape of the frame to get the wished angle when installed. Drazen
.thumb.jpg.92760a919c62afb46d96054a2fe39f64.jpg)
- 487 replies
-
- 9
-
-
- ship of the line
- 80 guns
- (and 1 more)
-
... and put just slight amounts of thin CA-glue to hold them in shape. Take care: Not to let the glue make your frame stick on the hull (you will want to remove it later on) CA glue will leave yellow colouring on the maple wood. On the pear wood it does not leave any colouration. Than I removed the frames and put additional thin/easy flowing epoxy resin to make it more solid. Drazen
.thumb.jpg.07ca62a5822a2f9c801b49151a2d3e56.jpg)
.thumb.jpg.0caab426783dc453c08538b243be988a.jpg)
- 487 replies
-
- 8
-
-
- ship of the line
- 80 guns
- (and 1 more)
-
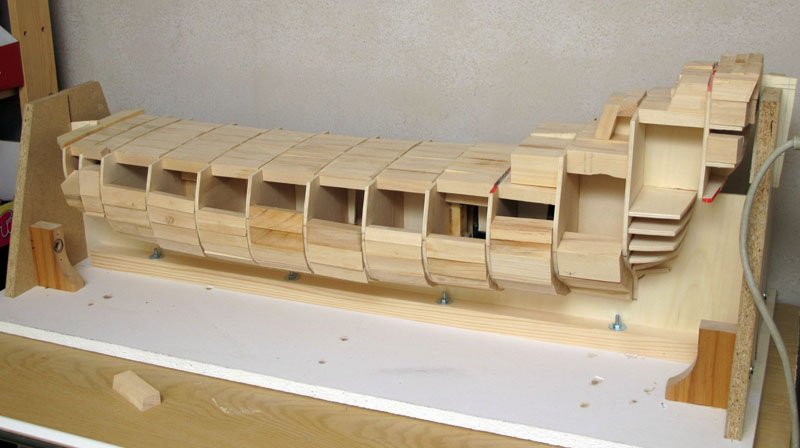
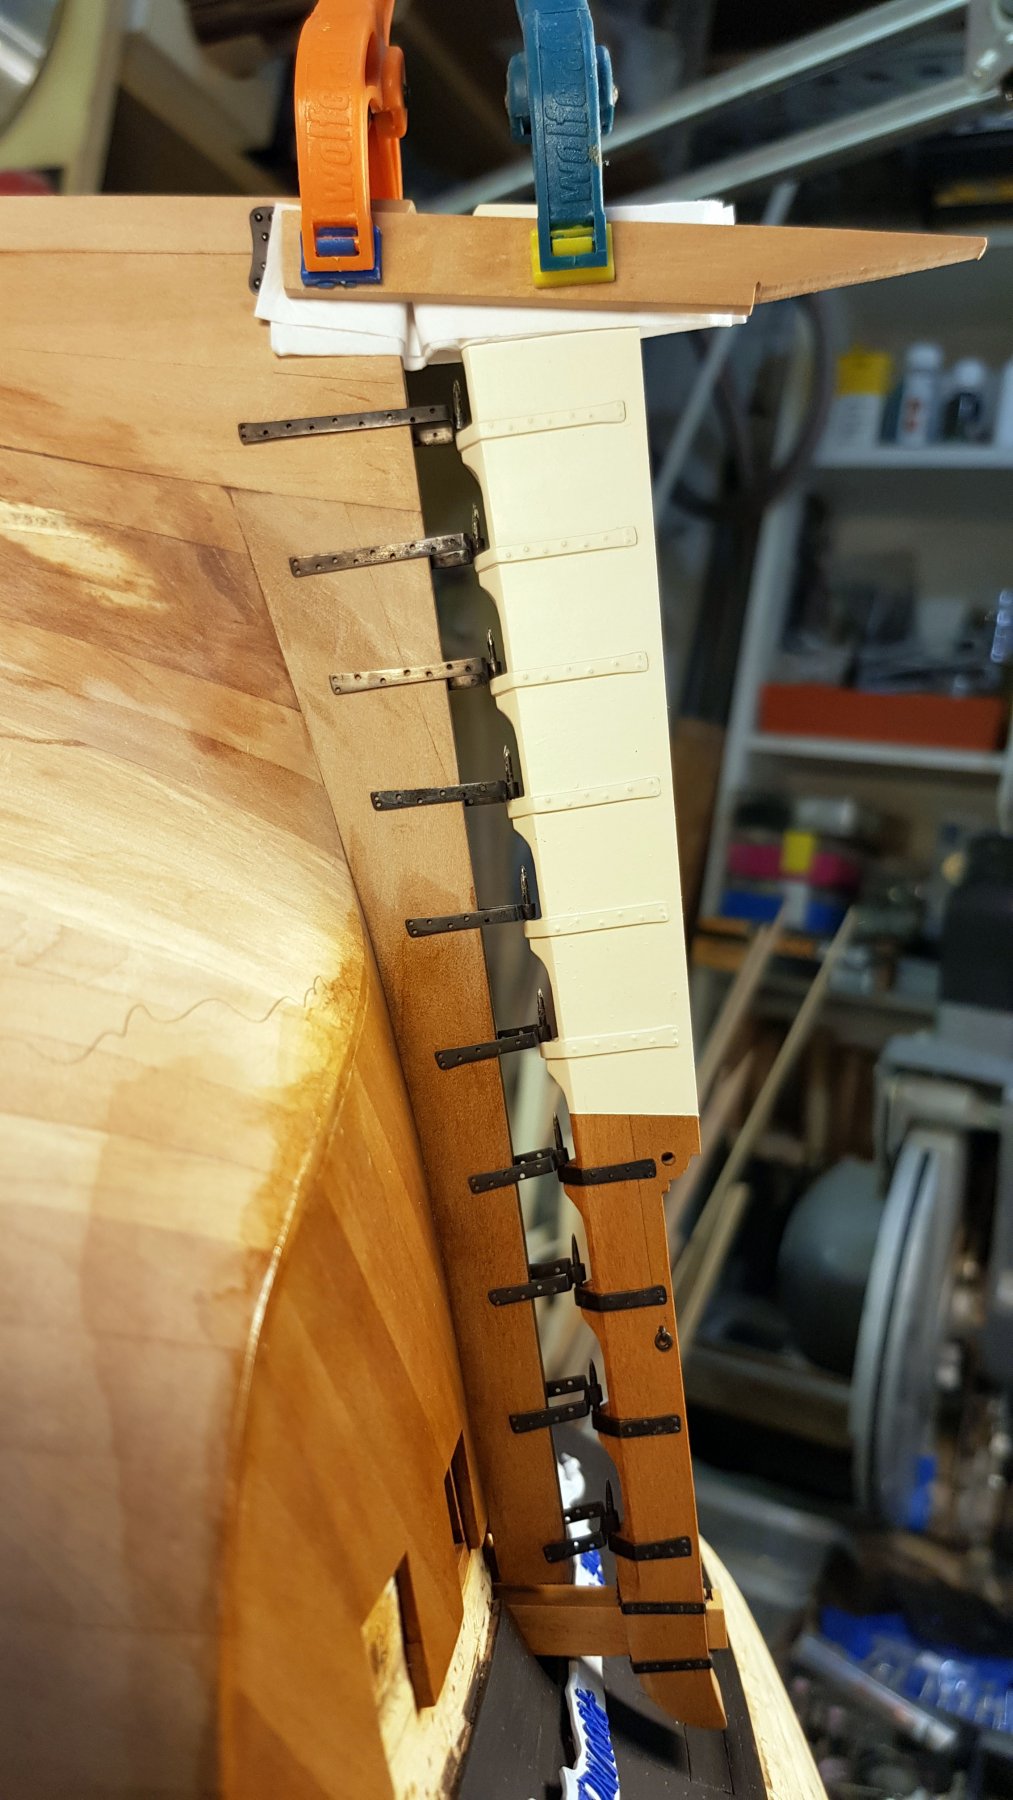
After bending the three pieces of the frame (per side) on the steam, I have inserted them into the position on the ship, so they follow the shape. Drazen
.thumb.jpg.1487802c64b565c4abe88d9a3fbe5139.jpg)
.thumb.jpg.e3aafd20a445478c4037a087c26c7c20.jpg)
- 487 replies
-
- 6
-
-
- ship of the line
- 80 guns
- (and 1 more)
-
The lower part of the transom frame after milling Drazen
.thumb.jpg.0bb79c463a2f7cc529c58c8e0abb1ed4.jpg)
- 487 replies
-
- 5
-
-
- ship of the line
- 80 guns
- (and 1 more)
-
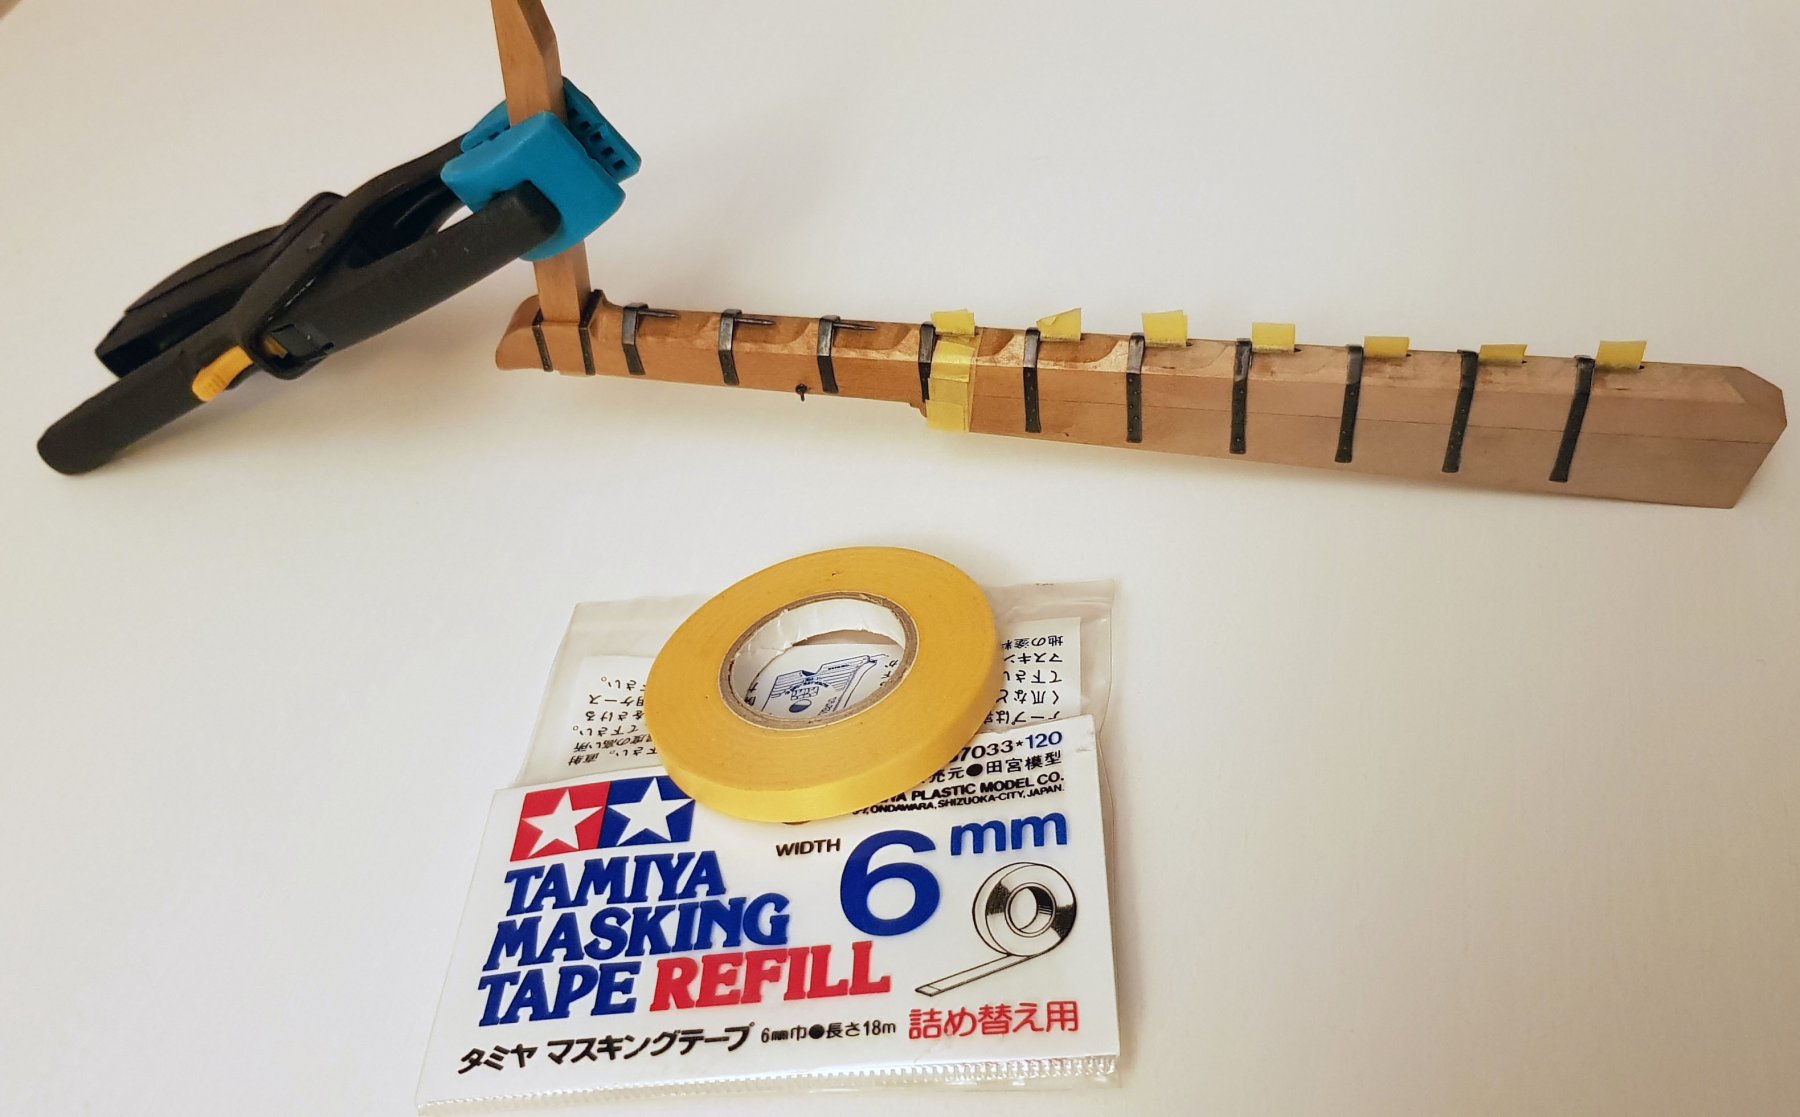
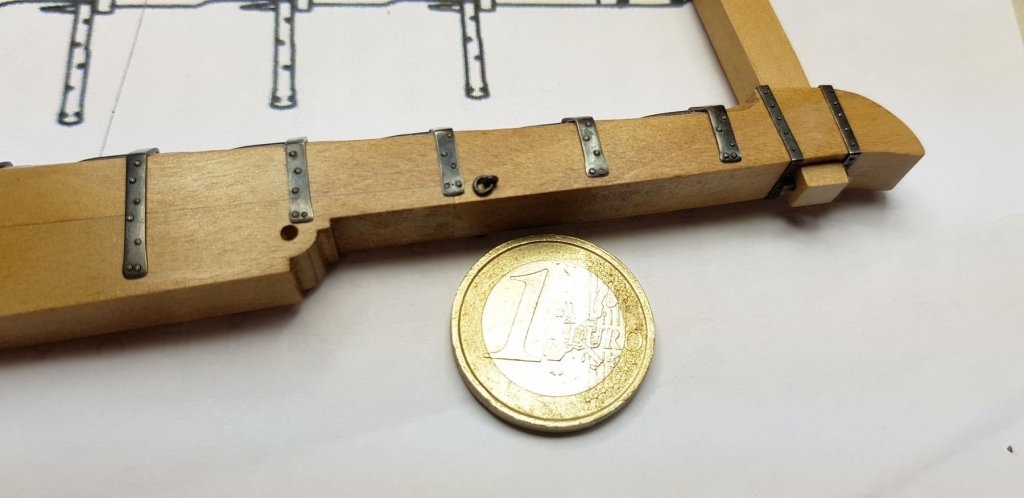
Let's go to more beautiful postings than cracking 🙂 ... the production of the decoration in transom... I first made a tool to mill the outer frame of the transom and have inserted it into the Proxxon milling machine. The upper guiding part of the machine is custom made by myself and according the Russian advices on the DVD (Dr. Mike). Still, I have changed some things according to my logic. The milling tool is made out of a common nail, which has been hammered and rasped to the shape in order to get the profile I need. Drazen
.thumb.jpg.f99787d892289091bc04630f60687ed8.jpg)
.thumb.jpg.3e4398d15c57f54fab7f3e75fd45b82c.jpg)
- 487 replies
-
- 7
-
-
- ship of the line
- 80 guns
- (and 1 more)
-
I am working on this problem right now. Out of the help received in the MSW, I decided to buy a humidifier for winter and a dehumidifier for summer. I am right now testing the humidifier. It works fine (an ultrasonic device), but has some problem with measuring humidity and thus steering the humidity on 50%. I will report in the other link about this appliance and how much it helps. This cracking is older, but is getting worse with the time. I just hope, it will go back somehow if I manage to keep the humidity between 40% and 60%. Till now, I did not do much effort on adjusting the humidity in my cellar. Drazen
-
Hi Piet, dear friend! I am working on this problem right now. Out of the help received in the MSW, I decided to buy a humidifier for winter and a dehumidifier for summer. I am right now testing the humidifier. It works fine (an ultrasonic device), but has some problem with measuring humidity and thus steering the humidity on 50%. I will report in the other link about this appliance and how much it helps. Link: This cracking is older, but is getting worse with the time. I just hope, it will go back somehow if I manage to keep the humidity between 40% and 60%. Till now, I did not do much effort on adjusting the humidity in my cellar. Drazen
- 487 replies
-
- 3
-
-
- ship of the line
- 80 guns
- (and 1 more)
-
I don't know why, but I cannot upload photos any more?? What I get is: " There was a problem processing the uploaded file. -200 "
-
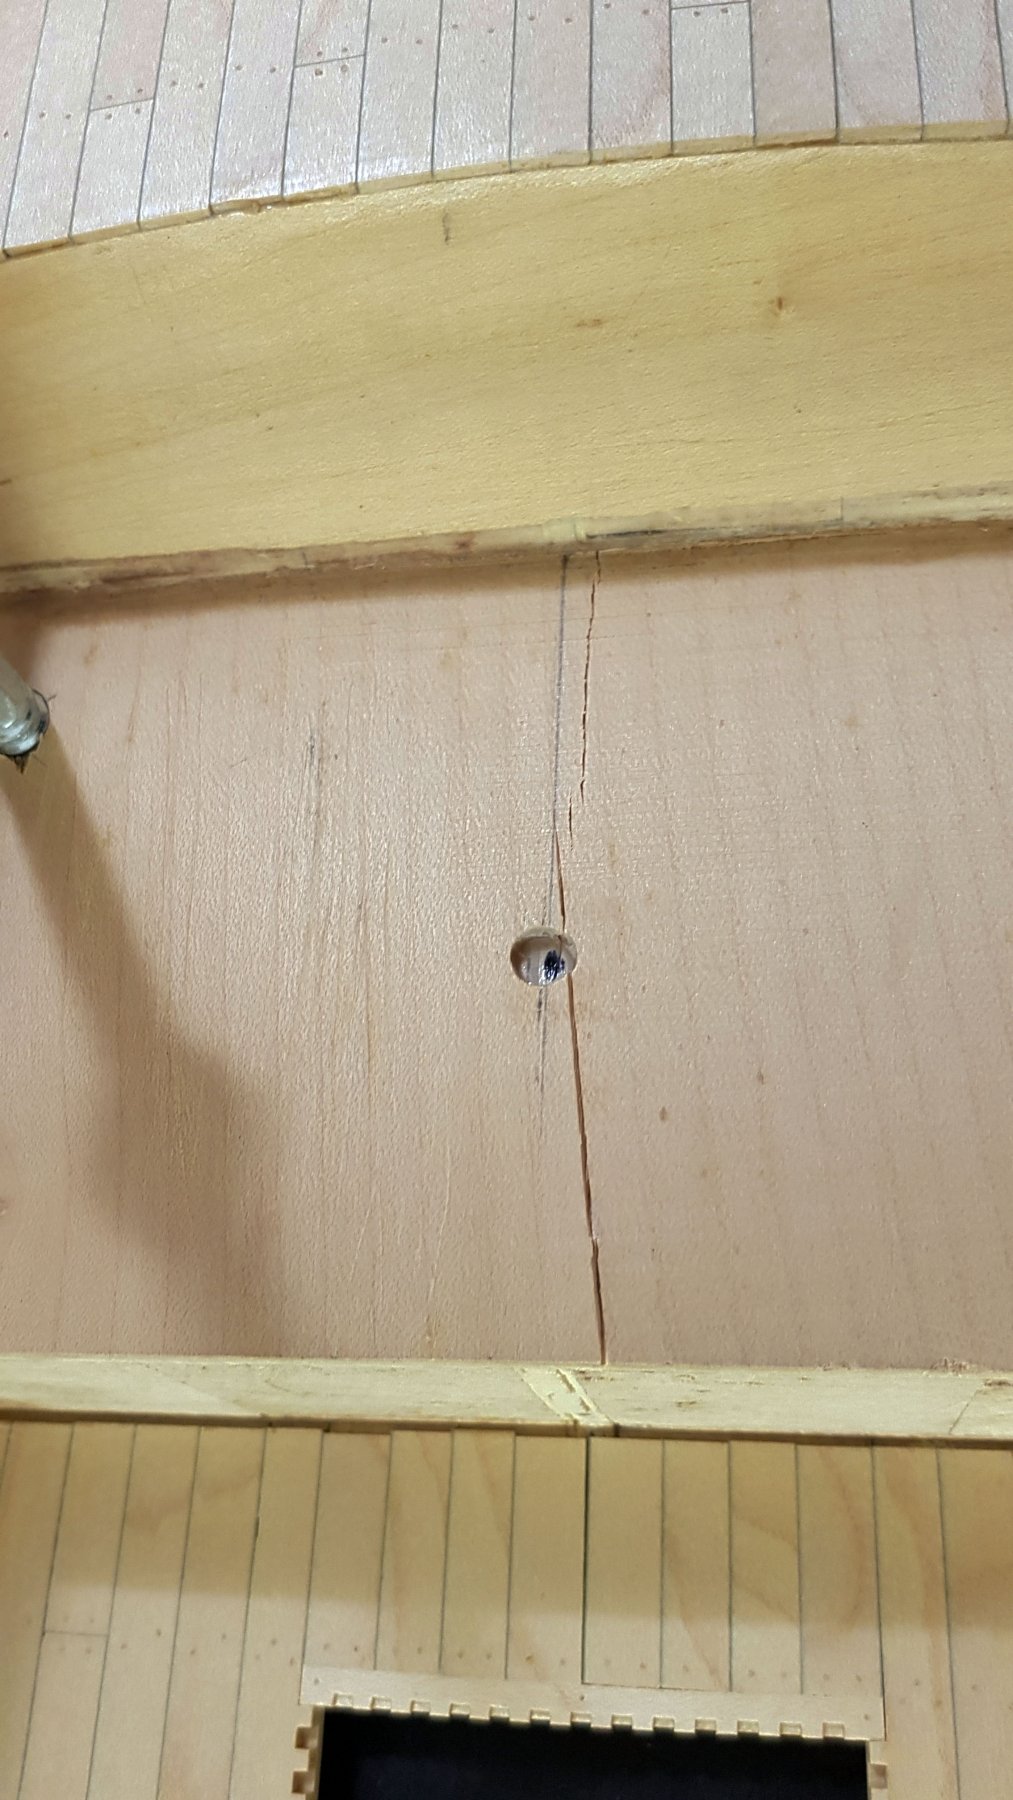
Yes, you are right: bulkheads of plywood (they started to crack first), lime as filling material with initial moisture approx 20-25% measured. Lime filling is set that the swelling goes in the width of the ship, not the length. See please photos below. My cellar has: - about 8m² - in winter constantly below 30%, sometimes below 25% (yesterday measured 20% - this is dry like a gunpowder 🙂 ) - in summer constantly higher than 75%, even 80% or 85% humidity - further problem is that this is a part of the cellar-complex in a bigger modern block of flats. I could partly separate this room by closing nearly all openings with foam. Still, If I heat or climatize in this room, it is soon away since not well isolated. Thus it is separated by concrete walls, what is good. So, to answer your question, no constant humidity in my cellar, but strong variations within a year cycle. The temperature is more or less constant: summer 19°C till winter lowest 17°C. The deviation is fine, but the temperature is low and supports the humidity deviations. Having constantly e.g. 24°C would be better. Drazen
-
Thank you guys ! Your advices keep me focussing on the best solution: to buy a house and set the working room in the living area and well isolated. No joke, I anyhow will need new place for this big model (the heigh is also significant - without stand: 127cm. 🙂 In the meantime, let' see... OK, but, let's answer some of your questions...
-
Just a question if someone can give hints: I am getting cracks in wood due to humidity deviations. Please see my posting here: Drazen
- 487 replies
-
- 2
-
-
- ship of the line
- 80 guns
- (and 1 more)
-
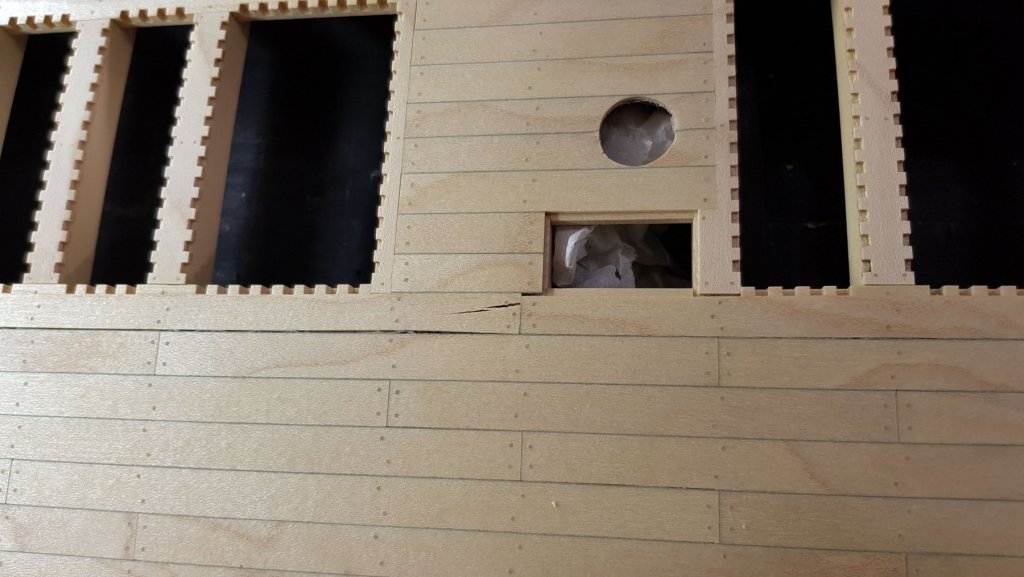
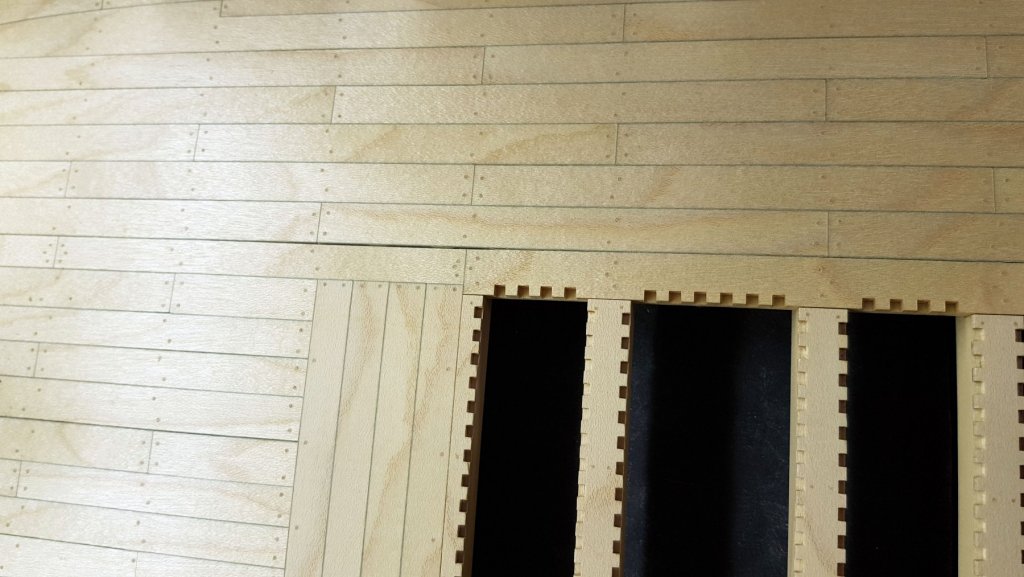
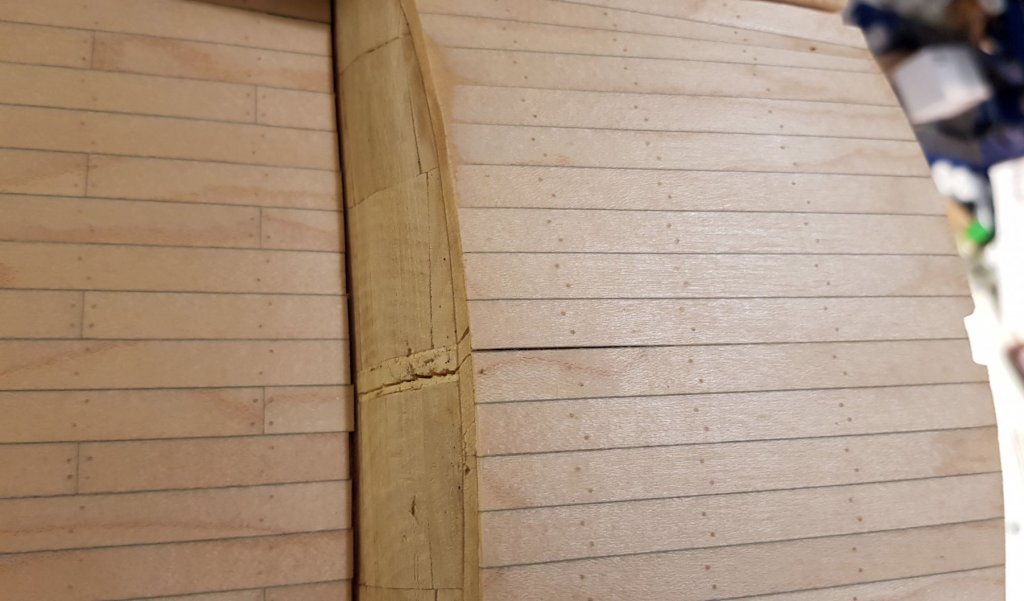
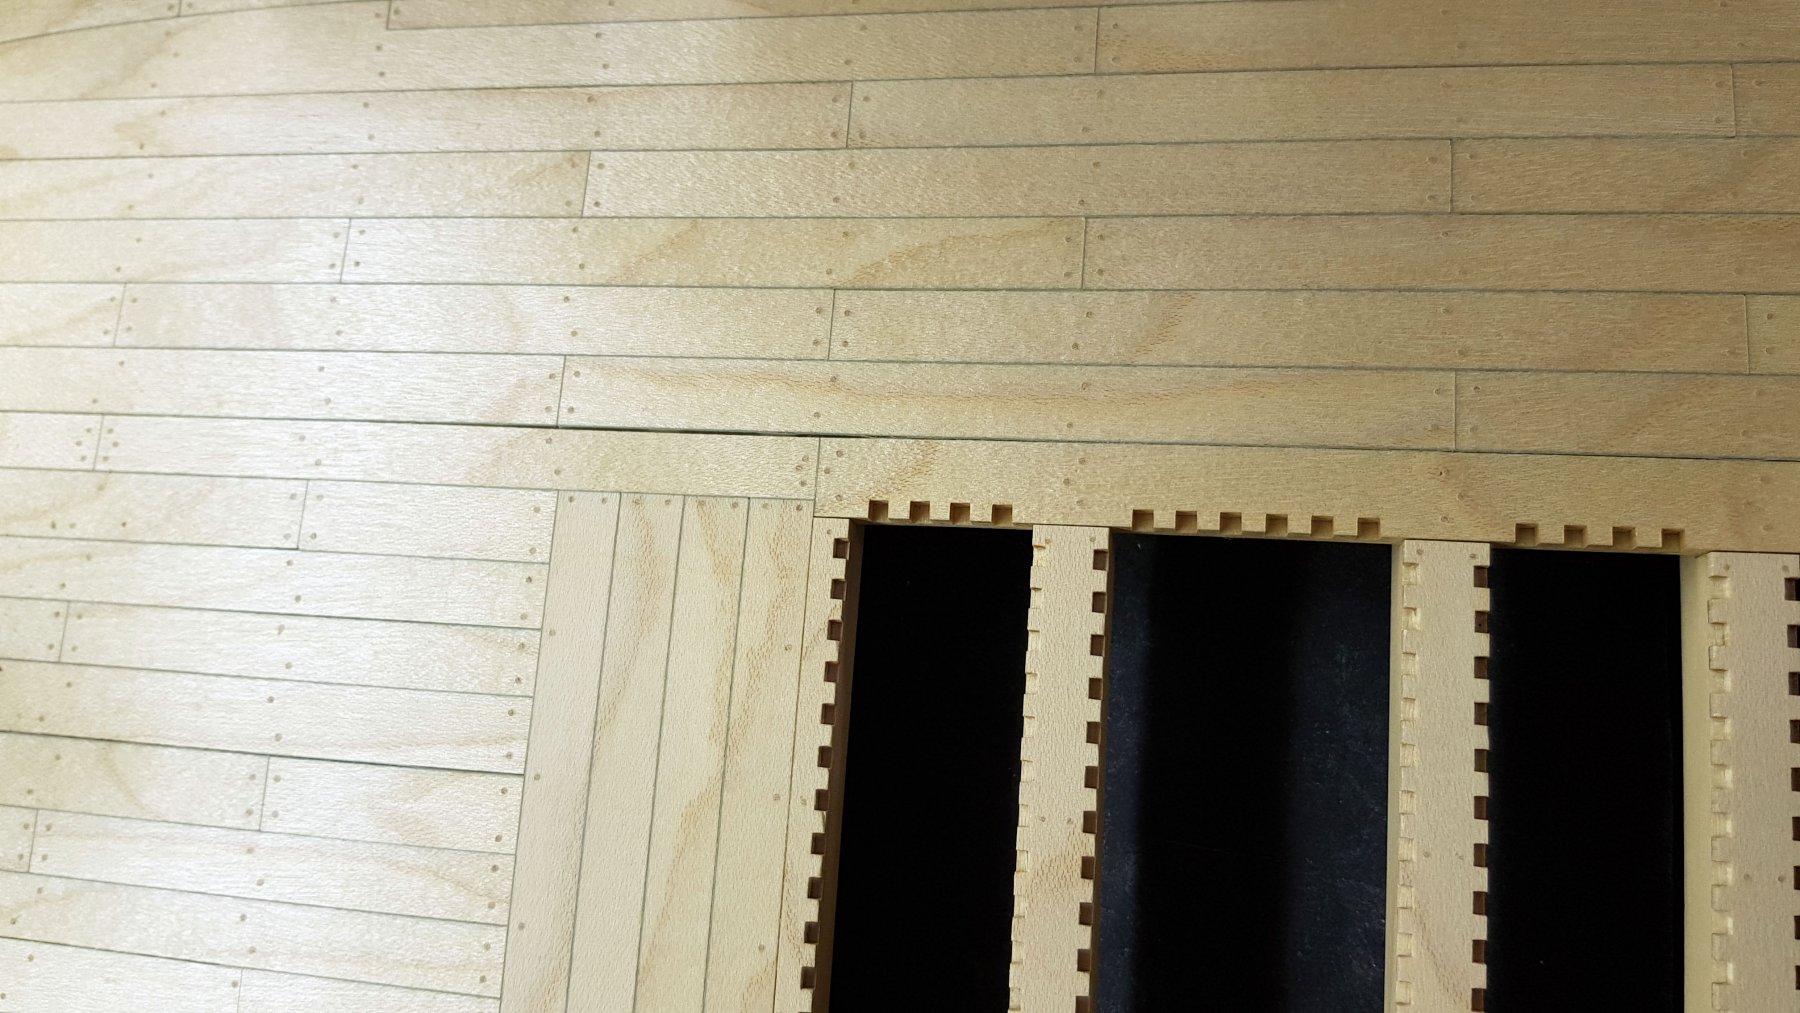
I am getting cracks on the decks and this is disturbing on a really nice model. Here are some photos. There were ideas to reinforce the model with screws, but this is nearly not possible to set everywhere and especially not in this stage of work. Does anybody have an idea about how to solve the problem and how to get these cracks away? I have a feeling, this is not a process which is finished, but is going on and on. The problem is getting bigger from time to time. How to stop the cracking? How to remove these cracks? Making several planks on decks would be possible, but will not solve the problem on other areas (hull below water, or the like. Looking forward to your hints! Drazen

-
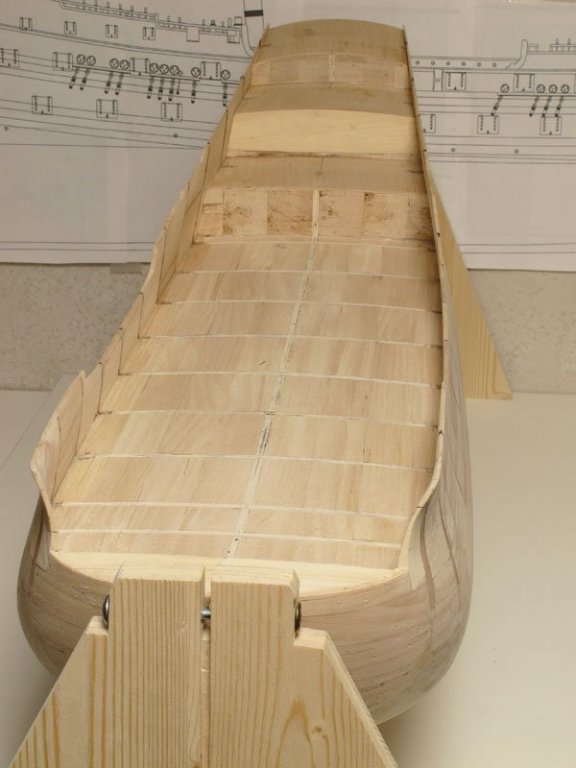
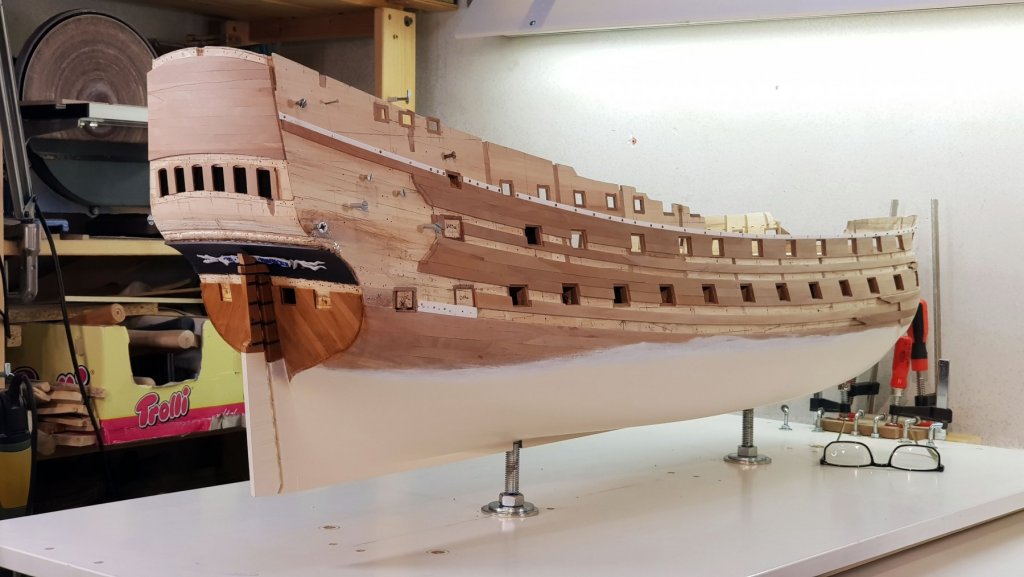
Hello, I have a big problem with cracking of wood on a nice model. Hope, somebody can help. Since few years, I am building a larger ship model of “DE 7 PROVINCIEN” in 1:45. The hull alone has a length of 106cm (0verall, it is 136cm), Width of the hull 28cm. So, it is a bigger model. The main problem is that the room where I am building has strong humidity deviations between summer and winter. Unfortunately, I cannot move anywhere else into better conditions for the time being. I am measuring with a professional humidity measuring device (TESTO) in winter constantly below 30%, sometimes below 25% and in summer higher than 75%, even 80% humidity. It is a cellar, but of a modern house – not the typical old cellar of old houses. I have no mould, and the working atmosphere is very pleasant. Still, it is very difficult to regulate the humidity in this place. In my flat, which is just half floor higher, but above the ground, well isolated, the humidity level is normal - measured from 42% in winter up to 58% in summer. The construction of my model: The ship model is built of linden/lime wood, the planks are mostly of pear wood and decks of maple. As you can see on the photos. Here are several phases of the built. More detailed steps, you can see here: https://modelshipworld.com/index.php?/topic/911-de-zeven-provinci%C3%ABn-by-dra%C5%BEen-cari%C4%87-scale-1-45-1665/& Lime wood as base. Unfortunately, I did not set the base in both directions of grain but was positioning the grain of the base, so they have less deviation in the longitudinal direction. At the beginning, I was not expecting such problems. Today, I would set the base in both directions, and protect (seal) with some layer additionally. The wood base (lime wood) was initially dry, below 20% humidity.
-
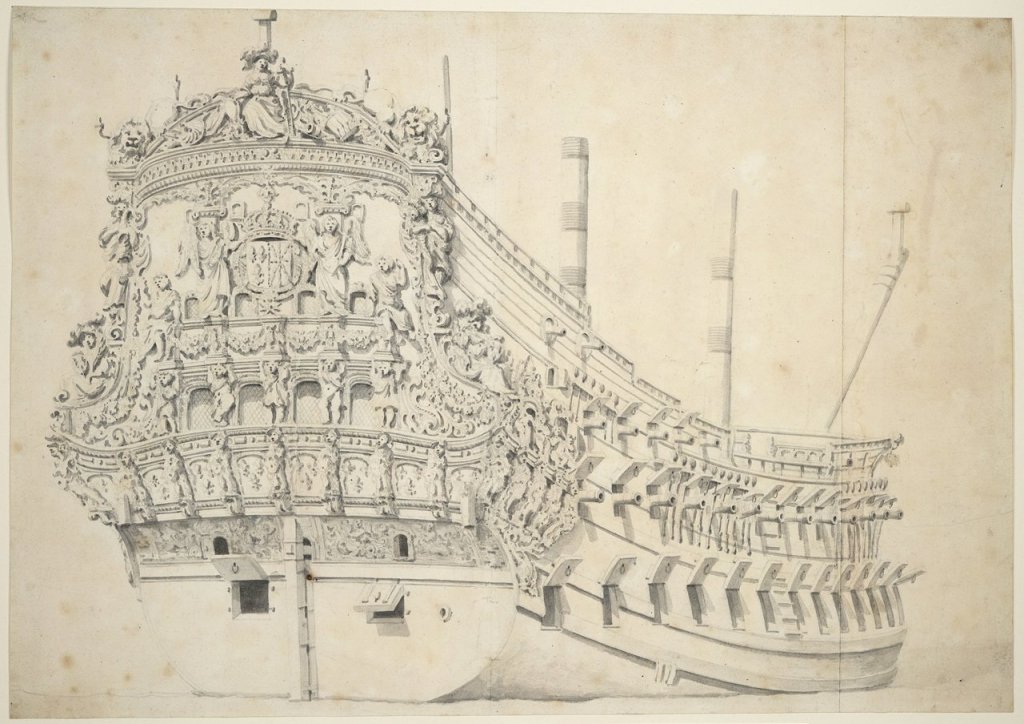
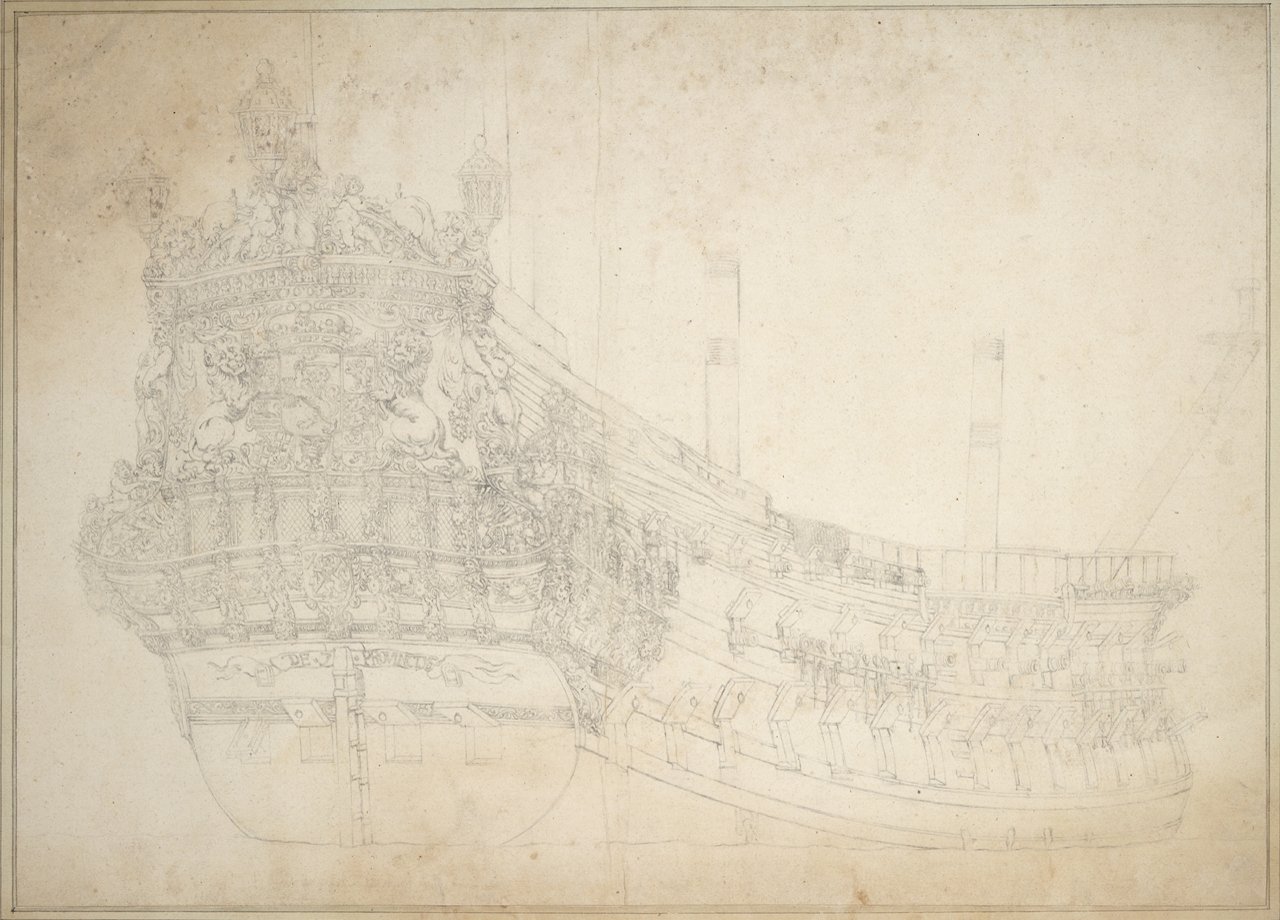
… following 3 drawings of 7P, than some other Dutch ships from this age. English ships have less fittings on van de Velde drawings. Otte Blom has even 11 in his plans. Dražen
.thumb.jpg.34c9de78beeadc51b0d50d82658d81aa.jpg)


- 487 replies
-
- 13
-
-

-
- ship of the line
- 80 guns
- (and 1 more)
-
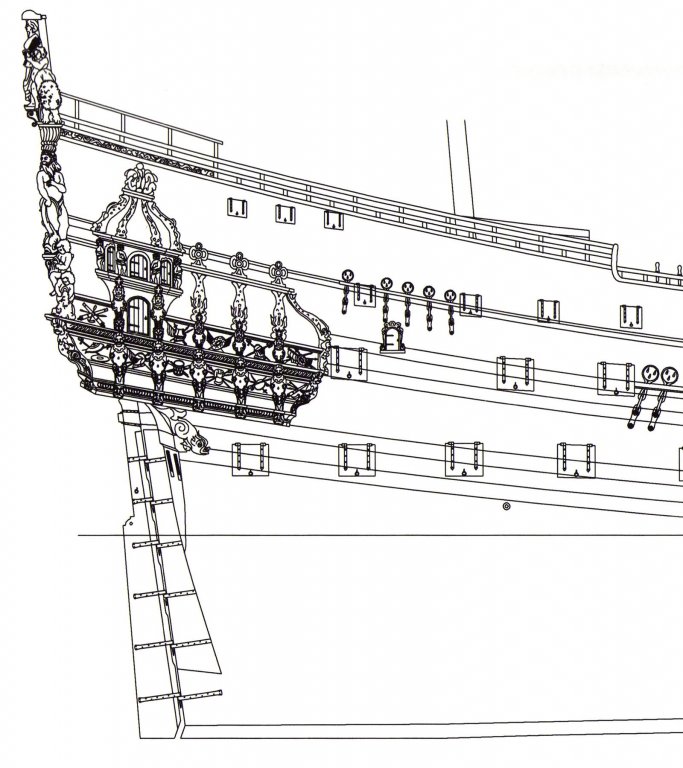
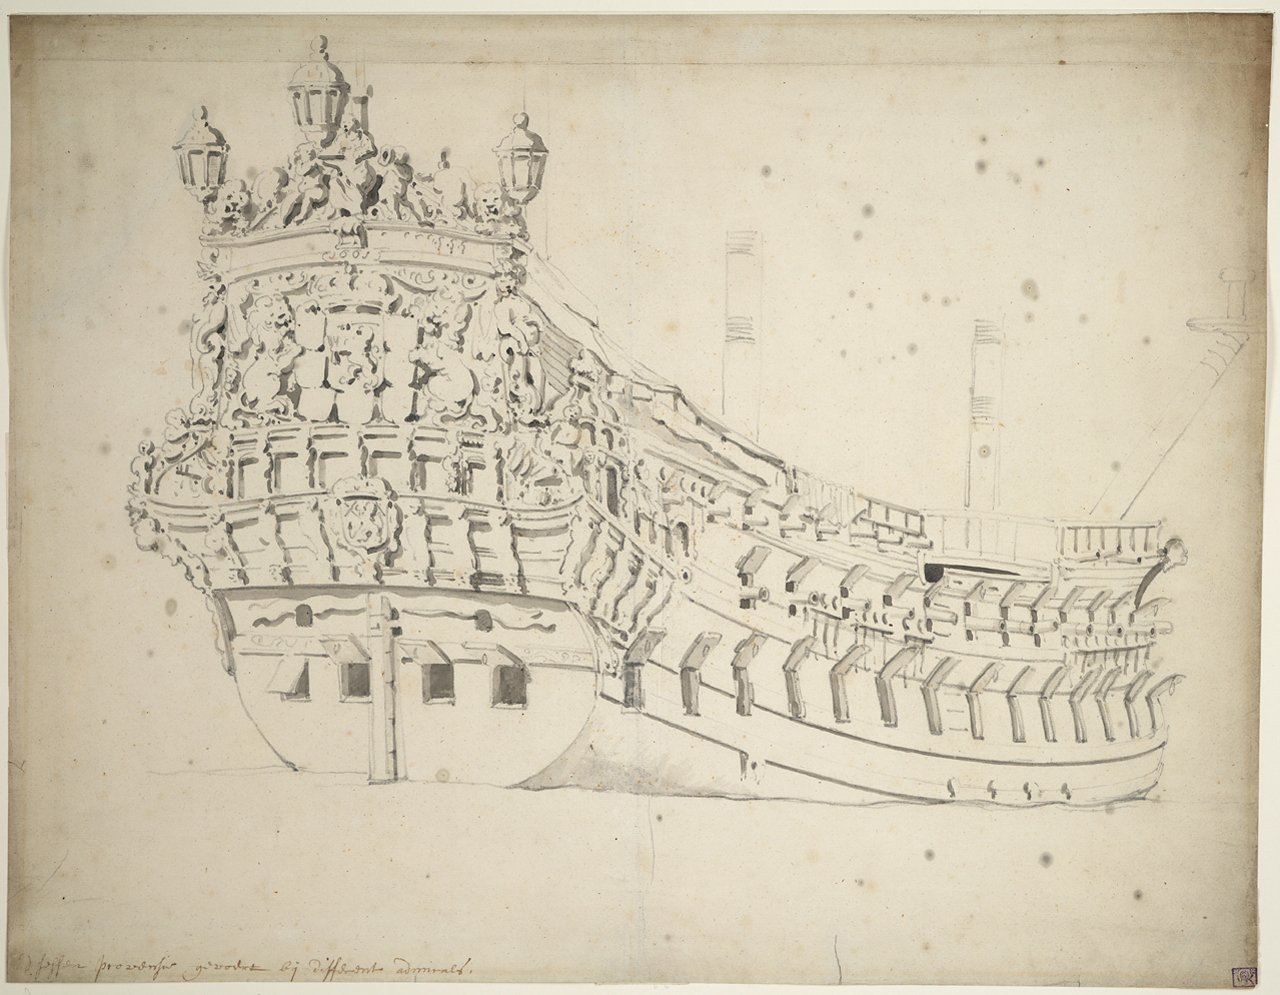
Thank you! The number of fittings above the waterline is actually 4. The plans from Lelystad show 6 (2 above the waterline). Still, in long discussions, I went for the original from the paintings - even other ships of the size like Witte Olifant 1666 or smaller have 4 above WL. Below: plan from Lelystad Dražen
- 487 replies
-
- 3
-
-
- ship of the line
- 80 guns
- (and 1 more)
-
… mounting the whole on the sternpost… and the rudder is ready. Dražen

.thumb.jpg.645a904c45f793aafc43078184aa1926.jpg)
- 487 replies
-
- 23
-
-
- ship of the line
- 80 guns
- (and 1 more)
-
After 6 thin layers of paint and longer drying periods in-between, the rudder was ready. I am using the Royal Talens Rembrandt Titanium White with some Ochre to give it an off-white effect. Talens Rembrand Yellow Ochre Light showed to be not covering well, so I switched to Old Holland Ochre which is excellent. Dražen
.thumb.jpg.7b5ed173cc987de7d4933610bd03bbd7.jpg)
.thumb.jpg.31fc93d77e5f541b0c760f880564b2b9.jpg)
- 487 replies
-
- 13
-
-

-
- ship of the line
- 80 guns
- (and 1 more)
-
That is how looked like before painting.... Dražen

- 487 replies
-
- 10
-
-
- ship of the line
- 80 guns
- (and 1 more)
.jpg.82edb46d6a8351e1fe0bab0f26cf2ae5.jpg)
.jpg.ae9a2c60c2c7d088f248349b99388717.jpg)
.jpg.9a852ee09f5ea4979d62ad7a5e579405.jpg)
.jpg.e2ea9c16f04cf3eed4bf88017110841c.jpg)
.jpg.9f0b1856a9046a19dc8f1e6e4813dae7.jpg)

.jpg.e502a266dd9b057ec471b6d6f029791f.jpg)
.jpg.b4002084a0c1d9193d56fbb3d49a49ea.jpg)
.jpg.81854770e06f85e572aadb31b5f67d84.jpg)
.jpg.c8b17bd5ccb533f7423582a7c5ae9b8f.jpg)
.jpg.a85cb938a2f0acb74d456a739ac01884.jpg)
.jpg.509bfe7c8550a73ae81000aabcc5c933.jpg)
.jpg.5f8342ca231671542a42f88aa9a3af97.jpg)
.jpg.26b7a682edb17fc5cdfea3c06ea9b48a.jpg)
.jpg.54f2ab79a41ad740e0c6ef815f916651.jpg)


.jpg.9abeb362cc26da0421bf46599d7bf337.jpg)


.jpg.e6a380b7905a8a2654352f6a1c8e84ed.jpg)
.jpg.932074b90b2c082c008dafce95707b6b.jpg)
.jpg.55ee1bfa66e19d2f074aee56c7b4767b.jpg)