
Drazen
-
Posts
389 -
Joined
-
Last visited
Content Type
Profiles
Forums
Gallery
Events
Everything posted by Drazen
-
 Making the wedge for fixing the tiller. The hole for the wedge was square in form and, after drilling a small hole, I needed to nail a metal part in it to make it square before setting the wedge. It seems to be easy, bit was not. Dražen
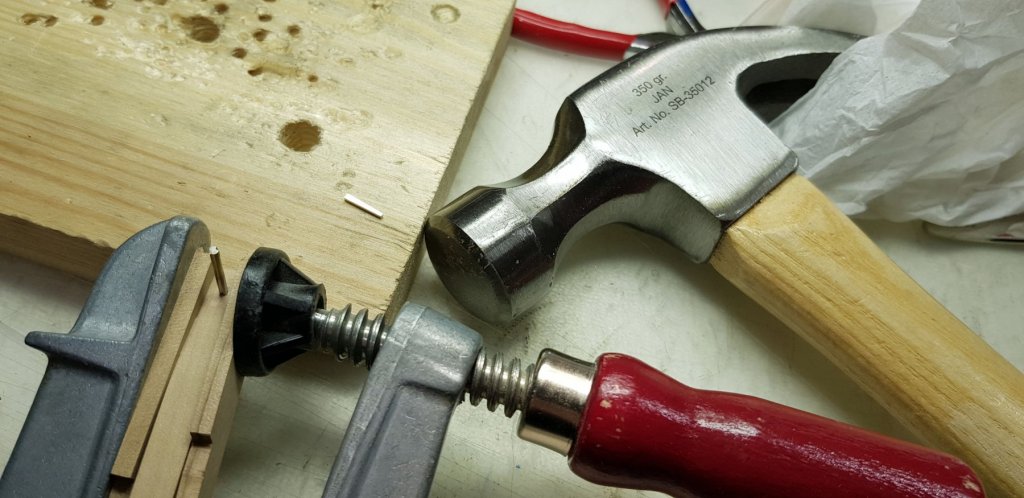
- 487 replies
-
- 7
-

-
- ship of the line
- 80 guns
- (and 1 more)
-
… and making the reinforcements in the tiller area on the upper part… The nails were slightly smaller. Dražen
.thumb.jpg.bd4181c0ea540bb116549f5a208385a4.jpg)
.thumb.jpg.3f4254179483d787573d11ff680e9e7b.jpg)
- 487 replies
-
- 9
-
-
- ship of the line
- 80 guns
- (and 1 more)
-
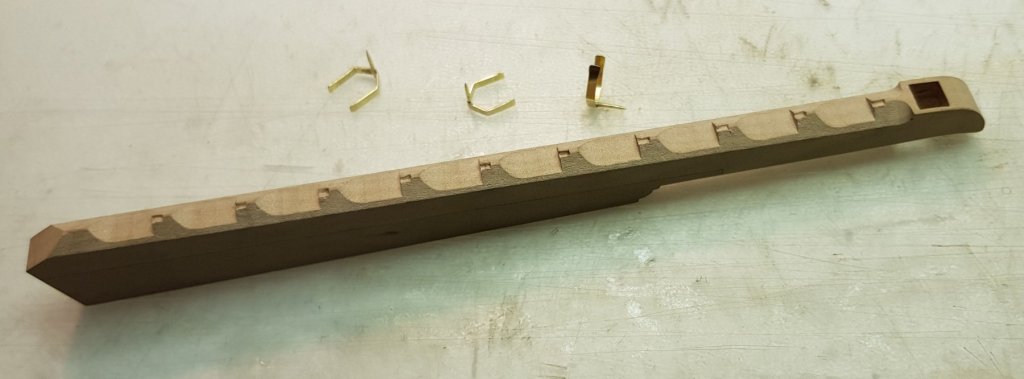
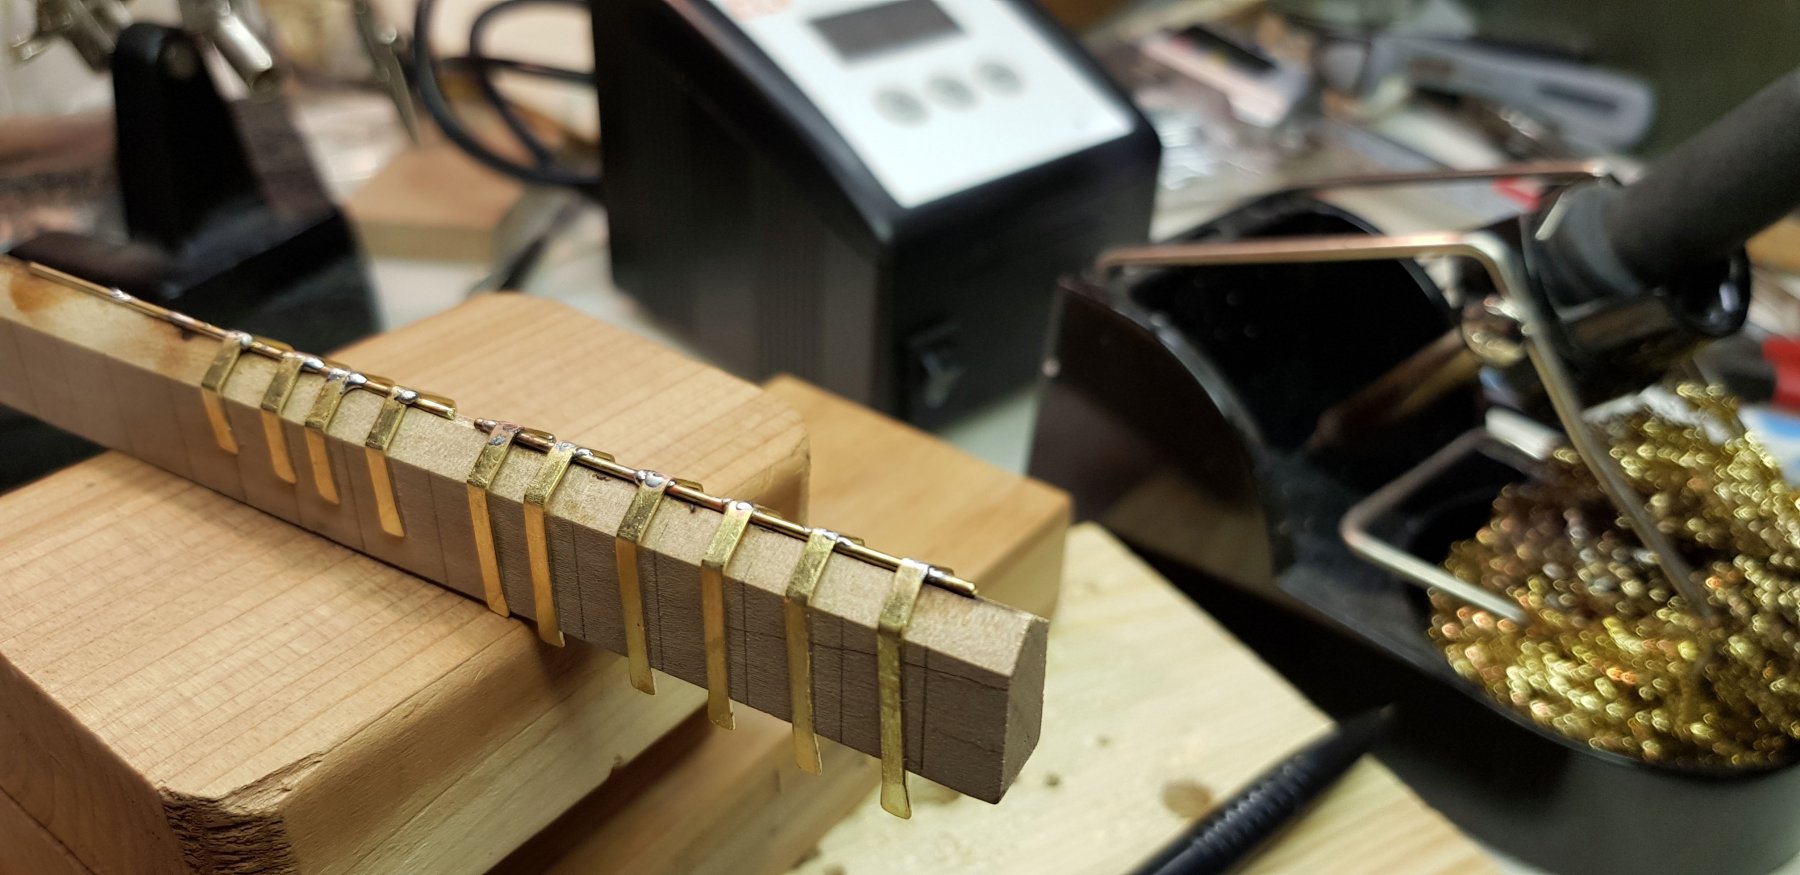
Making the other side – fittings on the sternpost. Here, it was necessary to get the whole thing into one line. For this, I used again a false-sternpost of the same size as the real one. I fixed the fittings into the right position on the false sternpost with some nails, … cut small cylinders which are going to be soldered … flattened them slightly on one side to get the right shape after soldering. When soldering, the rudder and the false sternpost have been fixed against each other in an exactly parallel position. Dražen
.thumb.jpg.f3e82158908d8d33b2d2a691ba4dcabd.jpg)
.thumb.jpg.1fc7f14856ea035cd247d55adfd027d5.jpg)
.thumb.jpg.73d4b2512f4061ab88f73ec6092640bd.jpg)
.thumb.jpg.5d82697767d7f934fb46ad4bd9922175.jpg)
.thumb.jpg.a816d6af08d1f7f33907b5c8162d3500.jpg)
- 487 replies
-
- 11
-
-
- ship of the line
- 80 guns
- (and 1 more)
-
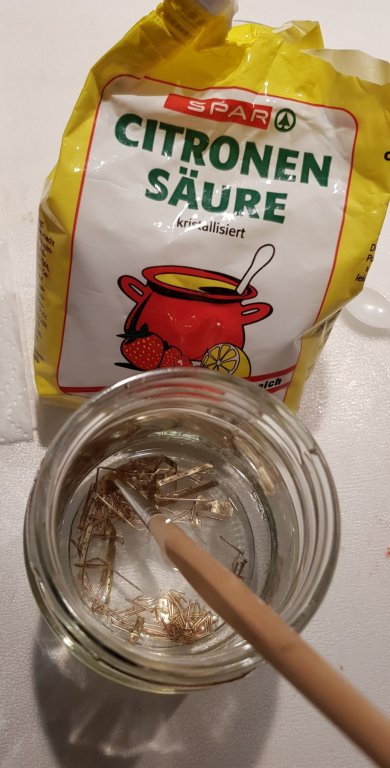
Patination … Before patinating, I cleaned it in the bath of citric acid. It is not aggressive, is cheap, easy to buy in a supermarket and cleans well. Dražen
.thumb.jpg.32ee8246c0aae177c8644929cd55b19d.jpg)
.thumb.jpg.0268ef45ec9102475da5e57cb591bd34.jpg)
- 487 replies
-
- 13
-
-

-
- ship of the line
- 80 guns
- (and 1 more)
-
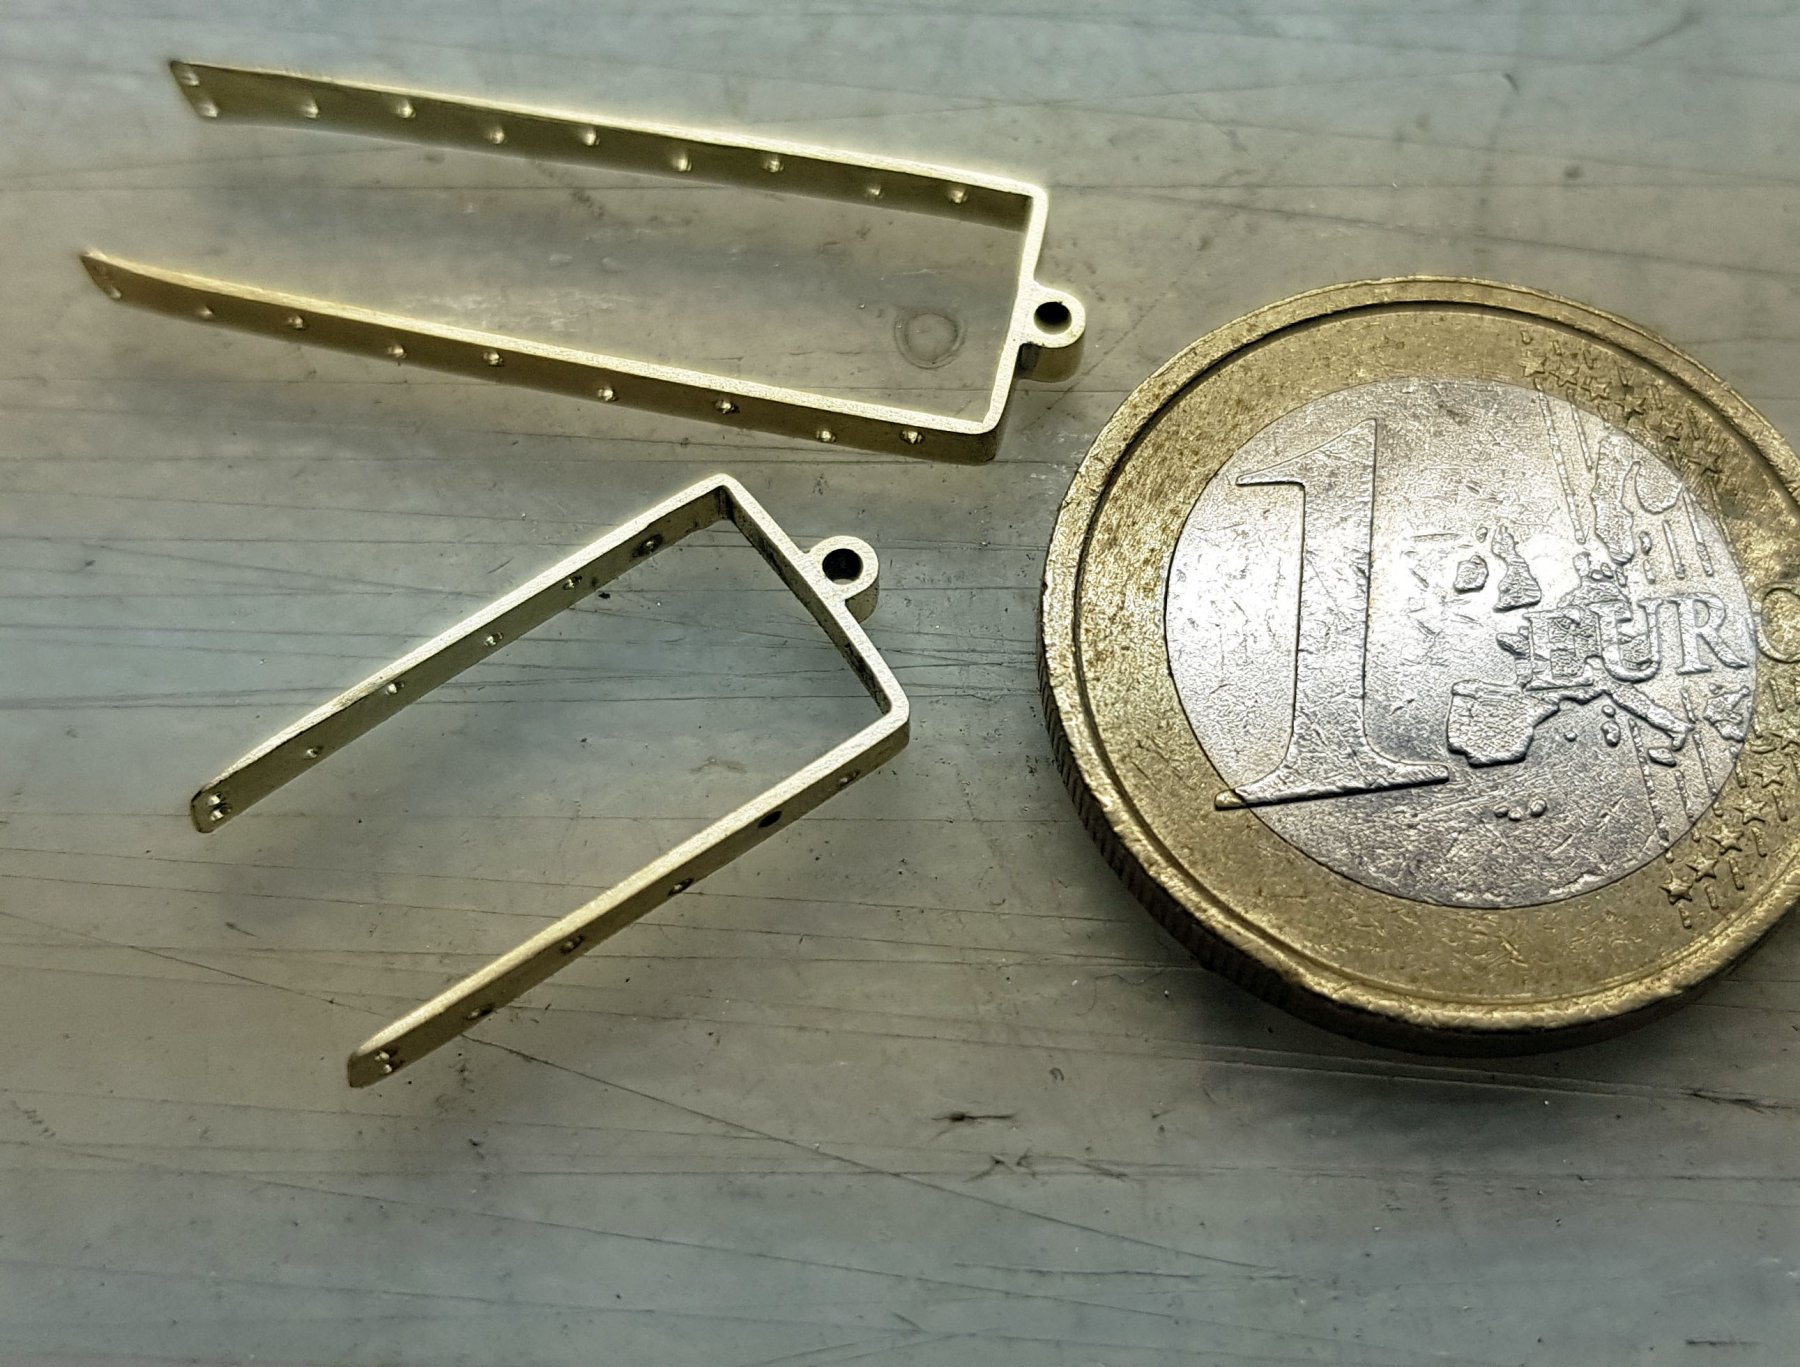
This is how it looks than ready – the part which comes on the rudder. Dražen
- 487 replies
-
- 13
-
-
- ship of the line
- 80 guns
- (and 1 more)
-
… soldering… After this, I cut the wire, but left enough wire to hold the whole piece in my Proxxon drill machine. Than, I turned the whole piece in Proxxon slowly and sanded the top with another Proxxon in order to get a nice sharp tip (not shown on photos - sorry). Dražen

- 487 replies
-
- 7
-
-
- ship of the line
- 80 guns
- (and 1 more)
-
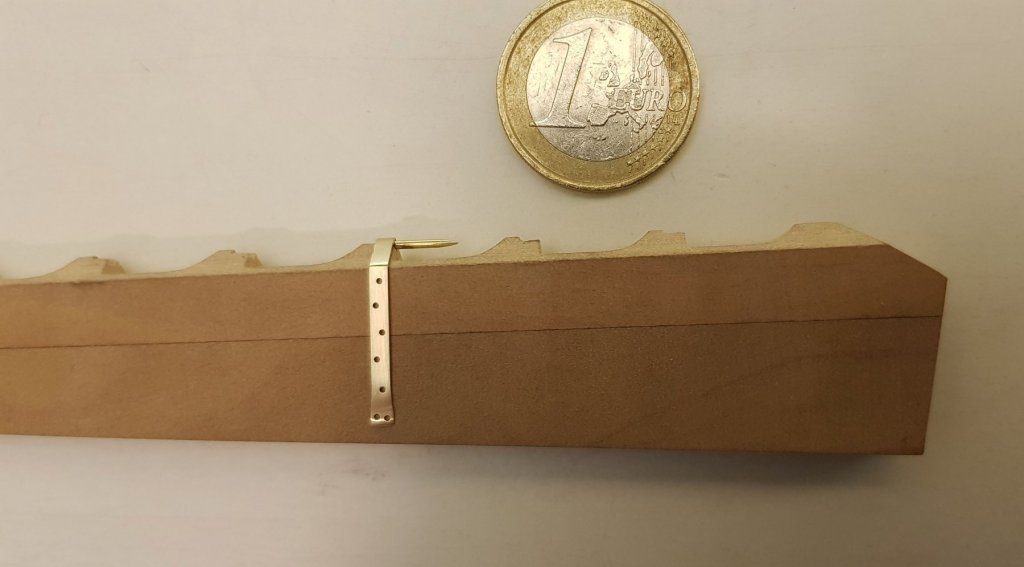
… preparing the place where the wire will be soldered in… Dražen
.thumb.jpg.32a952df4c4b72862d02ad445860408a.jpg)
- 487 replies
-
- 5
-
-
- ship of the line
- 80 guns
- (and 1 more)
-
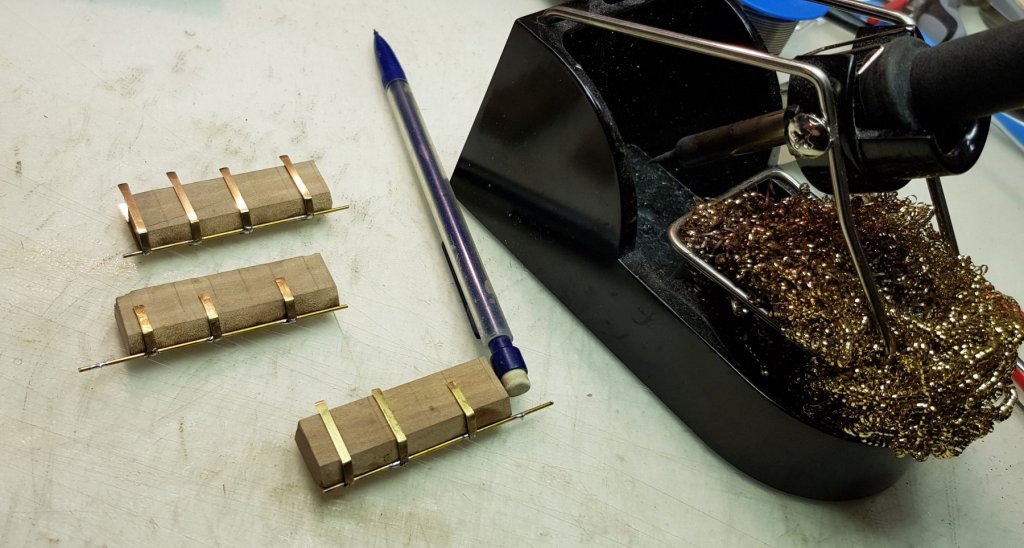
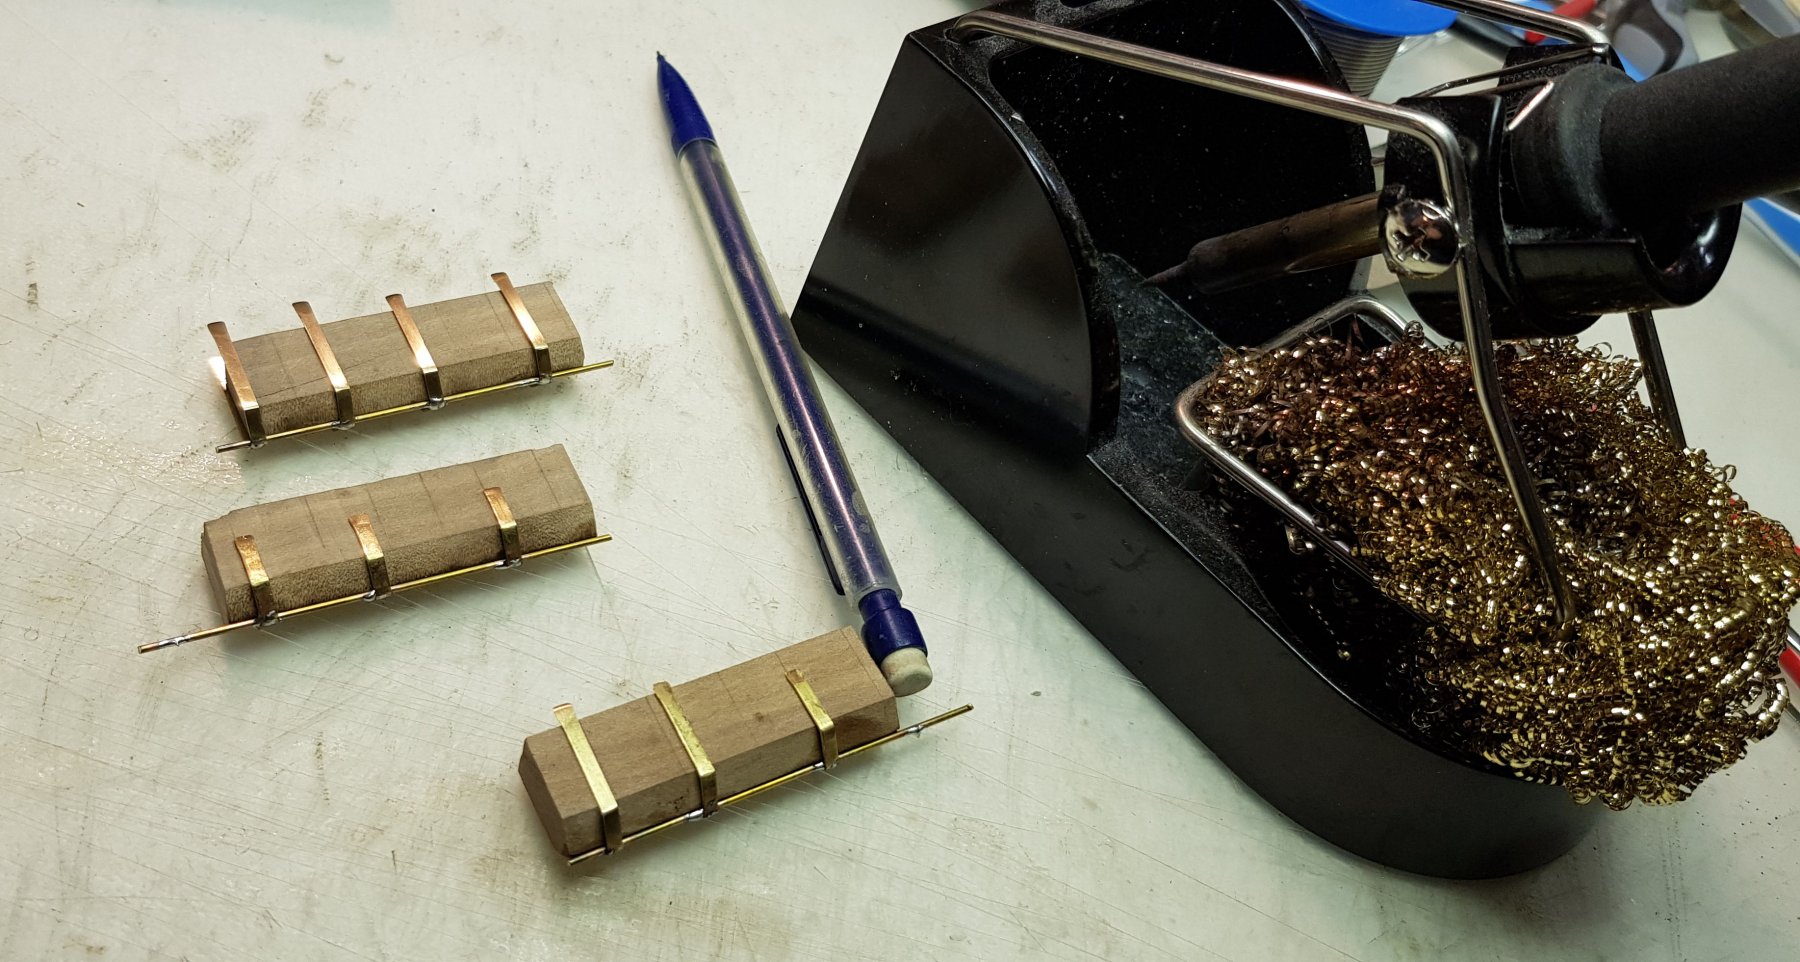
… a jig to hold the fittings when soldering. It is not the rudder, but a piece of wood having the same form (false rudder). Dražen
.thumb.jpg.2b6f3abc1c332b2edf7aa5fa7e240465.jpg)
.thumb.jpg.48dcab5144711199bdfeef6dd5e657ad.jpg)
- 487 replies
-
- 7
-
-
- ship of the line
- 80 guns
- (and 1 more)
-
Here is the procedure of getting nice, smooth and sharp cut-edges. For this, I made a channel which will hold the brass stripe when grinding with a fine sandpaper. Dražen
.thumb.jpg.d3668555ec62161de4dd429a816306d6.jpg)
.thumb.jpg.824203fa6e8c82eff35cc7ee287b98cd.jpg)
.thumb.jpg.b71b418fd6471955882658e9e0b19d25.jpg)
.thumb.jpg.4c5884b64af2fce78eb536bd26e8821c.jpg)
- 487 replies
-
- 6
-
-
- ship of the line
- 80 guns
- (and 1 more)
-
Making the fittings… I cut it out of the brass sheet with the Proxxon precise circular saw which is suited also for aluminium and brass. Dražen
.thumb.jpg.81e9220f1908906bfd8877b395777c64.jpg)
.thumb.jpg.678f80ff0ad28ccb26543e7423c476d5.jpg)
- 487 replies
-
- 6
-
-
- ship of the line
- 80 guns
- (and 1 more)
-
Making the rudder itself… I hope, the photos are explaining the procedure well. Dražen
.thumb.jpg.80ff8fe66a9f31bc47998cdd49614463.jpg)
.thumb.jpg.f3f8781249cf458892f932bee154c7d1.jpg)
.thumb.jpg.826294635bb731407429dc8f1fb25d08.jpg)
.thumb.jpg.a7932490da009d11e7faf85f2574d362.jpg)
.thumb.jpg.1242f8dc6cf375f39176ff7d081097f6.jpg)
.thumb.jpg.976f054b430e175c4b793b573ab23cf8.jpg)
.thumb.jpg.a82356920c3d3228747bc51f2b542167.jpg)
.thumb.jpg.24e7c4b580d2677bd563521e4a02340c.jpg)
.thumb.jpg.000f8cc66f7bacc5c466e17779feafe3.jpg)
- 487 replies
-
- 12
-
-
- ship of the line
- 80 guns
- (and 1 more)
-
Cut the wire in halves to get the right length of the nail. I needed also to grind the top of the nail (each) since the cutting with pliers made the tip wider – too wide for the holes Dražen
.thumb.jpg.34ad14d6c90ba1546d04157ee7576b6d.jpg)
.thumb.jpg.010468a5cf5328f75649d628b7aba75e.jpg)
.thumb.jpg.1762962c98684376c46aaae7fb2246d2.jpg)
.thumb.jpg.123e36ddbc63a0cdf45c2dd5be7b0c0f.jpg)
- 487 replies
-
- 8
-
-
- ship of the line
- 80 guns
- (and 1 more)
-
Than I use a big knife to cut (actually - roll) the wire. The knife must be sharp, but THE CUTTING ANGLE must be large – something like 70°-80°… but you shall make tests. If the angle is to small/sharp, you will just cut the wire without any effect. Than you roll the wire back and forth – taking care that the knife rolls on the same place. What happens is, that the cutting place deforms and builds a sort of “mushroom head” which simulates a head of a nail. I am sure, many know this method, but maybe not everybody. Dražen
.thumb.jpg.2fd54d4d59e35572ed911d94130b552a.jpg)
.thumb.jpg.6ca182ca6199041a961df857a38a925f.jpg)
- 487 replies
-
- 8
-
-
- ship of the line
- 80 guns
- (and 1 more)
-
I used a brass wire of 0.6mm, cut it into 8cm rods, and rolled with a piece of wood to get them straight. As a base, I use the “self-healing” matte. This is important for the nice rolling of the wire when cutting. Dražen
.thumb.jpg.497b87ae870945f40dd9983d66c70876.jpg)
.thumb.jpg.3d3d84f5f05cc5468a5b35359cd37bad.jpg)
.thumb.jpg.879b03d9229070d614e90b4f480a037e.jpg)
.thumb.jpg.aa0434bdd0c1c4adbdacd3a6f647c6db.jpg)
.thumb.jpg.6f574bc706ff50b68e6104f34587aa9d.jpg)
- 487 replies
-
- 10
-
-
- ship of the line
- 80 guns
- (and 1 more)
-
Let’s show the rudder... Before I show the making of the rudder, I will show the making of the nails. The rudder and the fixation required more than 200 nails. The nails were small and not easy to buy in this size (for my scale, I needed the head with width of 0.6mm-0.7mm). On YouTube there is a nice explanation by a Russian guy which shows the same procedure too. This procedure gives not perfectly round head. As the nail heads were slightly square (definitely not nicely round), this procedure gives in my opinion nice results. Dražen
- 487 replies
-
- 2
-
-
- ship of the line
- 80 guns
- (and 1 more)
-
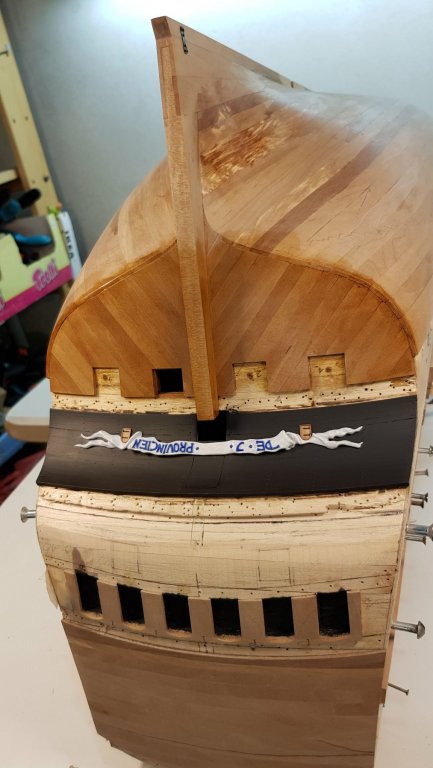
A complicated fixation when gluing… The paint below has been removed carefully… than… … despite the bent form, I needed to press the ribbon additionally to make it fit well. Gluing again with epoxy. … than, as it looks on the ship. The small windows have not been glued yet since I want to give the coat of varnish to the wulf & ribbon first, before gluing the windows. Dražen
.thumb.jpg.f2fbd05395873c0e238eeb5872f88c5b.jpg)
- 487 replies
-
- 16
-
-
- ship of the line
- 80 guns
- (and 1 more)
-
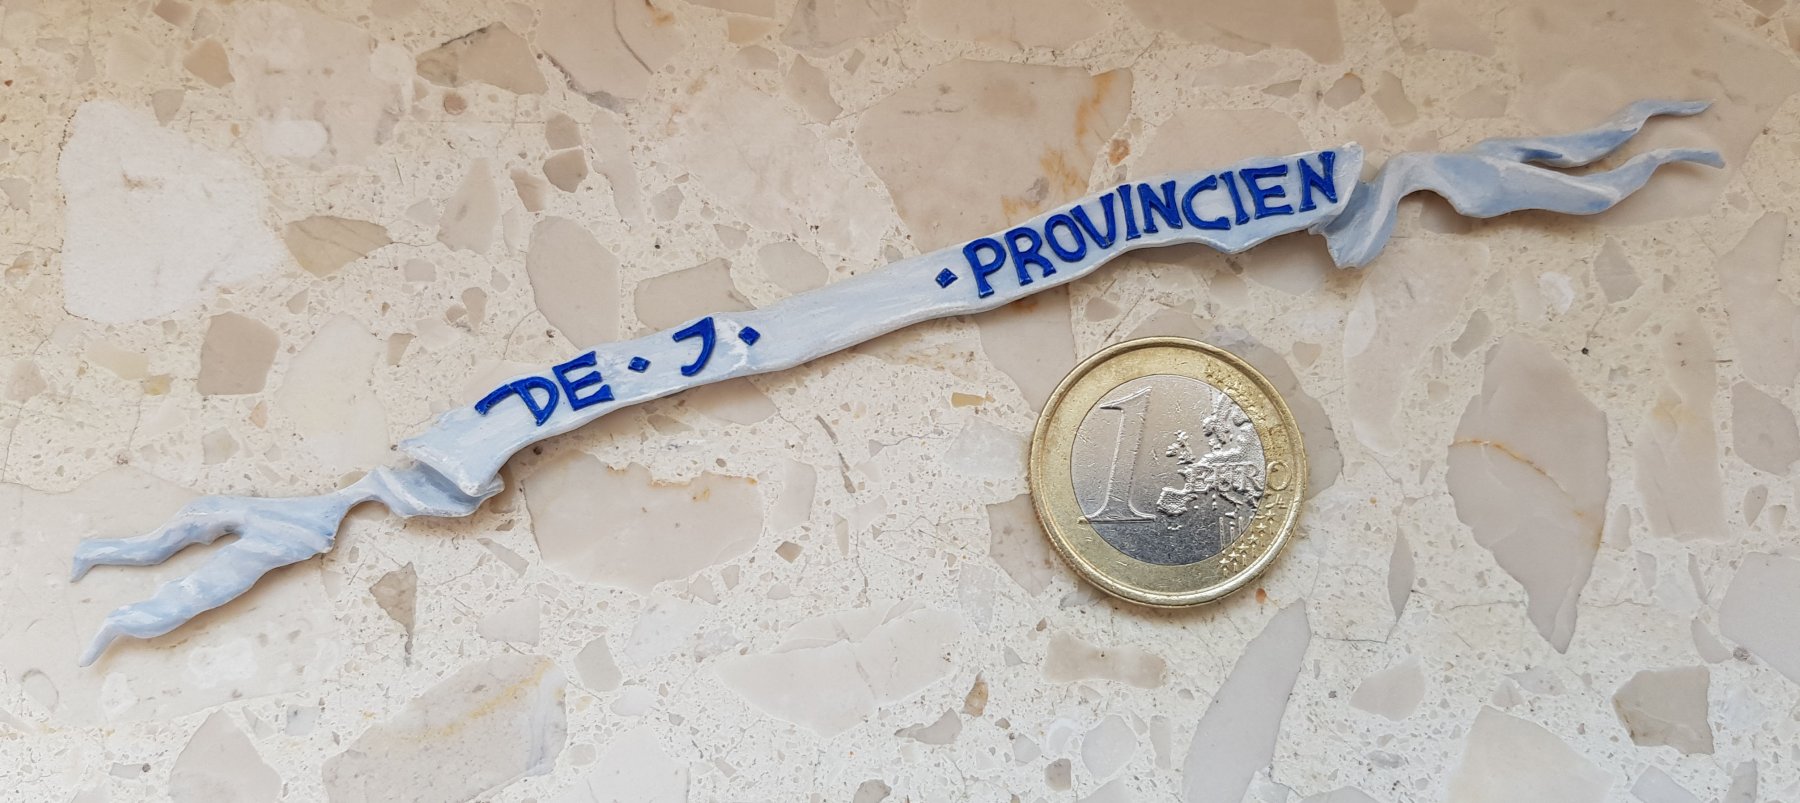
There was a lot of discussion on "blue or gold letters". Again, after consulting some experts and you in the forum and the historic paintings, the blue looked as the right solution. Dražen
- 487 replies
-
- 2
-
-
- ship of the line
- 80 guns
- (and 1 more)
-
… and this is the finished ribbon. When mounted on the ship and oil paint completely dried, it will get a thin layer of mat varnish and will blend in beautifully. Dražen

- 487 replies
-
- 11
-
-
- ship of the line
- 80 guns
- (and 1 more)
-
Of course, one needs to erase the letters contours with a clean high-quality rubber. For me, it worked OK, but some excessive parts of the paint went away and were more light. Usually this would be a catastrophic for the lot of work behind, but, I have learned that mistakes are the greatest potentials for improvements and innovation. I am in my profession an innovation manager consultant and train my clients in seeing obstacles or failures as the greatest potential to learn something new. One gets the other perspective, seeing things different, getting “out of the box” with sometimes entirely new opportunities. Well, for me, the erased excessive areas gave even more reality to the look. I was grateful for the “mistake” done by my rubber/eraser on the weak layers of the oil paint. Dražen
.thumb.jpg.53d9678ade11b3ef3171667674e38ea7.jpg)
- 487 replies
-
- 8
-
-
- ship of the line
- 80 guns
- (and 1 more)
-
… than, milling away paint till the ground layer of wood – without going over (or even near to!) the edges of the letter contours. Getting away just the middle part is fine. I am working with a dentist’s device. I am not sure if it is possible with a Proxxon or Dremel, but, maybe some can manage it with these bigger tools too… Dražen
.thumb.jpg.2ab872c84d2edae38605e5ae2f207a4c.jpg)
- 487 replies
-
- 8
-
-
- ship of the line
- 80 guns
- (and 1 more)
-
… than, I took a pen refill 0.5mm, fixed it onto an injection needle and made it very sharp. With this, I was drawing contours around the letters. Using it with any of my best pens was not possible since too big/chunky. Fixed on the needle, it was easy to move around the letters. Dražen
.thumb.jpg.c76dc2116eb61461230b8419927d696f.jpg)
.thumb.jpg.ead7698725ec4ee6369c9aef1e96f656.jpg)
- 487 replies
-
- 6
-
-
- ship of the line
- 80 guns
- (and 1 more)
-
On the previous photo, you can see a jig holding my ribbon. This was important in order not to touch the part. The photo shows ready painted parts – ribbon and the letters. The fine shades on the ribbon are difficult to be seen on the computer. Later photos will show it better. Dražen
- 487 replies
-
- 1
-
-
- ship of the line
- 80 guns
- (and 1 more)

.jpg.048c594e332a7568a0d39f914da6184c.jpg)
.jpg.40c06c7f1091a05396d6a08e03ef44c9.jpg)
.jpg.3cf3089f83b8e0b1684a9ed145dfd72a.jpg)
.jpg.064ca03855cf9e2168f9dbb6a8bb9234.jpg)
.jpg.9ed6ebba7aa128cfd19330115f67d64a.jpg)
.jpg.e0607a59227eaf98d1feced57969f80e.jpg)
.jpg.b011cfdbabb06abf434d80f1b3f67a0e.jpg)

.jpg.2fc541befaa16f9f7ed1aa456cc4211d.jpg)
.jpg.8e55699deb433f3f708a21e5a221f878.jpg)


.jpg.7e1c26de230bb743b4c4514e265a88ca.jpg)
.jpg.b8a46f478077d07d5b83ab95517dab70.jpg)
.jpg.6baf7e5ef0ce220ed65c1c50d8f75ce1.jpg)
.jpg.5a28766081cdb6db758644c64be27582.jpg)
.jpg.12d33a63ee7416d3049de2234ebf6db1.jpg)
.jpg.4046865a8a8c8884f6ffae79831f57fb.jpg)
.jpg.e78f276ef384ff901fa6e7c5c6b24714.jpg)
.jpg.e615570d4a1ca31132fa6b13d2b91ced.jpg)
.jpg.40f345a0b878dcfdcf89aff43994eb2a.jpg)
.jpg.a5f5b01c3e94edc37adc9aaab5136b39.jpg)
.jpg.c9137f5e298fca8fac54521b021390e3.jpg)
.jpg.3a117ab41b9d16f5b8c27bdd82edd359.jpg)
.jpg.5b9cb1081339c6121ced051686a6905c.jpg)
.jpg.5c2499b664724b6ecd6cbe76b2b3eae2.jpg)
.jpg.0590bffffe9eb8a07d718967e40416a5.jpg)
.jpg.72491c757bbcd9fedd82886173633f6a.jpg)
.jpg.63f919b97df1f0fde54b8437f43c075a.jpg)
.jpg.b2b9f65aa47c8c48287379727d071854.jpg)
.jpg.1ad88b0e9e50a42984dea49152e093e2.jpg)
.jpg.09262af6fd5c54a846ccbaa6498830ff.jpg)
.jpg.6d5c21482dc2e5dd965e02812e09b3a2.jpg)
.jpg.bcc9c688d5fe9d2ad47182f7c572649d.jpg)
.jpg.5cf710d983a4b77fb72cf2bf5909fd0d.jpg)
.jpg.e4b4b2a762055e2da14f20db3107d9f4.jpg)
.jpg.7a3bc23c5bd59188d737a03009c5998d.jpg)
.jpg.2e99a9a13657e71e117886203aff5cff.jpg)
.jpg.eb39f211a9afc411ce8e575c0f769d9a.jpg)
.jpg.2477b9b1519f1b3e2e008dcff302ca02.jpg)
.jpg.ba4c9ff6225931364be7c2eab77f9ab4.jpg)
.jpg.78b1582a5d70efe4513a78b6fc580f1a.jpg)
.jpg.1a965c069977339cce5adefd0b48bfab.jpg)
.jpg.fd5c9679adae2fb516c8dc1f176fe973.jpg)
.jpg.40b101247418eaf565797c56654dfa3e.jpg)

.jpg.b3ab8345dbb77e258f1317acdde130af.jpg)
.jpg.36cd926993724b74694ac77d1a932754.jpg)
.jpg.198e8359e5f6876a6212abfd294c35cf.jpg)
.jpg.fbf79e041b4f9daea1864ed03bff328c.jpg)