HOLIDAY DONATION DRIVE - SUPPORT MSW - DO YOUR PART TO KEEP THIS GREAT FORUM GOING! (Only 72 donations so far out of 49,000 members - Can we at least get 100? C'mon guys!)
×


jml1083
-
Posts
195 -
Joined
-
Last visited
Content Type
Profiles
Forums
Gallery
Events
Everything posted by jml1083
-
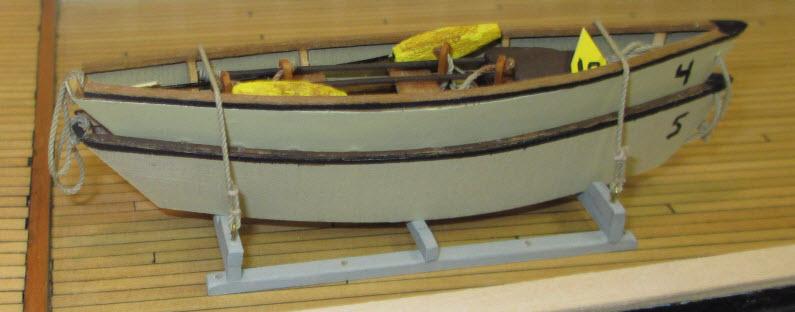
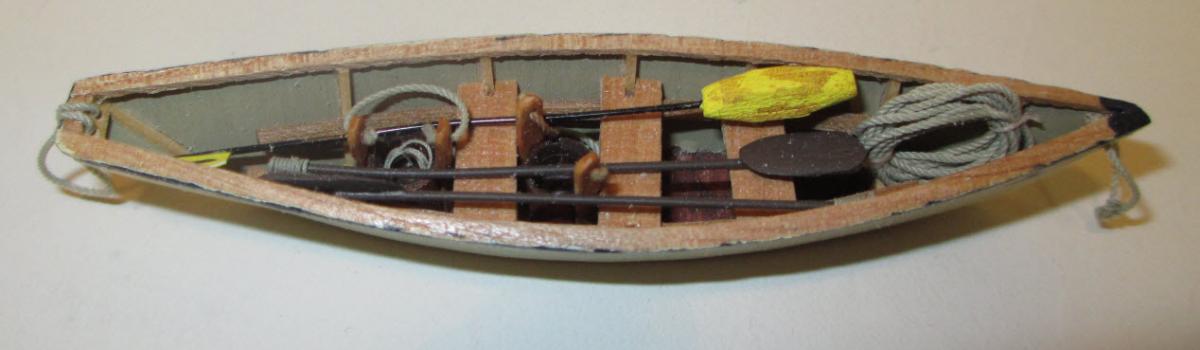
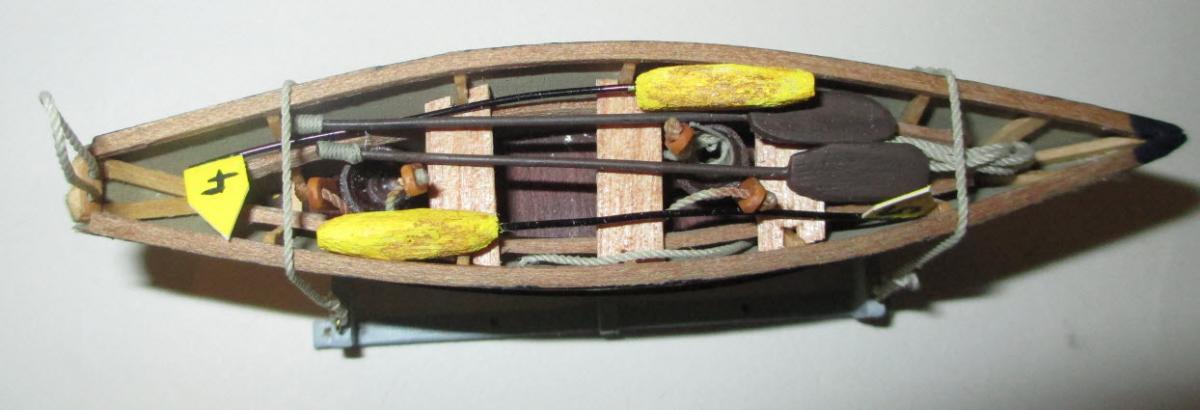
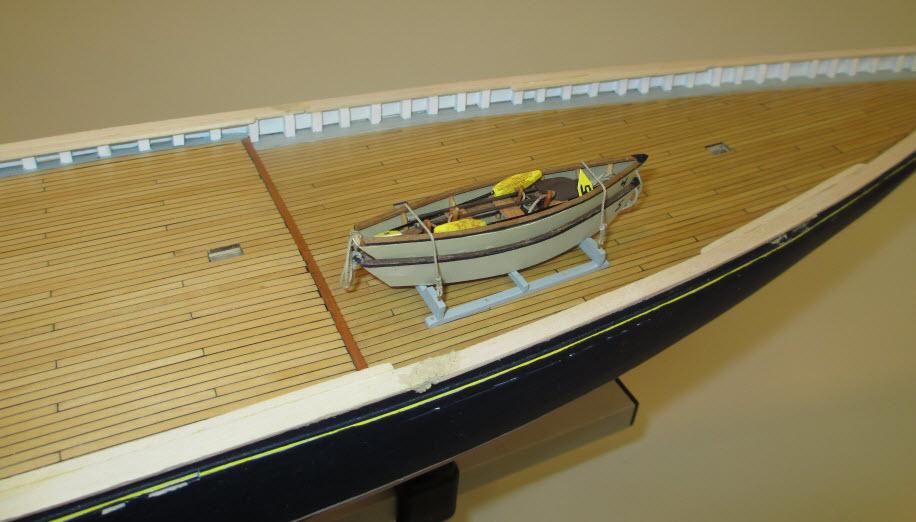
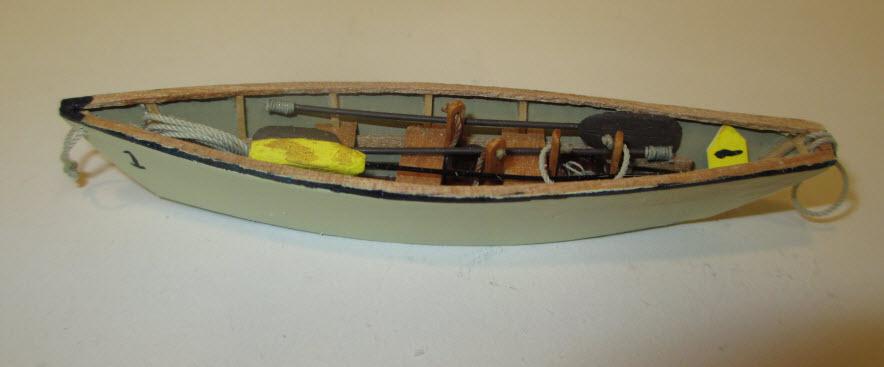
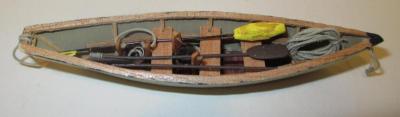
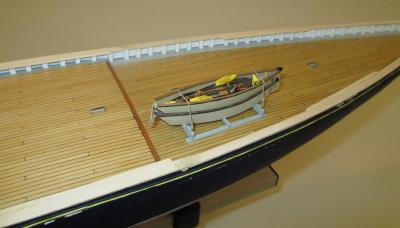
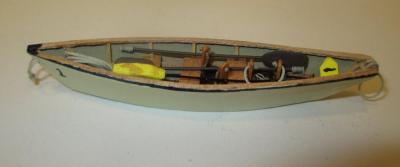
 Another log entry I found! Jeff, Alistair, Bob, Jay and Elia, many thanks for the warm welcome and kind words! As promised, here are some pictures of my dories. This first photo is of 2 stacked dories on the skids. They are made to look like they have been knocked about a bit as these are work boats and would have seen some rough handling in their day. There are minor differences in things like the rails to give each an identity beyond the number painted on the bow. I didn't want them to look like carbon copies of each other. This stack is just placed on deck for the photo, it hasn't been installed yet. I used the jig that came with the kit to make the dories. I found that the sides had to shortened by 1/8" (cut from the aft end, not the forward end) to make things work. I started assembly by edge gluing the P&S sides at the bow and holding them together with my fingers while the glue set up. This gave me a piece that looks like the letter "V". Next I got the sides clamped against the jig using the 8 hook shaped pieces held in place with clothes pins. I then pushed the floor into place. I had made a note of where the center cleat would be and marked the floor on P&S sides. Once in place I used a drop of CA glue to hold things in position and gave the glue time to dry (the spot of glue will be hidden by the batten). Once the glue was dry I turned the whole thing over and put tiny drops of CA glue all along the perimeter where the floor and sides meet, these acted like tiny liquid spot welds. Again, I gave the glue time to dry before I moved on. When the sides were securely attached to the floor I put in the transom. By putting the glue on from the bottom I avoided those shinny spots that show up when you paint over CA glue. With the hull now complete I started work on the interior. I dry fit the cleats and once I had their fit the way I wanted it I drilled the holes in them to allow water to flow between sections. With the cleats installed I glued on all the battens. Next came the thwart supports. I soaked them in water for awhile to make them a little more pliable then glued them in place. I cut the thwarts to fit and glued them in place. The rail was harder to get into place because although I soaked it the wood still wanted to spring back. Then I remembered something I learned at a meeting of the Ship Model Society of NJ. Chuck Passaro gave a demo of how to bend wood and make it hold its shape. I put a piece of paper over the drawing of the dory and traced the outline of the rail. I took that and laid it on a scrap piece of wood. After wetting the rail I used a small spring clamp to clamp one end of the rail on top of the tracing. I then slowly and gently bent the rail to conform to the tracing. I then clamped the other end to the board. The trick is to use heat to dry the wood while it is clamped into the shape you want. Once it is dry (and has cooled) you can remove the clamps and the wood will retain its shape! With the rail now bent to the correct shape I painted the outside edge the same deep midnight blue that I used for the hull of the ship. When the paint was dry I applied a coat of Wipe-On-Poly to both sides and the top. When all that was dry I glued the rails into place. I drilled holes in the transom and the bow and then threaded .6mm tan Morope through. The two loops of rope are used to hoist the dory out of the stack when they are needed for fishing. This is what a finished dory looks like. This single dory will be displayed off the ship at the height of the waterline, probably on a brass rod coming up from the base that the ship will be mounted on. Each dory has a bunch of gear in it. I've seen photos of fishermen in these dories and many times they had to sit on the rails with their legs intertwined in the thwarts to hold themselves in. My dories are equipped with a coil of .6mm beige rope, 2 oars, two buckets with rope handles (one with fishing line coiled in it, the other empty) and a marker buoy. The inside of the dory is painted with a color called dirty concrete which is a sickly green/tan combo that looks just right for a fishing boat. The outside is painted aged white. The floor of the dory is stained with a deep red oak which nicely simulates blood stained wood (fish blood, not fisherman blood). The number painted on the side is not meant to look like it came out of a factory but more like something a fisherman would have painted using whatever brush was handy. To make the yellow less glaring it is aged with walnut stain applied in a haphazard way. Over all I'm pretty happy with the outcome. This next photo is a shot looking down on a stack. You can see the oars, buoys, buckets and coiled rope. Before this assembly gets attacked to the deck I will load more oars, buckets, etc. As much gear as possible was stored in the stacked dories to save room on deck. That's it for now. Next up is deck furniture but I am still working out how I want to build these items.

-
Hello all, This is a reconstruction of my Bluenose log. I was able to salvage the text from my initial post which also happened to be my biggest so I should be able to a pretty decent job of getting it back. Unfortunately when you pull something back that has been cached on Google most of the time the photos are not there so this may be a bit hit or miss matching the text to the photos I have but I'll try. Onward and upwards! I've been working on my Bluenose for a number of months now so this log will not start at the beginning but rather at about the halfway mark. To date I've planked the hull, both decks, painted the hull and have begun working on the dories. Here are a few photos that show what has been done so far. This first photo shows what the hull looks like so far. You'll notice the waterline in this photo is yellow, not white. Actually the water line IS white but it is covered by a 3/64" wide strip of yellow automotive pin stripe tape. The way I did my water line is this: I painted a wide stripe white. This stripe is wider than the actual water line will be and it extends above and below where the final line will be. Next I took a piece of 3/64" yellow pin stripe tape and ran it over the white area exactly where I wanted the water line to appear. Finally I painted up to the tape with red and down to the tape with a midnight blue that I mixed up for this build. The tape will be coming off soon and I'll get a shot of the final result. I leave the tape on as long as possible to protect the white line. I hate to try and touch up thin lines. The next couple of photos show my decking job. I used boxwood from Hobby Mill and am very happy with the result. Boxwood has very tight grain so there was no bleed through of the artist charcoal I used to simulate caulking. As you can see I deviated a bit from the kit suggests when it came to the planking. I used 5 planks per set and used a pattern of 5-3-1-4-2. This gave me an appealing pattern with adequate spacing between plank ends in adjacent rows. Since it was my plan from the beginning to use a pattern like this rather than using one long plank, I used a 1/32" basswood subdeck. This made it very easy to apply the planked deck which is made with 1/32" x 3/32" boxwood. An unexpected but now that I think of it not surprising benefit of this was cutting the planks that go into the nibbing strake was much easier. Cutting 1/32" boxwood was very exact, push down on my knife and SNAP a nice clean cut. Boxwood sands very well so the little sanding I had to do on the edges is also very crisp, unlike basswood. Planks are 120mm long which is 25 scale feet, a believable length for a ship coming out of this region of Canada. Since I used 5 planks per set the offset for each is 24mm. With the narrow planks (6 scale inches) I think this arrangement worked well. The deck is finished with 3 coats of Wipe-On-Poly (Satin) rubbed with a green nylon pad between coats. I am just about done with my dories. I will have 2 stacks of 3. I did a bit of substituting on materials, here is a list of what I used: Battens are 1/32" x 1/16" boxwood Cleats are 1/32" x 3/32" boxwood Thwart support rails are 3/64 x 1/16" walnut Thwarts are 3/64" x 3/16" walnut (very light color - may be sapwood) Rails are 3/64" x 1/16" walnut I realize this is a long post but rather than spend time trying to figure how to break it up I decided to just dive right in, post this one long entry and then I'm caught up to date. Future entries will be shorter and cover one thing at a time.

-
Echo by jml1083 - cross-section
jml1083 replied to jml1083's topic in - Build logs for subjects built 1751 - 1800
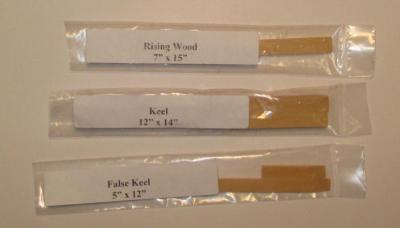
Hi All, Here are a couple of shots showing the starting point for my Echo cross section. The wood is from Hobby Mill and as always is top drawer material. Each section comes in its own little package so you really can't mix things up and since some of the pieces are very similar in size that is a good thing. There is enough wood supplied to build two complete keel assemblies and enough rising wood for 3. Since the rising wood is the most complicated part of this particular exercise it's nice to have that extra piece. This next photo shows how the wood arrives. I will start work on the keel this weekend and post whatever progress I have at the end of the weekend.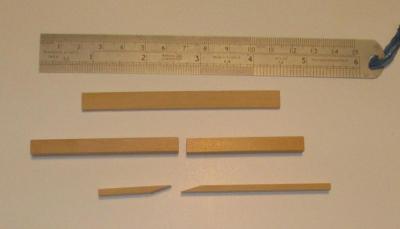
-
Hi All, I wil be attending David's and Greg's upcoming workshop in Baltimore. As the most inexperienced person who has ever attended one of these workshops (seriously) I'm counting on the great build logs that used to reside here being reposted. In anticipation of the workshop I had started to check out the build logs that were here and they were a great help in understanding what needed to be done. Earlier this week I received the wood for the keel from Greg and this weekend will be busy down in the shop doing my "homework". I'll start posting as soon as I have some work to show. Thanks in advance!
-
Hi All, Just wanted to get my Bluenose log going. I'll post photos and more text tonight.