jml1083
-
Posts
195 -
Joined
-
Last visited
Content Type
Profiles
Forums
Gallery
Events
Everything posted by jml1083
-
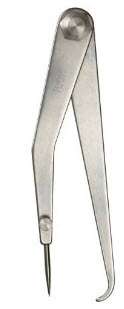
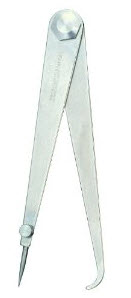
I recently discovered something called a hermaphrodite caliper. We are all familiar with normal calipers, what makes the hermaphrodite caliper different is one leg has a small inward facing "foot". This foot makes scribing or drawing a line that is a set distance from the edge of a piece of wood very simple and accurate. The foot follows the edge while the other leg, which can hold either a sharp point or a pencil lead, scribes or draws a line. I found that this is so accurate that I can quickly go over the same line multiple times to make a scribe mark deeper and the scribe always is in the exact same place. The following graphic shows some of the possible uses. Starrett make two versions of this tool. The 563-6 is a 6" tool where the opposite leg is straight for its entire length. The 243-6 is also a 6" tool but the opposite leg has a bend in it about half way up. The Starrett models are a bit pricey (about $50 USD each) so you may want to shop around. The ones I own have what Starrett calls a stiff joint which means there is a nut that you can tighten if needed to increase the amount of force needed to adjust the gap and these are the ones shown above. They also have a locking joint version of both but I find the stiff joint version is just fine and the lock joint version costs twice as much.

-

Where Do You Keep Your Working Plans
jml1083 replied to BubbleHead's topic in Modeling tools and Workshop Equipment
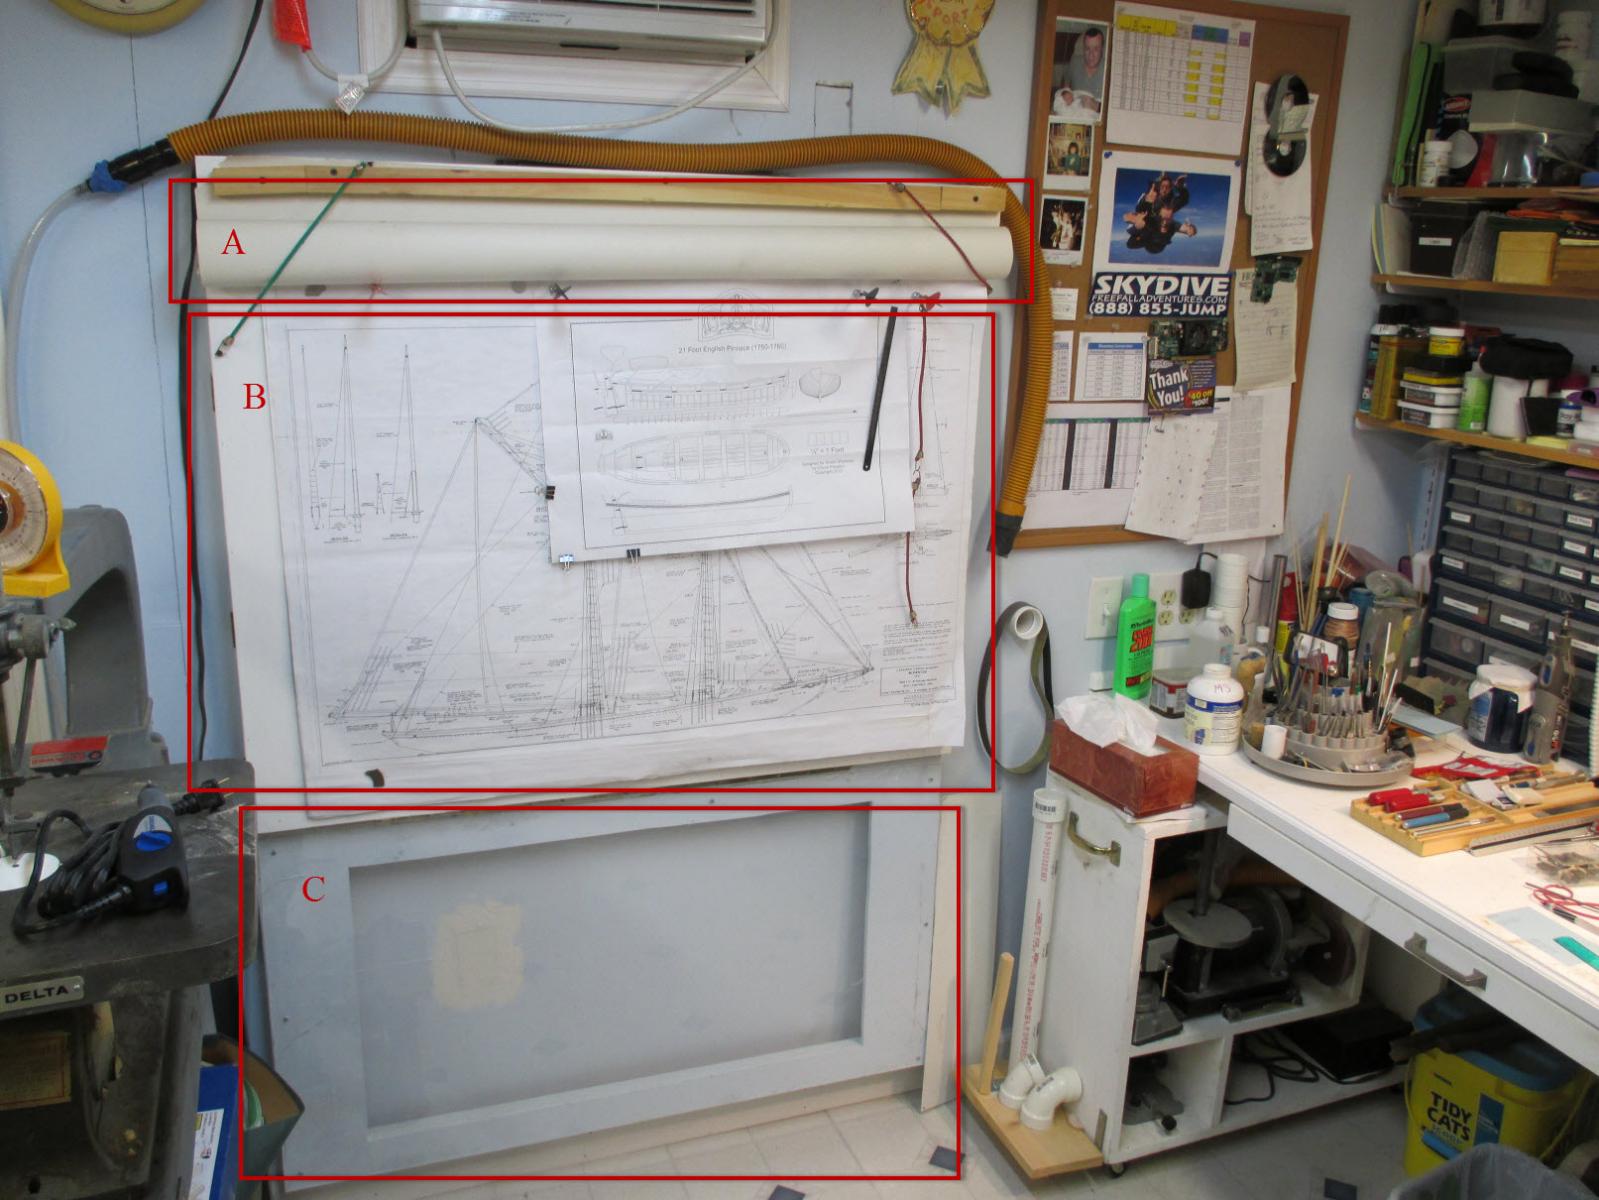
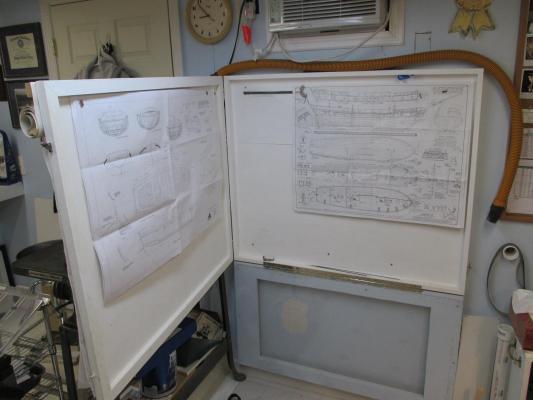
Until I recently expanded my shipyard I was working in an 8' x 8' (2.4m x 2.4m) room so I came up with ways to make the most of the space. I made a plans locker that served 4 purposes. A place where I could hang plans vertically so I could just glance over from my bench and see the whole plan. A photographic background A light table A locker where other plans can be stored Section A is a photographic background that stays rolled up and out of the way until I need it. Those 2 diagonal lines are tiny bungee cords that keep it rolled up until I need it. Section B is where the plans hang. There are 3 steel bands that run across the face and I hang the plans using rare earth magnets. Section C is a light table that is connected to the bottom of the locker with a piano hinge. It has legs that fold down to support it. The table also doubles as the base for the photographic background. I roll the paper down and it extends to the front of the table. The front of the locker is hinged along the left side so that the whole front face swings out. Inside is a lot of room for other plans. That orange snake like beast is my vacuum hose. I drape it over the top when I don't need it. When I do need it I just plug it into the PVC pipe outlet just below and to the right of the one end. I hooked a shop vac up outside the shop and installed PVC pipe outside to other outlets around the (now expanded) shop. The vac is wired to switches next to the suction pipes so I can just flick a switch and instant vacuum. My wife hasn't figured out yet that I have a central vac system in the shipyard and she doesn't upstairs in the house The vac as a grounded copper wire running through the piping to cut down on the fire risk.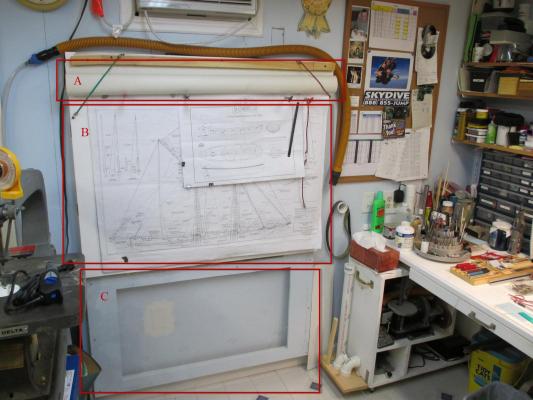
-
Congratulations Ben, your Echo looks GREAT! You really did a beautiful job on it.
-
Great news Bob. Will they be for sale at the NRG conference as well?
-
Like Overdale I also place hidden messages inside my models. They usually start with something like "Oh, this isn't good. If you are reading this then the main hatch has been sprung. I wonder what the year is? My name is Jim Lavelle and I built this ship in 2013. blah, blah blah details about me, where ship was built, etc." I also have a habit of making a scale sailor for each of my models, It helps me visualize things. On my sloop Providence when I was done I sealed him inside with a note. It's fun to wonder if and when the note will ever see the light of day again. If we are lucky our creations will long outlast us.
-
Echo by jml1083 - cross-section
jml1083 replied to jml1083's topic in - Build logs for subjects built 1751 - 1800
Thanks John. Progress has been pretty slow lately but the last of the Phase 2 construction (and destruction) on the home front wrapped up last week so I'm hoping that I can get back at it soon. I have this coming weekend to get some building in but the next 2 after that are booked (Admiralty Models workshop in Baltimore and then the NRG conference in Charleston). Enjoy the rest of your road trip, I've been following along. -
Hi Toni, I've been following your log for awhile. Your work is absolutely meticulous. Your descriptions and photos are a great help to less skilled builders (like me for example).
-
Jim Byrnes Model Machines
jml1083 replied to Mahuna's topic in Modeling tools and Workshop Equipment
Jim, I'm going to cast another vote for the Oscillating spindle sander with tilting table. I have a Rigid brand which is serviceable but it is a monster size wise. For me the perfect unit would be small in size, have a motor that does not bog down in routine model making activities (not talking about sanding 2" rock maple), has a removable pivot pin in the table surface, use off the shelf sanding drums and possibly be variable speed. -
Hi Freddy, welcome back to shipbuilding! Your Norske Love is looking very good. Considering the time and distance it has traveled it has held up extremely well. I look forward to seeing your progress.
-
Echo by jml1083 - cross-section
jml1083 replied to jml1083's topic in - Build logs for subjects built 1751 - 1800
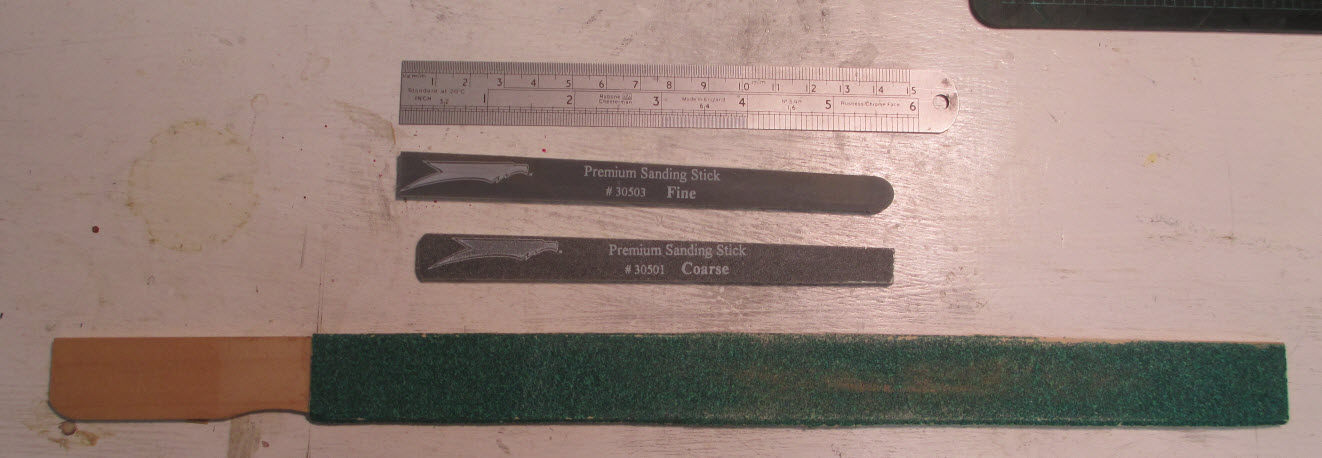
Hi Glenn, Here are a couple sanding sticks that I have. The two smaller ones are store bought. They have a core that is a stiff foam and so they have a bit of give to them and you can flex them pretty easily. The big guy is a wooden paint stirrer with 80 grit sand paper rubber cemented to it. I use this to fair the frames on my Echo cross section. It is long enough so that no end is ever inside the frames and the wood is very stiff so this sander does not flex at all. I've also made sanding stick out of popsicle sticks using the same method of gluing the sand paper to the stick. Hope this helps.
-
Good luck Richard! I'm sure you'll have fun and as others have said there is lots of help available here. We all started somewhere. Enjoy you build when your kit arrives and be sure to start a build log.
-
Hi LF, I know a gentleman by the name of Pete Jaquith built a beautful Newsboy. You could contact him via PM and see if he can help you.
-
Echo by Maury S - FINISHED - Cross-Section
jml1083 replied to Maury S's topic in - Build logs for subjects built 1751 - 1800
Hi Maury. I'm with Ben, very nice work indeed. -
Hi Bob, Thanks for posting. This looks like a very interesting book. I'm looking forward to meeting Ab at the NRG confernece in October.
-
Hi Ed, Let me add my voice to those singing their praise for your HMS Naiad, she is truly a work of art. Thank you for your very details posts and the beautiful photos, I've learned so much watching your log and I will certainly be purchasing your book. I can't wait to see what comes next. BRAVO ZULU !
-
Hi JPett, Really beautiful work! The treenails are a whole project in their own right. I'm not building the Rattlesnake but I am learning a lot from your build log. Thanks for such detailed logs and photos.
-
Really nice work Ben!
-
HI, I have the Proxxon mini chop miter saw that I got from MicroMark. Under the blade is a large bowl like excavation which you can see in the following photos. I marked the area in red in one photo to show where this is located and the photo without the markup shows the excavation itself. My question is this: what purpose does this excavation serve? The wood to be cut is held in the black vice attachment that you see in both photos. Because there is nothing under the wood when the blade passes through it, the wood tends to split or crack. Any other miter saw I've used has a groove that the blade passes through and both sides of the cut piece are supported during the cut. With this saw the right side of the wood is unsupported or backed and that's what is causing the problems. I had actually considered filling in this void with auto body filler and cutting through it but then I lose the abilty to cut miters. The void was cast into the base for a reason but for the life of me I can't figure out what the purpose is and since it causes the cut piece to be not cut smoothly I have to wonder why it was done. Any opinions? Thanks


-
What do you use your mill for ?
jml1083 replied to captainbob's topic in Modeling tools and Workshop Equipment
Meredith, I have the Sherline and really like it. Solid machine and as noted previously, lots of add ons available. When I got mine I also got the Sherline vice. You can buy cheaper but the Sherline vice has sides that are milled square which is real helpful as you can use the squareness as part of your set ups. Also their vice has a unique action so that as you tighten it the work is snugged down and there is very little chance that it can pop loose and come out of the vice while milling. Another thing you can get with your mill (money is really the only limit) is an angle table. You can mount the vice to the angle table and then set the whole thing at some angle other than 90°. Finally, as Mark says, the rotary table is also a really helpful attachment. -
Echo by jml1083 - cross-section
jml1083 replied to jml1083's topic in - Build logs for subjects built 1751 - 1800
Hi all, Contrary to the rumors, I did NOT sail off the end of the earth although it's beginning to feel like I did. I've received several emails and PMs asking if I'm OK. Construction work on the house & shipyard have kept me out of the shop for weeks. Things are starting to settle down but the construction which should have ended on June 30 continues more than 2 weeks later. The shipyard has a front and back door and the contractors have to walk through the shipyard with tools, wood, etc so for safe keeping my three projects (the very definition of insanity) have been moved upstairs and hopefully out of harms way. I hope to get back to work on my Bluenose, Echo and pinnace in about a week and will post photos soon thereafter. -
Echo by oneslim - cross-section
jml1083 replied to oneslim's topic in - Build logs for subjects built 1751 - 1800
Happy Birthday Bob, a couple of days late. Hope it was a good one! -
Echo by oneslim - cross-section
jml1083 replied to oneslim's topic in - Build logs for subjects built 1751 - 1800
Hi Bob, Really sorry to hear about the heart attack but glad to hear that they were able to clear the blockages. Time will pass quickly and before you know it you'll be back in the shop raising frames. Good luck !! -
Suzanne and Carla, May I add my most sincere condolences to those of everyone else here on MSW. John will be missed and not forgotten. Thanks for posting the photos of his King of the Mississippi. Sincerely, Jim
-
Hi Bob, You really did a nice job on the coppering, very impressive.
-
I'll say this for you Ben, you are a VERY quick study! The close up photo of that chock shows it is perfectly made. Congrats!