

mojofilter
-
Posts
160 -
Joined
-
Last visited
Reputation Activity
-

 mojofilter got a reaction from Mirabell61 in America 1851 by mojofilter - FINISHED - Mamoli - Scale 1:66 - First wooden ship build
So here is my latest attempt. The aft shroud, top deadeye seizing is my attempt at the method that Brian shows. There is actually three seizings, although hard to see due to black on black. I'll re-do the single shroud (to the top mast) and proceed to the other side.
I hope to keep all the shrouds about the same (very low) tension in the paperclip retainers so that at the end of rigging, the lanyards will bring the deadeyes to the same spacing. We'll see...
-
 mojofilter got a reaction from hamilton in America by hamilton - FINISHED - Mamoli - 1:66 scale
Hi Hamilton -
Be nice to see the windlass and skylights on some deck furniture ;-} ...
Kidding - life just kinda gets in the way of more important things sometimes.
Try getting doctor's orders for this special therapy.
- Tim
-
 mojofilter got a reaction from EJ_L in America 1851 by mojofilter - FINISHED - Mamoli - Scale 1:66 - First wooden ship build
So here is my latest attempt. The aft shroud, top deadeye seizing is my attempt at the method that Brian shows. There is actually three seizings, although hard to see due to black on black. I'll re-do the single shroud (to the top mast) and proceed to the other side.
I hope to keep all the shrouds about the same (very low) tension in the paperclip retainers so that at the end of rigging, the lanyards will bring the deadeyes to the same spacing. We'll see...
-
 mojofilter got a reaction from Elijah in America 1851 by mojofilter - FINISHED - Mamoli - Scale 1:66 - First wooden ship build
Eye-spliced - interesting. I guess that means the shroud lines are (natural, or nylon) rope of some kind. I would have thought that the replica America would have steel wire rope - but then would you even need deadeyes? One the other hand, the deadeyes are such a visual aspect of that period that you'd want to replicate them. Thank you for the research!
- Tim
-
 mojofilter got a reaction from Martin W in Yacht America by flyer - FINISHED - Mamoli - scale 1:66 - with some alterations
Peter - just re-read your last post, and remembering that the stern was quite ambiguous in the plans. I too have seen many variations on the look of the stern. Everything from a very flat slab, to a jutting break line below the hand rail around the stern. (sorry for my lack of nautical terminology). In many cases, it looks like to see the eagle carving on the stern, you would have to be directly under it - well almost.
Anyway, looking forward to seeing your interpretation!
Keep up the good work!
- Tim
-
mojofilter got a reaction from Martin W in Yacht America by flyer - FINISHED - Mamoli - scale 1:66 - with some alterations
Hi Peter -
Very nice job! Curious about the walnut stem/stern? IMHO, the more care you take with the Mamoli bulkheads, the easier the planking will be. Looking forward to your progress.
- Tim
-
 mojofilter got a reaction from mtaylor in America by hamilton - FINISHED - Mamoli - 1:66 scale
Hi Hamilton -
Be nice to see the windlass and skylights on some deck furniture ;-} ...
Kidding - life just kinda gets in the way of more important things sometimes.
Try getting doctor's orders for this special therapy.
- Tim
-
mojofilter got a reaction from Elijah in America 1851 by mojofilter - FINISHED - Mamoli - Scale 1:66 - First wooden ship build
Not a bit of it! Extremely valuable information. Please leave your post as-is. I will incorporate the seizing method on my next try.
I will probably still go with the white serving to the halfway point, and then black all the way around the mast and back down to half way, etc. since there are only two per mast (not counting the mainmast top), I will serve both the entire length.
I like the temporary deadeye positioners. mine are paper clip pieces.
Thanks,
- Tim
-
mojofilter got a reaction from Elijah in America 1851 by mojofilter - FINISHED - Mamoli - Scale 1:66 - First wooden ship build
Hi Hamilton -
Building the machine is straight forward, although the laser cut bits are nice and tight. If you buy the Syren server, don't be afraid to let out the shaft holes a bit. The top 'transfer shaft' holes. You want it to spin easily.
Using it takes no time to get the hang of. I keep the serving thread between my thumb and index finger, and just a smidge behind the wrap. It's pretty forgiving. The Syren rope choices didn't match the kit's 0.80mm shroud line. I used their 0.88mm rather than the 0.63. I'll try one with the smaller rope. Another 'complaint' is that the Coats & Clark mercerized cotton covered polyester thread is a bit fuzzy. There is probably a better thread - this was from Her sewing box.
I will eventually get to a step where I can't seize with the machine. Not looking forward to that (still no third arm no matter how hard I've tried). I'm wondering if anyone has tried one of those fly-tieing devices to hand-seize?
Any way, we'll see how this goes. I like the look!
- Tim
-
mojofilter got a reaction from Elijah in America 1851 by mojofilter - FINISHED - Mamoli - Scale 1:66 - First wooden ship build
So the rope from Syren arrived. My first attempt at serving:
I served about 1 1/2" at the bottom end with black thread for around the deadeye. Then seized it.
I then went from the top of the deadeye seize to about half way with white thread, then served the top inch with black thread again for around the mast (not shown)
I think the seize at the top of the deadeye is too long and fat. I might try the next size down on the shroud rope. I also think I'll not go quite as high on the white serving. But I do like the effect and believe I'll go with this rather than paint.
- Tim
-
 mojofilter got a reaction from slow2cool in America 1851 by mojofilter - FINISHED - Mamoli - Scale 1:66 - First wooden ship build
Not a bit of it! Extremely valuable information. Please leave your post as-is. I will incorporate the seizing method on my next try.
I will probably still go with the white serving to the halfway point, and then black all the way around the mast and back down to half way, etc. since there are only two per mast (not counting the mainmast top), I will serve both the entire length.
I like the temporary deadeye positioners. mine are paper clip pieces.
Thanks,
- Tim
-
mojofilter got a reaction from slow2cool in America 1851 by mojofilter - FINISHED - Mamoli - Scale 1:66 - First wooden ship build
Hi Hamilton -
Building the machine is straight forward, although the laser cut bits are nice and tight. If you buy the Syren server, don't be afraid to let out the shaft holes a bit. The top 'transfer shaft' holes. You want it to spin easily.
Using it takes no time to get the hang of. I keep the serving thread between my thumb and index finger, and just a smidge behind the wrap. It's pretty forgiving. The Syren rope choices didn't match the kit's 0.80mm shroud line. I used their 0.88mm rather than the 0.63. I'll try one with the smaller rope. Another 'complaint' is that the Coats & Clark mercerized cotton covered polyester thread is a bit fuzzy. There is probably a better thread - this was from Her sewing box.
I will eventually get to a step where I can't seize with the machine. Not looking forward to that (still no third arm no matter how hard I've tried). I'm wondering if anyone has tried one of those fly-tieing devices to hand-seize?
Any way, we'll see how this goes. I like the look!
- Tim
-
mojofilter got a reaction from slow2cool in America 1851 by mojofilter - FINISHED - Mamoli - Scale 1:66 - First wooden ship build
So the rope from Syren arrived. My first attempt at serving:
I served about 1 1/2" at the bottom end with black thread for around the deadeye. Then seized it.
I then went from the top of the deadeye seize to about half way with white thread, then served the top inch with black thread again for around the mast (not shown)
I think the seize at the top of the deadeye is too long and fat. I might try the next size down on the shroud rope. I also think I'll not go quite as high on the white serving. But I do like the effect and believe I'll go with this rather than paint.
- Tim
-
mojofilter got a reaction from EJ_L in America 1851 by mojofilter - FINISHED - Mamoli - Scale 1:66 - First wooden ship build
Hi Hamilton -
Building the machine is straight forward, although the laser cut bits are nice and tight. If you buy the Syren server, don't be afraid to let out the shaft holes a bit. The top 'transfer shaft' holes. You want it to spin easily.
Using it takes no time to get the hang of. I keep the serving thread between my thumb and index finger, and just a smidge behind the wrap. It's pretty forgiving. The Syren rope choices didn't match the kit's 0.80mm shroud line. I used their 0.88mm rather than the 0.63. I'll try one with the smaller rope. Another 'complaint' is that the Coats & Clark mercerized cotton covered polyester thread is a bit fuzzy. There is probably a better thread - this was from Her sewing box.
I will eventually get to a step where I can't seize with the machine. Not looking forward to that (still no third arm no matter how hard I've tried). I'm wondering if anyone has tried one of those fly-tieing devices to hand-seize?
Any way, we'll see how this goes. I like the look!
- Tim
-
mojofilter got a reaction from EJ_L in America 1851 by mojofilter - FINISHED - Mamoli - Scale 1:66 - First wooden ship build
So the rope from Syren arrived. My first attempt at serving:
I served about 1 1/2" at the bottom end with black thread for around the deadeye. Then seized it.
I then went from the top of the deadeye seize to about half way with white thread, then served the top inch with black thread again for around the mast (not shown)
I think the seize at the top of the deadeye is too long and fat. I might try the next size down on the shroud rope. I also think I'll not go quite as high on the white serving. But I do like the effect and believe I'll go with this rather than paint.
- Tim
-
mojofilter got a reaction from hamilton in America 1851 by mojofilter - FINISHED - Mamoli - Scale 1:66 - First wooden ship build
So the rope from Syren arrived. My first attempt at serving:
I served about 1 1/2" at the bottom end with black thread for around the deadeye. Then seized it.
I then went from the top of the deadeye seize to about half way with white thread, then served the top inch with black thread again for around the mast (not shown)
I think the seize at the top of the deadeye is too long and fat. I might try the next size down on the shroud rope. I also think I'll not go quite as high on the white serving. But I do like the effect and believe I'll go with this rather than paint.
- Tim
-
mojofilter got a reaction from hamilton in America by hamilton - FINISHED - Mamoli - 1:66 scale
So my Syren serving machine arrived and I assembled it - quite a nice little gadget. I mounted up some of the shroud line and served about an inch on one end in black - pretty fine thread - to go around the deadeye, then white thread from there to about half the length of the line, then about 3/4" at the top (black thread again) to be seized around the mast. I don't know if white and black paint was applied directly to rope in 1851, but I think I like the look of the served shroud line. I'll try to get a picture up on my log.
I note that in both links that Hamilton provided (THANKS!!), There are two shrouds to the step of the mainmast. The third (aft) shroud to the top of the stepped mast is not there (as in the kit). So in all the paintings and other references, the vote seems to be about 2/3 without the third shroud, and 1/3 with.
- Tim
-
mojofilter got a reaction from Elijah in HMS Warrior 1860 by Philg88 - Billing Boats - 1:100 - First British Ironclad with scratch built side heads per prototype
I love the effect of the thread!!
-
mojofilter got a reaction from mtaylor in HMS Warrior 1860 by Philg88 - Billing Boats - 1:100 - First British Ironclad with scratch built side heads per prototype
I love the effect of the thread!!
-
 mojofilter got a reaction from Philg88 in HMS Warrior 1860 by Philg88 - Billing Boats - 1:100 - First British Ironclad with scratch built side heads per prototype
I love the effect of the thread!!
-
mojofilter got a reaction from slow2cool in HMS Warrior 1860 by Philg88 - Billing Boats - 1:100 - First British Ironclad with scratch built side heads per prototype
I love the effect of the thread!!
-
mojofilter got a reaction from Martin W in Yacht America by flyer - FINISHED - Mamoli - scale 1:66 - with some alterations
Very nice start Peter. Both Hamilton and I are currently building the Mamoli kit. Hamilton has done an outstanding job on his hull - You might want to take a look.
I think the little wooden 'copper' plates supplied with the kit are an interesting concept, and I've seen it done well, but I think the real copper plates are very much nicer.
I look forward to following your log.
- Tim
-
mojofilter got a reaction from Elijah in Yacht America by flyer - FINISHED - Mamoli - scale 1:66 - with some alterations
Very nice start Peter. Both Hamilton and I are currently building the Mamoli kit. Hamilton has done an outstanding job on his hull - You might want to take a look.
I think the little wooden 'copper' plates supplied with the kit are an interesting concept, and I've seen it done well, but I think the real copper plates are very much nicer.
I look forward to following your log.
- Tim
-
mojofilter got a reaction from hamilton in America by hamilton - FINISHED - Mamoli - 1:66 scale
Very nice!!
I really like the three step plank butt progression. The kit said two so I did two.
Did you get pre-cut hand railing with your kit? I did not - had to cut my own out of thin walnut strip. They are in four pieces (plus the stern wrap) and it took me several trys. I recommend plenty of glue as the rails get a lot of abuse during construction. Up until I started the rigging (deck blocks) I used TiteBond II for everything.
Keep up the beautiful work!
- Tim
-
 mojofilter reacted to flyer in Yacht America by flyer - FINISHED - Mamoli - scale 1:66 - with some alterations
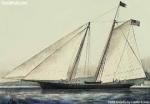
Build log schooner America
While working on HM Schooner Pickle I started to look out for a next project. As I really did like the simple elegance of the schooner and a friend of mine had long reserved some space in his office for a dust catcher in form of a model ship the decision to build another schooner was taken. This friend has family connections to the US and I always liked the elegant, innovative design of America and so this vessel was chosen. Also the Mamoli kit comes in scale 1/66 which is close enough to 1/64 to make all fittings in this scale available for a bit of kit enhancement. A decade ago I had built Mamolis La Gloire and found the kit of good quality (...for that time - I had never seen a JoTiKa kit yet).
Mamoli seems presently to be out of service but I was lucky to find a kit in a Swiss model shop.
The Kit
The first impression was quite good. A tidy box with cleanly separated parts in various compartments. The quality of the wood is only average but the cast parts look good. The plans seem to cover the whole build although the written instructions are meagre and sometimes a bit difficult to understand. The original is Italian, which I don't speak, but by combining English and German translations (by Google?) and some educated guess I should be able to get the meaning of it.
The coppering
Mamoli uses an ingenious simple way to imitate the coppering of the lower hull with small wooden tiles. The same method was used in Keith Juliers earlier books and looked to be an clever approximation.
However as the excellent copper plates of Victory Models are available I will use them. This asks for some re-planning as 0,5mm strips will be replaced by thin copper. Therefore lower hull and rudder will have to be different.
The skeleton
Keel and frames are of quite soft 3,5mm plywood and need some reworking to fit. The two deck parts equally need a rework but altogether a skeleton is quite easily formed. The slender elegant lines are now visible and I'm definitely hooked - a beautiful design.
Visible is also the that stem and sternpost need to be made as separate new parts with a strength of 5mm. Also the rudder will need a similar replacement.
Some additional wood strips are necessary to cover the lower hull and at the same time I can adjust the deck planking.
dry fit of the skeleton
Pickle's bosun standing on Americas deck is a bit overwhelmed by the sheer size of this modern schooner