HOLIDAY DONATION DRIVE - SUPPORT MSW - DO YOUR PART TO KEEP THIS GREAT FORUM GOING! (89 donations so far out of 49,000 members - C'mon guys!)
×


MEPering
-
Posts
91 -
Joined
-
Last visited
Content Type
Profiles
Forums
Gallery
Events
Everything posted by MEPering
-
This is just an experiment though. Oil paintings I have done have held up for 30+ years though, so I have faith in the substance. I just never knew it would be good for a metal prime.
- 117 replies
-
- 2
-

-
- constitution
- model shipways
- (and 1 more)
-
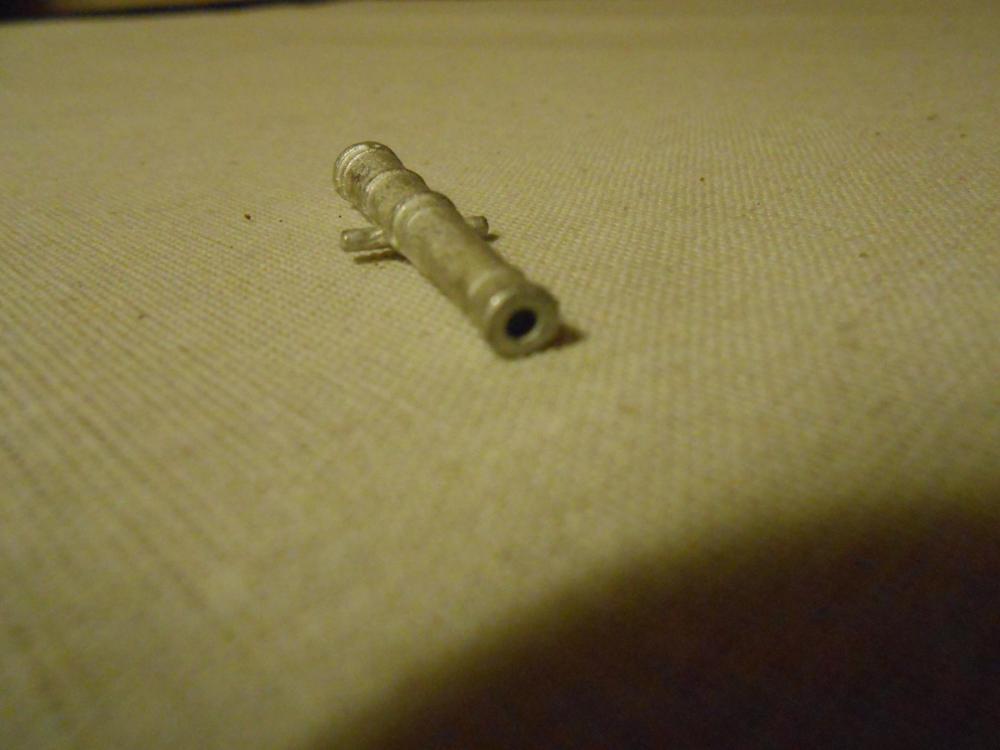
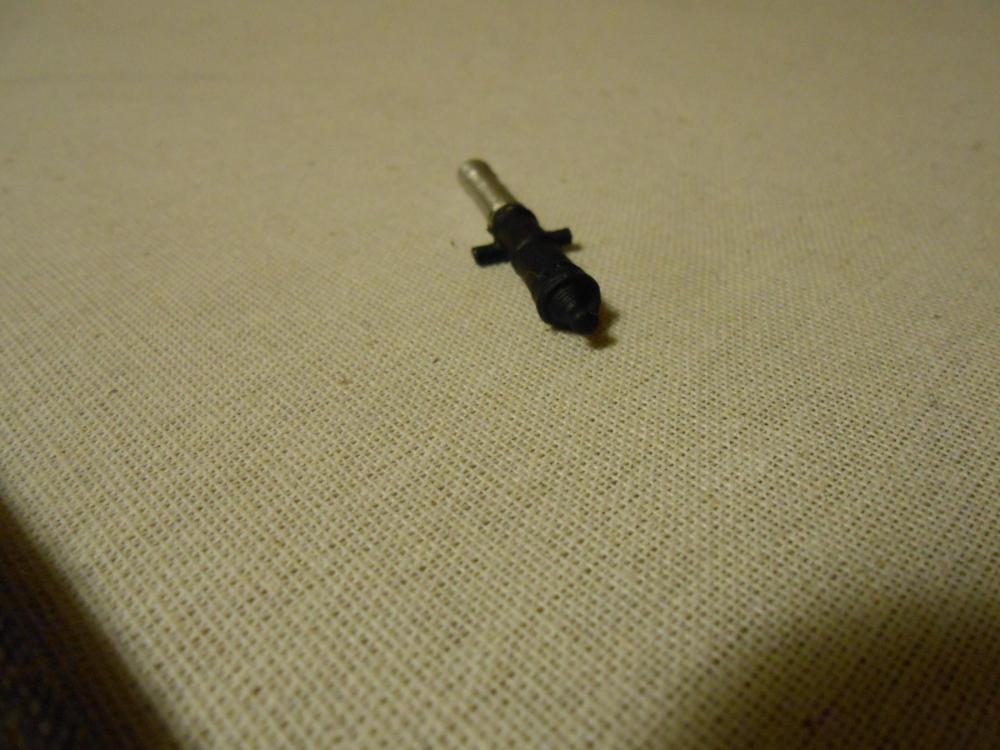
Hello all. I did finish building the dummy cannon boxes for the gun deck on my model. I am beginning to think it actually would have been easier to just add the gun deck and get cannons to fit it. Actually, I might do that... I haven't decided yet, I guess. But I decided to do some experimentation with priming the Britannia castings included with the kit. I am not impressed with the castings of the barrels, and I could turn my own pattern on one of my metal lathes, and make my own castings. It is not hard to do, but these castings are good enough. However, it would take me a week to do this for the carronades and the long guns, so I decided against it. Besides... Silicon molding rubber is expensive. Anyway, I have been experimenting with a primer coat on white metal parts to try and find what is best to make acrylic paint to stick. I may have found a solution. I first tried painting the raw metal with just black acrylic paint, and it couldn't stand touching... It fell of just by touching after a half hour. I searched the web to see what others did, and found someone who claimed that gesso would work well. I was extremely skeptical of this, since it is also acrylic based. So I tried it. I thought this could not possibly work, but then again, when I used gesso on canvases when I have done oil painting, it has really been tough. Once totally dry, Gesso is extremely hard. I had my doubts, but I am a believer now. I can handle the piece now after just a couple of hours, and the gesso sticks. The first picture is the raw cannon. The second is after coating with black gesso, and being handled a bit. Actually, the gesso is such a flat black, I might use it for the cannon boxes, unless I put in the gun deck. Matt
- 117 replies
-
- 6
-
-
- constitution
- model shipways
- (and 1 more)
-
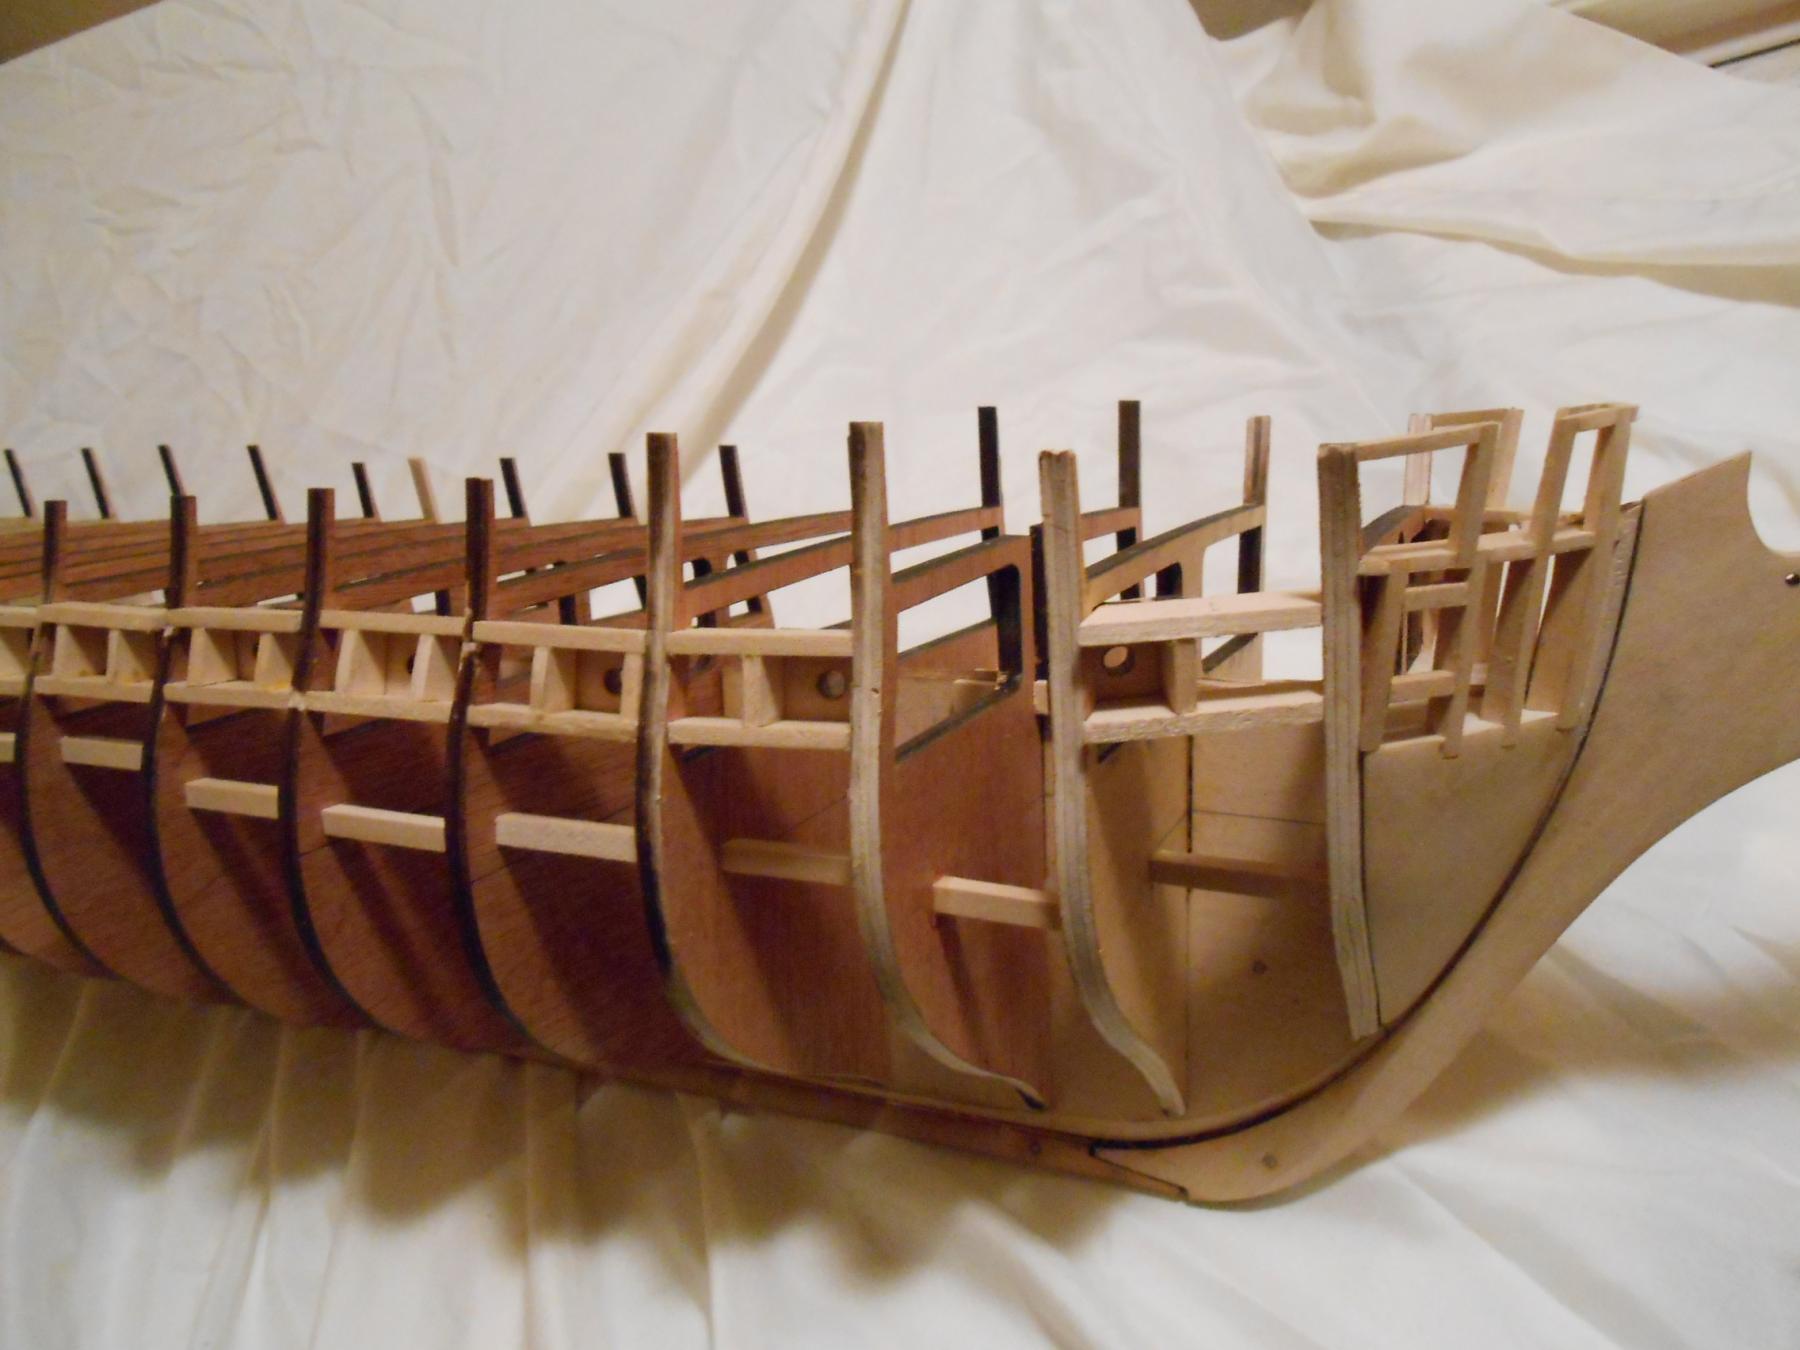
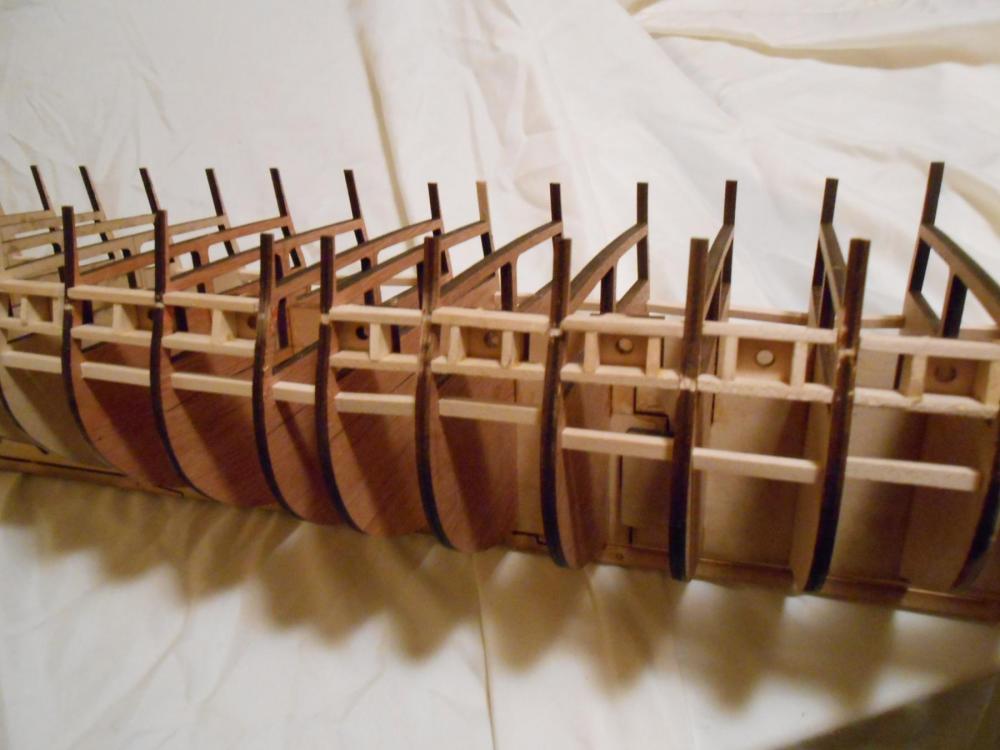
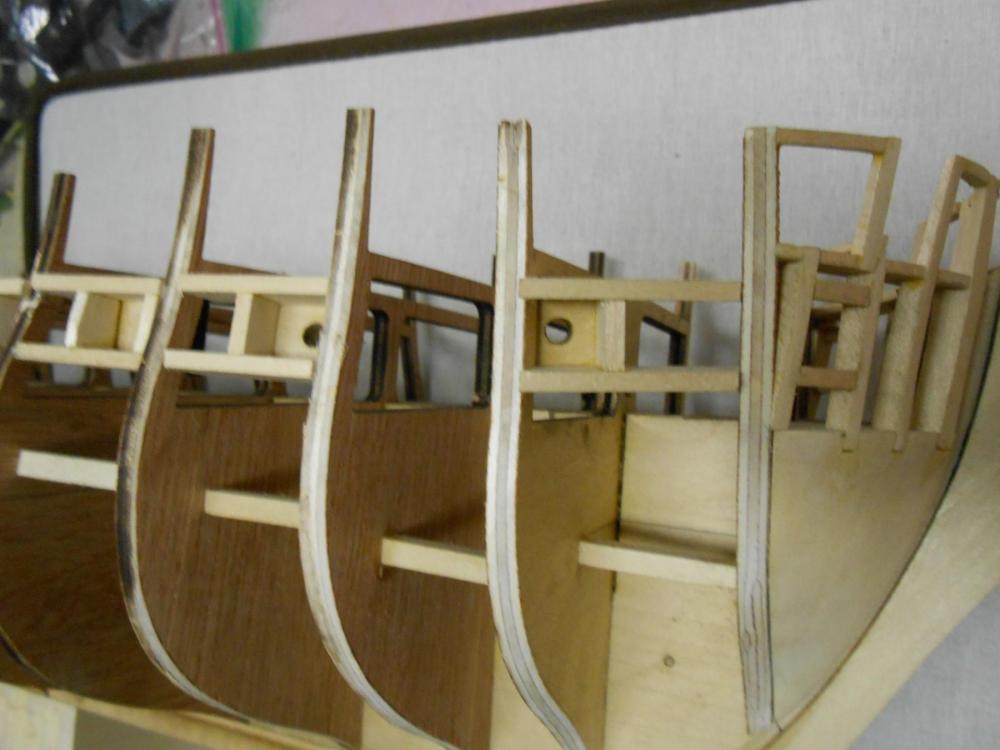
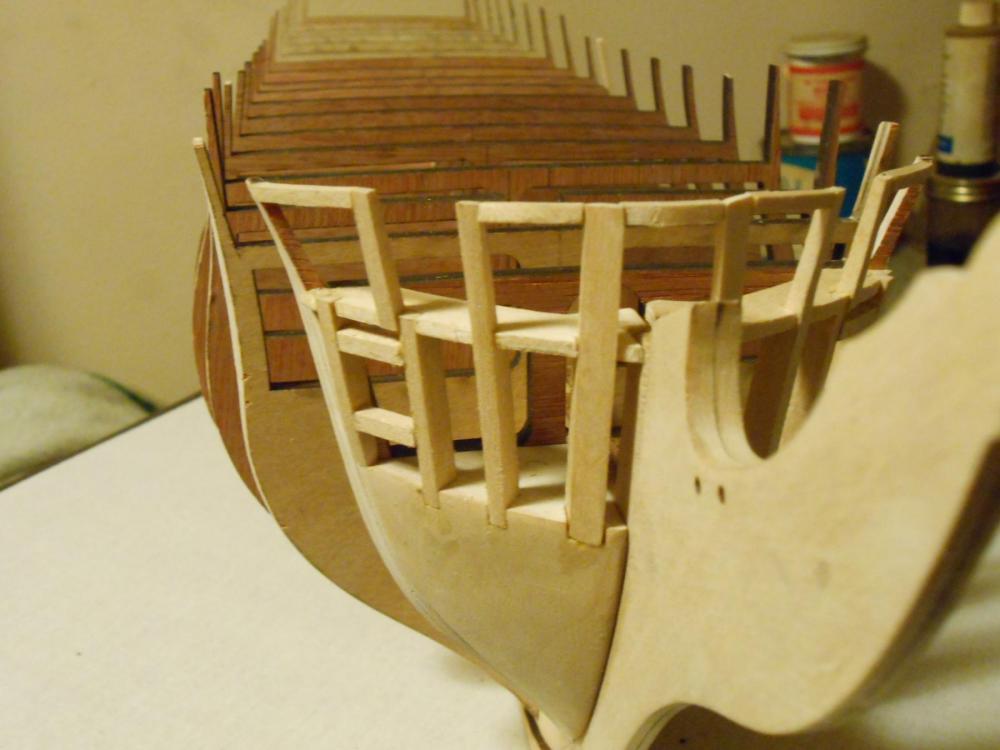
I finally completed the cannon boxes on the starboard side... It is surprising how long this takes. But it is what it is, and takes as long as it takes. These really need to be right, or planking will not come out quite right. To fit these is going to take some fine-tuning, but they are pretty close now. I cut them pretty large so that they could be perfected in the fairing process. This is only the one side done of the gun deck. Now, I have to do the other side, and then start on the yard deck carronades. It may be slow, tedious work, but very important for the final appearance of the ship... A smooth and gentle curve from bow to stern, with all muzzles aligned with one another. These are just dry fit, as I said. I have to build the other side now before fitting can actually start. I probably shouldn't even post such minutia, but it does feel like and accomplishment when you get this sort of thing completed. Lots of measuring and cutting. But knowing you did it right is worth the work. Matt
- 117 replies
-
- 7
-
-
- constitution
- model shipways
- (and 1 more)
-
Thank you much, Xken. I am not a great engraver, but do know what I can do with it in brass and silver. In that engraving, it is probably about .005 deep, though it could go much deeper, but that would not have been proper for an 18th century engraving from the United States. Your method though, since everything is painted, is a great way, and easier way to do it. It will take me some time to decide which I will use. Matt
-
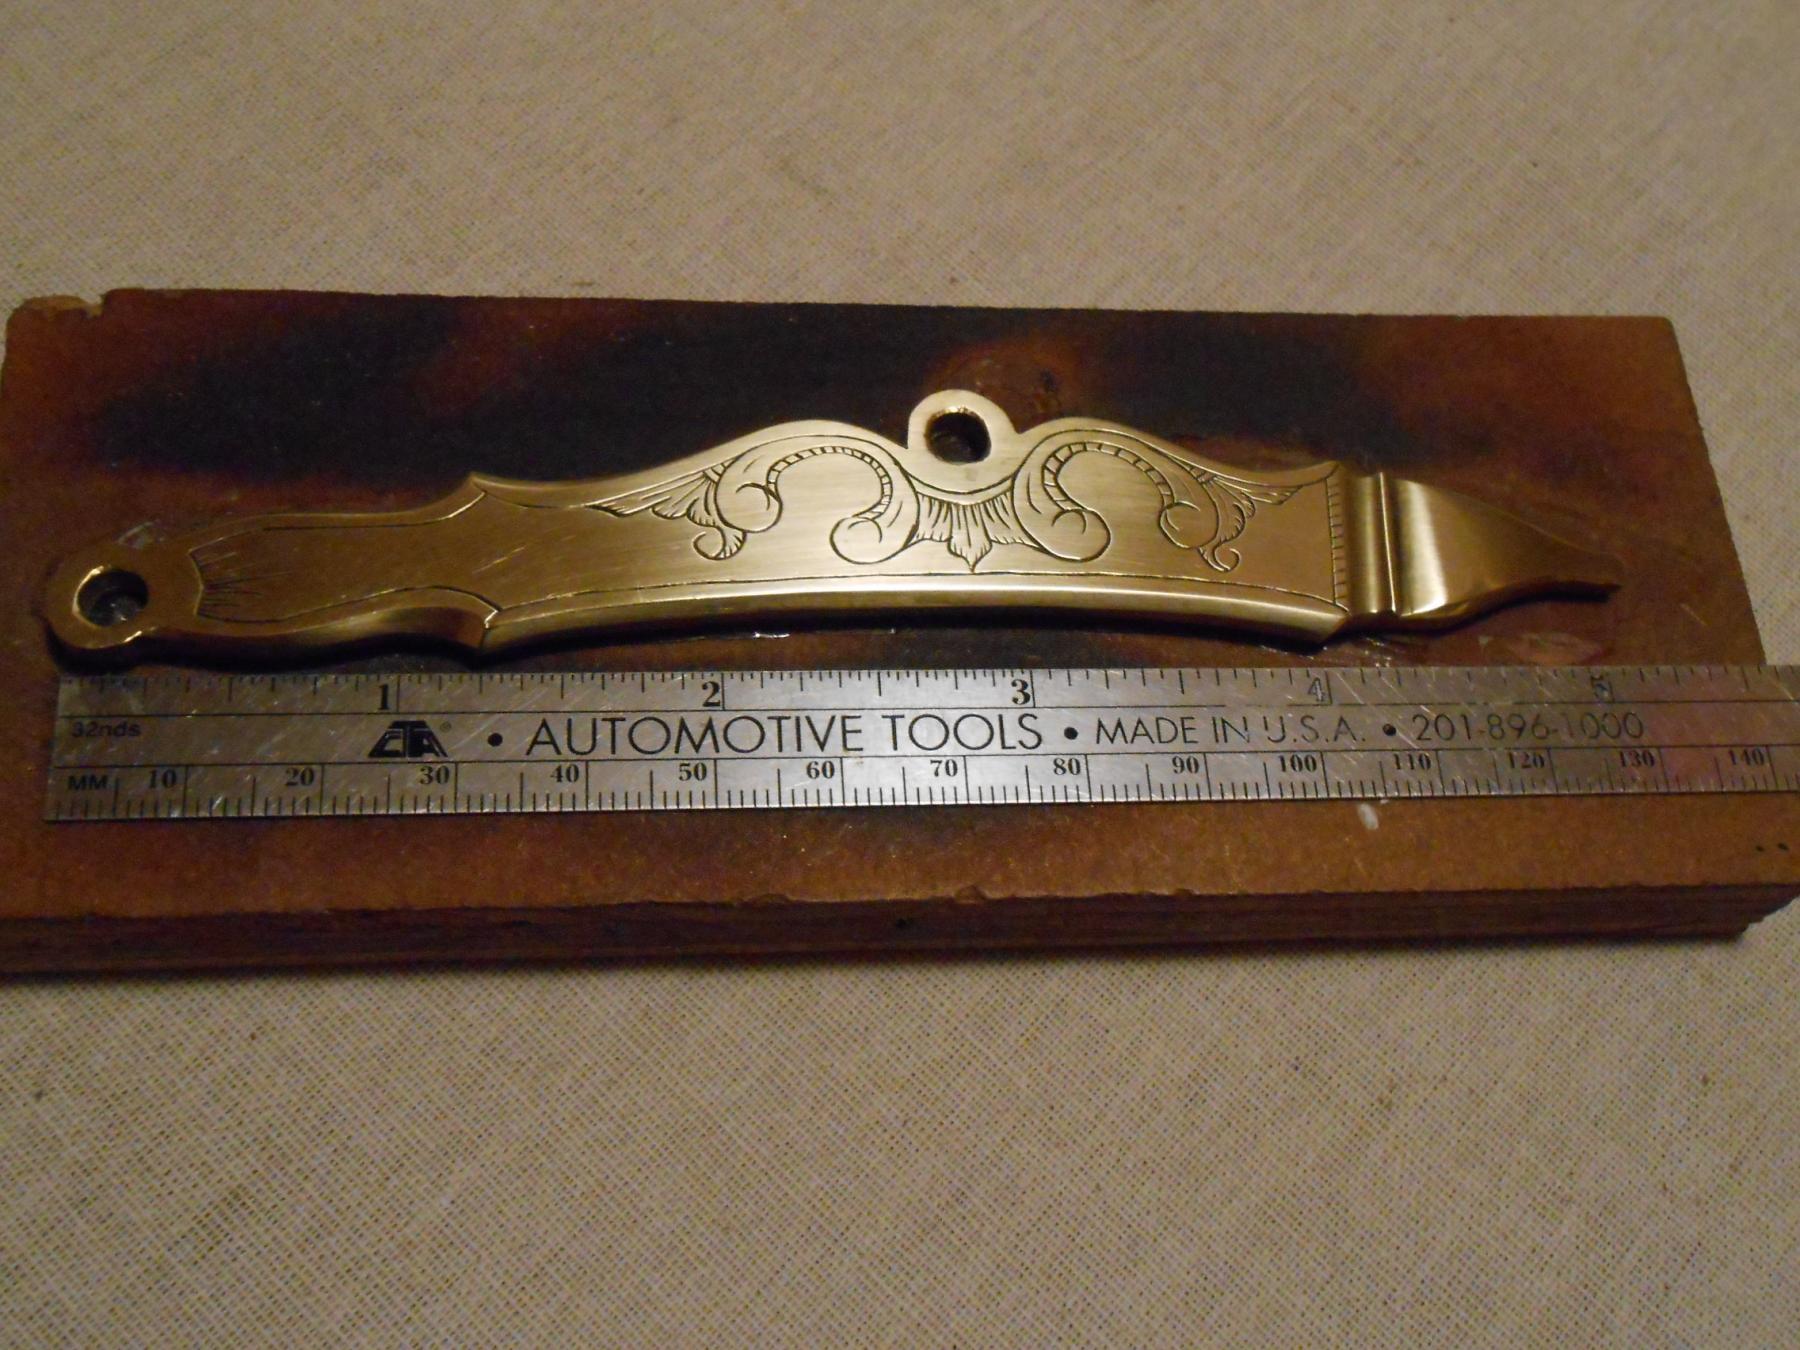
Hi Xken, That is a very ingenious way to handle a problem like this. I had been considering carving them out of holly, since it is a wood with very fine grain and could probably stand up to the fine carving. However, your method is something I hadn't considered, and now I am considering doing it totally in brass. Your method does have the advantage that the solder is much faster and easier to cut though. The level of relief here is going to be exaggerated no matter what though, and I wouldn't want anything greater than .015 in height, as I think it would be a bit out of scale. Your work here looks great though. I will include a pic of how I thought about doing mine... By engraving. This is from my current work on an 18th century firearm. I am now considering carving the actual brass with gravers. I will scratch my head a bit more and decide, since I am a long way from having to worry about the trailboard. Matt

-
Looks like a very good replacement, David. Like you said, a casual observer would never notice, and I probably wouldn't have noticed either had you not mentioned it. It looks like you only have the eyebolts left to install on the deck? Matt
- 117 replies
-
- 1
-
-
- constitution
- model shipways
- (and 1 more)
-
Welcome, Cindyp. I agree with all that has already been said, but would like to add that a rotary tool is also a handy tool. This is not absolutely necessary, since what it will do can be done with ordinary hand tools, but it does speed some tedious tasks, such as shaping filler blocks. Since you are a beginner, I would recommend buying the tools you find you need as you progress. I could suggest planes and chisels, but these tend to be expensive unless you are prepared to make your own. But that too requires other tools... A vicious cycle. The most valuable tool, I find though, is one you probably already have... And that is patience. Wooden ships do not come together over a couple of nights of construction, but only after months. I am not saying this to overwhelm you, but rather, to view each little task as a model in and of itself. It is much more satisfying to complete a part and see it as an accomplishment, than to look at the whole and wonder what could have possessed you to take on such a monumental task. For instance, view each individual plank as an accomplishment unto itself, and you will have a lot more fun, and will be more likely to complete the model. I wish you luck with your first build, and look forward to you build log here so we can follow your progress. Matt
-
Mills...Spindle Speed
MEPering replied to Bill Hime's topic in Modeling tools and Workshop Equipment
Hi Bill, I have a big mill (42" table) and I have used it for wood before. I believe it has a maximum speed of 6k rpm. I use it for metal most of the time, but when I have used it for wood, I have never had to get the rpms that high to do nice, clean cuts. The real secret is the sharpness of the cutter, the number of flutes on the cutter and the speed at which you feed the wood into it. You also have to pay attention to the direction that you feed the wood into the cutter, as to minimize tear-out. I have an automatic feed on mine, but I almost never use it when cutting wood, only on metals. I have heard great things about Sherline mills though. I have neither had one, nor have I used one, since my work is generally larger, and thus, a larger mill is required. But if it were me, I would see about buying one that was a little larger, and more substantial in weight than the Sherline. I know both Grizzly tools and Enco offer some inexpensive hobby mills, and they are cast iron beds. This makes a big difference, as the heavier the mill, the more stability you have. My mill weighs about 2 tons, so it is overkill for model building. Matt -
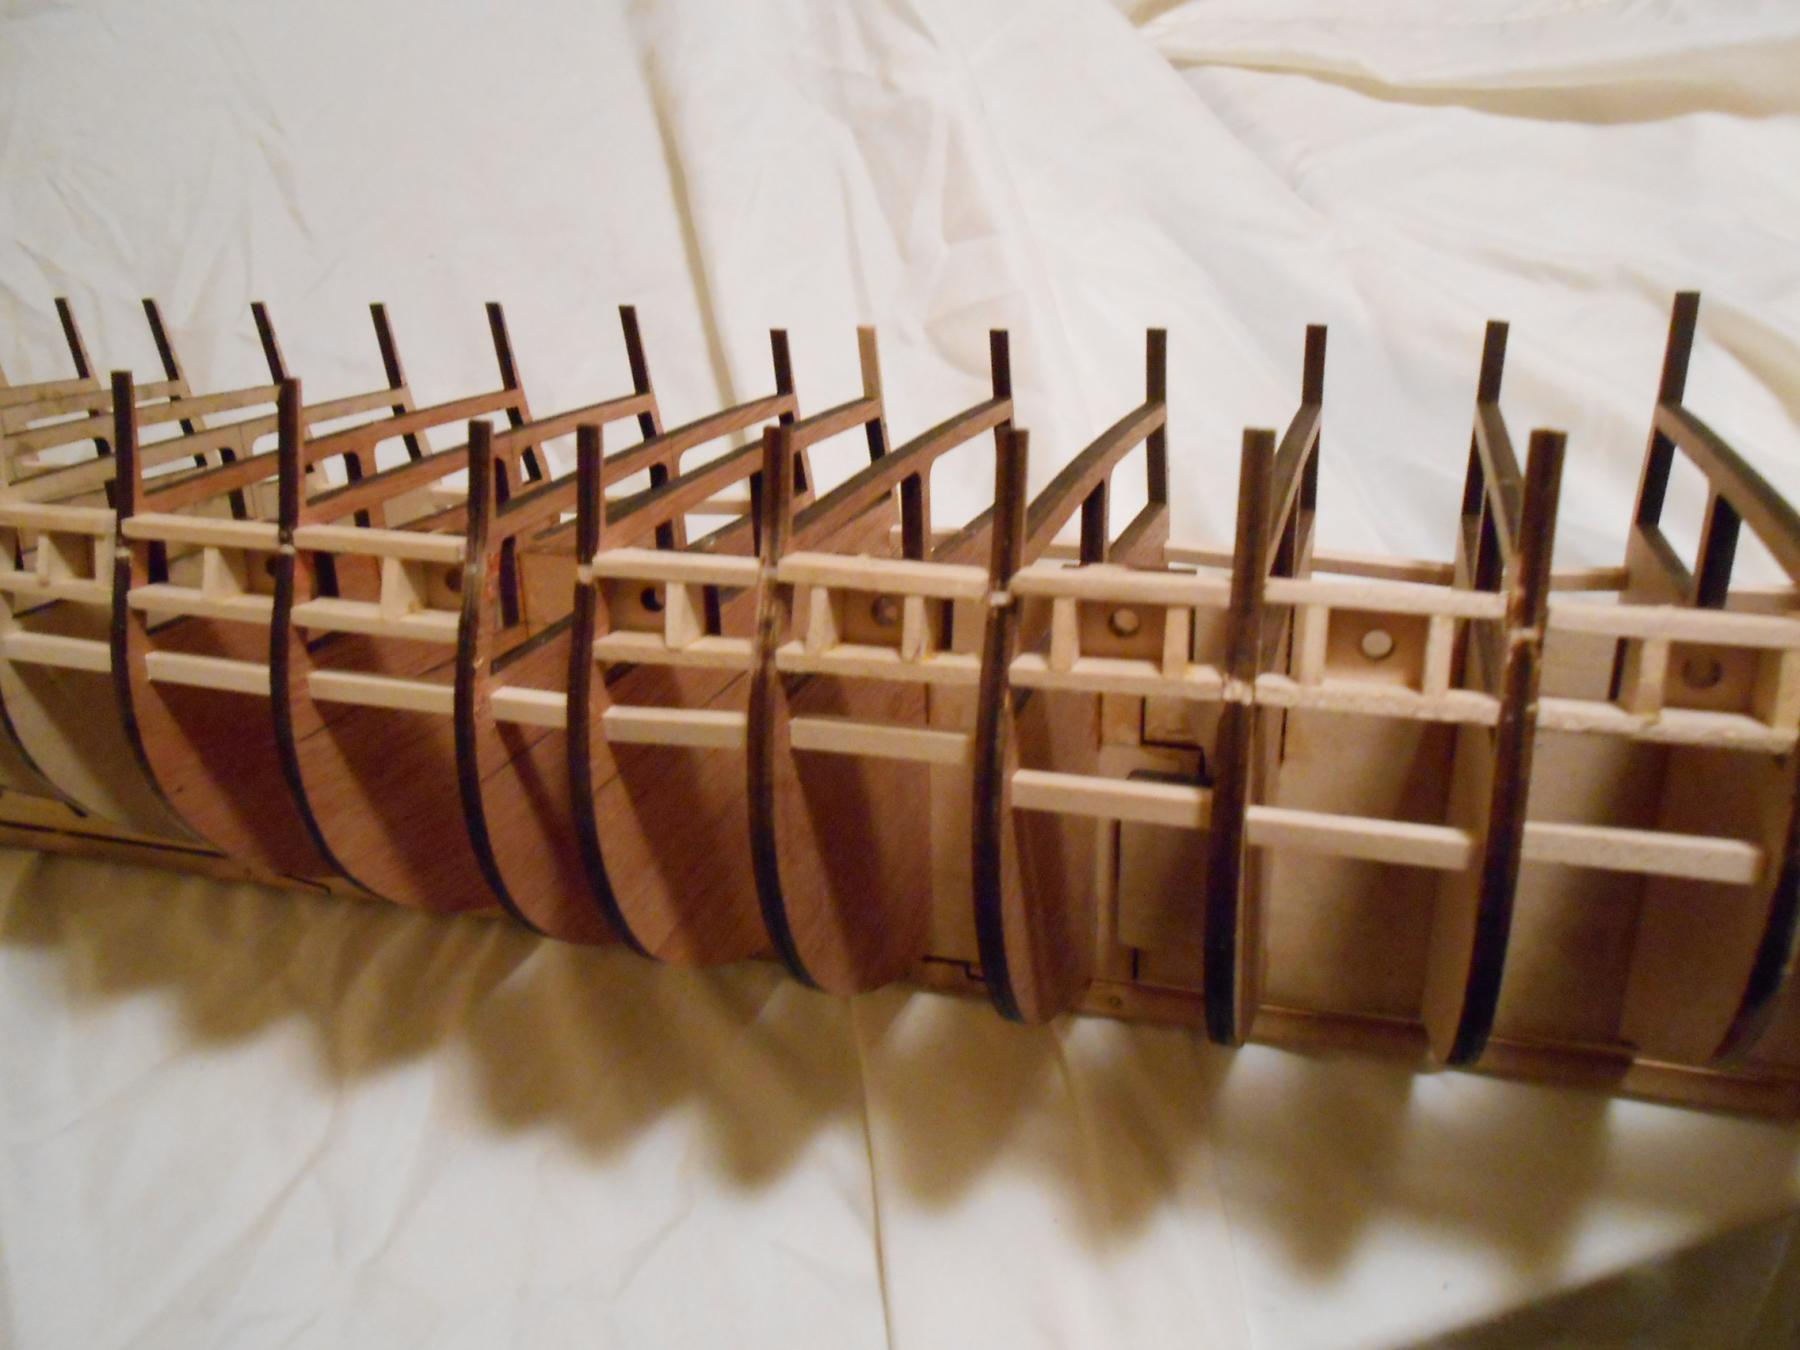
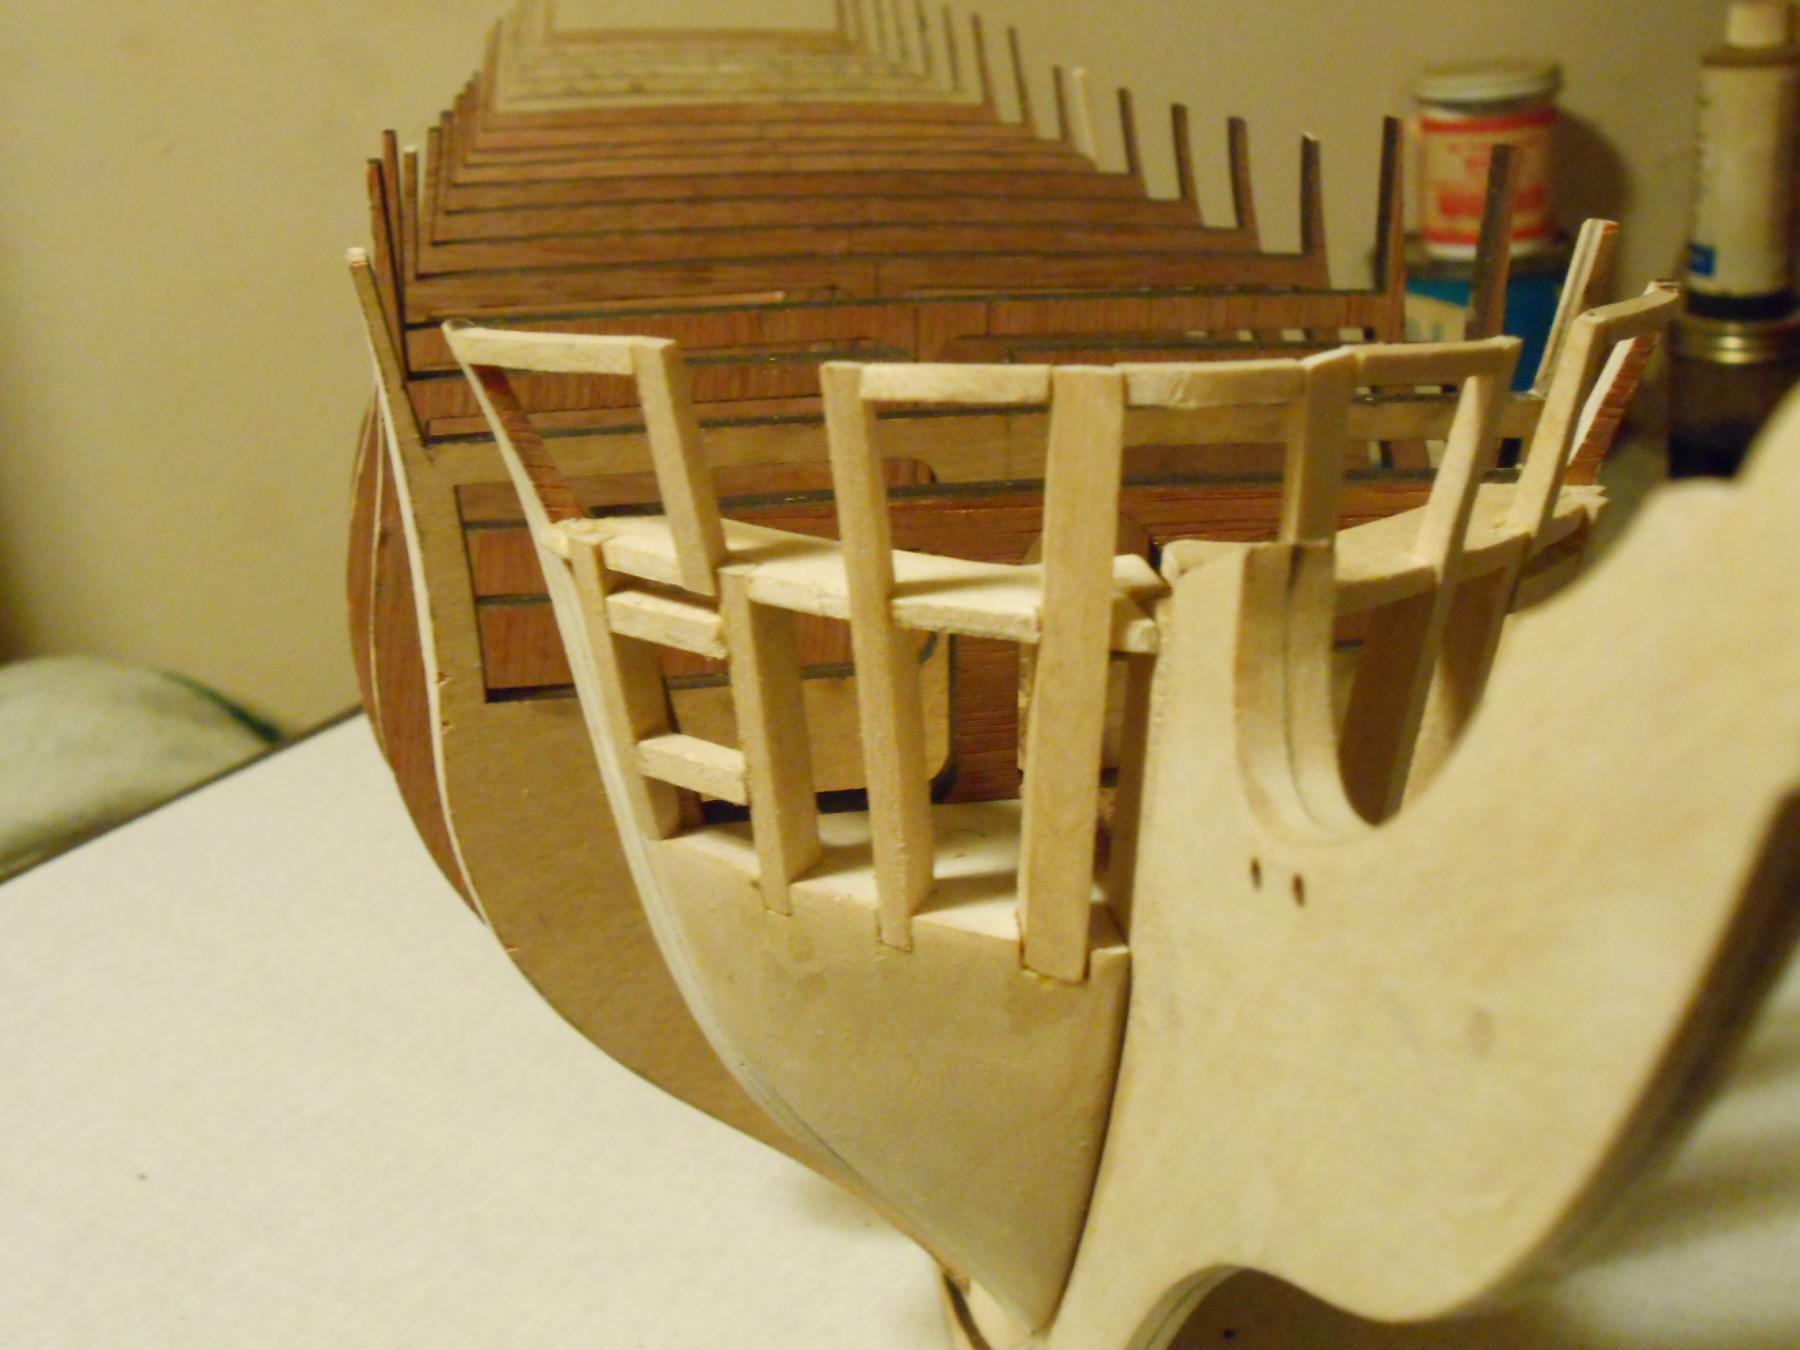
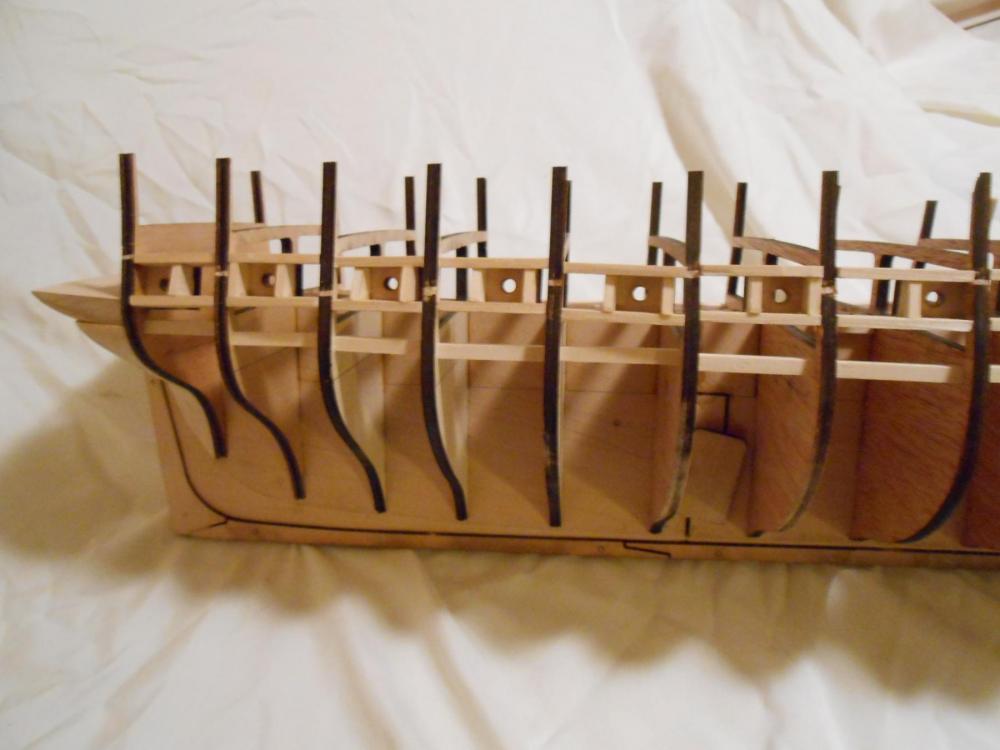
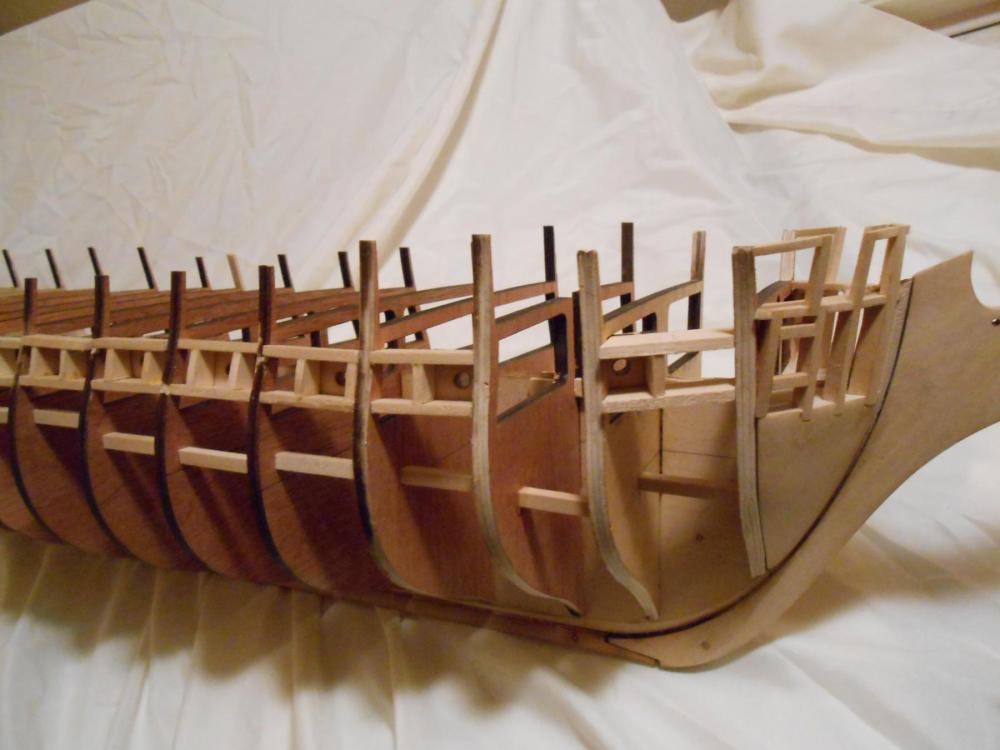
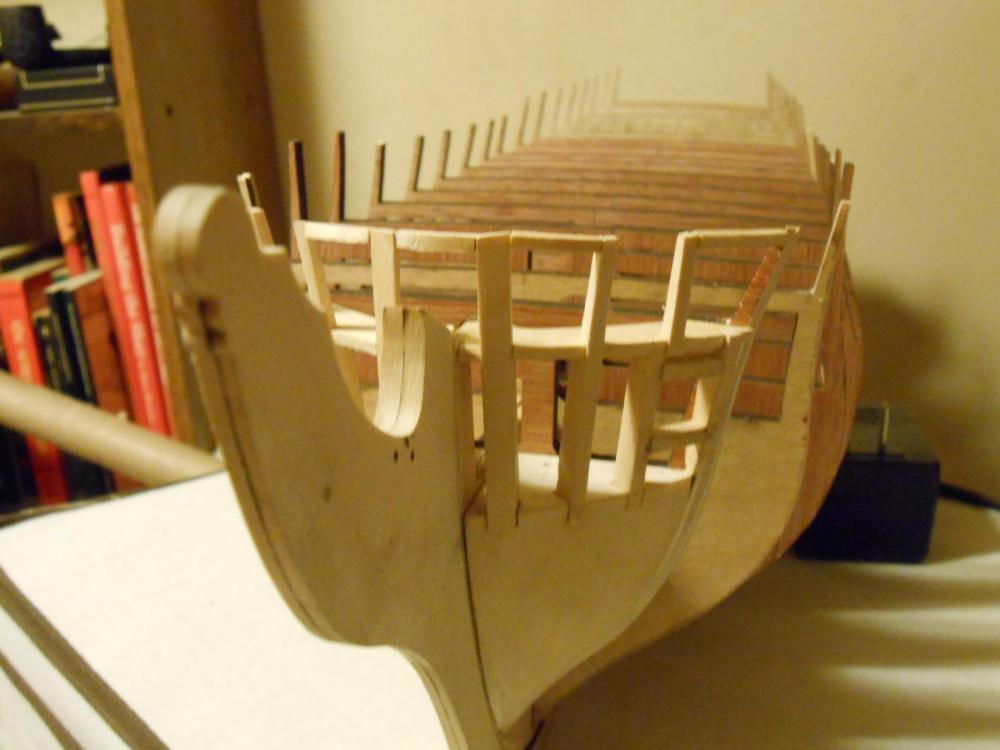
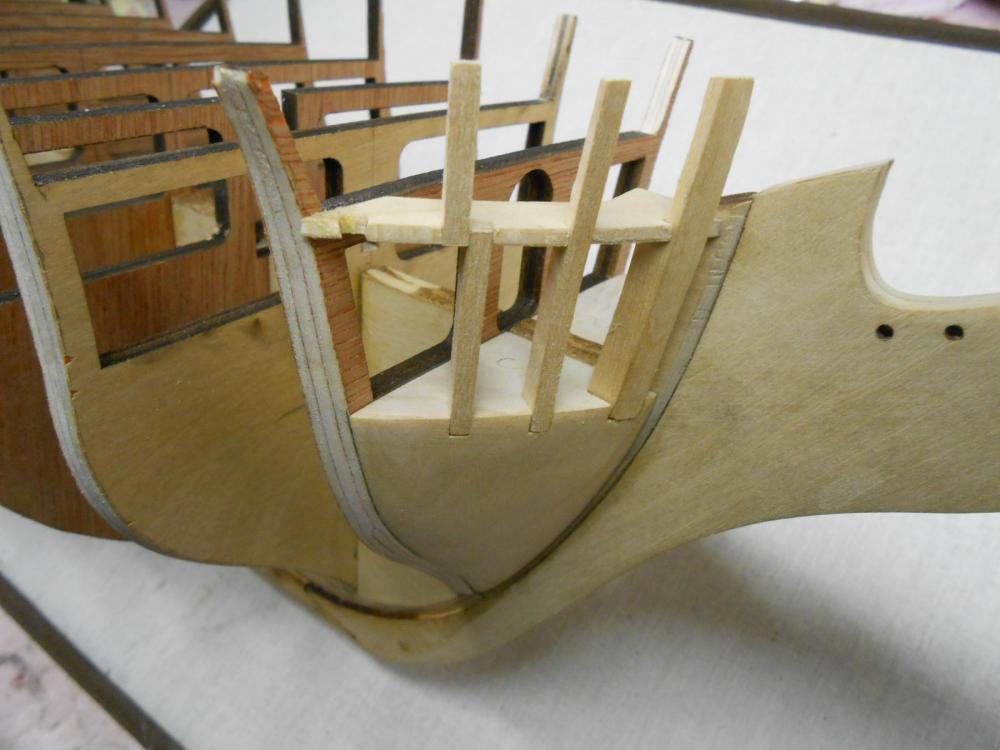
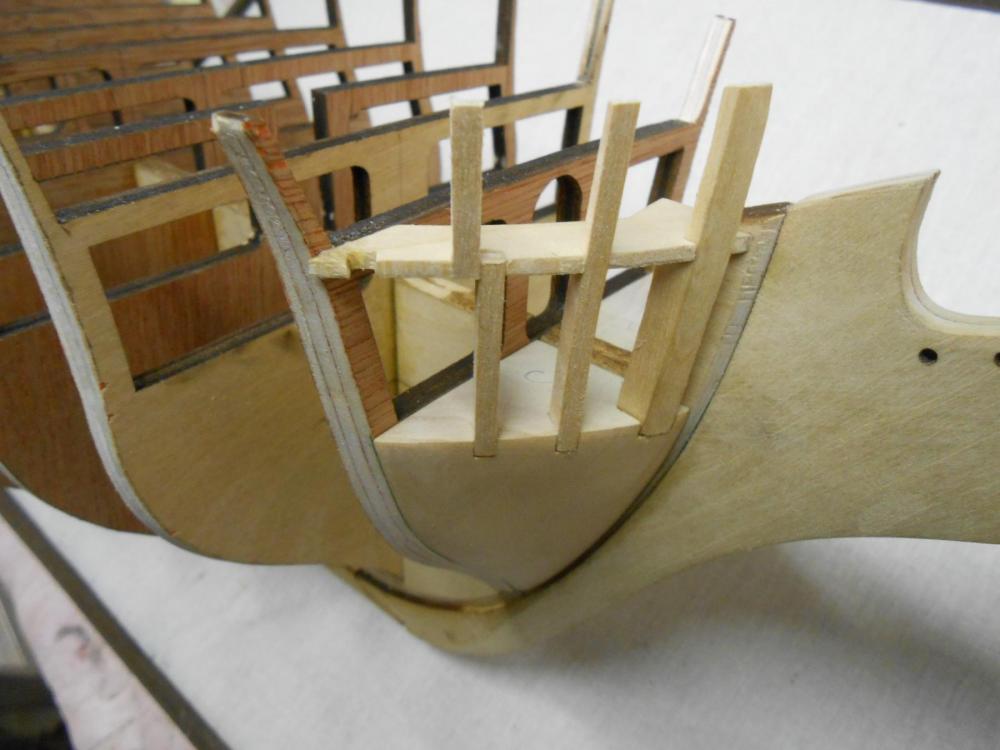
Thanks, Jimz66. It took a bit of work, but that is the nature of the ship-building beast I am finding out. All is well though, and we are having good weather here so I have just been busy mowing my yard, tilling my garden, fixing my cars and chasing my chickens. And of course, I work as a type of artist/craftsman, so that also takes a bit of time each day. So not able to make a lot of progress on the ship over the last few days. Plus, I am working on the dummy cannon boxes, which are all pretty much different, so what progress I have made is a bit slow. So I am making each box custom for it's particular position. I have a couple of pictures of them here. You may also notice I have made and installed the bracing as well. At the moment, they are only dry fit. I want to get both sides made before permanently affixing them, to make sure I don't induce any undue stress on the bulkheads. When I do get them all made, and start to permanently affix them, I will do so two at a time, switching from port to starboard, port to starboard, much like I shall do the planking when the time comes. All of the boxes stand proud of the bulkheads, so they my be sanded down in the fairing process to match the curvature of the hull. I know... I haven't got the transom framed yet, but I am still considering how I want to handle that. Besides, I doesn't need to be done before the gun deck gun ports. In fact, there are a few things I am going to put off doing until after planking is done also. I realize the transom isn't one of those things, but why would anyone install the gangway and hammock boards before planking? That is asking to get them broken. Sacrificial scrap should be used here, and later removed and replaced with those parts. Anyway... Enough of my talk. Here are the pictures. Matt

- 117 replies
-
- 5
-
-
- constitution
- model shipways
- (and 1 more)
-
That is quite possible, KirbysLunchBox. I see no evidence to contraindicate your theory. One thing I do think is there was an even number of windows in the beginning, since most ships of the day had a center post running up the center of the transom. Matt
- 117 replies
-
- 2
-
-
- constitution
- model shipways
- (and 1 more)
-
CaptainSteve, I tend to agree that the earlier configuration was probably 6 windows. I think it probably suffered damage to the transom, and was converted to 5 windows. But I am tempted to believe that the original configuration was 8 windows. But then again, there is just not enough evidence at this time to be able to say for sure, or at least I haven't seen it. Also, artificial lighting at the time was poor, and they tended to try and take as much advantage of natural lighting as they could. I think the paintings and the model just show her as she was at different times in her long history. Matt
- 117 replies
-
- 4
-
-
- constitution
- model shipways
- (and 1 more)
-
That's a really nice finish on the deck, David. Very realistic. Matt
- 117 replies
-
- 4
-
-
- constitution
- model shipways
- (and 1 more)
-
Thanks CaptainSteve for bringing that to my recollection... I had forgotten Xken had the same issue. Now it is a matter of just coming up with the simplest solution that satisfactorily solves the problem accurately. Have you decided on 5 windows or 6 on the transom? I considered doing a 1797 version myself, but can't find enough evidence for how she was originally configured. Besides, modifications were made for a good reason. So I decided to just go with the current construction of her, since I know for certain how she looks now. I will probably kick myself for it after the revision she is undergoing now is complete in 2018...lol. Matt
- 117 replies
-
- 4
-
-
- constitution
- model shipways
- (and 1 more)
-
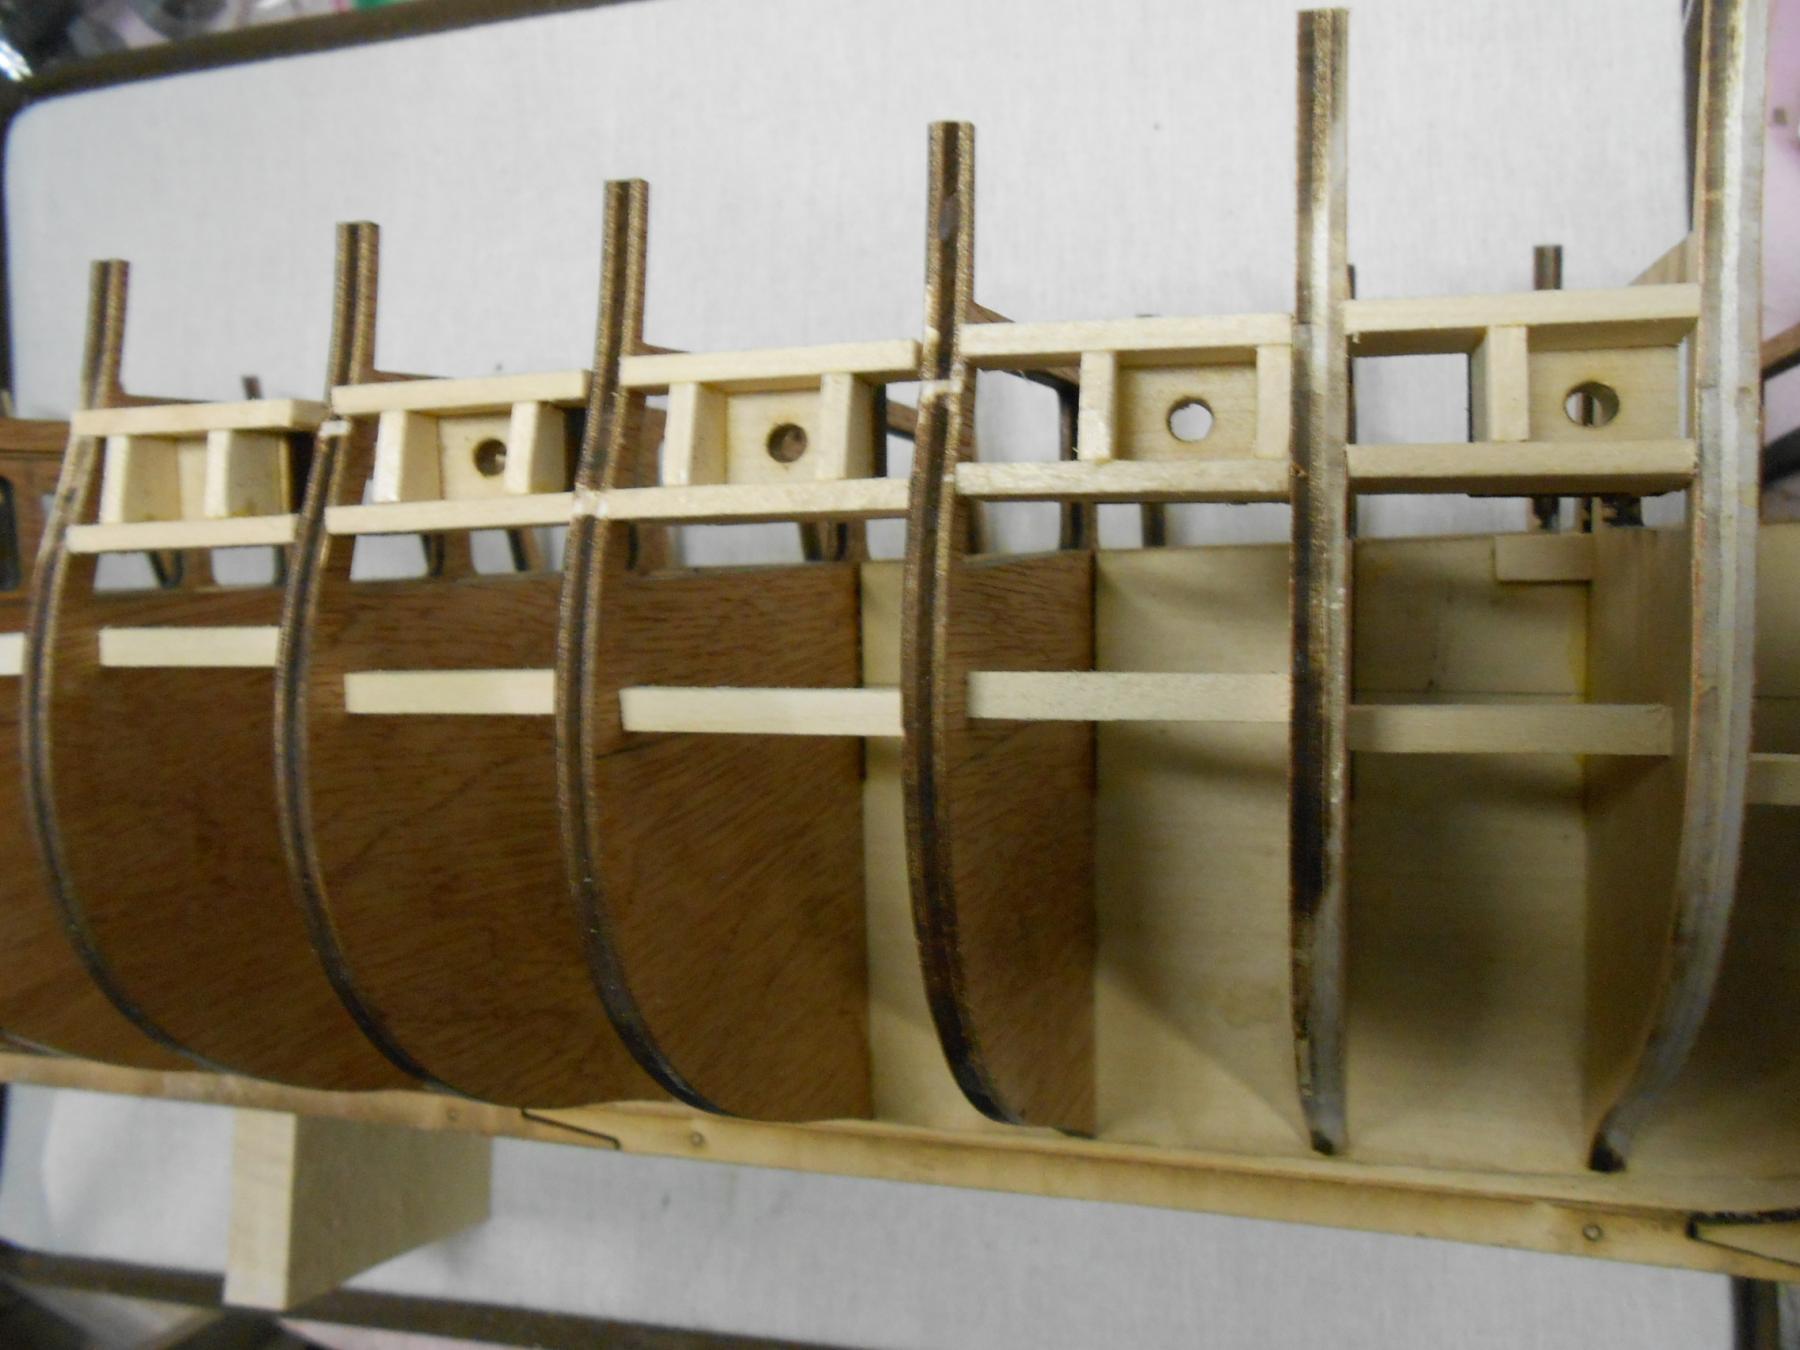
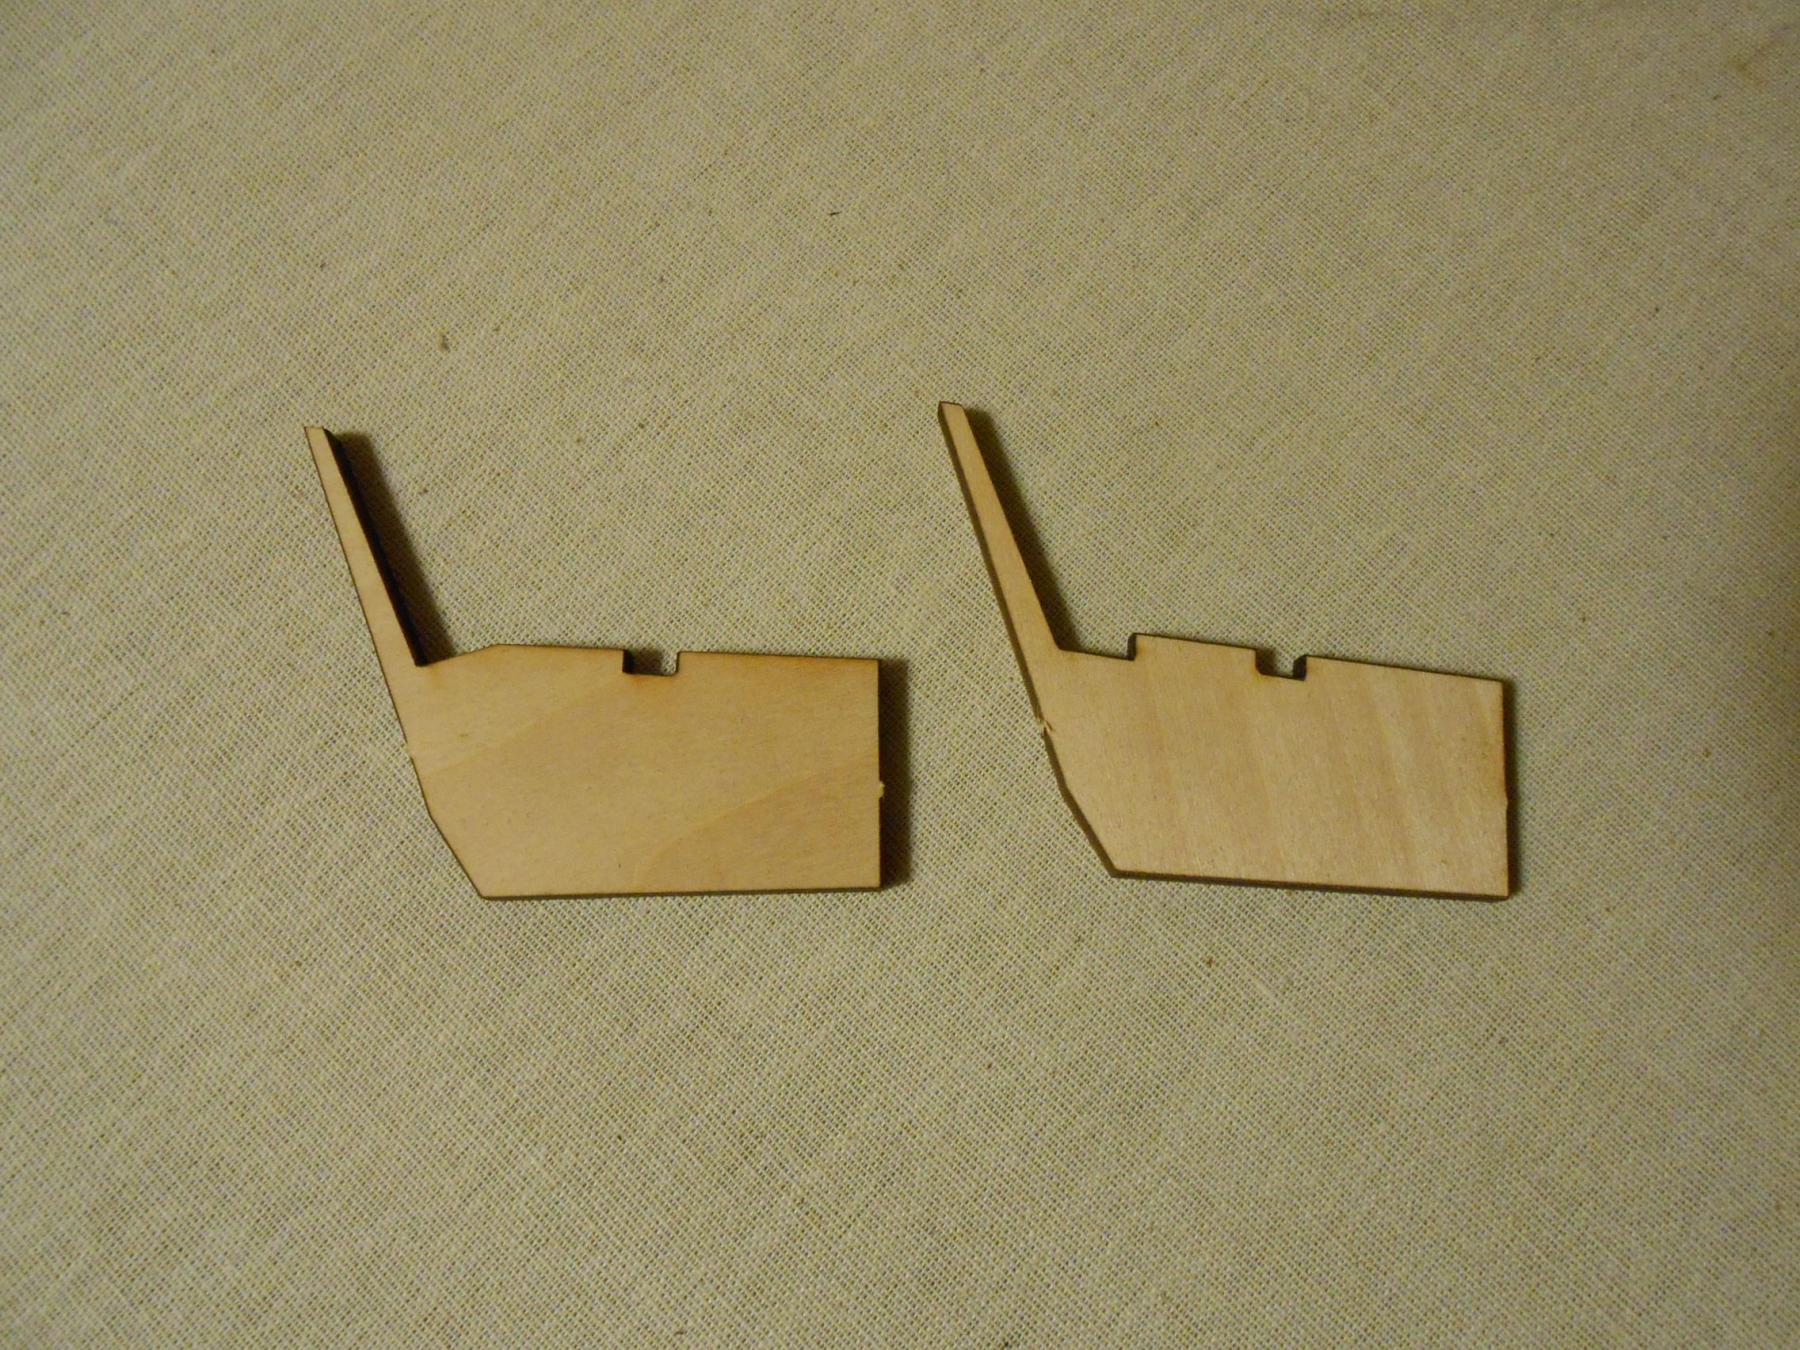
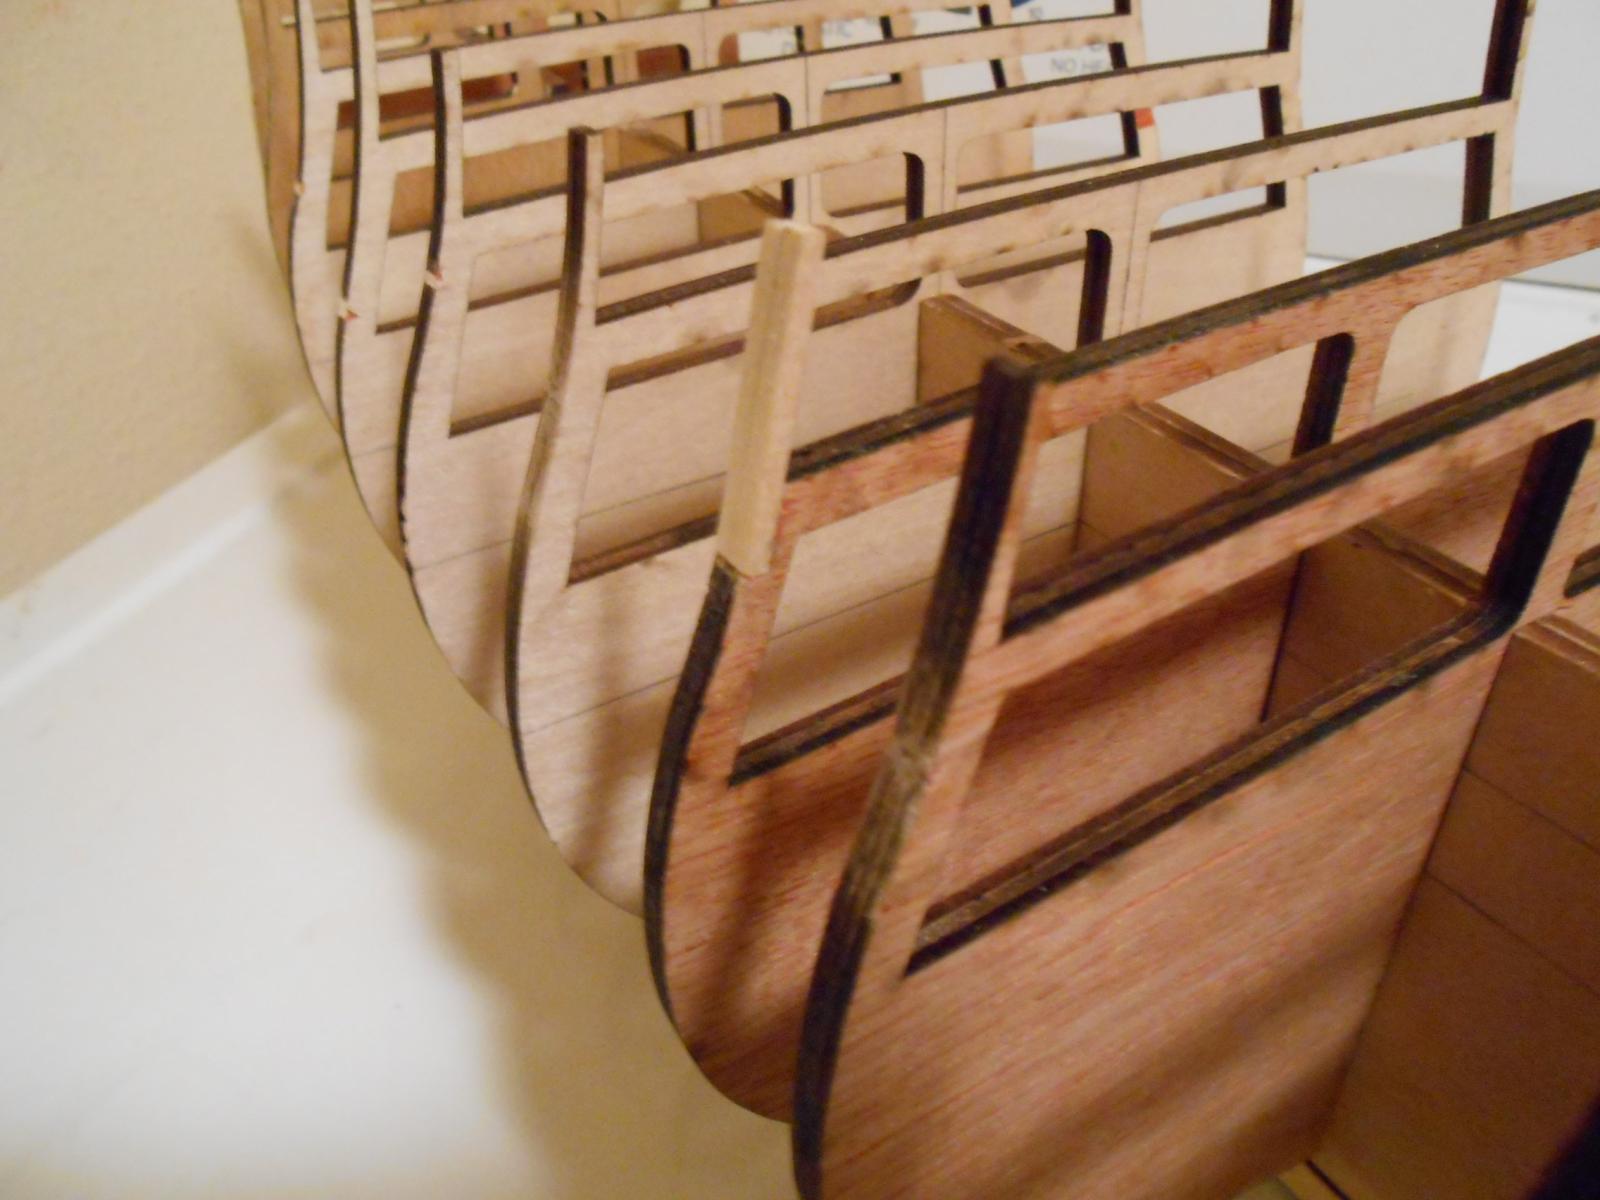
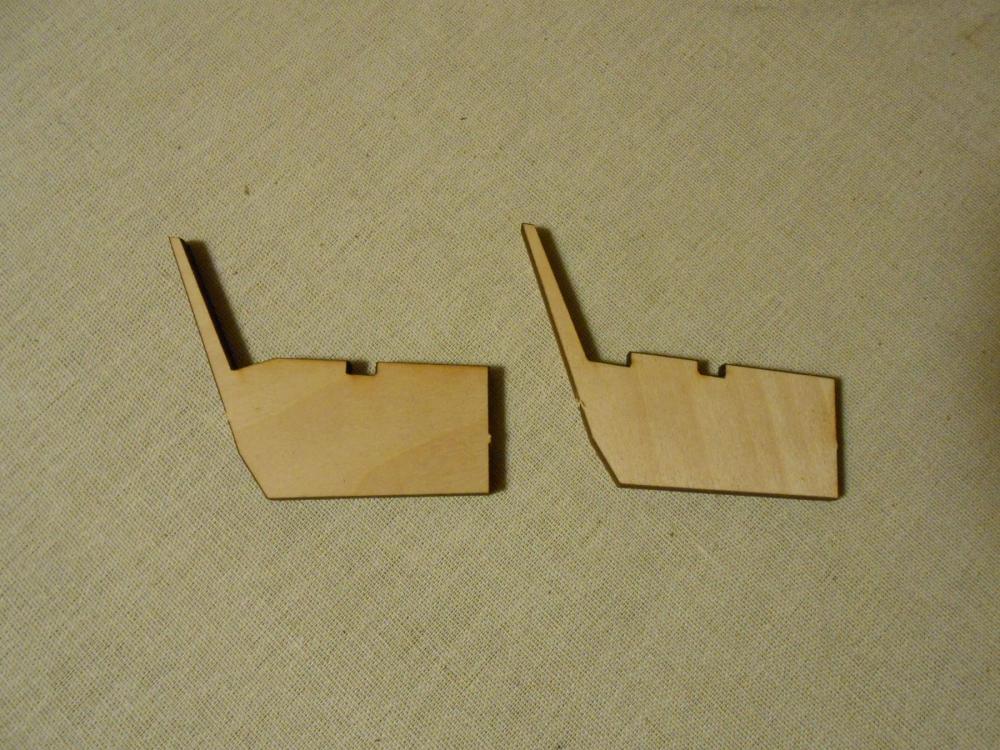
I did get some time today to glue up the bow framing, sans the plankshear, which will be added later. I have only glued it in, and a little time with a file and some sandpaper should get it into acceptable form for planking. It was a fairly easy job, but as I said in a previous post, everything needed to be hand fit, and the templates were mere guidelines that got me close. Once I completed the bow framing, I cut out my transom frames, and intended on continuing with that. However, as the picture below shows, there is a discrepancy in the outboard frames. After a few sips of grog from my mug (ok, ok... It was a few drinks of beer from a can), I decided to ask here. Is there a reason for this difference? Is it for fitting adjustment purposes, or just a mistake in the laser cutting? I really don't see why it should be intentionally cut this way. I expected both to be cut like the frame on the right. Any and all opinions are appreciated. The first photo shows this clearly, though the others are a bit out of focus. Ooops. Matt
- 117 replies
-
- 6
-
-
- constitution
- model shipways
- (and 1 more)
-
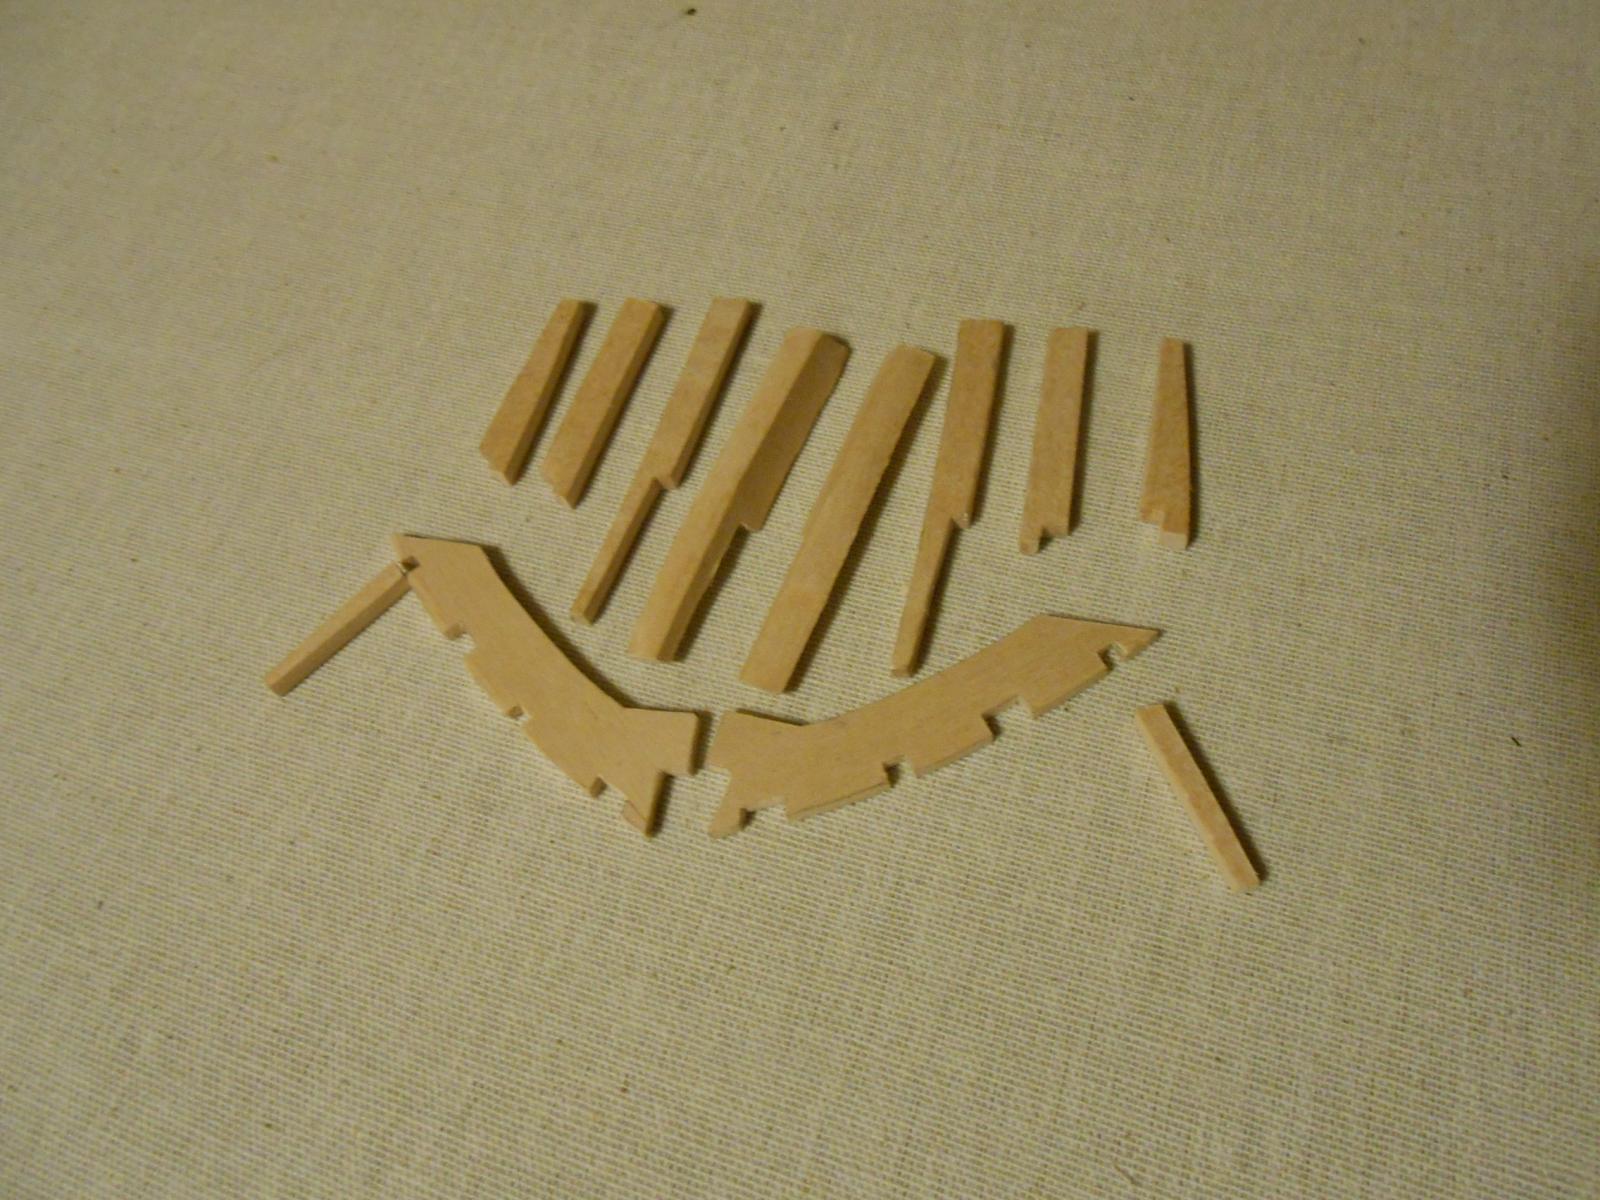
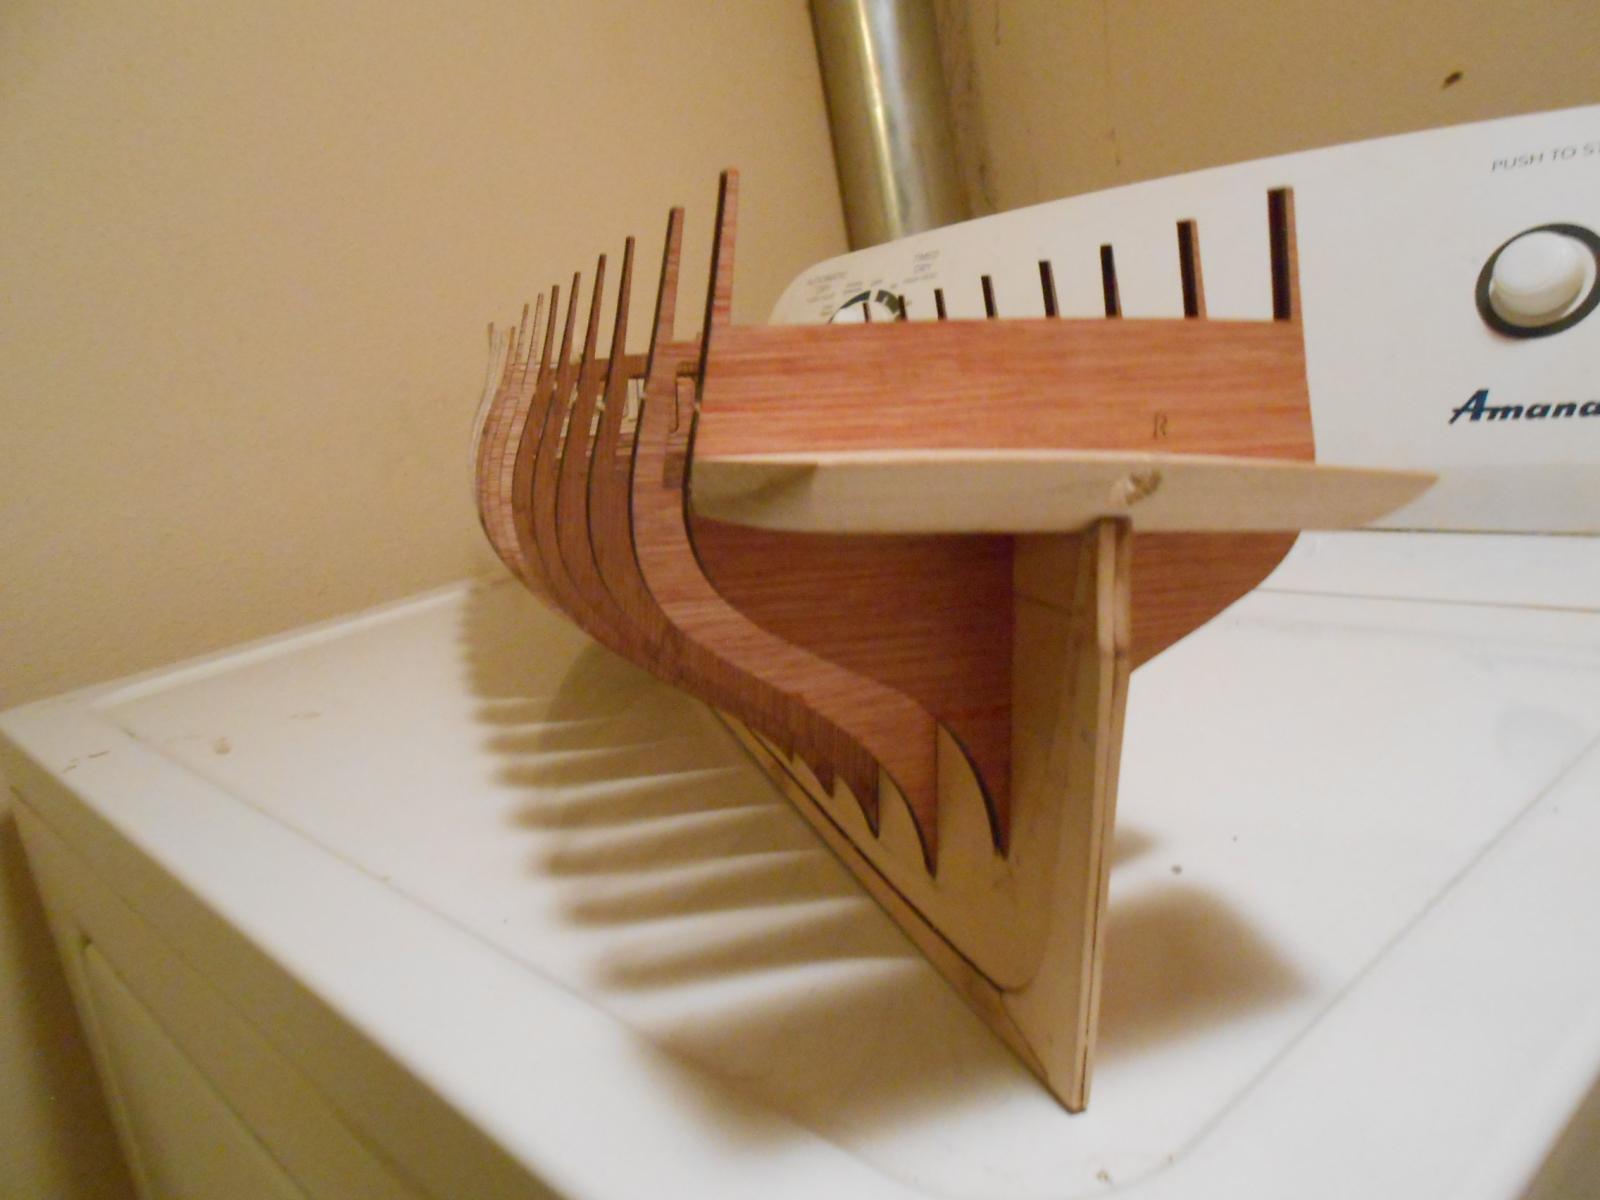
I finally got the starboard side bow framing completed to dry fit. It took a lot of trimming and trying, trimming and trying, but I think I finally got there. These pics are dry fit, except for the filler block which is affixed now, and these are the only pieces I will fit in the first glue-up. Timber number 5 will have to be custom fit, but the framework of these timbers needs to be solid first. And then it will be the bridal port sill and header, and the stiffeners. It may seem like I am spending a lot of time on this area of the ship, but this is a challenging area, and all pieces need to be custom fit. Once the parts were cut to the templates, there was much trimming that had to occur. I hope the rest of the plans are a little better. I also fit the other side, though I don't show it, and it was exactly the same way. Tomorrow, I hope I can have the bow framing completed, and begin working on the transom framing. Then it is on to gun port framing. Matt
- 117 replies
-
- 6
-
-
- constitution
- model shipways
- (and 1 more)
-
Thank you all for the comments on the bow fillers. All it takes is a really sharp chisel. Today I decided to work on the timbers that frame the bow... Knightheads and other framing. I did this because I think it is easier to do off the ship than when on it. Anything that can be done off the ship is better done that way, in my opinion. So I cut out the main framing timbers, and all came out well, but the plans are really off in this section of the ship. The knightheads are totally out-of-wack comparing the drawings to the actual pieces. I am coming to understand that the ship plans and instructions are more like guidelines than exact. That being said, I still think the kit is a great kit. It just takes a bit of thought to get to where you should be, rather than what they show. The picture shows what I got cut today, since I think pre-fitting of the pieces is better than having to do it when the parts are on the ship. Believe me, I had to modify the parts quite a lot to get them to fit properly so I am glad I chose to do it this way. Matt
- 117 replies
-
- 6
-
-
- constitution
- model shipways
- (and 1 more)
-
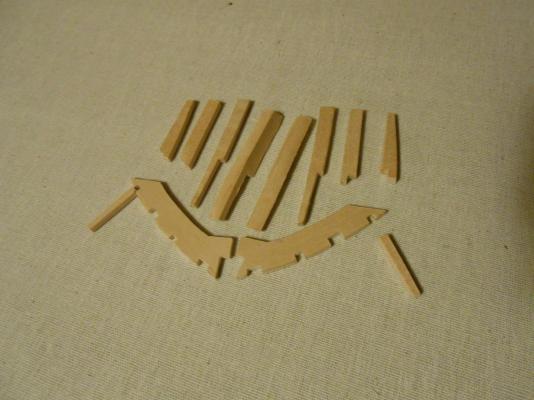
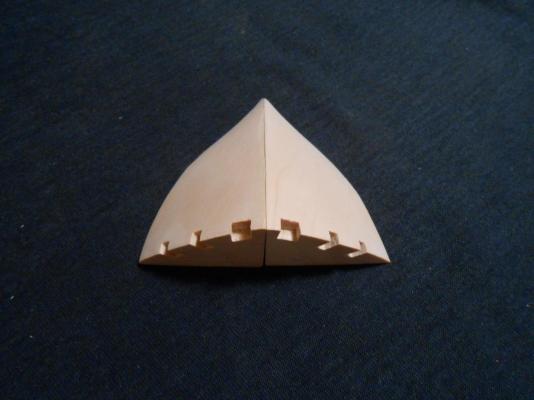
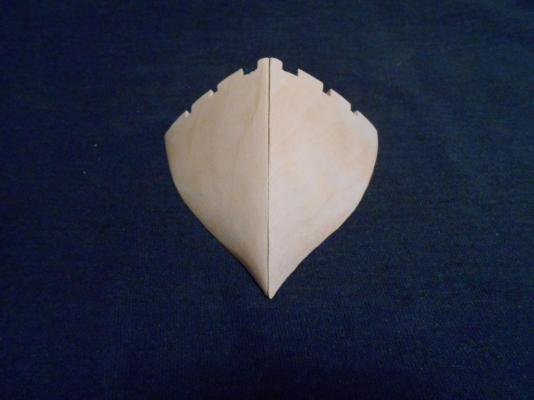
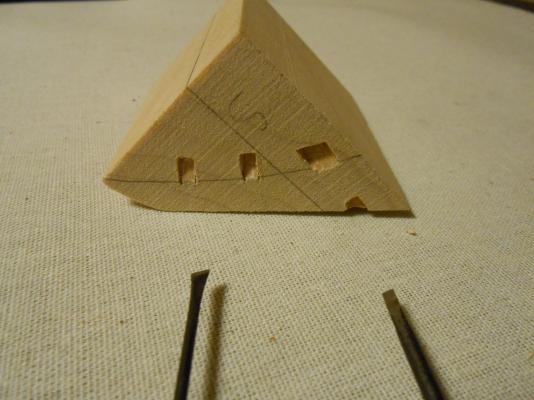
A rainy day here, so got the bow filler blocks completed. I started by cutting the notches to about 1/16" depth. Then, I shaped the blocks with a belt sander, Dremel and final hand sanding. Once they were shaped, I cut the notches to final depth. I think they turned out ok, and I will be using them in the build. Matt

- 117 replies
-
- 7
-
-
- constitution
- model shipways
- (and 1 more)
-
I should have also mentioned Xken's log above as well... Also very informative and inspirational. There are others as well, but please take no offense if I forgot to mention you. Matt
- 117 replies
-
- 3
-
-
- constitution
- model shipways
- (and 1 more)
-
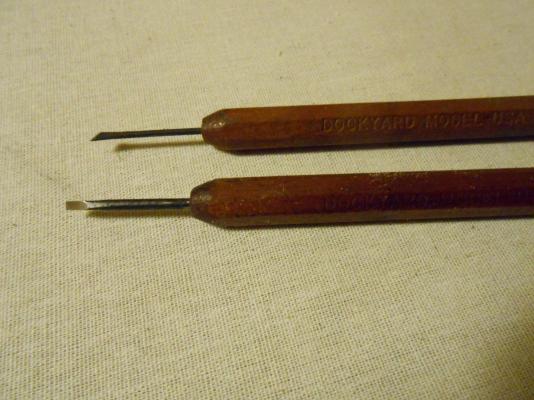
Hi David... Most agreed, this is a great method that you show. But I use chisels on a daily basis, and am fairly competent with them. That is a great solution when if things go wrong, too. And actually, I think for most people who don't have experience with using a chisel, or don't have a proper chisel, the solution you present is a better option. Another thing that backs that up, is that basswood is a softer wood, and is hard to cut cleanly with a chisel that isn't absolutely razor sharp. I am used to working with hard maple, and it is easier to cut with a chisel than basswood. Of course, after my post, I couldn't wait to see how it would work. Here are some pics of what my results are looking like, and also the chisels used. I bought these chisels about 25 years ago. They are old, but made of very good steel, and I would buy them again if I had too. Dockyard Model is the company that manufactured them. I have no affiliation with them, but they made a good product here: Matt

- 117 replies
-
- 7
-
-
- constitution
- model shipways
- (and 1 more)
-
Thanks Hipexec, David and Usedtosail. Your builds have been informative and inspirational. In fact, I question whether I would have ever attempted this project without some of your, and others, fine posts here. MSW is such a great resource. I did manage a little time today to get the other stern filler block completed, and a start on the bow filler blocks today. I am fairly satisfied they are about as close as I can get to mirror images of one another. If you see anything in the pictures which contradicts that, please point it out. My first one took me about 5 hours to build, the second one only about 2. I also started the bow fillers. These look easy, but then I remembered Usedtosail's post on the problem he had with the roughness of the notches for the posts. If you look very carefully at the pics, you should be able to see a test notch. Here too, I had issues with chipping-out of the wood where it was not at least 90 degrees. So my solution? I will make stabbing cuts BEFORE I shape the blocks. This should provide adequate support, so that there should be no chip-out. Hopefully, I will have at least one completed tomorrow, so we shall see. I will try and remember to photo as I go. Again, thanks for the great logs, and the encouragement. Matt

- 117 replies
-
- 7
-
-
- constitution
- model shipways
- (and 1 more)
-
Thank you, E.J. As a new ship builder, this is beginning to look like more scratch than kit. That is ok with me, but it is more like a set of plans and some wood and metal than a true kit. I like scratch building, so this doesn't bother me whatsoever. I am thoroughly enjoying it, and I find it totally engrossing. The plans aren't great so far, but they are adequate. My filler blocks, which are cut to the plans exactly, don't match the bearding line. I made a template to recheck my bearding line, and a template to recheck my 'R' bulkhead to align everything. My templates fit exactly, but the filler block, which also fit it's templates perfectly, didn't. That being said, the filler is oversized, and not under, so this is not a problem. Just more fine-tuning. I think this was by design from the makers of the plans. It is always easier to take more wood off than to put it back on. Another thing that the plans don't take into consideration is the fact that there is not a 90 degree relationship between the counter and the filler block. On the plans, it shows it as that, but it is not. This may seem like I am picking nits, it is a detail which should have been shown in the plans, in my opinion. It is really overall a good kit though. It has been fun to build so far, and I am sure it will continue to be that. They just need an update to the plans. Matt
- 117 replies
-
- 4
-
-
- constitution
- model shipways
- (and 1 more)
-
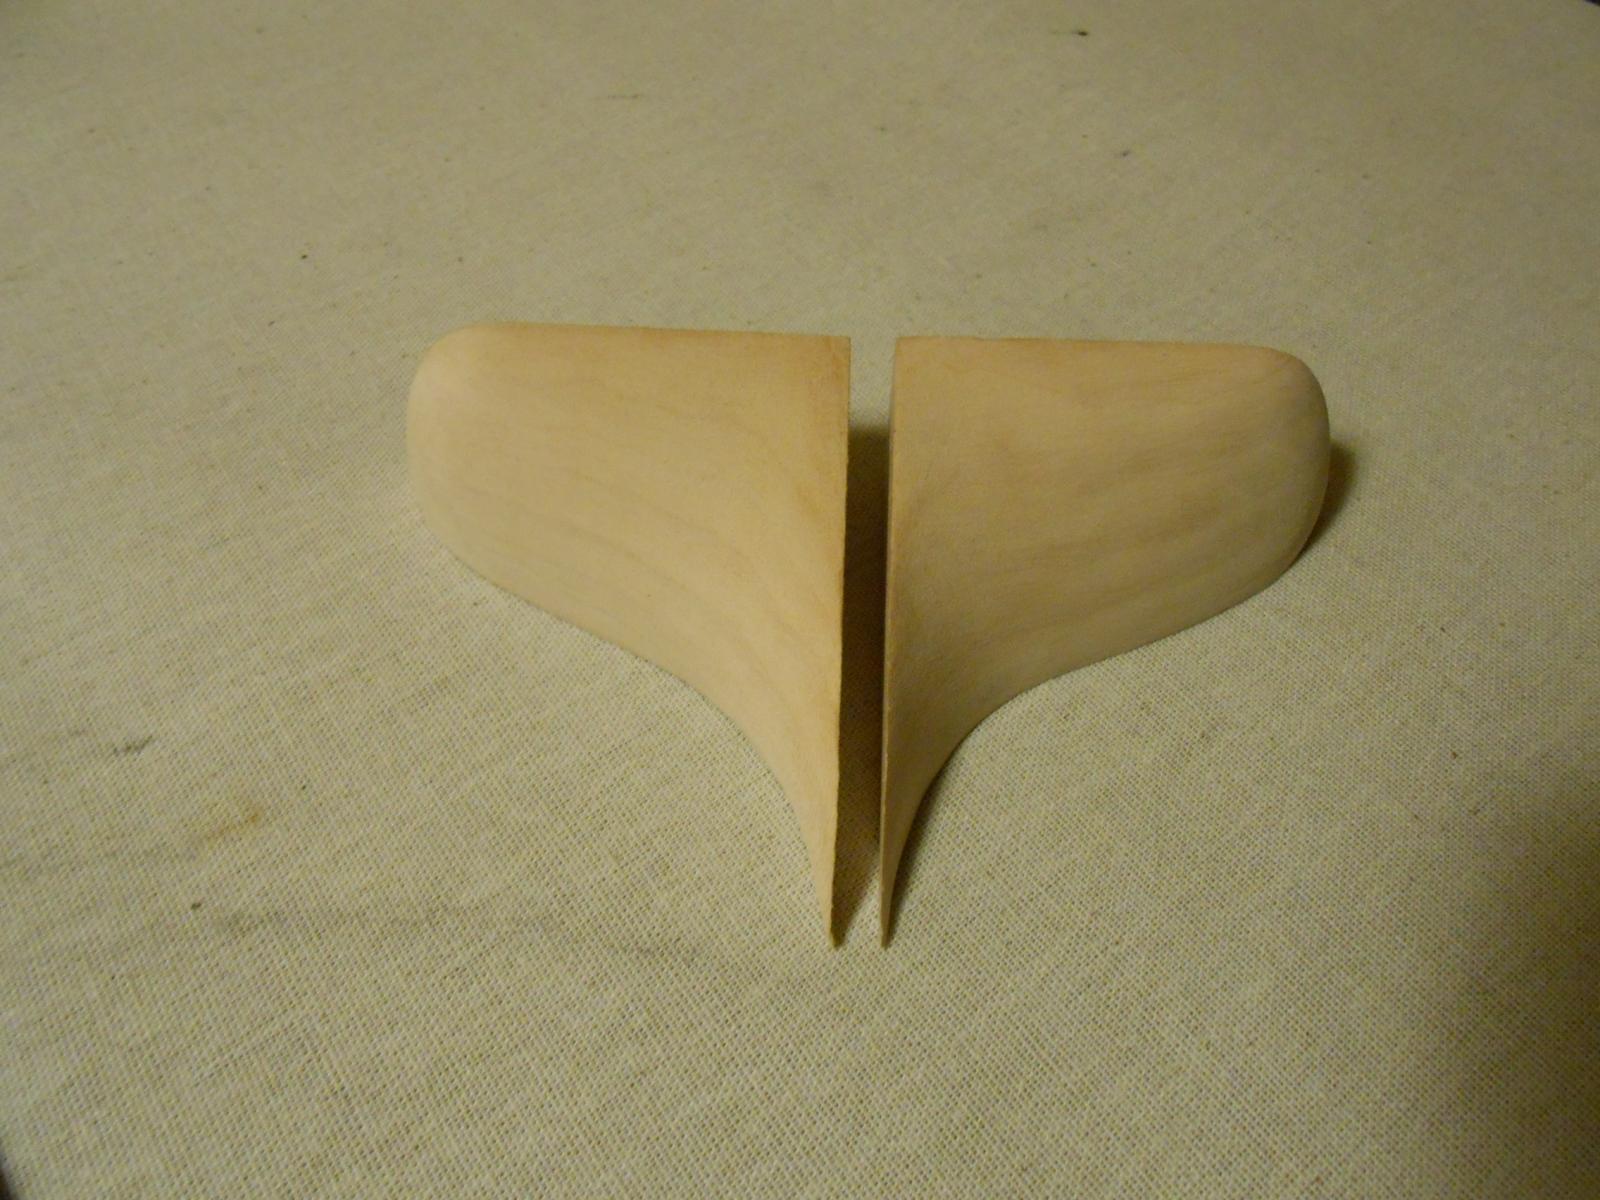
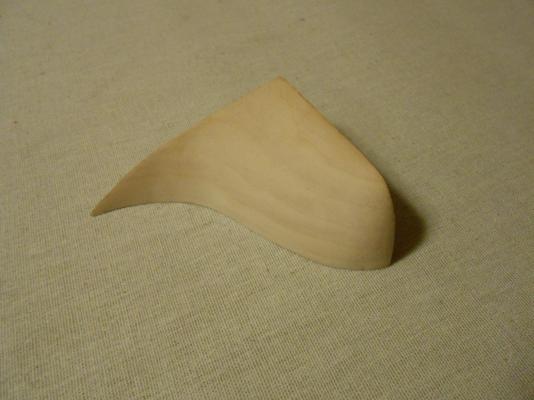
I didn't get much done today, since I had other work to finish first. But I did get one of the stern filler blocks finished to rough shape. Lots of filing and sanding involved, but I think it came out pretty close to final shape. Now comes the tricky part... Making one just like it that is a mirror image of it. This is the main reason I didn't have it attached to the ship, because I want to correct relationships between the two fillers and the counter all together, so that there will be less fine-tuning after they are mounted. Here are a couple pics: Matt
- 117 replies
-
- 7
-
-
- constitution
- model shipways
- (and 1 more)
-
Thank you, Ian. And yes, EJ... If I have to drill another hole in basswood, it will be small and taken out with files to proper size. I probably could have done a better job with the drill press or the mill, but that too is hindsight. Having never made a wooden ship before, it is a learning experience, and one I don't regret. I am having more fun than should be allowed, as it is like scratch building with guidelines. You can't really call the instructions included in this kit instructions. Maybe that is what makes it so fun. Matt
- 117 replies
-
- 4
-
-
- constitution
- model shipways
- (and 1 more)
-
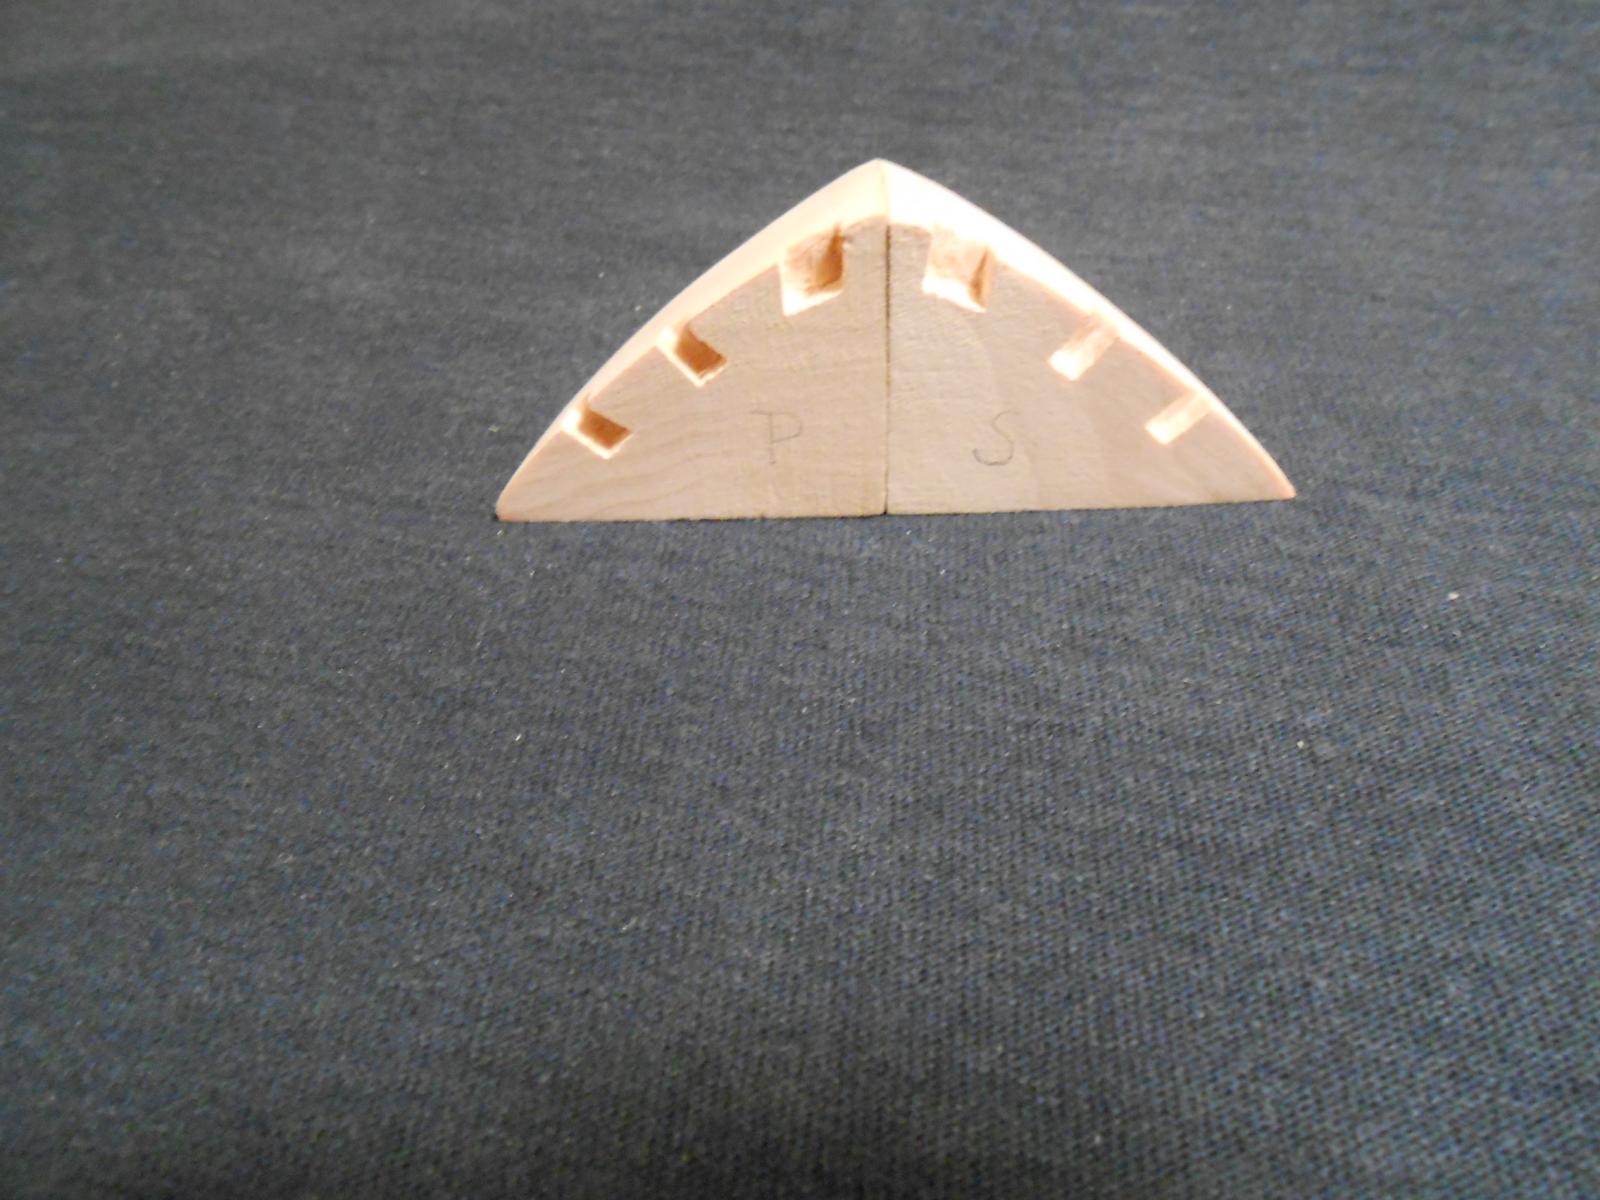
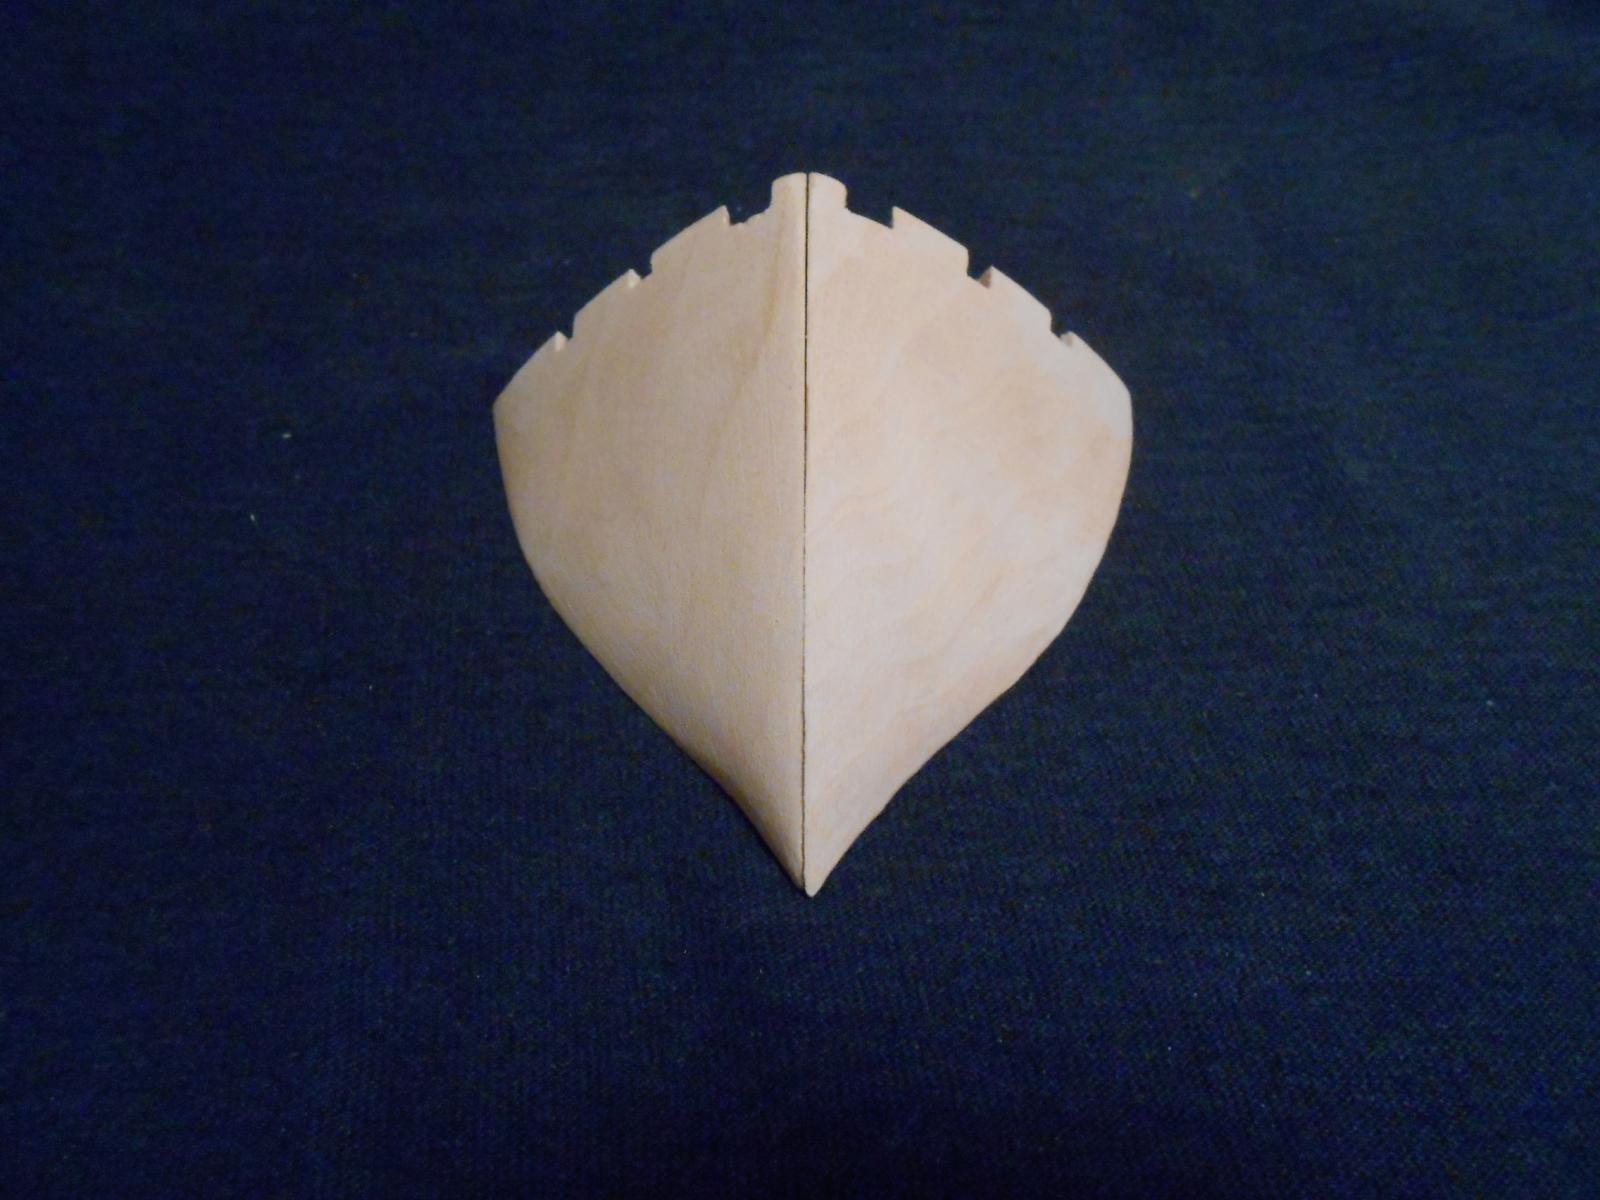
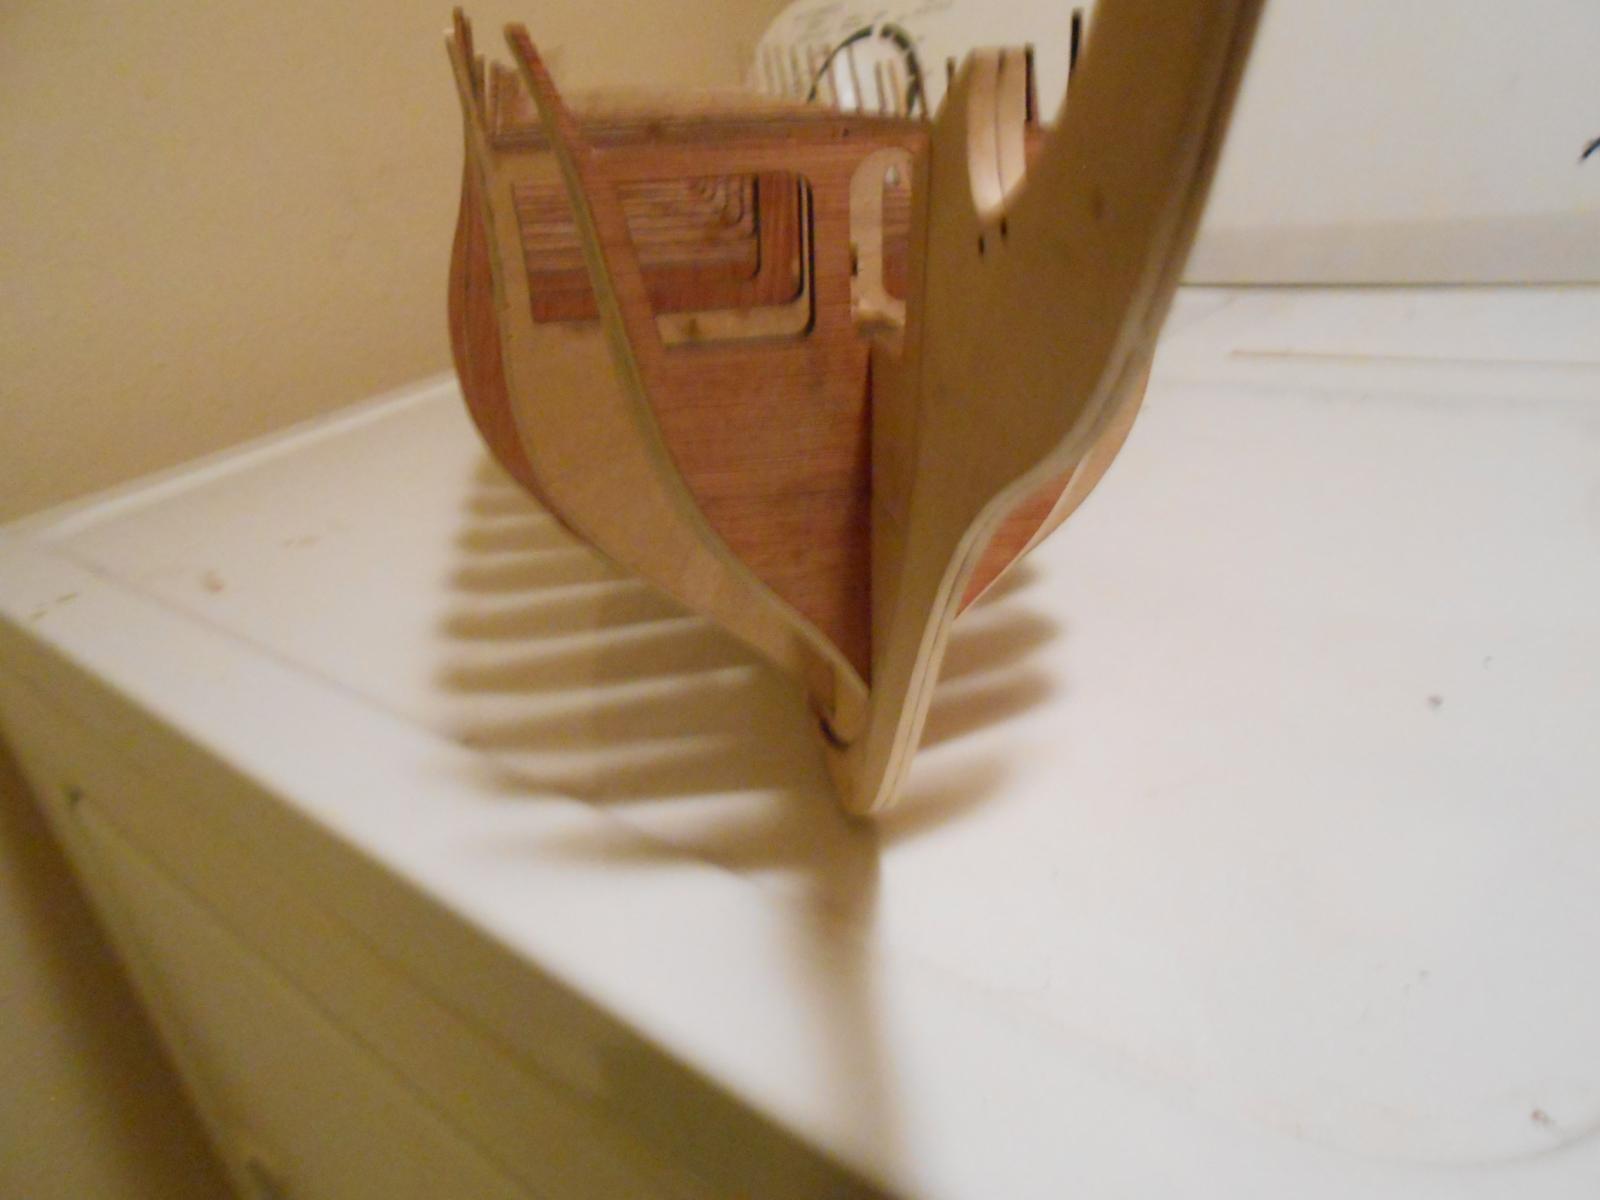
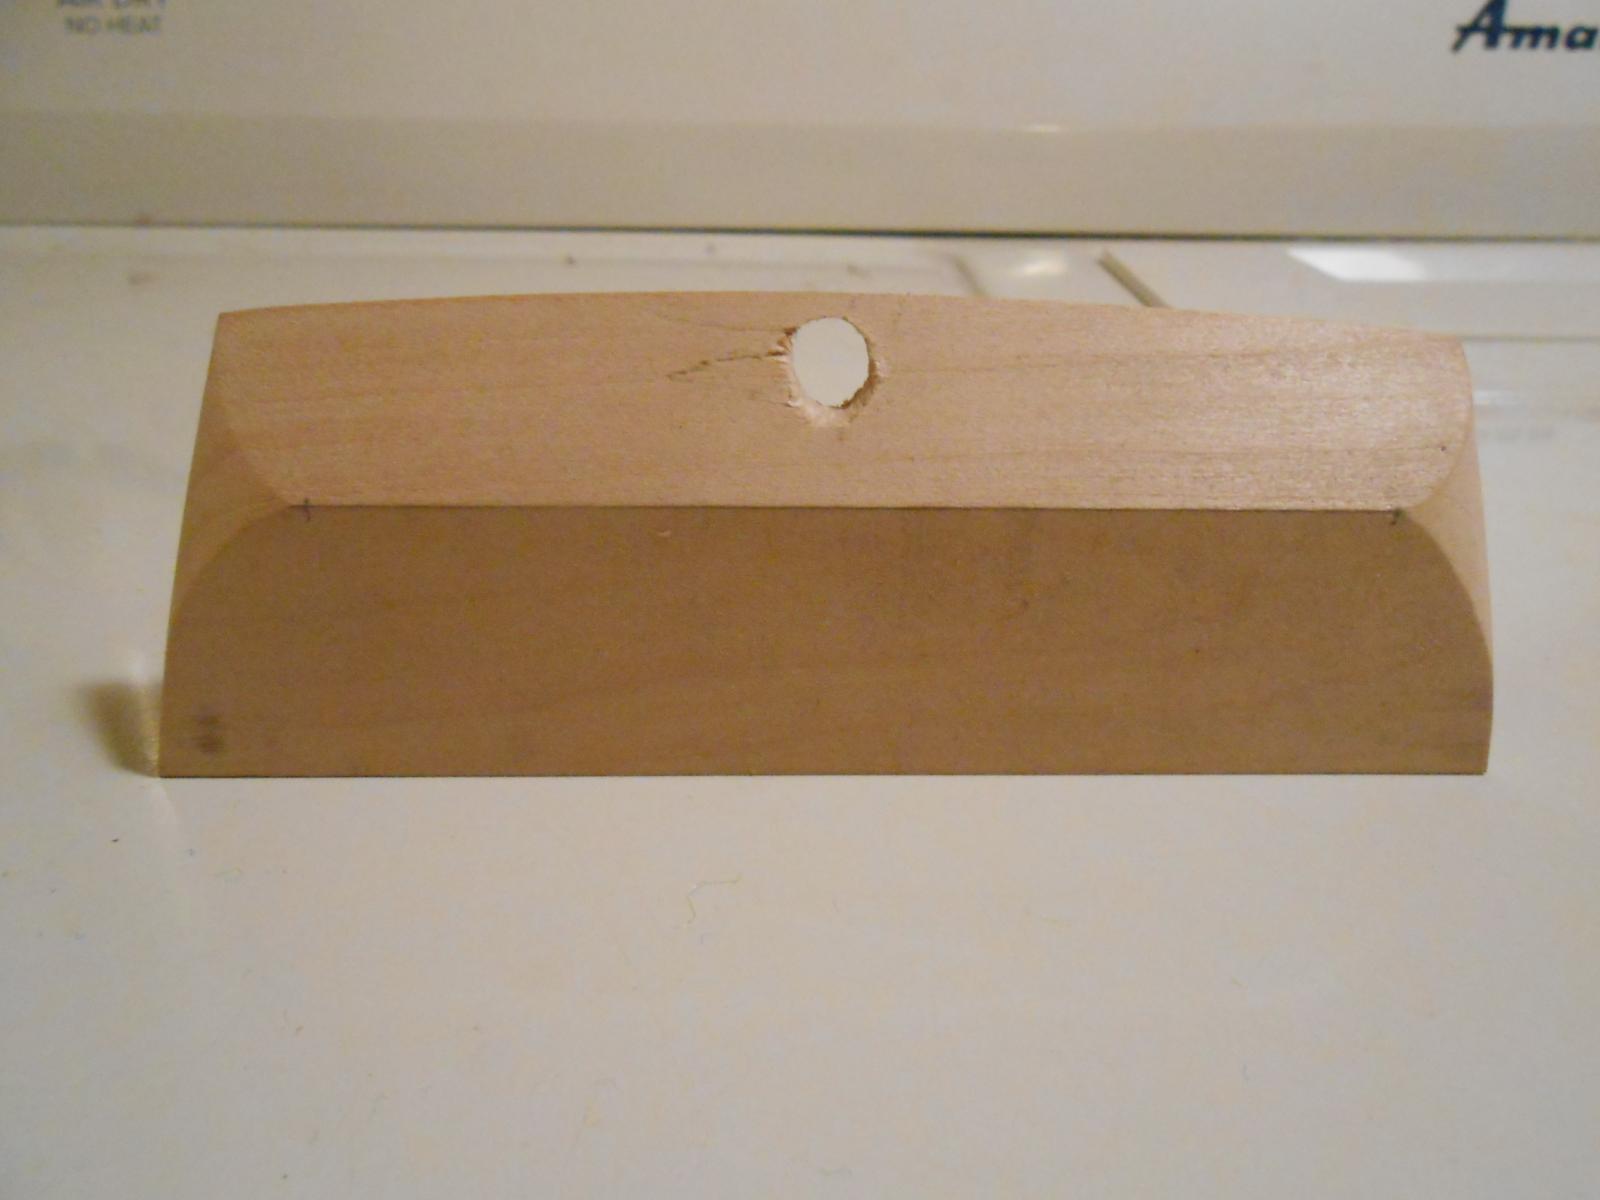
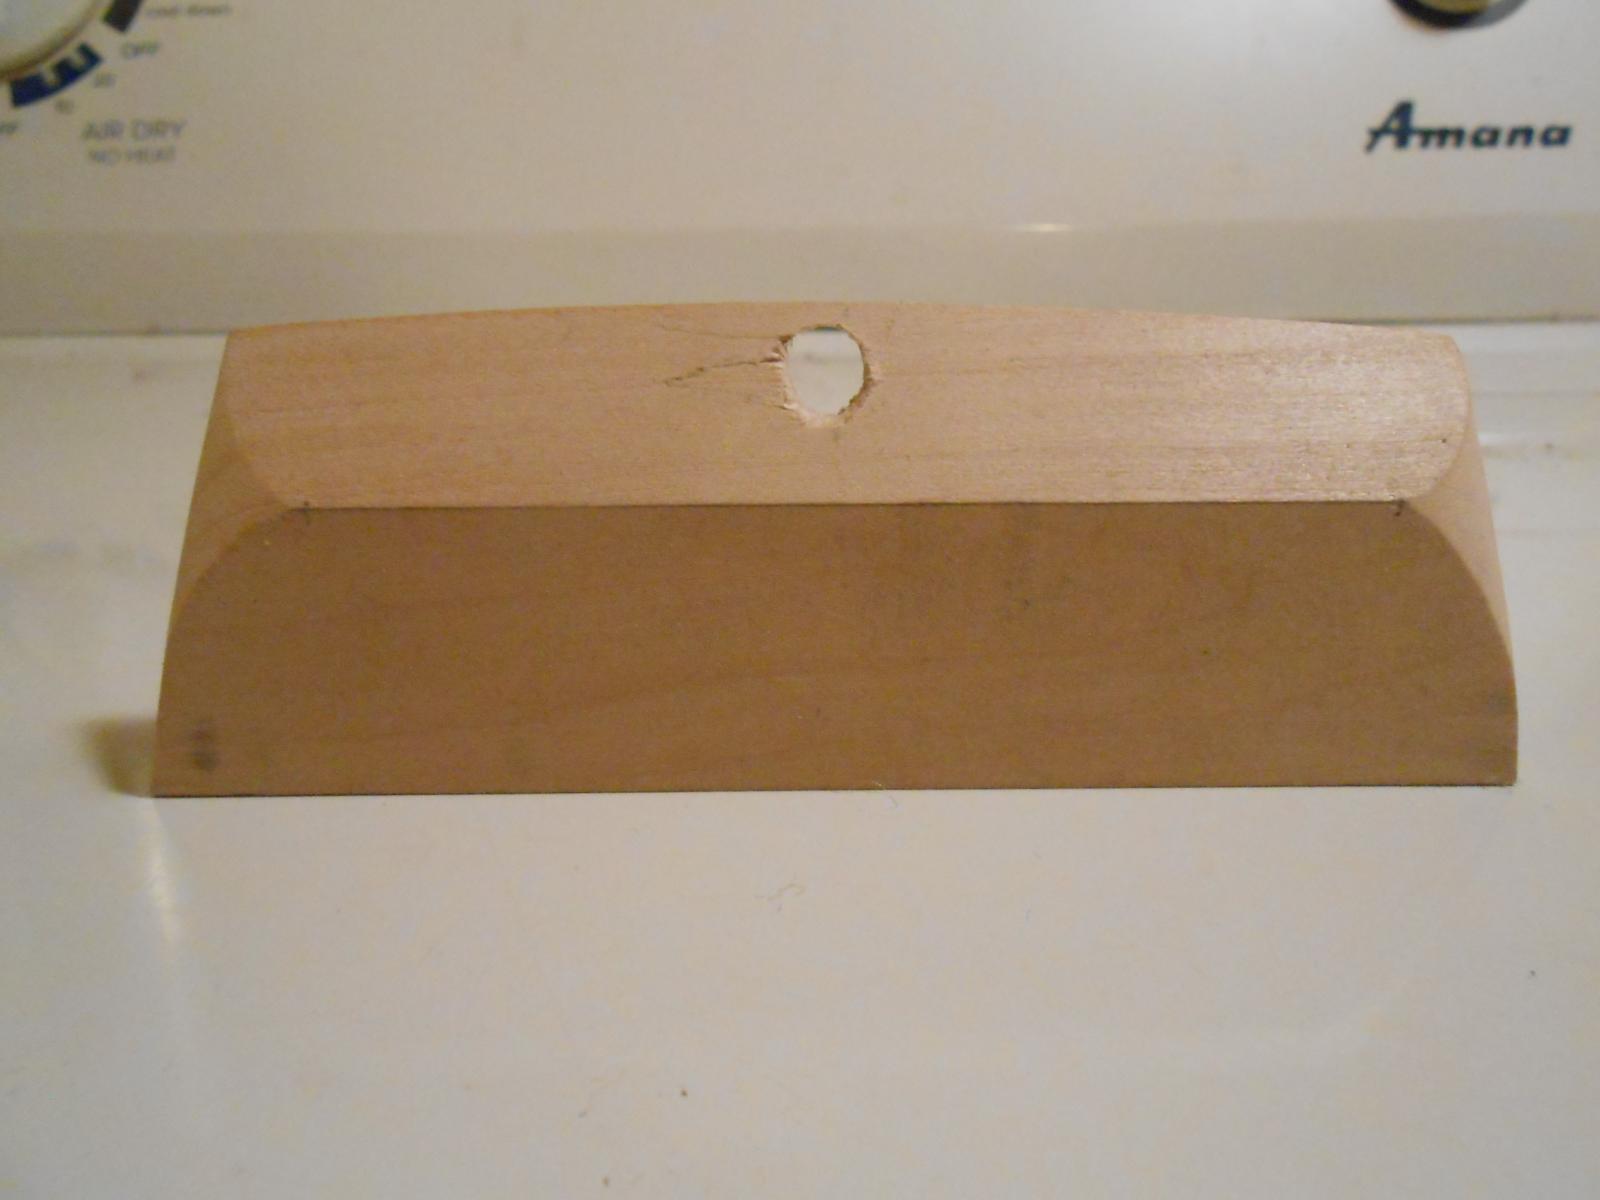
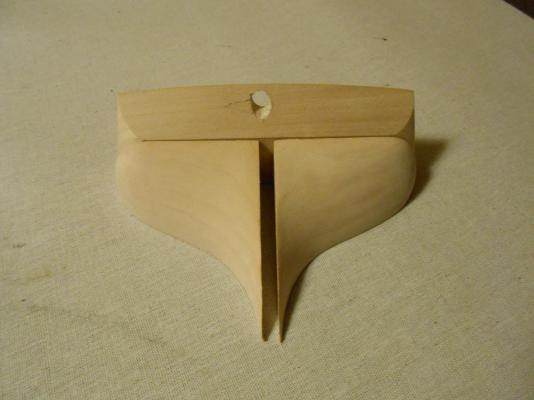
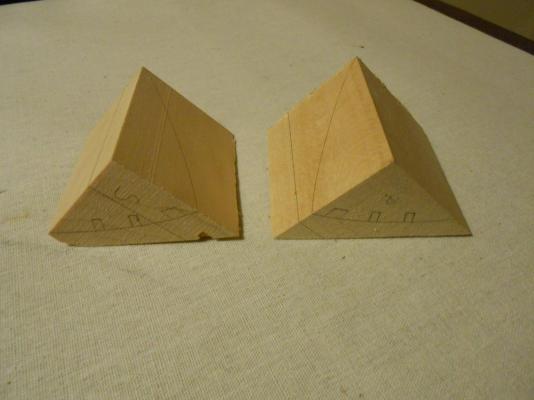
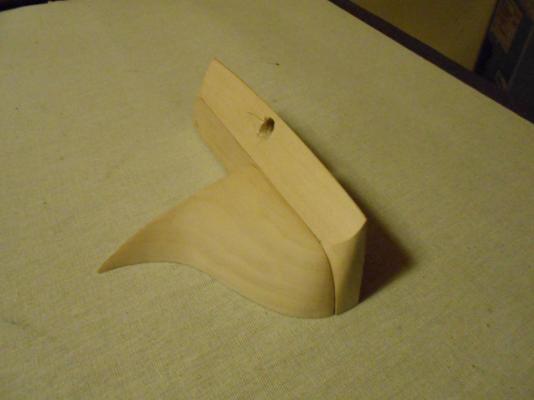
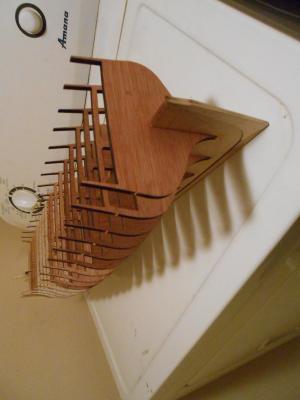
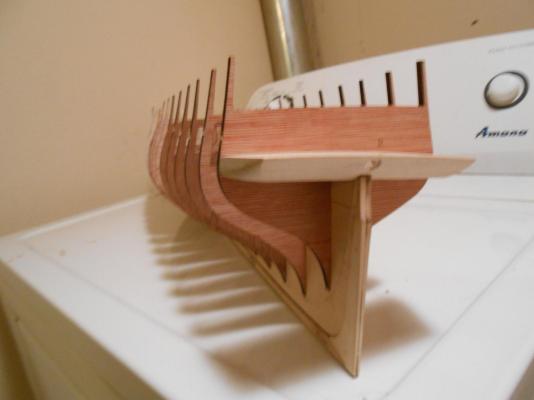
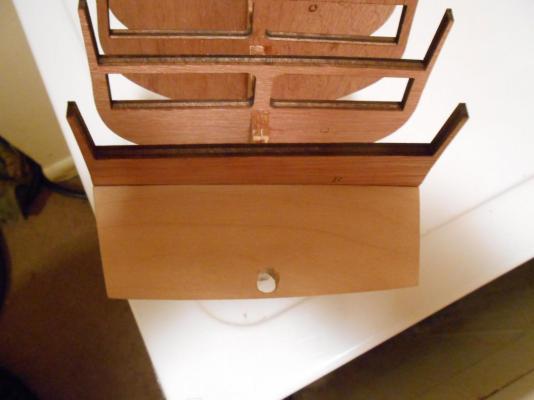
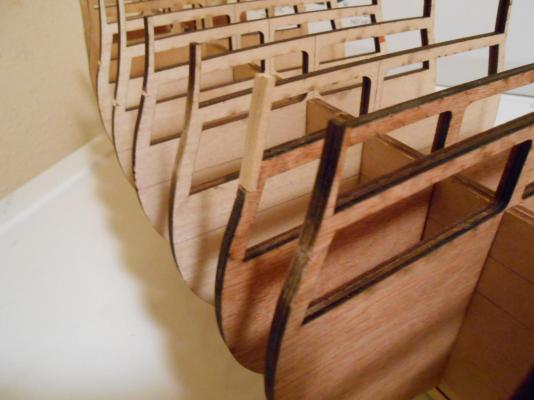
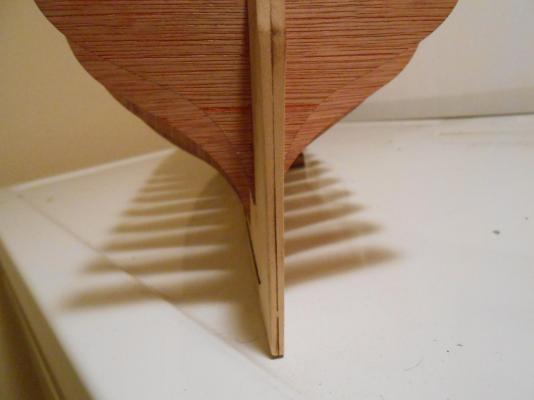
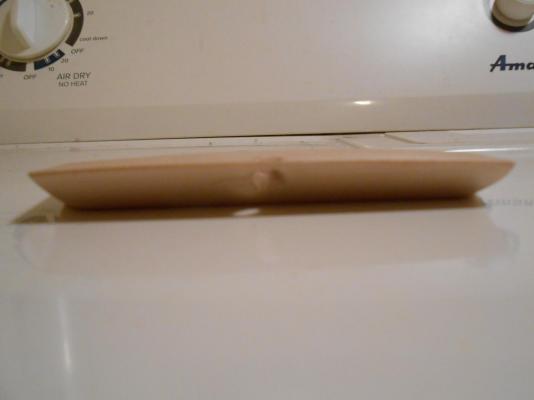
Yesterday and today I have mostly been working on mounting bulkheads, and repairing the defective one. This was just a process of fitting each one, squaring it and waiting on the glue to dry enough to unclamp it. It is an easy process, if somewhat tedious, but it is done. I intend on adding bracing between each bulkhead for extra strength, but the ones installed yesterday are quite stiff, and I doubt that it is really necessary. But I am going to do it anyway... It can't hurt, and can only help or be an exercise wasted. Perhaps it is just because I will feel more comfortable with braces in place. While waiting on glue to set this morning, I decided to hack out the counter. This is a deceptively complex piece, I discovered, as it has some curves that need careful attention. I am happy I bought those belt sanders years ago now. I did not finish it to final size at the side curves, since these will need to be trimmed to match the stern filler blocks. But it was a lot of fun to build, and I think it turned out well except for the hole for the rudder. Some sort of filler will be needed to clean up the tear-out caused by the drill bit. I first drilled it undersized, and then went up a few sizes, and finally to the final size. It still tore out. In hindsight, I would drill it half-sized, and then use a needle file to open it up. Looks like filler block construction and fitting are on the schedule for tomorrow. I doubt more progress than that can be made in one day, since it is a new thing for me. Plus, I am careful, since I don't like remaking parts. But the counter was the hardest part of the five to construct, I think. Enough of my babble though. Here are some picks. (apologies for using my dryer for my backdrop):


- 117 replies
-
- 10
-
-
- constitution
- model shipways
- (and 1 more)
-
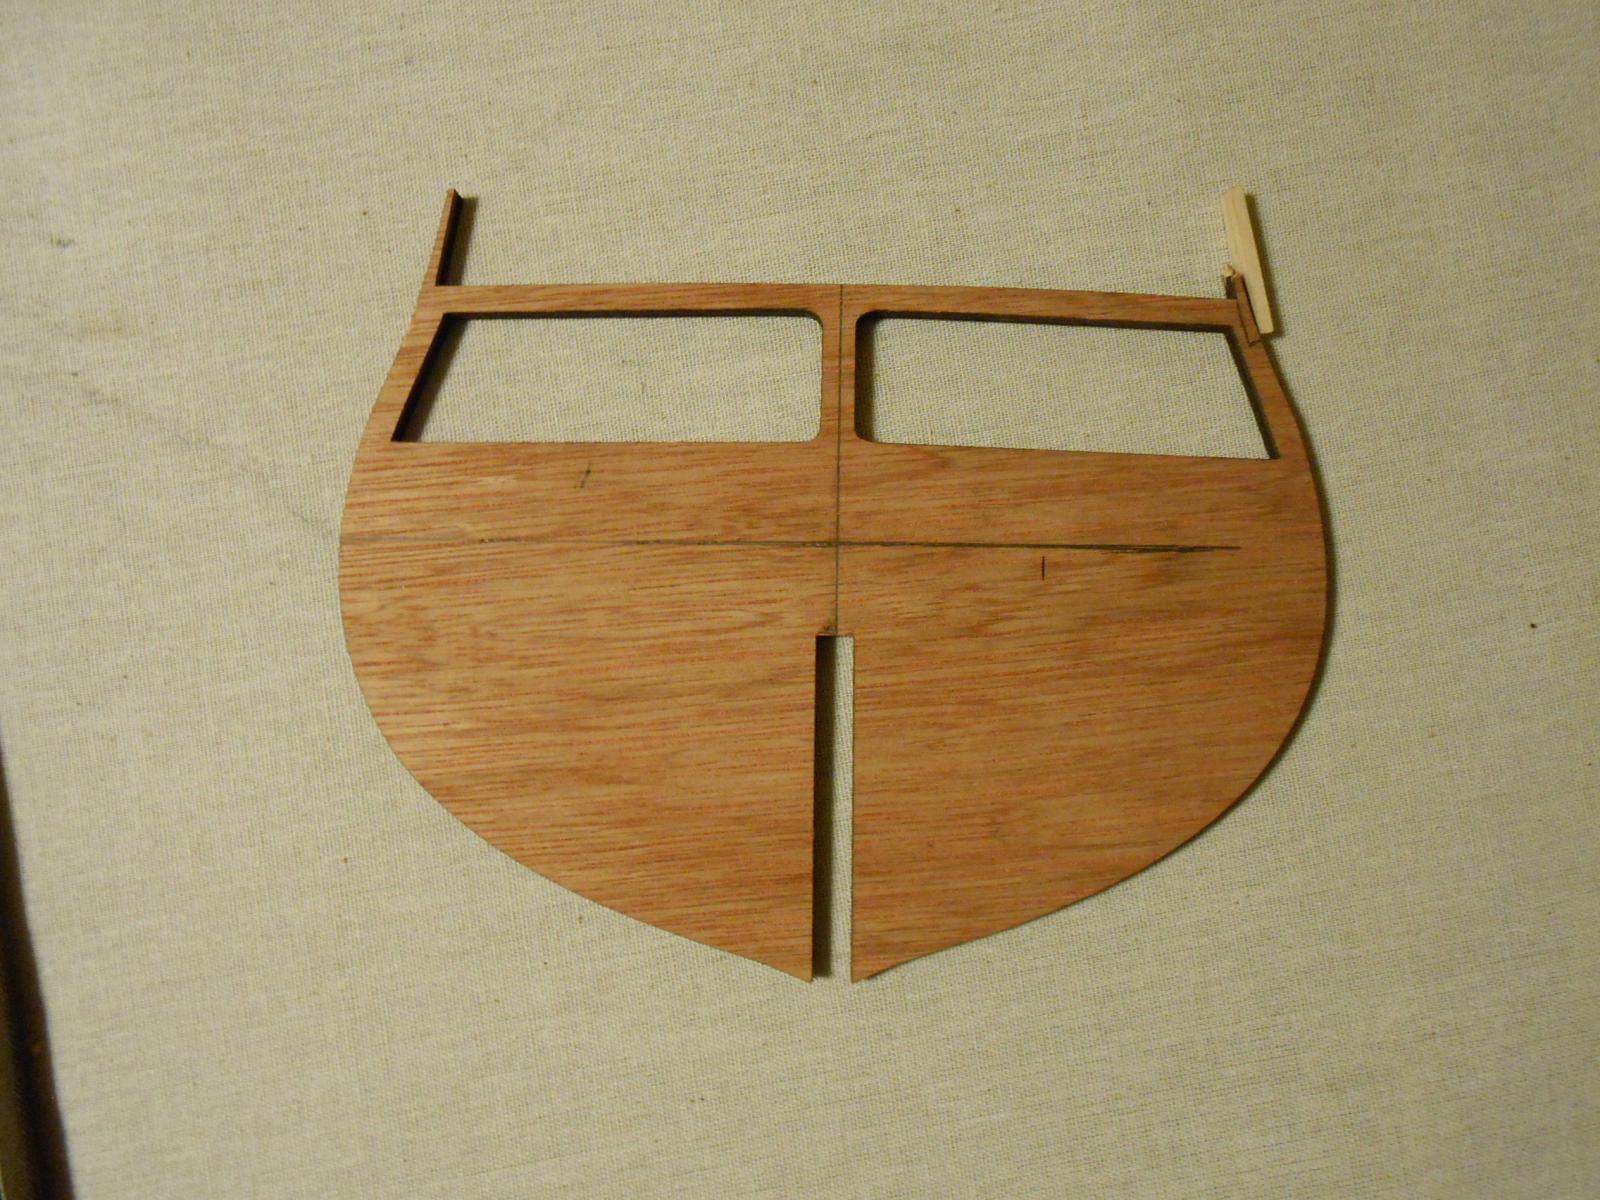
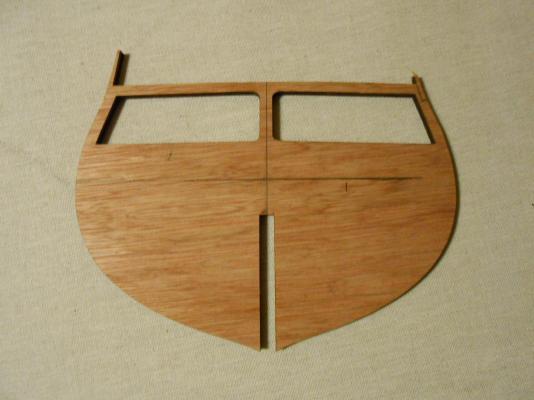
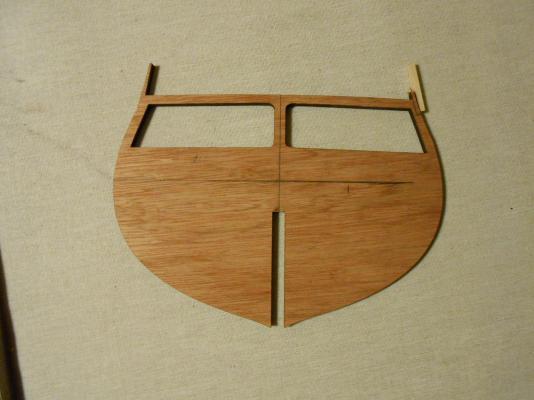
Thank you, David, Elijah and E.J. E.J. ~ I totally agree. If it is worth modeling, then I will try and get it as close to the prototype as is practical. Coming from the model R.R. culture, I am very used to not modeling many details, since there is simply no room to do so. Model railroaders often just model representations of certain structures to come close to the 'feel' of that structure. Lots of things in RRing are done this way. But when building a model ship, this is not the case. With this model, I am trying for as much exactitude as I can achieve. Today I began permanent installation of the bulkheads, and ran into an issue I knew I would have when I was originally cutting the bulkheads out. Bulkhead 'I' was cut from a piece of plywood that had a knot in the extensions above the spar deck. So bulkhead installation got as far as 'H' before I had to correct this problem. I could correct this after the bulkhead was installed, but it is much easier to do now, before installation. The first picture shows the problem, and the second shows the piece to be rabbeted into the plywood, and later shaped. I know I could have contacted Model Expo and asked for a replacement, but this is a rather silly solution for an easy problem to fix myself. Why cost them money, while at the same time delaying my build. Here is the damage, and the piece which will be the correction: Matt
- 117 replies
-
- 6
-
-
- constitution
- model shipways
- (and 1 more)