HOLIDAY DONATION DRIVE - SUPPORT MSW - DO YOUR PART TO KEEP THIS GREAT FORUM GOING! (Only 20 donations so far - C'mon guys!)
×


LMDAVE
-
Posts
172 -
Joined
-
Last visited
Content Type
Profiles
Forums
Gallery
Events
Everything posted by LMDAVE
-
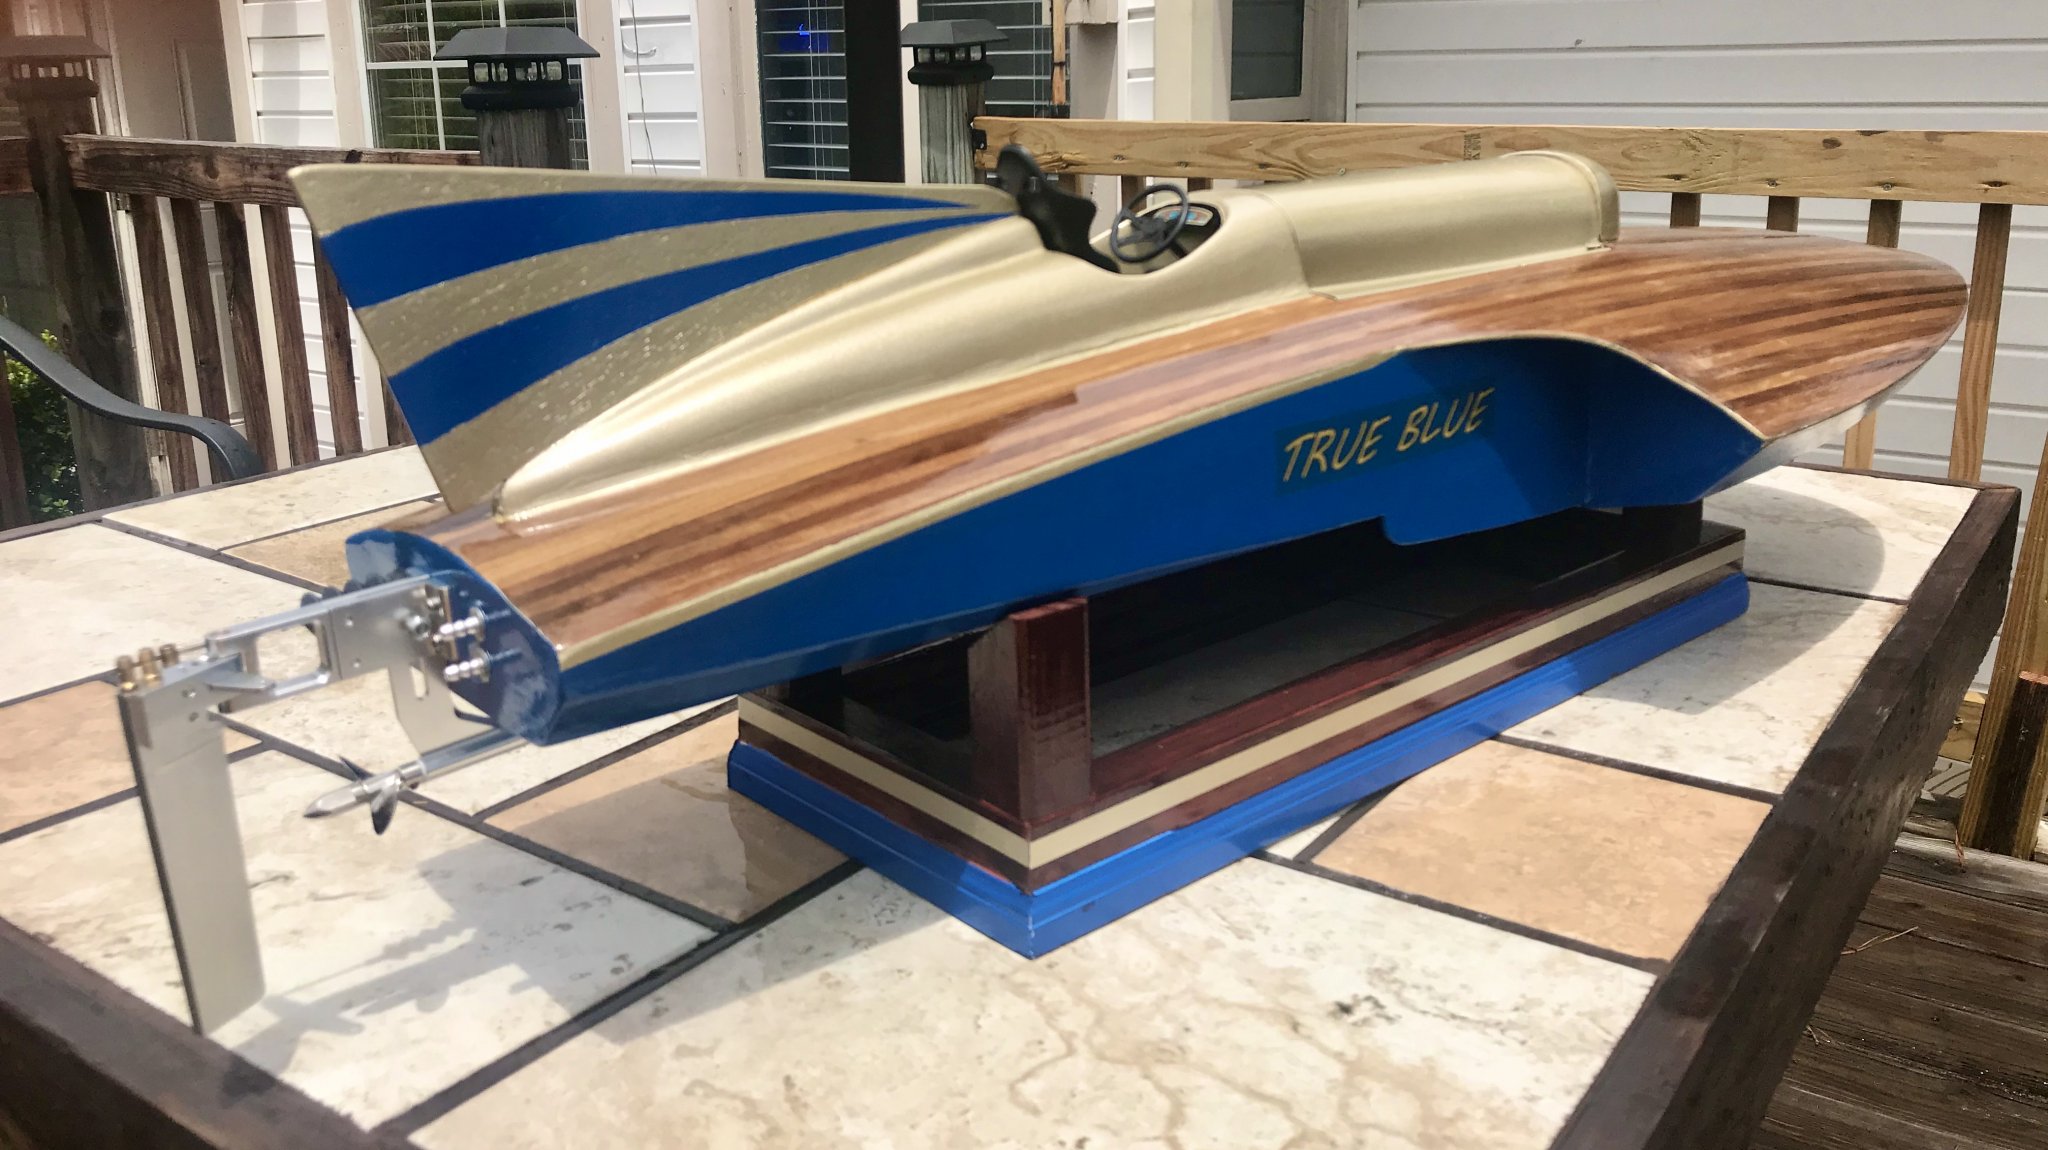
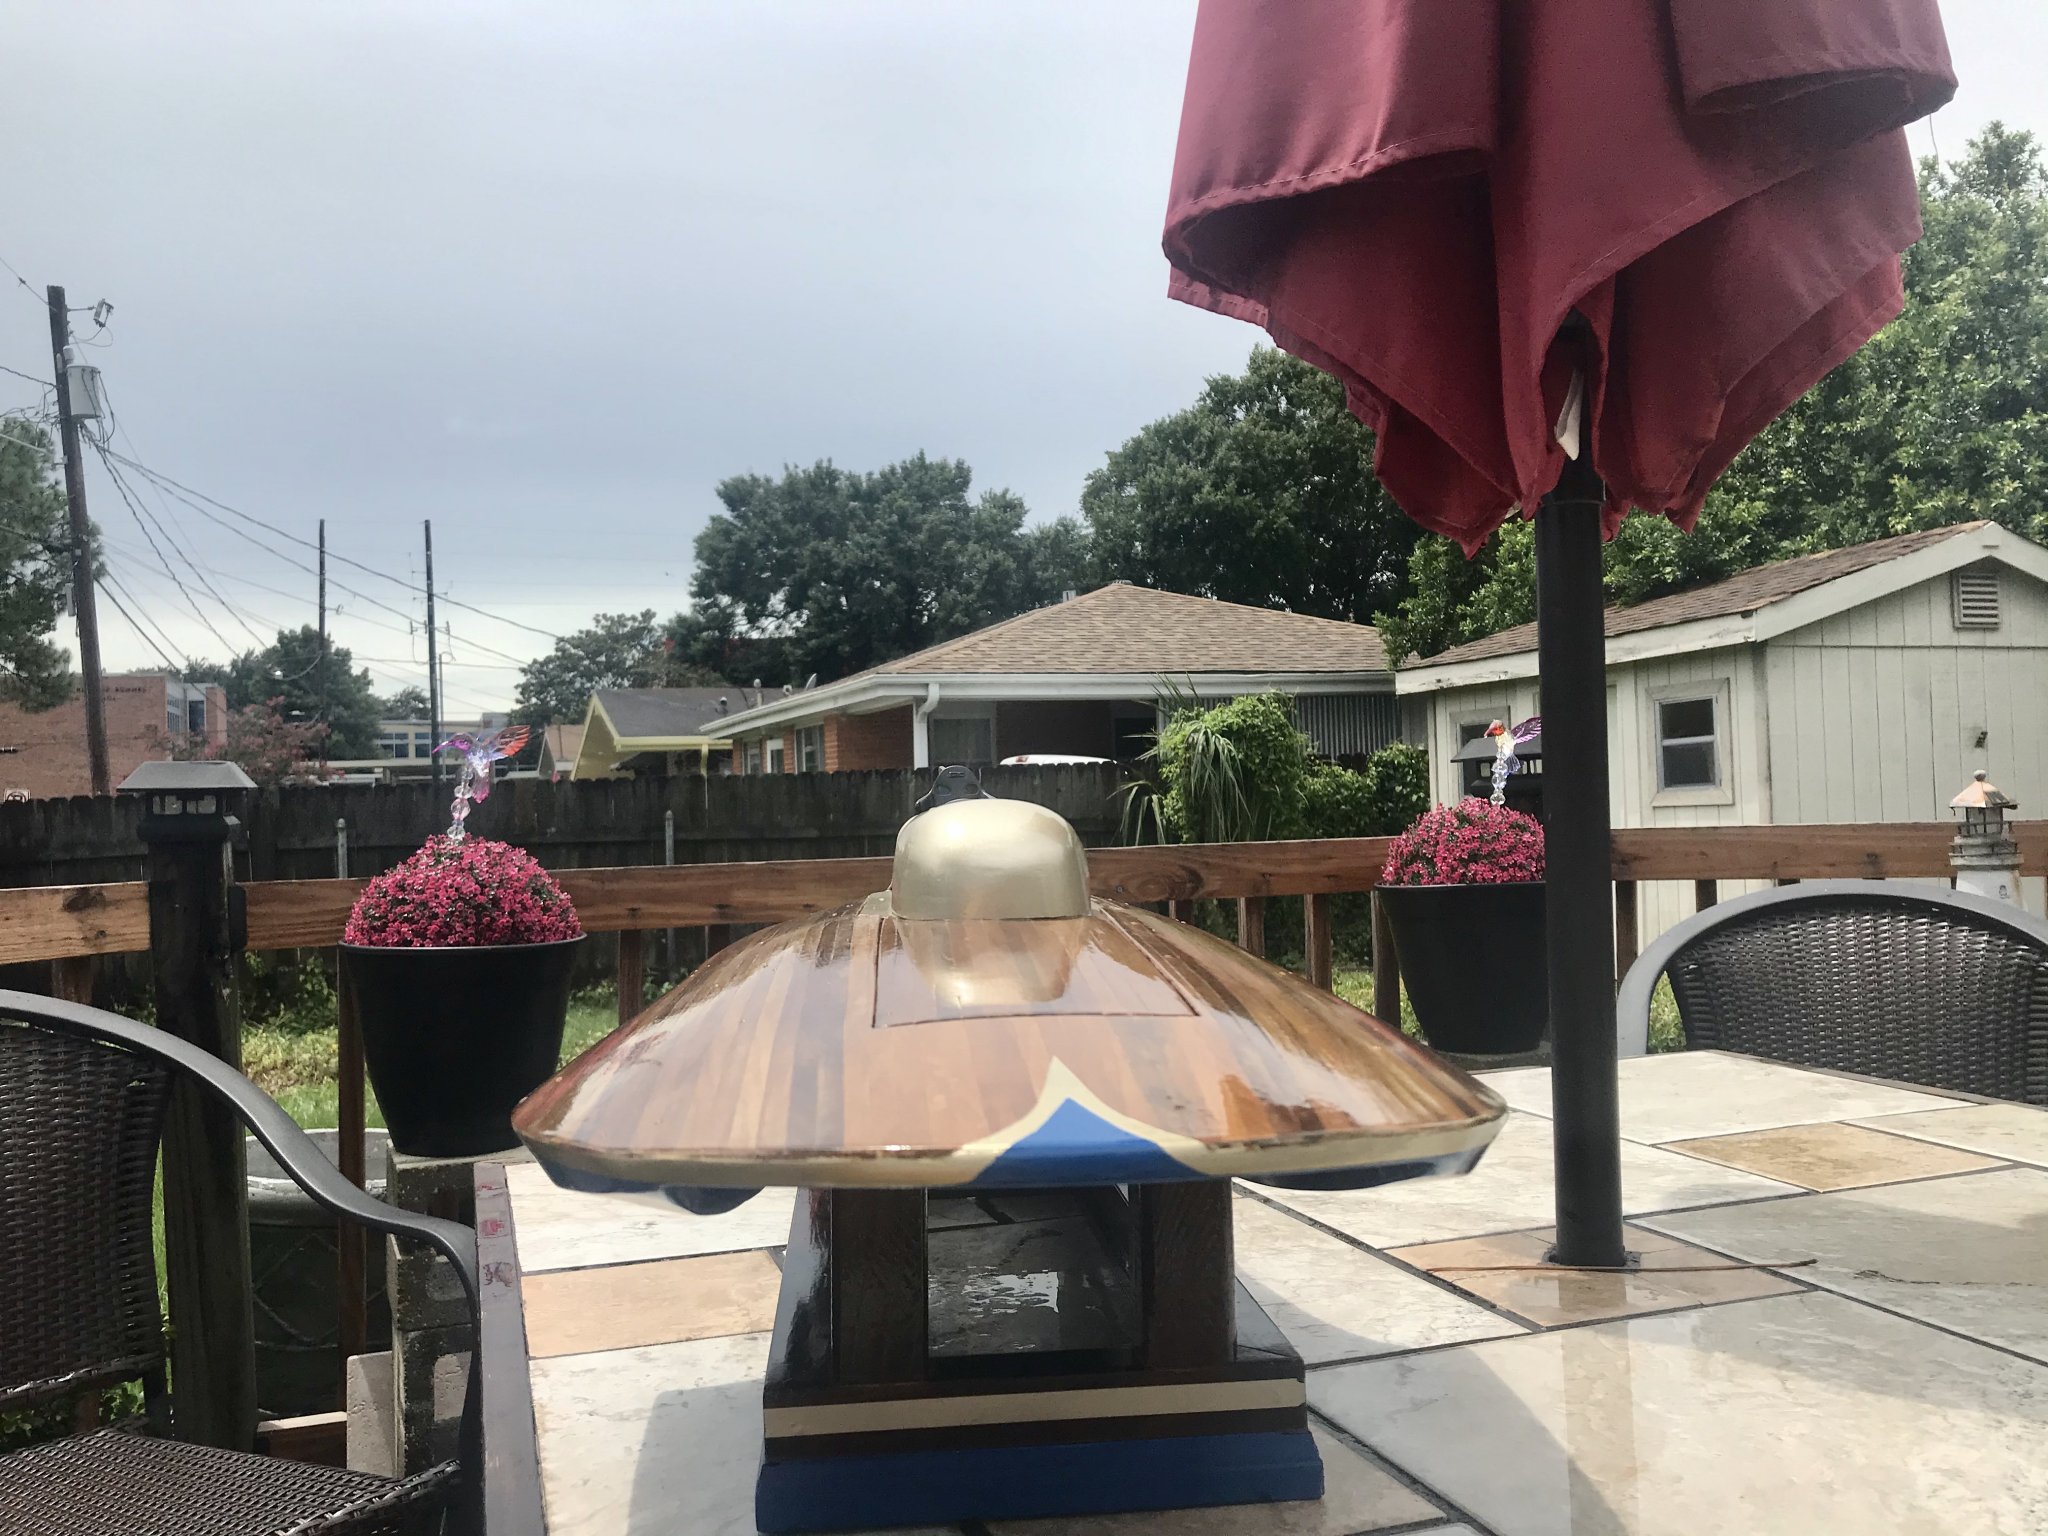
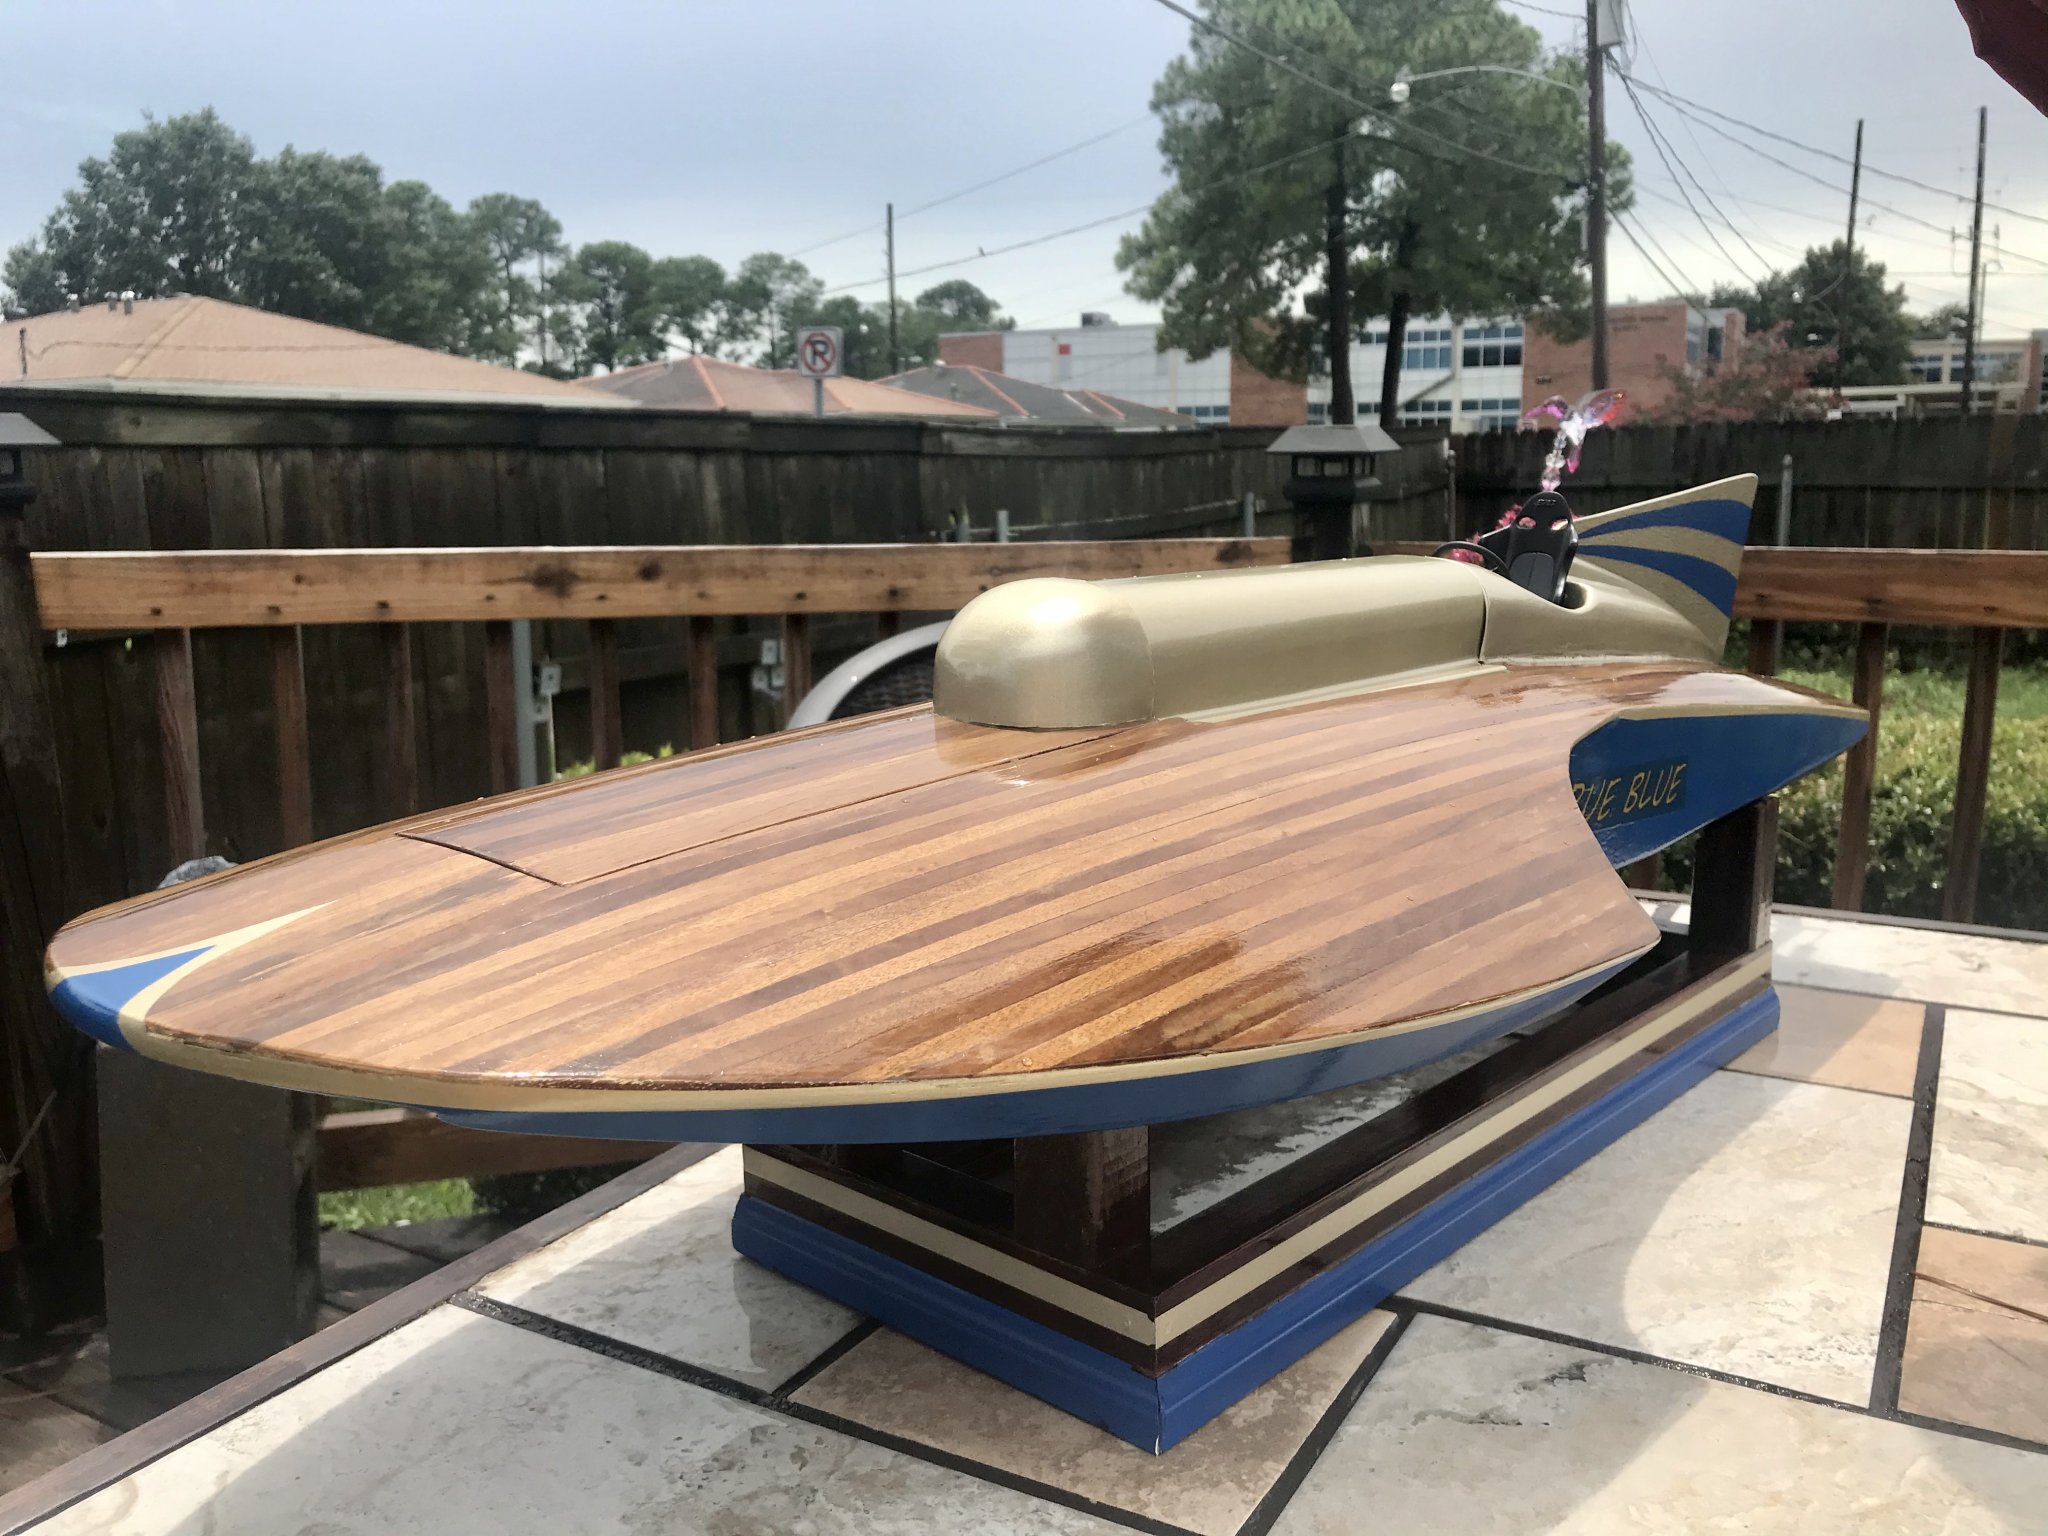
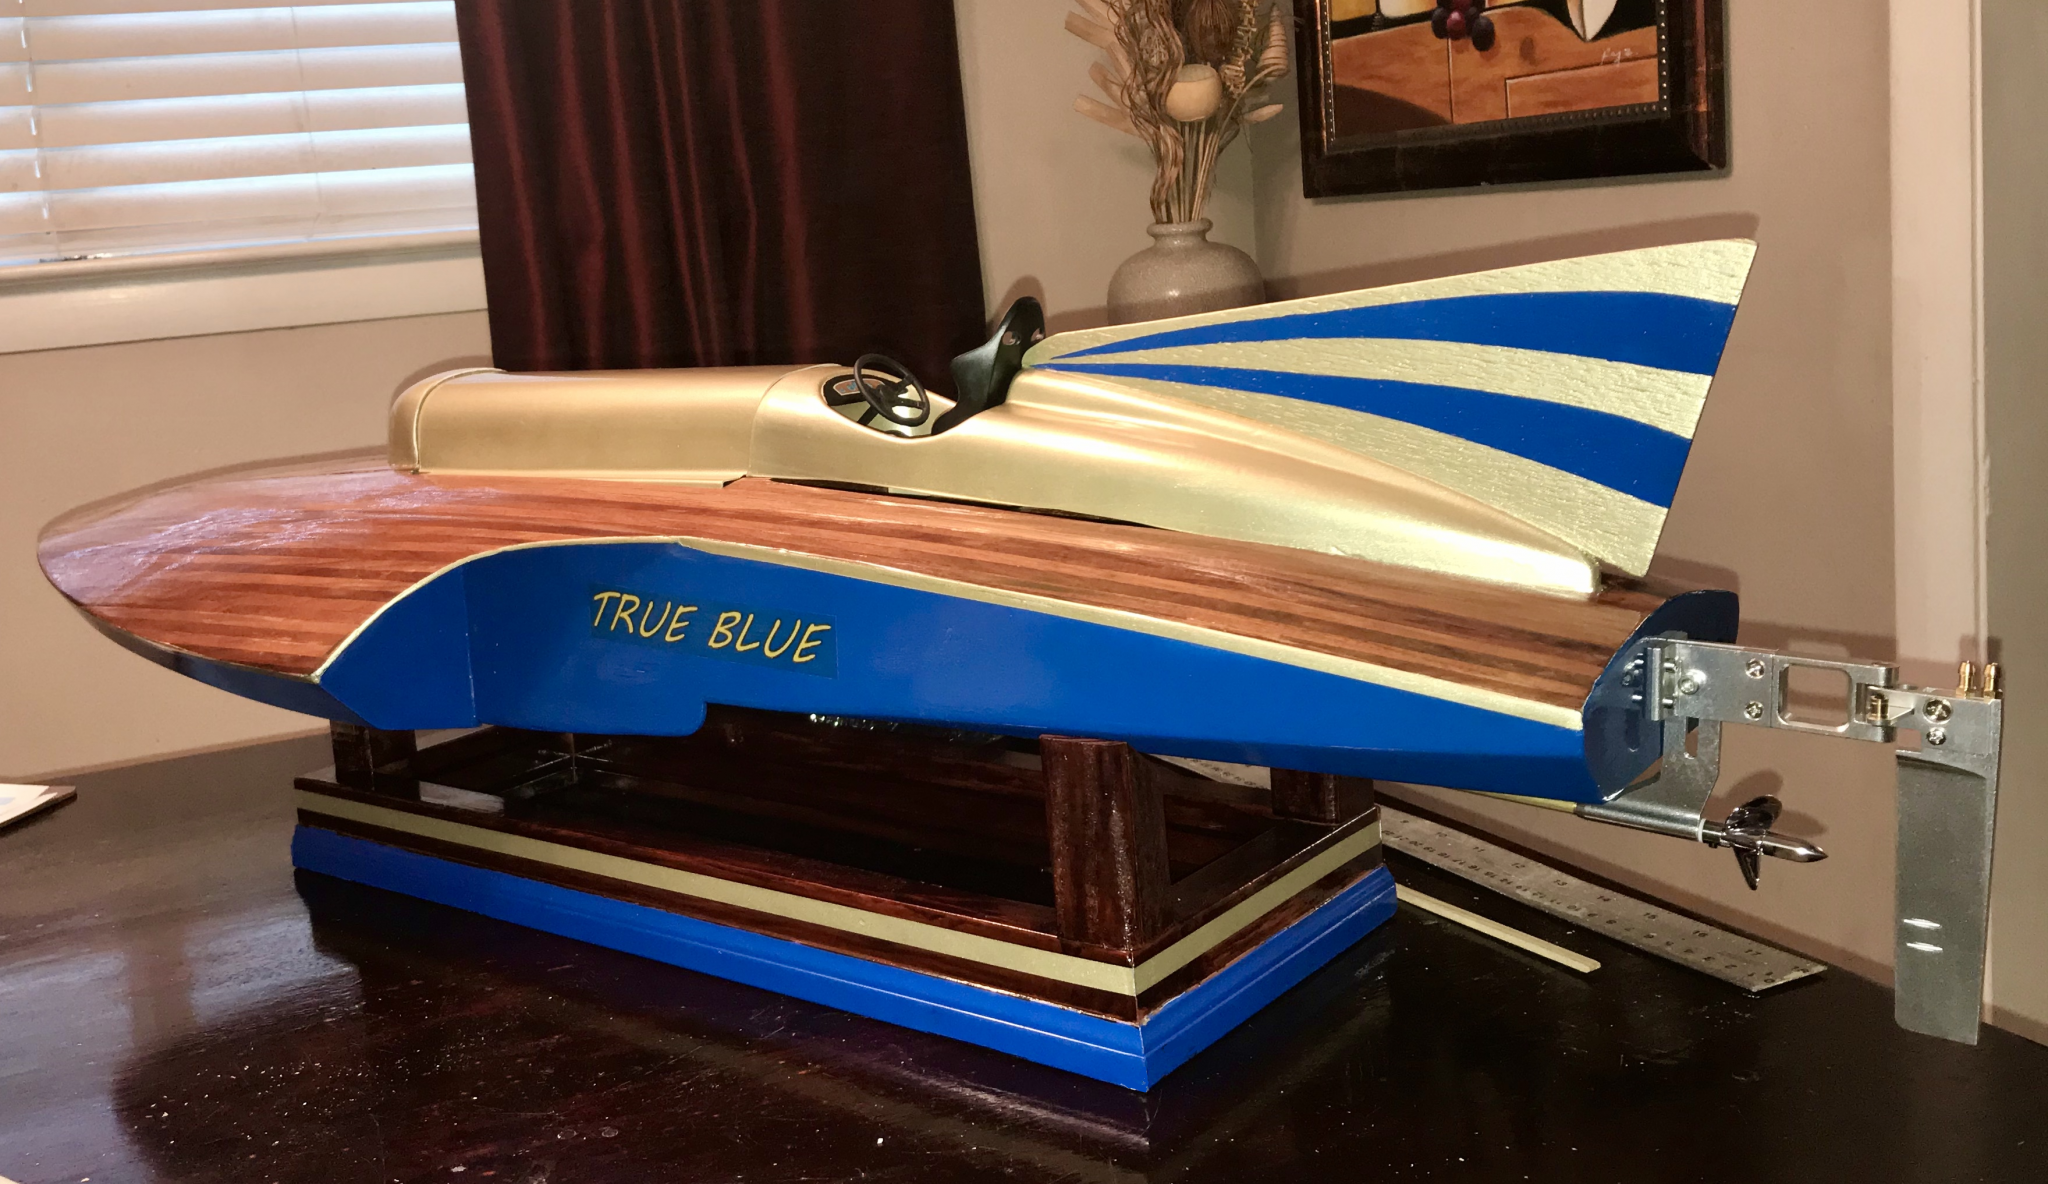
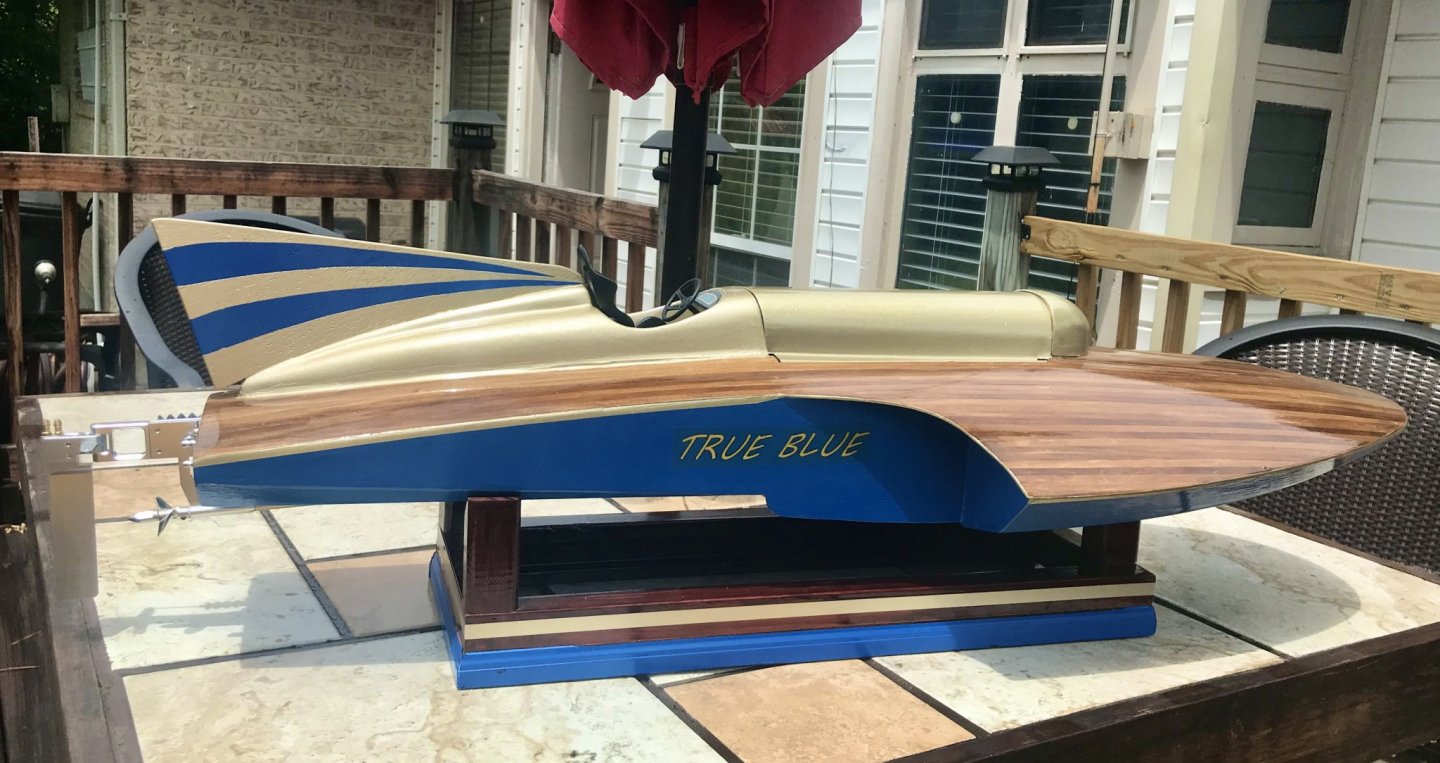
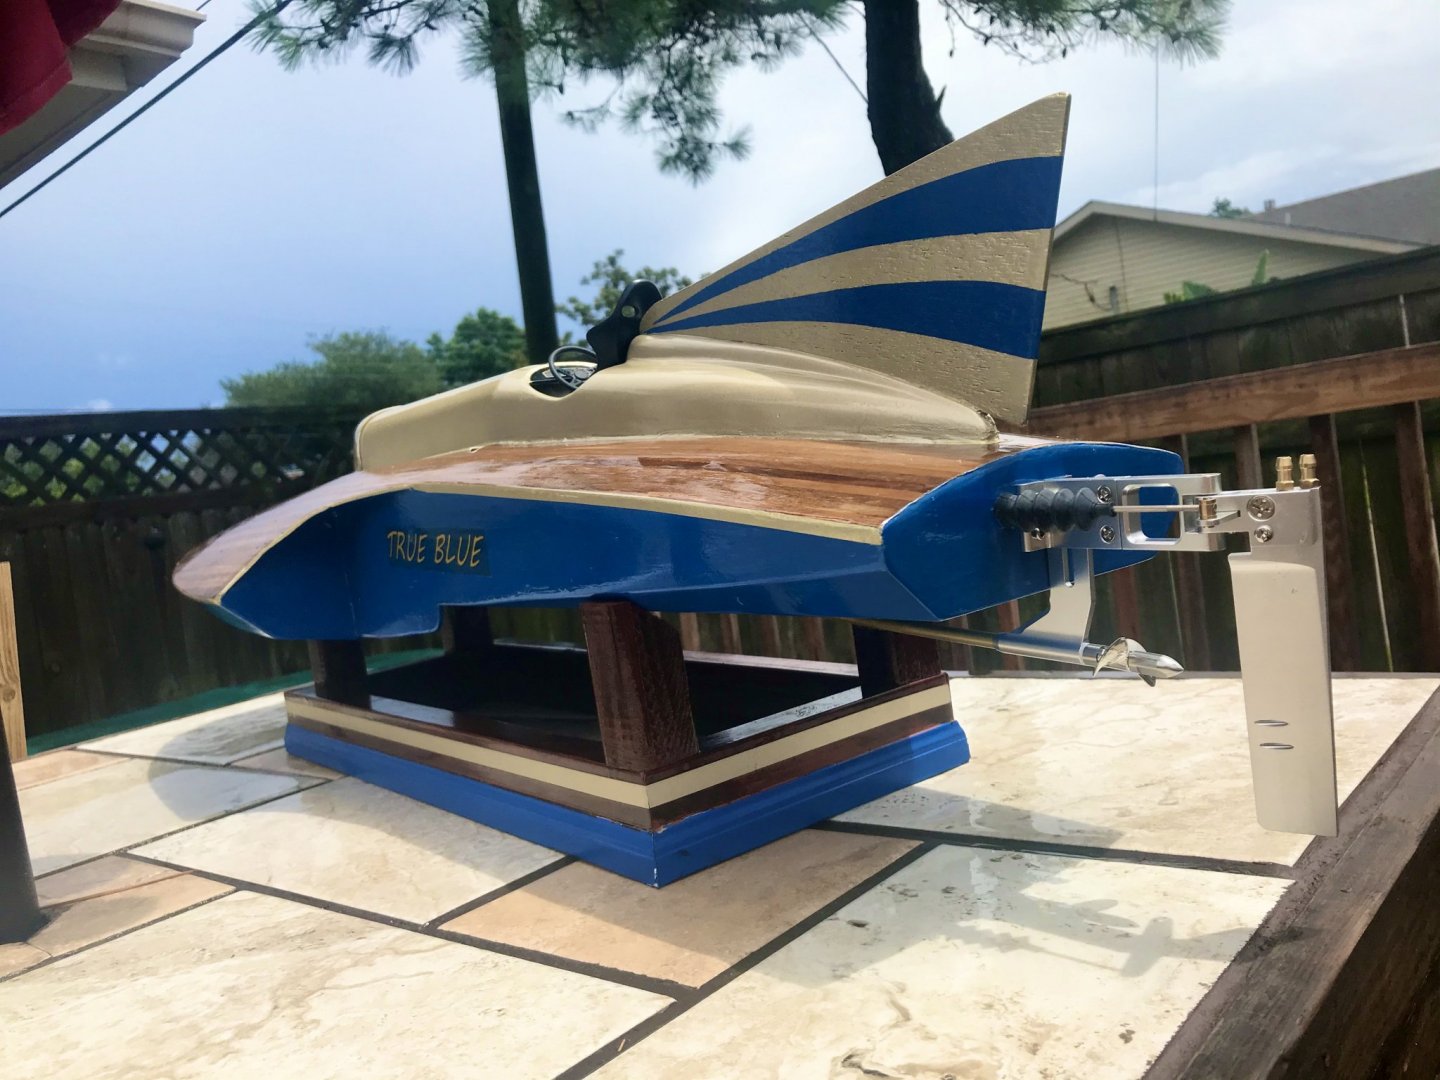
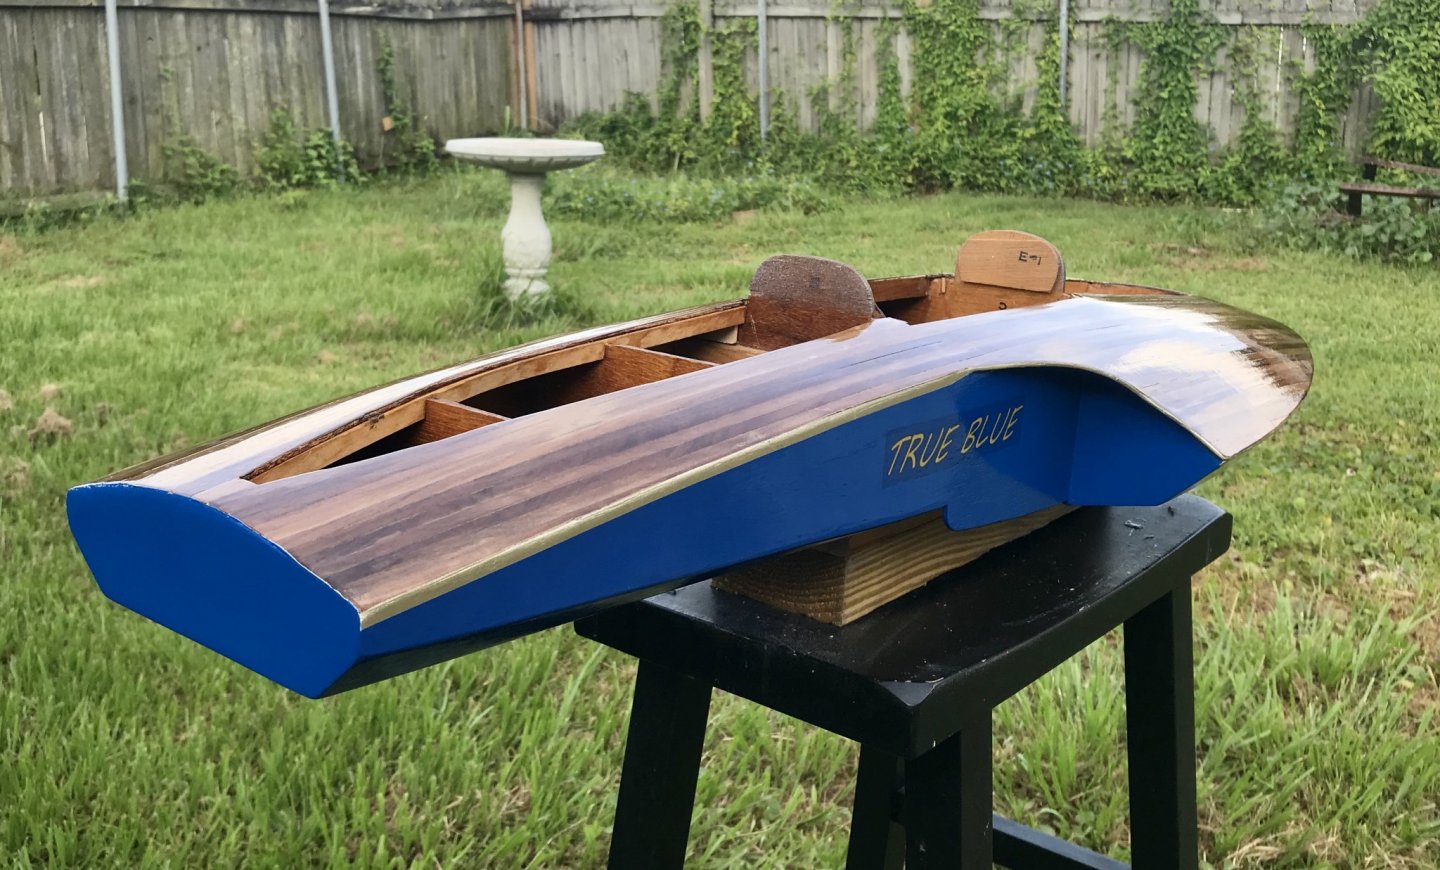
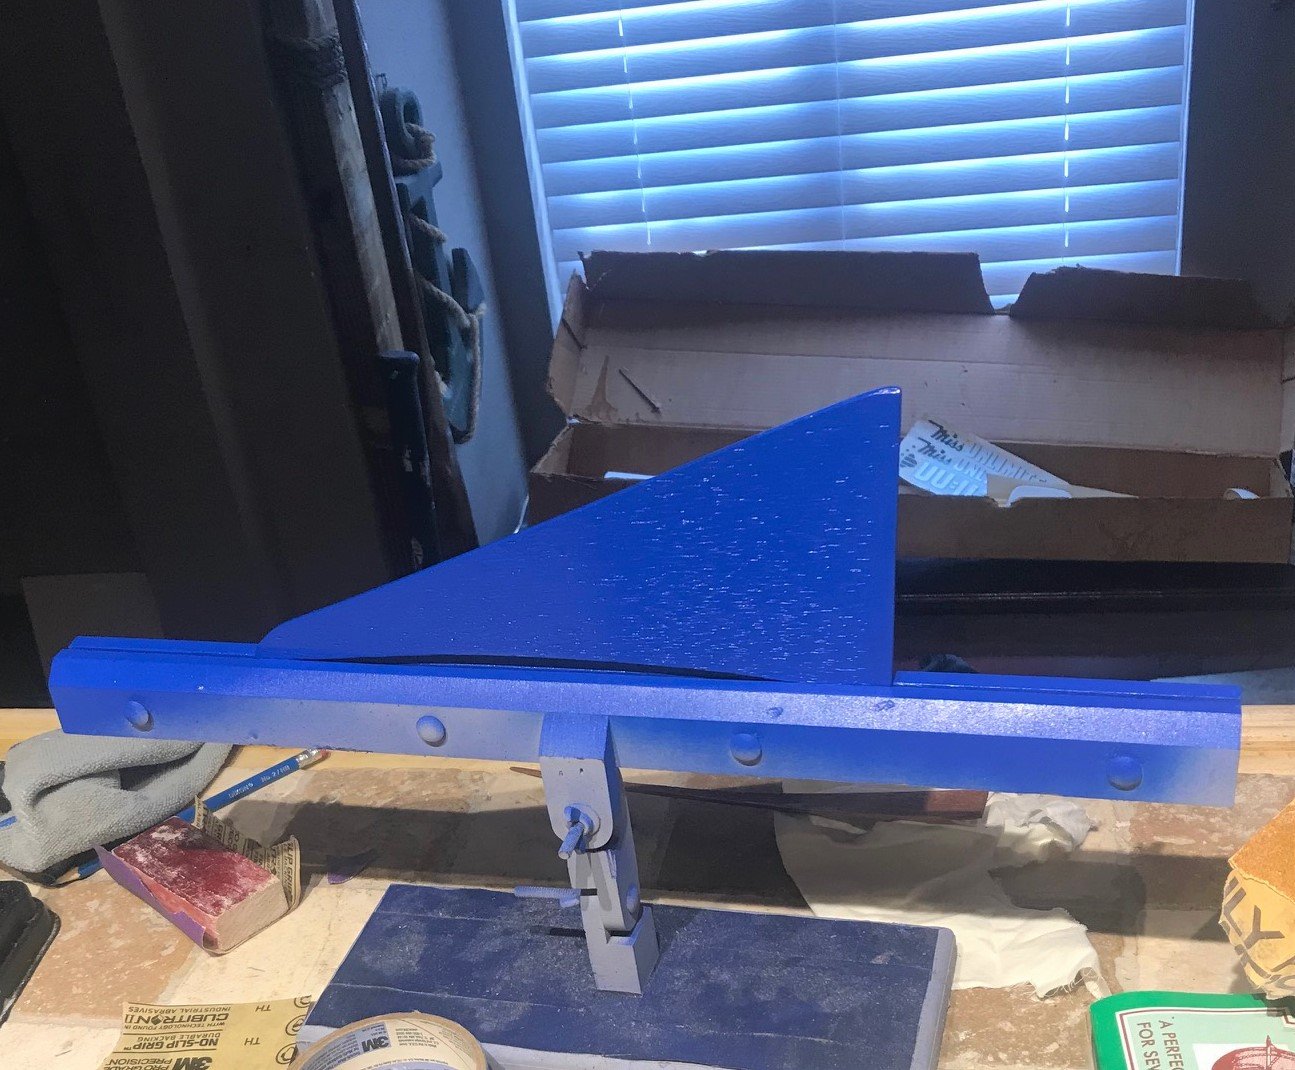
Finished the final hardware and sealed the back fin. This will be the final of the static model for display only ...for now. Thanks for following.

- 51 replies
-
- 13
-

-
- miss unlimited
- dumas
- (and 1 more)
-
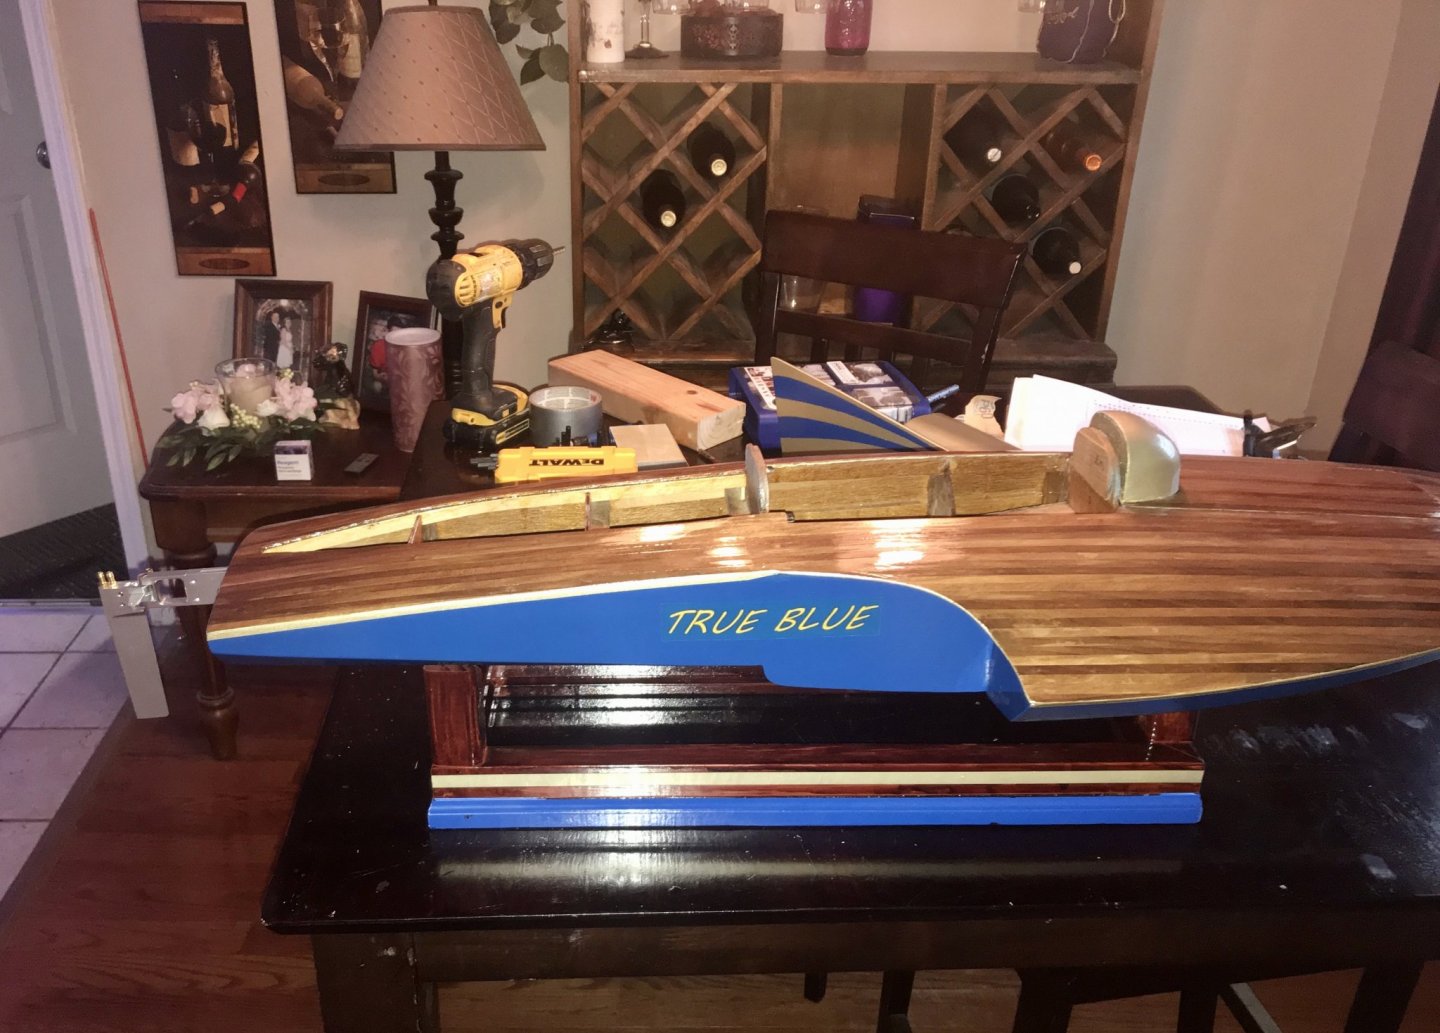
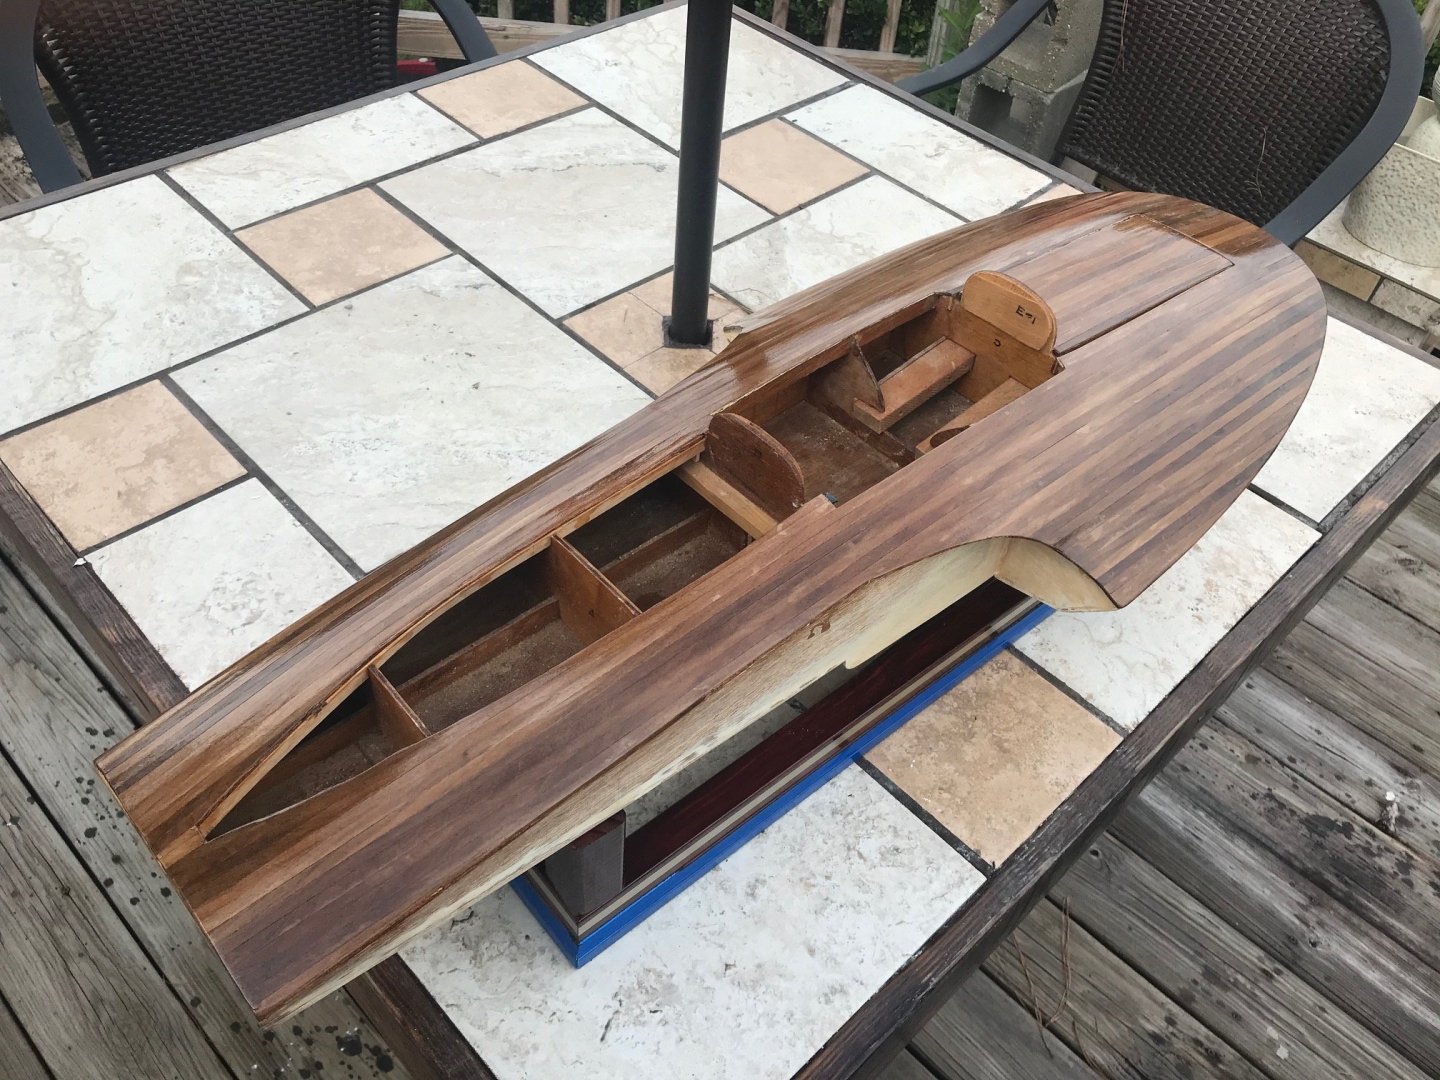
Thanks, those seats look cool, but almost $100 to get them and have them covered. So, not sure I'm going that route. Here's a sneak peak of the boat with upper sections temp installed. My main hold up is the fact that I am trying to tool this thing for possible future RC control, because the back cowl section will be permanently mounted, and running stuff from middle to transom would require breaking it apart. It wasn't really set up for removal. So I'm going to be installing bulkheads on the transom and linkage to control the rudder, and I just found out those water tubes coming out the back of rc boats to the rudder do. It's a cooling water system for the motor. So, I guess I'll be installing two bulkheads for that and pre running some tubing through the back section to the middle. I'm probably going about this all wrong, the learning RC as I go, the intent was for this to be a nice static model, but more and more the idea of it running one day still intrigues me. So, that's why I'm pre running all of this tooling once it comes in then, I can permanently install the back cowl and caulk and paint it.

- 51 replies
-
- 6
-
-
- miss unlimited
- dumas
- (and 1 more)
-
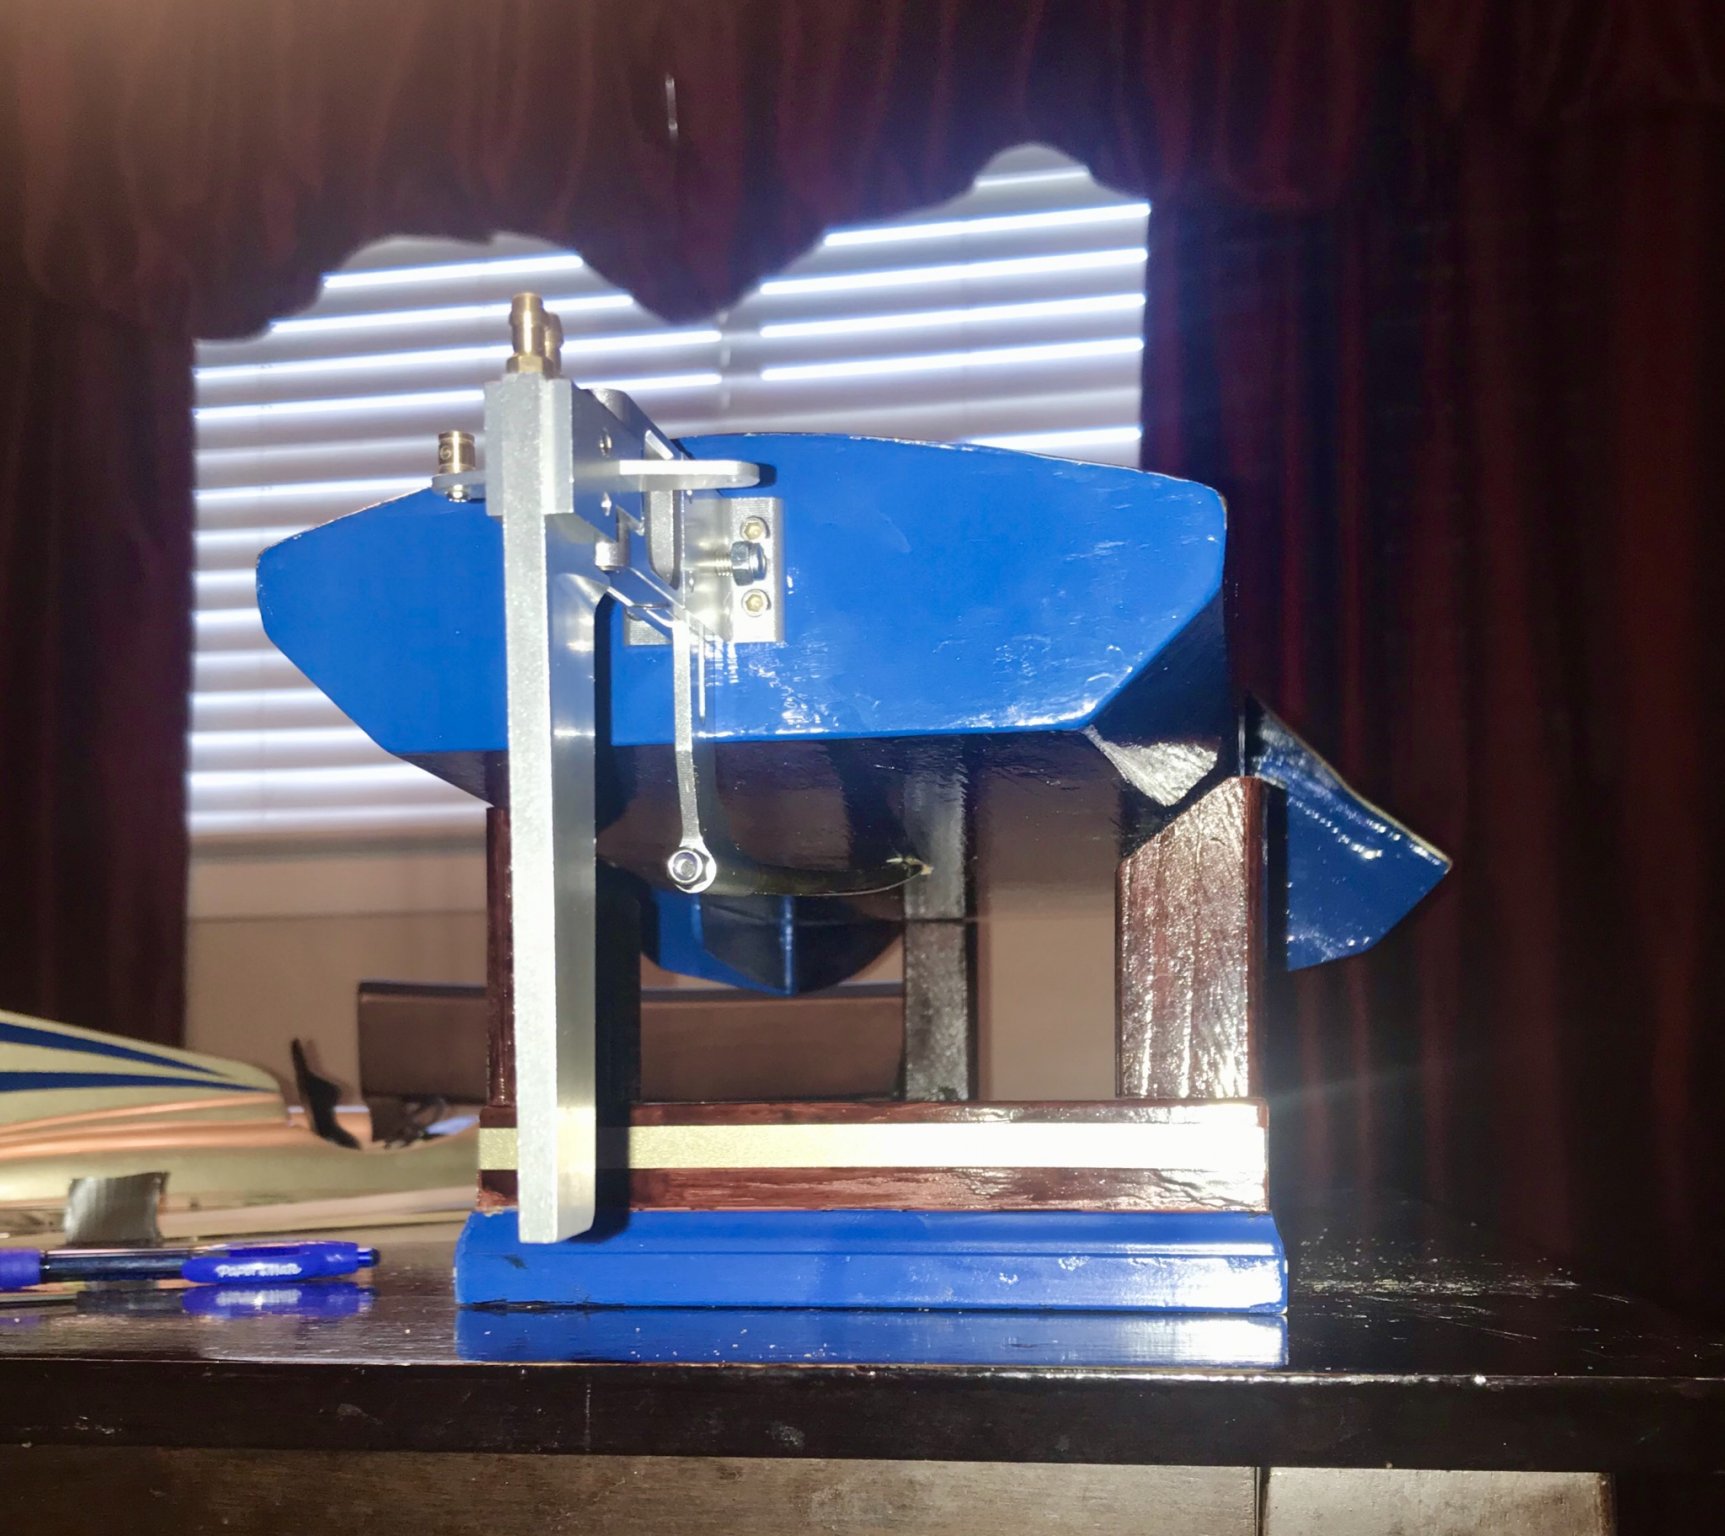
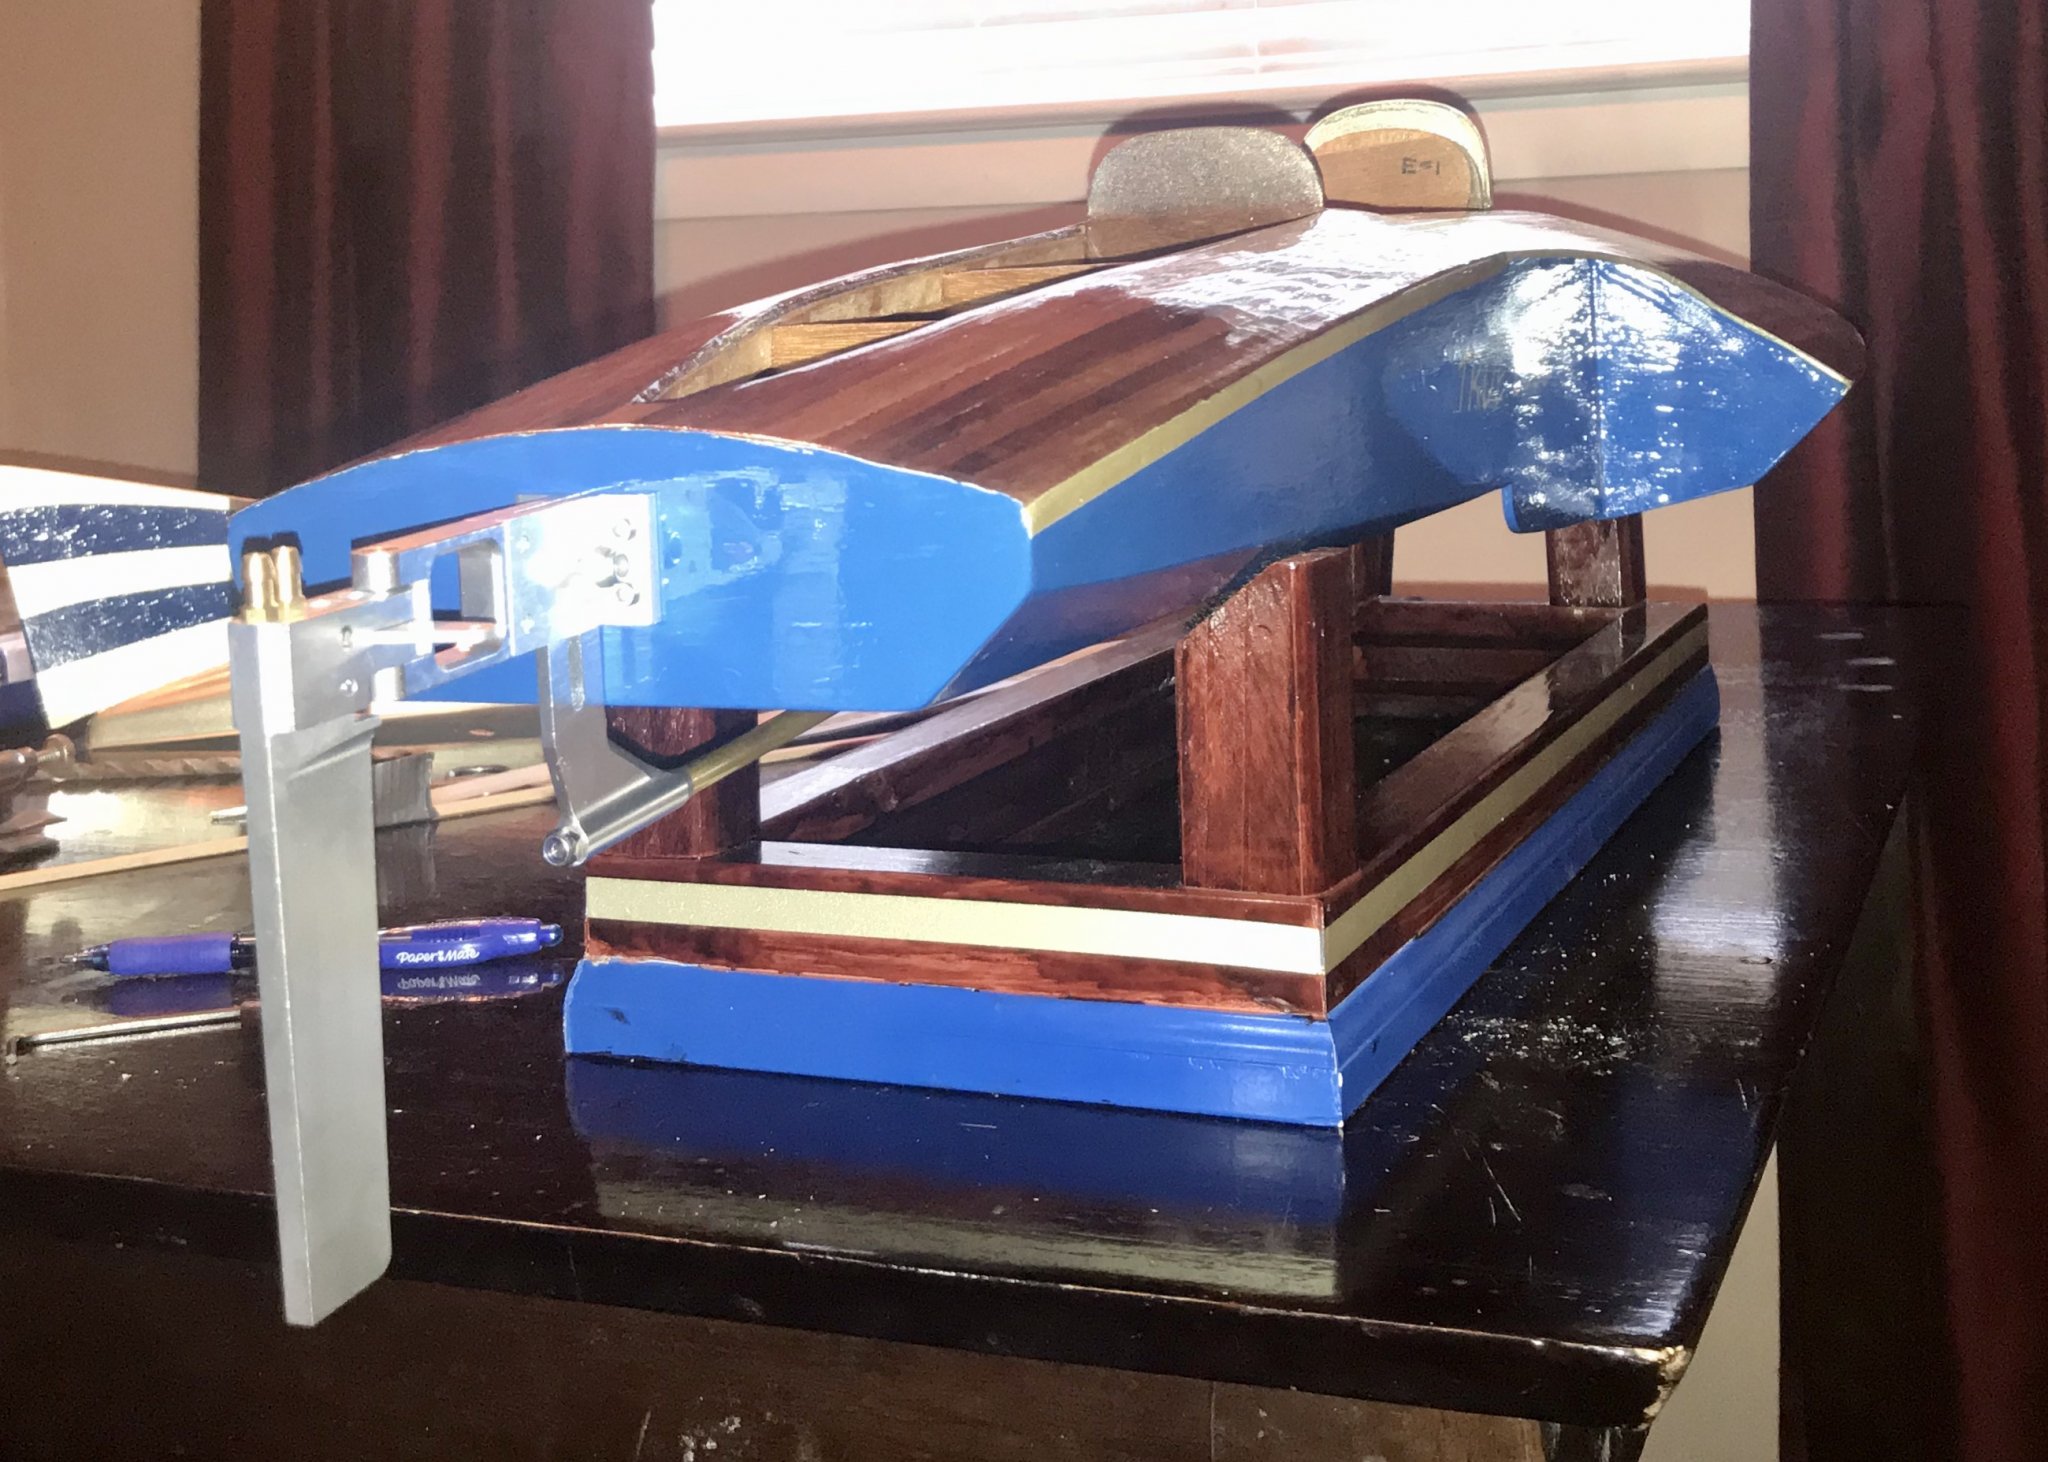
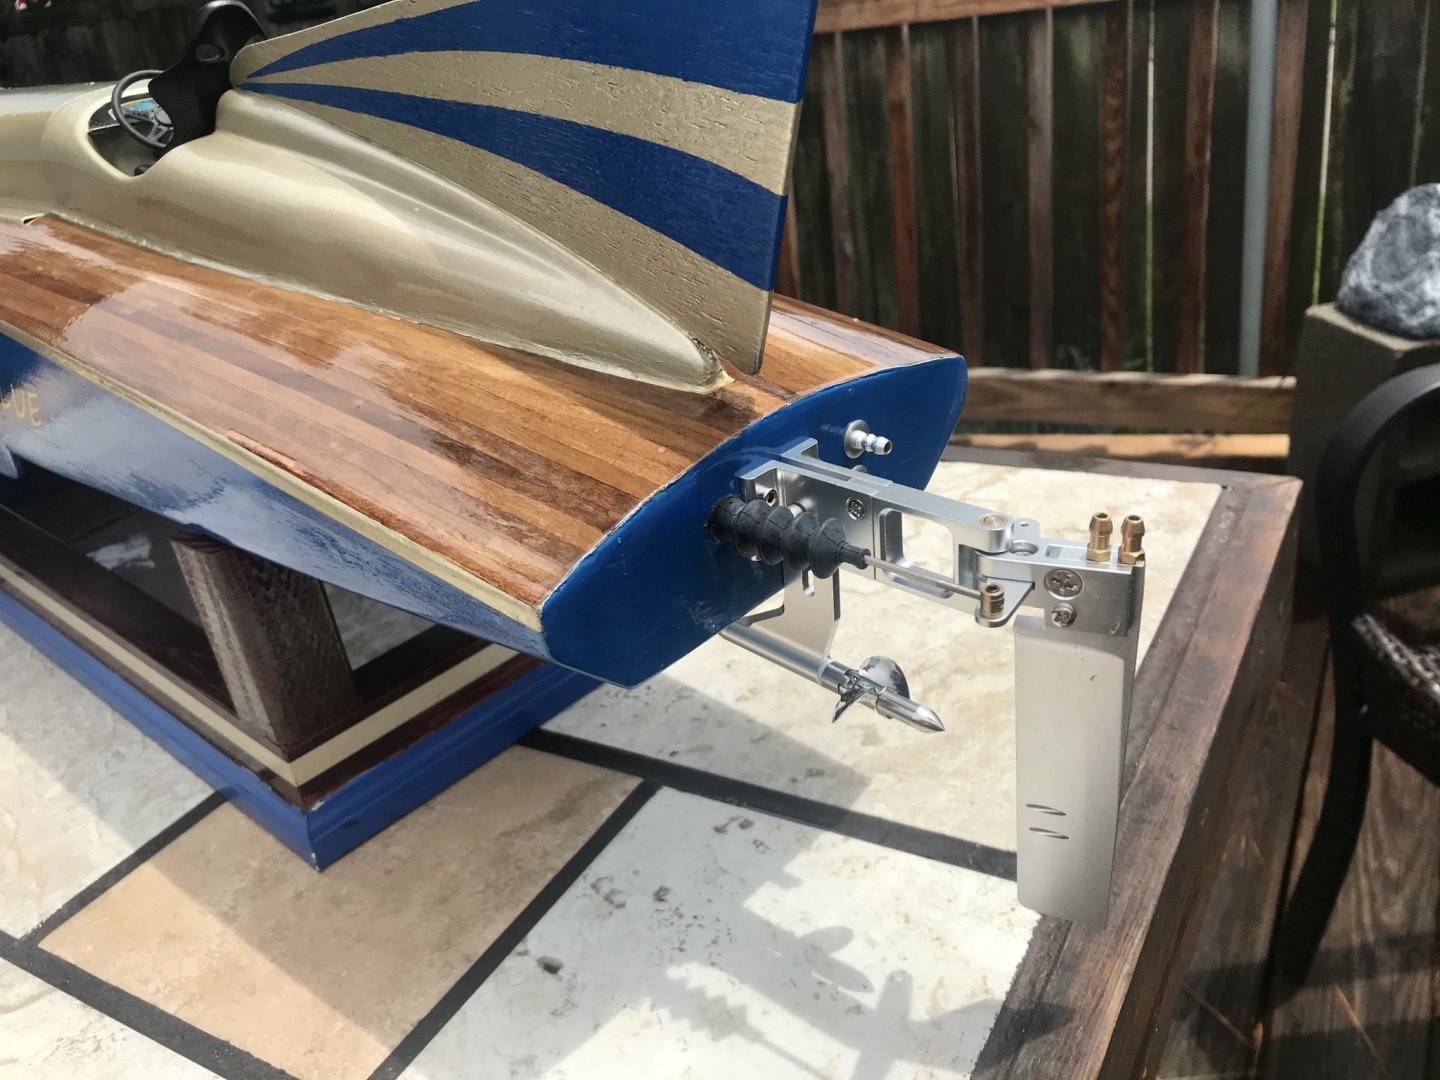
Installed the rudder/propeller bracket on. It was pain holding a socket on those lock nuts from the inside.


- 51 replies
-
- 7
-
-
- miss unlimited
- dumas
- (and 1 more)
-
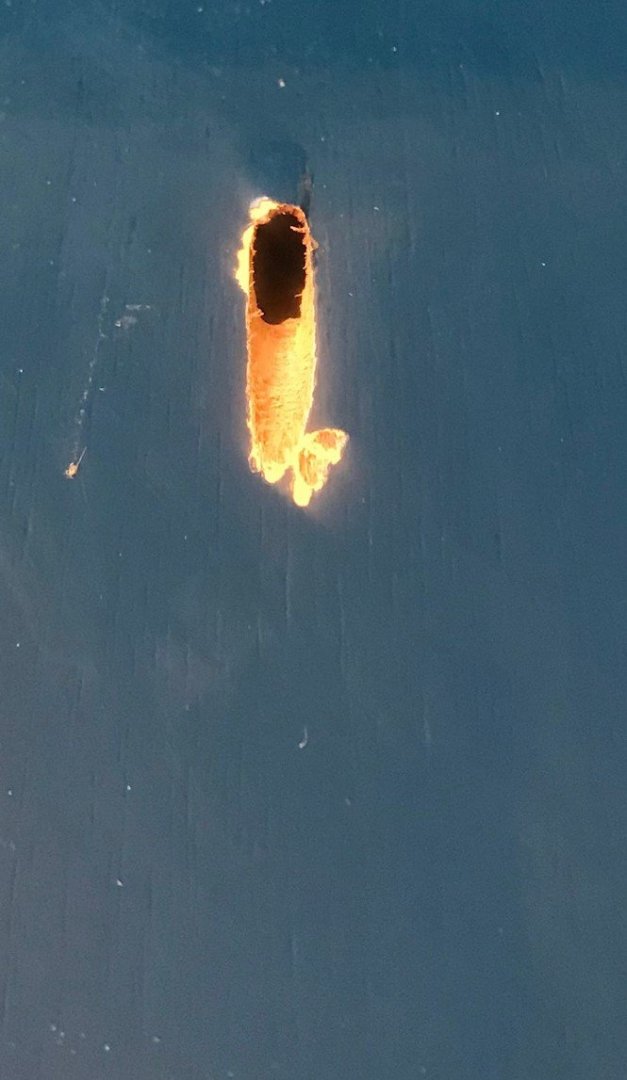
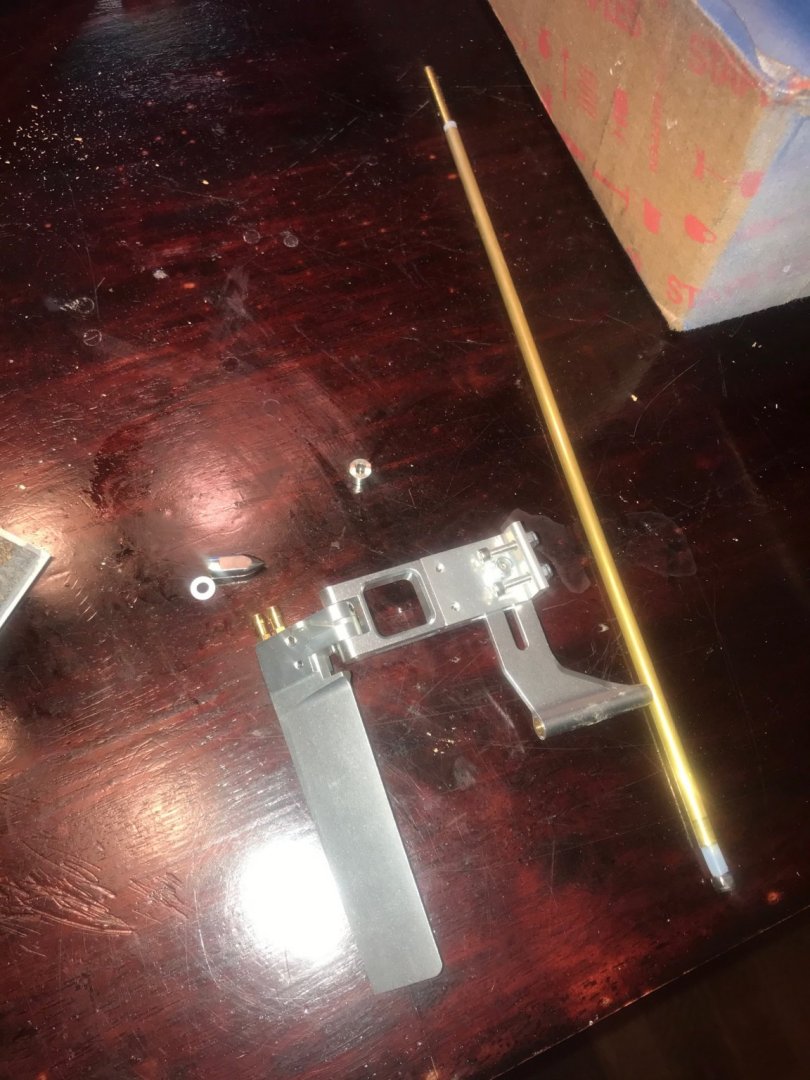
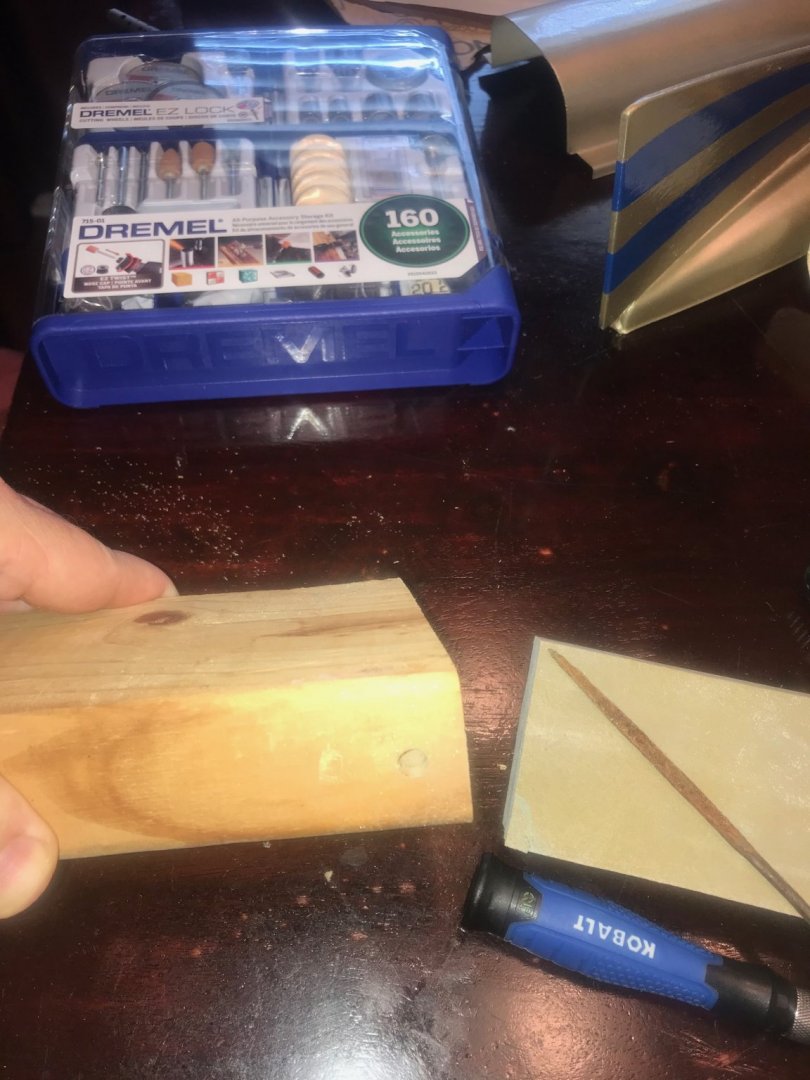
So, I've been waiting on the aluminum rudder and propeller bracket to come in before moving on any further. It finally came in. Even though I'm still up in the air about making this official RC, I will be installing the closest to correct hardware for visual appearance and for any future decision. The "stuffing tube" that came with the propeller bracket I will be installing at the best angle to meet up with a potential future motor. Drilling a hole at the correct angle on this existing boat was kind of a challenge. I already had this 12" 1/4" drill bit. Once I determine my angle needed to be about 8-9 degrees. I drill a hole in a 2 x 4, then cut the 2x4 on my miter saw set to 8.5 degrees, and this made a "jig" for me to use. It work out pretty well. Yes, I know a scarred up some of the blue bottom , but touching this up after sealing the stuffing tube should be an easy touch up.


- 51 replies
-
- 5
-
-
- miss unlimited
- dumas
- (and 1 more)
-
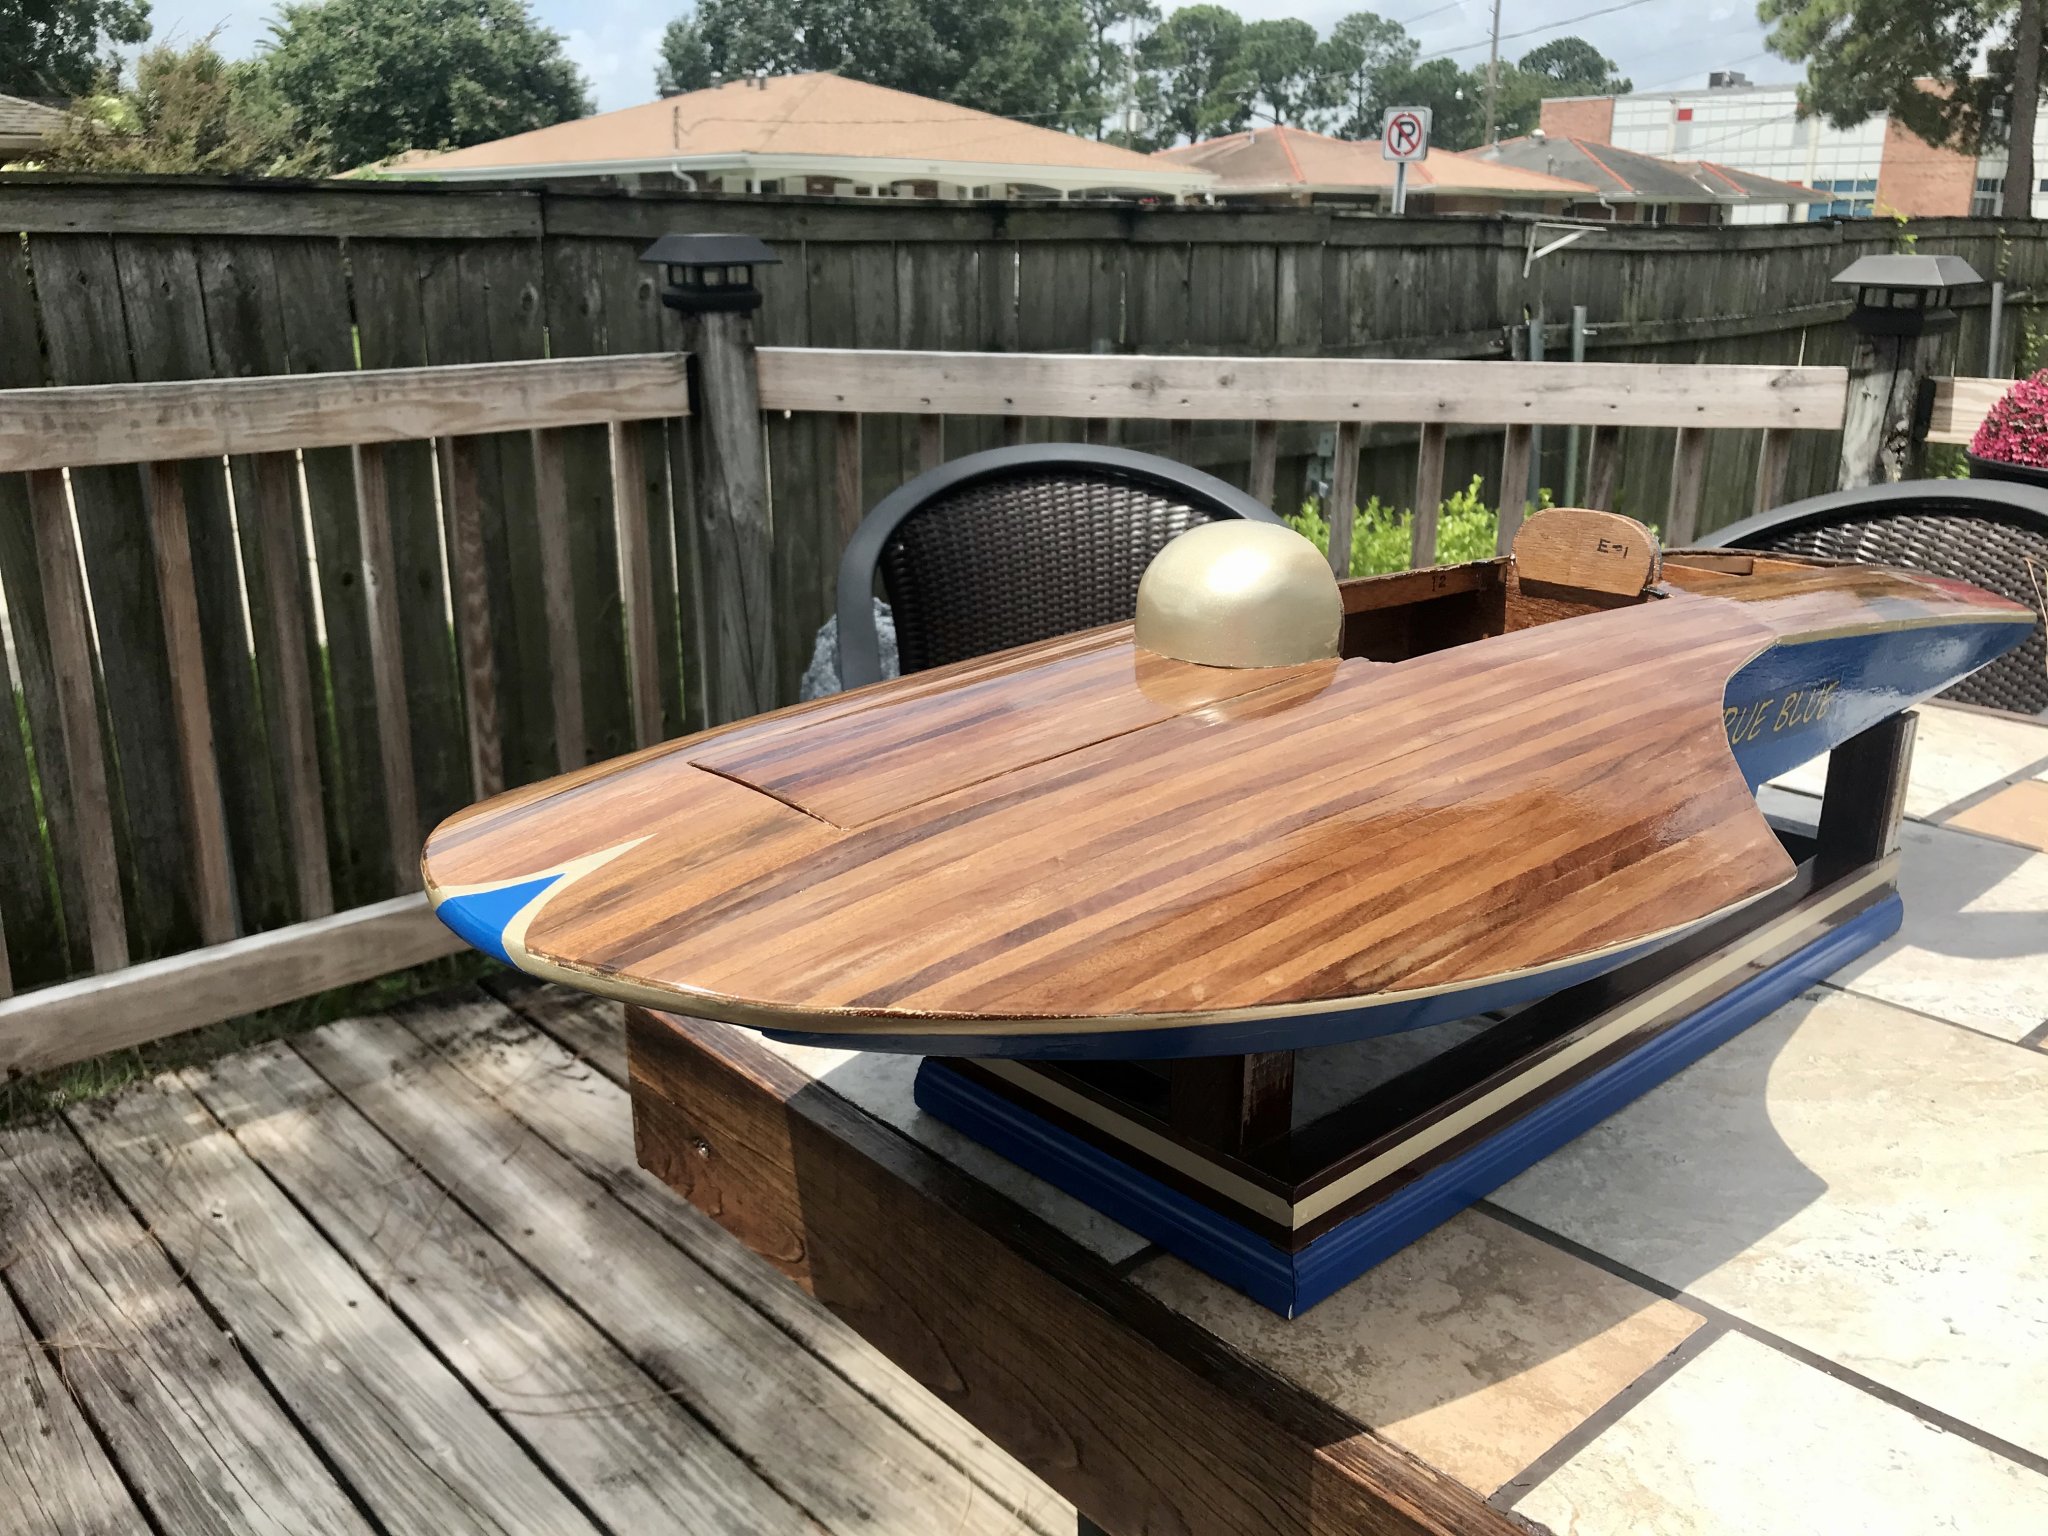
OK, may need a little advice here. Working on the cockpit of the hydroplane. I made a dashboard, and ordered a scale steering wheel, also got the only scale racing seat I could find, but does the high back look off on this? If anyone can find a low profile seat for a 1:8 scale that may look better, I may go that way

- 51 replies
-
- 5
-
-
- miss unlimited
- dumas
- (and 1 more)
-
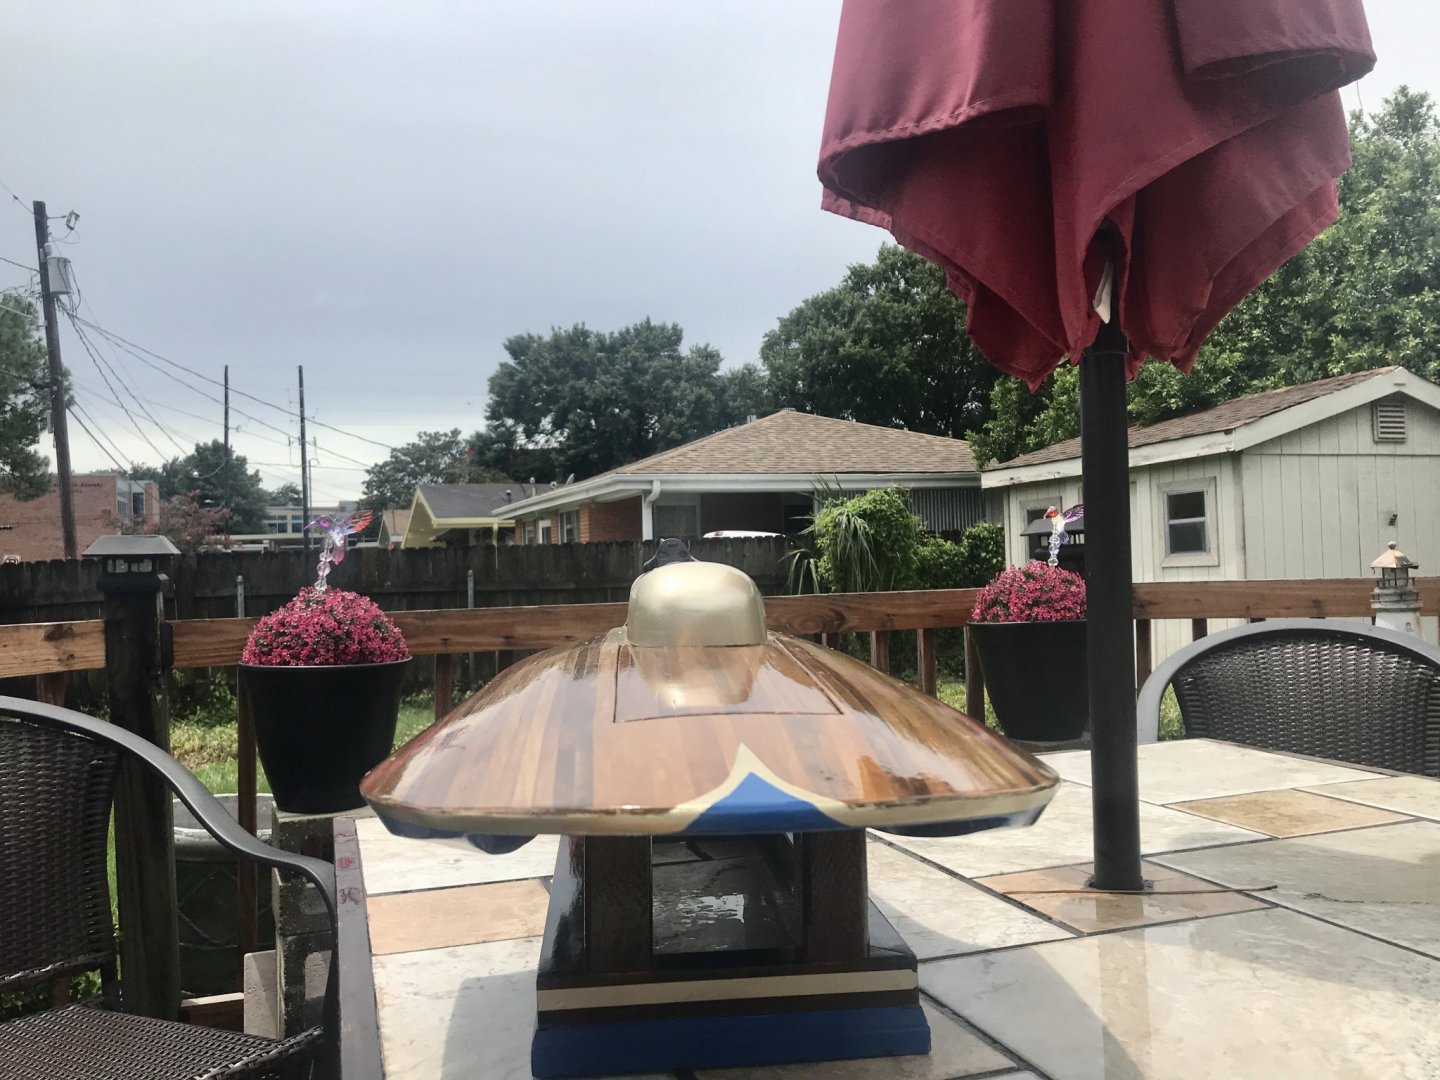
I saw a few models displayed like that, but I also like the way it sits on my stand. Both are cool.
- 51 replies
-
- 2
-
-
- miss unlimited
- dumas
- (and 1 more)
-
Thanks, yeah I have these polishing pads, 10 pads that go in series from 1500 to 12000 grit.
- 51 replies
-
- 2
-
-
- miss unlimited
- dumas
- (and 1 more)
-
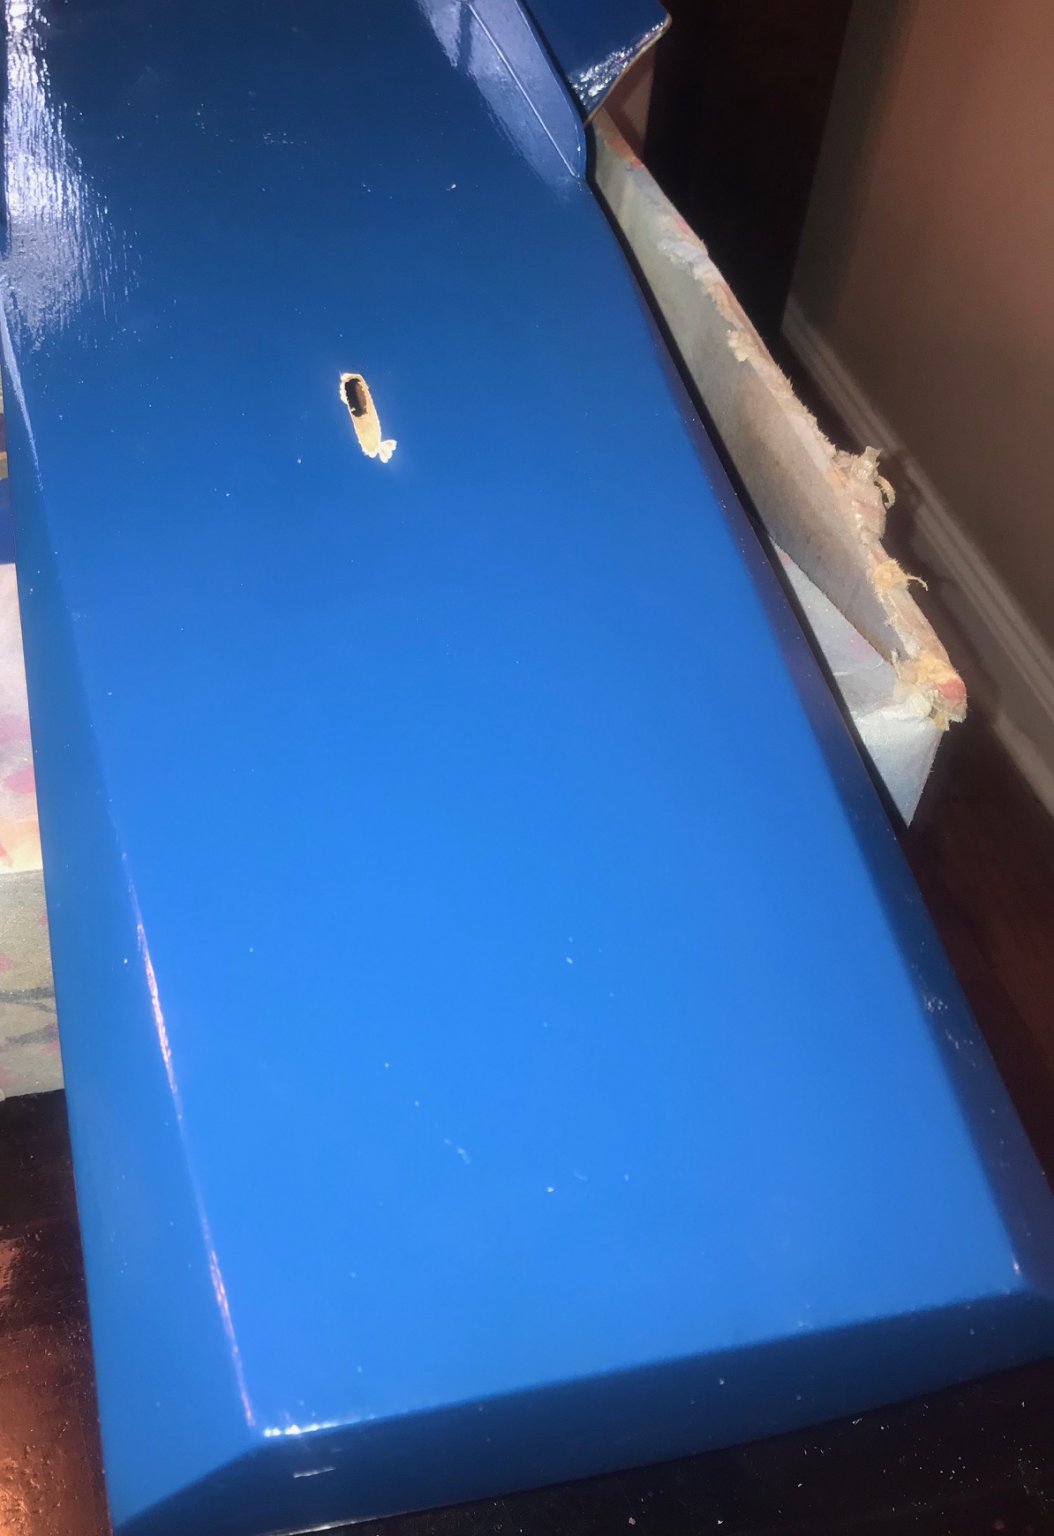
Well this is the painted hull, with several coats of clear on it. I still need to polish it down several times and when I put the cowl on I'll have to blend the clear into it. But this gives a basic shot of paint. The decal was an issue because I could print clear backing decals because it's transparent, so had to pick a blue background of closest match. So, you see the square.


- 51 replies
-
- 5
-
-
- miss unlimited
- dumas
- (and 1 more)
-
Well, I'm not saying it's going to come out as nice as an auto body shop. I've painted a few guitars over the years, and to me, a nice finish is based on the body prep and the clear coat, and not so much the color coat. But that being said, not all areas of the hull was smooth as glass before painting, but hopefully the final product will be to my liking.
- 51 replies
-
- 2
-
-
- miss unlimited
- dumas
- (and 1 more)
-
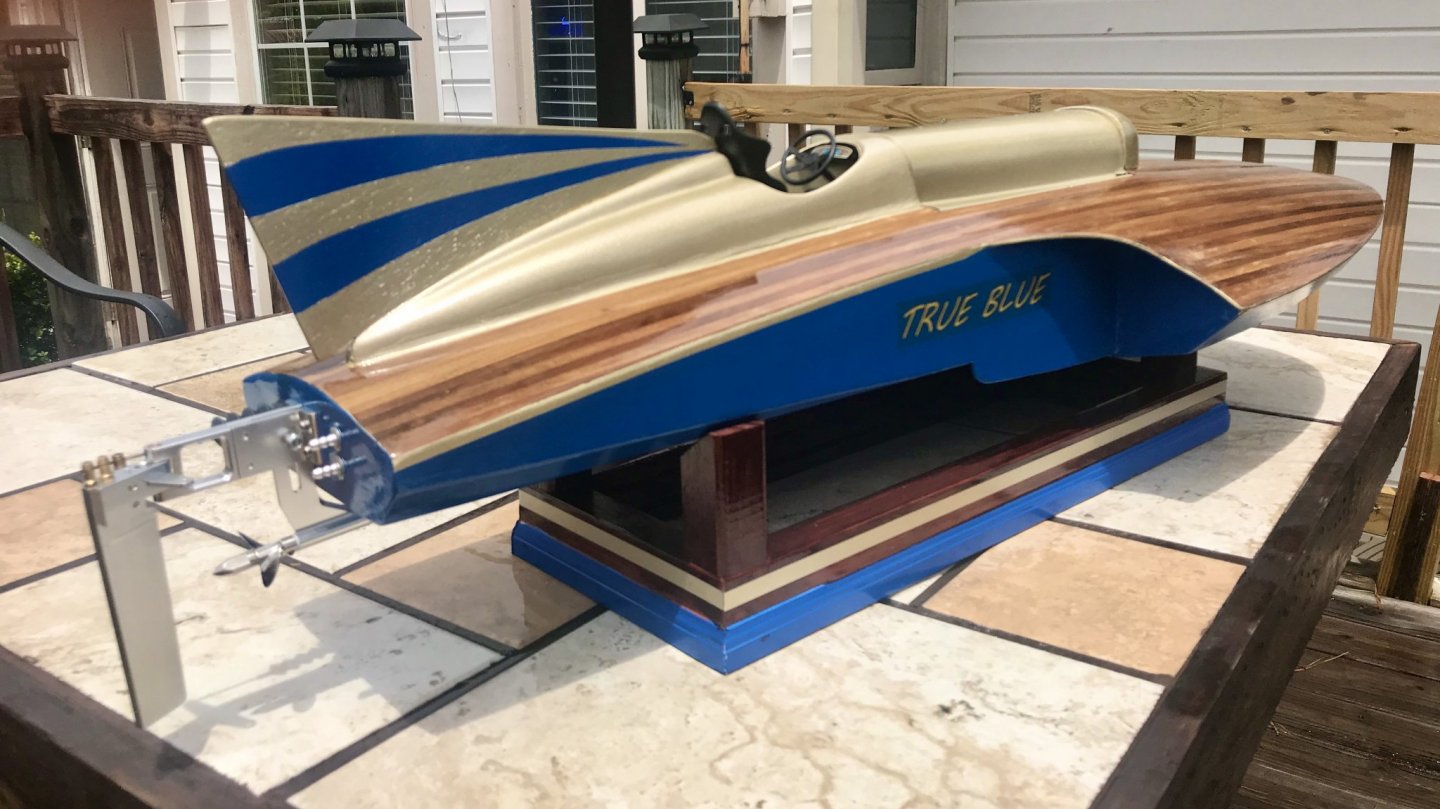
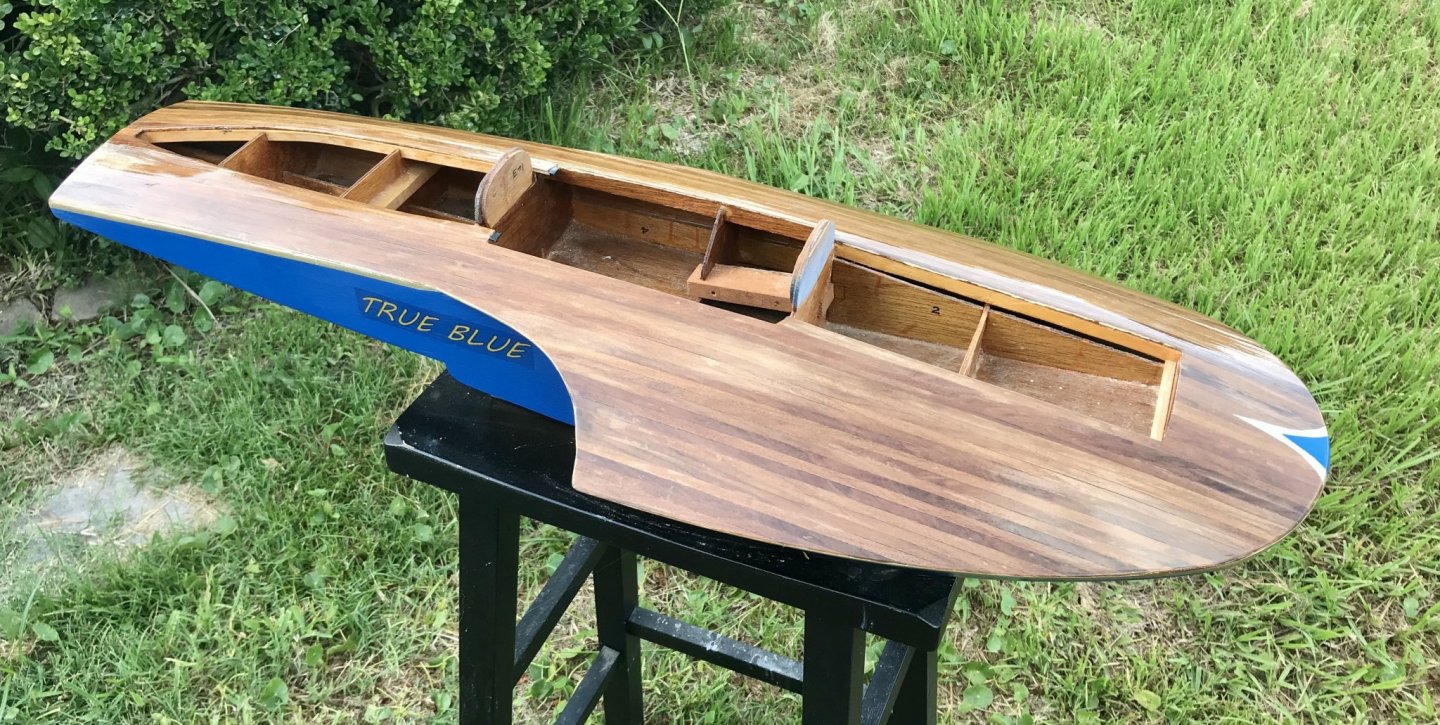
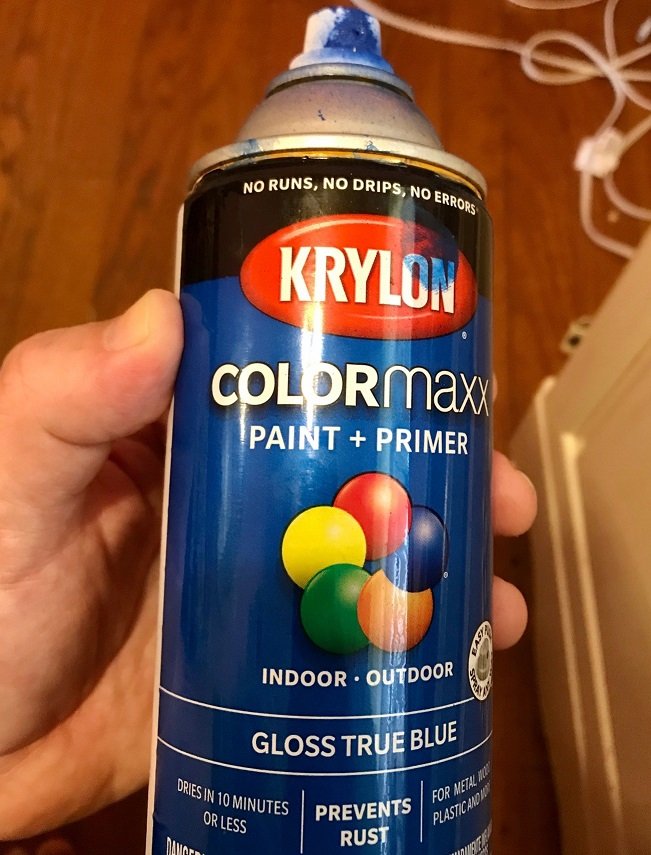
This is another interesting "sign" that happen while doing this, and true story. I know I wanted to call it true blue and had some shades of blue I was looking for, so I went to the paint store and was looking through the cans with my wife, and when I saw the color I wanted, look at the name of the paint:
- 51 replies
-
- 4
-
-
- miss unlimited
- dumas
- (and 1 more)
-
Thanks, I've been doing what I've been doing to finish this boat without any serious pre-planning, So, its been working out so far. I have a few hurdles to cross finishing the upper section so it doesn't look "cheesy". That was the only part about this kit that I was worried about is merging the cheap plastic cowl pieces on top of a beautiful wood mood boat. But I have some ideas to help it along.
- 51 replies
-
- 1
-
-
- miss unlimited
- dumas
- (and 1 more)
-
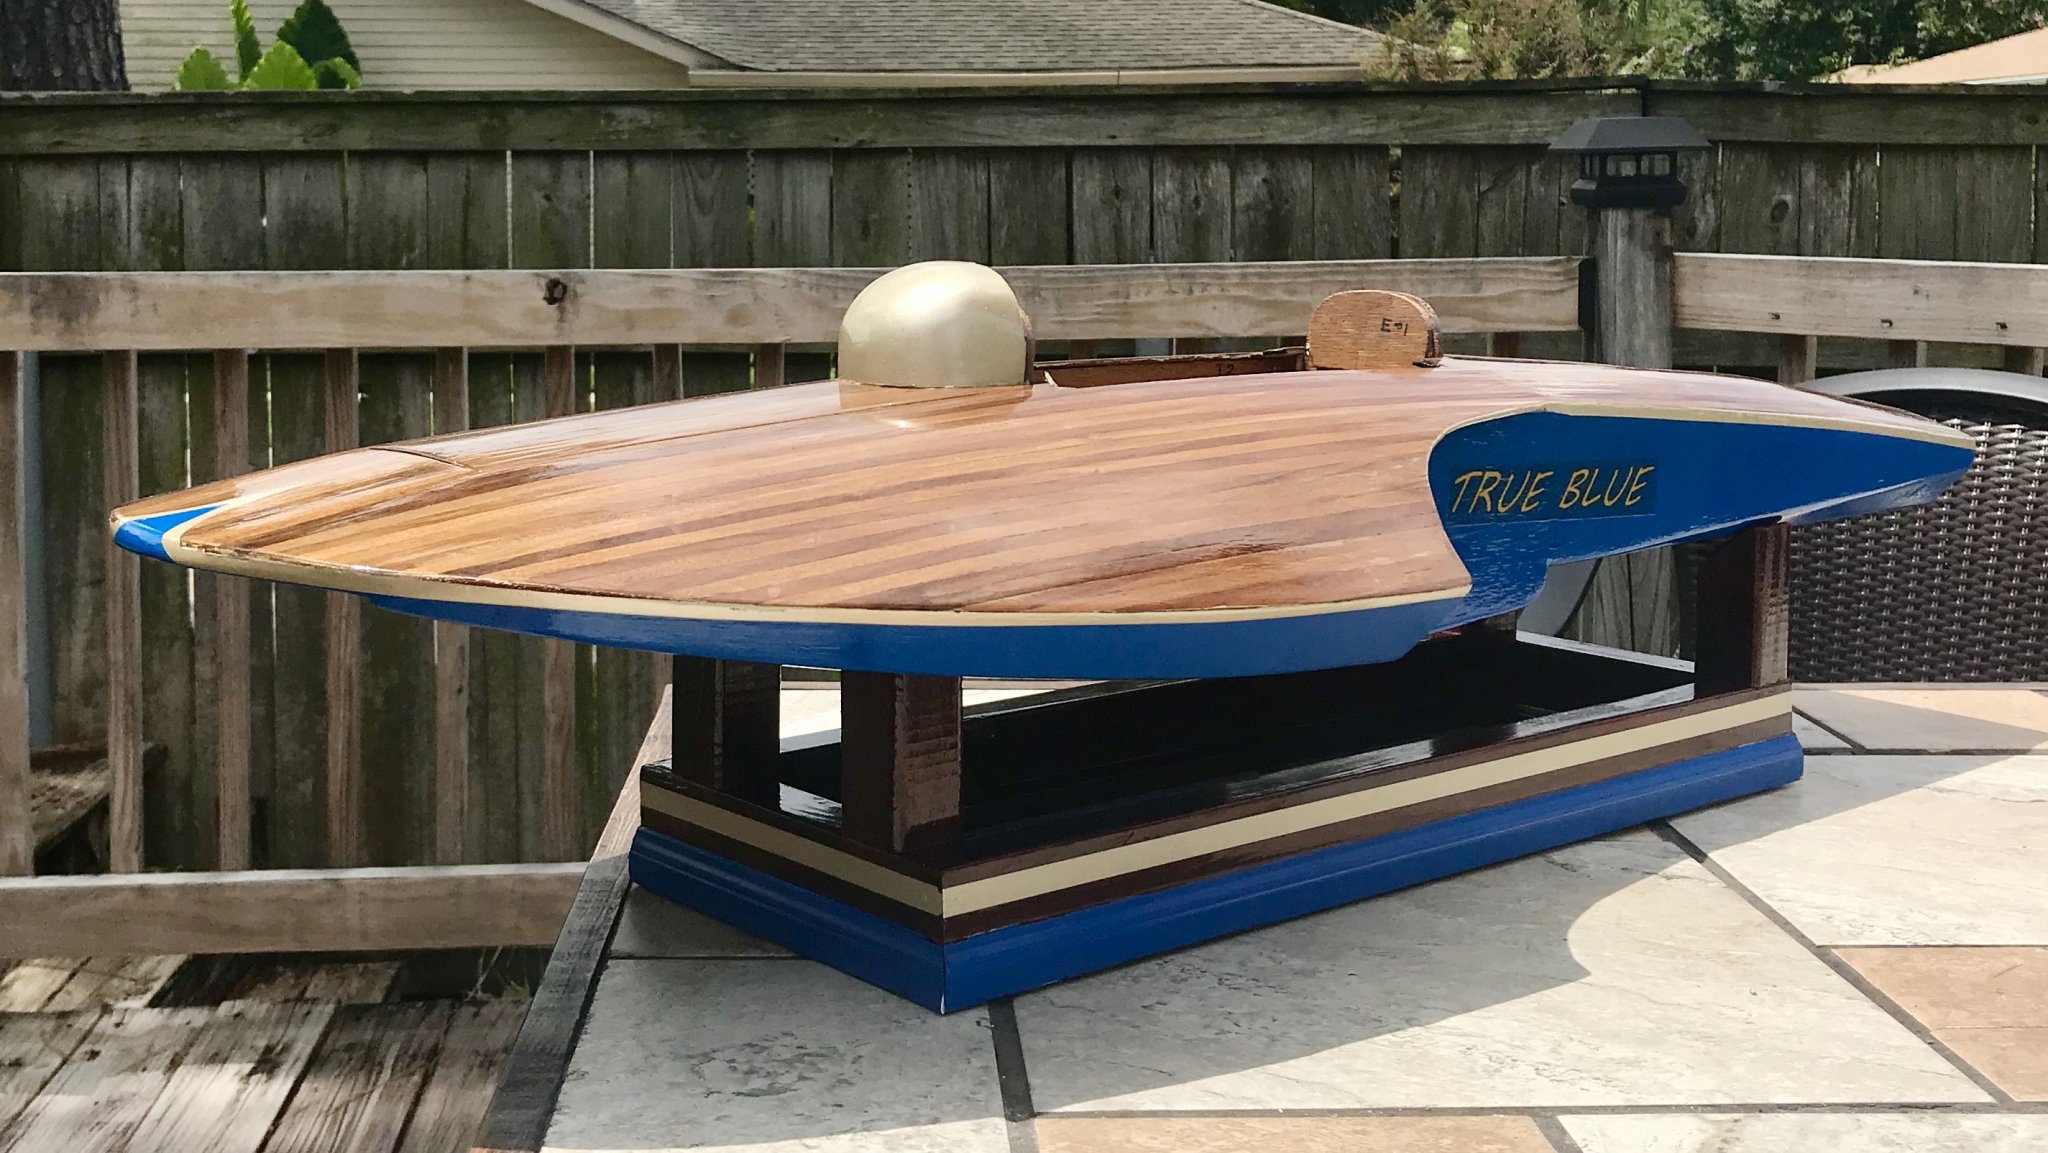
Thanks. I painted the boat over the last couple of days. That was the part I was most nervous about, the lines and color scheme and how it would look. I have a few more touch ups to do before posting update pictures. This boat is a good tribute to my dad, hence the name "True Blue" I gave it. (I know a male associated boat name is against tradition but seemed fitting this time).
- 51 replies
-
- 1
-
-
- miss unlimited
- dumas
- (and 1 more)
-
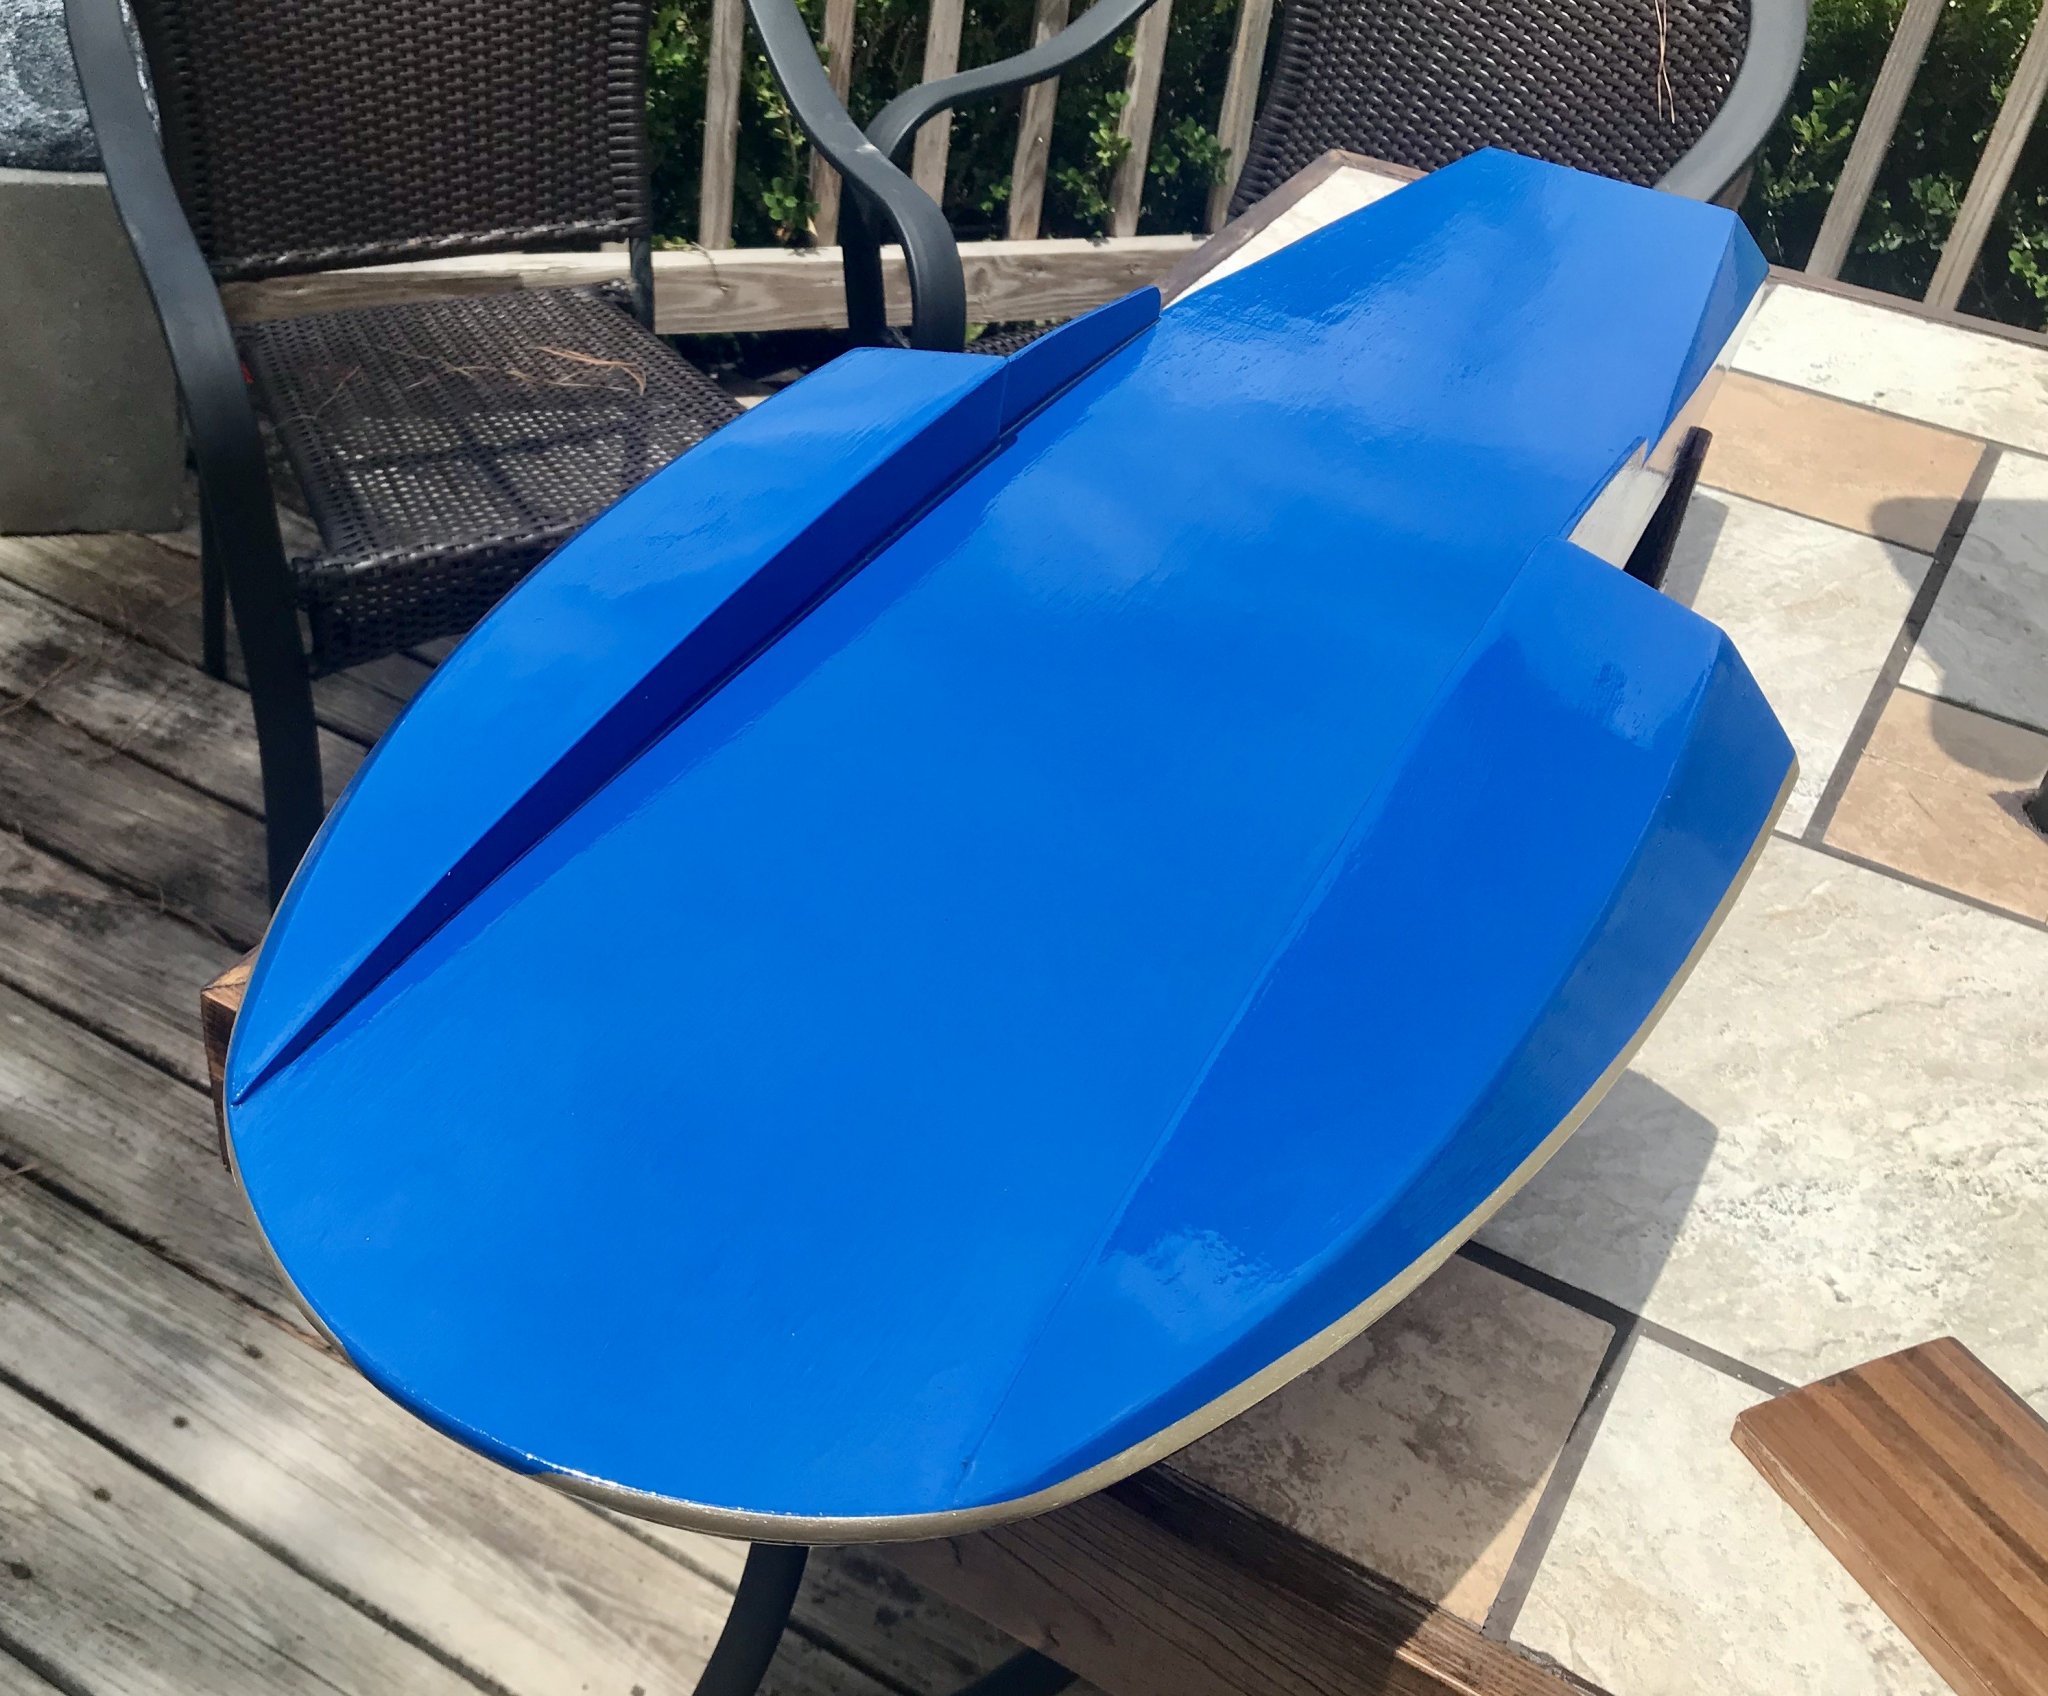
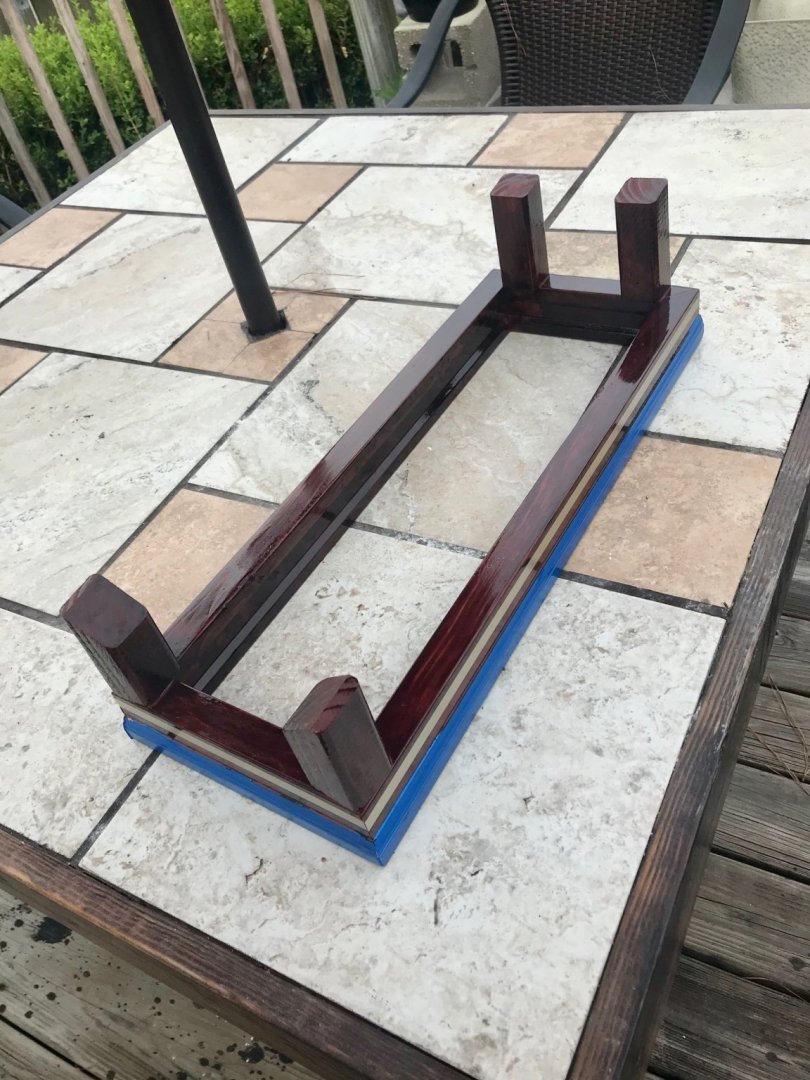
I've been busy the last couple of days with this. I've put on 3 coats of poly. Plan to continue sanding and coat, but this is enough for now before taping off the upper deck and paint the sides. I plan to poly over all coats together after that to get a uniform finish. Also, as a side project, I made this stand out of some scrap wood in the shed, and I trimmed it off with the two colors that will be on the boat hull.
- 51 replies
-
- 9
-
-
- miss unlimited
- dumas
- (and 1 more)
-
The Spar varnish is the part I'm up in the air about. Yes, I'd like to maintain the option, but I also did some test pieces of wood, since this will be a woodgrain deck and enamel colored sides with either white or gold line. The spar varnish I had from a previous outdoor project i did has a yellow amber tint when I put it over the colored enamel. I just didn't want to take any chances of ruining the finish after I have it how I like it. But at the same time I like the idea of keeping this RC ready. Unfortunately I already put the first coat of poly on. I'm not sure if spar works the same over poly. I read a few things that says its ok. But, I'll just have to see about as I continue and may do some more tests.
- 51 replies
-
- 3
-
-
- miss unlimited
- dumas
- (and 1 more)
-
Thanks. I’ll have to look Into that varnish but will probably stick with the poly since I already have some ready go on.
- 51 replies
-
- 1
-
-
- miss unlimited
- dumas
- (and 1 more)
-
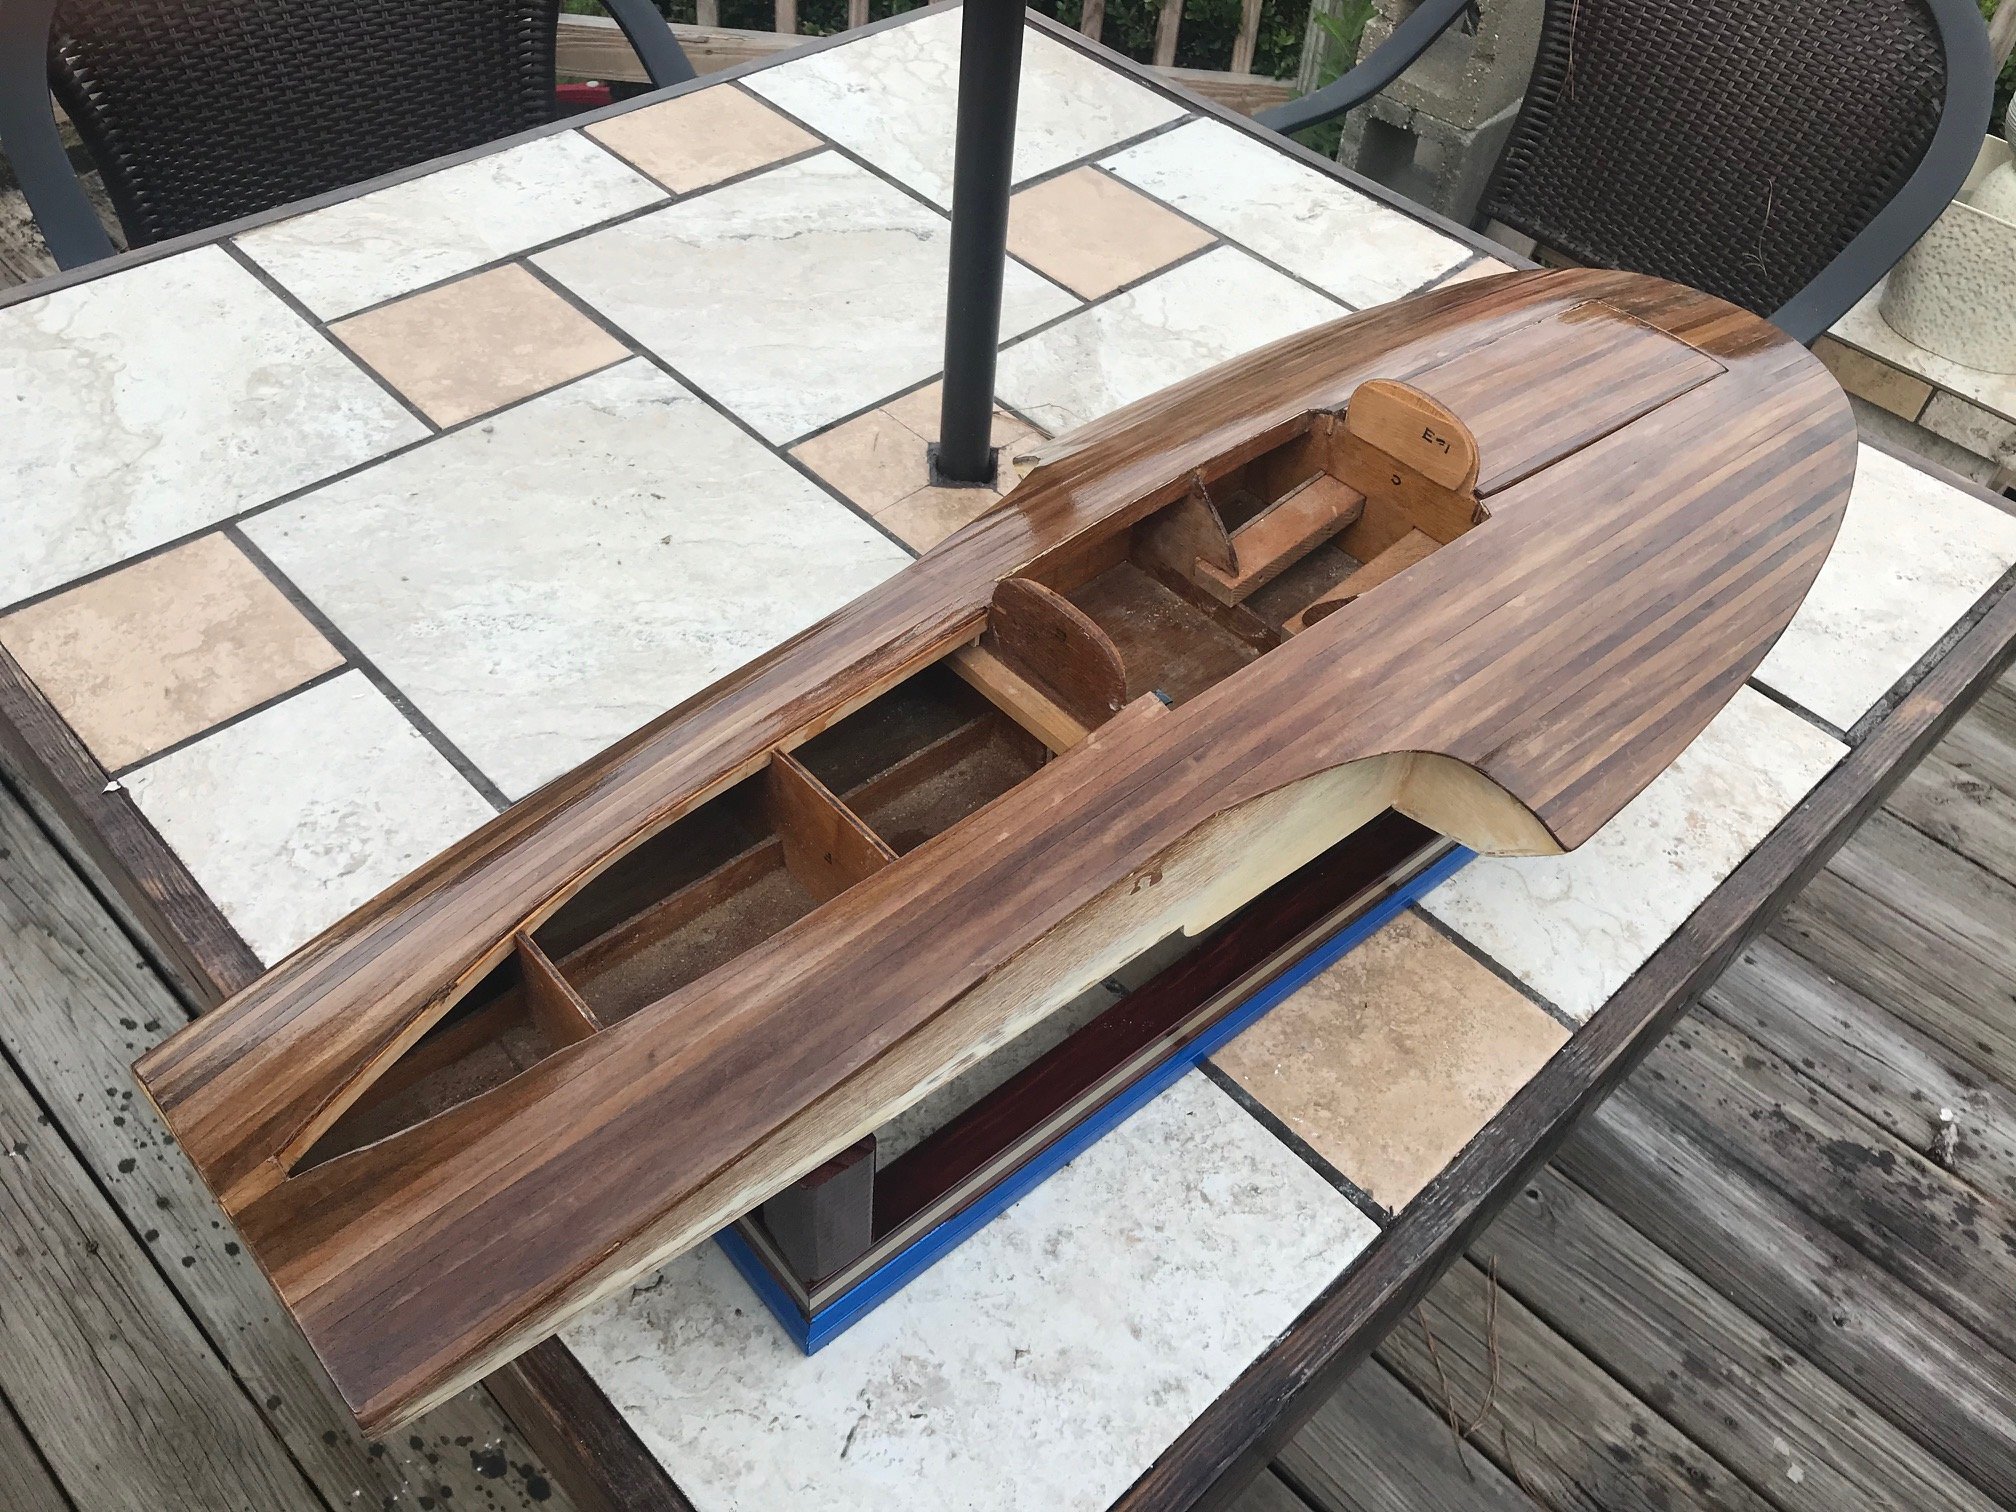
Thanks guys, I've been busy this week with the deck. My strips came in and I got it all planks. Here's some pictures of the steps. This is just the raw sanded wood. I cant wait to get some Poly on the walnut to make the color and shine come out and it should really pop.
- 51 replies
-
- 10
-
-
- miss unlimited
- dumas
- (and 1 more)
-
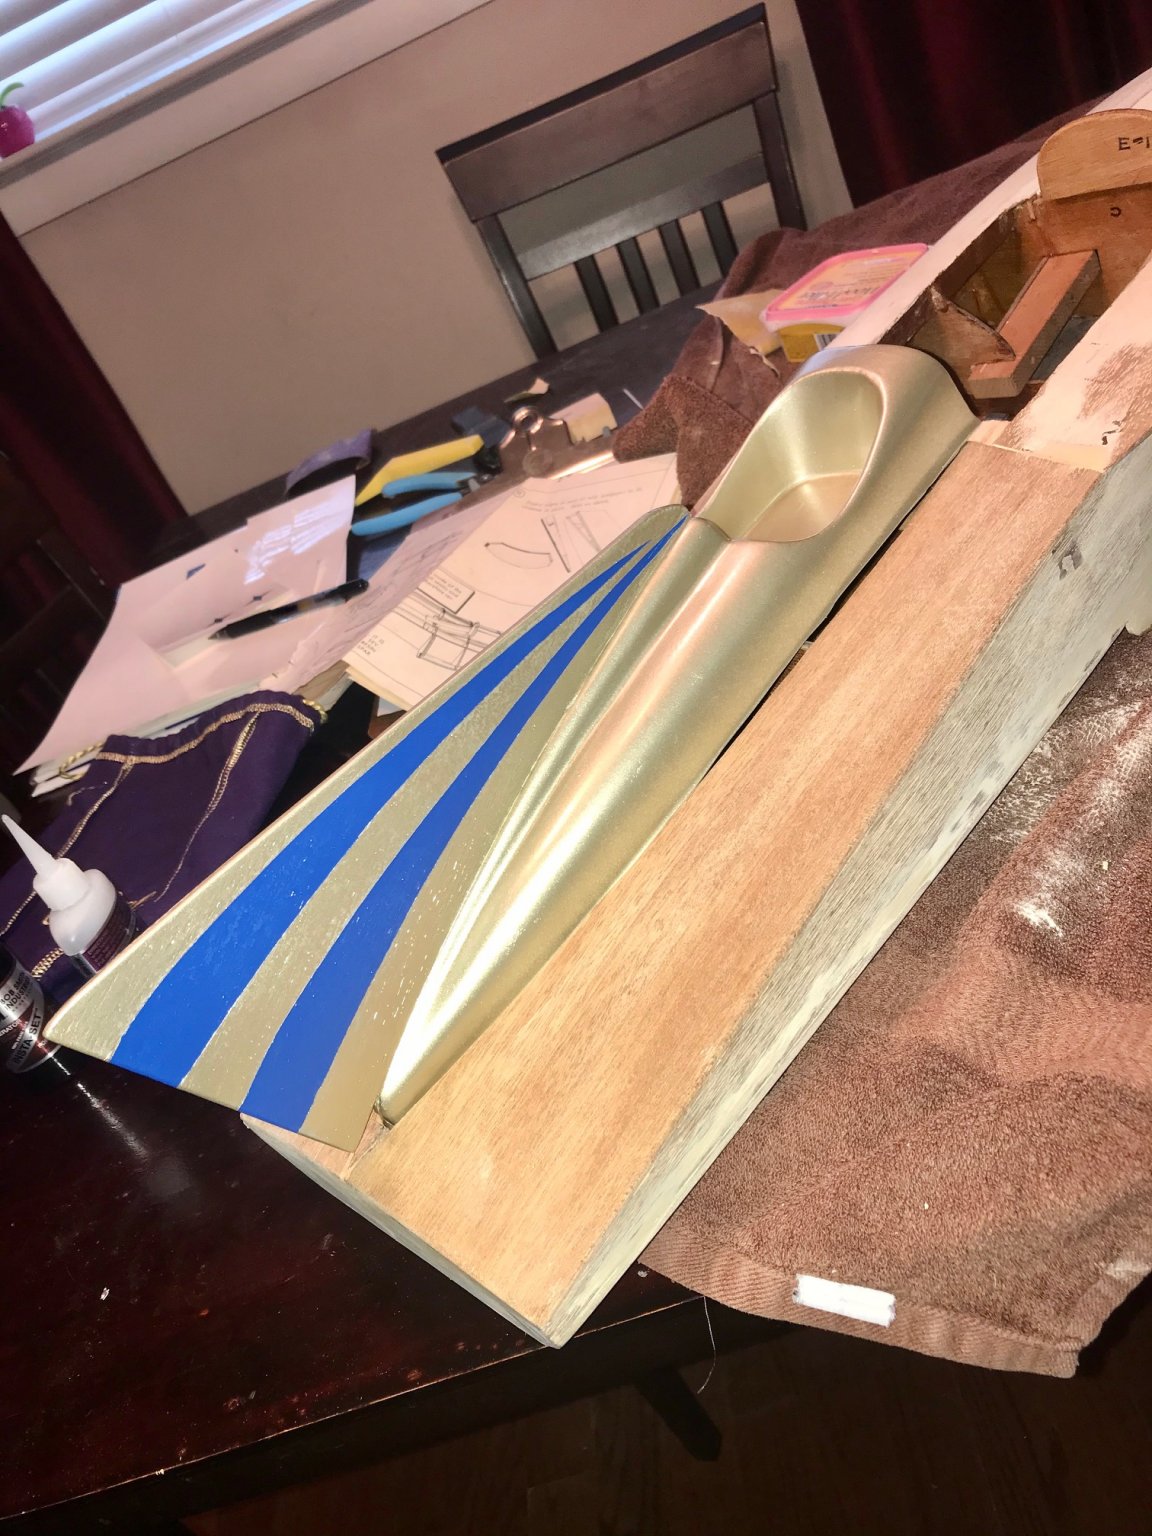
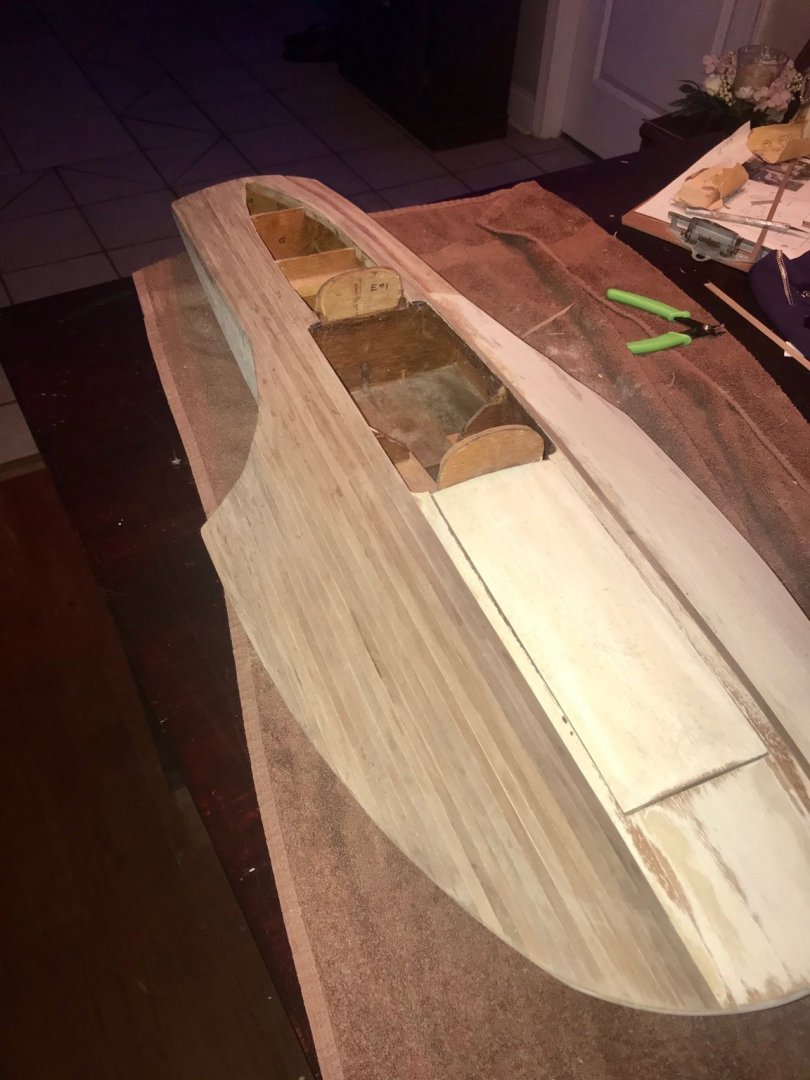
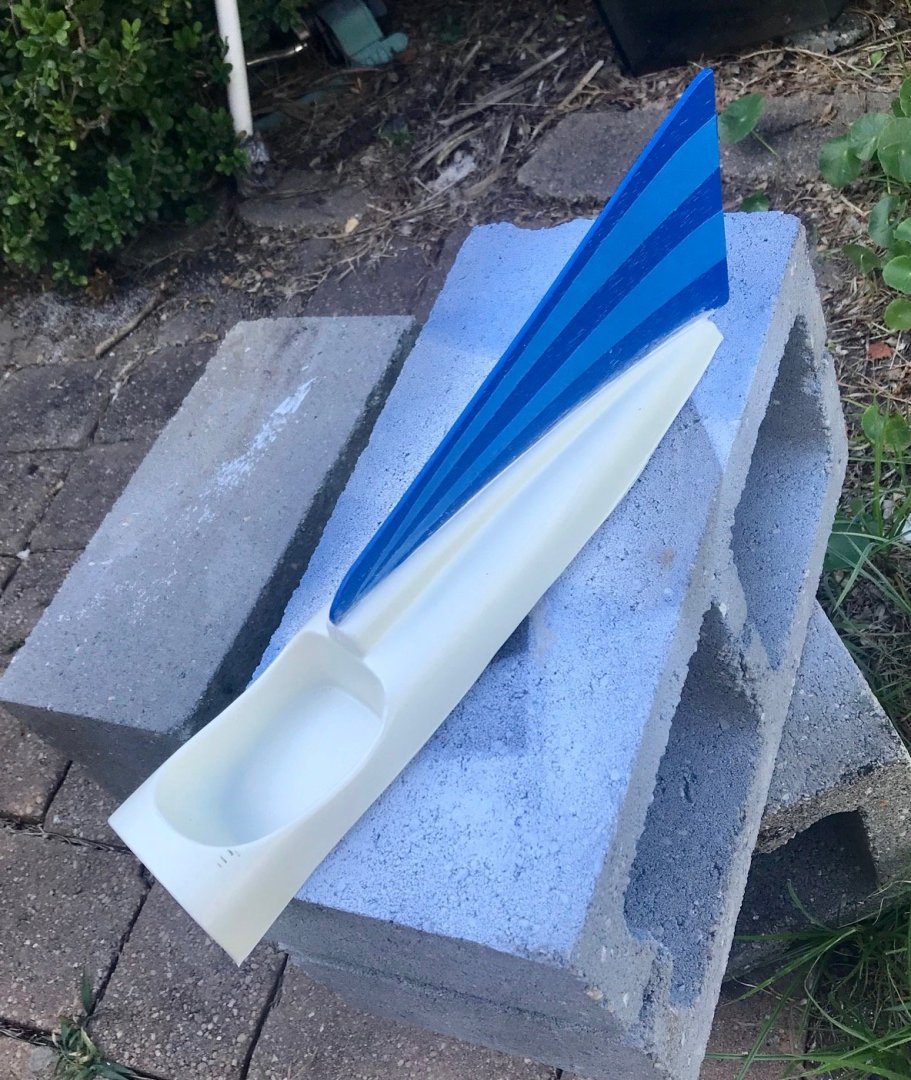
Still waiting on the Walnut decking to come in, so I moved on with a few things. I decided on a paint/style I was painting this. Walnut clear poly deck, Blue body, and gold cowl. I also designed a little paint scheme for the back fin. So, I worked on that this weekend, I'll be clear coating everything afterwards. Also, since this boat will be a tribute to my dad, I remember when I was young he was part of a CB radio club and his handle was "TRUE BLUE". So that is was this boat will be named. I'm even making so decals from waterslide printer paper to go on the body. I don't feel this is straying from the "Miss Unlimited" the kit is titled, because the kit is meant to build 1 of 4 or 5 separate popular boats from it's age, I'll just be customizing my own.

- 51 replies
-
- 11
-
-
- miss unlimited
- dumas
- (and 1 more)
-
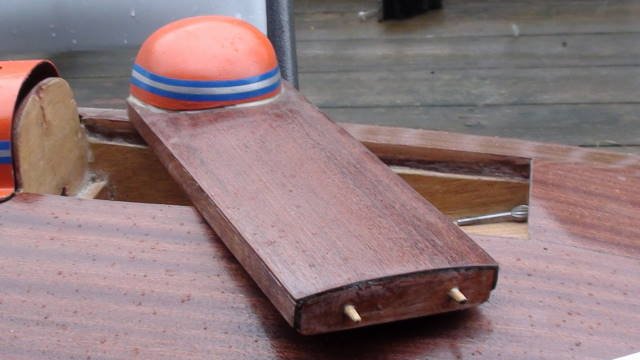
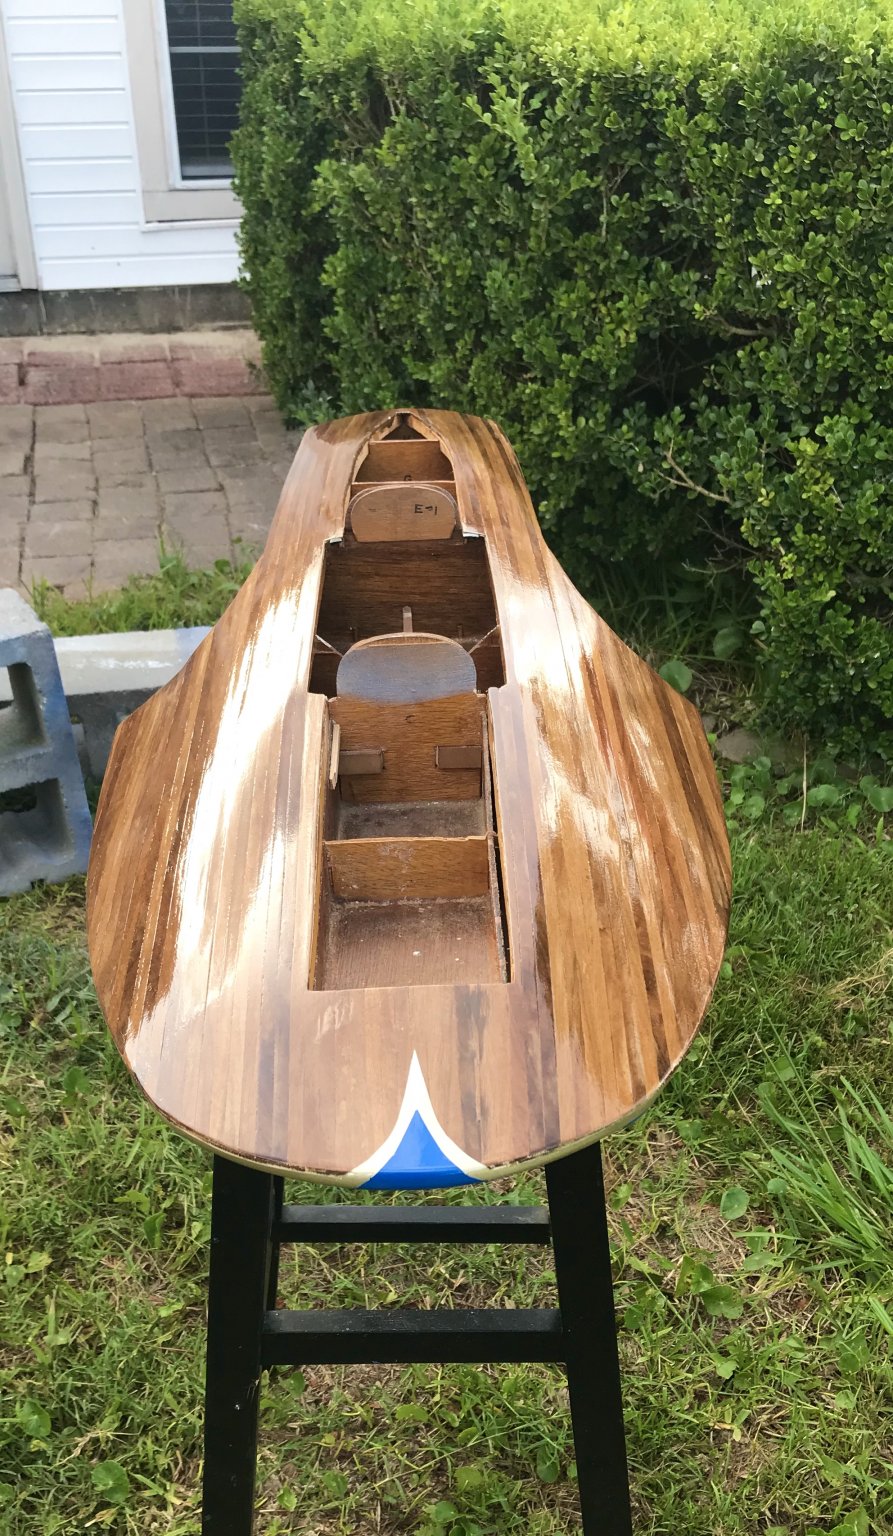
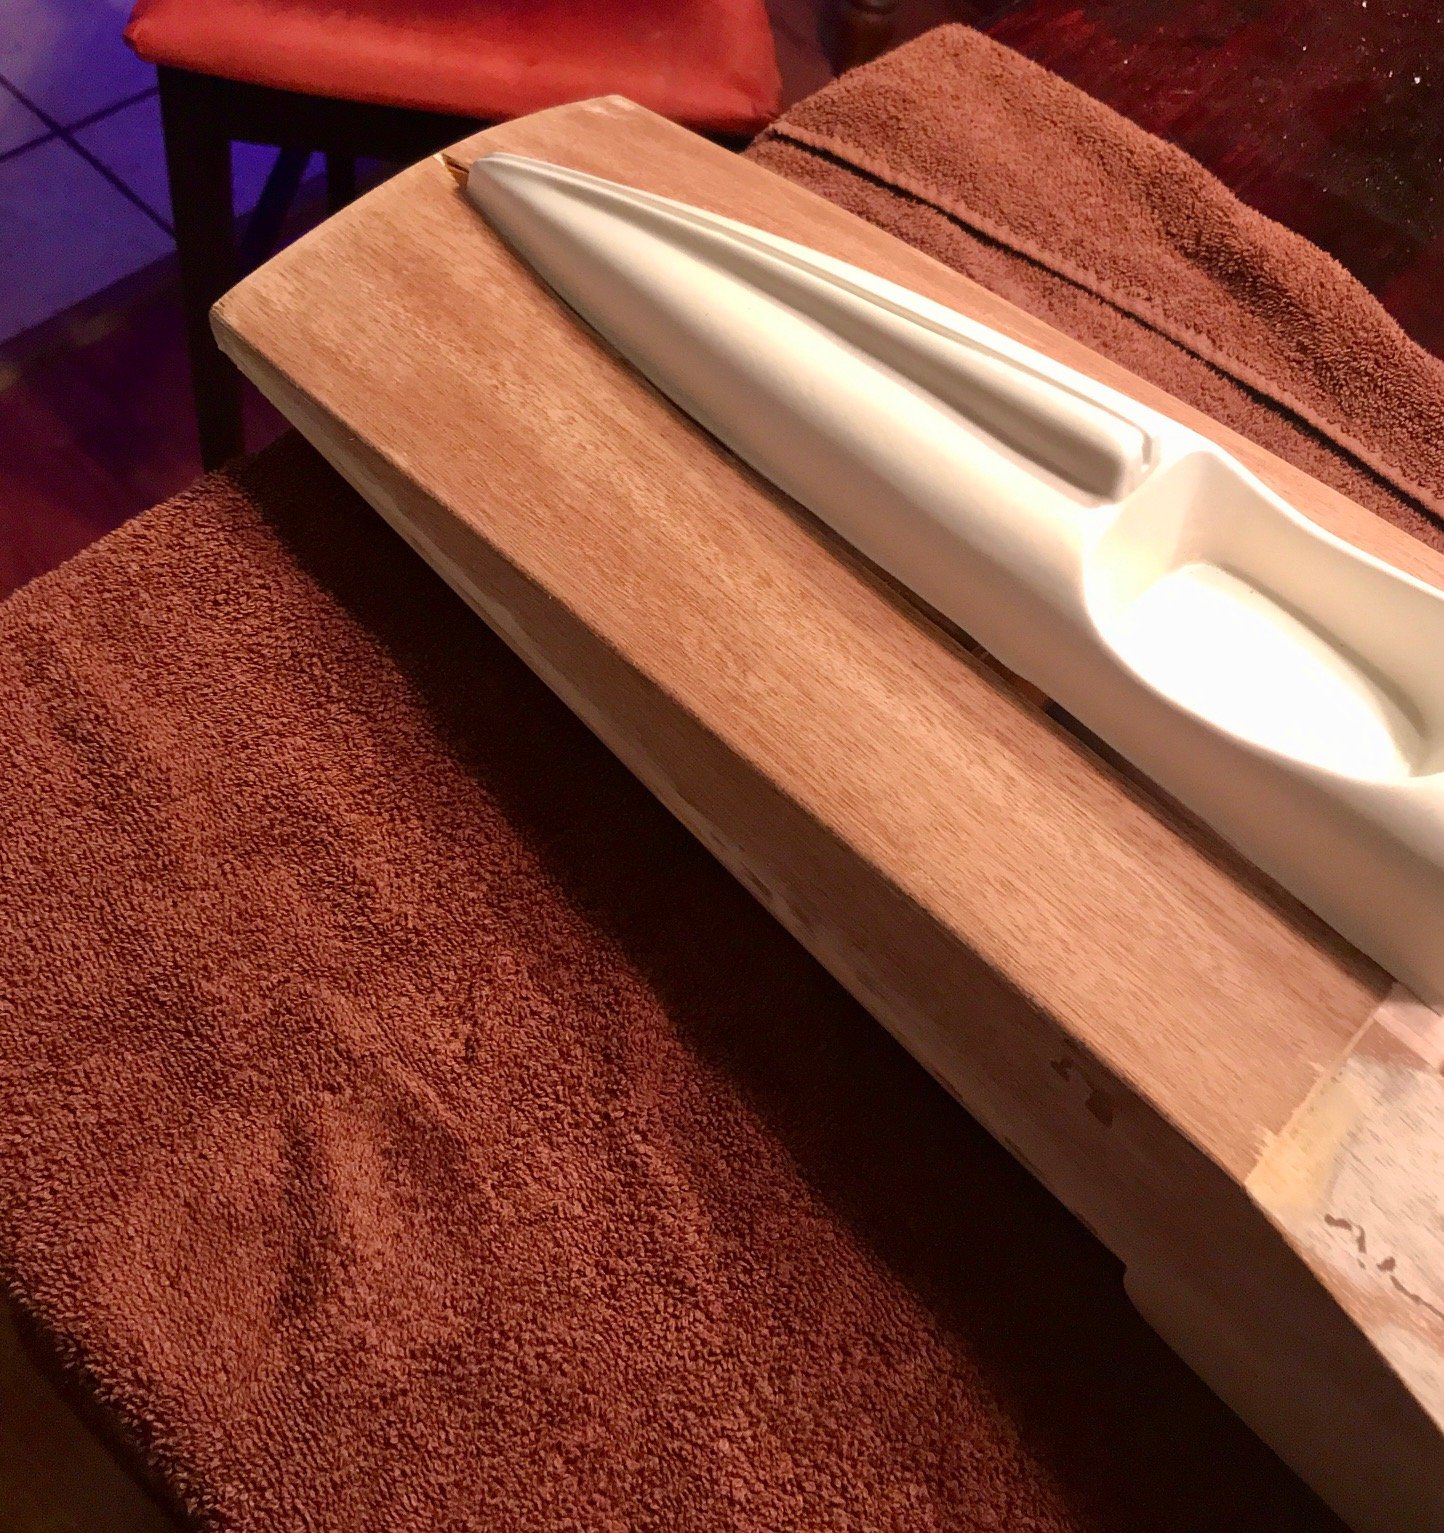
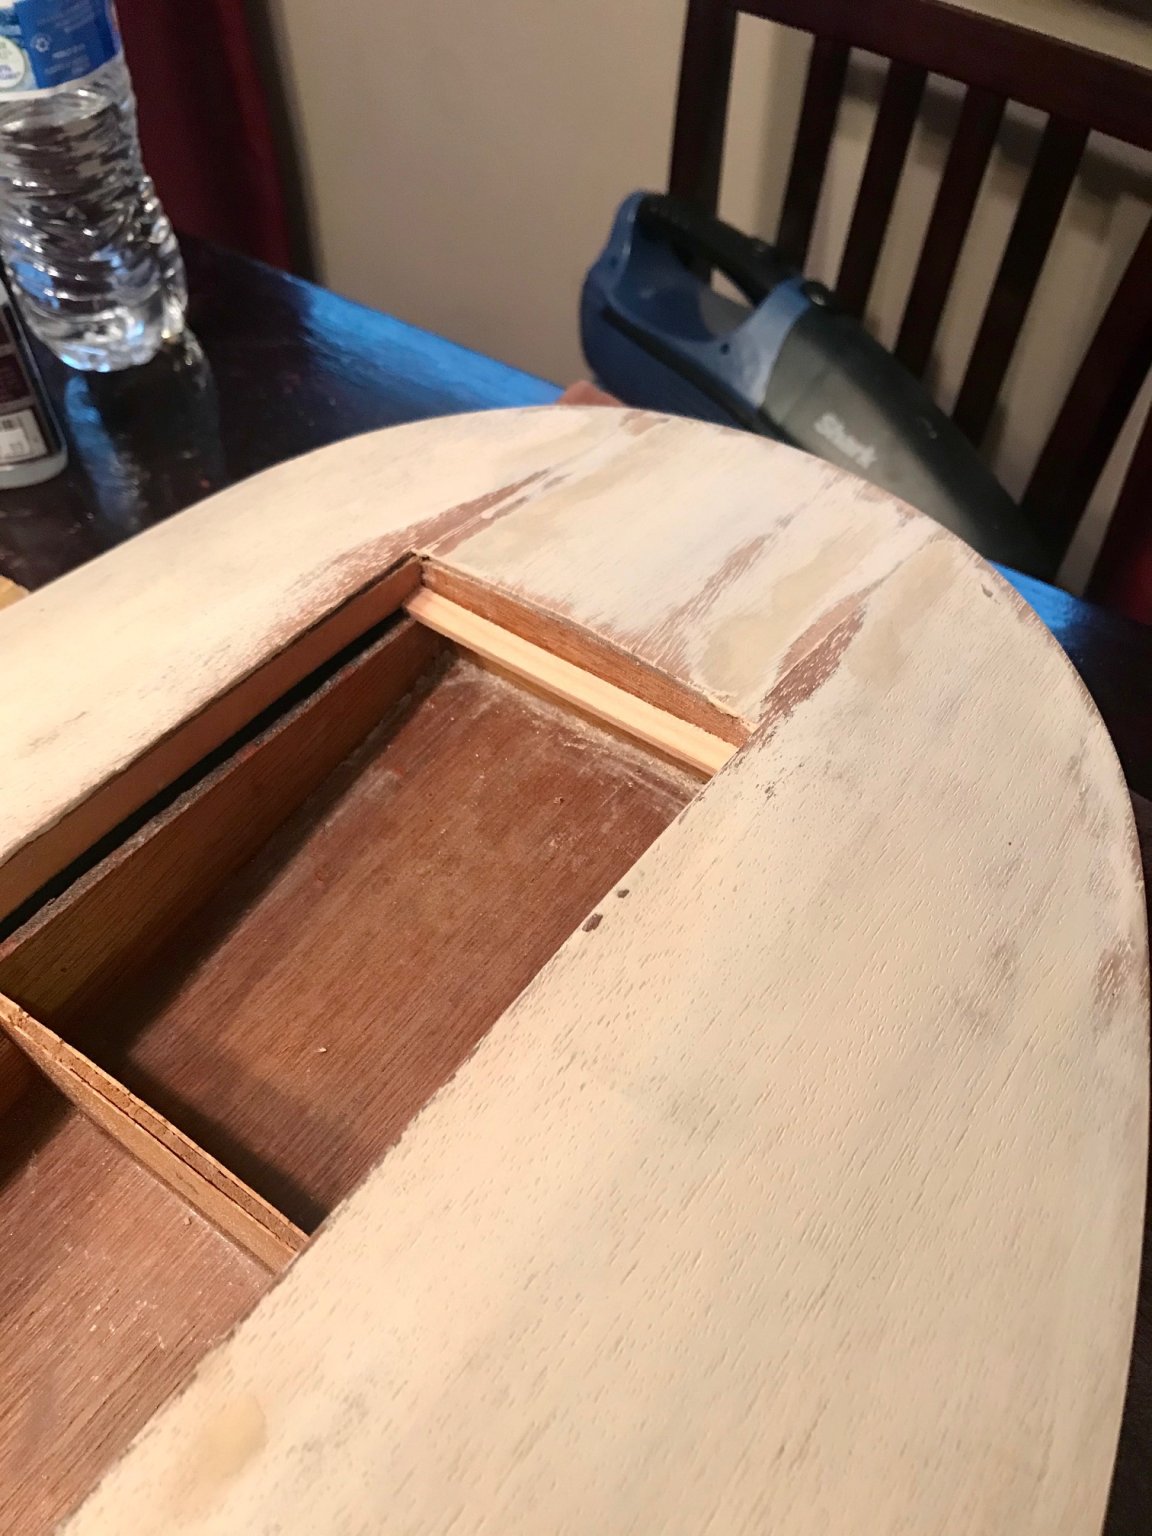
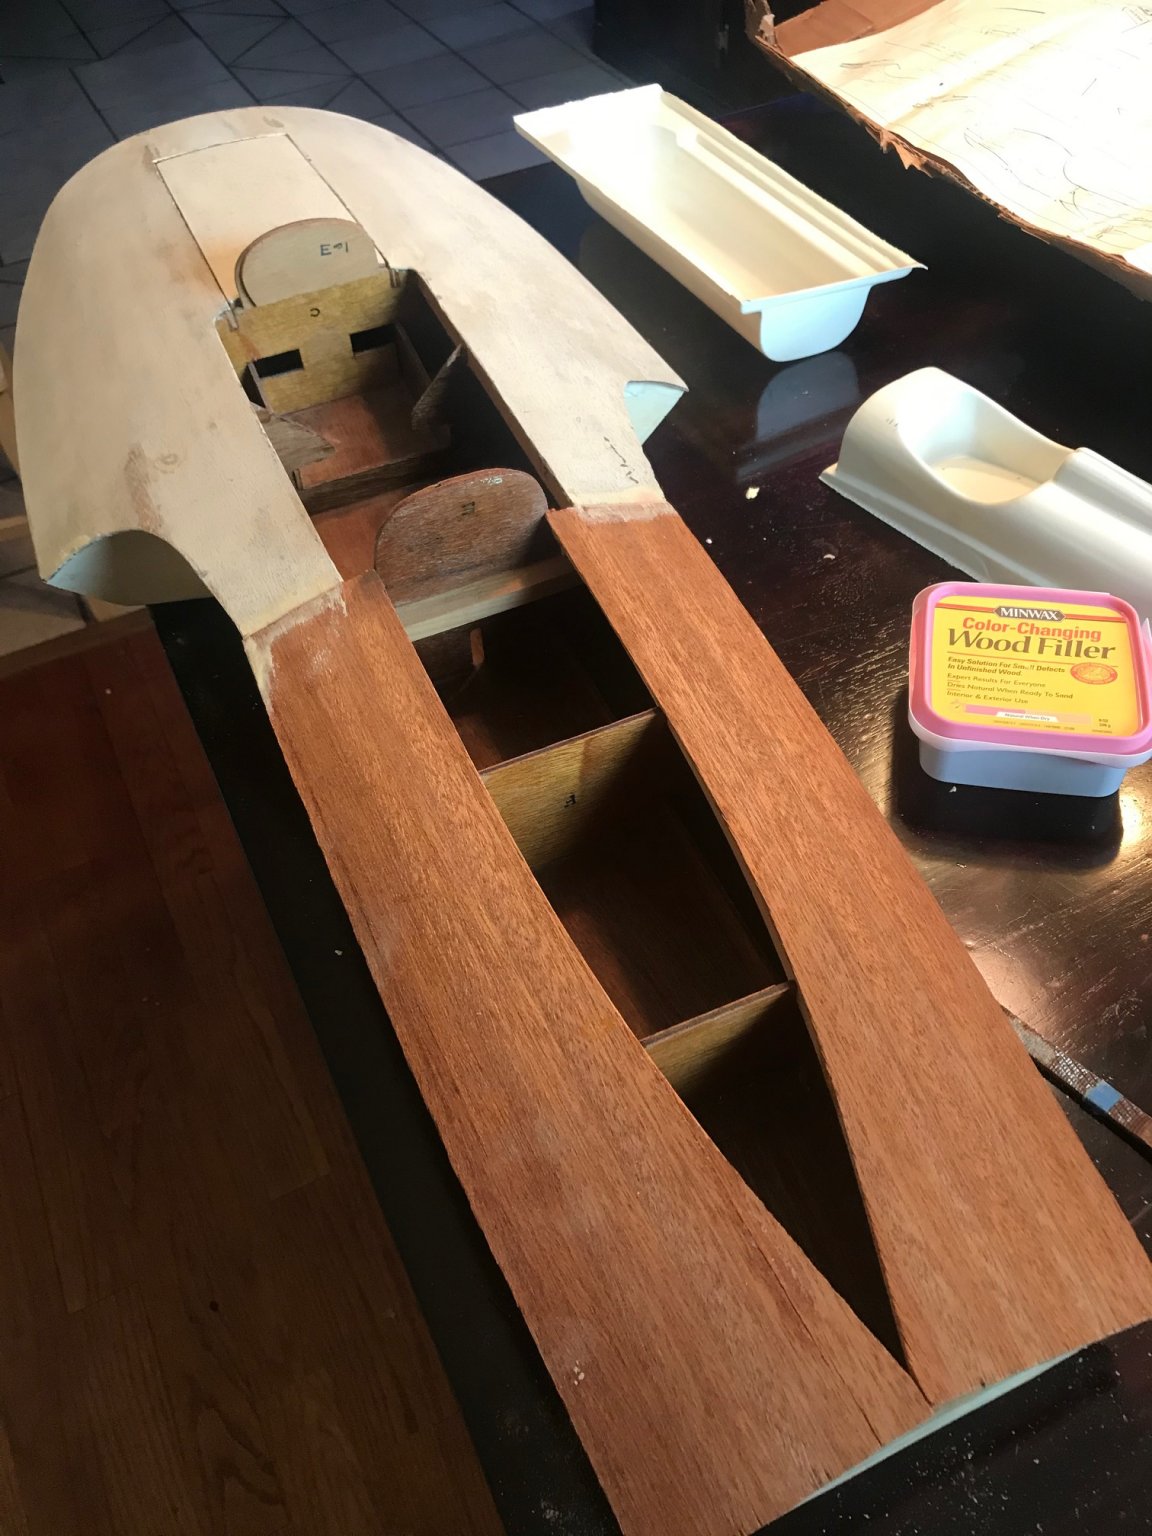
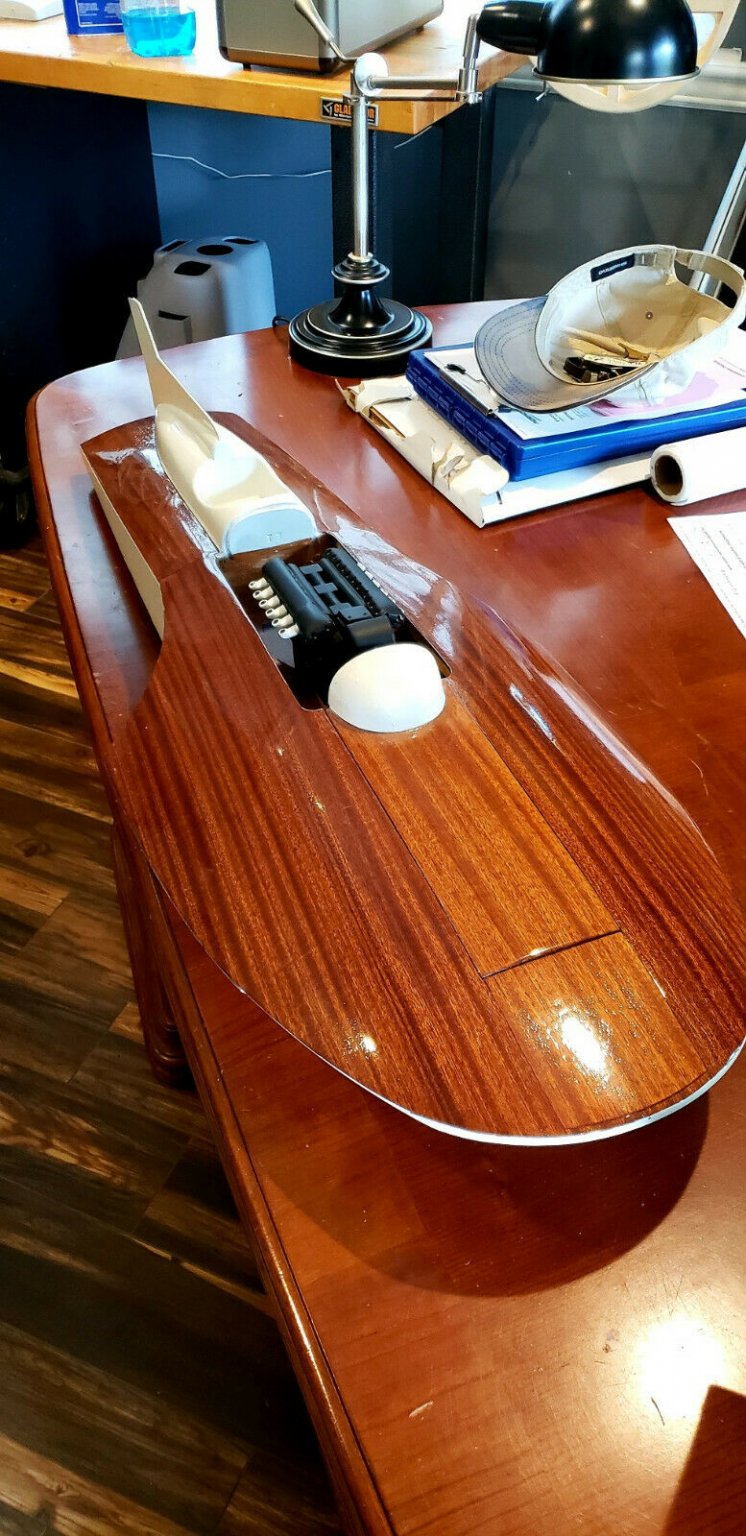
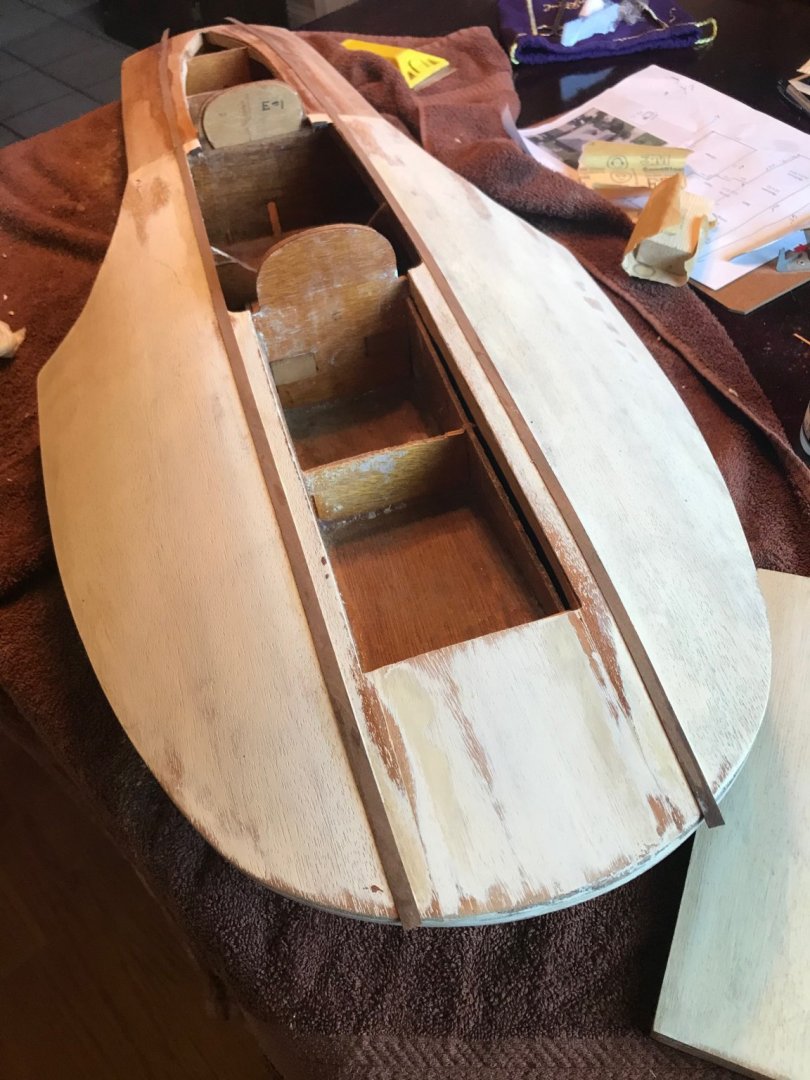
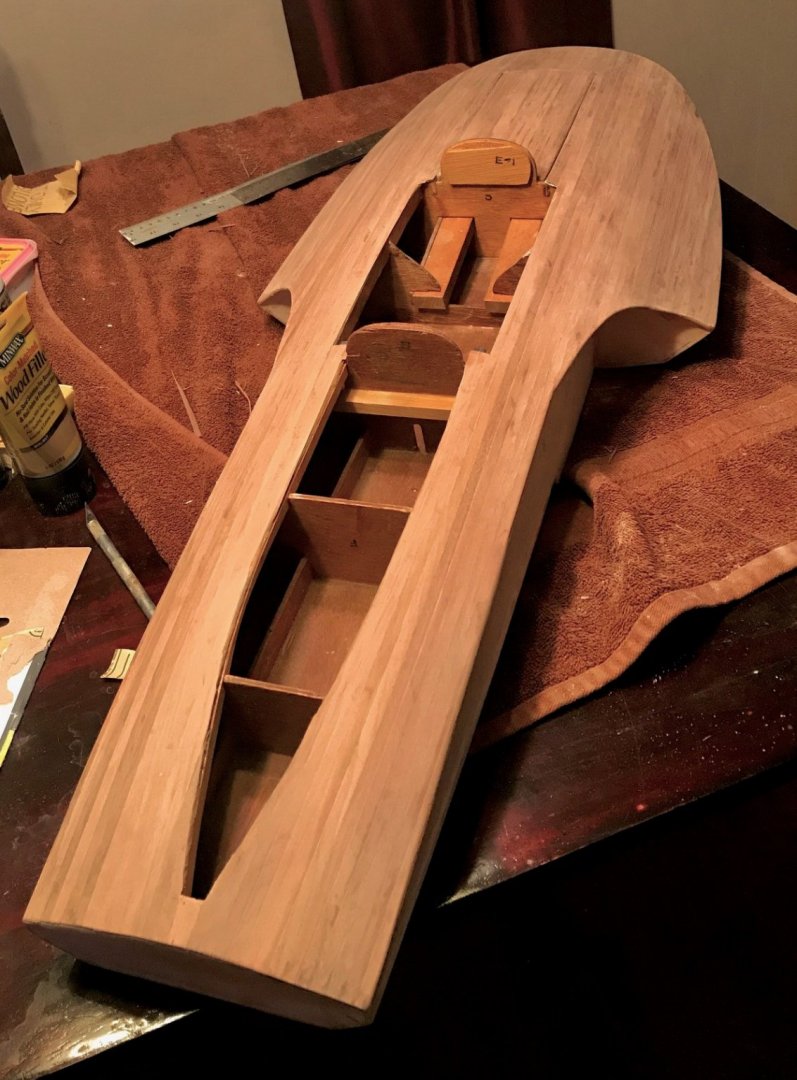
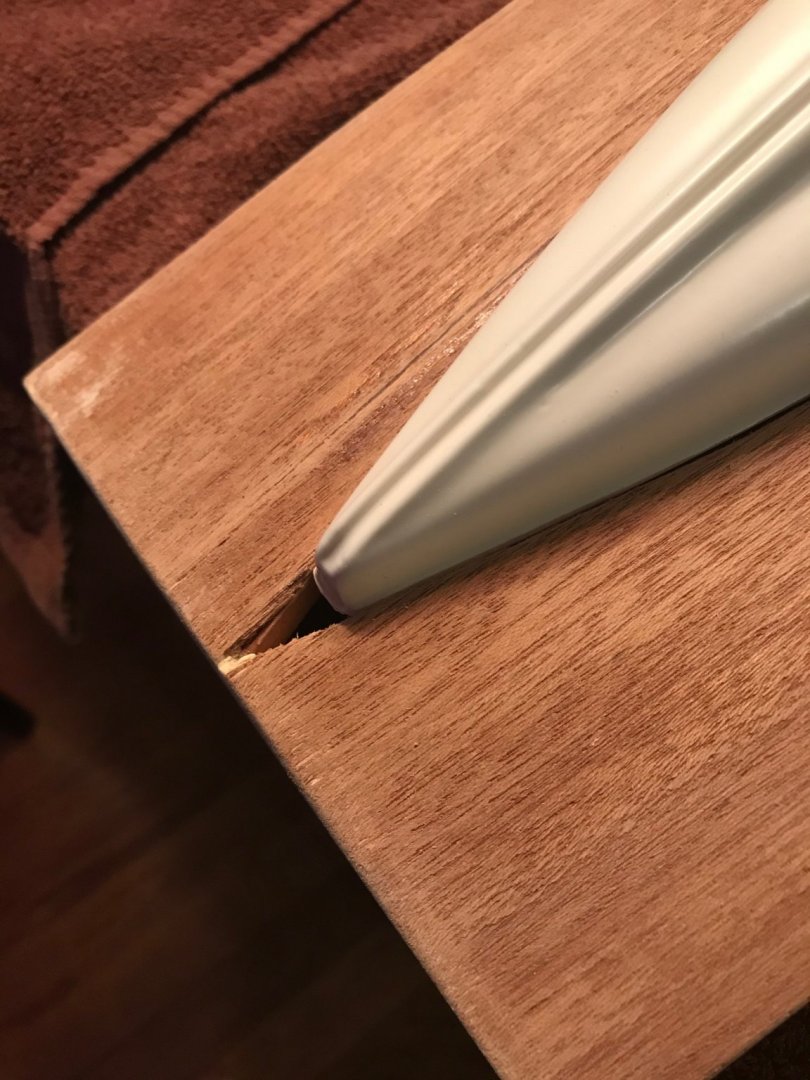
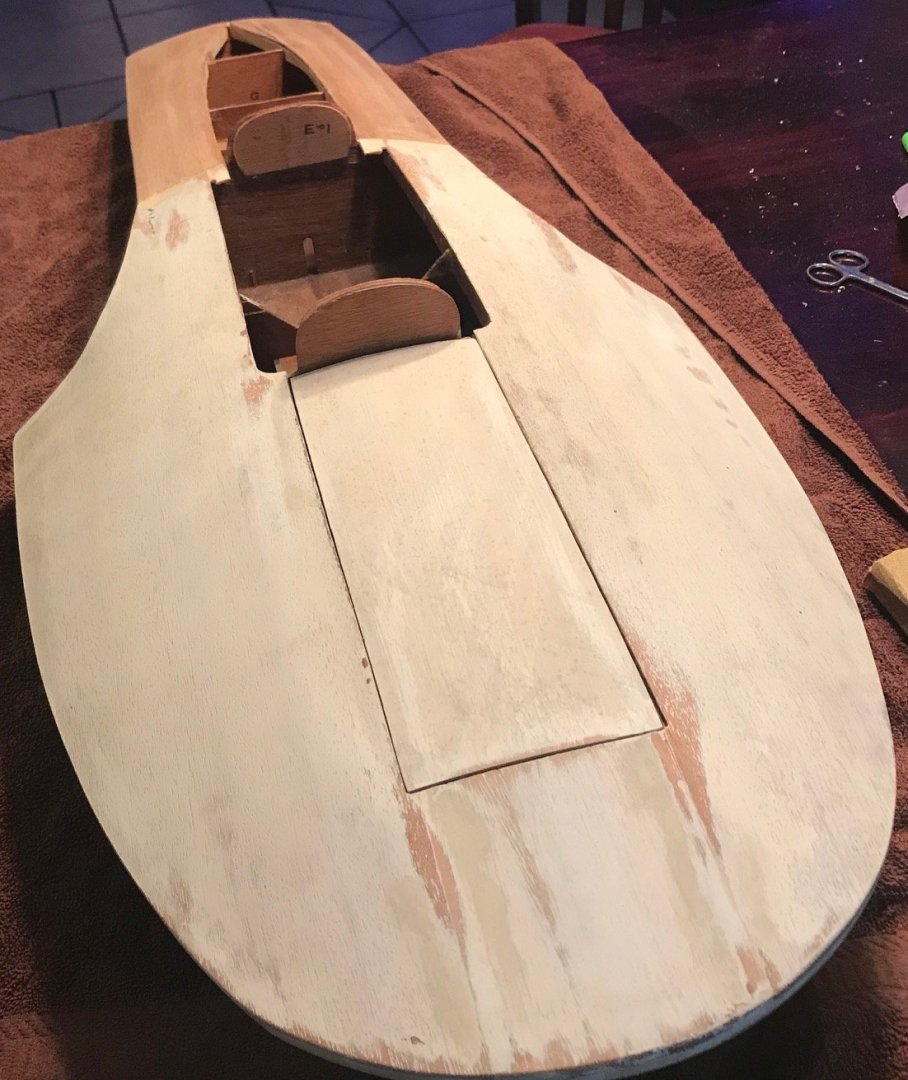
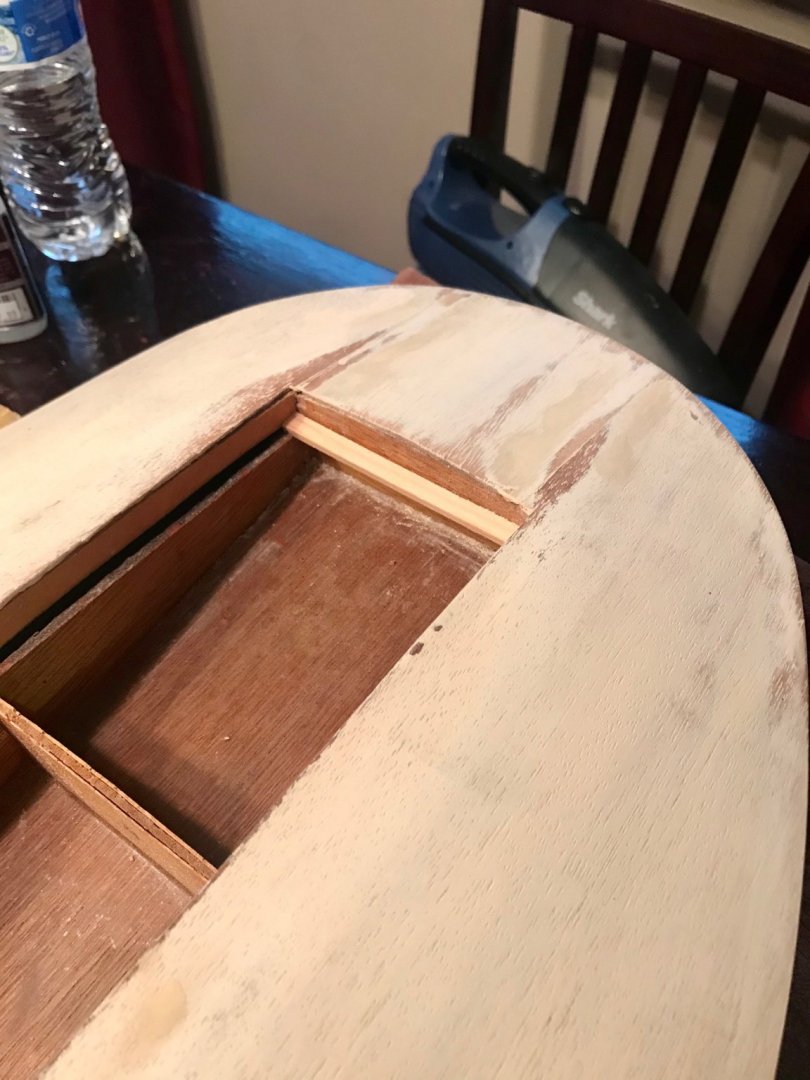
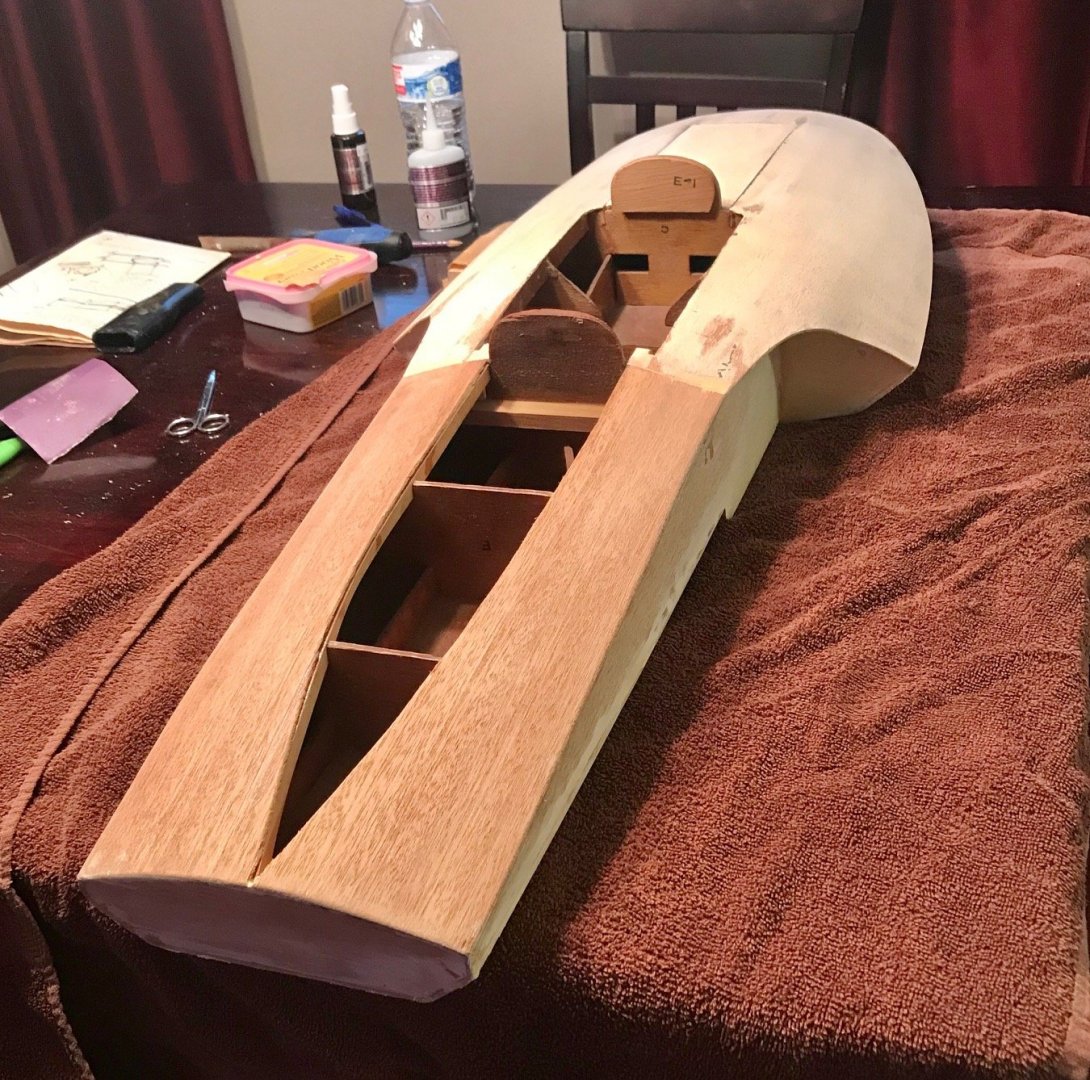
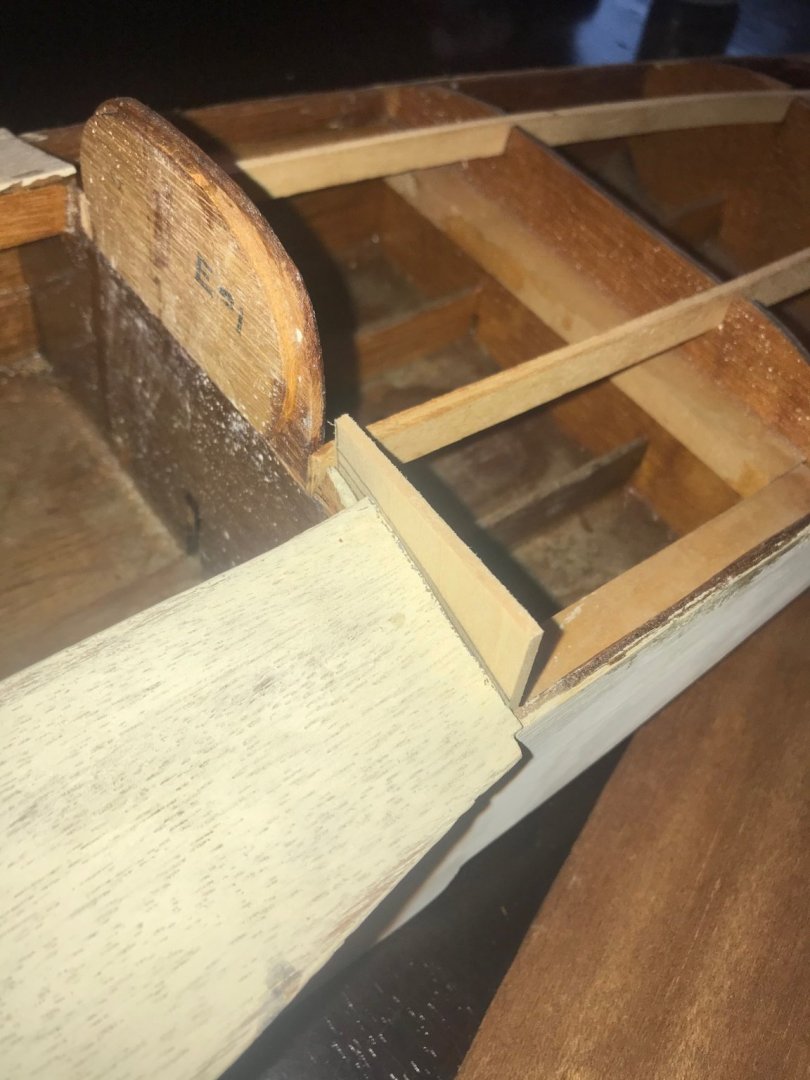
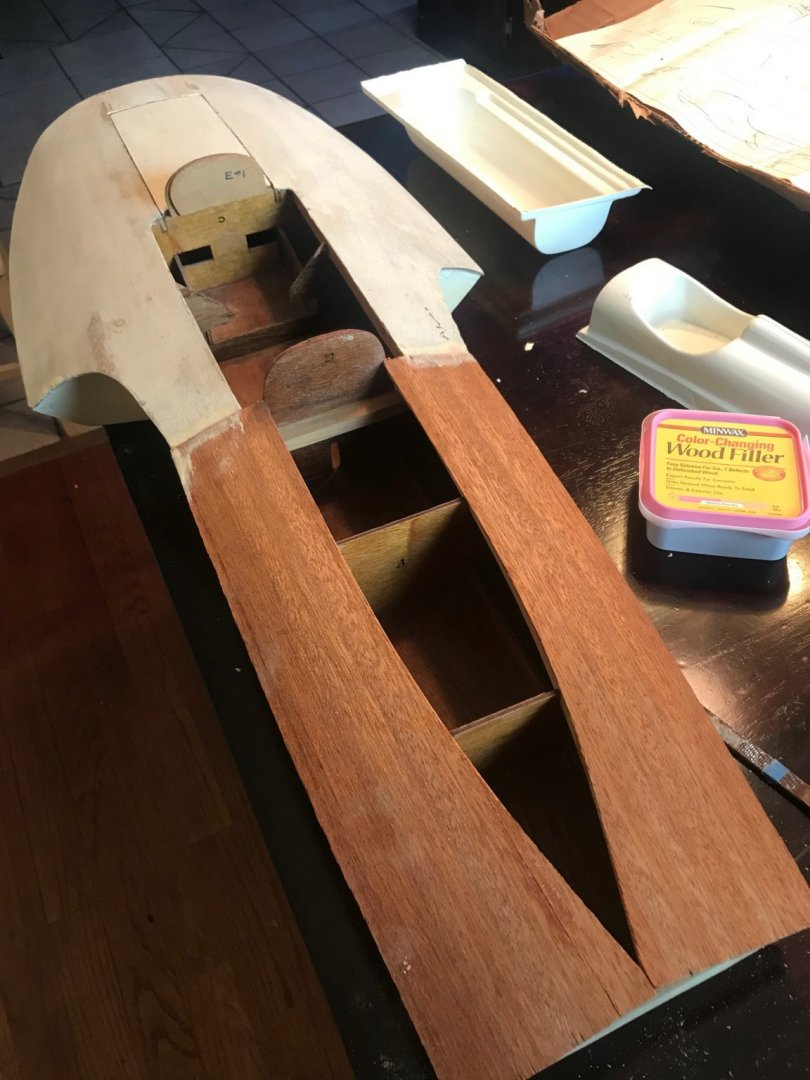
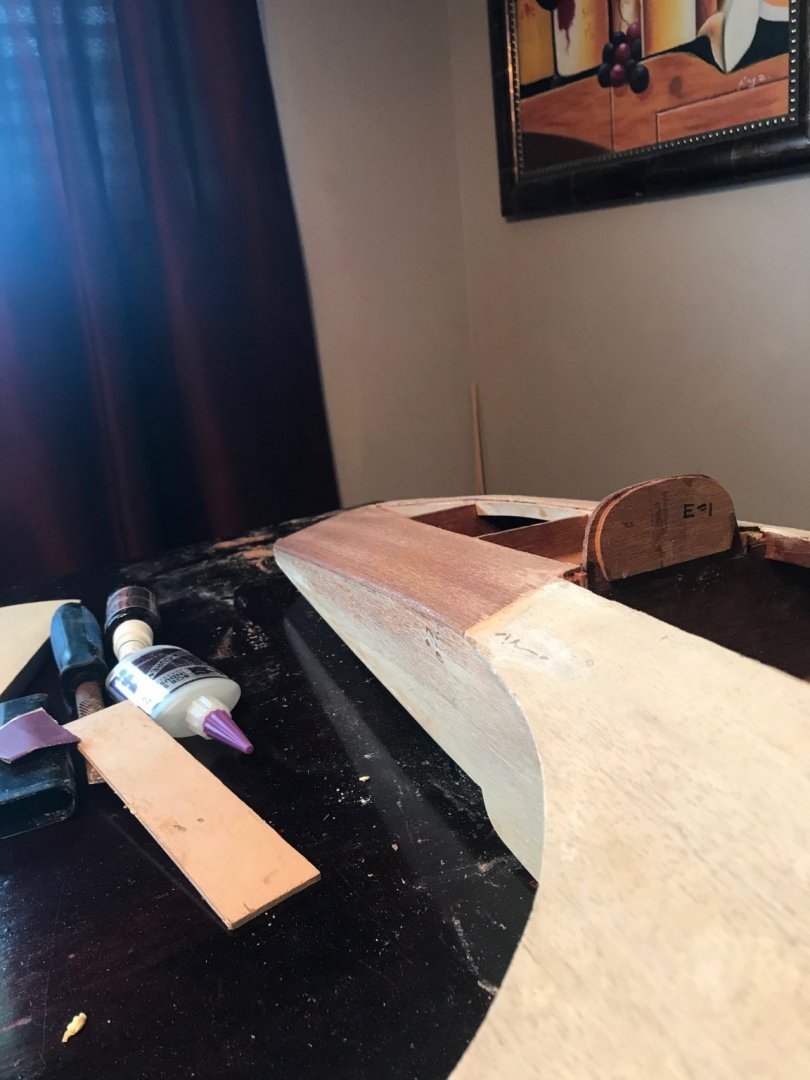
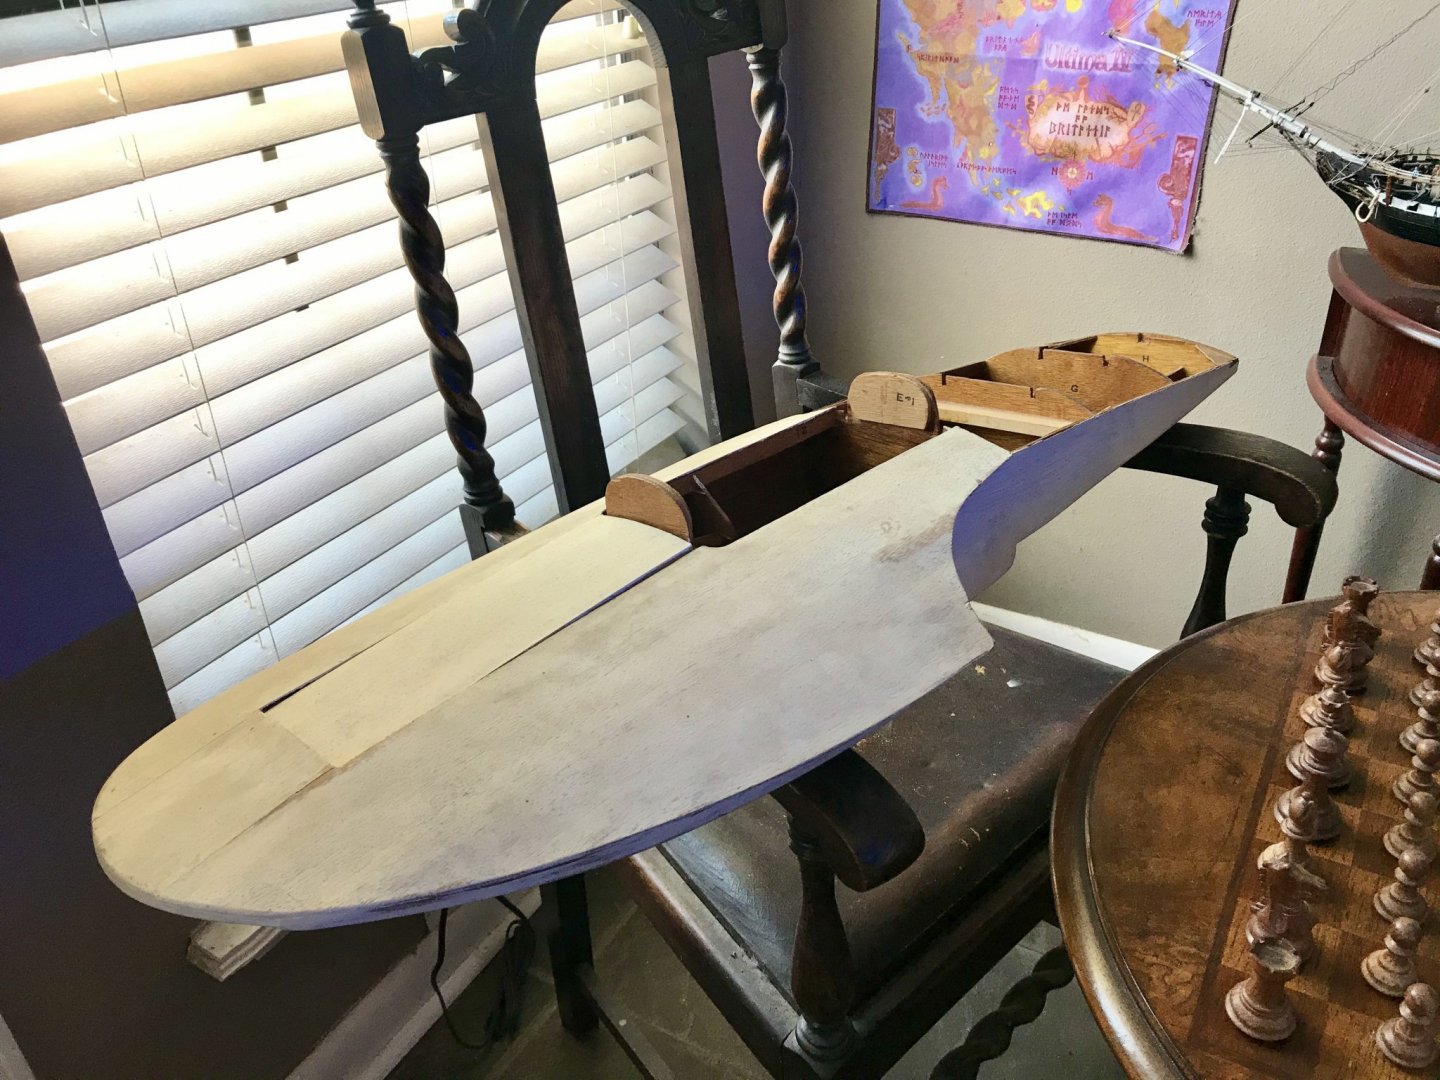
Continuing on with bringing this old model back to life. I trimmed and filed the aft deck panels to match to contours of the boat. Other than that it's been a lot of filling and sanding , then filling more spots and sanding just to get the little imperfections out from some cracking edges over the years. Other than that, I'm waiting on the decking walnut strips to come in. I didn't realize I ordered from overseas (modelers central) to USA when I ordered, so it may be a little while. I added this filler brace to the front access panel cavity because it was teetering on the middle brace, and panel wouldn't always sit flush. This assures a flush fit every time its installed. I need to make a little filler triangle here where walnut decking will be. I'm not very happy with how you had to cut the plastic formed cowl pieces out of the model kit. There's not a good guide where the exact cut should have been. I'll still use the pieces (because I really have no choice), but for what's going to be a nice wooden sturdy boat, these flimsy plastic cowl pieces are not going to be the best. Although I have no plans to make this RC controlled, I'm still leaving access just in case I change my mind.

- 51 replies
-
- 8
-
-
- miss unlimited
- dumas
- (and 1 more)
-
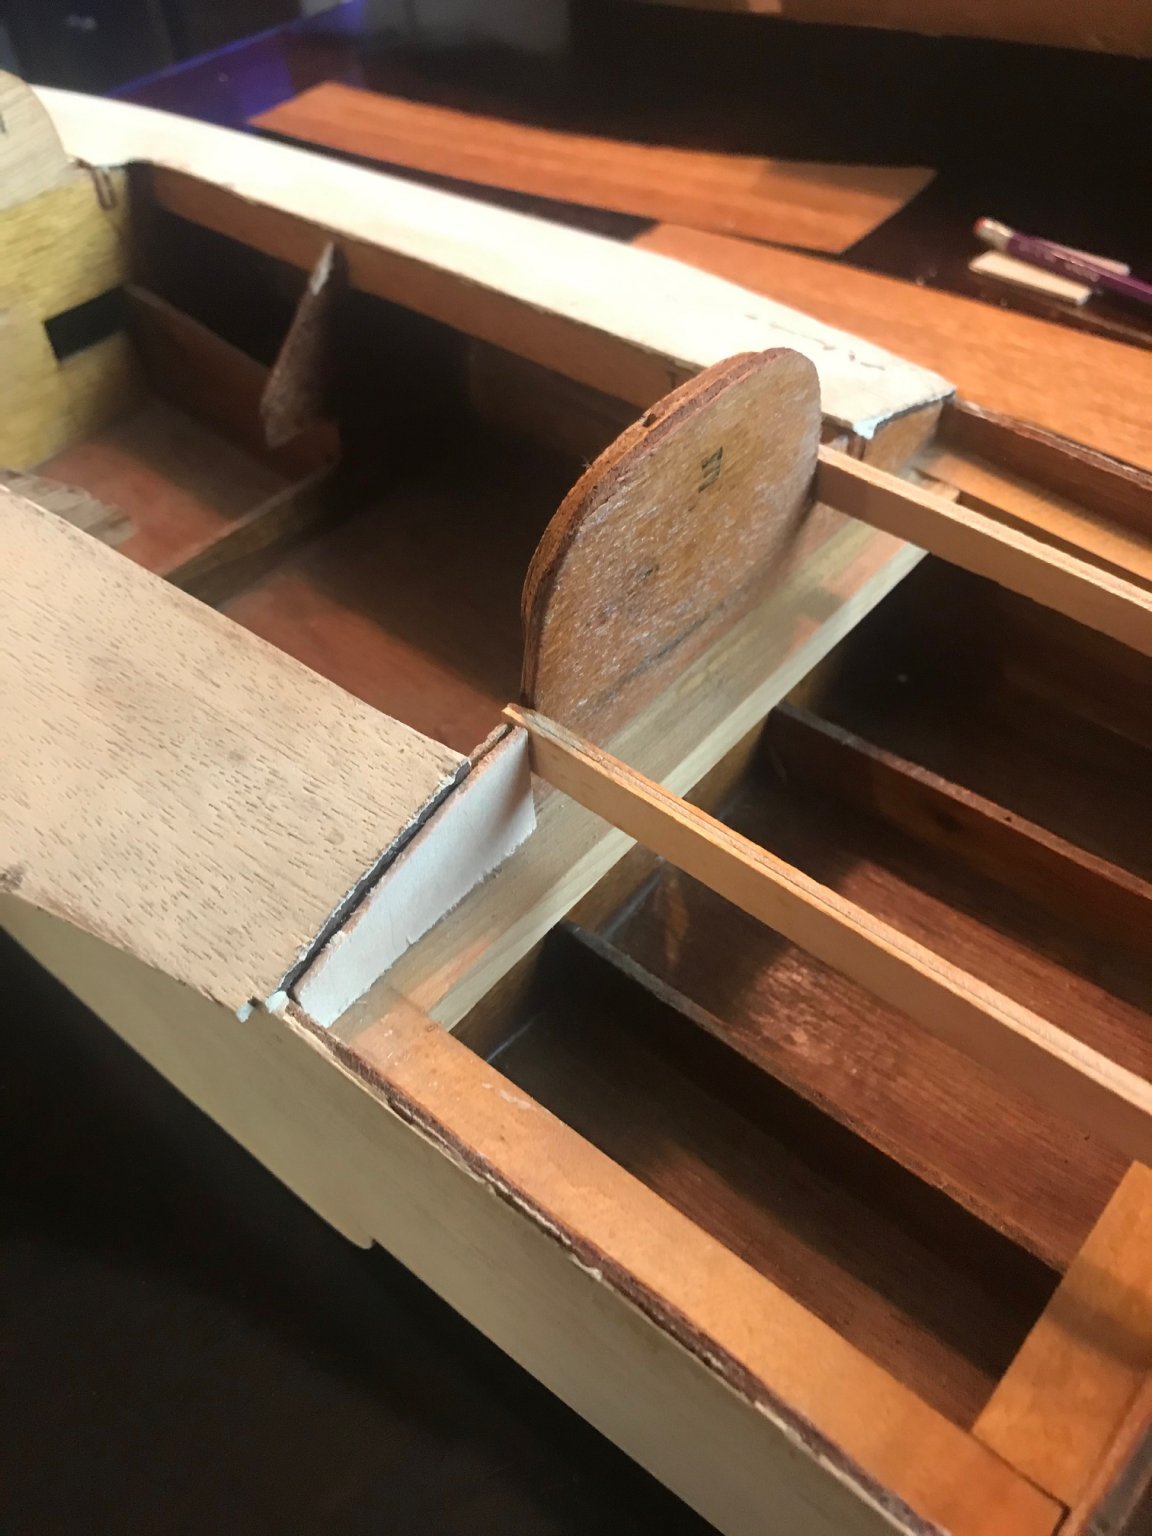
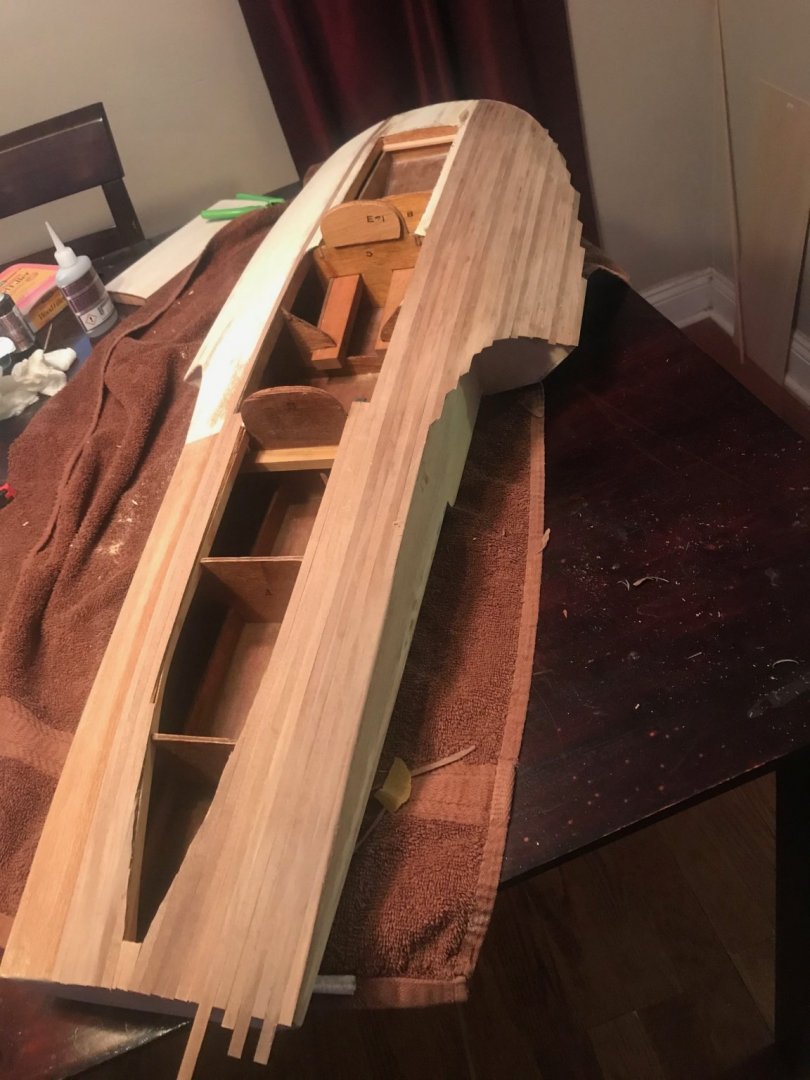
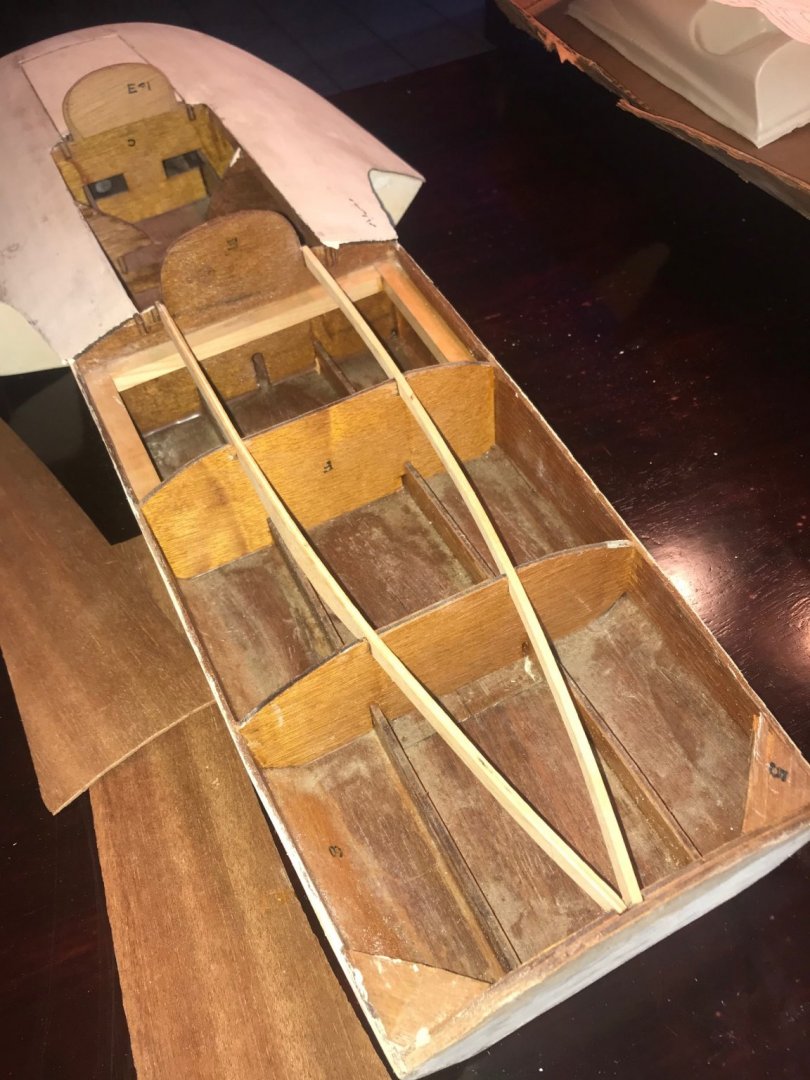
Jumped right in yesterday/today with making some progress on the build. I added in the bracing strips for the aft decking. I had to form some pieces out of wood scraps for joining the aft deck contour to the front deck. . Then glued the decking panels on. They slightly overlap, so there's a lot of filing and sanding to do for it to follow the hull. I filed/sanded one side already. Still a lot more to go. I decided I'm going to plank the whole upper deck with 3ft. mahogany strips (1/4" wide strips are on order). Since the forward deck was already painted white and sanded, I'd never get the aft to match. I want a nice varnished mahogany deck front to back, with solid paint hull, and possibly a white trim line dividing the two. Still planning that part out.

- 51 replies
-
- 10
-
-
- miss unlimited
- dumas
- (and 1 more)
-
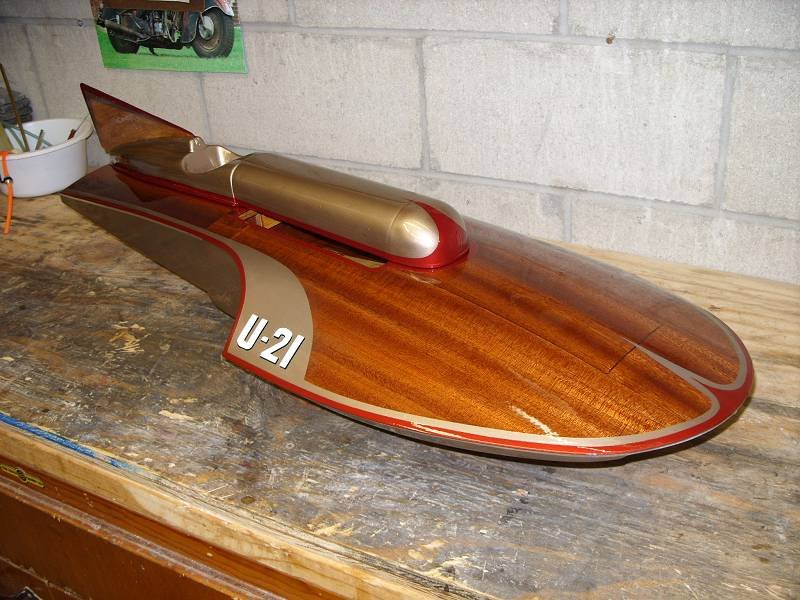
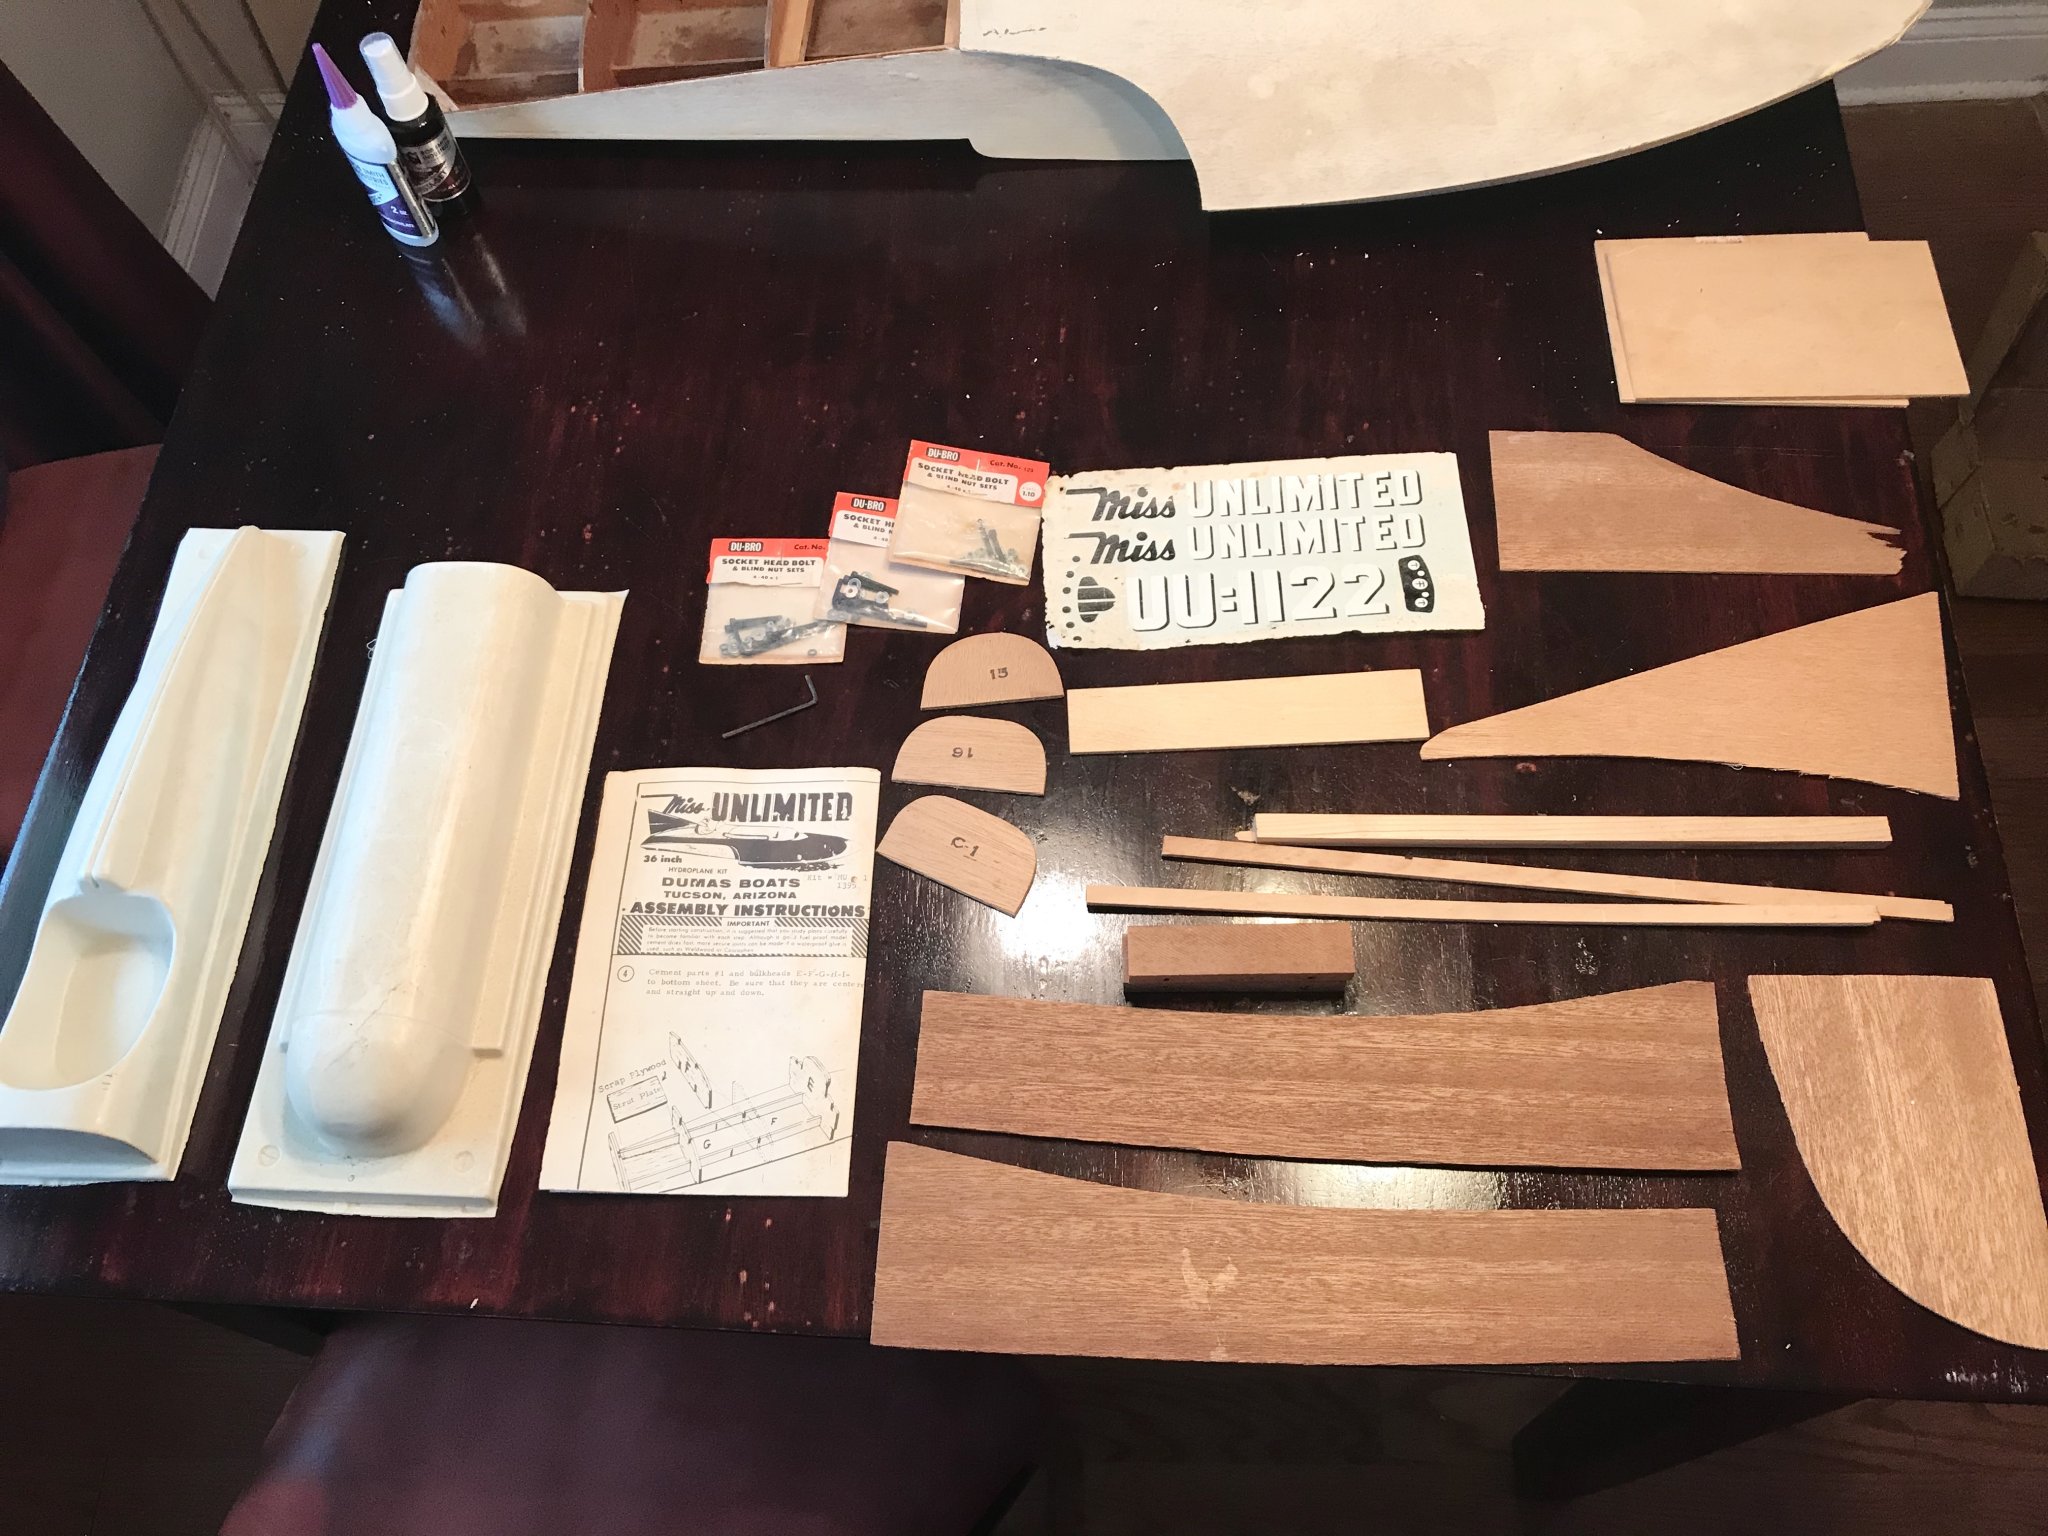
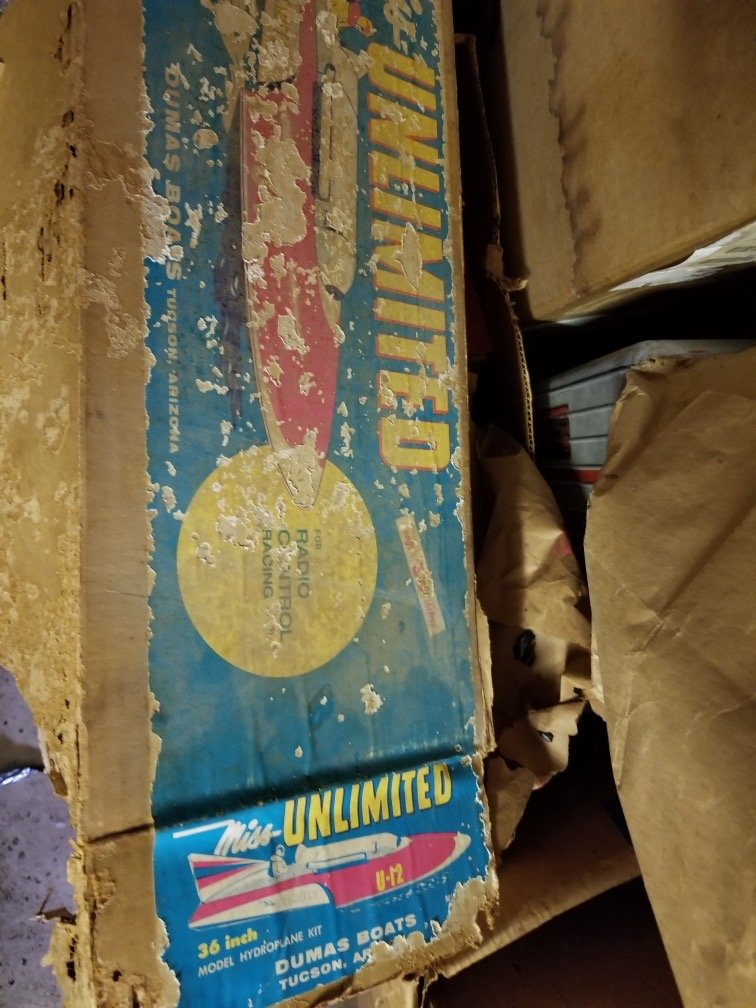
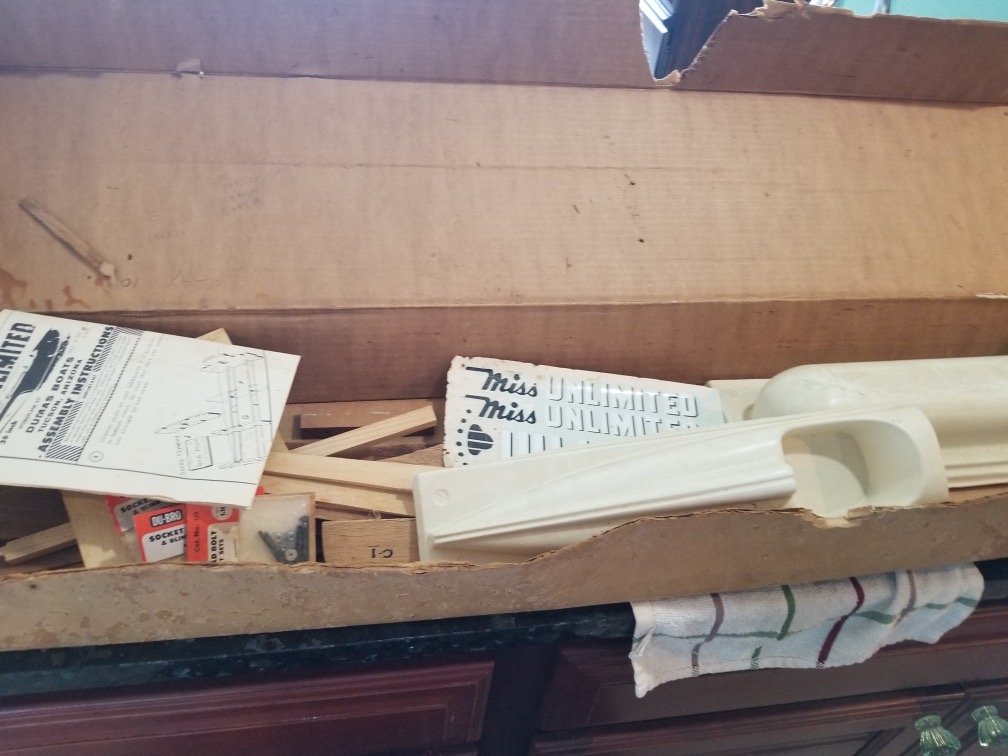
OK, this is going to be an interesting build. We are setting up to have an estate sale for my Mother and Father's home. I was remind that an old boat that he was building may still be up in the attic. I remembered the boat from seeing in when I was young in the 70's and 80's. Just remember it being a speedboat of some sort. Well anyway, the estate lady did find the boat and handed it over to me and I didn't know how it was built, or where I would go from there. After asking some questions on here yesterday trying to find out what kit this was, I had it narrowed down to Miss Unlimited. I asked the Estate lady if there was a box for it, and she said no, So I figured I had to scratch build the upper section of the boat (which comes as plastic molds). But surprisingly a few hours later I received a text with these pictures asking if this is what I was looking for: I was ecstatic to get to see this. I drove over and picked up the box. I want to finish this boat as a tribute to my dad, but I didn't have and intention of making it motorized/RC controlled, just for display. I don't know if I will change my mind later. But for now I just want to finish it and give it an interesting paint job. There isn't a whole lot of pieces left to finish, but I'm still going to make a build log for this. Working with a model that has been in the attic for 40 years will be a challenge. I already had to seal a lot of spit plywood with a thinned out wood glue mixture and some clamps. That worked out great. Also, the model appears to have a whitewash paint over it, it came with mahogany sheets for the top, but so much for making a nice varnished top. I will improvise with the paint job to get a finish I like. The main reason Im glad I found the box was for the plastic molds. The contests of the box left are this: One other funny thing:

- 51 replies
-
- 10
-
-
- miss unlimited
- dumas
- (and 1 more)
-
Vintage unfinished speedboat model, any ideas?
LMDAVE replied to LMDAVE's topic in Wood ship model kits
Looks like it's my lucky day! The estate lady just sent me these pictures asking if this is what I was looking for. She found it, Jackpot! Now I just need to assess the kit and start a build log picking up where this one left off.

-
Vintage unfinished speedboat model, any ideas?
LMDAVE replied to LMDAVE's topic in Wood ship model kits
Well, it looks like Dumas Miss Unlimited is the answer. You'll see in other's finished model the cutout. I just need to improvise on the upper section, and design my own color/varnish scheme. Will be a fun project to play with now that I know what I'm up against.