HOLIDAY DONATION DRIVE - SUPPORT MSW - DO YOUR PART TO KEEP THIS GREAT FORUM GOING! (89 donations so far out of 49,000 members - C'mon guys!)
×


LMDAVE
-
Posts
172 -
Joined
-
Last visited
Content Type
Profiles
Forums
Gallery
Events
Everything posted by LMDAVE
-
Vintage unfinished speedboat model, any ideas?
LMDAVE replied to LMDAVE's topic in Wood ship model kits
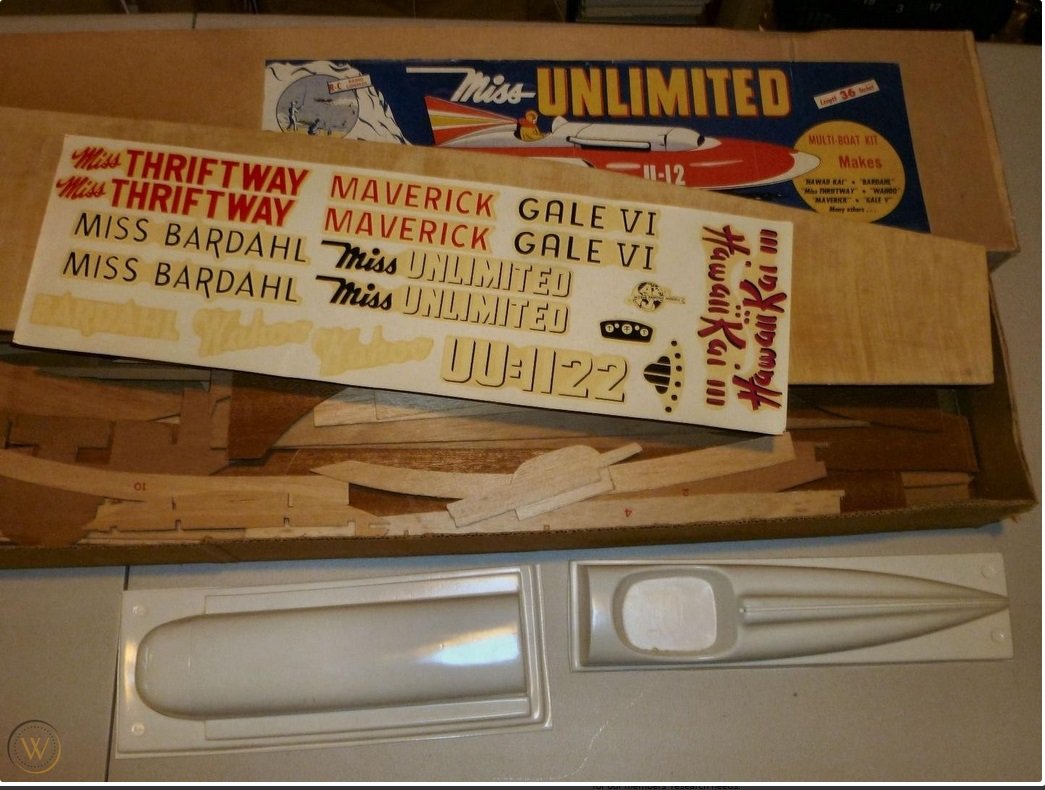
OK, I think I found a winner on this, this has to be the kit. Miss Unlimited "Vintage American Junior Aircraft Miss Unlimited Hydroplane Kit", its 36" long and makes multiple boats. So my only thing now is to find another kit or try and scratch build the Cowl section with maybe planks and wood filler. But this has got to be the kit. EDIT: If not this kit, then Dumas made a Miss Unlimited also that may be the one.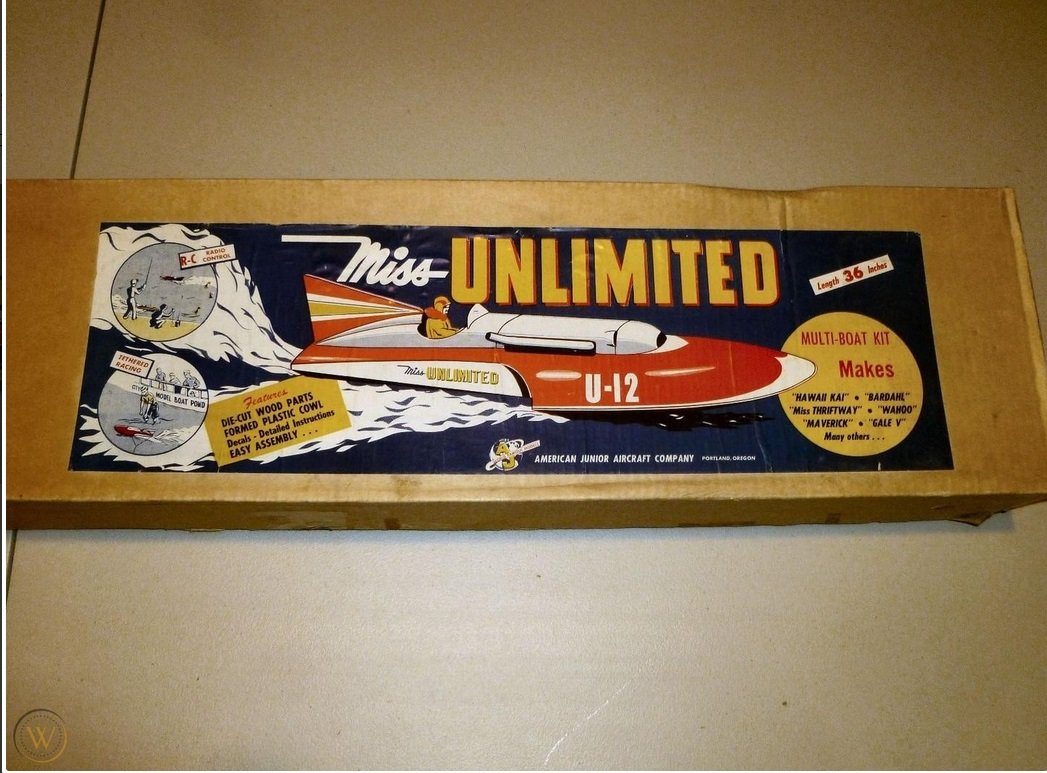
-
Vintage unfinished speedboat model, any ideas?
LMDAVE replied to LMDAVE's topic in Wood ship model kits
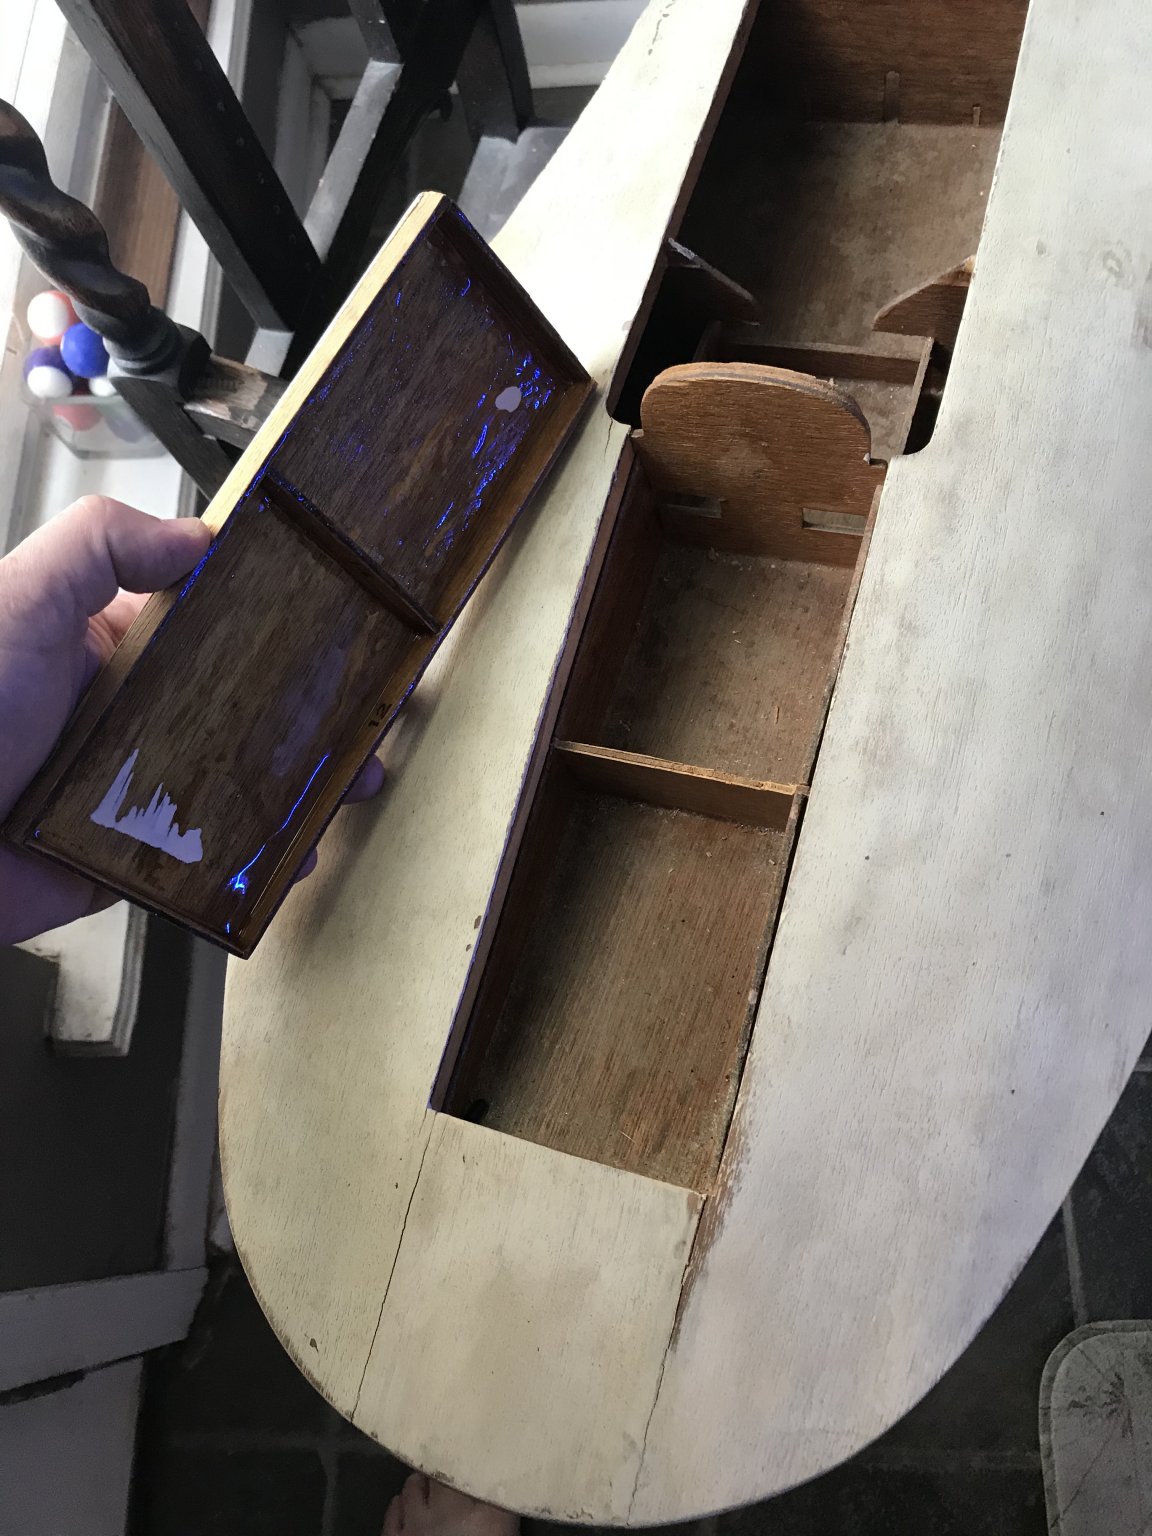
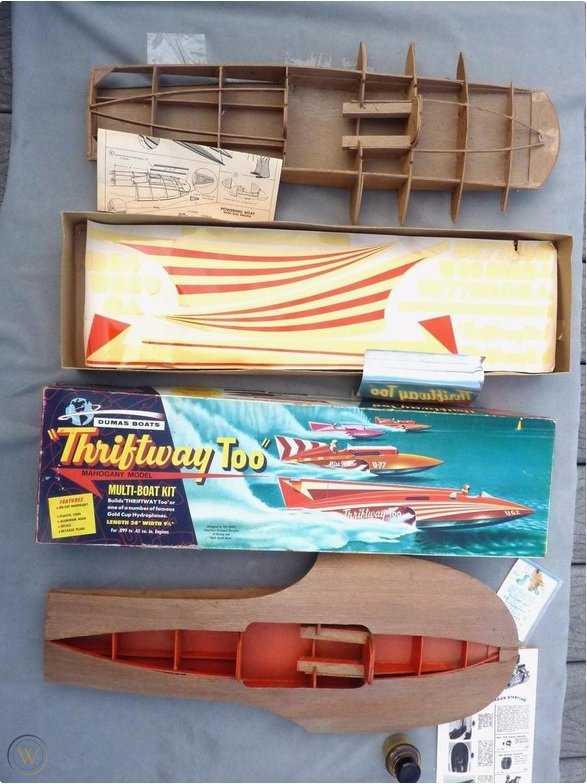
I checked that site, and still waiting for a response from them. I did come across something close, even though above they said this isnt Miss Thriftway, I found this Dumas Kit from late 60's that coincidentally was found half finished in an estate sale also. The is the link to it. But looking at the kit, then looking at my dad's boat, it almost follows the same lines, and I drew in yellow line from the slots to show this. But could my dad have possibly did something different on his own in the from section with the rectangle? Also, my dad's boat is 36" and this kit is 24", but could their be a version of "Thriftway too" that is 36". I do think this is close. https://www.worthpoint.com/worthopedia/vtg-wood-dumas-thriftway-hydroplane-1834282033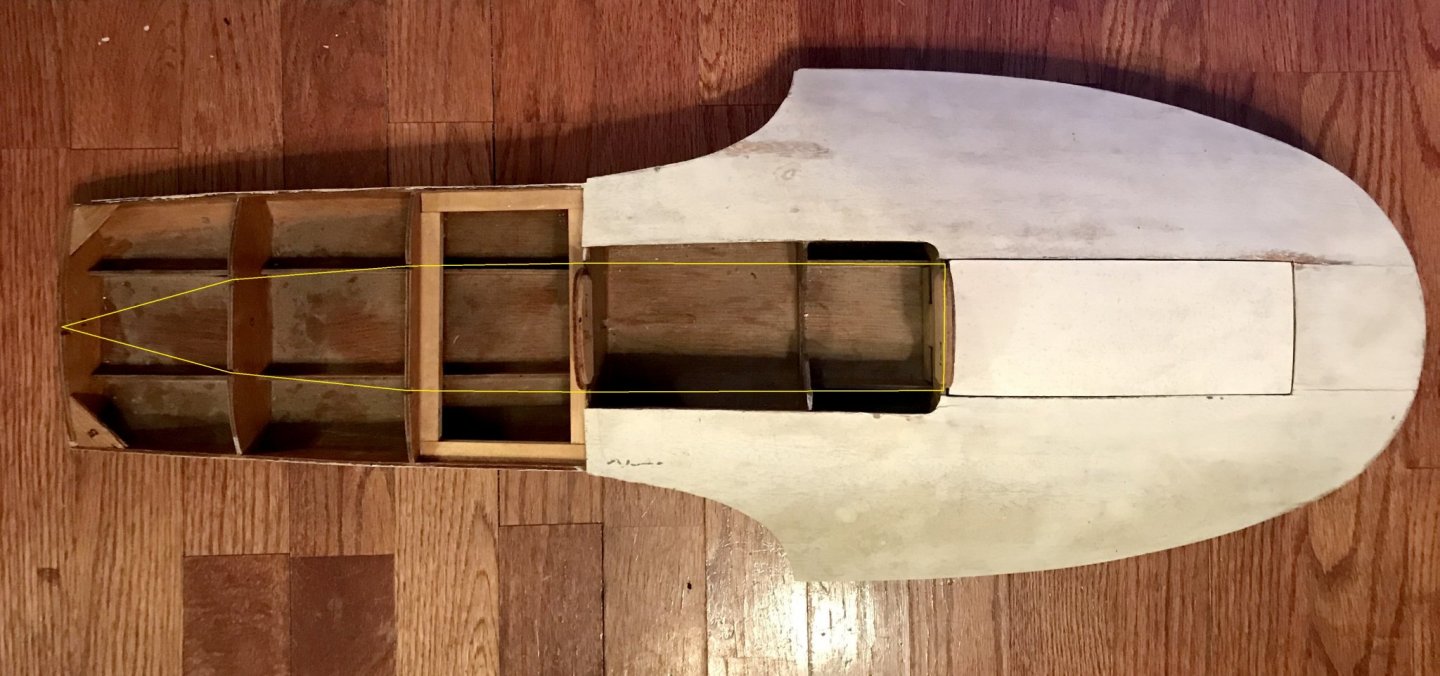
-
Vintage unfinished speedboat model, any ideas?
LMDAVE replied to LMDAVE's topic in Wood ship model kits
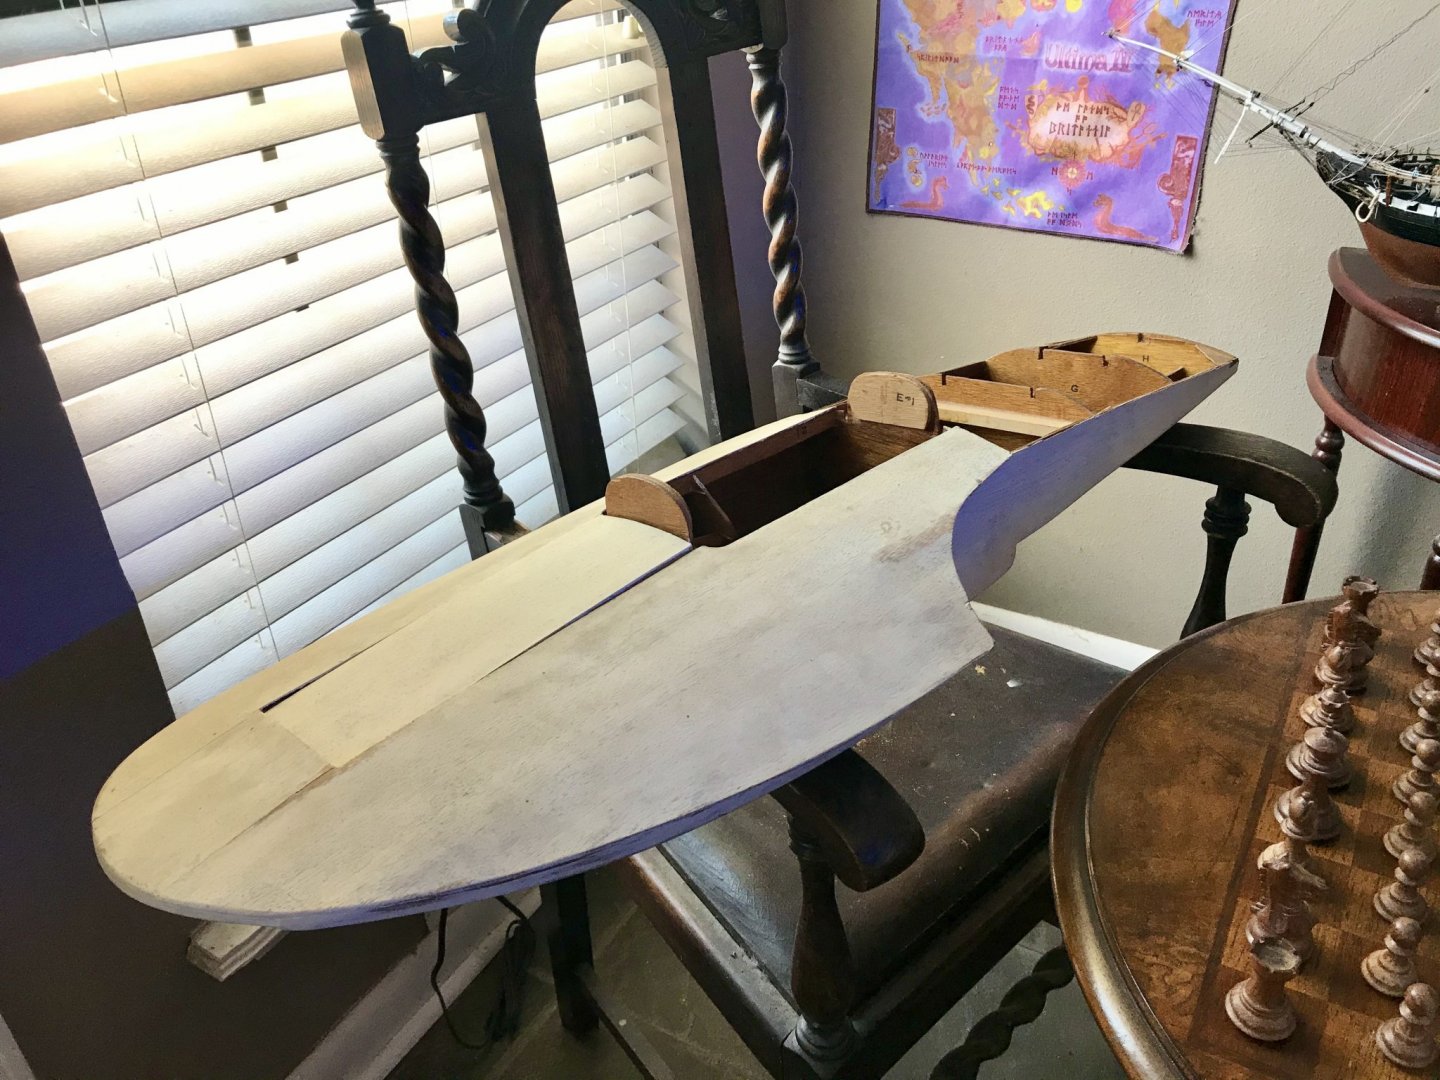
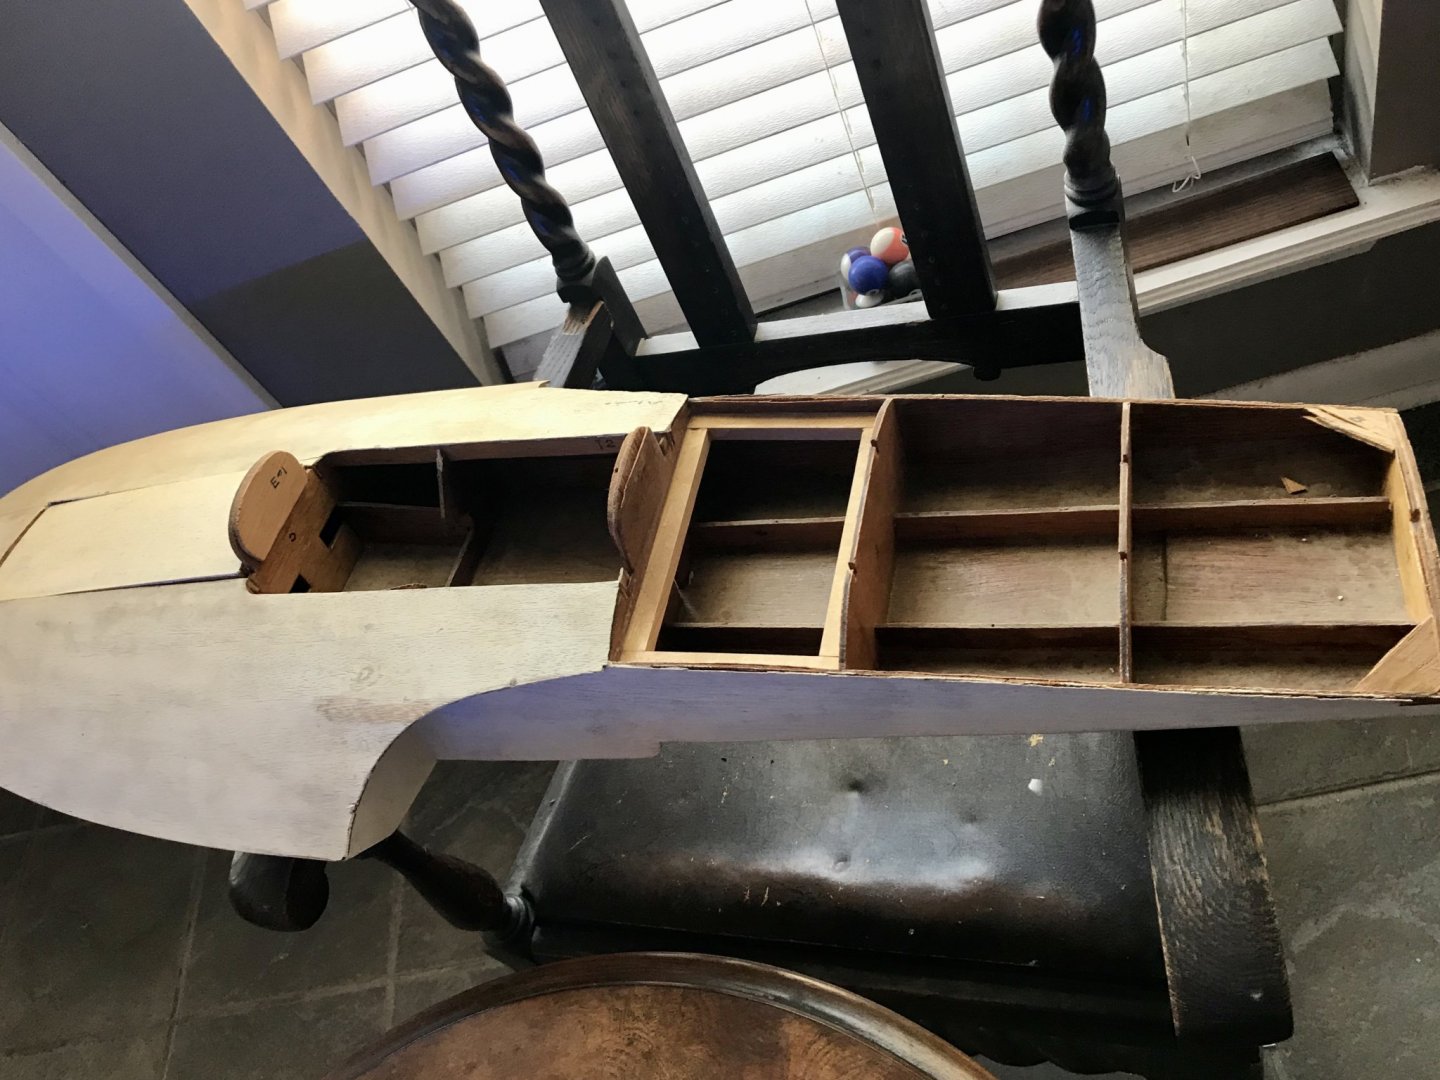
Thanks for what you all have found so far. I think the rectangle access panel in the front would be a good clue. I’m not looking to make it RC functional, but nice finished display, and yes would be a good tribute to my late dad. -
Vintage unfinished speedboat model, any ideas?
LMDAVE replied to LMDAVE's topic in Wood ship model kits
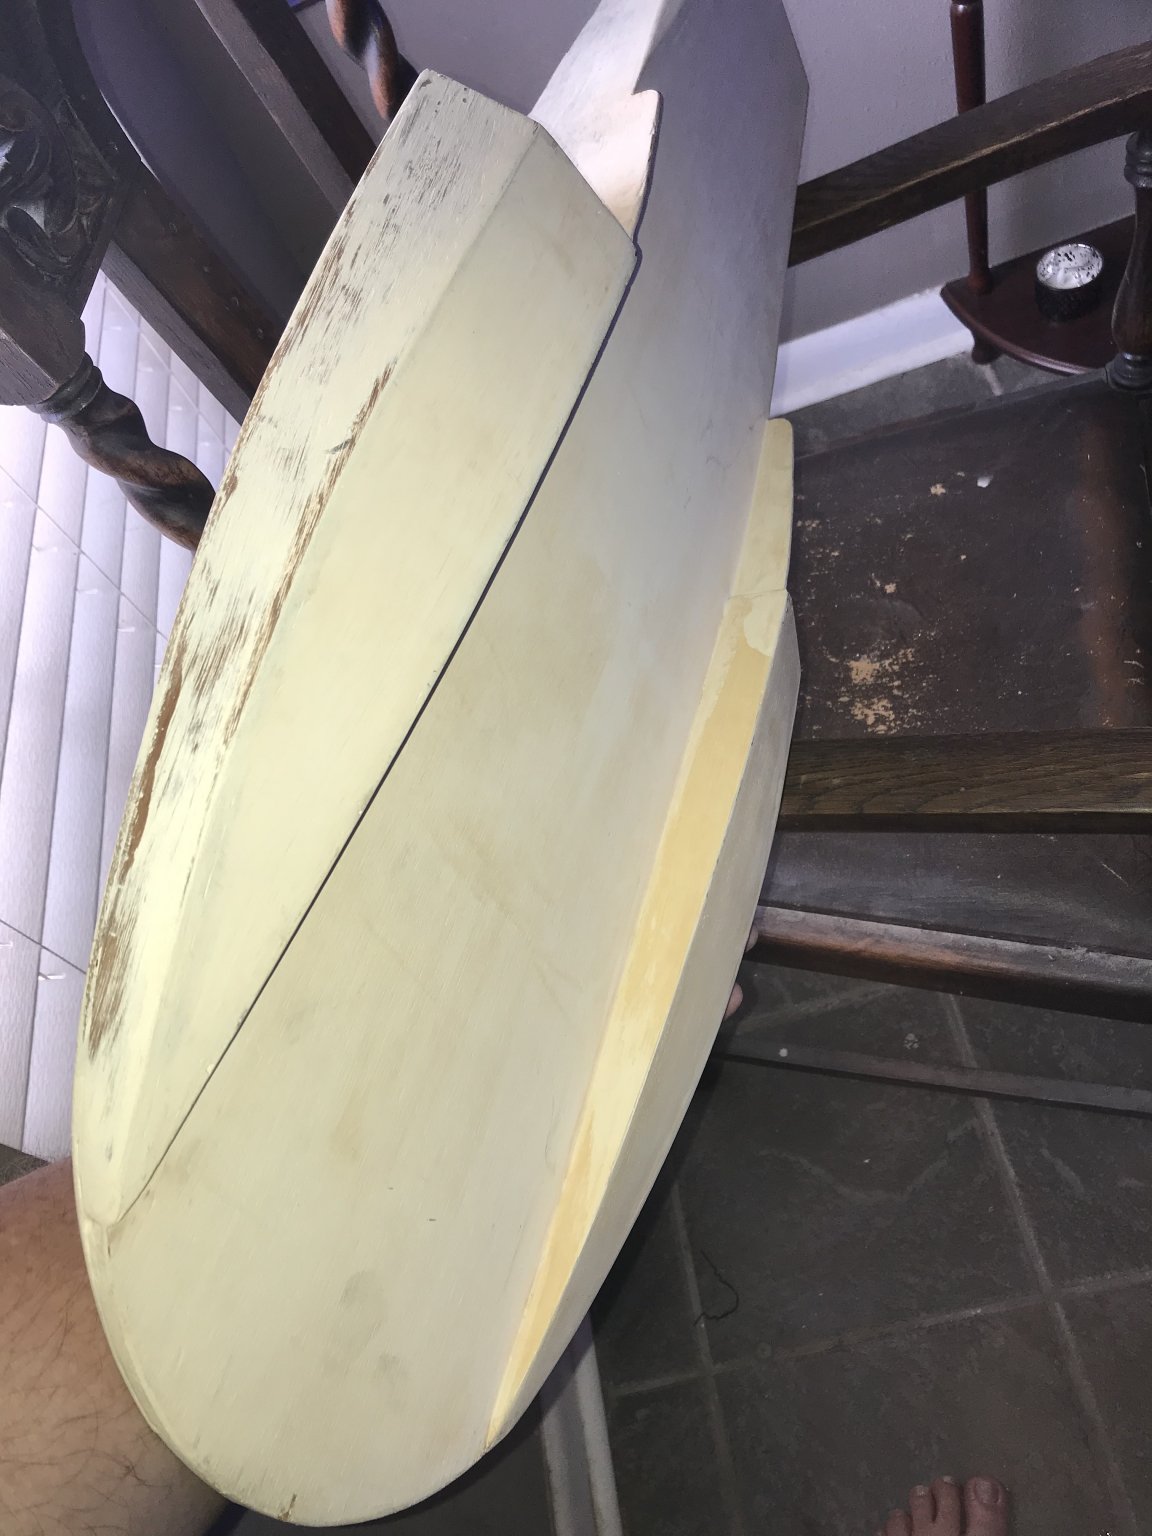
It’s about 3’ long. I found the Ferrari Hydroplane Racer you shown also. I was thinking that maybe. But not sure on that whole upper “fuselage” meant for this one. But maybe I was. Just want to find something close to get ideas. -
I'm going through my father's attic for an estate sale and came across this old boat I remember him building back in the 80's when I was younger. I have no idea if this was scratch build he was doing or if he was modelling it after another boat. I would like to take on the task on completing and painting it, and just curious if anyone has any idea which boat this was and ideas I can look at to finish it.


-
Floyd can you take a picture or find a picture of the connection point. I thought that may have been something I overlooked on the mast, but cant see it on the drawings. Maybe it was left out. But, I'd like to add it if I can find a picture of it.
-
OK, here's my spinnaker pole. It may be a little thicker than scale, I had to start from a 1/4" dowel and sand down.
-
Yes, I feel I should do some touching up , that is one big one I left out. I post corrections here when I do. Thanks
-
OK, I decided to to the finishing touches on this today, and posted the final pics here: http://modelshipworld.com/index.php/gallery/album/901-endeavour-j-class-yacht-1934-801-amati/ Thanks for everyone following this thread and build. LIke I said before, the end came faster than I expected. Now for a little break and think of the next possible build.
-
Floyd, not offended at all...yes, my love for sailing is more of a visual thing that I hope to someday learn. I love learning term, so that was a good lesson. I've learn a lot during the bluenose build, and more here. Henry James, I realized I didn't answer your question before, but the brass wire I used was around .020" or 0.019" brass wire. I know the kit suggests rope, but I liked the brass. This kit is almost finished. I'll even say my next update of pictures will be the final showing. I already attached the 3 sails. I'm dressing of the rigging of that, and will finish any final rigging. The end of this build came faster than I was expecting!
-
Yes the stropping came out pretty nice with the rope.
-
Thanks! Yeah, take one line at a time, try not to let slack happen in the lines unless it intentionally has slack in it. Sometimes pulling something tight will cause another to have slack, so think that through. Usually doing it in the order they show is good.
-
YOu can either order pieces online or find a local hobby shop that carry balsa wood strips. OK, decided to move forward and lace in the main sail. Probably a good idea to do it now since the more rigging to work around the harder it is. I didn't do all the loops up the mast and down the boom, just enough to hold it in place for now. The "hypotenuse" of the sail must have been a little longer than it should have because it doesnt pull tight and causes the sail to lay an inch or two to the side, Not a problem when seen from the side. My main problem with the main sail was the lower reef lines, those came out the worst before I started using my sewing machine better, but I kept it. I'll just 'pretend' the sail is old because of use.
-
Erik, you can see on page 8 of my build how the sails came out, I was forced to use dark brown and just sewed over the daark brown dashes. I would have preferred just an offwhite slightly darker than the sails. I didn't presoak in glue, if that doesn't make them look unnatural I guess that's a way to help form them, otherwise jsut let them have their natural hang from being cloth. I'm at the point that I might install the main sail. If it bothers me, I may start over with different sails. I guess once you get a good material, you can transfer lines onto the sail with transfer paper and sew reef lines over those lines, because the transfer lines wash out. Then you just let them air dry while stretching them over your plans with push pins so they don't shrink, and then iron.
-
The cleats are painted brown because I suppose the original ones were large wooden cleats. I can't find good old pics. They are cast metal because precutting these probably would not have worked well. It was a pain to paint them.
-
For the center stripe I used left over walnut and double stacked it, I saw you write about have bleed through from staining, that would have prevented the need for staining.
-
Yeah, I had green but no red. I used the red touch up paint I have for my Red Tundra truck. worked perfect. The winch was the lst thing I did on the deck and I was getting lazy and wanted to finish, so left it brass. Also had to make my own handle, didn't like the flat brass supplied one, so I just bent some wire in a "s" shape to make the two sides.
-
Some more updates on the rigging. I rigged the boom which had a real trick run trough about 7 blocks. And I'm only rigging one side to the mast before putting on sails, so the other side can be rigged later..will make it easier for putting on the sails.
-
Yeah, had a lot of experience with Bluenose on making the blocks with thin brass wire. I ran out but only have a few more blocks to go, so will probably use thread on those.
-
Looks pretty good, like the way your bench area came out on the main cabin. Mine came out too wide. I wouldn't gloss anything on the deck, satin at the most. I just used a sanding sealer over my deck and sanding it smooth and left it at that.
-
Here's a good shot to see some original rigging. One thing this picture shows is the gauges on the block is attach to the hatch behind the ship wheel, not the one in front, like most model show. I cant tell if the one in front of him has it, but it's clear that the guages and behind Sopwith. I'm leaving mine where it is.
-
Thanks ragove, it's not normally very clean on my desk. Floyd, I know most that do this kit jsut use the one roll of tan for everything. I don't want to be that laid back on it. I have a thicker gauge for the larger stays, and will just used the supplied tan for the running rigging goign through the blocks. This is a good picture for showing a lot of the rigging. http://homepage.eircom.net/~johnhearne/Sailing/Grenada/Endeavour%205.jpg'>http://homepage.eircom.net/~johnhearne/Sailing/Grenada/Endeavour%205.jpg
-
Starting out on some rigging. I rigged the shroud lines first. The problem I was having was color, should I use black or tan? Standing rigging is usually black, but I see a lot of the standing rigging on endeavour tan. I started black on the shrouds, then made the switch when I did the forward stay to tan. I will continue with tan. I hope the shrouds dont standout out as an outcast in the end being the on black rigging. I like it so far. Here are a few pics of the rigging starting.
-
It should be the same as one of the deck boards, I think I even left out the center strip in one of my deck lights, by accident, I jsut butted the two windows together but still looked fine. If you dont have you can always file/cut/sand another scrap piece down to size.
-
Sorry you're having trouble JD. Thanks Michael..yes, sails can be a pain. OK, I think I'm finished the deck and almost ready for some rigging. Can't believe I can see the end of this build already. Here, are deck pics with all the rigging blocks finished. One particular piece I just did that came out nice was the red/green light stand. It started out as just bright gold. I coated it with wood strips, painted lights red green, and a brown top.