.JPG.1db74a3c50dee7c3f86fbf4fdabbb0e2.JPG)
Ondras71
-
Posts
435 -
Joined
-
Last visited
Content Type
Profiles
Forums
Gallery
Events
Everything posted by Ondras71
-
.thumb.JPG.4d3261ccae06041fa7cc2933fb43d577.JPG)
Roter Löwe 1597 by Ondras71
Ondras71 replied to Ondras71's topic in - Build logs for subjects built 1501 - 1750
I continue tying the deadeyes. Mizzen mast..🔥 After measuring and tying the deadeyes to the shrouds, I glued the masts.. "Tackle" and Deadeyes tied cleanly. Just need to adjust the height..💥.thumb.JPG.bd78ee523d92754c505ba0dd755b262c.JPG)
.JPG.d471427b3907a574ae93d358e94508ef.JPG)
.JPG.752e2dba6b69001f6520aeff2935df74.JPG)
.JPG.0cf1928f363eb20c59f4ad6b6bafe584.JPG)
.thumb.JPG.8ef8a7cc8b91d1170914a402ba77da0d.JPG)
.JPG.f33cd58e30699b1b7d4bf5bc5a0bb6a7.JPG)
-
Roter Löwe 1597 by Ondras71
Ondras71 replied to Ondras71's topic in - Build logs for subjects built 1501 - 1750
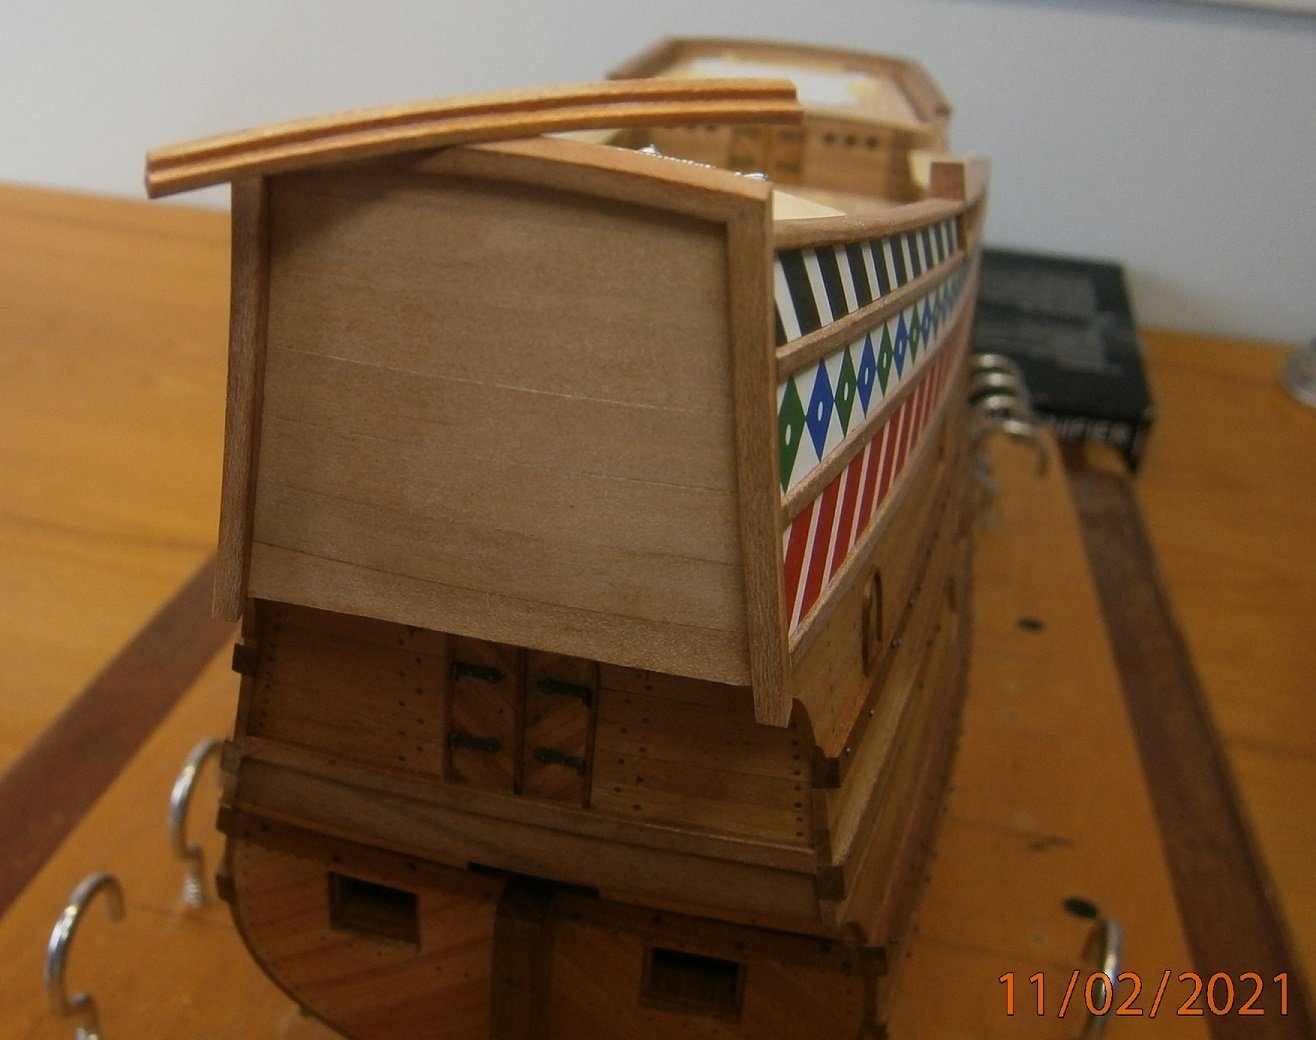
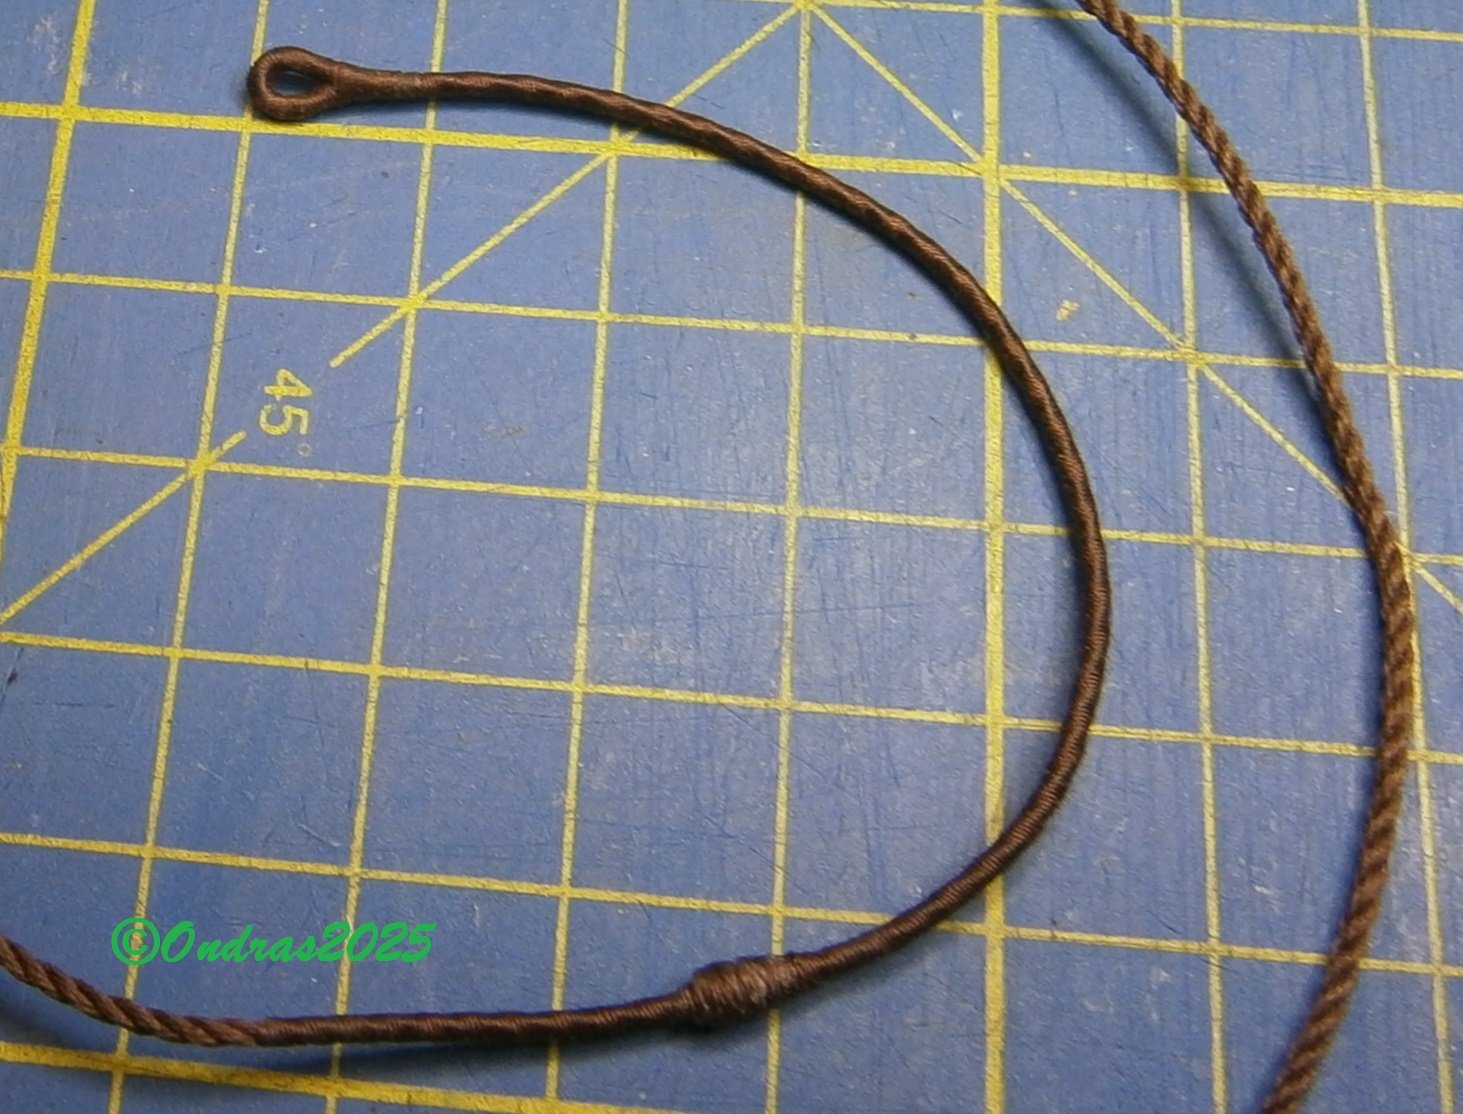
Hello Johann. Thank you for the compliment. I admit that I didn't recognize the groove, I only saw a thick line. The groove is really needed!!🔥 Hello Bella. Did you mean this crossing of blocks? Fortunately, the distances are fine.💥 Before gluing the masts, I tied the boat up, as Kirill had pointed out. I put in a thicker rope and immediately created smaller deadeyes.. All sizes created by me.. Deadeyes of the foremast measured..
.thumb.JPG.0ebf35fea6195970e0b70dfd450a62a6.JPG)
.thumb.JPG.76ba048d90ed4e22c9ceb9f222ba232a.JPG)
.thumb.JPG.8a1960289607aa7557648305961978cf.JPG)
.JPG.1fa0c607886e2c3f15ad4deb5ceea9e2.JPG)
.JPG.a156ef9e95e345442eb5be638f8120cd.JPG)
.thumb.JPG.185018323a4c531f05d0252b1fa75866.JPG)
.thumb.JPG.2b40c3fcee9f5d854329548de0f4b8d7.JPG)
-
Roter Löwe 1597 by Ondras71
Ondras71 replied to Ondras71's topic in - Build logs for subjects built 1501 - 1750
This is how I tie the Deadeyes to the main Shrouds. Due to the different distances between the upper and lower Deadeye, I used the system that modeler "archjofo" uses when building his beautiful rigs. It is a log with a diameter of Deadeyes, which is at the correct height even with different inclinations of Shrouds..👍 Then another binding.. Result ok..💥.JPG.0effa47d59785f0a007bf696ccb4a041.JPG)
.thumb.JPG.22766727643496d8d5e75ef671b4f816.JPG)
.JPG.994c9b686c1422a9fdec0c15977e93e4.JPG)
.thumb.JPG.bcc2910aee6bc5256118c9a4a9db0003.JPG)
.JPG.6071926494250d84bae5be727154ee5f.JPG)
.thumb.JPG.46a1eb3f4ed4c2d9a06af0396cccad0f.JPG)
.thumb.JPG.a670ded405044e6eae69f76e5f9db2fa.JPG)
.thumb.JPG.b77698fbc2ea92ee7b4c79f66fb49310.JPG)
-
Roter Löwe 1597 by Ondras71
Ondras71 replied to Ondras71's topic in - Build logs for subjects built 1501 - 1750
Thanks Kirill. Now with the installation of additional ropes, the boat rope really seems weak to me. I plan to install stronger ones.. Hello Bela. Due to the poor plan, I am still working on these things during the installation to make the result look believable. Thanks for the timely warning.. Thank you Marsalv. I have a good teacher...👍 -
Roter Löwe 1597 by Ondras71
Ondras71 replied to Ondras71's topic in - Build logs for subjects built 1501 - 1750
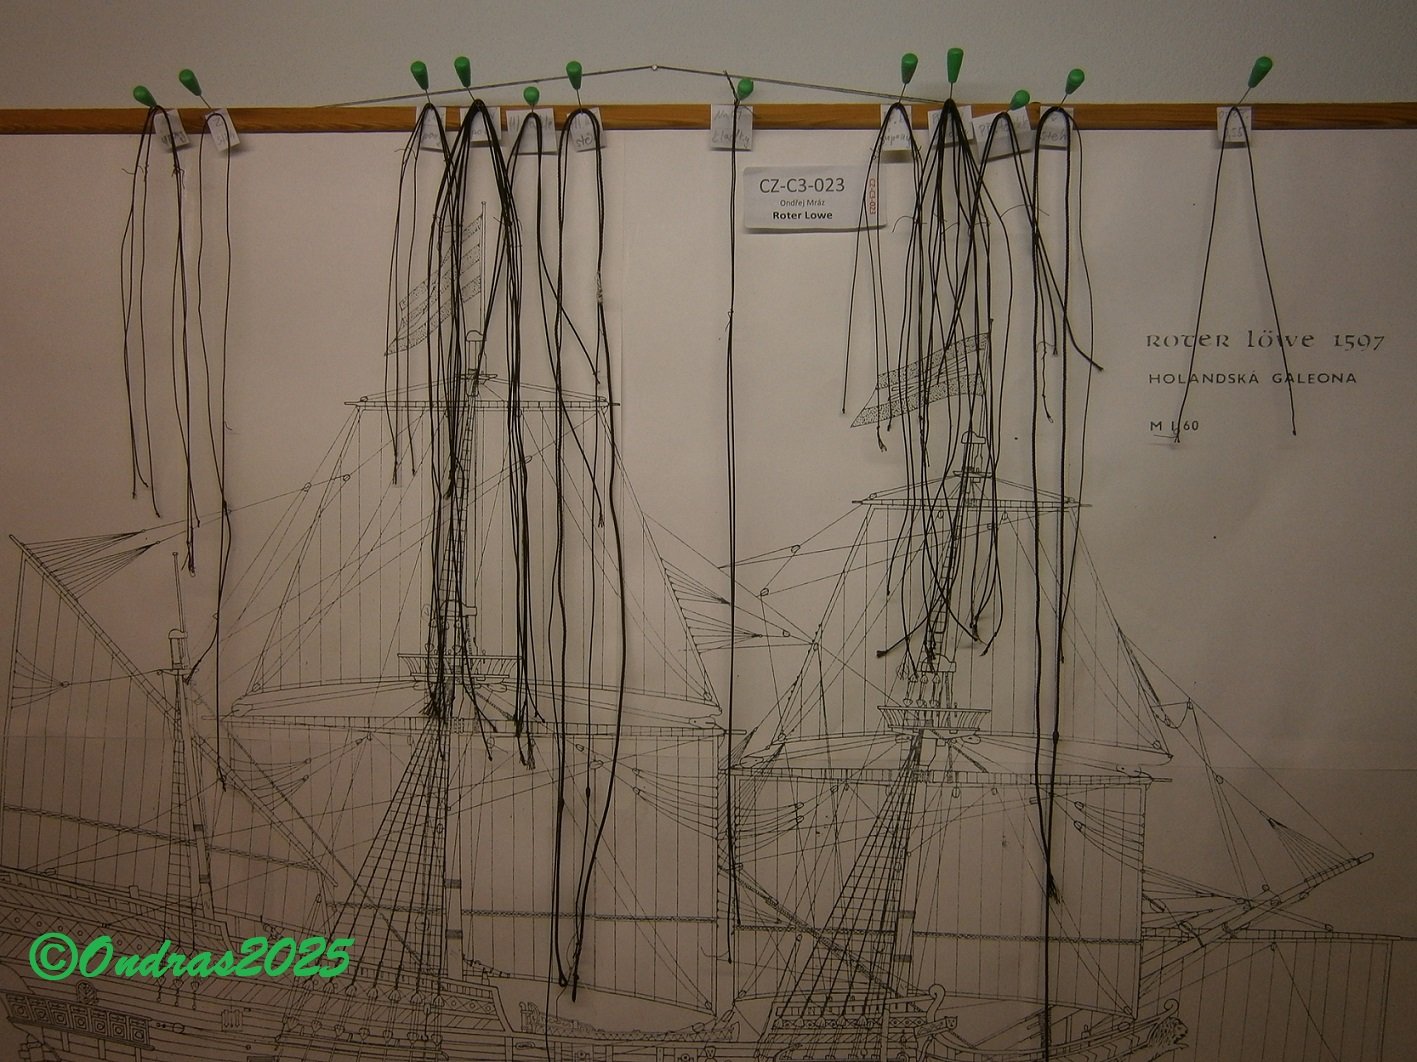
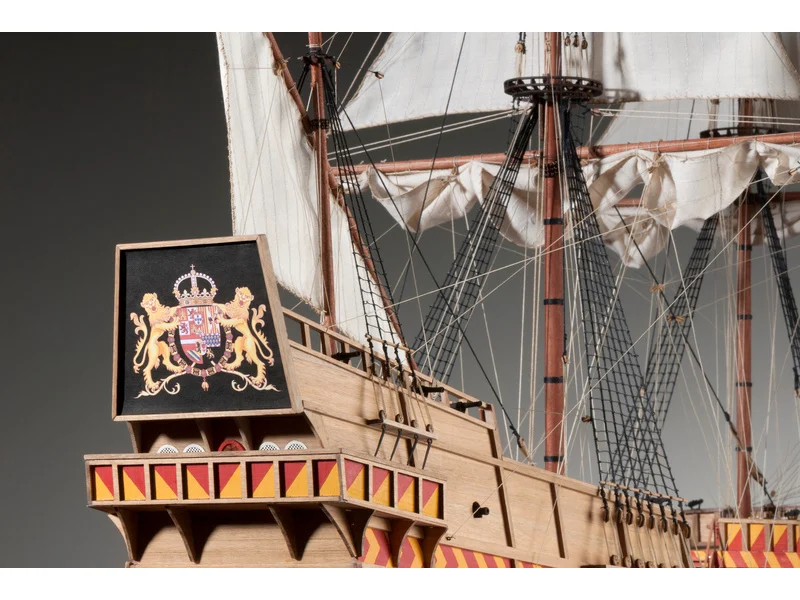
As I reported, I enjoyed a weekend in Sweden with the main goal, the Vasa Museum. https://www.vasamuseet.se/cs I had been preparing for this for about 40 years and it was worth it. When I arrived, my watch reported increased blood pressure and heart rate... I spent over 4 hours here, I could have stayed longer, but I took into account the company of my son. I walked around the ship several times and compared the beams and planks with the strips from which we model them... Having the ship about three meters away from each other is unreal. I tried to look at and photograph every detail. Simply indescribable, at the end a very long viewing with contemplation..🔥 I've made some progress on the boat. Front and main tackle finished, I'm tuning the Stays and the Schrouds are waiting for me..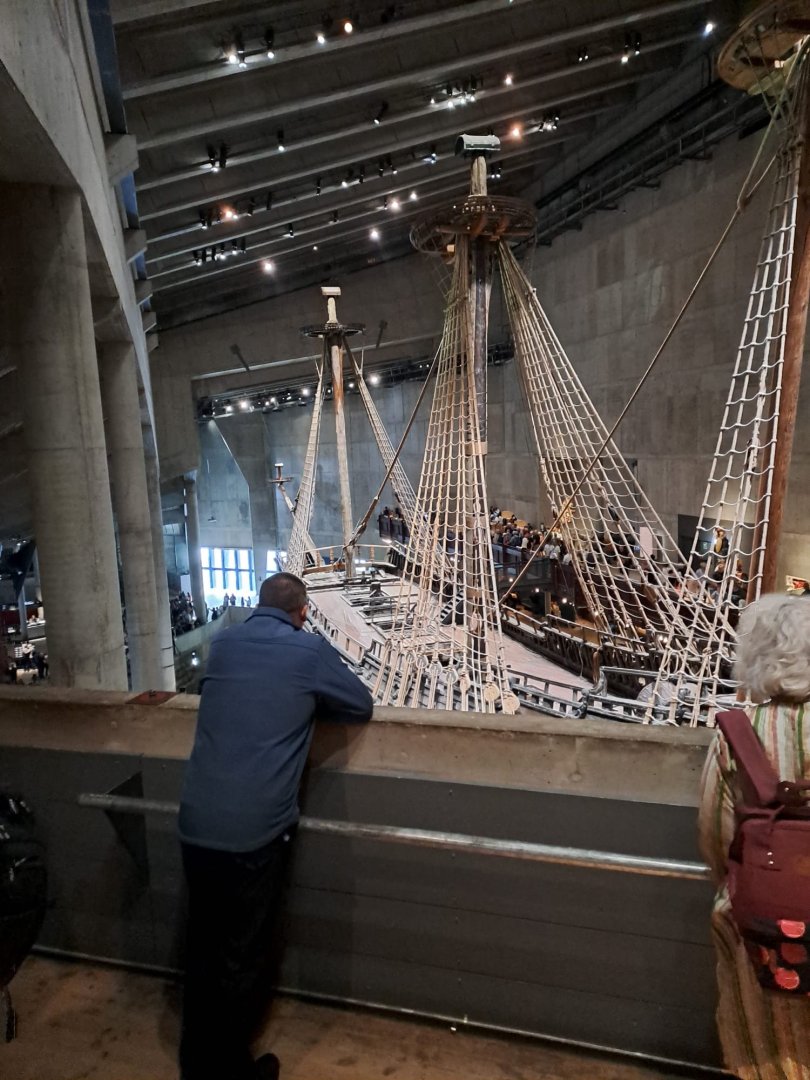
.JPG.58d1ad0a86f05384ae97fc689e42e54e.JPG)
.thumb.JPG.e4c3542b48d43db6b8d65d85bdff11b9.JPG)
.thumb.JPG.4cb0a34998e94d8a1b9dca8bf766efc7.JPG)
.thumb.JPG.f2429416448f51ef8edbcac55e1a9f79.JPG)
.JPG.1fabe5949a401c632afde3f738bec678.JPG)
.JPG.3992960f3b05ad26a85edb2b22835d79.JPG)
.thumb.JPG.ee21fc640be9849916698945c9dc4f24.JPG)
.JPG.821ce8babc88fd786f42ba675dd9ec0a.JPG)
-
Roter Löwe 1597 by Ondras71
Ondras71 replied to Ondras71's topic in - Build logs for subjects built 1501 - 1750
Thank you very much Ab and Kirill. I have been making tackle pulley halters for a long time. I chose a system of tying and gluing the tapered ends of the cables.. Now I'm already preparing for a weekend trip to see this beauty..🔥😍 https://www.vasamuseet.se/cs.thumb.JPG.eb9af7851ef8ab50f05e27a26d9a0844.JPG)
.thumb.JPG.6140d9546184bbb868eb89c0d2753eea.JPG)
.thumb.JPG.d3183d77bc9c118b8e500d52a6fede26.JPG)
.thumb.JPG.6079809e672362560fecb12c9eceaca8.JPG)
.JPG.2b9b17e1c06933859afa80da8ed4d2bd.JPG)
-
Roter Löwe 1597 by Ondras71
Ondras71 replied to Ondras71's topic in - Build logs for subjects built 1501 - 1750
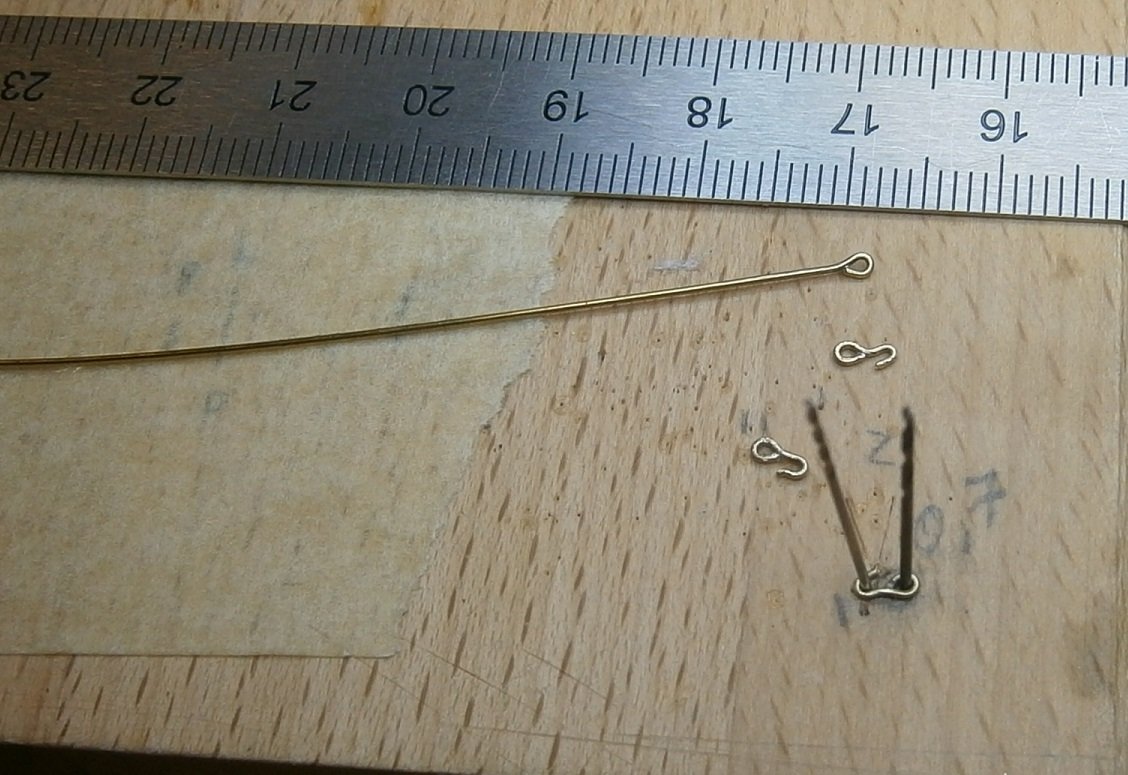
The set of all blocks for the ship is complete.. Hooks for Tackle blocks made..
-
Roter Löwe 1597 by Ondras71
Ondras71 replied to Ondras71's topic in - Build logs for subjects built 1501 - 1750
I'm continuing on blocks..🔥 Last batch of 3 mm size.. Gradual waxing...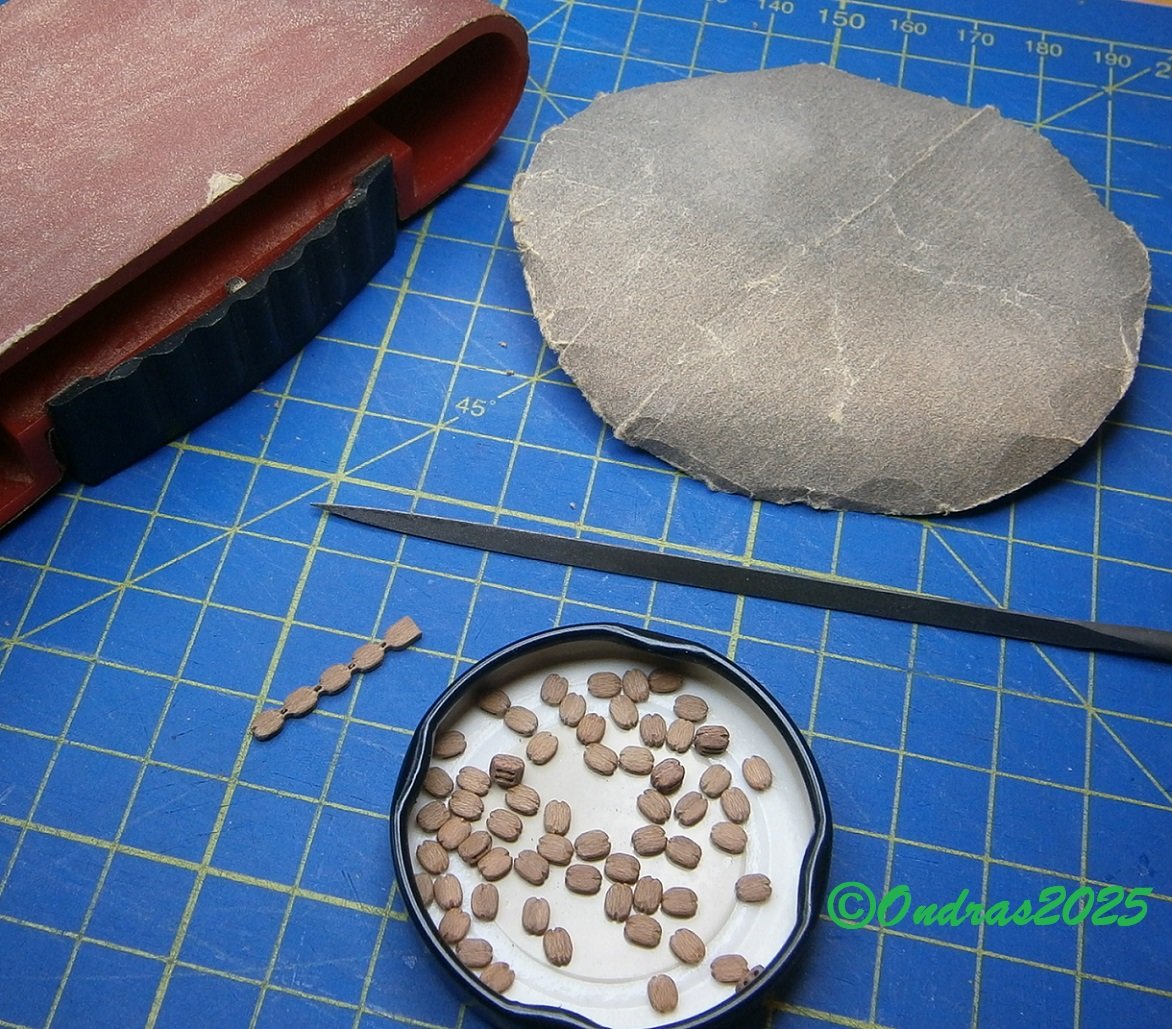
.thumb.JPG.50f78305d7455e6a3976eff71c83ad4e.JPG)

-
Roter Löwe 1597 by Ondras71
Ondras71 replied to Ondras71's topic in - Build logs for subjects built 1501 - 1750
A short break in construction. Czech Republic Championship competition and model exhibition in the beautiful surroundings of the Czech Doksy Castle..🔥 https://www.klom-admiral.cz//id:12346/micr-sekce-c-2025-zamek-doksy I continue to produce other blocks of smaller dimensions. "Machine" production with shaped cutters.. waxed... I'm gradually getting smaller and smaller. There will still be a lot of manual labor here..😴.thumb.JPG.4b64dee2a90f07b0f093fe7b842e736e.JPG)
.thumb.JPG.68721091f427d3328a30f254dee933f2.JPG)
.JPG.4d09d40054fe6578b65d530cb5889585.JPG)
.thumb.JPG.8d577314e60afb423c32996d64082923.JPG)
.thumb.JPG.2ffe9c57ec1ab9dcf4e05a0f51beedda.JPG)
.thumb.JPG.5fbce29e2f5b7868e7360204056aaa74.JPG)
.JPG.ed2e672de7495e41a75d3b5e45ac5f98.JPG)
.JPG.8b45e6544a8f4869a65ceaf667aea355.JPG)
-
Roter Löwe 1597 by Ondras71
Ondras71 replied to Ondras71's topic in - Build logs for subjects built 1501 - 1750
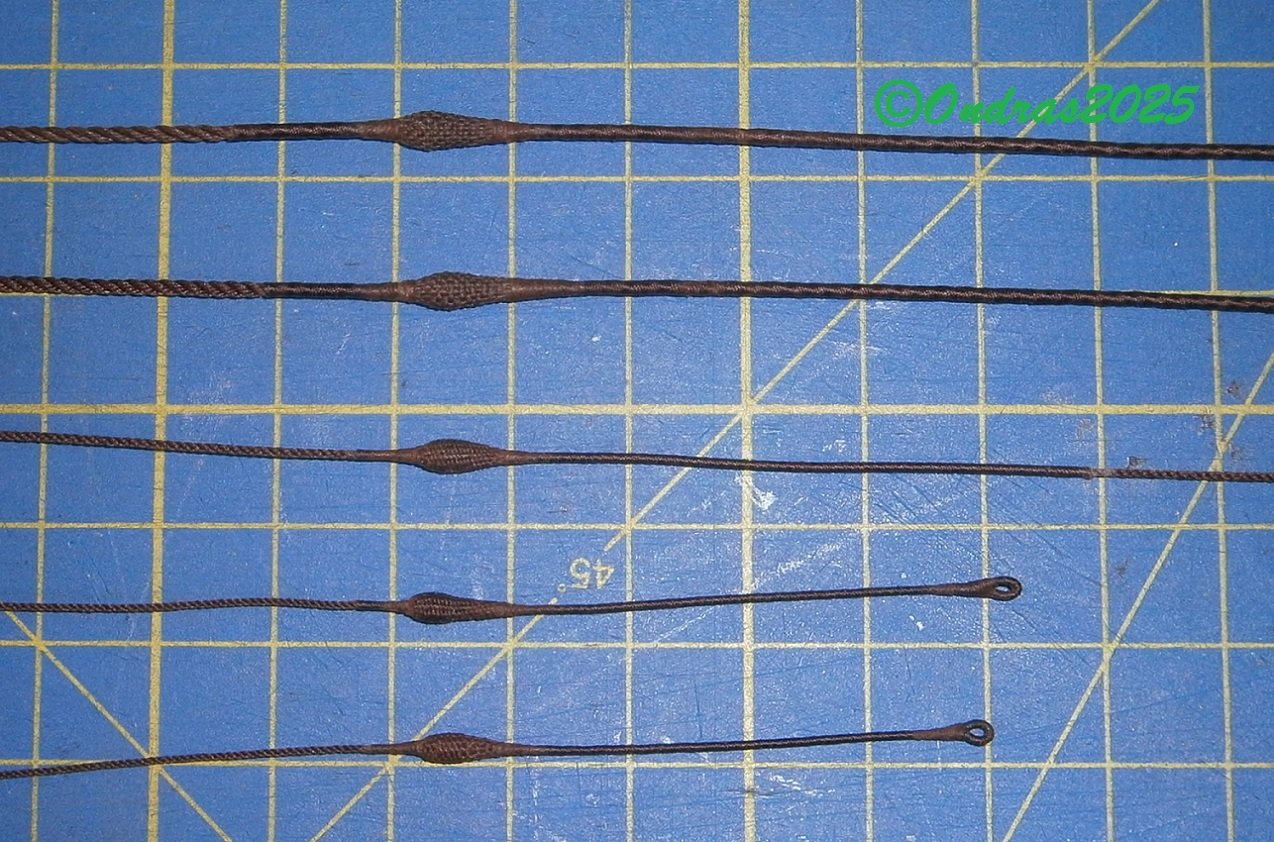
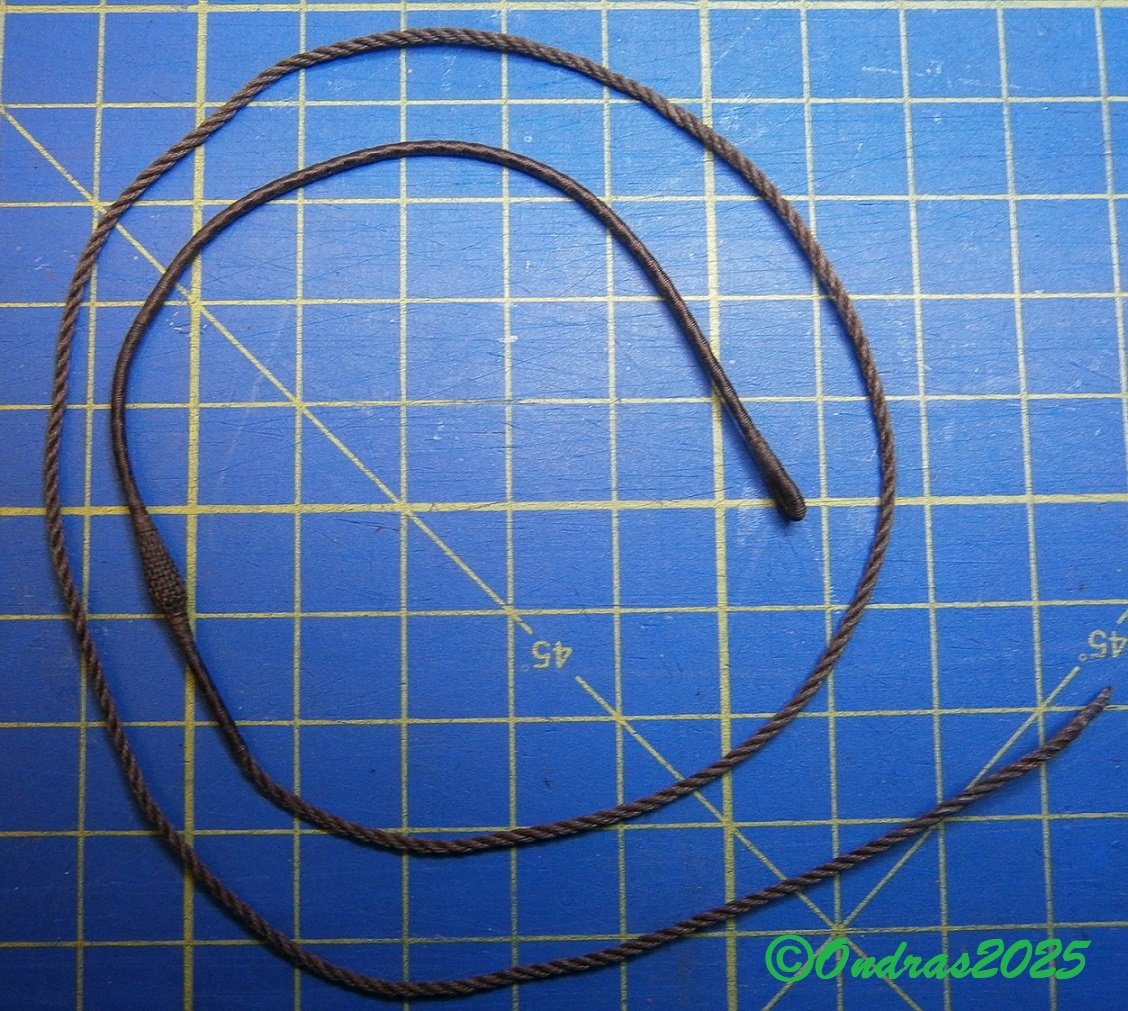
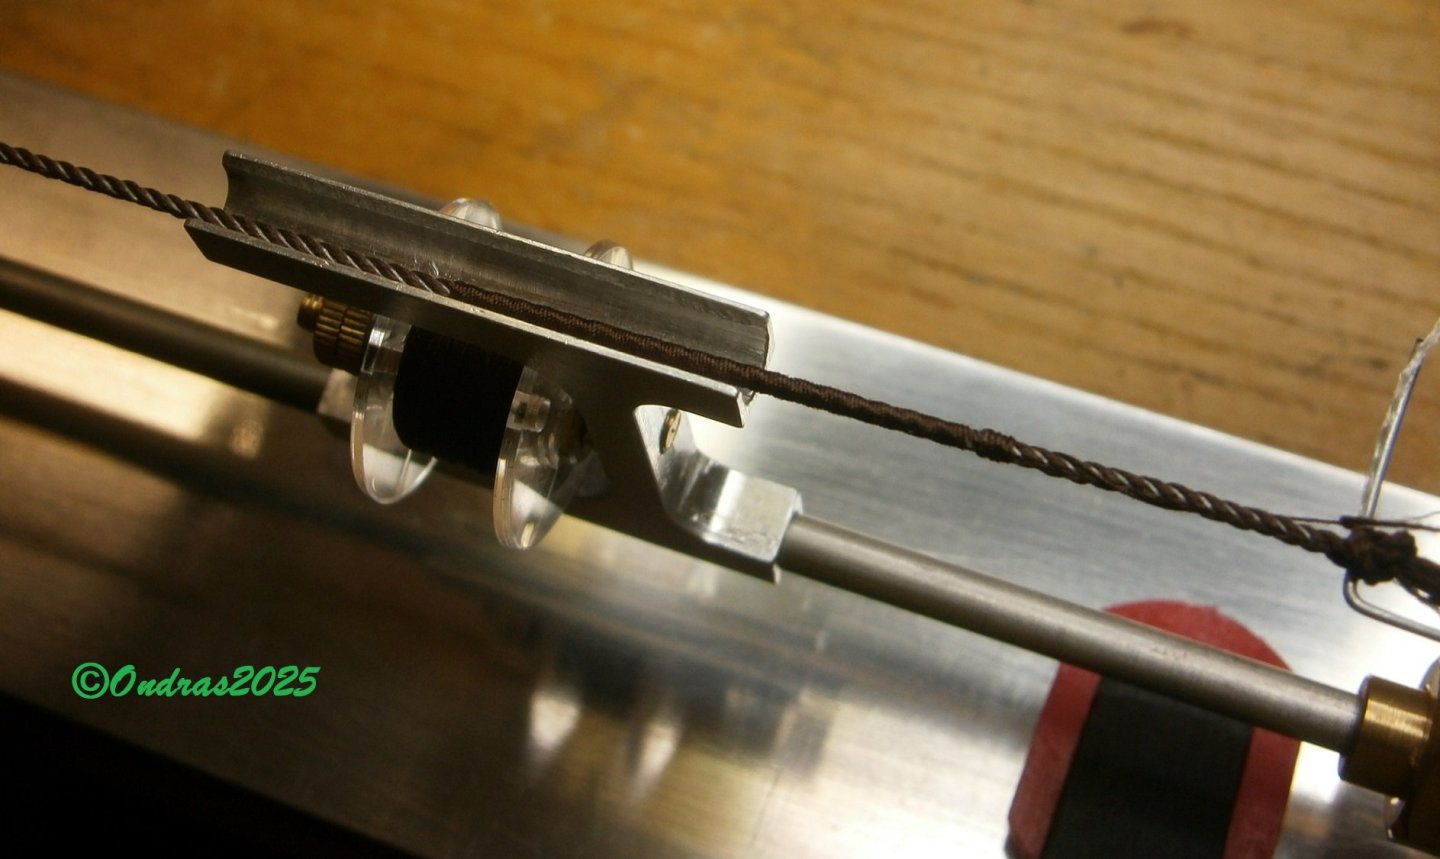
Thank you very much Patrick. It's just that the translator doesn't explain it well..😁 All five Stays Mouse done..💥 Shrouds and Stay Mouse are strung..🔥
.thumb.jpg.31d28f6973bb9593327fbc956e18b56f.jpg)
.thumb.jpg.5bab8d11c3137d4b6d76d54481f26489.jpg)

-
Roter Löwe 1597 by Ondras71
Ondras71 replied to Ondras71's topic in - Build logs for subjects built 1501 - 1750
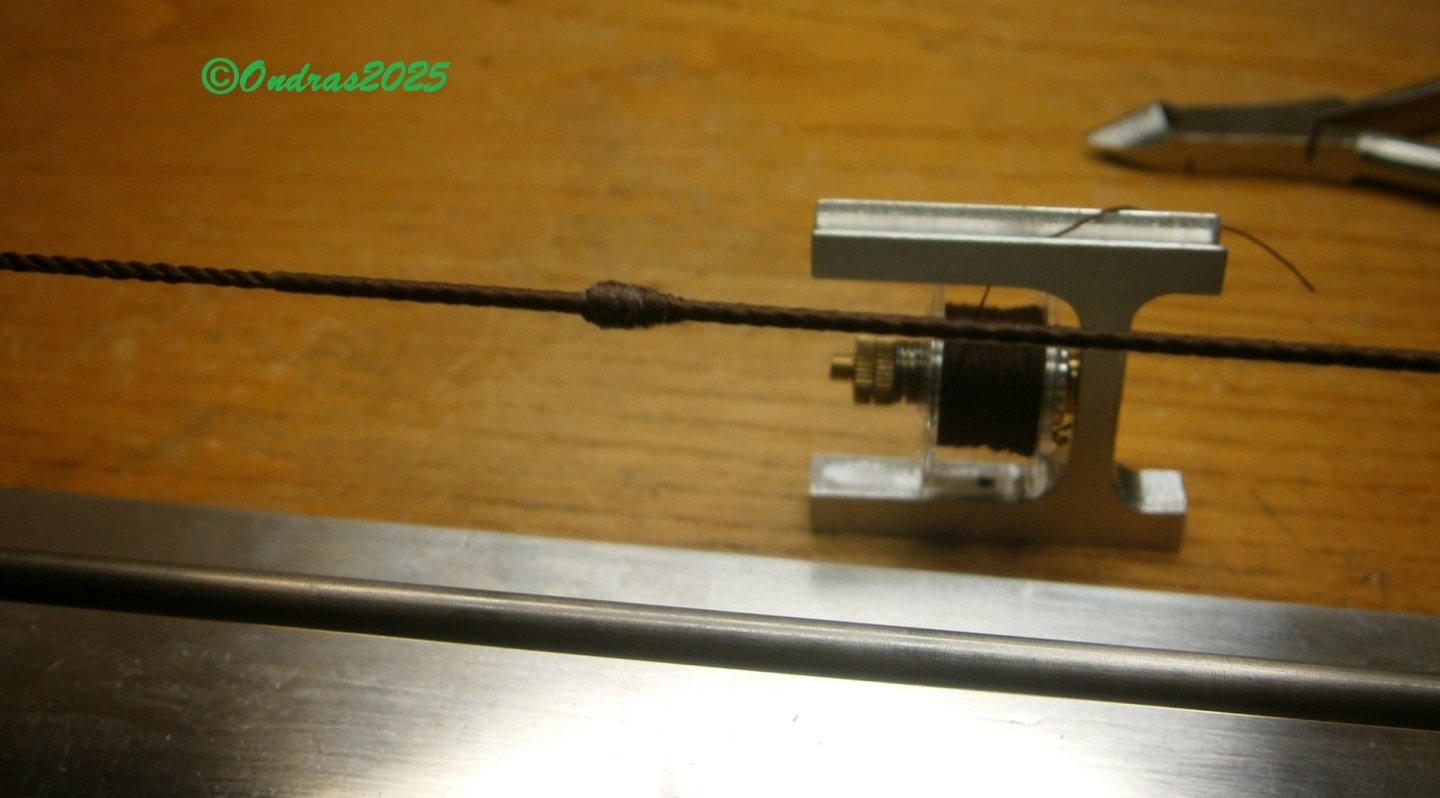
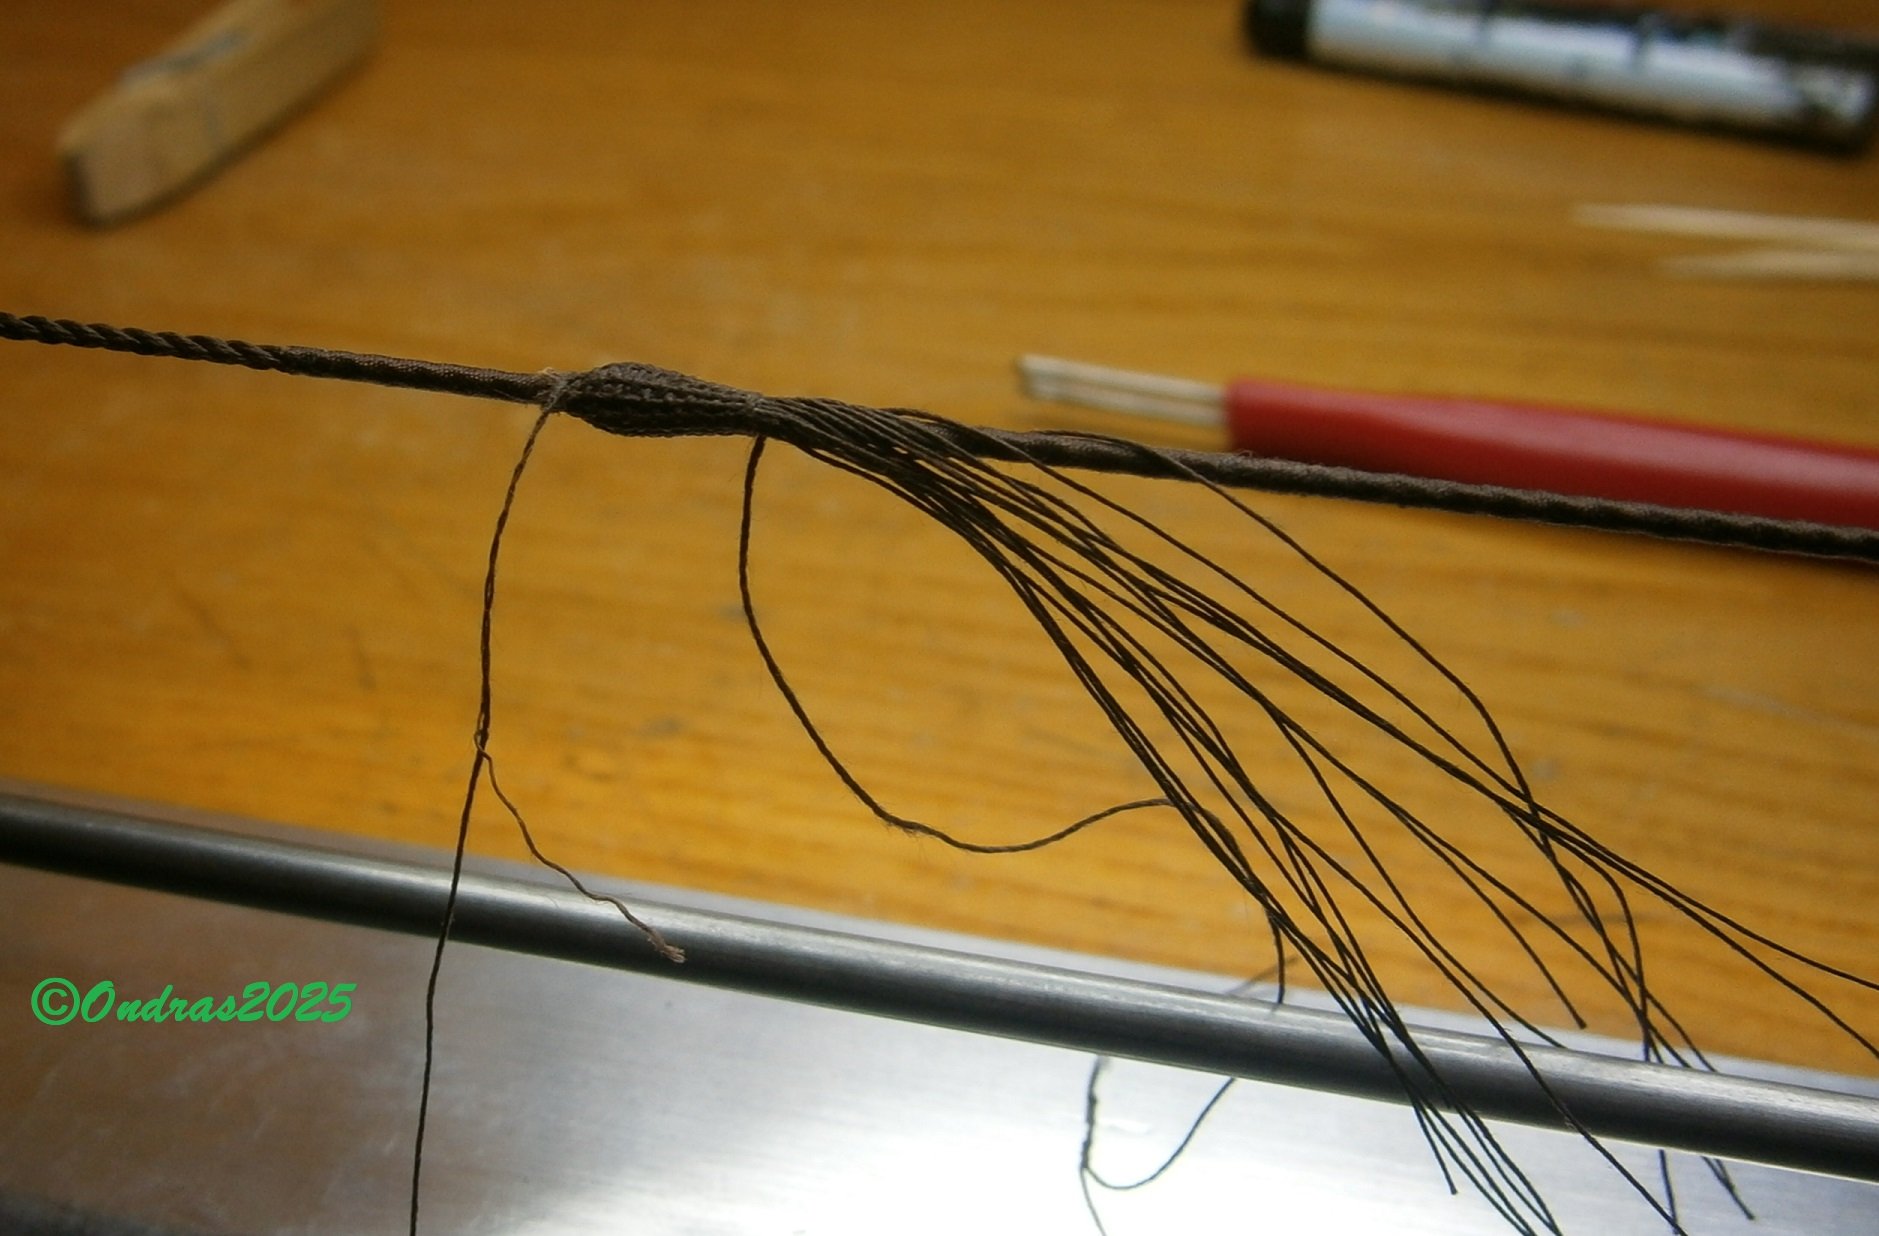
I studied the Stays Mouse braiding system. I created a jig from scraps. I used two systems I found..🔥 The ends are tied on a rope wrapping machine. I gradually weaken the wrapping thread until it is gone..💥 Stays mouse on Main stay done..💥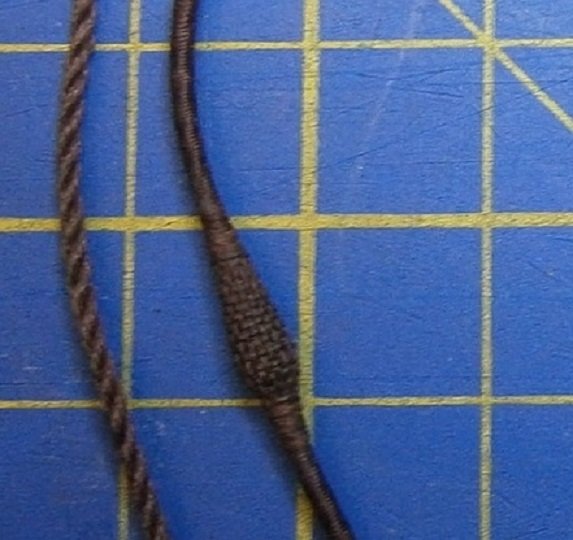

.thumb.JPG.98cec5eca185aafcc3160f23ed3d1ca5.JPG)
.thumb.JPG.831d4899769a3734db3a6853fb29336b.JPG)
.thumb.JPG.f1f2dc8250dba0ea5b976e51f8817f6e.JPG)

-
Roter Löwe 1597 by Ondras71
Ondras71 replied to Ondras71's topic in - Build logs for subjects built 1501 - 1750
For some, yes..😁 -
Roter Löwe 1597 by Ondras71
Ondras71 replied to Ondras71's topic in - Build logs for subjects built 1501 - 1750
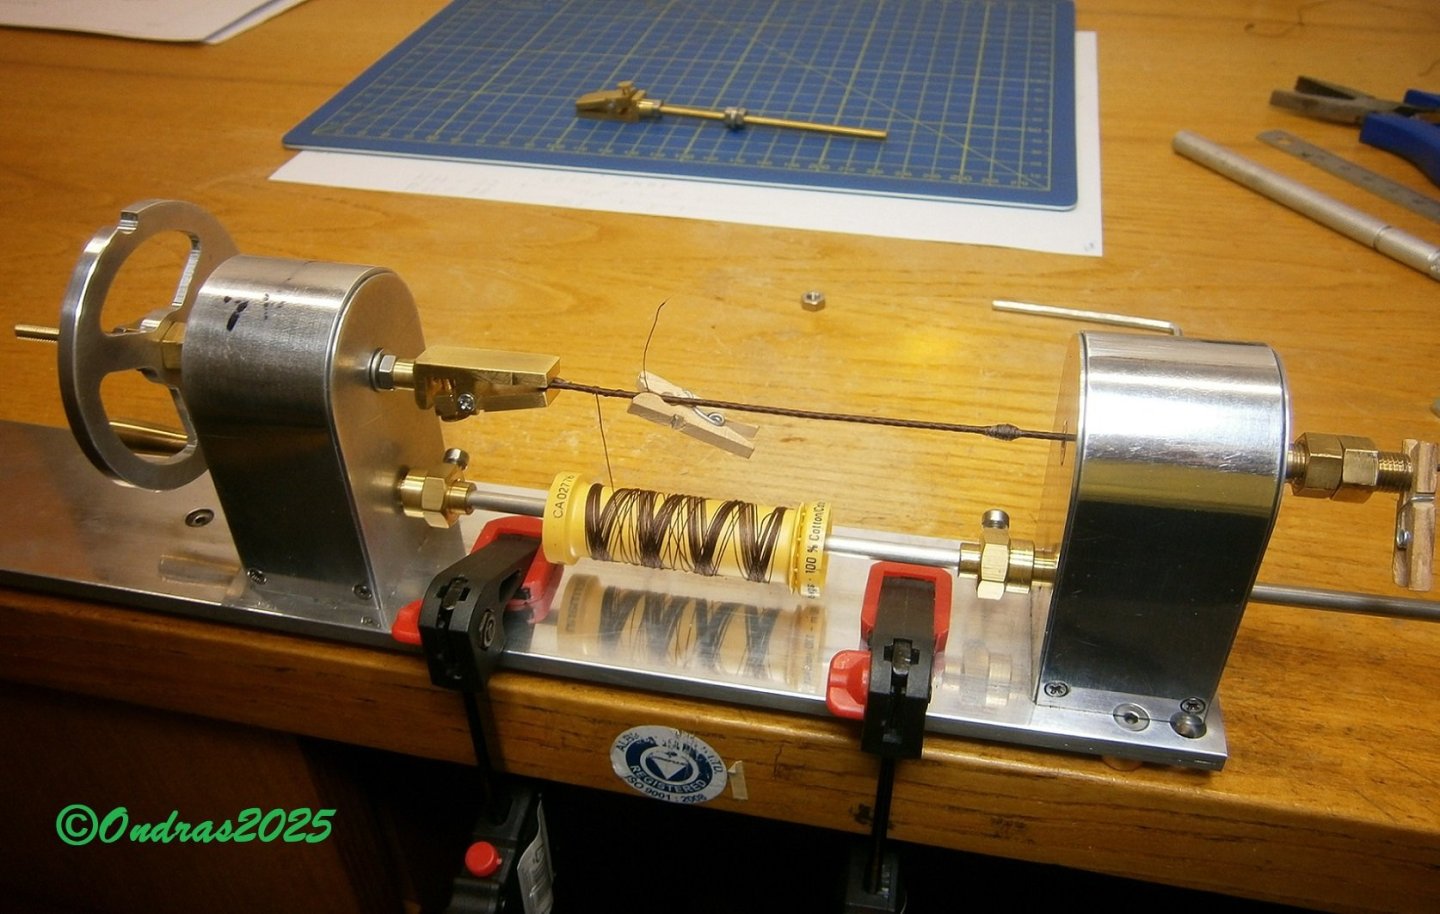
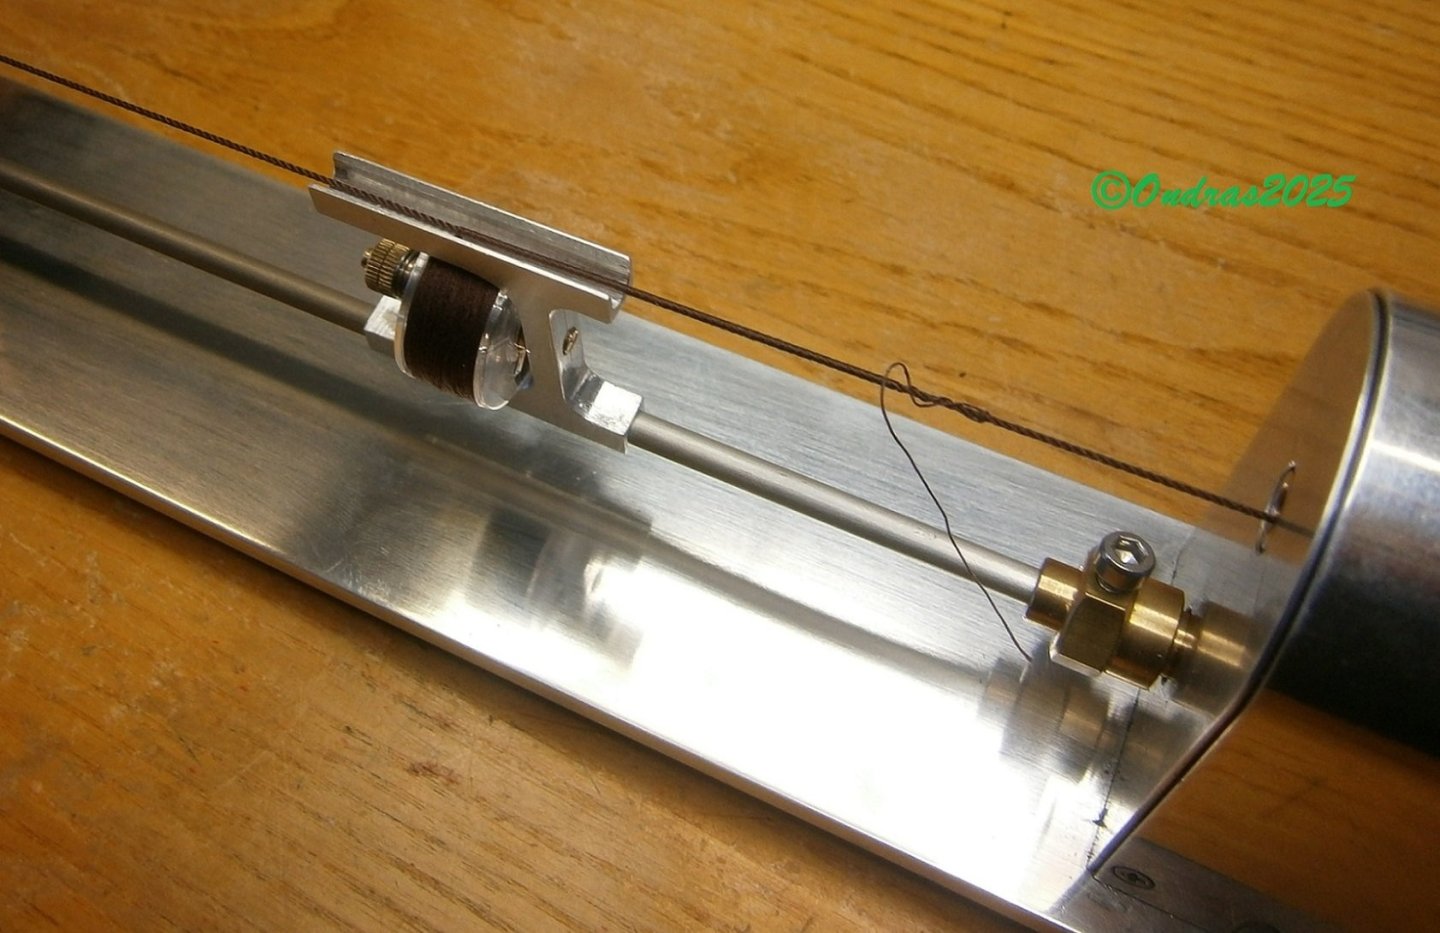
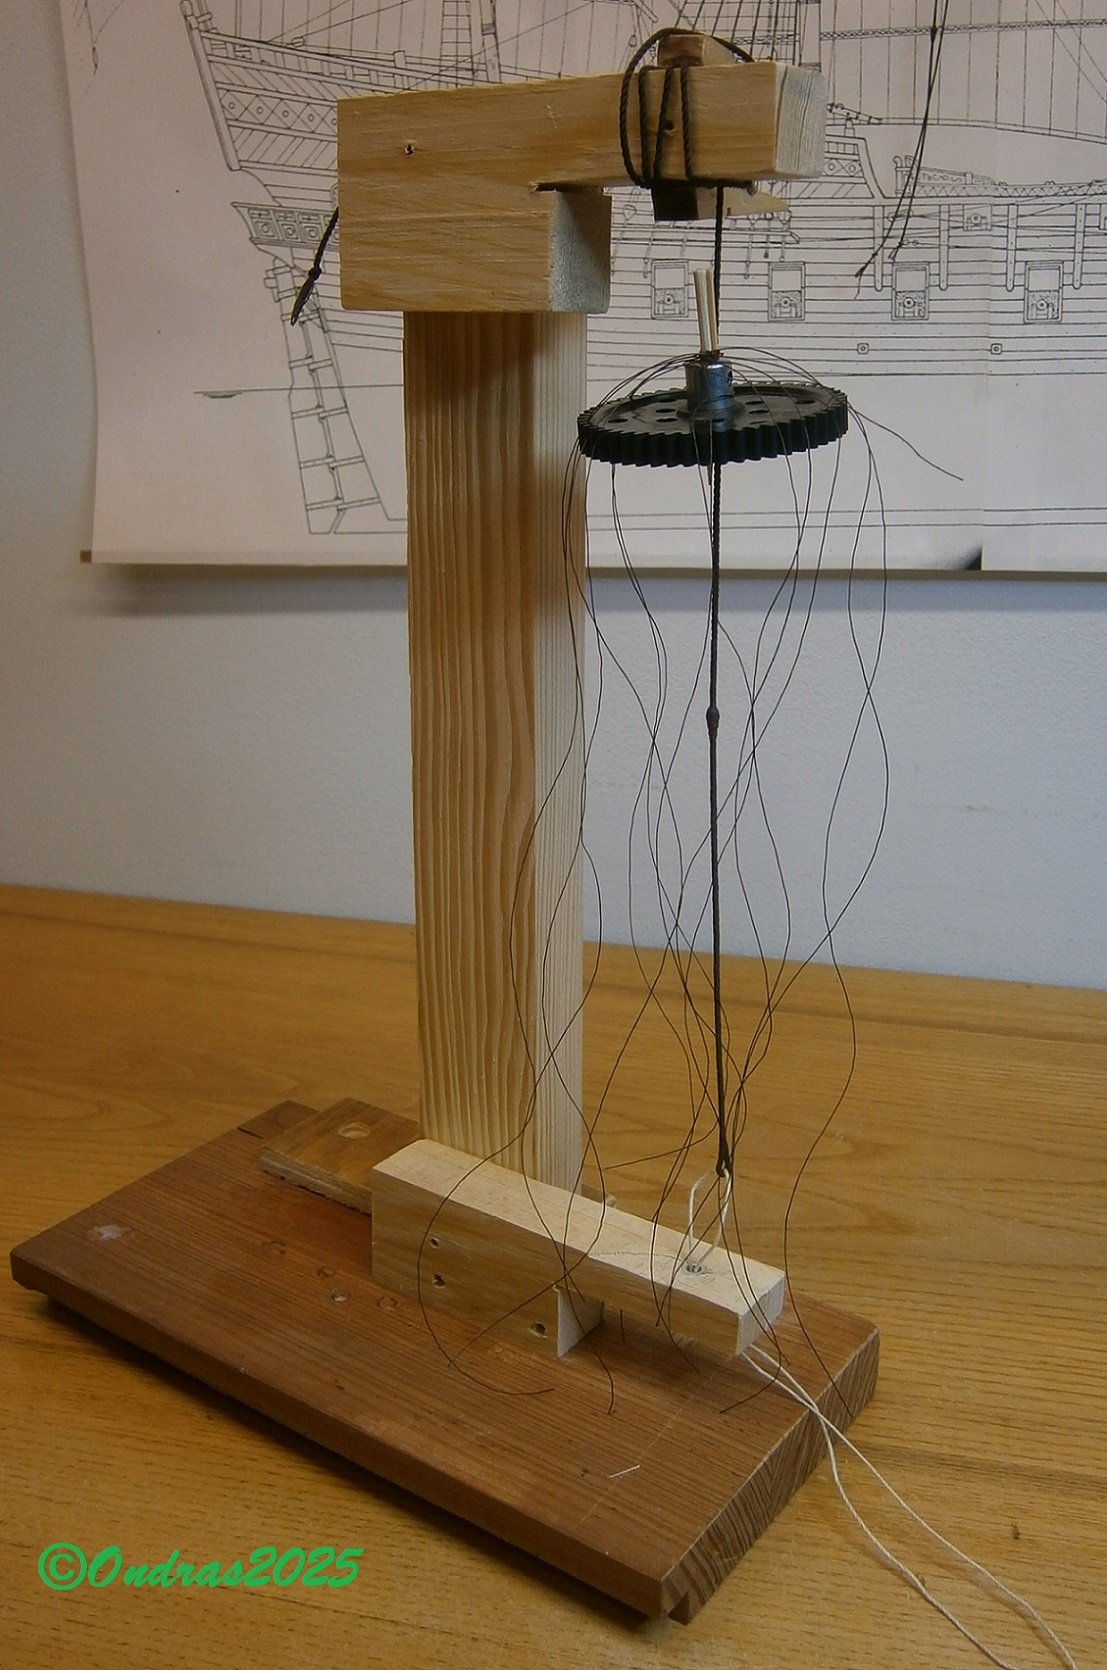
I am familiar with the Rope wrapping machine. I must confirm that the author Roman from Poland has mastered it with great craftsmanship. Super gears with gentle resistance prevent untangling. Polished material brass and aluminum. Interchangeable parts for many different activities. Very pleasant work... I wrap weaker ropes directly, strong ropes filled with thread.. Fixed rigging ropes braided..👌 Other work halter shrouds, eyes and Stay Mouse basics.. Dirt from superglue patinas well with brown bitumen.. Now I'm going to braid Stays Mouse. I found this work 1:1 on Duyfken replica..


.thumb.JPG.49642308657a7d1e3967ae766e94c55c.JPG)
-
Roter Löwe 1597 by Ondras71
Ondras71 replied to Ondras71's topic in - Build logs for subjects built 1501 - 1750
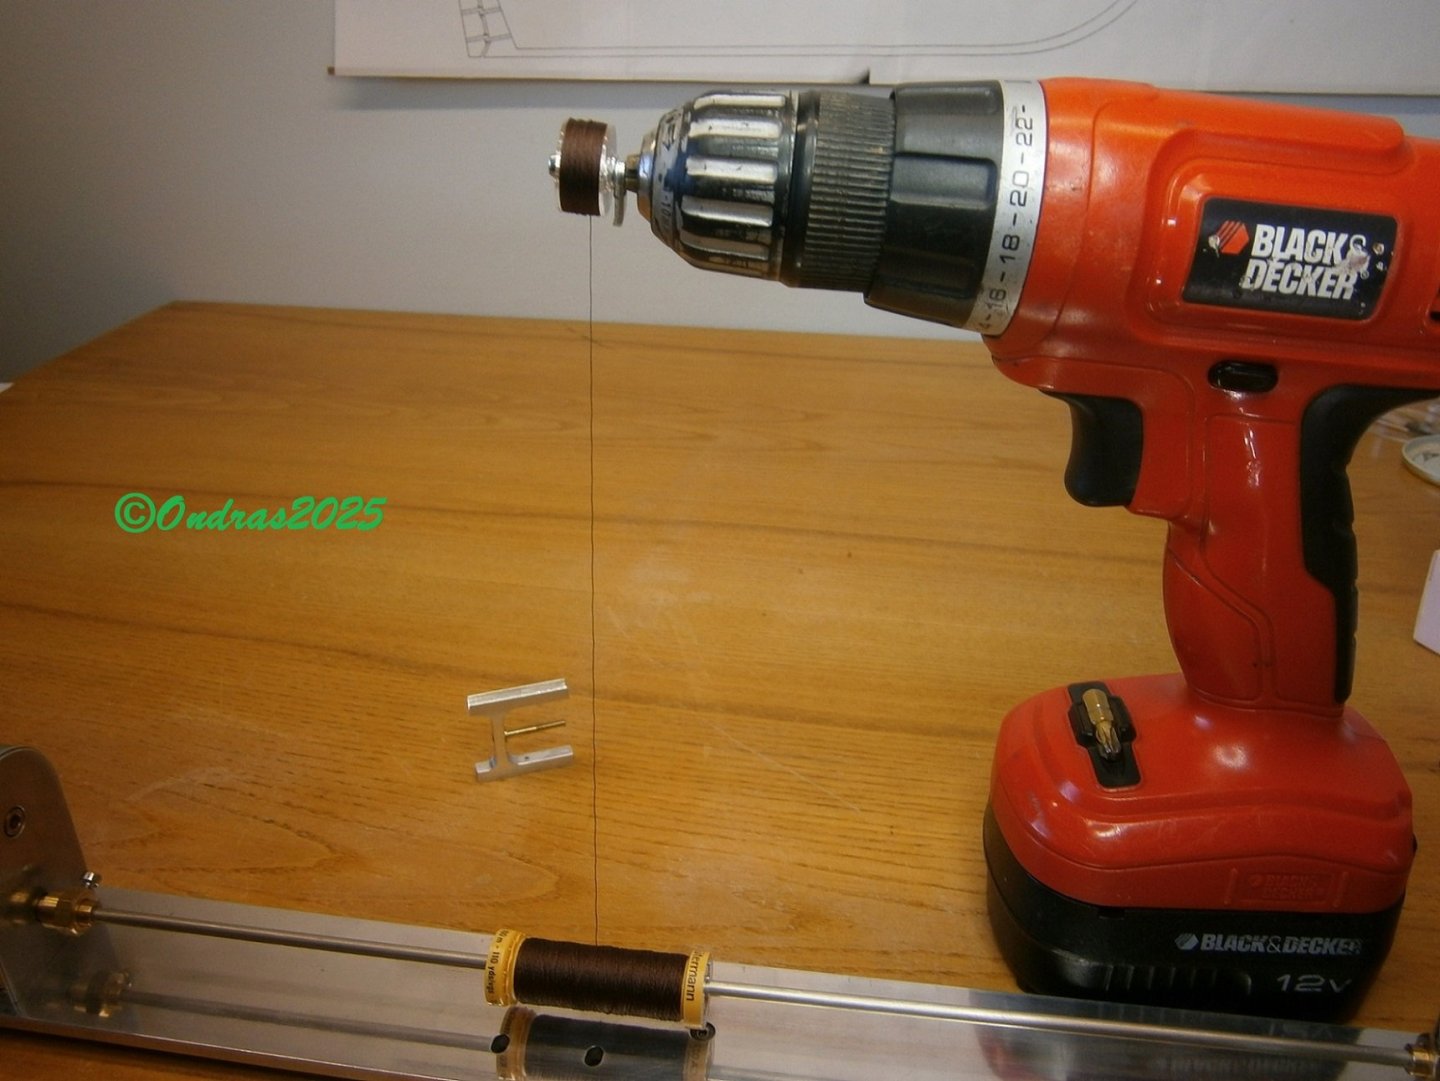
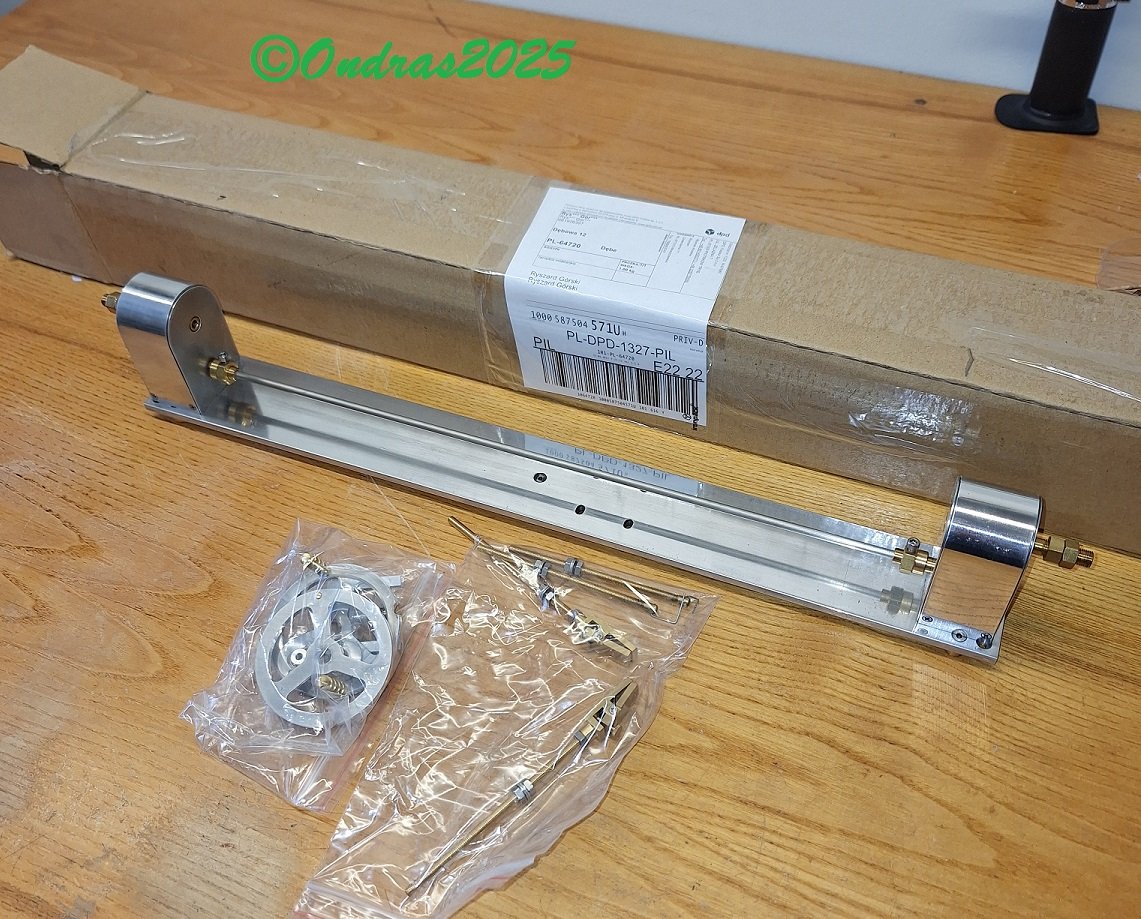
I finally started using a tool I've had at home for a long time - a beautifully crafted Rope wrapping machine..💥 https://www.rcmodel.com.pl/rope-wrapping-machin/ It works perfectly, tightens the threads beautifully when adjusting the spool resistance. 👍 And it doesn't matter at all that there is no motor.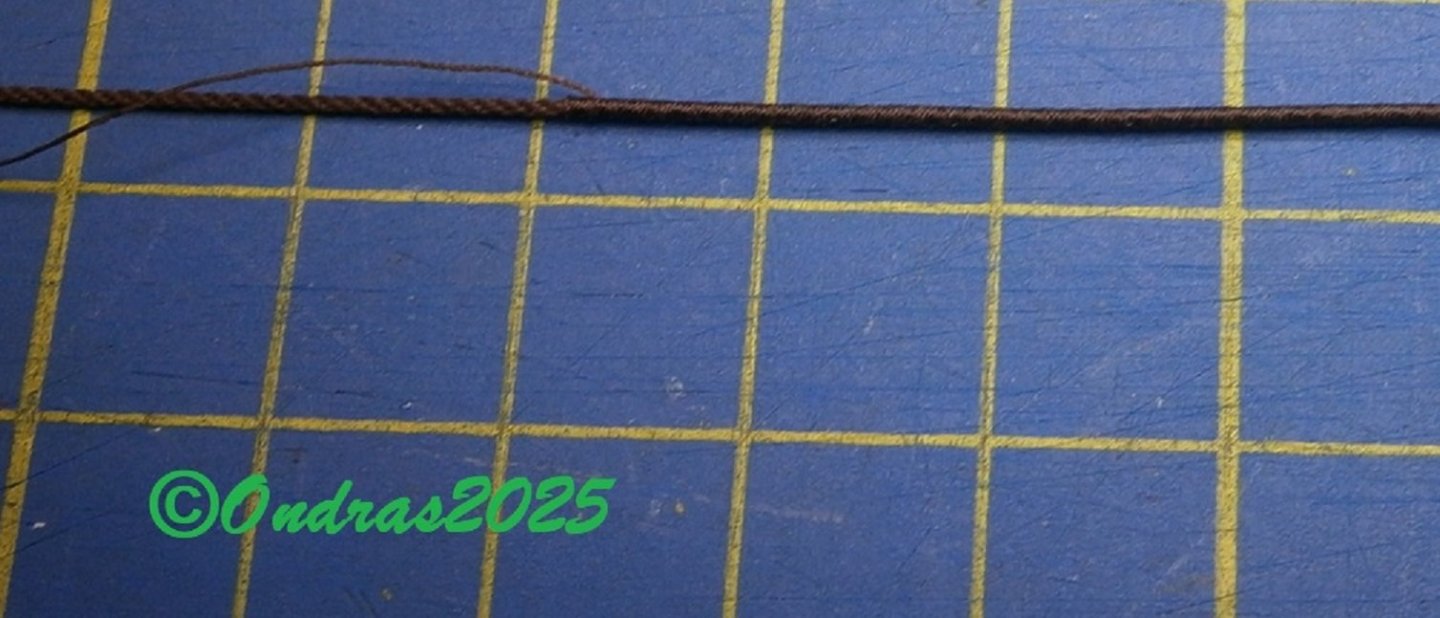
.thumb.JPG.9570fb8ed470384f91aed0cabbc1429a.JPG)
.thumb.JPG.529038f8ee8287e223593e6c60d90099.JPG)
-
Roter Löwe 1597 by Ondras71
Ondras71 replied to Ondras71's topic in - Build logs for subjects built 1501 - 1750
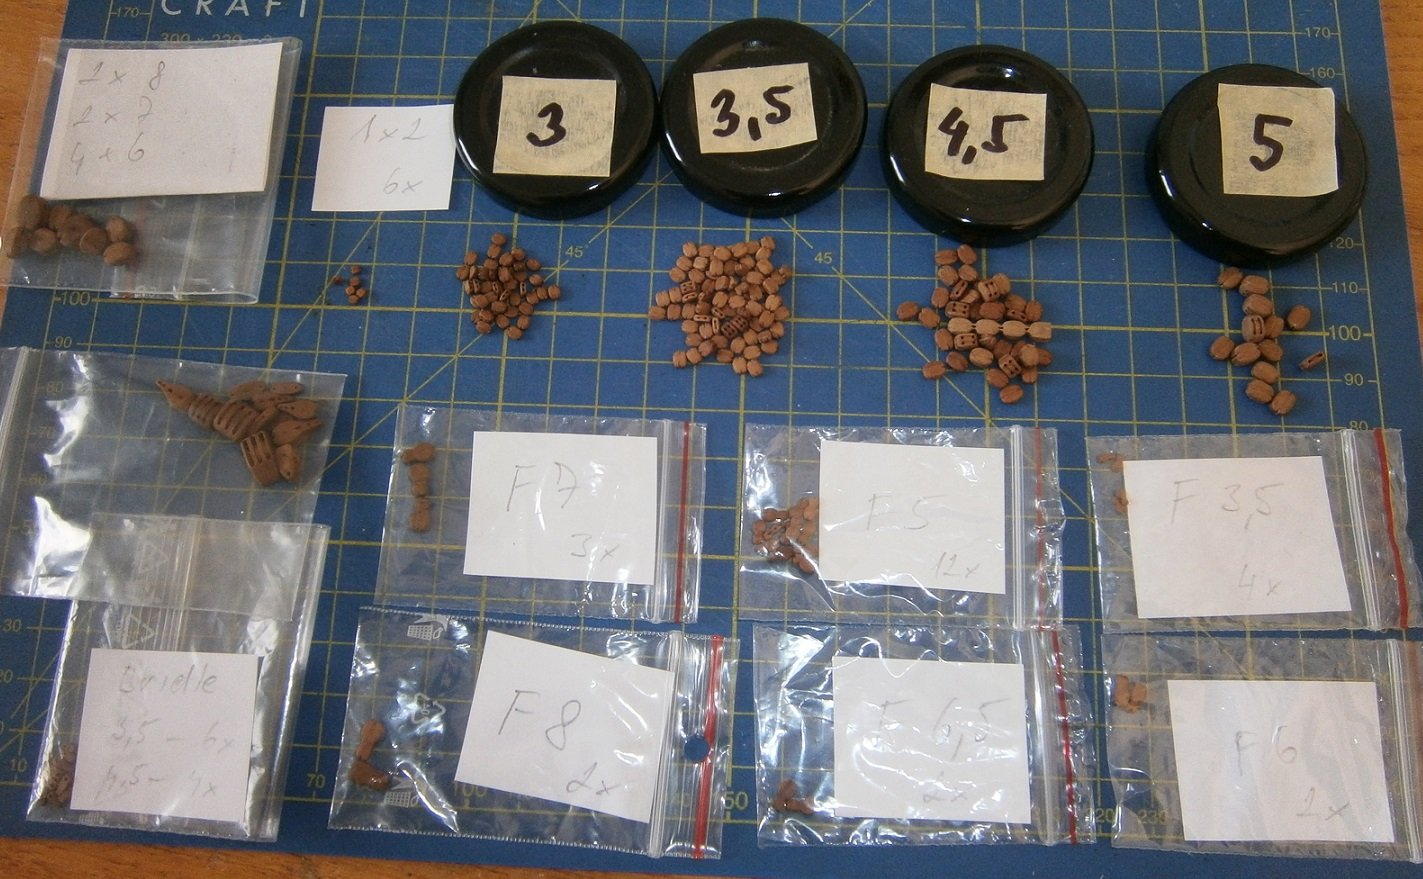
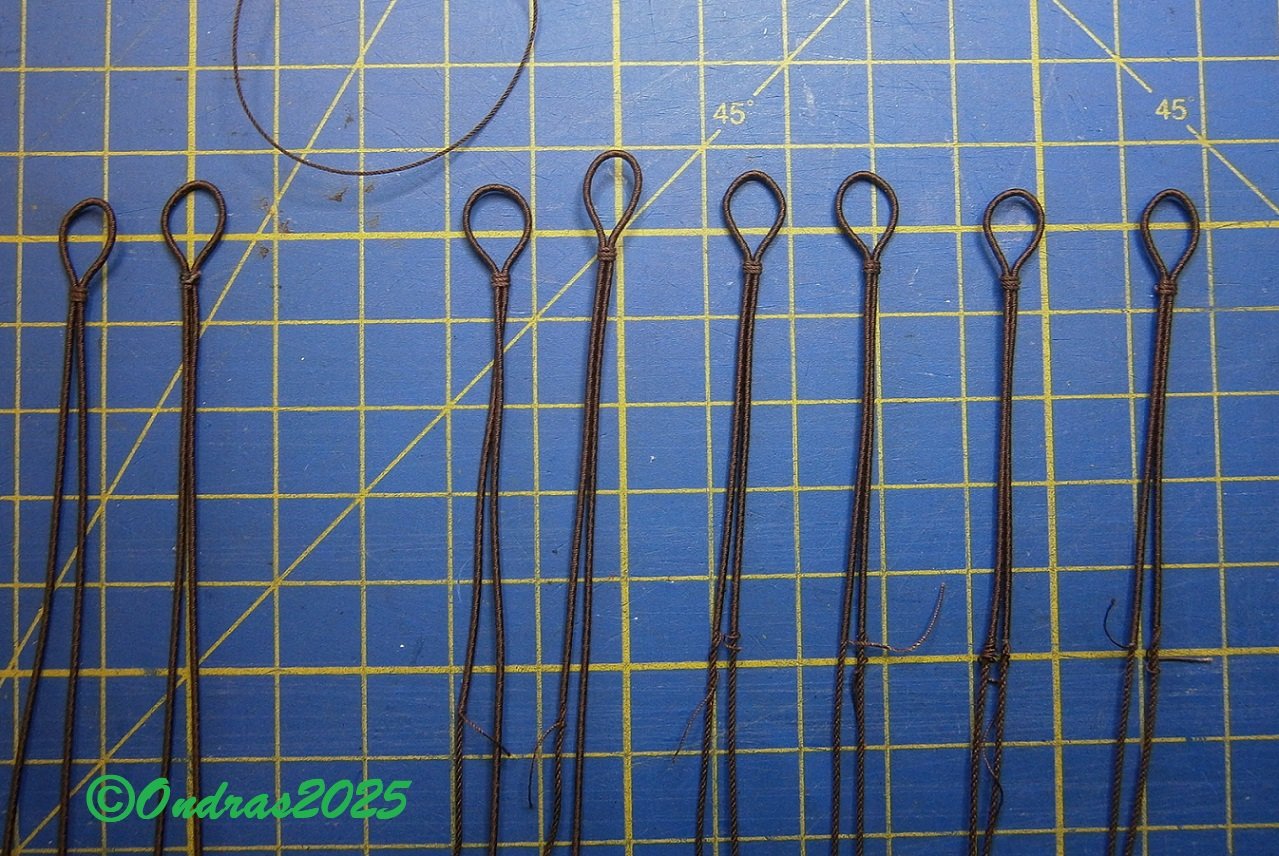
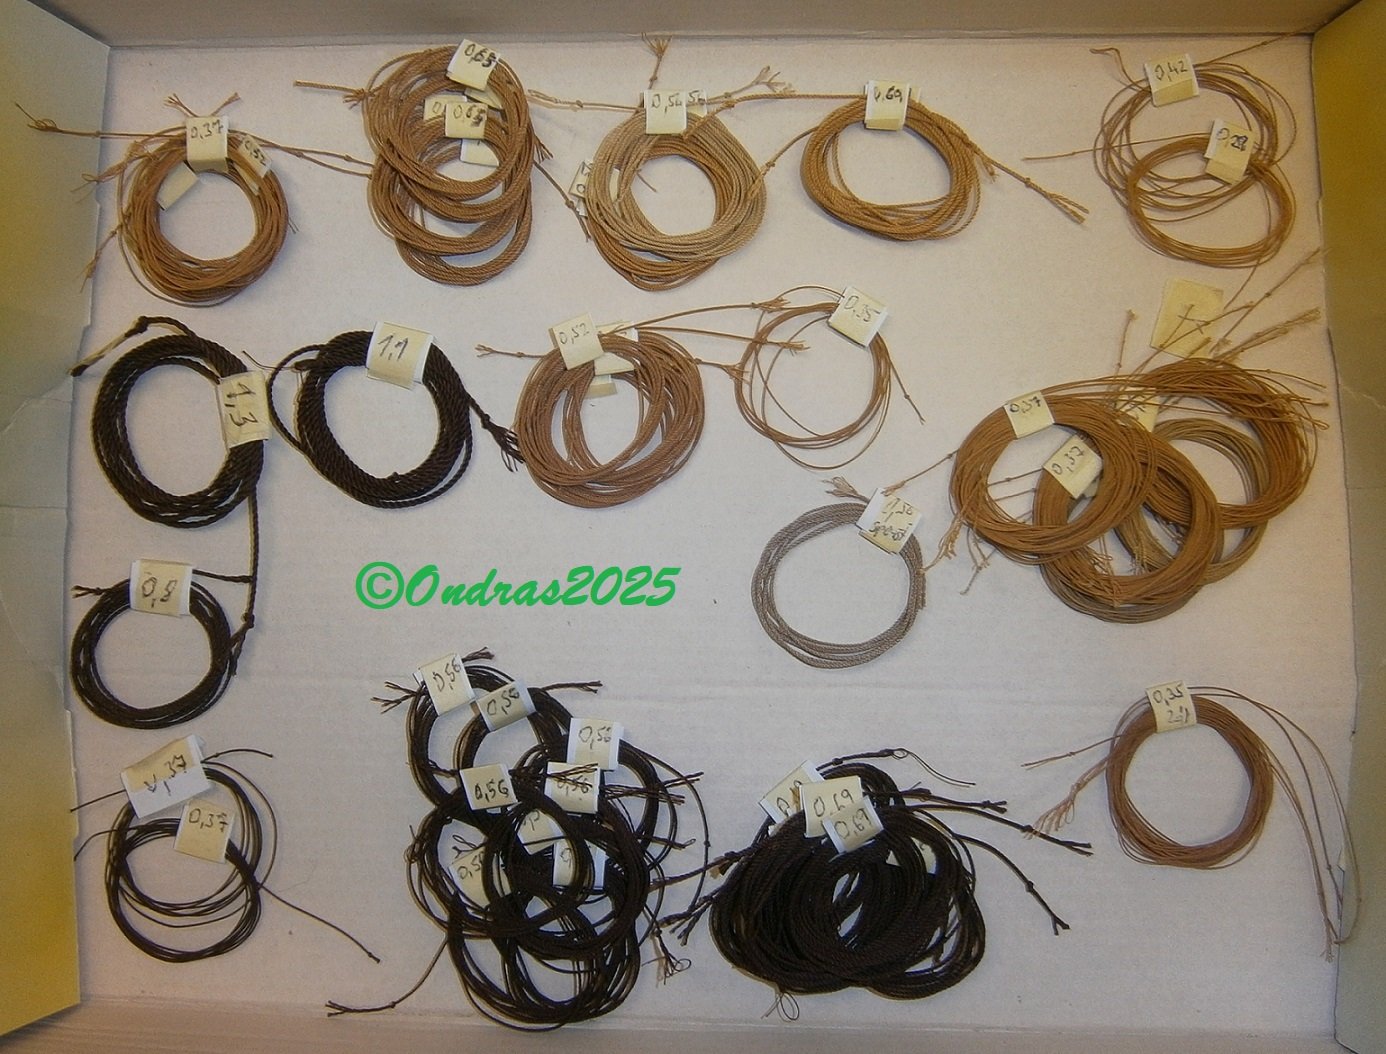
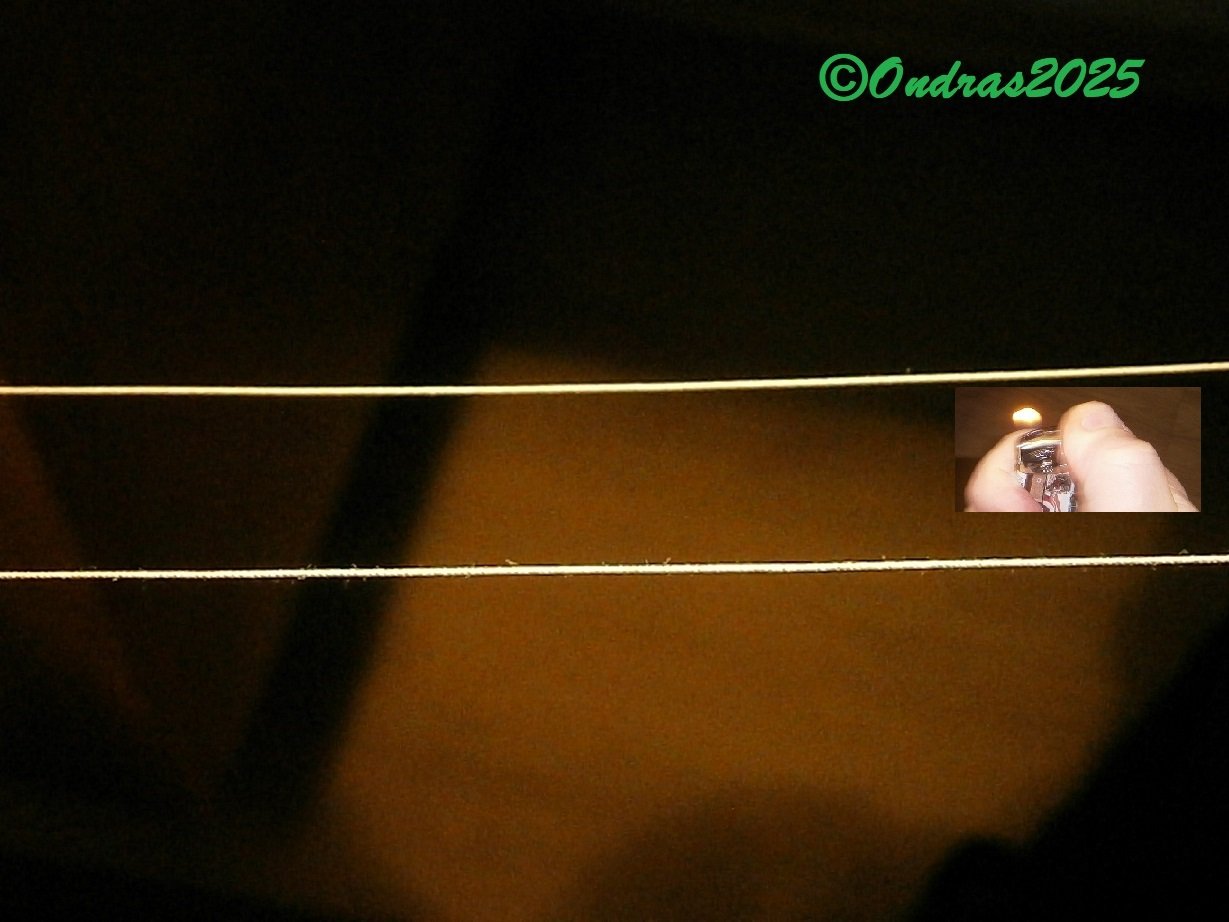
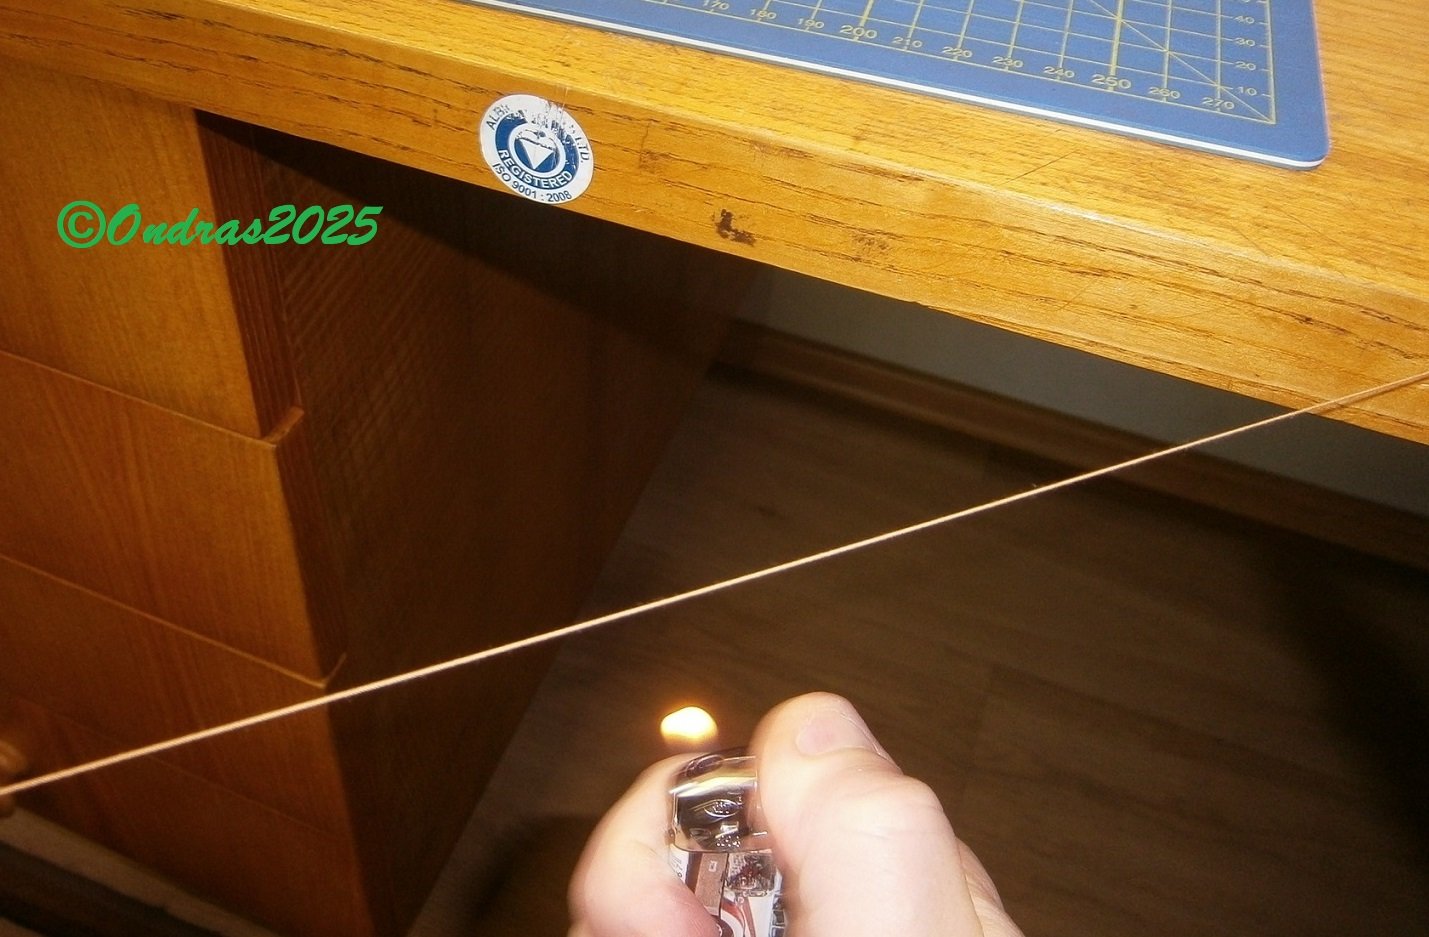
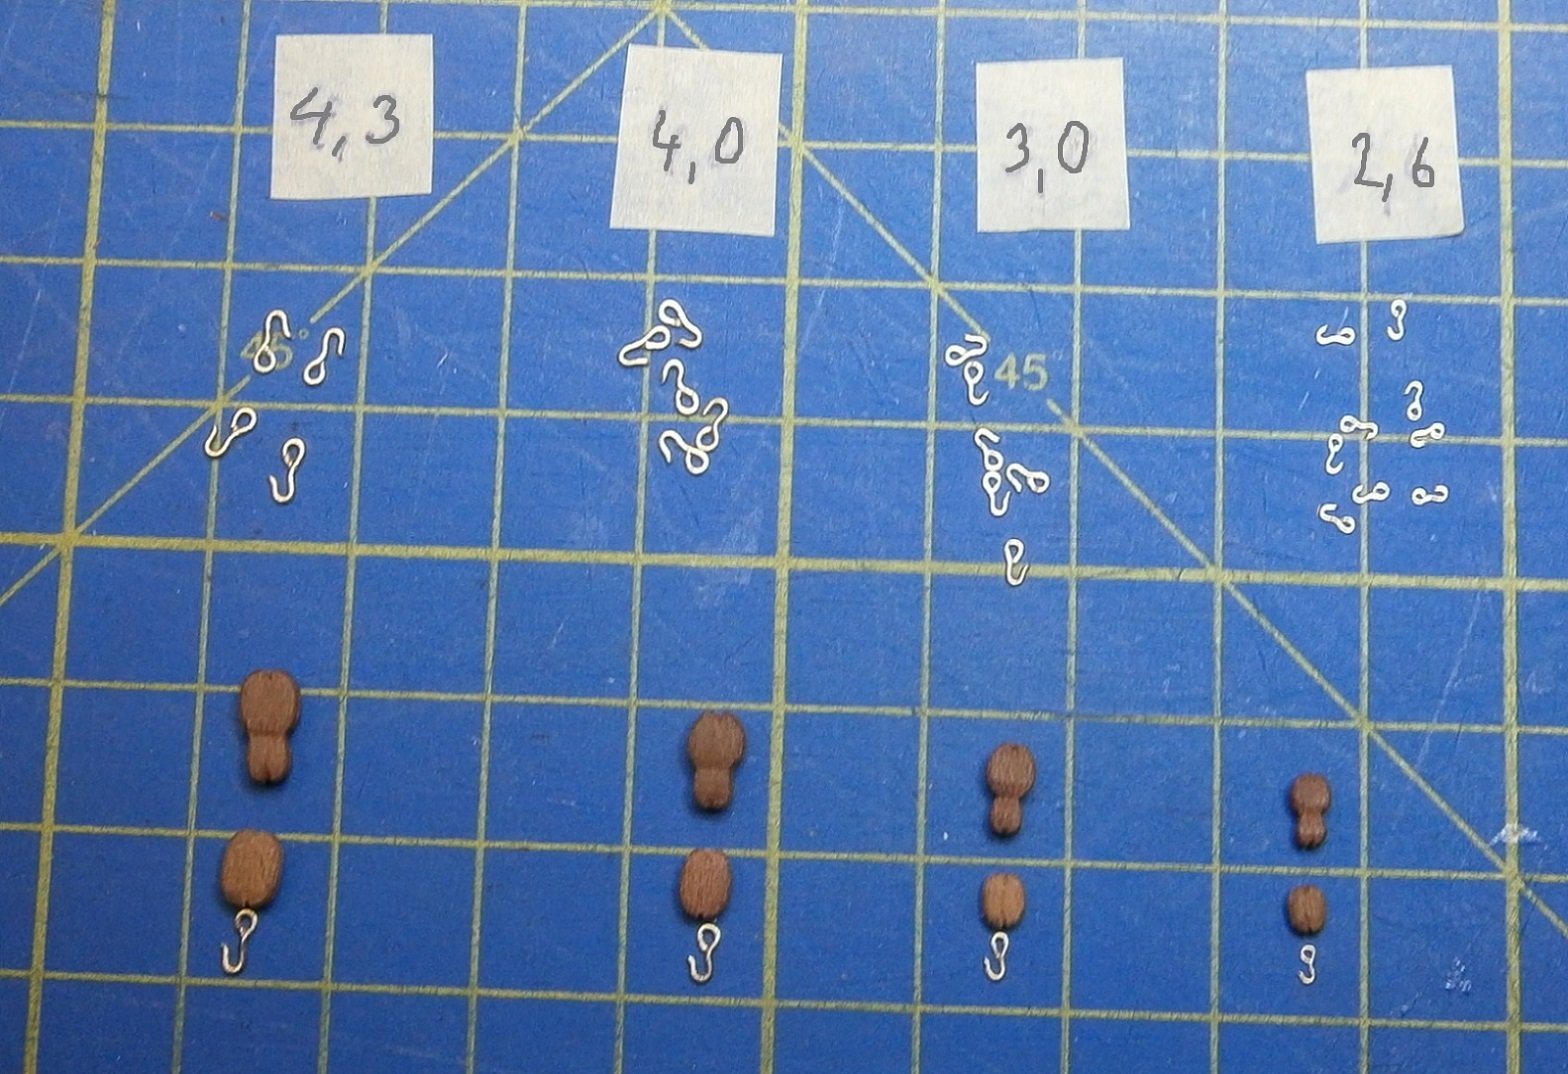
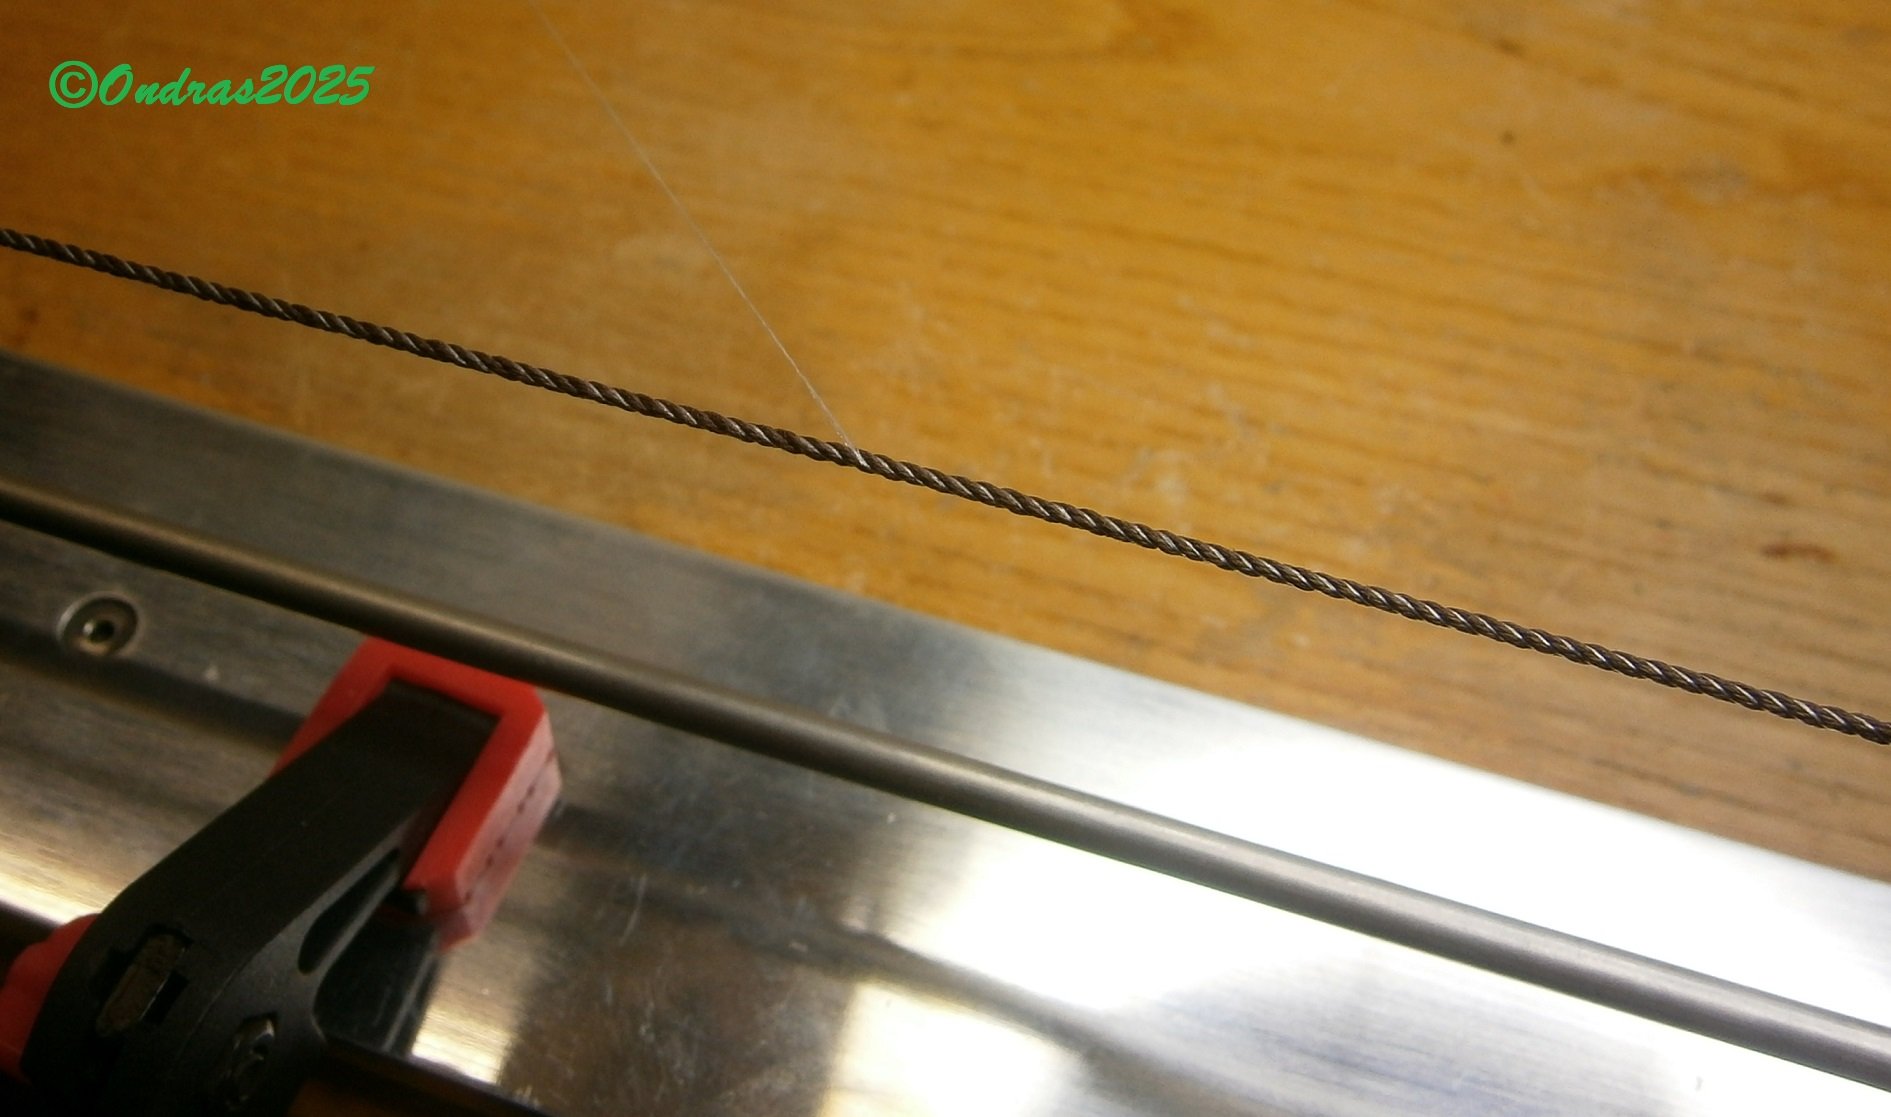
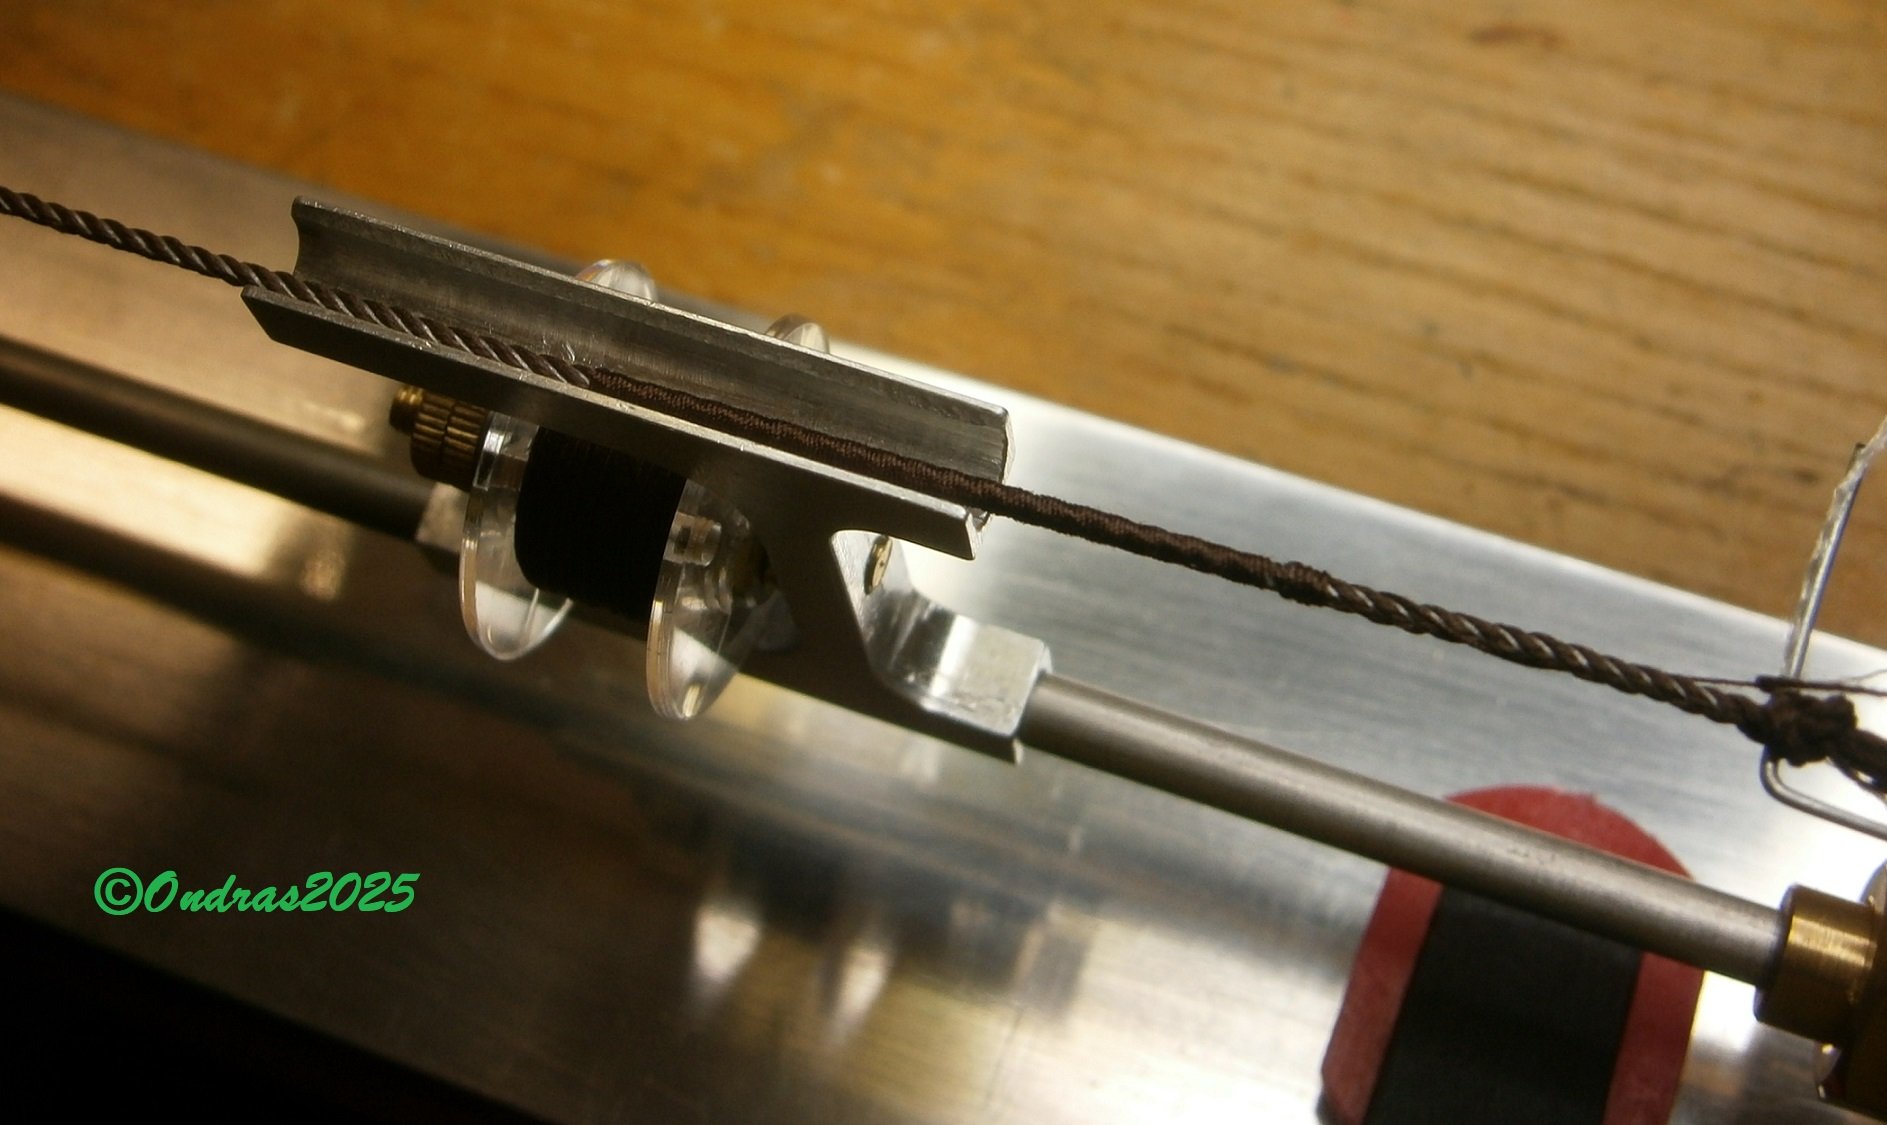
Thank you very much Chuck, thank you for the like.🙂 More small blocks made.. Before I have the milling cutters ready for the production of small pulleys, I started making all the ropes. There are a lot of them, 10 basic diameters in total. All Dutch ropes are right-handed, which means that it is difficult to make weak 3x1 ropes. Right-handed threads are first twisted into left-handed threads and then the ropes are knitted. Guttermann threads are quite good, but the weaker cotton waxed Sajou threads like to hold their shape and I don't want to twist them in the opposite direction. After a long time of trying, I figured out the ropewalk settings and especially the last adjustment. All the finished ropes are slightly hairy, I stretch them under the flame of a lighter...🔥 The 3x1 Sajou cable with a thickness of 0.35 mm also has to be pulled over the edge repeatedly to align the threads. But it works..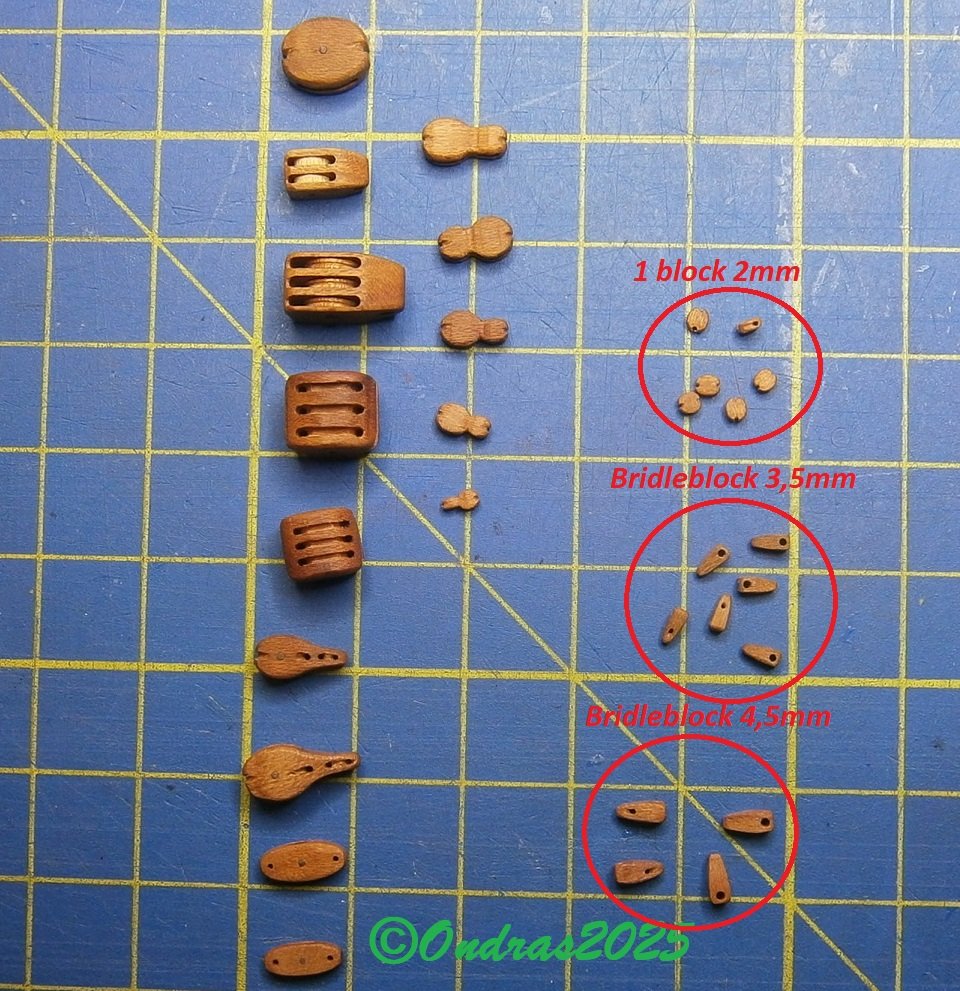
.JPG.9821dacc20cb093dab573ccd69f9995e.JPG)
.JPG.c1ccd1a9c955ee1f8dd60a0f4bdb0867.JPG)
.thumb.JPG.cf7b478b19daa135253534e502011632.JPG)
.JPG.7c9091bd429113c5e3d2923da1318c6f.JPG)
-
Roter Löwe 1597 by Ondras71
Ondras71 replied to Ondras71's topic in - Build logs for subjects built 1501 - 1750
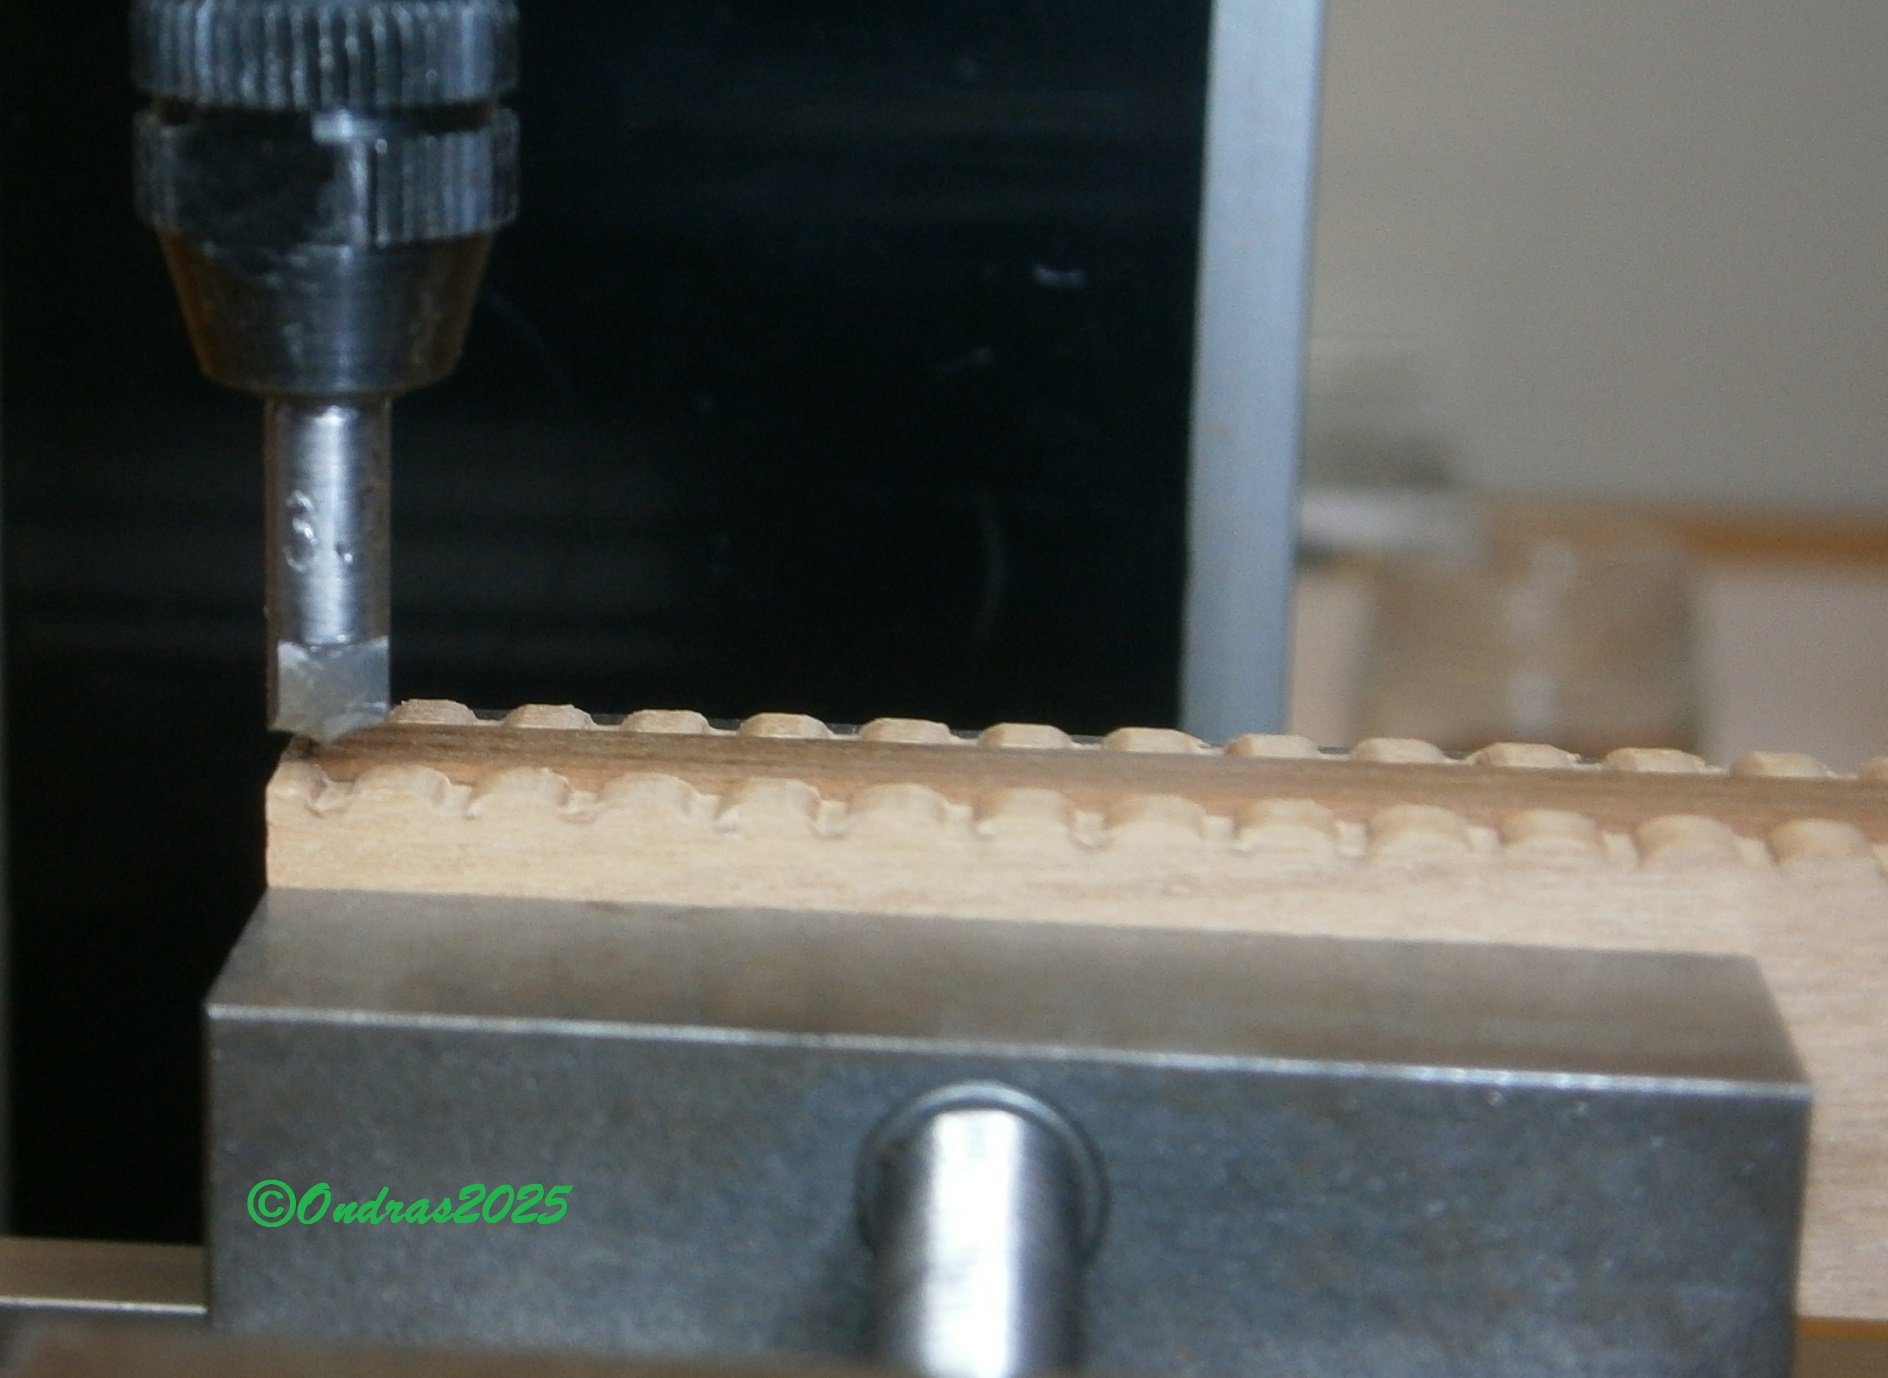
I continue to make blocks, now Fidleblock in several sizes. The last size is borderline....thumb.JPG.d831c1f19b3d187a5694e53d917bb75d.JPG)
.thumb.JPG.853c0a2e0ad5bc8c58b870892a97070f.JPG)
.thumb.JPG.96397e276798f2cede4e6996351f8b88.JPG)
.JPG.3e3ce387f423cc3d80a26a2c91d54856.JPG)
.JPG.ba7d3d212093a12dd3851d1ca50a5cf8.JPG)
.JPG.29f78ec9b0a08208d53e89a22e0f2b6c.JPG)
.JPG.e546aeac820a6f307bb8ca6eca88f9ec.JPG)
-
Roter Löwe 1597 by Ondras71
Ondras71 replied to Ondras71's topic in - Build logs for subjects built 1501 - 1750
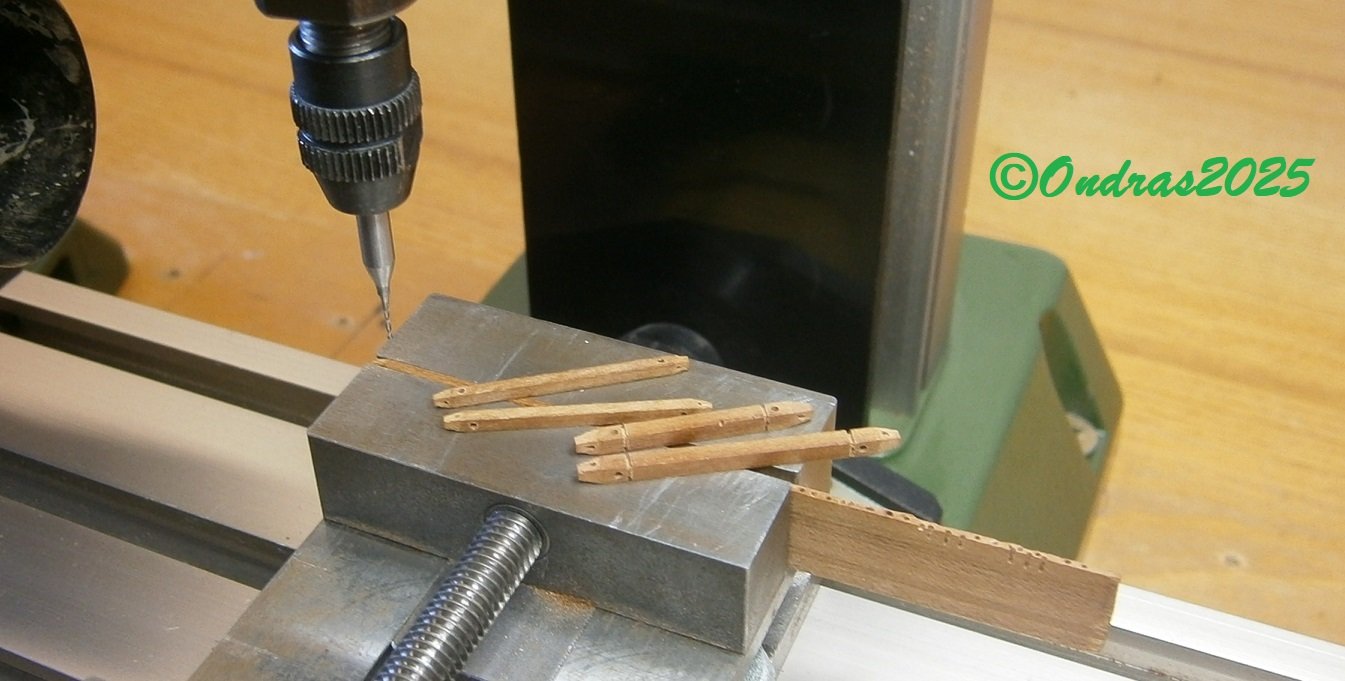
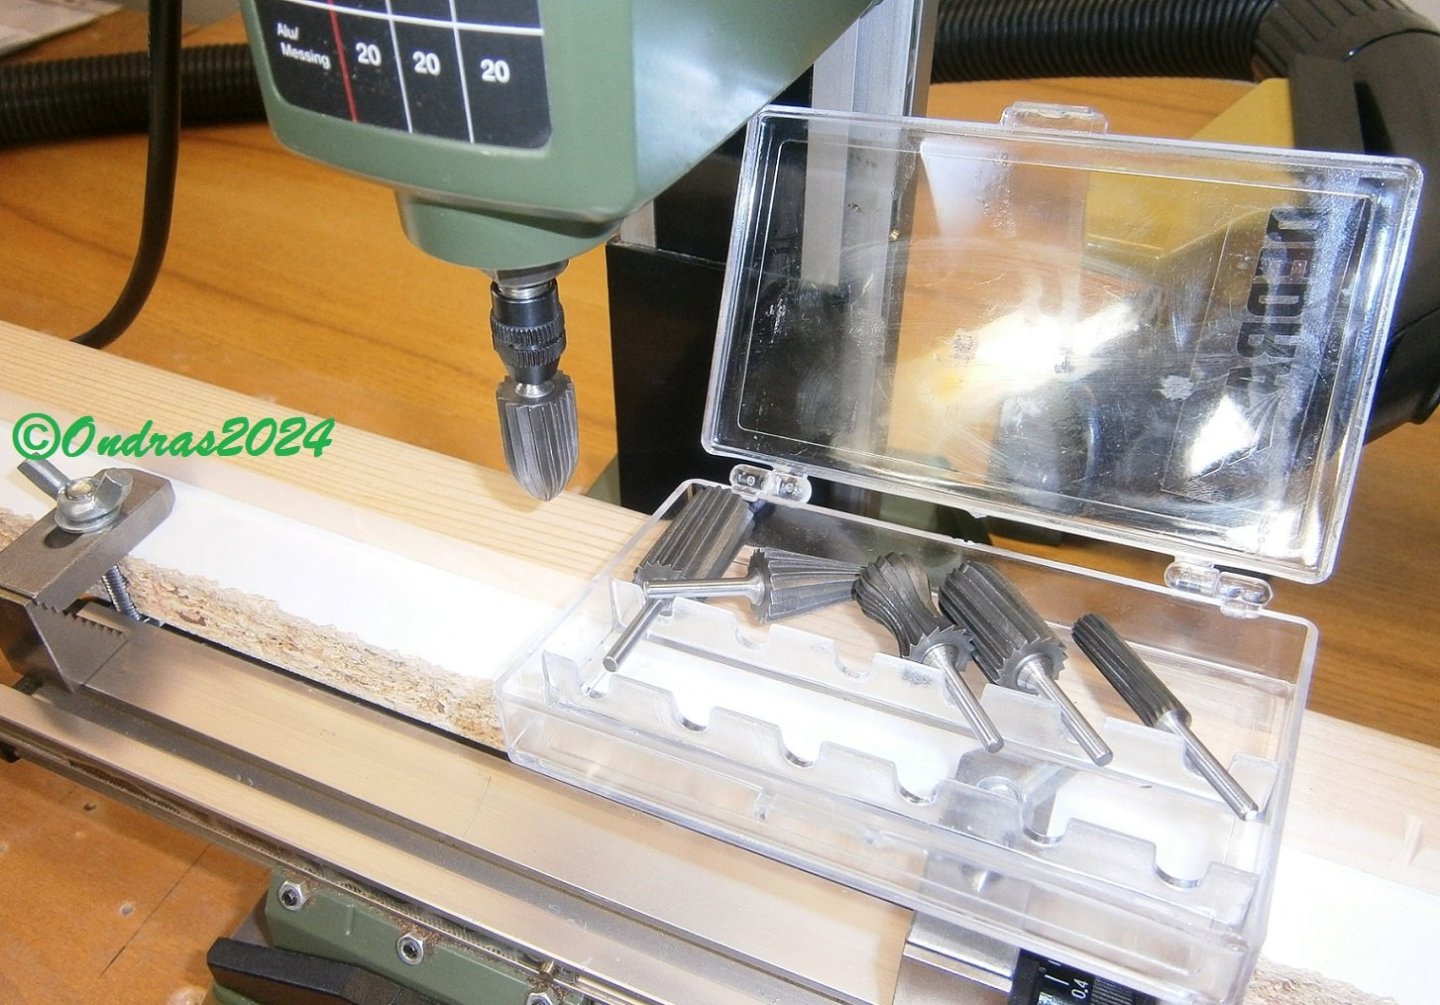
I started making blocks. First large sizes, there are only a few of them, and then non-traditional shapes. "lift block", "sheet block" and "fiddle block"... The base on the milling machine, then hand-made..🔥 I plan to produce small-sized pulleys "by machine" on a milling machine using shaped milling cutters..😴.JPG.0d6463ae1d9e3576fb3b72bd88c2d6ac.JPG)
.thumb.JPG.2fe339bc5edf74cce4e428524705426a.JPG)
.thumb.JPG.e6188f02b102a0480bf3cd91c476ef25.JPG)
.thumb.JPG.76e6f77a5ccdb69ae0f099c54e536536.JPG)
.JPG.4e06c2e53193869f7bf6d5bf60b693b4.JPG)
.JPG.23a2ade39e5668f67183a67dc677528b.JPG)
.JPG.1a84ef149caba9cacd6e53ae144cd4b2.JPG)
-
Roter Löwe 1597 by Ondras71
Ondras71 replied to Ondras71's topic in - Build logs for subjects built 1501 - 1750
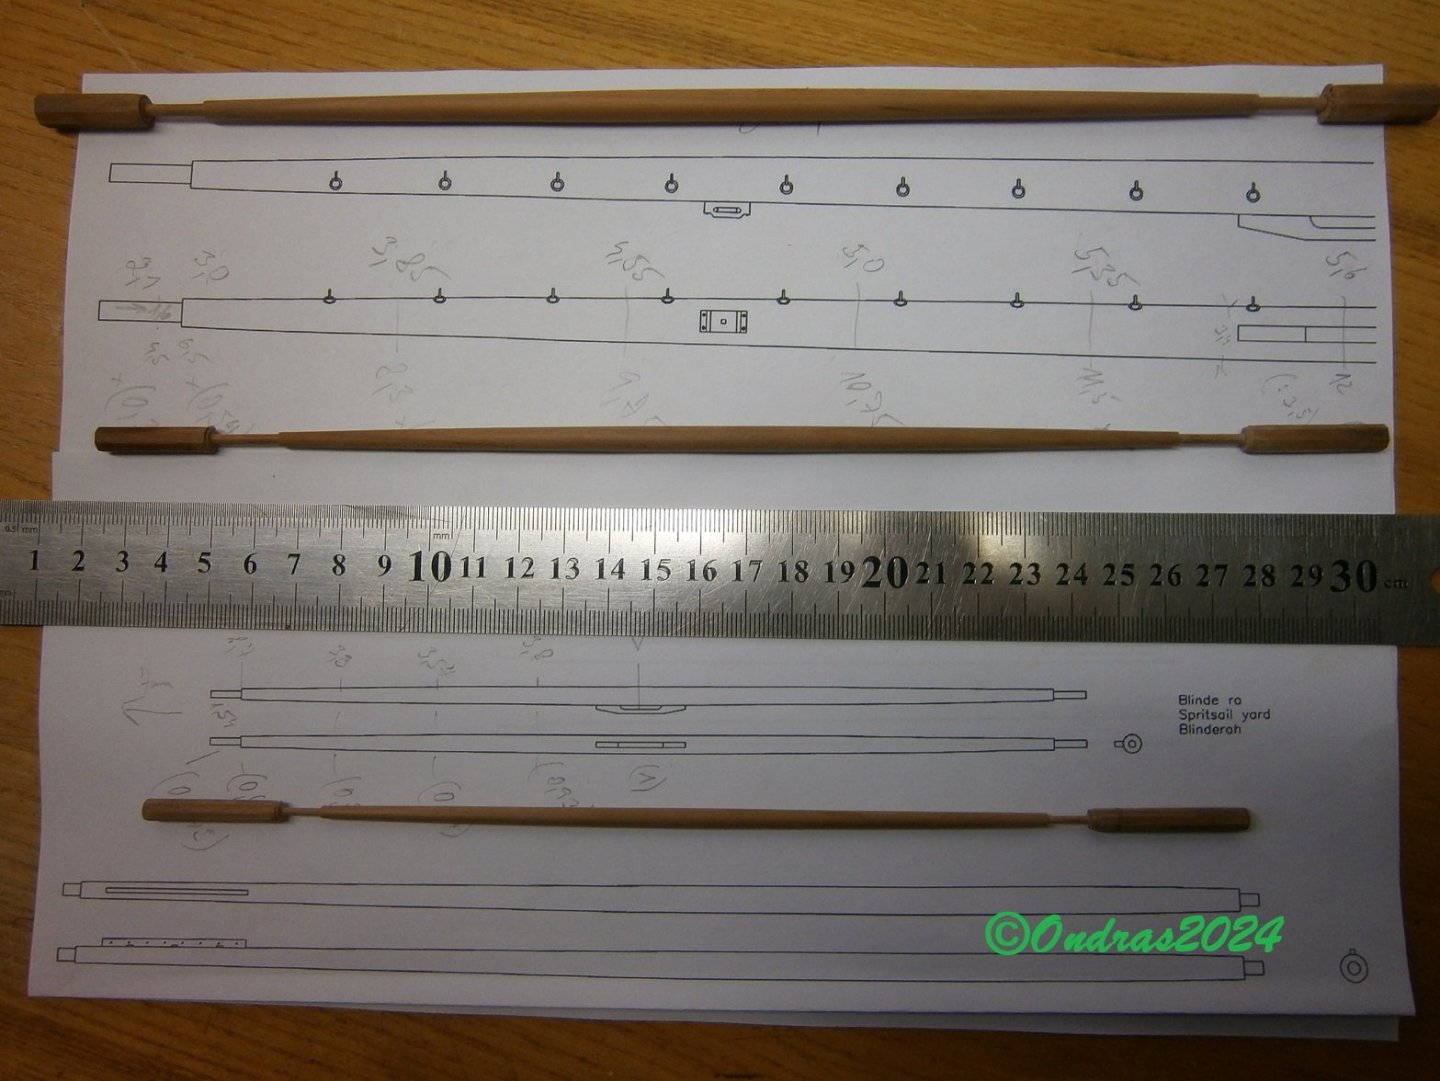
I finally fought the yards..🔥 Yards ready.. I bought fabric for sails, 80 g cotton batiste. I'm starting to learn to sew...thumb.JPG.c835adc8fd033350bb2cd668d6cdd146.JPG)
.thumb.JPG.5ea25cd67550472e78c4059f9b1a749d.JPG)
.thumb.JPG.cf0ad384dd3b7b3e9aac2f76ed2037c4.JPG)
.thumb.JPG.3ad0e7b69e5c83d947583edbc931f6b0.JPG)
.thumb.JPG.6ec12739e1cf8d7f43c7ab9622060c4d.JPG)
.thumb.JPG.60e9970e06b9b5947787ca087f424dbb.JPG)
.thumb.JPG.a4ee391b8a2d0dfe57e339190dbe4961.JPG)
.thumb.JPG.e04f10334facb5ef86688a781020887d.JPG)
.thumb.JPG.a53e877b67aaede32c47b9dc9378540d.JPG)
.thumb.JPG.24352030c788238d5478733be9a9c713.JPG)
-
Roter Löwe 1597 by Ondras71
Ondras71 replied to Ondras71's topic in - Build logs for subjects built 1501 - 1750
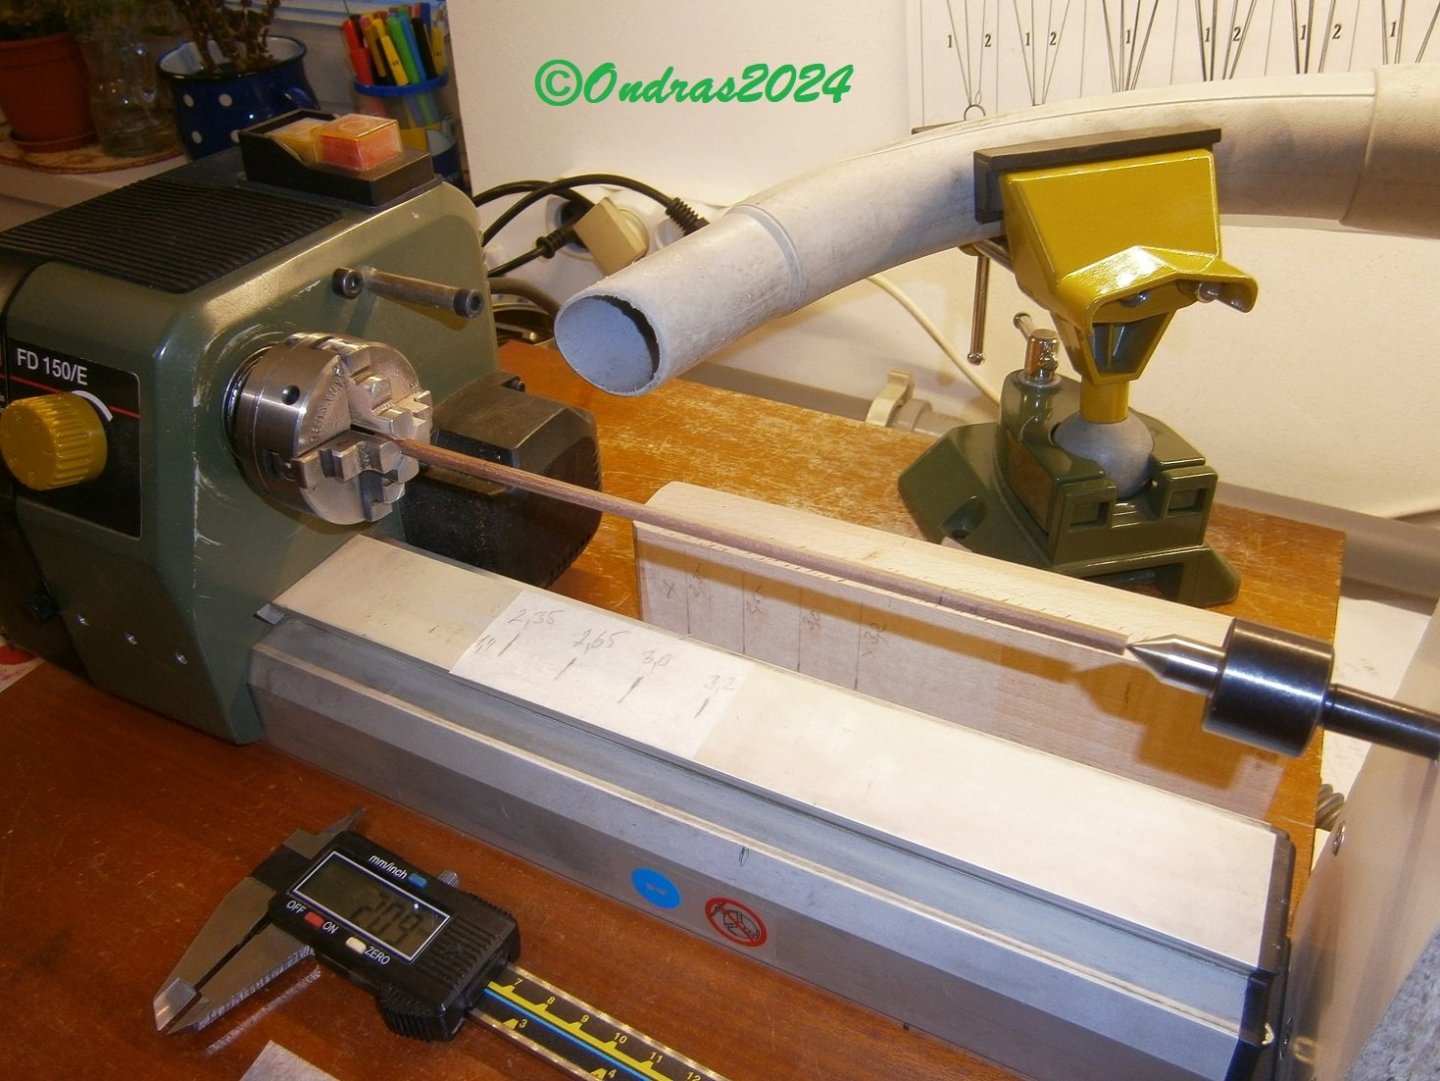
Thank you very much MikkiC, thanks for the like.. I keep going slowly, I'm turning the yards..🔥 I came across a new Proxxon, a 4-jaw chuck.. Great Christmas gift. The placement of the prisms is more accurate..😍 The first yards have been dialed in. Additional items will be placed.. I wish all modelers a lot of peace and, most importantly, diligence and a passion for building in the next construction year 2025.
.thumb.JPG.4b0c50f0c3fd56fbea1d4dd0d8c31c36.JPG)
.thumb.JPG.e795dd3264b84df6839a2597a8a72e3c.JPG)
-
Roter Löwe 1597 by Ondras71
Ondras71 replied to Ondras71's topic in - Build logs for subjects built 1501 - 1750
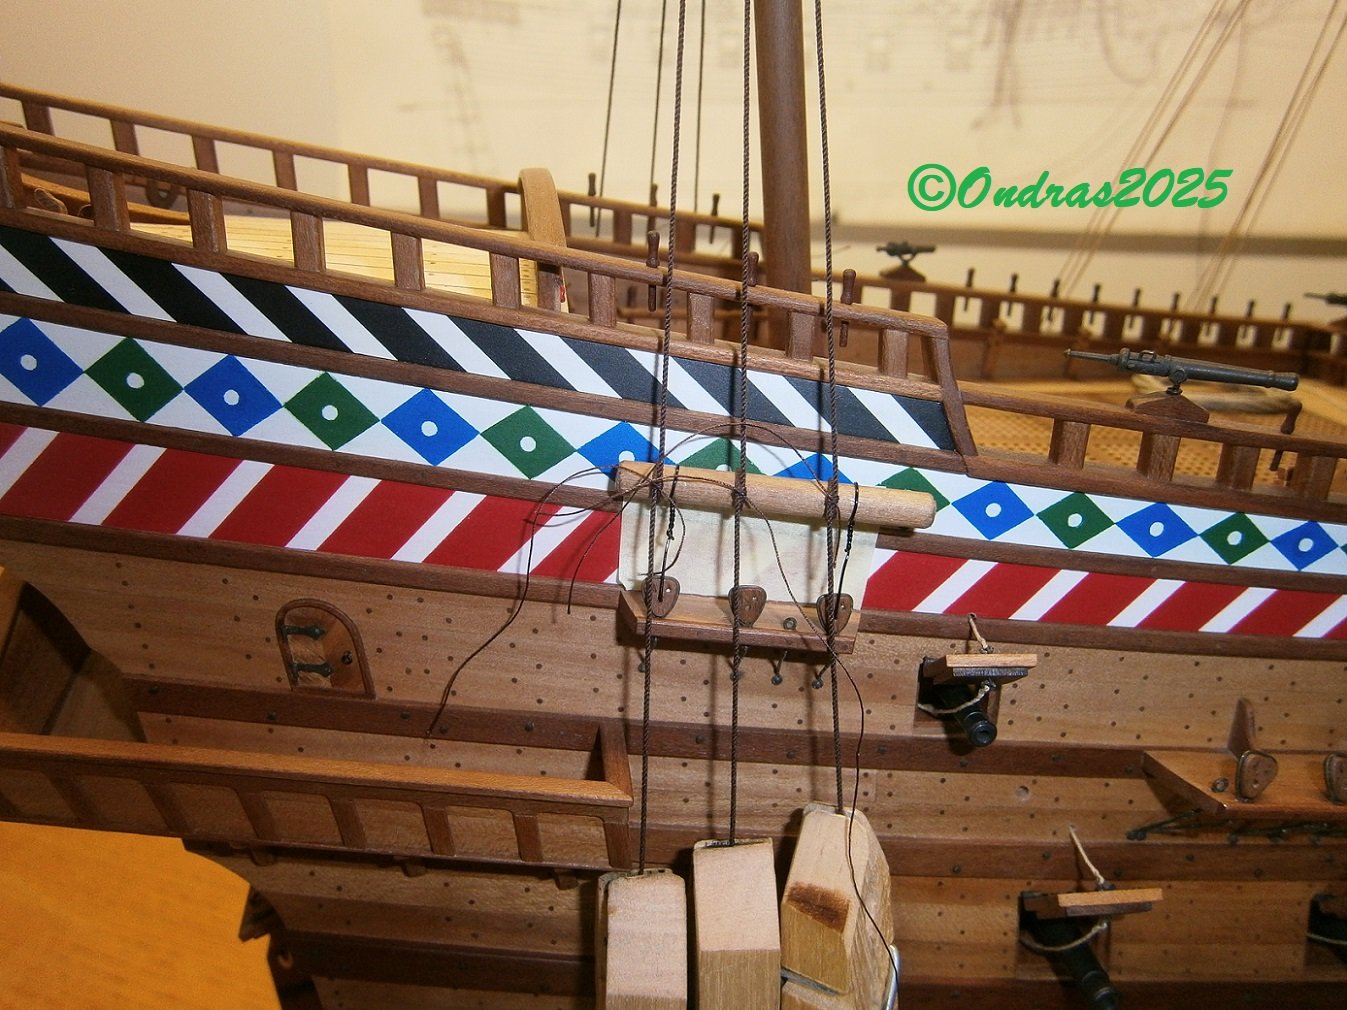
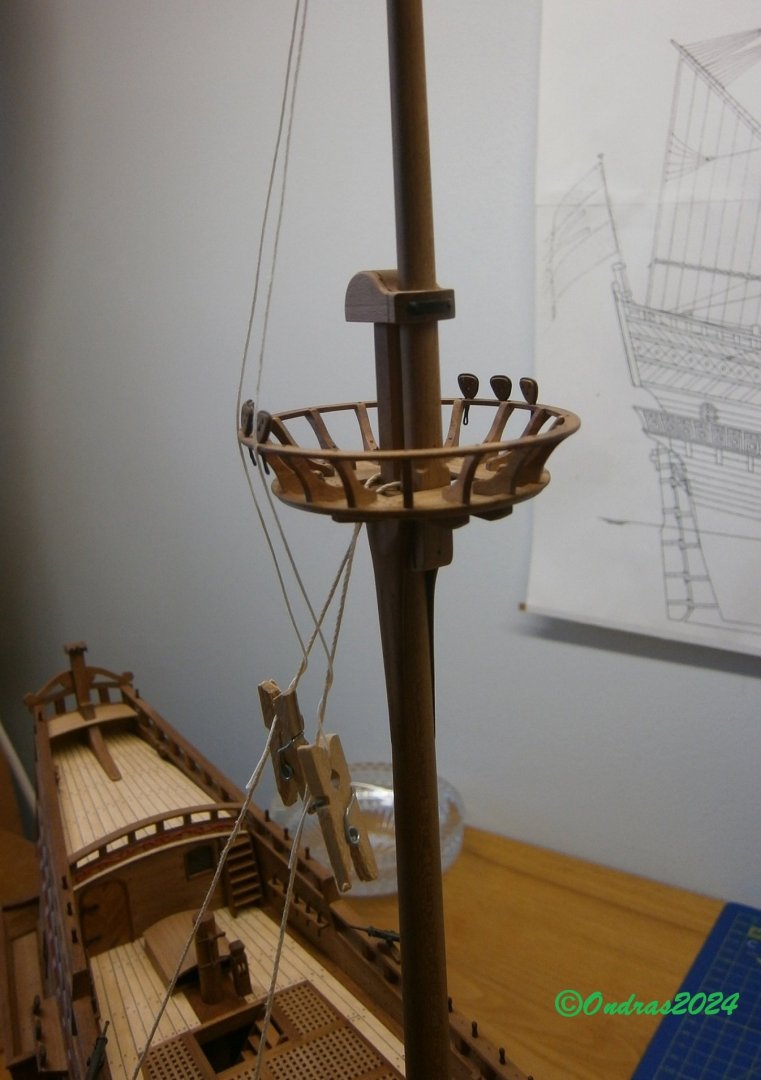
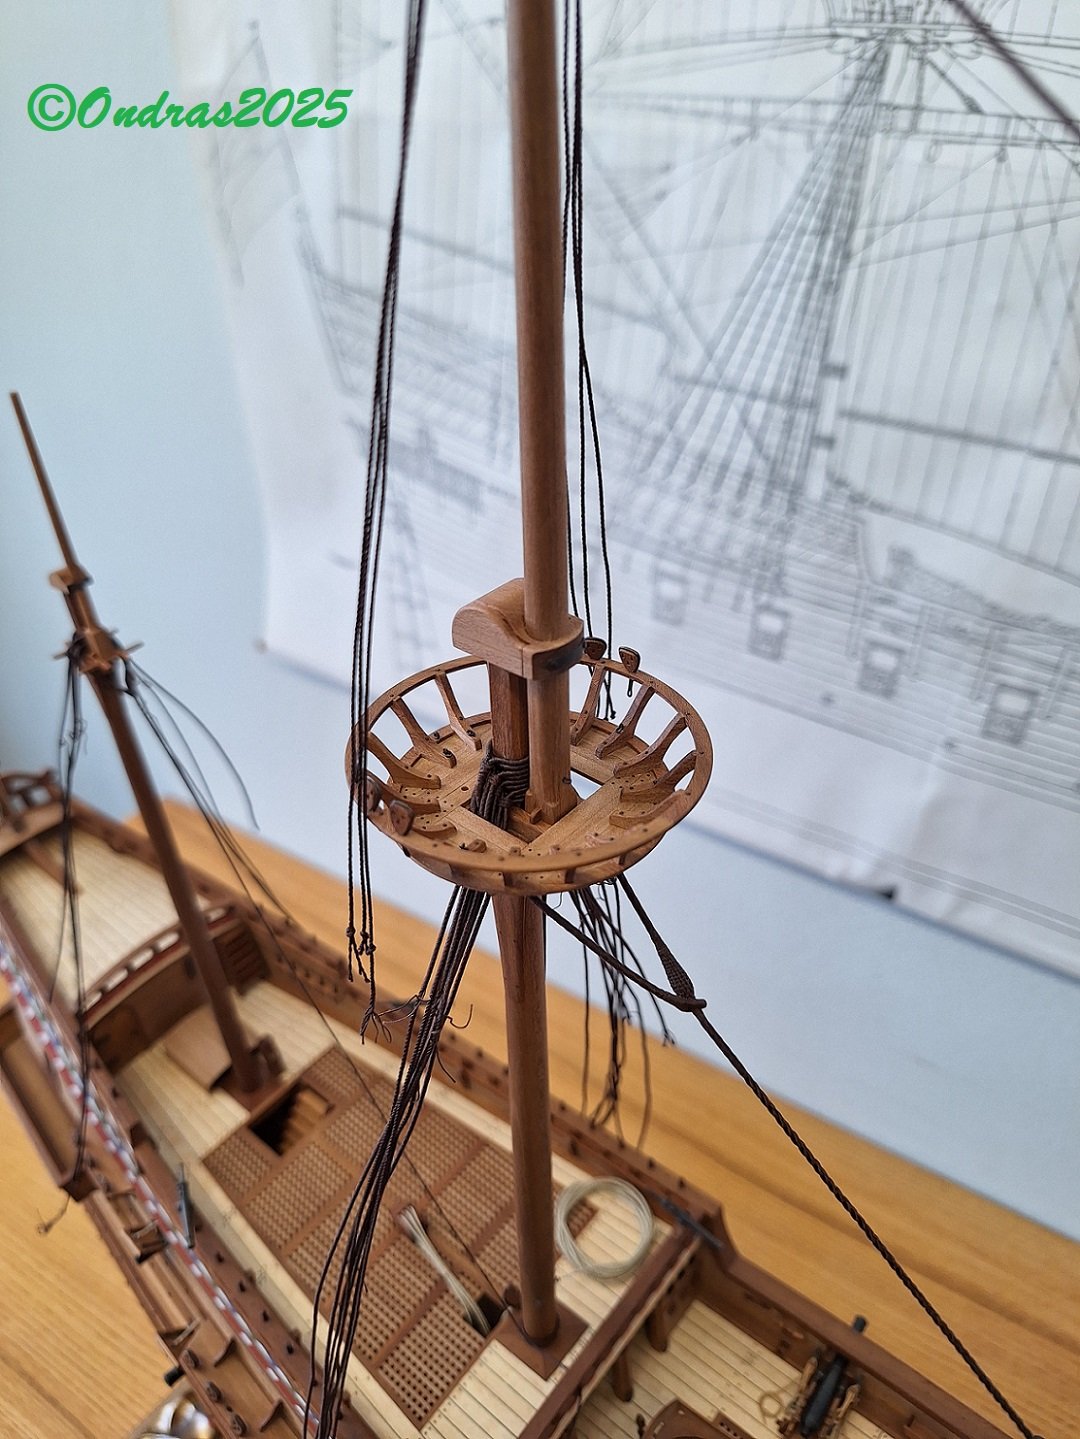
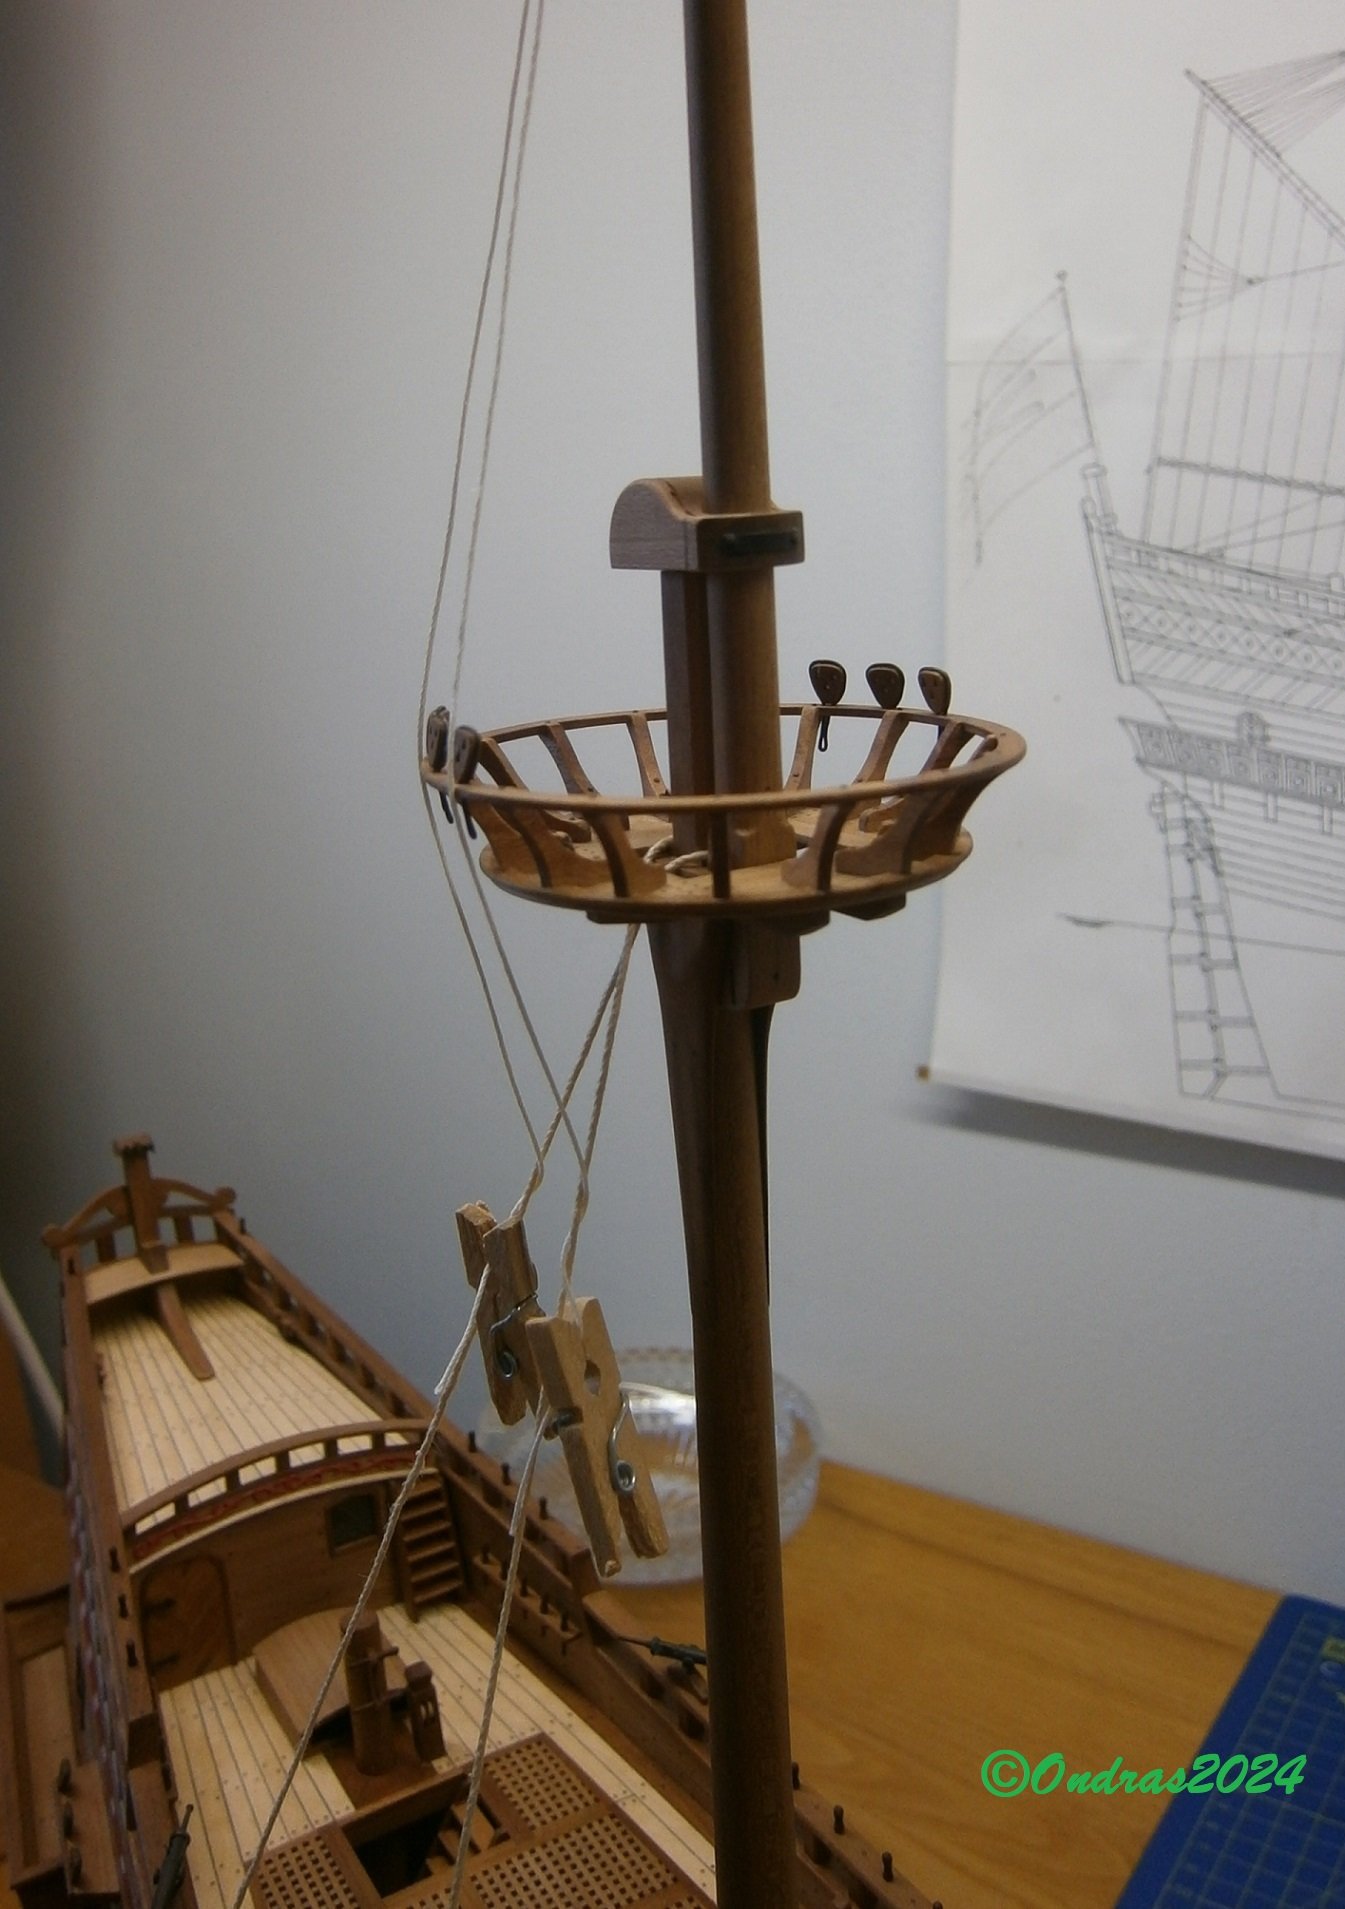
Placed deadeyes pulleys on tops..🔥.JPG.e6857691974cd078cfb8c98cd6cfe7fb.JPG)
.thumb.JPG.452f2f41aa2d351a23d251c4c1d38256.JPG)
.thumb.JPG.93787ef6eb7588616f67e7fa0f90bdfc.JPG)
.thumb.JPG.45a4076bb975d3b392d3d81da2e42f4b.JPG)
.thumb.JPG.dbdbacca9a32efd2acf443abdb7ad490.JPG)
-
Roter Löwe 1597 by Ondras71
Ondras71 replied to Ondras71's topic in - Build logs for subjects built 1501 - 1750
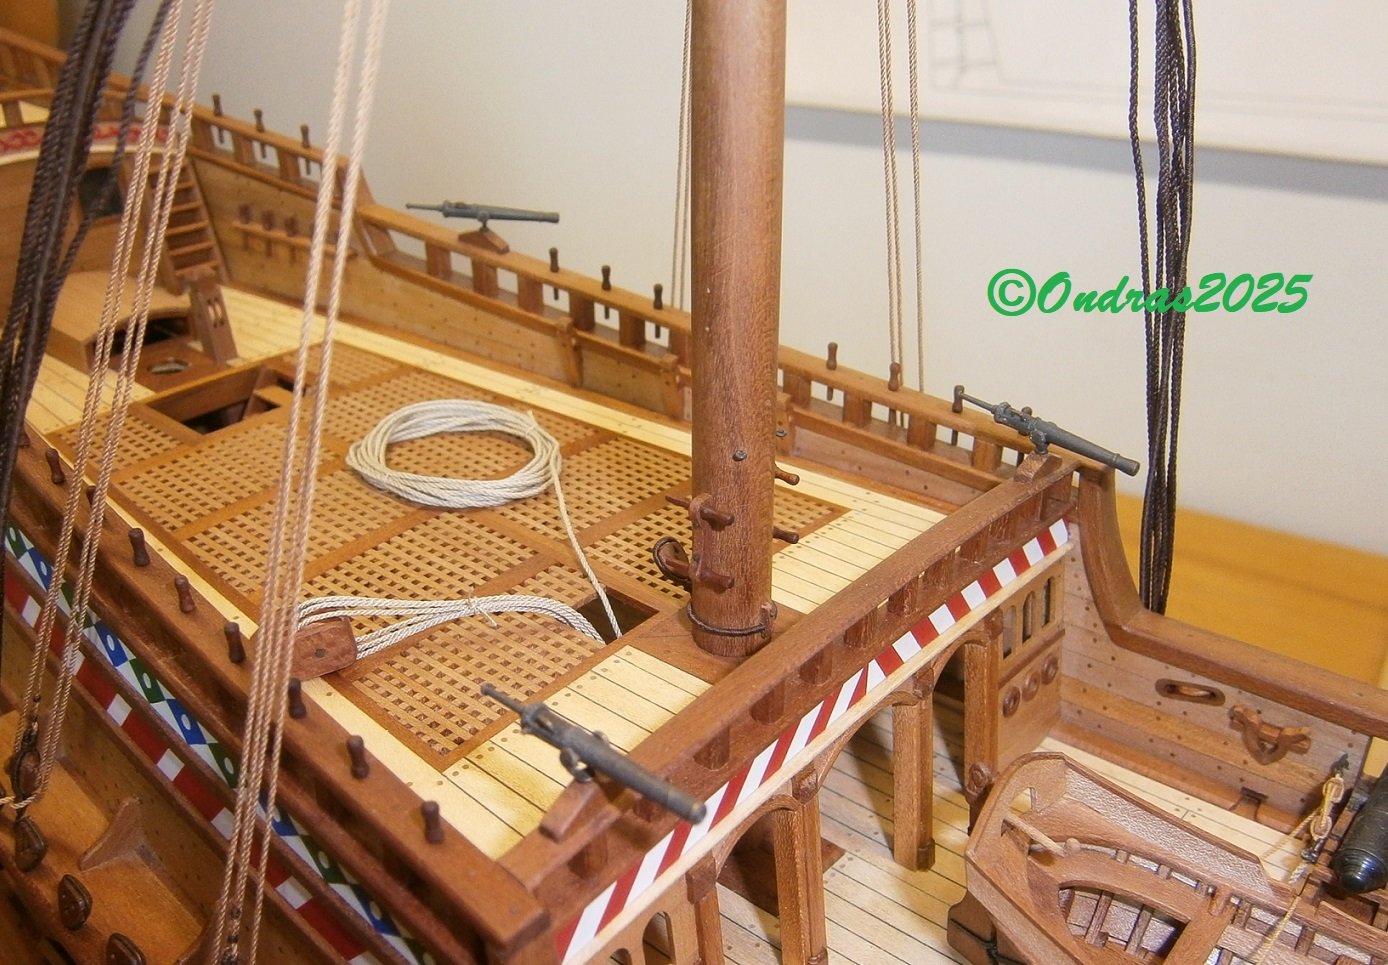
Tops received mounting elements..🔥 Like the pattern of Barents boat tops.. Here is a beautiful series about construction : Finished tops.. So it's rope and block time..🔥.thumb.JPG.5d7776d62065275986b43e879cf6728a.JPG)
.thumb.JPG.415d51f8963526b9ac495dda43ef607a.JPG)
.thumb.JPG.f5835db2d74bba2b4139459cca2478c9.JPG)
.thumb.JPG.f3d6fb01b0ebed1b9a75e591e9c0cb11.JPG)
.thumb.JPG.0c3d49b48fccbda8192f69c674af9141.JPG)
.thumb.JPG.f983aaa98812e2b884290eb9610428f5.JPG)
.png.6d30c9bf7181f161b77d9199c7c93026.png)
.png.edb47371d97a69251613b62ec3af2b84.png)
-
Roter Löwe 1597 by Ondras71
Ondras71 replied to Ondras71's topic in - Build logs for subjects built 1501 - 1750
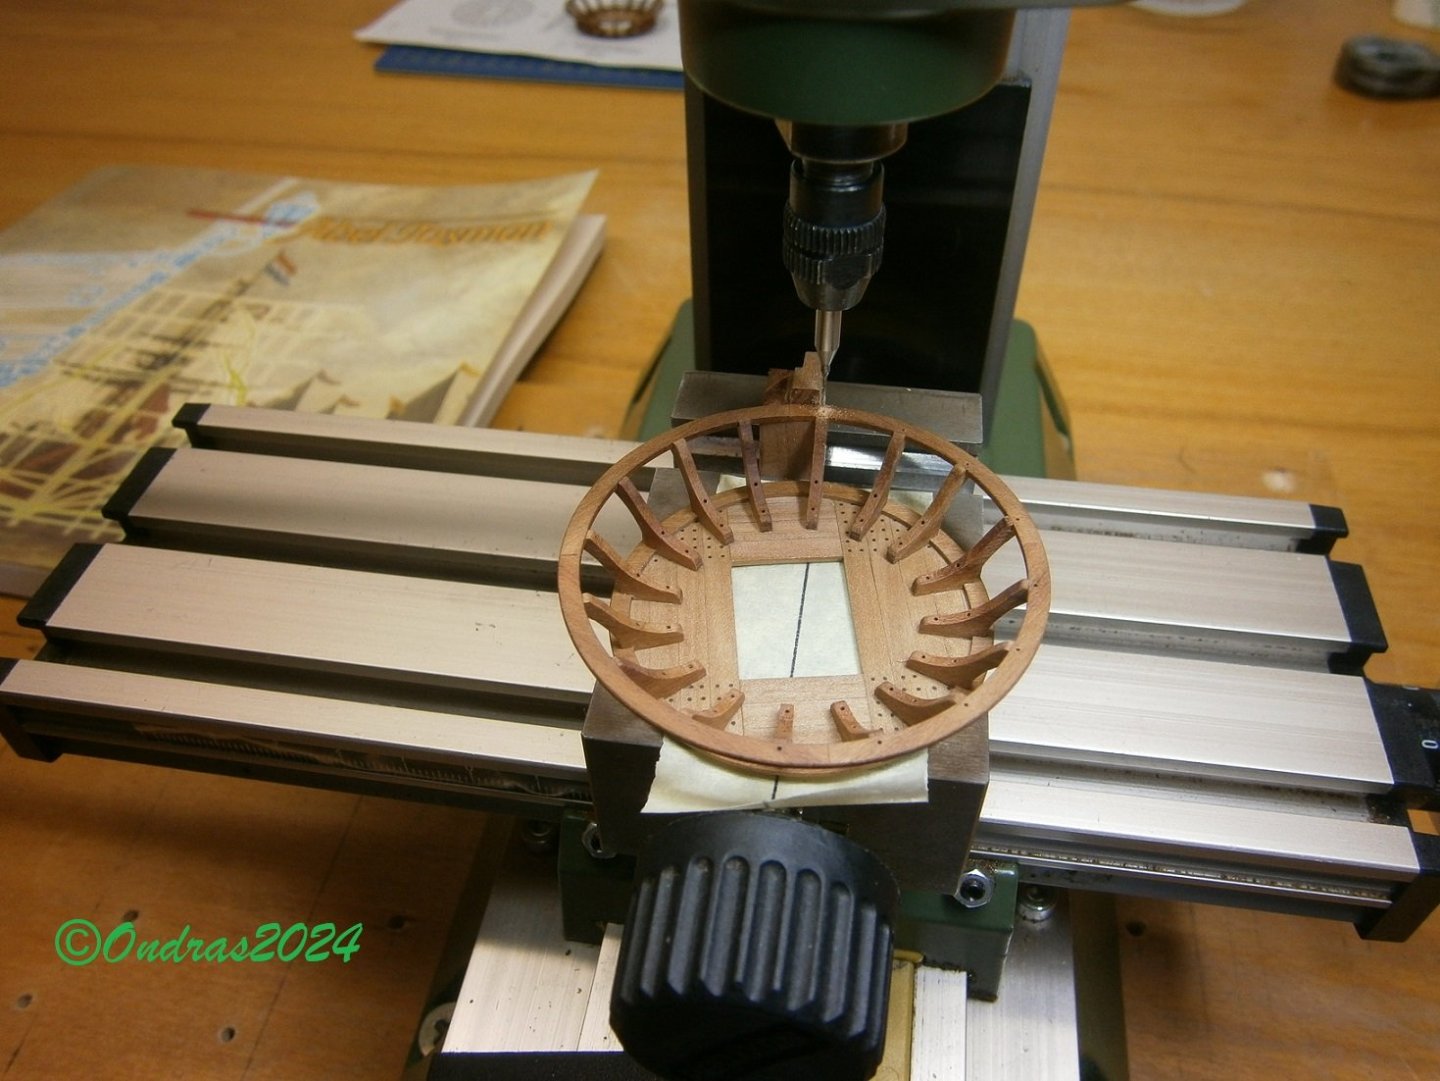
Thus, the production of column tops had two episodes. The first, of course, is an exam. The direction of the flight of wood betrayed me. The second attempt was successful.. The top of the main mast dries, After waxing, nails and other details are added. The second top will be a piece of cake..🔥 Measurement by a sailor...JPG.2ba67885e3207c54269effcae6e8f405.JPG)
.JPG.31b8dc2b0b00a657c9b49f98152b2dad.JPG)
.JPG.02d4bcb88a9412434ce9bb30b97abd1f.JPG)
.thumb.JPG.adee0ed046d4372ab17ea0298180b90a.JPG)
.thumb.JPG.0df8c1916b1fedc244e777f3b1d2ea10.JPG)
.thumb.JPG.ec3b208f9e93df36be3d4180f9abf3b1.JPG)
.JPG.90e18dafceb9b3d2d6b5d735695bd2b3.JPG)
.JPG.1afb4f85f5519751efb8e4731d6b2102.JPG)
.JPG.127bb1cdcdcc71b343d899589b6e5a2c.JPG)
.thumb.JPG.0be2e0acd5e85b77dd4a6ee2405ba9c4.JPG)
-
Roter Löwe 1597 by Ondras71
Ondras71 replied to Ondras71's topic in - Build logs for subjects built 1501 - 1750
Hello George. Interesting and clean painting. I also try to look for details and shapes on the internet, so I agree with your effort. I am curious about the resulting drawing. Ondras -
I greet you. The line is easy to maintain. I did the same thing on my boat. Fingers crossed for progress..🙂 San Martin kit...
-
Roter Löwe 1597 by Ondras71
Ondras71 replied to Ondras71's topic in - Build logs for subjects built 1501 - 1750
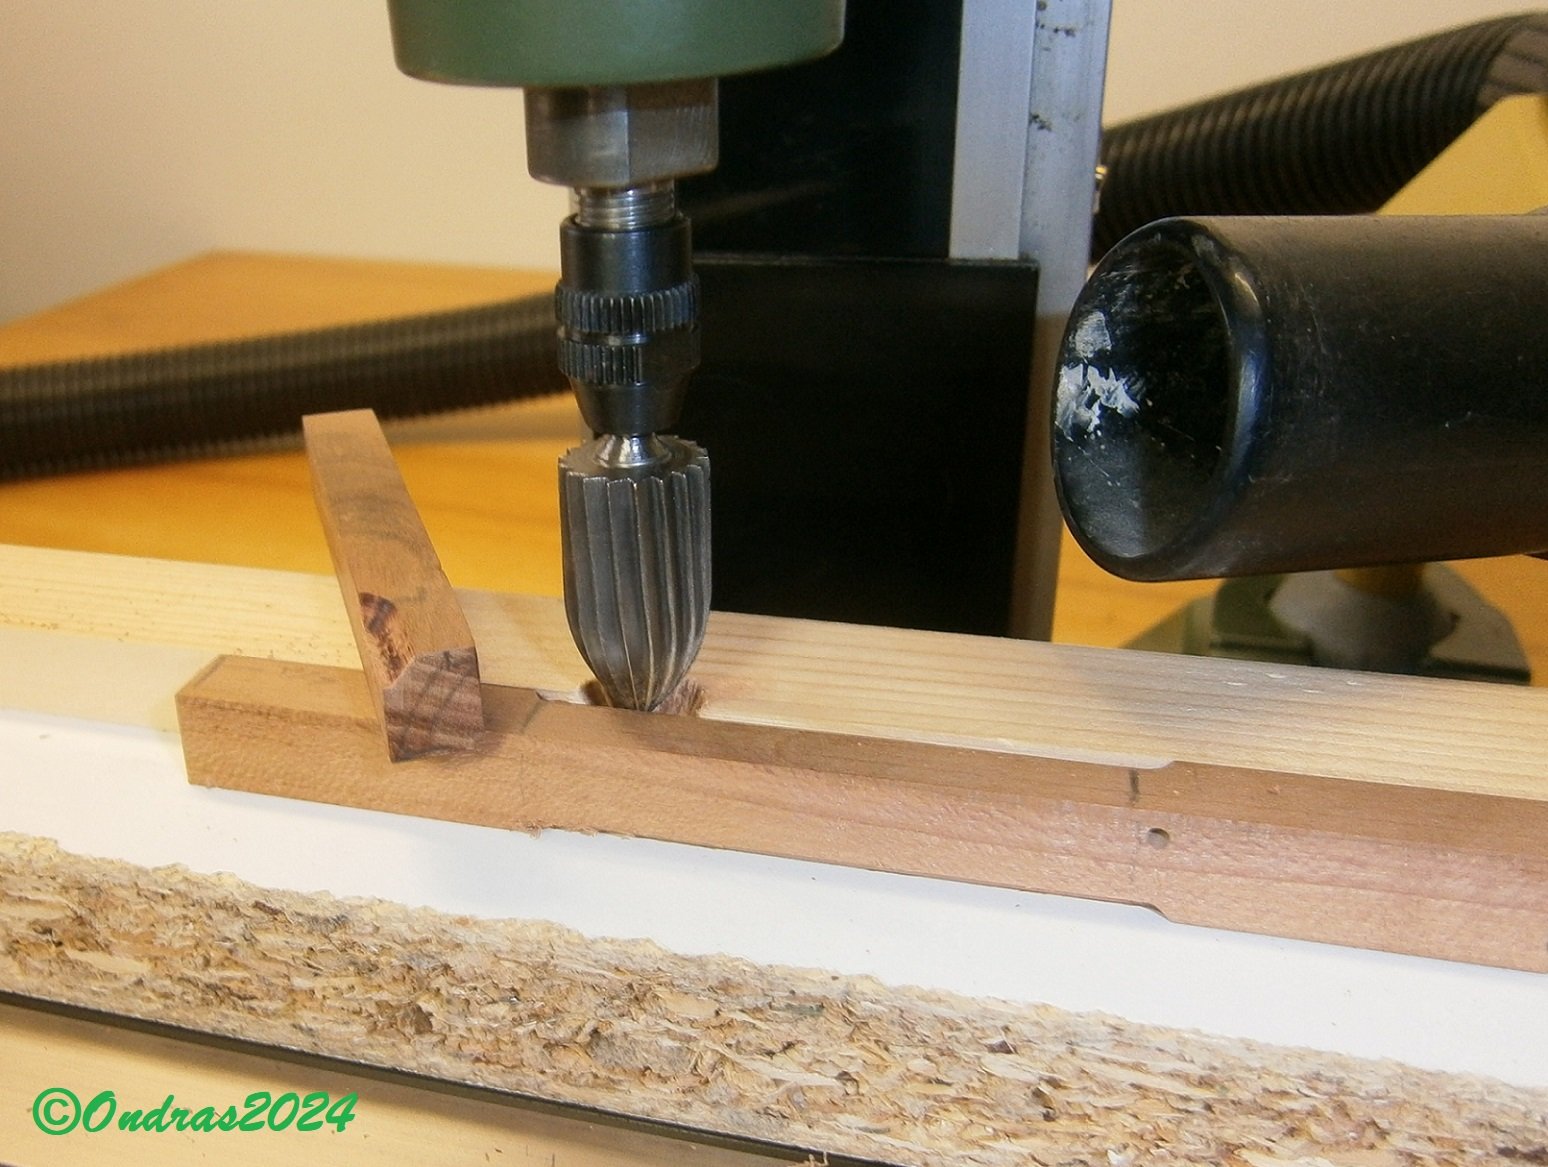
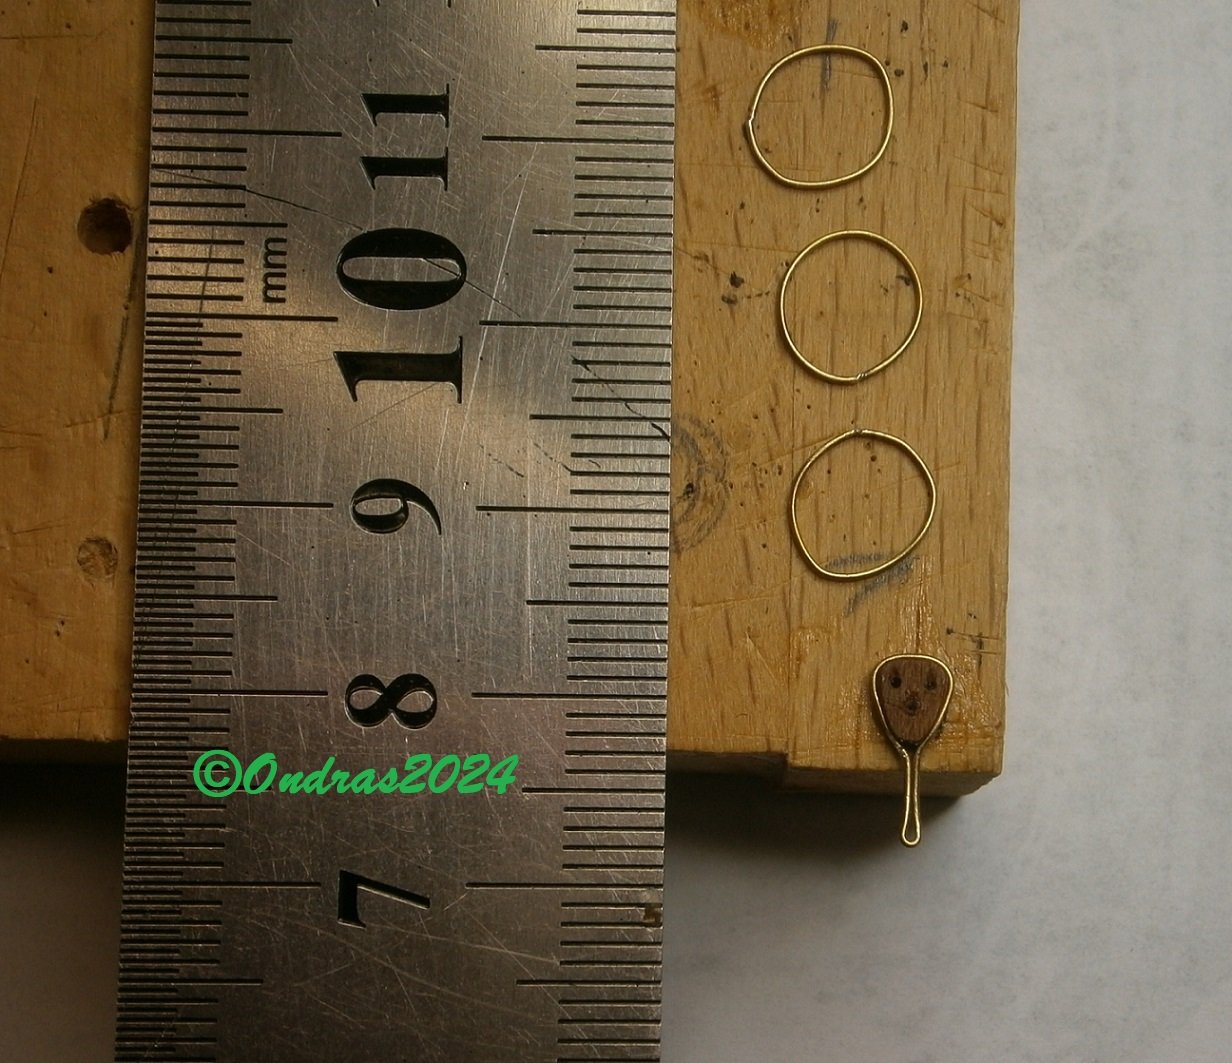
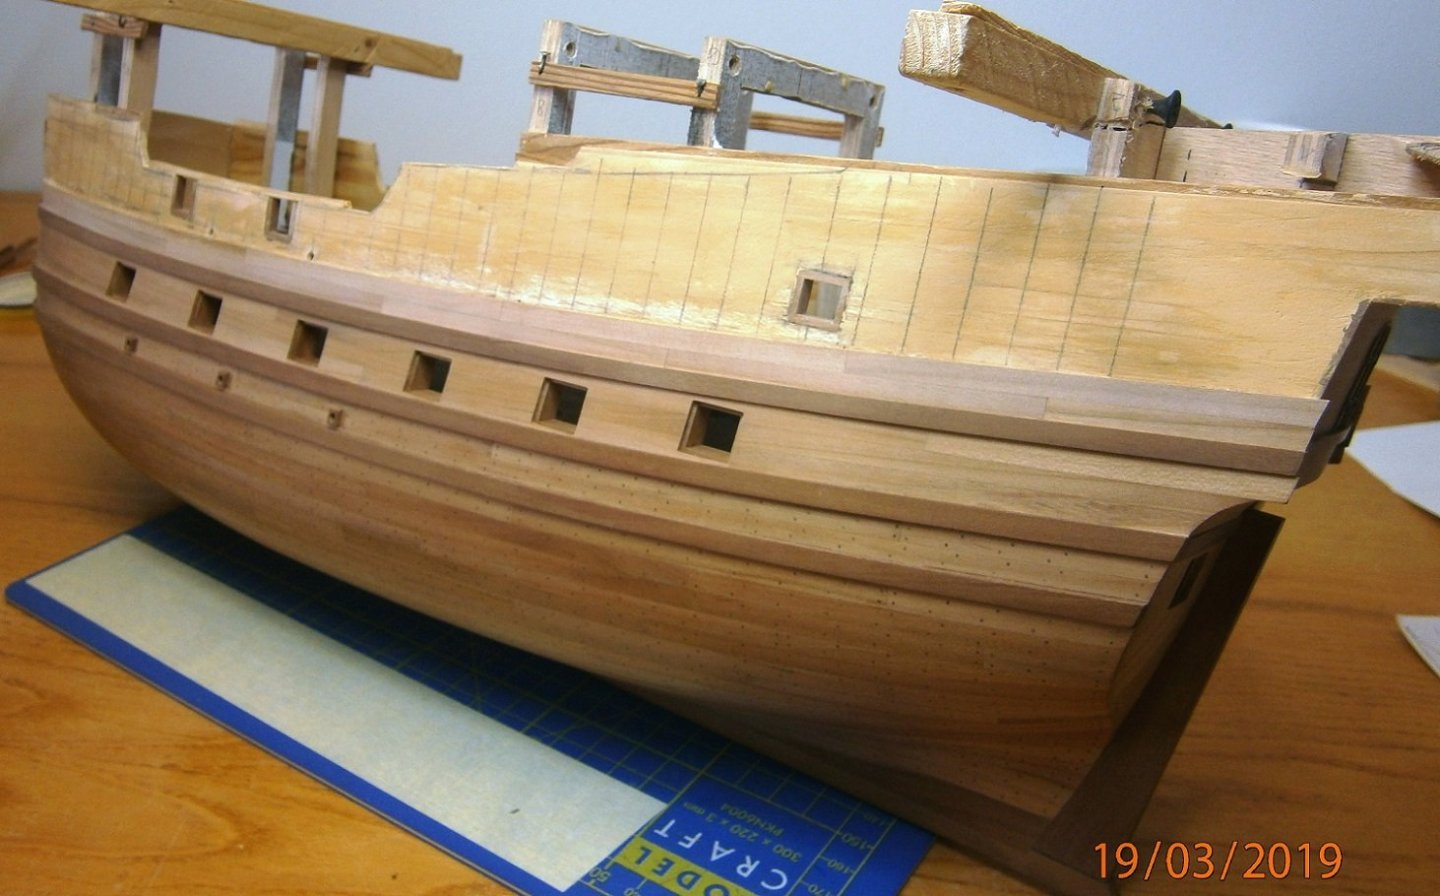
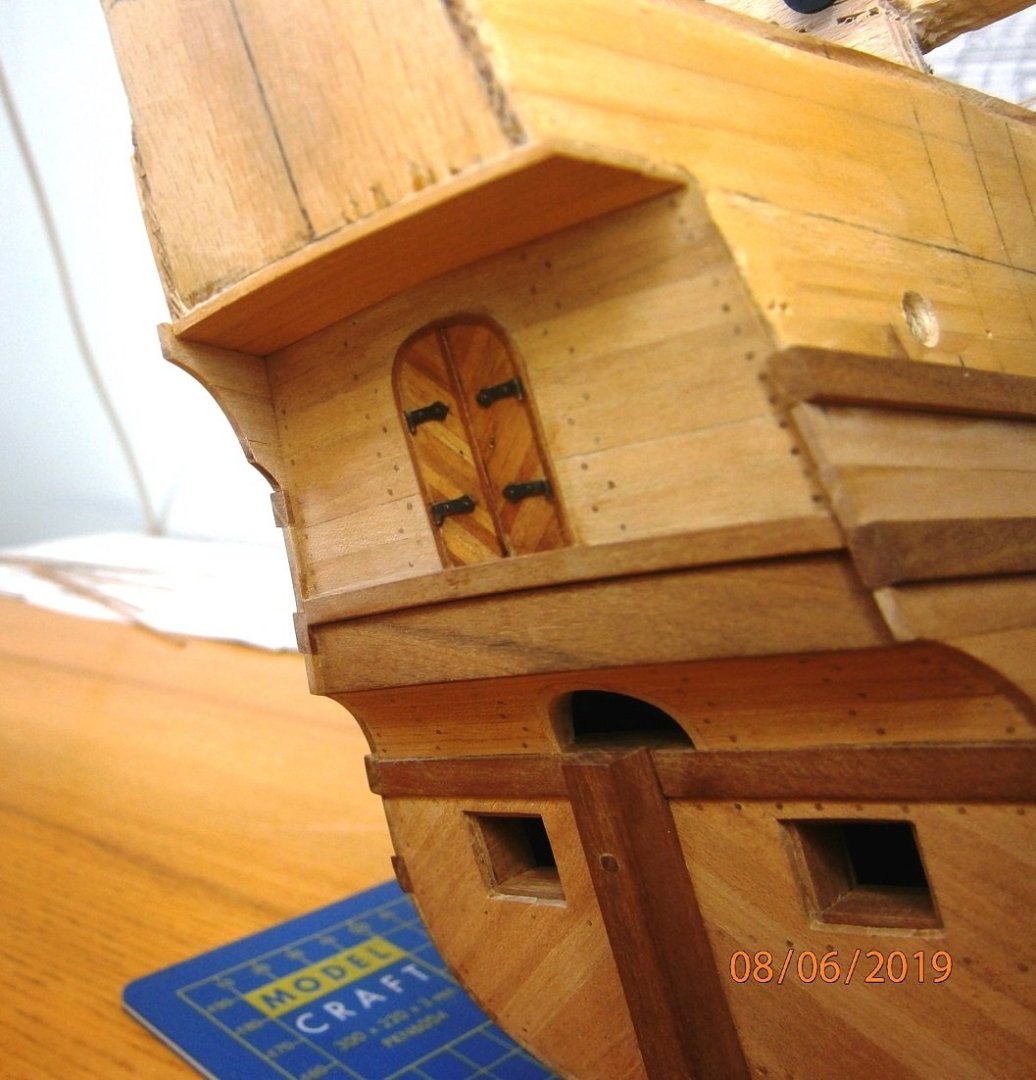
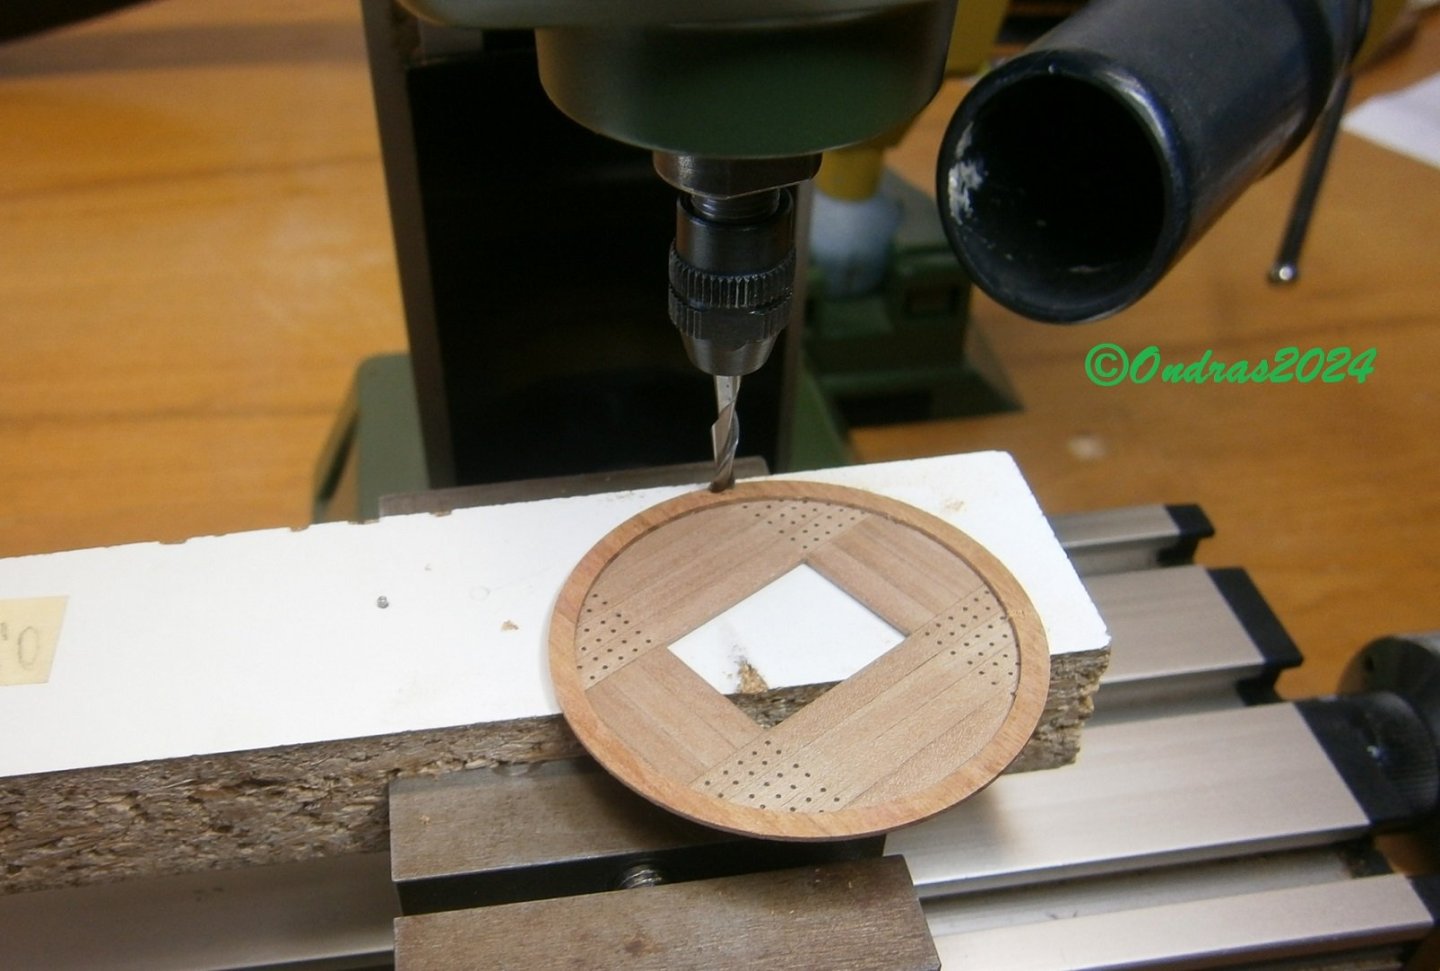
The second plate weakened under the cutter. After 0.1 mm, it removes sensitively.. Continuation of making hoops. My first attempt from the board broke years later. Second attempt according to reality from glued parts.. I had the cutters narrowed to 3 mm to shape the posts.. Now I will gradually create the shape of the posts, then they will be cut..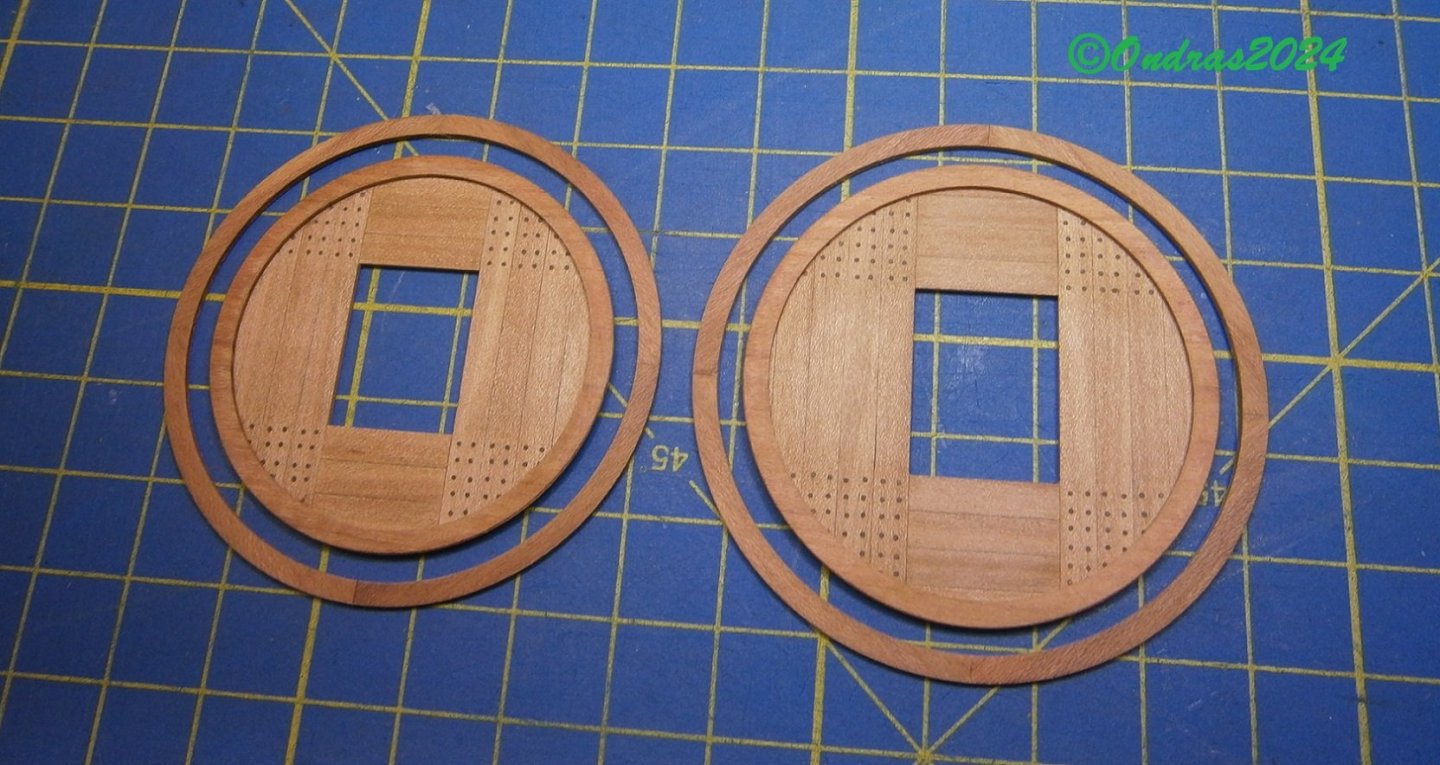


.JPG.df31bd7475a9e48f9a021d01c813d54a.JPG)
.JPG.5217e4ed4ff85f51b693264153d7b6fd.JPG)


.JPG.040ec45a2c799e37a9942eff022e6305.JPG)
.JPG.7d0ef8ed8b08f9cf356b25ef0afd87e8.JPG)
.JPG.b237d3fcae54717b46b78334d5c646e8.JPG)
.JPG.97d15070732b500f38b3dc7bae551b4d.JPG)
.JPG.31eed7913c0e877c36a36949848d9464.JPG)

.JPG.ea0e6141a0a8aa10a894a1fa3c4e2fee.JPG)
.JPG.9f39d4d32904693be52b5c71716f0d56.JPG)
.JPG.63d514d6923b172fe90b65950e62931b.JPG)
.JPG.21b107646f2c92d80392eaf60af67d6c.JPG)
.JPG.e8a12b2407a4aad887dcb22752bad834.JPG)

.JPG.03109e81584b628f2008c888a51daa58.JPG)
.JPG.93b3986c6d61a109de16637beeabe0ac.JPG)
.JPG.07a831f8f69d3a2b3191fcb69f0527b0.JPG)
.JPG.cfbd102220dc0c25b55ceb2cc33c96f7.JPG)
.JPG.409d482f8a641a7fdfc4a5cd5b2b9953.JPG)
.JPG.66ba2692f6ebc94f9e938e0e5f80fbbc.JPG)
.JPG.b7e0cb70bd89e249e28c722c4c25bbea.JPG)
.JPG.5fd680b7bb9b67d51c35a2a27289a17b.JPG)


.JPG.da5b7daef8fd2bee370d7372abe65b4e.JPG)
.JPG.37a305da28096d8888bf81420dc2ee96.JPG)
.JPG.85cbb59cb1ac6490e61bb941f227ee04.JPG)
.JPG.f033b1d434db65a9c70d4cd3f64e2f23.JPG)
.JPG.f134d8e33b15e9b4705974b302f13b9a.JPG)
.JPG.b18dcec6090cd08c54a035d37b8f08a6.JPG)
.jpg.172601153276e34364455e775e25806b.jpg)
.jpg.2d496e60658b75dcfa37b3346b0e03ca.jpg)

.JPG.ba9def59d76b6b8ee1672414dca05c88.JPG)
.JPG.7be71be3d753357ebdc498413bf15b06.JPG)
.JPG.077d76356dde28de666bc1f707235de9.JPG)

.JPG.427b3416025f029f099b528dbfa8bb05.JPG)


.JPG.54c2b83bfe58c06dd5a183c2b4e96a8d.JPG)
.JPG.92ca5a32d255096867be8f98c3e04eba.JPG)
.JPG.3112d7244d986a1db5b247bd5c607ee1.JPG)
.JPG.6f56cb895ddc439d9fc5e38b3bee8a1a.JPG)
.JPG.c128eaefee800043665fd83179c16cce.JPG)
.JPG.e31ca2e590b704bdf8241d144e02cfc8.JPG)
.JPG.3ed31bb1cd0b0273217503e7aeac859d.JPG)
.JPG.ac3eb365e34fdc7c892e3b323d48aaf4.JPG)
.JPG.ba9b675d644f242c5d1ad98d7857971f.JPG)
.JPG.deb24076ba641c549e03c8ee4db421df.JPG)
.JPG.5f1253f9cf20748699ee4ca7bb453aaa.JPG)
.JPG.04c1d649179f6292fee7ea3135d40ef7.JPG)
.JPG.c256156d2eb590dc9ca2a03451863e1d.JPG)
.JPG.051bde3a6090a7cd1308426e950927be.JPG)
.JPG.6193d98b3761435f576c65694a952867.JPG)
.JPG.a1b68cfbaafb2f03136471e3f5cf04e1.JPG)
.JPG.ff1233b75c3de3e68188f46d76c787e8.JPG)
.JPG.ccd18e5dfc28b41a98e7069432ce9f34.JPG)
.JPG.5e2b8ab0af6101e1029aa6ac2b39c8e4.JPG)

.JPG.2f8ddaa045147aa7d45f7e501f4574bd.JPG)
.JPG.6c0ec4f0eff7737830a8880af8f17114.JPG)

.JPG.0bdb16c005c953faeb3a8624e5352ce5.JPG)
.JPG.e11fbcfdb9276adfd70135eaeff4a941.JPG)
.JPG.042a8e29a9f19204d88710d910b66530.JPG)
.JPG.dba9ae669afd8b174680089c74ea7f3d.JPG)
.JPG.35d8b88a9c883d64ece6ebc4b2986555.JPG)
.JPG.de11ce07c5e0b91e4b4bae484c8bbffe.JPG)
.JPG.990b7e5c35ac32fc99e8156c12081246.JPG)
.JPG.ef85b72341acf03a81fb08e894cf6e3e.JPG)
.JPG.3a264d61c91f2e67e6a7492f0364d582.JPG)
.JPG.3a7ab0f45ba933d2b8535f9280981de9.JPG)

.JPG.3a53ed989b72fd0056648d28d9dfef5e.JPG)
.JPG.61617d01a5fbfb1496e451c8493e1688.JPG)
.JPG.a48b72a2e577e72aad2cc3a4c6beea18.JPG)
.JPG.13c07c487b77242443be107c8052421f.JPG)