
HOLIDAY DONATION DRIVE - SUPPORT MSW - DO YOUR PART TO KEEP THIS GREAT FORUM GOING! (Only 53 donations so far out of 49,000 members - C'mon guys!)
×


Koppalakki
-
Posts
172 -
Joined
-
Last visited
Content Type
Profiles
Forums
Gallery
Events
Everything posted by Koppalakki
-
 Ok here's a bit more indepth into painting. Just a disclaimer, some of the shading and weathering are a bit hard to see in the photos as my mobiles camera and my lighting has trouble capturing it all. For naked eye it's way more visible. It is subtle though. So primed with mr surfacer 1200 thinned down with leveling thinner and a few drops of mr retarder. Then Tamiya black sprayed. All paints thinned with leveling thinner to about 30/70 paint to thinner ratio. Also low pressure used. I use an Iwata custom micron CM-B for my airbrushing. Next Tamiya XF-19 grey sprayed. After this some overspray to tone it down. I don't take breaks at these steps normally, just trying to show it a bit clearer. Then some more white is added to the mix. Once again overspray to tone it down. Next I used lifecolors dark gray to paint the base and a blue filter using AKs blue for panzer thinned about 80% with white spirit. If you see it forming around details like a wash, then it's too heavy. You also don't want to drown the surface, just get some filter into your brush, get excess off to a paper towel, then go around the whole part. Then a black wash. Dark wash from ammo of mig used, thinned about 80% again. And cleaned up. Next some white oils were dotted around. For larger surfaces you can use a bit more varied colors from buff to yellow and blues. Then blended in with white spirit. To finish it off a bit of dry brushing with light gray enamel mixed with white oil paint. And here's a finished Harpoon launcher. Here you can see the same piece, but different angle to show how all the shades disappear. They do look a lot better to naked eye and all the steps are worth it imo.
- 178 replies
-
- 15
-

-
And here's the infinis harpoon launcher! About 50 pieces of PE and builds up nicely! And some painting and detailing going on with the middle tomahawk pad.
- 178 replies
-
- 13
-
-
Don't really have any tips for that tbh. I usually only paint decks, I use Life color acrylics for that most of the time and just dip in the can brush on!
-
Well once you got the quality you like it's hard to go back. I've built one model out of box in 5 years or so 😁
-
I guess I can setup some tutorial on some small piece when I get the time. The only problem is to setup the "light booth" to take the photos as I have to dismount it as I don't have space to leave it. And the fact I like to work fast when I'm in the zone so taking pauses for every step slows me down.
-
Thanks for the compliments, glad you're all enjoying! I'm working on the harpoon launchers from infini now. Another piece of jewlery I must say!
-
No worries guys! Well here they are and in comparison! Judge for yourself, I myself am pretty satisfied with the end results. I did add some mix and smash to the Infini set. The launcher base isn't provided so I added one from sheet styrene. Also the front door face got some details cut out from the Veteran ones. I think they look a like now a bit more and should work out ok! So here's the finished Infini one! Veteran closed one! Next to each other! And in context!
- 178 replies
-
- 18
-
-
The outside details are pretty on par with each set. I actually put custom PE bits to the infi launchers to get them to look more like the veteran ones. The biggest difference is the infi launchers are a bit bigger than the veteran ones. It's hard to see as it will be open so it extends even further back. I'm replacing the 4th launcher on the aft platform (just like the reference photo) all else are closed. I doubt they had multiple launchers open while firing anyway.
-
They sure do look great, but I'm a bit worried that they stick out like a sore thumb next to the veteran ones. I try to finish it up later today so we'll see!
-
So some mail arrived! Like I mentioned, this image made me order some infini launchers! And some madness did I get! The infini set is just unbelievable! Though it's not for the faintest of heart! One launcher is about 100 pieces of PE and the smallest ones are tiny. More like new level of tiny I ever encountered! This will put your dexterity and mental toughness to the test. I spent about 4 hour getting everything as best as I could, there's a few bits I'm not too happy about it but the set comes with 2 launchers so if I feel too unhappy about it I can always make a another one.
- 178 replies
-
- 19
-
-
I carefully mask the lines with masking tape. Starting with all the horizontal lines then after those the vertical ones. Just spray lighter shade then some overspray to tone down the effect.
-
And a llittle bit more! Middle tomahawk part primed. Rest of the details will be added after painting. And finished the aft funnel!
- 178 replies
-
- 18
-
-
And the construction finished on the rear funnel! Some additional details added, the booms will be added after painting because some decals needs to be placed behind them. Funny how the angle of the photos distort the ladders and antennas making them look really crooked.
- 178 replies
-
- 16
-
-
Some more progress on the aft tomahawk platform. Some minor details will be added before gluing it down but otherwise finished.
- 178 replies
-
- 17
-
-
I know the dry transfers are a bit iffy. The only problem I've had with them is when you need to place them on top PE plates. It always peel off down to the primer. To remedy this as possible as I can is to cut all excess material off the sheet. On normal plastic I've not had any problems so far.
- 405 replies
-
- 6
-
-
- tamiya
- king george v
- (and 2 more)
-
You might want to weather the draft marks aswell. They would have chipped and eaten dirt just like the hull aswell. I usually apply them and other decals before any weathering so they will get the same treatment.
- 405 replies
-
- 5
-
-
- tamiya
- king george v
- (and 2 more)
-
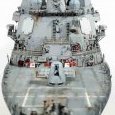
Still finishing and getting the hull ready for some paint operations. Here's some other small stuff which I have worked on the side. Finished the aft Mk 38 director. Pretty straight forward using the Pontos set. Only difference is that I used individual grab handles instead of ladders. Some attention was given to the aft tomahawk platform. First some antiskid surfaces were masked with tape then some surfacer 1000 with a brush dappled to give some texture and bring the areas more visible. A lot of lights were scratch build from styrene, wires and PE. Bottom recieved some generic detailing with styrene and wires. I really need to get started on the painting though, but I'm a bit hesitating because I know it'll take me a good 30 hours of airbrushing the damn oil canning effect. And it's boring
- 178 replies
-
- 12
-
-
You need lifecolors own thinner for the paints! I tried to airbrush them a couple of times but they weren't up to my standards on how they behave. They are absolute marvelous brushing though! GL with the camo, a lot of split hairs while I did mine on the Tirpitz!
- 405 replies
-
- 6
-
-
- tamiya
- king george v
- (and 2 more)
-
Actually I got some info on this matter (2nd turret has antiskid surface while number 1 does not) and after seeing this picture I think I got them pretty right by chance!
-
And the 2nd turret finished! And on their respective positions. Might bring the 1st turret top more inline with 2nd ones weathering. Have to see when all the pieces lock together to see if it's too much of a contrast.
-
Well I never really care about the colors too much. The way I paint consists of so many layers of shades that using a color match to a certain paint chip would be useless anyway. Also the scale and everything plays a factor. I just mostly make a shade of color that I find pleasing to my eye and go with that. Not sure how many different deck gray colors were used on the Missouri in 1991 but here's a photo you can spot over 4 shades (could be just weathering effects etc.) on different sections of the decks and turret tops. So I just look at photos and go with that! https://i.redd.it/0p6oaz03vhzy.jpg
-
For the light gray xf-19 lightened with white and the dark gray is a random mix of dark gray xf-24 , light gray xf-19 and blue xf-50.
-
Did some testing with the deck. I applied some oils thinner with white spirit. Then some light sanding here and there to get a bit of toned down worn look. And comparison for untreated one. Here's my main source of inspiration for the deck. And some basic paint on the turret 2. And for scale!
- 178 replies
-
- 16
-
-
Hey, I'll see what I can do with that ruler in the next set of photos! Well, in my opinion less is better! That doesn't mean clean look, but in this scale I think being subtle is still the key even though throwing everything and the kitchen sink at it! Doing a lot of layers but keeping everything light. I can also post some comparisons vs just a gray primer on the turret so it's pretty obvious how much all those little subtle details bring it more to "life". Though in this case the ship looked to be in pretty neat condition. It just came from a refit and it looks like the crew kept her in good condition on the final cruise. So not much any heavy weathering will be present in the end.