
HOLIDAY DONATION DRIVE - SUPPORT MSW - DO YOUR PART TO KEEP THIS GREAT FORUM GOING! (Only 53 donations so far out of 49,000 members - C'mon guys!)
×


Koppalakki
-
Posts
172 -
Joined
-
Last visited
Content Type
Profiles
Forums
Gallery
Events
Everything posted by Koppalakki
-
 Some more action on the aft section. More details added. Also the small wooden part on the stern, usually I leave the decks for last but it's a small section so I try some masking see how it works out! Number 2 turret construction finished. Straight forward using the Pontos set. A lot of clean up needed on the tamiya parts (yes it's a pretty old kit). Almost all the parts had parting lines running in the middle. Nothing little scraping action with a blade would not fix! Also care was taken removing the seam between the PE top plate and the rest of plastic turret. After curing medium CA once again on top of the seam and yadda yadda some sandin and ta daa! And turret number 1 completly painted and finished! The usual pre/post shading with Tamiyas and oils and pigments for weathering. Metal parts with Alclad. Then need to finish what's left on the hull so I can start a massive paint operation on the weekend!
- 178 replies
-
- 20
-

-
Another day spent! Finished and primed the DCG Antenna. Thought this was gonna be an easy small build The damn thing almost had 100 pieces! Aligning everything was a PITA! I used gator grip glue to help me with drying time when aligning. The hardest part was that the support beams have little plates that go inside them which then attaches to the main beams. You also need to align those small plates even with the deck so they sit in well. So you can use the deck as help, but glue them only into the beams and not the deck! Then have them stay on when you take the antenna base off the deck so you can fit the beams in! Phew! Not super happy how it turned up but it took the whole day to assemble so I guess we have to do! After the basic construction of the Pontos set some extra details were added. Lights, loud speakers, wiring and some ladders and steps. I initally thought about going HAM and doing the ladders like they really are (individual grab handles) but the ones I had were a tad too big and didn't look good at all. So I just used 1/700 PE ladders to keep them fine. It's a bit dull looking with only primer for now.
- 178 replies
-
- 14
-
-
More details added on the middle part. At this point I decided to glue it in. I started gluing the aft section first. Let it dry firmly! After this I moved about 4 cm at a time joining the deck with the hull using Tamiyas extra thin glue. I tried to kept them as level as I could so sanding would be easier.After curing seams were sanded and all the mistakes filled with CA and sanded away. The boat area has a "shield" on the decks edge that needed to be seamless. Carefull restoration and done! And some shot of the bow area with some primer to check the seams. For some reason the Pontos set doesn't provide the right boom on the aft part so I scratch build one for both sides. Next step to add some deck details and then it's off to painting the hull which will be a big undertaking aswell!
- 178 replies
-
- 14
-
-
Some progress on the middle deck piece. I used a combination of CA and Gator grip white glue on the various PE parts. Gator was used to glue the PE plates on. Then some CA on the edges that needed to be blended into the plastic. Still more detailing to go on but no further structures are needed before I can attach this to the rest of the hull. All the other pieces can be finished separately in their own sub assemblies.
- 178 replies
-
- 14
-
-
Hey Harley! Yes I'm using the CA as a filler! I use a brand called ZAP which comes in 3 types. Thin , medium and heavy. I have preferred CA over puttys etc. for a good couple of years. I think it's just easier to use. It's easy to apply, dries really fast and makes a hard/strong enough surface to even scribe on afterwards. Also easy to sand! And no, it doesn't hurt the plastic! I think the brand is made exactly modelling in mind.
-
No worries! I'm always happy to answer! I only use a mobile phone to take photos. I have 2 LED lights to help me but the quality isn't always the best even though I try my best!
-
Don't worry the plating is still there, it's just the angle of light that masks them on those photos. And it's really faint, so when the painting is finished a light wash will bring it out a bit more, but it's point is to stay subtle.
-
And work must go on! Last details on the hull in place and aft deck glued down. Primer on the hull. Deck fit was decent on the seams, just normal clean up procedure. Some locator holes filled and all the details removed. PE decks glued in place. The old tubs for the bofors in the aft had horrible seams and they didn't meet the rest of the hull at all. Liberal application of medium CA and a lot of sanding and voila! Rest of the PE details added. Before I get the middle deck in place there's a lot of detail removal and PE part joining on the superstructure that I need to finish. It looks like I need to finish the aft and middle part of the superstructure but the bridge area can be done in it's own sub assembly so I can eliminate all the seams.
- 178 replies
-
- 12
-
-
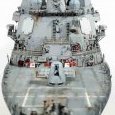
Calm down gentleman! Form an orderly line and be seated, plenty of room for everyone! So I got woke up by delivery guy bringing me goodies! To help me align all the details I used masking tape to show where the boot topping would end. Then the details were added. I used gators white glue to get them on. It allows time for positioning and gives a bit more mass to the thin PE parts. Next some holes were drilled with 0.5mm and 0.4mm bits. The 0.4mm ones were then filled with 0.4mm styrene rod. Also the flight deck netting location holes drilled aswell. Pontos provides a nice jig for that and is easy to get them all aligned and in proper places. Dry fitted the net, fits perfectly! The bow deck was first cleaned of all the details then glued down. After leveling it with sanding paper some more medium CA into the seam and sanded clean. And some overall photos.
- 178 replies
-
- 15
-
-
Hi! After a break I'm back to ship modeling, and this time I'll share the build here aswell! So my next project is the Uss Missouri as she appeared on her last tour in the Operation desert storm. My first form of business is with the hull! Firstly all the details were removed from the hull. After this thorough sanding to get rid of the all the parting lines and minor damages. Then the hull plates were masked and sprayed with Mr surfacer 500. This is by no means 100% correct so bare that in mind! Some other details were done with some masking tape on the top belts. After this Mr surfacer 1200 on top to check how it would look like. And closer look of the effect. Still waiting for the pontos set to arrive, then I'll continue to add the rest of the remaining drain pipes etc. details before continuing to the decks.
- 178 replies
-
- 14
-
-
Yes, it also doesn't help at all that the waterline part is made out of that terrible red styrene which is a lot harder than normal grey one. Goes to the same I never want to deal with this again box with the clear styrene parts for some ships they insisted on doing.
-
Oh and btw, by judging from the images the 4th bulge towards aft on the starboard side isn't a prairie piping as far as I know so doesn't need piping runing down (there isn't anything on the port side either).
-
I really love the modern russian/soviet era destroyers. Great job on finishing her and a beer well deserved!
-
Wow, this is actually funny, I just got commisioned to do the Spruance aswell! I'll be starting before the summer though so some time to plan it but really looking forward to seeing you completing this one most likely before I start on mine!