
HOLIDAY DONATION DRIVE - SUPPORT MSW - DO YOUR PART TO KEEP THIS GREAT FORUM GOING! (Only 53 donations so far out of 49,000 members - C'mon guys!)
×


Koppalakki
-
Posts
172 -
Joined
-
Last visited
Content Type
Profiles
Forums
Gallery
Events
Everything posted by Koppalakki
-
 And just some overall shots. The bridge didn't sit perfectly (had some warp on the other side) and needs some minor filling and fixing but nothing too serious.
- 178 replies
-
- 21
-

-
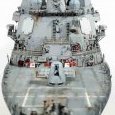
So been grinding this whole weekend. Some minor details and the MK 37 directors missing. Sorry, the lights were almost out of batteries so the pictures aren't as sharp as I wanted them to be but here we go...
- 178 replies
-
- 19
-
-
Primed the bridge. Rest of the details will be added after painting. Still so much to do...
- 178 replies
-
- 12
-
-
No I was thinking spending the rest of the year with the mighty Mo. Next project might be the Spruance depending on stuff (tm). Other than that I don't think I'll even start anything new this year.
- 405 replies
-
- 5
-
-
- tamiya
- king george v
- (and 2 more)
-
I think I'll have my hands full for the rest of the year! 😅
- 405 replies
-
- 6
-
-
- tamiya
- king george v
- (and 2 more)
-
Well, you don't really need to shelf out too much money to get decent pictures. I have 2 portable 36W LED lights (120e a piece) and white background paper (15e 30 meters) and a Samsung S5 galaxy mobile phone and I think my pictures will definetly do the trick for documenting model building as a hobby! Good job finishing her and best of luck for the next project!
- 405 replies
-
- 6
-
-
- tamiya
- king george v
- (and 2 more)
-
Here's some progress on the bridge itself. Had to get this out of the way, the window area needed a lot of work. First a lot of dry fitting was done, I came to the conclusion it was best to glue it first to the upper deck and get it sit there nicely first. After that it was just a matter of some CA and a lot of mr surfacer 500 applied with a brush to get rid of the seam. Mostly happy now as it wasn't easy as the joining part is just width of the PE so you have to be really careful while sanding it. And just a bit to work still here.
- 178 replies
-
- 12
-
-
And finally some progress! The first section of the forward superstructure is done. A lot of care and planing was needed to get everything lined up and seamless. In the end the effort will pay off as usual! Some surgery was needed and a lot of piping etc. were scratch build with styrene.
- 178 replies
-
- 16
-
-
I usually use sand color for wood. After that couple of washes/filters with burnt sienna and umber oils usually do the trick. Depends really what kind of look you're after. You can also go to extremes as to apply filters on specific planks to give them more life.
-
I always threw oil based washes on my wooden decks to give them more color and to dull them down and they don't care about it in any way. I don't use anything to seal them either.
- 405 replies
-
- 7
-
-
- tamiya
- king george v
- (and 2 more)
-
Well I have to confess... it is pretty easy for me. Right tools and knowlegde does play a big part and that's why I'm spreading it, if you choose to accept it! 😁
- 178 replies
-
- 10
-
-
Some finished 5" turrets. I also made some home brew floaters in the baskets. The Tamiya one is pretty crude replication of them with a tarp on top of them. Also wanted to depict them without the tarp on top of them. I made some "bedrolls" from masking tape varying in different sizes. They were painted and placed in the baskets and added some arresting wires. The netting in the aft also recieved some arresting cables. I used infinis super fine (0.065 mm) brass rods for this. And some overall shots. Started to add railings. I first painted them dark gray. After cutting out of the fret I modified them to match all the deck details and cut the bottom run away. Then stanchions were brush painted and glued down.
- 178 replies
-
- 19
-
-
The Internet? 😜 I use a mix smash of photos from the museum and real photos during desert storm to cross reference. All of the Iowa classes have different configuration on the aft deck and around the bridge. Hulls are the same but small differencies all around betweem the ships. Also the museum versions of the ship are completly different aswell, hence why I cross reference info between time frames.
-
Thanks for the compliments! I've working on various details on the aft area. Finished the last main battery, unrep post and various stairways. No where near finished, still going through all the photos I have available to add details etc.
- 178 replies
-
- 17
-
-
Sorry for the lack of updates but haven't had the time to take photos. Still a lot of stuff going on! So first I wasn't really happy with all the details on the Pontos set on the side walls. They were a bit flat and shallow so I added piping from styrene and brass to bring it more inline with all the rest of the details. On the aft a lot of weathering and details added. First some filters with oils, then a dark wash and topped it off with pigments. I used light dust and rubbel dust. First layer was done with pigments and white spirit. They were made into a thin wash and brushed onto details. After drying they were blended in more with a dry brush. Then some additional pigments added dry with a brush. Some small fixing needed on the fligh deck markings to be done.
- 178 replies
-
- 17
-
-
Finished the antenna. Then worked some details on the bow area. And finished the weathering on the other side aswell.
- 178 replies
-
- 15
-
-
And some more action on the hull! Next step was to airbrush couple of shades of yellows and greens in specific places. After this some deep red oil paints were dotted where only hull red was visible to give more variation. Then a light dark wash on selected details. The props and shafts got a mix of light dust pigments and some slime green and browns enamels on top of them. And I think thats it for most of the underwater hull weathering. On the other side I already finished the upper areas aswell. First a blue filter, then a dark wash. After this light oil colors dotted around the surface and blended in. Dirt and rust stains with burnt umber oils streaked down. The crew kept her in good condition according to reference so I'm gonna keep her clean for the most part.
- 178 replies
-
- 13
-
-
Cheers gents! Glad you're all enjoying! Here's some work on the hull. First I masked the section I was working on and then sprayed 3 layers of Ammo of mig scratches effect chipping fluid. I air dried the layers in between with my airbrush and spraying each layer from different direction. The ammount of layers defines how fine the effect will be! Next step is to spray some enamel color. I used Ammo of mig rain streak, which is a light buff color. Take care not all hairspray/chipping fluids work with enamels! Next step is to use a brush with water to start to build the effect. I start by going through the waterline first, then removing the tape. After this all the surfaces not covered with the buff color gets some water brushed on. After this with a damp brush I start to brush into the buff. The enamel bound by the chipping fluid can be moved around the surface creating nice faded chipping effect. Then the next section masked. Enamel buff sprayed. Rinse and repeat! And the whole ship gone through. And the work continues!
- 178 replies
-
- 12
-
-
Finally basic painting and decals finished! This time I was surprised how the dry trasfers worked! A bit of issues here and there but all in all they went down nicely without destroying too much! Next step is to weather the hull so I can move on to detailing the deck!
- 178 replies
-
- 19
-
-
Yes they are sprayed seperately. It doesn't matter what width you use, though smaller is easier to work with. I'm not too exact on the widths, that would drive you insane 😜. And there's variance in real ships anyway. I just look at photos and usually make a nice compromise on it. I was surprised it only took me about 5 hours for one side, last time on my DDG it took forever, though I did a bit smaller pattern that time.
- 178 replies
-
- 10
-
-
The back side is a glue film (some sort of thin plastic film/card on the bottom between the glue and the wooden deck) so the water doesn't even get in contact with the "wood". Though I don't think nothing would happen to it anyway, I've thrown washes and what nots on top of these and I've not noticed anything bad happening to them and I've had models for over 4 years with these decks.
-
Finally got myself up to painting the hull! So first some hull red. I started with Tamiyas hull red as base. I then masked at the plate joins with masking tape and sprayed flat red. After this some good ol overspray to give the hull more of a red color. After masking the boot top bottom some black base was sprayed. After this XF-19 as base gray while letting some black show through. On the other side I started with the oil canning already. Lightened the XF-19 with some white and masked the horizontal lines first. I did it in a couple of about 10 to 15 cm long sections. After that about 360 vertical lines were masked and sprayed. After looking through the photos of the real ship the oil canning effect seem to concentrate on the bow and the stern while the mid ship is not that noticeable. So the mid ship recieved the most overspray then gradually less towards the stern. The bow is still untreated to show how it looks after just masking and painting. Also most of the decks were painted and wooden decks in place. They went alright even though the order in the build wasn't the best. I had to stretch the deck to get them to go under some PE details on the side walls etc. I brushed the decks with water before applying the deck. This will help to get them into position and to get it to glue in better! This is from a old pontos deck instructions, yet nowadays they never mention about it. So use a lot of water when attaching them and your good to go and it won't come off!
- 178 replies
-
- 15
-