


king derelict
-
Posts
3,295 -
Joined
-
Last visited
Content Type
Profiles
Forums
Gallery
Events
Everything posted by king derelict
-
Thank You OC. The IBG PE is nicely made and apart from the Oerlikons is relatively straightforward. I think a breakthrough for me was to to think out the folding process and use some tools to help instead of going at it "freestyle". That little aluminium block with grooves is great for getting decent curved sections. Alan
-
Craig Looks like this one is going to be yours. Good luck, stay safe and I hope the power stays on. Alan
-
In between throwing Sculptamold around the Penelope diorama I made a start on this little Hunt Class destroyer. The hull and decks went together very nicely. The plastic is not as fine as the Flyhawk stuff, softer and parts are generally thicker but so far its all matching the Kujawiak drawings I have. The first PE has been added, The railing around the searchlight platform was a bit fiddly but the fold lines in the PE work well and I really like the little grooved tool for curving PE (I use drill bits of various sizes with it). The PE is nice to work with so far. I have my doubts about teh Oerlikon guns though. The instructions are nicely presented using 3D models to illustrate the work Next I plan to add the brass barrels to the four inch guns and the primer. Thanks for looking. Alan
.jpg.7b7b6a91d881eb606326b03689295806.jpg)
.jpg.69d365c55ff571da53a706a0f8d0d129.jpg)
.jpg.40ca194605cd26cc8ee7728a48b8034e.jpg)
.jpg.54280e0dbda94290f4d930ab3e21d247.jpg)
-
I mixed up some Sculptamold and smoothed it over the foam contours to develop the fjord landscape. This was my first acquaintance with Sculptamold and I found it harder to use than I expected. It is a mix of plaster, clay and finely shredded paper so it has properties of Papier Mache and plaster. It is quite lightweight and adheres well to most things. I found it has quite a fibrous appearance although I have seen notes claiming a glass smooth finish is possible. I embedded the plaster "rocks" made earlier and blended them in with some of the Sculptamold. I Sculptamold instructions state that the mixed compound remains workable for about thirty minutes. Videos I have watched said twenty to twenty-five minutes but I barely got ten minutes. It allowed me to get the first cut at the landform but barely It occurred to me that water from the cold tap is not truly cold this time of year in Florida and working in the garage is also a warm environment and these factors might be shortening the cure time so I mixed a second batch to finish the landscape using water from the refrigerator and working in the house (ahem). The mix was unusable in fifteen minutes but I got the last parts done to my satisfaction. I read a wide range of statements about curing time; from 2 hours to 48 hours. Its still damp to the touch so I think at least twenty-four hours before i put a layer of white gesso over everything and see if I like it before painting.
.jpg.02601d04cfc2eb32a6c340dfc8261bd2.jpg)
.jpg.a590dbfda3efdfd90e8d8762626ee52c.jpg)
-
Jack I forgot to add in my original reply. Your Sherman dioramas are really impressive. Beautifully executed. Alan
-
Greg. Thank you for the kind comments. I aspire to be better; your models are an unreachable goal I amafraid but they are works of great beauty and I love watching them come together. Thanks for the information regarding the YX resin chain. I had ordered a couple of lengths but I won't wait for them to arrive; I will use the PE chain as you suggest and hope the resin might work with The Prince Of Wales which I think is the biggest kit on my shelf or the USS Wasp Thanks again Alan
-
Many Thanks Egilman. That is some very detailed research and I value it a lot. I learned a lot as well now having an identity for the tank. Its a great help Thanks again Alan
-
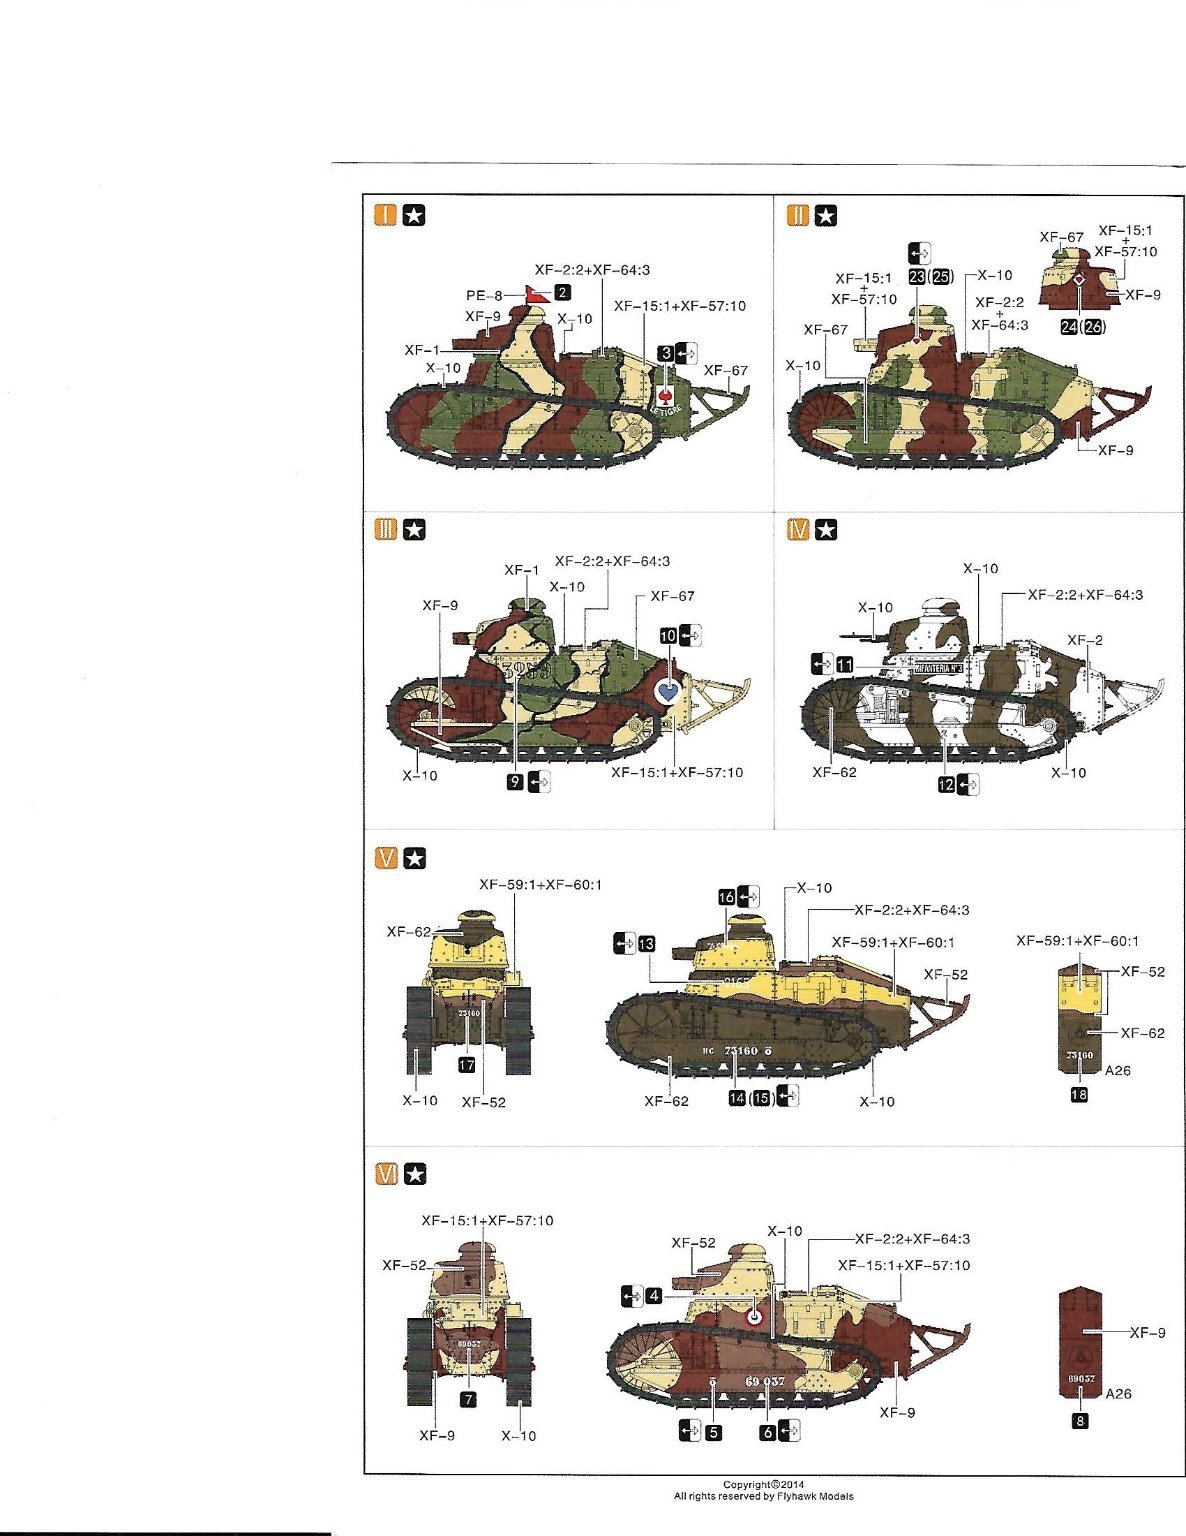
Thanks Patrick That is hugely helpful. I had been thinking Spain for #4 but the paint scheme doesn't look very desert but I suppose Spanish Morocco was also the coast and some of the Rif mountains as well as Western Sahara, I still like the paint scheme so this will be one of teh two builds. Thanks again Patrick Alan
-
Patrick Yes please. The Flyhawk kit is quite comprehensive; it builds two complete vehicles in any of six configurations. A paint scheme is provided for all six but nowhere in the instructions have I found a clue to the six configurations or the operators of each paint scheme. The first one has a marking "Le Tigre" so maybe that is a French one. I quite like the white / brown camouflage but have no idea who might be behind Ïnfantaria" marking. If you are able to shed any light on any of these paint schemes it would help enormously. Many Thanks for your help and Interest. Alan

-
Thanks Jack i found the Sculptamold to be a bit difficult to use, probably because it was the first time Alan
-
Craig It's rained a lot here but the lakes were so low there is still plenty of room for more. Elsa looks like it's coming up your side but I think we are both in for some dirty weather starting tomorrow night. As long as it stays as a tropical storm and keeps moving,........... Take Care Alan
-
This is going to be very impressive Alan
-
Hi Ken. It's a very nicely produced book, a lot of information and well written and translated Alan
-
Thanks Jack The Woodland Scenics moulds look very useful; the crumpled foil moulds are a bit hit and miss as to how they turn out. Woodland Scenics seems another huge source of diorama material. Have you ever used Sculptamold ? I used it for the first time and I'm not sure how long it takes to dry. Thanks Alan
-
Thanks Lou; I think the Renault will be next up. It looks like I won't be subjected to individual track links this time. I need to read up a bit more as the Renault 17 spans a period 1917 - 1945 or possibly later with a wide range of operators from France through the US to Brazil Alan
-
As HMS Penelope approaches completion I decided to work on something simpler before starting another Flyhawk kit heavy on PE and fine detail. So this is the IBG 1/700 Hunt class destroyer Kujawiak. The box is a lot emptier than the Flyhawk kits but there is a small PE fret which has all the railings and inclined ladders. It also has some very intricate pieces to fold into the 20mm Oerlikons that look like they will be a challenge. Luckily there are spares in the fret. Its a waterline model; no lower hull is provided. The plastic is quite soft but there is nice detail on the hull and superstructure. The four inch gun barrels are rather poor and the injection points may be difficult to clean up. I plan to replace the barrels with brass ones. The mast is very nasty and I hope to replace it using brass rod. I found a great book about the Hunts in Polish service. Very informative with a lot of photographs and a final chapter covering the modern times location of the wreck of the Kujawiak (sunk in 1942 off Malta) and the recovery of the ships bell. The book is written in Polish and English with each language in a separate column on each page. The book comes with two sets of prints for each of the four ships; one in 1/200 and then in 1/350 scale. Very nicely drawn The back of the book comprises four sections of 3D computer images generated by the authors, one for each ship. A lot of detail is shown. They also confirm the IBG paint scheme. So the plan is to add brass gun barrels and mast and use the book as a reference to add some of the left over deck hardware from Penelope. The IBG bridge in particular looks very bare. The quad pompom is quite good but I think the Flyhawk one is nicer. Painting the camouflage should be a challenge in masking. Thanks for looking Alan
.thumb.jpg.b8c0b55b46231445285f95d4b9bff504.jpg)
.thumb.jpg.8d2ec0782b53e3df5b78ab54422326a6.jpg)
.jpg.b90257051f08a27c4409e1ebefaa5a60.jpg)
.jpg.b53fbc4559470079cf825844acd82807.jpg)
.thumb.jpg.f9652f3eb79b83dbff6b4d83eb951ff0.jpg)
.thumb.jpg.f701f04392c9ffcdf0fd648db863d2ee.jpg)
.jpg.934353287a6d7c93c8015c1984c24760.jpg)
-
I decided I needed some rocky texture to add to the cliffs and steep parts of the mountains. All the real stuff in the garden is rounded and waterworn so I resorted to making some. I lined a small box with crumpled kitchen foil and poured in some Plaster of Paris. Its out of the mould now and looks quite good. I made a second thinner cast. Once it has dried and cured the plan is to break it up and use it in pieces embedded in the Scupltamold compound. A messy day I suspect. A fit check with the display case suggests all is well so far. Alan
(1280x720).jpg.5c20b7b058f5b90fd7c17f8f9da8364a.jpg)
.jpg.d2eb95f25dbbb1feeaf79df8e82ff2ff.jpg)
-
You were very successful. The brickwork looks completely real Alan
-
Thank you for the kind comments Lou. I'm learning about the Armour world too. I hadn't realized that there were these small, two man infantry tanks armed with machine guns. I have a couple of Renault tanks that look about the same size and the Panzer II which I think is a similar size too. I am thinking of building a Tiger or similar large battle tank to provide a comparison Its great to see the expanding range of AFVs having really only been aware of Shermans, Panthers and Tigers, T-34s and Churchills. After reading Colin Forbes Tramp in Armour" I would like to try a Matilda at some point. Thanks Again Alan
-
The brickwork is beautiful. Very masterful painting. Alan
-
A by product of your plan for using the PVA mix to seal the MDF might seal the smell in. I assume the laser was used to make the brick details etc. Light sanding on the ends of the boards and sealing them too might be a good thing too as long as it doesn't spoil the joints. Good Luck Alan
-
So now to try to recreate a 1/700 bit of a Norwegian Fjord. Please let me know if it is not acceptable to continue with this in the current thread or whether it should be moved. I hope the later posts will reintroduce HMS Penelope on the diorama with details like anchor chains added and possibly tenders out and about. The base is a 20 x 11 inch piece of extruded polystyrene which should fit the display box I have ordered. Further pieces from the sheet were cut to form the basic shape of the mountains. I used Weldbond glue to stick them in place and that seems to have created a good bond. Cocktail sticks were used to hold it all together while the glue dried. After 24 hours to let the glue set well I started carving the basic shapes to suit my idea of the terrain. The extruded polystyrene carves much better than expanded polystyrene but the blades on scalpels and hobby knives are not really long enough to make the cuts I wanted. Oh My! Is that a kitchen knife I see there? It has a very fine serrated and slightly flexible blade and it went through the foam very easily. Hopefully it will still do the same with tomatoes The ravine at centre will be a frozen waterfall I hope. After the tense breath holding working on tiny PE this is very relaxing for the muscles. I have an overall idea of what I want but teh details are being developed on the fly. Happy 4th July Weekend for some and Euro 2020 quarterfinals for others Alan
.jpg.590b239fa8402756481c6f60c80263a3.jpg)
.jpg.4ef295a22cef68466ab1cad77985aad7.jpg)
-
Thank you Popeye. I learnt a lot building this one. PE forming is an art all on its own. I think having better tools helped a lot on this build; using shorter runs of railing and generally using Gators Grip glue instead of CA. The last few details will be completed on the diorama.


.jpg.ccccb88a3042843e1a121c6c47c8b29a.jpg)
.jpg.e8dcd4b8a8c5c5731d04fc3404769f42.jpg)
.jpg.5d4eba486ad581647a291f5d863323cb.jpg)
.jpg.1e8e68c35bf68d95816814706bd815d9.jpg)