HOLIDAY DONATION DRIVE - SUPPORT MSW - DO YOUR PART TO KEEP THIS GREAT FORUM GOING! (Only 13 donations so far - C'mon guys!)
×


Johnnyreg
-
Posts
178 -
Joined
-
Last visited
Content Type
Profiles
Forums
Gallery
Events
Everything posted by Johnnyreg
-
 I understand now what you mean. The pictures say it all thanks for explaining. I suppose your method is straight forward enough for straight planking but would get more tricky for fancy stuff like this if you wanted to maintain the caulking effect gap between every joint. Also if you wanted to lay down a specific plan on paper first you would have to allow for an accumulation of gaps over the width of the deck which would be easy enough too. I will do a test run though to see if the resulting caulking effect is a big enough improvement to warrant the extra work.
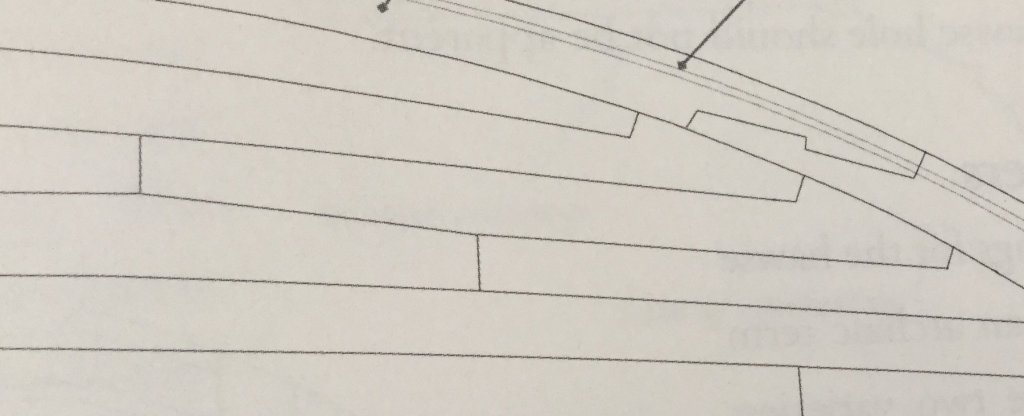
-
Thanks SpyGlass. Lots of good info there thank you and duly noted. Yes I think it was your log I got the keel thinning info from. Varnish - I think I will stick to thinned coats from now on based on my limited experience and findings plus of course your good advice. Thinking about your caulking method of using 0.004" shim... if for instance your planks were 3mm, forcing the shim in after gluing is actually compressing the plank edges only and not affecting the pitch of your planks which remain at 3mm... is this correct? may have to do more tests and try this. Just when I think I've decided someone throws me a curve ball to make me rethink . Not complaining though so don't stop throwing them curve balls.
-
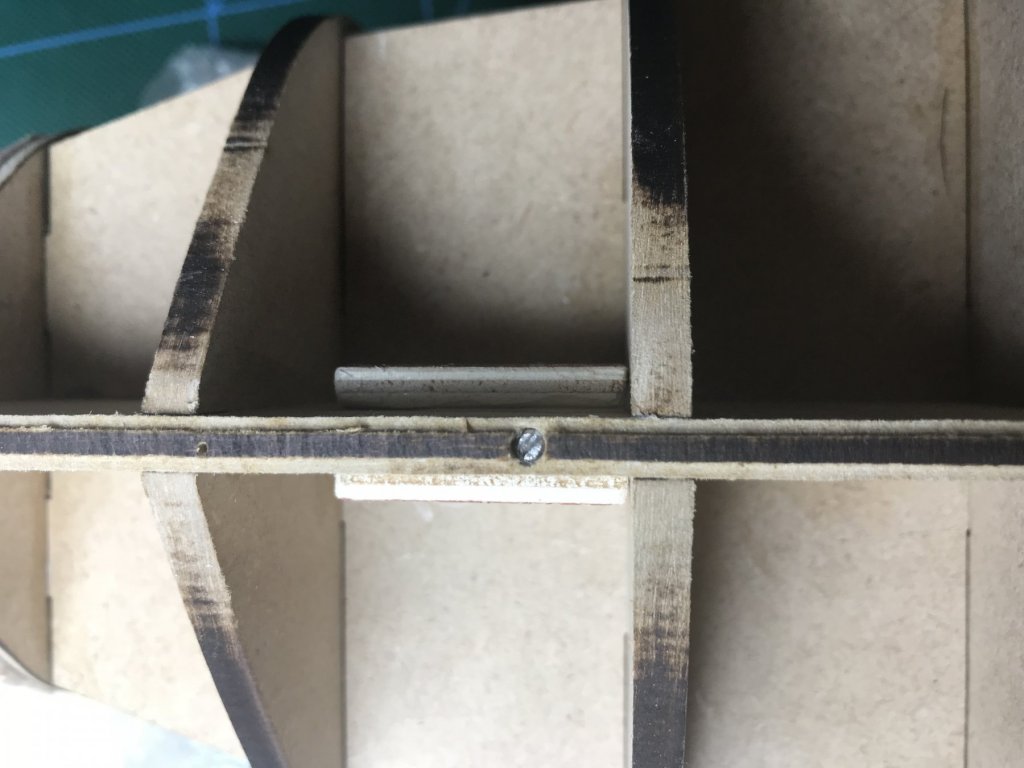
Thanks SpyGlass for your good words and clarifying the shift pattern. I'm using Lord Nelson "Matt" varnish which does have a sheen to it hence my finishing with Scotch-brite. Not sure if this is a good varnish or not as not used many but my local hobby shop recommended it. If you see my earlier caulking tests I did try a gap instead but only 0.05mm (0.002") which looked quite good but the idea of maintaining an equal gap between every join seemed a bit daunting to me. I think you used a bigger 0.005" gap if I remember. I was going to finish my 1st planking half way to stern and then feather and taper to 3mm for 2nd planking. I'm sure I read that in someone's log. You've got me thinking now so I will revisit once I get to that stage. It will be easier for me to get my head round once I get several planks offered up to it. I think my next steps now are: * Shaping and dry fitting the gun strips and trimming the gun deck edges, which are a bit oversize, to suit. * Look at the canons, consider replacement barrels, check the gun port heights and compare the supplied carriages to the Fly upgrade ones (which I have) * Building the gun deck furniture and dry fitting so that I can work out the gun deck planking pattern * Plank the gun deck, except for the areas near the break off bulwark bits * ...
-
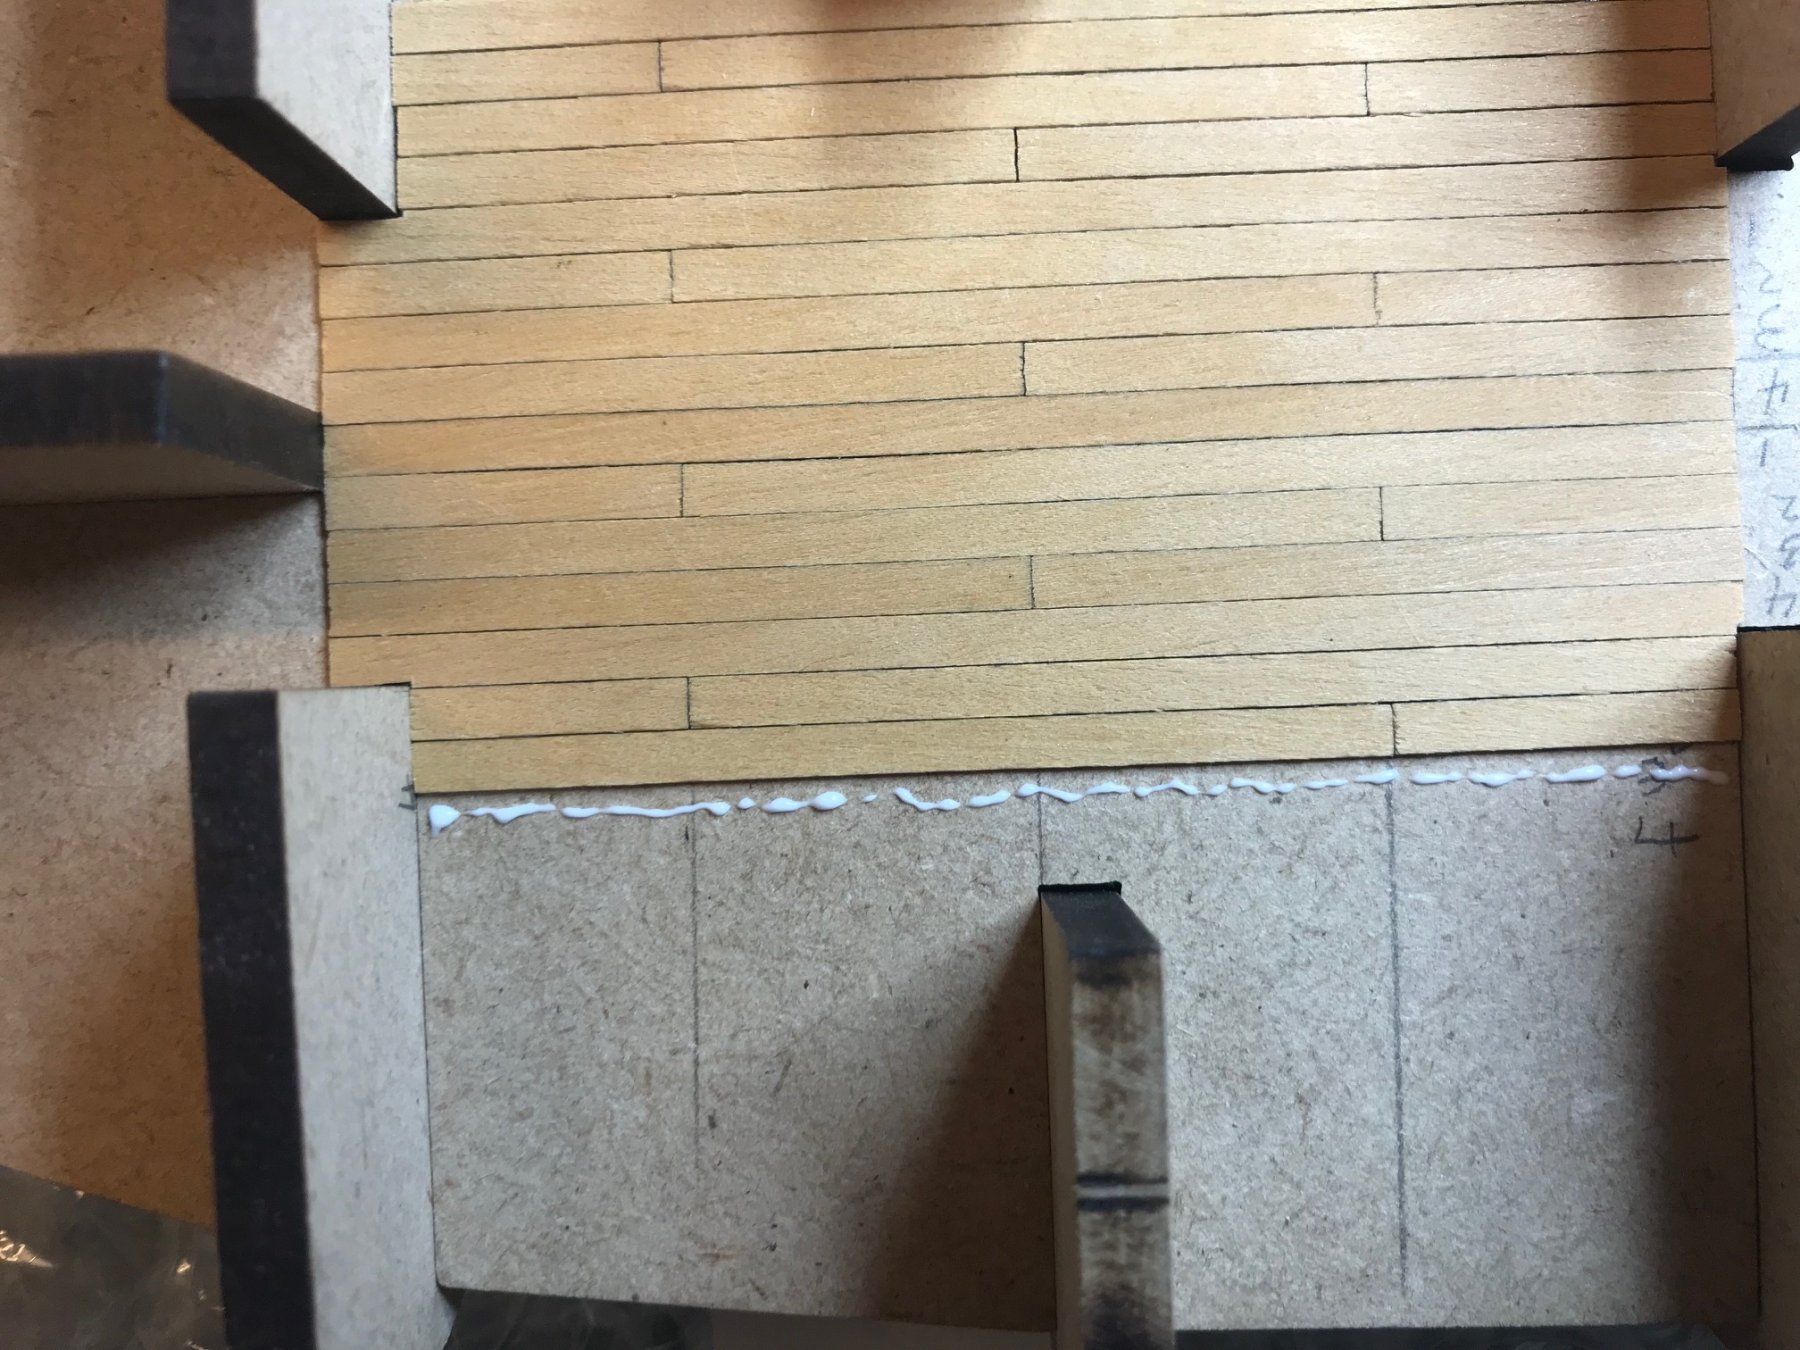
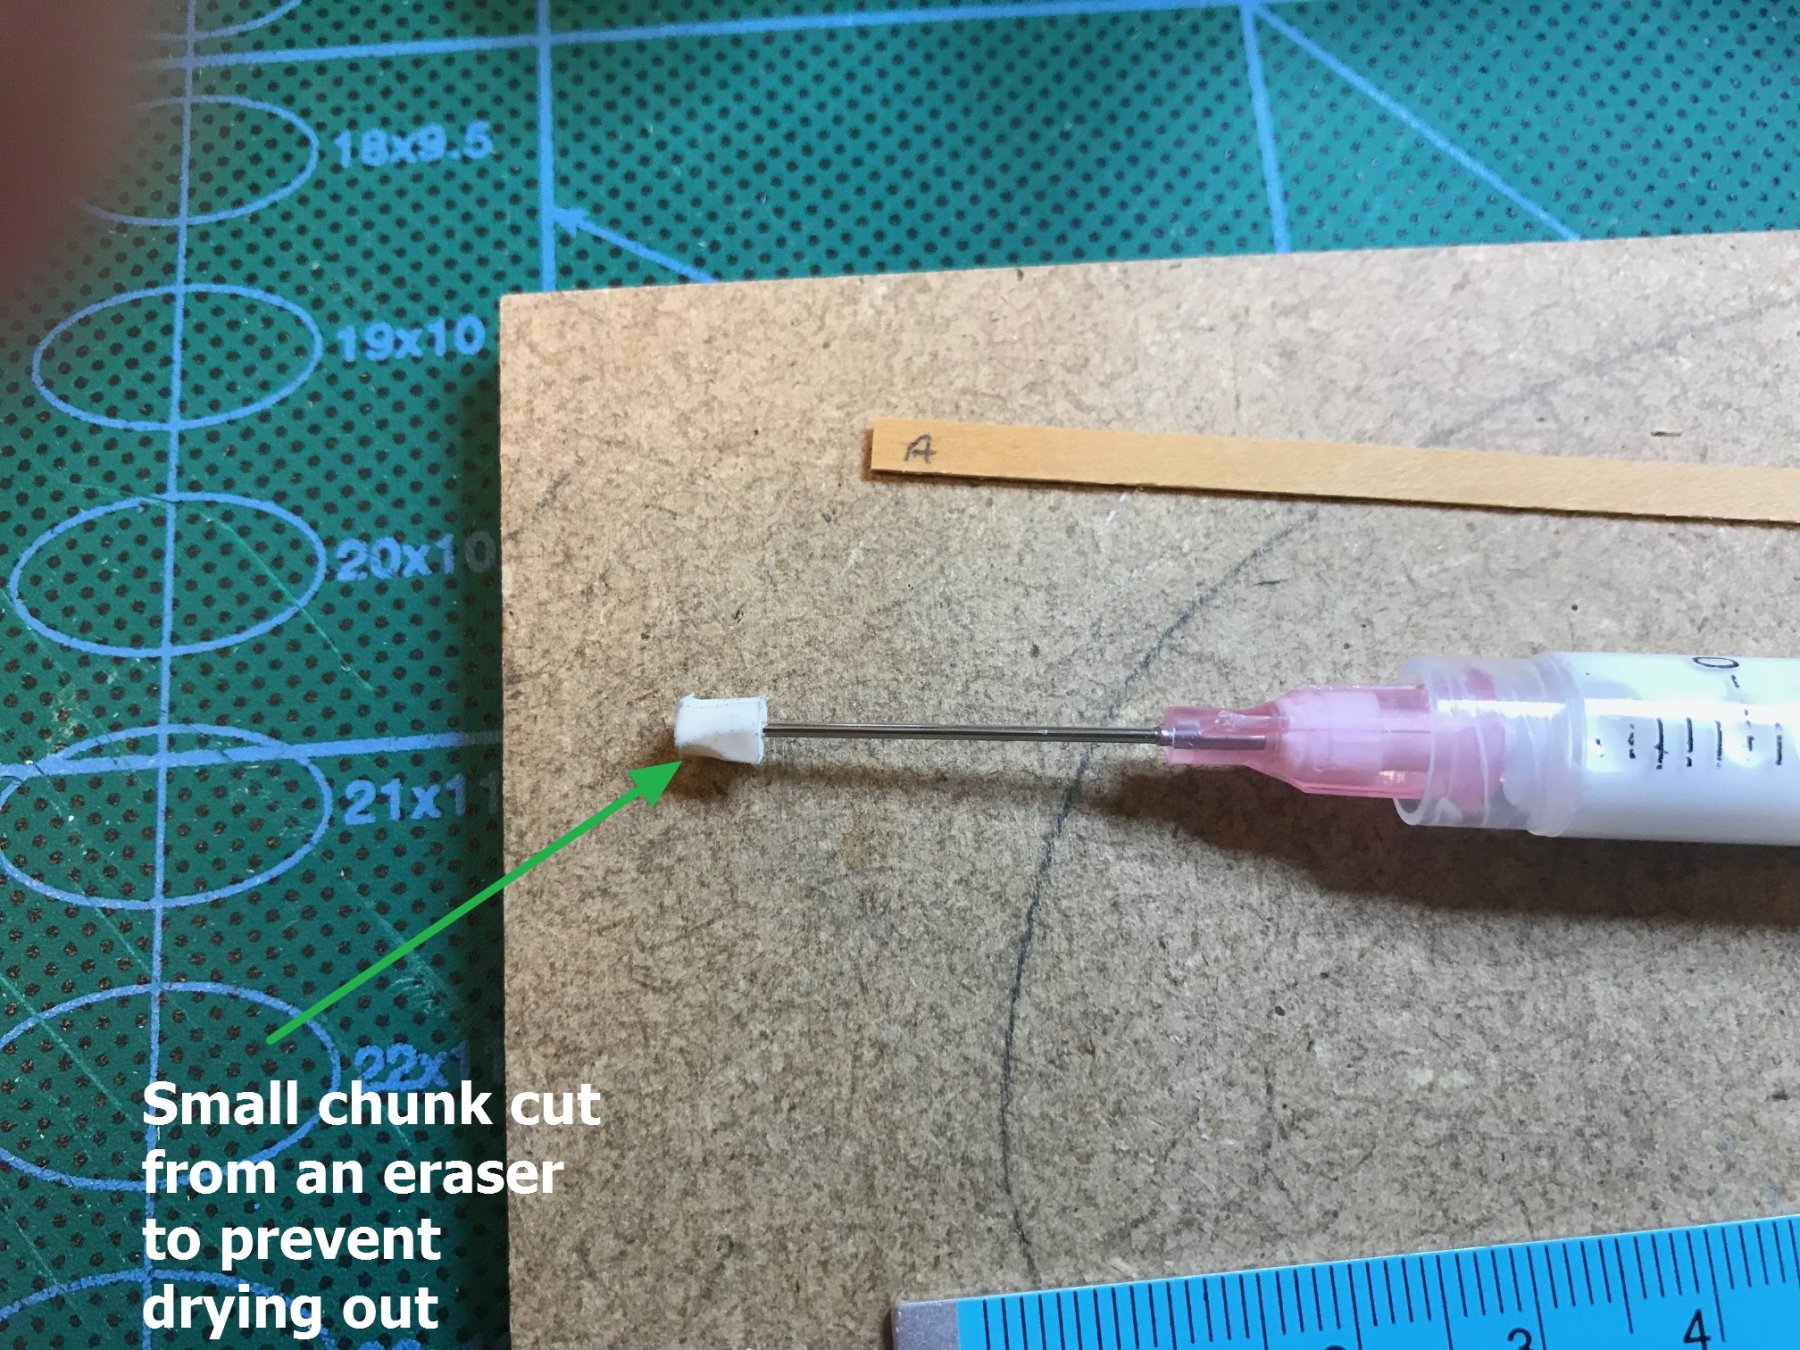
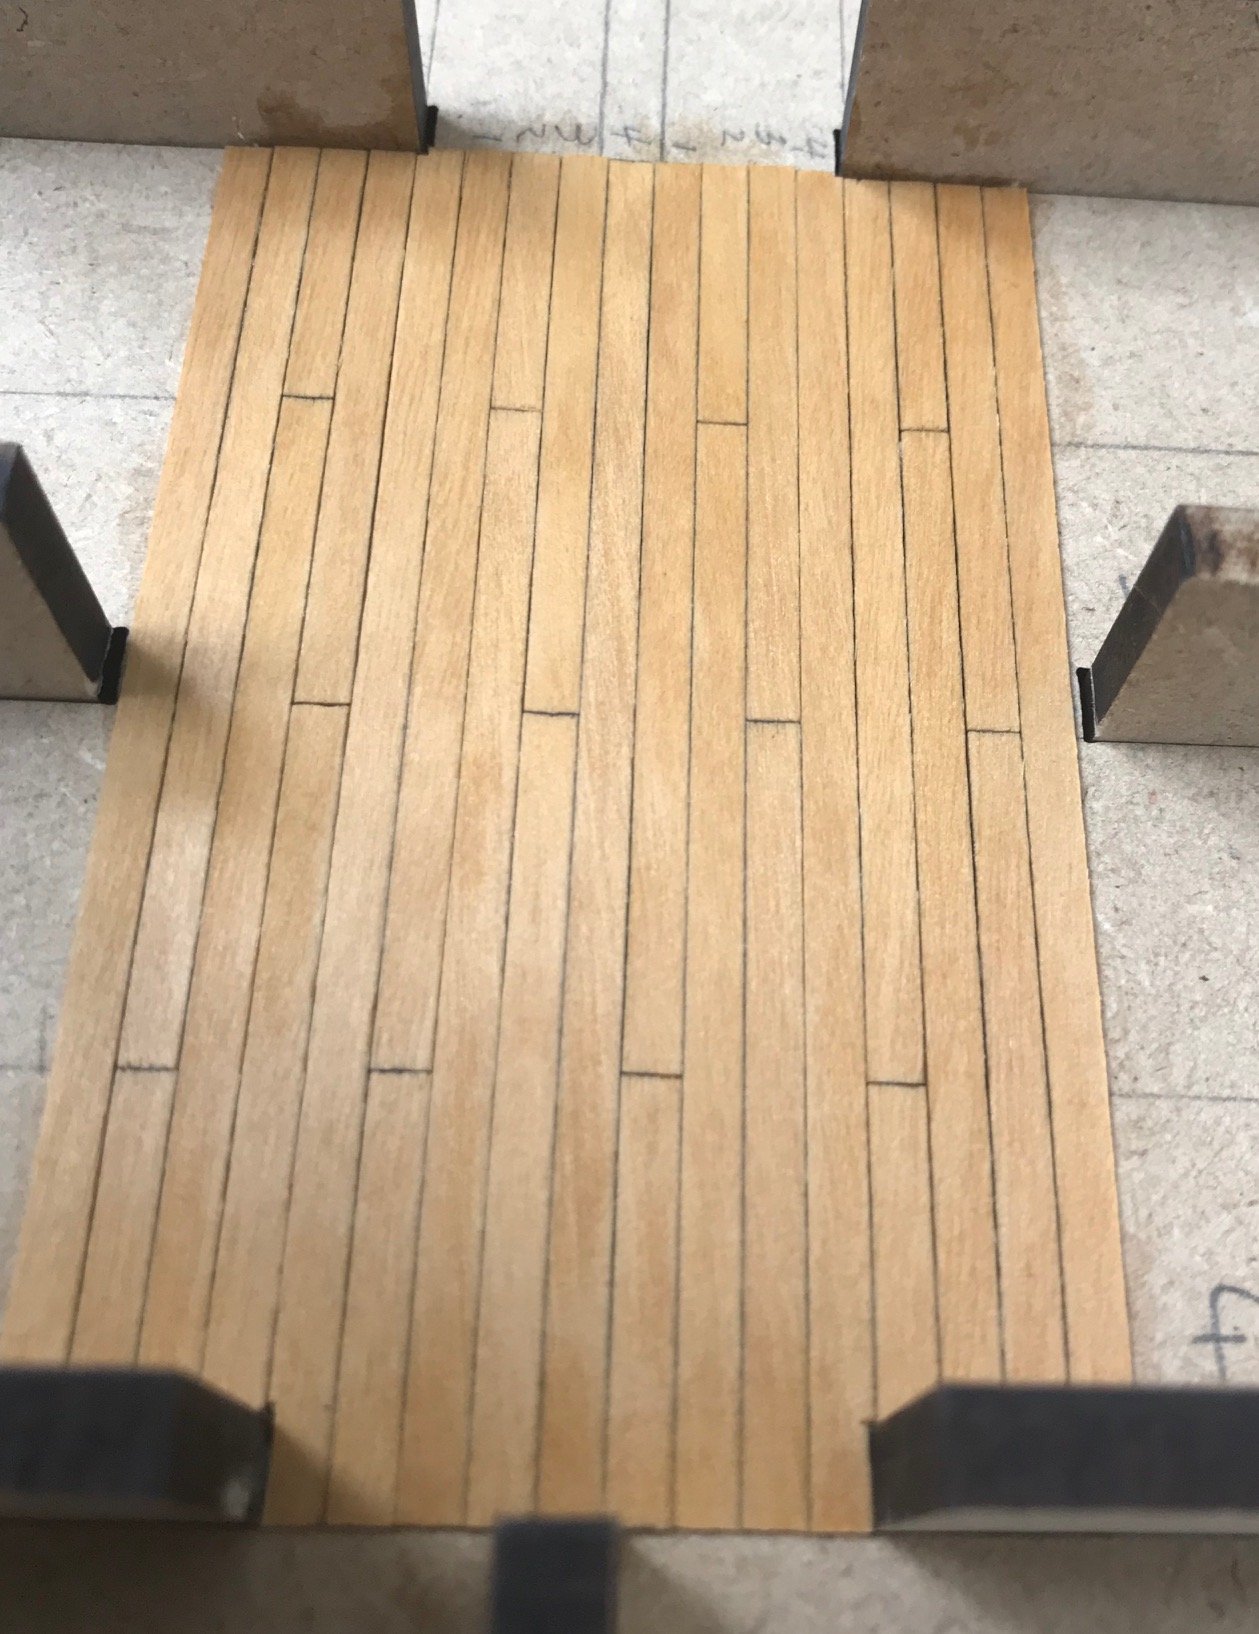
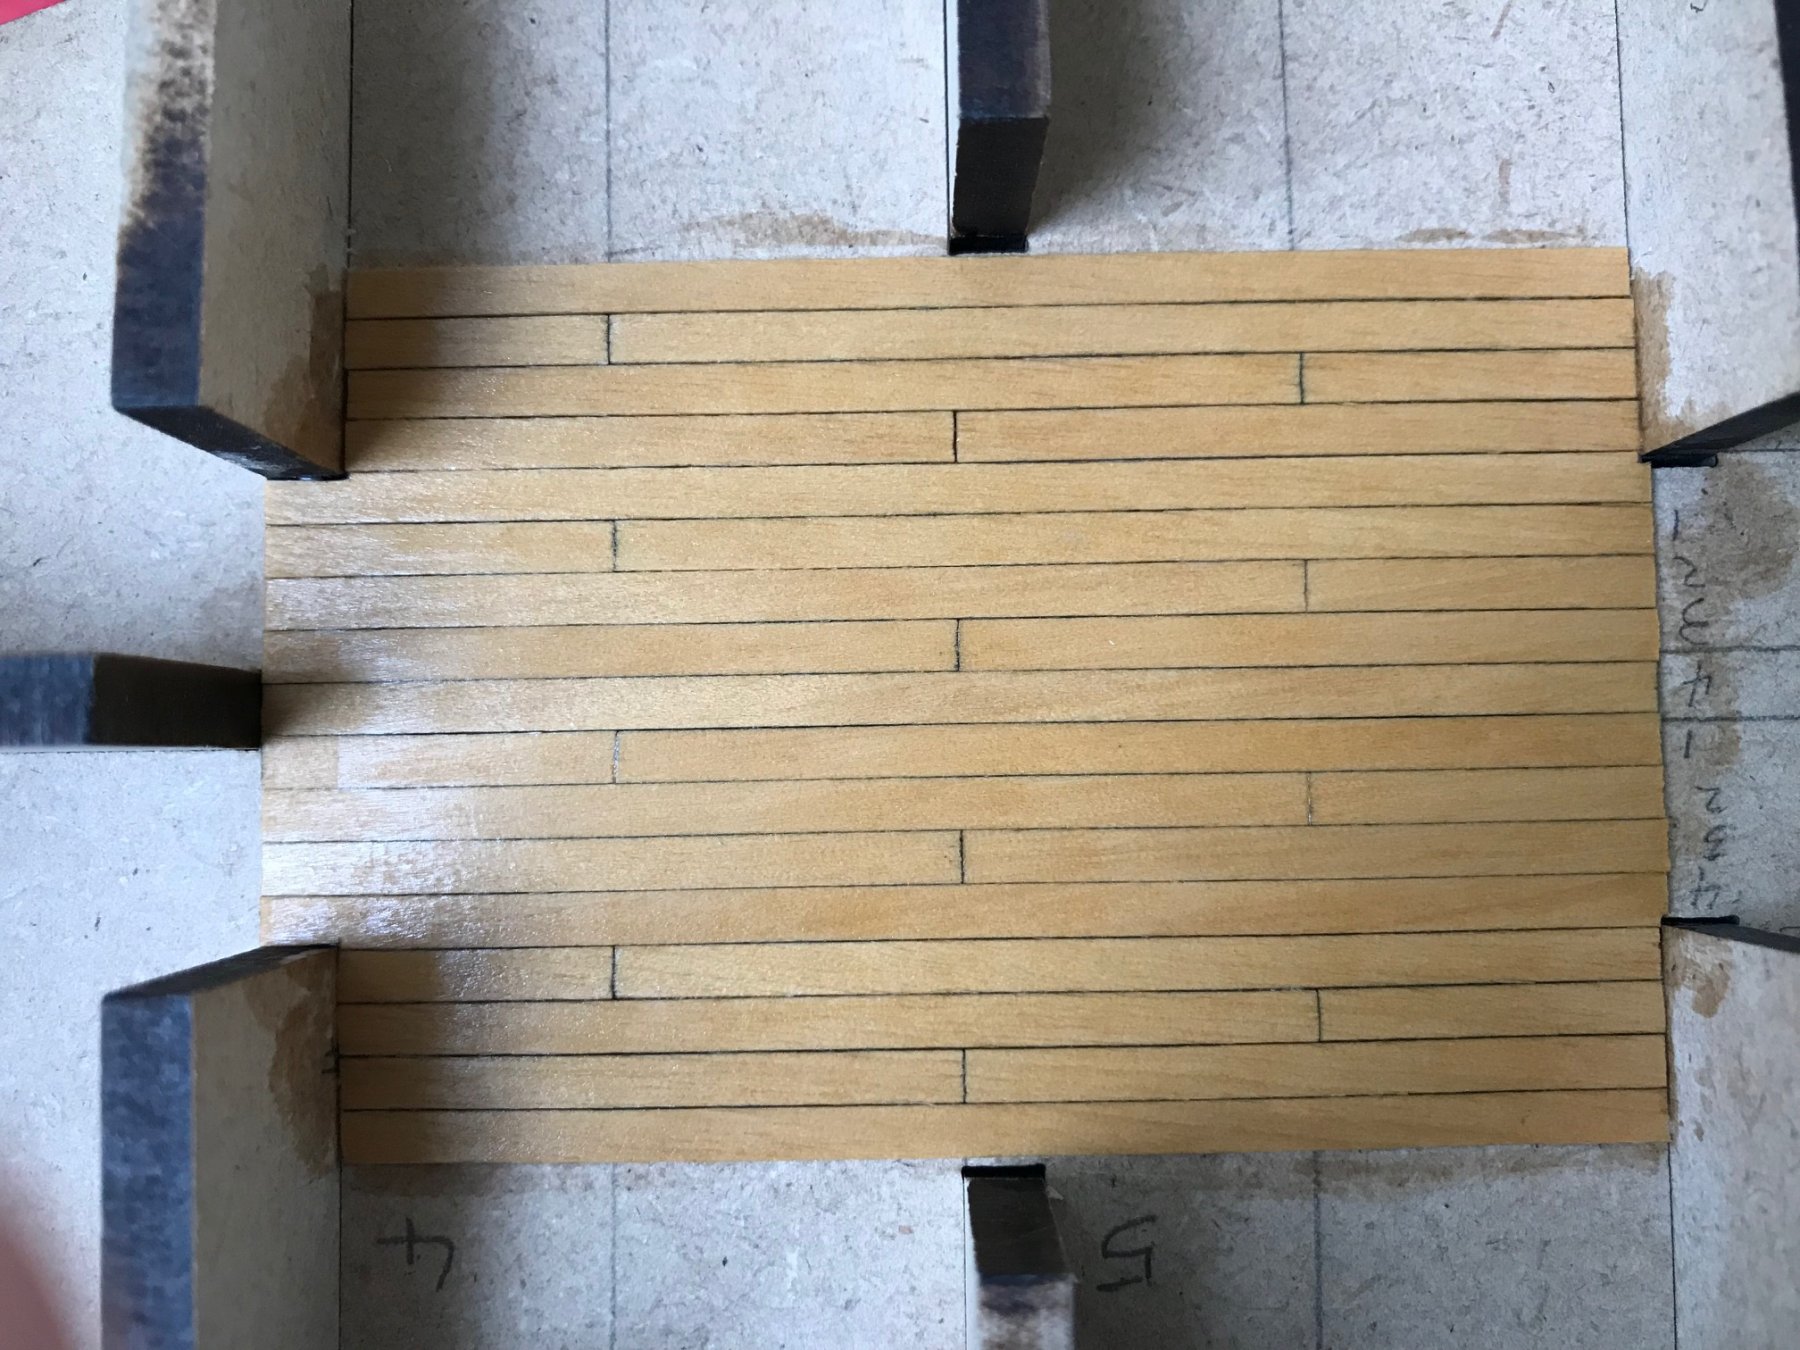
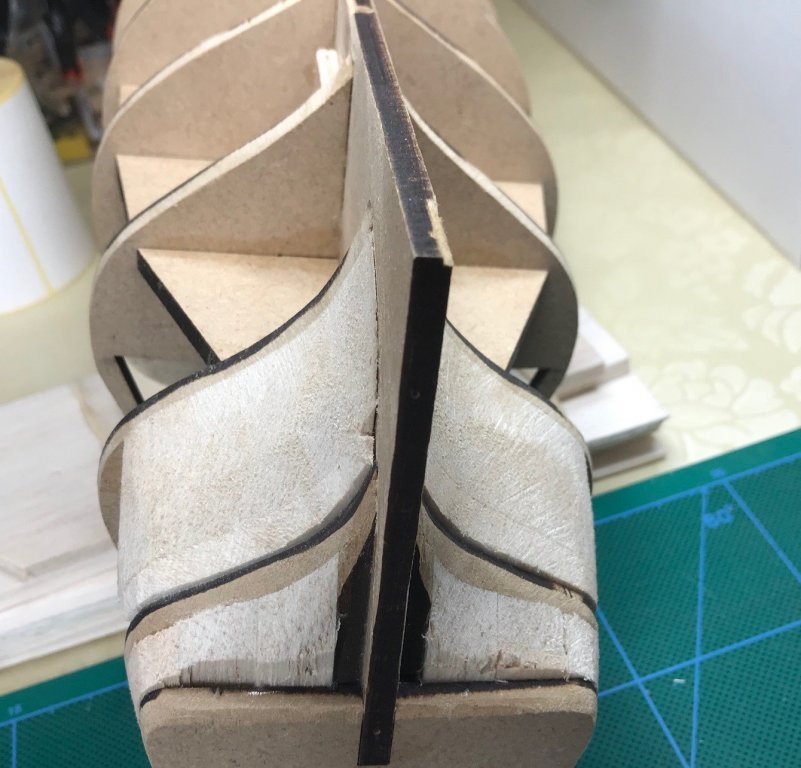
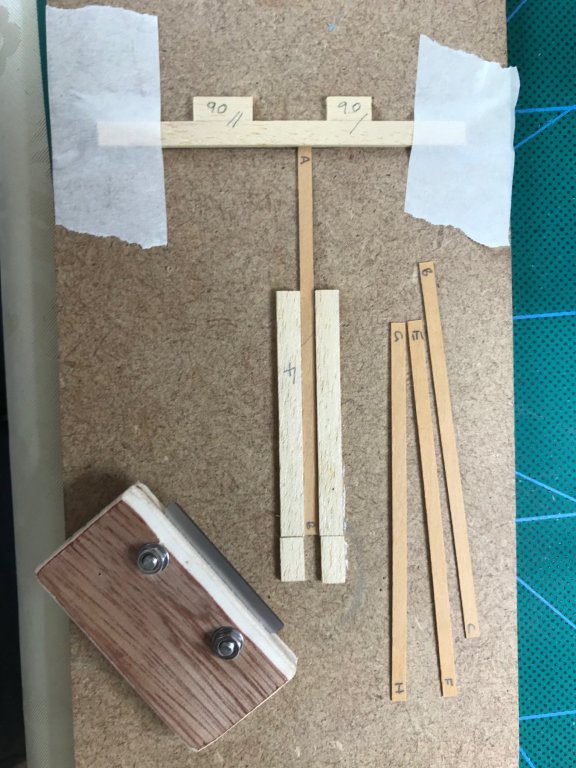
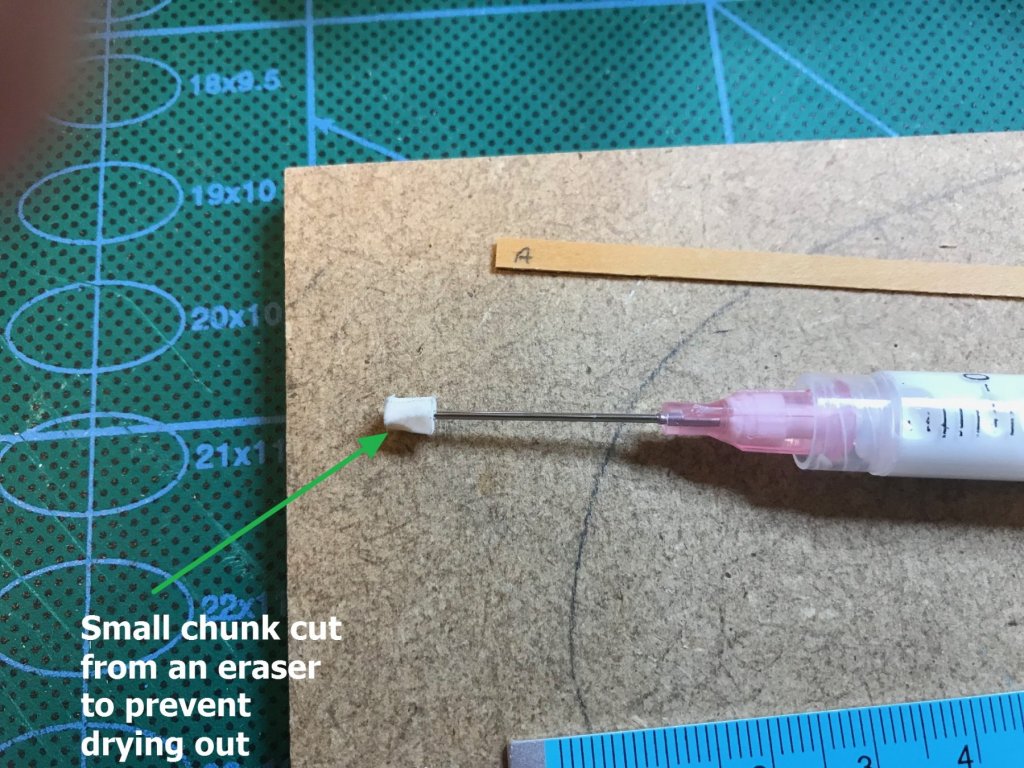
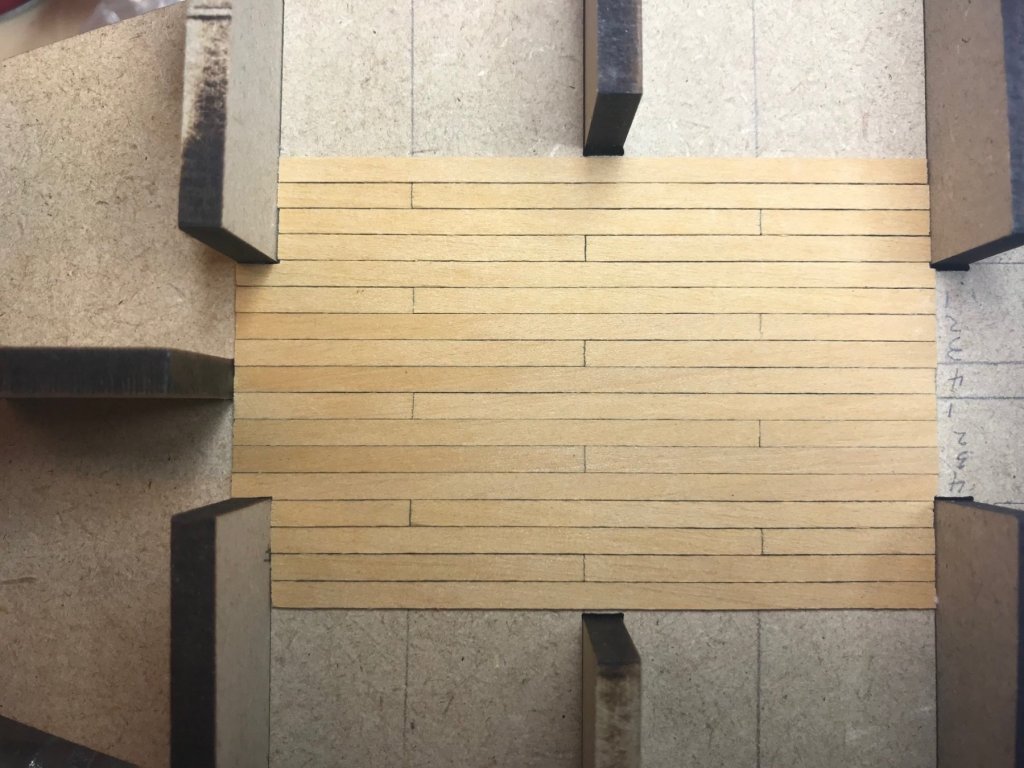
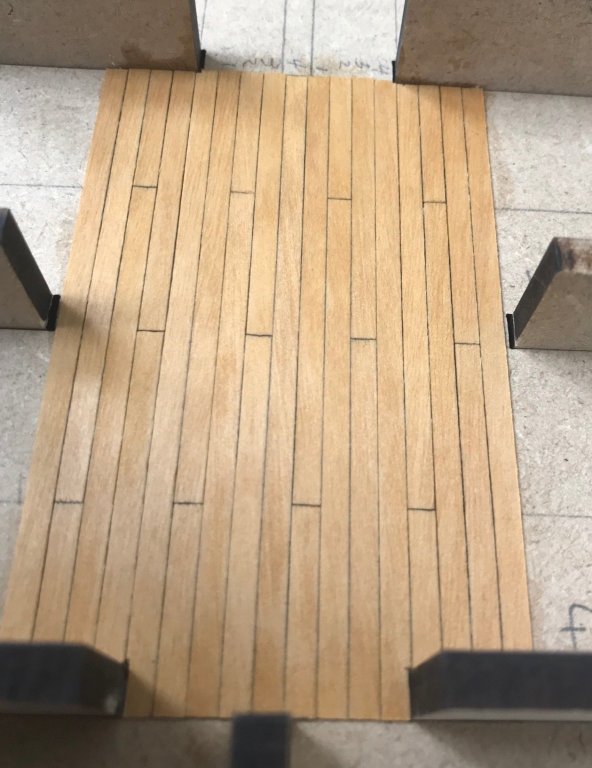
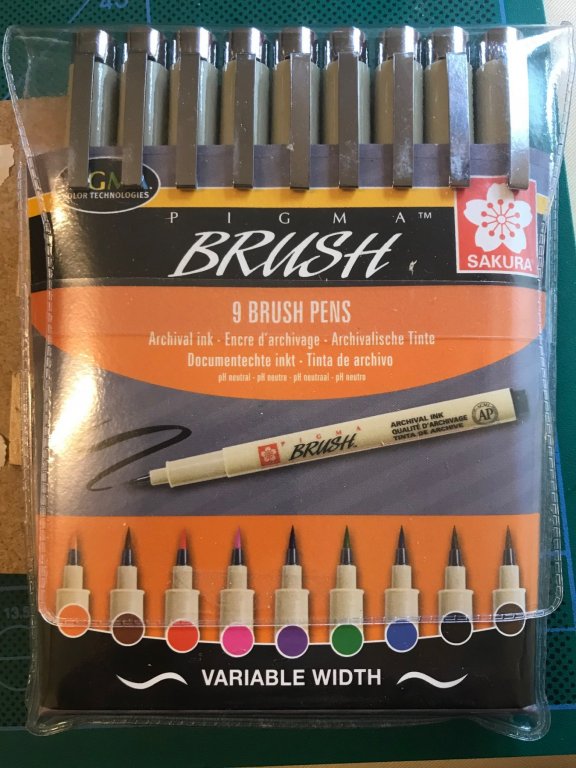
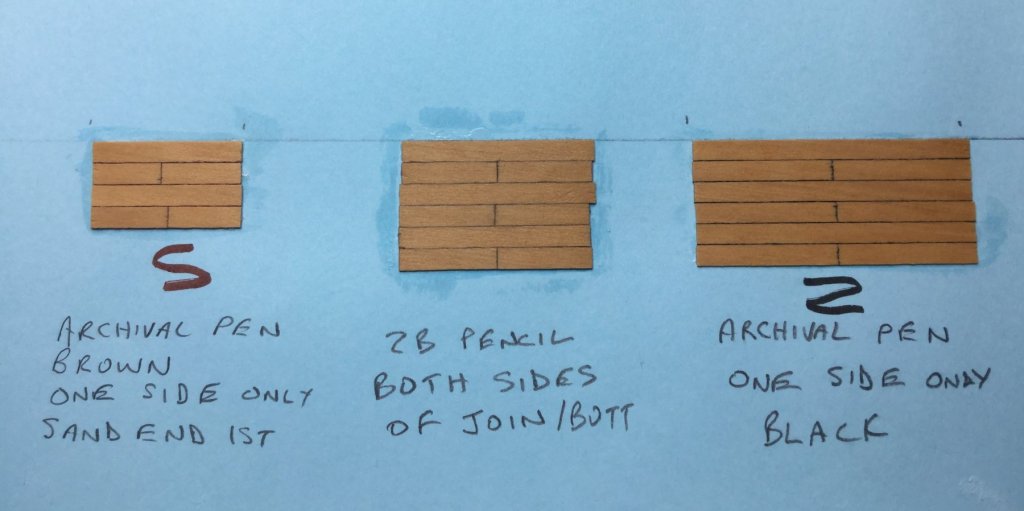
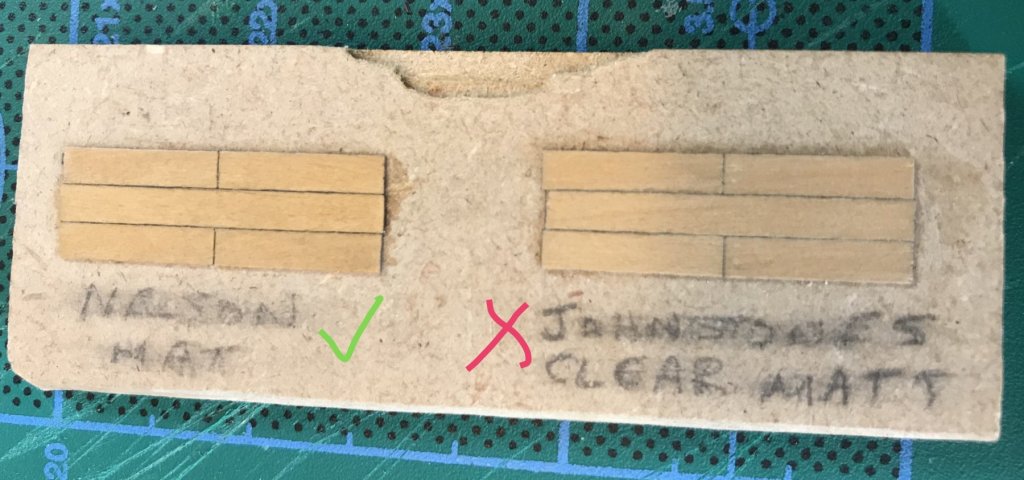
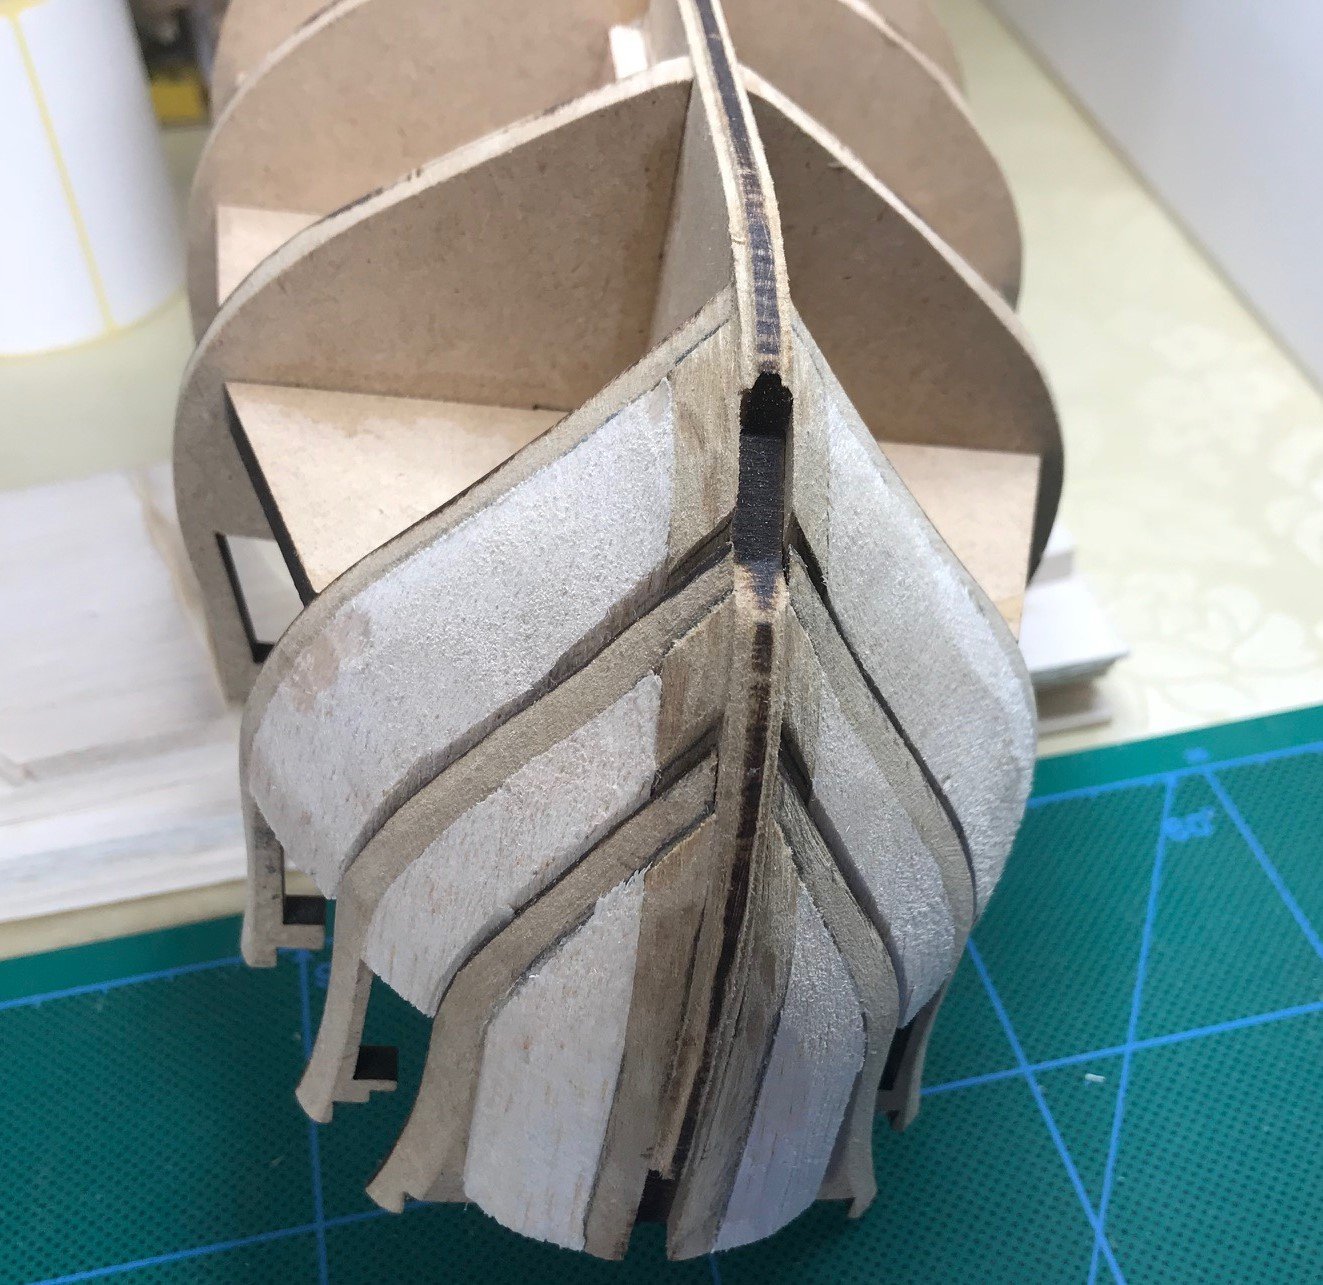
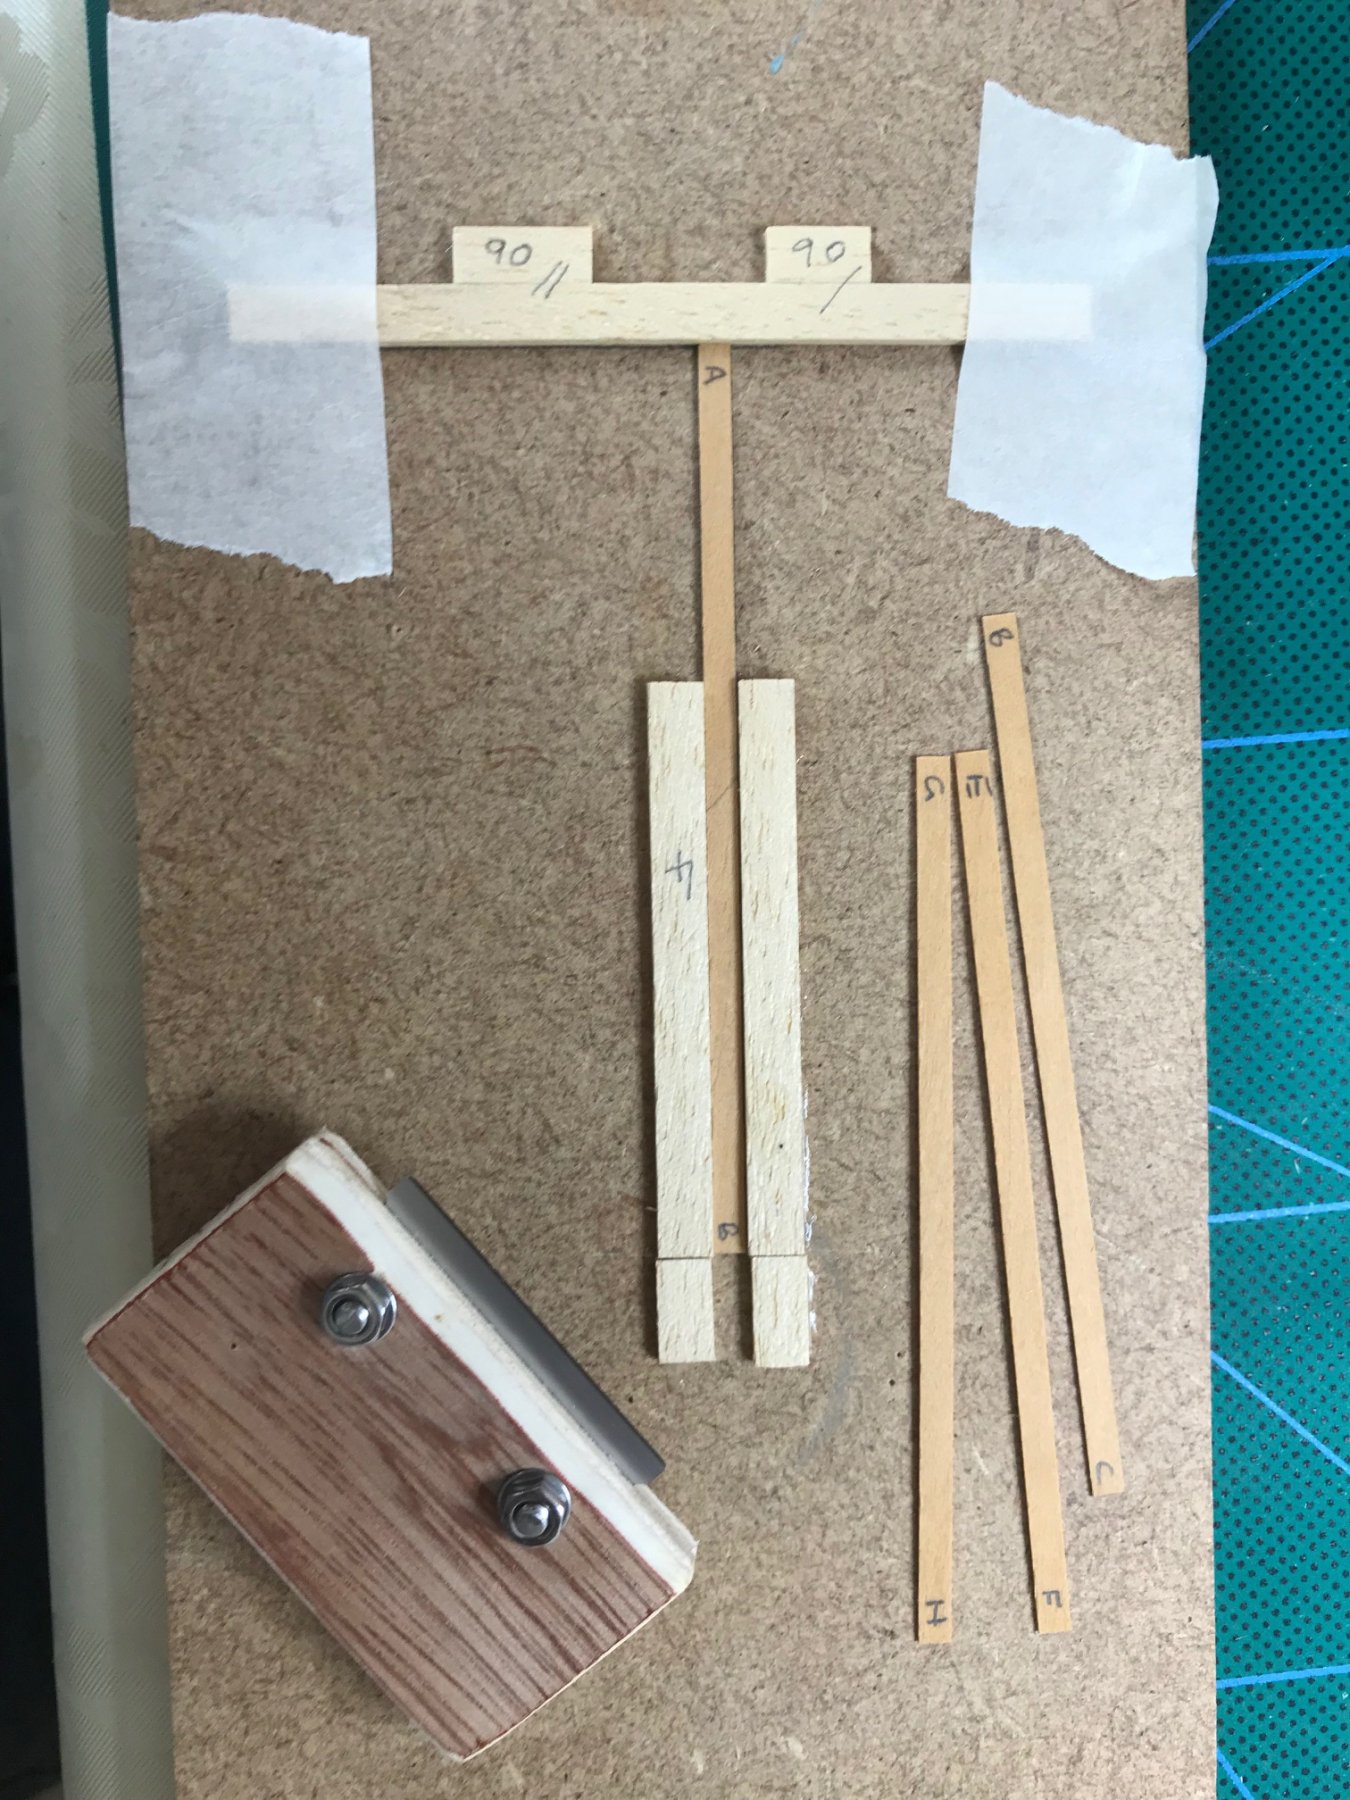
Here are the pictures I mentioned of the small amount of progress done. Bulkhead and filler pieces fairing - Bow Stern Next I planked the small area view-able down through the gun deck. My archival pens hadn’t arrived yet so I hadn’t had chance to do the caulking comparisons with pencil so decided to press ahead using 2B pencil, for this small area anyway. 1st I made a simple plank cutting jig (for 90mm length) and a simple razor blade cutter I decided on a 3 butt shift pattern, which I’ll probably use throughout (I have a question about this later) I wanted a means to dispense small amounts of pva glue to prevent any surplus being squeezed up through the joins. For the limited amount of planking I had done in the past, I had always used a pin to put small blobs spaced out along the length but I now need something more efficient so went for a blunt needle syringe. Started off gluing the back of the plank but switched to doing it this way because I dropped a few glued planks which requiring a clean-up. When I was done, I left for a few hours and then scraped it (Denis styley ) and then gave it a diluted varnish (70% polyurethane/30% White spirit) coat. I diluted it because I’m struggling to get a good, none ripple finish with neat varnish (Nelson) so may use several thin coats instead. I feel a long heavy YouTube session coming on Scraped Diluted 1st coat of Varnish What the hell - I tried a 2nd 100% neat coat the next day (mostly hidden so no worries) It doesn’t look too bad to me but I’m no expert Look what’s arrived!! The Postman (my hero) has battled through the snow to get these to me . So I did a comparison to the pencil caulking on the boxwood I’m using. Both samples were scraped, varnished and grey Scotch-brited the next day. Better photo If you look close at the one on the right, there is still a bit of bleeding on the butt join. To be fair the pencil has also bled slightly, probably at the varnishing stage because there was no sign after scraping, but it’s not so noticeable because the pencil is more of a subtle shade. The jury is still out but I’m swaying toward the pencil for this build. Maybe a different wood may not bleed as much. My brain hurts now and it’s nearly curry time so that’s all for now. The butt shift question: Is it standard practice to mirror the shift pattern either side of the centre? E.g. assuming the central planks won’t have a shift pattern because of the deck furniture, 4,3,2,1,4,3,2,1 - (Central planks) - 1,2,3,4,1,2,3,4


.thumb.jpg.f3f2cf32773499d6f9fc409a5379e13d.jpg)


-
Lots of innovative ideas there Denis. Can't wait to see this lady finished.
- 378 replies
-
- 5
-

-
- t78 norden
- billing boats
- (and 1 more)
-
On the home straights now Denis and looking good. Are you planning on doing any fish boxes with handles using the supplied 0.7 x 1.0mm (splinters as I call em)? I found these quite a challenge and the air turned blue a few times I can tell you. Was disappointed with the plastic fish that went in them though. I'm sure you'll come up with some surprises.
- 378 replies
-
- 5
-
-
- t78 norden
- billing boats
- (and 1 more)
-
Thanks for that SpyGlass. The grating looks good I will try that method. I will watch out for the aft curvature when I come to the gun port strips. Thanks for the pictures I will refer back to them when I'm at that point.
-
Thanks SpyGlass. I've checked the Bulkheads with a strip and the only problem I can see is on BH7 which I think is the correct width but appears to be 1mm off centre i.e. 1mm gap on Port side and 1mm proud on Starboard which I will have to correct. You said you thought it was BH11 but this area seems ok. If you can remember the specific BH I will double check. Still waiting for my Archival pens which were due Wednesday but they couldn't deliver from 17 miles away due to "Bad weather or natural disaster" according to tracking info. Don't laugh but we've had 6" of snow over the last few days and the UK has come to a standstill Done the deck planking that can be seen through the forward hatch. Getting late now so will post pictures tomorrow. I've been thinking ahead to the coamings and gratings. I'm going to build them prior to decking as I want to plank up to the coamings as some have done. I was going to glue the grating pieces with 50/50 diluted pva and sand a camber athwartship together with the coamings frame to match the deck curvature. Once that has been done I will remove the grating pieces from the coamings and paint/varnish separately. My question is, has anyone brush varnished/lacquered the grating successfully or would you spray? I was thinking I could dip into dilute polyurethane varnish and then quickly brush the top to remove excess. I welcome any suggestions.
-
Thanks Denis & SpyGlass. Good advice from both of you and duly noted thank you. Now done the bulkhead fairing, which I was dreading but it wasn't too bad once I got my head round it and made a start. When my archival pens arrive I will do one more planking test, archival pen vs pencil and hone my finishing technique, pictures next time.
-
Thanks Denis, SpyGlass & Kevin. Denis, thanks for the kind words. I will look into the archive pens they sound promising. I will hold off till I have tried them. I can imagine the sanding spreading the lead dust about. I didn't sand but used a fine Scotch-Brite hand abrasive pad but I can see that and/or scraping would cause the same problem. Maybe if I do end up using pencil then maybe varnish 1st to seal in the lead dust and then the scraping/abrasive treatment. SpyGlass, definitely not the steel wire wool. Regarding treenails, the FFM books say that planks of 8" (3.18mm @ 1:64) or less have a single treenail at the butt join so with this fact and with them not supposed to be visible anyway I won't bother with them this time. i didn't mention I tried various size hyperdermic needles but I couldn't get the consistency. As you and others say, it's a personal thing. Hi Kevin, thanks for following and welcome aboard. You're not late to the party as you can see by my progress. Just to let you know I like my popcorn with caramel not the salty stuff and a beer or merlot to wash it down
-
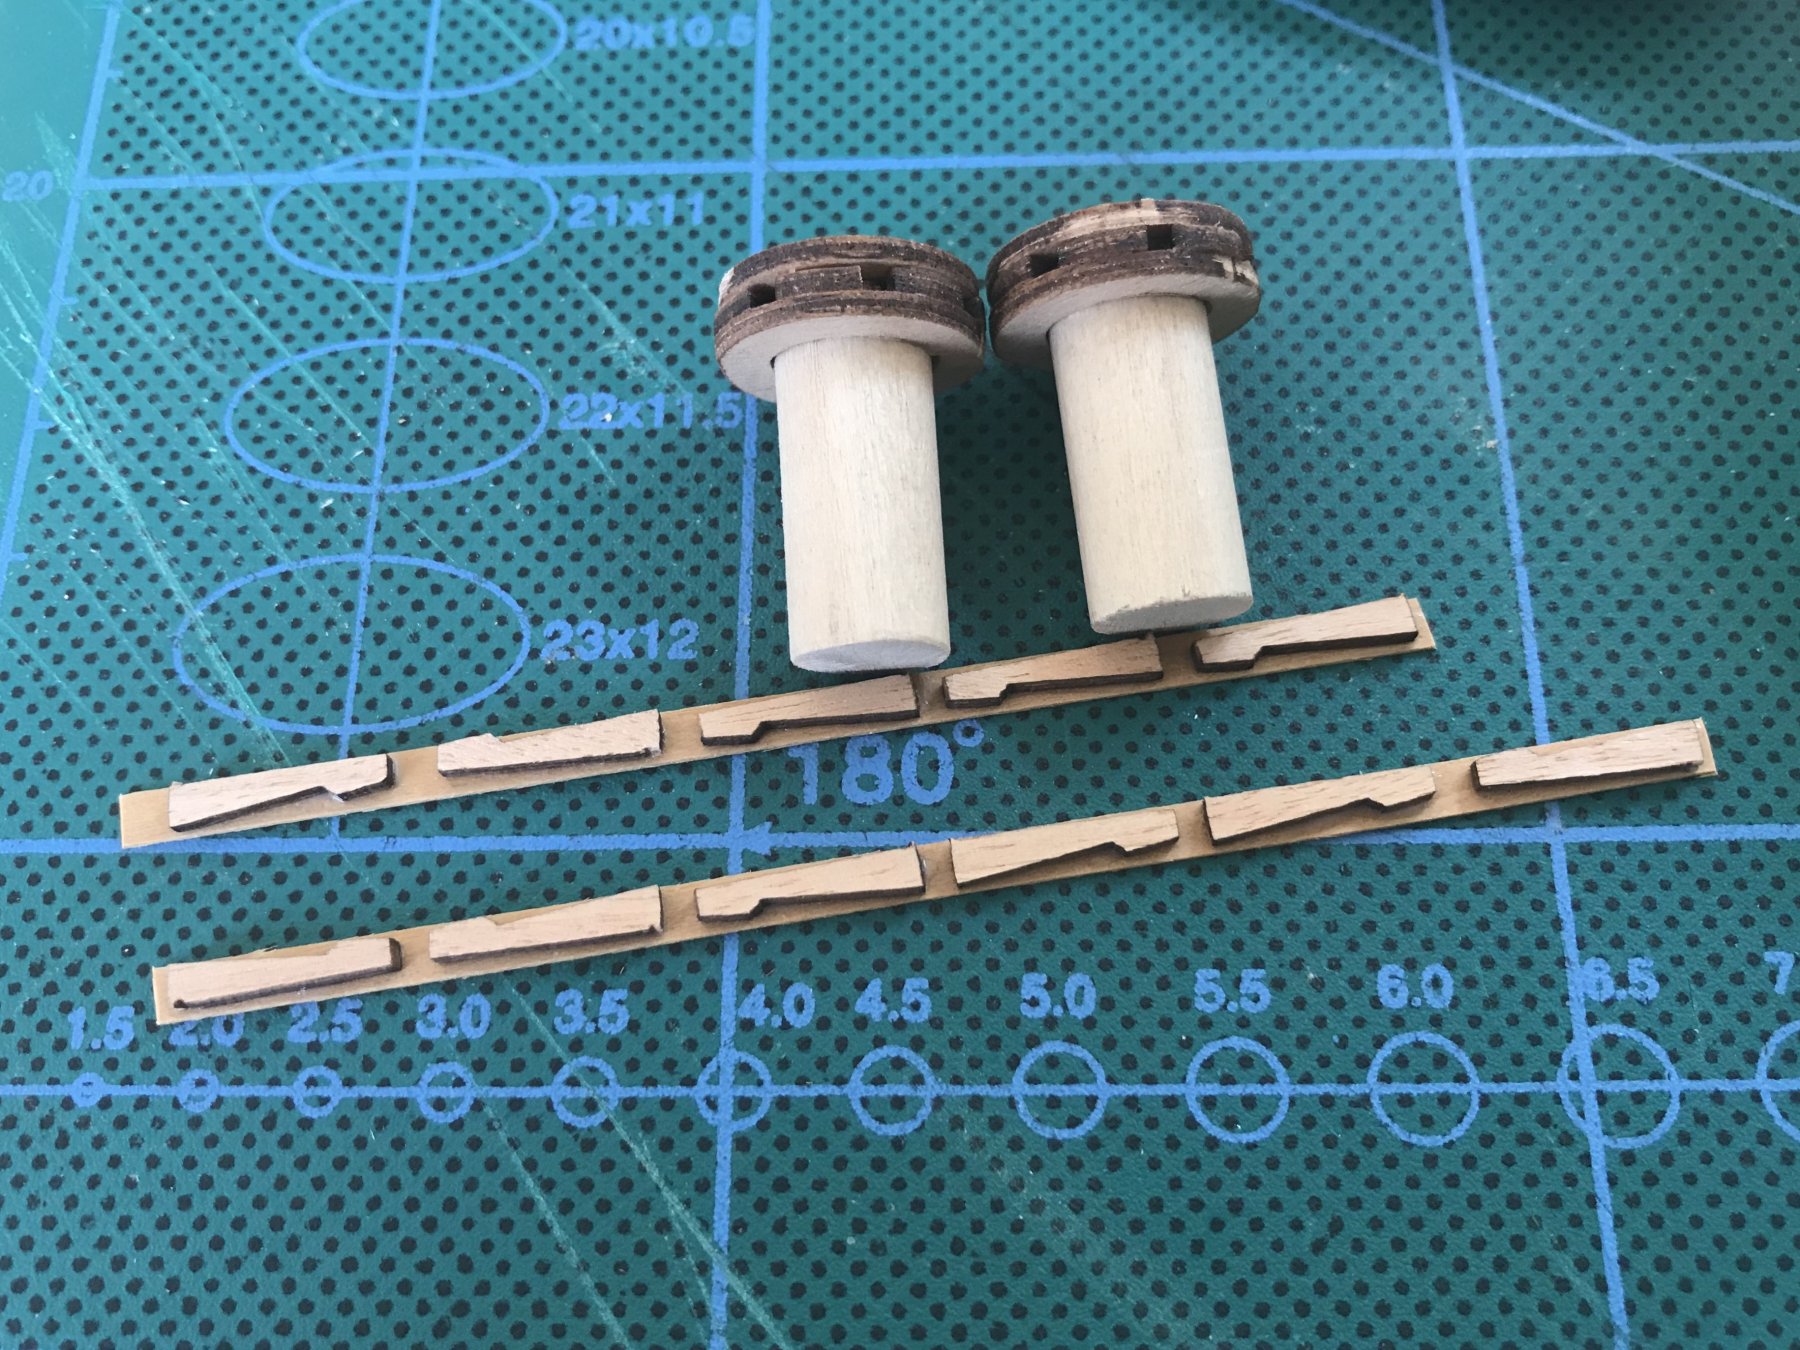
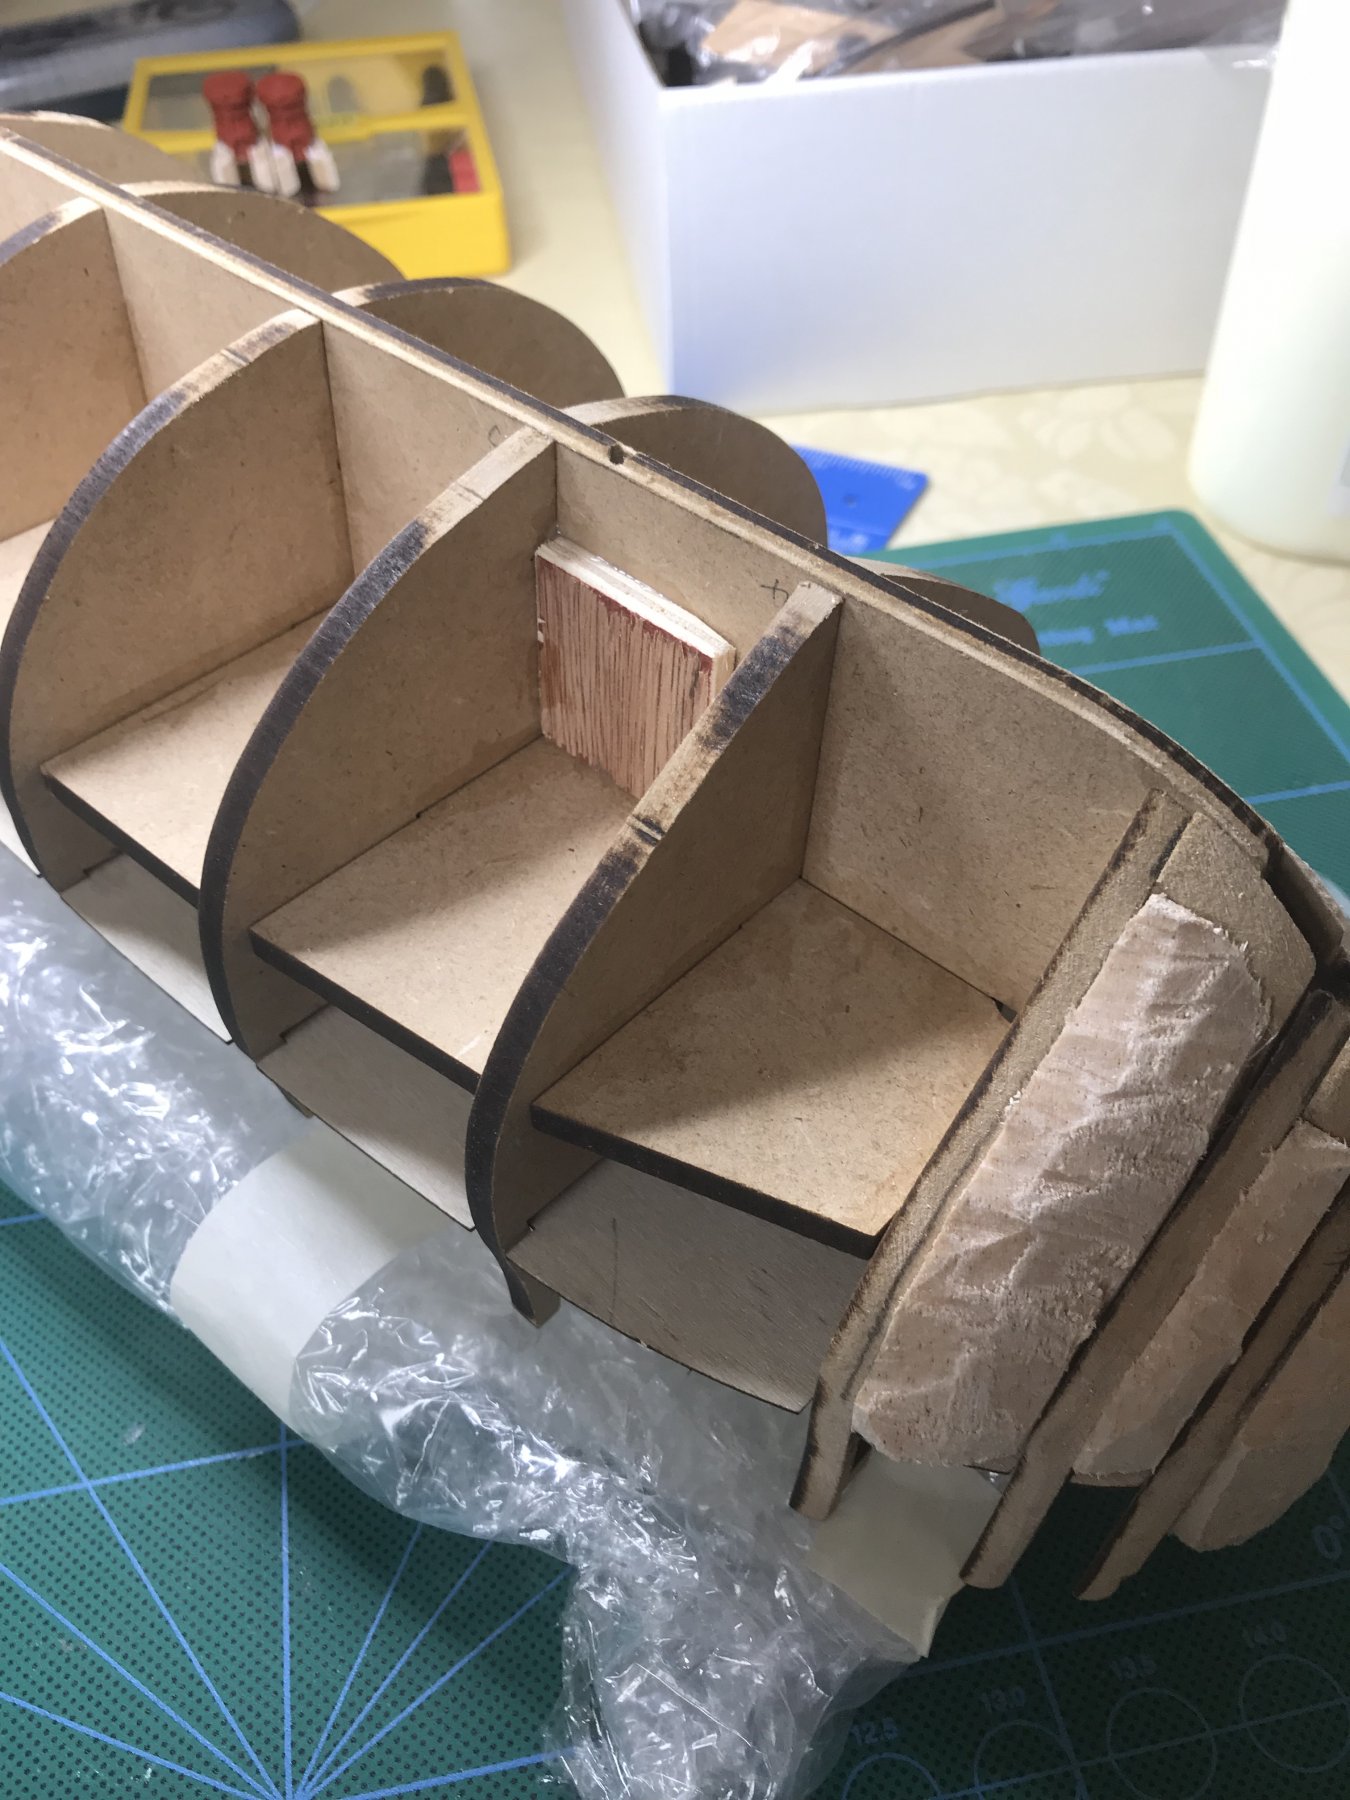
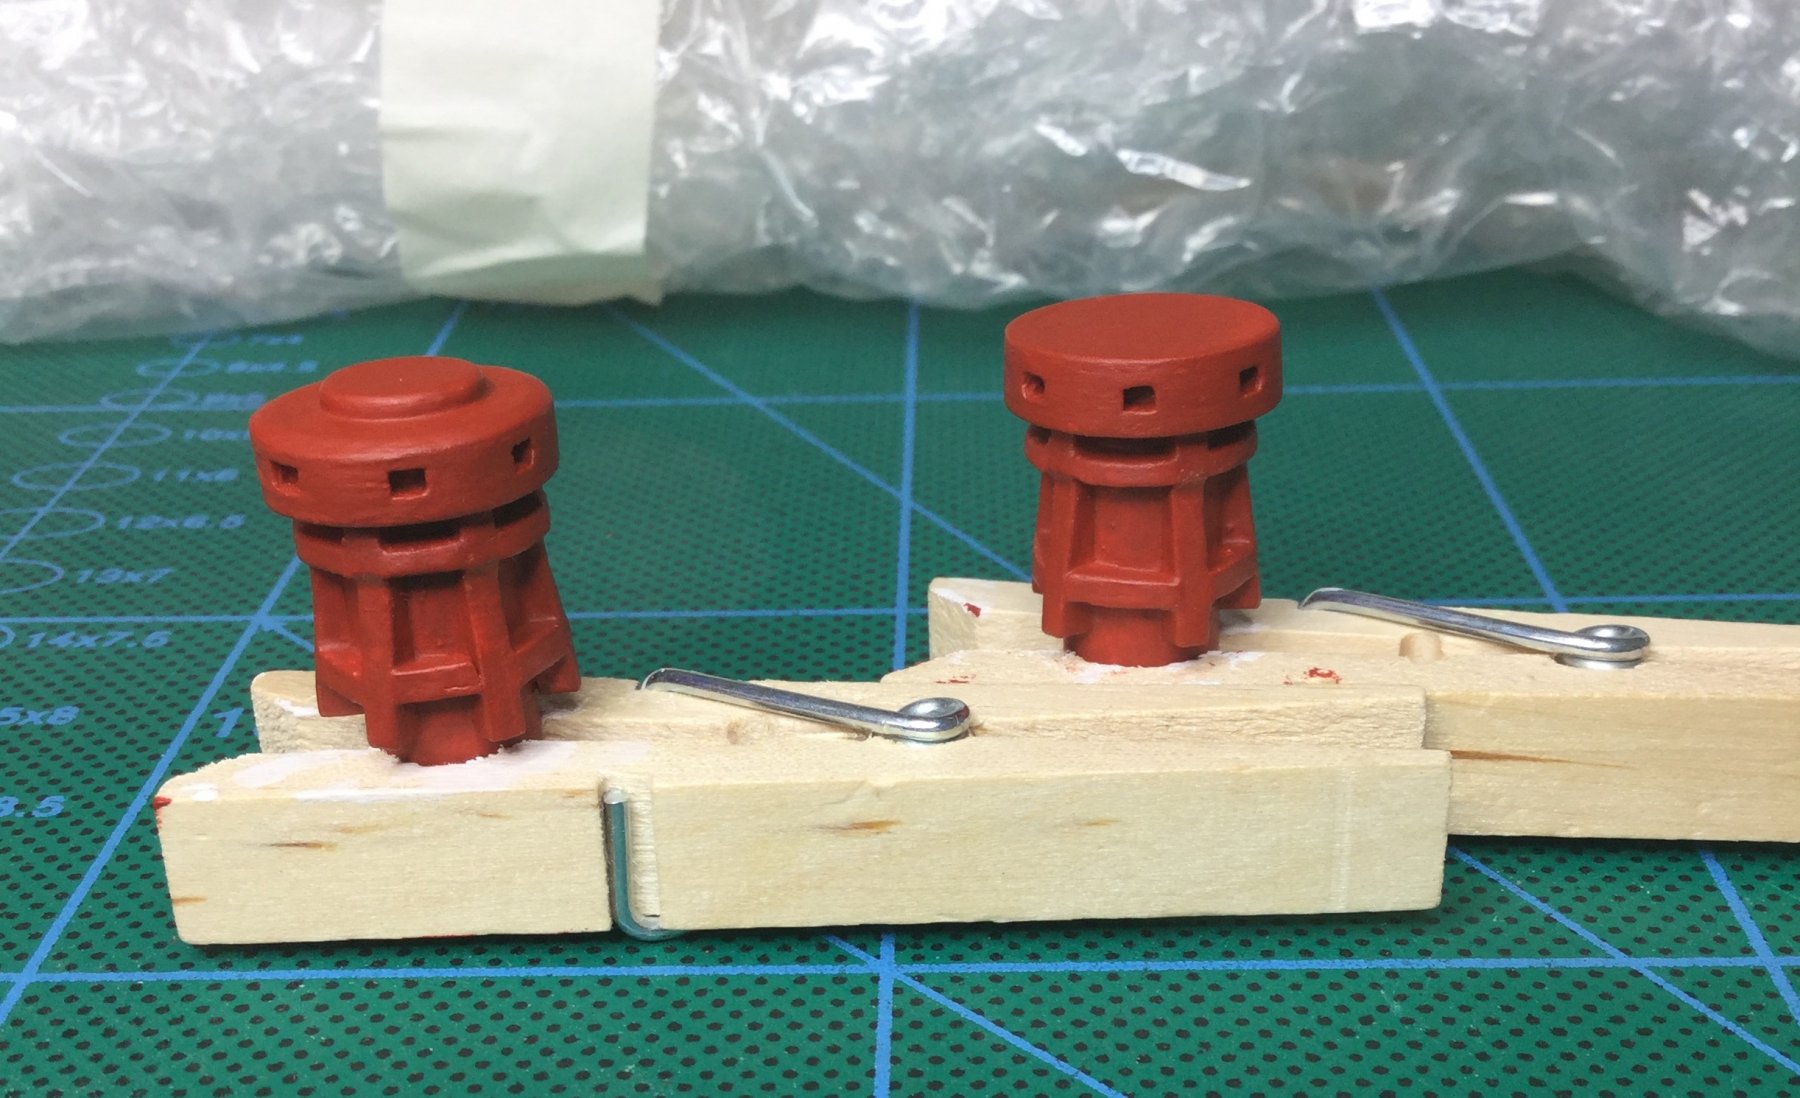
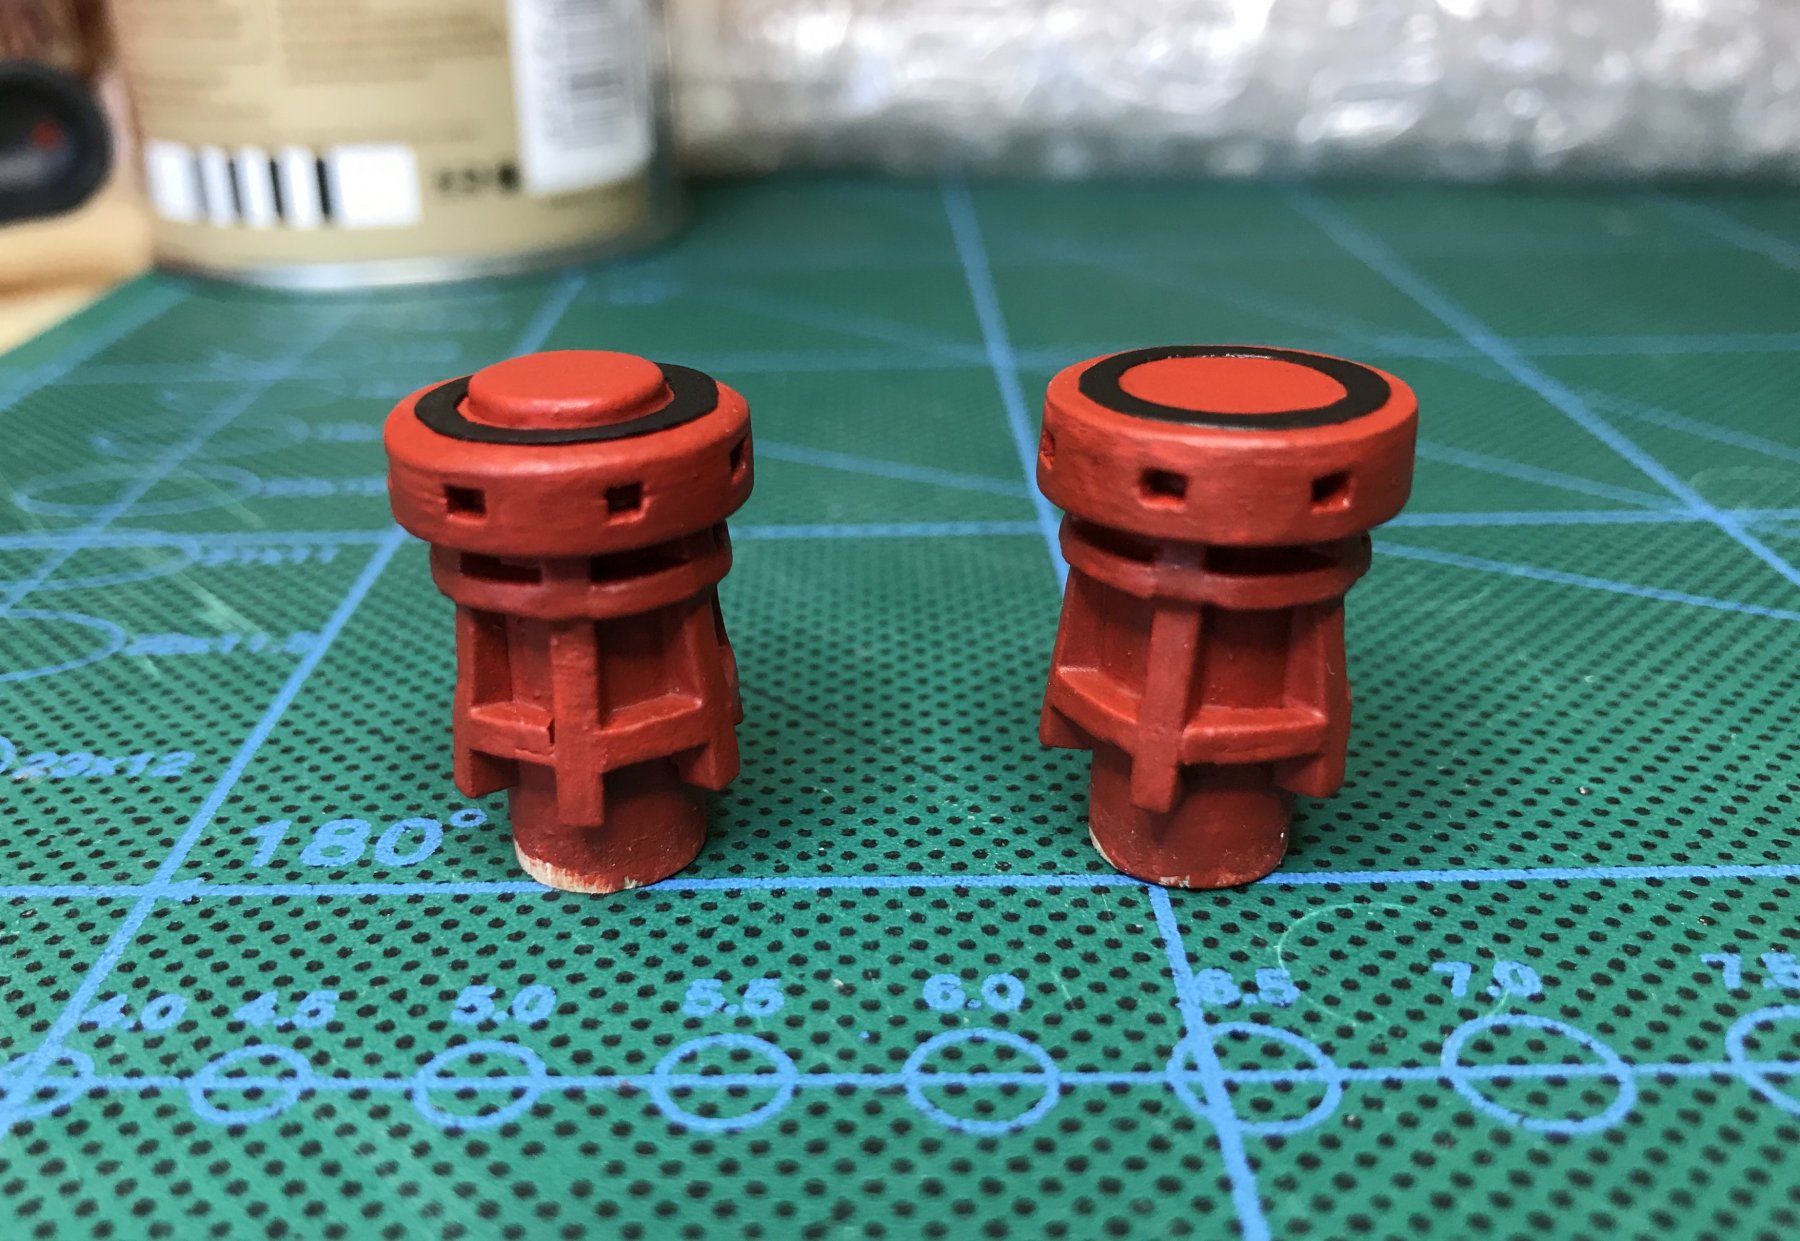
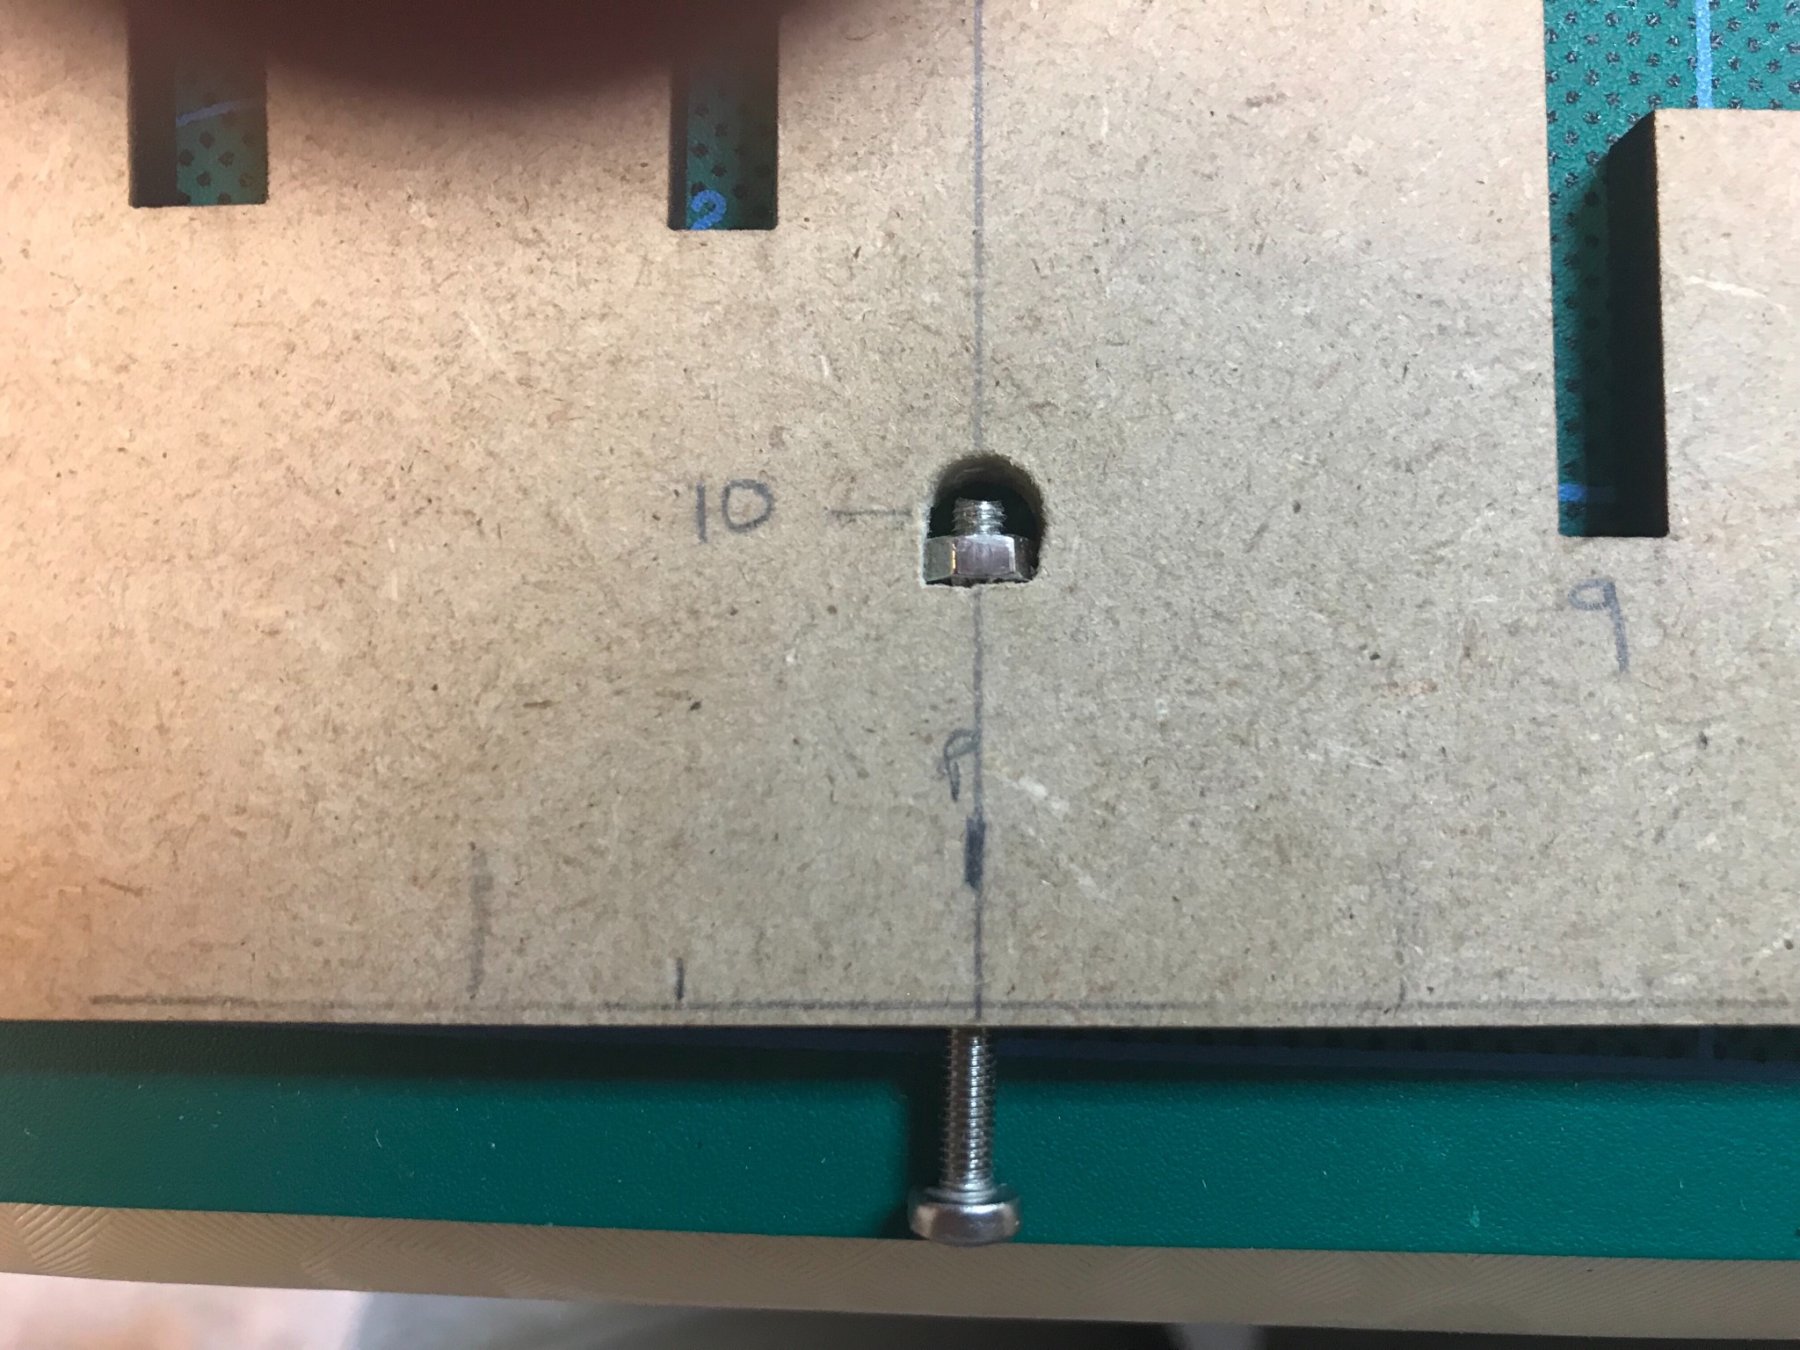
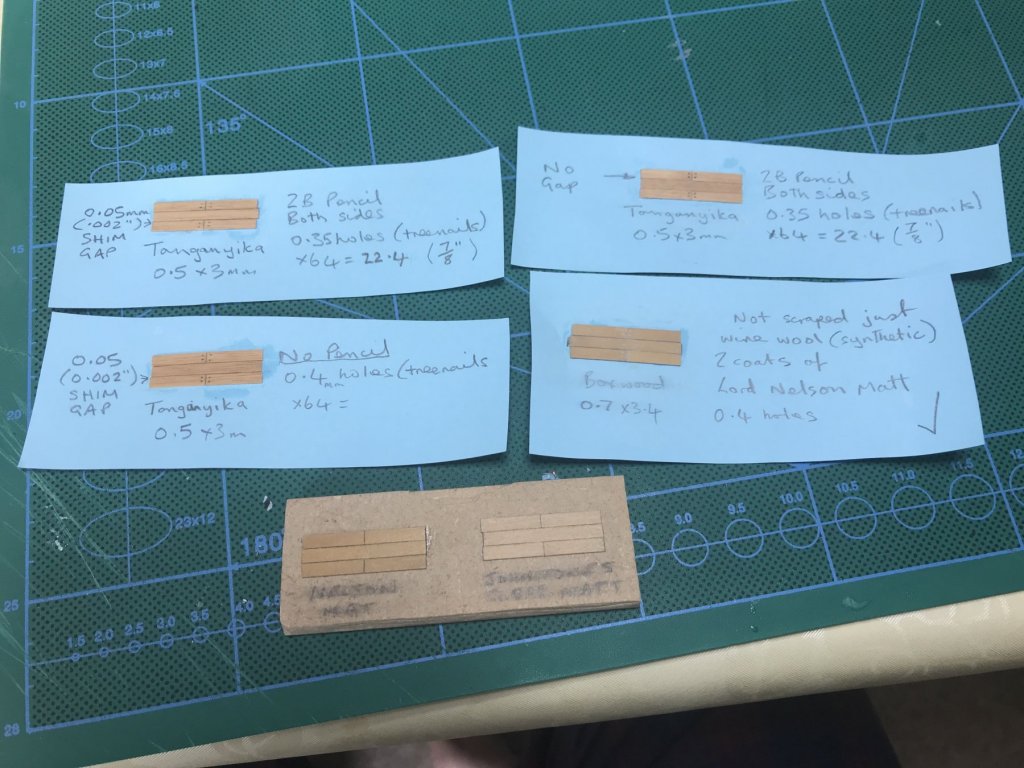
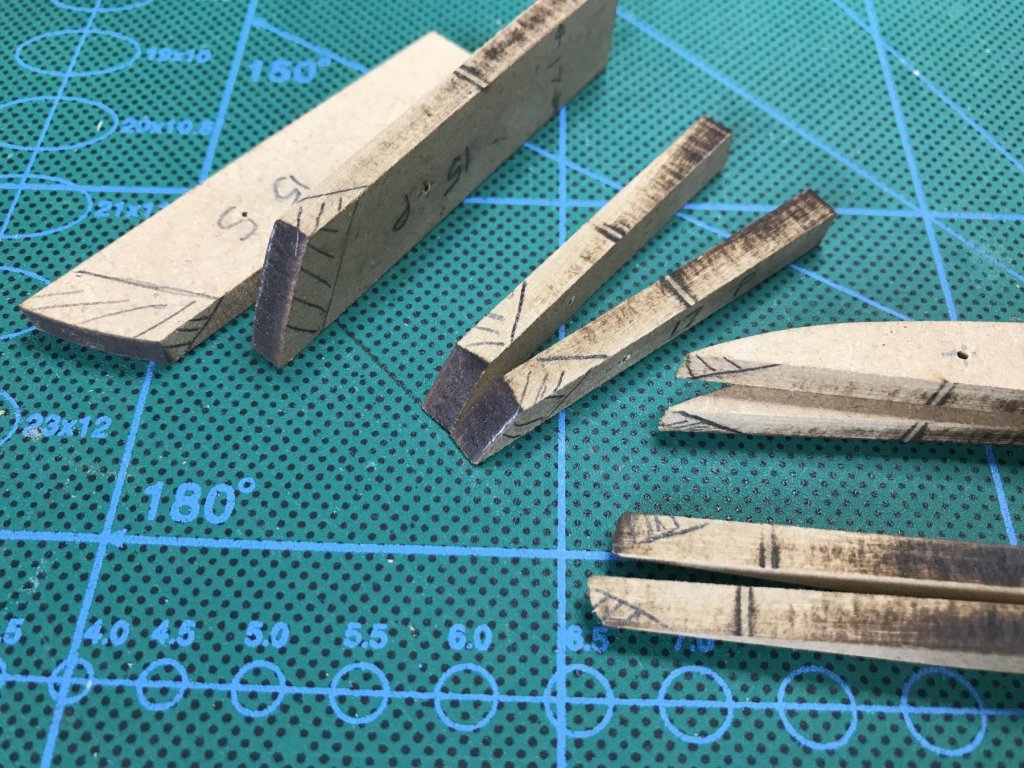
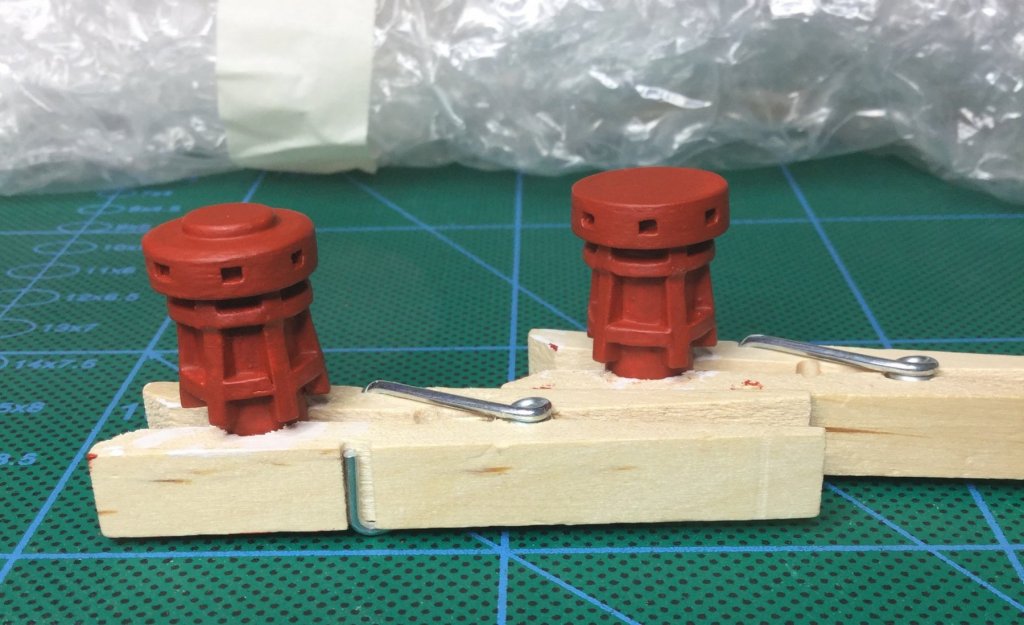
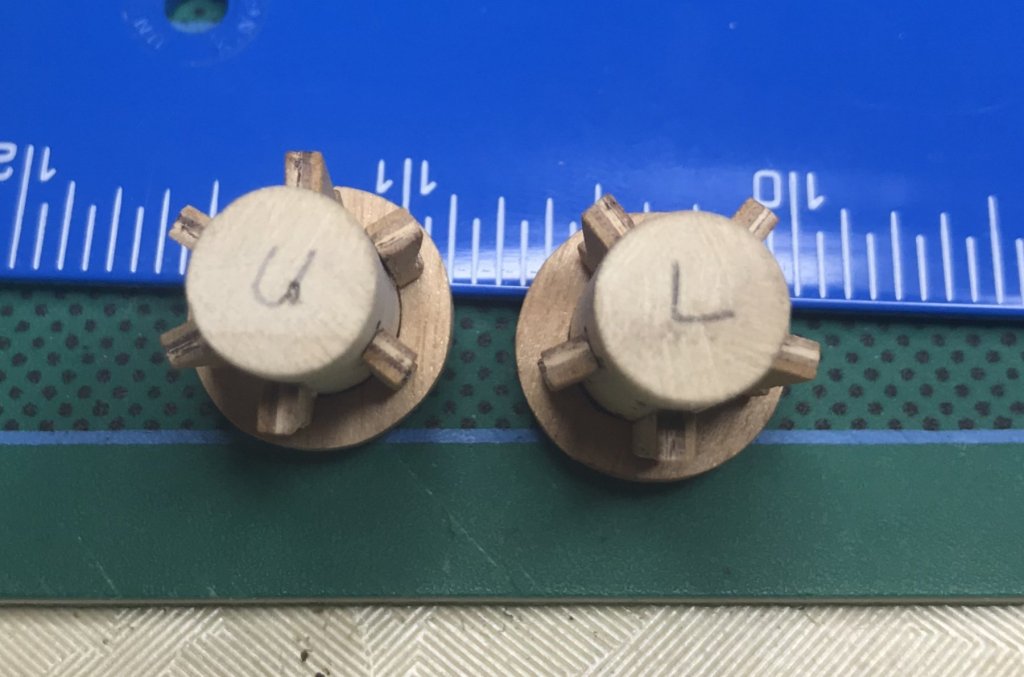
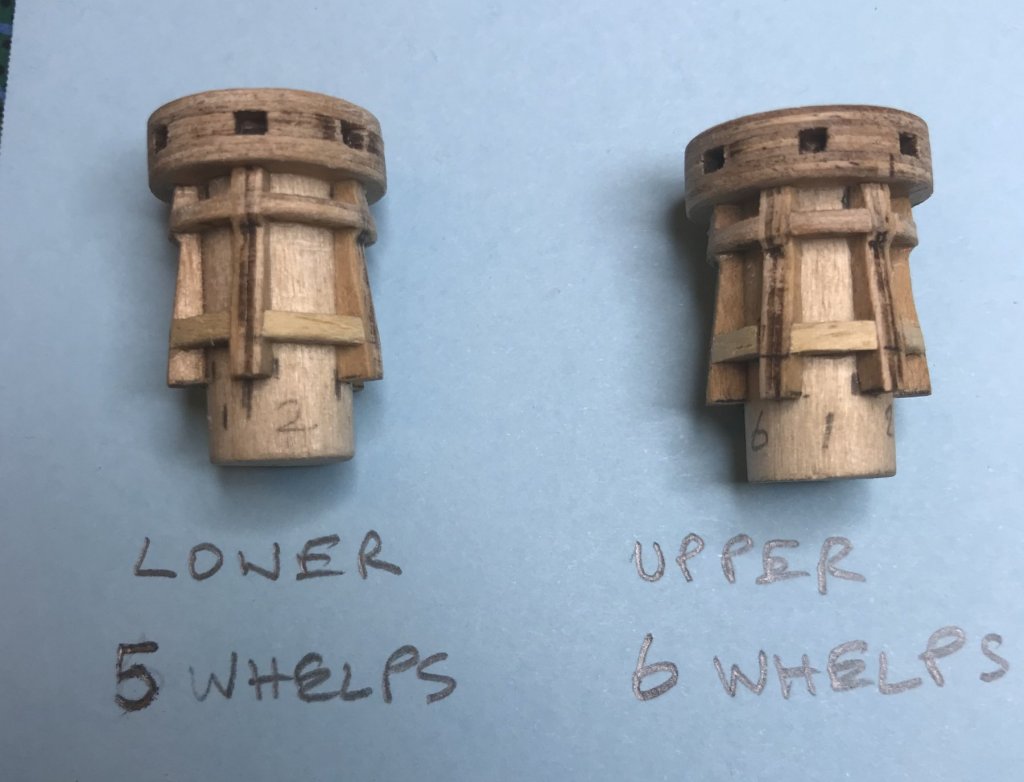
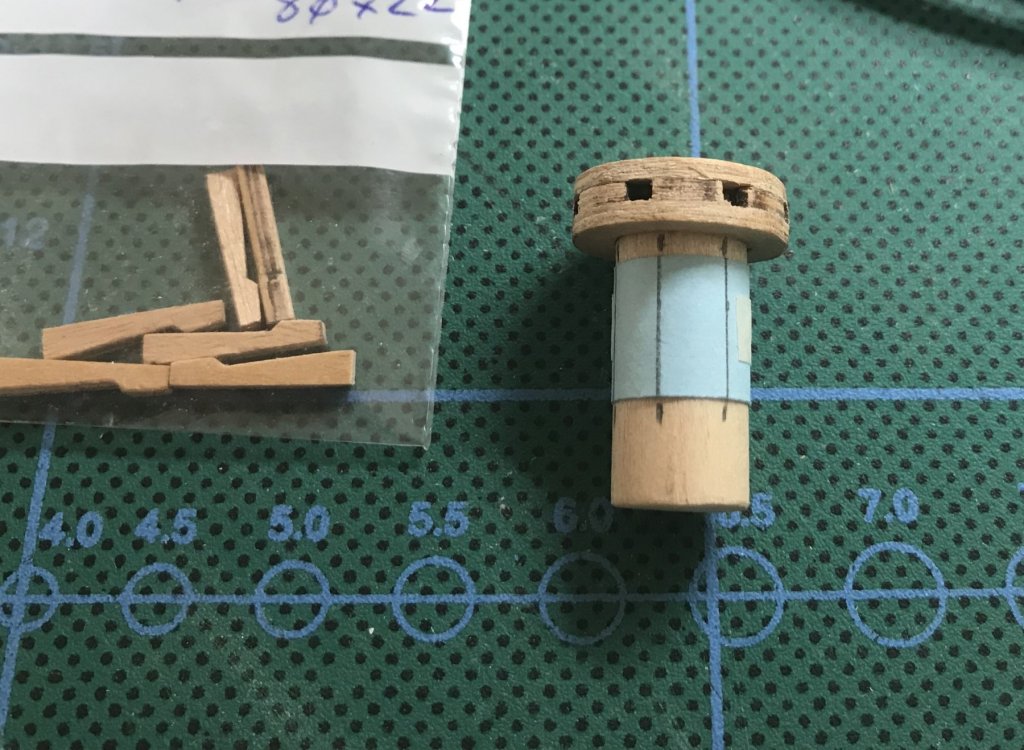
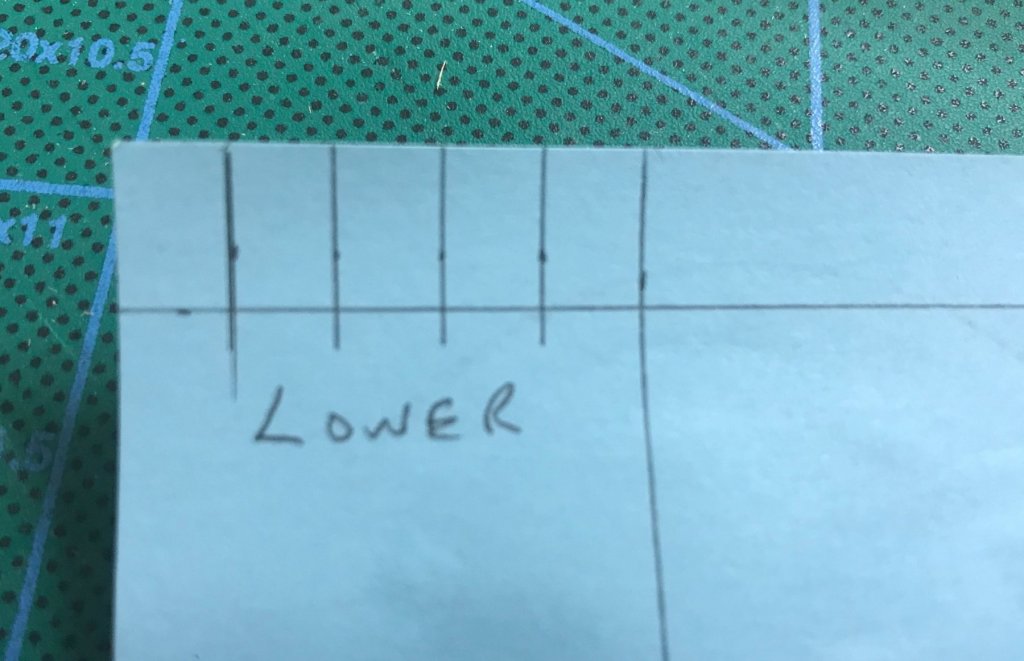
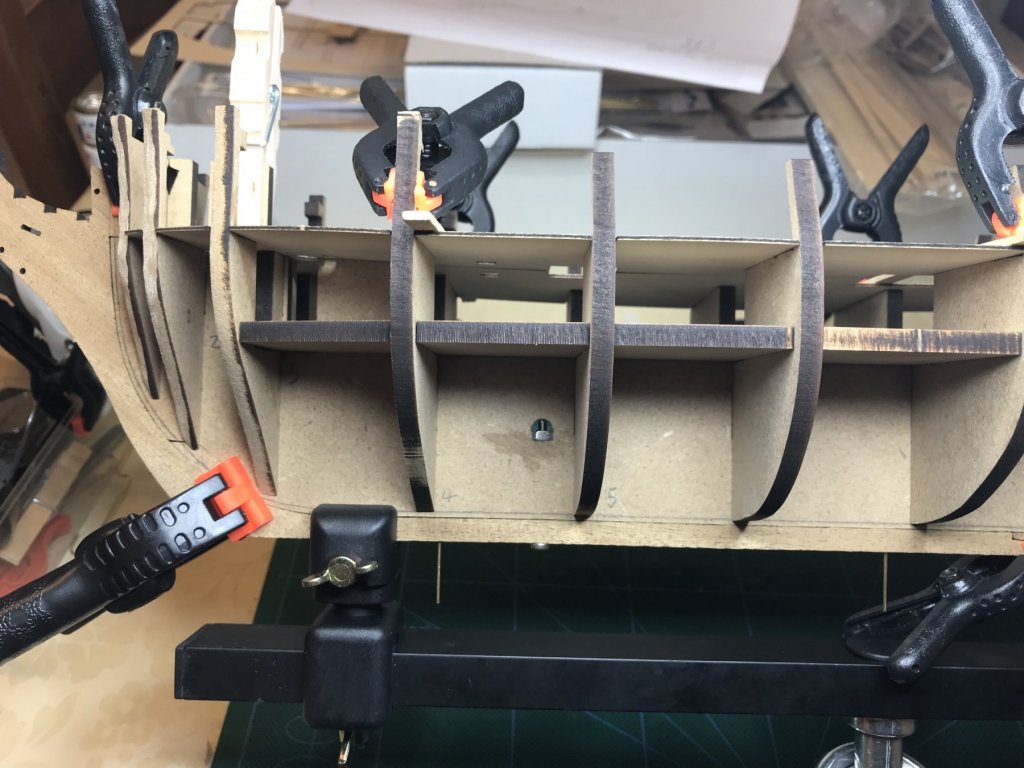
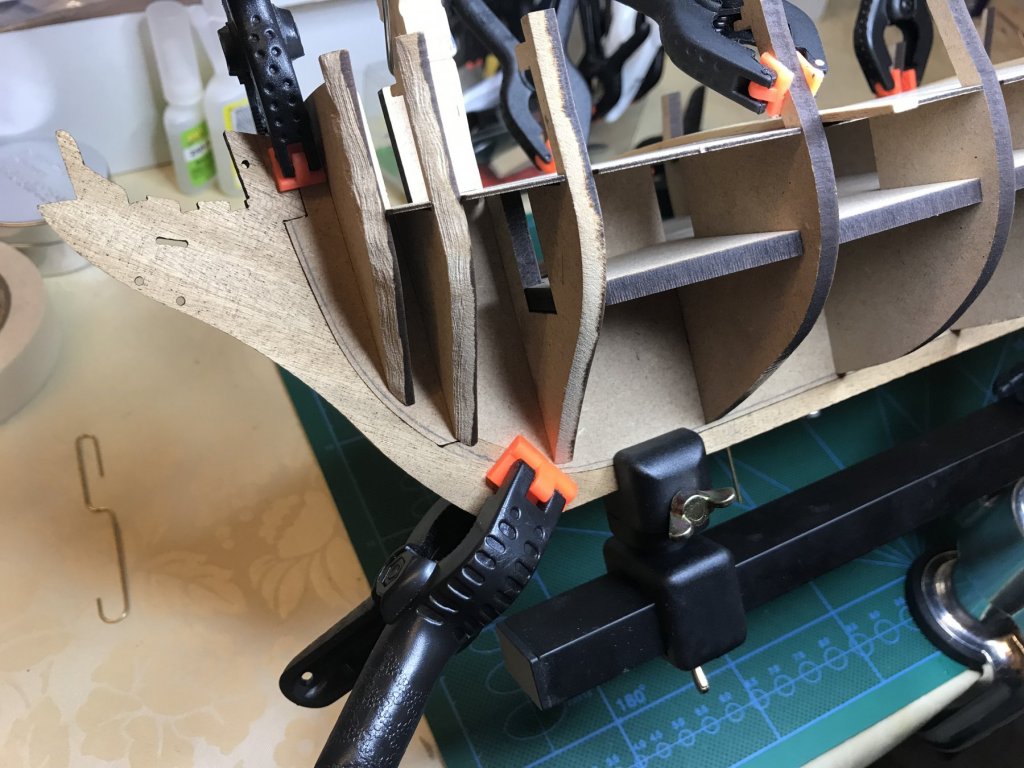
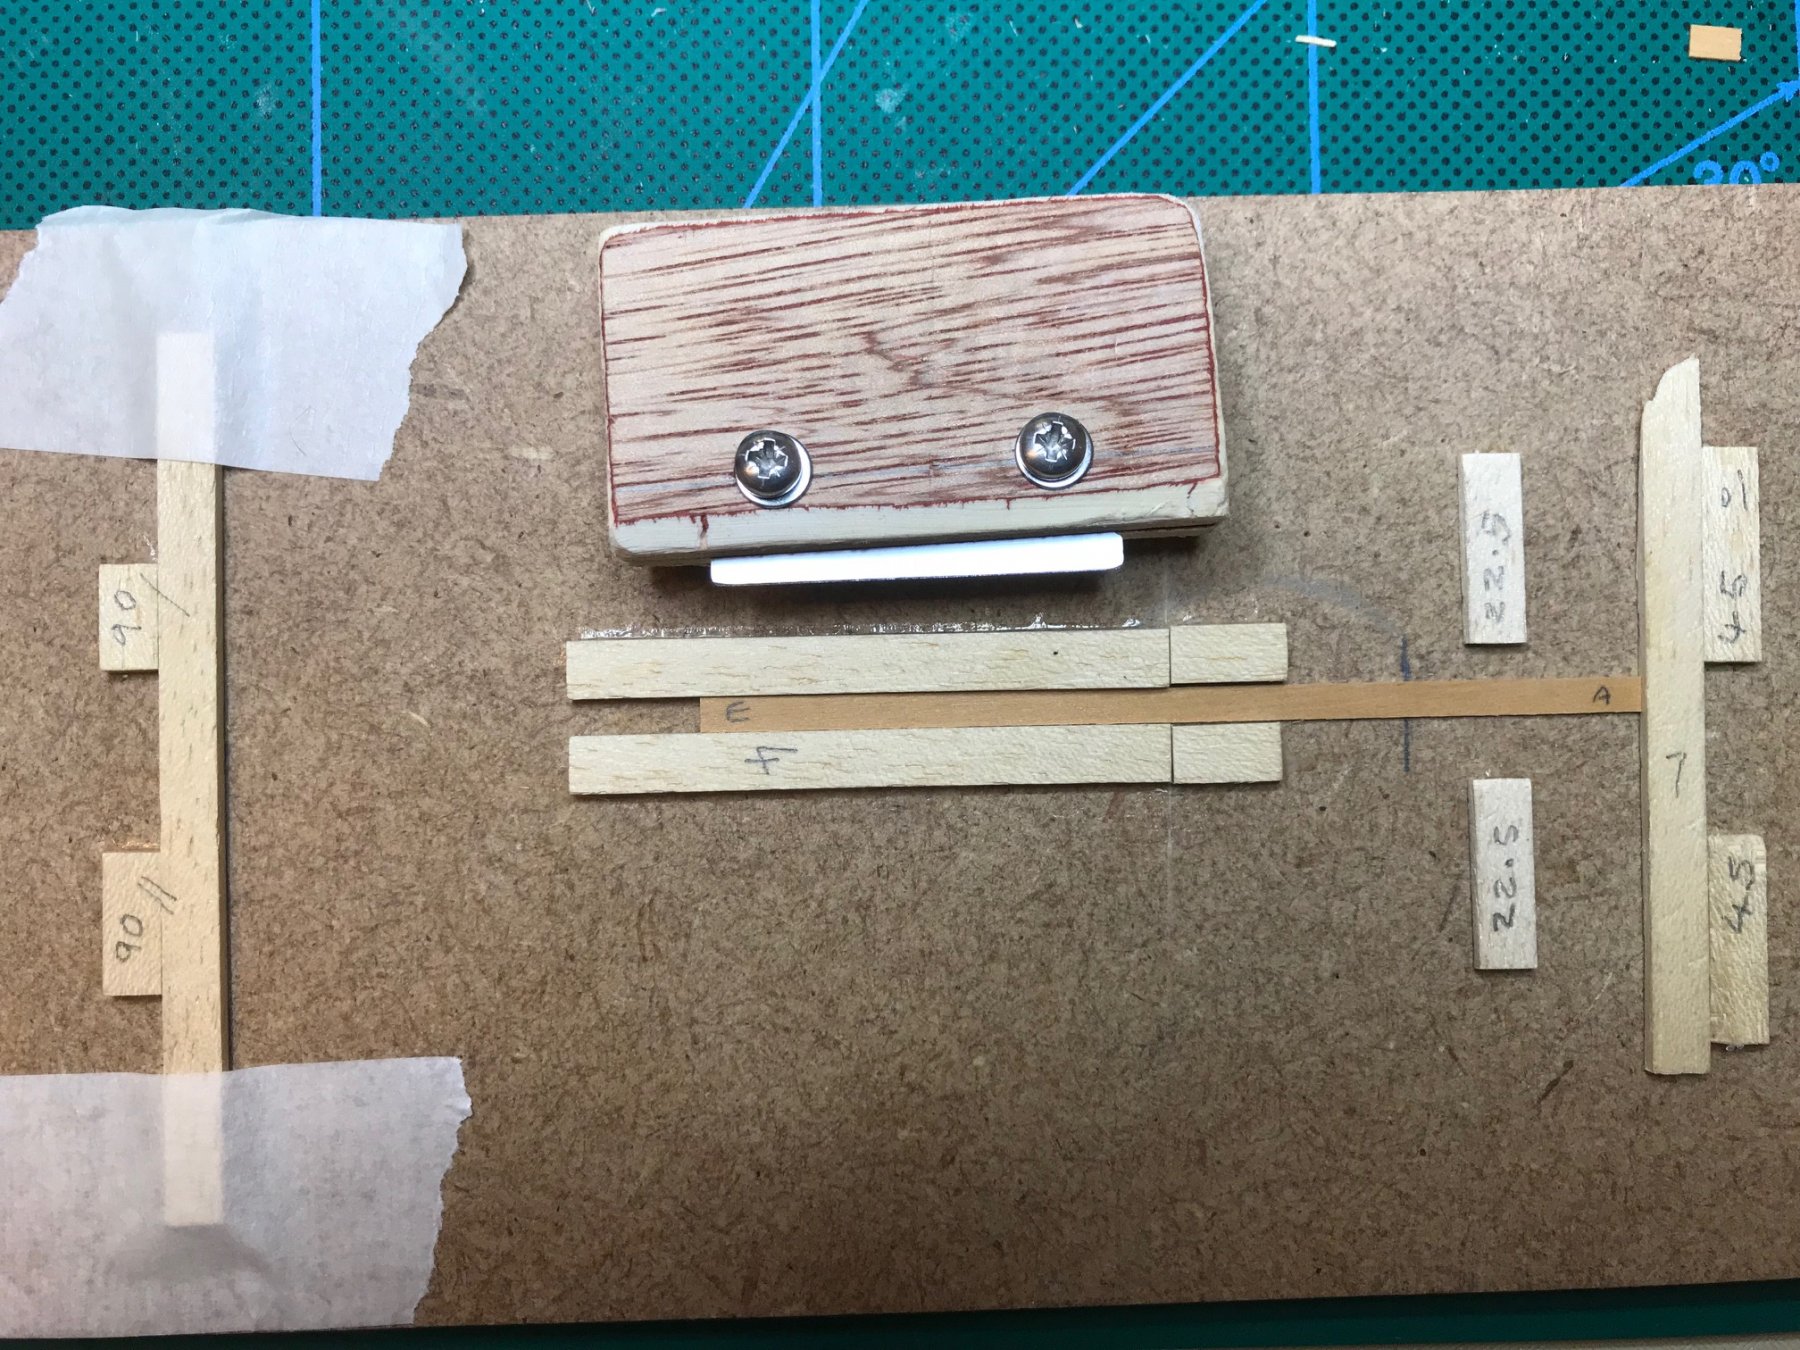
…Now sorted a space in the garage so things are looking up but still too cold in there. Last time I mentioned I had cut the rabbet so here is a picture. Note also the ply pieces for captivating the mounting nuts and the temporary M3 studding with saw cut (thanks SpyGlass) I’ve been quiet for a while but I have been busy doing a lot of plank testing over the last few weeks for the decking. The tests I did: Material - supplied Tanganyika (0.5 x 3mm) vs Boxwood (0.6 x 3.4mm) Caulking - pencil vs permanent marker vs 0.05mm (0.002”) gap Treenails - None vs drilled (with pencil) vs drilled (with Hobbylite filler) Treenail size - 0.3mm (3\4”) vs 0.35mm (7/8”) vs 0.4mm (1”) Finish - Scraping vs sanding vs synthetic wire wool Varnish - Polyurethane vs Acrylic Here are just a few of the samples It took me ages to decide on which one to go for. Here is my final choice and reasoning: Material - Although I like the look of the Tanganyika , I’ve decided on the boxwood as its harder and easier to cut cleanly without splintering, which maybe important if I try a bit of scarfing. Also the boxwood stock I have has nice smooth edges and give better caulking lines. Caulking - The marker pen was too black and bled into the end cuts. I know I could seal the ends 1st but didn’t fancy the extra work. The 0.5mm gap looked the best but trying to maintain a uniform gap between every single joint would be too much. So I’m going for the 2B pencil on both side of each join. Treenails - I’ve decided not to do any on this build as none of my attempts on the samples were consistent enough so therefore I wasn’t happy with the results. I will probably do treenails on a future model but I need to play around with using actual treenails and different fillers. Varnish/Finish - The boxwood I have is pretty consistent thickness wise so I may not need to scrape or sand. I don’t know if anyone else has had this issue but the Acrylic varnish seemed to make the pencil dust bleed into the wood grain (below right) so I’ve opted for the matt polyurethane varnish (Nelsons) which does actually give more of a satin finish so I will follow with a light rub down with very fine synthetic wire wool to remove the shine (below left). Decision made. I have also added the infill pieces and additionally added balsa between the fore and aft bulkheads as others have done. Pinned and roughed out Glued in together with additional balsa Now needs sanding but didn’t fancy going into the cold garage so looked for something else to do and decided to do the capstans. Instructions say use 8mm dowel but 10mm should be used to match the laser cut parts. I’ve deviated slightly from the instructions and referred to the FFM books which show the lower Capstan with 5 whelps and the upper capstan with 6. Not sure if this is correct for the Fly but decided to go with it. The whelps seemed too thin and out of scale so I thickened them up a bit with some strip (didn’t fancy making from scratch) Next I marked the whelp positions on the dowel. That maths lesson did come in handy after all - PI x 10 / 5 for the lower one. Added 2 sets of cross pieces (in TFFM book but not in instructions). Top ones are convex and bottom one should be concave but I settled for straight. The FFM book show an inset metal ring on the top but my attempt using card wasn’t good enough so I decided to remove them. With After removal and repaint I intend to add the capstan partners and pawls after planking as shown in the FFM books and yes I have checked the beam height for the lower capstan and we’re ok for clearance. Next job is the bulkhead fairing and planking the small area that is visible from above through the fore hatch (with ladder)


-
Buoy oh Buoy Denis looking dapper I know what you mean about work. I am now retired but was forced to retire early after 30 years of service, because of a new boss I got. Long story short... he knew nothing about my job but he tried to tell me how to do it... I kicked off big time (big mistake, should have left)... a year of in fighting with him affected my health so I left and then went through a 2 year tribunal which was horrible but ended well in my favour financially but it took its toll mentally. I wouldn't recommend this route to anyone. Time is a great healer though and I still keep in touch with my friends there, who were brilliant and very supportive. Sorry for the digression. Back to your fine vessel... glad you spotted the one sided attachment on the gill net winch which I mentioned. I had the same problem with the decal flags as they are just too brittle. I ended up using folded over black electrical insulating tape with stick on numbers which were a big improvement for a novice like me (see in my album). Not sure how they will hold up over time though and maybe a coat of lacquer or something would help. Keep up the good work.
- 378 replies
-
- 7
-
-
- t78 norden
- billing boats
- (and 1 more)
-
Good picture SpyGlass Interesting. Looks like your shoe width size wise so yes I agree that ships planking looks equivalent scale to supplied strip. Will do some samples with supplied 3mm strip and the ordered boxwood when I get it, and see what looks best. Forgot to to say thanks for following and keeping an eye on me.
-
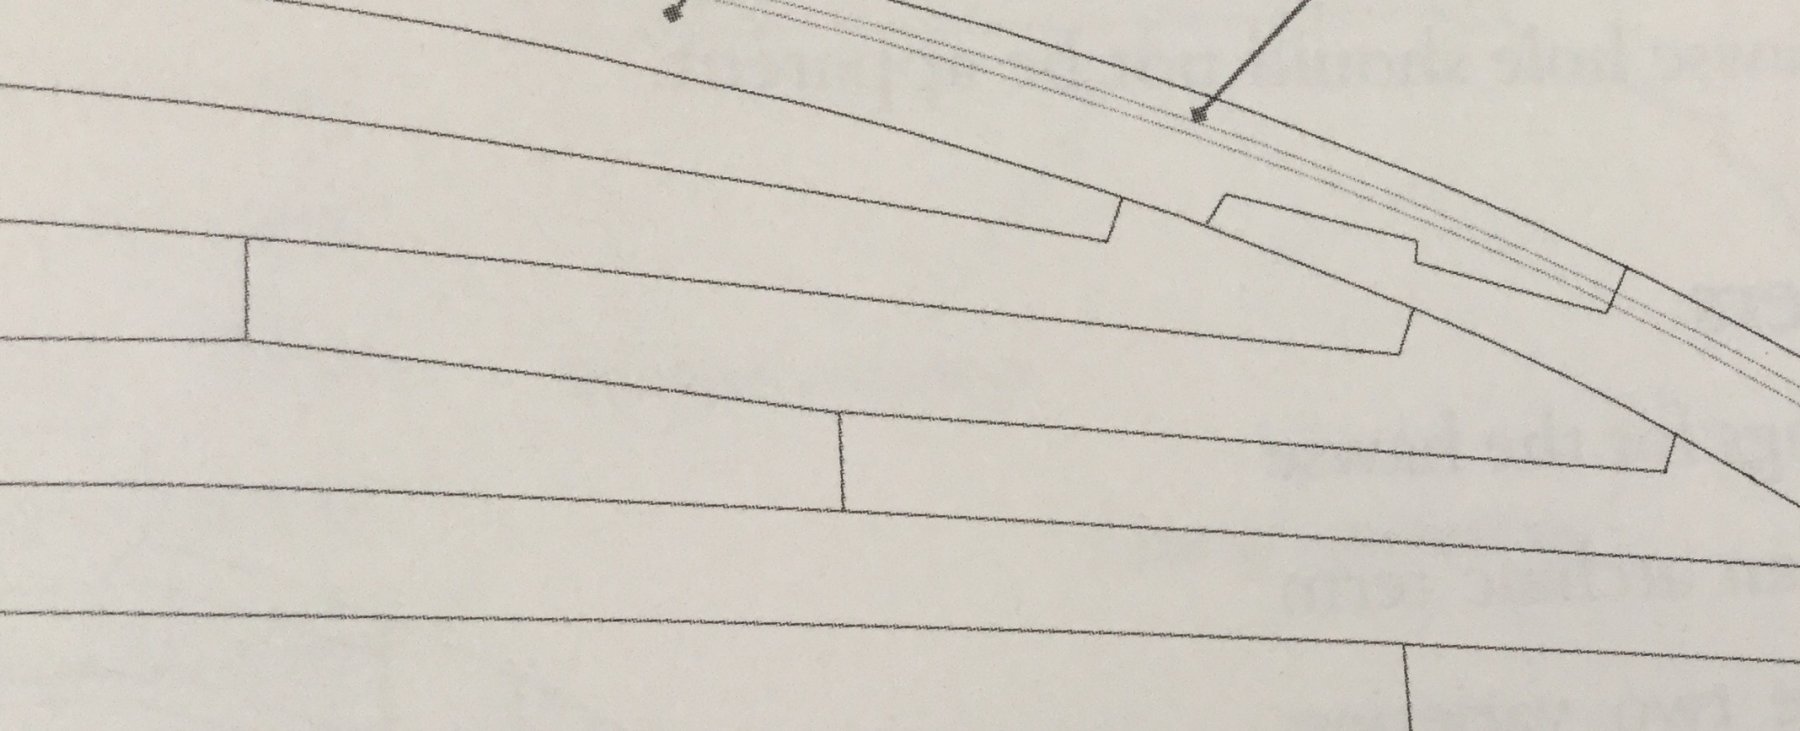
I've done a bit more but no photos yet. I've cut the rabbet and glued the Bulkheads and lower mdf deck to the keel. I'm now thinking ahead about the decking... I checked the FFM vol 1 (revised) book, and there is a 1:48 drawings on pages 268 showing a centre plank and 14 planks each side (at midship) then the waterway. These 14 planks measure 69mm so therefore converted to full size gives me 69 / 14 x 48 = 236.5mm ( 9.3" ) sized planks so reduced to 1:64 = 236.5 / 64 = 3.7mm. The supplied decking is 3mm wide so is way out of scale (7.55"). I haven't bought the plans and cd that they mention (£175 ) in the FFM books so cannot confirm the sizes I have come up with. I have ordered some 3.4 & 4.5mm boxwood, mainly to compare quality with the supplied 3mm Tanganyika and to see why everyone on here rates it highly. I'm thinking the 3.4 would be closer to scale?? I would appreciate your thoughts on my figures and choice of material? Just realised I was looking at the drawing of the lower deck which is mostly hidden. Now looking at gun deck on page 76 vol 2 (revised) and found centre plank and 11 varying sized planks to waterway. Applying the same calculations as above the planks average 69 / 11 x 48 = 301 (11.85") so reduced to 1:64 would give 301 / 64 = 4.7mm so 4.5mm would be closer to scale.
-
Thanks SpyGlass and Mike. I was going to remove the screws until needed so I didn't catch on them but I like your idea of a temporary shorter one with saw cut. I have some 3mm studding on order so I will cut to length when I know what pedestals and board I'm using. I'm getting 2 metres which should be enough for this one and all my future builds . , I may make my own wooden pedestals and base but do any of you guys know a good, preferably UK, supplier of ready made ones. I've looked at the Amati ones, are these ok? I reckon about 400mm long would look ok for this one, what do you think?
-
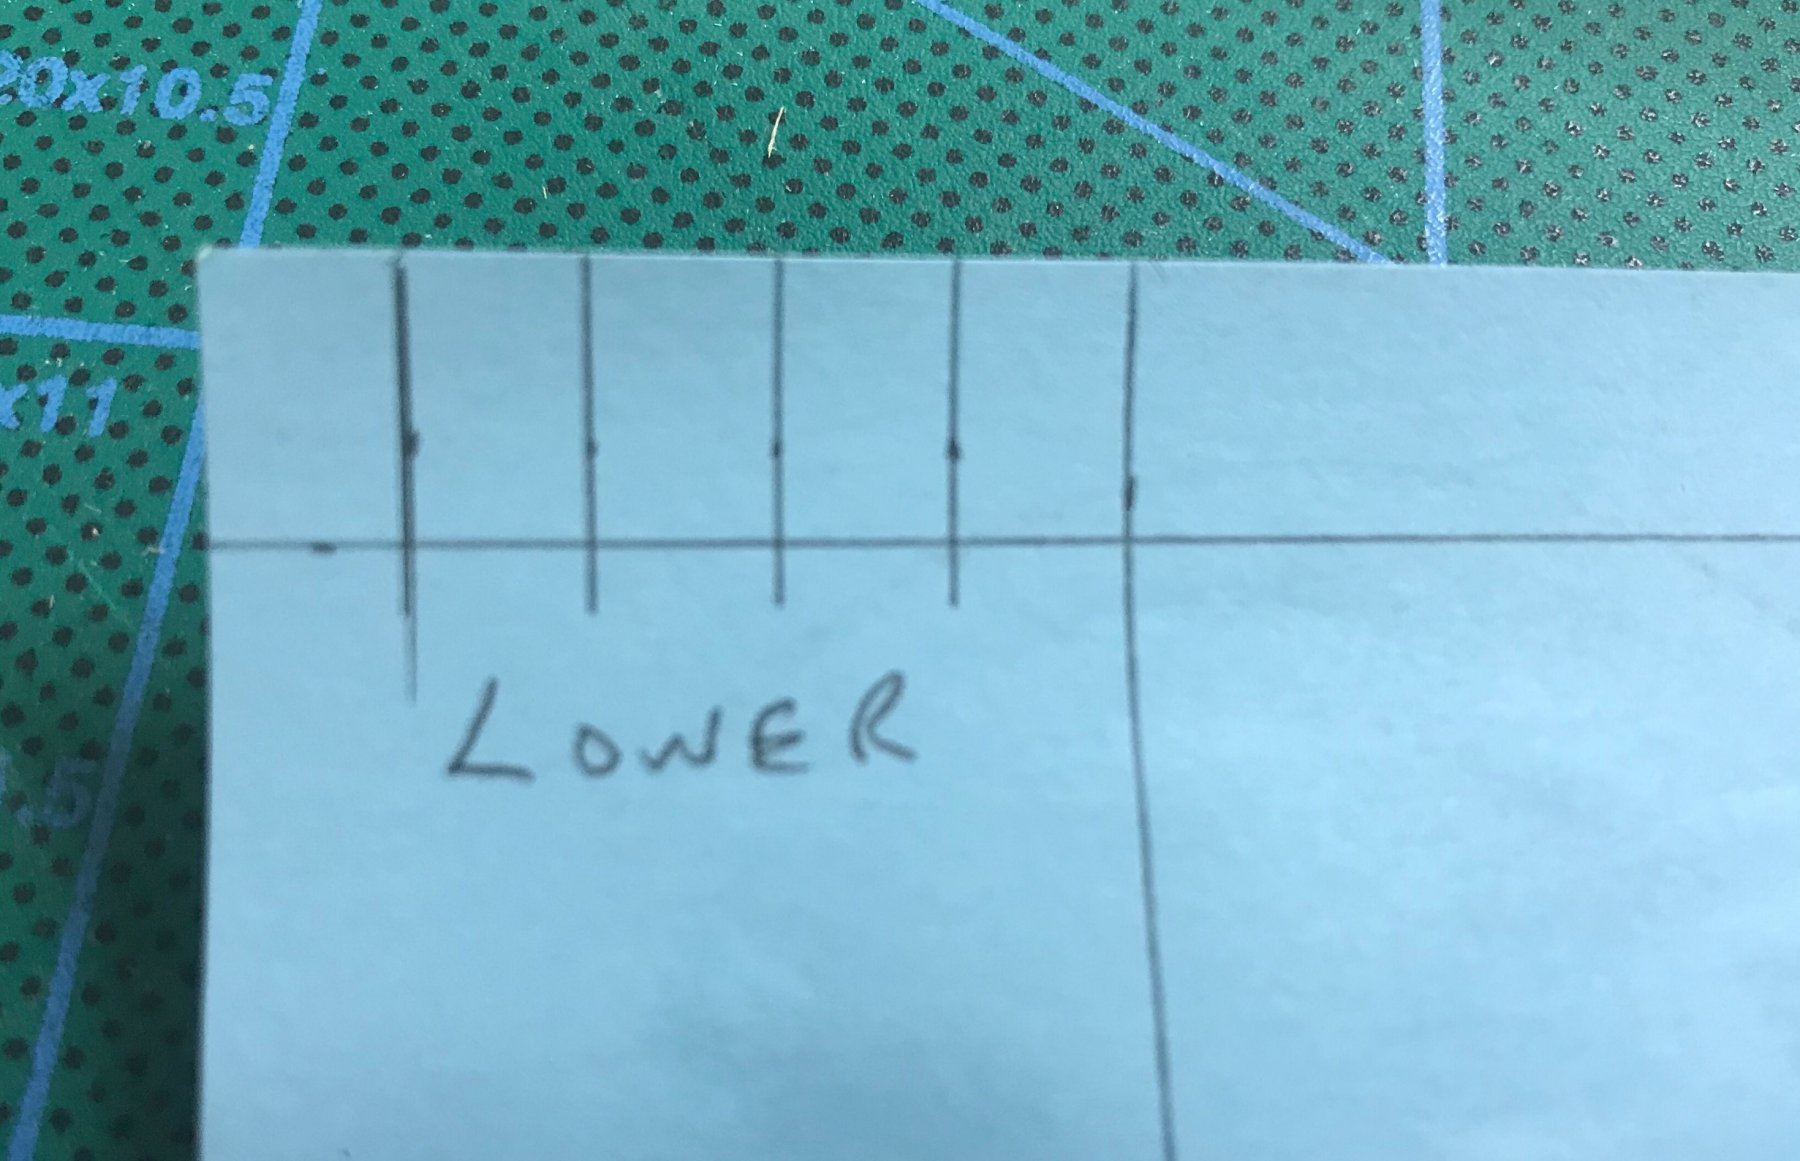
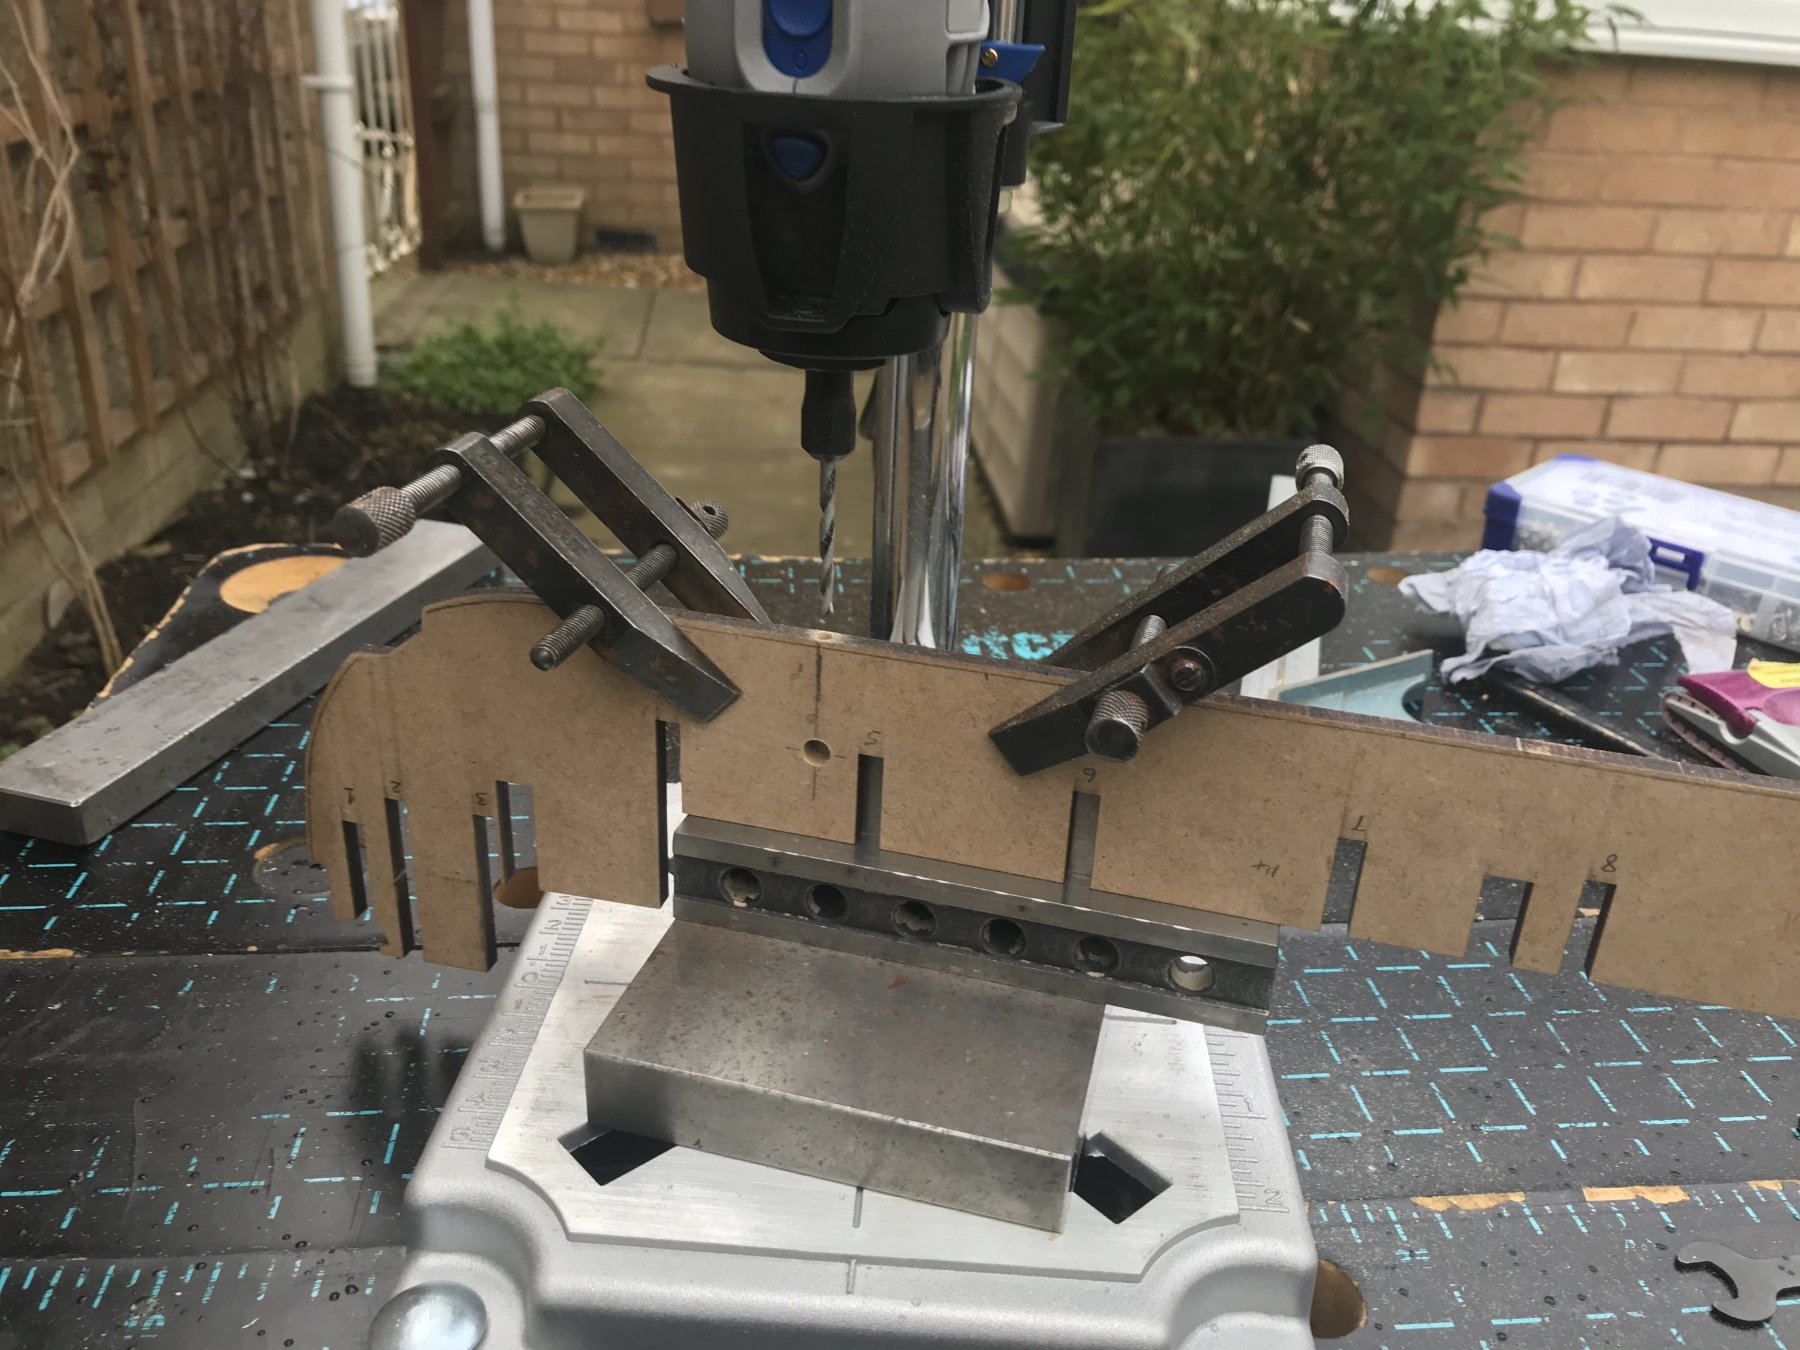
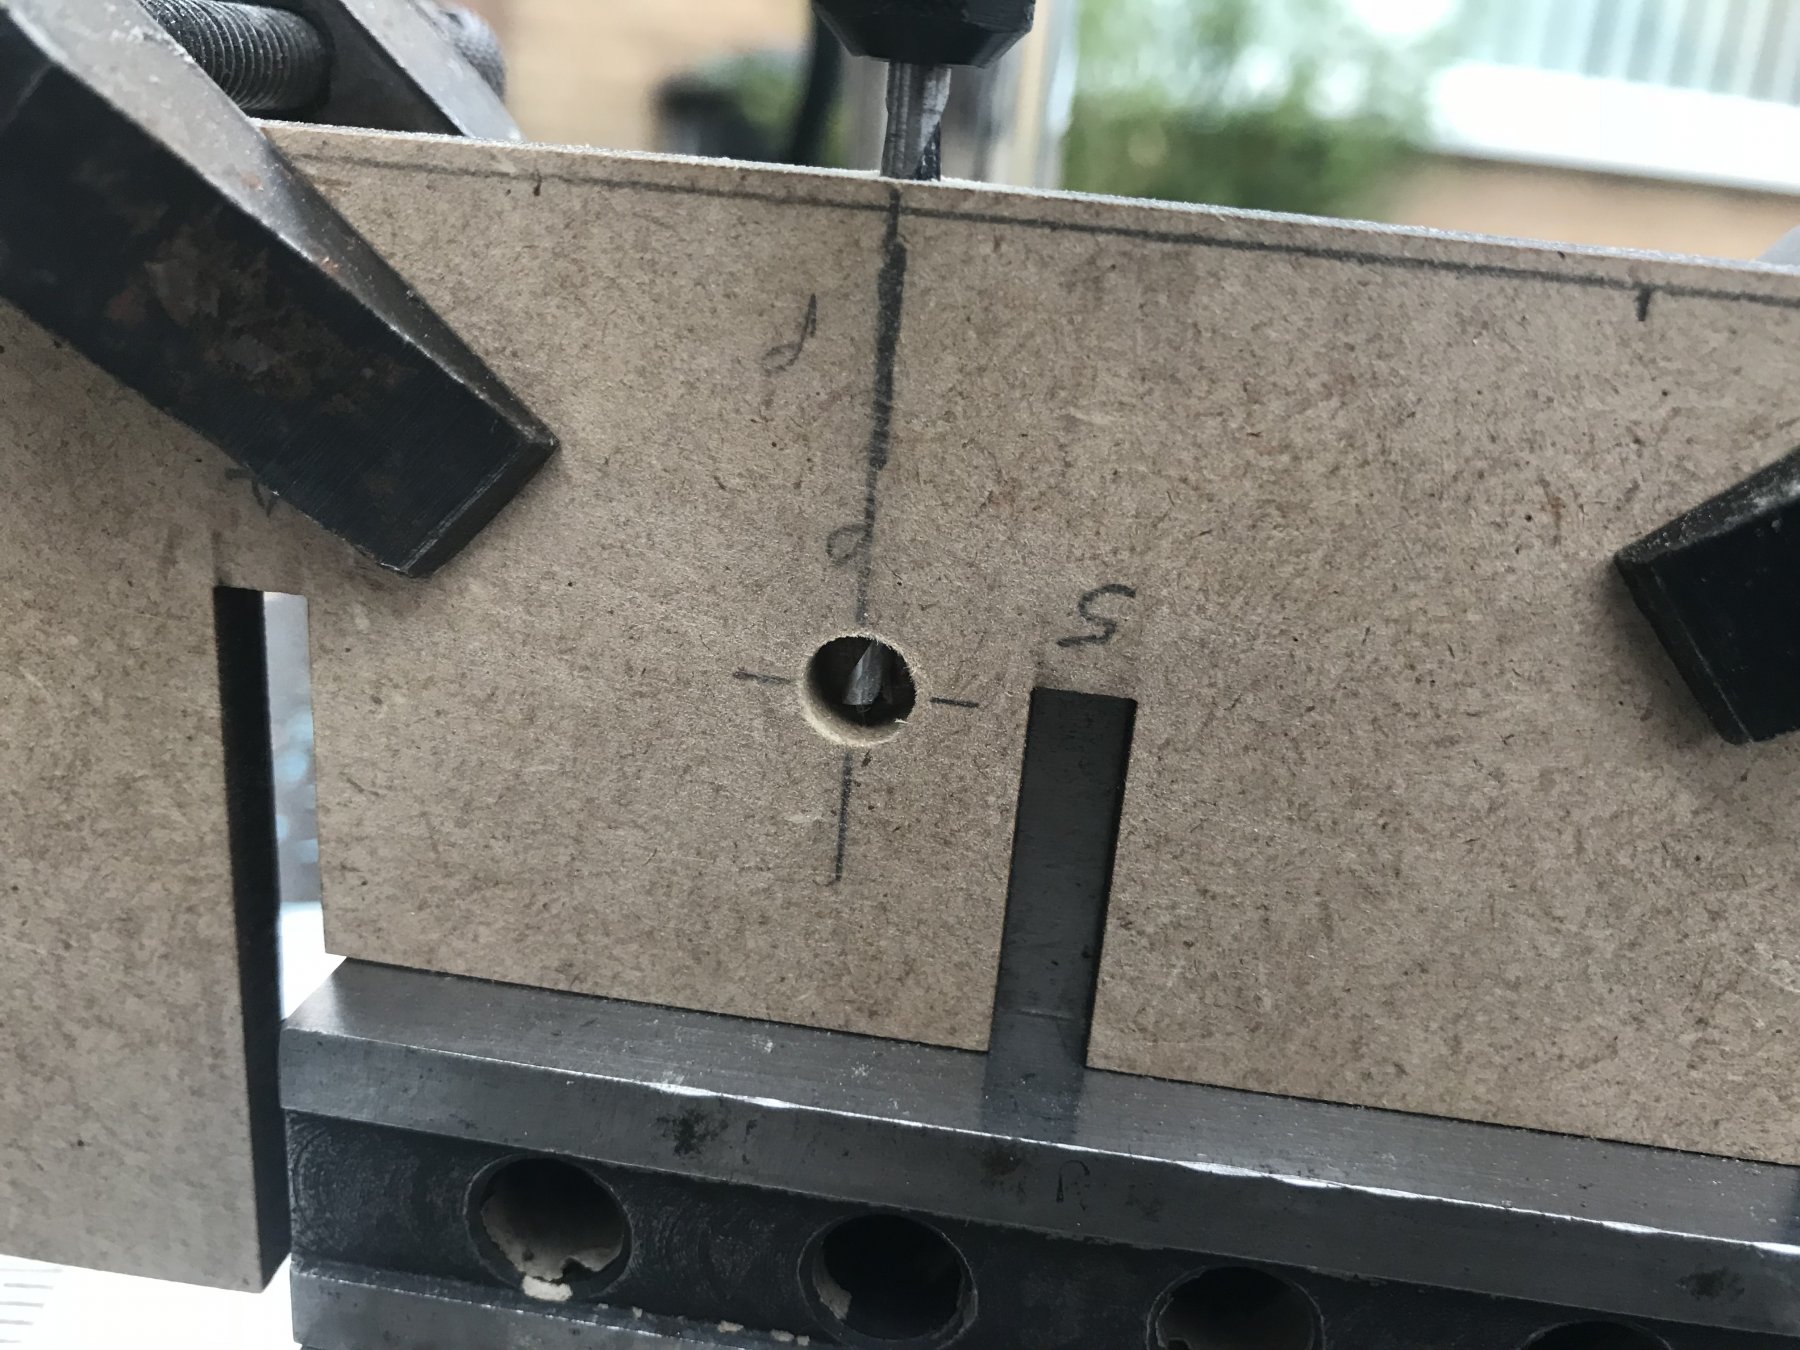
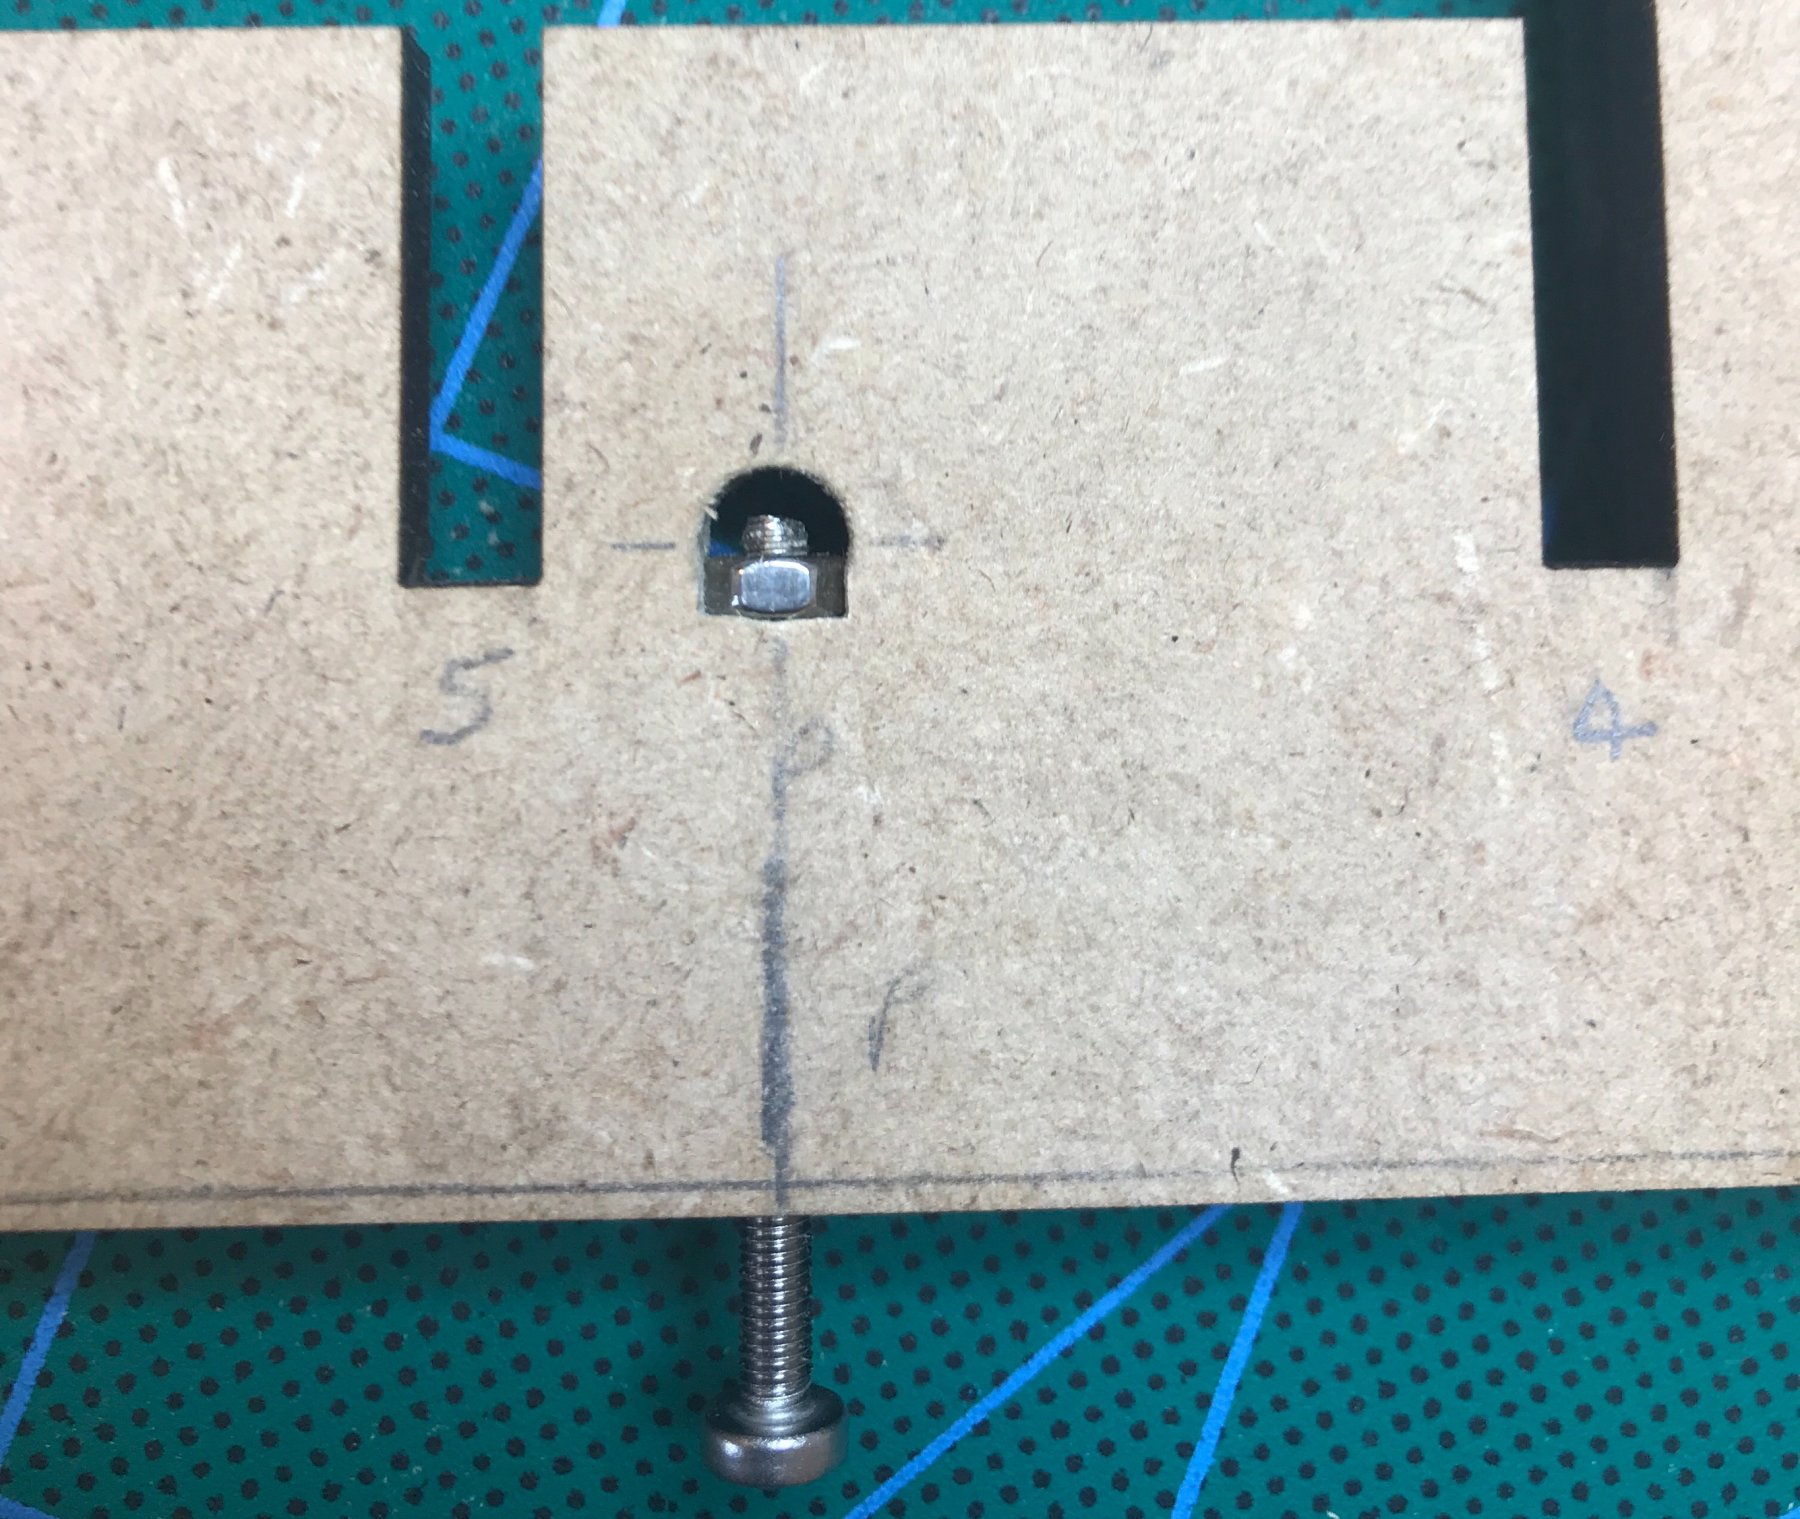
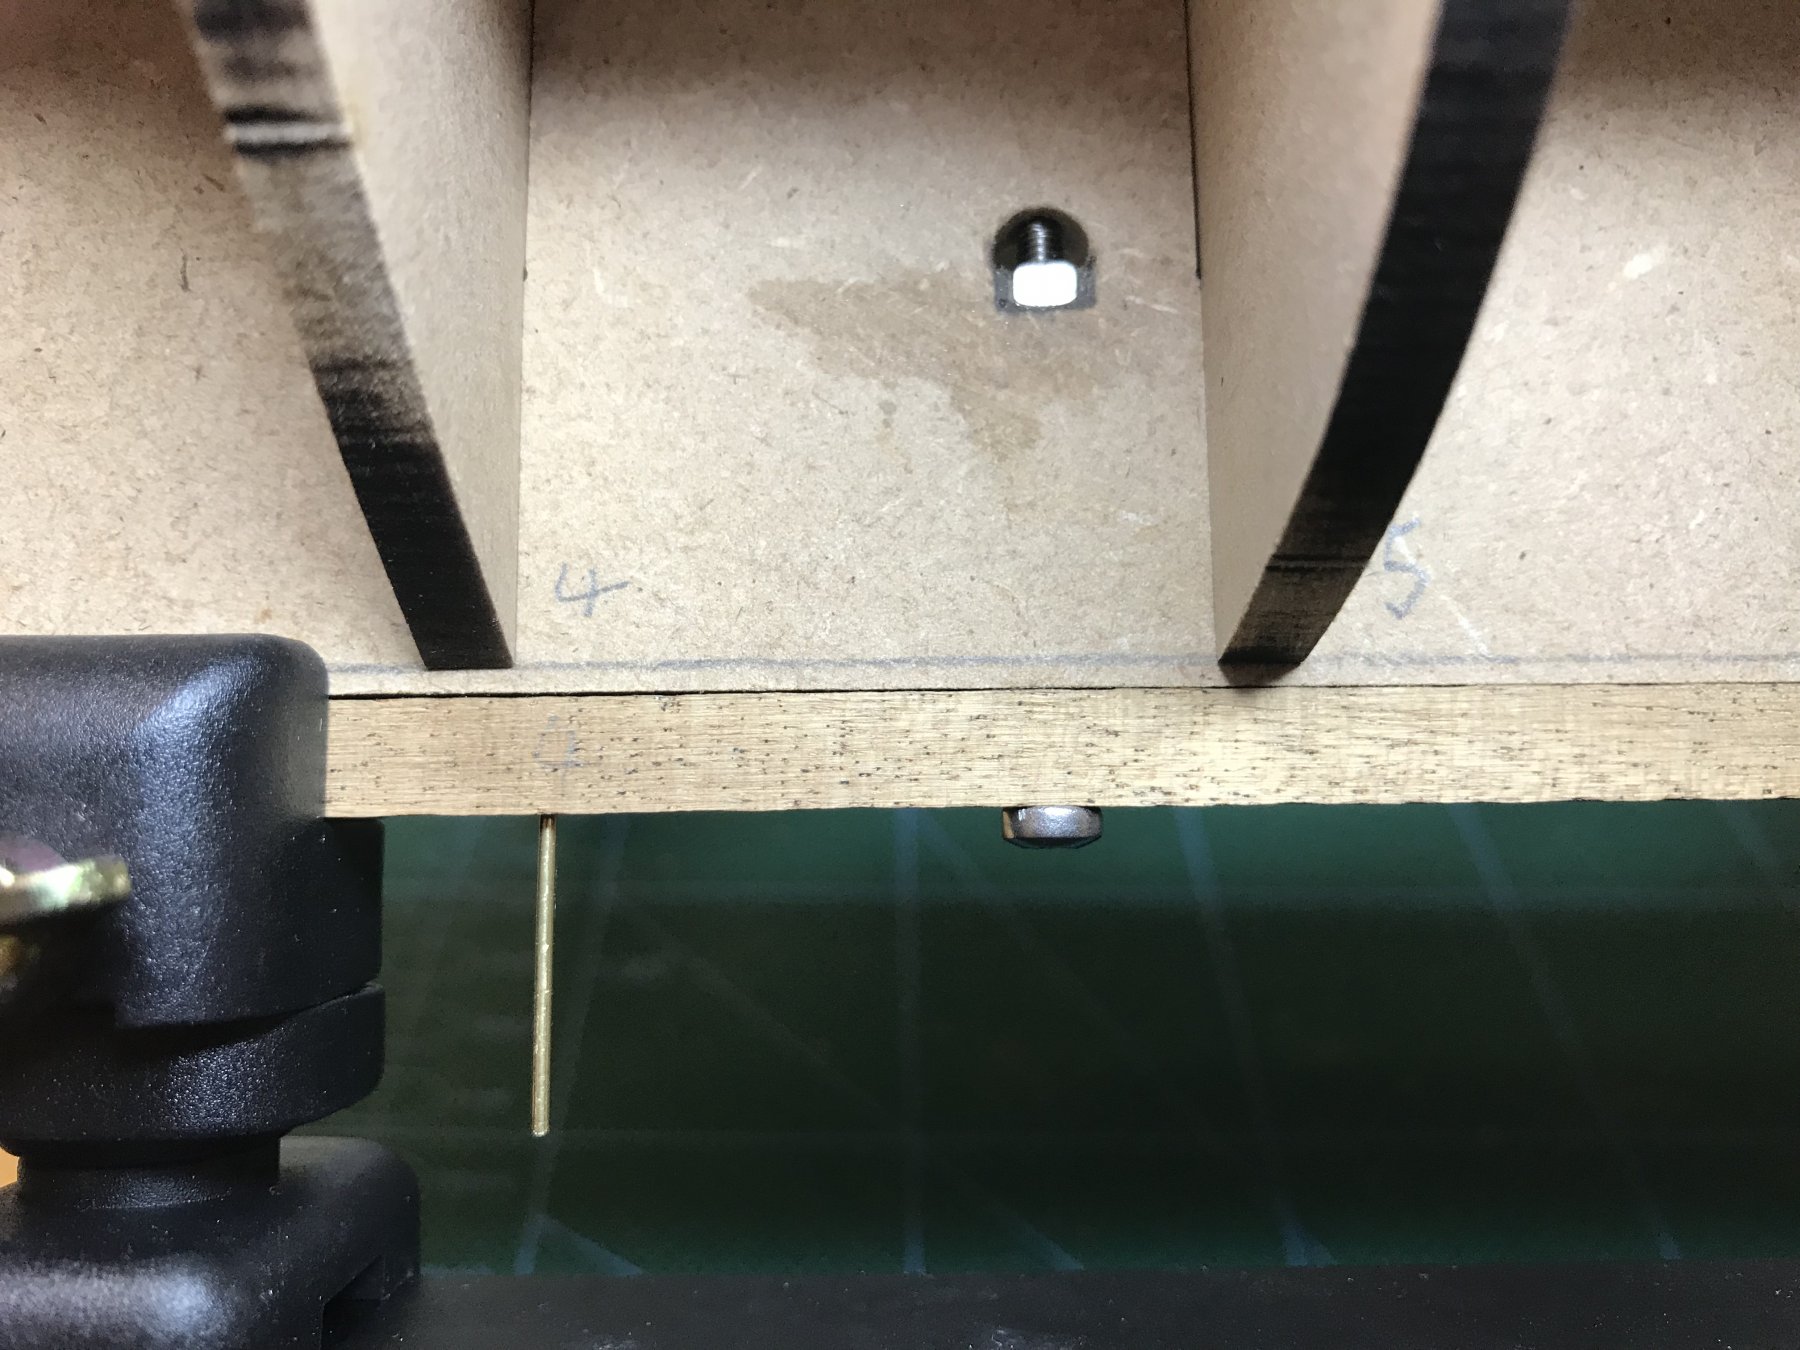
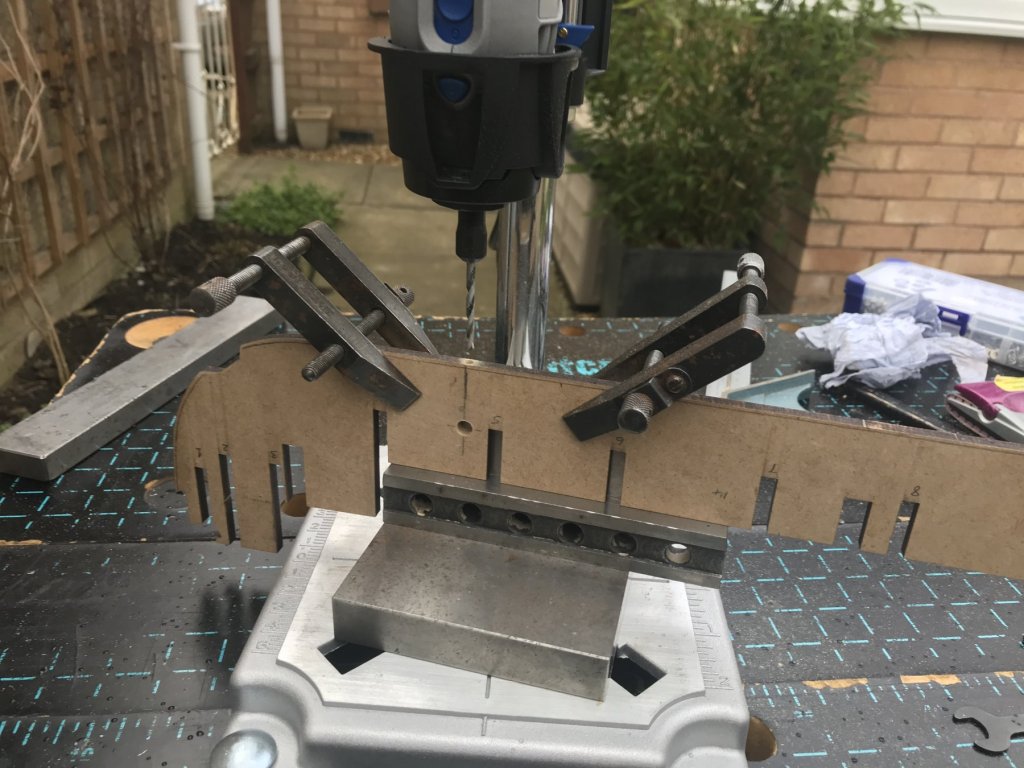
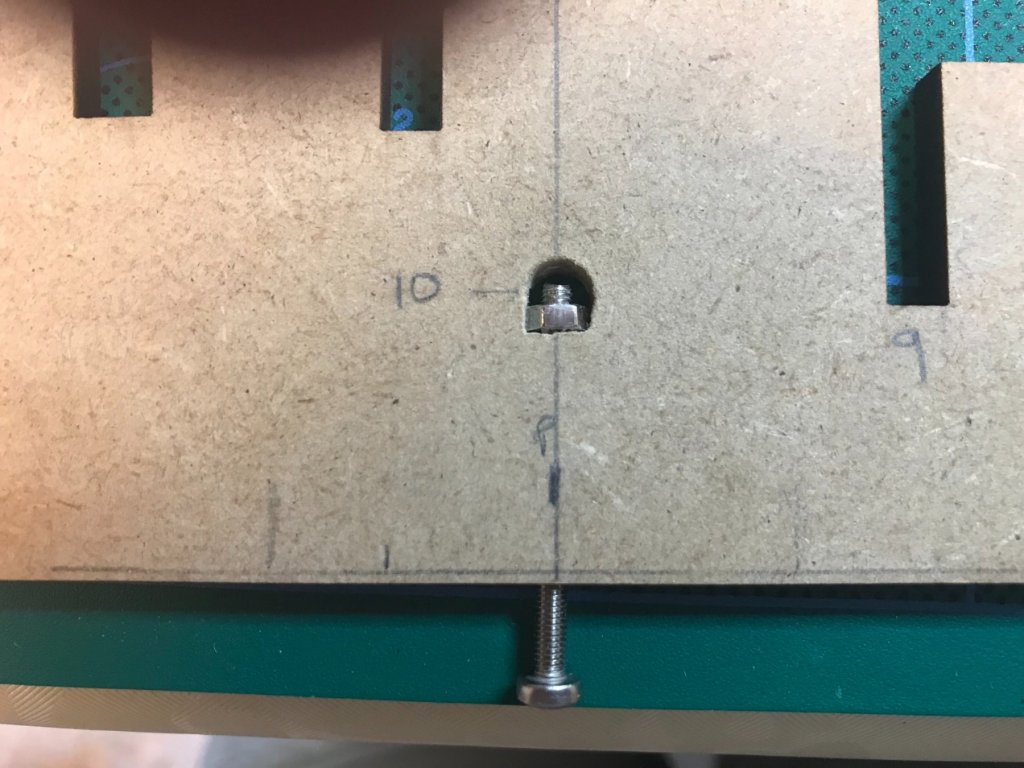
Just a tiny bit of progress… Before I start, nothing is glued except my nuts (all will become clear later ). I mentioned last time that my workshop is half the kitchen table, as long as I’m not creating sawdust (which is one of the Admiral’s rules). Anyway I now need to create sawdust so I had to go outside. Outside!!... well the reason I had to go outside is our only spare room is the computer room and our garage is full of junk, sorry I mean really useful stuff that we are bound to need some day . So here we are outside in the garden with my quickly assembled mobile workshop. Like others, I am drilling for the captive nuts, which will be used for screwing to a display stand through 2 pedestals. The drill press is my new Dremel power tool and new Dremel workstand/drill press. The angle plate is one I made during my apprenticeship nearly 50 years ago and is hardened, ground and cock-on square, inside, outside and edgewise. A bit overkill for this task... but why not. The drill is 3.2mm for 3mm studding Notice the spots of rain… Grrrrr That was lucky it hit the hole. Both filed out and ready for the nuts to be glued I then went inside (other workshop) and decided to pin the keel strips and rudder post before cutting the rabbet to help re-location after completion of the 1st planking. I used 1mm brass wire which is all I had and, although a bit small, it should do the job. The nuts were then glued in with 5 min epoxy. The screw thread was dipped in Vaseline and turned every few minutes to keep it from being glued as well. I will glue some scrap plywood either side to fully captivate the nuts later. I was going to cut the rabbet but it’s getting dark… Grrrrr and the mobile workshop will have to be dismantled and put away… Grrrr Seriously though, I need to sort myself out a workshop space in the Garage so tomorrow some of the “useful stuff” is definitely going… watch this space…


-
Re dog house Drive, I see where your coming from now Denis. Can't wait to see what you come up with
- 378 replies
-
- 5
-
-
- t78 norden
- billing boats
- (and 1 more)
-
Yes the laser char does it for me and the doweling is a good idea. The pictures say it all. Thank you SpyGlass.
-
Good progress Denis and looking great. I think you may have missed my previous post on the previous page (differential gearbox & gill net winch side bracket). Unless you have other ideas for driving the winch shafts from the Dog House that you mentioned? I like your method of attaching the aft mast by the way. I think I'll get a tin of the green stuff to get me going at your speed.
- 378 replies
-
- 4
-
-
- t78 norden
- billing boats
- (and 1 more)
-
Thanks SpyGlass. All good advice. Some of it I've read in yours and other builds and plan to do. I think I will revisit the fairing (pre gluing the BHs) using a heavy stock strip as you suggest. I've seen your Peg picture and see what you mean. Regarding the walnut prow, I stand corrected (rabbet not thin) when I said thin I didn't mean fair but I meant thin equally leaving a sharp defined rabbet edge for the 2nd planking, if that makes sense. Either way it won't be glued in until 1st planking is complete and sanded as I don't want to damage it. I've not forgotten your previous good advice about sorting the pedestal mounting out before pre gluing the BHs. I was thinking of drilling for 3mm studding/screw and using the captive nut method that you and others have used. I noticed you used #5 gauge screws which is about 3mm. I've been looking at the Amati brass & wood pedestals but can't decide but that's a long way off. Will also check the mast holes. In fact before I do any work I will alway dry fit other affected parts and try to think "many moves" ahead, a bit like chess I suppose. Thanks Jefta for following and welcome aboard. Appreciate all the likes also so thank you.
-
Just a couple of thoughts on what you have done. If you watch the video again I sure that the gill net winch fixed brackets are an upturned "L" shape, the same as the kit. They are attached to one side frame only. If you imagine that you've retrieved half the net and fish and you get a jam up, you would want to pull the net out from the side, sort the problem out, then slide the net sideways back between the spools. On the winch spindle I think the centre part I have indicated is crudely supposed to represent a differential gear box (like on a car) to make the outer spools turn in the same direction. Looking really good Denis

- 378 replies
-
- 5
-
-
- t78 norden
- billing boats
- (and 1 more)
-
Thanks Lou I was thinking about it and I may do some time in the future but I've got my focus on another build now. Not ruled it out though. Beside I want to see how Denis does it first
- 378 replies
-
- 6
-
-
- t78 norden
- billing boats
- (and 1 more)

.jpg.b5f654df02a7e40b5b7887c05ffbad57.jpg)