HOLIDAY DONATION DRIVE - SUPPORT MSW - DO YOUR PART TO KEEP THIS GREAT FORUM GOING! (Only 13 donations so far - C'mon guys!)
×


Johnnyreg
-
Posts
178 -
Joined
-
Last visited
Content Type
Profiles
Forums
Gallery
Events
Everything posted by Johnnyreg
-
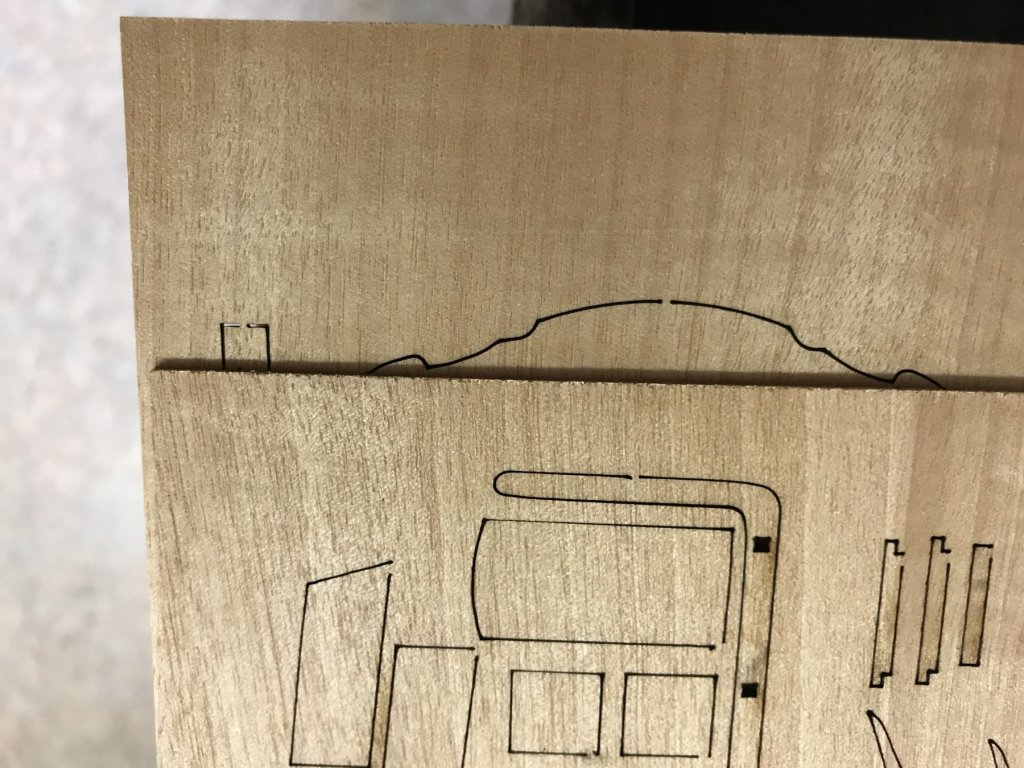
 Thanks Denis. Yes I knew the camber was normal I just thought I would show others what it should look like. No the deck isn't faulty and SpyGlass has confirmed it's not the rubbish stuff. I very pleased with the quality so far.
 -
Hi Oliver Thanks for dropping by. I also have Ship Modelling Simplified and It's an excellent book. These 2 books are not cheap, especially if you live in the UK. They were $70 EACH plus $30 EACH to ship to the UK as Seawatch didn't combine shipping costs. I've only had chance to have a quick browse through them but they are all about scratch building a Sloop type ship in the same way the original ships were built in the 1700s. There is hell of a lot of detailed information in them. I will have a look at the other 2 books you mentioned. Thank you.
-
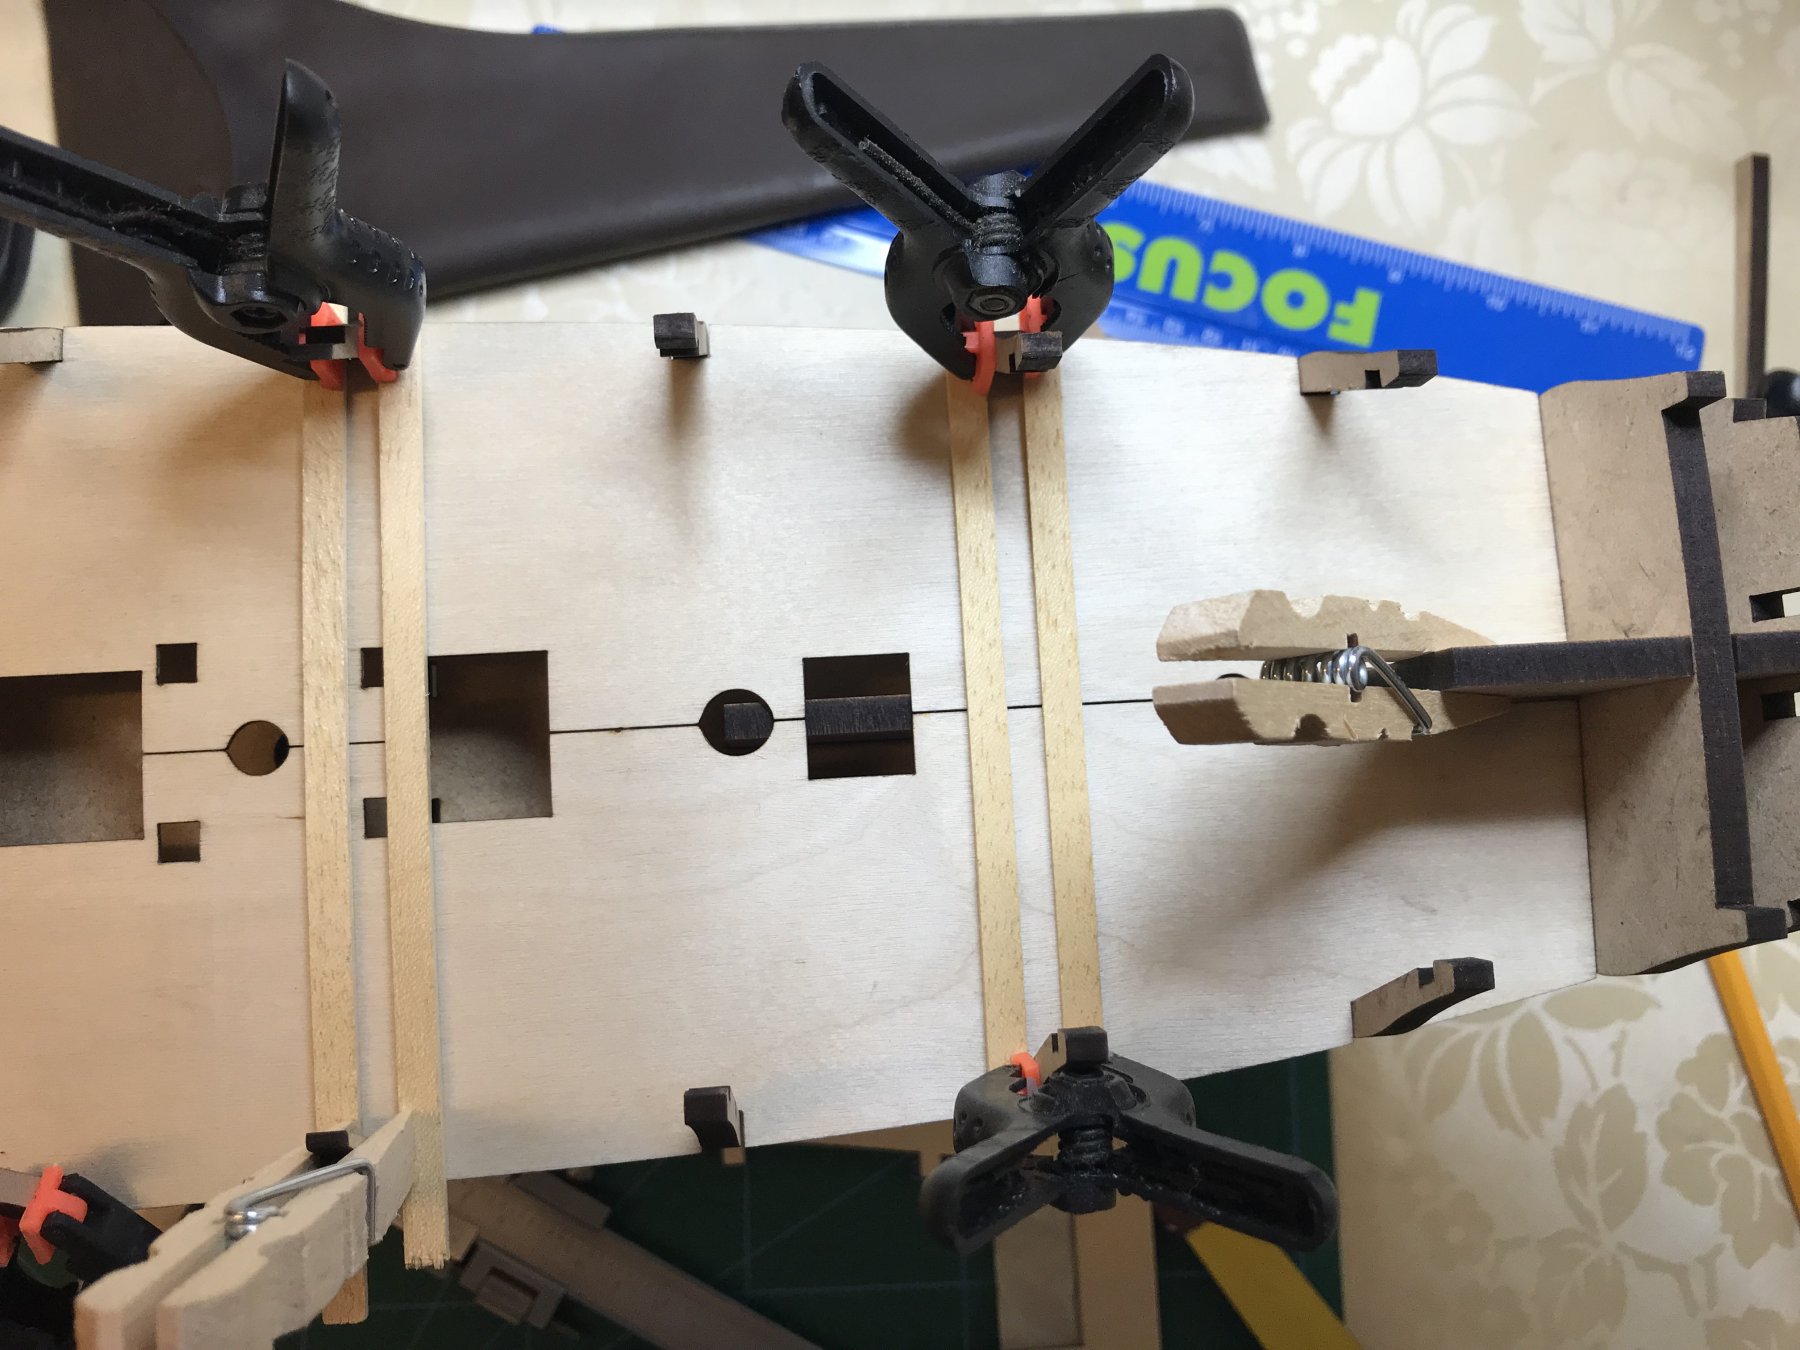
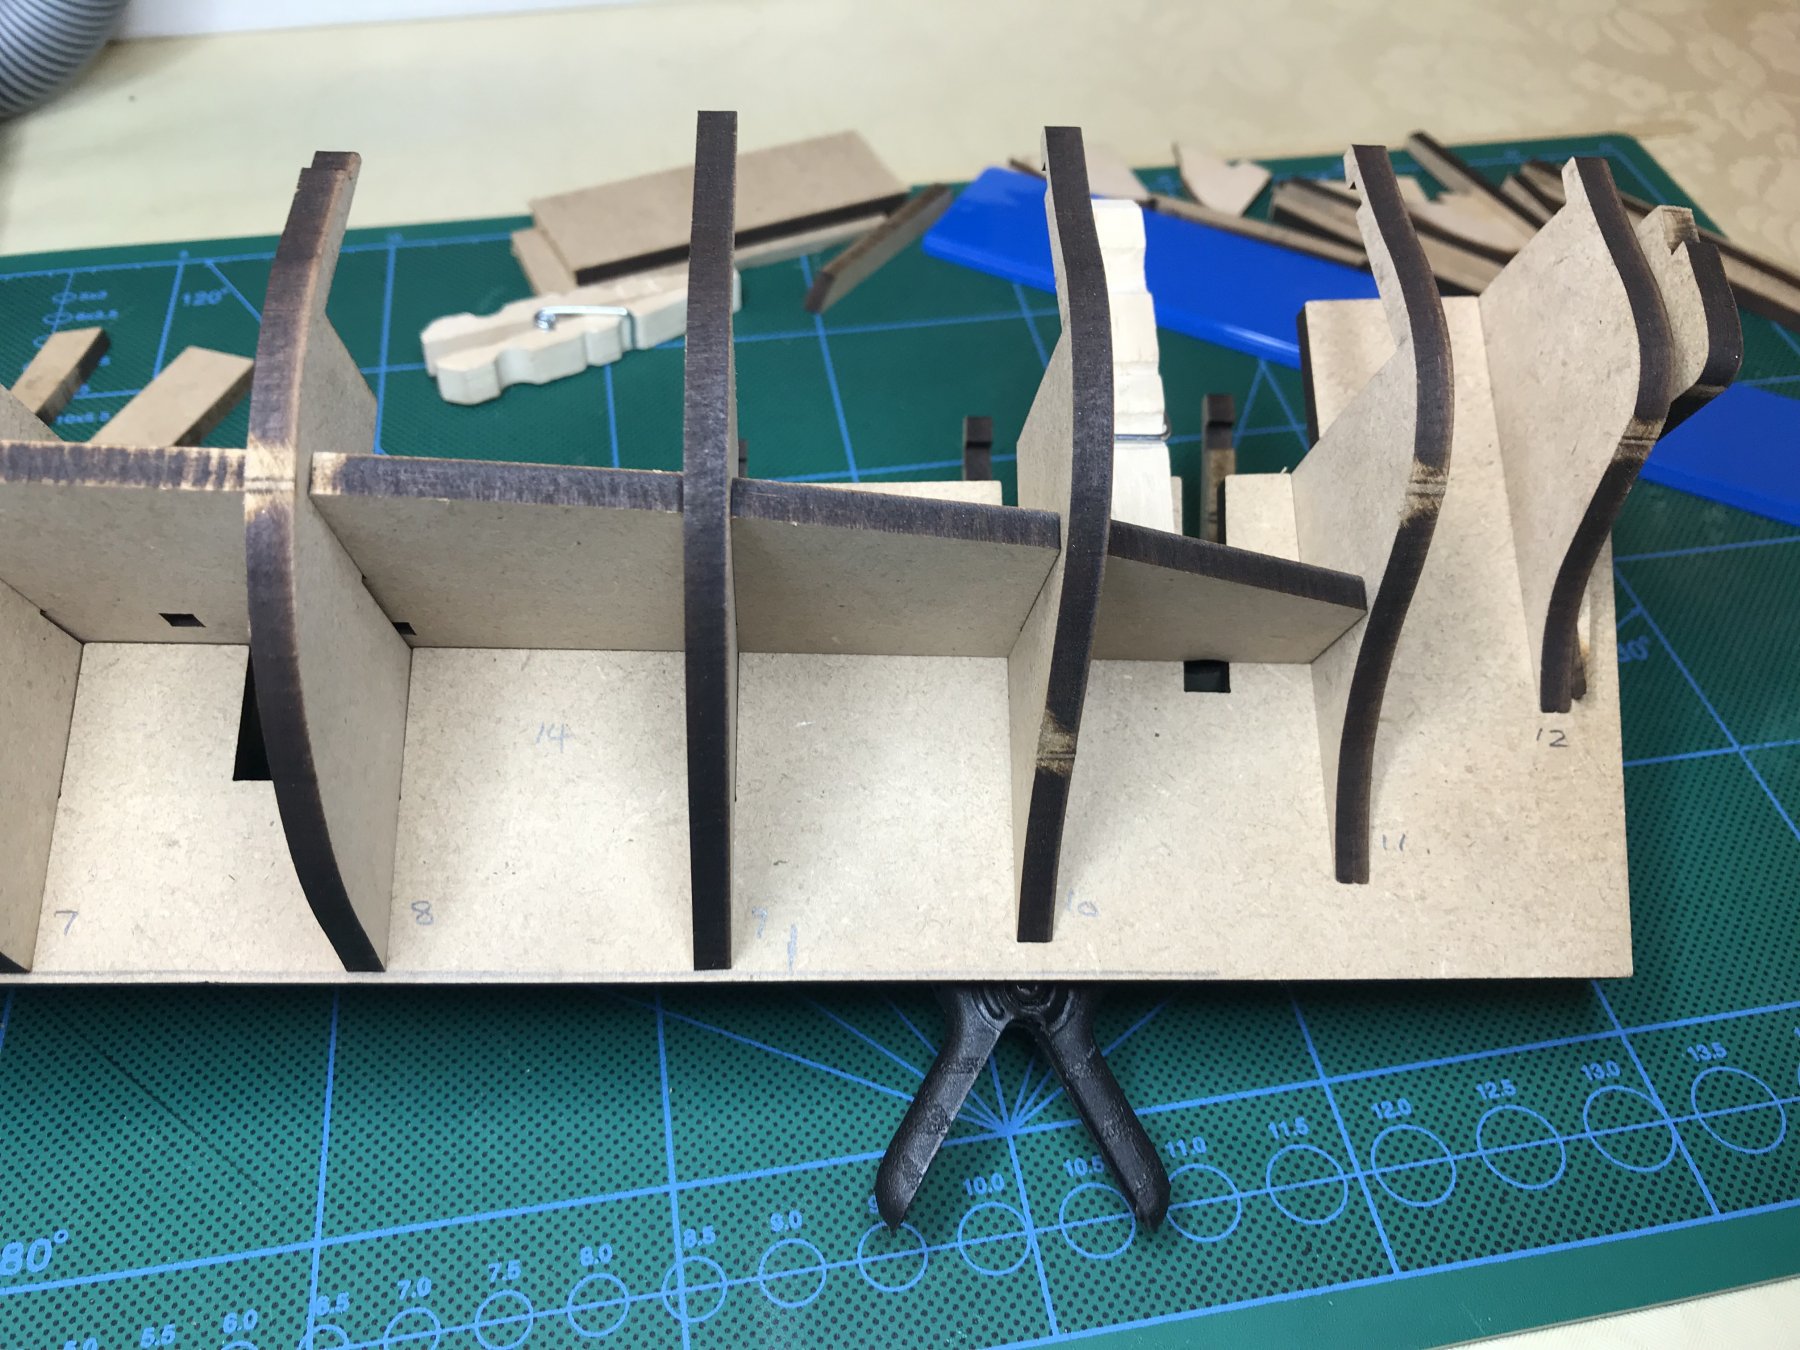
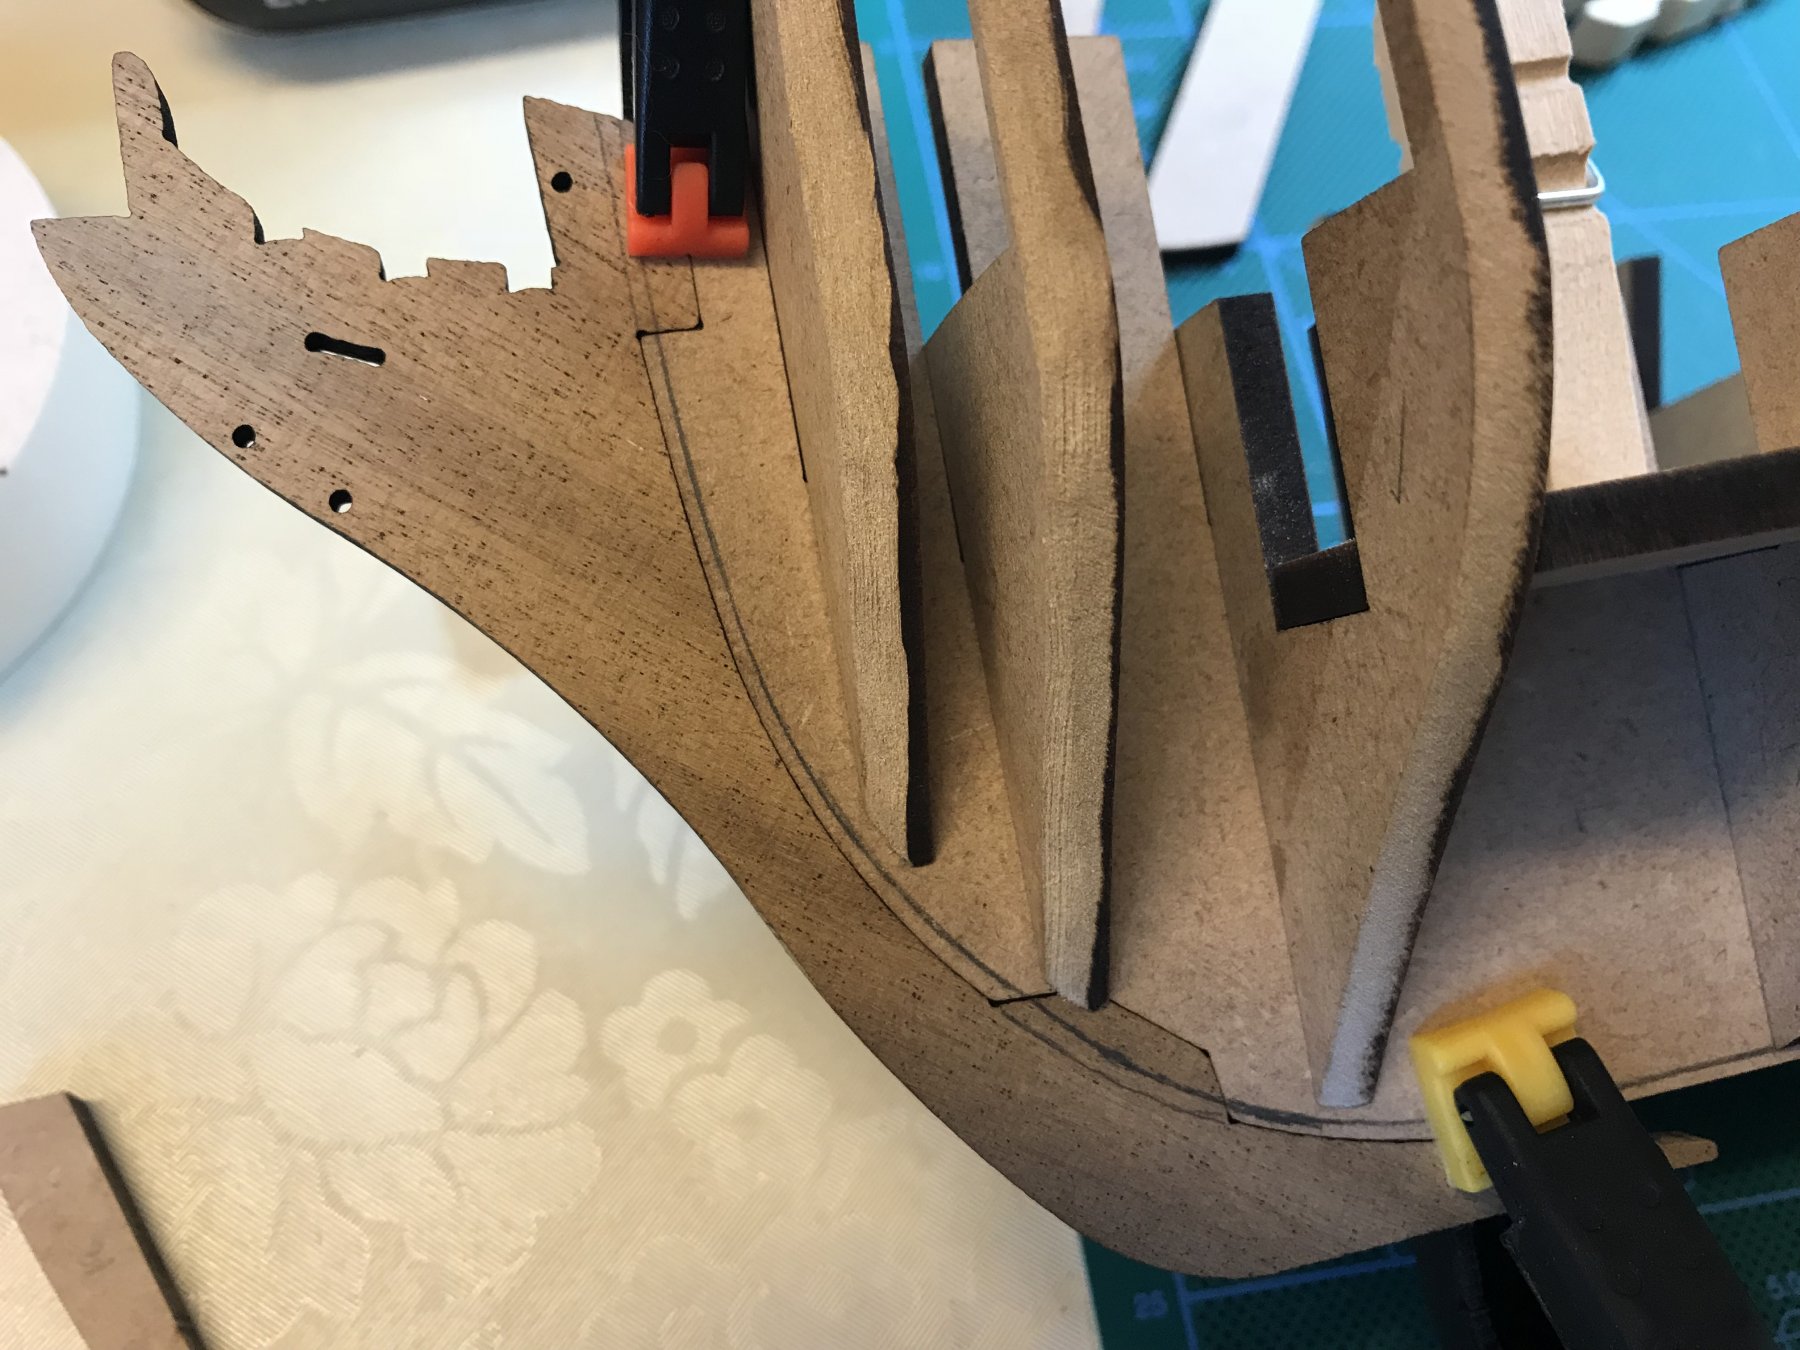
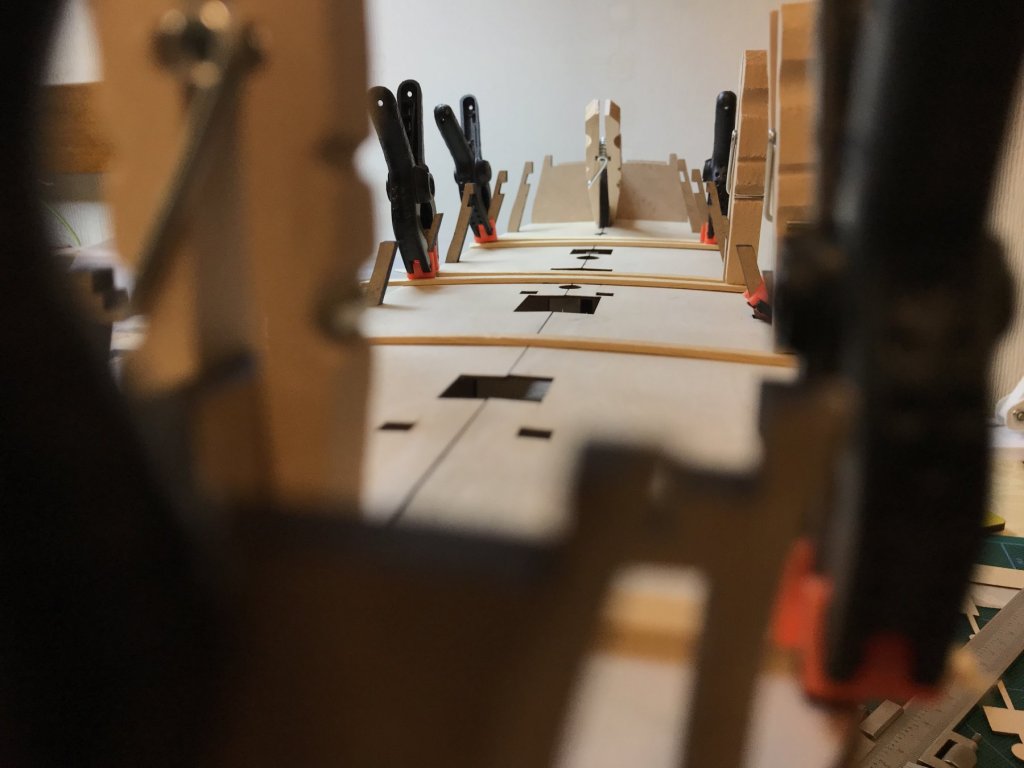
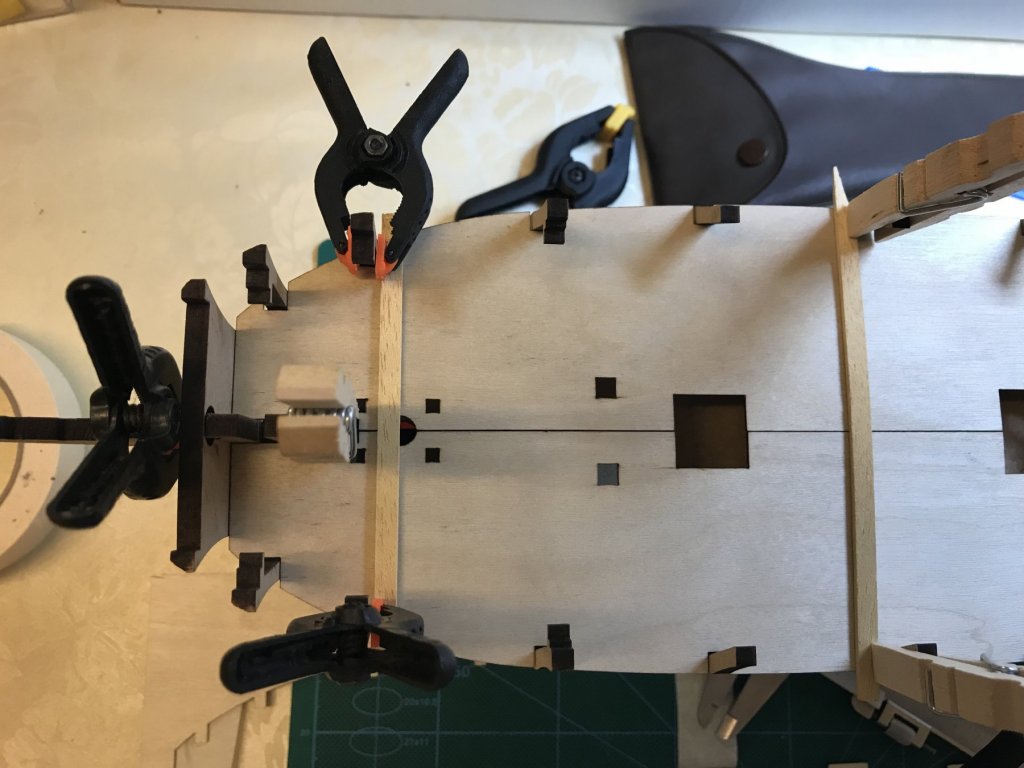
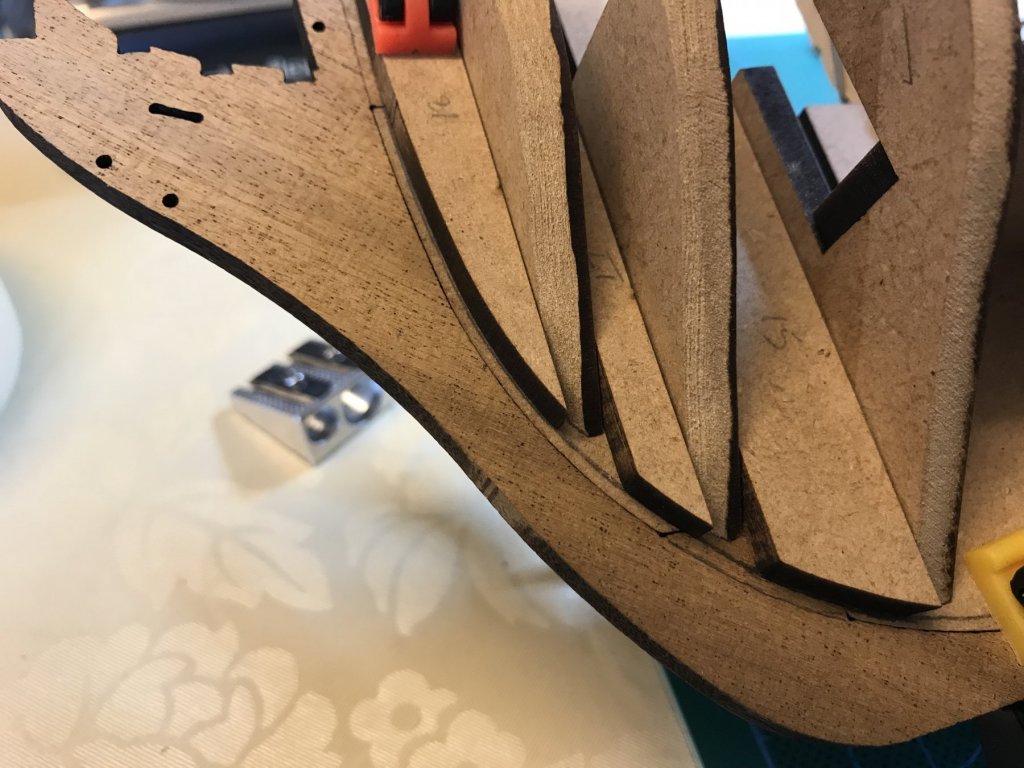
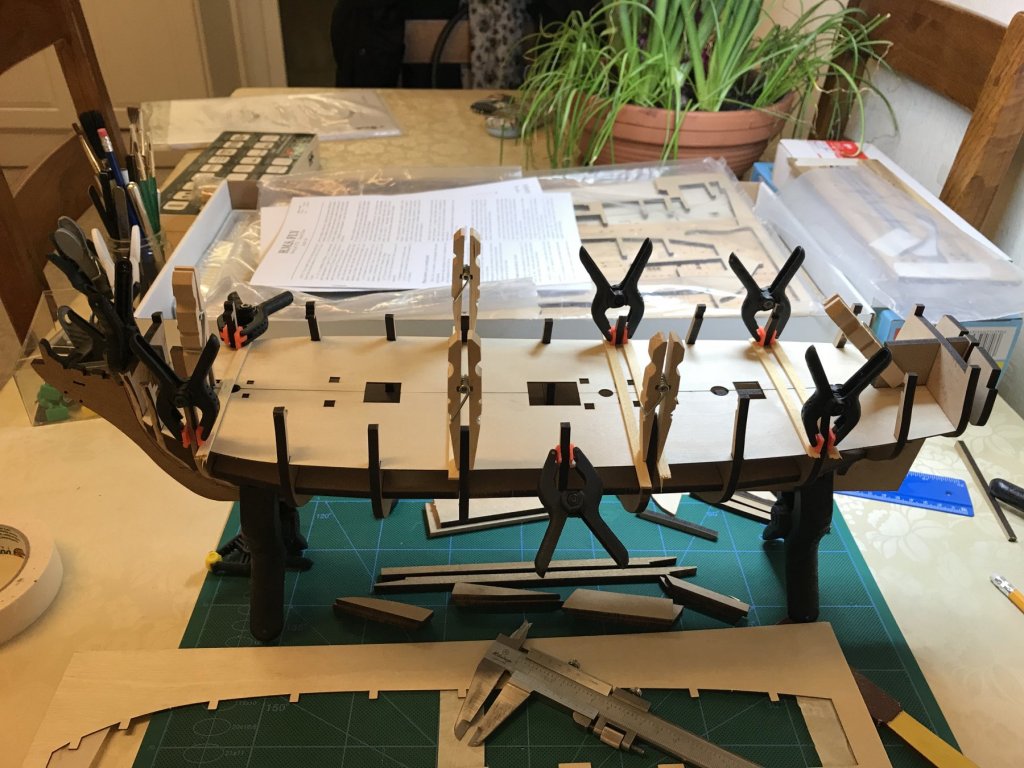
I’ve now got my new Dremel so there’s no excuse for me to linger any longer. I started by roughly fairing bulkheads 1, 2 & 3 Here’s the same view but with the infill pieces 15, 17 & 18, which I will fair back and glue once the bulkheads have been glued. As others have done, I will insert balsa blocks between these 3 bulkheads, and also the 3 at the stern, to give more gluing area around the bends and also to maintain hull shape better. I’ve also drawn the rabbet line, which is for the second planking only. For the first planking, I will taper the edges and ends of the planks where they meet the keel face as they won’t be seen anyway (thanks for the suggestion SpyGlass) I will cut the rabbet groove as shown above and extend it sternwards as far as the pencil mark shown (near bulkhead 9). The stern area of the keel will only be faired down to 3mm after the 1st planking is complete and then blended into the rabbet cut-out. Notice I haven’t rough faired the stern bulkheads as I don’t want to get the angle wrong as some others have. I will have more idea once I get to dry fitting the dreaded gun strip and the stern counter bits. I’m also leaving the thinning of the walnut prow tongue (above) until after first planking. I’ve dry fitted the gun deck to get a feel for it and it fits quite well. I also noticed it keys the bulkheads in better than with just the 5mm mdf deck (not as much wobbling) so I will probably dry fit the gun deck during the gluing of the bulkheads step Notice the deck curvature. That’s where I am for now. I may go quiet for a while as these have just landed. There big heavy books but really good quality. Only took a week to arrive in the UK which is good. I only wish there was a Kindle/pdf version so I could take them everywhere with me. This half of our kitchen table is my workshop by the way, as long as I’m not creating sawdust. Sometimes it’s more than half but the Admiral kindly lets me know when that happens.


-
Thanks Denis. You won't be able to sleep tonight with all these options to think about but i guess that's what floats your boat (see what i did there)
- 378 replies
-
- 4
-

-
- t78 norden
- billing boats
- (and 1 more)
-
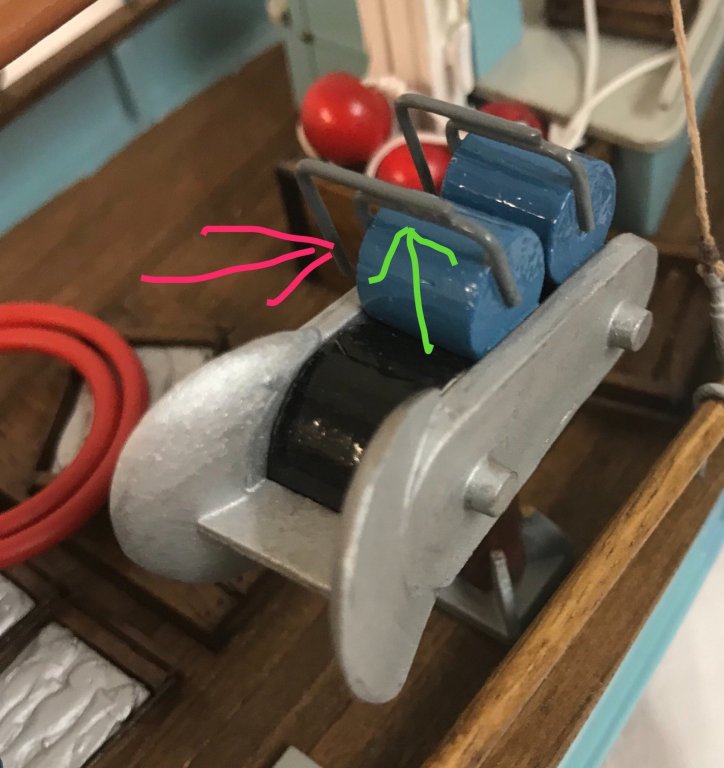
Hi Imagna - yes that's exactly what I wanted Denis to see. The fish and the nets (gill nets I think) go between the rollers, under their own weight as you noticed. I wish I'd seen this video before I built my Norden as it's highlighted a mistake I made on mine The 2 bits with the red arrow should be more vertical and, more importantly, should be attached to the silver side frame (mine aren't). The joint where the green arrow is where the rollers pivot or hang under their own weight. Denis will do it correctly I'm sure
- 378 replies
-
- 5
-
-
- t78 norden
- billing boats
- (and 1 more)
-
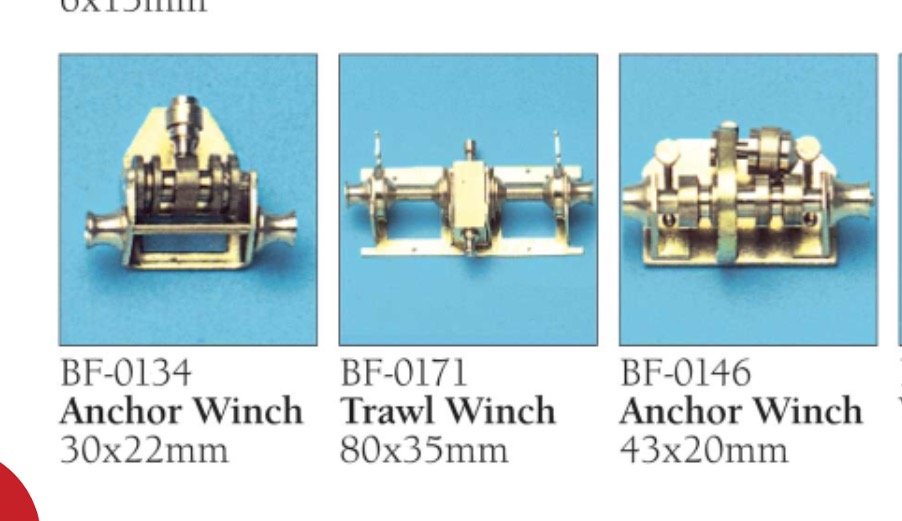
Just seen on the same Billings page a "Trawl Winch" which looks more like it. Please ignore my last few posts and big apologies. I'm still learning.
- 378 replies
-
- 4
-
-
- t78 norden
- billing boats
- (and 1 more)
-
I noticed in the last picture there is an anchor lying there that looks similar to our kit but not sure what sort of boat is depicted in this picture. I agree Denis with most of what you say but I'm just playing devil's advocate here. Maybe there should be hawse holes but the kit designer put notches in the bow top rail there instead to simplify the kit. I suppose the Anchor Windlass had to go near the engine for practical reasons, especially on an older boat design. I know the deck is cluttered but there may have been "Anchor Rope Guides" to divert the anchor rope around the forward structure. Even if none of this is correct and I'm way off the mark, and because the kit is a generic representation of a Danish Cutter of that era, maybe the kit designer just decided to stick an anchor windlass there on the kit for aesthetic reasons. I know very little about Danish fishing boats of that era and I have no idea what it is used for so will wait for someone more qualified to let us know.
- 378 replies
-
- 5
-
-
- t78 norden
- billing boats
- (and 1 more)
-
Great news on the Nordkap fittings Denis. Not sure what the kit includes, have you picture? I was looking on the Billing Boats official website for the Nordkap fittings but couldn't find them but while I was looking I saw a few fittings labelled "Anchor Winch" here which look very similar to the Norden boathouse winch. Do you think that's what they are? I also found these images on google image search. They are all labelled as Anchor Windlasses.


- 378 replies
-
- 4
-
-
- t78 norden
- billing boats
- (and 1 more)
-
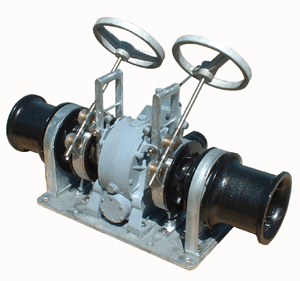
Some interesting videos there Samson. I wish I had seen these when I was building my Norden. Have you seen this one Denis? It's the nearest to our boats that I have seen and the only one with a boathouse winch that I have seen. Still don't know what this winch does though. If it was for lifting nets then shouldn't there be a swinging boom? Ive just realised that what I thought was the middle spool of the three could be the motor housing!! Doh! So therefore should be attached to the boathouse not central on the shaft like I have got it Doh! I wondered why the hole was a lot bigger than the shaft. Your decking looks really good by the way.
- 378 replies
-
- 5
-
-
- t78 norden
- billing boats
- (and 1 more)
-
Great news SpyGlass and thank you for confirming. Just spotted the pics and see what you mean about the matchstick look.
-
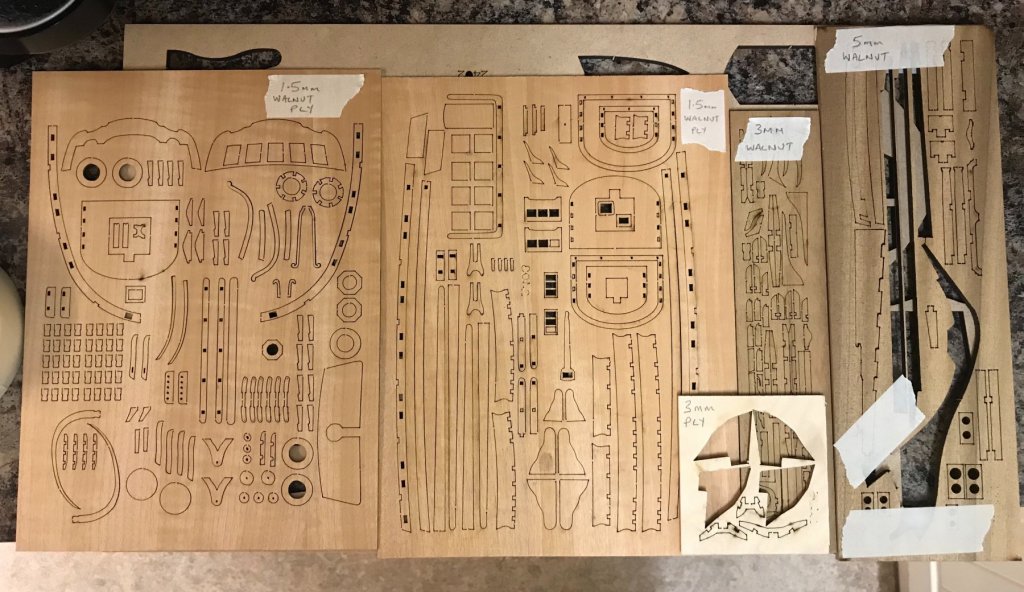
Thanks SpyGlass. Here are some close up pics showing both sides of the 1.5 walnut ply sheets. I've got everything crossed here hoping it's not the bad stuff.
-
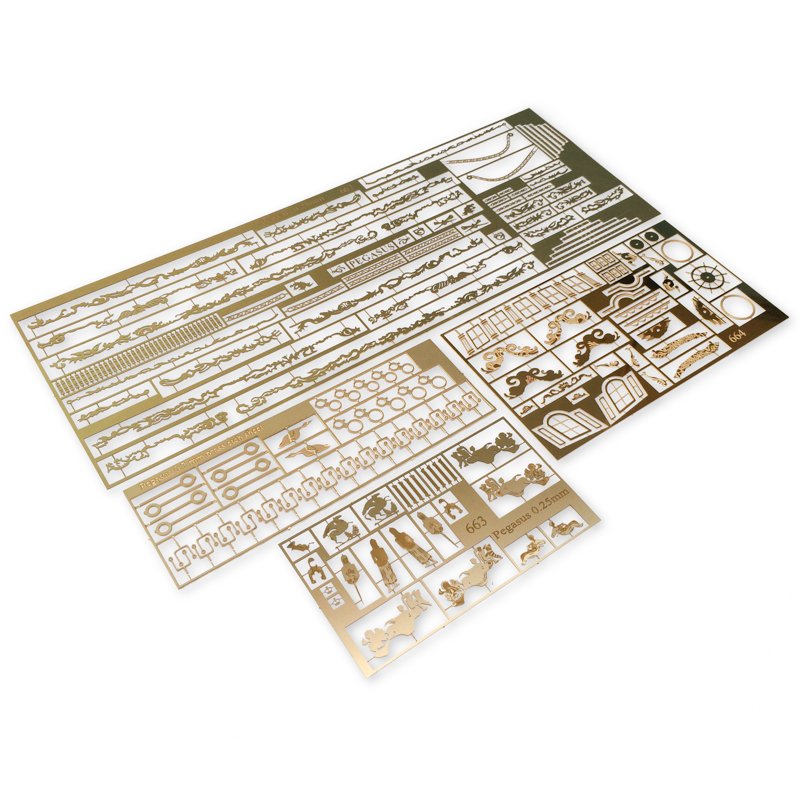
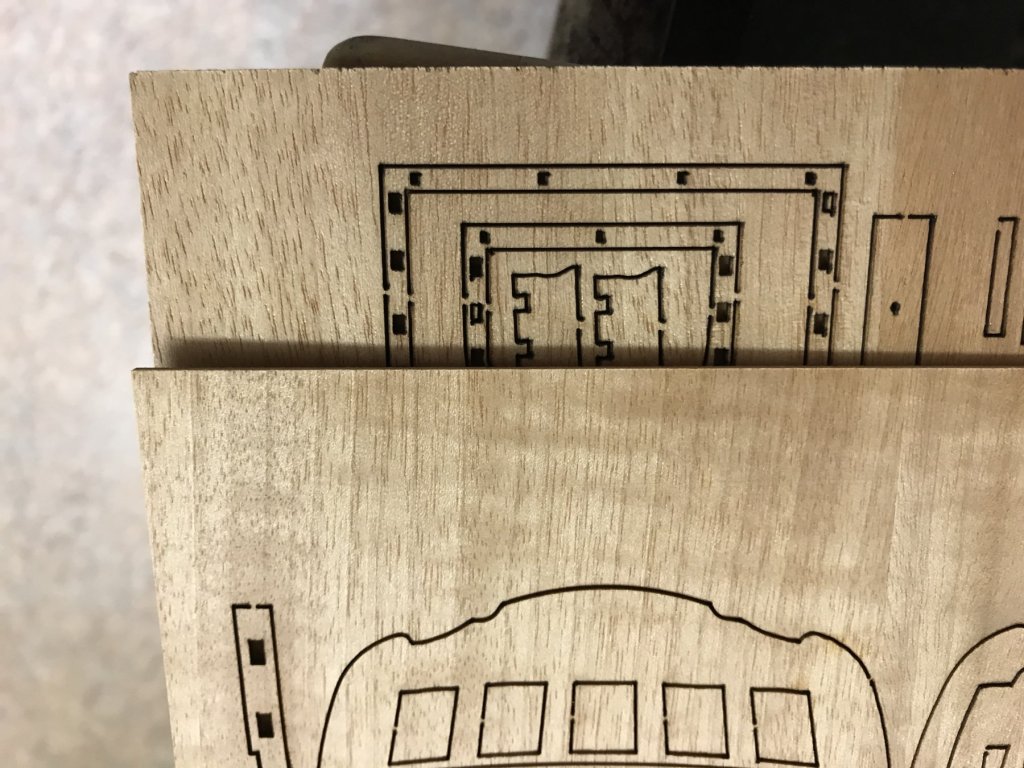
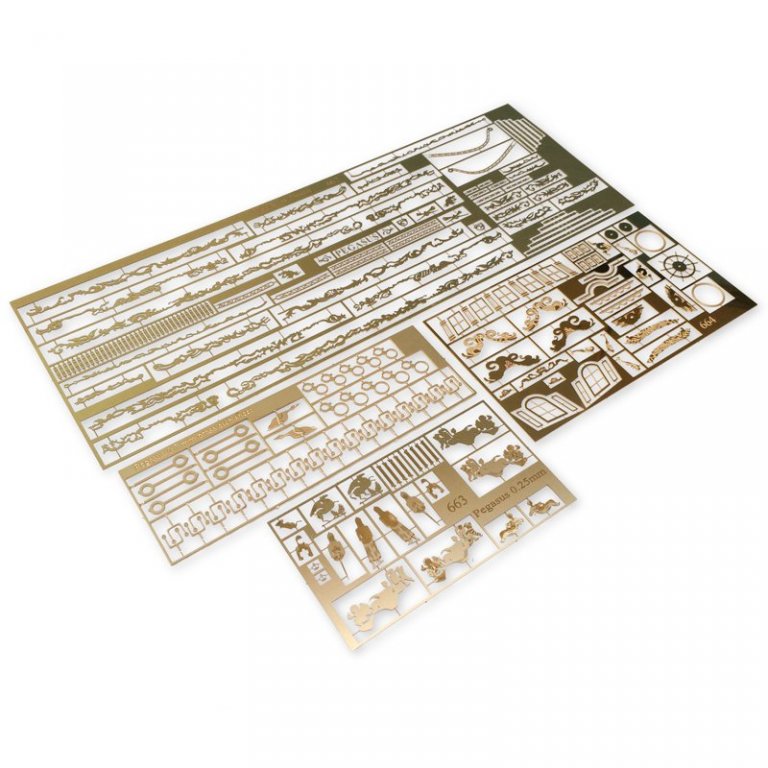
Hi Mike For completeness, here are the other laser cut sheets which, quality wise, seem ok.
-
Hi Mike Ive just checked the parts list and these are all the parts listed as 1mm ply. The gun port hull strips look and feel slightly different so I'm hoping they're stronger.
-
Brilliant. I wanted to create the illusion that I was organised and you fell for it . I only bought the notebook a couple of days ago because I was getting so much excellent info from all you guys and the logs here that I knew I wouldn't remember it all (see my new signature). I agree. Seen your pic and ouch!!
-
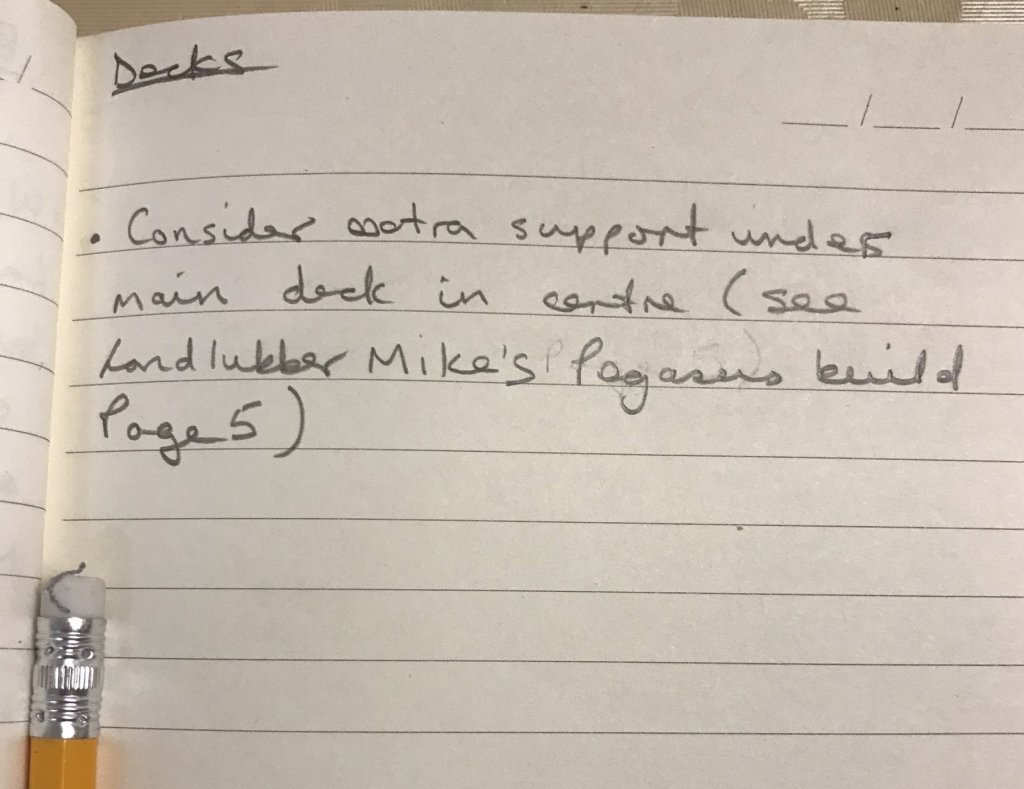
Thanks Mike & Denis. Re deck strengthening, you're both right so it's gone into my black book. For anyone who wants to see what we're talking about: HELP! Not sure how to link to a specific post Cheers John
-
Hi Mike Neat solution. I would imagine that the deck is strong enough once the deck planking has been laid. Do you need the extra support to perform the deck planking? Cheers John
-
I do hope so Chris. It maybe the benchmark for all of us. SpyGlass: thanks for clarifying. I did find it on CornwallModelBoats I've made a note for when I get closer to that stage. Cheers John
-
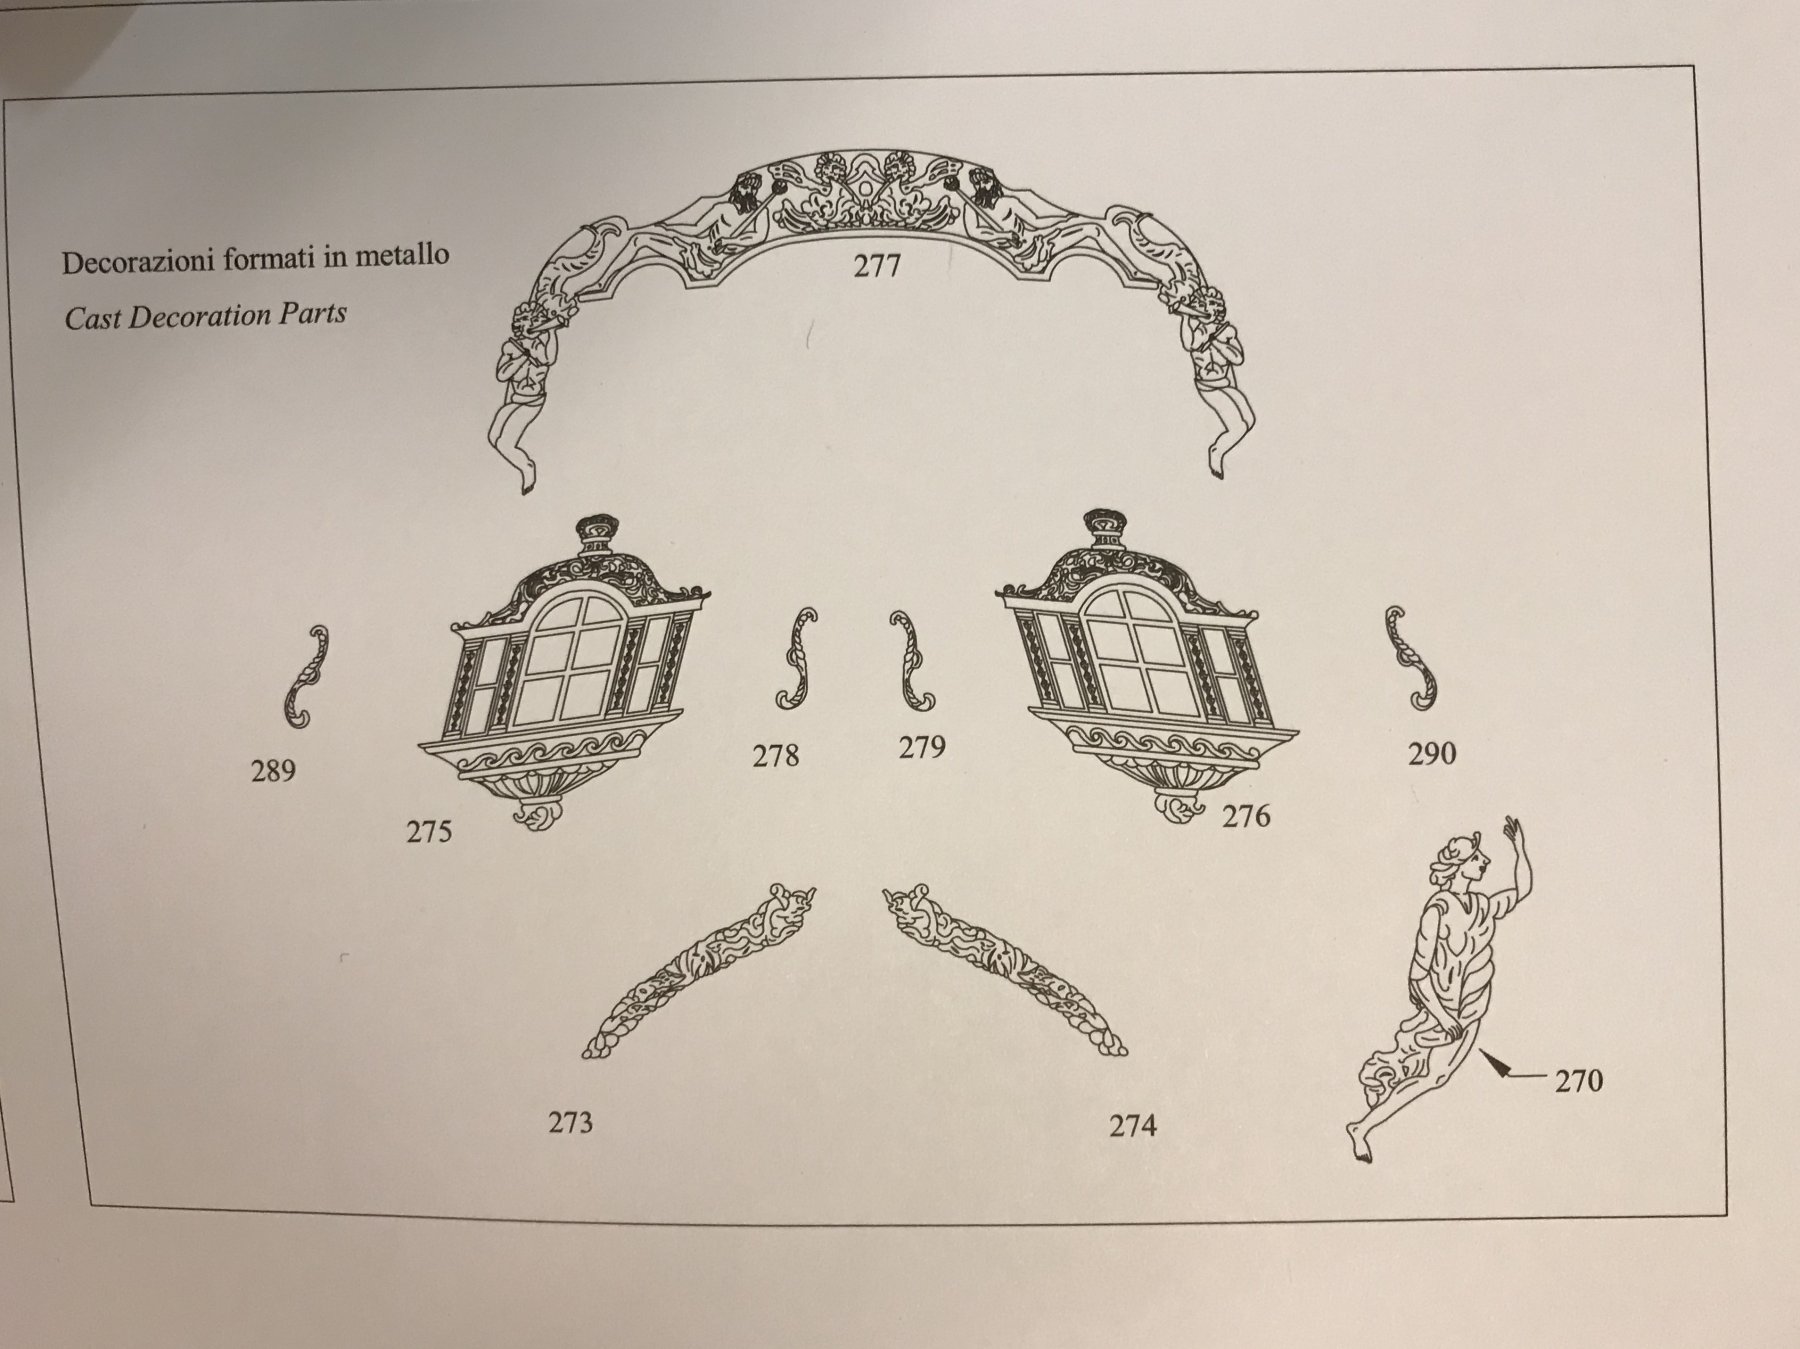
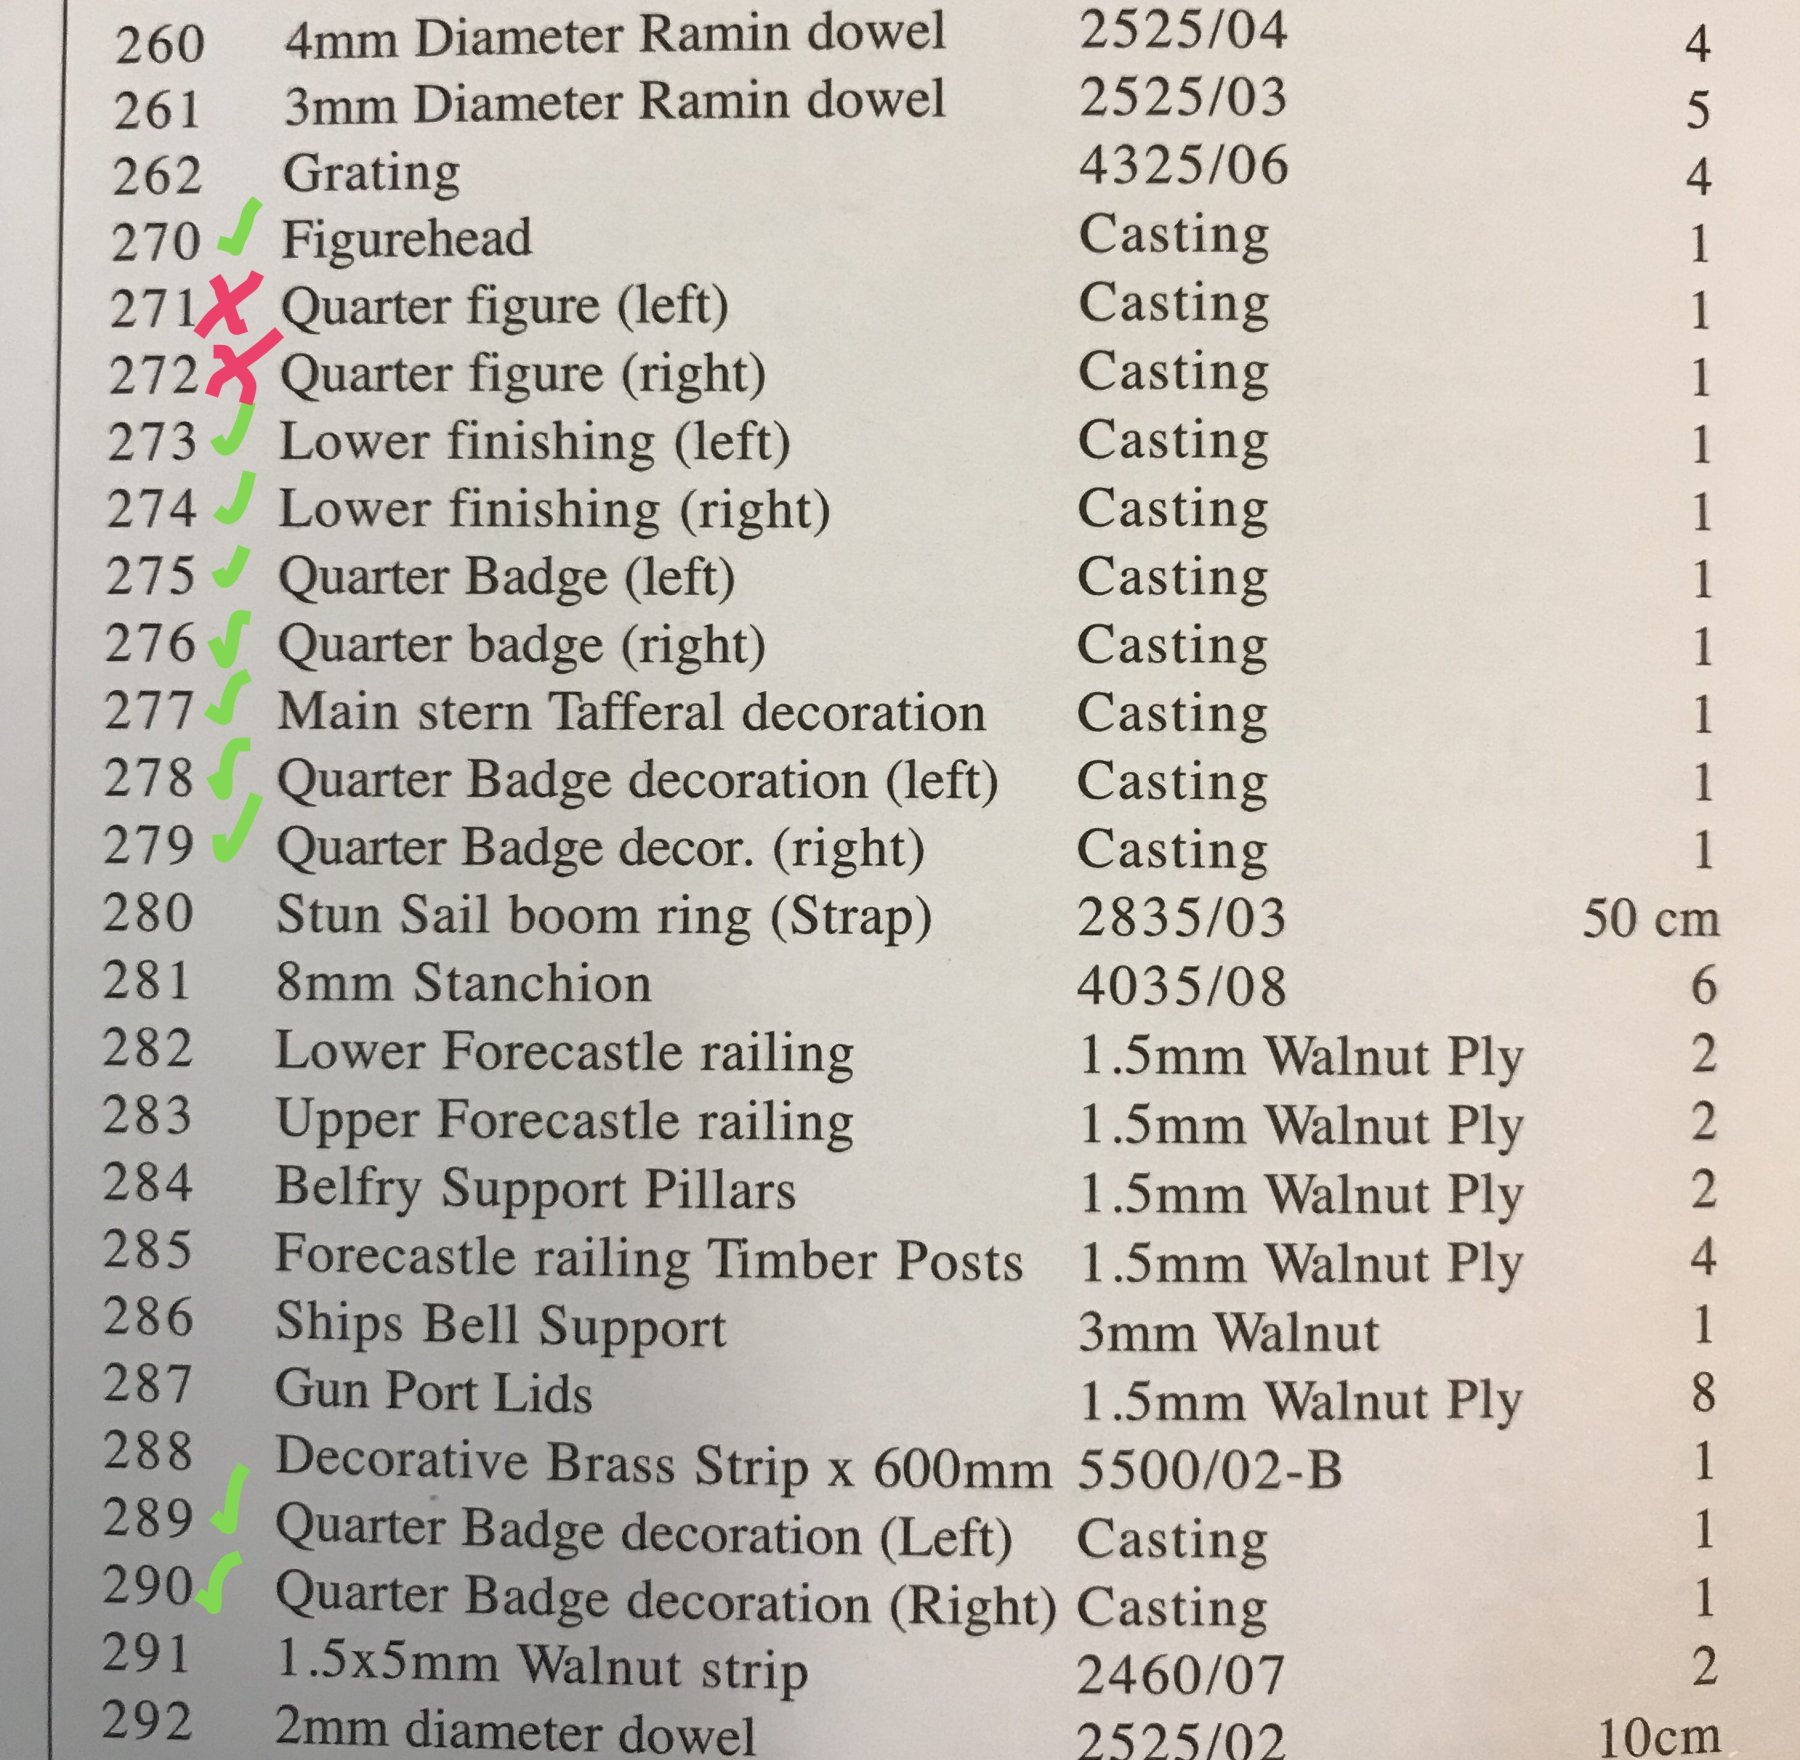
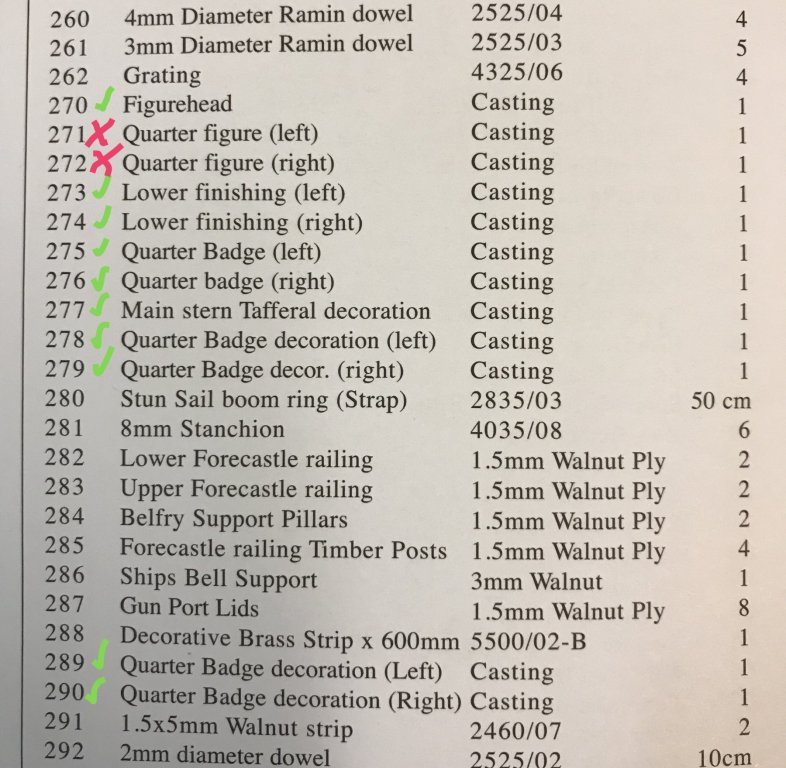
SpyGlass: Don't worry I will be careful. I took the decks out of their sheets to try out and promptly taped them back in to protect till needed. Other points noted thank you. I will presume pieces 271 & 272 are redundant, unless told otherwise. I'm not sure what you mean by Pegasus PE bits but I have the Fly upgrade kit. Are they one and the same? If not where do you get it from please? I have indeed looked at Chris Coyles Fly log. It's a thing of beauty. The good news is I made some sawdust today (let's see if Denis smells it). Don't get too excited though as all I've done is remove the blips from the keel & bulkhead parts. I was going to practice doing a rabbet on some scrap mdf but when I got my hobby power tool out, which I bought years ago and have never used, I realised it was cheap and not fit for purpose. The collet wobbled and it vibrated badly so it went straight into the bin. Long story short I ordered a proper one and it should be with me tomorrow so I can hopefully crack on. Cheers John
-
Don't you just love technology. In the wrong hands it can be dangerous Looking good Denis Cheers John
- 378 replies
-
- 3
-
-
- t78 norden
- billing boats
- (and 1 more)
-
Looking good Denis. Love the funky colours and the extra cabin detail. Are you adding detail to the inside of the cabin or blanking the windows out? I did neither but not sure what the rules are, oh I forgot you don't follow the rules When you retrace the structures on the deck are you going to allow for the boxed area where the float balls go or are you leaving the box out? Cheers John
- 378 replies
-
- 5
-
-
- t78 norden
- billing boats
- (and 1 more)
-
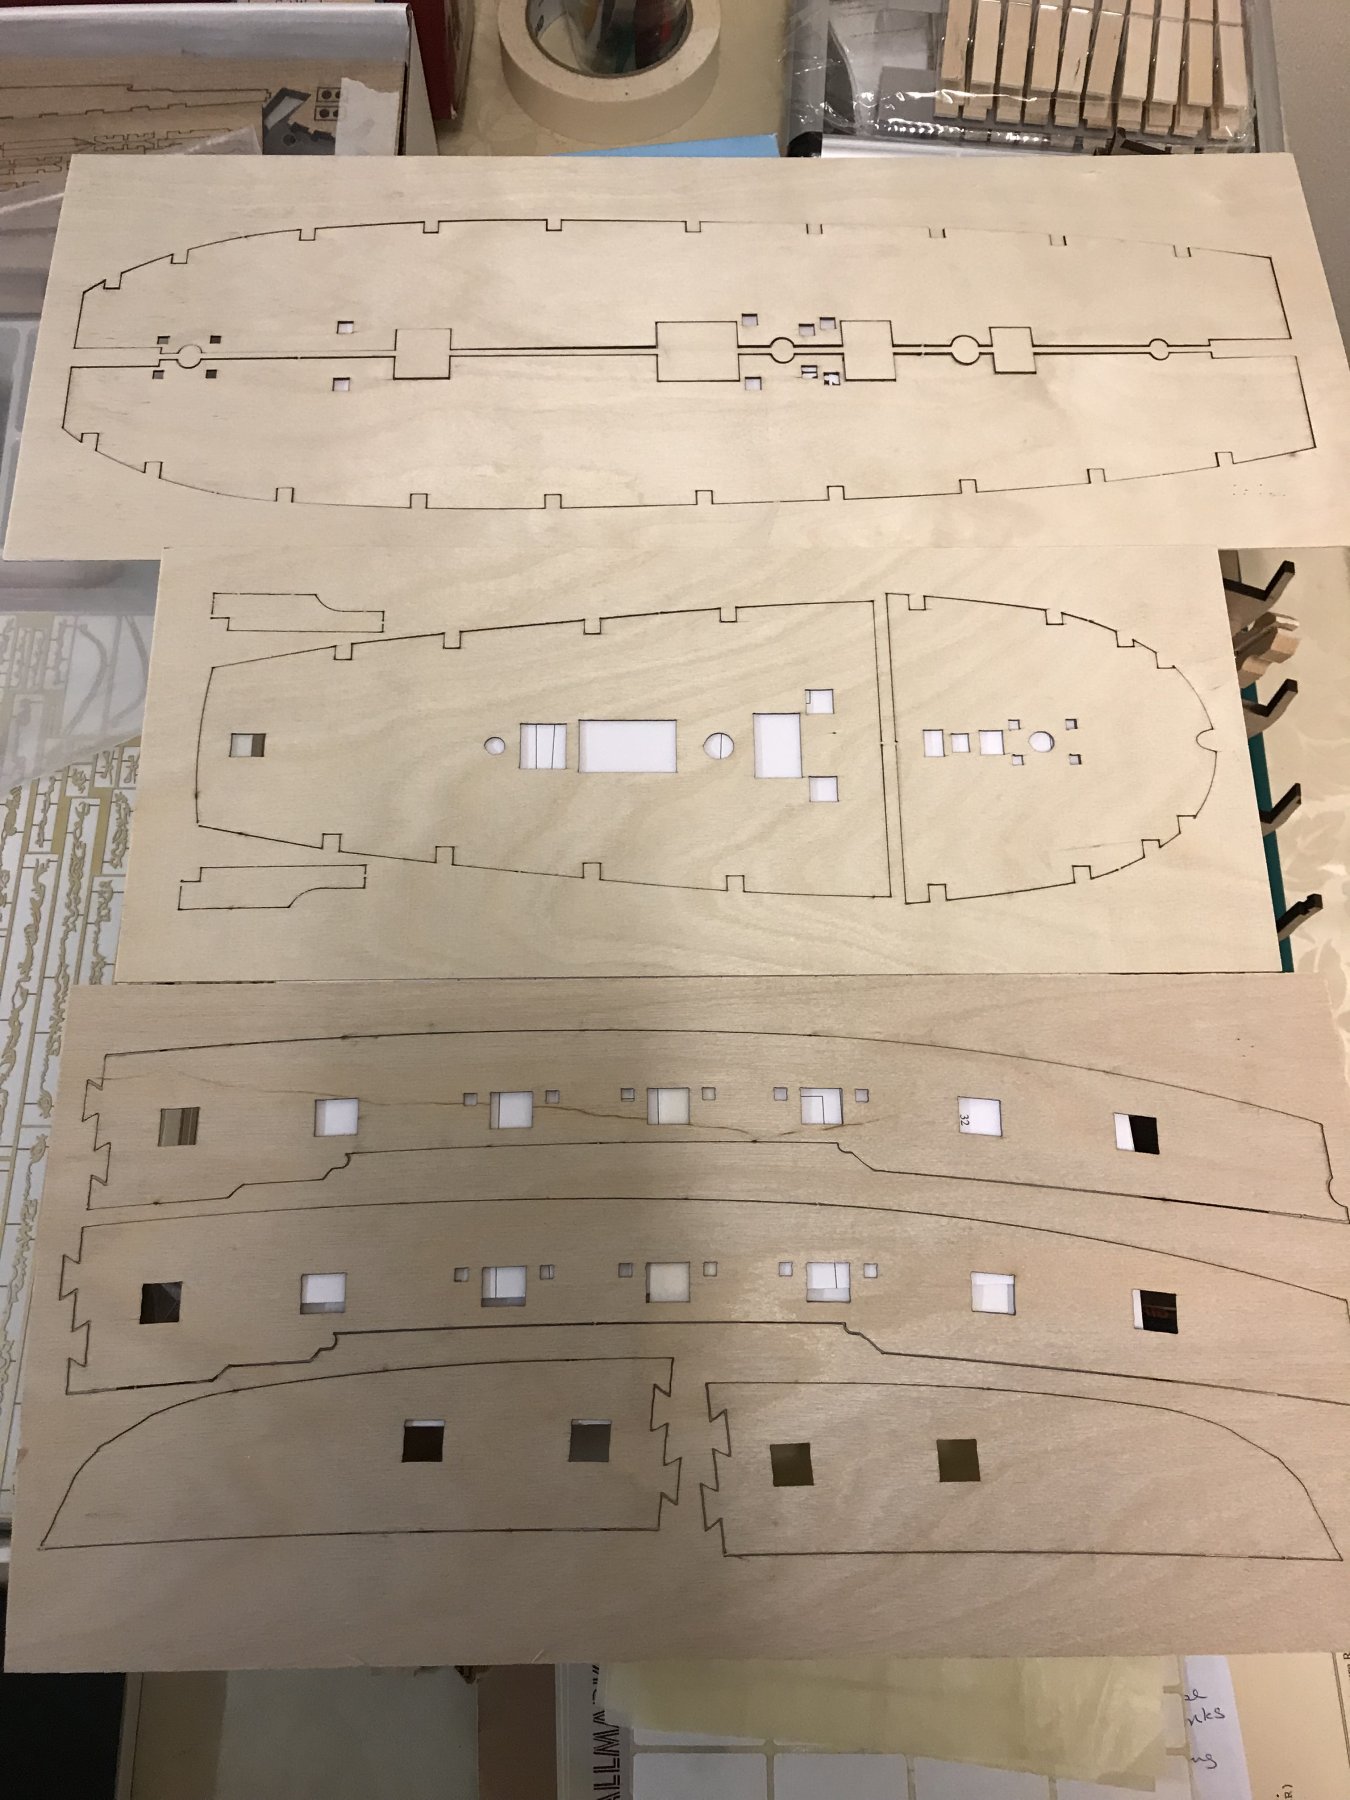
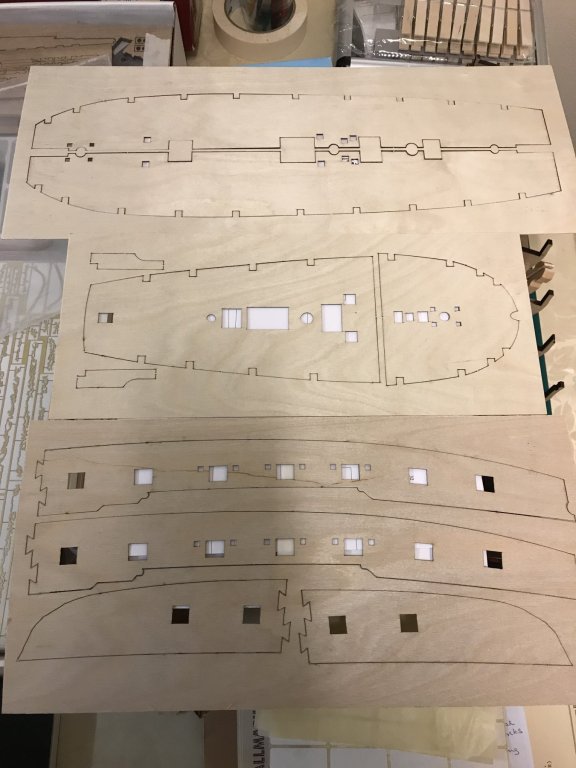
Hi SpyGlass. Just realised I forgot to answer a previous question...apologies. The main deck is in two pieces and it looks pretty flimsy, like I could easily put my thumb through it. All decks are the same ply material so some extra support may be necessary. Thanks for the warning. Here is the parts list section showing all castings and the drawing sheet. No extra, unidentified, casting in the box. John

-
That's a great illustration SpyGlass thank you. The 1mm shimming is something I will try. Will let you know how it goes. Cheers John
-
Denis, SpyGlass & Don Denis: Great advice thank you. Don't worry I can't get enough info and while the Admiral is watching her high class TV (Not) I spend hours reading online, watching vids, etc. Too much time spent sometimes because I get the look (you know that look) SpyGlass: Thanks for the very detailed advise. There's a lot of waste MDF so I am going to practice all these techniques until I'm happy with them. I think that's the only way now for it all to fall into place. Don: Thanks for following and welcome aboard. Hope you enjoy the voyage. Cheers John