


DSiemens
-
Posts
1,060 -
Joined
-
Last visited
Reputation Activity
-

 DSiemens got a reaction from GrandpaPhil in Bermuda Sloop by DSiemens - Aprox: 1:300 - BOTTLE - How-to
Now for some deck furniture. Before I start I'd like to point out that the technique I use I learned from John Fox III. He told me to break down the objects into their individual shapes. For instance when you look at a cannon the main shapes are a cylinder that sits on a rectangular box. By breaking down the shapes of objects it makes them easier to model at a small scale.
One other note. One thing I do starting out with deck furniture is mark where the mast is going. You don't want to put a hatch or a deck house right where the mast is supposed to be. So I put a small pencil mark where the mast will be.
The first piece I'll work on for this ship is the helm. Breaking down the shapes for this helm, it will have a rectangular box that holds the helm and a circular object that is the helm. The box is easy enough I cut a piece of wood into a tiny box that fits the size I want and glue it in place. The circular piece it harder. It's hard to get circles small enough to fit the scale. One of the great techniques of ship in bottle building though is to use found objects that fit the pieces you need. Just as old sailors used bottles and wood scraps that were otherwise garbage on the ship, there is often objects lying around that can work for ships in bottles. One technique I like a lot for helms is going down to the watch repair store and asking for spare gears. Watch gears make very good helms. We'll cover found objects more when I get to the cannons.
If you don't have access to a watch store there is another method that can be done with string. Take a piece of string and tie loose knot.
Then slowly tighten that knot into a loop that is the size of the helm.
Glue it down and trim off the edges. Any left over edges glue into the circle so you have a nice round piece of string.
Then the piece of string is glued on to the rectangular box that holds up the helm.
Report post (IP: 97.118.17.116) Posted June 5, 2018 Now for some deck furniture. Before I start I'd like to point out that the technique I use I learned from John Fox III. He told me to break down the objects into their individual shapes. For instance when you look at a cannon the main shapes are a cylinder that sits on a rectangular box. By breaking down the shapes of objects it makes them easier to model at a small scale.
One other note. One thing I do starting out with deck furniture is mark where the mast is going. You don't want to put a hatch or a deck house right where the mast is supposed to be. So I put a small pencil mark where the mast will be.
The first piece I'll work on for this ship is the helm. Breaking down the shapes for this helm, it will have a rectangular box that holds the helm and a circular object that is the helm. The box is easy enough I cut a piece of wood into a tiny box that fits the size I want and glue it in place. The circular piece it harder. It's hard to get circles small enough to fit the scale. One of the great techniques of ship in bottle building though is to use found objects that fit the pieces you need. Just as old sailors used bottles and wood scraps that were otherwise garbage on the ship, there is often objects lying around that can work for ships in bottles. One technique I like a lot for helms is going down to the watch repair store and asking for spare gears. Watch gears make very good helms. We'll cover found objects more when I get to the cannons.
If you don't have access to a watch store there is another method that can be done with string. Take a piece of string and tie loose knot.
Then slowly tighten that knot into a loop that is the size of the helm.
Glue it down and trim off the edges. Any left over edges glue into the circle so you have a nice round piece of string.
Then the piece of string is glued on to the rectangular box that holds up the helm.
One thing to keep in mind is you don't need a perfect helm. With the location and size chances are no one will even notice how the helm is modeled. When it comes to modeling ships this size the details can be left out. Often I find the mind has a way of recognizing the shapes and filling in the details. So how far you take those details is up to you. Personally I like the challenge. In reality you could glue in the rectangular box with no helm and chances are no one would know the difference.
Moving forward I modeled a small deck house. It's more of a raised hatch on this ship. The picture below is a good example of what this looks like and the Bermuda sloop deck in general. The hatch just forward of the helm is made up of a box with a tilted top. This top stick out over the edges slightly. So to model it I cut a piece of wood into a box, sand the top down and glue on some paper strips on top. Then with a pencil I made a mark for the hinges.
Looking at this photo know I think I have the helm in the wrong place. All well it's already glued in. Another important tip. You are the captain of this ship and things go where you want them to go. You can follow my instructions or do it your own way. What ever makes you the captain the happiest with your work.
After the deck house I put in a couple hatches. I can't remember if this is a Jim Goodwin technique or a Greg Alvey technique. I learned it from one of them. Any way, first I find some plans for hatches. I googled it and found some that I pasted into word and copied and resized the photo to a lot of various sizes. With the varied sizes I can makes hatches for a variety of ships by printing one page of hatches. The word file I used for this ship is attached. Once I have the hatches printed I turn the page over and lightly stain the back of the page. That way the ink doesn't run. The wood stain gives it a wood color and the ink makes it look like a hatch. Then I cut out the hatch and glue it on the hull. For this I use white glue. This allows me plenty of time to put the hatch in position. If you use super glue and the hatch goes down crooked it becomes a big mess.
-
 DSiemens got a reaction from popeye the sailor in Bermuda Sloop by DSiemens - Aprox: 1:300 - BOTTLE - How-to
Now for some deck furniture. Before I start I'd like to point out that the technique I use I learned from John Fox III. He told me to break down the objects into their individual shapes. For instance when you look at a cannon the main shapes are a cylinder that sits on a rectangular box. By breaking down the shapes of objects it makes them easier to model at a small scale.
One other note. One thing I do starting out with deck furniture is mark where the mast is going. You don't want to put a hatch or a deck house right where the mast is supposed to be. So I put a small pencil mark where the mast will be.
The first piece I'll work on for this ship is the helm. Breaking down the shapes for this helm, it will have a rectangular box that holds the helm and a circular object that is the helm. The box is easy enough I cut a piece of wood into a tiny box that fits the size I want and glue it in place. The circular piece it harder. It's hard to get circles small enough to fit the scale. One of the great techniques of ship in bottle building though is to use found objects that fit the pieces you need. Just as old sailors used bottles and wood scraps that were otherwise garbage on the ship, there is often objects lying around that can work for ships in bottles. One technique I like a lot for helms is going down to the watch repair store and asking for spare gears. Watch gears make very good helms. We'll cover found objects more when I get to the cannons.
If you don't have access to a watch store there is another method that can be done with string. Take a piece of string and tie loose knot.
Then slowly tighten that knot into a loop that is the size of the helm.
Glue it down and trim off the edges. Any left over edges glue into the circle so you have a nice round piece of string.
Then the piece of string is glued on to the rectangular box that holds up the helm.
Report post (IP: 97.118.17.116) Posted June 5, 2018 Now for some deck furniture. Before I start I'd like to point out that the technique I use I learned from John Fox III. He told me to break down the objects into their individual shapes. For instance when you look at a cannon the main shapes are a cylinder that sits on a rectangular box. By breaking down the shapes of objects it makes them easier to model at a small scale.
One other note. One thing I do starting out with deck furniture is mark where the mast is going. You don't want to put a hatch or a deck house right where the mast is supposed to be. So I put a small pencil mark where the mast will be.
The first piece I'll work on for this ship is the helm. Breaking down the shapes for this helm, it will have a rectangular box that holds the helm and a circular object that is the helm. The box is easy enough I cut a piece of wood into a tiny box that fits the size I want and glue it in place. The circular piece it harder. It's hard to get circles small enough to fit the scale. One of the great techniques of ship in bottle building though is to use found objects that fit the pieces you need. Just as old sailors used bottles and wood scraps that were otherwise garbage on the ship, there is often objects lying around that can work for ships in bottles. One technique I like a lot for helms is going down to the watch repair store and asking for spare gears. Watch gears make very good helms. We'll cover found objects more when I get to the cannons.
If you don't have access to a watch store there is another method that can be done with string. Take a piece of string and tie loose knot.
Then slowly tighten that knot into a loop that is the size of the helm.
Glue it down and trim off the edges. Any left over edges glue into the circle so you have a nice round piece of string.
Then the piece of string is glued on to the rectangular box that holds up the helm.
One thing to keep in mind is you don't need a perfect helm. With the location and size chances are no one will even notice how the helm is modeled. When it comes to modeling ships this size the details can be left out. Often I find the mind has a way of recognizing the shapes and filling in the details. So how far you take those details is up to you. Personally I like the challenge. In reality you could glue in the rectangular box with no helm and chances are no one would know the difference.
Moving forward I modeled a small deck house. It's more of a raised hatch on this ship. The picture below is a good example of what this looks like and the Bermuda sloop deck in general. The hatch just forward of the helm is made up of a box with a tilted top. This top stick out over the edges slightly. So to model it I cut a piece of wood into a box, sand the top down and glue on some paper strips on top. Then with a pencil I made a mark for the hinges.
Looking at this photo know I think I have the helm in the wrong place. All well it's already glued in. Another important tip. You are the captain of this ship and things go where you want them to go. You can follow my instructions or do it your own way. What ever makes you the captain the happiest with your work.
After the deck house I put in a couple hatches. I can't remember if this is a Jim Goodwin technique or a Greg Alvey technique. I learned it from one of them. Any way, first I find some plans for hatches. I googled it and found some that I pasted into word and copied and resized the photo to a lot of various sizes. With the varied sizes I can makes hatches for a variety of ships by printing one page of hatches. The word file I used for this ship is attached. Once I have the hatches printed I turn the page over and lightly stain the back of the page. That way the ink doesn't run. The wood stain gives it a wood color and the ink makes it look like a hatch. Then I cut out the hatch and glue it on the hull. For this I use white glue. This allows me plenty of time to put the hatch in position. If you use super glue and the hatch goes down crooked it becomes a big mess.
-
DSiemens got a reaction from GrandpaPhil in Bermuda Sloop by DSiemens - Aprox: 1:300 - BOTTLE - How-to
The planking method works well and I think it looks good. I cut some paper at 1.5 mm stained it with golden oak and glued it in place. I started from the outside edges and worked in. I also stained the hull with golden oak.
From there I did the windows. One of the best ways to do windows is to print off windows from plans and glue them onto the model. My printers down at the moment so I hand drew some windows. I took a darker stain and stained a strip of paper for the door.
-
DSiemens got a reaction from GrandpaPhil in Bermuda Sloop by DSiemens - Aprox: 1:300 - BOTTLE - How-to
Thanks Carl.
So the next part is adding on to the stern bulwarks. I cut out part of the plans to get the sizing that I needed and then cut out a piece of wood to glue in place. I soak the wood for a couple minutes and then glued it to the top of the bulwark.
After I send the bulwark down I work on the rail to go on top of the stern bulwark. I cut out another 1.5 mm piece soak it for a a few minutes and then do a grain break at the very end to give that lip between the two rails. Then I glue it in place.
I sand that piece down to thin it out and then move on to the stern cabin. I start with the front of the cabin that will be on deck cut out a piece that fits in the place where the cabin will be and then sand the top edges to round it out.
I decided to cut out the door on this model this is more for my own experimentation it doesn't have to be done as part of the beginners build. For the door typical I'd go out a piece of paper paint it and then glue it in place I wanted to try this out since the cabin is open and I will glue the door hinged open so that it looks like you can walk inside.
After the front of the cabin was placed I put in the back of the cabin this is kind of the same thing placing the piece sanding off the top edges to round them out and gluing it on.
-
 DSiemens got a reaction from IgorSky in Bermuda Sloop by DSiemens - Aprox: 1:300 - BOTTLE - How-to
Now for some deck furniture. Before I start I'd like to point out that the technique I use I learned from John Fox III. He told me to break down the objects into their individual shapes. For instance when you look at a cannon the main shapes are a cylinder that sits on a rectangular box. By breaking down the shapes of objects it makes them easier to model at a small scale.
One other note. One thing I do starting out with deck furniture is mark where the mast is going. You don't want to put a hatch or a deck house right where the mast is supposed to be. So I put a small pencil mark where the mast will be.
The first piece I'll work on for this ship is the helm. Breaking down the shapes for this helm, it will have a rectangular box that holds the helm and a circular object that is the helm. The box is easy enough I cut a piece of wood into a tiny box that fits the size I want and glue it in place. The circular piece it harder. It's hard to get circles small enough to fit the scale. One of the great techniques of ship in bottle building though is to use found objects that fit the pieces you need. Just as old sailors used bottles and wood scraps that were otherwise garbage on the ship, there is often objects lying around that can work for ships in bottles. One technique I like a lot for helms is going down to the watch repair store and asking for spare gears. Watch gears make very good helms. We'll cover found objects more when I get to the cannons.
If you don't have access to a watch store there is another method that can be done with string. Take a piece of string and tie loose knot.
Then slowly tighten that knot into a loop that is the size of the helm.
Glue it down and trim off the edges. Any left over edges glue into the circle so you have a nice round piece of string.
Then the piece of string is glued on to the rectangular box that holds up the helm.
Report post (IP: 97.118.17.116) Posted June 5, 2018 Now for some deck furniture. Before I start I'd like to point out that the technique I use I learned from John Fox III. He told me to break down the objects into their individual shapes. For instance when you look at a cannon the main shapes are a cylinder that sits on a rectangular box. By breaking down the shapes of objects it makes them easier to model at a small scale.
One other note. One thing I do starting out with deck furniture is mark where the mast is going. You don't want to put a hatch or a deck house right where the mast is supposed to be. So I put a small pencil mark where the mast will be.
The first piece I'll work on for this ship is the helm. Breaking down the shapes for this helm, it will have a rectangular box that holds the helm and a circular object that is the helm. The box is easy enough I cut a piece of wood into a tiny box that fits the size I want and glue it in place. The circular piece it harder. It's hard to get circles small enough to fit the scale. One of the great techniques of ship in bottle building though is to use found objects that fit the pieces you need. Just as old sailors used bottles and wood scraps that were otherwise garbage on the ship, there is often objects lying around that can work for ships in bottles. One technique I like a lot for helms is going down to the watch repair store and asking for spare gears. Watch gears make very good helms. We'll cover found objects more when I get to the cannons.
If you don't have access to a watch store there is another method that can be done with string. Take a piece of string and tie loose knot.
Then slowly tighten that knot into a loop that is the size of the helm.
Glue it down and trim off the edges. Any left over edges glue into the circle so you have a nice round piece of string.
Then the piece of string is glued on to the rectangular box that holds up the helm.
One thing to keep in mind is you don't need a perfect helm. With the location and size chances are no one will even notice how the helm is modeled. When it comes to modeling ships this size the details can be left out. Often I find the mind has a way of recognizing the shapes and filling in the details. So how far you take those details is up to you. Personally I like the challenge. In reality you could glue in the rectangular box with no helm and chances are no one would know the difference.
Moving forward I modeled a small deck house. It's more of a raised hatch on this ship. The picture below is a good example of what this looks like and the Bermuda sloop deck in general. The hatch just forward of the helm is made up of a box with a tilted top. This top stick out over the edges slightly. So to model it I cut a piece of wood into a box, sand the top down and glue on some paper strips on top. Then with a pencil I made a mark for the hinges.
Looking at this photo know I think I have the helm in the wrong place. All well it's already glued in. Another important tip. You are the captain of this ship and things go where you want them to go. You can follow my instructions or do it your own way. What ever makes you the captain the happiest with your work.
After the deck house I put in a couple hatches. I can't remember if this is a Jim Goodwin technique or a Greg Alvey technique. I learned it from one of them. Any way, first I find some plans for hatches. I googled it and found some that I pasted into word and copied and resized the photo to a lot of various sizes. With the varied sizes I can makes hatches for a variety of ships by printing one page of hatches. The word file I used for this ship is attached. Once I have the hatches printed I turn the page over and lightly stain the back of the page. That way the ink doesn't run. The wood stain gives it a wood color and the ink makes it look like a hatch. Then I cut out the hatch and glue it on the hull. For this I use white glue. This allows me plenty of time to put the hatch in position. If you use super glue and the hatch goes down crooked it becomes a big mess.
-
 DSiemens reacted to josh44 in Flying Dutchman by josh44 - FINISHED - 1/500 - BOTTLE
Launch
In you go!
Something's gotta be busted pretty badly.
Dripping in the silicone
Waiting for it to set
Sadly, all the shrouds got torn off their bead passthroughs. The bowsprit broke her nose.
Finally, righted, and afters tons of internal repairs.
It was a rush in 8 days, but I'm pretty pleased.
The silicone sea definitely helped - thank you Igorsky!
I have to work on bigger, blooming sails. And i need better hinges for the yards, to prevent all the problems which occur when i collapse the masts.
Anyway, my nephew will like it! Thanks for reading. Next I will complete the Alaska.
-
DSiemens reacted to GrandpaPhil in Prince de Neufchatel by GrandpaPhil - FINISHED - 1/72 - CARD - from Chapelle Plans
My test fit:
-
DSiemens reacted to GrandpaPhil in Prince de Neufchatel by GrandpaPhil - FINISHED - 1/72 - CARD - from Chapelle Plans
The first of the 9 lb. cannon:
It’s far from perfect, but once it’s painted, it’ll be just fine.
By the way, all guns are going to have glass seed beads glued to their breeches for cascabels along the getting the breech eyebolts for the breeching rope.
The last picture is after I sanded it to clean it up a bit.
-
DSiemens reacted to GrandpaPhil in Prince de Neufchatel by GrandpaPhil - FINISHED - 1/72 - CARD - from Chapelle Plans
All eighteen carriages are ready to take their guns.
Now, I just have to make them.
I think that I will try carving them first, from a dowel rod. If I don’t like how that goes, I will try chucking said dowel rod in a drill and making a makeshift lathe.
But, carving sounds safer, so I will try that first.
-
DSiemens got a reaction from GrandpaPhil in Fly by DSiemens - FINISHED - 1:400 - BOTTLE - British Cutter
This is a ship I built from plans in "The Story of Sail" by Verez Laszlo and Richard Woodman. It's the first ship I ever build using plank on bulk head. I used match sticks to plank it. I'm not sure whether I will go through and recaption the photos yet. In a way I'm liking these photo only build logs gives you a good over view of the build.
-
DSiemens got a reaction from GrandpaPhil in Santa Maria by DSiemens - FINISHED - 1:712 scale - BOTTLE
Thanks John and Augie. I think your right the slight distortion and the old look of the symbol do add to the overall look. It's not the crisp clear look I'm used to but it works.
Took some better photo's in the day light. Thank you all again. This has been a fun project. It turned out great. I think the "spanish lady" will highly enjoy it.
-
DSiemens got a reaction from GrandpaPhil in Santa Maria by DSiemens - FINISHED - 1:712 scale - BOTTLE
John you aren't even kidding. It had better be a nice Bonsai or I'm going to want my ship back.
Thank Augie that means a lot coming from you. Your work is incredible.
So I went to post pictures and all hell broke loose. My own fault really. Here's my initial pictures.
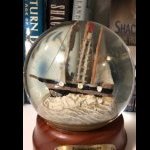
Let me preface with had this bottle not been given to me for the project I wouldn't not have used it. It doesn't have amazing clarity and the cap is so huge it makes it hard to see the ship. What led to trouble though was not the bottle but the sea and the position of the ship. There was so much sea that the ship was being pushed towards the enormous cap and making it hard to see. I didn't want to go from "spectacular" to blah so I knew it had to be fixed. The lines had been cut and glued there was no getting the ship out so I pulled it up from it's clay base and started digging clay out around the ship.
I do no recommend working the sea with a ship in the bottle. It's mind numbing stressful work. I got a little clay on one yard that took ten minutes to clean off. Worst of all the line between the mizzen lateen mast and the main mast came off. Needless to say words were said. I managed to get it back together good as new. Had this bottle opening not been so gigantic that would have been even more stressful After the clay was dug out I positioned the ship again with a slight angle so the crosses on the sails could be more readily seen. Here's how she turned out.
Despite the ending craziness she turned out well. They only thing I wanted to work out better was the touch up of the symbol on the bottle. The more I painted the worse it got. I may recommend it be taken off all together though it was the inspiration for the Santa Maria in this particular bottle in the first place. We'll see. I'll post pictures of the Bonsai once I get it. I'm already making plans for my next build I just haven't found a bottle I'm particularly fond of yet. Thank you all for reading and commenting. Your support is greatly appreciated.
-
DSiemens got a reaction from GrandpaPhil in Mercury by DSiemens - FINISHED - BOTTLE
She's in! Lines are tight and she's sailing beautifully. This ship is by far my best work. The bottle it's in has the best clarity I've seen in a bottle. It's a tradition of mine to call the entering of the ship into the bottle her maiden voyage. Old sailor superstition has it that the maiden voyage is a reflection of the life of the ship. If that's the case the Mercury's got a good long life in front of her. She shook off the snag's and problems and came together with ease. She's been a pleasure to work on. I'm just sad I have to ship her away for some one else to enjoy. I still have to build a stand and put a turks head knot on the bottle but other then that she's good to go.
-
DSiemens got a reaction from GrandpaPhil in Mercury by DSiemens - FINISHED - BOTTLE
Thanks Augie and Bob. Mark I think I will have to try a bigger model one of these days.
She went in today and so far so good. I hope to have her wrapped up this weekend.
-
DSiemens got a reaction from GrandpaPhil in Mercury by DSiemens - FINISHED - BOTTLE
The ship it's self is done! Now just got to get the dory and the launch and bottle her all up.
-
DSiemens got a reaction from GrandpaPhil in German Cutter 1910 by DSiemens - FINISHED - 1:300 - BOTTLE
She's done except for seagulls. Part of me is still debating that. I know I can do it it's just a matter of do I want to spend any more time on this. I'll mull that one over.
Also a something to note. The Bottle Shipwright, Ship in Bottle Association of America's quarterly magazine, had a great template for Turks head knots.
One more photo just for fun.
-
 DSiemens got a reaction from Javelin in German Cutter 1910 by DSiemens - FINISHED - 1:300 - BOTTLE
Success!
Still needs a bit of work with the sea and the main mast needs a slight adjustment but she's in.
-
DSiemens got a reaction from GrandpaPhil in German Cutter 1910 by DSiemens - FINISHED - 1:300 - BOTTLE
Thanks Mark. I do appreciate the like even if it's a post of bad news. This problem is a curse and a blessing. I wasn't fond of the main Jib any ways so now I have an excuse to replace it. I did it the same size as the plans but because I wasn't checking them as often as I should I had to tie the line down more forward then it should be. This resulted in the jib hiding behind the other jib. To remedy this I'll make it a little bigger. I think I'll make that darn hole just a tad deeper as well.
Thank you too Augie. Strangely enough I find it very fun. I really am doing this the hard way which is part of why it's so tedious. The easy method is to use a hinge to keep the mast in place and glue the hull down before raising the mast. Doing that can make it as easy as pulling a few strings. I like this method though because without the hinge the ship looks more real and more impossible in the bottle. Also it allows for some flexibility since the mast can be held closer to the hull or even to the side as opposed to straight back. A common problem with the hinge is having deck furniture get in the way and the mast not being able to fold down far enough. The shallow hole method does get tricky with more masts though. I've done up to four and it took a while. The other advantage to not gluing it down is I can pull the ship out if things go awry. If the ships glued in tight you may have to break the bottle to get it out. Which can cause a whole other set of problems. Any ways I'm caring on. Thank you for your comments they are very much appreciated.
-
DSiemens got a reaction from GrandpaPhil in Bermuda Sloop by DSiemens - FINISHED - BOTTLE - aka building in super mini scale
The lasr part as far the ship goes is the sails. I just trace them the best I can and compare them to the ship and trim them. Once thier ready I glue them in place. The main sail I just glue to the gaff so I can wrap it around the ship when going in/ I make sure to keep the wind direction in mind so all the sail look uniform. Doesn't make sense to have the sails leaning i multiple directions.
I actually had to finish this ship fast to include it in a show for the Rocky Mountain Shipwrights. I didn't include all the running rigging this time.
For the sea I put just a little bit of clay in the bottle and flatten it out. I held it over a hot burner for a few seconds to make melt the bottom. This just makes sure the clay sticks to the bottle. I give it a few minutes to dry and then it's ready to go.
I cut the ship off with a dremel and carefully fold the mast back being sure the main sail curls around the ship and doesn't crinkle. Once in the bristles pop the mast back up. I put a little white glue on a tooth pick and get it between the ship and the sea to glue it down. I then use a small piece of wire to glue the forward stays down.
-
DSiemens got a reaction from GrandpaPhil in Bermuda Sloop by DSiemens - FINISHED - BOTTLE - aka building in super mini scale
Thanks Mark a Michael.
Parbick I use a cutting wheel on a dremel at a low setting to cut the ship off. It's fast even on low setting and it's nice and precise.
Once the standing rigging is in place I work on the running rigging. I don't go crazy on this but I like to add the rigging on the boom and gaff. For the boom I tie an over hand knot around the boom and glue it on either side of the ship like I did with the back stays. I'm not sure you can see it in this photo but here is is.
Here's a better picture of another one I did. You can see all of the running rigging I include.
-
 DSiemens got a reaction from mtaylor in Flying Dutchman by josh44 - FINISHED - 1/500 - BOTTLE
Great start. Looking good.
-
DSiemens got a reaction from mtaylor in USS Alaska by josh44 - FINISHED - 1/1000 - BOTTLE - Sloop-of-War
Great work. I love the pendants as well. Its a very nice touch. She'll look great in the bottle.
-
 DSiemens got a reaction from josh44 in Flying Dutchman by josh44 - FINISHED - 1/500 - BOTTLE
Great start. Looking good.
-
DSiemens got a reaction from josh44 in USS Alaska by josh44 - FINISHED - 1/1000 - BOTTLE - Sloop-of-War
Great work. I love the pendants as well. Its a very nice touch. She'll look great in the bottle.
-
DSiemens got a reaction from GrandpaPhil in HMS Bounty by DSiemens - FINISHED - Bottle
A bit of a catastrophe on this one. The shelf it was sitting on gave out. I have some plans for putting her in a new case but she won't be going back into a bottle. I'd like to get a nice sea under her. Any ideas on what to use? Without the constraints of a bottle I would like to make it look really nice.